
Cubase’s Control Room can help you switch between your mix and a reference track on the same headphones. This older tutorial describes setting up Monitor and Cue channels in VST Connections, displaying cue sends in the MixConsole, and using a pre-fader cue send while turning down the reference track’s main fader. Menu names and routing options vary by Cubase version.
Monitoring Options with Control Room
Cubase includes a feature called Control Room.
It is designed in part to help coordinate recording
between the control room and a separate recording booth.
It also offers useful options for mixing and mastering.
Here we explain how to switch conveniently between your mix and a reference track.
You can switch between the two sounds on the same headphones.
Setting Up Control Room
Before starting, note the hardware requirement for the setup shown here.
The original tutorial calls for at least two stereo pairs of audio-interface outputs for its Monitor and Cue assignments. This describes the specific routing in the tutorial, not a universal requirement for every Control Room setup.
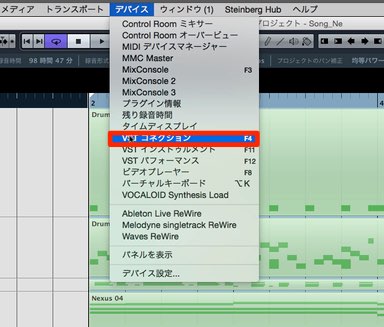
From the top menu, open Devices → VST Connections. In newer versions, this window is called Audio Connections.
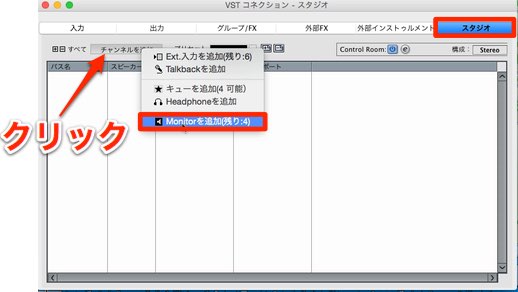
Select the Studio tab and click Add Channel.
Choose Add Monitor.
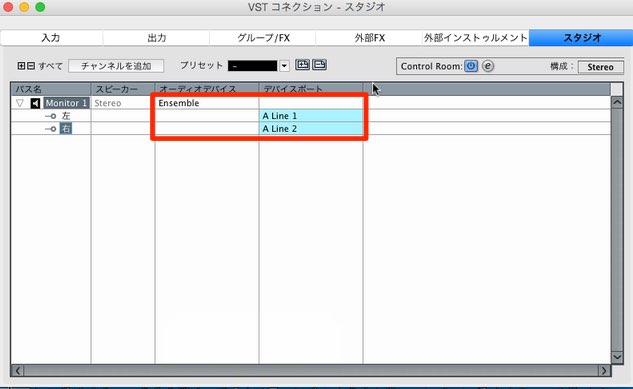
Set Audio Device to the interface you are using.
Assign available outputs as well.
Here we have selected Line 1/2.
The main Cubase mix is monitored through this assigned port in the example.
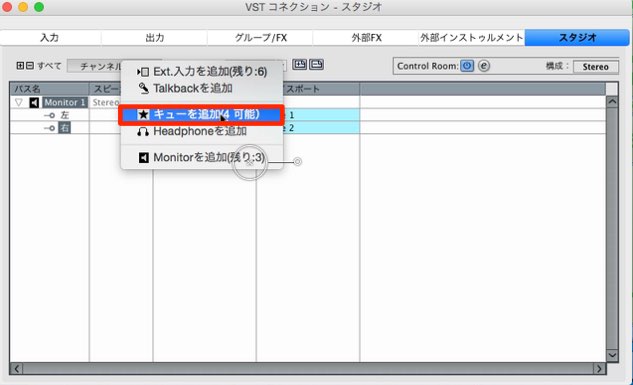
Likewise, click Add Channel and select Add Cue.
This is the channel used for the reference signal in this setup.
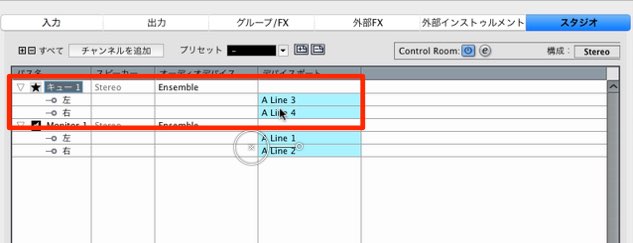
Assign outputs different from the Monitor outputs above.
That completes the Control Room setup.
Setting Up the MixConsole
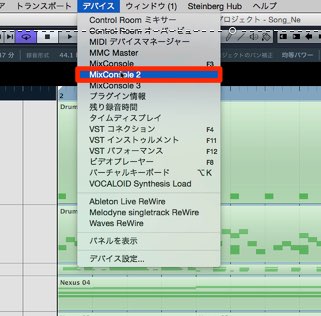
Next, configure the MixConsole for use with Control Room.
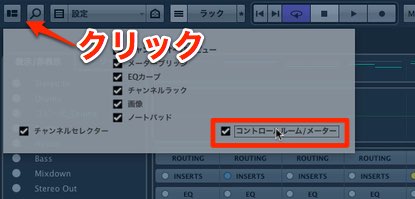
Click the icon at the upper left of the window
and enable Control Room/Meter.
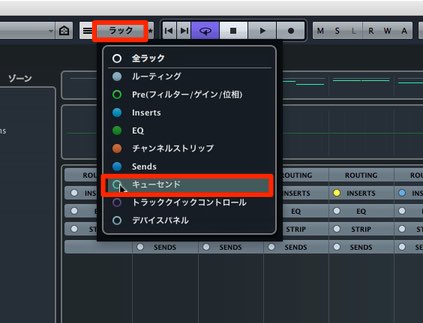
Click the area shown to display the Cue Sends.
The setup is now ready.
Using a Cue Mix
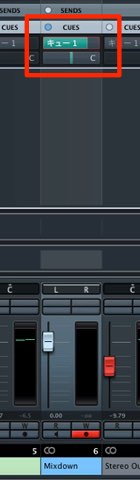
Click CUES on the reference track and enable its cue send.
At this point, the song and reference may play at the same time.
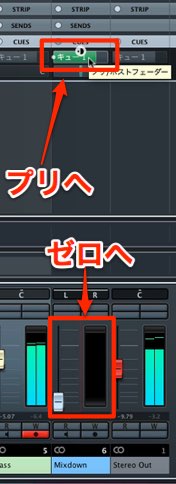
Set the cue send to pre-fader and turn the reference track’s main fader all the way down, so the reference is absent from the main mix while its pre-fader cue send remains available.
Set the cue-send level as needed; 0 dB is unity gain, not silence.
The setup is now complete.
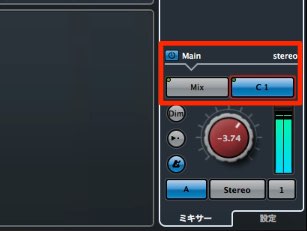
In the Control Room at the lower right,
switch between MIX (the song) and C1 (the reference cue)
to compare the two sounds. Check the headphone source and routing so the selected signal reaches the same headphones.
Frequently Asked Questions
Q1. What equipment is needed for this Control Room setup?
The original tutorial uses at least two stereo output pairs on an audio interface: one assigned to Monitor and another to Cue. Control Room requirements can differ for other configurations and Cubase versions.
Q2. What if the reference and song play at the same time?
Set the reference cue send to pre-fader and lower the reference track’s main fader fully. Keep the cue send enabled and select C1 to hear the reference; select MIX to hear the song. Verify the actual routing and levels in your setup.
Q3. Where do I access Control Room settings?
In the version shown, choose Devices → VST Connections, then use the Studio tab to add Monitor and Cue channels. Newer versions use Audio Connections and may present the controls differently.
NEW ARTICLES
Latest English Articles







































































































































































































































































































































































































































































































































