XLN Audio's XO is an electronic beat-making instrument that lets you intuitively build drum kits from samples scattered across a universe of sounds. Its distinctive visual interface arranges sounds by pitch from left to right and by sample length from top to bottom, helping you quickly find what you need. With eight drum slots, MIDI support, excellent presets, and similar-sample searches, it speeds up drum programming. You can also add your own samples and use Favorites to expand and manage your sound library efficiently.
Explore a Universe of Samples
Here, we will explore XLN Audio's electronic beat-making instrument XO.
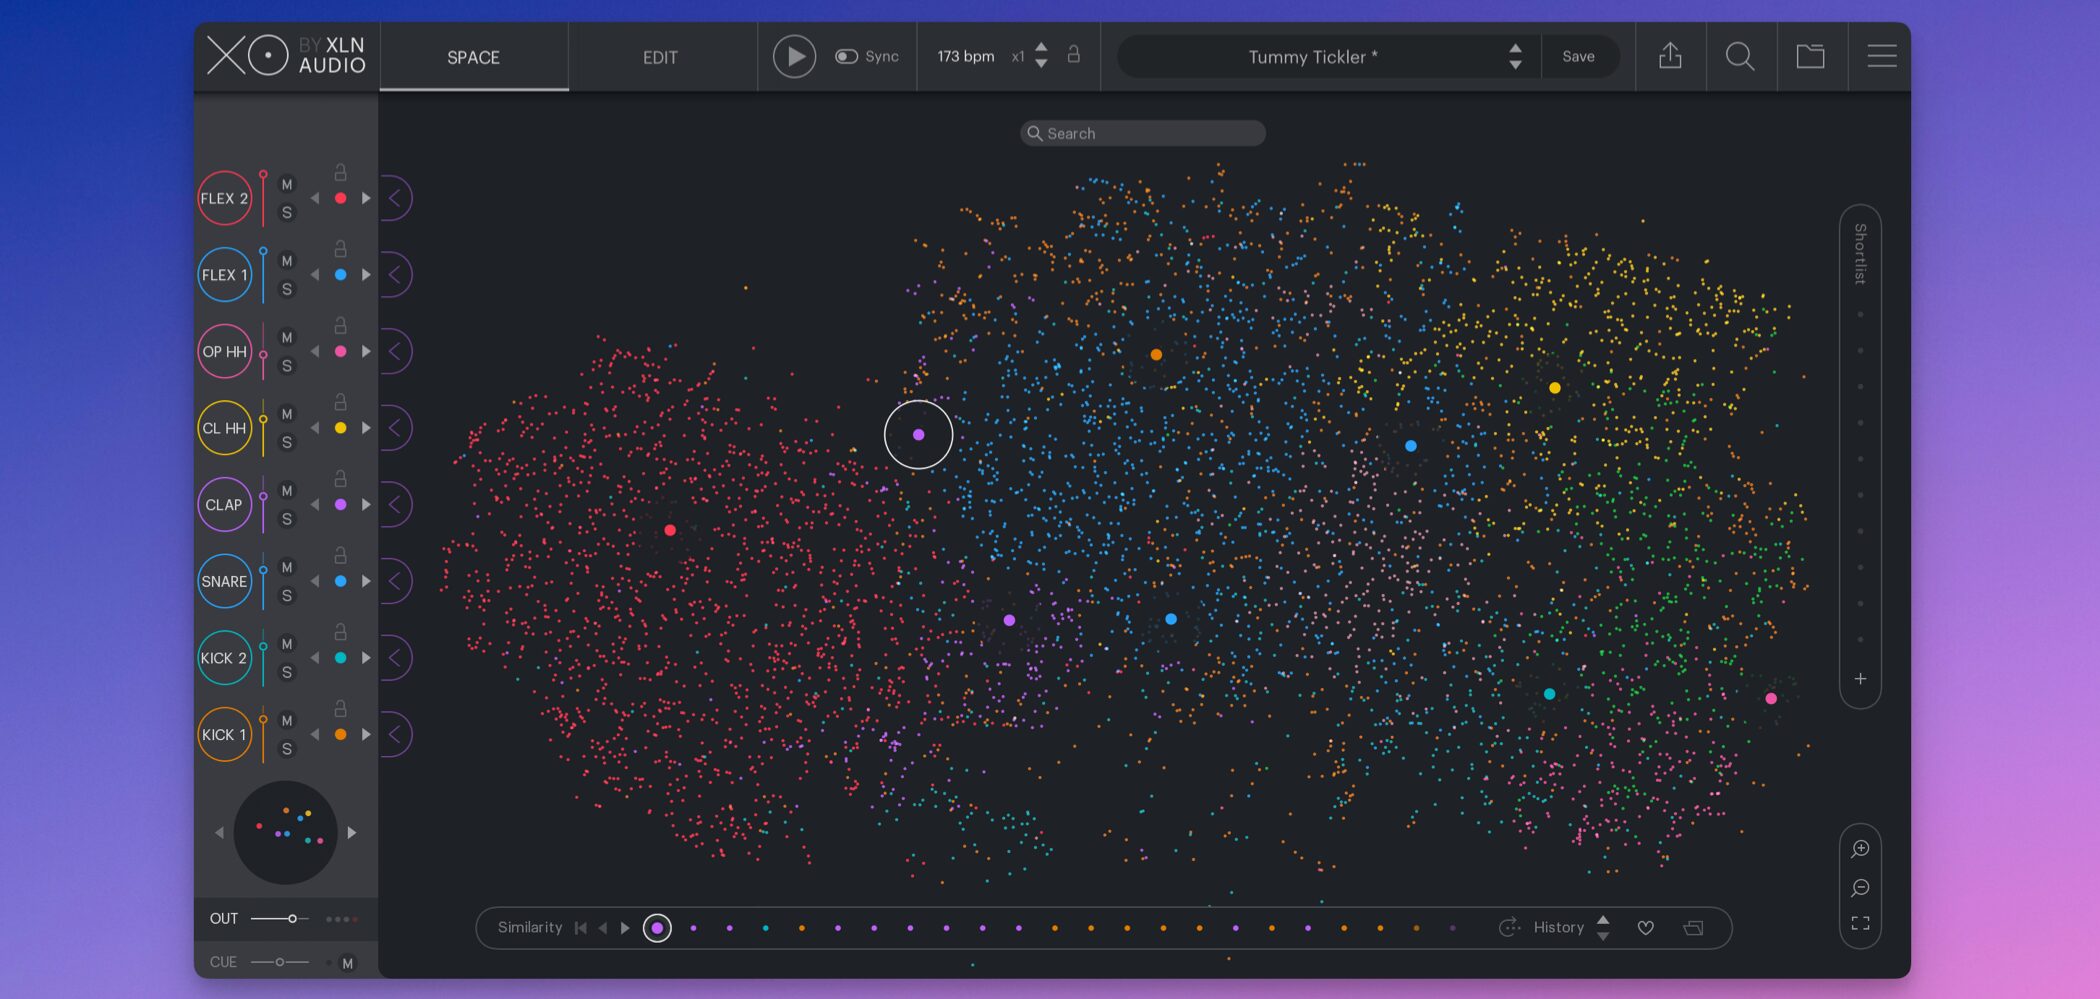
The concept behind this product is space.
Its unique approach to sample browsing lets you build a drum kit from sounds scattered across a vast universe, and it is designed to help you quickly find the sounds you want.
You can also add your own one-shot samples to this universe and use it as a sound library.
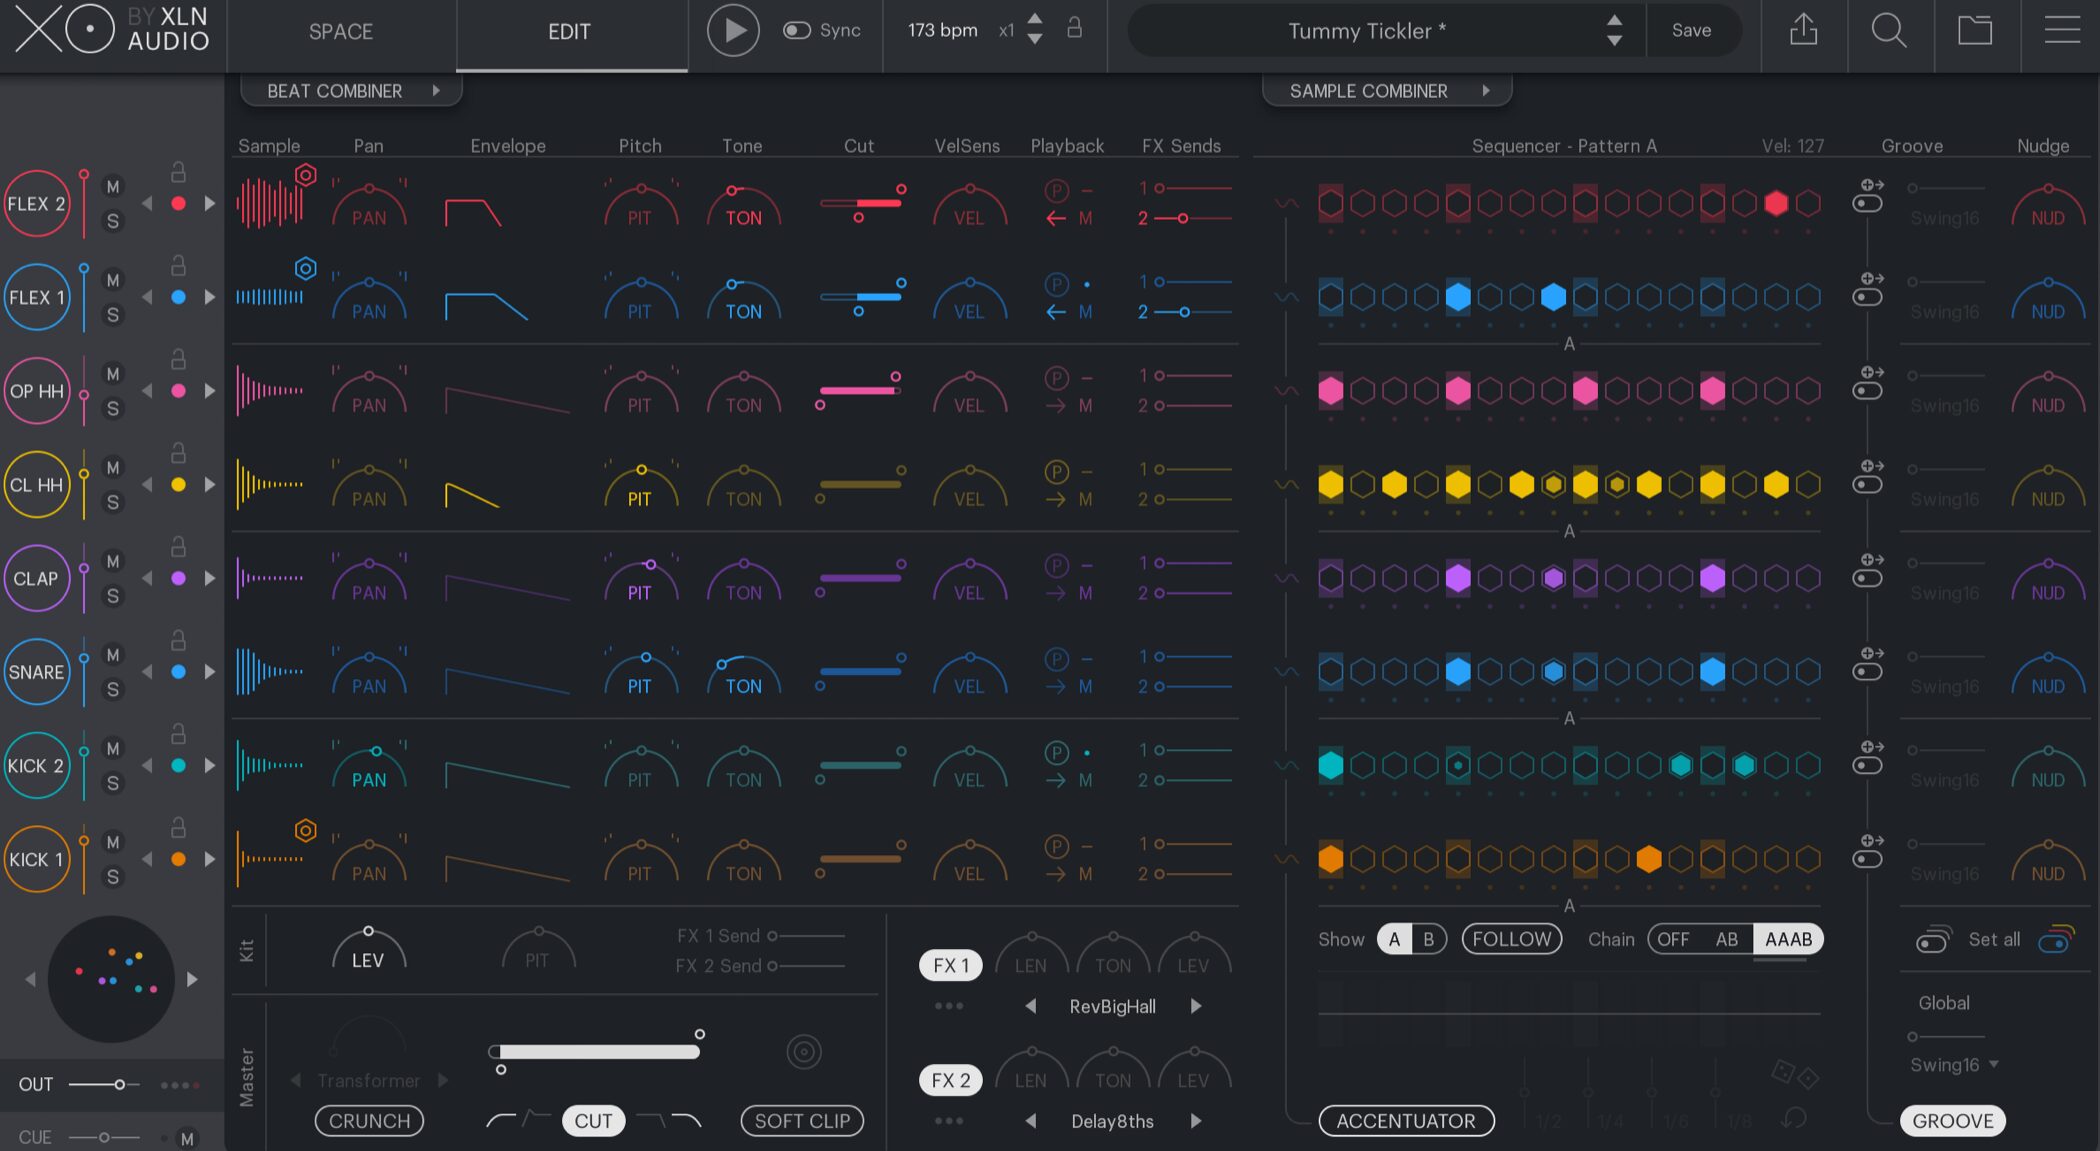
Although the space display immediately catches your eye, XO's tools for refining individual drum sounds and creating patterns are also extensively developed.
They can save considerable time when making electronic beats, where detailed editing often takes a while.
Let's start by looking at how to choose drum sounds and navigate SPACE.
XLN Audio XO Video: An Overview of SPACE
Using Sound Presets
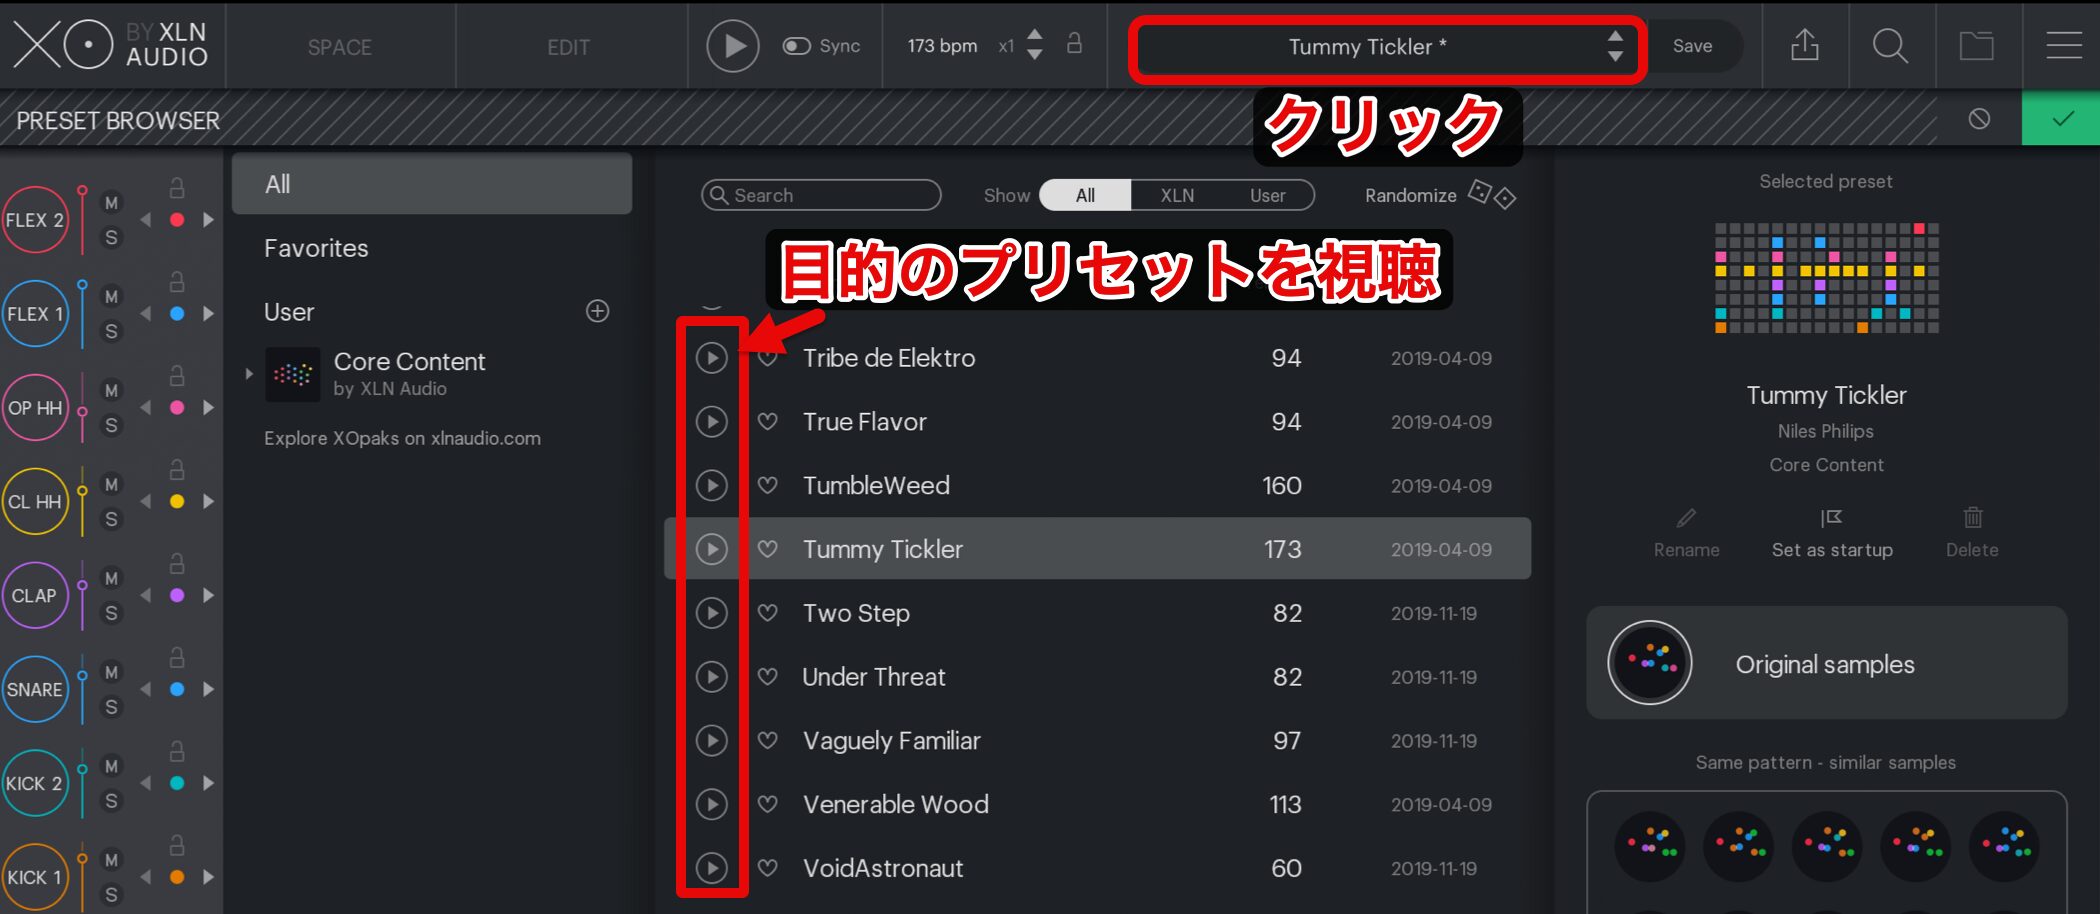
XO comes with excellent presets that combine drum sounds and patterns.
Click the preset name at the top to open the preset window and audition the presets you want.
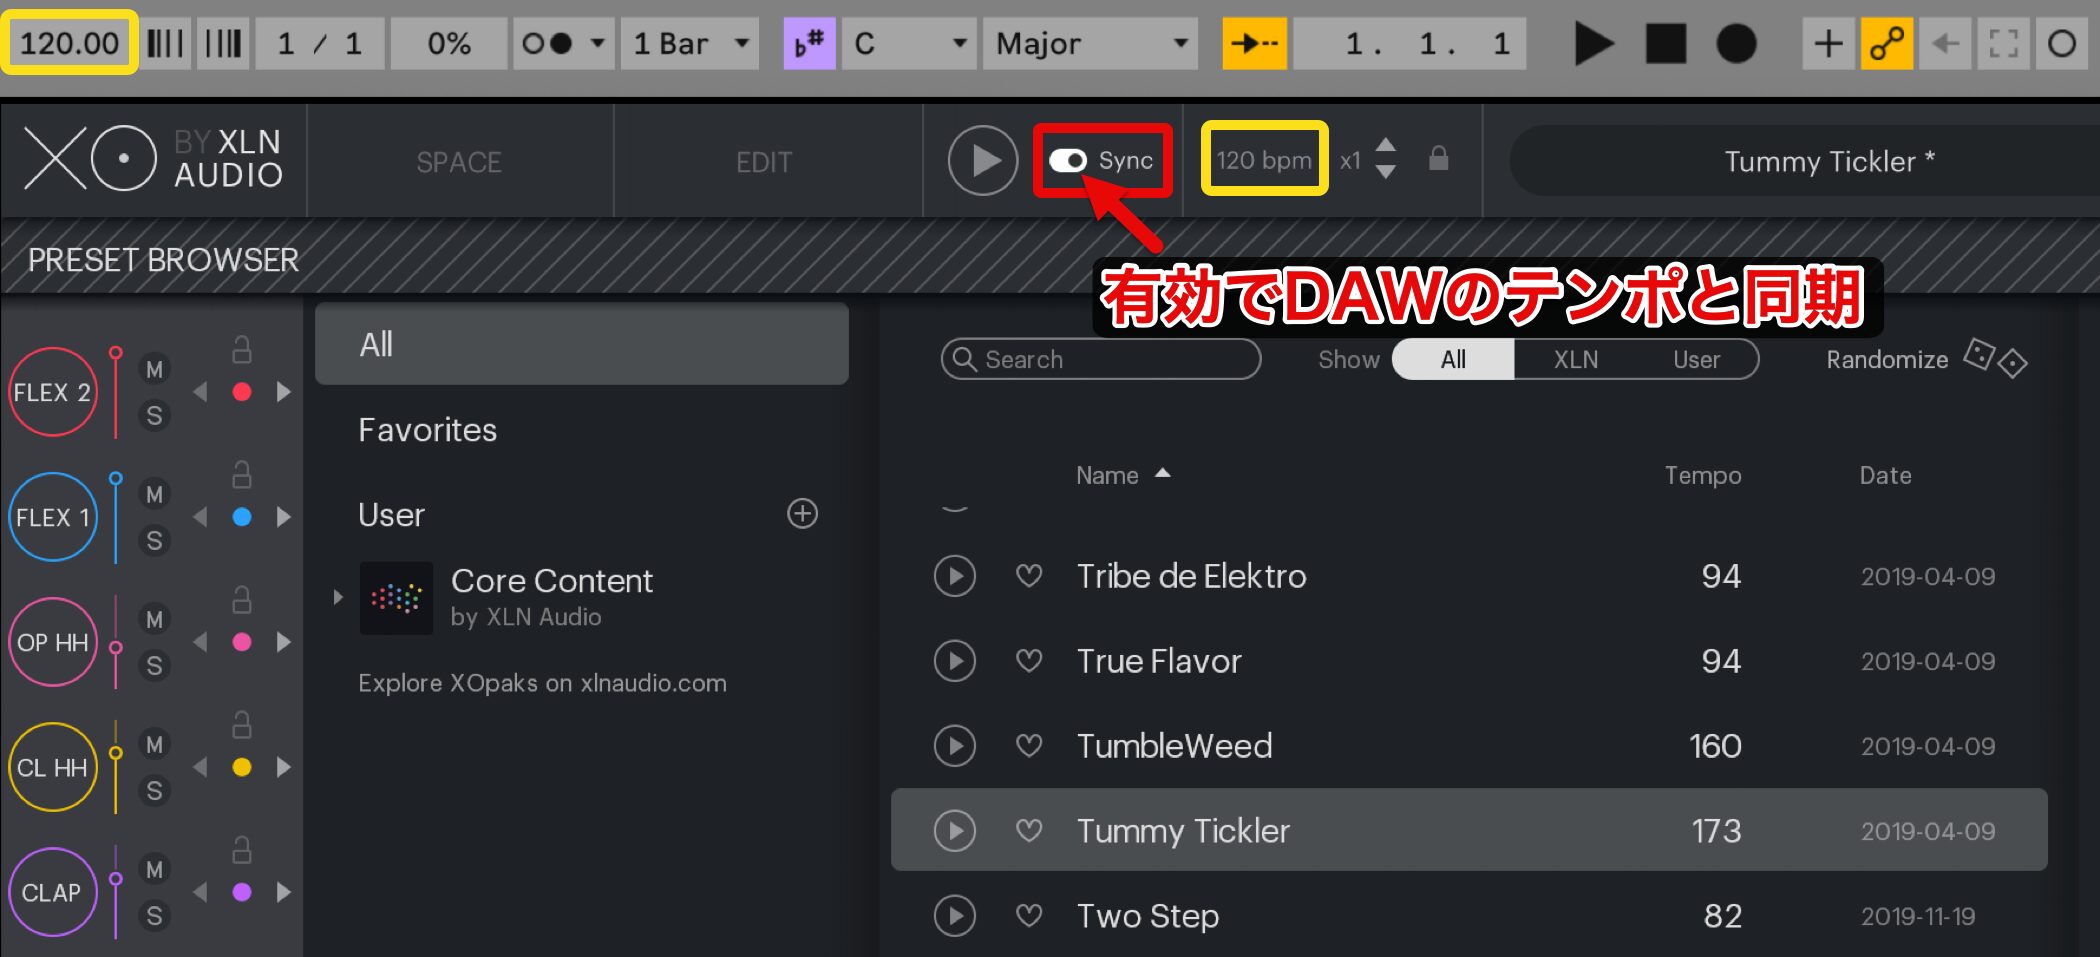
To audition presets at your DAW's tempo, enable the Sync button at the top.
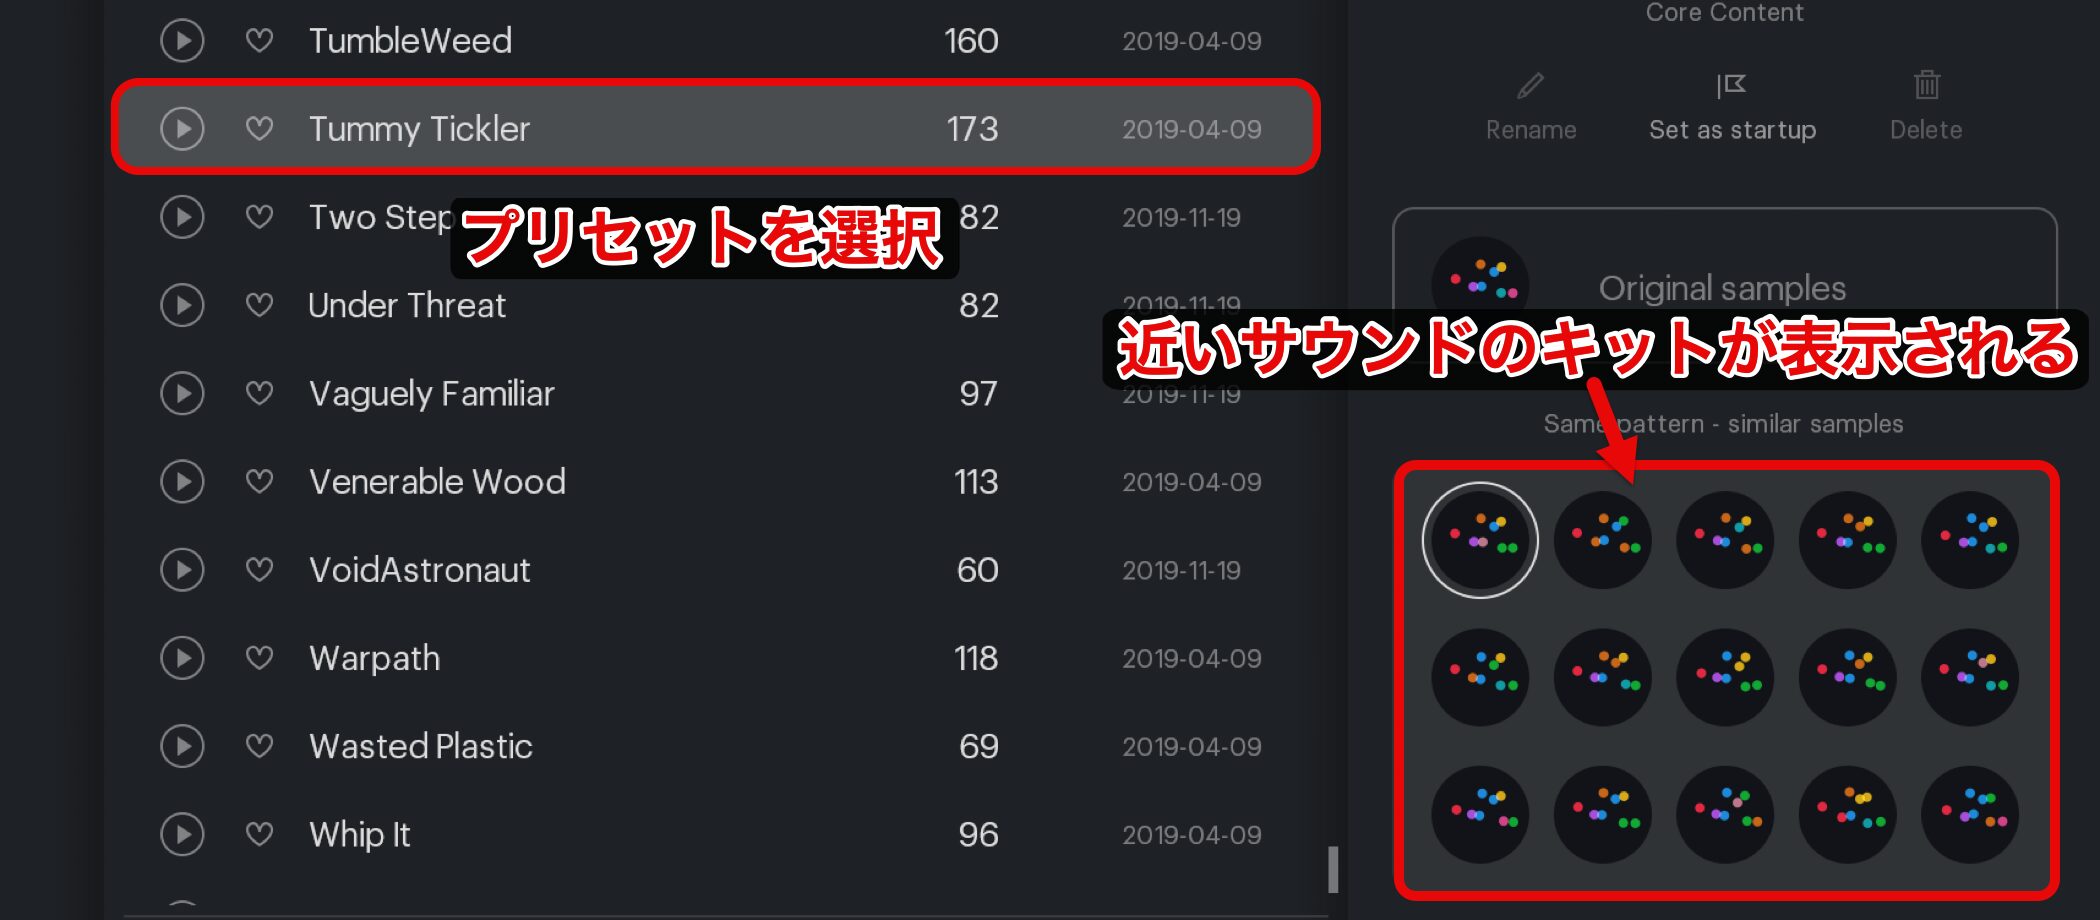
Kits with a similar sound to the selected preset appear at the bottom right.
Click them to try different combinations.
Navigating the SPACE Window
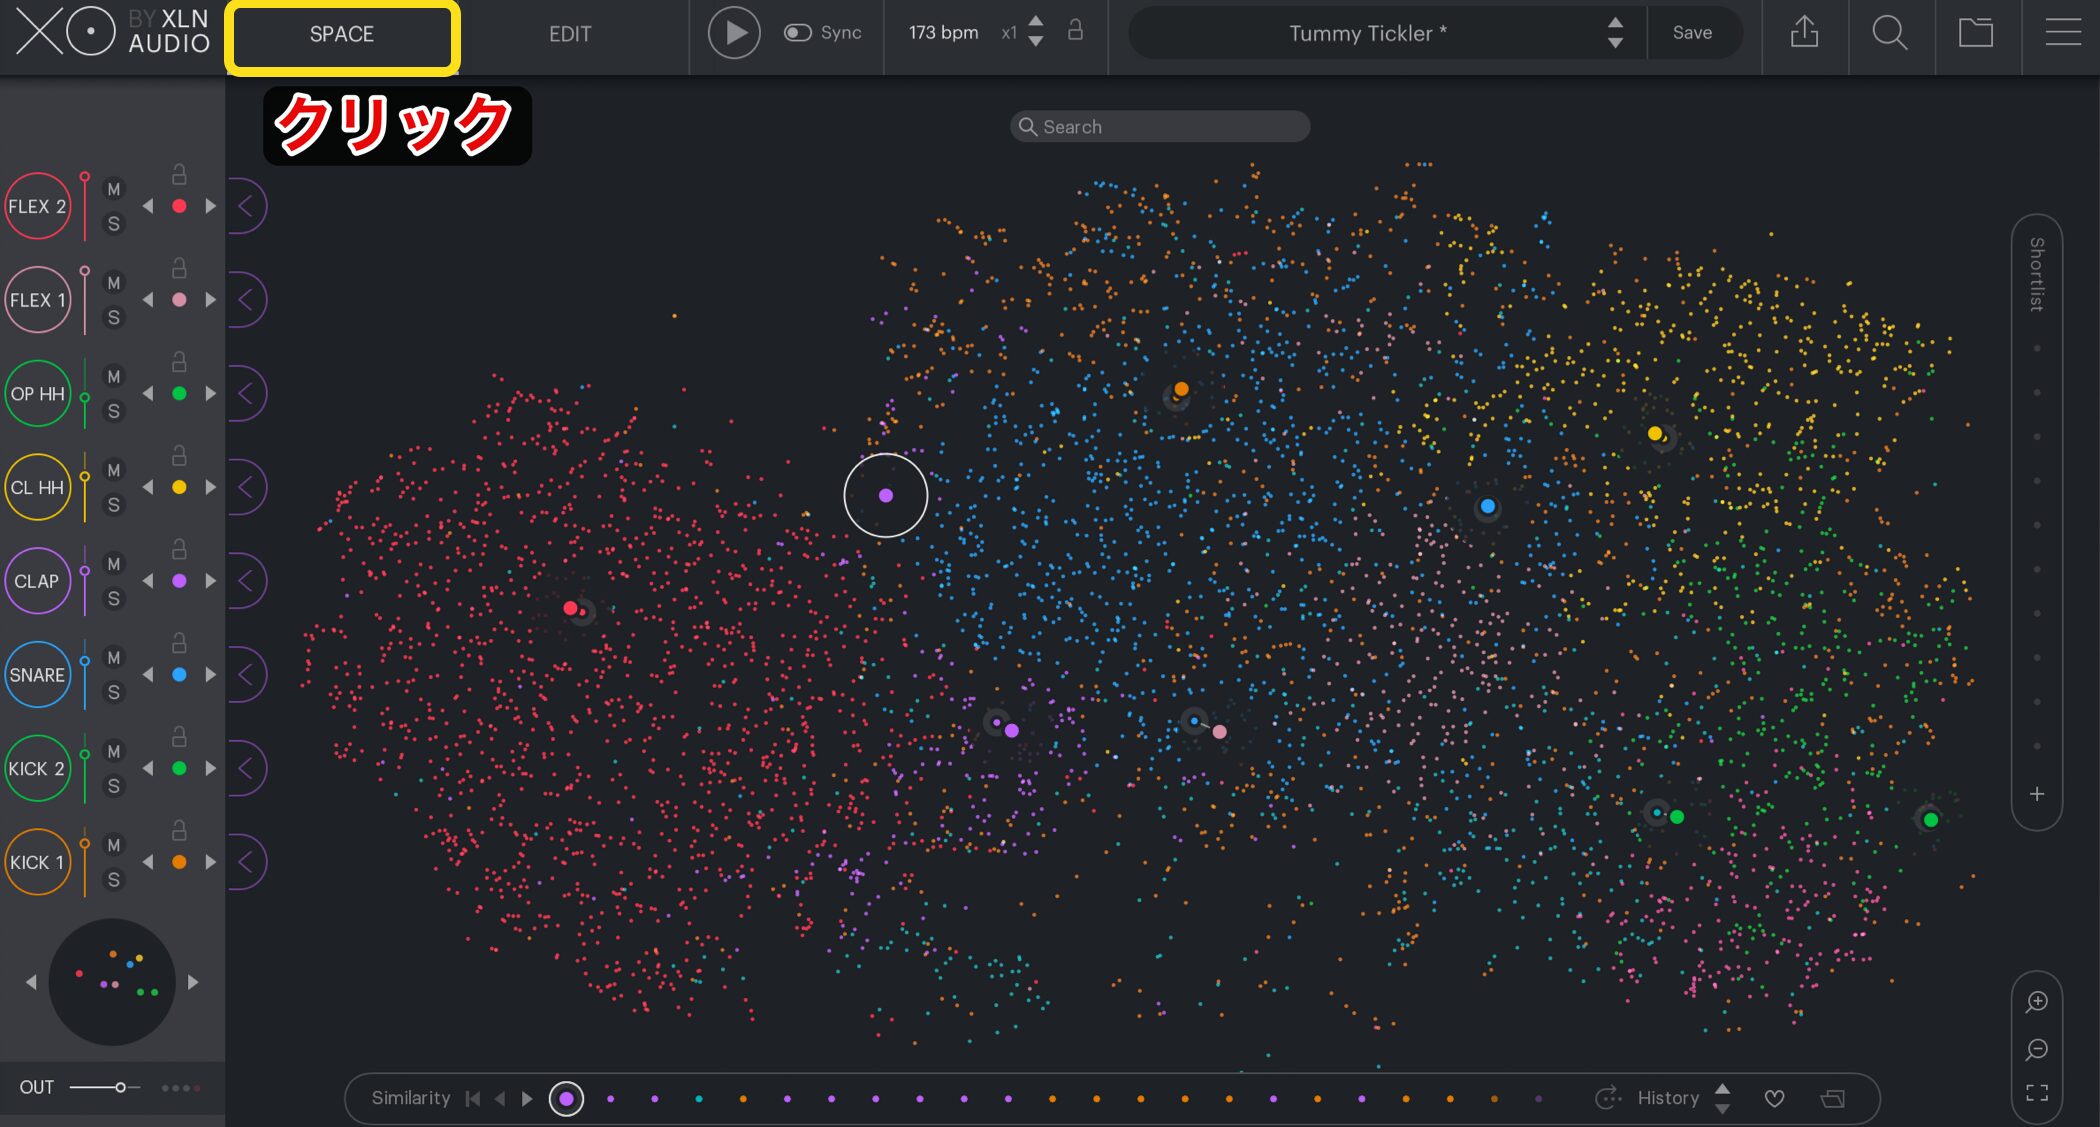
We will use the SPACE window to select samples, but first let's cover the basics of XO.
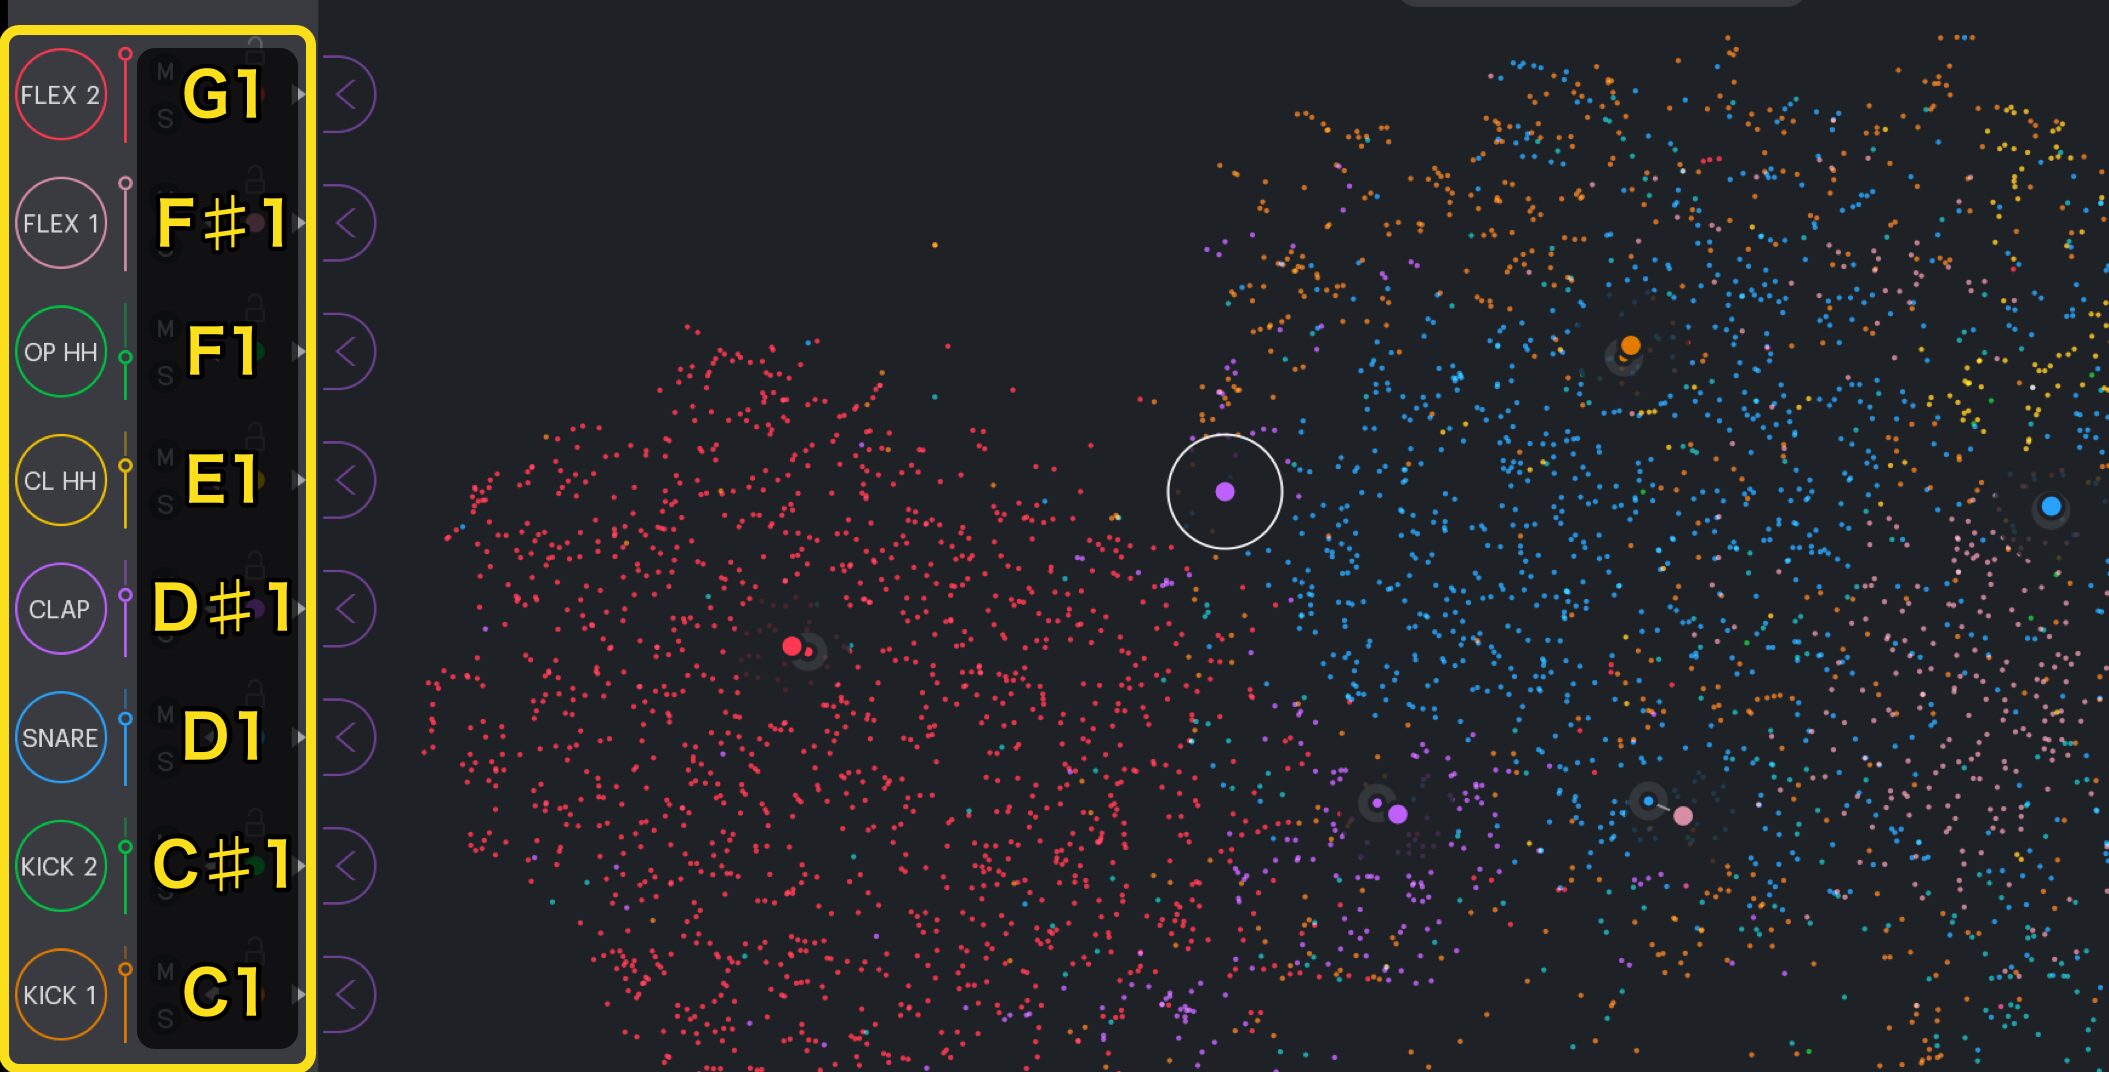
XO can load and play up to eight drum sounds in a kit.
Each drum slot is assigned a MIDI note, so XO also supports MIDI programming, just like a conventional drum instrument.
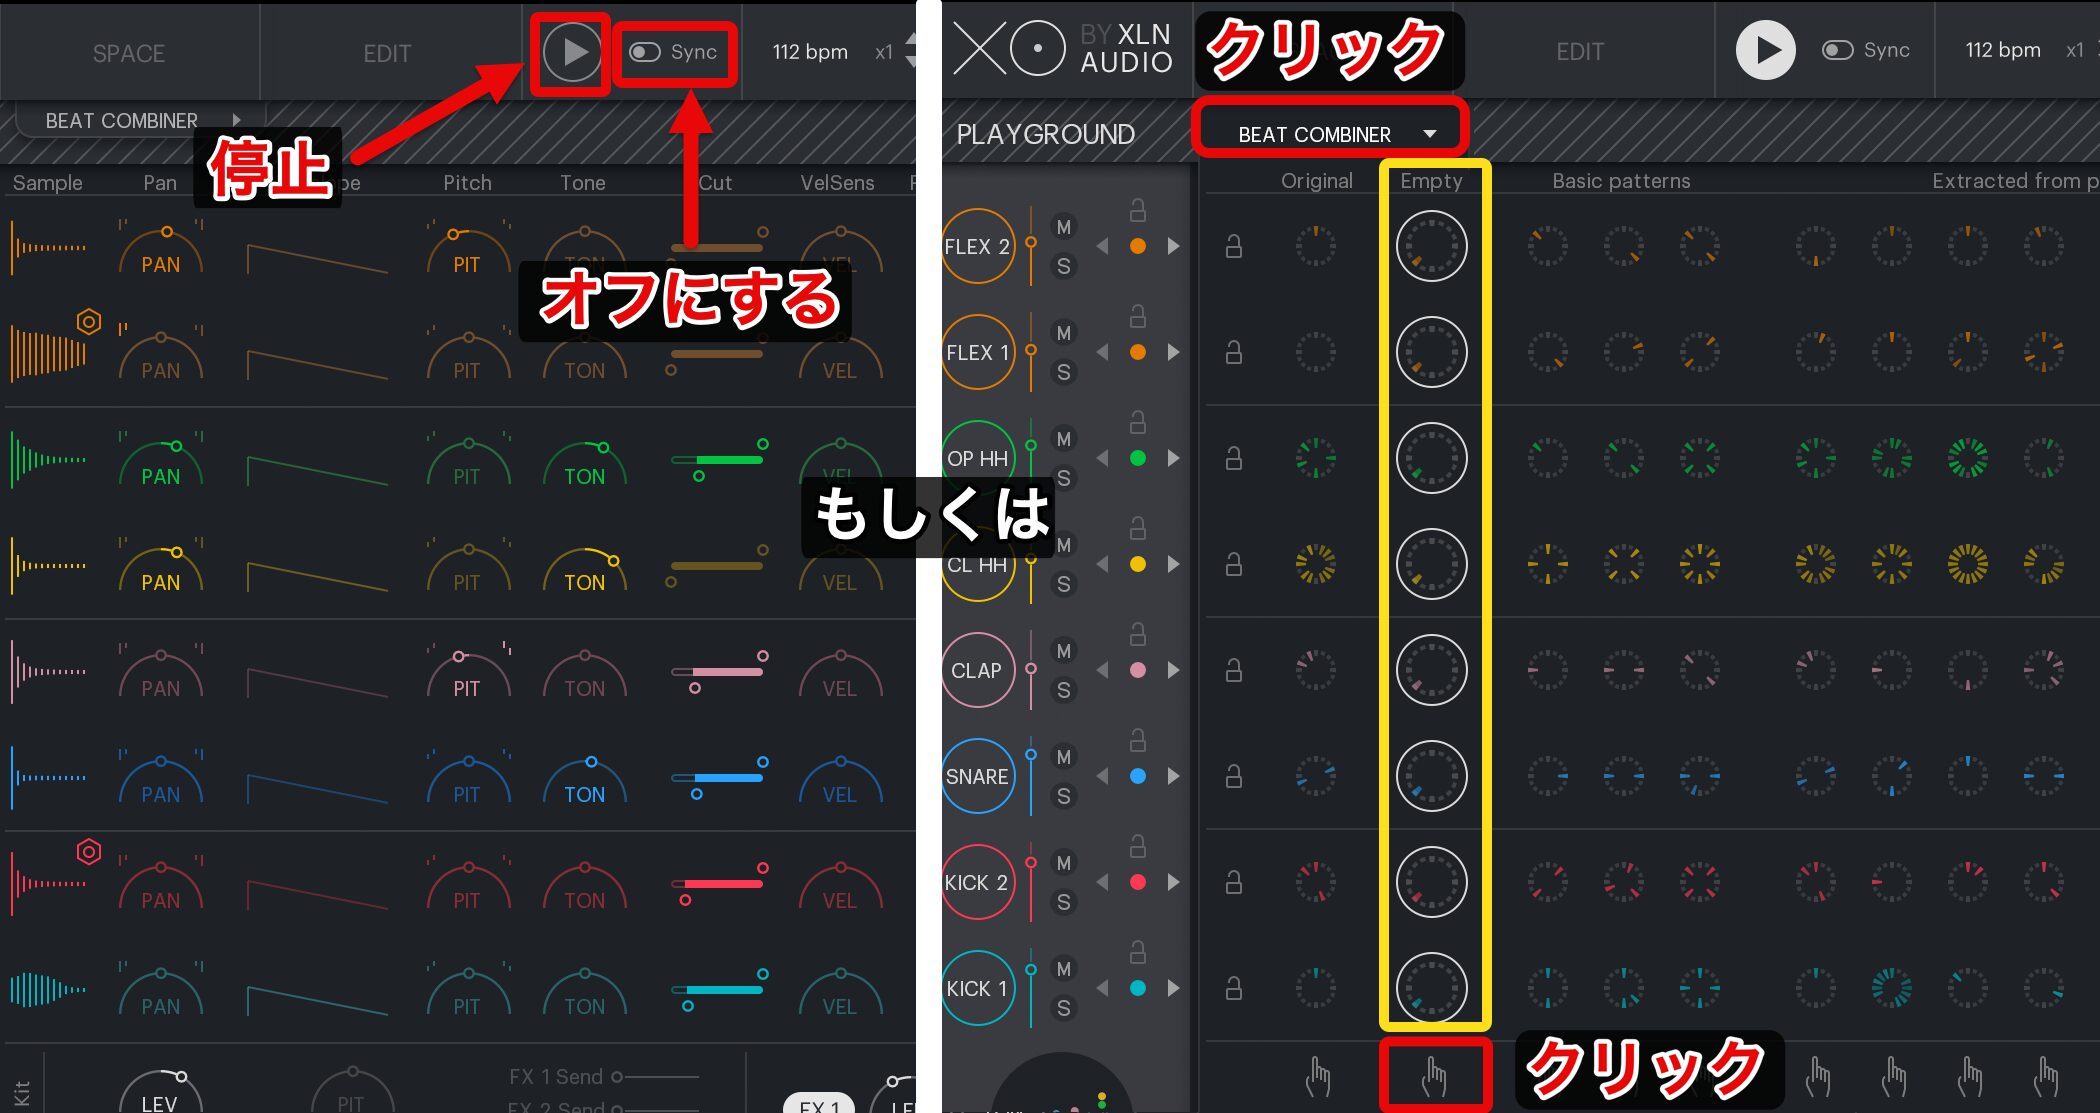
One point to keep in mind during playback is that XO's internal pattern and a pattern programmed with MIDI play at the same time.
Turning off XO's play button lets you play only the DAW's pattern. However, if Sync is enabled, stopping and restarting playback automatically turns XO's playback back on.
To repeatedly play only the DAW's pattern, use one of these methods:
Method 1: Turn off Sync, then turn off XO's play button.
Method 2: Select the Empty column in BEAT COMBINER. Sync can remain enabled.
We will explain BEAT COMBINER in more detail later.
Auditioning and Loading Samples
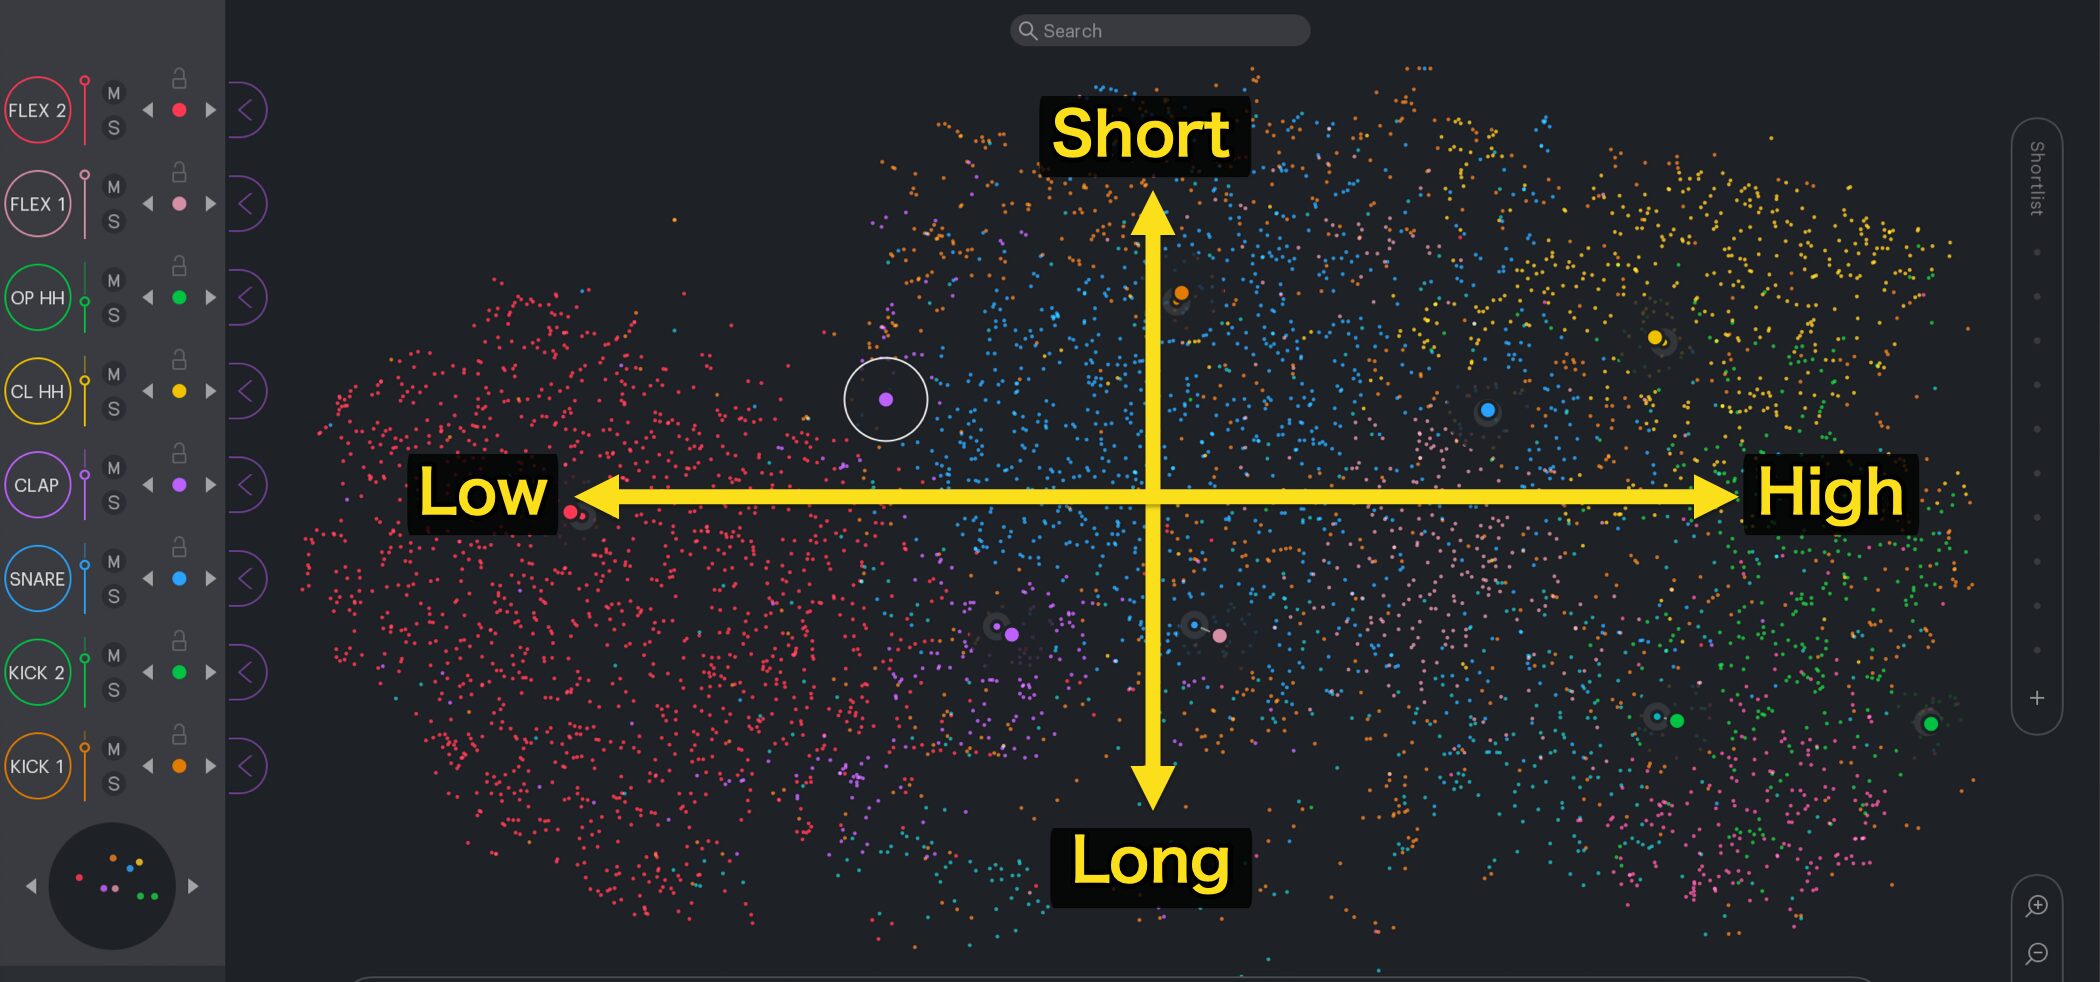
Click the stars, which are color-coded by drum type, to audition samples.
Although they may appear to be scattered at random, their arrangement follows a pattern.
- Pitch gets lower toward the left and higher toward the right.
- Sounds get shorter toward the top and longer toward the bottom.
Knowing this makes it easier to find the sample you want.
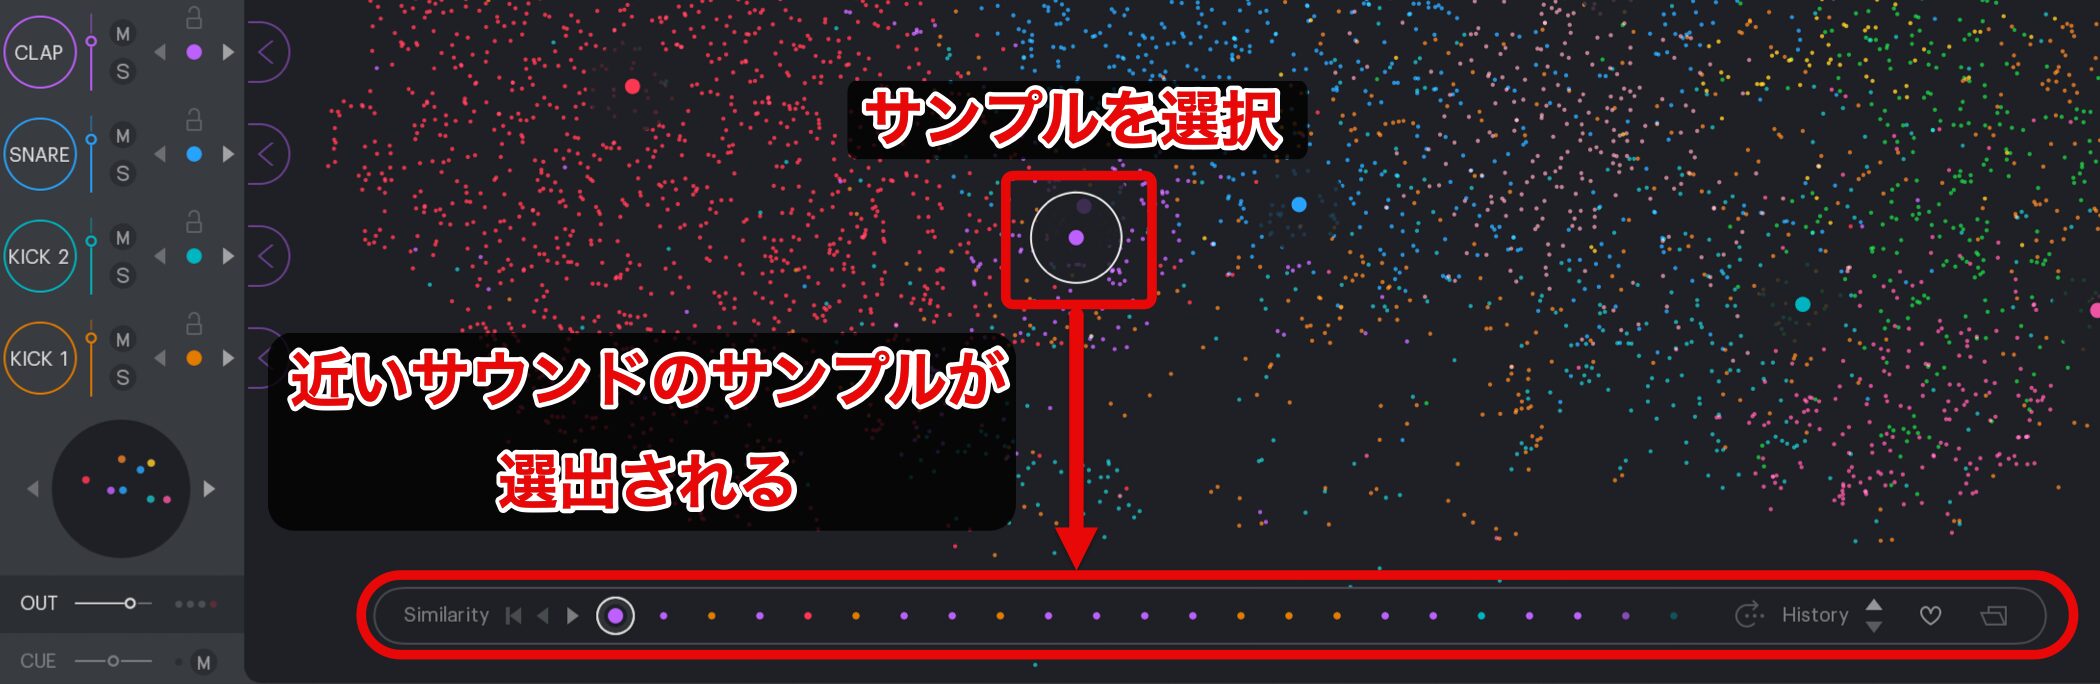
The contents of Similarity change to match the selected sample.
This feature finds samples with a sound similar to the one currently selected.
You can click the samples shown in Similarity to audition them.
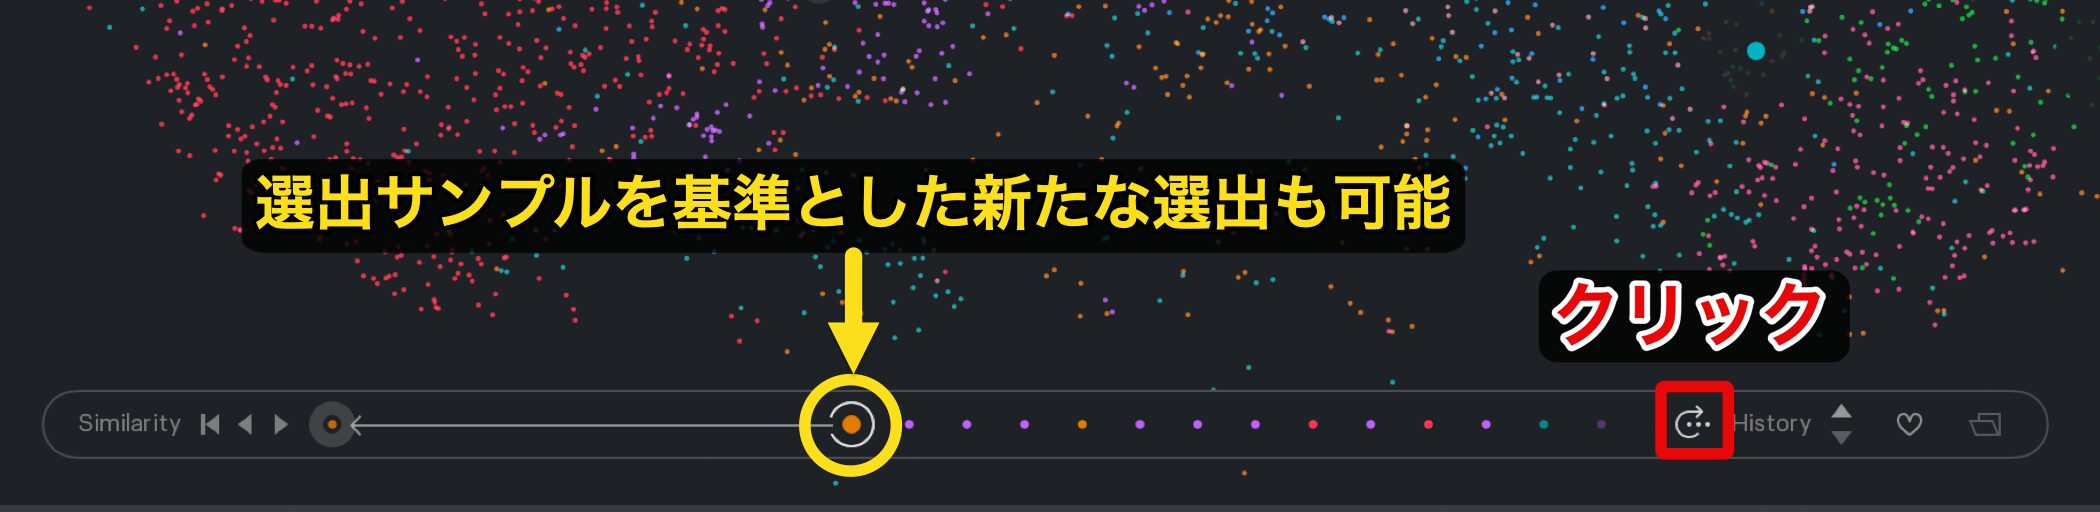
You can also use a newly selected sample as the starting point for another Similarity search, making this a useful way to explore sounds.
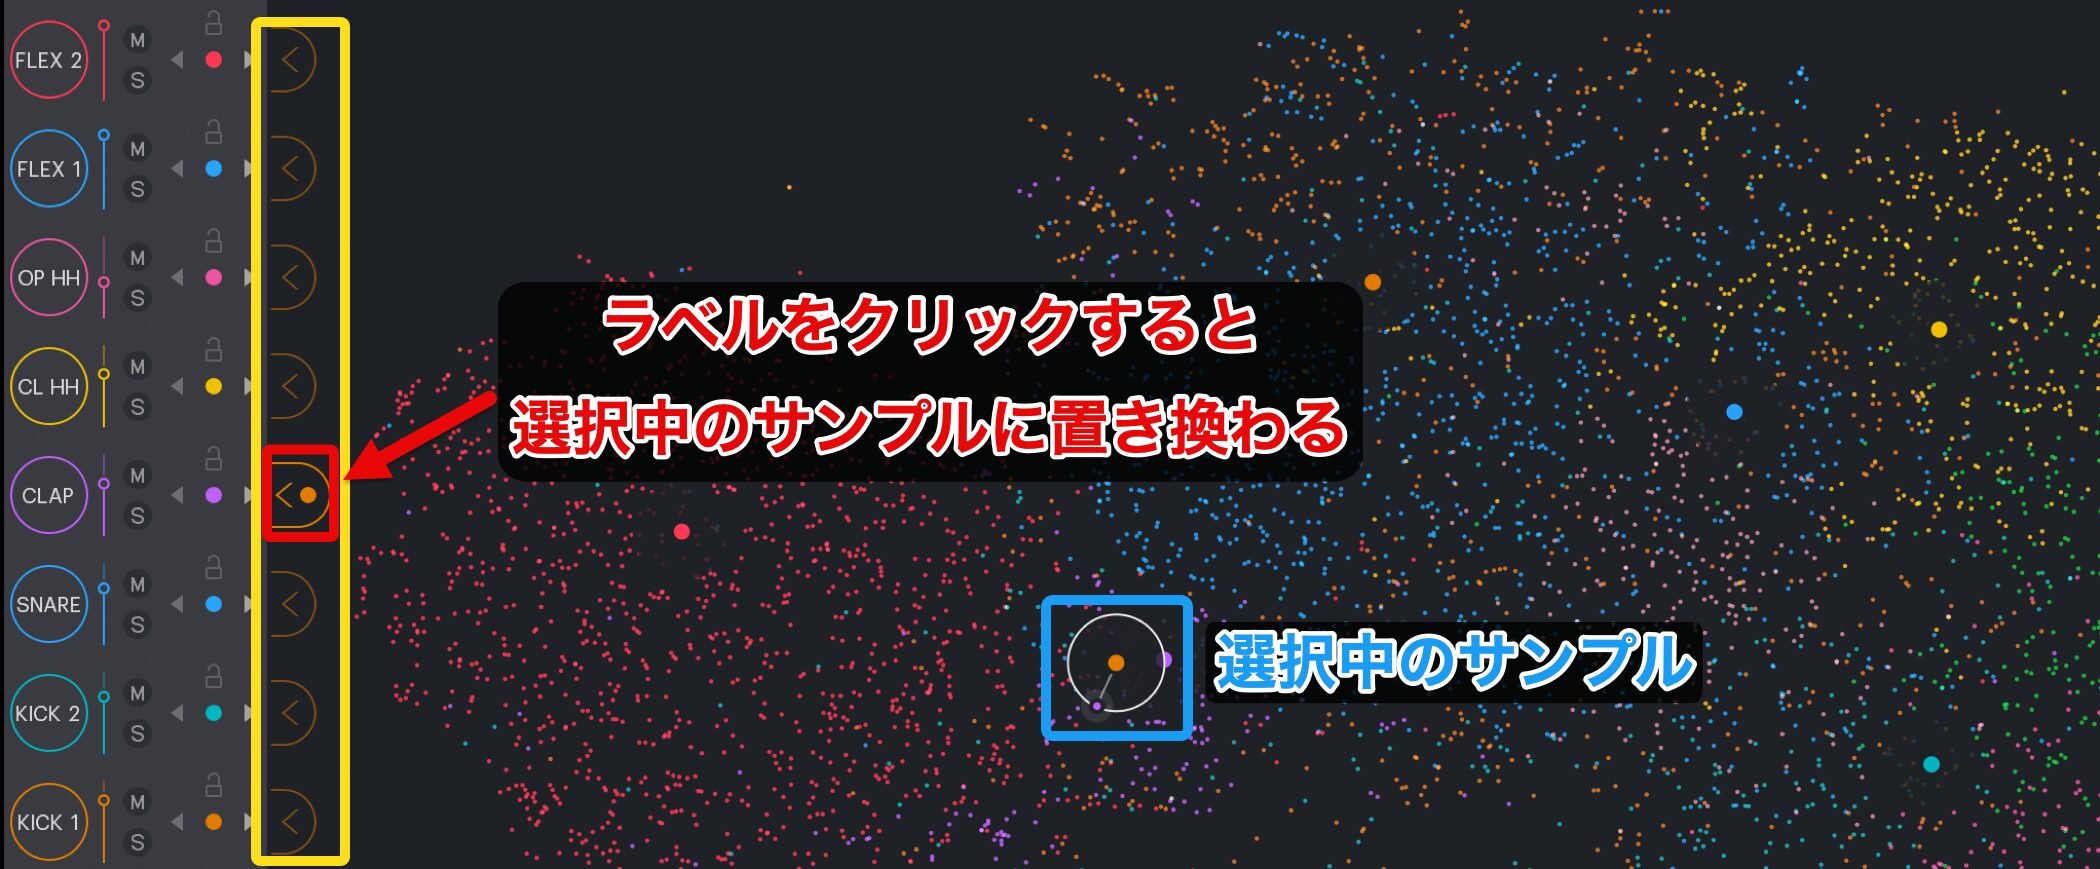
Click a drum slot's label to load the currently selected sample into that slot.
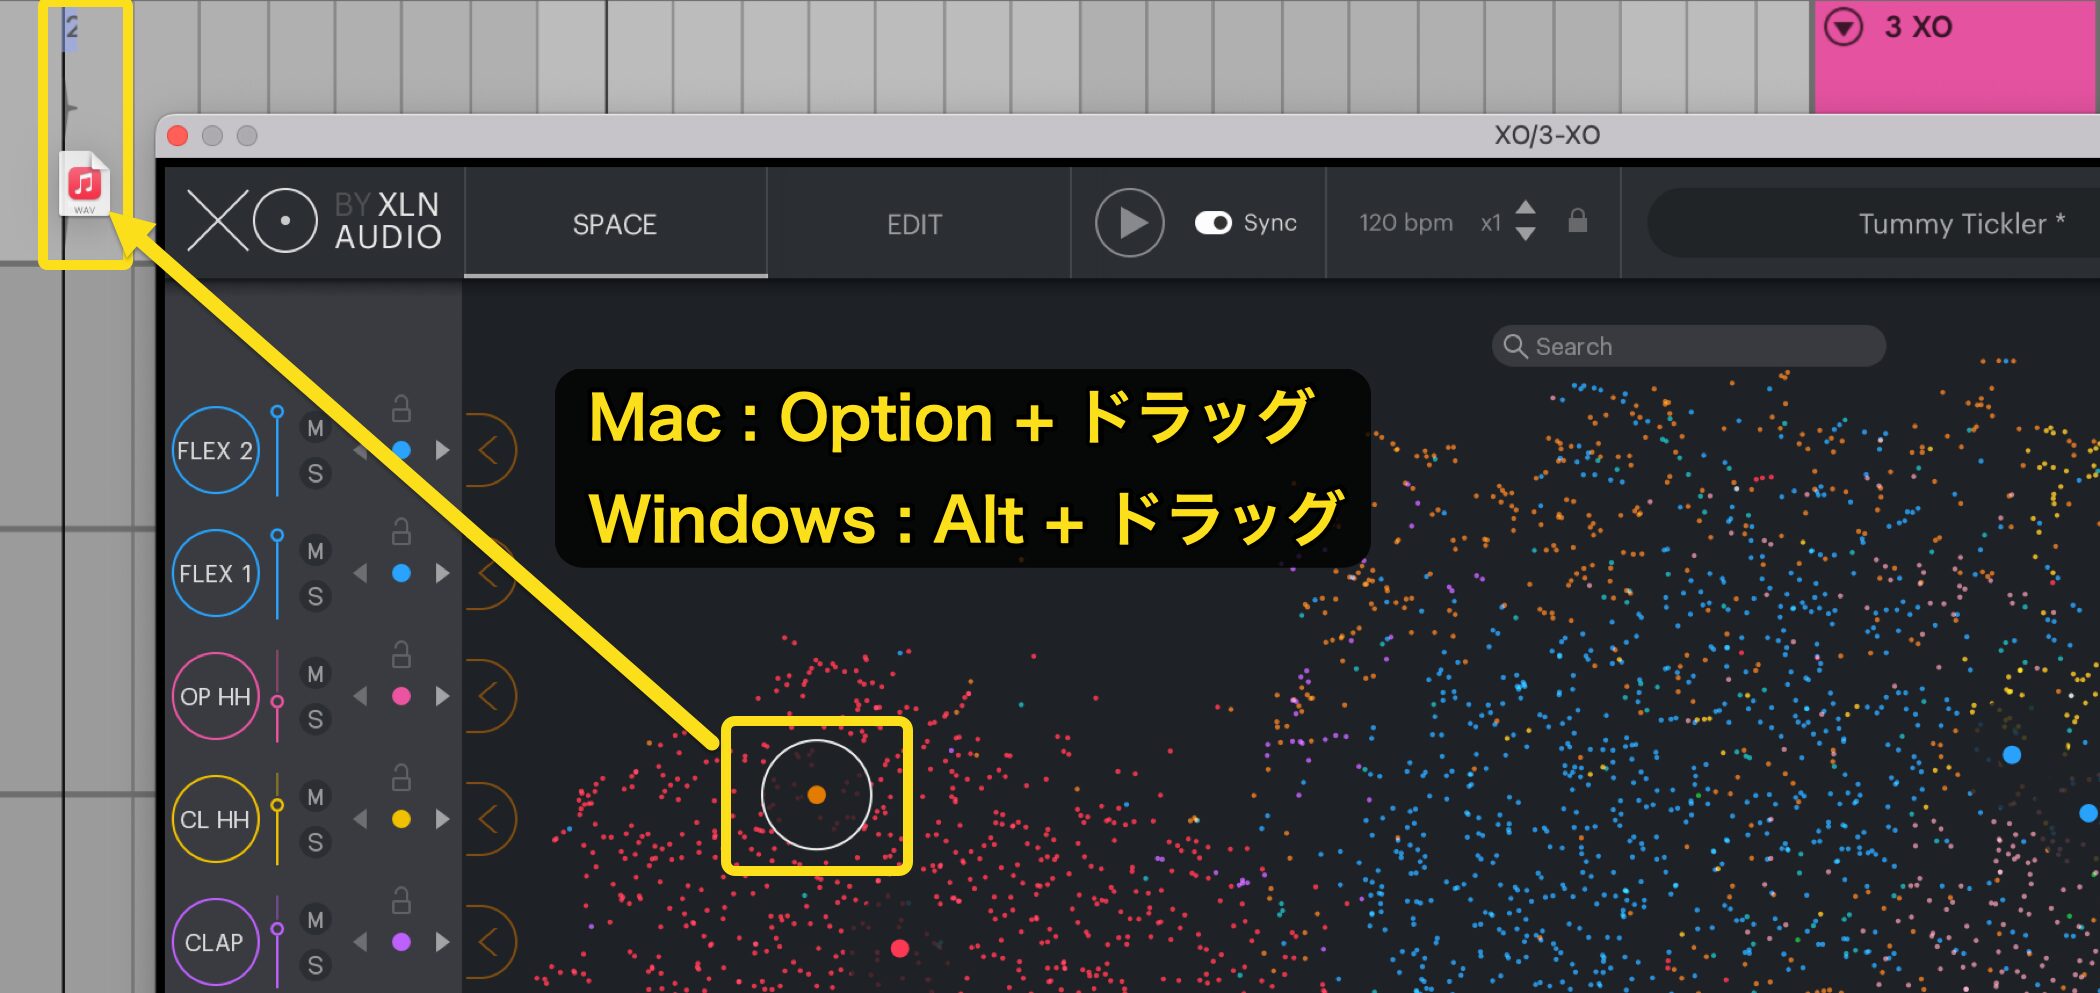
You can also drag a sample using:
- Mac: Option + drag
- Windows: Alt + drag
This lets you import the sample directly into an audio track in your DAW in a single action.
This is useful for sounds you want to use just once in a song, such as sound effects.
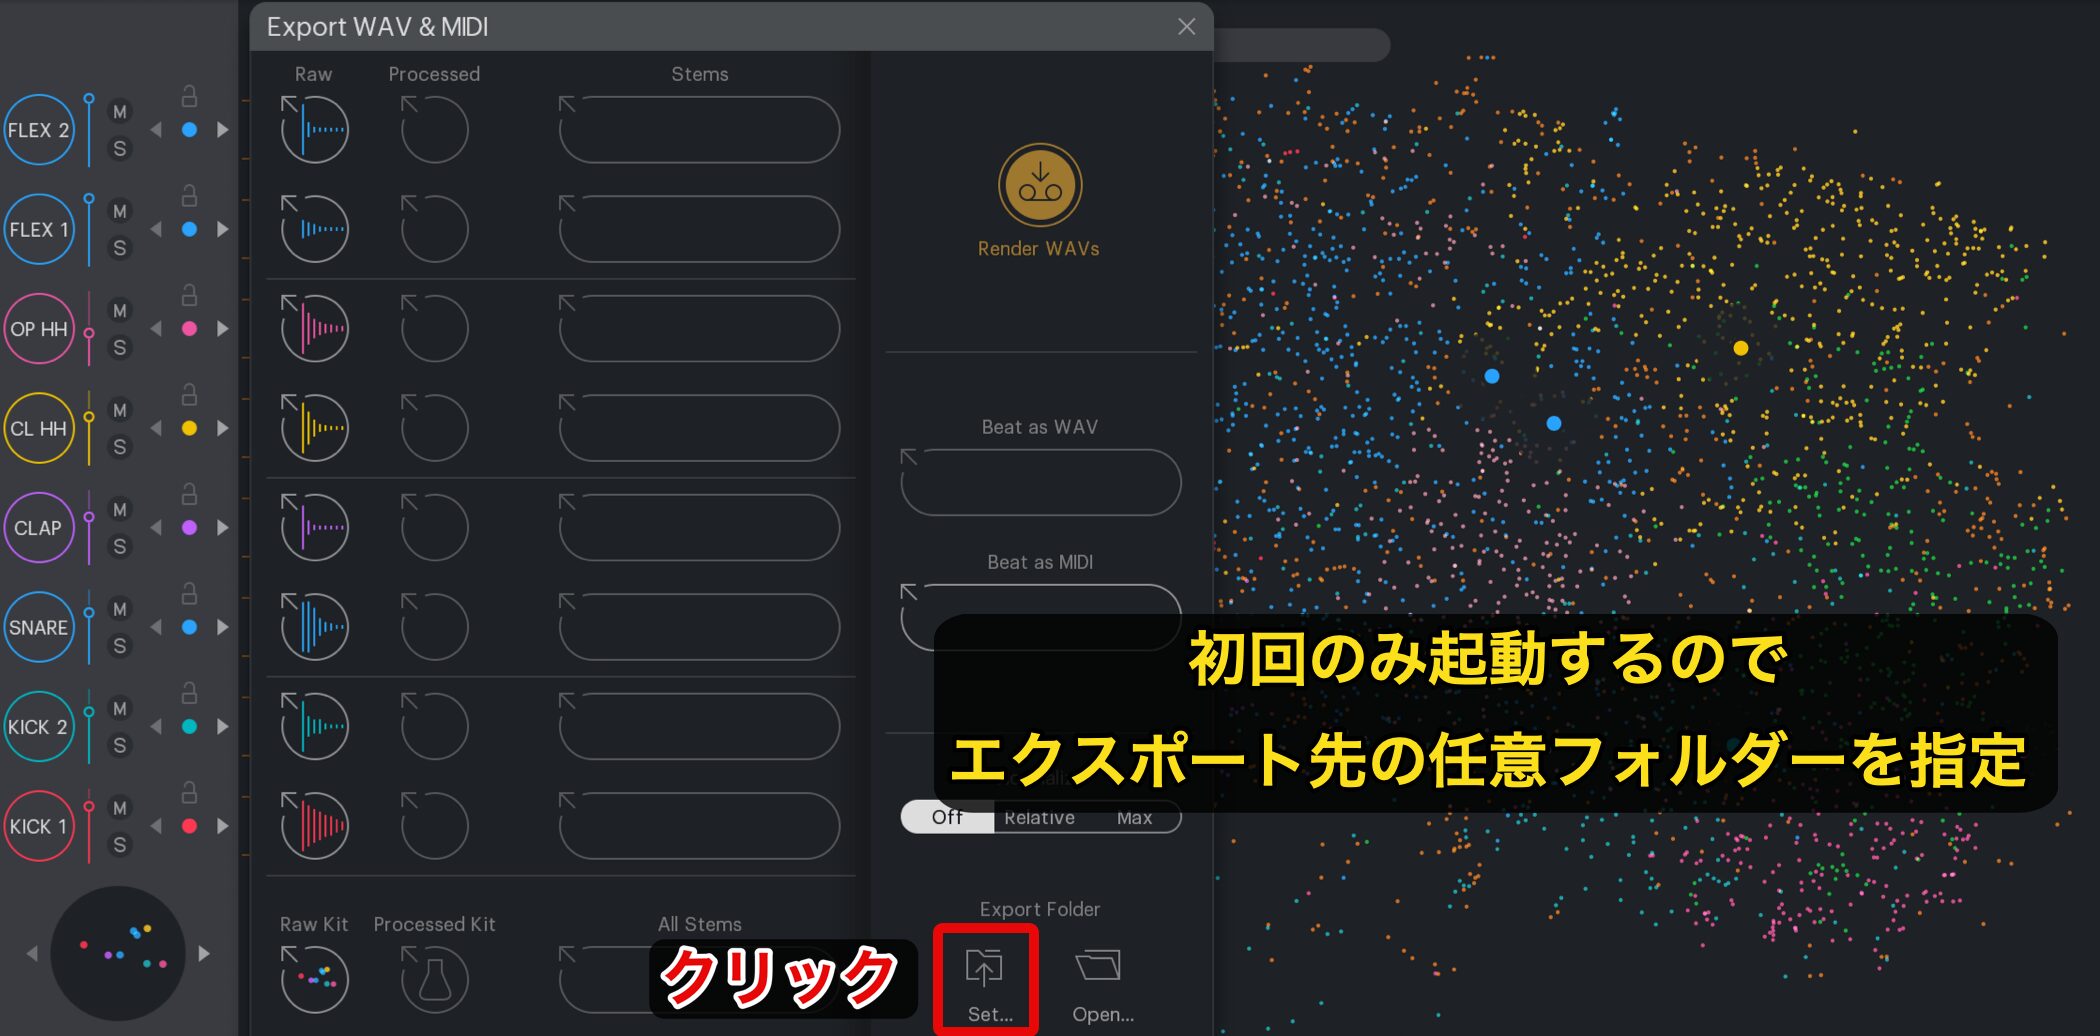
The first time you drag a sample, the window shown above opens and asks you to choose a folder. Click Set… and either create a folder for saving samples or select an existing folder.
After that, samples are automatically saved in the selected folder.
Zooming In and Out of SPACE
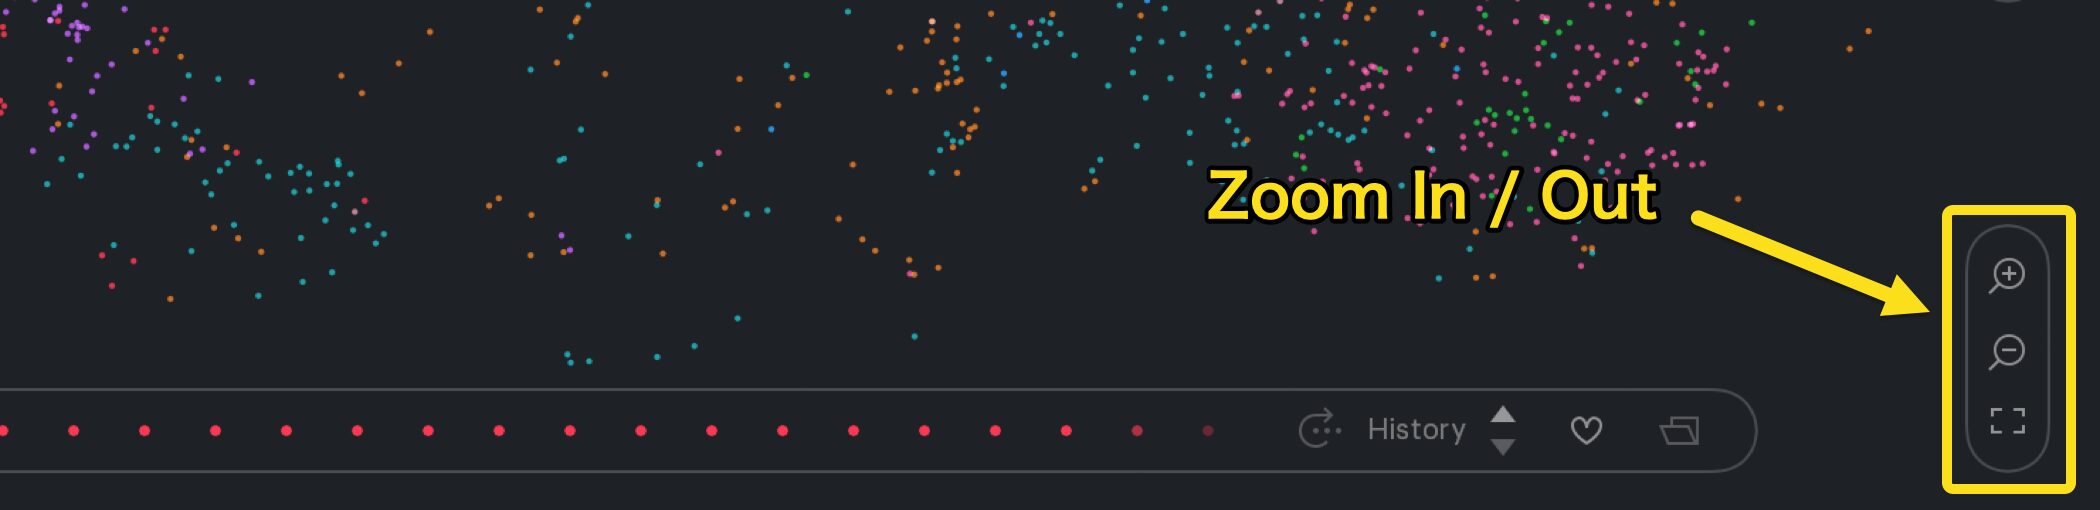
You will often want to zoom in or out while selecting samples.
Use the mouse wheel to zoom, or use the +/− controls at the bottom right.
You can also right-click and drag across SPACE to move around while keeping the current zoom level.
Saving Favorite Samples
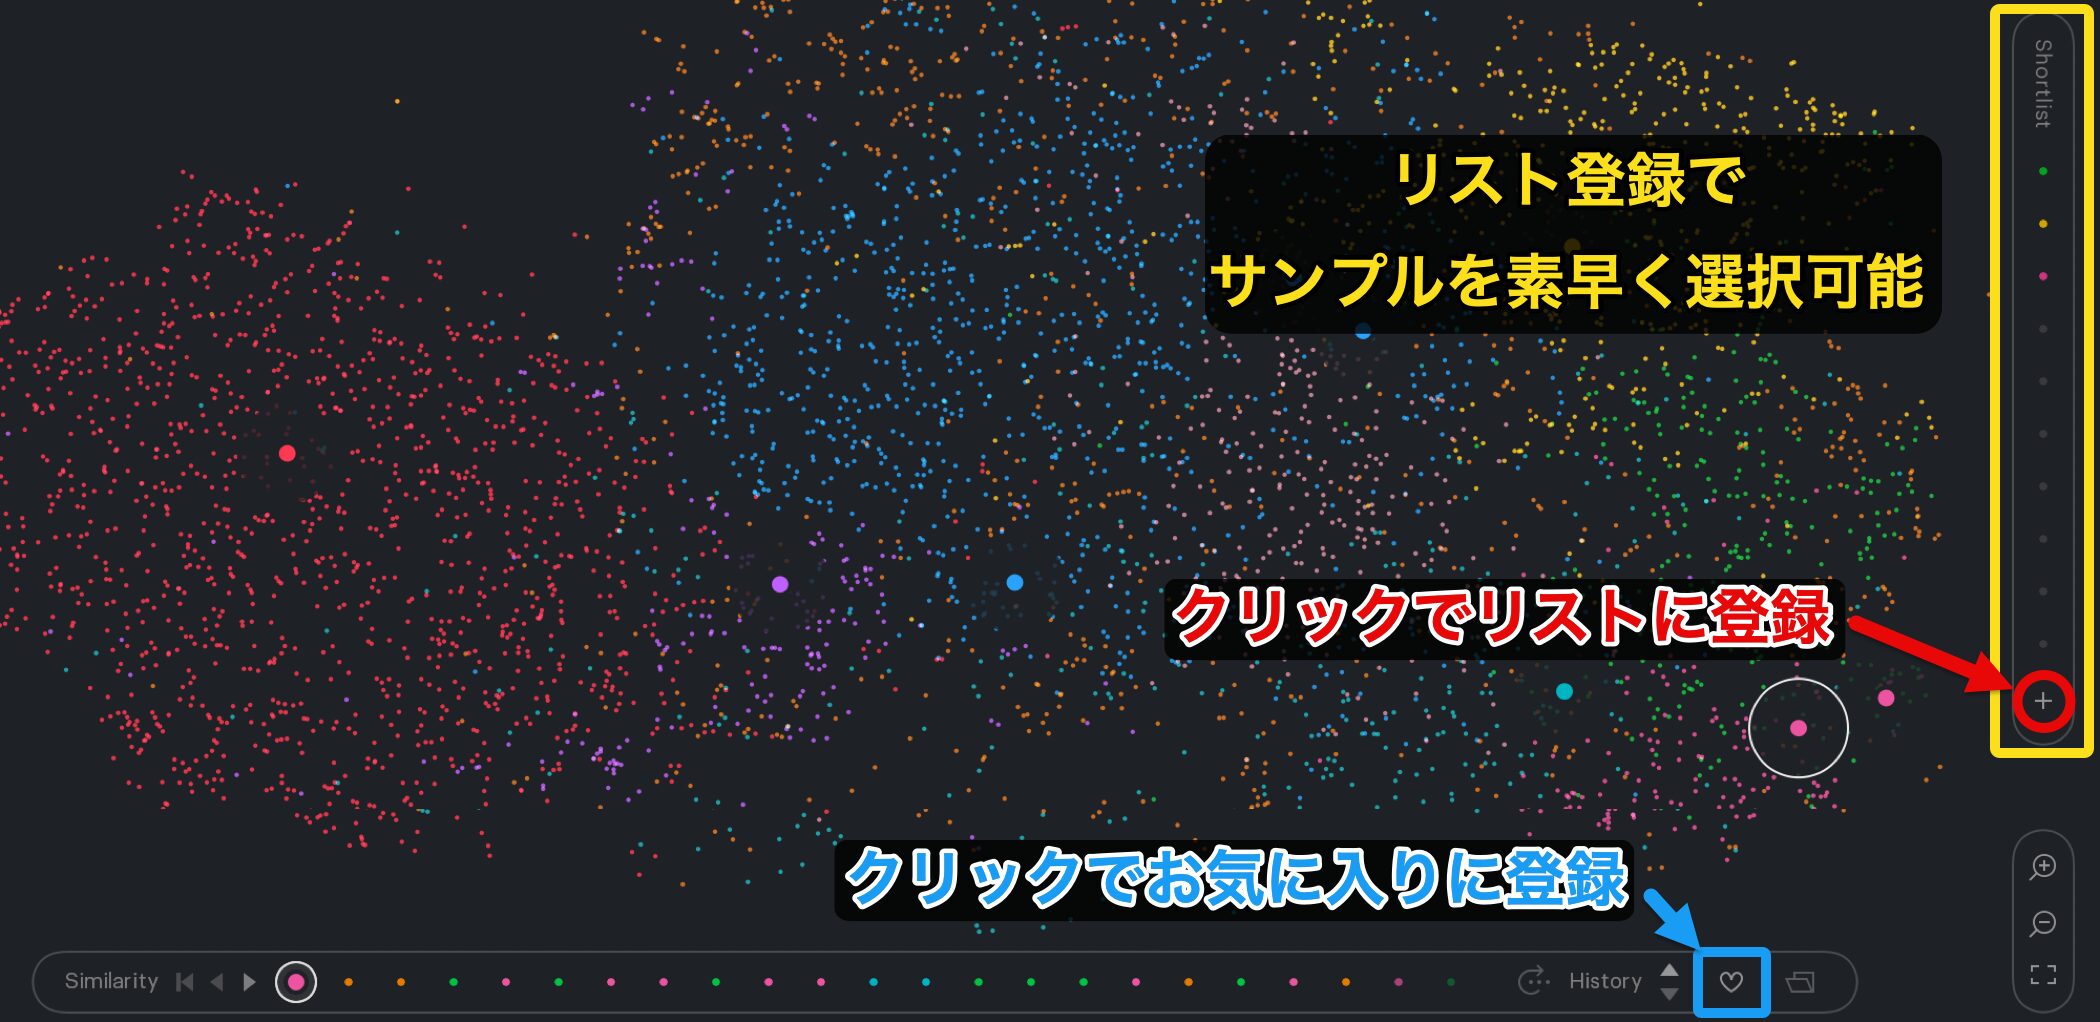
While auditioning a large collection of samples, you may find sounds you want to use in another song or simply keep for later.
In these situations, Favorites and Shortlist are useful.
- Favorites: Click the heart icon to mark a sample as a favorite.
You can find it using the search functions described later, and your favorites remain available in other songs. - Shortlist: Adds samples to the list on the right, where you can quickly select them with a click.
The shortlist is available only in the XO instance where you created it; it does not carry over between songs or applications.
Knowing when to use each of these features is an important part of managing samples effectively in XO.
Adding Your Own Samples
You can expand SPACE by adding your own samples.
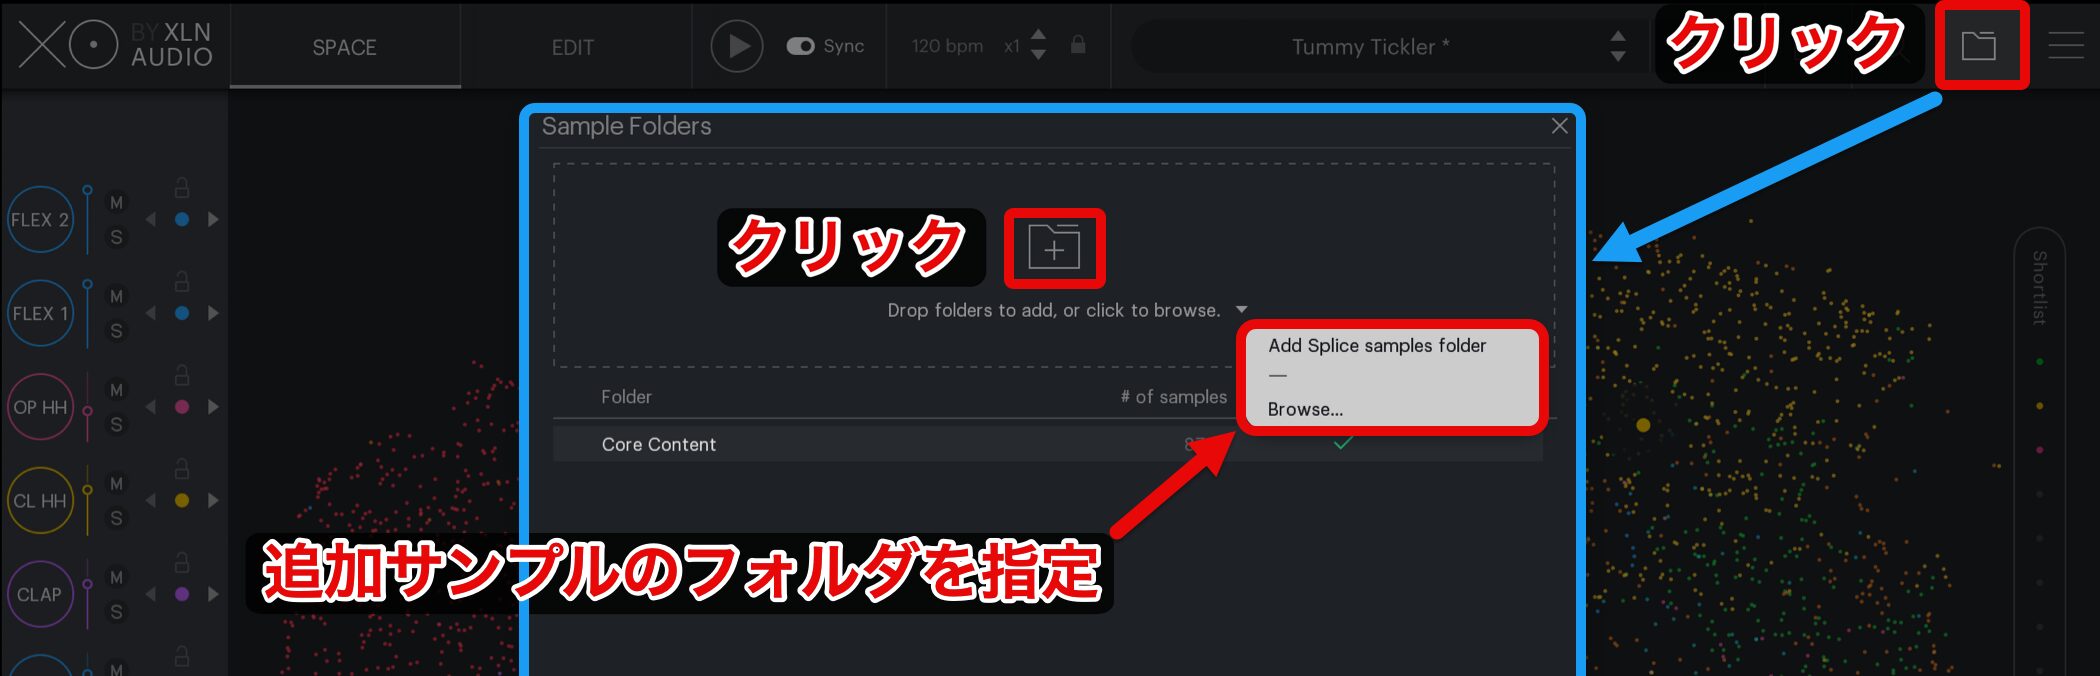
Click the folder icon at the top.
Click + Folder and select the folder containing the samples you want to add.
- Add Splice samples folder: If you use Splice Sounds, this option makes it easy to add those samples.
- Browse: Use this to select a sample folder anywhere on your computer.
You can also add a folder by dragging and dropping it onto + Folder.
You can add multiple folders, allowing you to manage samples from different locations together in XO.
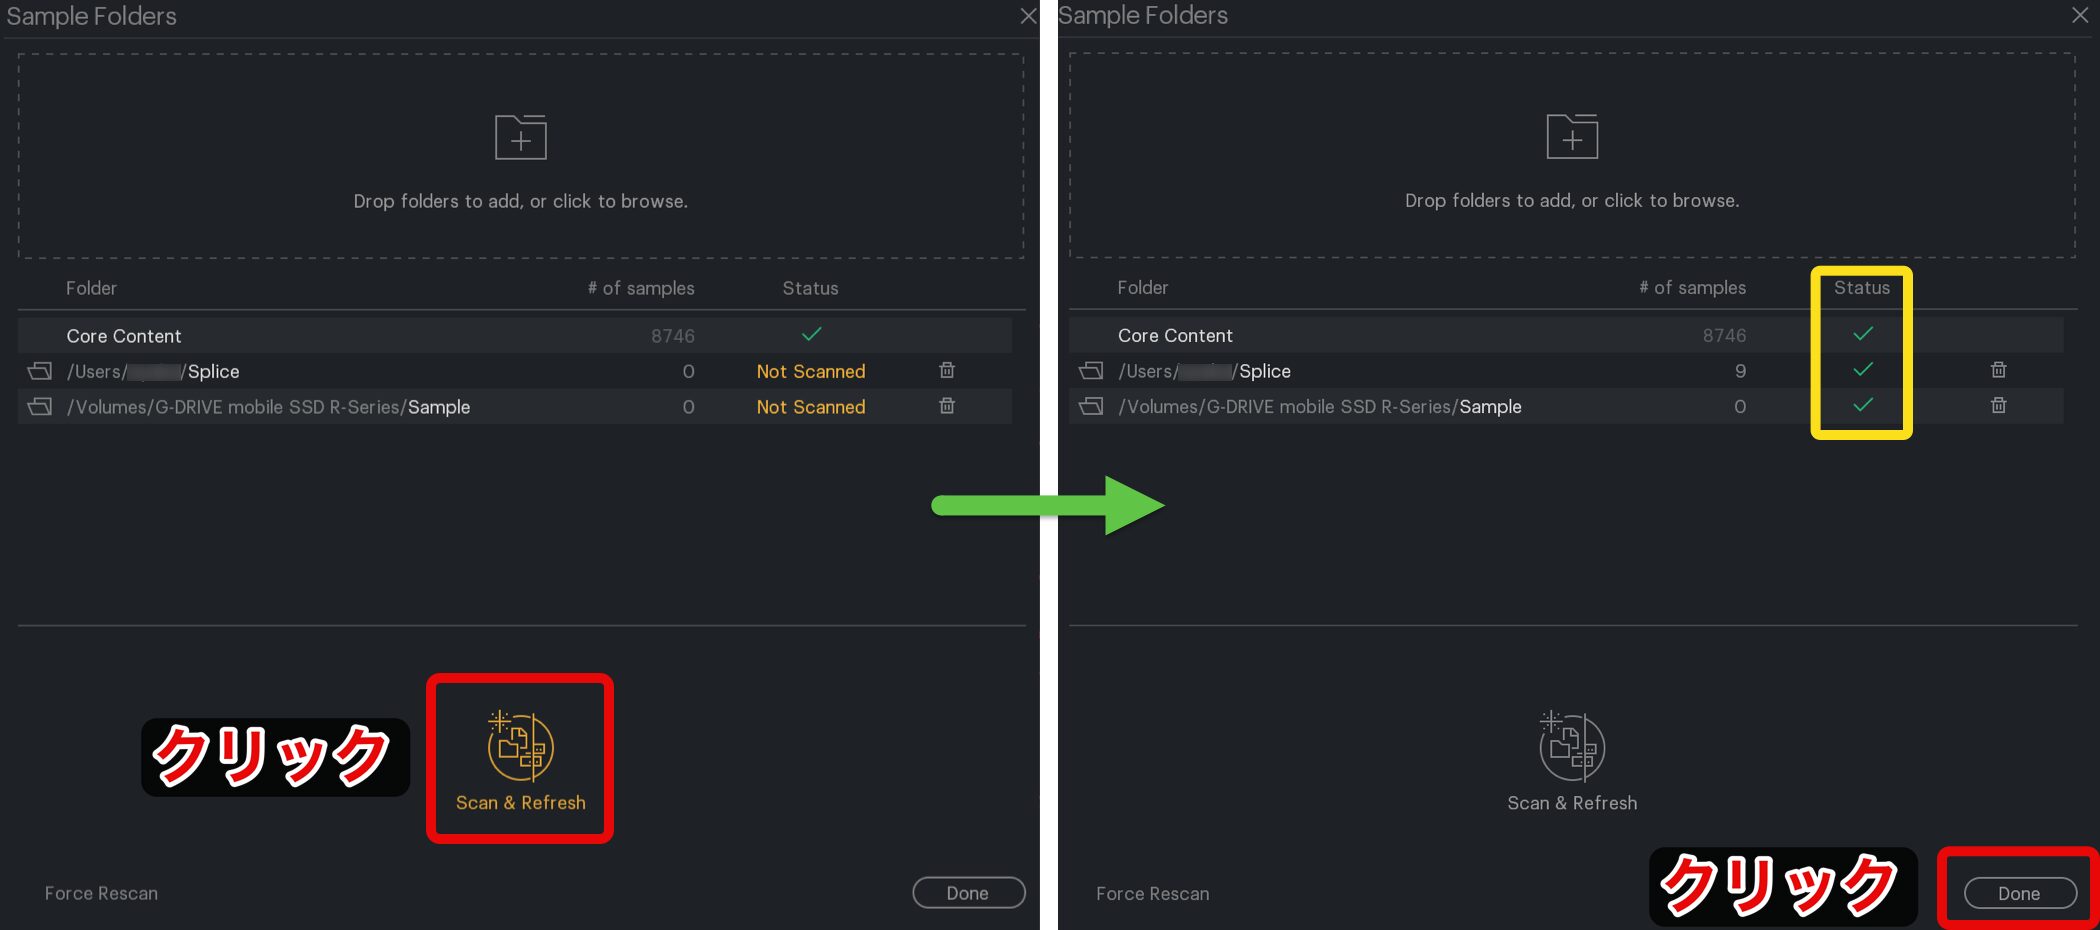
Check the sample locations, then click Scan & Refresh to start loading and analyzing the samples.
When analysis is complete, check the Status indicator and click Done.
Your own samples have now been added to SPACE.
XO automatically analyzes and categorizes them as Kick, Snare, Hihat, and so on.
Filtering and Searching Samples
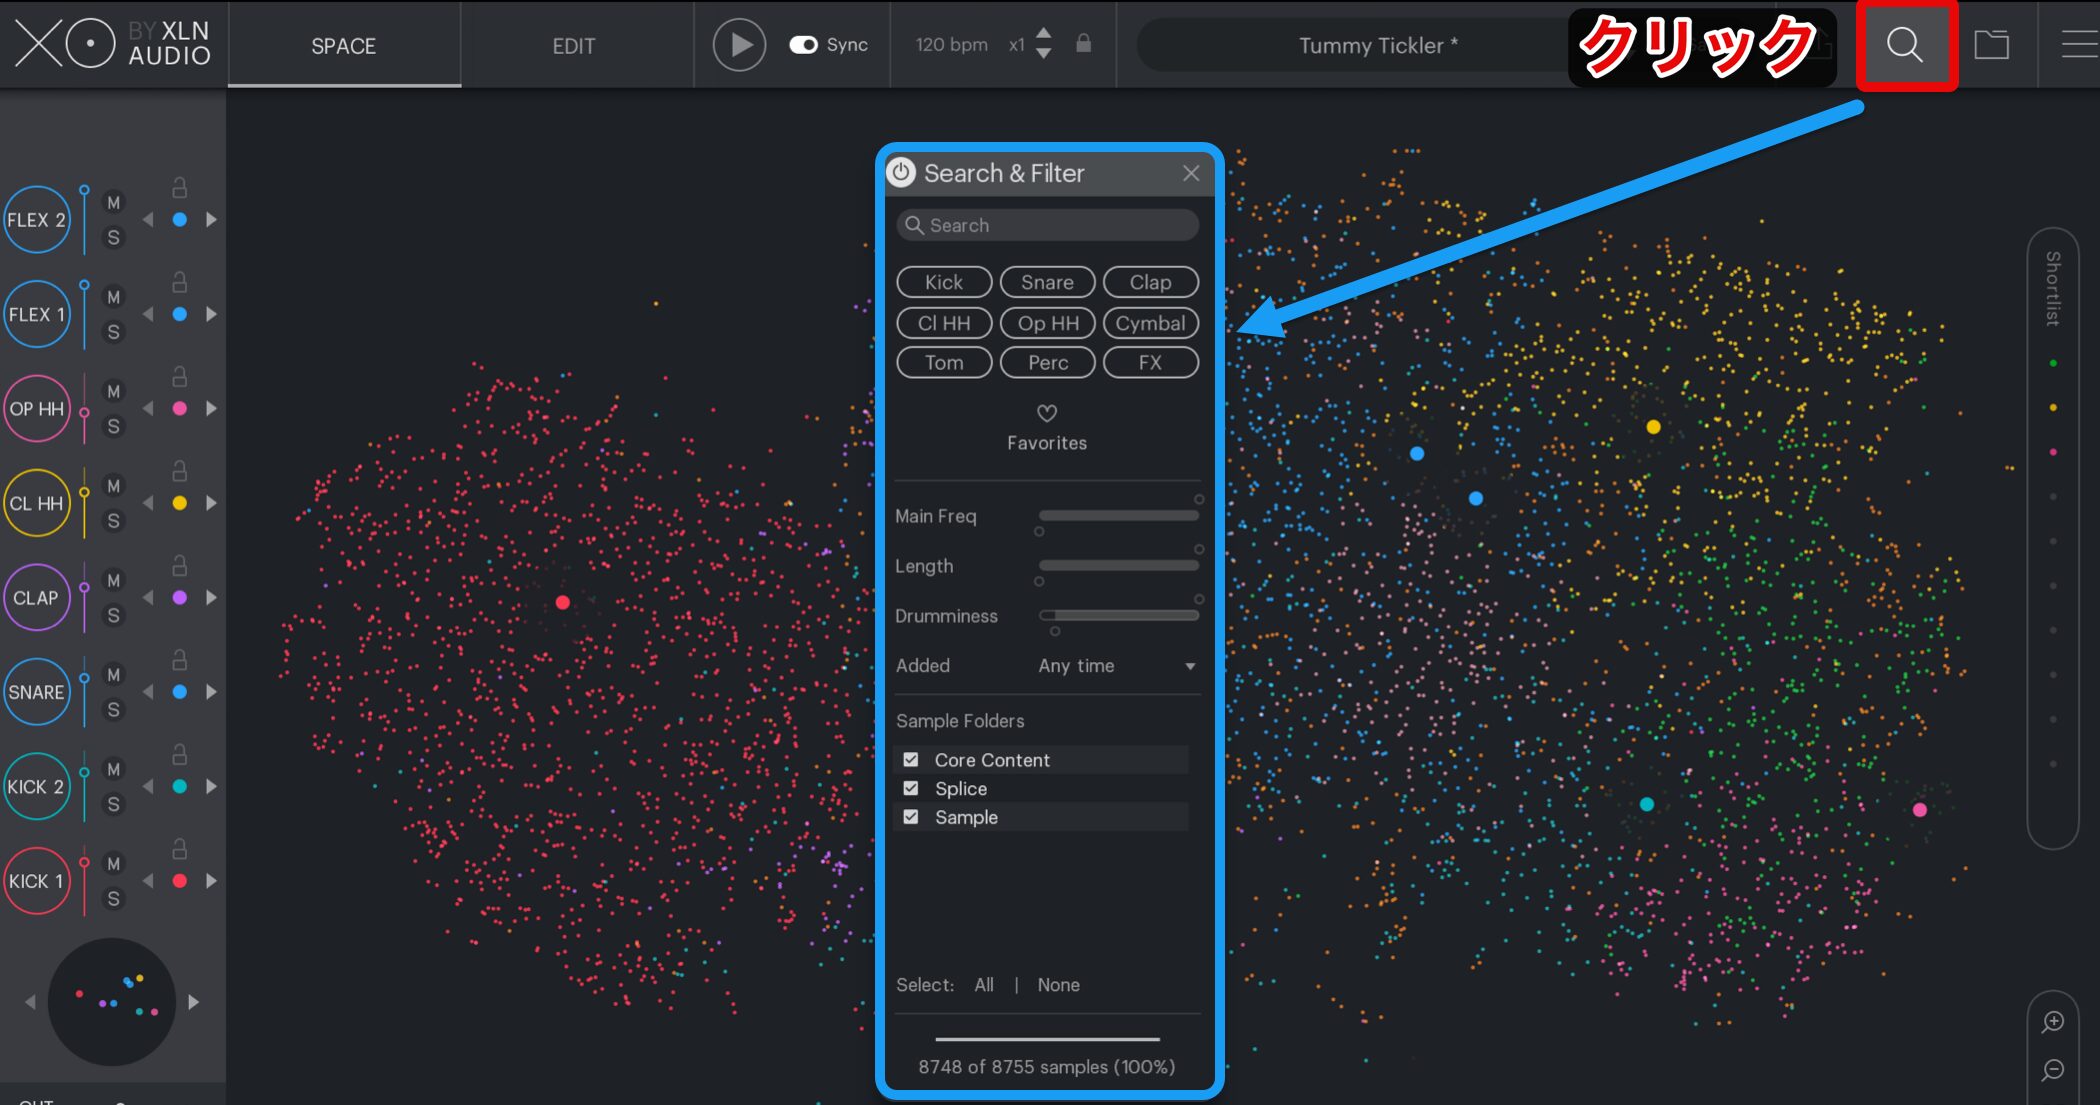
To help you find the sound you want among a huge number of samples, XO also provides search tools.
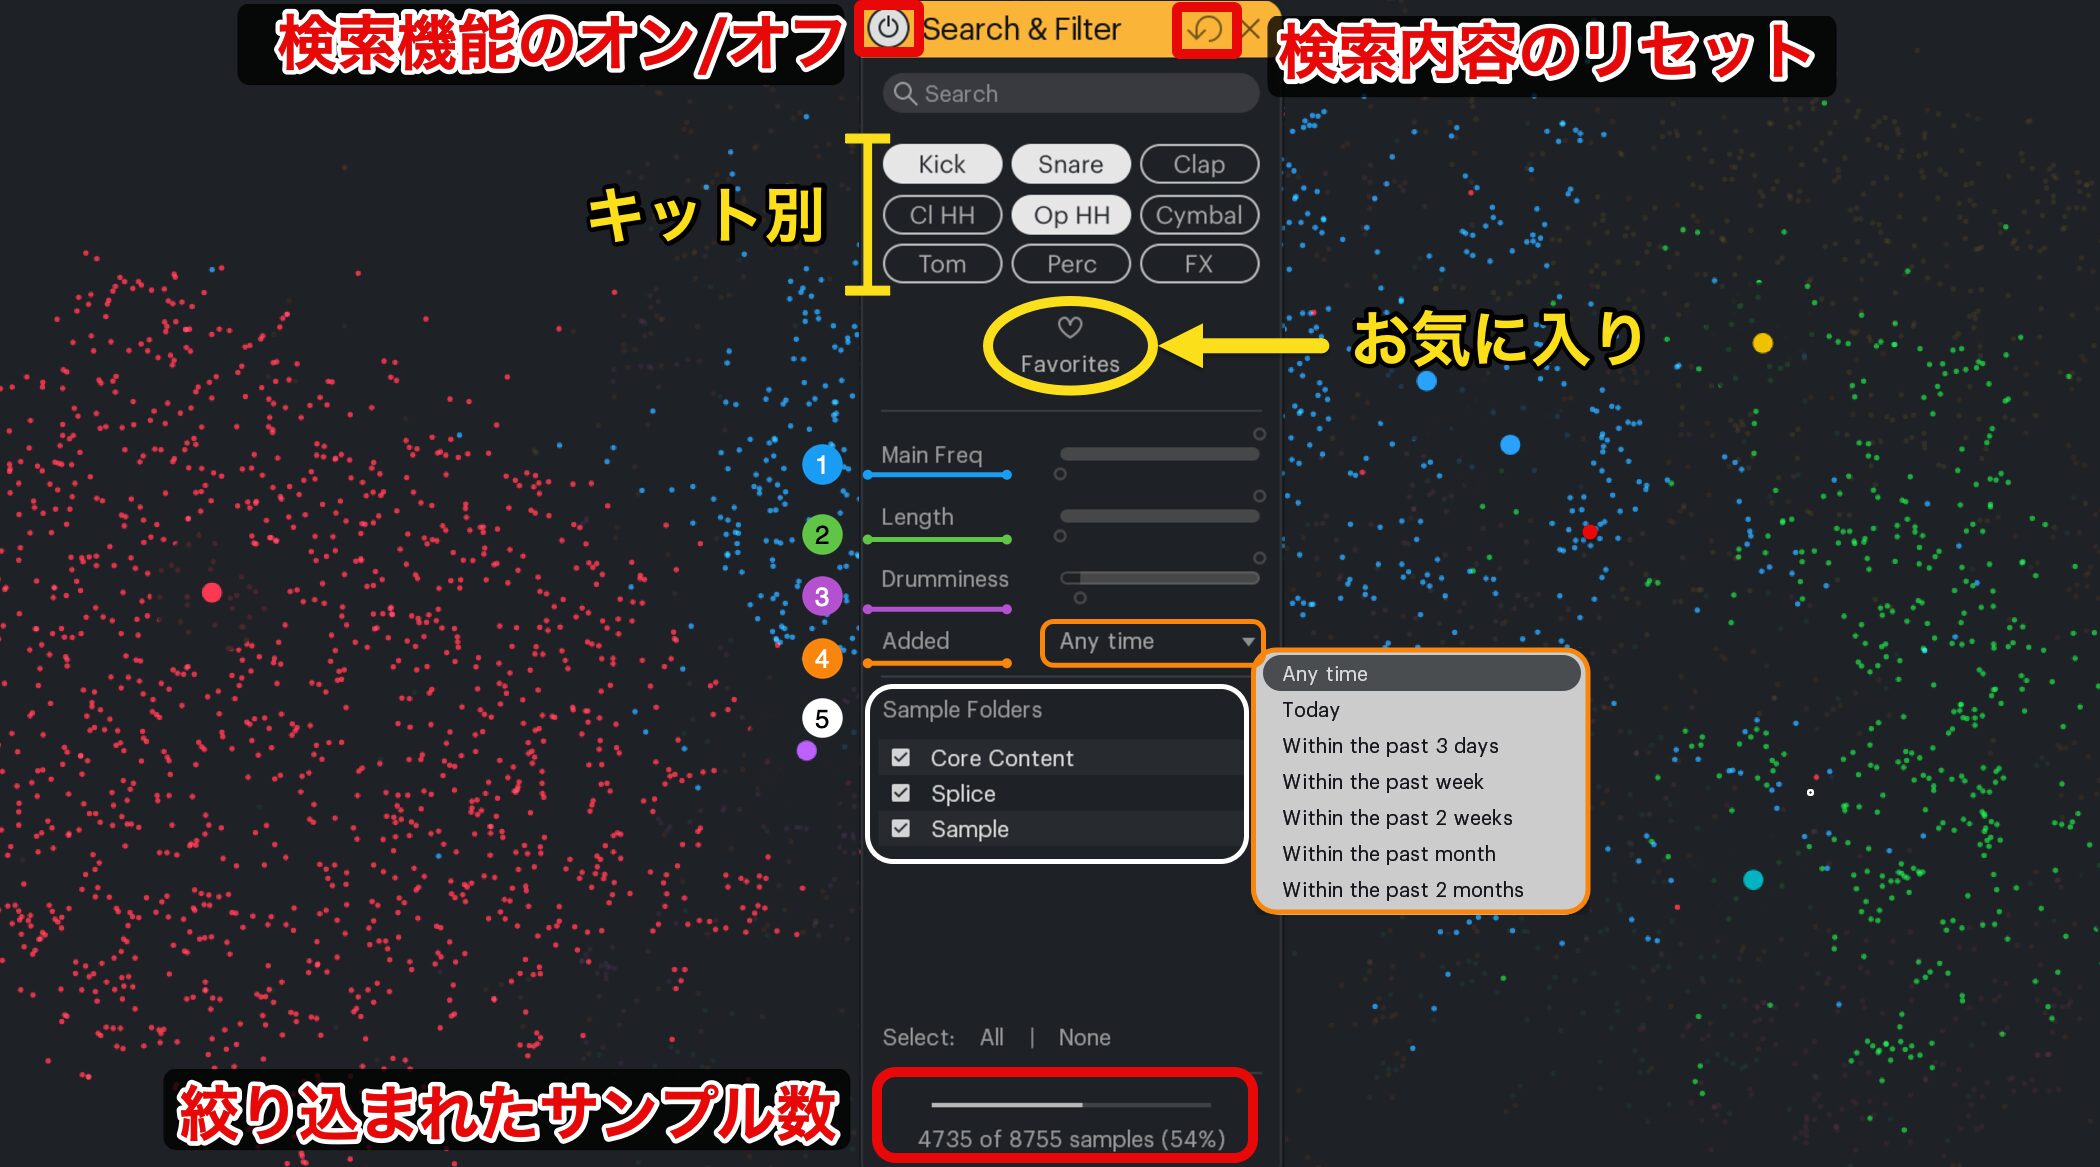
① (Blue) Main Freq: Specify the sound's pitch range using the sample's main frequency.
② (Green) Length: Specify the sample length.
③ (Purple) Drumminess: Specify how drum-like or percussive the sound is.
④ (Orange) Added: Specify when samples were added to the library.
⑤ (White) Sample Folders: Specify which sample folders to search.
You can combine these different conditions to narrow your search.
Samples that fall outside the search criteria are dimmed in SPACE.
Create High-Quality Rhythm Patterns in Less Time
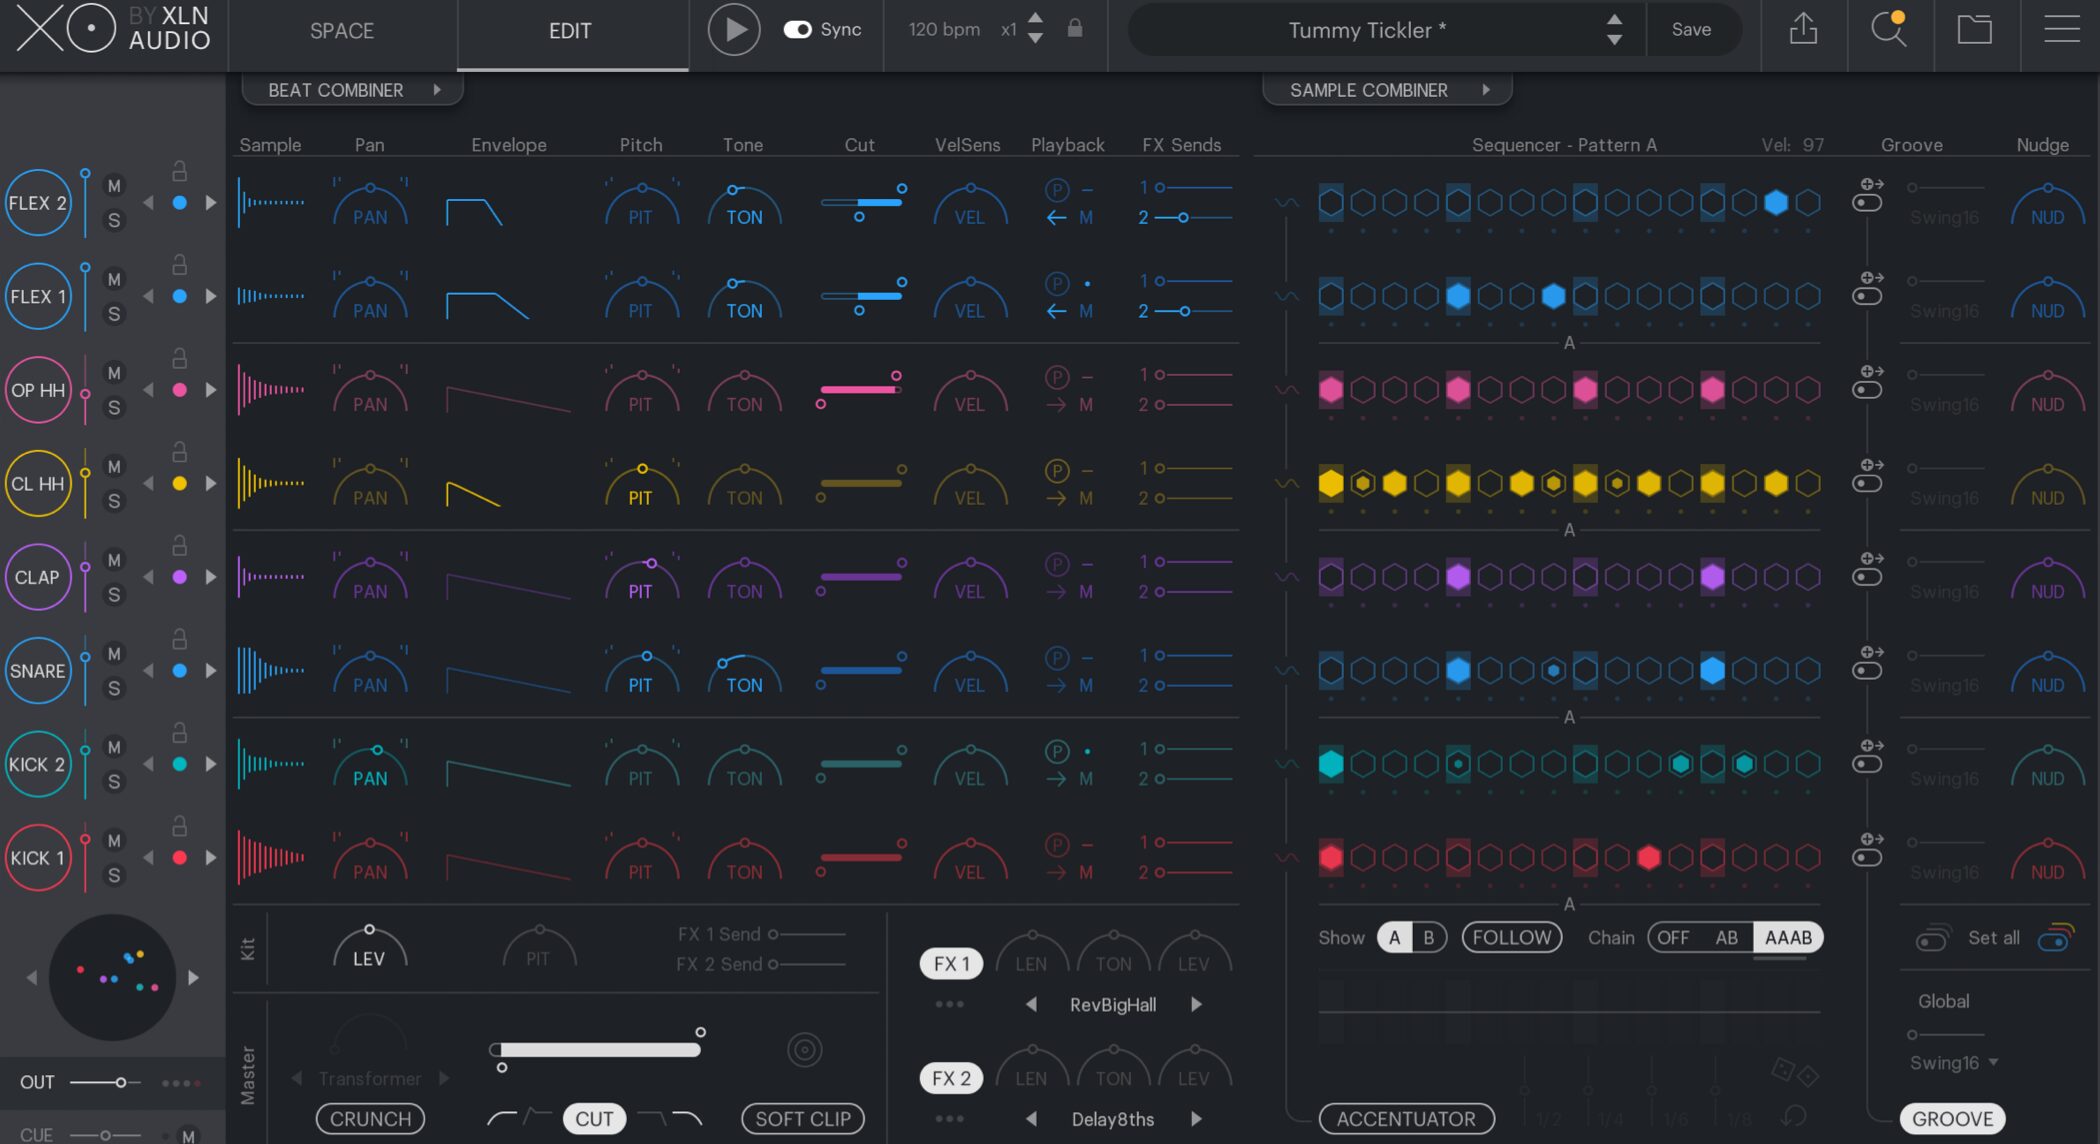
Next, let's explore XO's powerful pattern-creation tools.
XO lets you edit drum sounds and create rhythm patterns on a single screen, making beat creation very efficient.
Its pattern editor includes many thoughtful features that reduce the time needed for detailed rhythm programming.
XLN Audio XO Video: Creating Rhythm Patterns
Using the Pattern Editor
First, let's look at the pattern editor's layout.
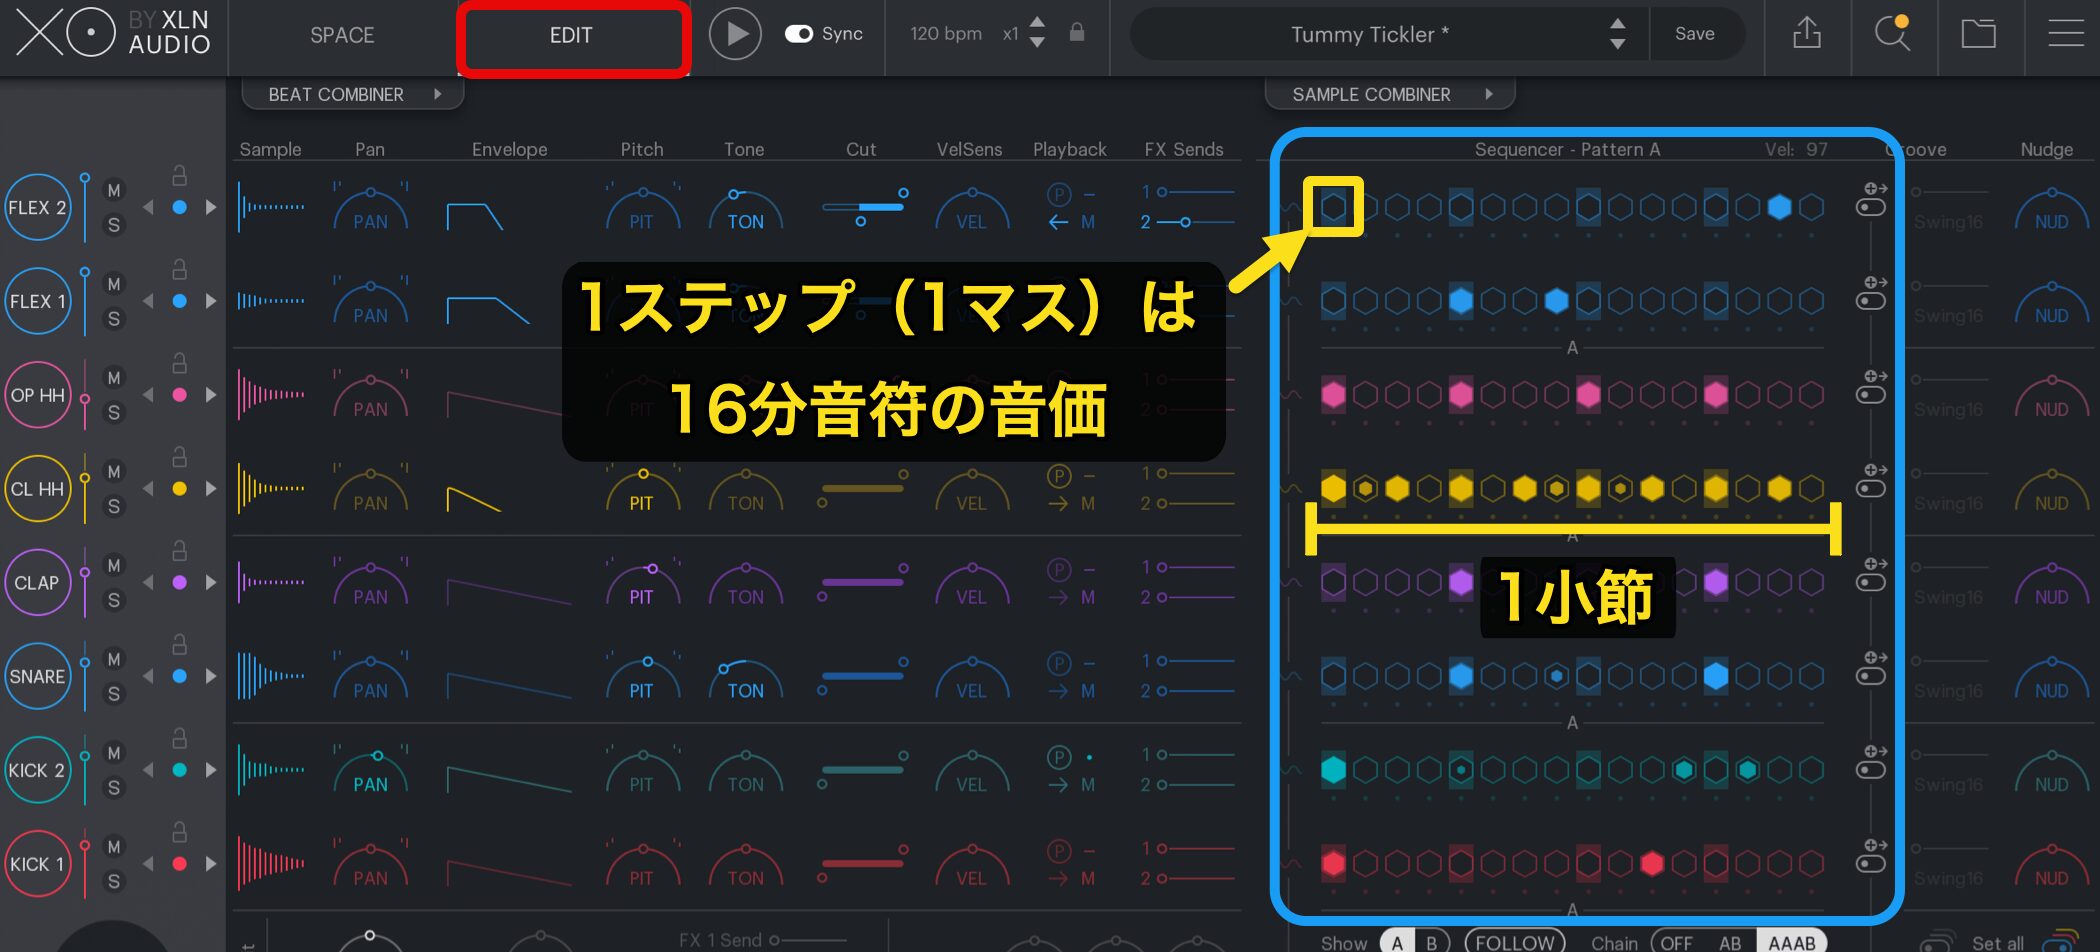
Click EDIT at the top to switch windows.
Build your pattern in the section on the right.
The sequence is one bar long, and each step (one square) represents a sixteenth note.
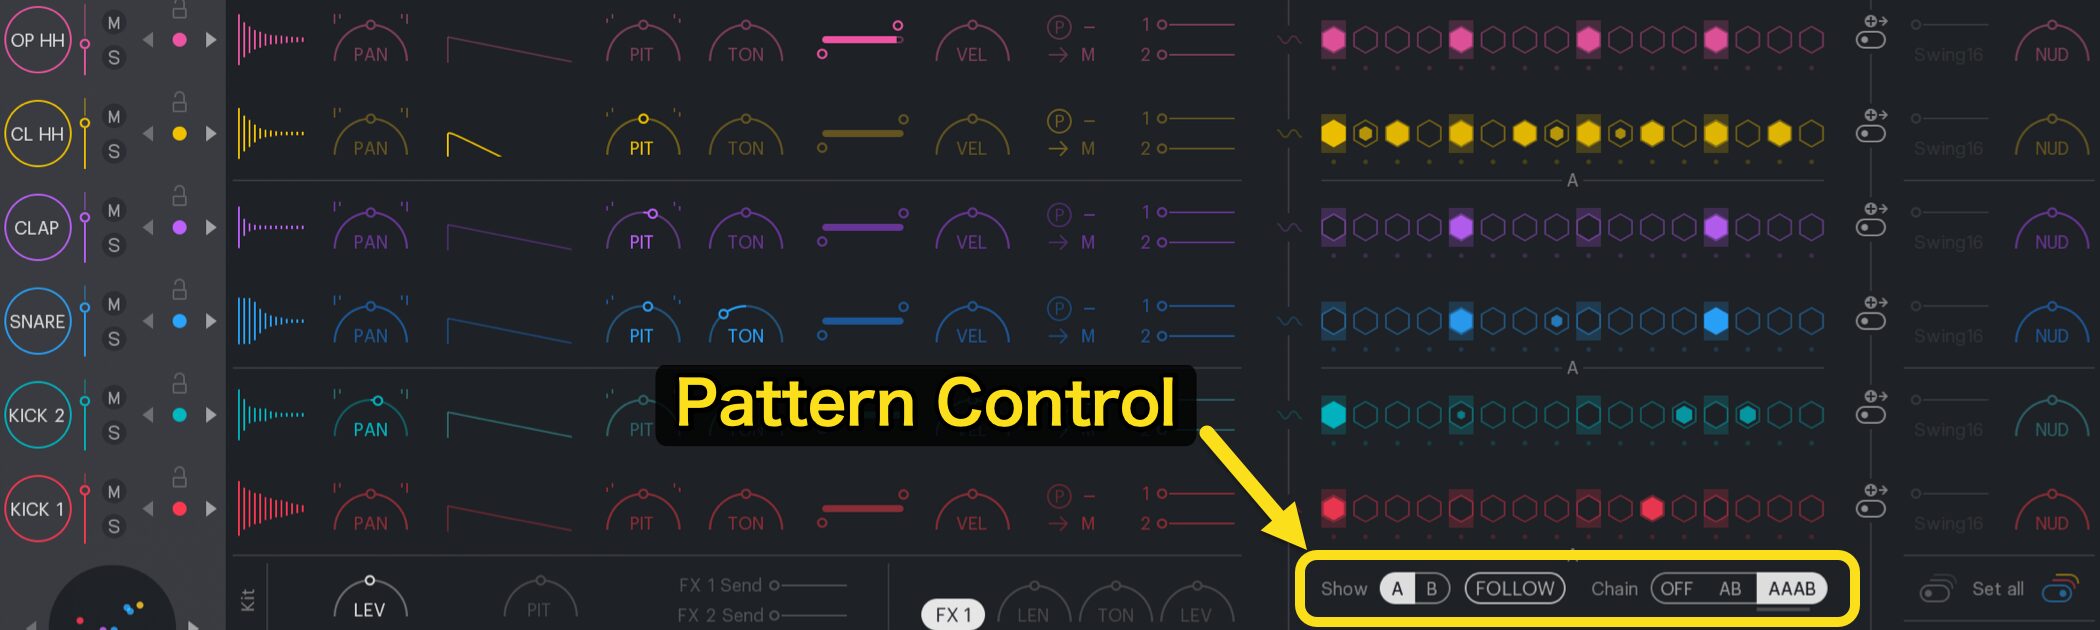
You can create a separate one-bar pattern in A and B.
The Chain control on the far right lets you play them in the following sequences:
- OFF: Plays the selected pattern, A or B.
- AB: Alternates between patterns A and B. Use this to create a two-bar pattern.
- AAAB: Plays pattern A for three bars, followed by pattern B for one bar. Use this for a four-bar pattern.
Enable FOLLOW in the center to make the sequence display switch to the pattern currently playing.
Entering a Pattern
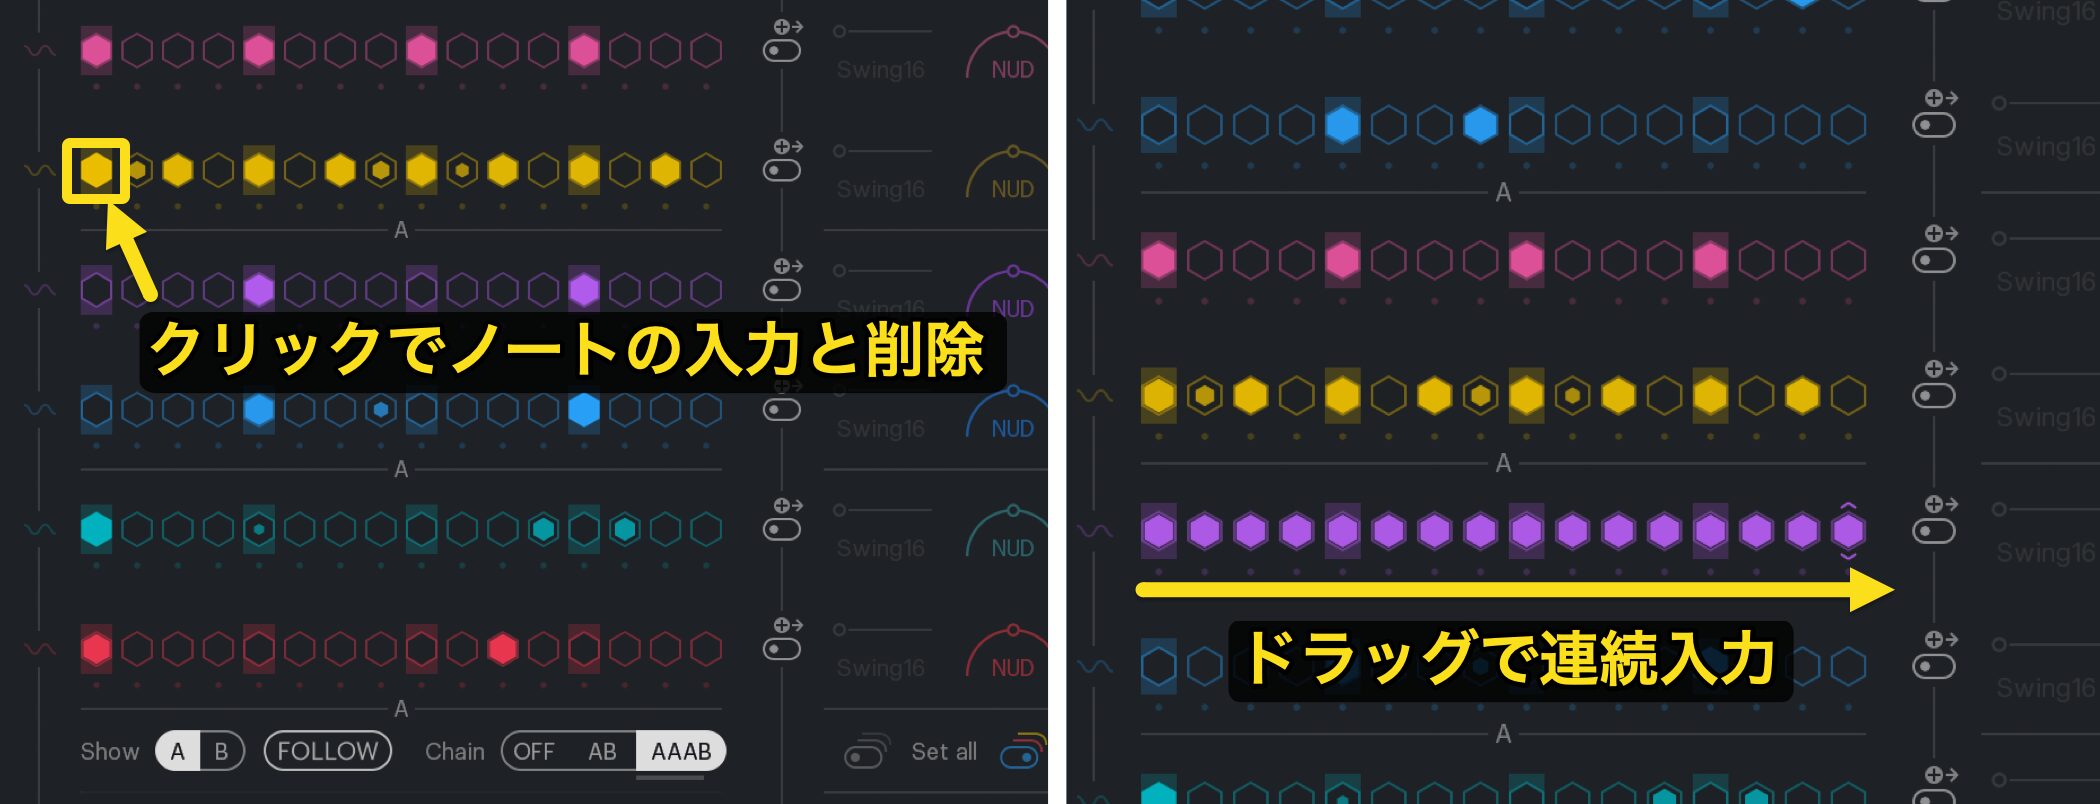
Click a step to add a note, or click an existing note to delete it.
You can also hold the mouse button and drag to enter consecutive steps; the same method works for deleting them.
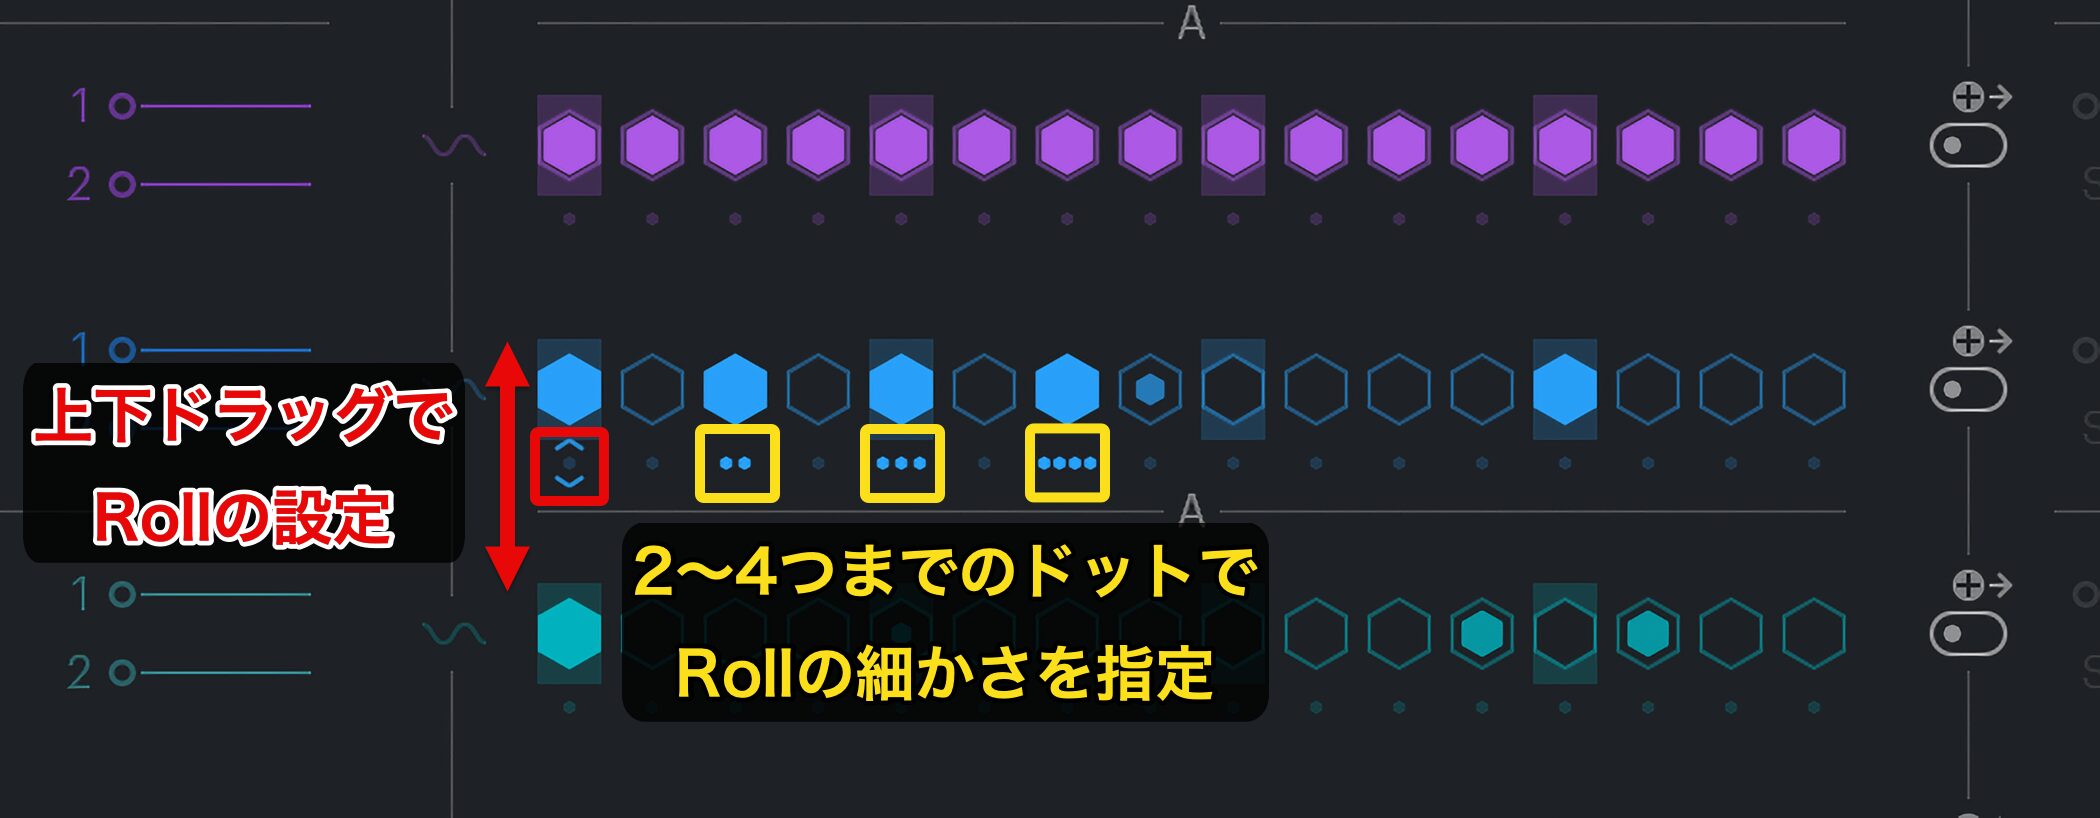
Drag the up/down arrow below a step vertically to display two, three, or four dots and play subdivisions shorter than a sixteenth note.
- Two dots: Thirty-second notes
- Three dots: Thirty-second-note triplets
- Four dots: Sixty-fourth notes
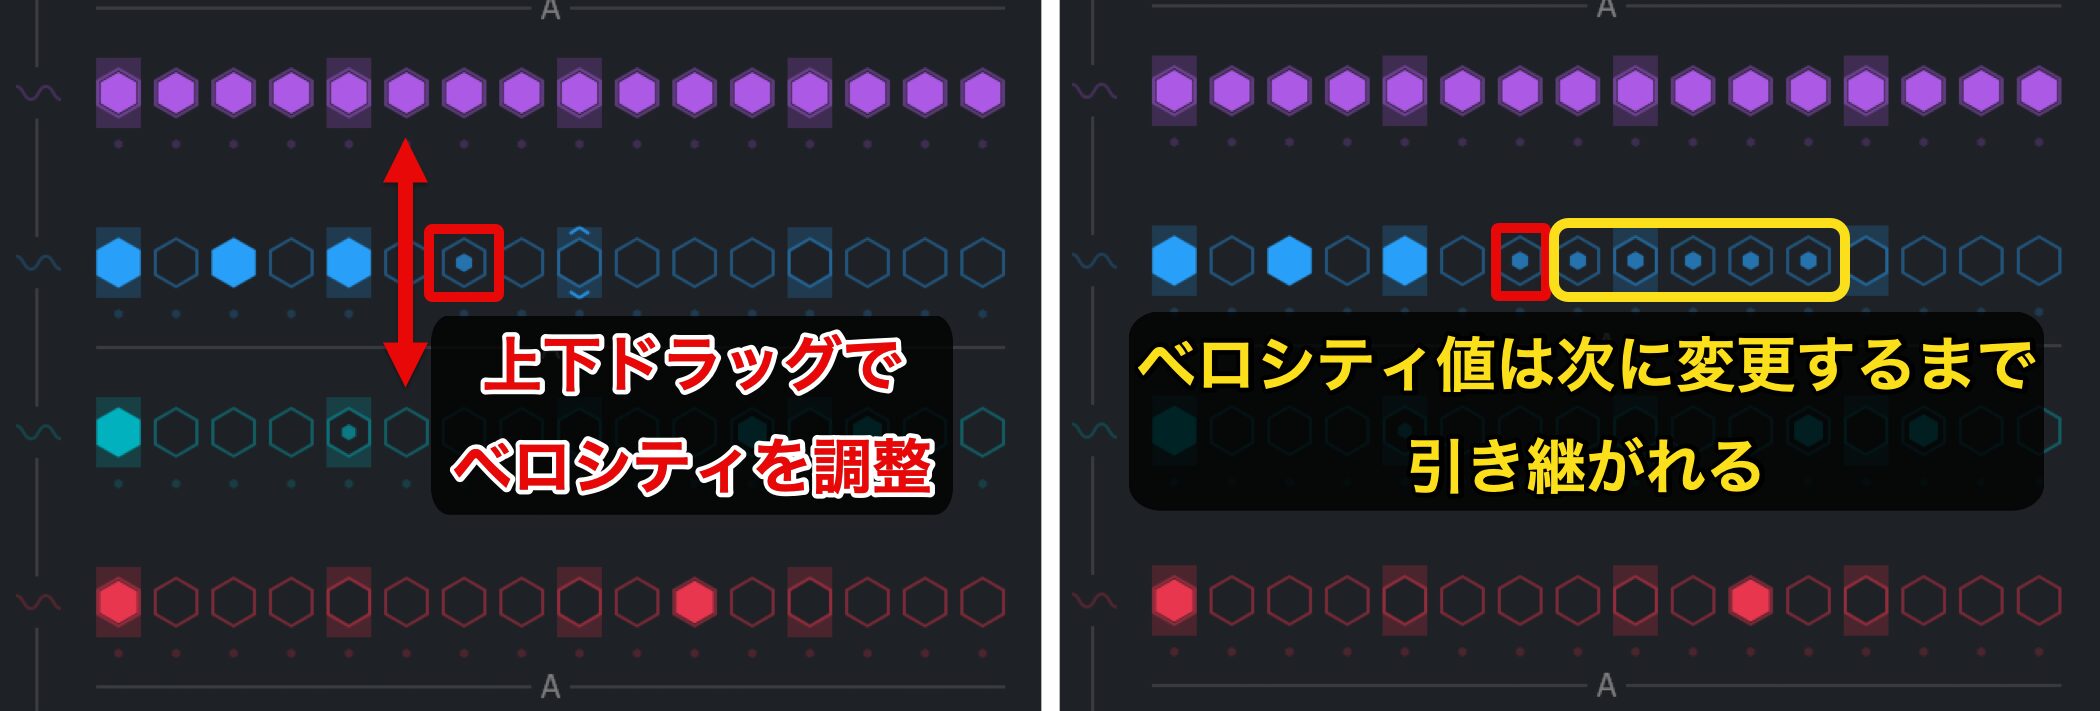
Drag a note up or down to adjust its velocity, changing how strongly it plays.
Dragging up makes it stronger and down makes it softer. The note's size within the step changes with its velocity, making the dynamics easy to see.
The specified velocity is also used for subsequent notes until you change it.
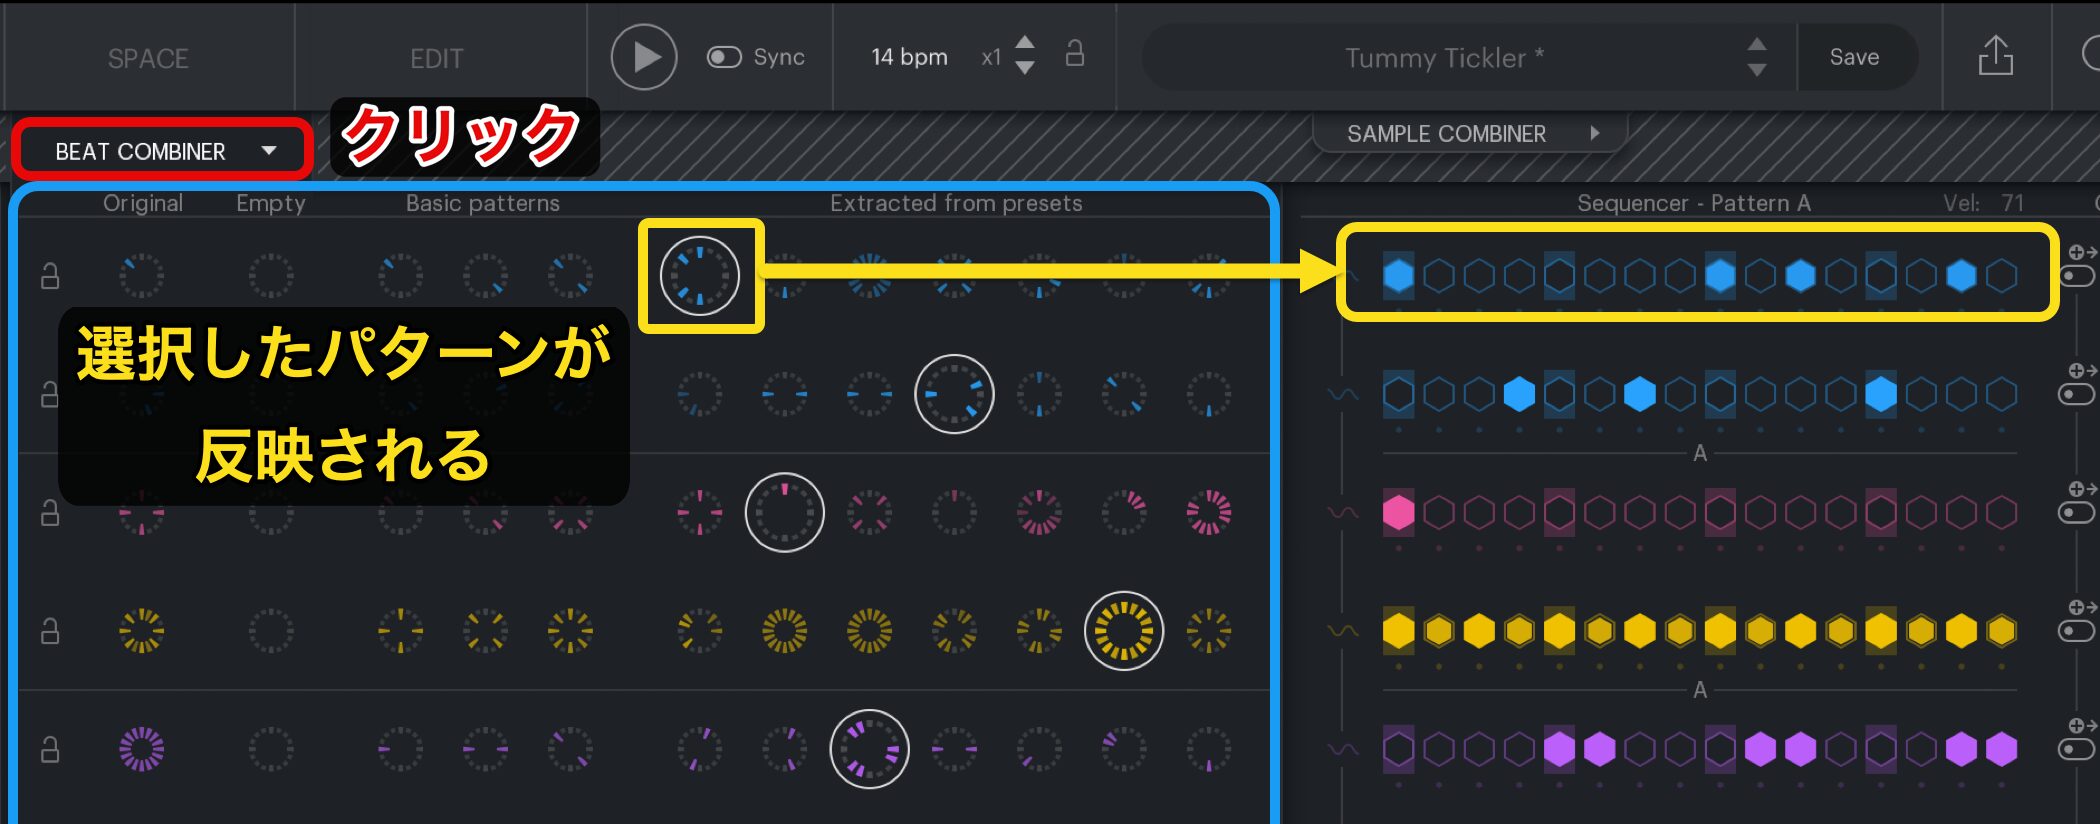
BEAT COMBINER lets you quickly enter regularly spaced steps, such as four-on-the-floor kicks, hits on beats 2 and 4, or offbeat eighth notes.
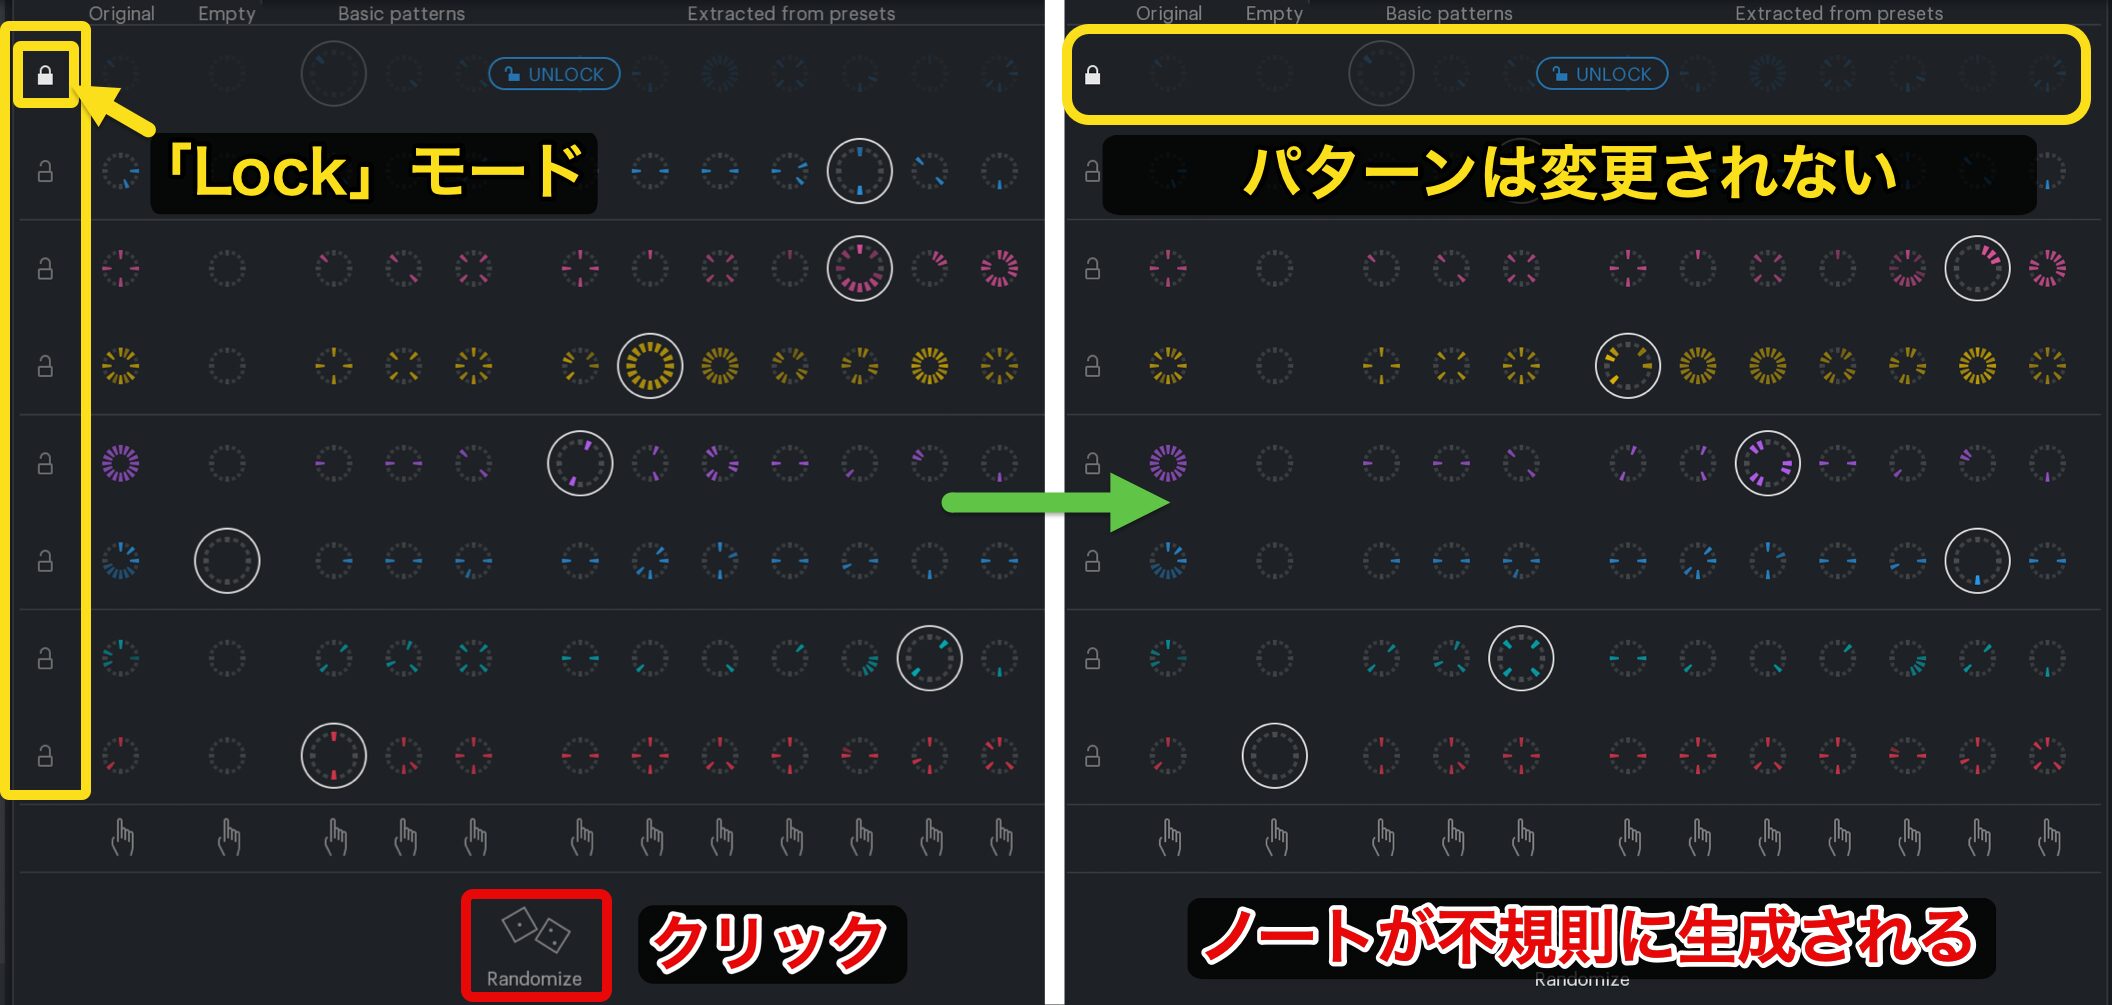
Each press of the Random button generates an irregular arrangement of notes.
This is useful for adding variation to a pattern.
To keep a particular drum's pattern unchanged, click its padlock icon to enable Lock mode.
Using Groove Quantization
To give your pattern a sense of groove, you can set groove quantization for each drum sound.
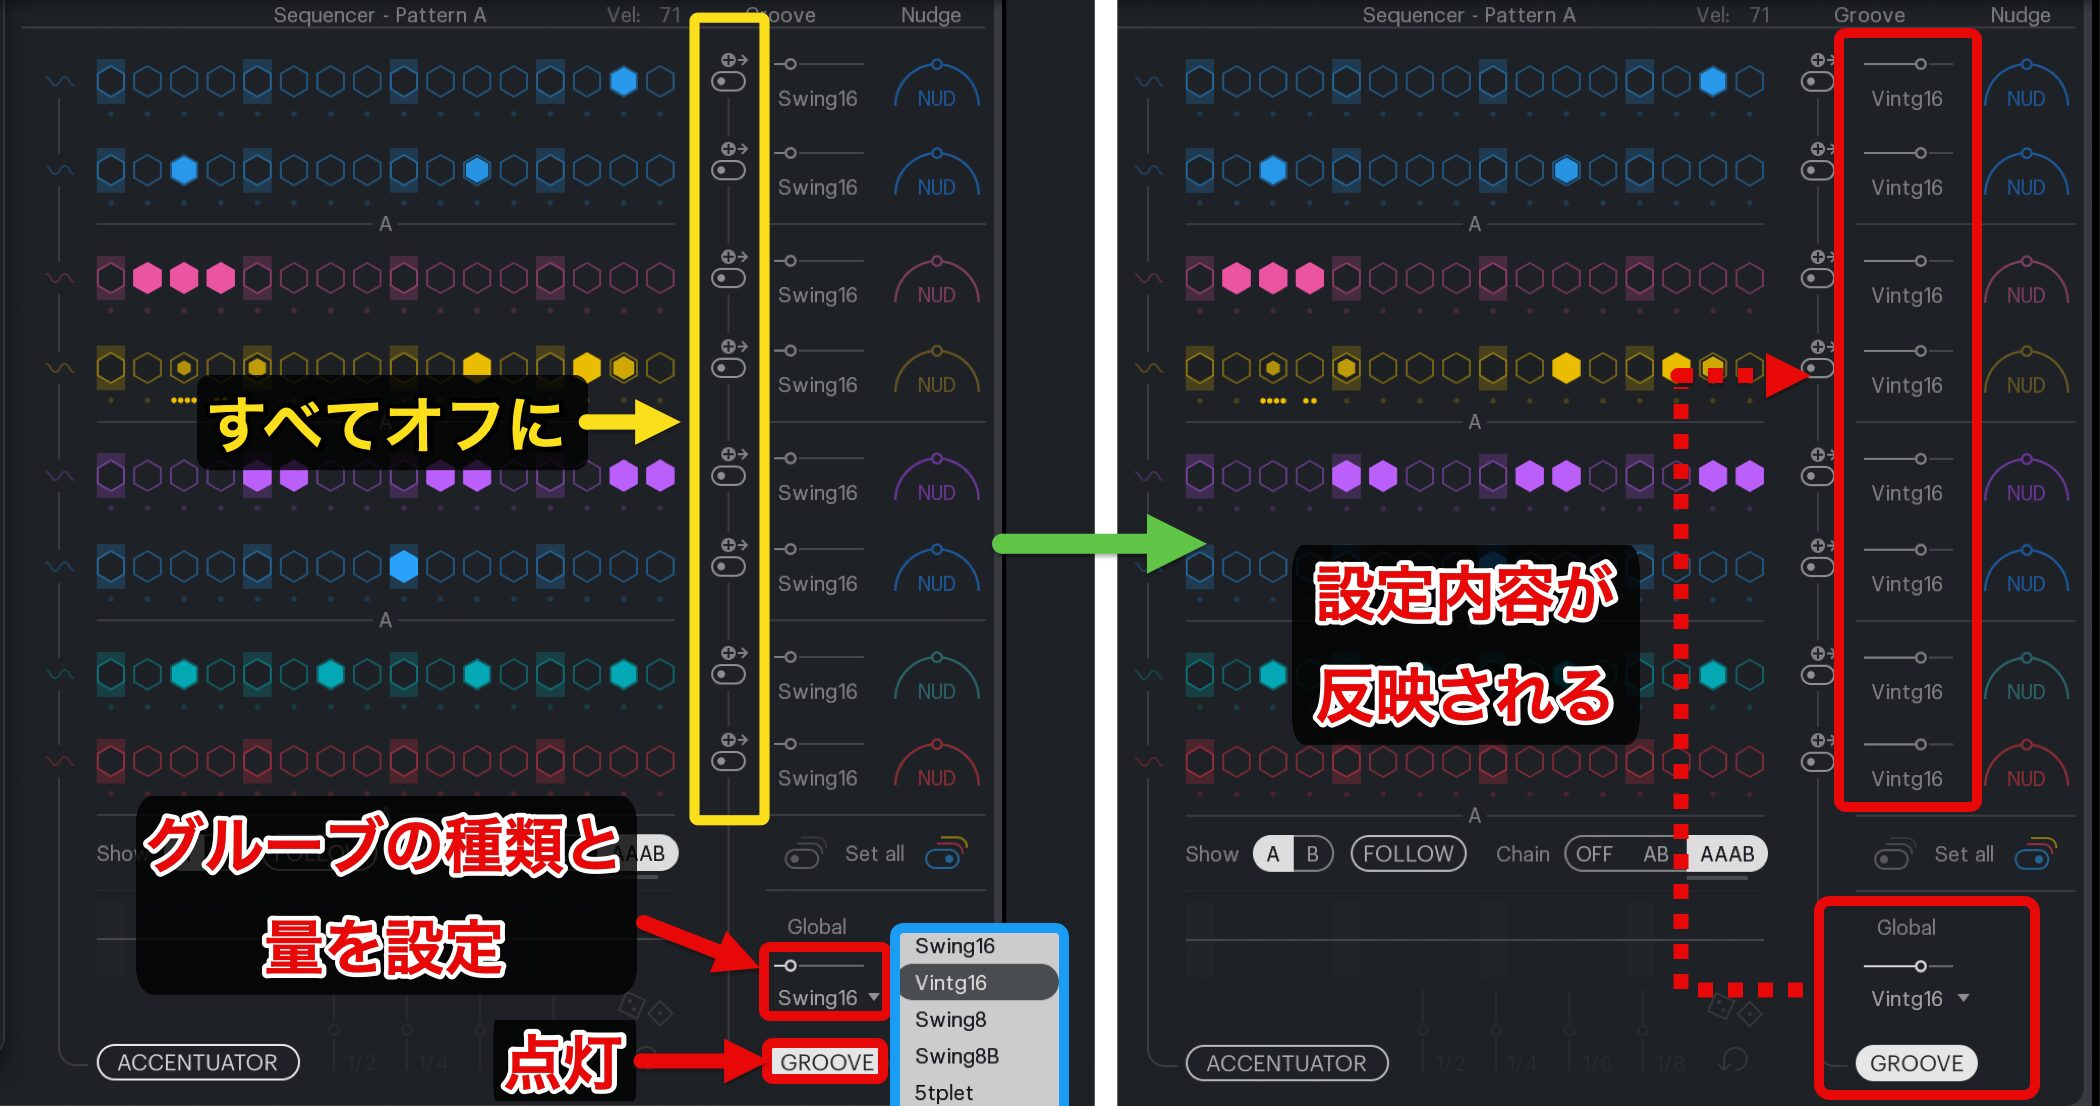
First, let's look at global quantization, which affects all drum sounds.
Turn off the individual quantization switches and enable GROOVE at the bottom right.
Then select the quantization option you want and use the slider to set its strength.
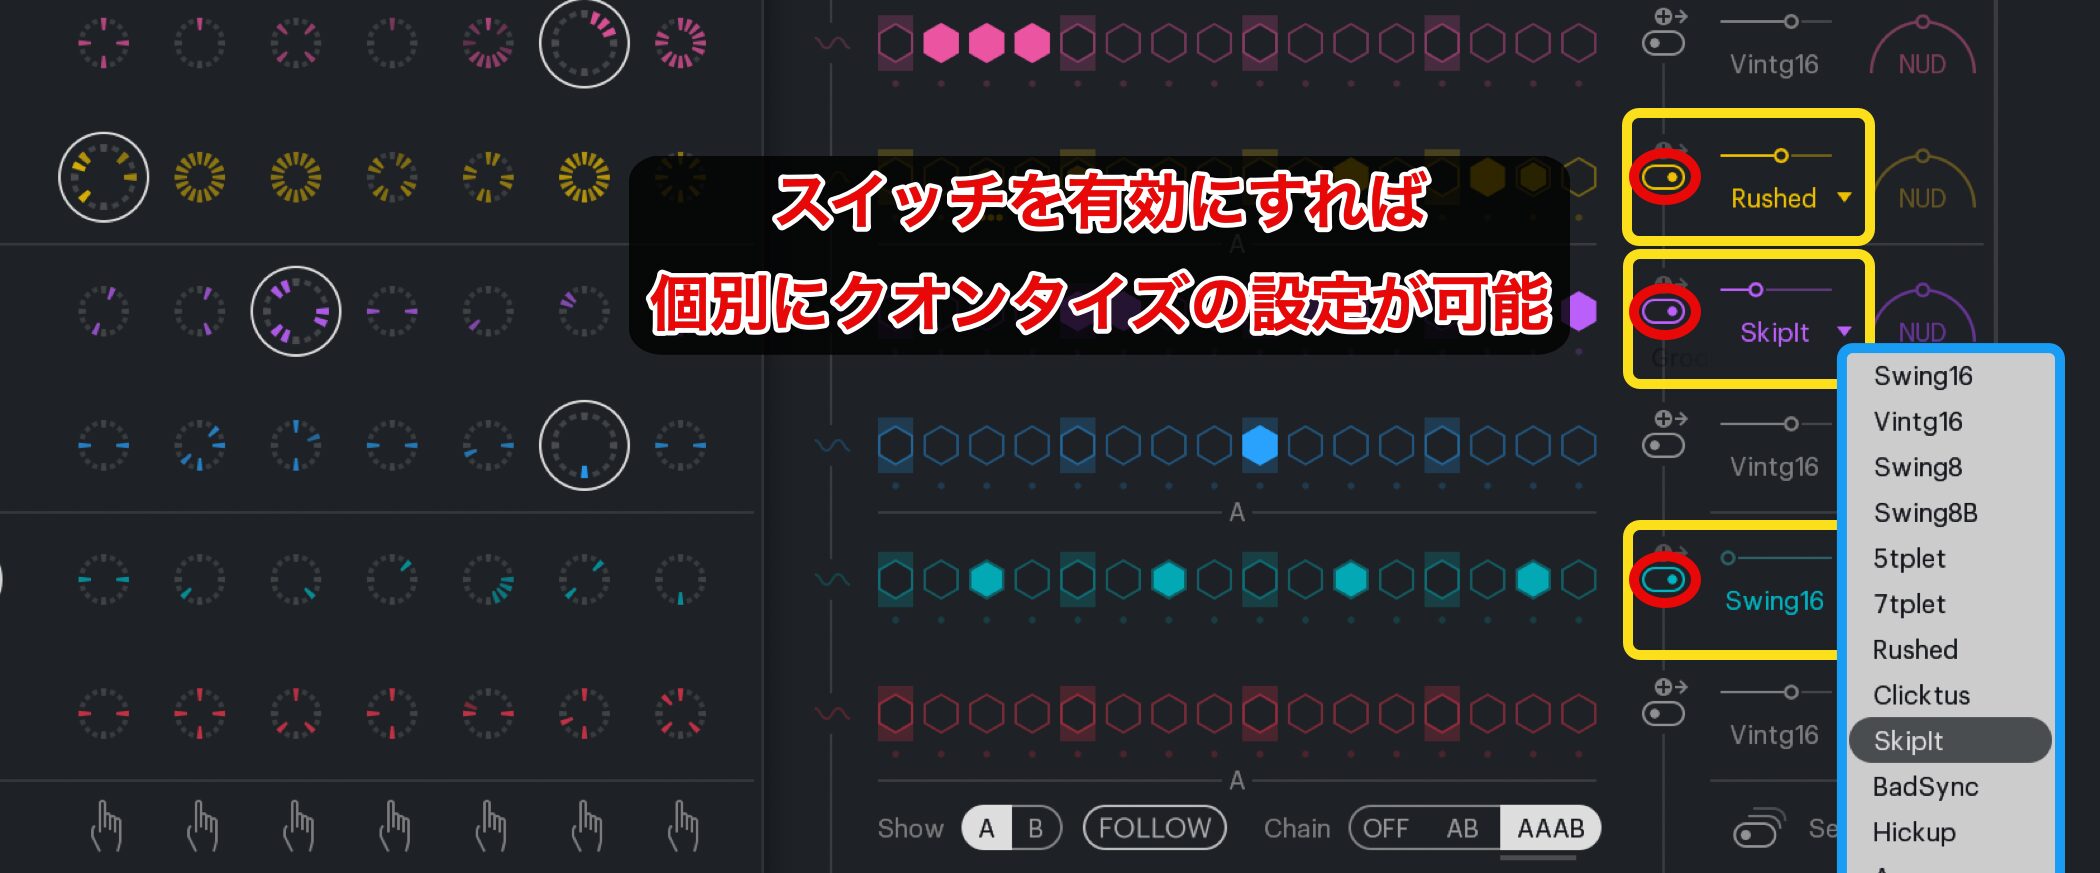
For individual quantization, enable the groove switch for the drum sound you want to affect and select the desired quantization option.
Then set the strength of the quantization with the slider.
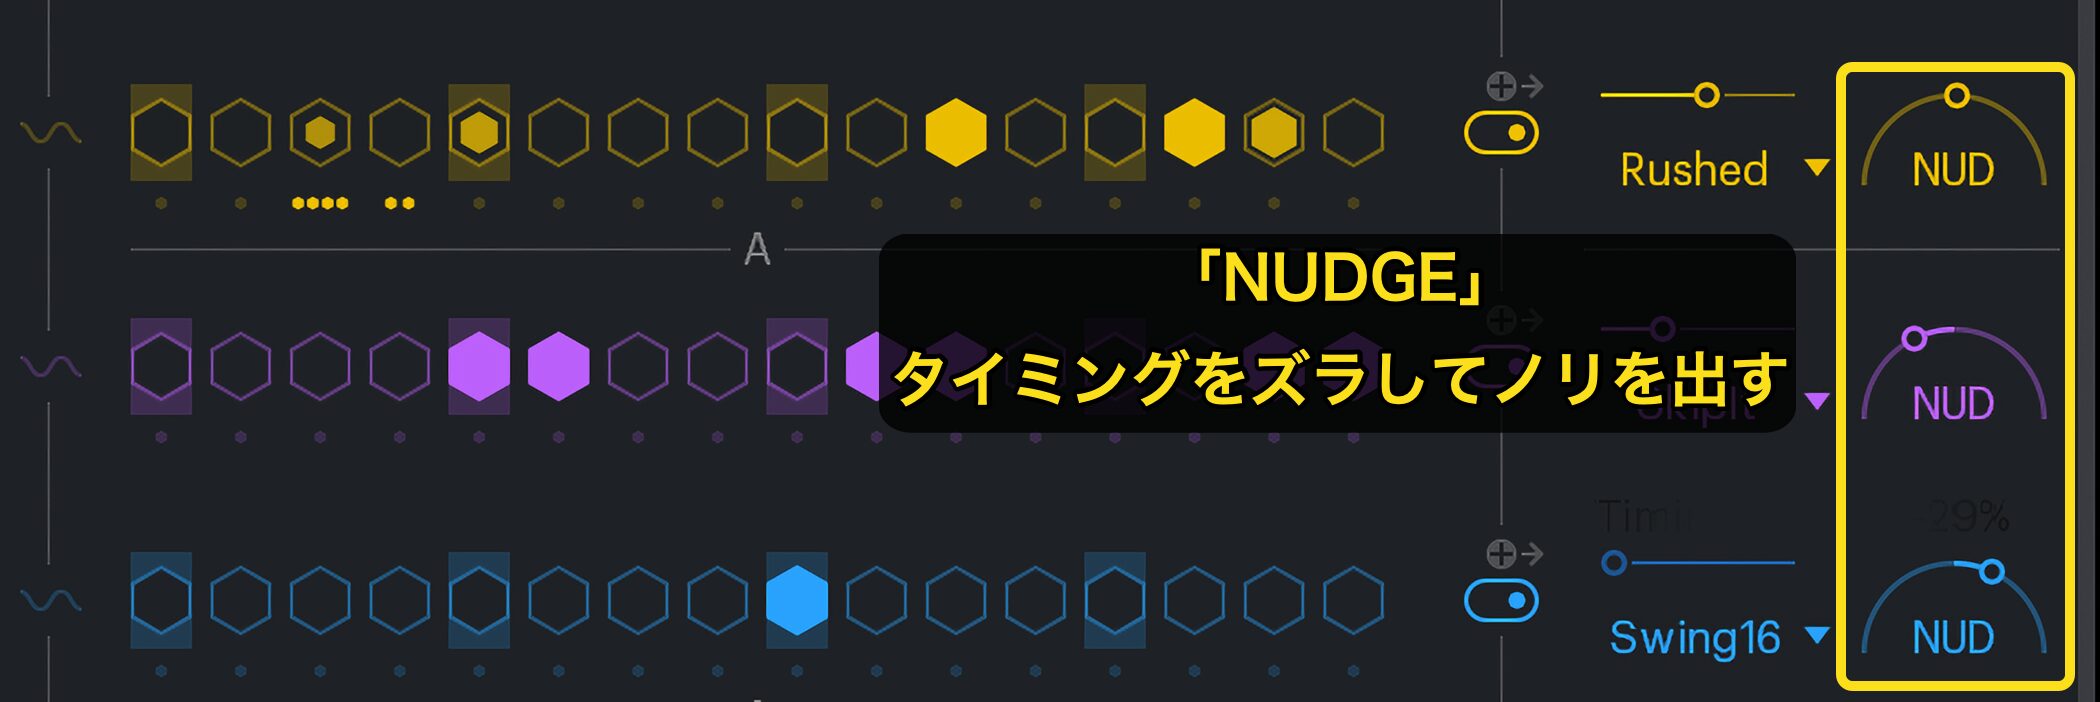
Each drum sound also has NUDGE, which shifts its timing slightly to change the feel.
- Center: Plays exactly on time.
- Left: Plays earlier.
- Right: Plays later.
For example, delay a snare or clap to give the beat a laid-back feel, or move the hi-hat earlier to add urgency.
These adjustments let you create a variety of performance nuances.
Adding Dynamics with ACCENTUATOR
Volume changes across a bar are a key part of giving a pattern its groove.
ACCENTUATOR lets you control these dynamic changes.
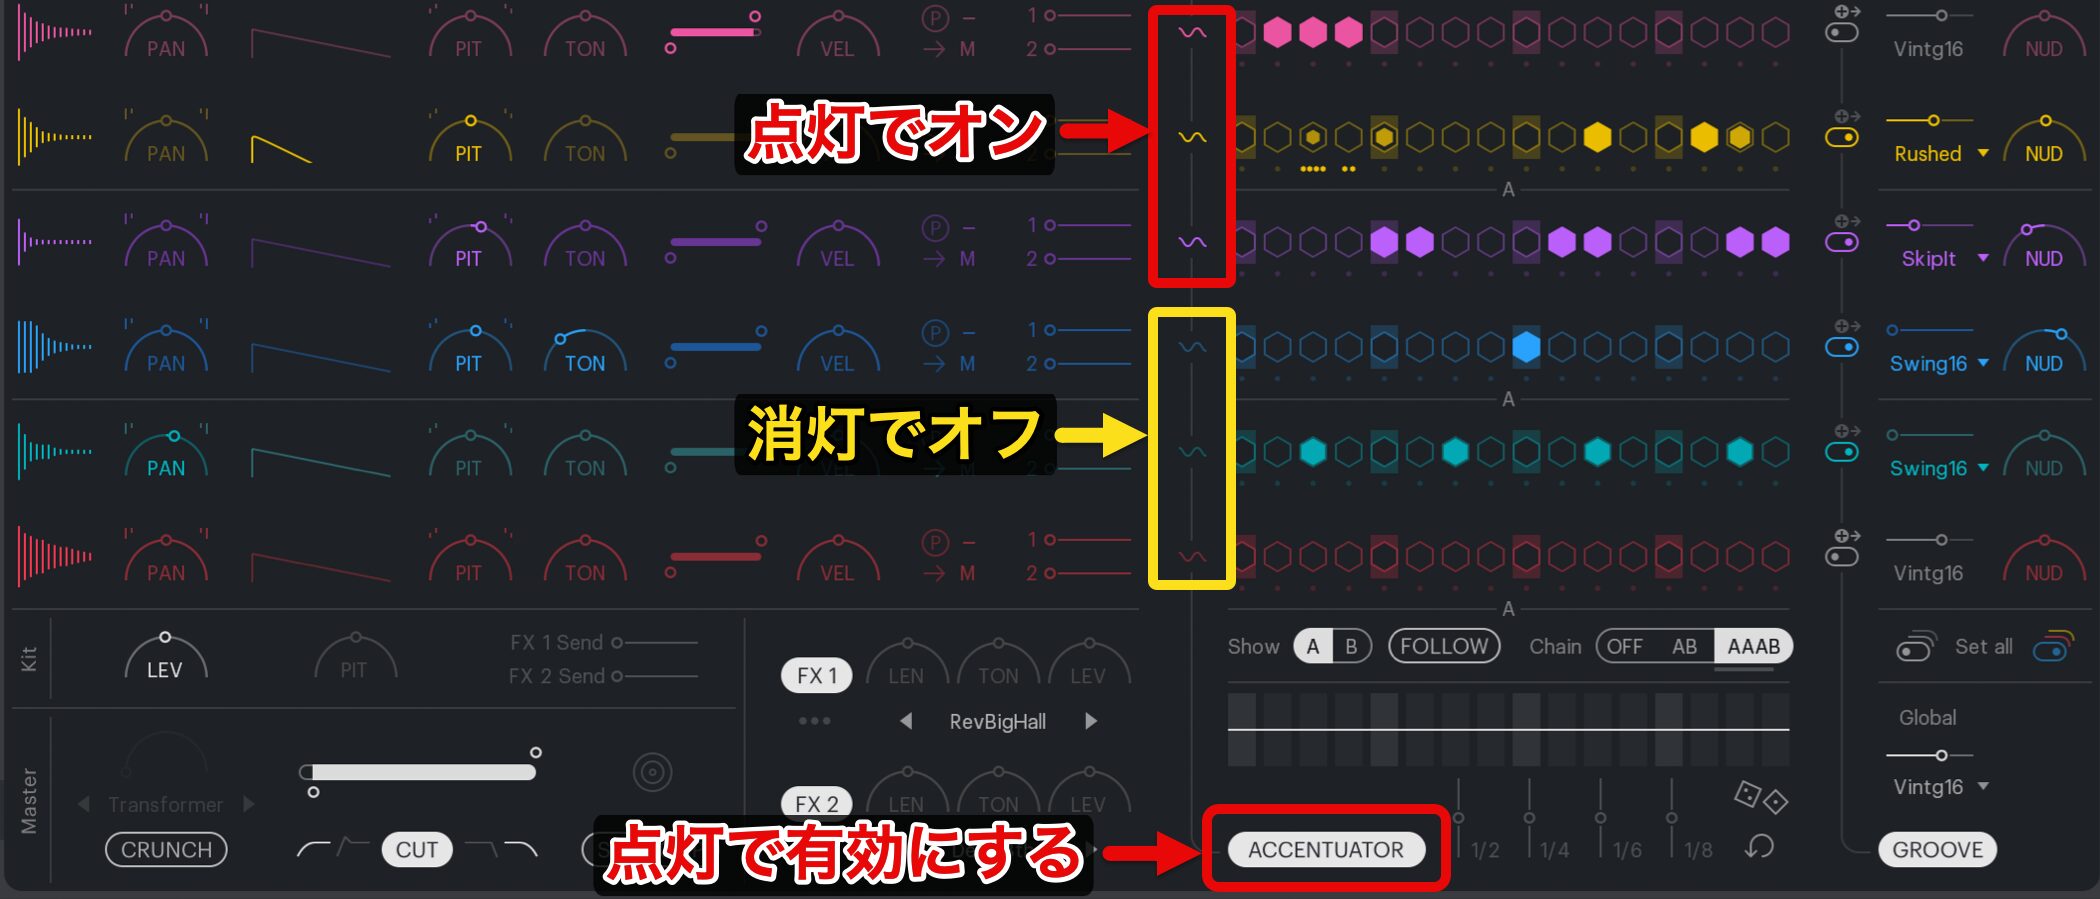
Click ACCENTUATOR to enable it.
You can also choose individually which drum sounds it affects.
For example, leave the kick unchanged as the foundation of the beat and apply it only to hi-hats and percussion.
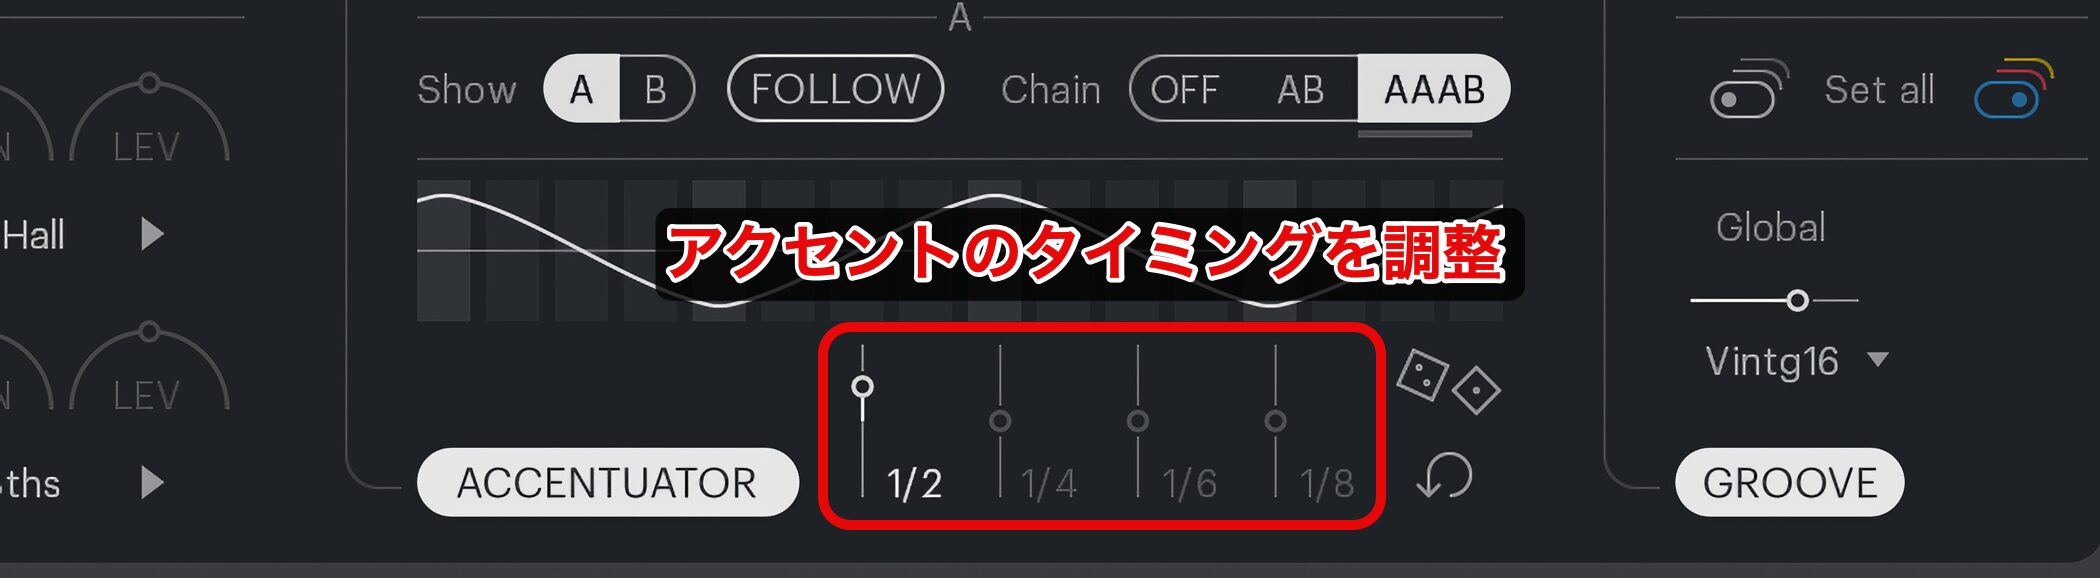
The sliders let you add volume accents at different rhythmic subdivisions.
- Center: No effect.
- Raise the value: Accents the onbeats of the subdivision.
- Lower the value: Accents the offbeats of the subdivision.
These are the basic behaviors of the controls.
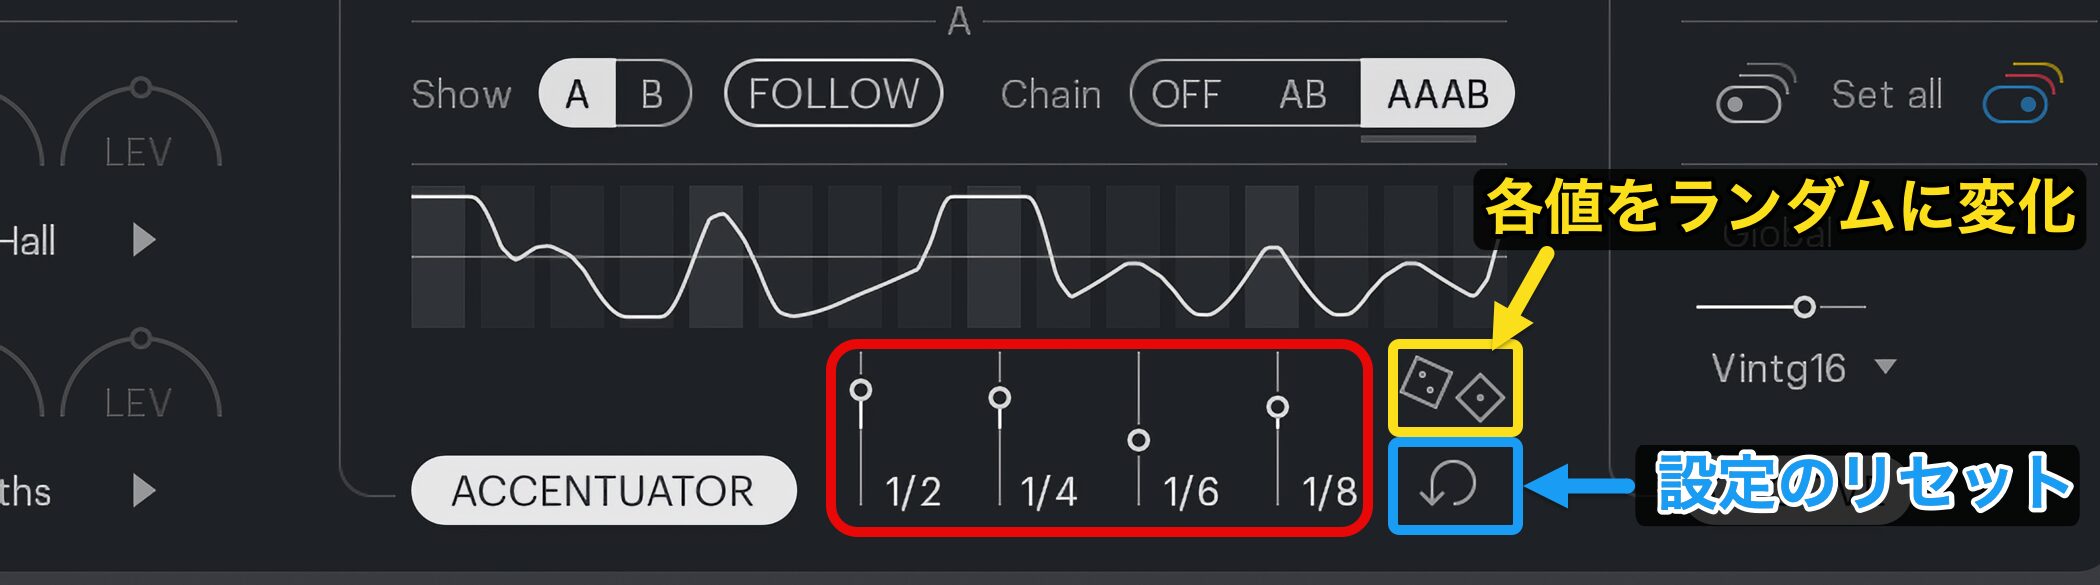
Combining different subdivisions lets you create more complex dynamic patterns.
The dice icon on the right randomizes the values, and the arrow at the bottom right resets the settings.
Per-note rolls, subtle quantization nuances, and regular accent patterns are just some of the features that can quickly improve your beats.
Try using these tools in your own music.
Customizing Drum Sounds with the Sound Editor
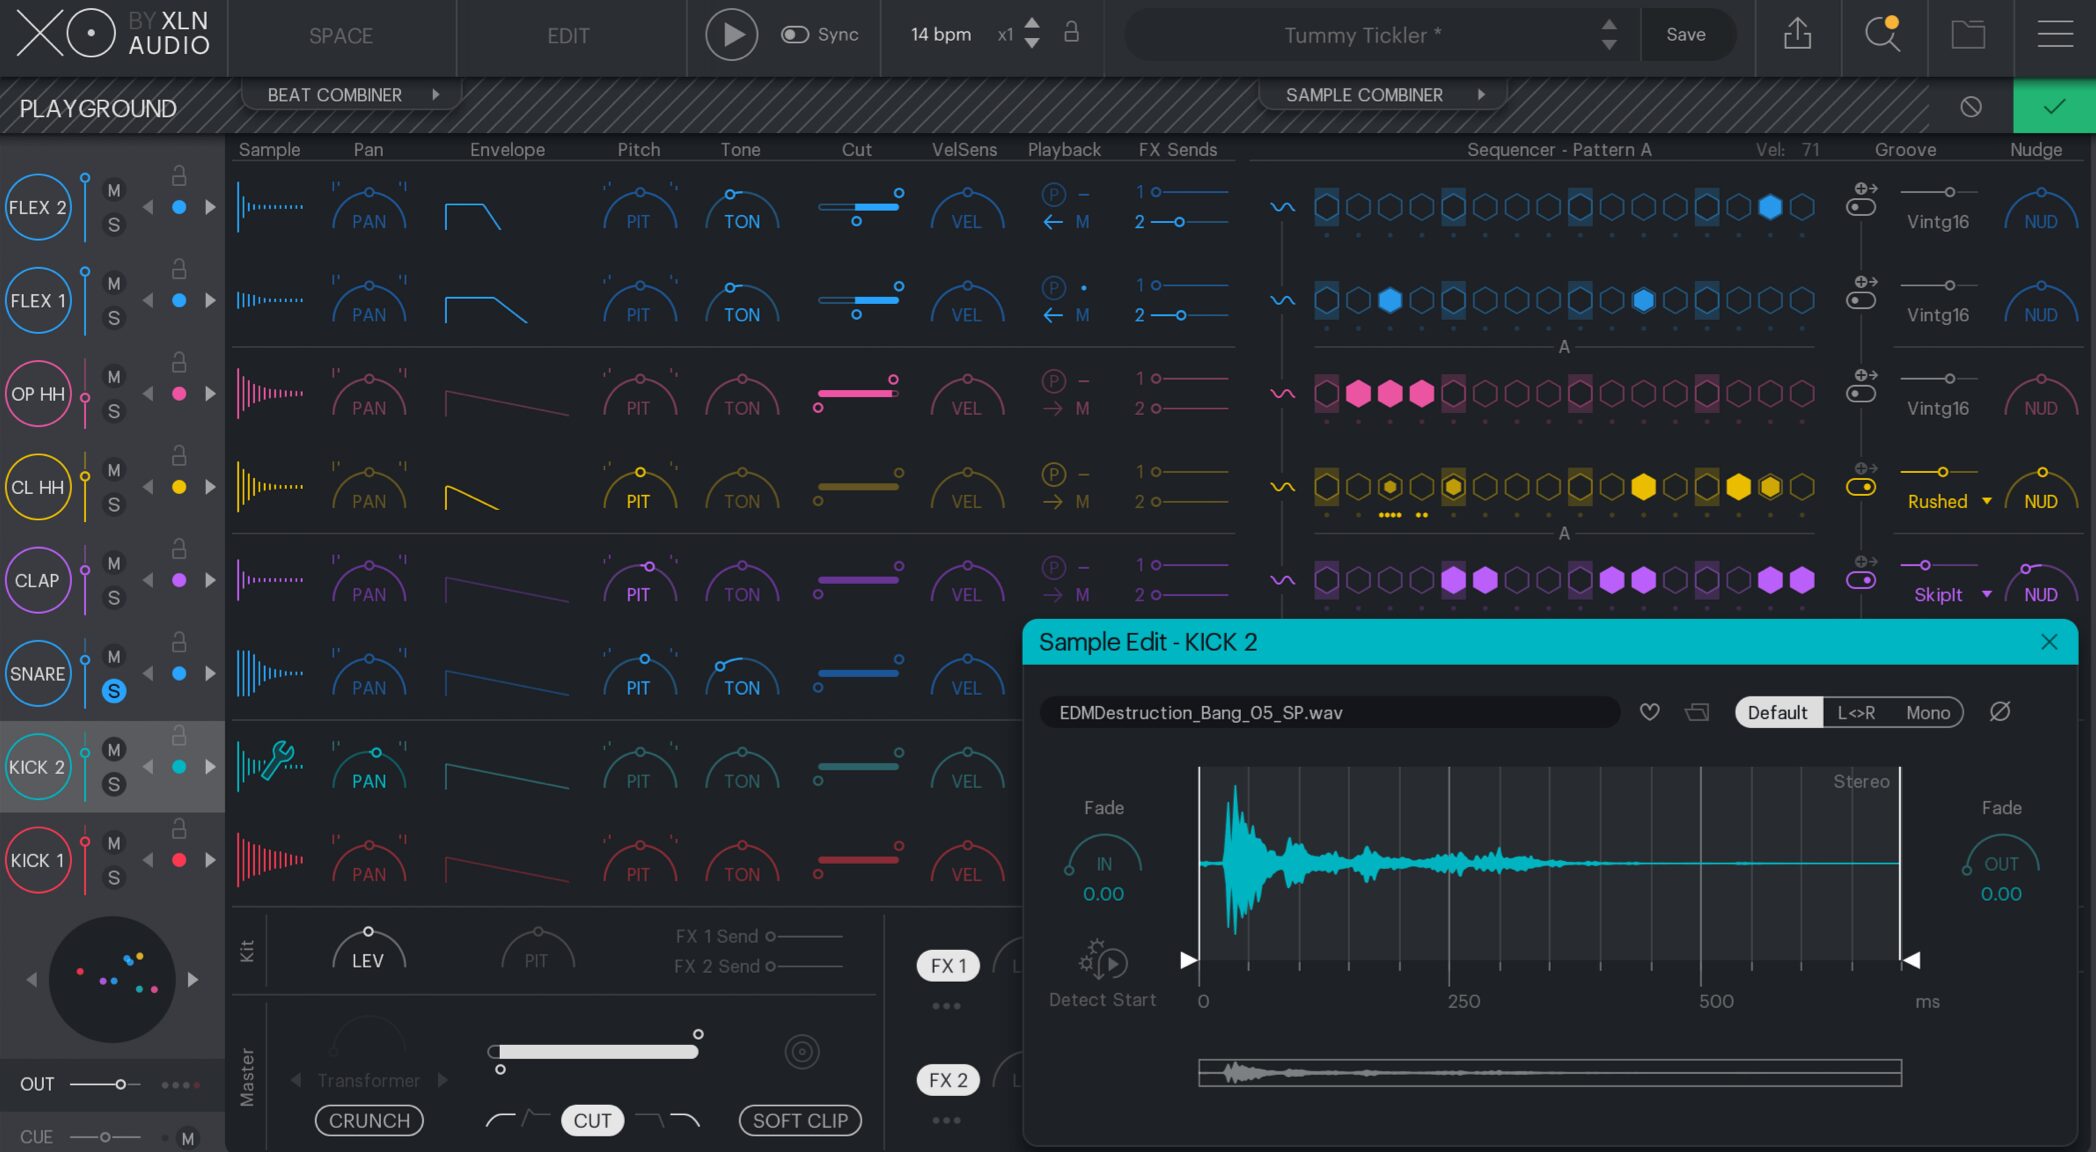
Next, let's look at sound editing to refine each drum sound.
XO's drum-editing tools are exceptionally comprehensive. It is a capable sampler that helps you quickly turn the sound in your head into reality.
Here, we will cover pitch, volume envelopes, velocity response, reverse playback, and other ways to edit your drum sounds.
Let's explore the editing controls for each drum slot.
Working through them should give you a feel for the fun of shaping sounds to match your ideas.
XLN Audio XO Video: Editing Individual Drum Sounds
Drum Volume Balance and Panning
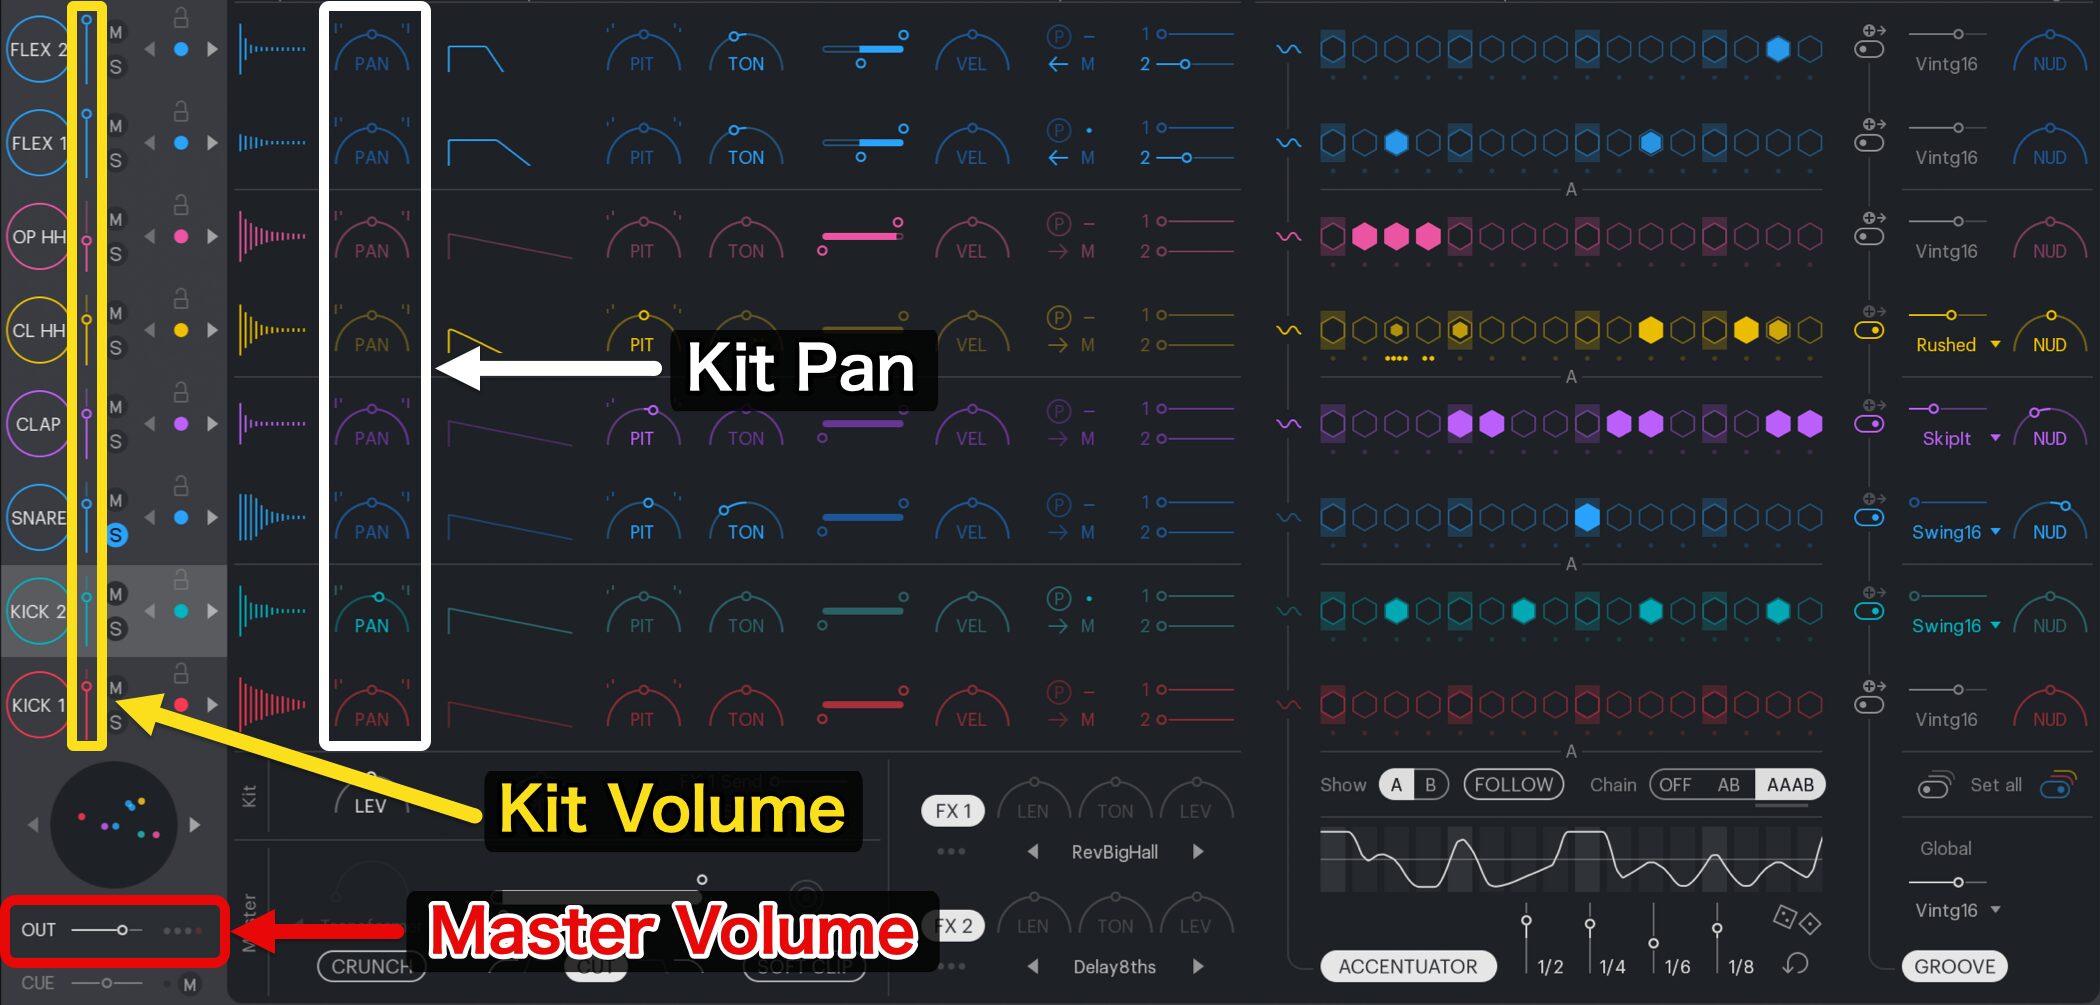
You can control each drum sound's volume and pan position, and adjust the overall volume with OUT.
Setting the Sound Envelope
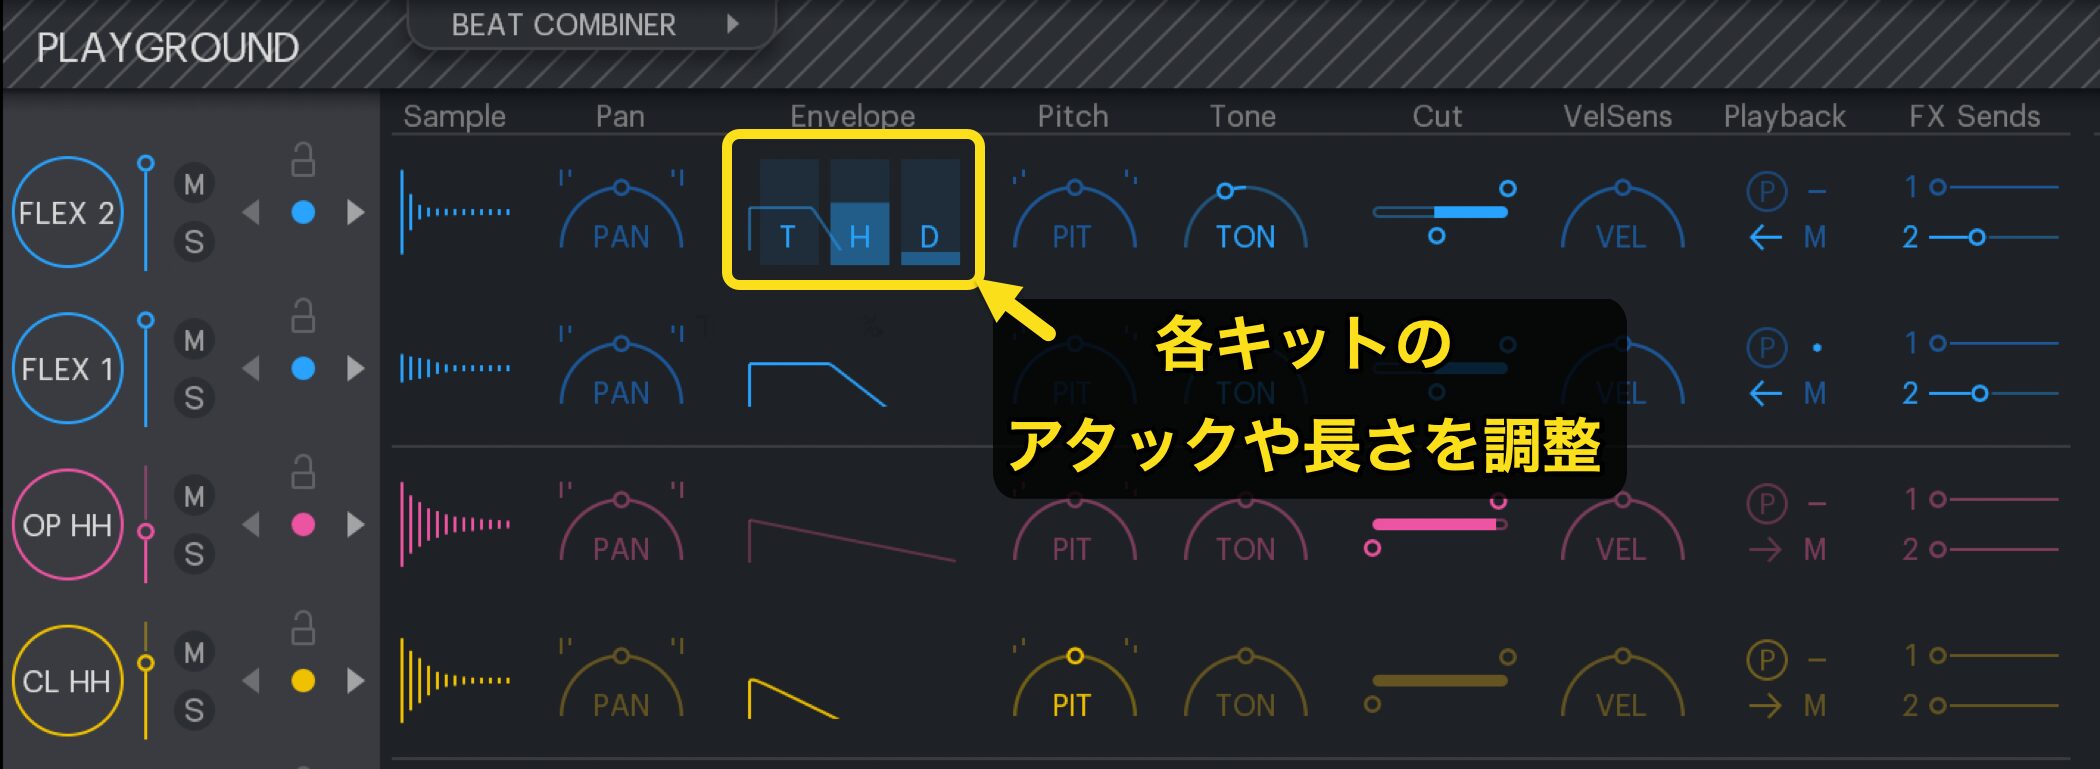
Quickly control each drum sound's attack and length with these useful envelope controls.
- T (Transient): Emphasizes or reduces the sound's attack.
This helps when a drum sound does not cut through the arrangement, or when its attack is too strong and stands out too much. - H (Hold): Adjusts how long the sample plays, in milliseconds (1/1,000 of a second).
For example, shorten a sound to make it tighter. This is an important control that can greatly affect the groove. - D (Decay): Sets how long the volume takes to fade out after the playback duration specified by H.
Adjust it to make the tail sound natural.
Setting the Pitch
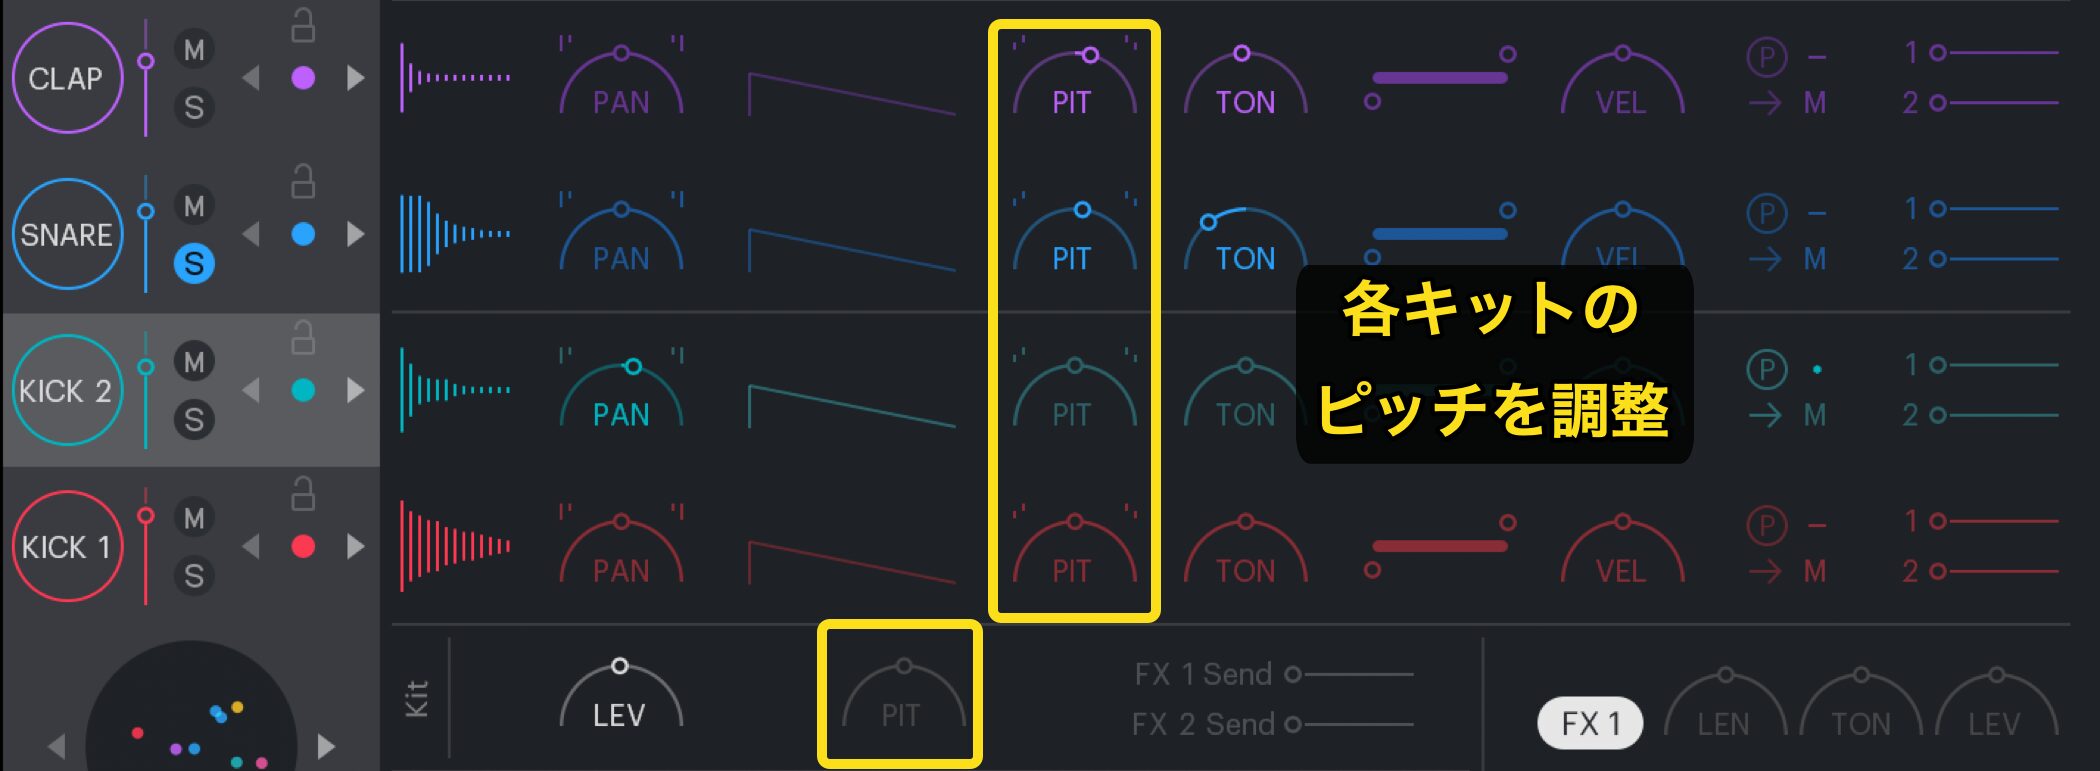
Each drum sound's pitch can be adjusted in increments of one tenth of a semitone.
For example, tune the kick to suit the bass track, or adjust a snare or sound effect to match the mood of your song.
Experiment with these settings to customize your sounds.
Tone and Filters

Tone adjusts the balance of low and high frequencies.
Higher values (to the right) emphasize the highs and reduce the lows. Lower values (to the left) emphasize the lows and reduce the highs.
Cut provides low-cut and high-cut filtering.
- Low cut: Removes low frequencies to make the sound lighter and prevent low-frequency clashes.
- High cut: Reduces harsh high frequencies so the sound blends better with the arrangement.
These are examples of how you can use the filters.
Assigning Sound Groups
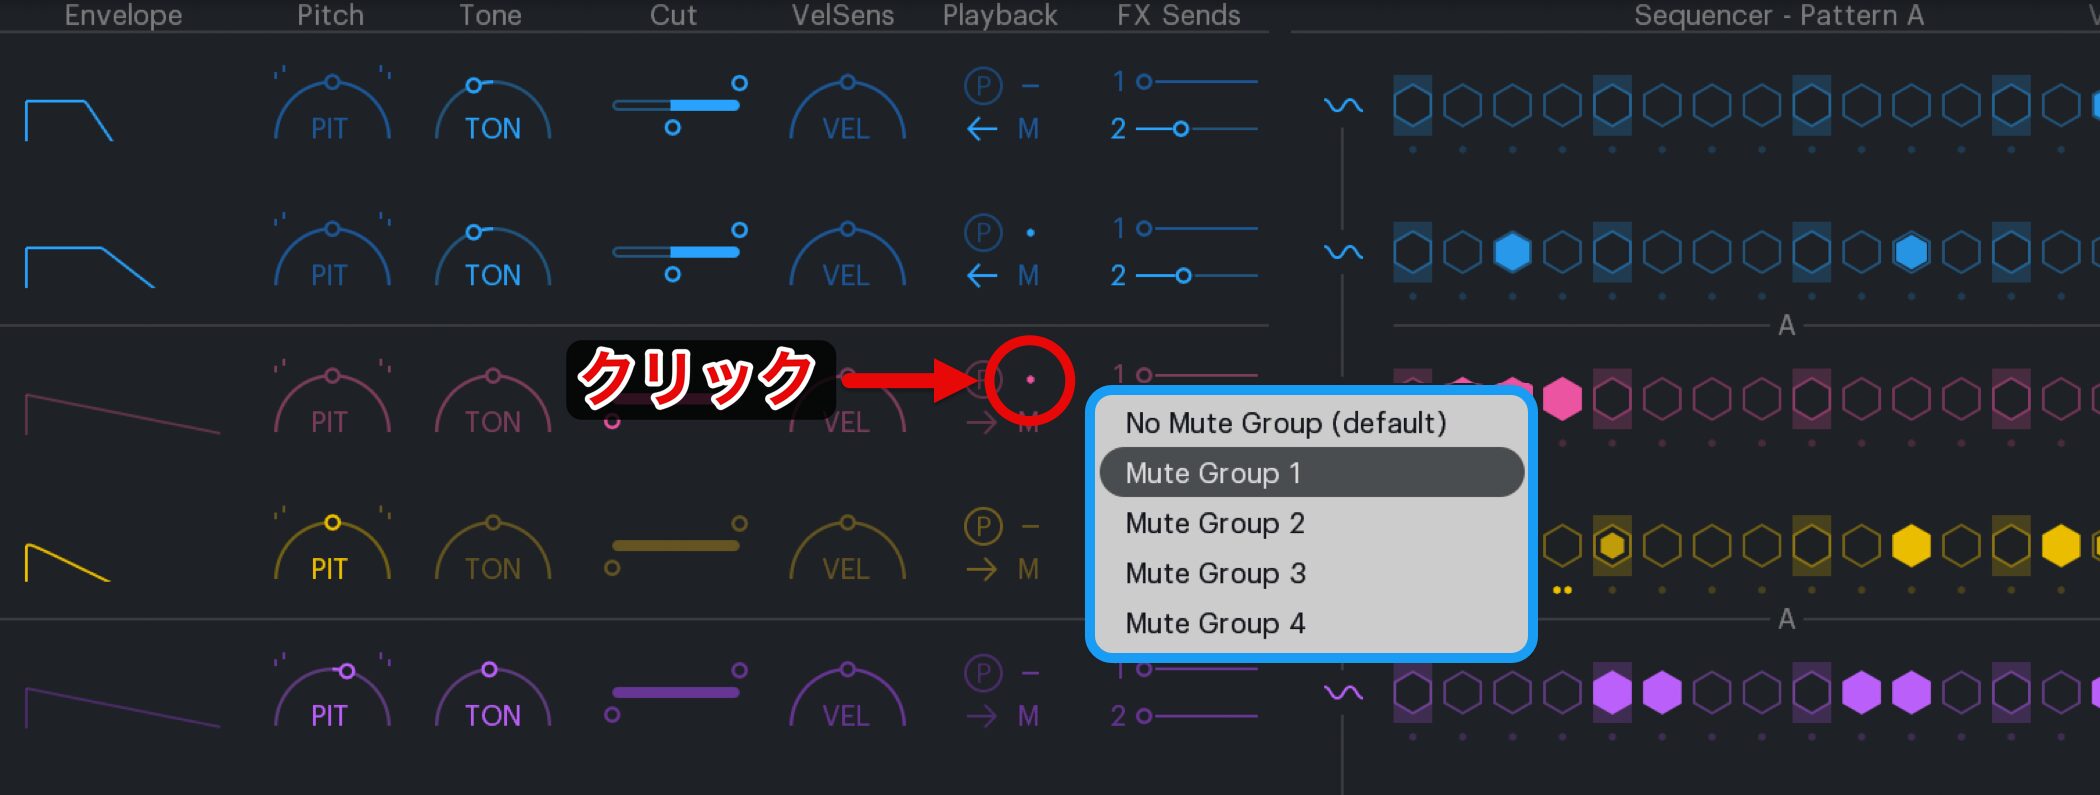
Assigning drum sounds to the same sound group limits that group to one playing sound at a time.
A newly triggered sound cuts off the sound already playing in the group. Use this, for example, to stop an open hi-hat's tail with a closed hi-hat.
Reversing Samples
<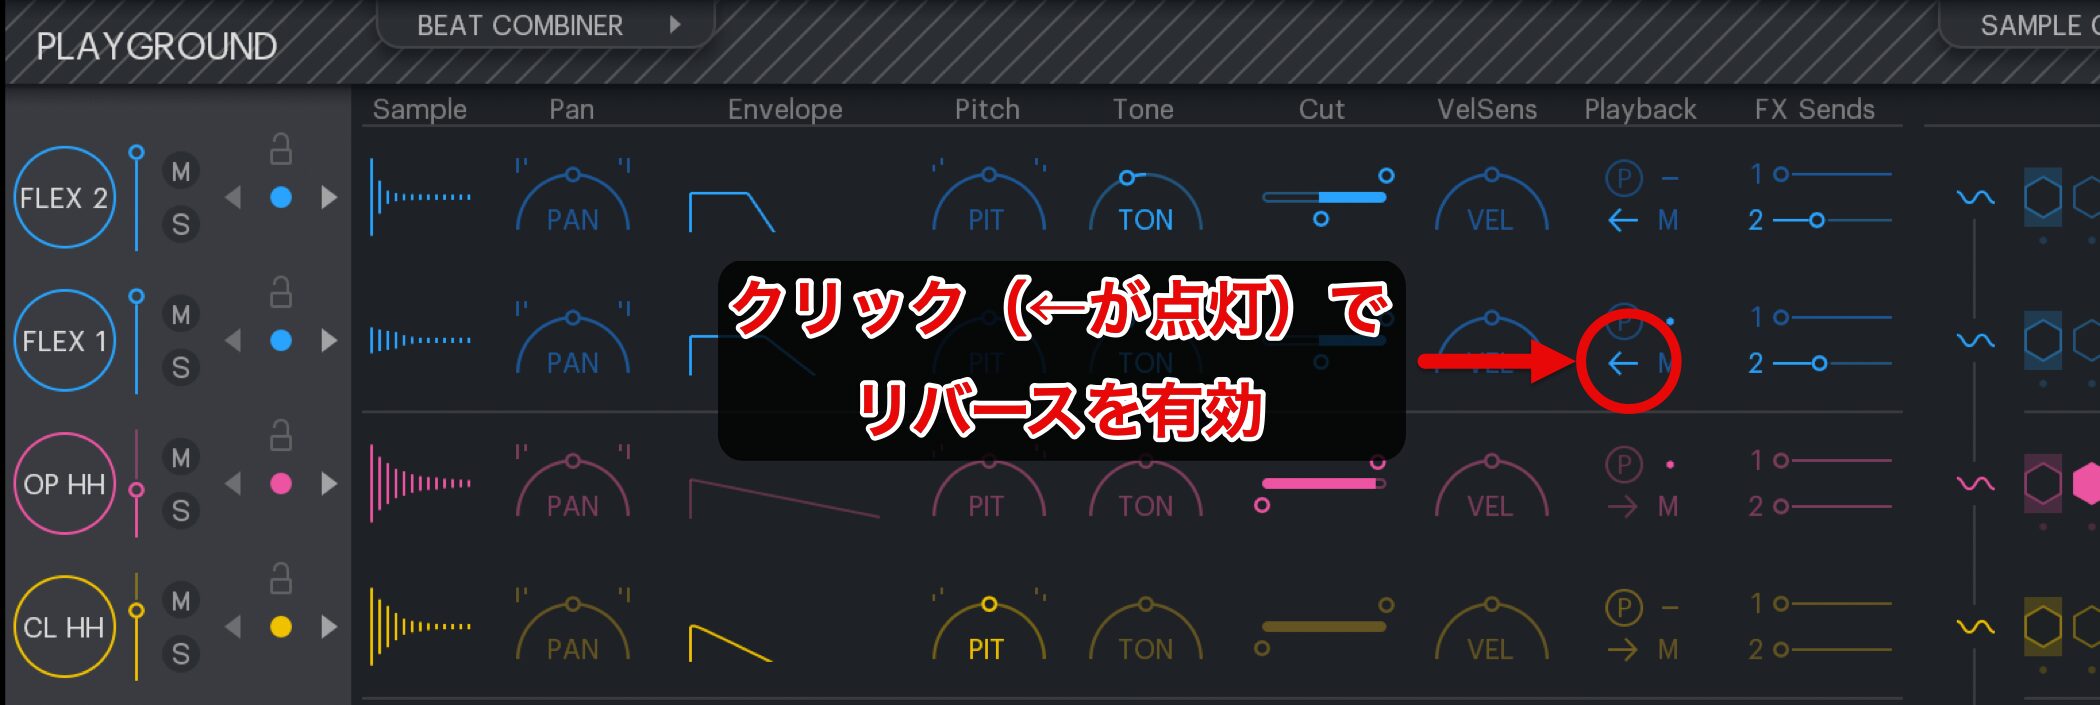
Enable Reverse to play a sample backward.
A reversed cymbal is a familiar example of this effect.
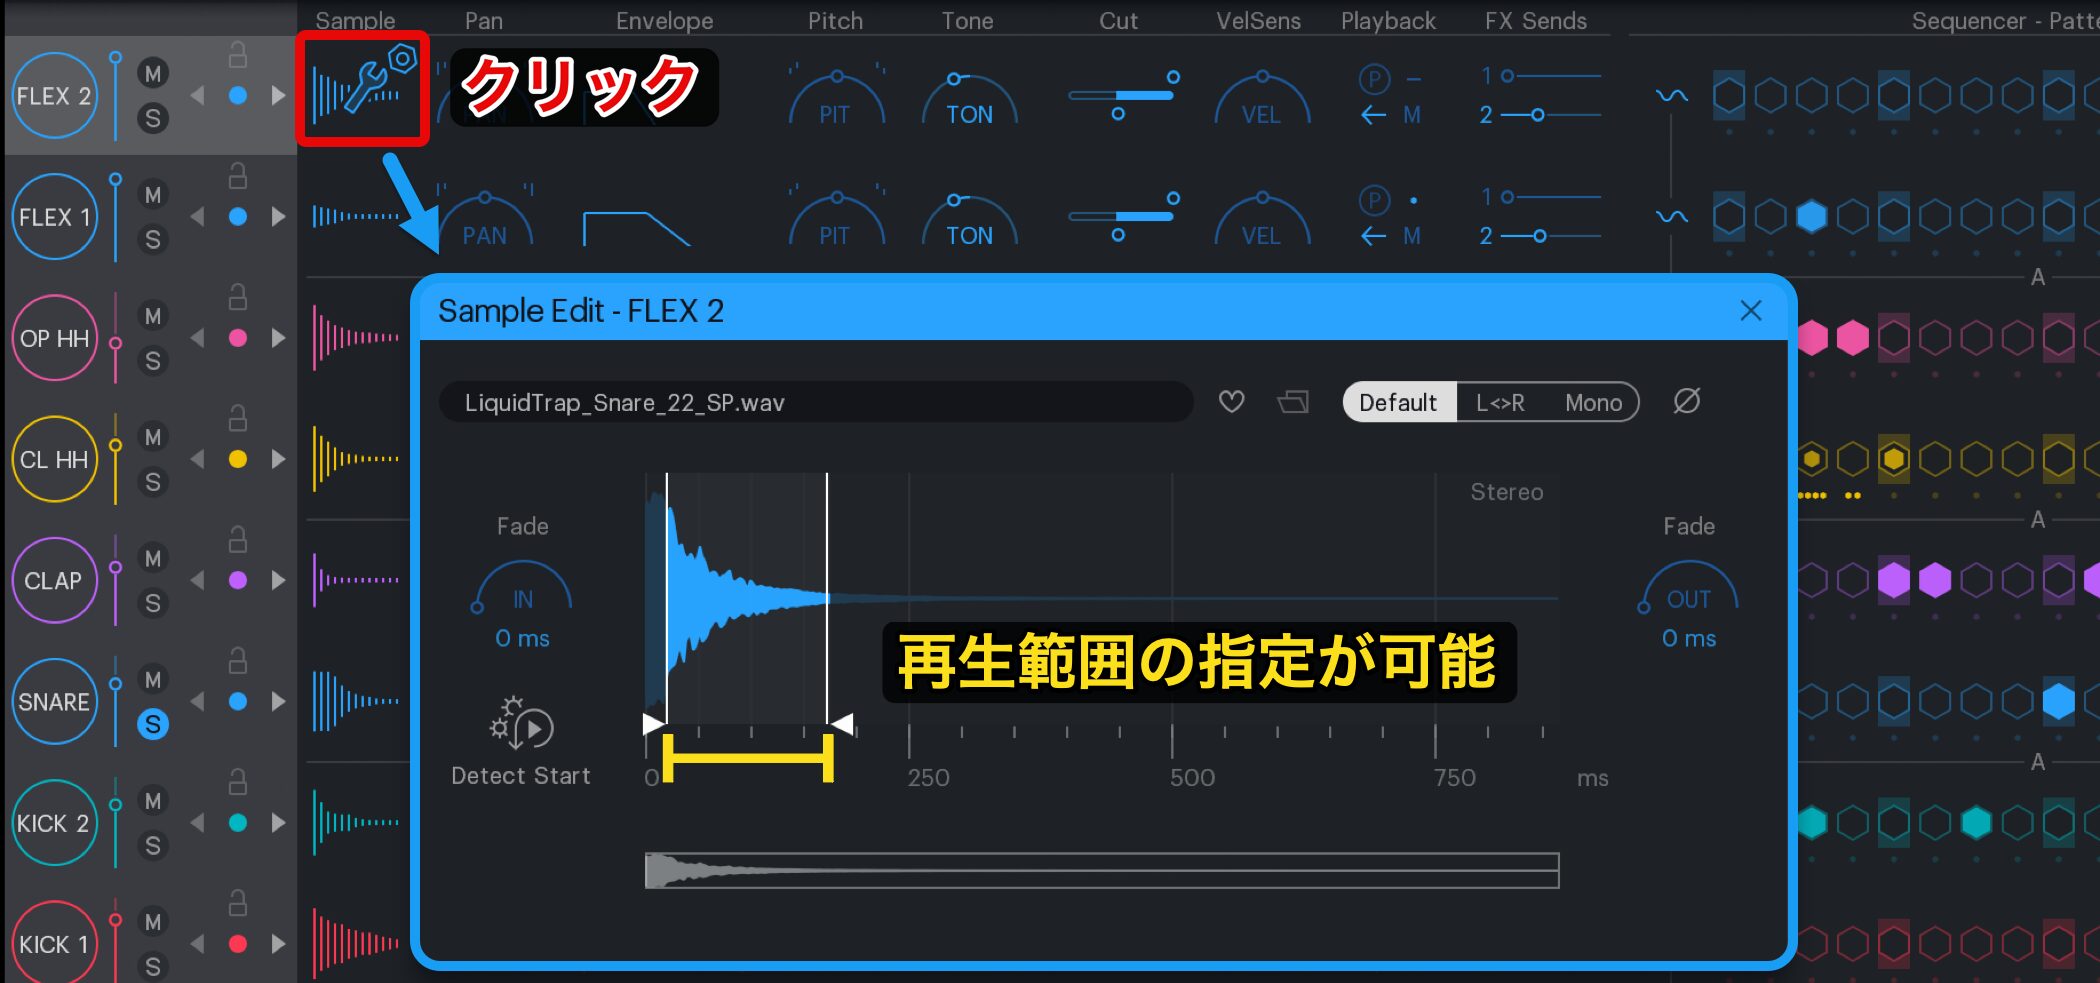
In the sample editor, you can set the playback range, allowing precise adjustment of when the reversed sound is heard.
Switching Between Mono and Poly
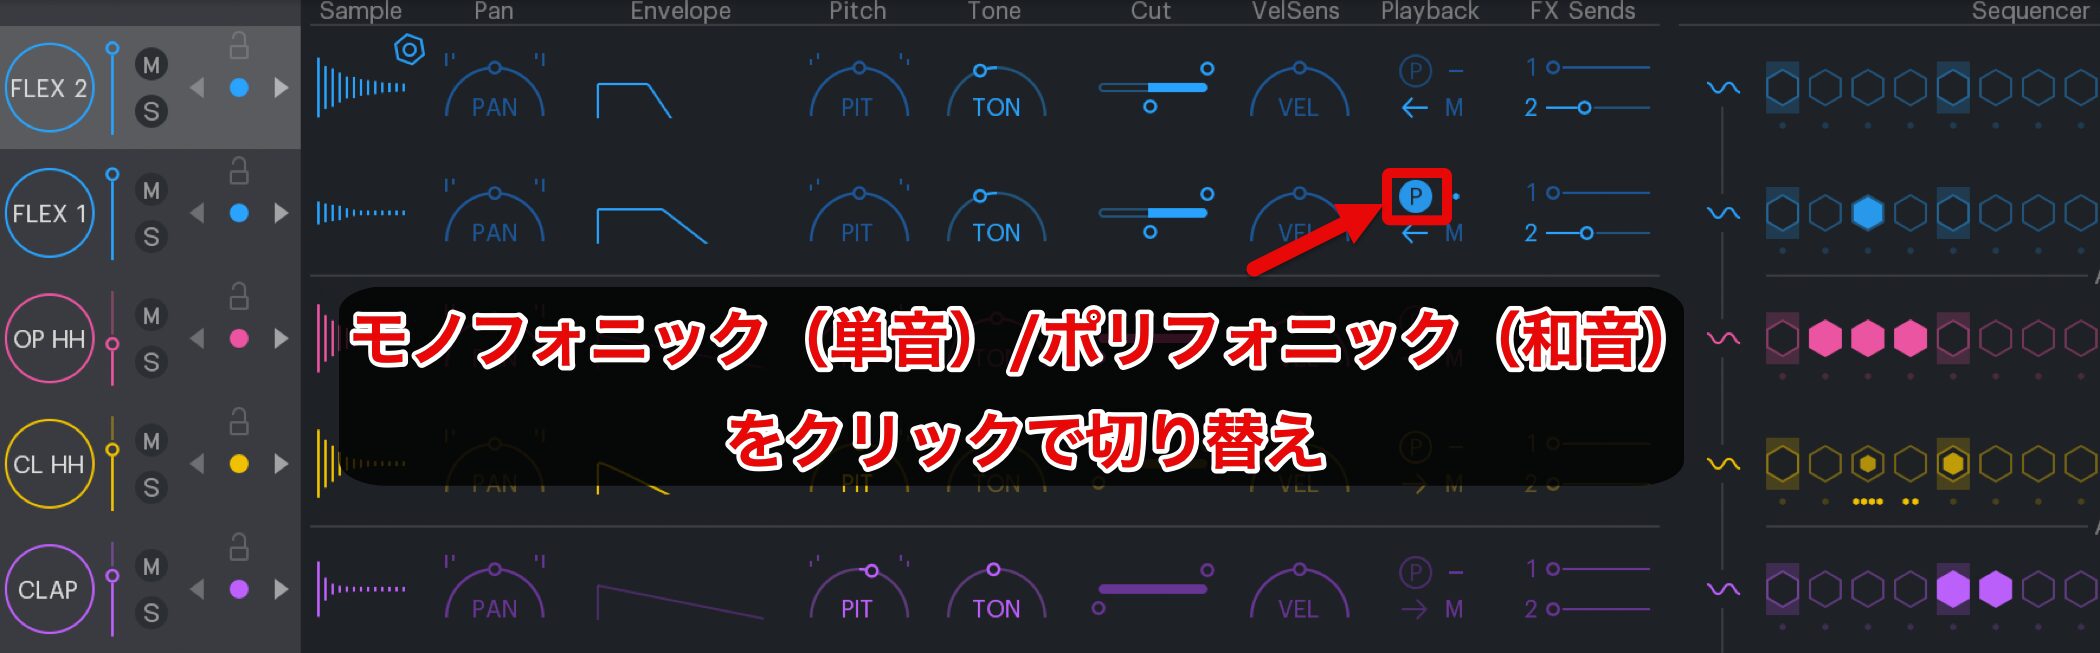
When you enable the Poly button (P), a sound in the same drum slot is no longer cut off when the next step triggers it.
For regular drum sounds, the Poly button (P) is often left off to prevent tails from overlapping. For sound effects and other material, use it according to the sound's character and your intentions.
XO offers not only ready-to-use drum kits but also excellent flexibility for freely editing them.
These tools can substantially reduce the time you spend shaping sounds.
Have fun exploring the instrument as you build your own original beats.
Effects, DAW Export, and Multiple Outputs
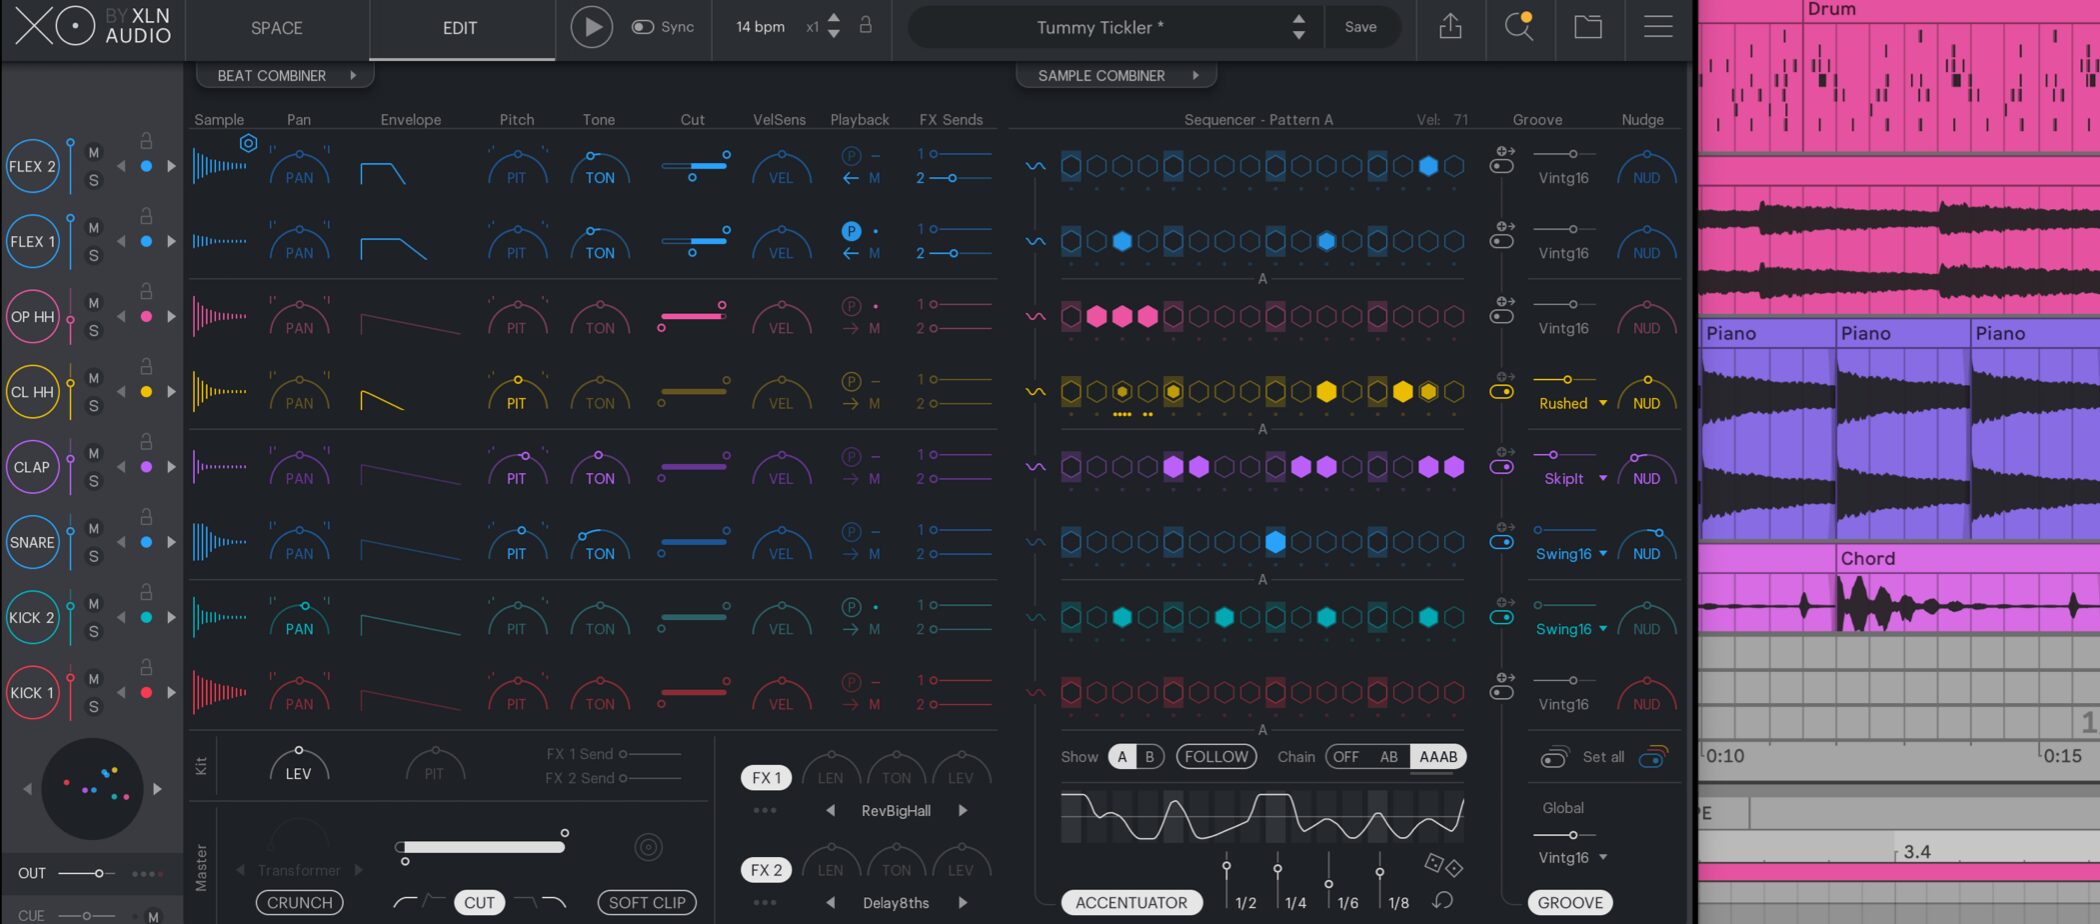
Finally, we will focus on effects, routing separate outputs to your DAW, exporting, and saving presets—ways to integrate XO more closely with your DAW and get more out of the instrument.
XLN Audio XO Video: Multiple Outputs, Export, and Preset Saving
Setting Up Effects in XO
Applying Reverb and Delay
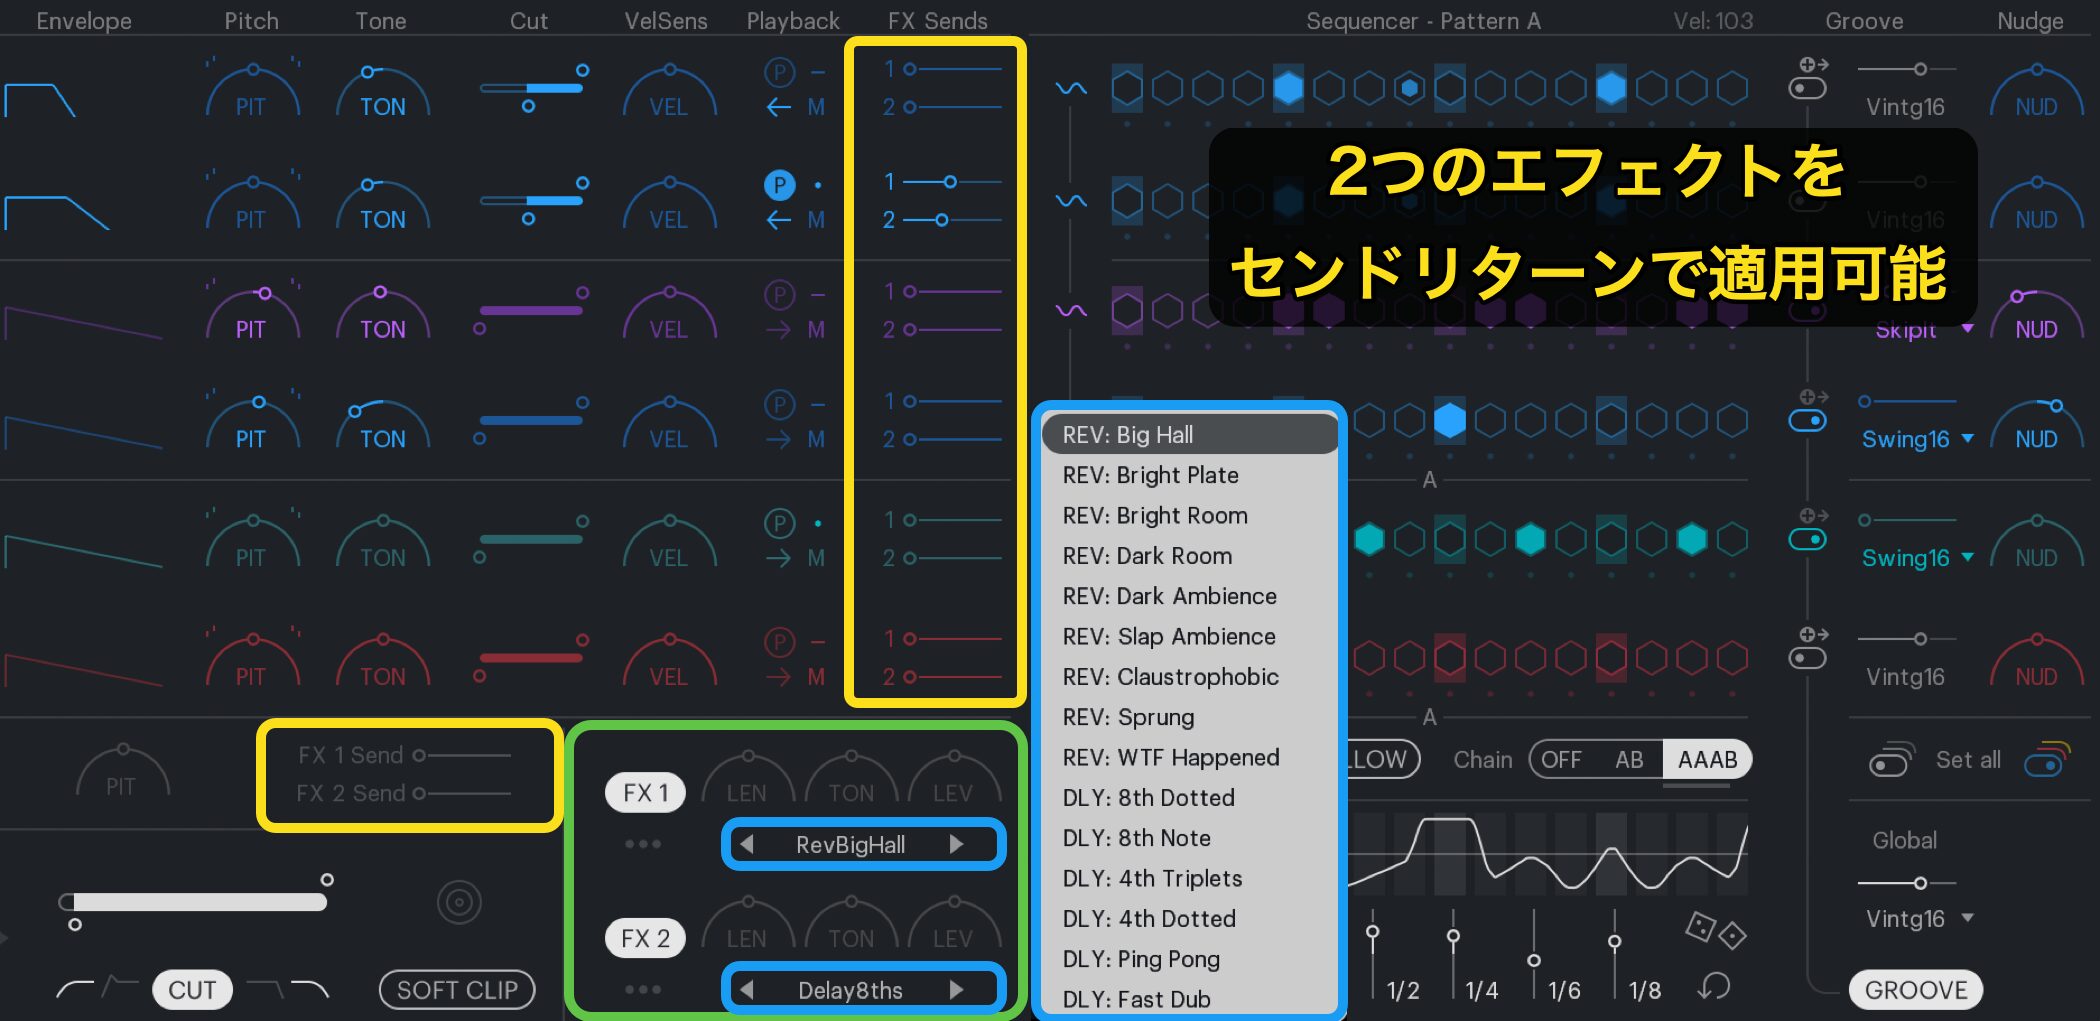
Each drum sound can feed two spatial effects through send/return routing.
A wide choice of effect types lets you create different kinds of space to suit your song.
Master Effects
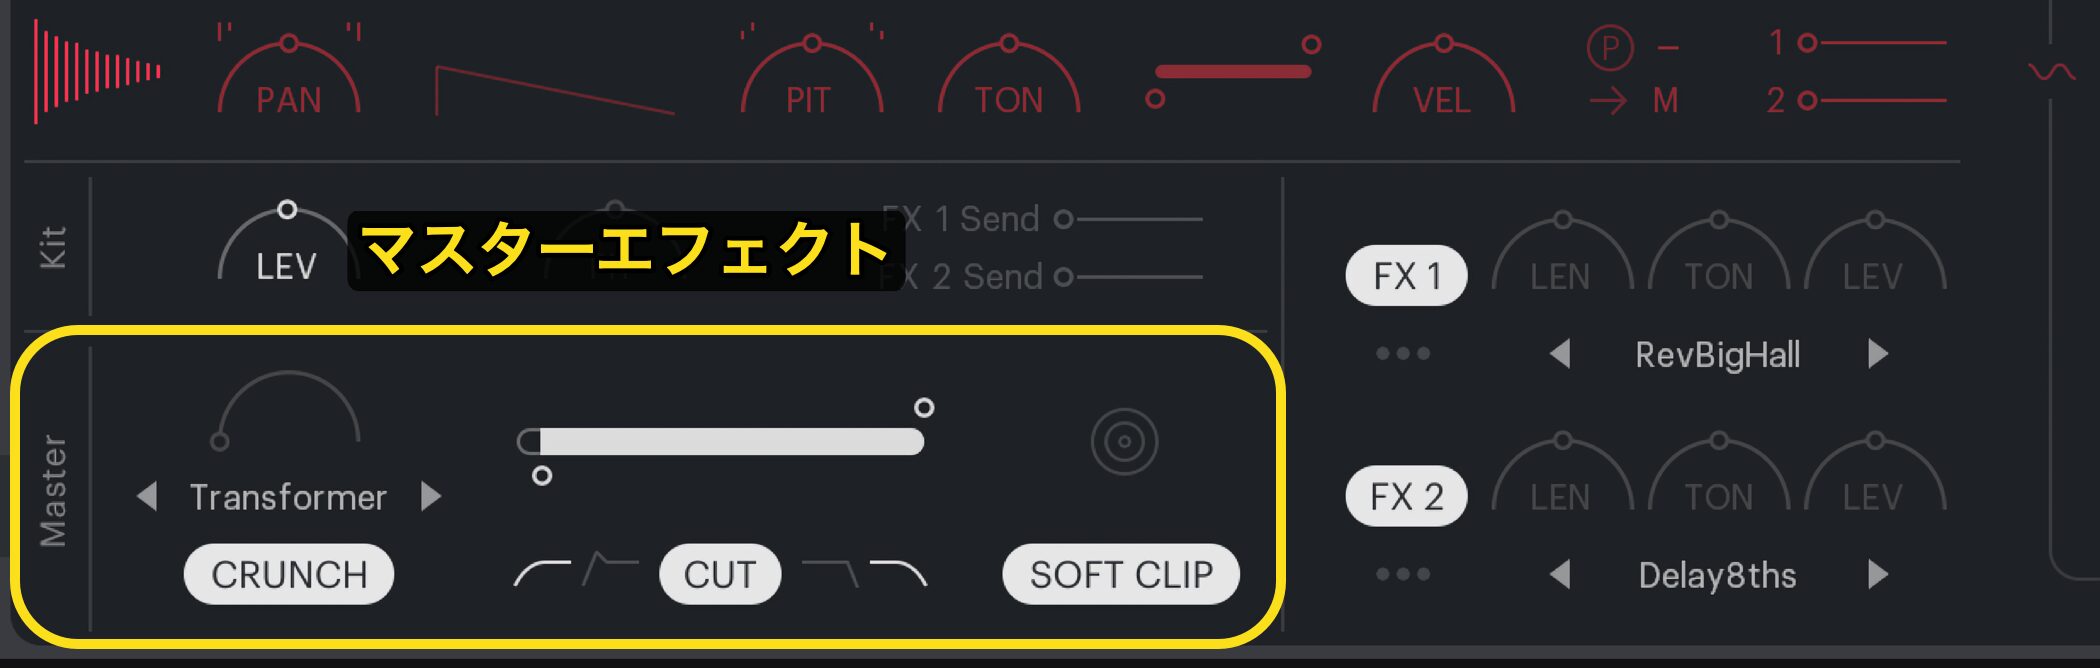
XO also includes master effects that process the sound of the entire kit.
Saturation, filtering, and limiting are available to help you quickly finish your rhythm track.
Routing Individual Drum Sounds to Separate DAW Outputs
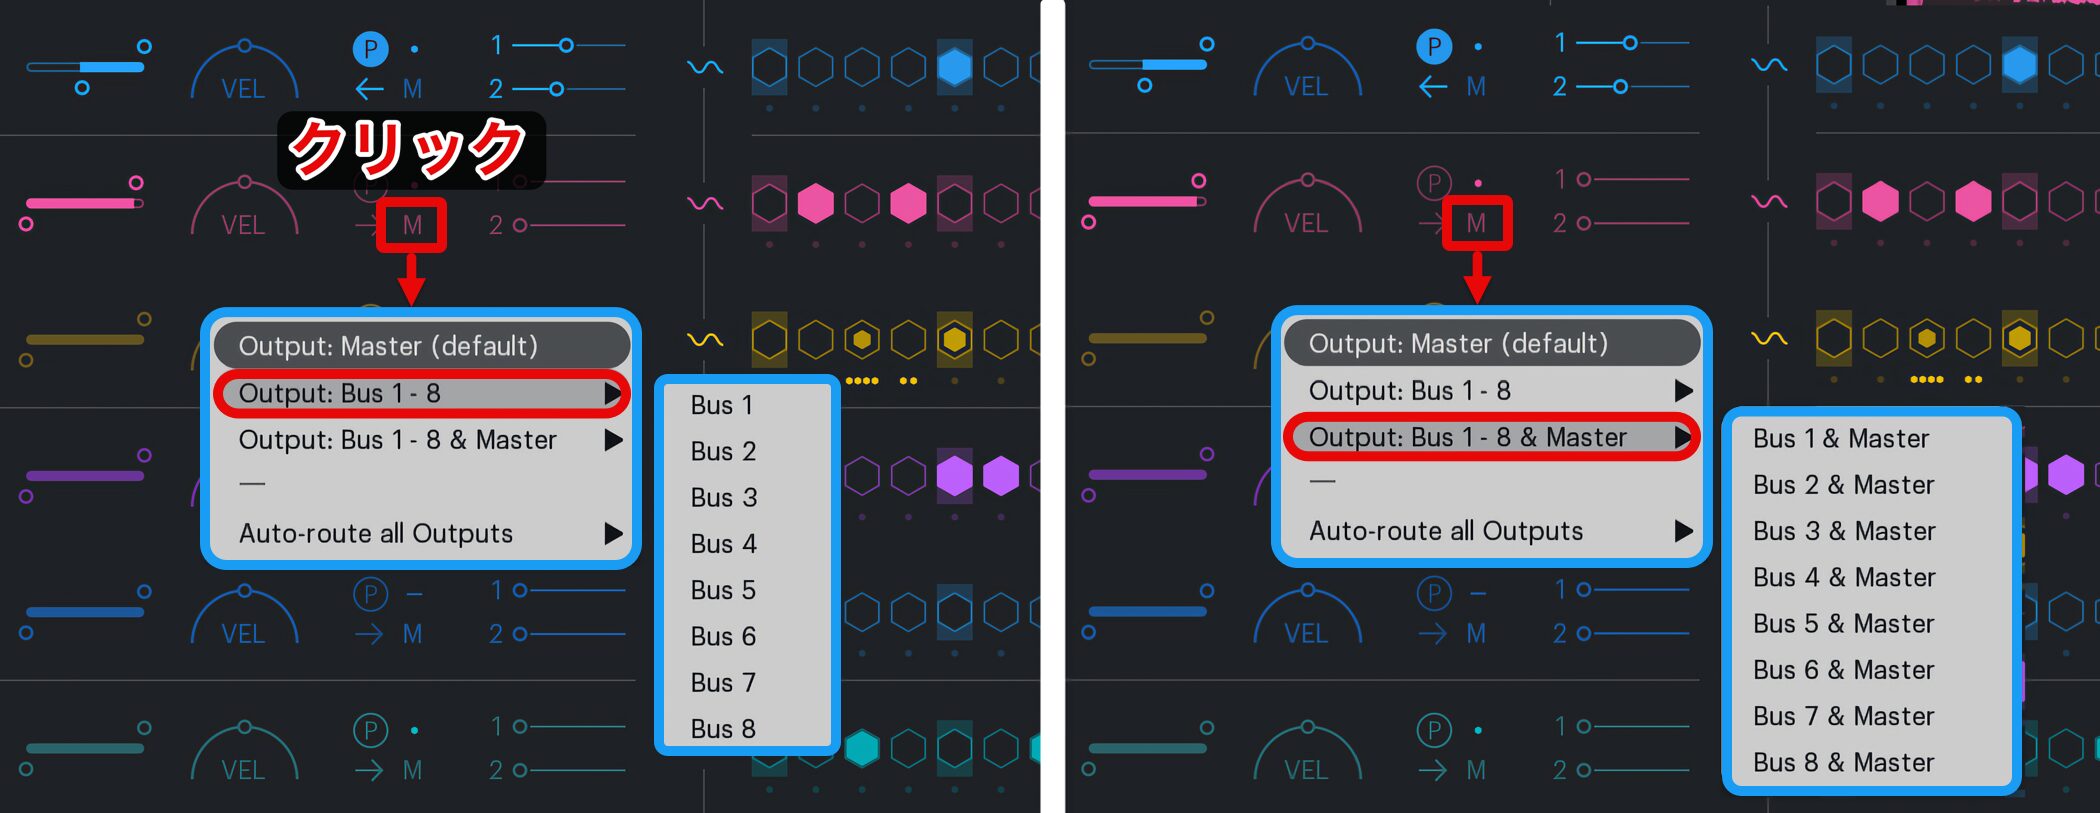
XO supports separate outputs for sending each drum sound individually to your DAW.
Click M and assign the drum sound to an individual bus.
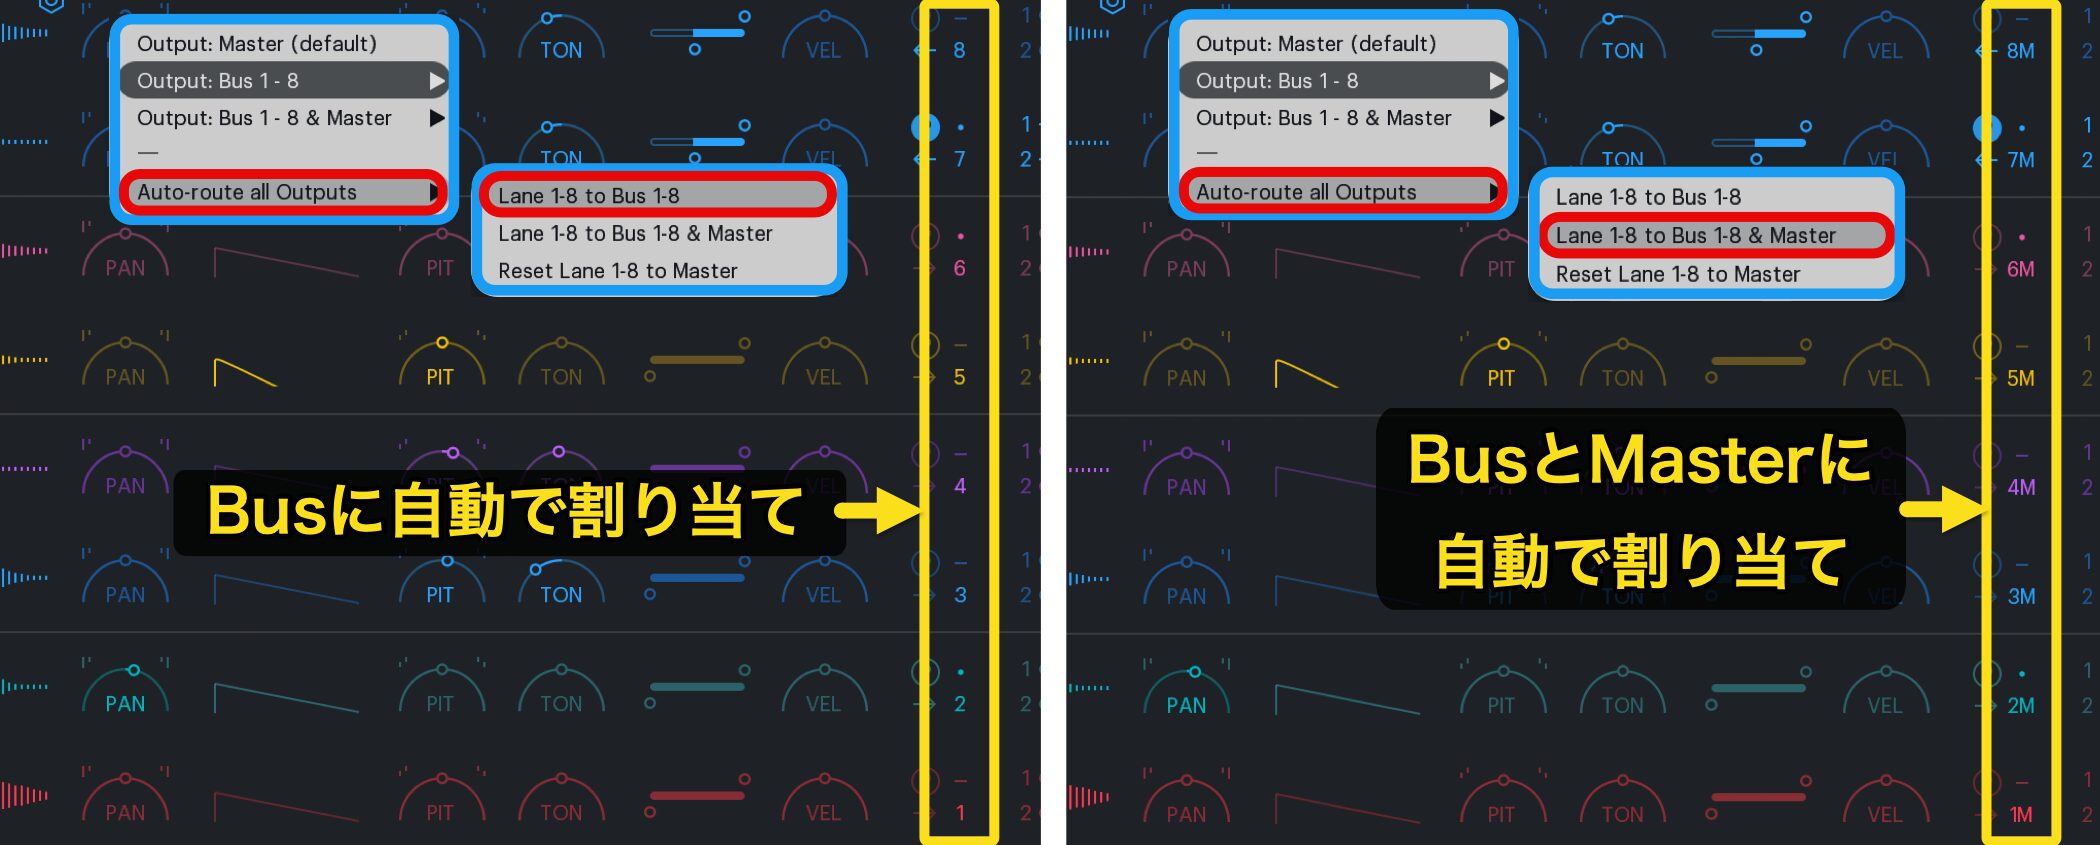
Auto-route all Outputs automatically assigns the outputs to buses, or to buses and the master output.
Click Reset Lane 1-8 to Master to easily reset these assignments.
After assigning the outputs, configure multiple outputs in your DAW to receive the sound from each bus.
Using Multiple Outputs with Software Instruments

 Logic
 Cubase
 Ableton Live
 Studio One
 FL Studio
Exporting MIDI and Audio to Your DAW
You can export the sounds and patterns you create in XO to your DAW.
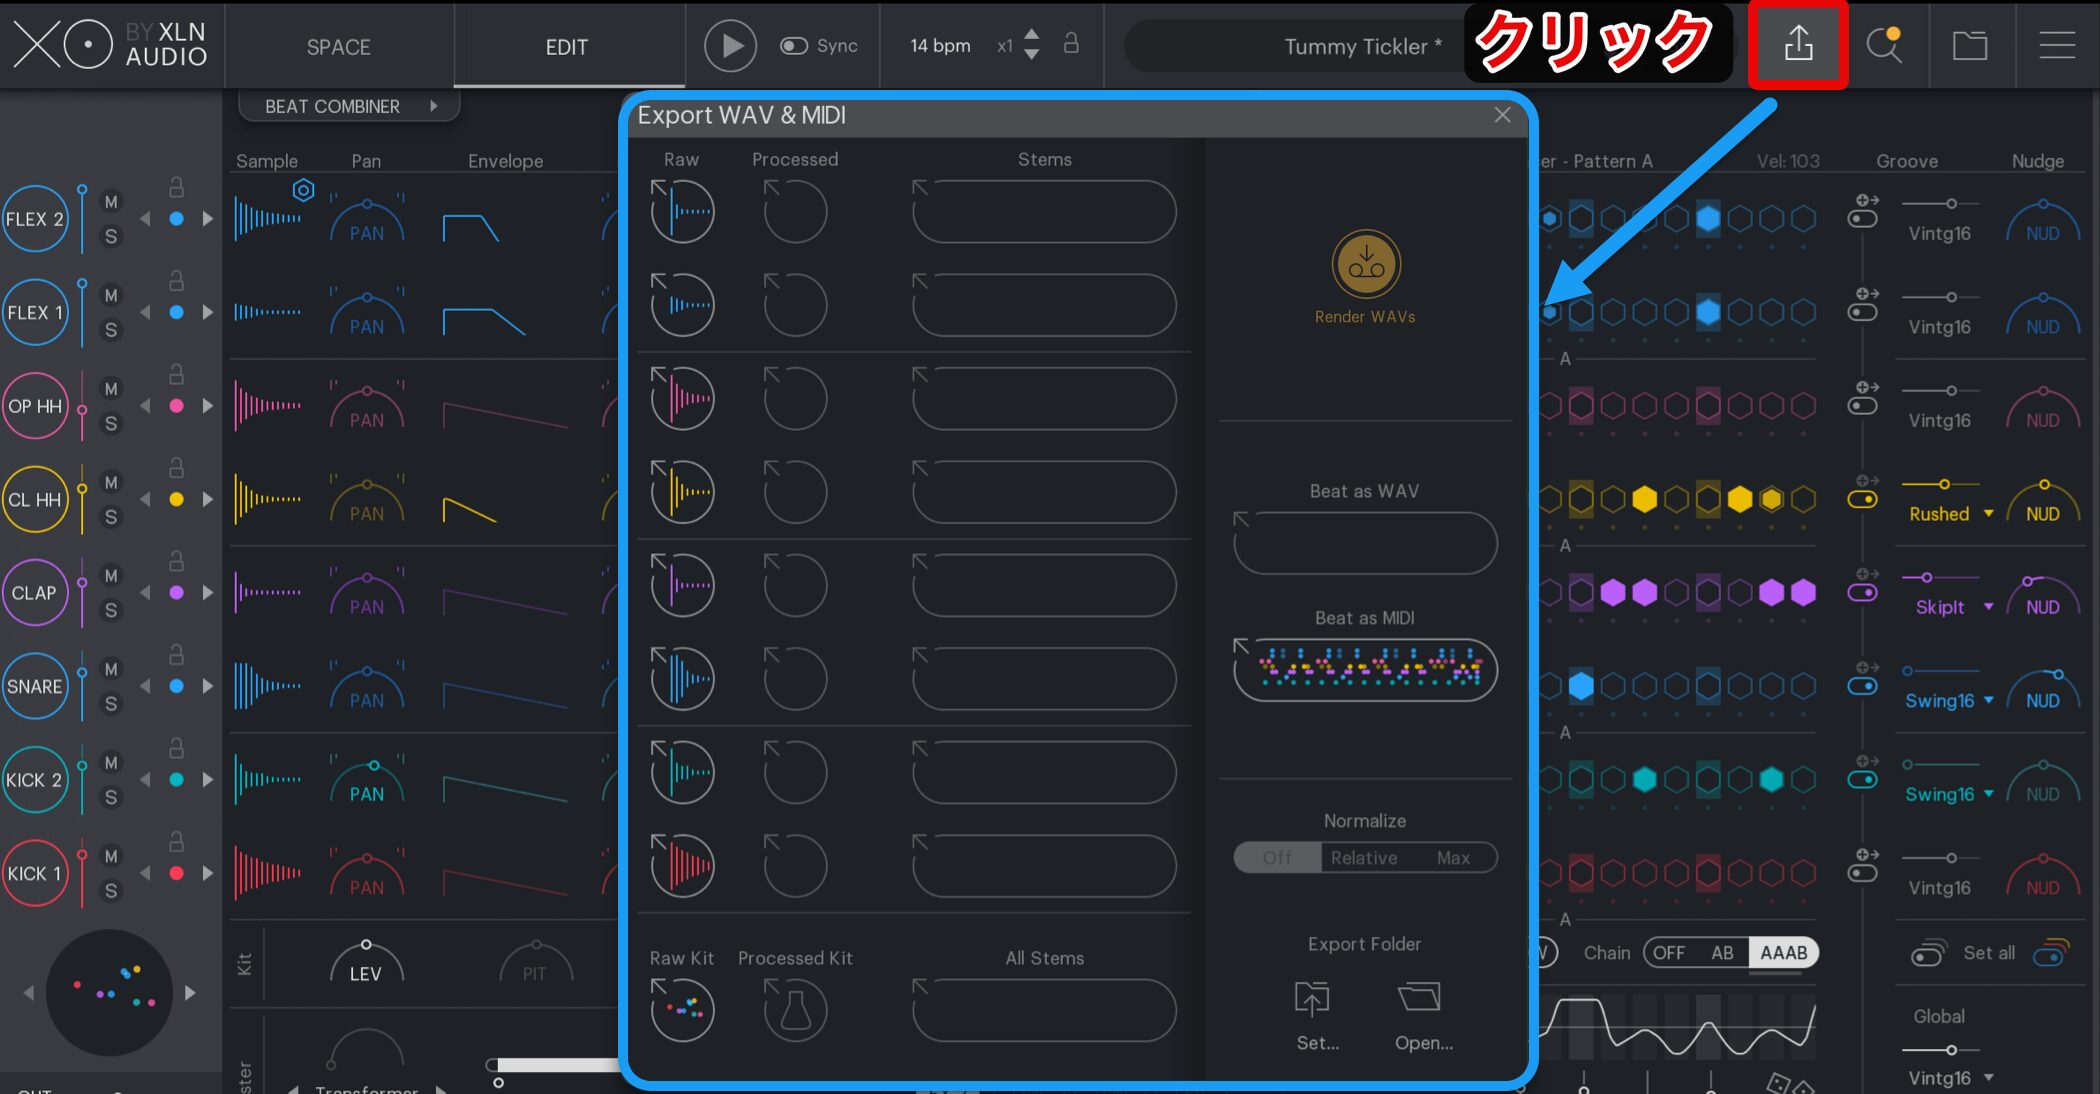
Click the export icon in XO.
Exporting a MIDI Pattern
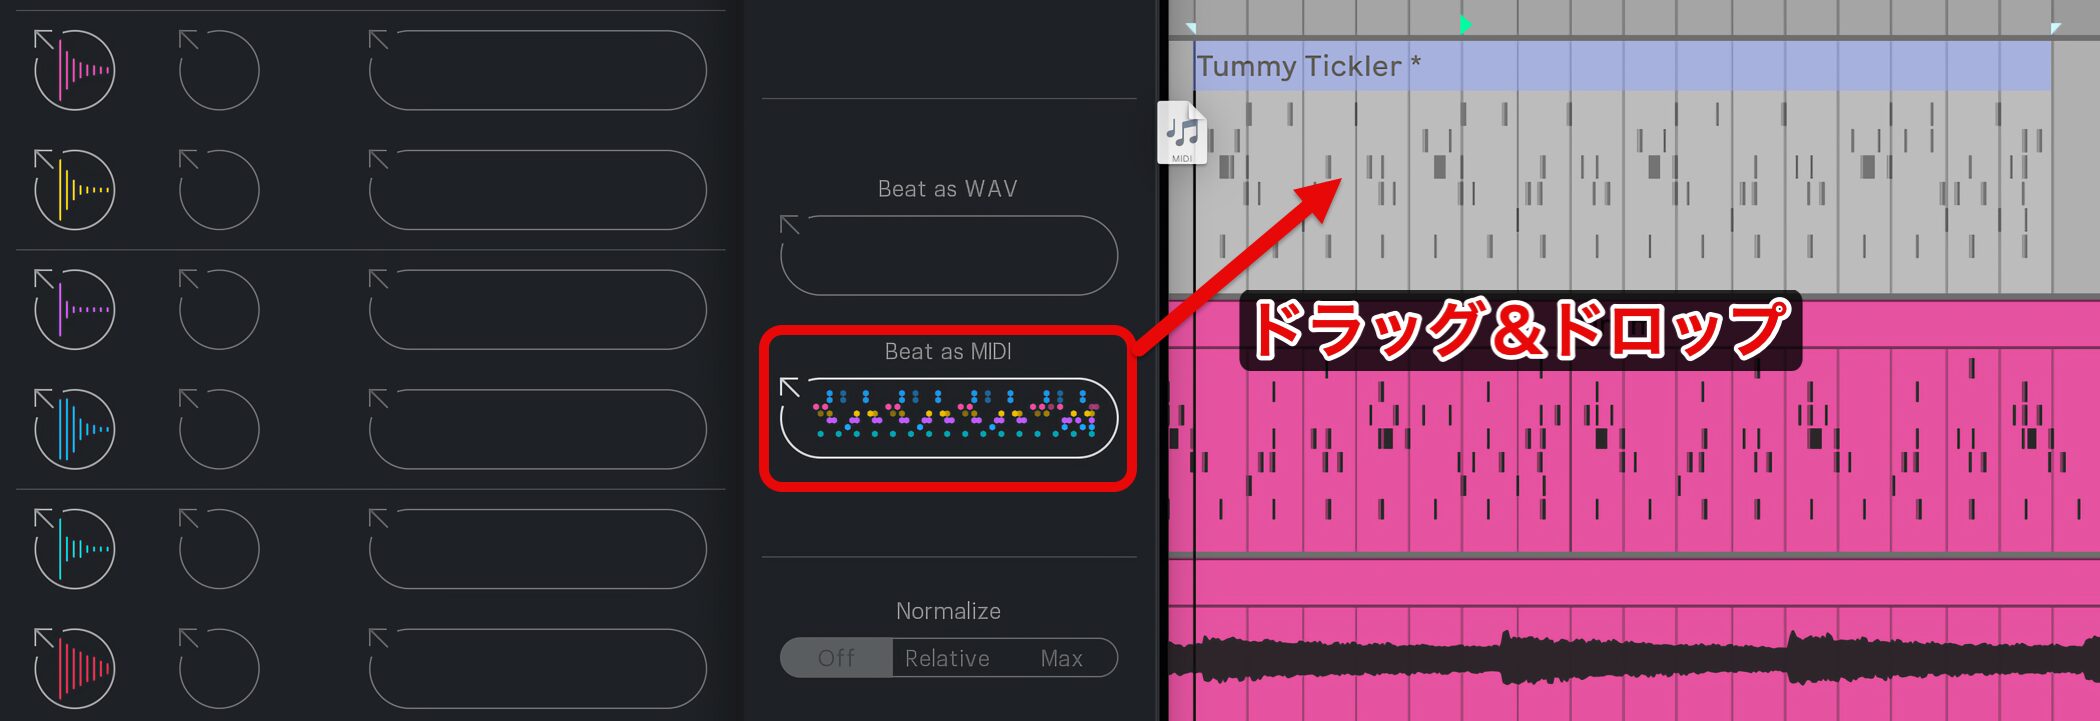
Drag Beat as MIDI onto a MIDI track in your DAW.
Exporting Audio Files
When exporting audio, XO creates audio files in a specified folder.
Setting this location in advance makes the files easier to manage.
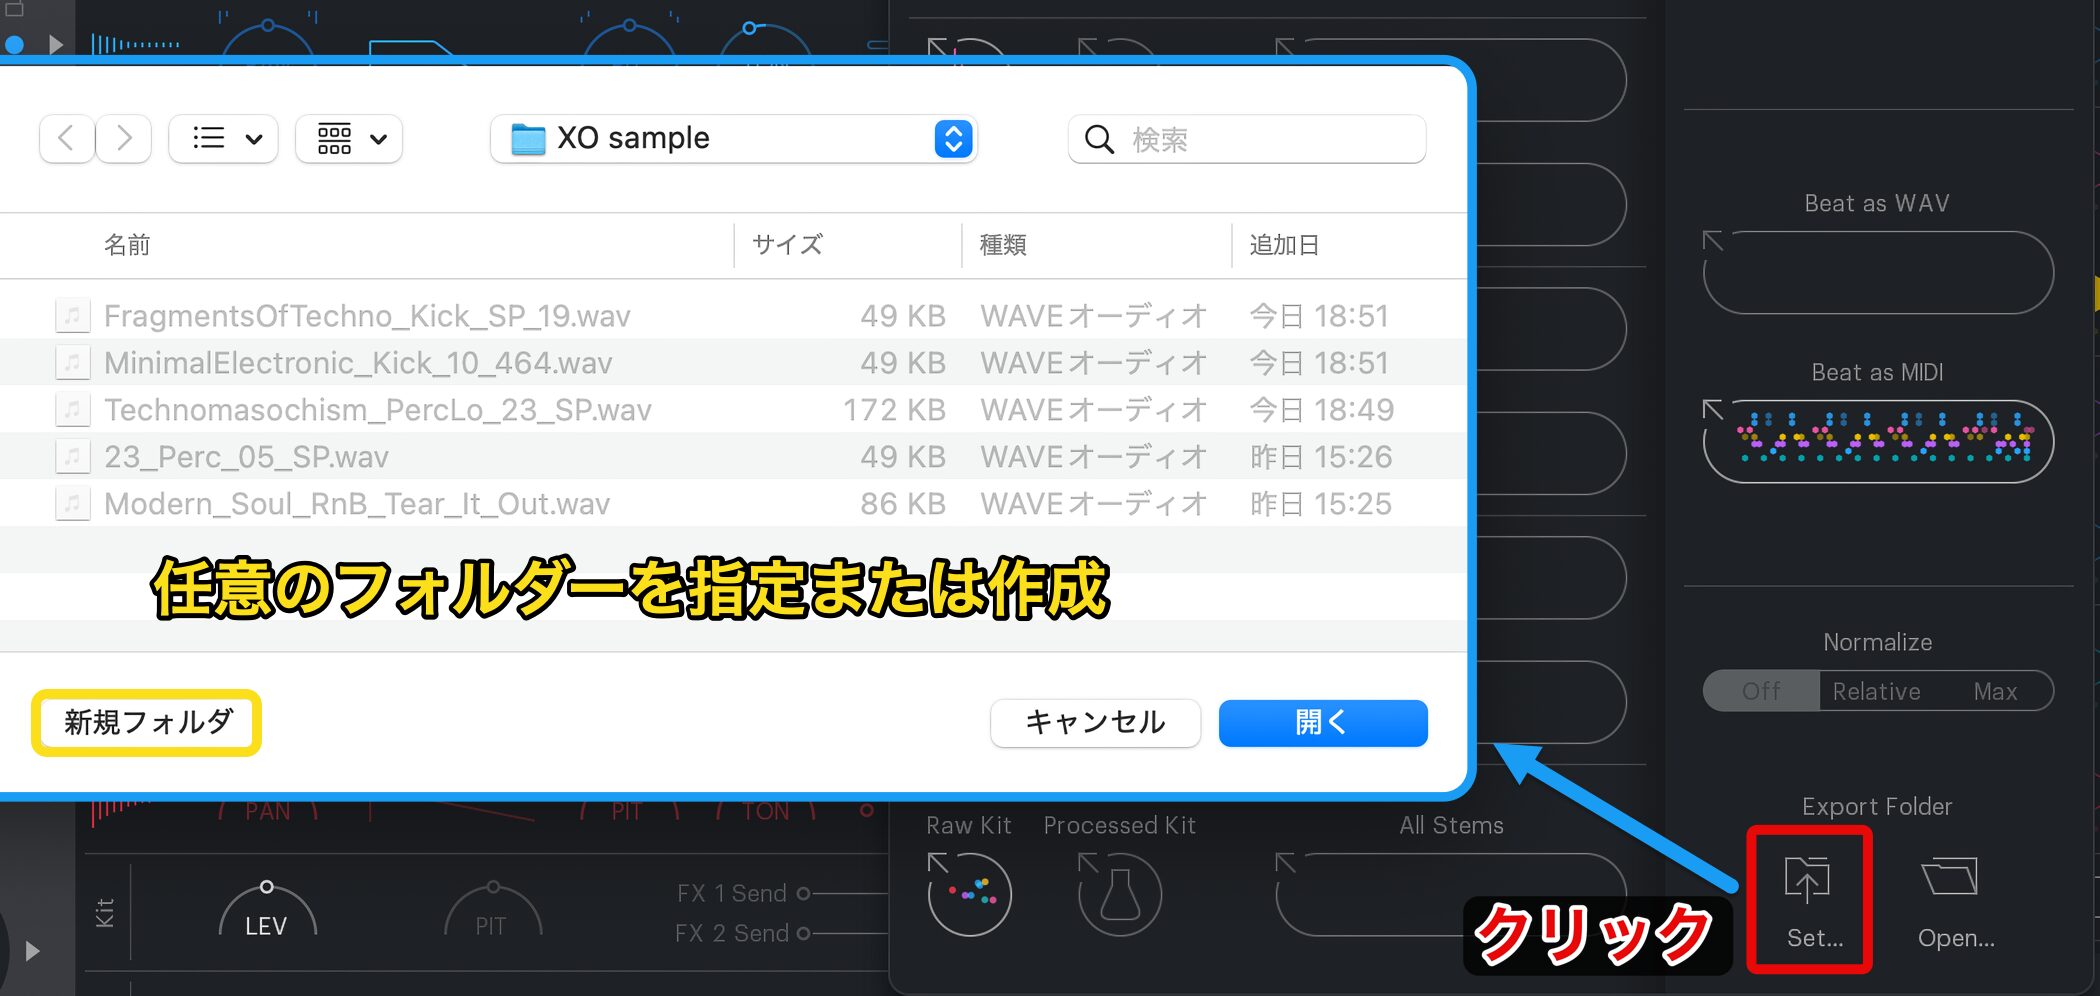
Click Set.
Create a folder for exports, or select an existing folder if you already have one.
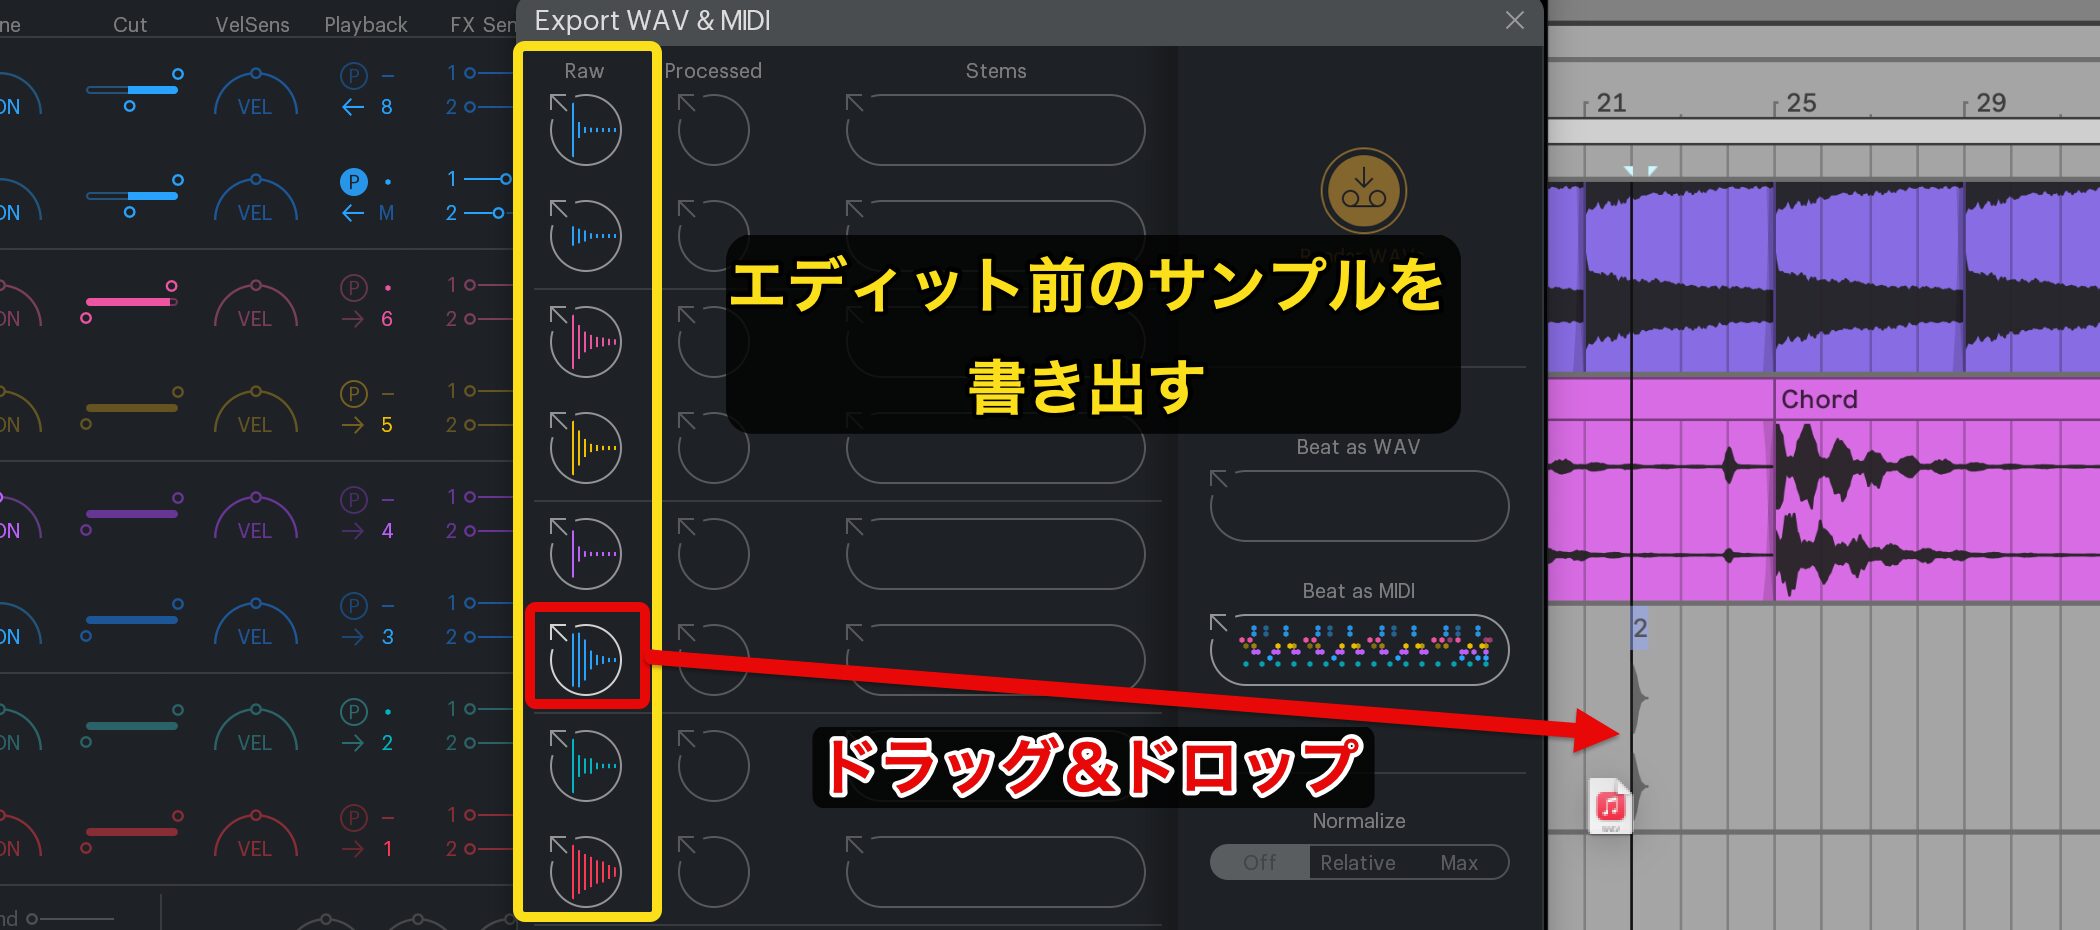
The Raw column lets you export the original samples before editing.
Simply drag and drop the drum sound you want into your DAW.
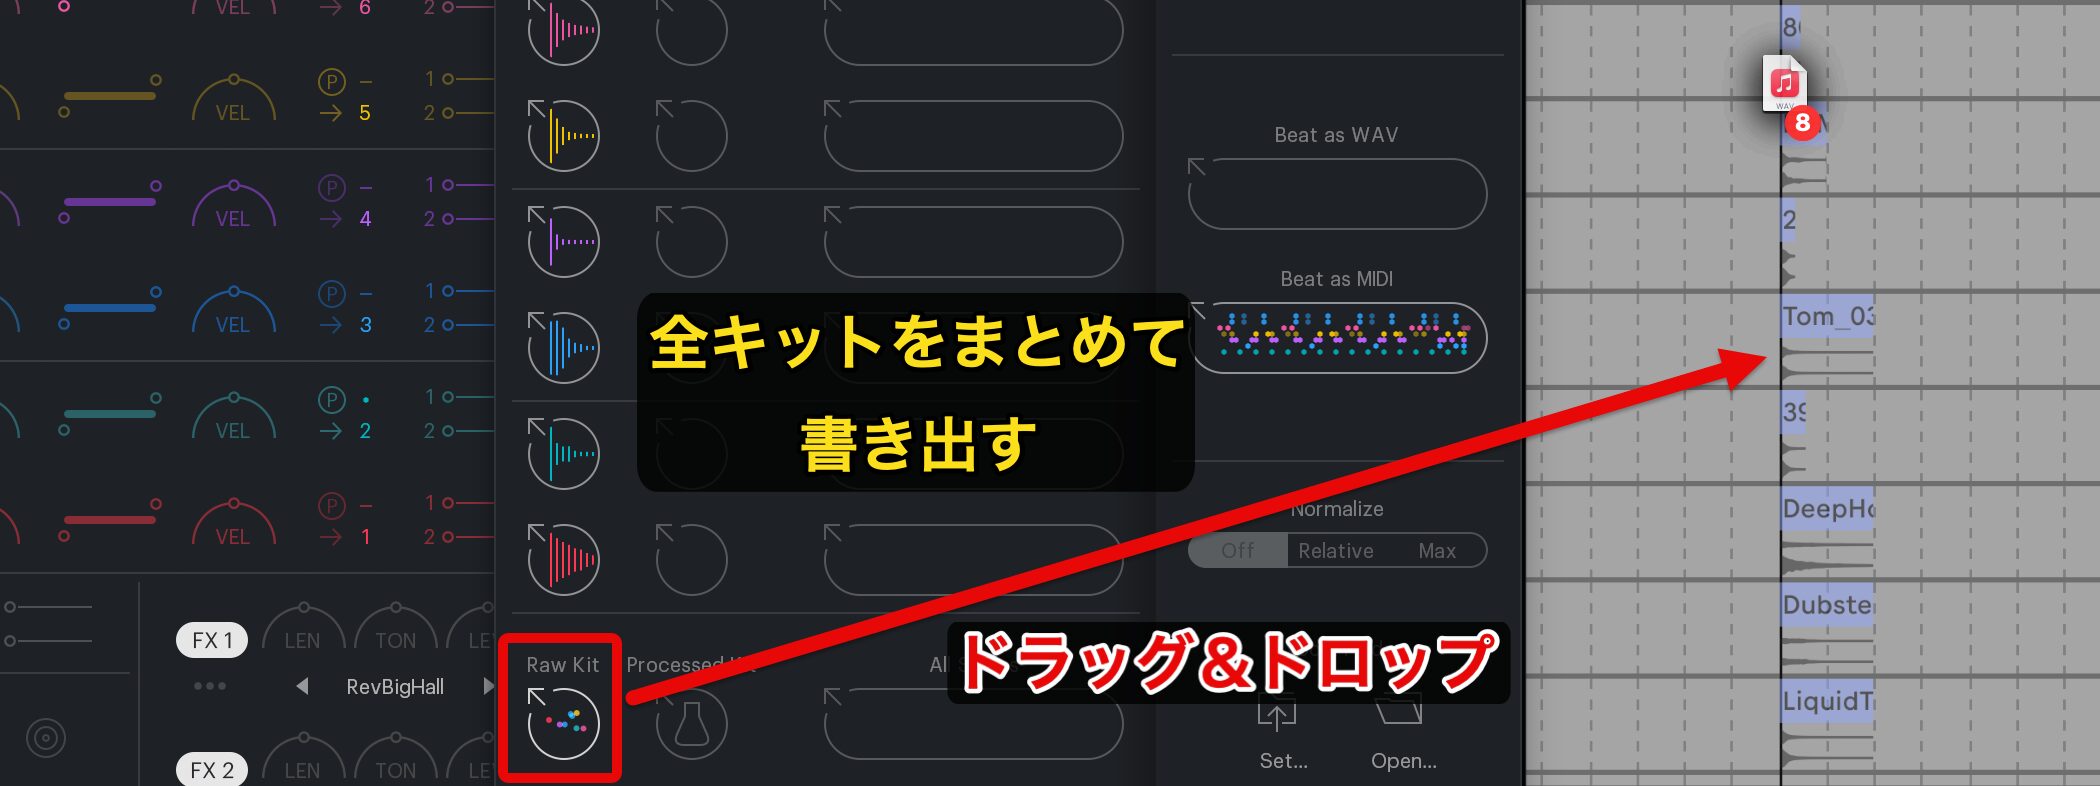
You can also export all drum sounds together, as shown here.
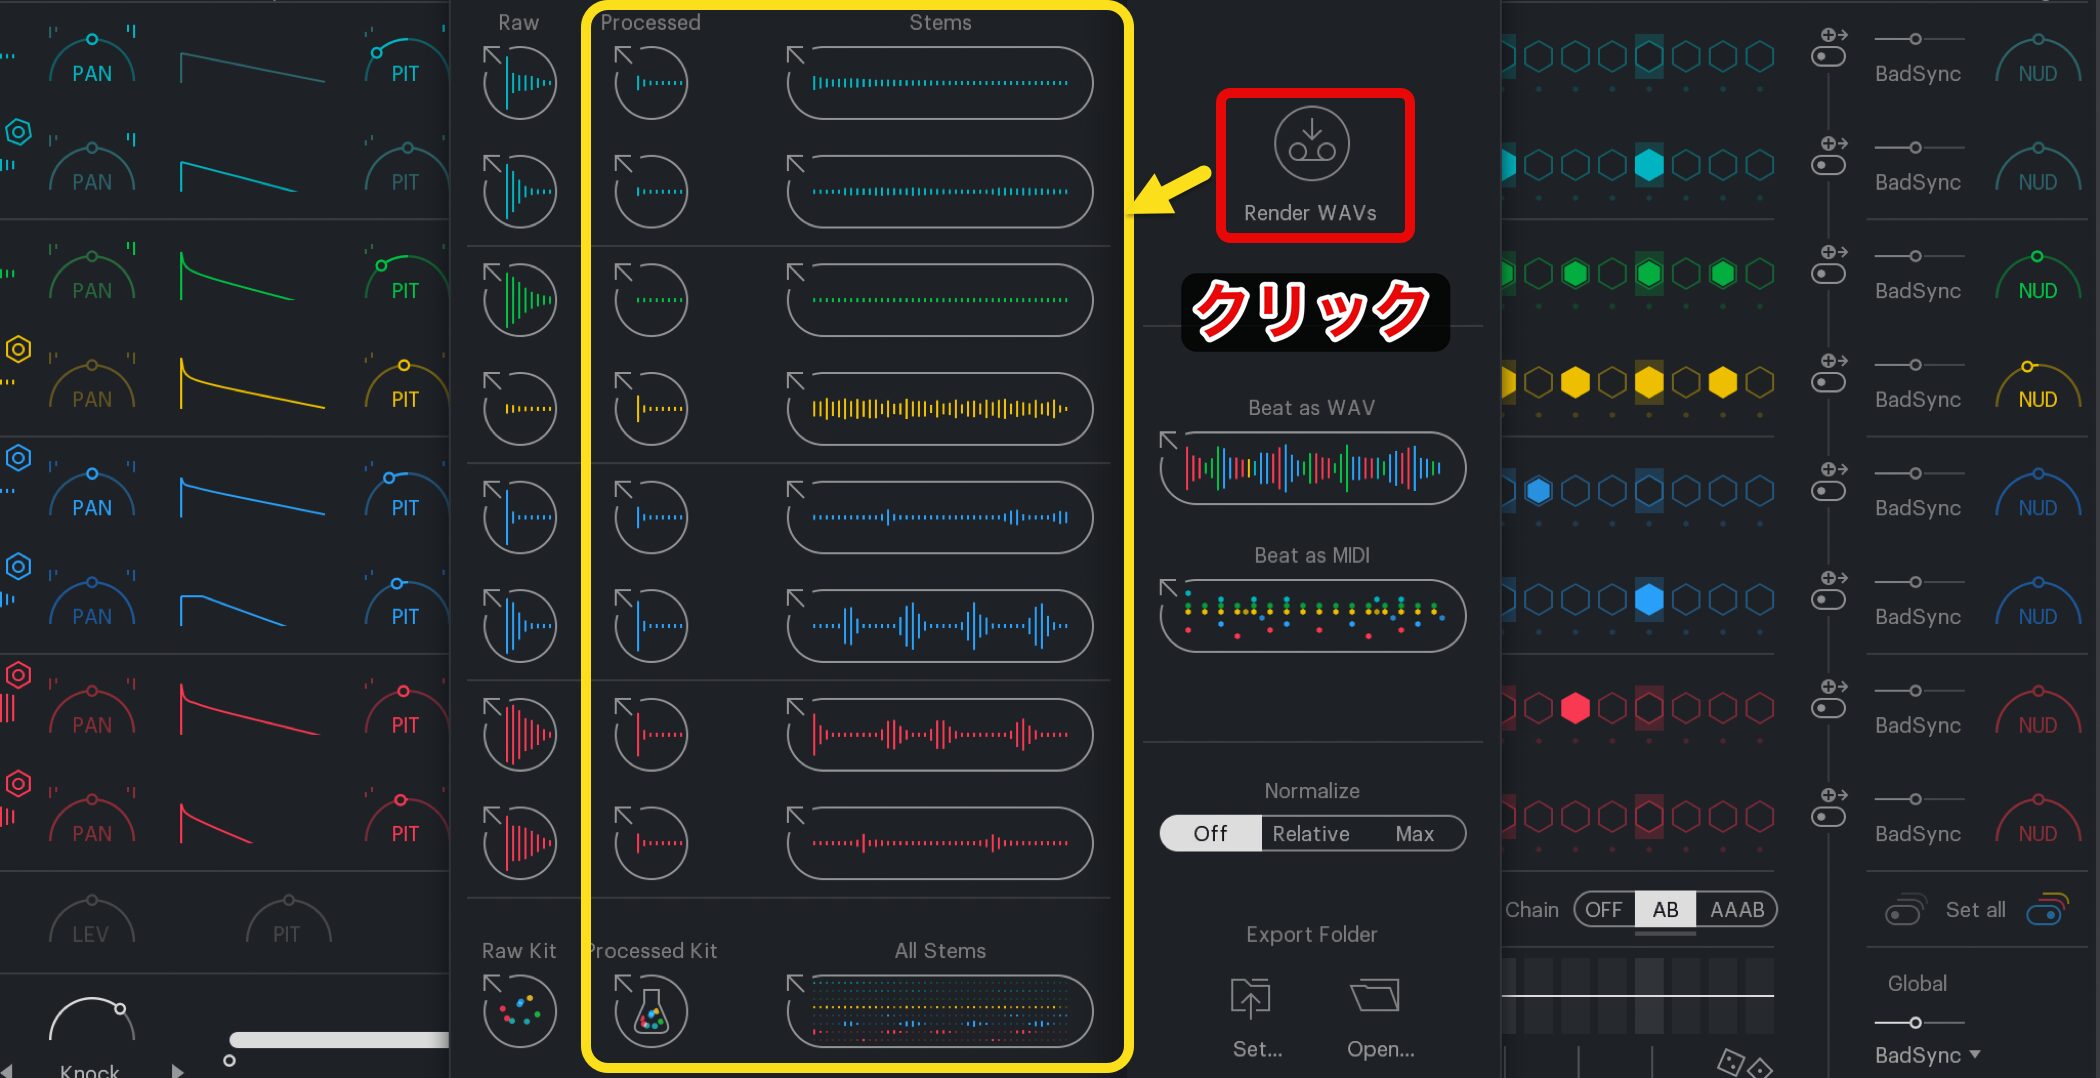
Click Render WAV's to generate samples and loops that include the edits you made in XO.
As with the Raw column, drag and drop them into your DAW to export them.

Beat as WAV lets you export a stereo mix of the entire kit.
Saving Presets
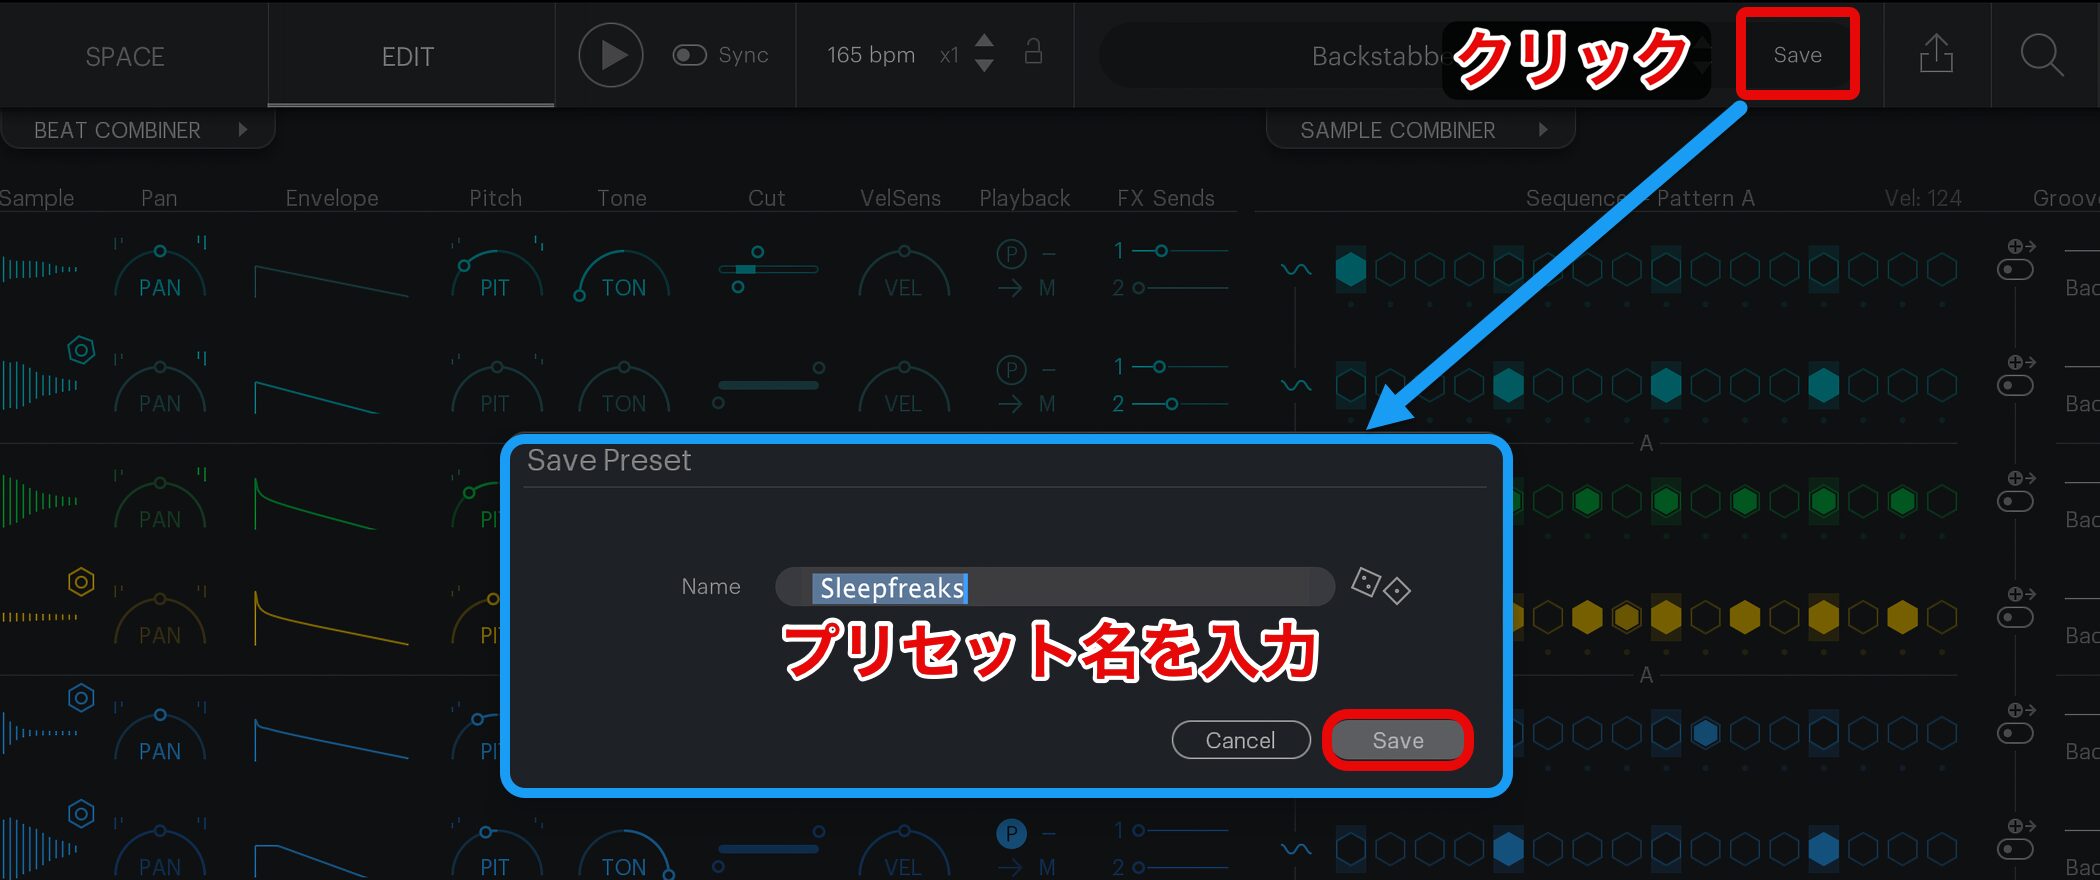
It is useful to save the kits you create as presets so you can recall them whenever you need them.
Click Save, give the preset a name, and save it.
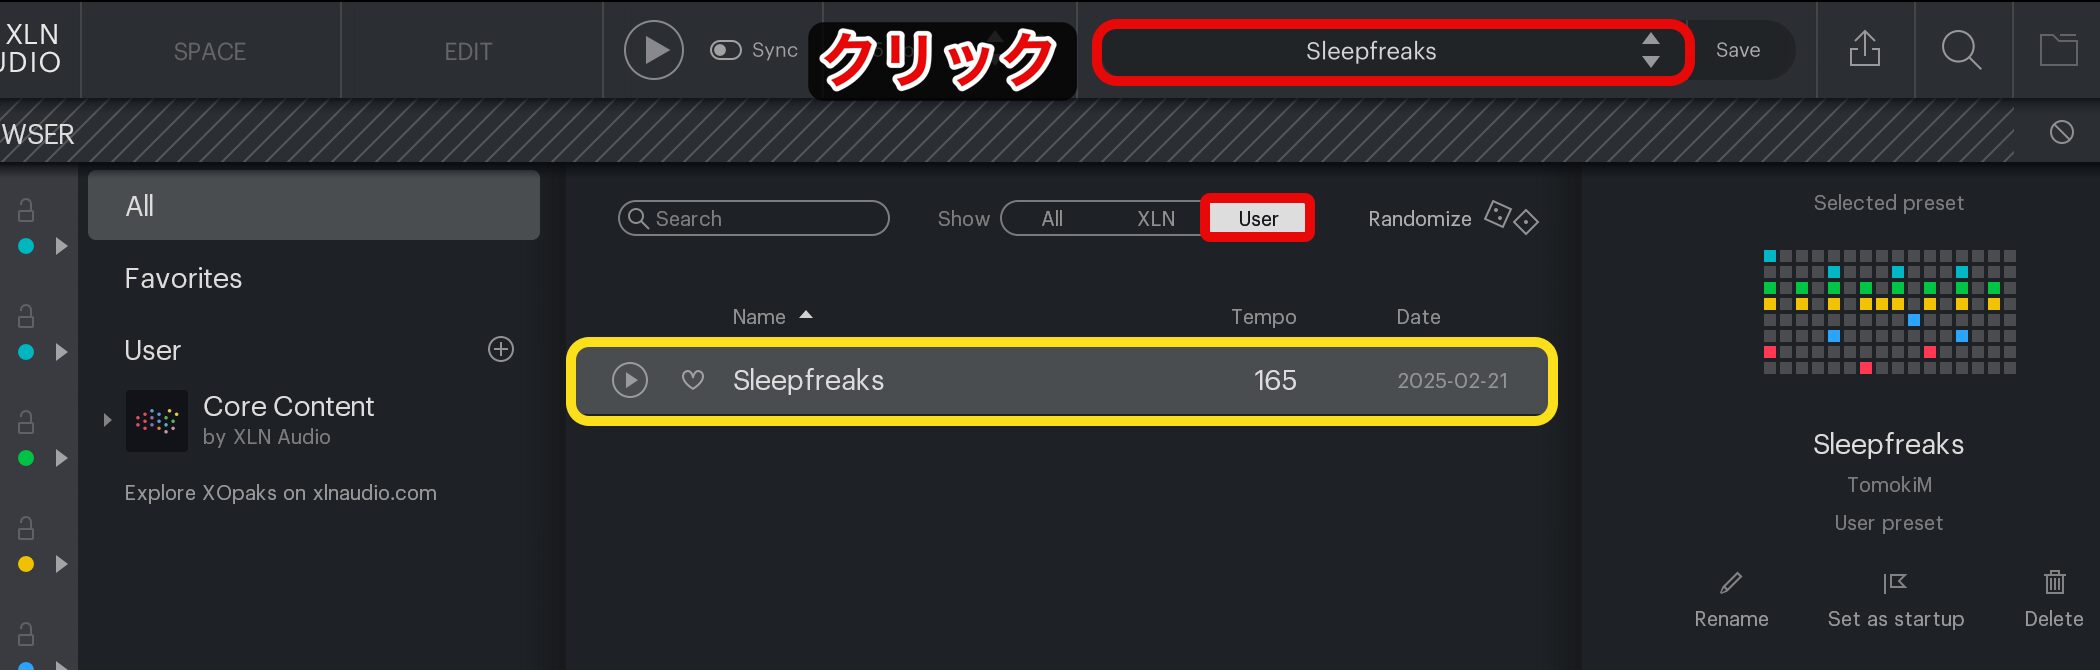
Recall saved kits from User in the preset window.
What do you think?
With kit-pattern creation, sound editing, and flexible DAW export, we found XO to be an excellent instrument that covers everything needed to build rhythm tracks for electronic music.
A demo version is also available, so give it a try!
Frequently Asked Questions
Q1. How do I use XO's SPACE window?
Click the stars in SPACE to audition samples, using the left-to-right pitch and top-to-bottom length arrangement to find the sound you want. Click a drum slot's label to load the selected sample, or Alt-drag it directly into your DAW.
Q2. How do I add my own samples to XO?
Click the folder icon at the top, use + Folder to select the sample folder you want to add, and click Scan & Refresh. XO automatically analyzes the samples, categorizes them as Kick, Snare, and so on, and adds them to SPACE.
Q3. How can I separate DAW-only playback from XO's pattern playback?
Either turn off Sync and XO's play button, or select the Empty column in BEAT COMBINER. This lets you play only the DAW's pattern.
NEW ARTICLES
Latest English Articles