This article explains five ways beginners can give programmed drums more dynamics and a stronger sense of development. Add fills, vary their lengths, change patterns between sections and within each section, and coordinate the drums with other parts to turn a predictable song into a lively arrangement. Using a drum instrument such as Addictive Drums 2 lets you put these practical techniques into action without extensive specialist knowledge.
Key Points for Arranging Pop and Rock Drums
Here are five things to check when programming drums to create a pop or rock arrangement with dynamics and a sense of development.
Common questions we receive about arranging include:
- I cannot give the song enough dynamic contrast.
- The chorus does not feel exciting enough.
- Everything feels predictable, with nothing to catch the listener’s attention.
Many of you may have encountered similar problems.
When trying to solve these issues, it is tempting to add more tracks or make the melodic and decorative parts busier. However, changing the accompaniment often produces better results.
Here, we will focus on drums—the backbone of the accompaniment—and introduce five ways to bring movement to your arrangement.
For the video, we use Addictive Drums 2, the drum instrument with the most users in our survey of popular music-production products at the time.
Many of the patterns and fills in this tutorial are edited versions of Addictive Drums 2 presets. It is a product we recommend to anyone who finds drum programming difficult.
- 1STEP 1 — Add Fills
- 2STEP 2 — Vary the Length of Your Fills
- 3STEP 3 — Change Patterns Between Sections
- 4STEP 4 — Change Patterns Within a Section
- 5STEP 5 — Coordinate with Other Parts
- 6Additional Patterns
Selected Questions and Answers from YouTube

When I program dynamics with MIDI, compression levels them out quite a lot. Should I also use automation? Would I need to set automation for every individual note?

When programming acoustic drums, velocity is the basic way to express dynamics. If the compressor feels as though it is squashing them too much, we recommend revisiting its settings, such as the ratio and threshold.
First, let us listen to the difference these techniques can make to an arrangement.
Track with Almost No Drum Variation
Track Using All Five Techniques
All tracks other than the drums are identical in these examples. Applying the five techniques gives the flow of the song more contrast.
Next, we will improve the drum track step by step, so be sure to follow along to the end.
STEP 1 — Add Fills
The first step in improving a drum arrangement is to add fills.
A fill, also called a fill-in, changes a repeating pattern and helps connect sections smoothly.
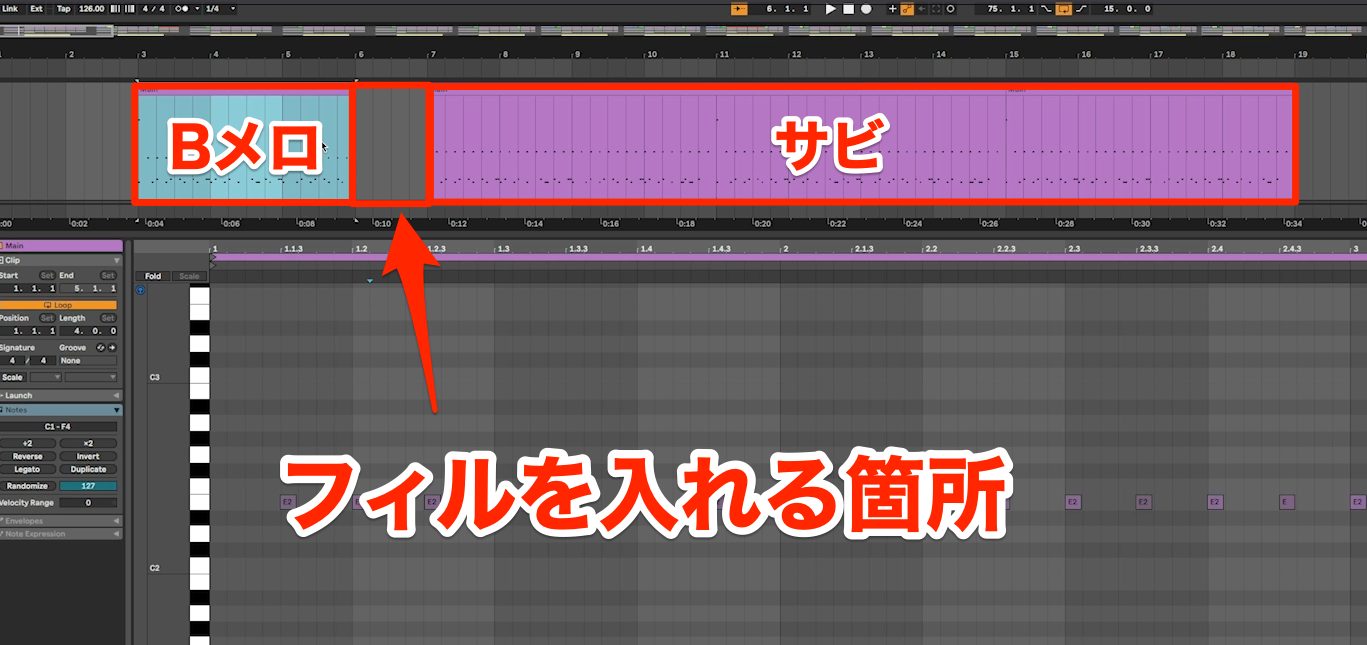
Let us add a fill between the pre-chorus and chorus to hear its effect.
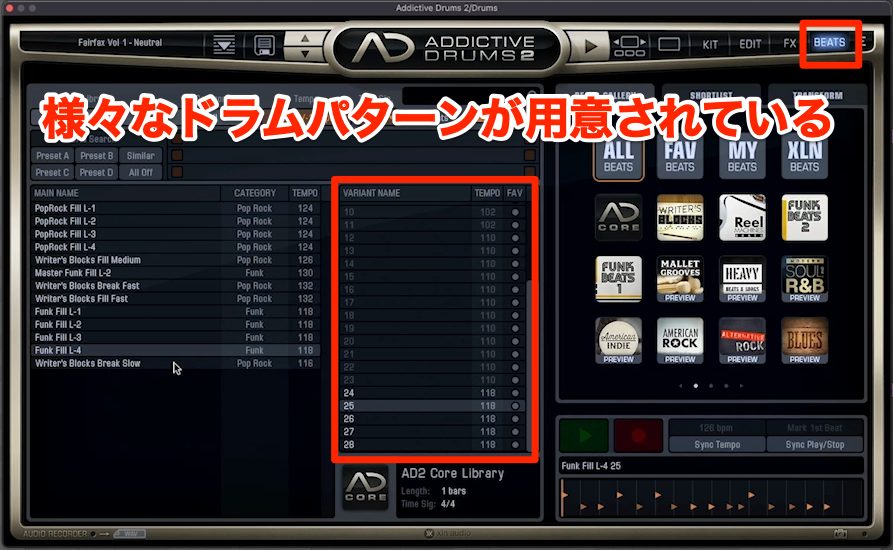
Choose a fill you like from the BEATS section in Addictive Drums 2.
You can place each pattern easily using drag and drop.
Track with an Added Fill
The fill creates momentum toward the chorus, bringing variation to what had been a flat progression.
Sometimes, however, adding a fill can make the sudden rhythmic change feel unnatural.
In that case, hinting at the coming change just before the fill can create a smoother flow.
Here are three standard approaches. Listen to the examples first.
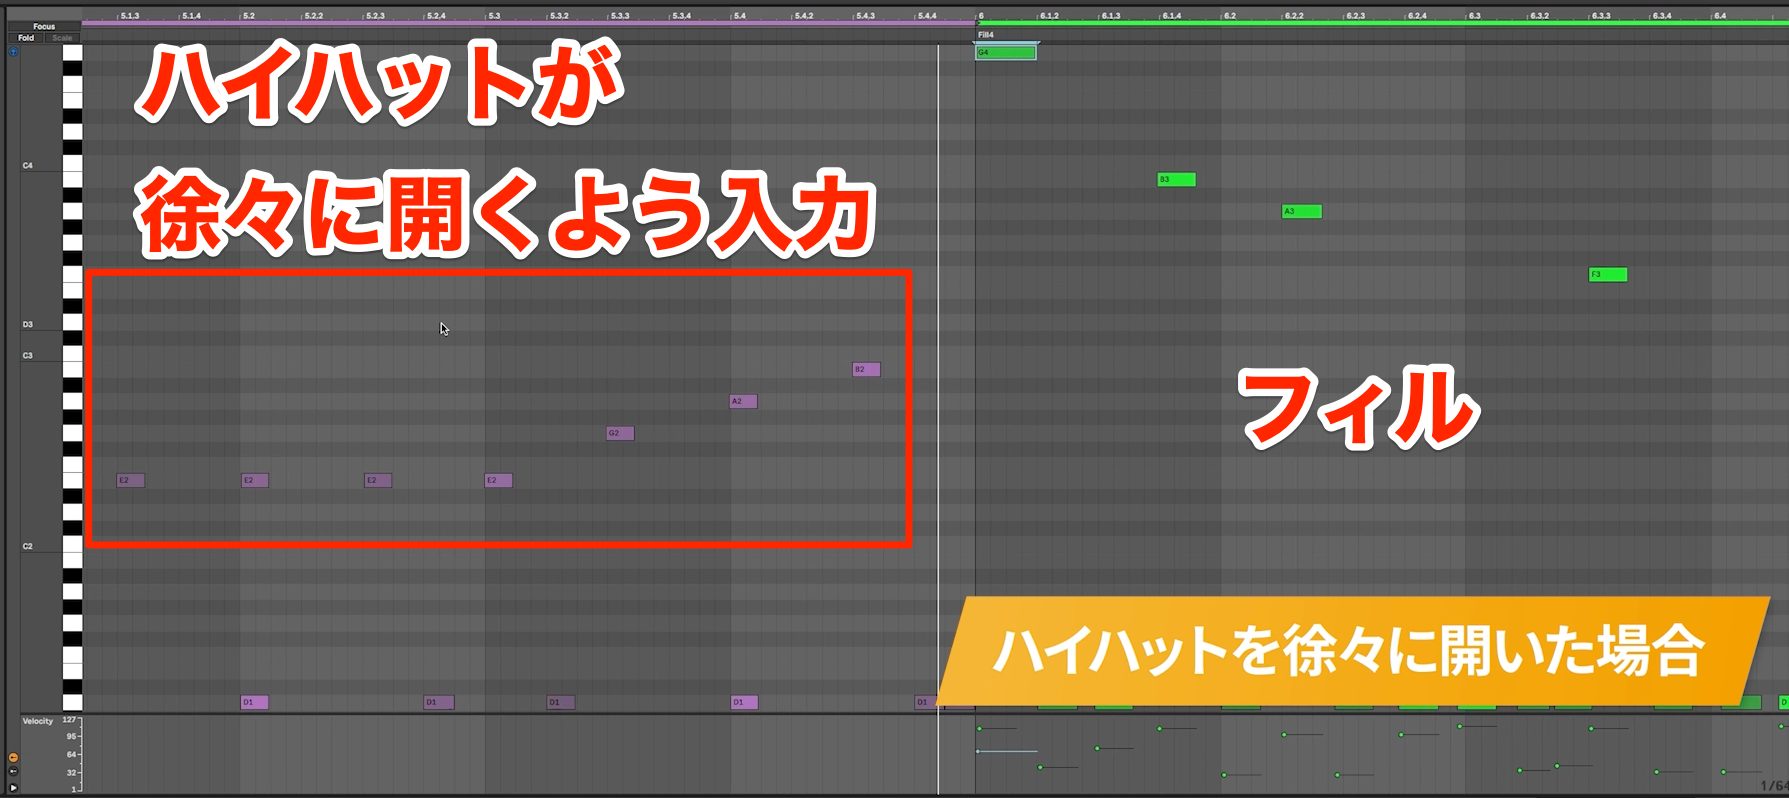
Gradually Opening the Hi-Hat
Gradually building toward the fill reduces the sense of an abrupt rhythmic change.
In addition to gradually opening the hi-hat, a crash-cymbal accent on beat four is another common way to achieve the same purpose.
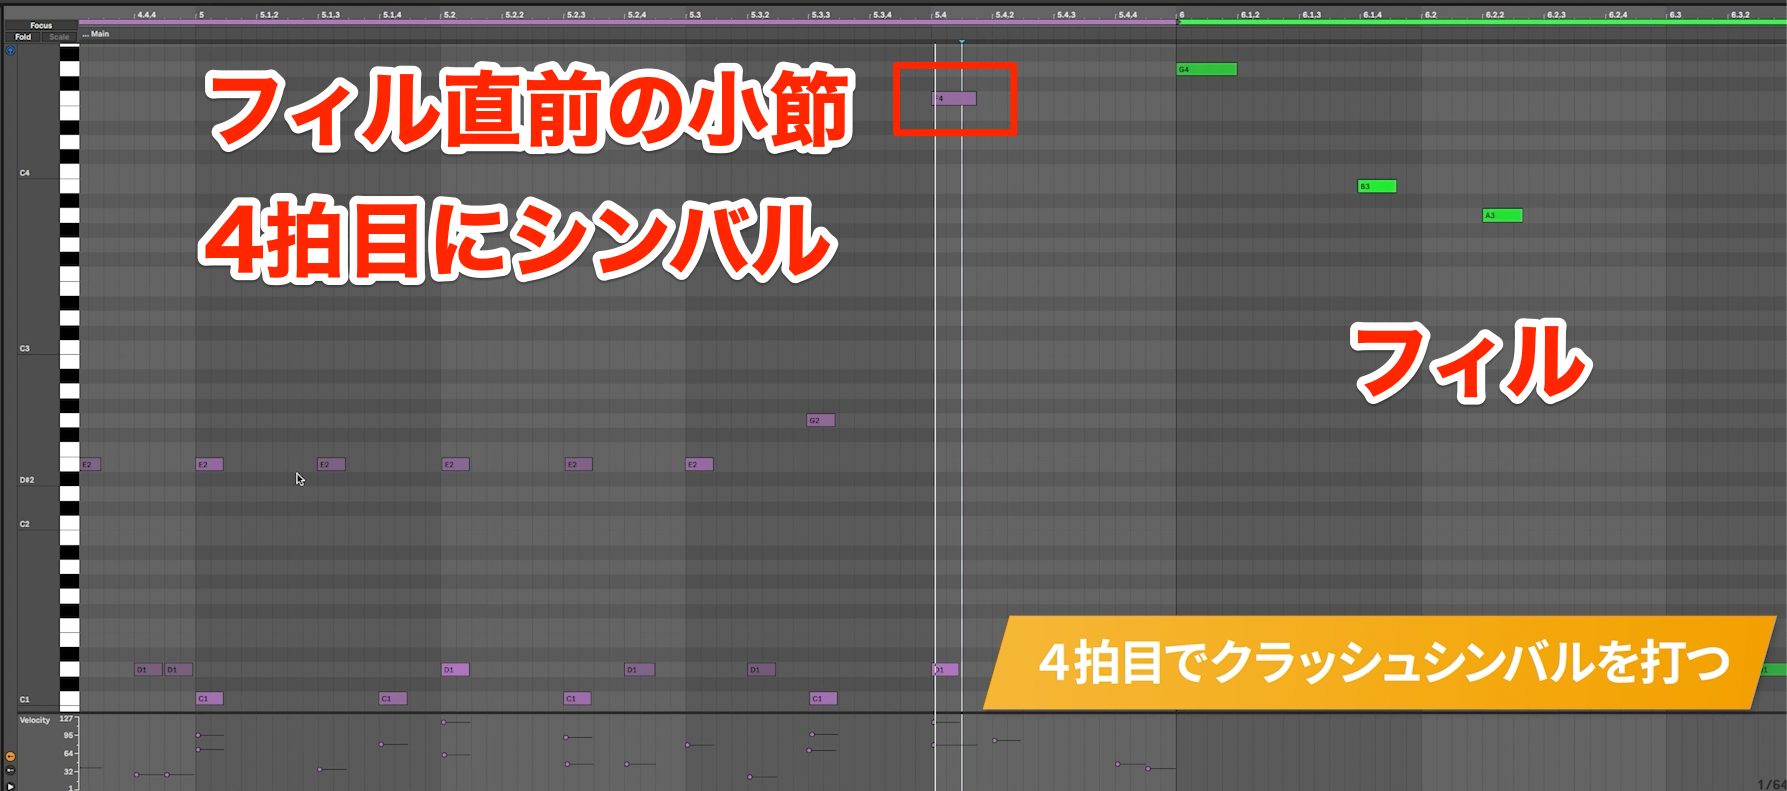
Crash Cymbal on Beat Four
Another option is to add a short fill leading into the main fill.
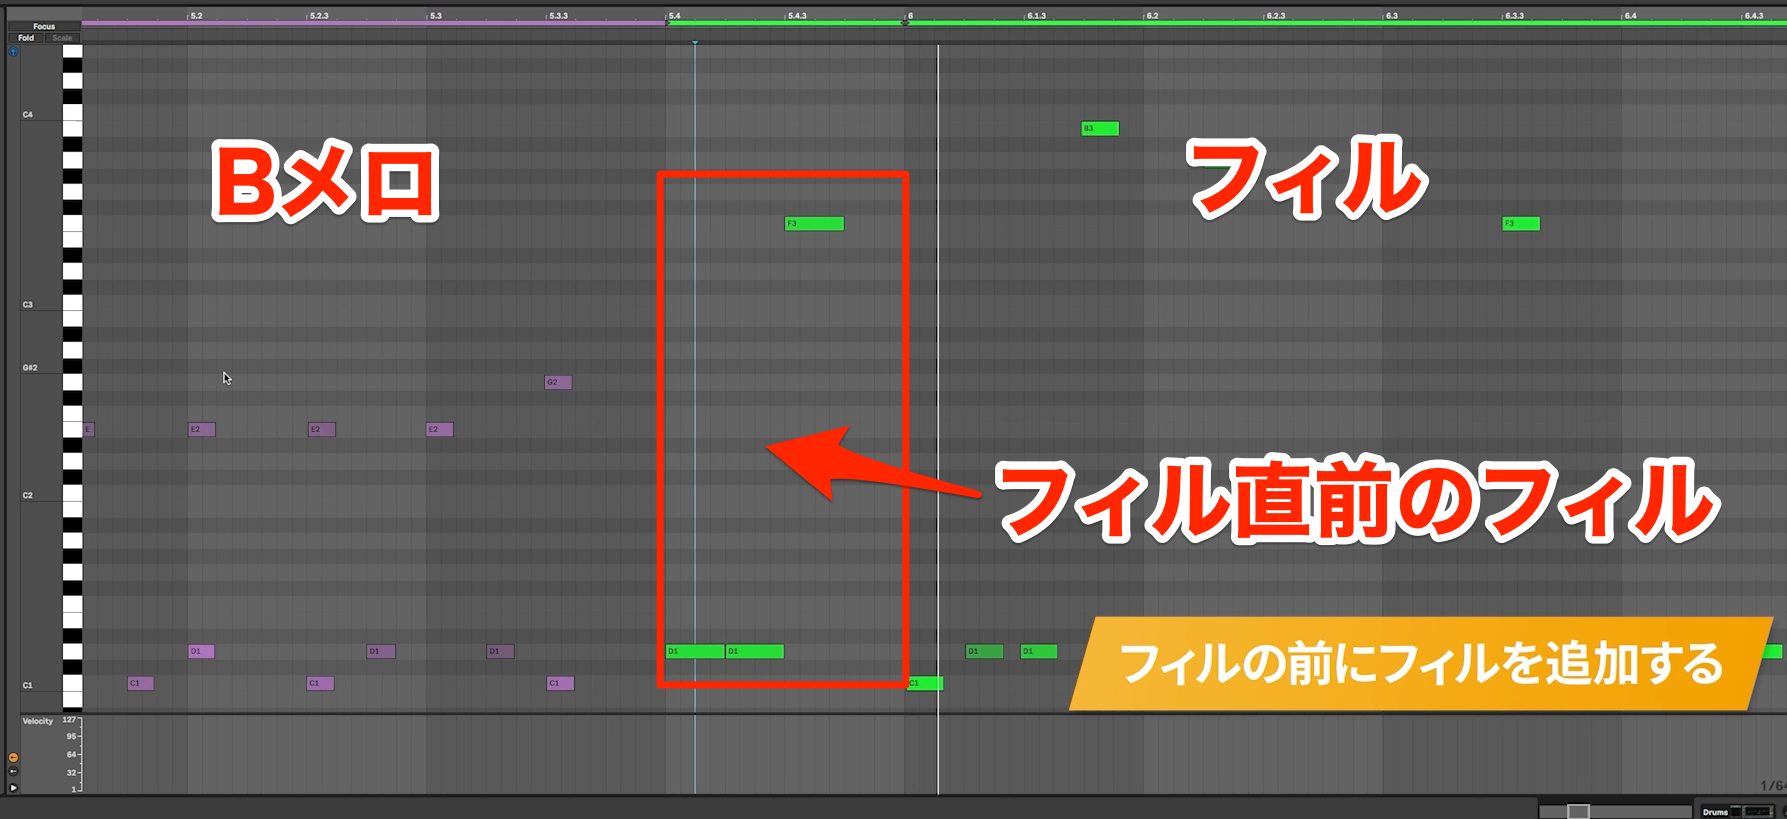
Its role is to set up the larger fill, so choose something short.
A Short Fill Leading into the Main Fill
These are basic techniques for connecting changing patterns smoothly. Try incorporating them into your own productions.
STEP 2 — Vary the Length of Your Fills
The second step is to pay attention to fill length.
Fills add variation and momentum to a rhythm, but repeatedly using similar phrases makes them predictable and reduces their impact.
To avoid a monotonous arrangement, vary the length to suit the moment—for example, a full bar or two beats.
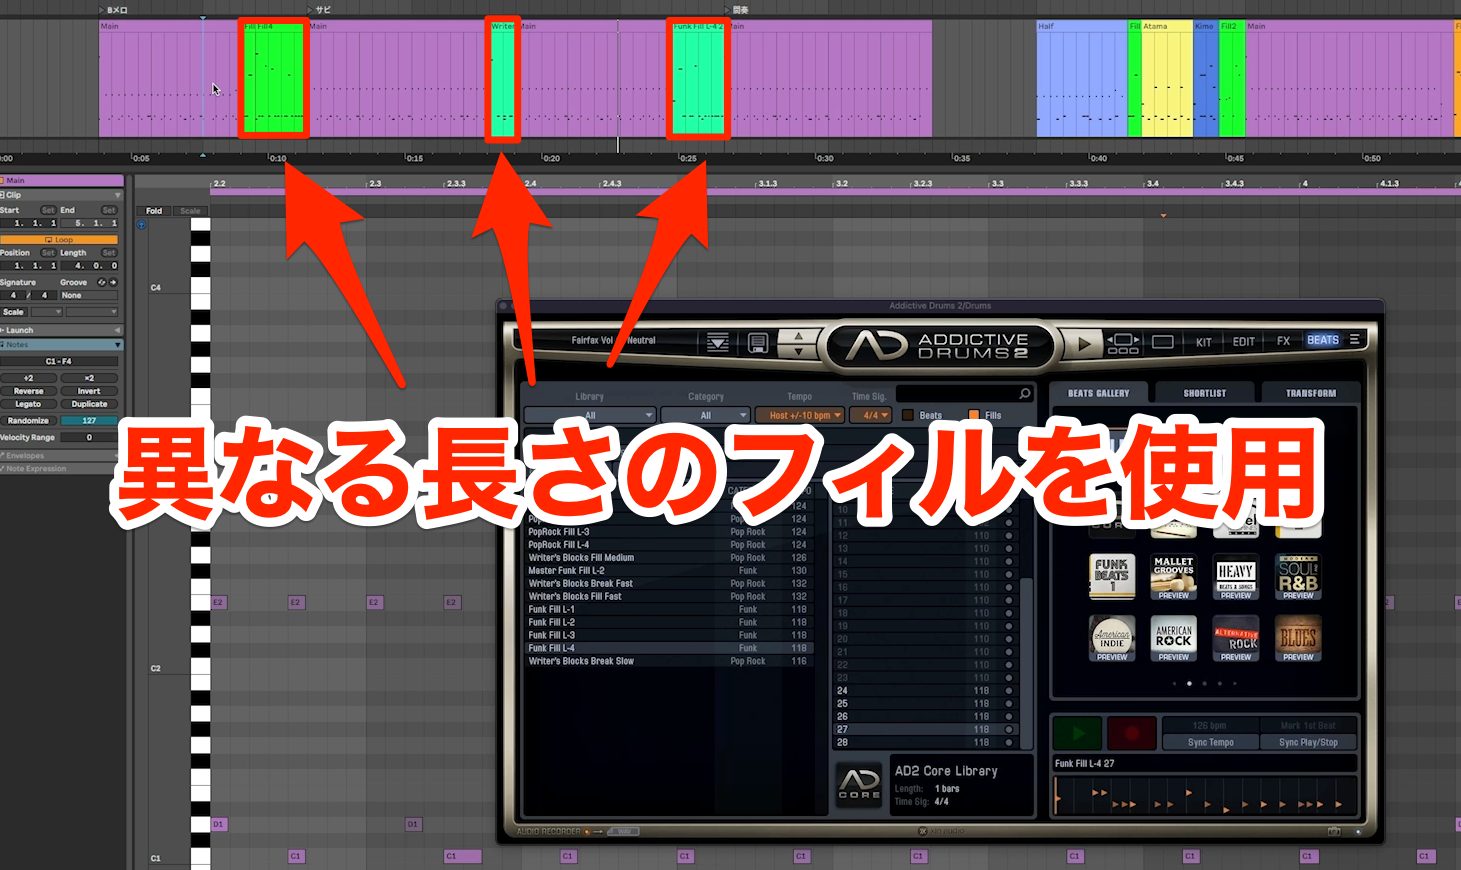
In the demo song, we used fills of different lengths on the way from the pre-chorus into the chorus.
Track with Three Fills of Different Lengths
You can hear how a variety of fills gives the song more life.
There is no fixed rule for choosing the length of a fill, but a common approach is to use longer fills before major changes in the music, and shorter fills where the change is smaller.
STEP 3 — Change Patterns Between Sections
The third step is to change the drum pattern from one section to another.
Using different patterns for the verse, pre-chorus and chorus is another important way to give a song a sense of development.
If you are unsure which patterns to choose, here are some commonly heard in pop and rock.
Half-Time Feel
A half-time pattern makes the rhythm feel as though the tempo has been halved.
It reduces the perceived speed, making the return to the original pattern feel more energetic.
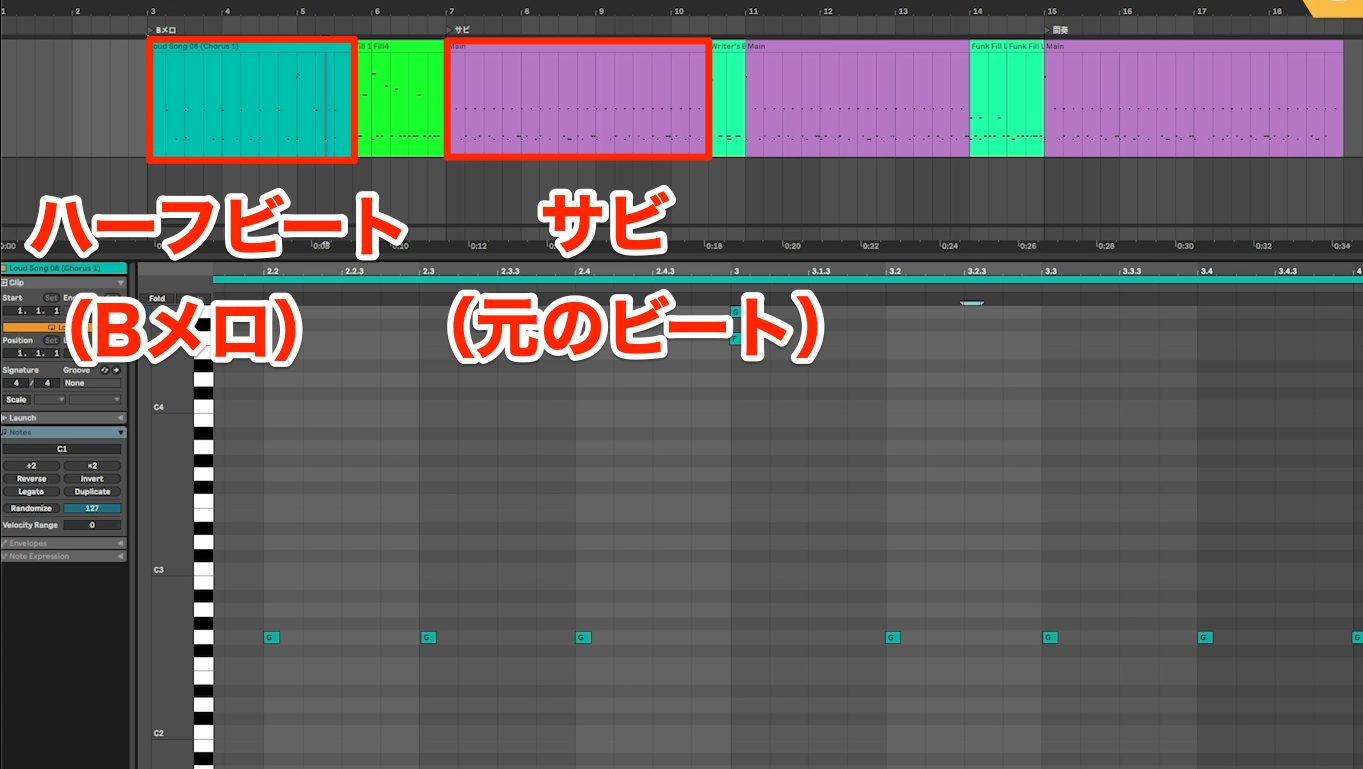
Here, we switch the pre-chorus to half-time so that the chorus feels more lively when the original beat returns.
Half-Time Pre-Chorus
Shifting the Accents
If you do not need as dramatic a change as half-time, shifting the accents can also help the song flow.
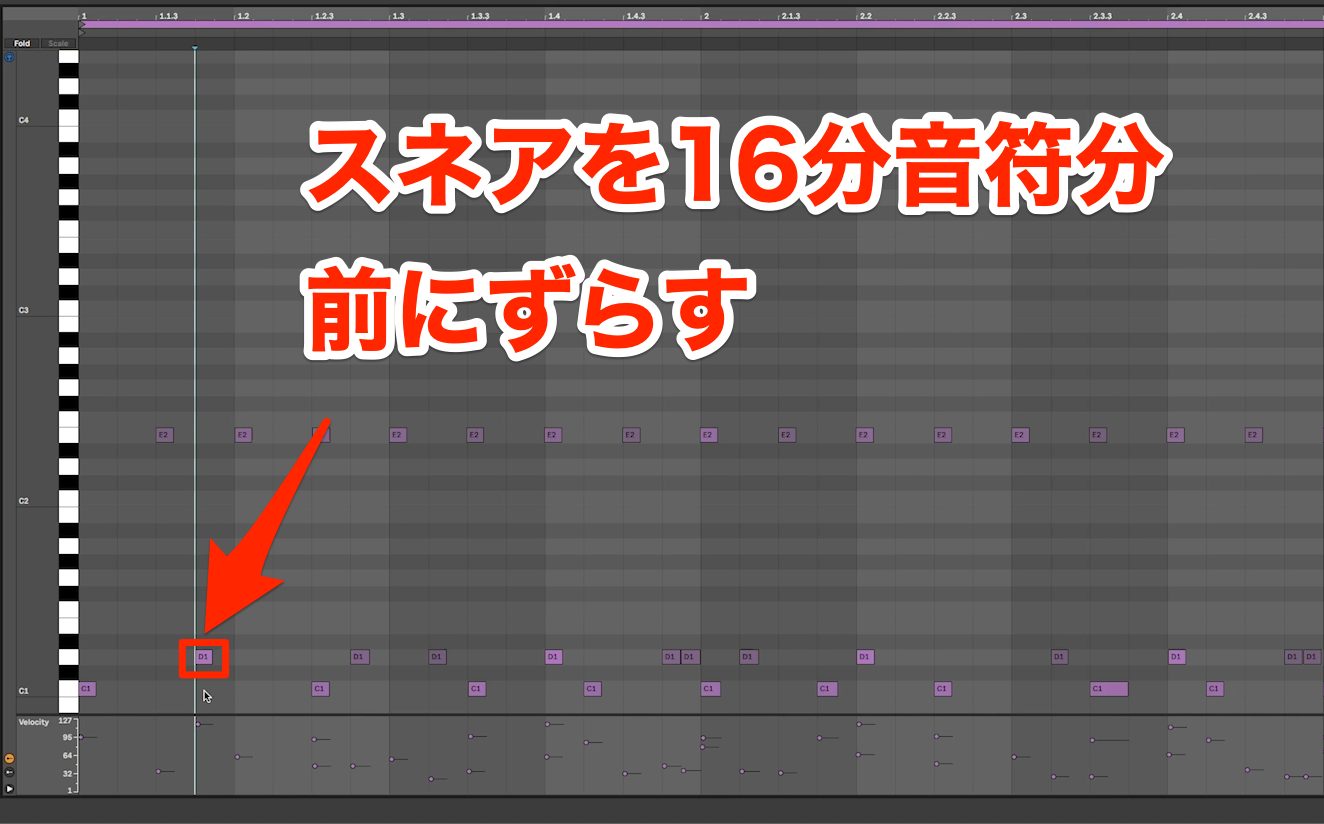
Again using the pre-chorus, we shift one of the accented snare hits by a sixteenth note.
Shifted Snare Hit in the Pre-Chorus
Only one snare hit has moved, but the displaced accent gives the pattern a different feel.
Four on the Floor
Four on the floor places a kick on every beat. It is a standard pattern widely used in dance music and other styles.
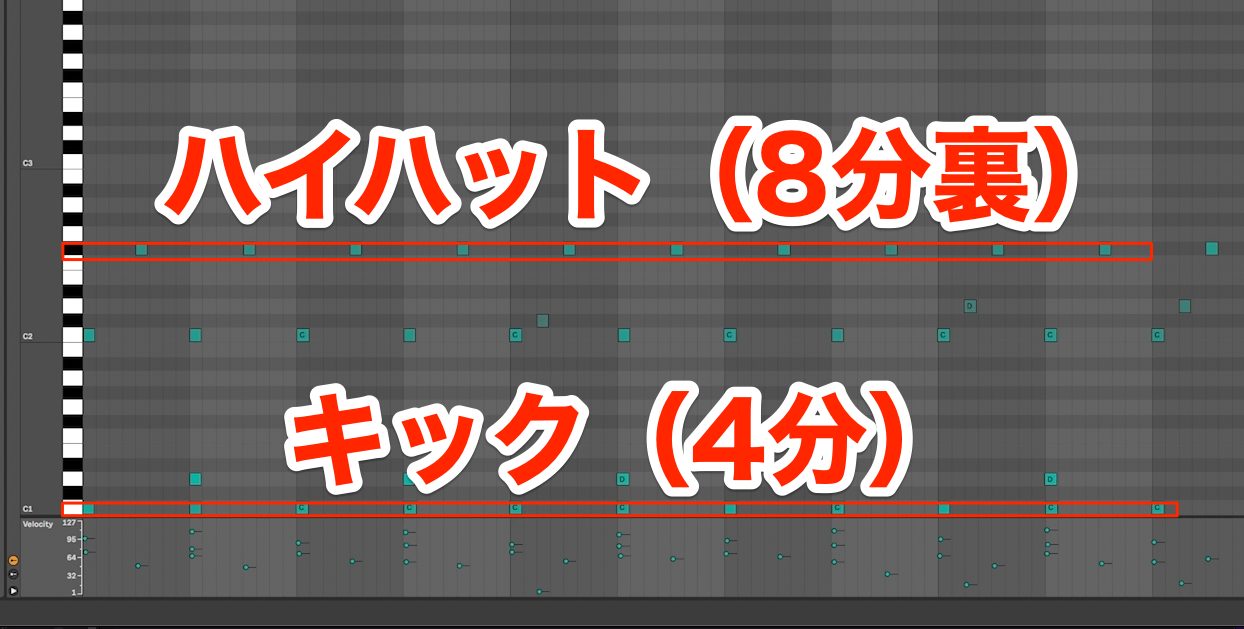
It is often combined with hi-hat accents on the offbeats.
Here, we change the chorus to four on the floor to contrast with the pre-chorus.
Four-on-the-Floor Chorus
The simpler rhythm gives the chorus a catchier feel than the original version.
There are countless other drum patterns. Choosing which one to use, and where to use it, is an important part of a song’s identity.
If your drum instrument includes MIDI patterns, try a variety of them.
STEP 4 — Change Patterns Within a Section
The fourth step is to change patterns within the same section.
In Step 3, we varied the rhythm between sections. Changing patterns within a section can produce a similar effect.
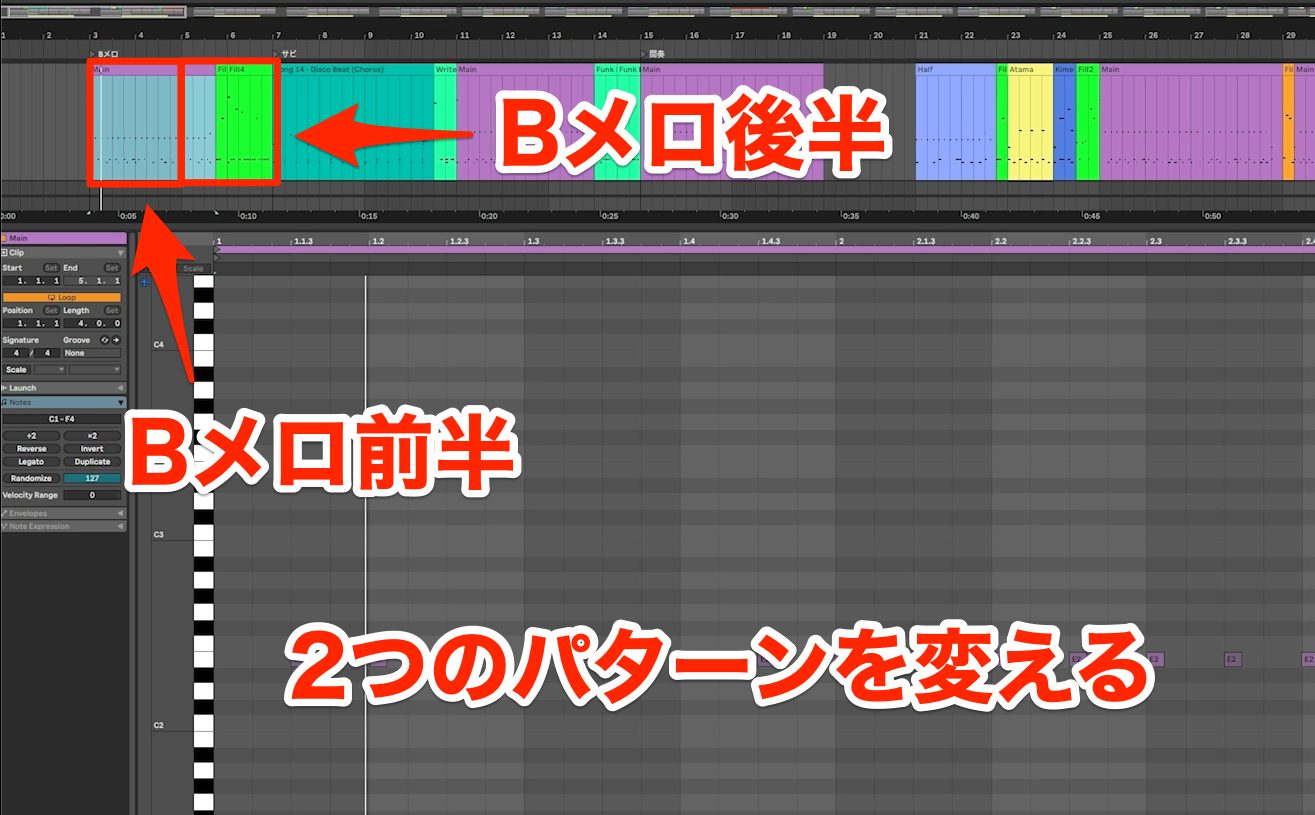
Here, we divide the pre-chorus into first and second halves and introduce a more detailed pattern change.
Snare Accents on the Beats
First, let us use a pattern with the snare placed on the beats.
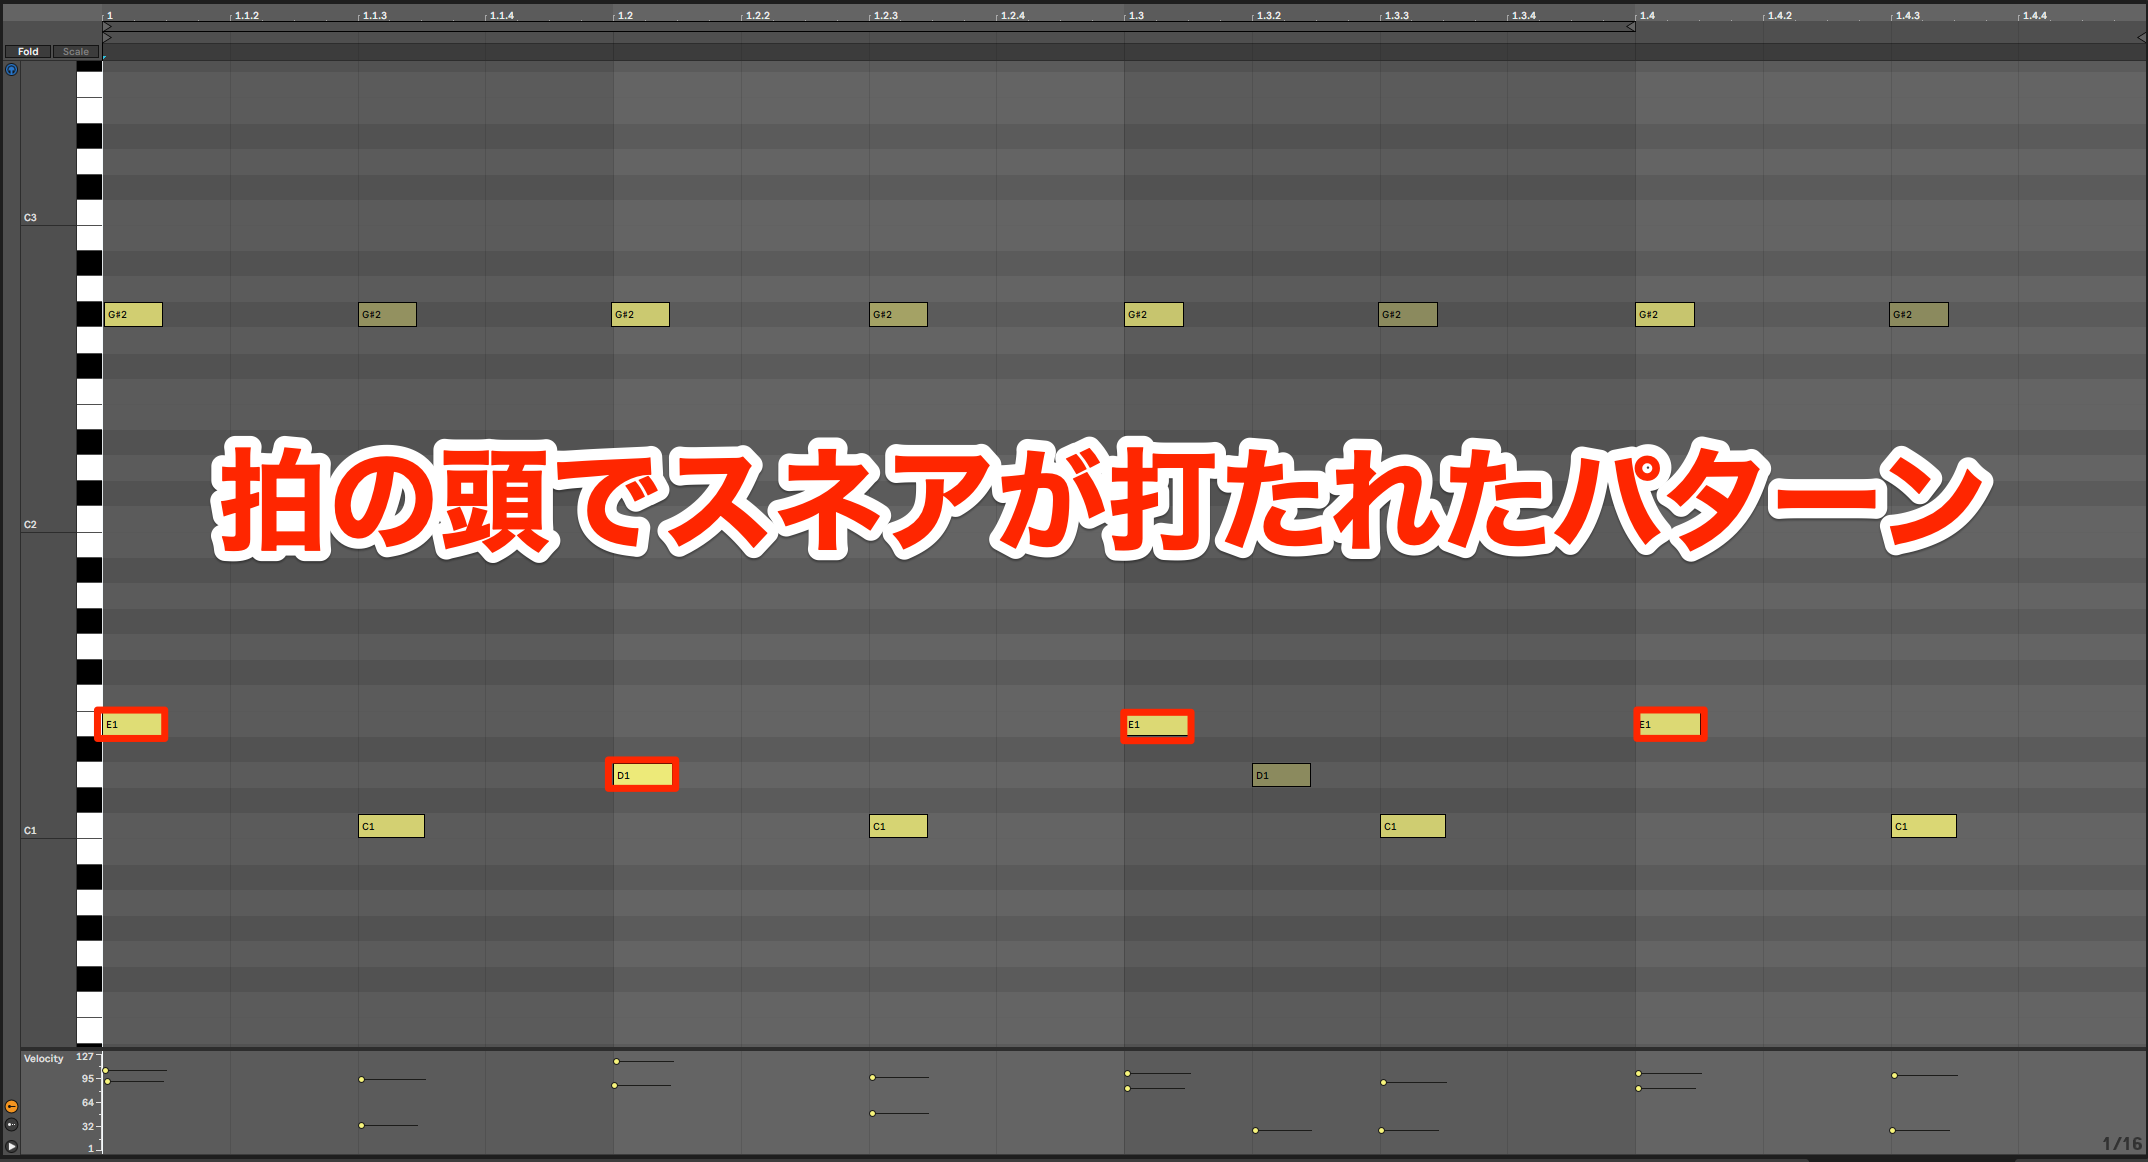
Like four on the floor, it accents the beats, but the snare gives it a different feel from a kick-led pattern.
If you already have a pattern in mind, try the Grid Search function in Addictive Drums 2.
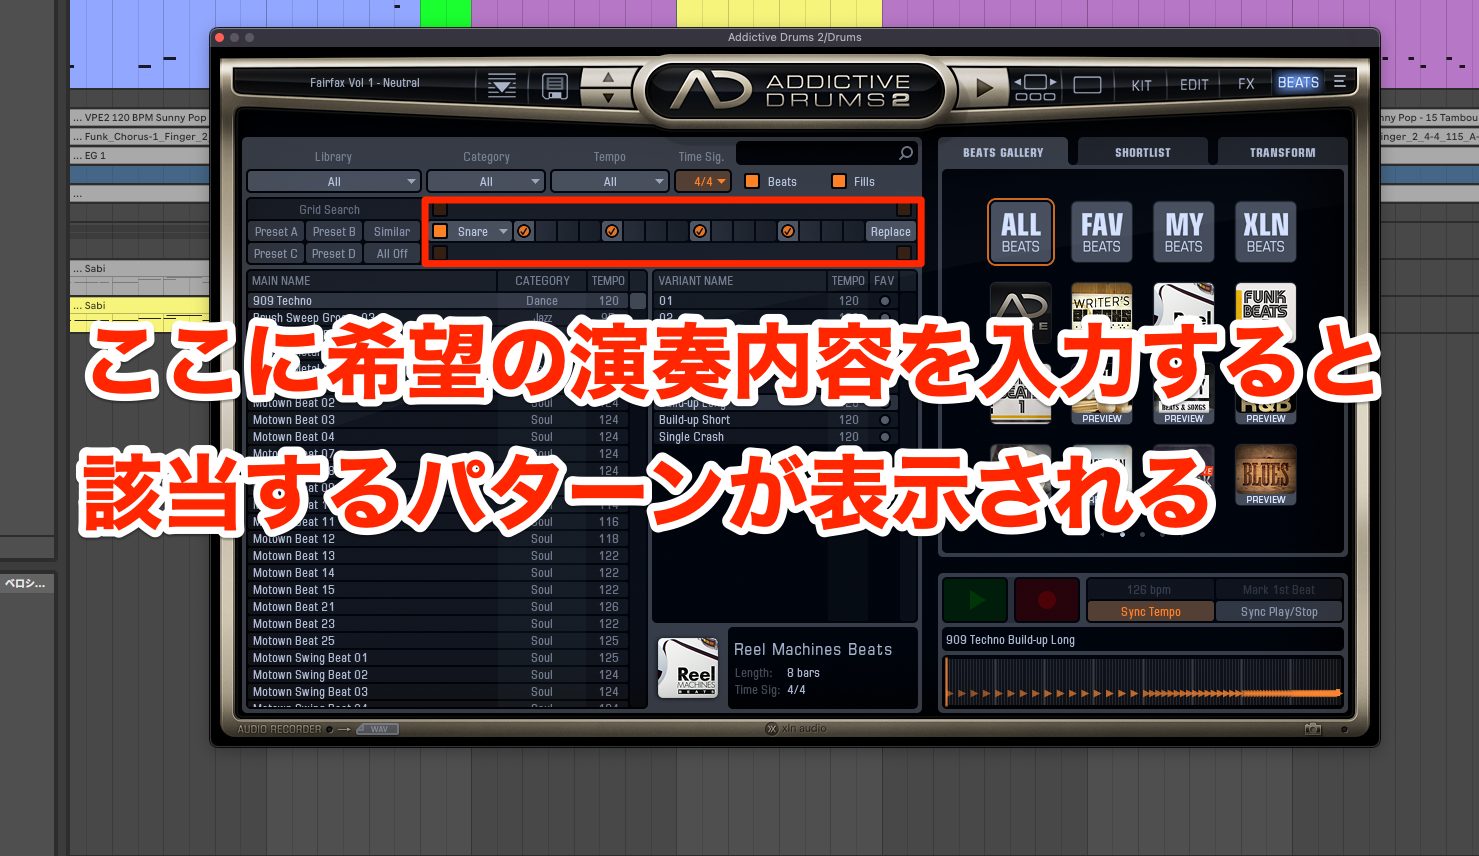
Enter the timing of kick and snare hits into the grid, and it will suggest matching patterns—a very useful feature.
Snare-on-the-Beat Pattern in the Second Half of the Pre-Chorus
The 3+3+2 Pattern
Another standard pattern divides the bar into groups in a 3:3:2 ratio and accents those groups.
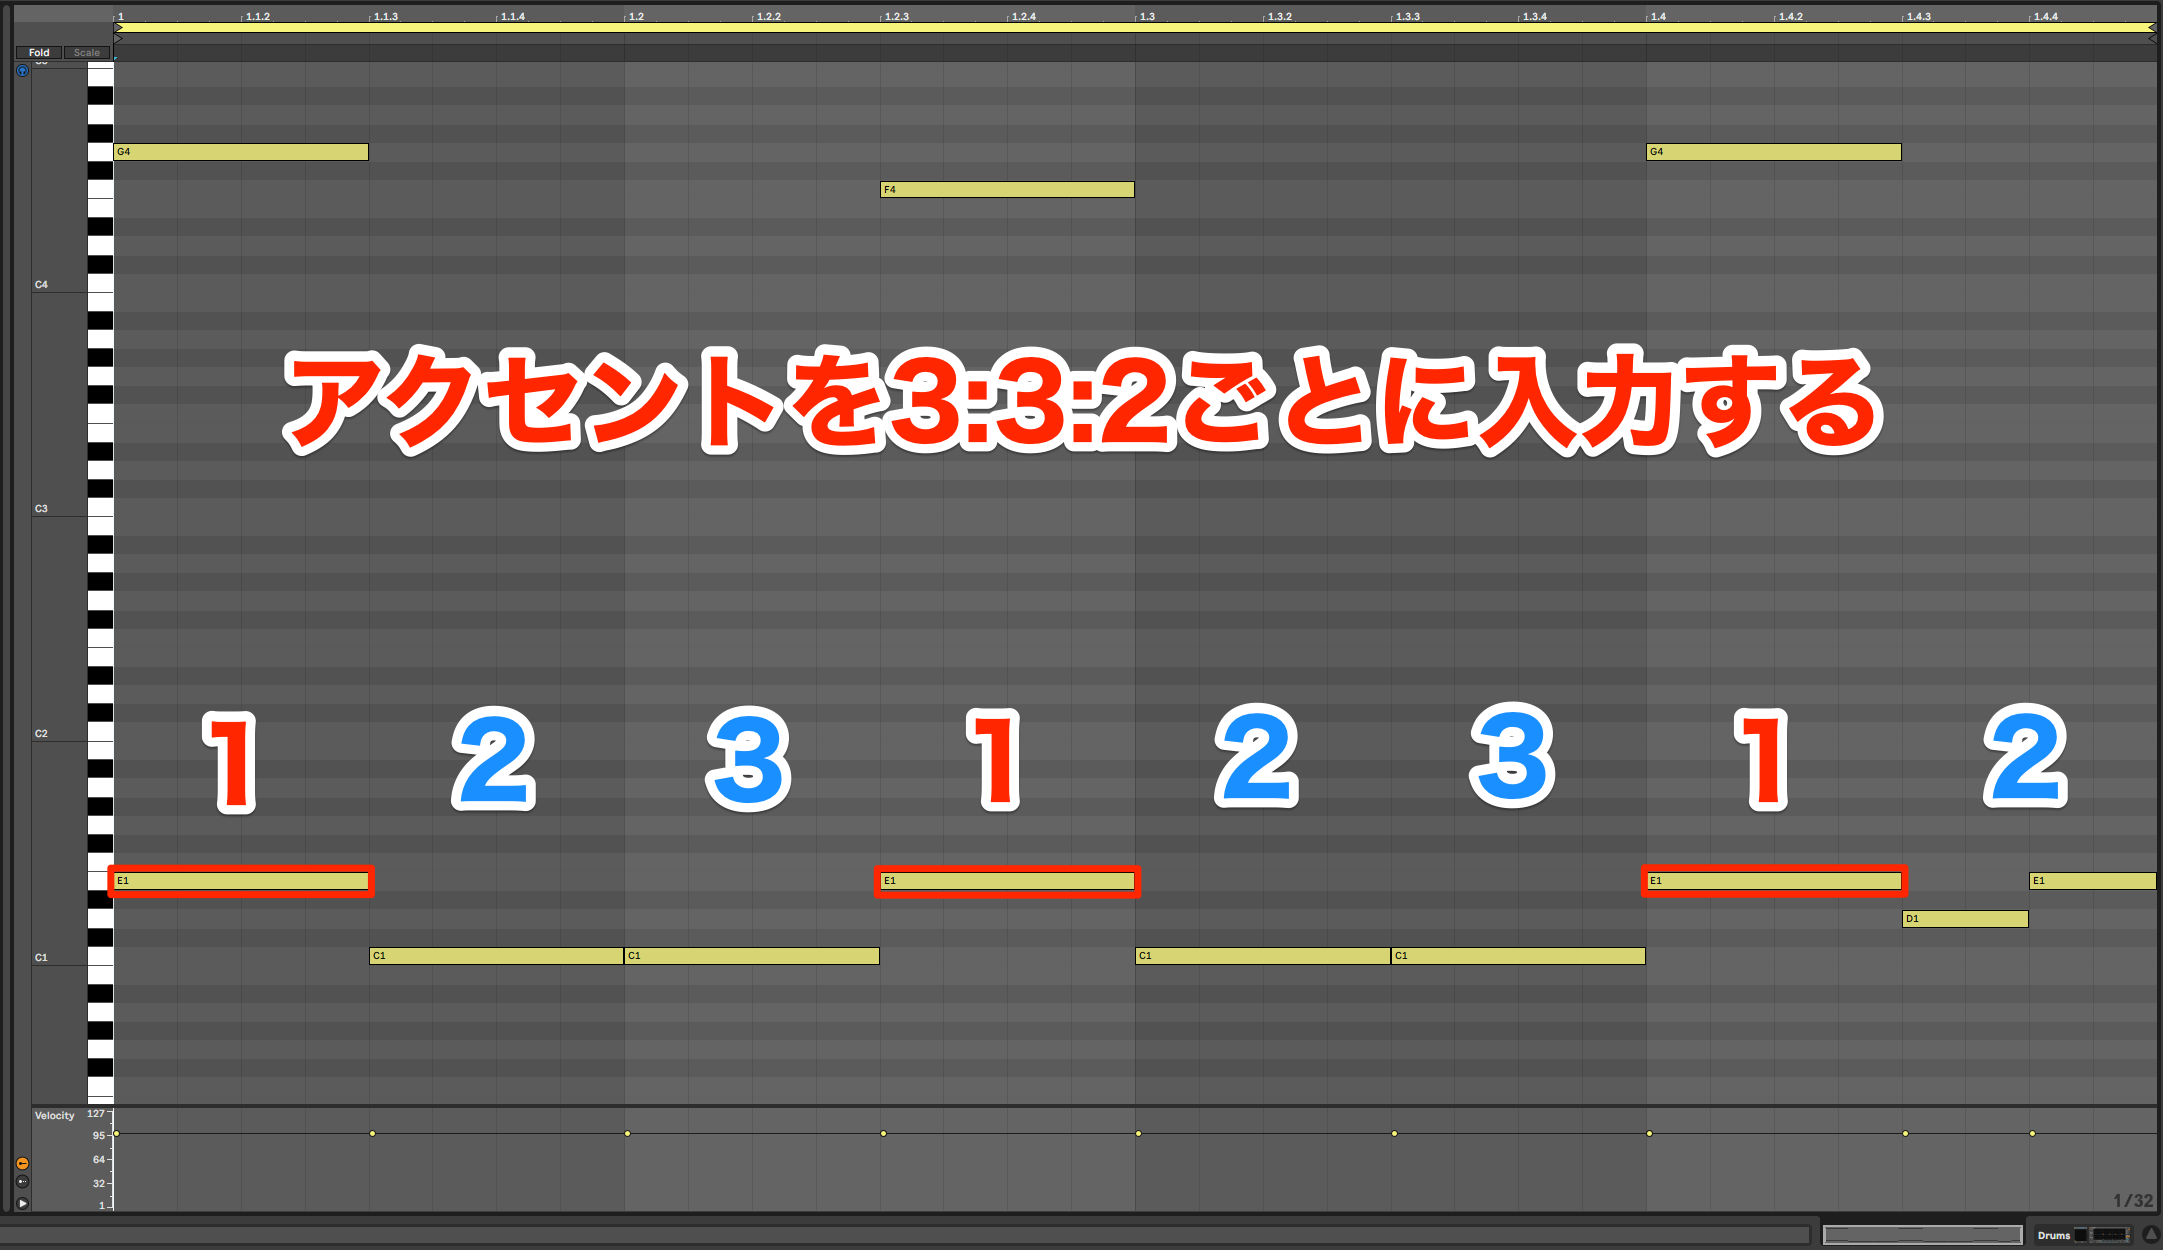
This can be seen as a variation on shifting the accents, but it is common enough in pop and rock drumming to learn as a pattern in its own right.
3+3+2 Pattern
Crescendo Patterns
Patterns that build in volume on the snare or floor tom are also common.
You could regard them as extended fills, but here we will treat them as drum patterns.
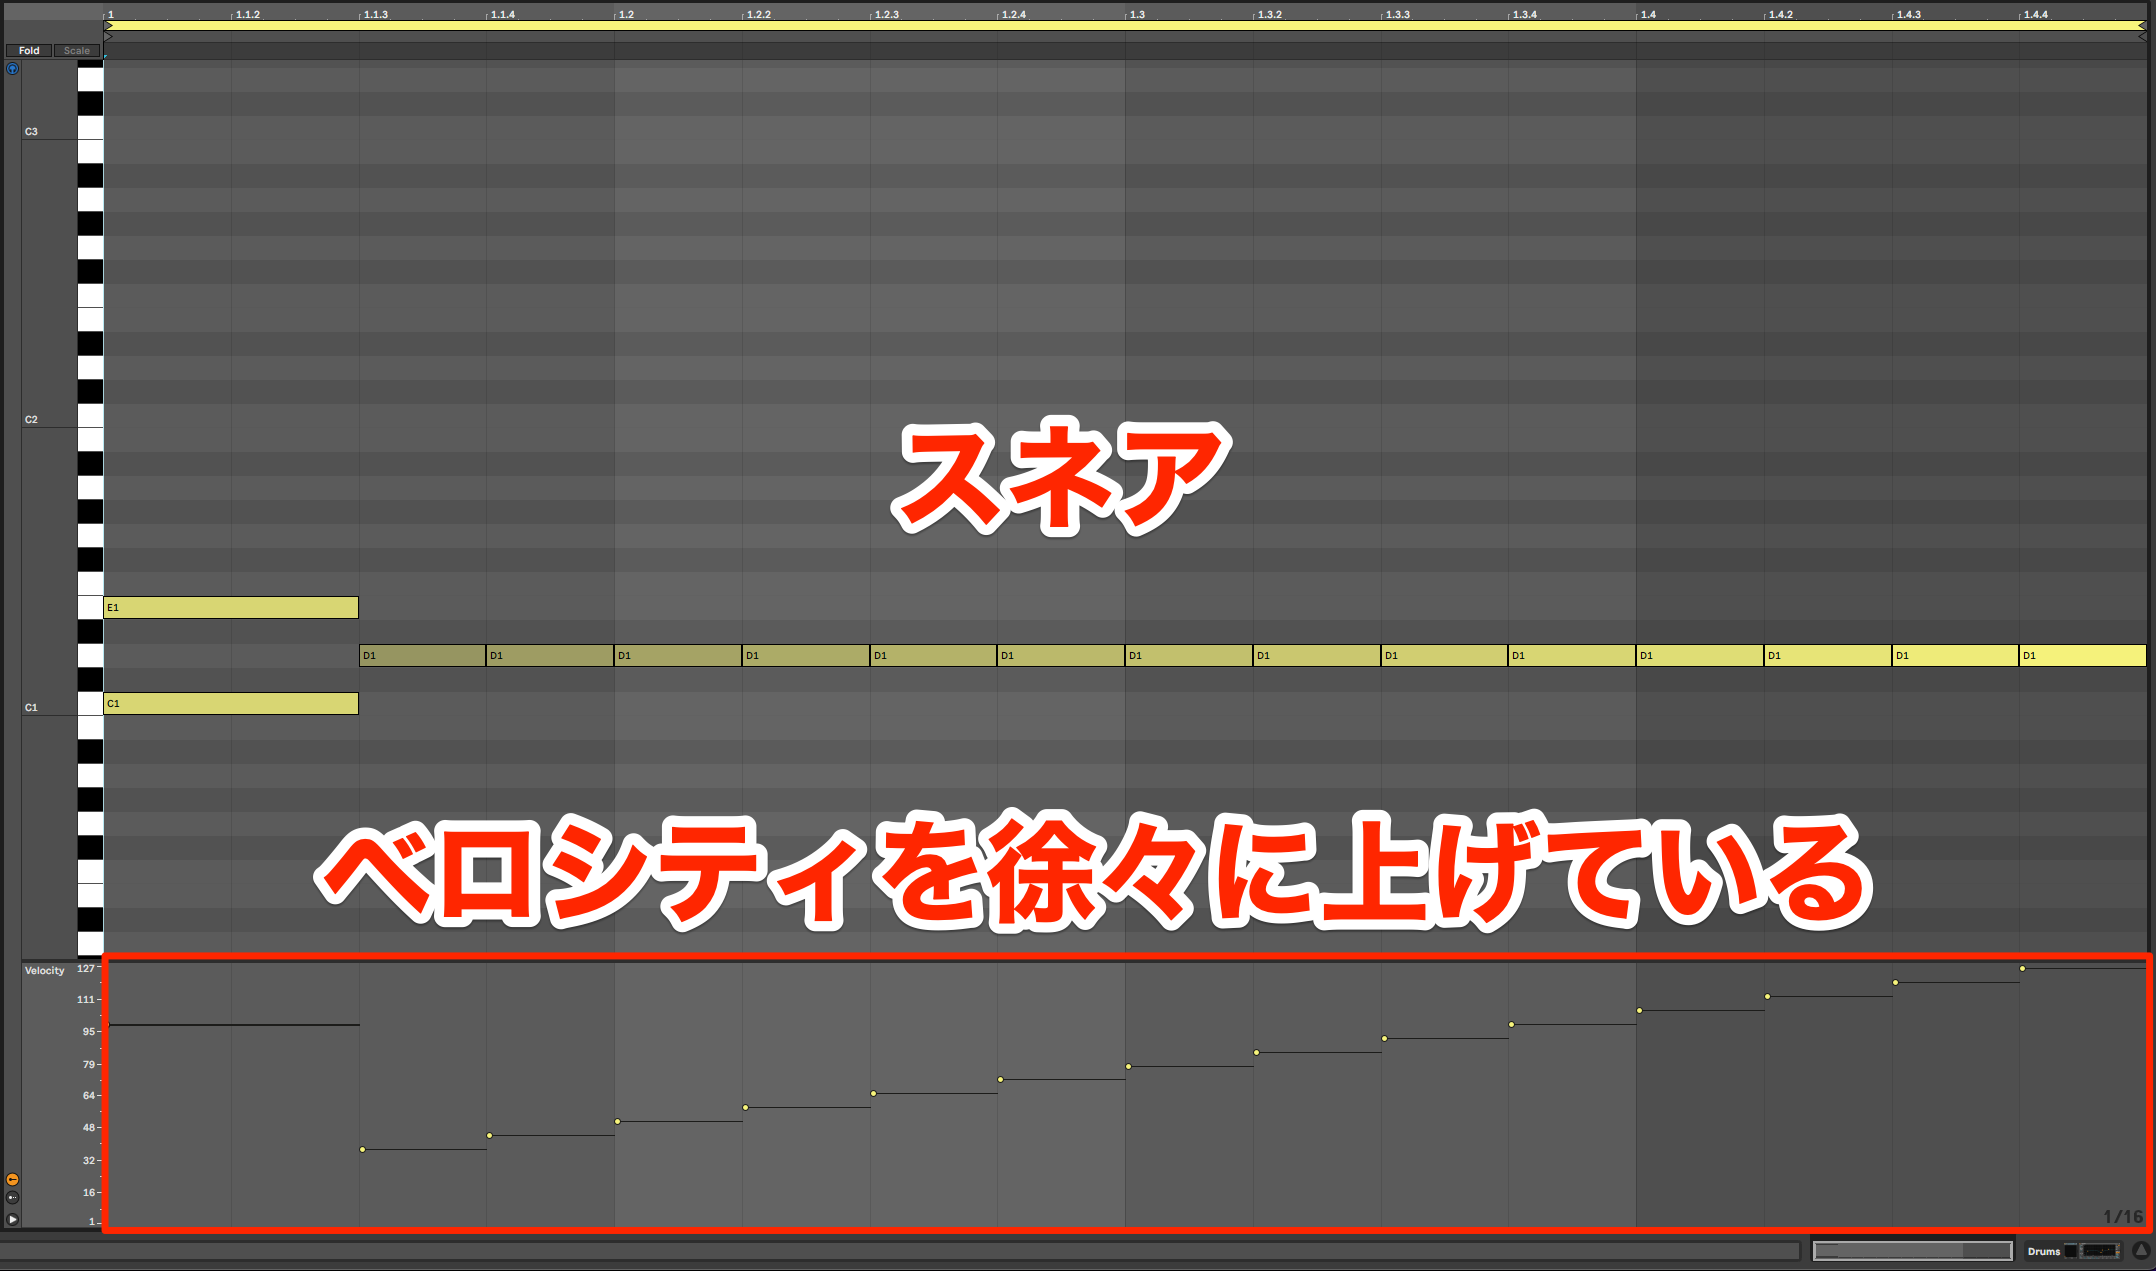
One option is to play repeated sixteenth notes on the snare, gradually increasing the velocity.
Sixteenth-Note Snare Crescendo
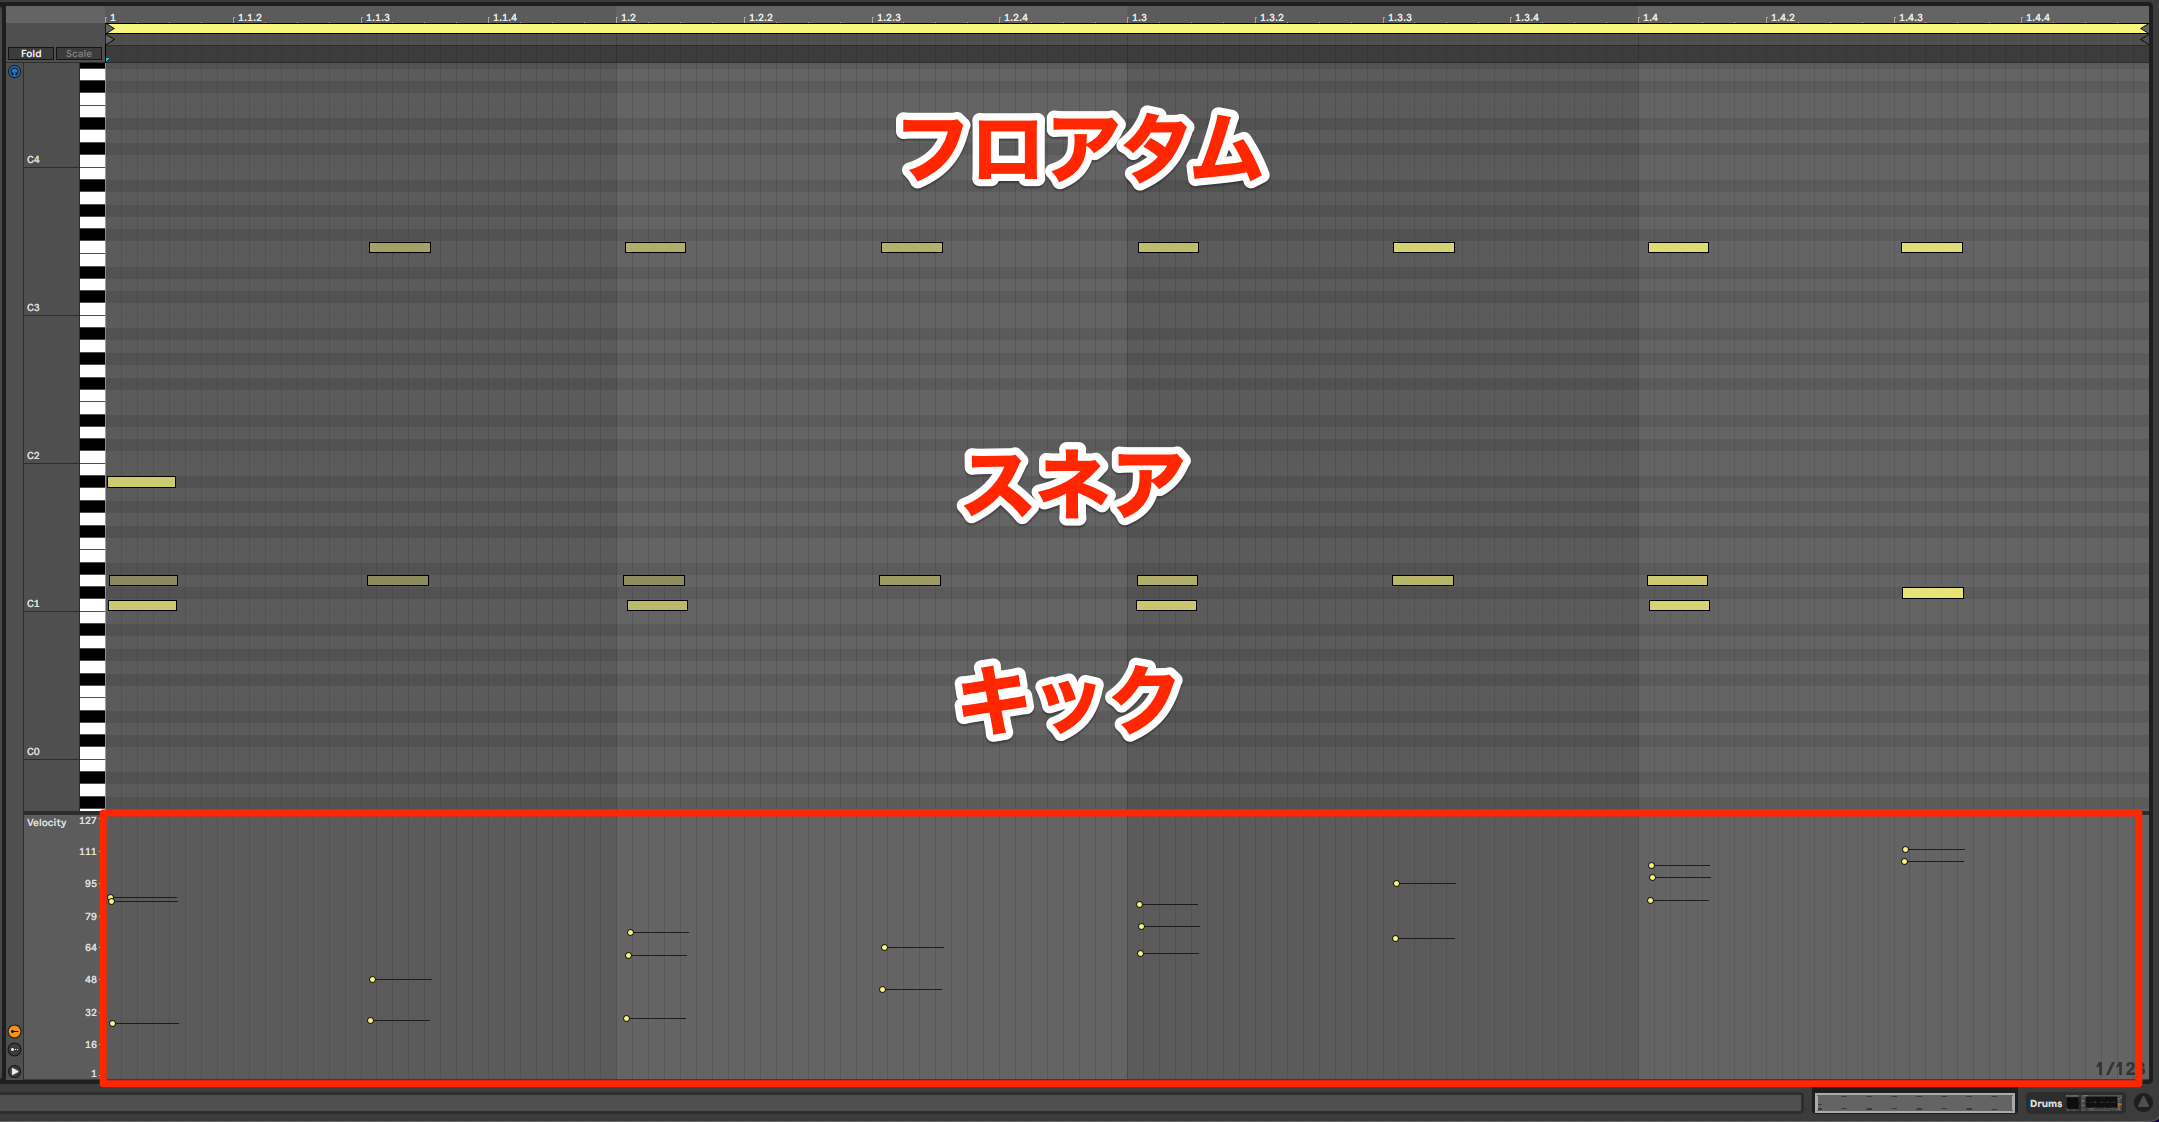
Another uses eighth notes on the snare and floor tom, sometimes with the kick as well.
Eighth-Note Snare and Tom Crescendo
You can also insert a fill at the end of these patterns, just before the next section begins.
So far, we have varied patterns within the pre-chorus, but the same technique works in the chorus and other sections too.
Pattern Changes Within the Chorus
There are many other possibilities. Listen closely to the drum patterns in music you enjoy—you may discover something new.
STEP 5 — Coordinate with Other Parts
The fifth step is to coordinate the drums with other parts.
Matching the drums to selected moments in the melody or the rhythms of other parts is another highly effective way to bring movement to an arrangement.
Following the Melody
A common technique is to match the drum rhythm to parts of the melody you particularly want to emphasize.
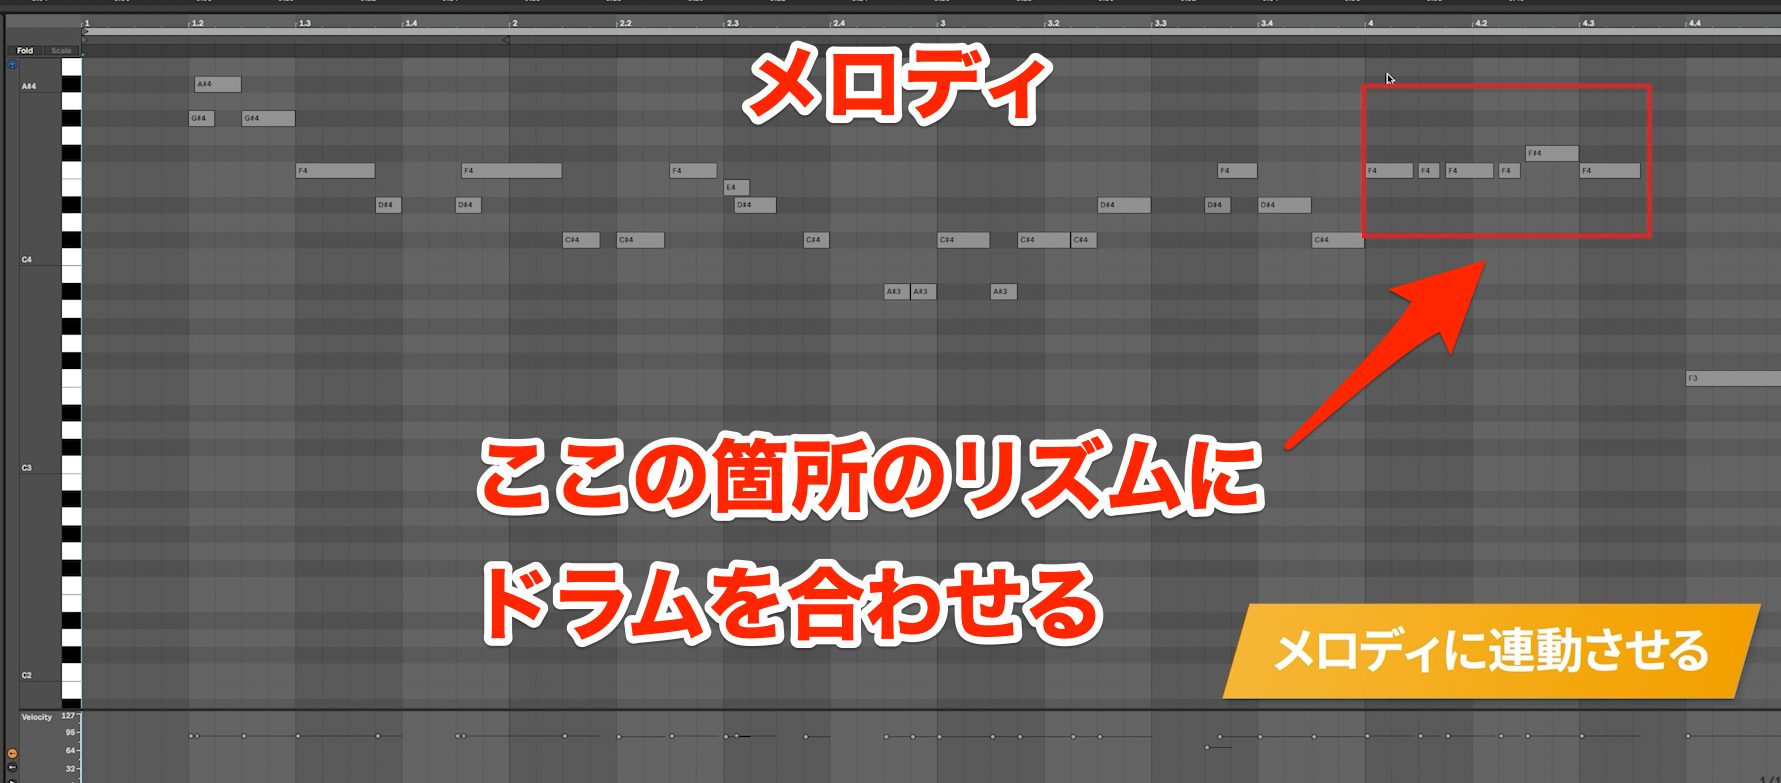
Here, we will coordinate the drums with the melody inside the red box.
We initially wanted to use another included Addictive Drums 2 pattern, but could not find one that suited the phrase, so this time we will program the rhythm manually.
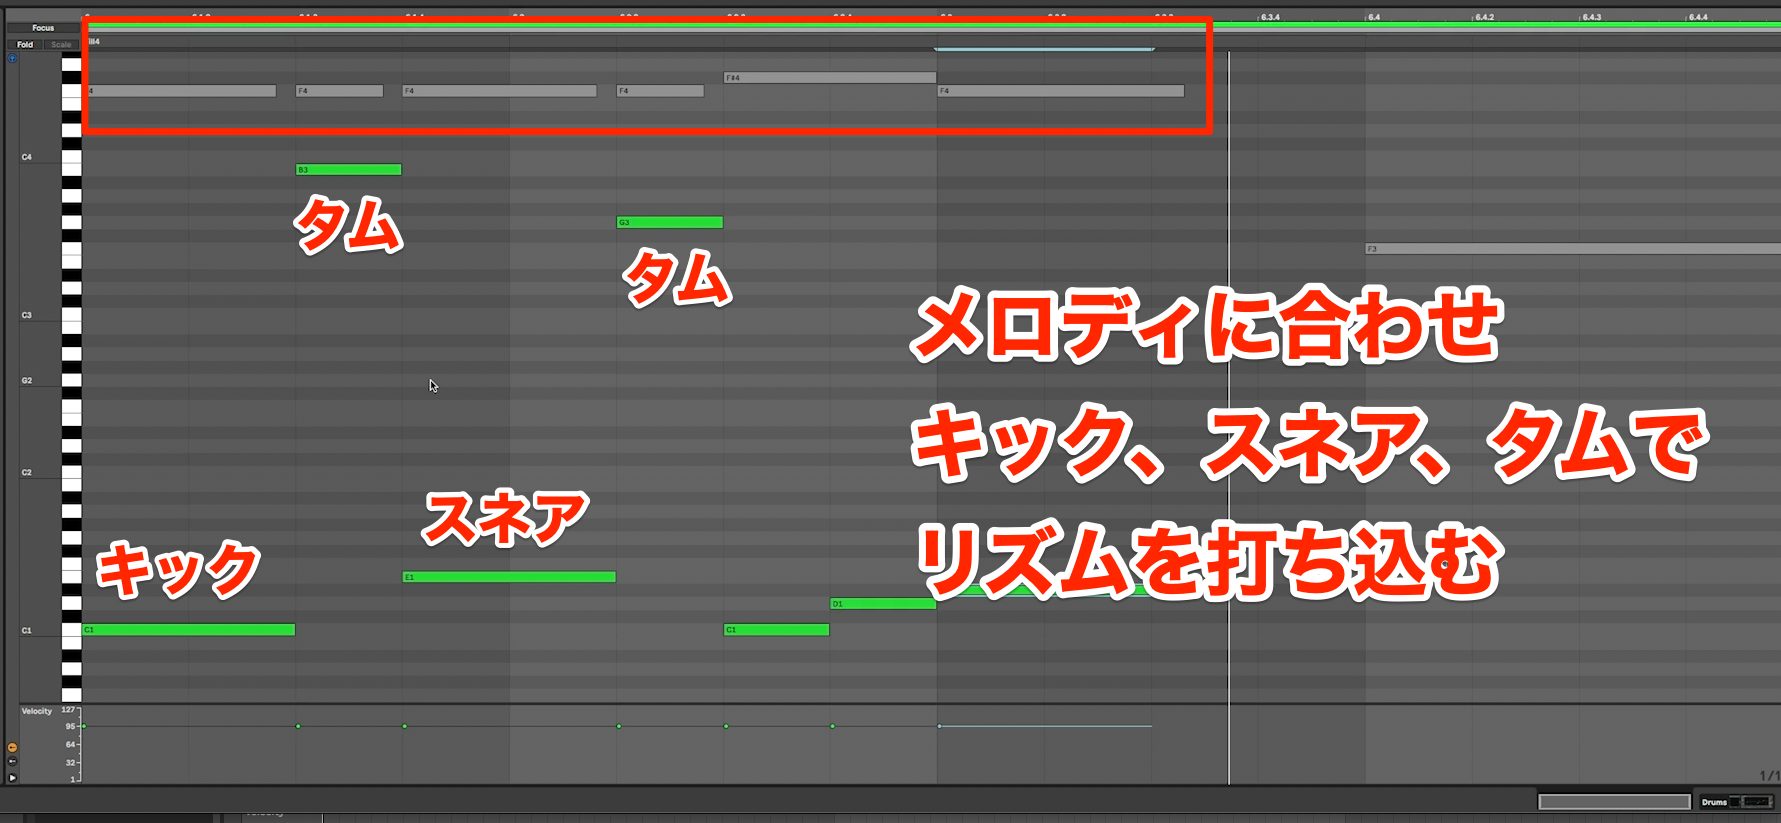
Use the kick, snare and toms to place notes at the same times as the melody and build the pattern.
We programmed two patterns using this approach.
Drum Accents Following the Melody Before the Chorus
Drum Accents Following the Melody in the Second Half of the Chorus
By following the melody, the drums make that phrase stand out more strongly than the surrounding passages.
Creating Ensemble Hits
An ensemble hit is a rhythmic figure played together by the whole band.
It can make a strong impression when used at the moment where you most want to emphasize the rhythm.
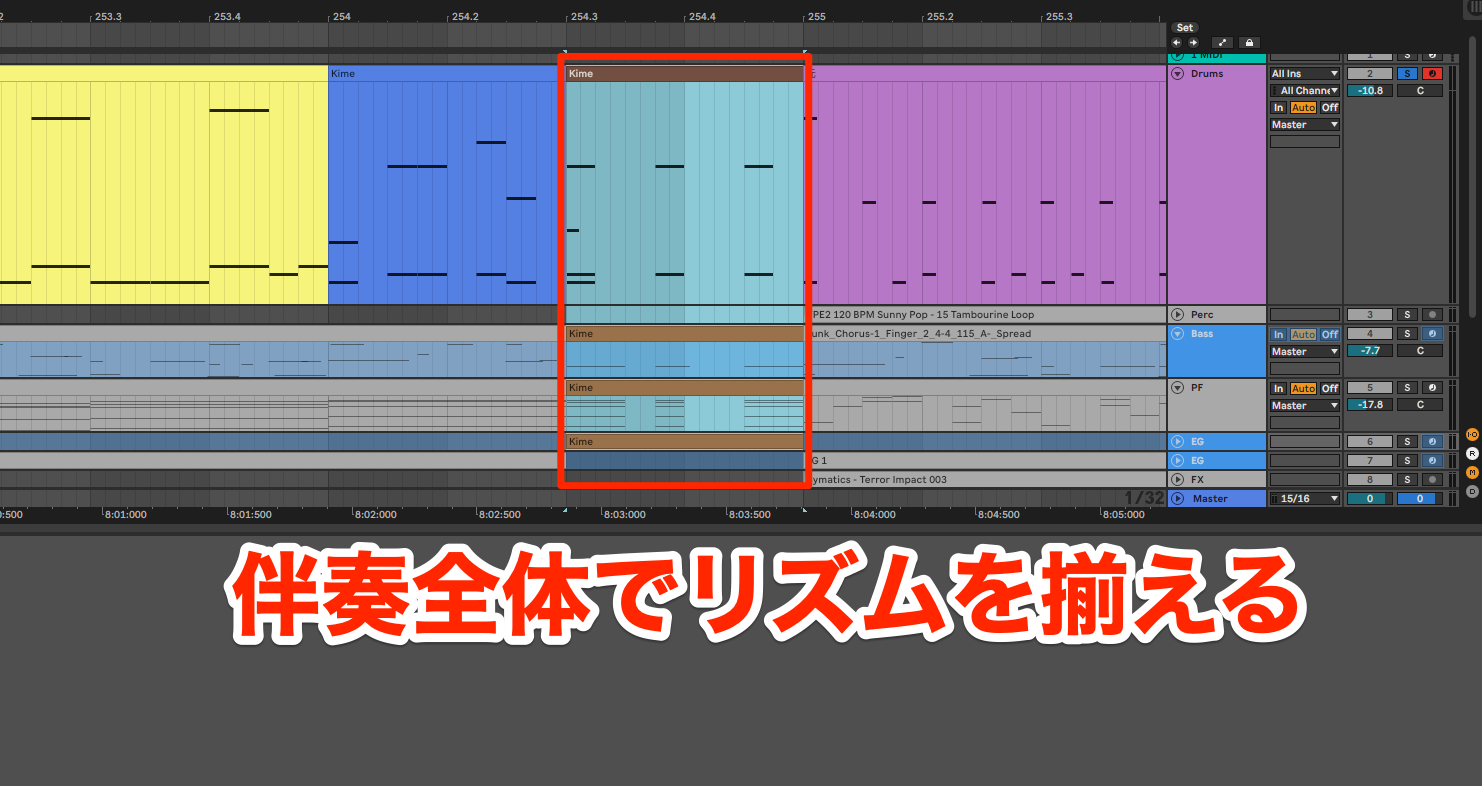
As a common example, listen to this version in which the fill before the chorus is replaced with ensemble hits.
Ensemble Hits Before the Chorus
Unlike a fill, this pushes the rhythmic accents to the foreground.
Use it when you want a key rhythmic moment to make a particularly strong impression.
Additional Patterns
To finish, here are two additional approaches.
A Fill at the Start
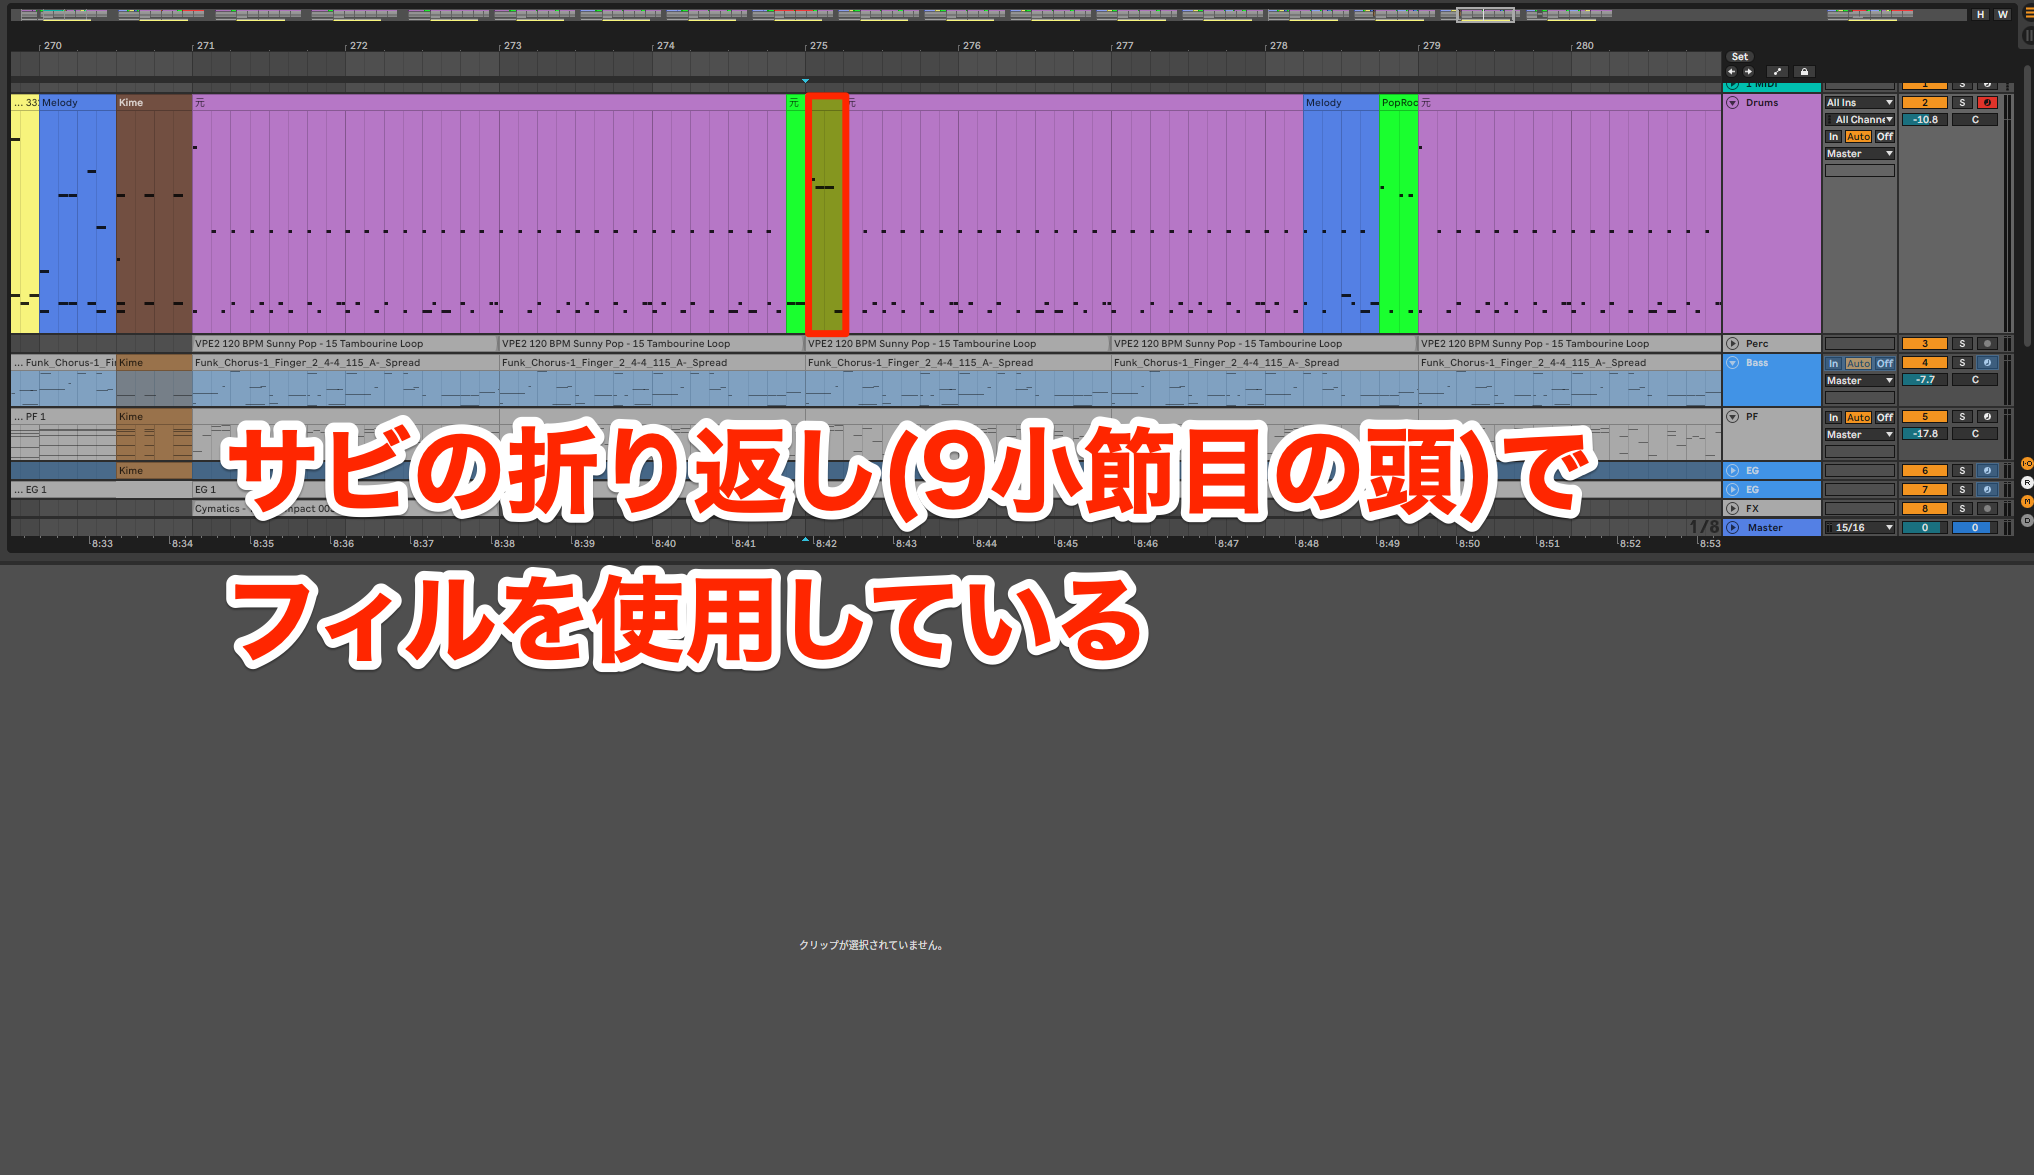
Occasionally, a fill is used immediately after a section change or the start of a repeated phrase, rather than as a transition into the next section.
Fill Immediately After the Chorus Repeats
This is effective when a repeating pattern needs variation or when you want to surprise the listener.
Drum Breaks
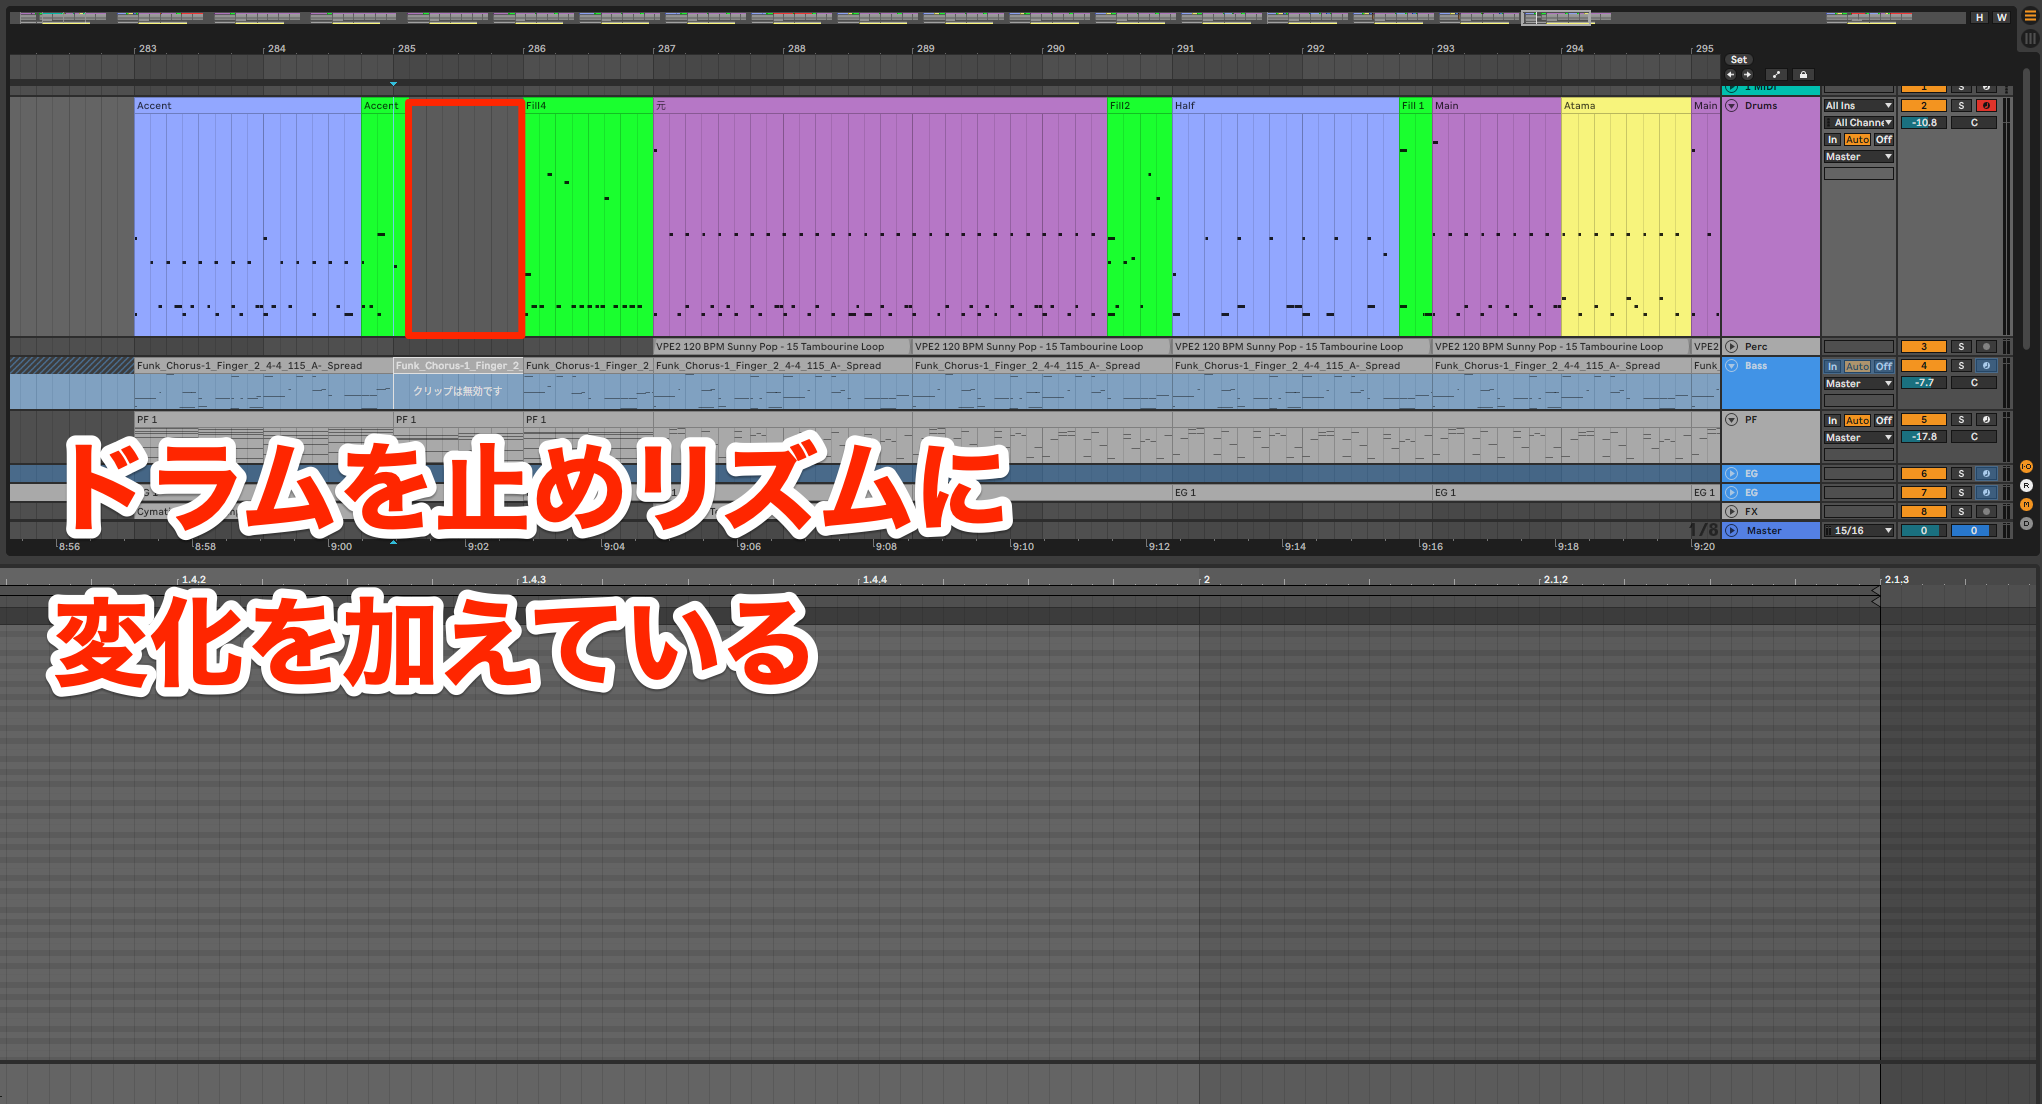
A break means temporarily stopping the sound. Deliberately leaving the drums silent is another way to create contrast in an arrangement.
Drum Break in the Pre-Chorus
To make the break more effective, the other parts need to stop as well.
As mentioned at the start, drums form the foundation of the accompaniment. When the drums change, the bass and chordal backing often need to change with them.
This is why drum arranging has such a major influence on the sense of development, particularly in pop and rock.
When your arrangement needs variation, focus on the drums and work through these five points.
Five Drum Programming Tips!
Here are five things to check when programming drums to create a pop or rock arrangement with dynamics and a sense of development.Video: https://t.co/yFtA3bPBNr
Article: https://t.co/VYxxqiFYlx #DTM #Drums pic.twitter.com/ZgkTU4AQVW
— SLEEP FREAKS (@SLEEPFREAKS_DTM) October 1, 2022
Frequently Asked Questions
Q1. Where should I start if my programmed drums lack dynamic contrast?
Start by adding fills. Suitable fills between sections can bring momentum and variation to the song. Then introduce the other techniques step by step.
Q2. How long should a fill be?
There is no fixed length. A common approach is to use longer fills—two beats or more—before major changes, and shorter fills—around one beat—where there is less change. The important thing is to vary them.
Q3. How can beginners choose different patterns for each section?
Start by learning standard pop and rock patterns such as half-time, shifted accents and four on the floor. You can work efficiently by editing presets in a drum instrument such as Addictive Drums 2.
NEW ARTICLES
Latest English Articles