ミックスが上手くなるTIPS Waves Platinum Bundle 活用術
Goldからのステップアップに最適

今回は前回のWaves Goldから、Platinumバンドルにアップグレードした際に、追加されるプラグインにフォーカスして、Tipsをお送りしたいと思います。
発売から長い年月が経ったプラグインもありますが、その使い勝手や確かな効果は健在です。
いくつかをピックアップし、定番の使い方からちょっと捻った使い方までご紹介したいと思いますので、どうぞ最後までご覧ください。
それでは、各プラグインの詳細を見ていきましょう。
ミックスが上手くなるTIPS Waves Platinum Bundle 活用術 動画


PuigTec EQP1-A/MEQ-5
まずは、PlatinumからラインナップされるビンテージEQ、PuigTec EQP1-AとMEQ-5です。
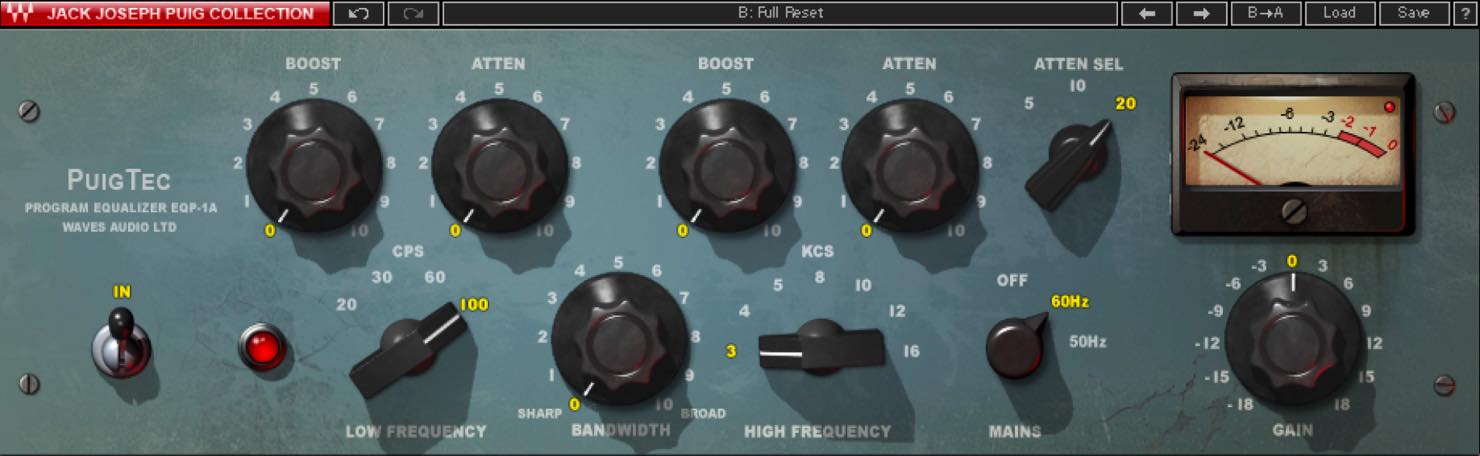
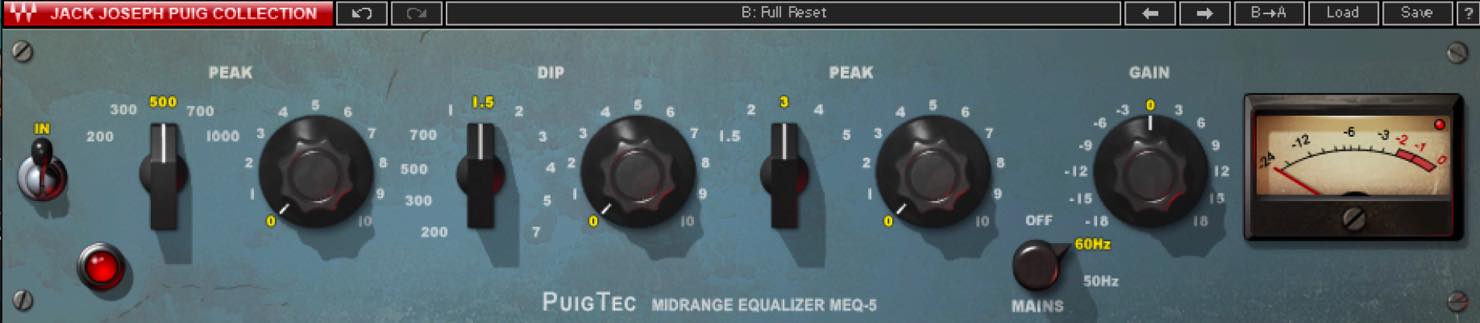
これは、U2やレディ・ガガ、ローリング・ストーンズなどを手がけた著名なエンジニア、ジャック・ジョセフ・プイグ氏が愛用し、最高の状態にメンテナンスされたPultecのEQを、精巧にモデリングしたものです。
今回はこれらを、ドラムバスとギターバスに適用してみましょう。
解説に入る前に、EQP1-Aのツマミの構成について簡単に触れておきます。
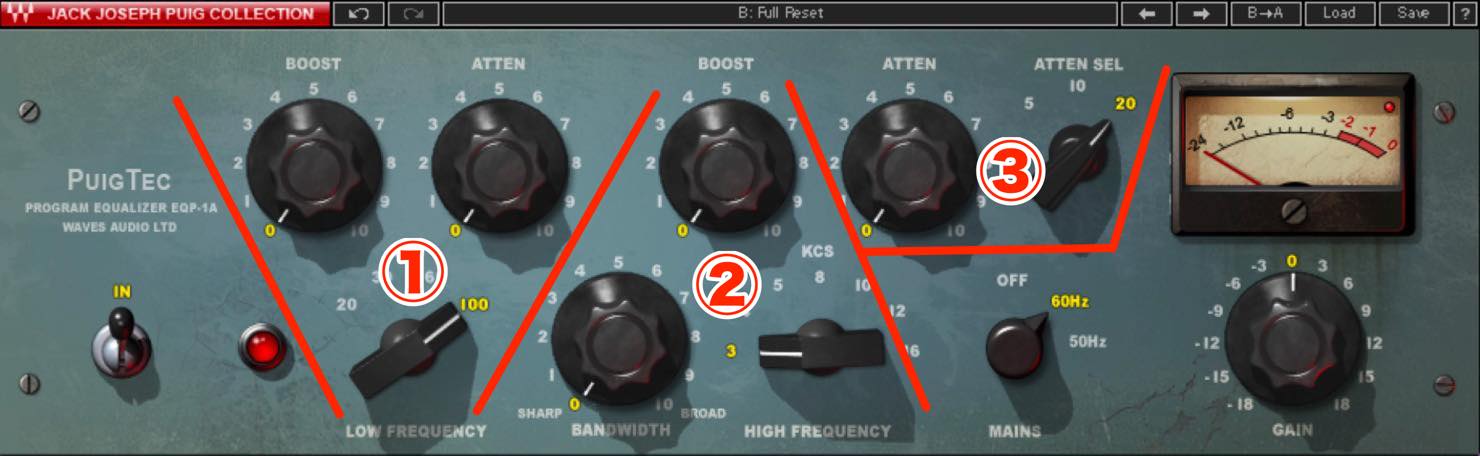
- ①低域用です。BOOST、ATTENUATION(カット)、CPS(周波数)で構成されます。
- ②高域のブースト用です。BOOST、BANDWIDTH、KCS(周波数)で構成されます。
- ③高域のカット用です。ATTEN SEL(周波数)、ATTENUATION(カット)で構成されます。
それではドラムバスの処理に入っていきましょう。対象となる音源はこちらです。
▶︎適用前(ドラムバス)
手始めに、EQP1-Aでドラムの低域を作っていきます。

EQP-1Aの最大の特徴が、低域処理に関してブーストとアテヌエーション(カット)を同時に行える点です。ブーストとカットを同時に行うと打ち消しあうように思えますが、それぞれの周波数特性が微妙に違うため、独特の効き方をします。
続いて高域をブーストしてみましょう。
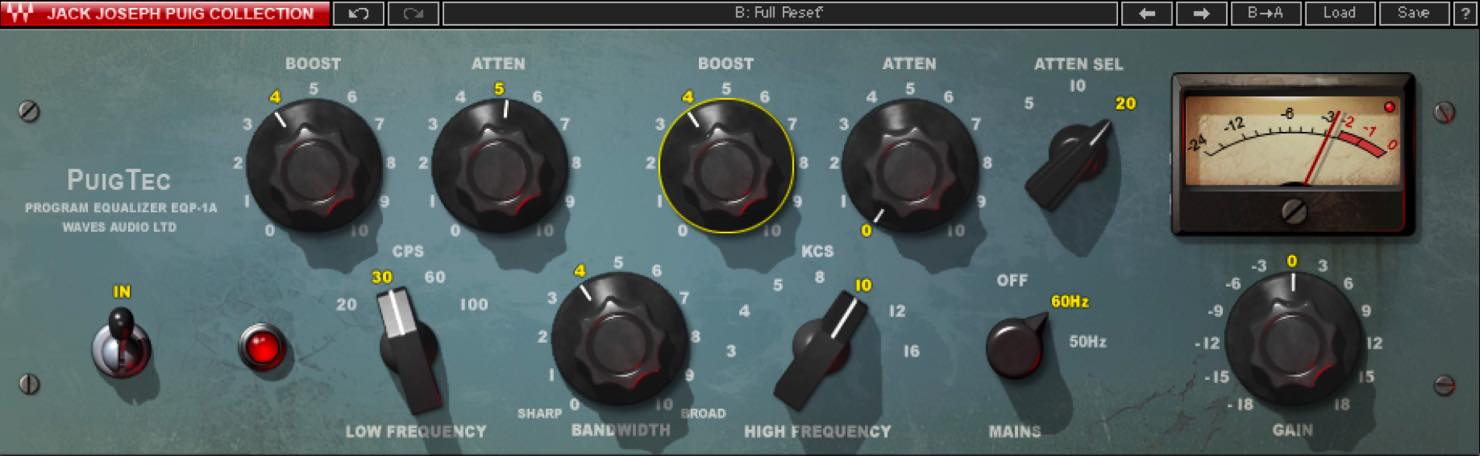
中央の3つのツマミでコントロールします。KCSが周波数ですので、10kHz付近を狙ってみます。BANDWIDTHはQに相当します。左が狭いとなっていますので、やや広げ、ブーストをかけていきます。
非常に自然な効き方で、耳に刺さる感じにはならないのが特徴です。
EQP1-Aは中域の処理ができませんので、MEQ-5も同時に使っていきましょう。
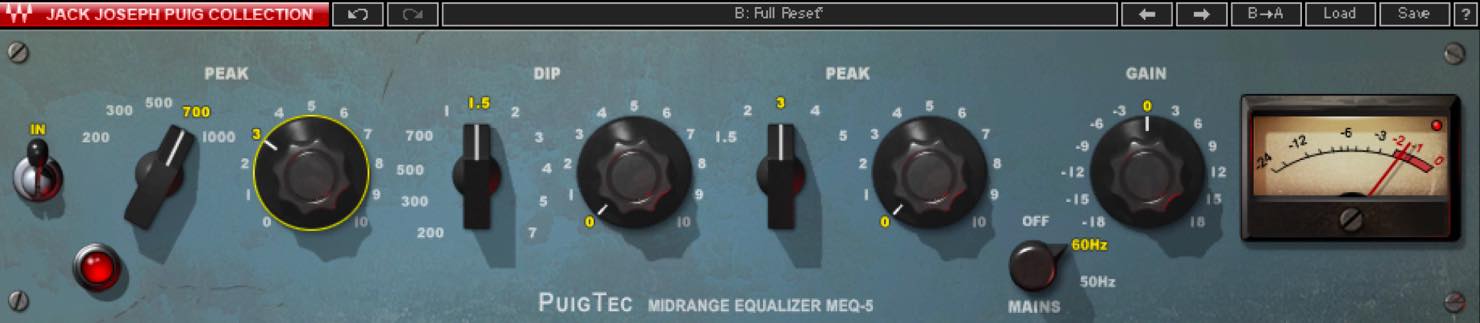
一番左のPEAKは中域のブーストですので、700Hzを狙ってスネアの抜けを出してみます。こちらも非常にスムーズな効きですね。
これでドラムバスの処理が完了しました。仕上がりを確認してみましょう。
▶︎適用後(ドラムバス)
ローエンドはキープされながら、低音に締まりが出たのがわかるでしょうか?
ハイハットやスネアも程よく抜けが出て、レンジ感のあるダイナミックなドラムになりました。
続いてギターバスの処理です。こちらも、中域中心の処理となりますので、MEQ-5を使用します。対象となる音源はこちらです。
▶︎適用前(ギターバス)
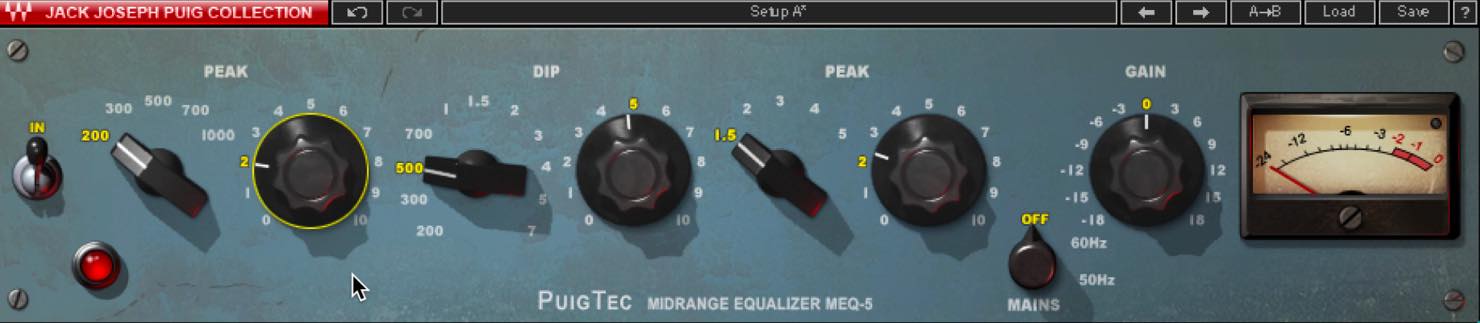
ややドンシャリ傾向の仕上げとしたいので、中域のカットであるDIPで500Hz付近を狙ってカットします。
右のPEAKでは1.5kHz付近を狙い、ブーストをかけきます。仕上げに、左のPEAKで200Hz付近をブースト。こちらの効きも非常にスムーズです。
結果を確認してみましょう。
▶︎適用後(ギターバス)
ベースと干渉しそうな帯域が低減され、すっきりとしました。
上下のブーストでは、サウンドに輪郭が出て、ヘヴィロックらしい重さも出ましたね。
ややワイドになった印象もあると思います。

Renaissance Vox
次にご紹介するのは、Renaissance Voxです。
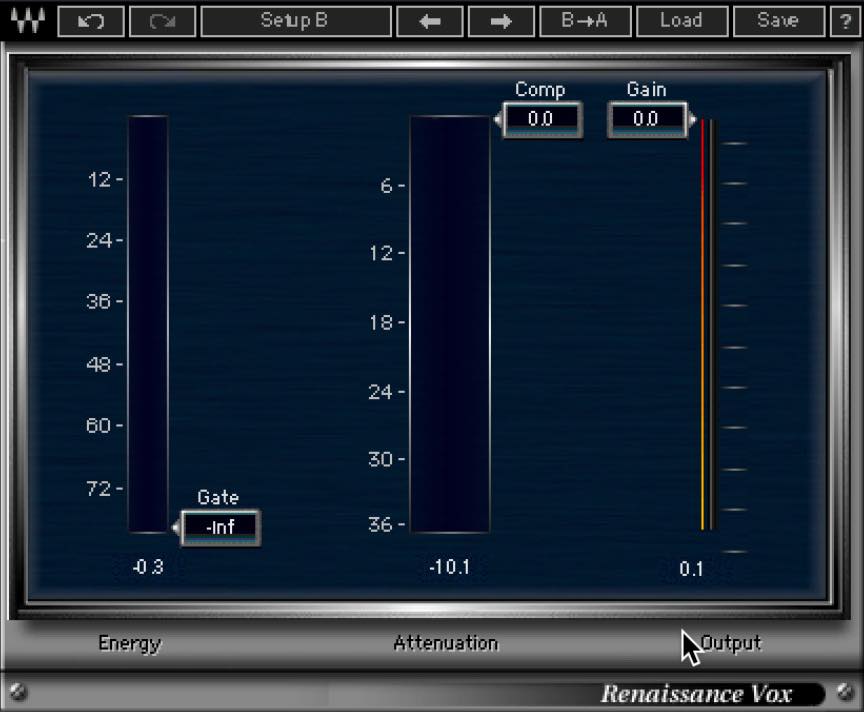
こちらはボーカルに最適化されたコンプレッサー/ゲートとなっていますが、その特徴は何と言ってもシンプルなUIです。コンプレッションもゲートもスライダー一つでコントロールする仕組みとなっており、後は最終的なゲインを調整するだけです。
では早速、ボーカルにRenaissance Voxを適用してみましょう。
対象となる音源はこちらです。今回はあえてミックス全体の中で確認していきます。
▶︎適用前(ボーカル)
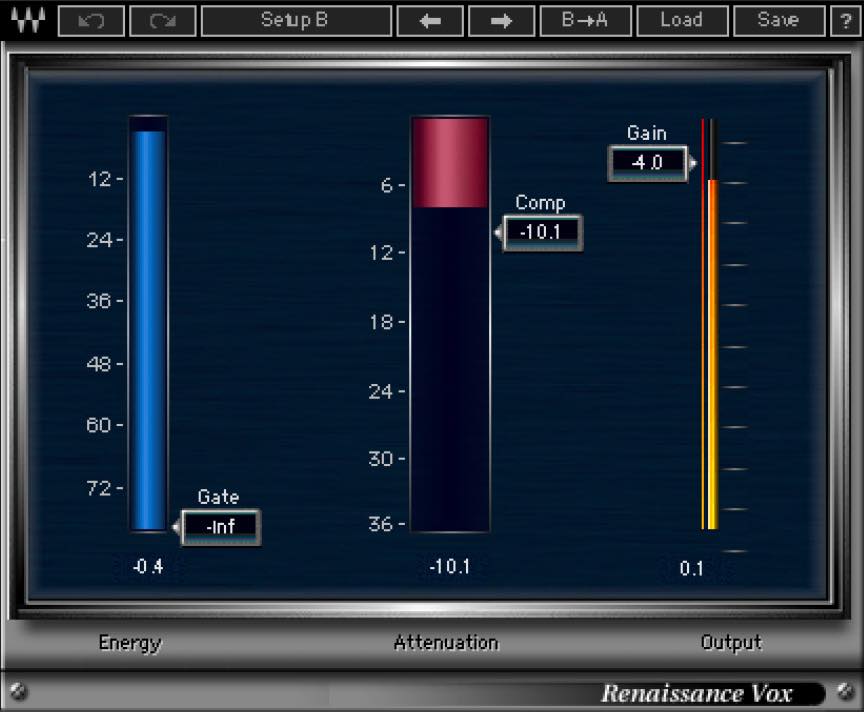
Compのスライダーを下げていくと、コンプレッションがかかるとともにゲインが上がっていきます。
そこで、ゲインを少し下げて調整しましょう。
たったこれだけの手順で、ダイナミクスが適度に整ってきます。出音は非常にクリーンで自然です。
結果を確認してみましょう。
▶︎適用後(ボーカル)
アタック感が損なわれず、ノリがキープされていますね。また引っ込み気味だった部分もレベルが整い、偏りがなくなりました。
このRenaissance Vox、ボーカルに限らず様々なトラックに使うことができます。例えばベースです。
今回はベースのDIのトラックに適用して、適度にサスティンを出してみたいと思います。
対象となる音源はこちら。
▶︎適用前(ベース-DI)
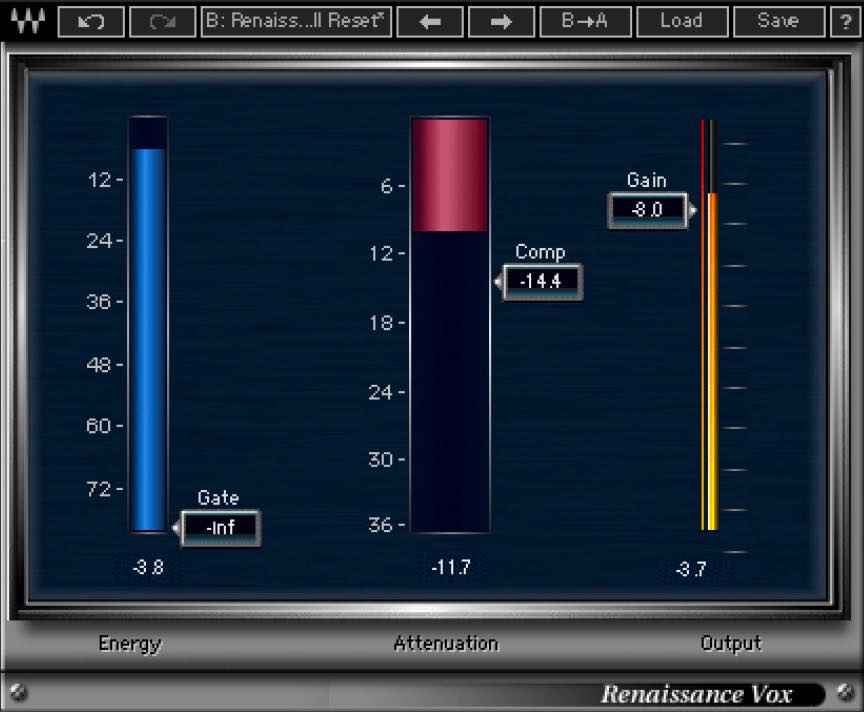
ボーカルの時と同様にCompスライダーを、ダイナミクスの幅がしっかり出るところまで下げ、ゲインを適度に下げます。
結果を確認してみましょう。
▶︎適用後(ベース-DI)
アタックの後の伸び方が明らかに変わってきましたね。一つ一つの音でしっかりと倍音の振動が感じられます。
Renaissance Voxはこのようにシンプルにコンプレッションを行うことが出来るため、サウンド作りに集中できるのも特徴です。
トランジェントなどを細かく追い込みたい時は他のコンプも必要になるとは思いますが、録り音を活かして整えたい場合はこれで十分の場合もあると思います。色々処理した上でもうひと押し欲しい時などにも重宝しますね。
Renaissance Bass
さて、更にベースに一手間かけてみましょう。次にご紹介するのは、Renaissance Bassです。
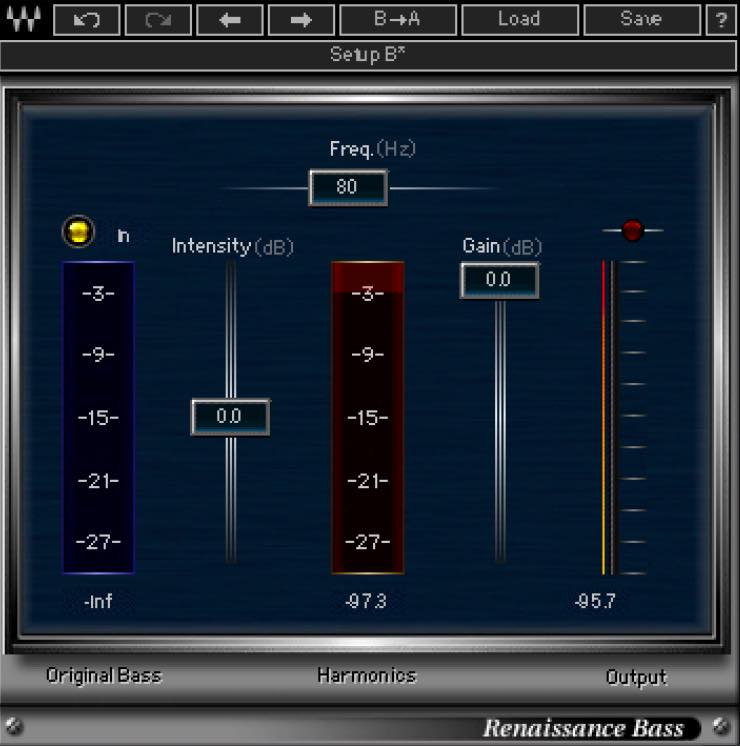
Renaissannce Bassは、特定の倍音を付加することによってサウンドに含まれる低音成分を際立たせます。これはEQとは根本的に原理が違うため、なかなかこれでしか再現できないサウンドです。
今回はベースのアンプトラックに適用してみます。対象となる音源はこちらです。
▶︎適用前(ベース-アンプ)
Renaissance Bassの使い方は極めて簡単です。周波数を合わせ、Intesityで強さを決めるだけ。
使い方のコツとしては、Intensityを一旦最小まで下げ、徐々に上げていくことです。ほとんどの場合、少量で十分な効果を発揮します。
ベースは大体デフォルトの80Hz辺りが美味しい領域となります。サウンドを聴きながら徐々にIntesityを上げていきます。
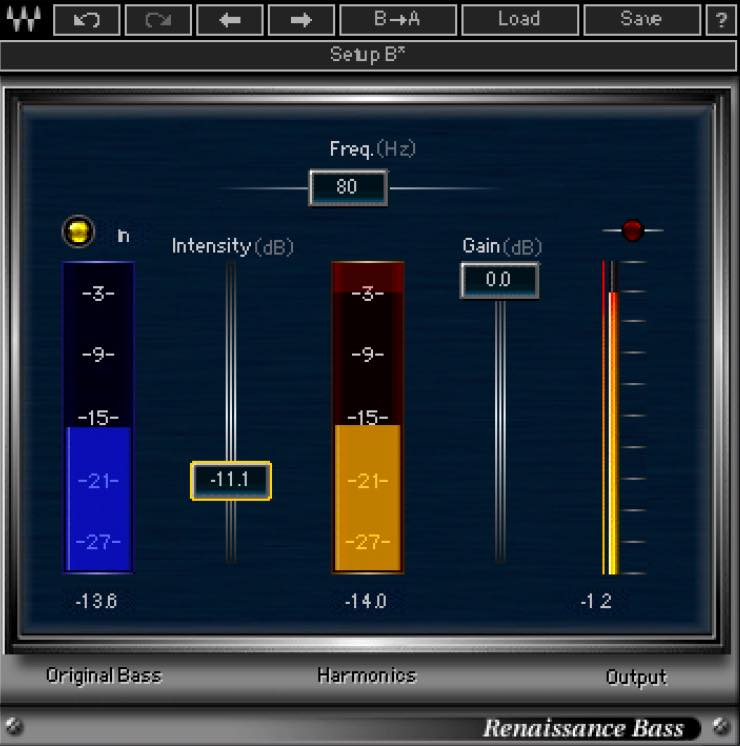
結果を確認してみましょう。
▶︎適用後(ベース-アンプ)
ベースの腰が一段下がり、しっかりと曲全体を支えてくれるようになりました。
個人的にも、Renaissance Bassは唯一無二の低音増強プラグインだと思います。ベースやキックにはかなりの頻度で使っています。
L1とL2の使い分け
続いては、言わずと知れたリミッター/マキシマイザーの金字塔、Lシリーズです。
L1はGold から含まれていますが、PlatinumからはL2、L3シリーズが追加されています。
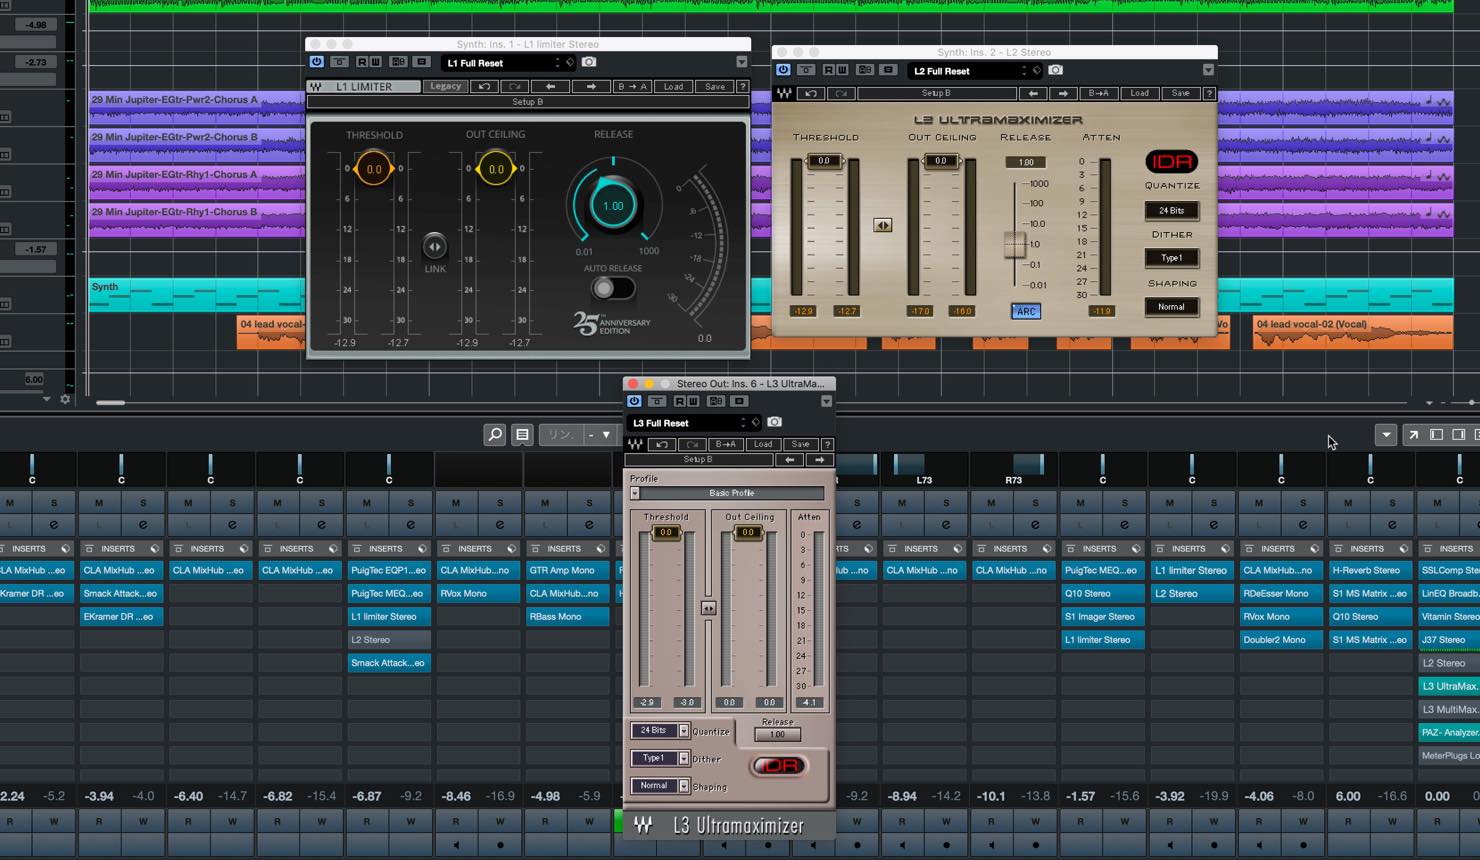
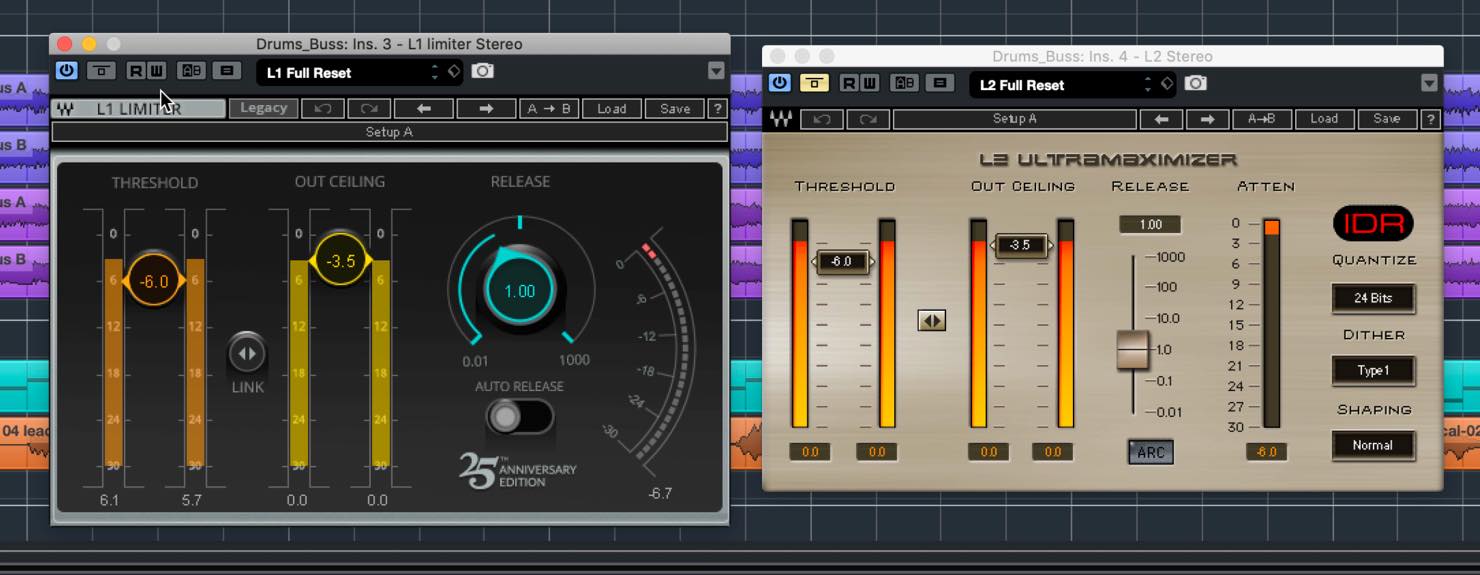
ここではまず、L1とL2をマスターではなくシングルトラックやバスに使用するケースを想定し、どう使い分けていくかについて取り上げていきたいと思います。
今回適用するのは、シンセトラックです。対象となる音源はこちら。
▶︎適用前(シンセ)
若干音量に暴れがありますので、これをリミッターで平坦にしたいと思います。
このように、スレッショルド、アウトシーリング共に同じに設定したL1とL2をインサートし、違いを聞き比べてみましょう。
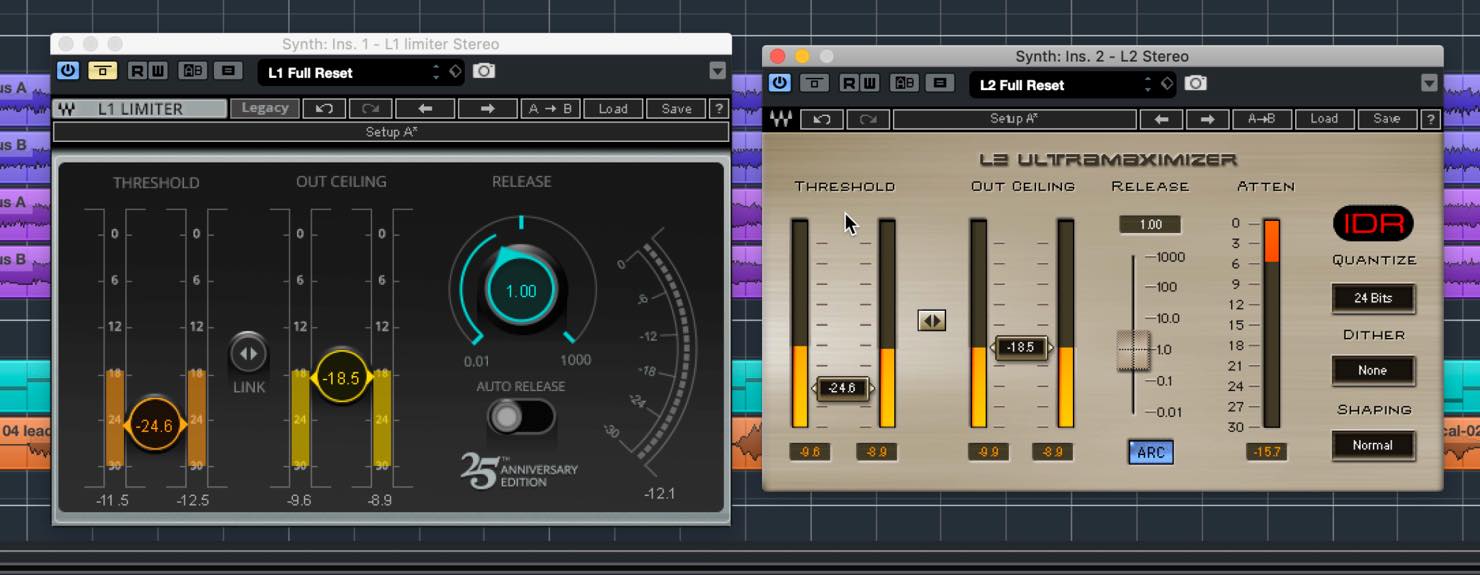
セッティングとしては、Attenuationが6〜10dB程度となるようThersholdを設定し、適用前と極端に音量が変わらないくらいにOut Ceilingを下げています。
▶︎L1(シンセ)
▶︎L2(シンセ)
L1は少し歪みがかったサウンドで若干ポンピングしているようにも感じます。L2はあくまでクリーンにレベルを整えています。
この場合やはりL2が適しているように感じます。敢えて歪みがほしい場合はL1を使用するのもありでしょう。
このようにやや歪みっぽいL1ですが、使いようによってはそれが活きてきます。その例がドラムです。
ドラムバスにバスコンプ代わりに使用してみても良いでしょう。
こちらも、Attenuationは-6dB程度を目指してスレッショルドを設定し、音量感が変わりすぎない程度にOut Ceilingを下げています。
L1とL2を聞き比べてみましょう。
▶︎L1(ドラムバス)
▶︎L2(ドラムバス)
L1はキックのアタックがカチッとした感じになりますね。スネアもハイが伸びているように思います。L2はあくまでクリーンです。
楽曲によって、または好みによっても変わってくると思いますが、L1はこのように色付け的な使い方もできる、ということを知っておいていただければと思います。
L3 UltraMaximizer
さて、最後にL3です。
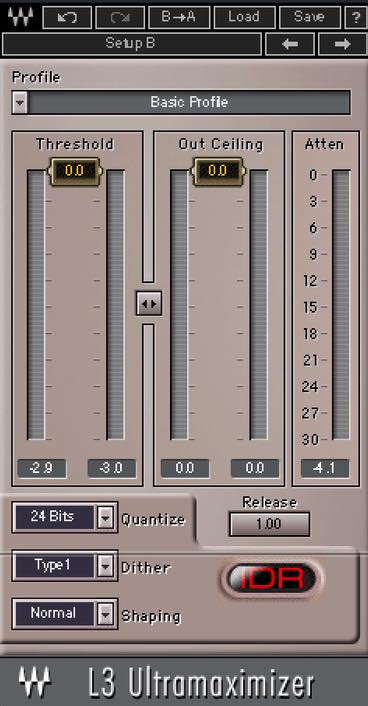
L3 Ultramaximizerは、内部的にマルチバンドリミッティング技術が導入されているため、自然な音圧アップはもちろん、Profile選択による音作り・色付けも可能となっています。
今回はマスタートラックに適用し、まずはL2と比較してみましょう。
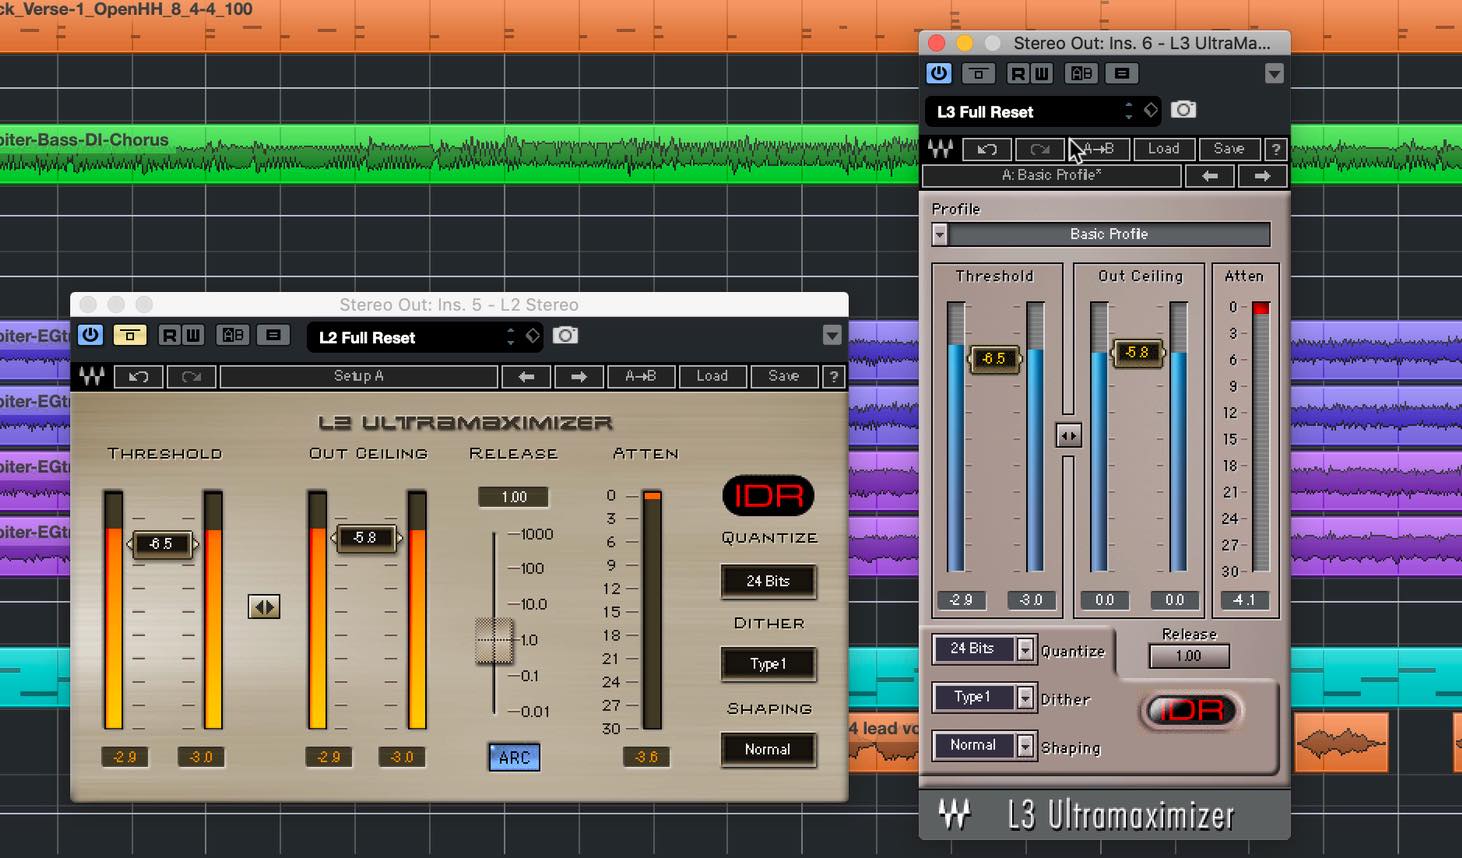
先ほどと同じように、両者同じ設定で、Attenuationは-1〜-3dB程度となるようThresholdを調整しました。Out Ceilingは、バイパスと比べて音質変化だけを感じ取れるよう、適度に下げてあります。
▶︎適用前(マスター)
▶︎L2(マスター)
▶︎L3(マスター/Basic Profile)
L2はクリアながら若干ローが膨らんで、どっしりした印象ですね。
一方L3は、キックのアタックやスネアのハイがはっきりしたように感じますが、L1のような歪み感は感じられません。
個人的には、L3の色付けは内部的なマルチバンド処理によるものだと思うので、これを積極的に活かす方向で使うべきだと思います。
L3 Ultramaximizerの最大の特徴は、その色付けの方向性をProfileという項目でコントロールできる点です。
ちなみに先ほど聴いていただいたのは、Basic Profileというプリセットです。
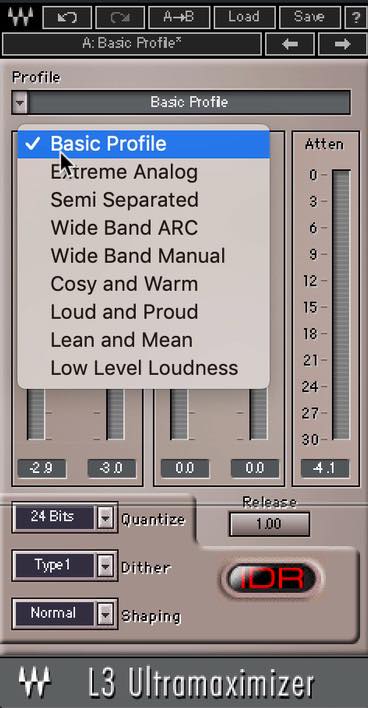
例えば、色付けなくあくまでクリアに仕上げたいならば、Cozy and Warmを選ぶといいでしょう。L2に近いような結果で、ローの膨らみもさほどありません。
▶︎L3(マスター/Cozy and Warm)
パンプ感が欲しいなら、Extreme Analogか、Wide Band Manualですね。ダンス系の曲などに合いそうです。
▶︎L3(マスター/Extreme Analog)
この手のジャンルに合うのは、やはりLoud and Proudでしょうか。しっかりとドンシャリ傾向ですが、レンジ感もあり聴感上の音圧感は最も稼げるように感じます。
▶︎L3(マスター/Loud and Proud)
このようにL3は、単なるマキシマイザーではなく、お好みで最後に一味加えることのできるエフェクター的な要素も備えていると言っていいでしょう。
いかがだったでしょうか?
このように、Platinumバンドルにも非常に魅力的なプラグインが揃えられています。
Goldバンドルを使い倒して、もう一歩ミックスをステップアップさせたい、という方には、最適なバンドルではないでしょうか。
既にお持ちの方も、ぜひ改めて活用していただければと思います。
記事の担当 大鶴 暢彦/Nobuhiko Otsuru