ミックスが上手くなるTIPS 「Waves Smack Attack」による奥行きのコントロール
トランジェントを制して奥行きを自在に操ろう
今回のTIPSはWaves Smack Attackを用いたトランジェントのコントロール、特にミックスの奥行き、遠近感を操る方法について解説します。
ミックスの奥行きや遠近感をコントロールするには、音量、高域成分の量、トランジェントの特性、リバーブによる残響の量、といった要素がありますが、とりわけトランジェントのコントロールはその中でも難しい部類に入ると思います。使用するエフェクターとして代表的なものはコンプレッサーですが、元のニュアンスを残しながらトランジェントだけをいじるのは中々難しいものです。
そこで登場するのがトランジェントシェイパーと呼ばれるエフェクターなのですが、このSmack Attackもそのトランジェントシェイパーに類するプラグインです。
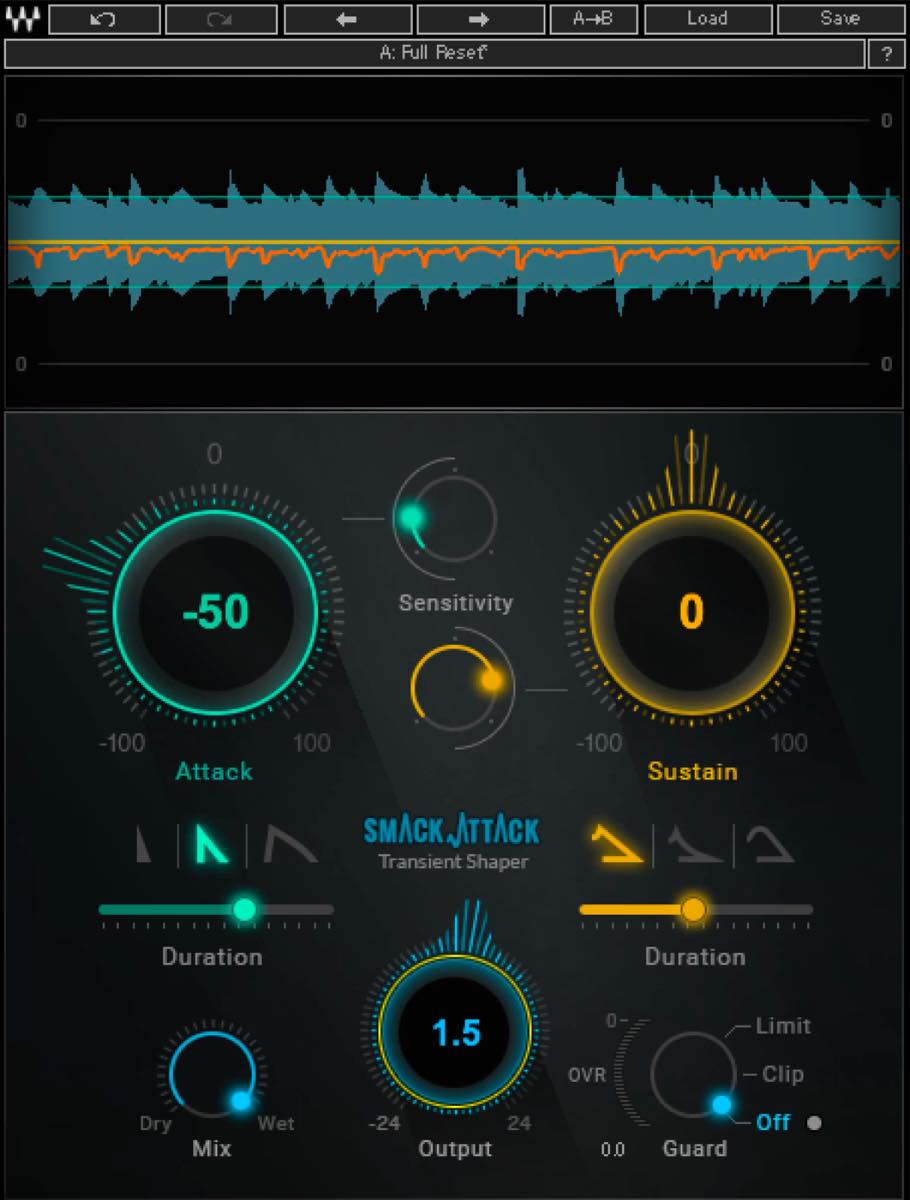
特筆すべきは、波形を見ながら視覚的に影響範囲・量を捉えられることと、トランジェントの形状を選択できる点ですね。
それでは、Smack Attackの各機能も交えて解説していきます。
ミックスが上手くなるTIPS 「Waves Smack Attack」動画
製品リンク : https://store.minet.jp/item/5144.html


ドラムの遠近感について
まずは、サンプル楽曲をご用意しましたので、特にドラムのキックとスネアの遠近感に注目して聴いてみてください。
いかがでしょうか?キックが比較的近くで聴こえるのに対し、スネアはやや奥まった印象に聴こえ、奥行きに違和感を感じられたことと思います。
このキックとスネアは、メーター読みで大体同じくらいの音量に揃えられています。両者の遠近感の鍵は、どうやらトランジェントの特性にありそうです。
このドラムはソフトウェア音源を使用していてオーディオ化されていませんので、波形は見えません。
そんな時でもこのSmack Attackを使えば、トランジェントの状態を波形で確認することができます。
Smack Attackを開いて、確認してみましょう。

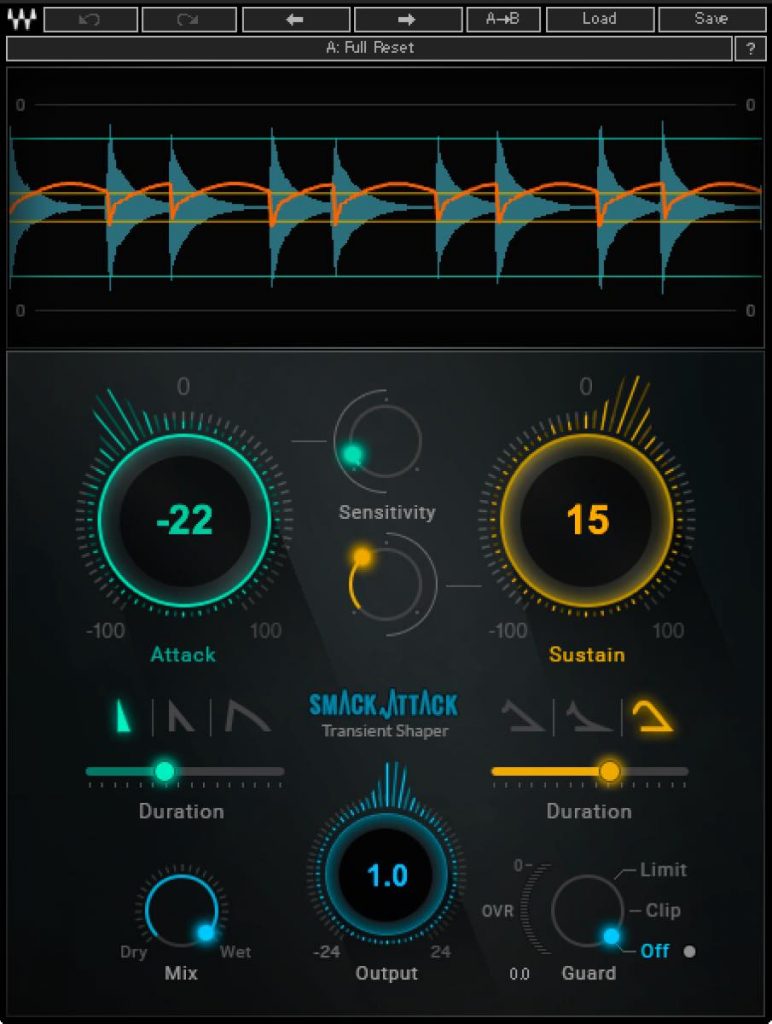
このように、波形が表示されますね。この表示領域をオーディオグラフと呼びます。やはり、キックの波形は非常にアタックが鋭く突出しています。一方でスネアの波形は、キックに比べるとやや鈍いアタックの波形となっています。
これらに対し、Smack Attackを用いてトランジェントを調整してみましょう。

奥まったサウンドを前に出す
まずはスネアから。キックに遠近感を合わせて行くためには、アタックを強調しなければいけません。
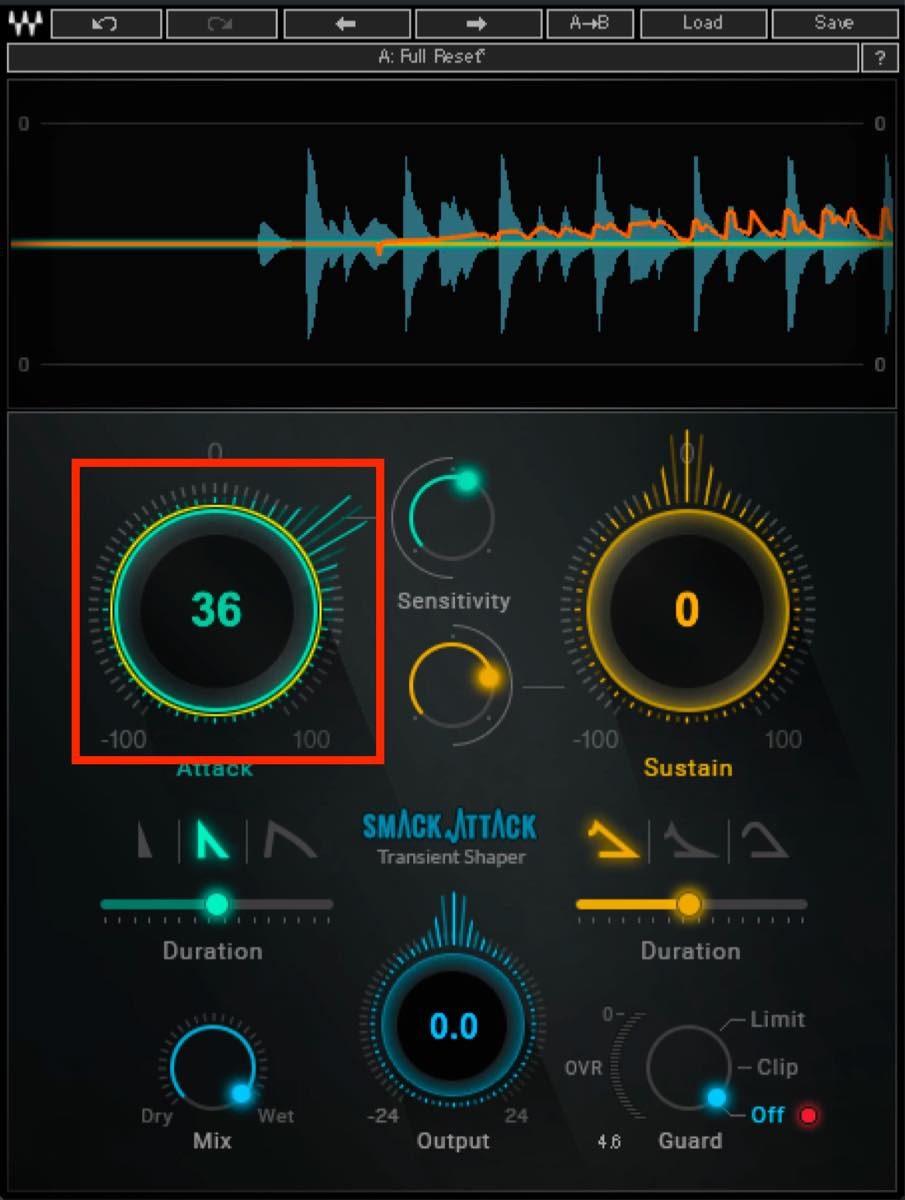
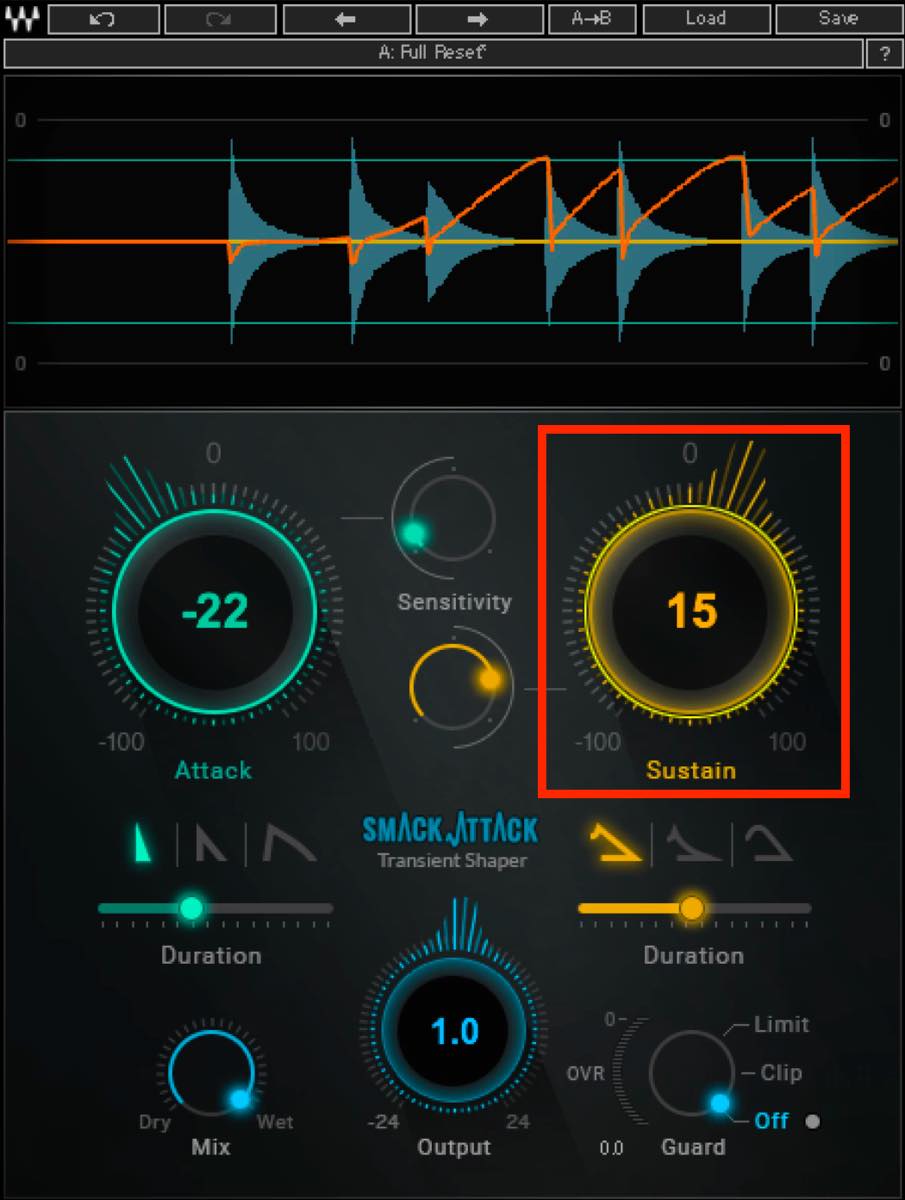
そこで、このAttackの大きなつまみを上げてみましょう。
確かにアタックがしっかりと聴こえて、音像的には前に出てきたように感じます。ですがこのままでは、ゴーストノートなどの細かい音まで強調されてしまい、やや不自然です。
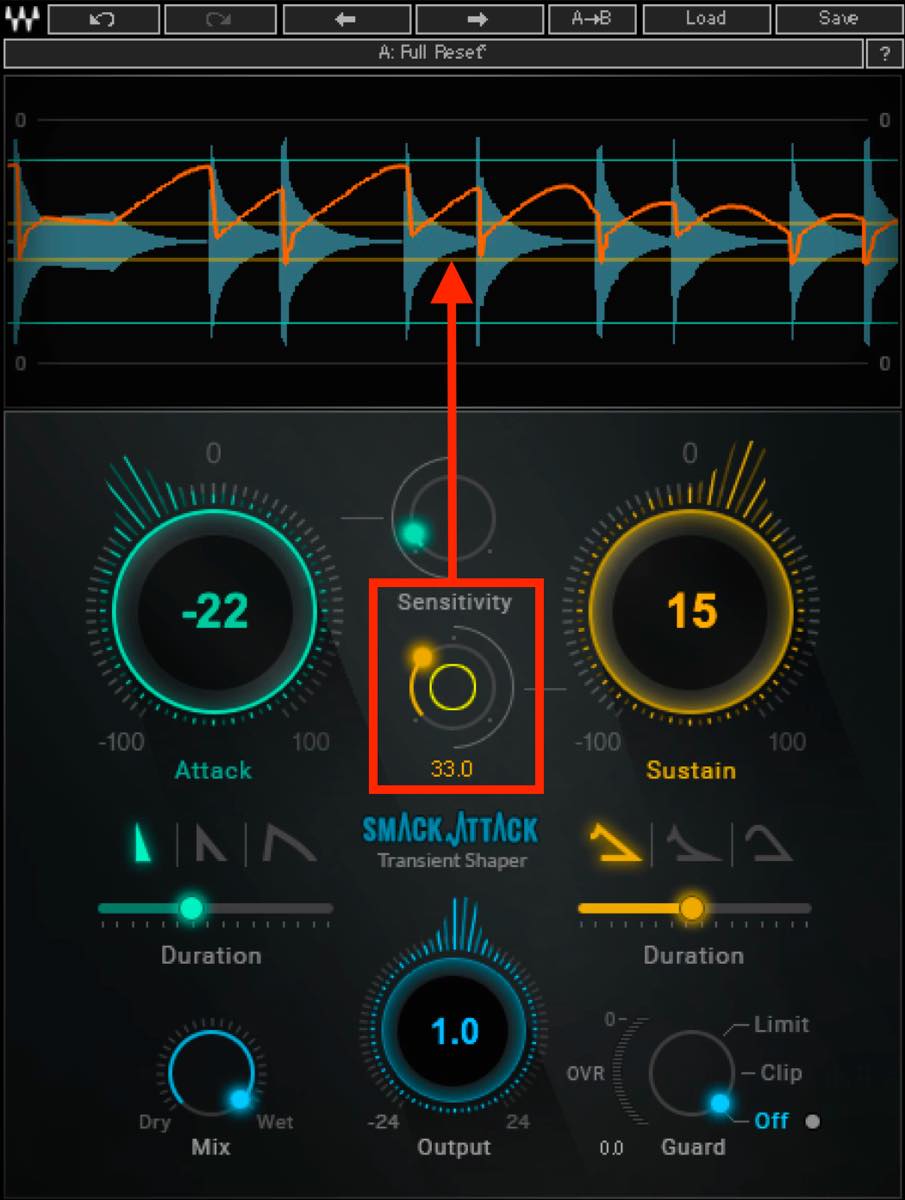
そこで、Sensitivityを調整しましょう。今はSensitivityが強すぎる状態なので、左に回して下げていきます。
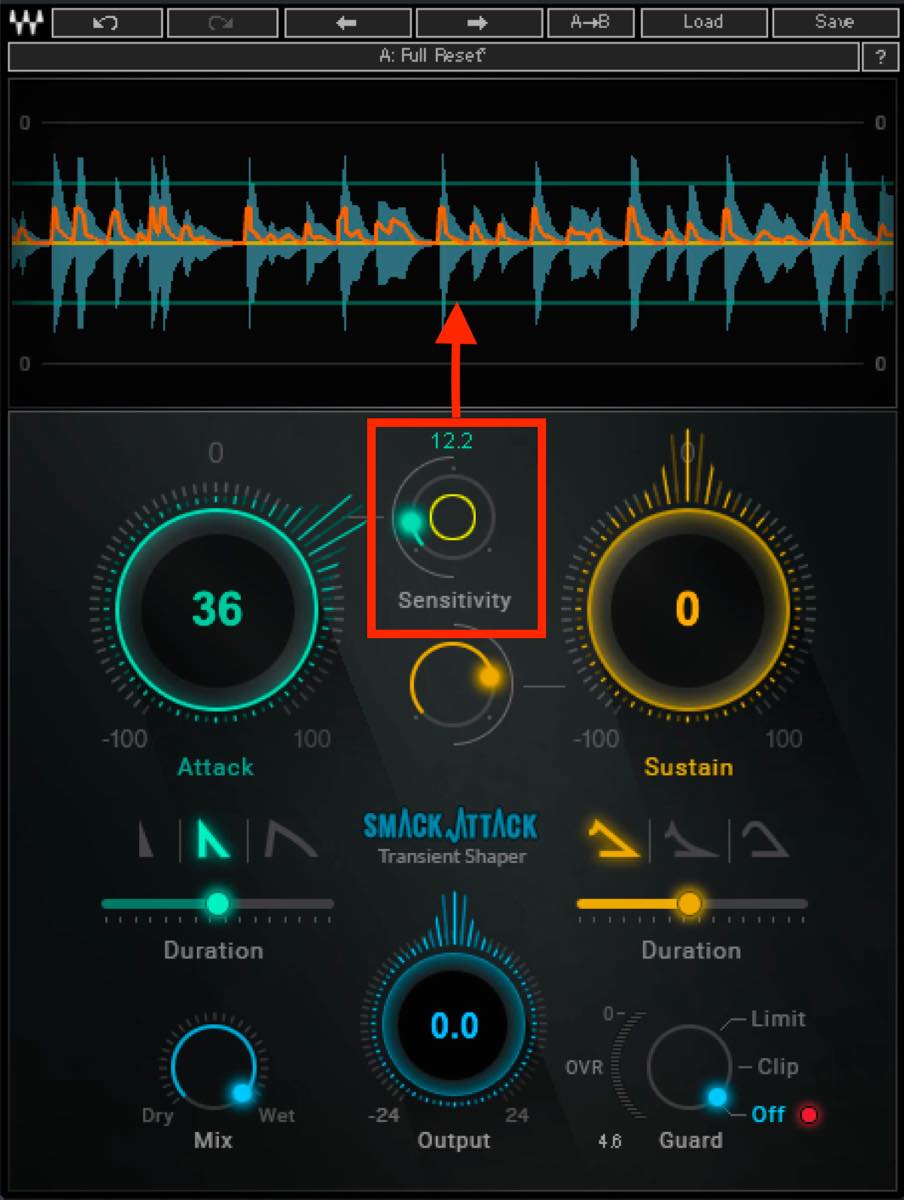
ここで上のオーディオグラフを見ていただきたいのですが、スレッショルドレベルのように波形との関係が表示され、どこまでをアタック強調の対象とするかが一目瞭然です。
今回は、アクセントのスネアとなっている大きな波形だけが対象となるよう調整してみましょう。
オレンジ色の線にも注目してください。これはSmack Attackによってどのように強調または抑制されているか、その結果を表示しています。
次にアタックを強調する際の形状を決めます。
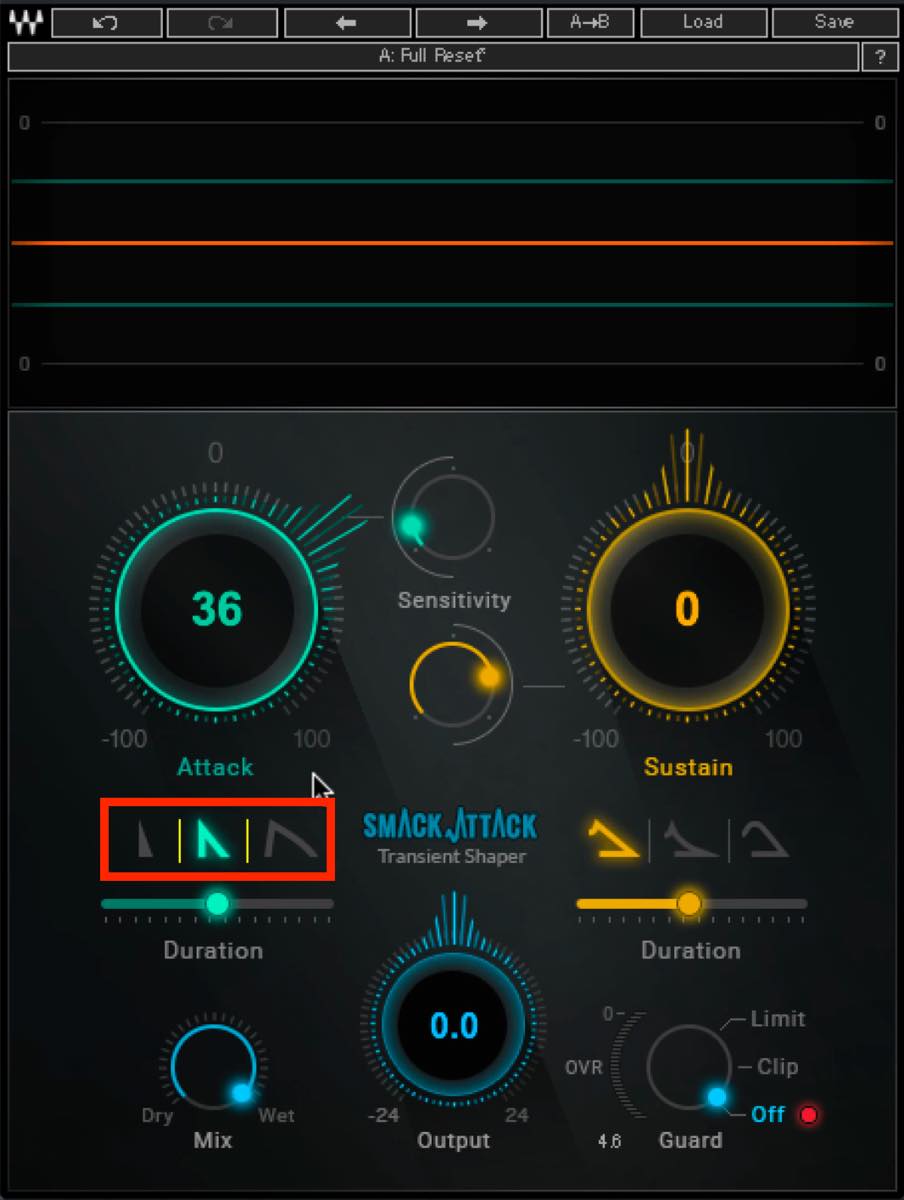
見た目の通り、一番左が最も鋭いニードル、一番右が鈍めのブラント、その中間のネイル、と分かれています。
特にこのスネアの場合、胴鳴りの太さに関わってきます。今回はアタック感、パンチともに丁度いいので、ネイルを選択しました。
続いてはデュレーションです。デュレーションはアタックを強調する時間の長さを決めます。
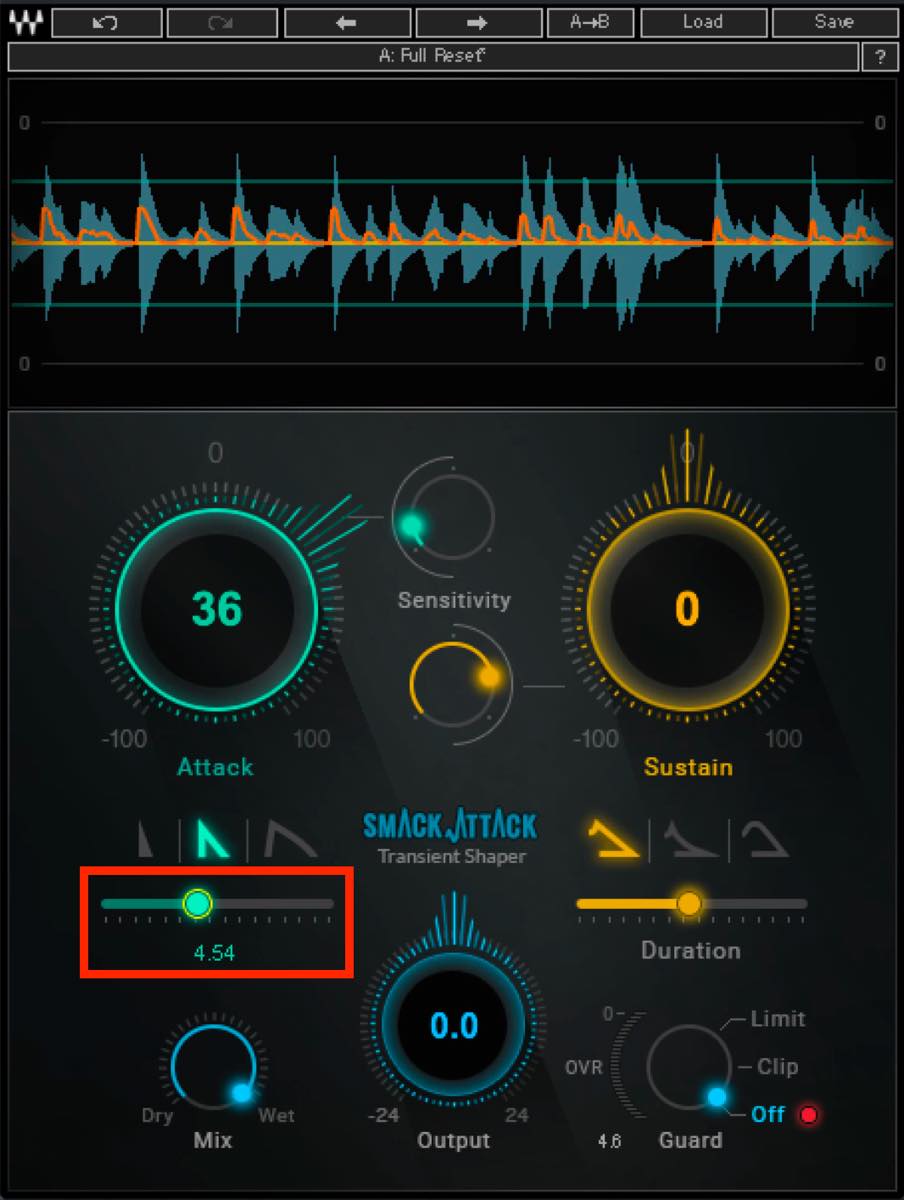
あまり長すぎると、トランジェントというよりも全体の音量が持ち上がってしまい、のっぺりとした印象になるので注意しましょう。
上のオーディオグラフも見て、オレンジの線の角度が波形よりもやや急こう配となるよう調整するといいでしょう。
右のGuradはリミッターのようなもので、今はレベルオーバーしていませんので、オフのままでもいいですが、ここで積極的な音作りをすることも可能です。
上のLimitは純粋なリミッター、次のClipはレベルオーバーした際にサチュレーションを加えながらリミットをかけます。
試しにClipにして、敢えてレベルを上げてみましょう。
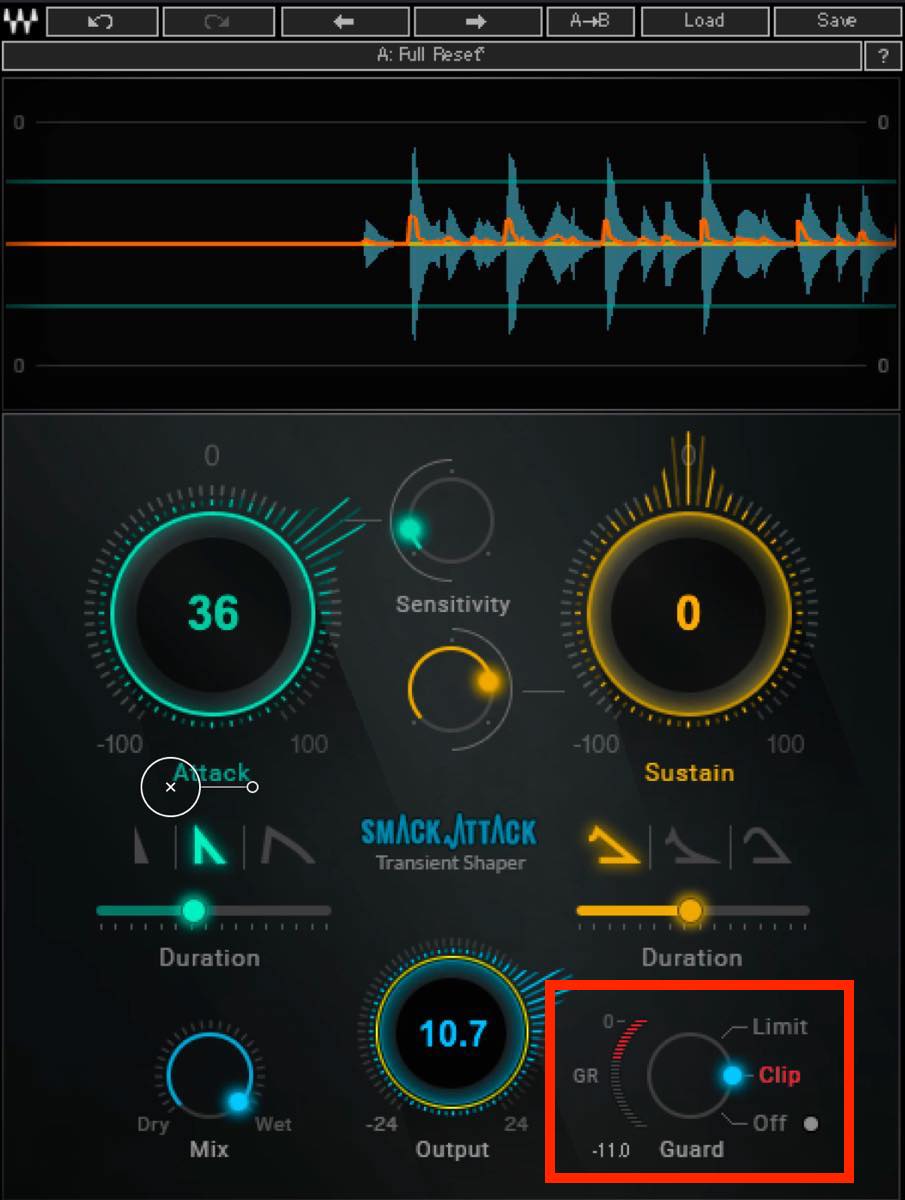
Limitと比べてみると音質に変化があることがわかると思います。こういったクリッパーのような機能が備わっているのも面白いですね。
さて、アウトプットを元に戻して、バイパスと結果を確認してみます。
この結果は、ドラムソロで聴くよりも、全体のミックスの中で確認した方がわかりやすいです。
▶︎適用前
▶︎適用後
バイパスの時と比べて、アタックが明瞭となりスネアが前に出てきたのがわかるでしょうか?
だいぶキックとの距離感が近づいてきましたね。
出過ぎたサウンドを奥に押しやる
キックの方も調整してみましょう。こちらはアタックが鋭すぎますので、Attackのつまみを下げて音を奥に押しやっていきます。
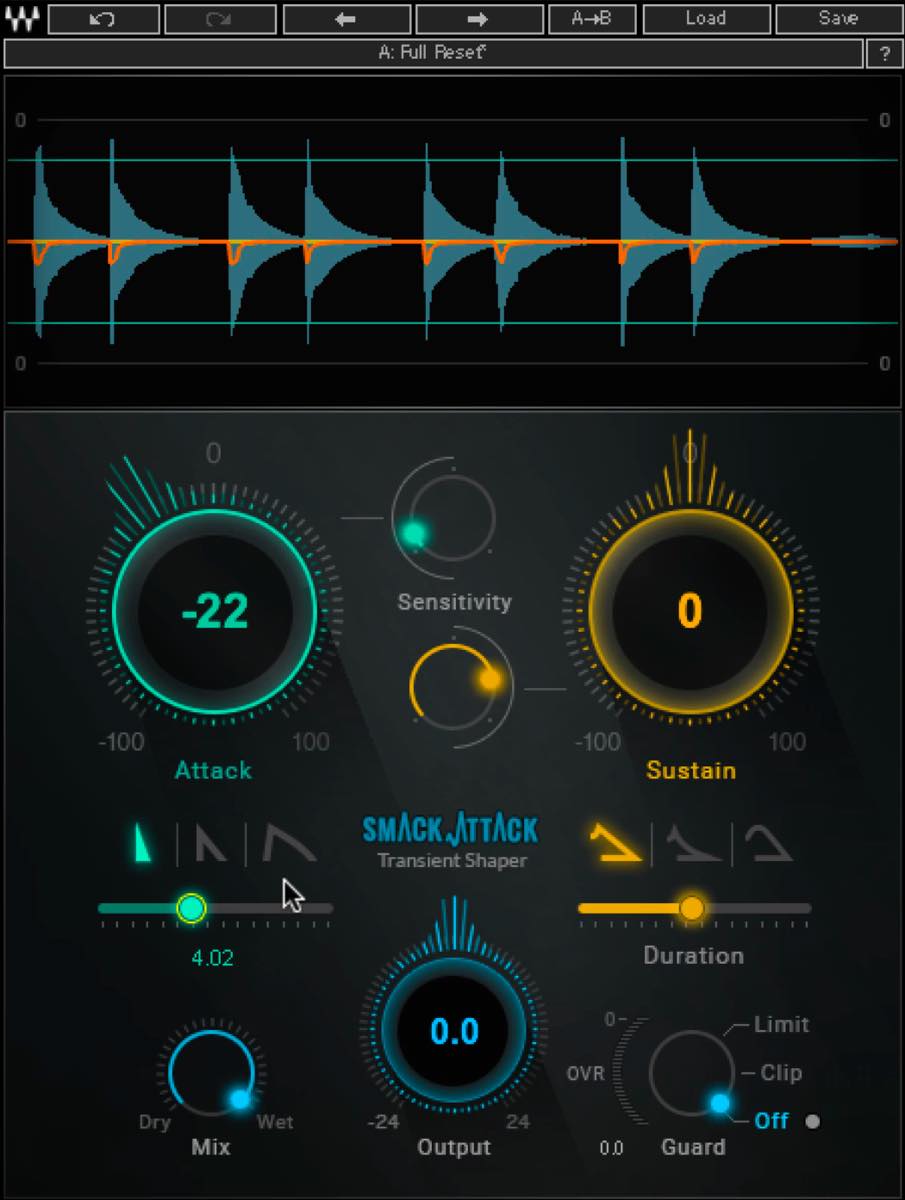
Sensitivityは波形の頂点付近を狙うように調整し、形状は波形に合わせてニードルとしてみましょう。デュレーションもやや短めとします。
アウトプットは、結果を比べやすいようにやや上げて、バイパスと比べてみましょう。
▶︎適用前
▶︎適用後
この時点でも、だいぶキックの印象が柔らかくなり、音像としては遠くなりましたね。スネアとの距離感が丁度よくなってきたと思います。
キックではさらに、Sustainの調整も行ってみましょう。余韻を出すことで太く、温かみのあるサウンドにすることができます。
まずSustainのつまみを上げてみます。
このくらいでも十分効いてきます。
Sensitivityは、今の状態だとほぼ全体に影響しているので、少し下げておきます。オーディオグラフも参考にしながら、丁度良い余韻の感じになるところを探っていきましょう。
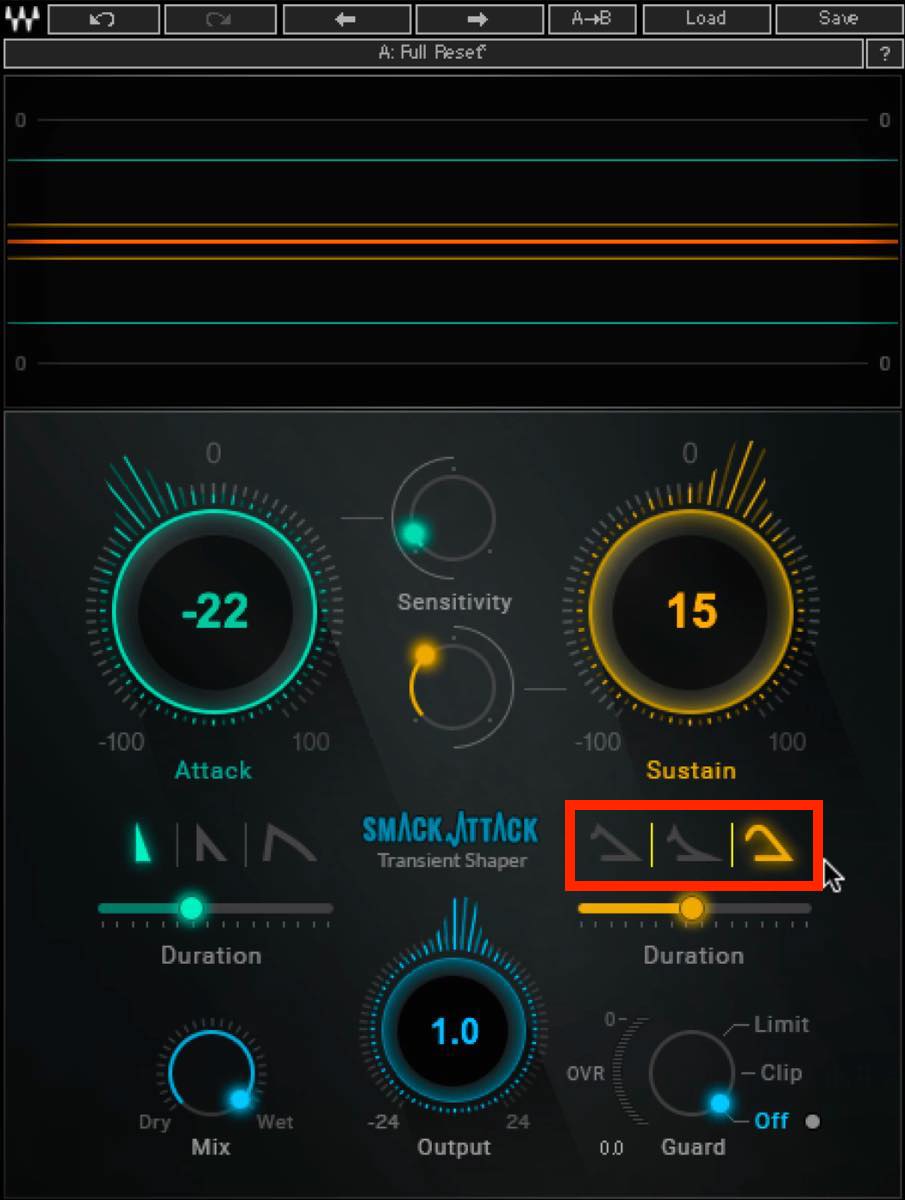
次に形状です。これは左からまっすぐに減衰するリニア、急激に減衰するノンリニア、柔らかく減衰するソフトリニアの3つが用意されています。
キックのふくよかさに影響しますので、よく聴き比べながら選択しましょう。
今回はソフトリニアが狙ったサウンドを得られると感じました。
続いてデュレーション、余韻を強調する時間の長さを調節します。
このパラメーターの注意すべき点は、あまり長すぎると余韻の小さい部分に主に効いてしまい、逆に効果を得づらくなる点です。
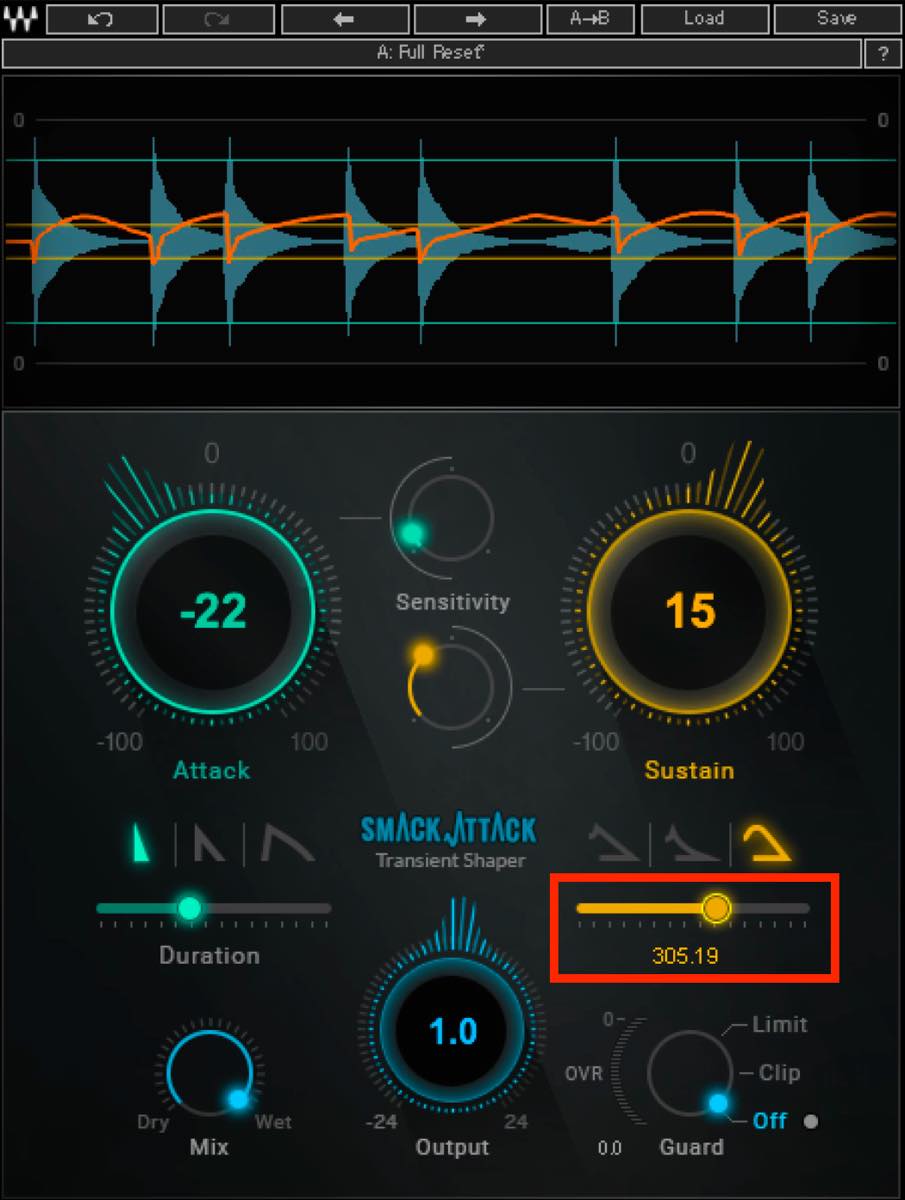
今回は中央の200よりもやや長めくらいに値をとってみましょう。
改めてバイパスと比べてみます。
▶︎適用前
▶︎適用後
アタックに偏っていたパワーが程よく慣らされて、全体のミックスにもよく馴染むようになりましたね。
アコギをミックスに馴染ませる
さて、これまでドラムの奥行き、遠近感を中心にお話をしてきましたが、Smack Attackが活用できるのはドラムだけに限りません。例えば今回のトラックの中にあるアコギですね。
アコギは高域のきらびやかさを出していきたい楽器で、EQで高域をブーストすることがよくあると思いますが、一方でダイナミクスが強調されすぎてミックスに馴染みにくくなるという副作用も出てきます。
こういった際によくコンプを使うことになると思いますが、Smack Attackならもう少し手早く対処することができます。
Sensitivityで波形の飛び出した部分を狙いつつ、アタックをやや強めに下げてみます。
形状は、ネイルが程よい効きで良さそうです。
デュレーションもアタックの抑え方に影響します。少し抑えを効かせるため、やや長めにとってみましょう。
比べやすいようにアウトプットは少し上げておきます。
さて、バイパスと比べてみると…
▶︎適用前
▶︎適用後
コンプよりも自然な感じで、距離的にはやや奥まり、ミックスに馴染んでいるのがわかりますね。調整も非常に簡単で手早いです。
以上今回のTIPSは、トランジェントシェイパー「Smack Attack」を用いて、ミックスの奥行きや遠近感をコントロールする手法について取り上げました。
ぜひ上手に取り入れていただければと思います。
製品リンク : https://store.minet.jp/item/5144.html
ミックスが上手くなるTIPS#2 トランジェントシェイパー「Waves Smack Attack」を用いたミックスの奥行きや遠近感をコントロールする手法
サウンドのニュアンスを残しながらトランジェントのみ調整が可能です。
🎥YouTube:https://t.co/WIgaLw1Z5M📝使い方-記事:https://t.co/ck4DJwH0QD#DTM pic.twitter.com/tTjfC7dSgW
— SLEEP FREAKS (@SLEEPFREAKS_DTM) August 31, 2019
記事の担当 大鶴 暢彦/Nobuhiko Otsuru