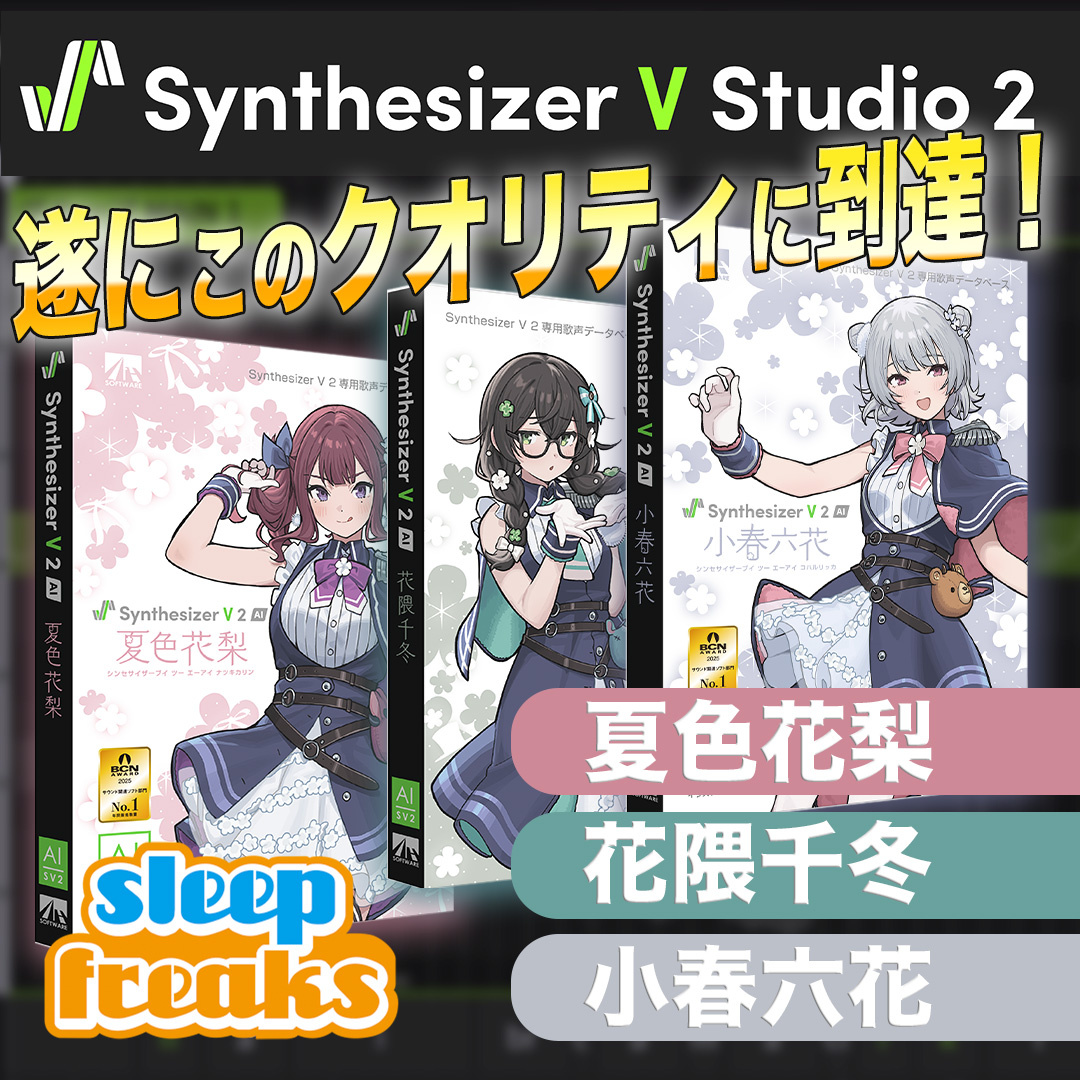
Synthesizer V Studio 2 Pro is a powerful vocal instrument that can create natural, human-like singing from notes and lyrics. This beginner-friendly guide walks through creating a Dreamtonics account, registering and installing the product, setting up a voice database, and using it in a DAW. Because one voice database is included, you can begin producing realistic vocals without buying an additional voice right away.
Synthesizer V Studio 2 Pro: Full Tutorial Video
Selected Questions and Answers from the YouTube Video

When I open Synthesizer V in Logic Pro, the window is extremely small and hard to use. Does anyone know how to make it bigger? 😢

This may depend on your setup. In Synthesizer V, try Display → Settings Panel → General, then adjust the screen scaling option.
Before You Begin

I'm Okamoto from Sleepfreaks.
Synthesizer V Studio 2 Pro is a popular vocal instrument that can generate remarkably natural singing simply by entering notes and lyrics.
If you are installing Synthesizer V Studio 2 Pro for the first time, this guide explains the process from creating an account after purchase to using the software.
First, listen to the song used in this tutorial.
You may be surprised by how difficult it is to distinguish the voice from a human singer.
The ability for anyone to work with realistic vocals could mark a major shift in music production.
Create an Account
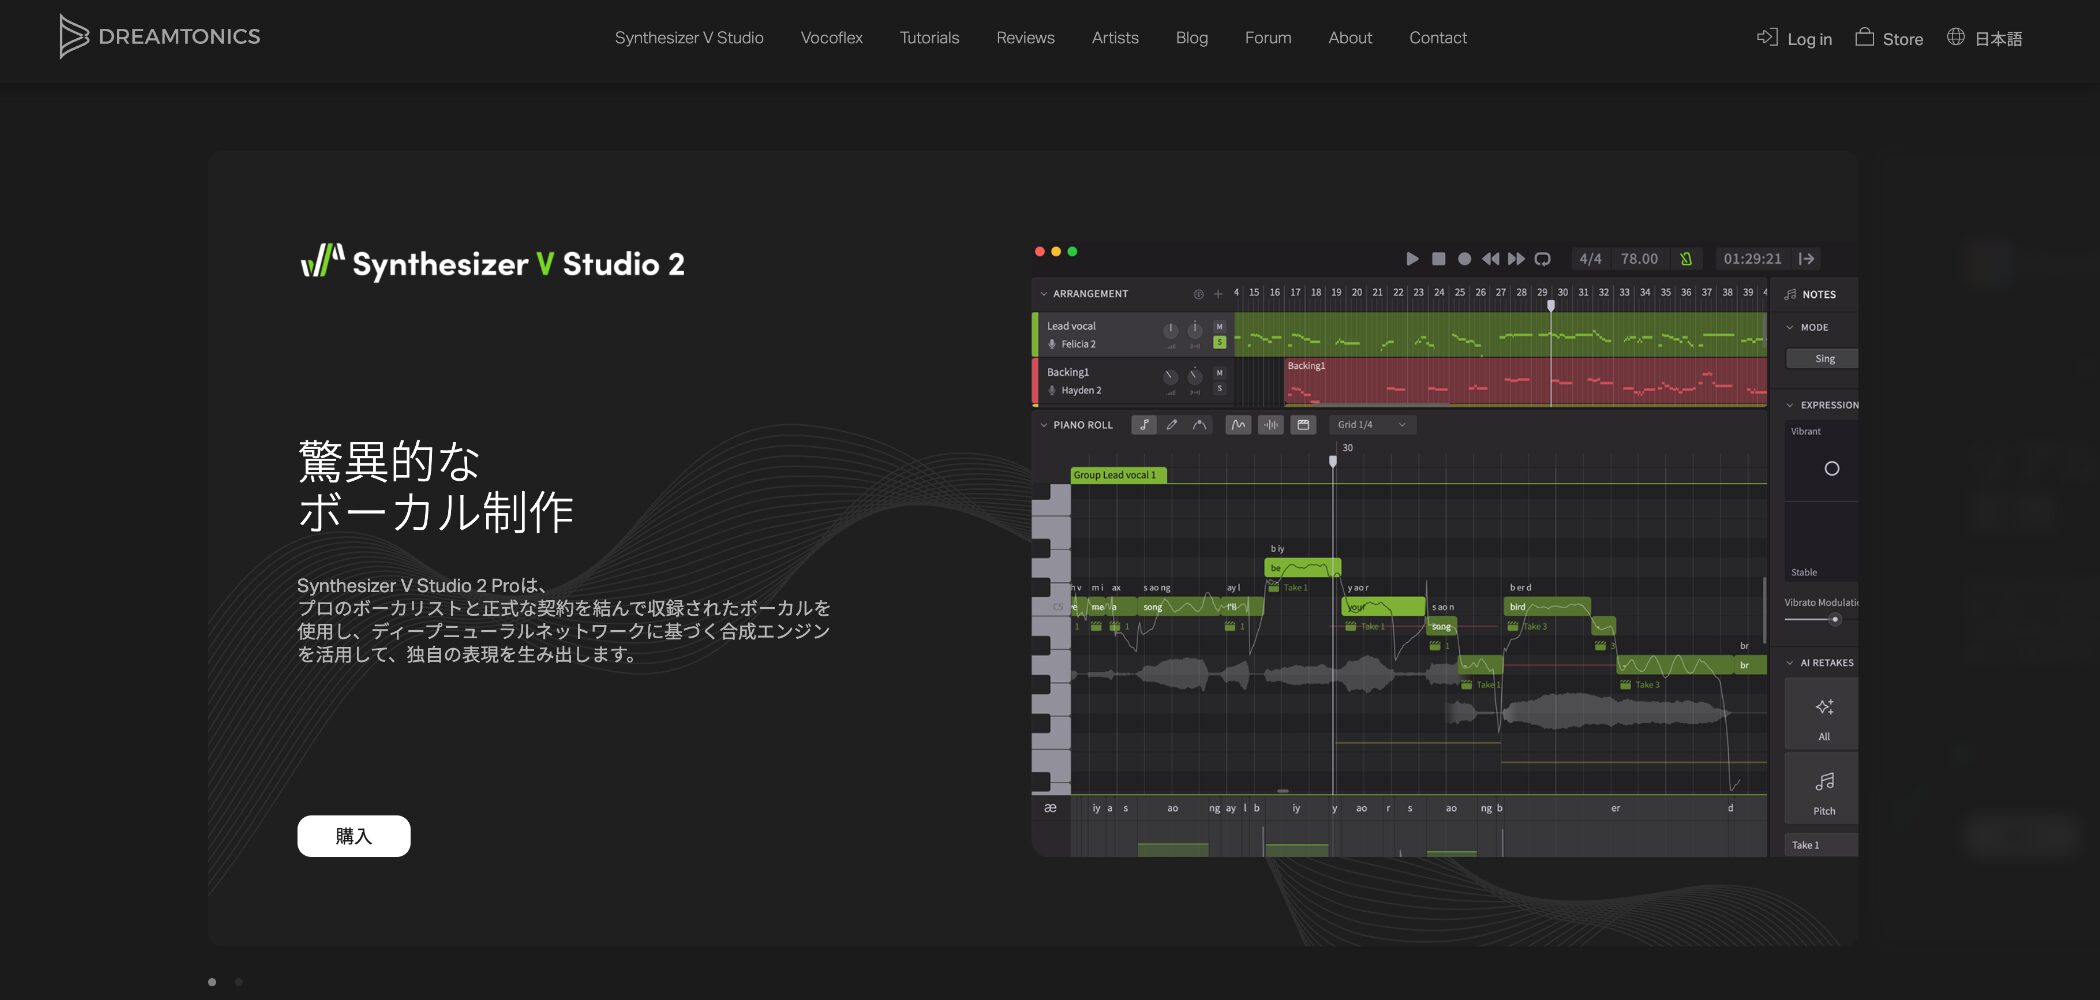
First, create an account on the official website of Dreamtonics, the developer and seller of Synthesizer V Studio 2 Pro.
This is required even if you purchased the product through a distributor such as AHS: you still need a Dreamtonics account.
It is separate from any account you created with the distributor, so be sure to register with Dreamtonics itself.
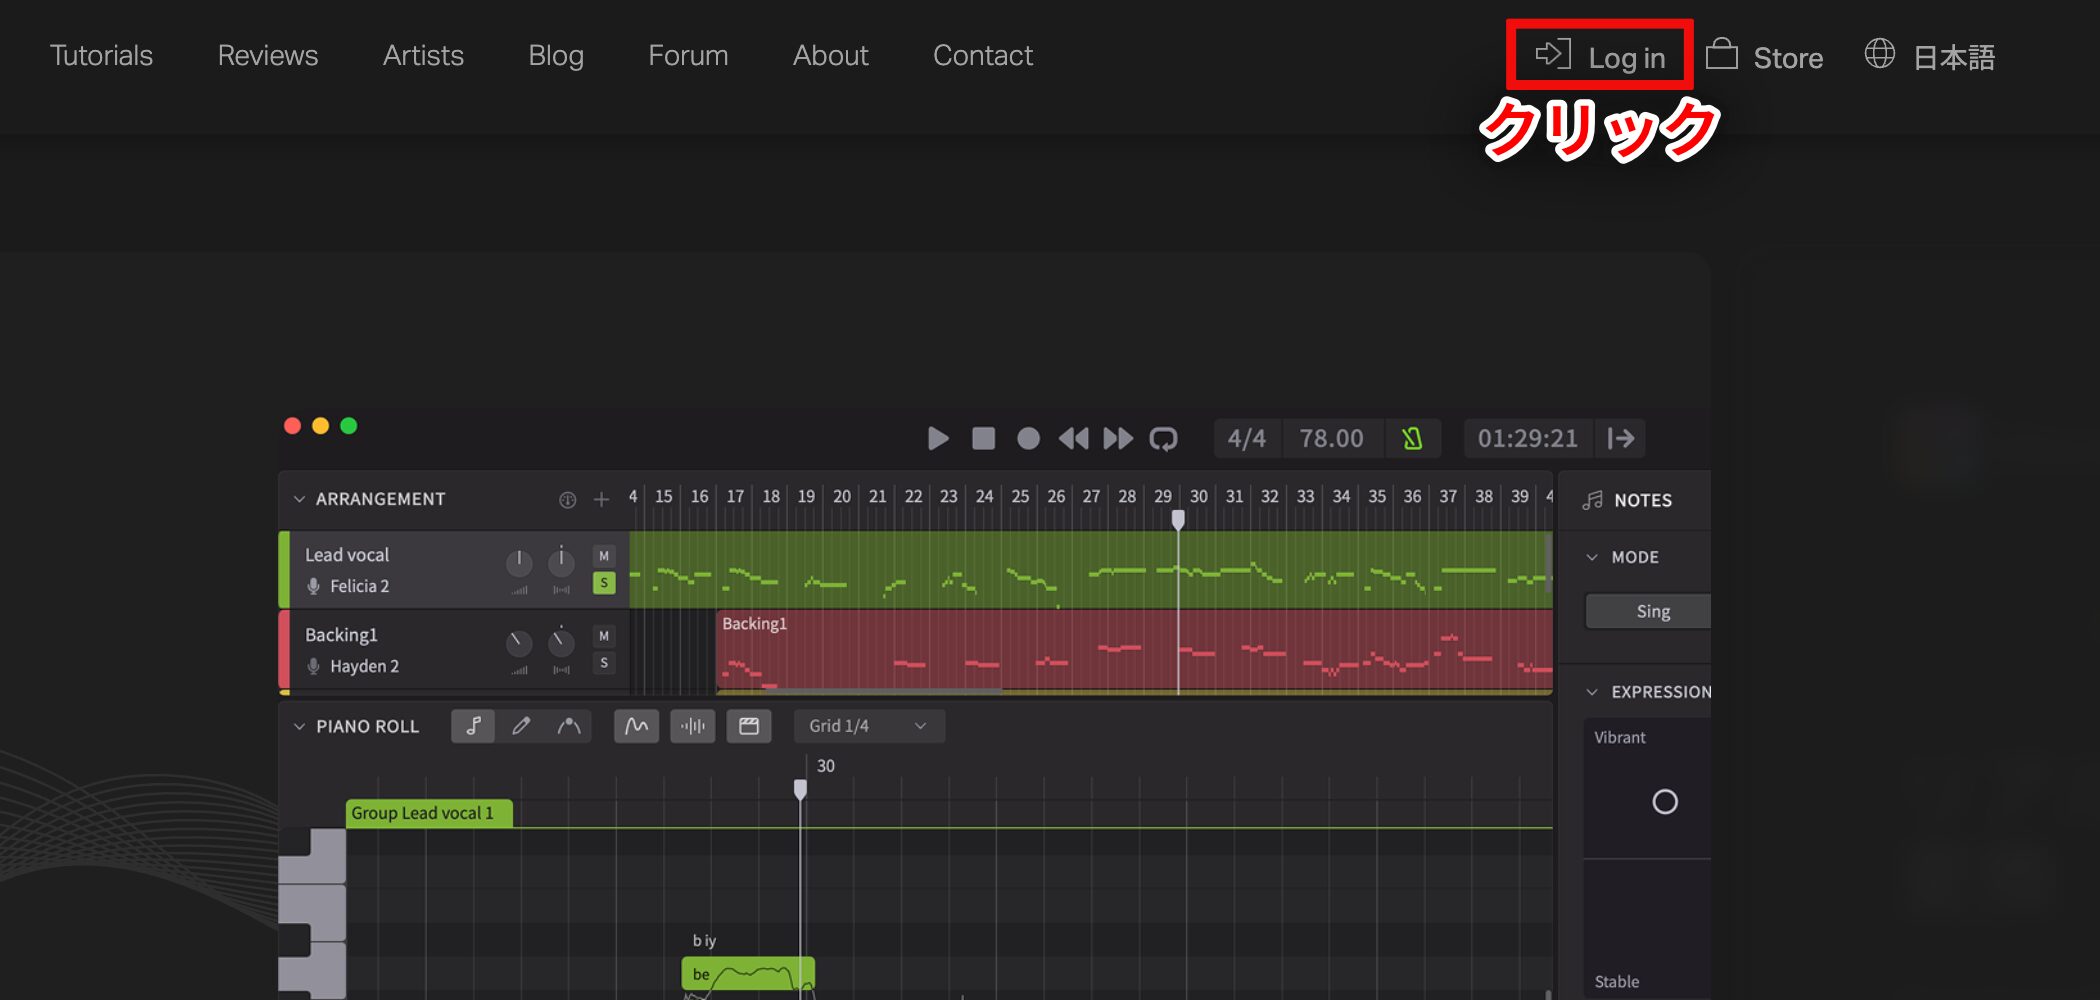
To create an account, open the official website and click Log In.
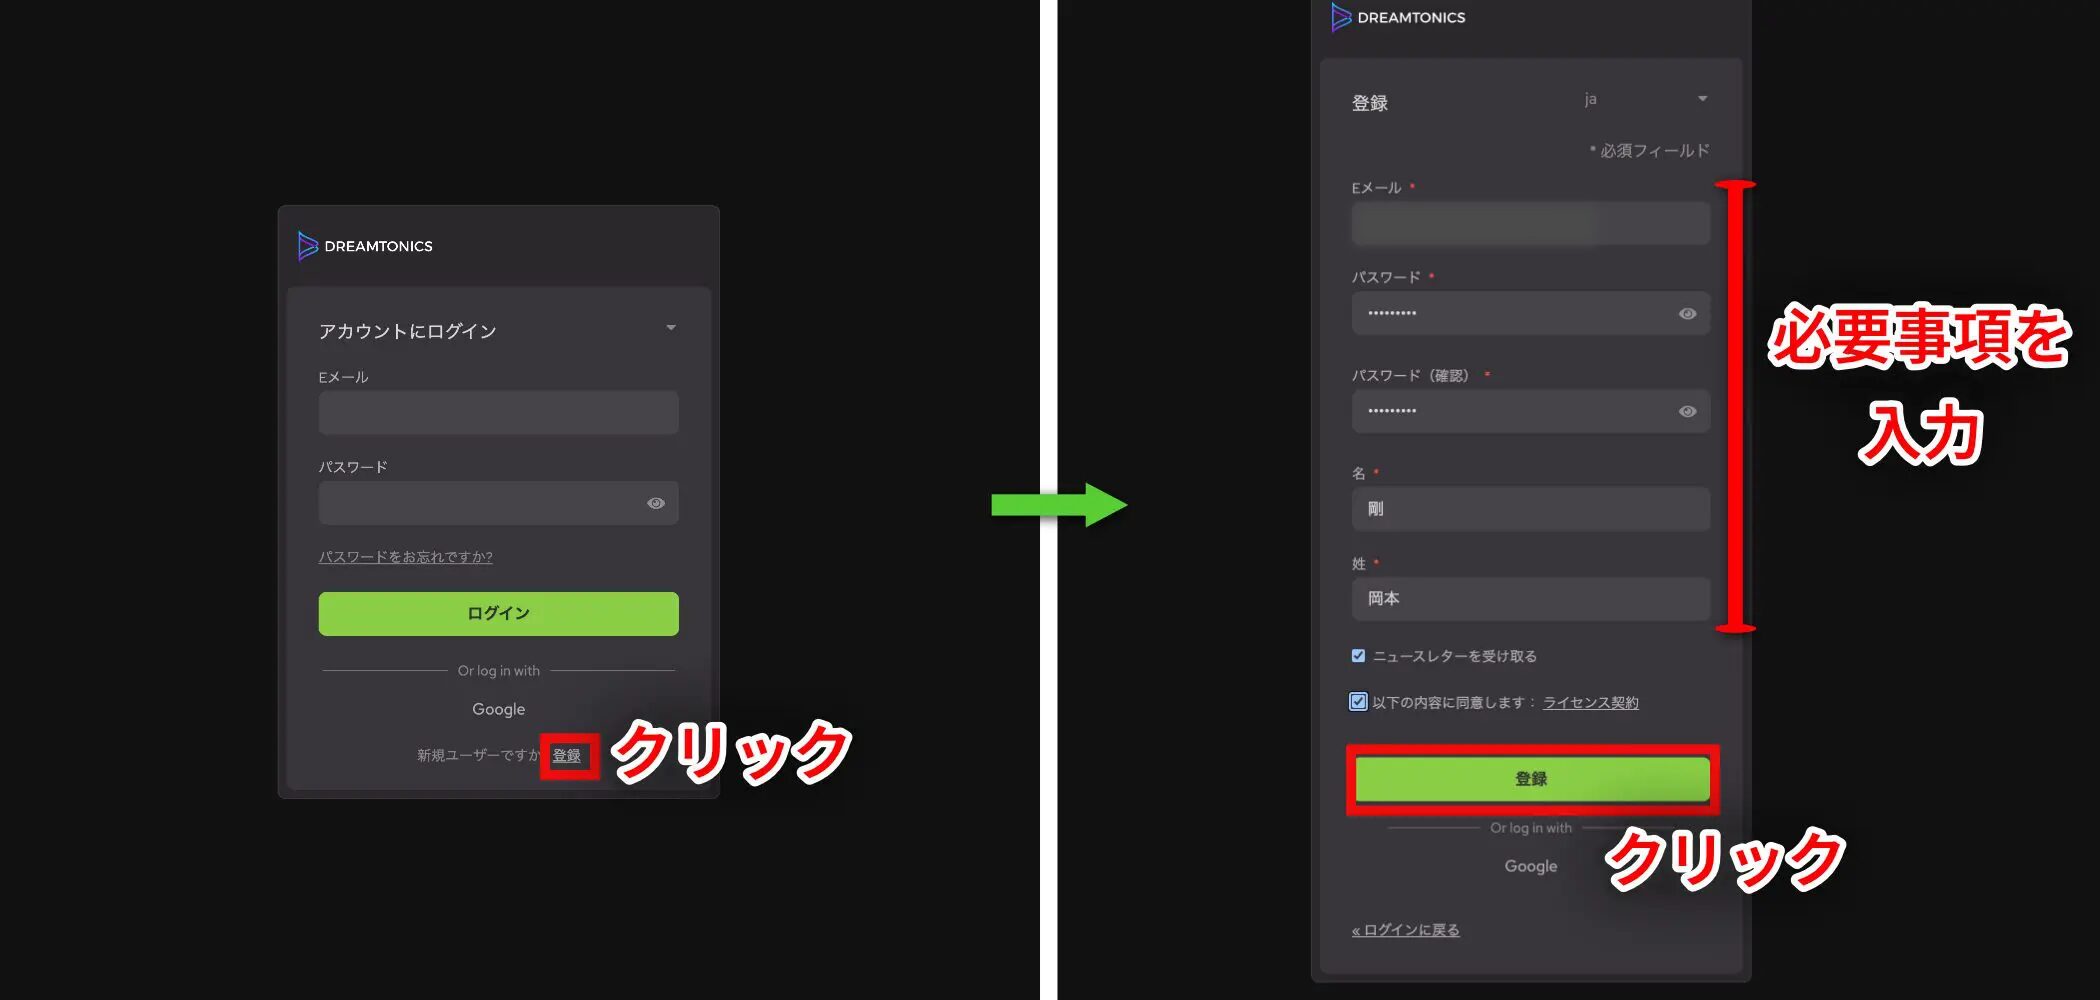
At the bottom of the page, choose Register. Enter the required details on the next screen and click Register again.
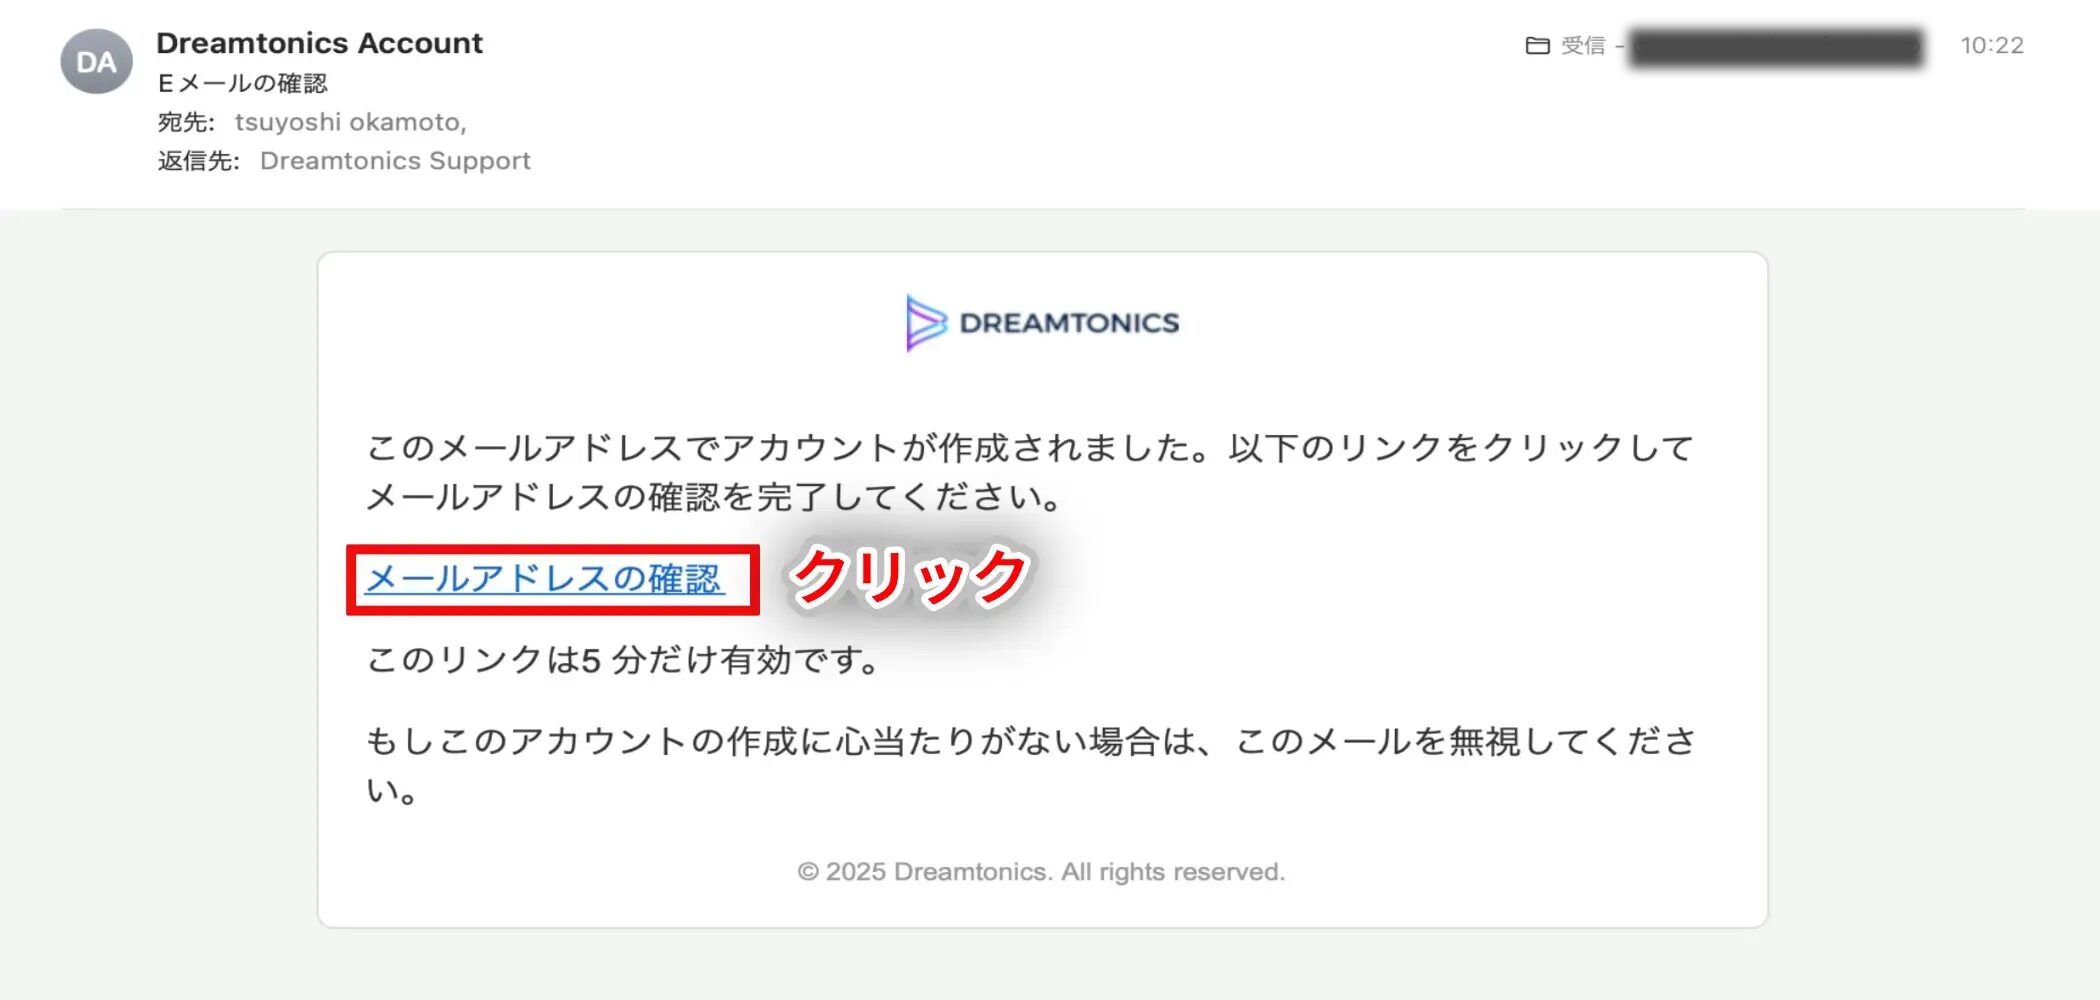
A confirmation email will arrive at the address you entered. Click the link in the email to complete verification.
If it does not arrive, check your spam folder as well.
Your Dreamtonics account is now ready.
Register and Install the Product
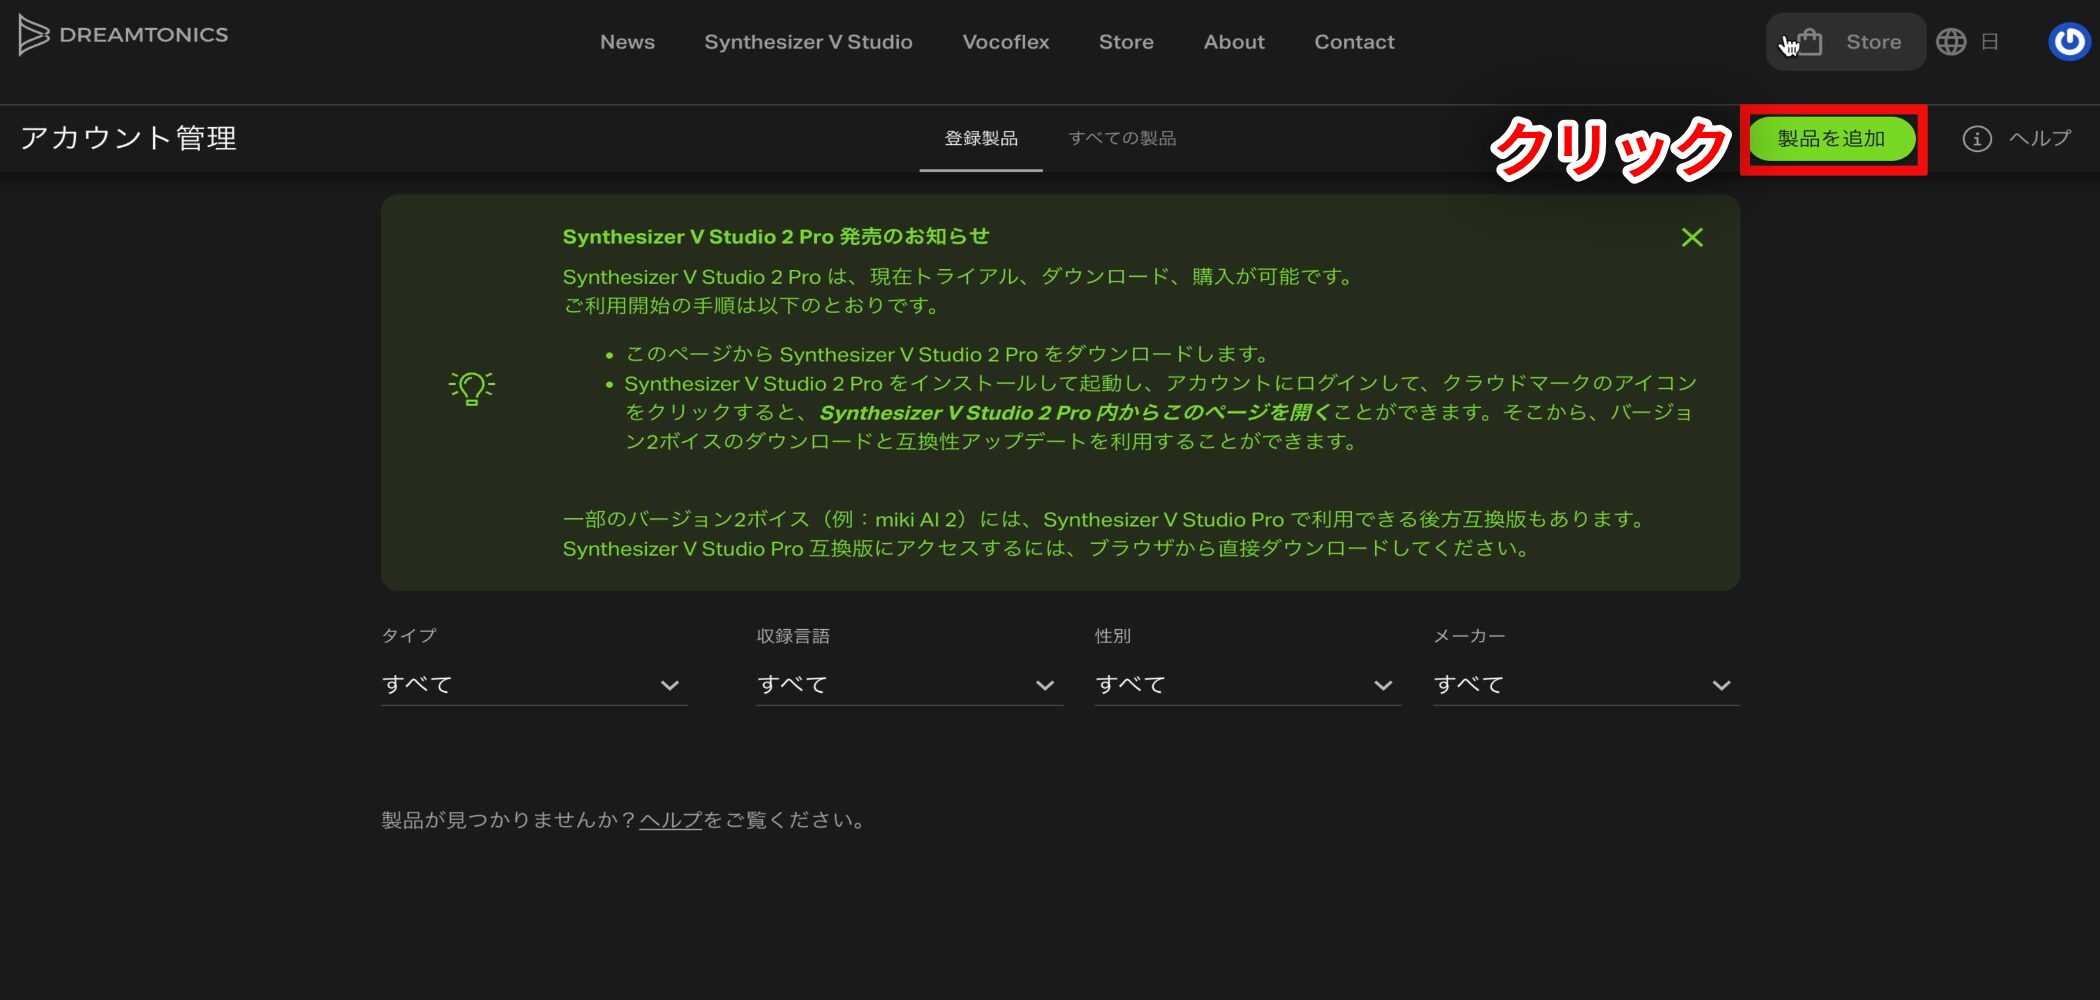
After creating the account, log in to the Dreamtonics website and click Add Product.
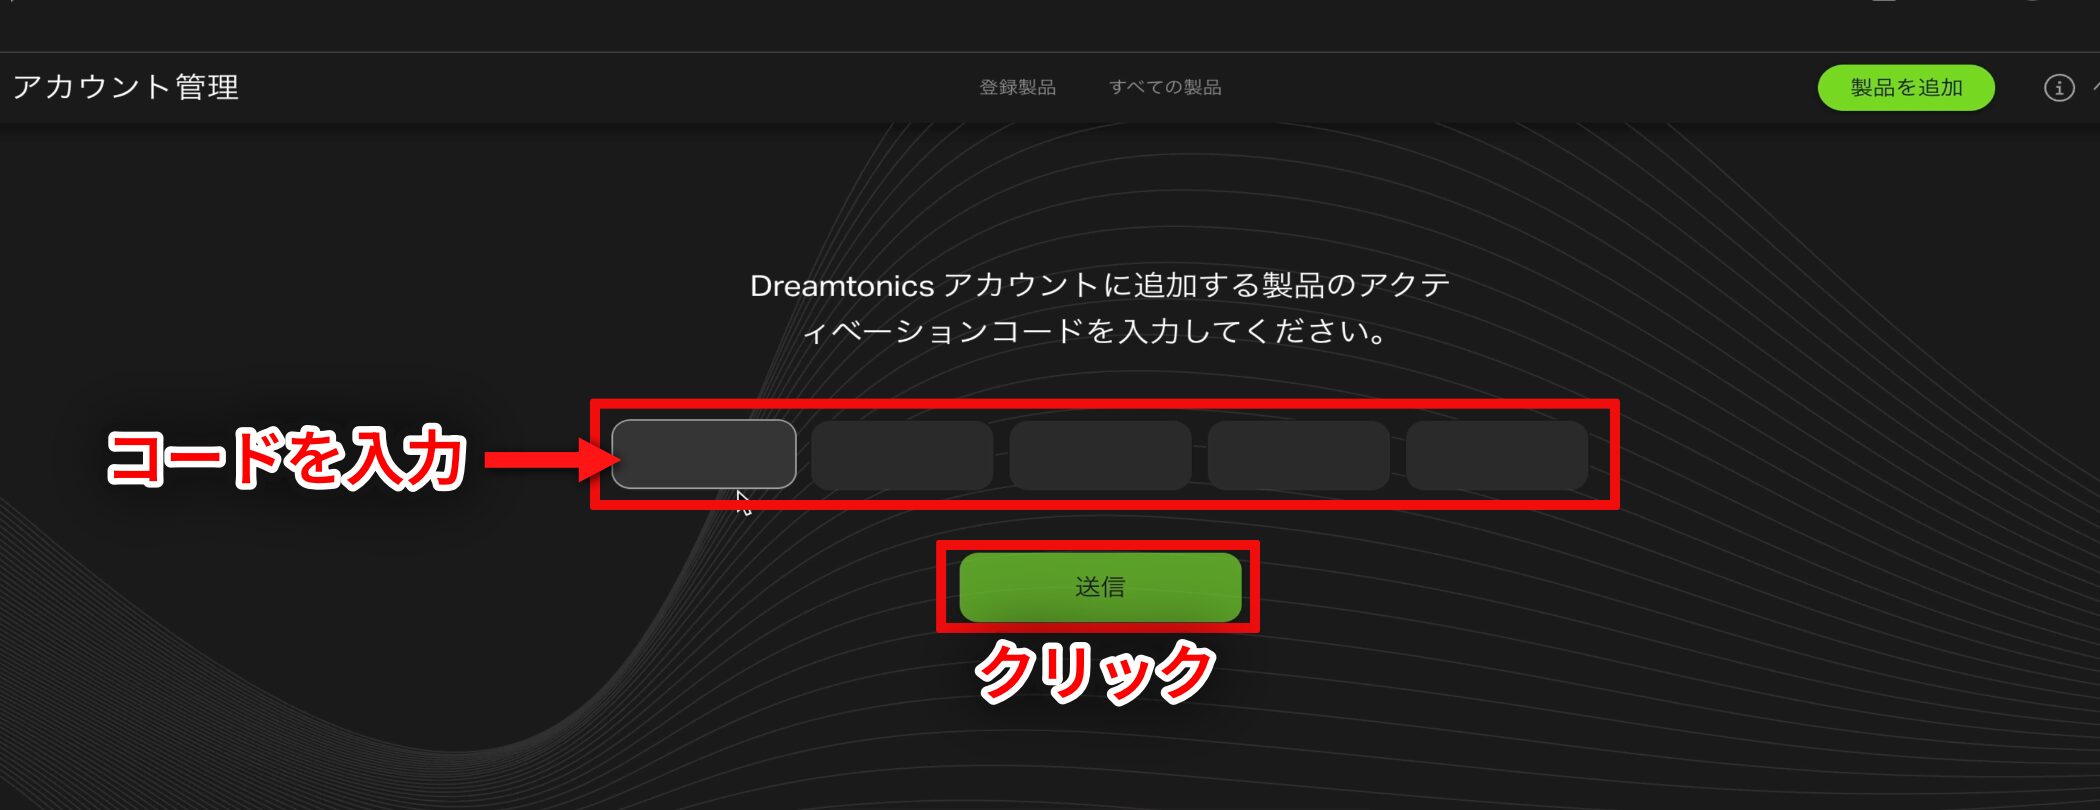
Enter the activation code you received with your purchase and click Submit to complete registration.
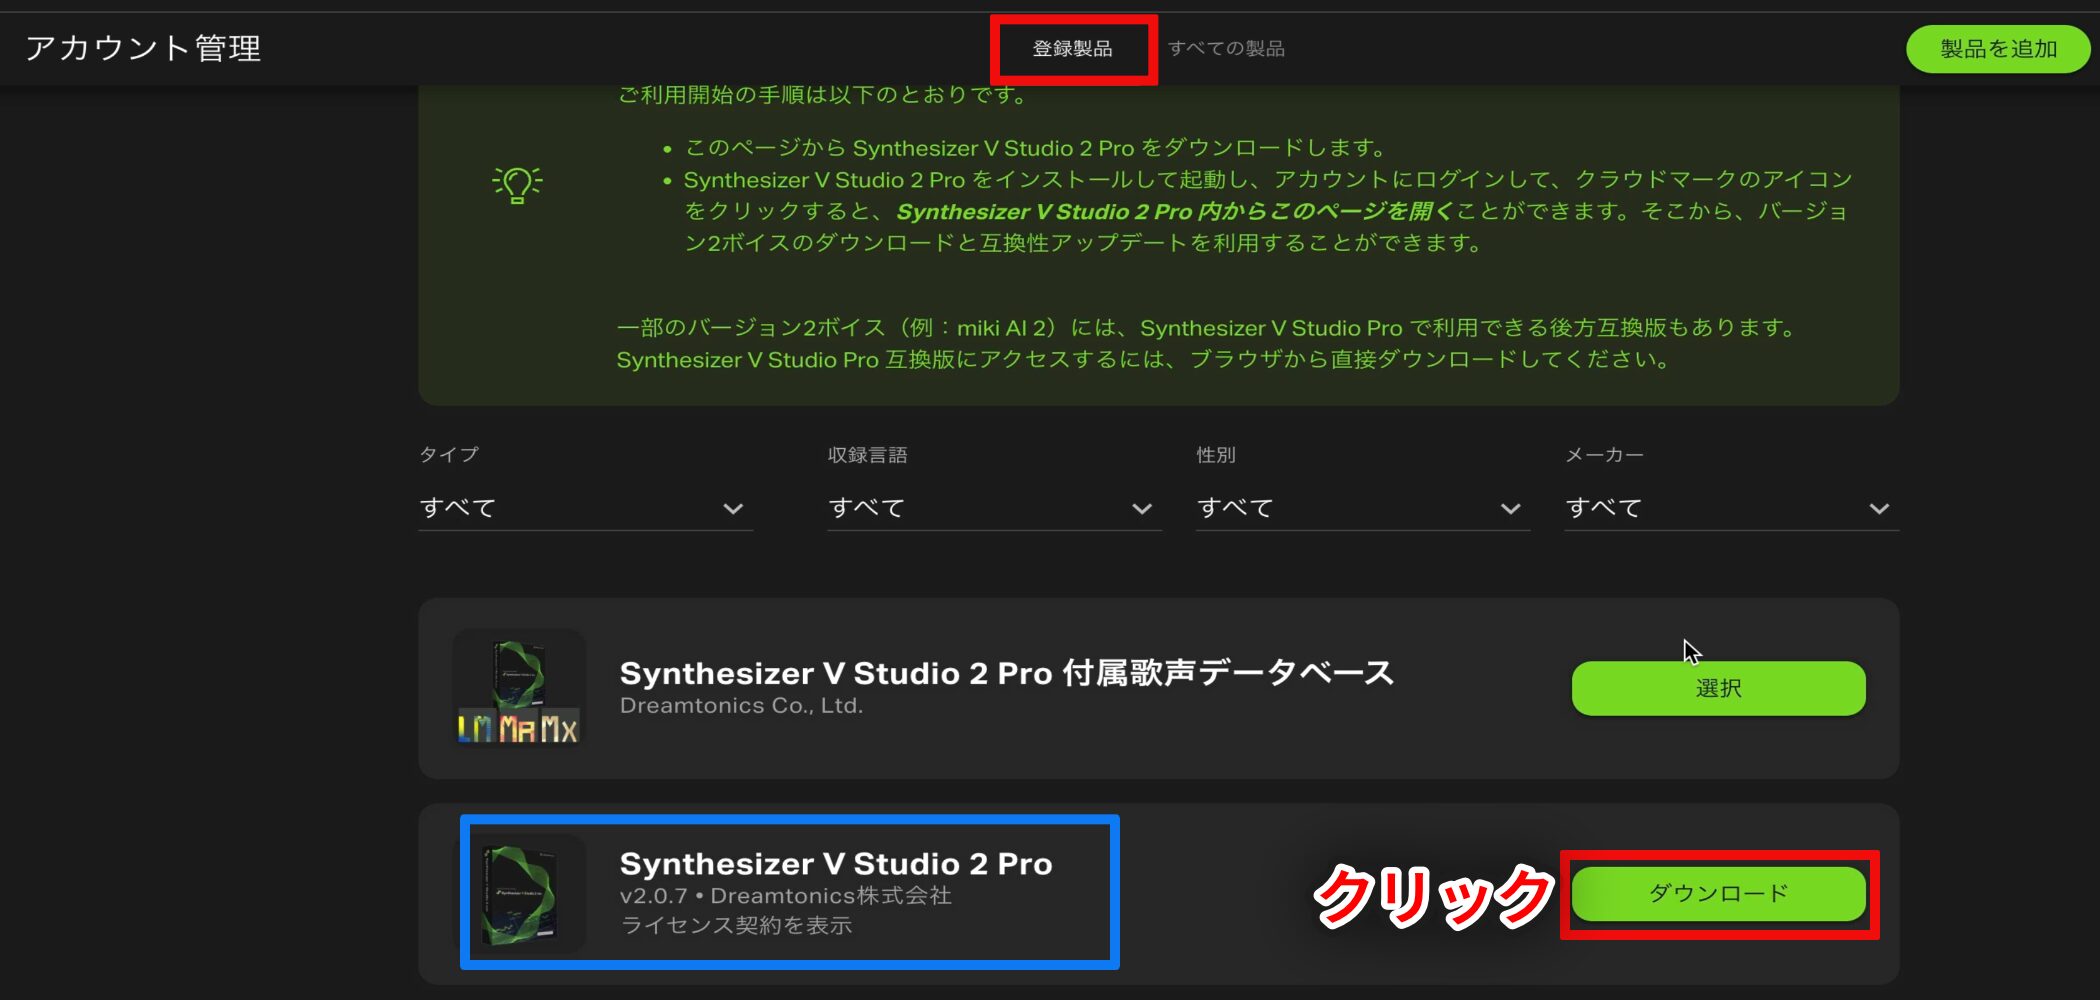
When registration succeeds, Synthesizer V Studio 2 Pro appears under Registered Products. Click Download.
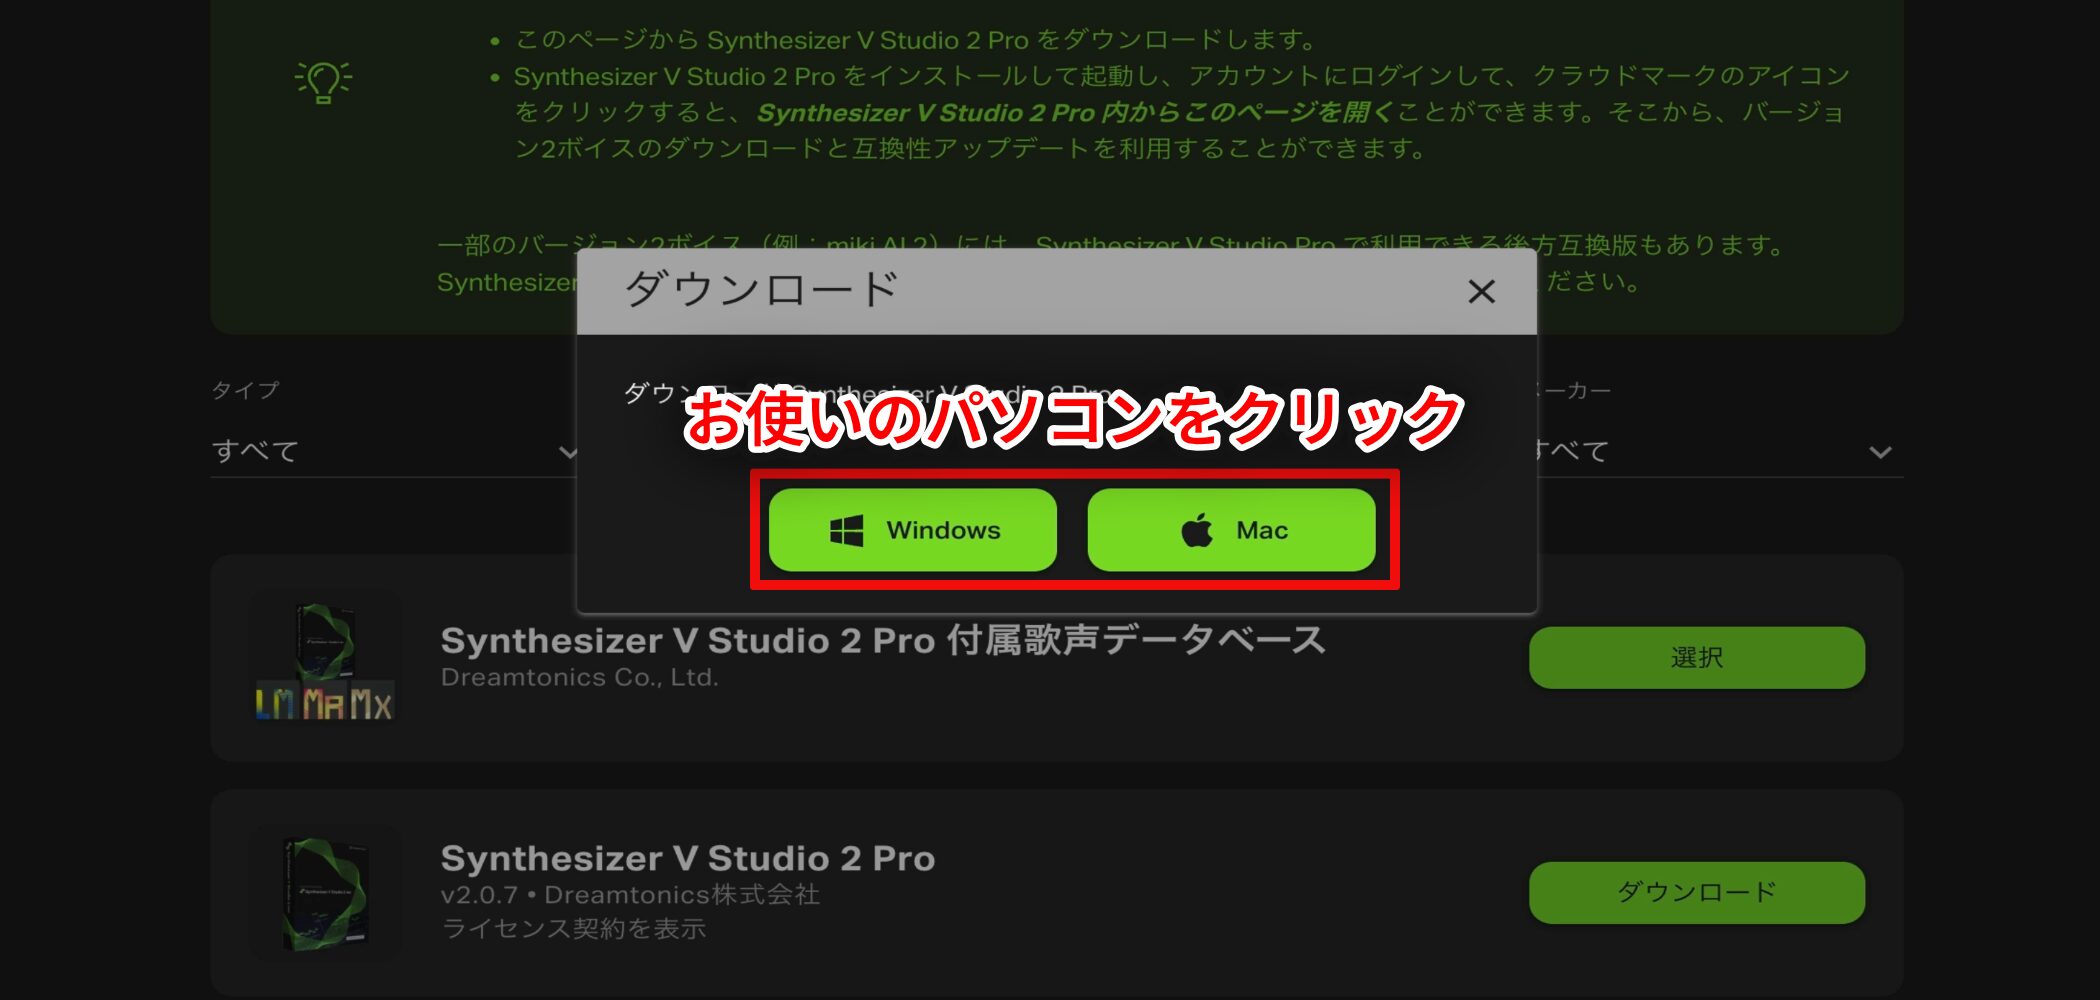
Select your computer to get the installer.
The following steps use a Mac.

Double-click the downloaded file to install the software.
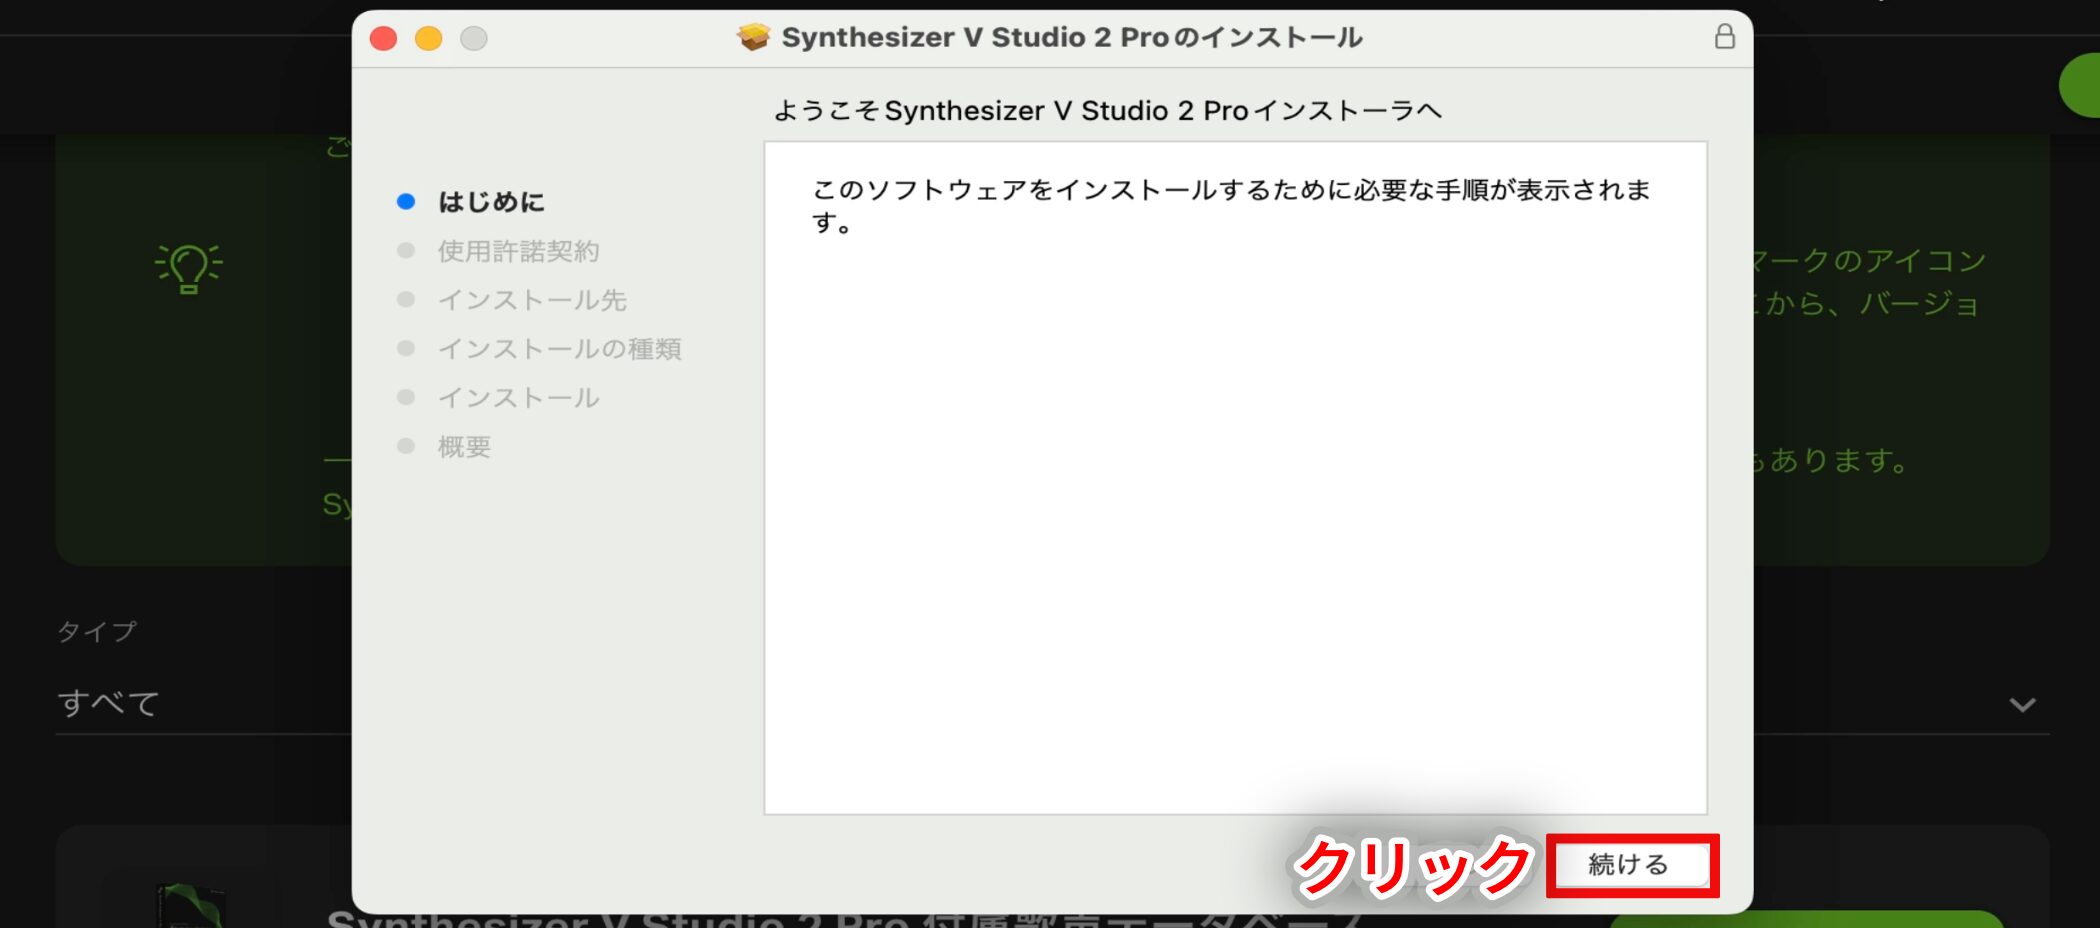
Run the downloaded installer and follow the installation steps.
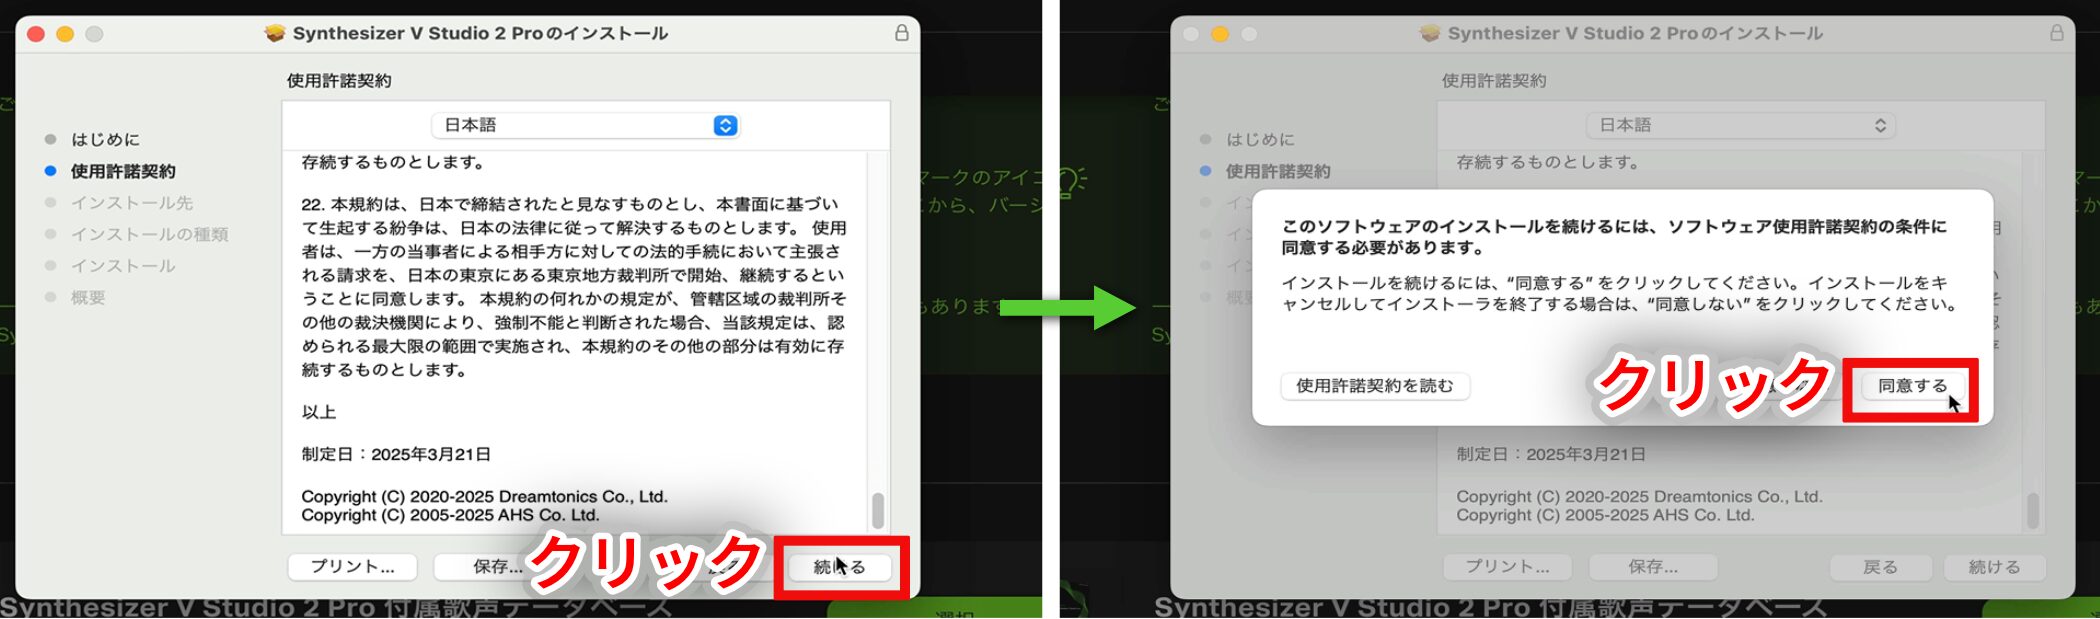
Read the license agreement during installation and select Agree if you accept its terms.
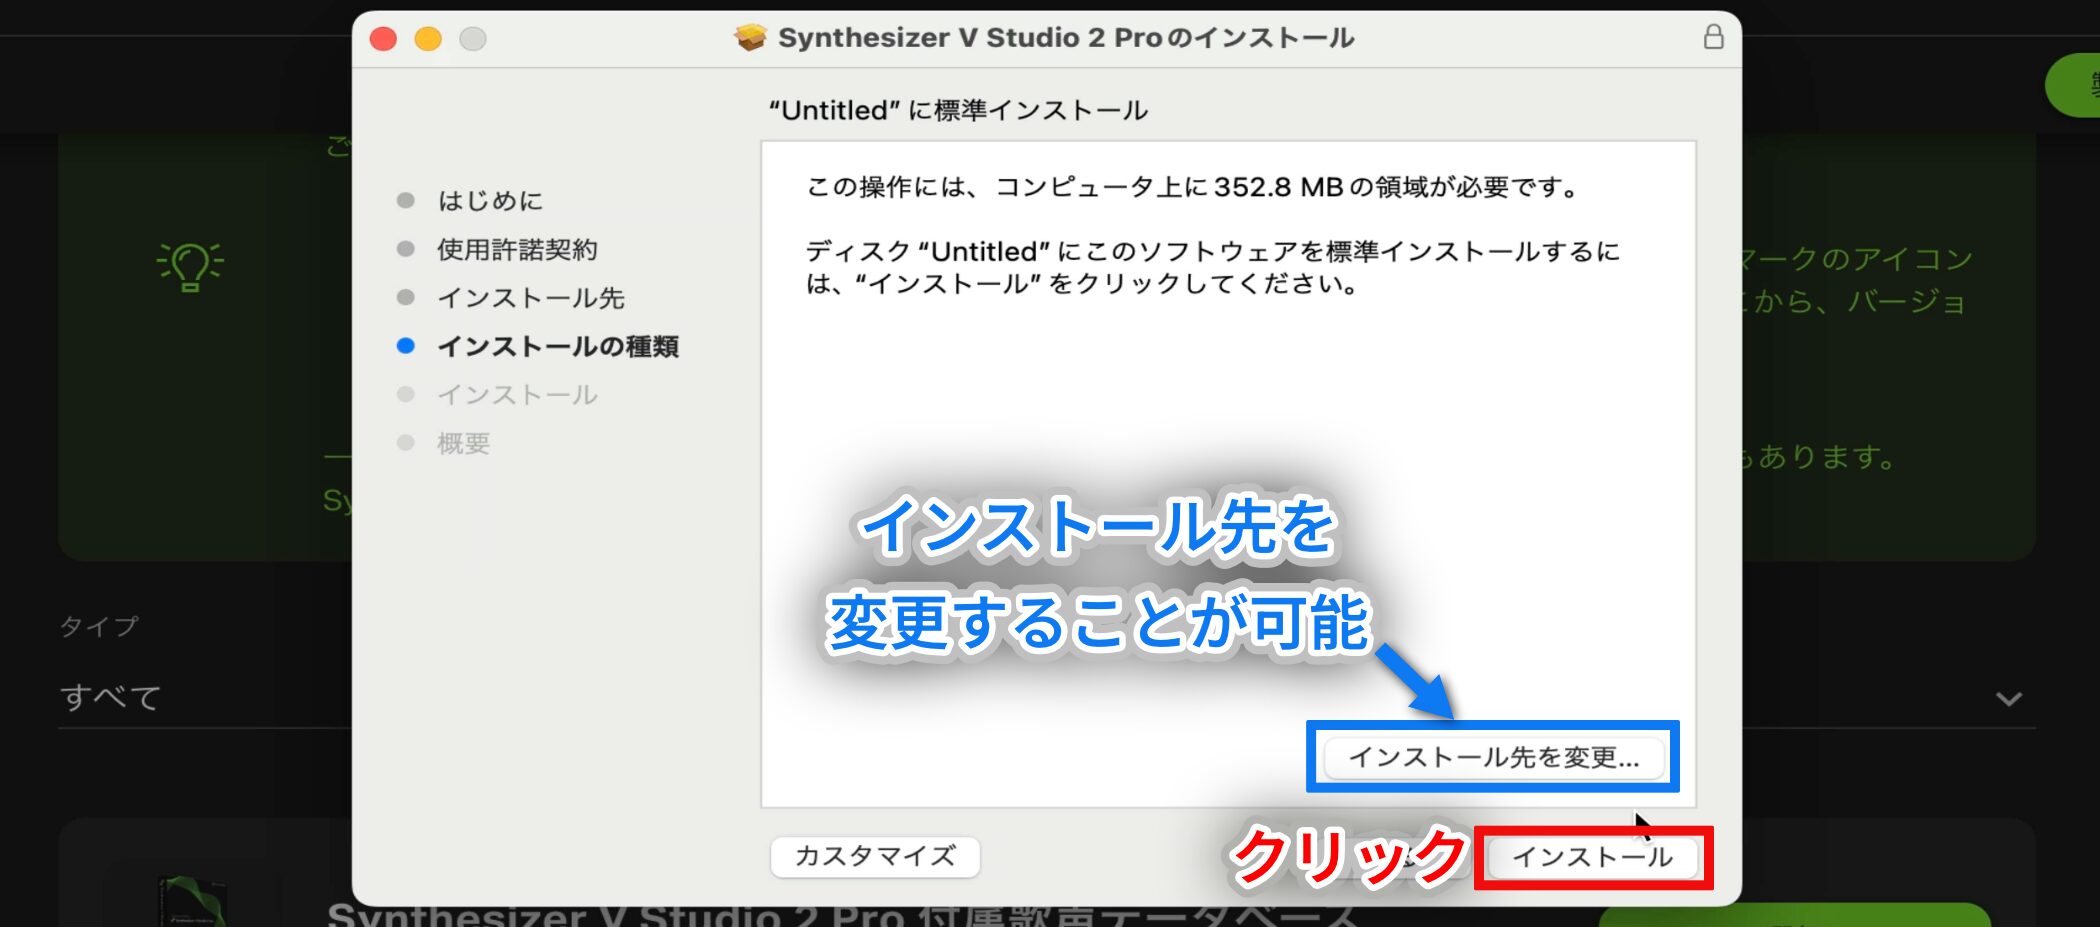
On the next screen, Change Install Location lets you choose another folder. Avoid an external drive or USB stick, and keep the default location if possible.
Click Install and wait for the process to finish.
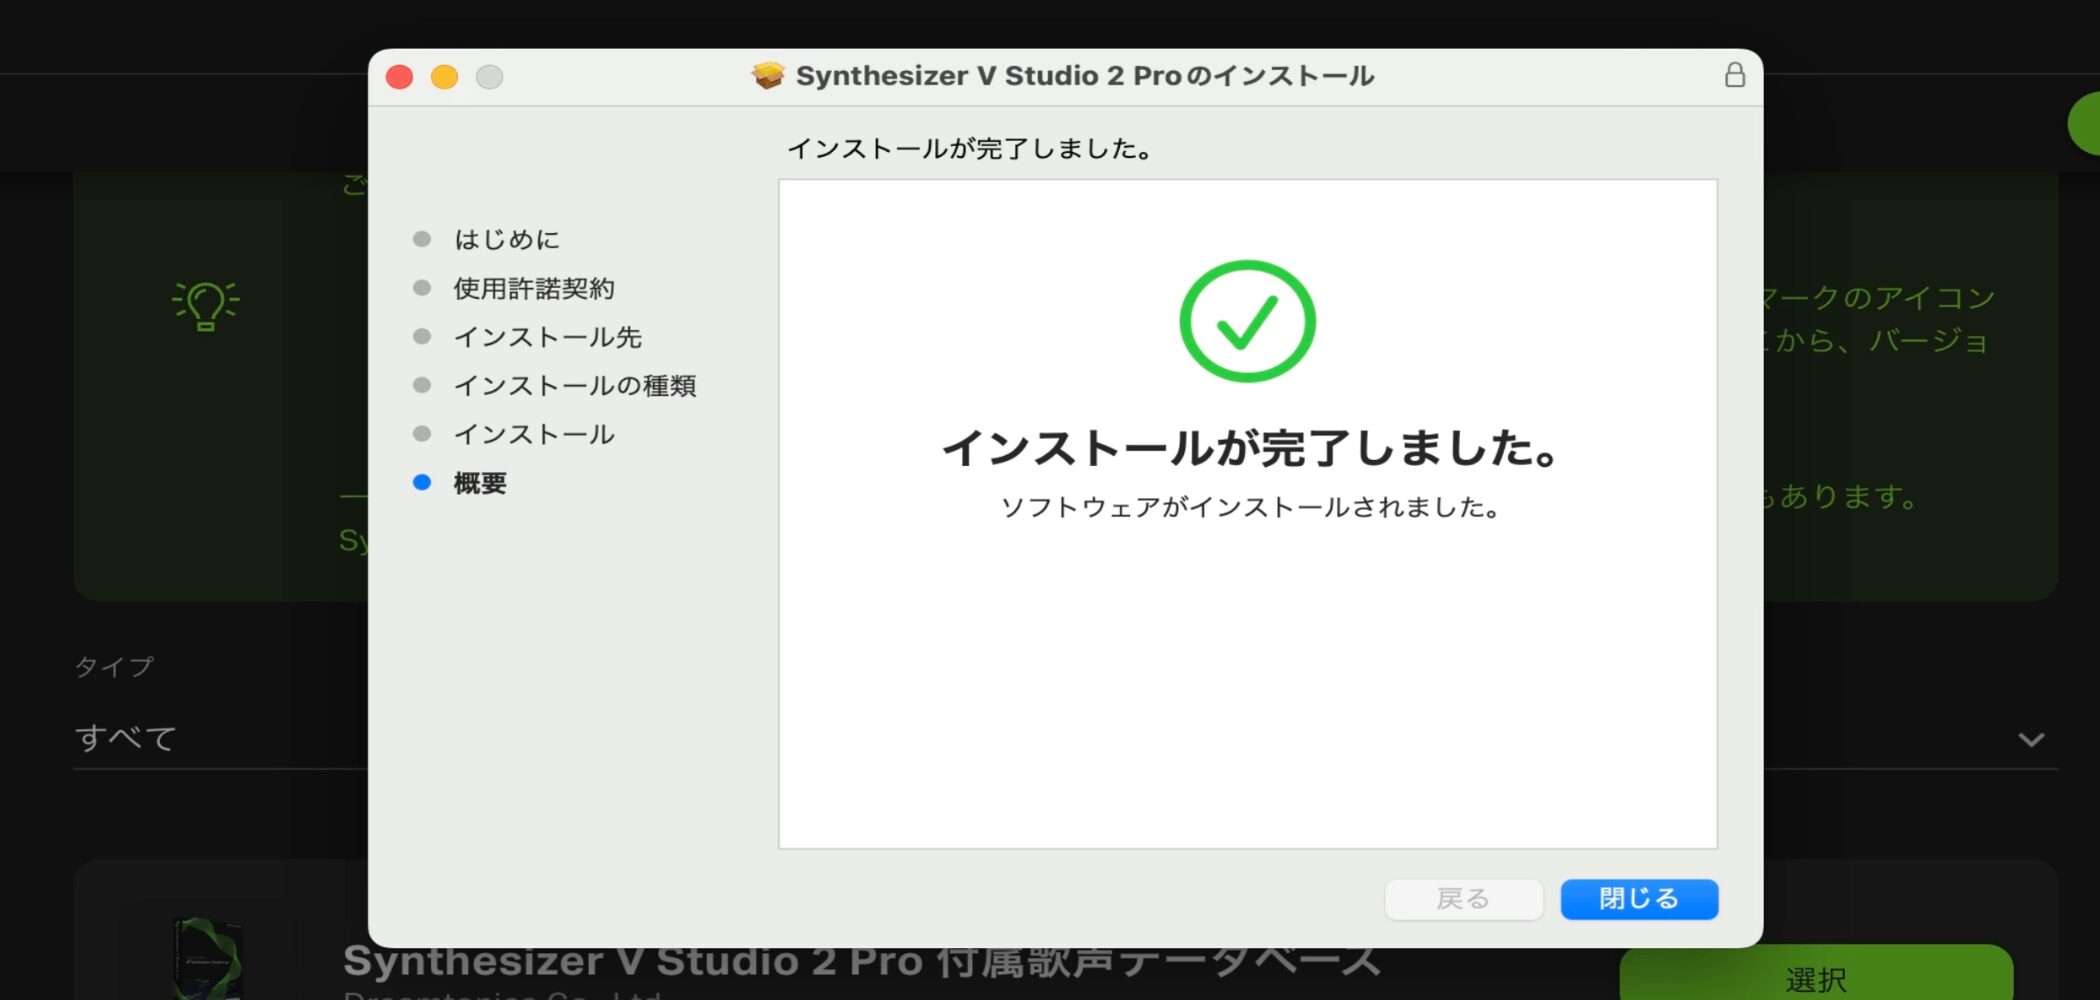
The main Synthesizer V Studio 2 Pro application is now installed.
Register and Install a Voice Database
What Is a Voice Database?
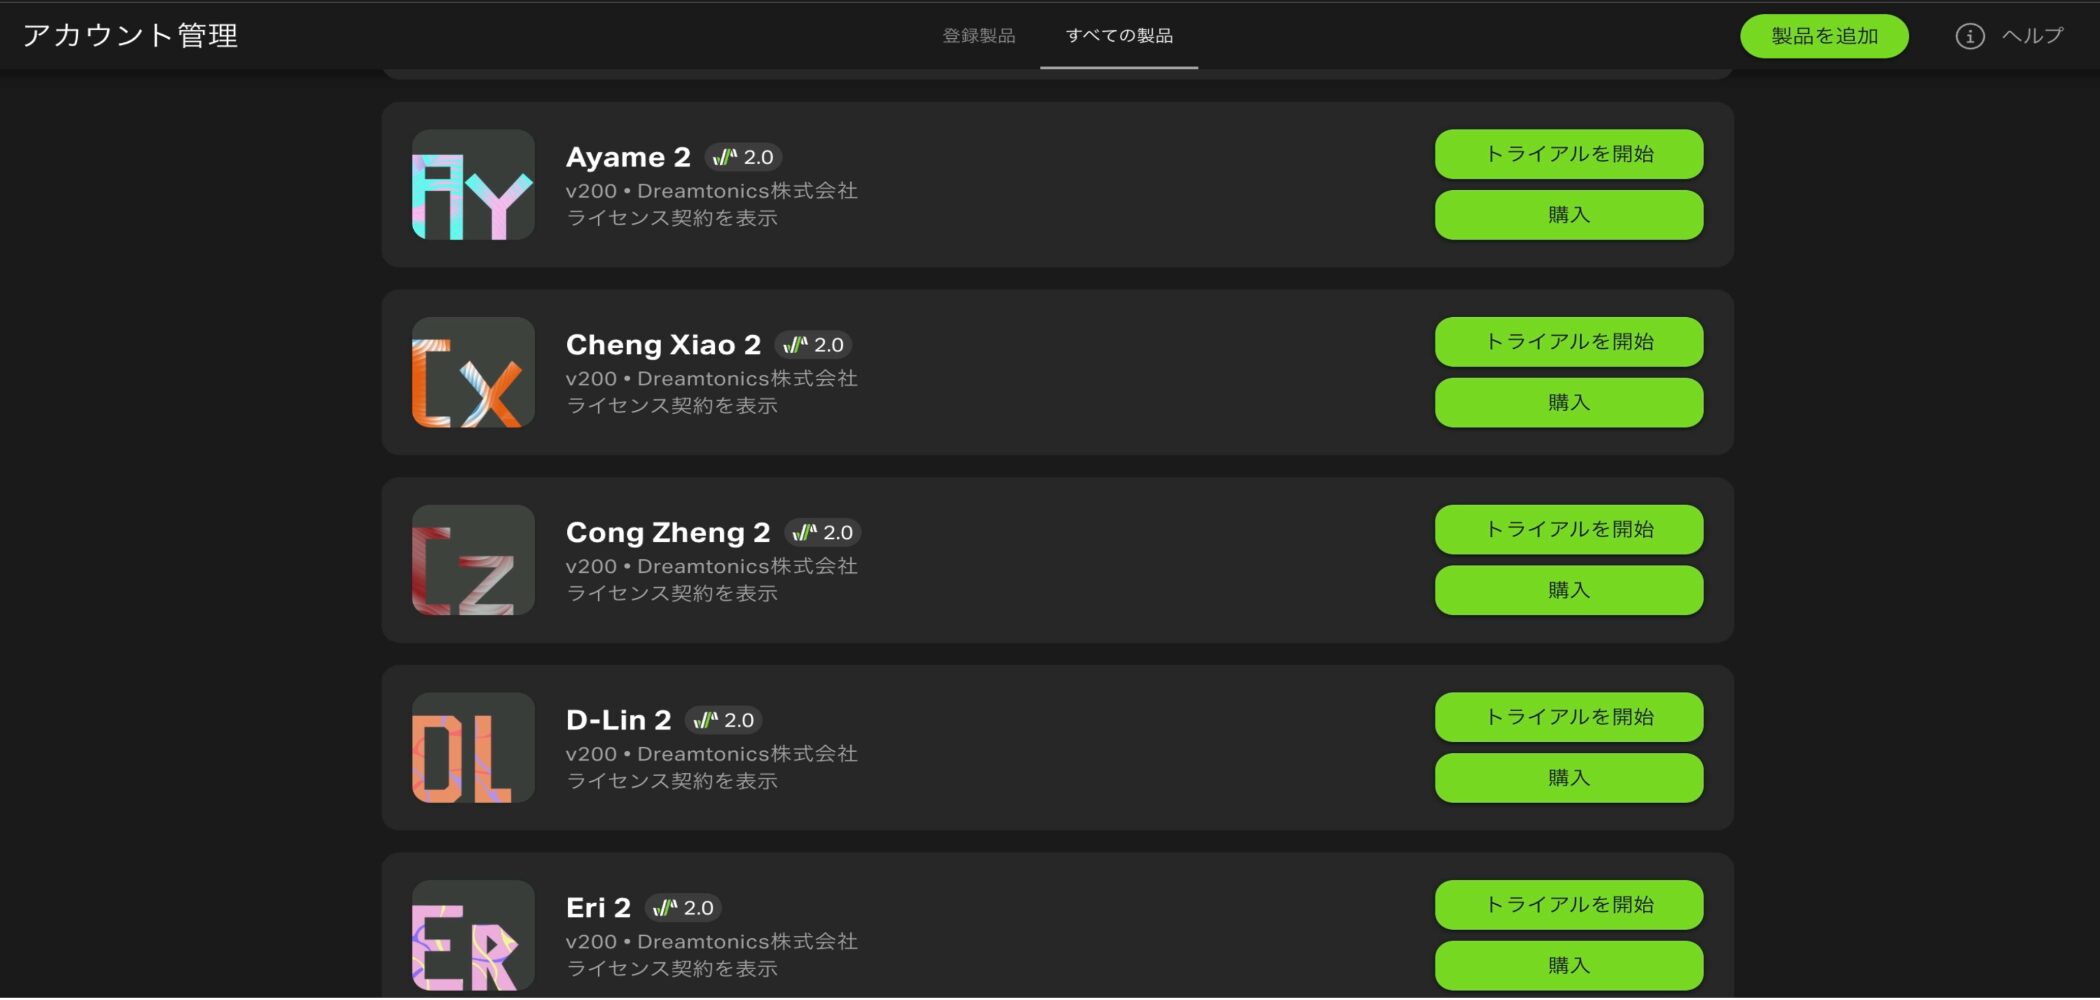
To generate singing in Synthesizer V Studio 2 Pro, you need to register a voice database.
Think of the main application as a game console and a voice database as the game you play on it.
The application alone cannot sing; voice generation becomes possible only after you add a voice database.
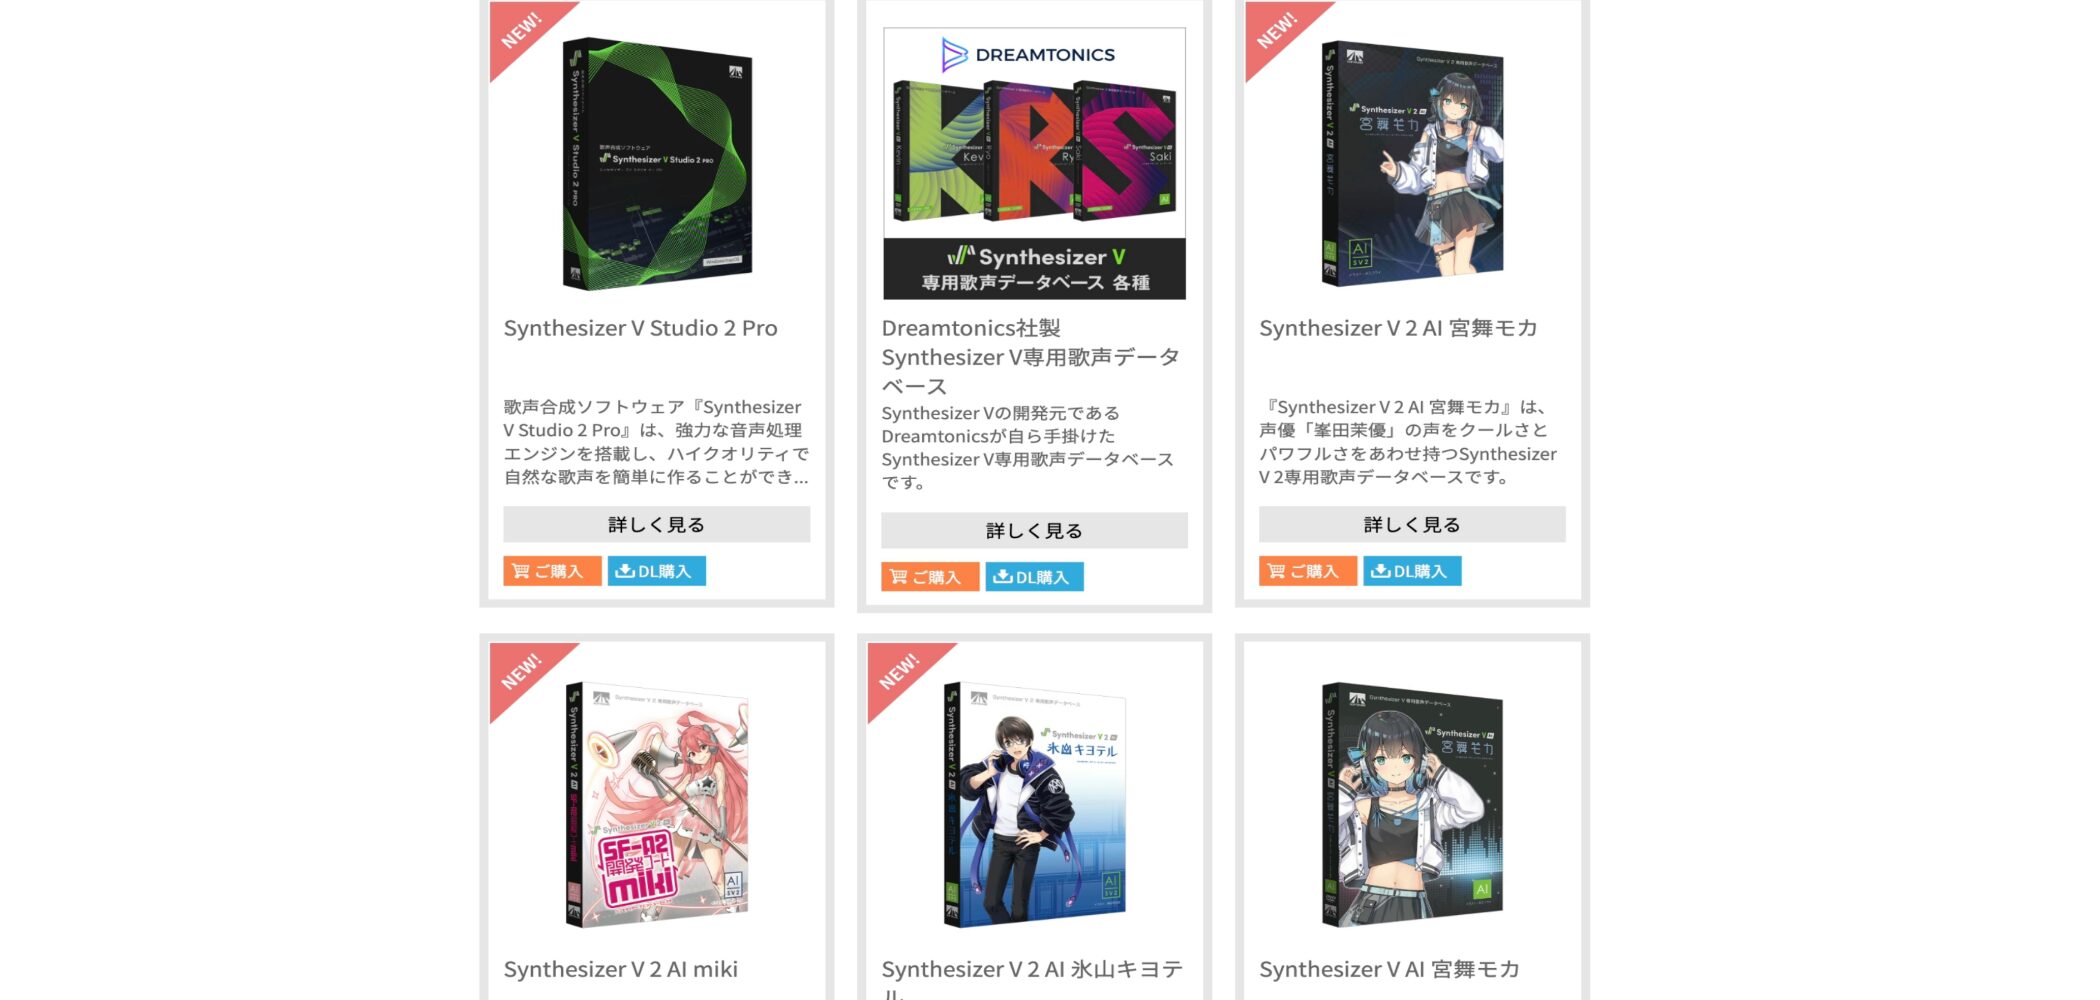
Alongside Dreamtonics' own voices, third-party voice databases are available. You can choose and buy one to suit your preferred sound.
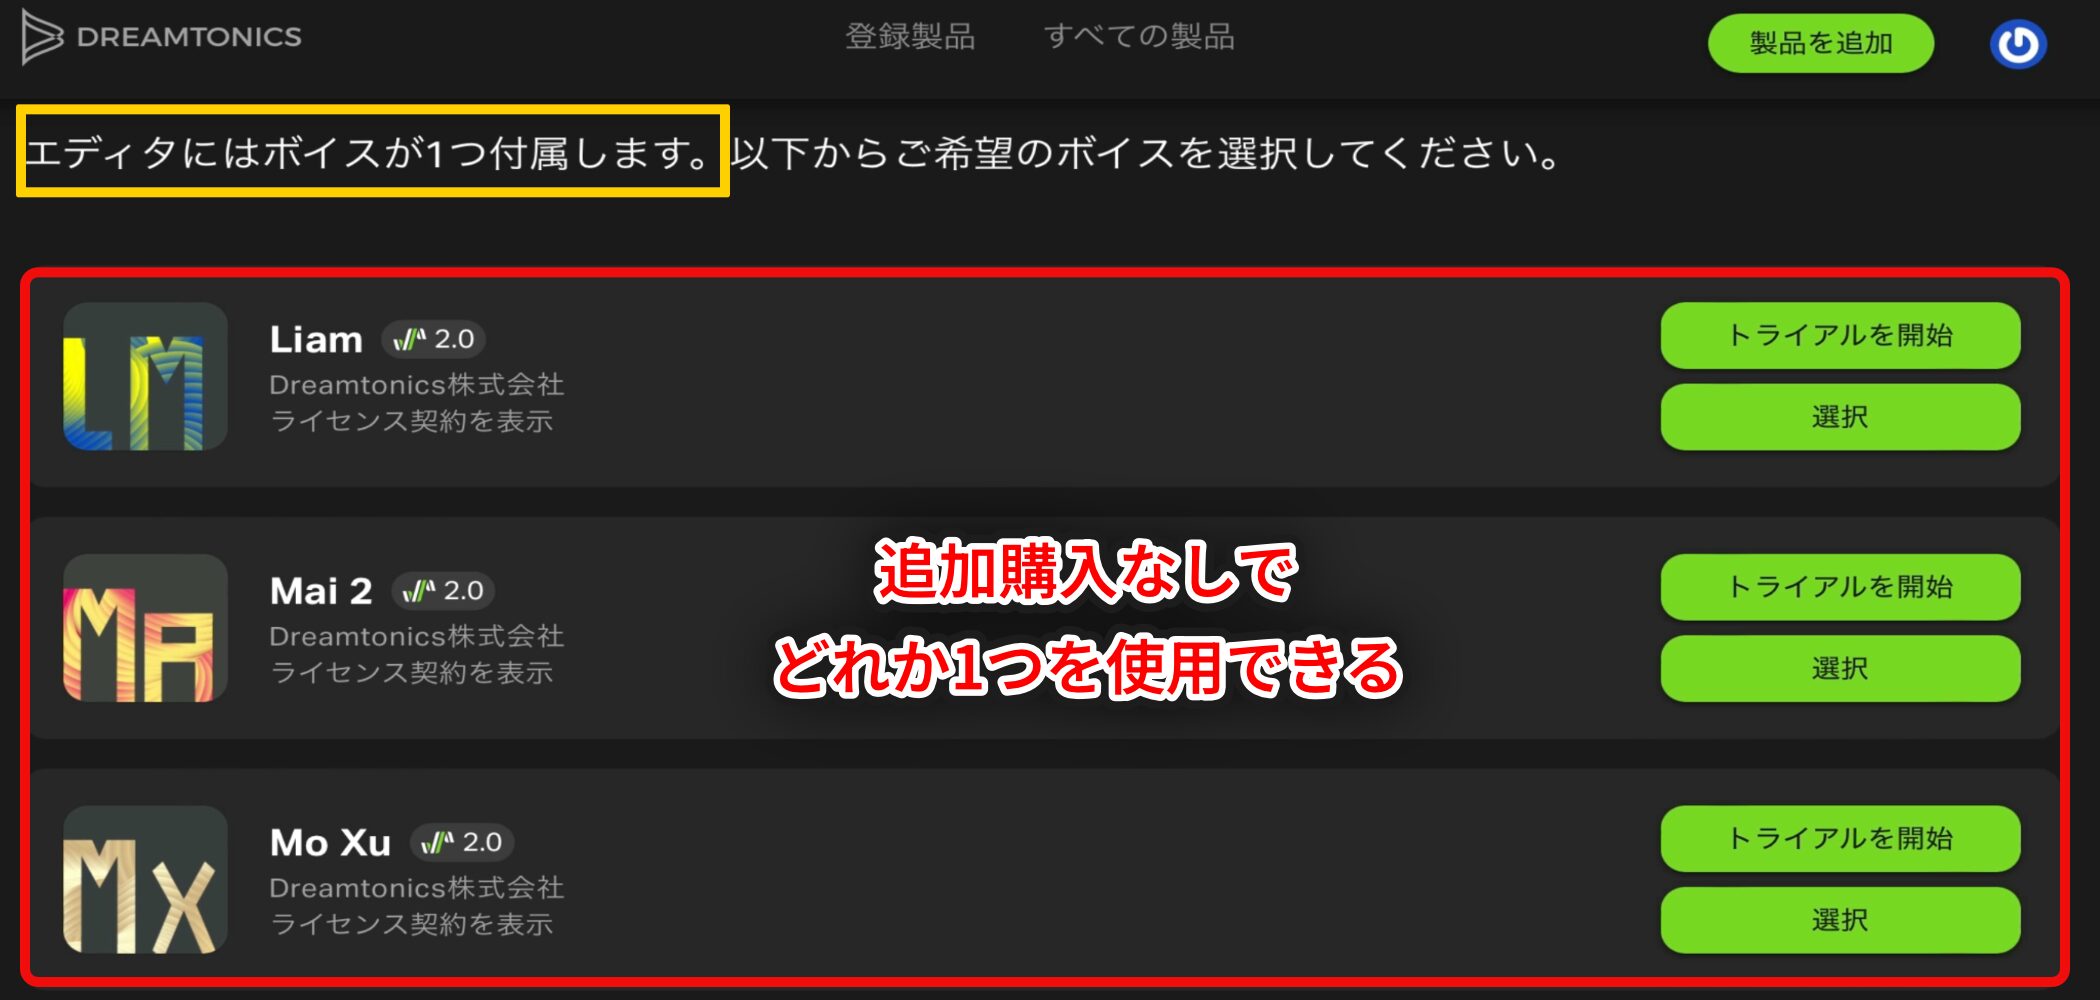
However, a purchase of Synthesizer V Studio 2 Pro includes one voice database, so you can get started without another purchase.
Install the Voice Database
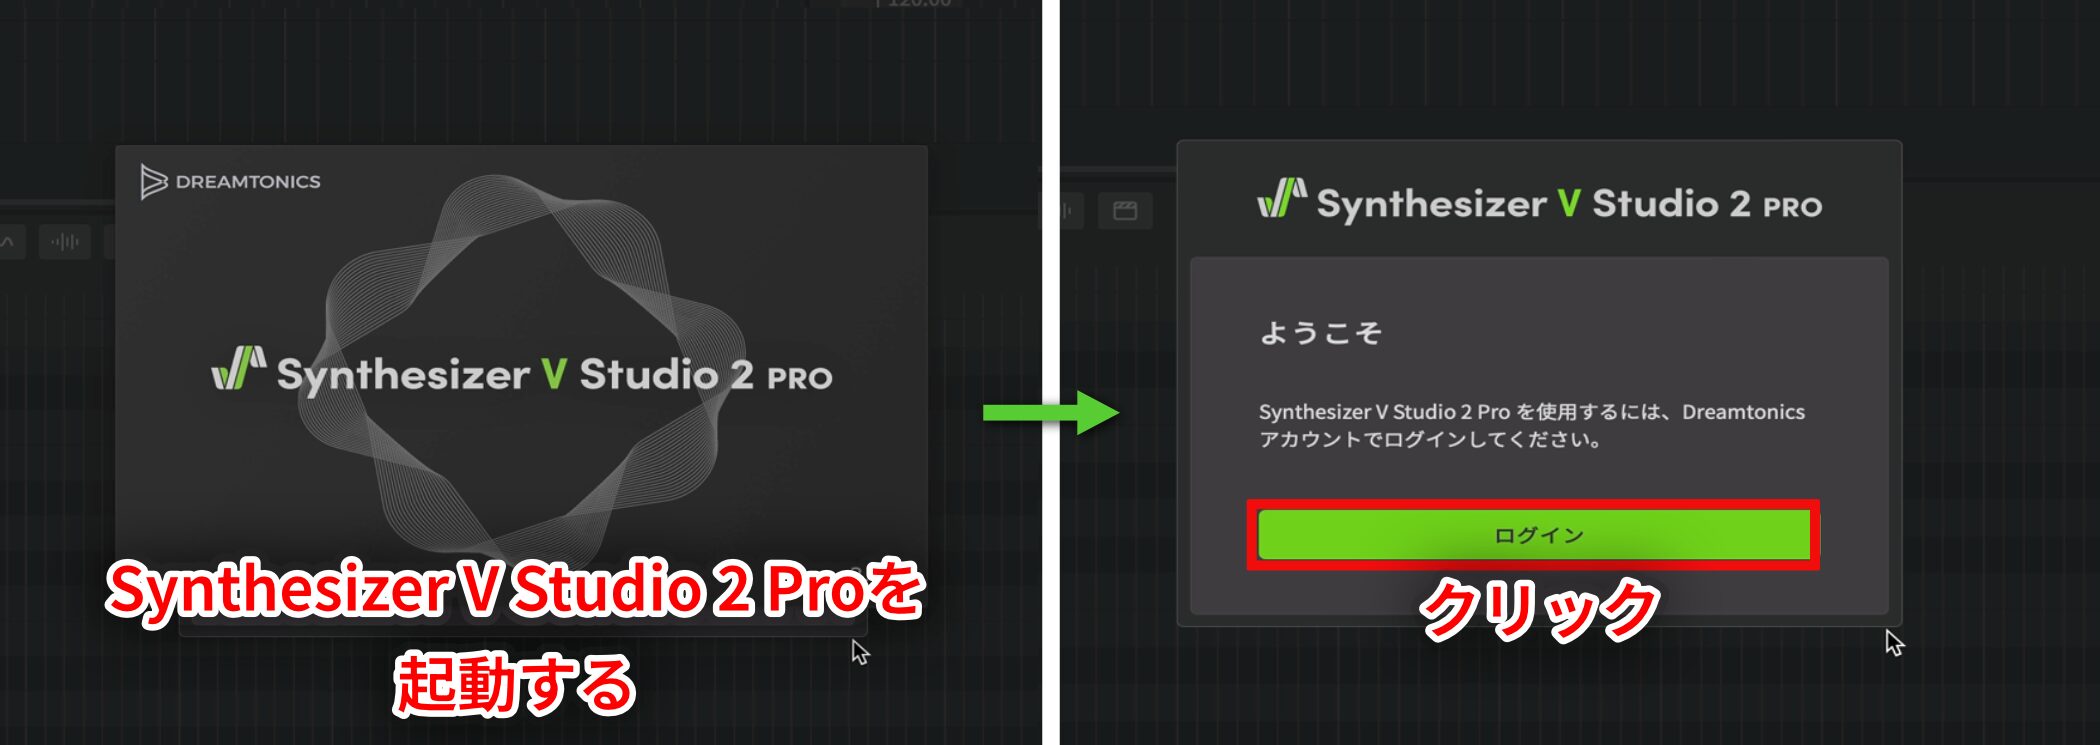
Launch Synthesizer V Studio 2 Pro and click Log In.
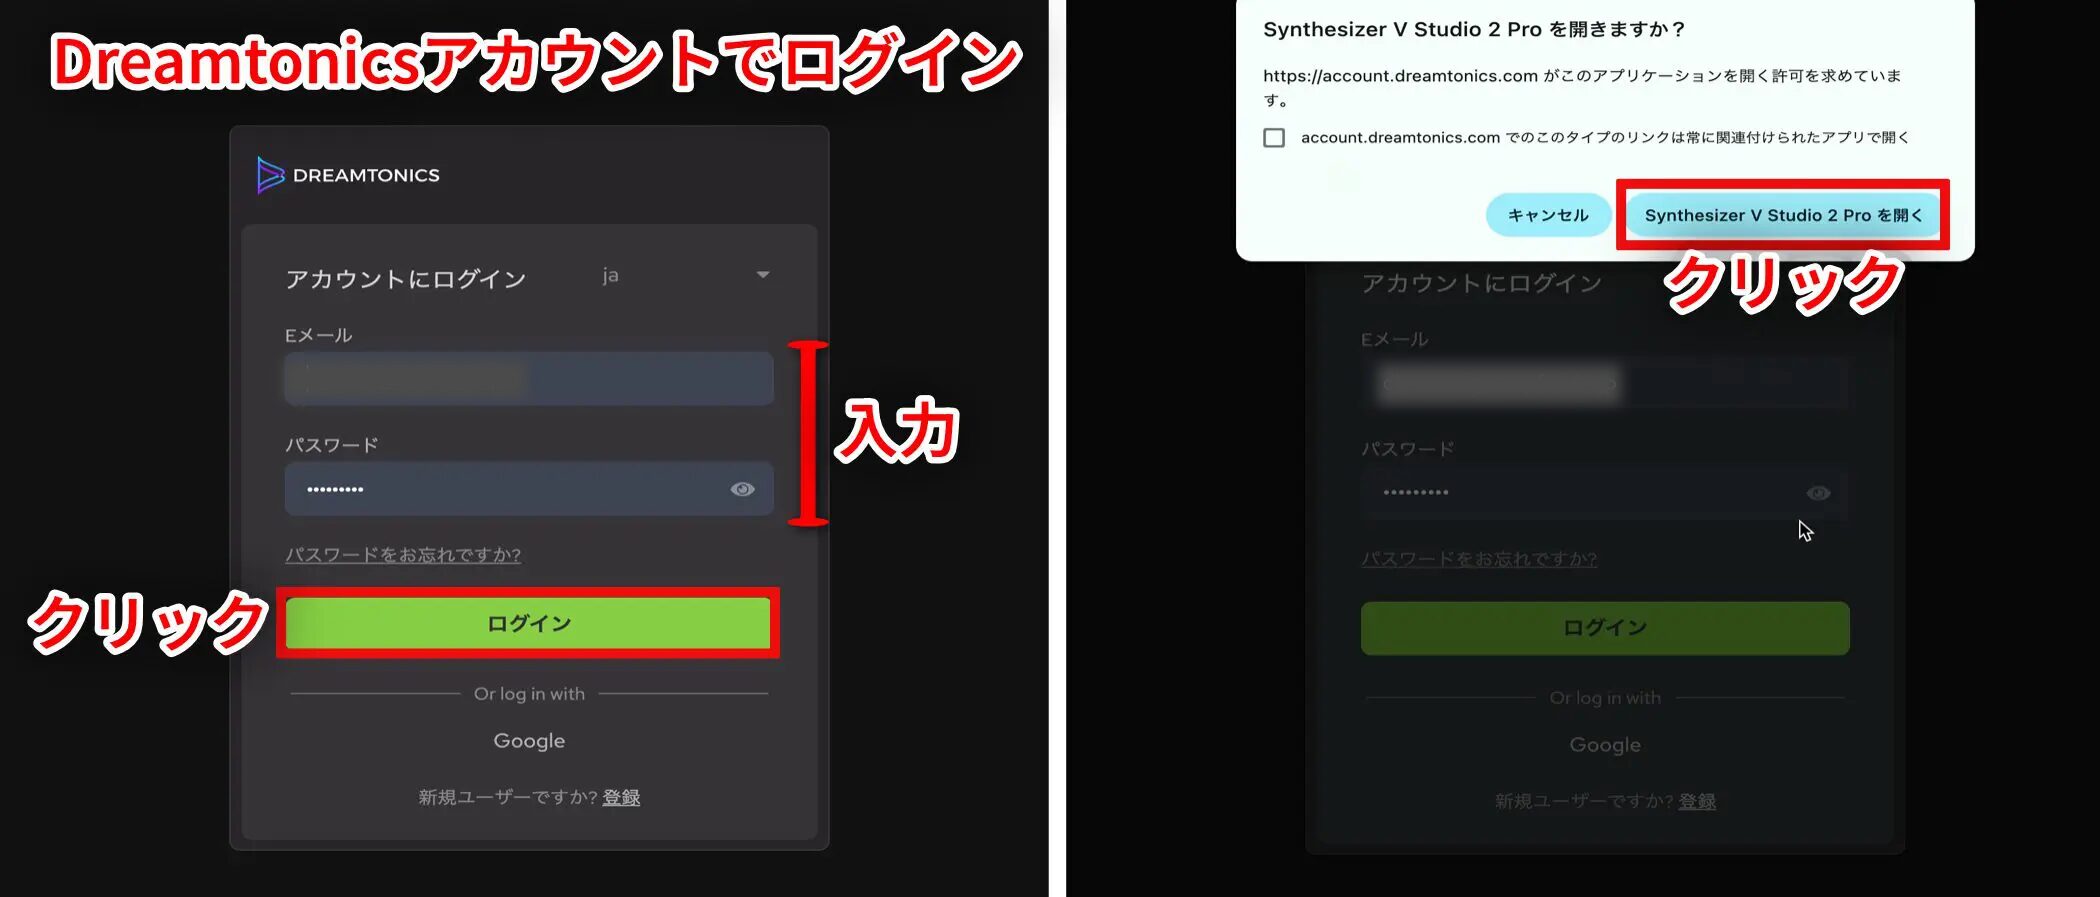
Enter the details for the Dreamtonics account you just created.
If a browser dialog asks you to confirm authentication, choose Open.
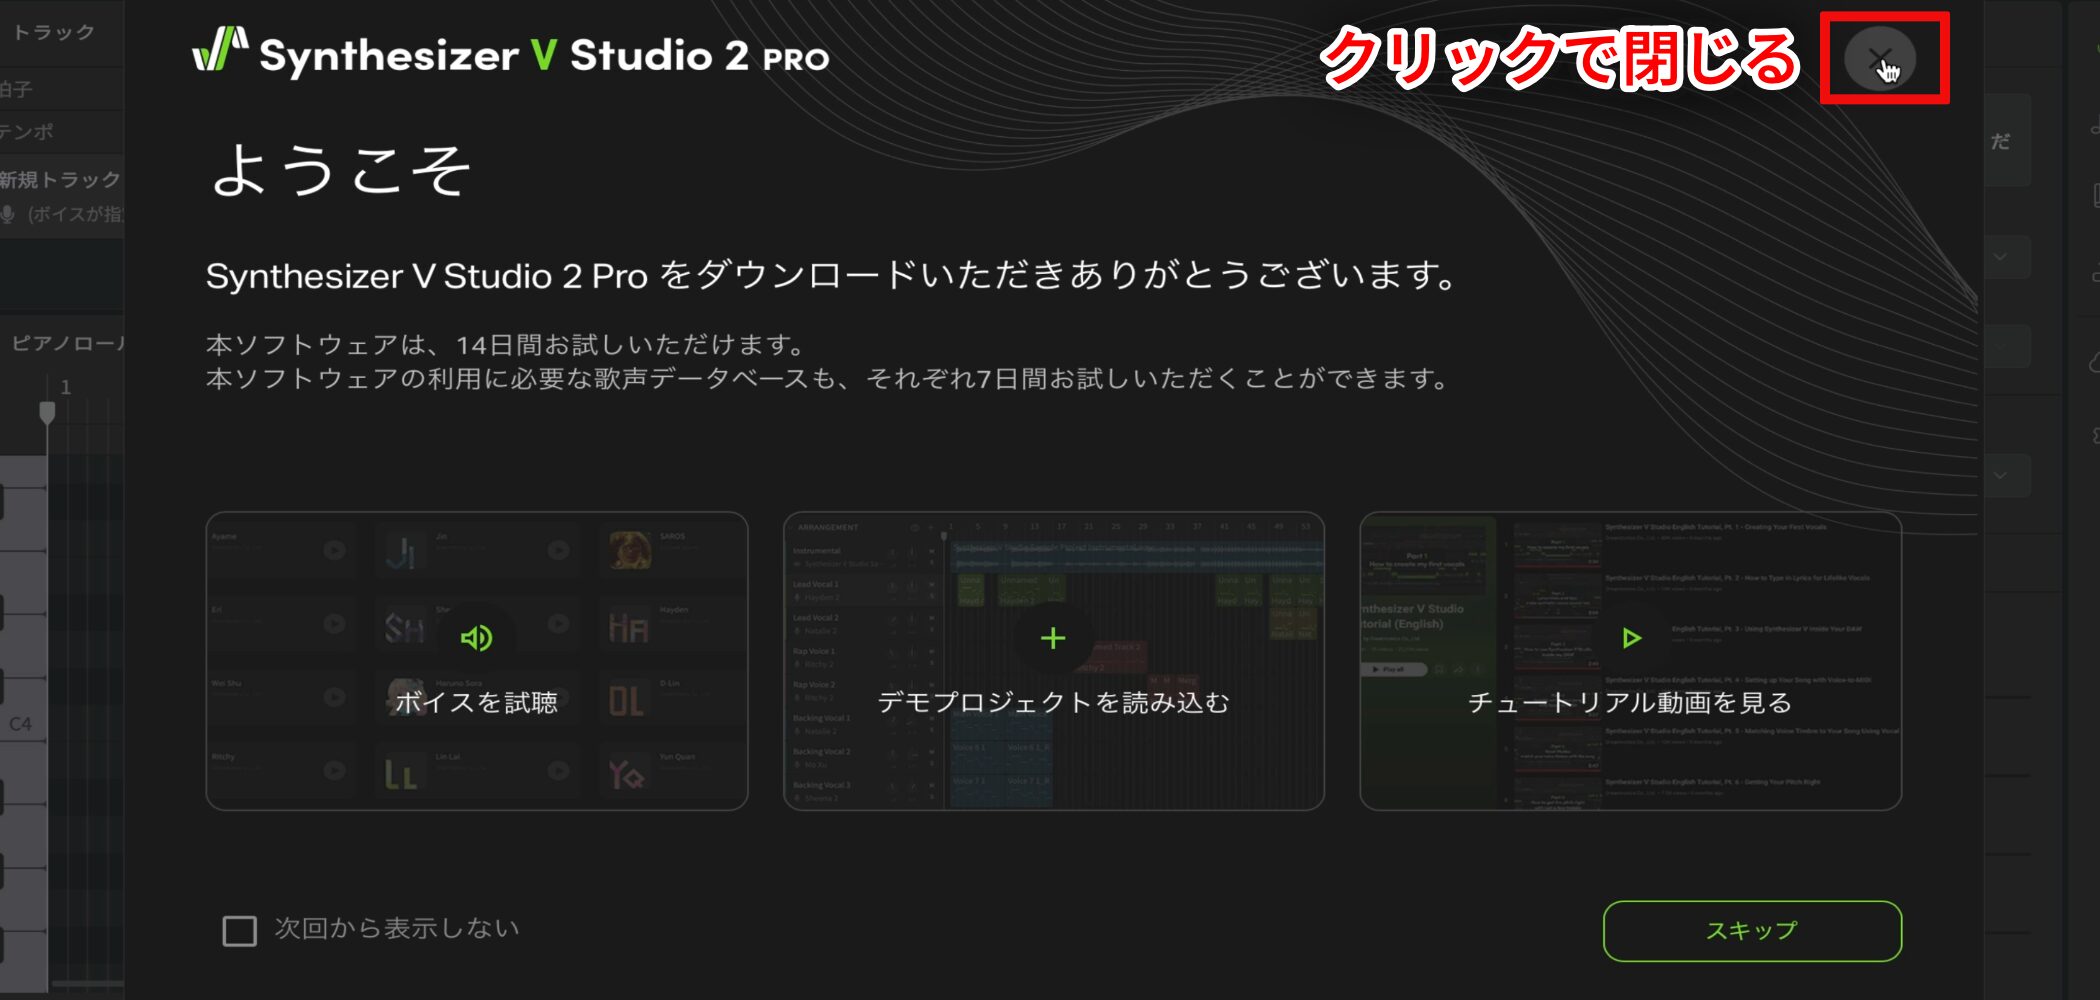
After logging in, close the Welcome screen using the X in the upper-right corner.
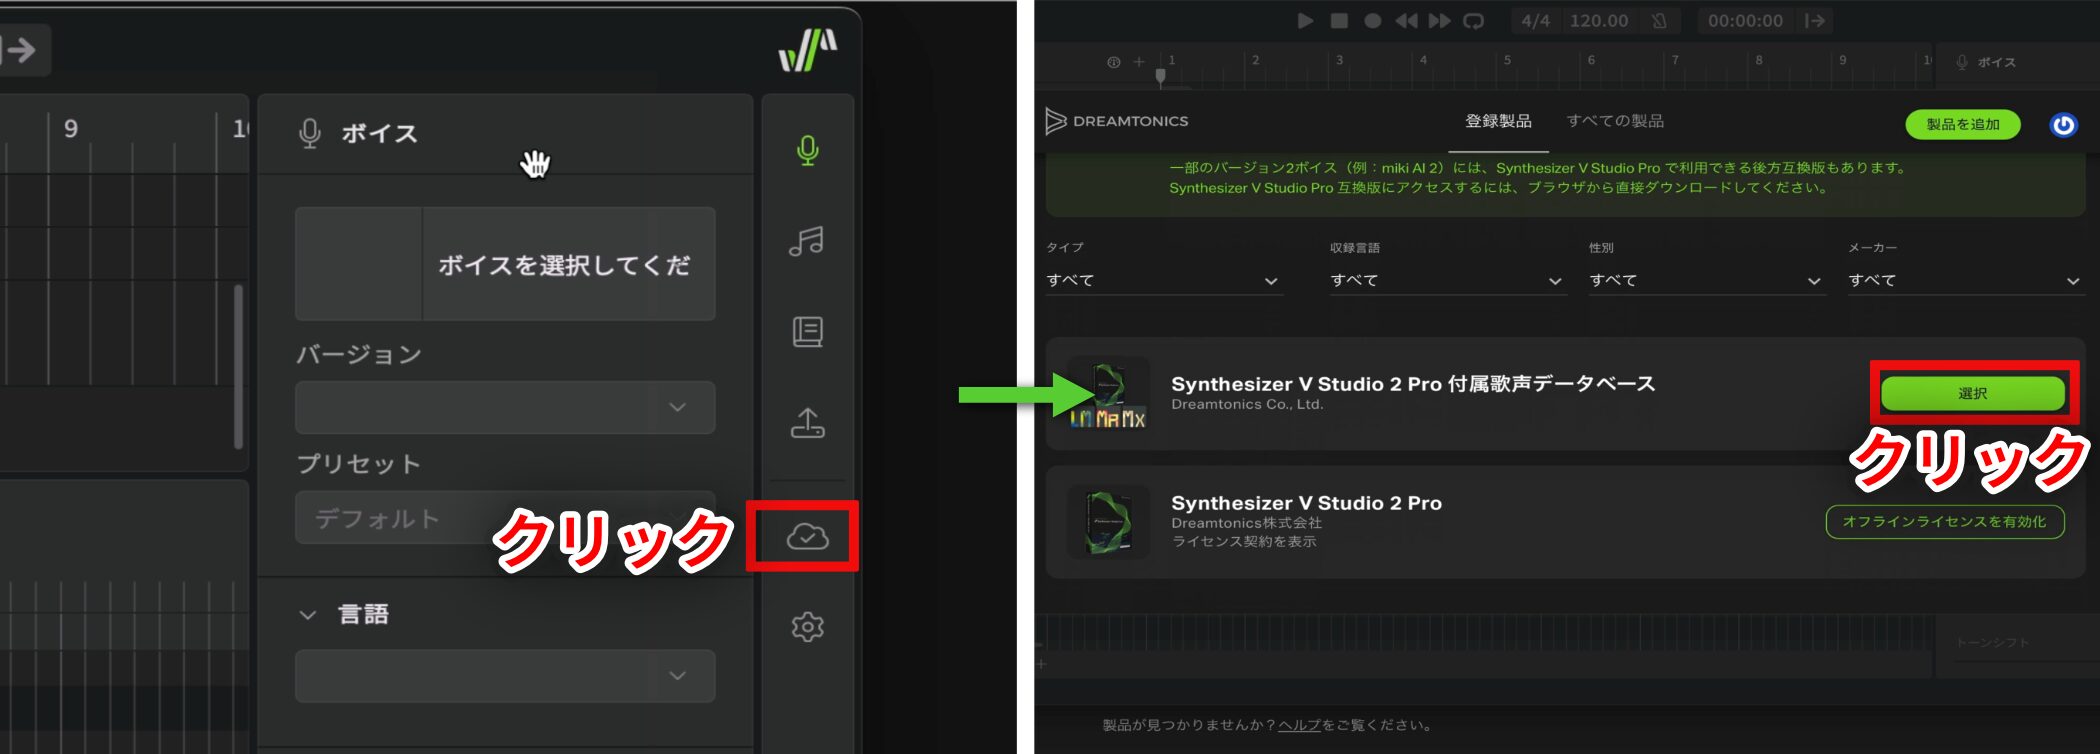
Click the cloud icon on the right and choose Select for the voice database.
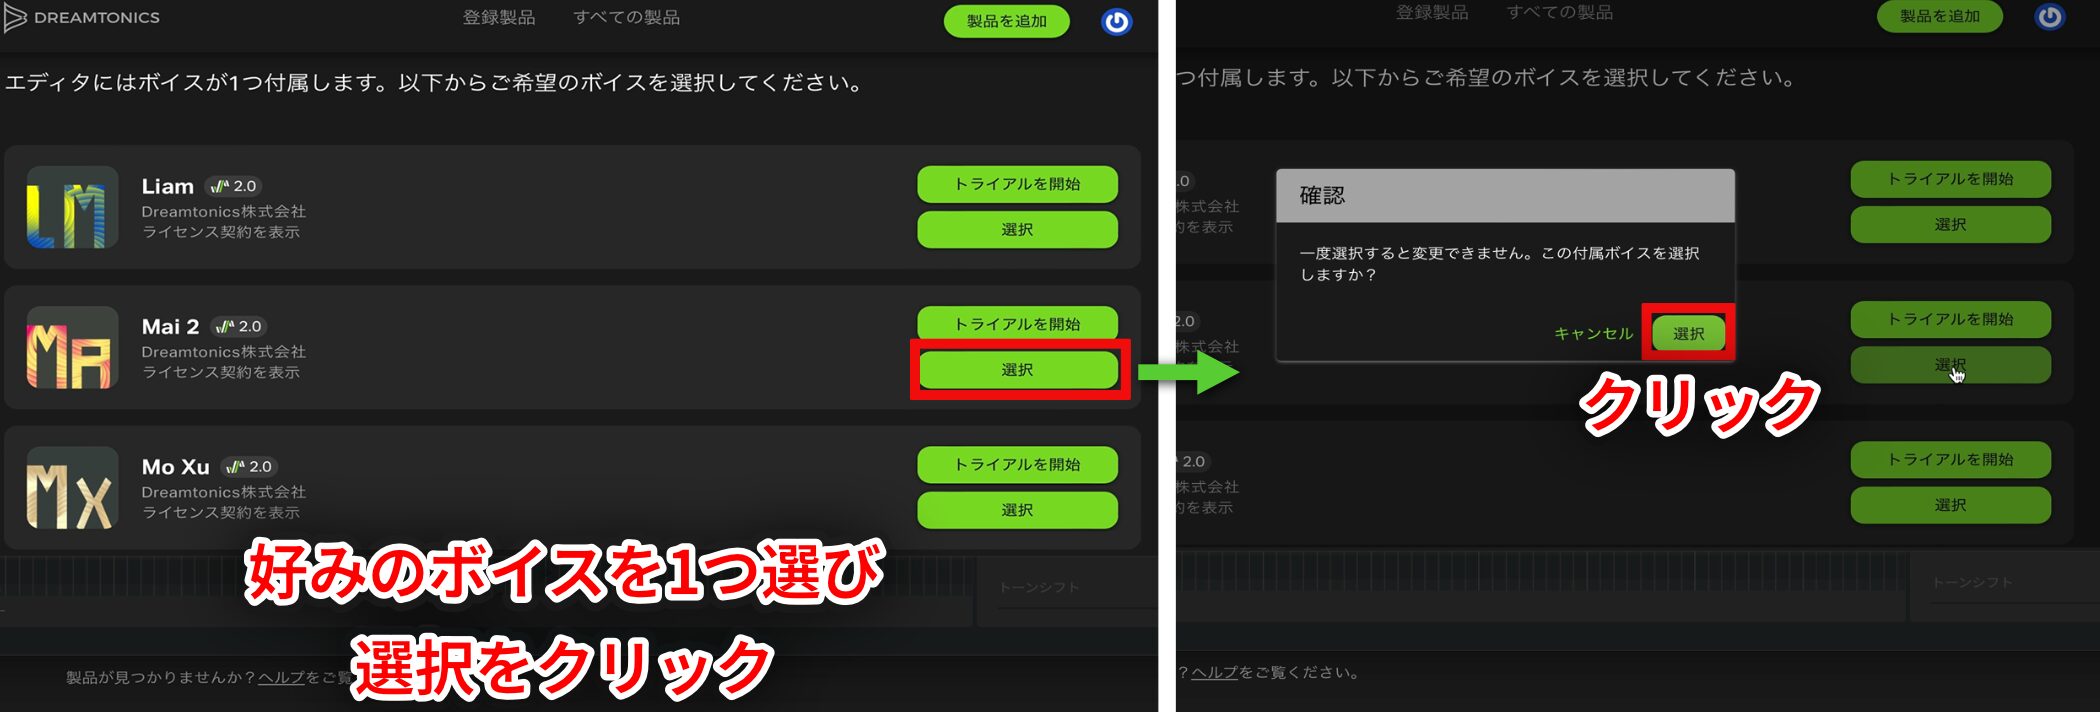
Choose one of the three voice databases offered with the purchase.
In this tutorial, we chose Mai 2, a versatile female voice suited to J-pop with a relatively neutral character.
Mai was already popular for guide vocals in version 1. Version 2 adds more expressiveness and supports a wider range of singing styles.
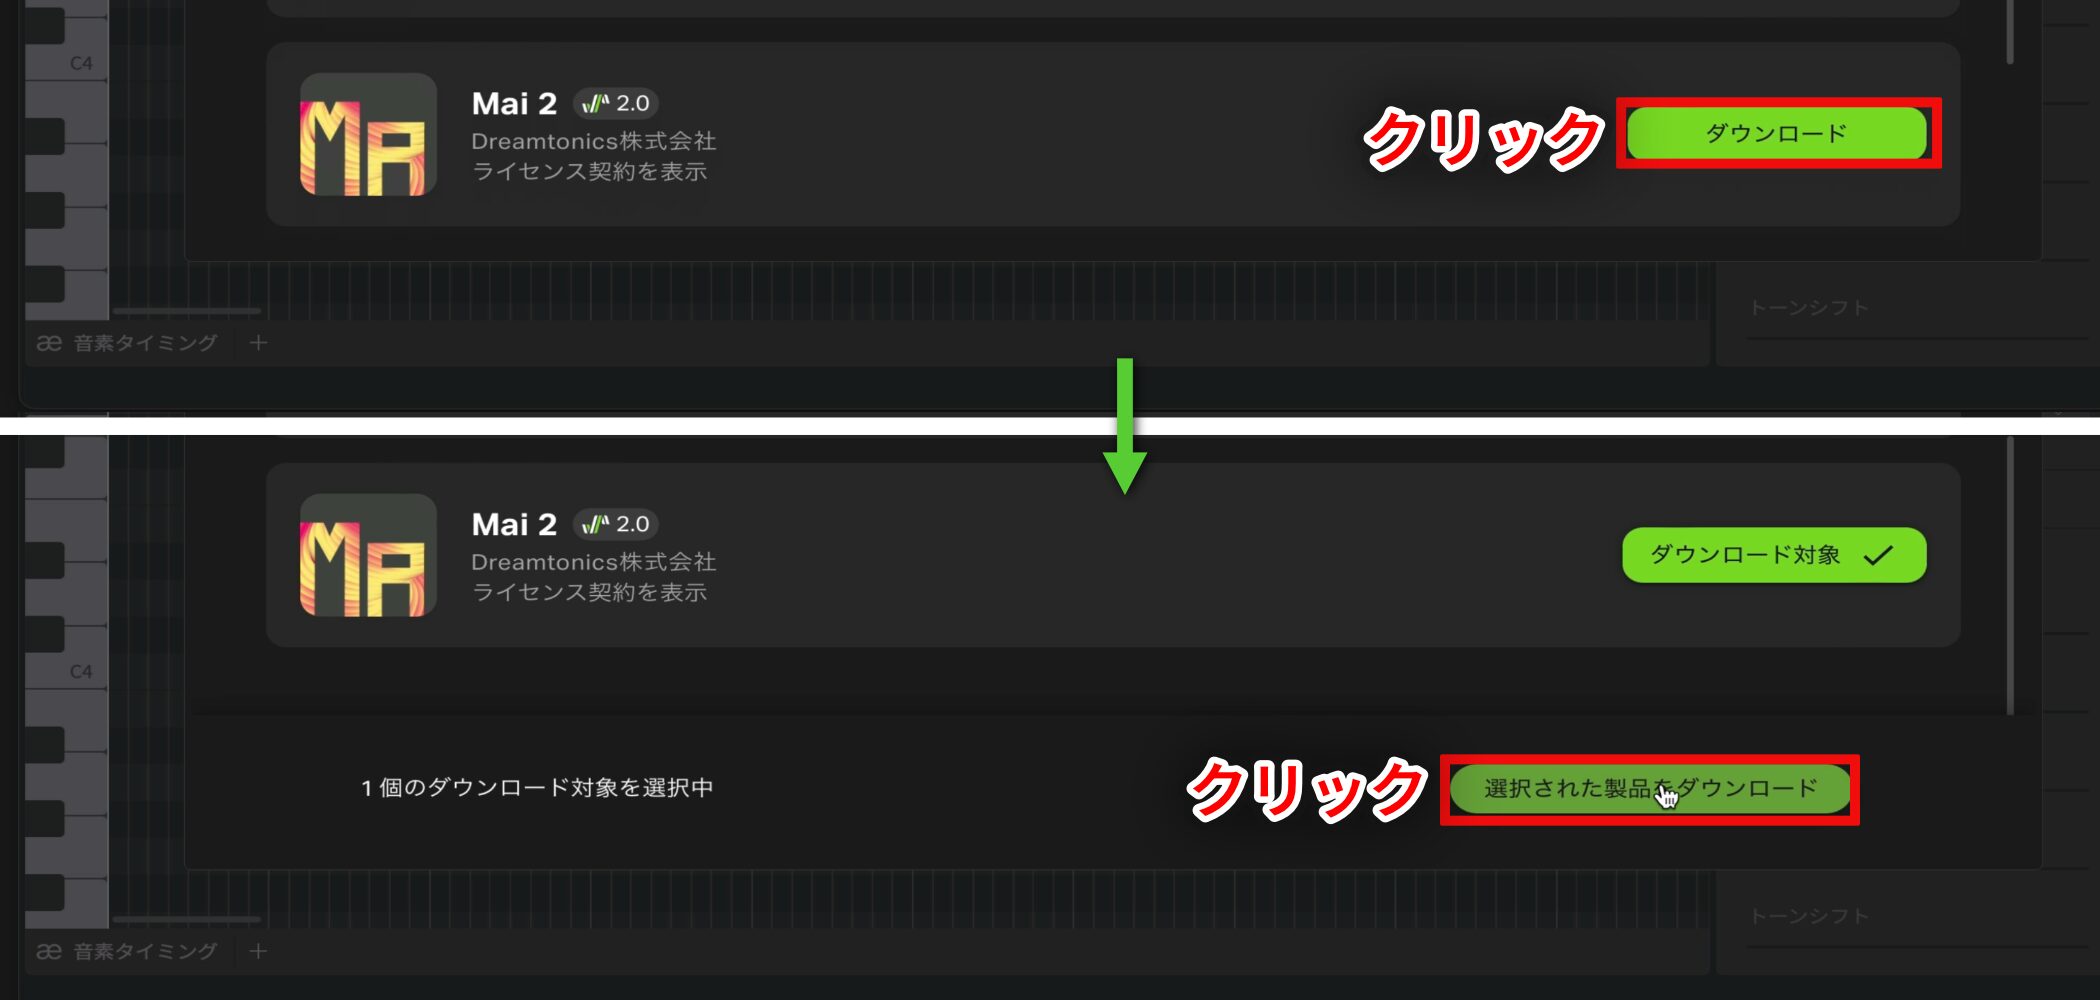
After choosing a voice database, select Download → Download Selected Products.
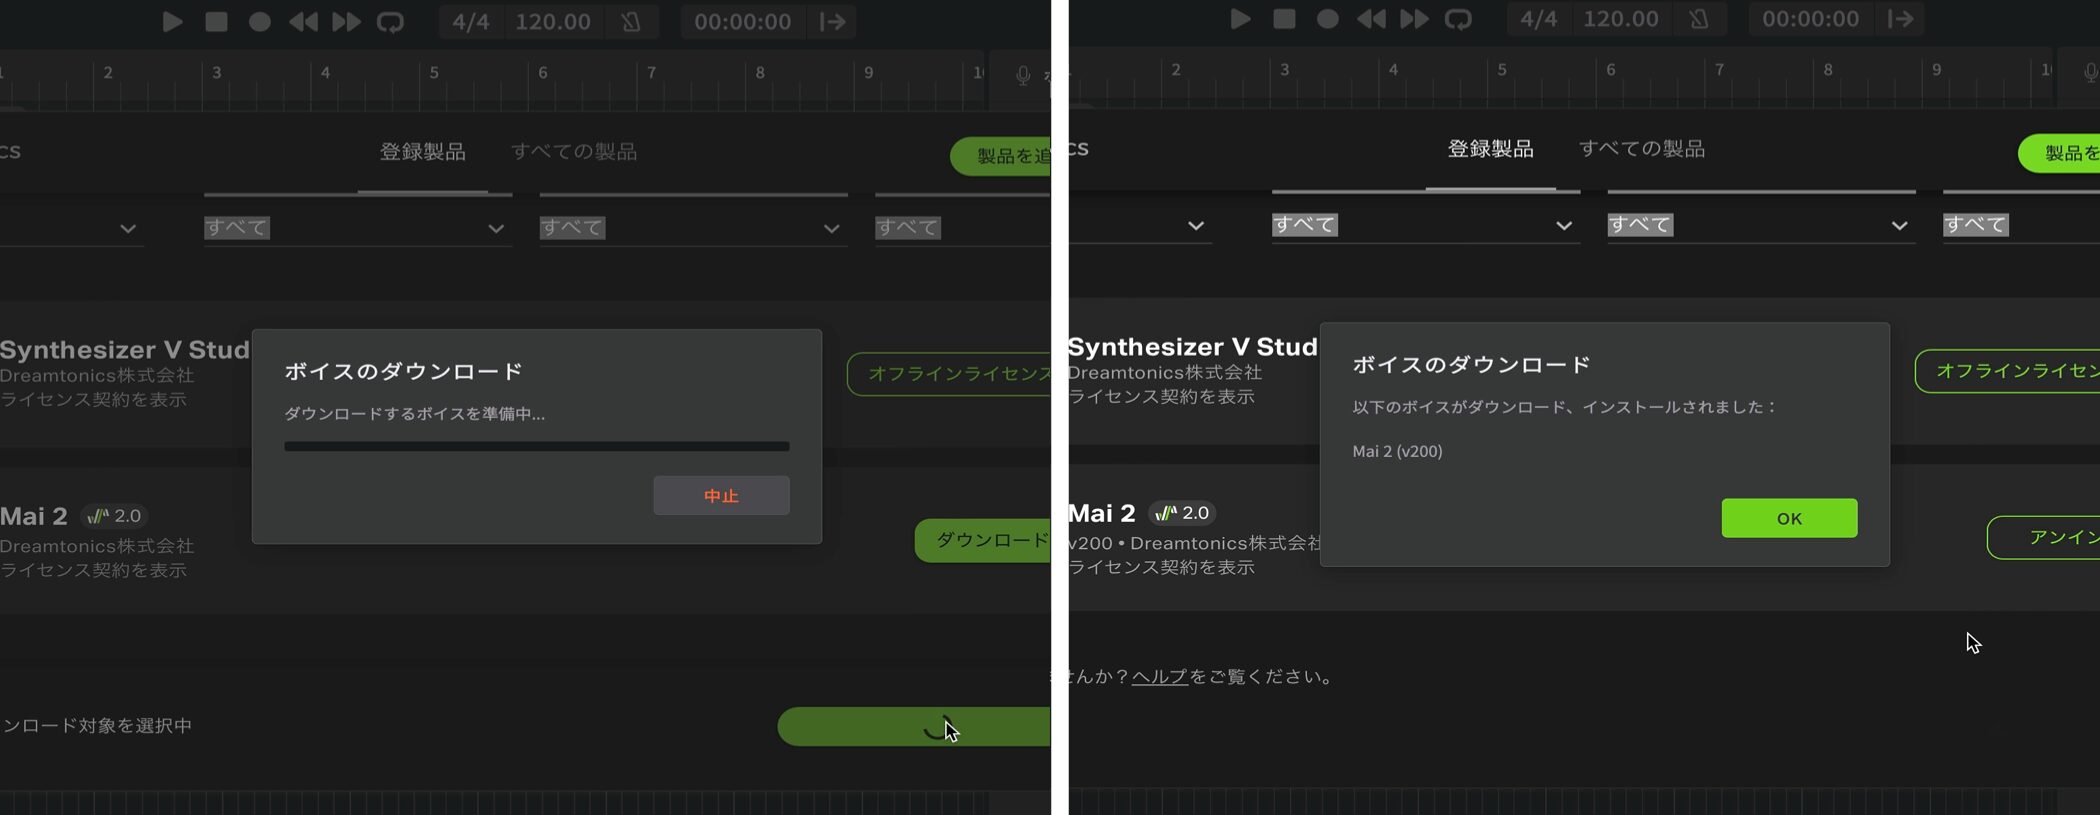
The voice database is now downloaded and installed, and Synthesizer V Studio 2 Pro is ready to generate vocals.
Use Synthesizer V in a DAW
Like a software synth instrument, Synthesizer V Studio 2 Pro can run inside your DAW and fit into a normal music production workflow.
The next section covers the basic steps and settings for using it in a DAW.
Create an Instrument Track and Set It Up
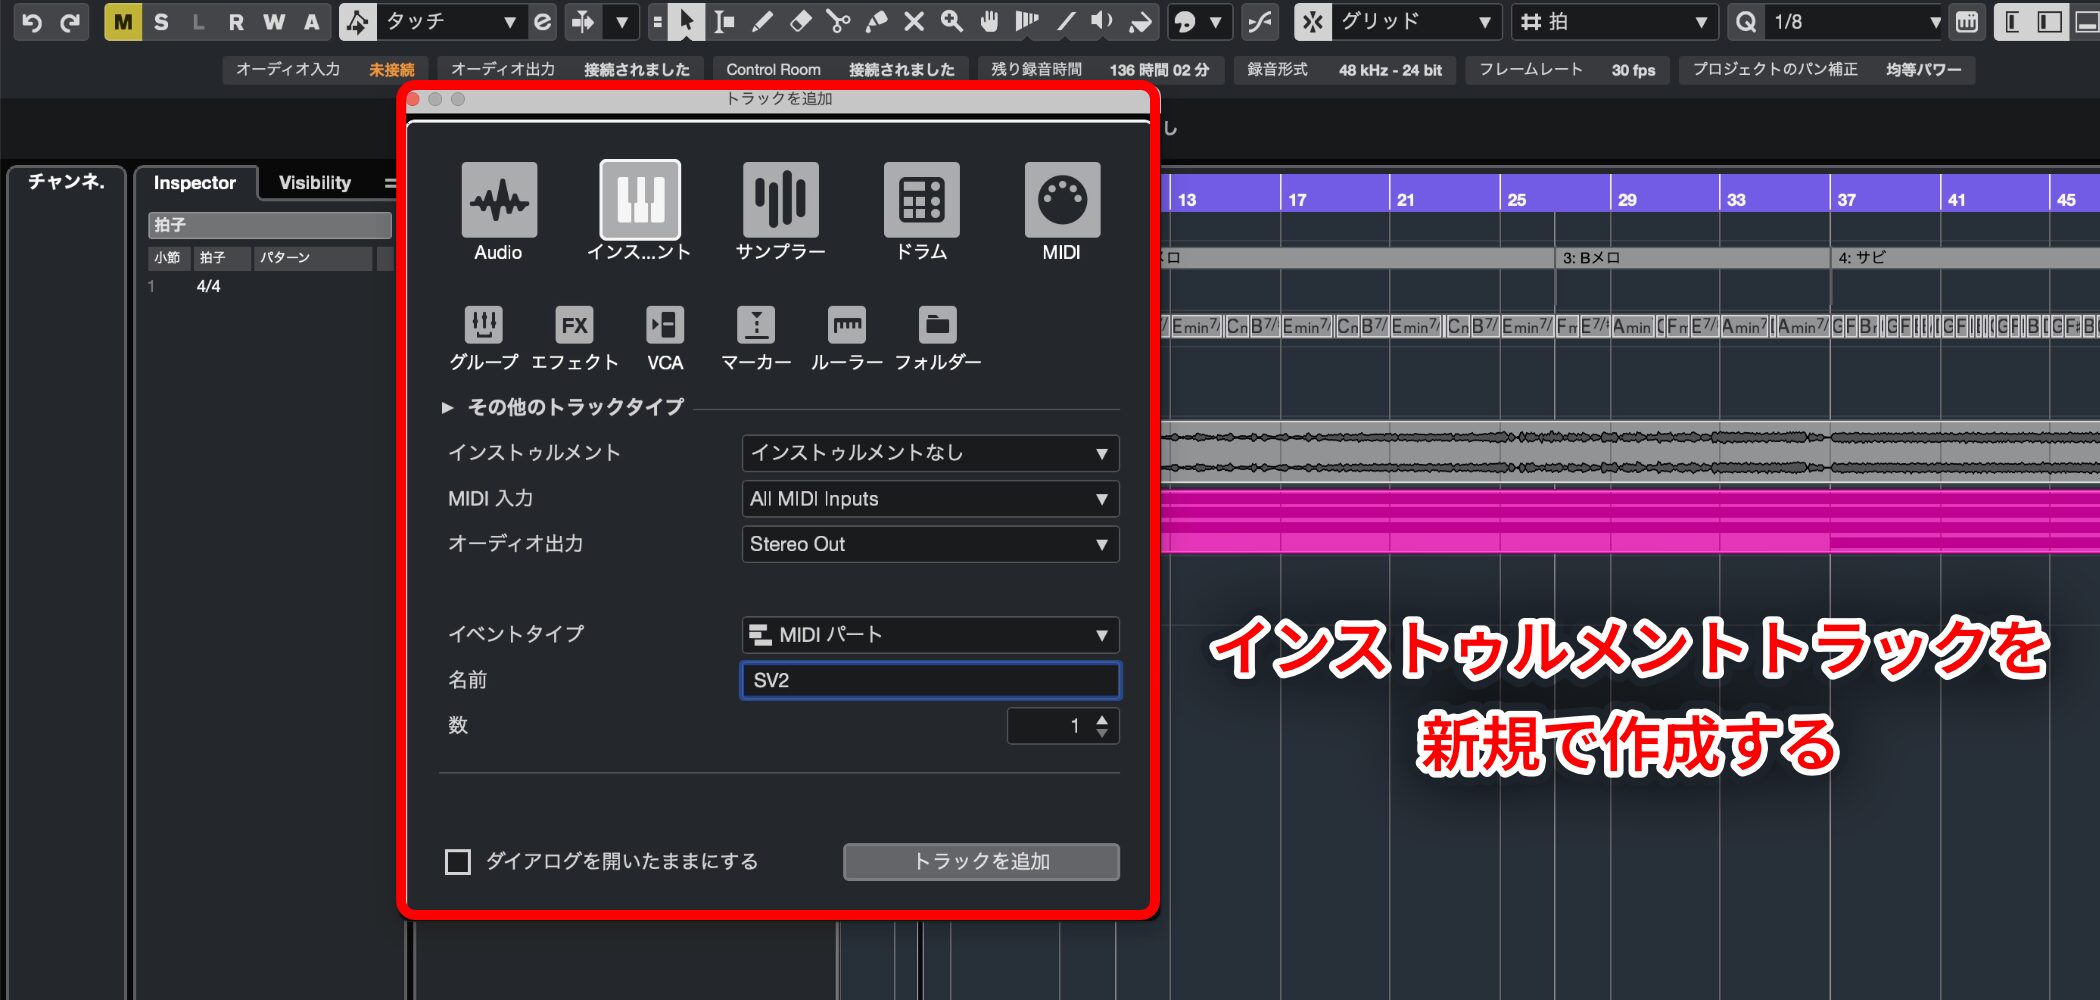
To use Synthesizer V Studio 2 Pro in a DAW, as with any other synth, create a new instrument track.
For information on launching it with ARA, see the linked documentation.
https://sv2.docs.dreamtonics.com/ja/plugins
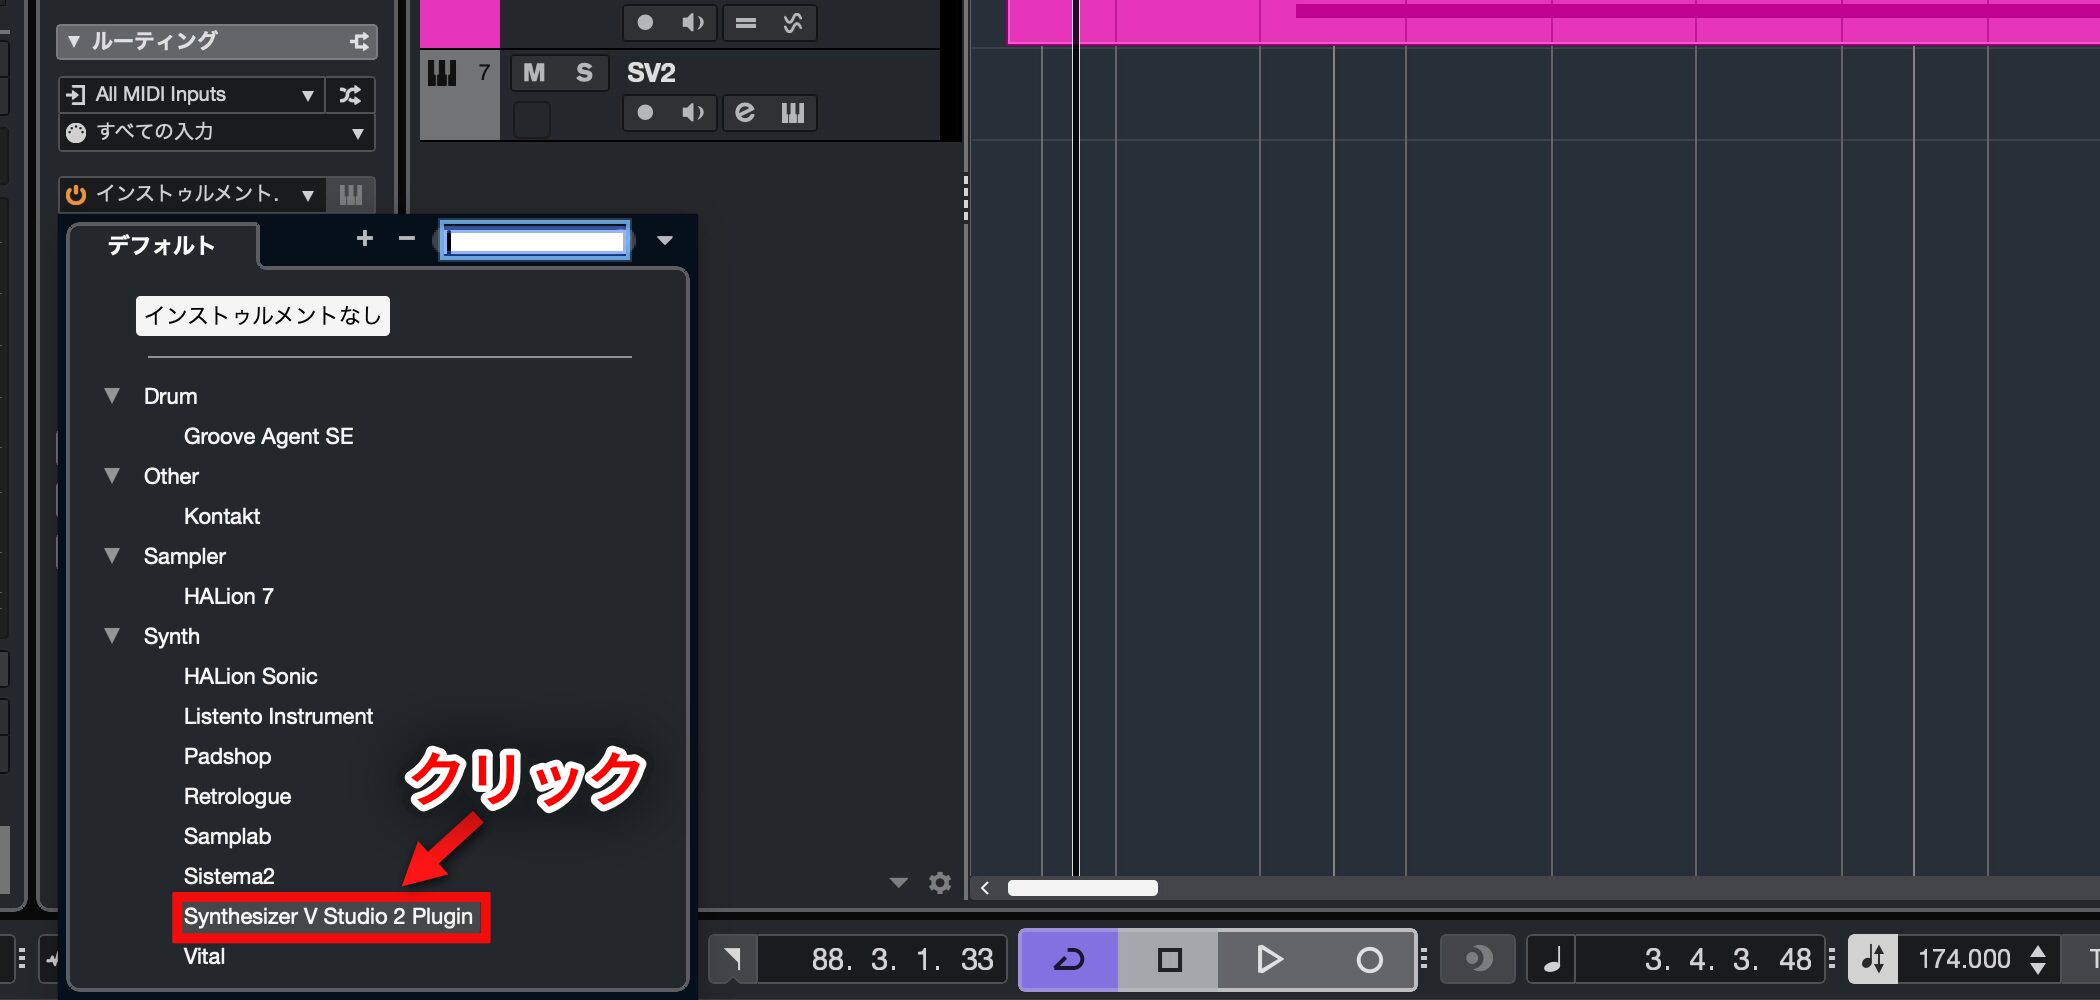
For the instrument, select Synthesizer V Studio 2 Plugin.
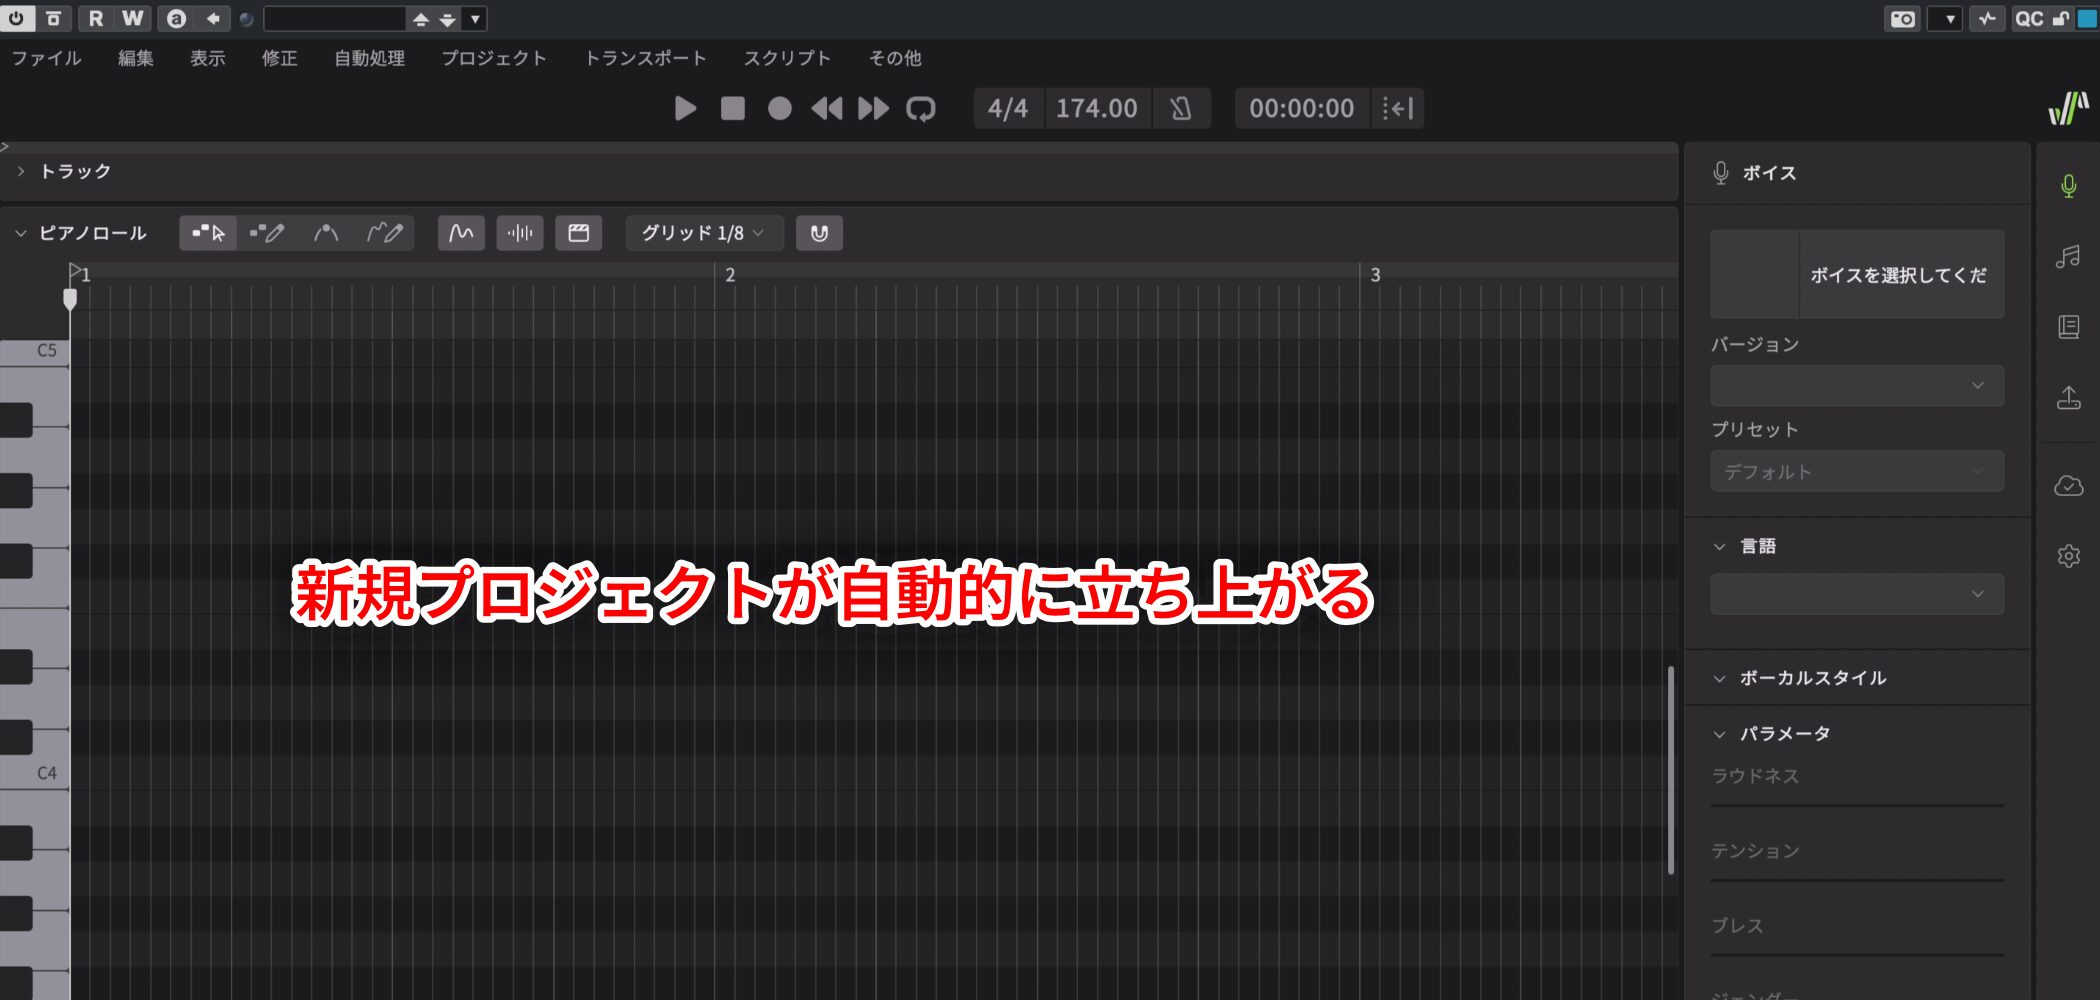
A new project for Synthesizer V Studio 2 Pro opens automatically.
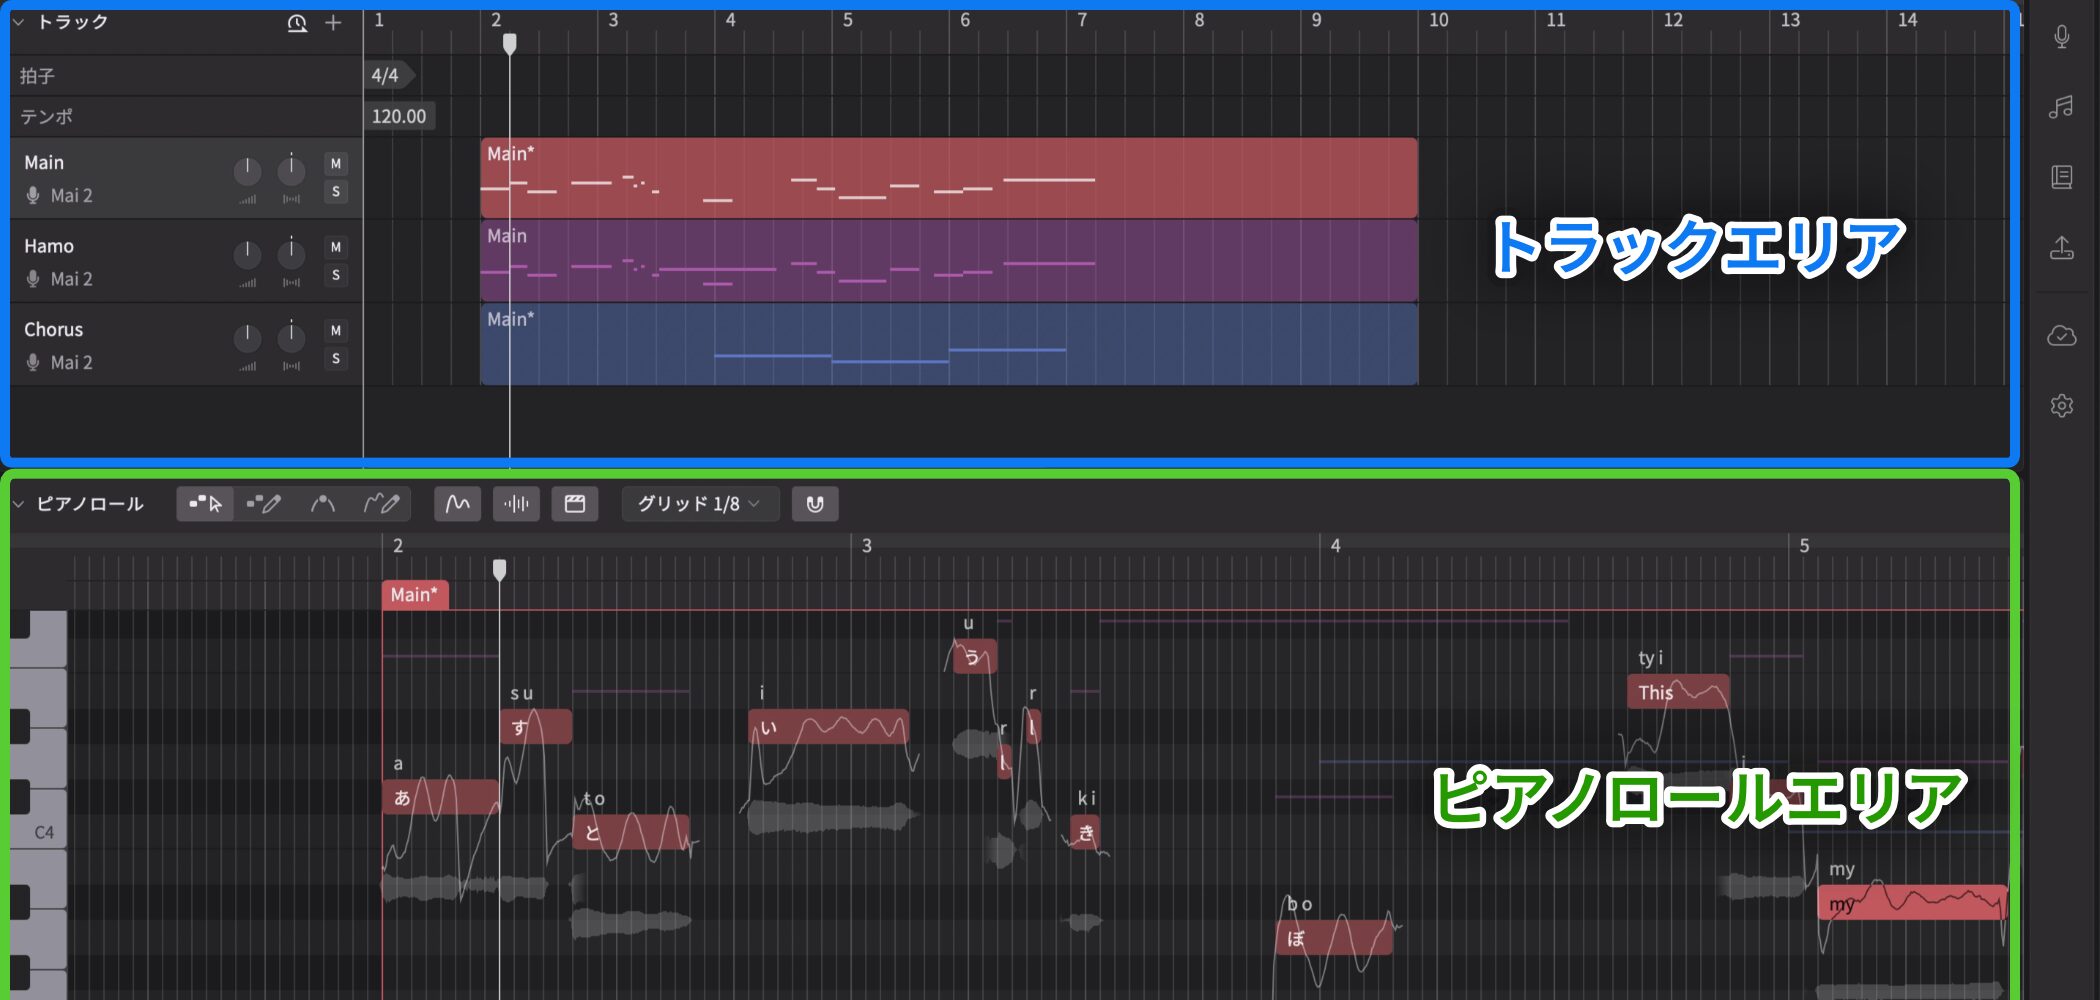
The center of the screen has two areas: Tracks and Piano Roll.
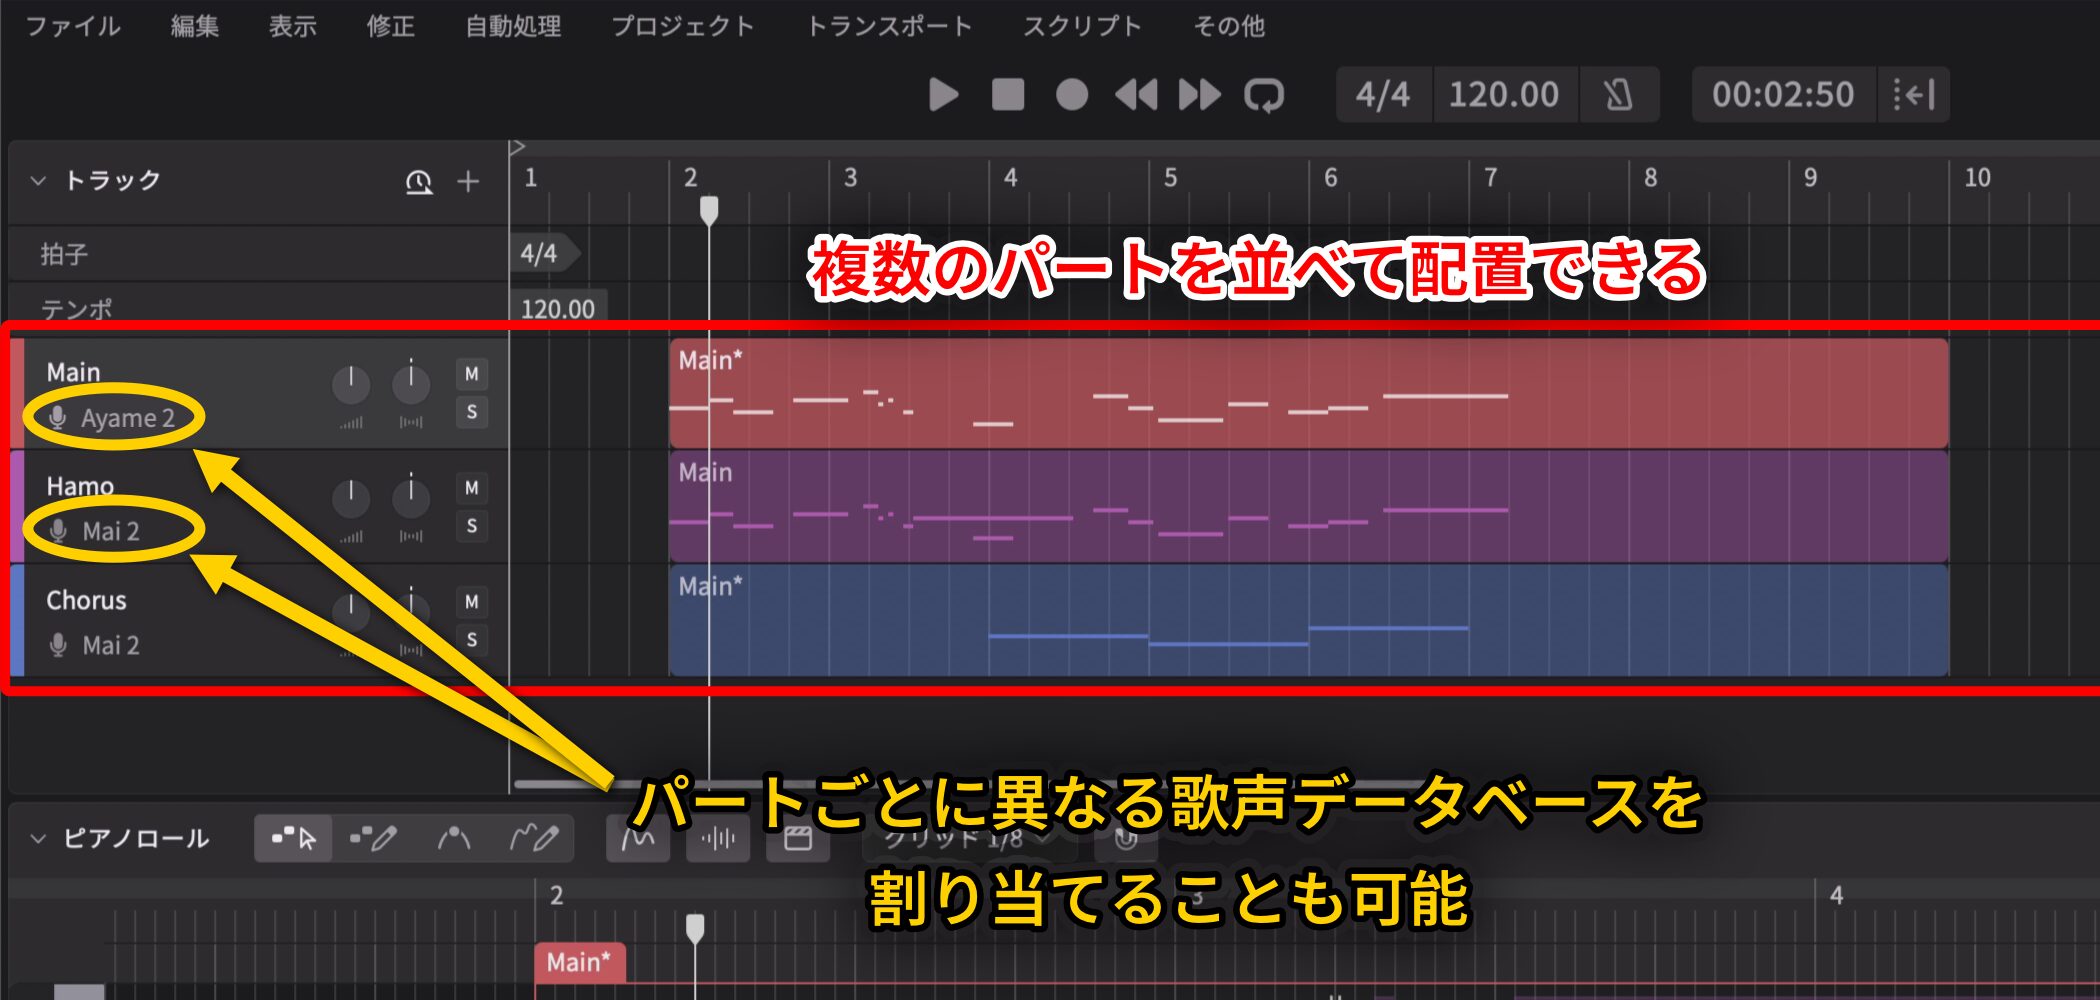
In Tracks, you can arrange multiple parts, such as lead vocals and harmonies, and assign different voice databases to each part.
Prepare a MIDI Keyboard (Optional)
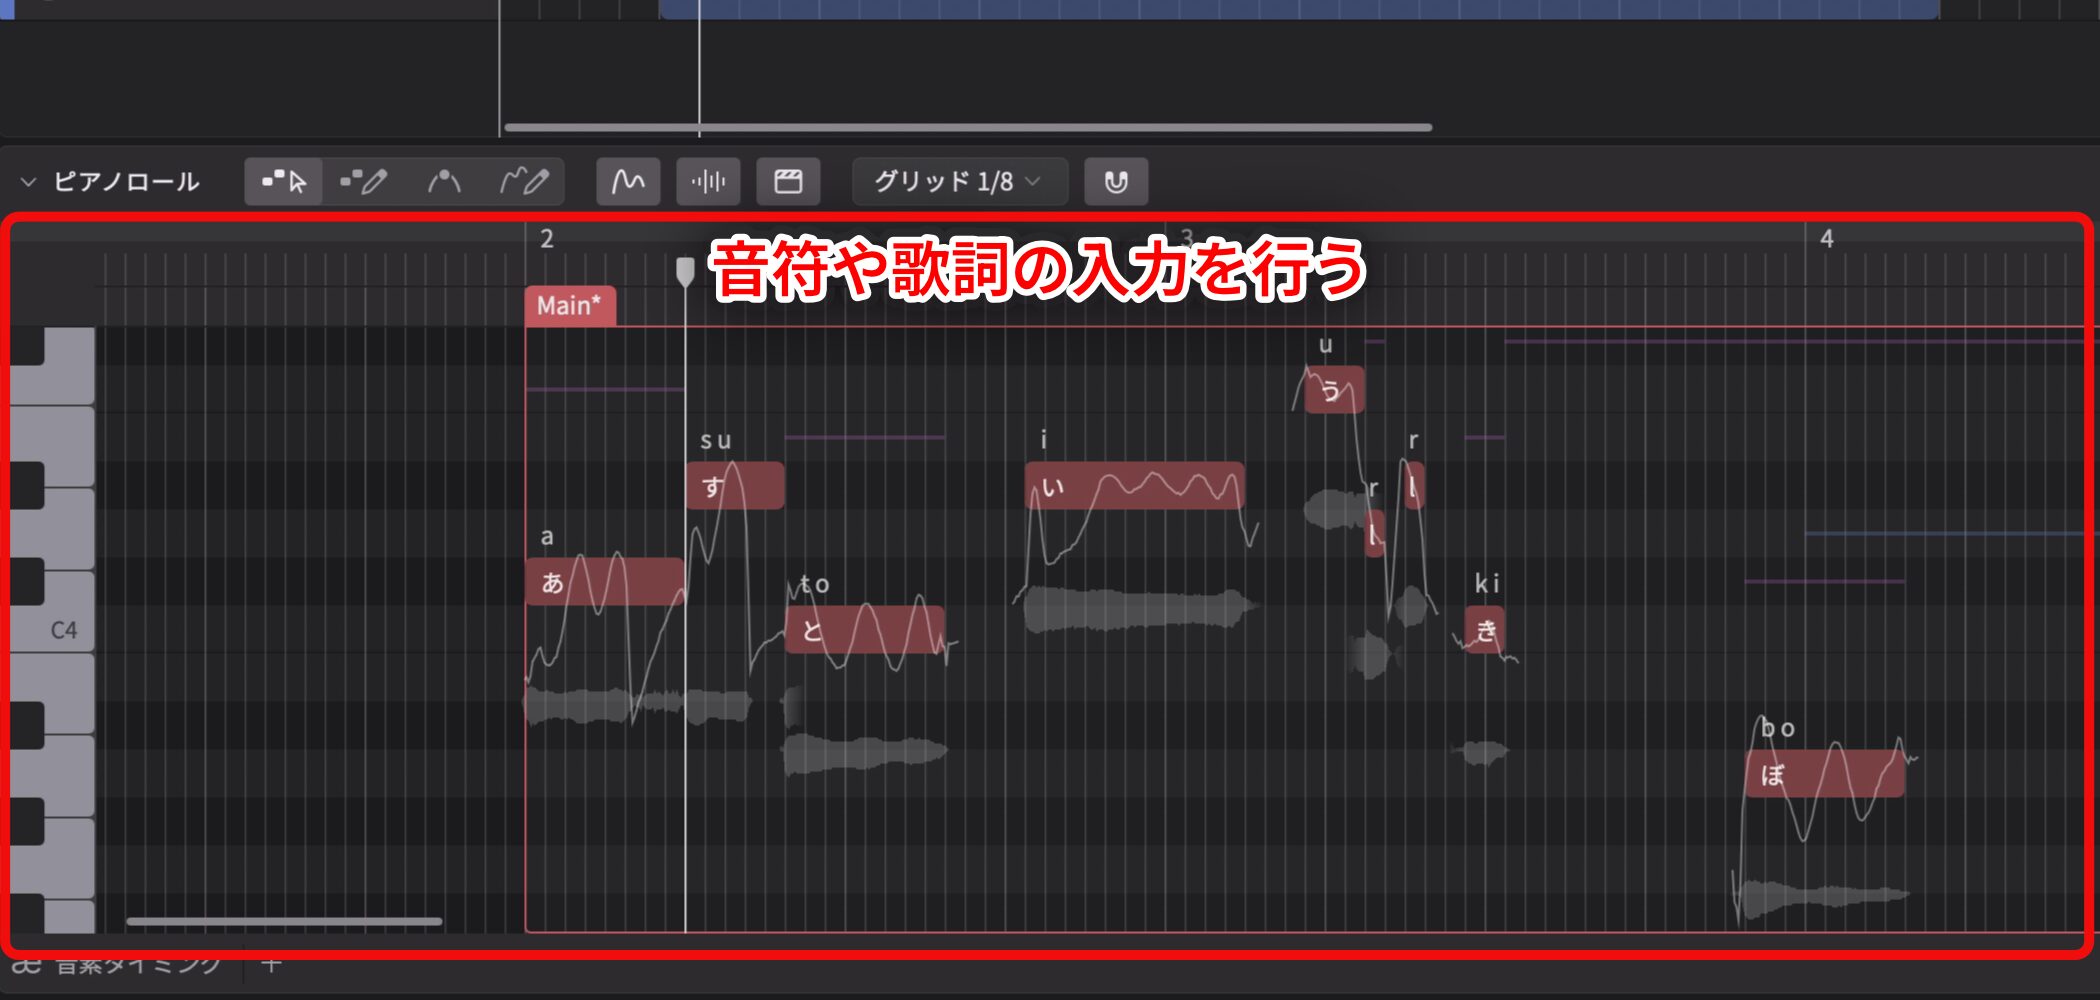
In the Piano Roll, you enter notes and lyrics.
You can enter notes with a mouse, but a MIDI keyboard is useful if you want a more intuitive and faster workflow.
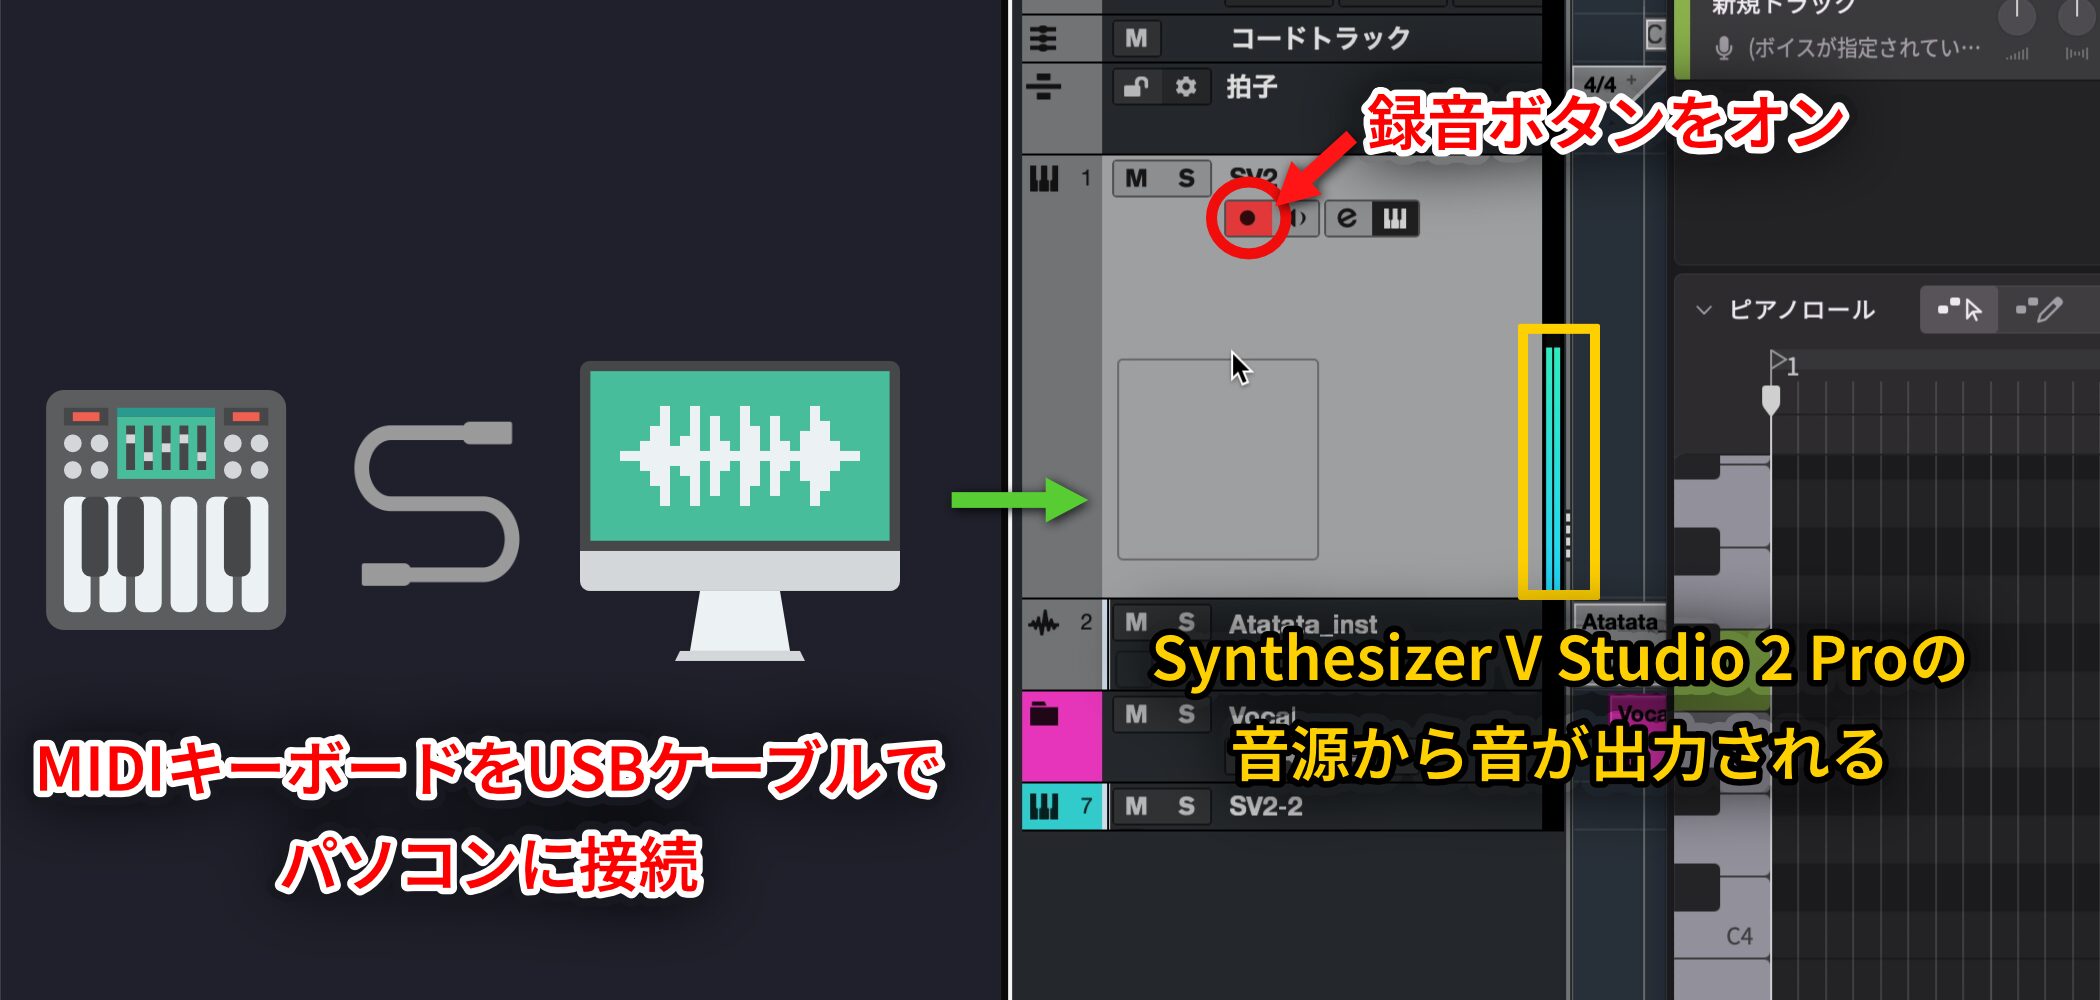
Connect the MIDI keyboard to your computer with a USB cable and arm recording on the DAW's instrument track. You should then hear sound from Synthesizer V Studio 2 Pro.
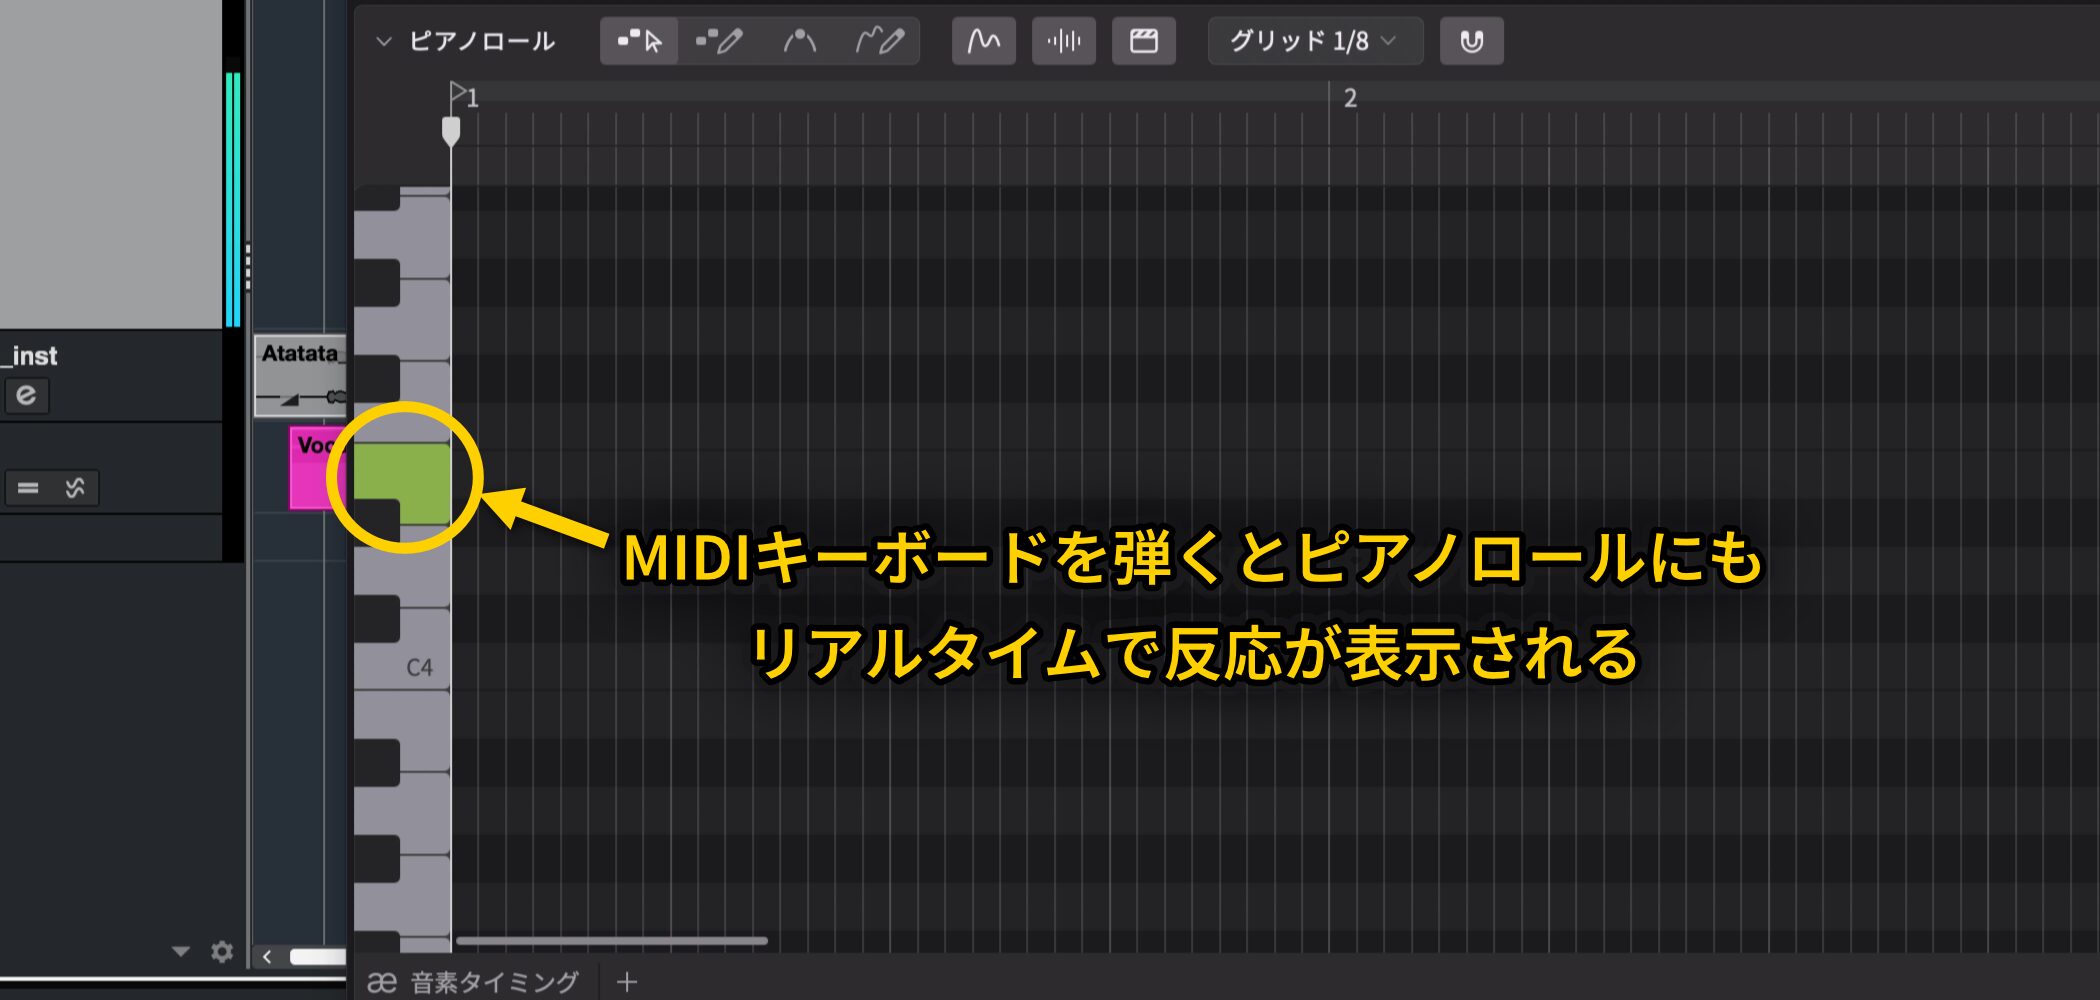
The Piano Roll will also respond in real time.
If the MIDI keyboard does not respond, check your DAW's MIDI input settings or, instead of using a USB hub, connect the keyboard directly to the computer.
Set the Tempo and Time Signature
Before you start producing, set the tempo and time signature.
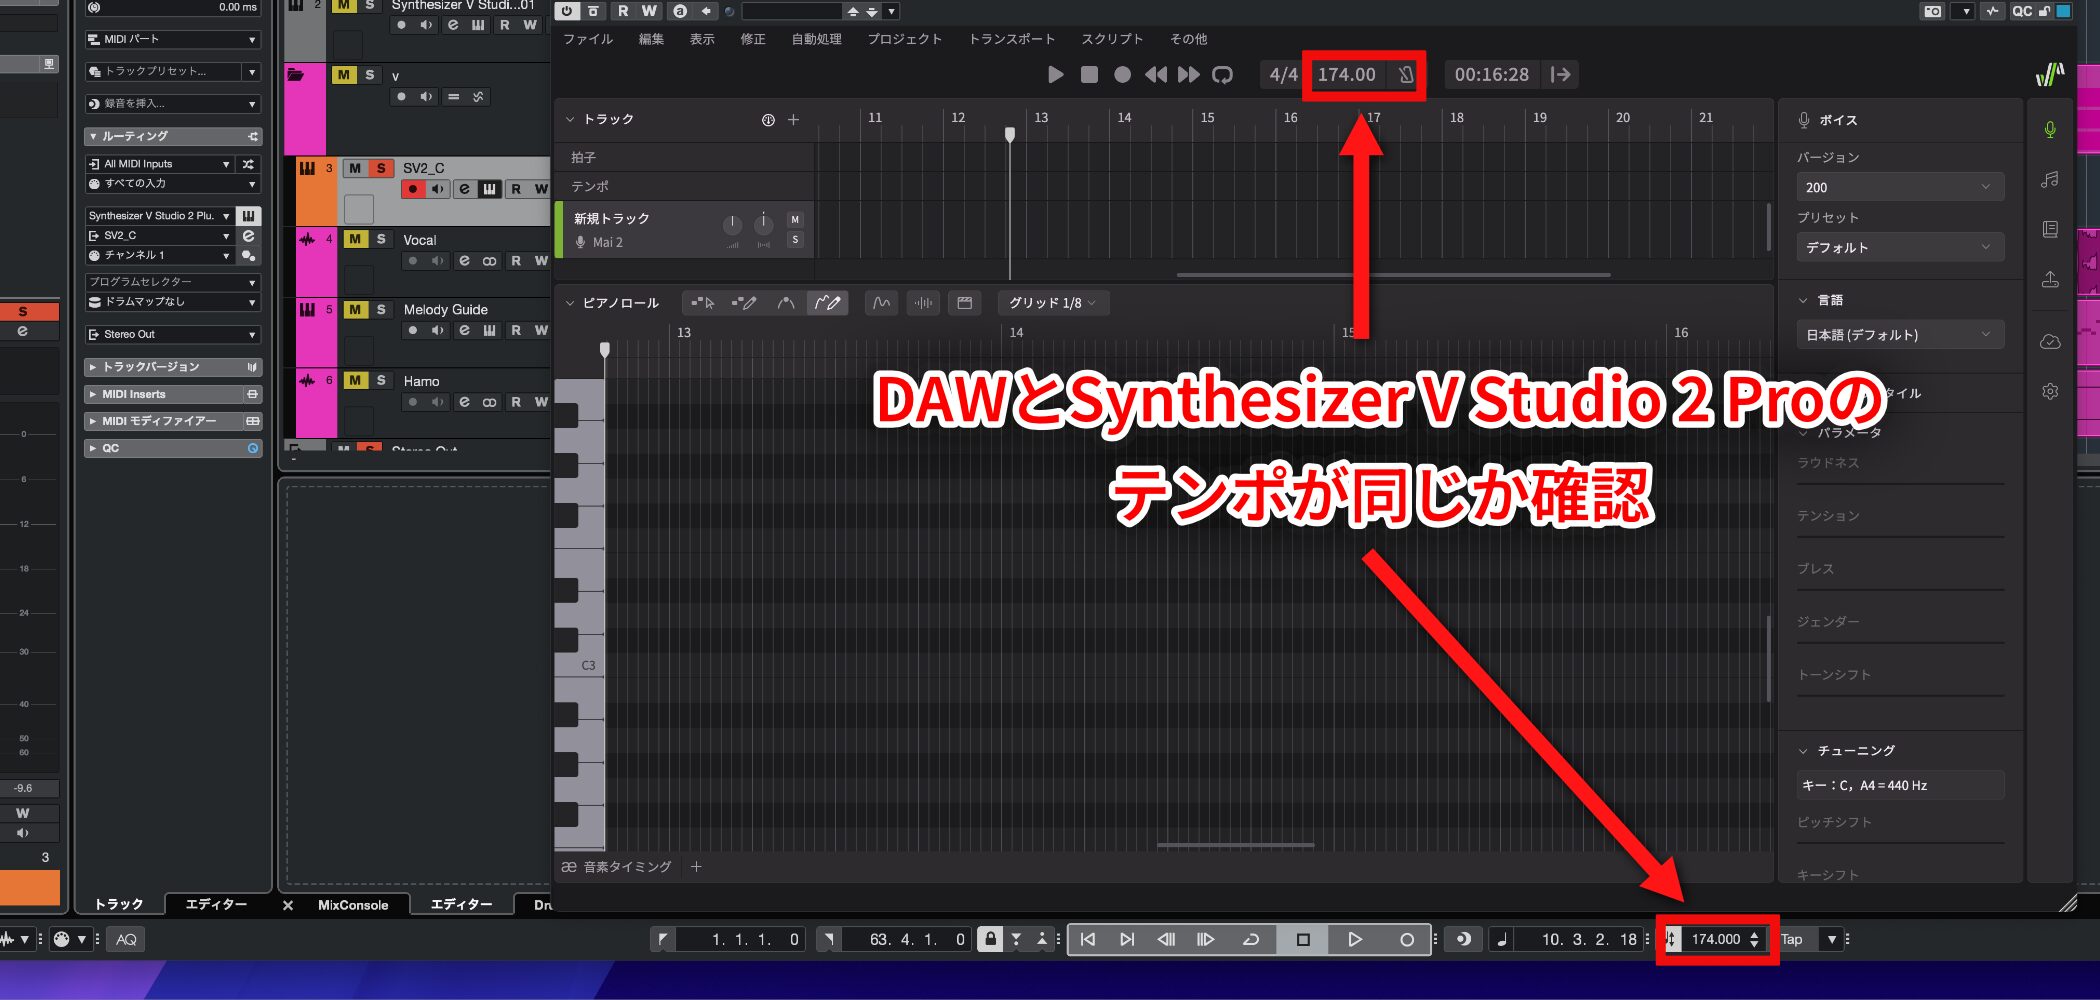
When you create a project, the DAW and Synthesizer V Studio 2 Pro normally sync their tempos automatically.
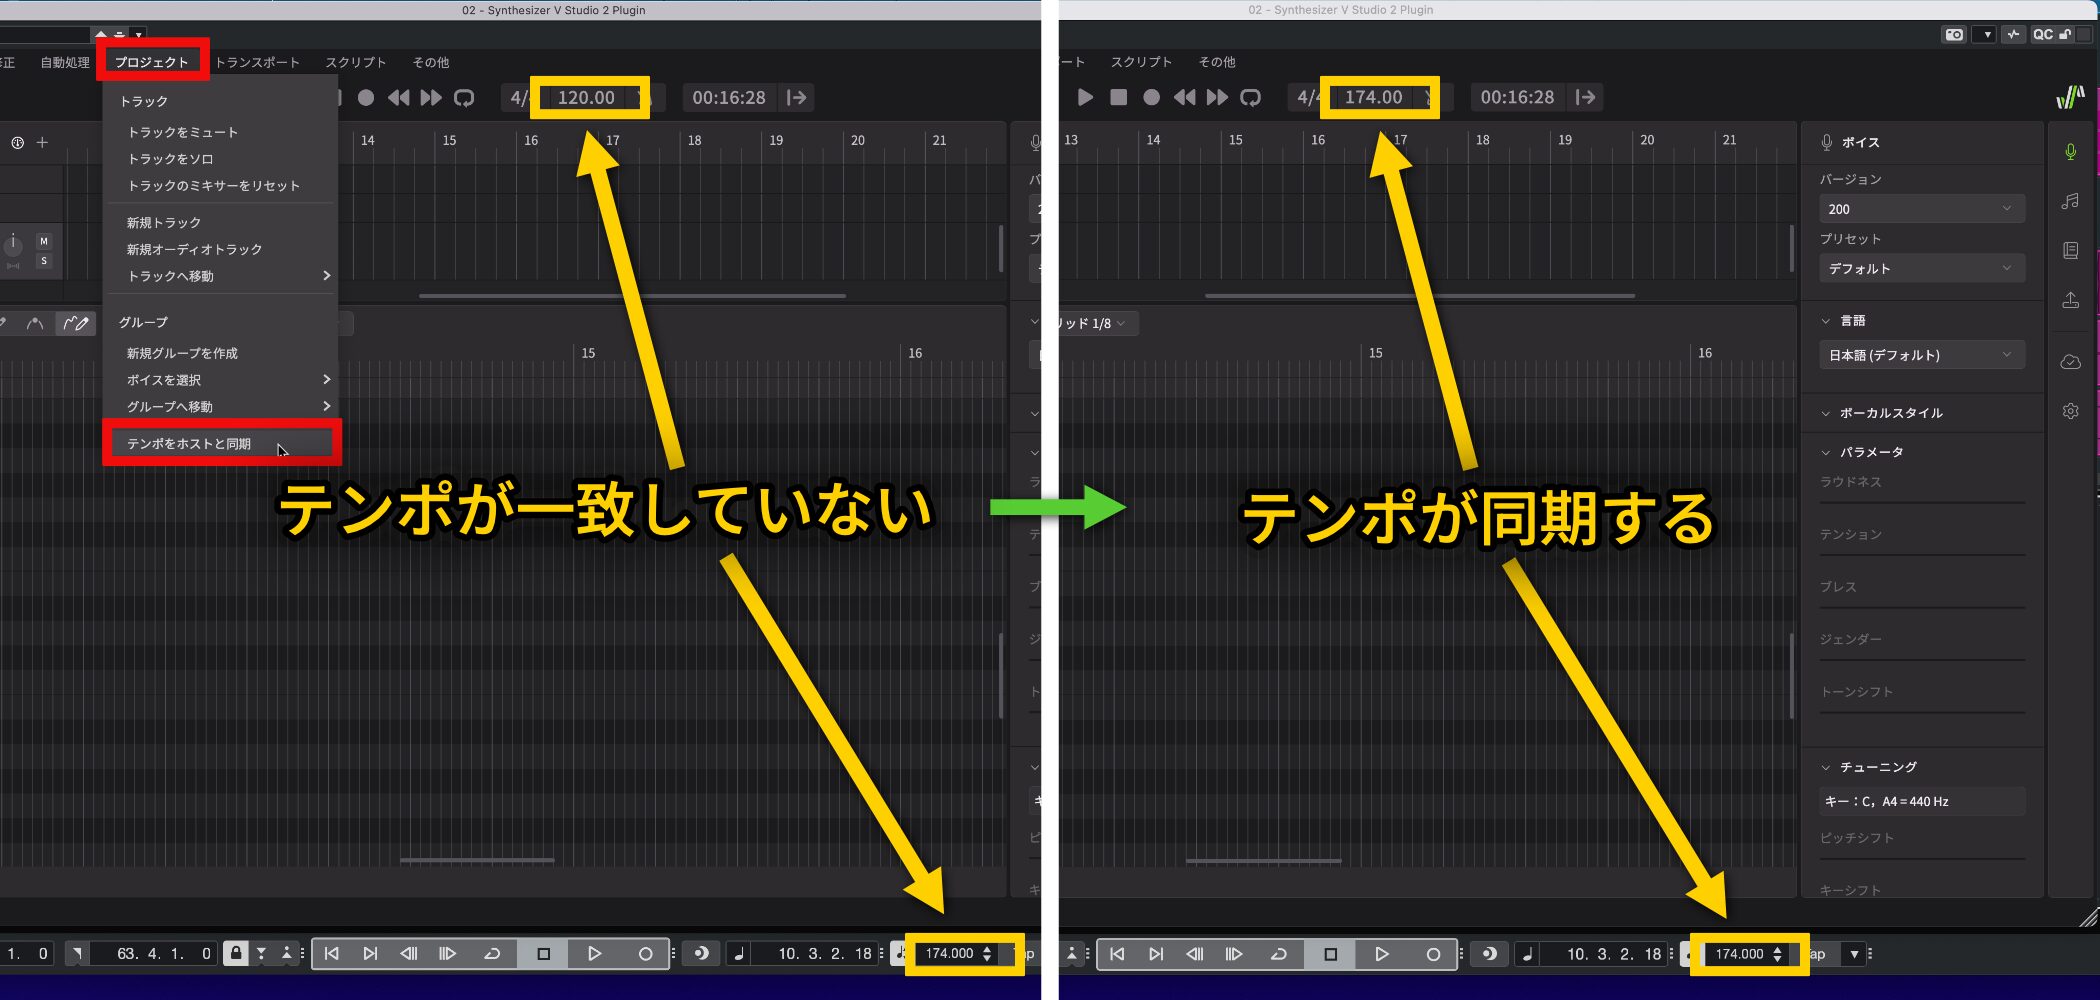
If they do not match, choose Project → Tempo → Sync with Host from the menu.
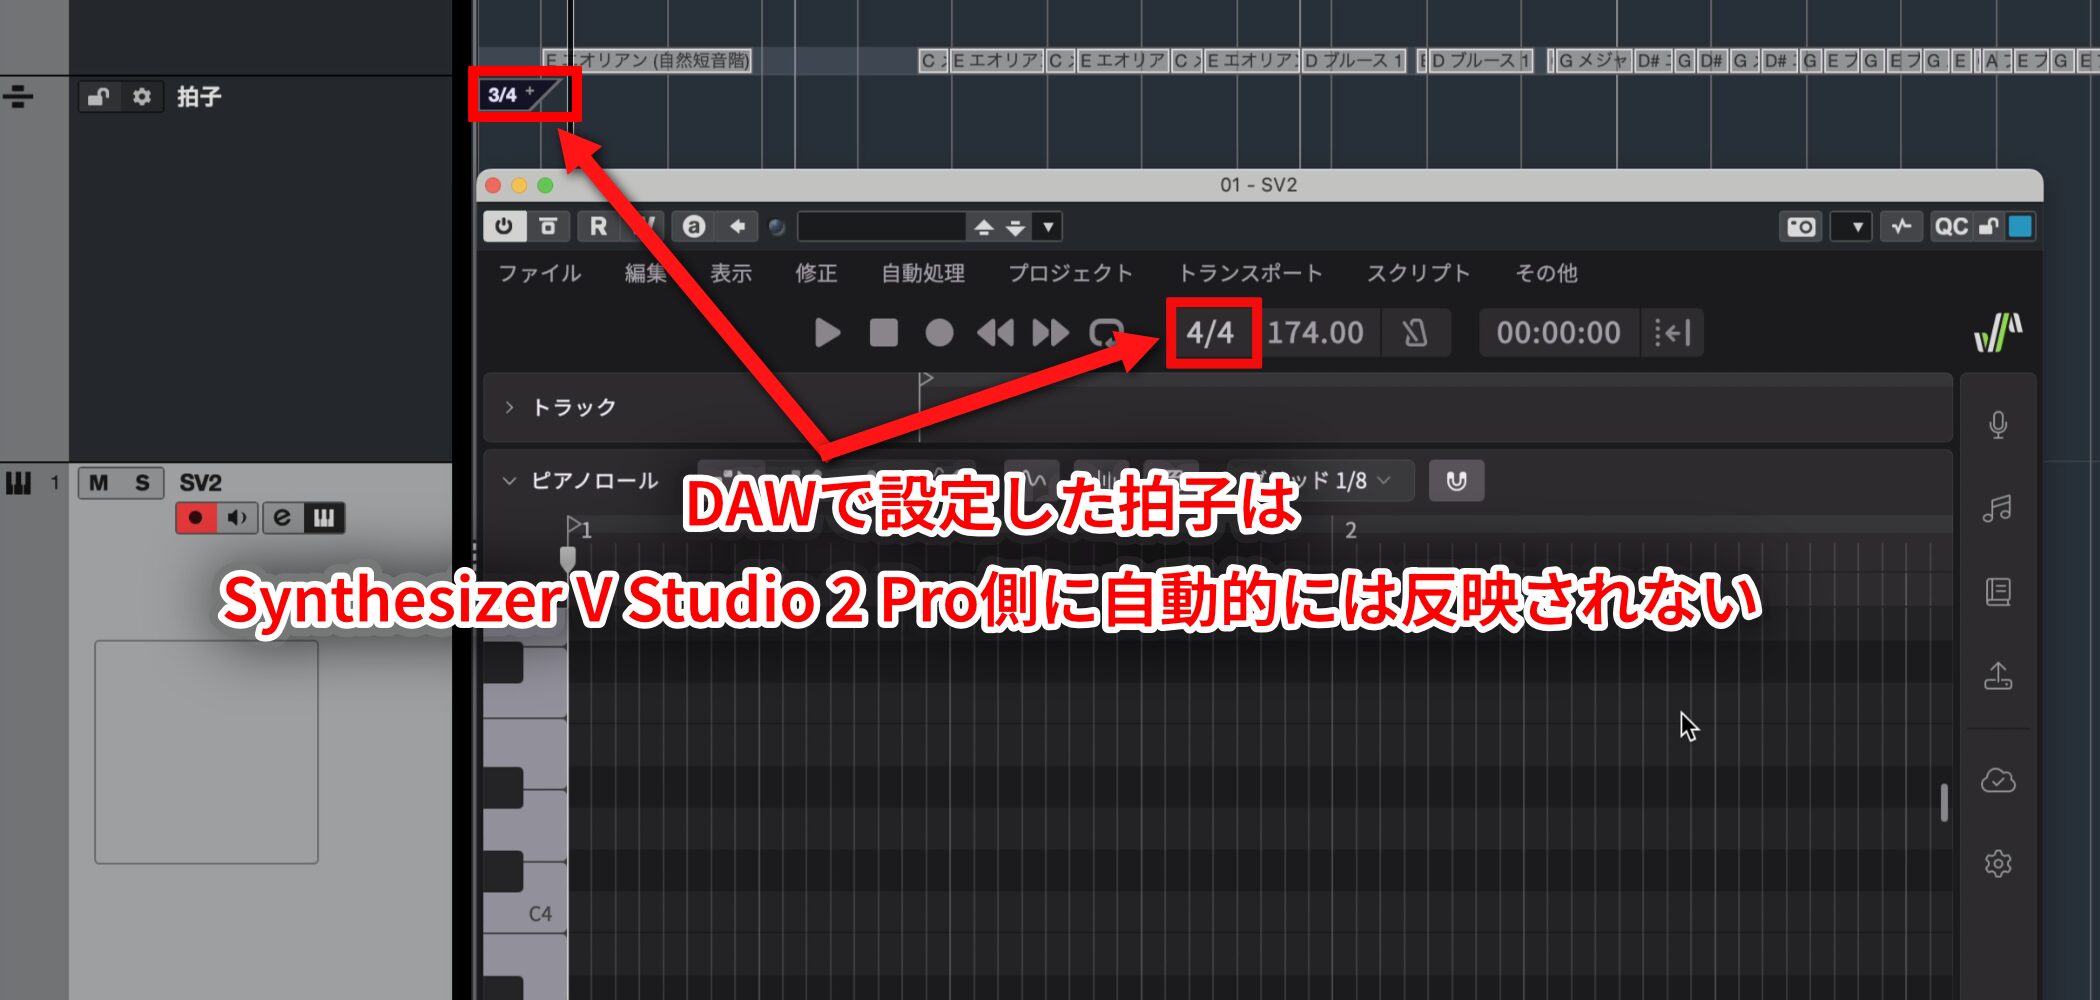
The default time signature is 4/4.
The DAW's time signature is not automatically reflected in Synthesizer V Studio 2 Pro.
Therefore, if your song is not in 4/4, set the time signature in Synthesizer V Studio 2 Pro as well.
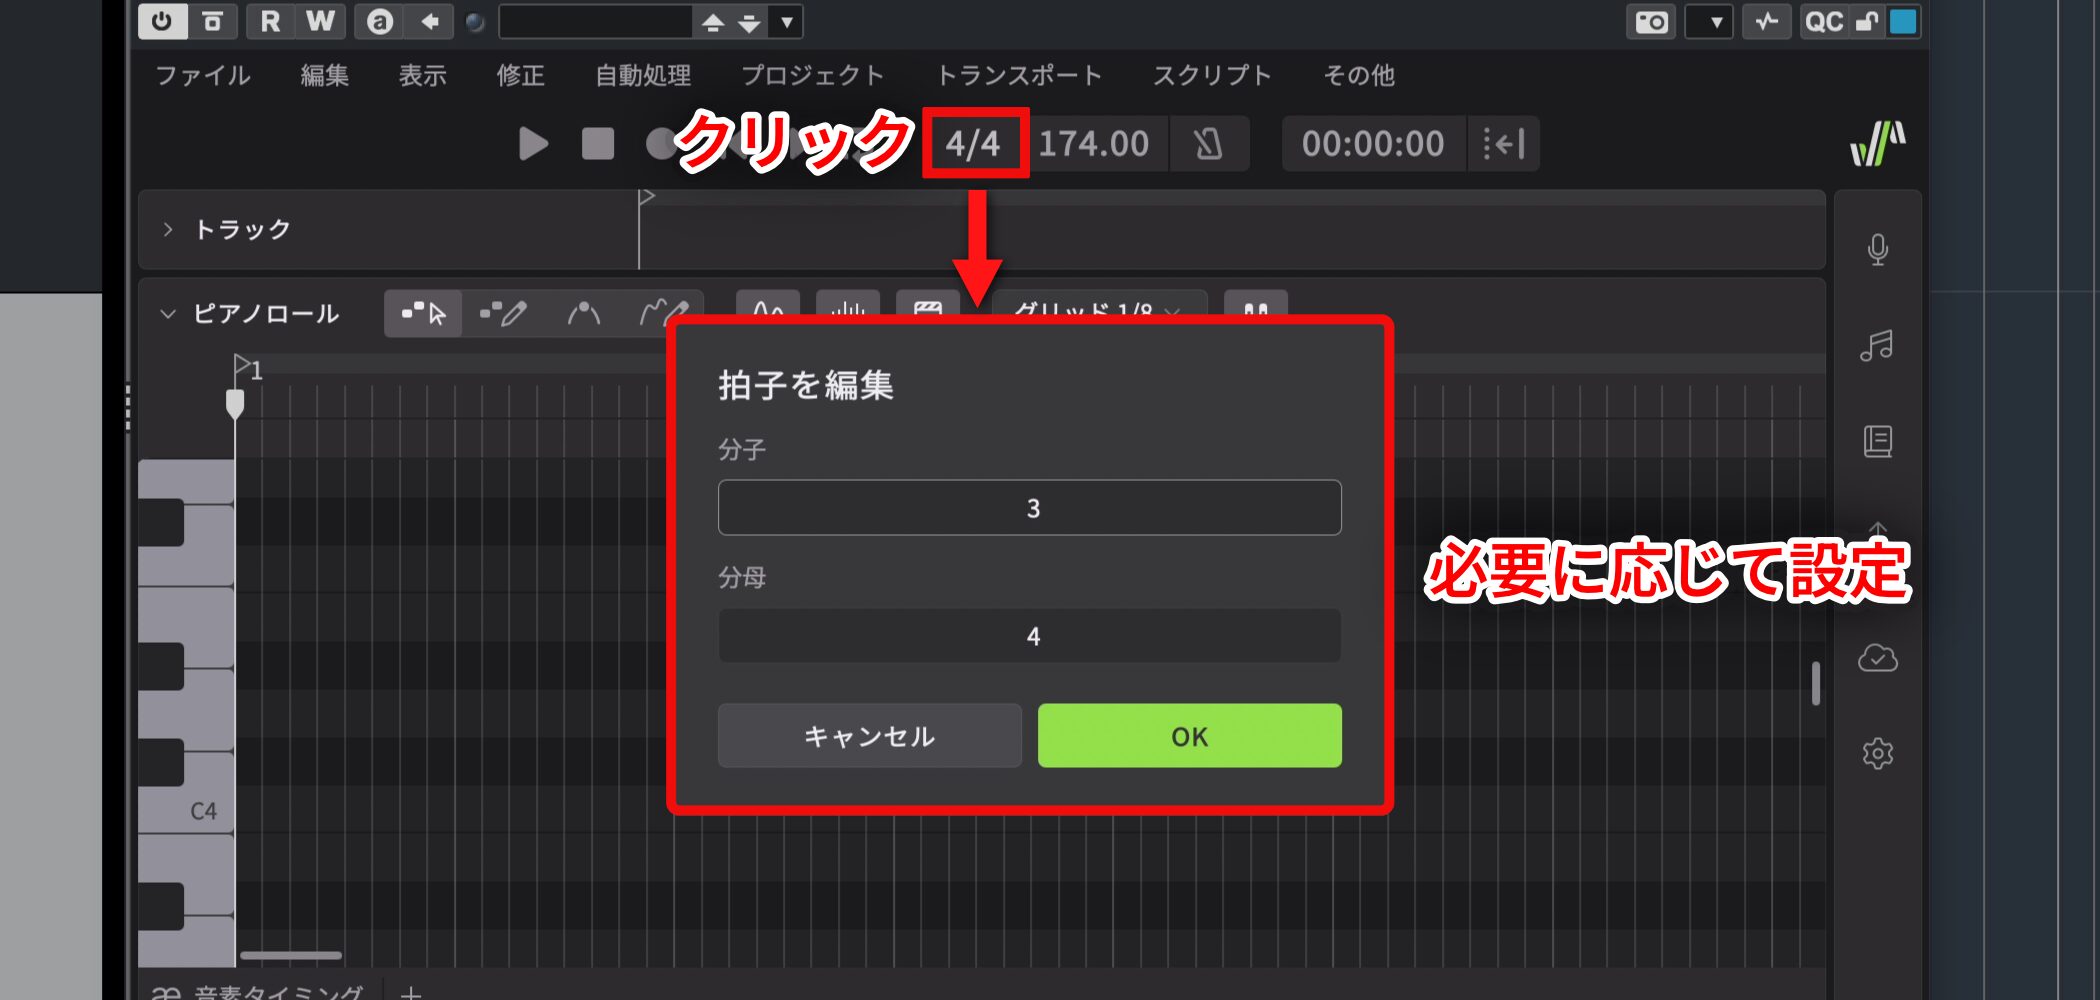
Click the time signature to open its editor, then change it if necessary.
Save the Project
Managing your work is also important.
Save the setup you have made so far.
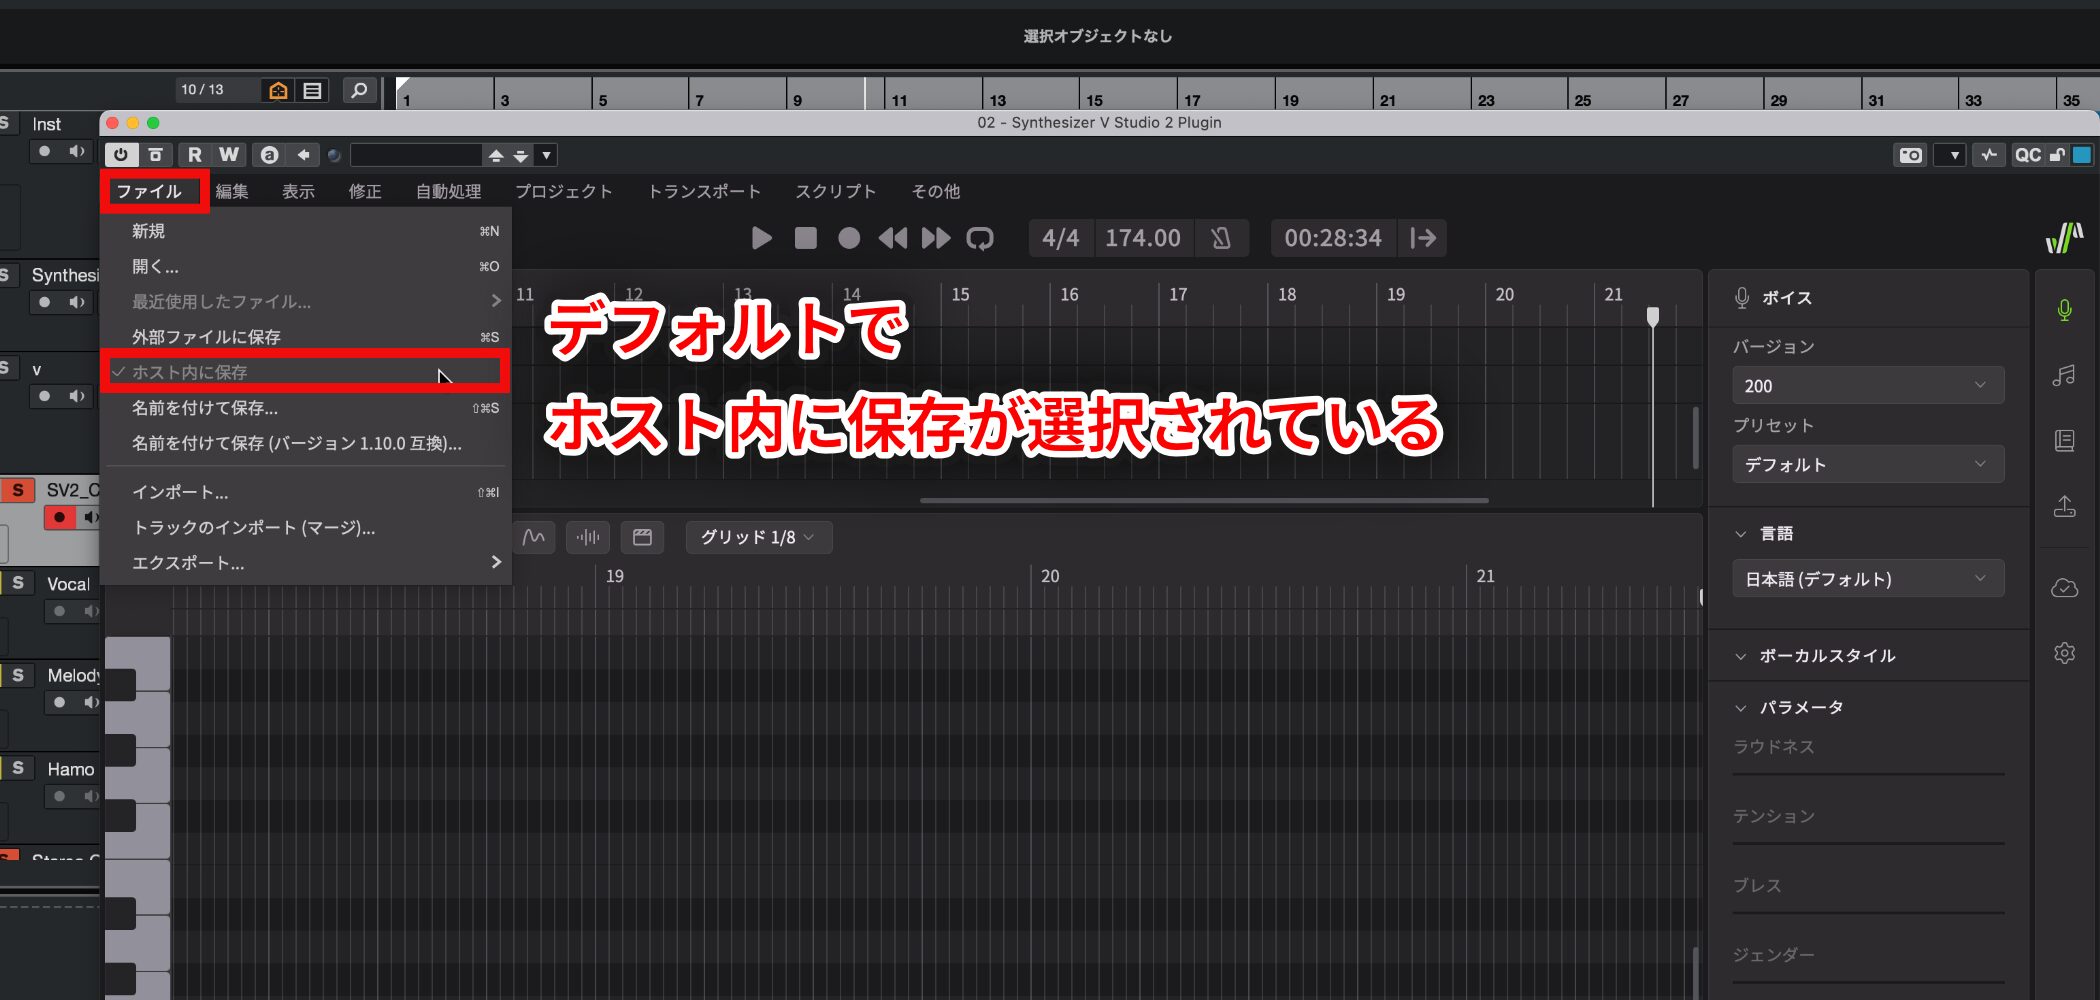
By default, Synthesizer V Studio 2 Pro uses File → Save inside Host for its project file.
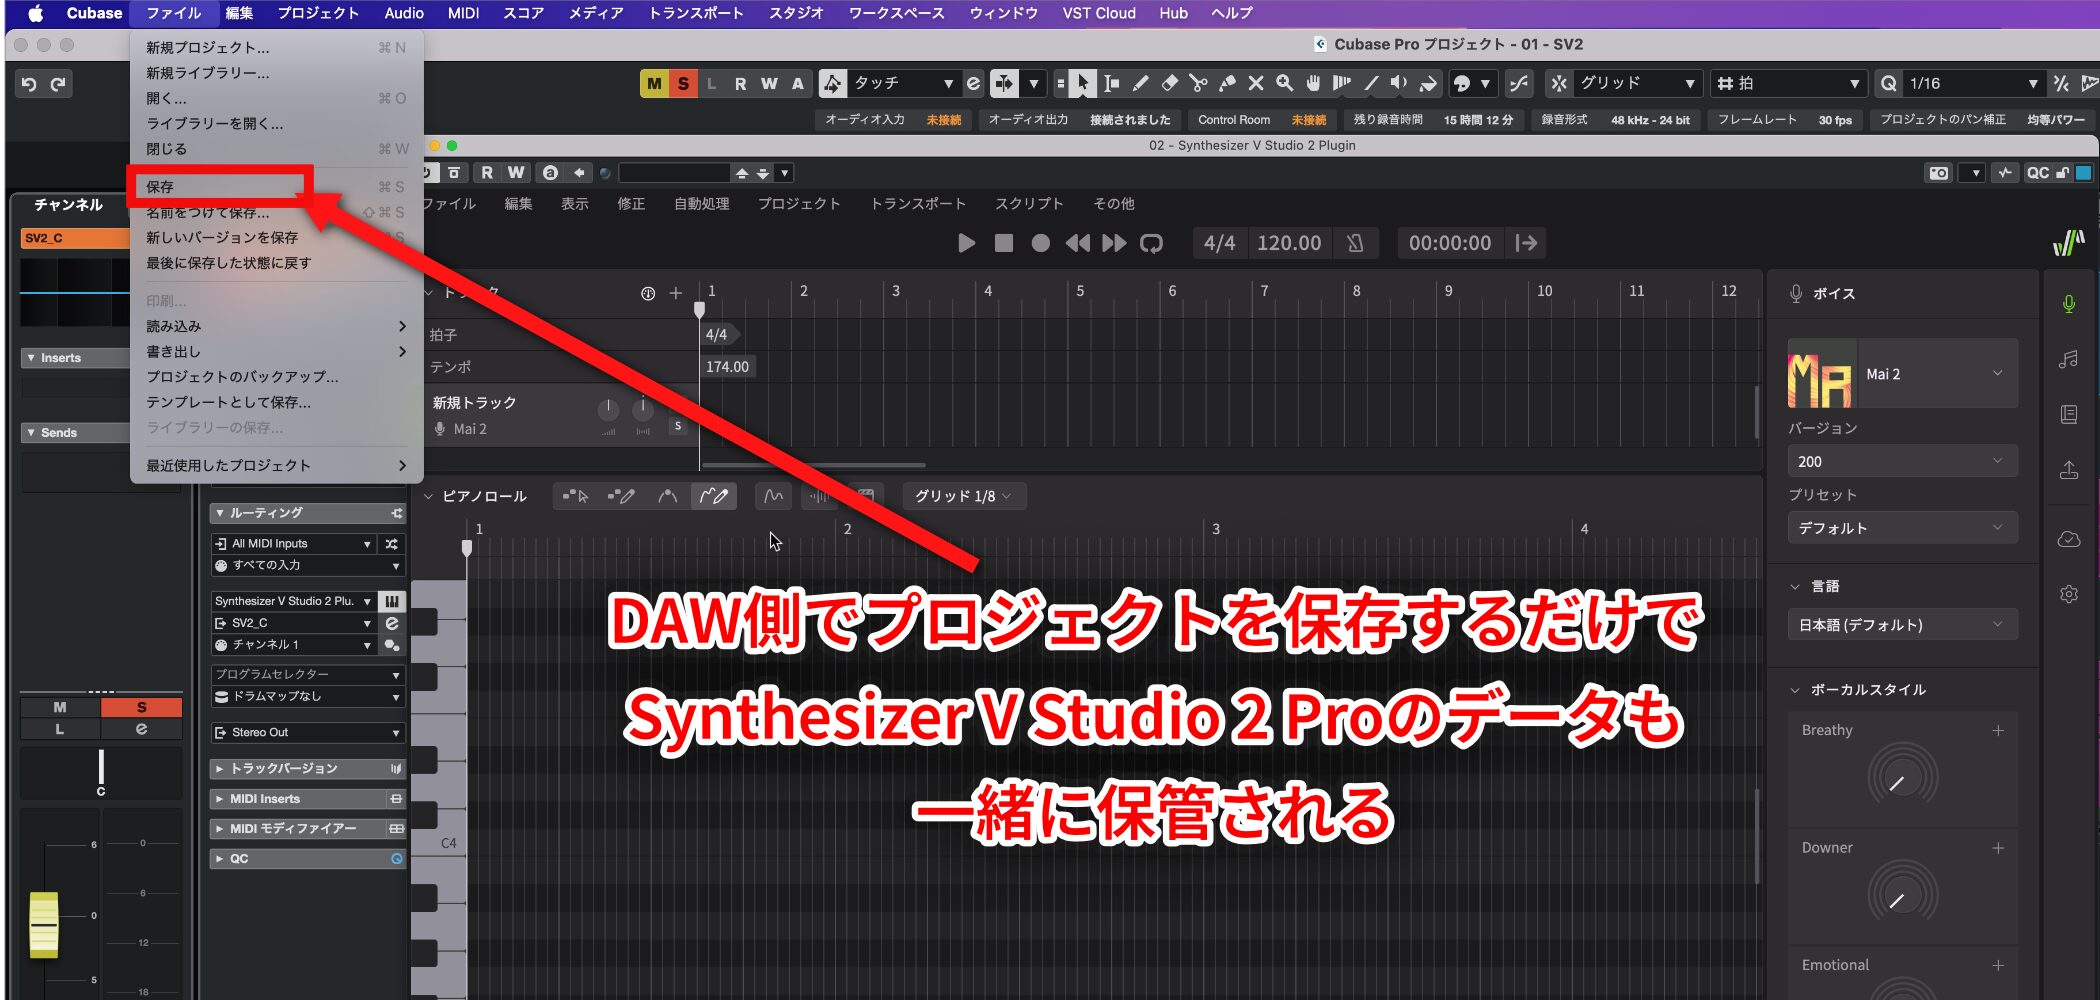
With this setting, Synthesizer V Studio 2 Pro data is included automatically in the DAW project, so saving the DAW project also saves the vocal work.
Save frequently as you work to protect against unexpected data loss.
Enter Melodies, Lyrics, and Rap
Synthesizer V Studio 2 Pro lets you enter melodies, lyrics, and rap intuitively and efficiently with a mouse and keyboard.
The following example uses the song's first verse to explain the basic controls.
Prepare to Enter Notes and Understand the Piano Roll
First, enter the melody for the first verse.
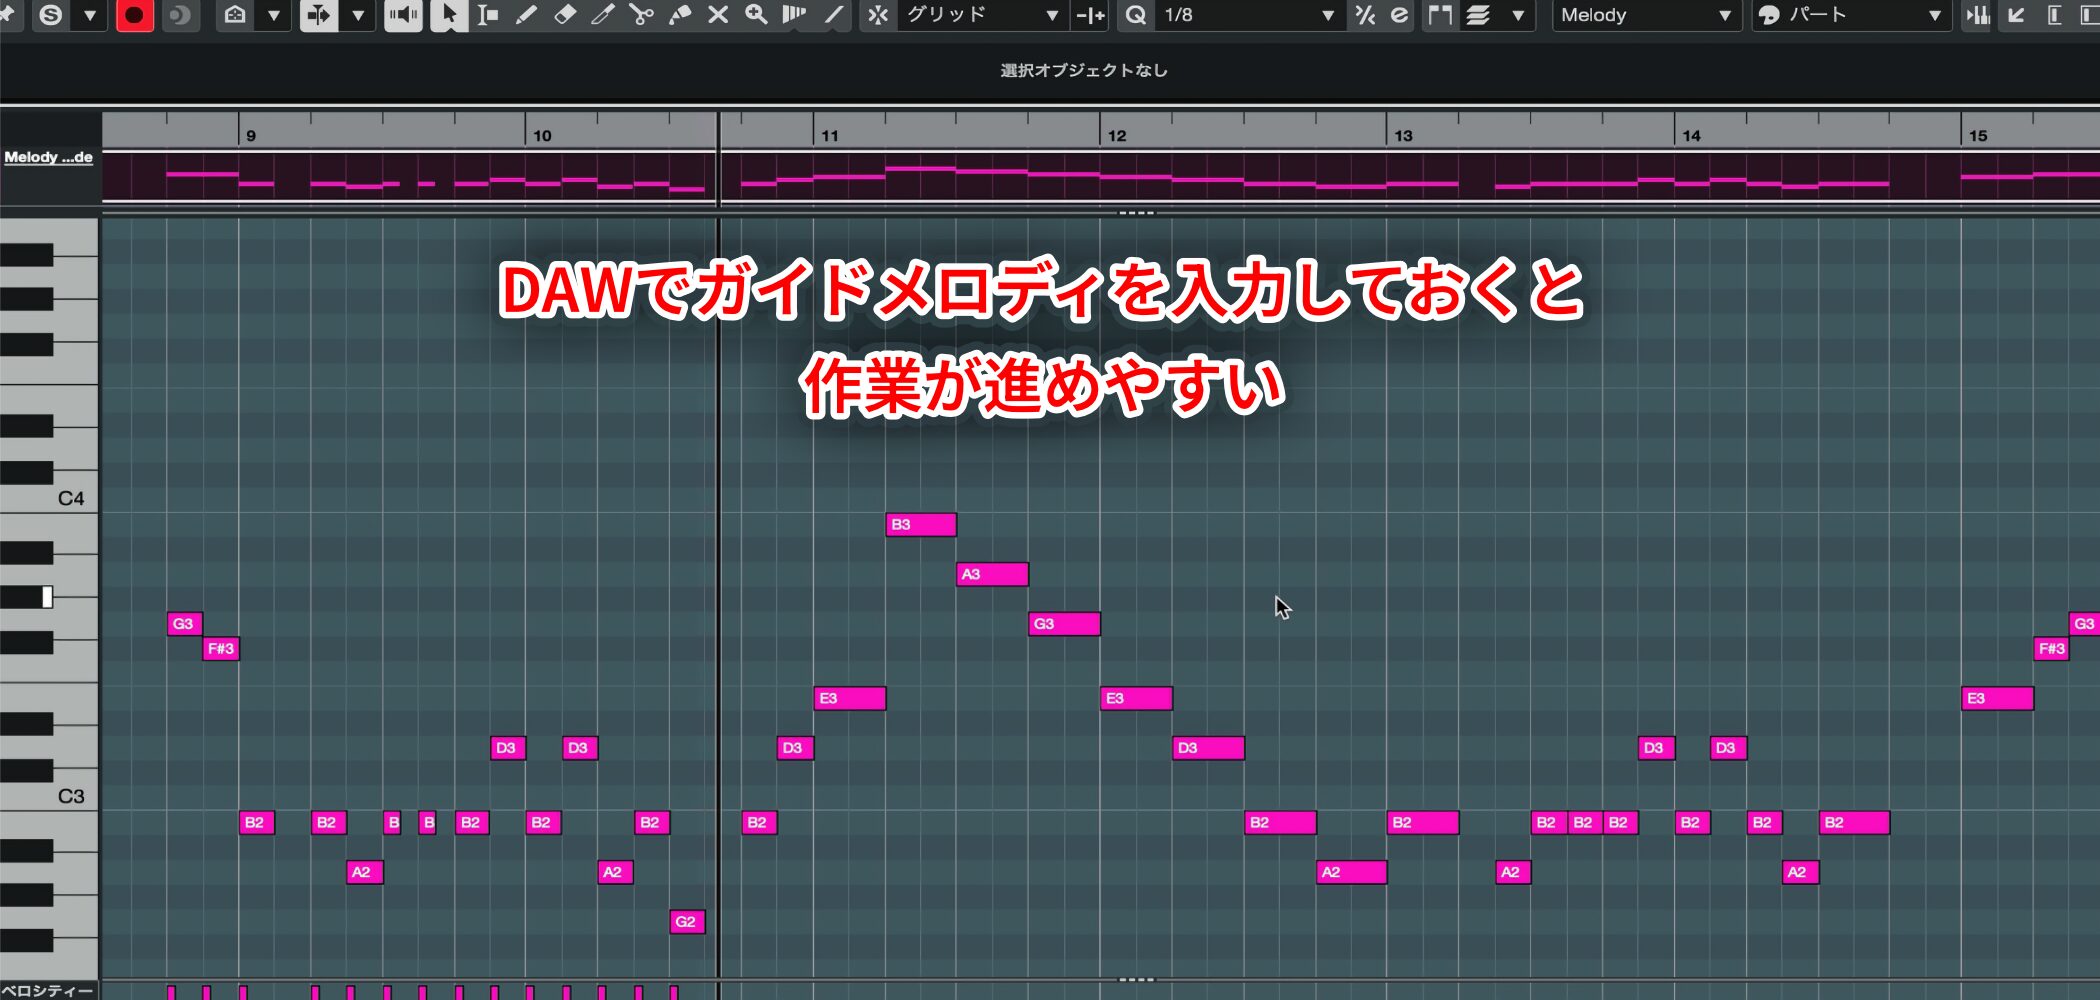
Having a guide melody in your DAW beforehand can make the process easier.
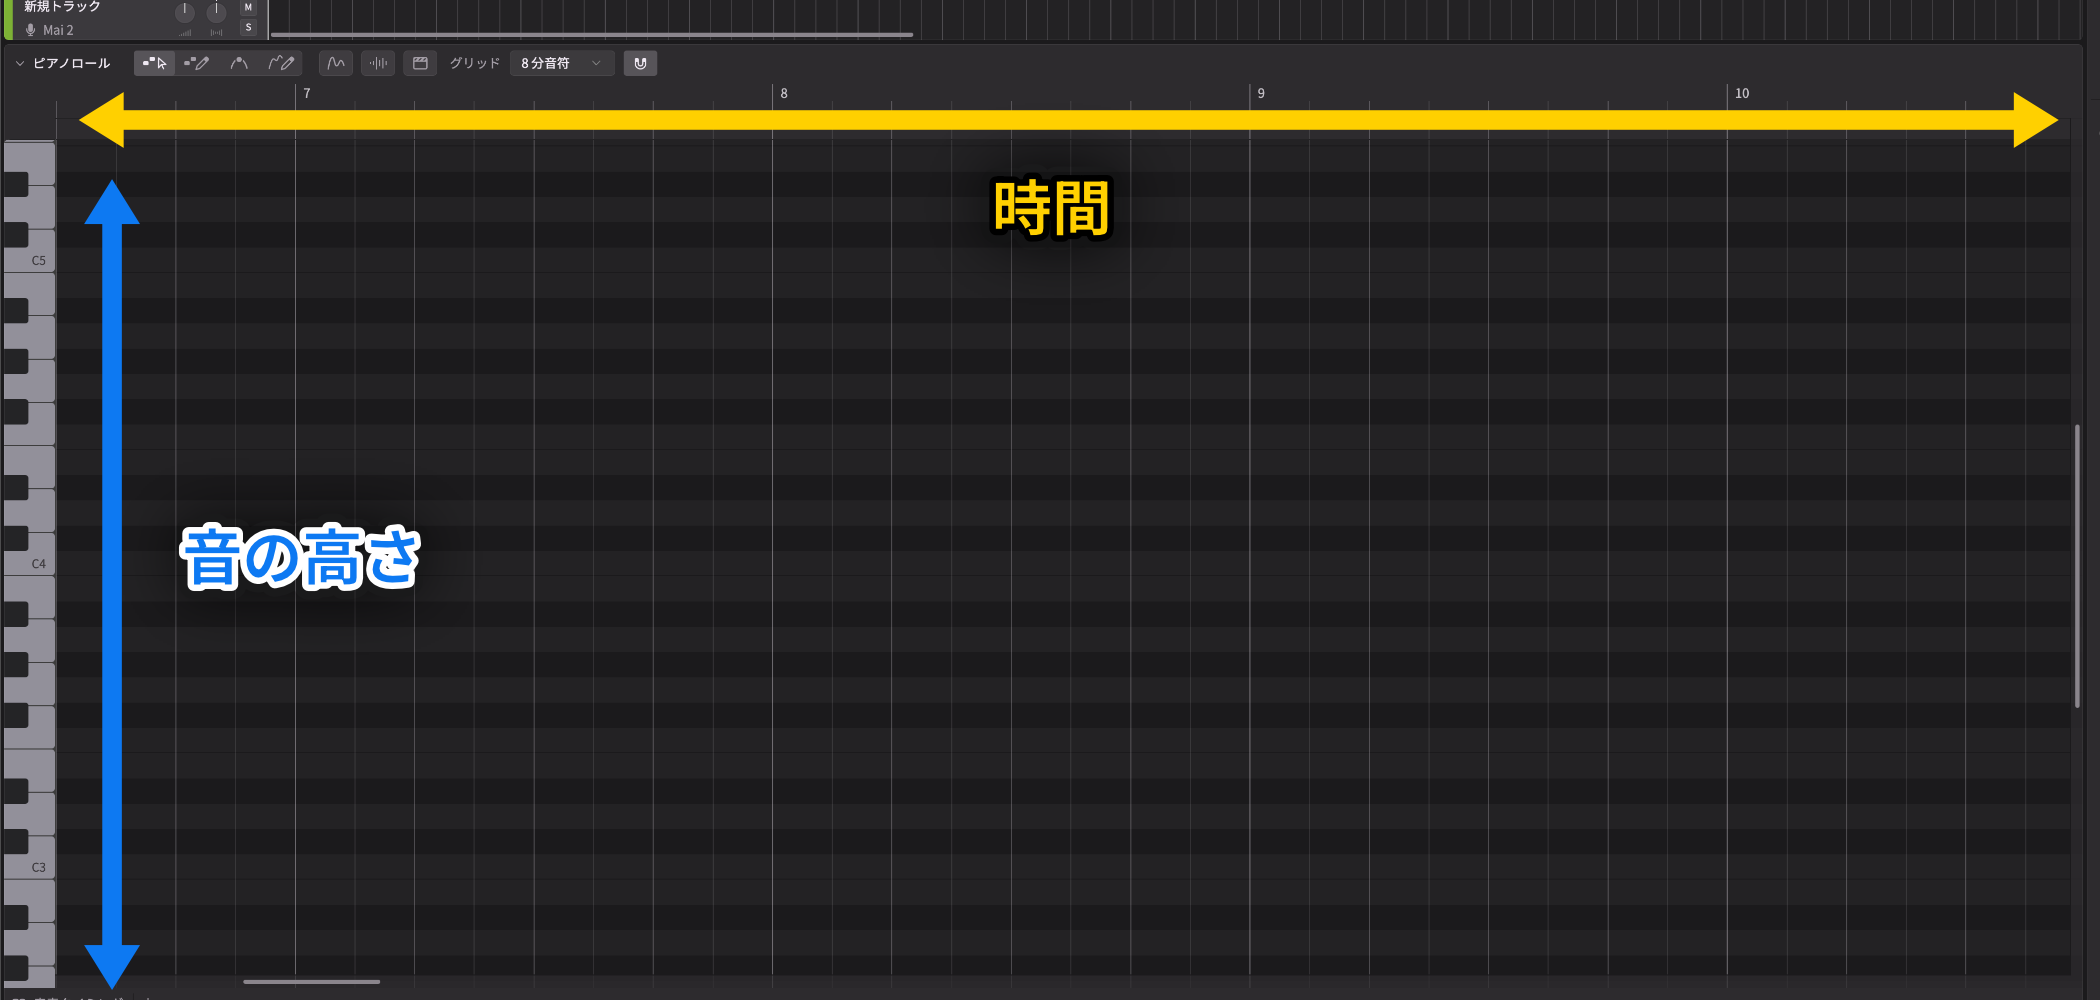
You will enter the notes in the main Piano Roll.
As in many DAWs, the vertical axis shows pitch and the horizontal axis shows time.
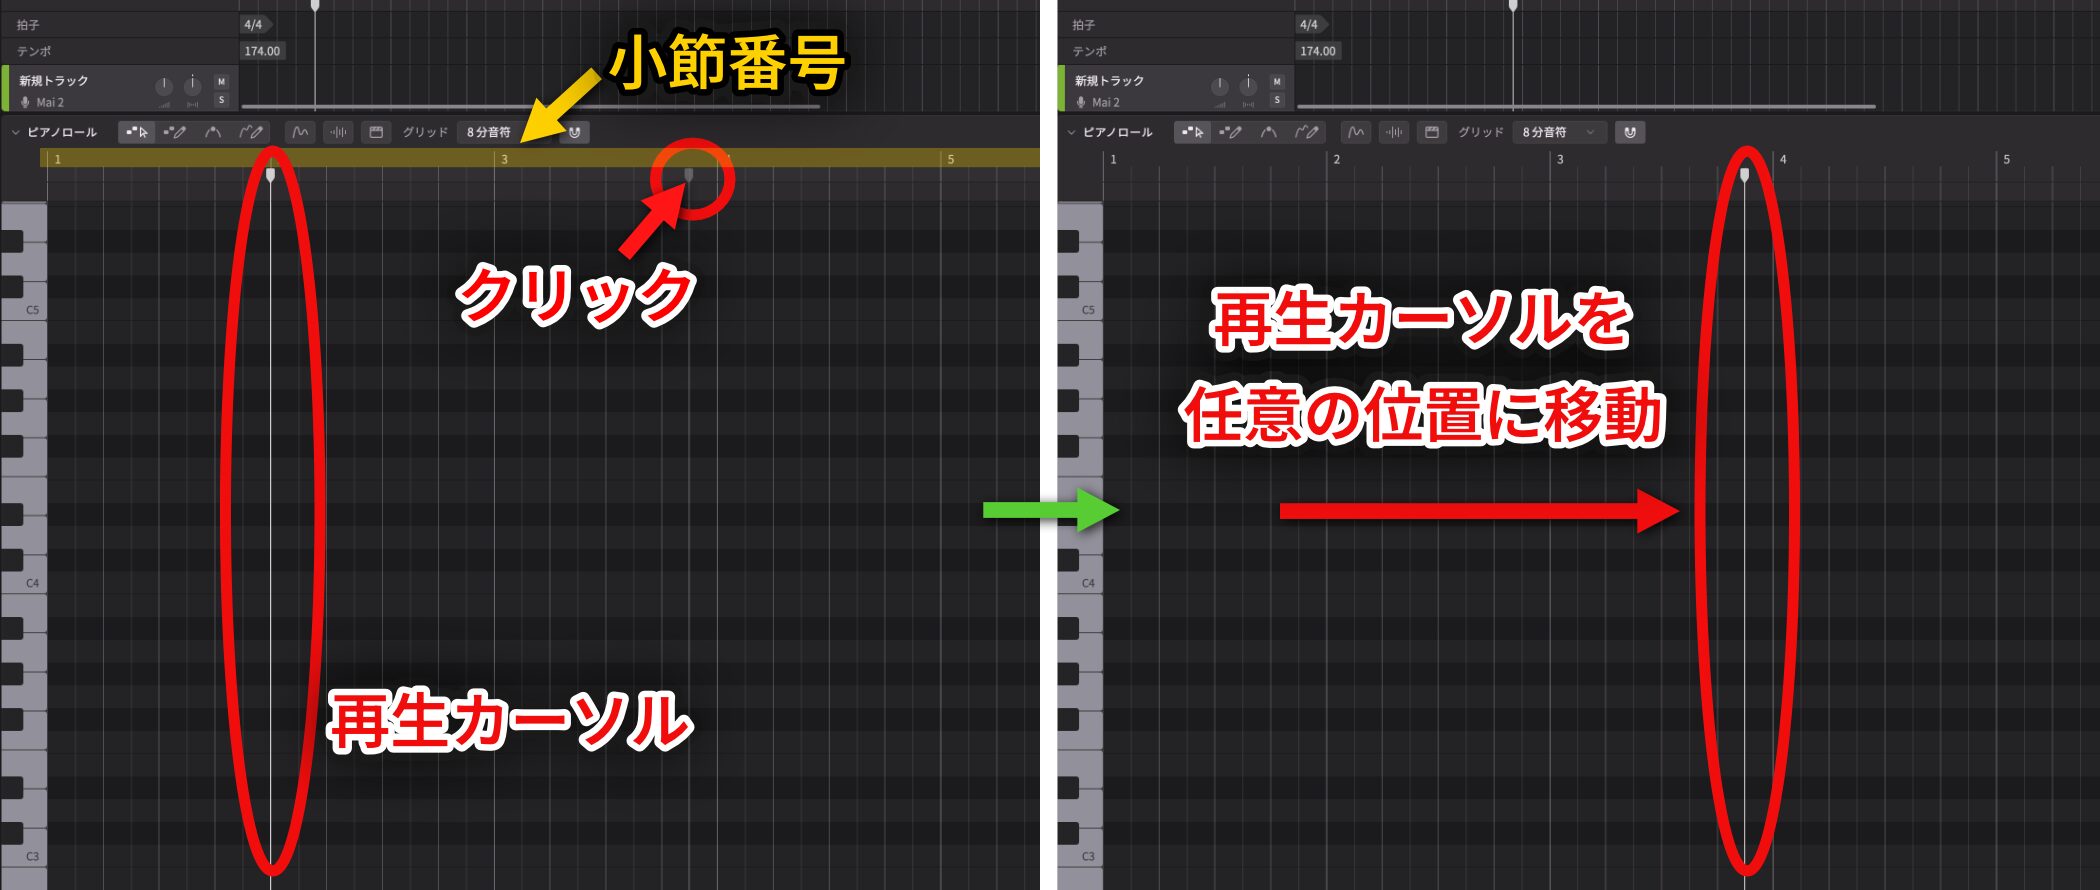
Bar numbers appear along the top. Click one to move the playhead to that position.
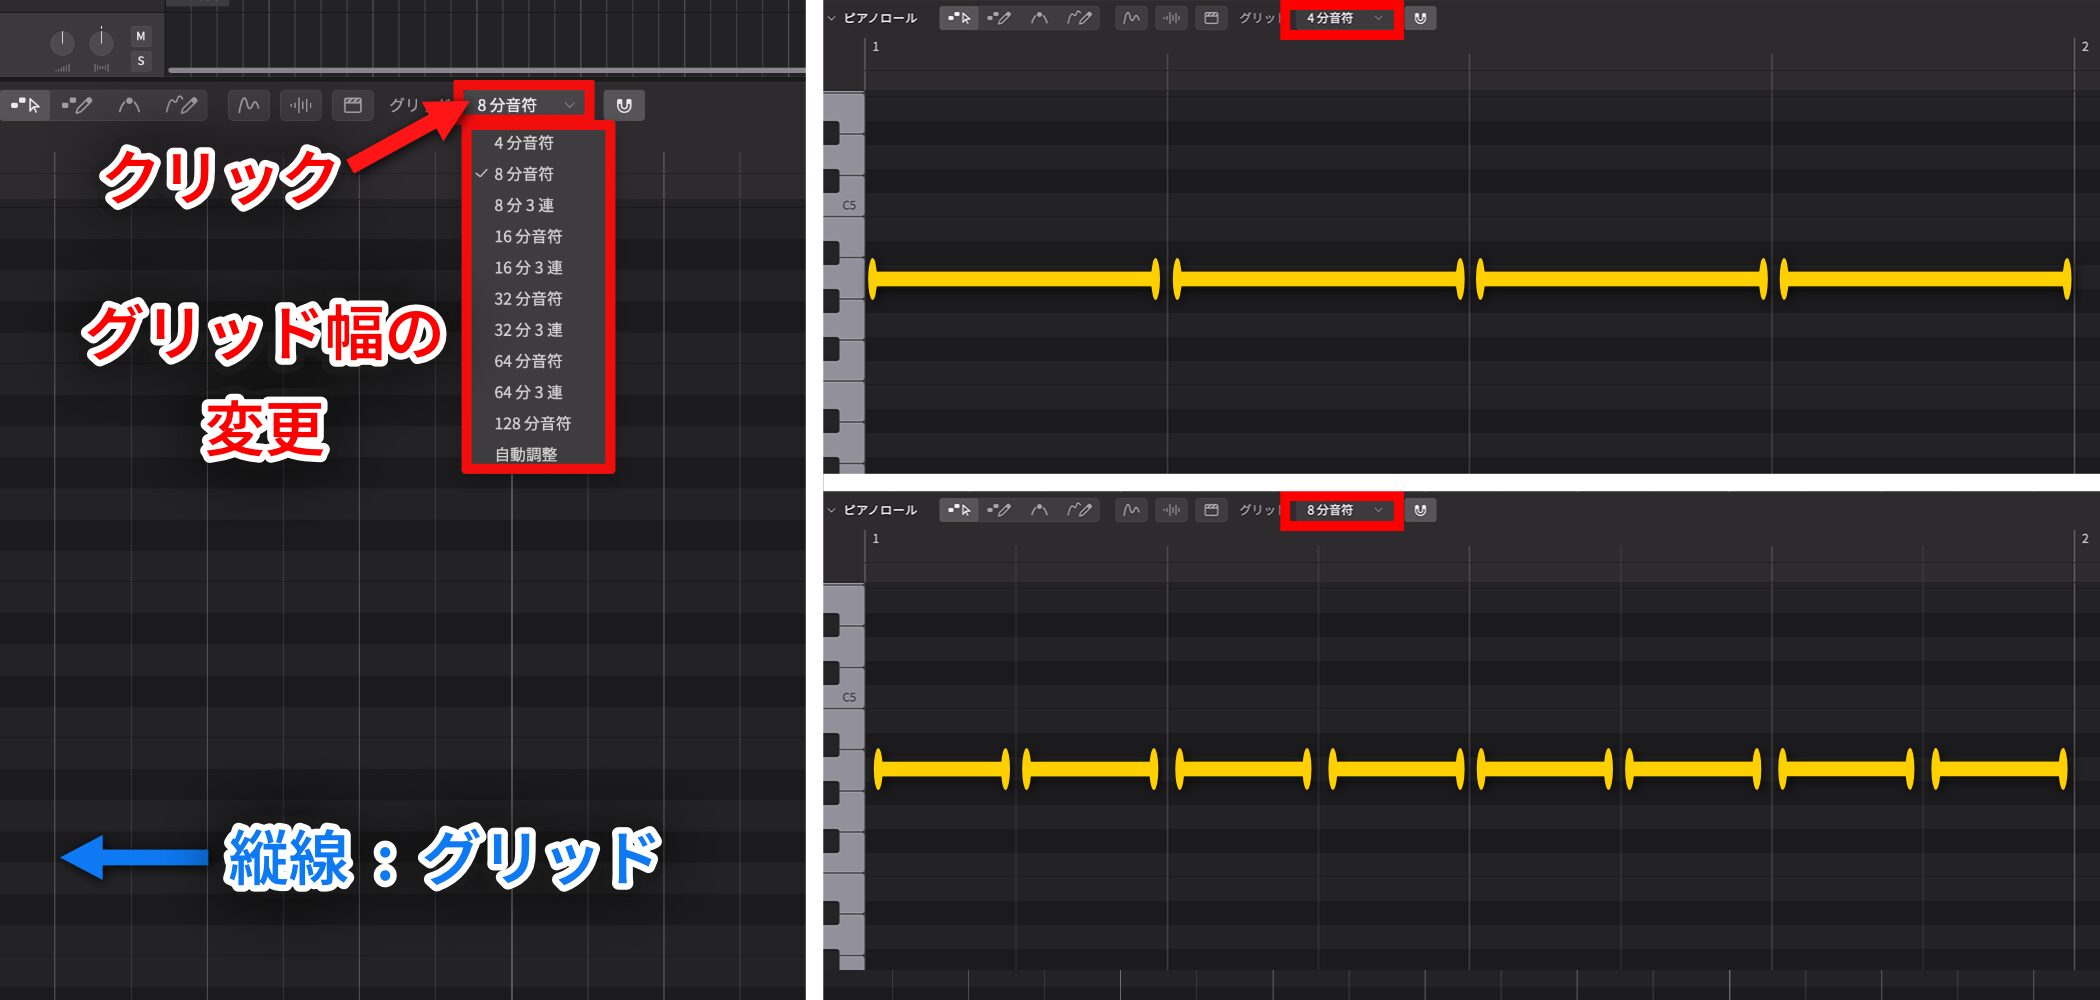
Vertical lines called the grid appear in the Piano Roll. Change the grid setting at the top to adjust the note division freely.
This example uses eighth notes.
Enter and Edit Notes
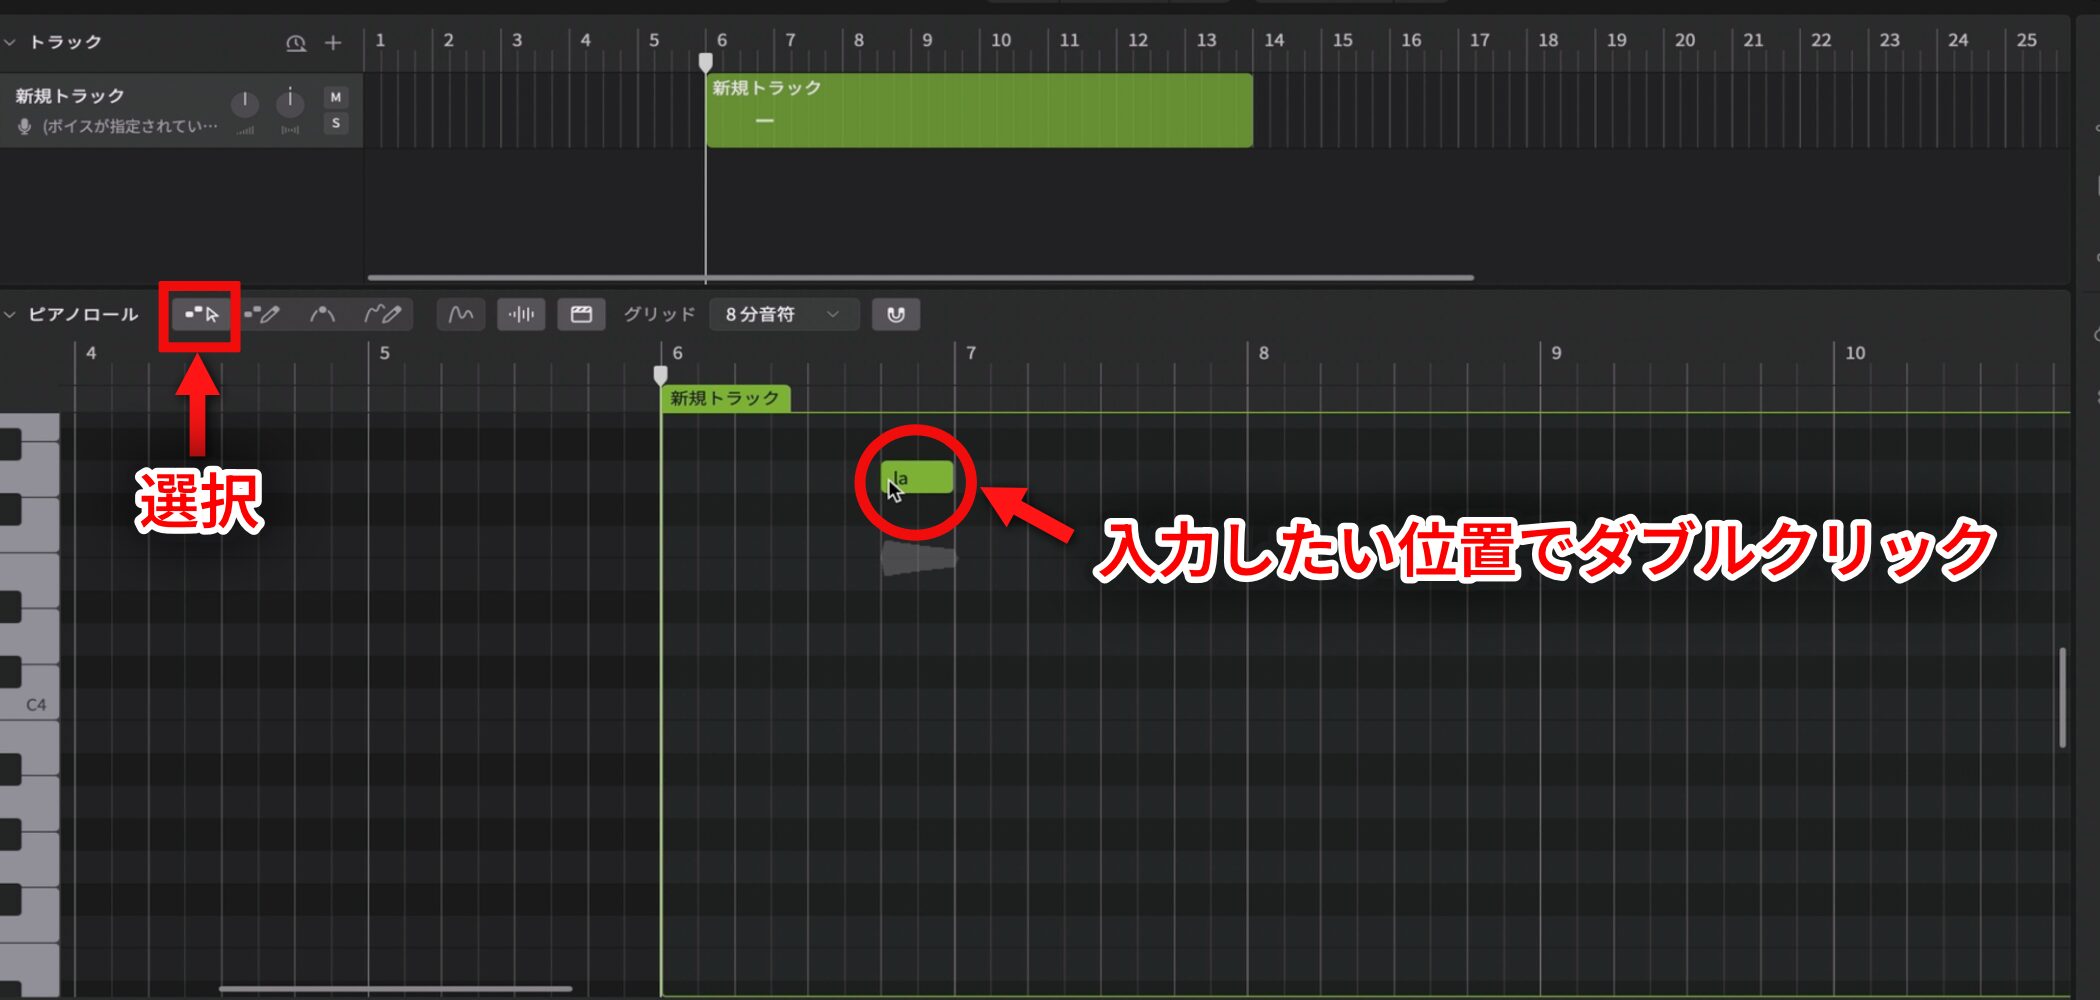
To enter a note, choose the Note Edit tool and double-click the desired position in the Piano Roll.
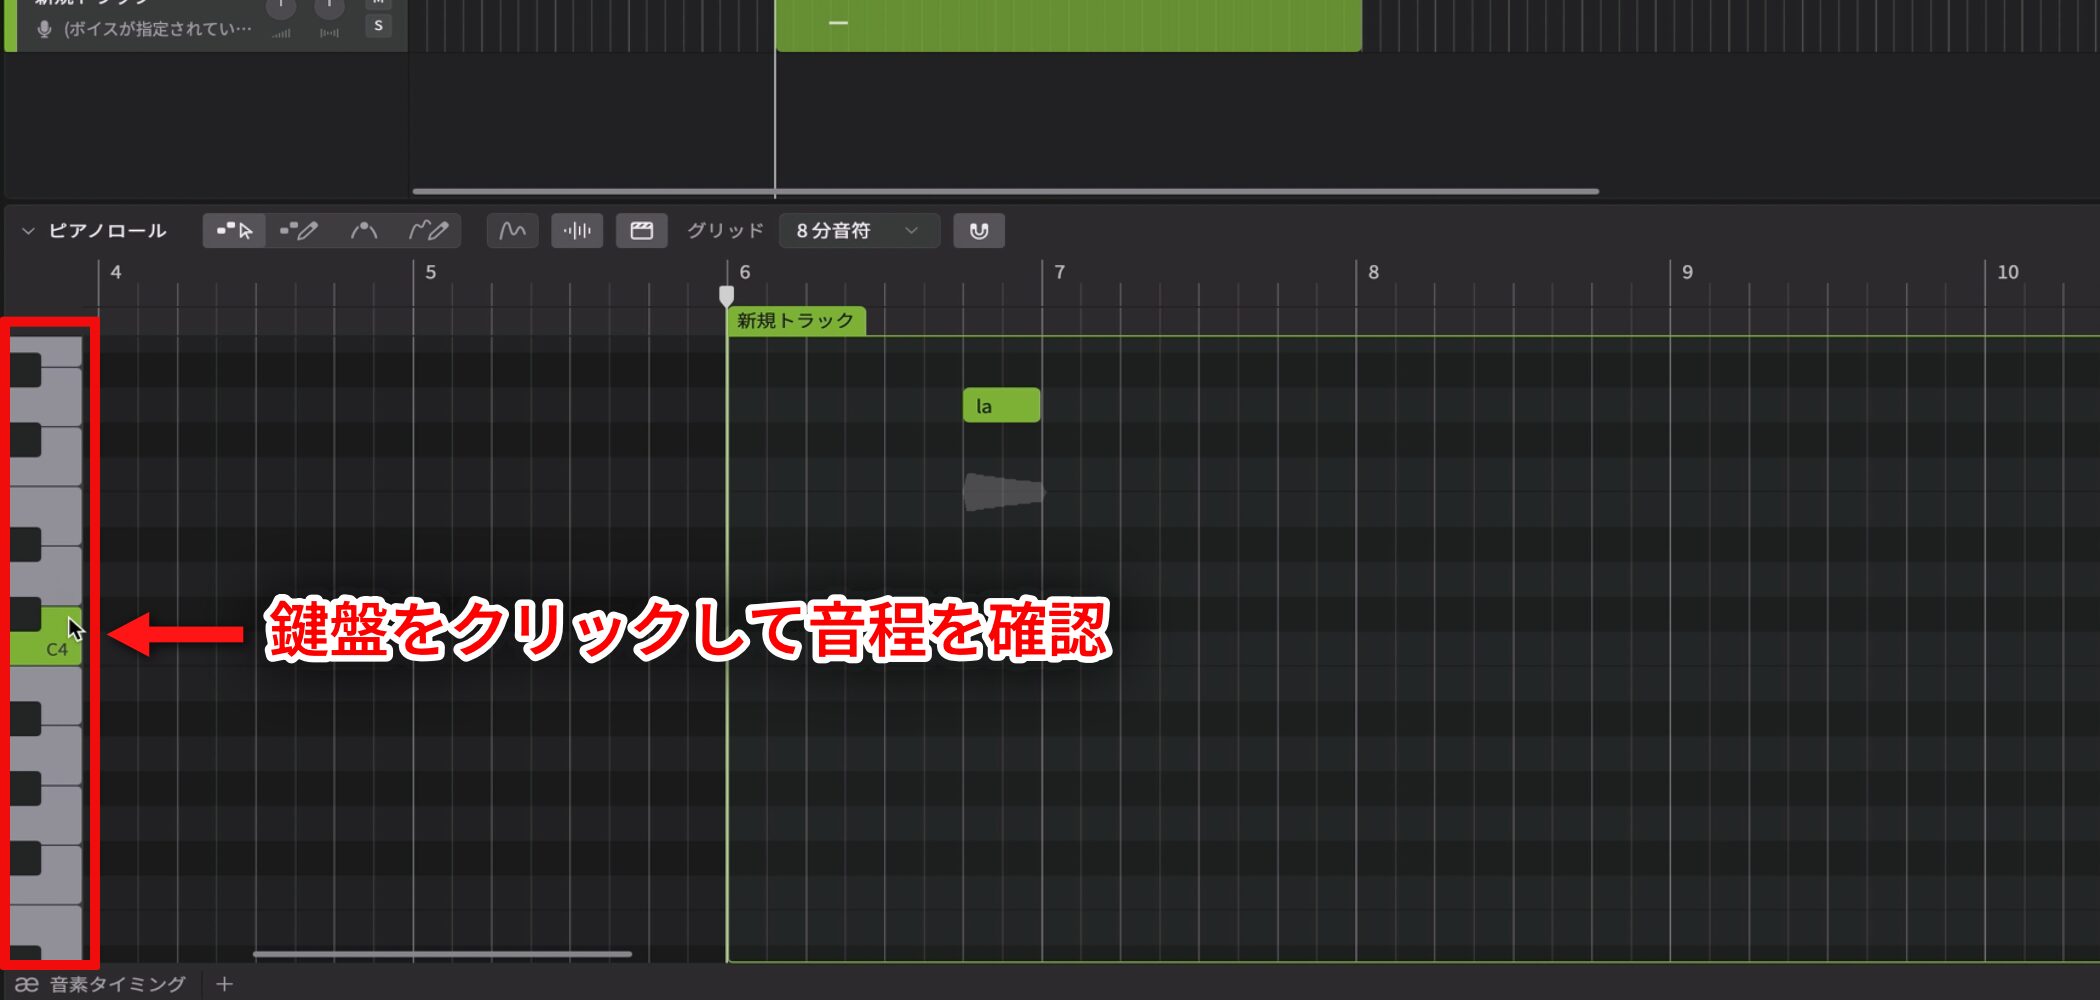
To check a pitch first, click the piano keyboard on the left side of the Piano Roll.
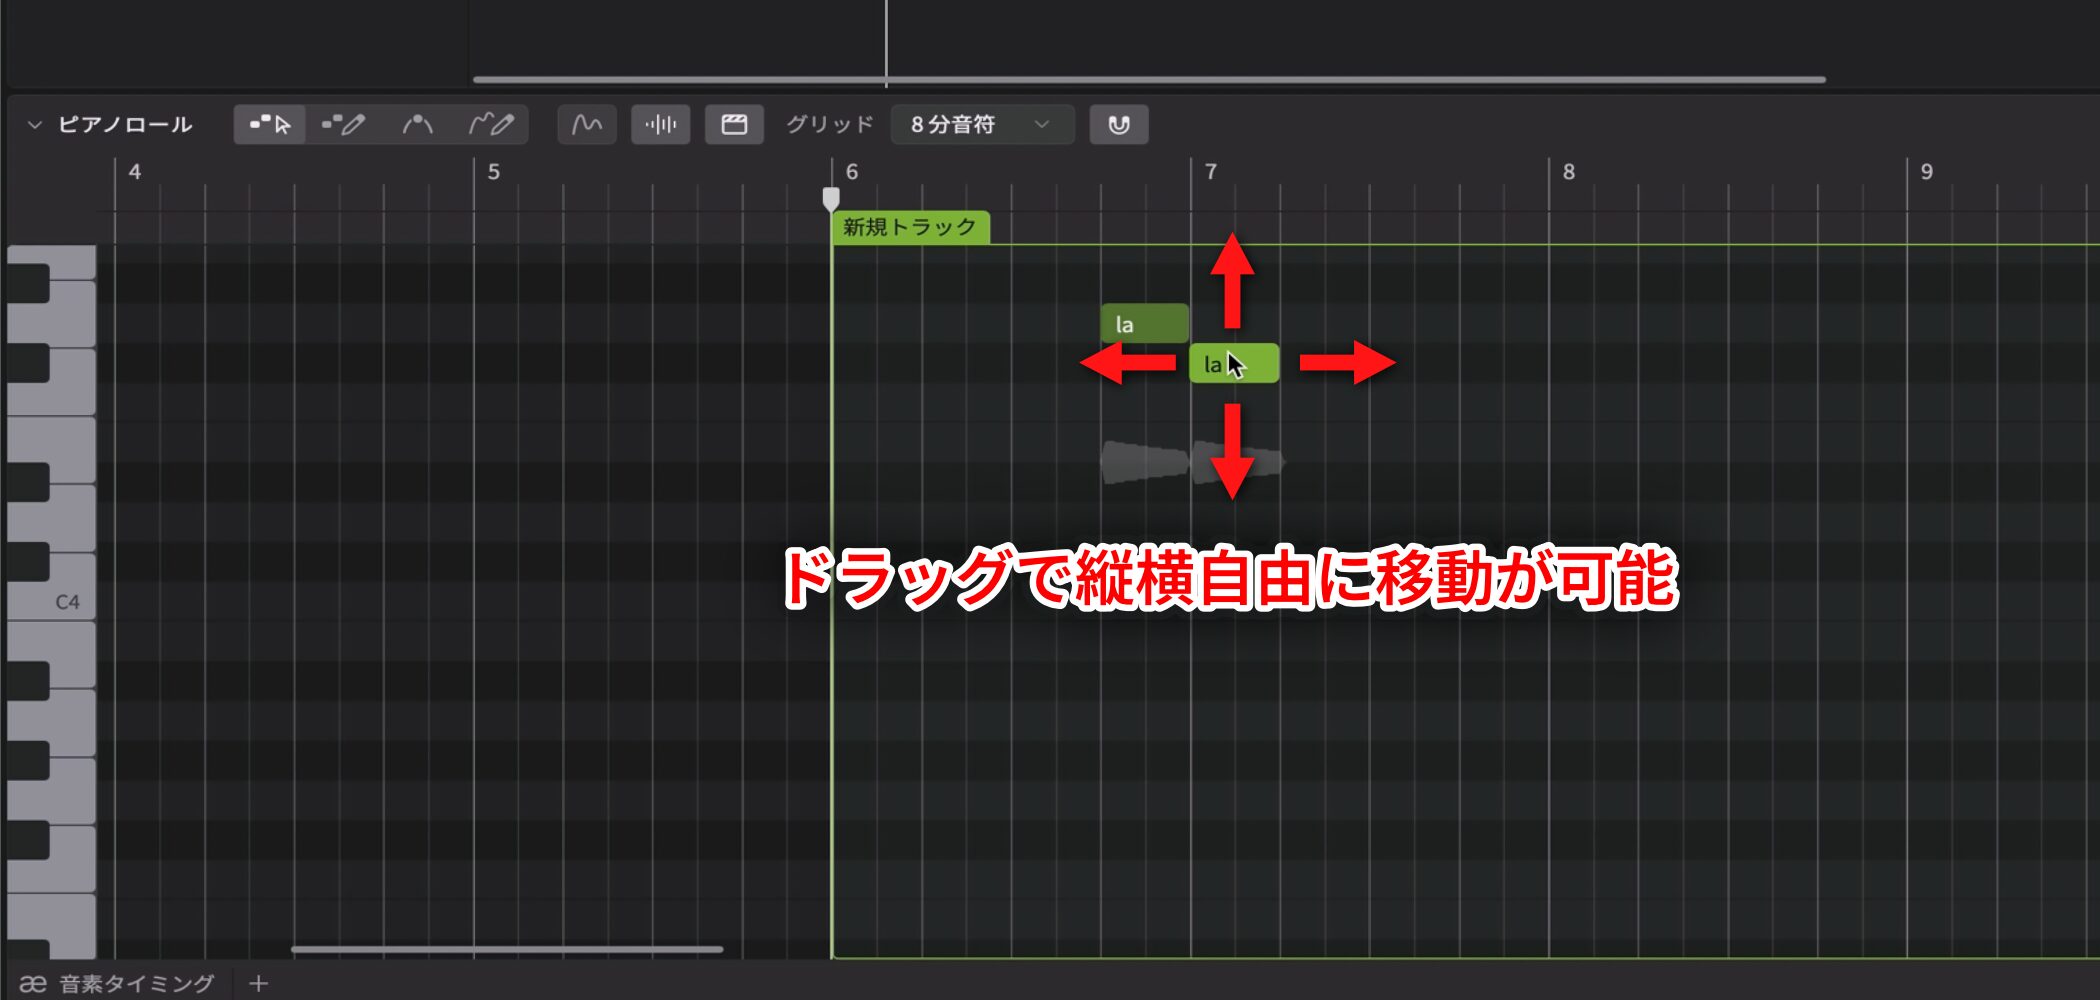
If a note lands in the wrong place, drag it vertically or horizontally to correct it.
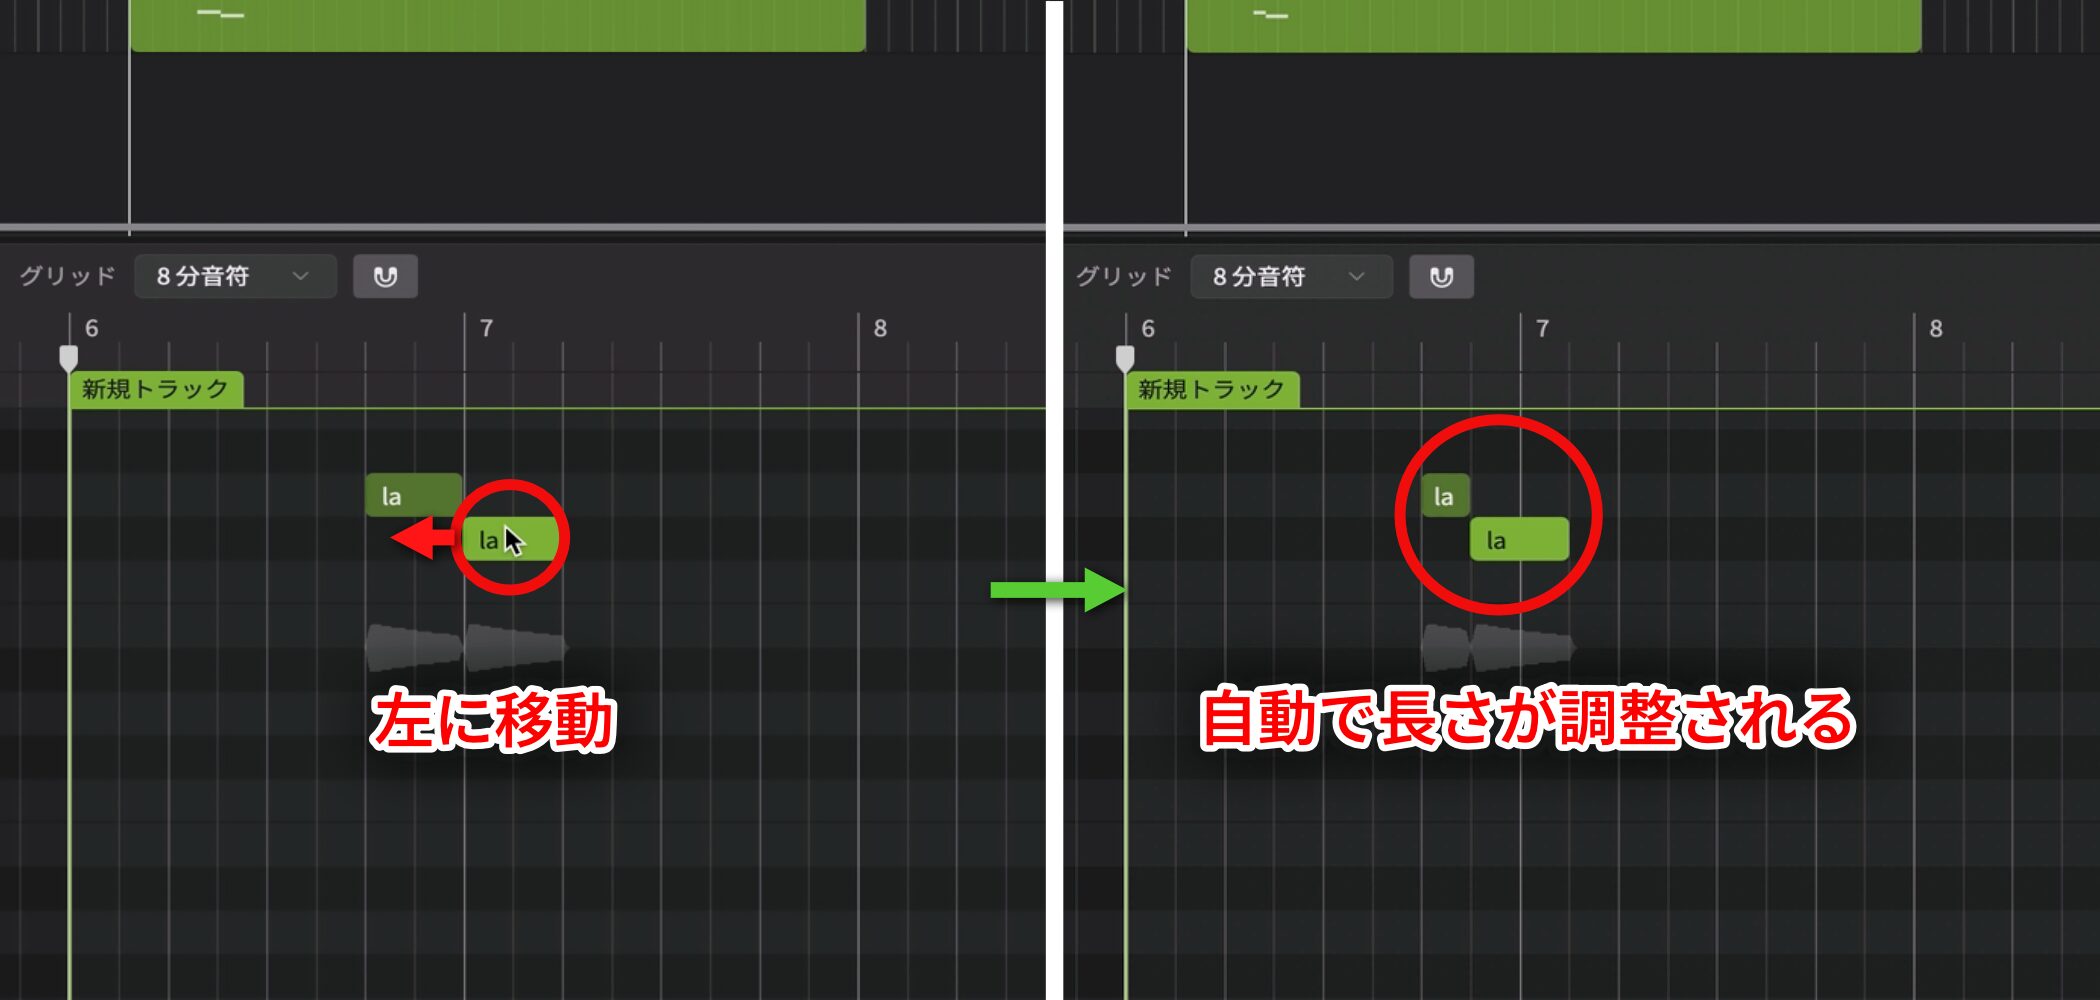
If moving notes causes several notes to overlap at the same time, their lengths are adjusted automatically to prevent playback problems.
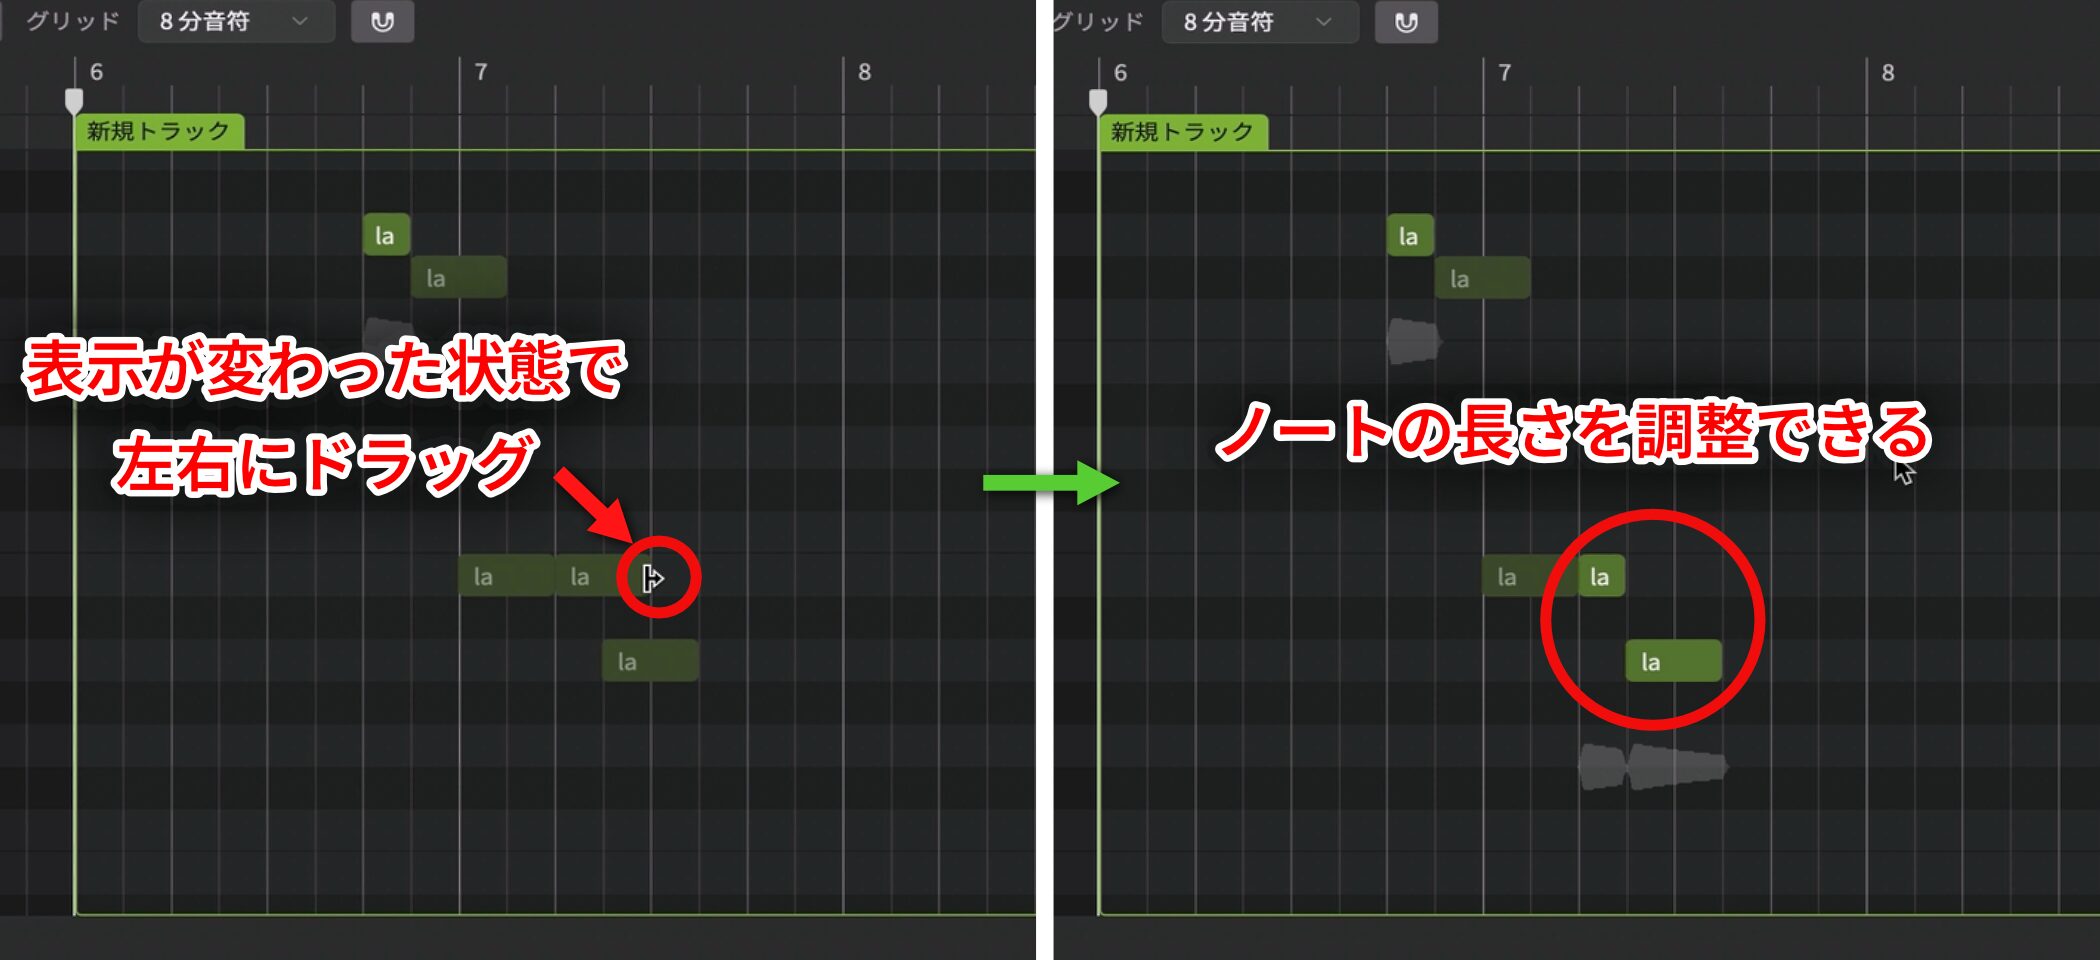
Move the pointer to a note's start or end until the cursor changes.
Then drag left or right to change the note's length.
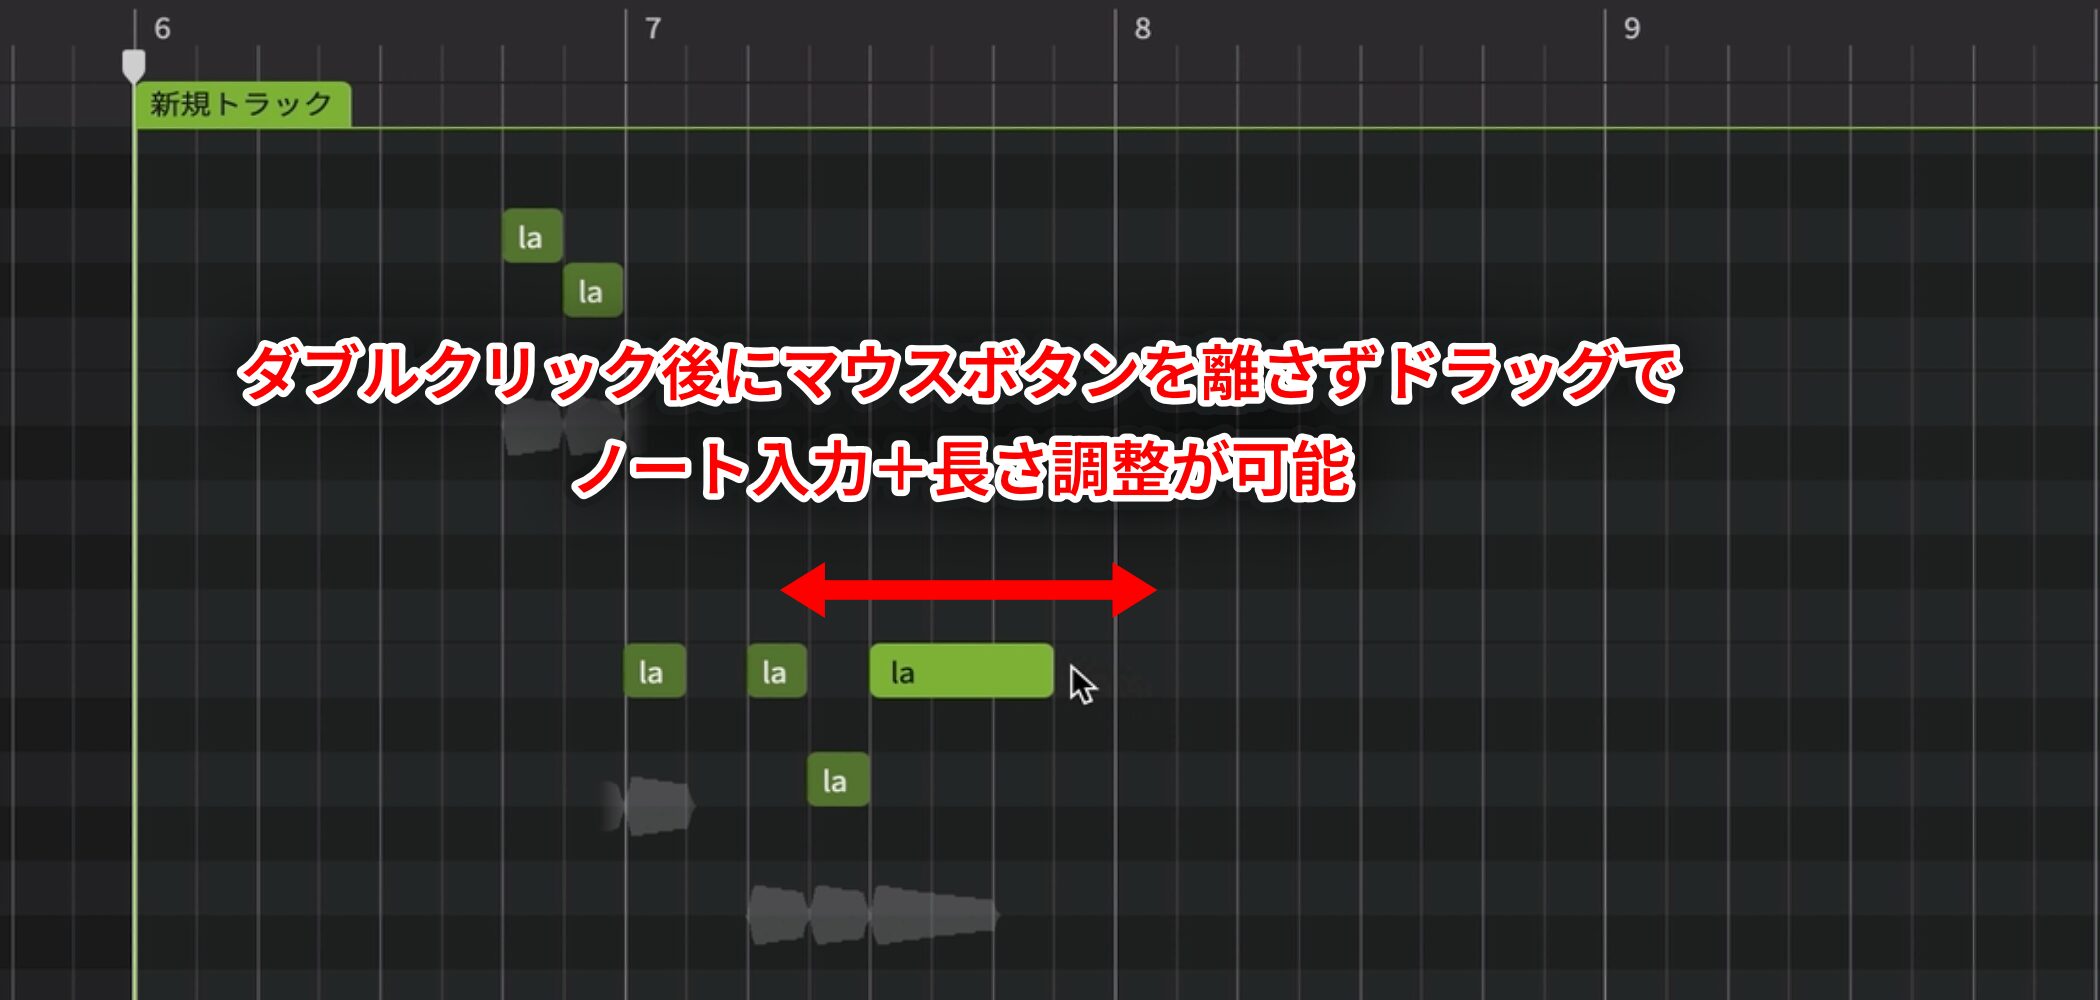
You can also double-click and keep the mouse button pressed while dragging horizontally to set the length as you enter a note.
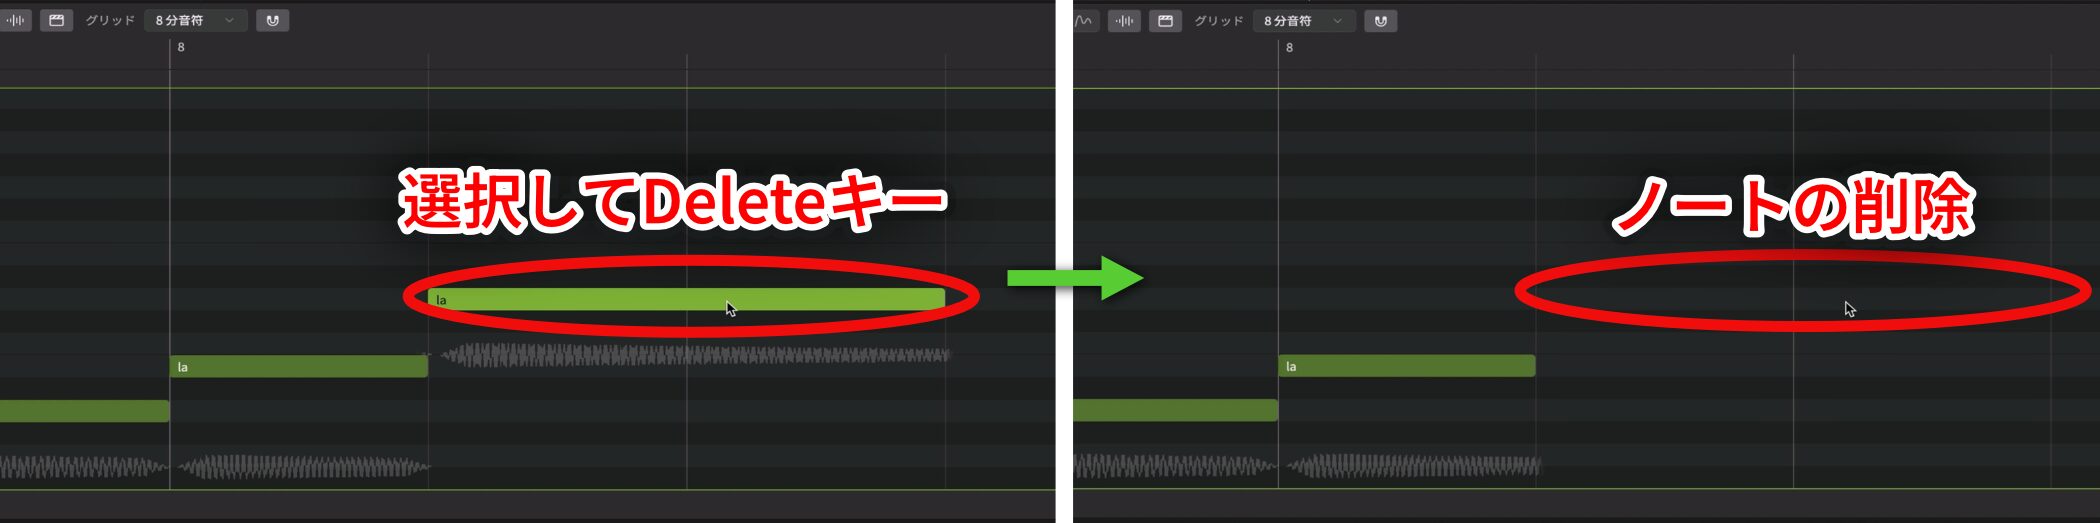
Press Delete to remove an unwanted note.
Navigate the Display Efficiently
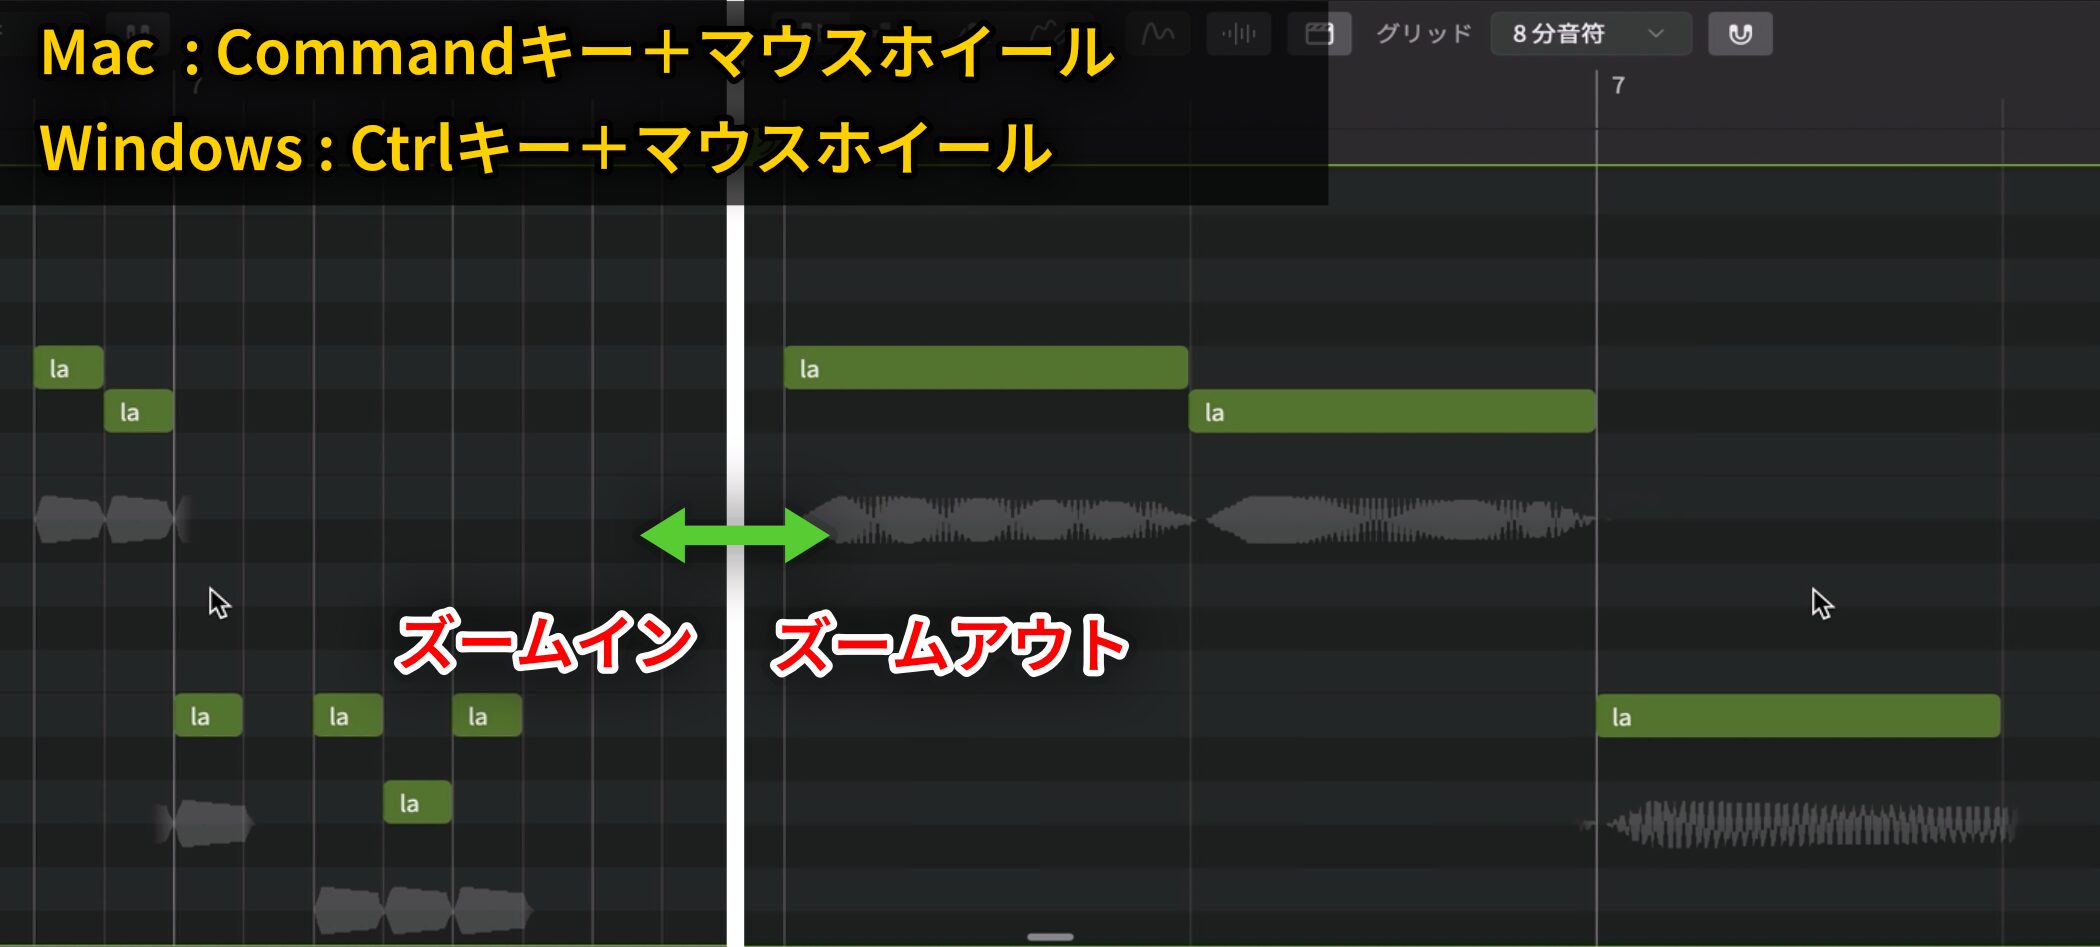
If the work area is hard to see, use these controls to zoom in or out:
- Mac: Command + mouse wheel
- Windows: Ctrl + mouse wheel
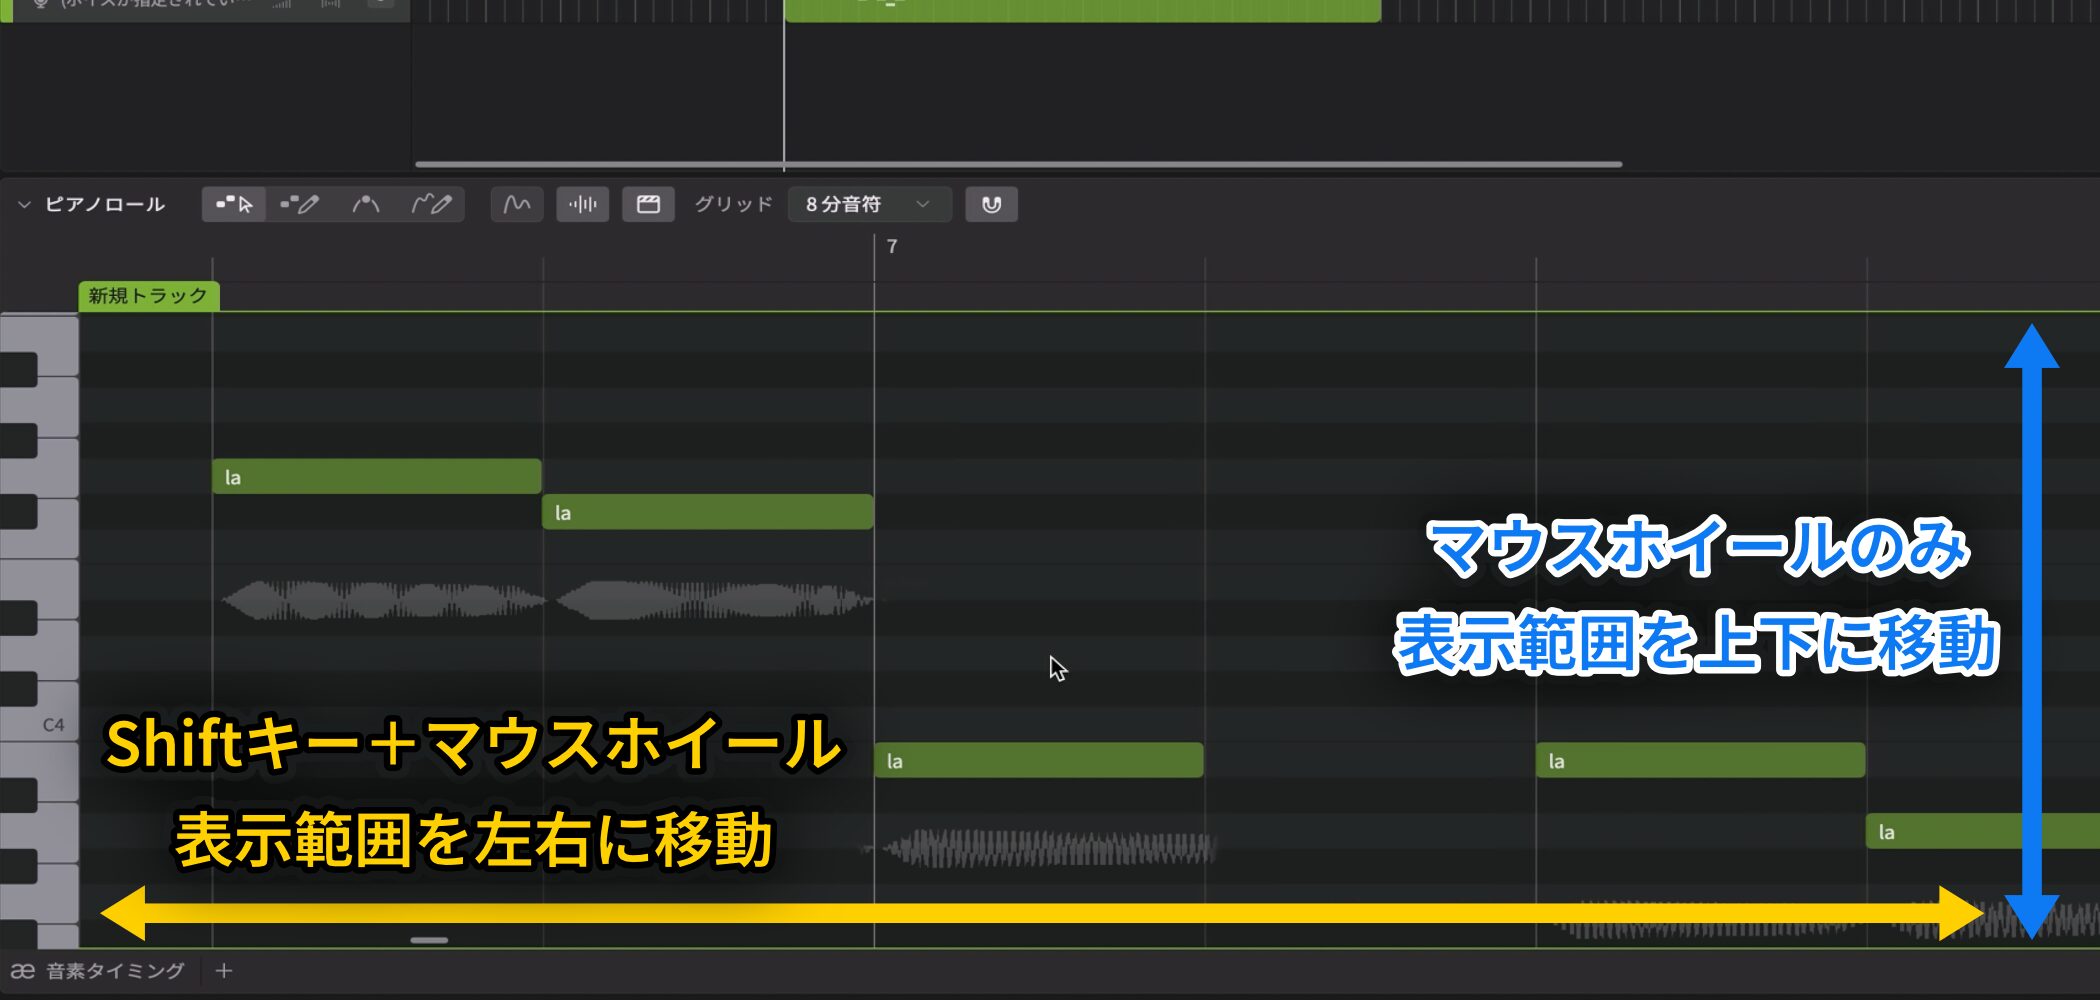
Use Shift + mouse wheel to scroll horizontally and the mouse wheel alone to scroll vertically.
Assign a Voice and Play with the Accompaniment
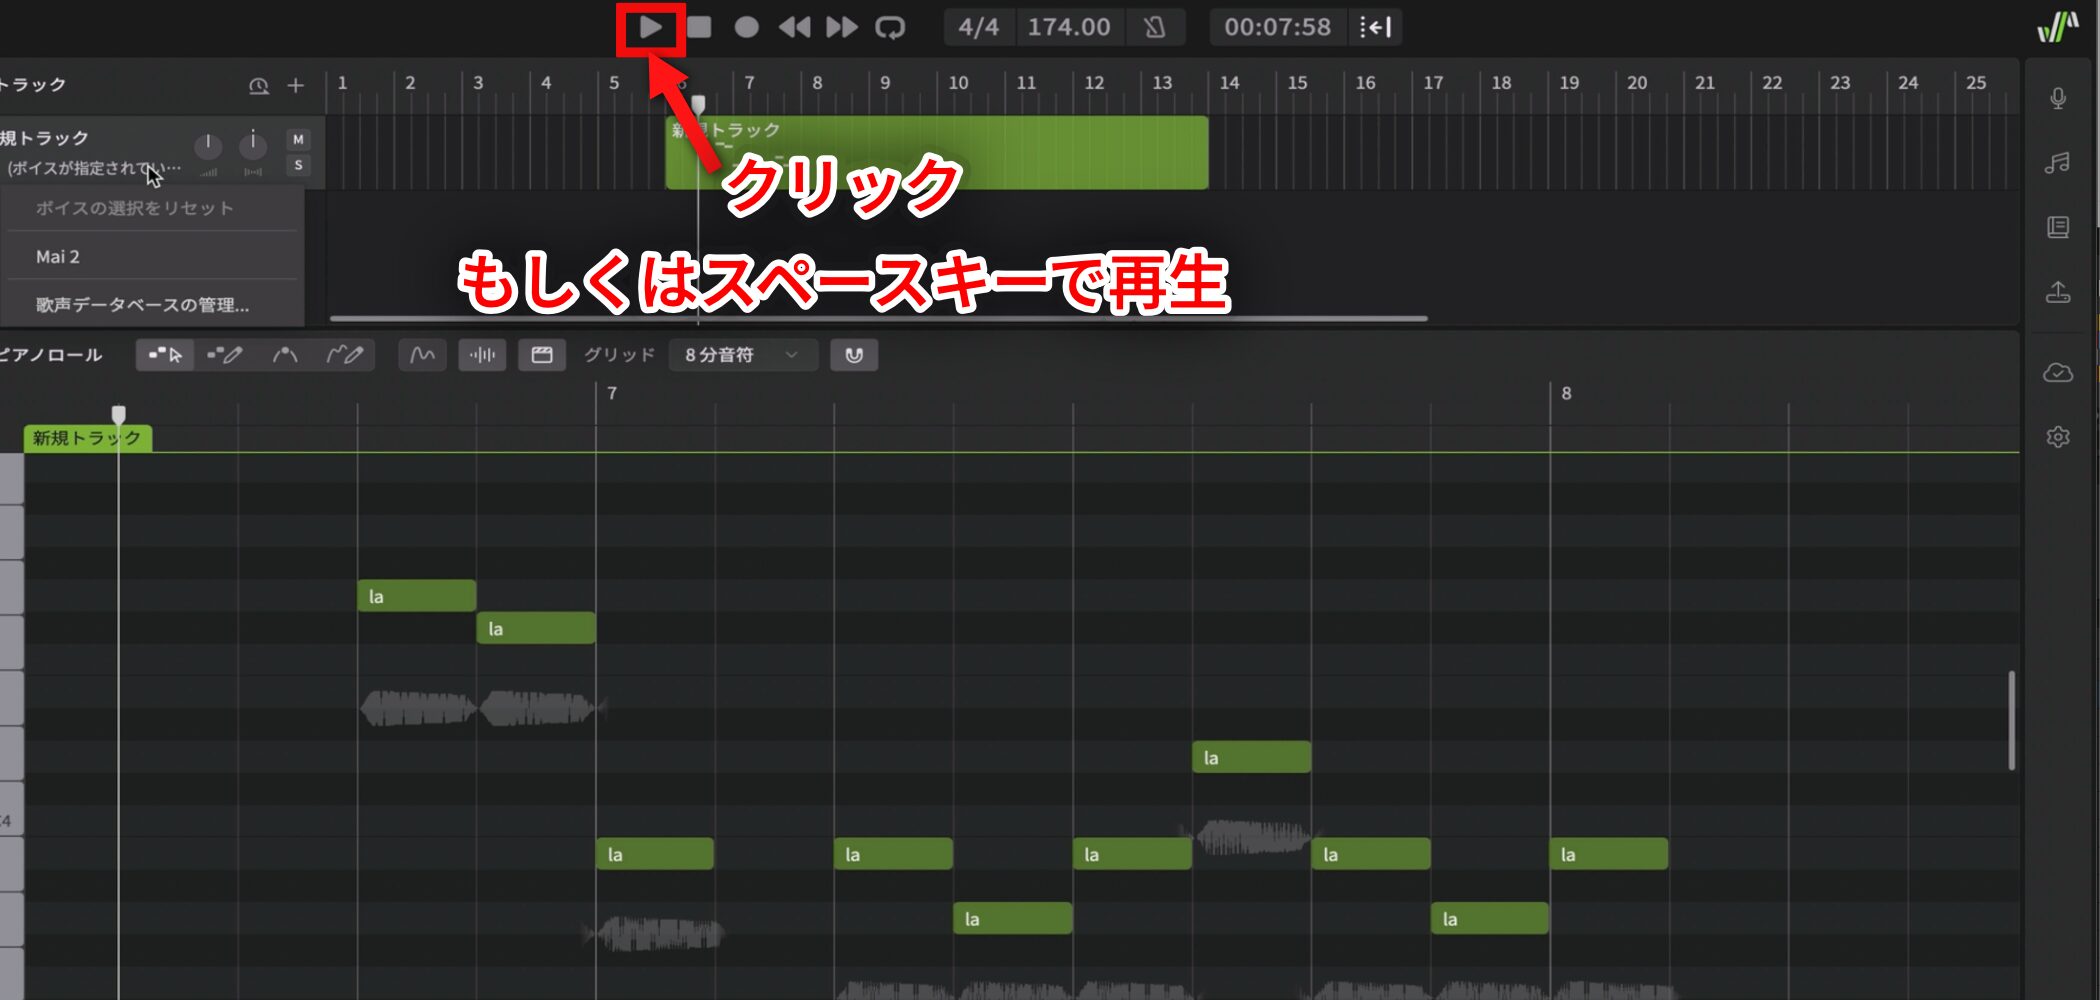
Press Space or click the transport's Play button to hear the result.
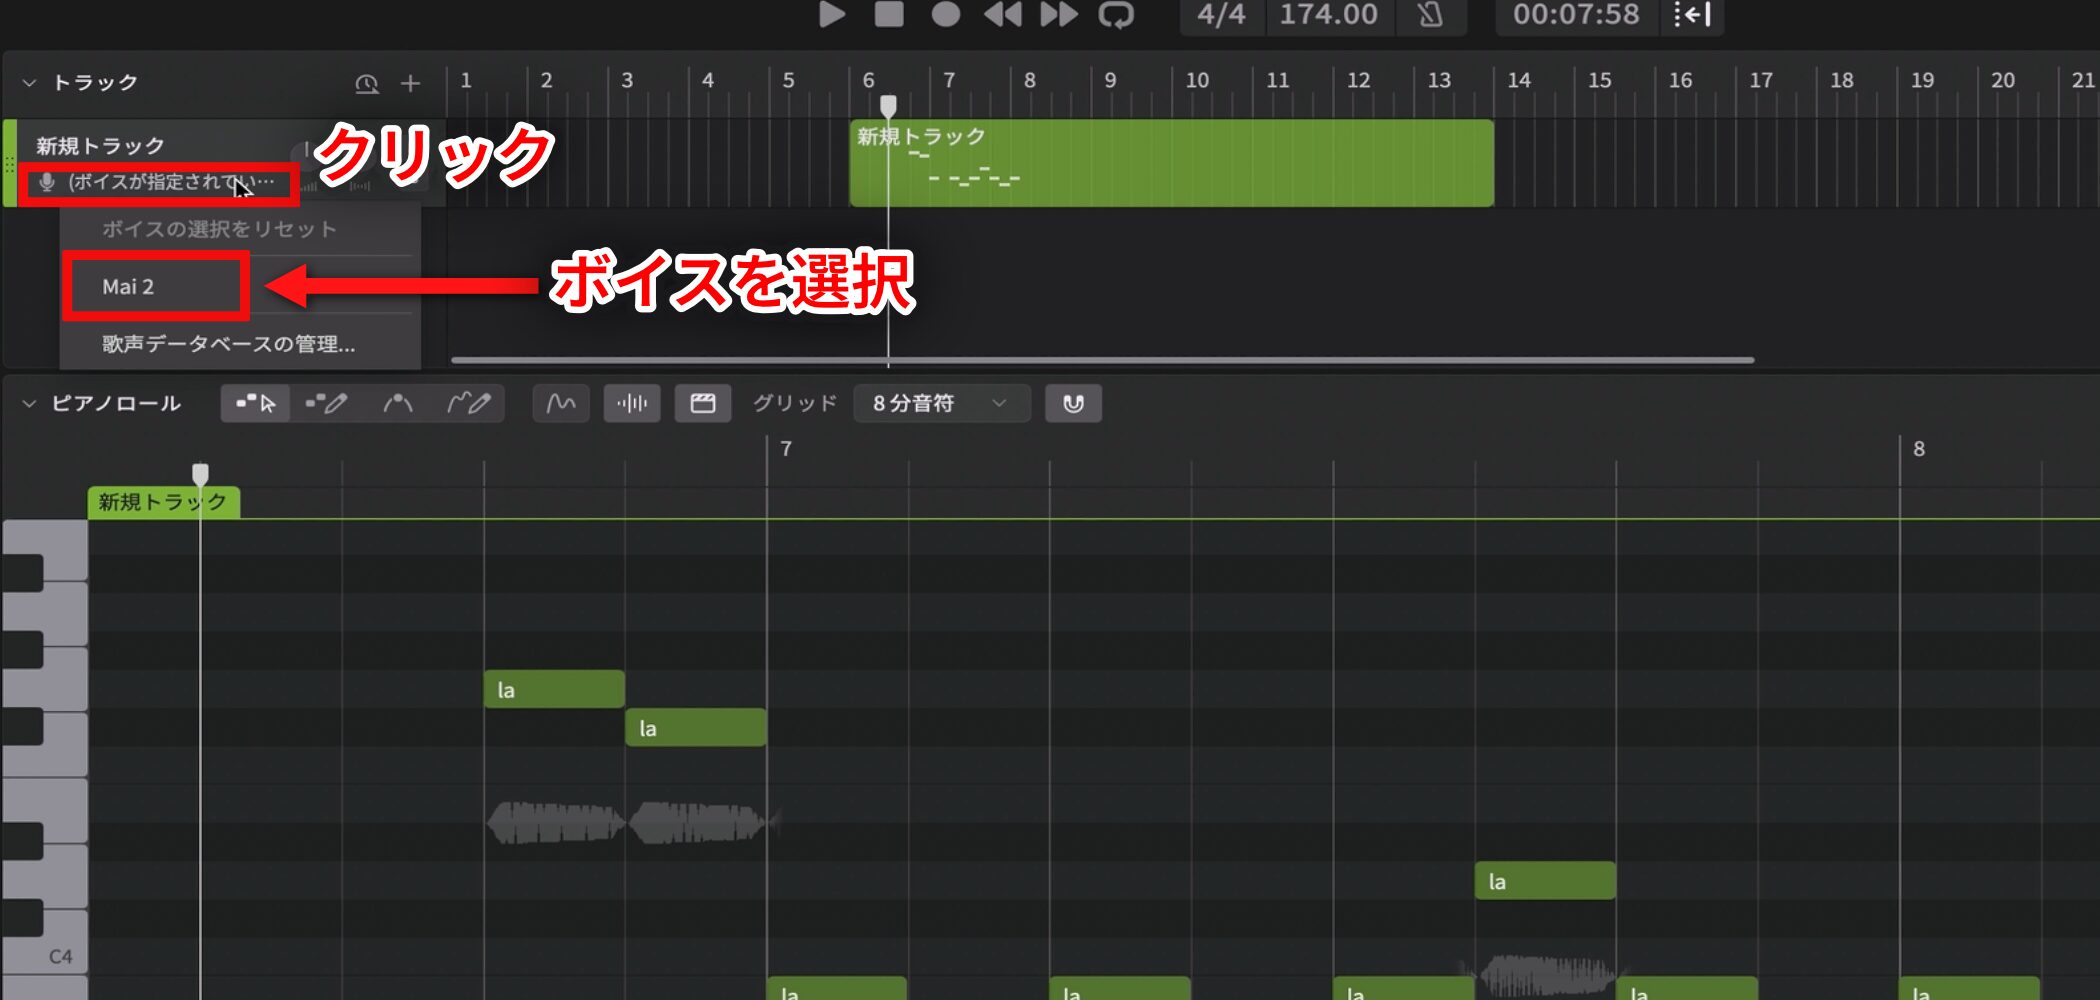
At first you will hear a synthesizer sound because no voice has been assigned yet.
Click the relevant part on the track and select the voice you want to use.
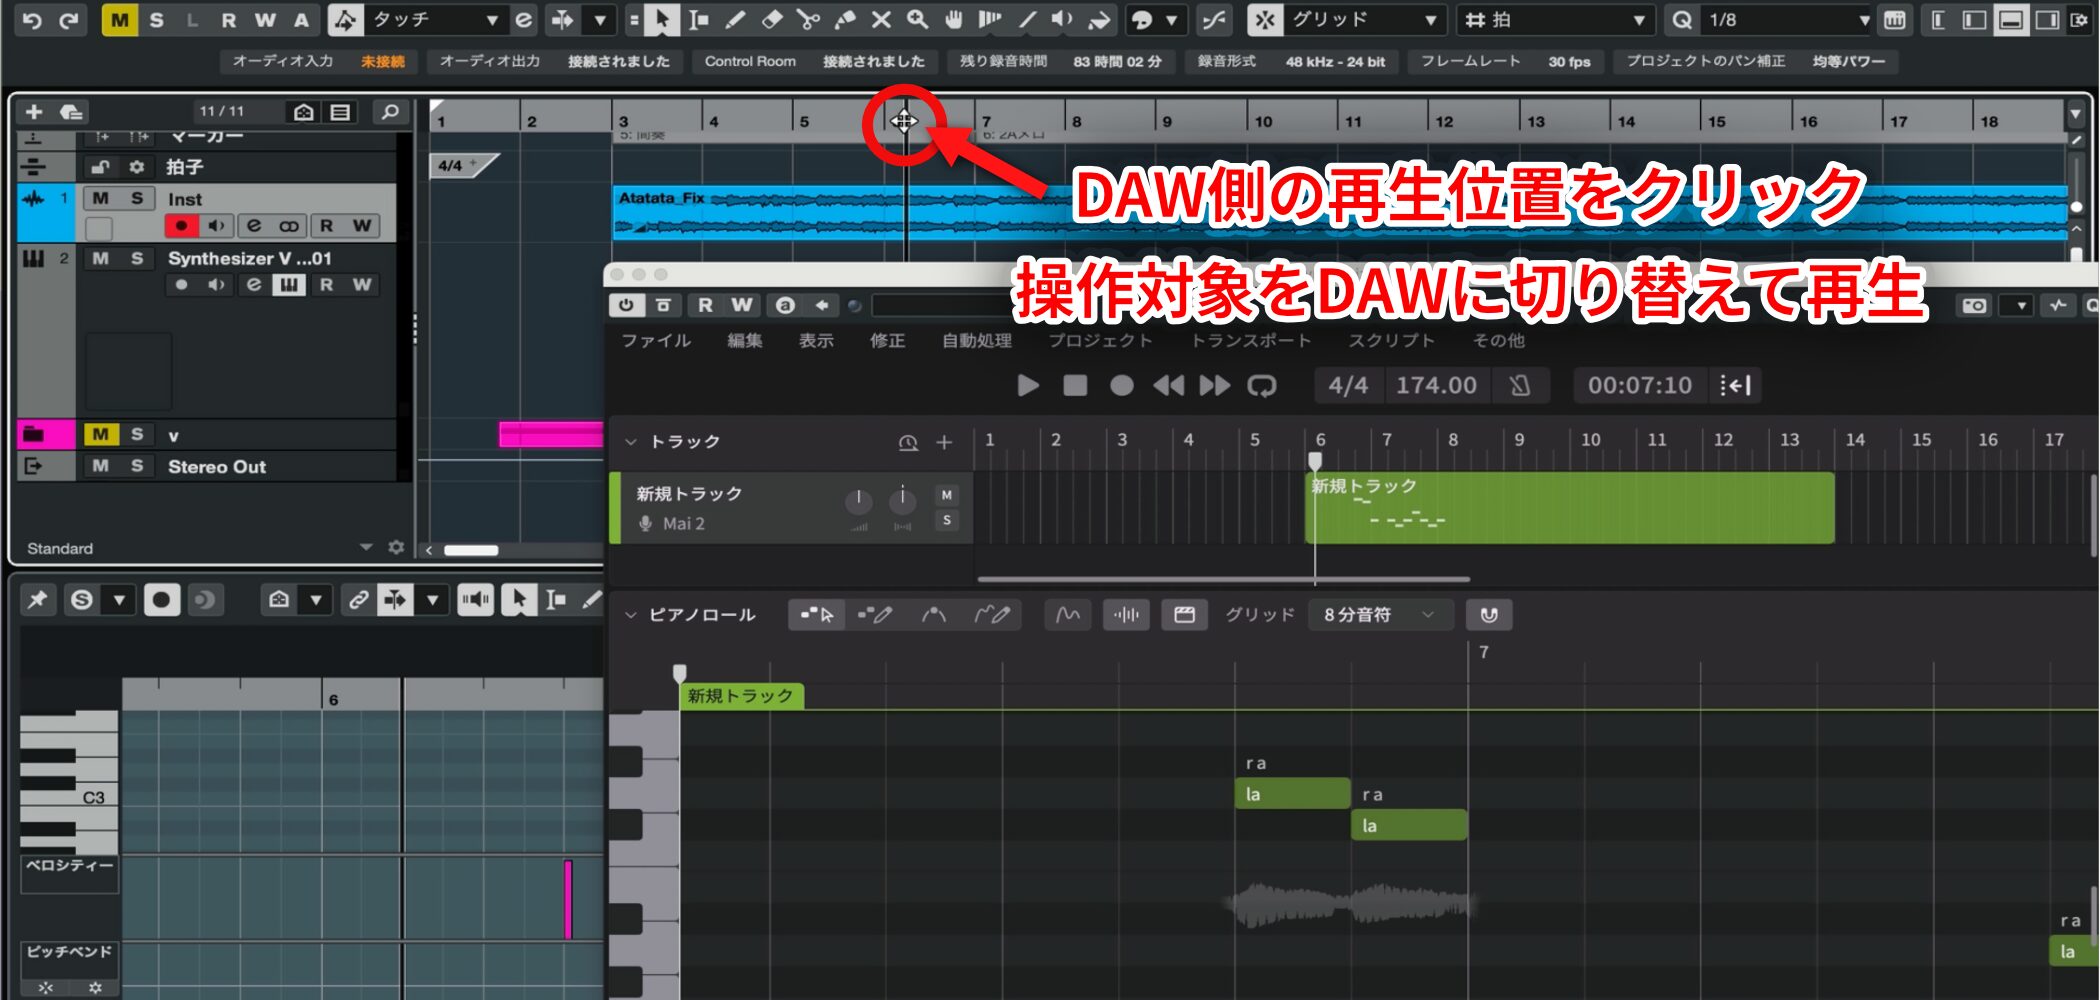
To check it with the accompaniment in your DAW, click the playback position in the DAW and switch control to the DAW before pressing Play.
The voice will play with the accompaniment, making it easier to judge whether the melody fits the song.
Use Copy and Paste and the Metronome
If a phrase repeats, copying and pasting saves time.
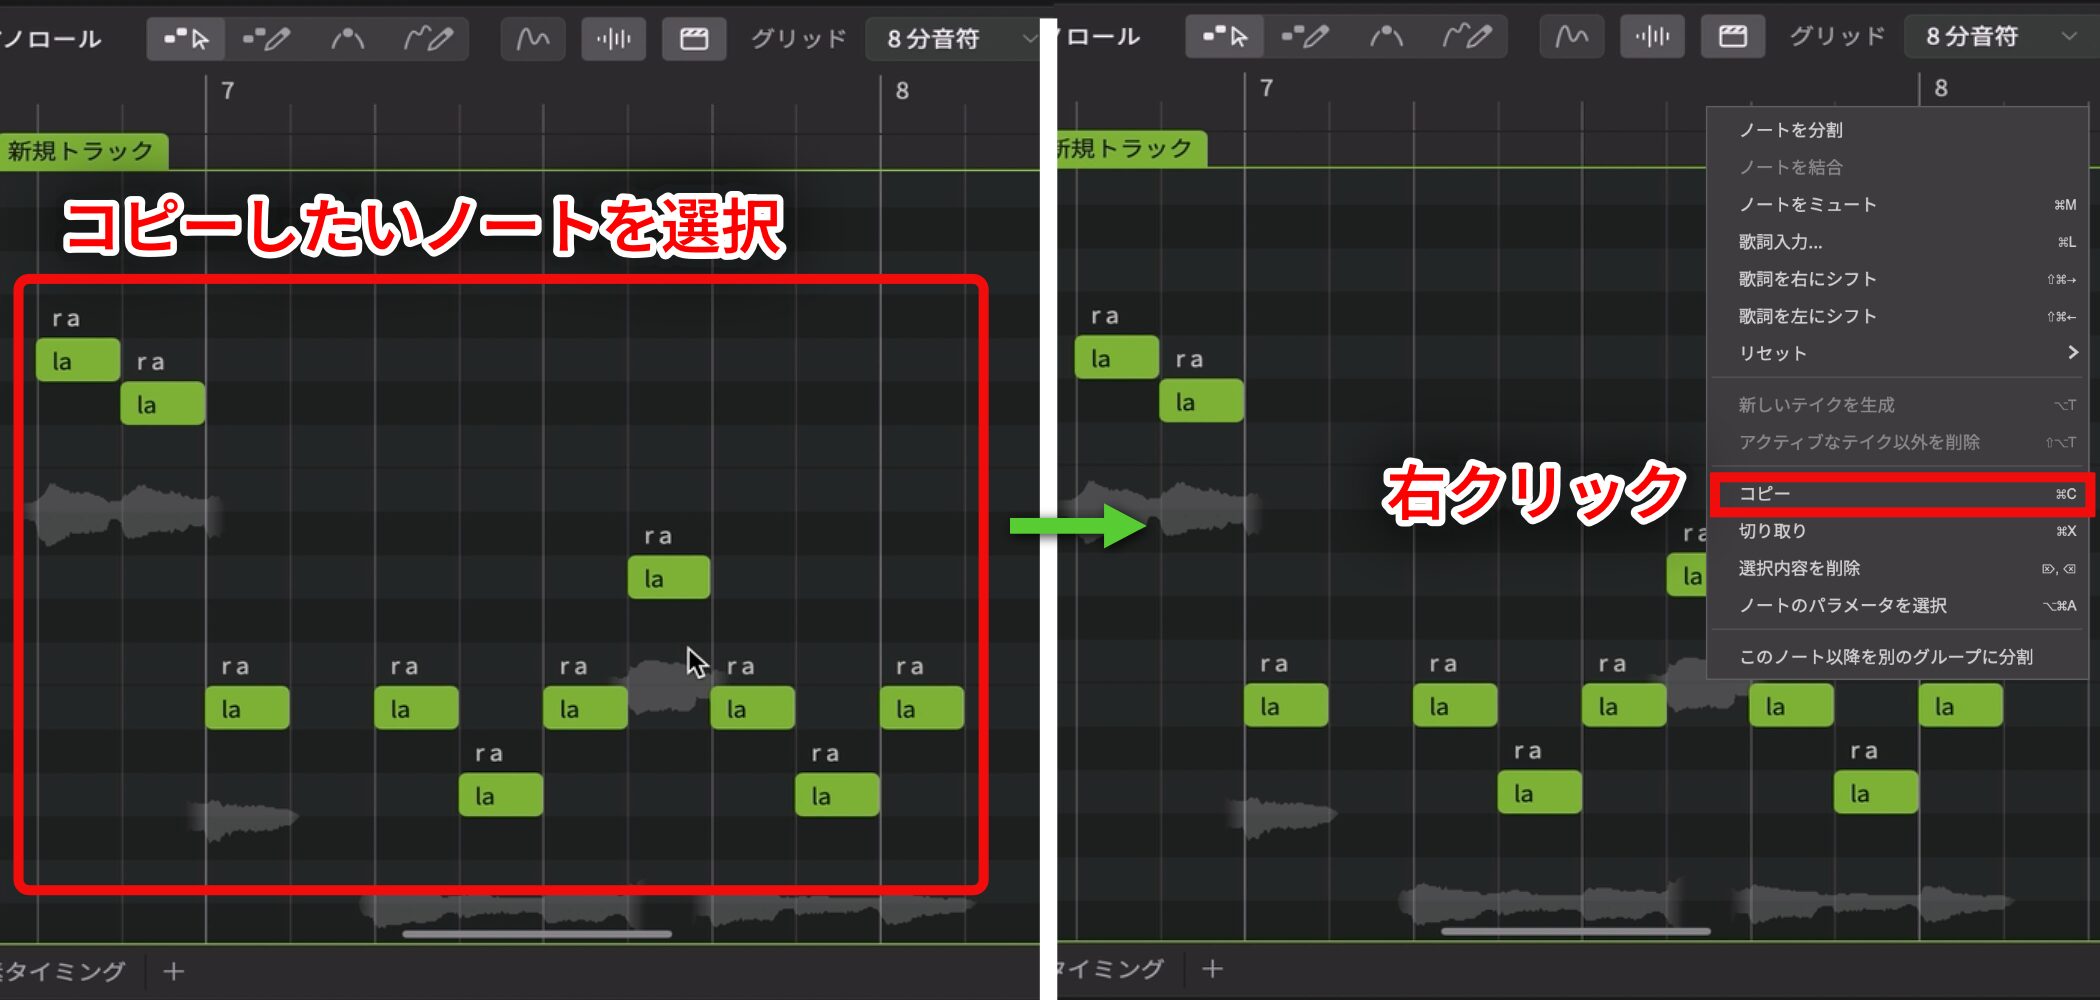
Select the notes to copy and choose Copy from the right-click menu.
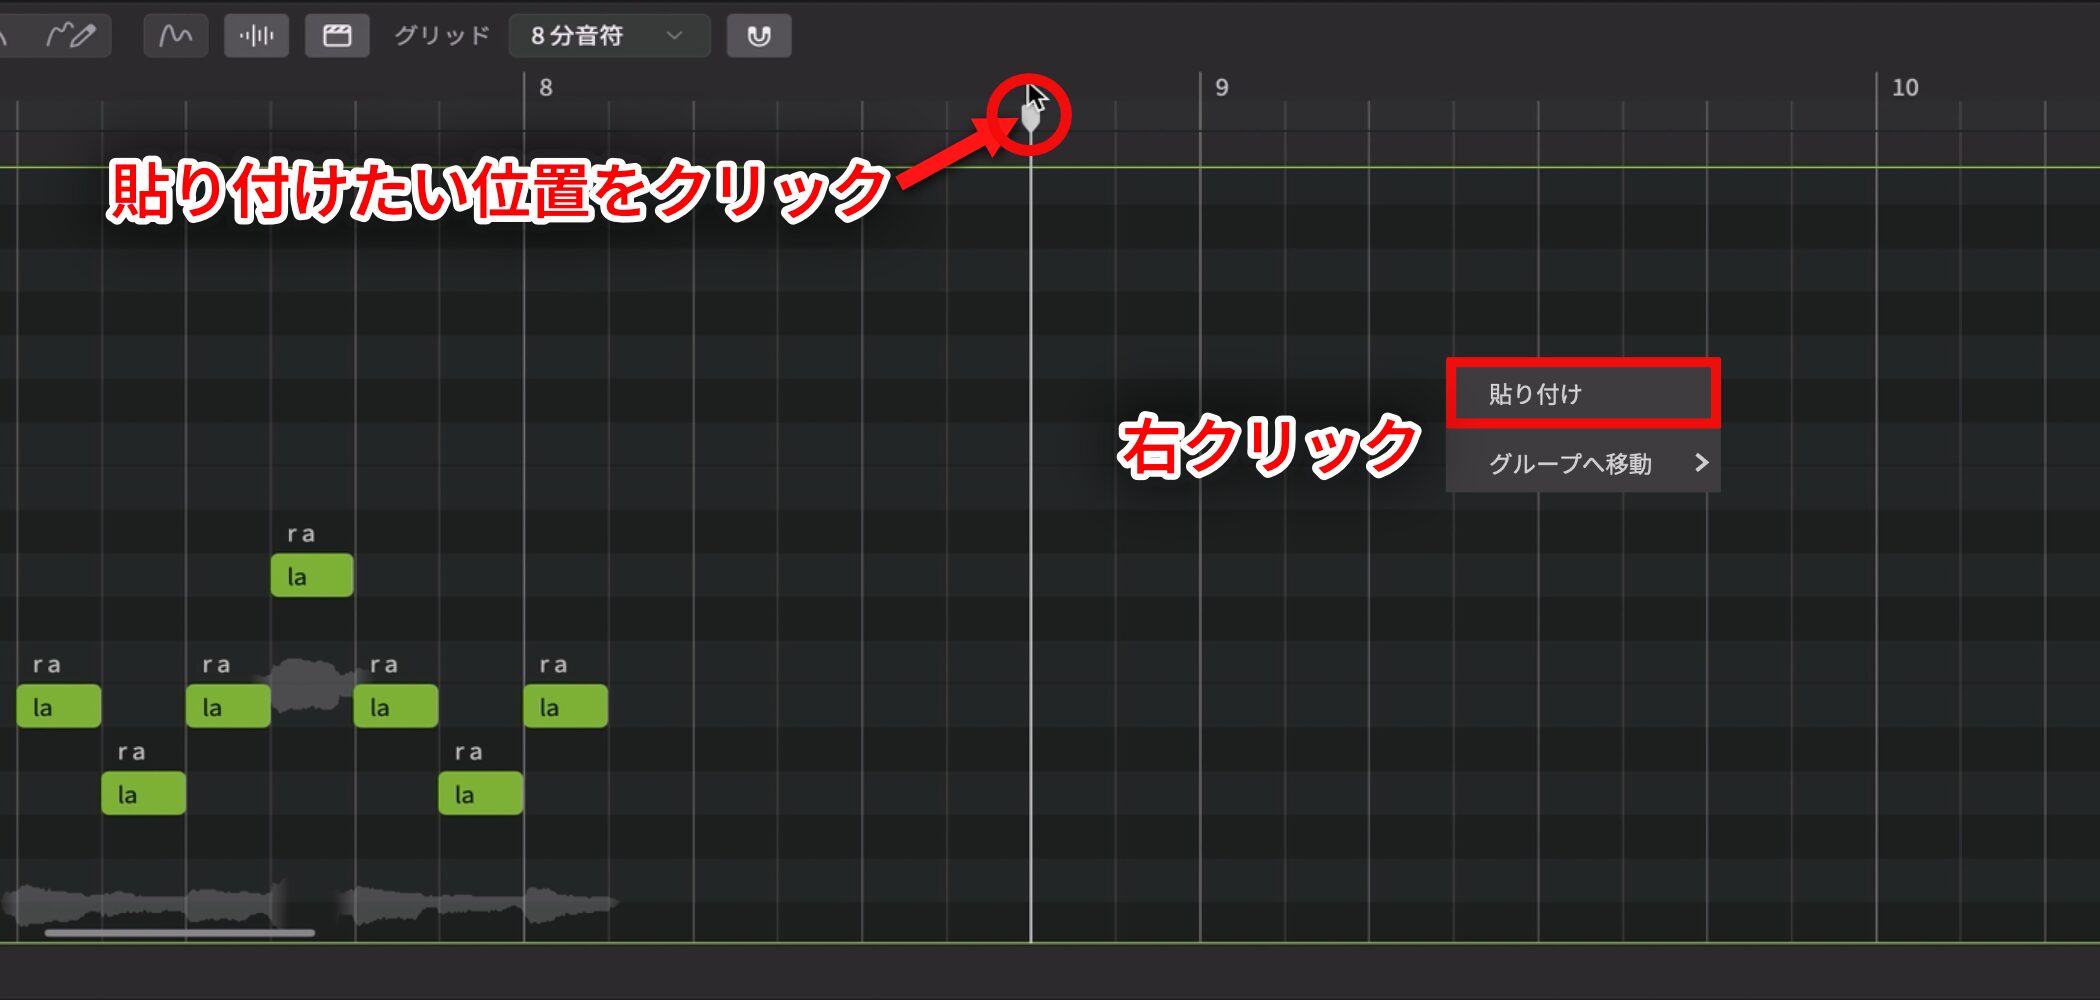
Click the destination, then choose Paste from the right-click menu.
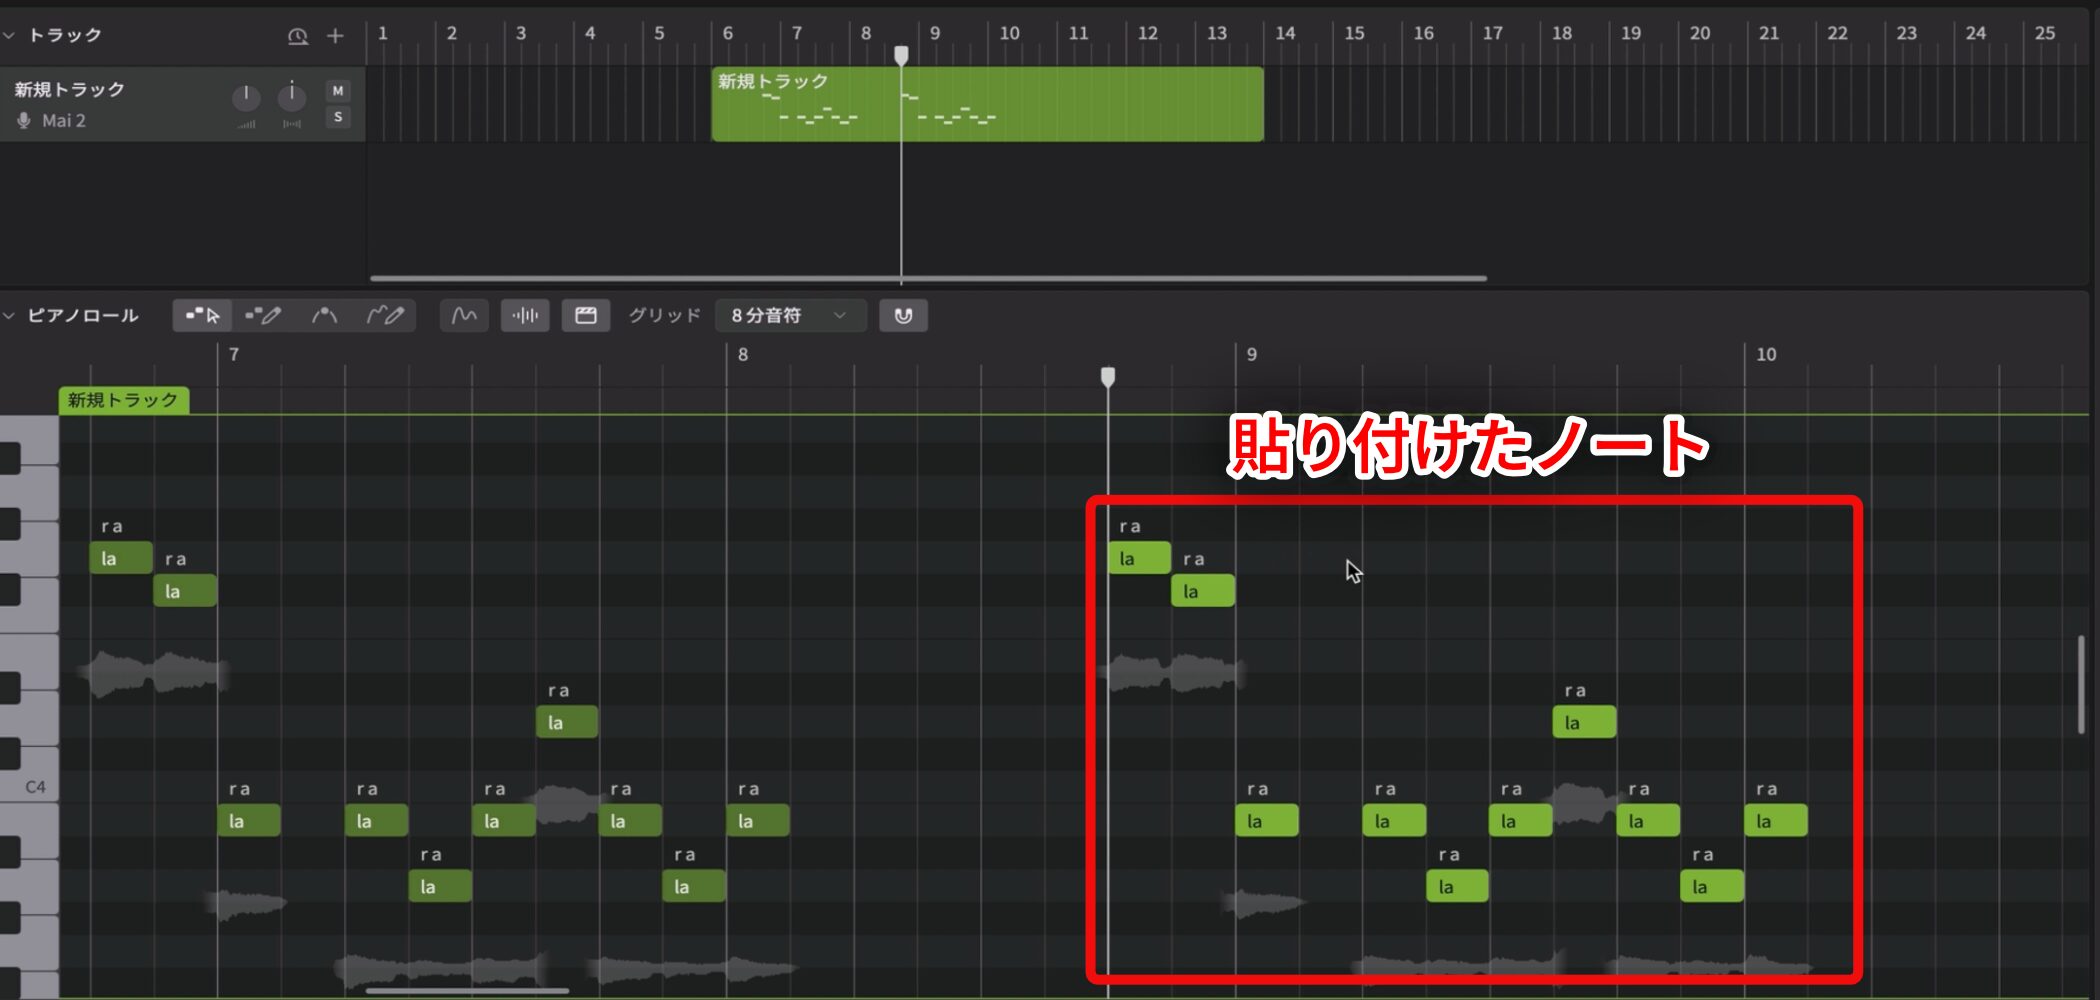
You can edit pasted notes as usual.
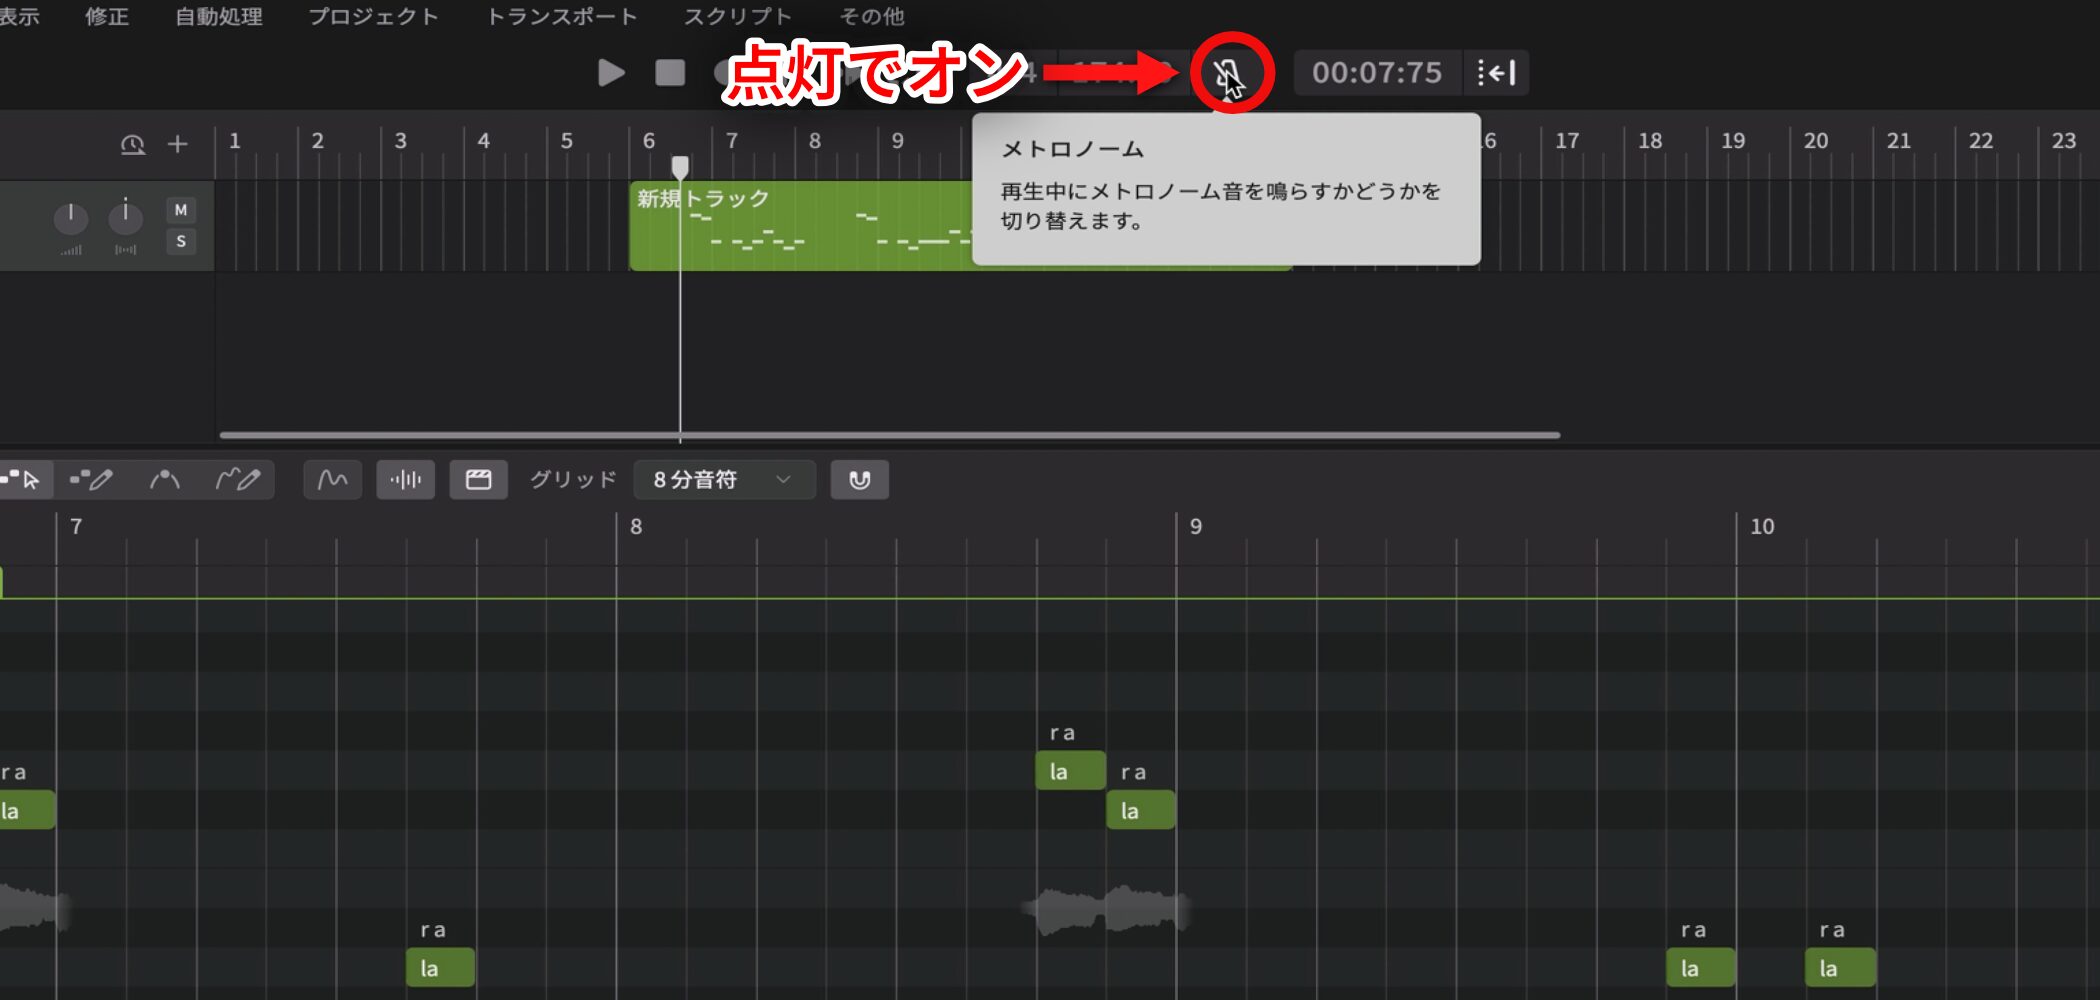
If the rhythm is hard to follow, turn on the metronome icon at the top to hear a click during playback.
Import MIDI Data to Work Faster
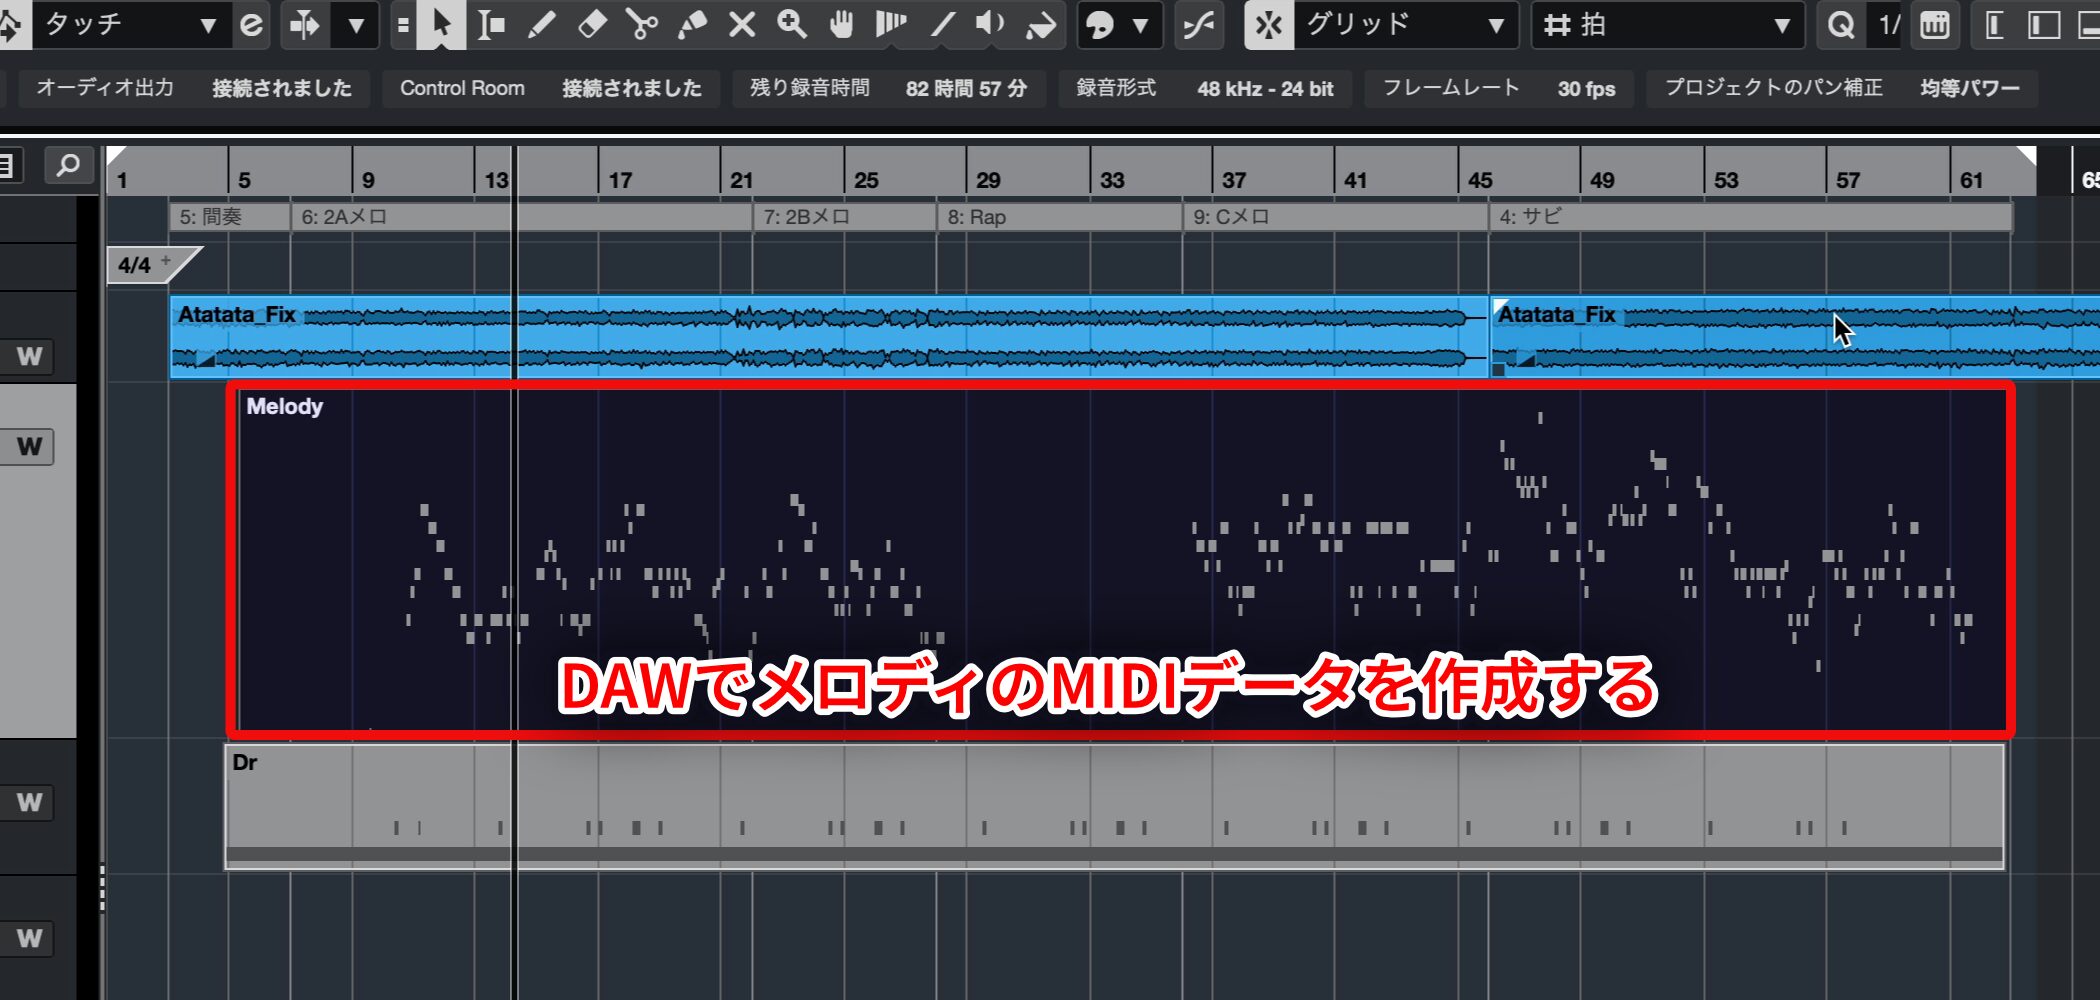
When entering many notes across the verse, pre-chorus, chorus, or other sections, it is efficient to create MIDI in the DAW and import it into Synthesizer V Studio 2 Pro.
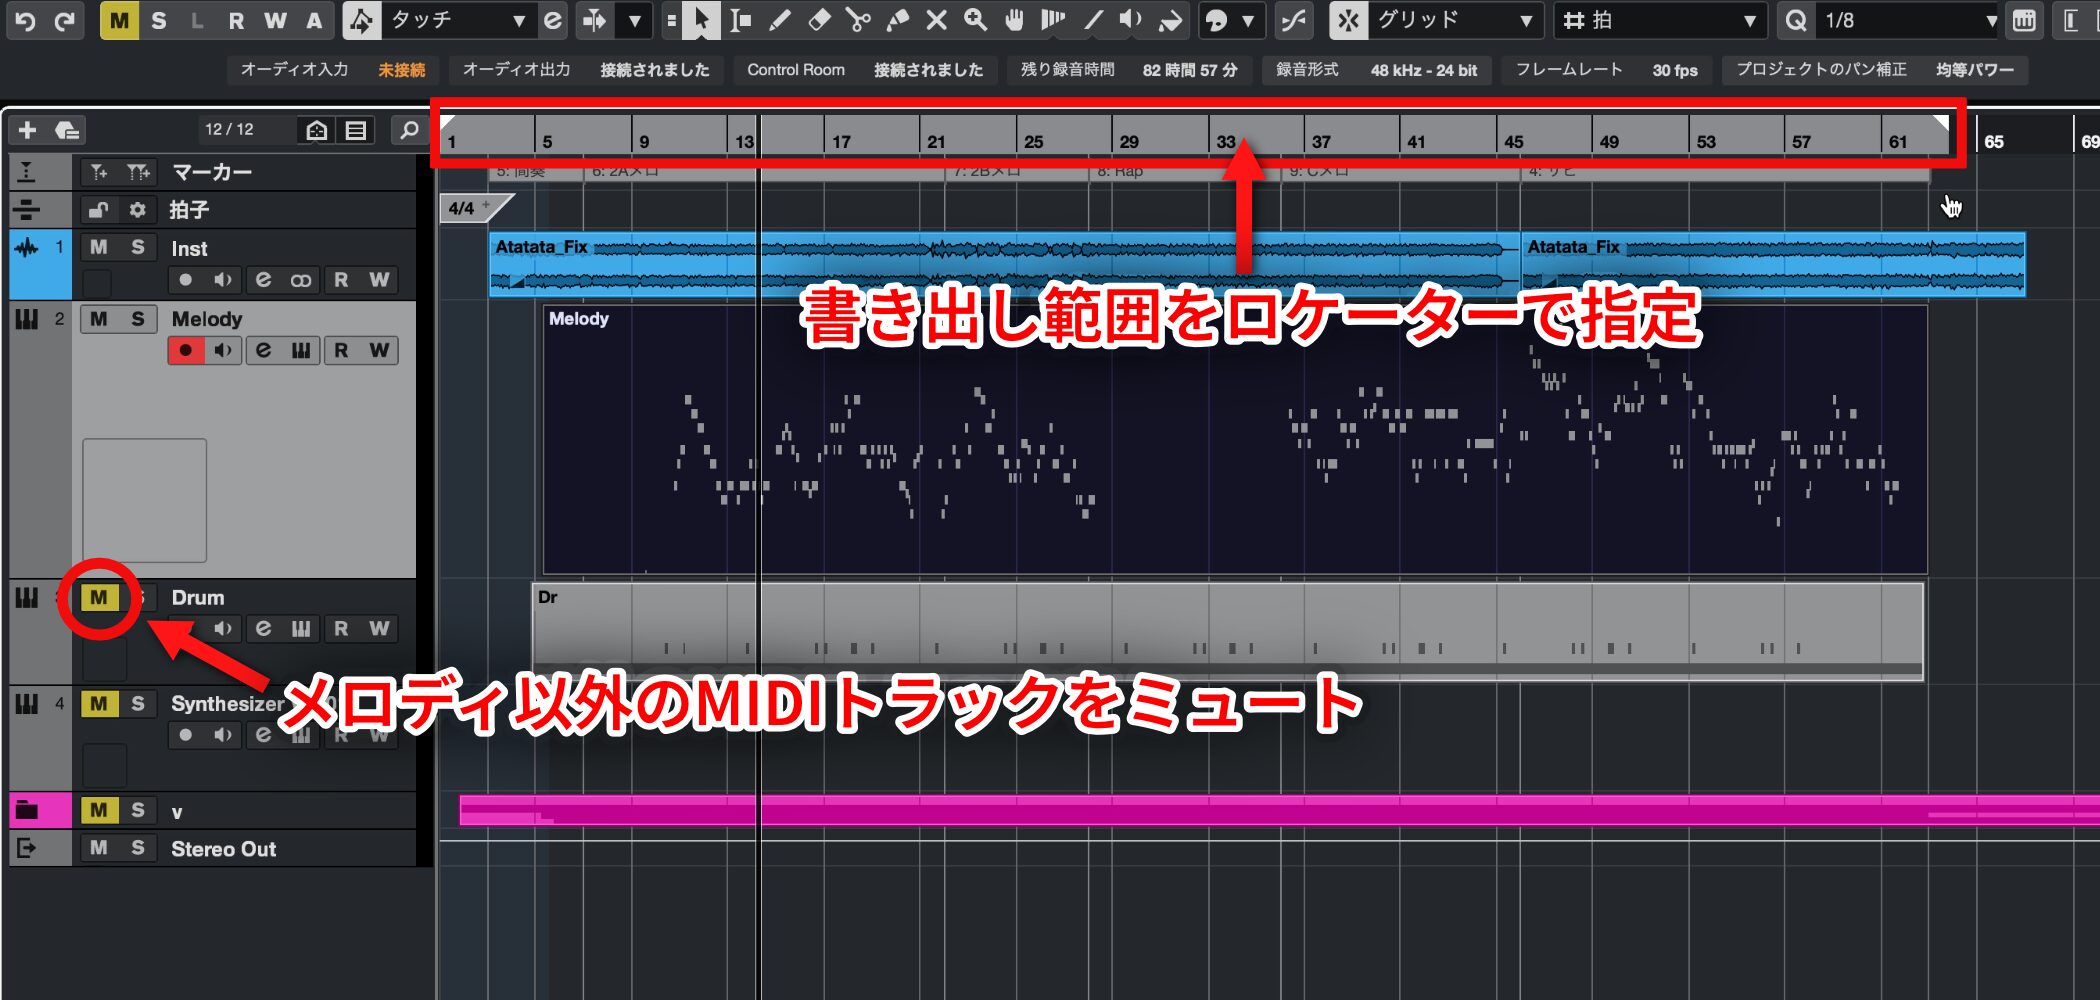
In Cubase, for example, mute MIDI tracks other than the melody and set the export range with the locators.
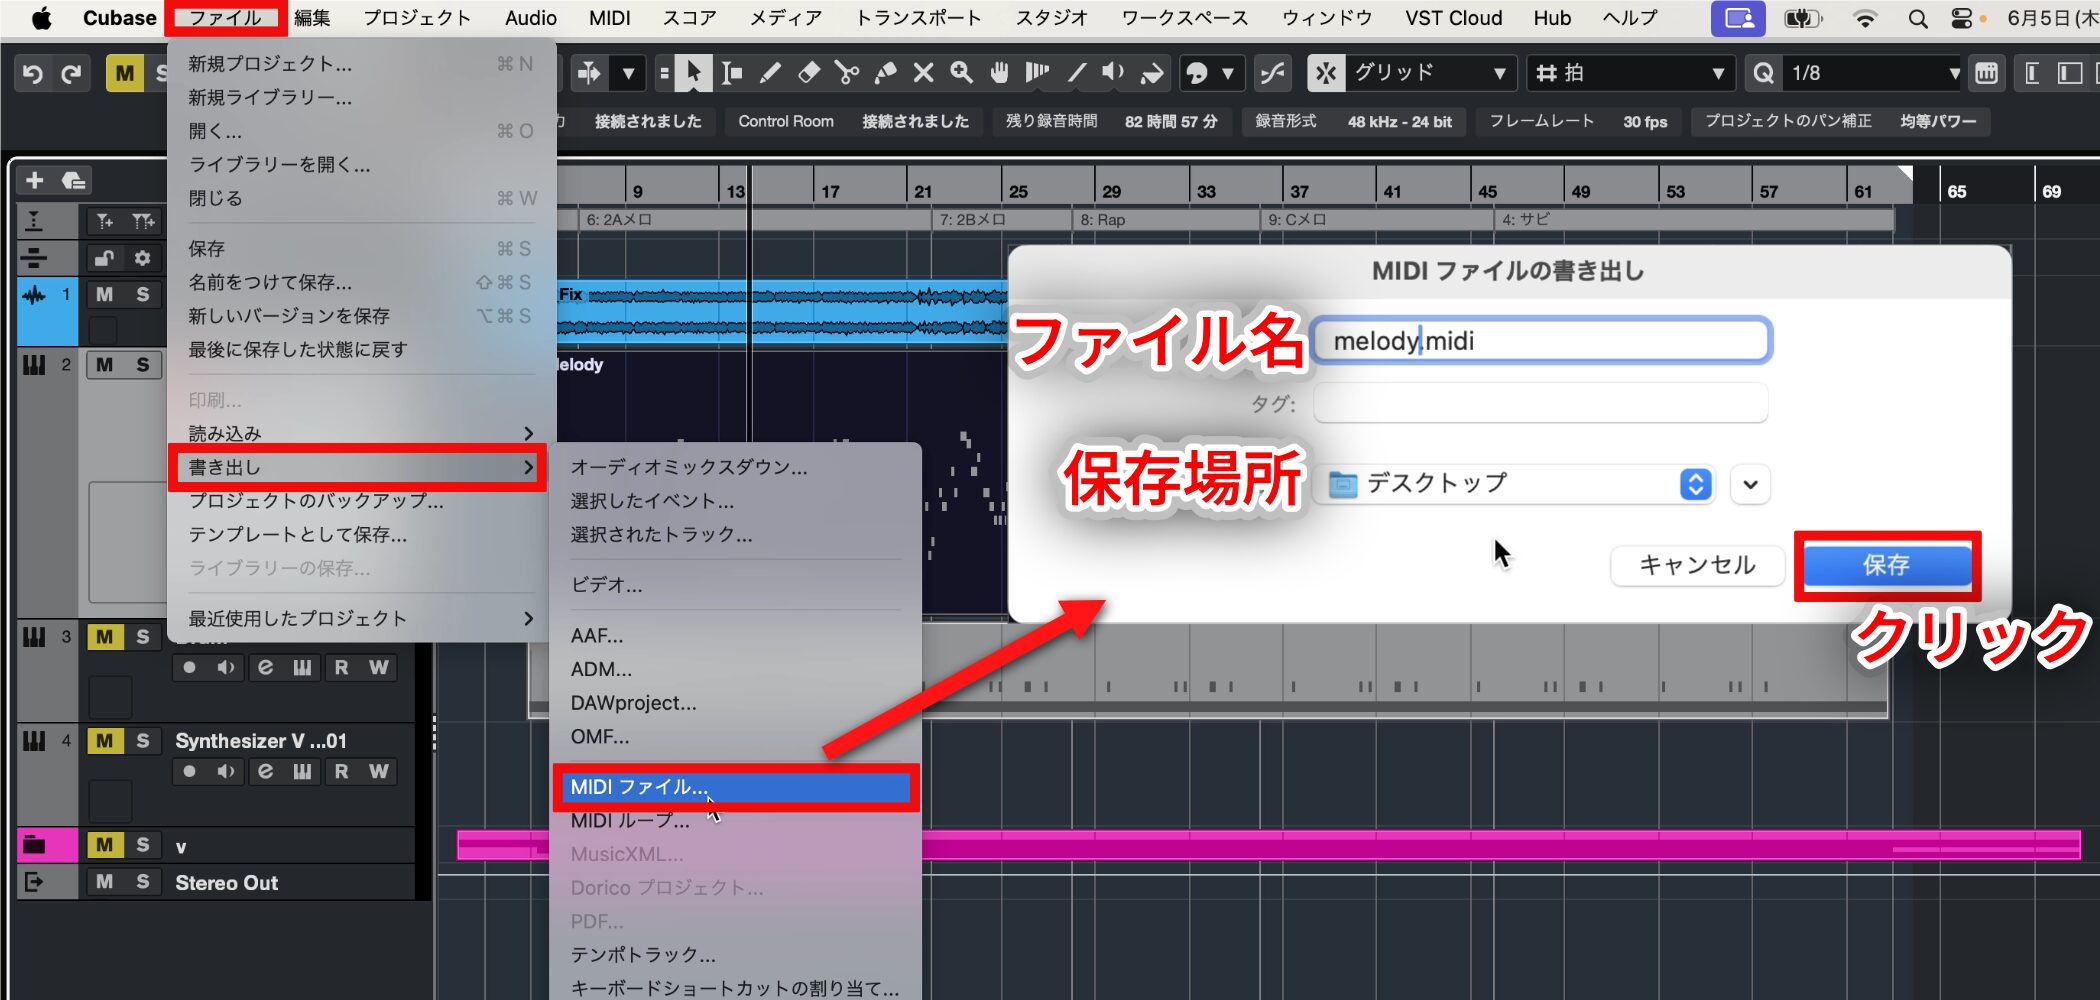
Choose File → Export → MIDI File, name the file, select a location, and export it.
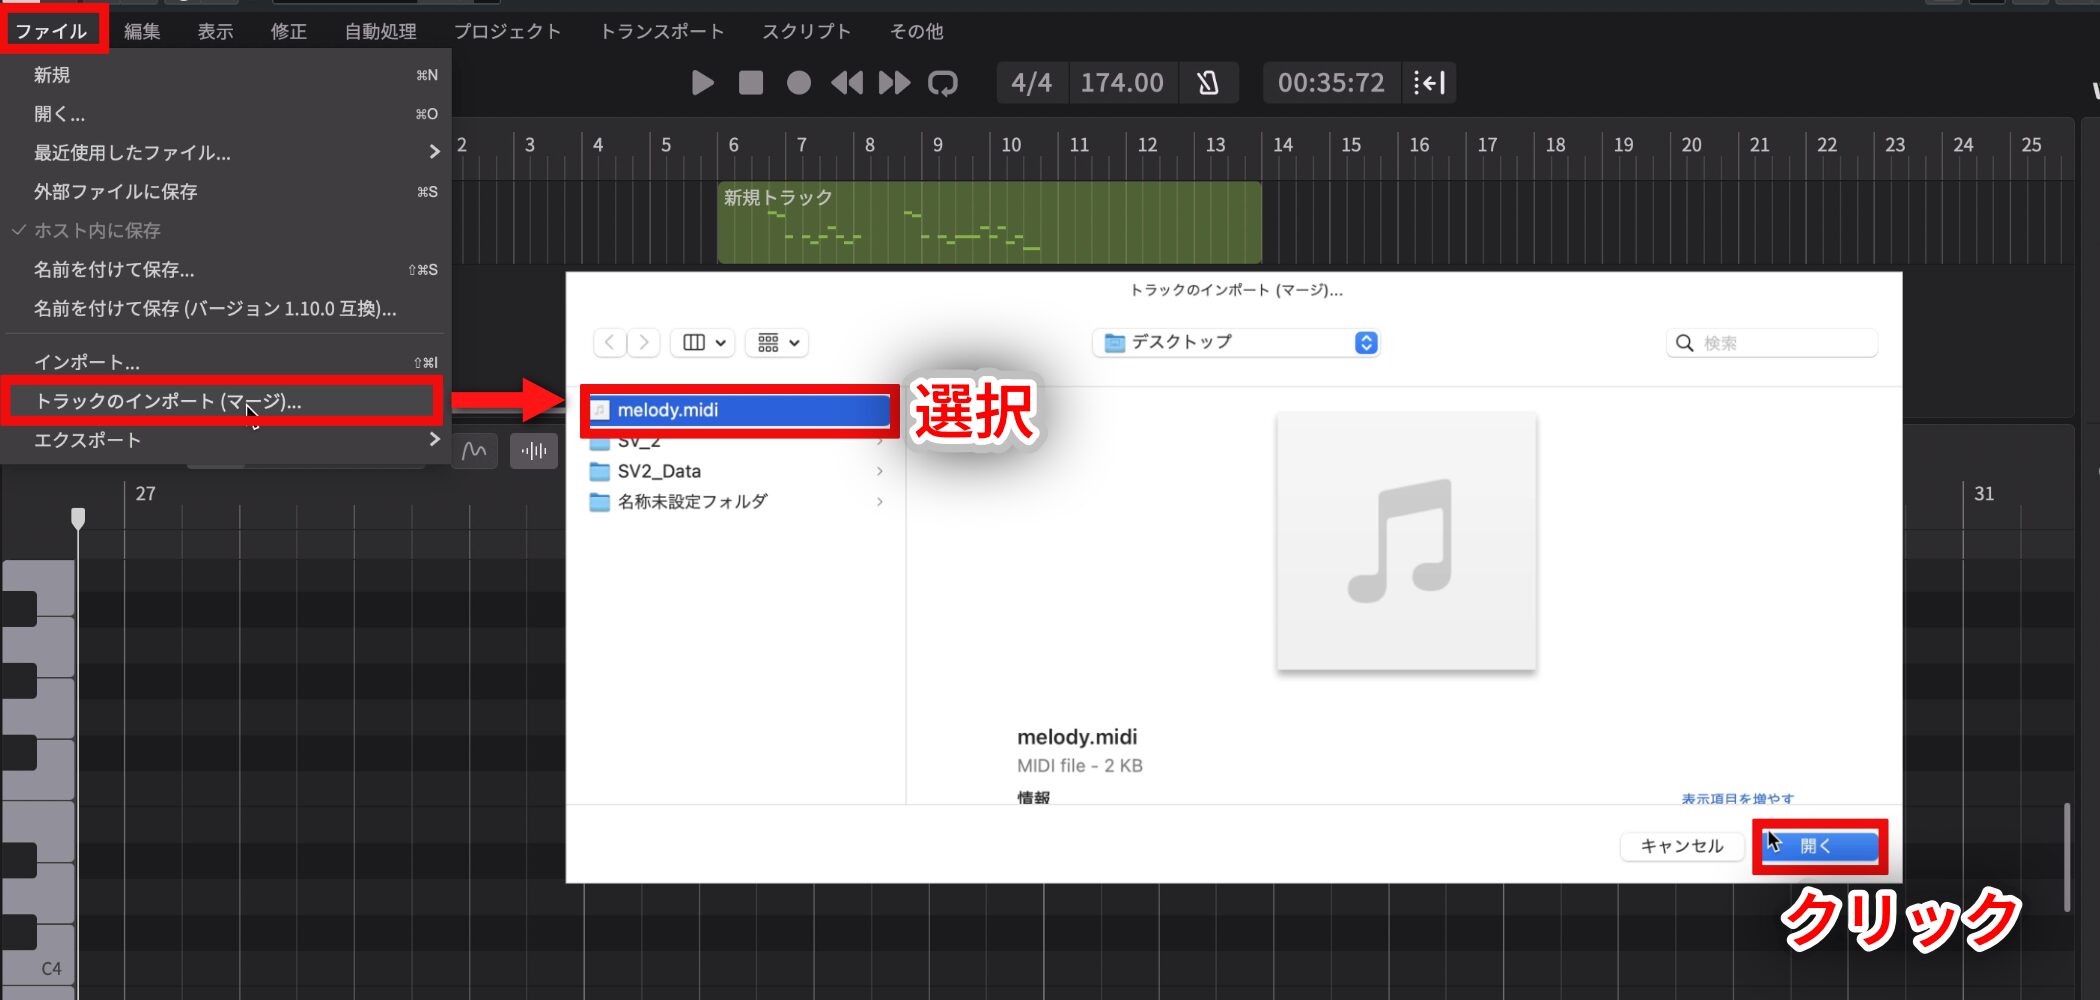
In Synthesizer V Studio 2 Pro, choose File → Import Tracks (Merge), then open the melody MIDI file you exported.
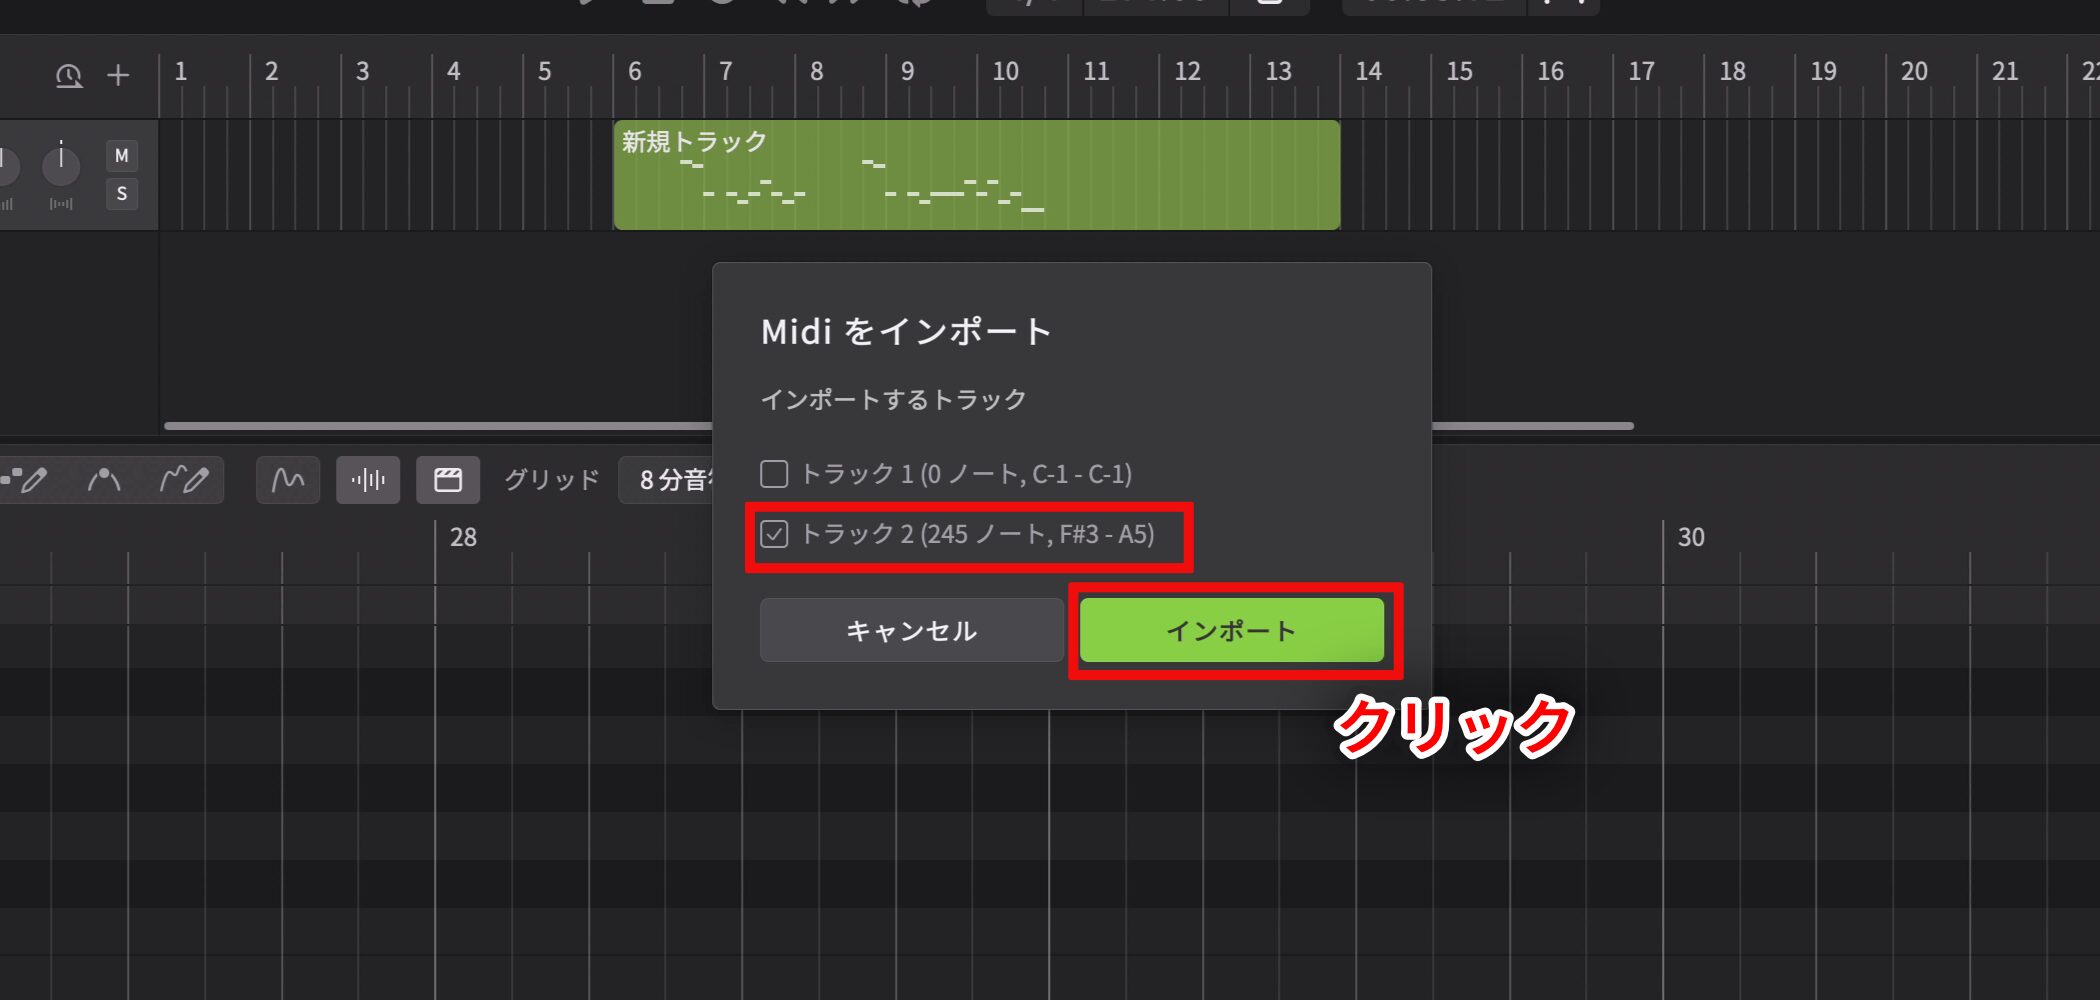
Two tracks appear in the import dialog. Leave only Track 2 checked and click Import.
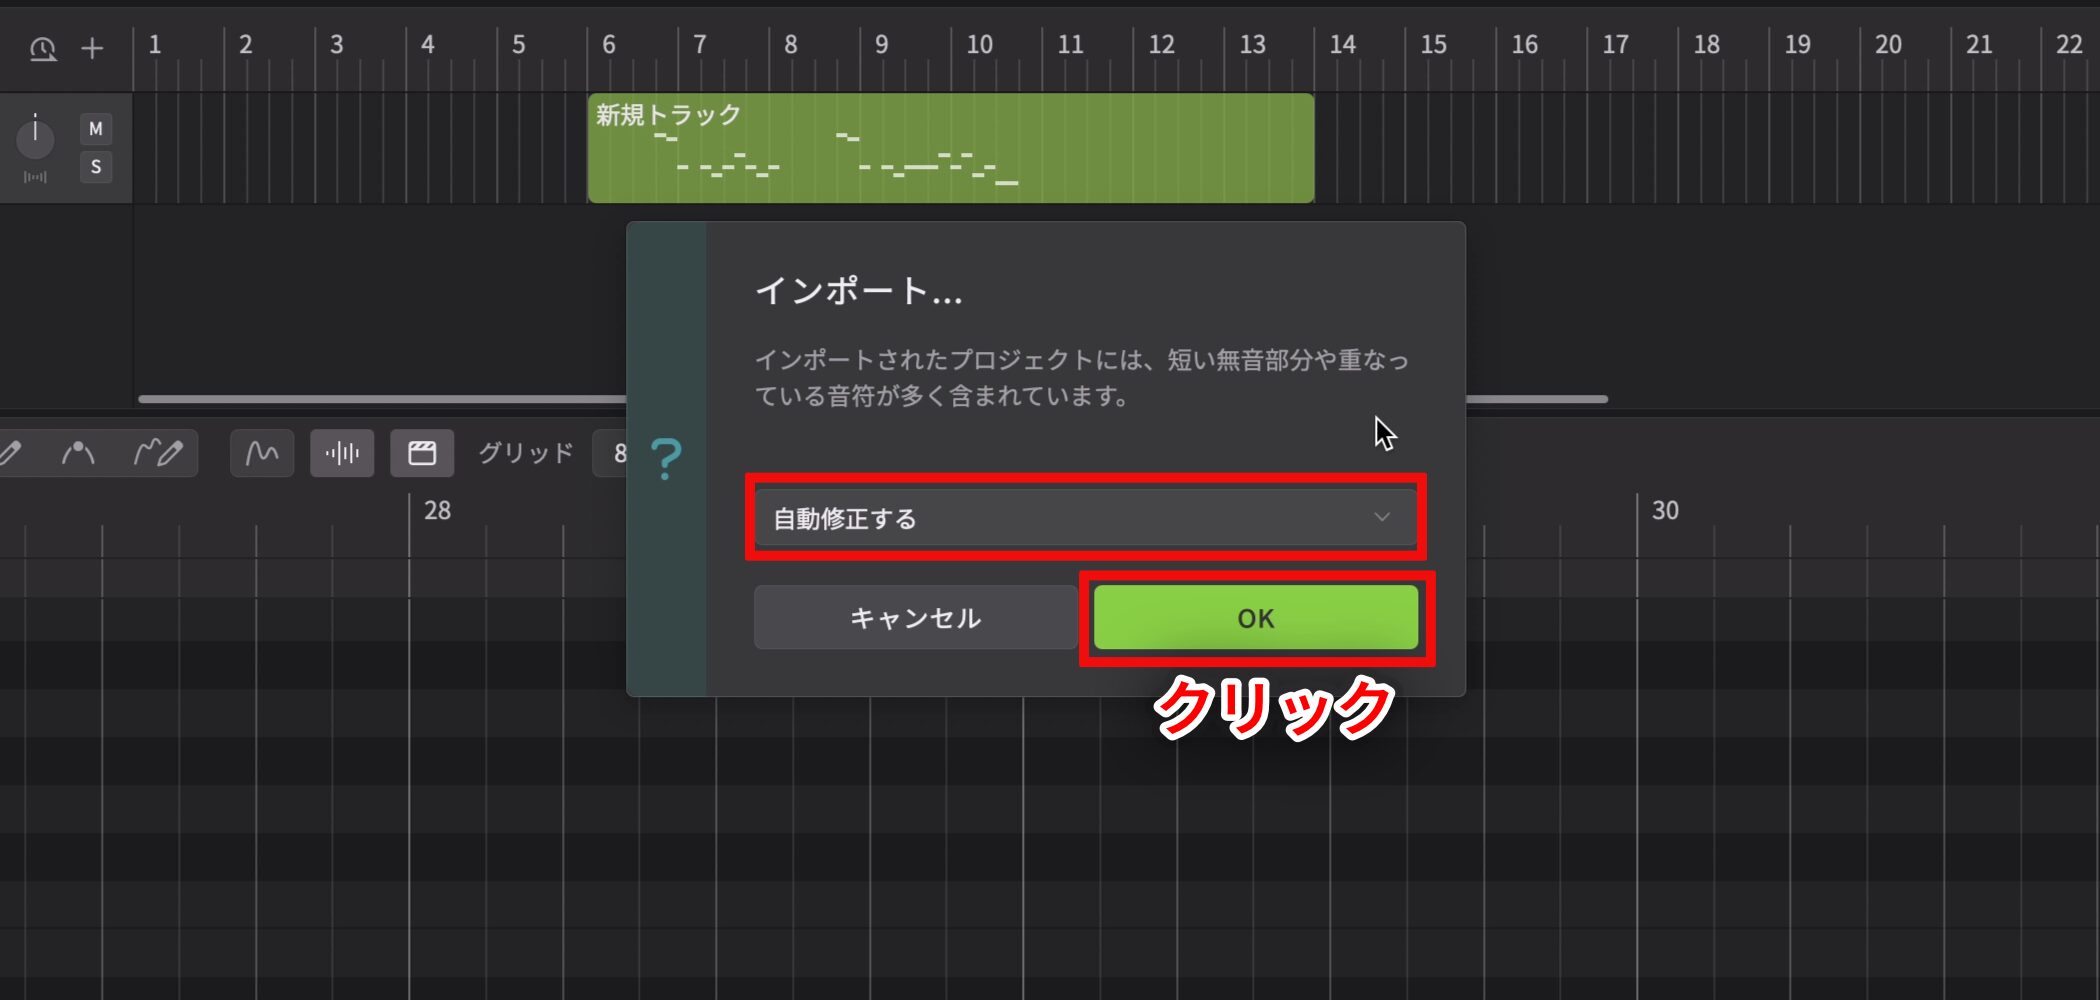
If the MIDI file contains overlapping notes, a screen may suggest an automatic repair.
By default, selecting Auto Fix automatically corrects overlapping notes as they are imported.
Unless you need special adjustments, you can usually click OK and continue.
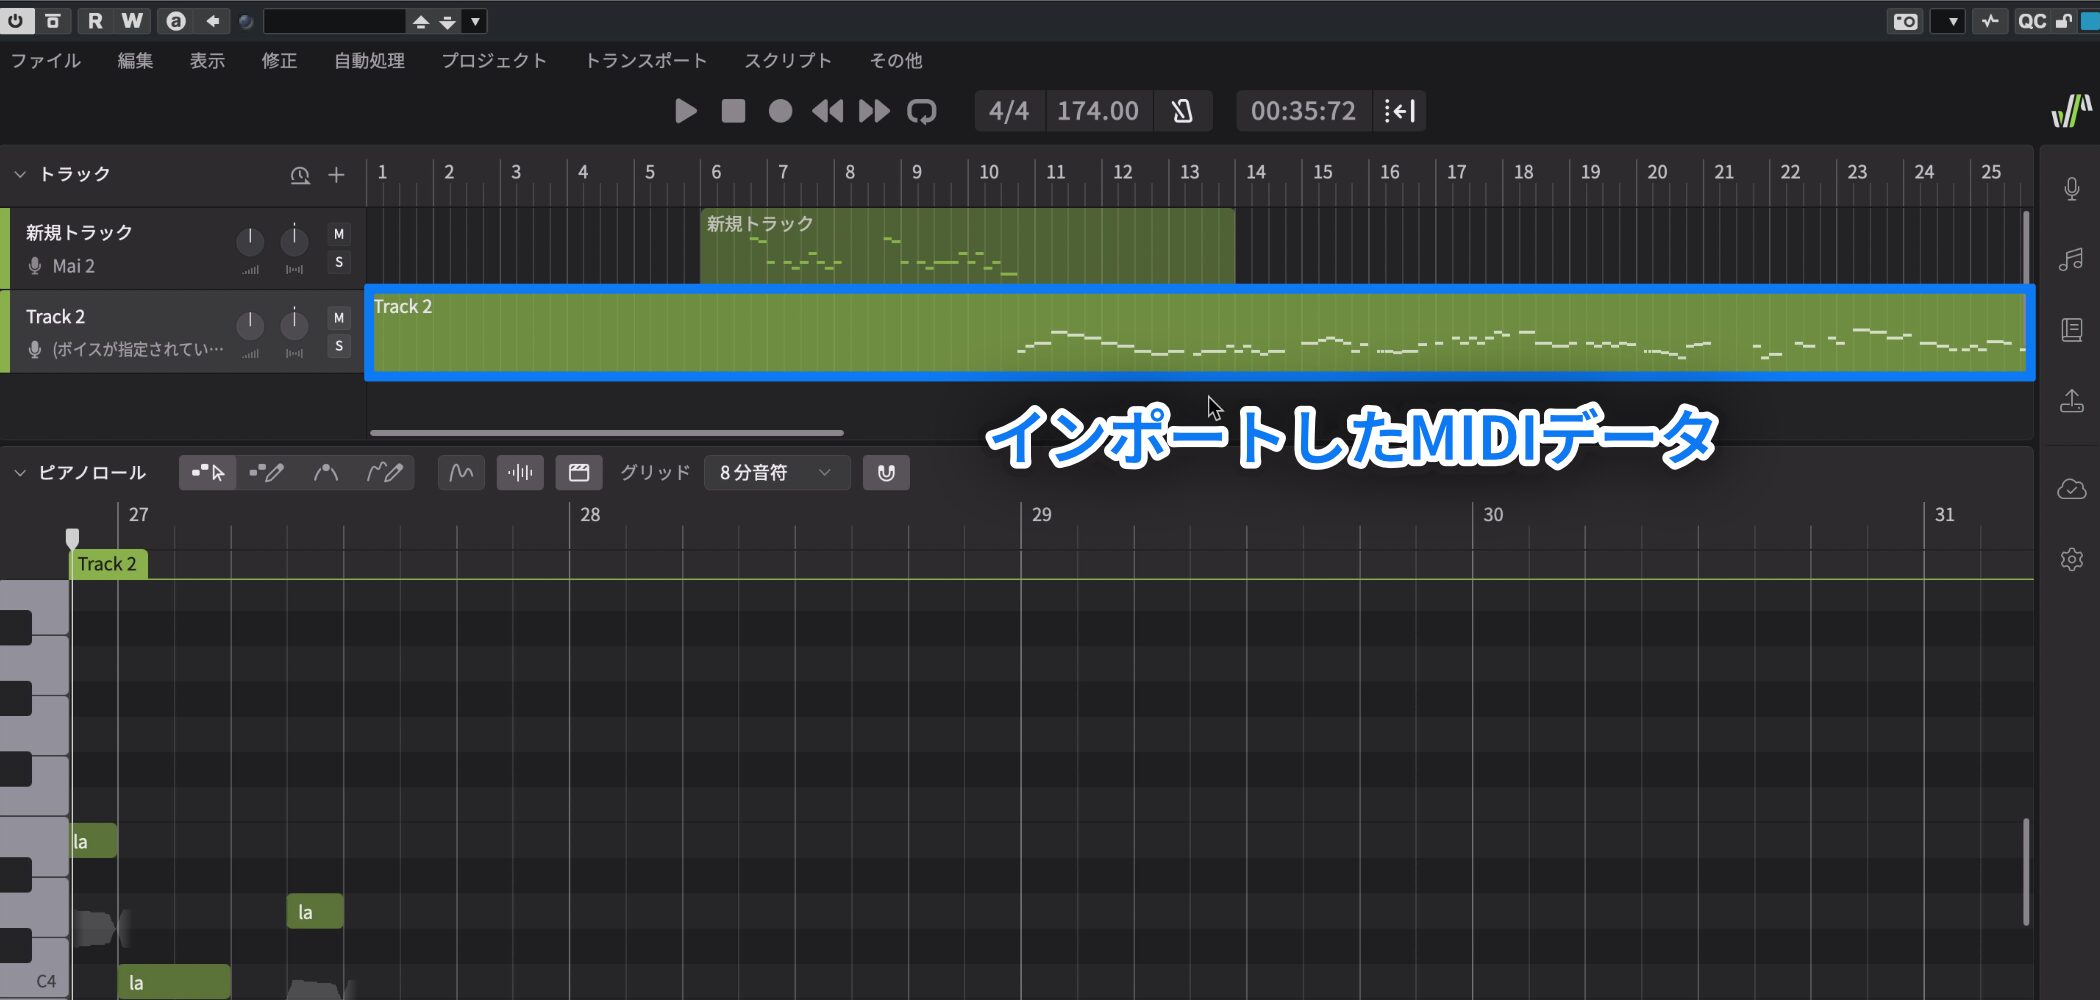
Using MIDI from your DAW can make entering many notes much more efficient.
Edit Imported Notes and Manage Groups
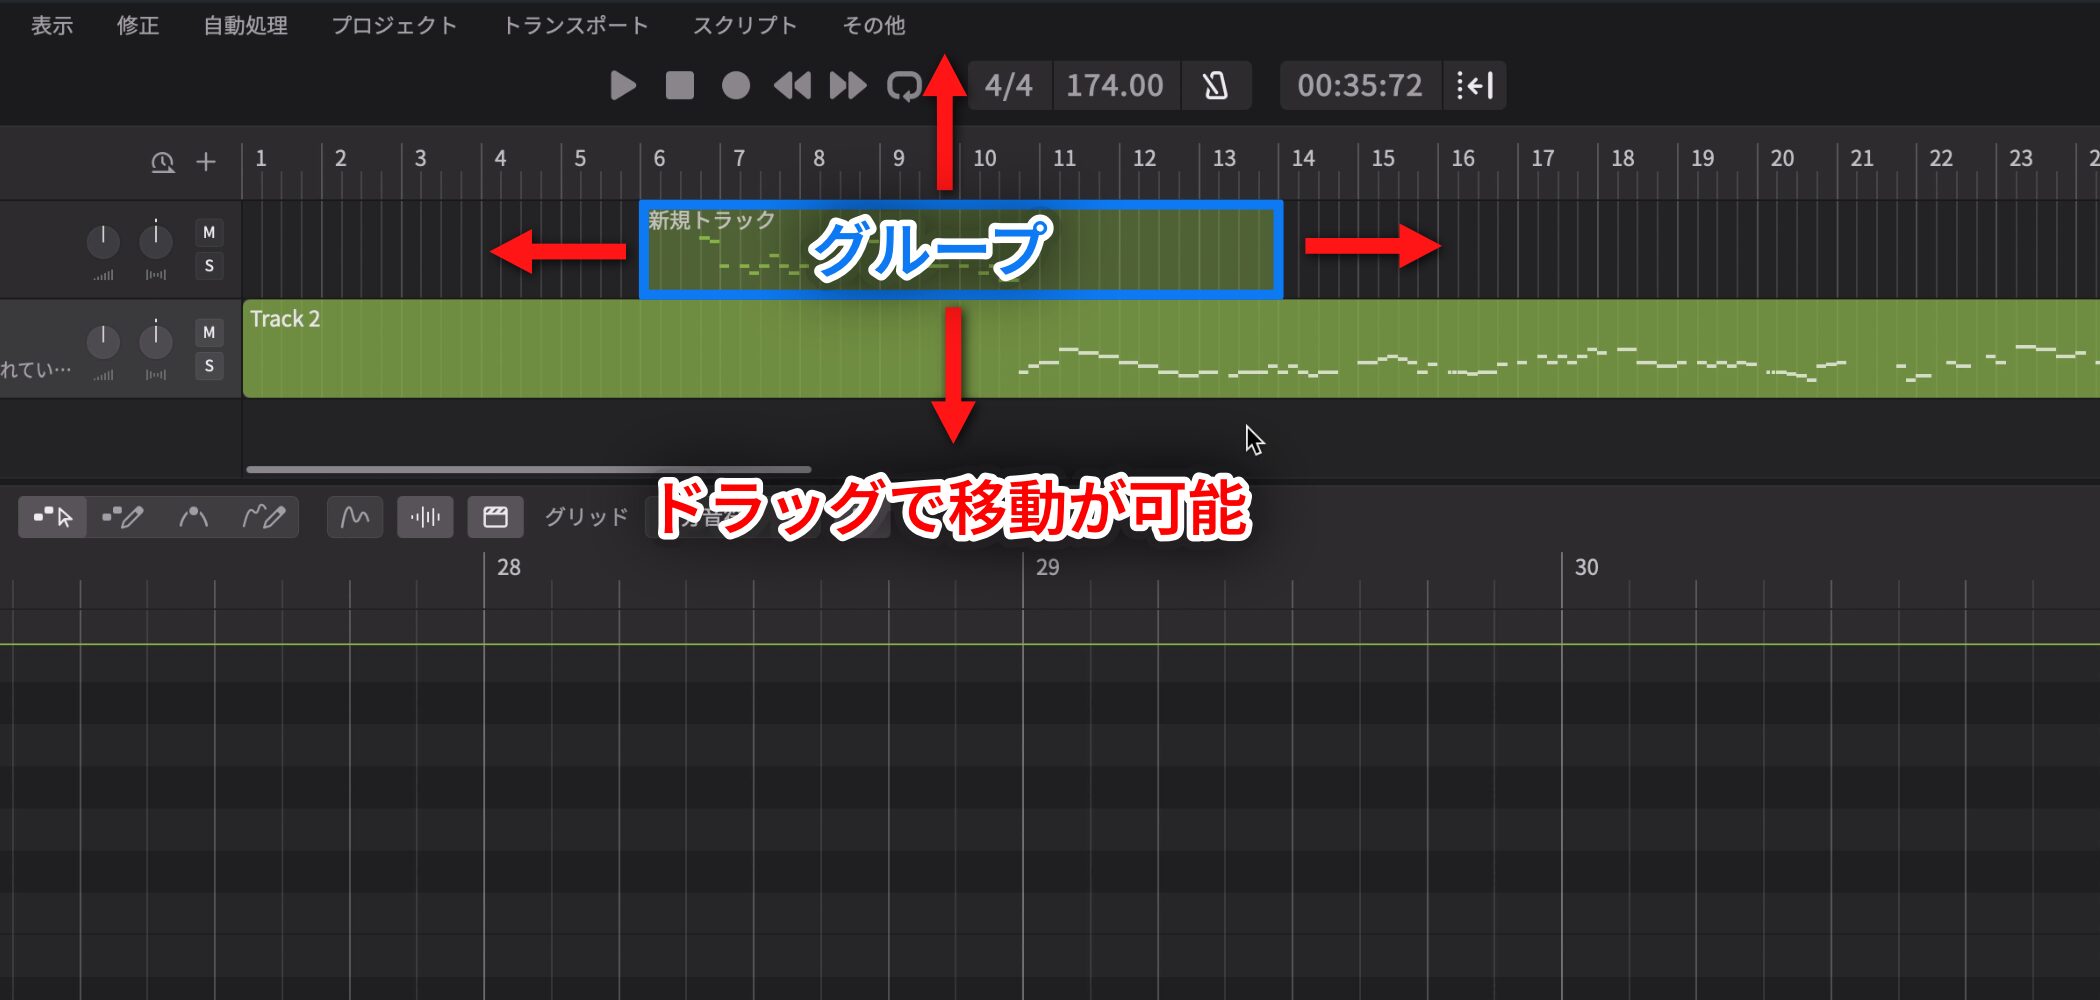
Tracks appear in frames called Groups, which you can move as a unit.
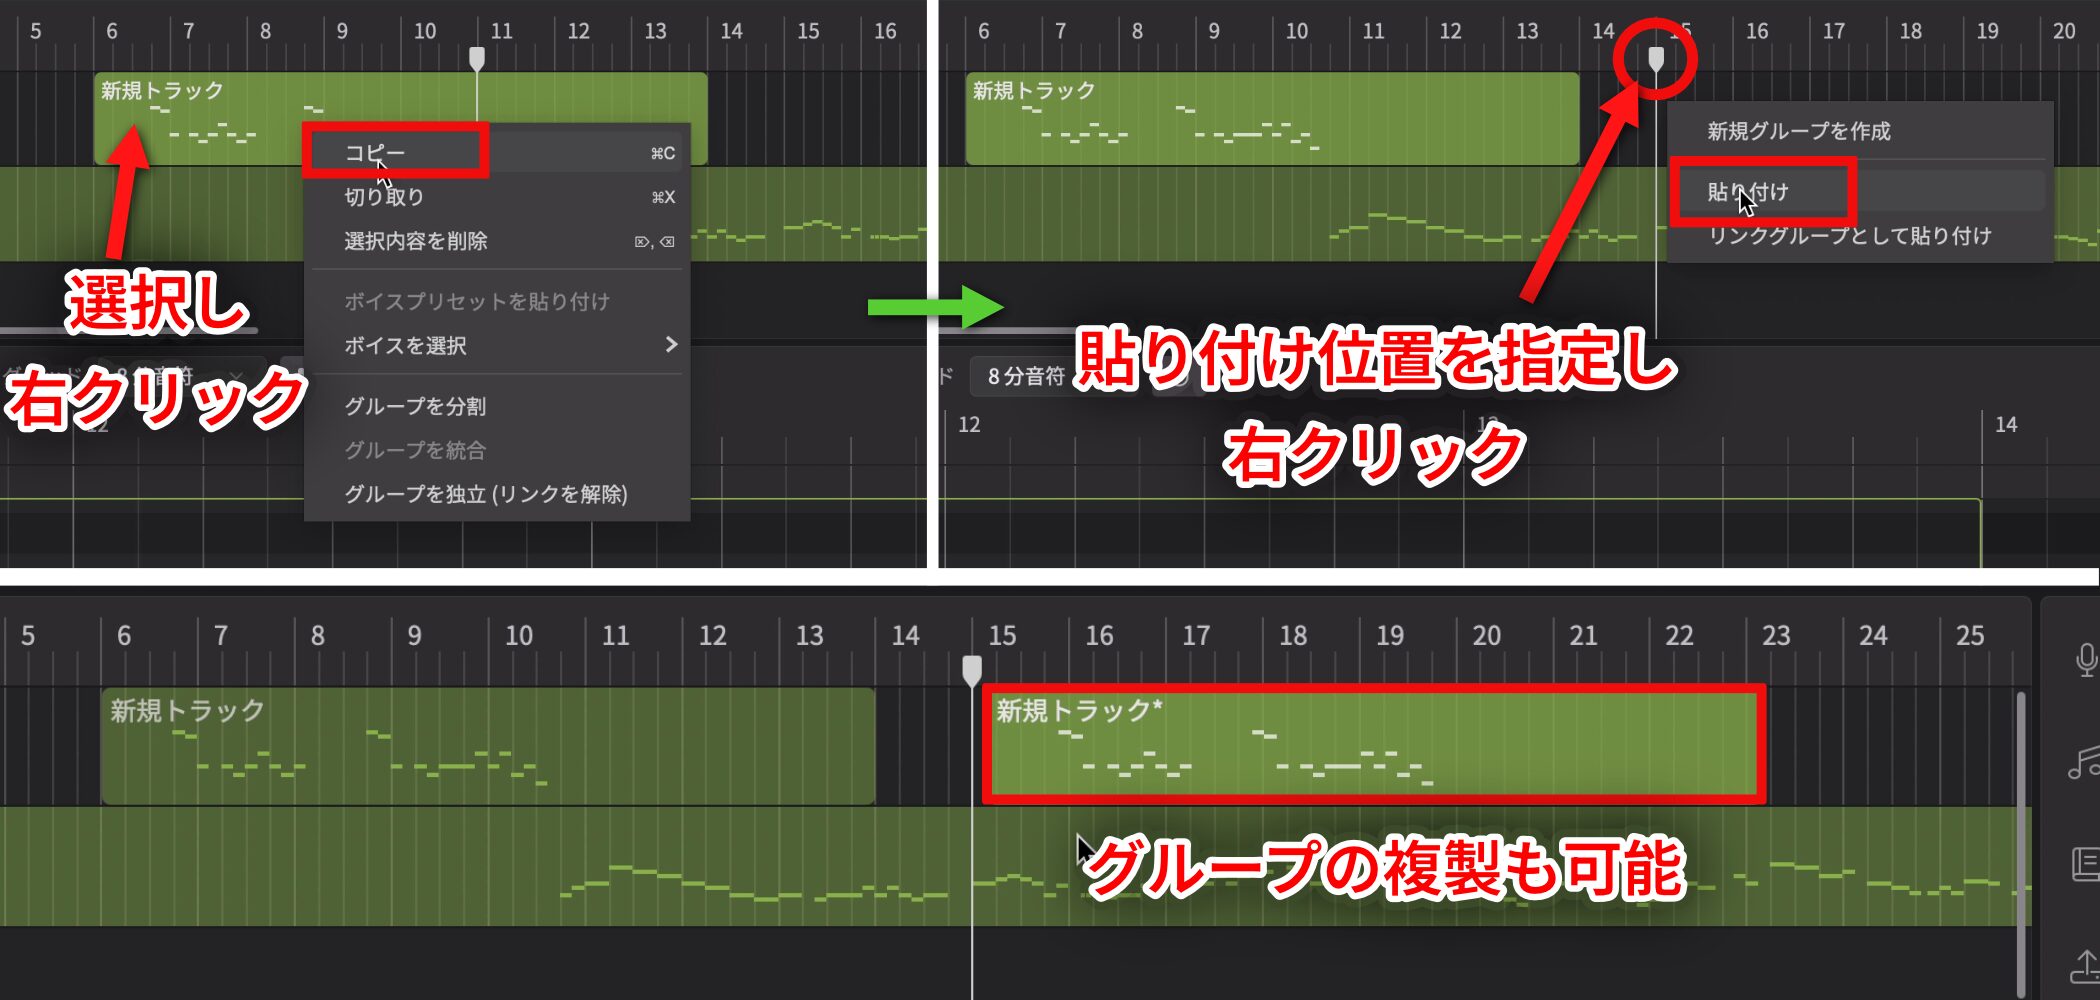
You can duplicate a Group with the same method used for notes.
Select the Group to duplicate and choose Copy from the right-click menu.
Move the playhead to the destination and choose Paste from the right-click menu to duplicate the Group.
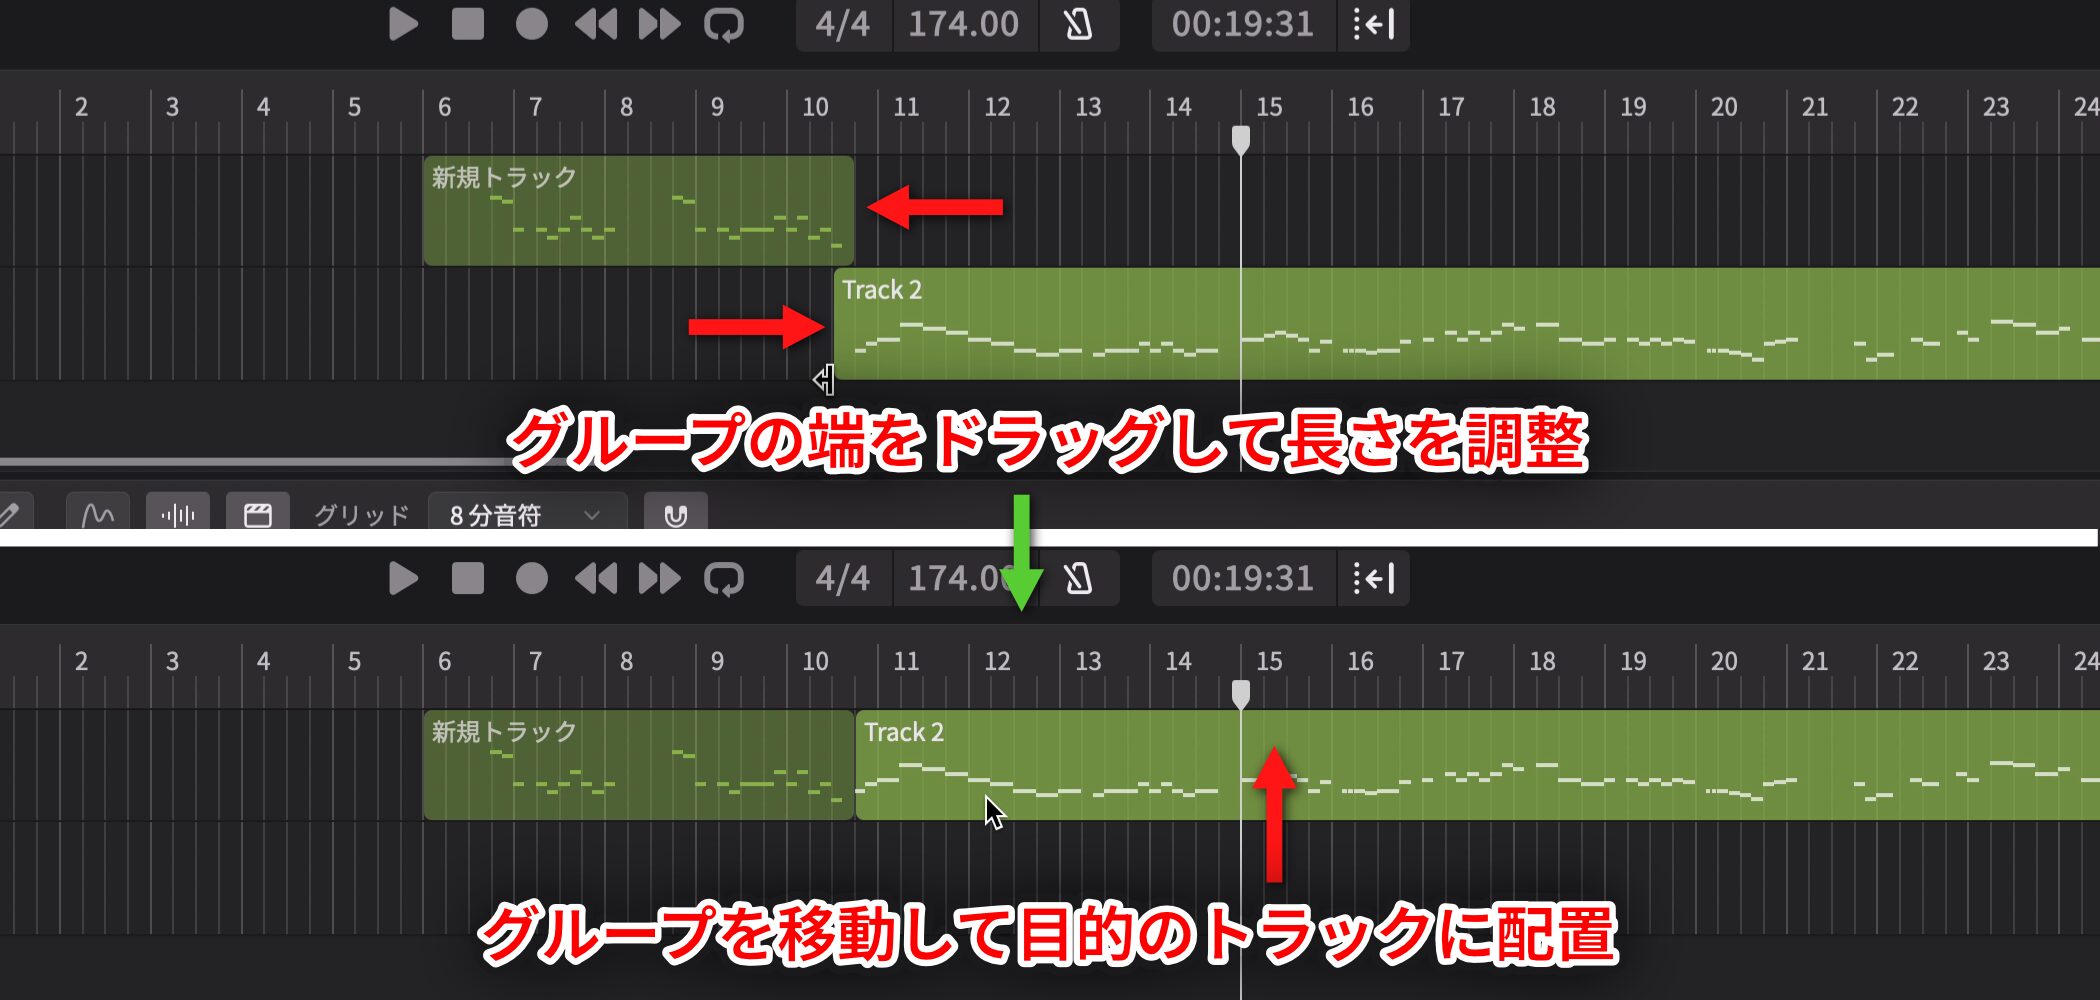
You can also drag a Group's edge to adjust its length and move it onto the desired track, allowing you to combine several Groups on one track.
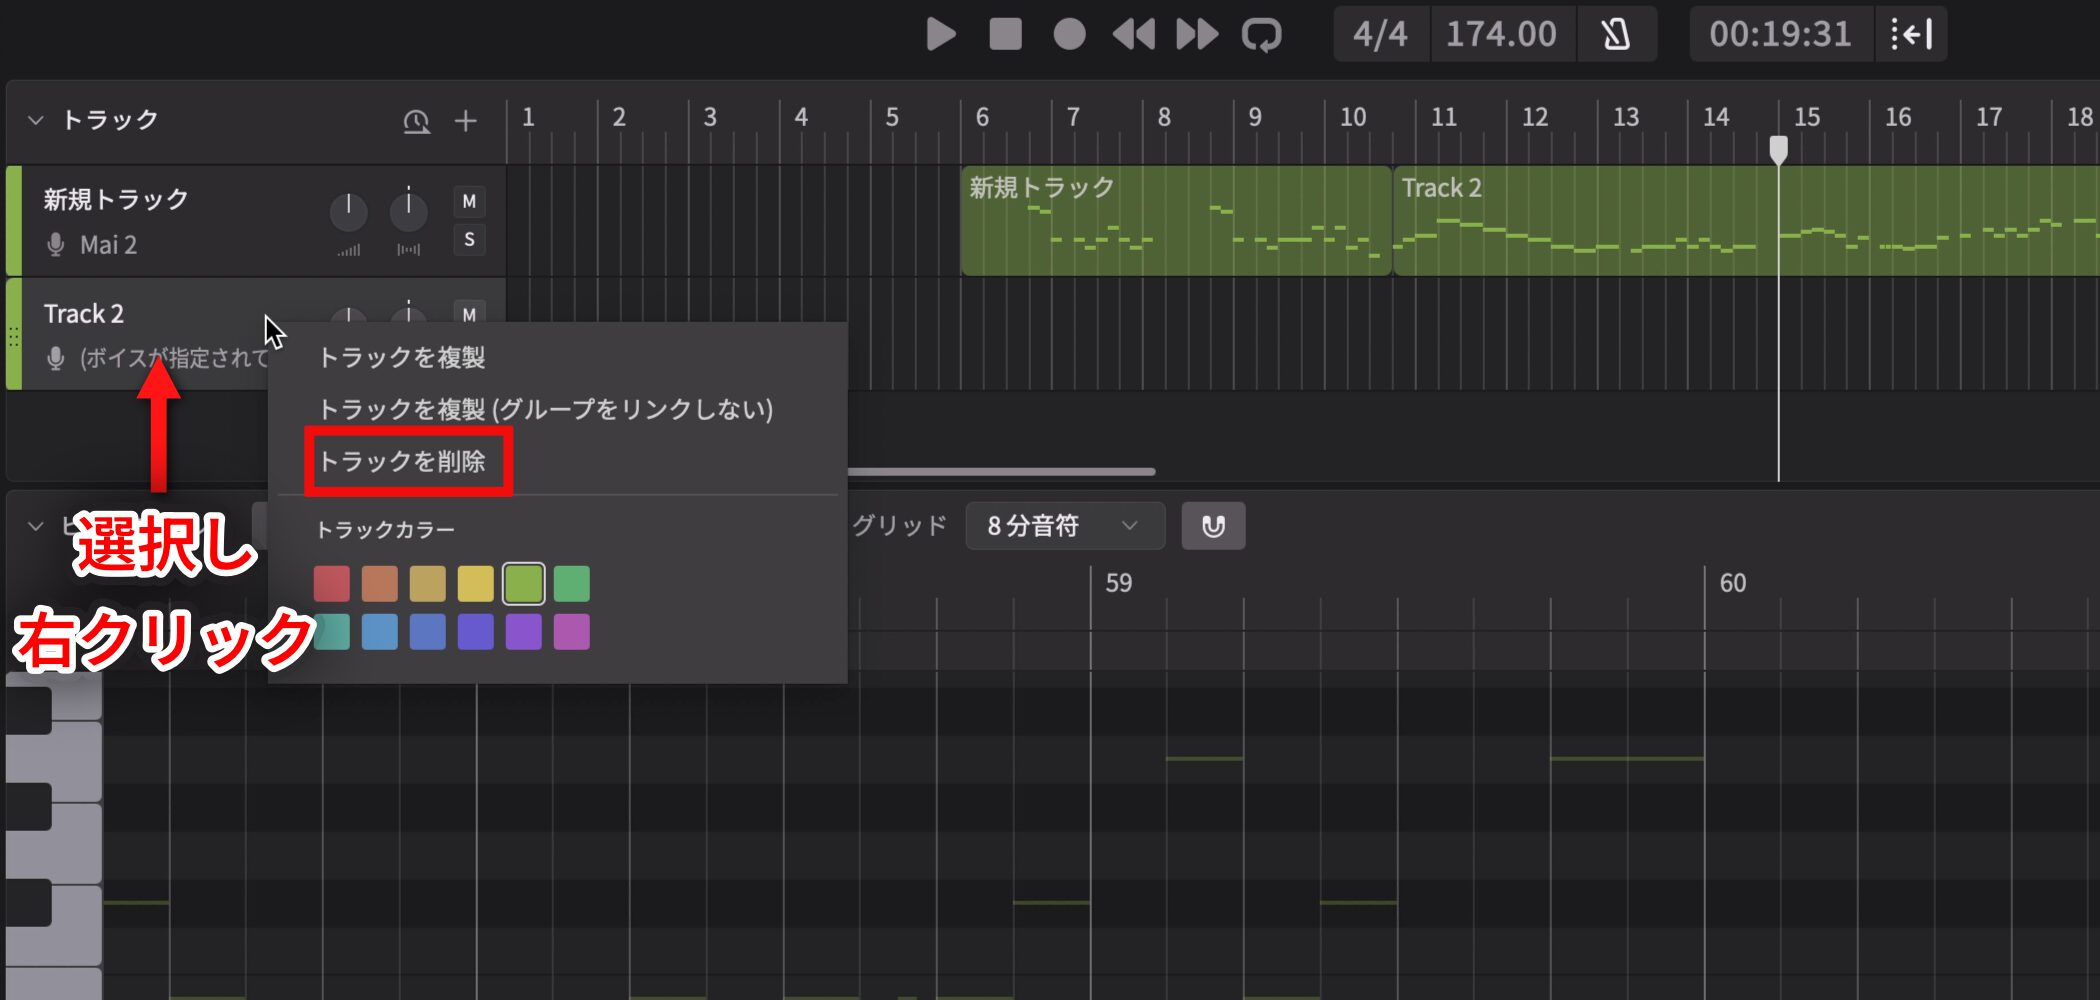
Right-click an unwanted track to delete it.
Enter Lyrics: Individual Characters, Batches, Multiple Characters, and Sustained Notes
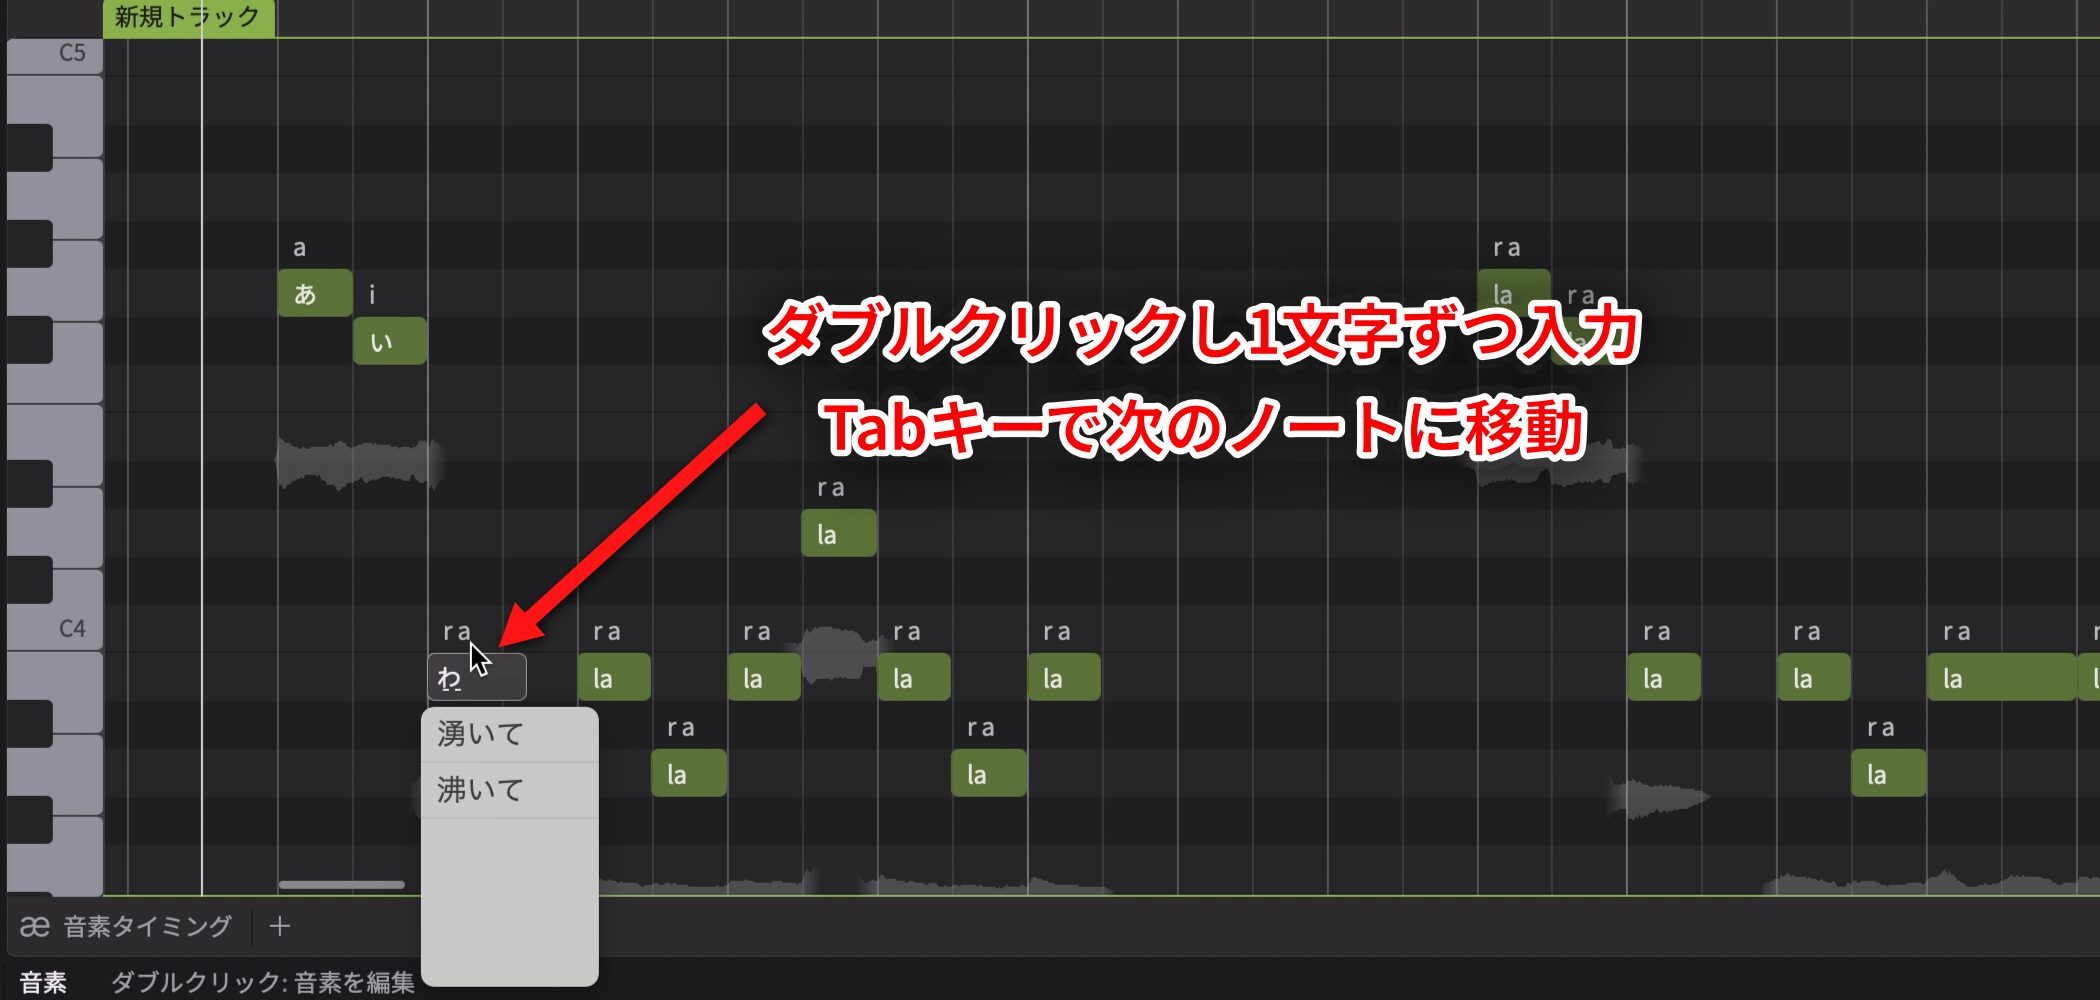
For Japanese lyrics, double-click the appropriate note and enter one hiragana character at a time.
Tab moves to the next note, helping you work quickly.
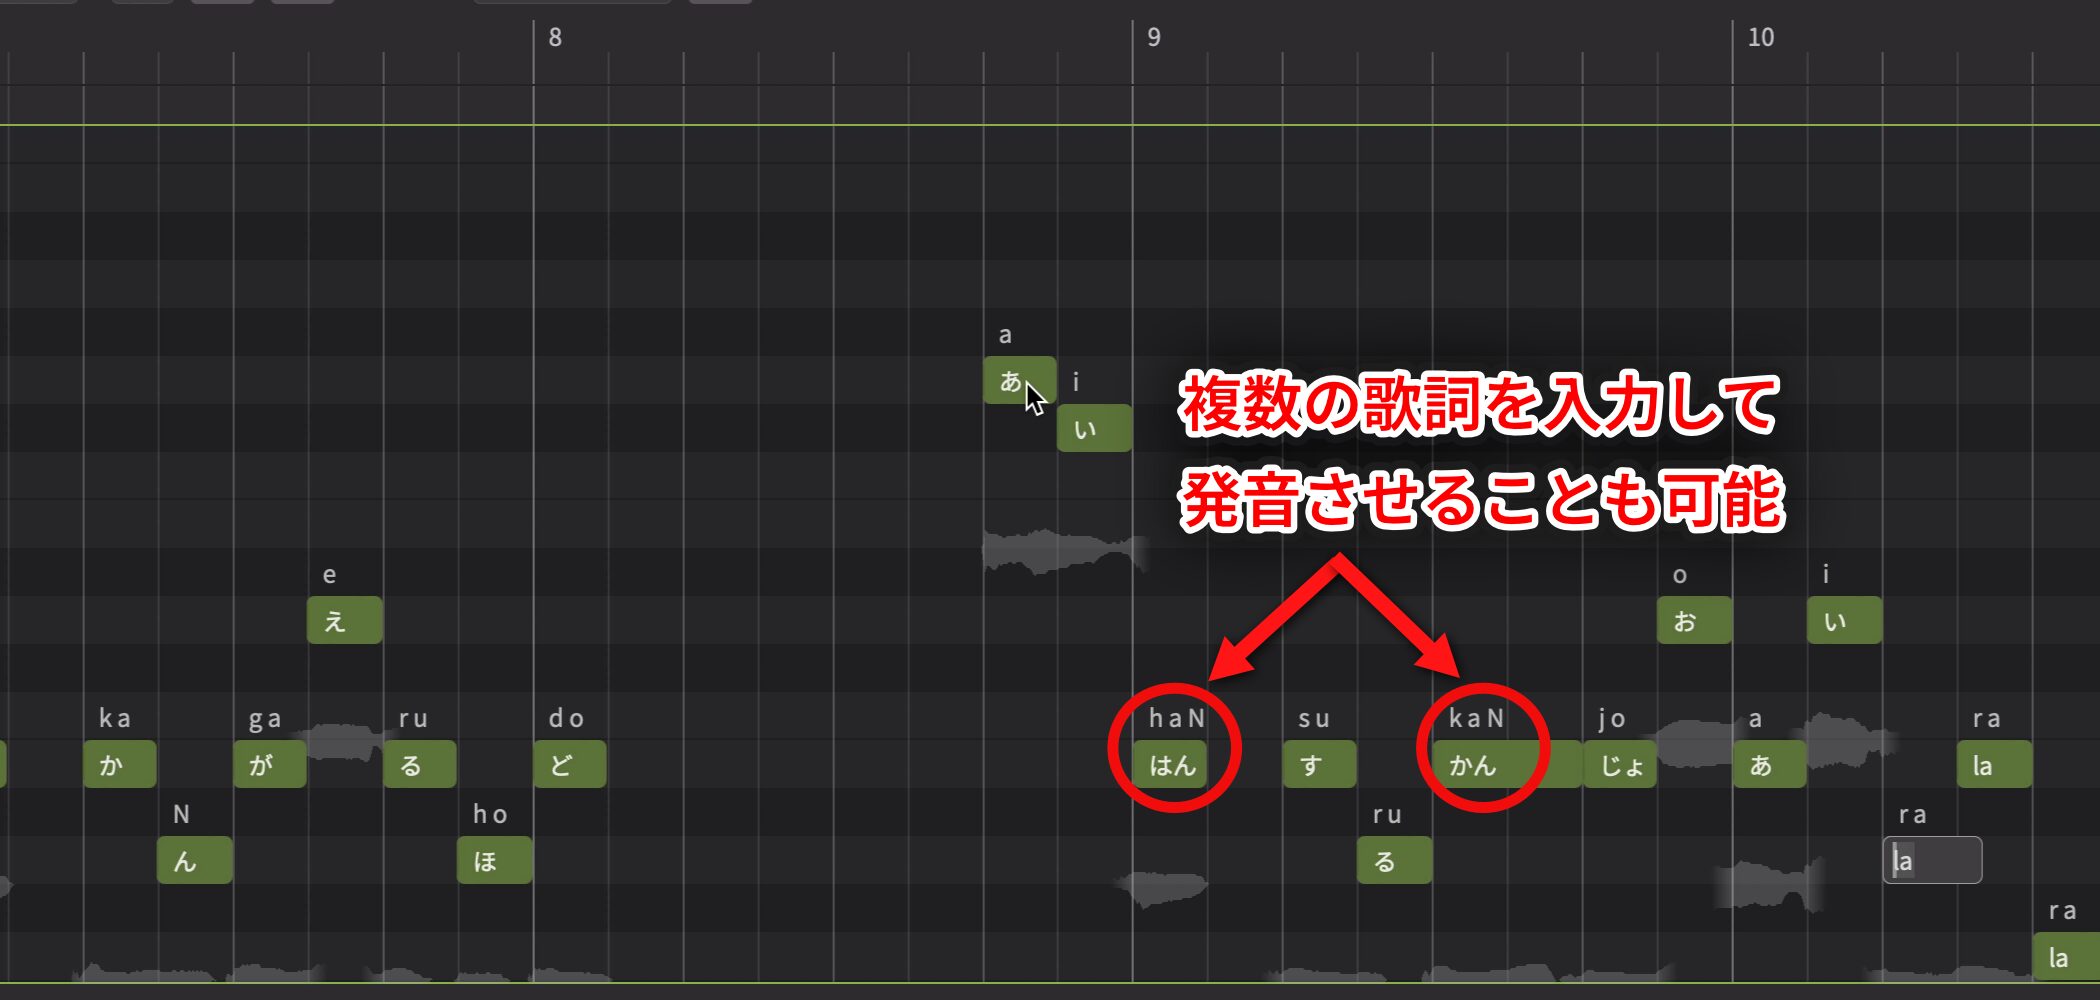
It is also possible to enter several characters in one note and have them pronounced.
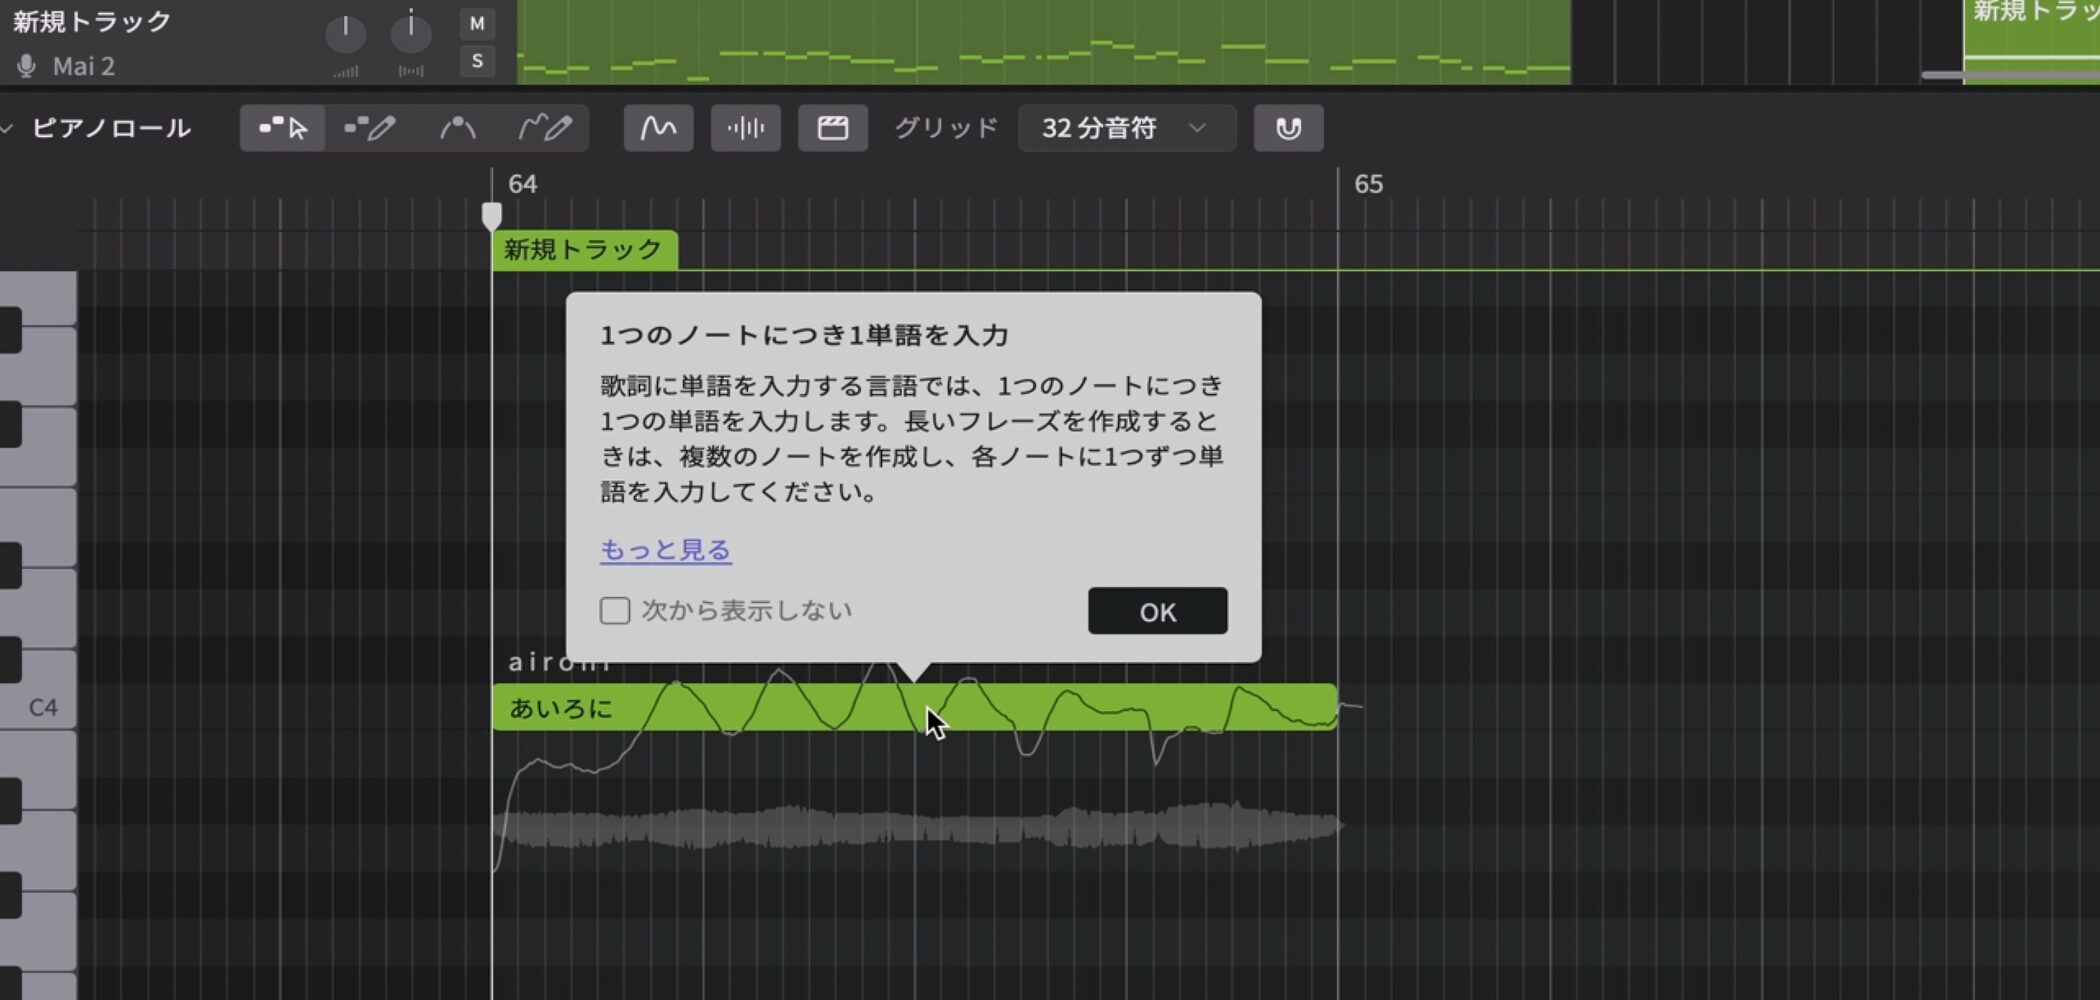
For Japanese, however, entering one character per note is generally recommended.
A popup like the one shown above may therefore appear when you enter several characters.
You can close it with OK, but the phrase may be pronounced with an unintended rhythm, depending on the song.
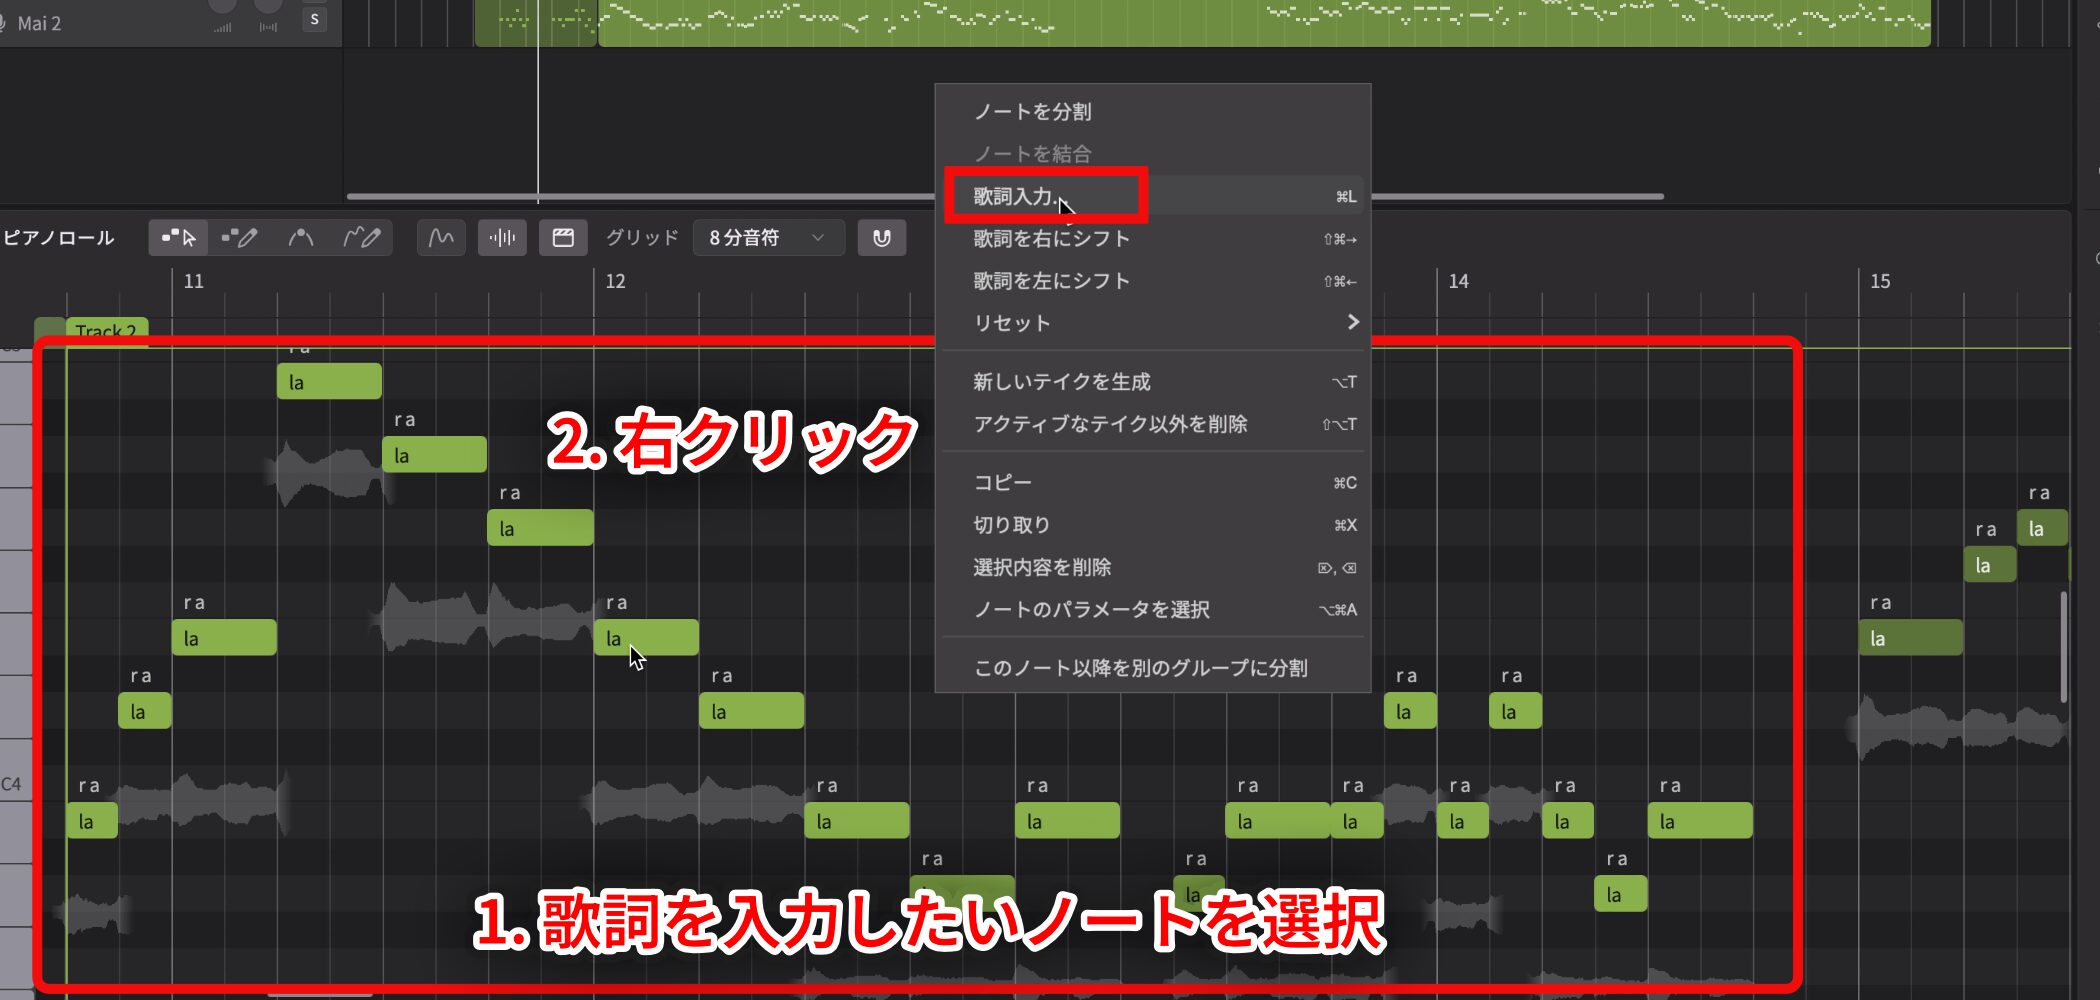
To enter lyrics in a batch, select the notes and choose Lyric Input from the right-click menu.
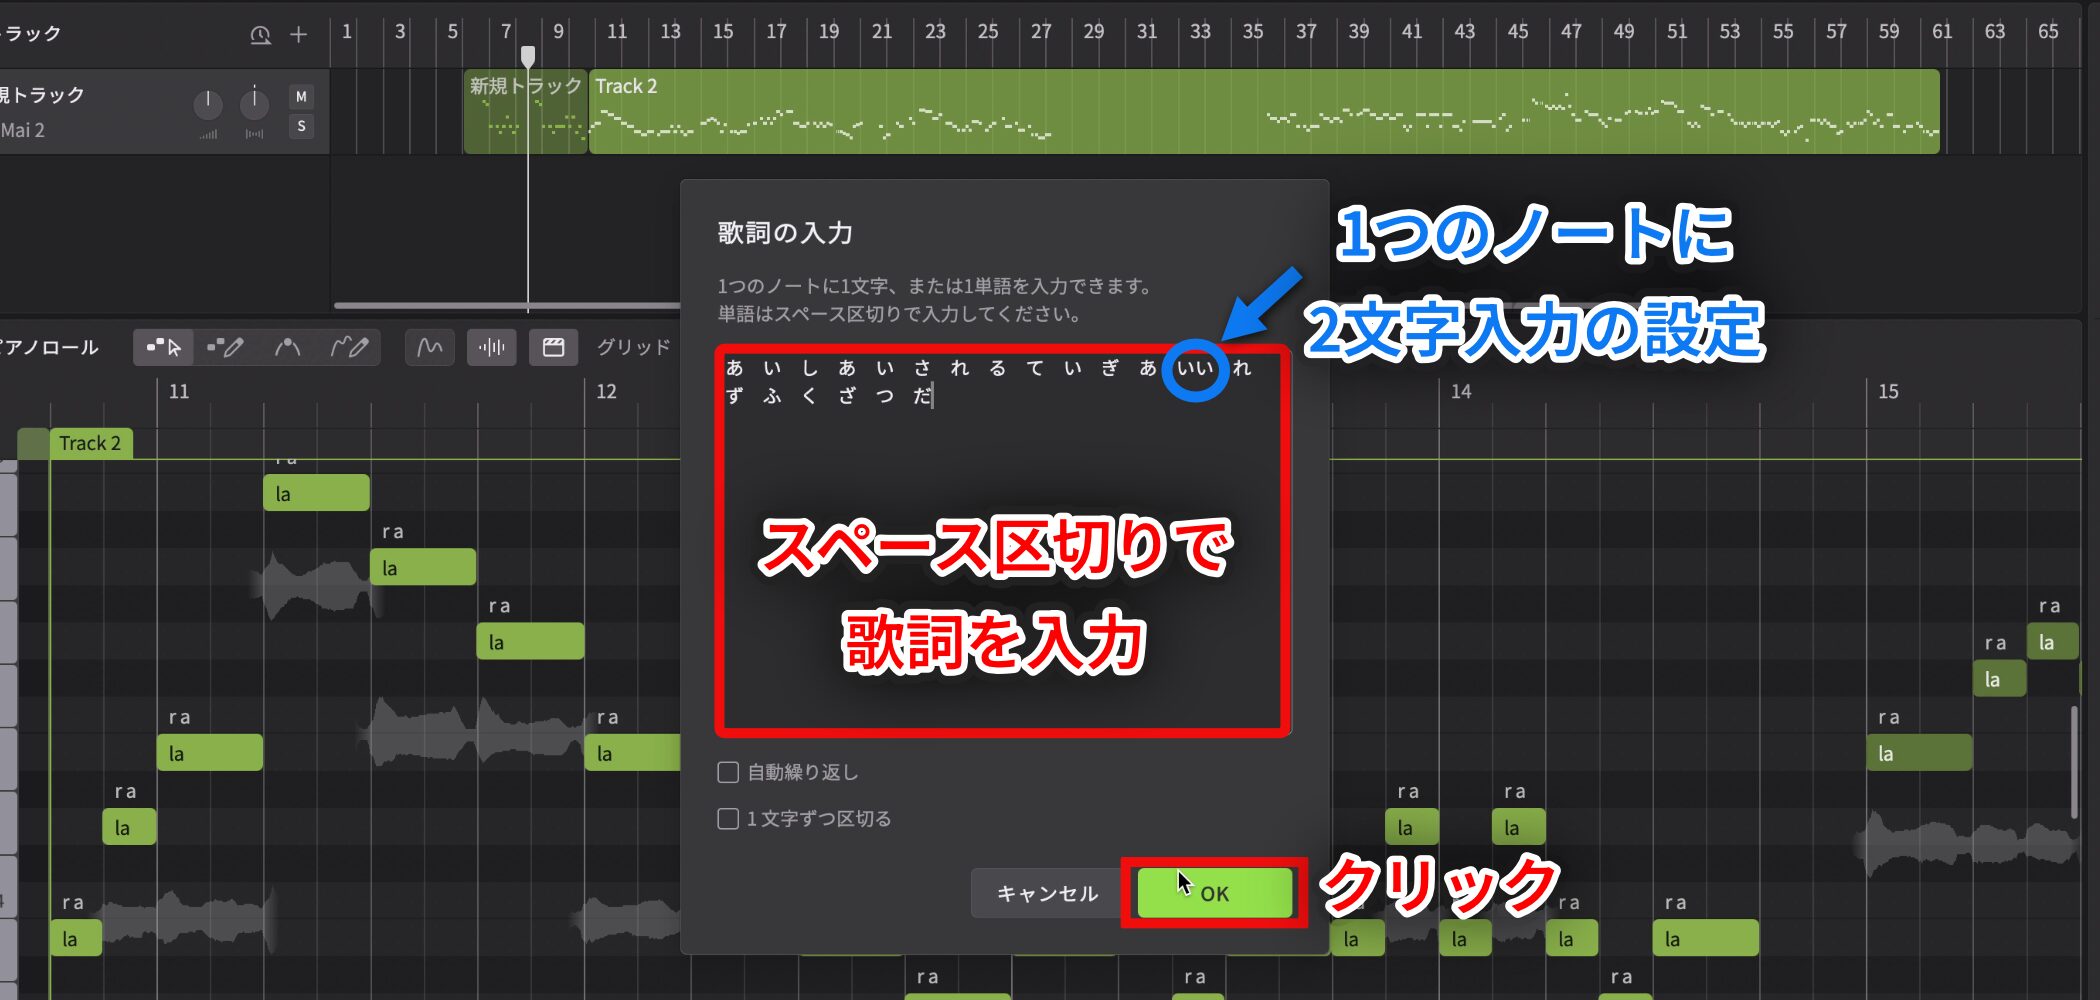
Enter the lyrics in the dialog, separating them with spaces.
Using spaces also allows you to put several characters on a single note.
Click OK when finished.
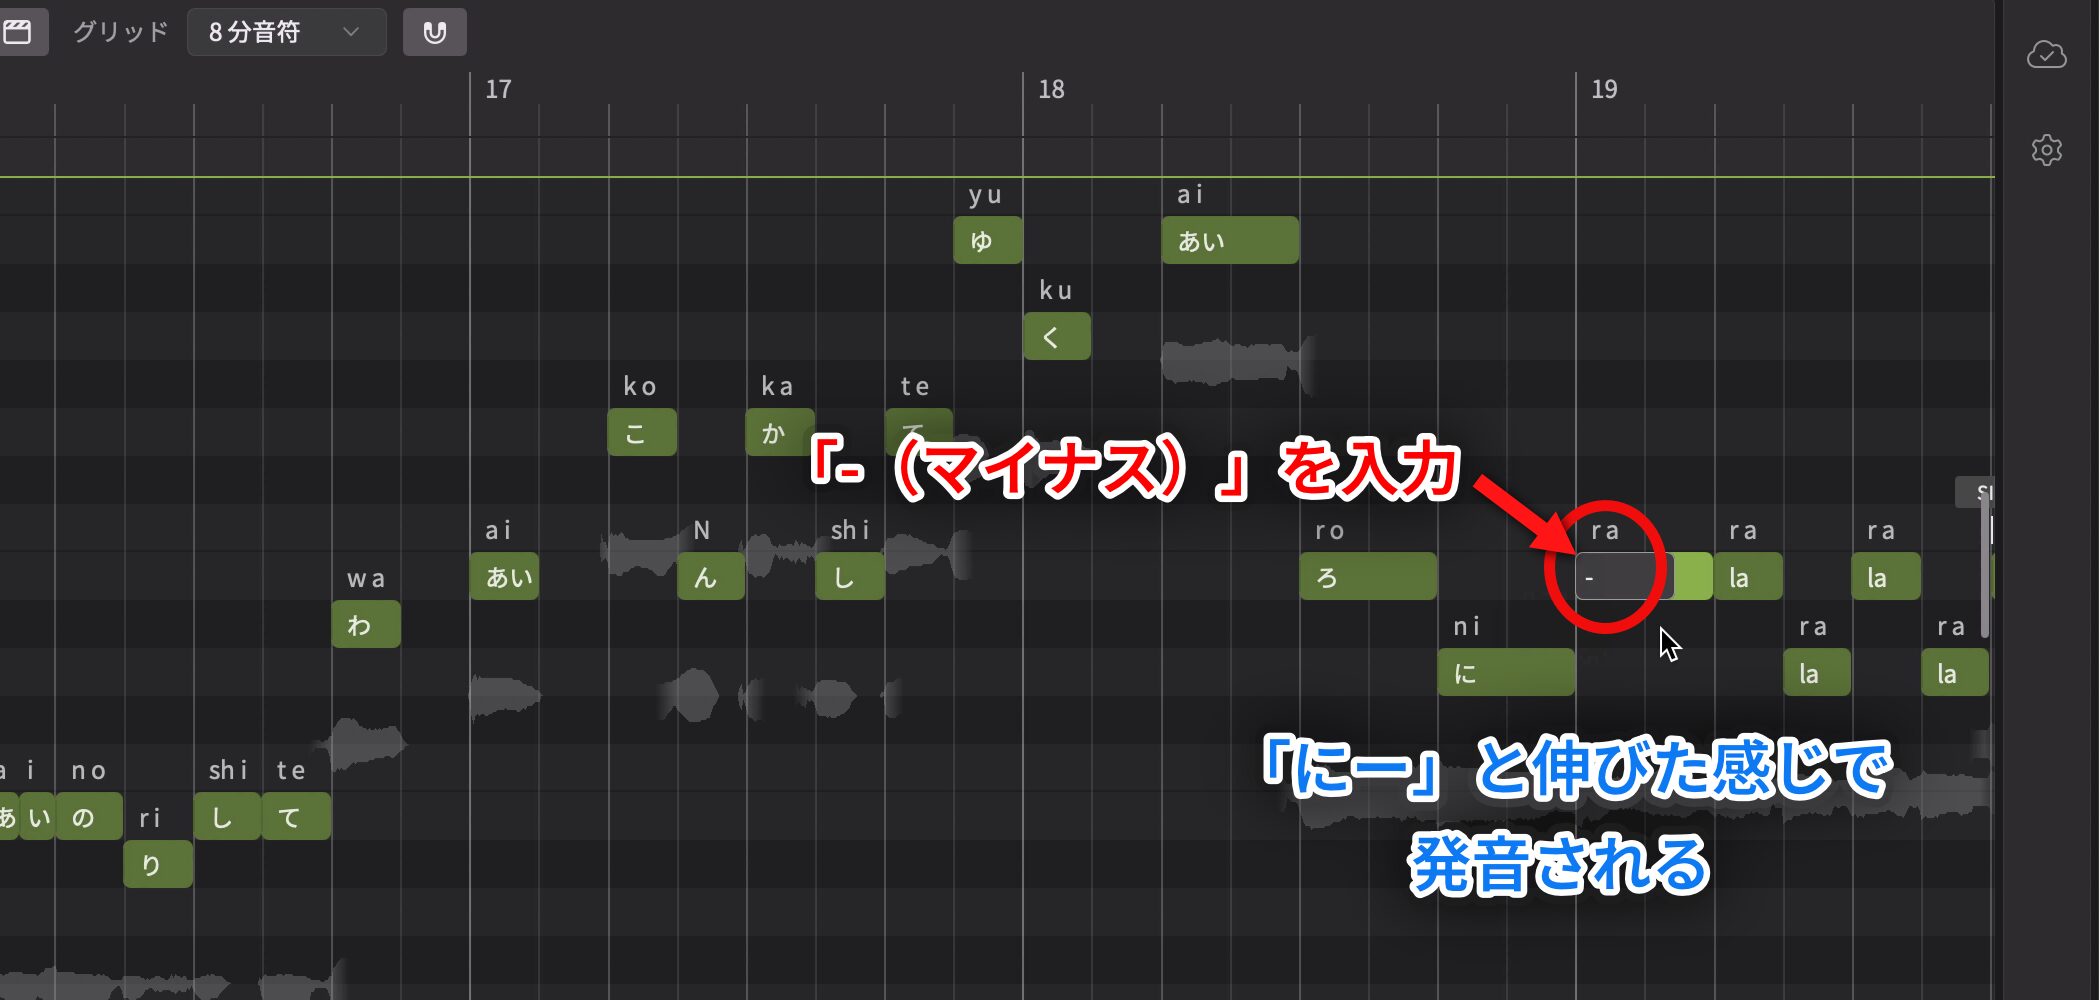
To sustain a lyric across the next note, enter a hyphen (-). This extends the previous character or sound through that note.
Enter Lyrics in English and Other Languages
Synthesizer V Studio 2 Pro also supports multilingual lyrics.
Here is how to enter English lyrics.
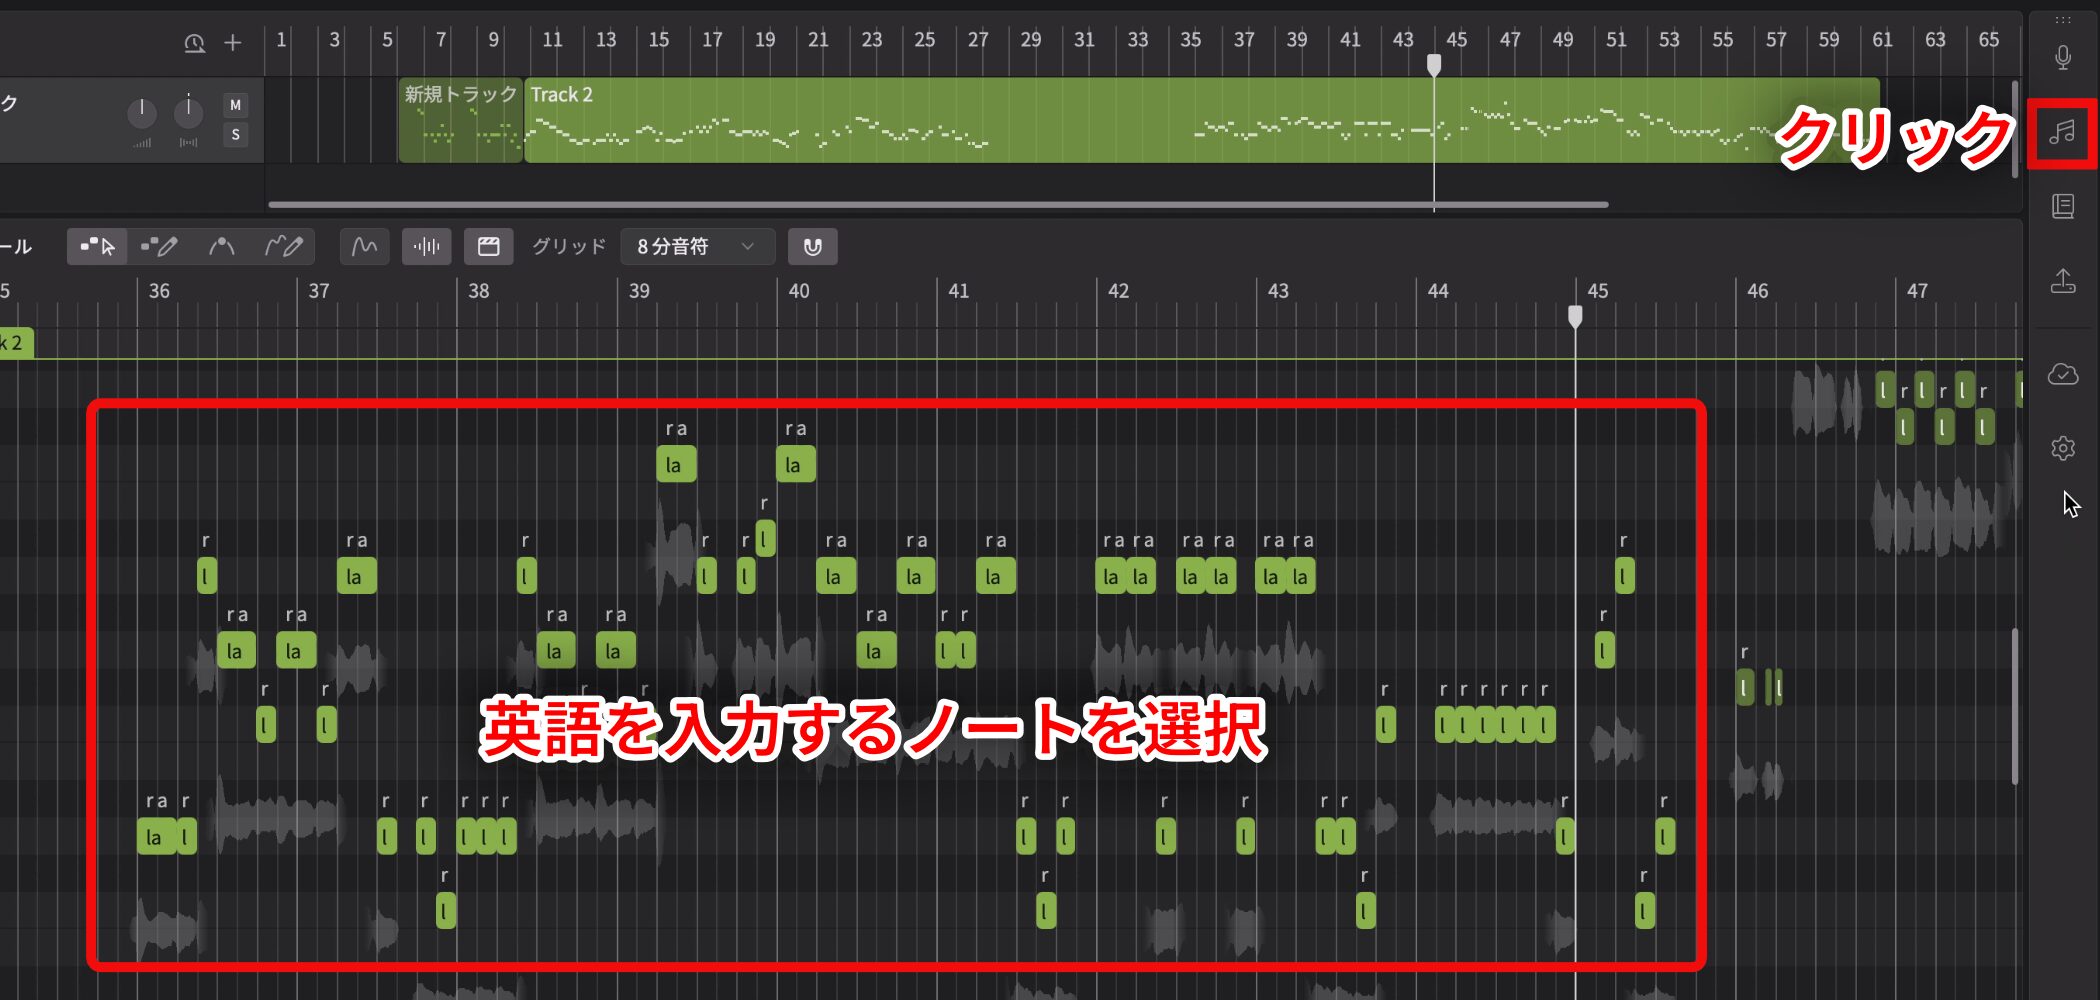
Select the note for an English lyric, then click the musical-note icon on the right side of the screen.
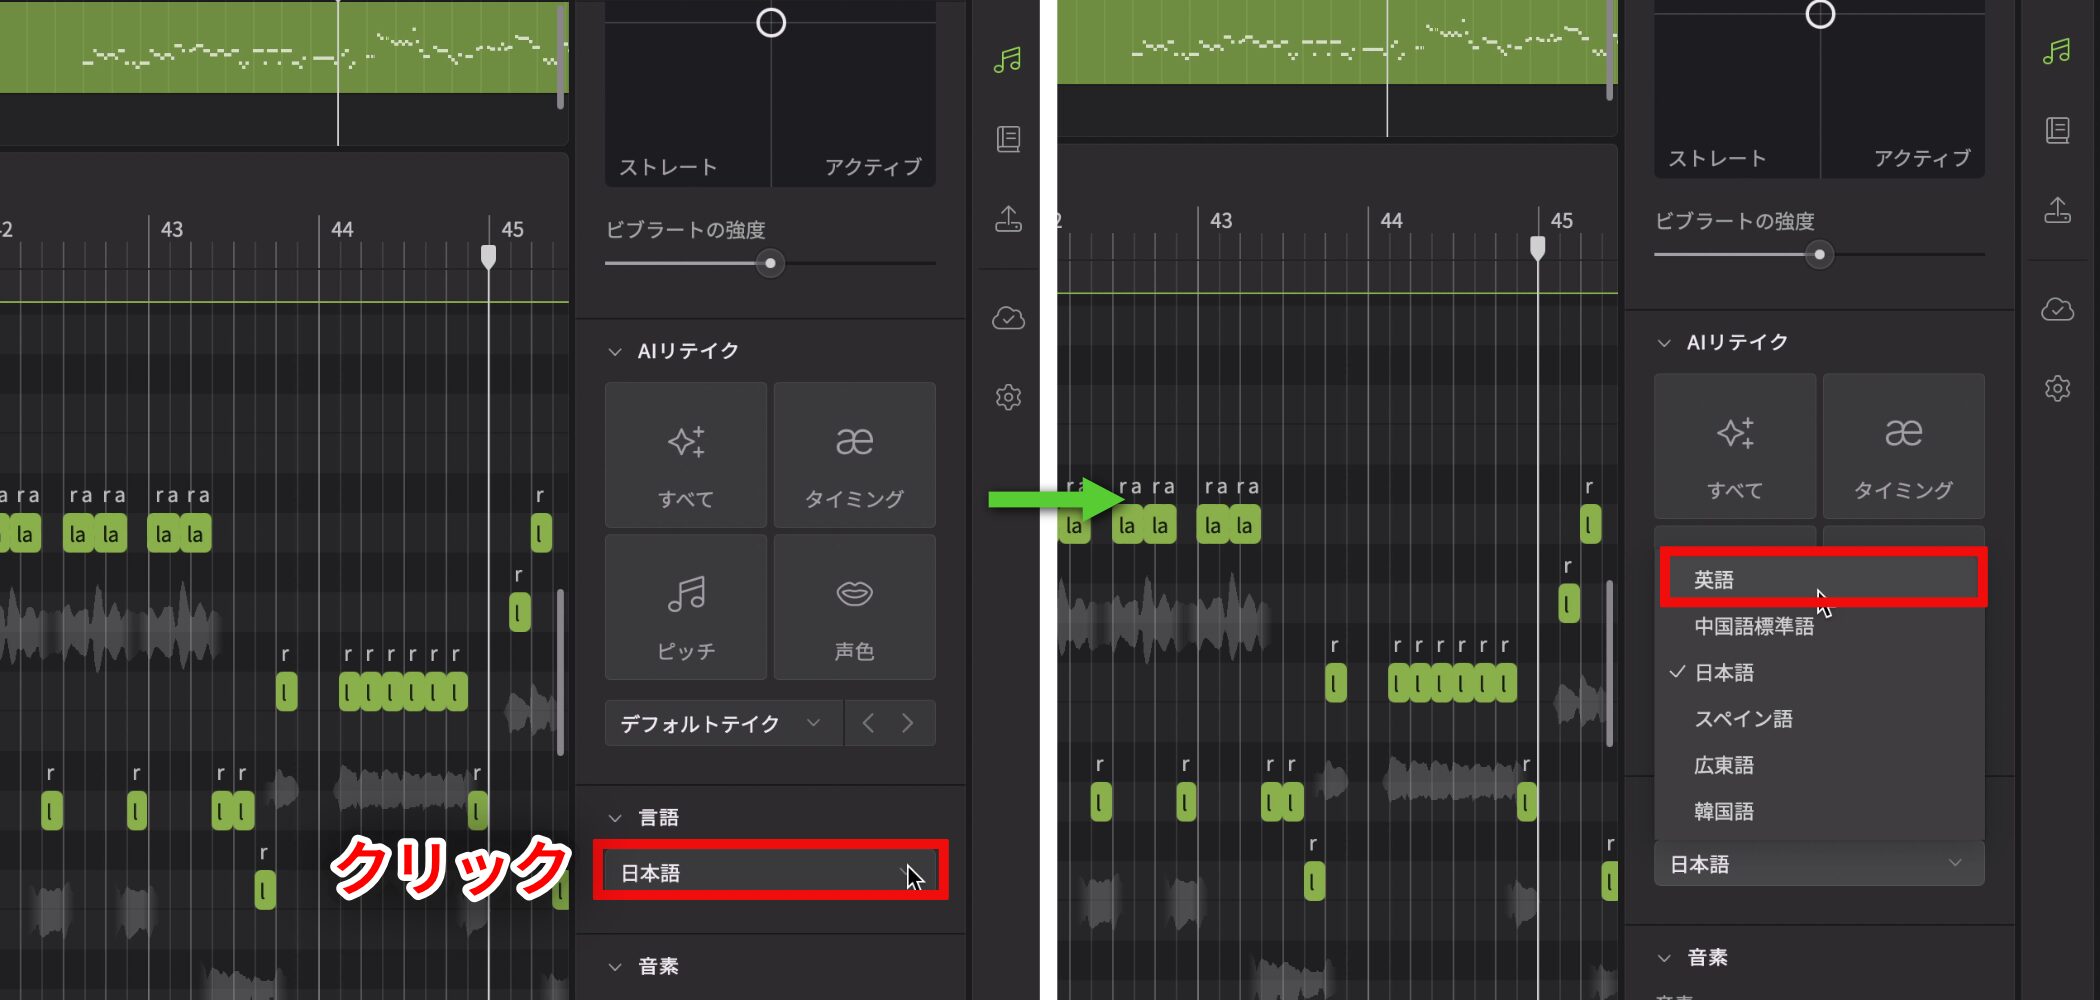
In the Note panel, click Language and change it to English.
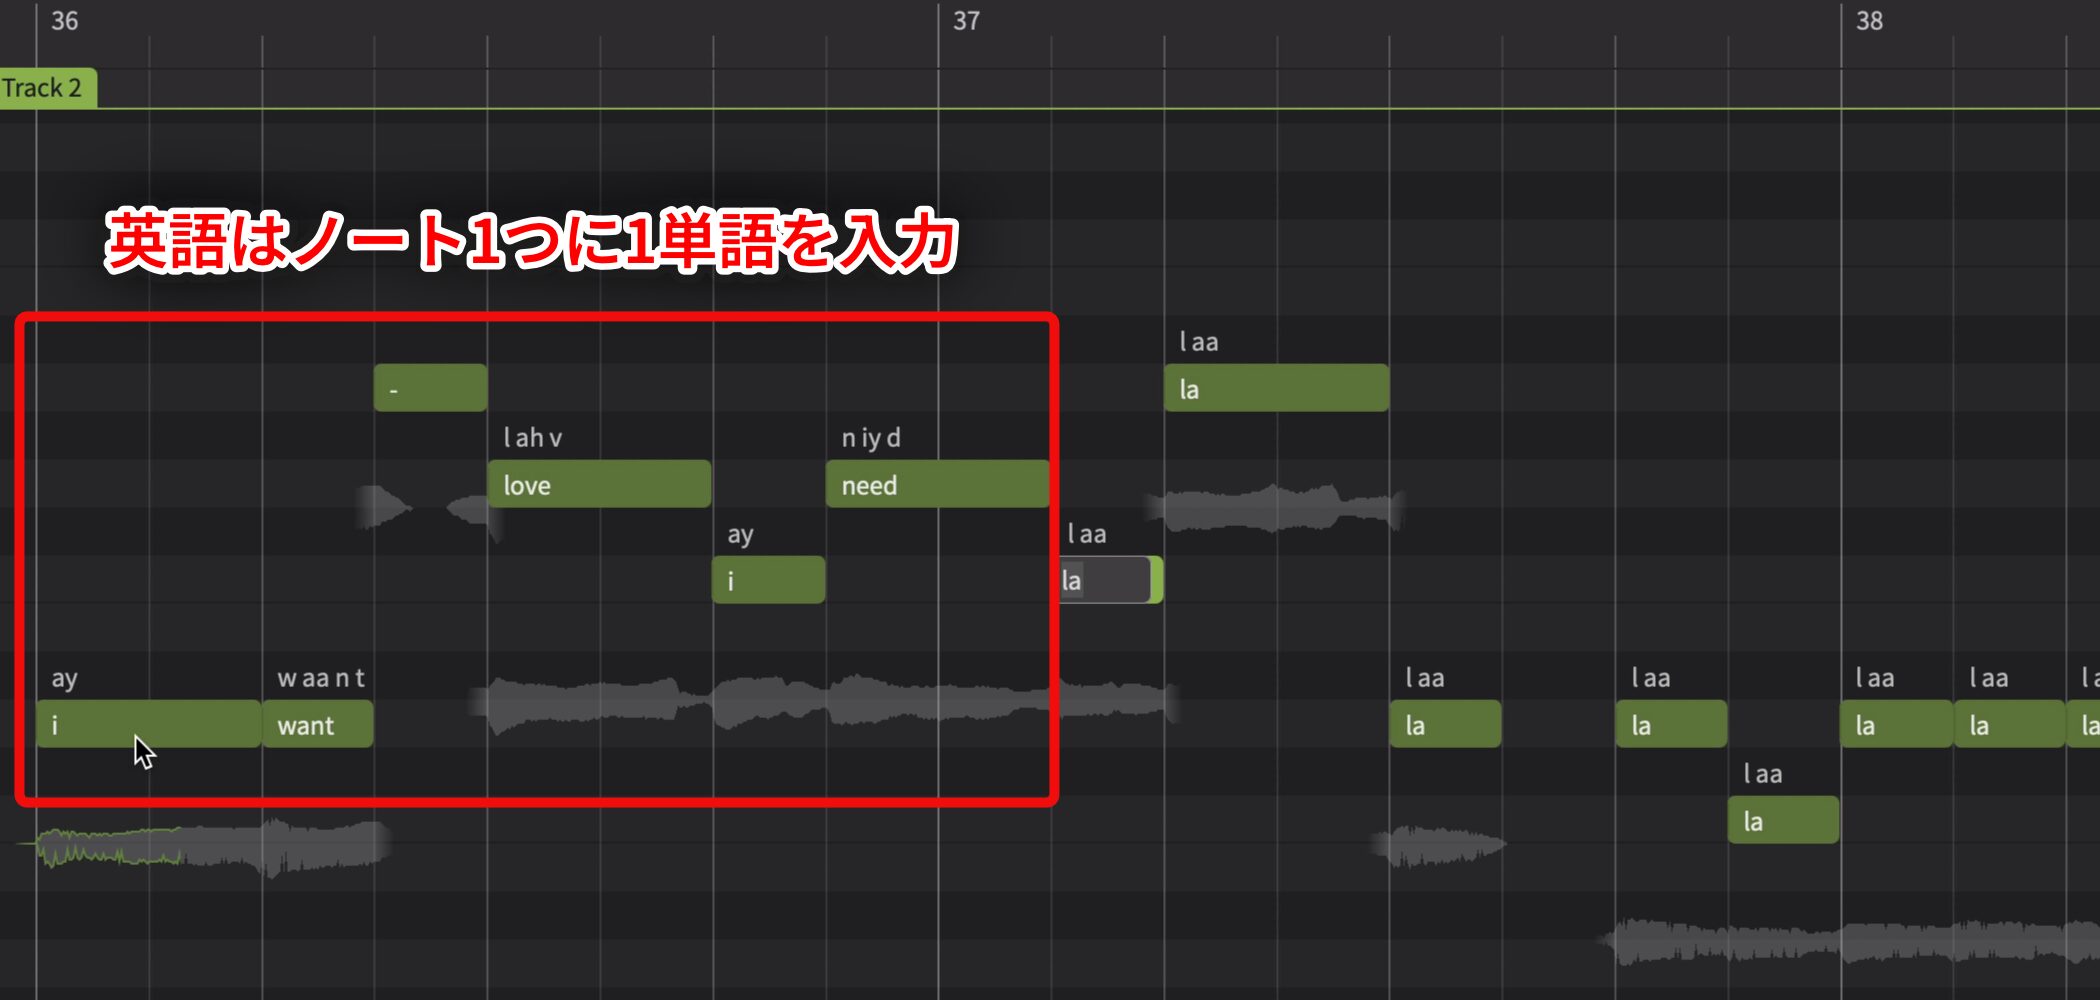
For English, generally enter one word per note.
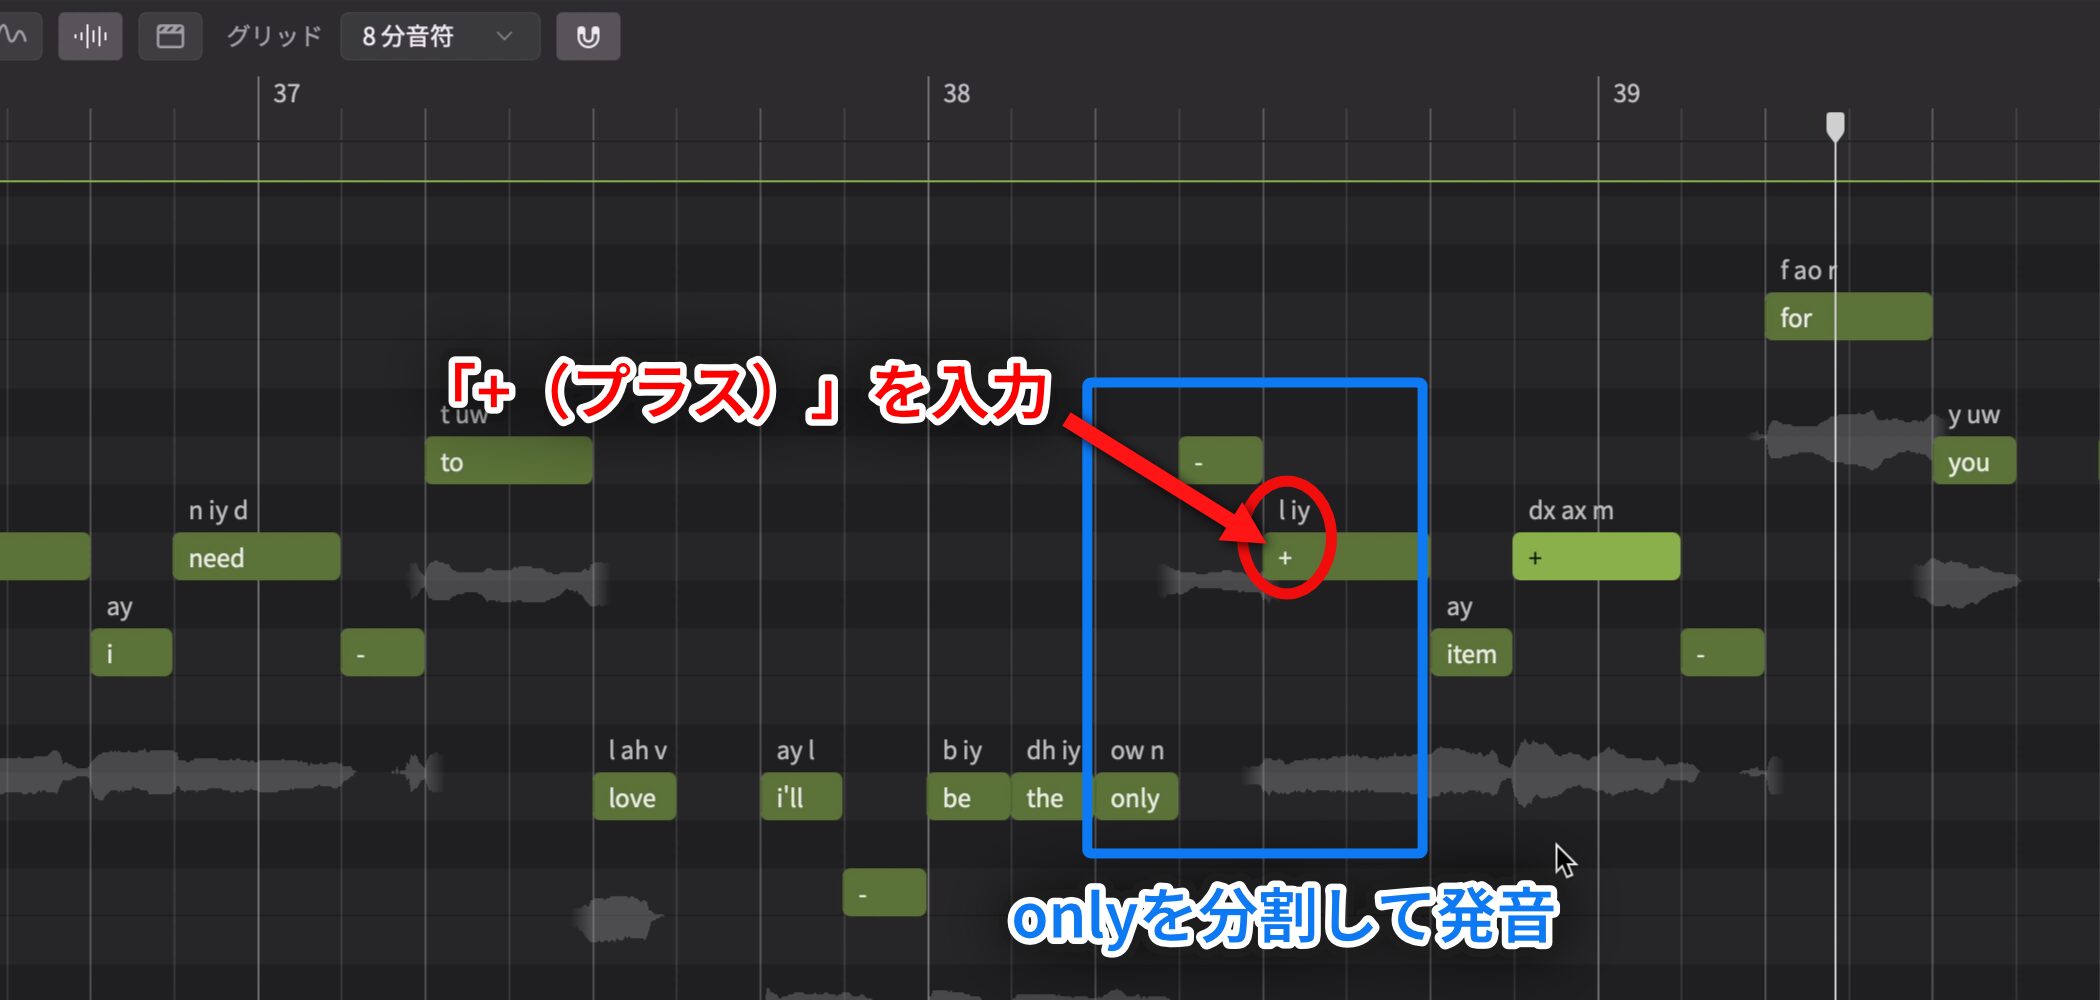
If you want a word to span several notes, enter the word on the first note and enter + on the following note to split the word into syllables for natural pronunciation.
Enter a Rap Part and Adjust the Rap Feel
Synthesizer V Studio 2 Pro can create rap as well as singing.
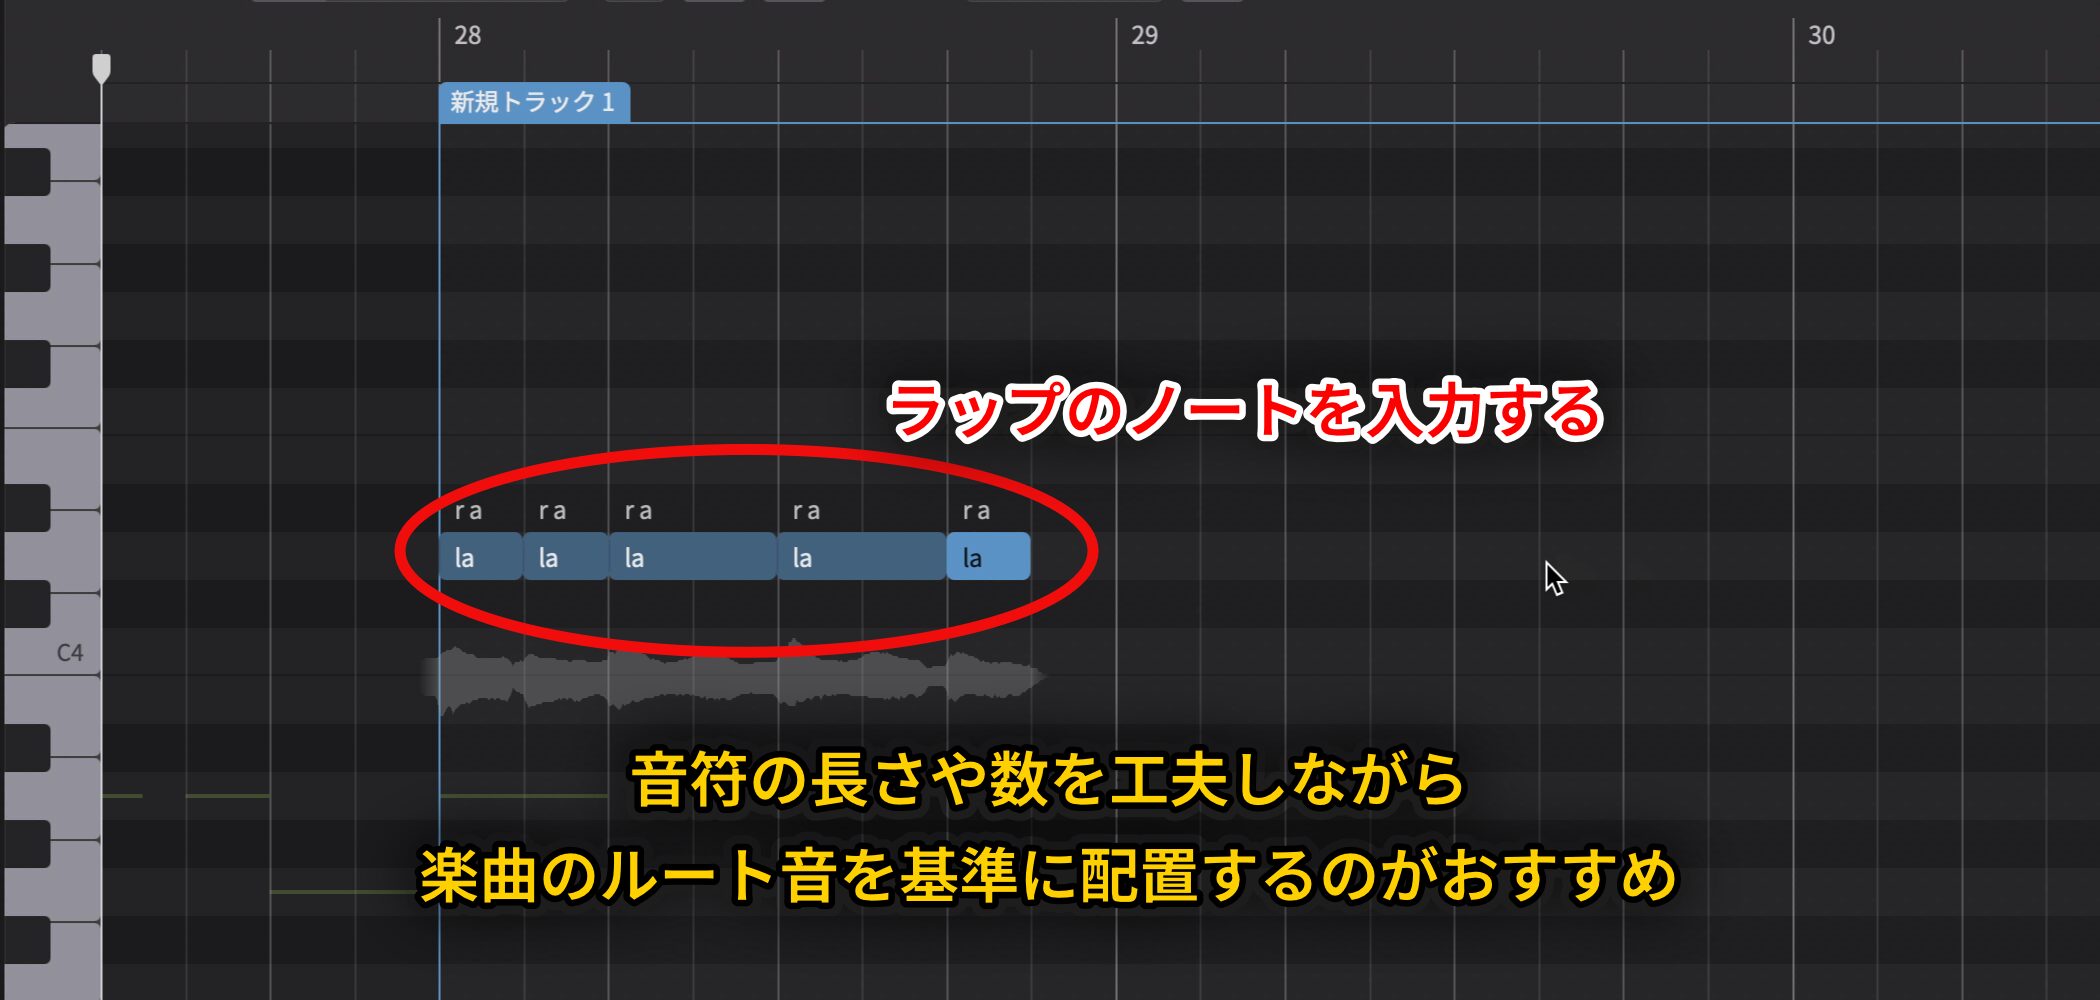
For rapid, energetic rap with many words, use more short notes. For a cooler feel with fewer words, use longer notes.
For note pitches, start by placing them around the song's root note.
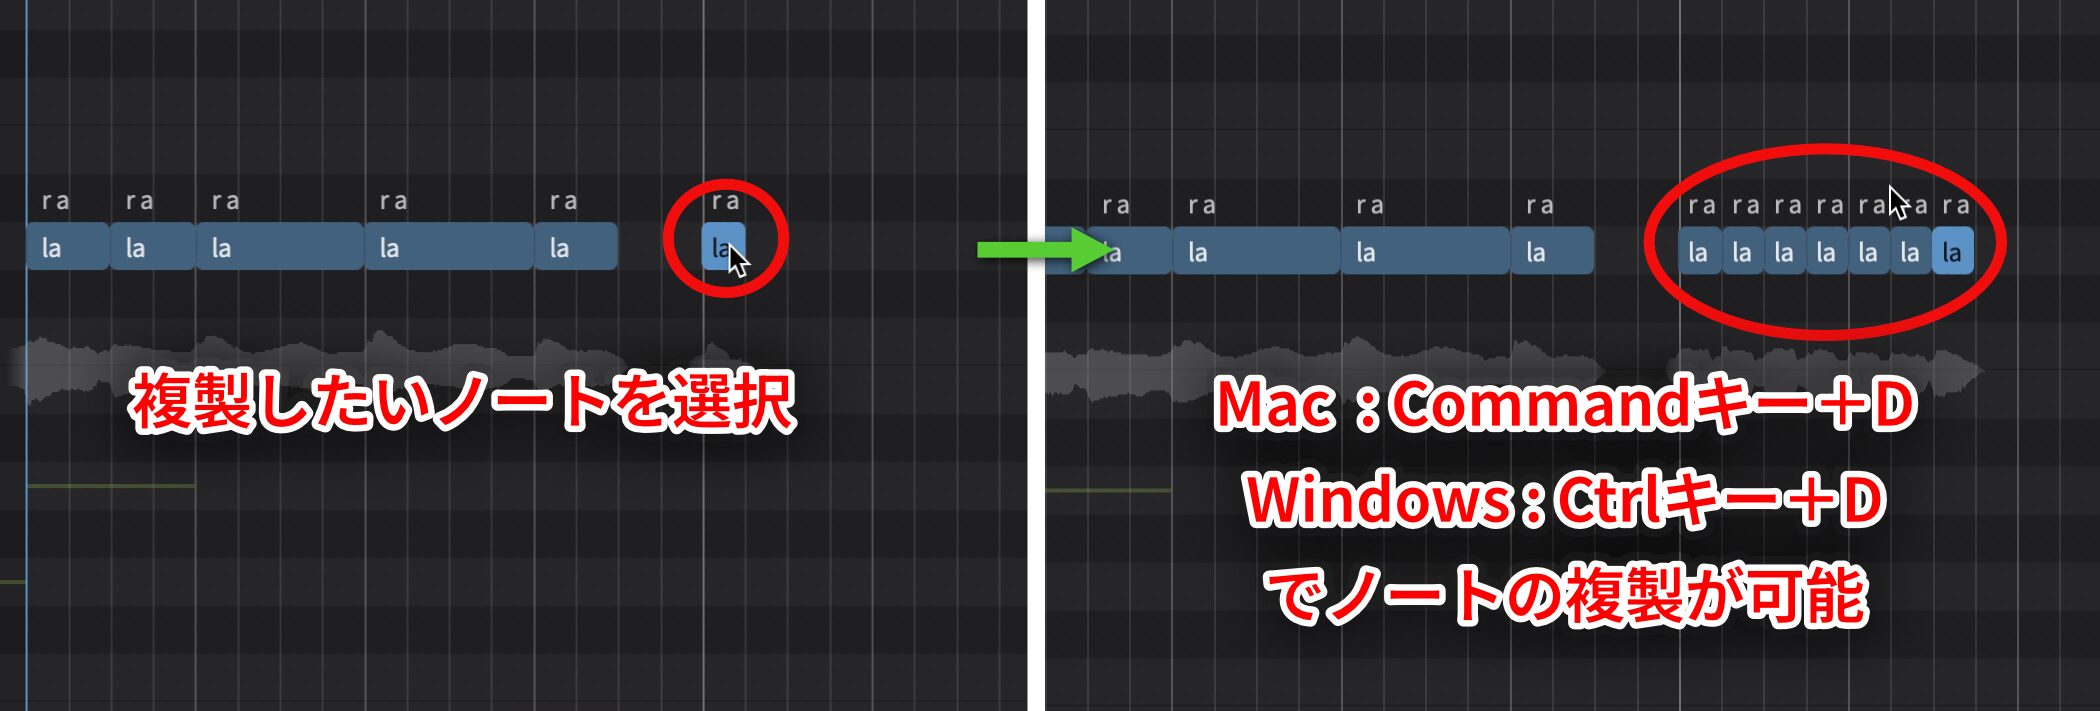
Duplicating notes is especially useful when entering many short notes in sequence for rap.
Select a note and use the shortcut below to duplicate it repeatedly:
- Mac: Command + D
- Windows: Ctrl + D
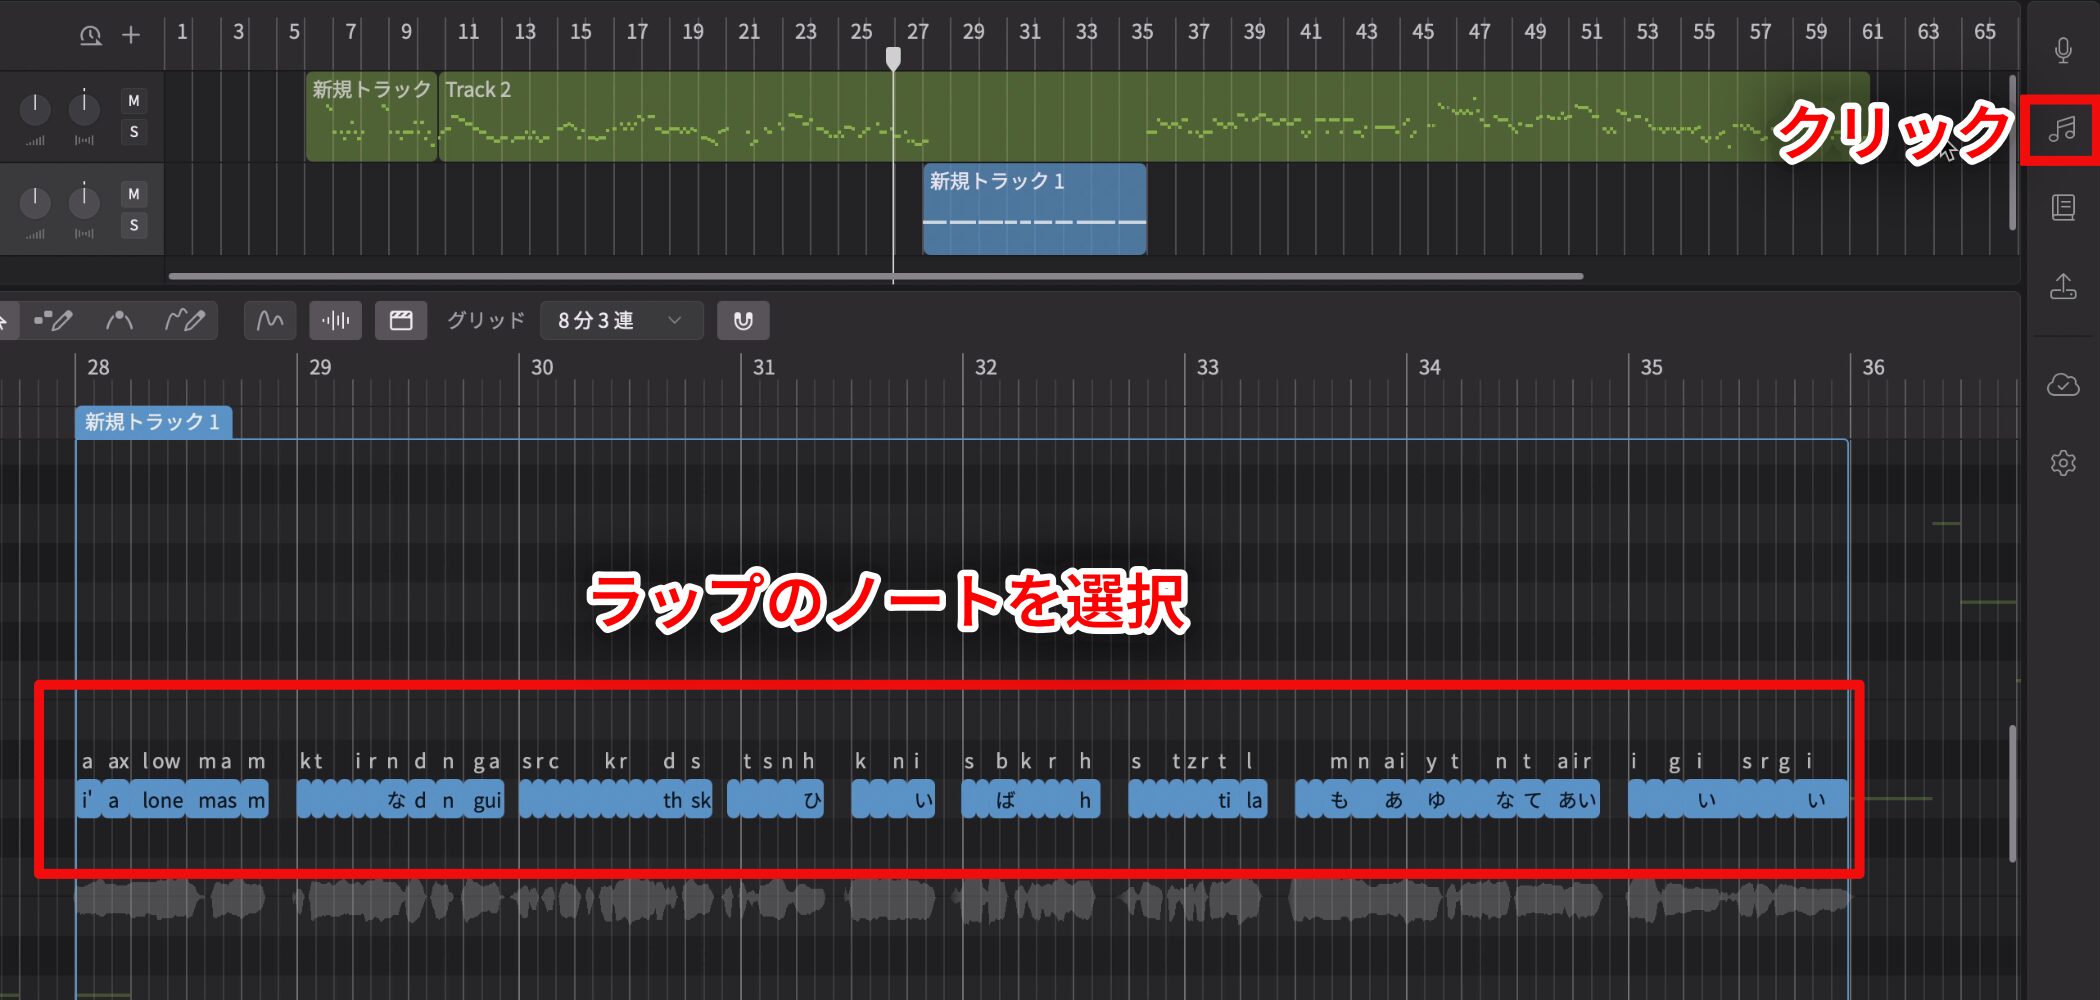
To give a part more of a rap feel, select its notes and click the musical-note icon on the right.
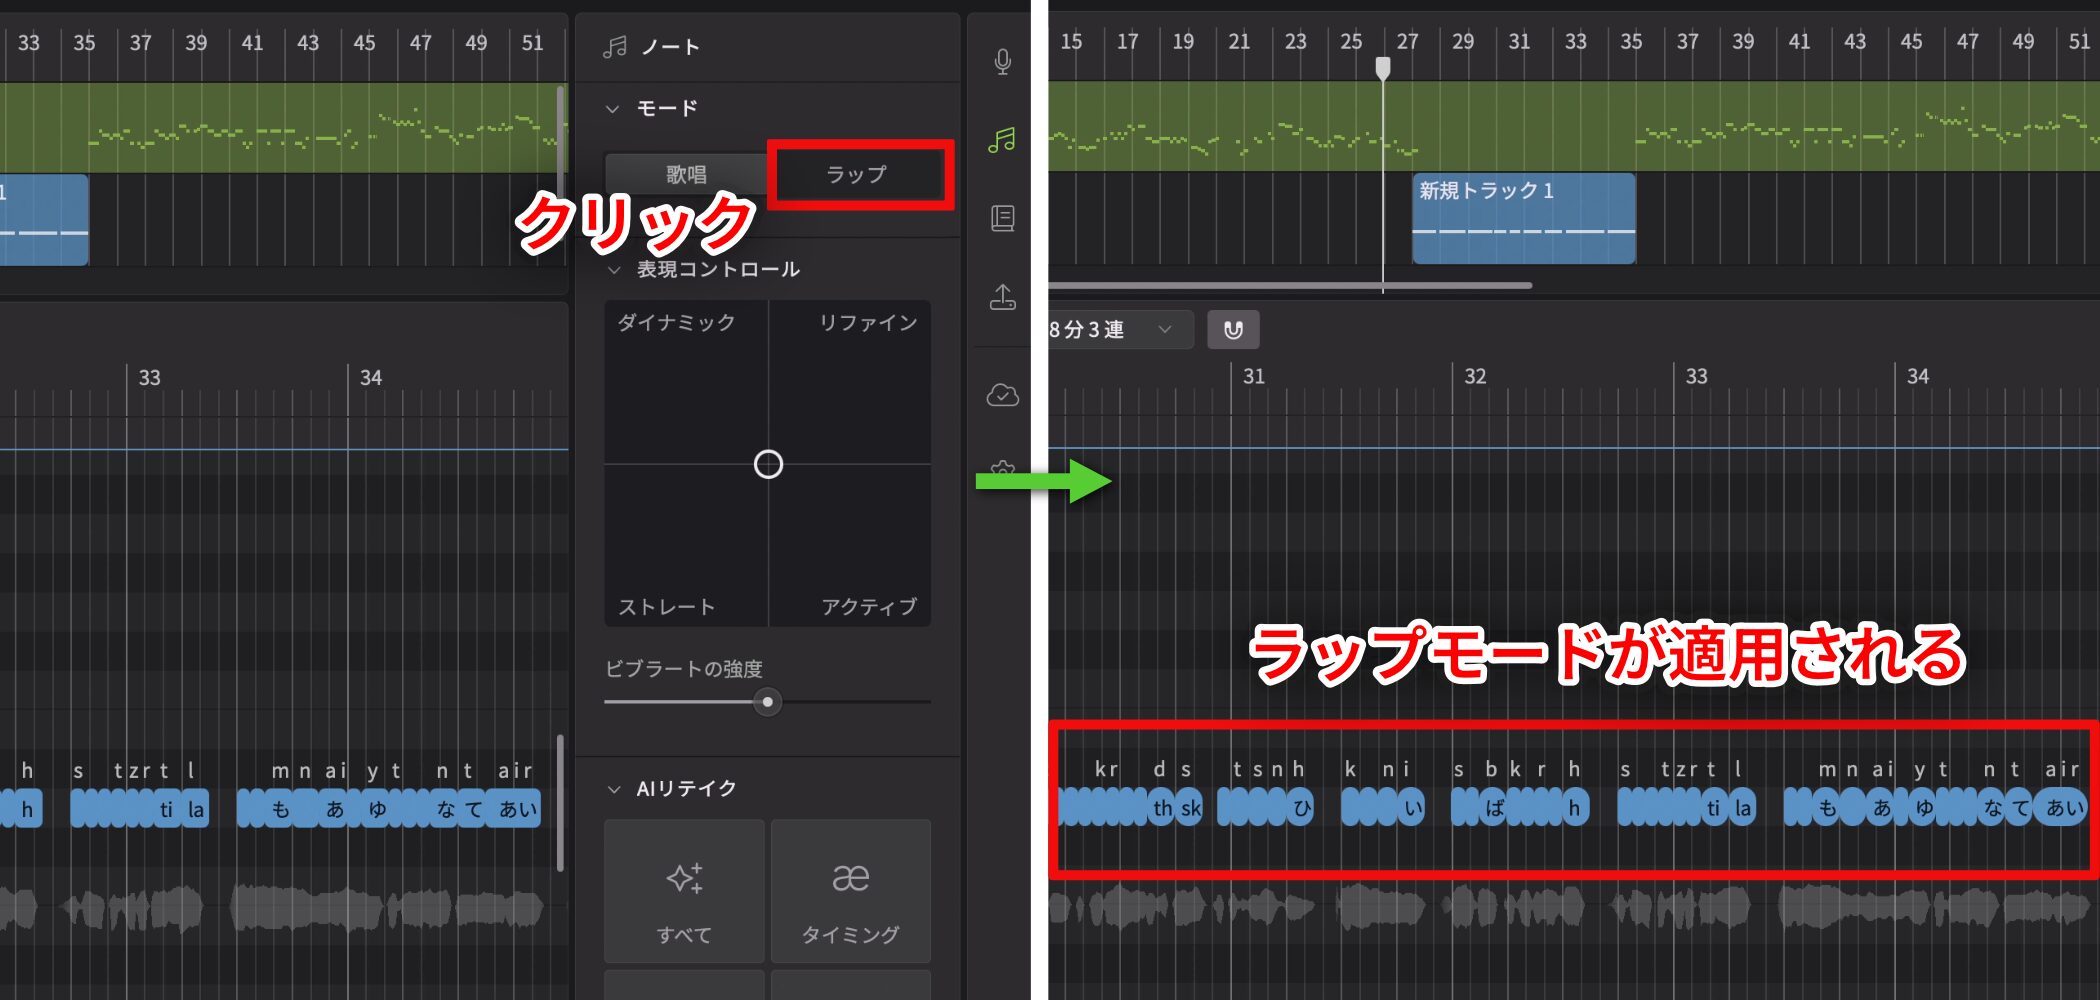
In the Note panel, choose Rap under Mode.
The note outlines become rounded, indicating Rap mode is active.
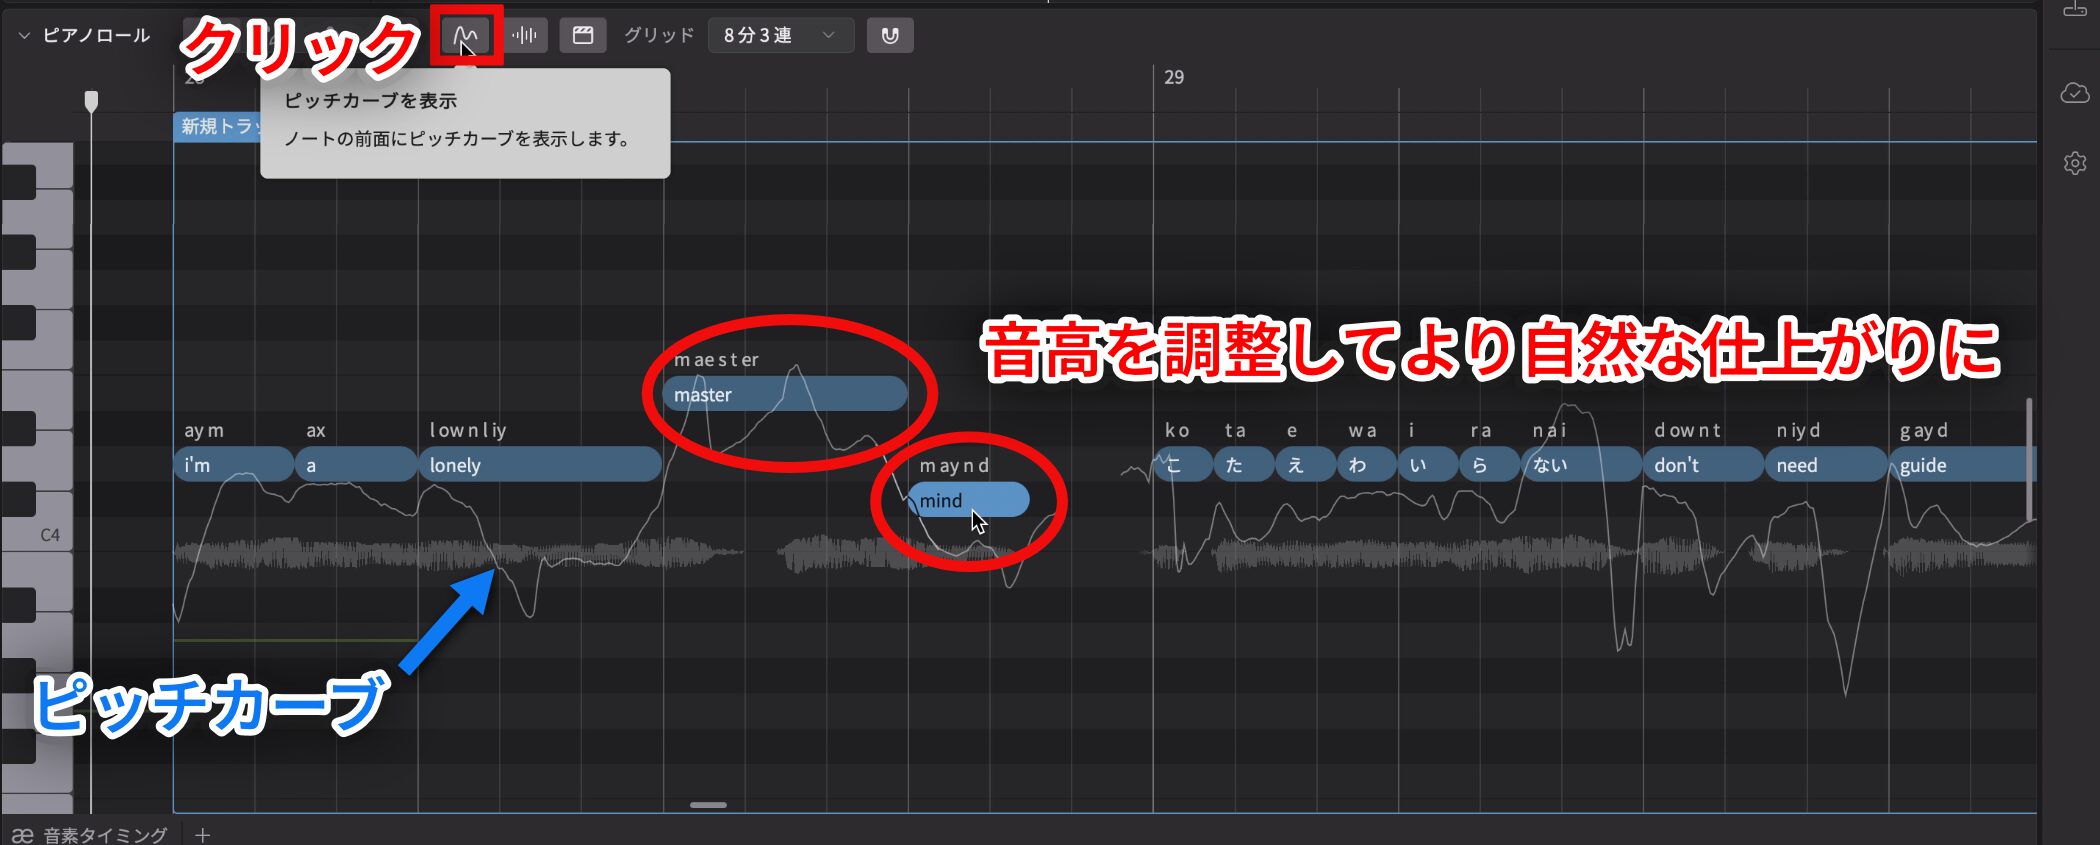
Show the pitch curve, raise sounds you want to emphasize slightly, and lower the ends of phrases. Adjusting the notes' pitches can create natural, speech-like inflection.
Basic Adjustments for a More Expressive Voice
Synthesizer V Studio 2 Pro offers vocal styles and parameters for detailed adjustments that bring the generated voice closer to what you imagine.
This section explains how to shape vocal nuances for different song sections, such as verses and choruses.
Use Vocal Styles
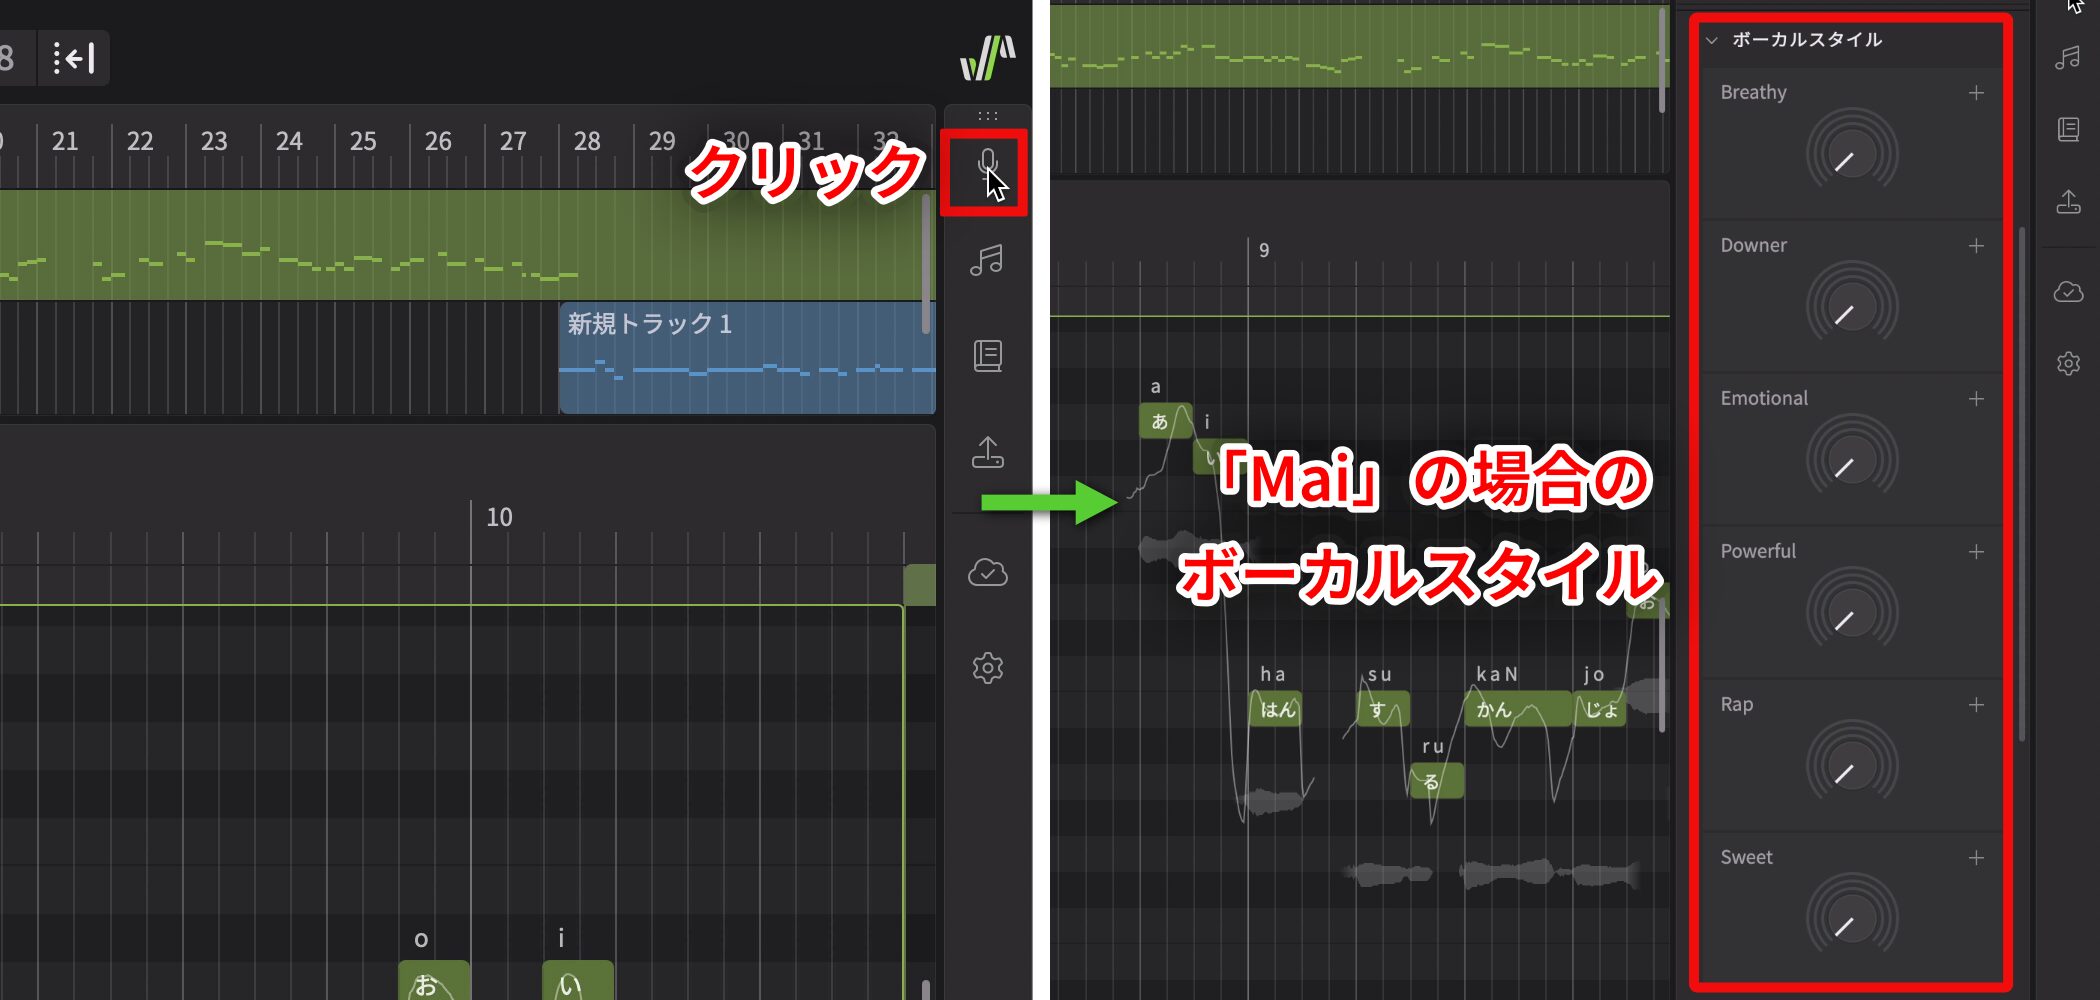
Click the microphone icon on the right to open the Voice panel, then choose Vocal Style to adjust the voice.
A vocal style is like a preset for how the singer performs, and the available options differ by voice database.
For Mai, for example, you can use these styles:
- Breathy: A gentle, whispery voice with plenty of air, suited to ballads and quieter songs.
- Downer: A languid, melancholy tone suited to lyrical ballads and subdued rock.
- Emotional: An expressive, passionate tone useful in dramatic songs and rising chorus sections.
- Powerful: An energetic, resonant tone ideal for choruses, rock, and other strong styles.
- Rap: A crisp delivery focused on word definition and rhythm, suited to hip-hop and spoken sections.
- Sweet: A bright, slightly youthful tone suited to idol songs and pop.
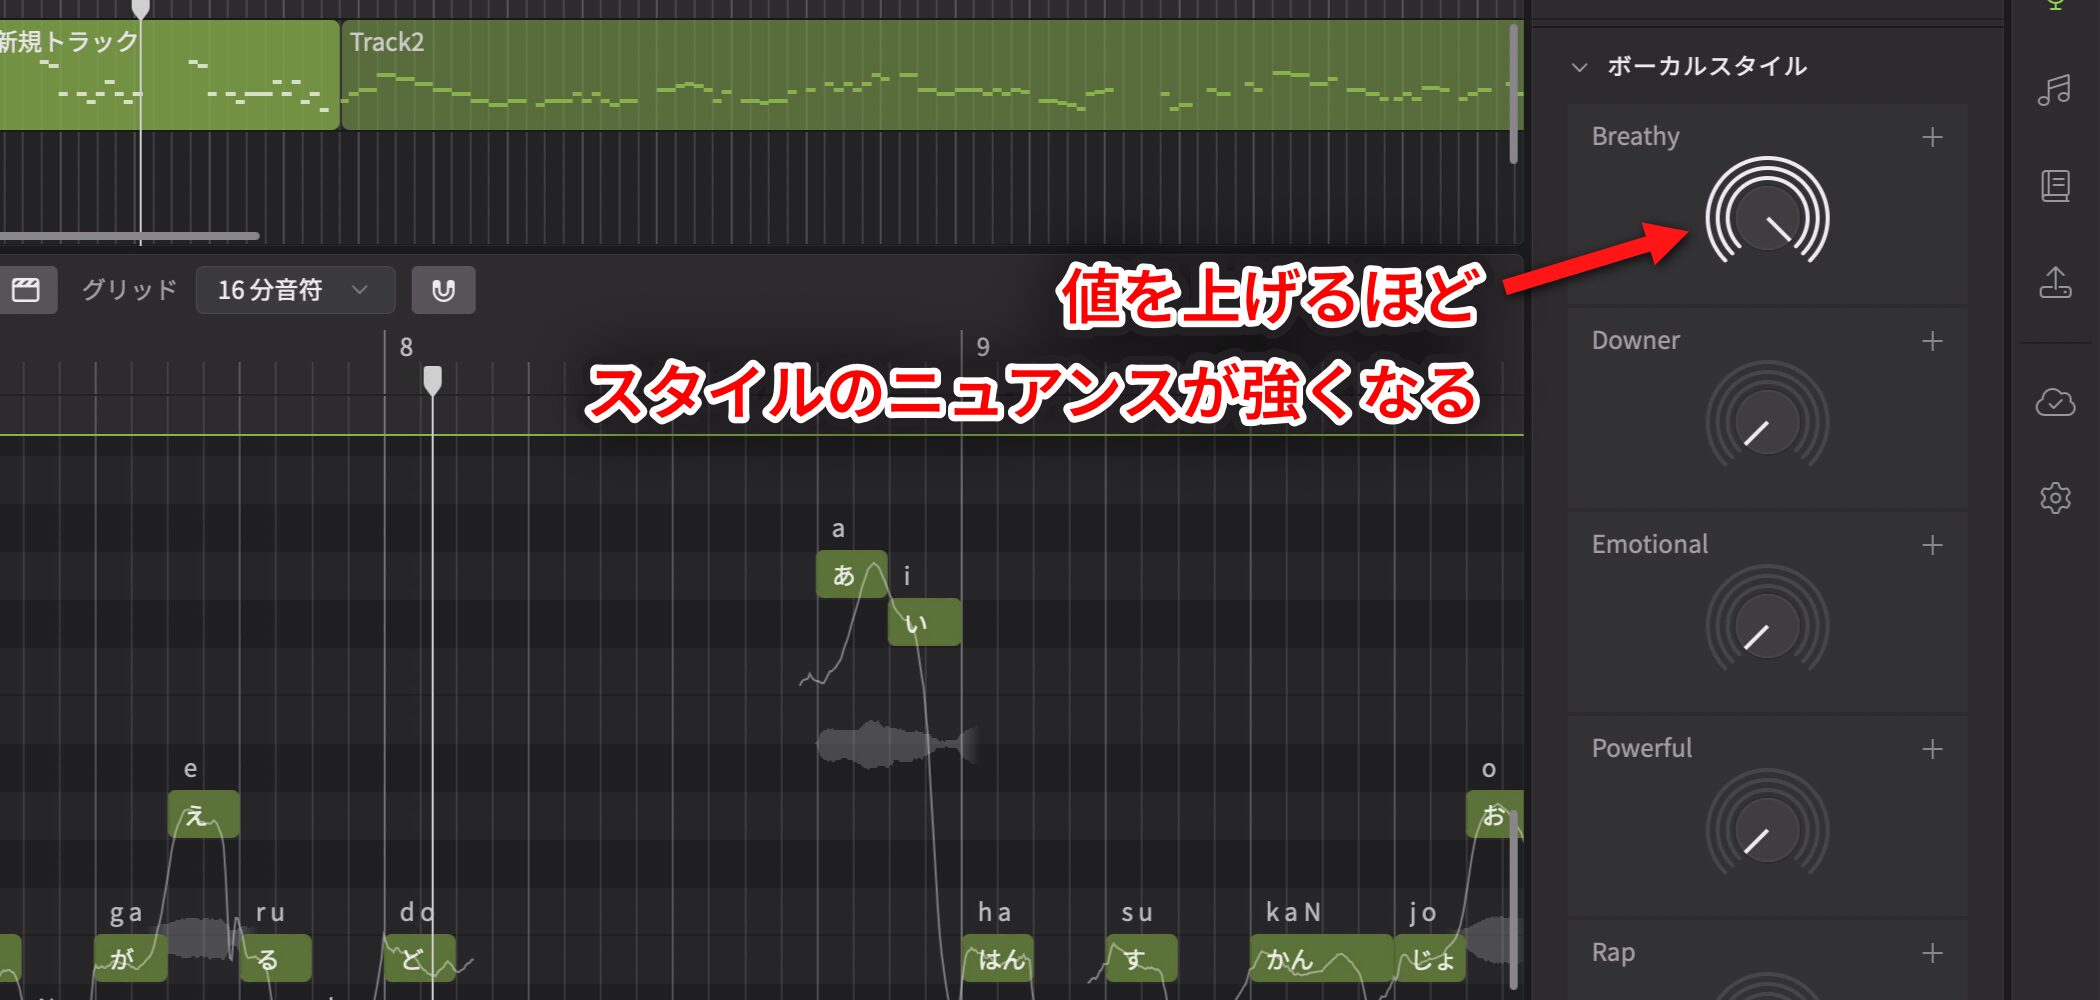
For a vocal style, higher values make that style's character more pronounced.
To give the first verse a softer feel, compare an unadjusted example with one that has more Breathy style.
You may be surprised by how much the impression changes.
Even without adjusting individual parameters, changing the Vocal Style alone can create a natural performance.
Split Groups to Control Where Adjustments Apply
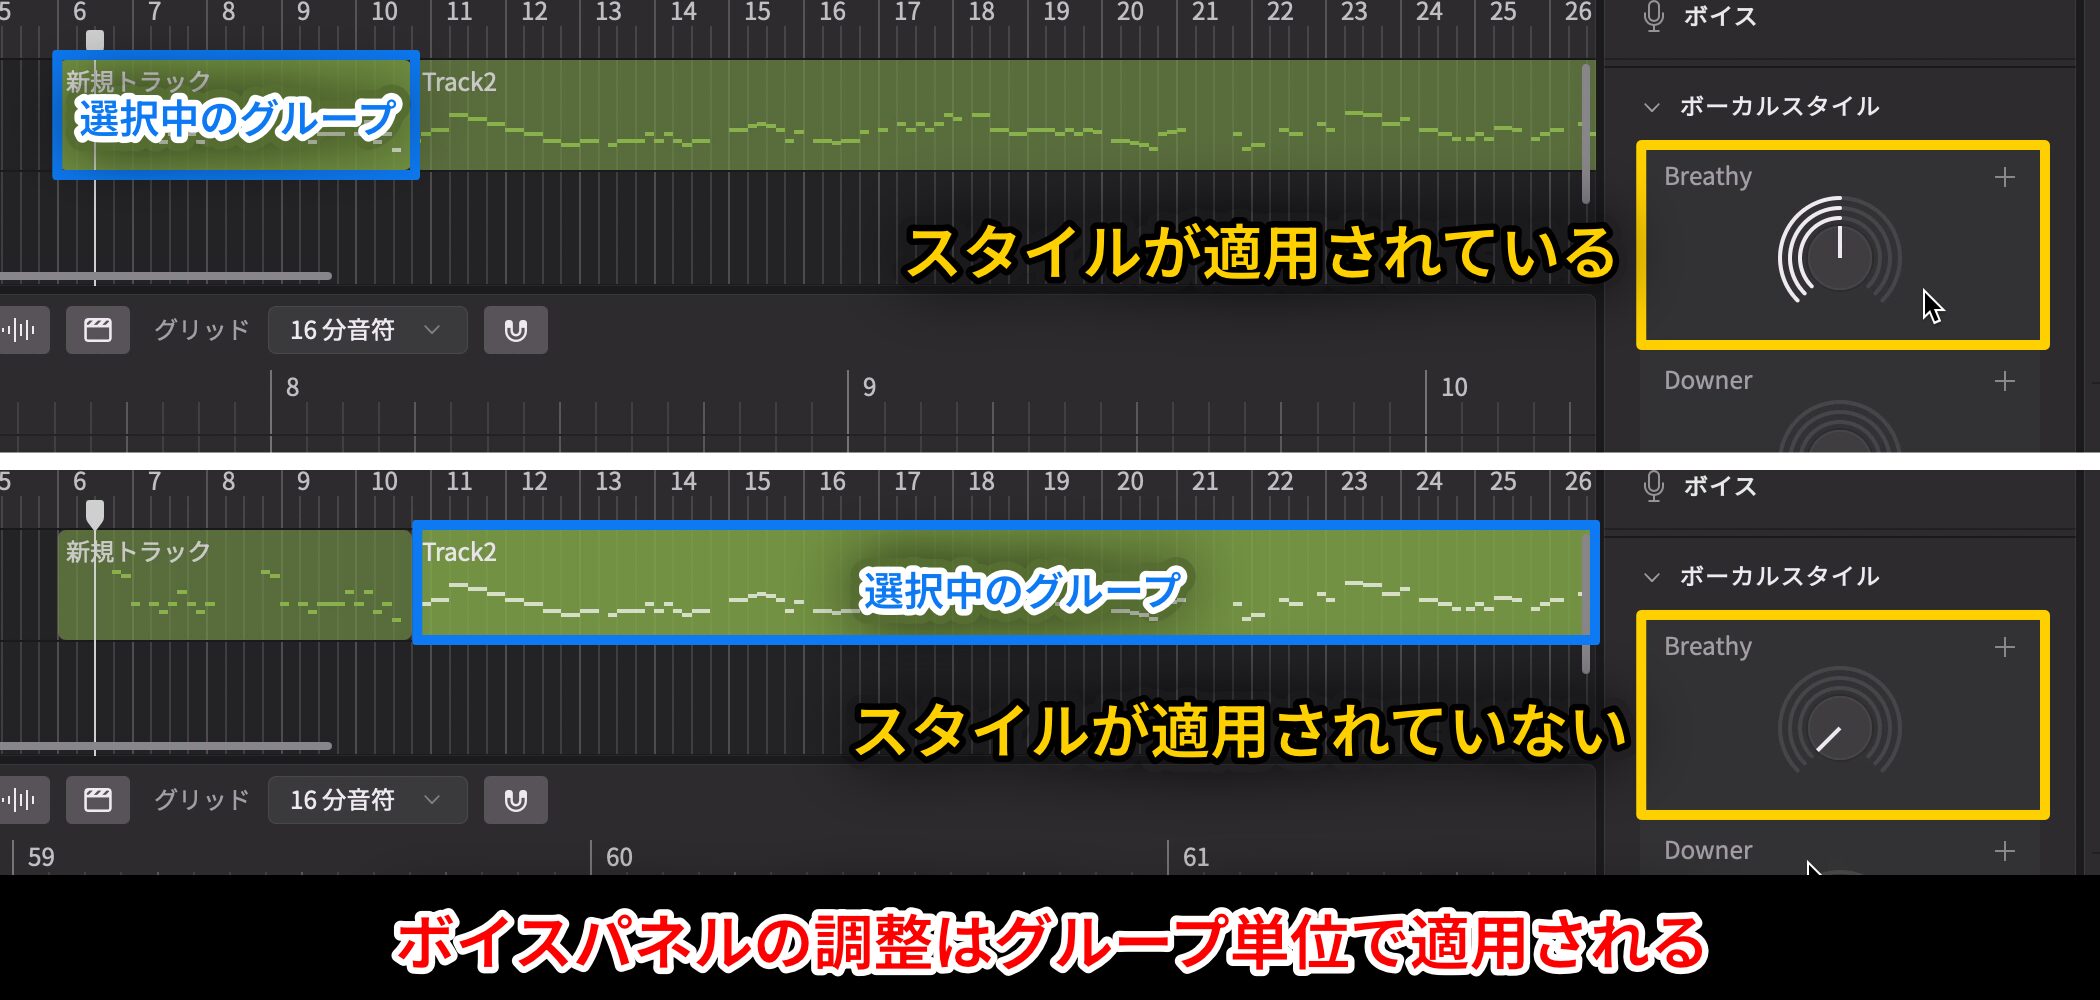
There is one important point about the Voice panel: Vocal Style and parameter changes apply to an entire Group.
To adjust individual sections or specific passages, split the Group first.
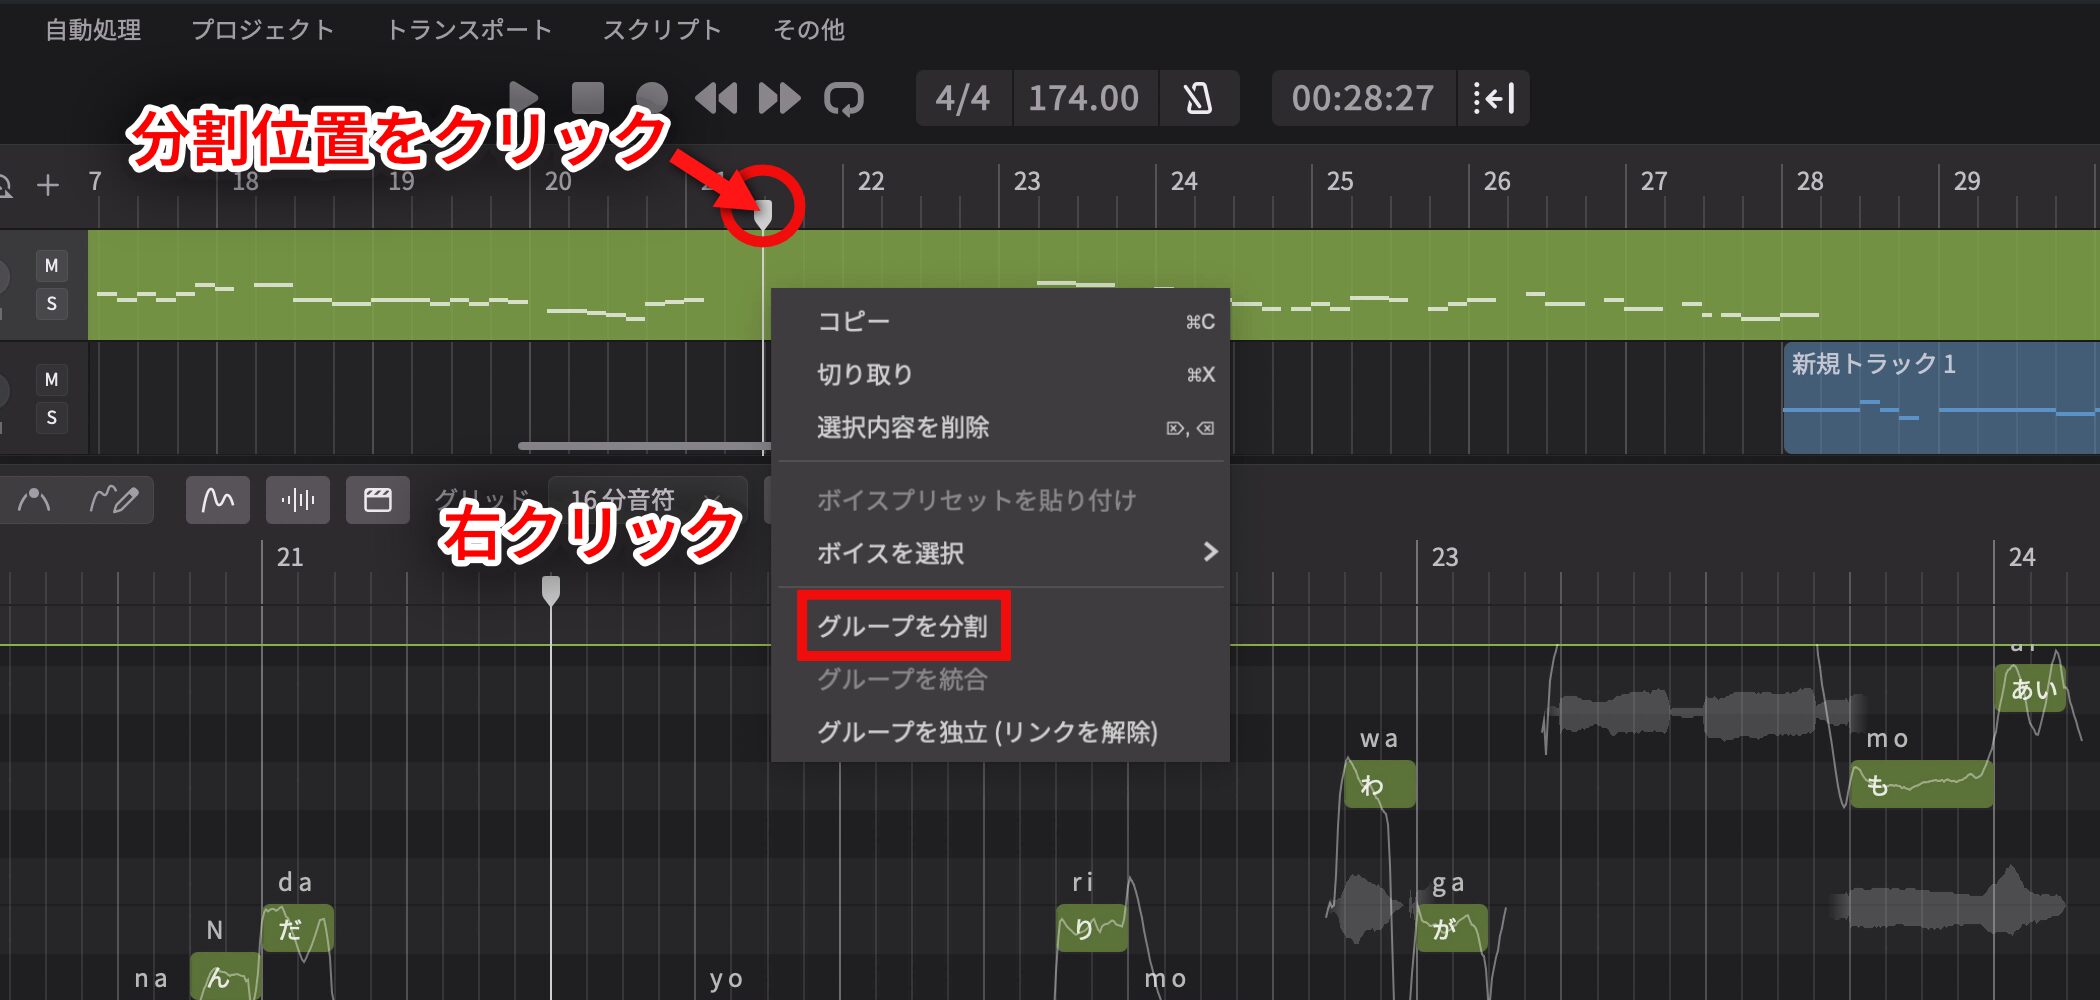
Move the playhead to the desired split point, right-click, and choose Split Group.
You do not have to split exactly at a bar line. Splitting about one beat before the singing begins can make editing easier.
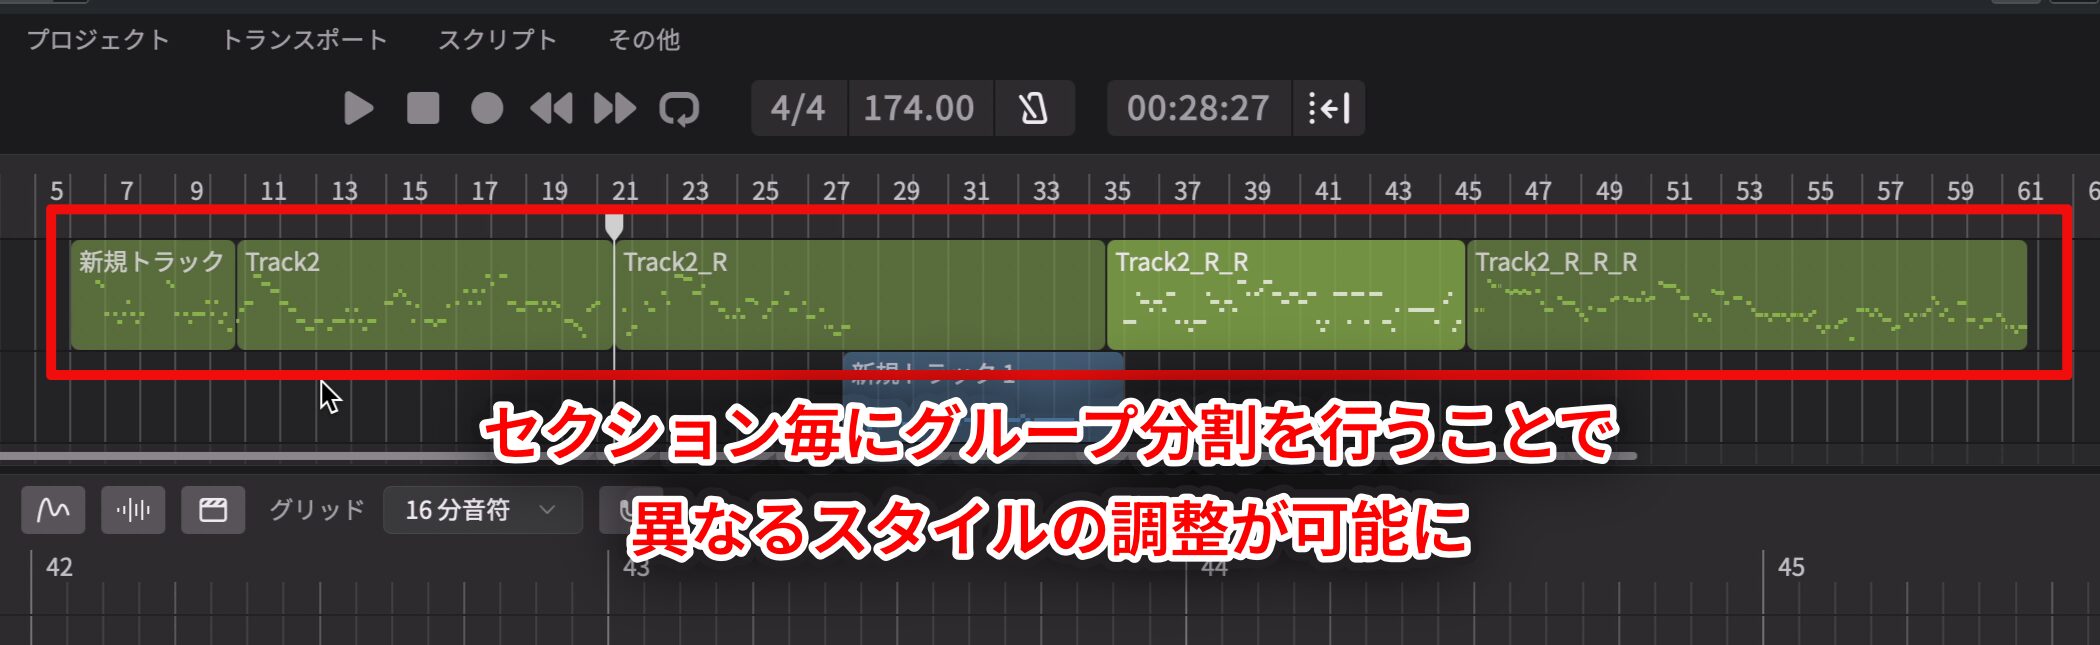
Split Groups at the other section boundaries too, so you can apply different style settings to each section.
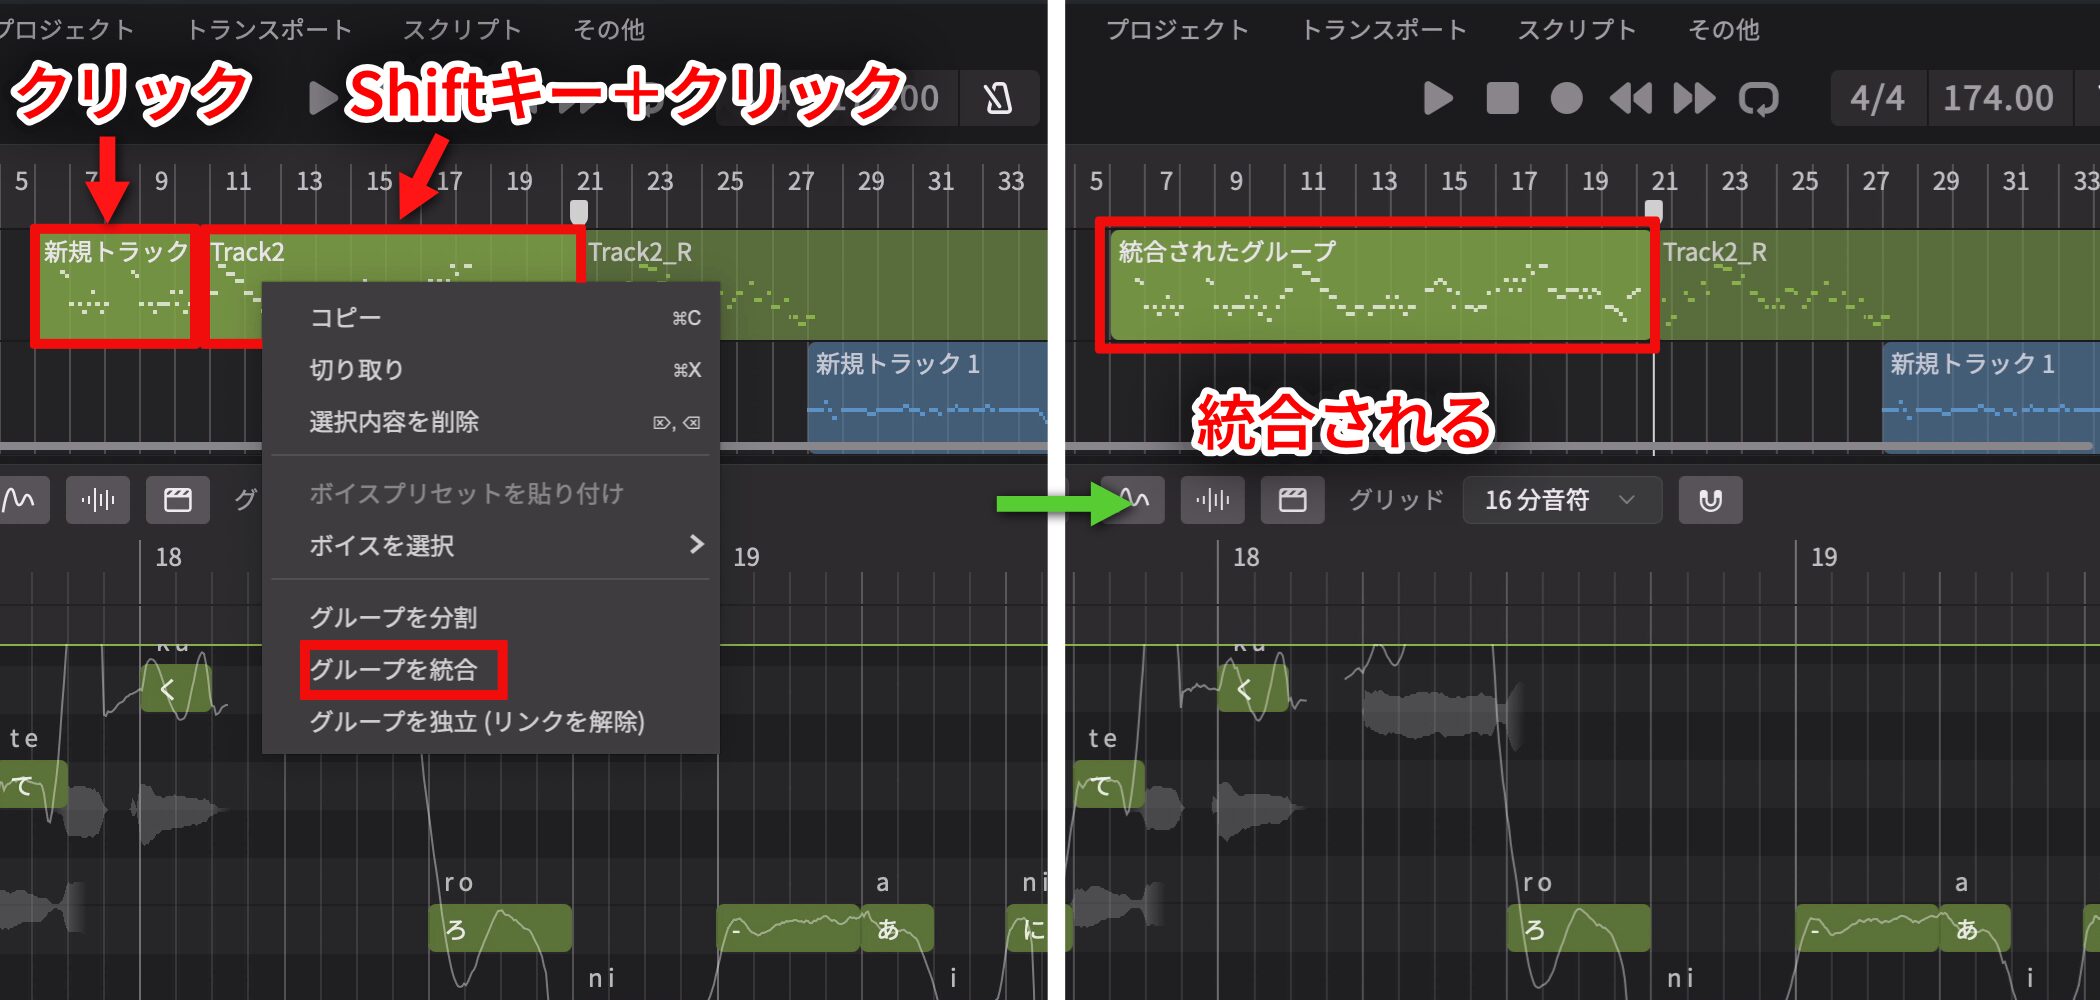
You can also merge Groups.
Select one Group, hold Shift while selecting the Groups to join, then right-click and choose Merge Groups.
Be aware that merging Groups resets settings adjusted in the Voice panel. Reapply them as needed.
Tips for Chorus Vocal Styles
Because the chorus is often the most energetic part of a song, start by deciding how far to push its Vocal Style. You can then balance the other sections against it.
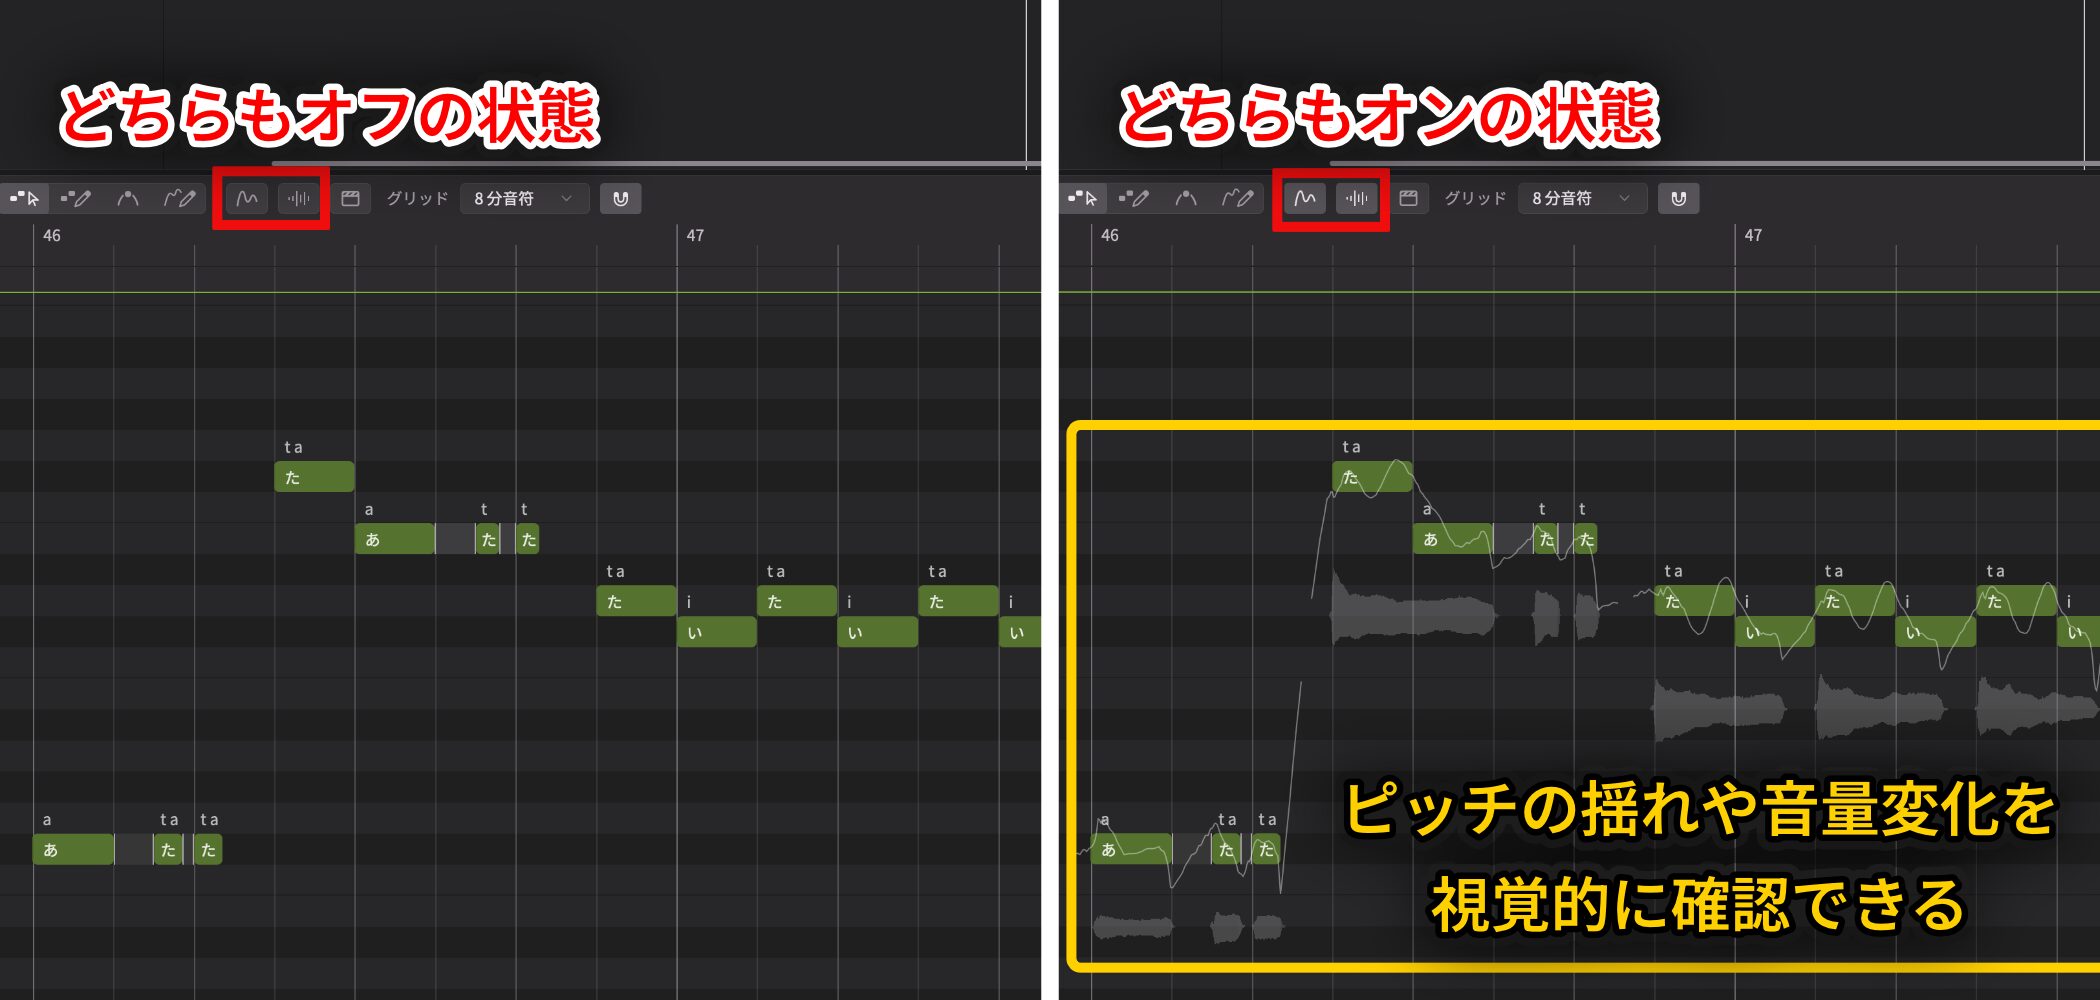
Turn on the pitch curve and waveform while adjusting so you can see pitch movement and changes in level.
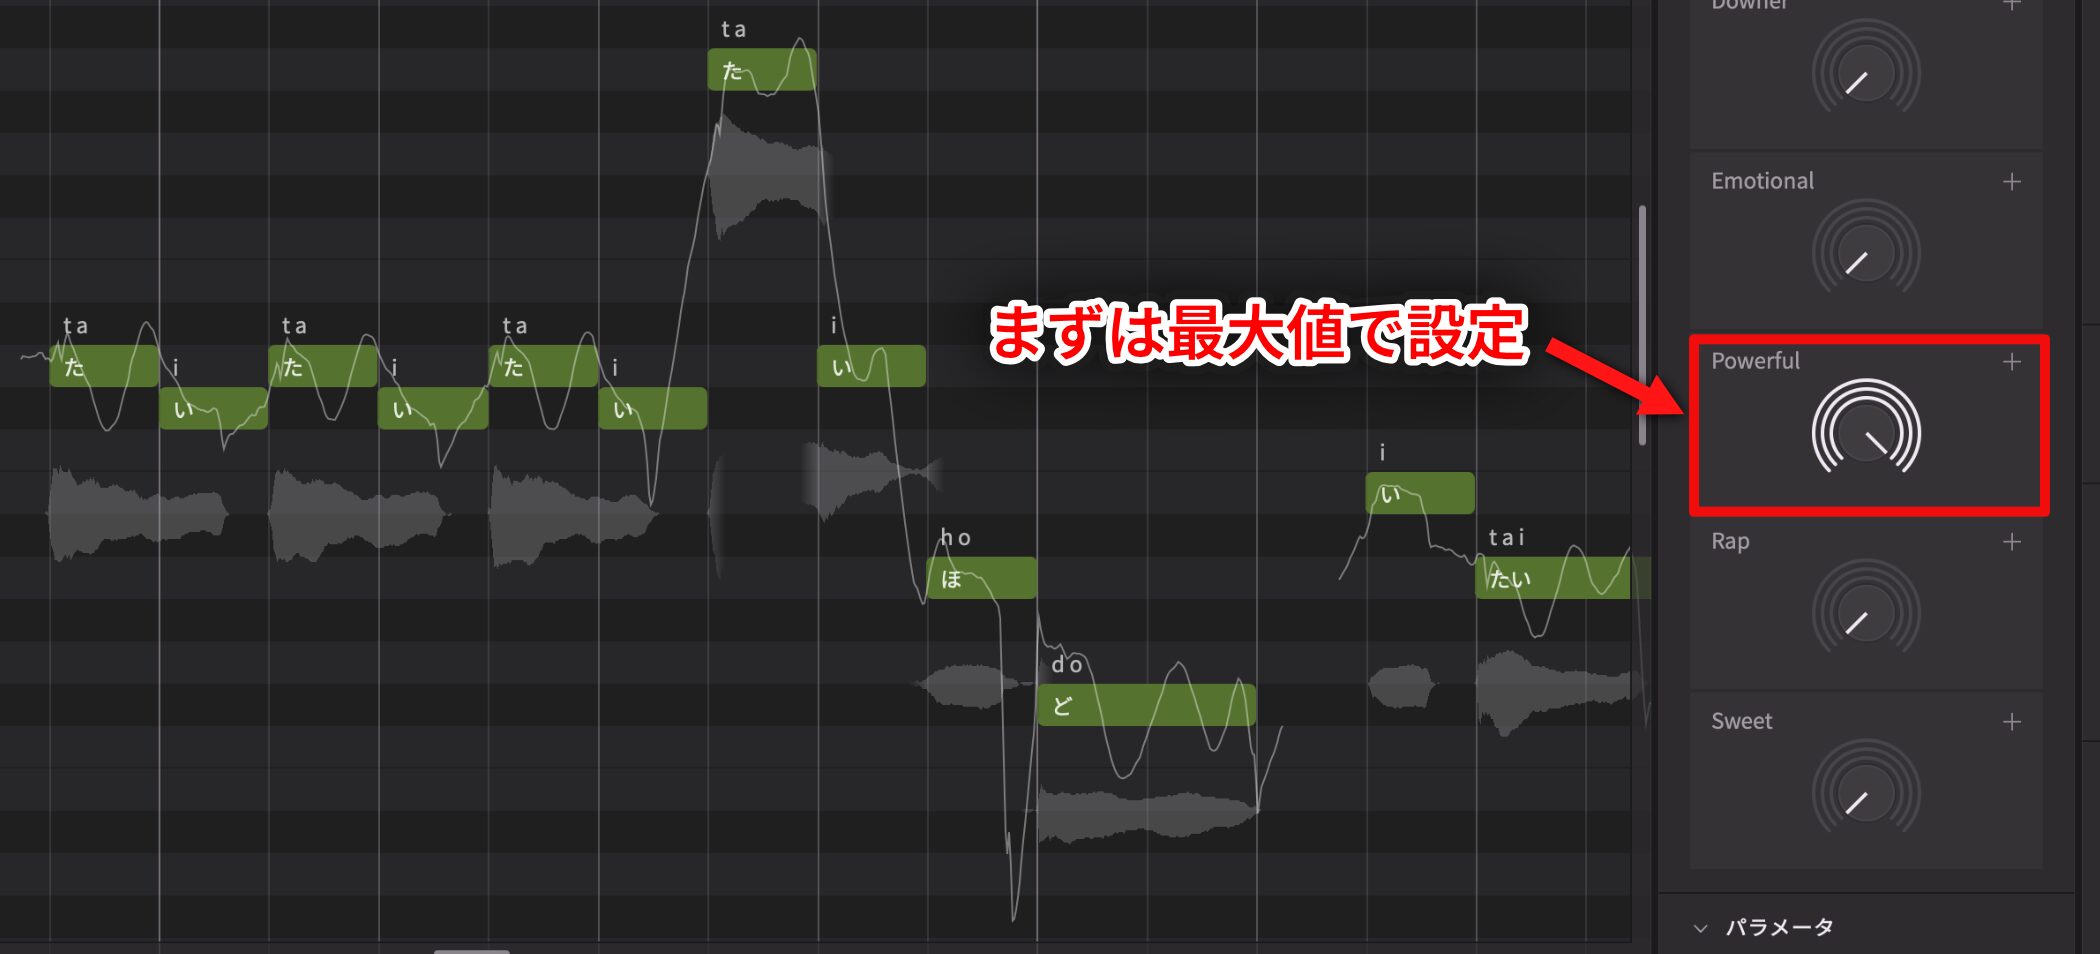
For this example, apply the strong Powerful style to suit a chorus.
Compare the ordinary chorus with the same passage set to the maximum Powerful value.
At its maximum, it sounds a little too forceful, so lower the value.
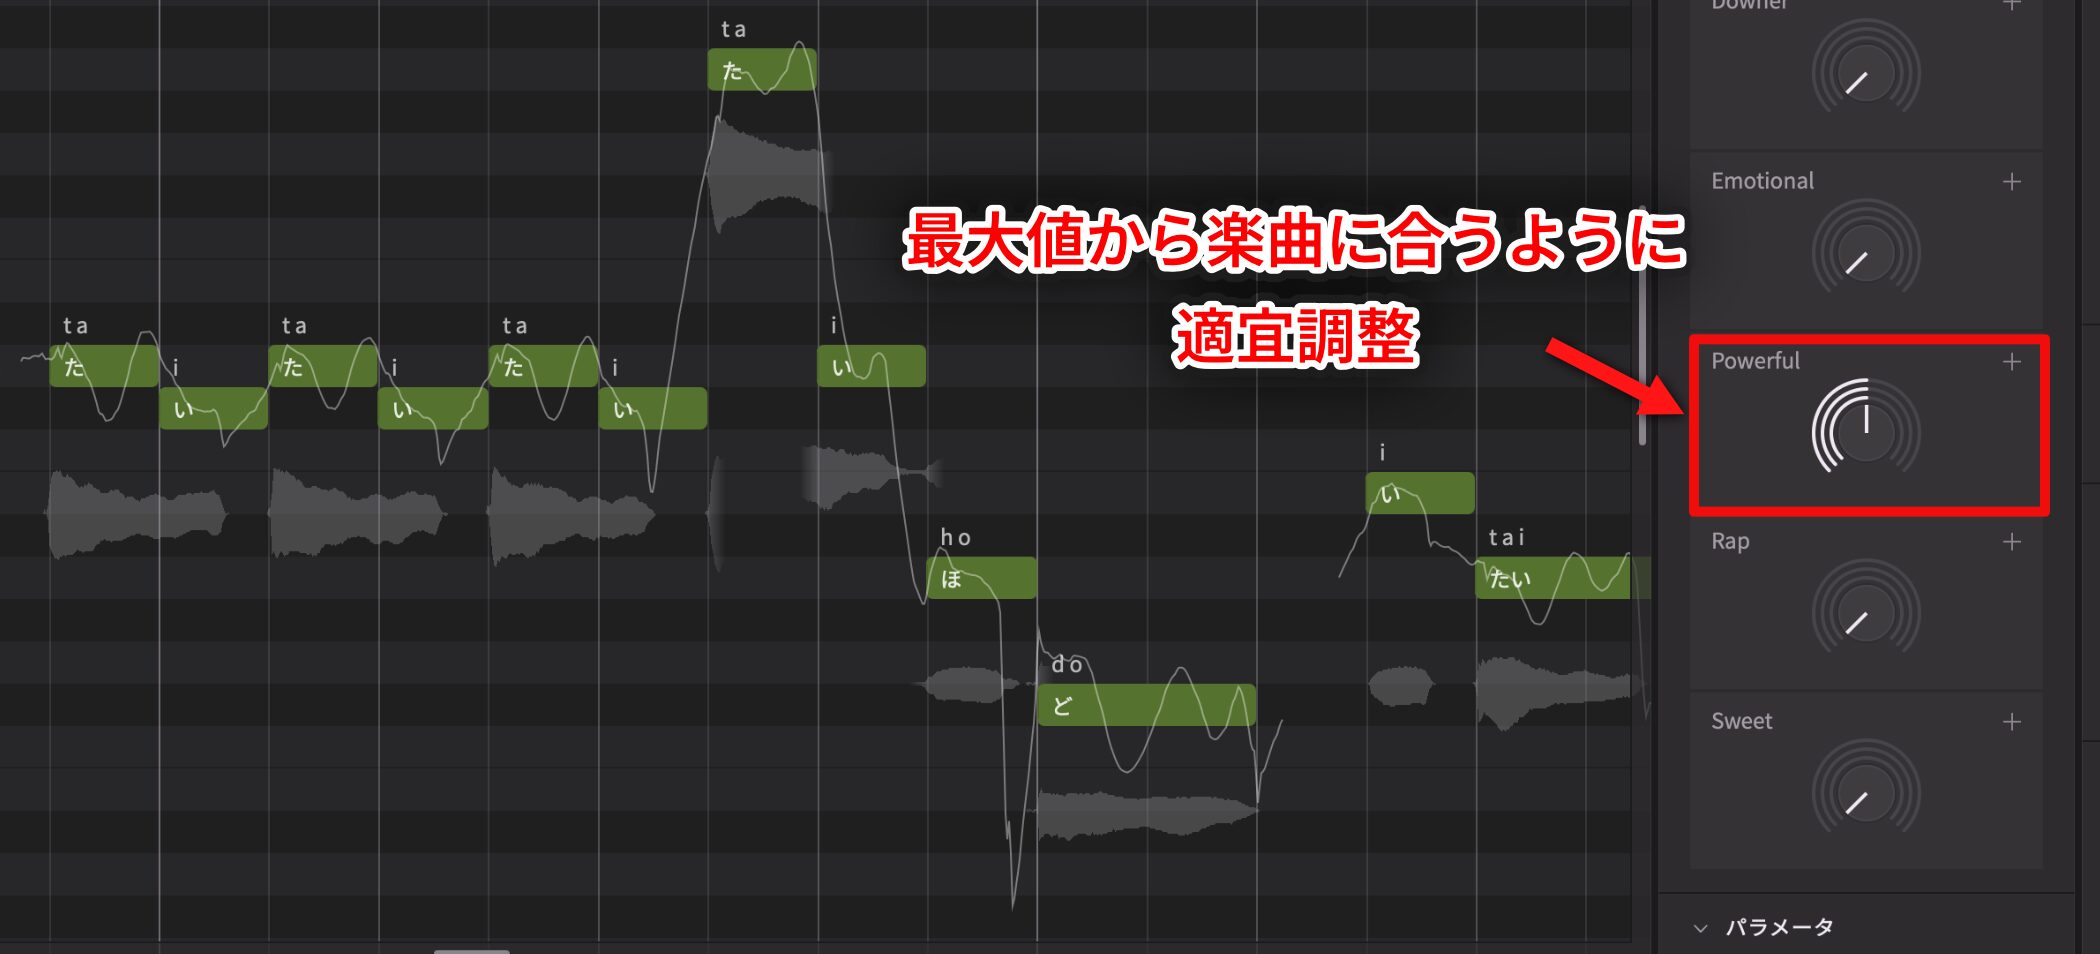
A useful approach is to try a Vocal Style at its maximum first, hear its character, then dial it back as needed.
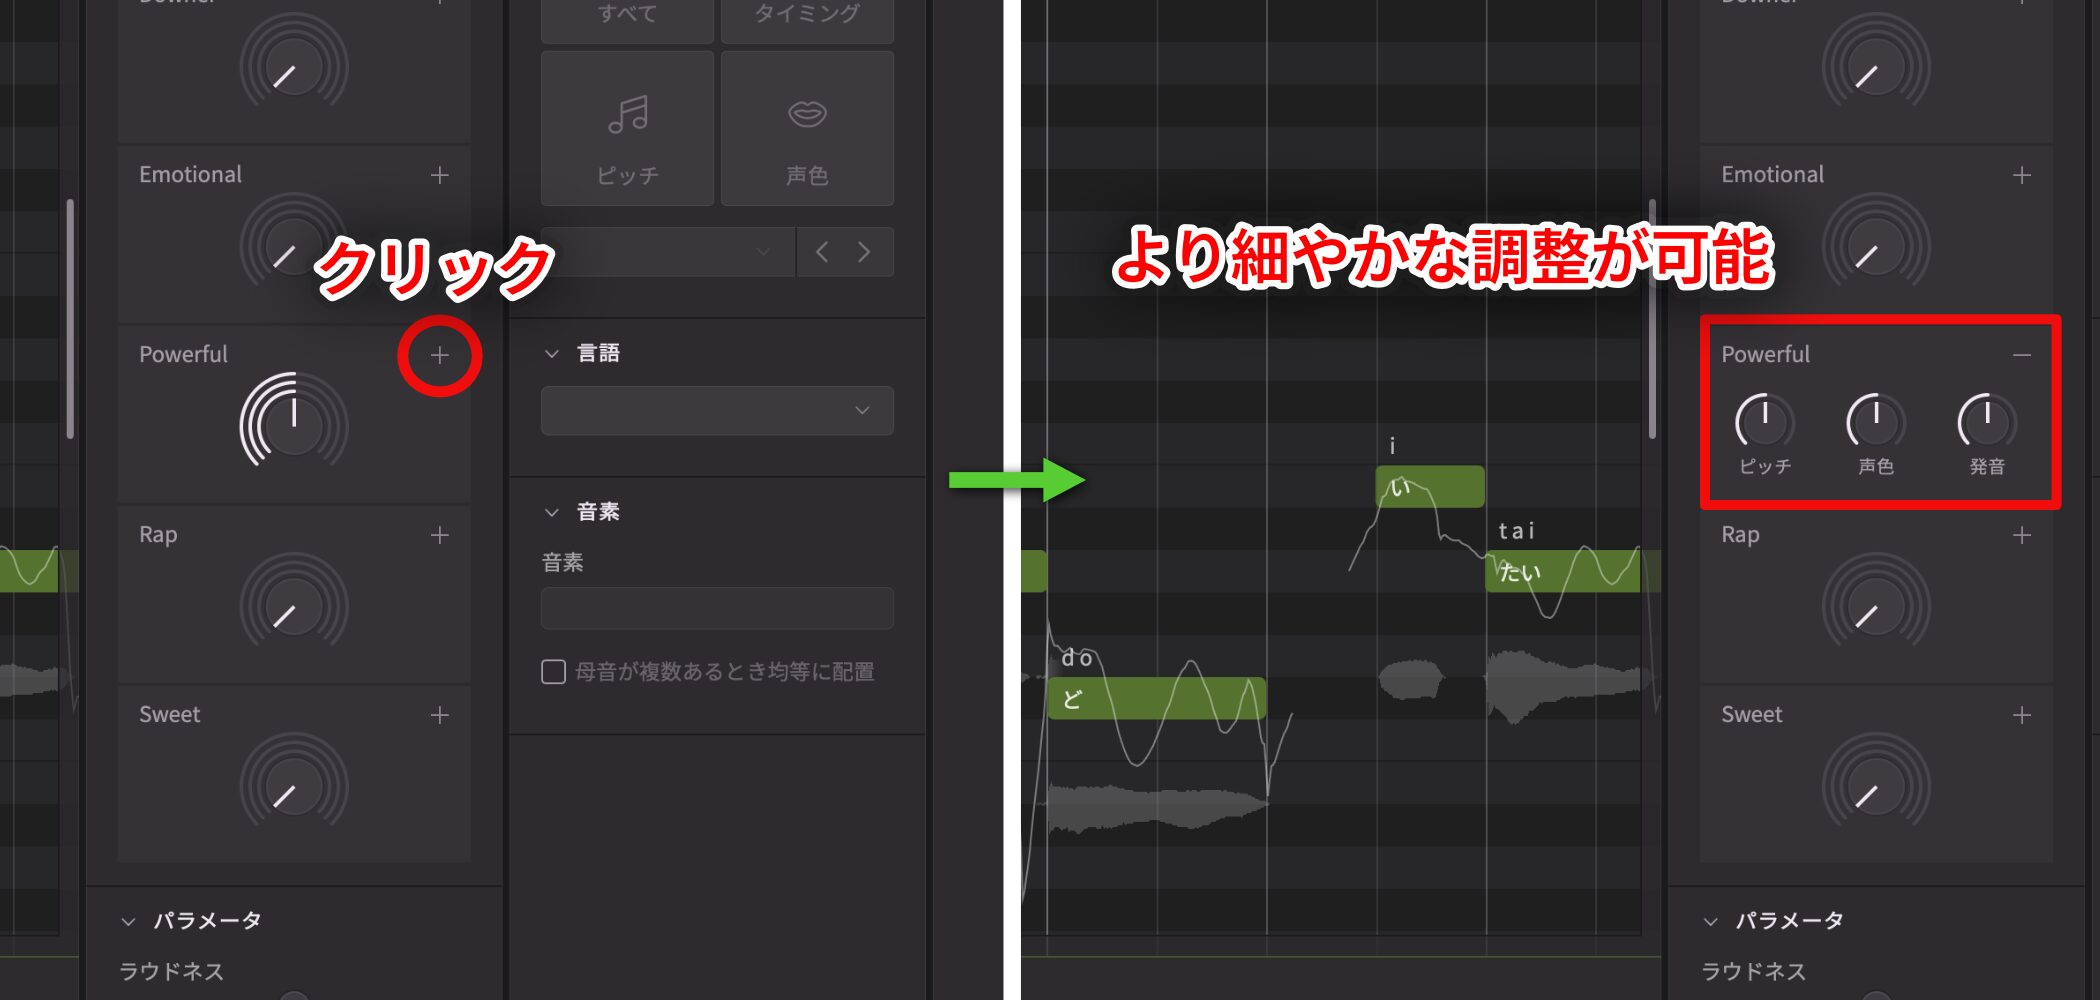
Click the plus icon at the upper right of a style to open a panel for finer adjustments.
Combining styles is usually enough, but the detailed controls can help when you want a more subtle nuance.
Fine-Tune with Parameters
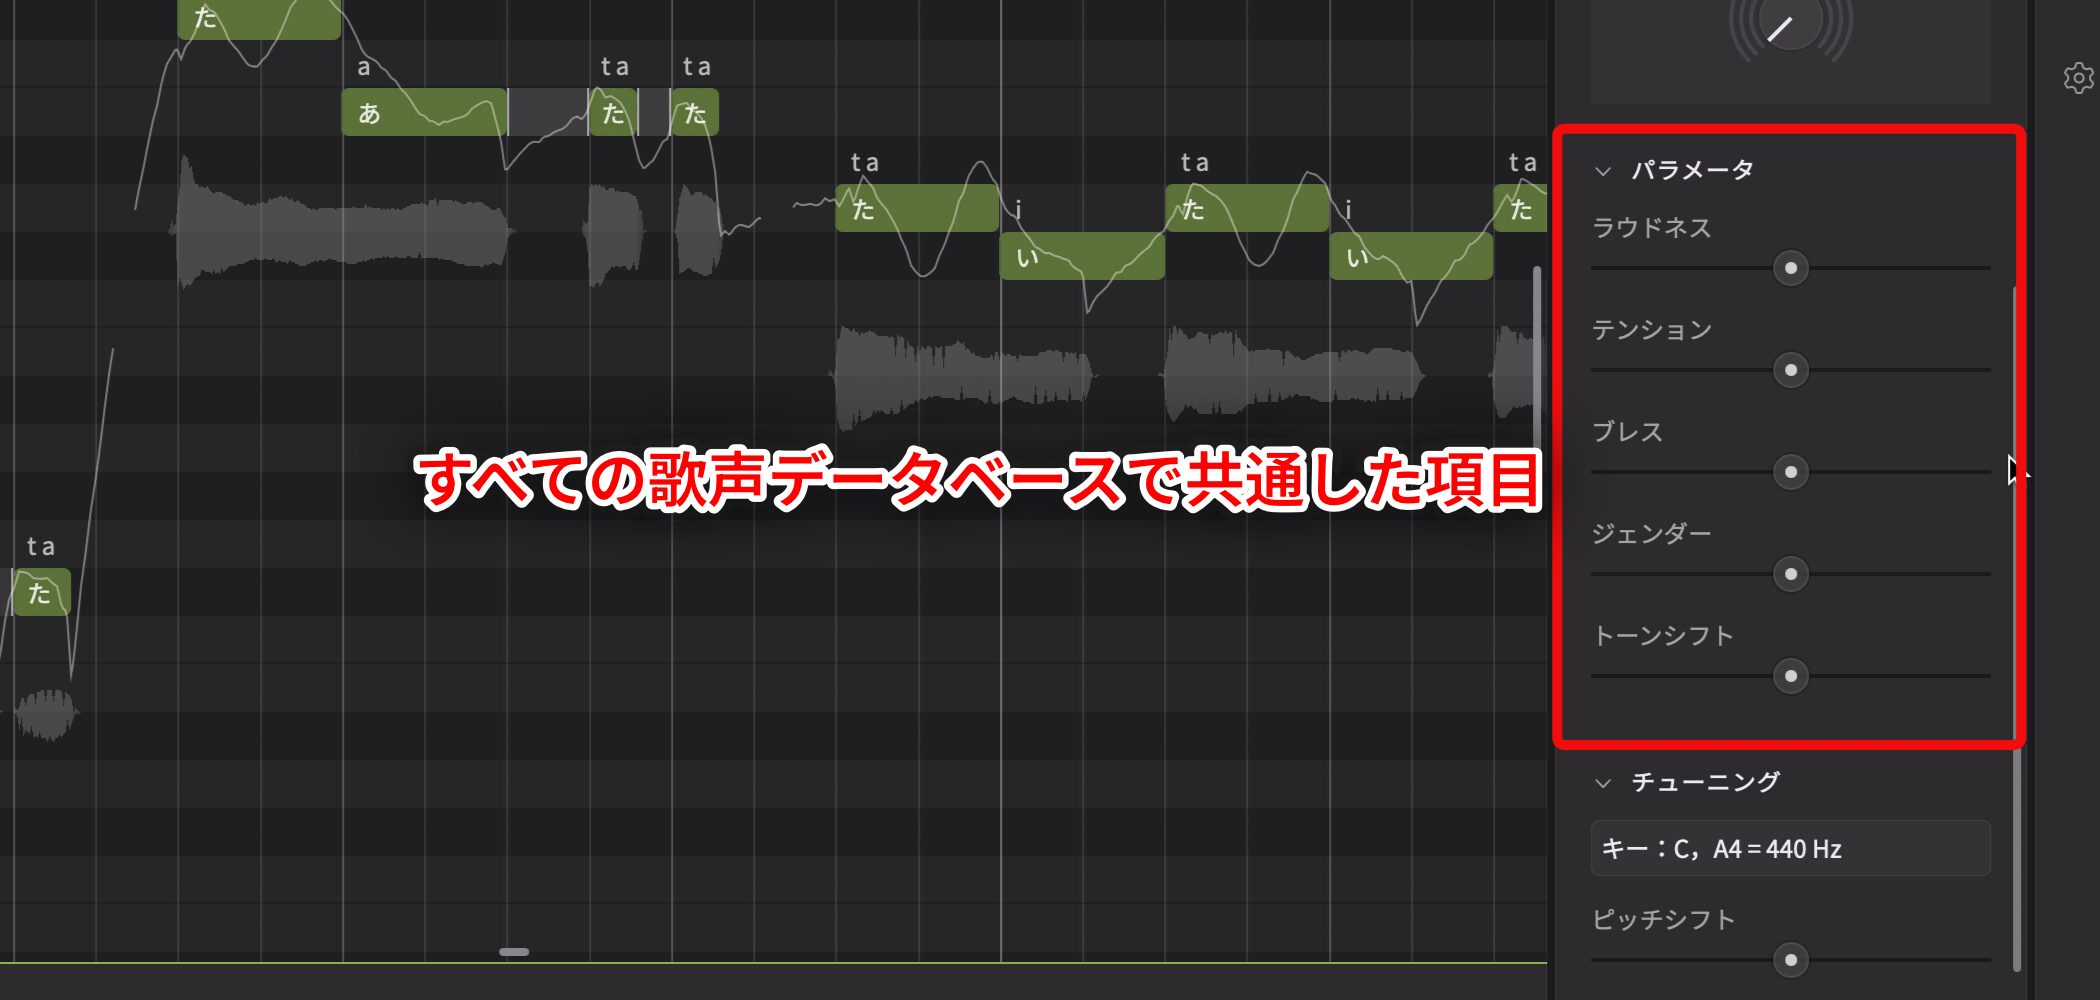
Parameters are available across all voice databases. Each has a different effect:
- Loudness: Controls vocal level and can add phrasing, dynamics, and emphasis as well as changing overall volume.
- Tension: Changes firmness, intensity, and punch. Higher values sound stronger; lower values sound more muted.
- Breathiness: Changes the amount of breath. Higher values add an airy, whispery quality; lower values make the voice drier.
- Gender: Changes vocal character. Higher values sound thicker and more masculine; lower values sound thinner and more feminine.
- Tone Shift: Changes vocal register. Higher values move toward a high-register, falsetto-like tone; lower values toward a low-register, chest-voice tone.
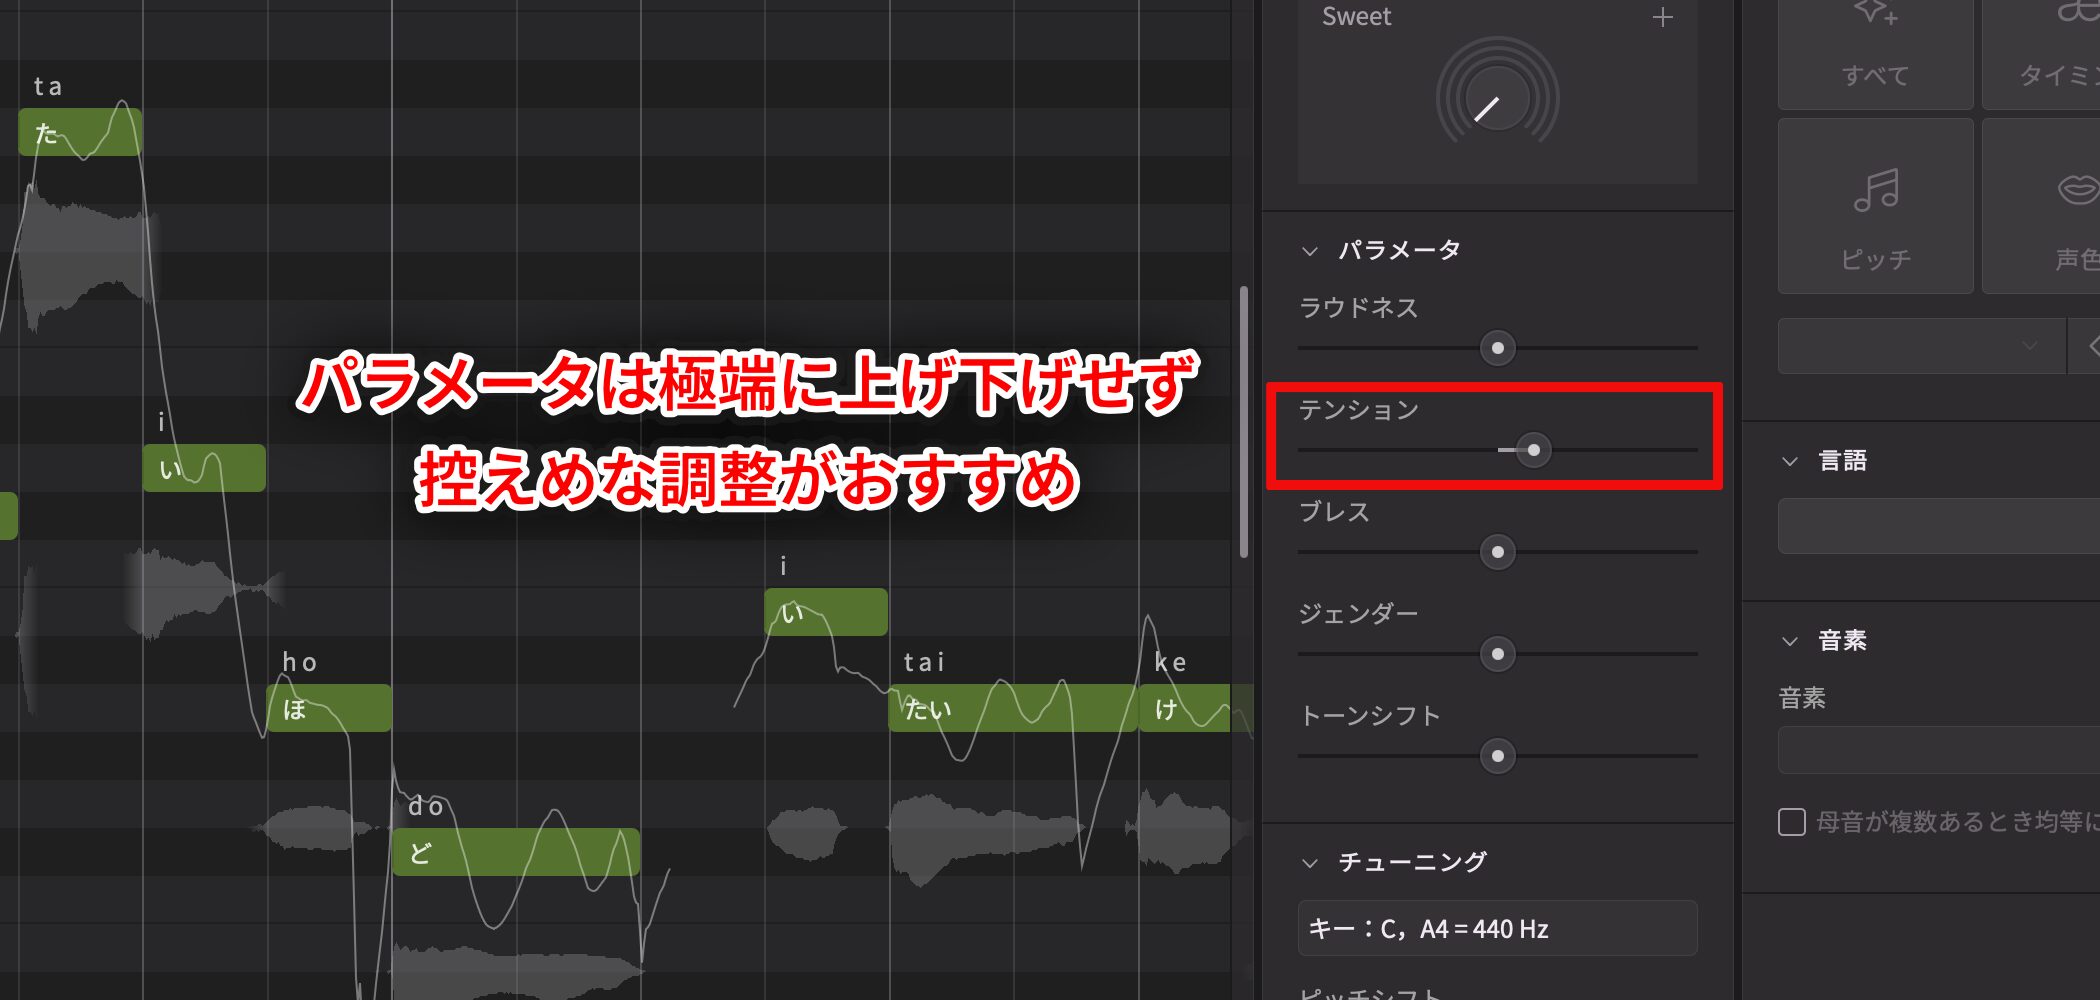
Parameters can have a strong effect, so avoid extreme changes and make small adjustments.
Vocal Style changes often sound more natural. Beginners can start there, then use parameters if they need to get closer to a specific sound.
Check the Result and Review Settings by Section
After adjusting styles and parameters for each section, listen to the entire song.
The example song used these settings to match its character:
First verse
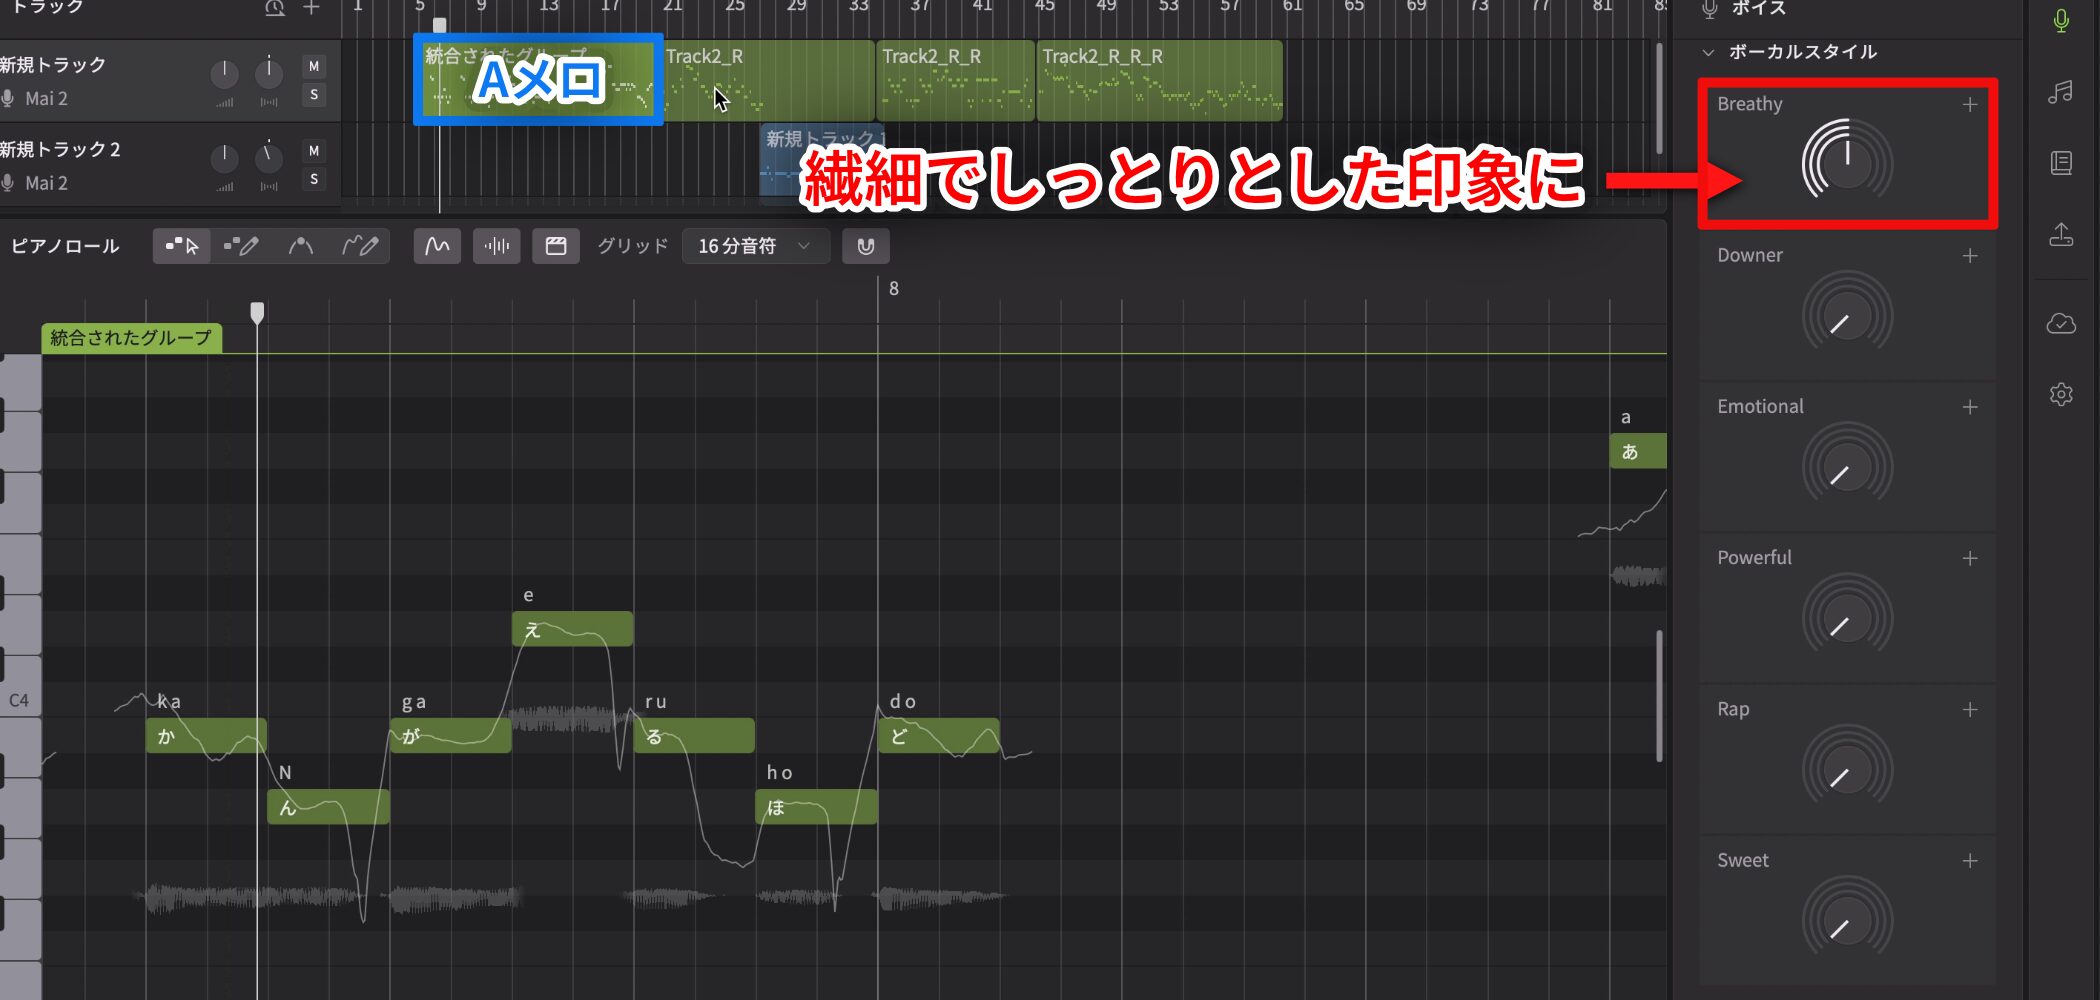
For a delicate, restrained impression in the first verse, Breathy was raised to about halfway (75%).
Pre-chorus
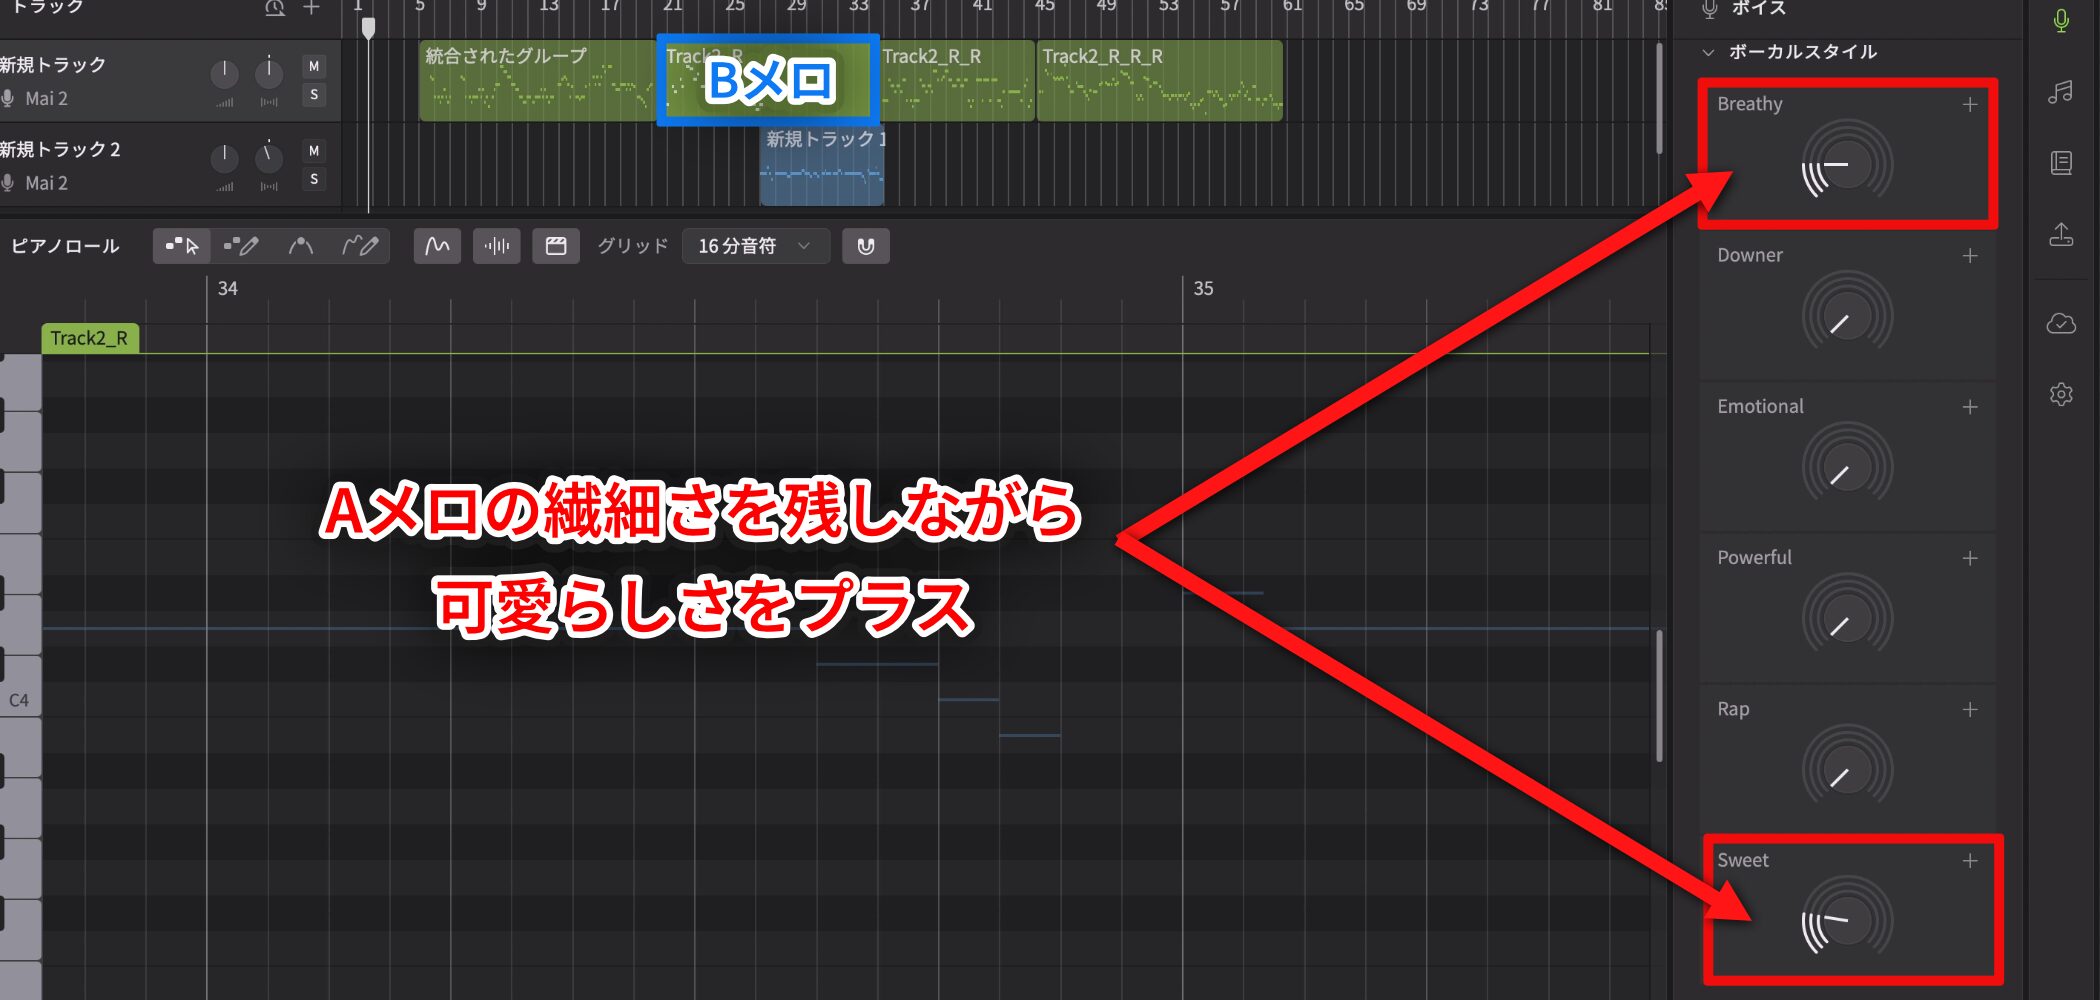
In the pre-chorus, Breathy was raised by around 20% to retain some of the first verse's delicacy, while Sweet was applied at around 30% for a cute expression.
Rap
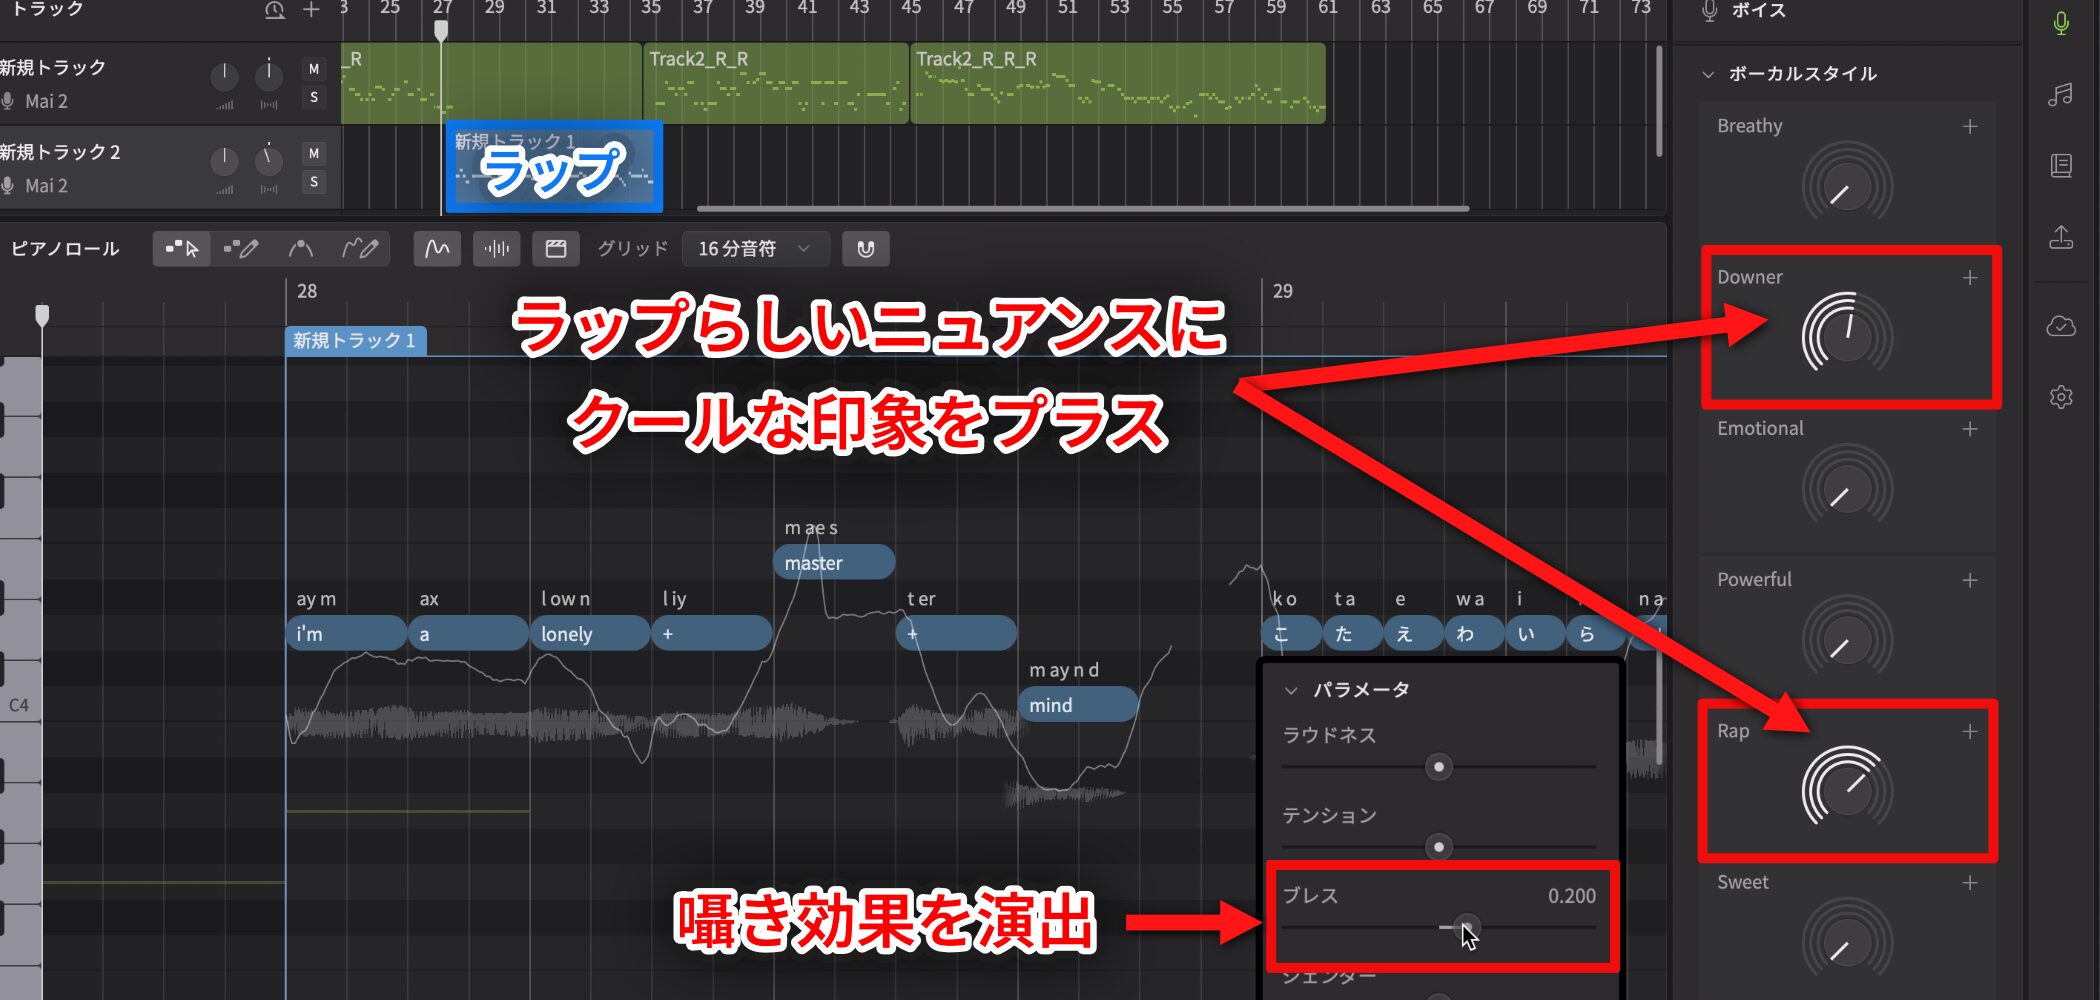
For the rap section, Rap was raised to around 100%, with Downer applied about halfway for a cooler feel.
Breathiness was also increased slightly to add air and create a close, whispering effect.
Bridge
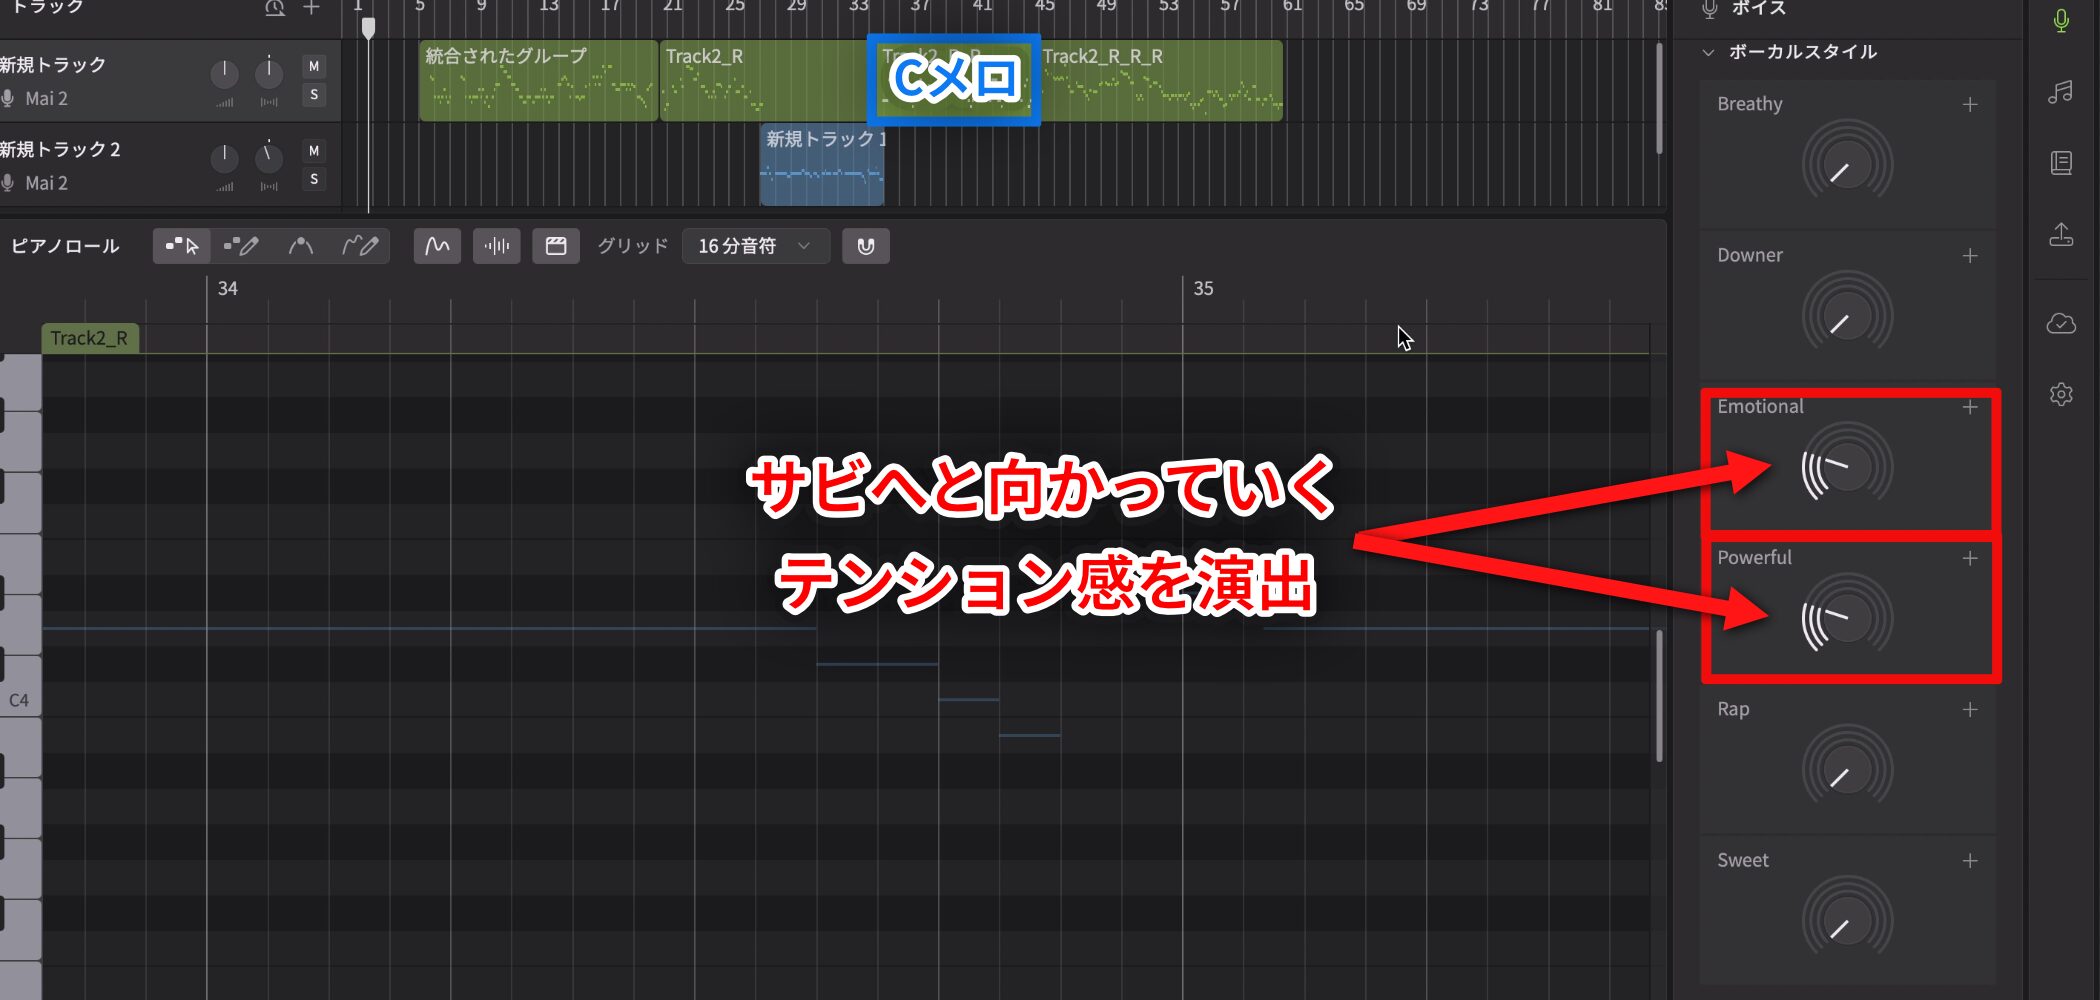
In the bridge, Emotional and Powerful were each applied at around 30% to lead naturally into the chorus without becoming too intense.
Chorus
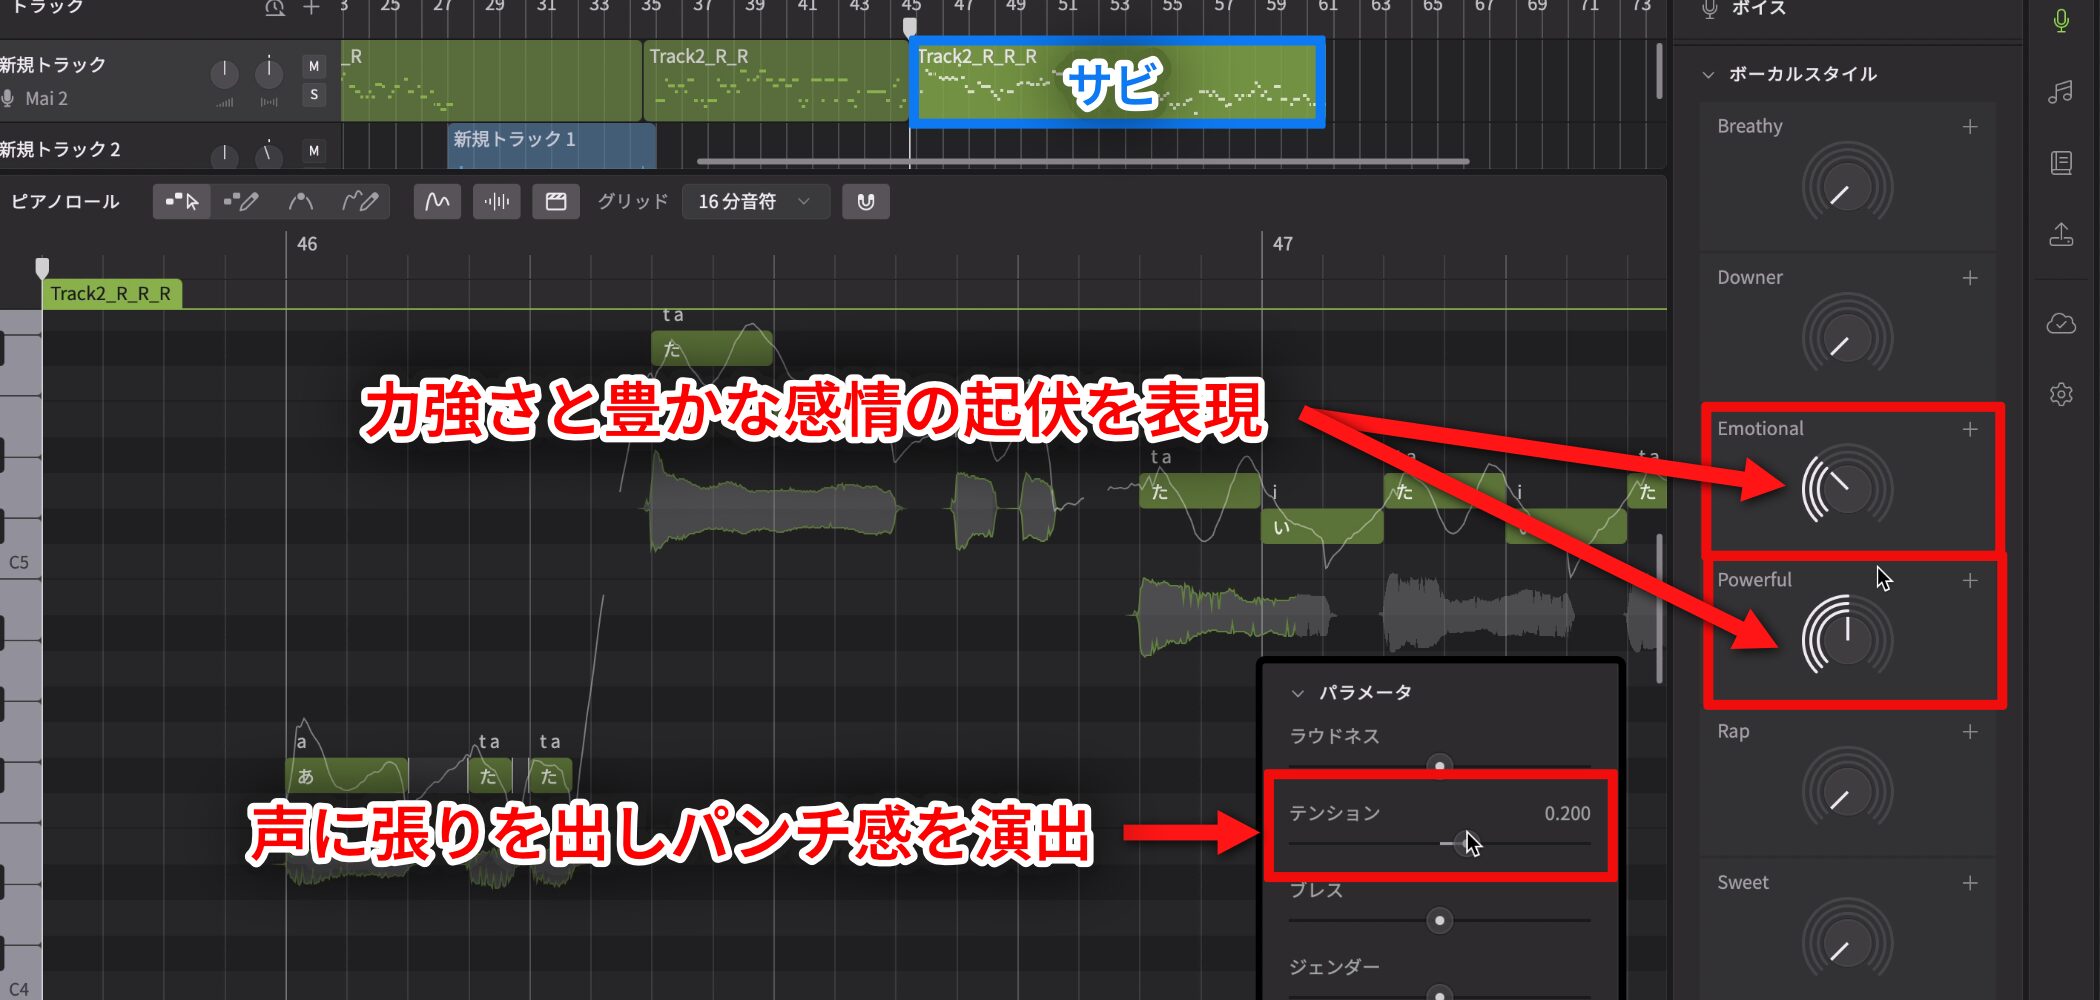
For strength in the chorus, Powerful was raised about halfway and Emotional applied at around 30%, preserving a brisk feel while adding expressive movement.
Tension was also increased slightly for a firmer, punchier chorus sound.
Advanced Parameter Editing and Automation for More Expression
Next, learn more advanced editing and parameter techniques for making an expressive vocal in Synthesizer V Studio 2 Pro.
First compare the example adjusted in the previous section with a version refined using the tools and techniques below.
Comparing the two examples should reveal a wider range of expression.
Now let's look at the specific techniques and adjustments.
Use the Parameter Panel for Smooth Vocal Changes
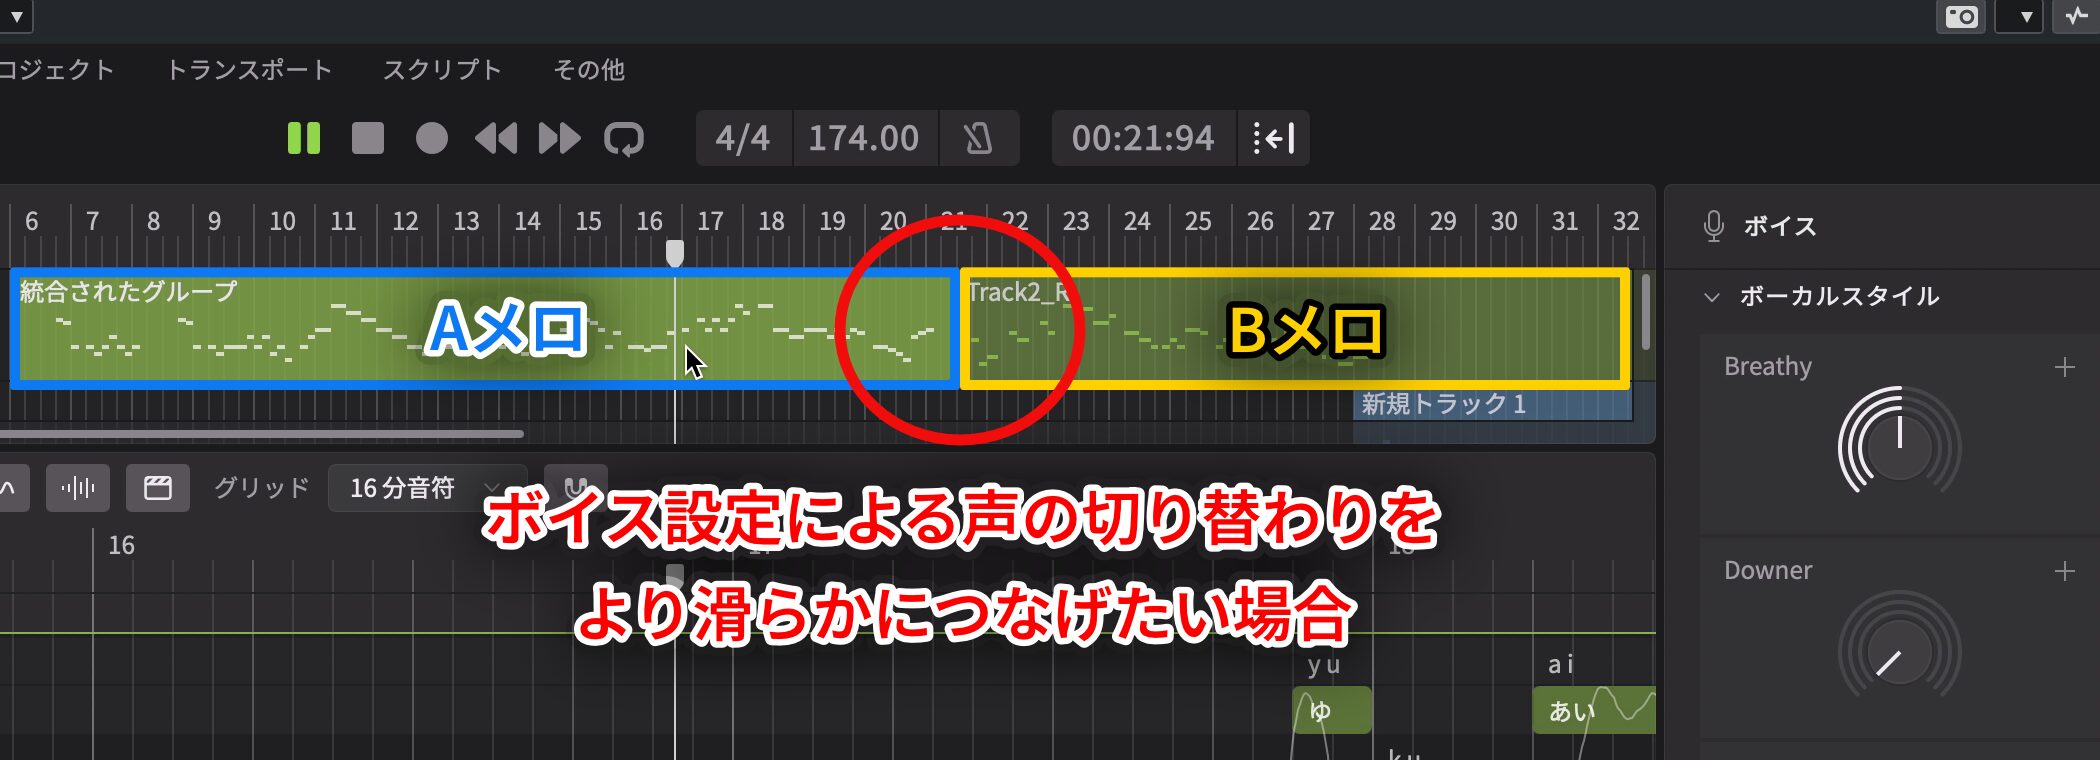
Switching vocal styles or timbres midway through a song can sound abrupt.
In that situation, use automation in the Parameter panel.
Changing parameters gradually over time creates a more natural performance.
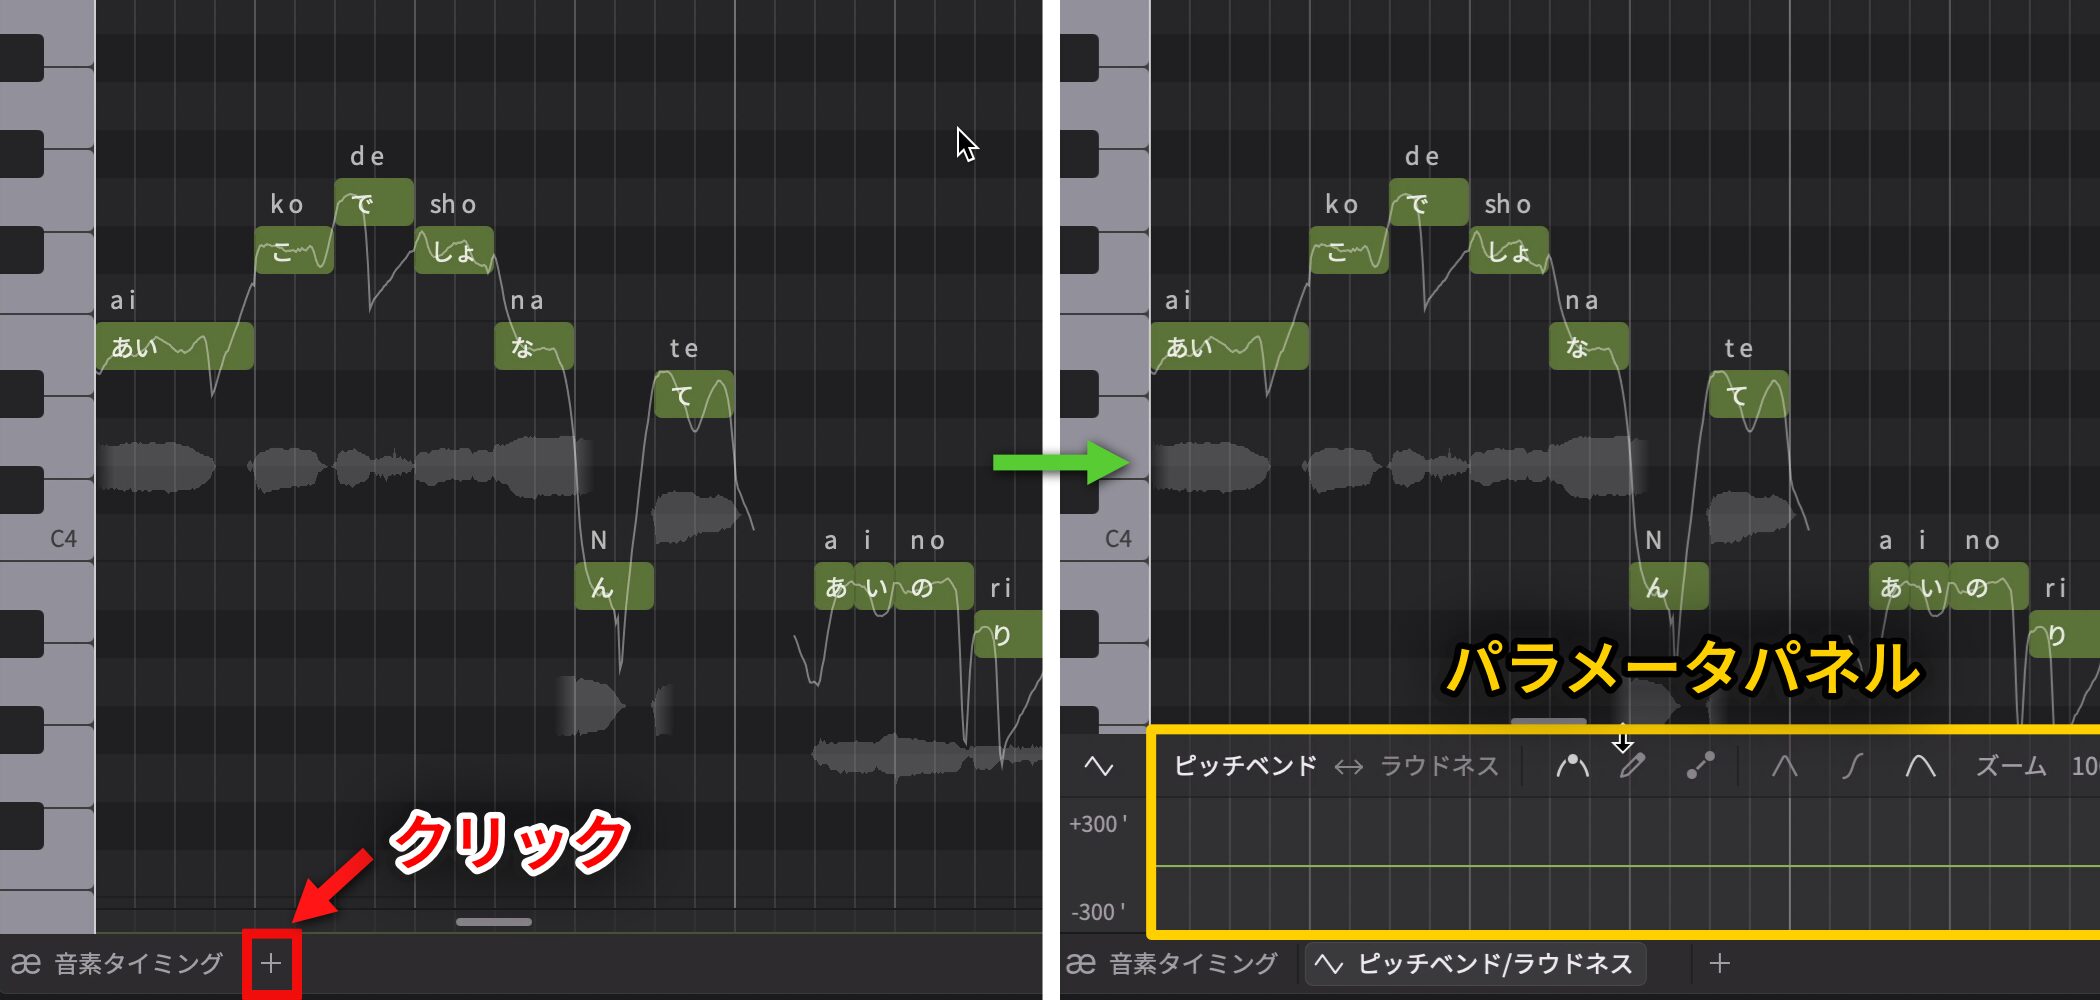
Click the + button below the Piano Roll to add a Parameter panel.
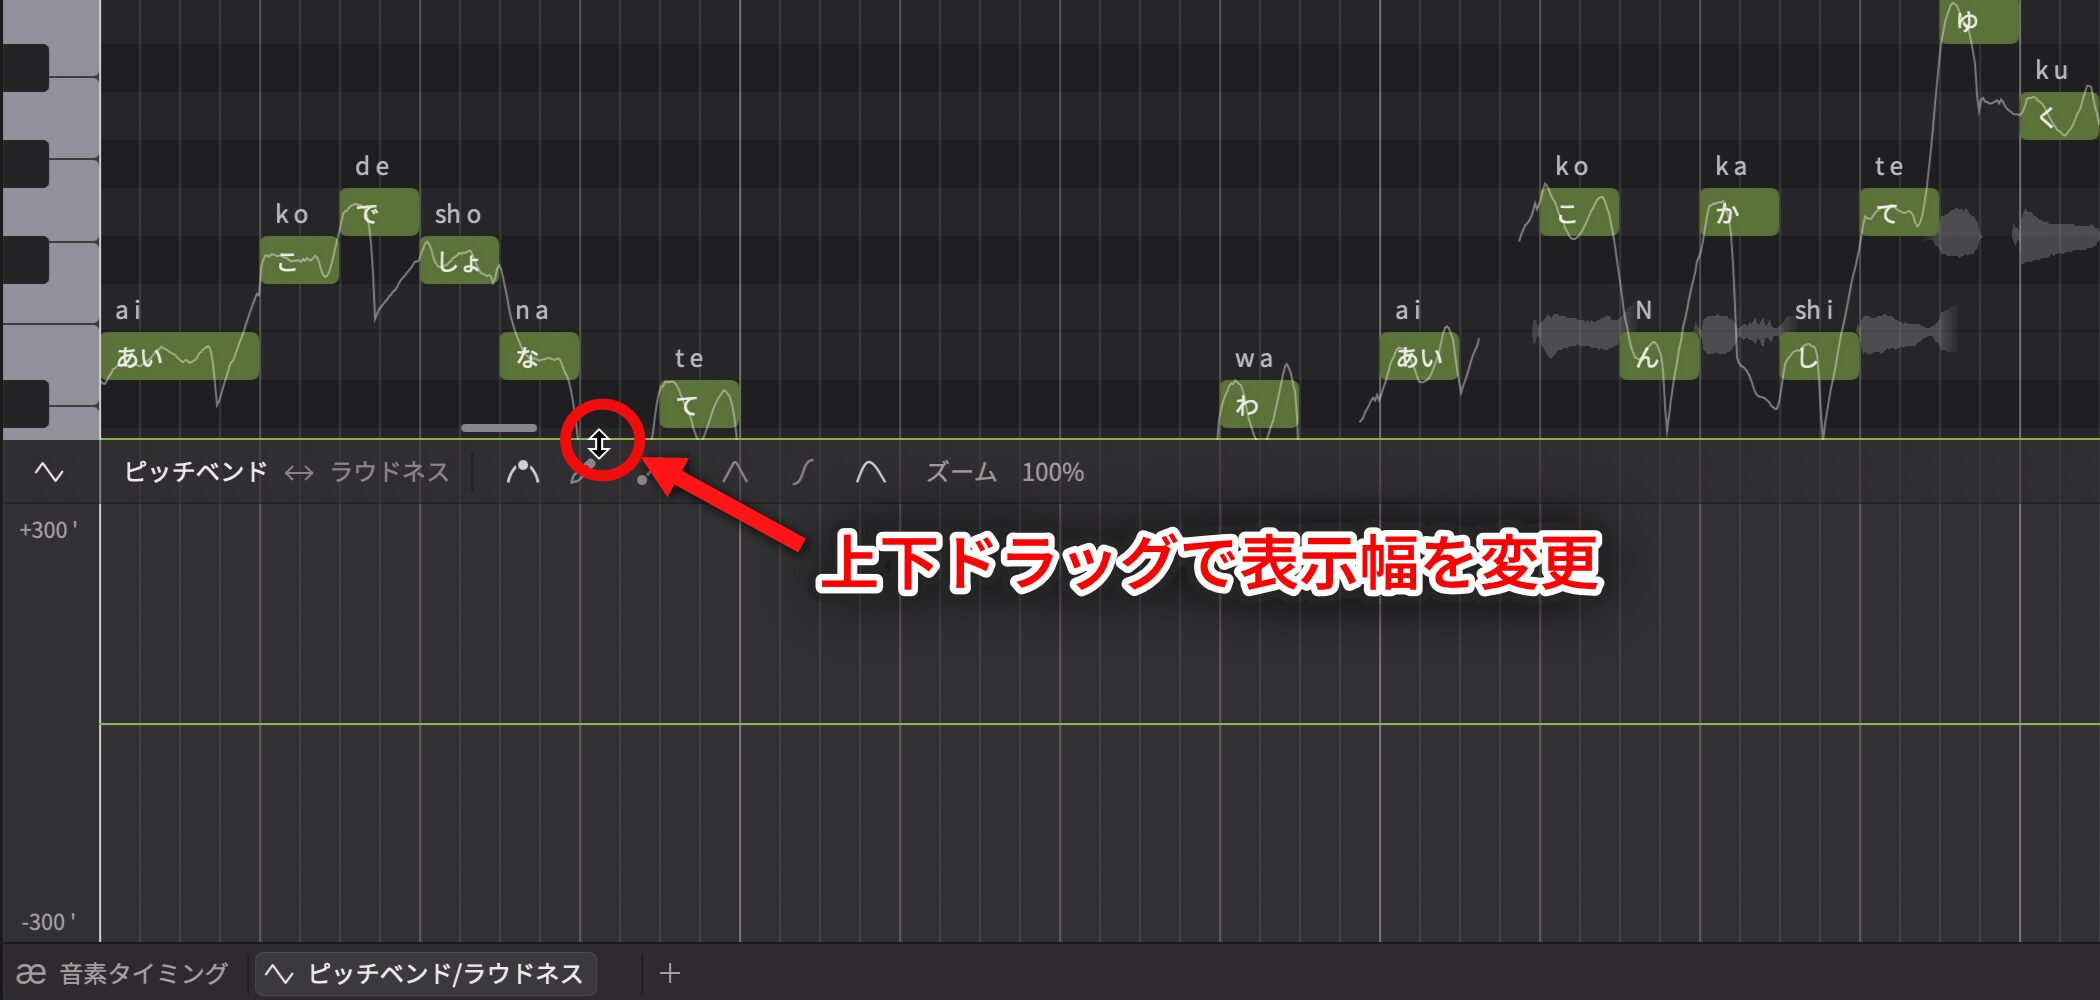
Drag its edge to widen it for easier editing.
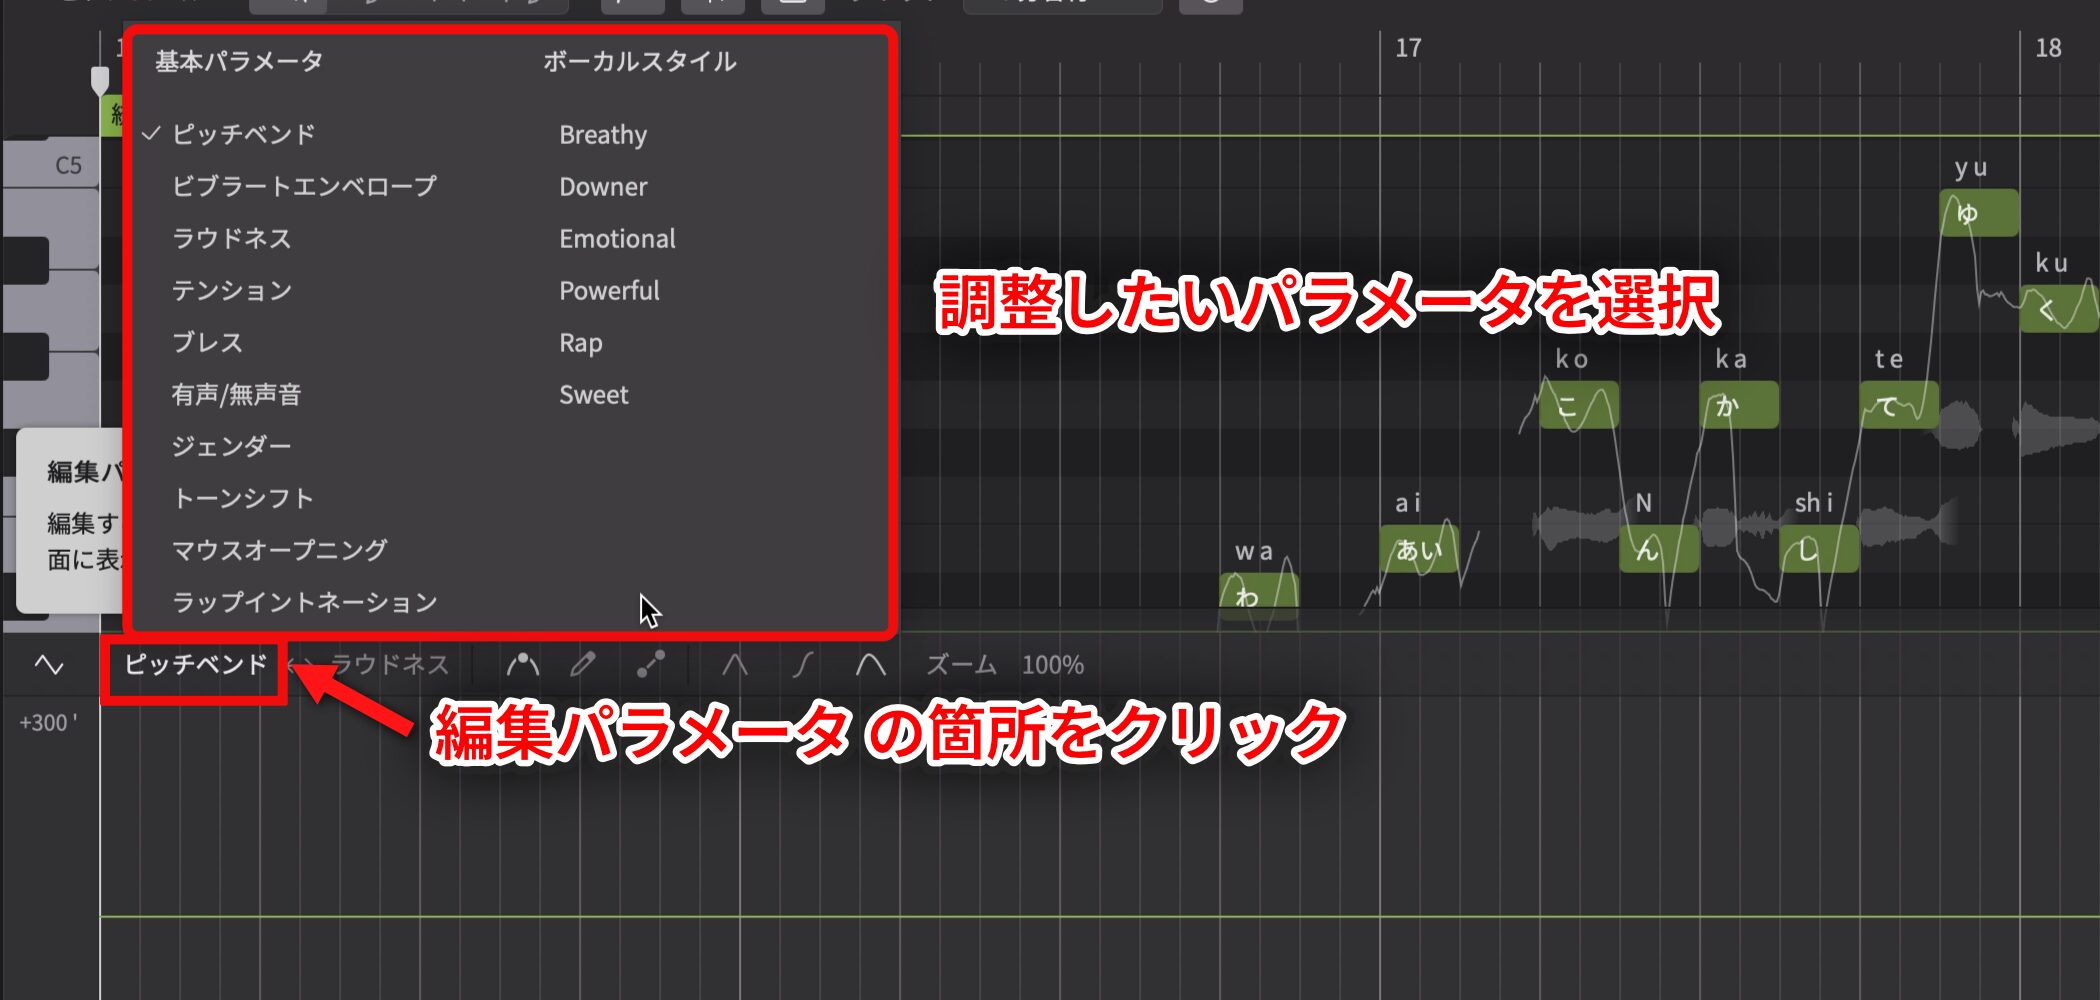
Click Edit Parameter and choose the parameter you want from the list.
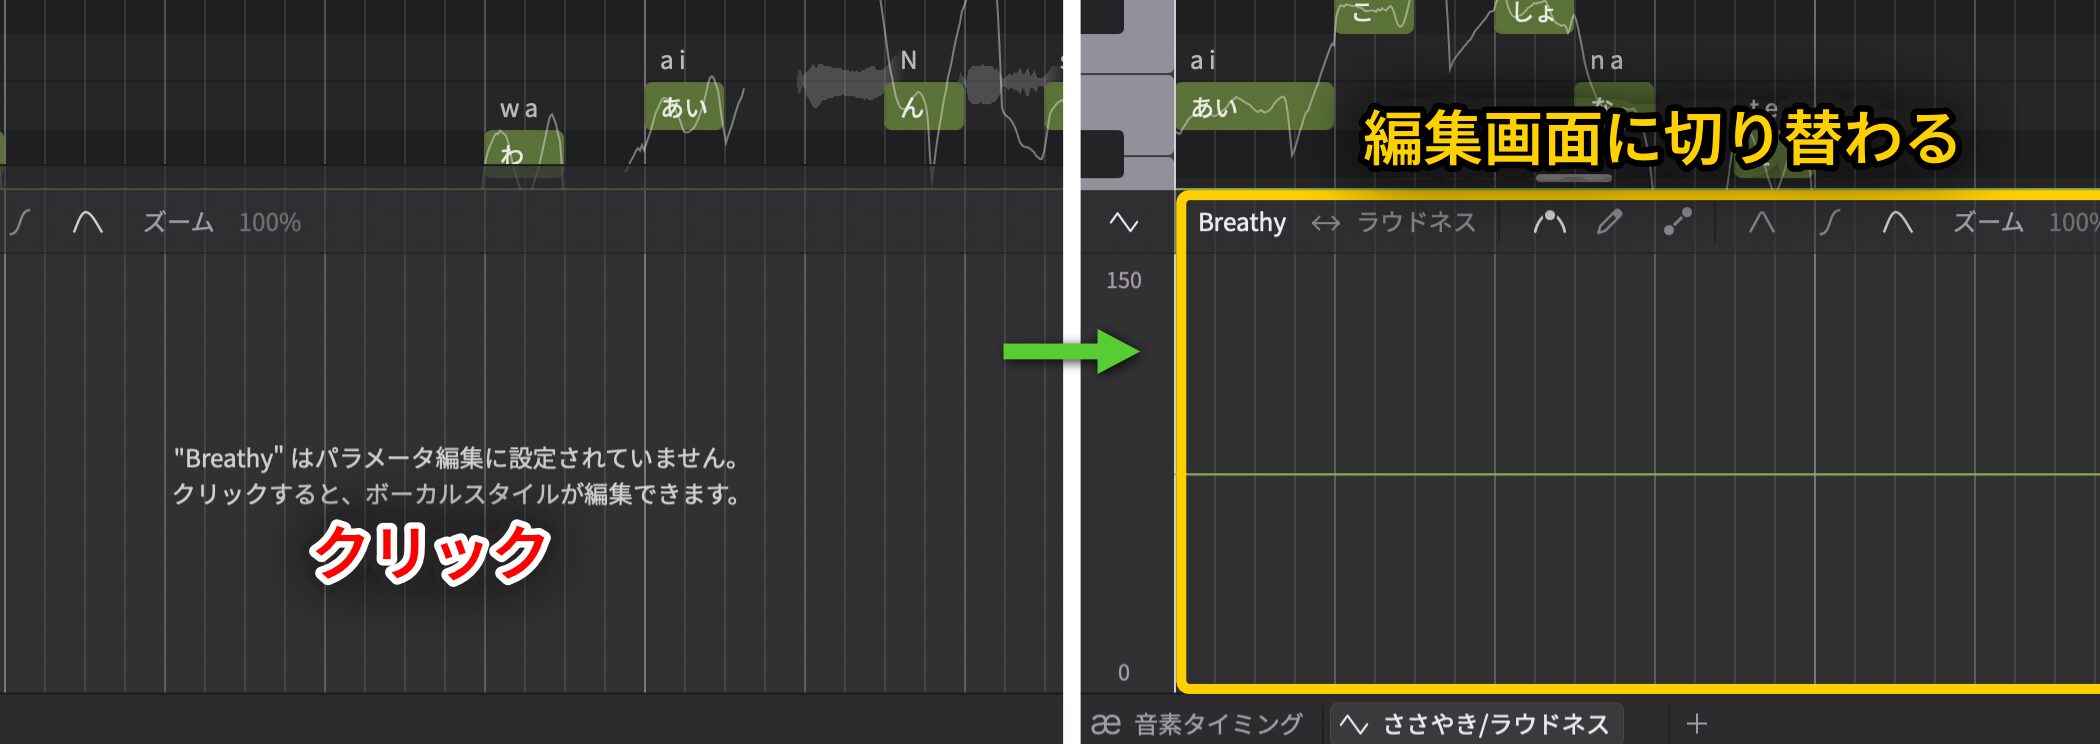
At first it may say Not Set for Parameter Editing. Click it to switch to the automation editor.
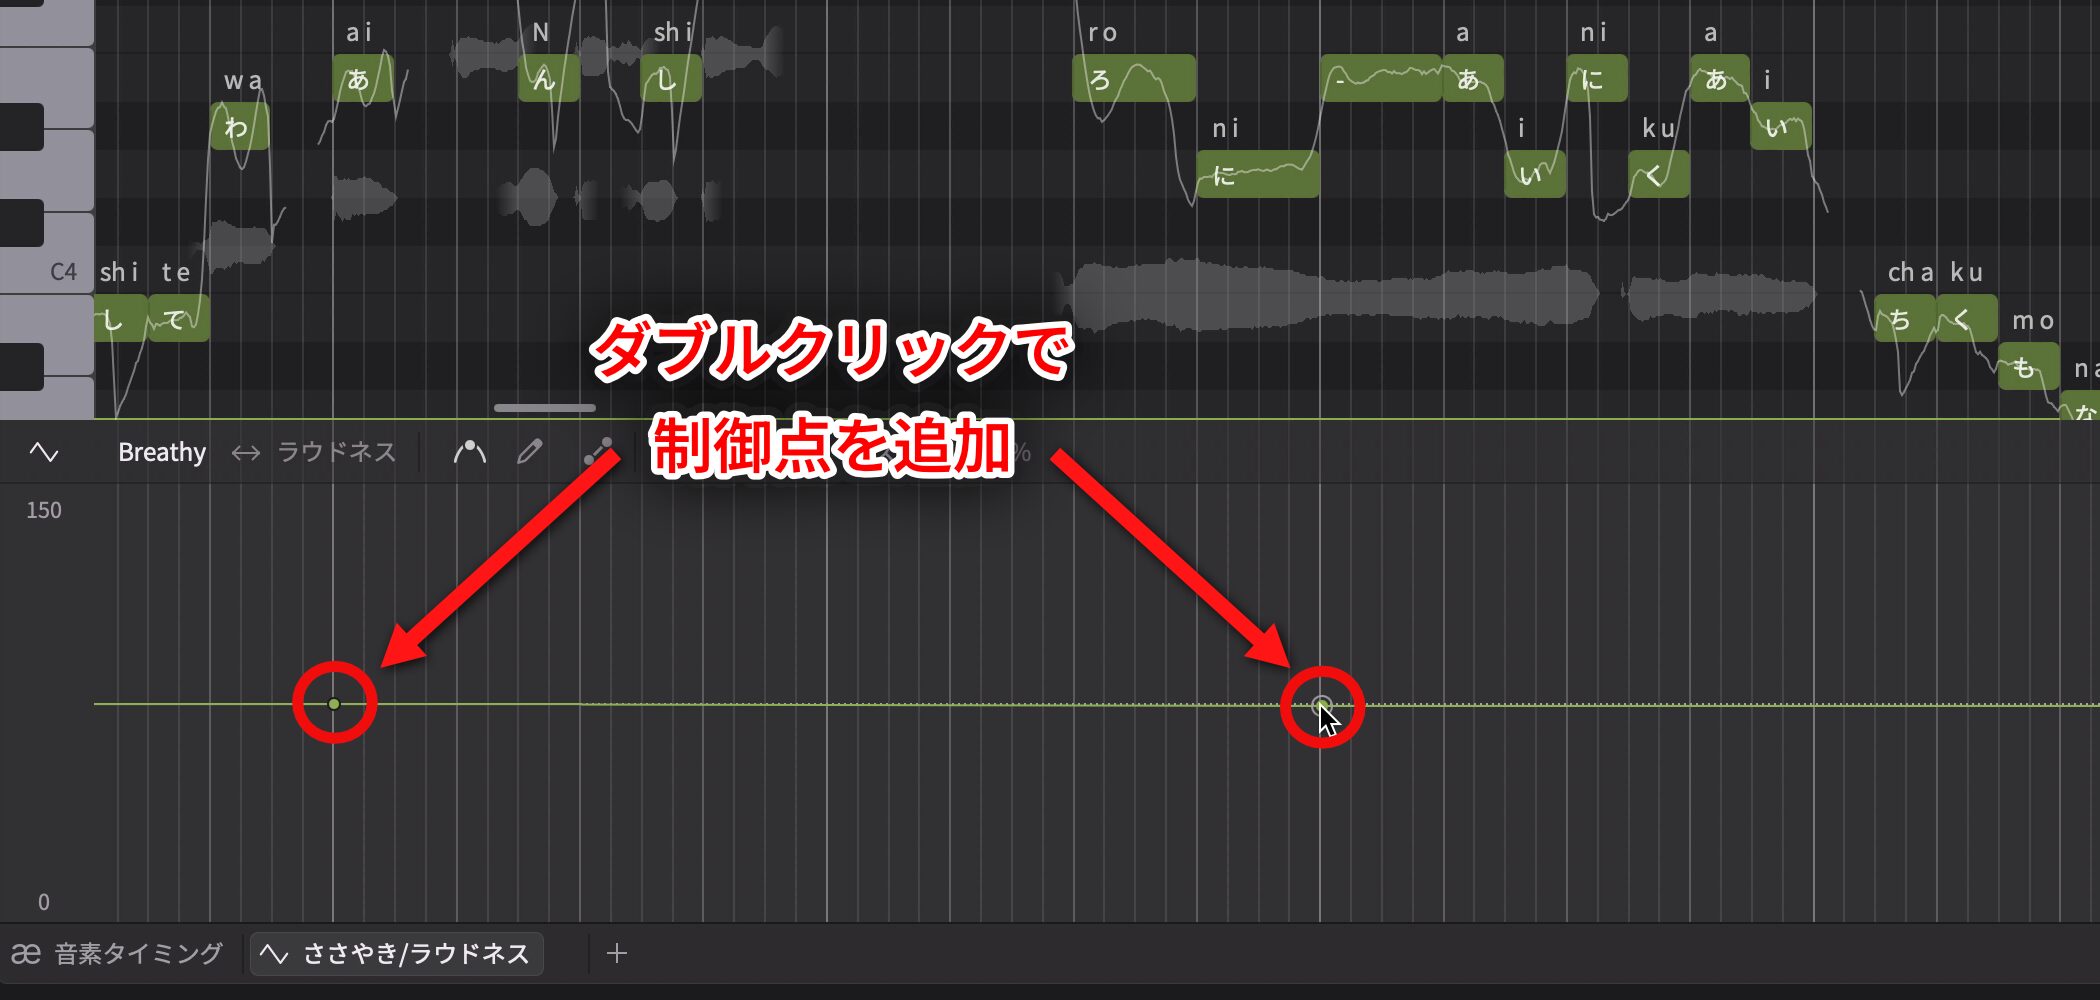
Double-click at the start and end of the section you want to change to add control points.
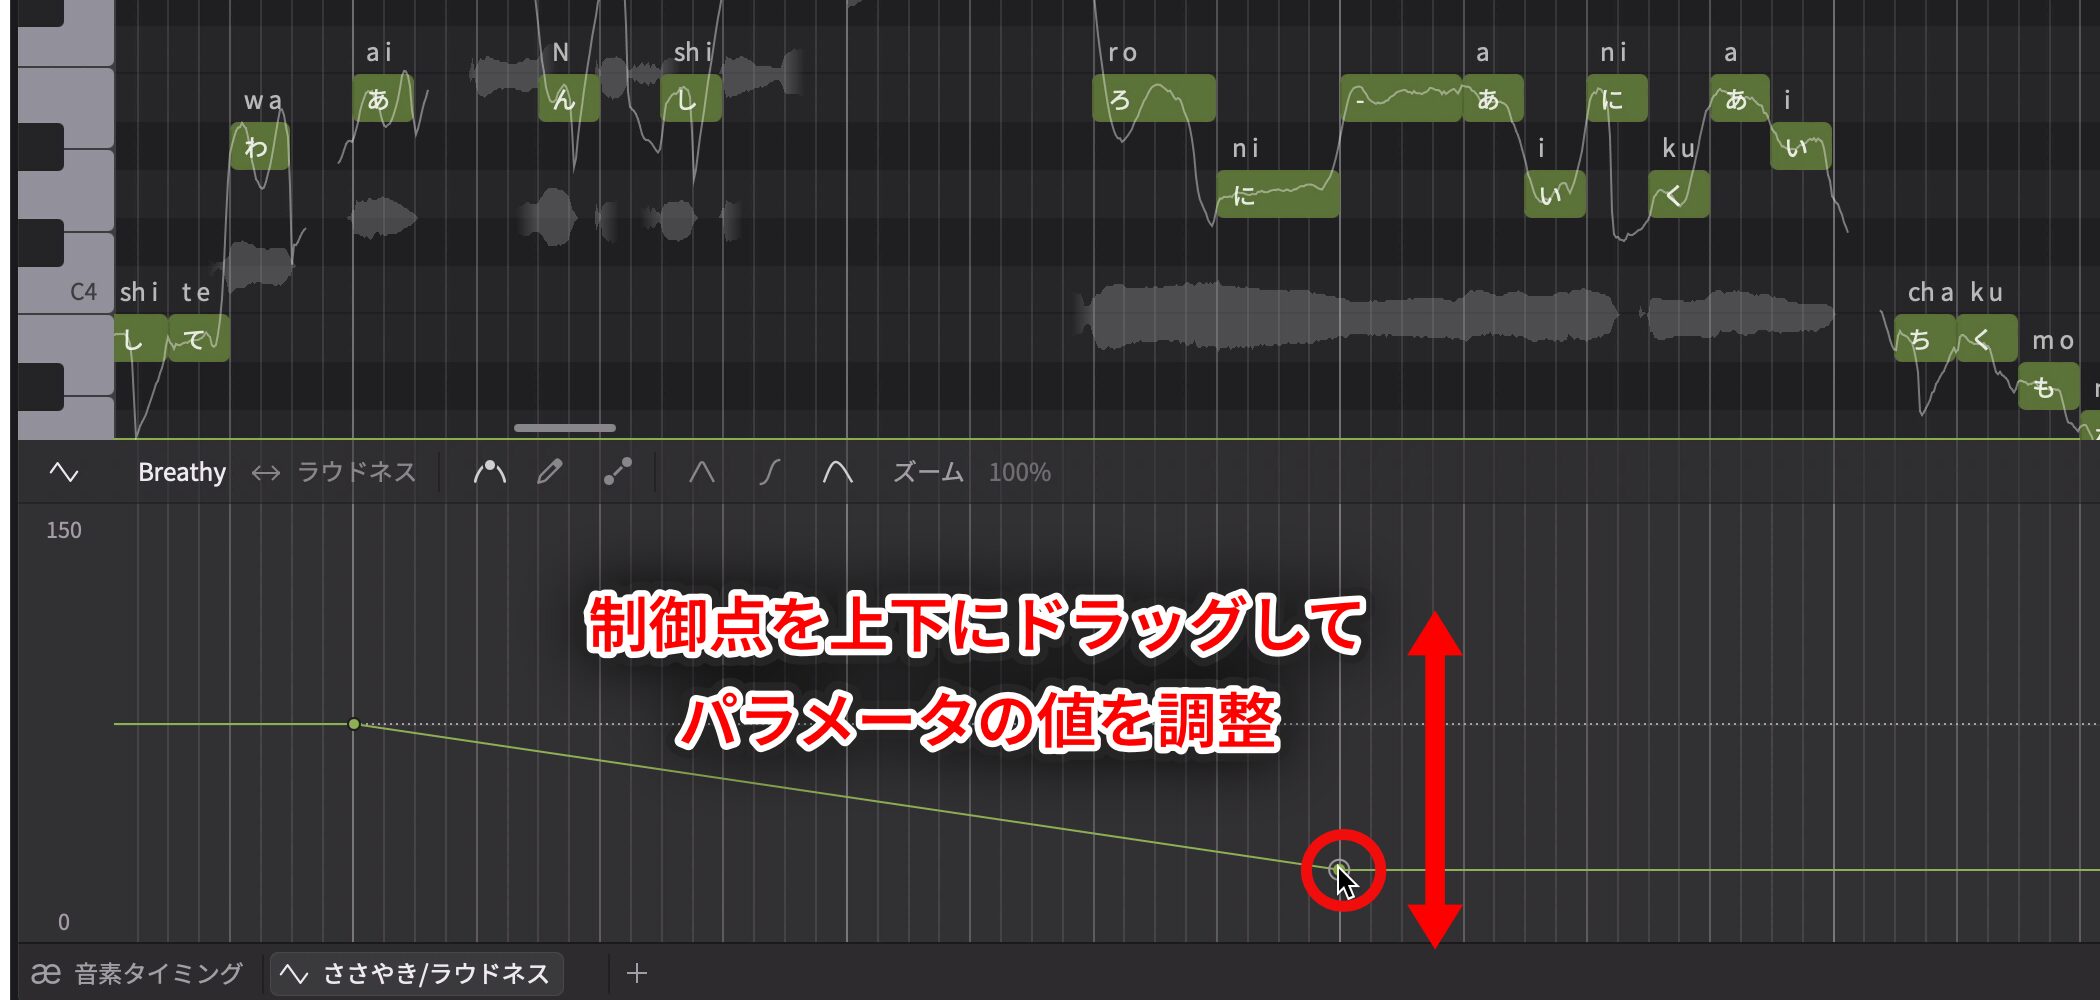
Drag those points up or down to adjust their values.
You can add a second parameter the same way.
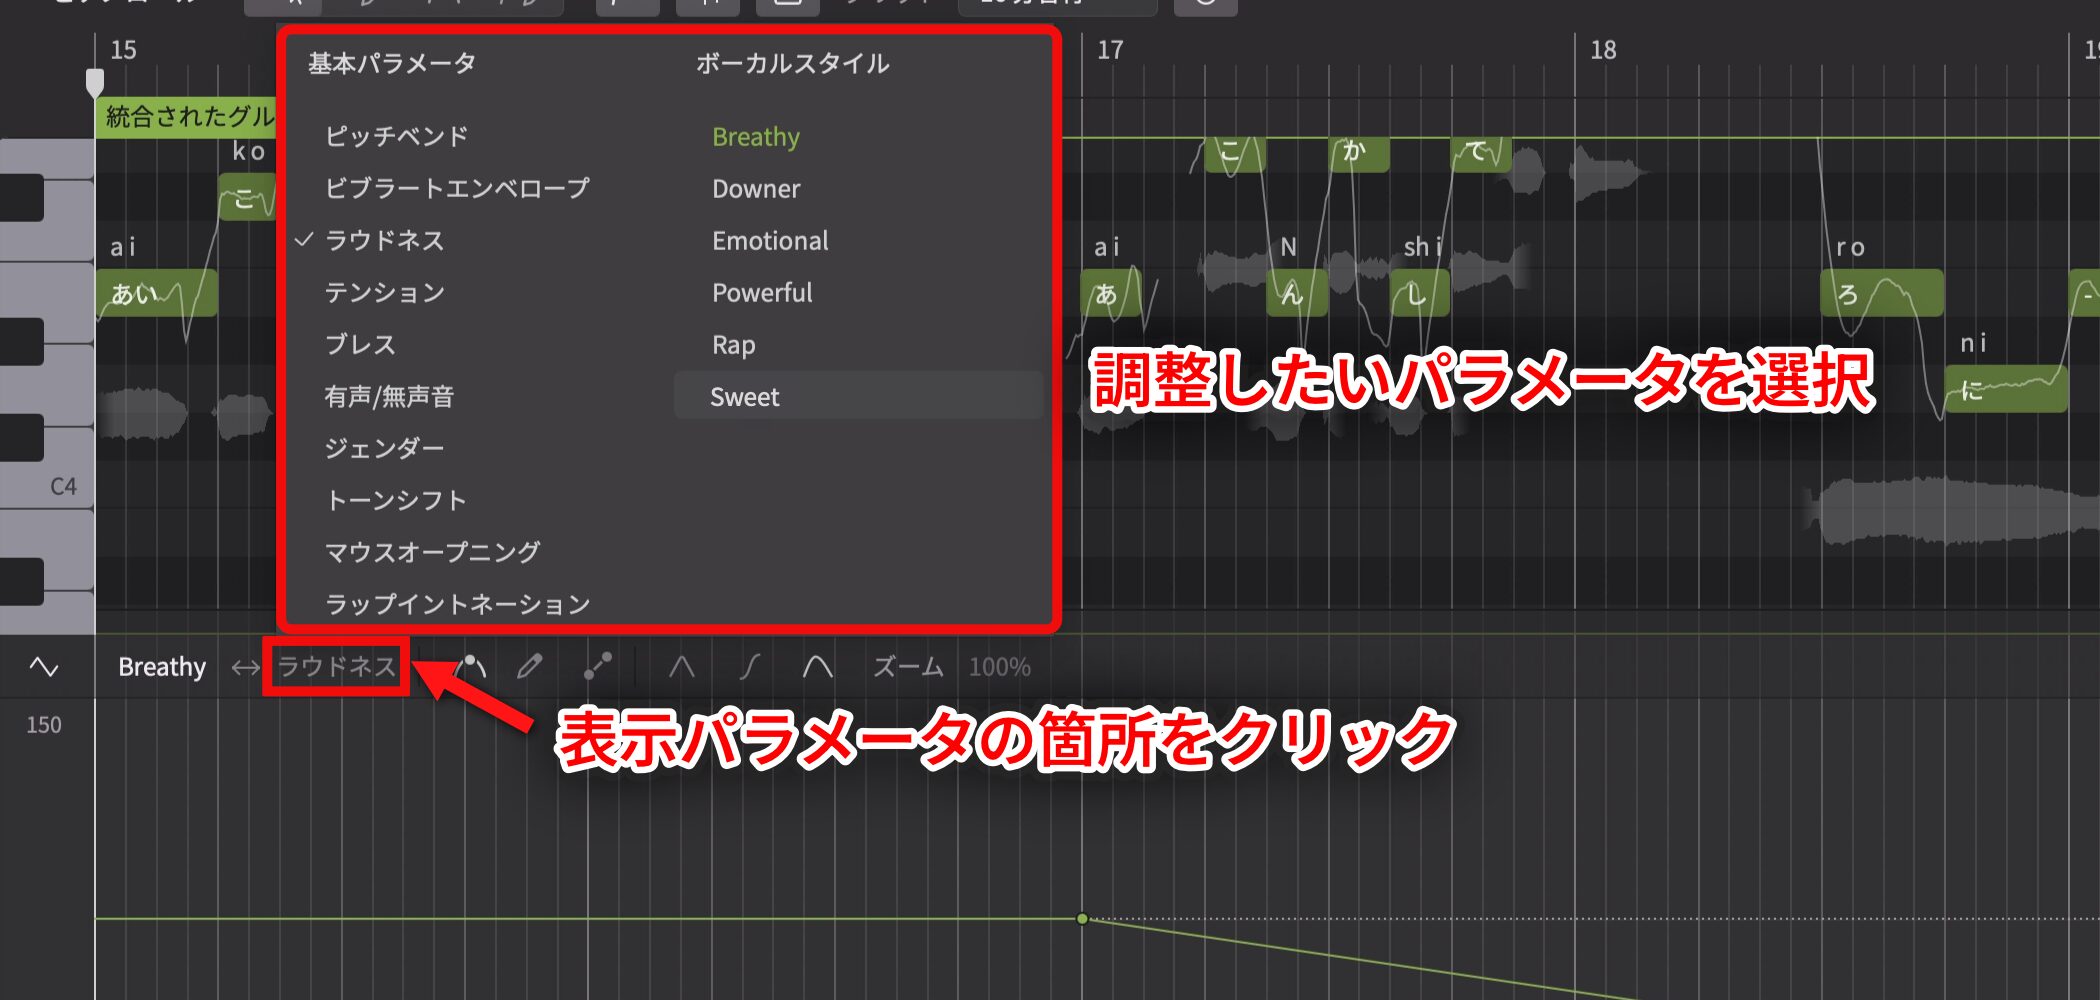
Choose the second parameter under Display Parameter.
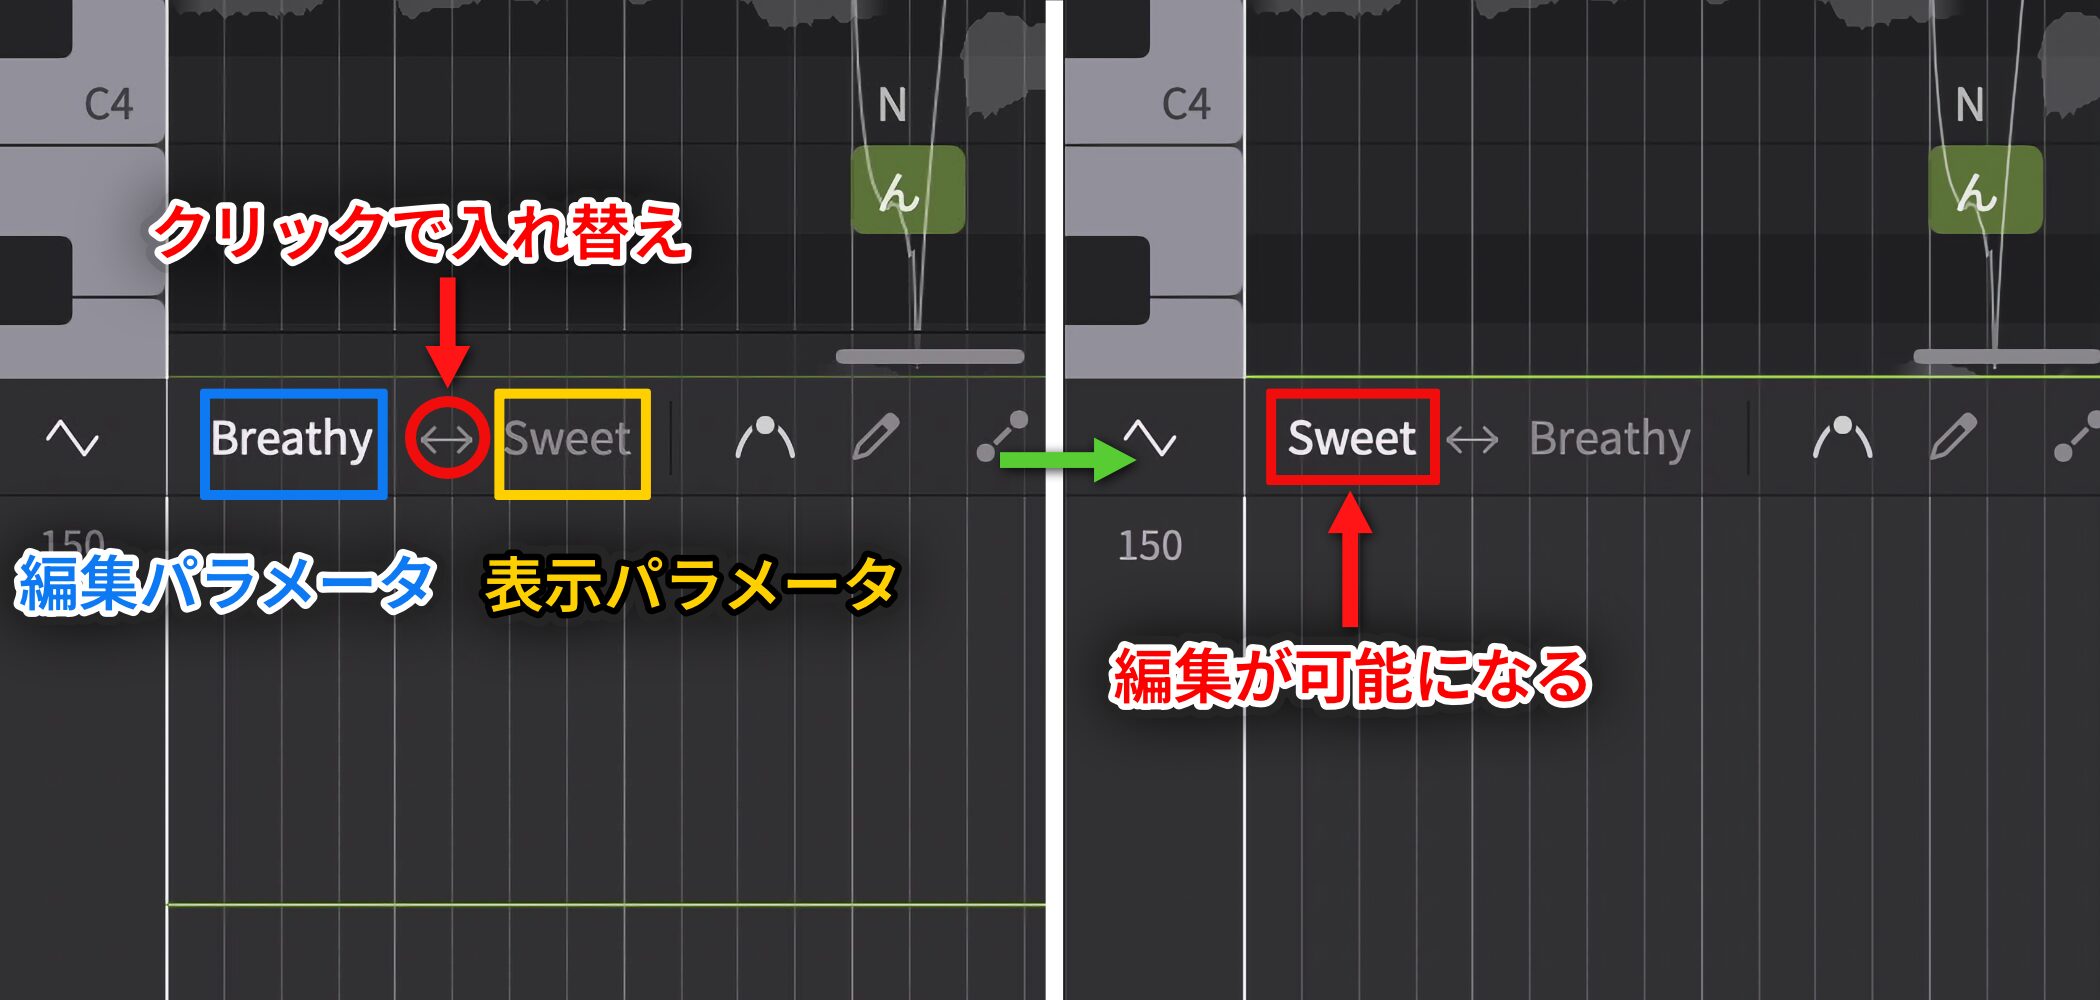
The Edit Parameter and Display Parameter positions can be swapped with the left and right arrow buttons.
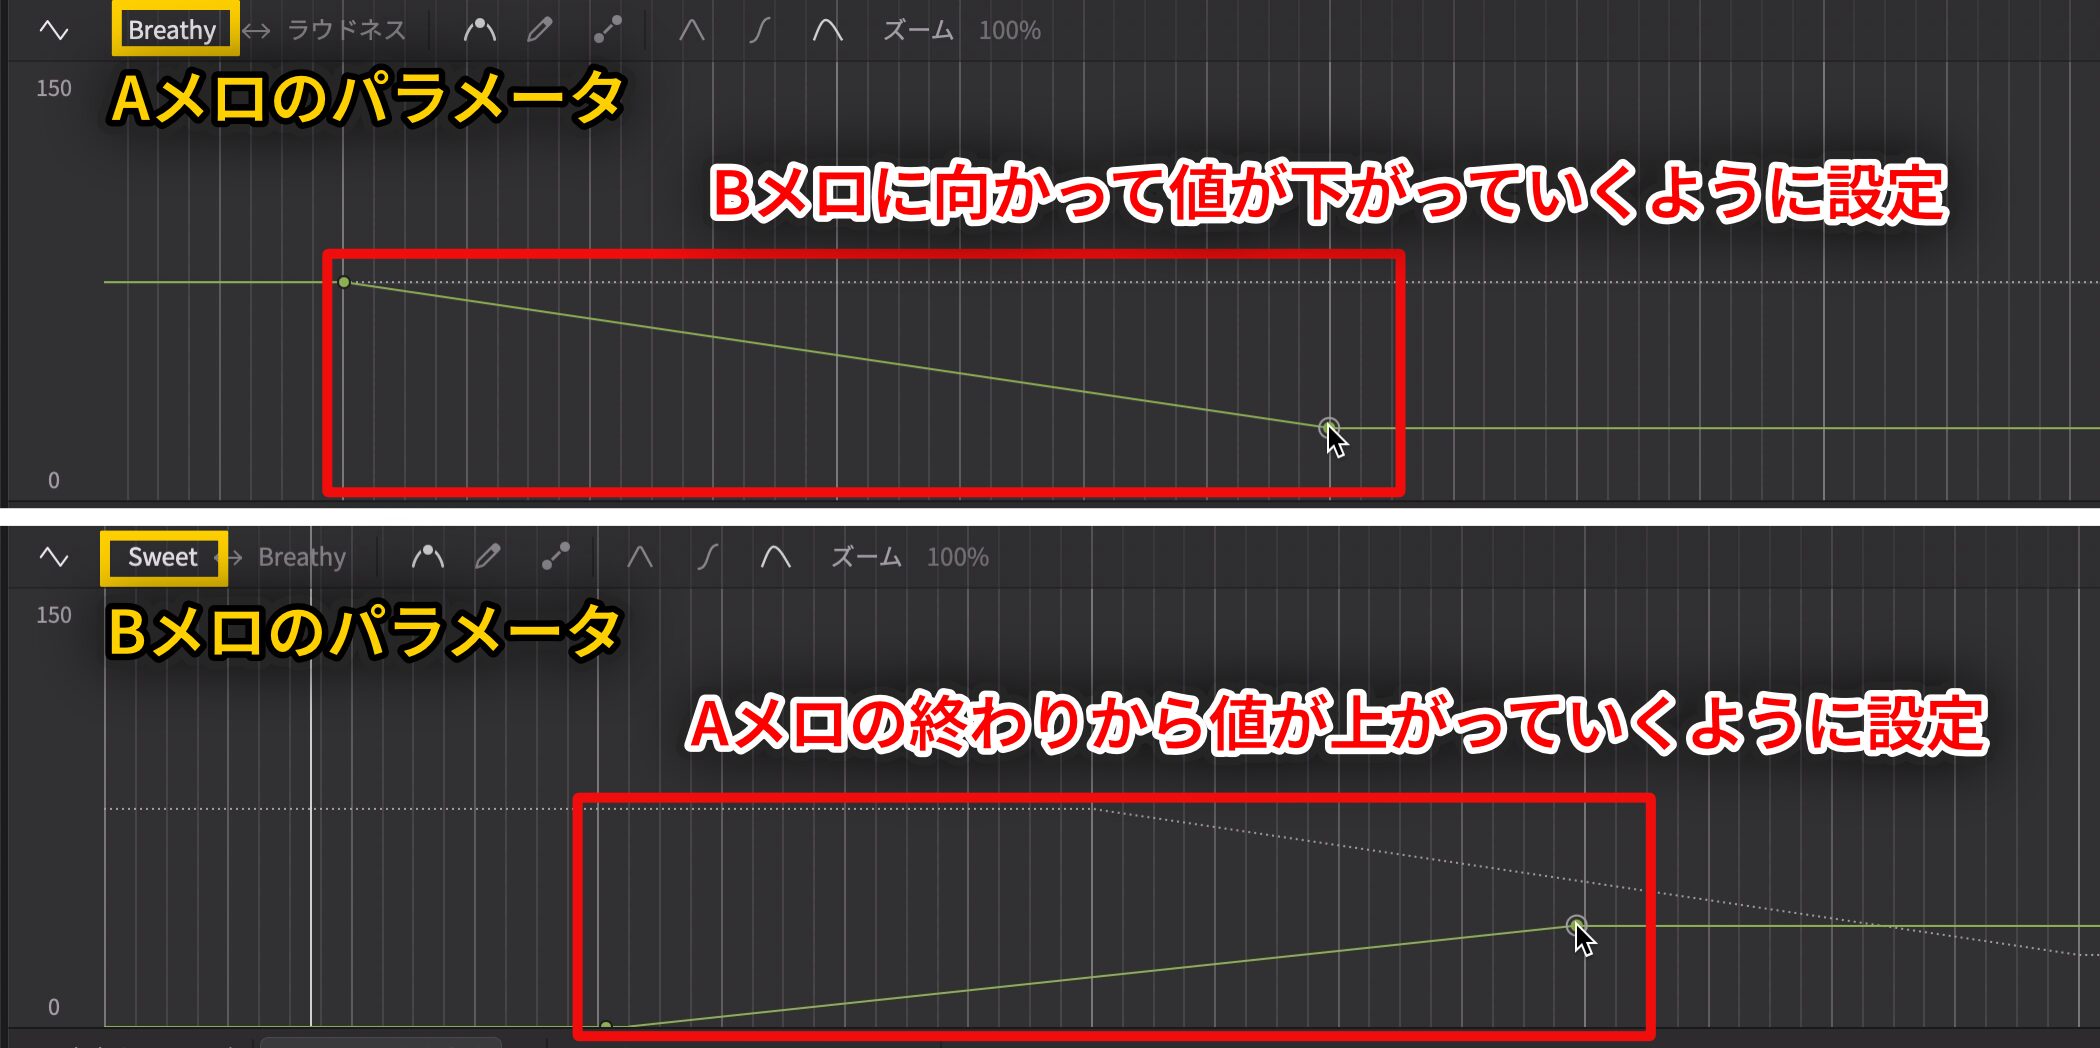
For example, you can gradually reduce a parameter used in the first verse as the pre-chorus approaches, while bringing in a new parameter toward that section. This can create a smoother transition.
Fine adjustments that follow the song's sections and emotional arc can make the voice more natural and expressive.
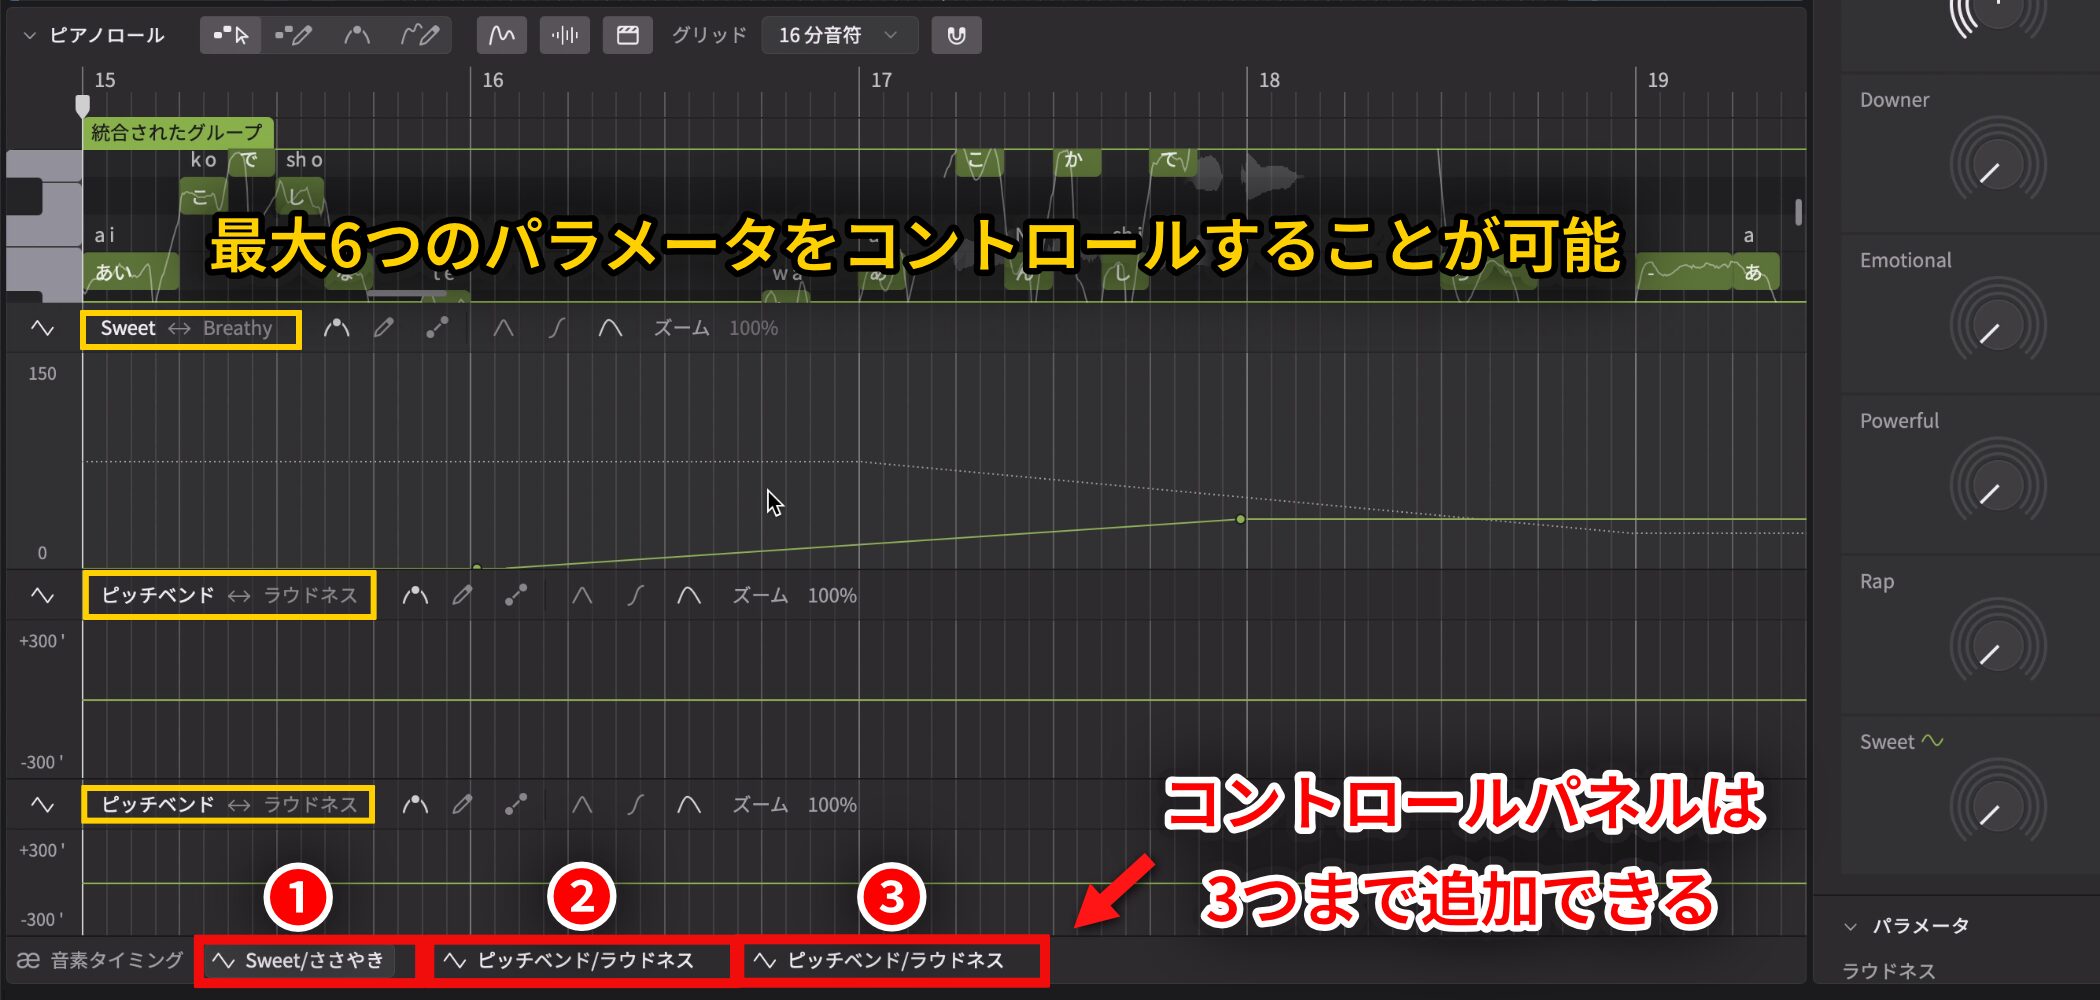
You can add up to three control panels, each managing two parameters.
That means you can control up to six parameters at once.
Broaden Expression with Expression Control
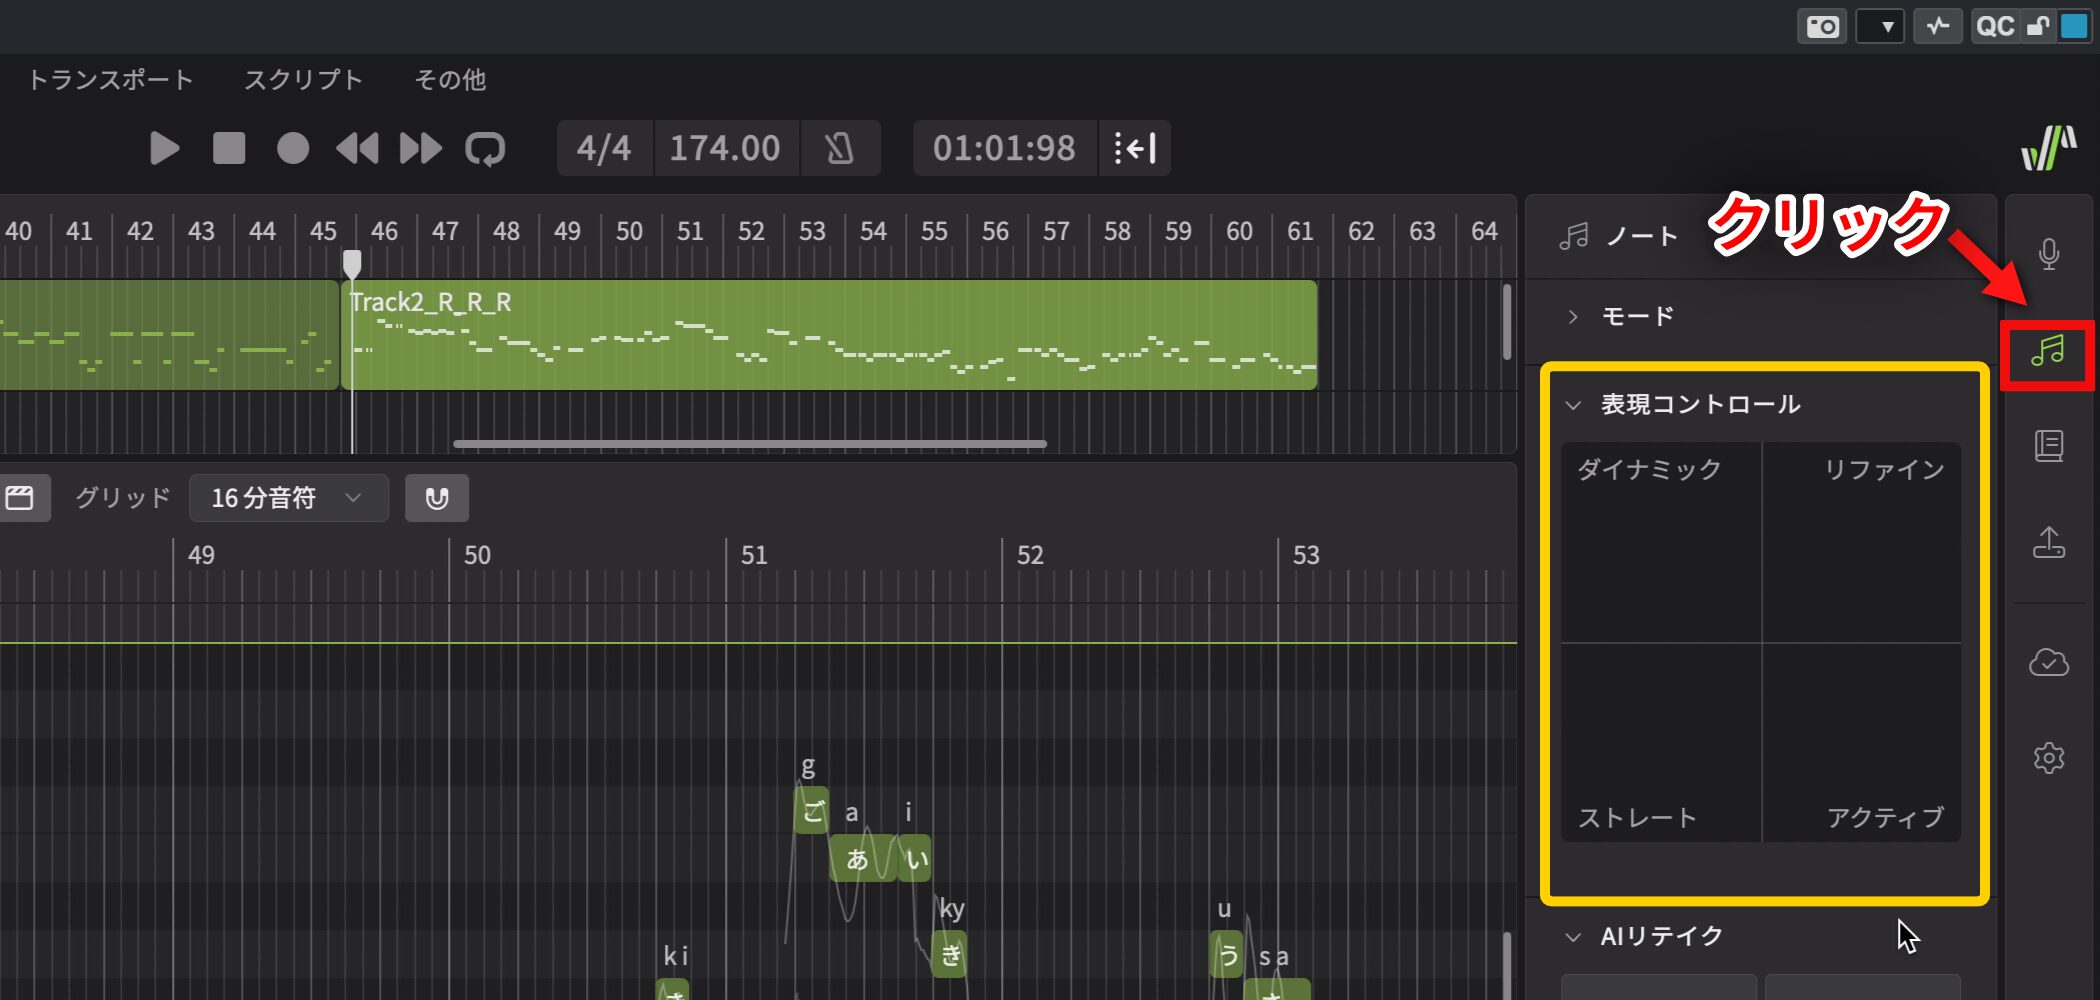
Expression Control in the Note panel combines four styles as you move a pointer on an XY pad. It lets you change pitch movement and vocal character.
The four styles are:
- Dynamic: Expressive singing with pronounced rises and falls.
- Refined: A balanced voice with steadier pitch and rhythm and fewer quirks.
- Straight: Direct singing with stable pitch and rhythm and little inflection.
- Active: Distinctive singing with more human variation and a live feel.
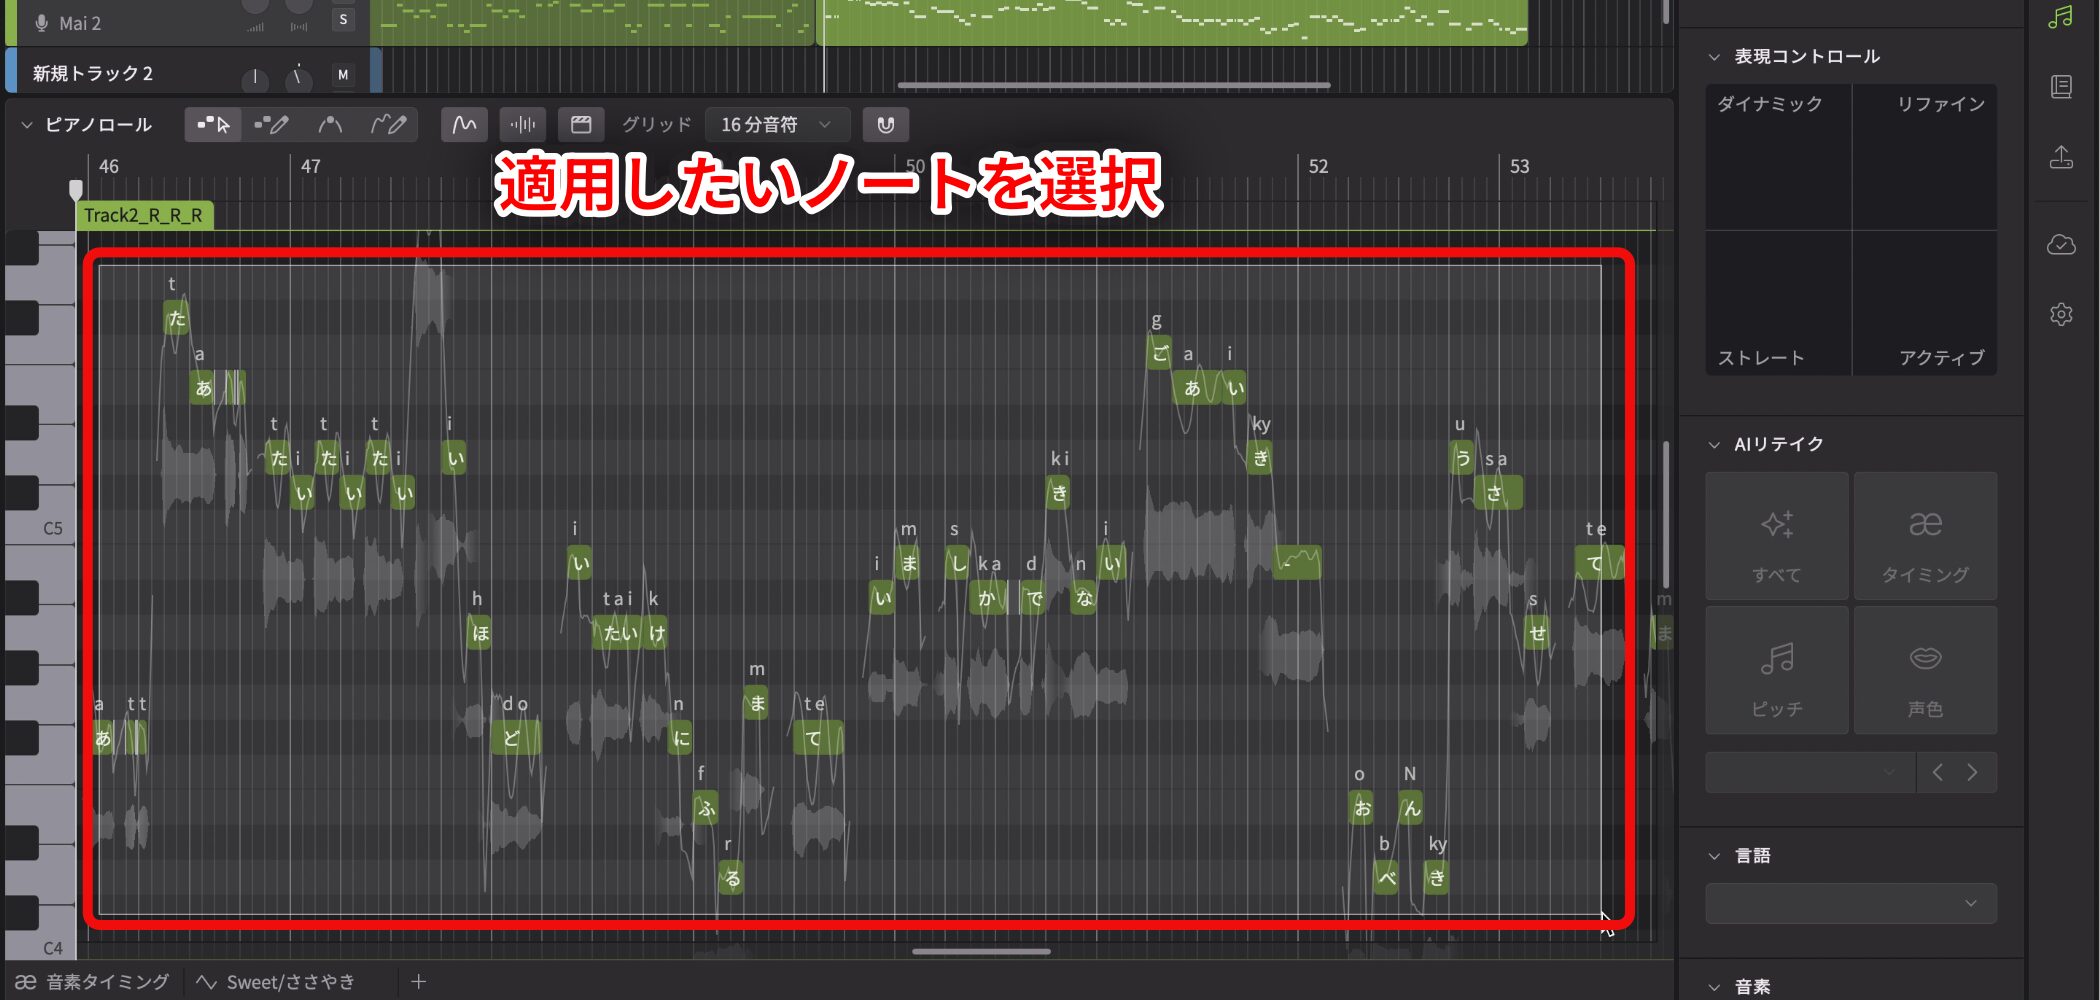
First select the notes you want to affect.
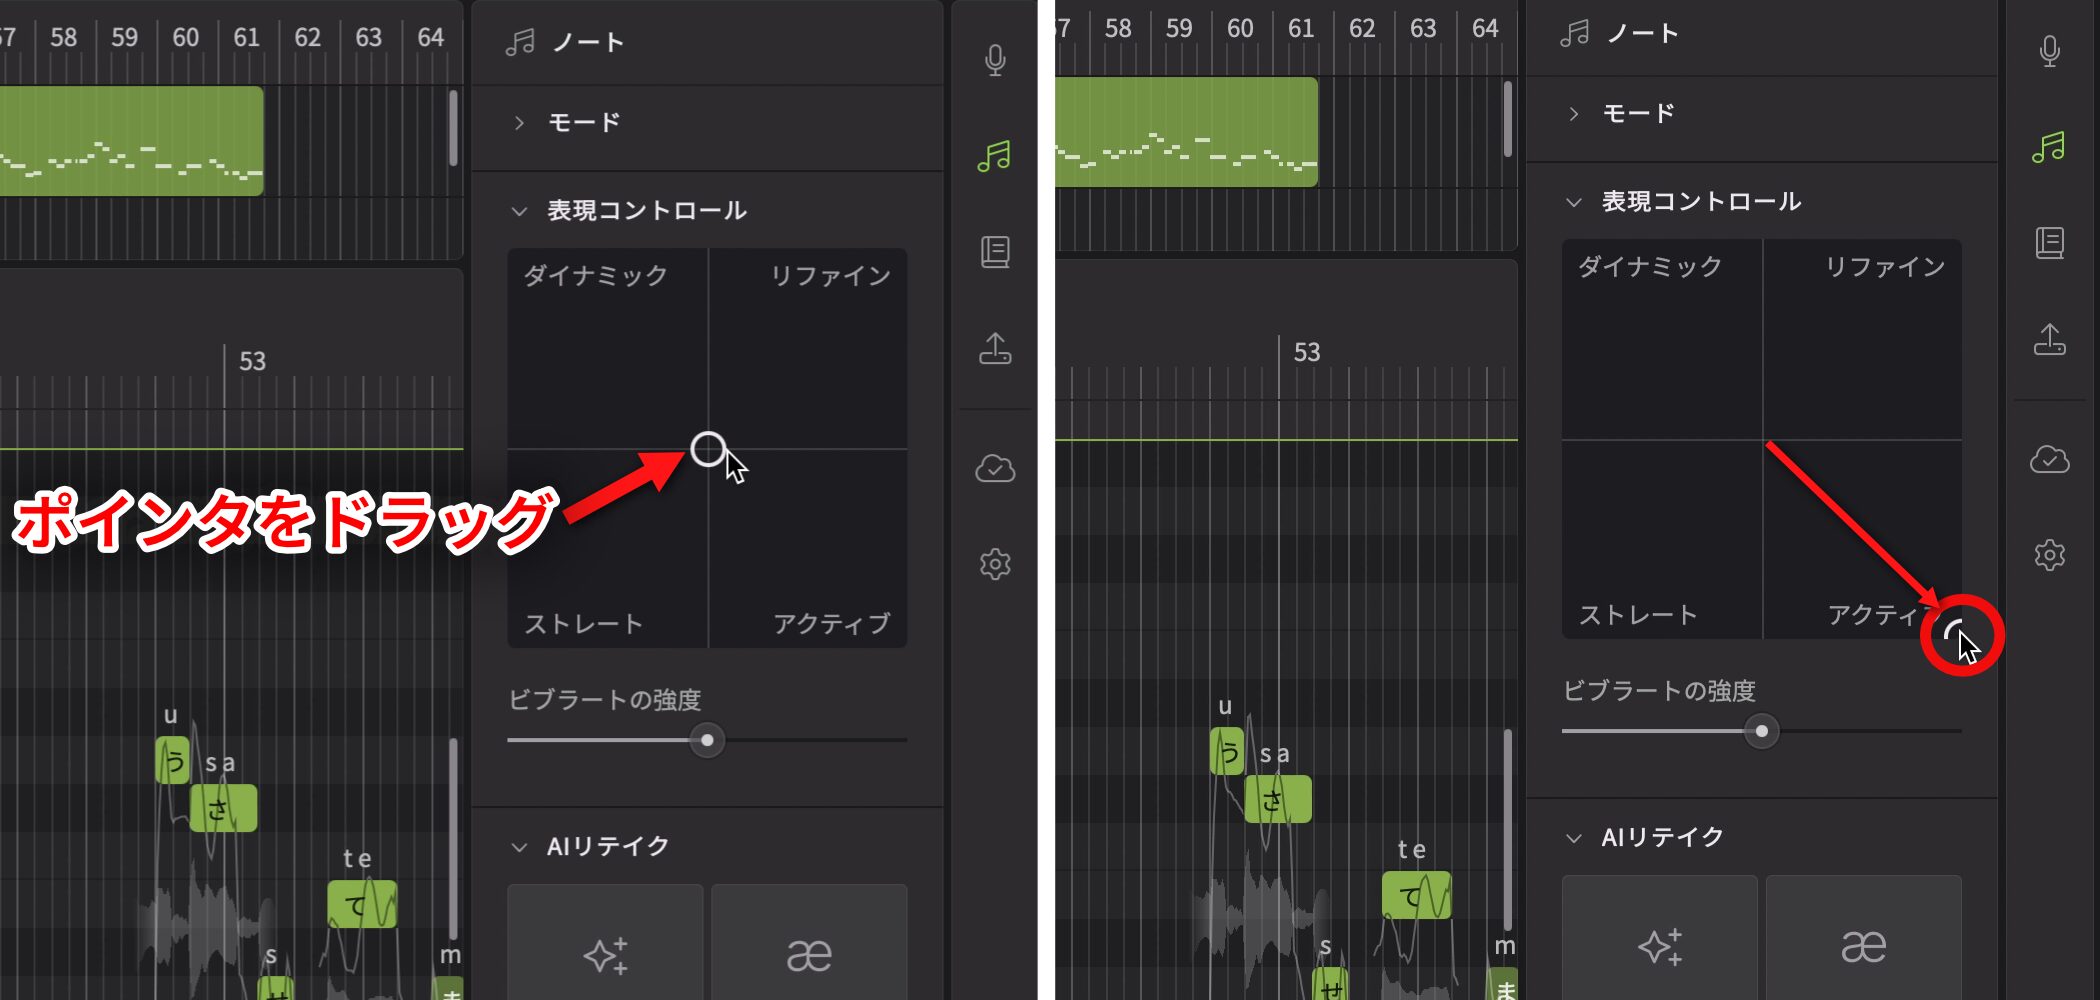
The pointer starts in the center. Drag it toward the desired style.
Listen to an example with Active applied to the start of the sample song's chorus.
The stronger movement and emotion add impact to the chorus compared with the unadjusted version.
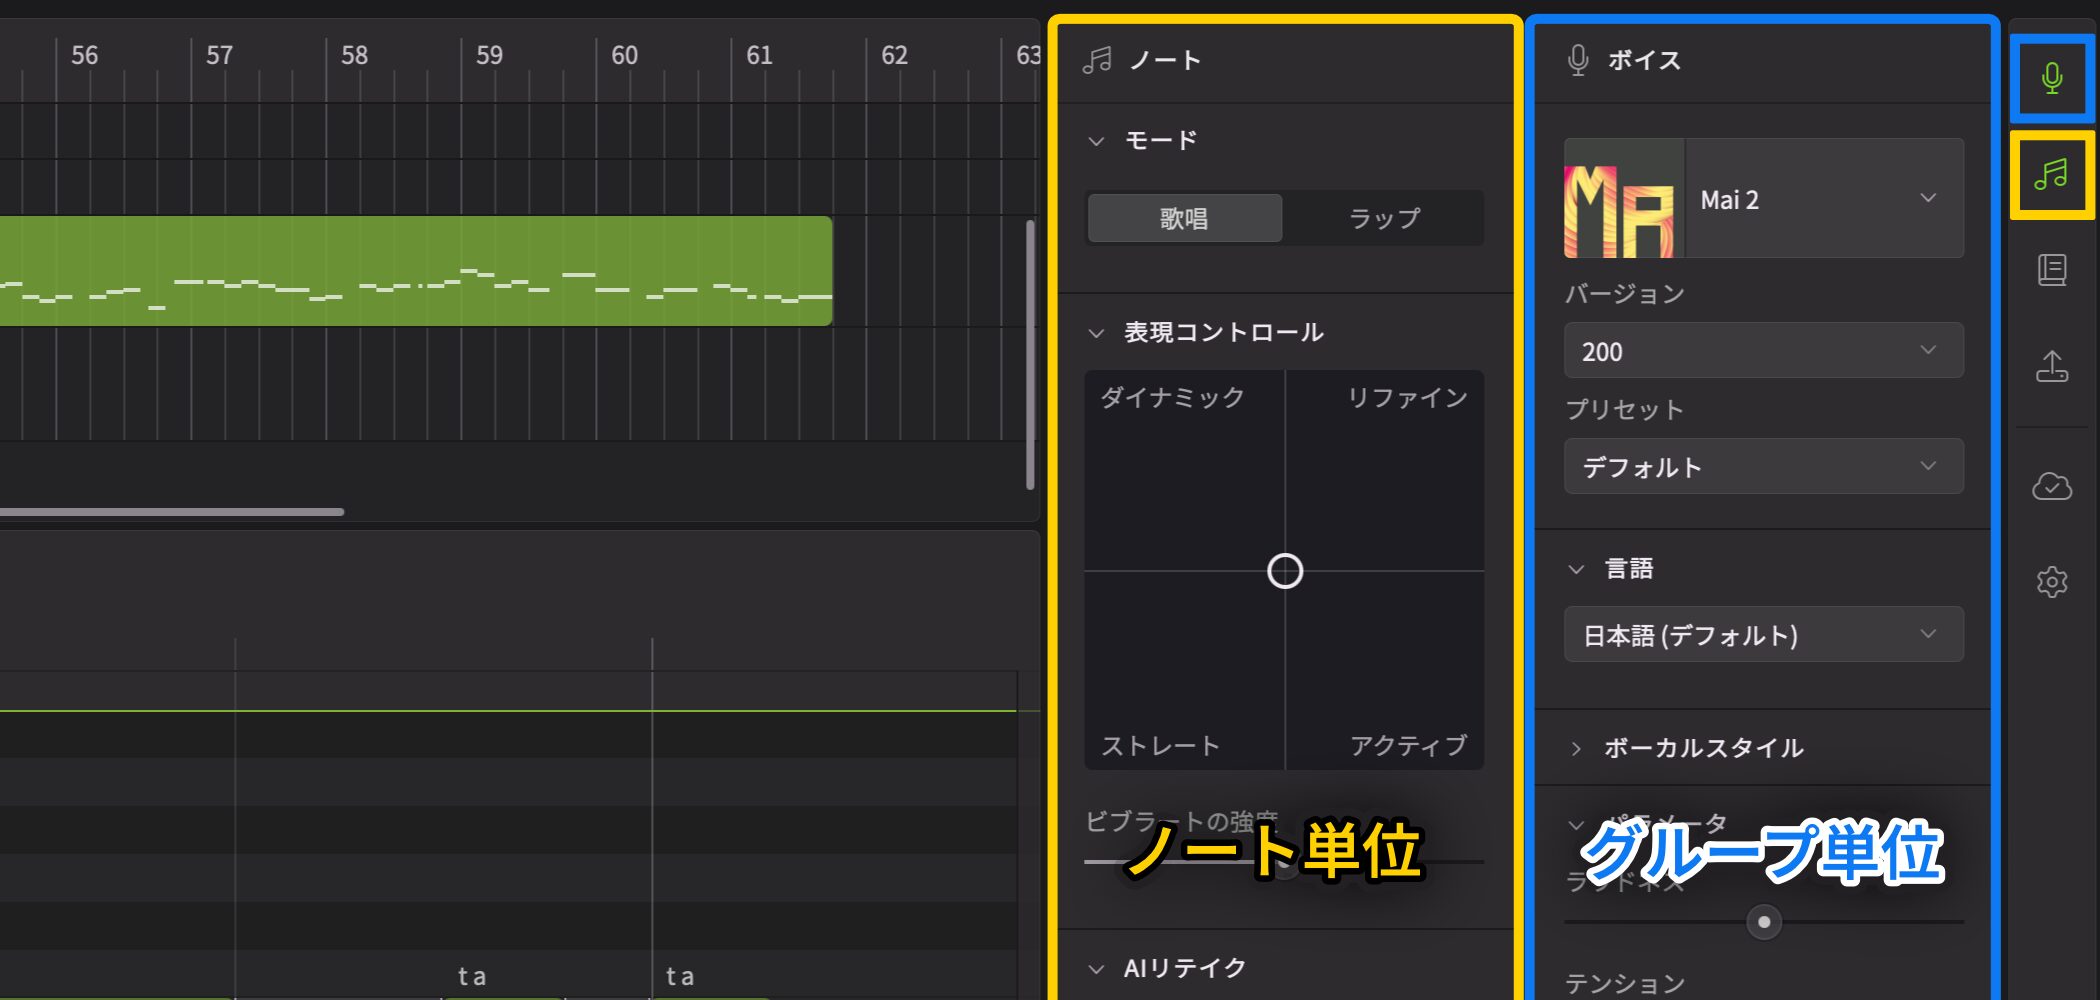
Whereas the Voice panel works by Group, the Note panel lets you adjust individual notes.
Set the overall direction in the Voice panel, then add Expression Control to memorable phrases such as the chorus.
Correct the Pitch Curve for Stable Intonation
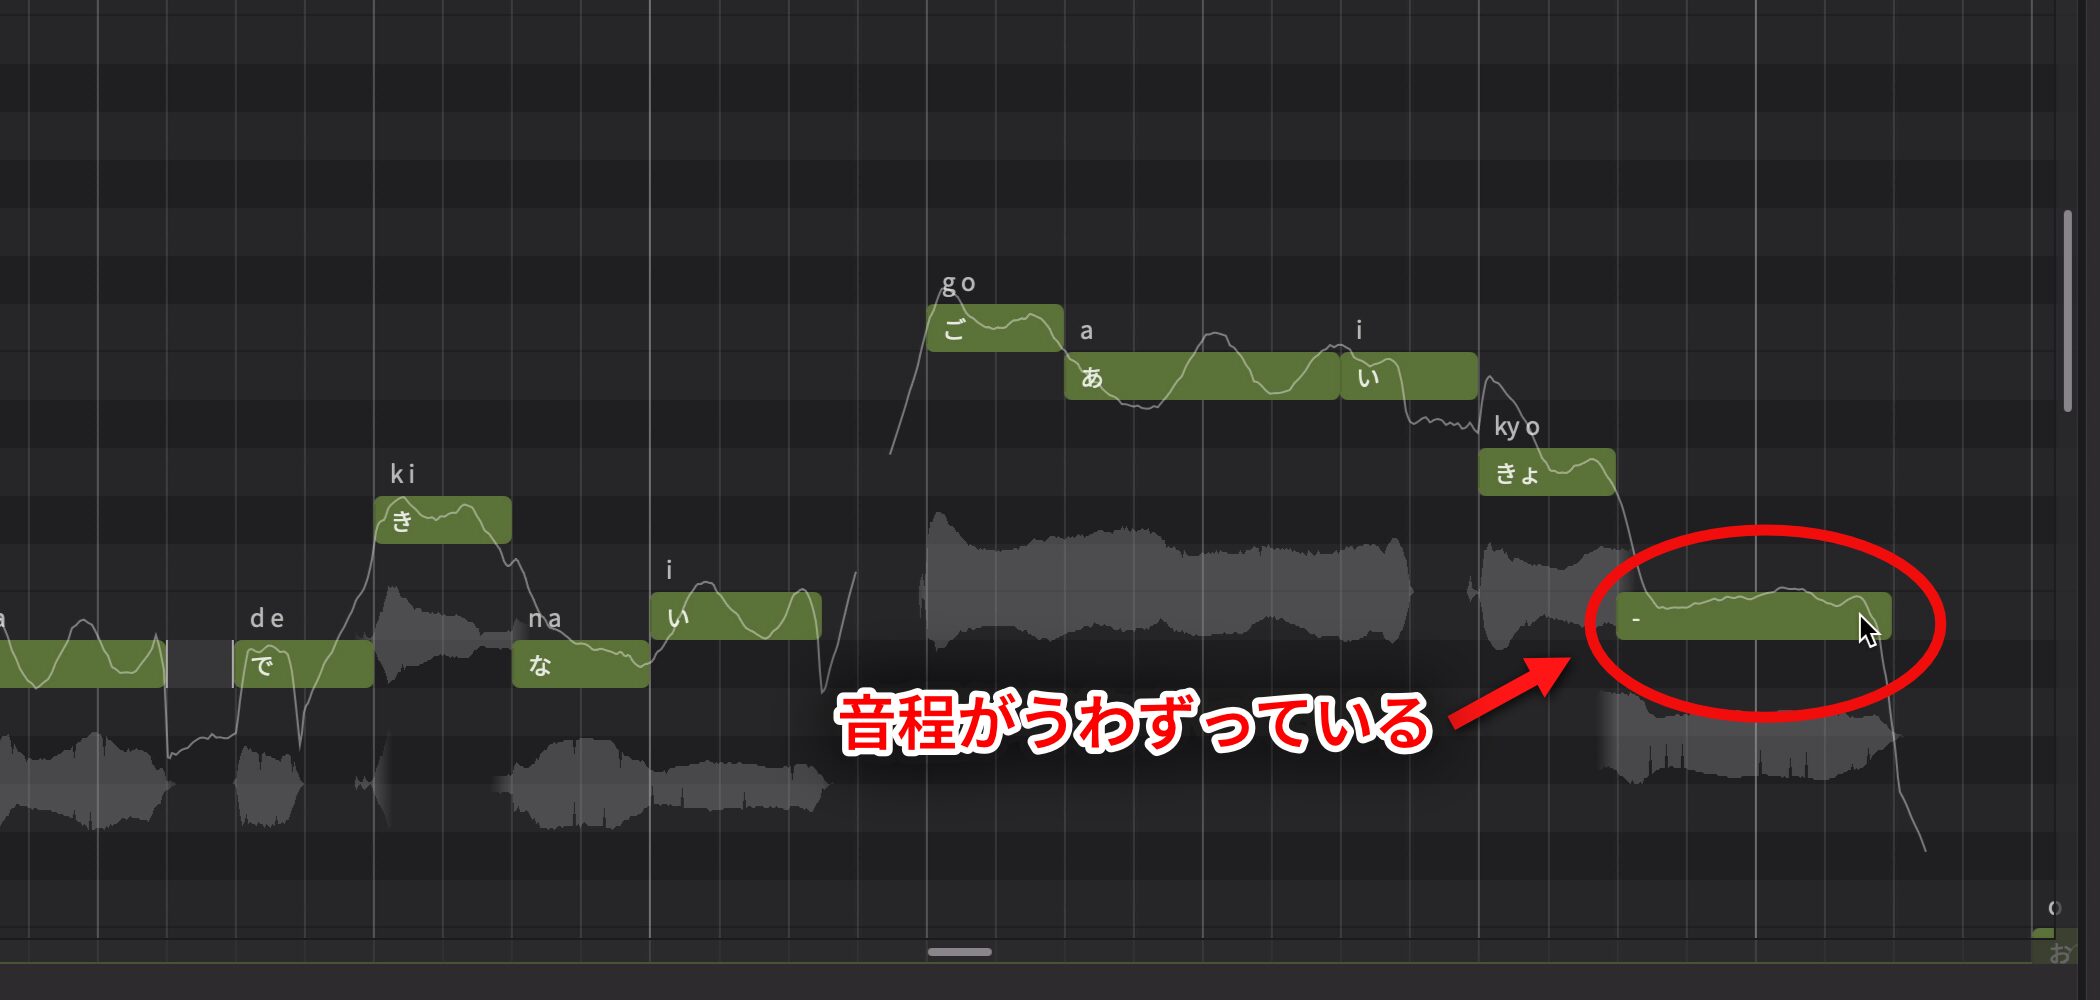
Voice-panel and Expression Control adjustments can sometimes make pitch unstable or unnatural.
If that happens, correct the pitch curve to stabilize the intonation.
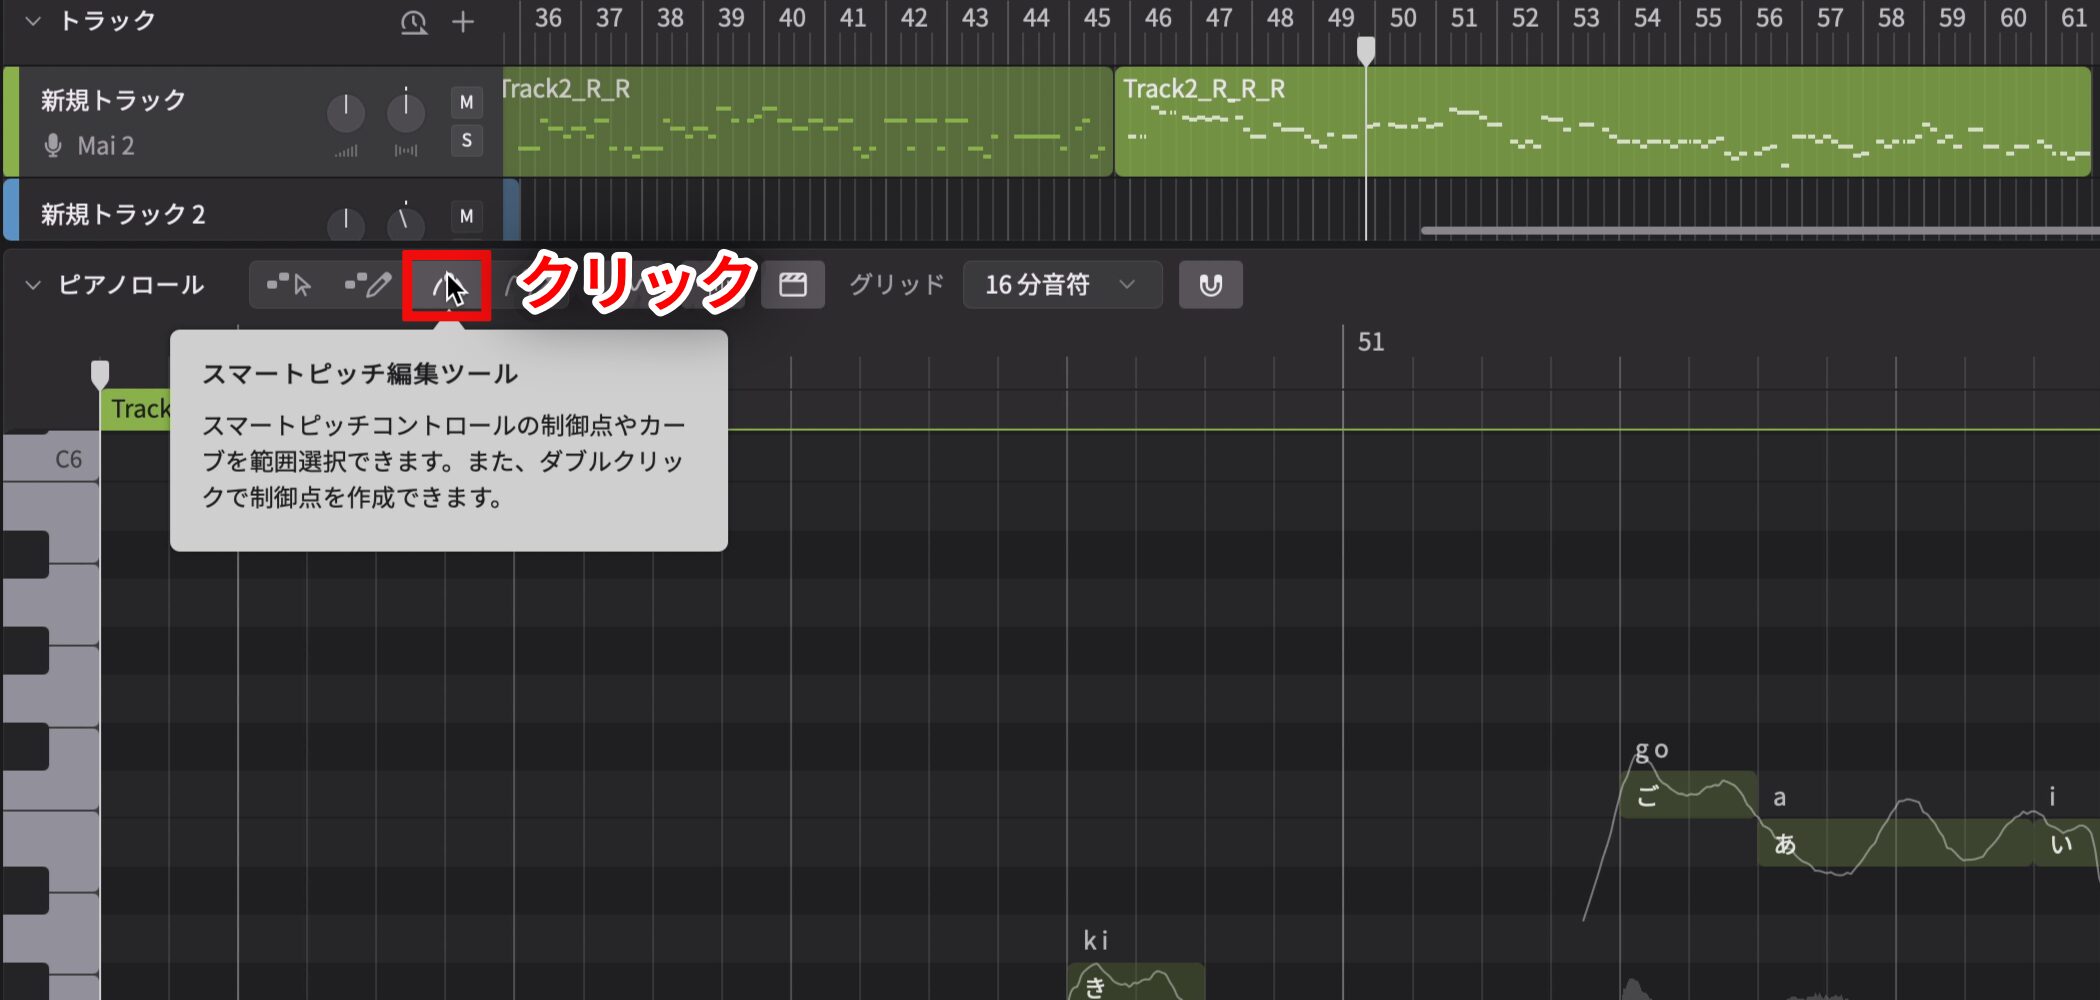
Switch to the Smart Pitch Editing tool.
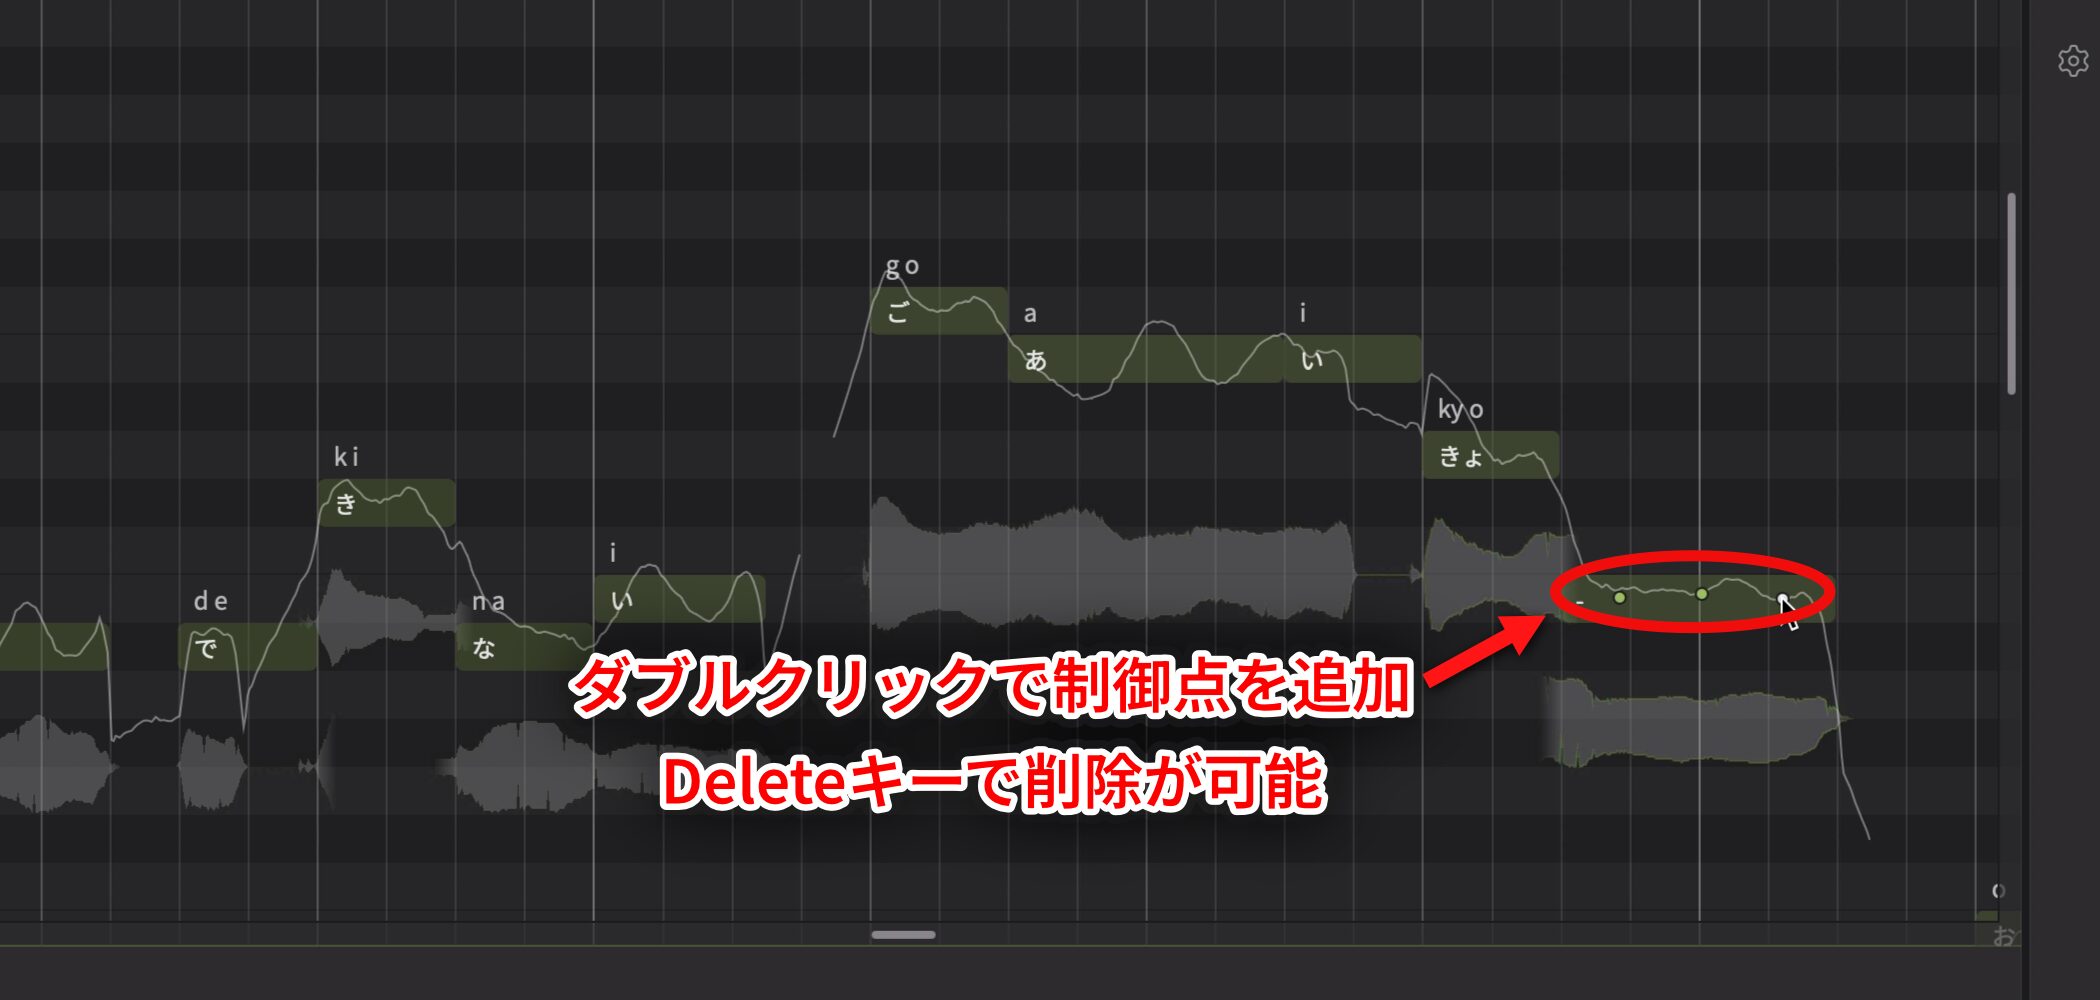
Double-click where the pitch rises too high to add a control point.
This example adds three points.
Press Delete to remove a control point added by mistake.
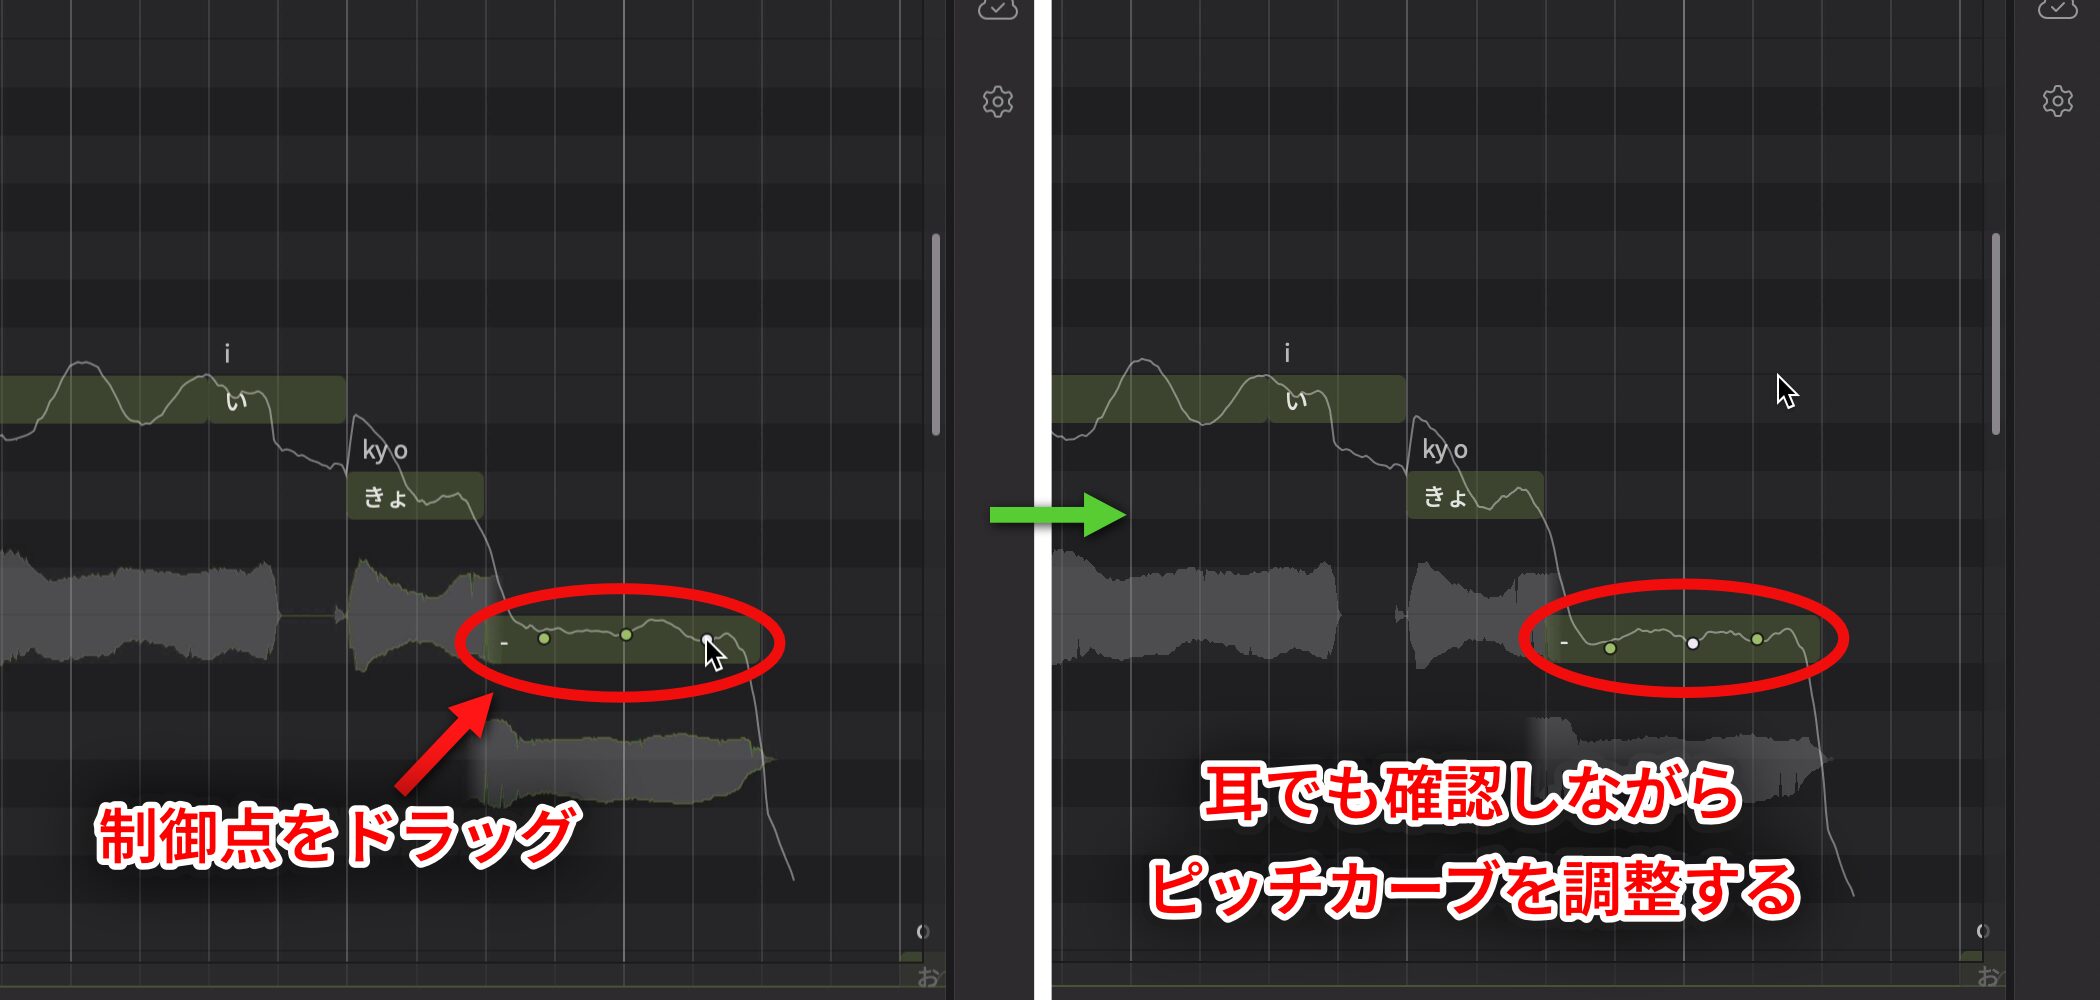
Drag the points to adjust the pitch curve precisely while retaining a natural performance.
Be careful: over-editing can make the voice sound mechanical. Unless that is intentional, judge the result by ear as well as by the display.
Fix Gaps Between Notes for Natural Singing
The timing and connection of notes strongly affect naturalness and rhythm.
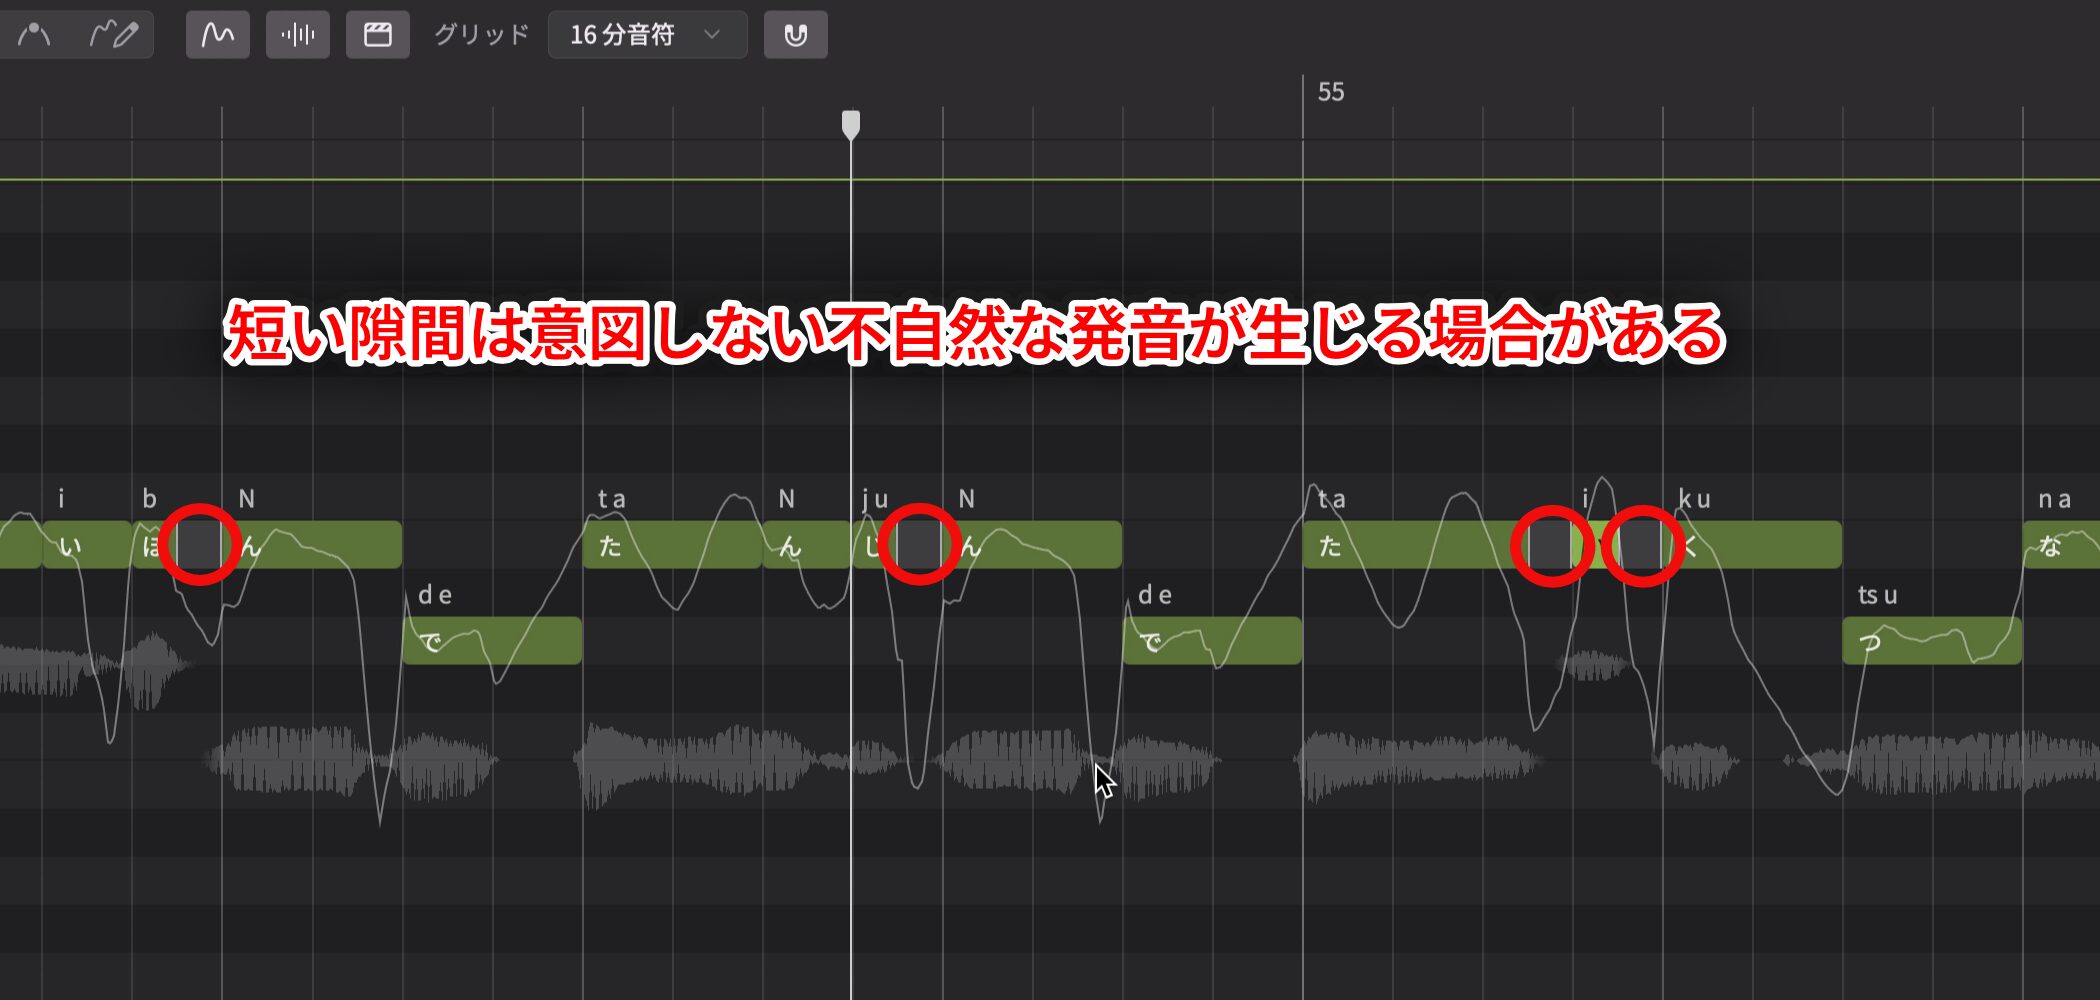
Gaps can create a rhythmic delivery, but because of the product's behavior, short gaps can cause unintended, unnatural pronunciation.
Fix such gaps when necessary.
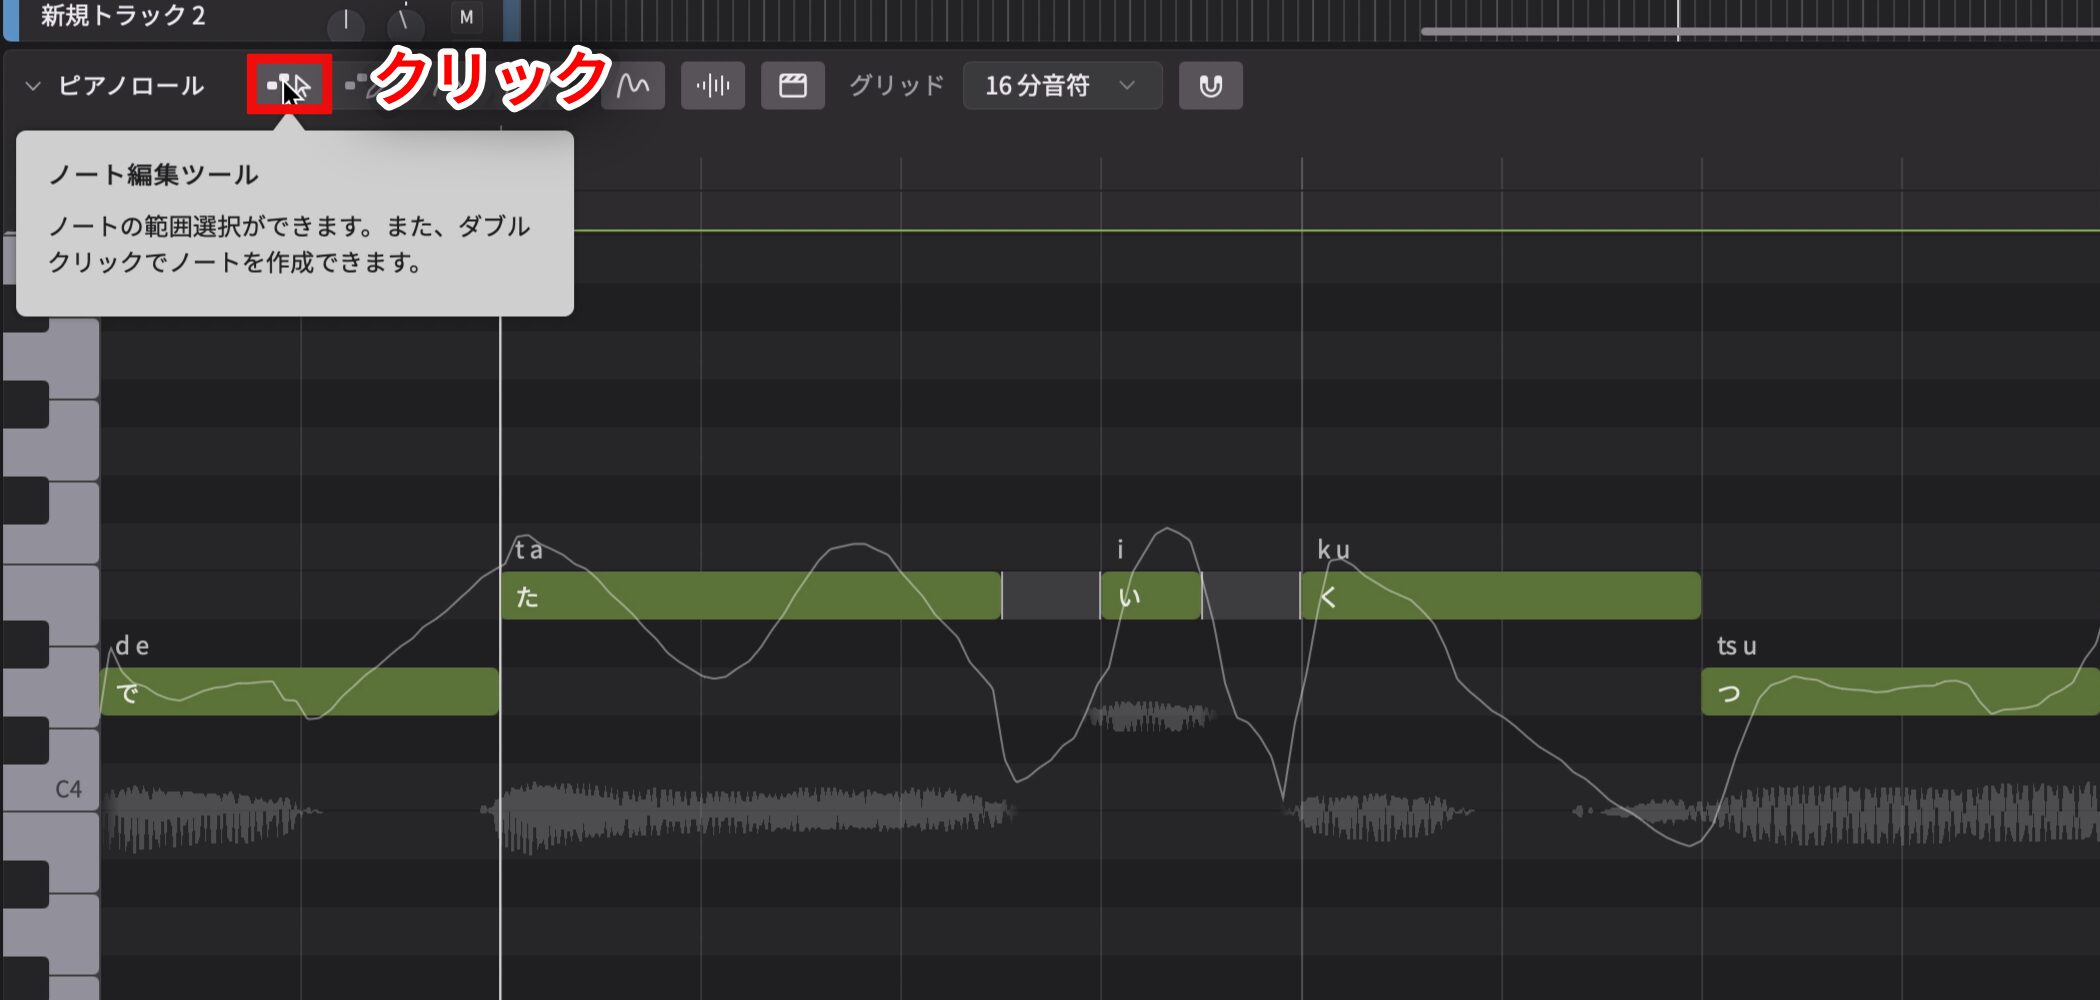
Select the Note Edit tool.
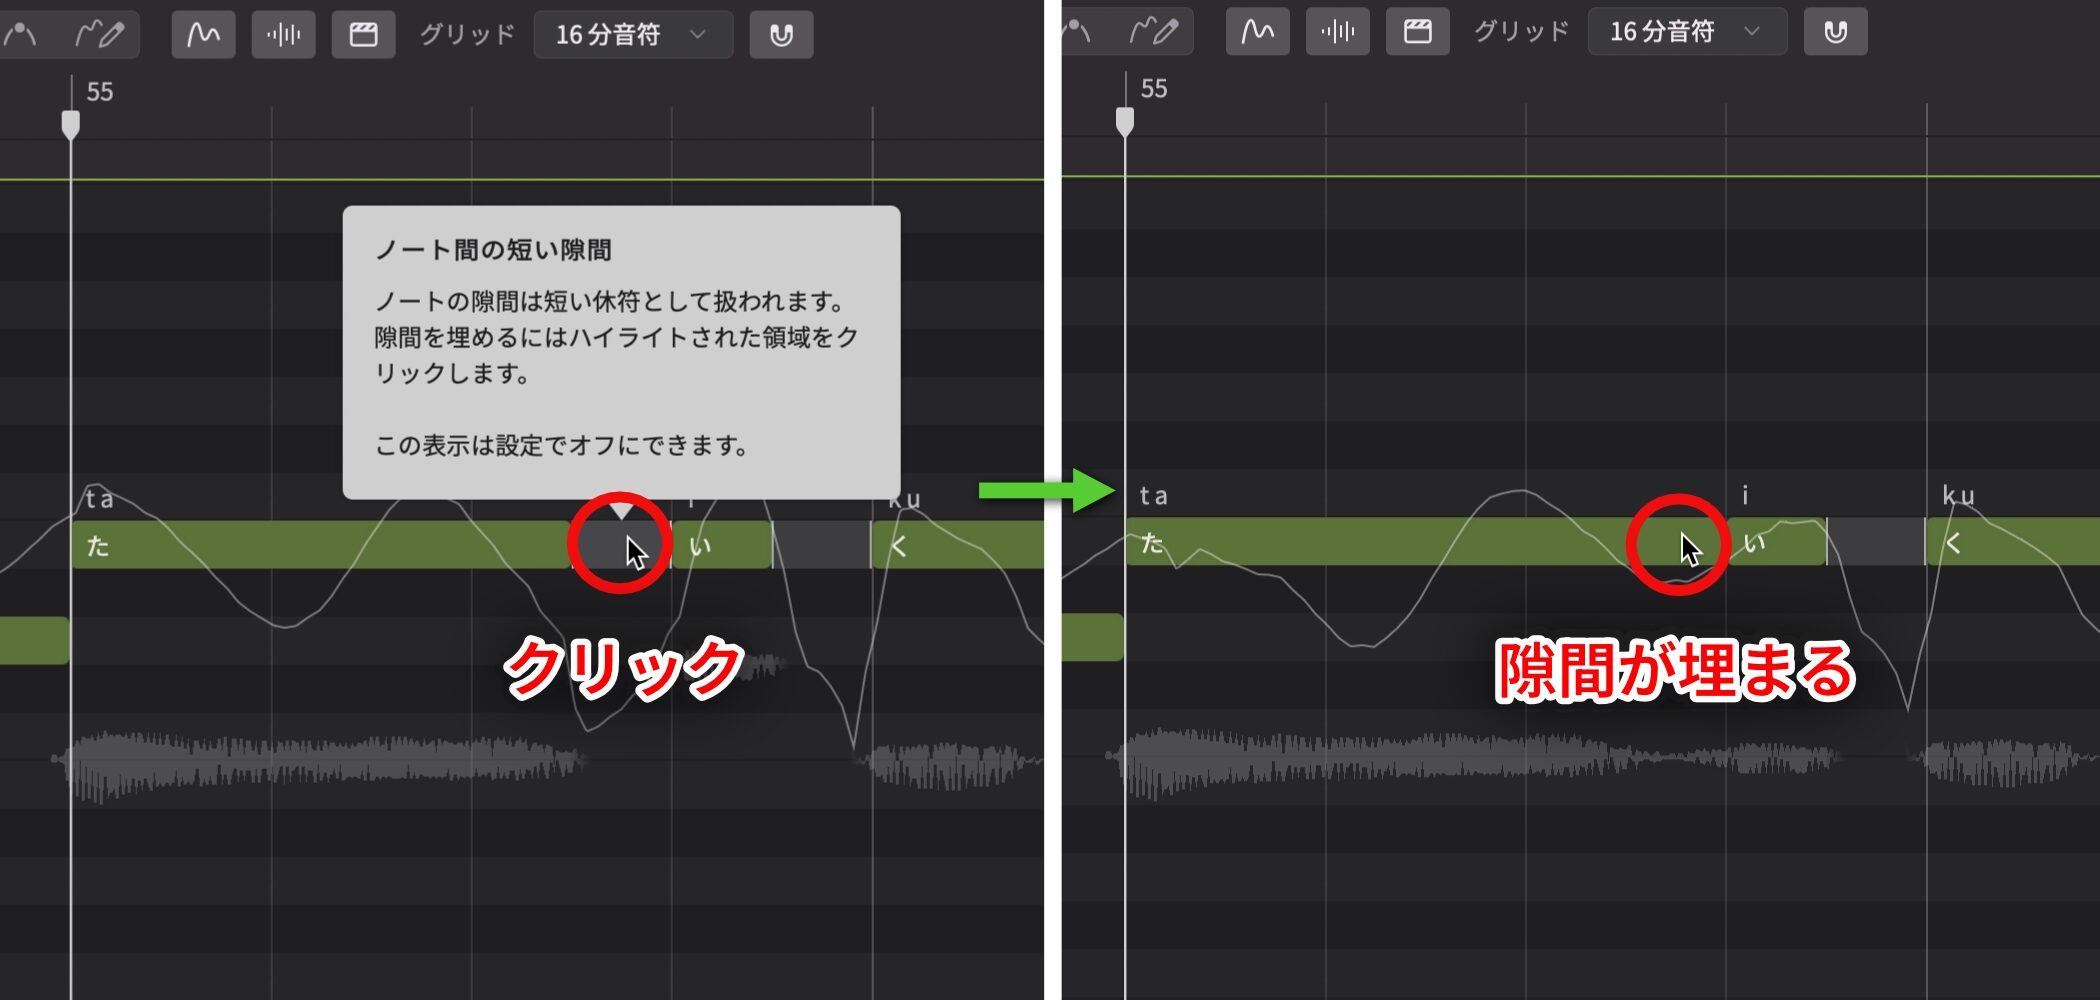
Click the gap between the vertical note boundaries to fill it.
Create a Rhythmic Delivery
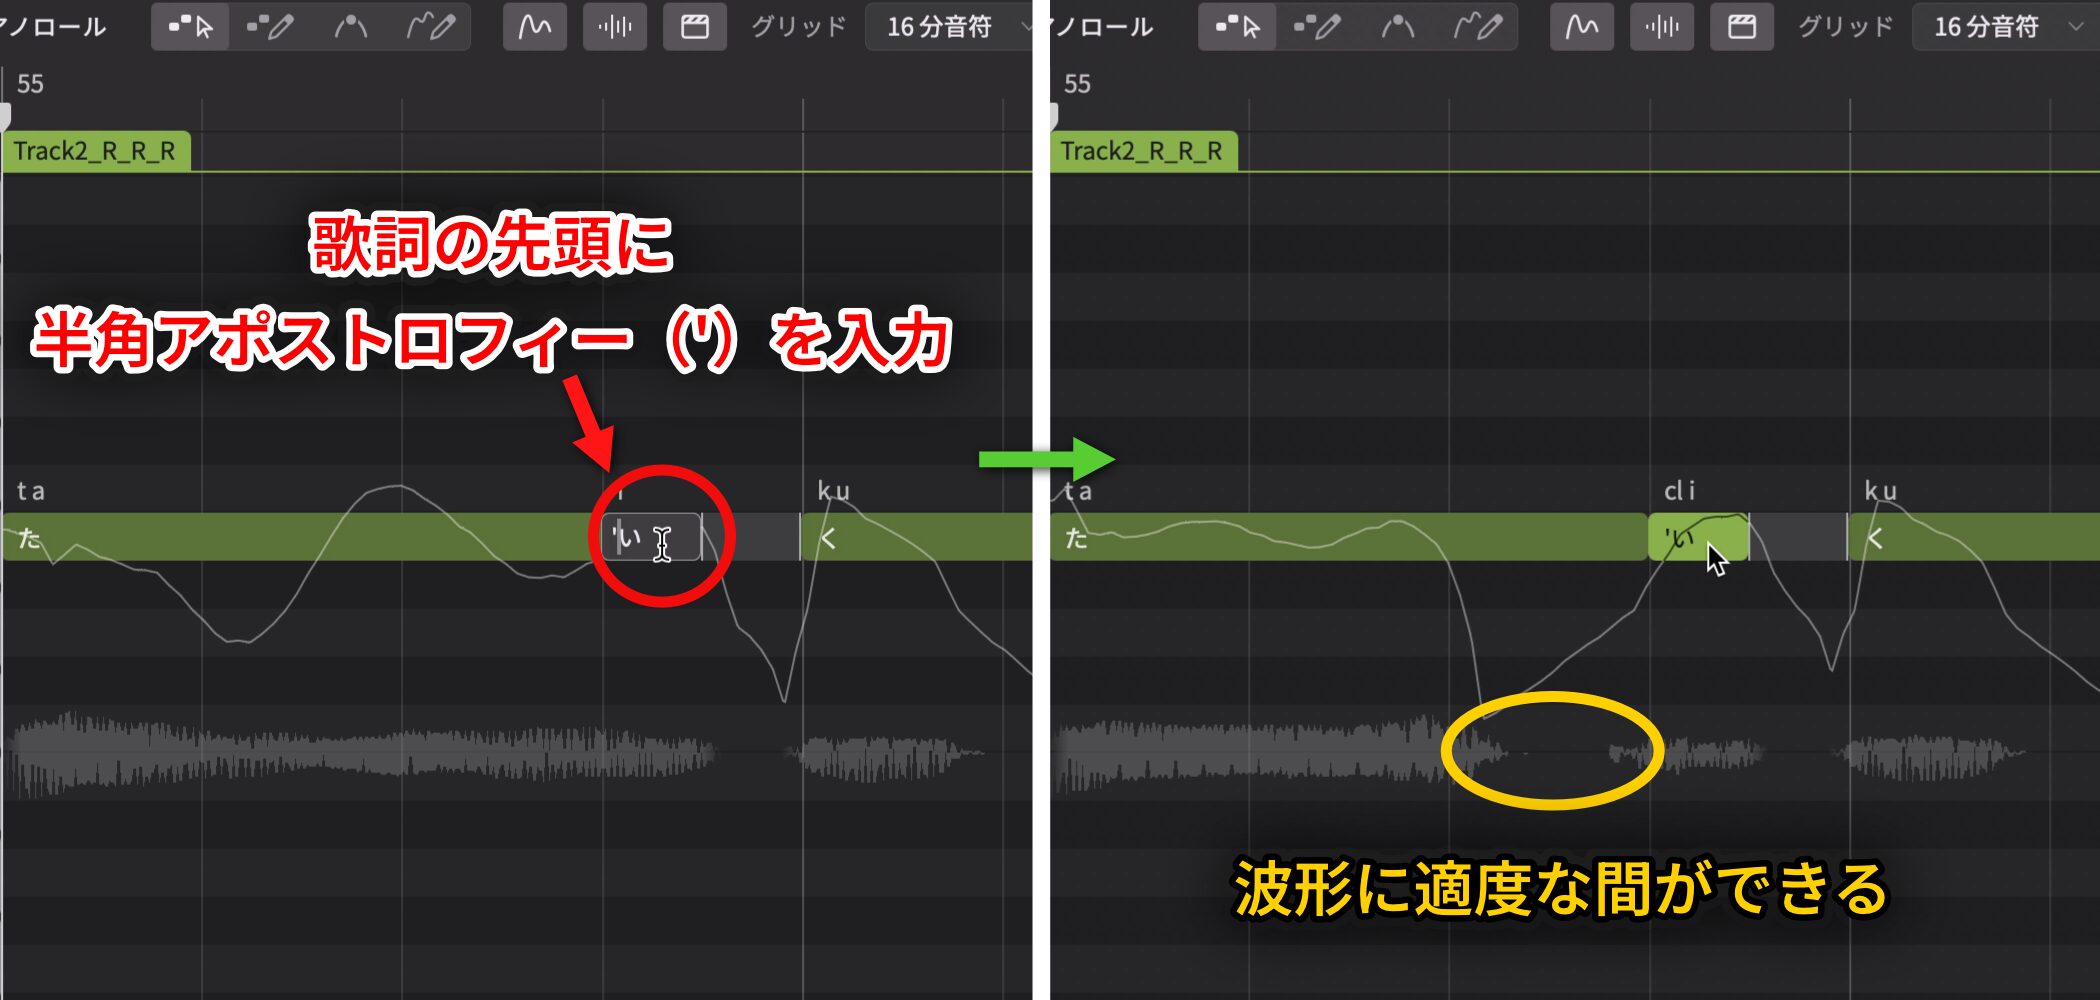
For a more rhythmic feel, enter a straight apostrophe (') at the start of the lyric on the note after the sound you want to cut off.
This makes an appropriate pause in the waveform and creates a natural rhythmic pronunciation.
Adjust Phonemes to Control Pronunciation Timing
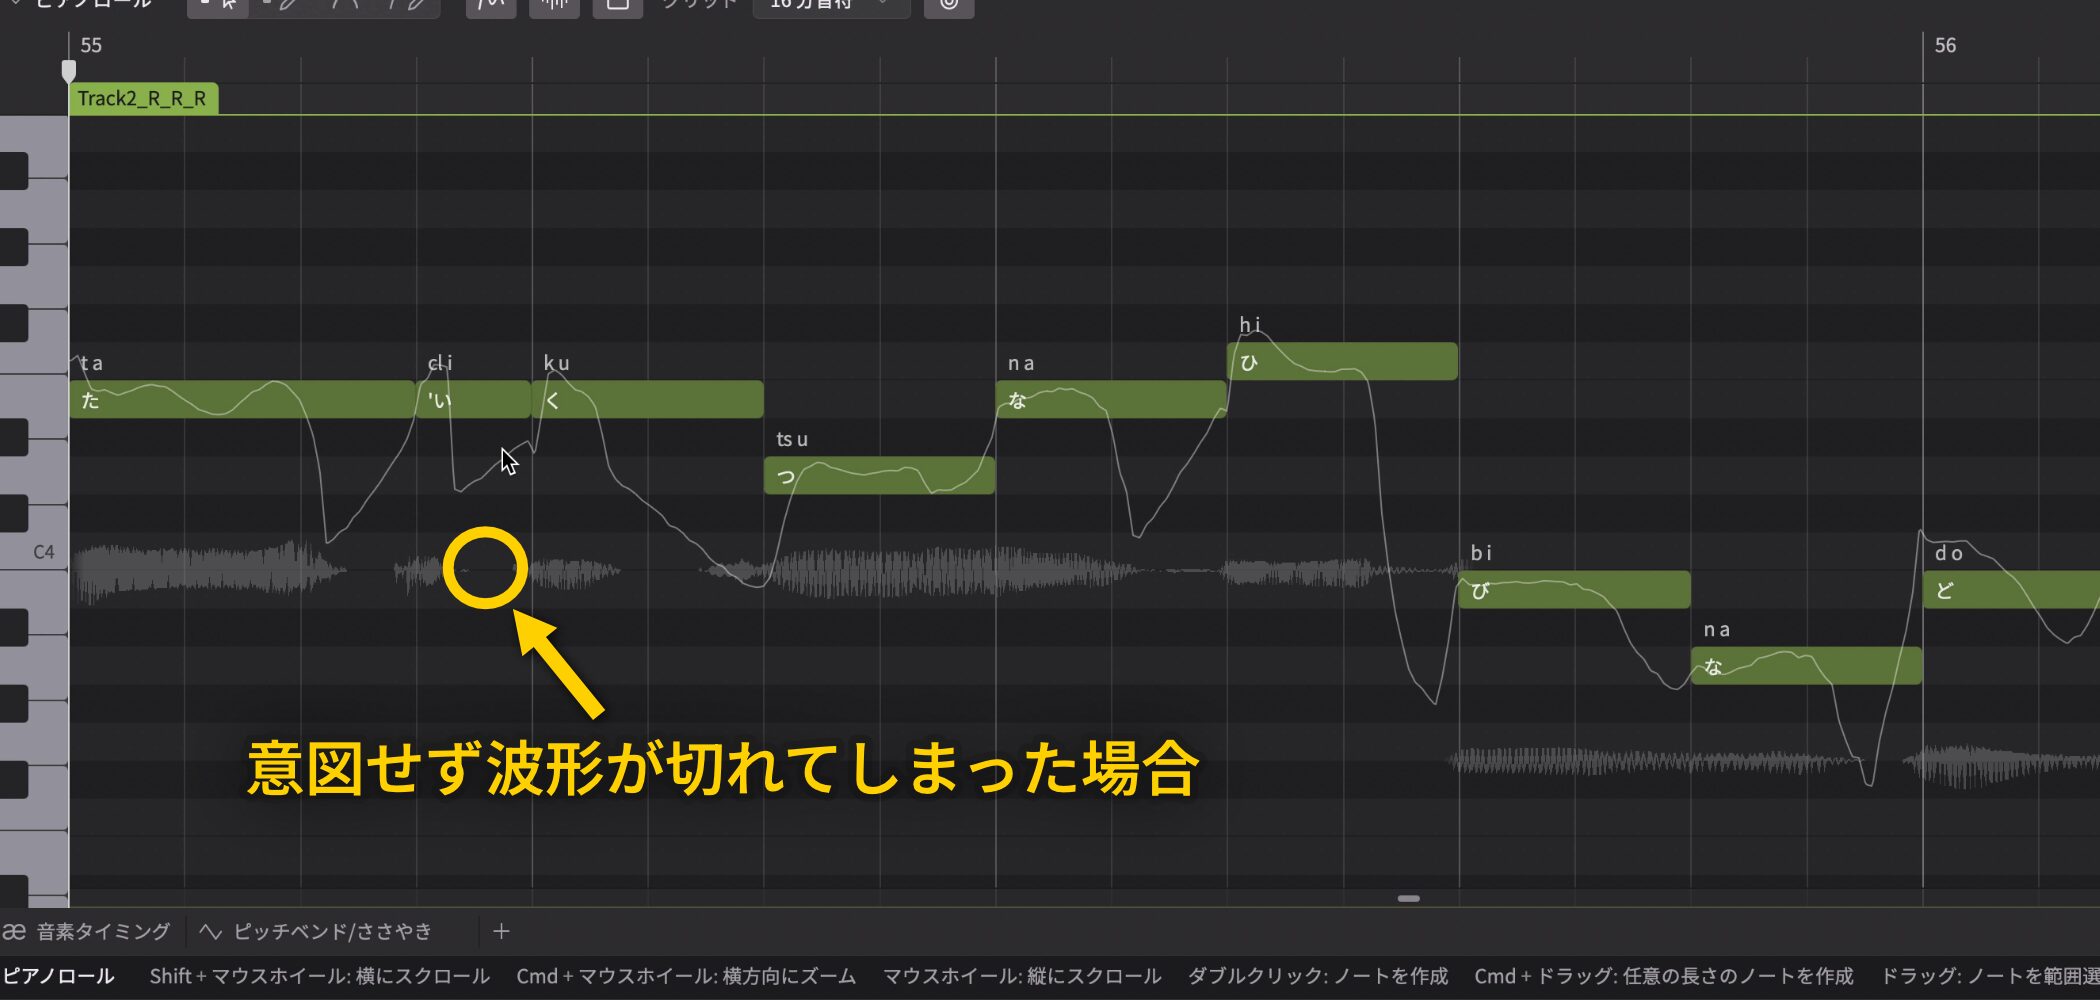
If a waveform cuts off unexpectedly, you can fix it by adjusting phonemes, the smallest units of pronunciation.
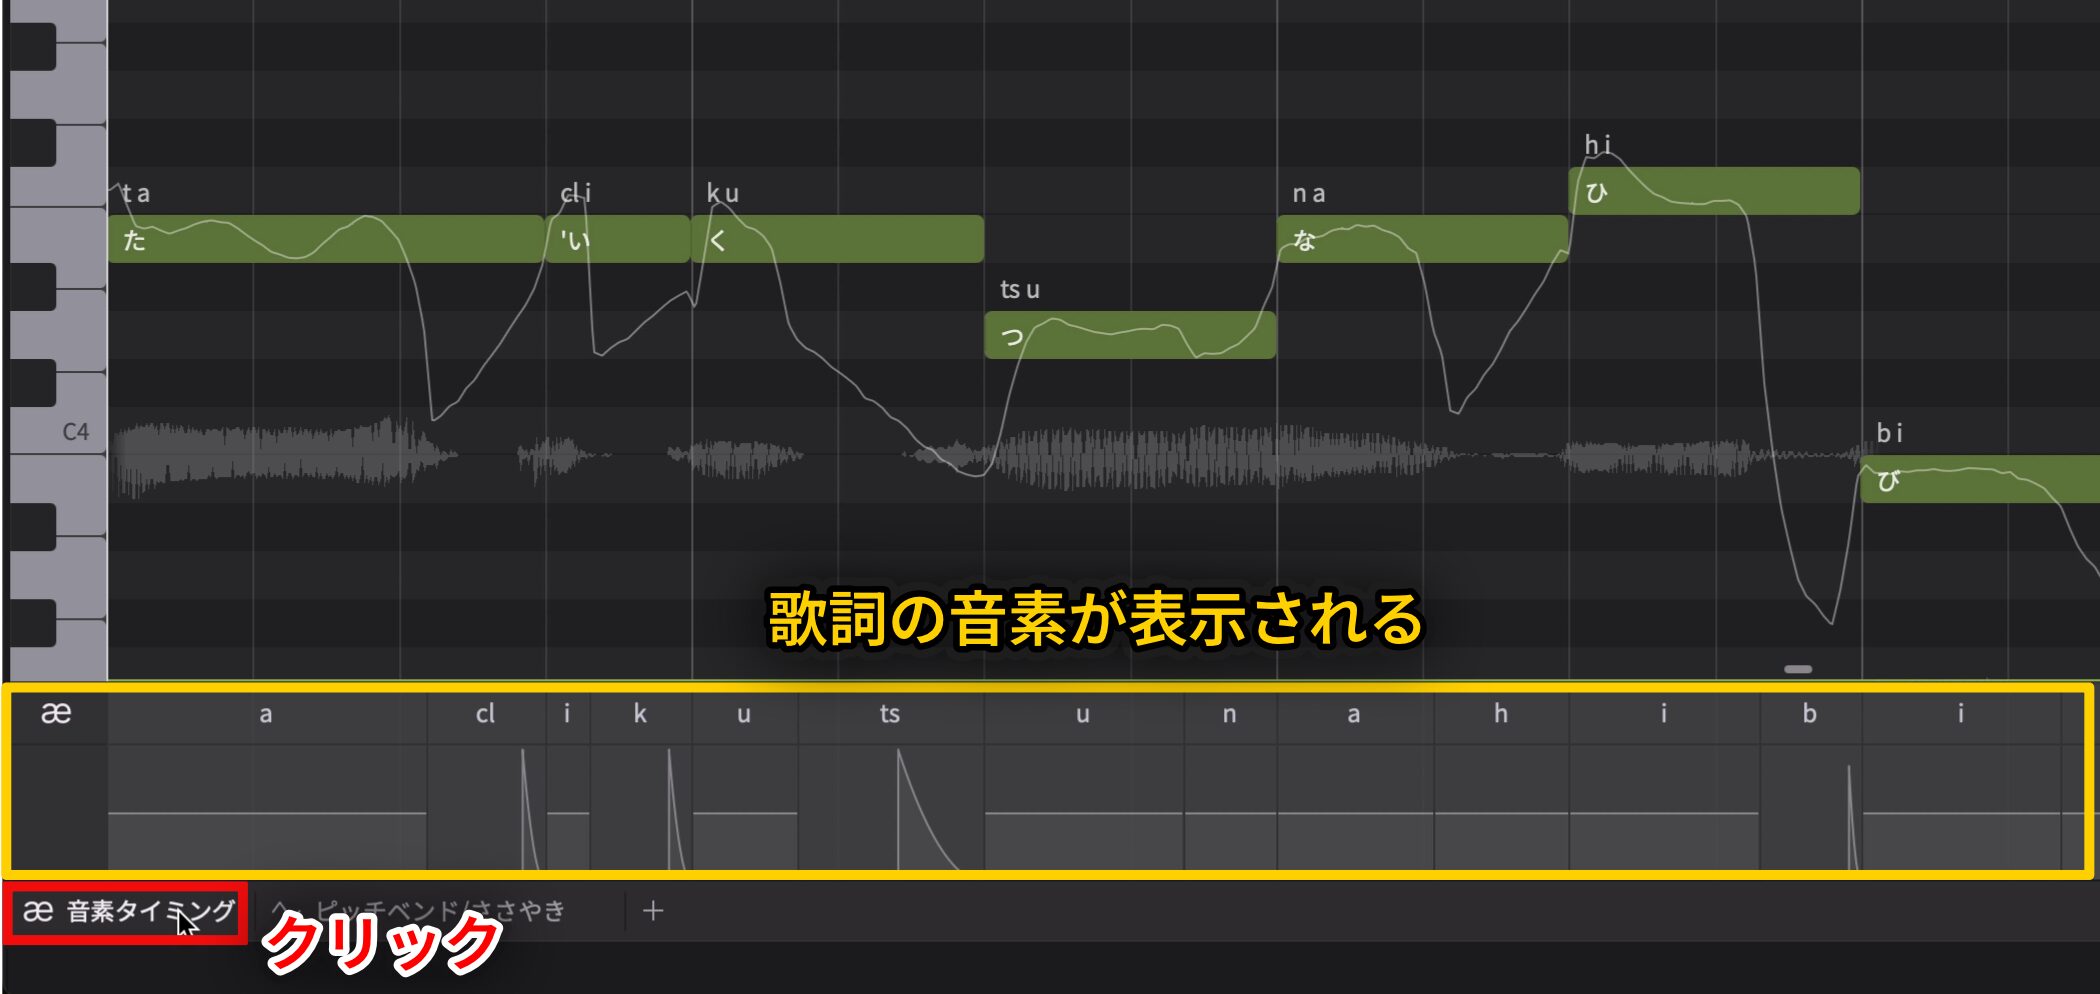
Click Phoneme Timing in the lower-left corner to show each note's lyric divided into phonemes.
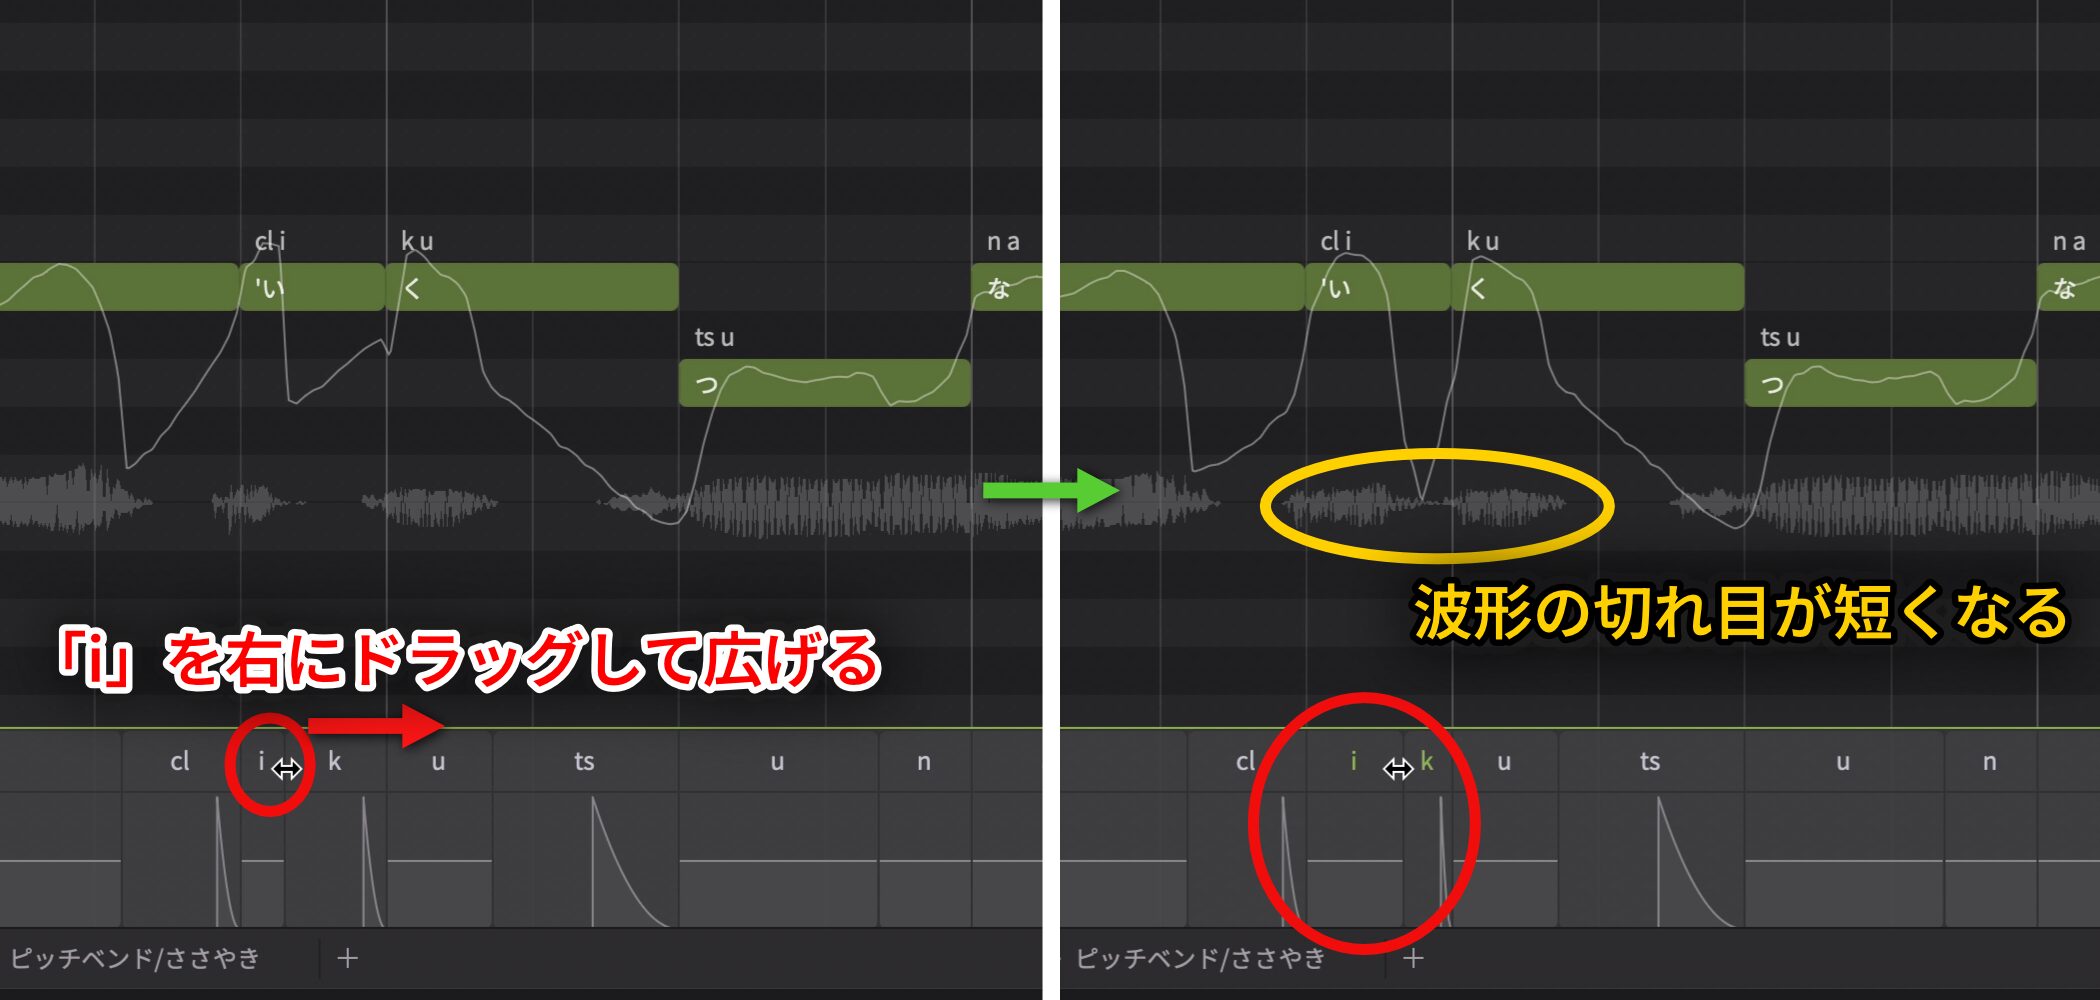
For example, place the pointer between the i phoneme of “i” and the k phoneme of “ku” to reveal a horizontal arrow.
Drag i to the right to lengthen its waveform, soften the gap, and make the pronunciation more natural.
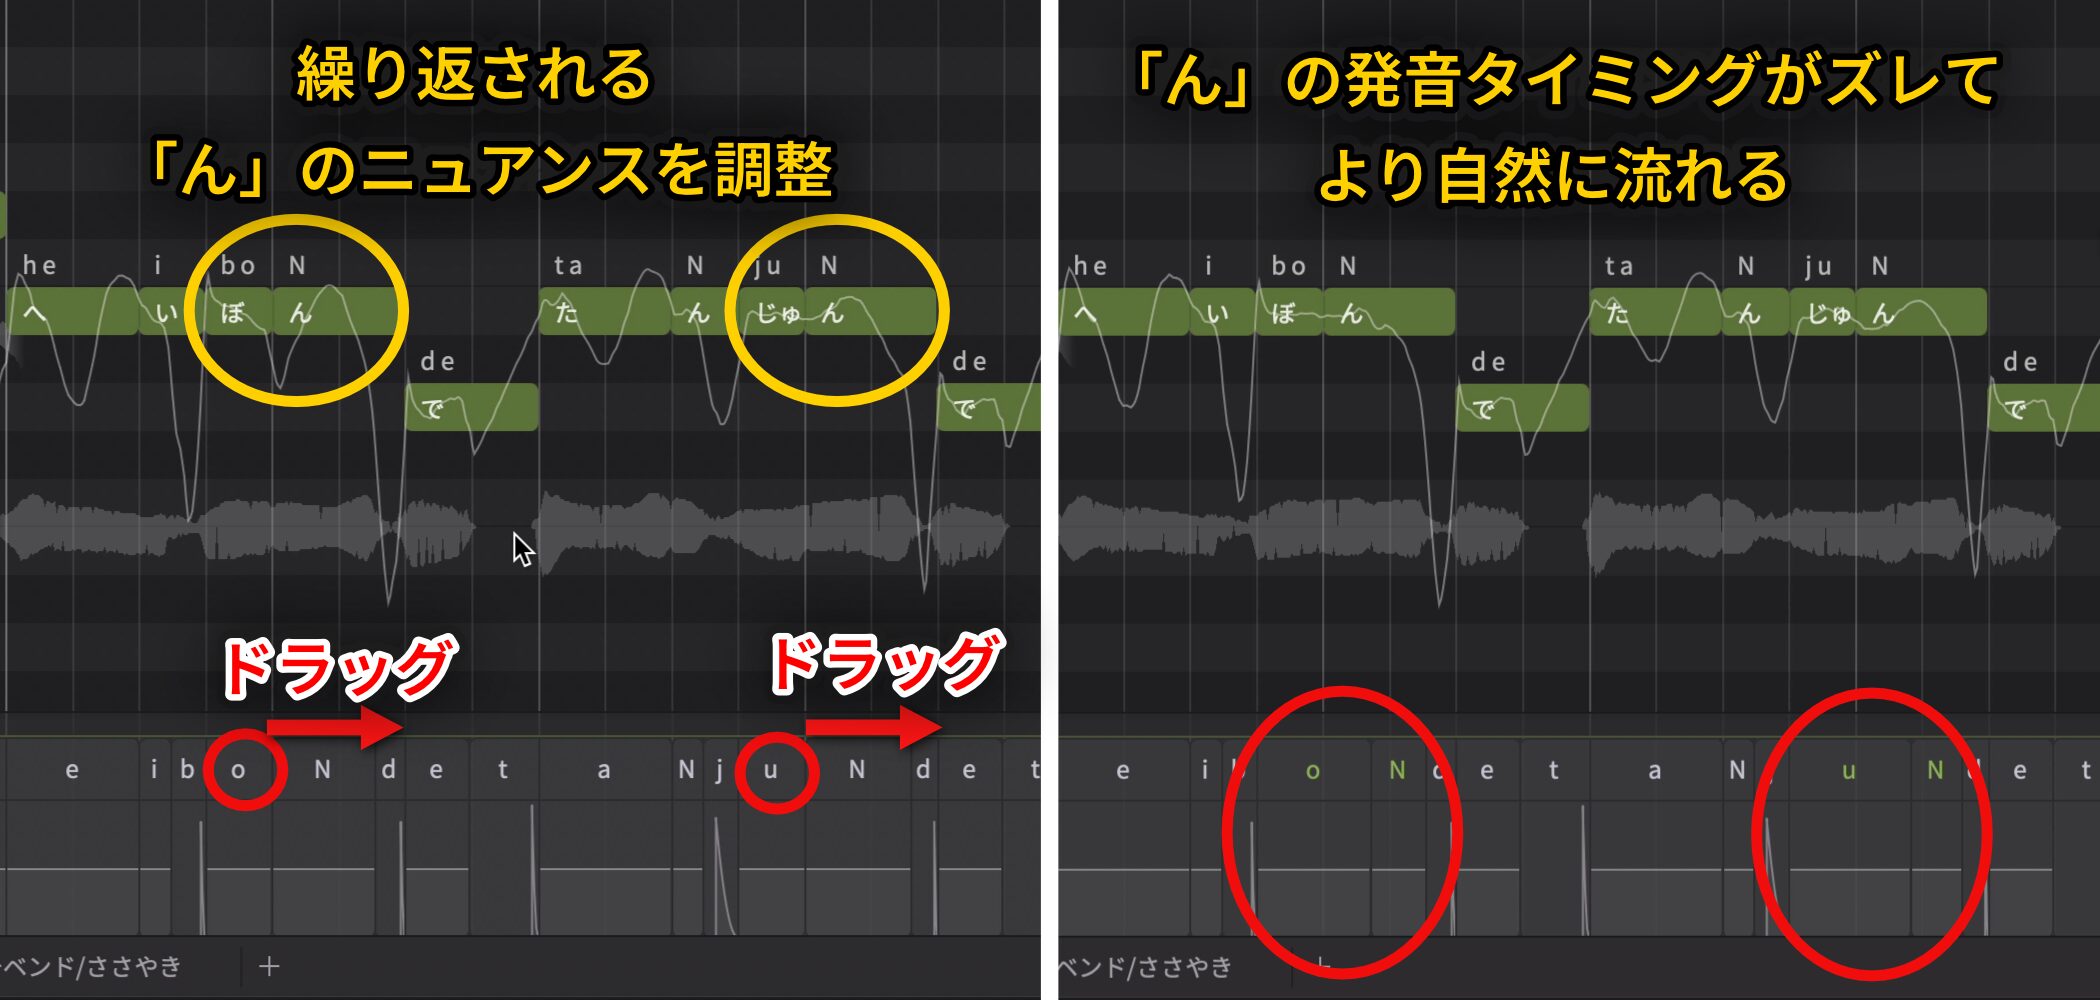
Fine-tuning phoneme timing in repeated lyrics or tightly rhythmic phrases can also create a smoother flow and a more human feel.
Control Vibrato in Detail
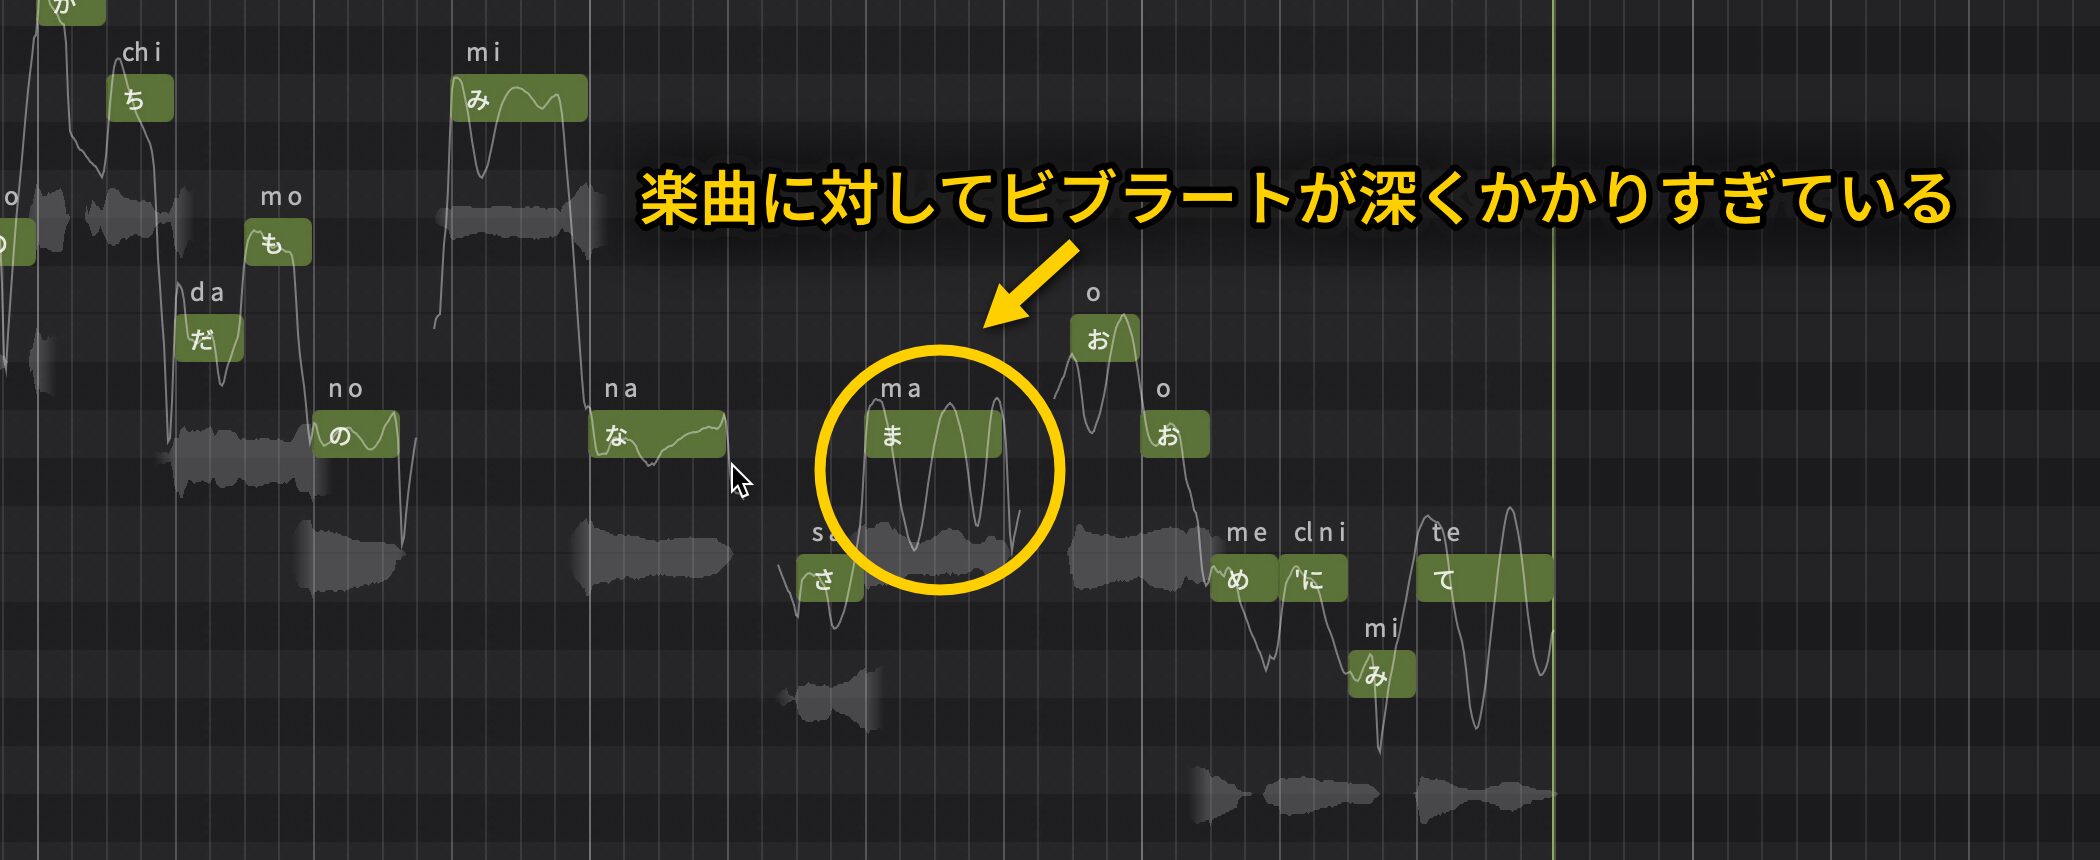
The amount of vibrato strongly affects the song's impression.
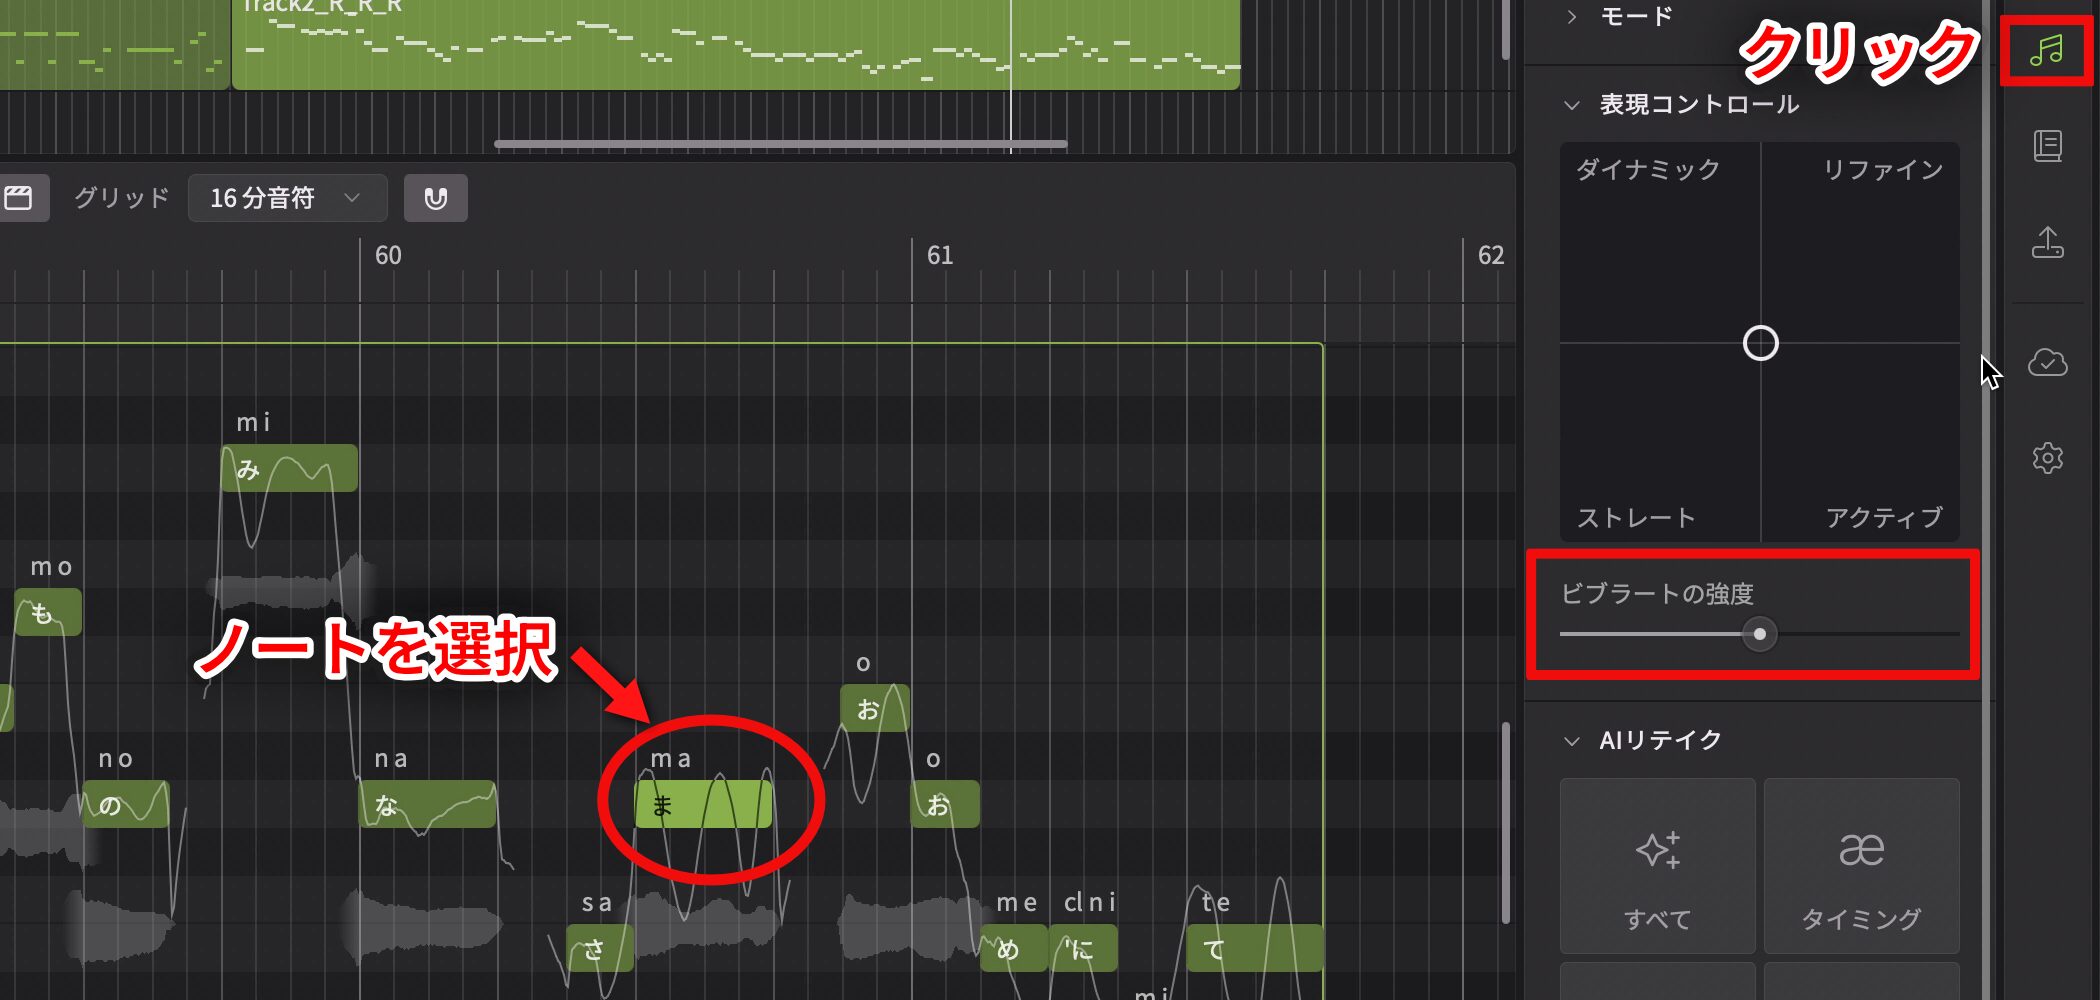
Select a note and adjust Vibrato Depth in the Note panel.
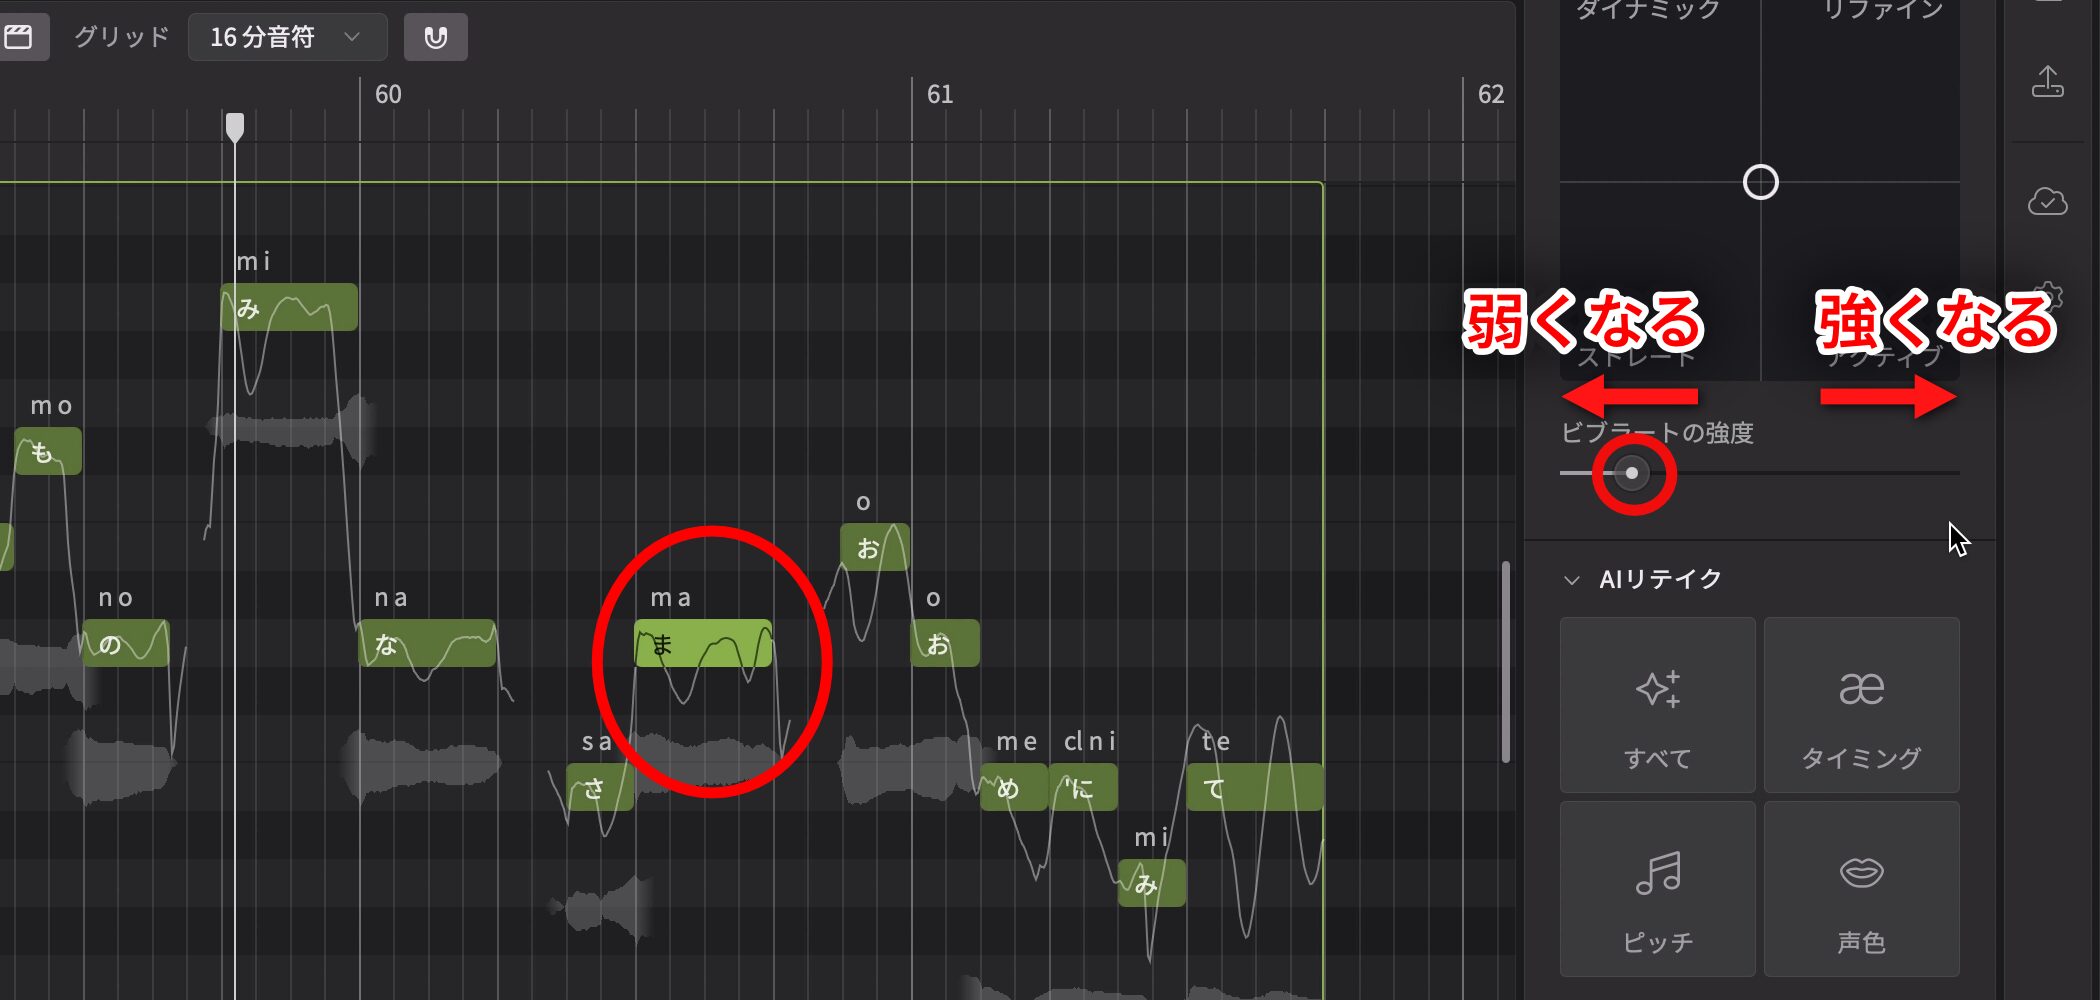
Lower values weaken the effect; higher values strengthen it.
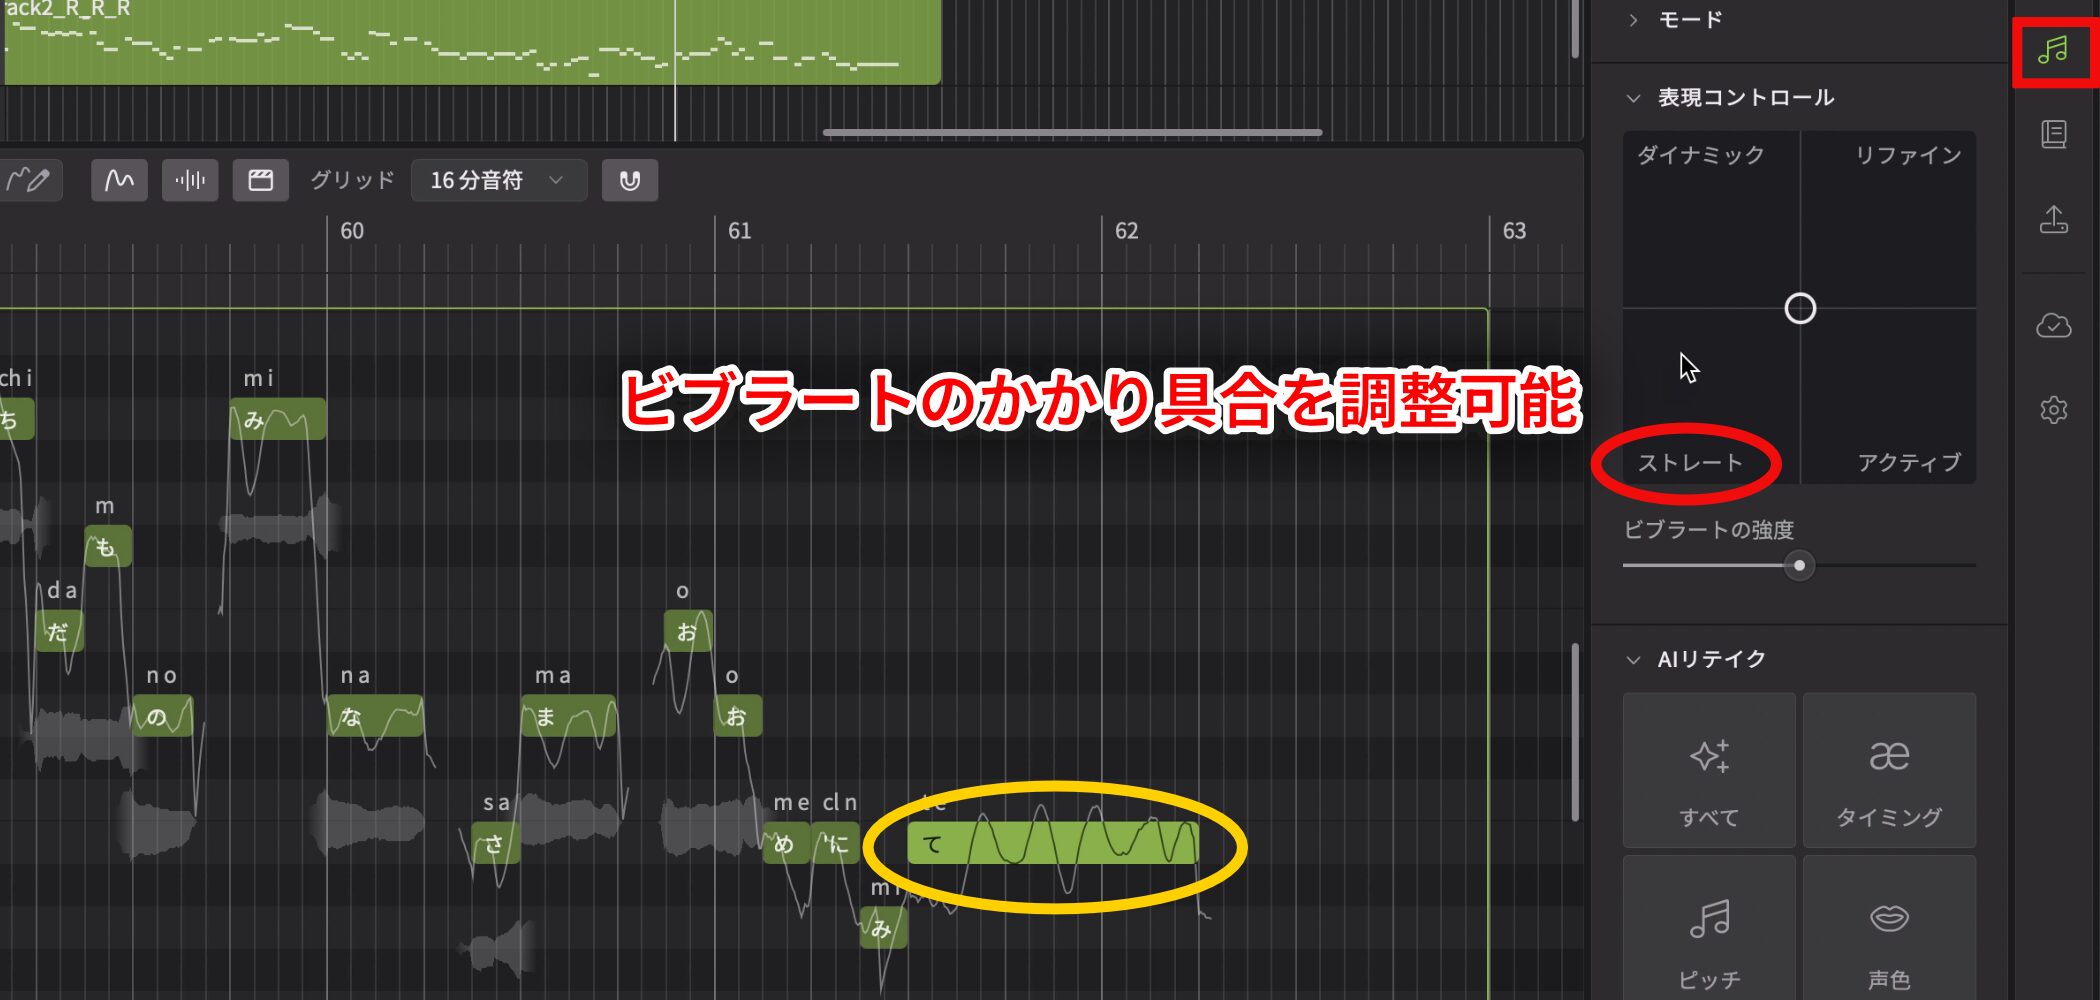
You can also reduce vibrato with the Straight setting in Expression Control.
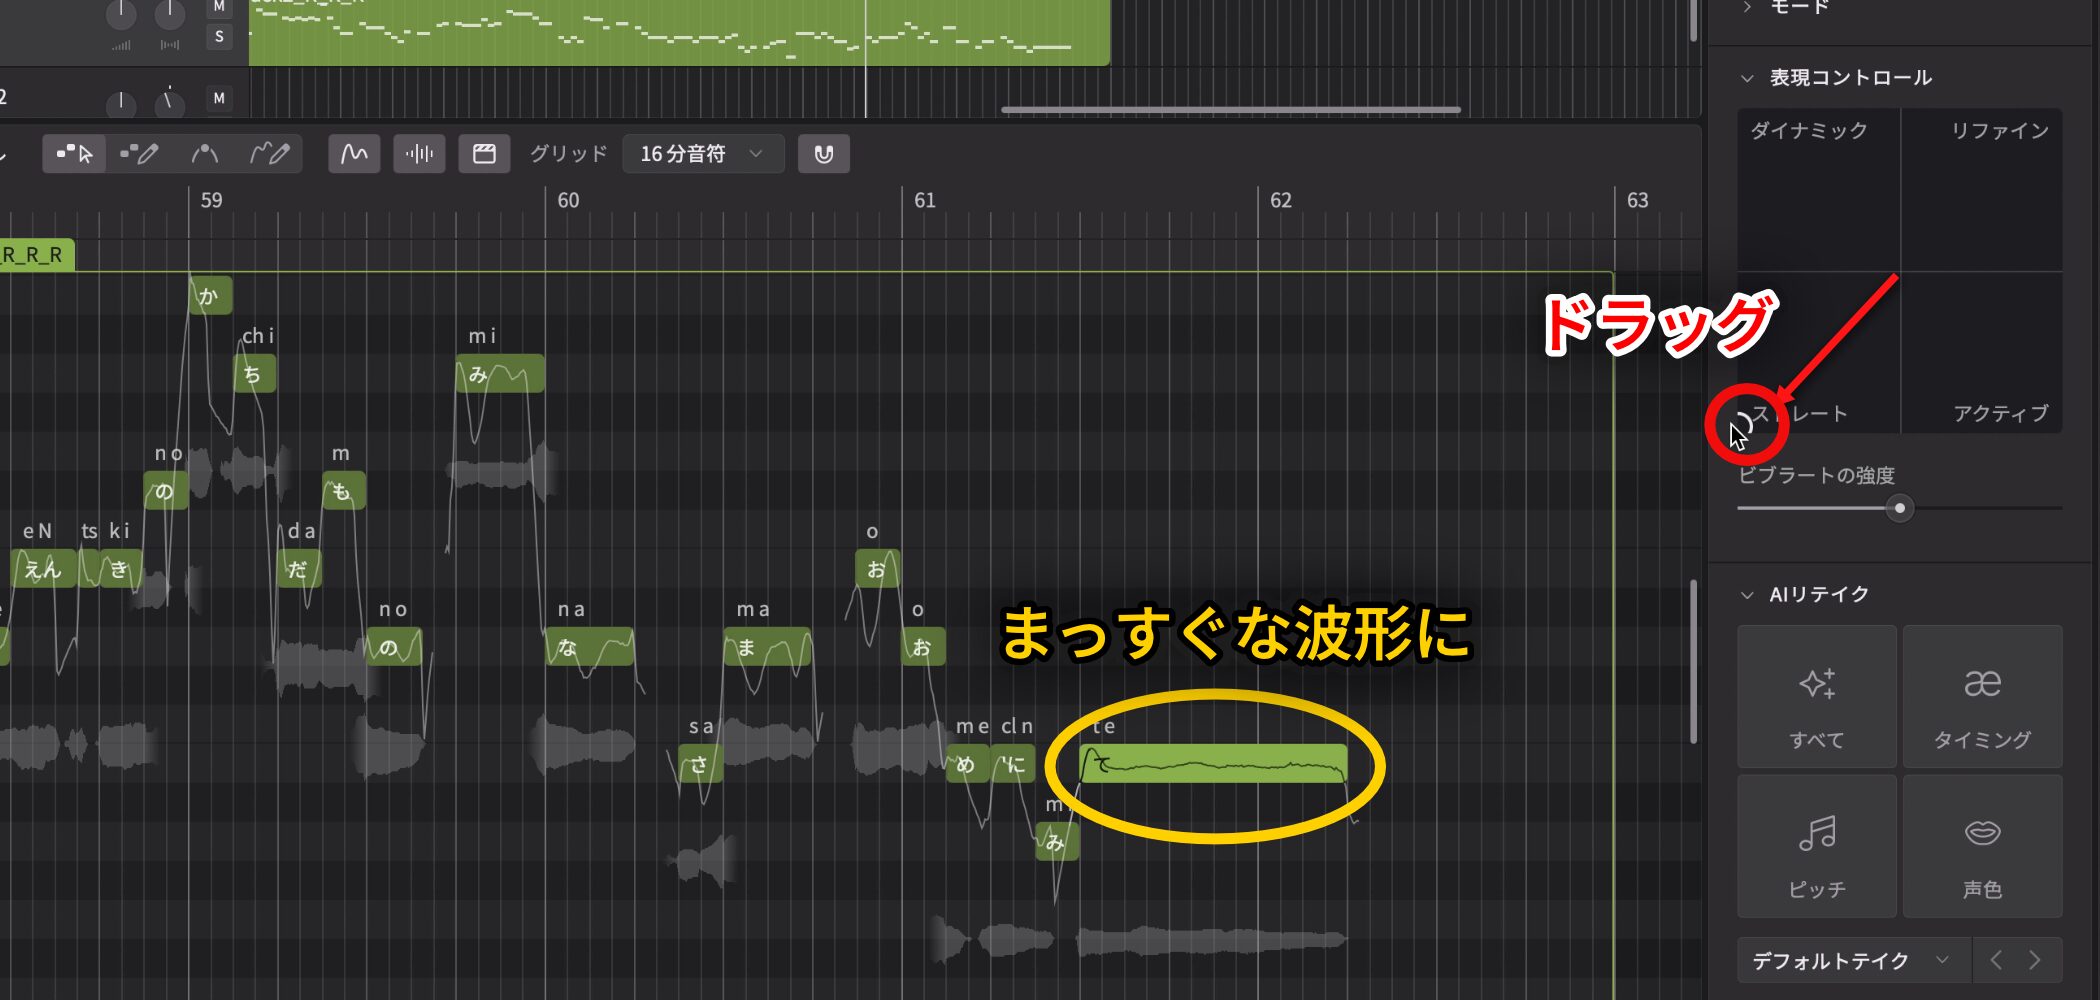
Select the note and drag the XY-pad pointer toward Straight to flatten the waveform and reduce vibrato.
Adjust it while listening until it suits the phrase.
Create a Memorable Ending with a Long Note
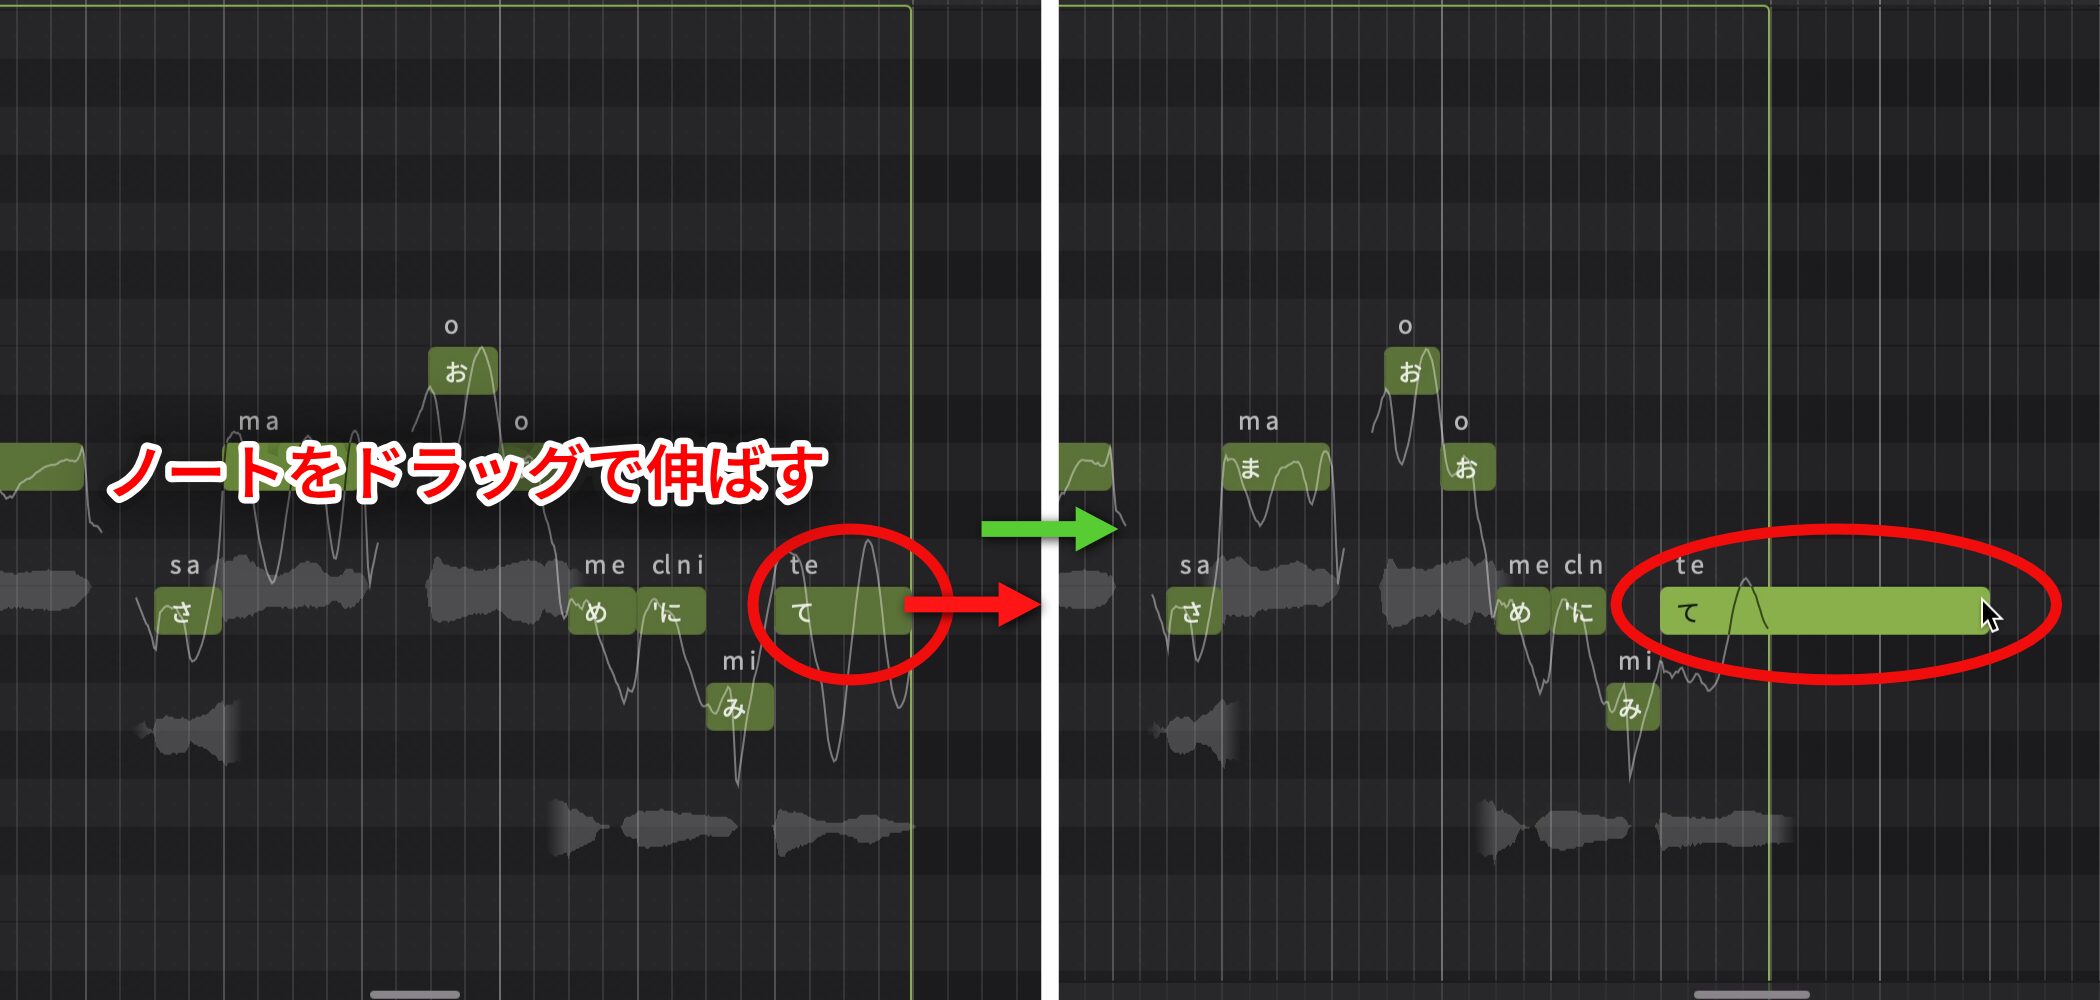
At the end of a chorus, for example, drag a note to turn it into a long sustained tone.
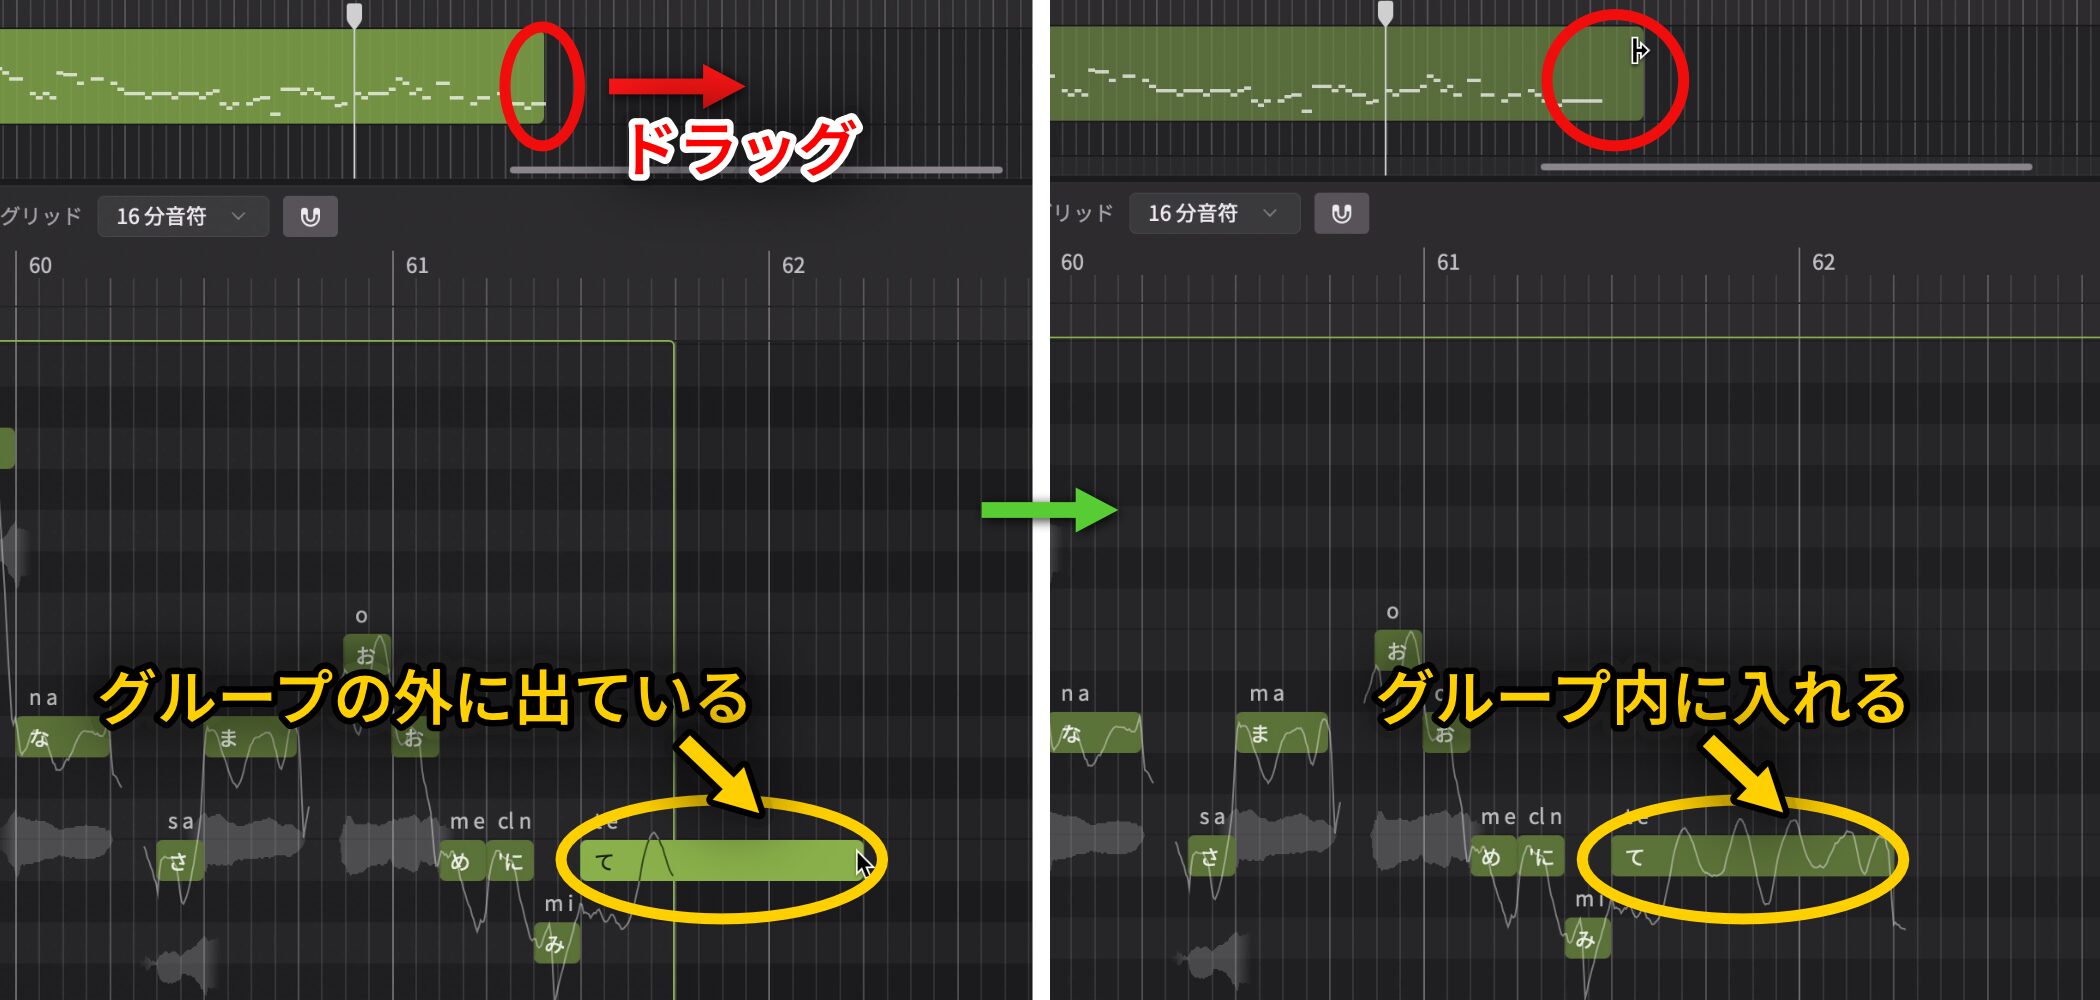
A note that extends beyond its Group will not sound, so watch the Group boundary.
Use Mouth Opening to Add Movement
Use the Mouth Opening parameter to shape how widely the singer seems to open their mouth.
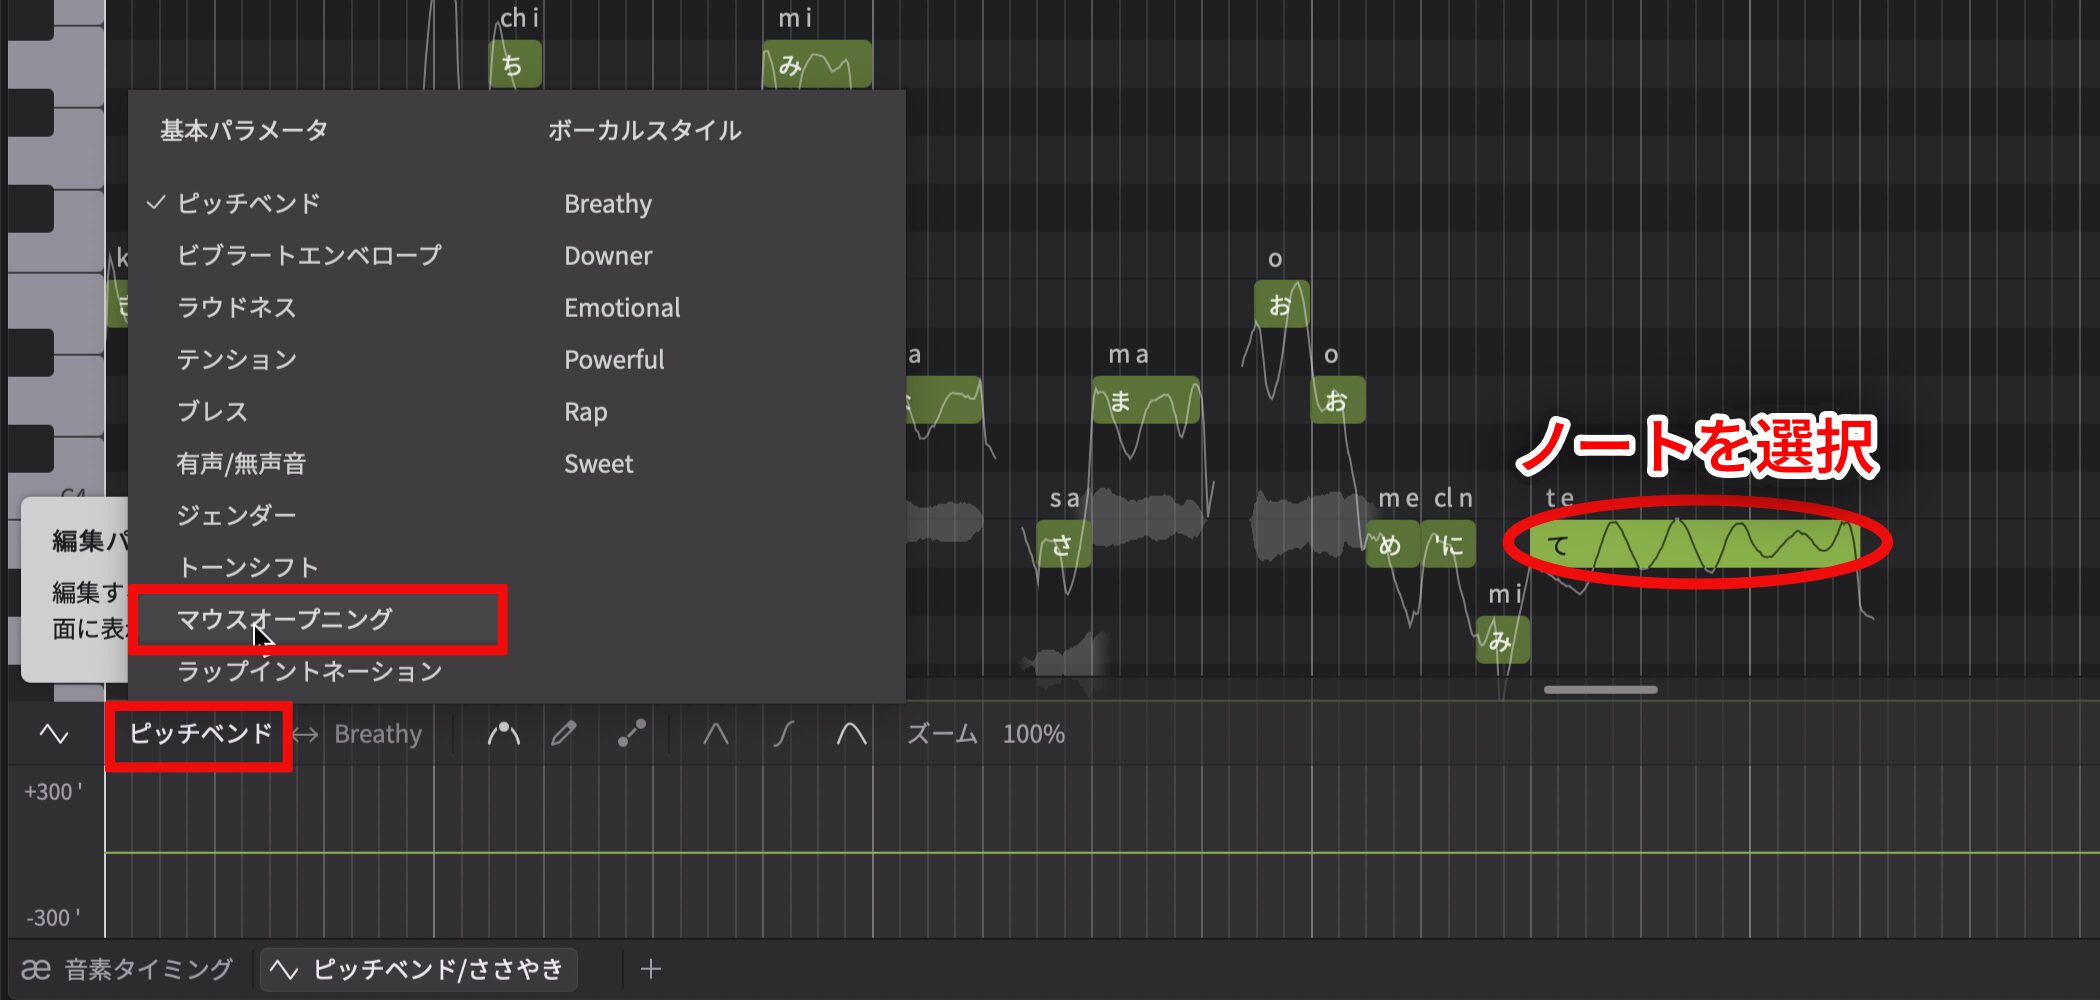
Select the note and choose Mouth Opening in the Parameter panel.
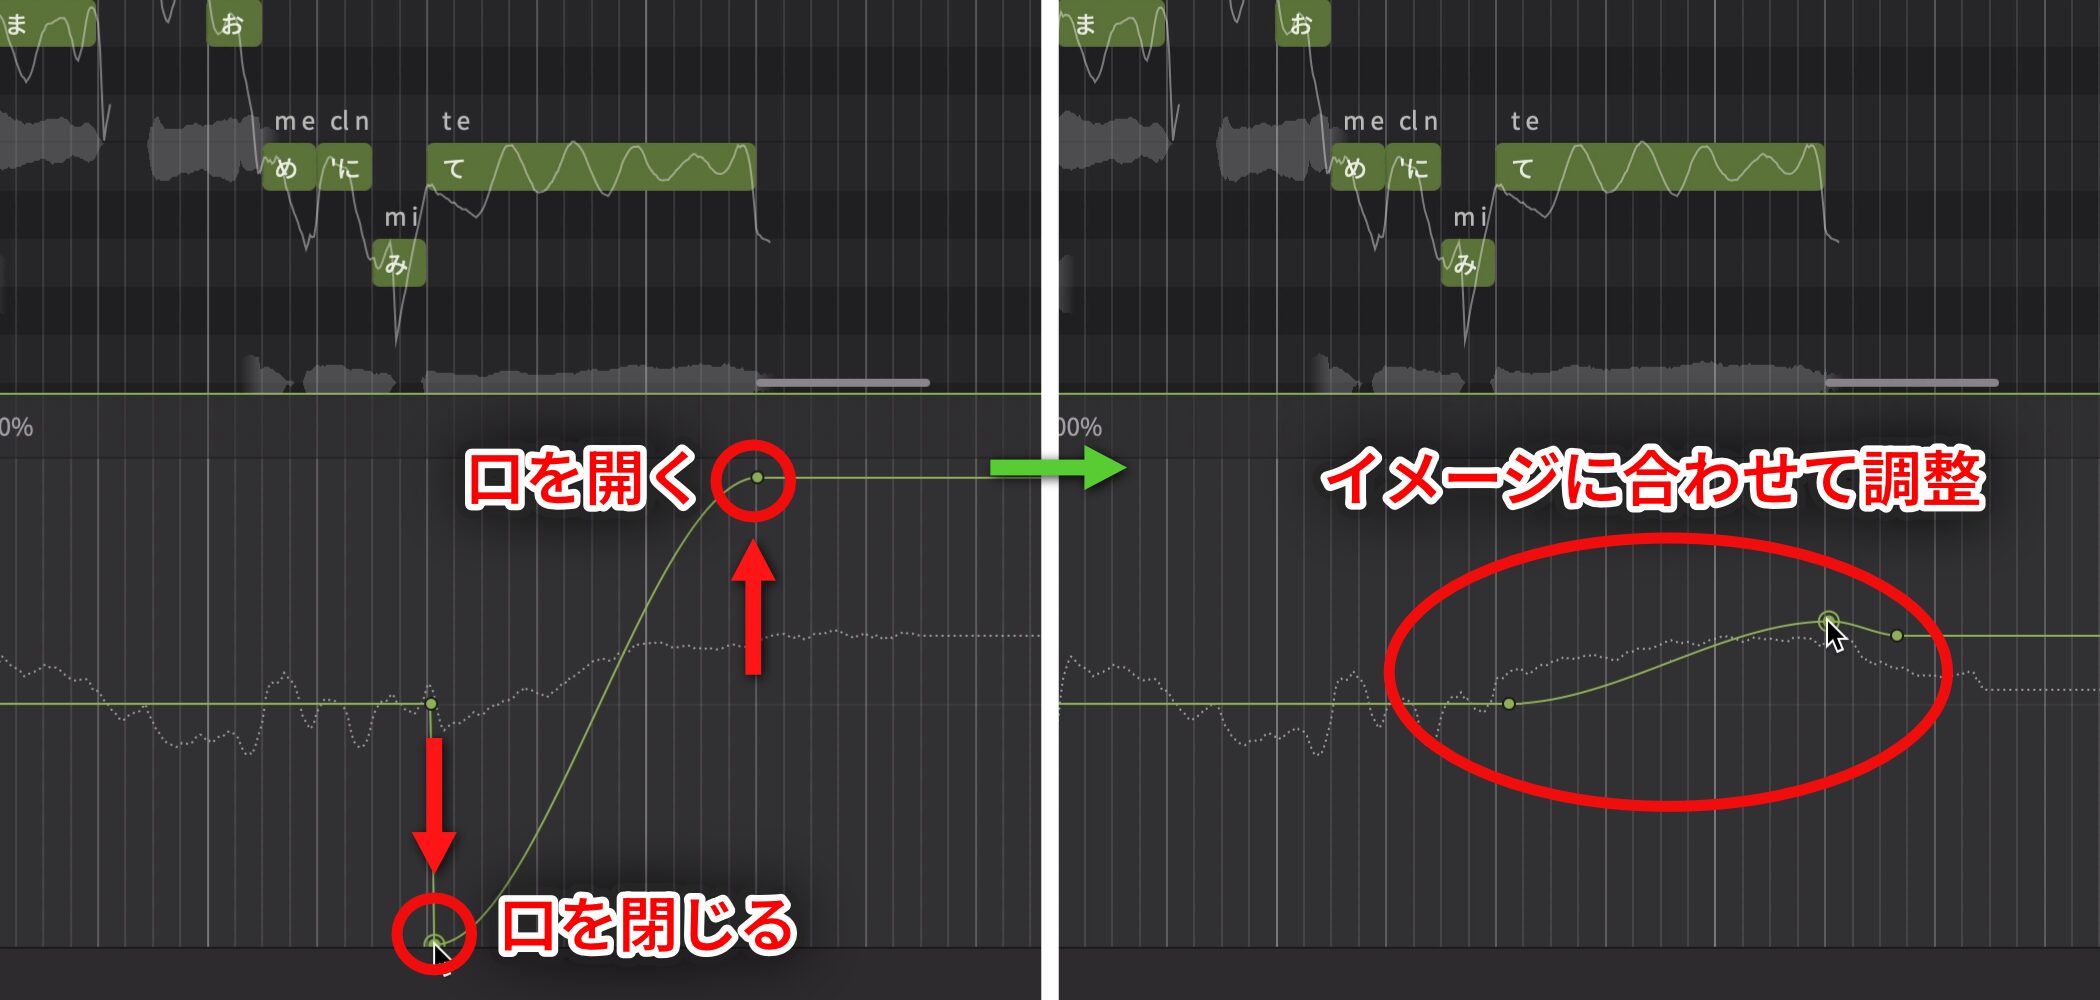
Double-click to add control points, then drag them to draw a curve.
Raising the value creates a more open-mouth delivery; lowering it creates a more closed nuance.
Adjust the curve to match the sound you want.
Add Expression to a Rap Part
Automation and per-note parameter controls can add motion and energy to a rap part.
First, use Dynamic in Expression Control for a more expressive delivery.
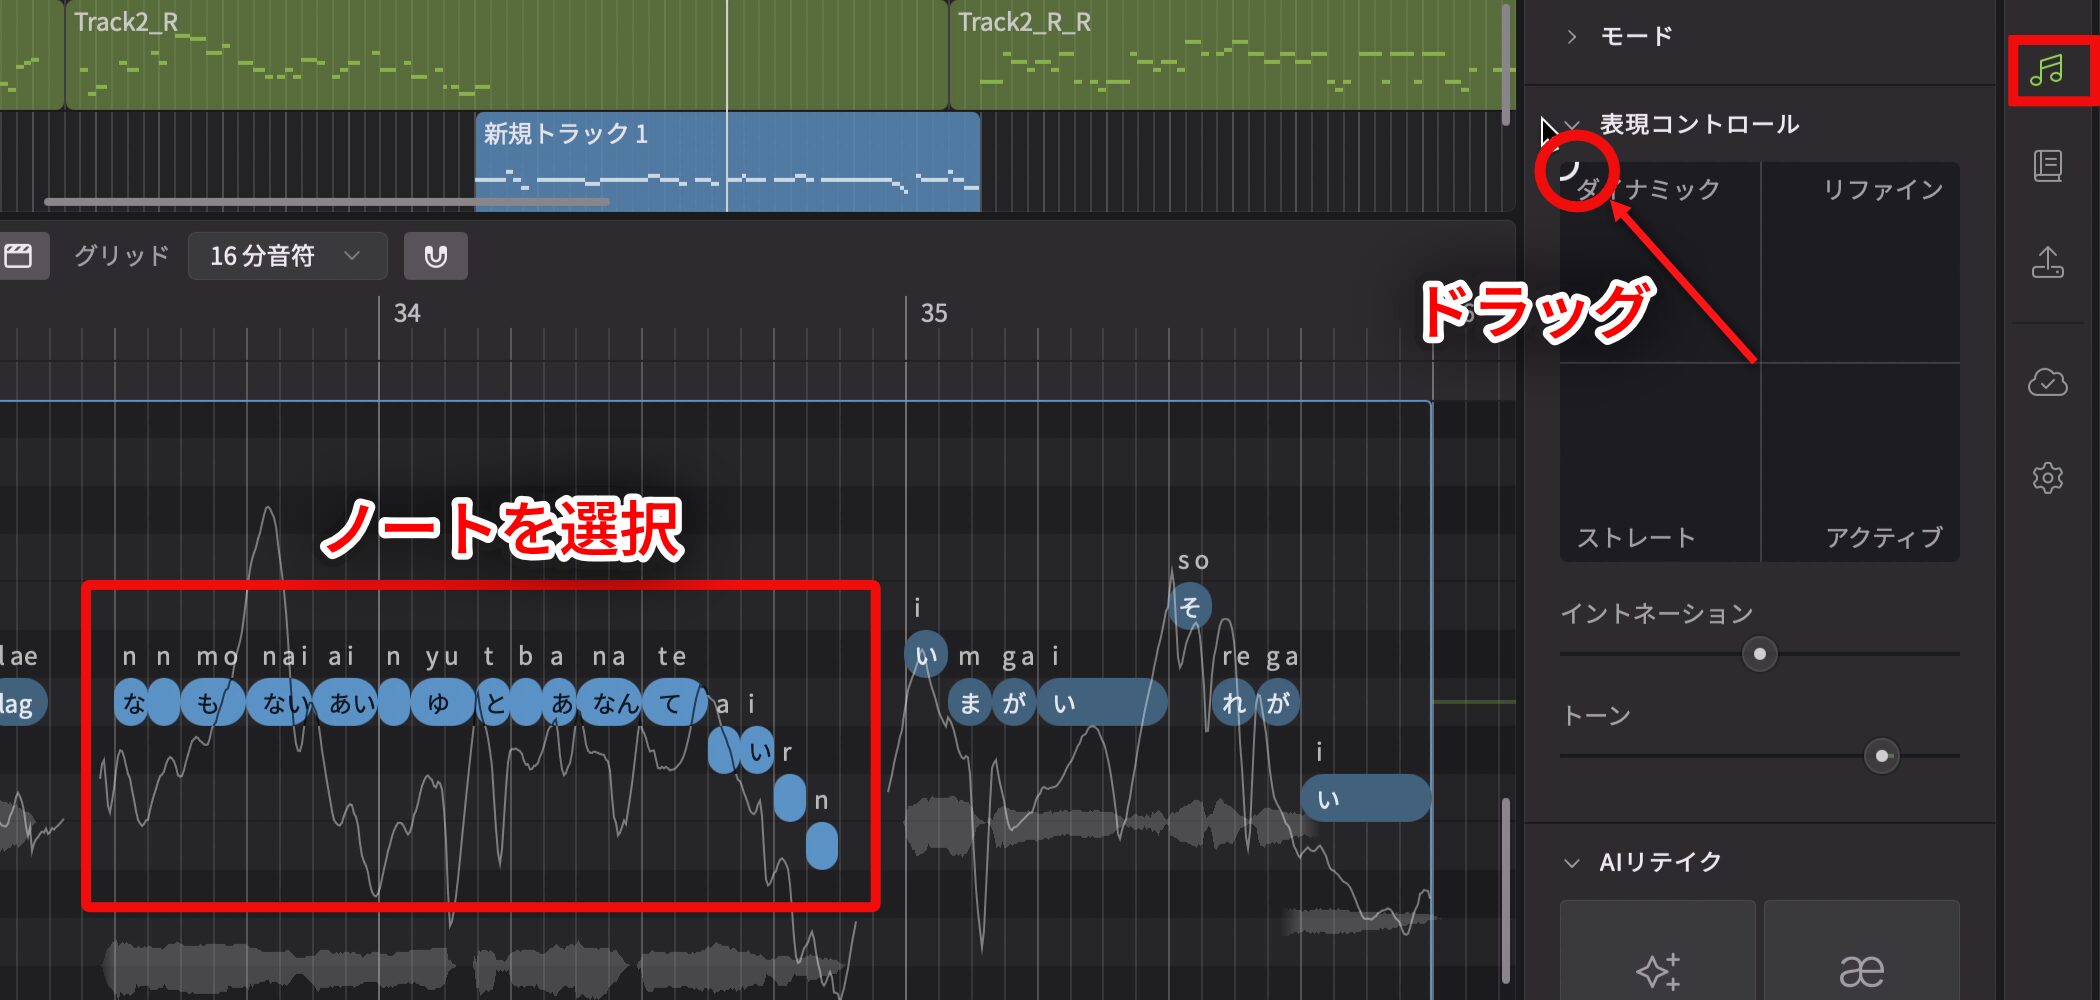
Select the notes, then drag the pointer toward Dynamic on the Note panel's XY pad for energetic rap with more inflection.
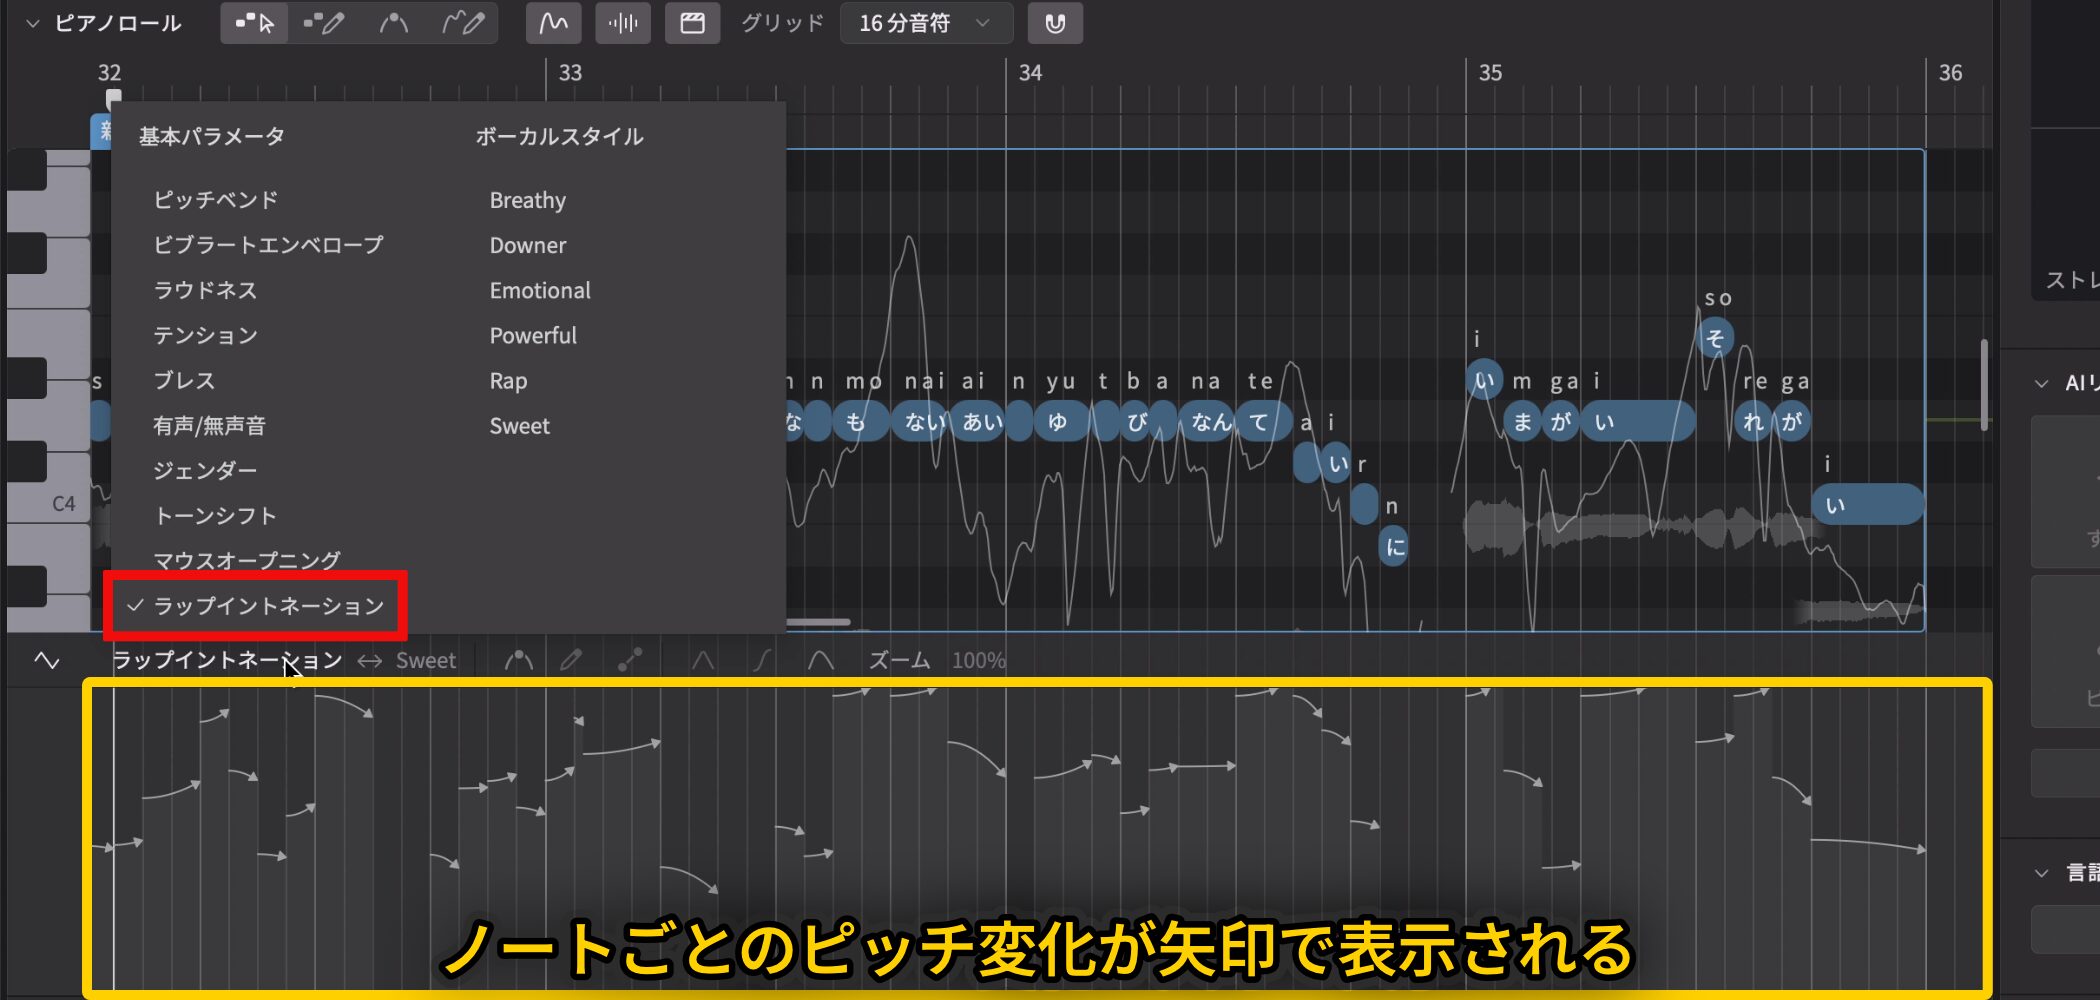
Choose Rap Intonation in the Parameter panel to show arrows for pitch changes on each note. This lets you control intonation at phrase endings and the overall pitch tone.
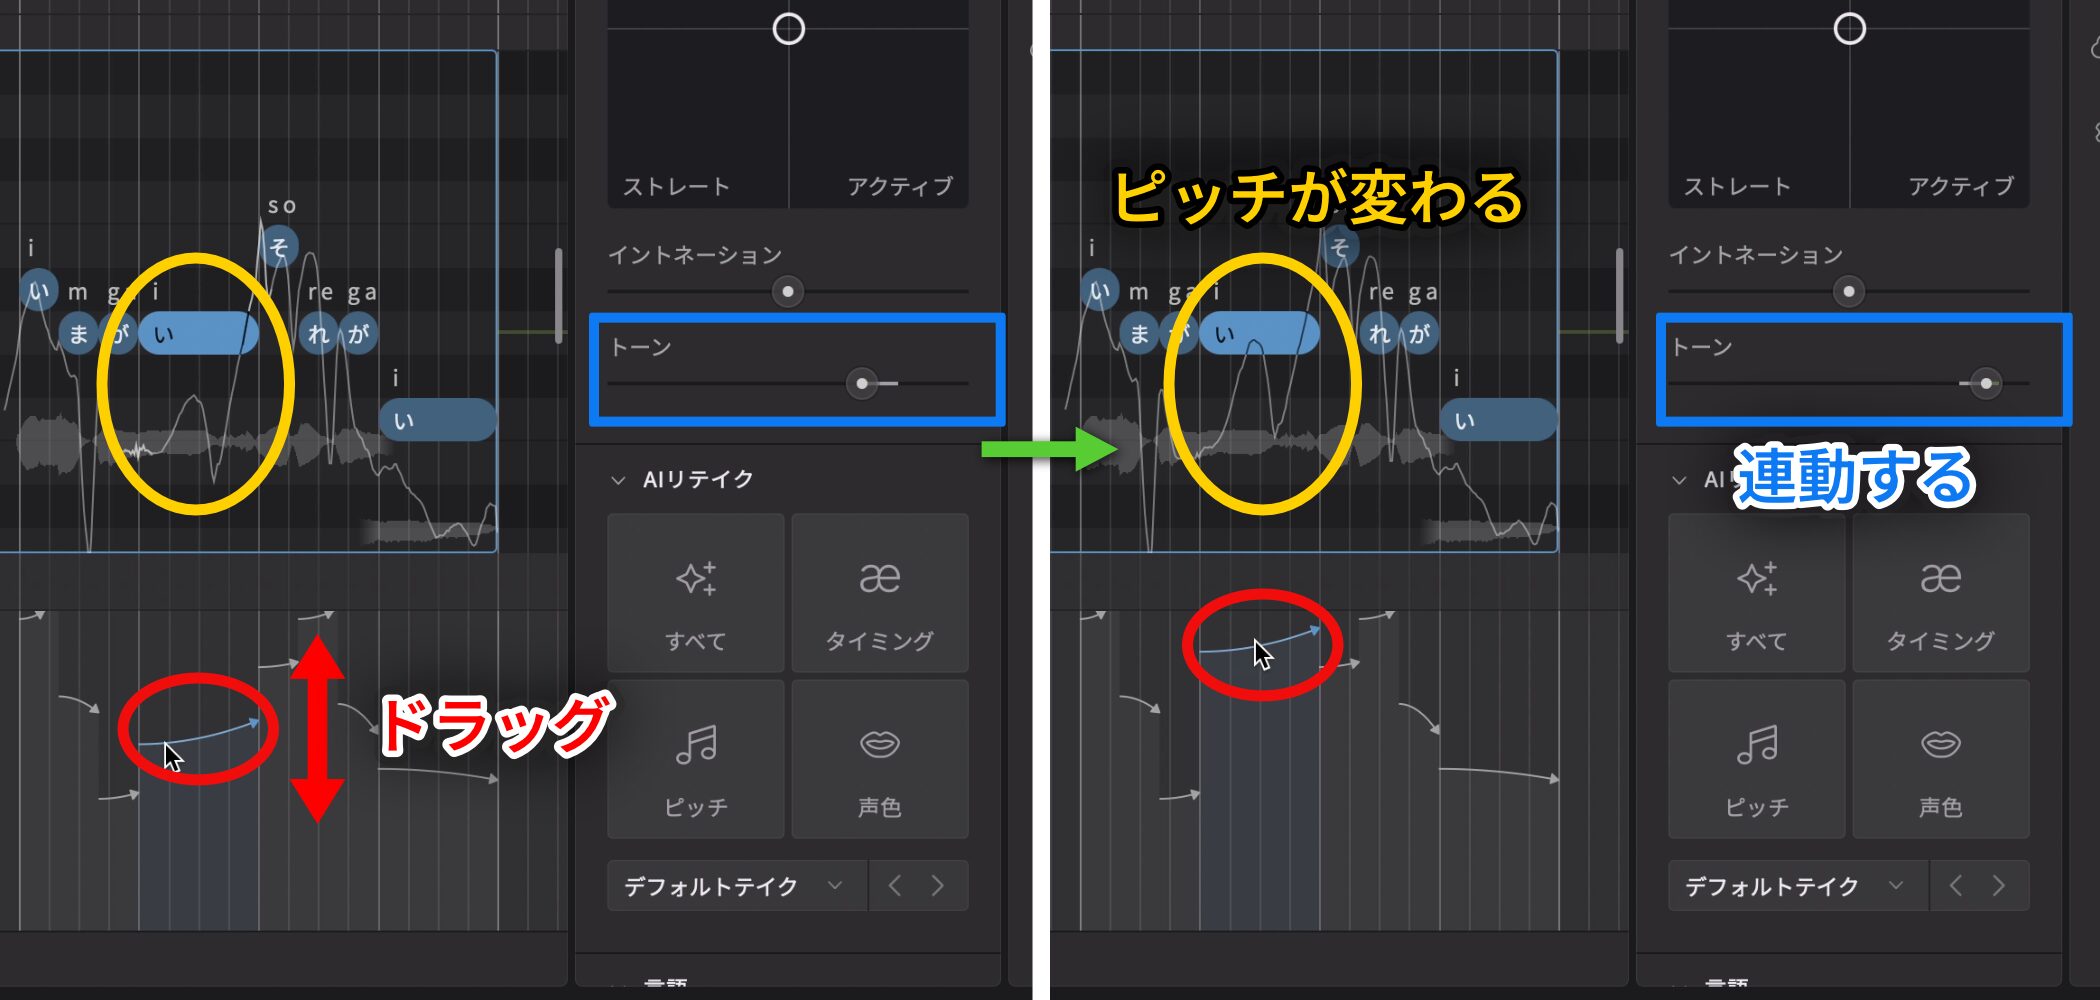
Drag the whole arrow up or down to change the tone and the selected notes' overall pitch.
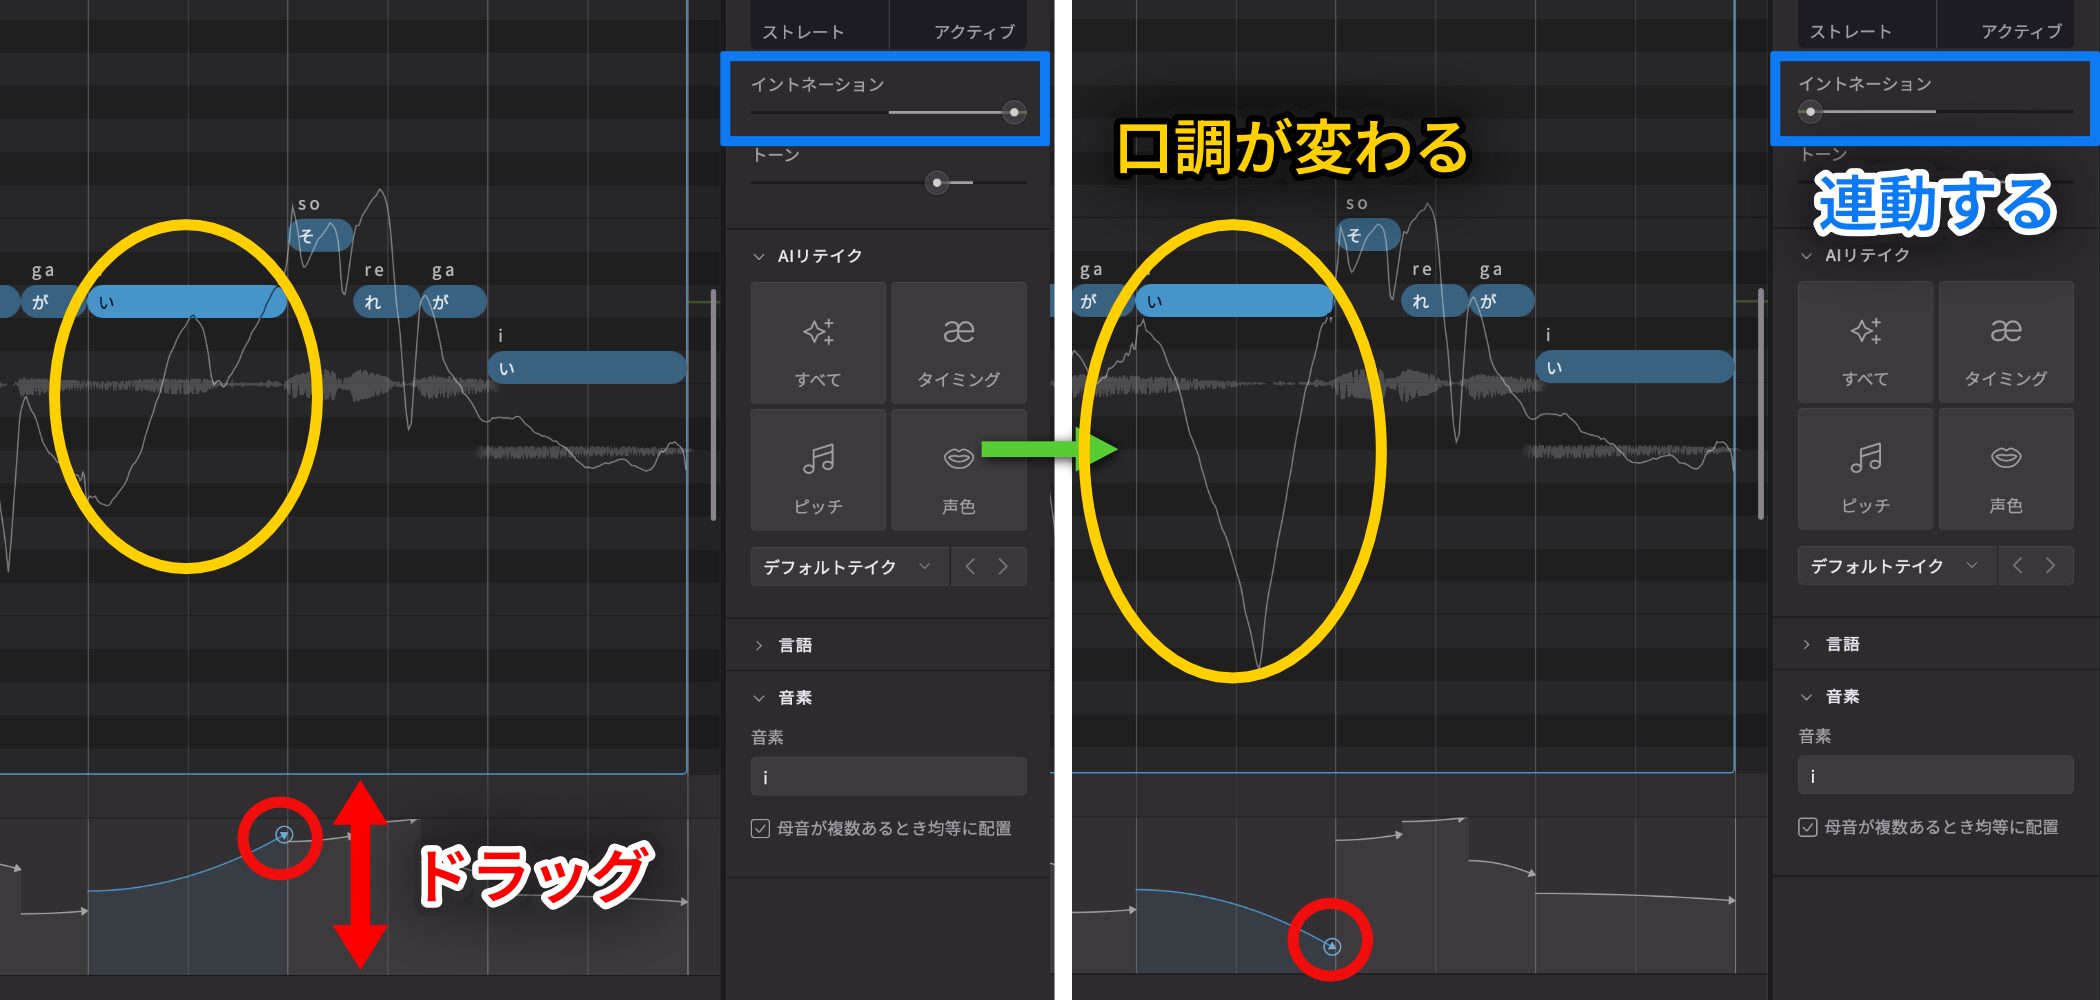
Move the pointer onto the arrowhead and it changes to an arrow with a circled tip.
Dragging the circled tip changes intonation, letting you make the selected notes rise or fall at the end of a phrase.
Use these controls for a more convincing rap feel, stronger phrasing, or a natural transition to the next section.
Add Depth with Doubles and Harmonies
Once the lead part is edited, add double and harmony parts for a fuller arrangement.
This section also explains how to export each part as audio.
Add Natural Thickness with Doubling
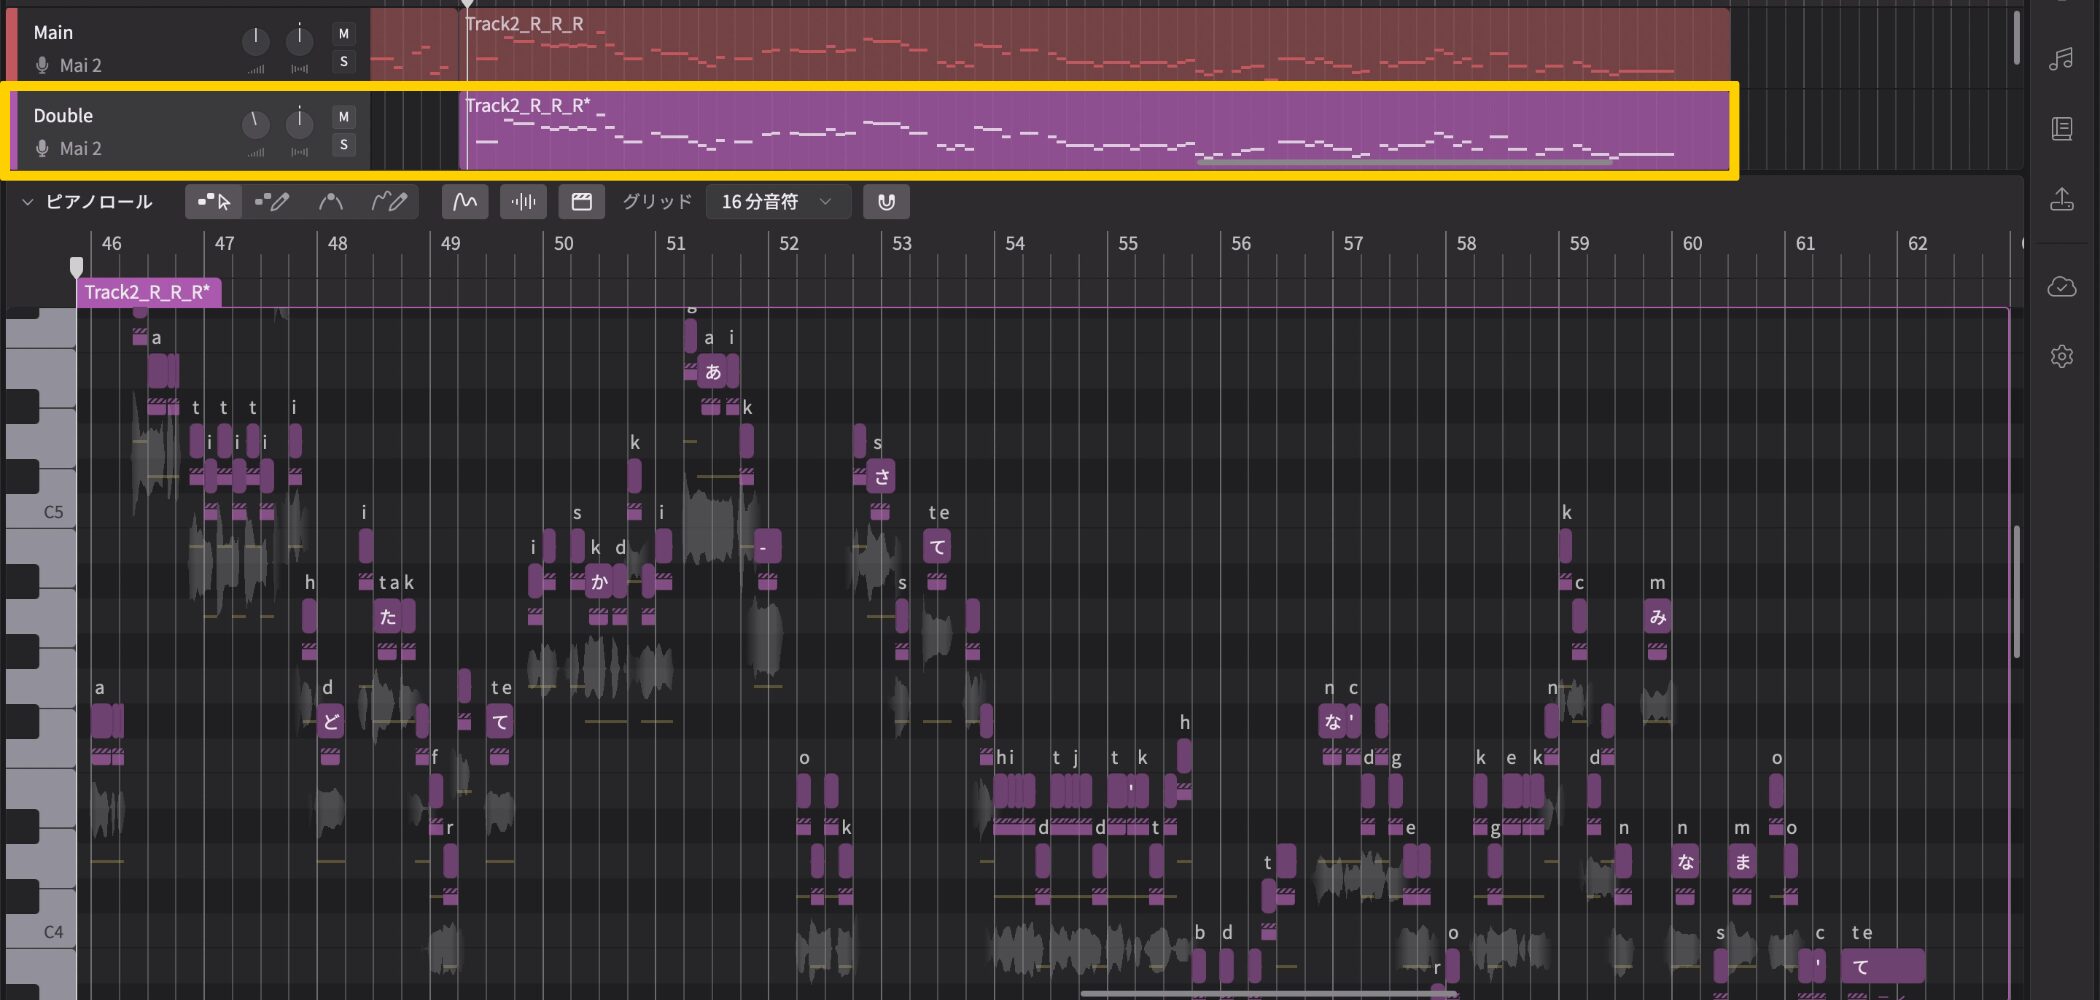
Doubling means layering two or more performances of the same melody to add natural variation and thickness.
First, listen to the effect.
The vocal should sound thicker and more present.
Create the part in four steps:
- 1. Duplicate the track.
- 2. Delete note Groups you do not need.
- 3. Generate another take with AI Retakes.
- 4. Switch takes and adjust the volume.
Here is the process in detail.
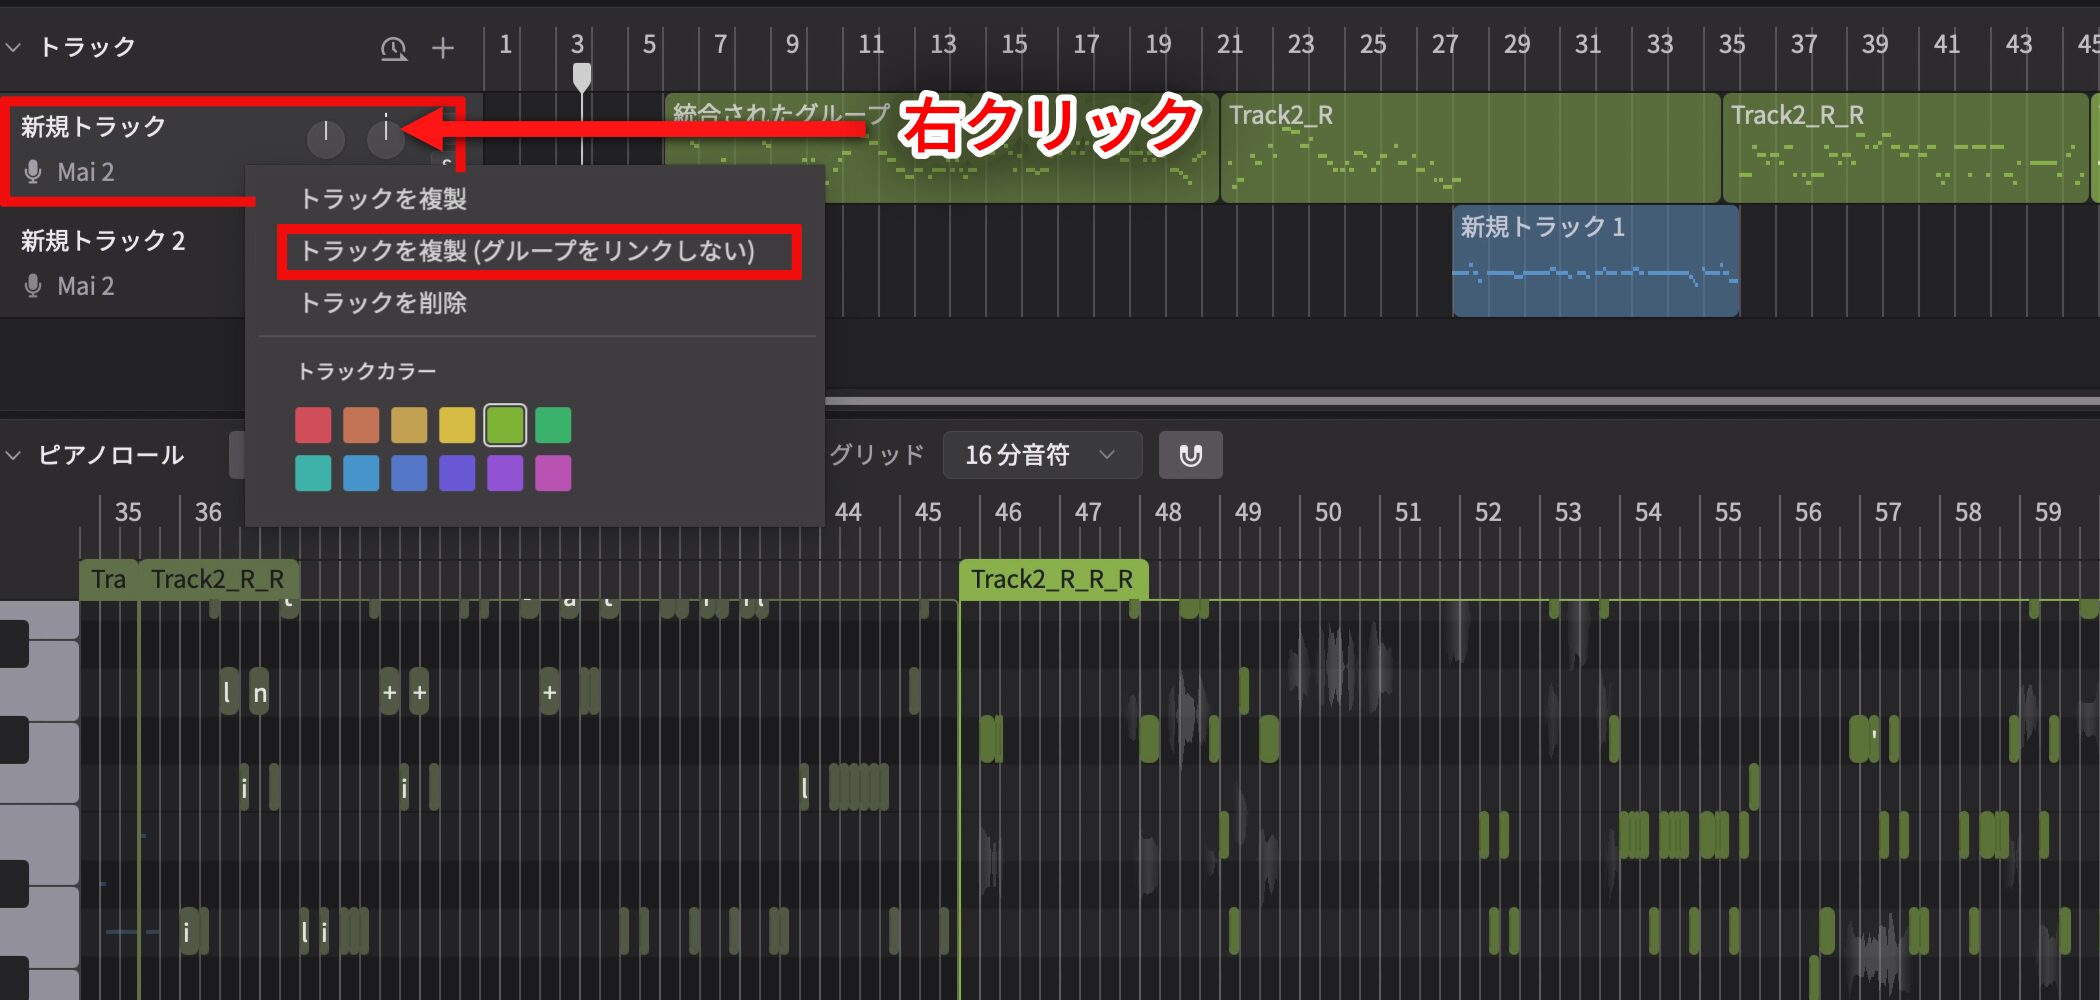
Right-click the lead track and choose Duplicate Track (Do Not Link Groups).
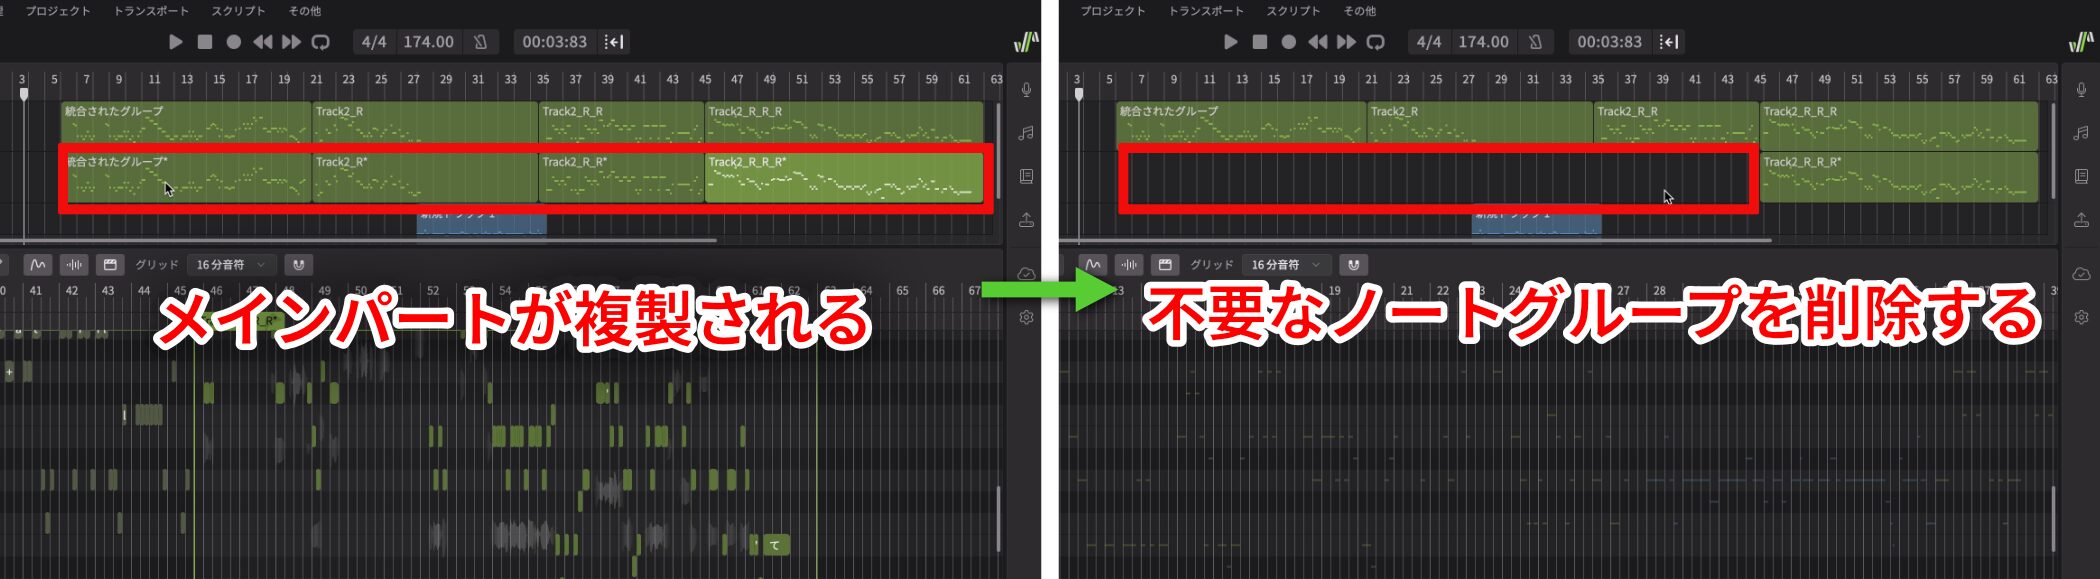
This creates an identical track.
Because this example doubles only the chorus, delete Groups outside the chorus.
Simply copying the same performance would only stack identical vocals and would not create a natural doubling effect.
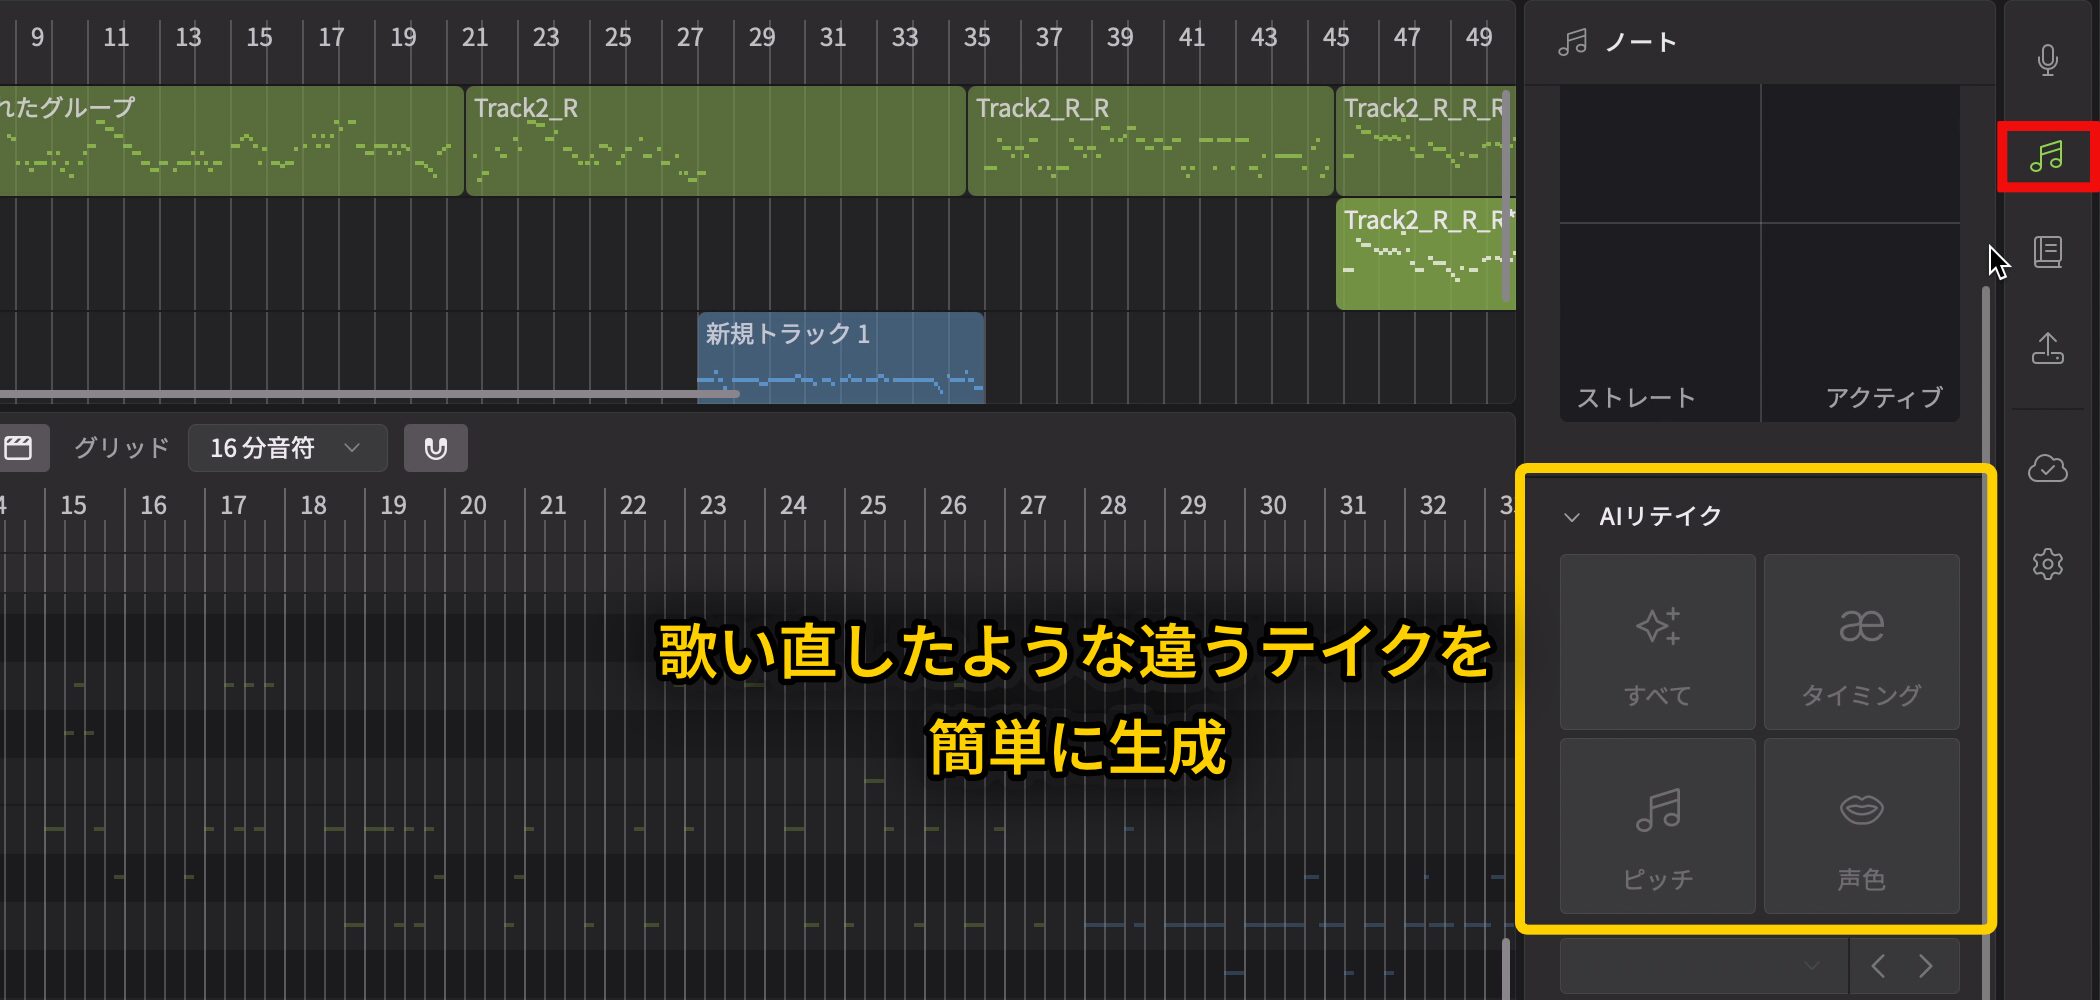
Use the AI Retakes feature in the Note panel instead.
It can quickly generate a performance with different nuances, as if the singer recorded another take.
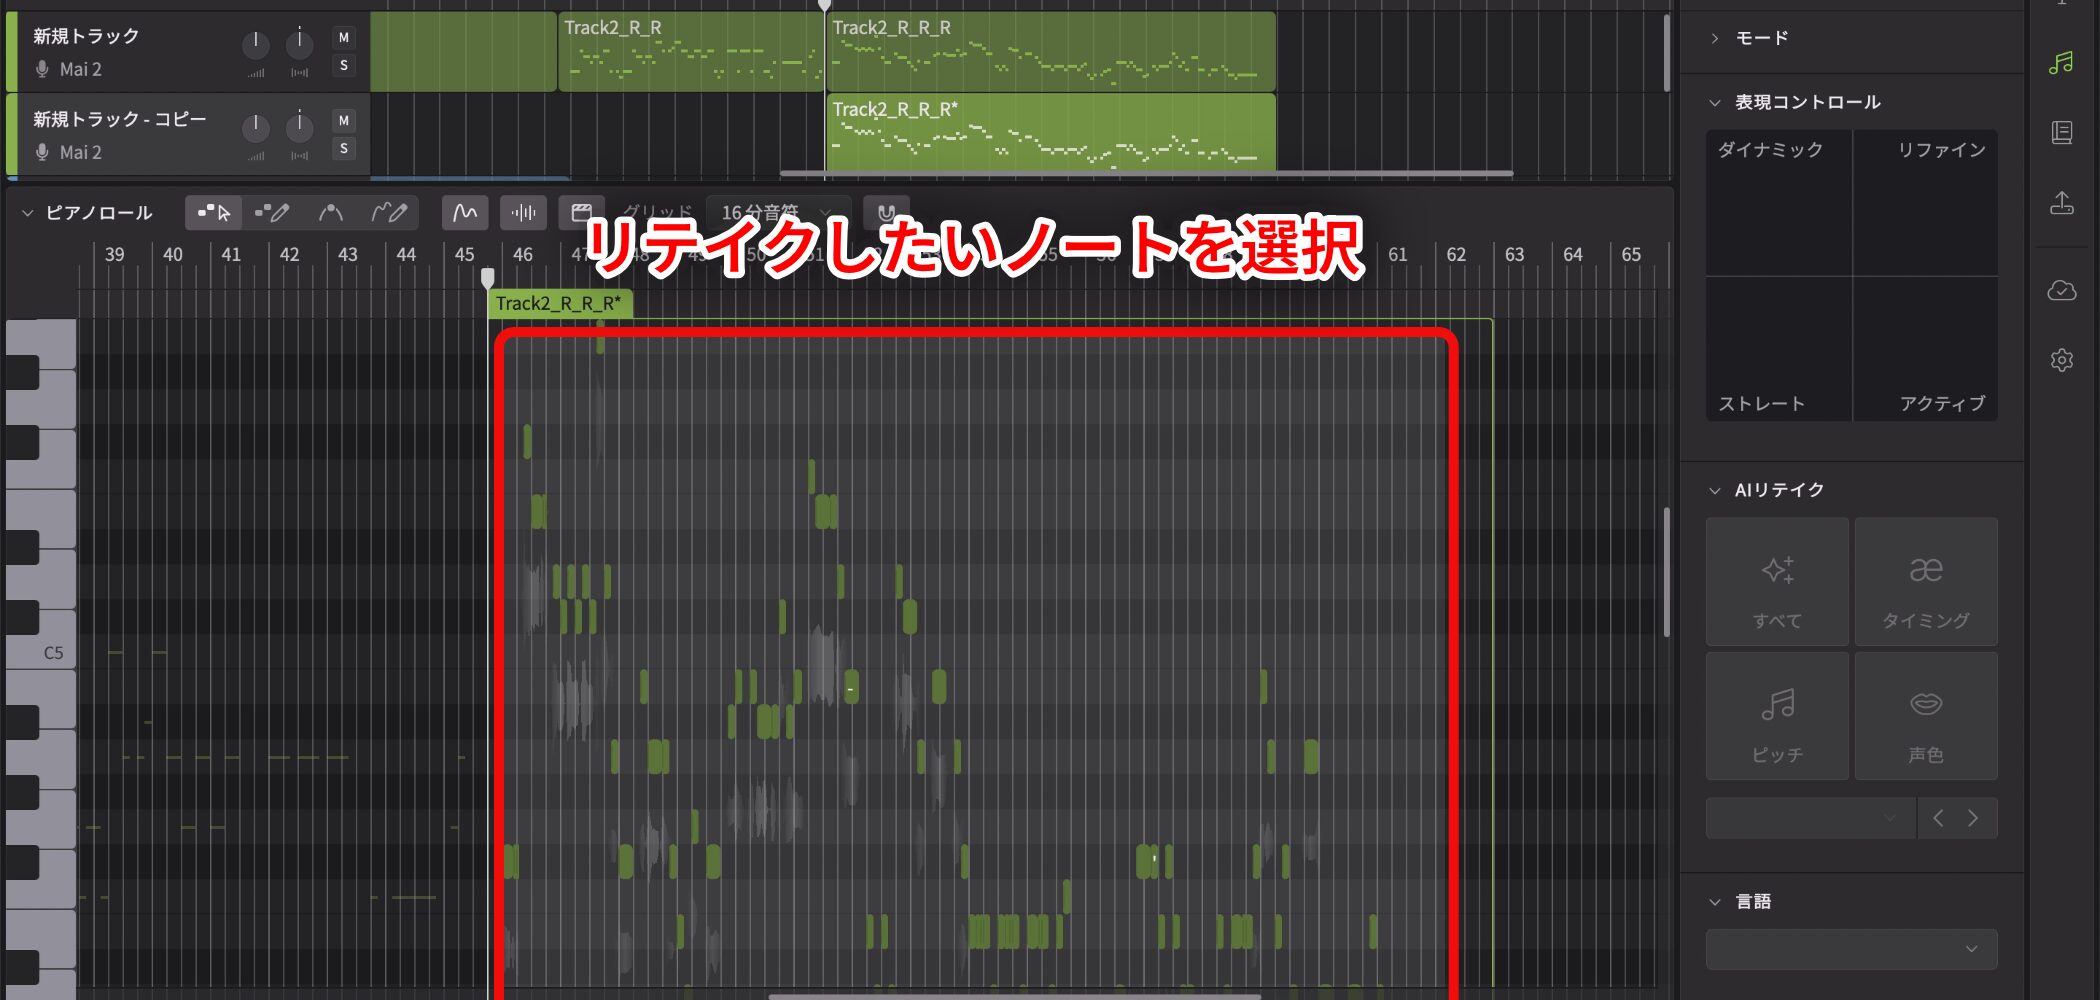
Select the notes you want to retake.
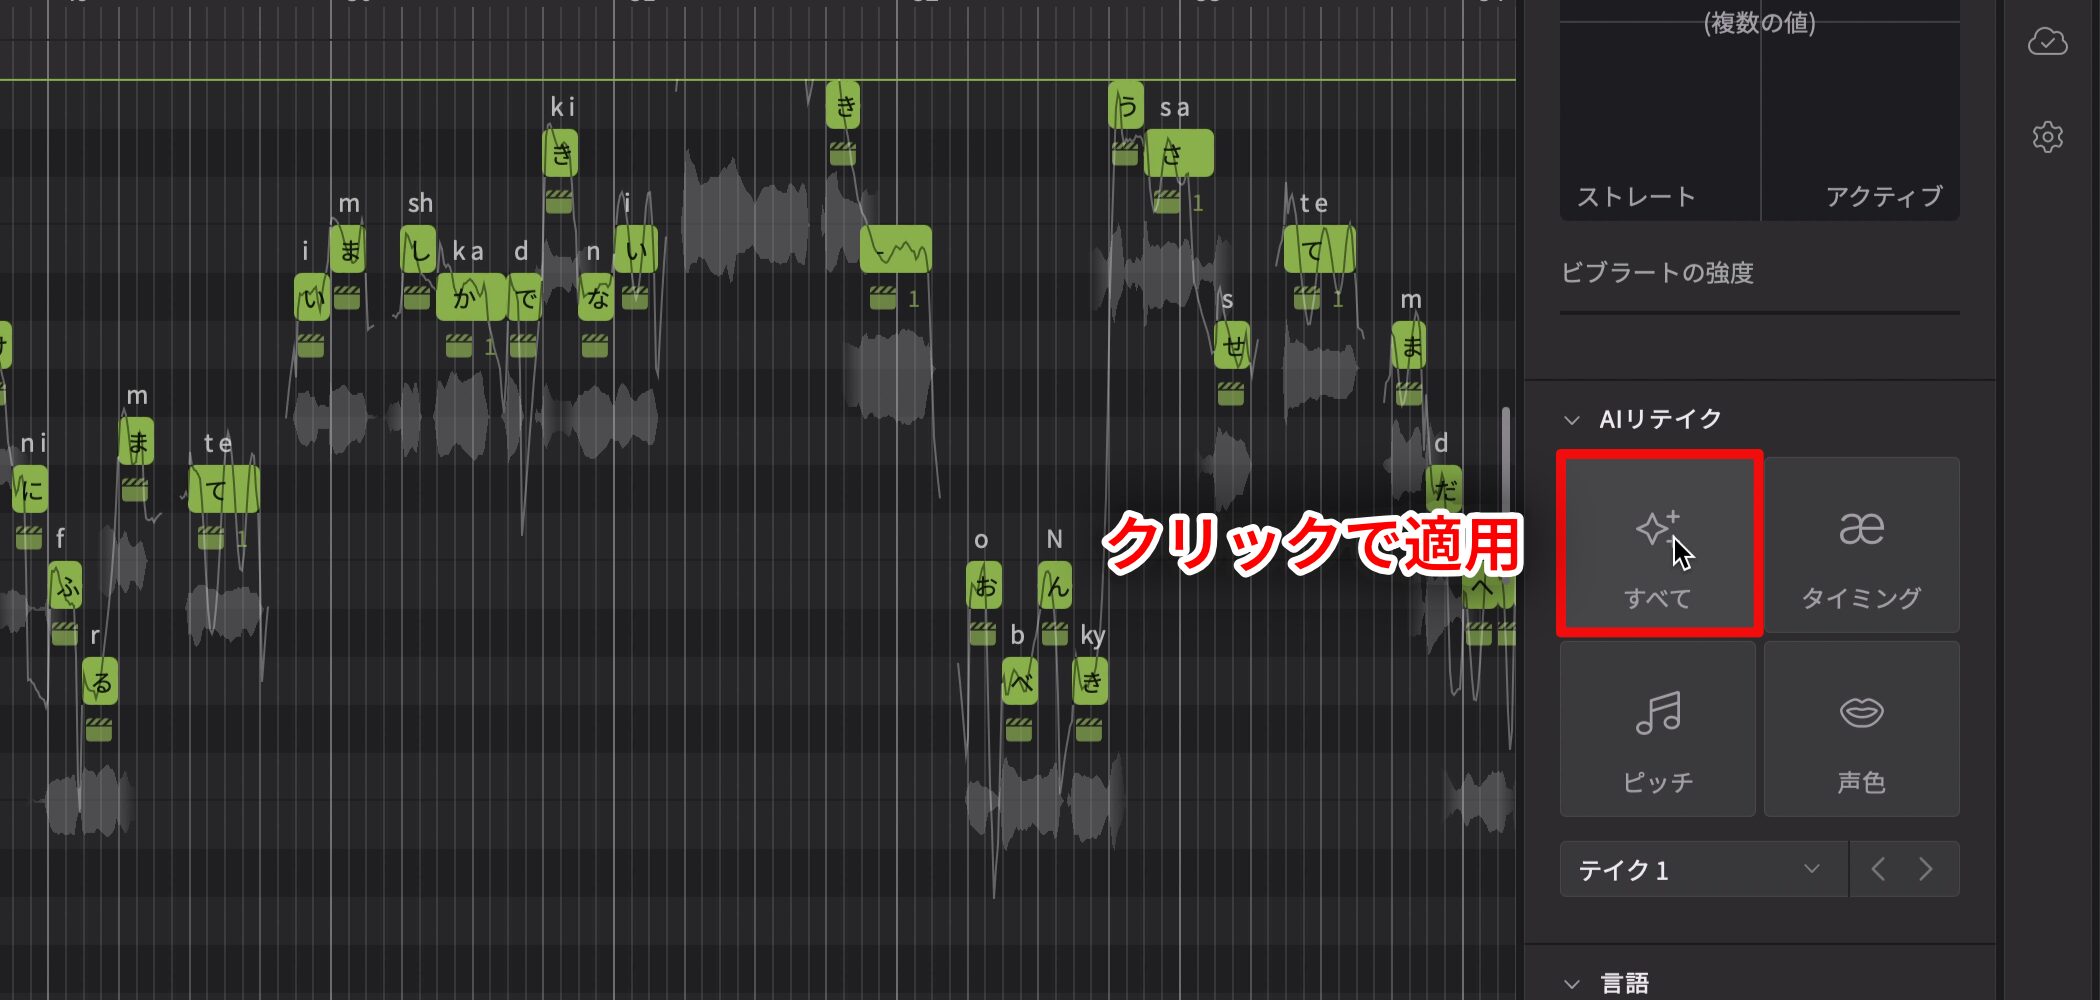
Click All to apply the feature.
This adds natural variation similar to a real double.
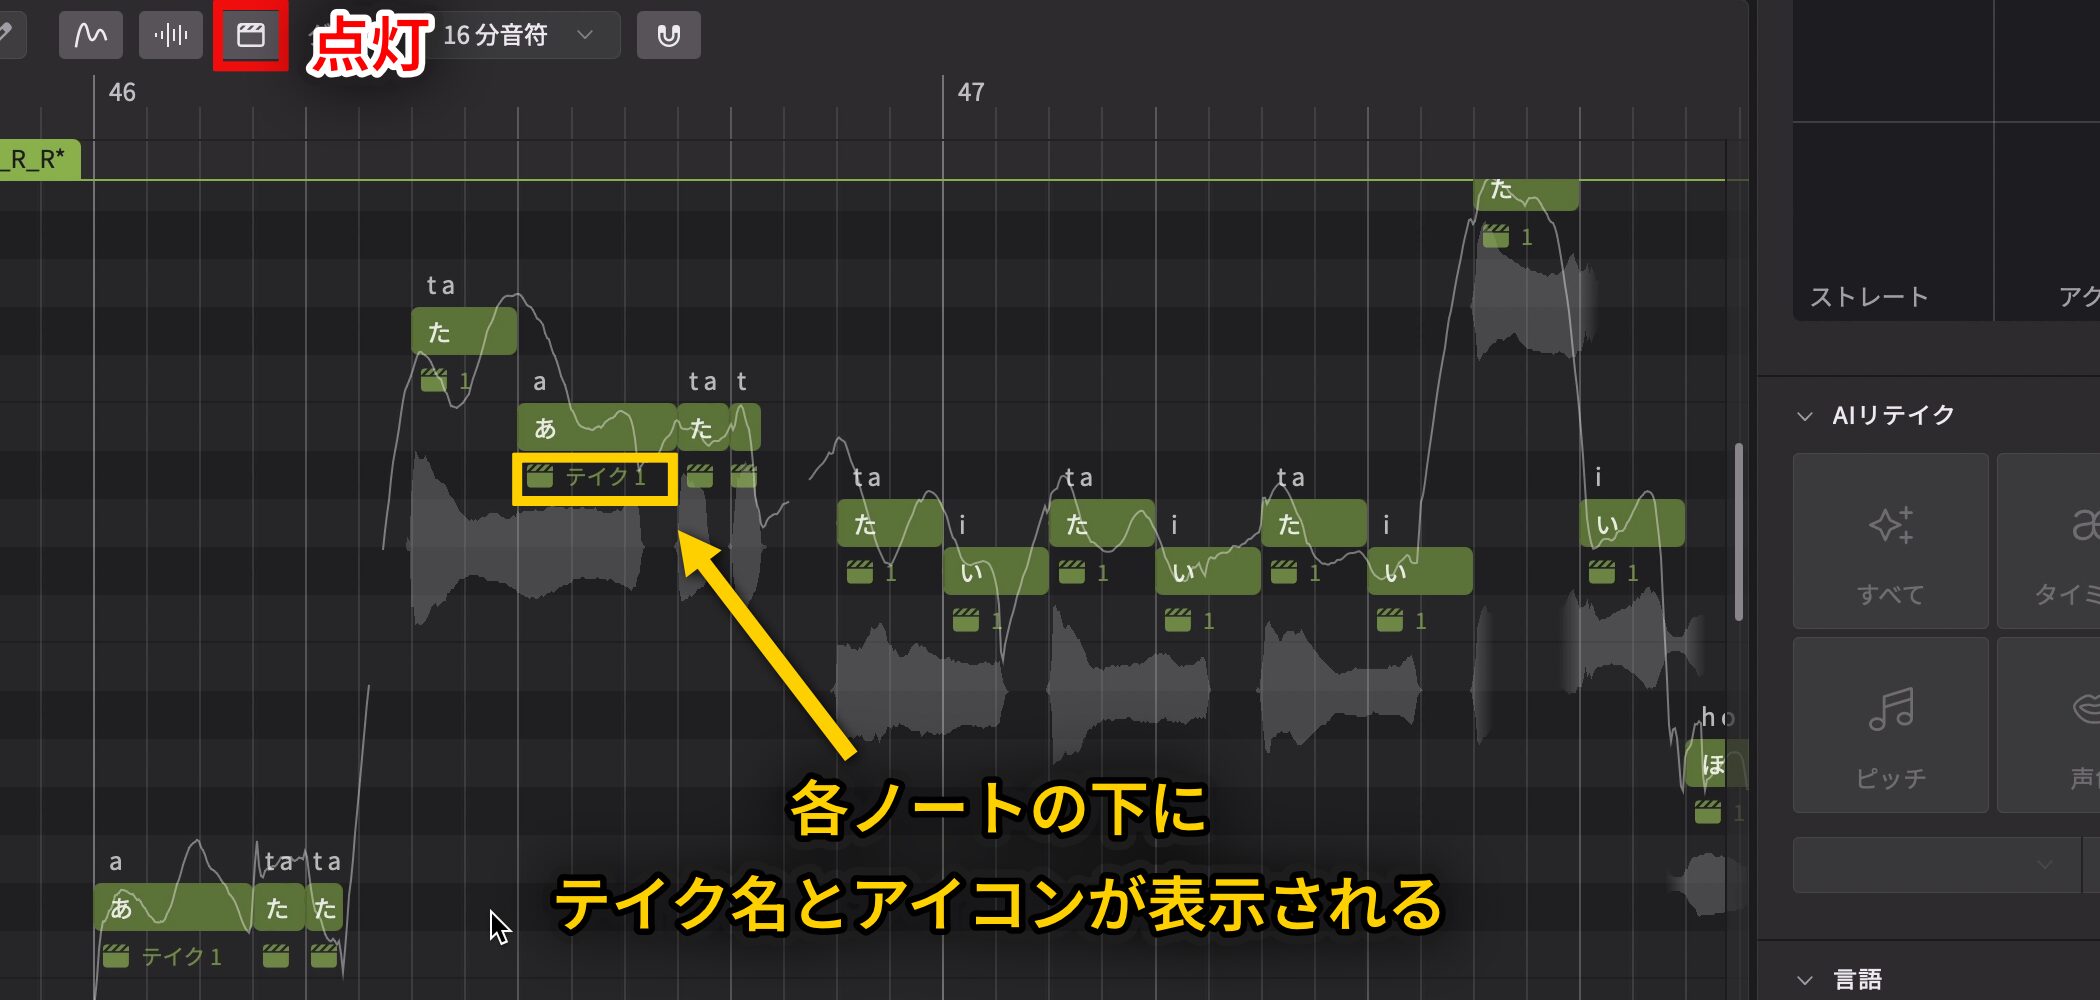
After applying AI Retakes, each note displays a take name and icon below it.
If you do not see them, turn on the AI Retakes button.
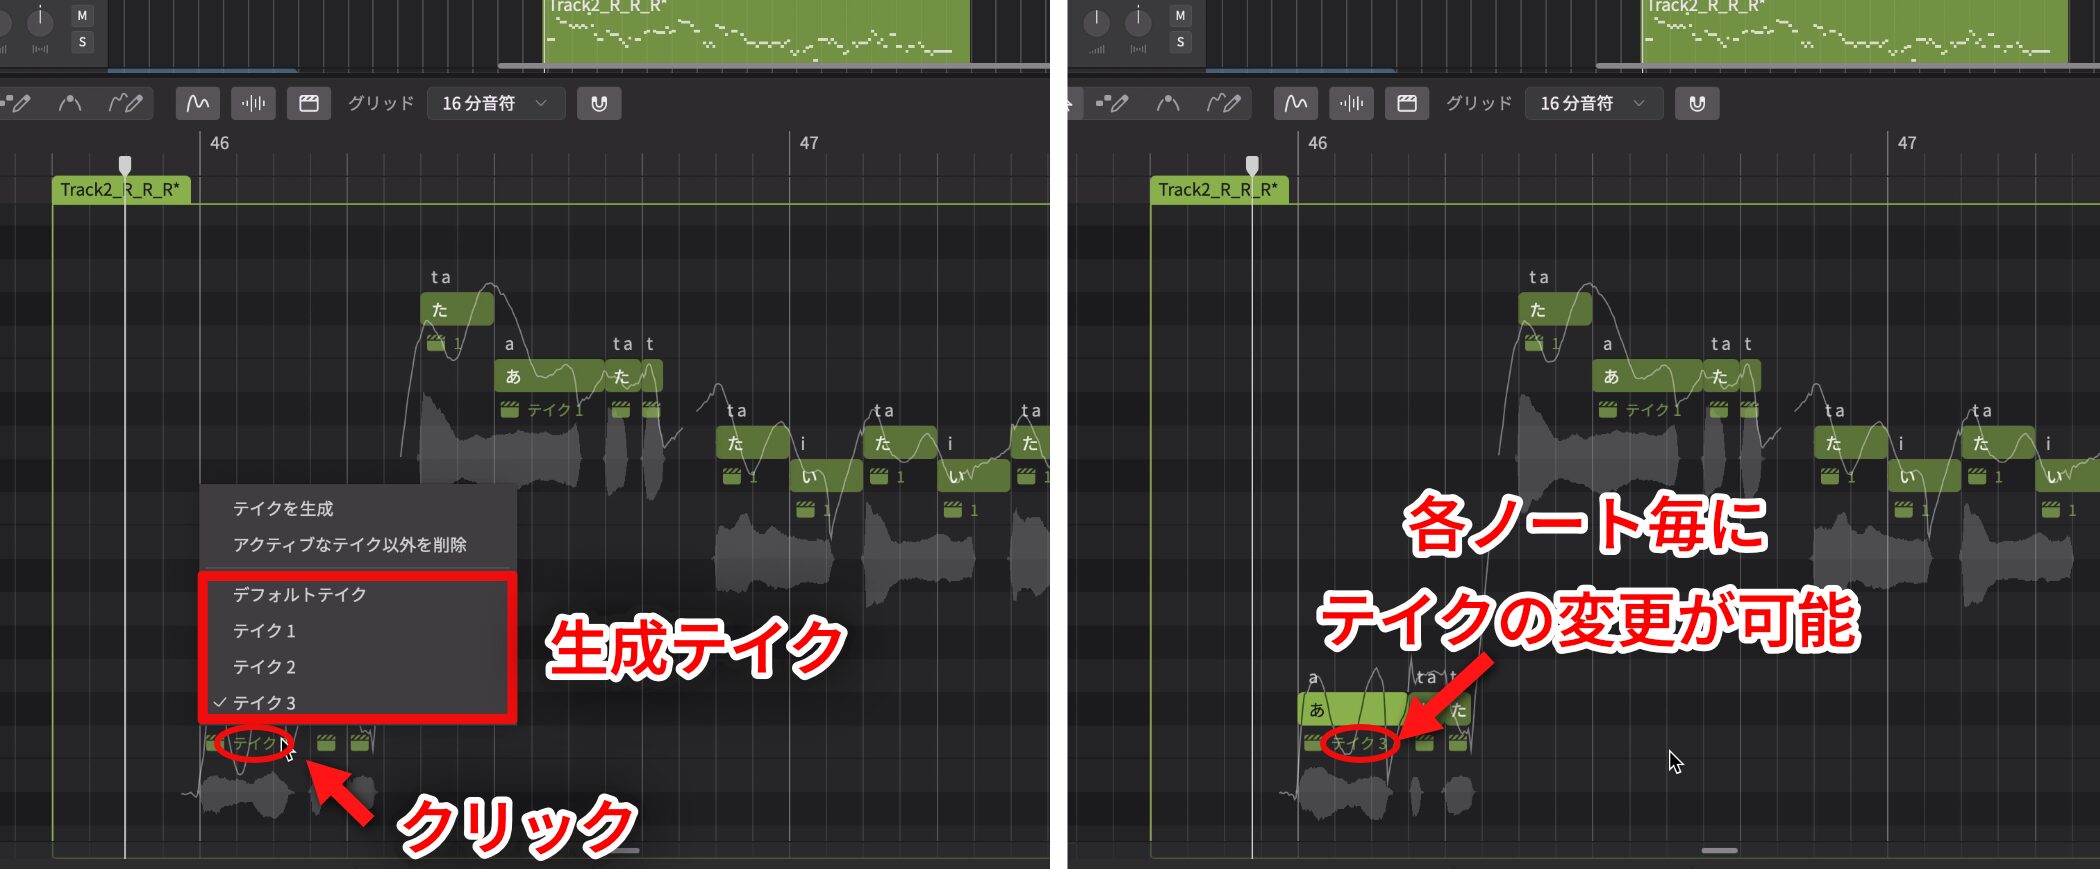
Click a take name to switch takes for an individual note.
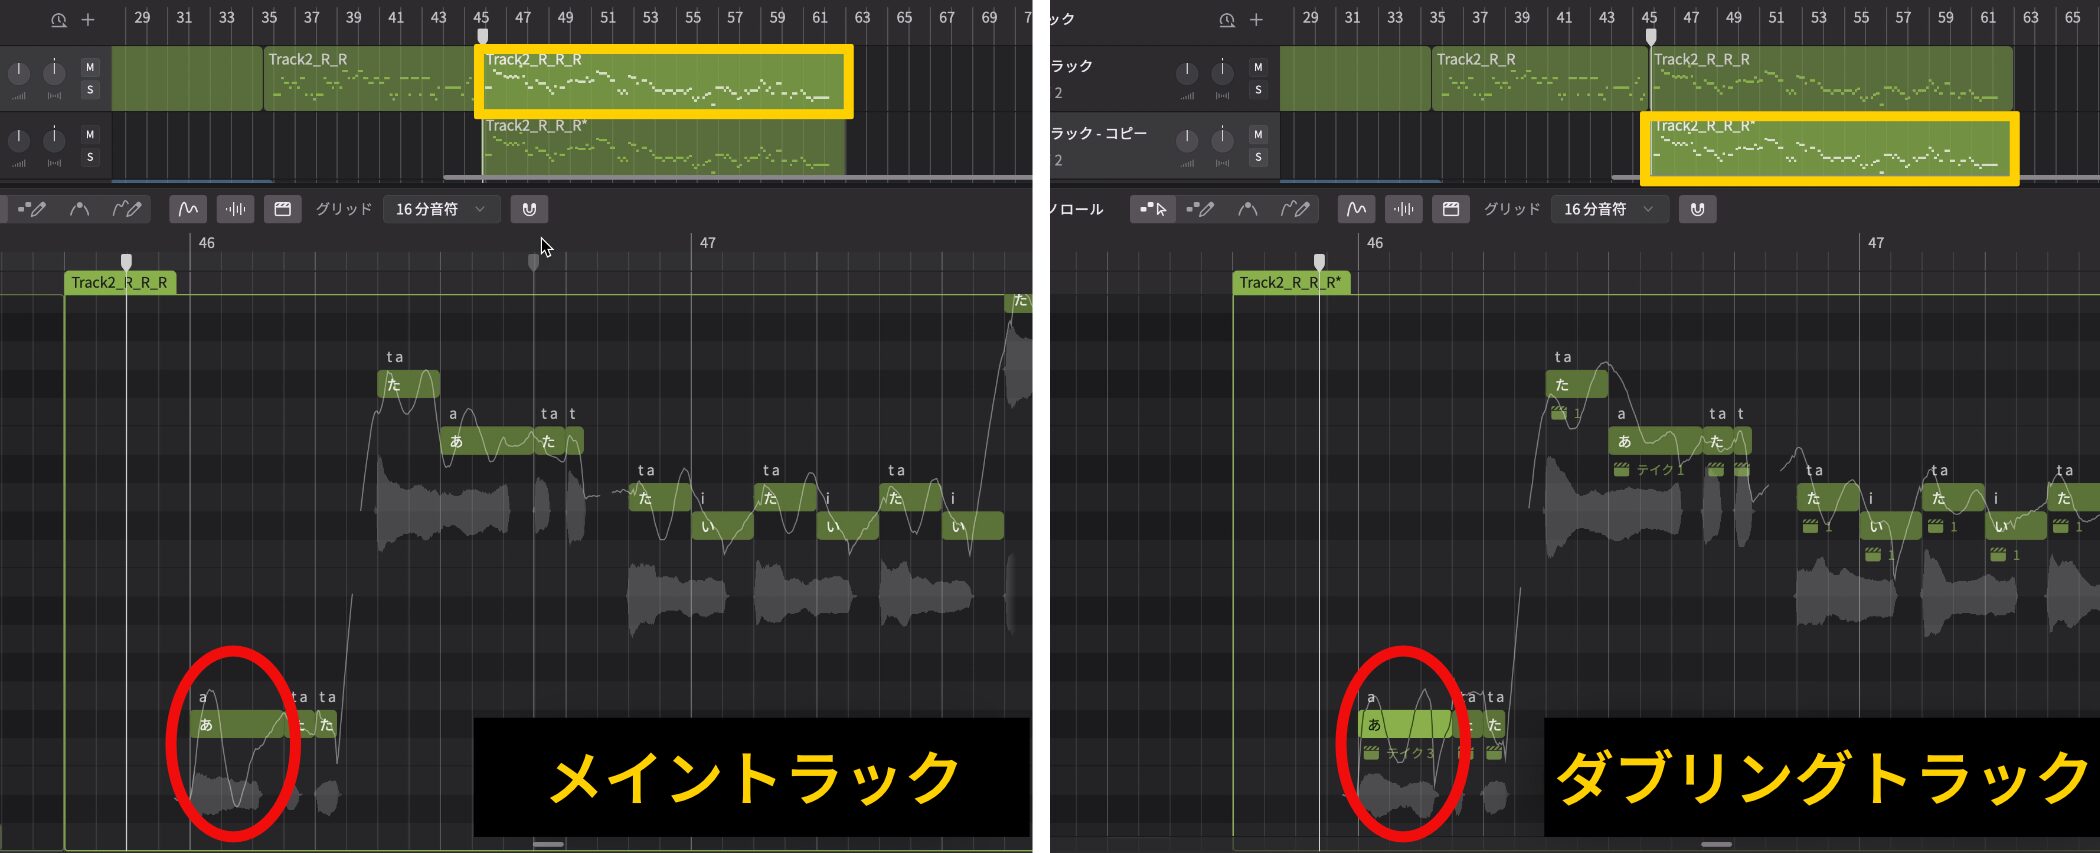
Each generated take has a different waveform and may sound quite different from the lead part.
Listen with the lead and choose other takes where something sounds unnatural or could be more expressive.
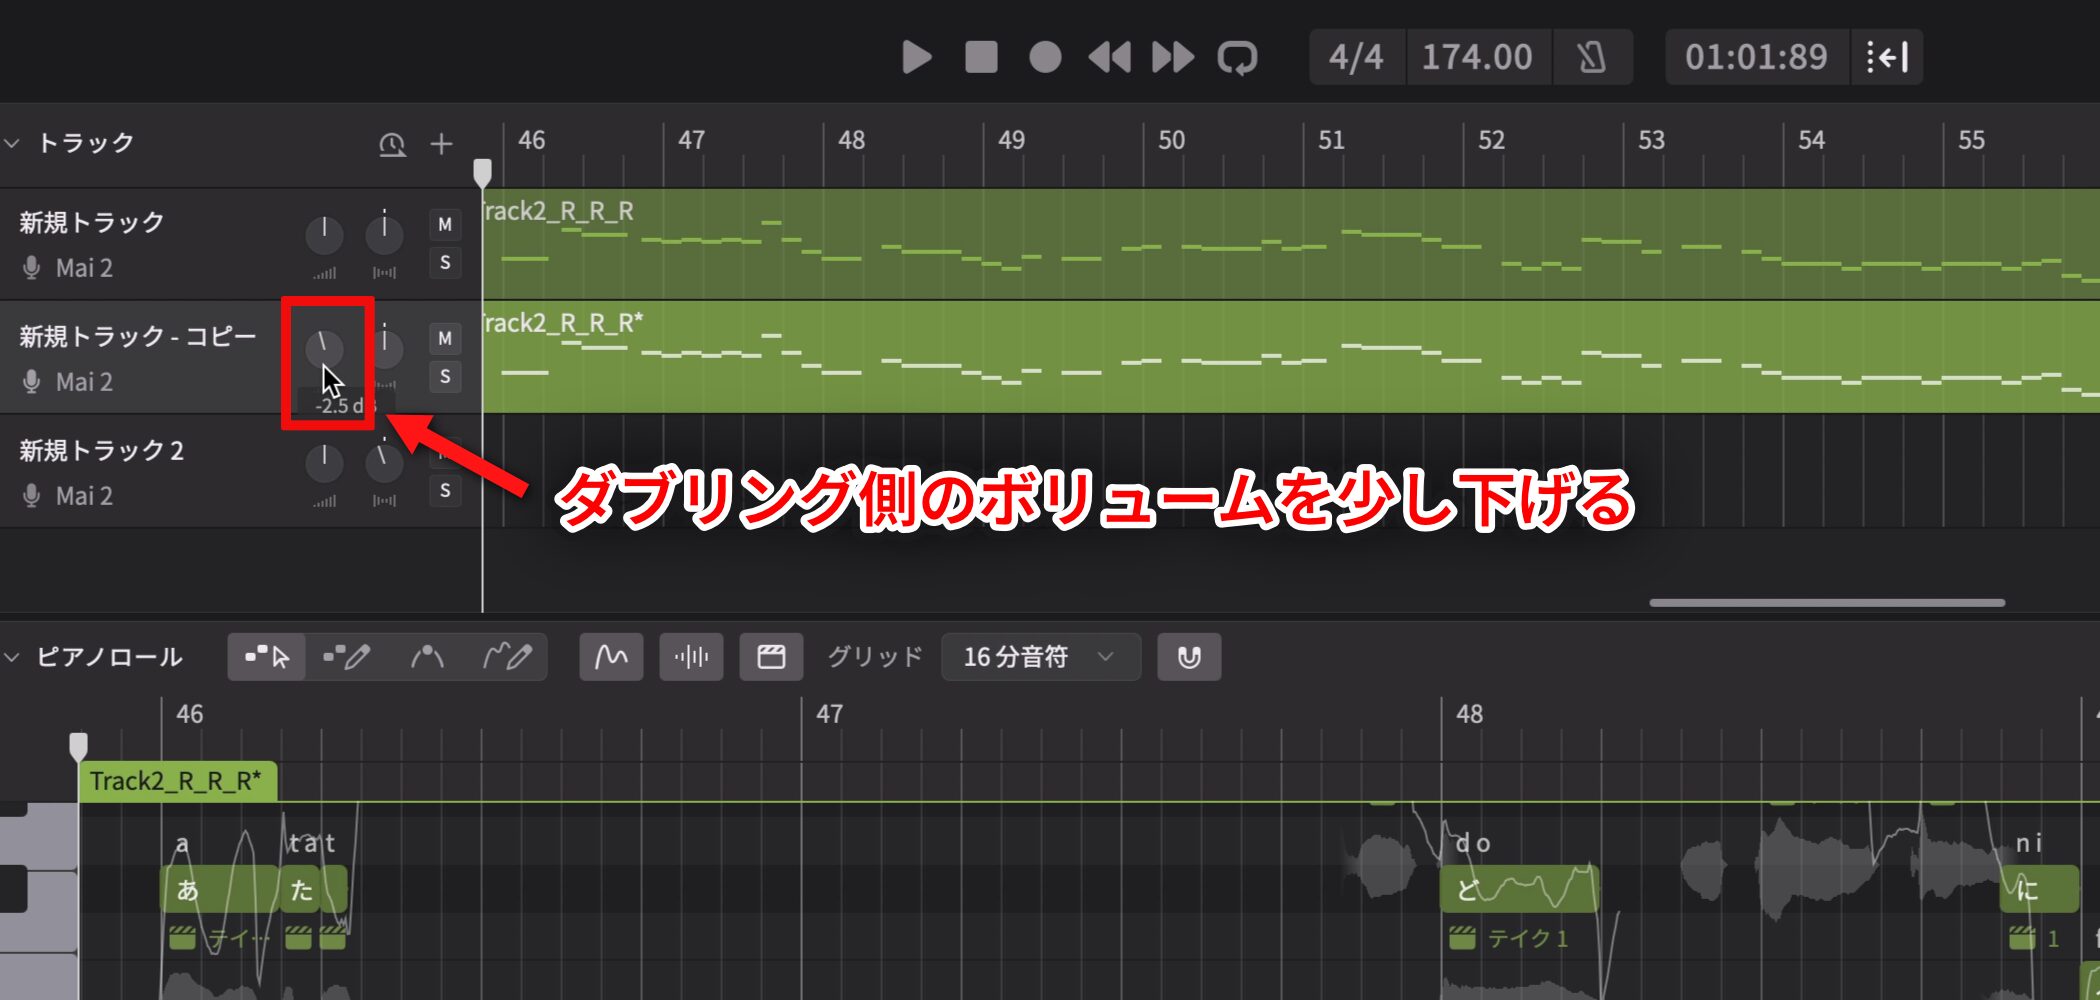
When the double is ready, lower its volume slightly to balance it with the lead.
How AI Retakes Interact with Other Settings
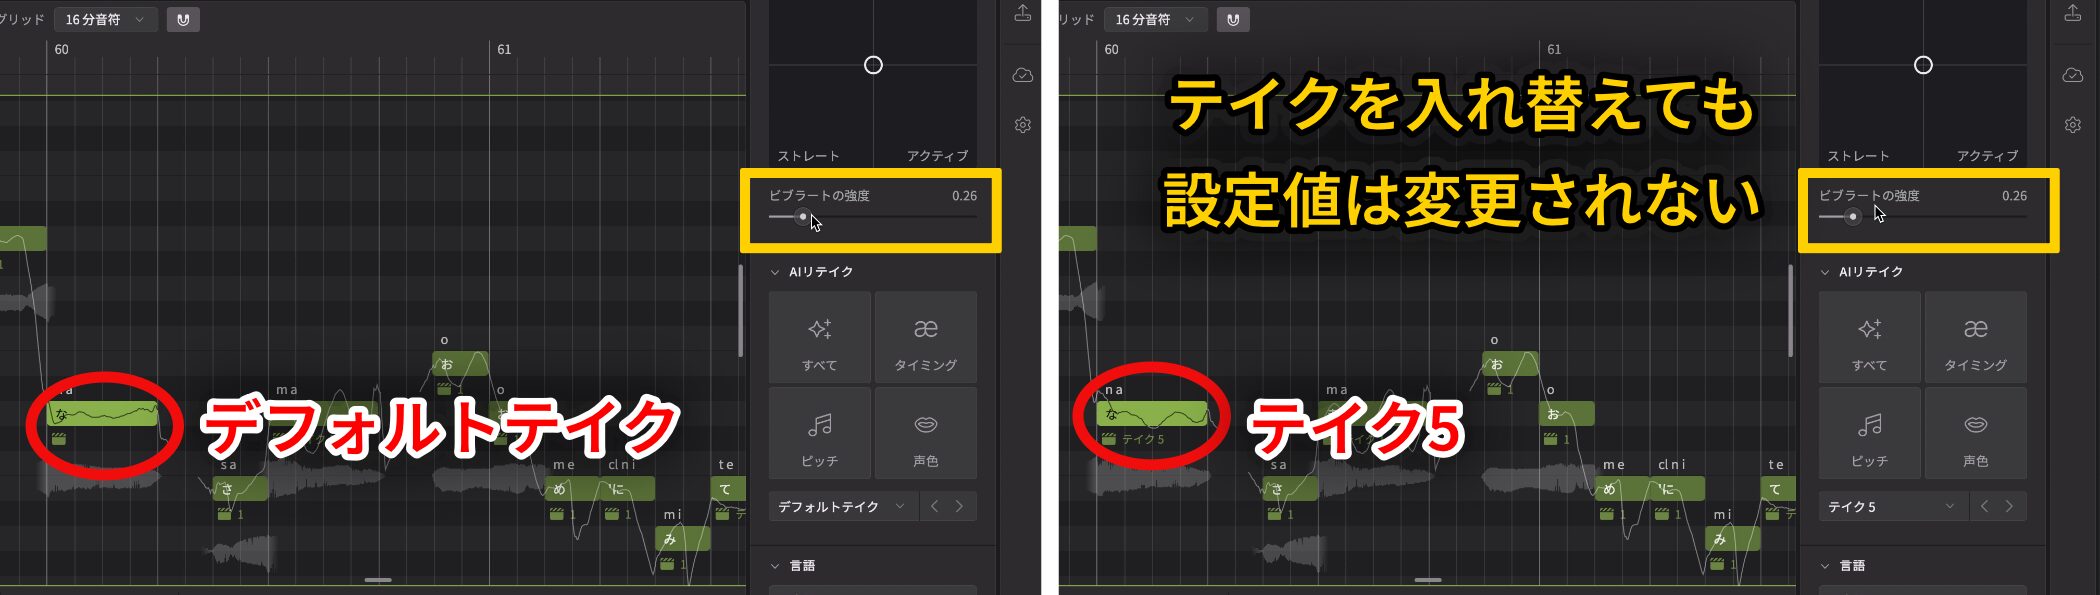
AI Retakes do not change existing Note- or Voice-panel values. For example, switching takes with Vibrato Depth set to 0.26 leaves that setting at 0.26.
In other words, Note- and Voice-panel settings apply equally to all takes, even when you switch AI Retakes.
Create a Harmony Part
Next, add a harmony to give the chorus more depth and color.
This example uses the familiar harmony a third below.
Listen to the chorus before and after adding the harmony.
Although some notes clash slightly with the chords, the harmony makes the song sound brighter and more three-dimensional.
Now let's create it.
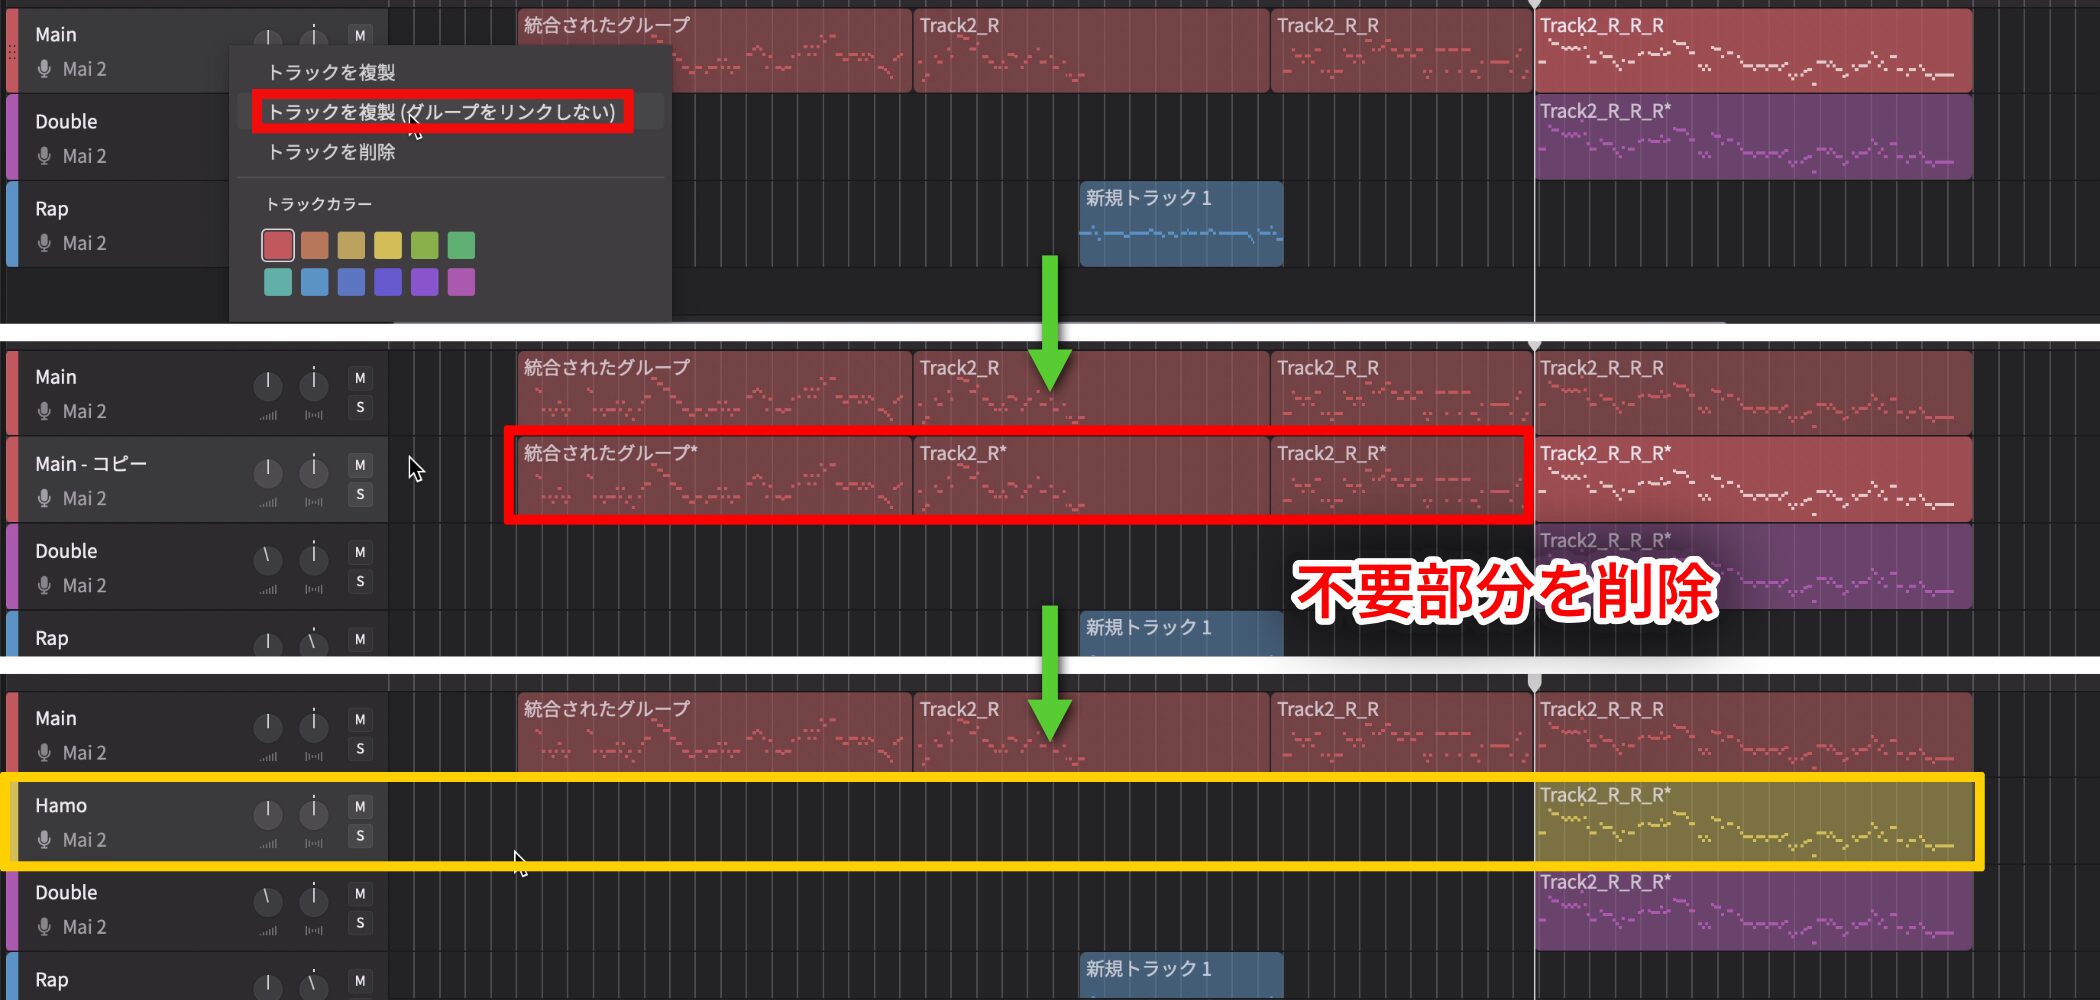
As with the double, copy the lead part and remove Groups outside the chorus.
As the number of tracks grows, organize them as you work.
See Organize Tracks below for the method.
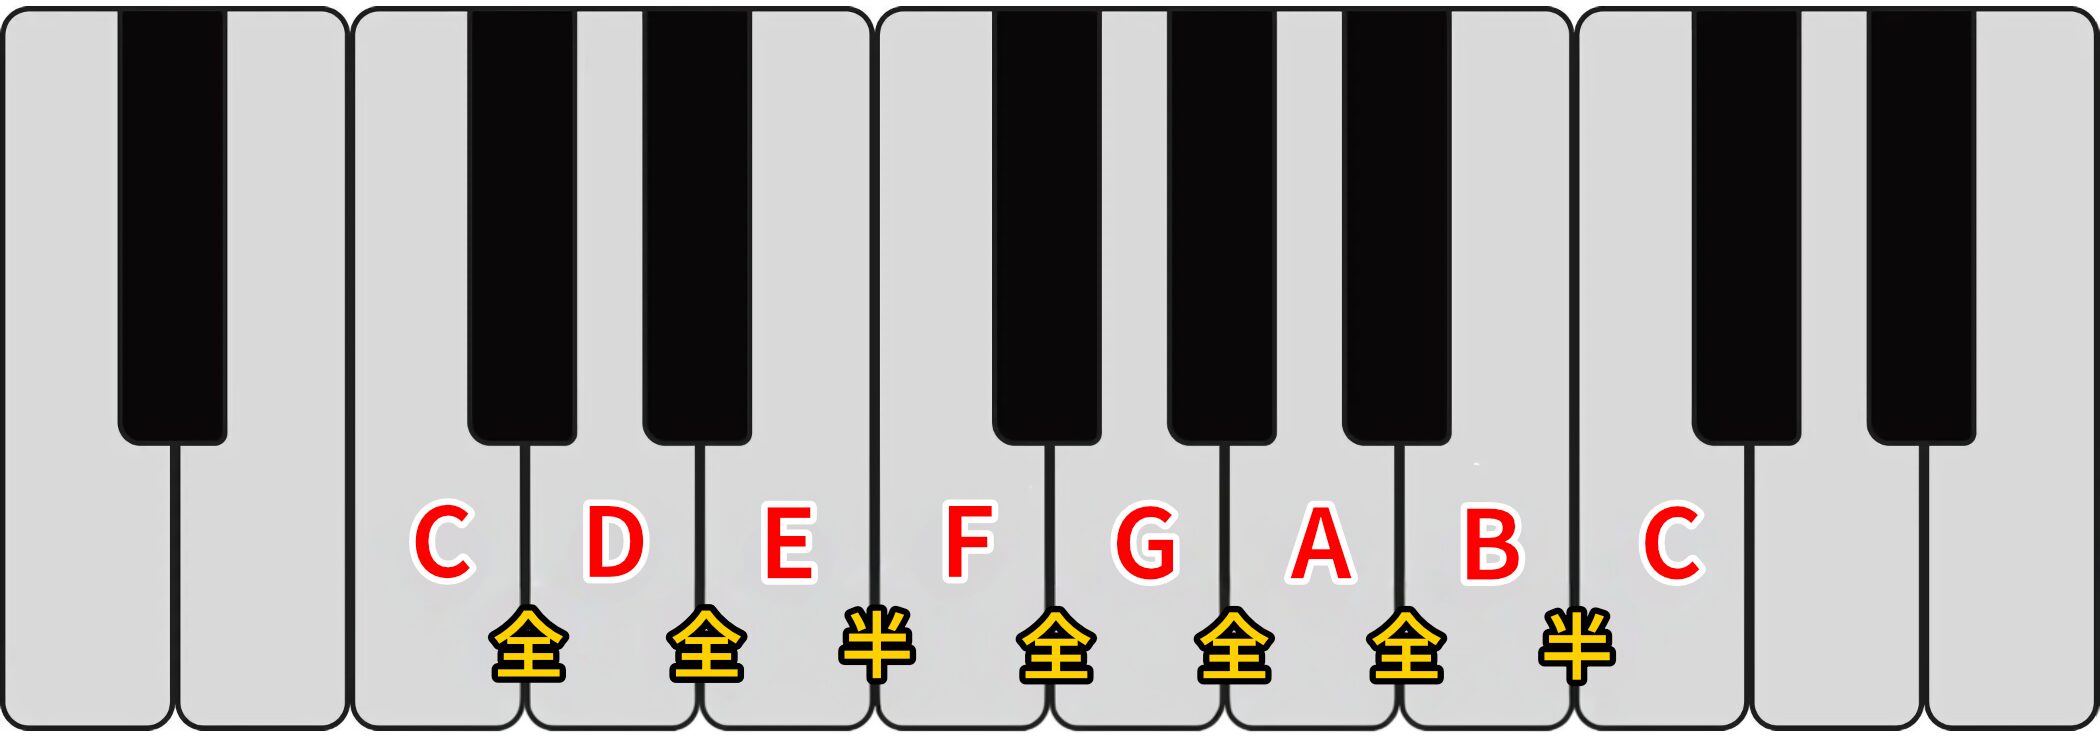
For a harmony a third below, you might move every note down three semitones. However, the diatonic scale contains both whole and half steps, so that alone will not give you a clean harmony.
To correct these intervals, first adjust selected notes separately.
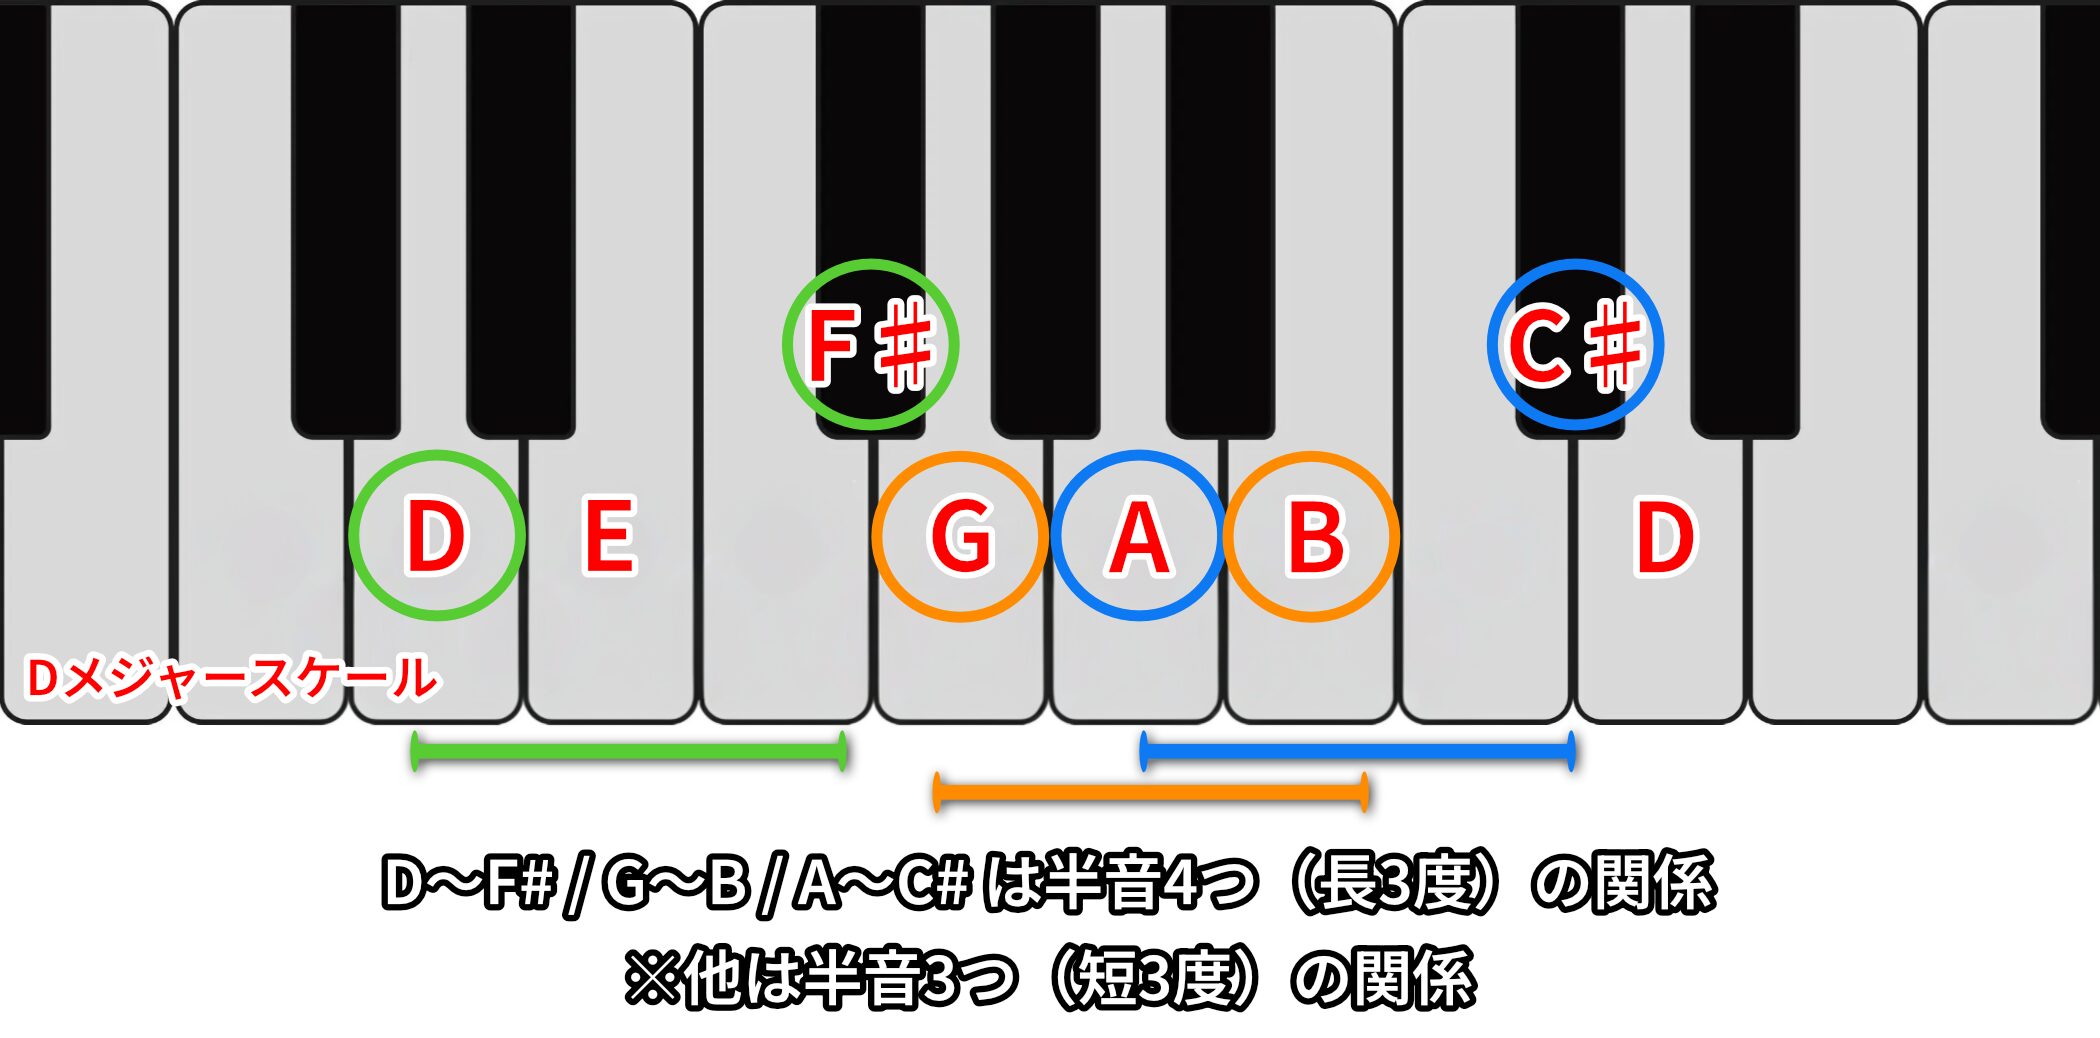
The sample chorus is in D major.
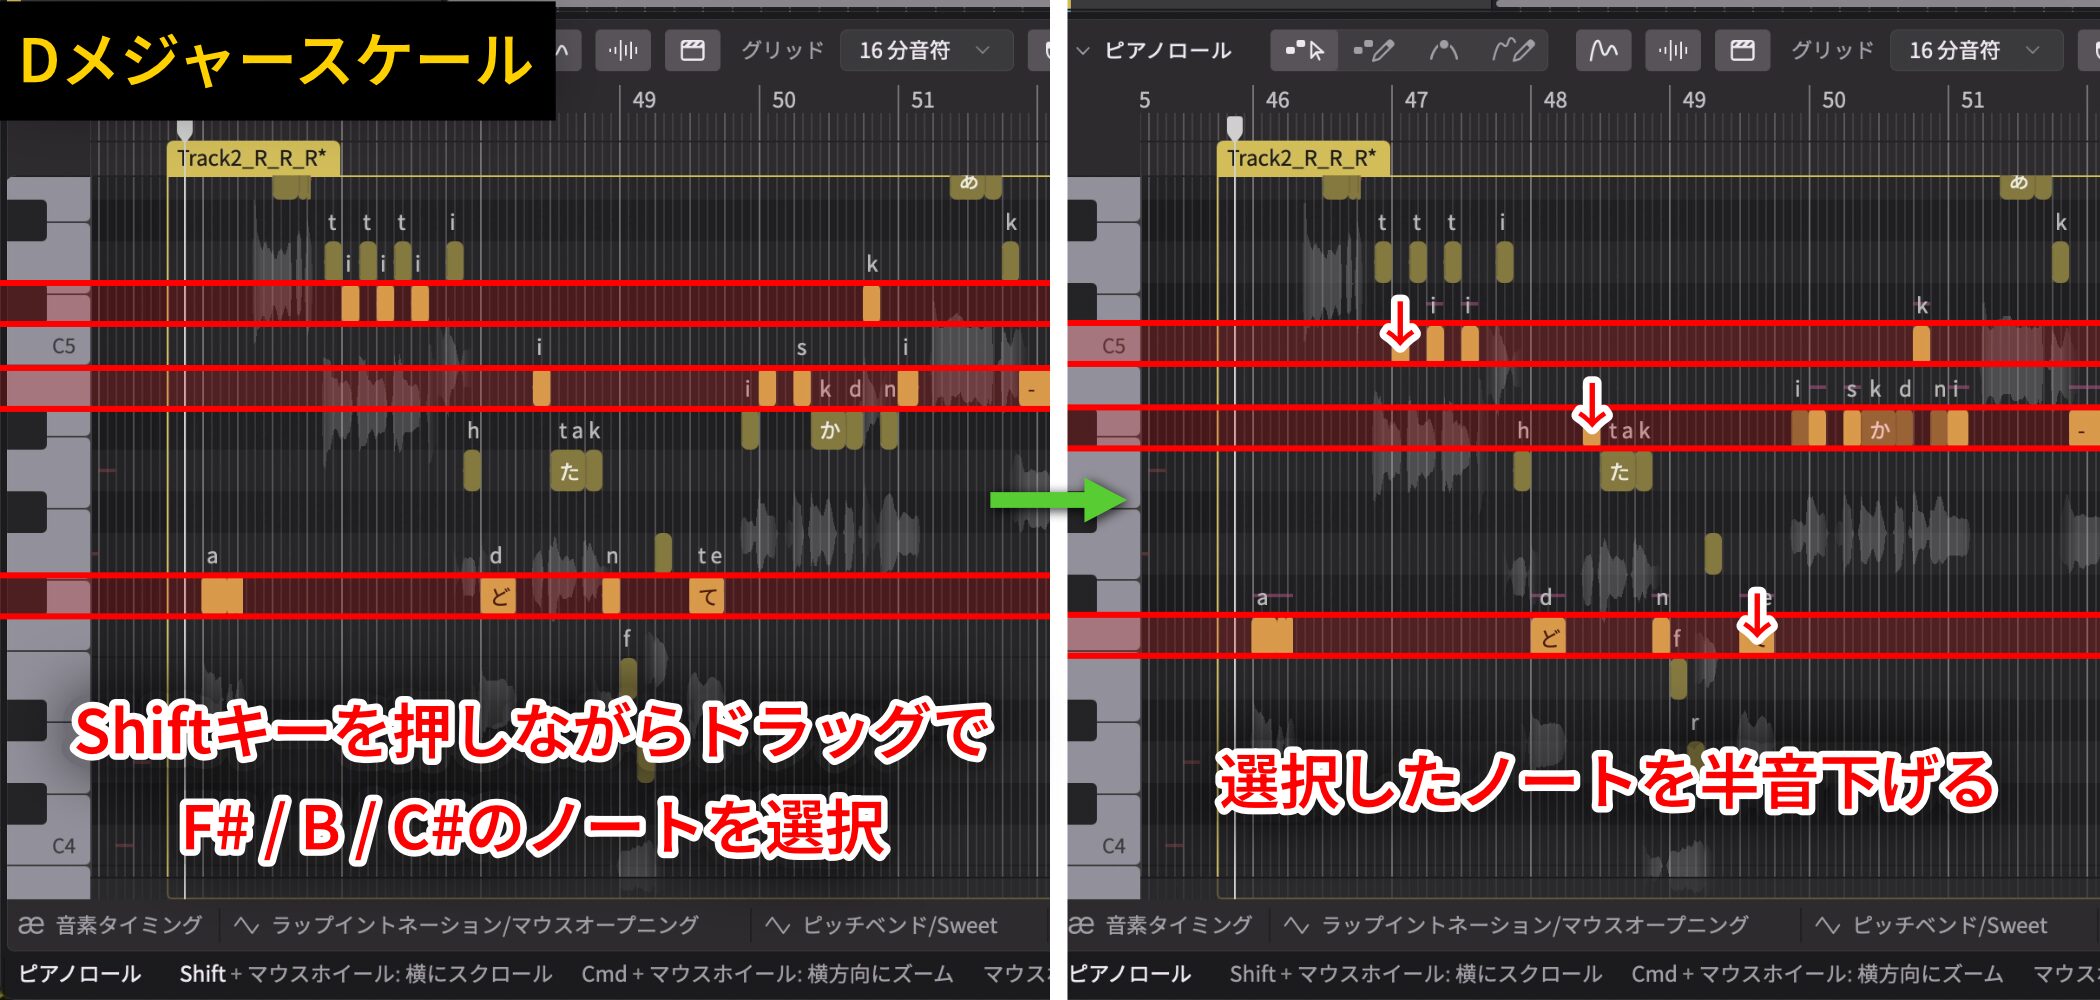
In this scale, F#, B, and C# have a different interval relationship to the other notes when creating a harmony a third below, so lower those notes by a semitone first.
Hold Shift while dragging to select several notes at once.
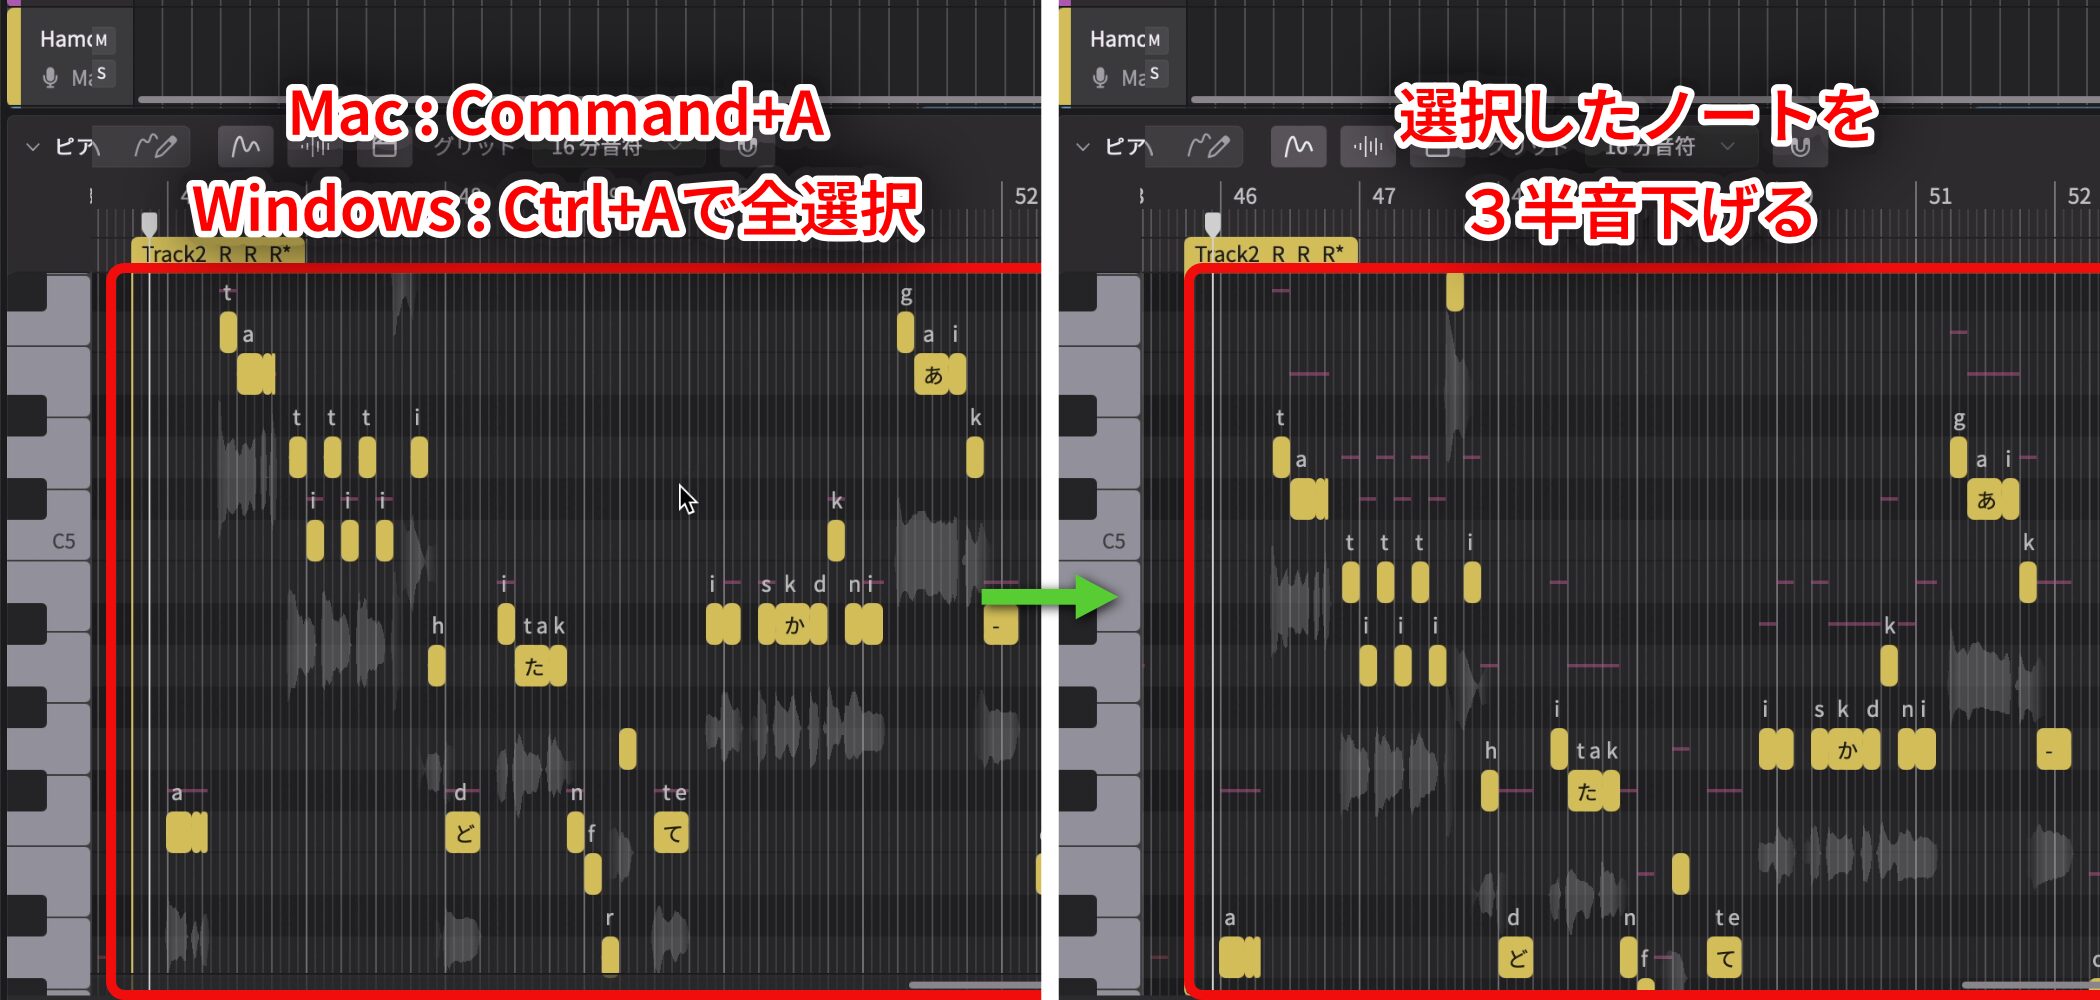
Then move all notes down three semitones to get the harmony you heard earlier.
Use Command+A on Mac or Ctrl+A on Windows to select all notes.
First create the basic harmony a third below, then adjust notes that clash with the chords or do not fit your taste.
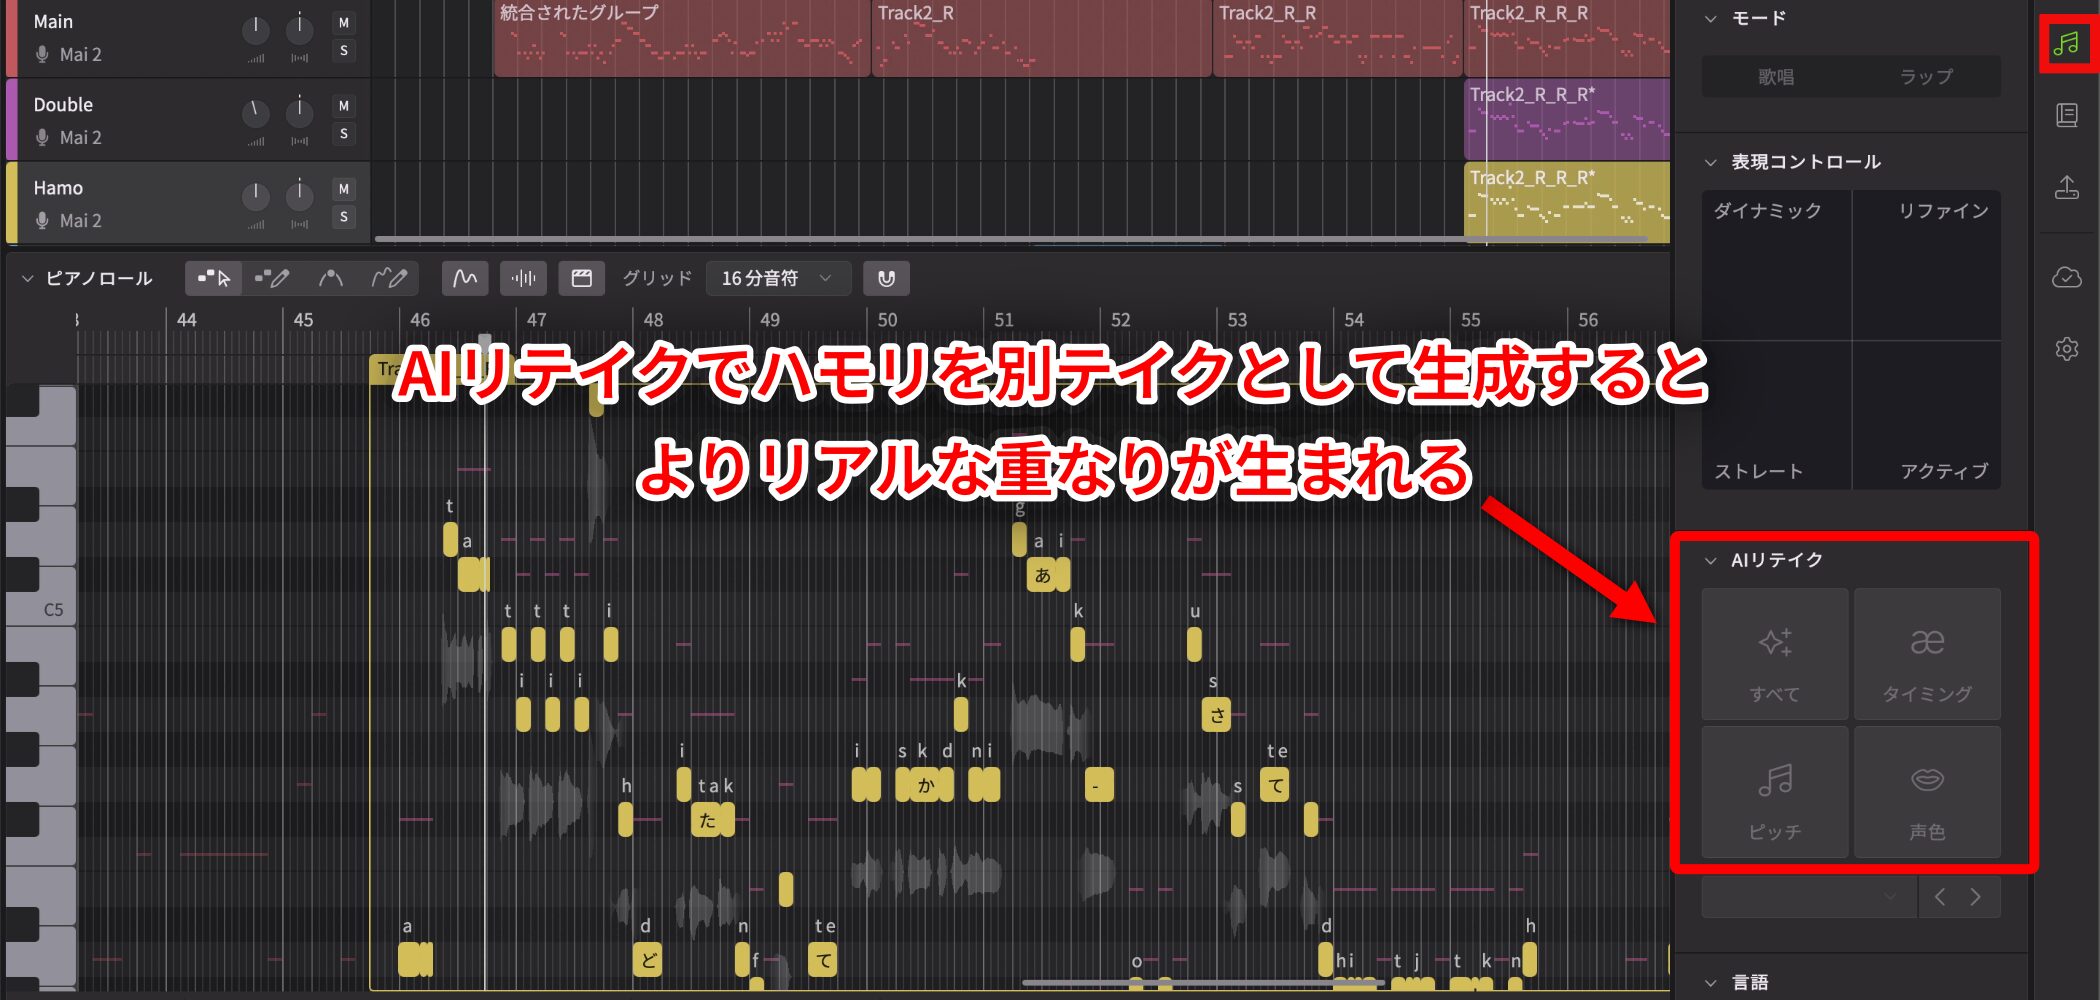
You can also use AI Retakes to generate another take of the harmony for a more realistic layered sound.
Organize Tracks
Organize the tracks as their number grows.
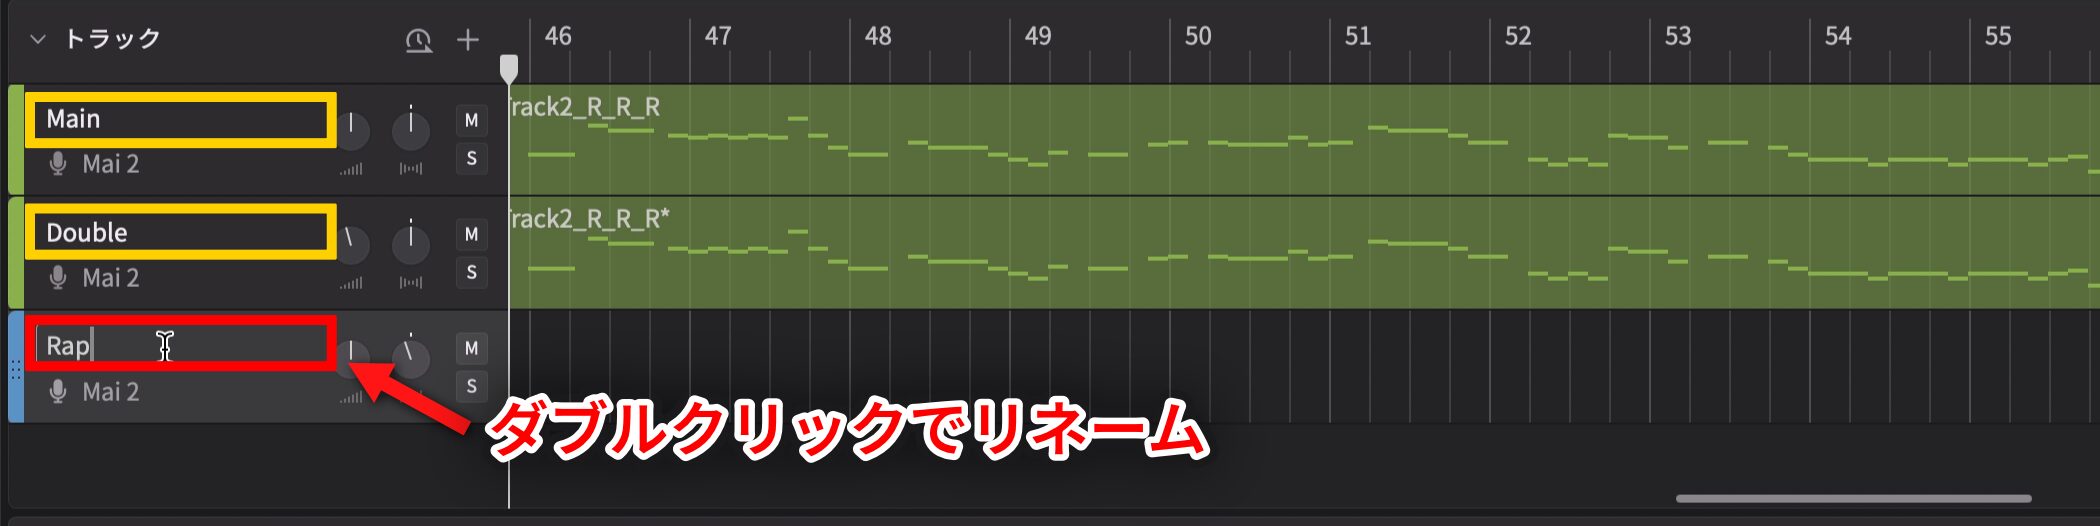
Double-click a track name to rename it.
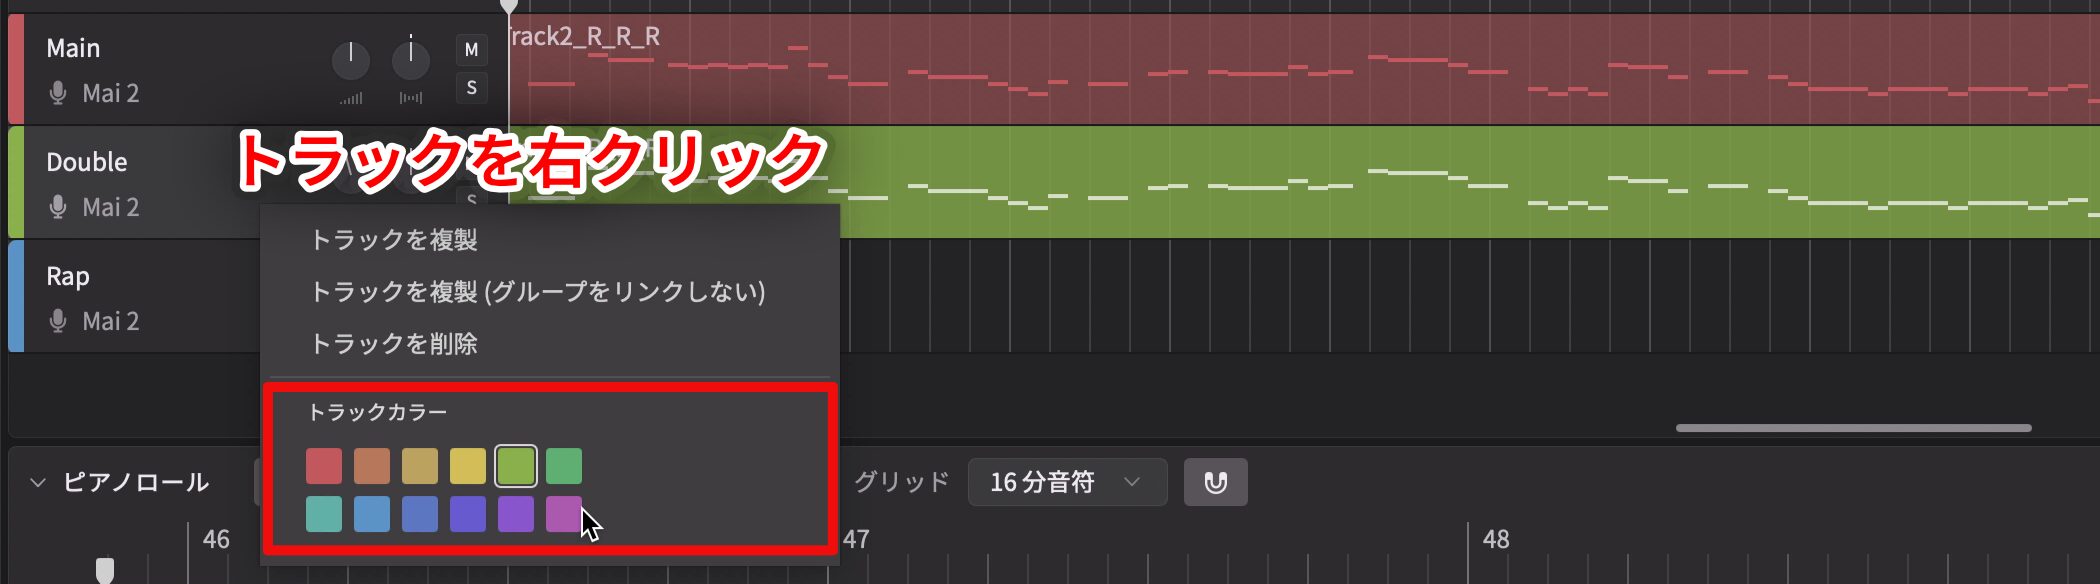
Choose Track Color from the right-click menu to assign colors, which makes the tracks easier to distinguish and edit.
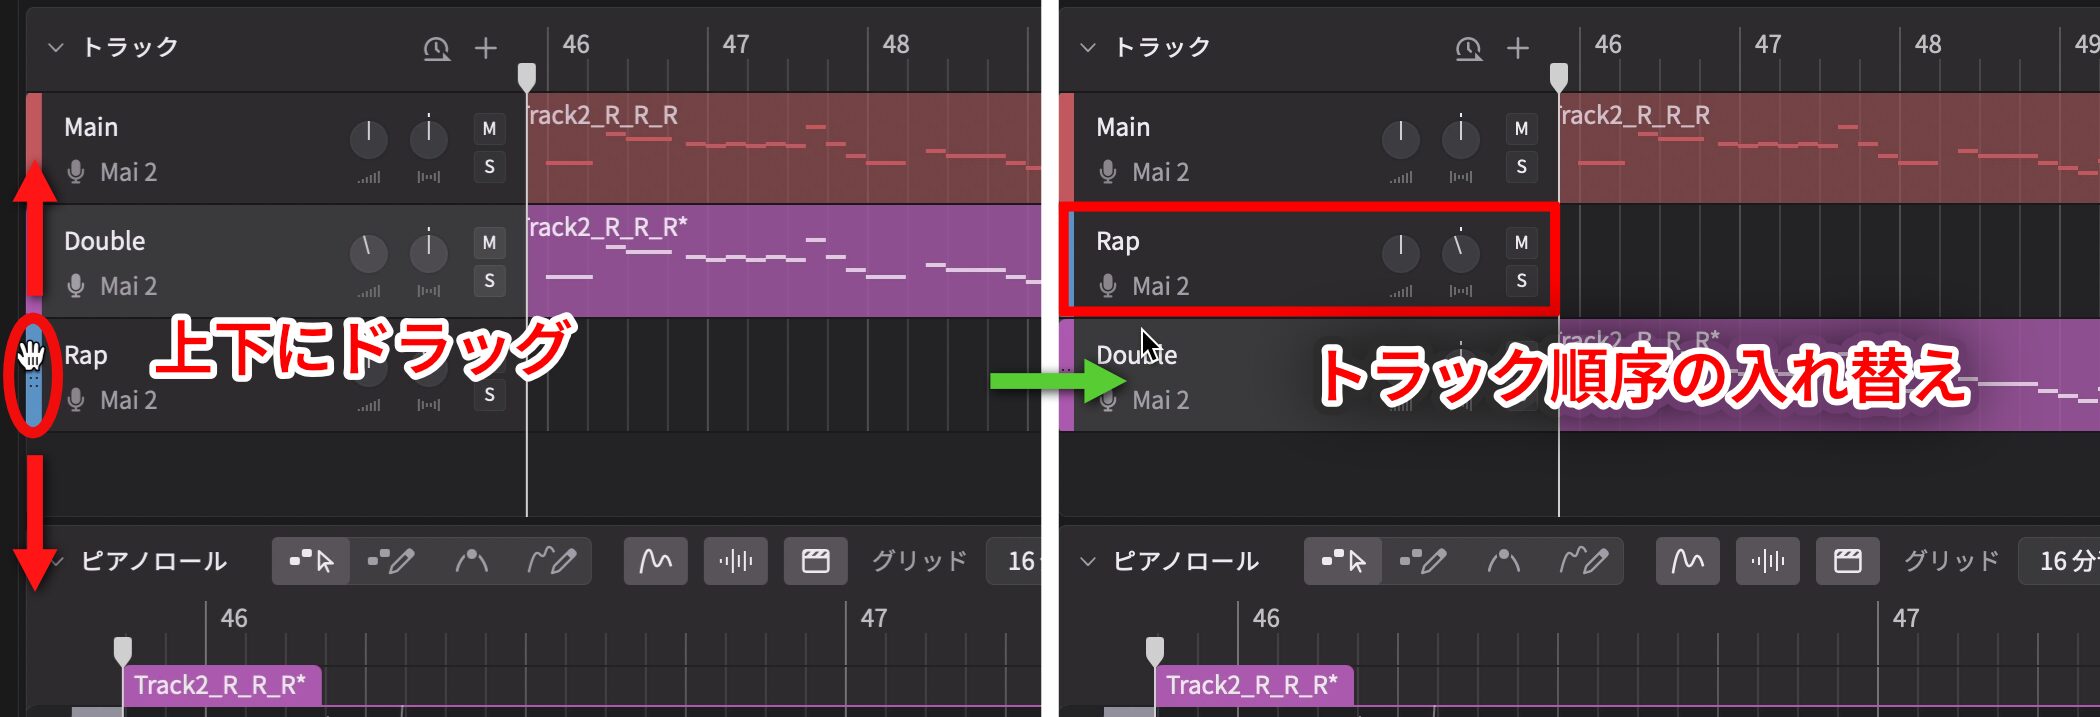
Drag a track up or down by its left edge, where the hand icon appears, to change its order.
Export Audio Data
Once all parts are ready, export them as audio for editing and mixing in your DAW.
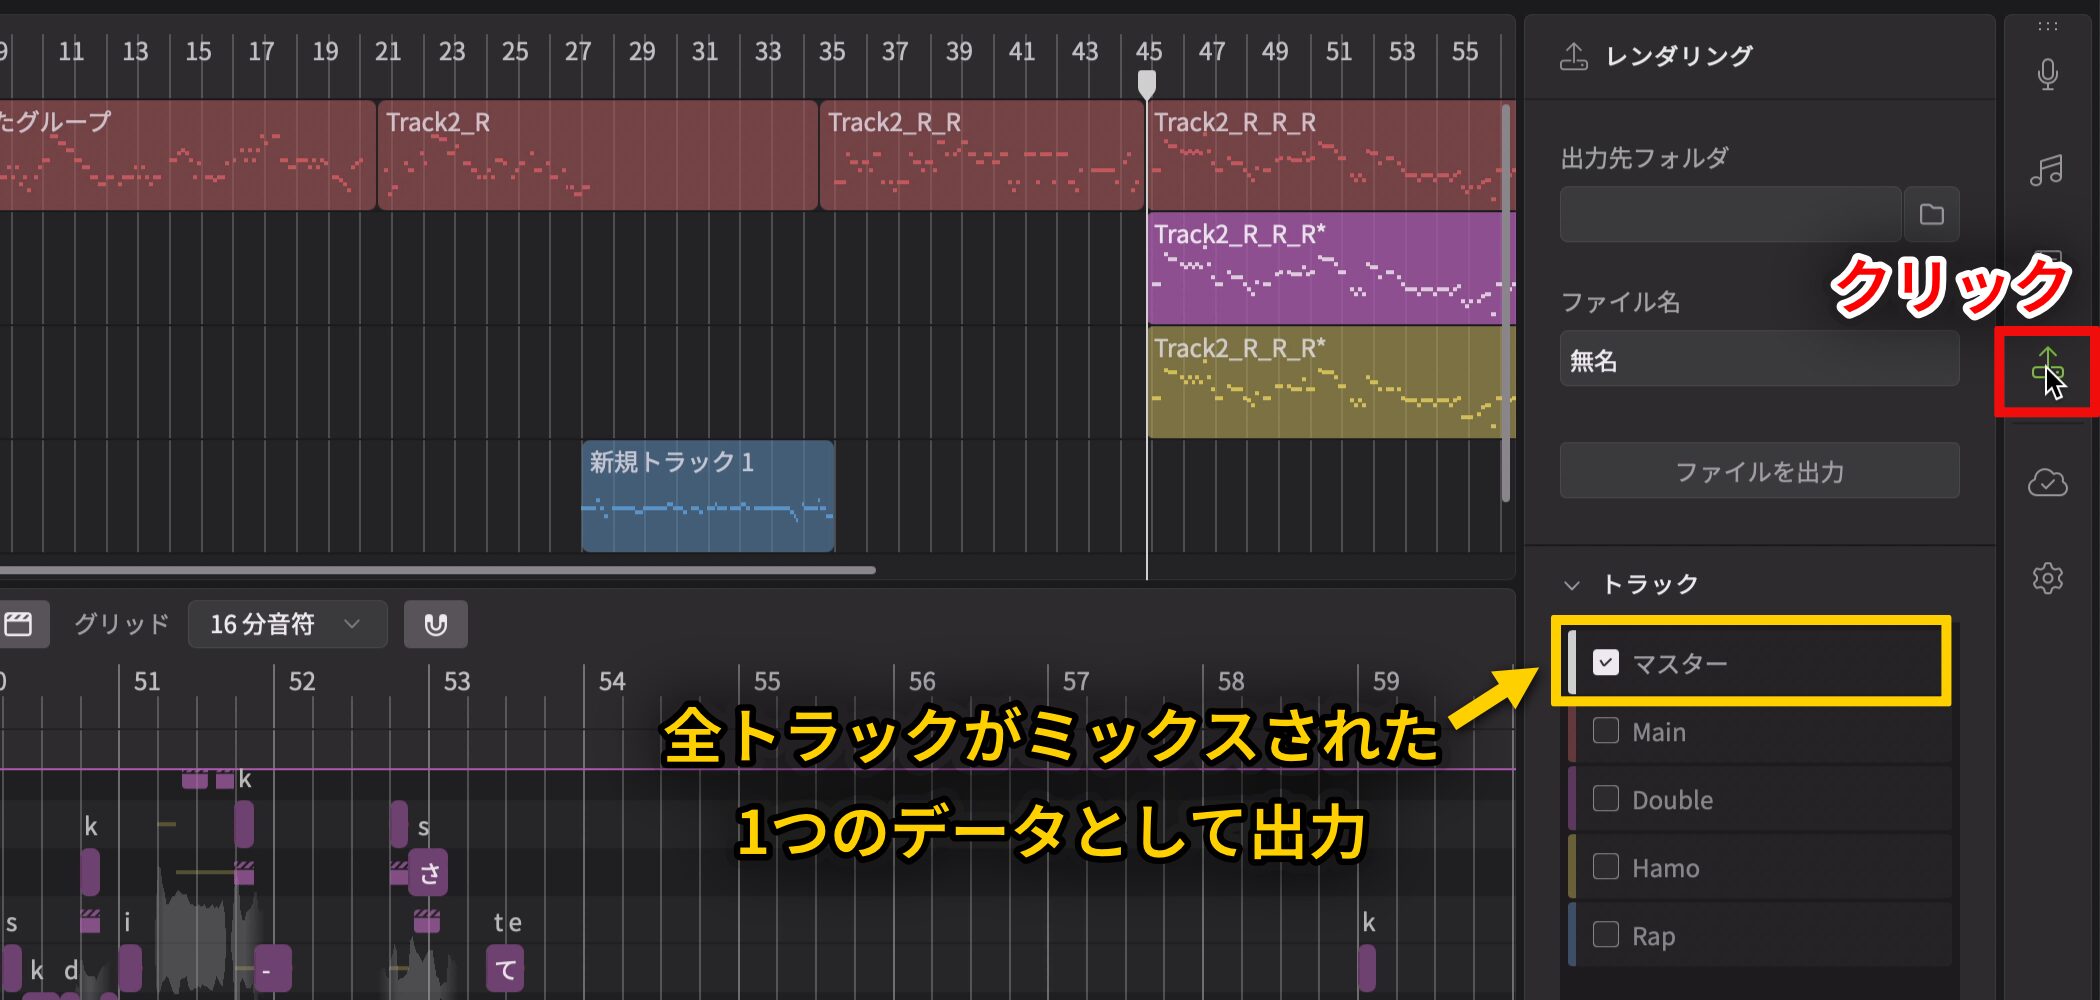
Open the Rendering panel first.
Choosing Master exports all tracks as one mixed file.
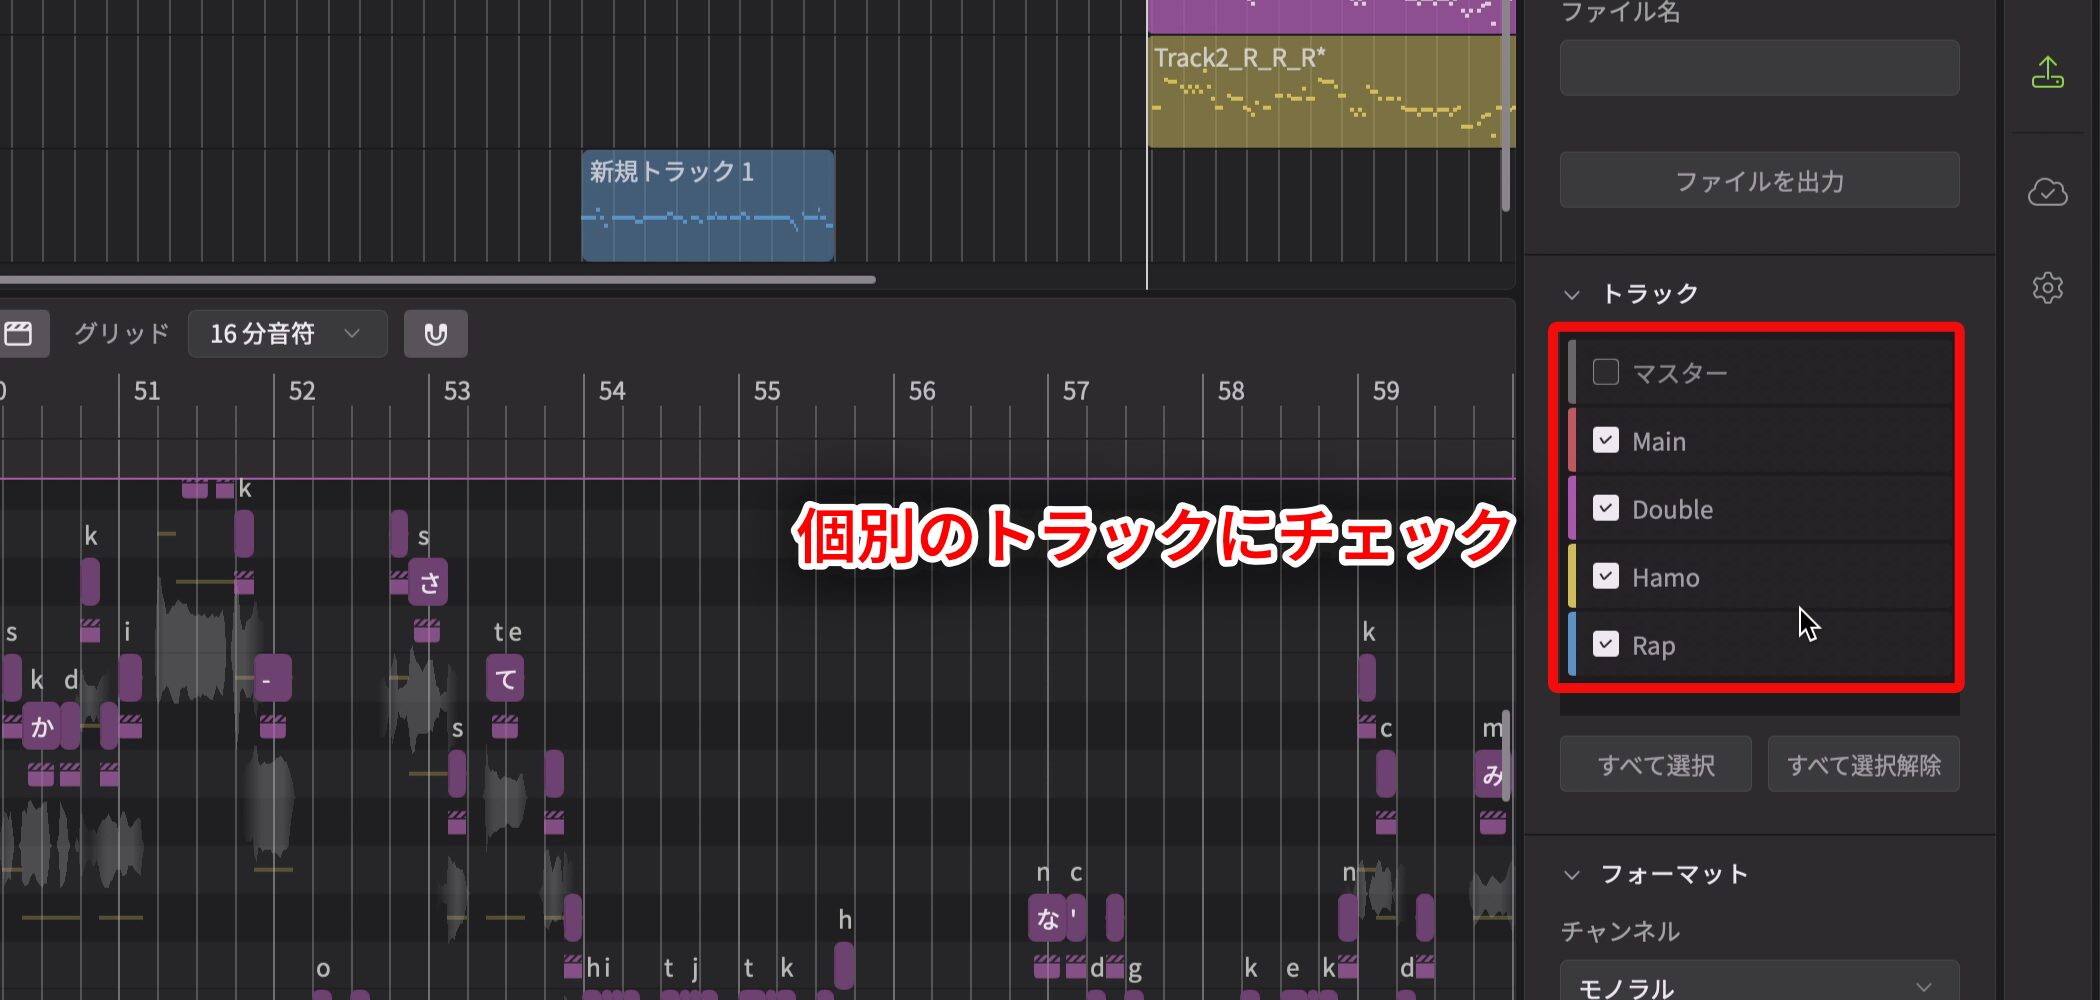
Here we want to export each part separately, so uncheck Master and check the individual tracks.
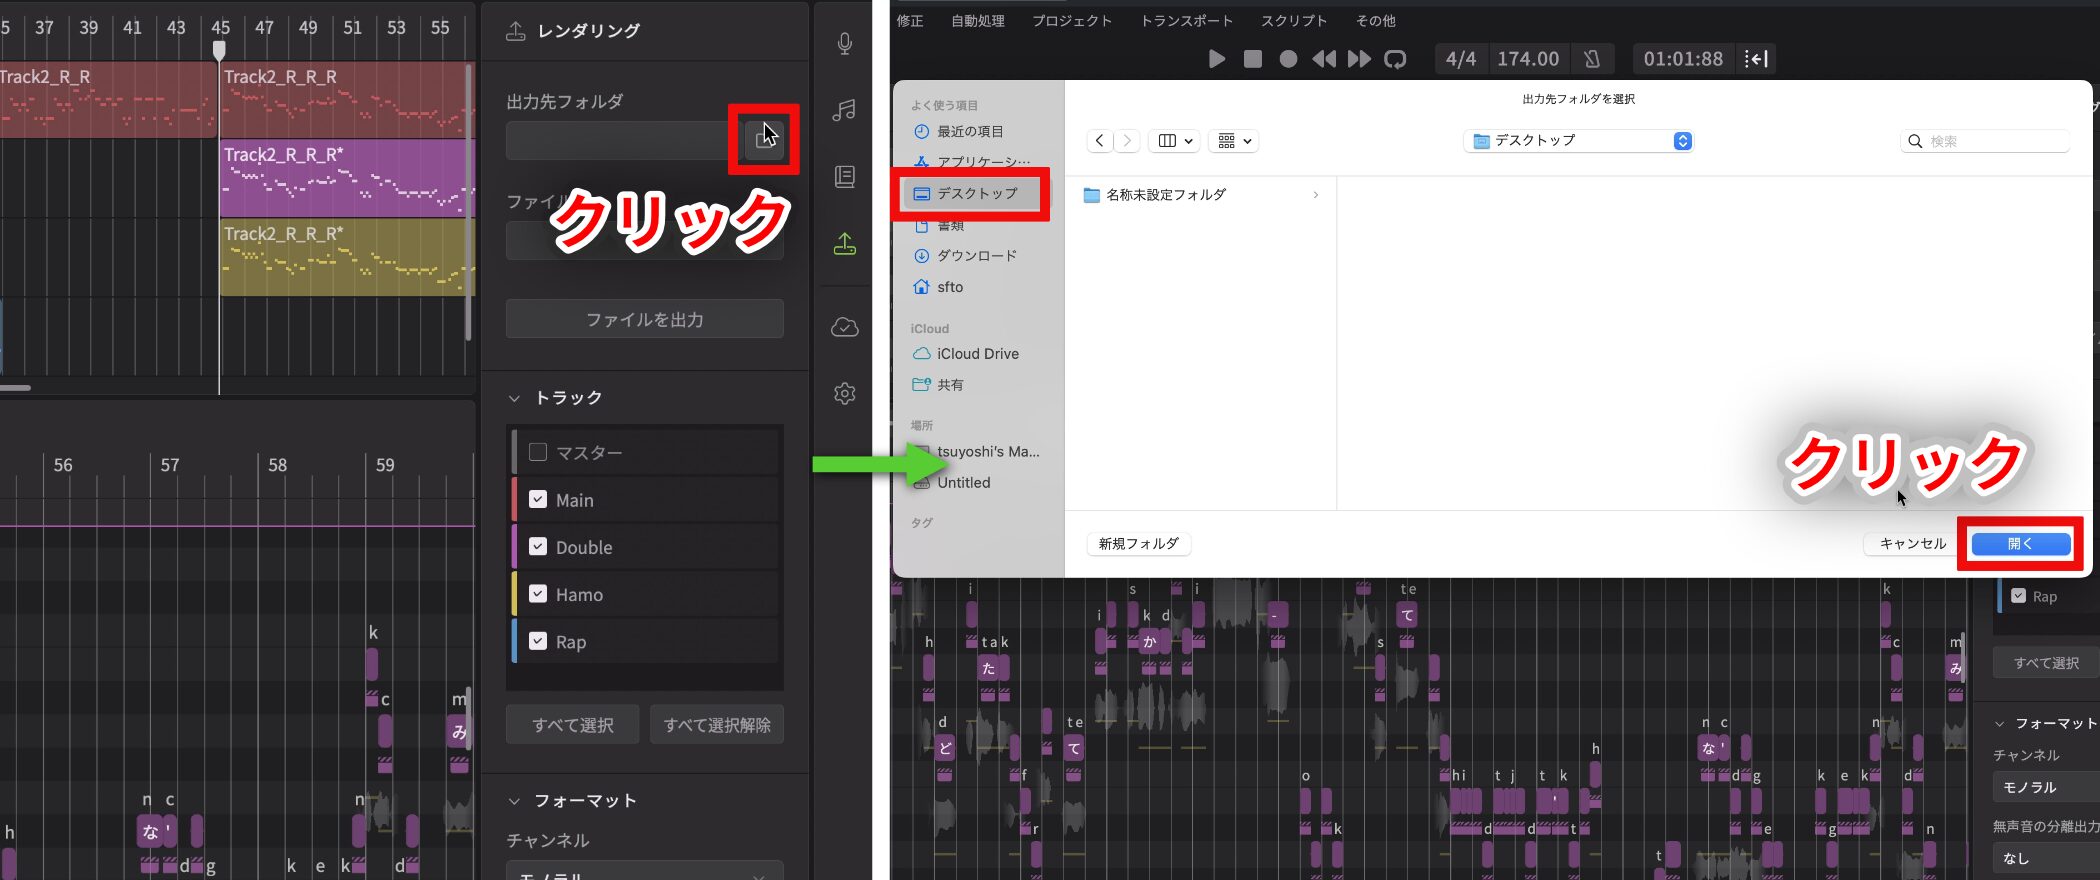
Choose a destination folder, such as the Desktop in this example.
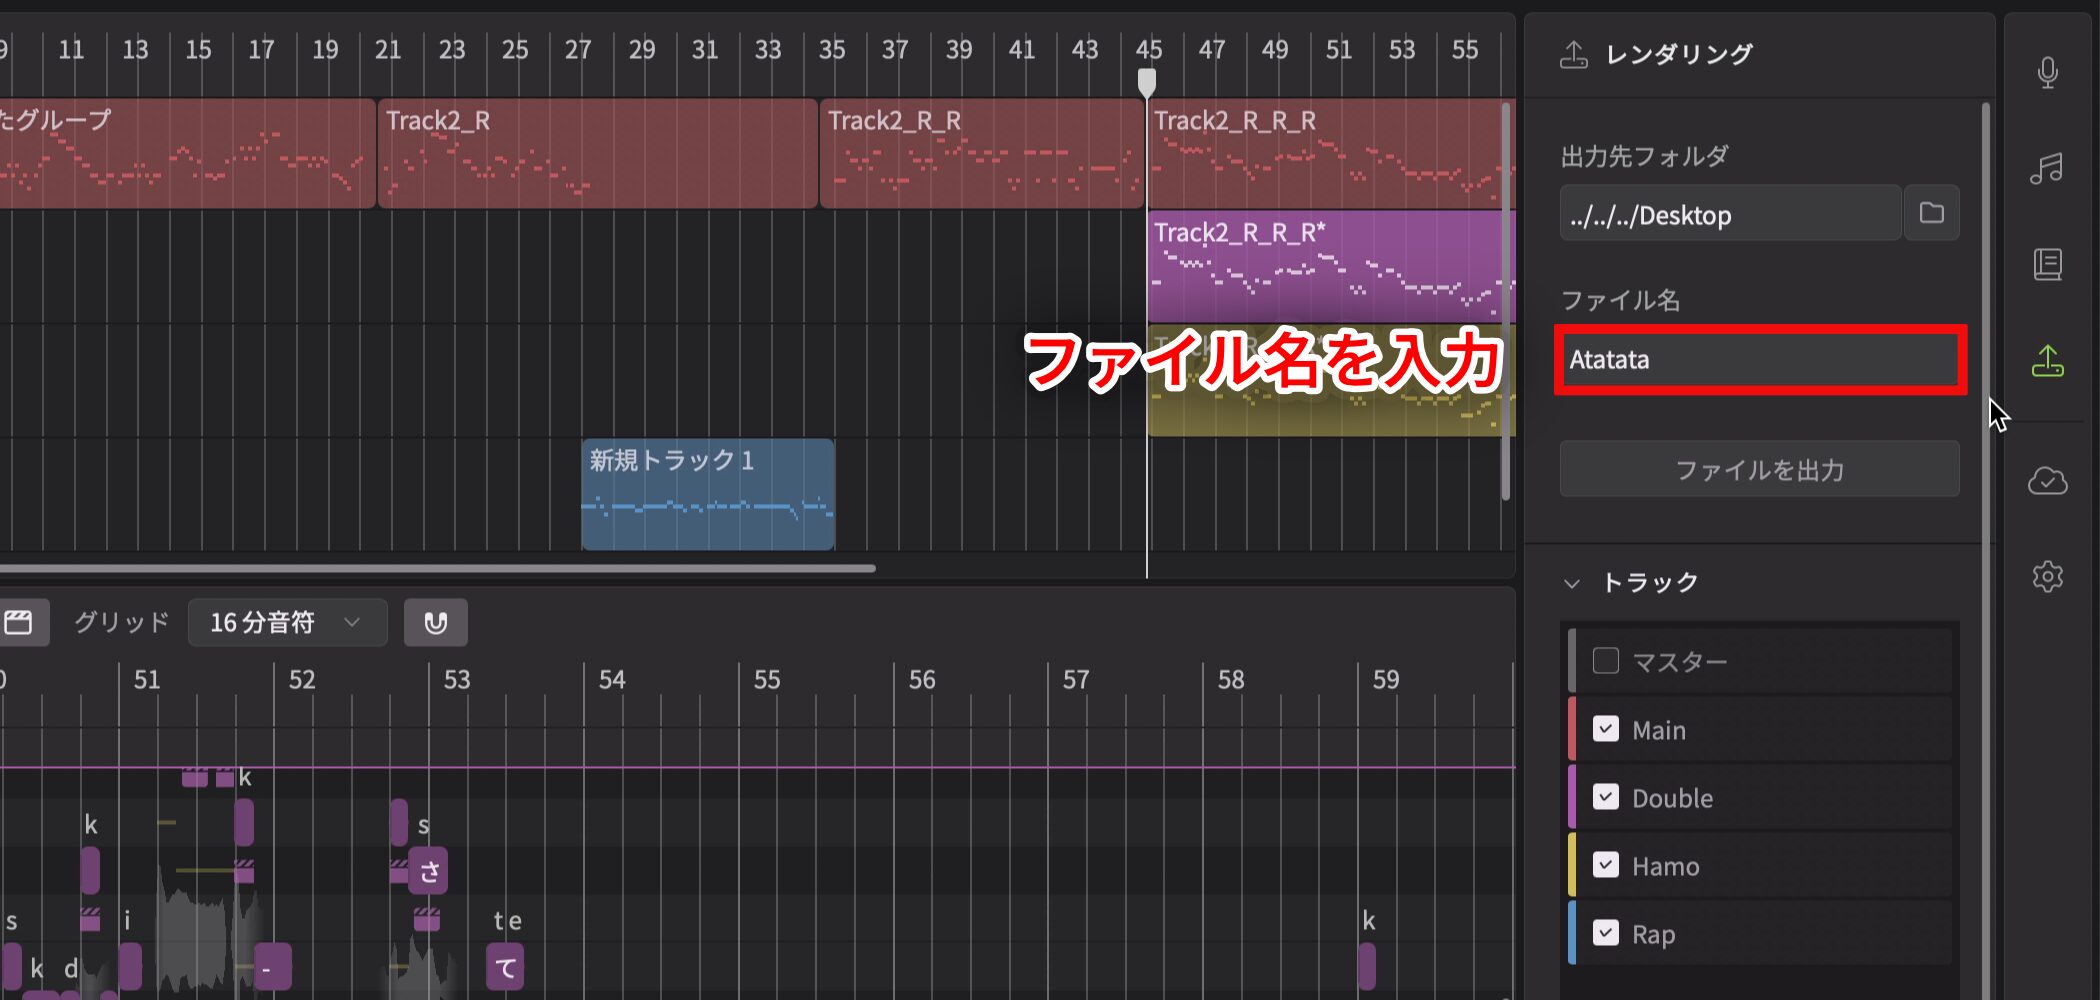
Enter a file name.
That name will be added to the beginning of every track name.
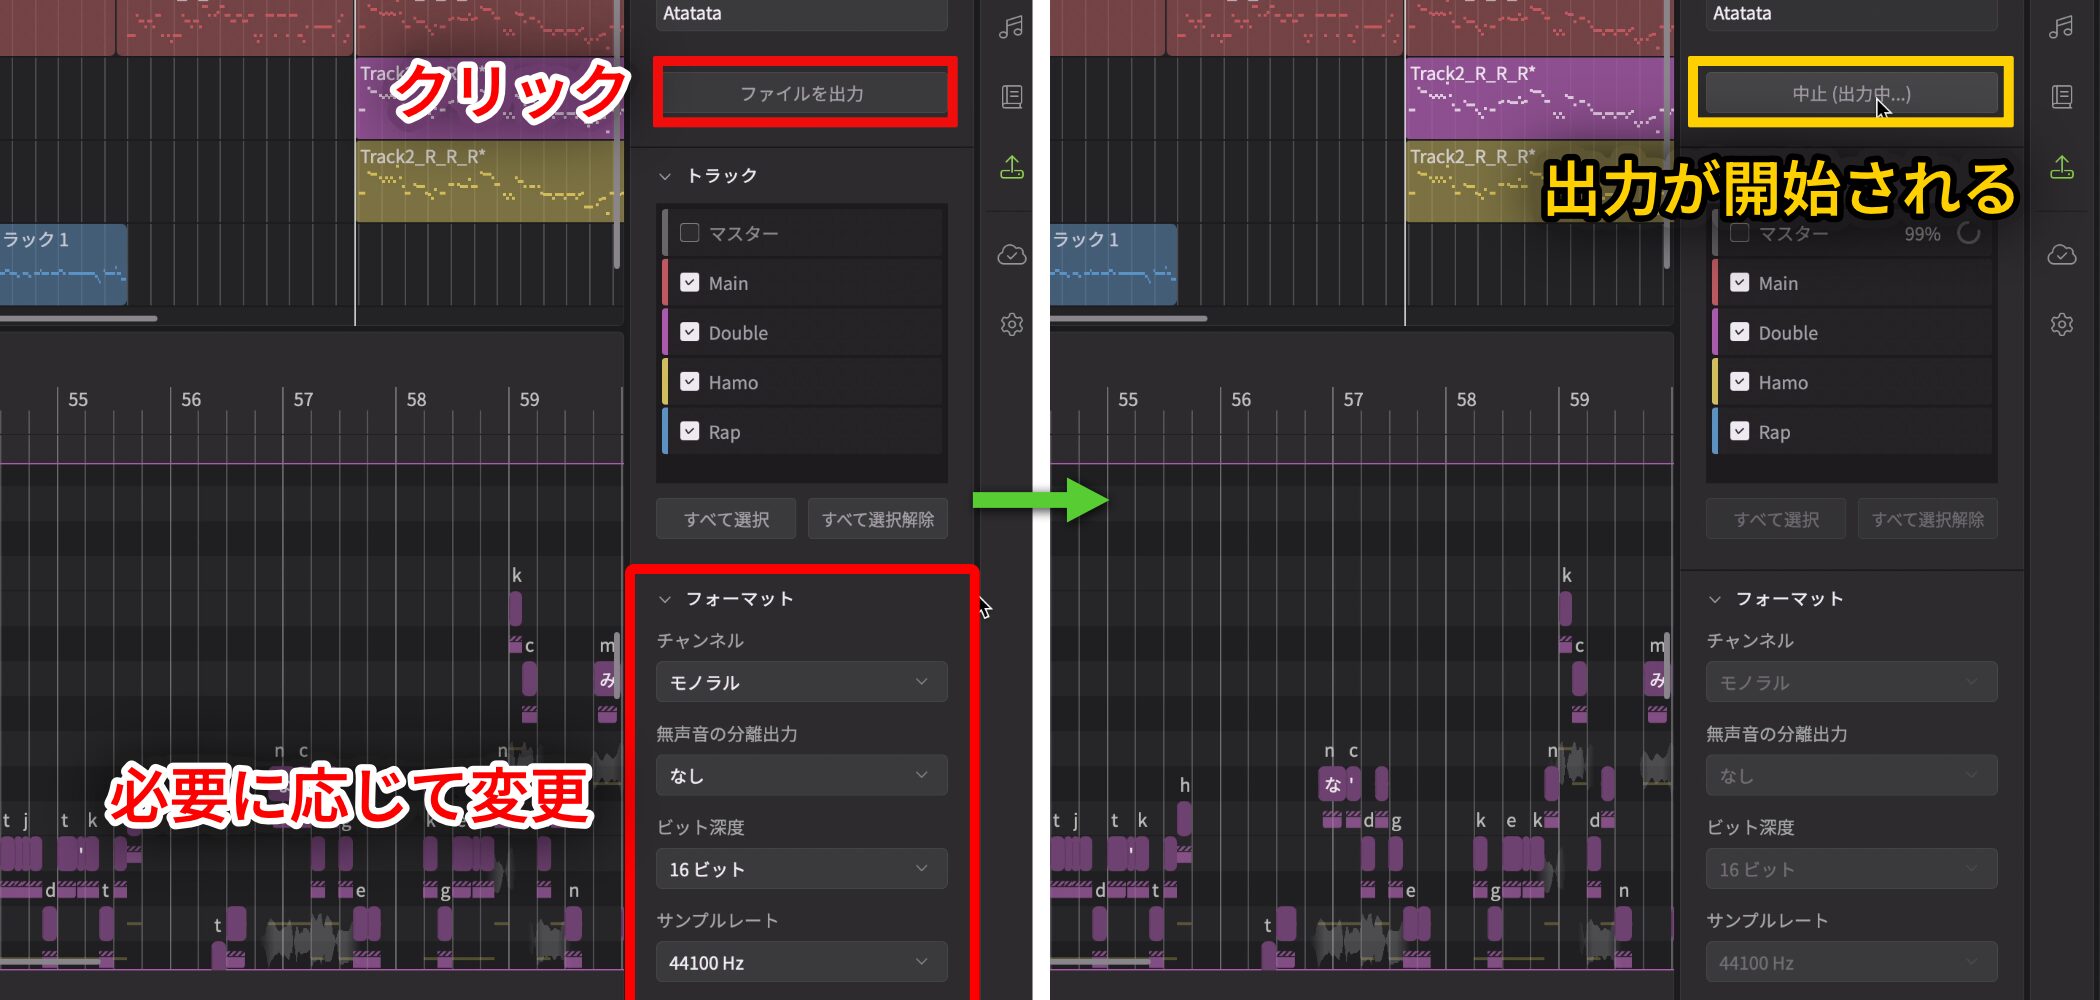
Set the data format as needed, then click Export Files to begin.
Set the Data Format
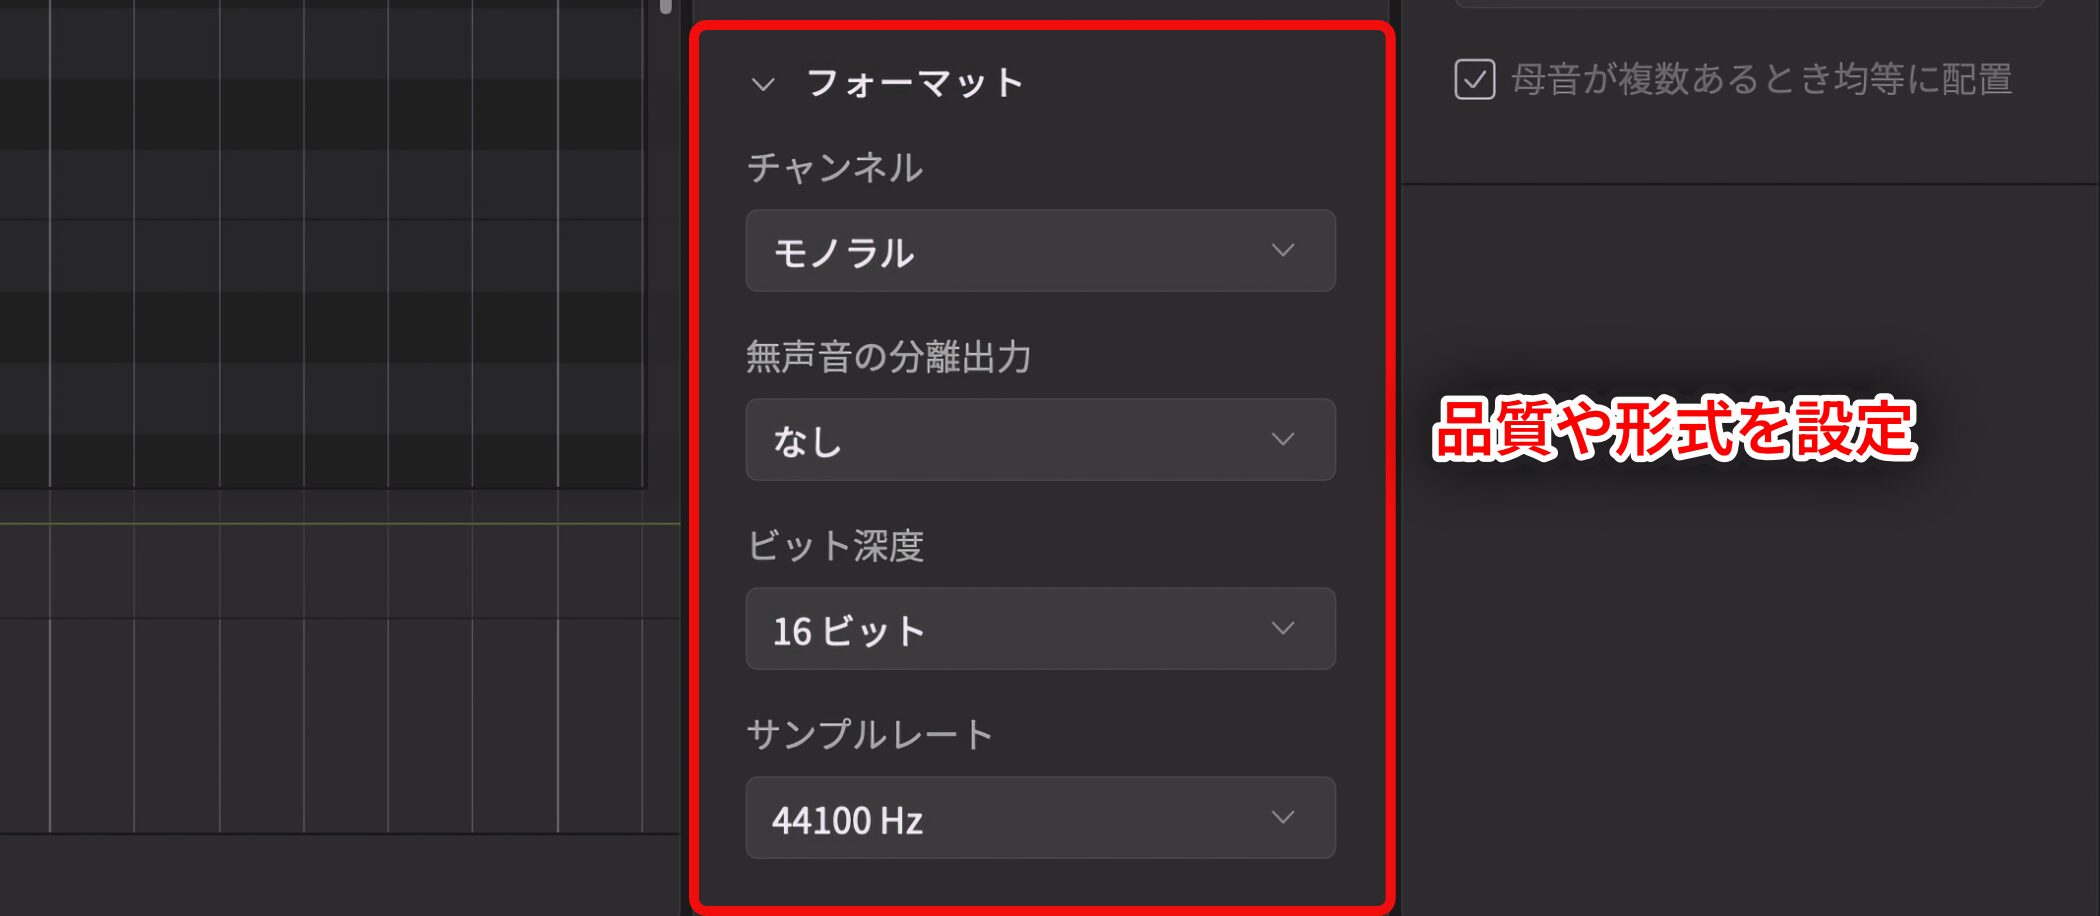
The format controls the quality and file type of your exported vocals.
Here is what each option means.
Channels
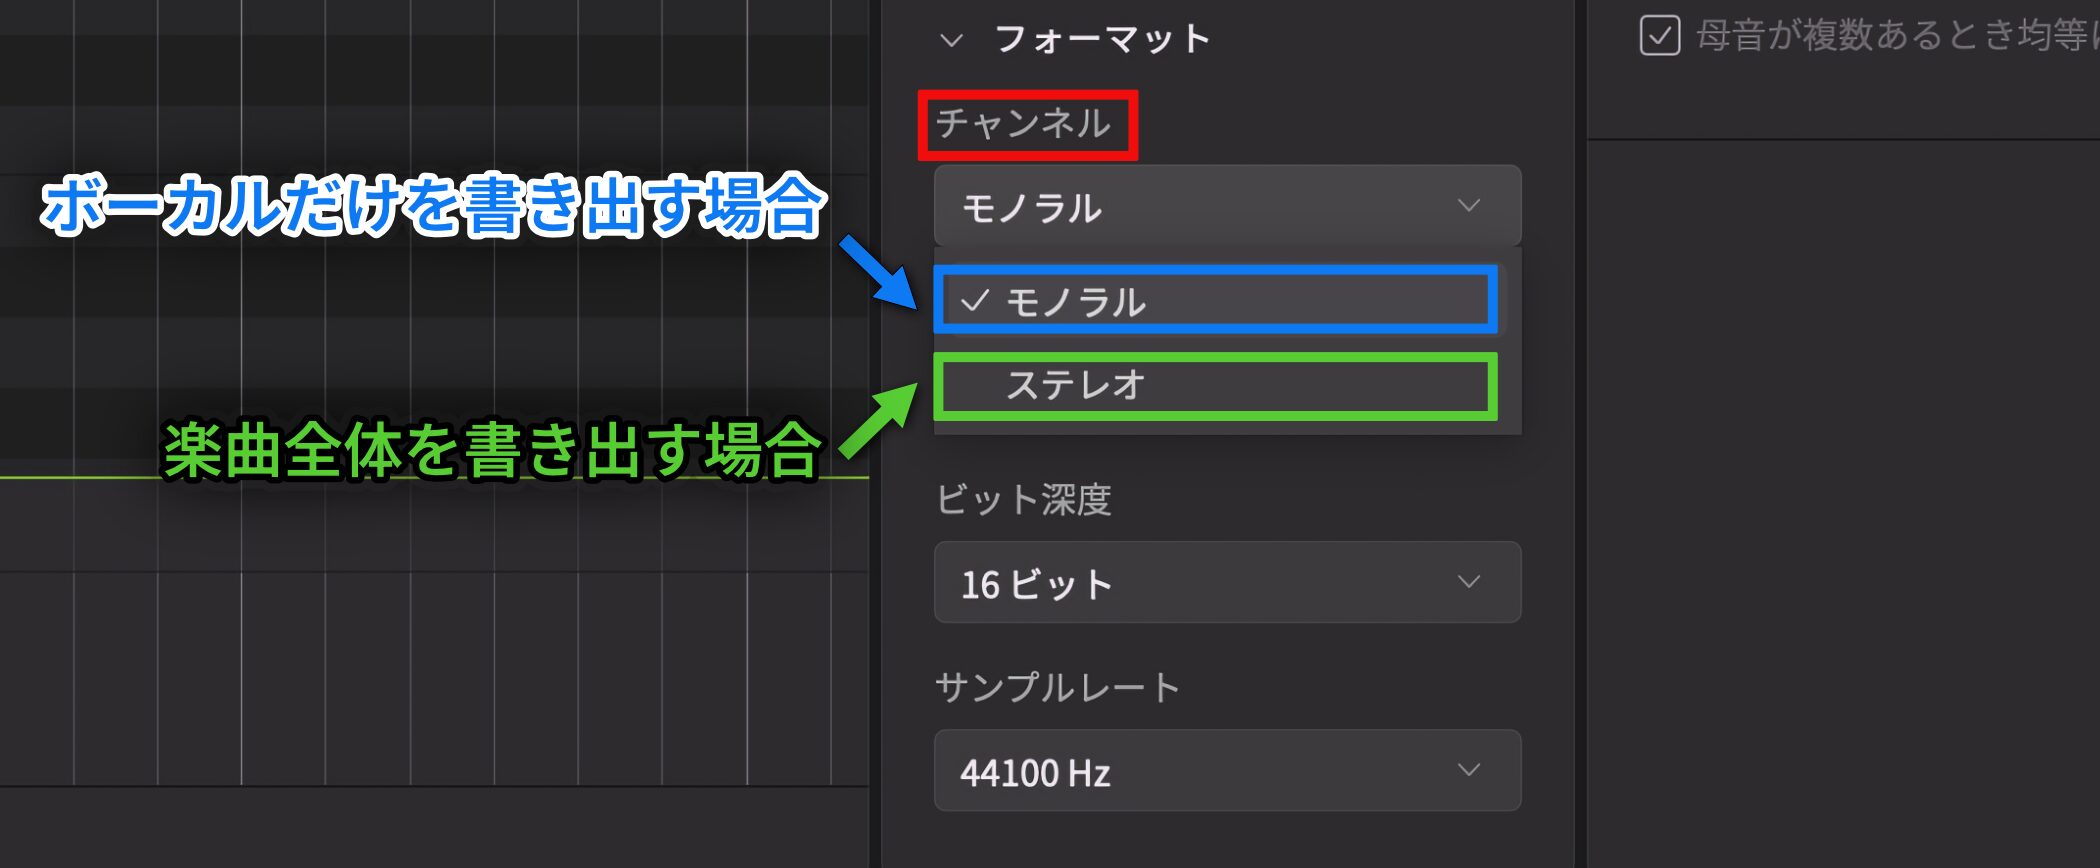
Choose Mono or Stereo.
- Mono: A simple format with sound from one central point. Usually suitable for exporting a vocal part alone.
- Stereo: A format with different sounds in the left and right speakers. Usually suitable when exporting a whole song with accompaniment.
Separate Unvoiced Output
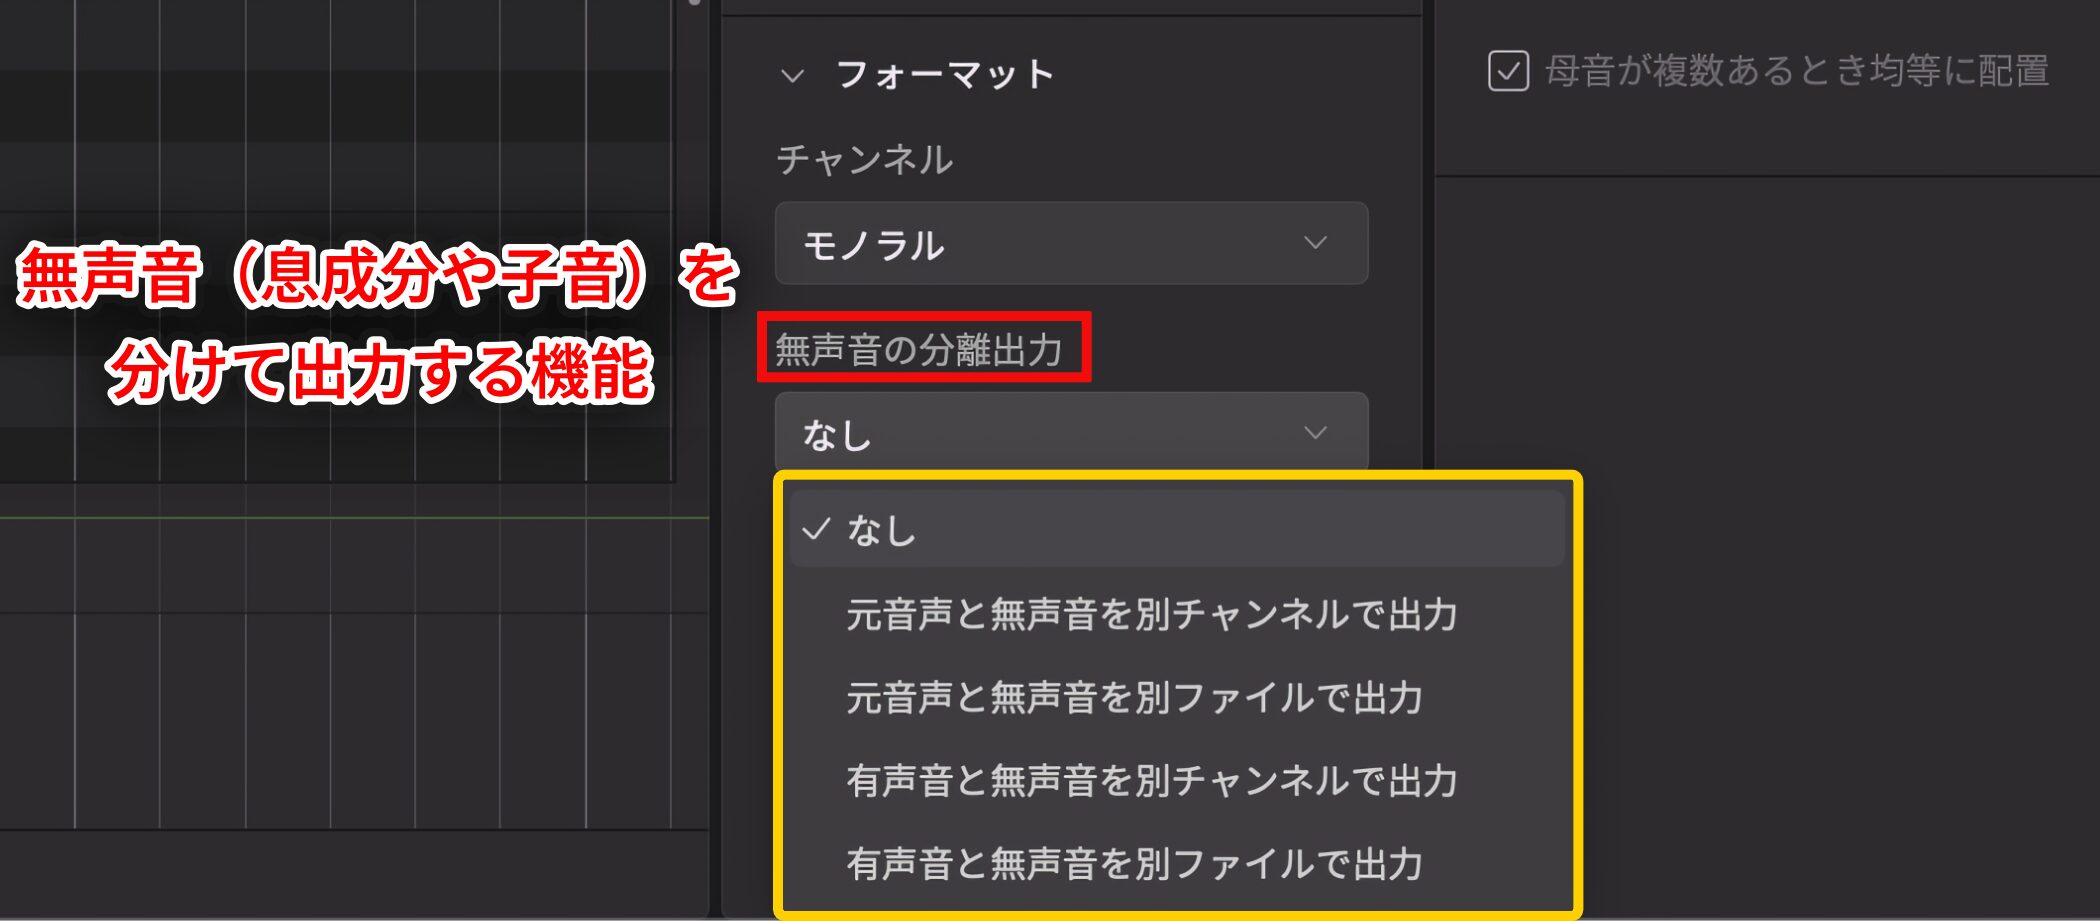
This feature separates unvoiced elements such as breath and consonants from the original voice or its voiced core.
It can be useful when you want to adjust only the breath sounds later during mixing.
The available output options are:
- None: Export the normal vocal as one file.
- Original and unvoiced on separate channels: Put the normal vocal and the breath/consonant component on separate channels in one file.
- Original and unvoiced as separate files: Export the normal vocal and the breath/consonant component as two files.
- Voiced and unvoiced on separate channels: Put the vocal core and the breath/consonant component on separate channels in one file.
- Voiced and unvoiced as separate files: Export the vocal core and the breath/consonant component as two files.
If you do not need the components separately, the default None option is fine.
Bit Depth
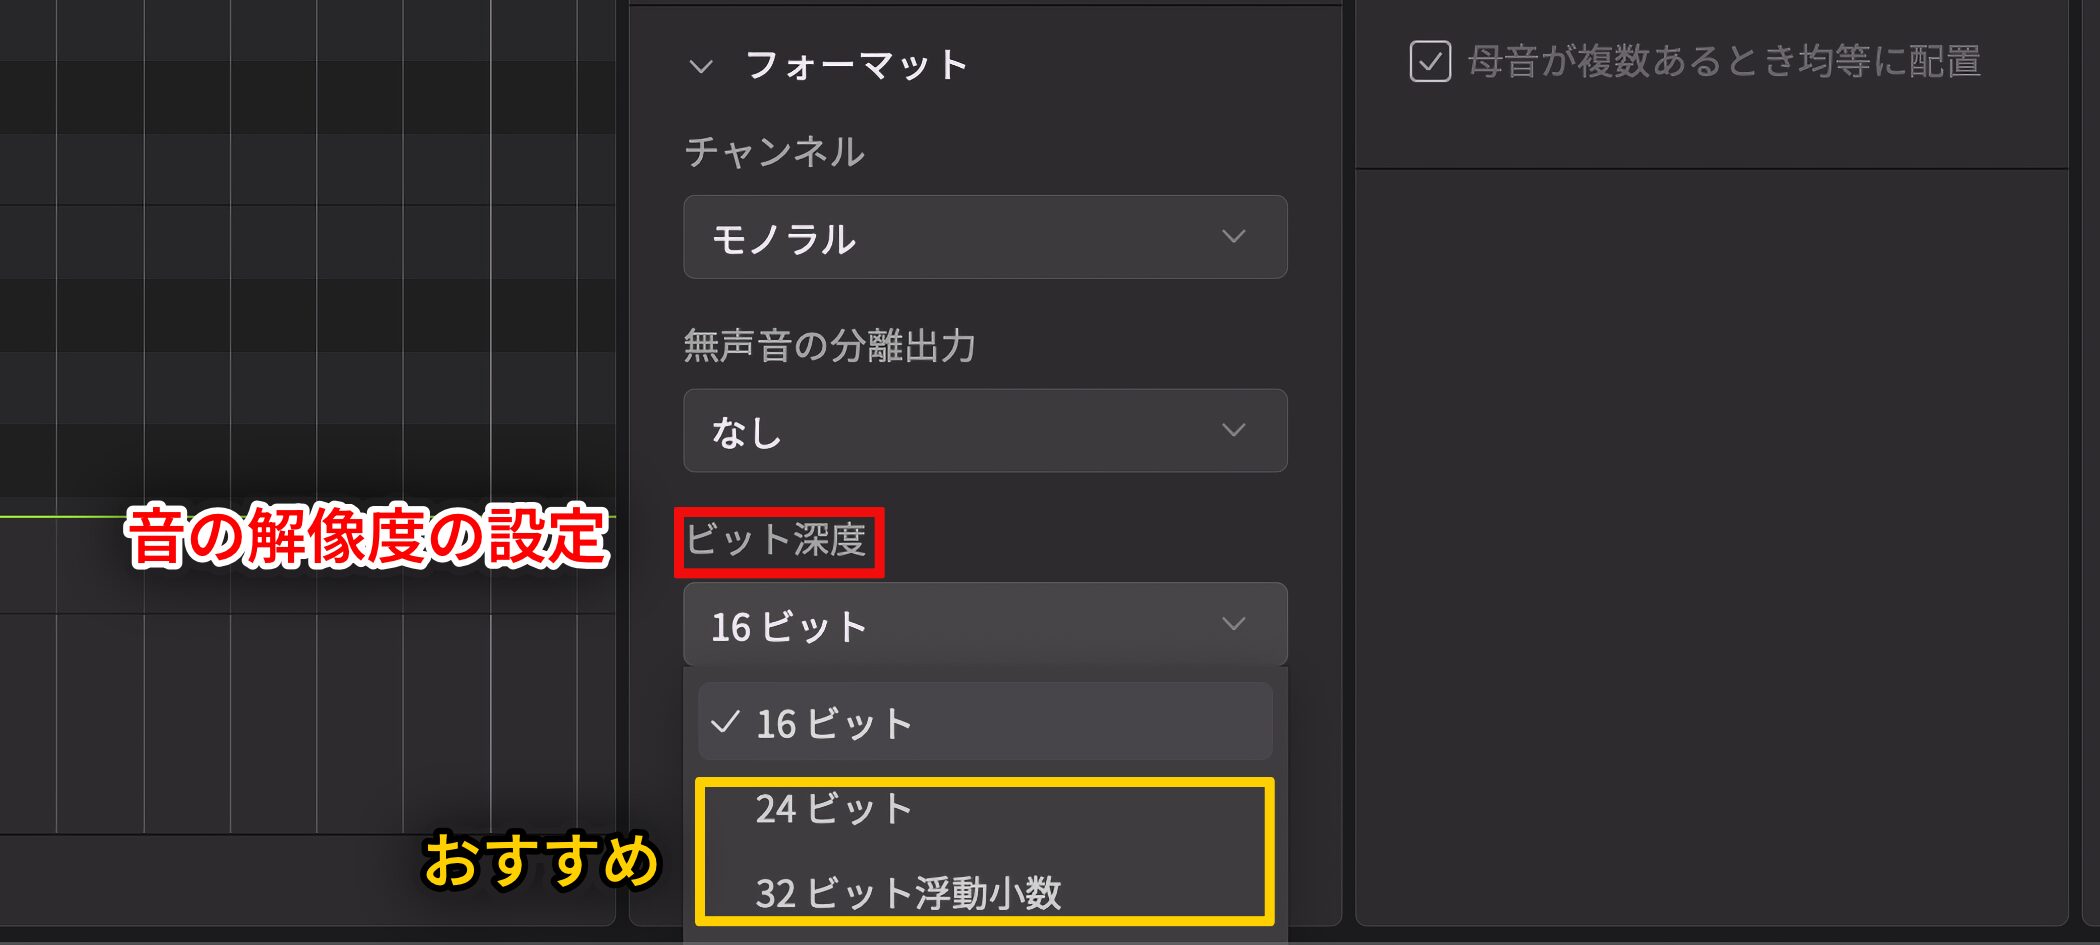
Bit depth sets the resolution of the sound's level.
Higher values can provide greater resolution but also make larger files.
For serious editing in a DAW, consider more dynamic-range headroom than the default 16-bit setting: 24-bit or 32-bit floating point.
The video below explains bit depth in more detail.
Video: Bit Depth
Sample Rate
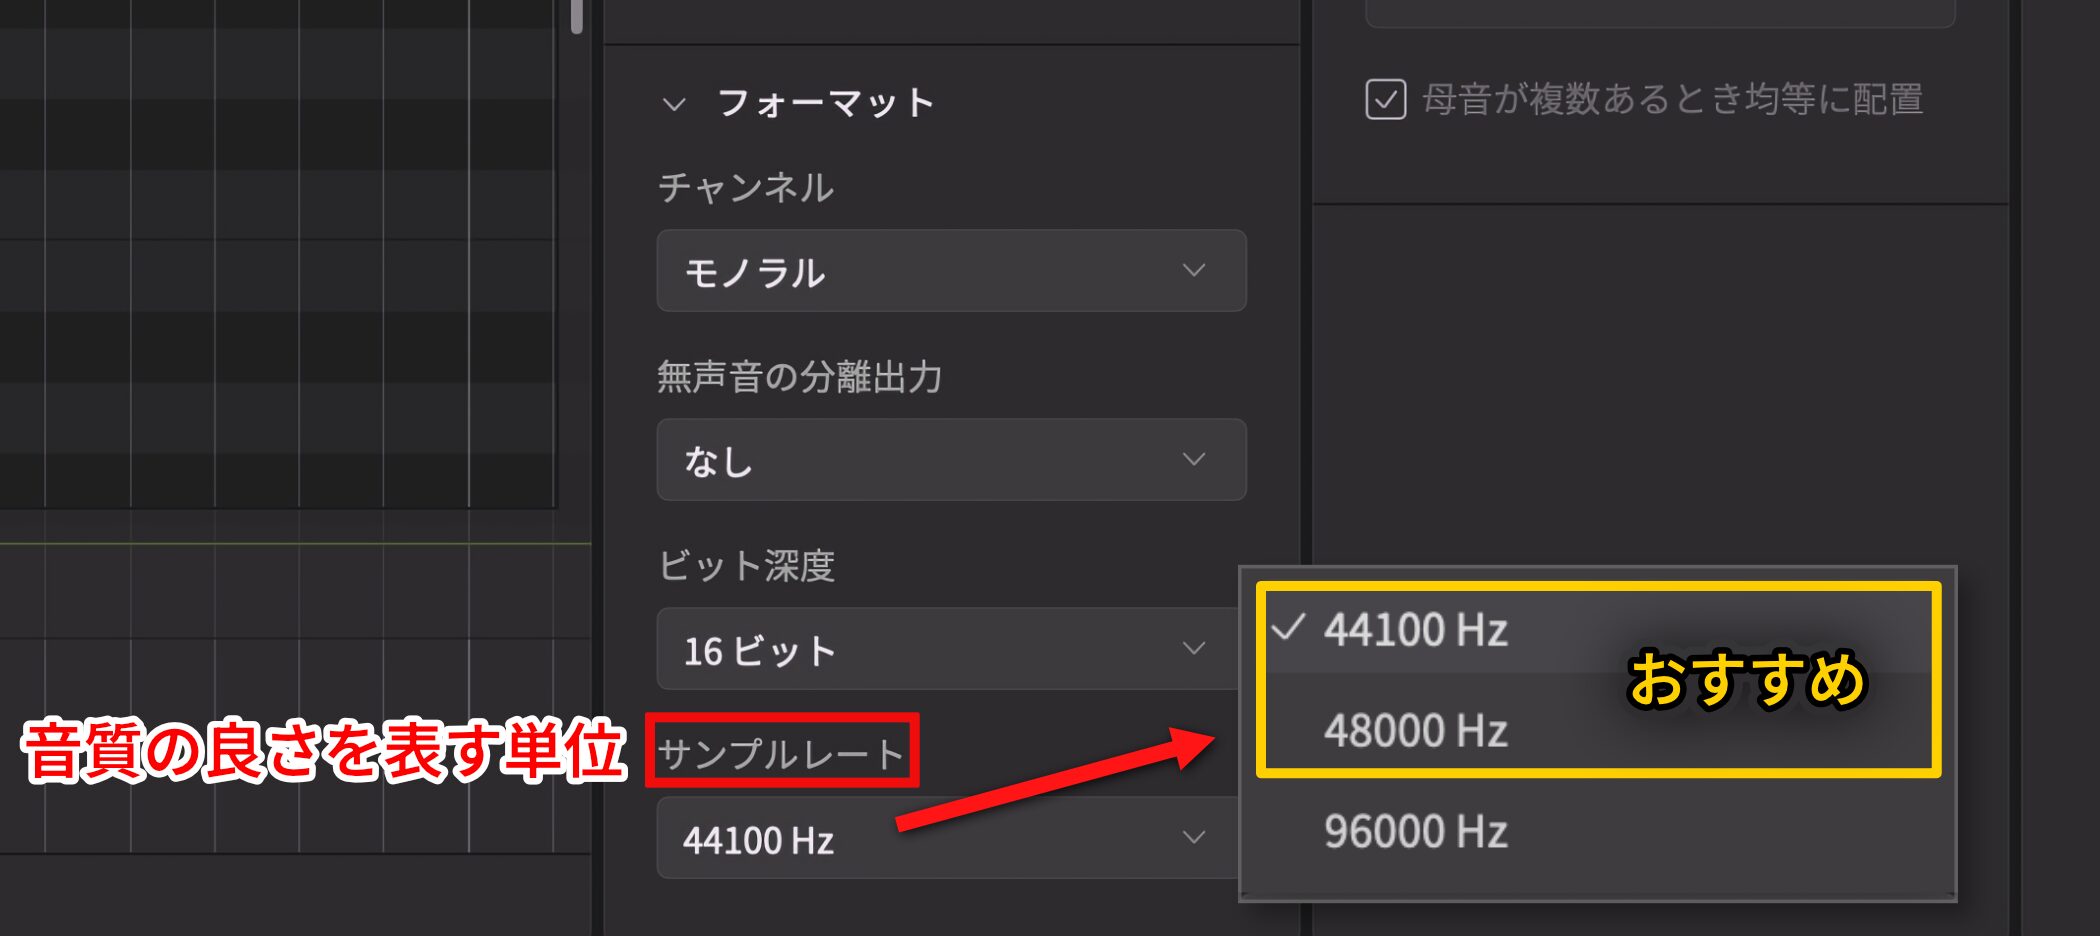
Sample rate describes how often sound is measured in one second.
A higher value is generally associated with higher audio quality.
44,100 Hz is common for CD audio, while 48,000 Hz is also widely used in professional work.
The most important point is to match the sample rate set in your DAW project.
A mismatch can cause problems such as a change in playback speed.
See the video below for more on sample rate.
Video: Sampling Rate
Listen to the Finished Sound
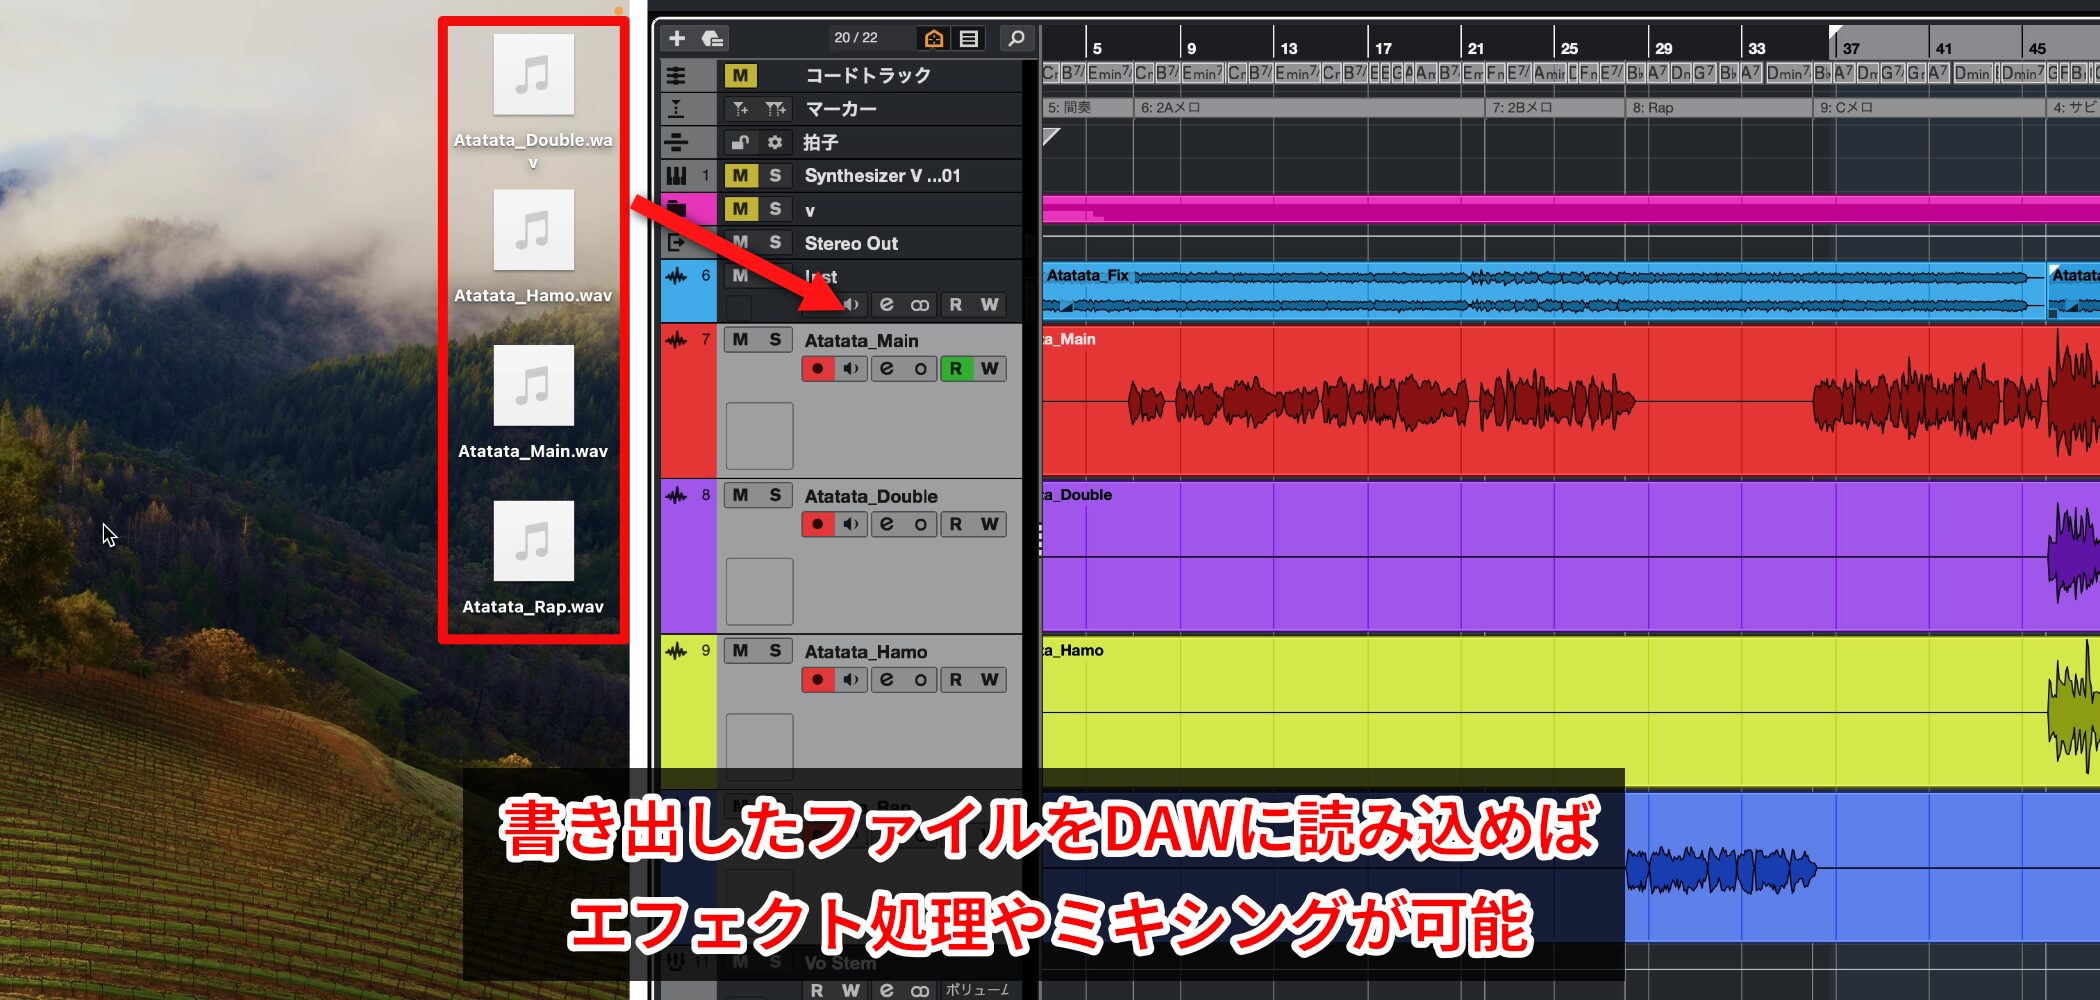
Import the exported files into your DAW to process and mix them like any other vocal audio.
Finally, listen to the finished song after applying effects and mixing the exported tracks.
Closing Thoughts
Thank you for following this complete guide to Synthesizer V Studio 2 Pro.
As the examples show, the software makes it possible to create natural singing with ease—something that would have seemed difficult only a few years ago.
Vocal Styles, AI Retakes, and detailed parameters can become creative partners that bring the melodies you write to life.
Trust your ears and explore the expression you imagine without being intimidated by the technical controls.
We hope this guide helps with your music production.
Keep shaping the vocals you want with Synthesizer V Studio 2 Pro and making great music.
Frequently Asked Questions
Q1. Which computers support Synthesizer V Studio 2 Pro?
It supports Windows and Mac. Use the default installation location if possible, and avoid installing it on an external drive or USB stick.
Q2. Do I need to buy a voice database separately after purchasing the product?
The purchase includes a choice of three voice databases, so you can choose one and start without another purchase. You can buy additional Dreamtonics or third-party databases if you want more vocal options.
Q3. Do I need special settings to use Synthesizer V Studio 2 Pro in a DAW?
Create an instrument track and select Synthesizer V Studio 2 Plugin, as you would with another software synth. You can also launch it through ARA in a compatible DAW.
NEW ARTICLES
Latest English Articles