This article explains a practical workflow for producing vocals with Yamaha VOCALOID 5. Aimed at beginners and intermediate users, it covers creating melodies with a library of more than 2,000 phrases, adding human expression with Style presets, and refining consonants with the Emotion Tool. Combining these features helps reduce the unnatural qualities of synthesized singing and create professional vocal tracks.
A Production Workflow Using VOCALOID 5's New Features: Creating a Melody

In this article, we explore how VOCALOID 5's new features can make your vocal editing sound more human.
We will begin with these two areas:
- Creating melodies from phrases
- Adding human expression with Style
These will be our initial focus.
Here is the finished version of the song used in this tutorial.
It is a dance-oriented J-pop ballad written with a male singer in mind.
We hope this helps you master the expressive techniques and edits used on the vocal track.
Video: Creating a Melody
Selected Questions and Answers from YouTube

I'm thinking of buying VOCALOID 5. Is the only difference between the Premium and Standard versions the number of voices included? I plan to use Hatsune Miku V4X, so if there are no differences apart from the voices, I'm considering the Standard version.

The Standard and Premium versions differ only in the included voicebanks, as shown at the following URL: http://www.vocaloid.com/compare/#operating_table
Creating a Melody with VOCALOID 5
Let's enter a melody over the backing track.
Choosing a Singer
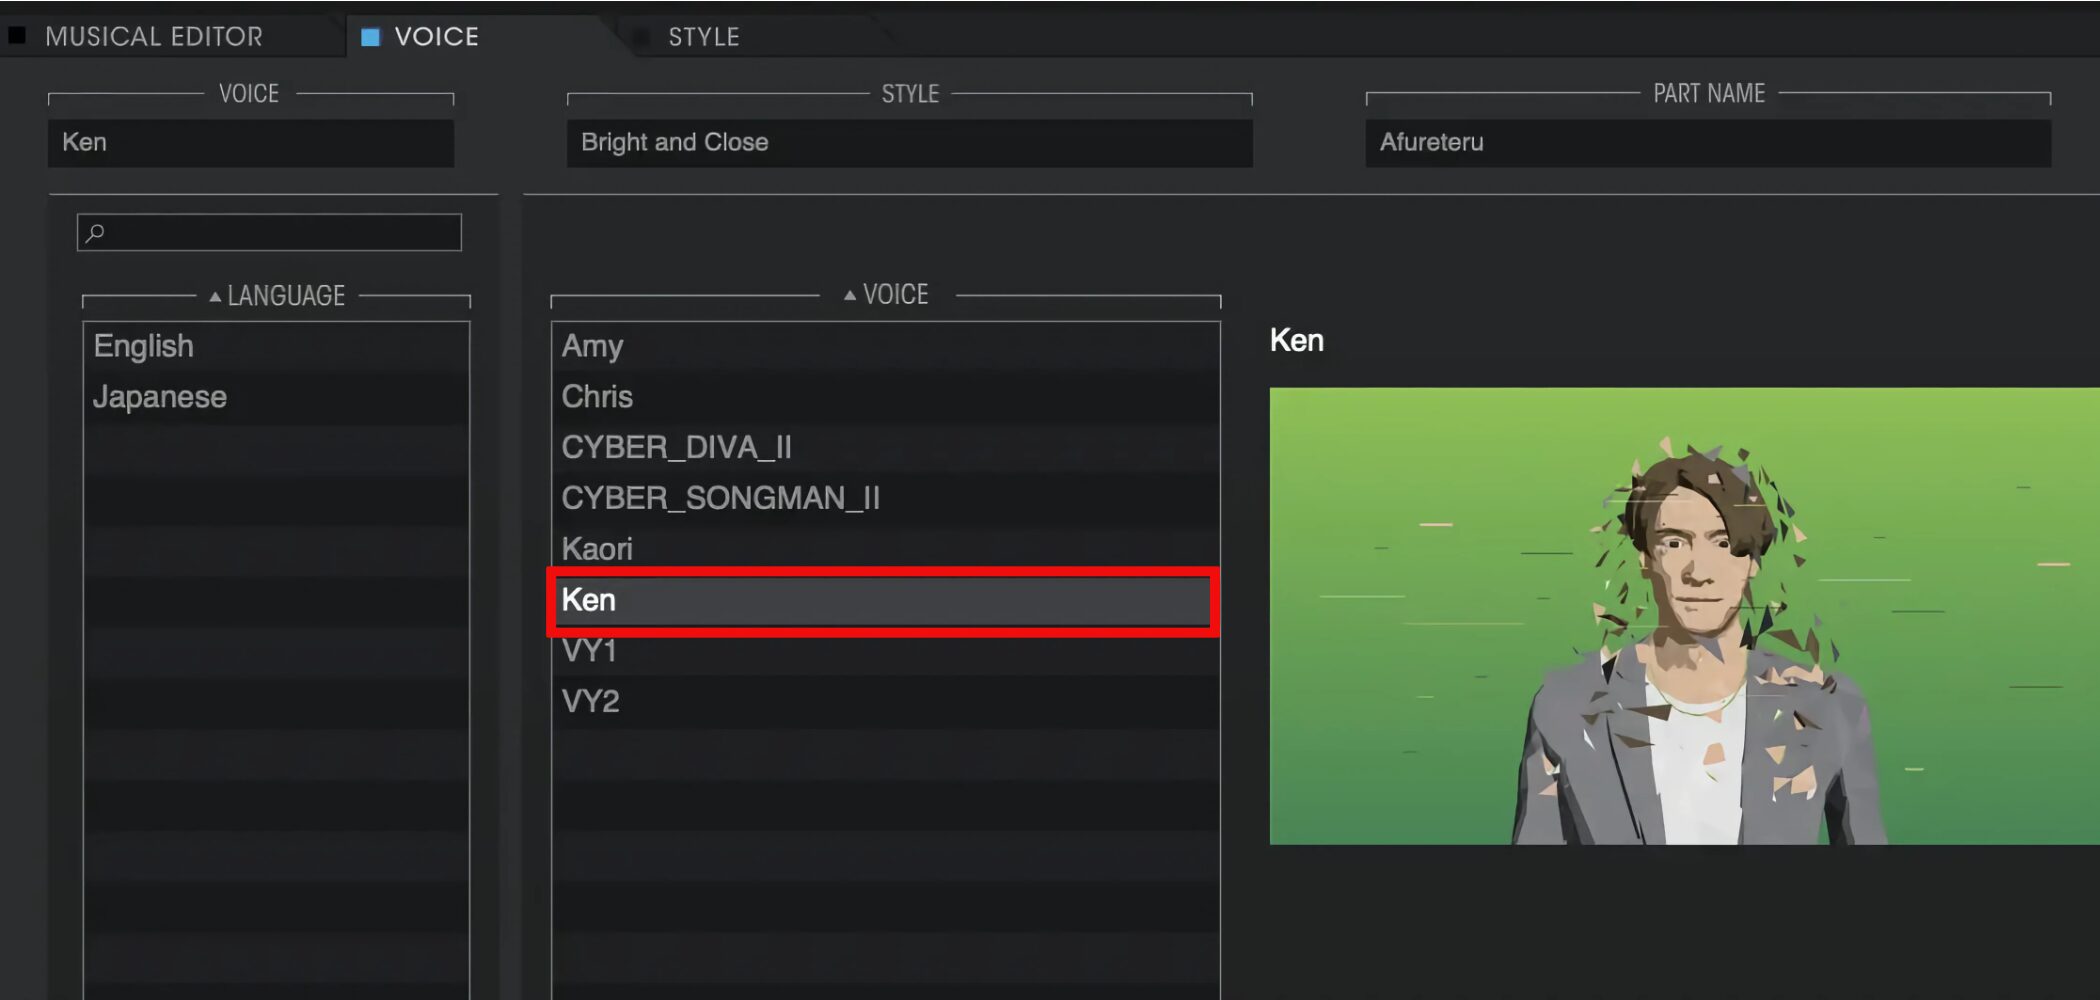
Our theme is a dance-oriented J-pop song with a male singer, so we selected Ken, a voicebank well suited to this style.
Using Phrases
When you are searching for the core melody early in production, we recommend using the Phrase feature to help you get started.
VOCALOID 5 includes more than 2,000 phrases covering a wide range of genres.
Finding a phrase you like and bringing it into your song gives you a useful starting point for writing a melody.
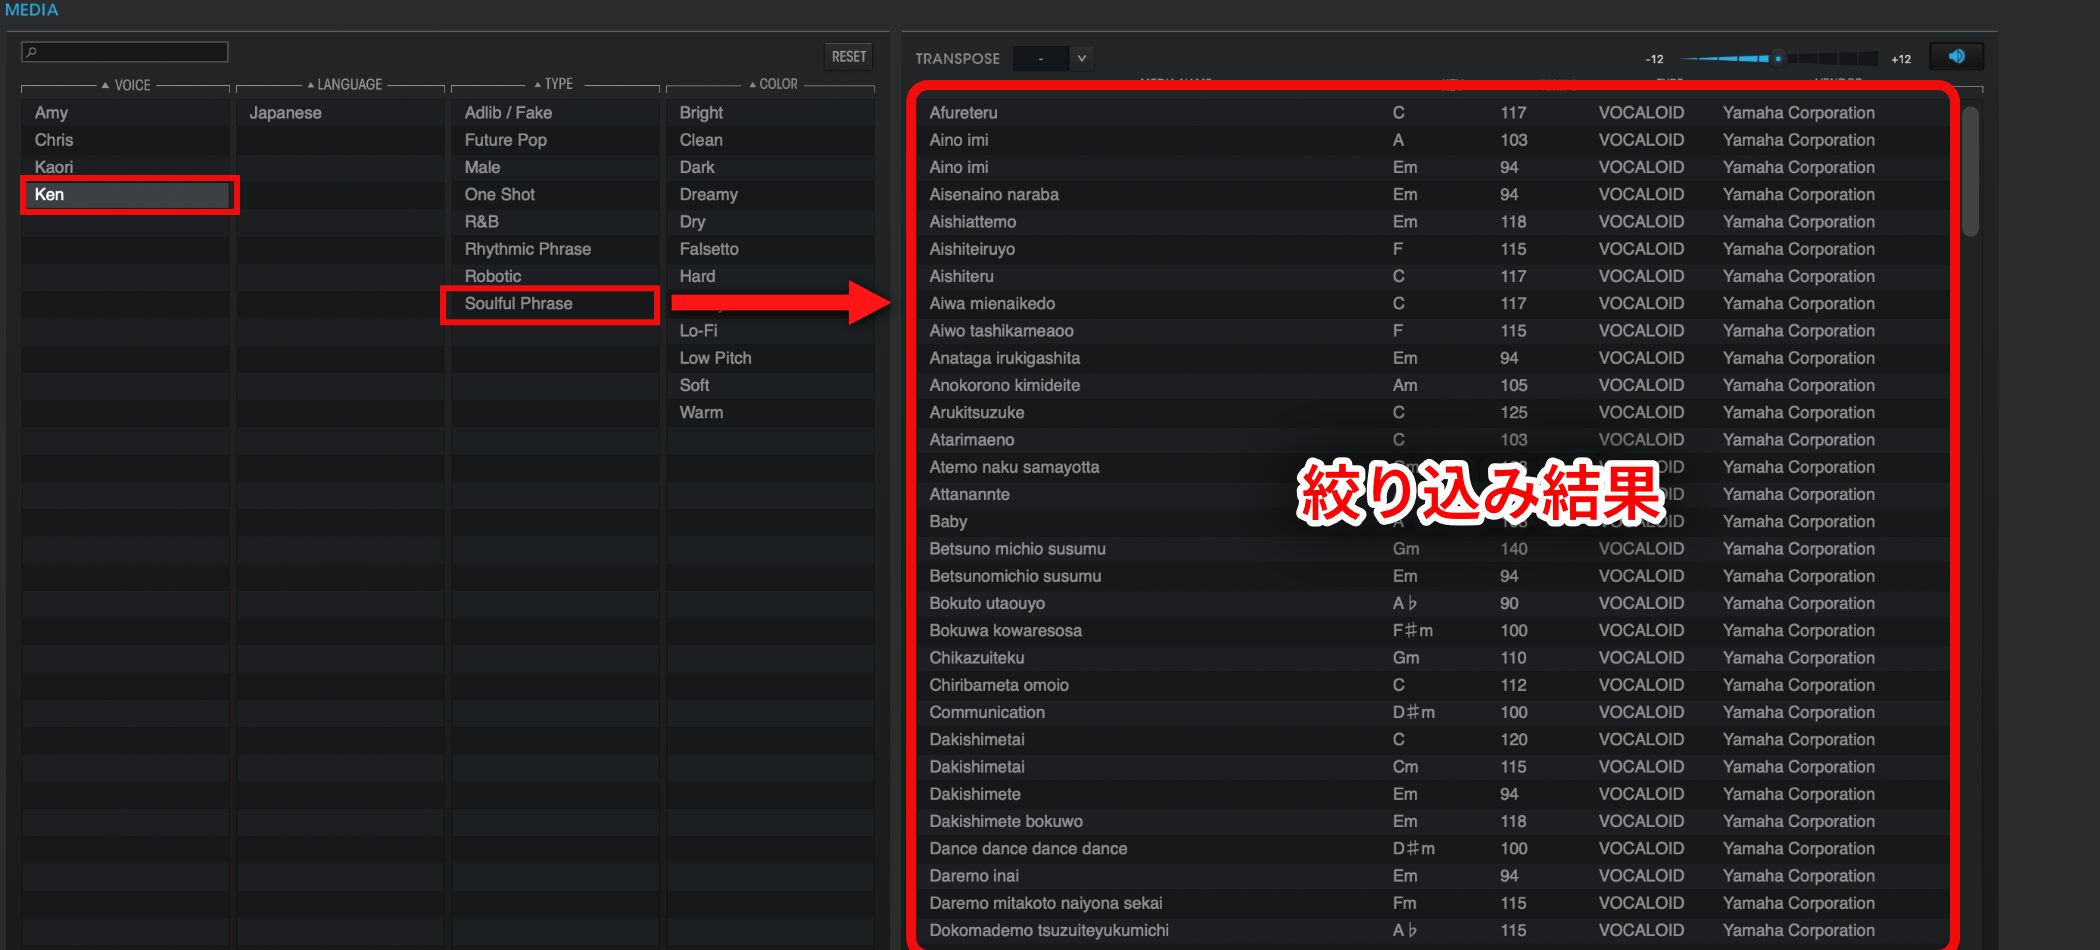
Select Ken under VOICE and Soulful Phrase under TYPE, then look through the filtered phrases for one that suits the song.
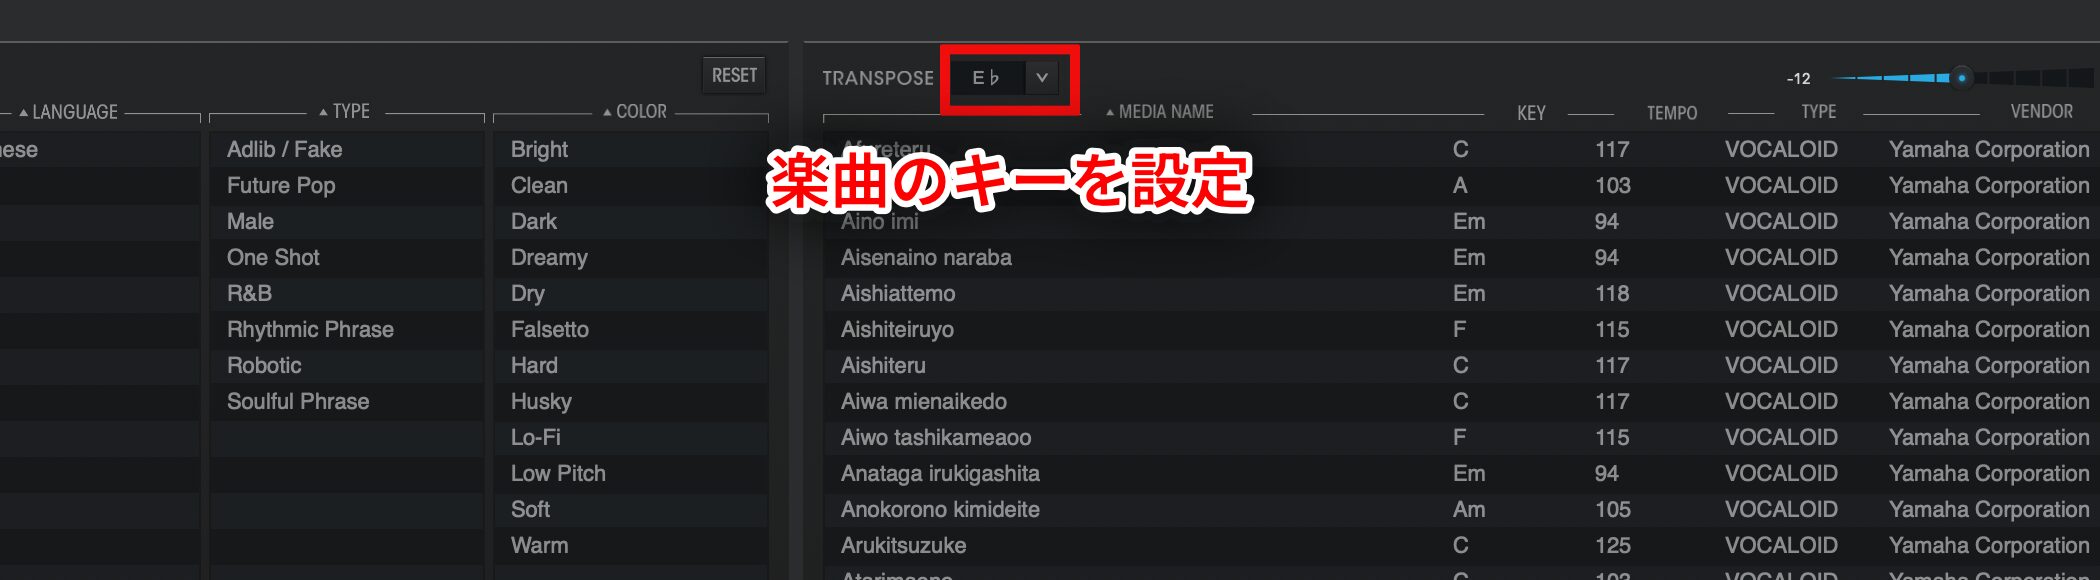
When importing a phrase into a track, you need to match the phrase's key to the song's key.
We selected E♭, the key of our song, under TRANSPOSE.
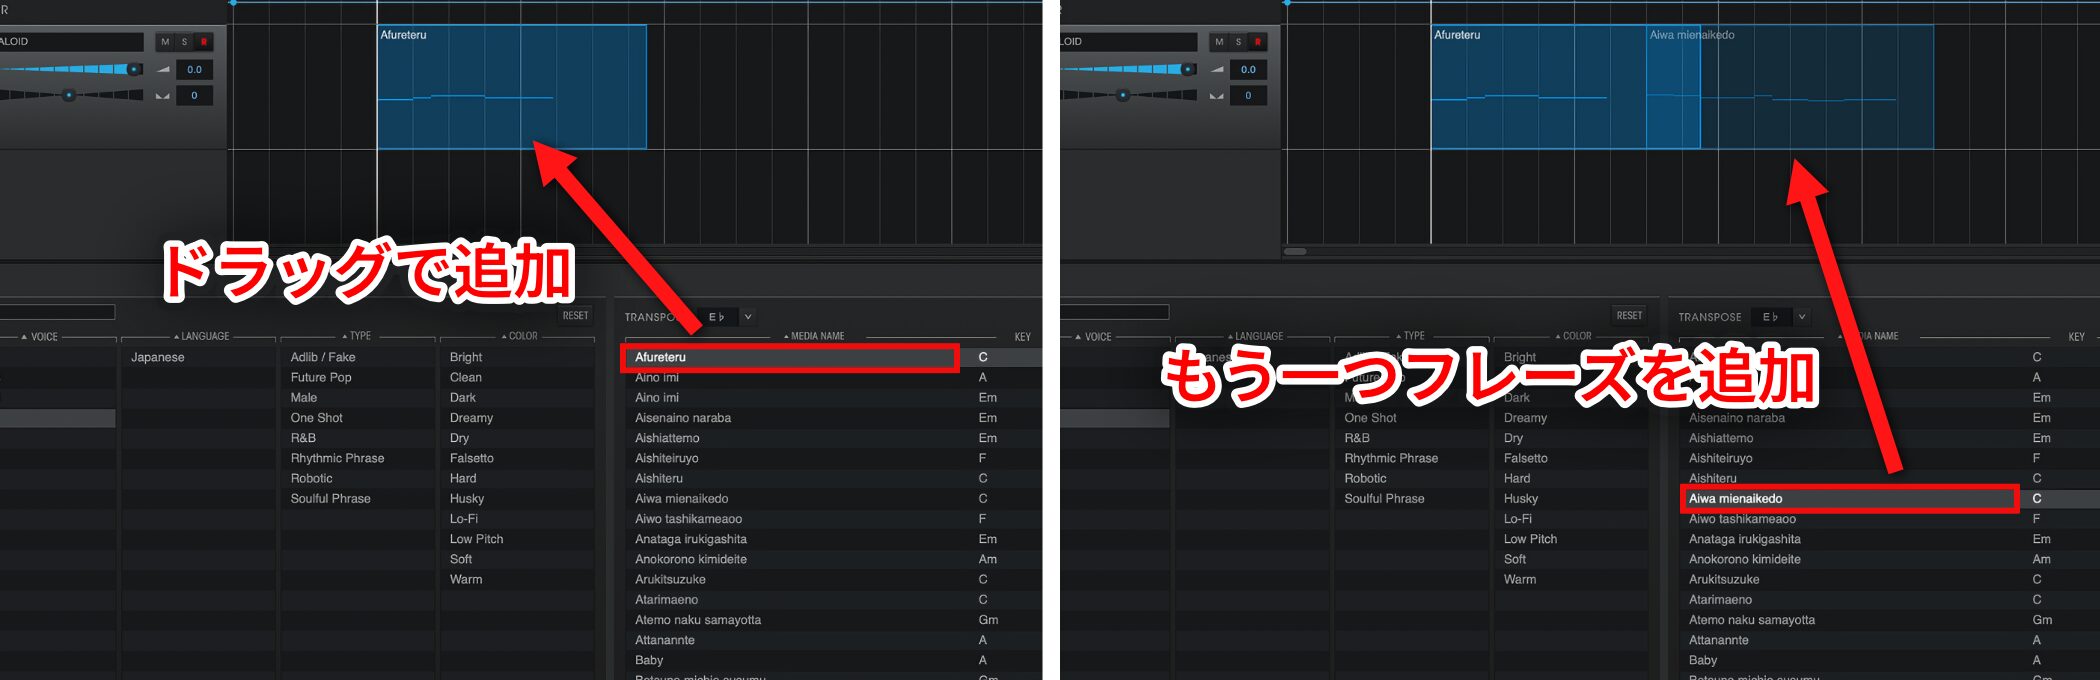
Once you have chosen a phrase, drag it onto the desired track.
We added a second phrase in the same way.
Combining phrases helps develop your ideas for the song further.
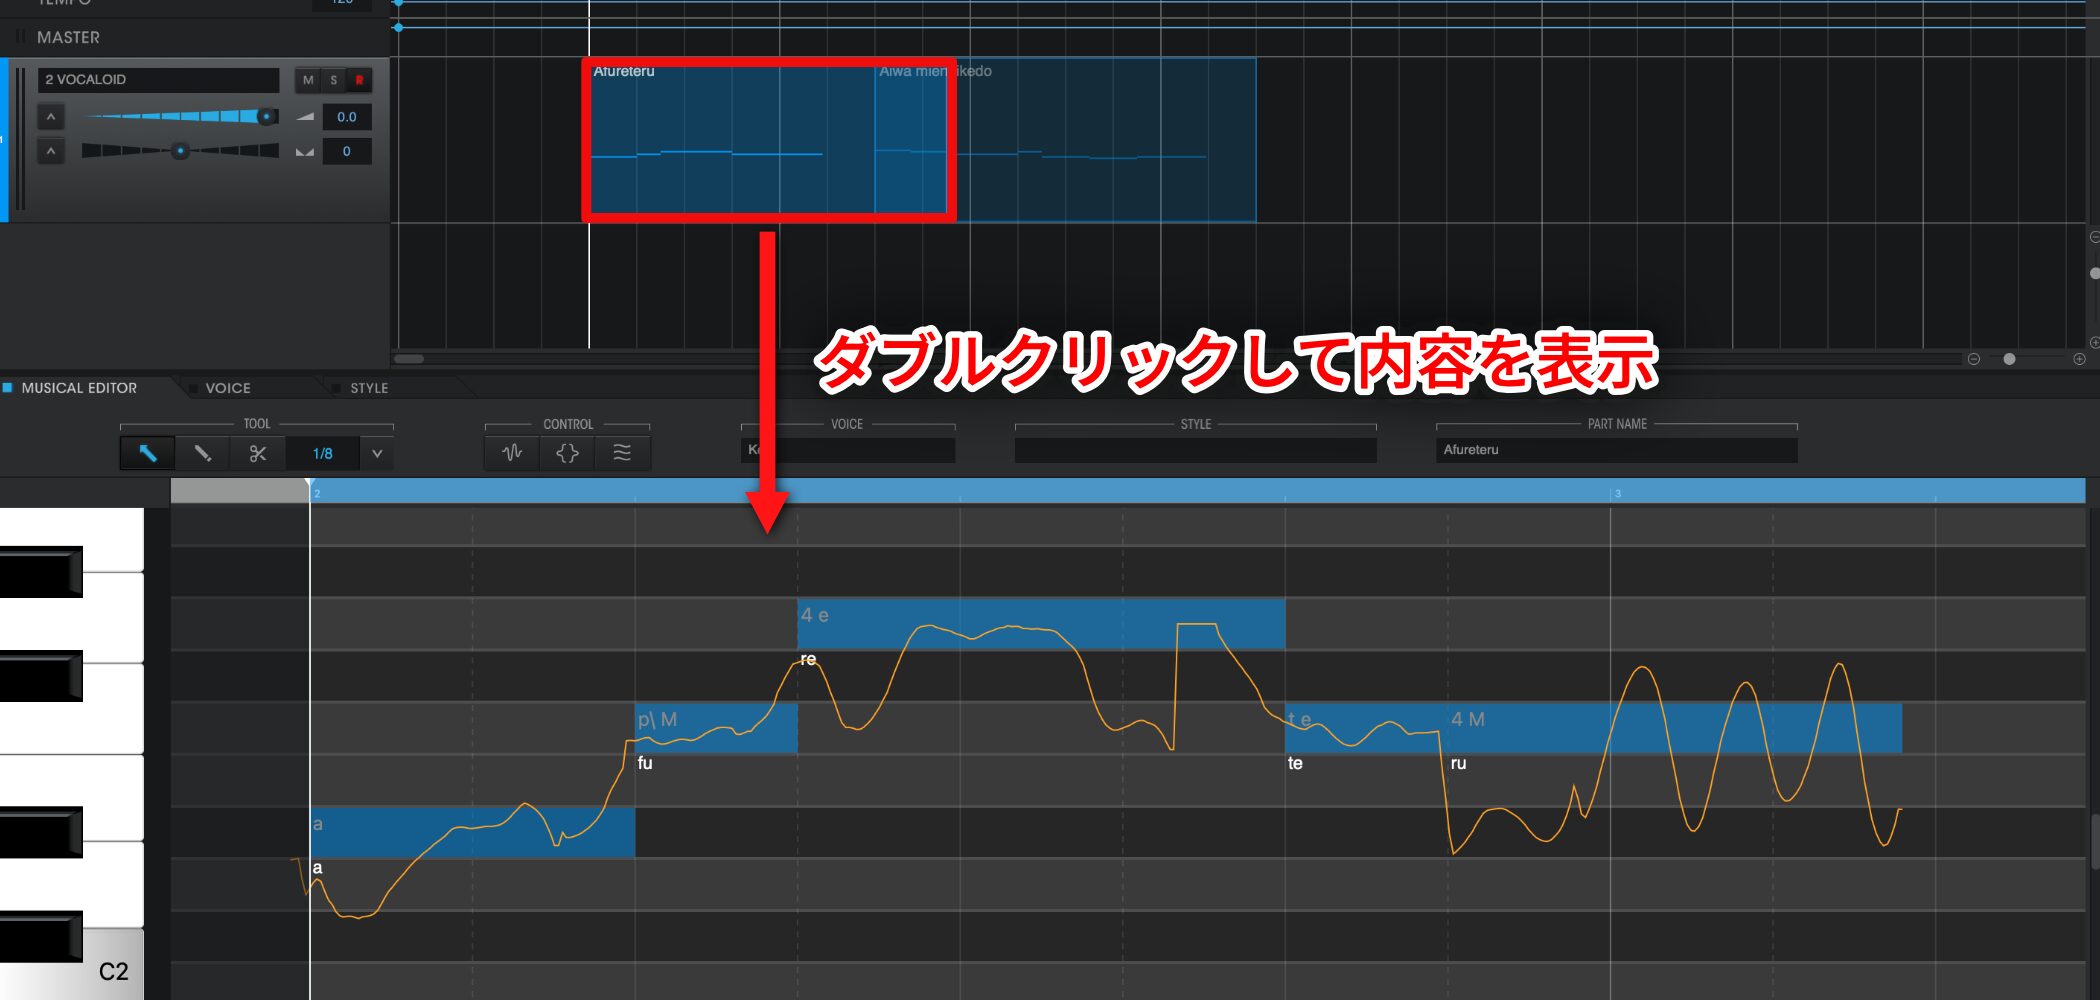
You can also customize an imported phrase to suit your preferences more closely.
Simply double-click the part and edit its notes into the line you want.
Using expressive phrases like these can spark melodic ideas and help production flow more smoothly.
Although Yamaha owns all of the phrases, the original article states that you are permitted to use them freely, so give them a try if writing melodies is not your strong suit.
For more detail, see the section on using phrases and editing parts in the following article.

Resetting a Phrase's Vocal Expression
Imported phrases may contain lyrics and have Attack & Release Effects applied, which we will discuss later.
We will eventually bring these elements together to finish the vocal track. However, if they make it difficult to judge the melody at this stage, reset the settings to a neutral state first.
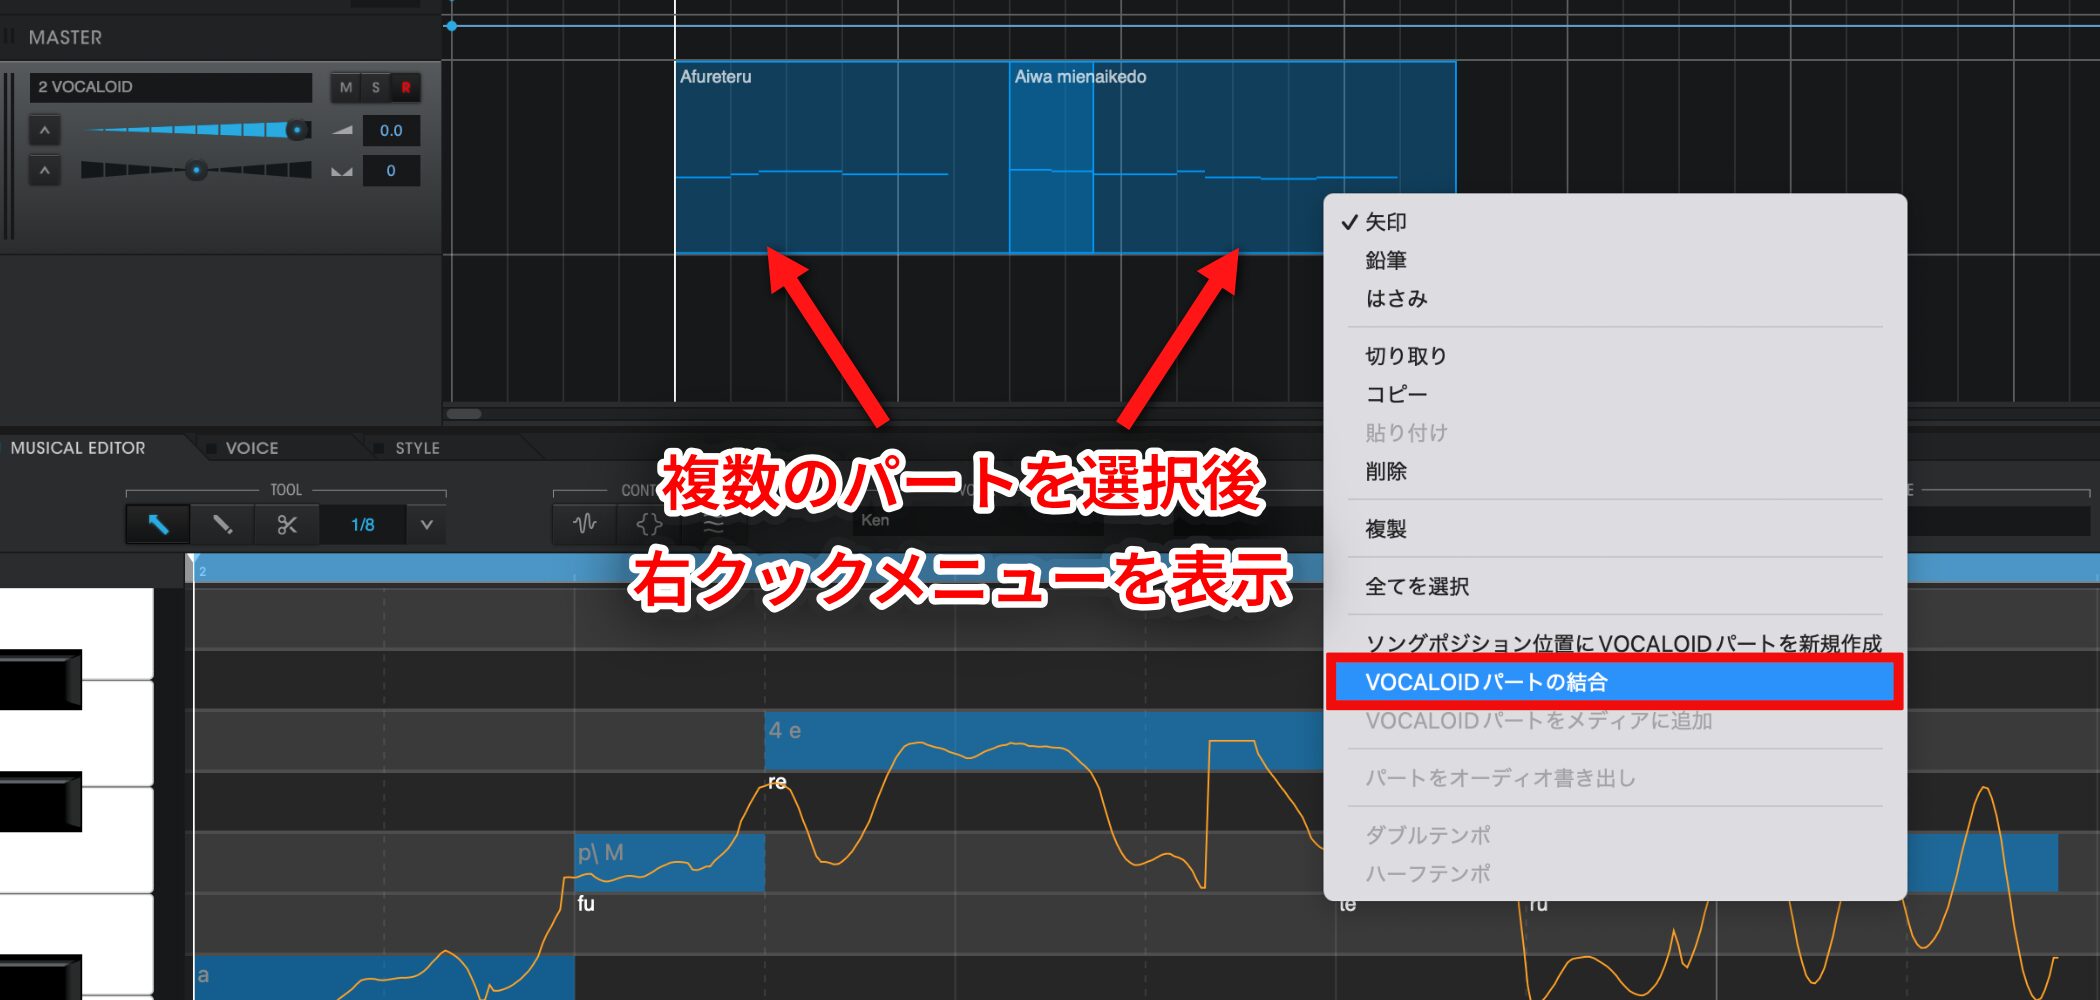
Select multiple VOCALOID parts and right-click.
Choose Join VOCALOID Parts from the menu.
This combines them into one part, making it easier to apply the same settings and edits throughout.
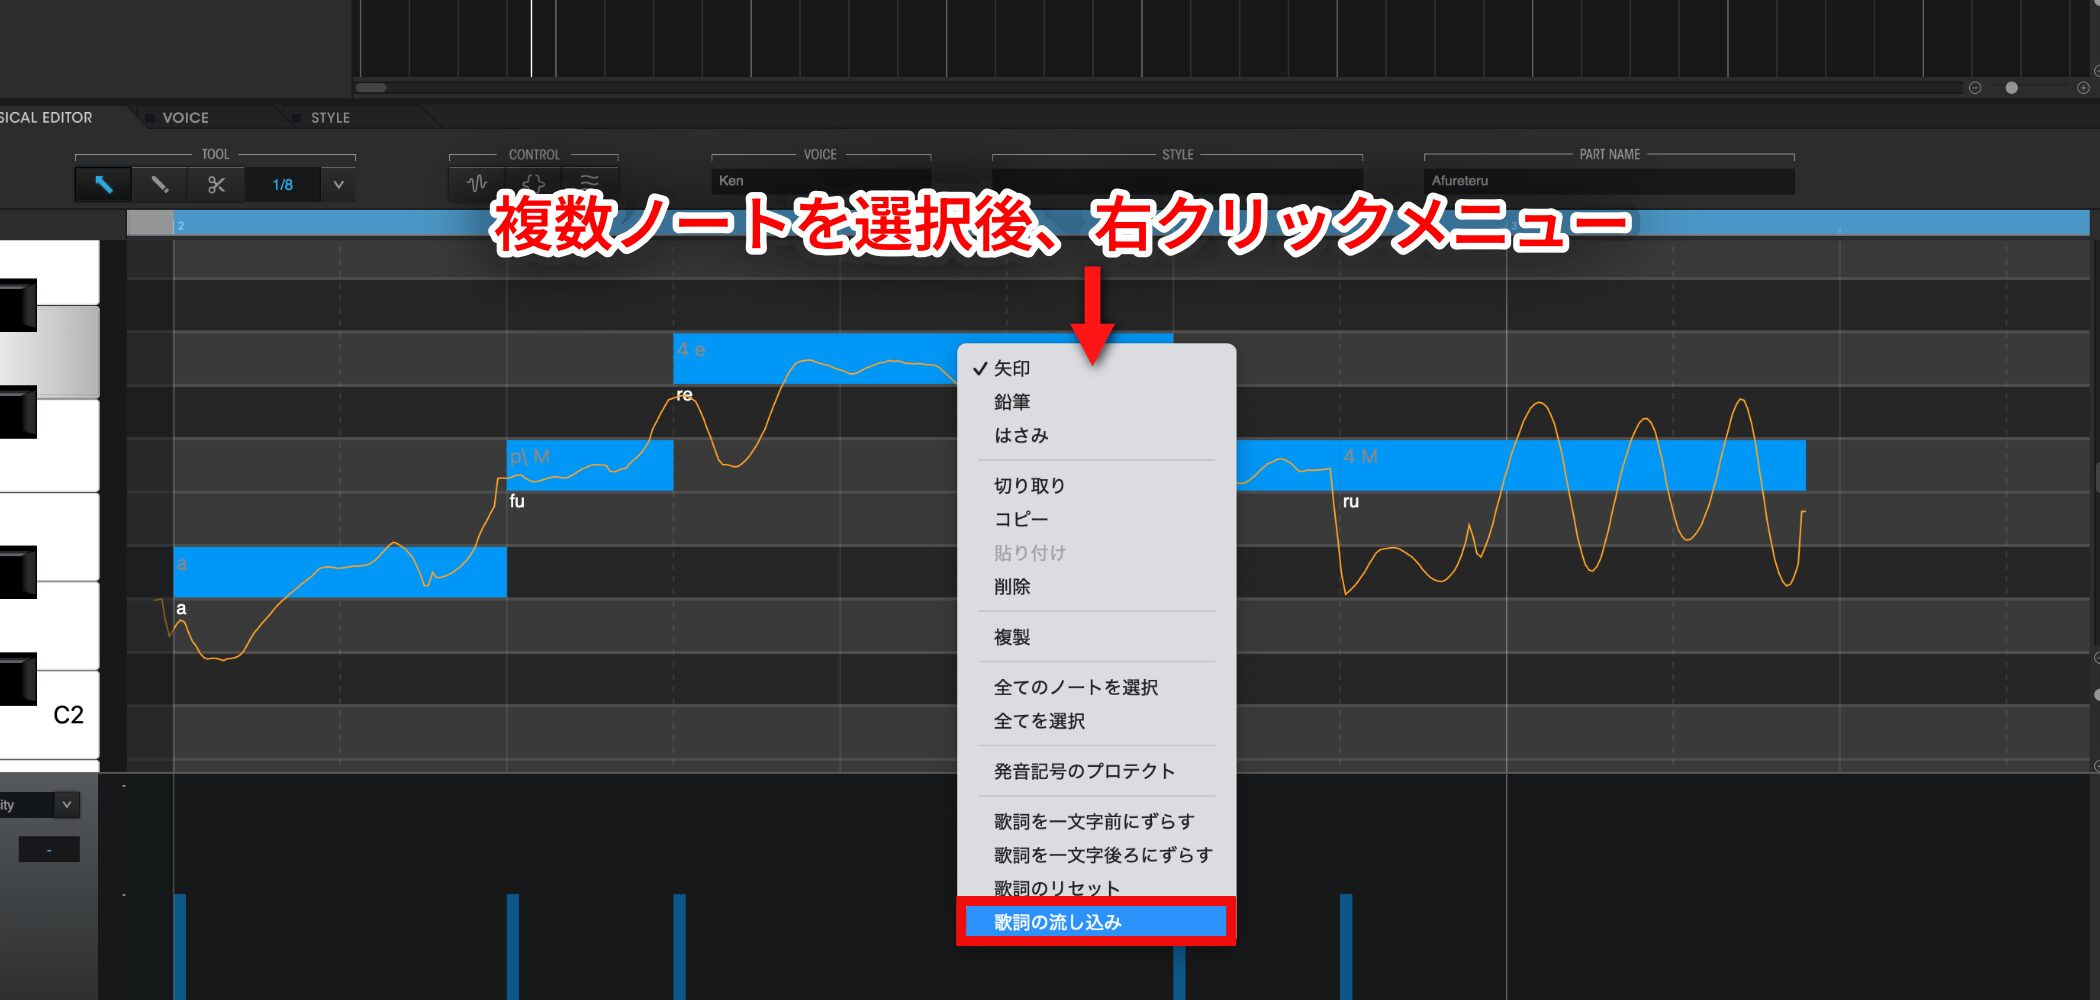
First, replace all the lyrics with the Japanese vowel “a.”
Right-click the part and choose Insert Lyrics to change the lyrics in bulk.
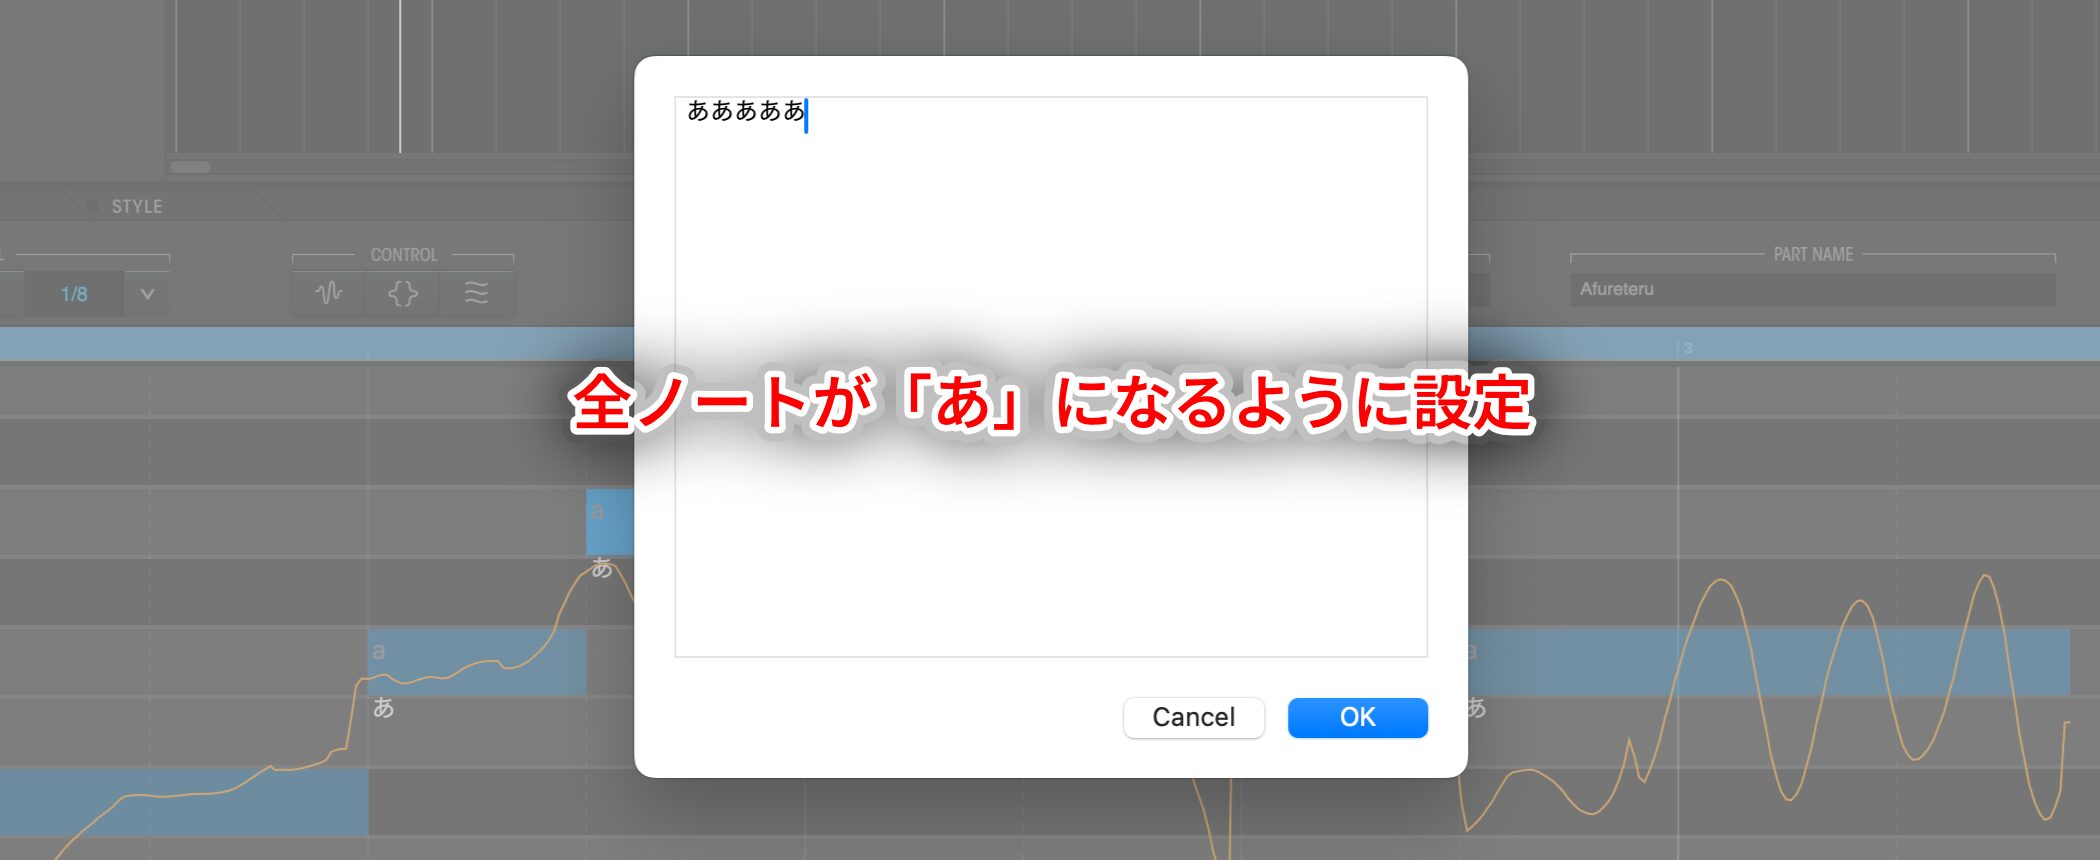
Here, we set every note to “a.”
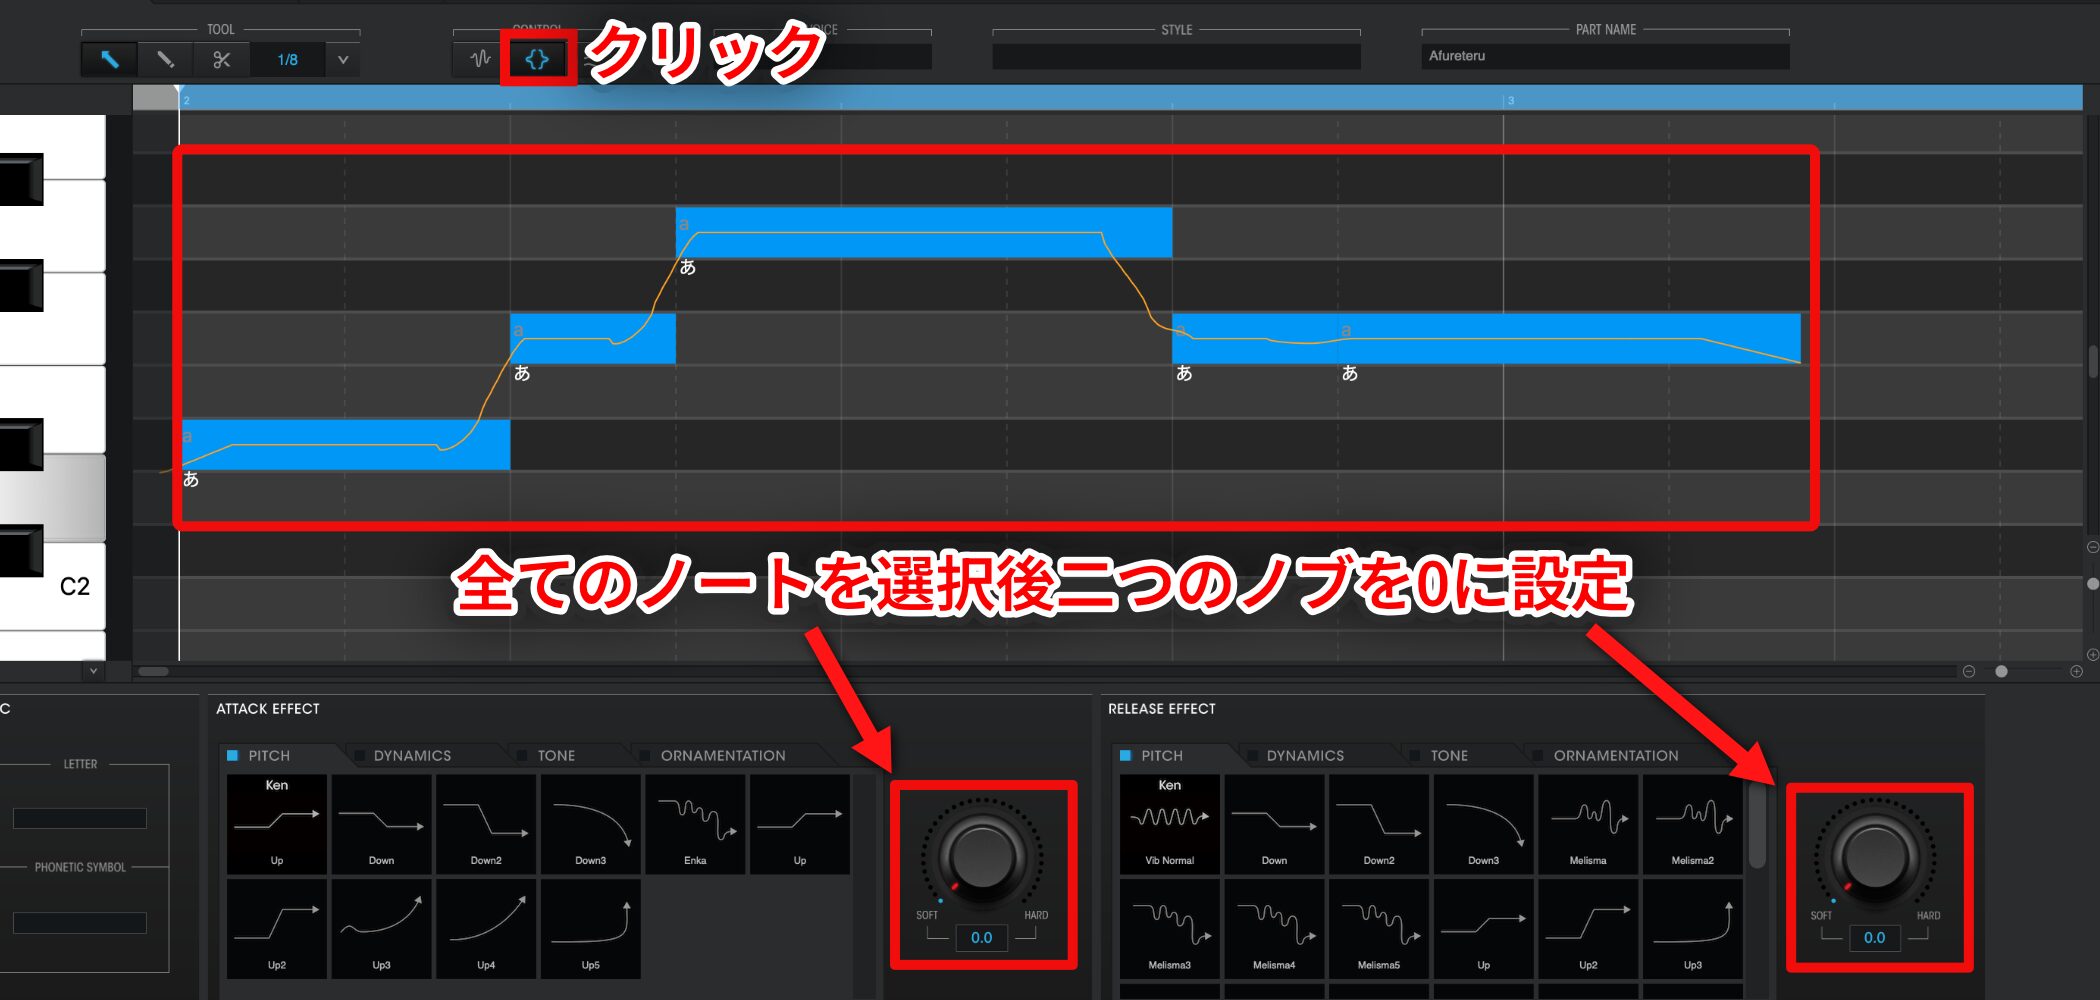
For Attack & Release Effects, select the area you want to change and set each value to 0 to turn the effects off.
All the notes are now neutral, removing the patchwork feel and letting you concentrate on composing the melody itself.
Adding Human Expression with Style
Once you have created the melody in this neutral state, let's add expression to make it sound more human.
STYLE makes it easy to add expression to a vocal track.
STYLE offers presets covering a wide range of vocal tones and nuances.
Each has its own character and is ready to use in a production, so try different options and choose one you like.
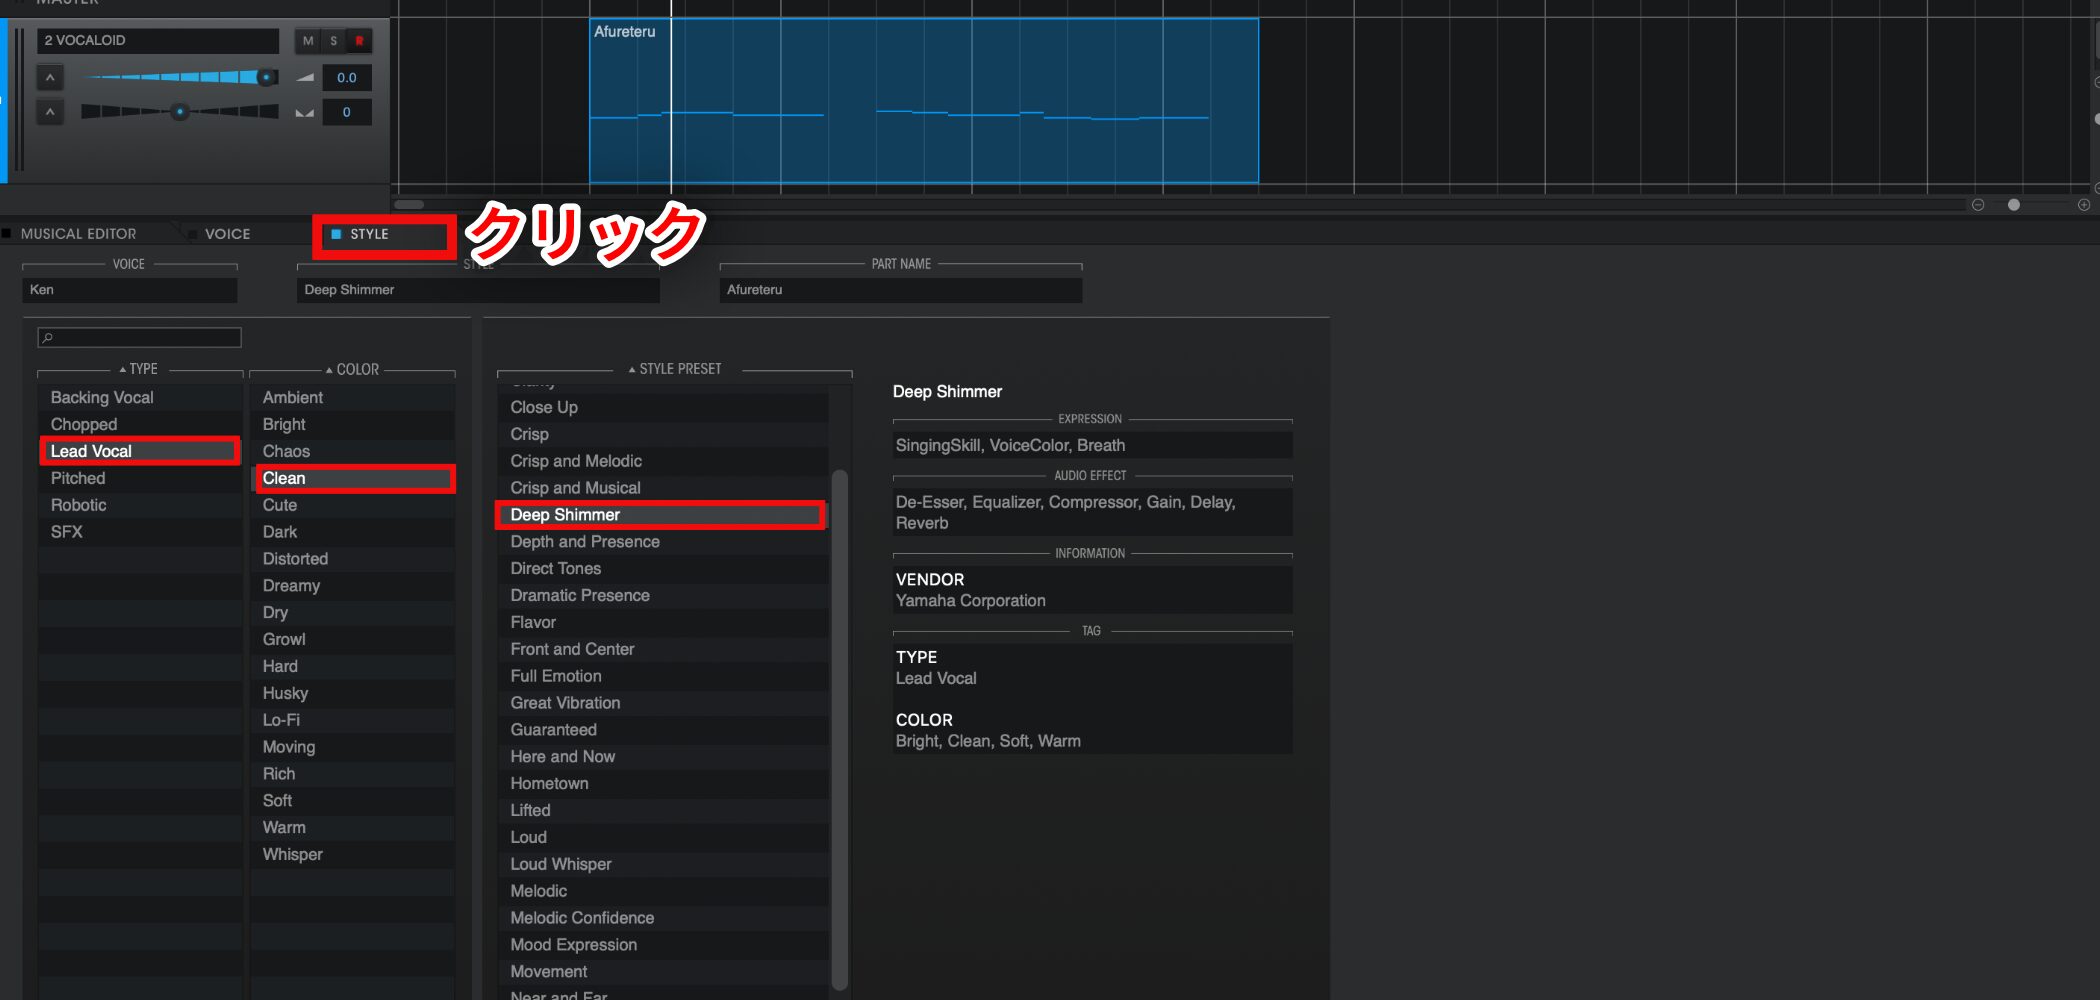
We selected Lead Vocal because this melody is intended for the main vocal.
We wanted a simple sound without strong coloration, so we selected Clean under COLOR and applied Deep Shimmer from the matching presets.
This alone sounds quite good, but to fine-tune the expression further,
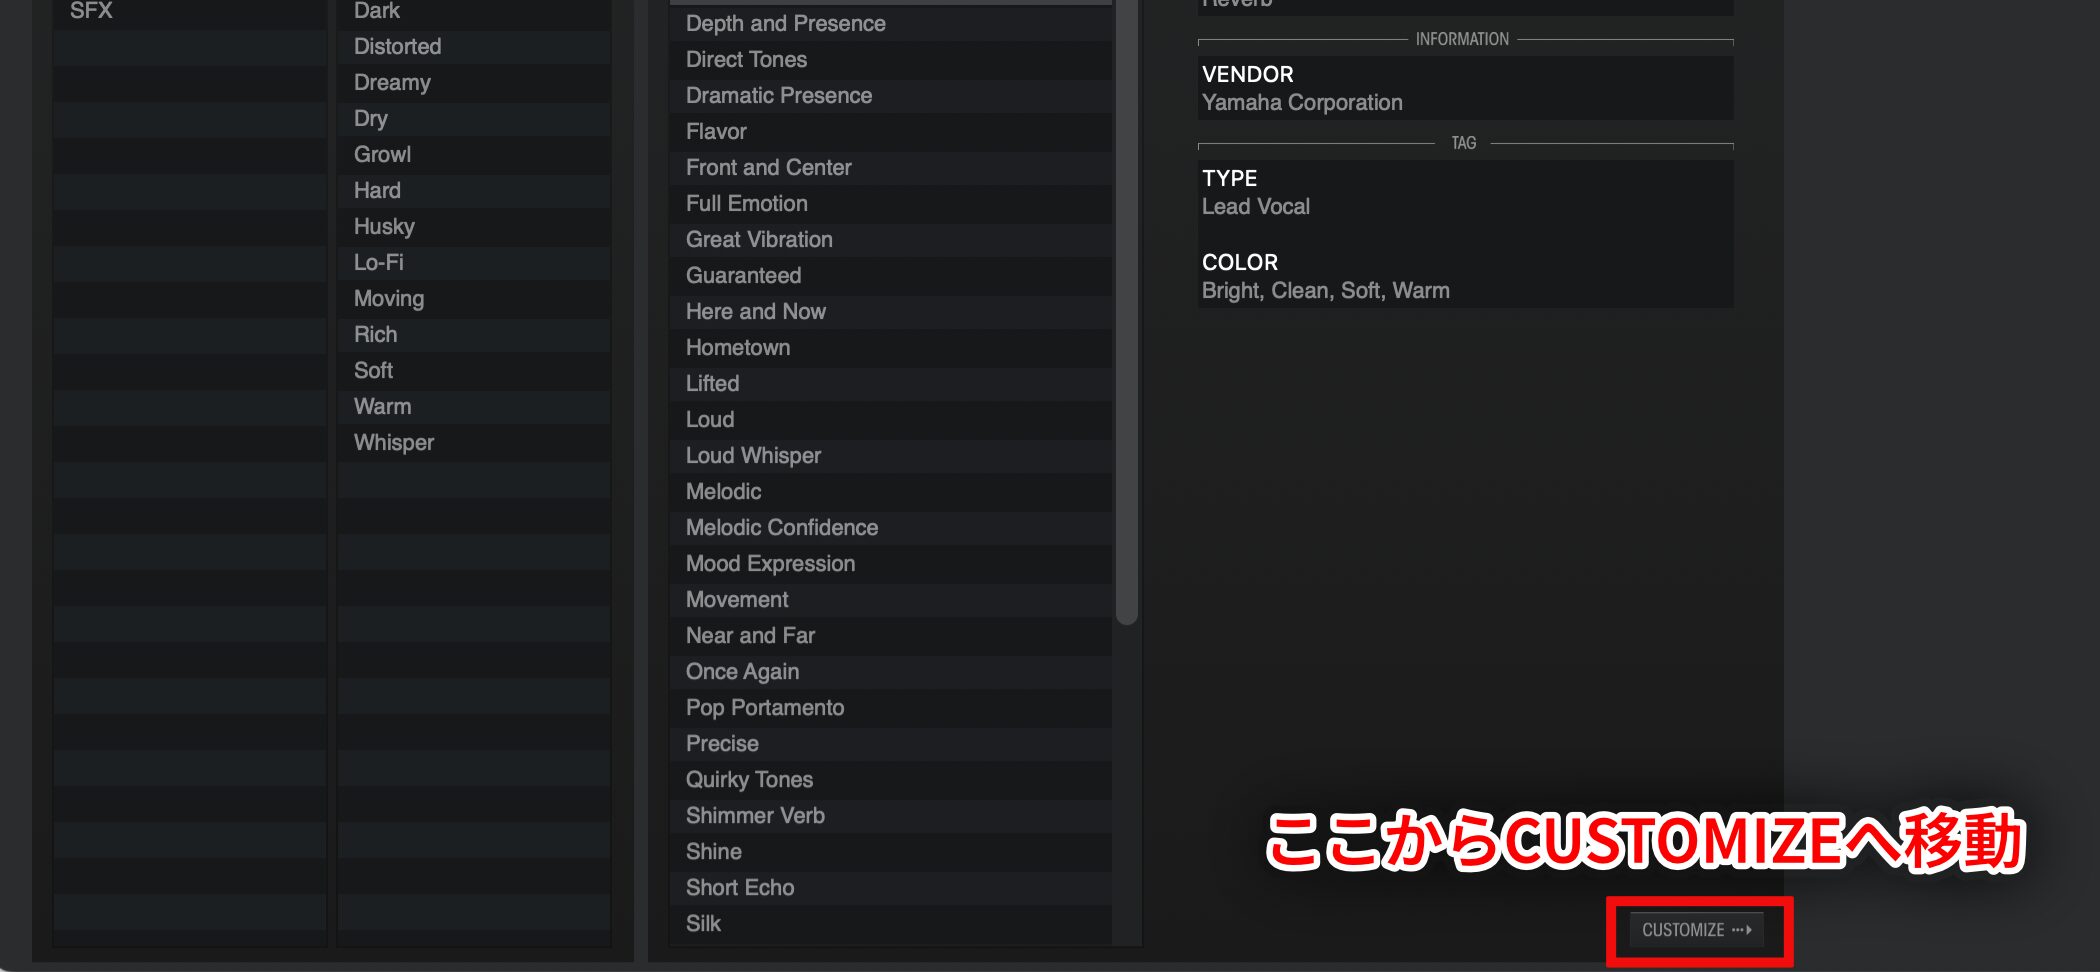
open CUSTOMIZE at the lower right and
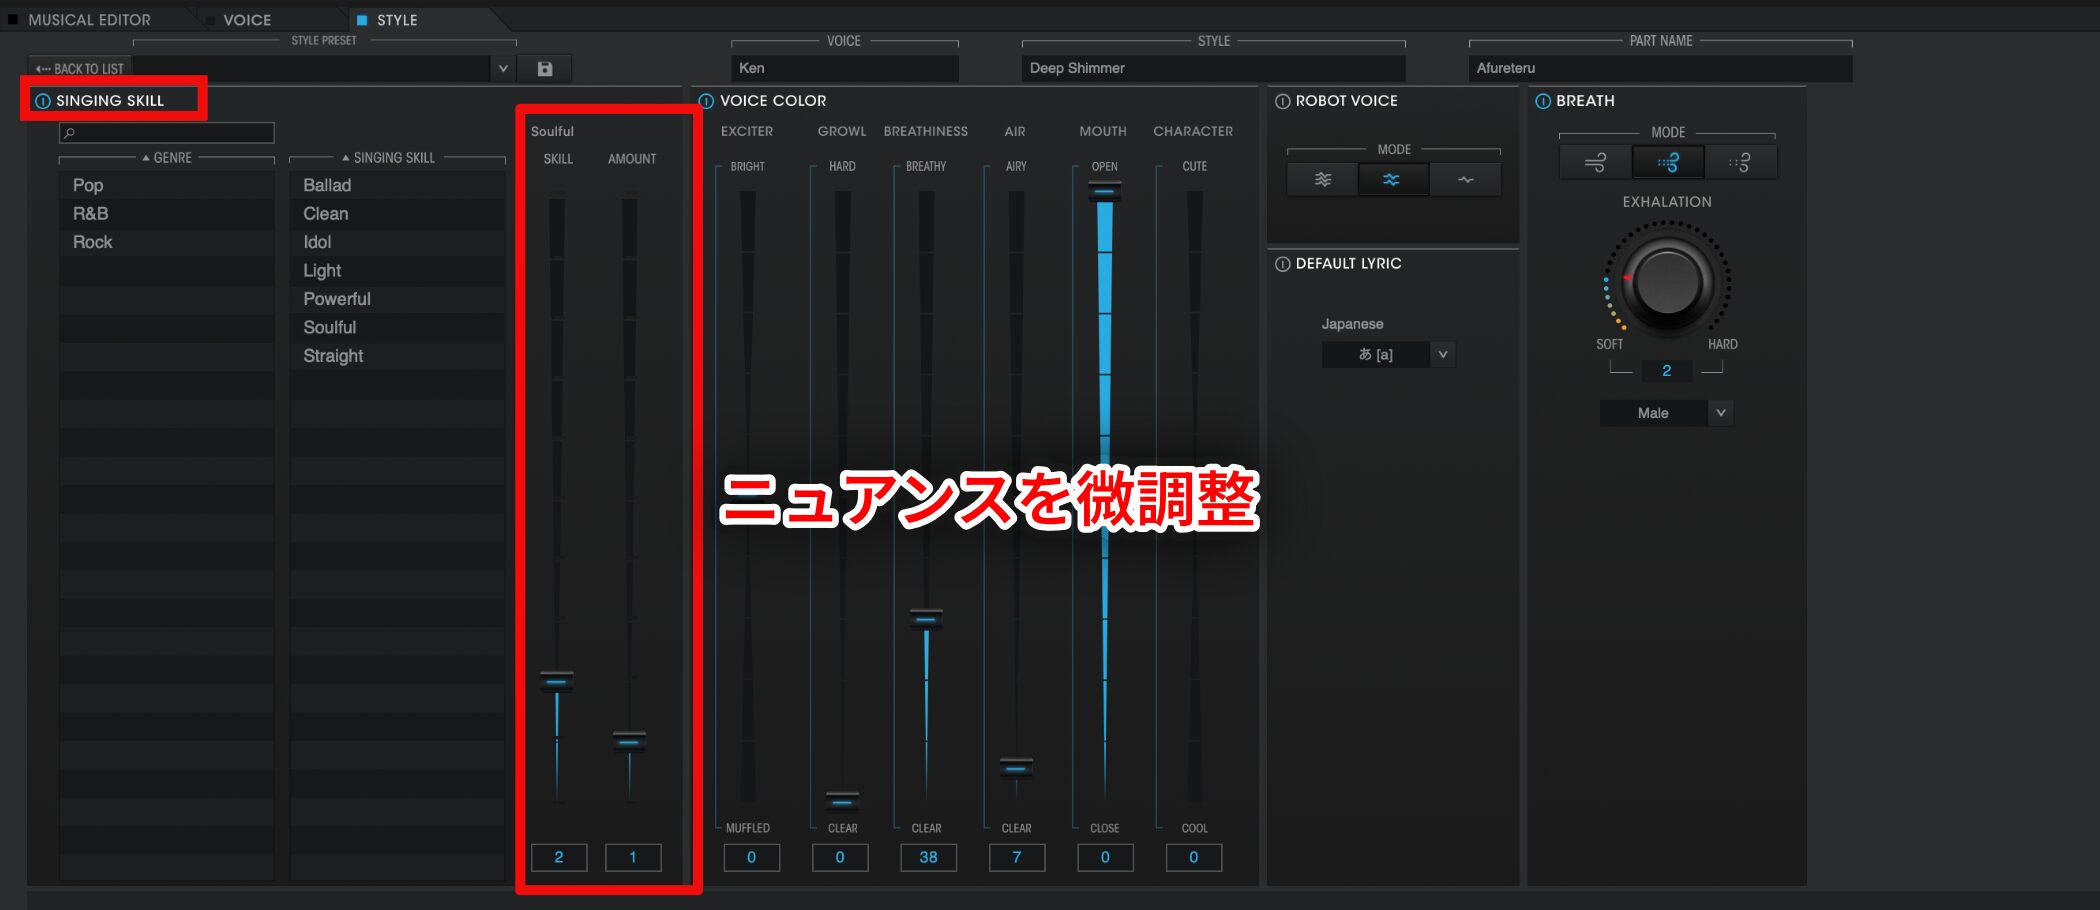
go to SINGING SKILL.
Here, we reduced Soulful slightly because we wanted less pitch movement.
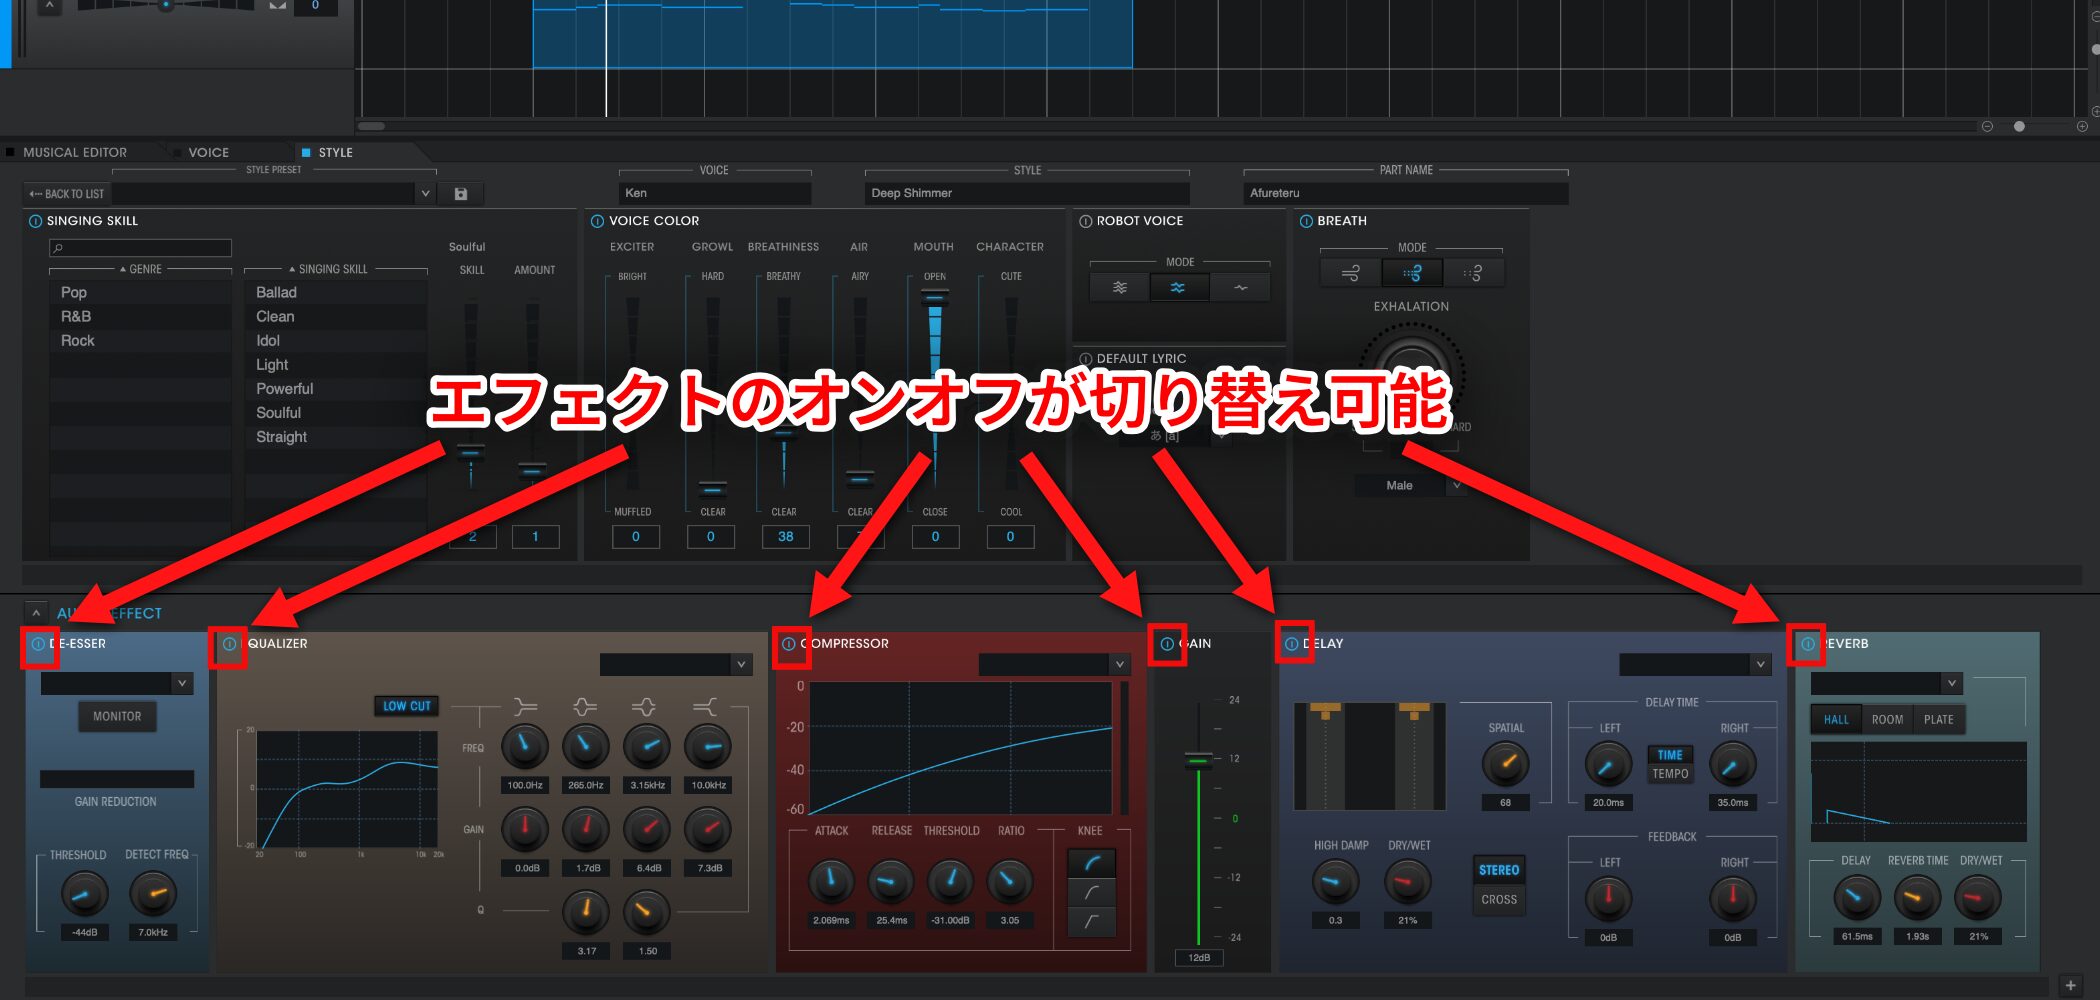
This STYLE also includes audio effects.
If you do not need these effects and want to start from a neutral sound, switch off the power button for each effect to disable it.
A Production Workflow Using VOCALOID 5's New Features: Using Attack Effects
Next, we will fine-tune individual notes to make the vocal sound more realistic and human.
Here is the vocal after entering the melody and lyrics in the previous section.
There is still room to improve its human-like expression.
Starting from this version, we will make detailed edits with VOCALOID 5's new features.
Video: Using Attack Effects
Refining Consonant Pronunciation
The default consonant settings are uniform, so some syllables can sound unnatural in slow melodies or intricate phrases.
Let's tailor the consonants to each phrase.
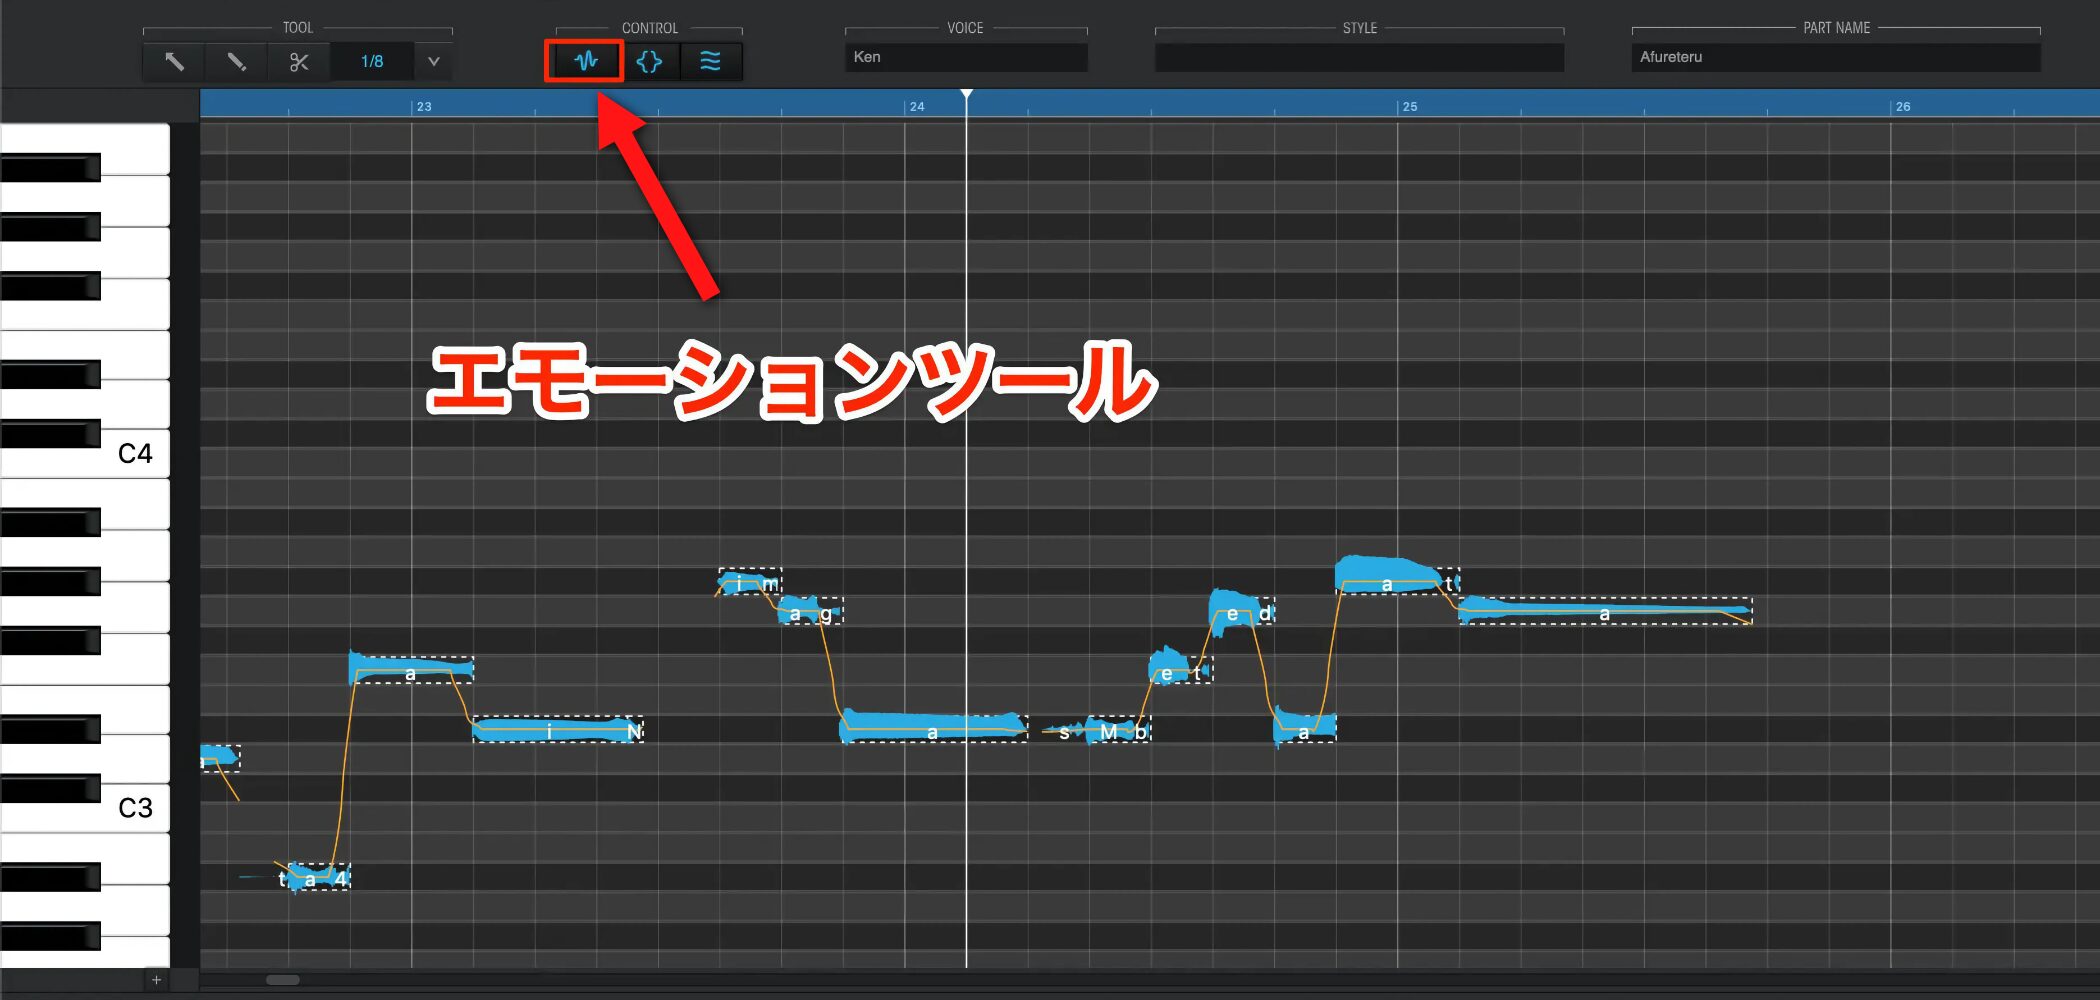
Use the Emotion Tool to control consonants.
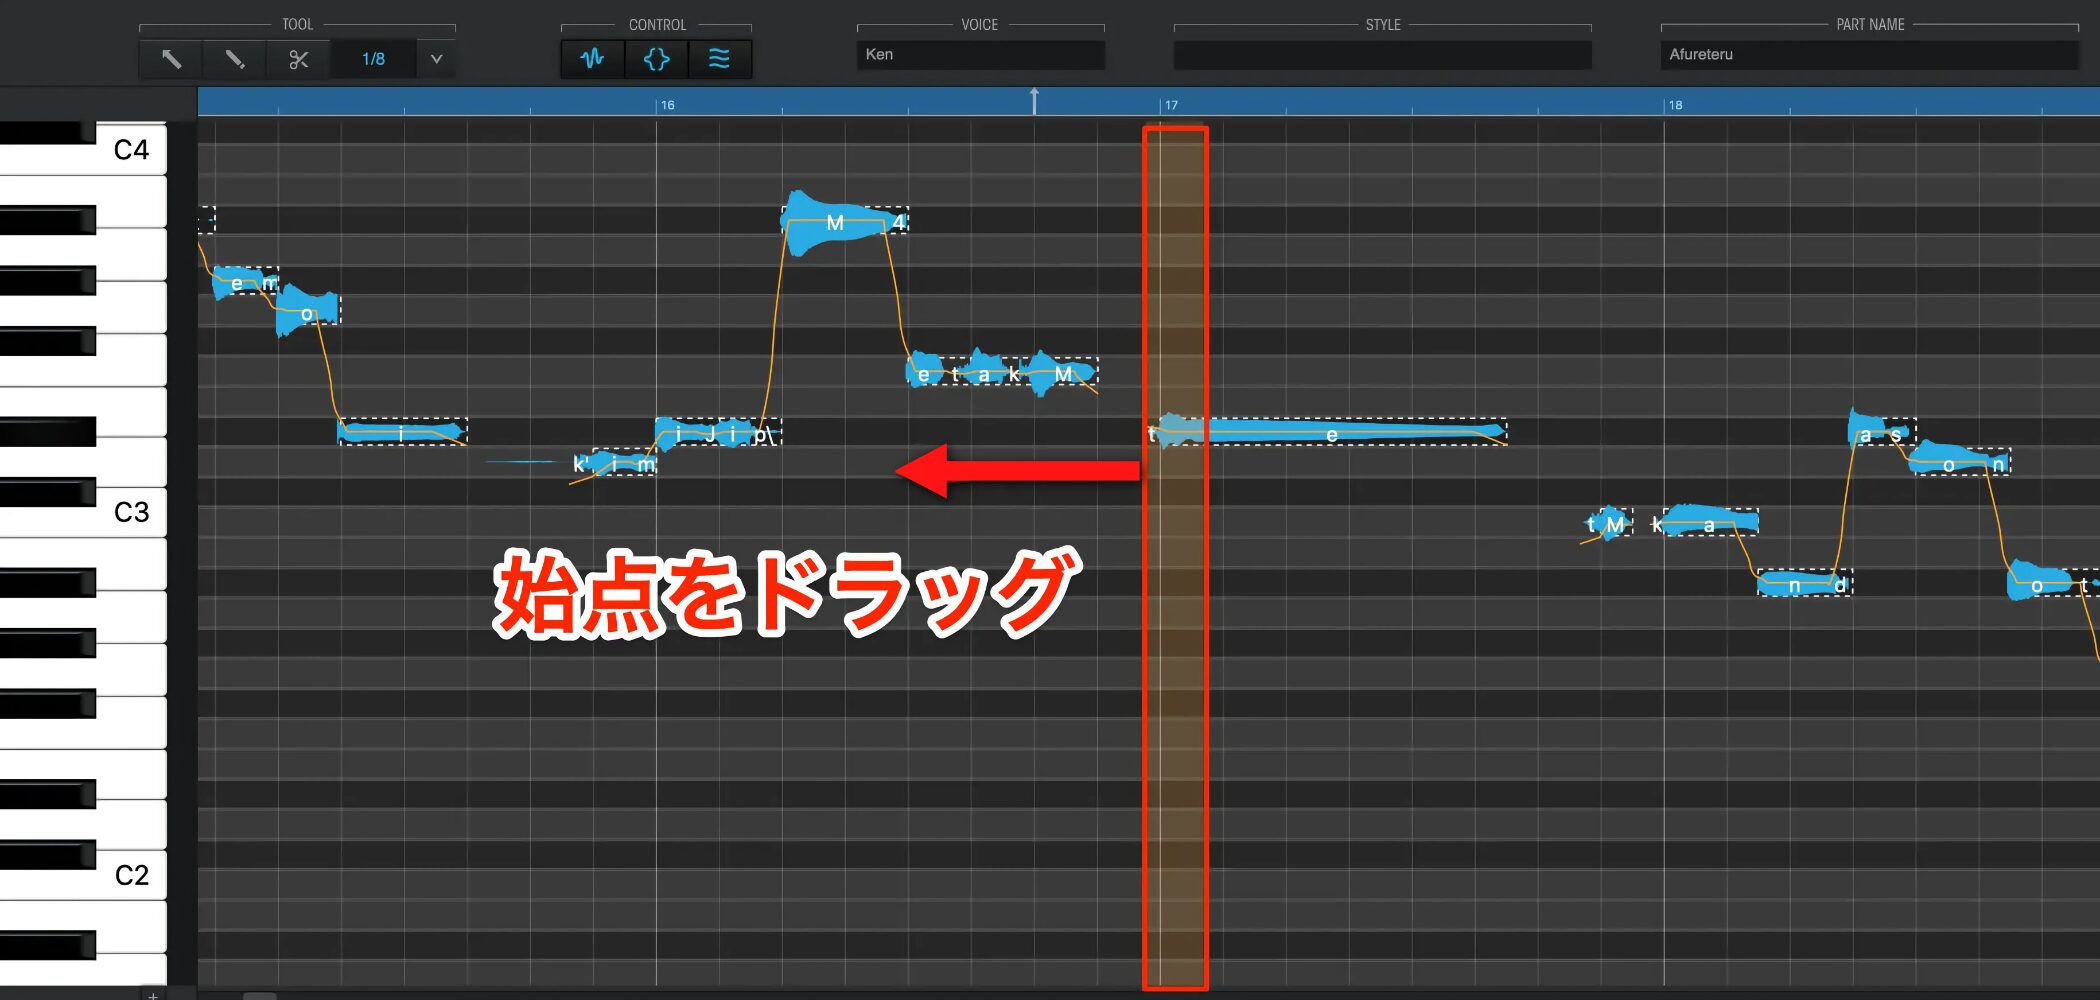
When you move the pointer just above a note, its first and second sections light up orange.
You can drag the start of the first section backward or forward to control consonant length.
Lengthening Consonants for Clearer Pronunciation
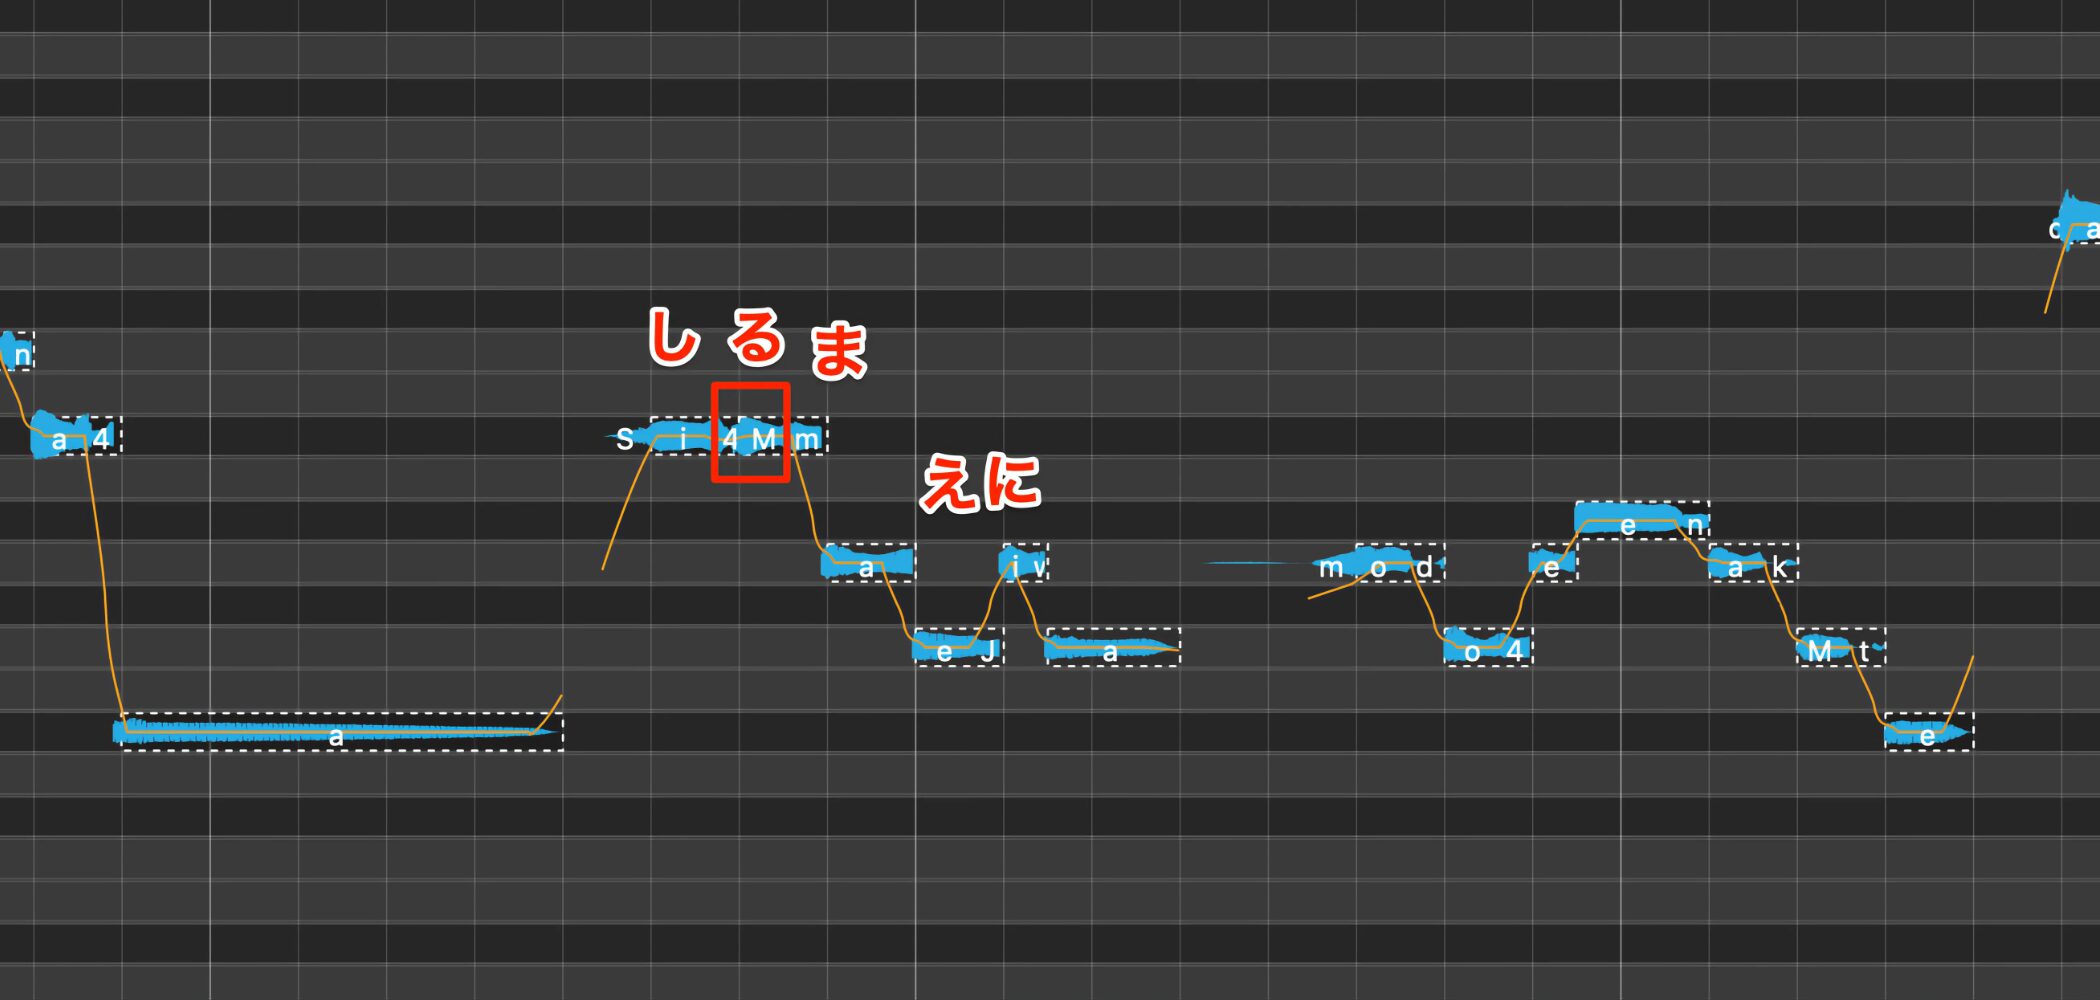
The “ru” in “shiru mae ni wa” sounds indistinct.
- Before Editing the Consonant
Move the consonant's starting point earlier to lengthen it.
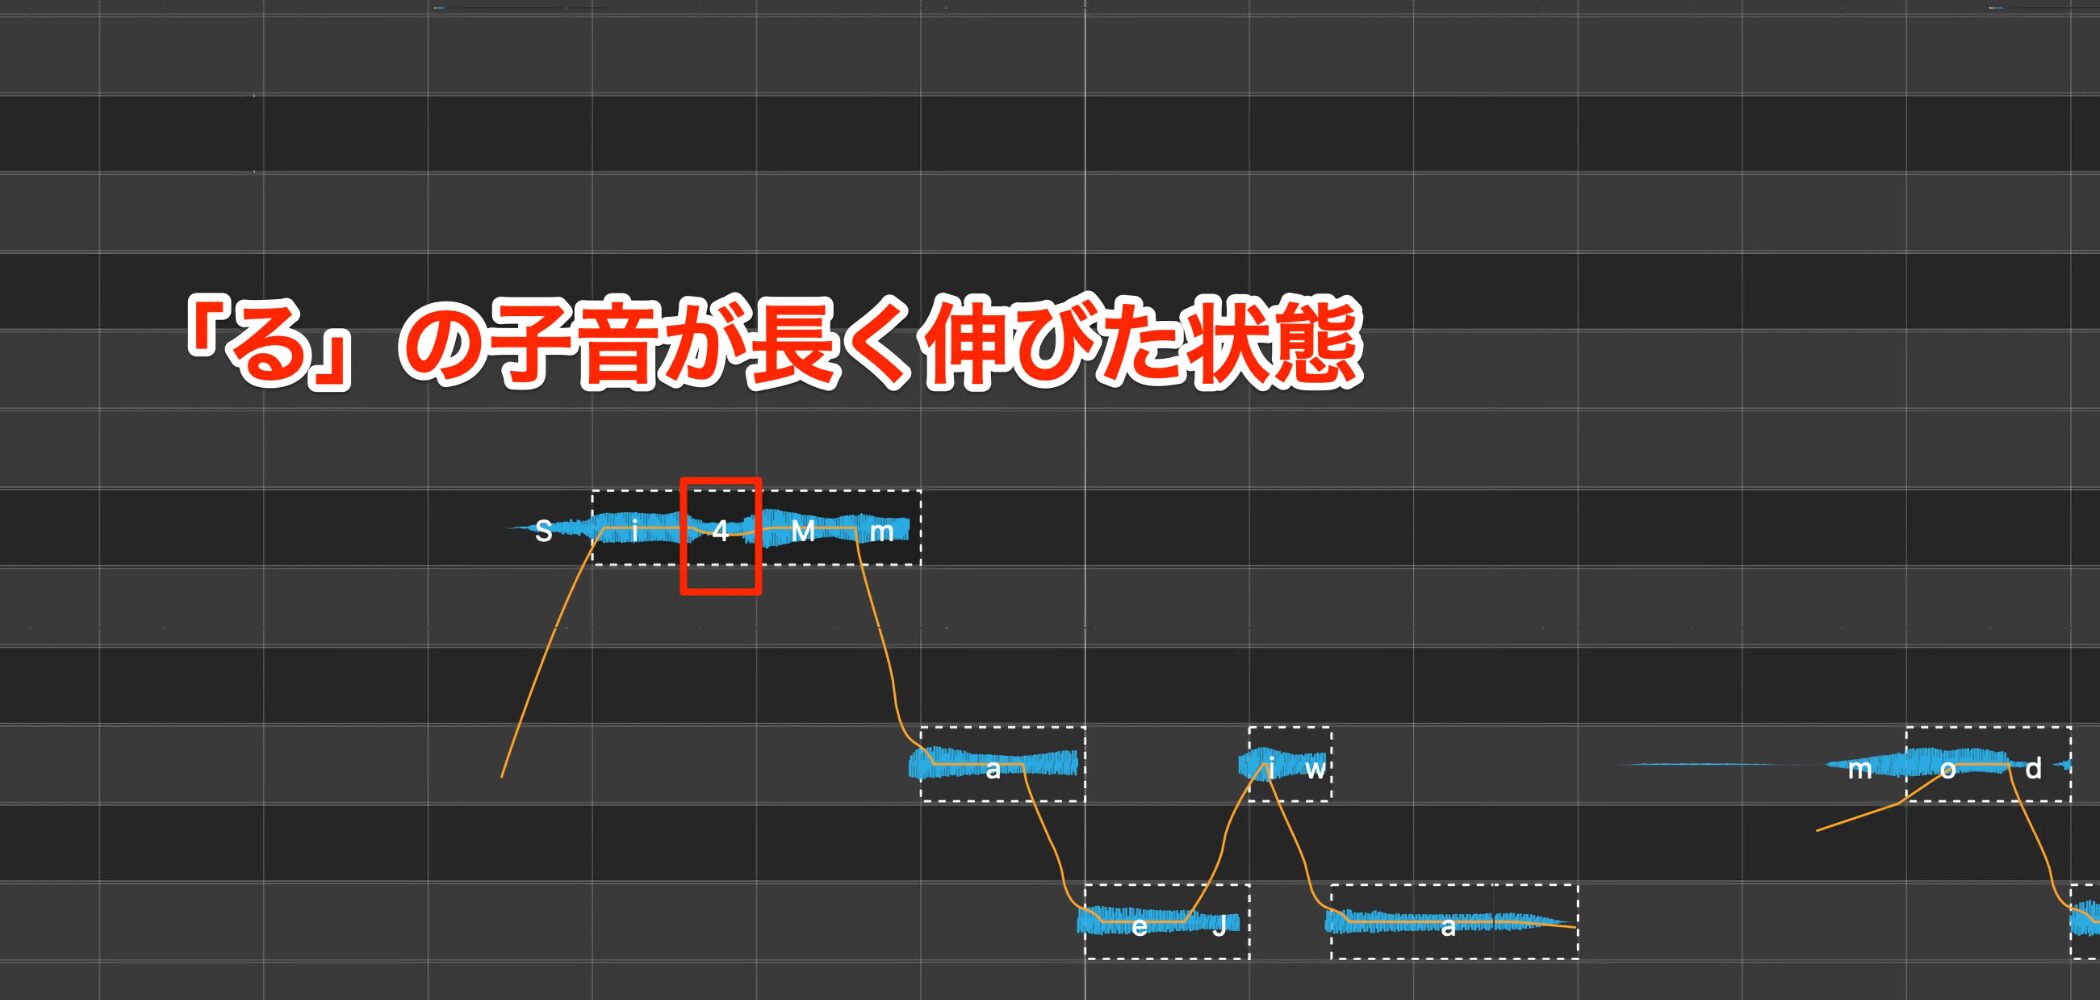
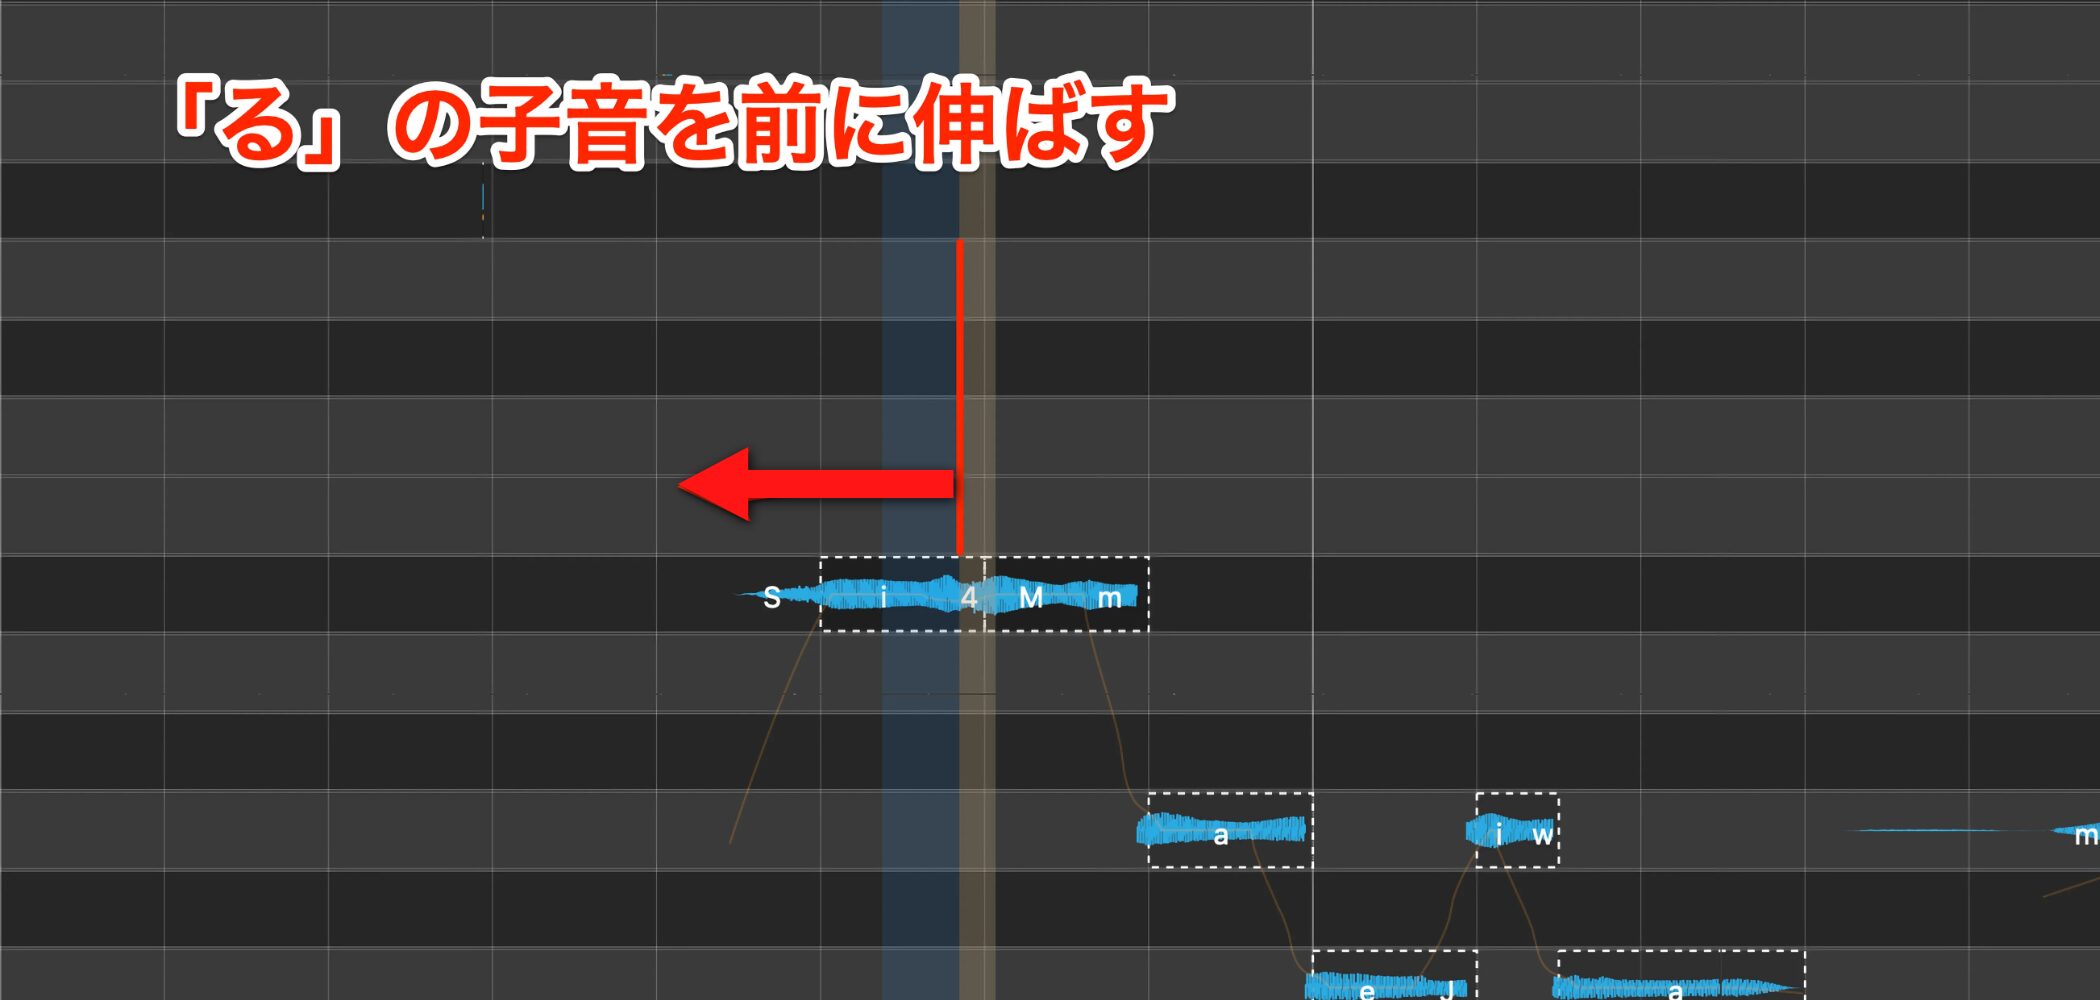
The “shi” note becomes shorter, leaving a gap before “ru” and making the pronunciation clearer.
Reviewing each consonant setting carefully in this way can make the singing sound more natural.
- After Editing the Consonant
Shortening Consonants for Smoother Connections
Let's adjust another consonant.
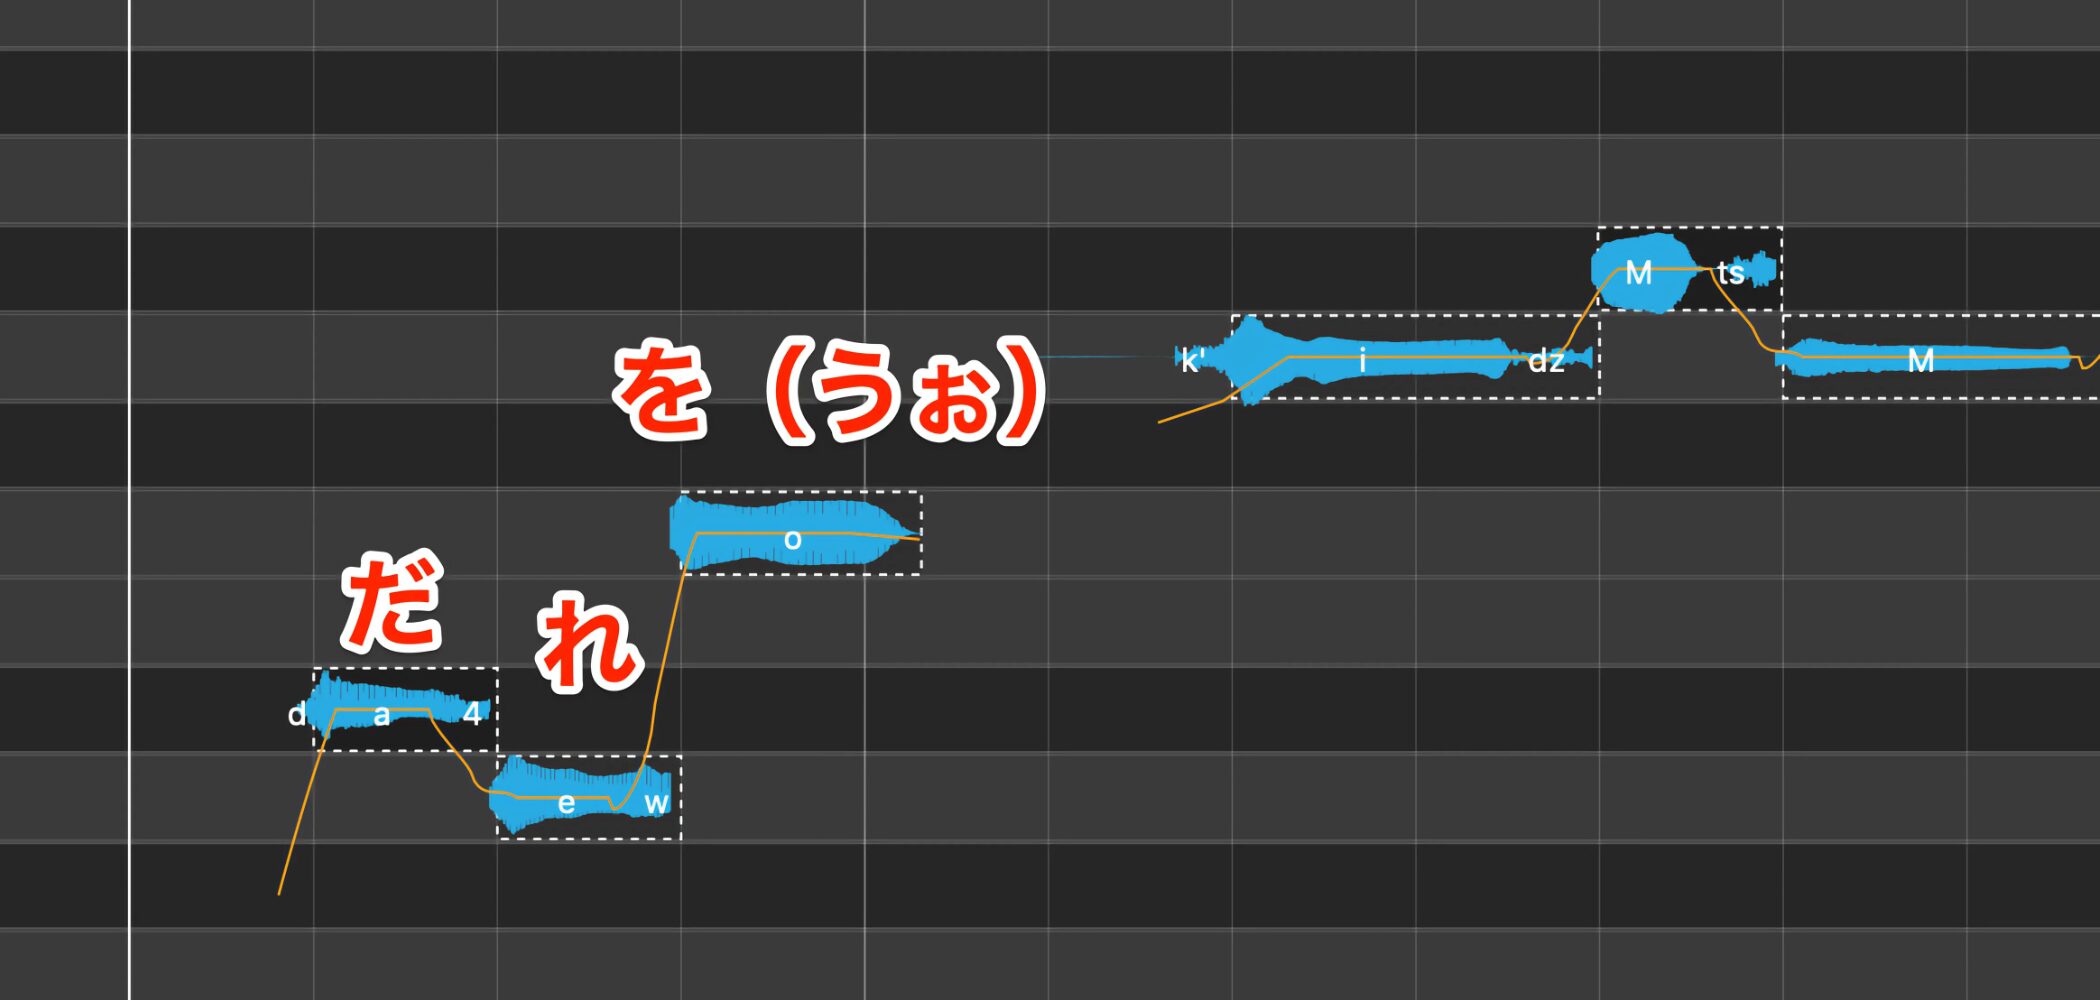
In “dare wo,” the break between “re” and “wo” sounds unnatural.
In this case, the consonant is too long.
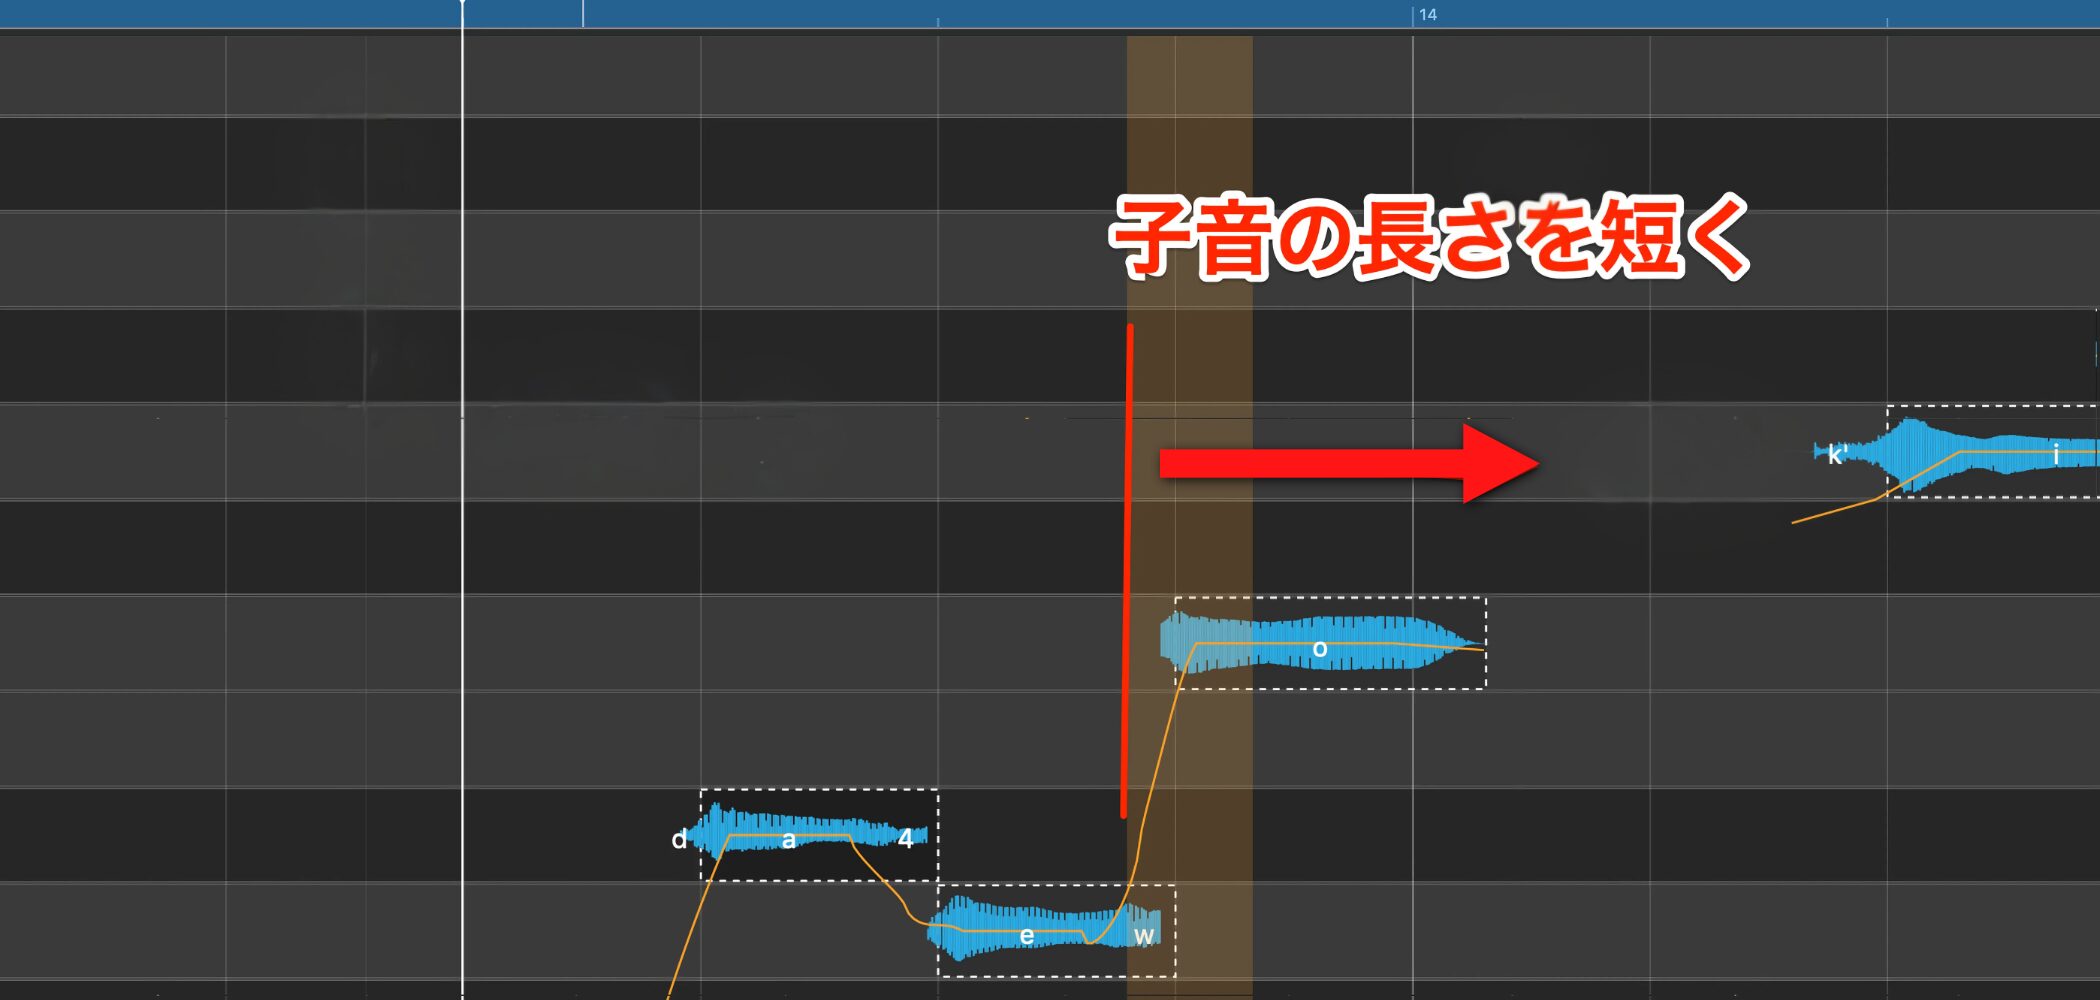
Listen while moving the consonant's starting point later.
This produces a more natural sound.
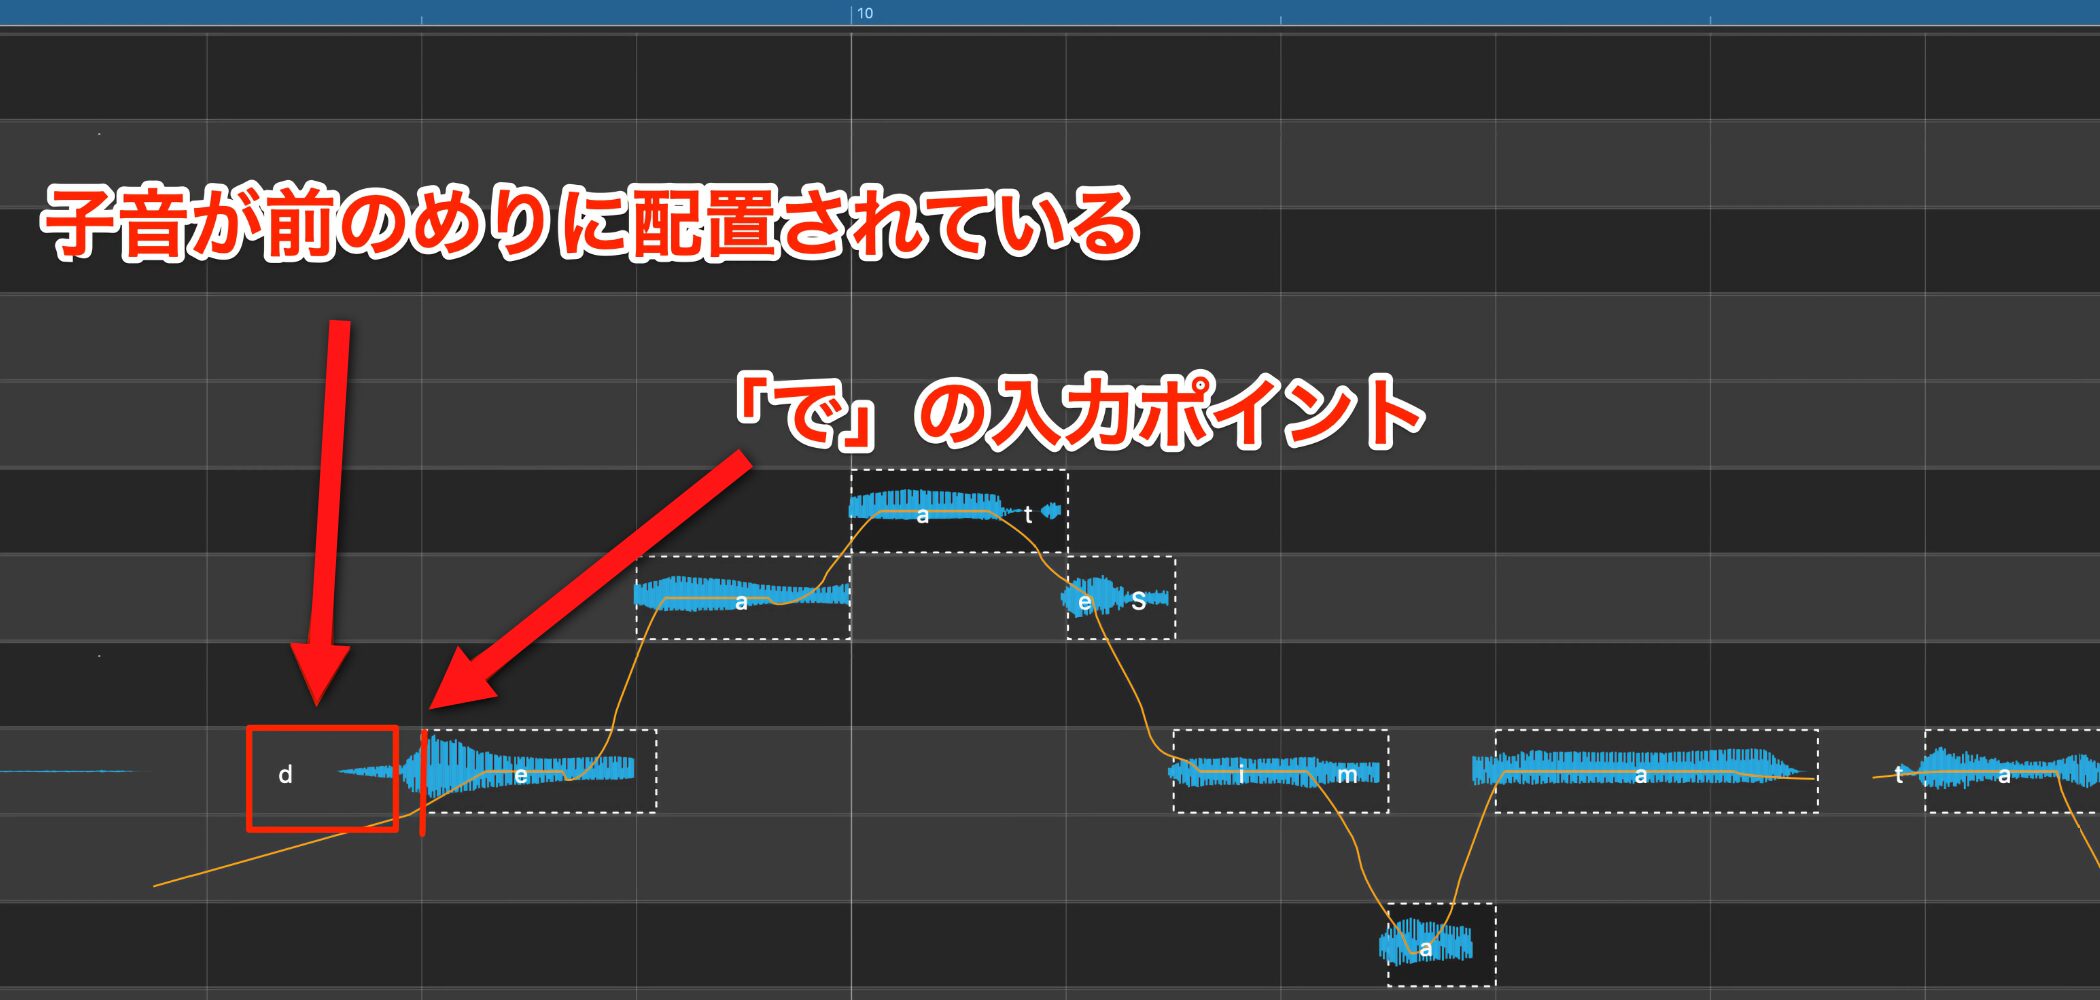
One characteristic of VOCALOID 5 is that pronunciation begins ahead of the entered note.
Lengthening a consonant shortens the preceding note; conversely, shortening the consonant lengthens the preceding note.
You can use this behavior to create a light, somewhat staccato delivery.
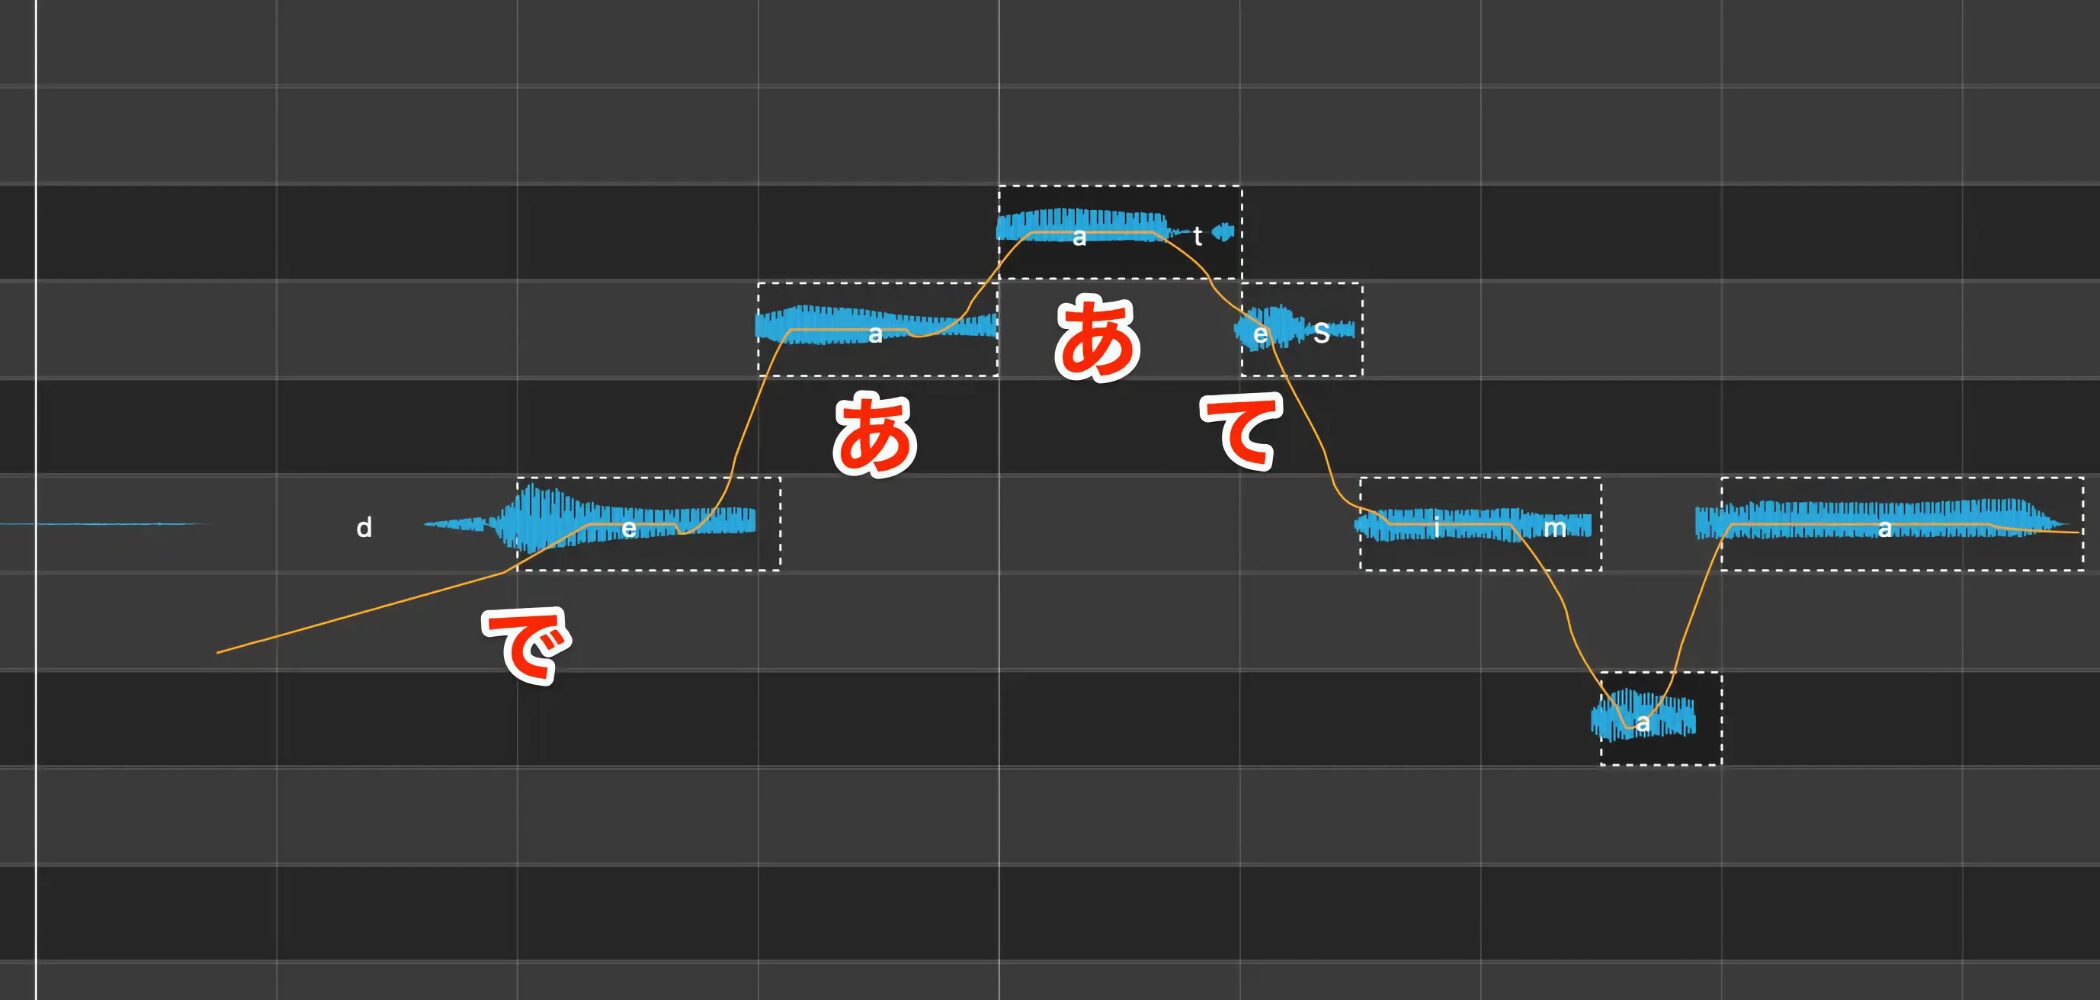
Let's look at “atte” in the earlier phrase “deatte shimatta nara.”
We want a crisp, light vocal delivery here.
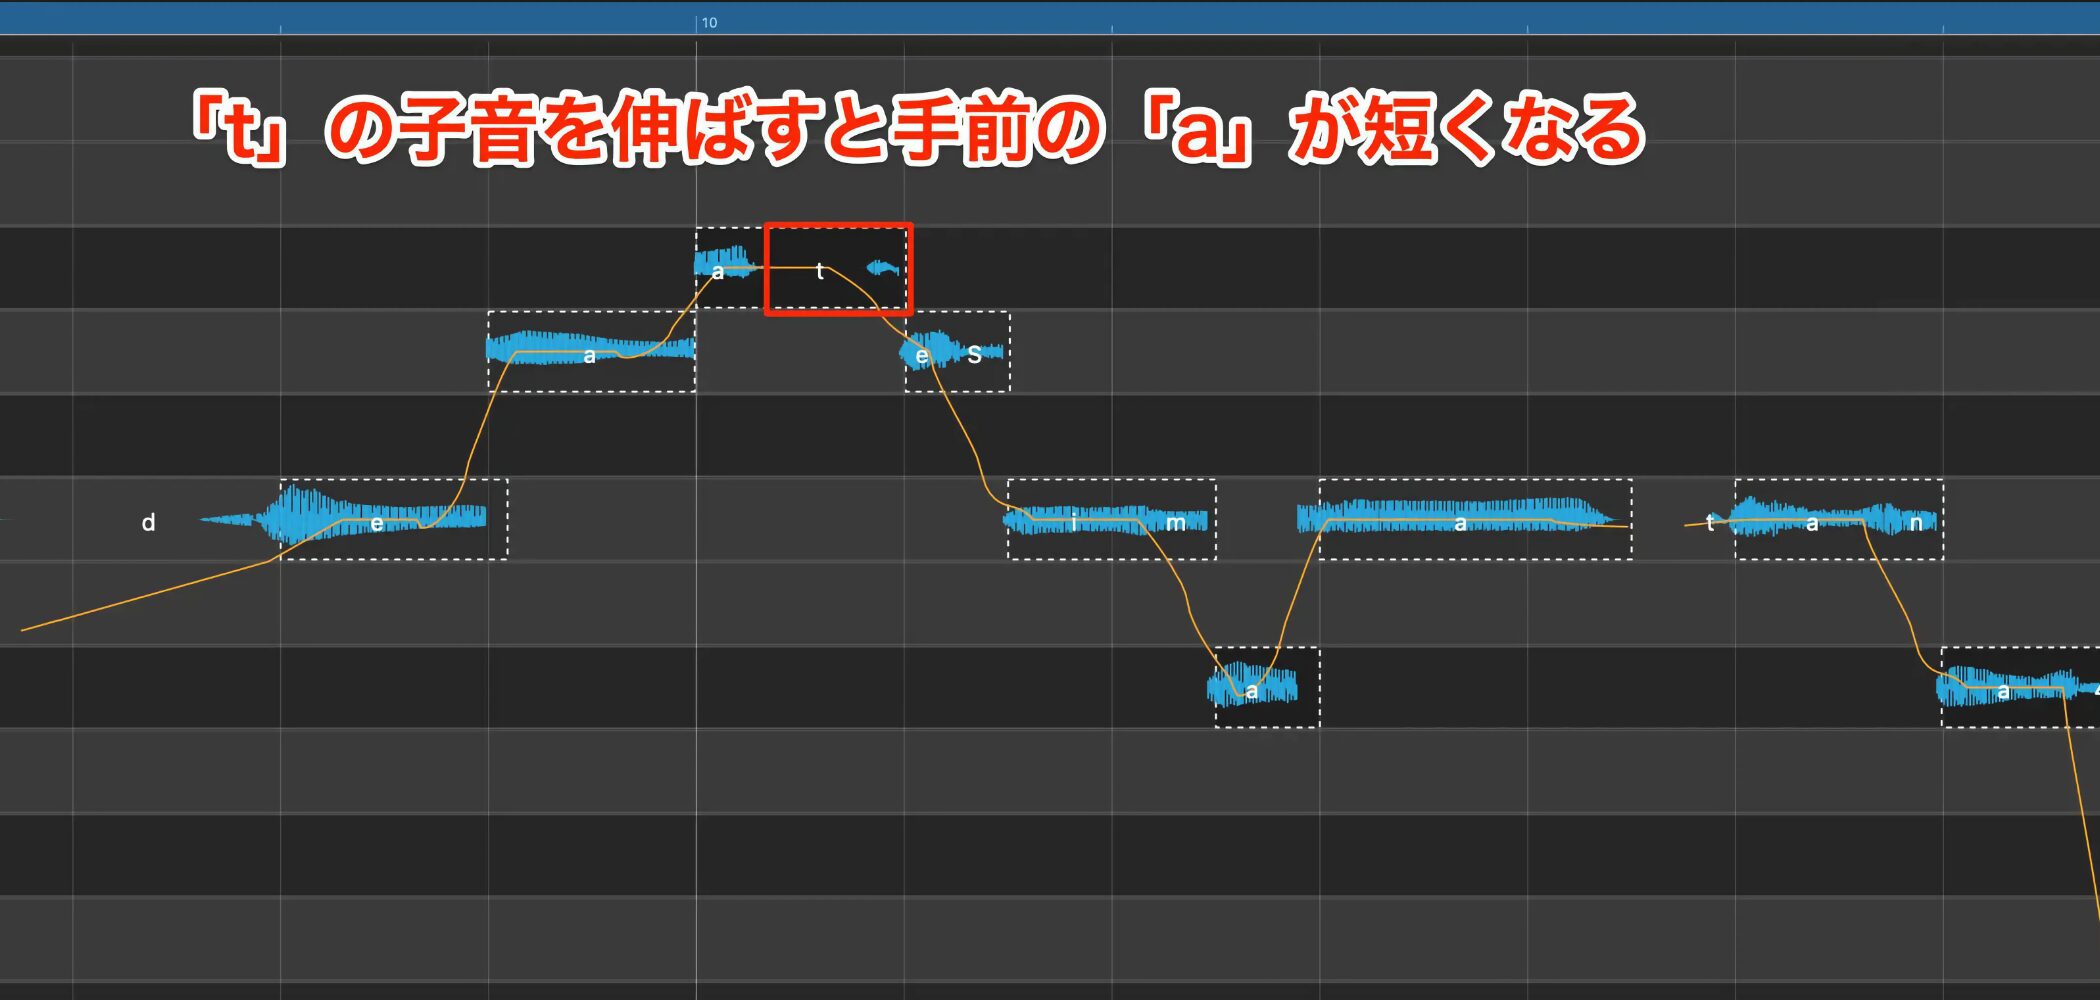
Lengthen the consonant of “te” to shorten the preceding “a.”
Adding this lighter articulation in selected places can give the track more movement and momentum.
Controlling Consonants from the Control Lane
Remember that consonant length is controlled by velocity, just as in earlier VOCALOID editors.

Use Velocity in the control lane to edit consonant settings across the displayed area at once.
Use the Emotion Tool for individual notes and the control lane for bulk changes to work more efficiently.
Adding Expression with Attack Effects
Now let's give the notes more expression.
Pitch movement in particular reveals a singer's personality, so it deserves careful editing.
VOCALOID 5's Attack & Release Effects make expressive editing quick and easy.
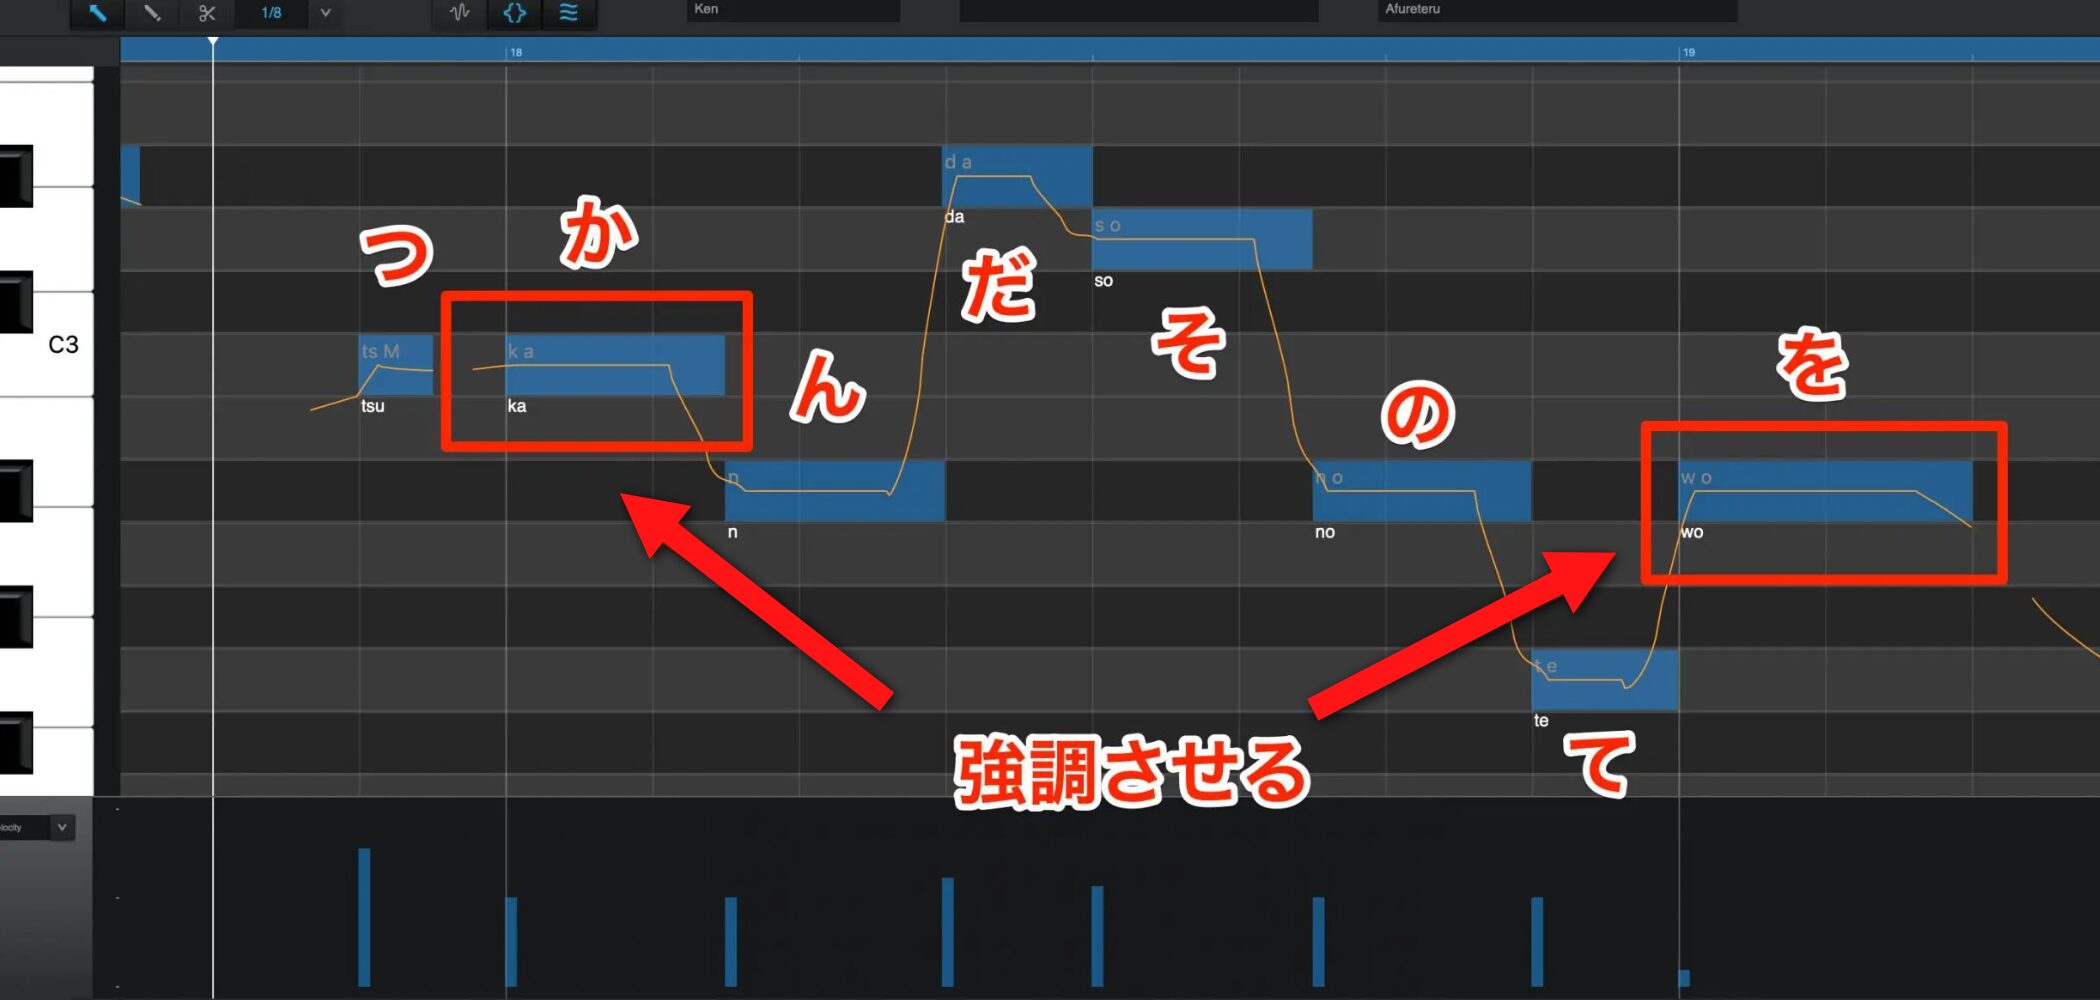
We will adjust accented points in the phrase, such as “ka” in “tsukanda” and “wo” in “sono te wo.”
Since we are shaping the beginnings of notes, we will use Attack Effects.
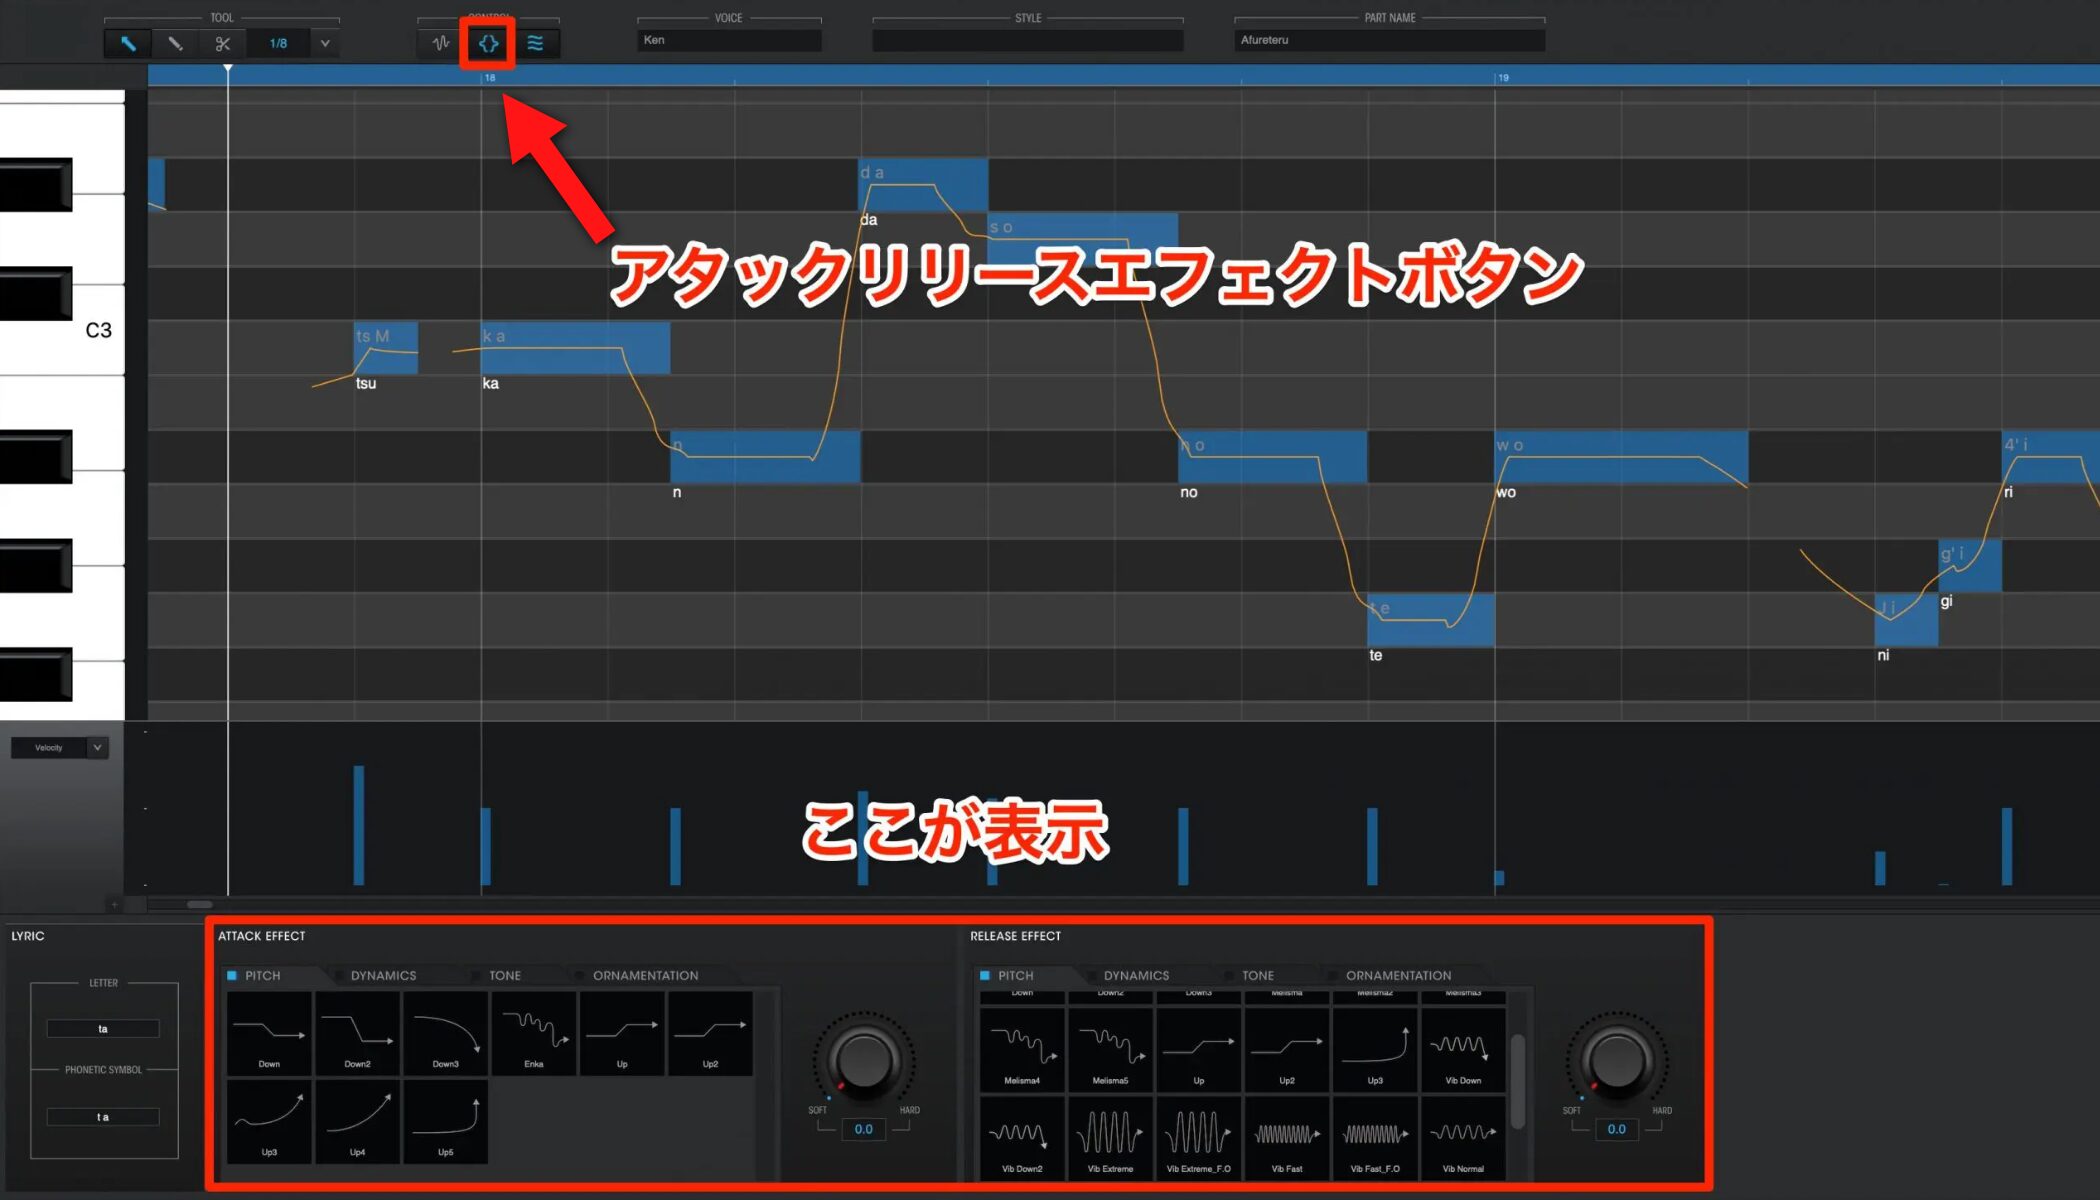
Display Attack & Release Effects and select the note you want to edit.
Here, it is “ka” in “tsukanda.”
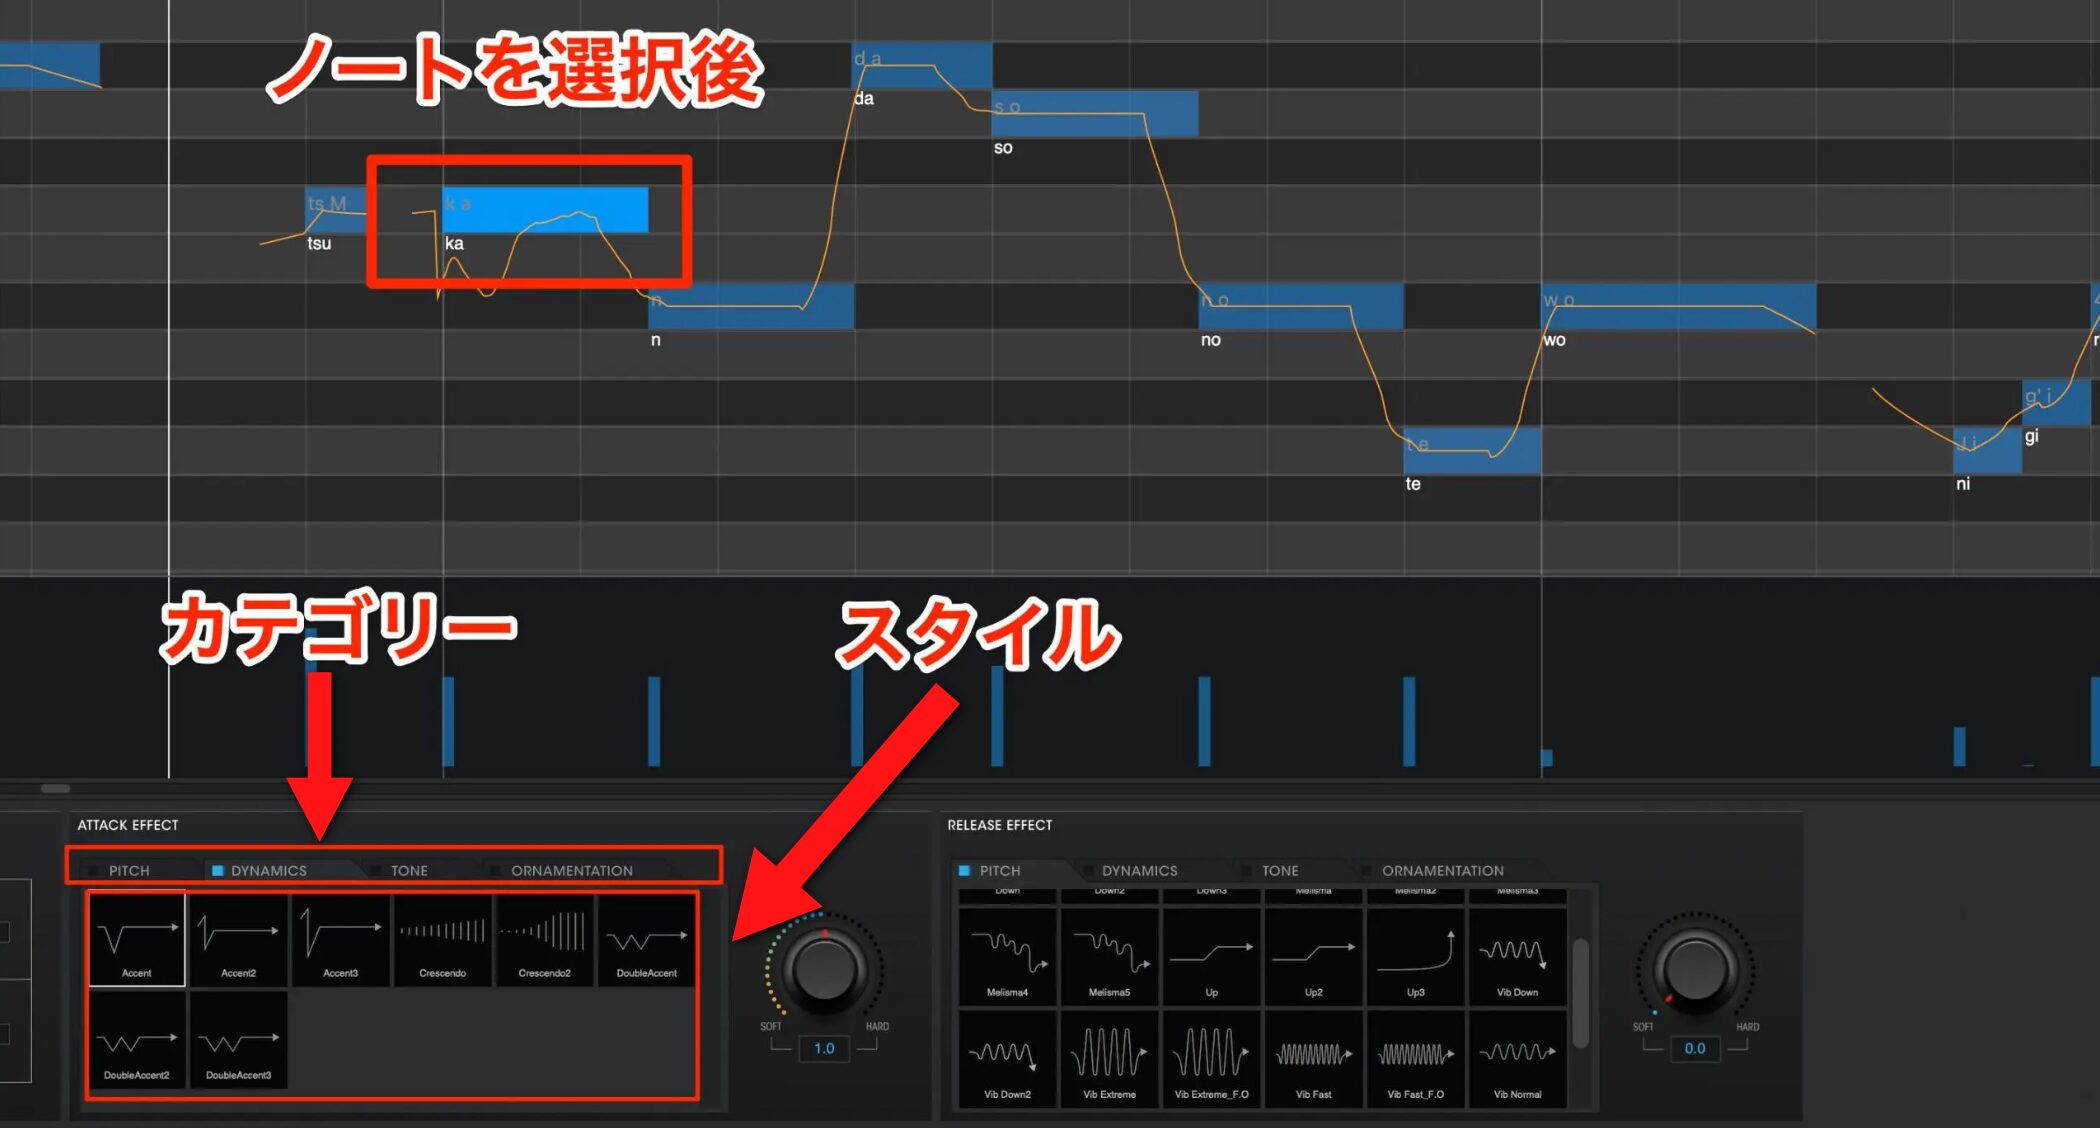
Simply choose the most suitable effect from the available options.
To emphasize the note, we will use an effect in DYNAMICS, which focuses on changes in volume.
First, select Accent to apply that expression.
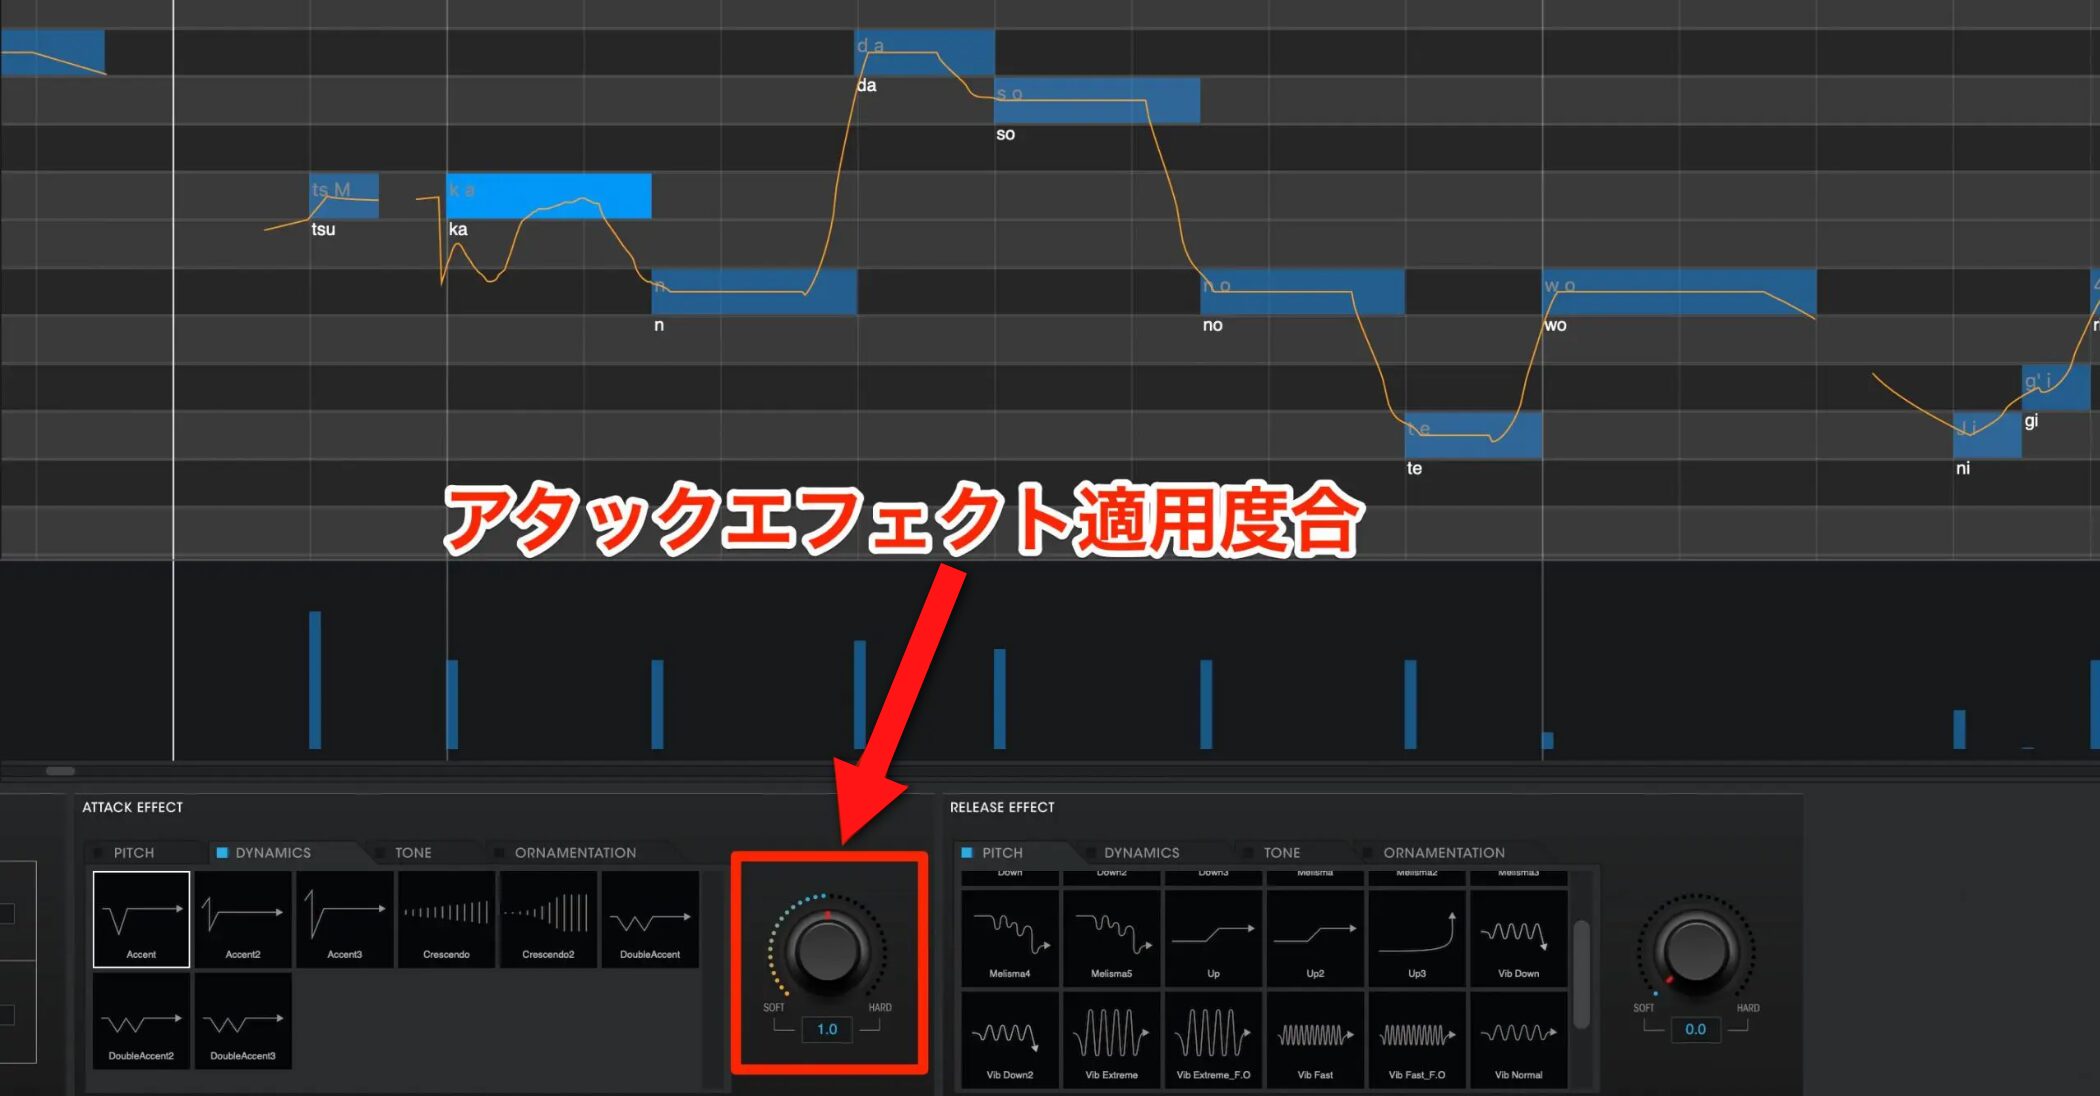
Listen repeatedly and adjust the effect amount with the knob.
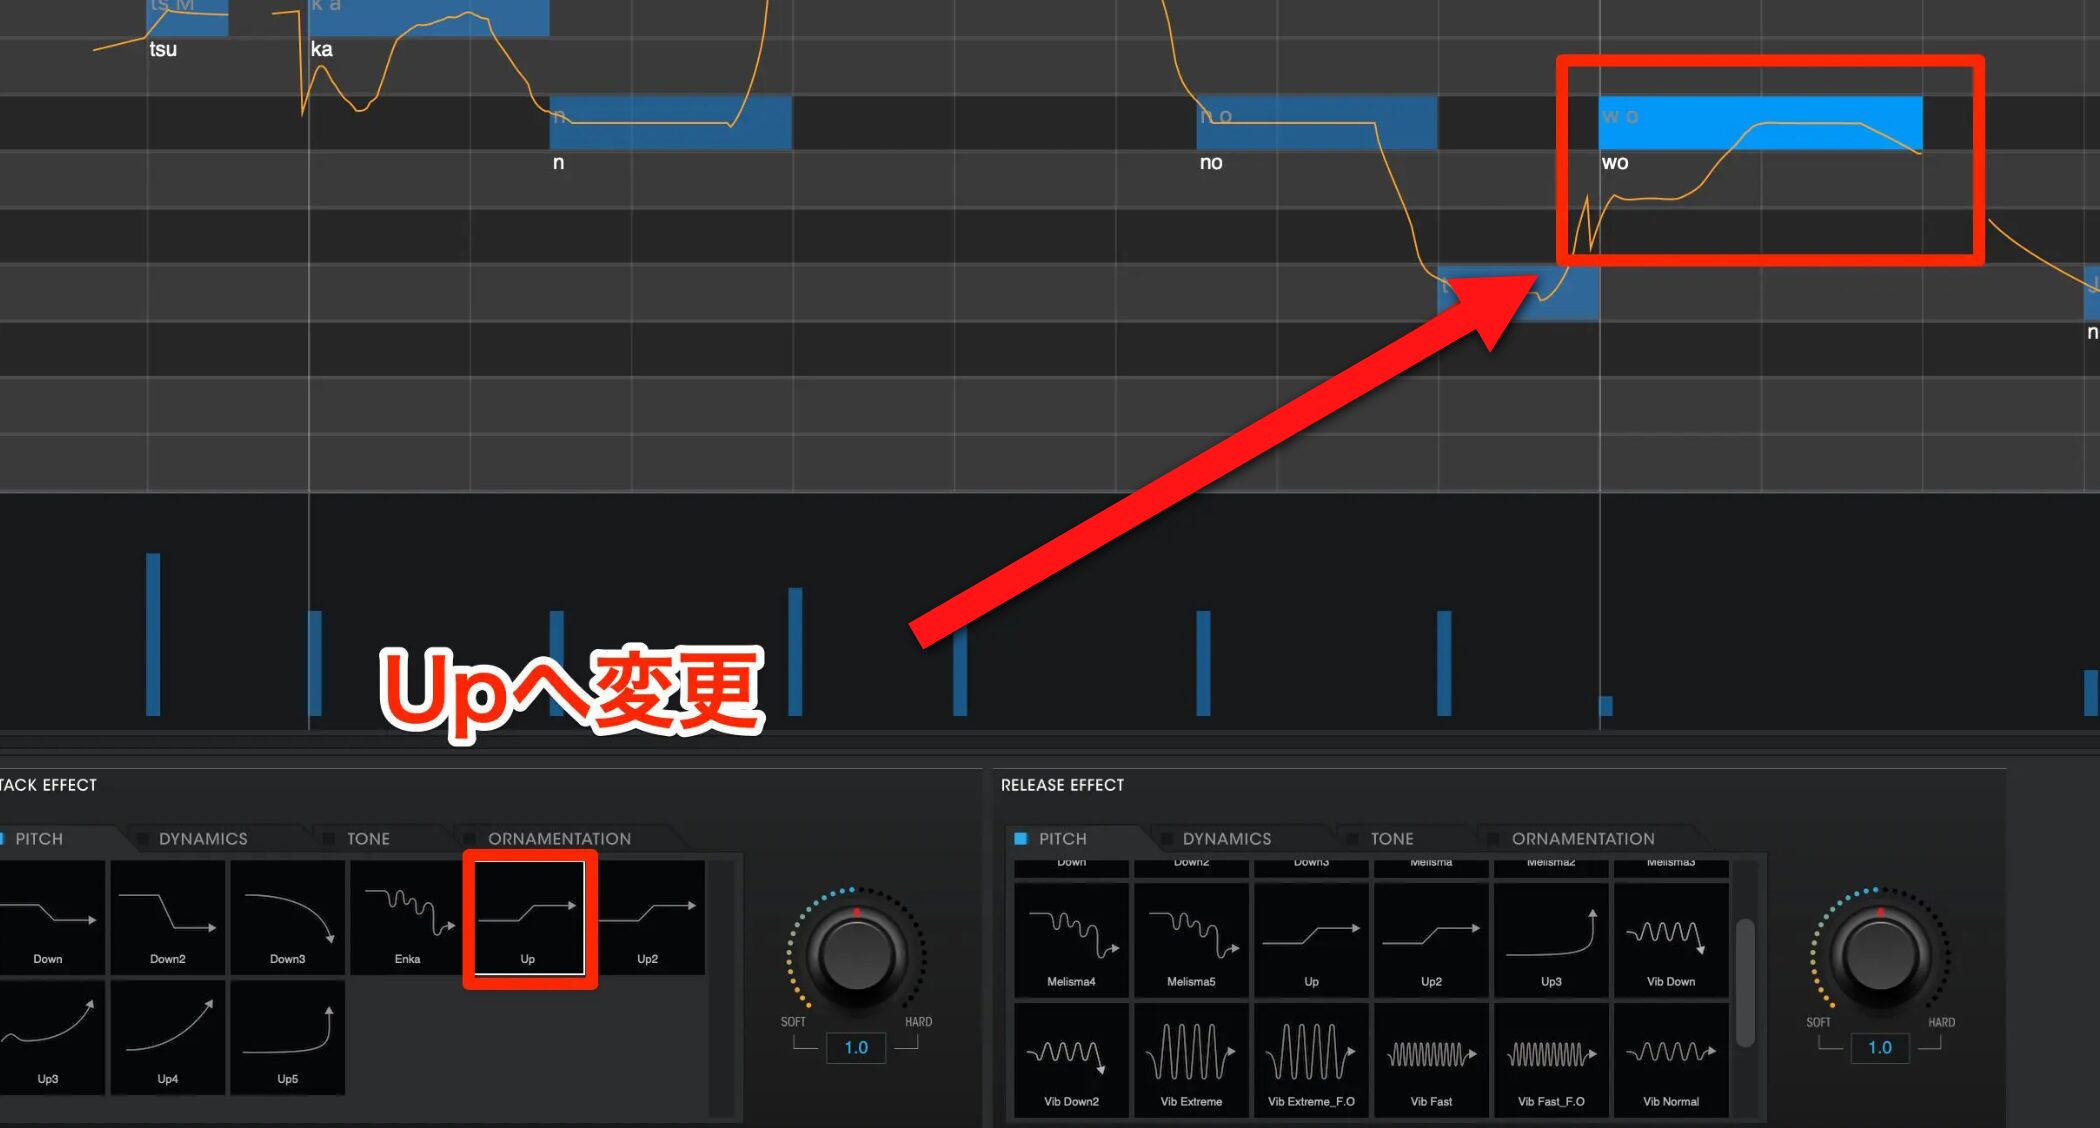
Next, we will add an upward pitch scoop to “wo” in “sono te wo.”
One of the Up options under PITCH should work well here.
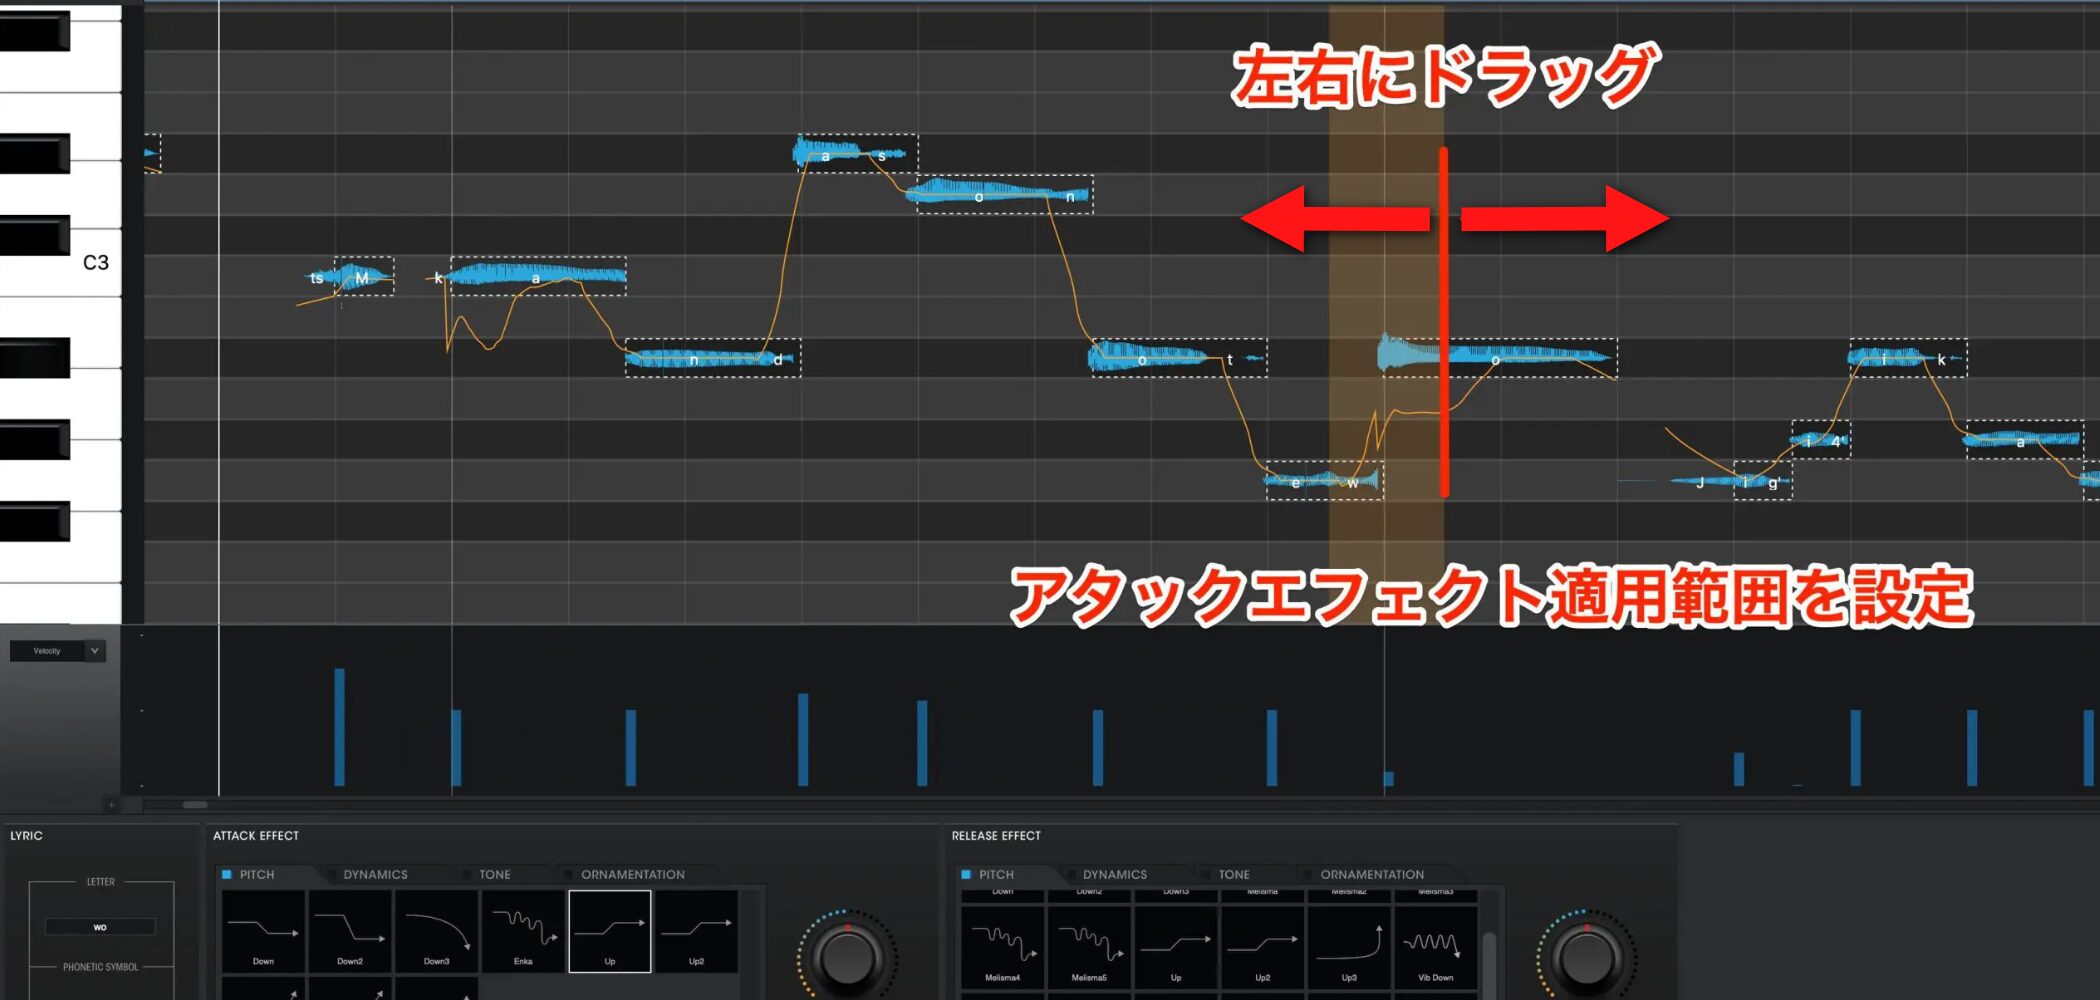
With the Emotion Tool, move the end of the highlighted region at the beginning of the note backward or forward to adjust the range over which the Attack Effect is applied.
Here, we make it slightly shorter.
Fine-tune the other notes in the same way, keeping these points in mind:
- Use stronger accents for Japanese s-row and t-row syllables.
- Apply Up across the notes to introduce a little pitch movement.
These settings make the phrase sound even more human.
Compare the audio before and after applying Attack Effects.
- Before Attack Effects
- After Attack Effects
You should hear a significant change in expression and an improvement in the quality of the track.
A Production Workflow Using VOCALOID 5's New Features: Using Release Effects
Next, we will explore humanizing techniques with Release Effects and note splitting, followed by an effective way to create a robot voice.
Video: Using Release Effects
Adding Vibrato with Release Effects
In the previous section, we added expression to individual notes with Attack Effects.
Now we will use Release Effects to shape the latter part of each note.
We will demonstrate this on the pre-chorus.
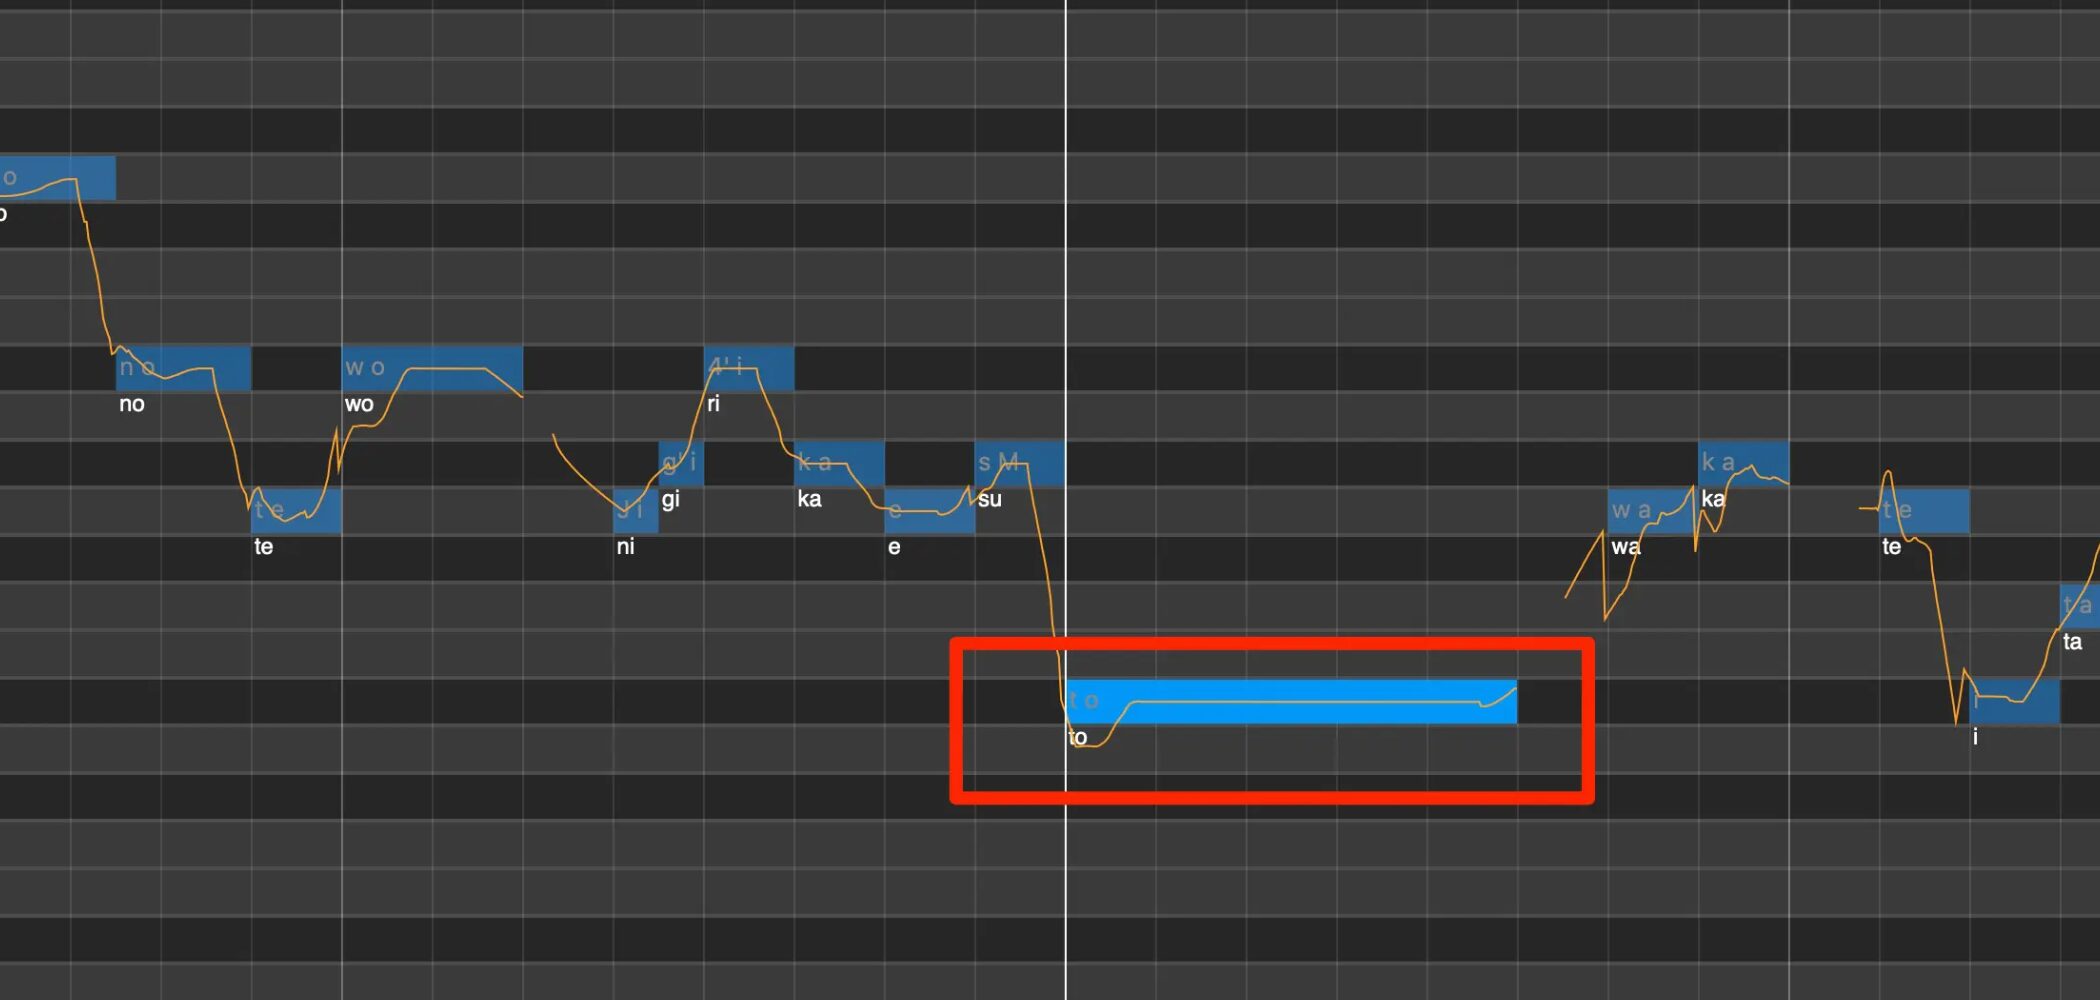
The notes in this phrase felt a little short on expression.
Let's add vibrato to bring them to life.
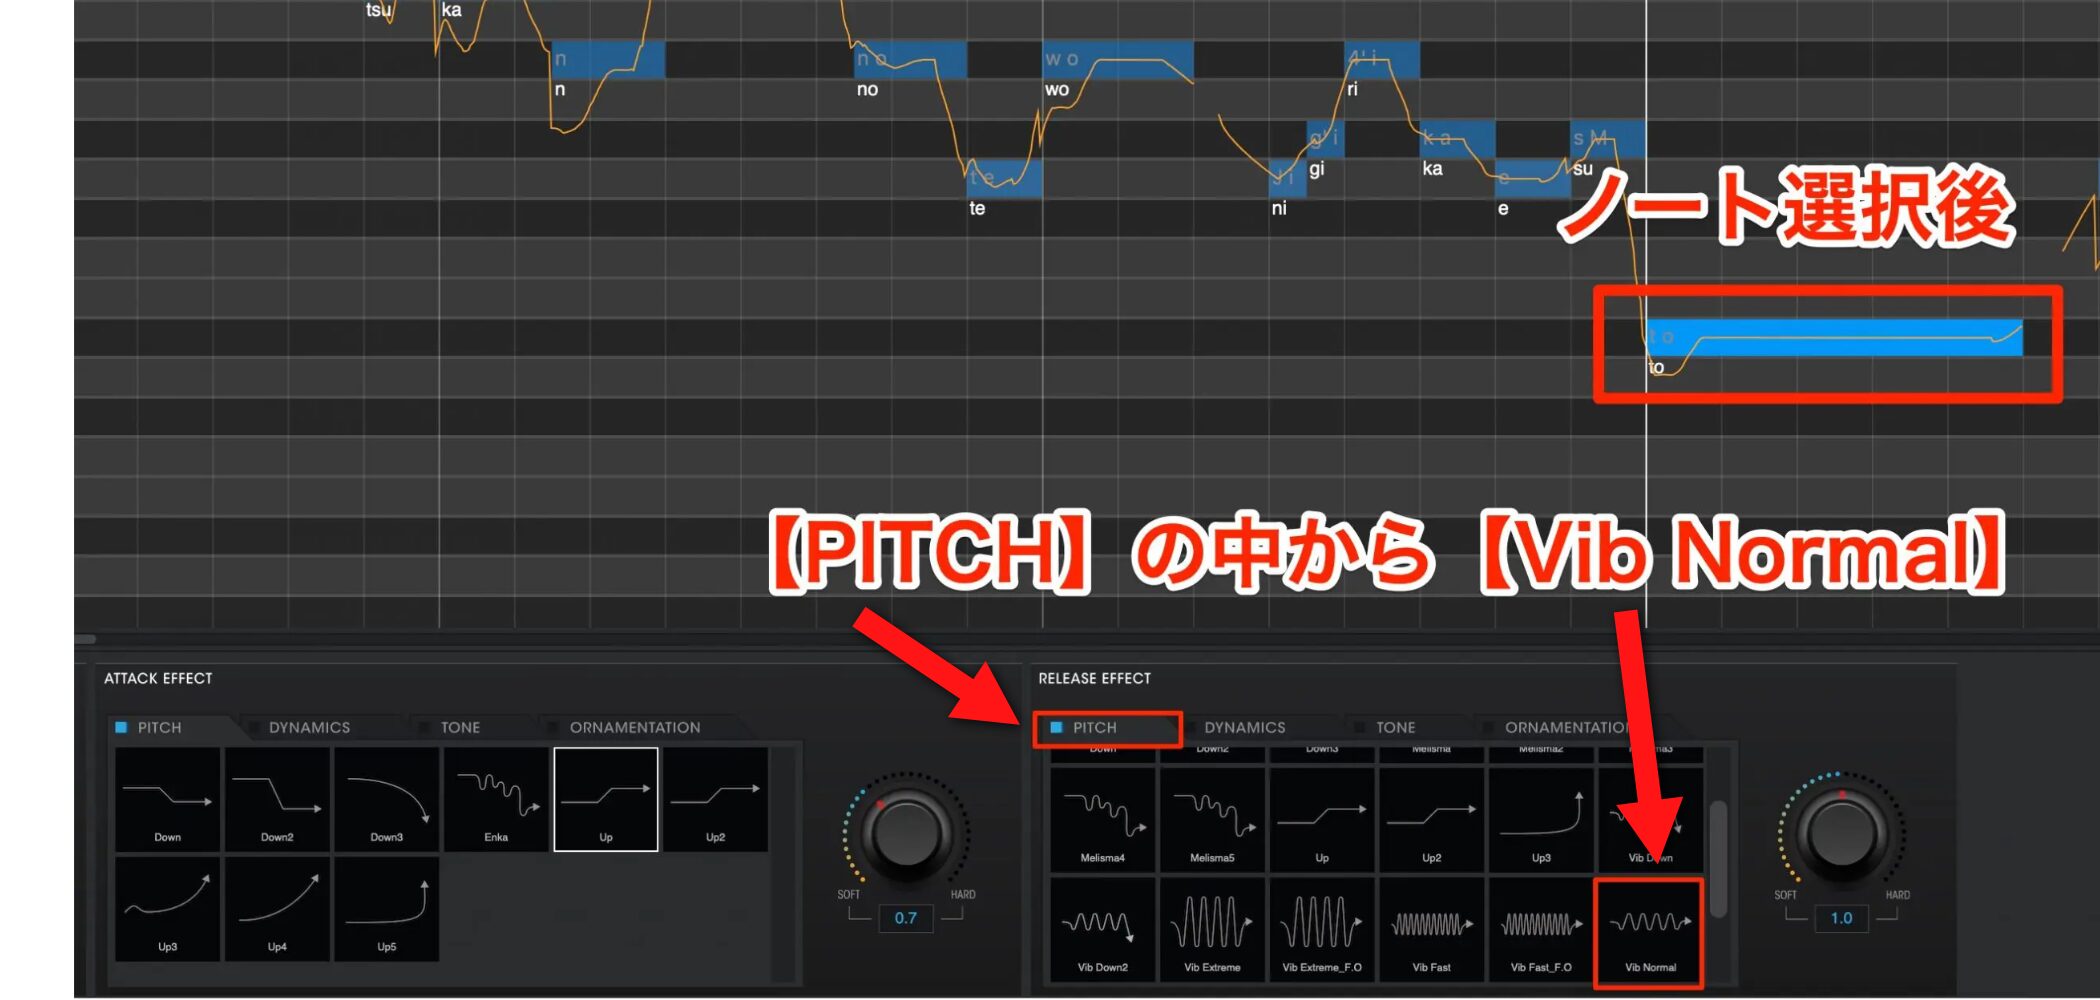
As with Attack Effects, select the target note and choose the desired style.
Here, we will try the vibrato types under PITCH.
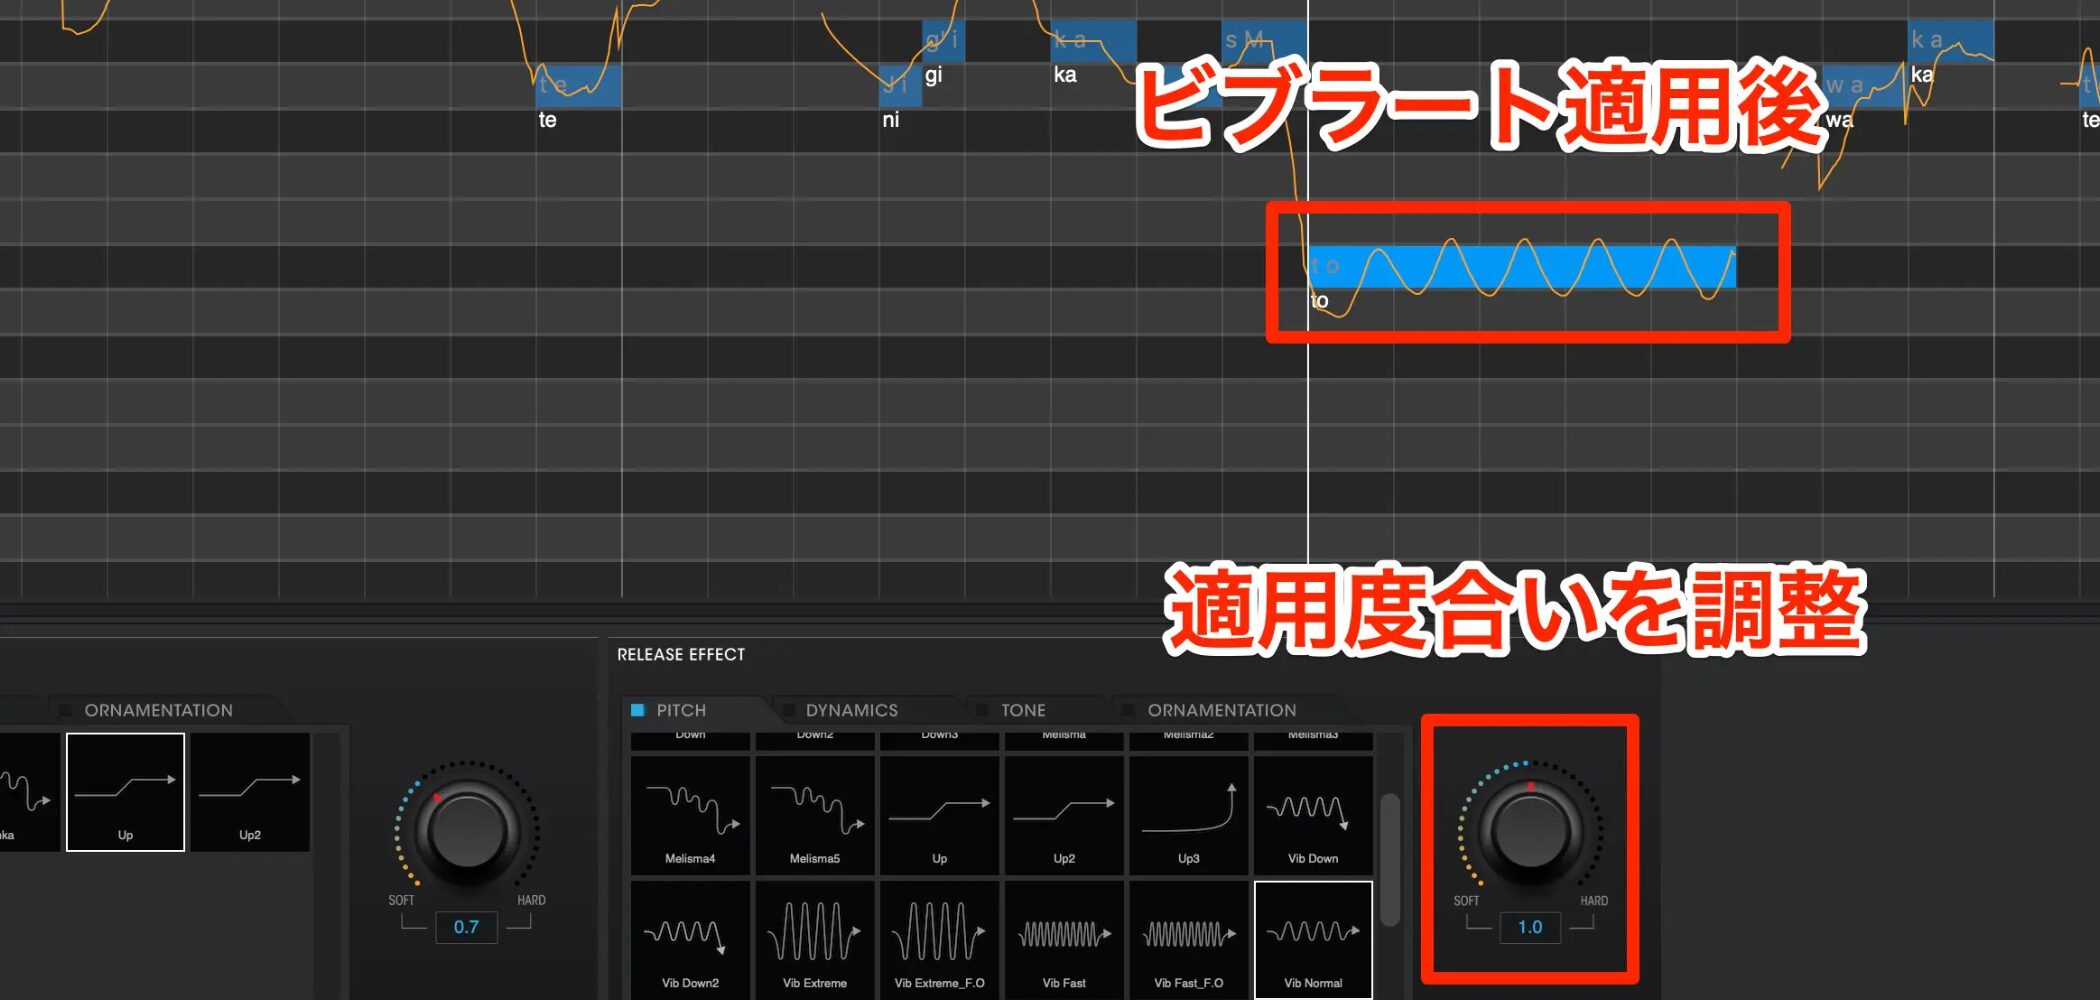
We felt that Vib Normal was simple and suited the song.
After choosing the effect, adjust its amount.
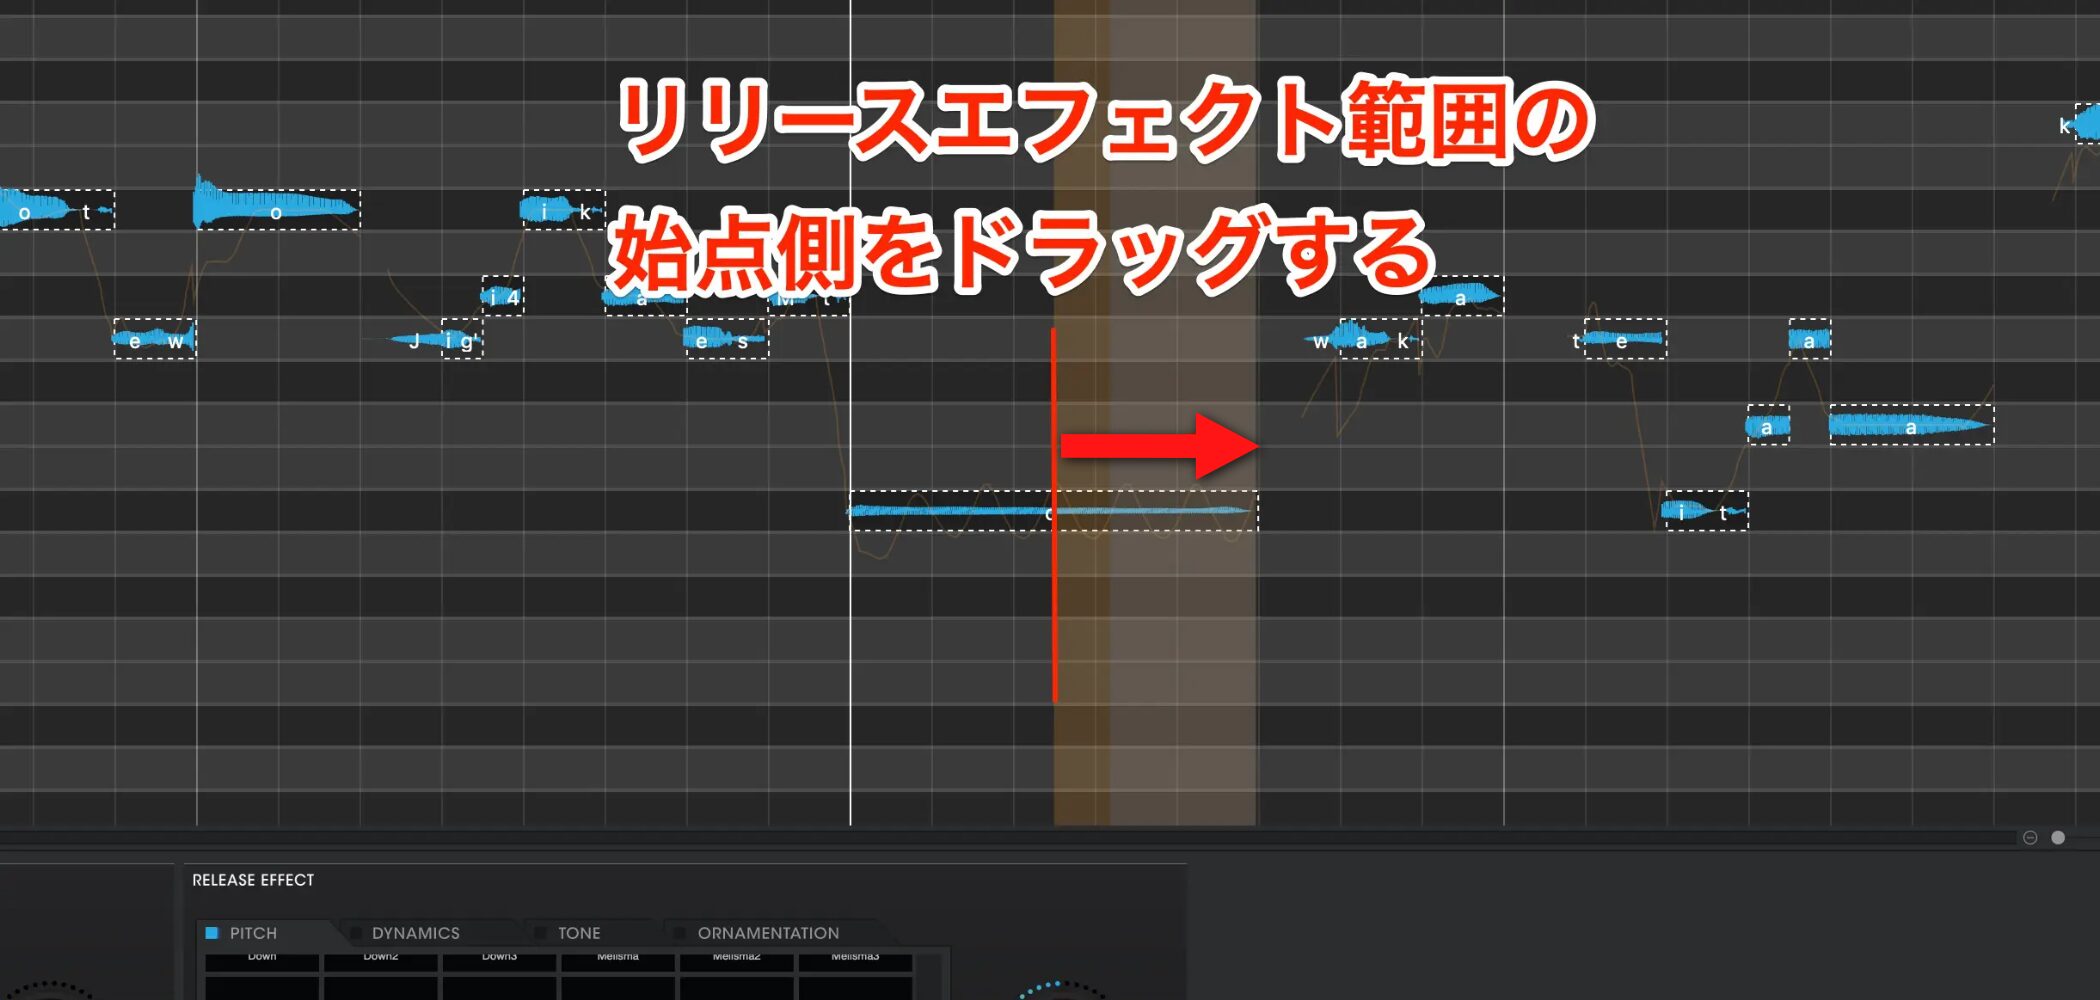
The timing of the vibrato onset matters, because it affects vocal expression and groove.
You can fine-tune this timing as well.
Let's make the vibrato begin slightly later.
Move the pointer to the latter half of the target note and drag the start of the orange region to adjust the effect's timing.
The key is to move it back gradually while previewing and listening to the result.
This is closer to the expression we want, but we will also adjust the vibrato speed slightly.
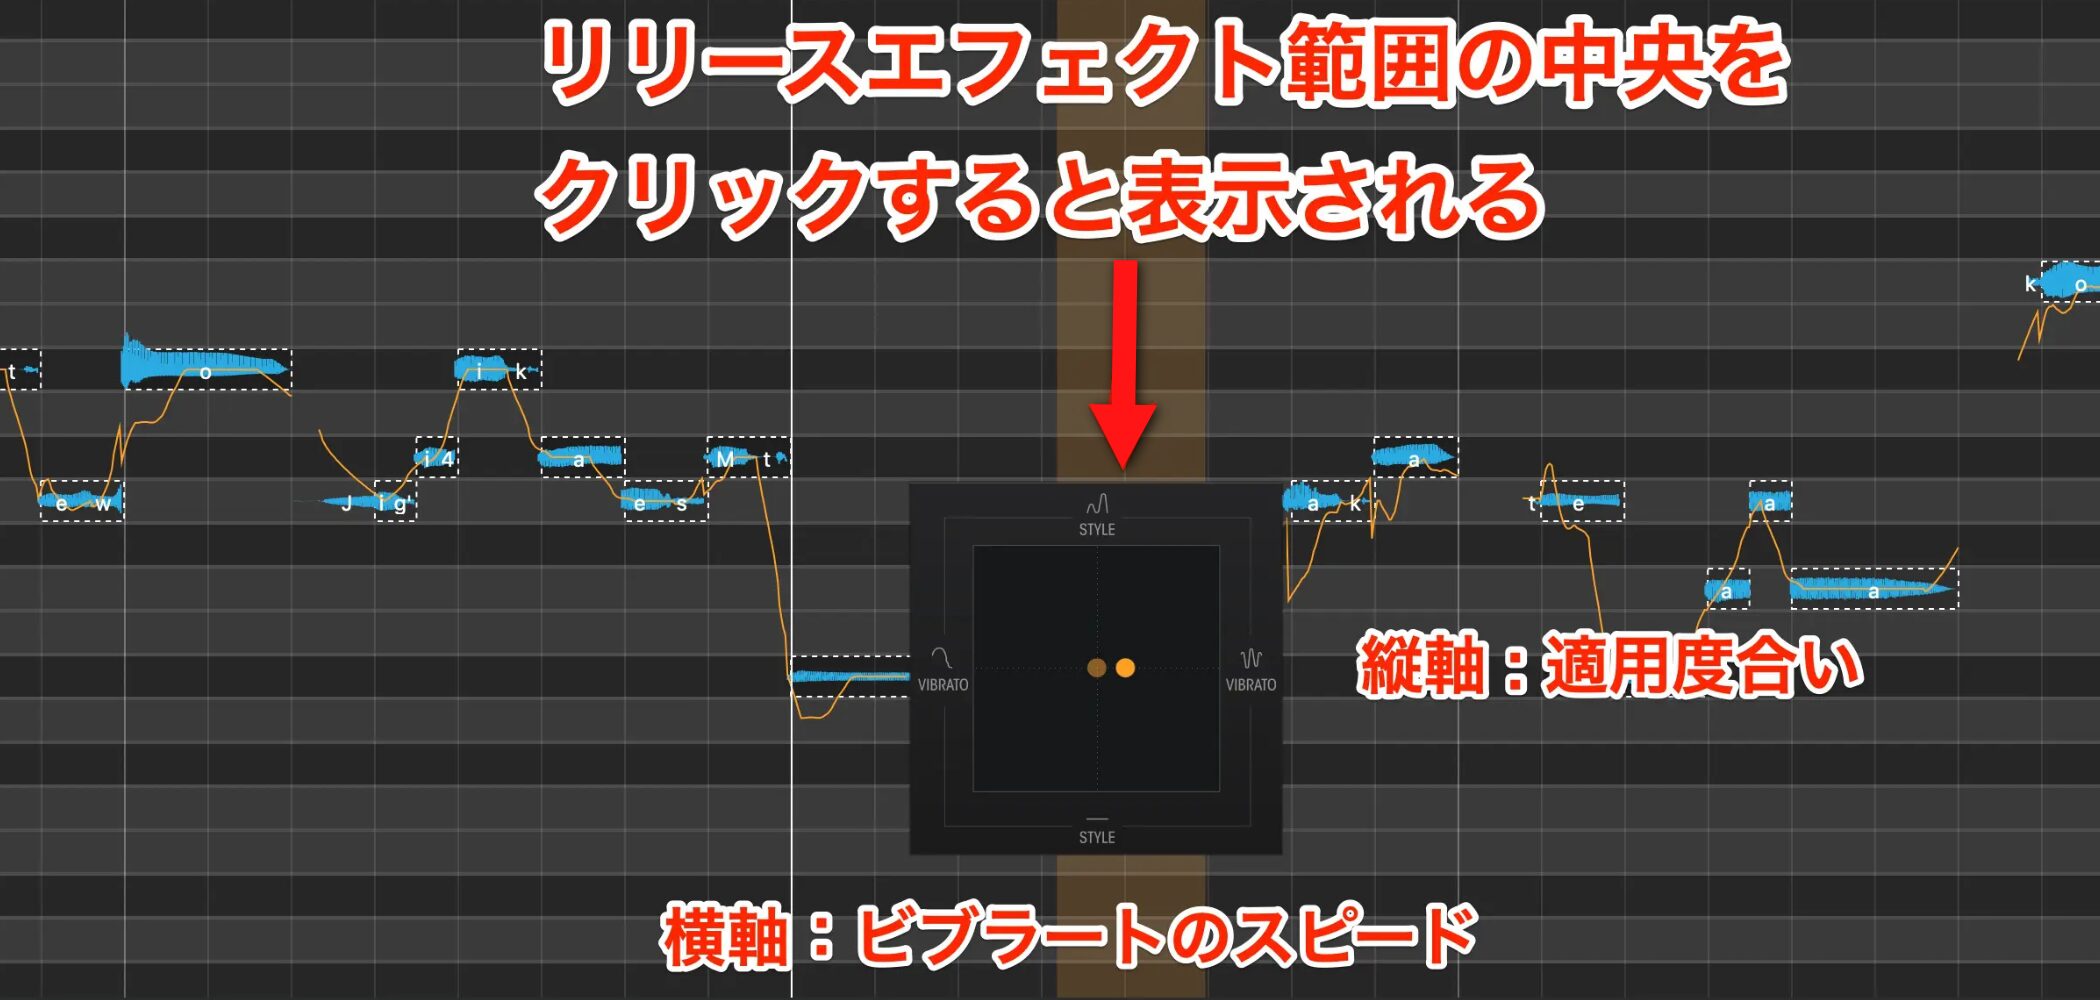
Click inside the orange region to fine-tune vibrato along its vertical and horizontal axes.
The vertical axis controls the amount, and the horizontal axis controls vibrato speed. Positioning the point on this XY display adjusts both parameters together.
We moved the point slightly to the right to speed up the vibrato.
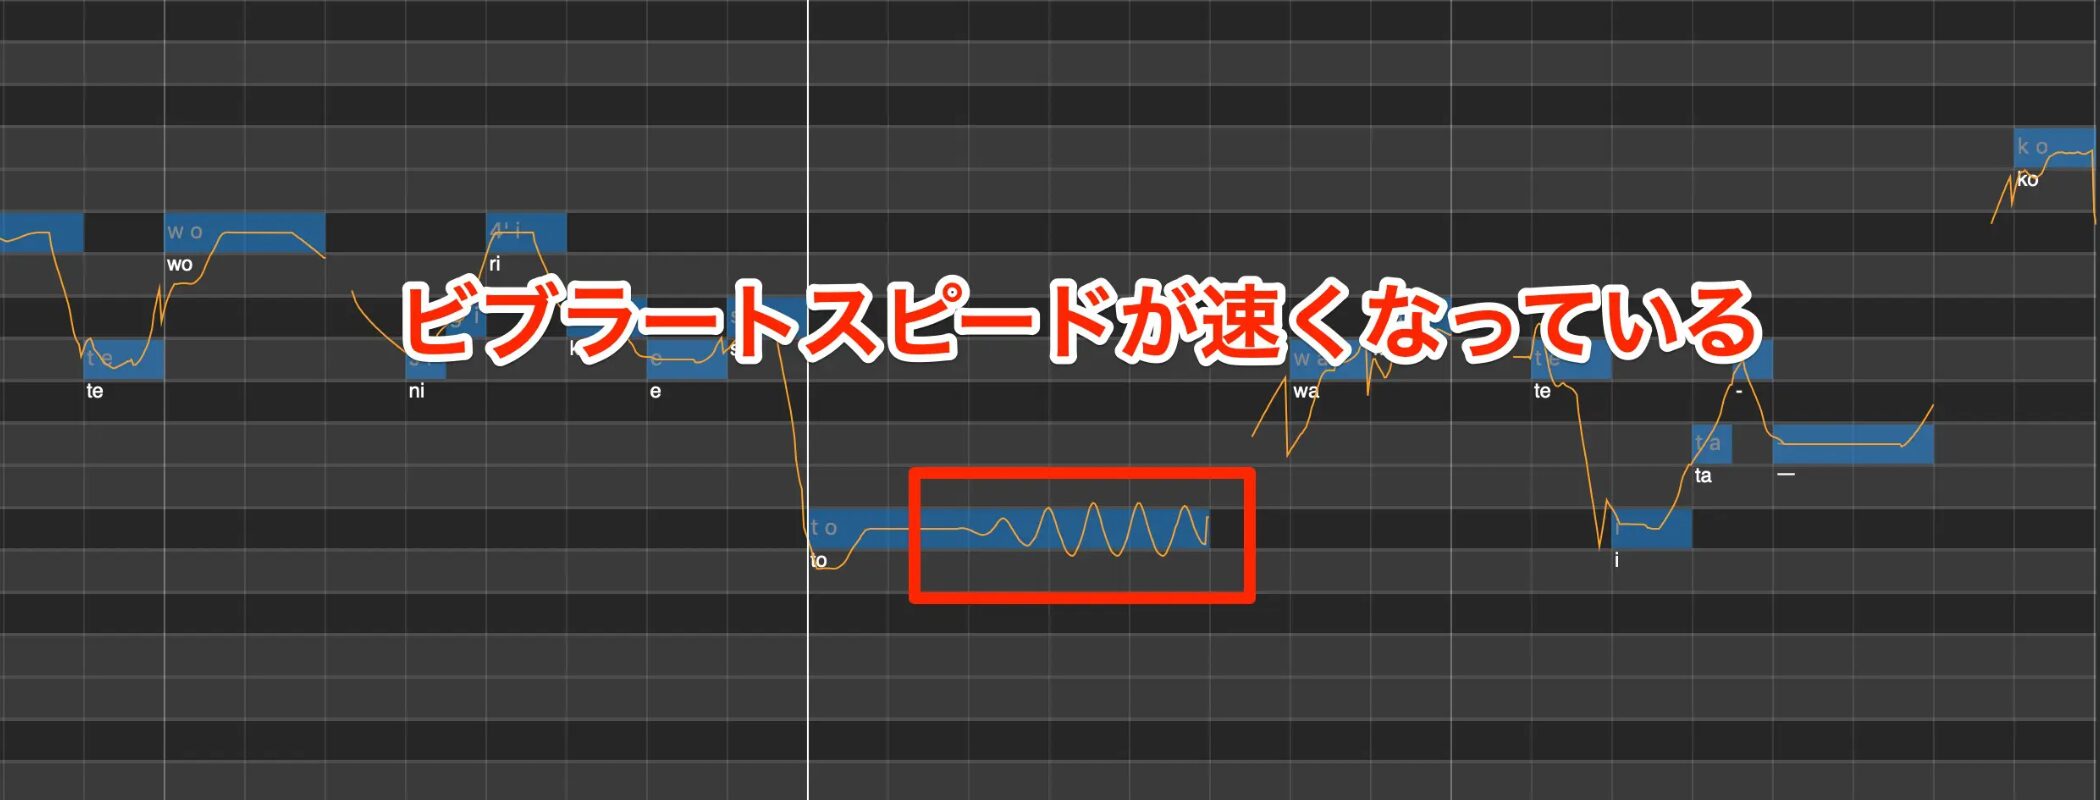
These edits are also reflected in the pitch curve.
Other effects can likewise be adjusted directly on the note.
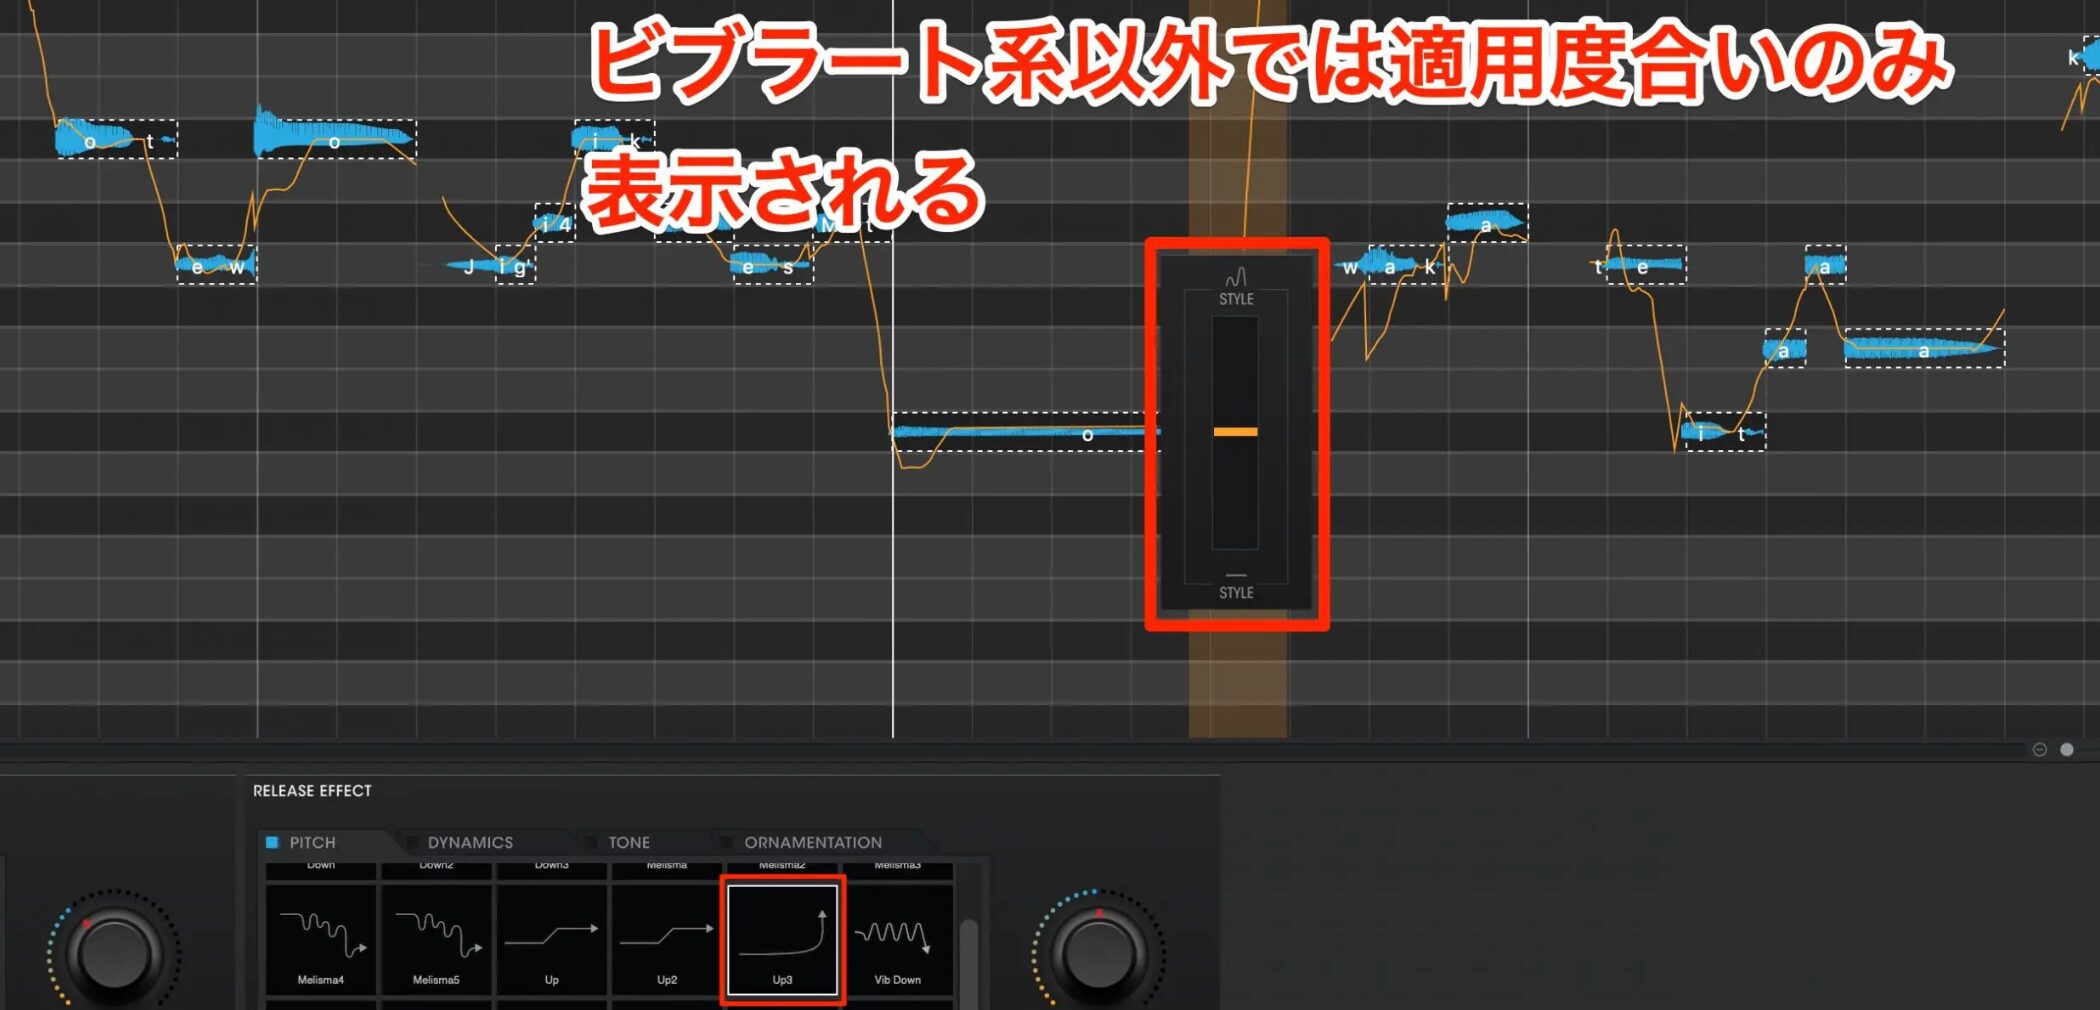
For effects other than vibrato, you can adjust the strength of the style's effect.
Adding a Vocal Run
Let's add expression to the release of another note.
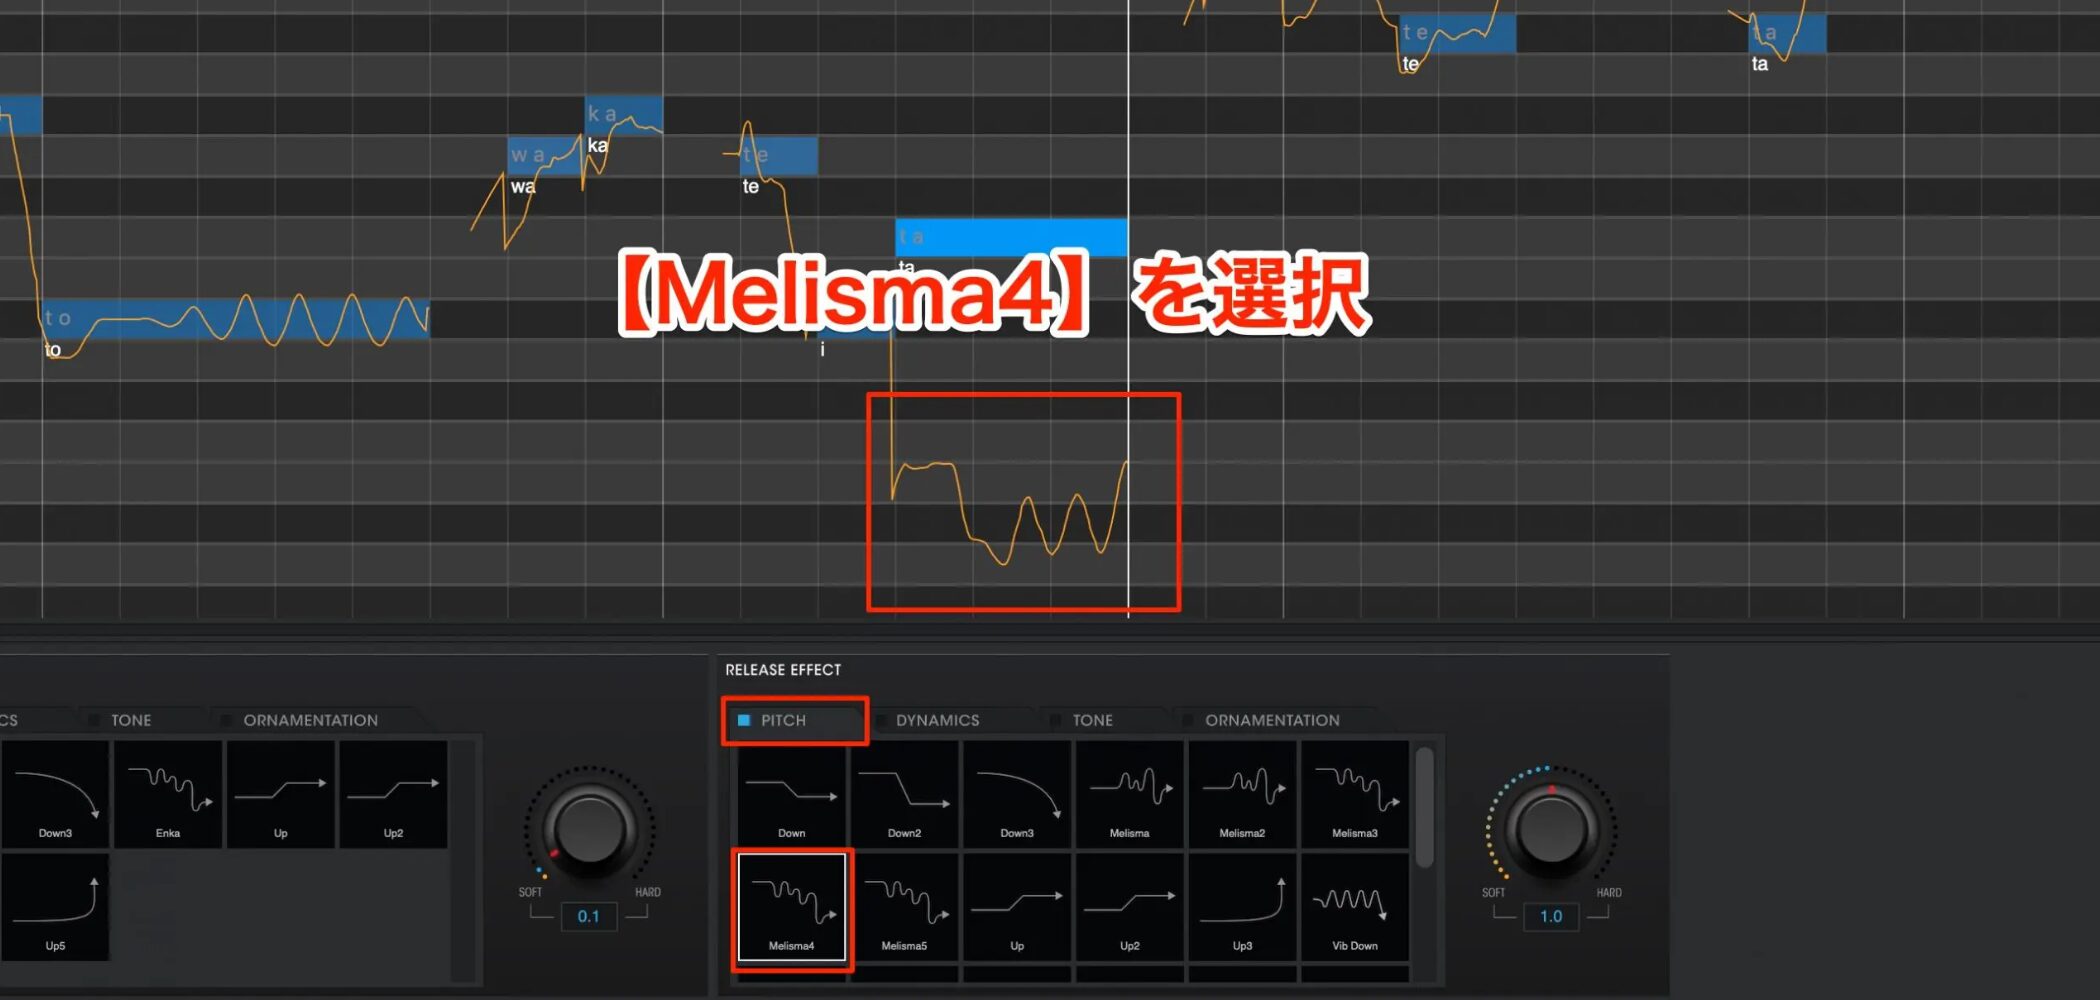
We will give this “ta” a pitch movement resembling a vocal run.
Release Effects include options that change the pitch substantially.
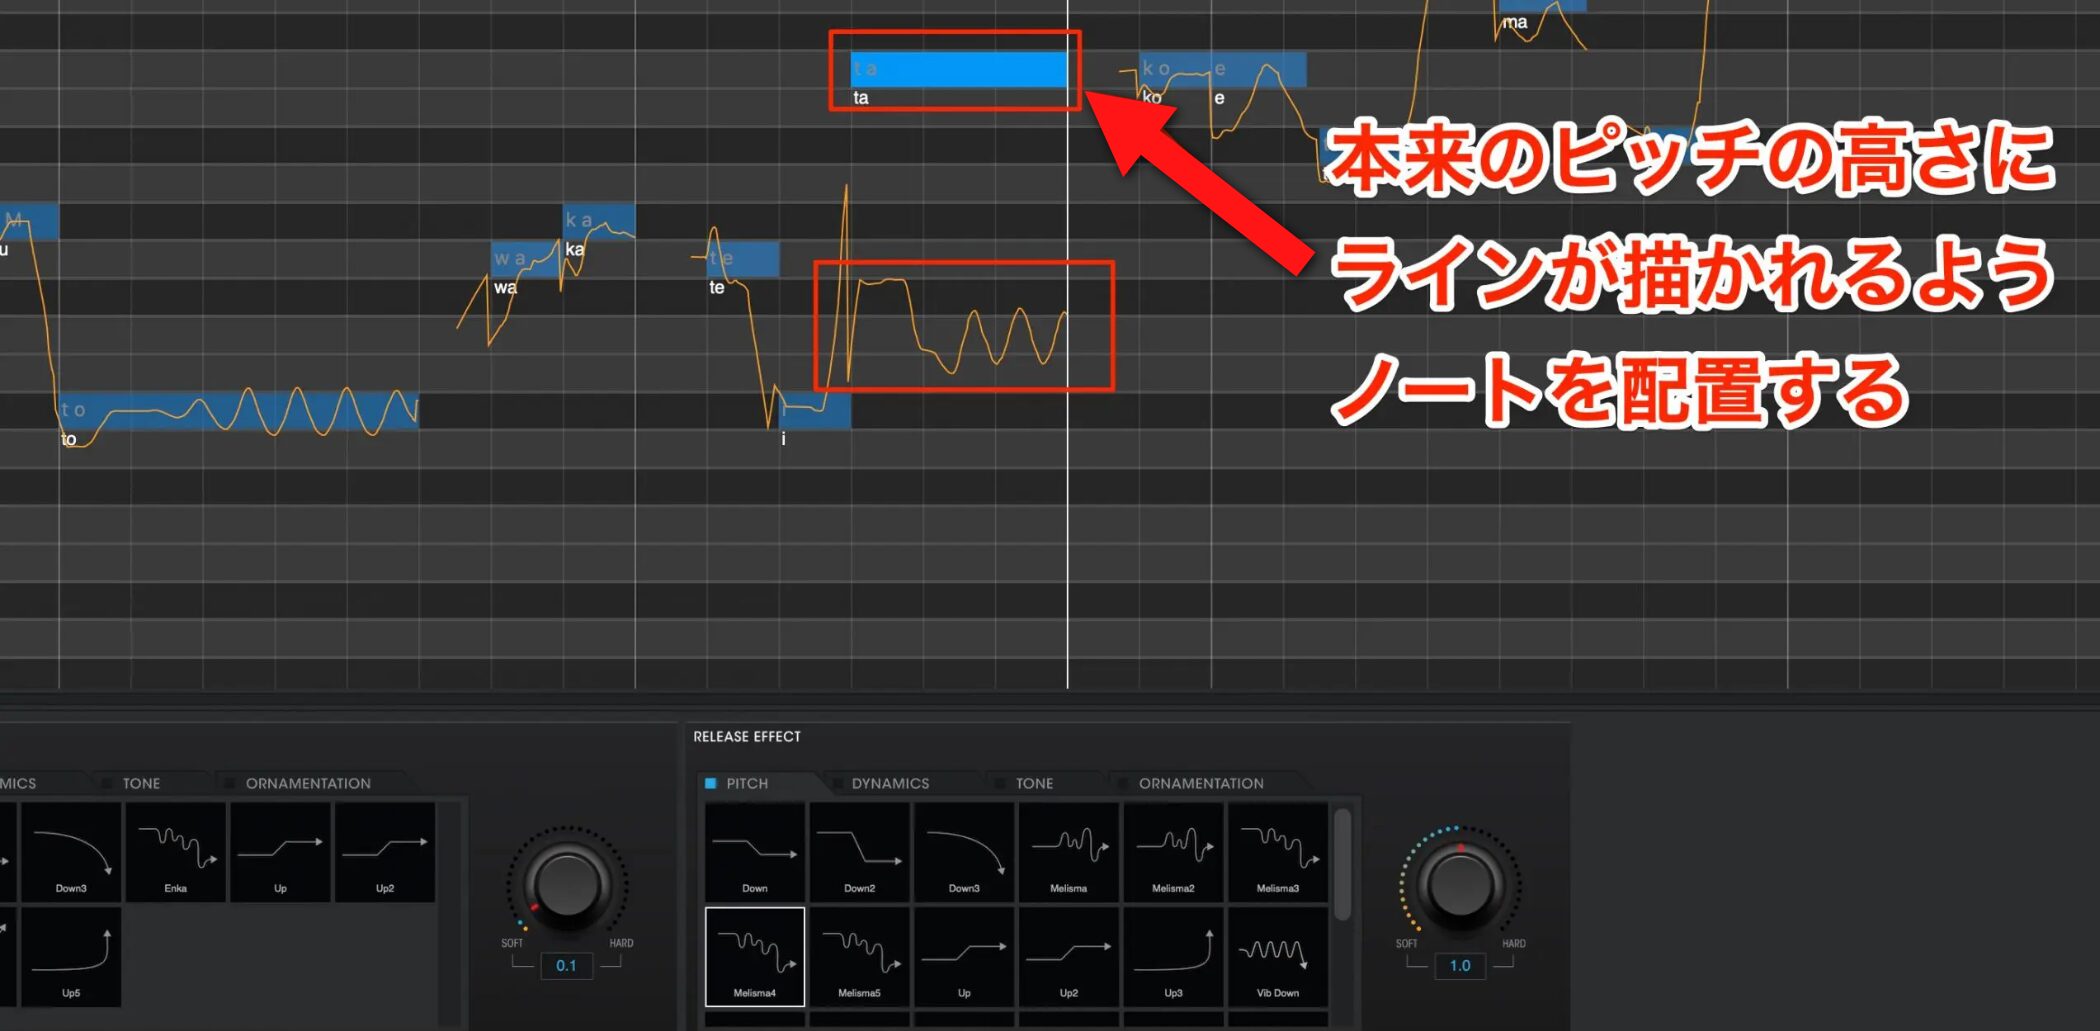
At the default setting, the pitch movement is large enough to change the melody itself.
We will adjust it while referring to the displayed pitch curve.
The original pitch is F, so move the note until the curve lands on F.
This gives us a more human-sounding expression.
Splitting Notes
If a style cannot produce the expression you have in mind, you can shape the pitch by splitting the note.
First, reset the Release Effect we adjusted to a neutral setting, then let's try this technique.
Split the note into as many sections as needed.
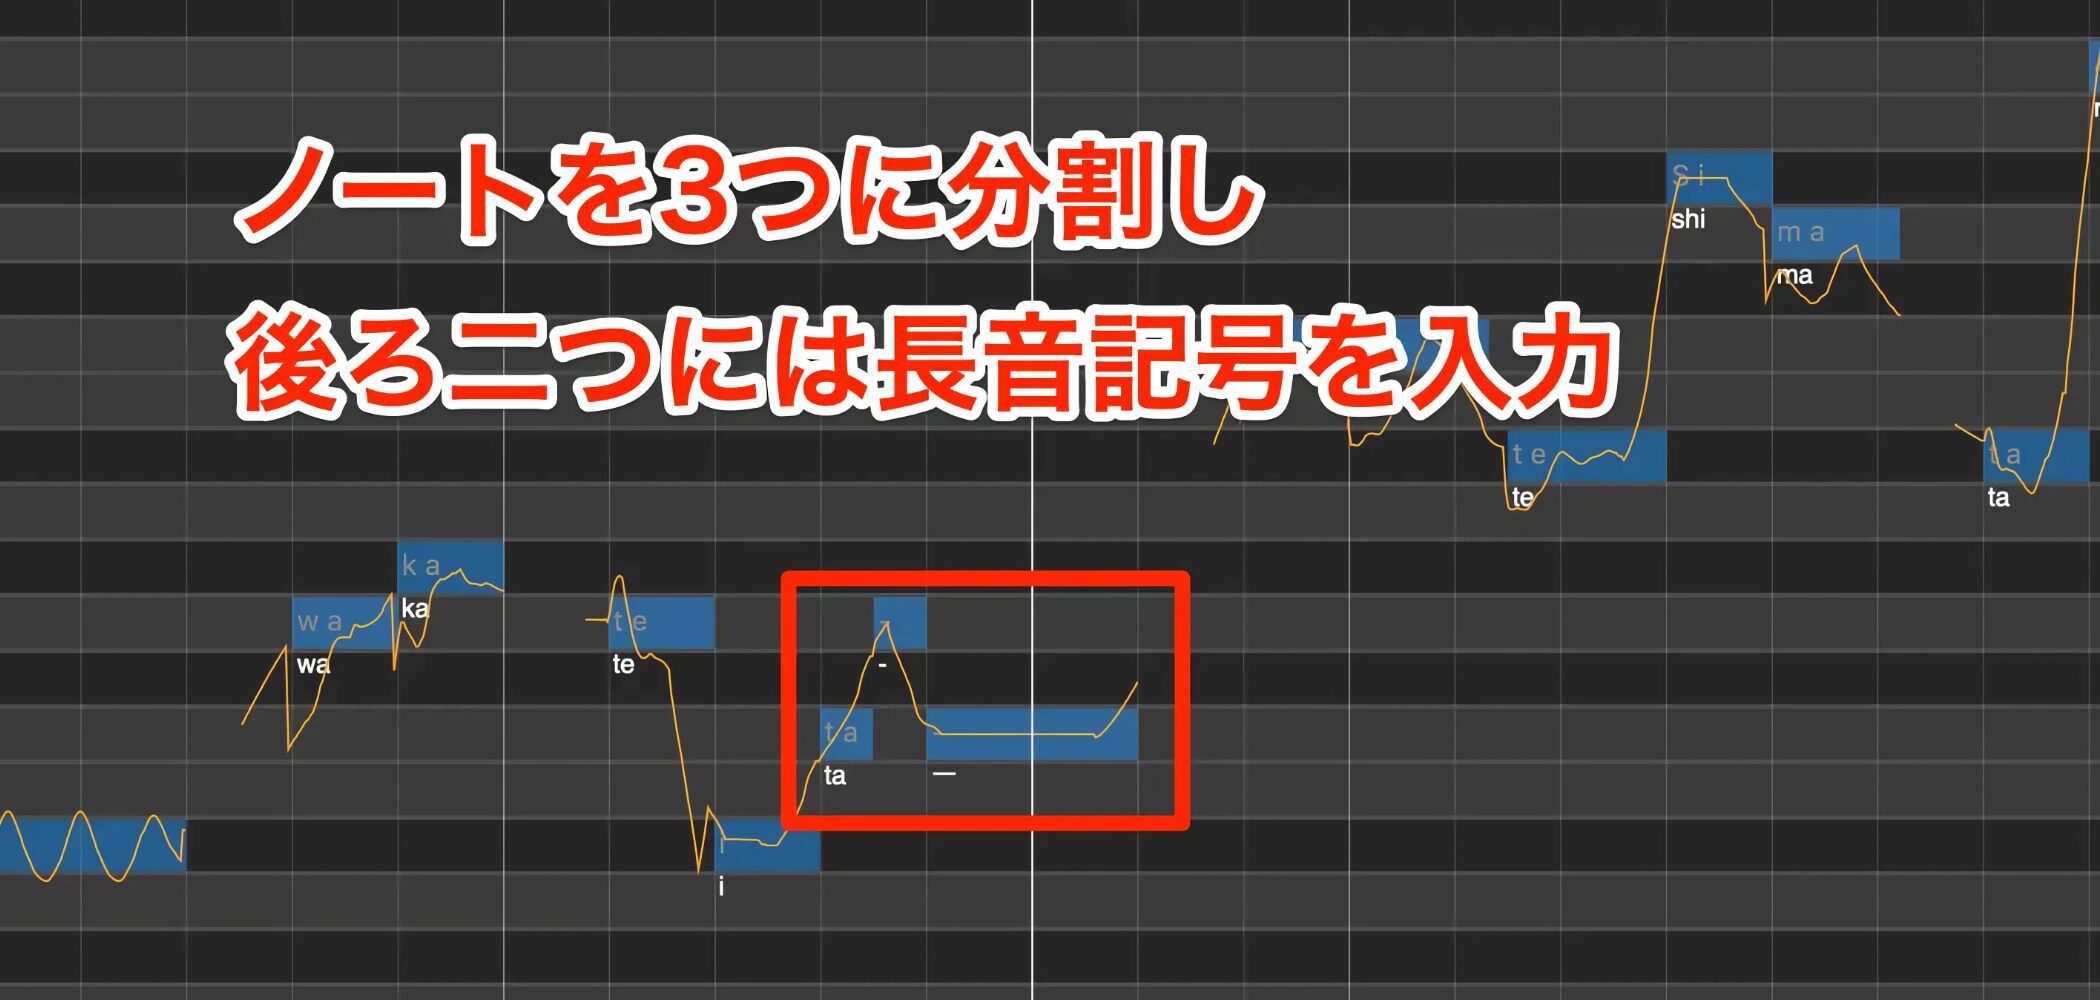
Here, we want the pitch to rise and then fall, so we split it into three.
Keep “ta” on the first note and set the remaining notes to the vowel-extension mark.
When you move those split notes to other pitches, they retain the pronunciation specified by the preceding note.
Raise the second note to create a subtle pitch inflection.
Combining Release Effects and note splitting to suit your needs and musical intent can make the vocal sound more human.
Creating a Robot Voice
Let's look at the robot voice used at the beginning of the chorus.
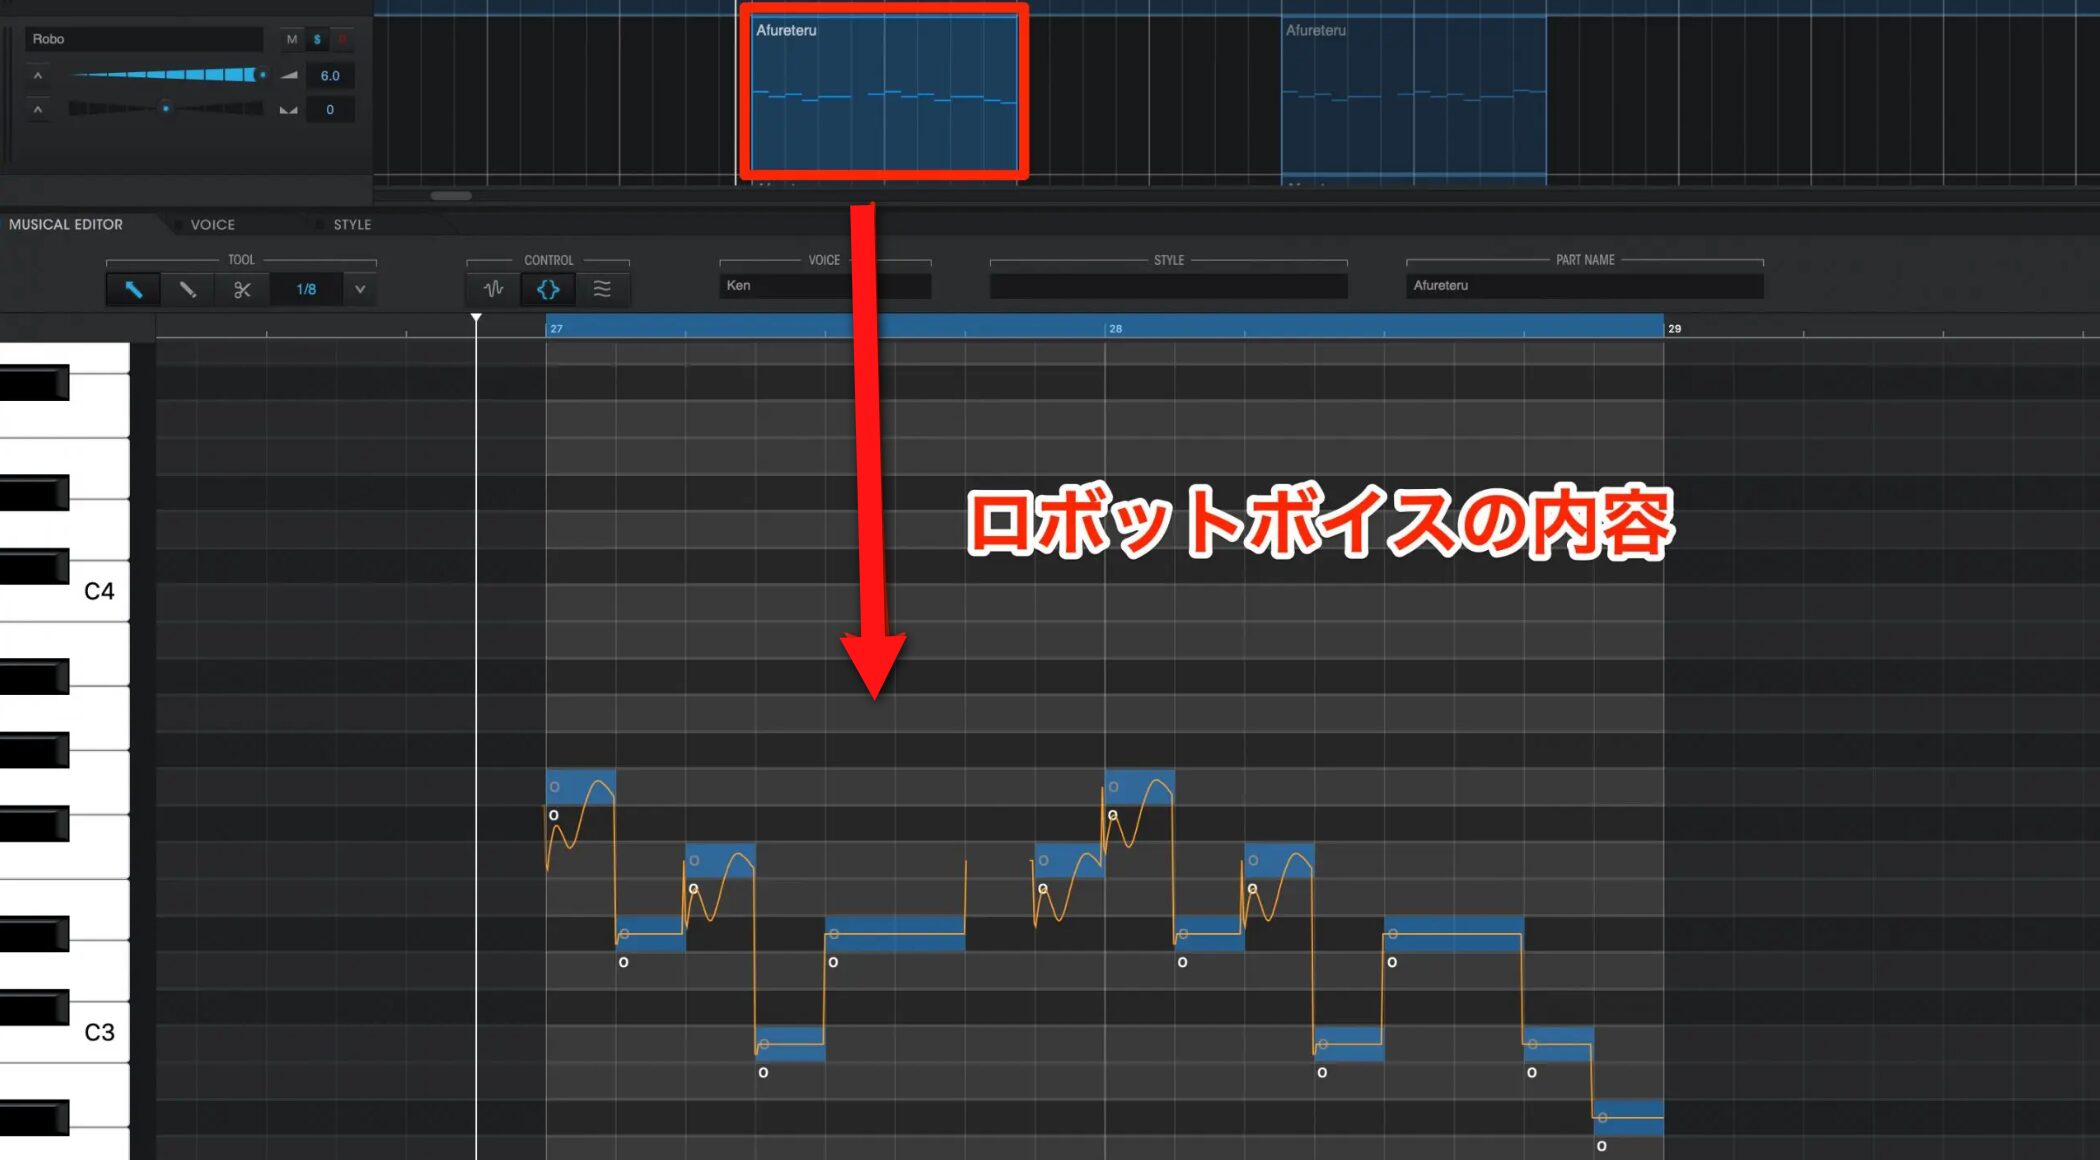
This technique uses the sound produced by applying strong pitch correction.
You can apply it with Robot Voice.
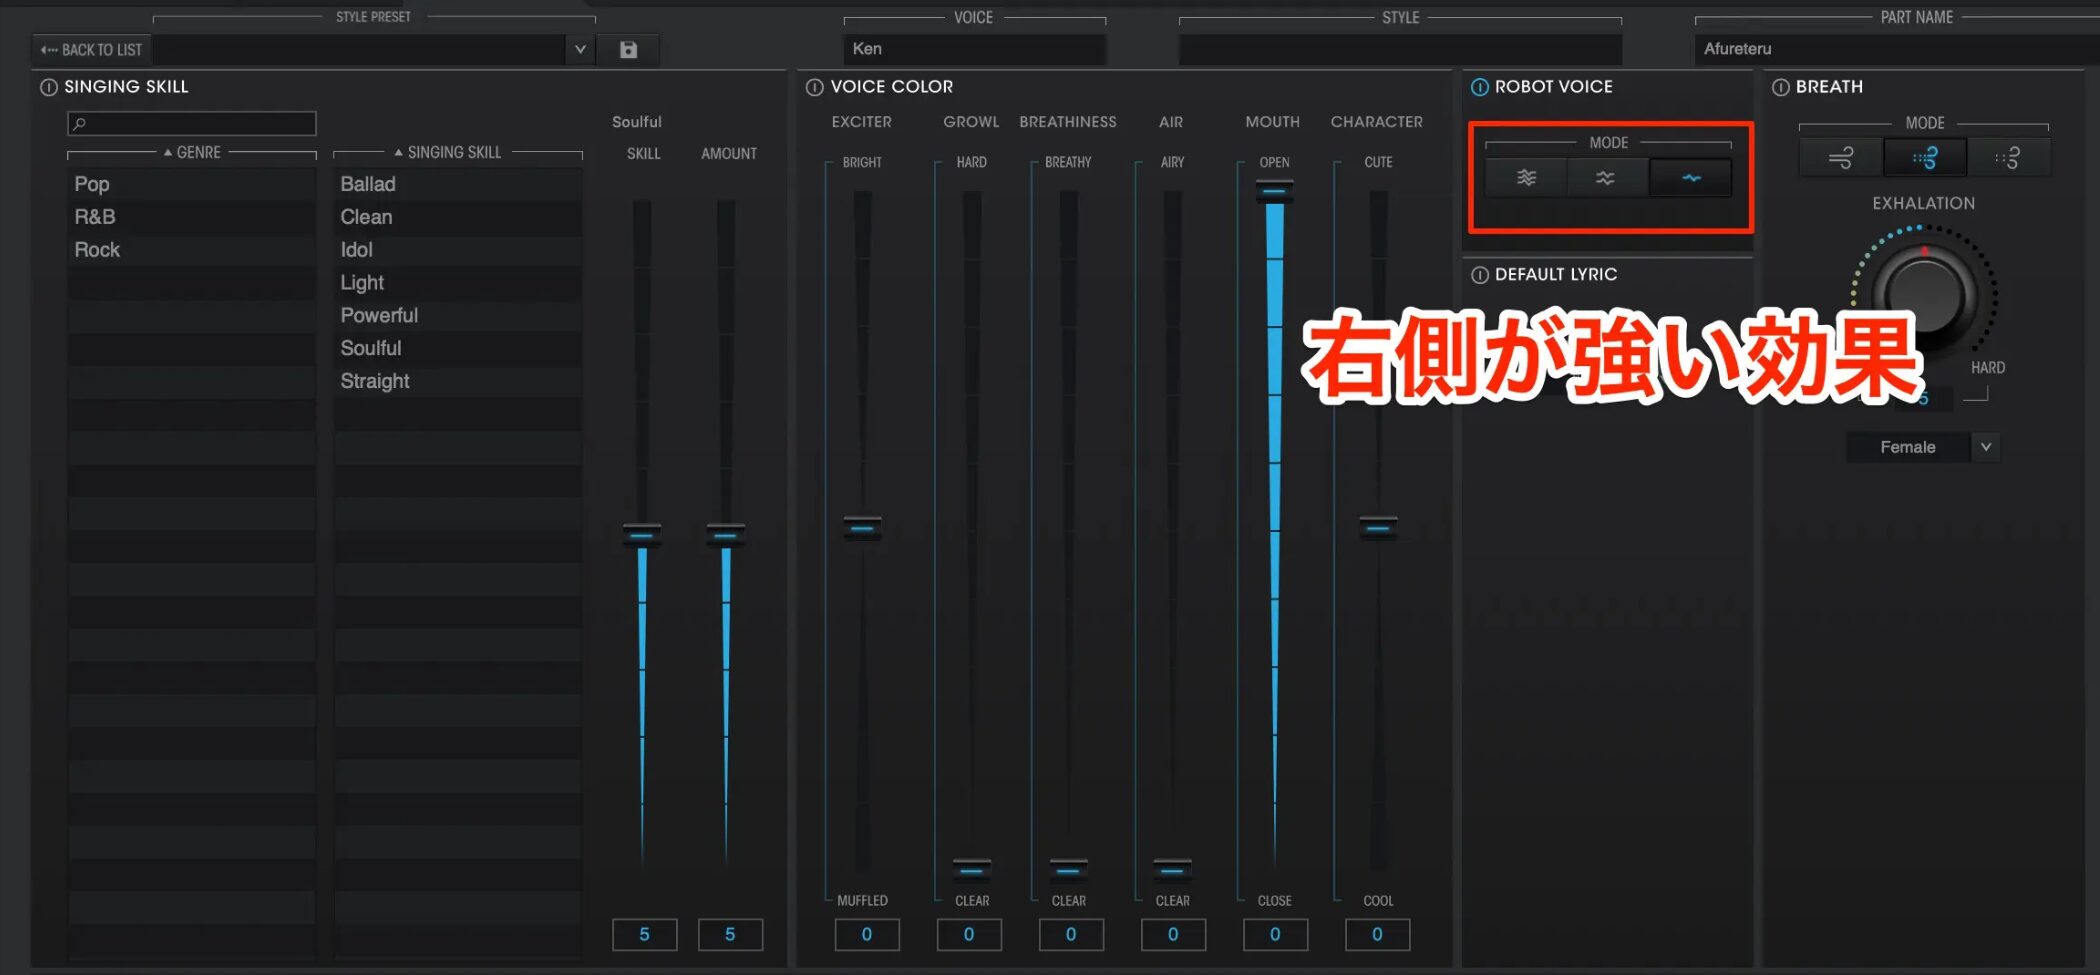
Pitch correction becomes stronger toward the right, so select the far-right option for the strongest effect.
For now, we have applied it to a vocal entered without expressive editing.
Here is how it sounds at this stage.
Applied to an unedited vocal like this, the result lacks musical interest.
We will therefore deliberately add pitch movement.

Adding upward scoops with Attack Effects at the beginnings of phrases and on ascending notes introduces musical expression.
The previously static pitch now has more movement.
How did you find these techniques?
VOCALOID 5's new features let you improve vocal tracks by choosing and adjusting ready-made effects, without the complex settings required in earlier workflows.
Try using these styles and Attack & Release Effects to bring the techniques from this tutorial into your own productions!
Frequently Asked Questions
Q1. Where should beginners start when creating a melody in VOCALOID 5?
Try the Phrase feature. Choosing a suitable phrase from more than 2,000 presets gives you a starting point for writing a melody. Filter by VOICE (voicebank) and TYPE, then use TRANSPOSE to match your song's key and bring it into the track.
Q2. How should I choose and use Style presets?
Style presets adjust vocal tone and expression together. Choose Lead Vocal for the main vocal, or select presets to suit the roles of different parts. Choose a nuance such as Clean under COLOR, then fine-tune SINGING SKILL in CUSTOMIZE for more detailed control of the voice.
Q3. How can I fix consonants that sound indistinct?
Use the Emotion Tool to control consonant length. Move the pointer above the note and drag the orange region's starting point earlier to lengthen the consonant and make the pronunciation clearer.
NEW ARTICLES
Latest English Articles