SERUM の使い方 【Xfer Records】
世界中のクリエイターが愛用!Serumの音作りの自由度と操作性を徹底解説
Xfer Recordsが開発した「Serum」は、多くの音楽制作現場で利用されているソフトシンセサイザーです。
直感的で分かりやすいインターフェースと優れた音質を備え、発売から時間が経過した現在でも、エレクトロニックミュージックやサウンドデザインの分野で高い支持を集めています。
今回は、Serumの機能や使い方について詳しく解説します。
SERUM動画 : 基本概要とプリセットのカスタマイズ


プリセットの選択
SERUMには、アーティストの手によるものなど、魅力的なプリセットが多数収録されています。
まずプリセットから選んで、音色のイメージを探っていくのもいいですね。

プリセットは画面上の黒い小窓から選ぶことができます。
また、その隣の「< >」ボタンを押すことで、次々と試していくことも可能です。


SERUMの基本的な構造
ベースとなるプリセットが決まったら、基本的な構造を理解して音をカスタマイズしていきましょう。
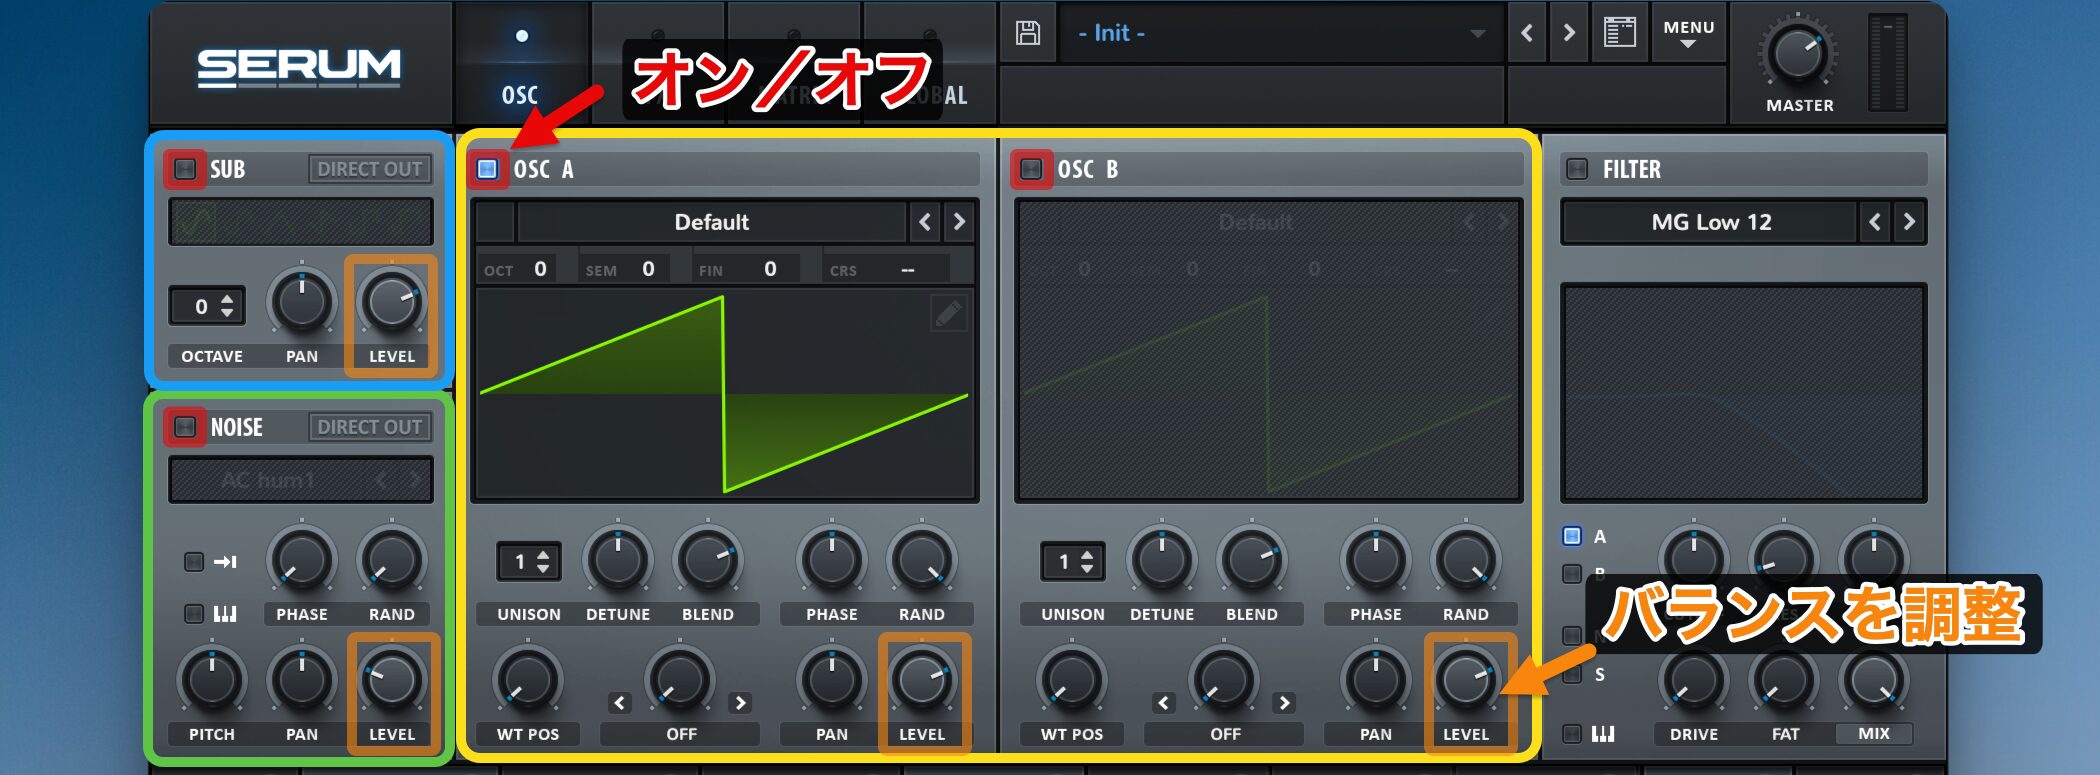
SERUMには、2つのメインオシレーター(黄枠)、サブオシレーター(青枠)、ノイズオシレーター(緑枠)が搭載されています。
それぞれの名前の横にある青いボタンでオン/オフを切り替えて、「LEVEL」ノブでバランスを調整することができます。
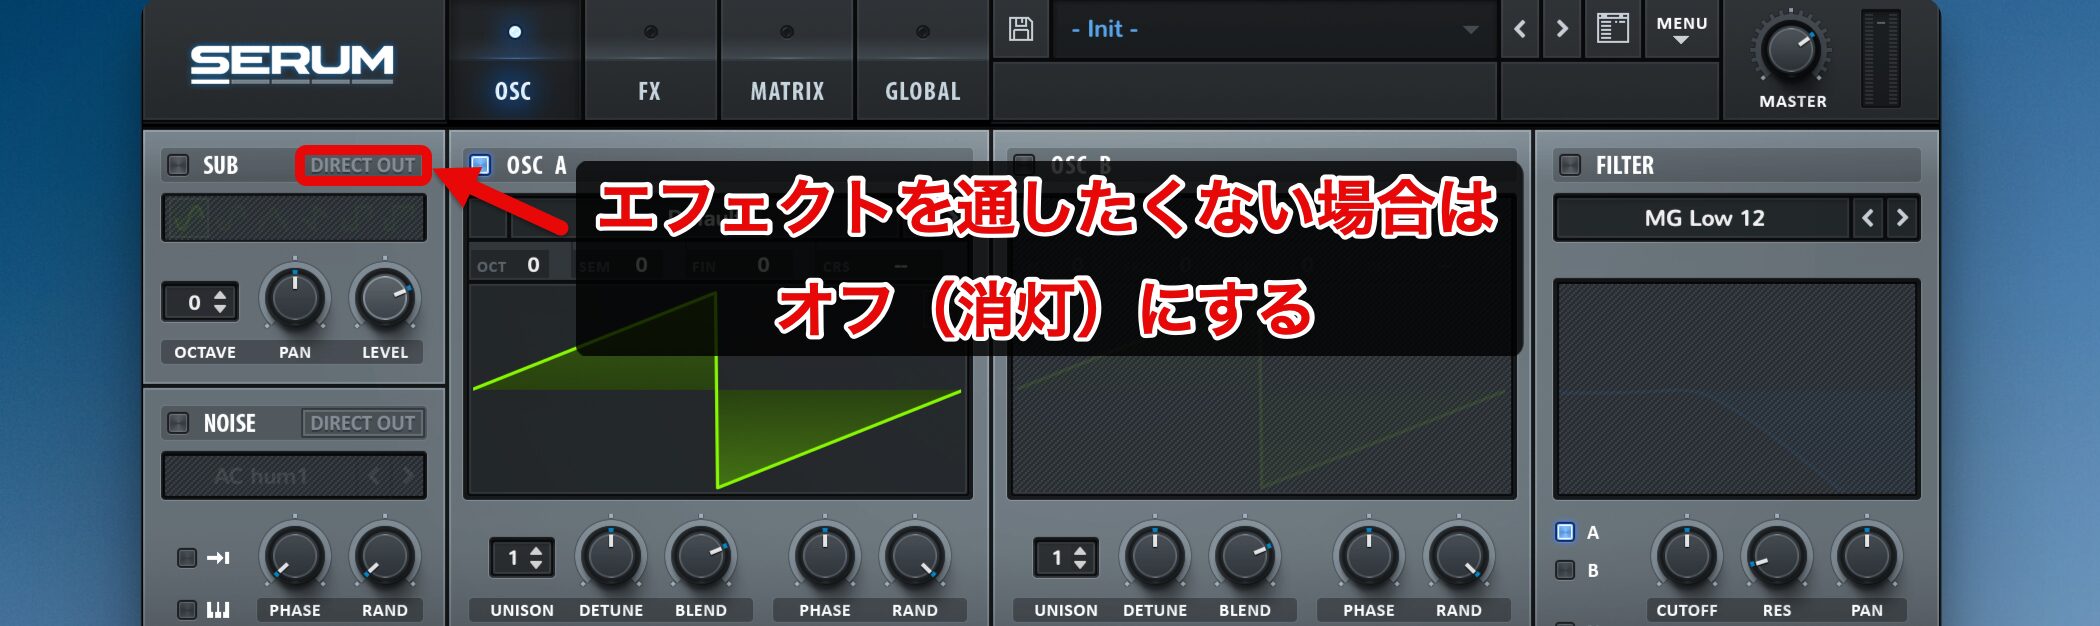
SUBオシレーターの横にある「DIRECT OUT」は、エフェクトを通すかどうかを選択することができるボタンです。
サブベースなど、エフェクトを通したくない場合はオフにしておきましょう。
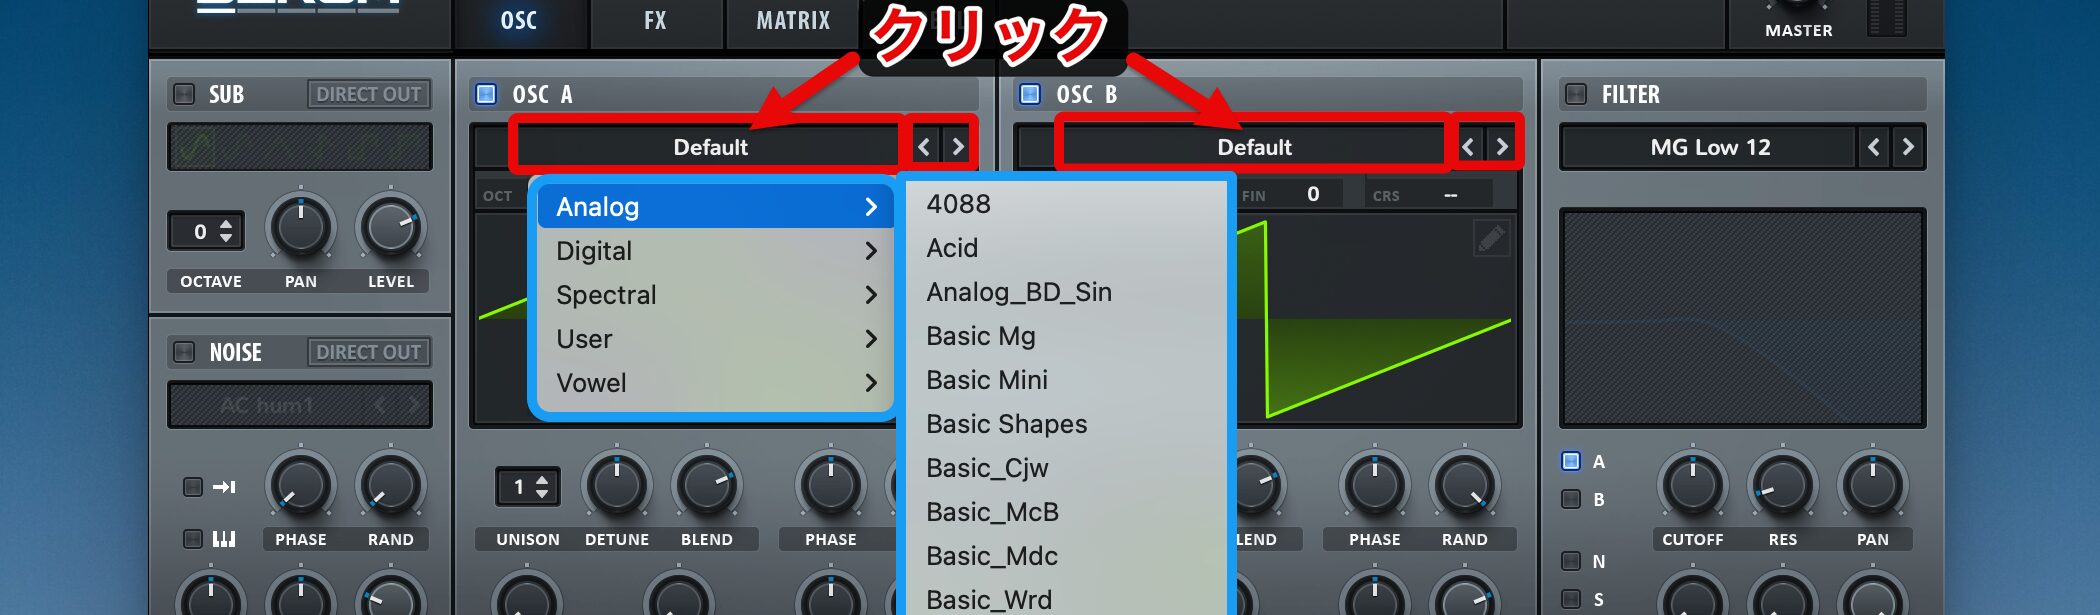
OSC AとBの波形(Wavetable)は、「Default」の箇所をそれぞれクリックすると選択できます。
こちらも「< >」ボタンで次に移っていきます。
非常に多くの種類があり、切り替えるごとにプレビューできるので、選んでいるだけでも楽しいですね。
エンベロープとLFOの概要
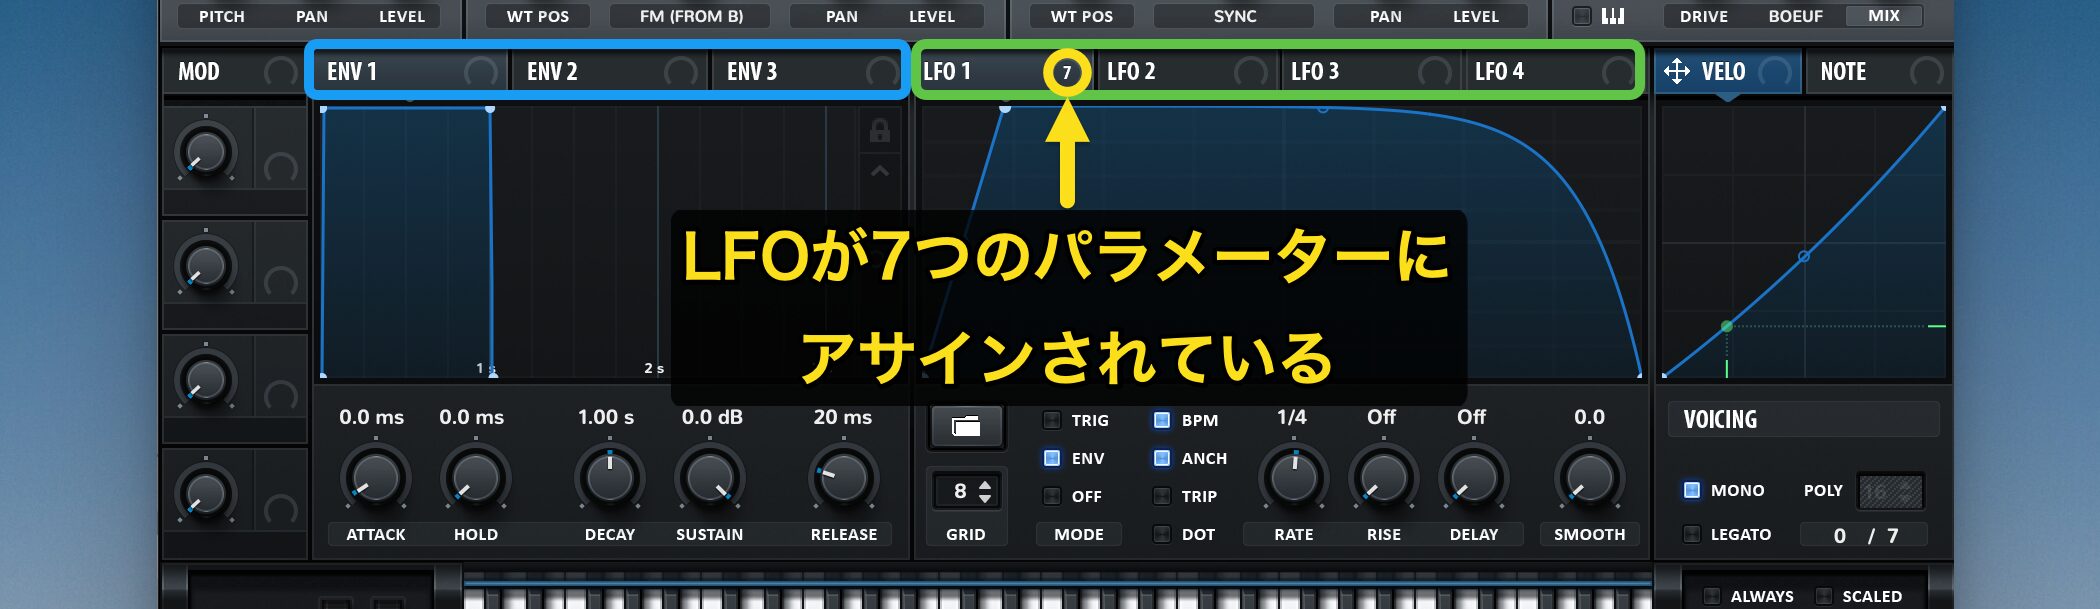
音に動きをつけていきたい場合は、画面下段のエンベロープとLFOを操作します。
左がエンベロープ(x3)、右がLFO(x4)です。
このプリセットの場合、「LFO1」の横に7という数値が表示されていますが、これはLFOが7つのパラメーターにアサインされていることを表しています。
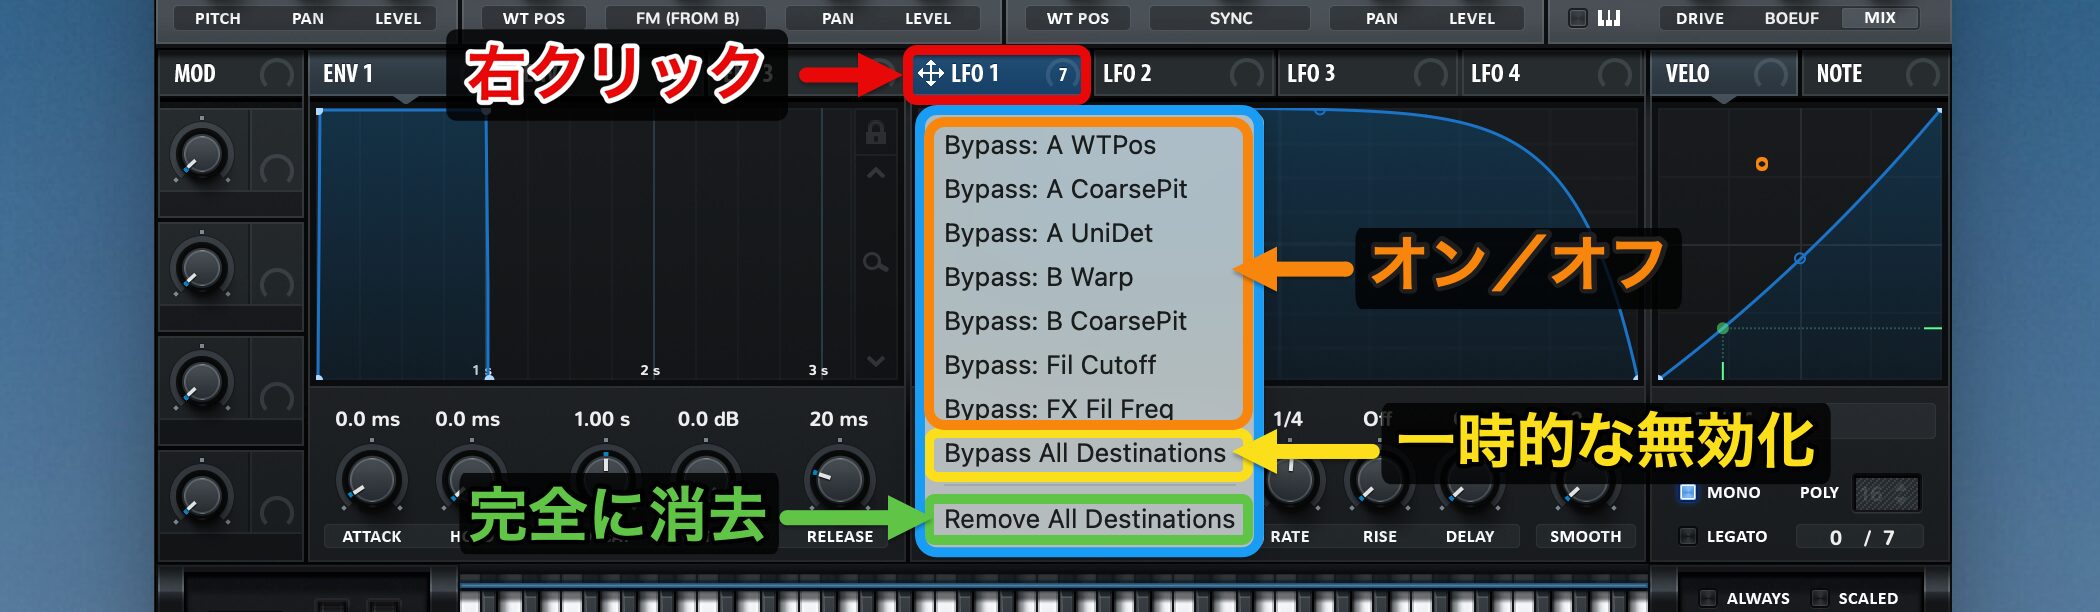
その箇所を右クリックすると、アサインされているパラメーターの一覧が表示されます。
ここでは以下の操作を行うことが可能です。
- 各パラメーター名 : アサインのオン/オフ
- Bybass(Activate) all Destinations : LFOアサインの一時的な無効化(その後の復帰)
- Remove all Destinations : LFOアサインを完全に消去
LFOの基本操作
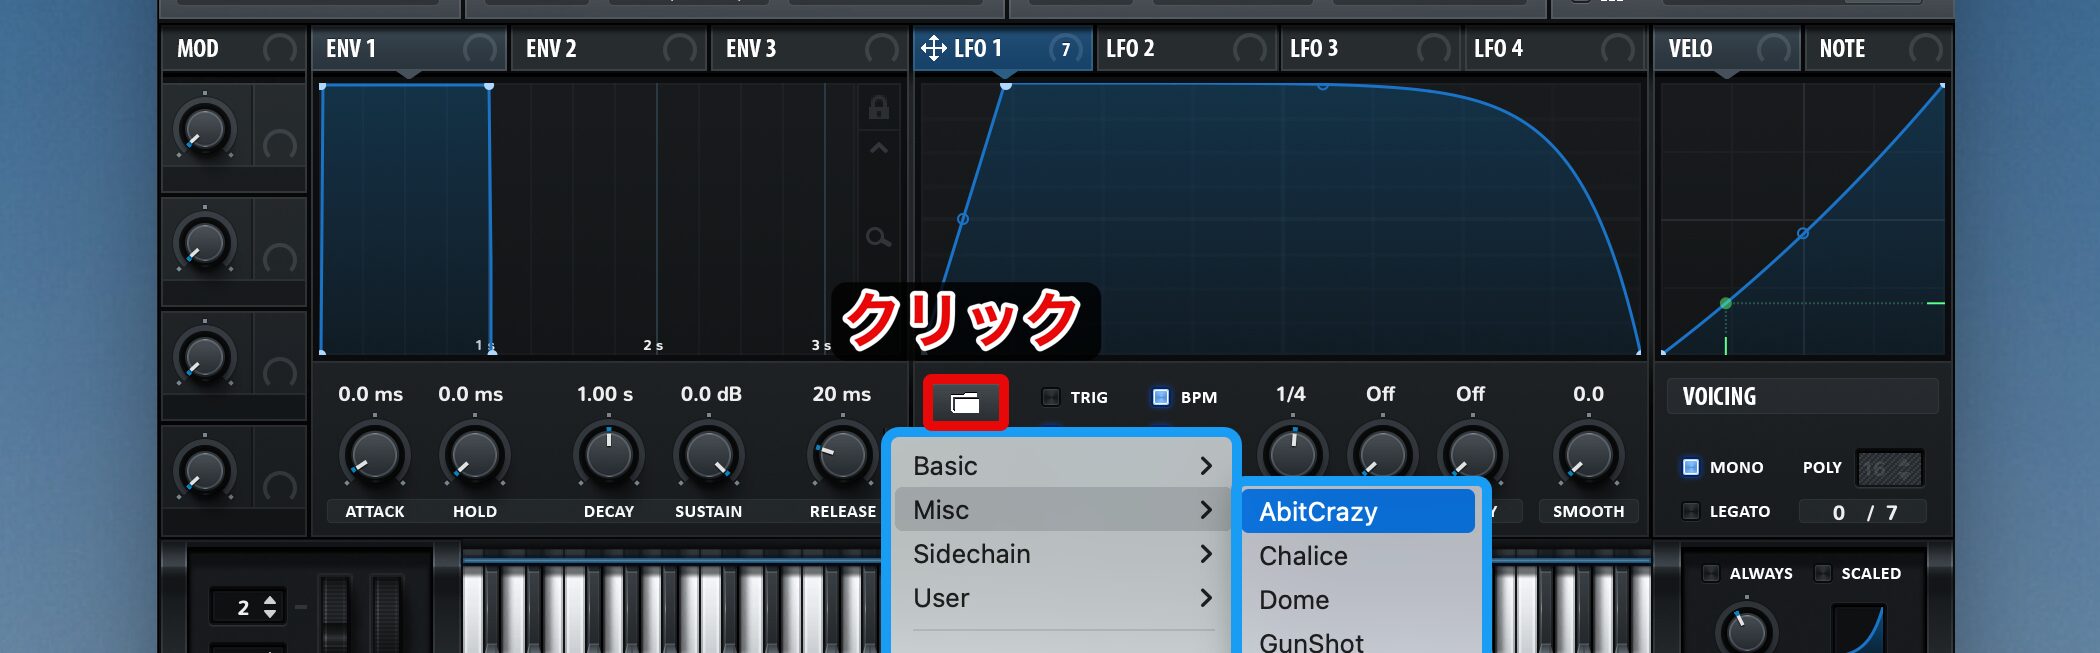
LFOのノブが並んでいる箇所にあるフォルダマークをクリックすると、LFOタイプのプリセットを選択することができます。
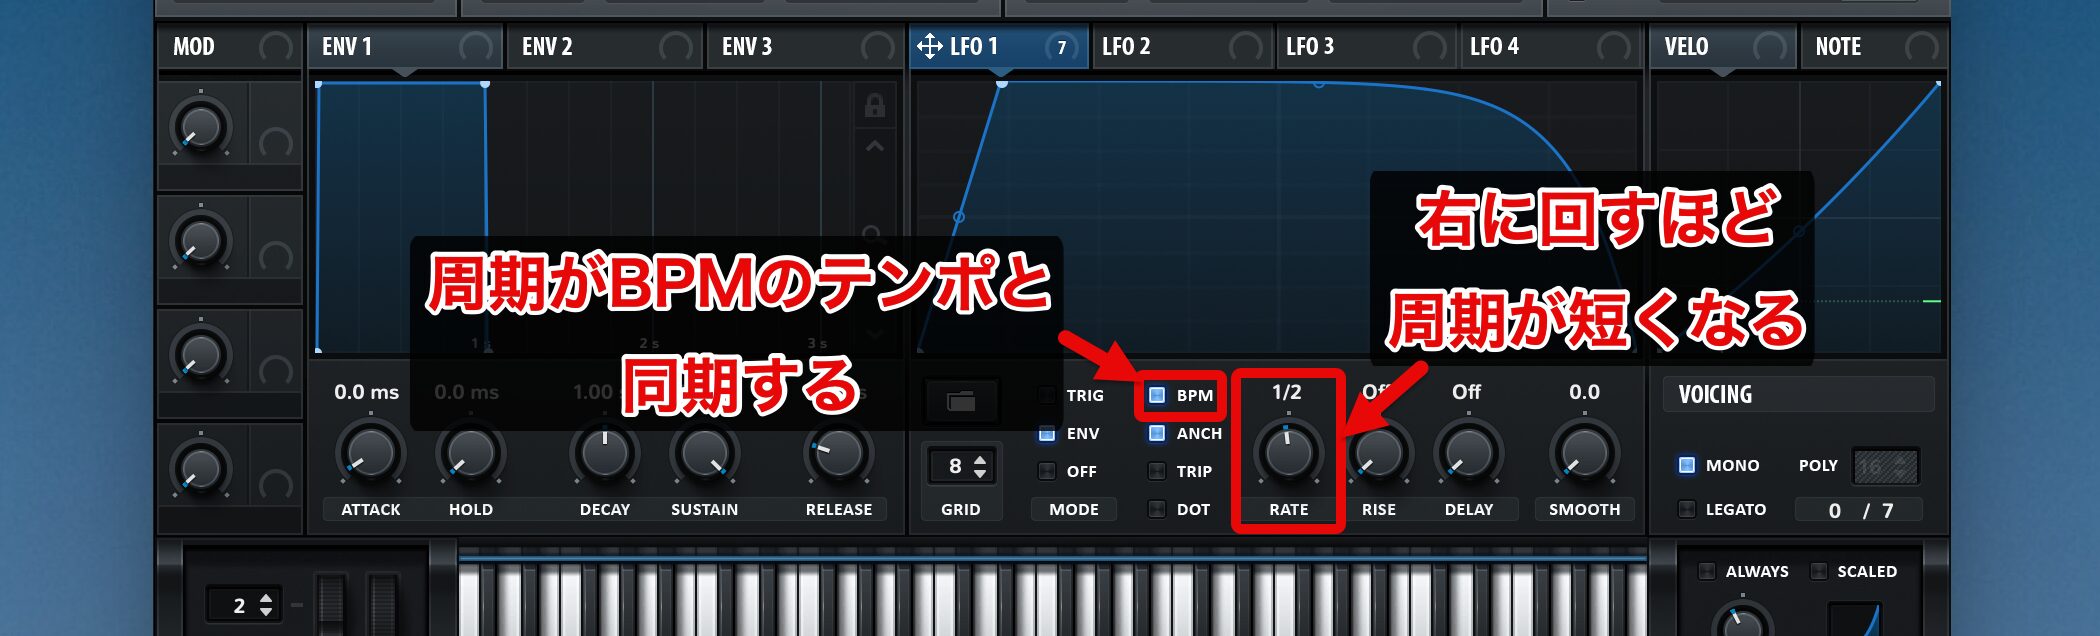
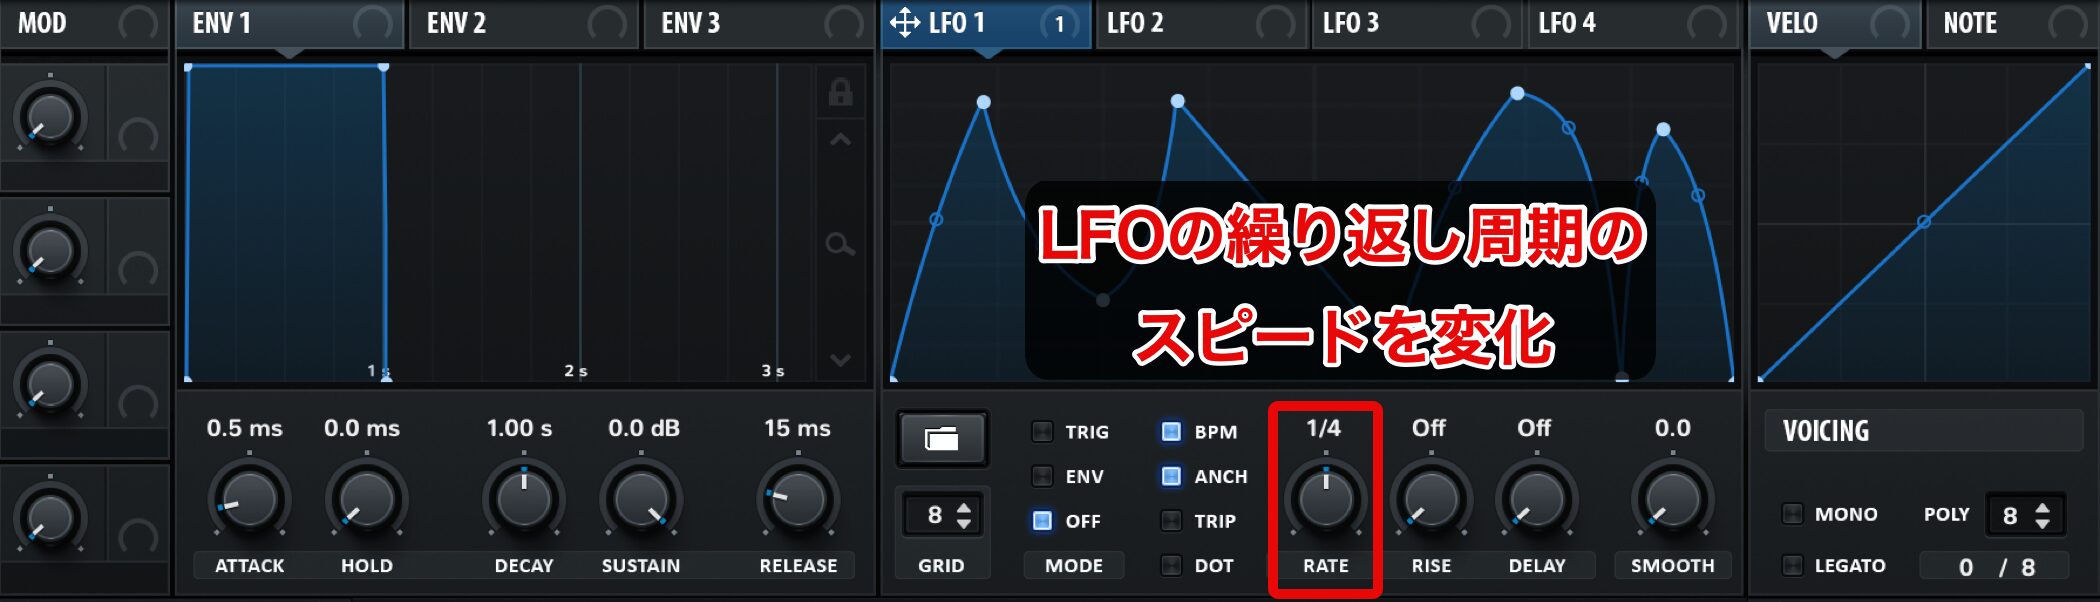
次に、「RATE」を変えてみましょう。
RATEノブを右に回すほど、周期が短く(動きが早く)なります。
左の「BPM」スイッチをオンにすると、周期がBPMのテンポと同期し、RATEの表示が「1/2」「4」といった数値になります。
楽曲のビートに合わせたい場合などはこちらを使いましょう。
エンベロープの基本操作
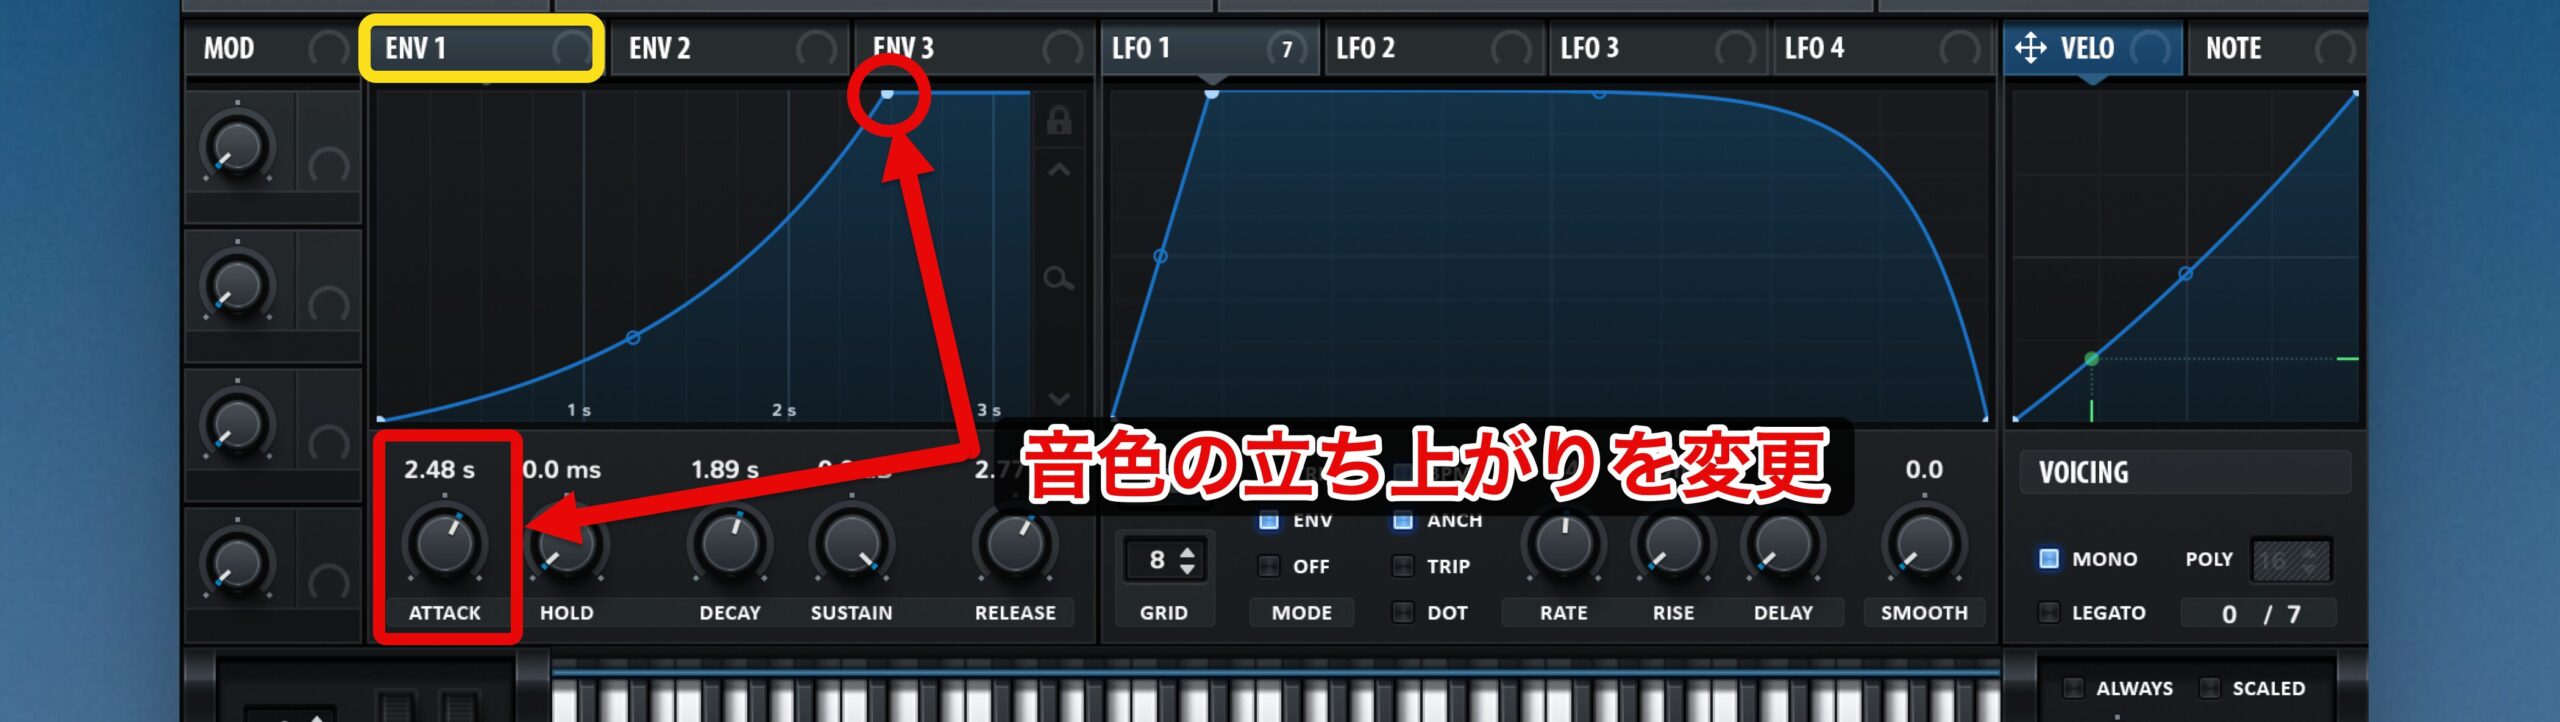
SERUMのエンベロープでは、「ENV1」がマスターボリュームにアサインされています。
例えば、ENV1の「ATTACK」ノブを回すか、ビジュアル表示の左上の点を動かすと、音色の立ち上がりを変更できます。
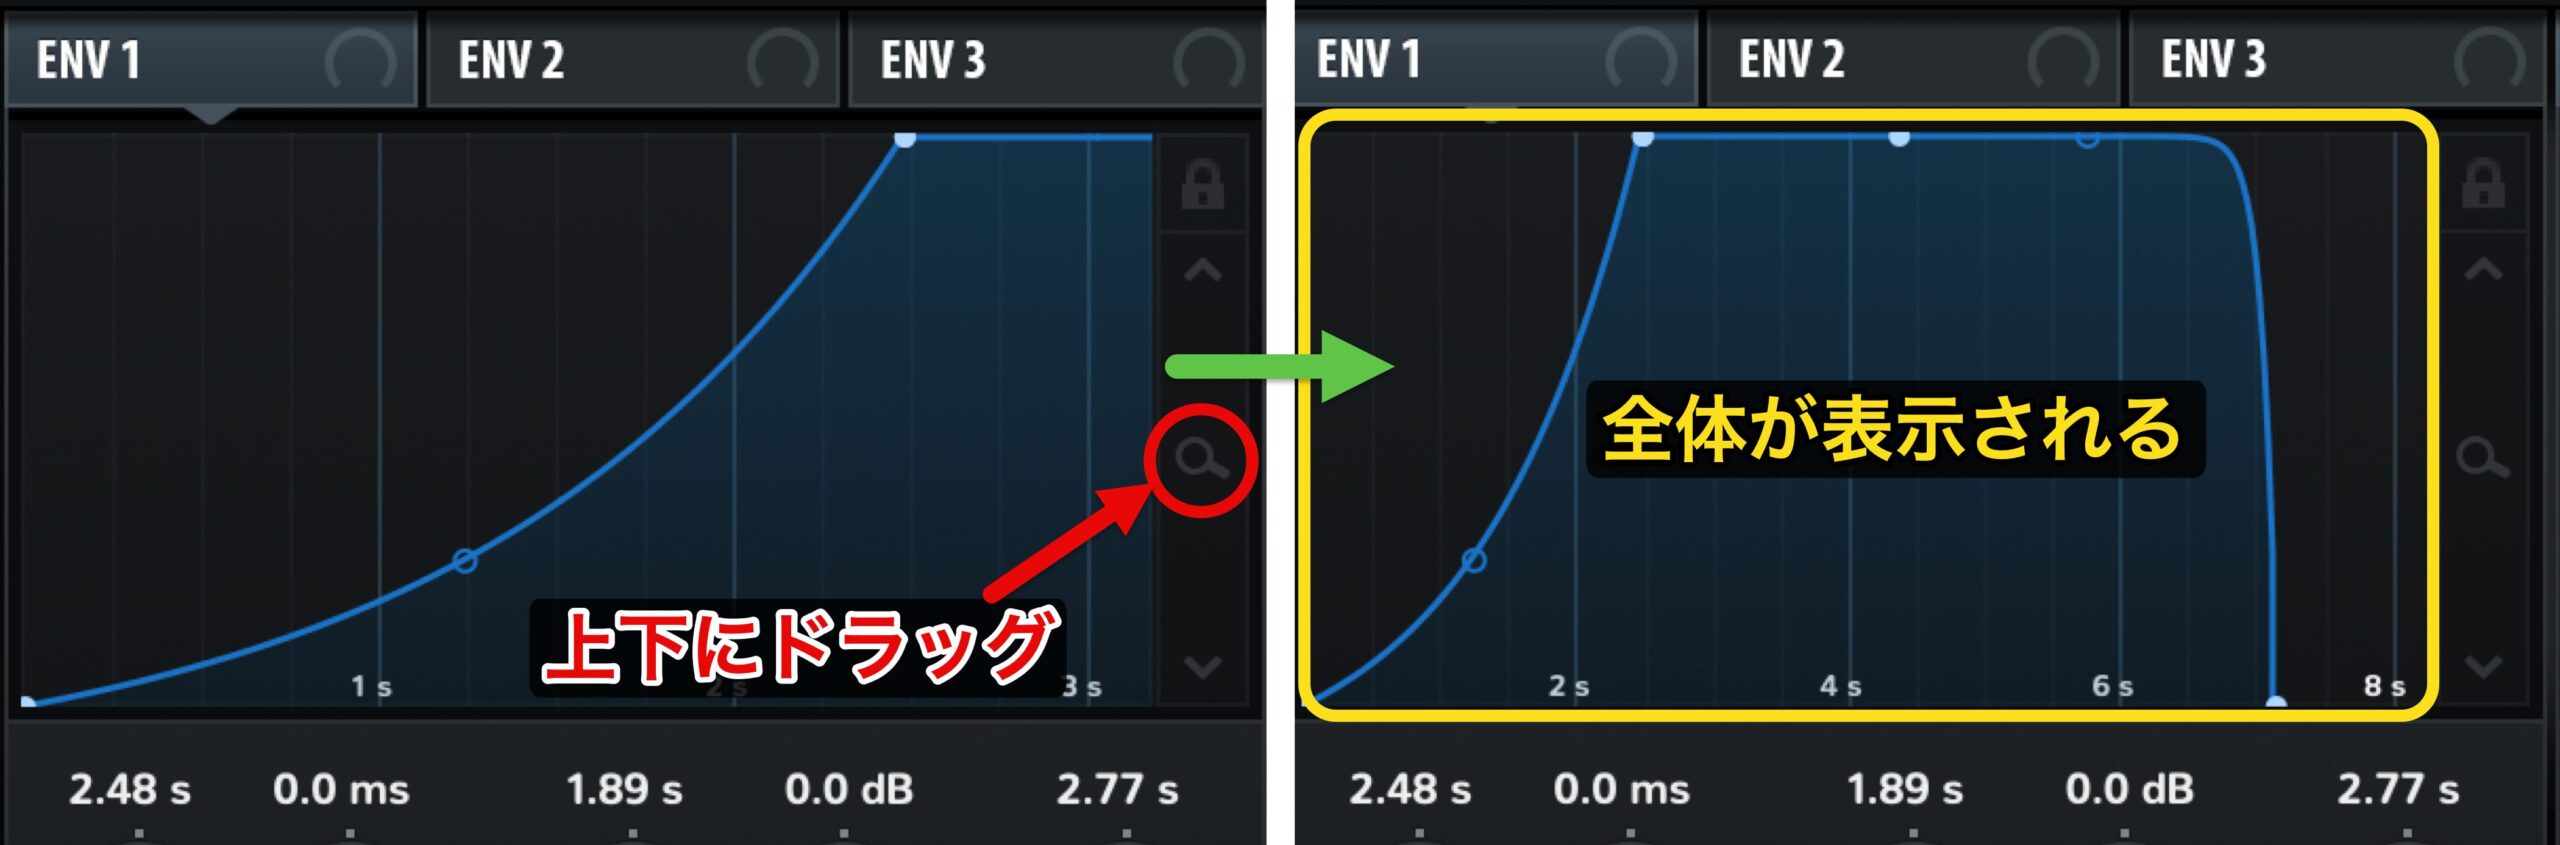
Releaseを操作したいのにビジュアル表示が見えない、という場合もあると思います。
そういった際は、右の虫眼鏡アイコンの箇所を上下にドラッグすると全体が表示されます。
エンベロープ/LFOアサイン先のビジュアル確認
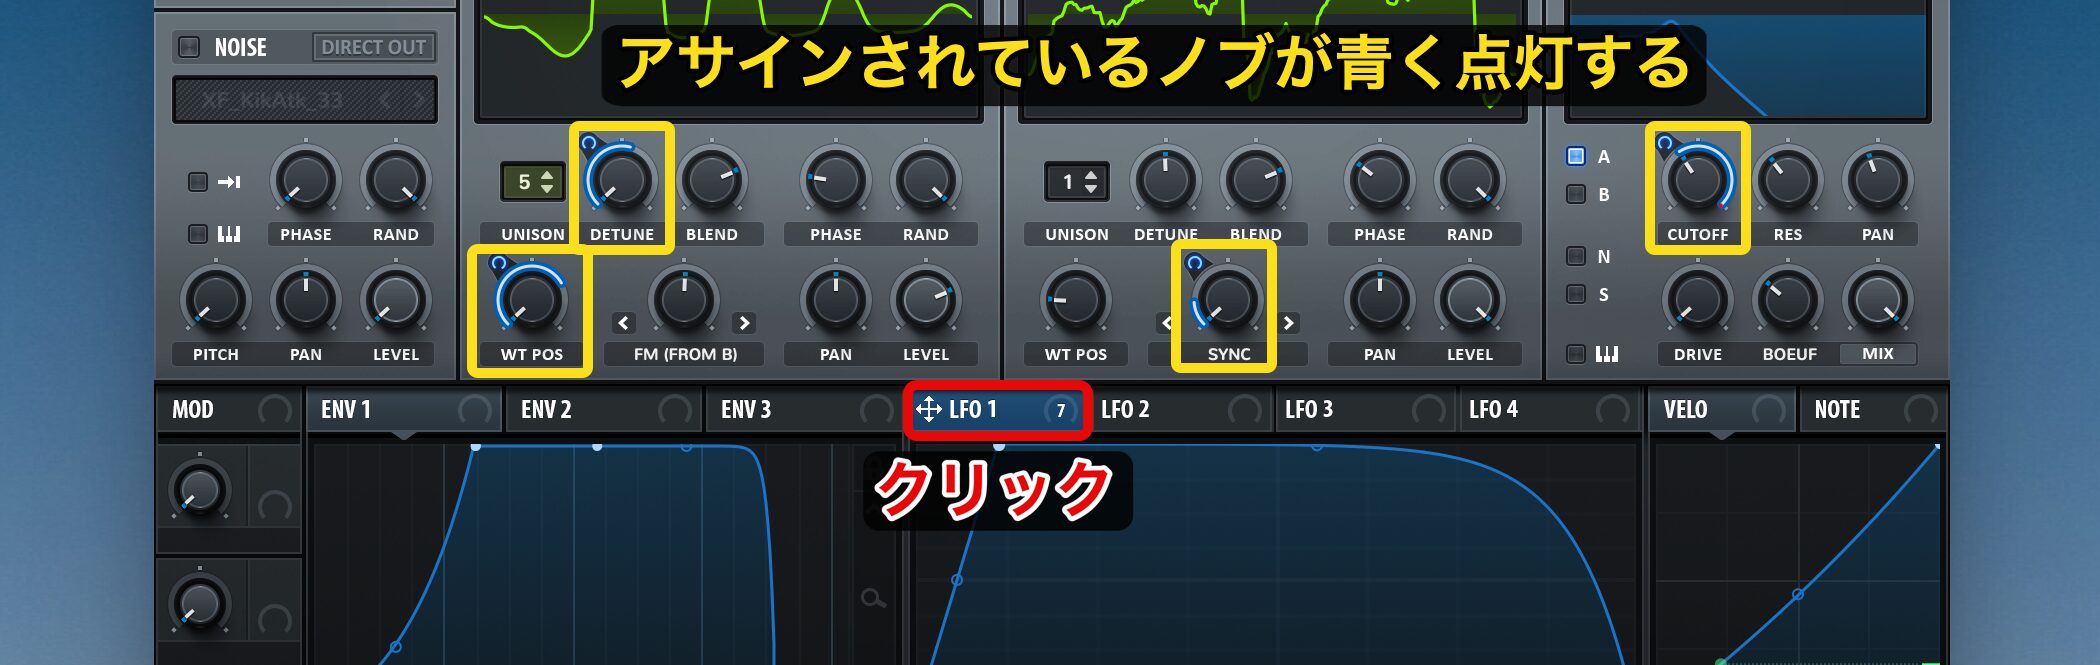
エンベロープやLFOのアサイン先をビジュアルで確認することもできます。
数値が表示されている各ENV/LFOタブをクリックすると、アサインされているノブが青く点灯します。

ノブの左上にあるマークを上下にドラッグすることで、エンベロープやLFOによる動作範囲を設定できます。
フィルターの概要
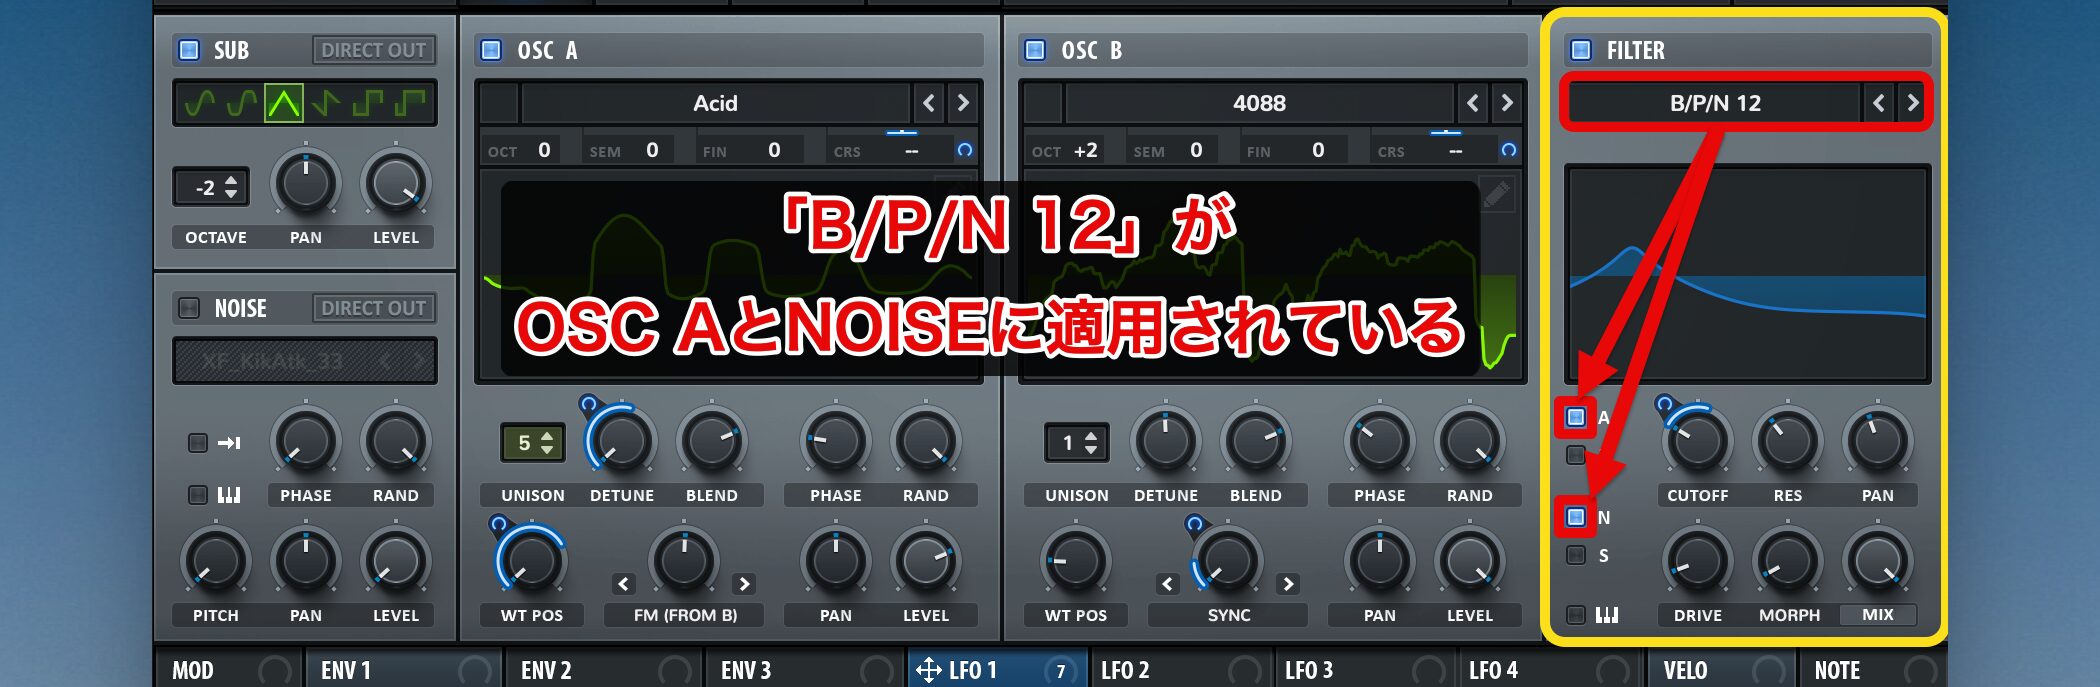
SERUMのフィルターセクションでは、各オシレーターを通すかどうかを左側に配置されたボタンで選択します。
この例では、「B/P/N 12」というフィルターが”OSC A”と”NOISE”に適用されていることを示しています。
もちろん、各パラメーターへエンベロープやLFOを簡単にアサインできるので、音作りの自由度は非常に高いと言えます。
プリセットの保存と読み込み
プリセットをカスタマイズし、かっこいい音が出来たらどんどん保存していきましょう。
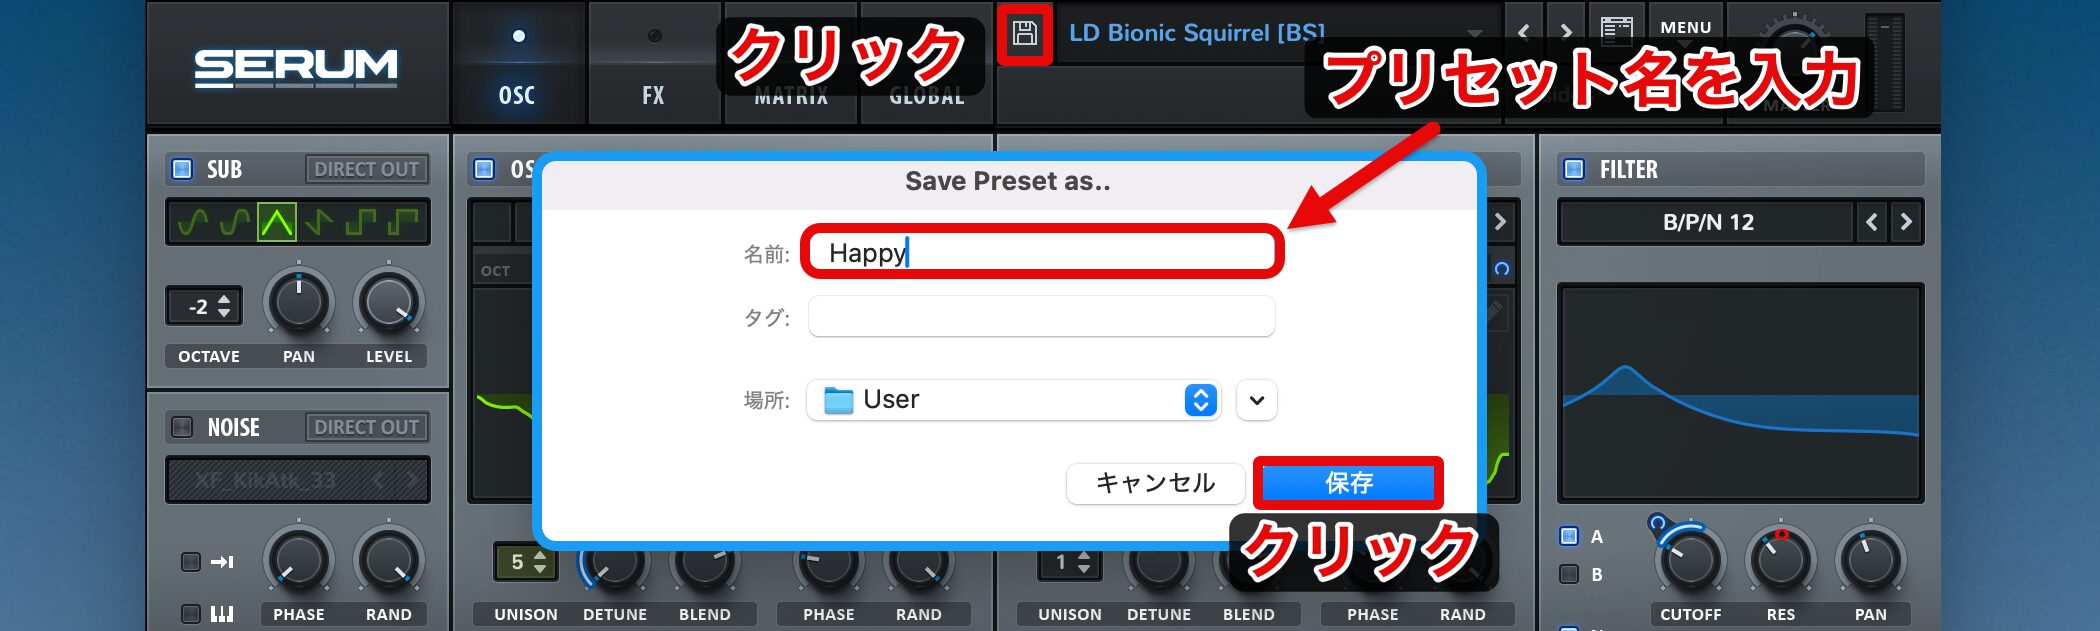
保存の仕方は簡単で、プリセット名の横にあるディスクアイコンをクリックし、希望するプリセット名を入力した後、「保存」をクリックするだけです。
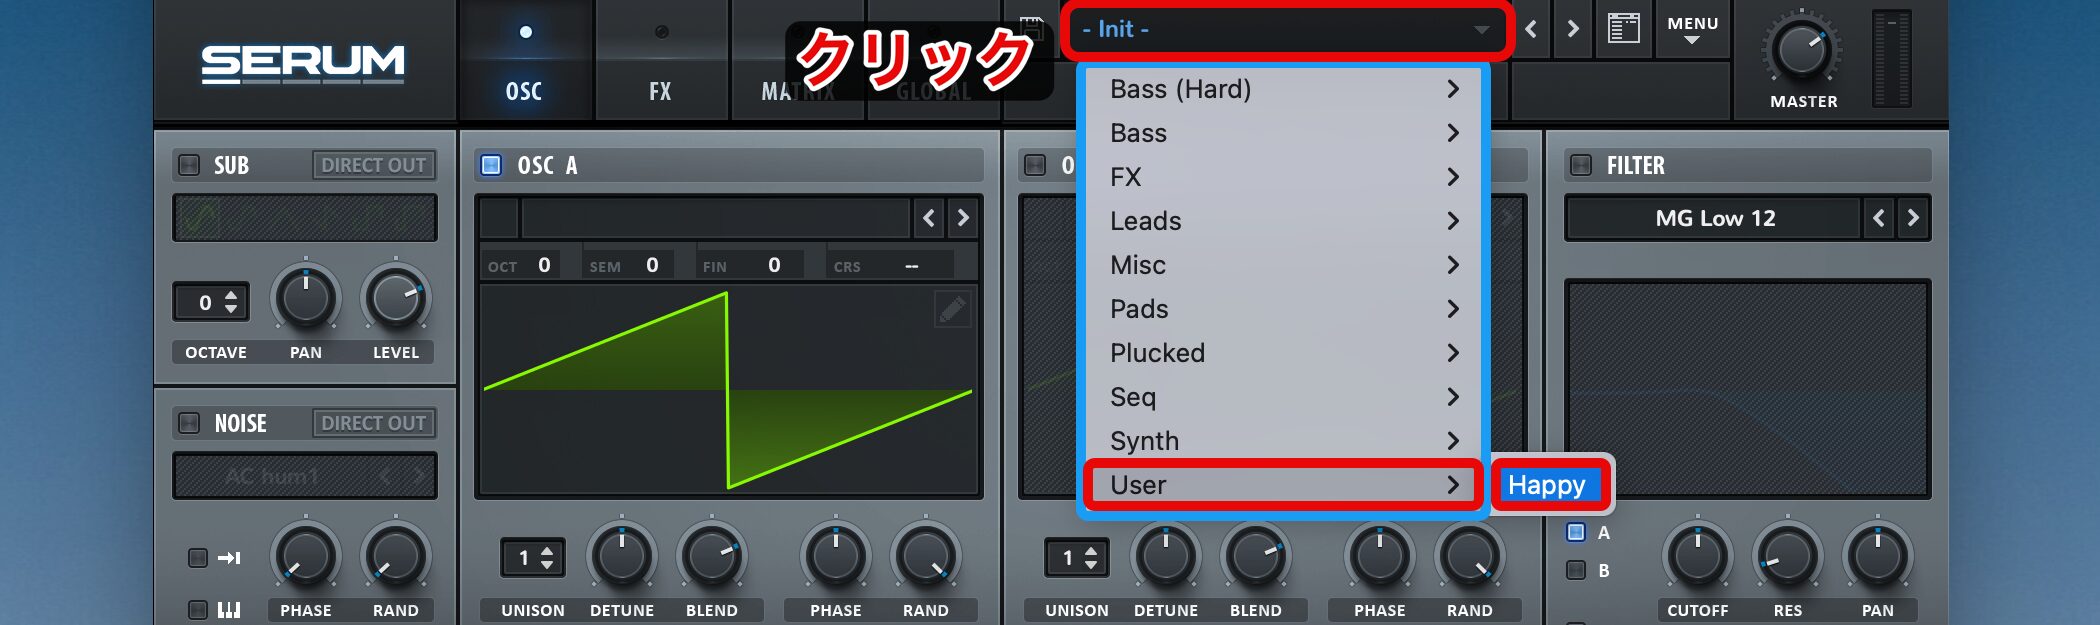
また、読み込む際は「User」フォルダに格納されています。
OSCの基本調整

次に、SERUMの醍醐味とも言えるウェーブテーブルオシレーターを解説します。
オシレーターはサウンドの特性を決める最も重要なセクションで、Serumには豊富な波形プリセットが用意されています。
複数の波形を組み合わせたり、オリジナルのオーディオファイルを使用することで、柔軟なサウンドメイキングが可能になります。
SERUM 動画 : オシレーターのコントロール
波形の選択
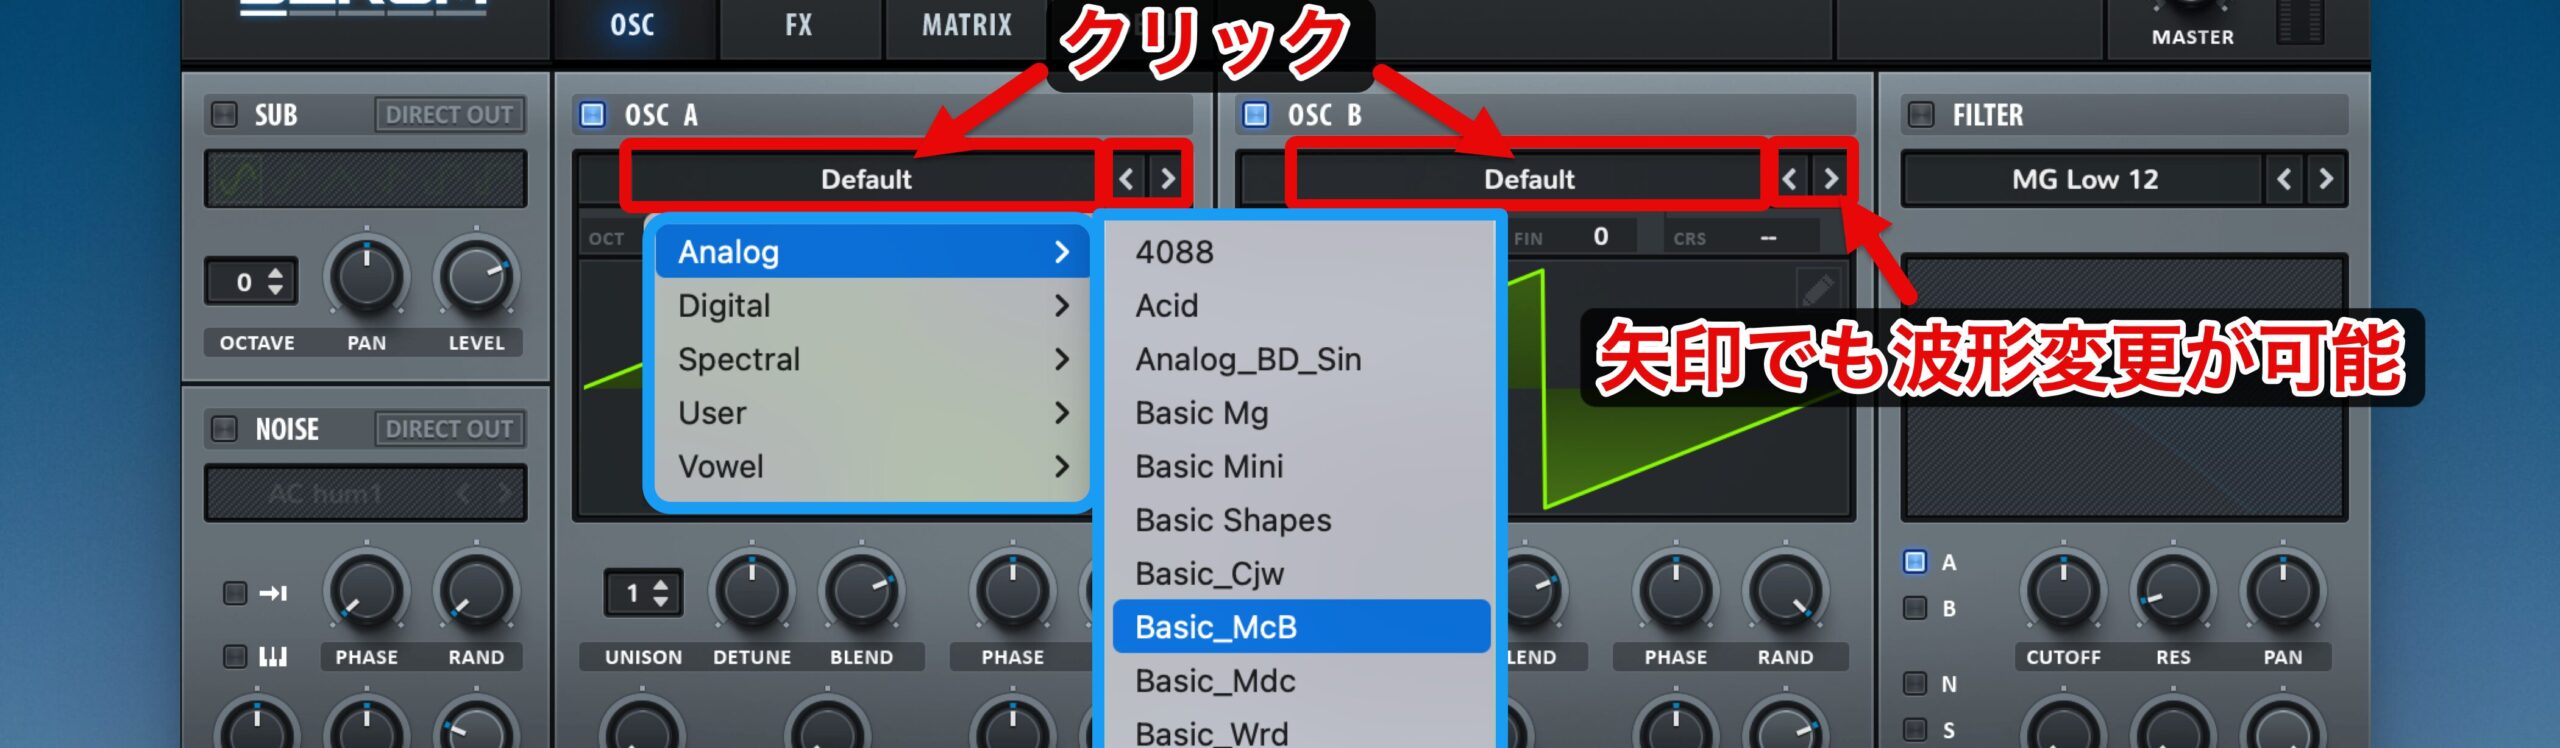
「OSC A」および「OSC B」に対して使用する波形を選択できます。
「Default」の部分をクリックするか、左右の矢印を使って波形を変更できます。
多様な波形が用意されていますので、サウンドを確認しながらお好みのものを選んでください。
ピッチの変更
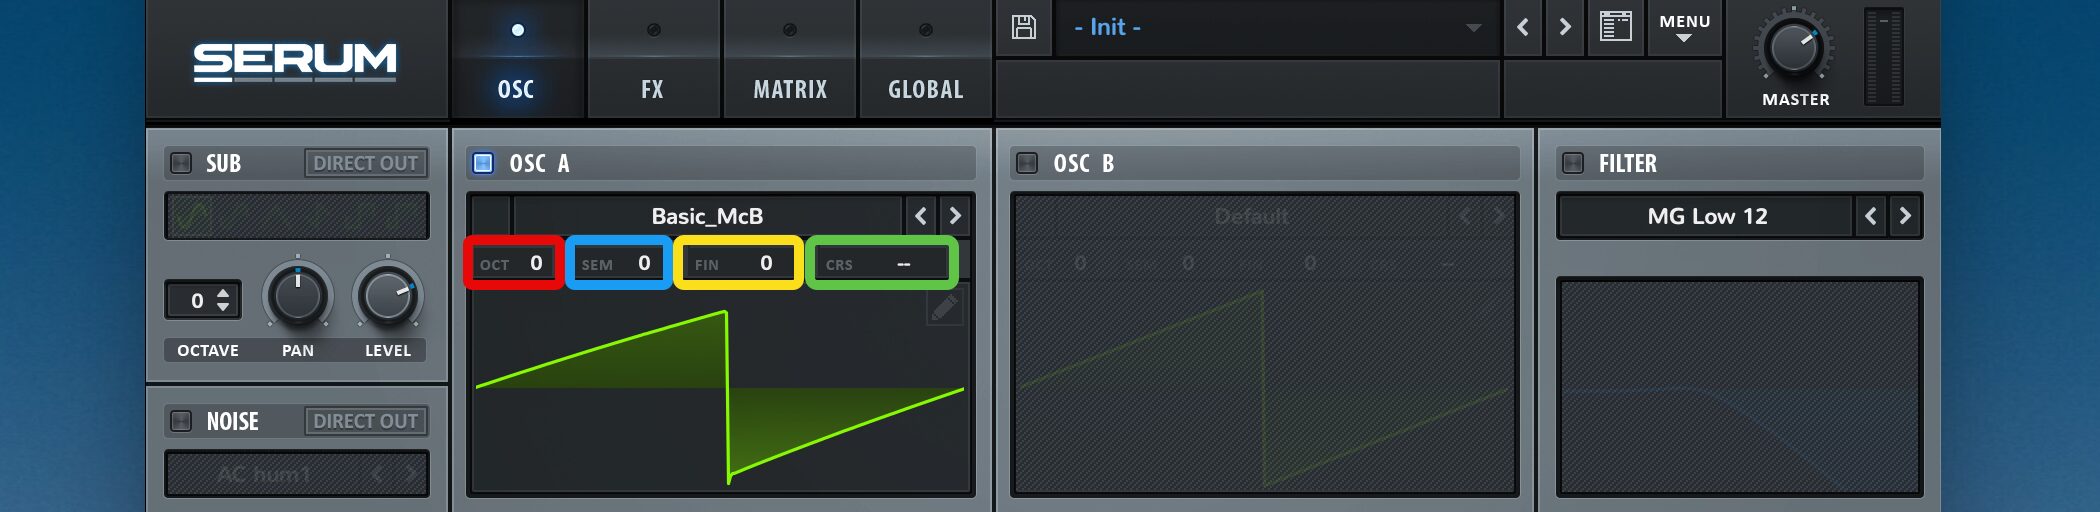
OSCでは、発音される基本的なピッチを変化させることができます。
例えば「OSC A」はそのままで、「OSC B」のピッチを1オクターブ上げて、サウンドに厚みを持たせるということも可能です。
- OCT(赤) : ピッチを1オクターブ単位で変更
- SEM(青) : ピッチを1半音単位で変更
- FIN(黄) : ピッチを100分の1半音単位で変更
- CRS(緑) : ピッチを100分の1半音単位で上下6オクターブの変更が可能
ユニゾンの適用
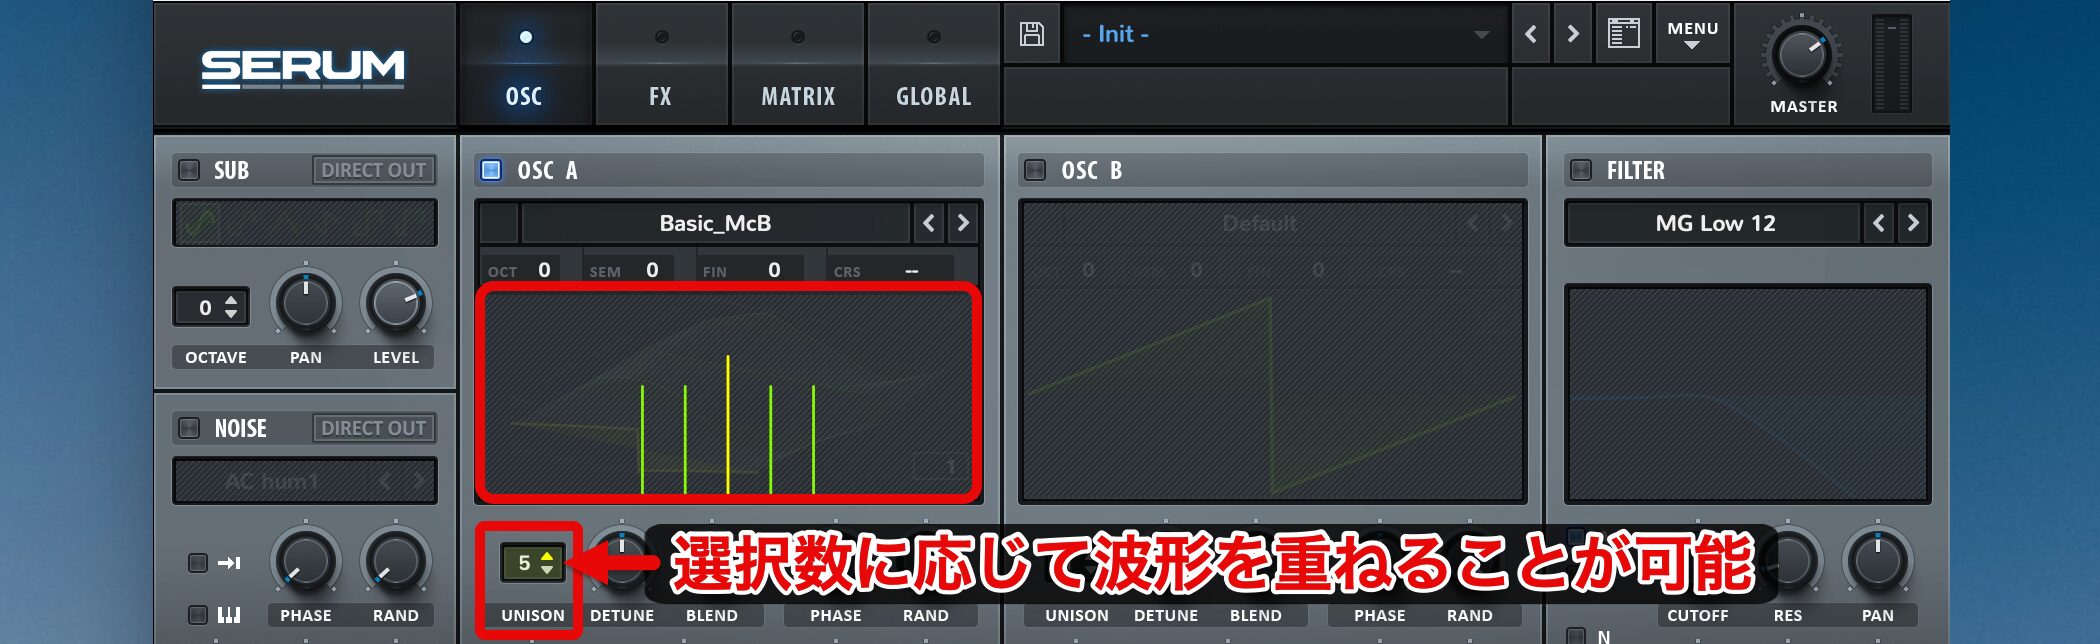
「UNISON」では、選択した数に応じて波形を重ねることが可能です。
サウンドに厚みが加わり、サウンドが左右に広がります。
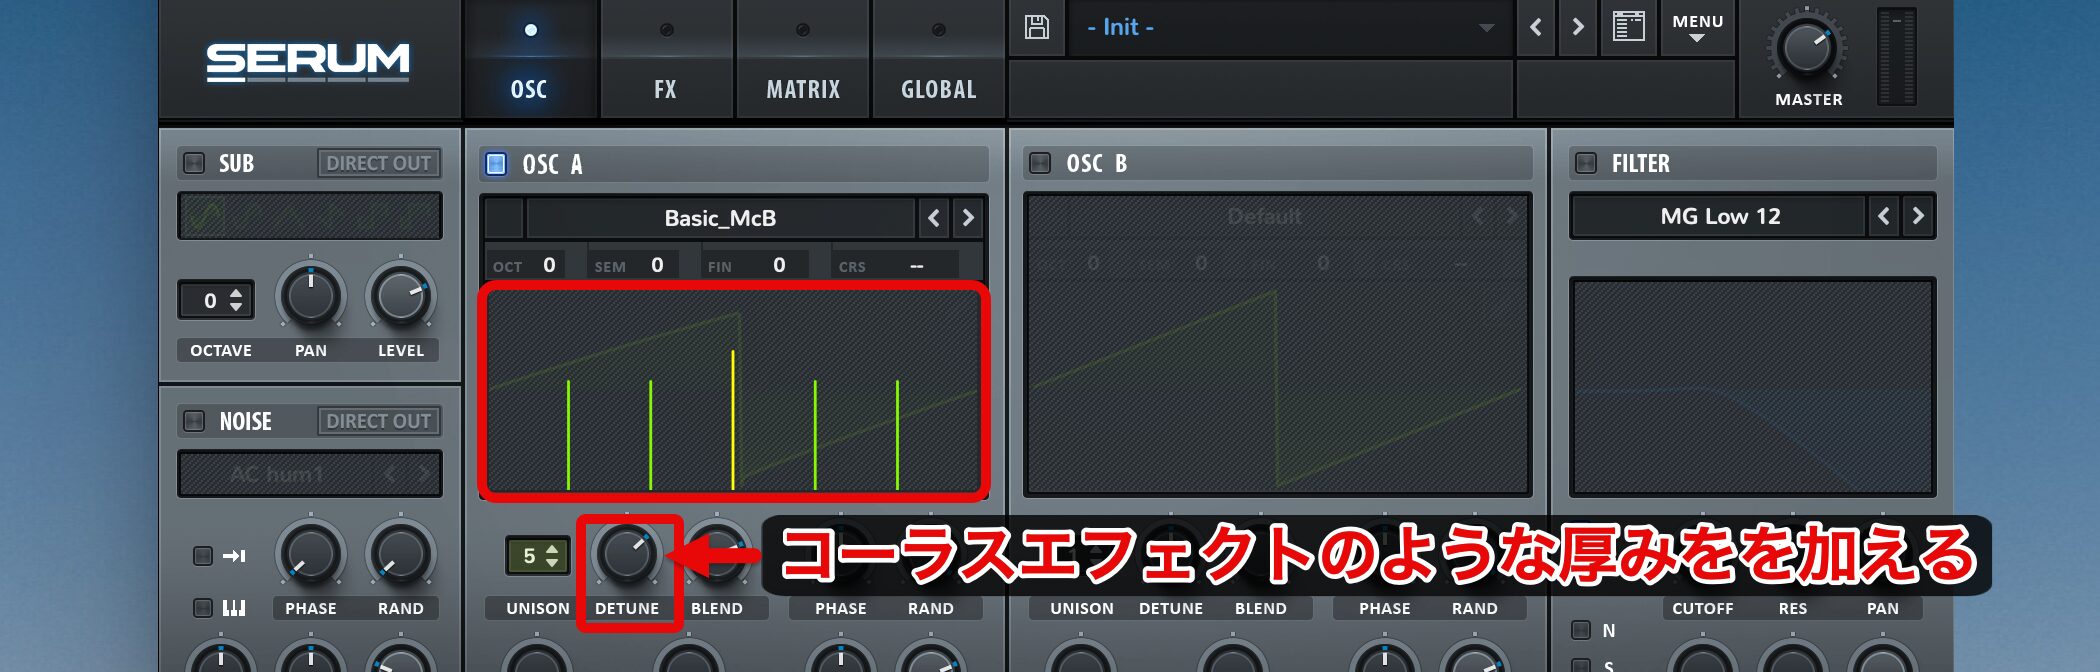
「DETUNE」はUNISONで重ねたサウンドのピッチを変化させ、コーラスエフェクトのような厚みを加えることができます。
ノブを右に回すほど、その効果が強くなります。
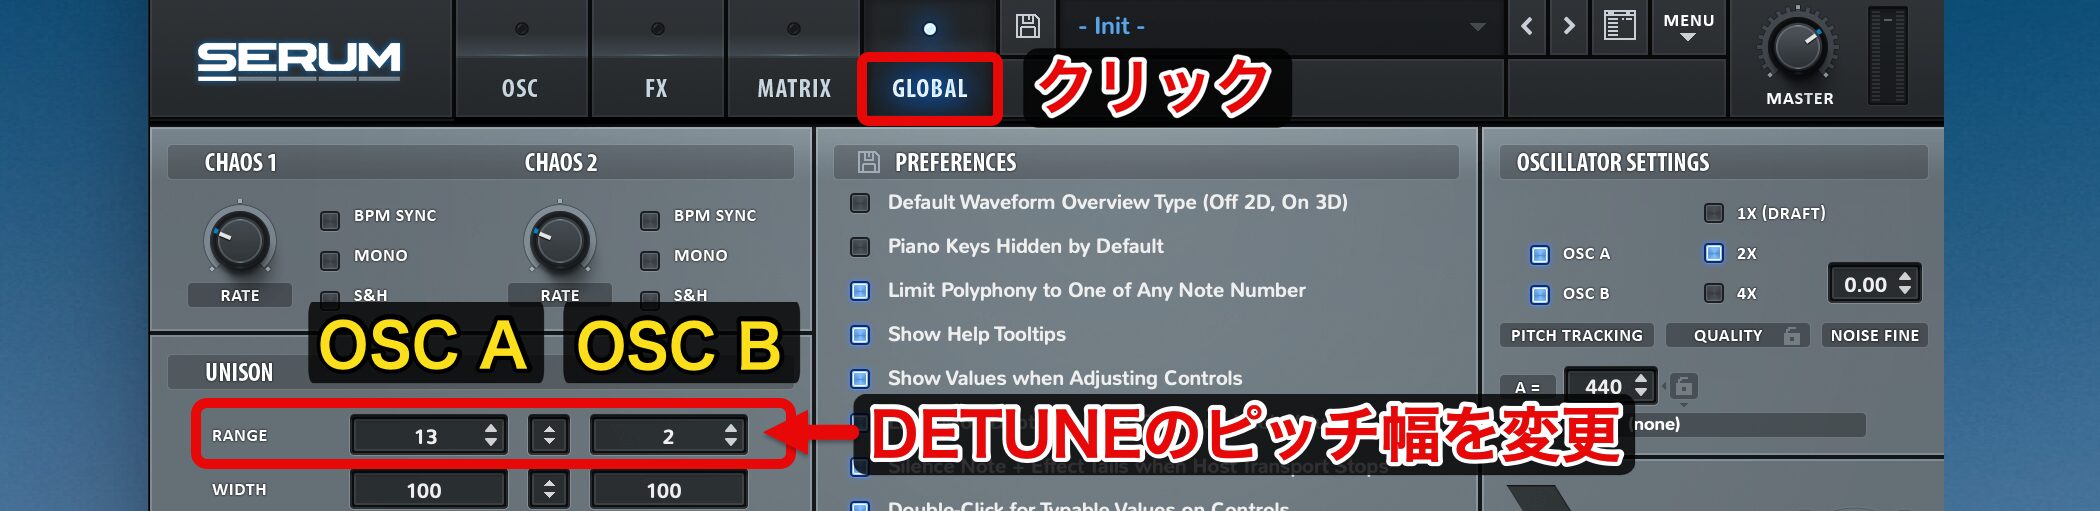
「GLOBAL」の中の「RANGE」では、DETUNEのピッチ幅を変更することが可能です。
1半音単位で調整可能となっており、この数を増やすほどDETUNE適用時の音程変化が大きくなります。
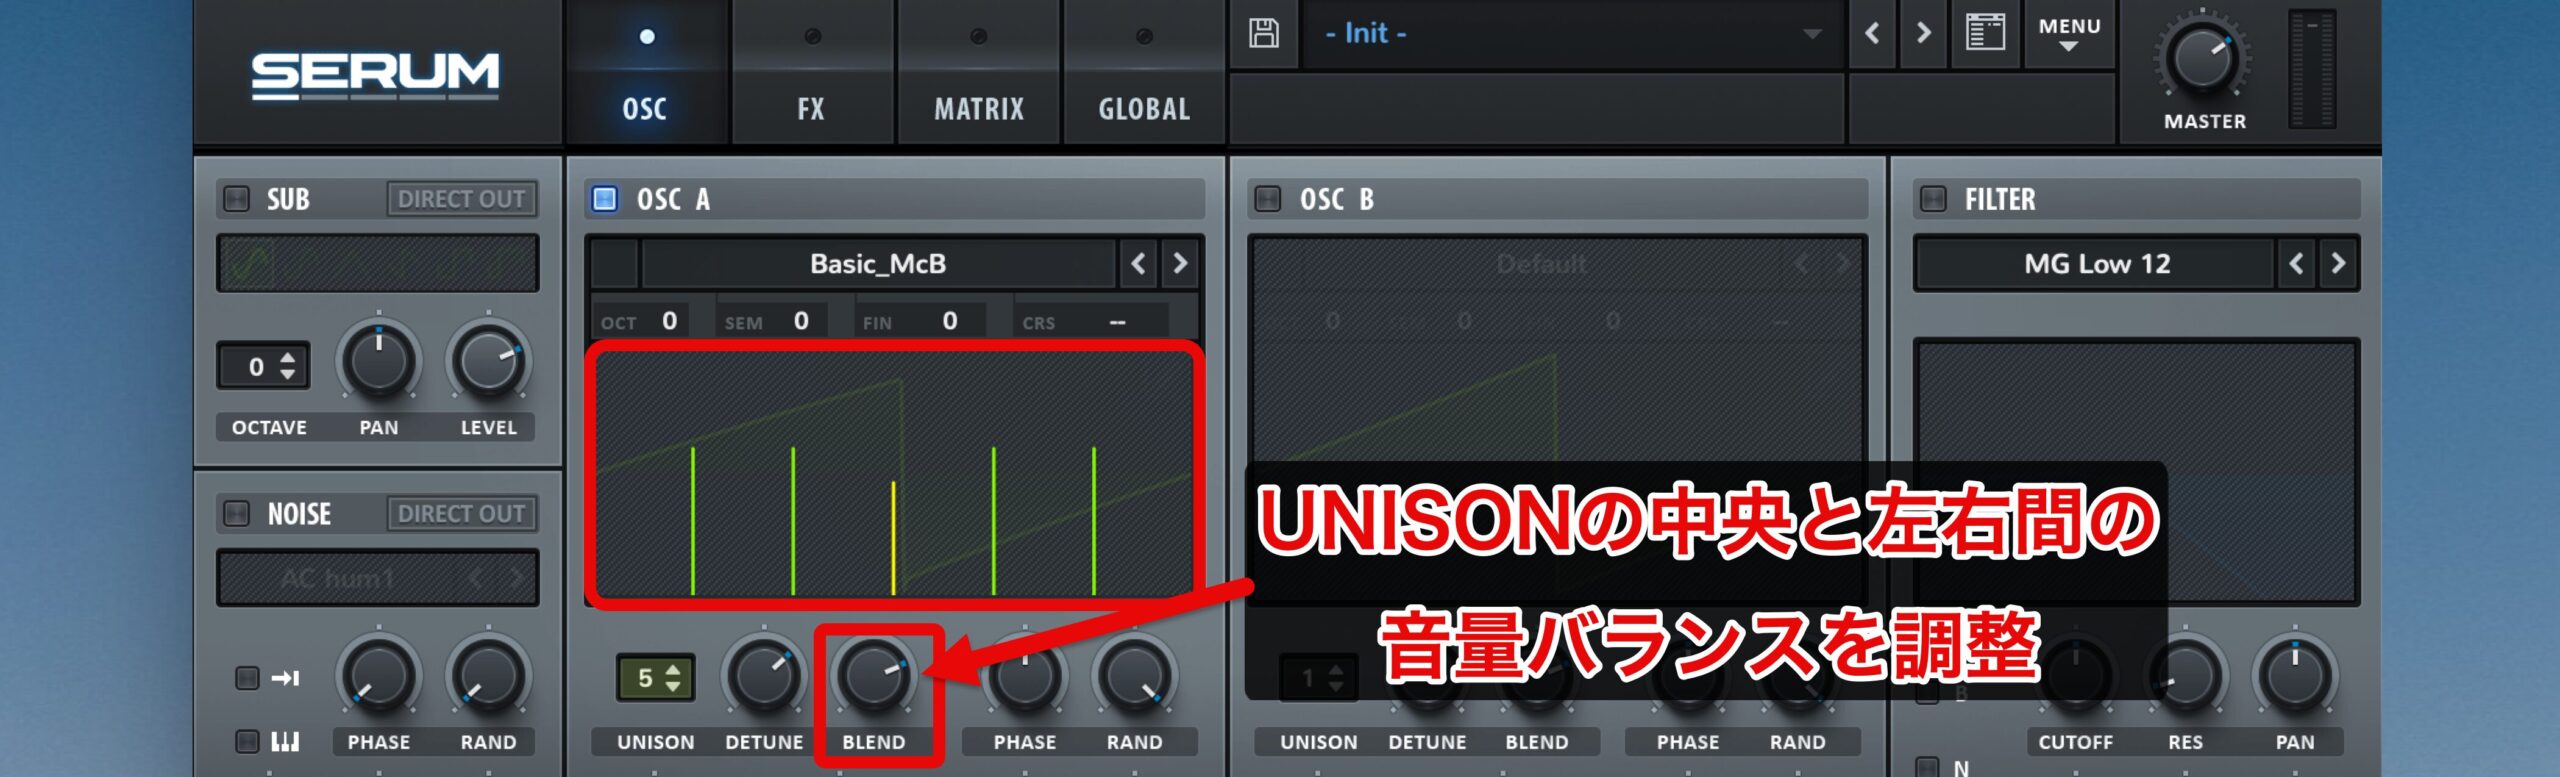
「BLEND」は、UNISONの中央と左右間の音量バランスを調整することができます。
好みの広がりや音像になるように、サウンドを確認しながら設定を行って下さい。
波形の再生位置を変化させる
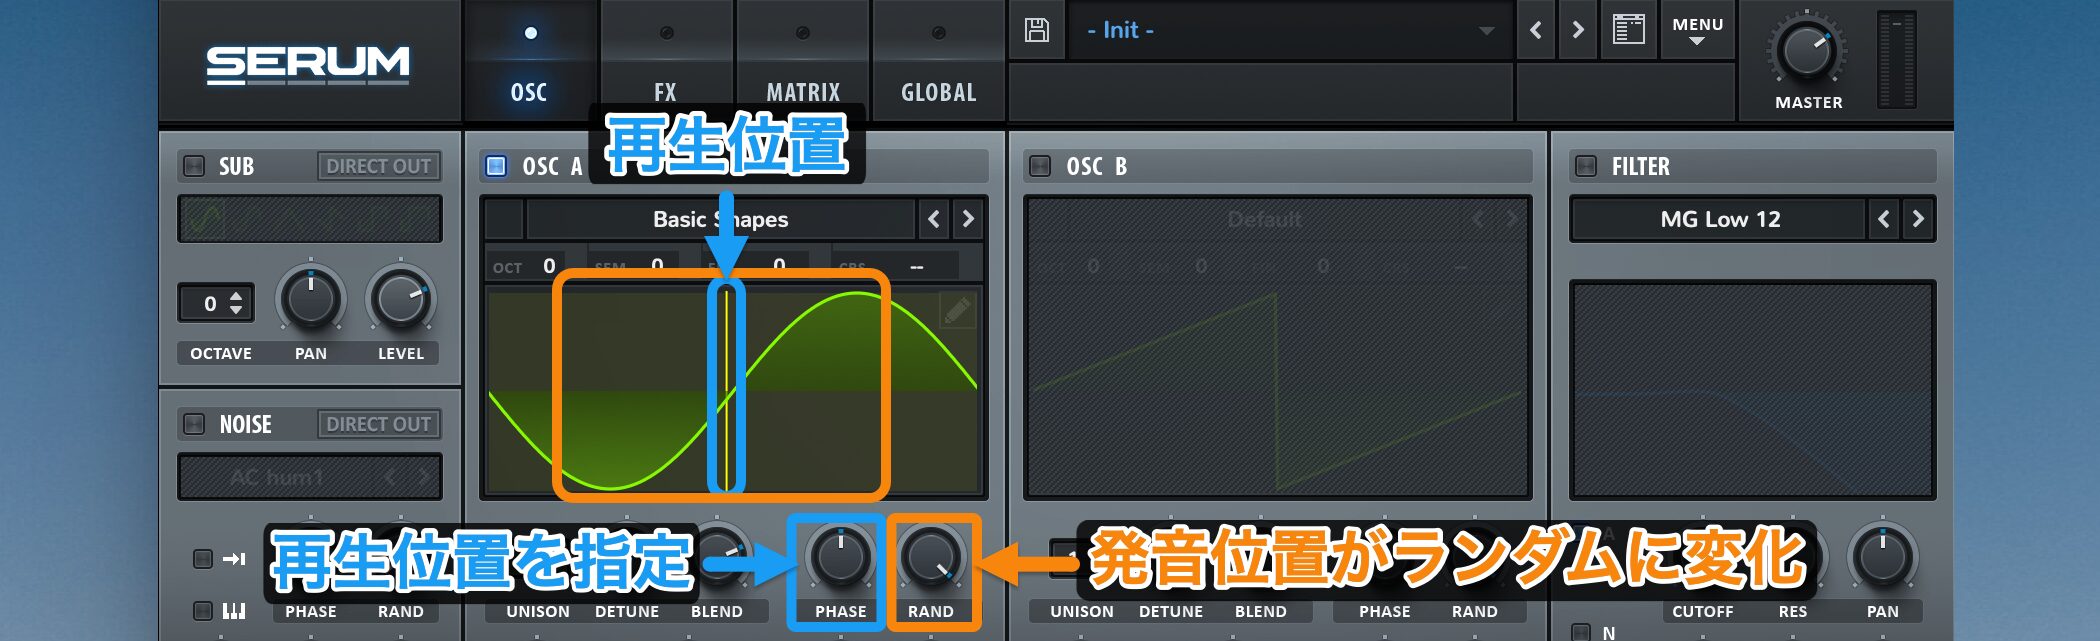
OSCへ読み込んだ波形の再生位置を指定することが可能です。
- PHASE : 再生位置を指定します。
- RAND : 指定した再生位置を基準とし、発音開始位置をランダムにします。この値を大きくするとランダムの幅が広がり、MIDIノートが再生されるたびに音色のニュアンスが変化します。
FMやSyncの適用
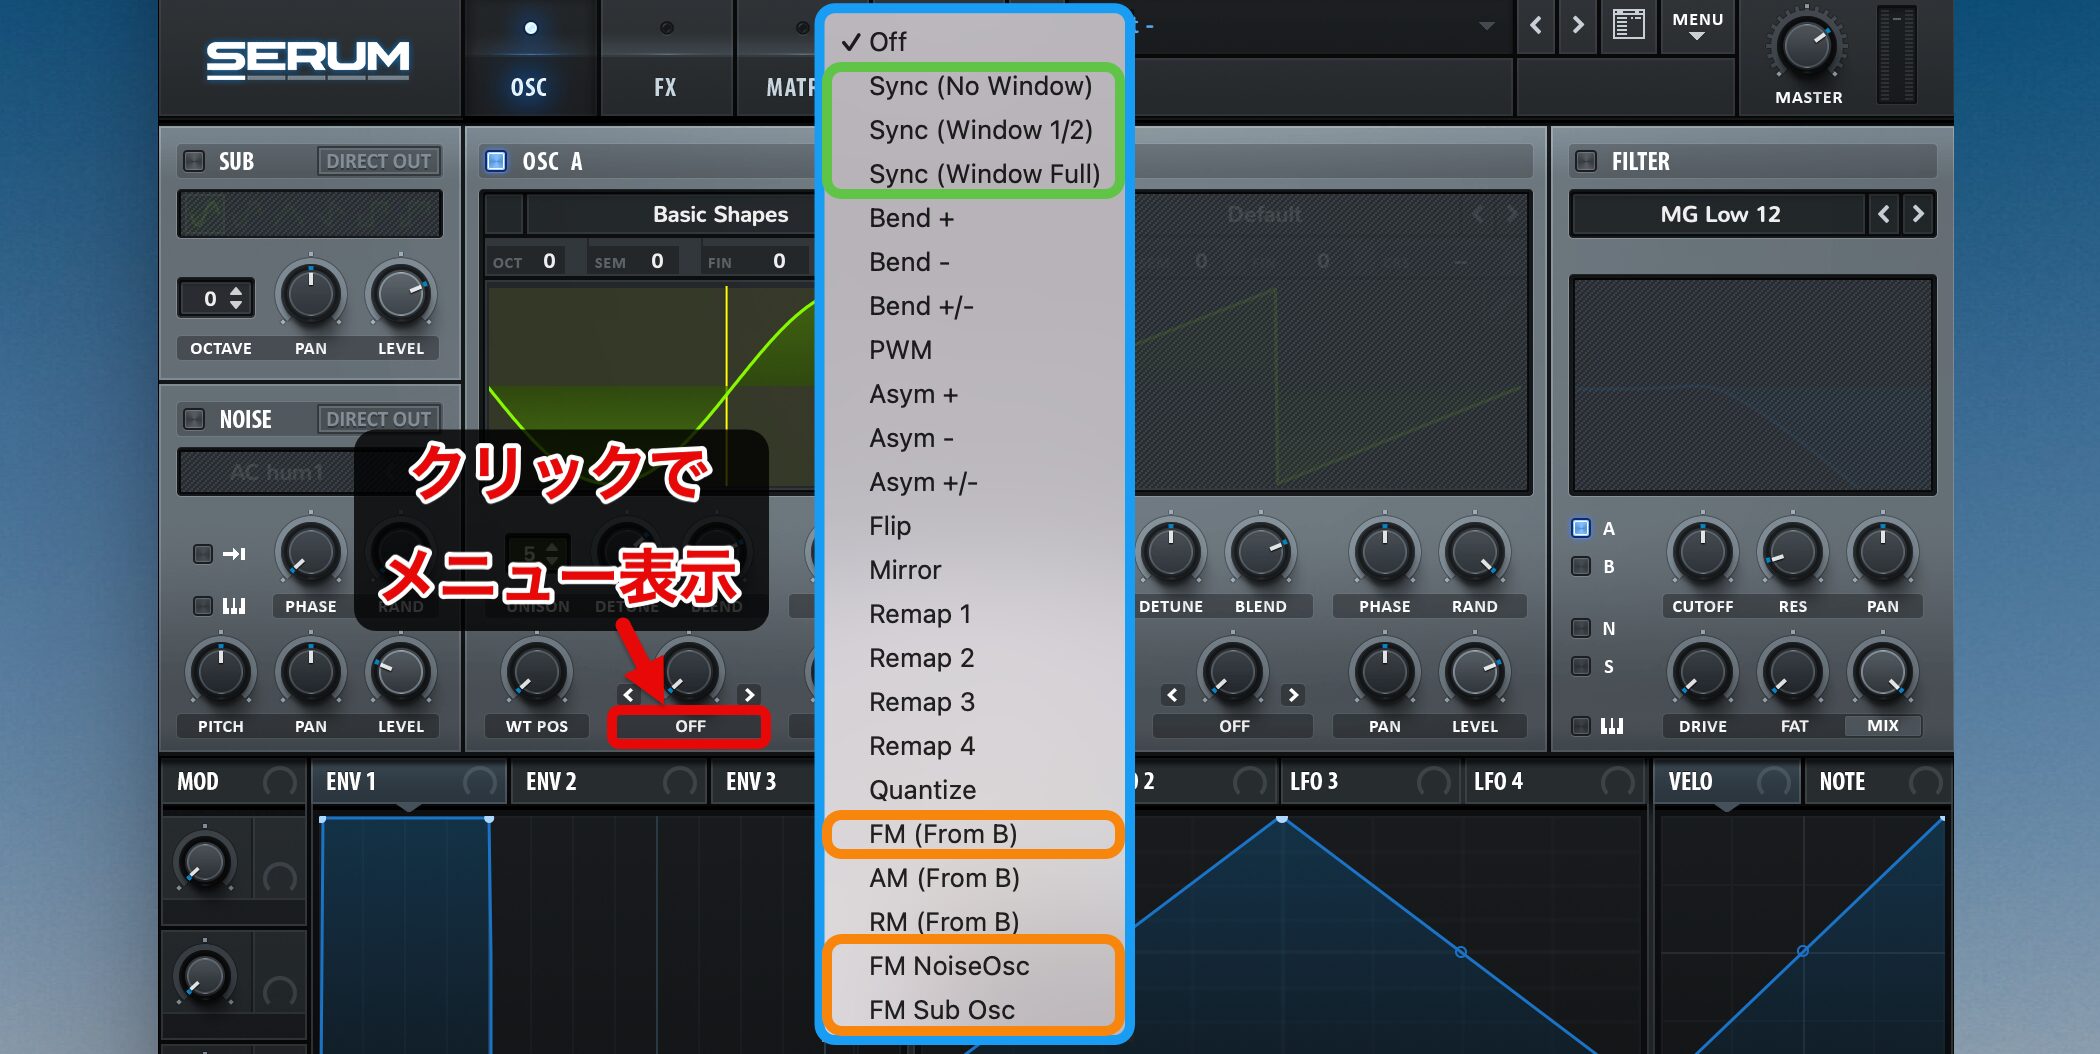
SERUMでは、シンセサイザーのサウンドメイキングとして頻繁に用いられる「FM」や「Sync」も使用することができます。
「Warp」の「OFF」の箇所をクリックすると、メニューが表示されます。
この中に「FM」「Sync」が収められています。
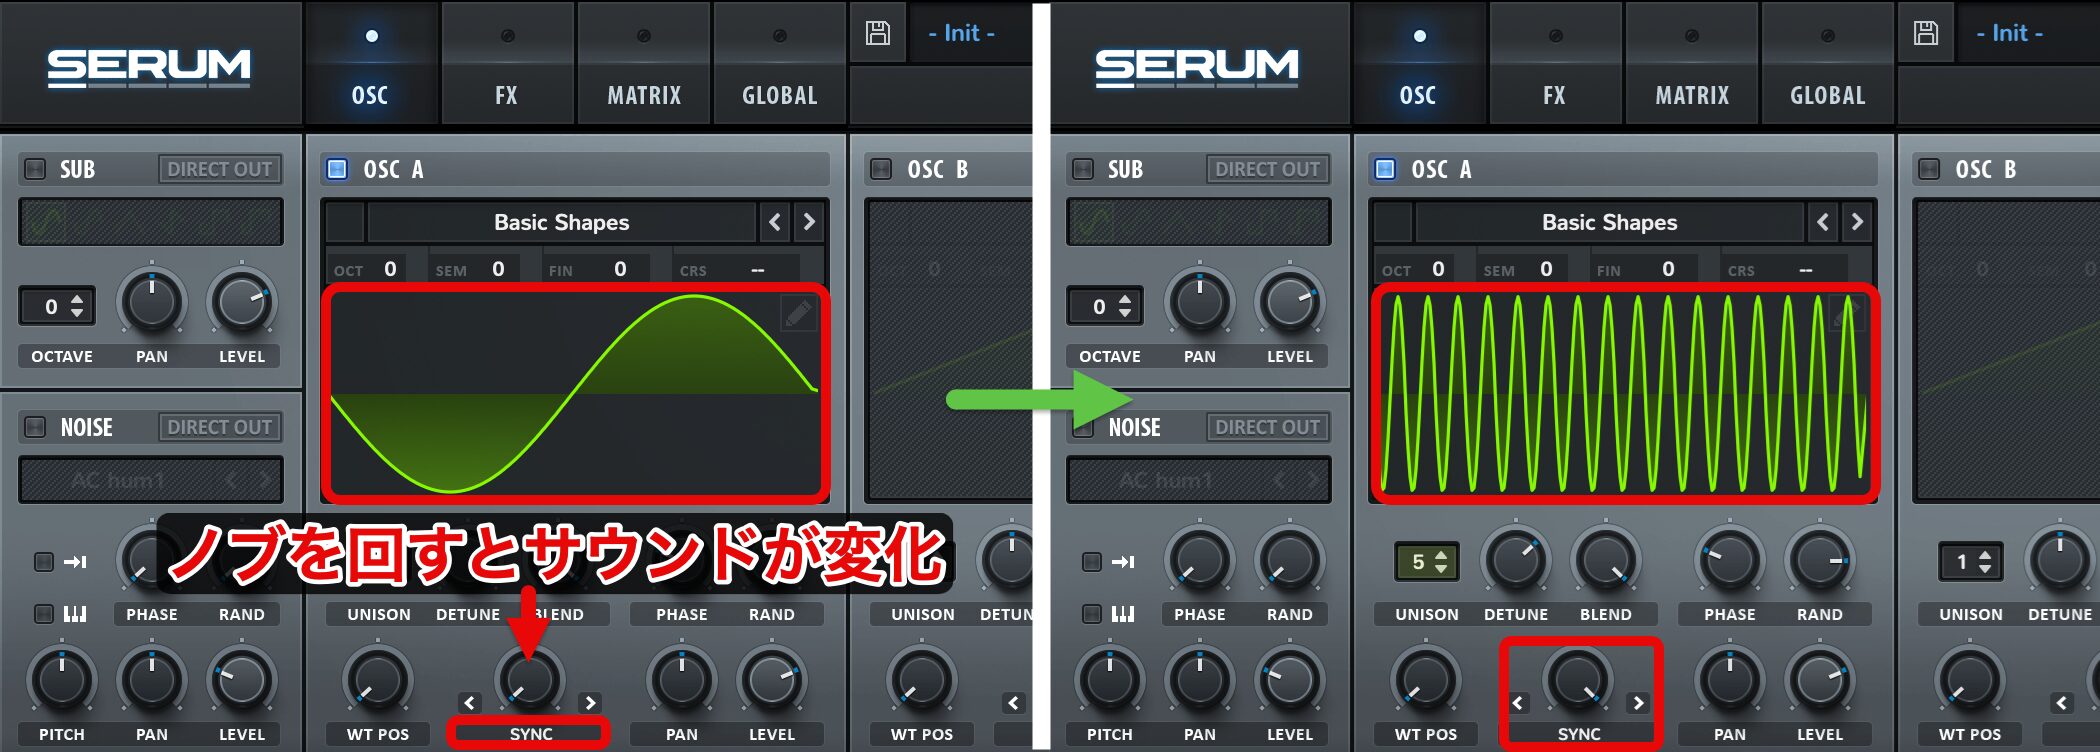
Syncは、1つのオシレーターの波形を、別のオシレーターの周期に合わせて強制的にリセットし、倍音を生み出す機能です。
ノブを右に回すとリセットのタイミングが頻繁になり、より大きく音を変化させることができます。
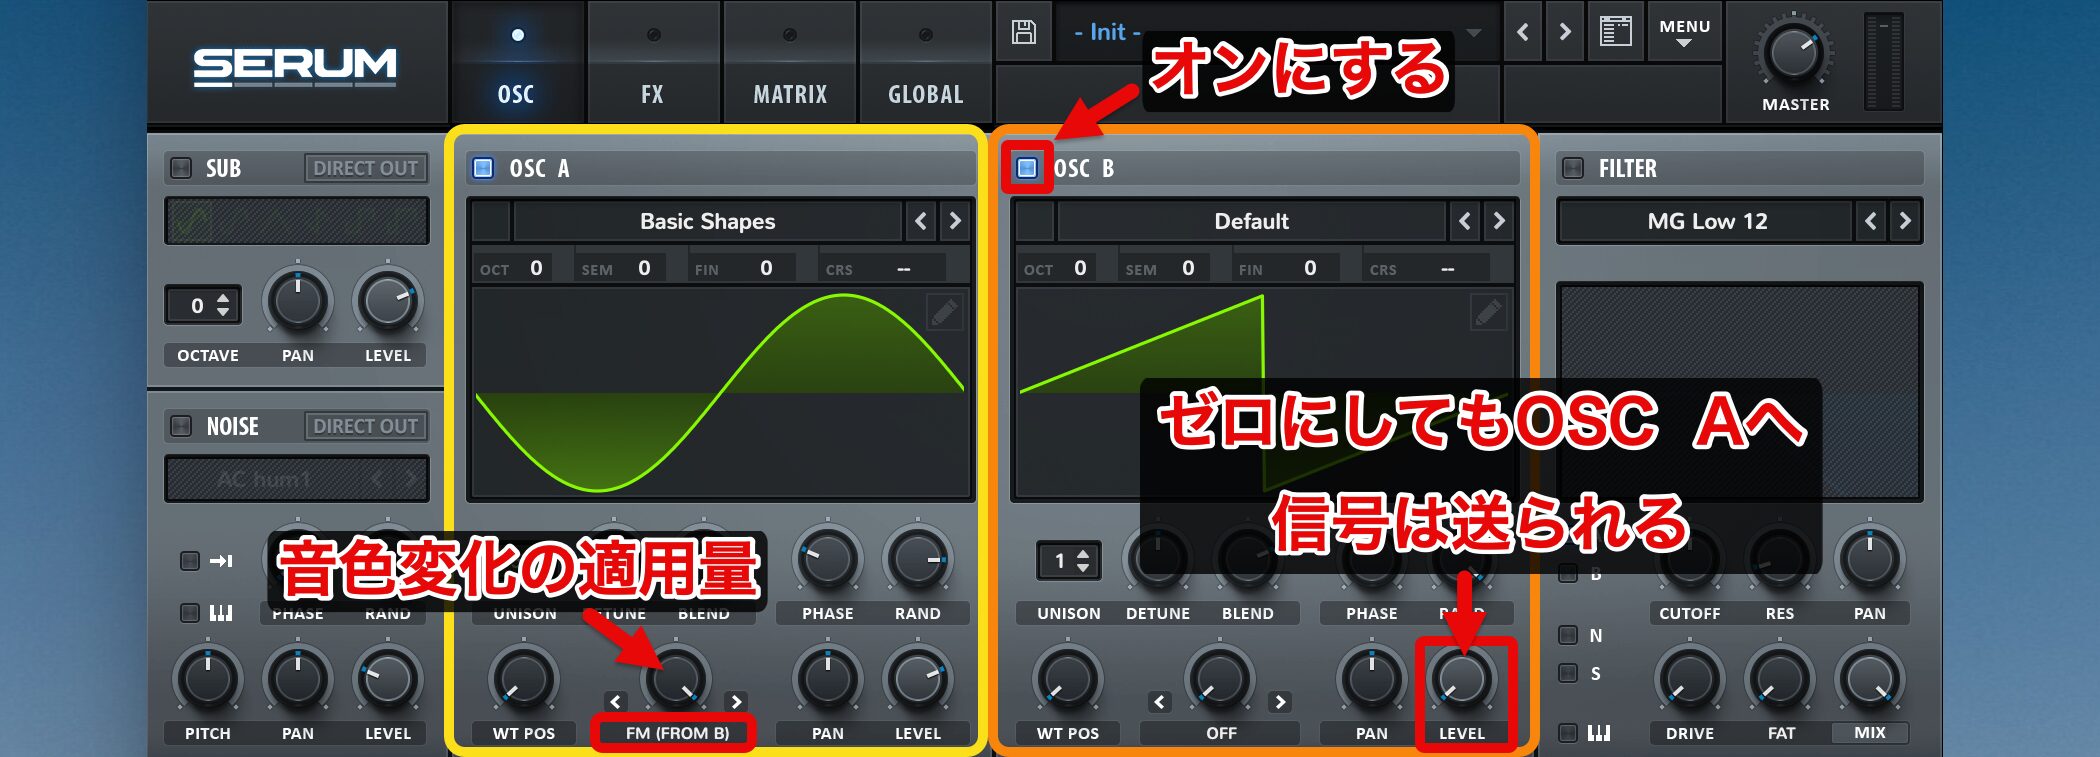
FMの場合、指定したOSCの波形を用いて音を変化させます。
今回の設定では「From B」を選択しているため、OSC Bは必ずオンにする必要があります。
また、OSC Bの「Level」を0に設定していても、OSC A(受け取る側)に信号は送られます。
FMによる音色変化の適用量は、OSC A側の調整ノブでコントロールします。
ウェーブテーブルポジションを使用する
SERUMは 各OSCに対して複数の波形をセットしておくことができます。
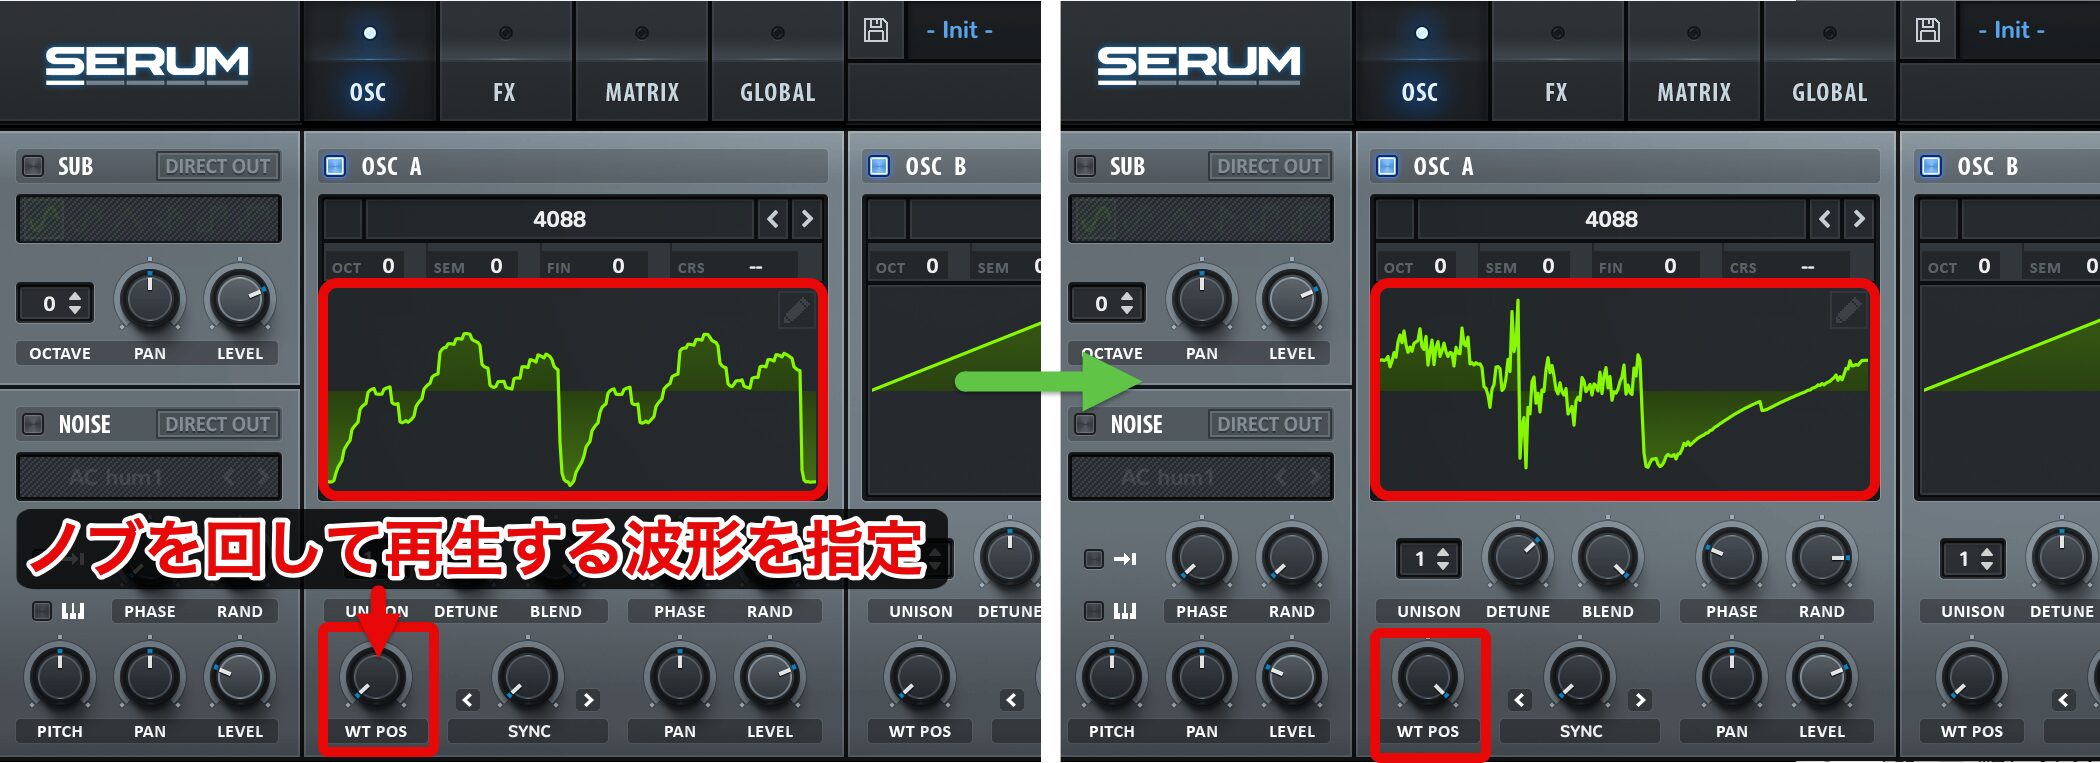
複数の波形から使用する波形を「WT POS」で指定します。
WT POSノブを回すと再生する波形を指定することができ、サウンドにバリエーションを与えるという仕組みです。
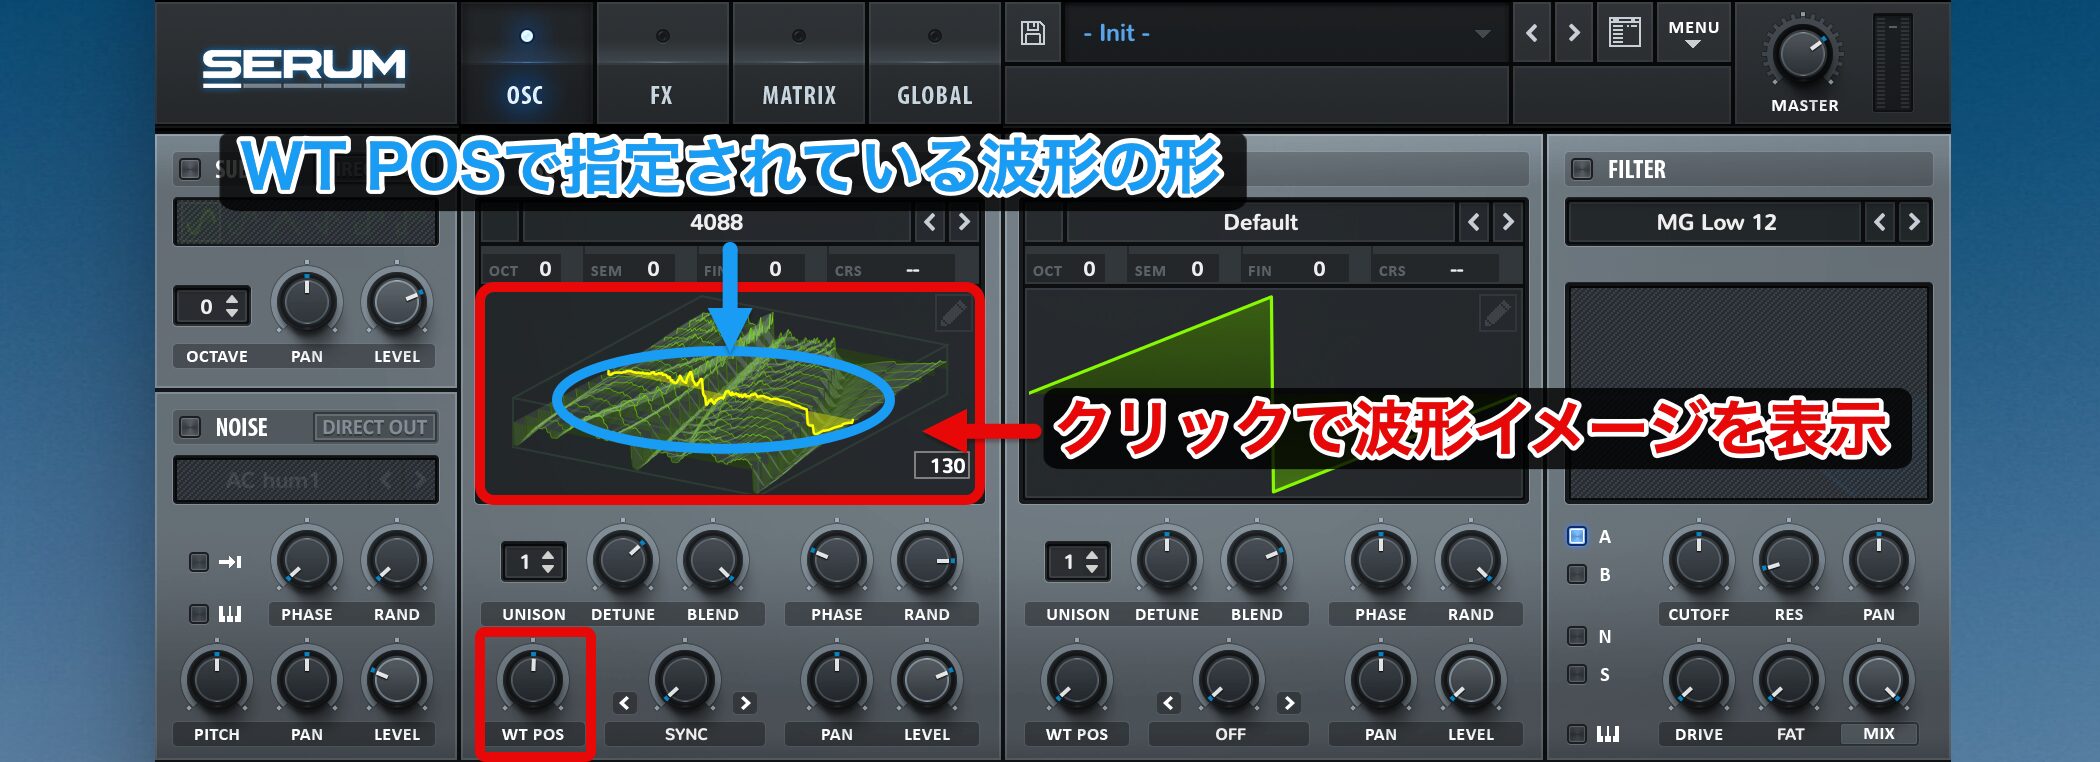
波形画面をクリックすることで、設定された波形イメージを視覚的に確認できます。
黄色い線で示されている部分は、WT POSによって指定された波形の形状を表しています。
OSCで選択した波形によっては、波形が1つしか用意されていないものがあります。
その場合、WT POSのノブを回してもサウンドに変化はありません。
エディターでウェーブテーブル作成する
このウェーブテーブルを自分で作成し、セットしておくことも可能です。
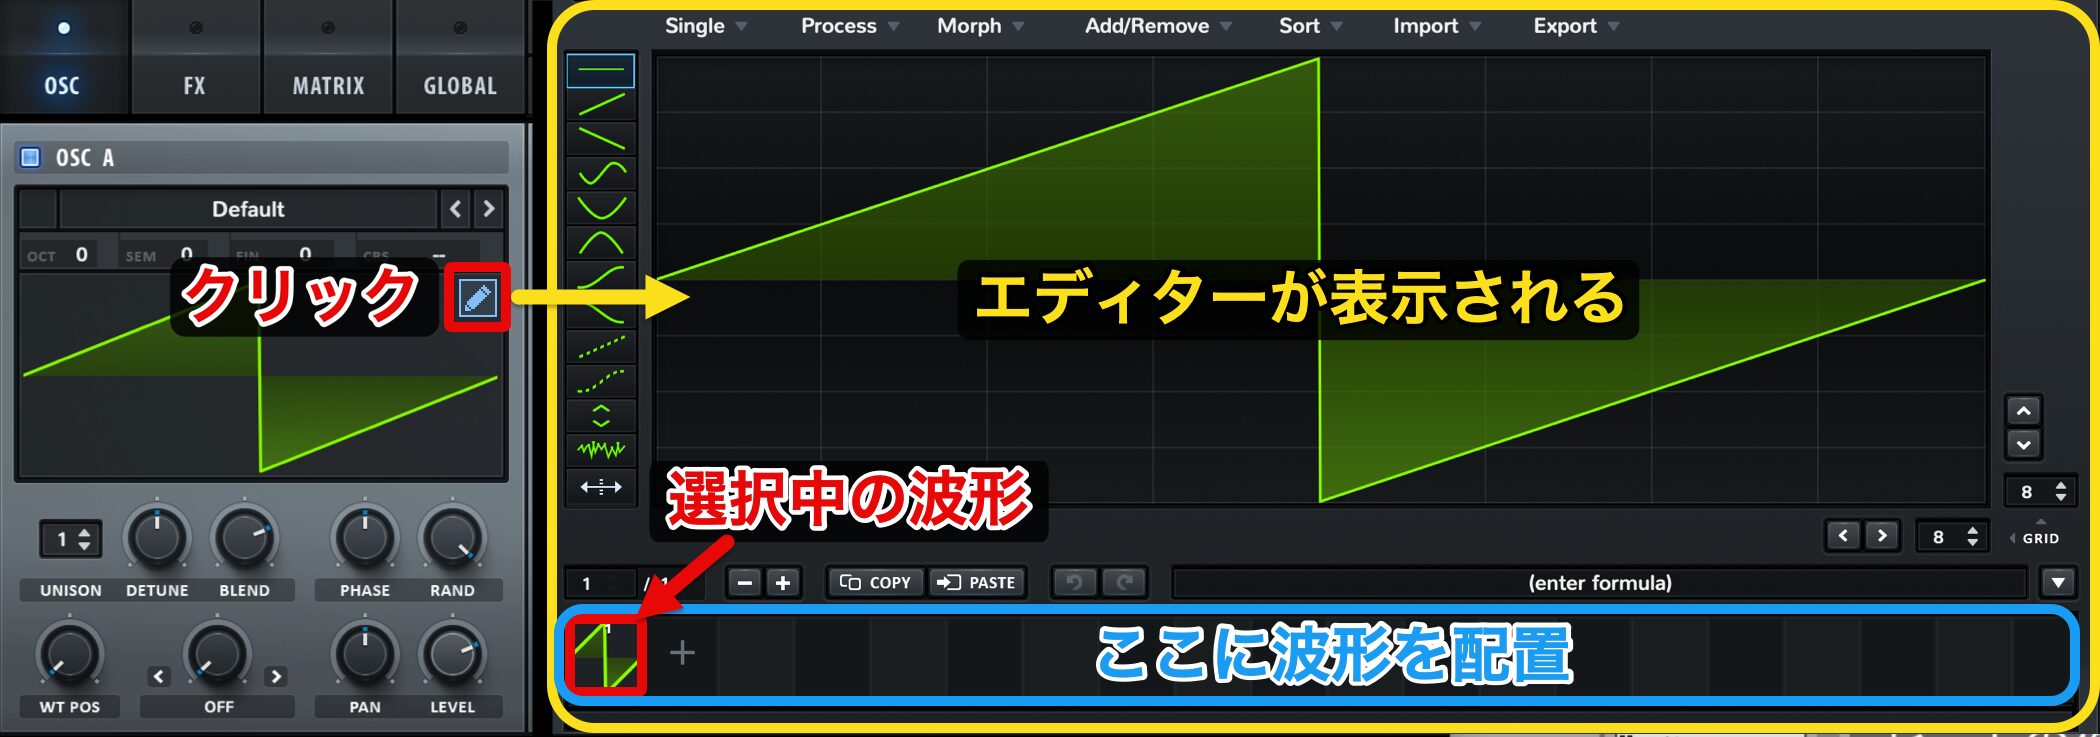
「ペンアイコン」をクリックすると、ウェーブテーブルのエディターが表示されます。
青で囲んだ部分に配置した波形が「WT POS」ノブで指定できる波形ということになります。
新たにウェーブテーブルを追加してみましょう。
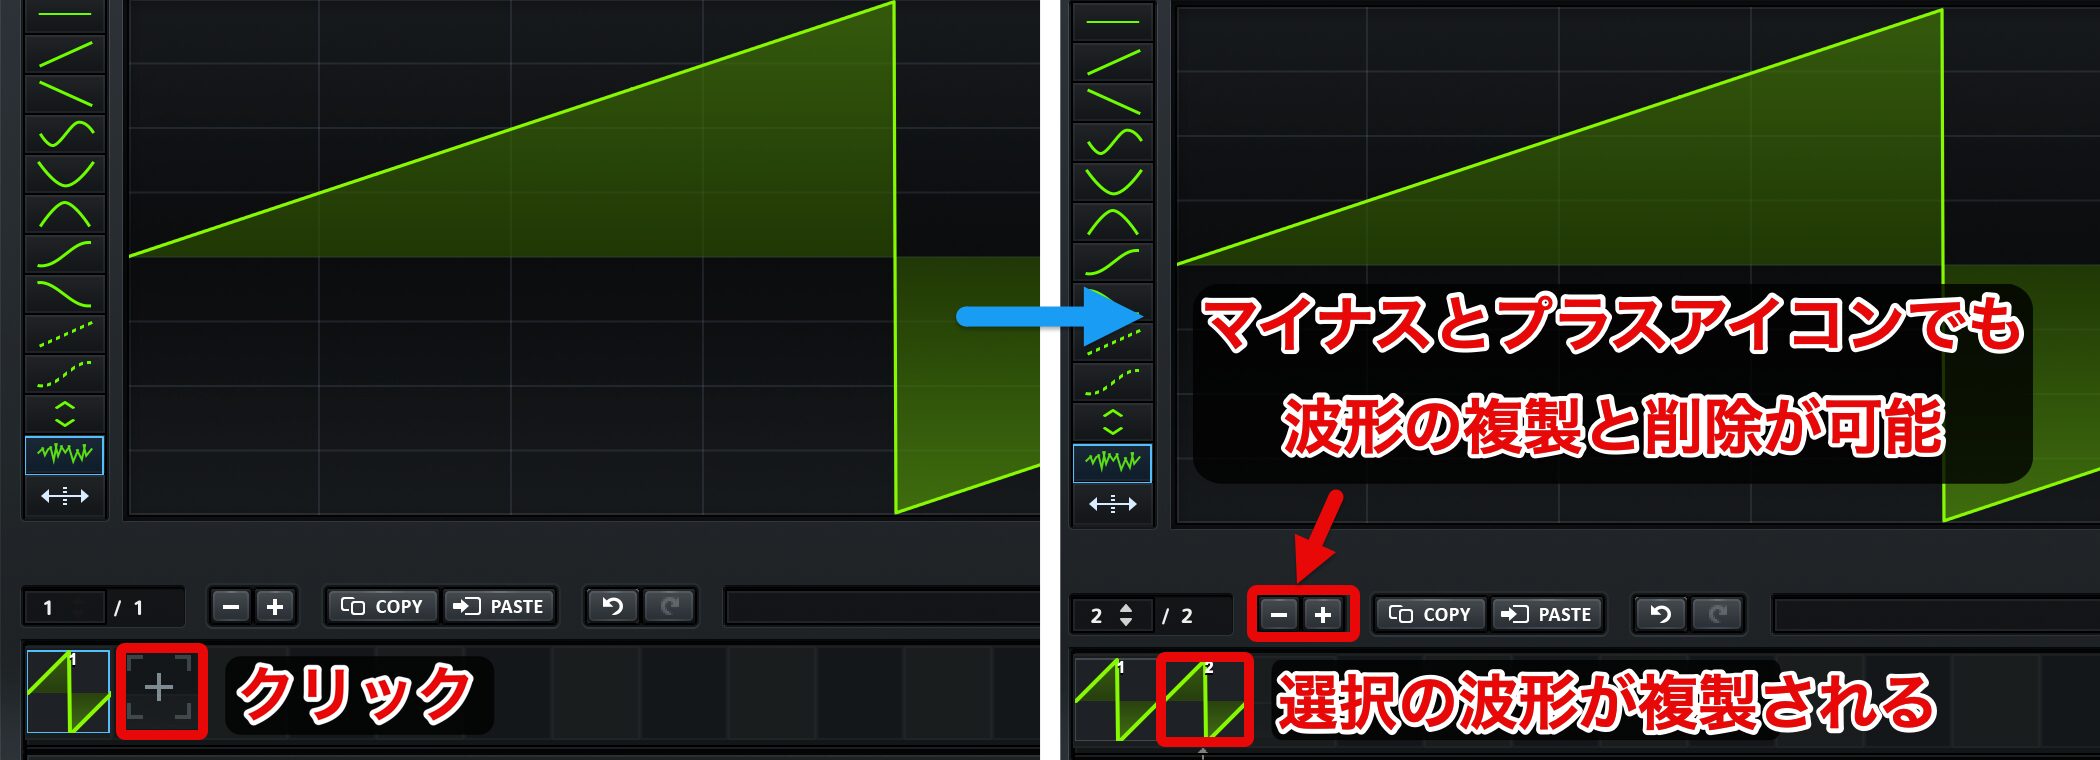
「+」を押すと、現在選択されている波形が隣に複製されます。
波形を配置する箇所の上部にある「-(マイナス)」「+(プラス」アイコンでも選択波形の複製や削除が可能です。

左にあるツールを使用して、ドラッグで波形をデザインしていきます。
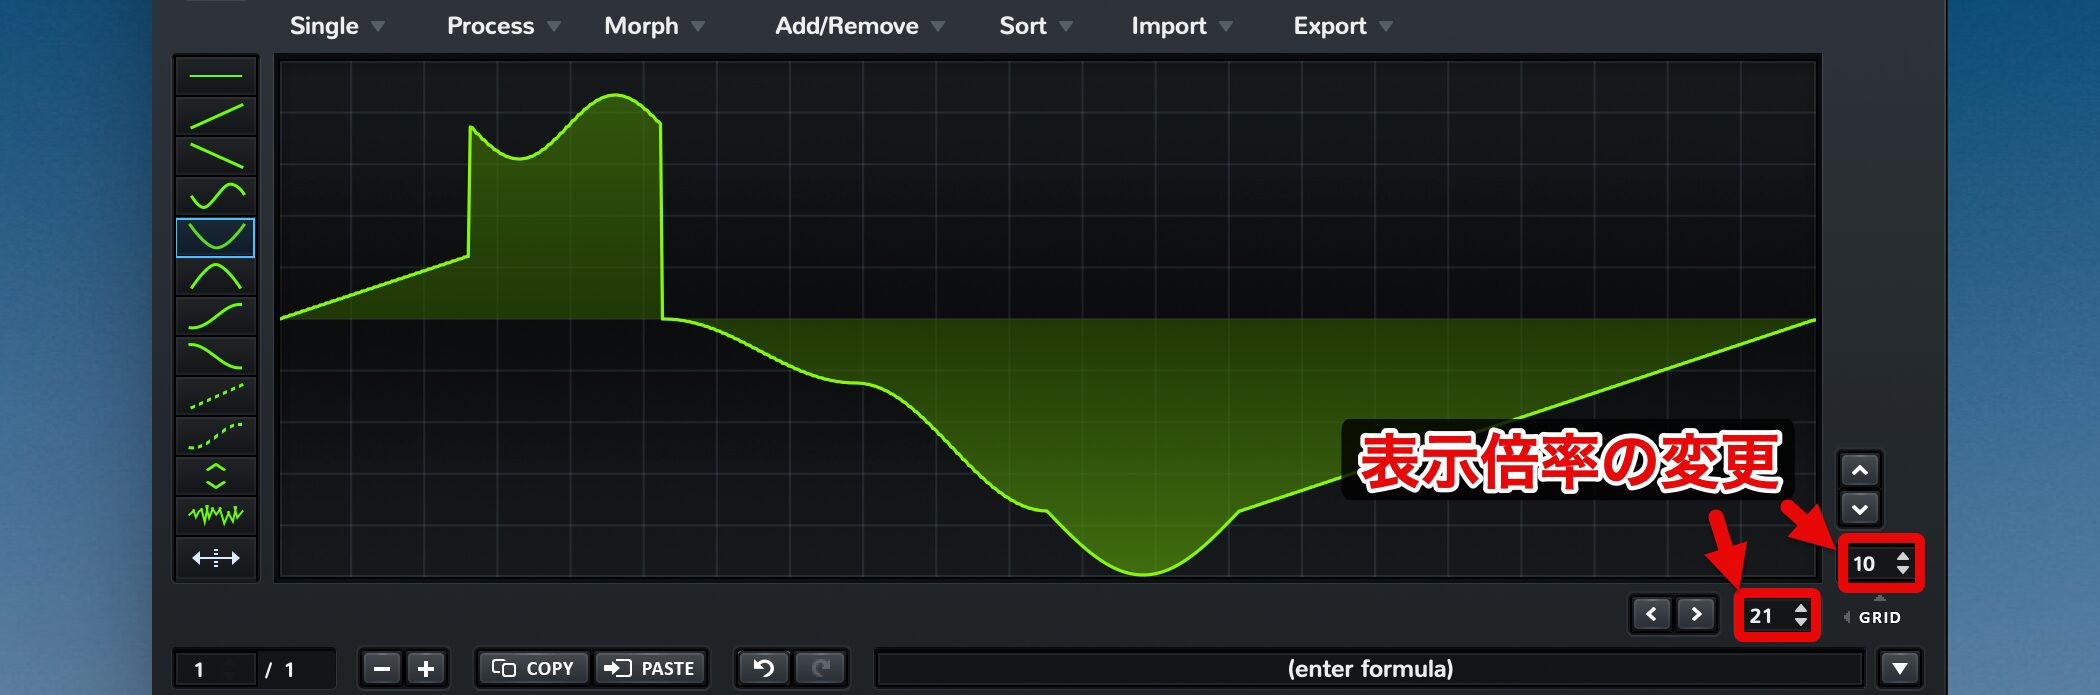
さらに細かくエディットを行う場合は、右下に配置されているズームで表示倍率を変更します。
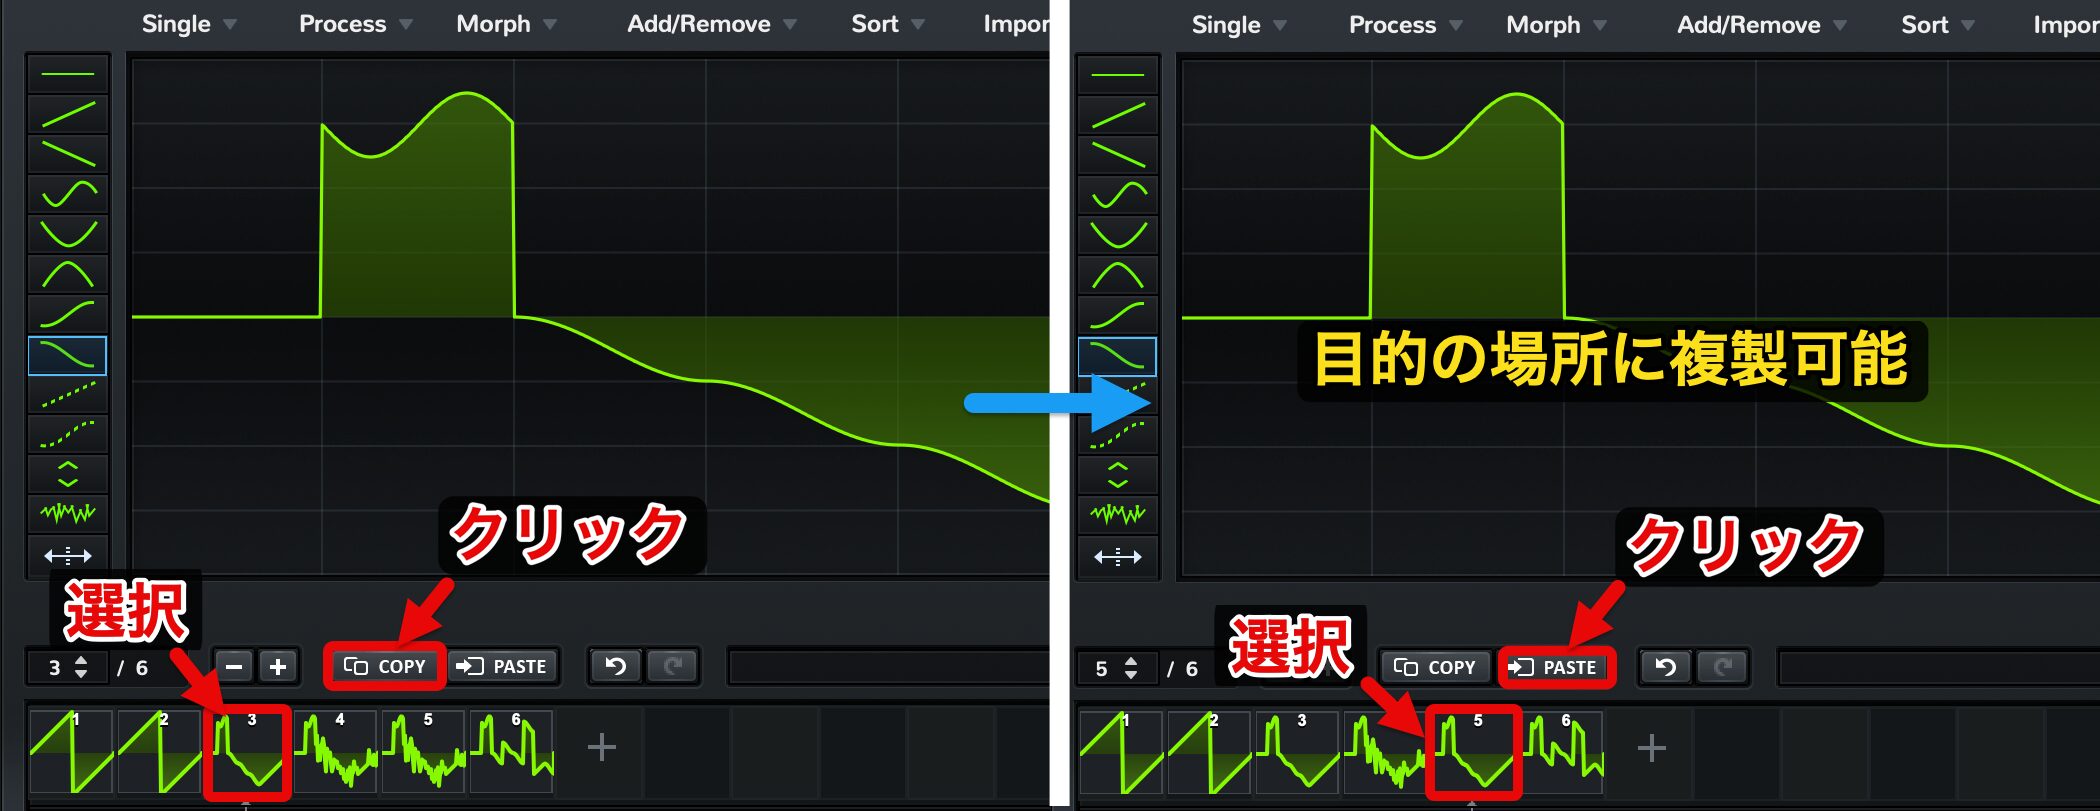
また、作成した波形を選択し「COPY」ボタンをクリックした後、複製先を選んで「PASTE」をクリックすると、波形を指定した場所に複製できます。
FFTでウェブテーブル作成する
ウェブテーブルの作成方式として、もう1つ「FFT」というものがあります。
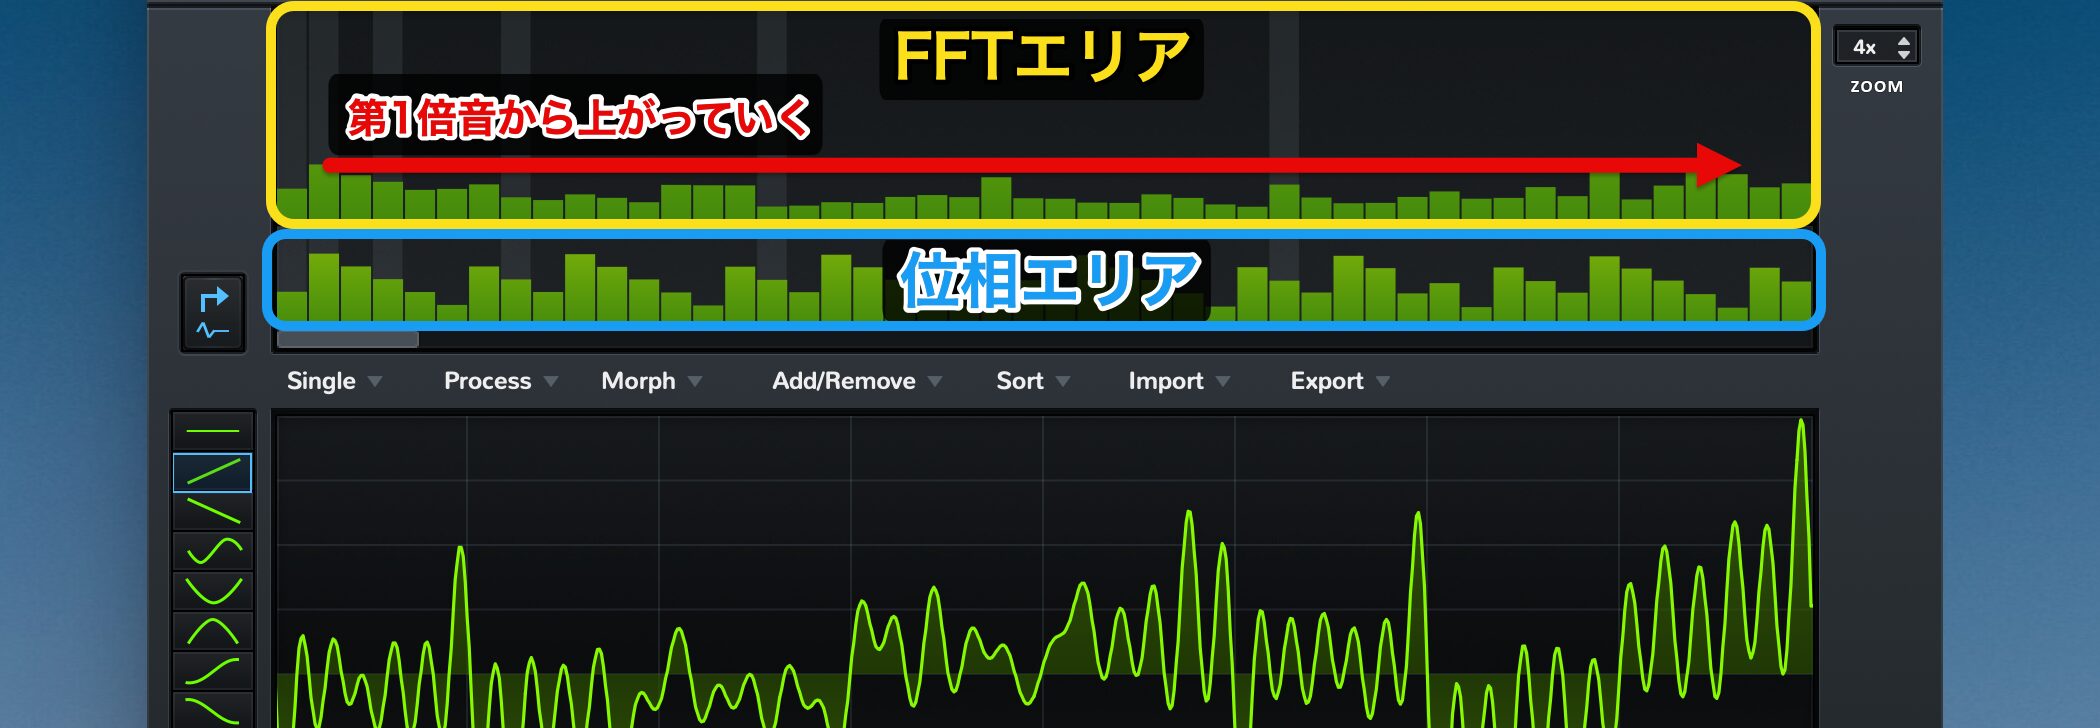
- FFTエリア(黄色部分)
周波数スペクトラムが表示され、各周波数成分の振幅(音の強さ)が視覚化されます。
一番左が基音、右に向かって第二倍音、第三倍音…と続き、縦軸は振幅(音量)を示します。
倍音を調整して音の明るさや厚みを編集できます。
- 位相エリア(青色部分)
各周波数成分の位相(波のタイミング)が視覚化され、上下のバーで倍音の時間的な位置関係が表示されます。
位相を調整することで波形の形状が変わり、音の印象や倍音の目立ち方が変化します。
ウェーブテーブルをモーフィングする
上記で波形をセットした後、「WT POS」ノブを回すと使用される波形が変わっていきます。
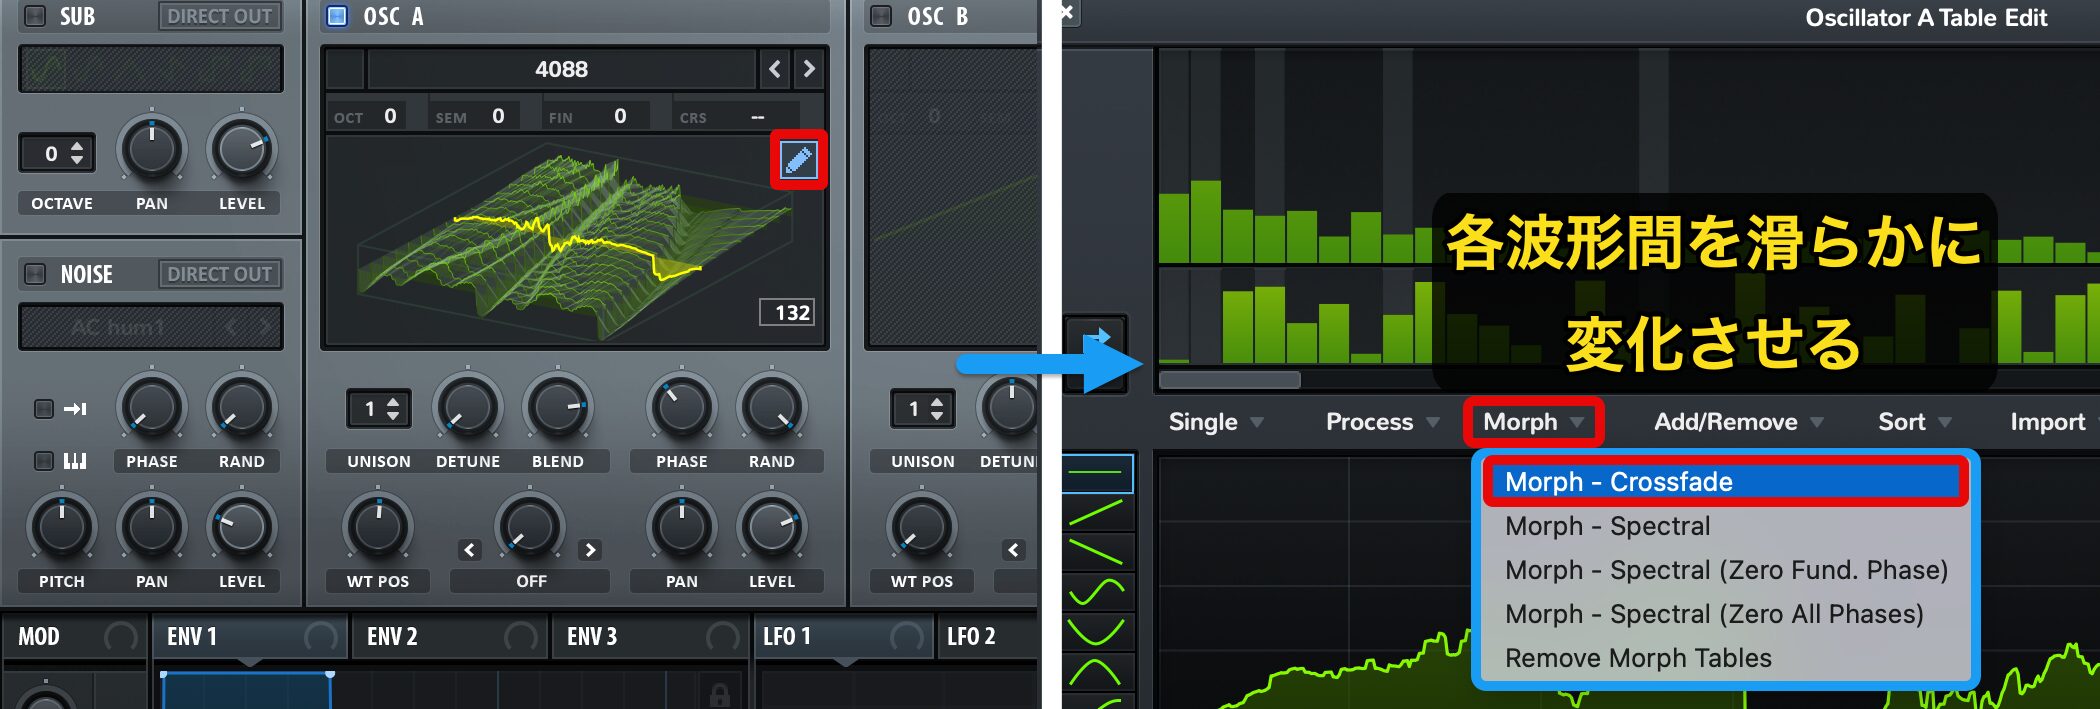
この際、各波形間を滑らかに変化させる機能として「モーフィング」が用意されています。
「ペンアイコン」をクリックし、「Morph」タブからモーフィングの項目を選択することで、機能が有効となります。
ここではメーカーが推奨している「Morph-Crossfade」を選択していますが、他の様々な項目も試しながら、お好みの効果を探ってみてください。

「WT POS」ノブの動きに合わせて、セットした波形が滑らかに切り替わってきます。
オリジナルのオーディオ素材を読み込む
SERUMでは、ユーザーが用意したオリジナルのオーディオファイルを解析し、オシレーター波形として使用することができます。
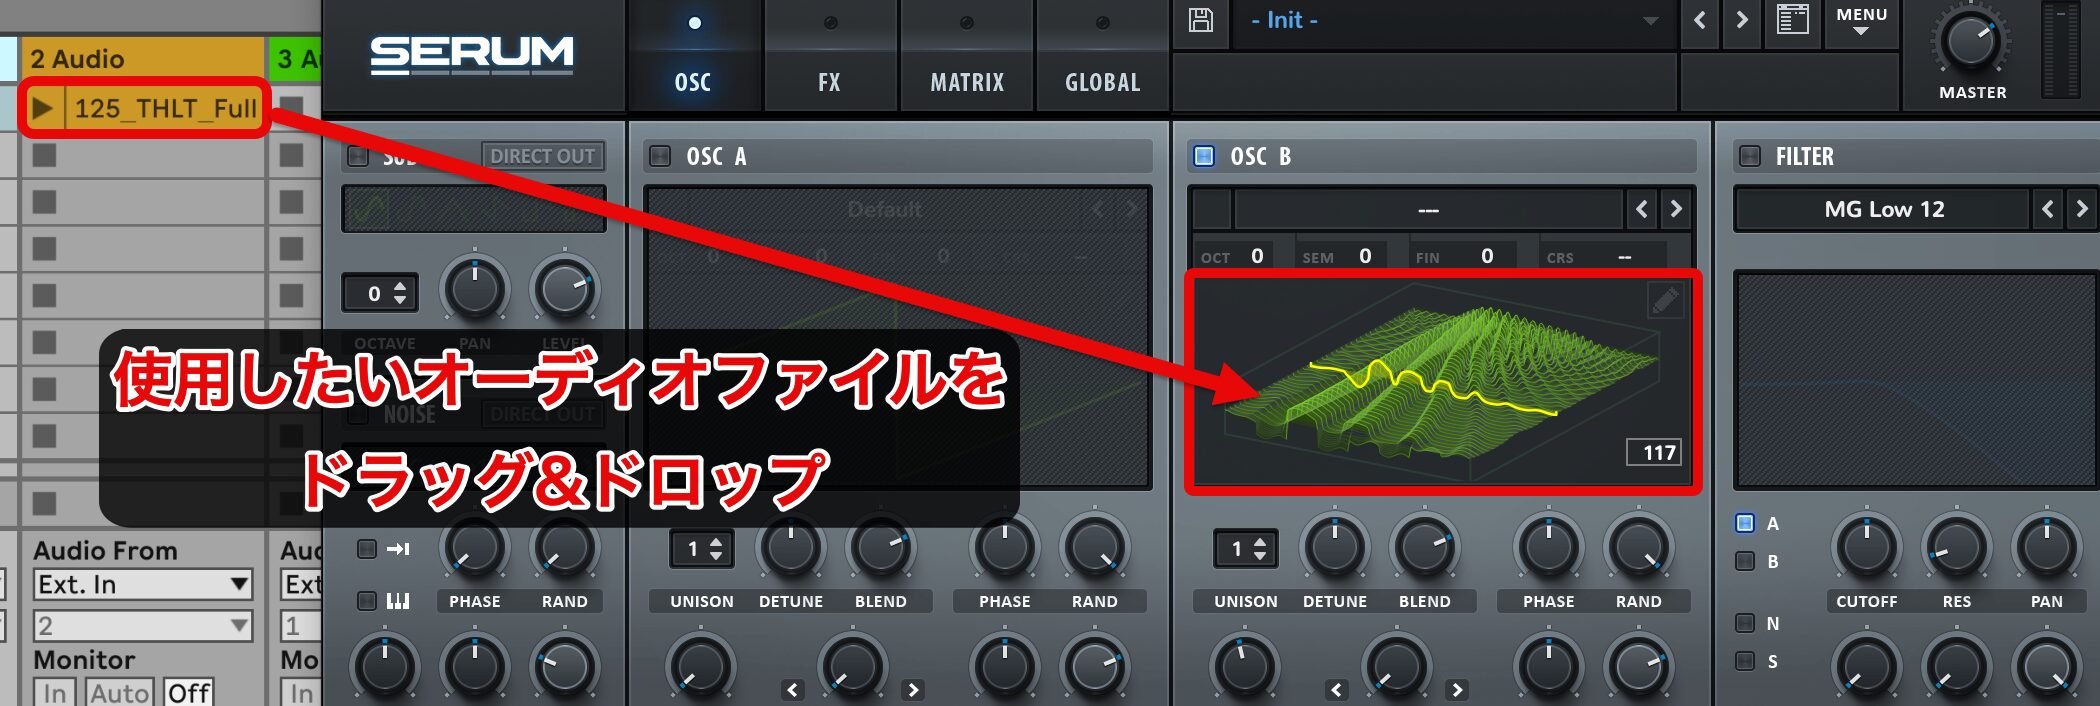
使用したいオーディオファイルを直接オシレーター部分へドラッグ&ドロップします。
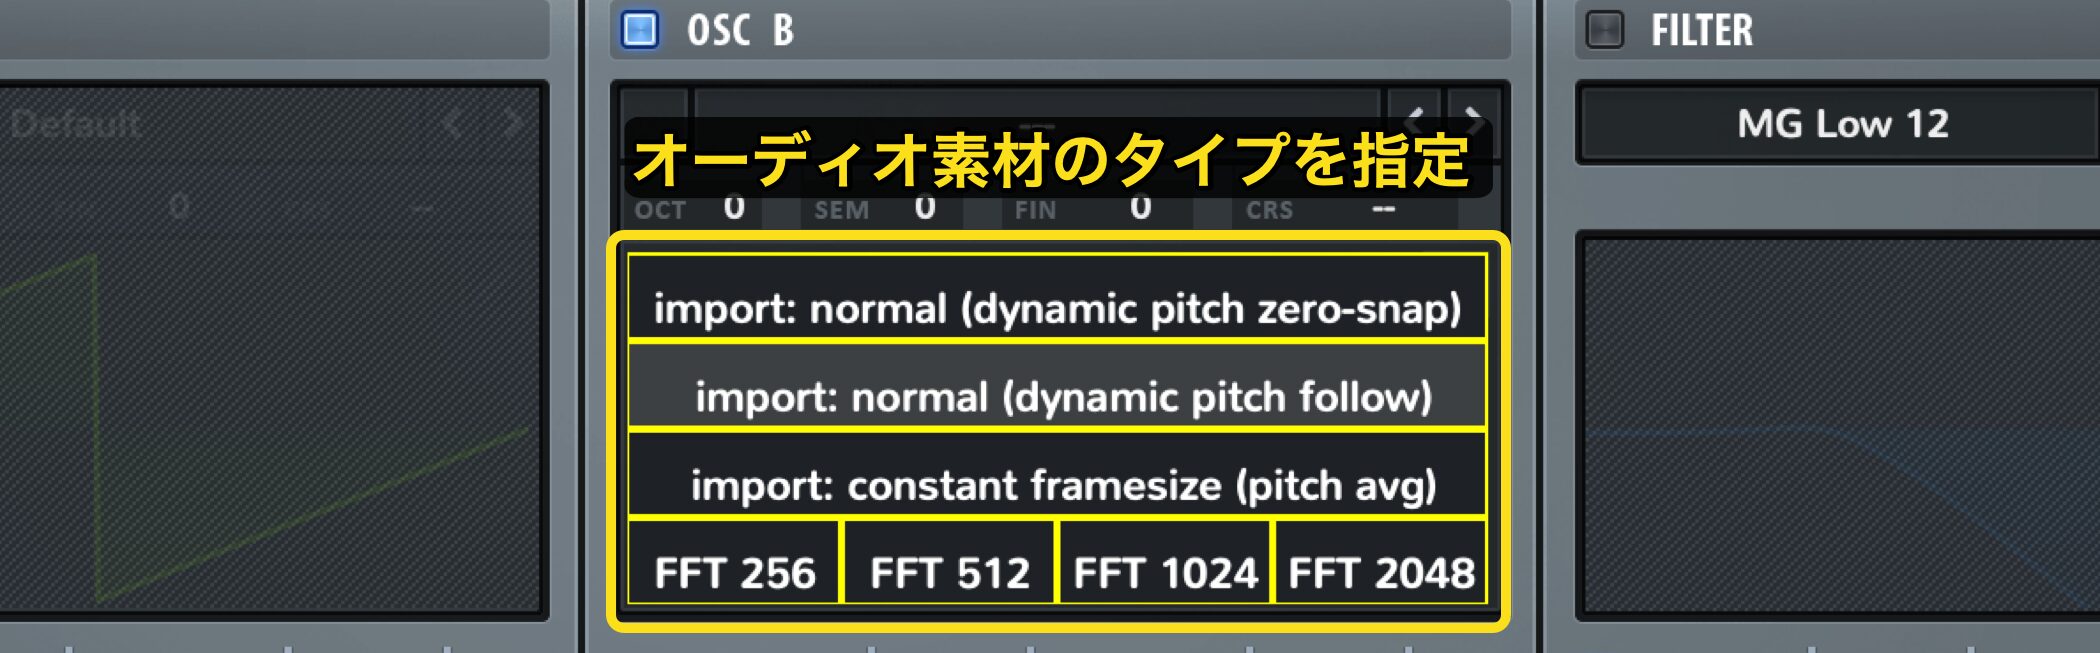
オーディオ素材のタイプを指定することで、最適なサウンド解析が行われます。
- normal (dynamic pitch zero-snap) : 音量やピッチ変化がシンプルなサウンド素材向け
- normal (dynamic pitch follow) : 音量やピッチ変化が大きいサウンド素材向け
- constant frame size : ワンショット向け(推奨)
- FFT : ドラムや効果音などサウンドのピッチが不鮮明なもの向け
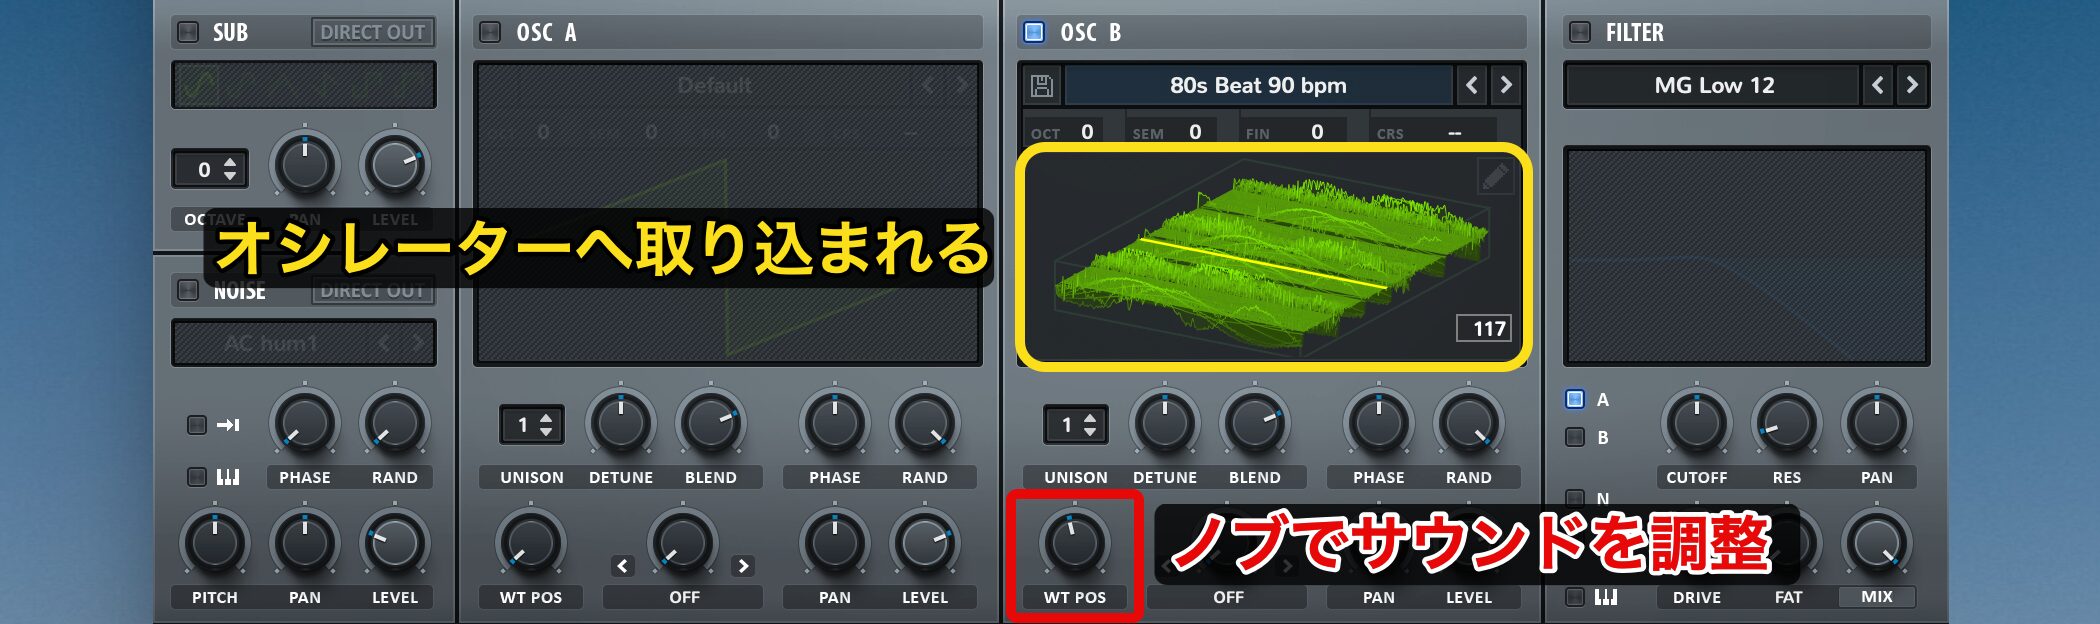
オーディオファイルが解析されて、OSCへ取り込まれます。
「WT POS」ノブで良い感じのサウンドになるように調整しましょう。
サウンドに動きを与える各セクションを把握する
続いて、LFOを中心としたモジュレーション部分を解説していきます。
シンセサイザーはこれらモジュレーションを使用して、サウンドにどのような動きをつけていくのか?という点が非常に重要となってきます。
このセクションを把握して、様々なサウンドを生み出してください。
SERUM 動画 : モジュレーションのコントロール
LFOセクション
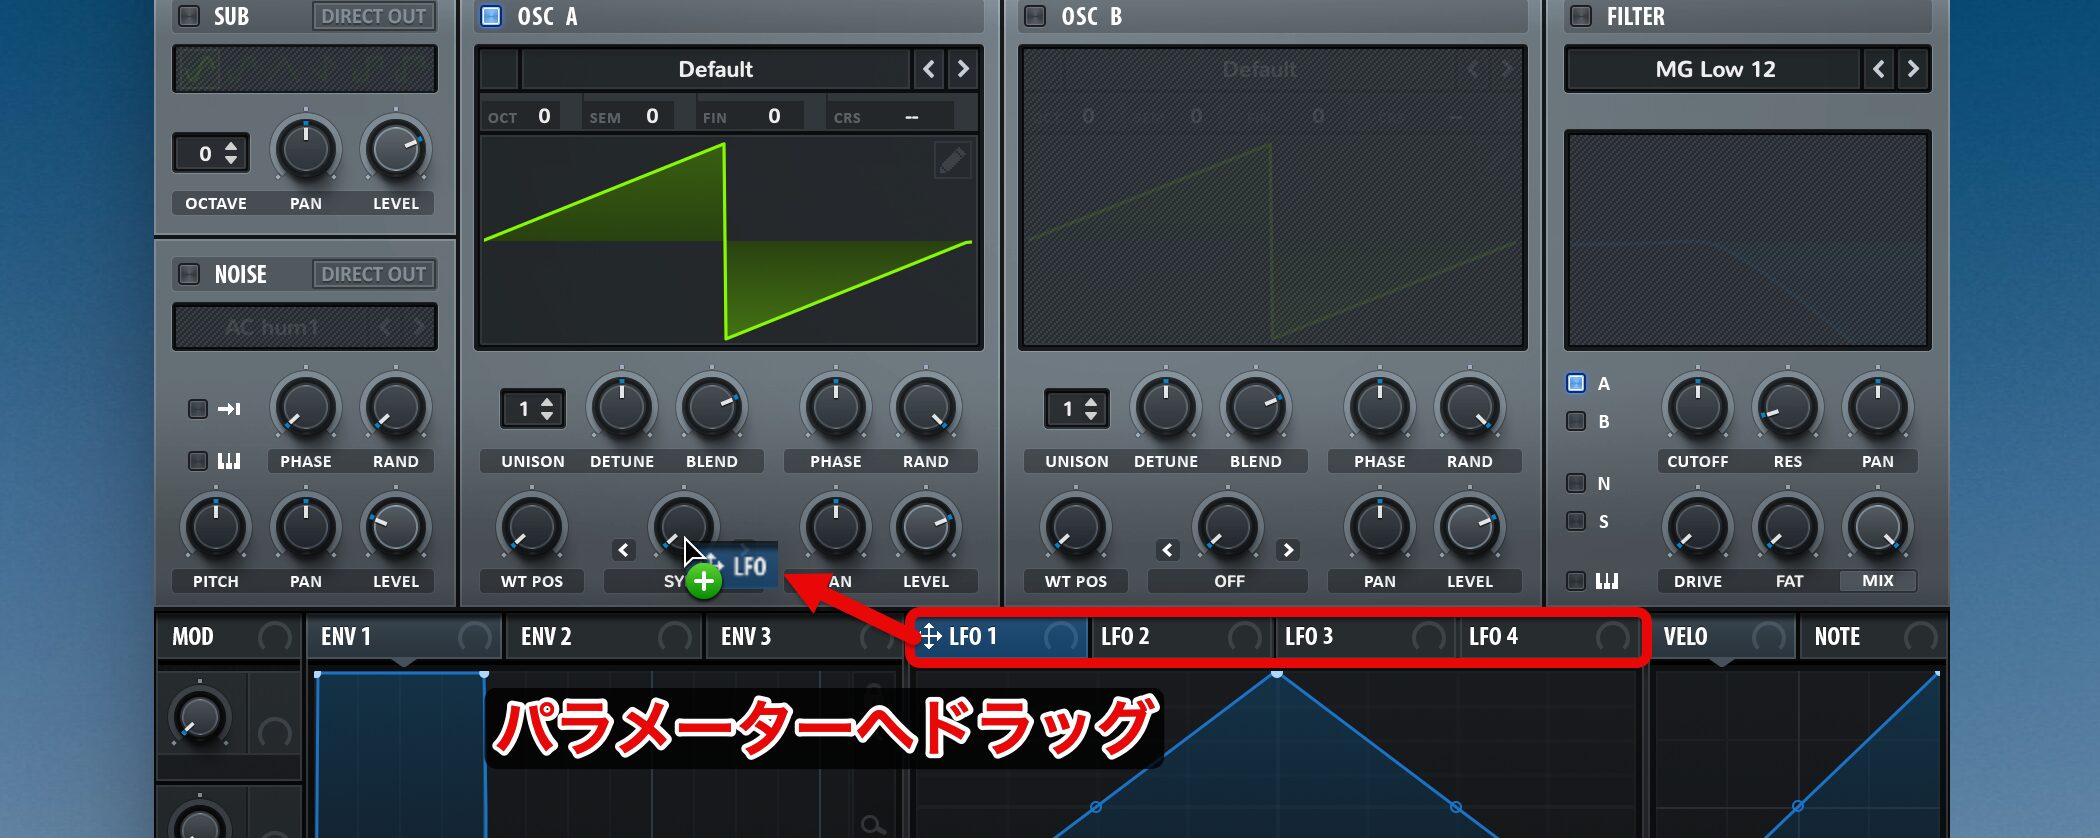
Serumには4つのLFOが用意されています。
各LFOを目的のパラメーターへドラッグするだけで、簡単に適用することができます。
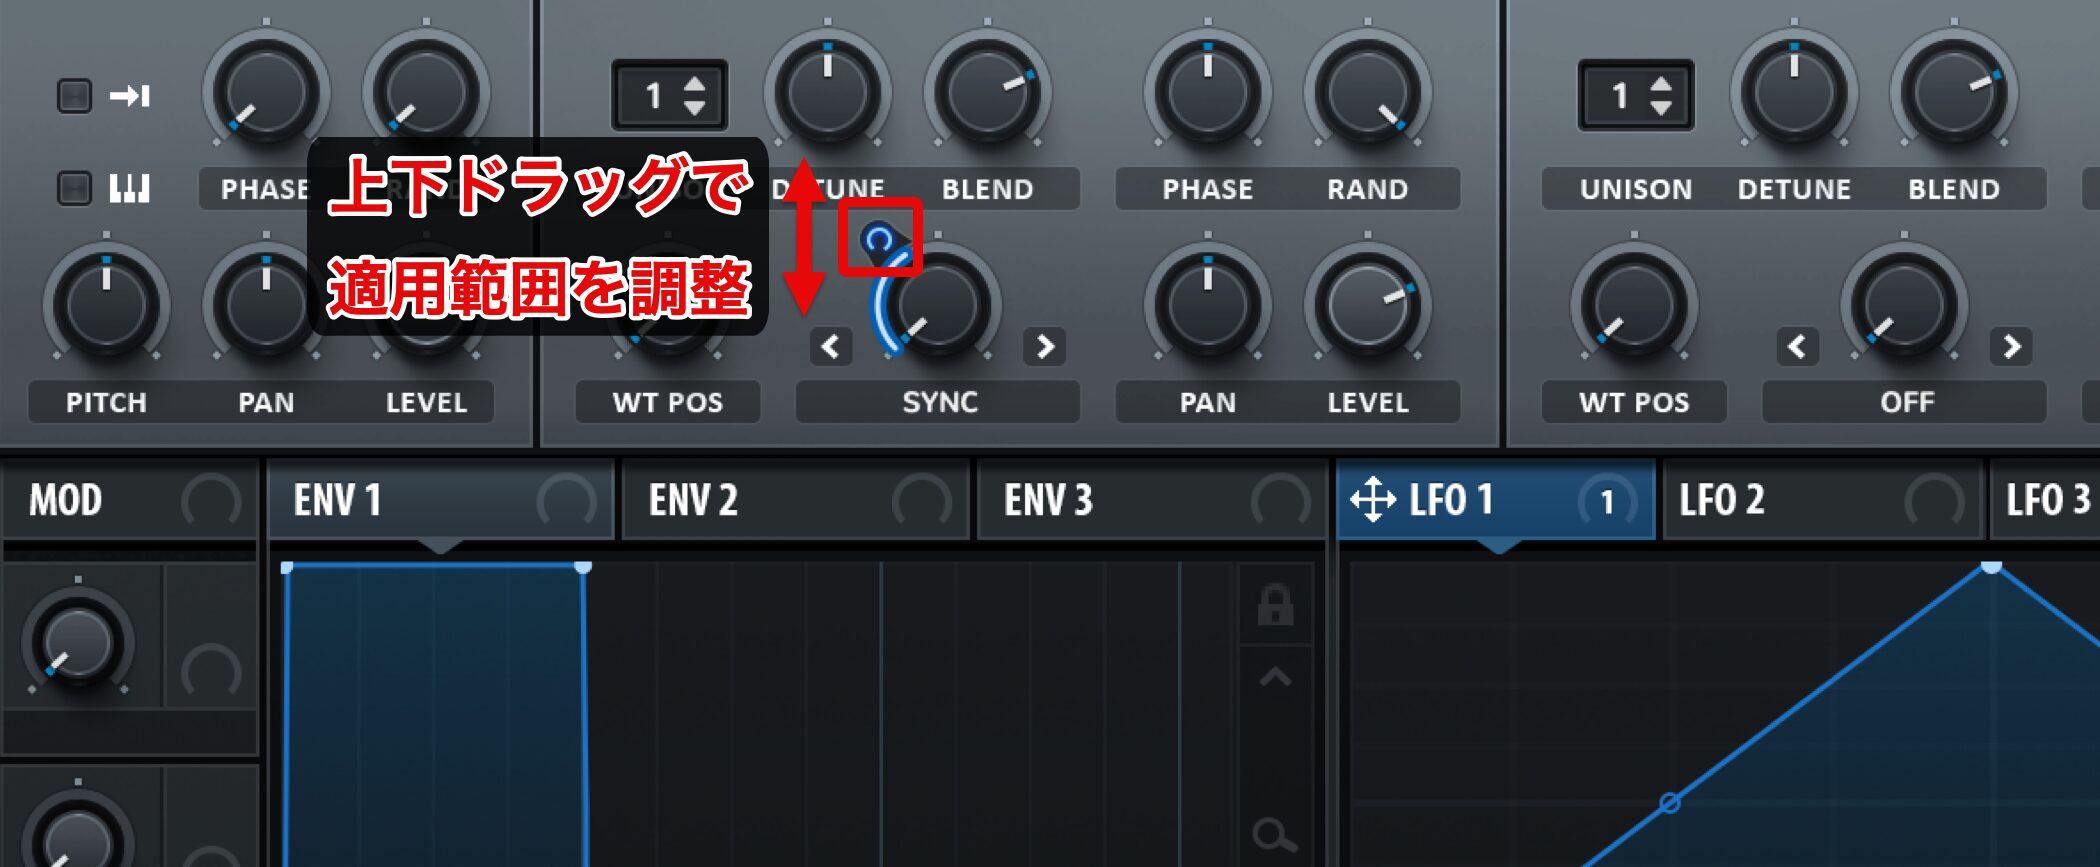
赤く囲んだ部分を上下ドラッグすることで、LFOの適用範囲を調整することができます。
ブルーラインの表示がLFOの適用範囲ということになります。
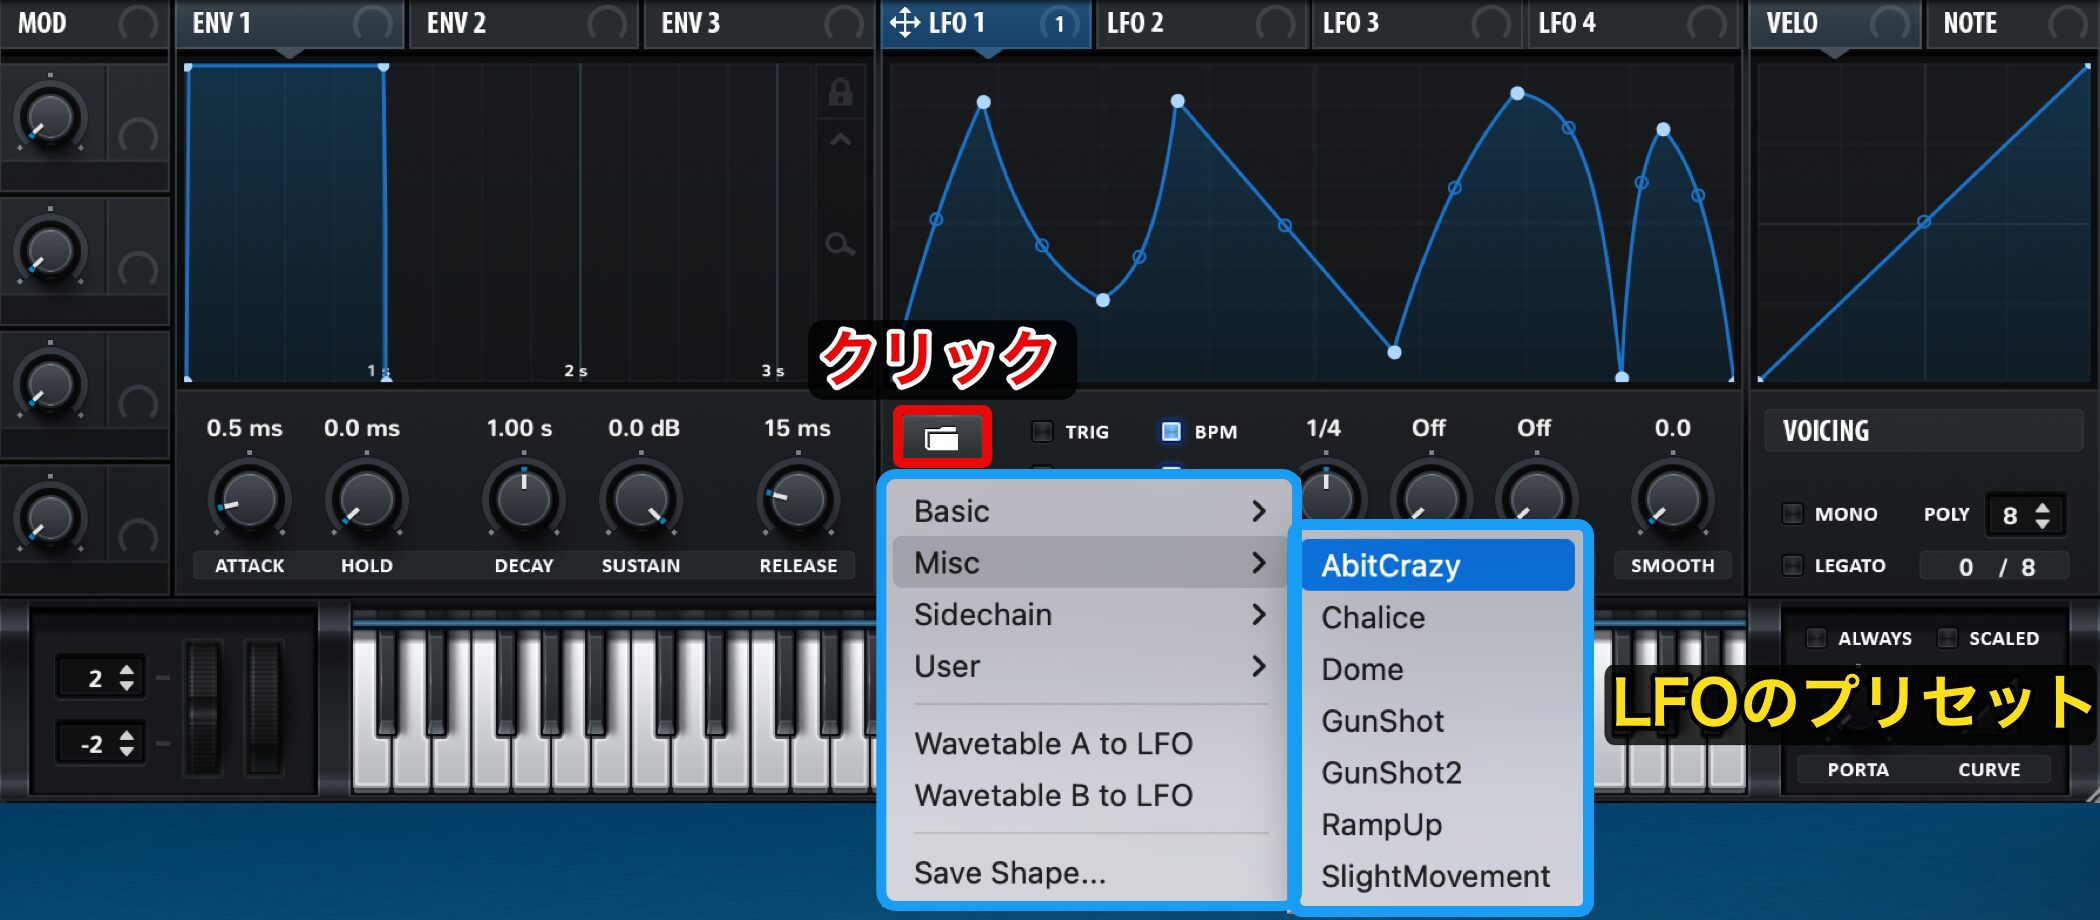
LFOの種類も様々なプリセットが用意されています。
フォルダアイコンから好みのプリセットを探してみてください。
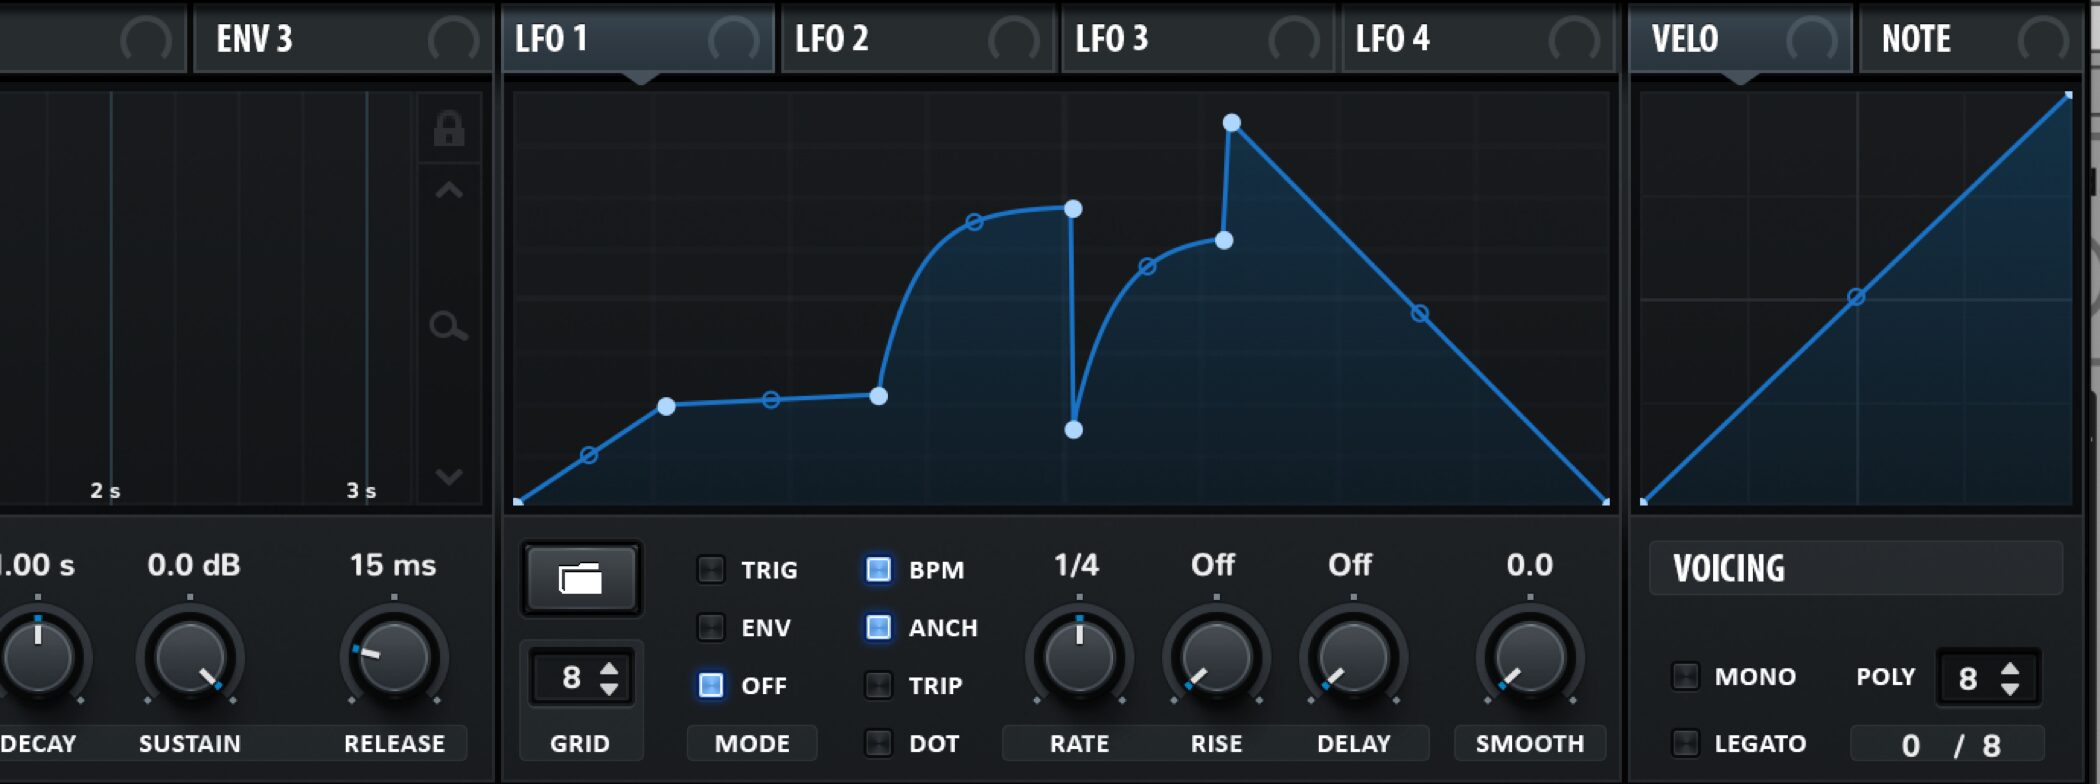
「RATE」からLFOの繰り返し周期のスピードを変化させることができます。
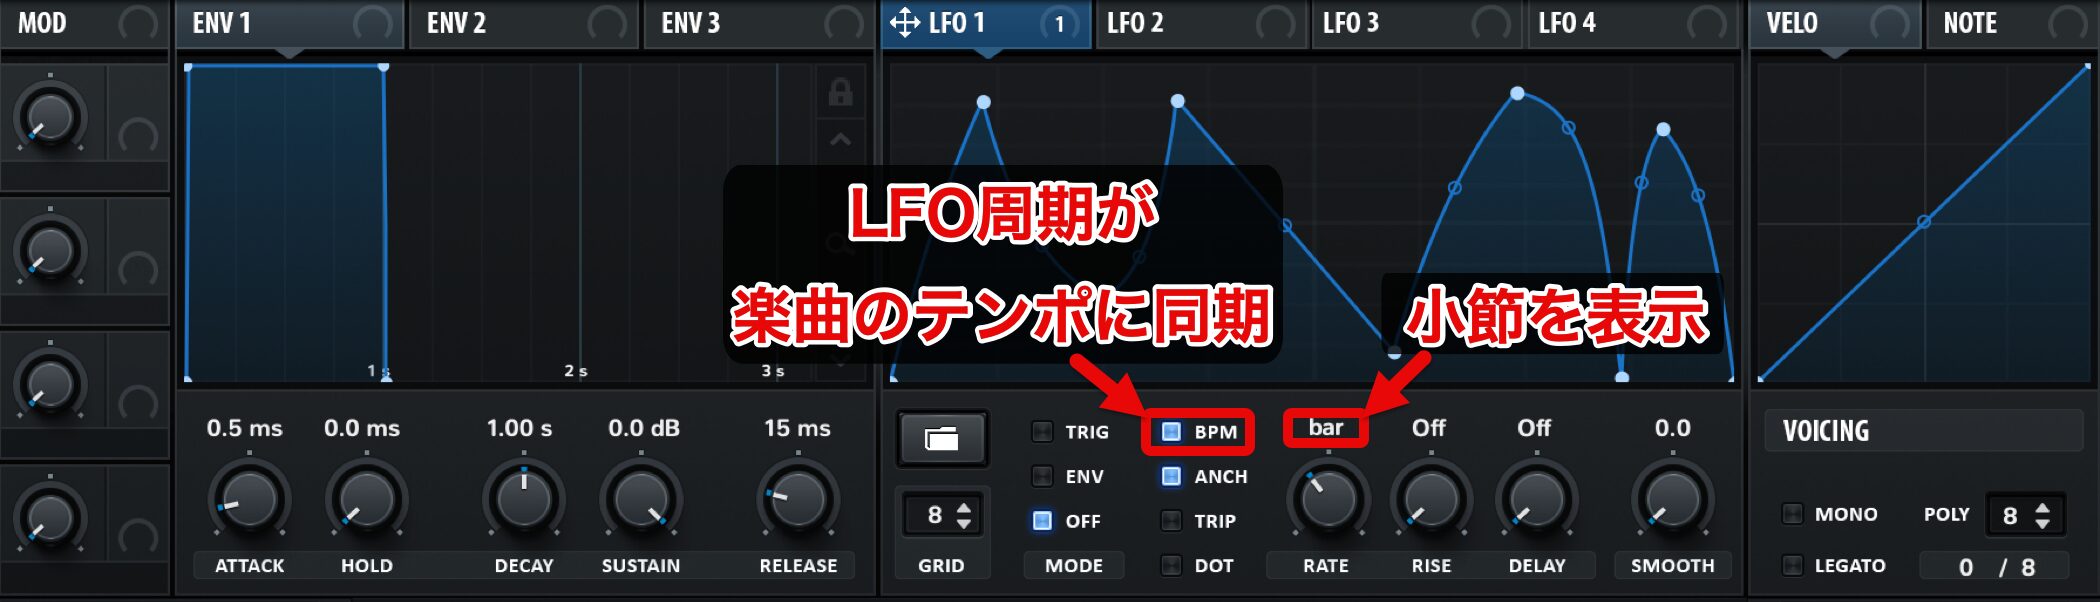
この際、「BPM」を点灯させることで、LFO周期が楽曲のテンポに同期します。
「RATE」の「bar」というのは小節を表しており、1小節にLFOの周期が一周するということになります。
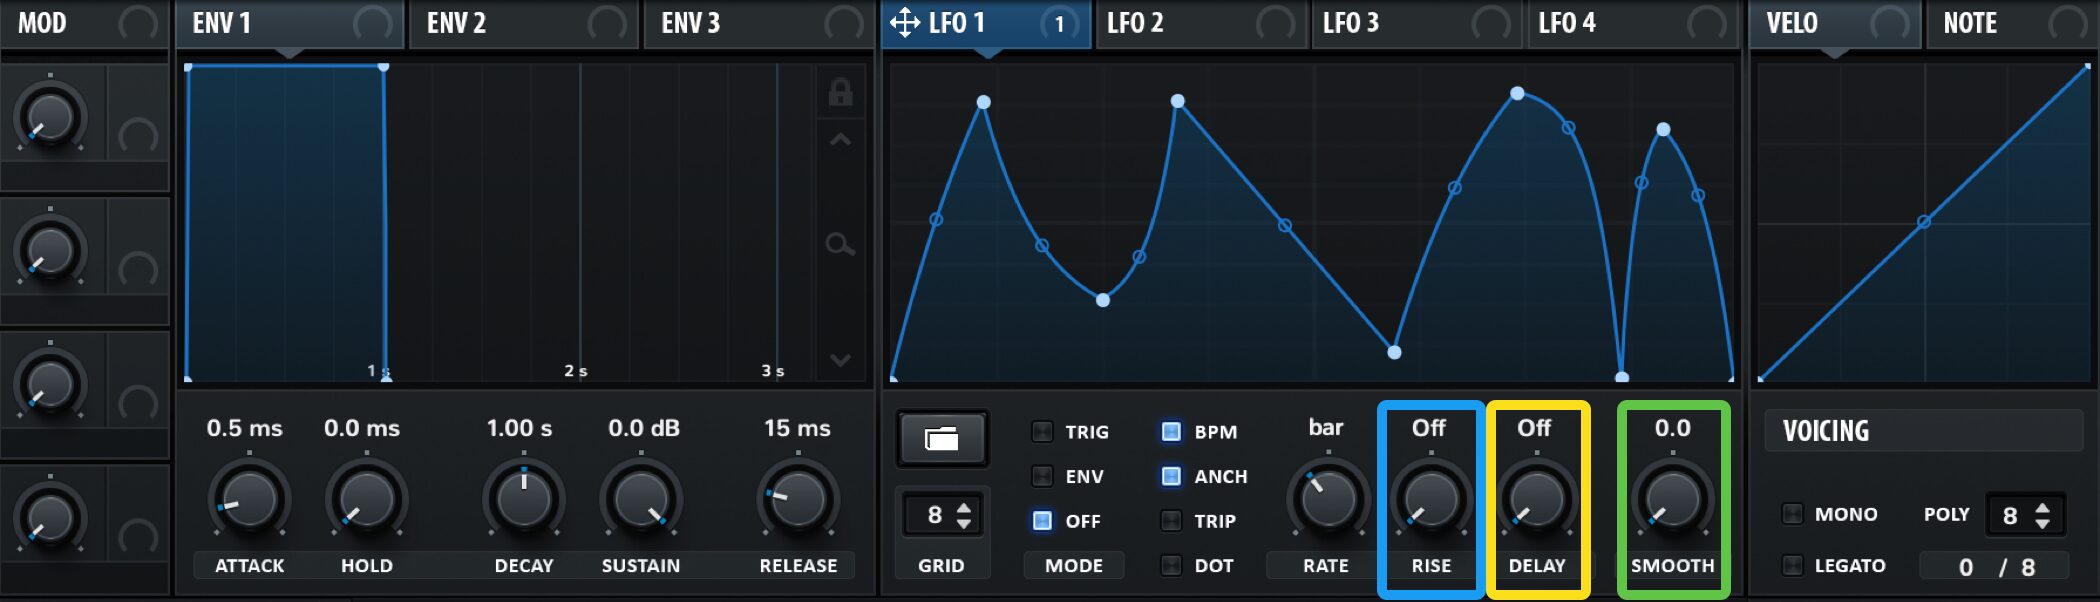
RATEの他にもLFOの動きを各パラメーターで細かく指定することができます。
- RISE(青) : 時間の経過とともにLFOの効果をフェードインさせることができます。
- DELAY(黄) : LFOが動き出すまでの時間を遅らせることができます。
- SMOOTH (緑) : LFOの動きを滑らかにすることができます。
このように徐々にサウンドが変化していく効果を与えることができます。
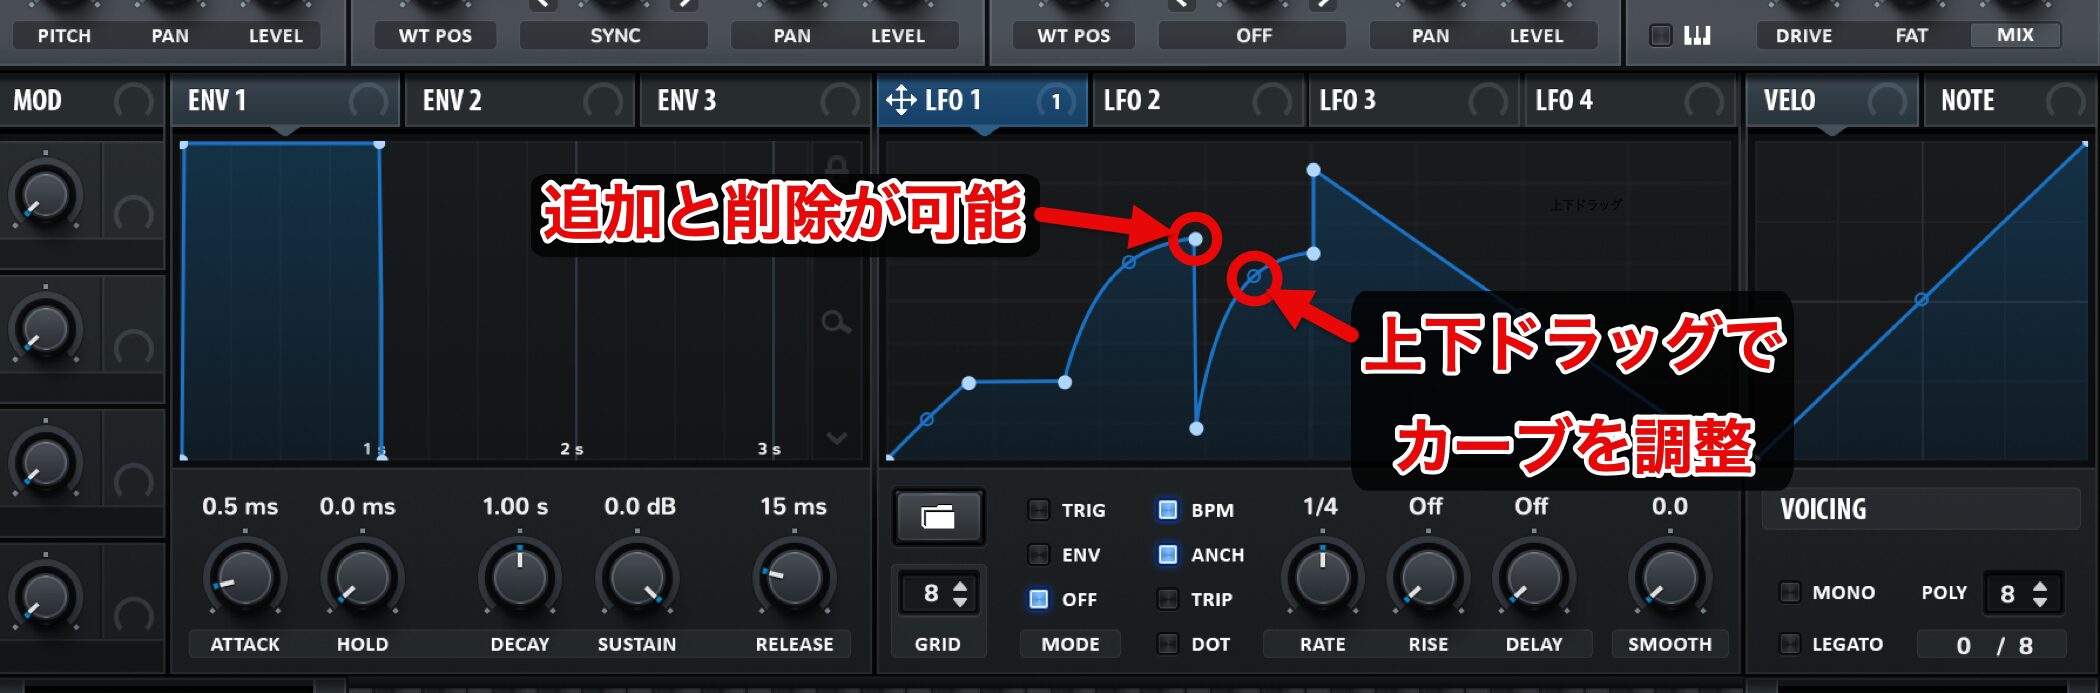
また、LFOの動きを自分好みに作成することもできます。
「Shiftキー + クリック」でグリッドにスナップしたステップを追加したり、ライン上でダブルクリックすると新たにポイントを追加できます。
既存のポイントをダブルクリックすると削除が可能です。
さらに、カーブの途中にある青いポイントをドラッグすると曲線のカーブを調整できます。

「GRID」で4分、8分、16分などに設定すると、画面上に音符単位の目安となるグリッド線が表示されます。
- Mac : Option
- Windows : Alt
を押しながらドラッグすると、指定したグリッド単位で操作が可能です。
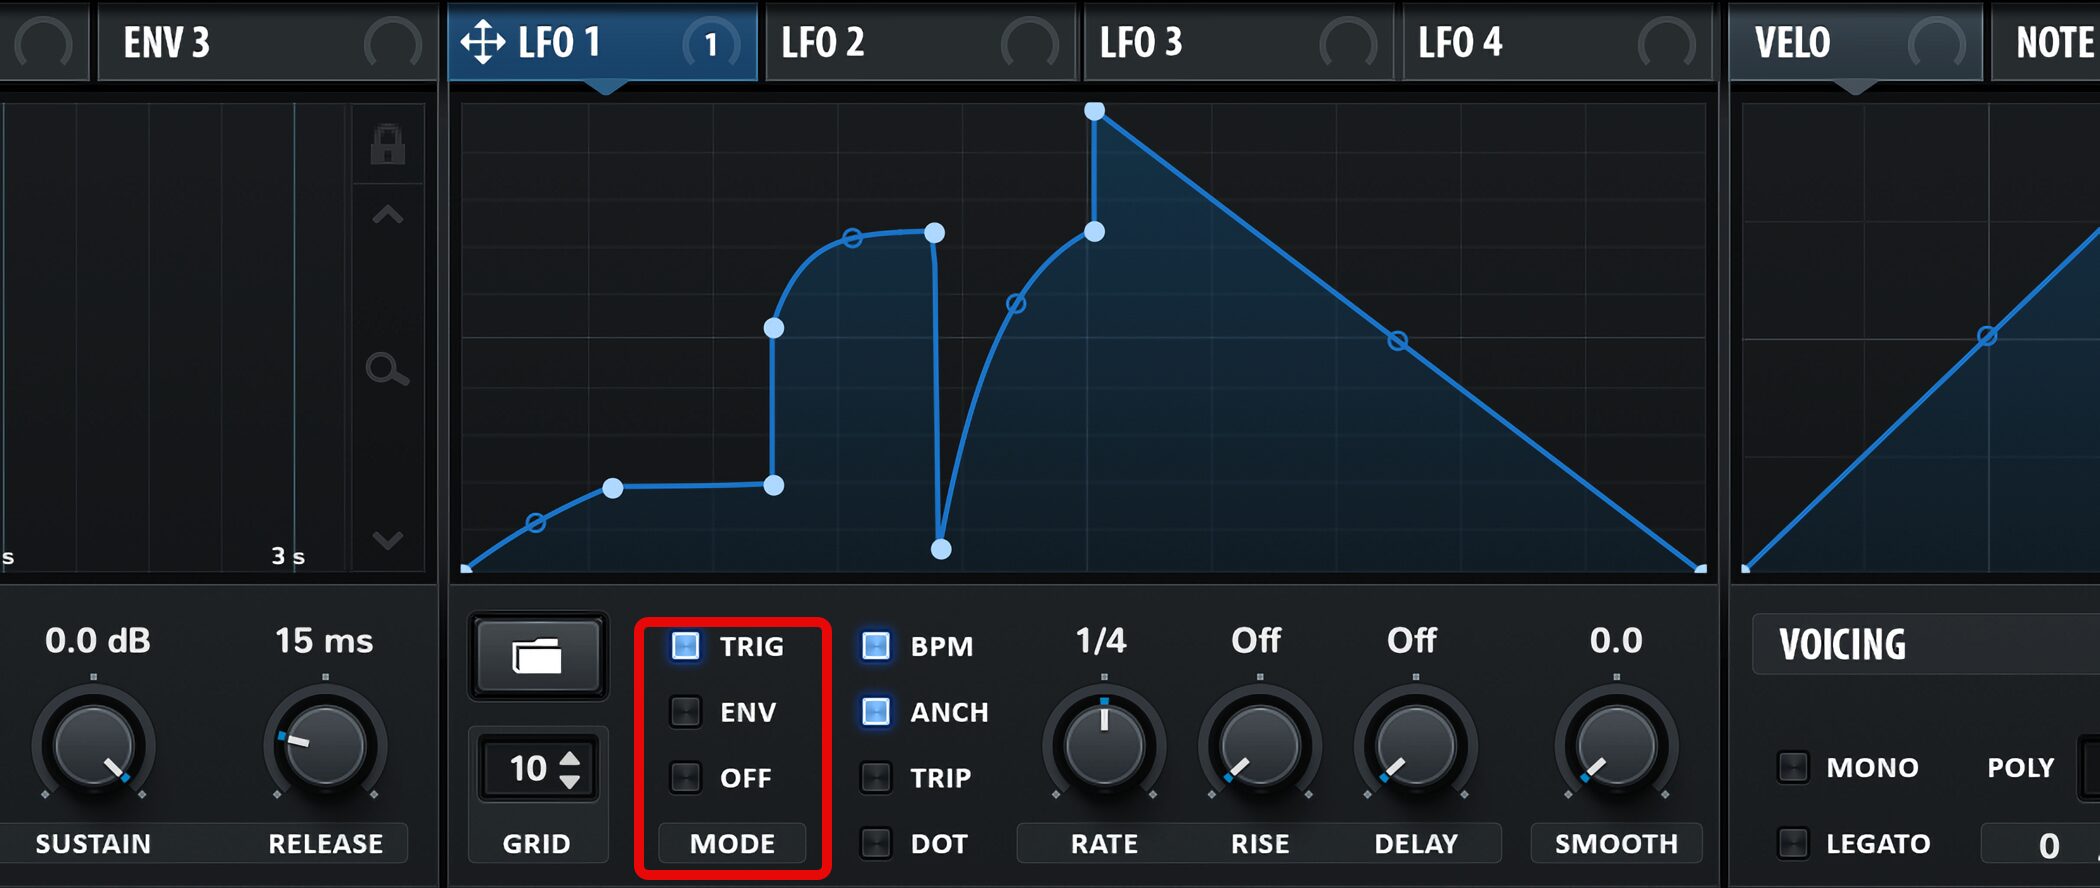
この部分からは、LFOのトリガーの「MODE」を指定することができます。
- TRIG : MIDIノートが発音される度にLFOの周期が頭に戻ります。
- ENV : LFO周期が1度だけ演奏されます。
- OFF : MIDIノートの発音に関わらずLFO周期が繰り返されます。
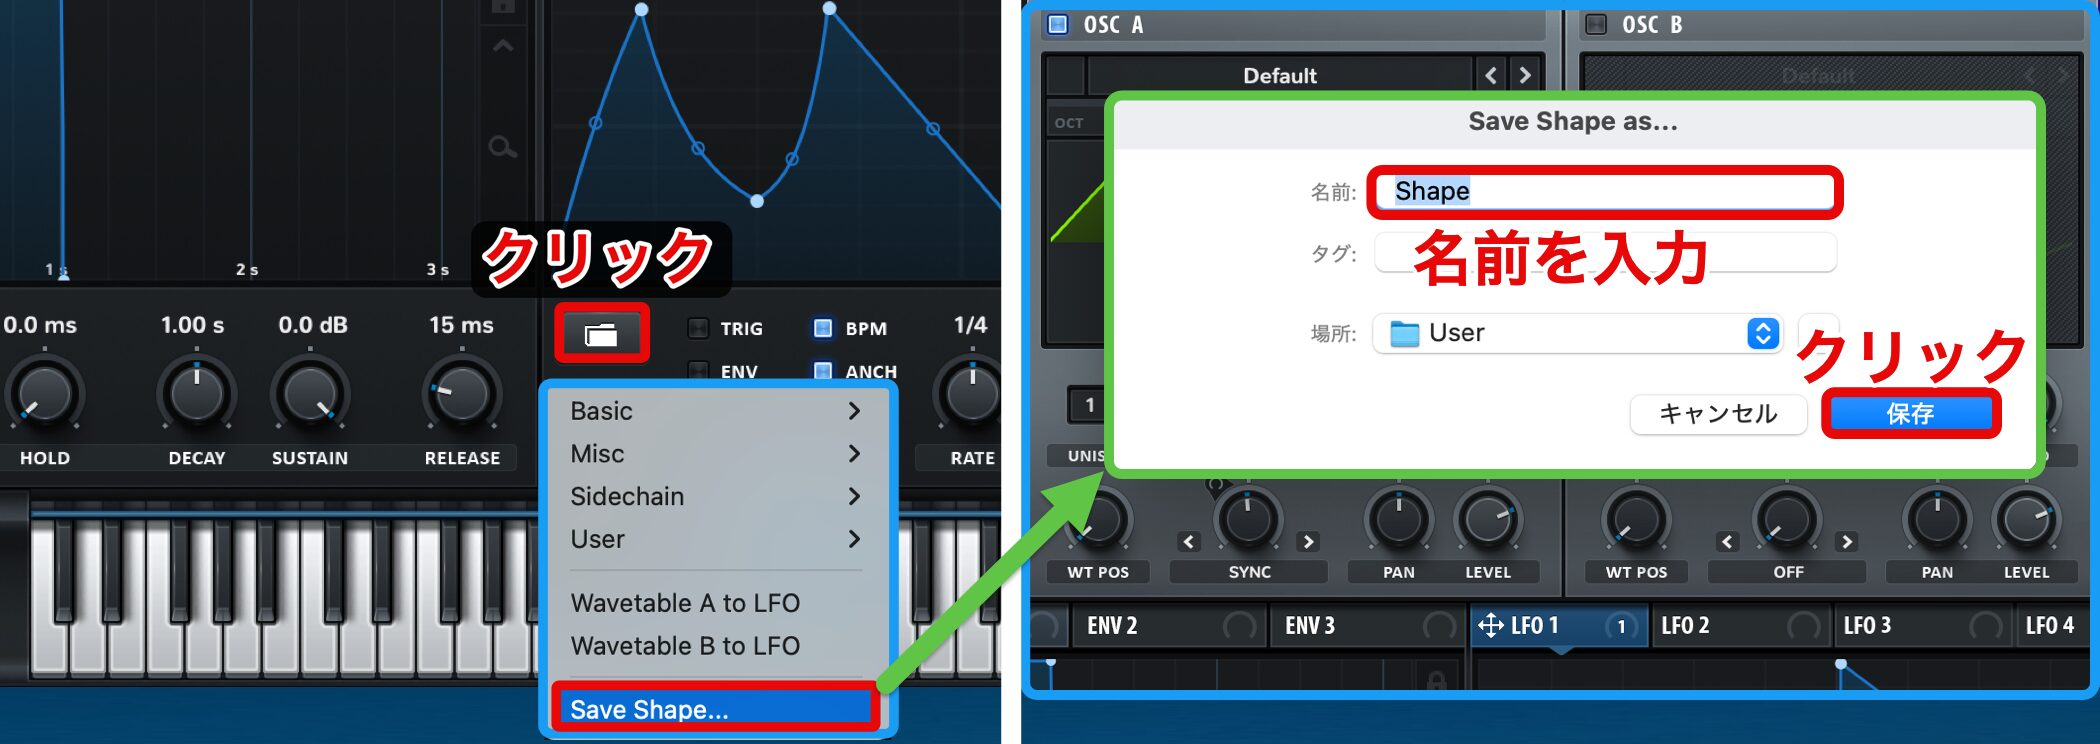
作成したLFOを保存しておくことができます。
フォルダアイコンをクリックして「Save Shape」を選択し、名前を入力した後、「保存」をクリックするだけです。
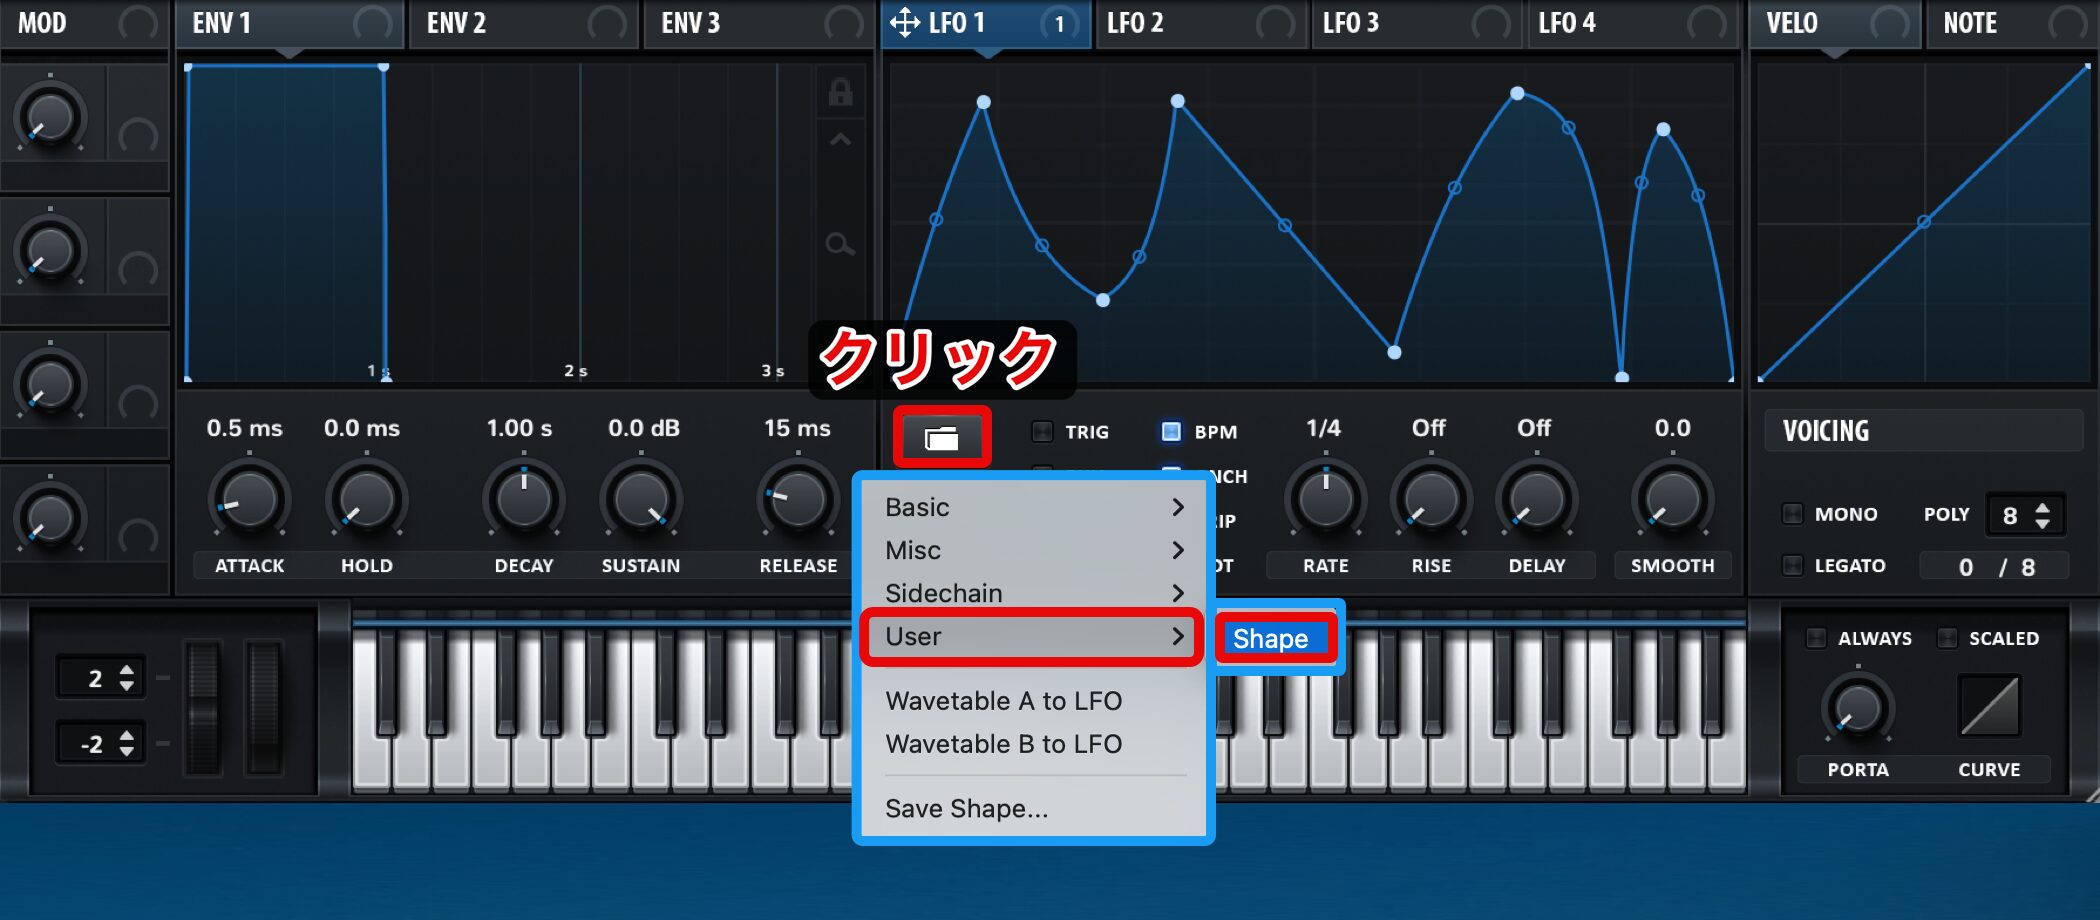
保存したLFOは「User」から呼び出すことができます。
マトリクスセクションの設定
マトリクスセクションからは、LFOやエンベロープの可変範囲を細かく設定することができます。
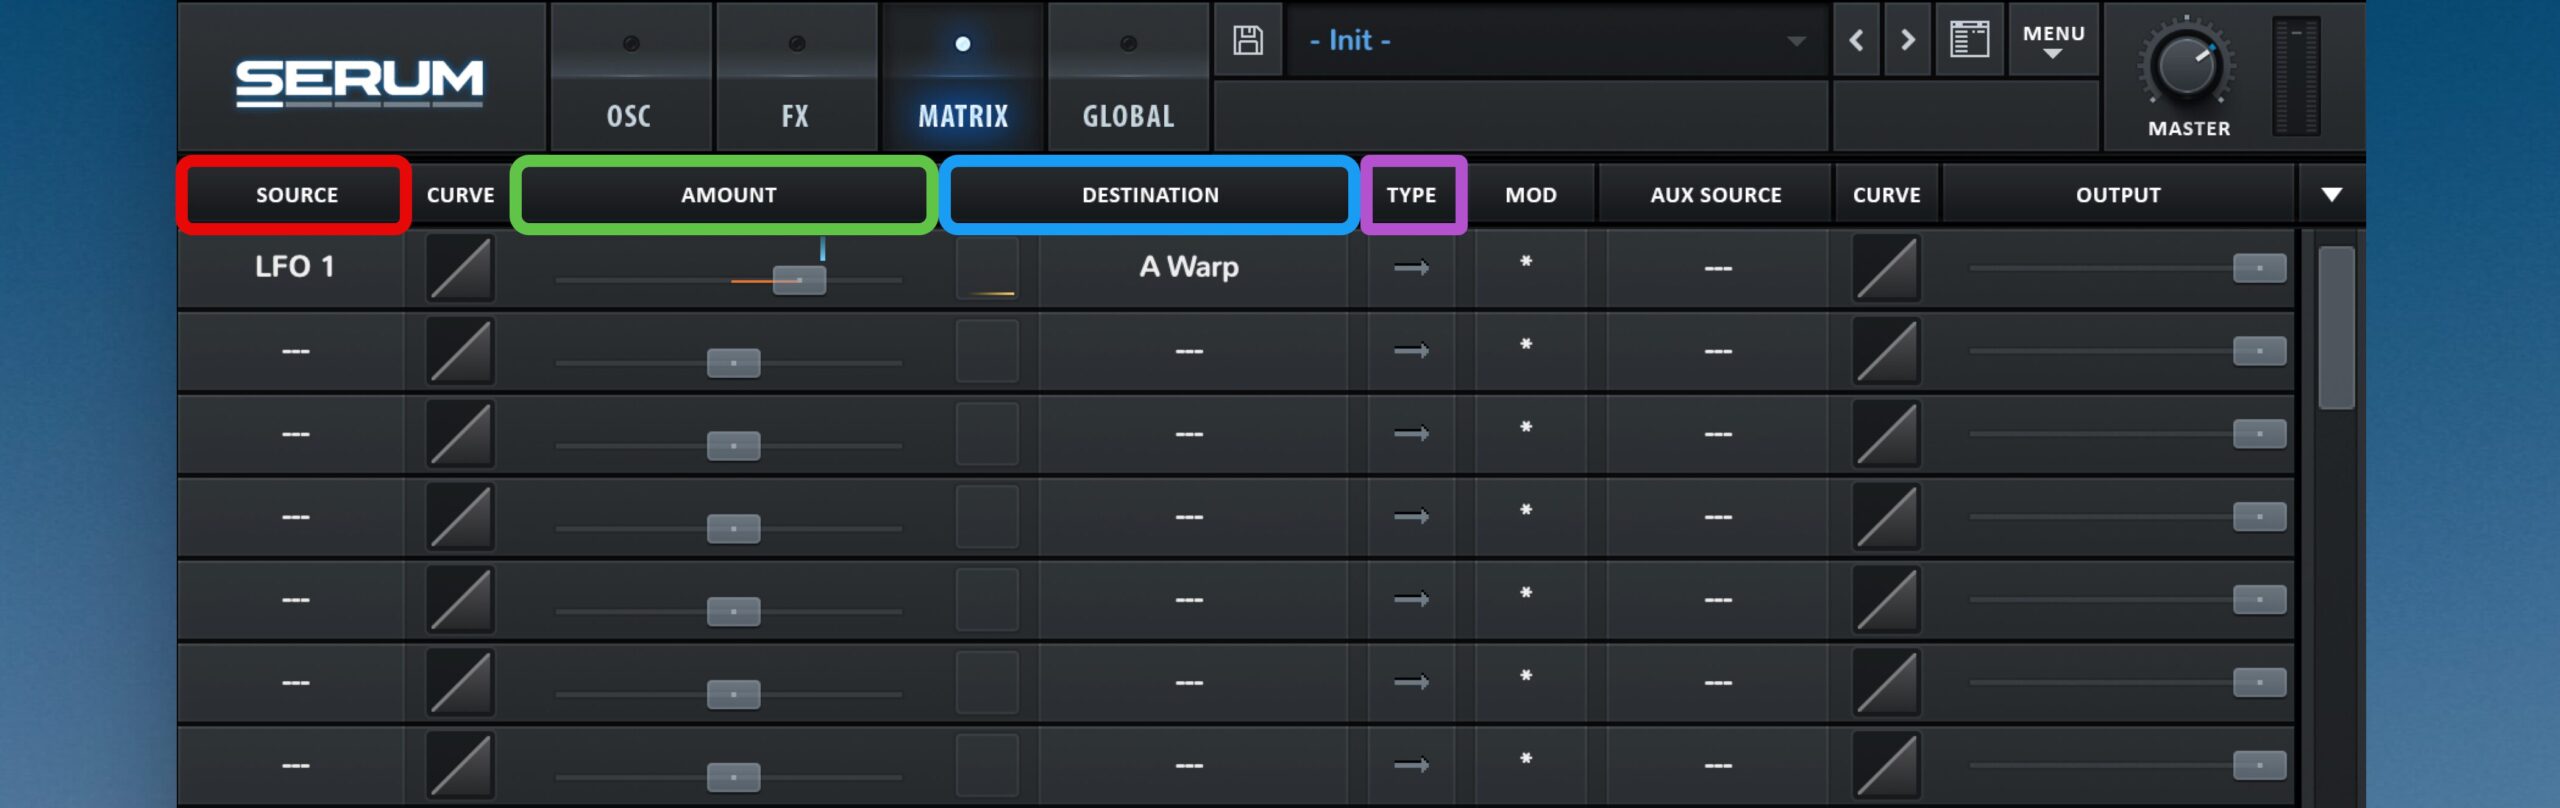
- SOURCE(赤) : LFOやエンベロープ番号を指定します。
- DESTINATION(青) : SOURCEが適用されるパラメーターを確認、指定します。
- AMOUNT(緑) : OURCEによるパラメーター変化量を指定します。
- TYPE(紫) : OURCEの動きを両方向へ変更することができます。

これら複数のモジュレーションを「MACRO」へ割り当て、一斉にコントロールすることができます。
「AUX SOURCE」から割り当てる「MACRO」を選択するだけです。
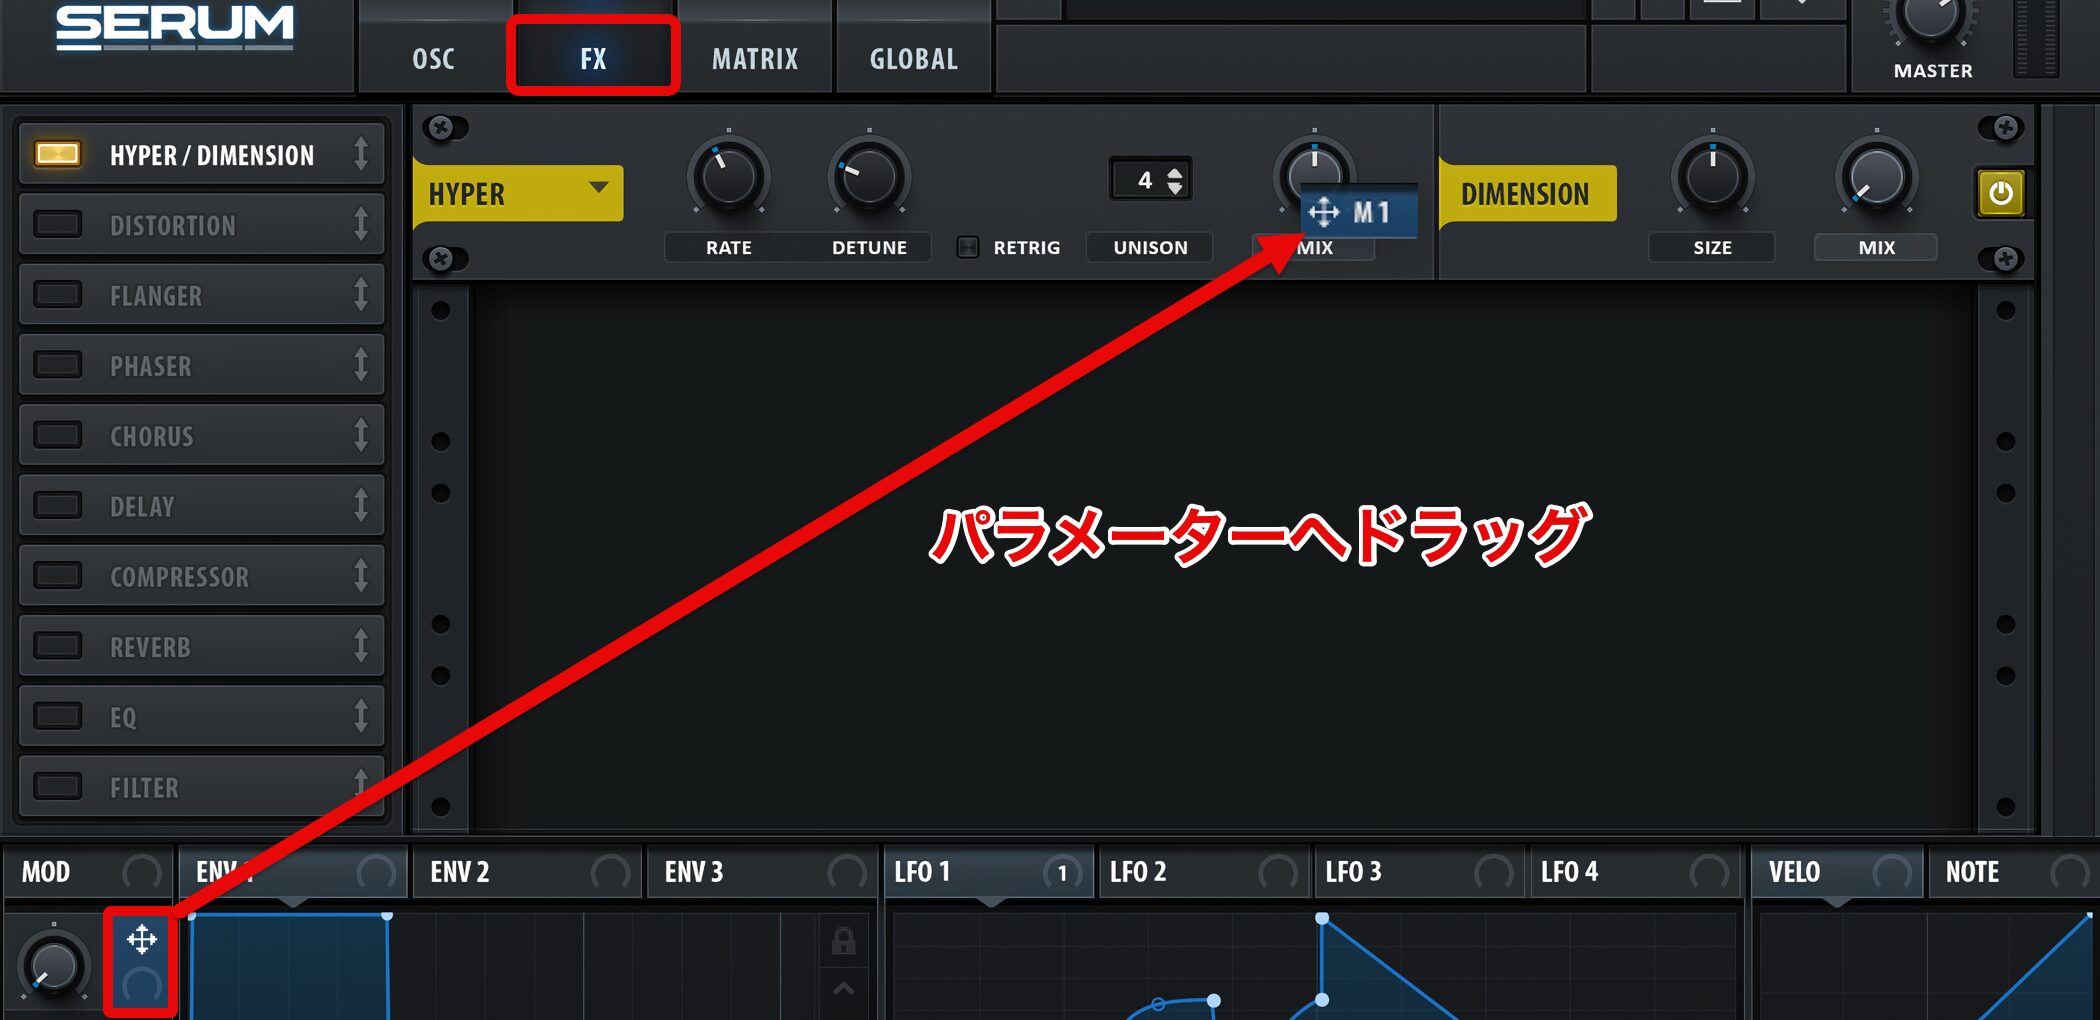
また、MACROを直接パラメーターへドラッグすることでも、登録が可能です。
SERUMの特色を活かした音作りの例を紹介
ここまでSERUMの機能や使い方をそれぞれ解説してきましたが、最後に実践編ということで、それらの機能を活かした音作りTipsをご紹介します。
複雑そうに聞こえる音色でも、便利な機能を使えば思ったより簡単にできてしまいます。
ひとつひとつ見ていきましょう。
SERUM 動画 : 簡単な音作りのTips集
バウンシーなベースサウンド
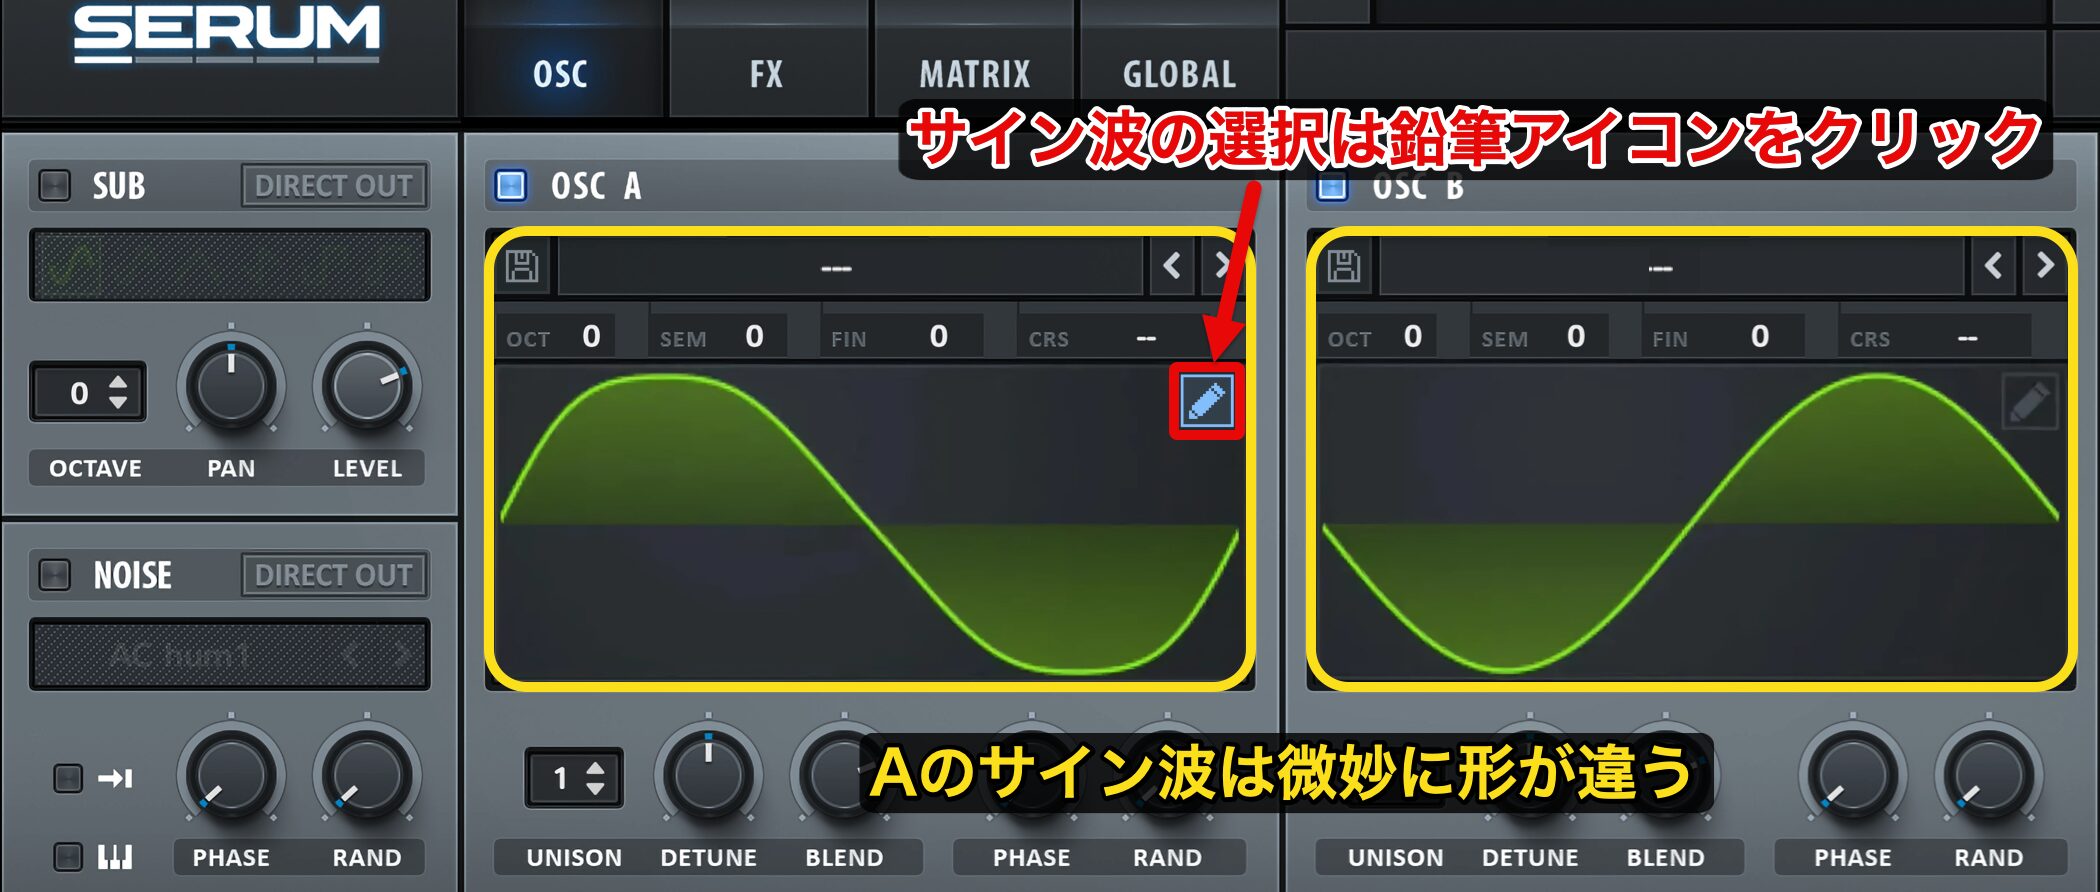
まずサンプル曲のベースですが、軽快でやや固い感じのバウンシーなサウンドとなっています。
波形はオシレーターA、Bともにサイン波ですが、Aの方は微妙に形が違っています。
サイン波は通常の波形選択のメニューでは選択できないため、右上の鉛筆アイコン(編集)をクリックします。
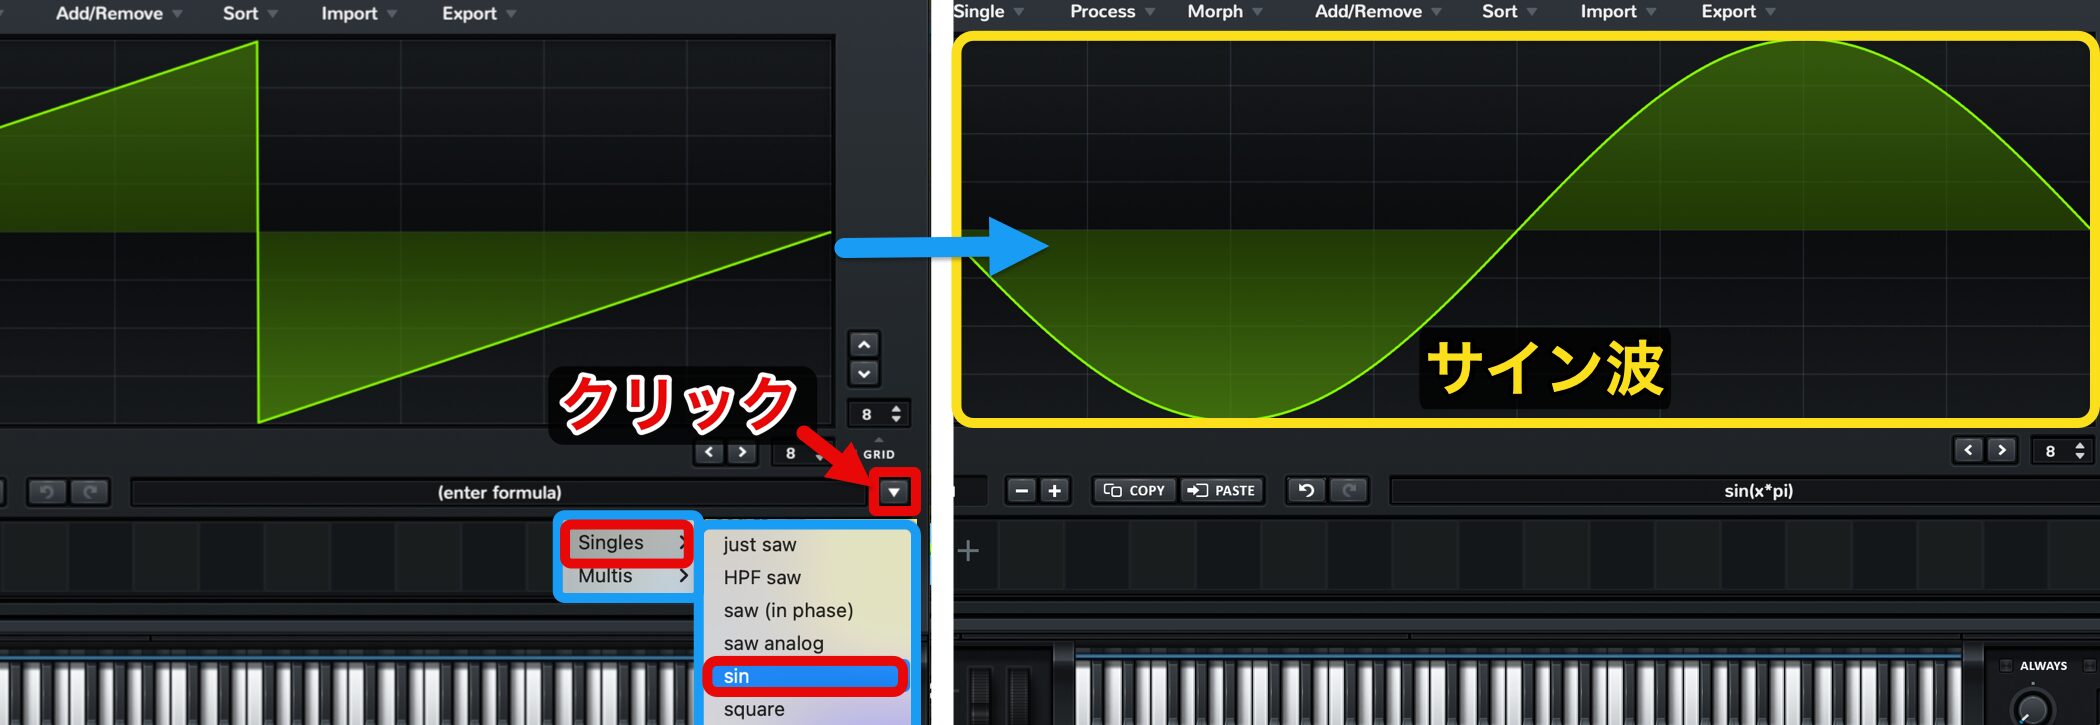
その後、右下のメニューから、「Singles」を選択すれば、基本的な波形を選んでいくことができます。

今回は、オシレーターAで「Phat Sub」、オシレーターBで「sin」を選択しています。
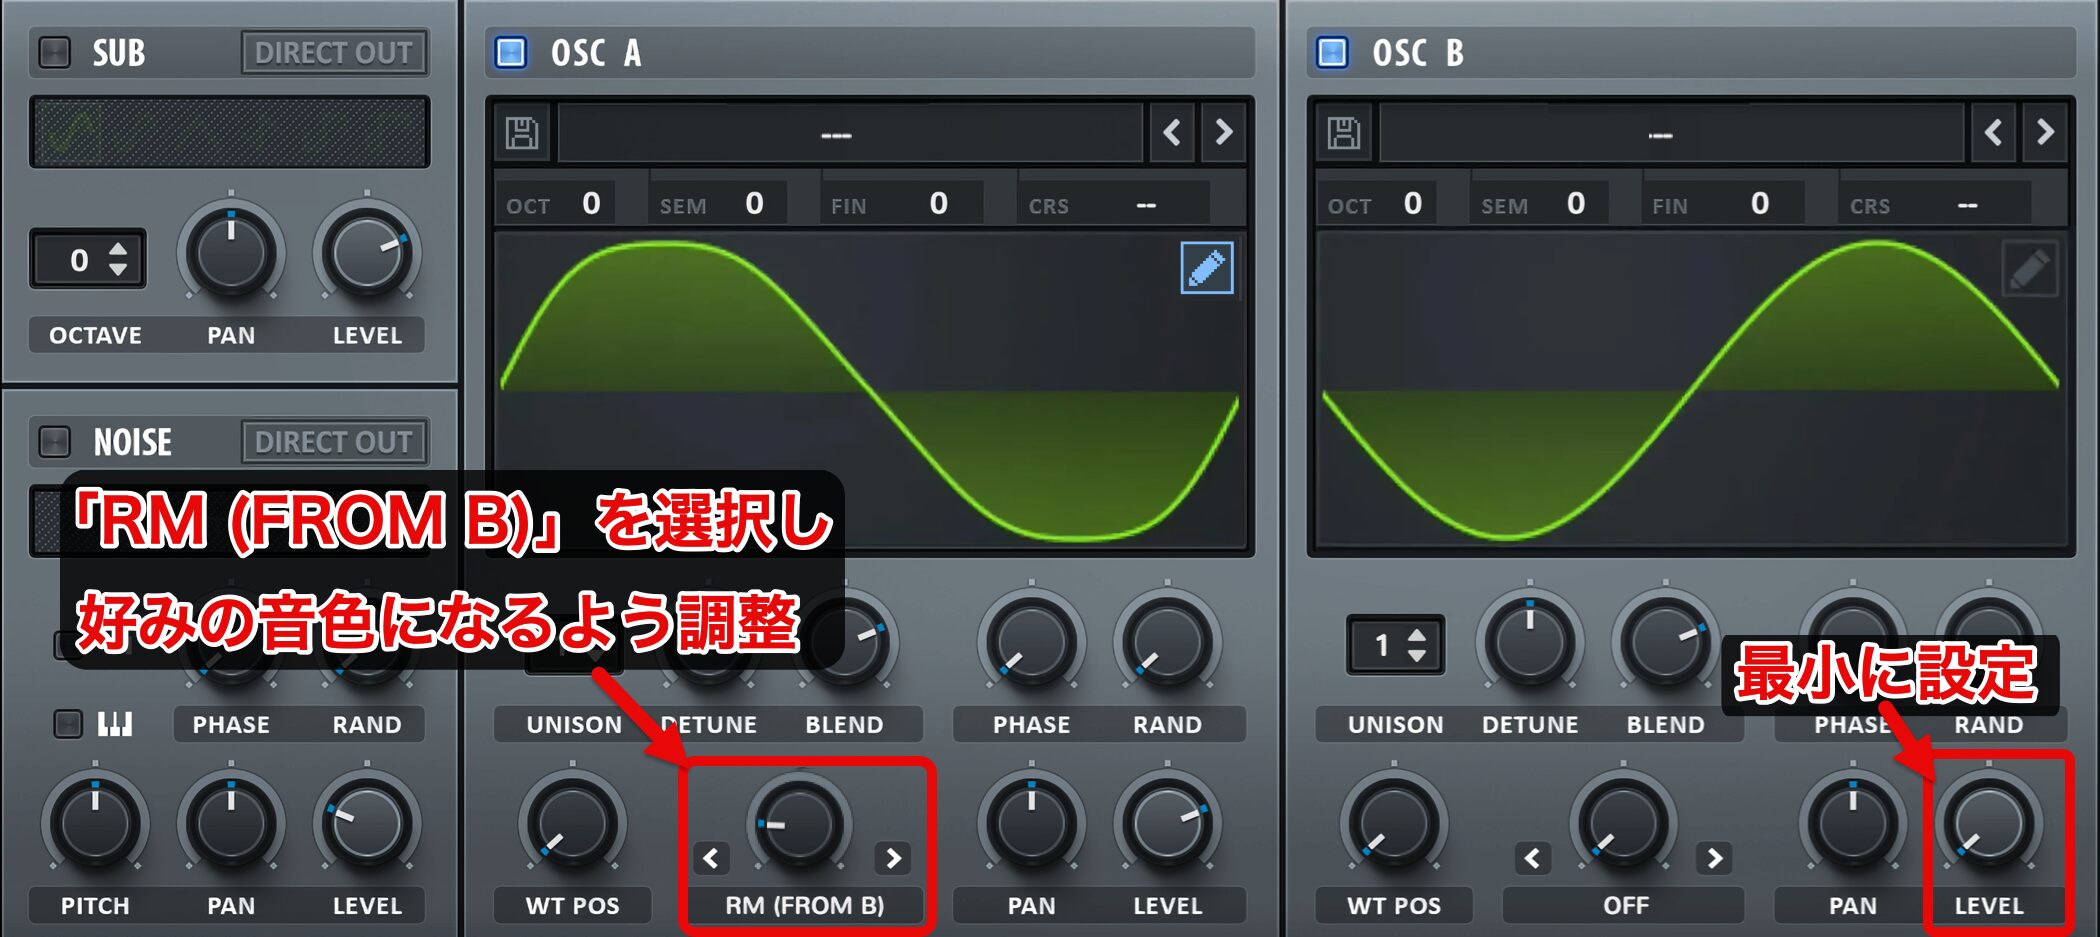
この音色では、オシレーターAとBを両方鳴らすのではなく、オシレーターBを使って、オシレーターAの音色にリングモジュレーションをかけていきます。
そのため、オシレーターBの音量は最小とし、オシレーターAのWARPを「RM (FROM B)」として好みの音色になるよう調整します。
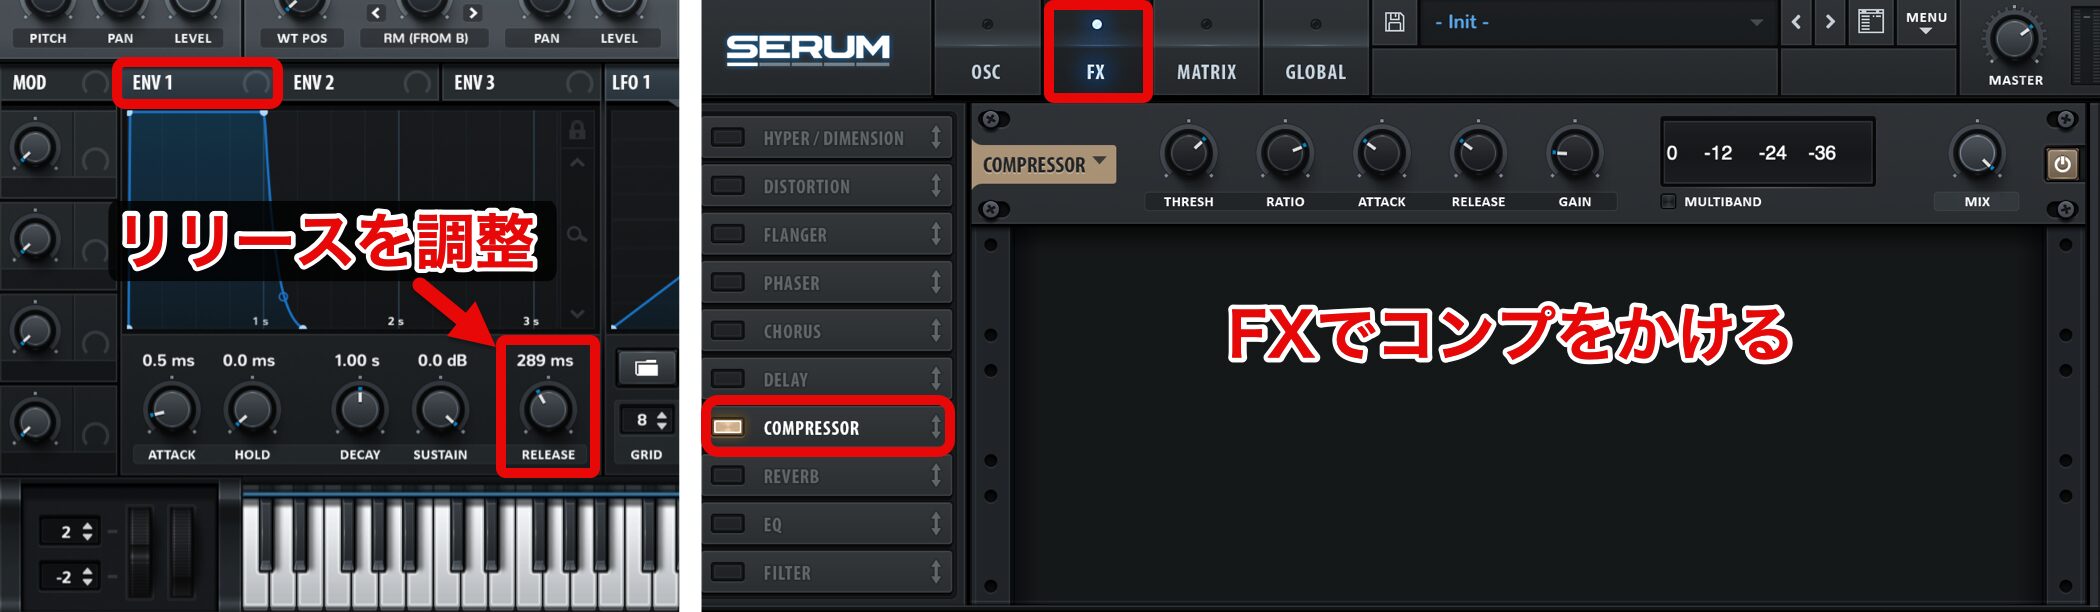
その後、マスターエンベロープのリリースを少し残す設定とし、FXでコンプをかけて完成です。
サイドチェイン風のバッキング
サイドチェインは通常、他のトラックからの信号を受けて、コンプレッサーなどのエフェクターを使って適用しますが、SERUMはその中で効果を得ることができます。
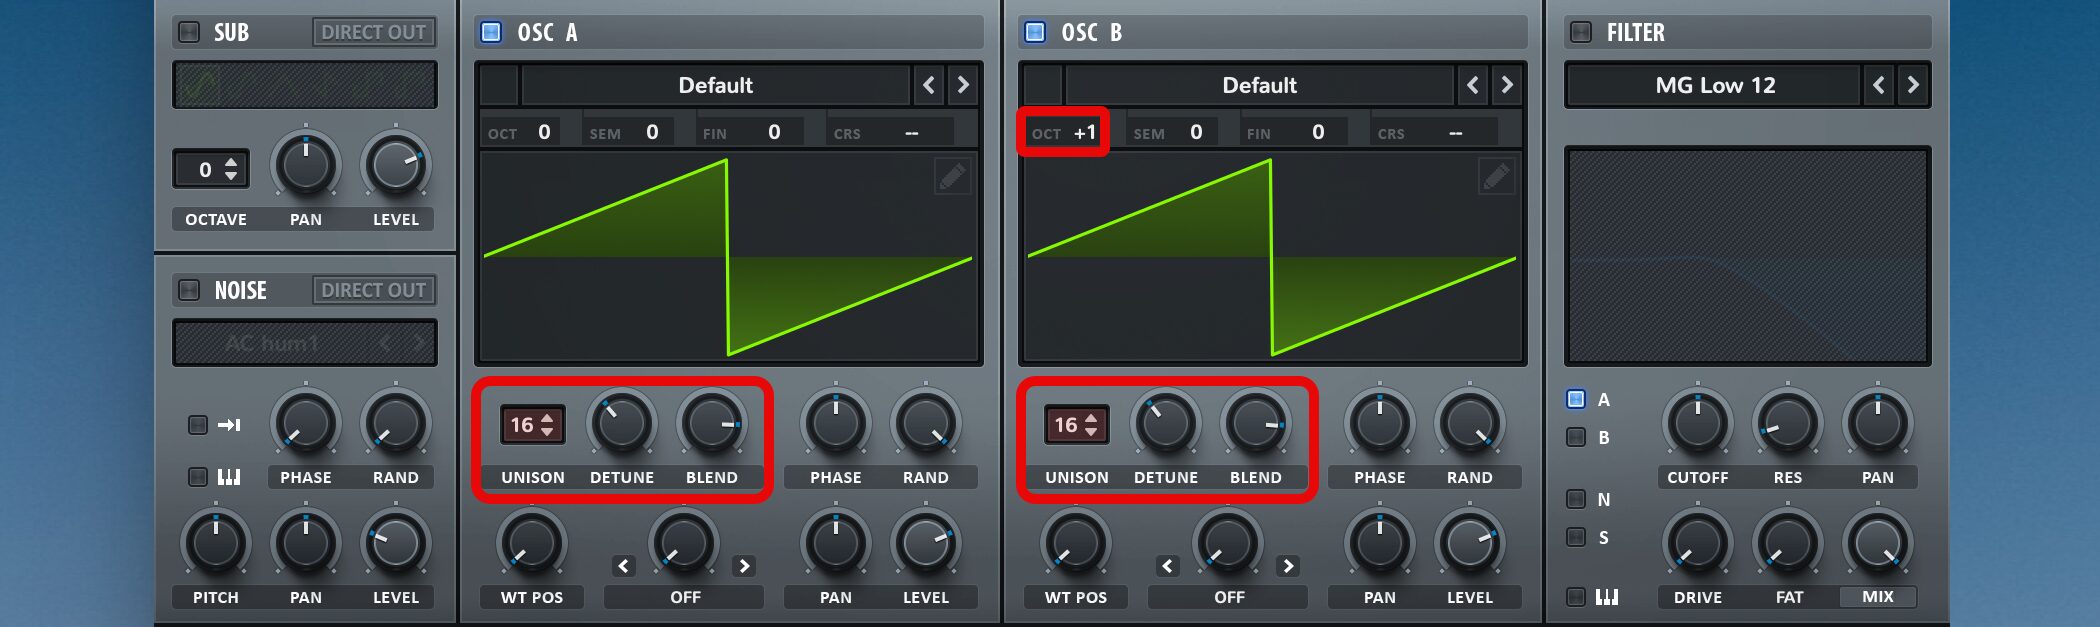
まずはオシレーターAとBをSAWの波形にし、オシレーターBは1オクターブ上げています。
UNISON、DETUNE、BLENDの調整を行い、SUPER SAW的なサウンドを作っておきます。
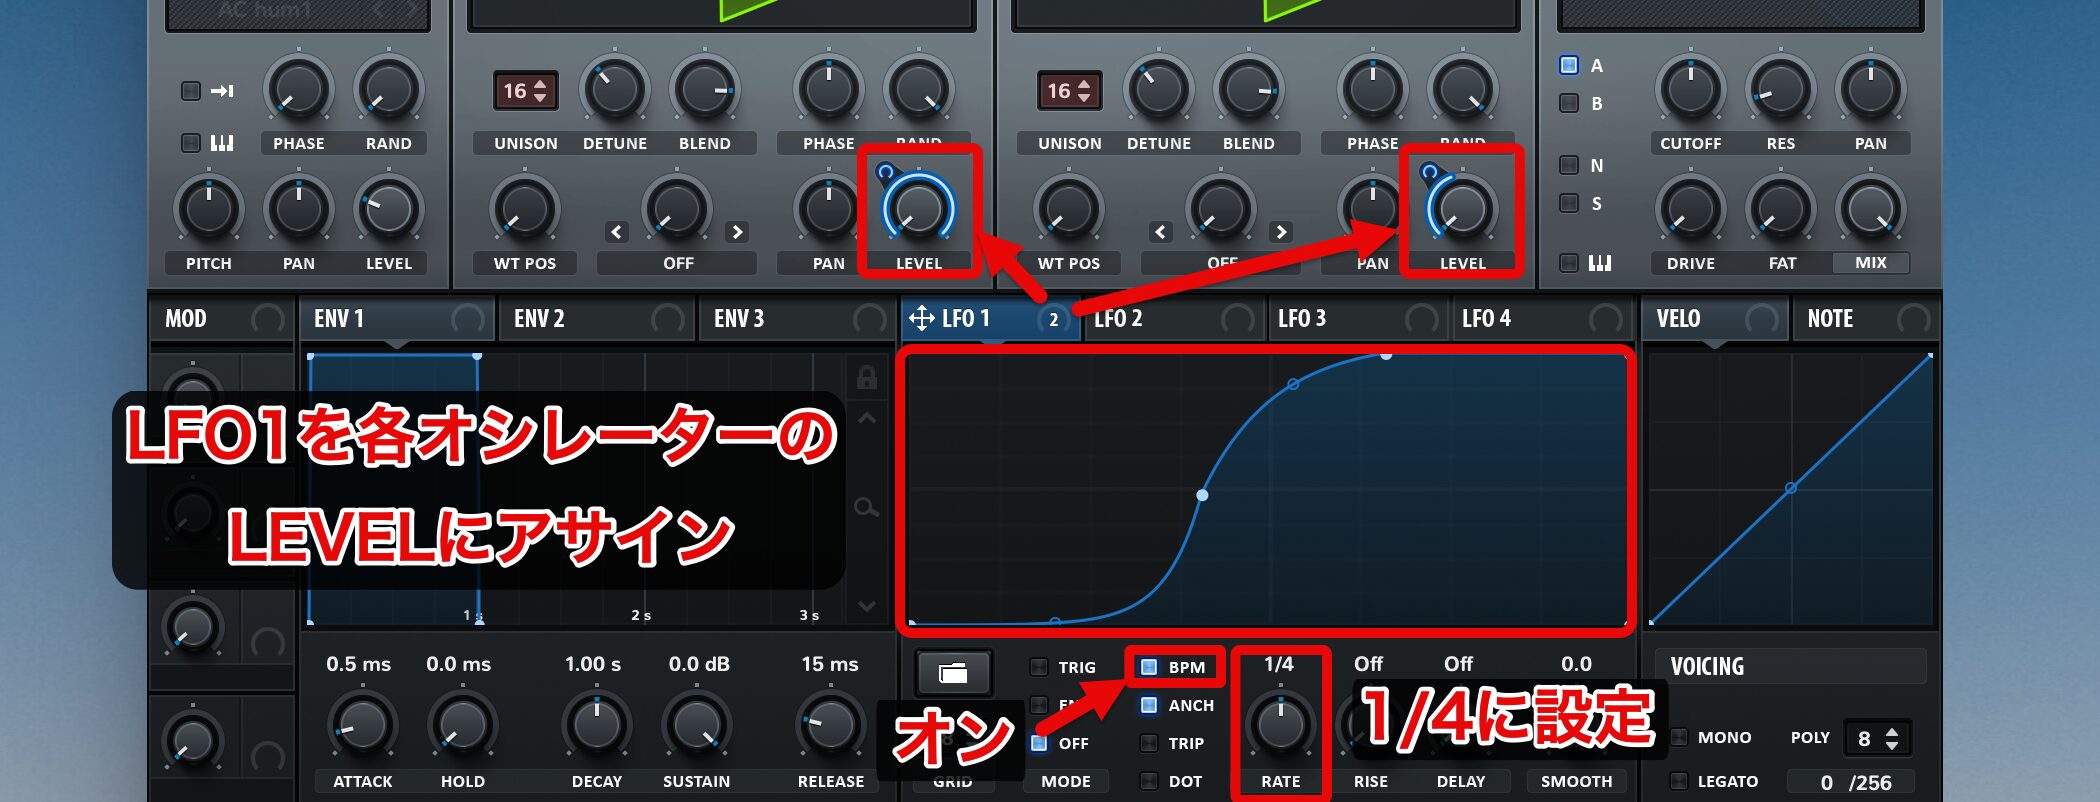
SERUMの擬似的なサイドチェイン効果は、LFOで行います。
サンプル曲では、LFO1を各オシレーターのLEVELにアサインし、BPMオン、RATEは1/4とします。
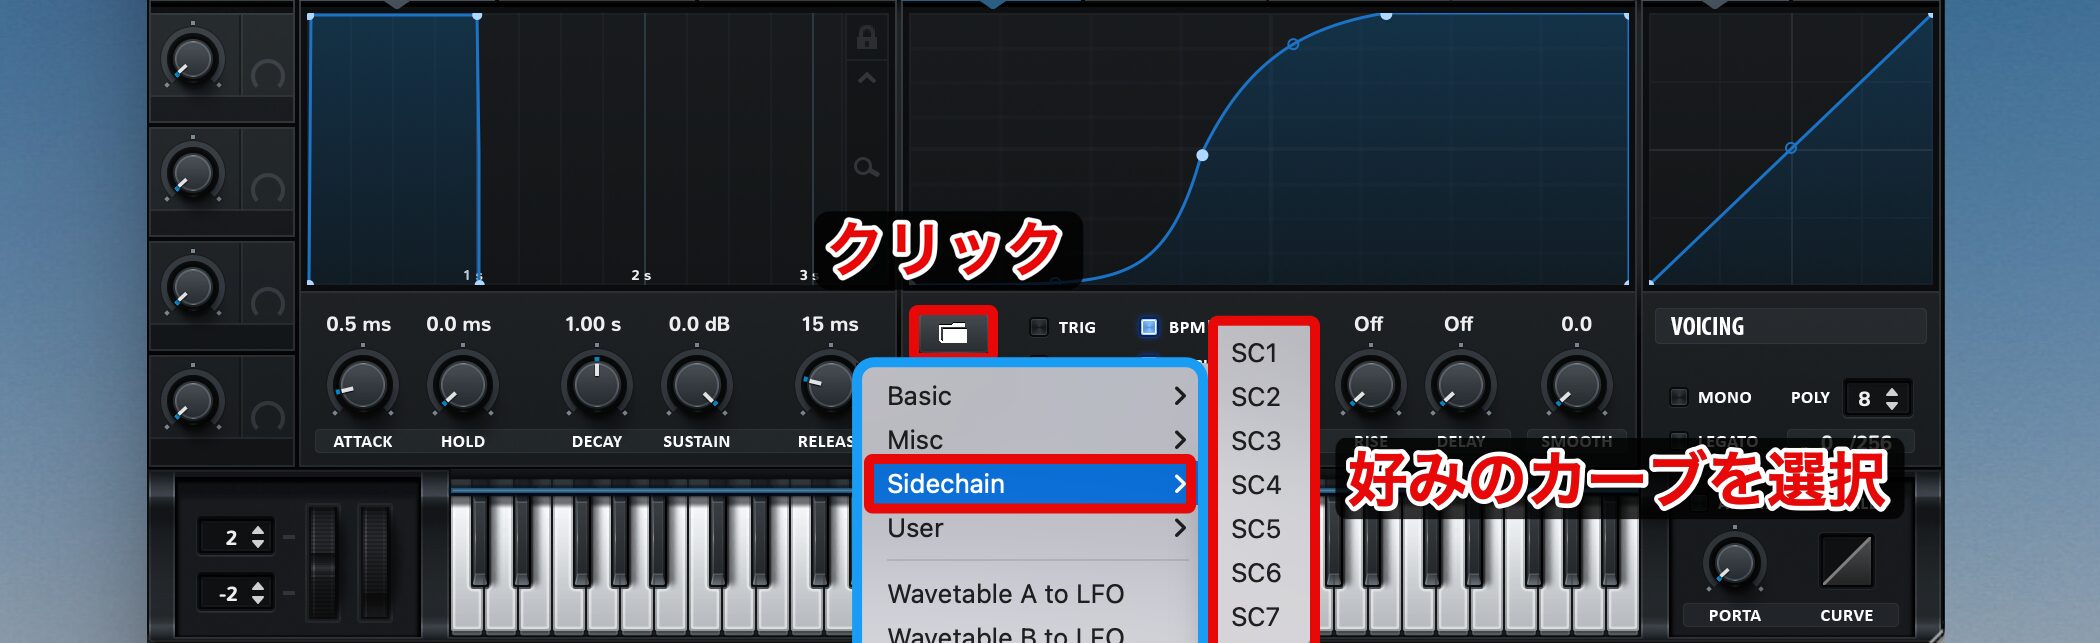
あとはフォルダから、Sidechainを選択し、幾つかある種類の中から好みのカーブを選択します。
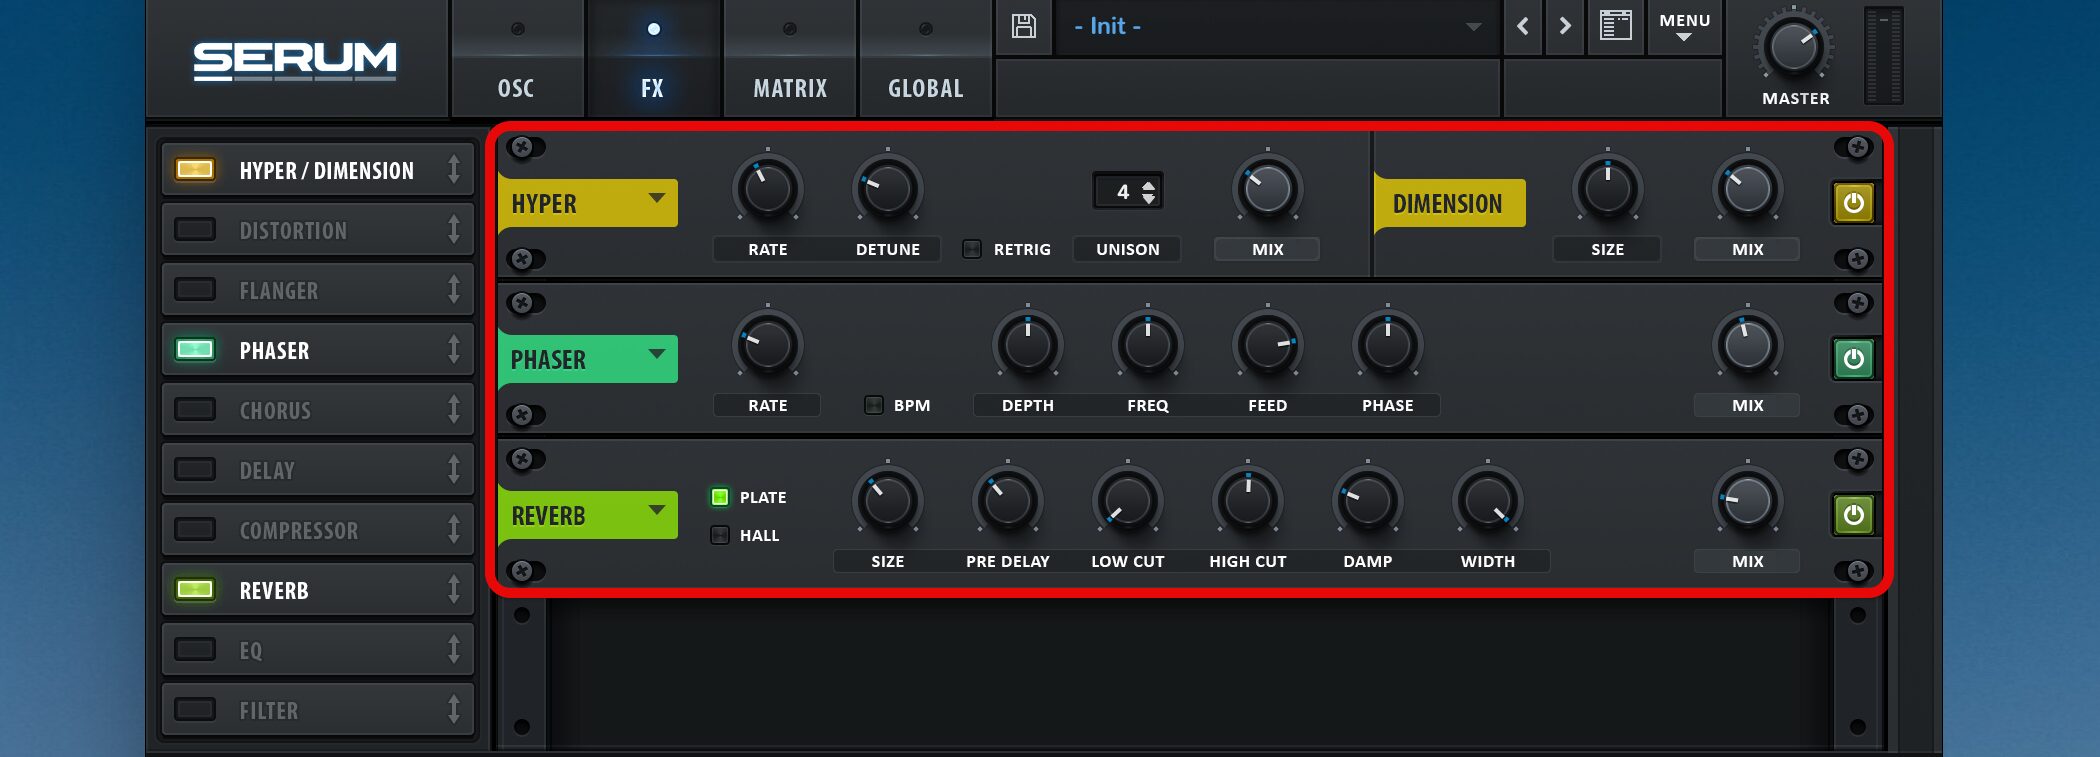
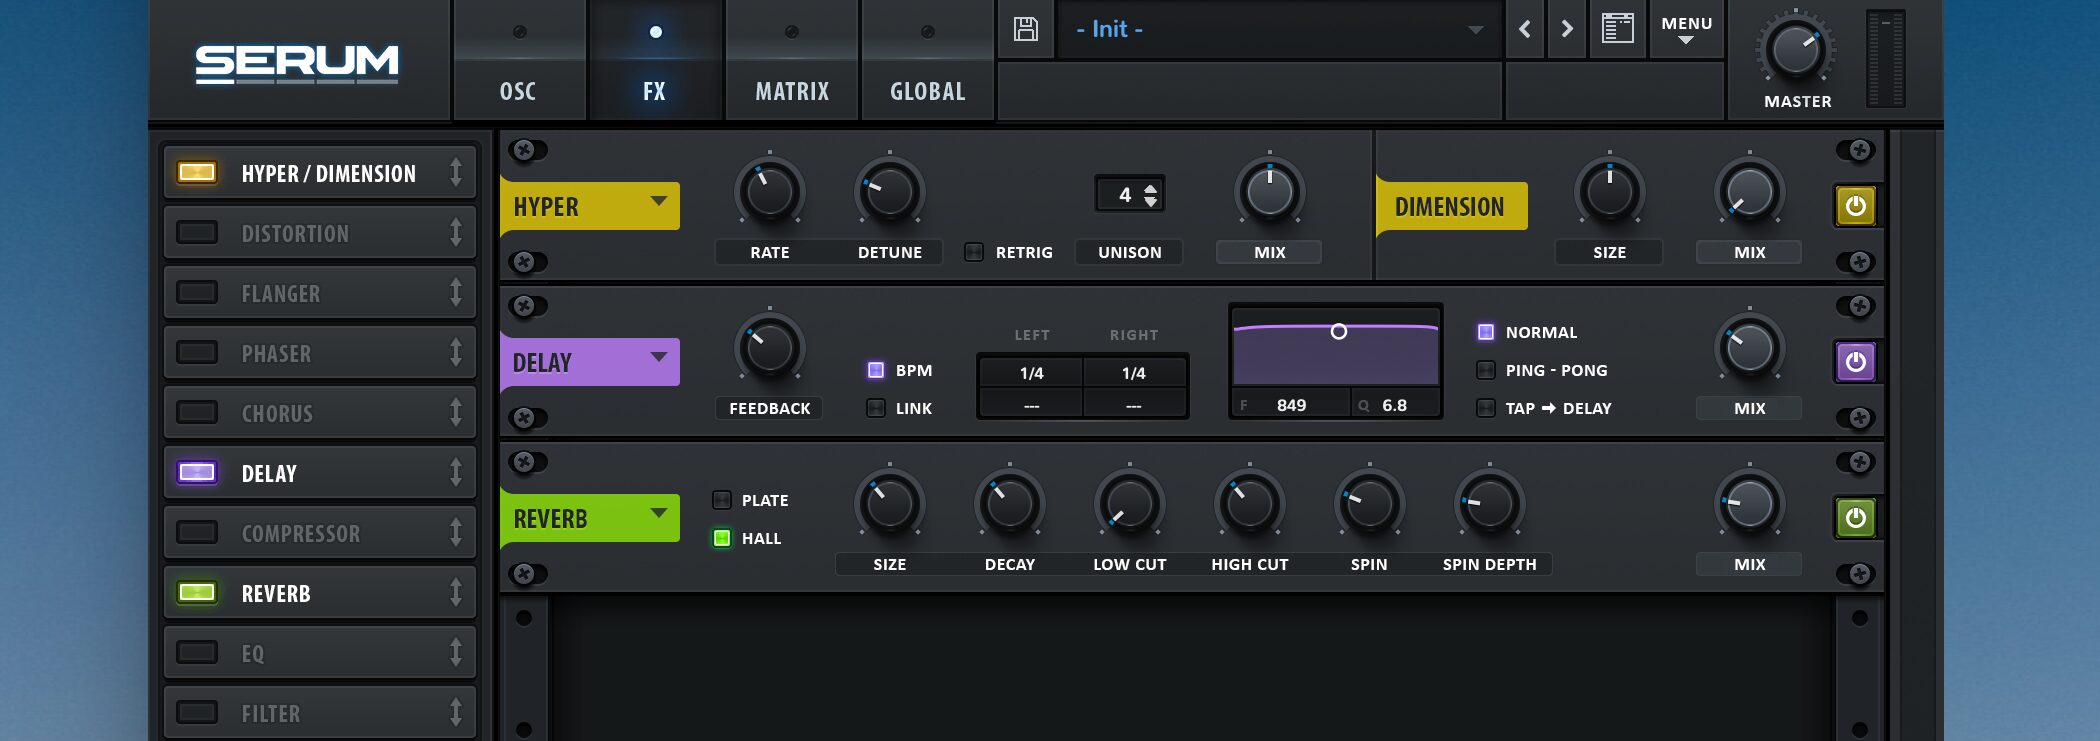
サンプル曲では、HYPER DIMENTION、PHASER、REVERBなどのエフェクトをかけて完成させています。
微妙に揺れるパッドサウンド
LFOを用いて微妙に揺らしながら綺麗に響くパッドサウンドを作ってみましょう。

マスターのエンベロープはパッドらしくアタック遅めの設定とします。
リリースもやや長めにとっておきましょう。
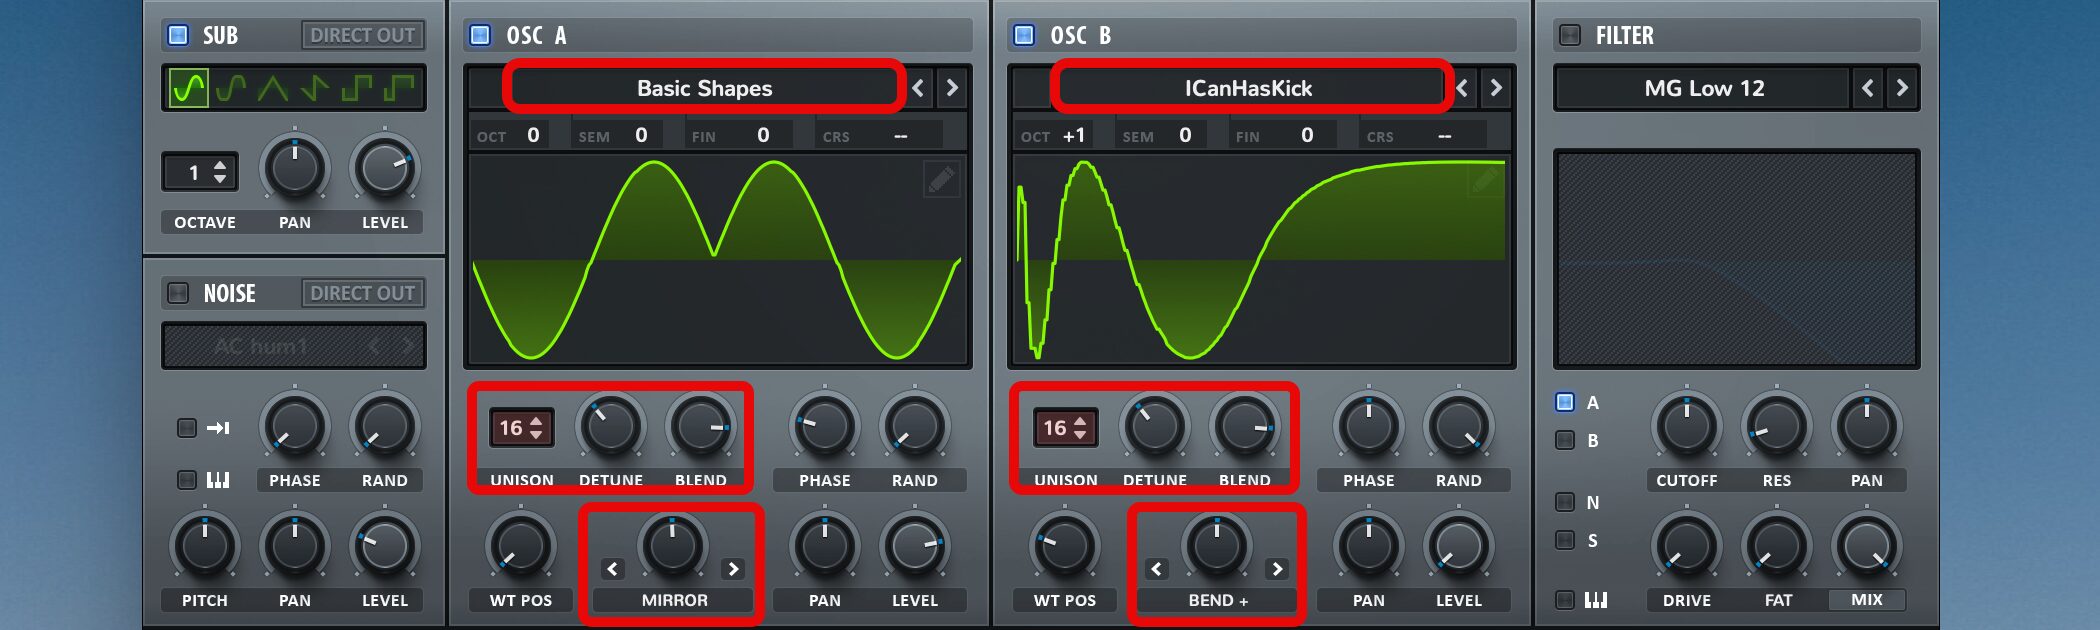
オシレーターAのWARPを「MIRROR」に設定し、「Analog」→「Basic Shapes」を選択しました。
オシレーターBのWARPは「BEND」として真ん中で固定、「Digital」→「ICanHasKick」を選びました。
どちらもUNISONをかけ、DETUNEやBLENDを調整しています。
また、SUBでサイン派を少し混ぜています。
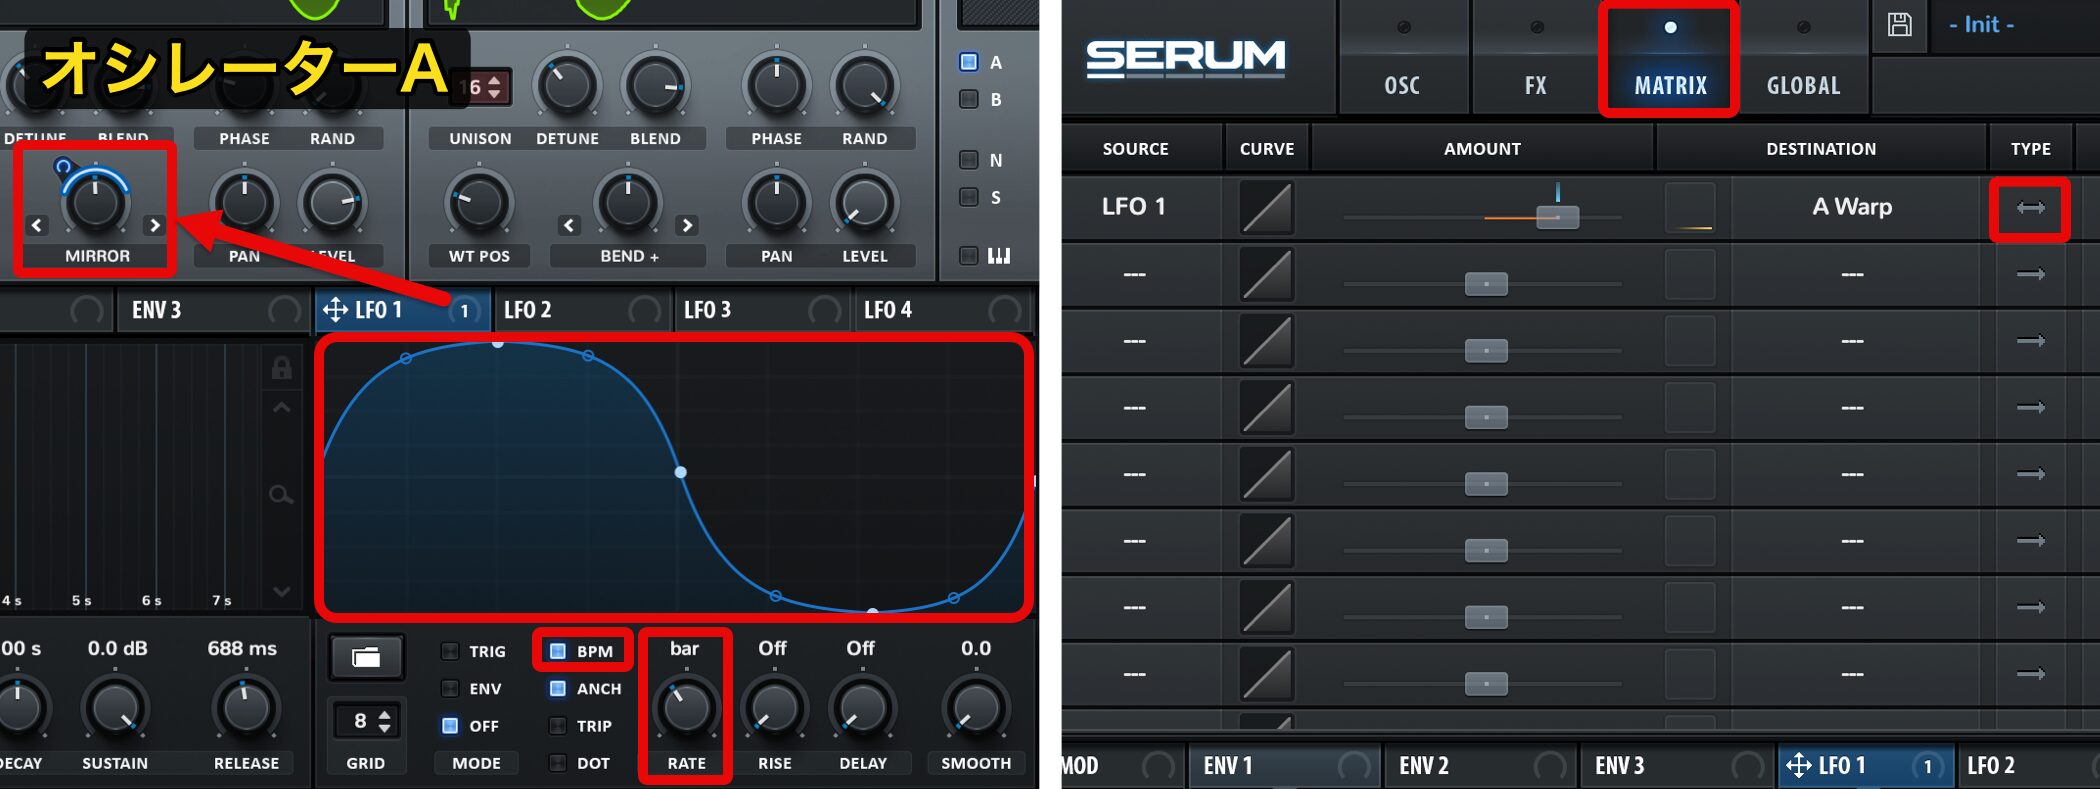
オシレーターAの「MIRROR」に、LFO1をアサインします。
LFO1の波形はサイン波、BPMオン、RATEはBAR、MATRIXのタイプは「↔︎」とします。
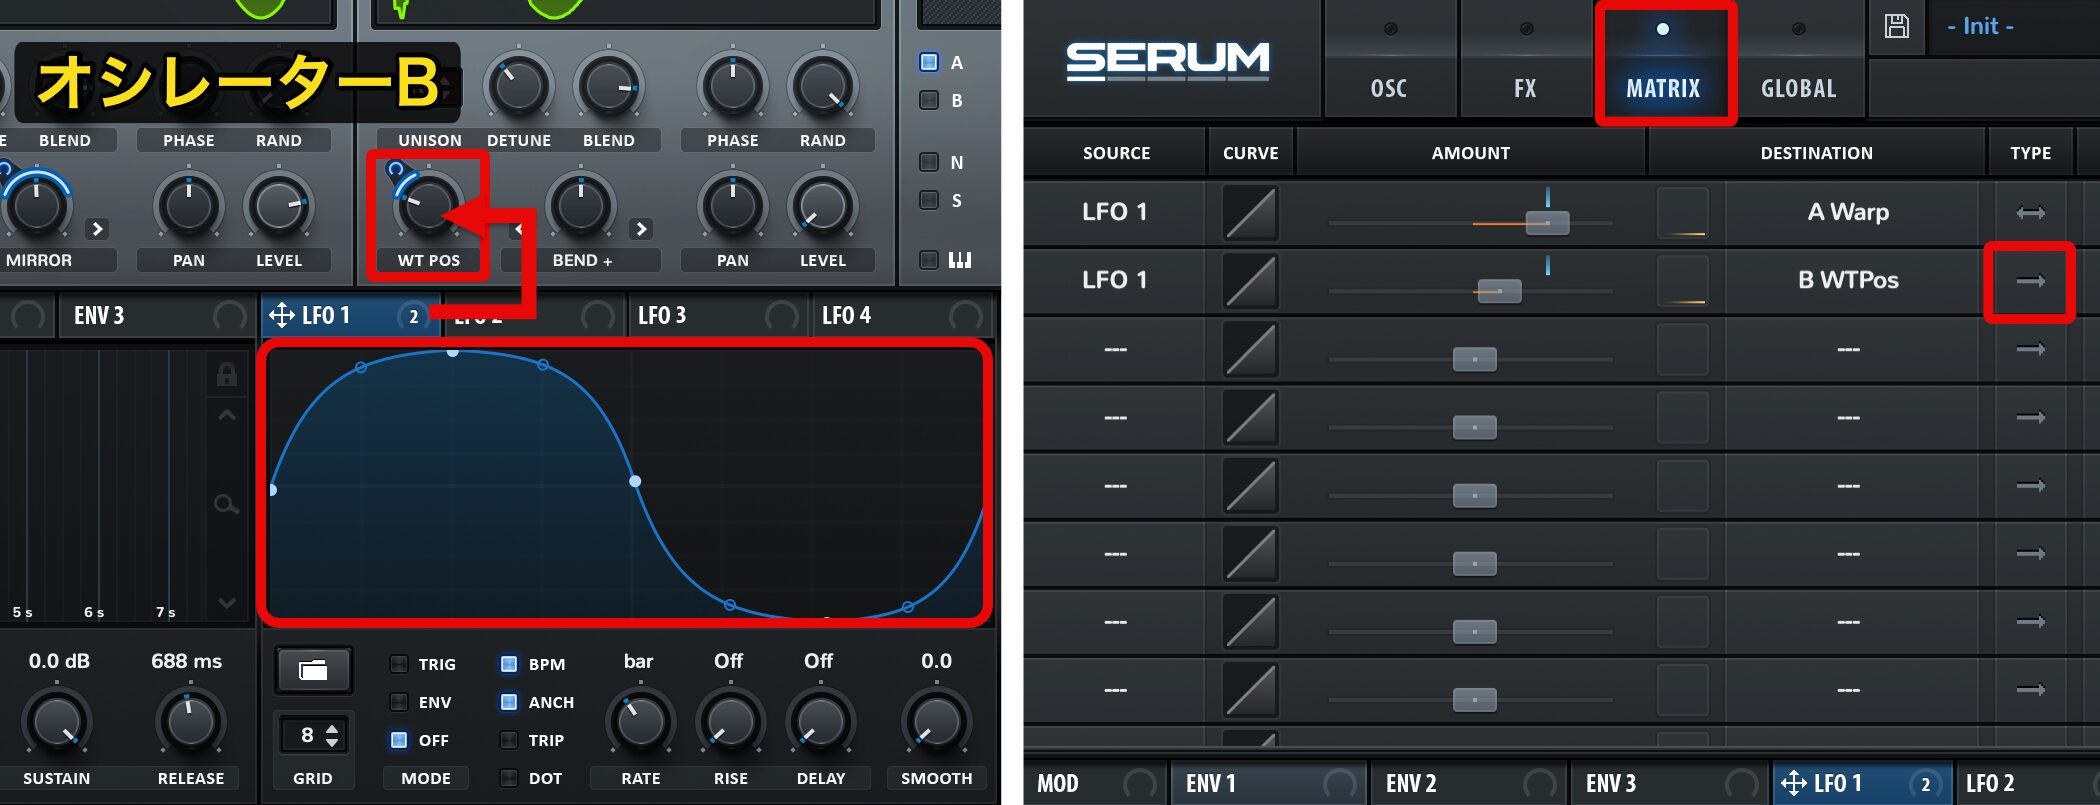
オシレーターBは、WT POSに同じLFO1をアサインします。
MATRIXのタイプは「→」とし、ノブの設定値よりも左に動かないようにします。
あとは、ハイパスフィルターをかけ、HYPER DIMENSIONやDELAYといった空間系エフェクトをかけて完成です。
ベロシティによって音色変化するシーケンス
SERUMではベロシティを使って様々なパラメーターを動かすことができます。
使い方はとても簡単で、LFOの右にある「VELO」を任意のパラメーターにアサインするだけです。
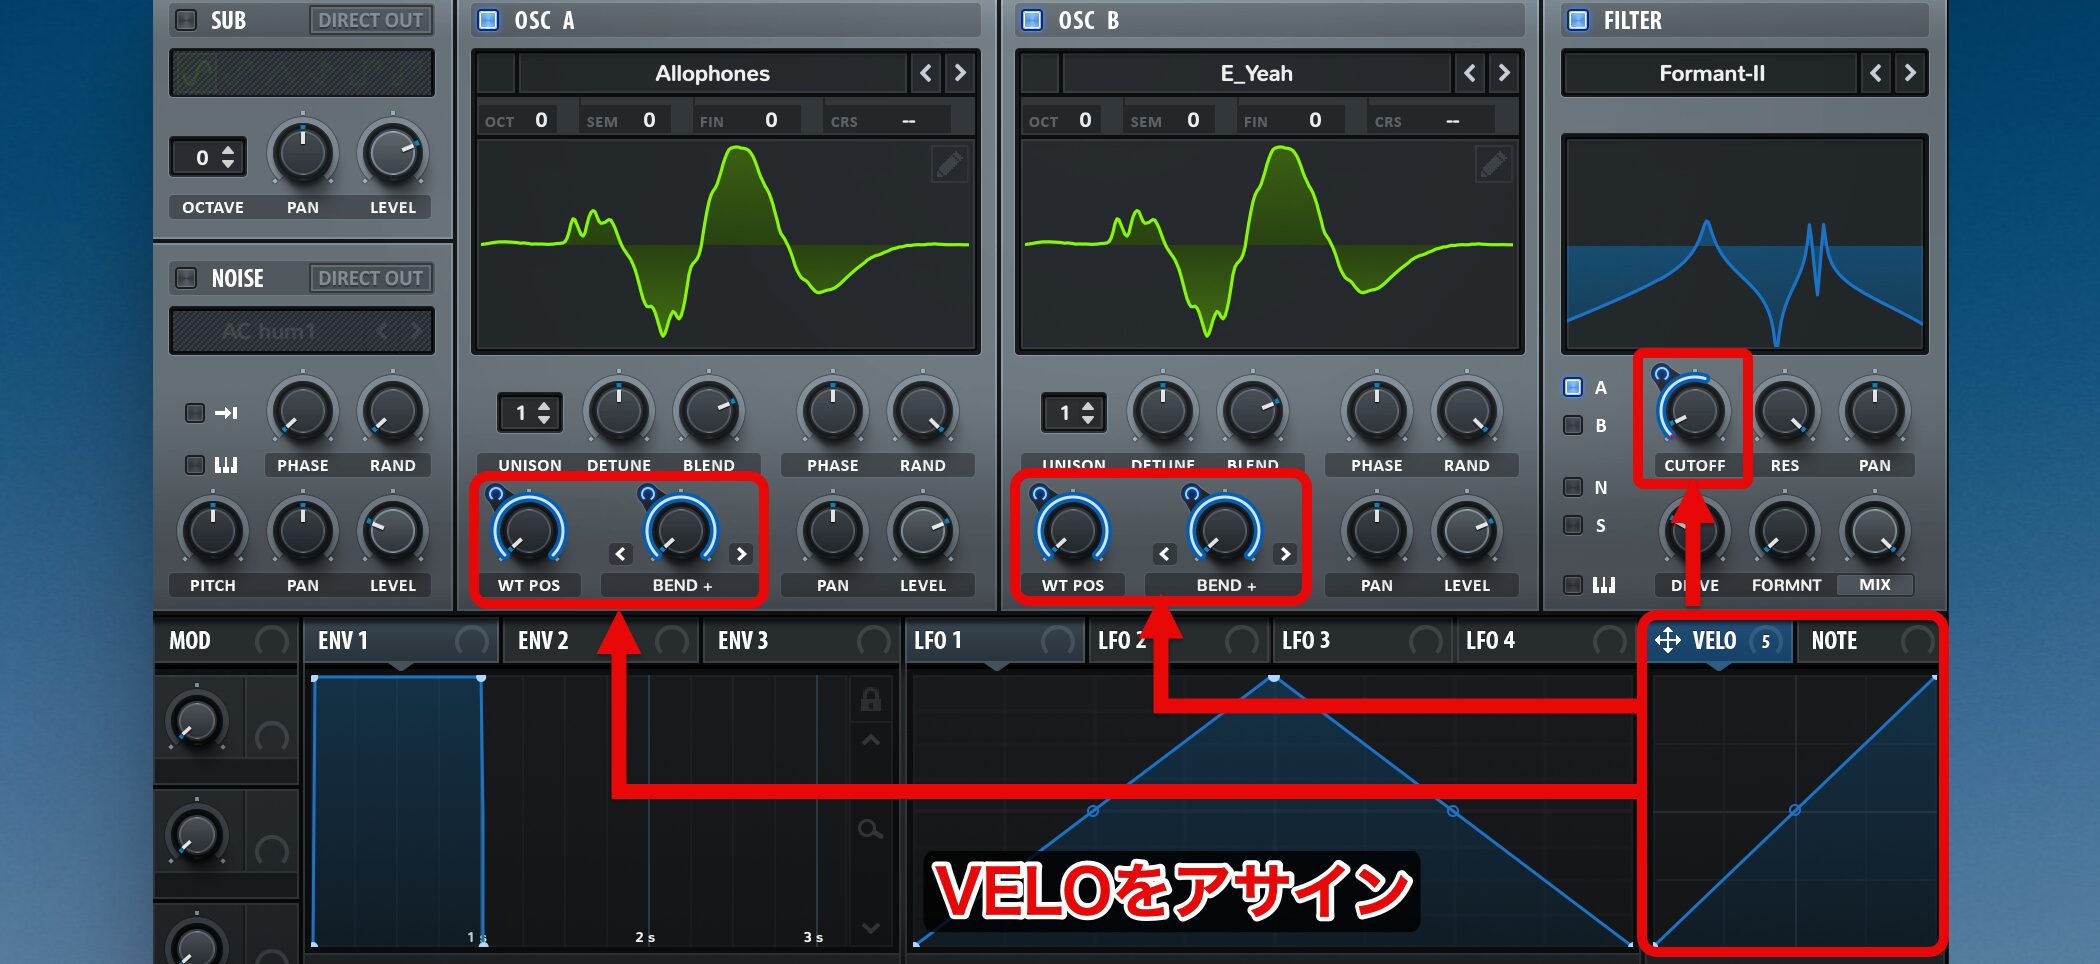
今回は、オシレーターAとBのWT POSITIONとWARPにVELOをアサインしました。
ベロシティの最小値と最大値が、各パラメーターの青いインジケーターの範囲に対応します。
同時にフィルターなどにアサインすれば、音色変化が大きくなり効果的です。
あとは、ベロシティにバラツキをもたせながら打ち込めばOKです。
複雑に揺れるリード
まずリードを滑らかに繋ぐために、ポルタメントの設定を行います。
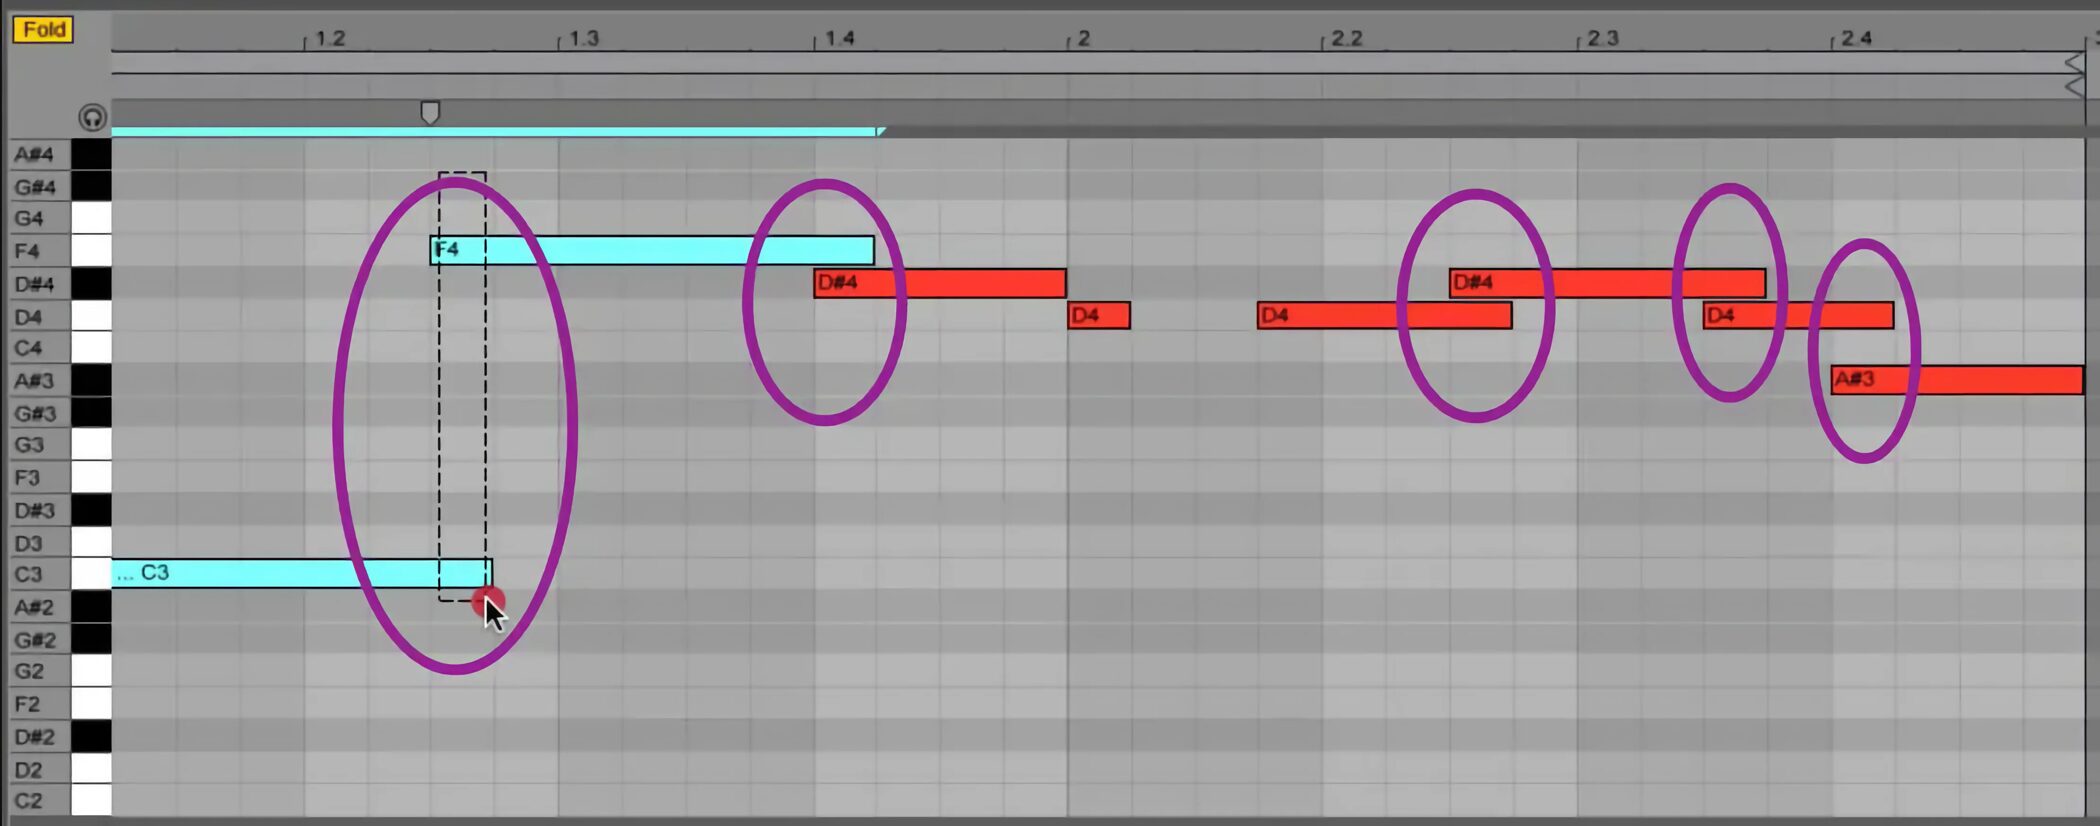
下準備として、滑らかに繋げたい部分のみノートを重ねておきます。
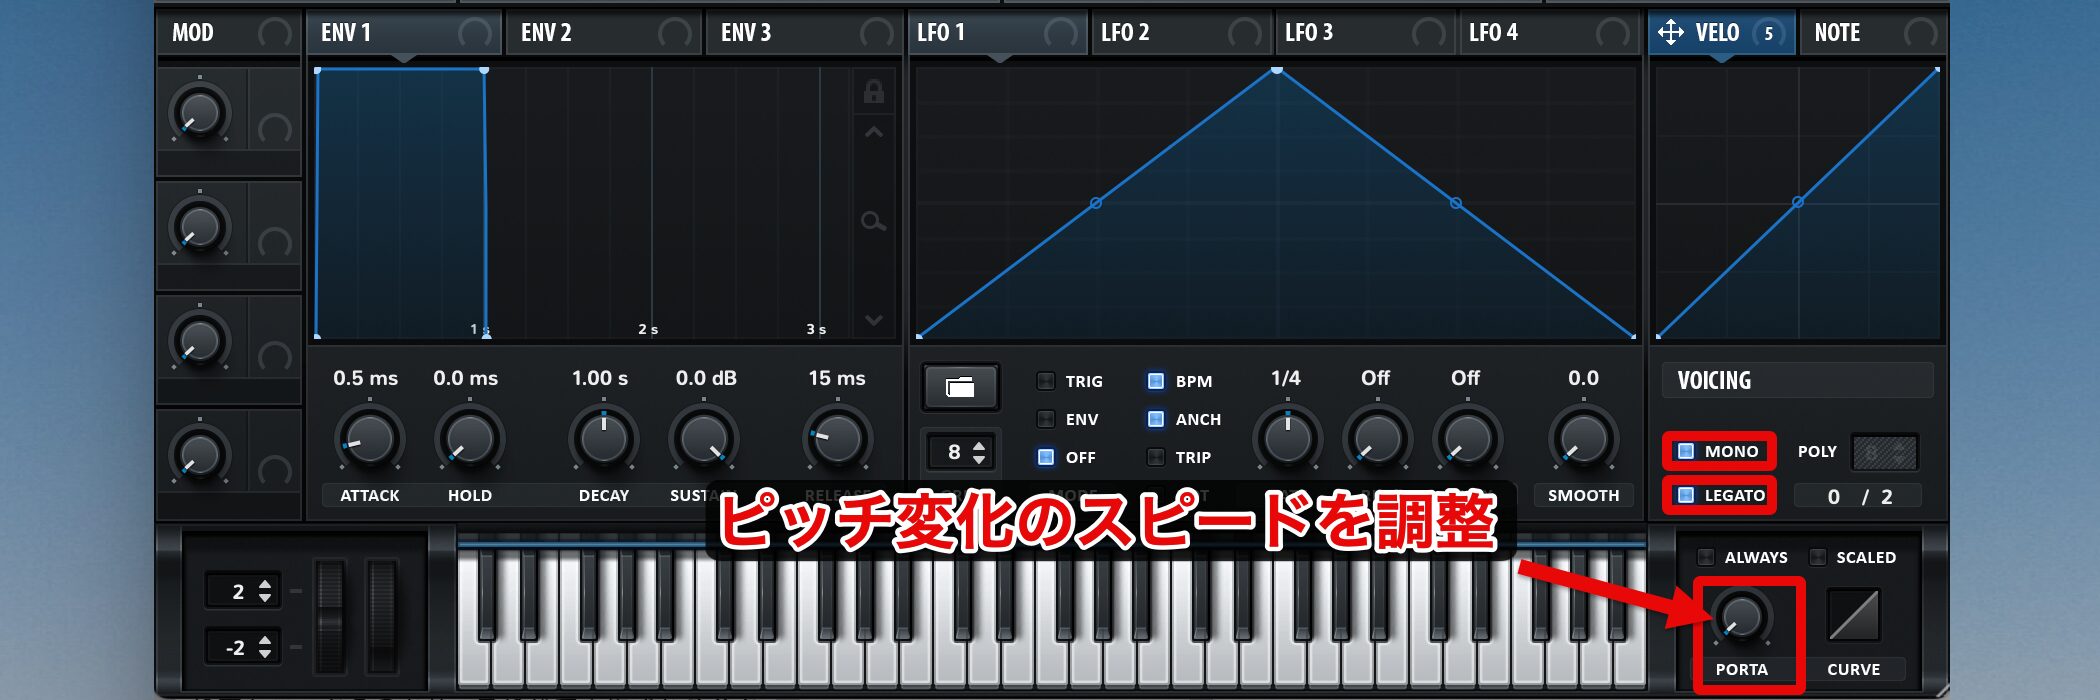
次に、画面右下の「MONO」「LEGATO」をオンにし、「PORTA」のノブを上げてピッチ変化のスピードを調整します。
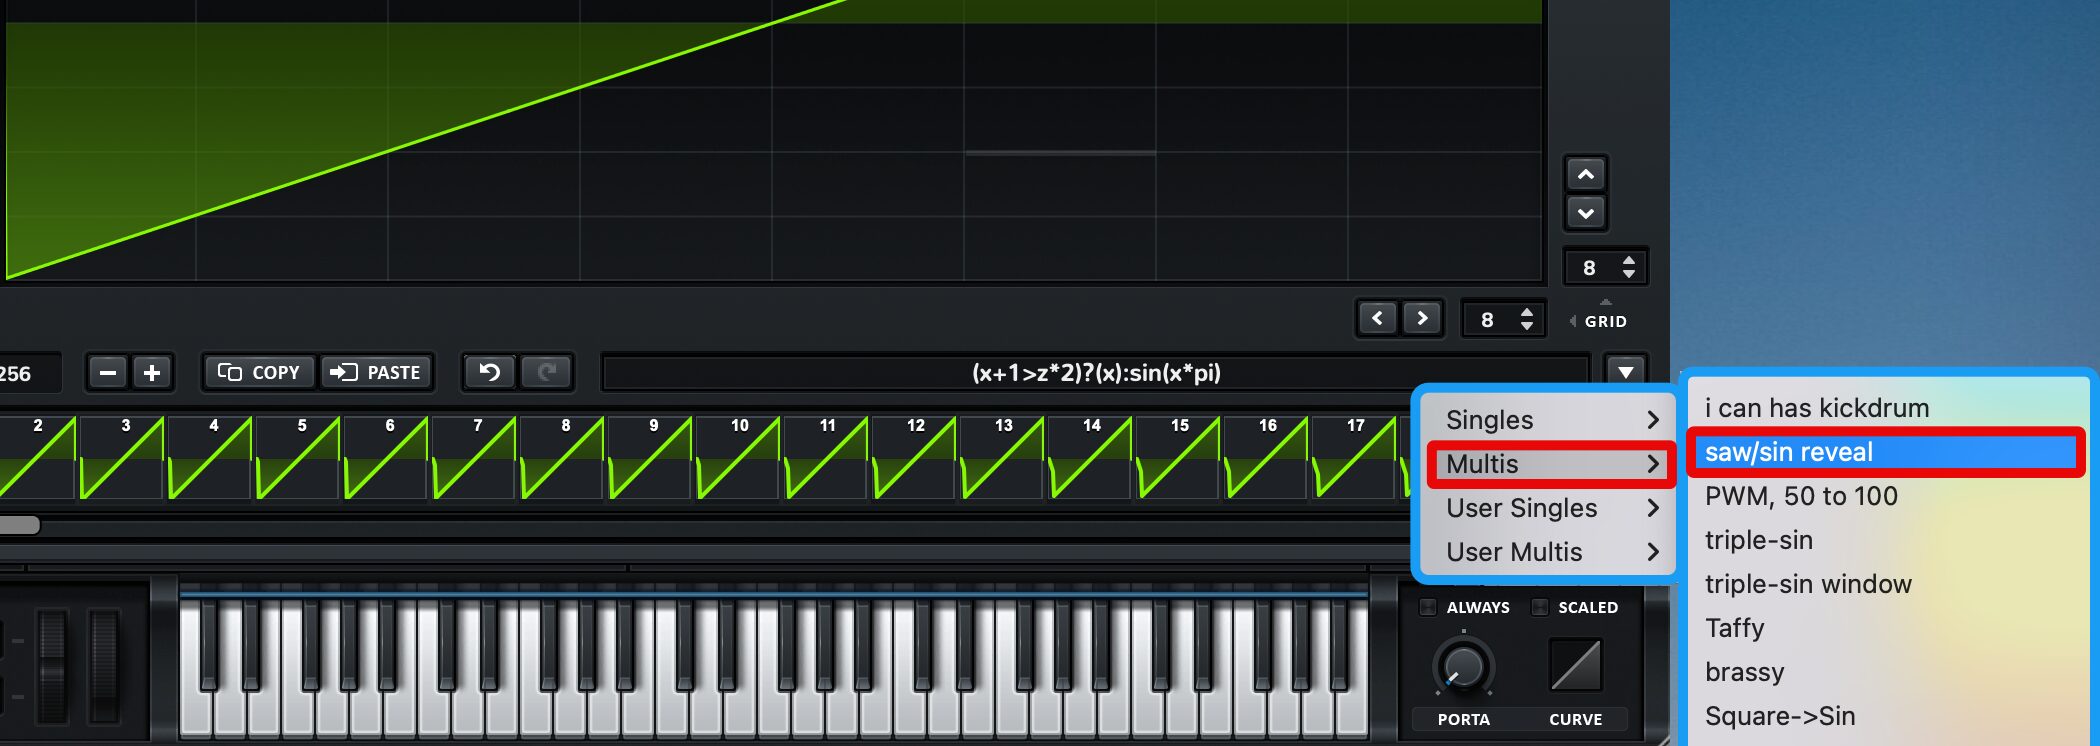
オシレーターAは「Multis」→「saw/sin reveal」を選択しました。
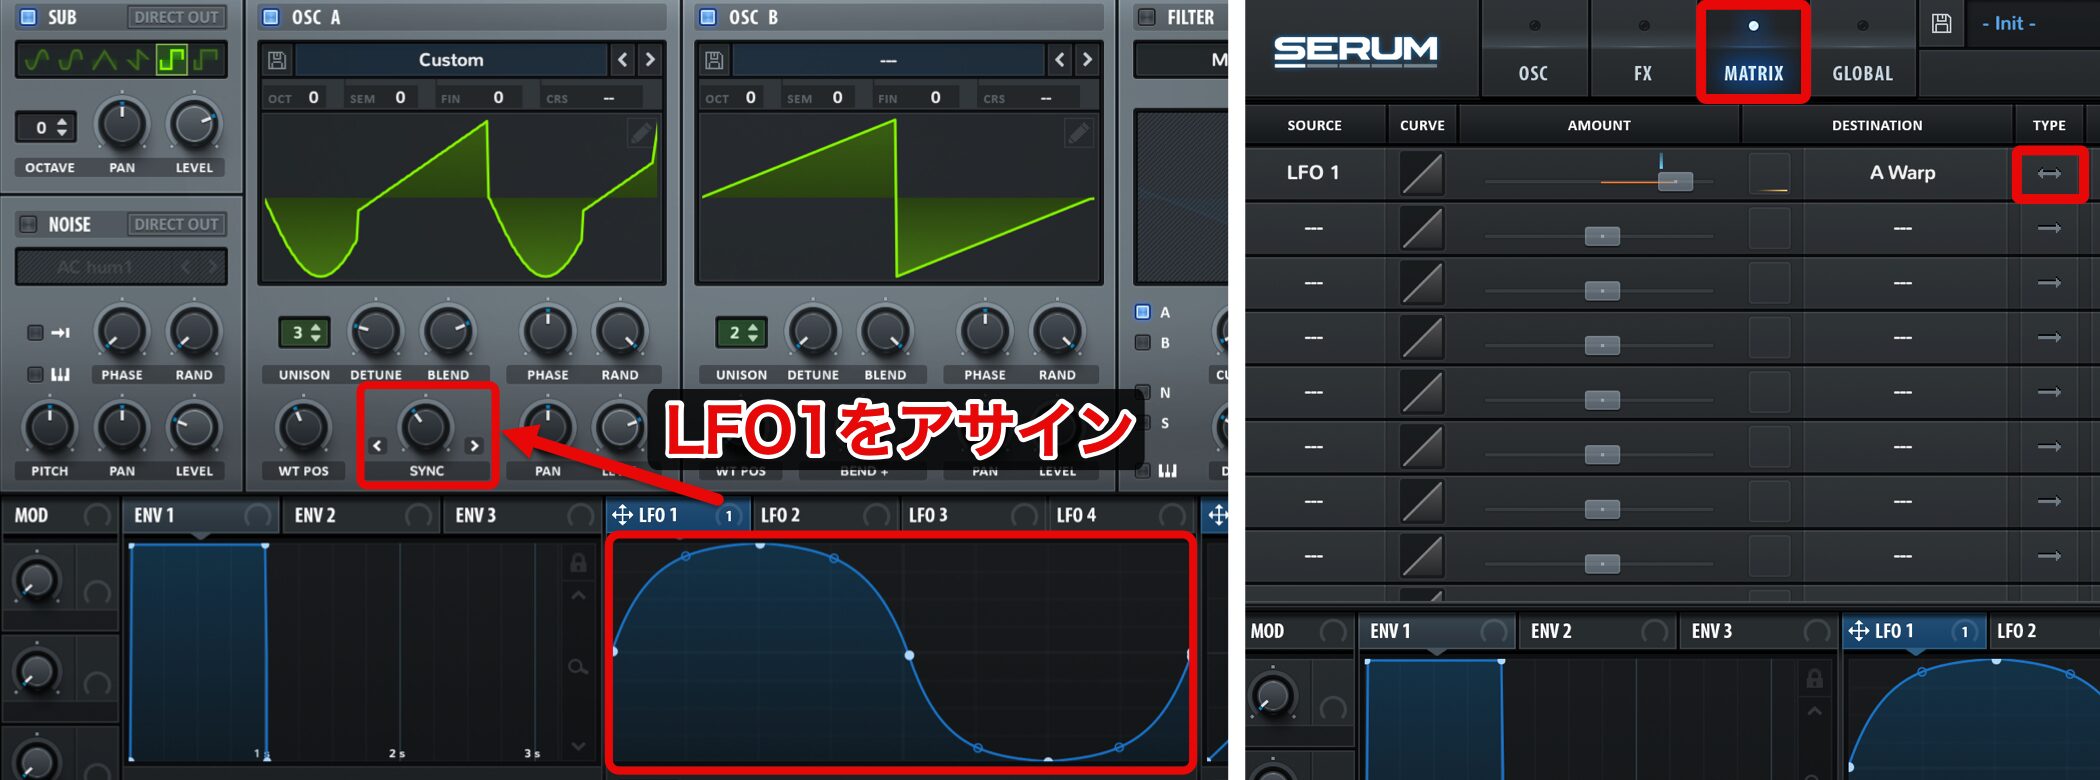
WARPをSYNCとし、そこにLFO1をアサインします。MATRIXのタイプは「↔︎」です。
揺れ幅はほんの少しとしておきます。
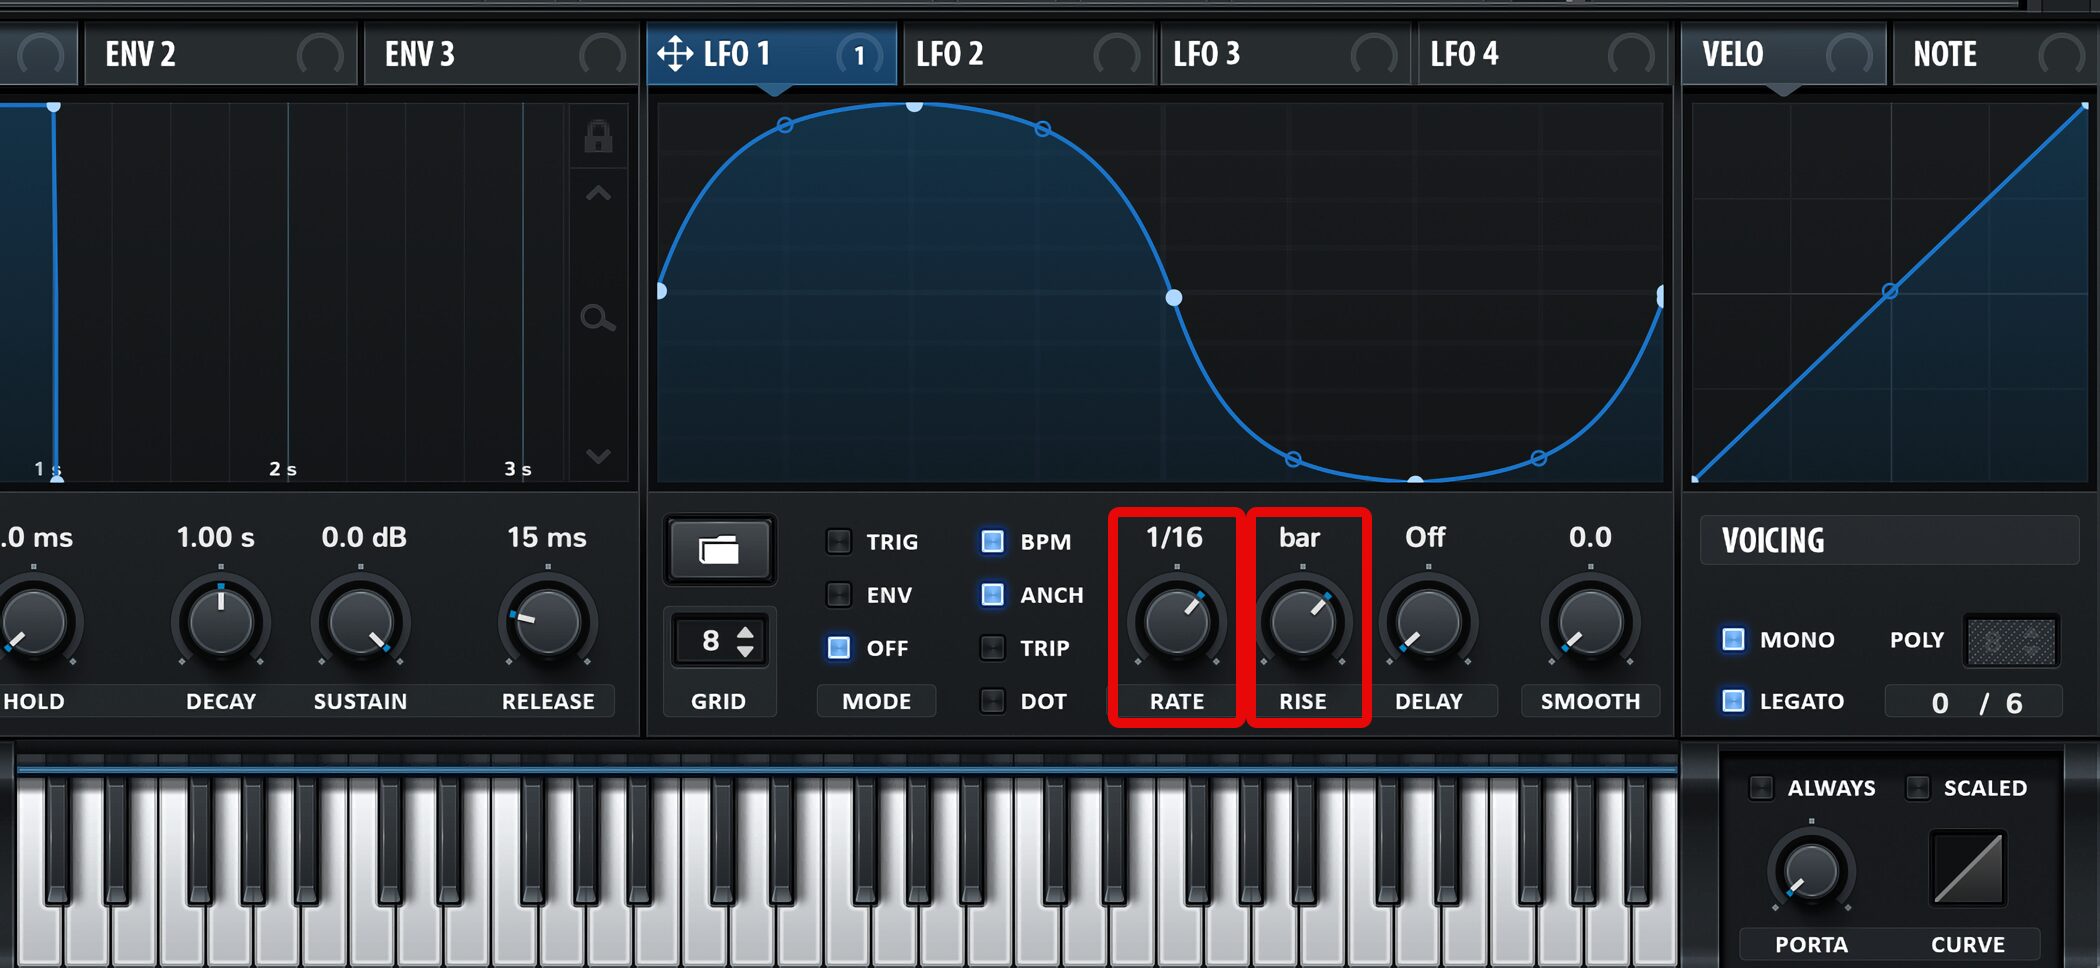
LFOの設定は、RATEが1/16、RISEをBARとします。
RISEはLFOの効果をフェードインさせる役割を持っており、ロングトーンでは音の後半でLFOの効果が徐々に出てくる傾向となります。
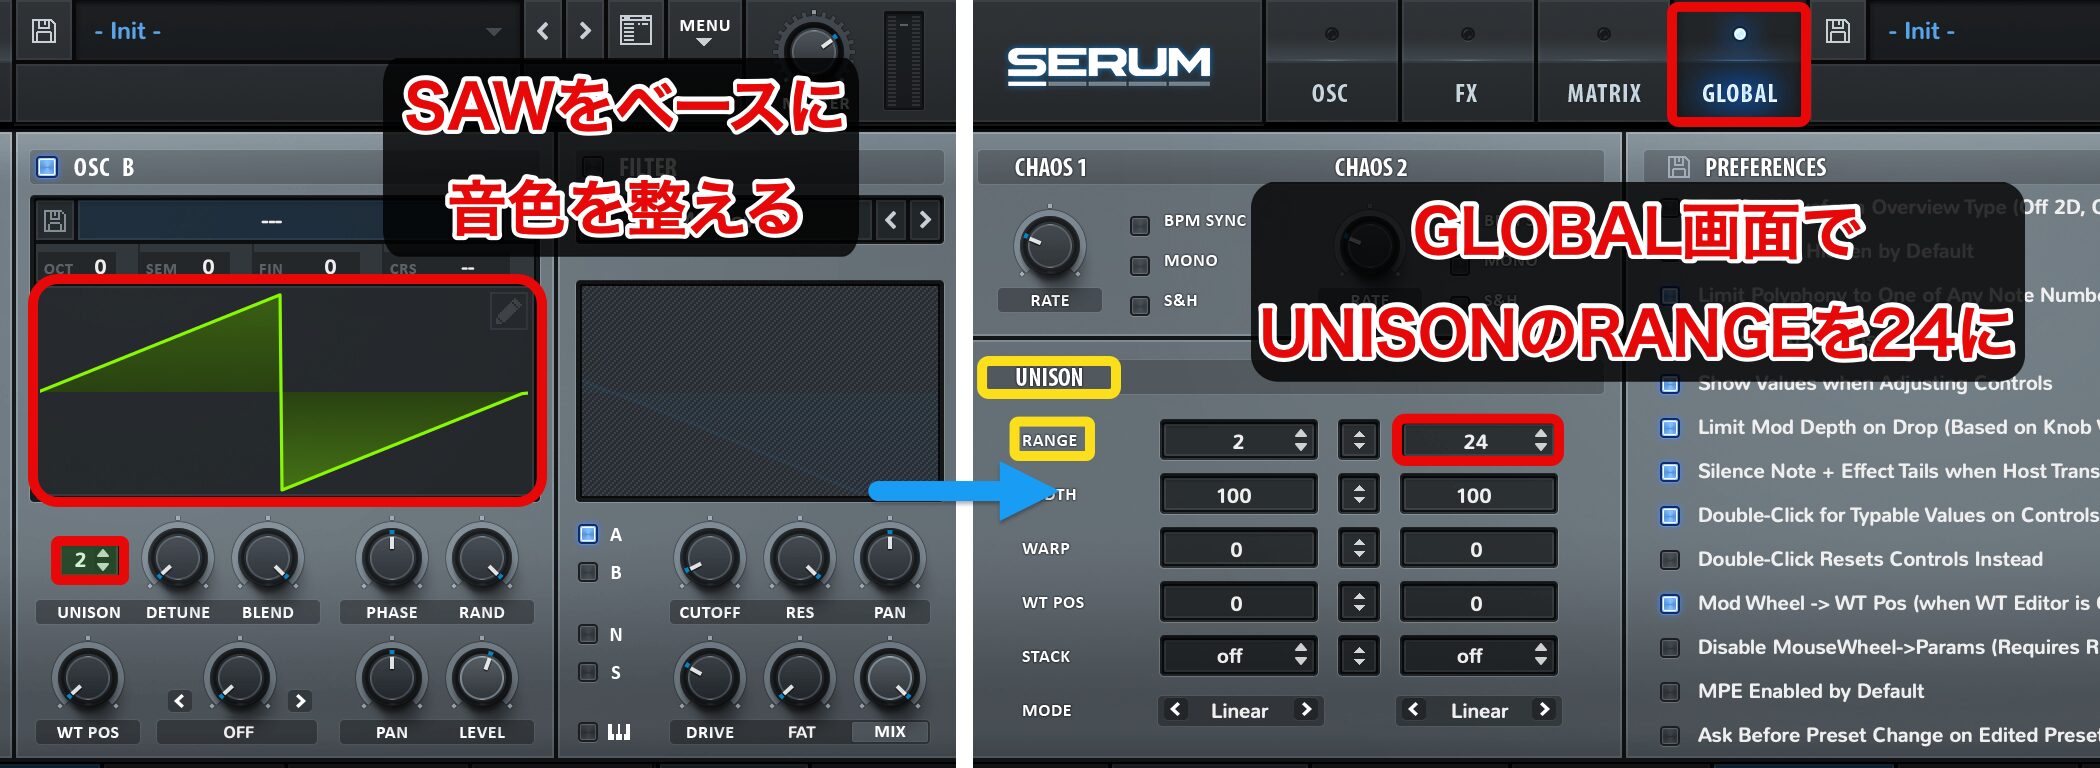
オシレーターBは、SAWをベースにUNISONを「2」にし音色を整えた後、GLOBAL画面でUNISONのRANGEを24としておきます。
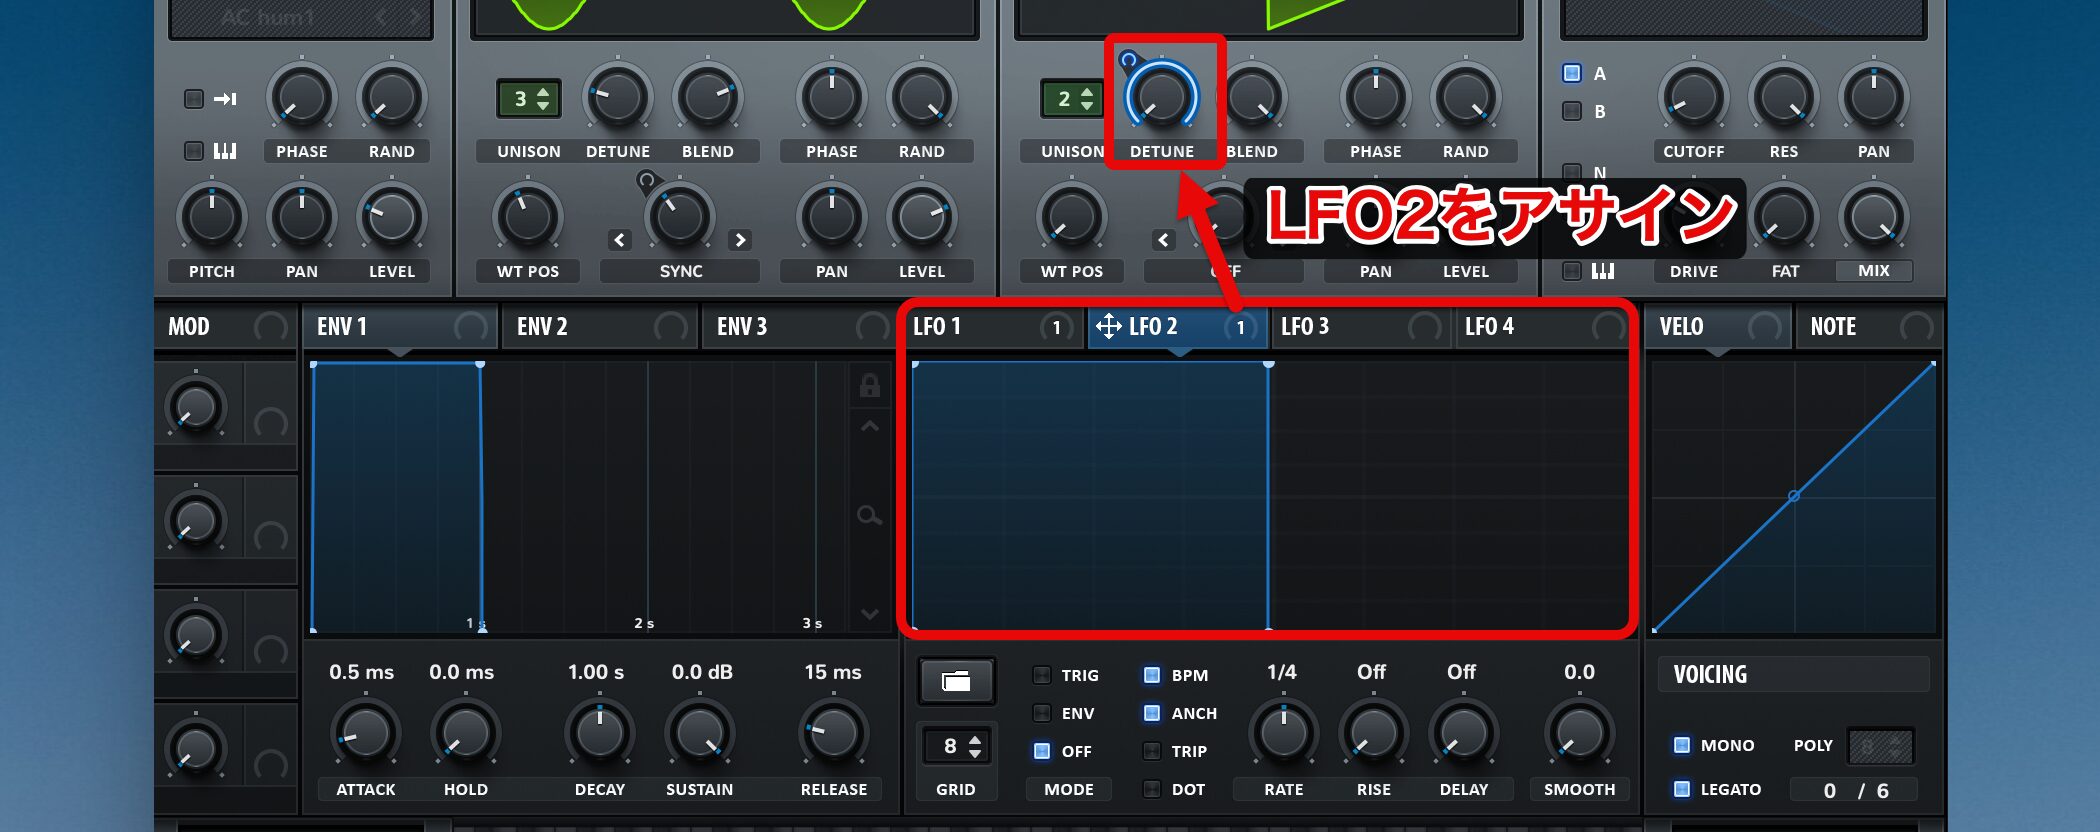
LFO2をスクウェアとし、DETUNEにアサインして振り幅を左右いっぱいとします。
この際、DETUNEのスタート地点を右に振り切り、範囲を左に振っておくのがポイントです。
(上の画像と逆の設定)
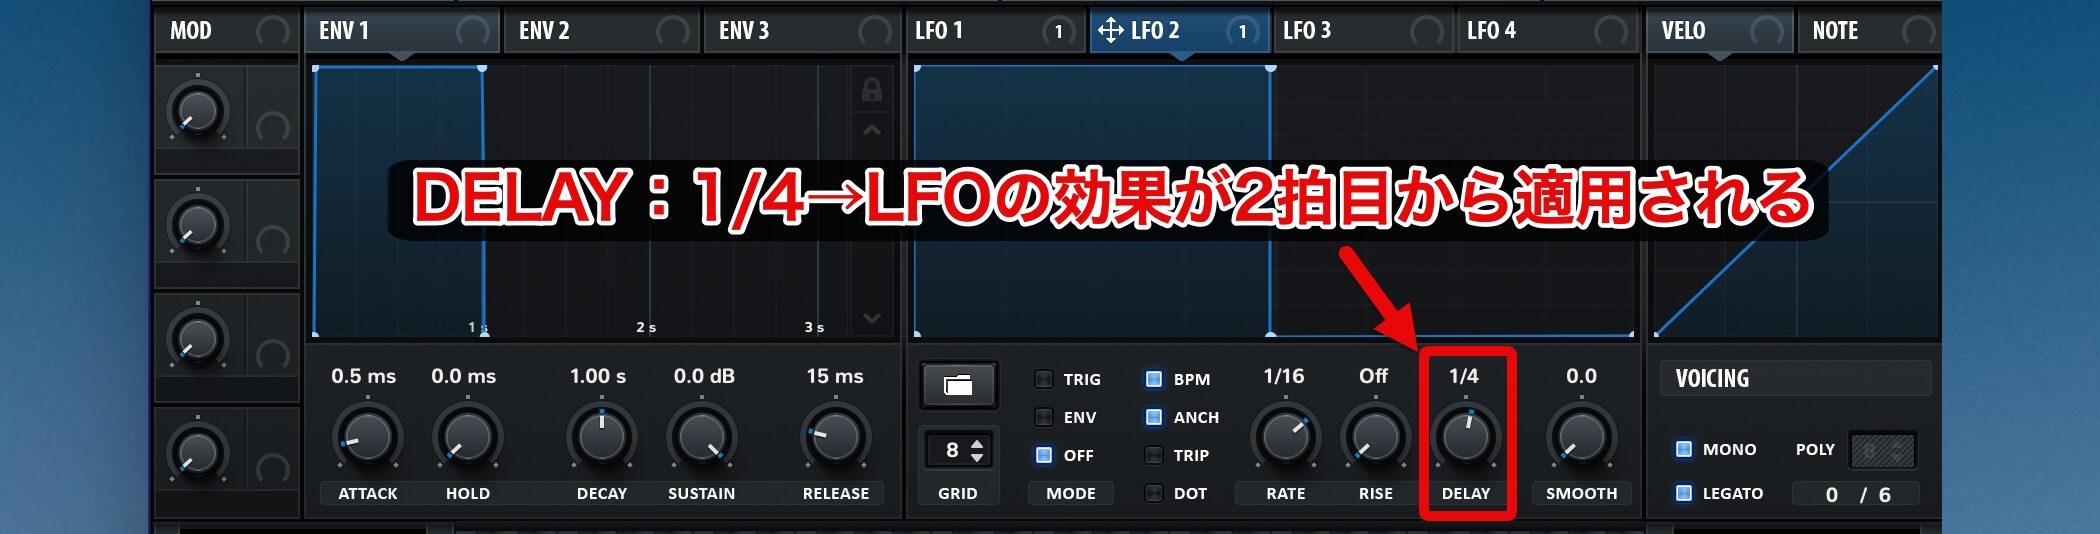
また、この際にLFOのDELAYを1/4としておくことで、4分音符分遅れてLFO効果を発生させることができます。
以上、SERUMの機能を存分に活用した音作りのTIPS集をお届けしました。
ぜひお試しの上、オリジナルの音作りにも活かしていただければ幸いです。