 Gear & Software
Separate your favorite songs and play along: analysis and recording in one view
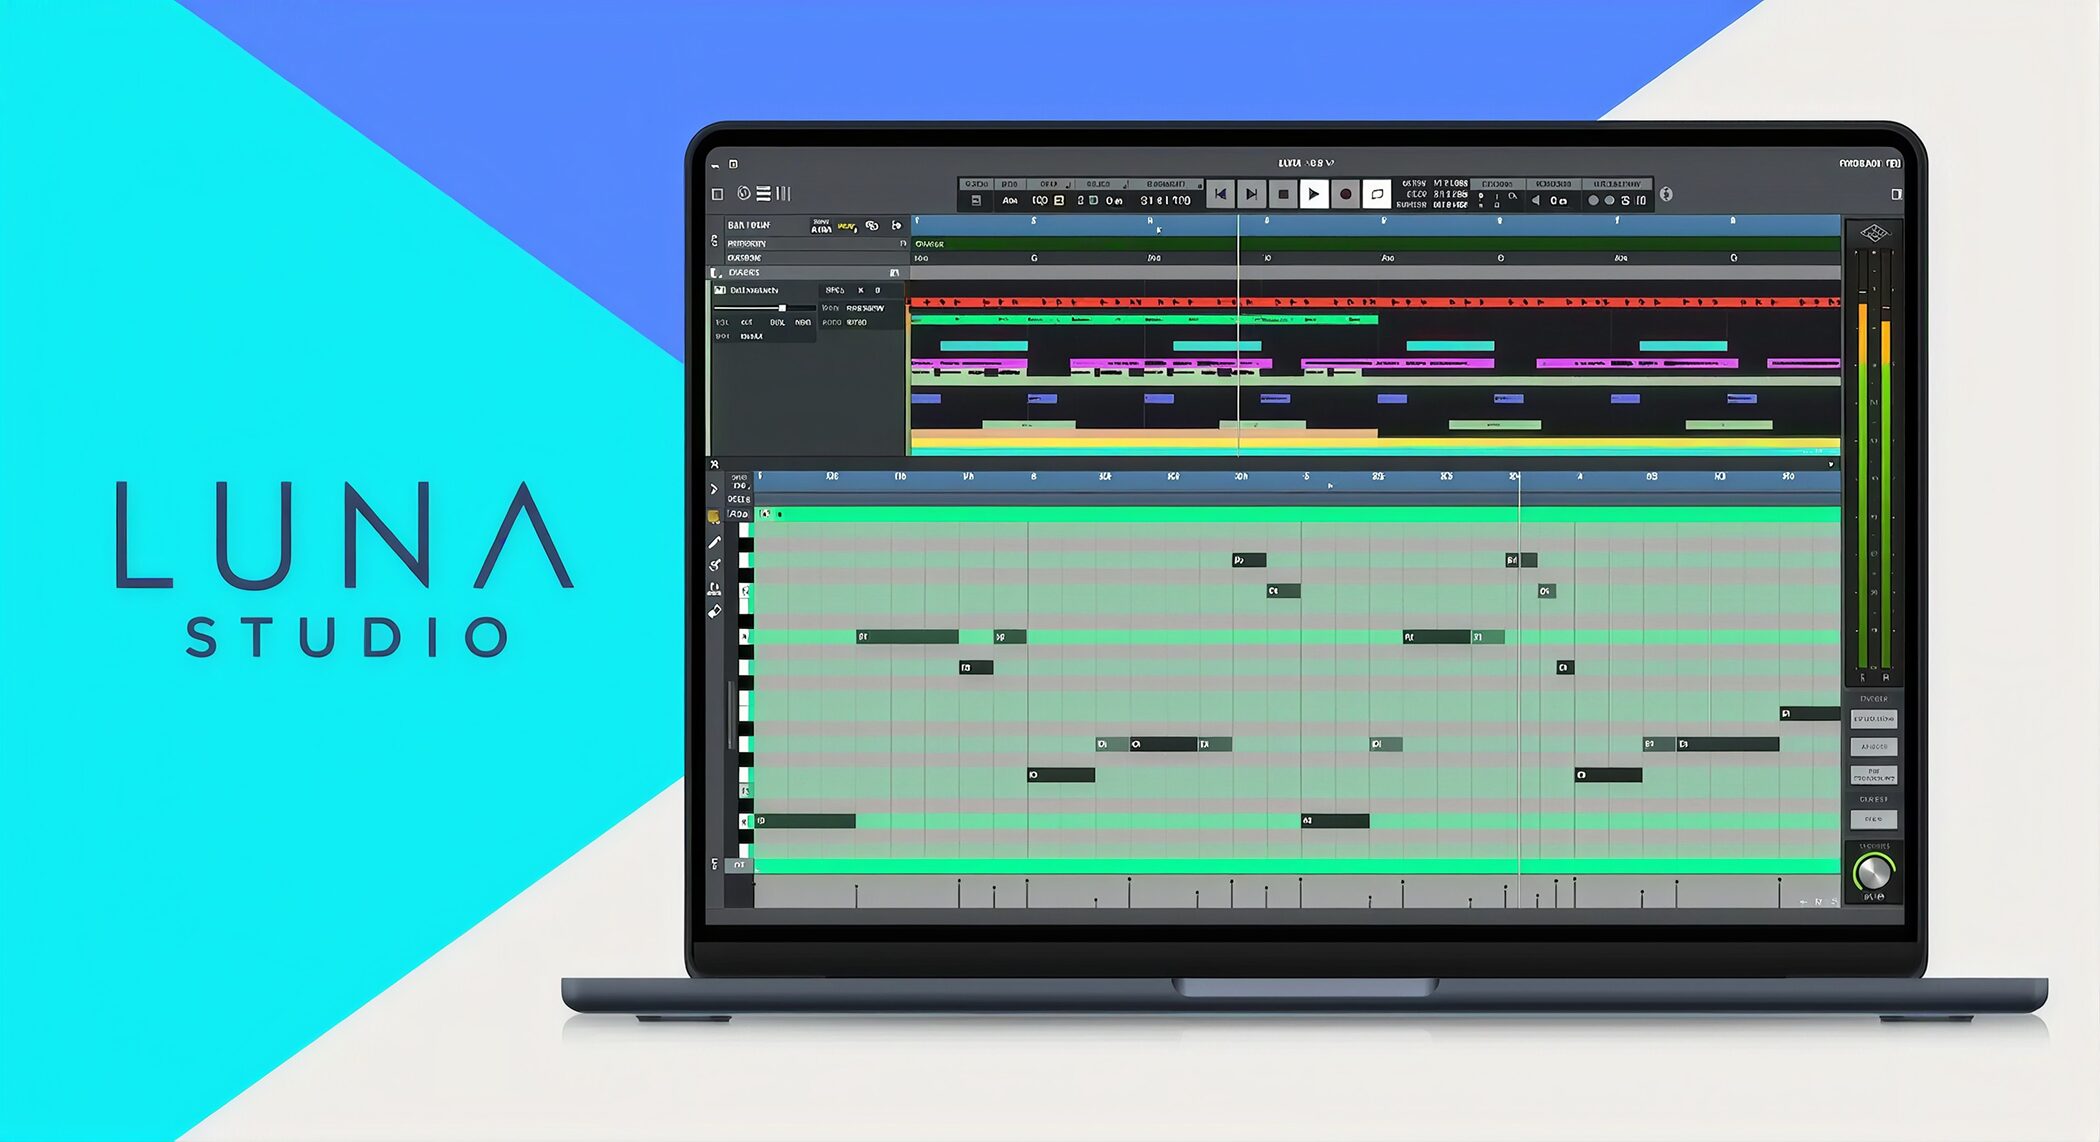
LUNA 3, the latest version of Universal Audio's LUNA DAW, has been released.
A particular highlight this time is the newly added LUNA Play.
Load a song you already have, separate it into individual parts, detect its tempo, analyze lyrics and chords, and record—all from a single view.
New editing features also let you split out silent sections and organize tracks in fewer steps.
The paid LUNA Studio edition also adds the ability to convert audio to MIDI.
This article introduces the new features, focusing on the LUNA Play view.
If you are using LUNA for the first time, the following article is also a useful reference.

Video
Three components in the new version
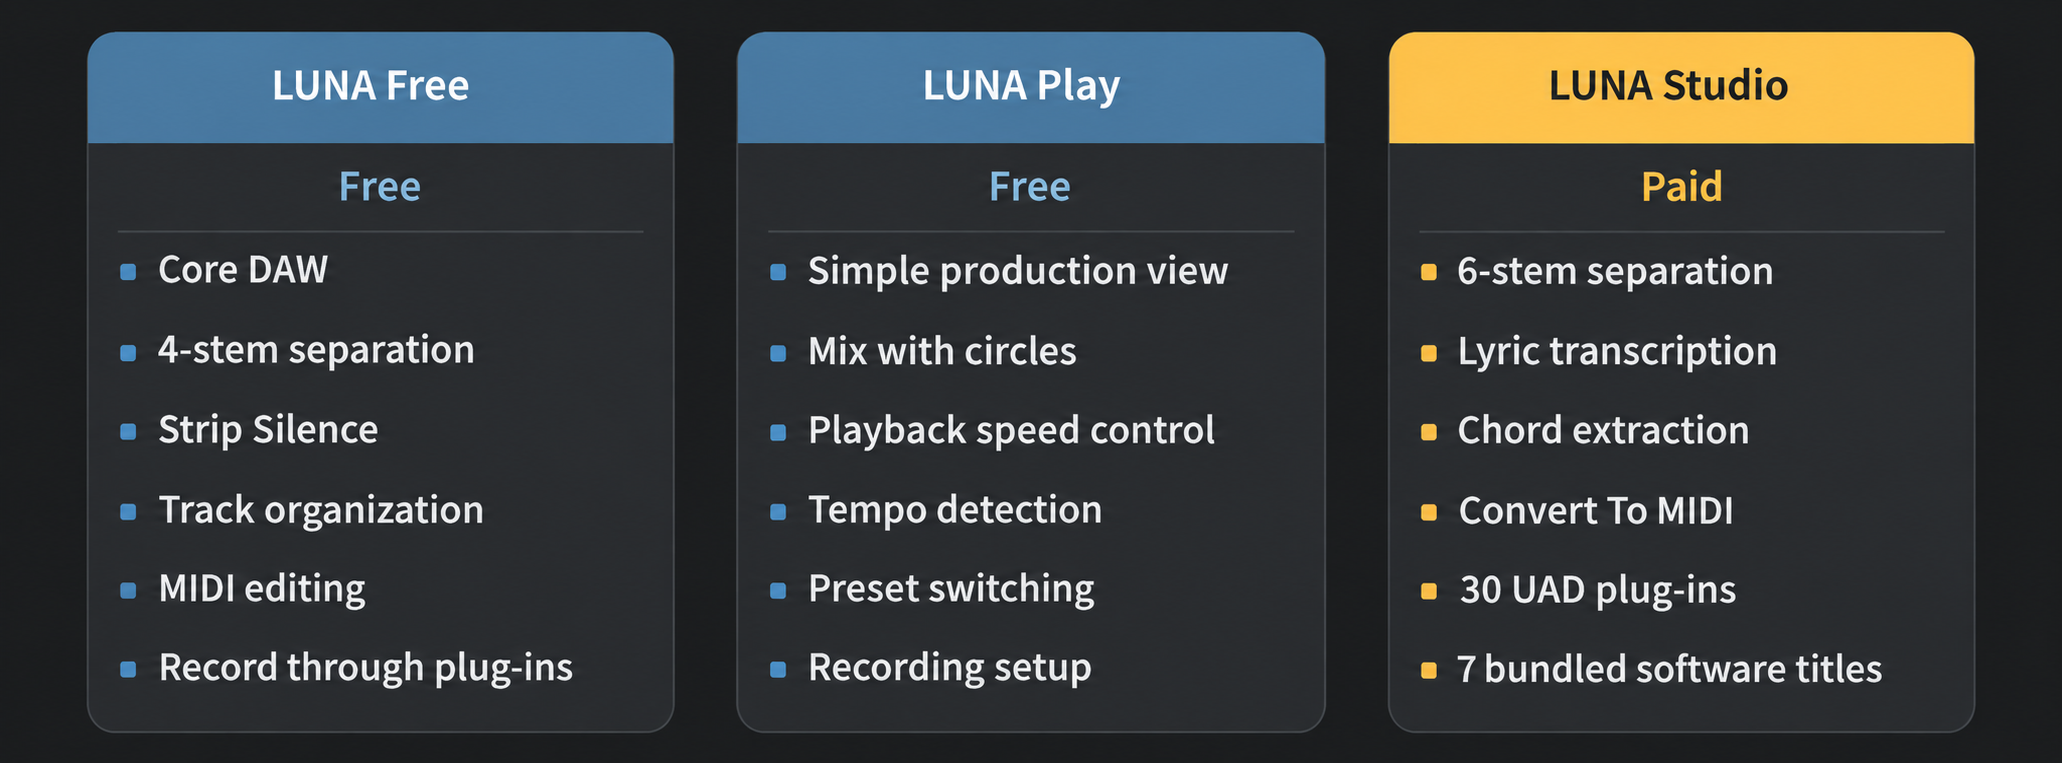
LUNA 3 reorganizes the lineup itself.
- LUNA Free: free. The core application, with a full set of basic DAW functions
- LUNA Play: free. A production view that runs as a tab within LUNA
- LUNA Studio: paid. Unlocks analysis features and bundled software
The free edition previously known simply as LUNA has been renamed LUNA Free, while the paid LUNA Pro edition is now called LUNA Studio.
LUNA Play is a new addition to the lineup.
Even the free LUNA Free edition has no limit on the number of tracks or plug-ins, and includes eight UAD plug-ins, such as compressors and reverbs.
LUNA Play
LUNA Play has a simple interface designed to let you start recording and adjusting your sound intuitively, even if you have never used a DAW before.
Separating a song
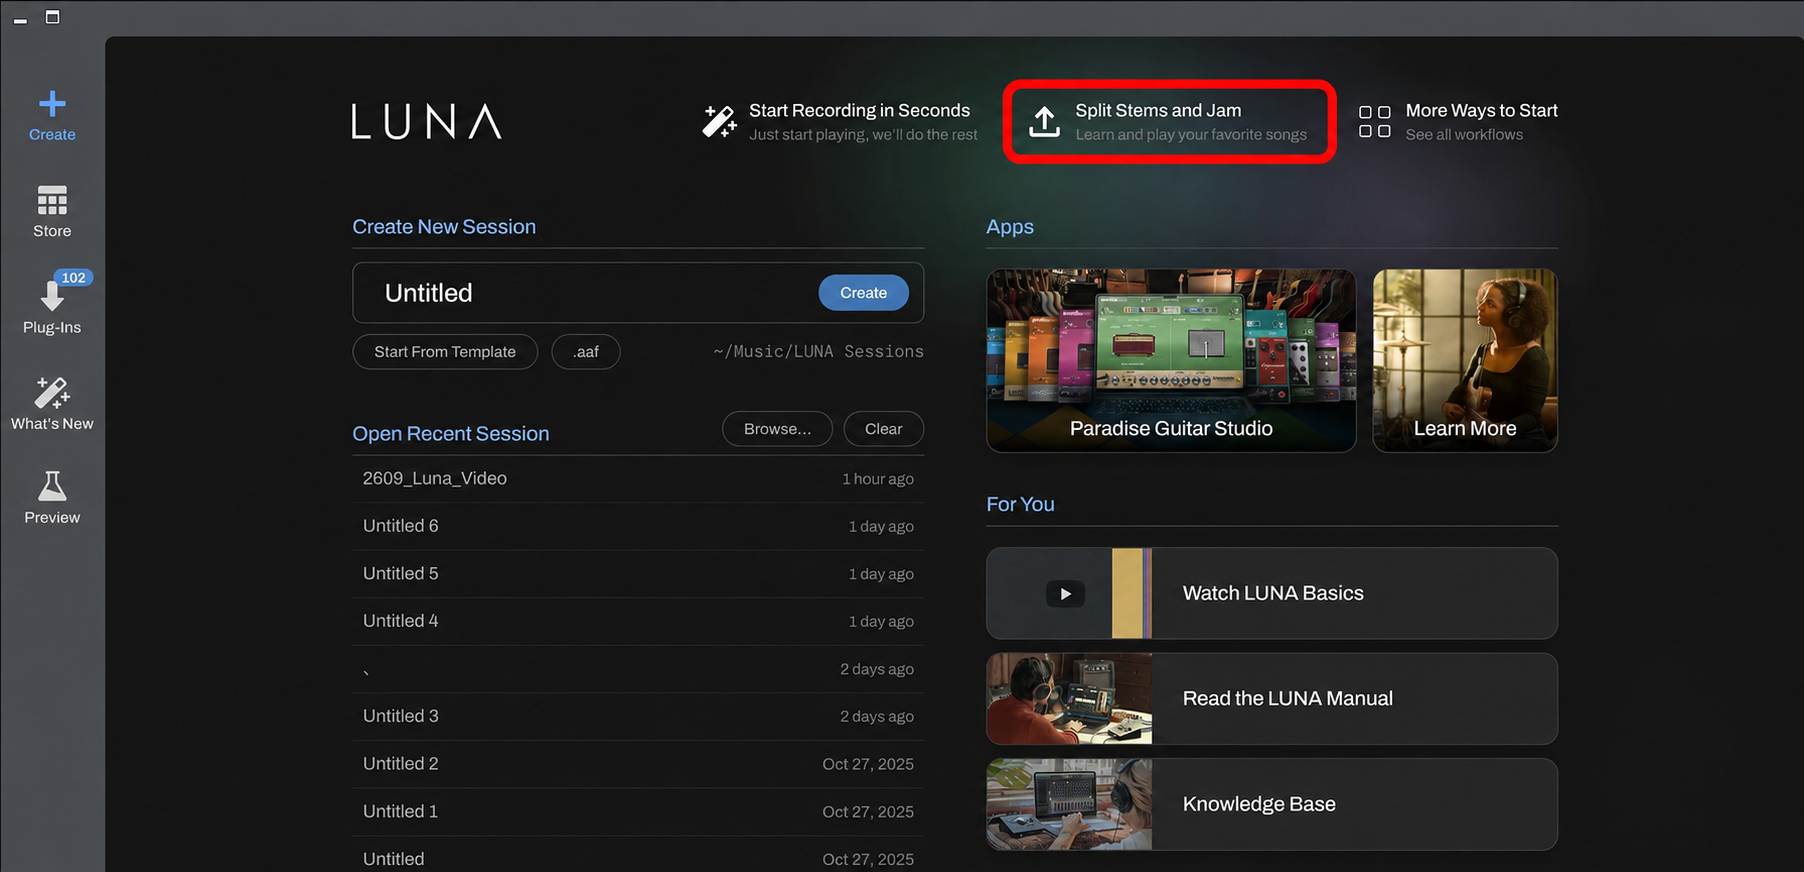
Click “Split Stems and Jam” on the startup screen.
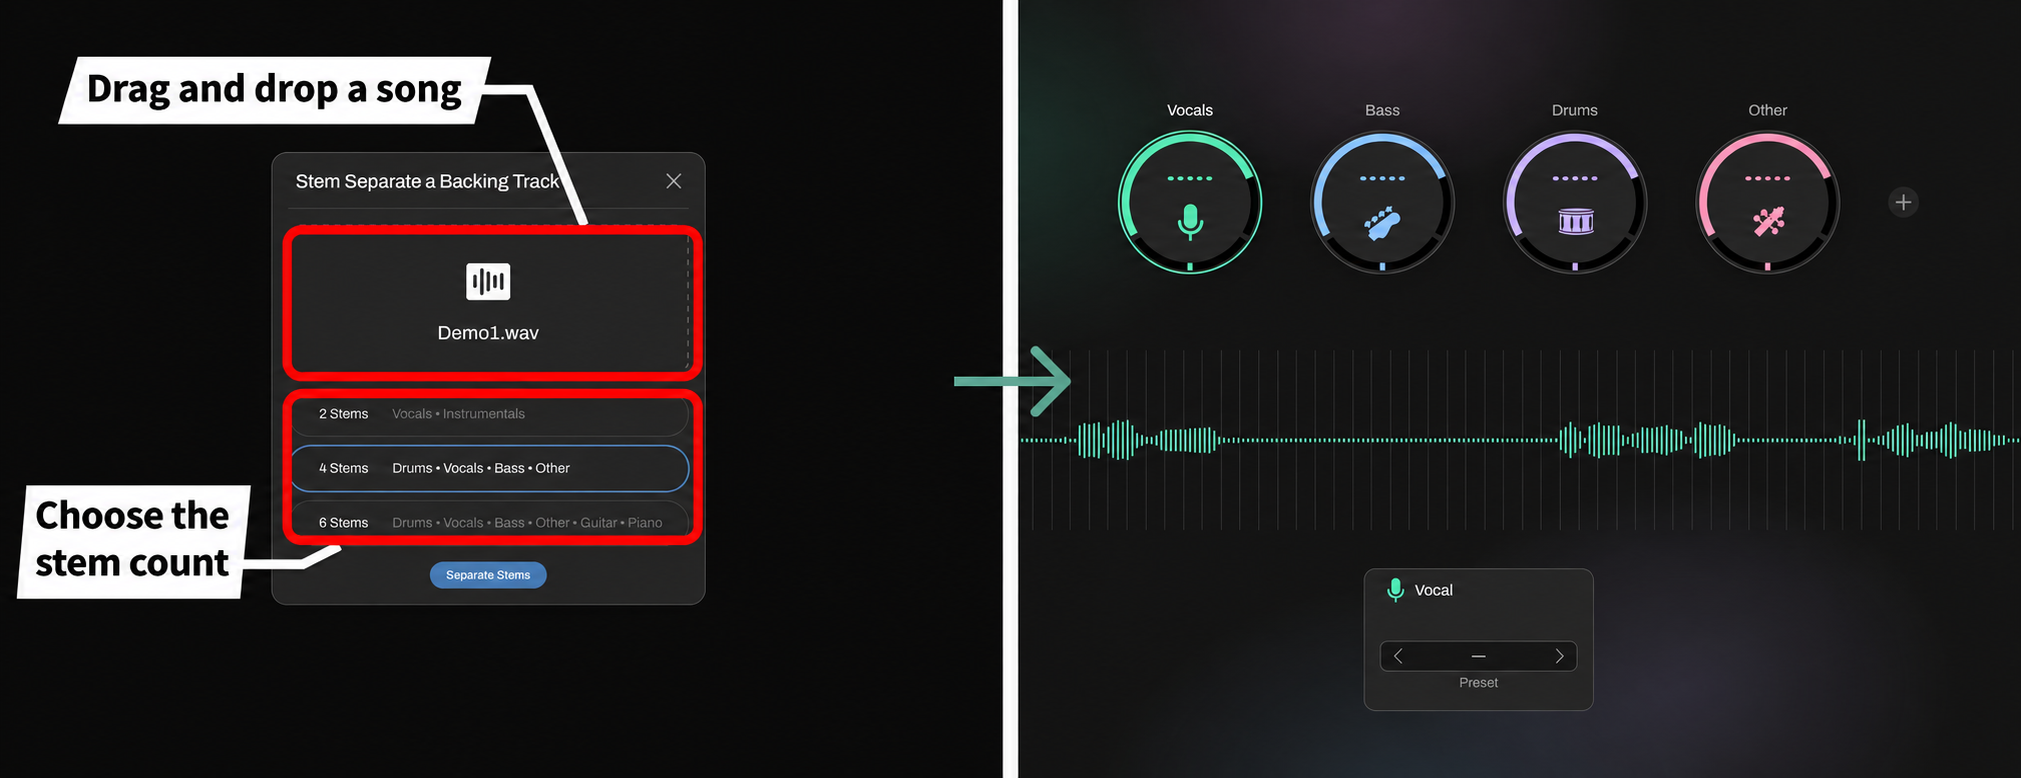
The “Stem Separate a Backing Track” window opens. Drag and drop the song you want to separate into it.
Choose the number of stems using the three buttons below the filename, then click “Separate Stems.”
6 Stems is available only in the Studio edition; 2 Stems and 4 Stems are available in the free edition.
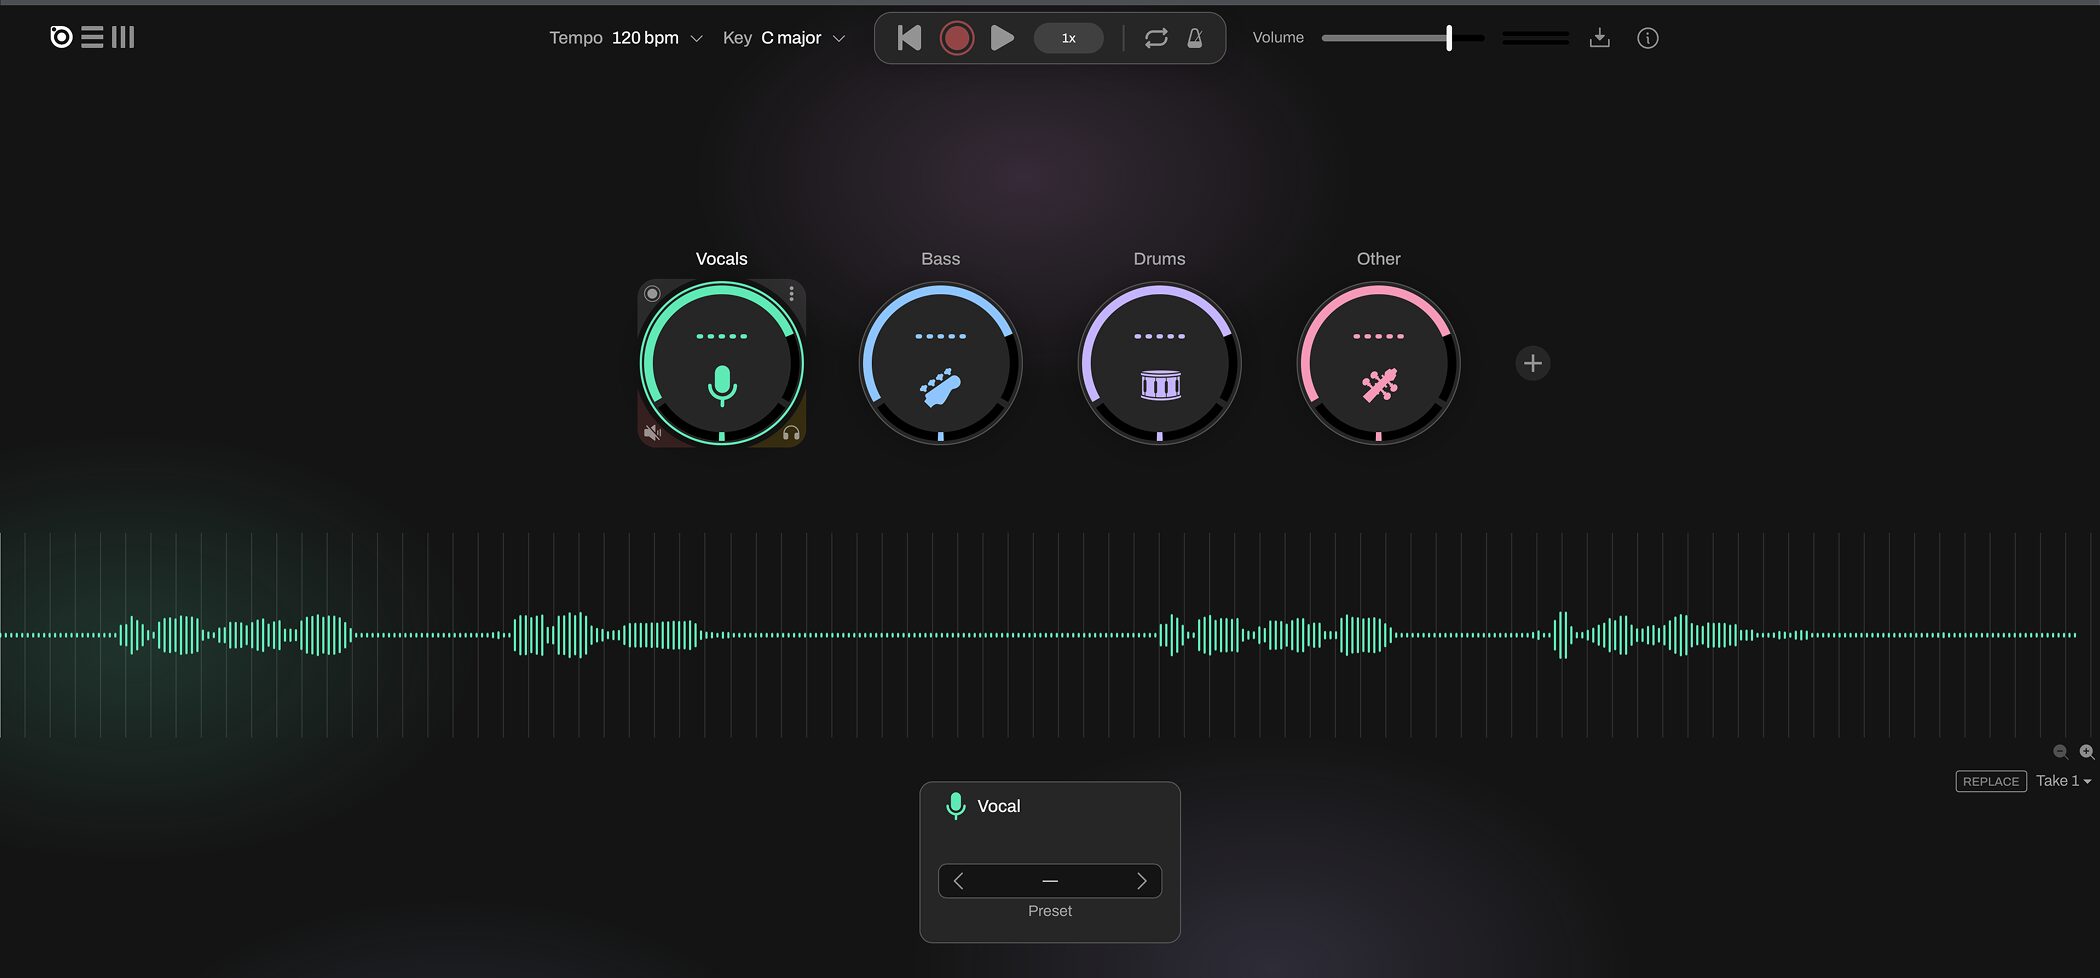
After a short wait, LUNA Play appears with a circle for each separated part.
Understanding and controlling the view
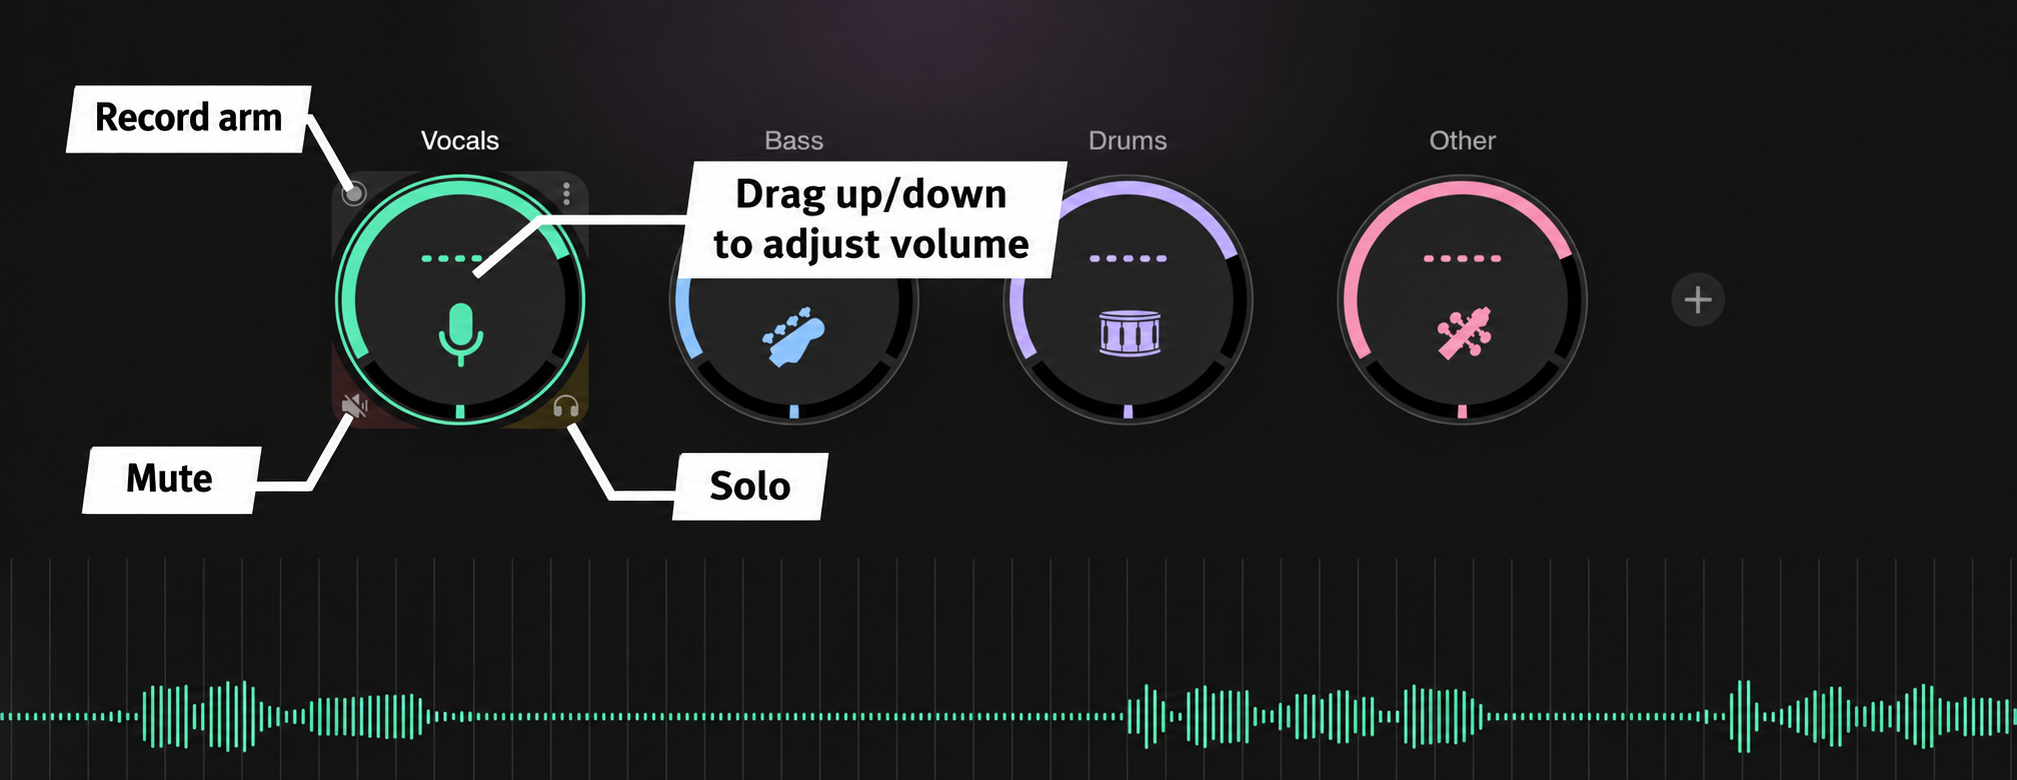
Each circle represents a track.
The small round icon at its upper left arms the track for recording. Drag the circle up or down to adjust its volume, use the speaker icon to mute it, and use the headphone icon to solo it.
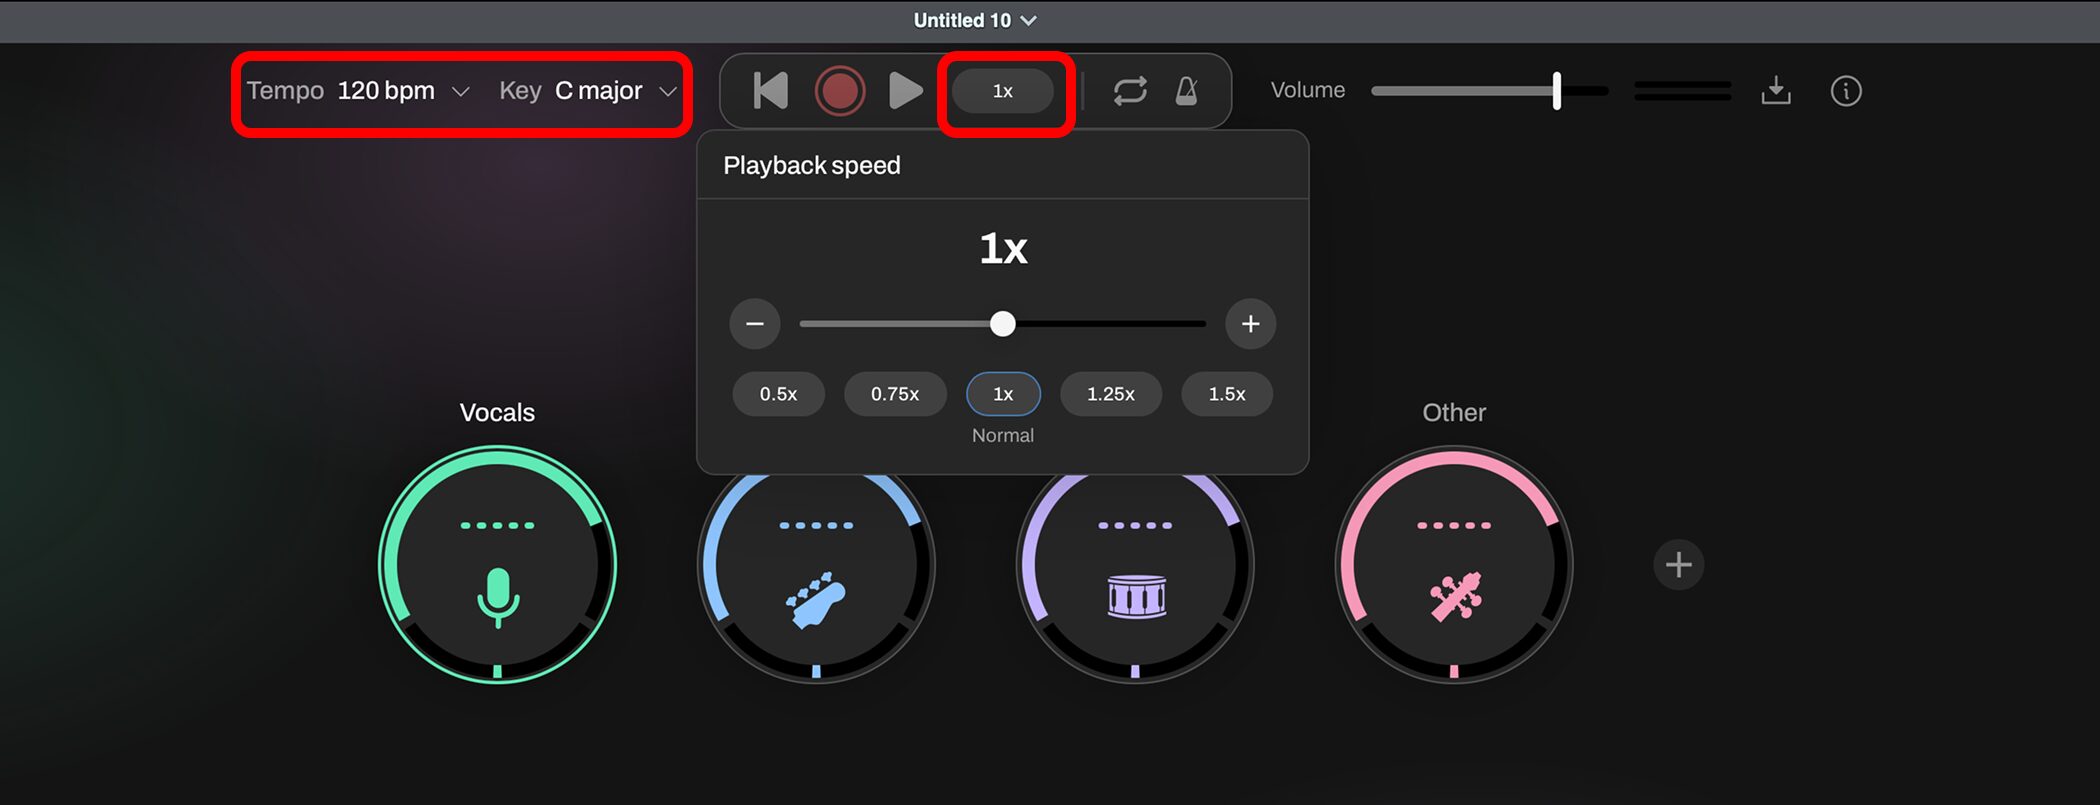
The top bar lets you change the tempo, key, and playback speed.
Playback speed ranges from 0.5x to 1.5x, so you can slow down fast phrases to practice them.
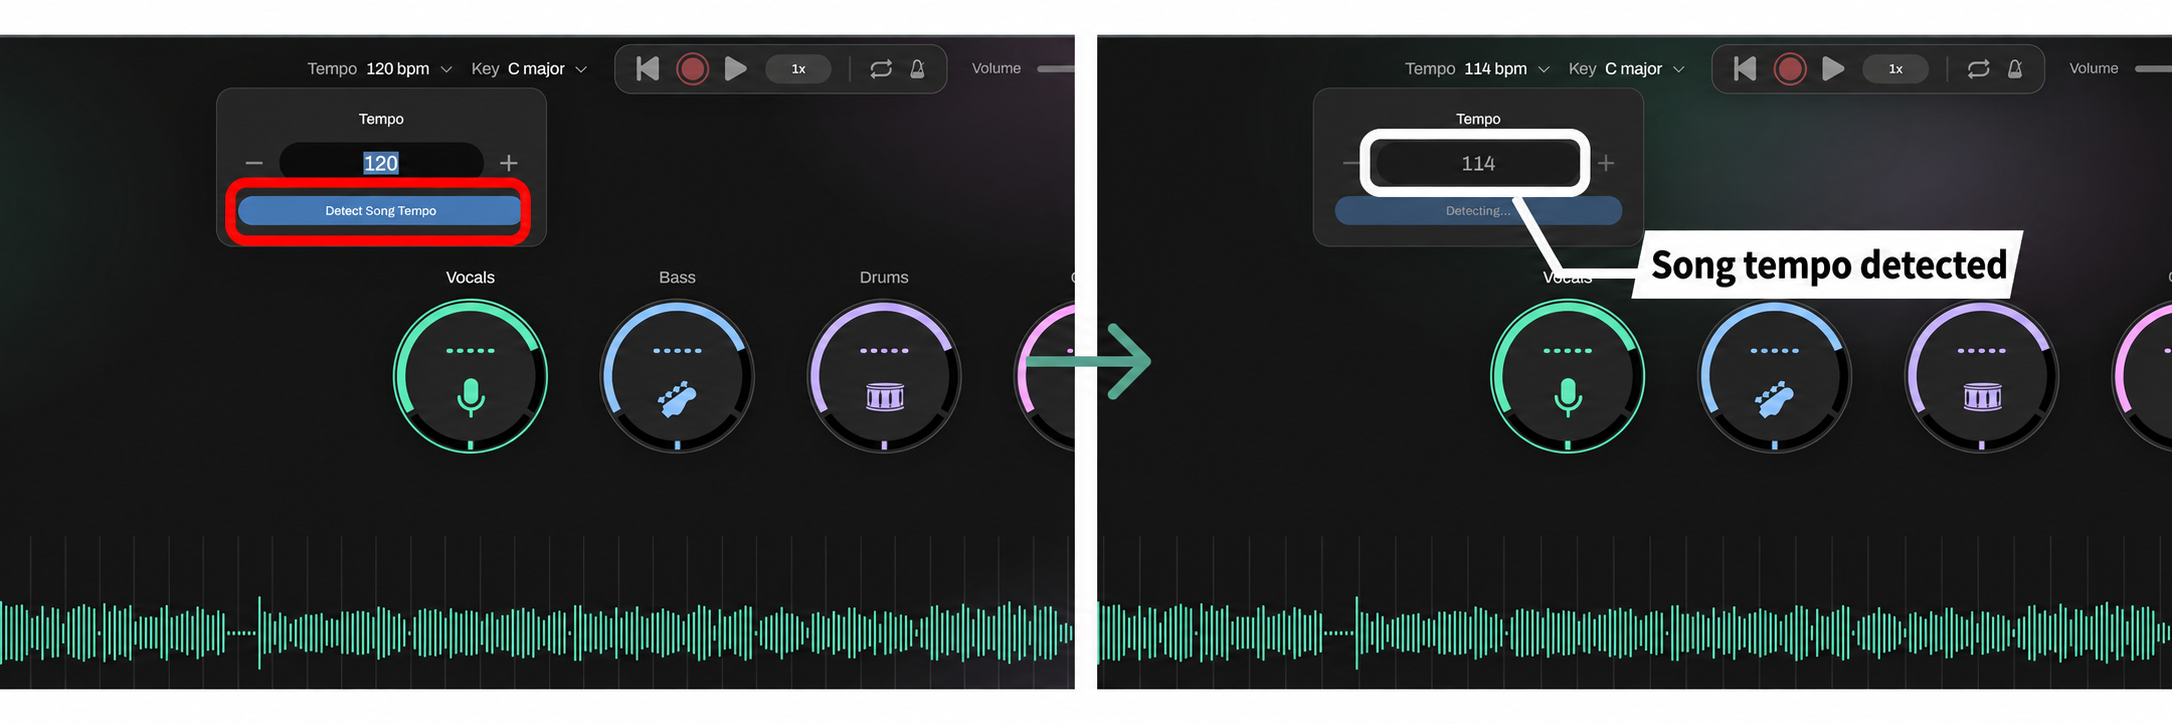
Click “Tempo” and choose “Detect Song Tempo” to detect the song's tempo in a few seconds.
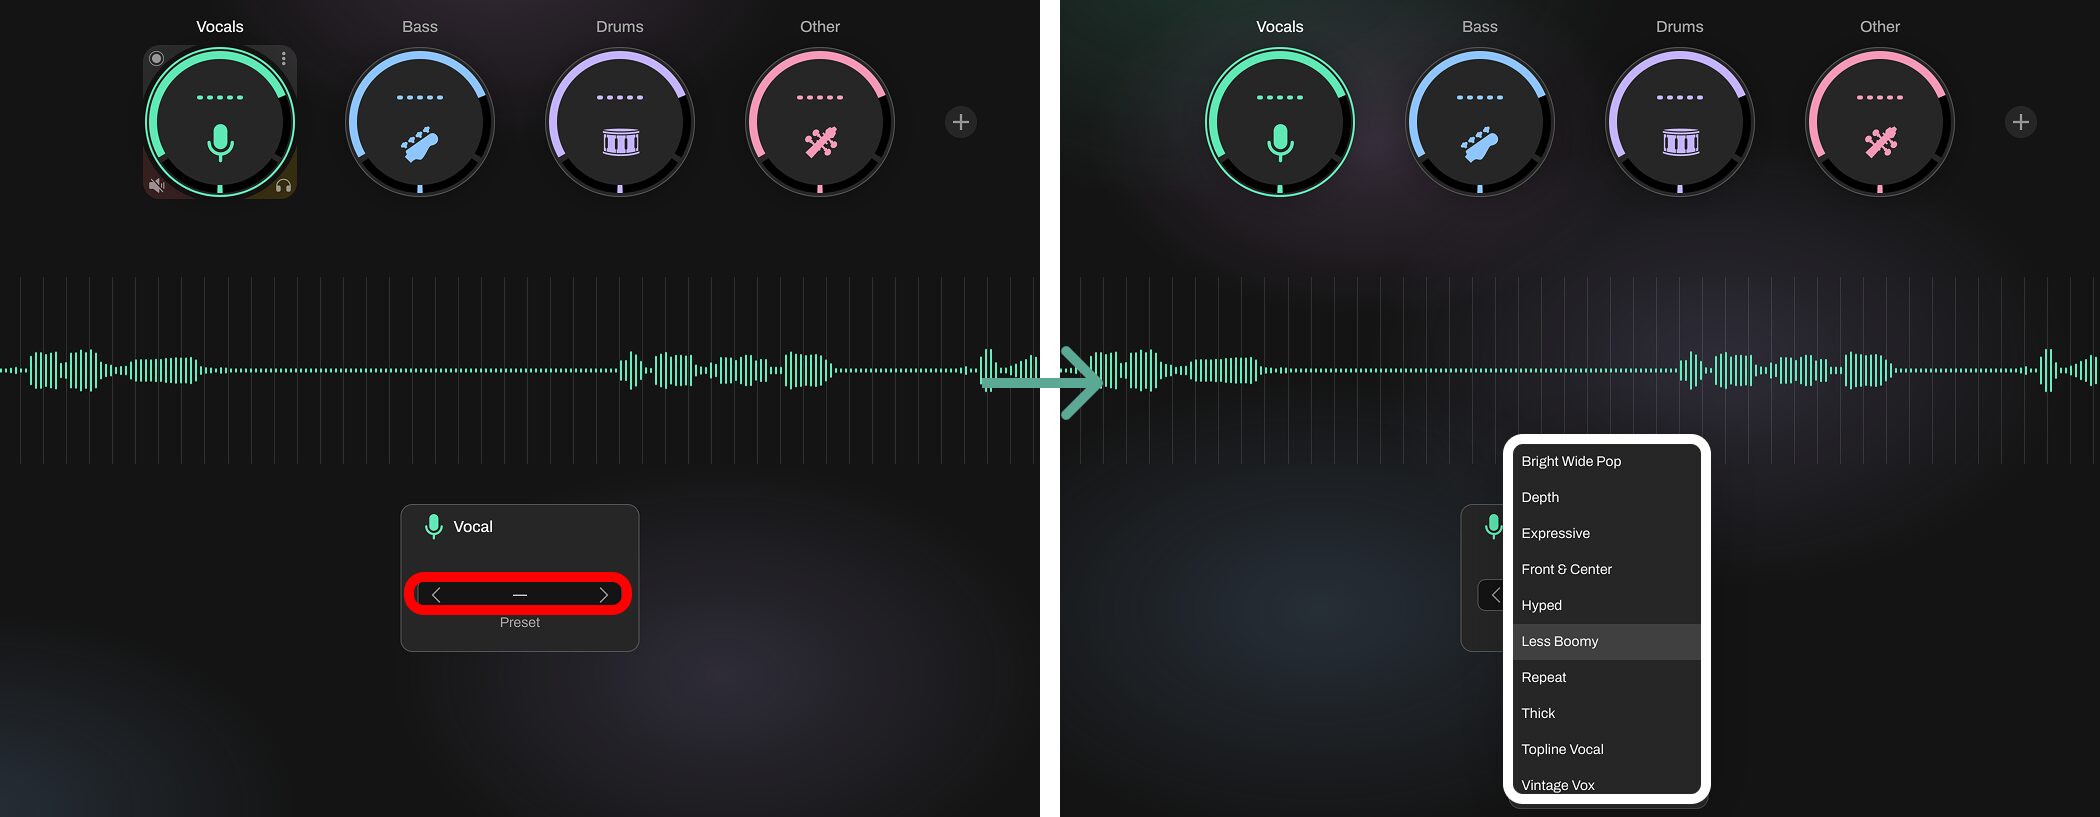
Click a circle to open its control panel at the bottom of the view.
Click the arrows under “Preset” to switch between presets suited to that track.
Lyric transcription and chord extraction (Studio edition only)
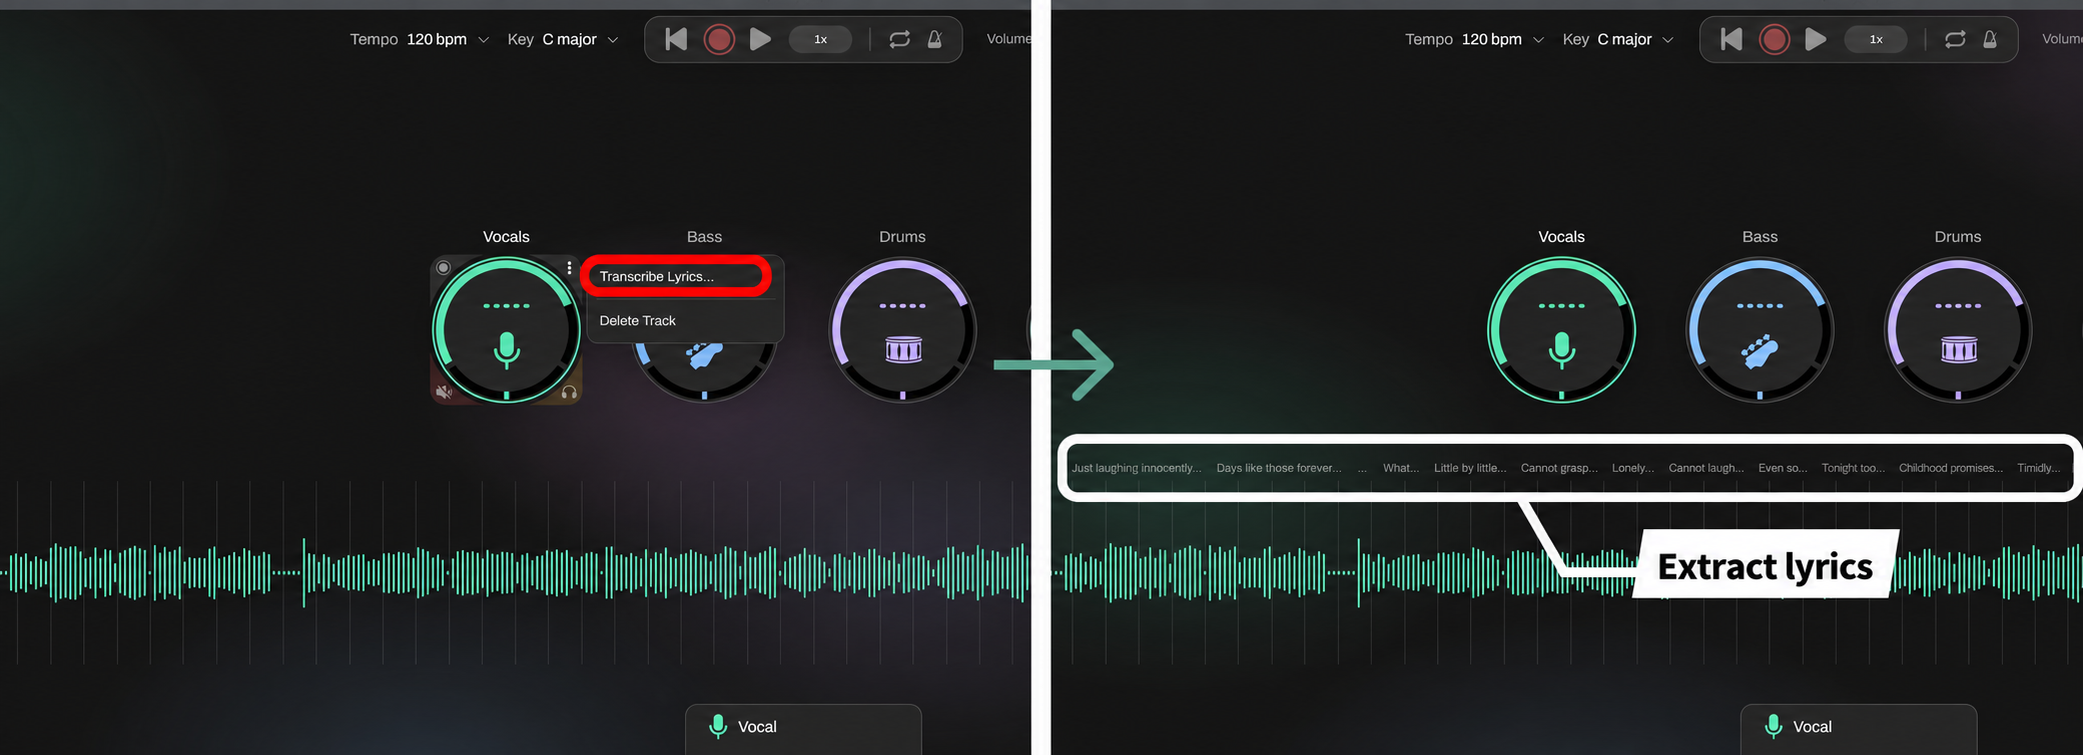
Click the vocal circle's “⋮” menu and choose “Transcribe Lyrics…” to extract the lyrics.
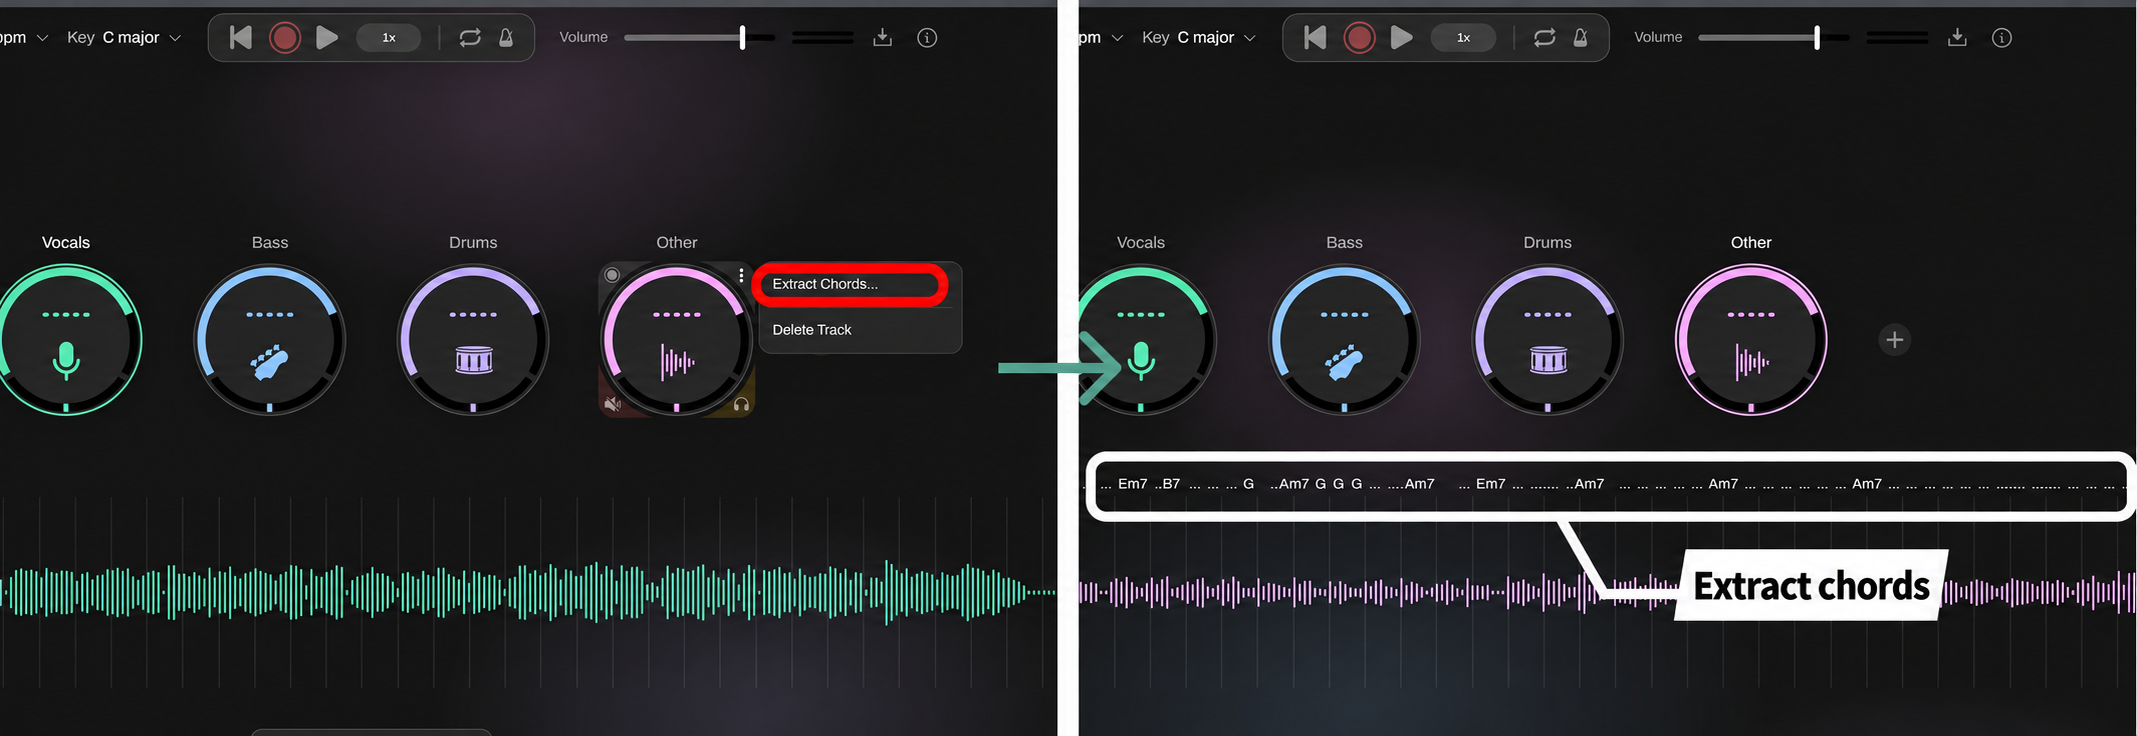
For circles containing chords, such as guitar or keyboard parts, the “⋮” menu includes “Extract Chords…”.
Click it to extract the chords.
Adding tracks
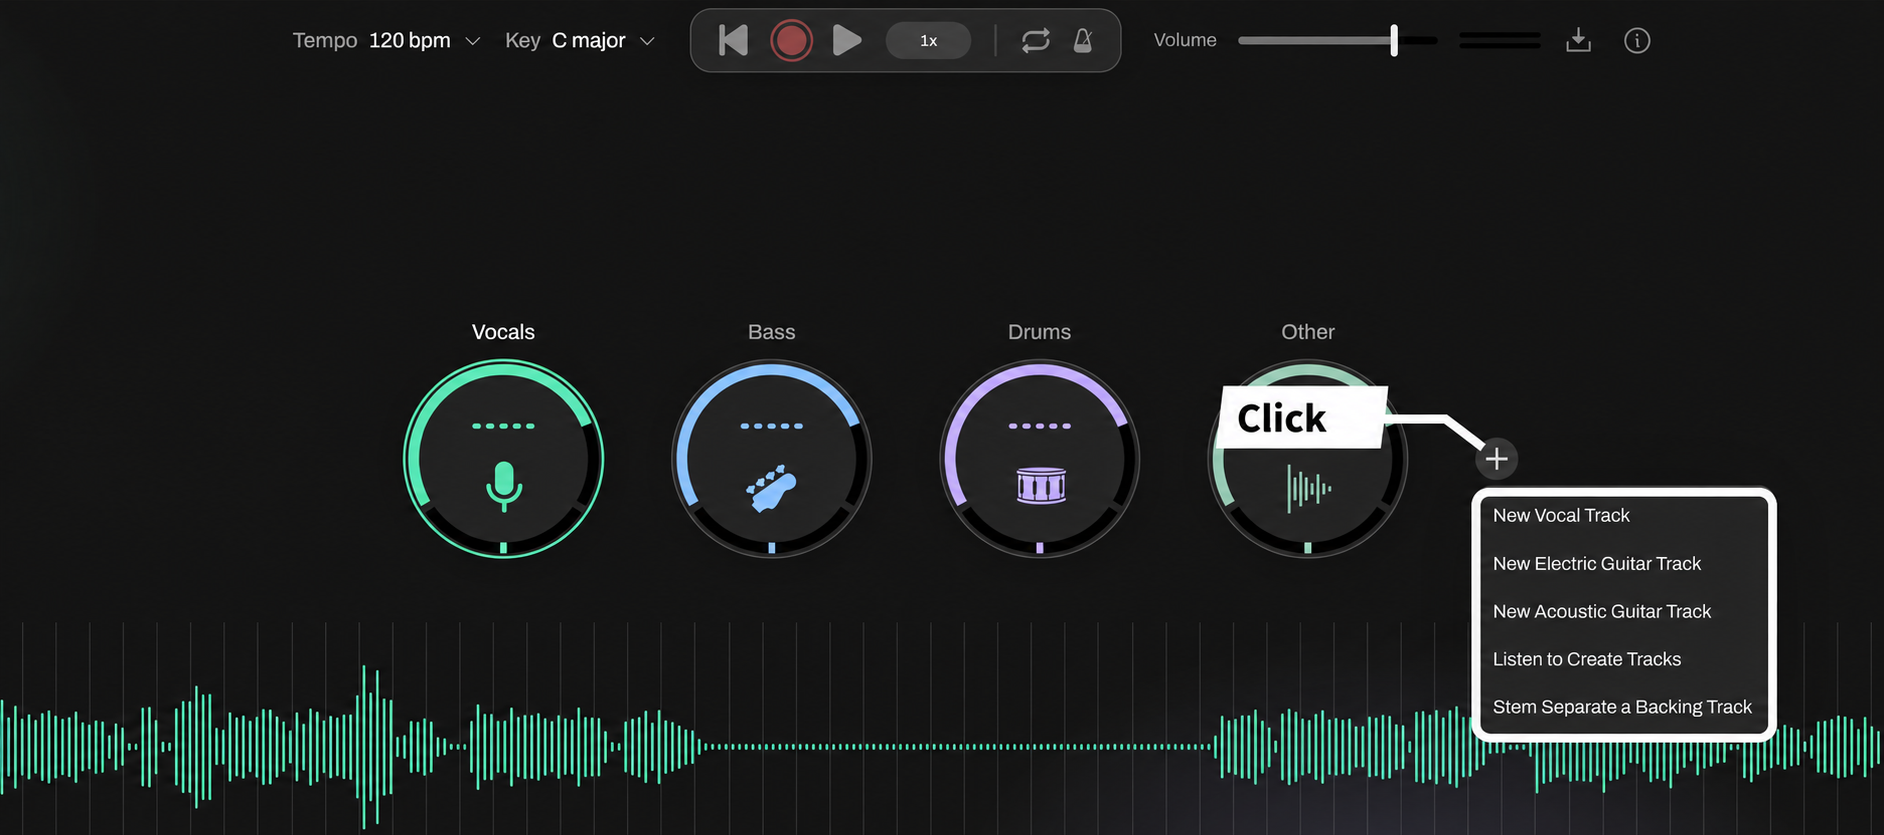
Click the “+” to the right of the circles to open the menu for adding tracks.
- New Vocal Track: creates a track for vocals
- New Electric Guitar Track: creates a track for electric guitar
- New Acoustic Guitar Track: creates a track for acoustic guitar
- Listen to Create Tracks: identifies the instrument you play and creates a track
- Stem Separate a Backing Track: opens the song separation window
Add vocals or instruments to play and record along with the song.
Switching to the timeline view
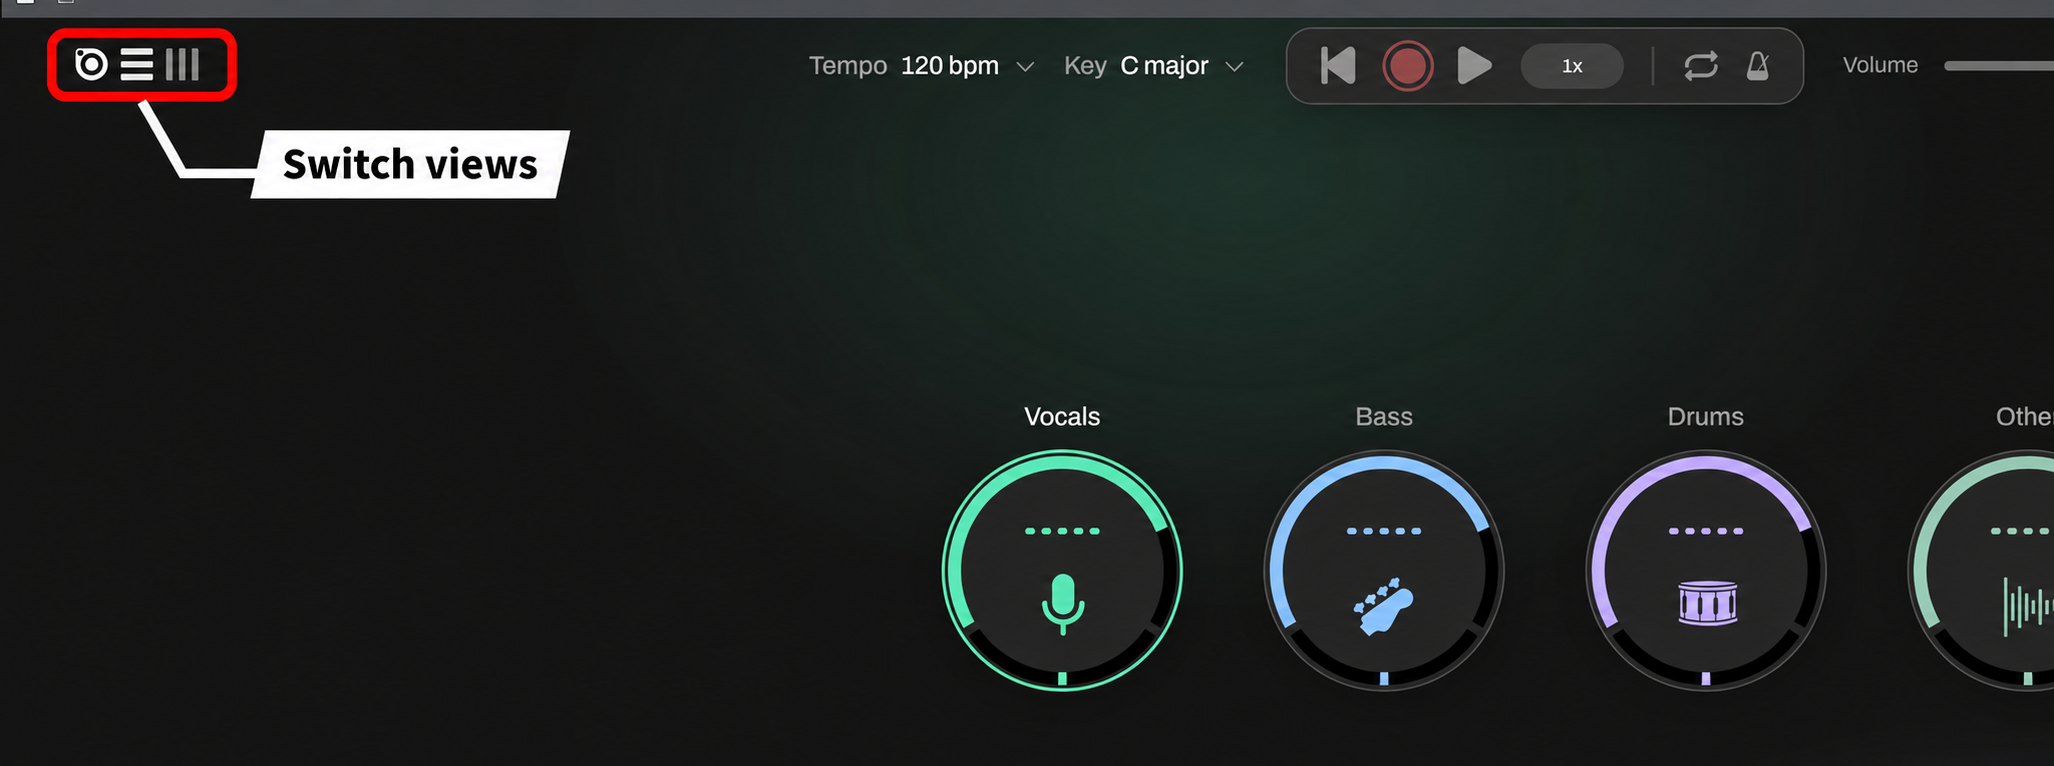
Three icons appear at the upper left of the view.
From left to right, they are LUNA Play, the timeline, and the mixer. Click one to switch views.
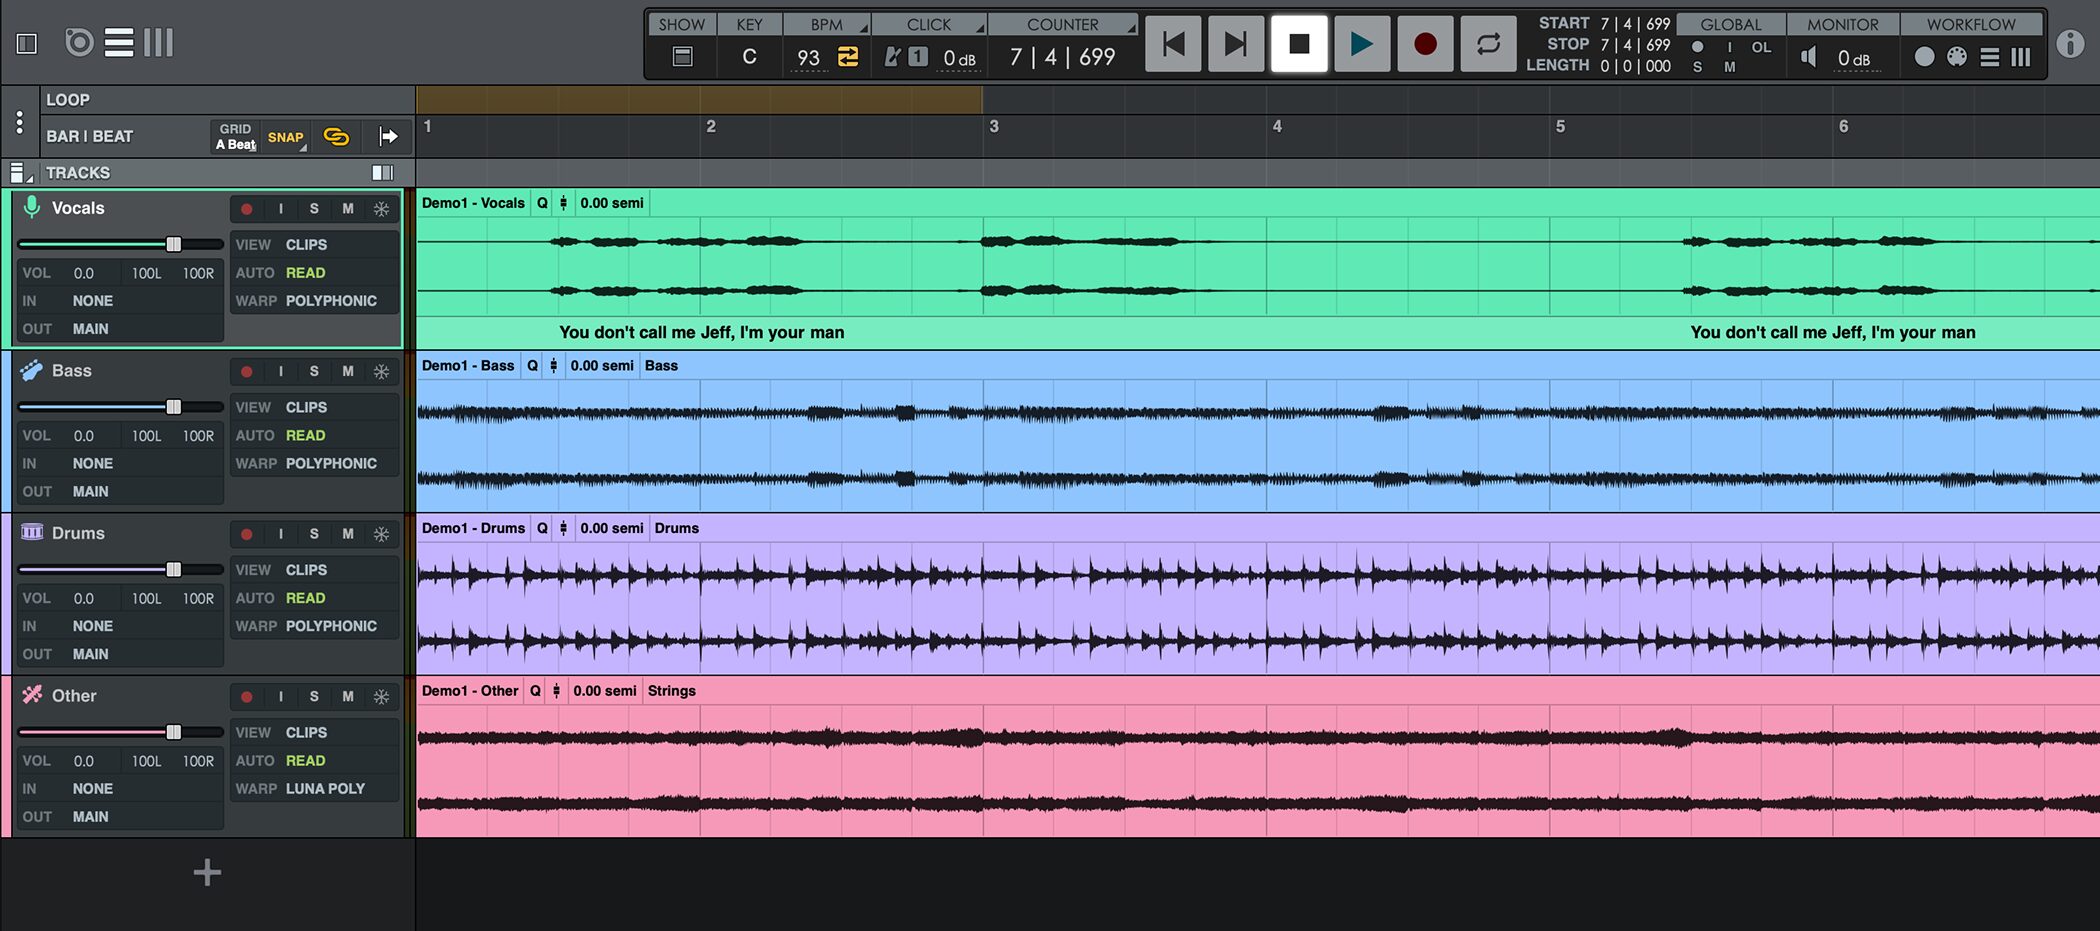
Switch to the timeline view, and the separated parts appear as individual tracks.
Track colors and instrument names are assigned automatically.
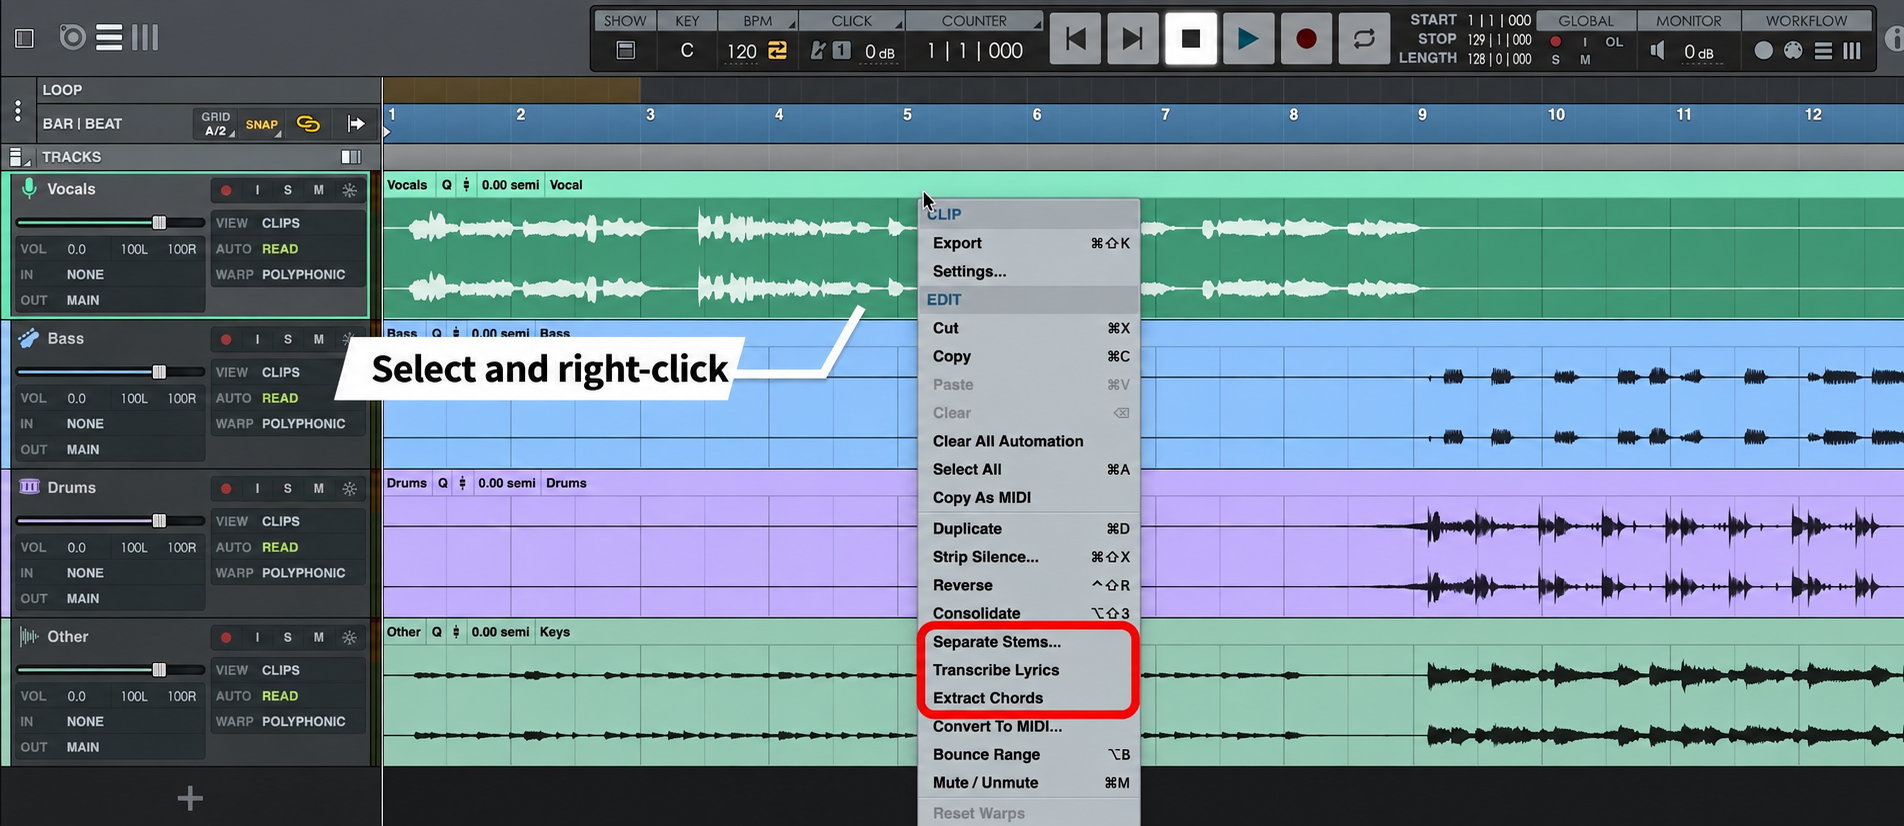
You can run the same analysis from the timeline view.
Select a clip and right-click it. The menu includes “Separate Stems…”, “Transcribe Lyrics”, and “Extract Chords”.
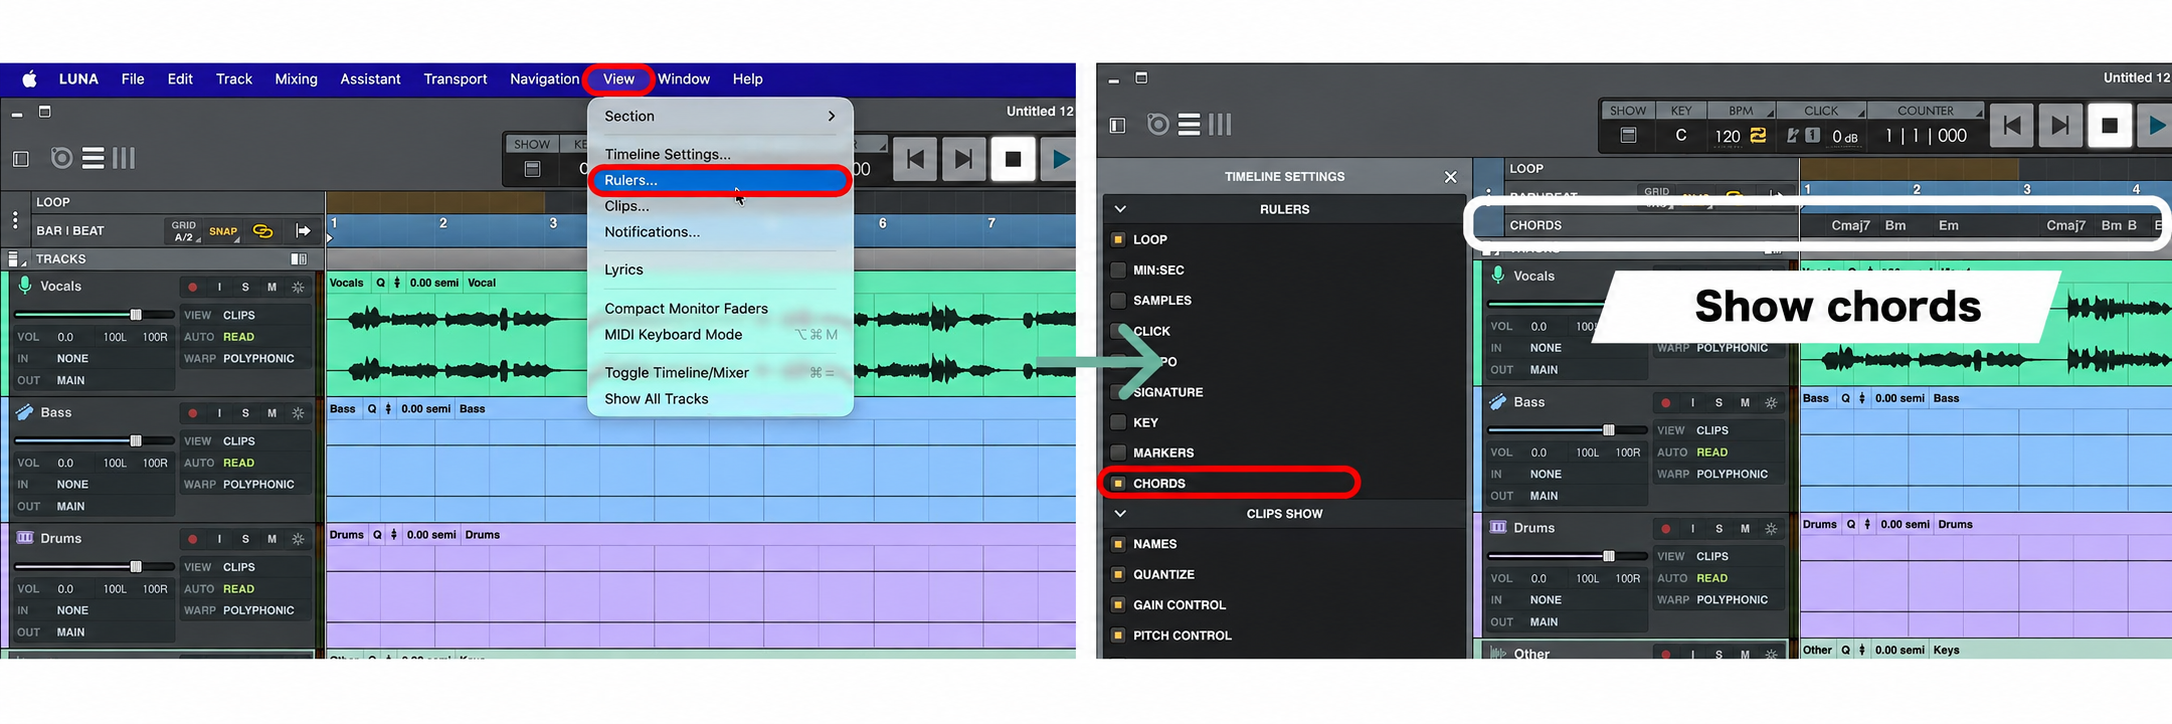
If chords are not visible, open “Rulers…” from the “View” menu and check “CHORDS” in the list.
A new way to start recording
The free LUNA Play also adds a feature that prepares you to record simply by playing a sound.
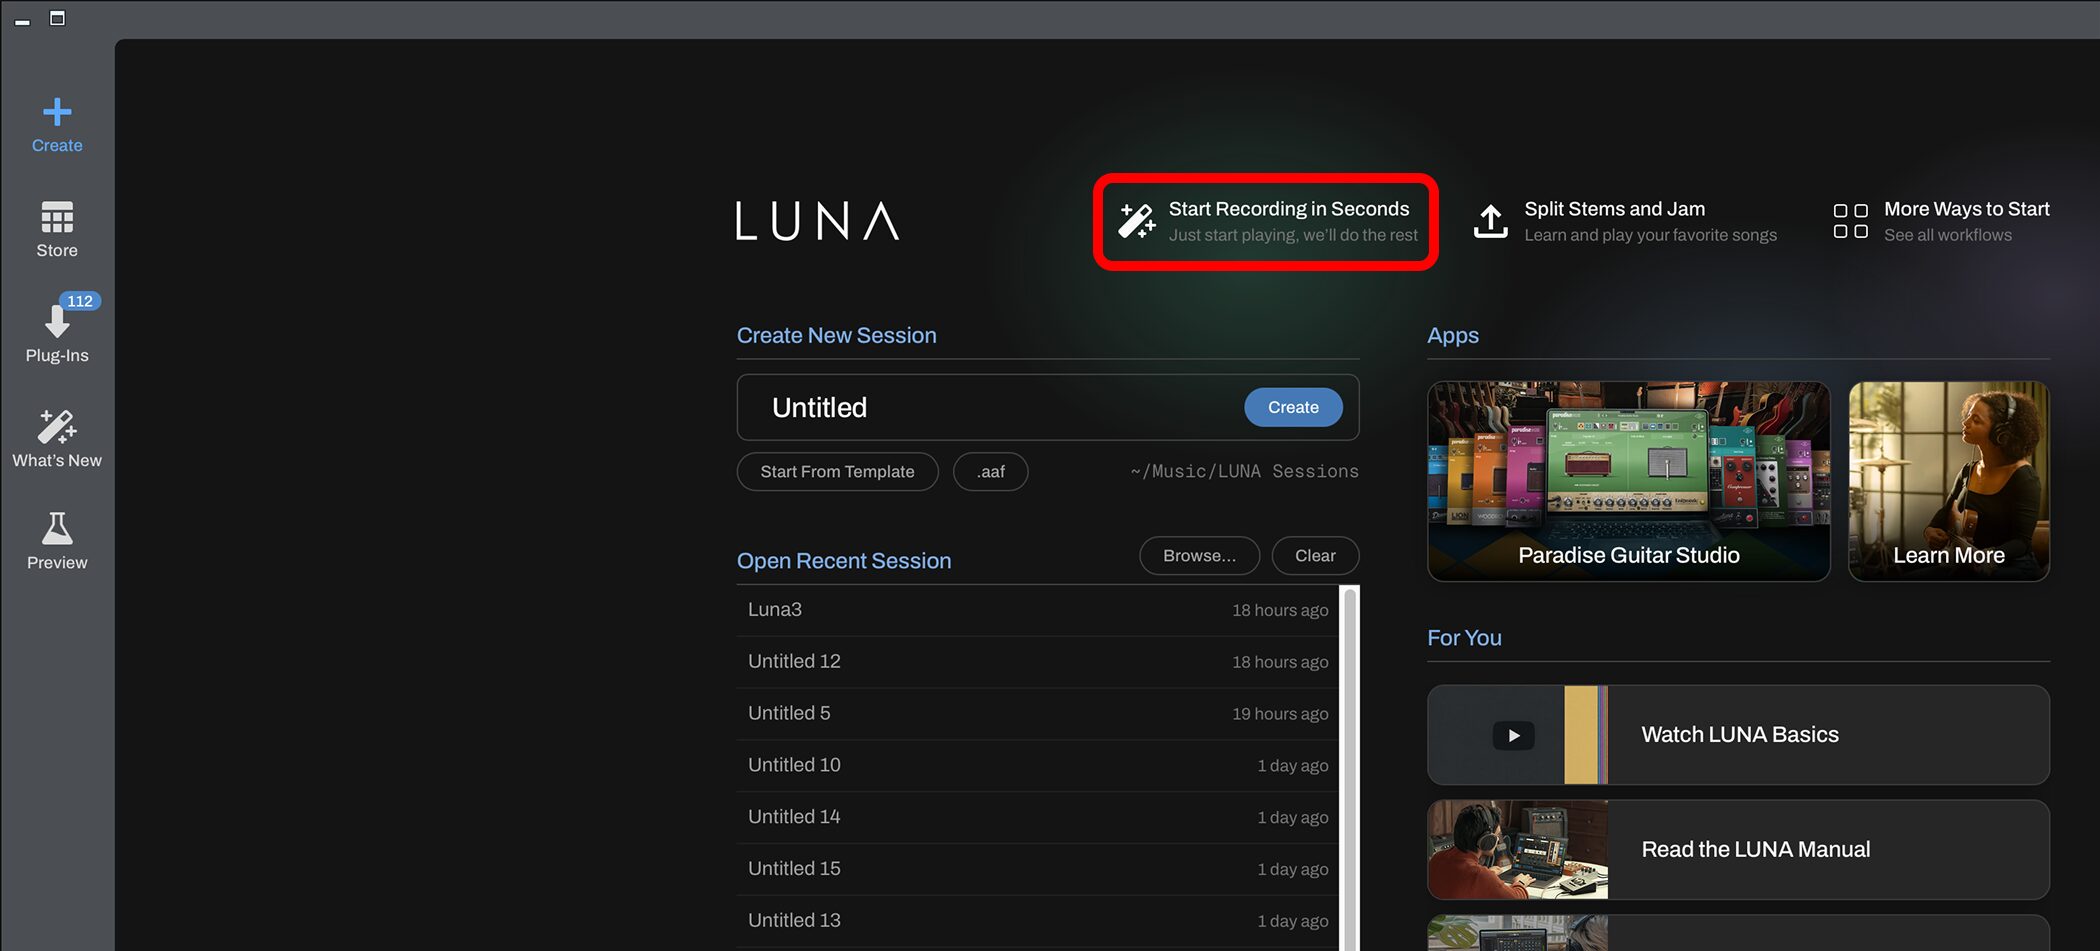
To start with recording, click “Start Recording in Seconds” on the startup screen.
Soundcheck: getting ready to record
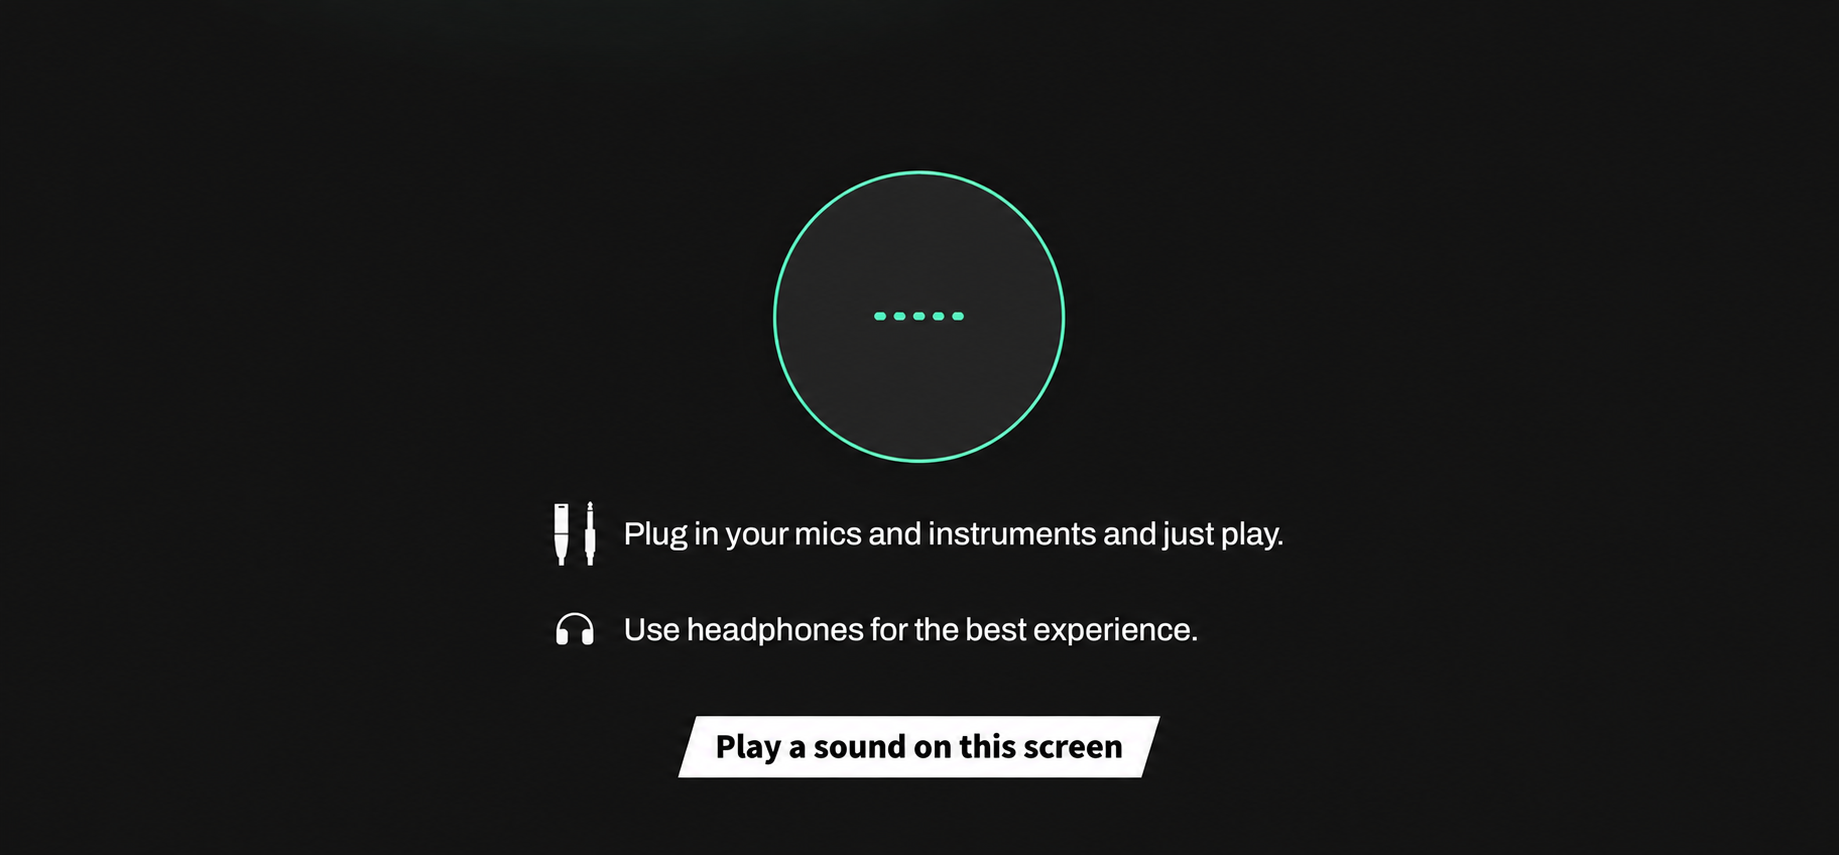
Soundcheck starts and displays a single circle.
Follow the prompts to connect your microphone or instrument, then speak, sing, or play.
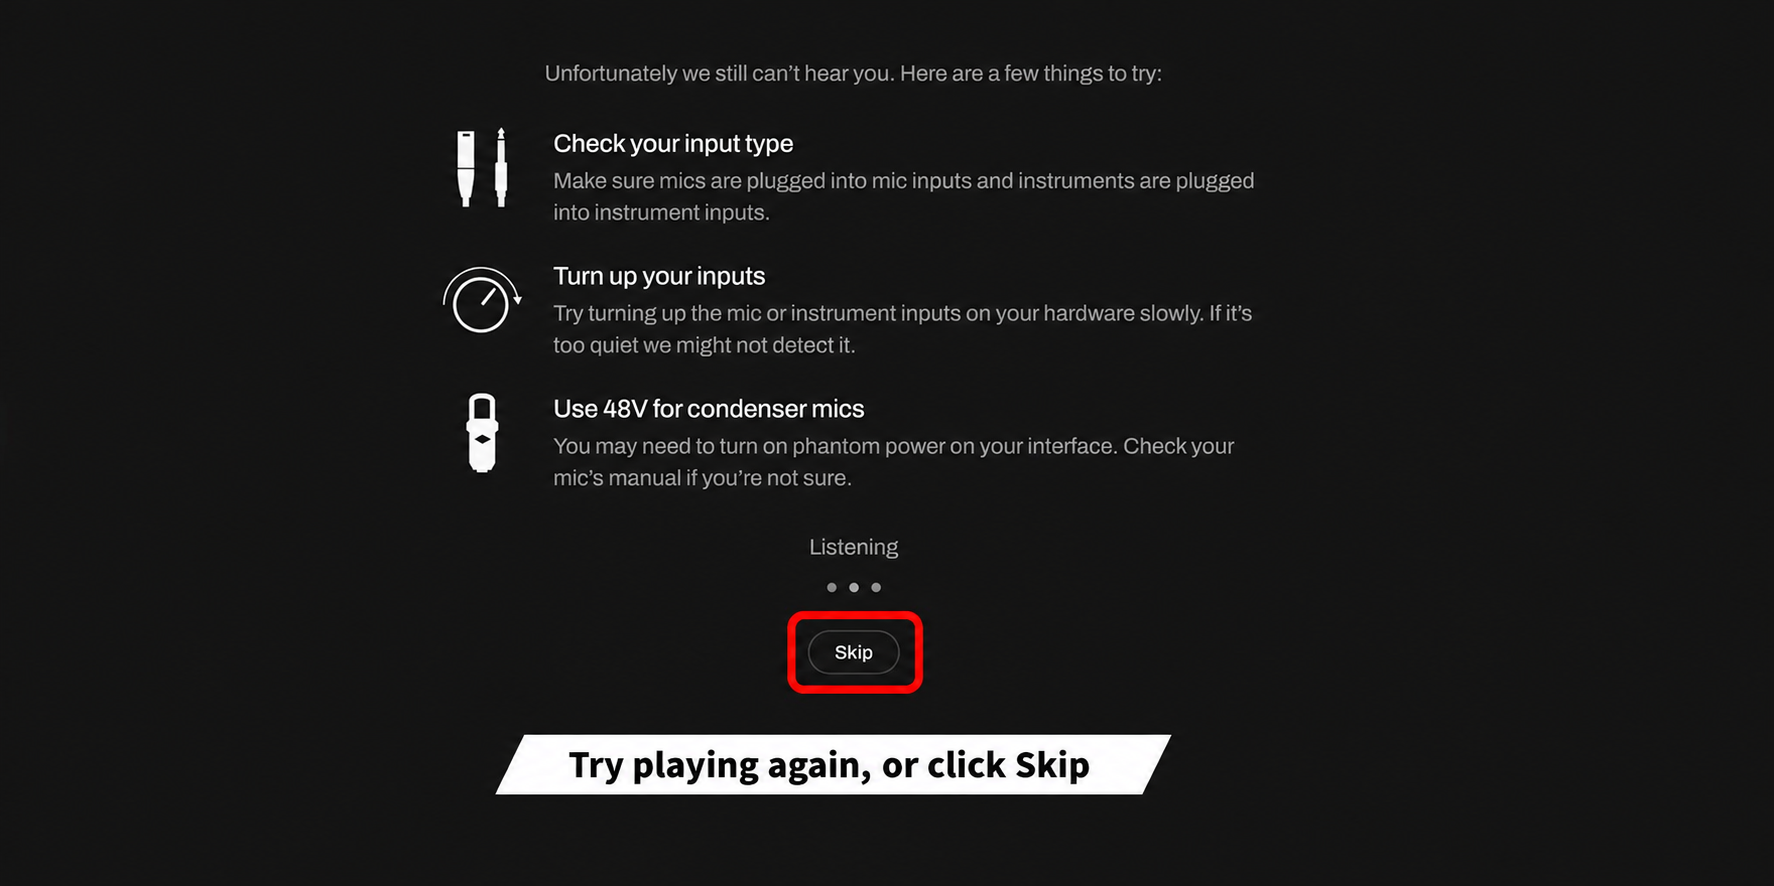
If no sound is detected, a checklist appears.
Check the input jack used for the microphone or instrument, your audio interface's gain, and phantom power (48V) if you are using a condenser microphone. Then try making a sound again.
To continue without making a sound, click “Skip.” On the next screen, you can choose the input and instrument to create a track.
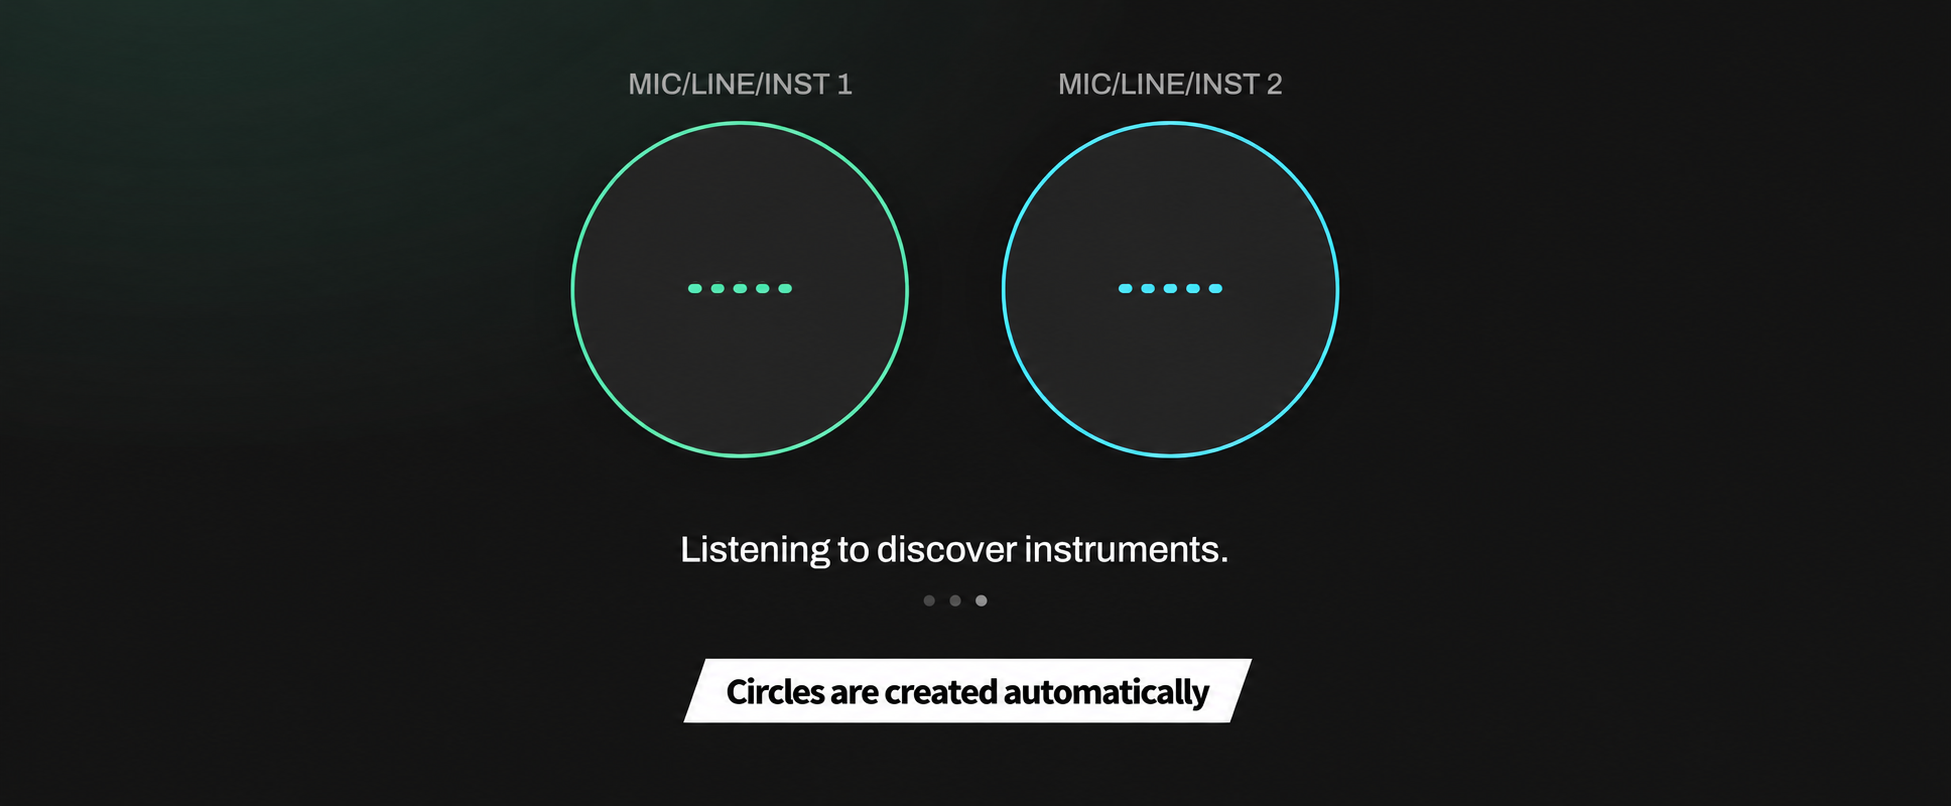
Once a signal arrives, LUNA automatically finds the inputs receiving audio and creates a circle for each one.
The number of circles depends on the audio interface you are using.
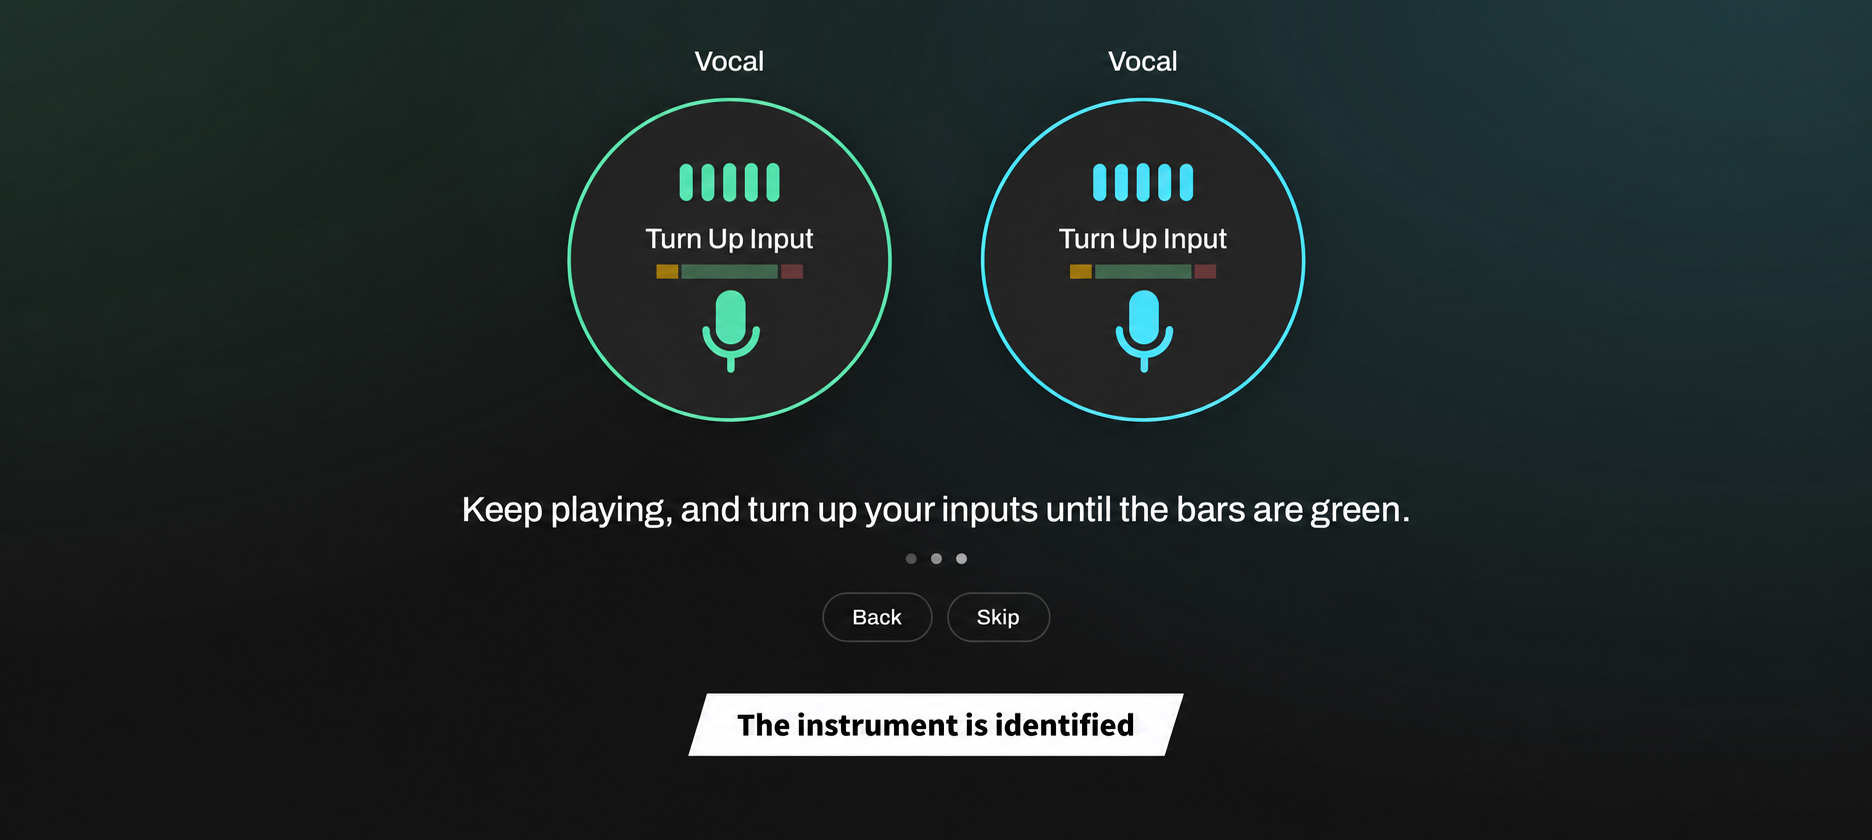
Keep making a sound, and LUNA identifies the instrument and changes the circle's name.
Next, it moves on to setting the recording level.
With Gen 2 Volt or Apollo hardware, Auto-Gain automatically adjusts the level to a suitable setting while you play for about five seconds.
With hardware that does not support Auto-Gain, “Turn Up Input” appears. Keep playing and raise the gain on your audio interface.
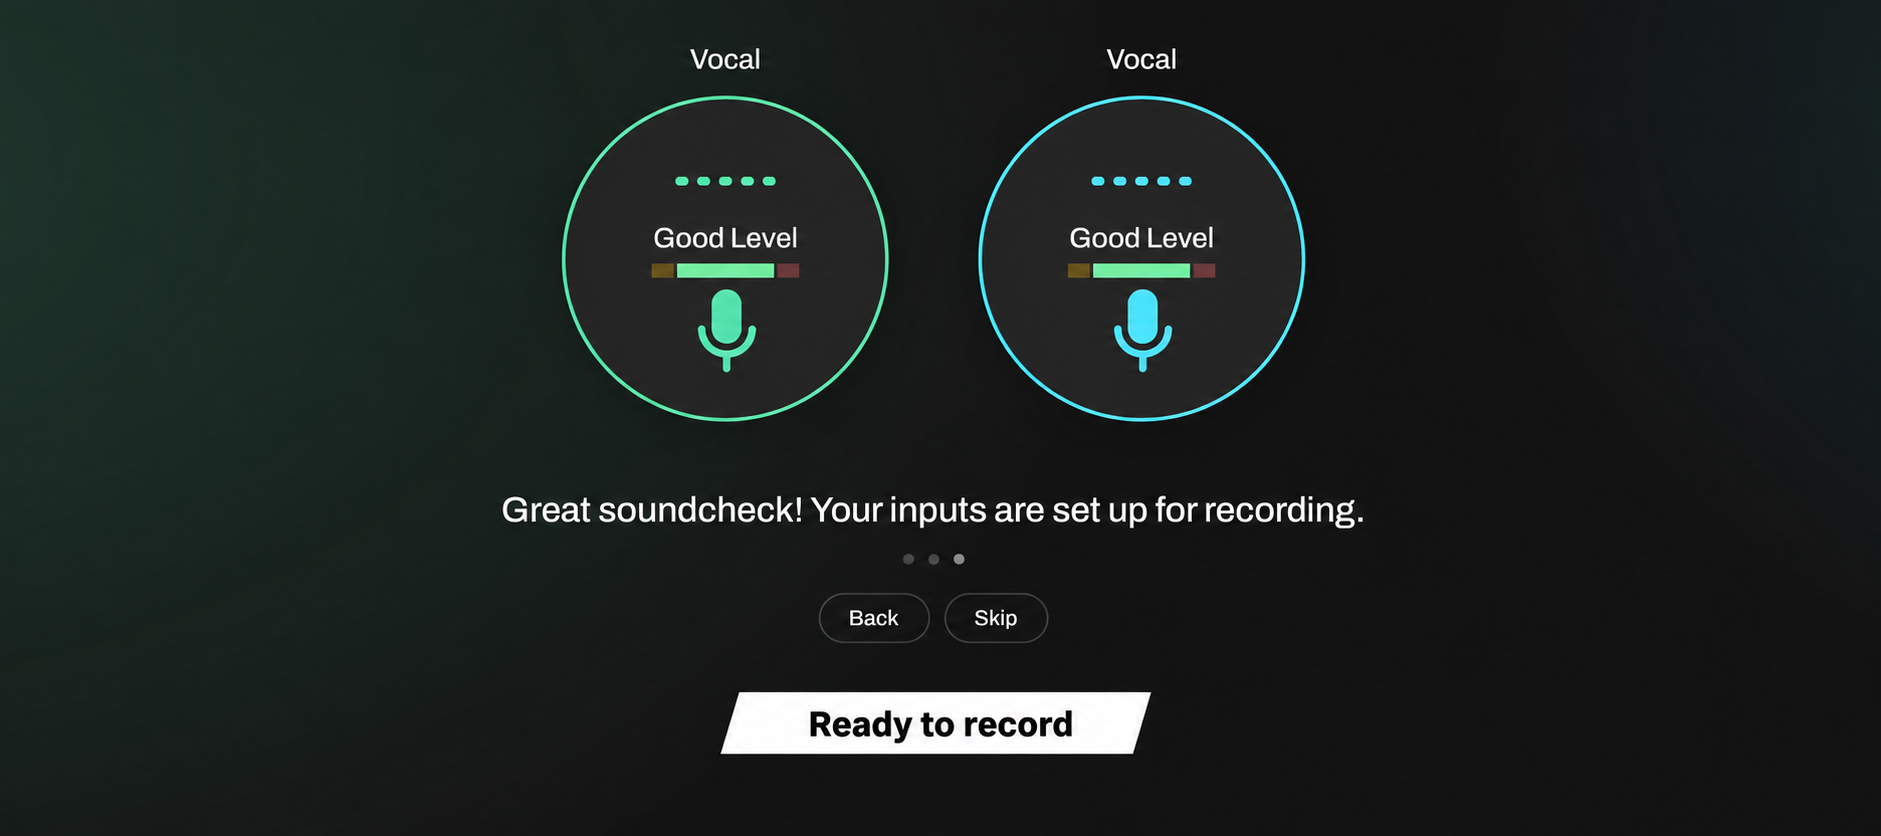
Once the level is suitable, the label changes to “Good Level.” When “Great soundcheck!” appears, you are ready to record.
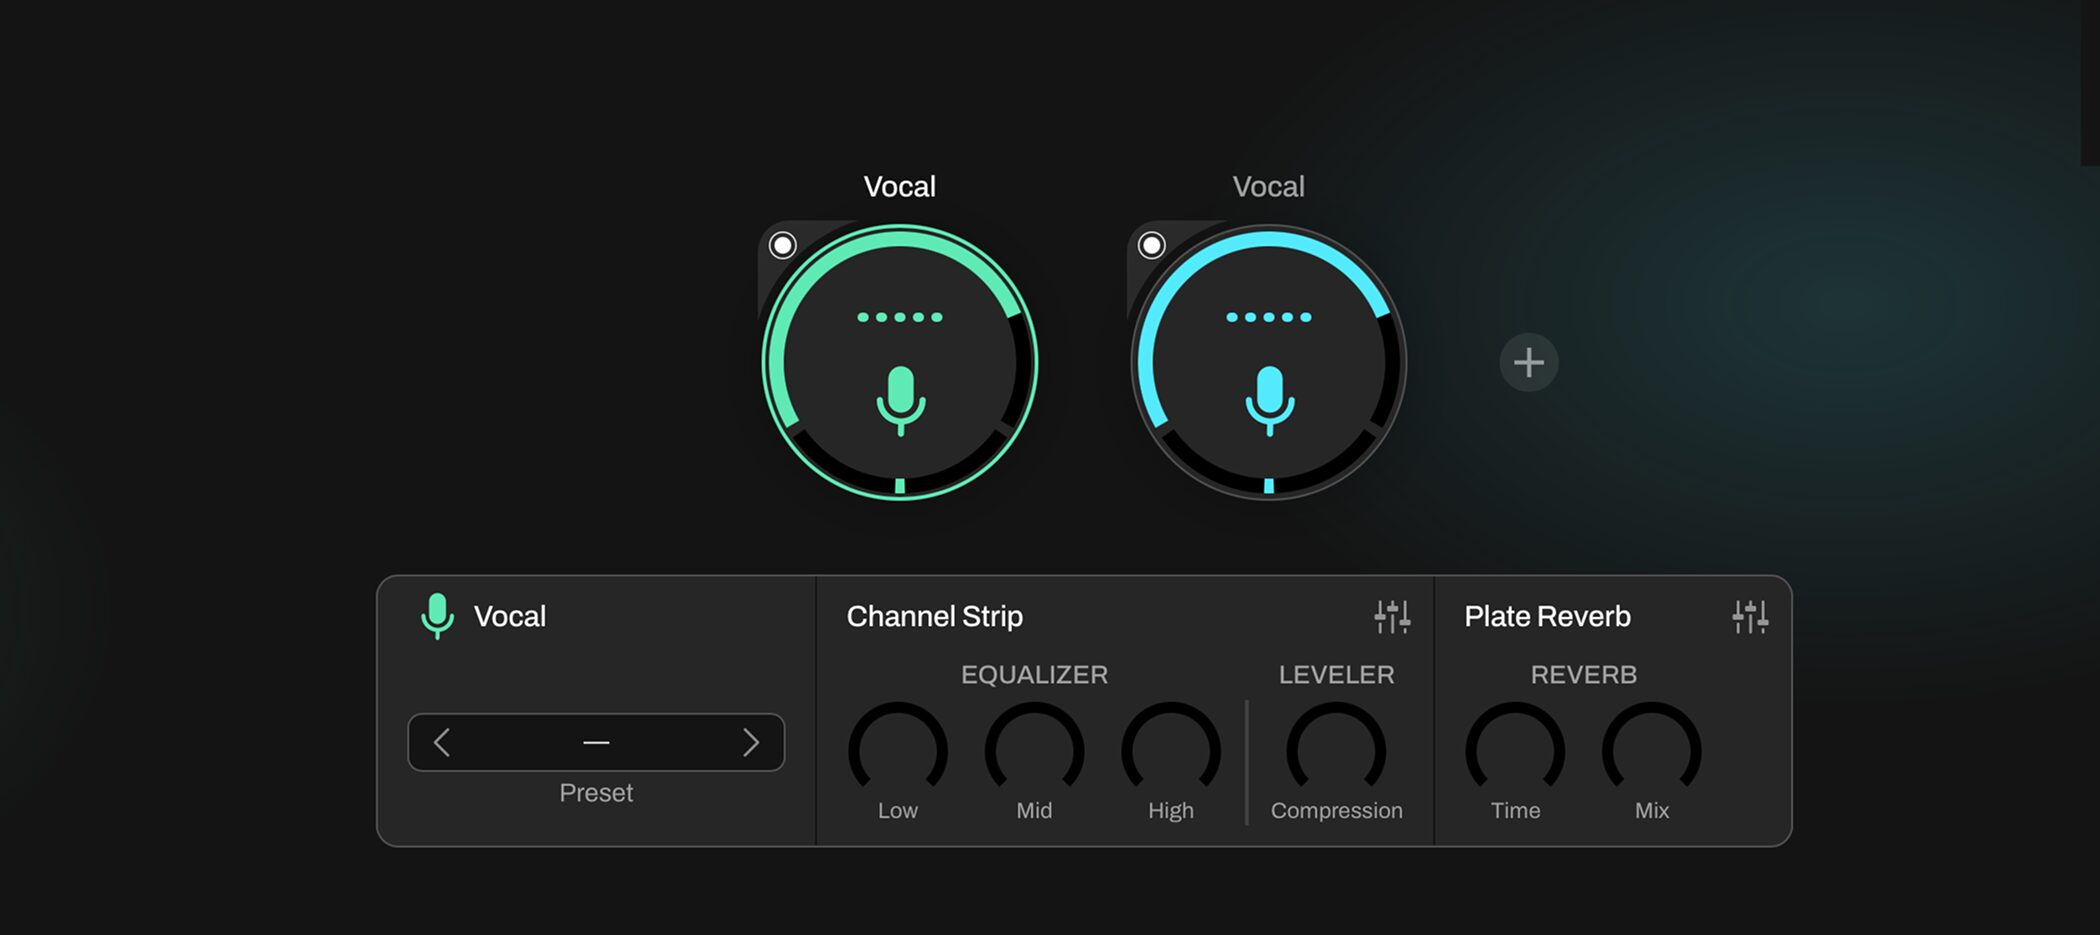
The LUNA Play view provides a channel strip and effects matched to the identified instrument, leaving you ready to record immediately.
Other features
All the following features except Convert To MIDI are available in the free LUNA Free edition.
Convert To MIDI: converting audio to MIDI (Studio edition only)
Audio of a melody you sing or a phrase you play on guitar can be converted to MIDI and played by a different instrument.
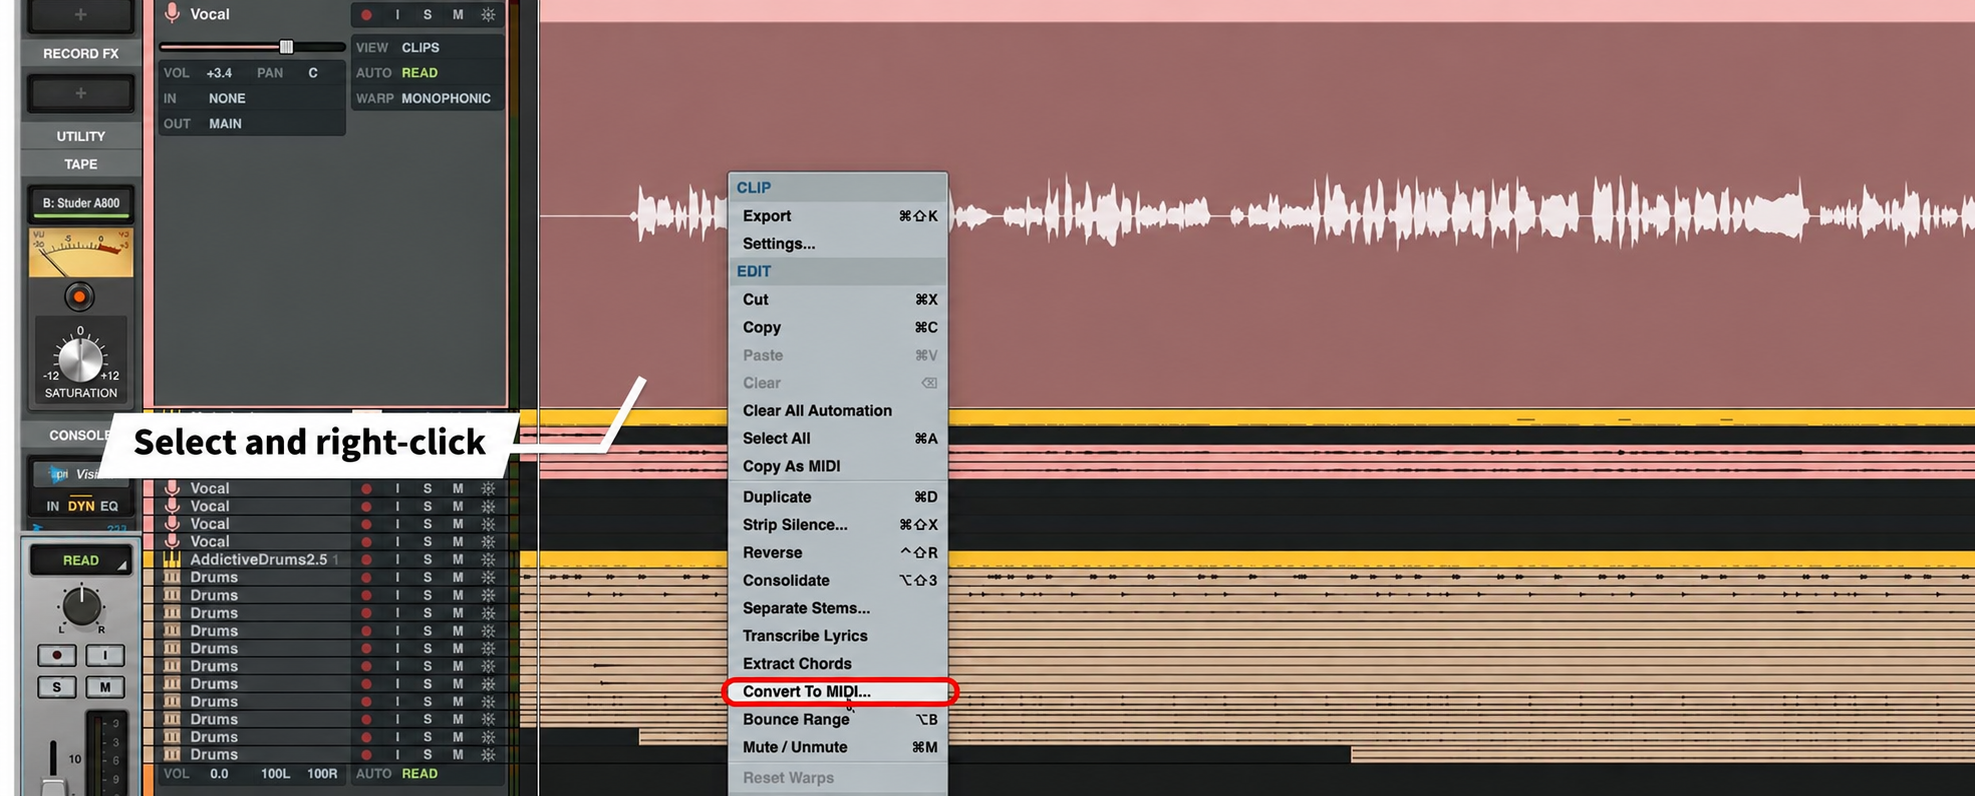
Select a clip, right-click it, and choose “Convert To MIDI…”.
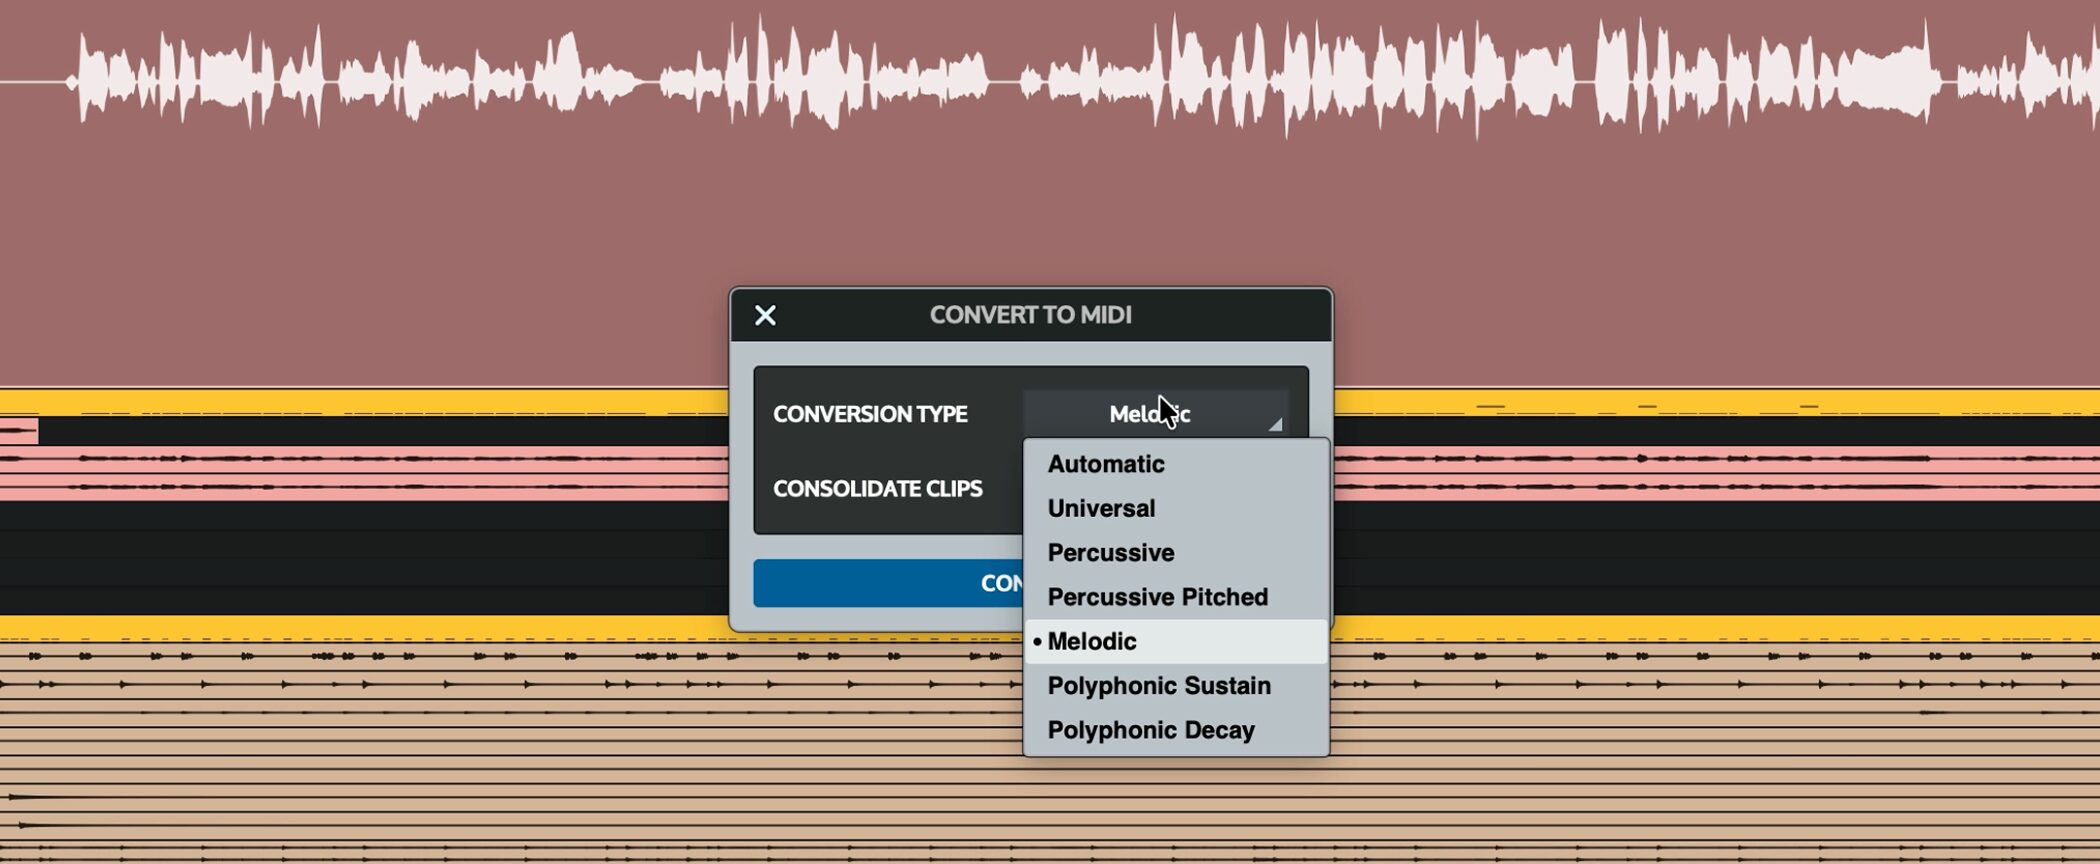
The conversion window opens.
Under “CONVERSION TYPE”, choose the method that suits your material.
There are seven options. The following three are commonly used for vocals and instruments that play chords.
- Melodic: material with only one note sounding at a time, such as vocals or bass
- Polyphonic Sustain: chords with less pronounced attacks, such as organ or legato strings
- Polyphonic Decay: chords with clear attacks, such as guitar or piano
For phrases containing chords, such as piano or guitar parts, choose one of the latter two options to retain the chords when converting to MIDI.
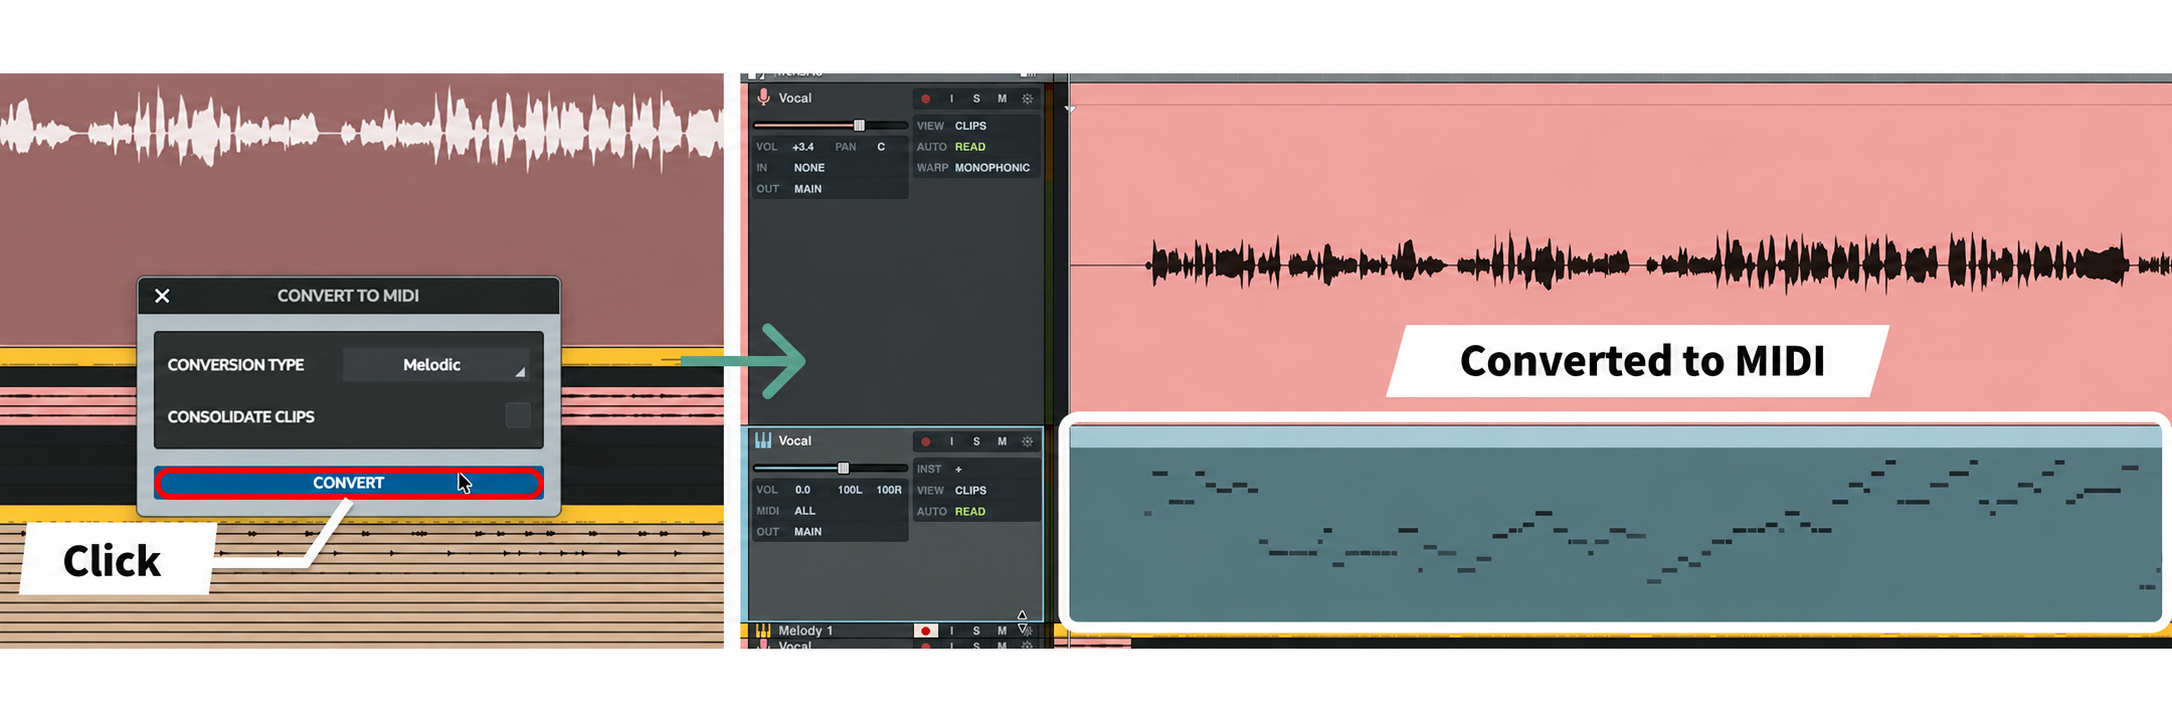
Click “CONVERT” to create a MIDI track directly below the original track.
You can adjust the converted pitches and timing in the MIDI Clip Editor described next.
MIDI Clip Editor: editing MIDI
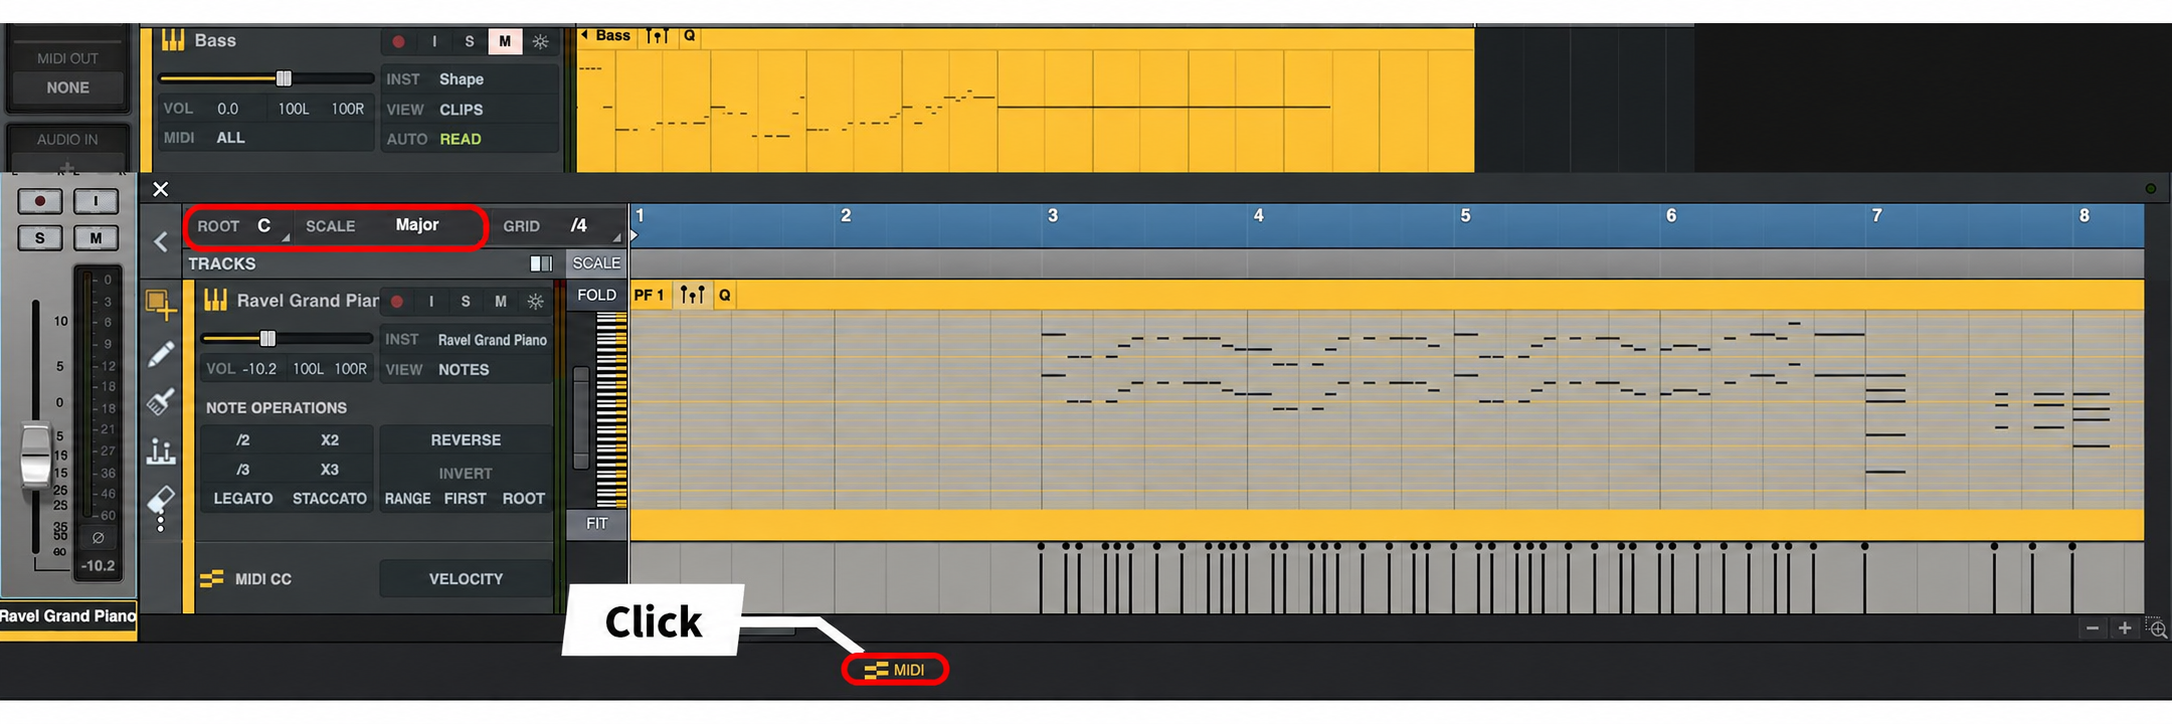
Double-click a MIDI clip, or click the “MIDI” button at the bottom center of the screen, to open the dedicated MIDI editor.
Set the key and scale using “ROOT” and “SCALE”, and notes belonging to the scale are highlighted on the keyboard and background.
The highlighting follows the track's color.
Strip Silence: splitting out silent sections
This feature extracts only the sounding portions of an audio clip.
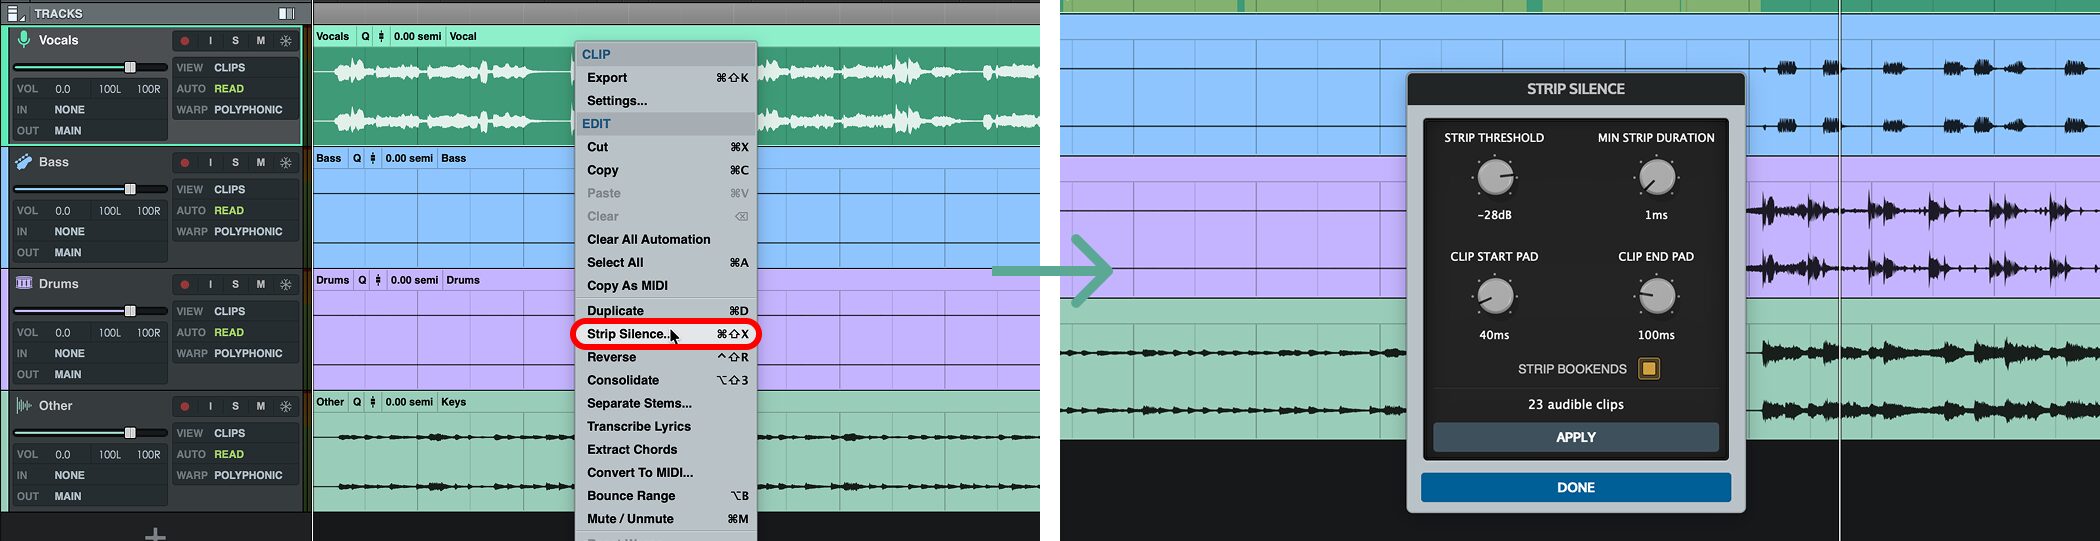
Select a clip, right-click it, and choose “Strip Silence…” to open the settings window.
There are four settings to adjust.
- STRIP THRESHOLD: treats audio below this level as silence
- MIN STRIP DURATION: leaves silent sections shorter than this duration in place
- CLIP START PAD / CLIP END PAD: padding to retain before and after the sounding portion (up to 500ms)
- STRIP BOOKENDS: determines whether to remove silence at the beginning and end
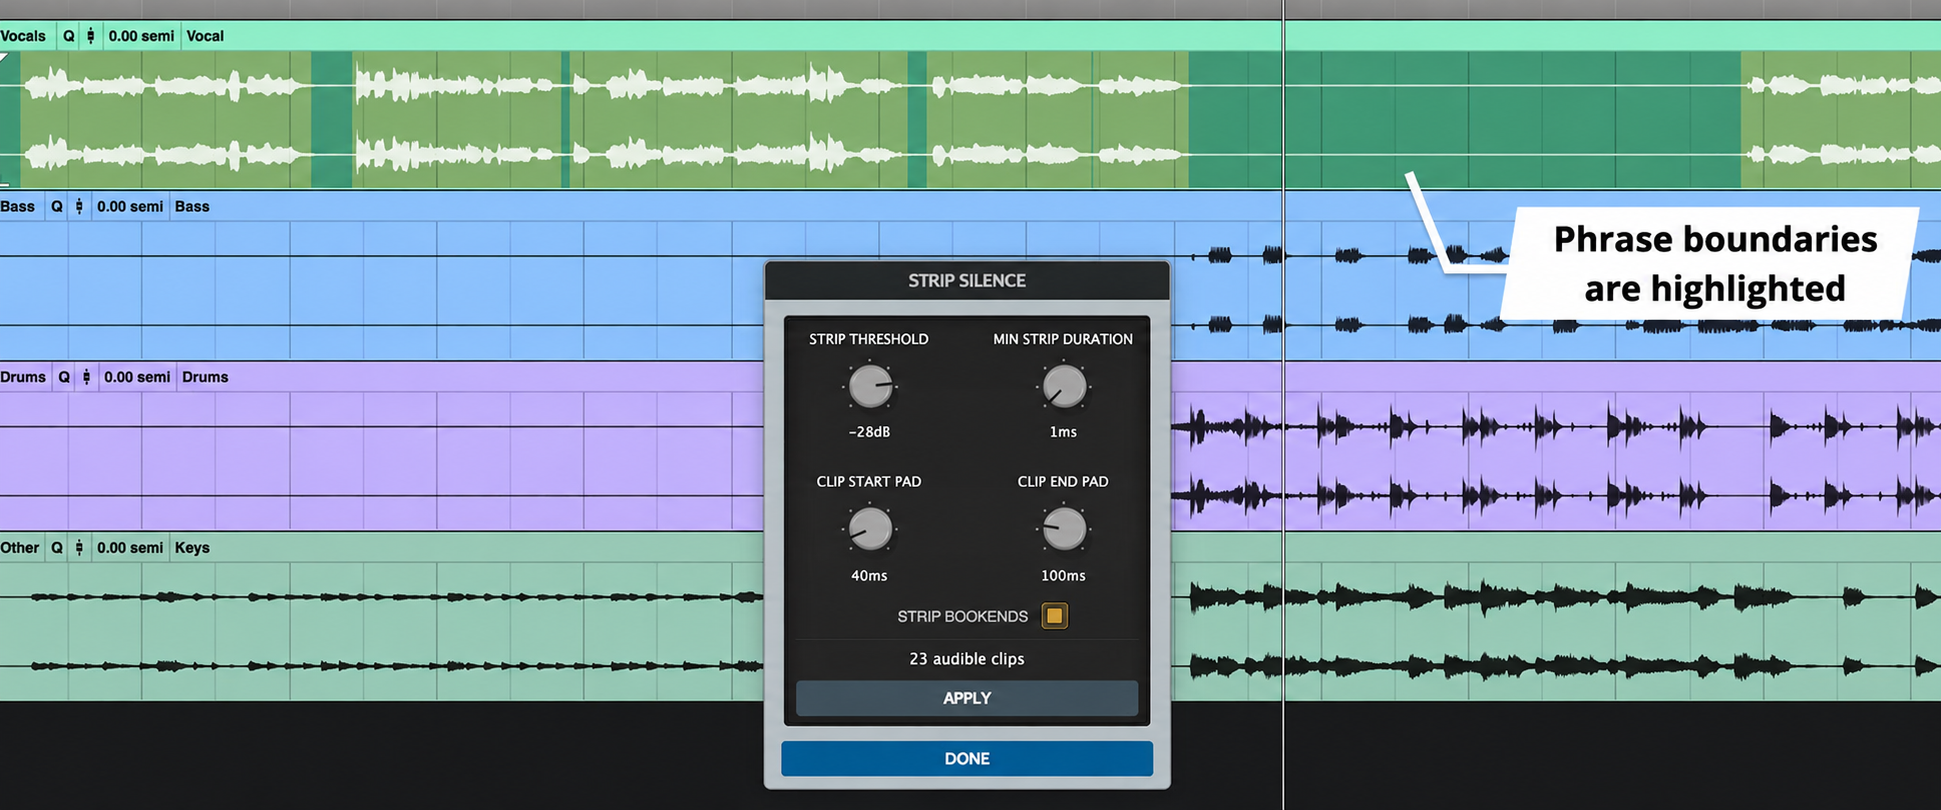
As you raise STRIP THRESHOLD, the boundaries between phrases are highlighted.
If the clip splits into too many small pieces, increase MIN STRIP DURATION. If the start or end of a sound gets cut off, adjust CLIP START PAD or CLIP END PAD.
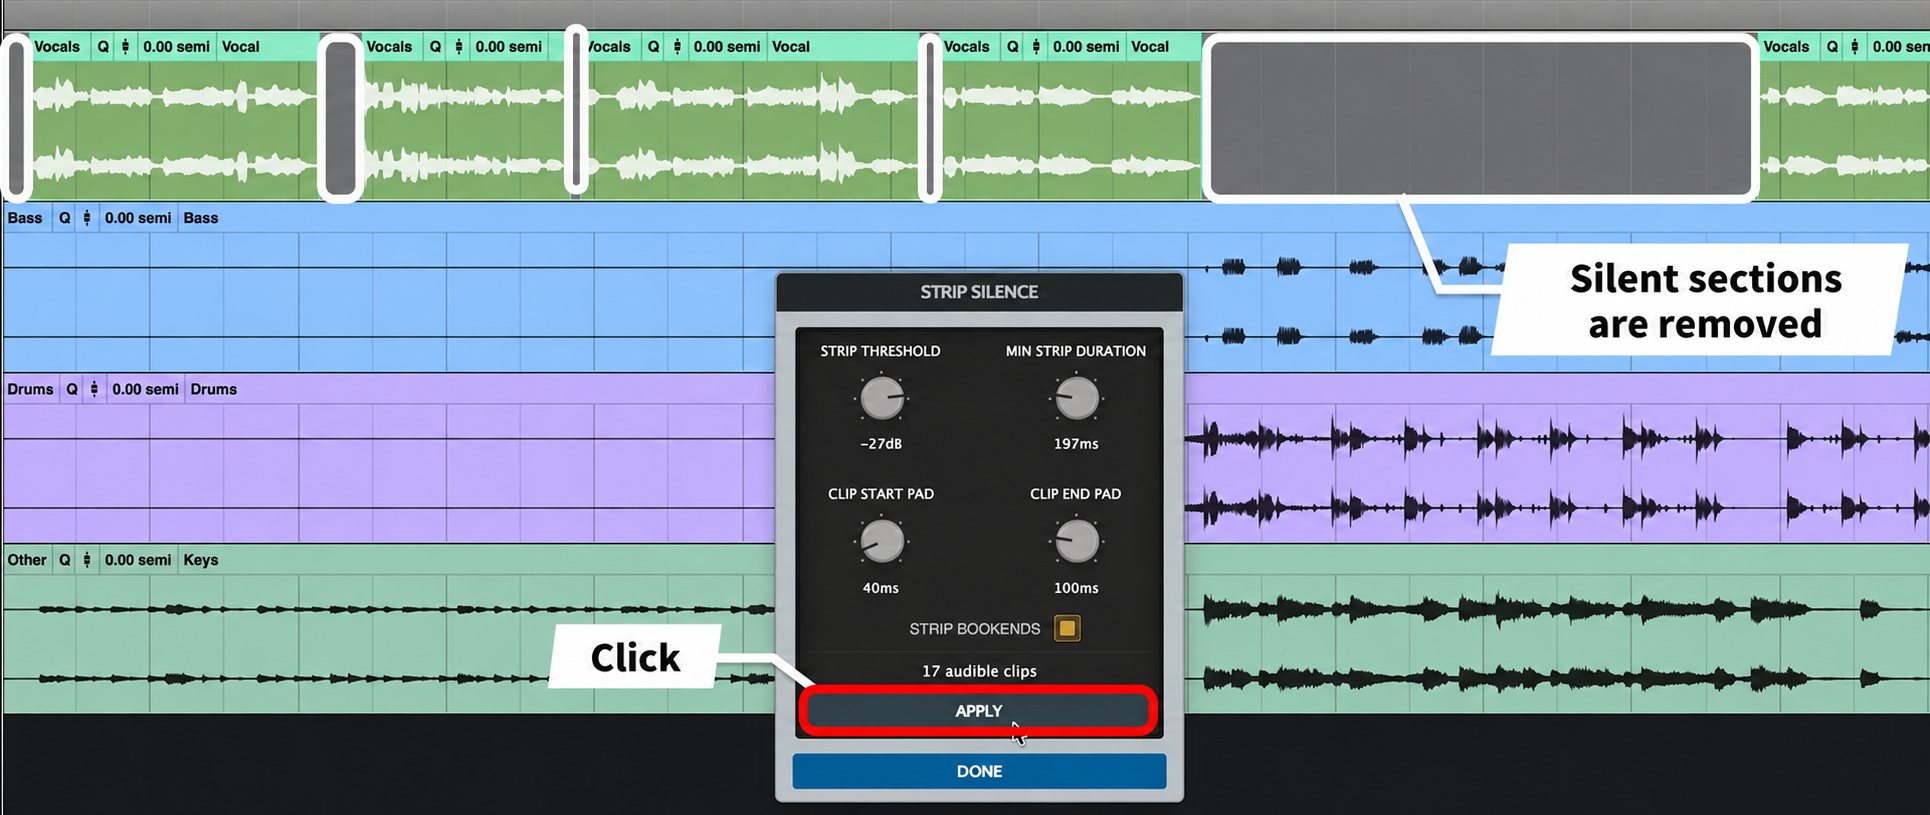
Once the preview looks right, click “APPLY” to delete the portions identified as silence.
Click “DONE” to close the settings window.
Folder Tracks: organizing tracks
Group multiple tracks into a folder.
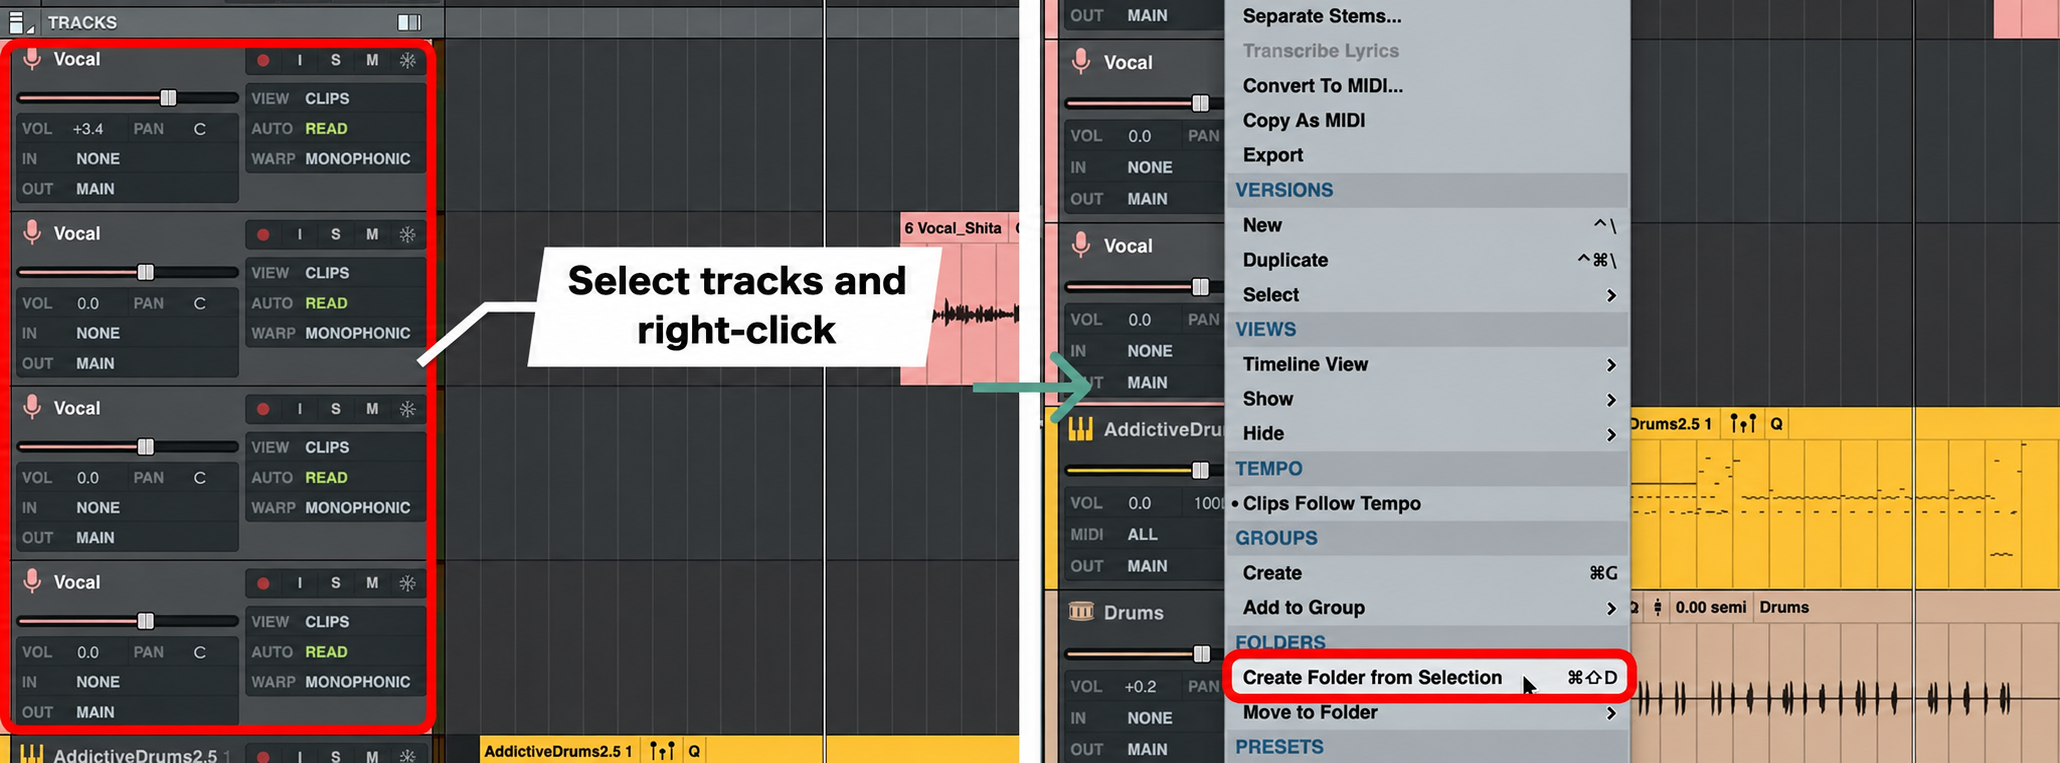
Select the tracks, right-click them, and choose “Create Folder from Selection” under “FOLDERS”.
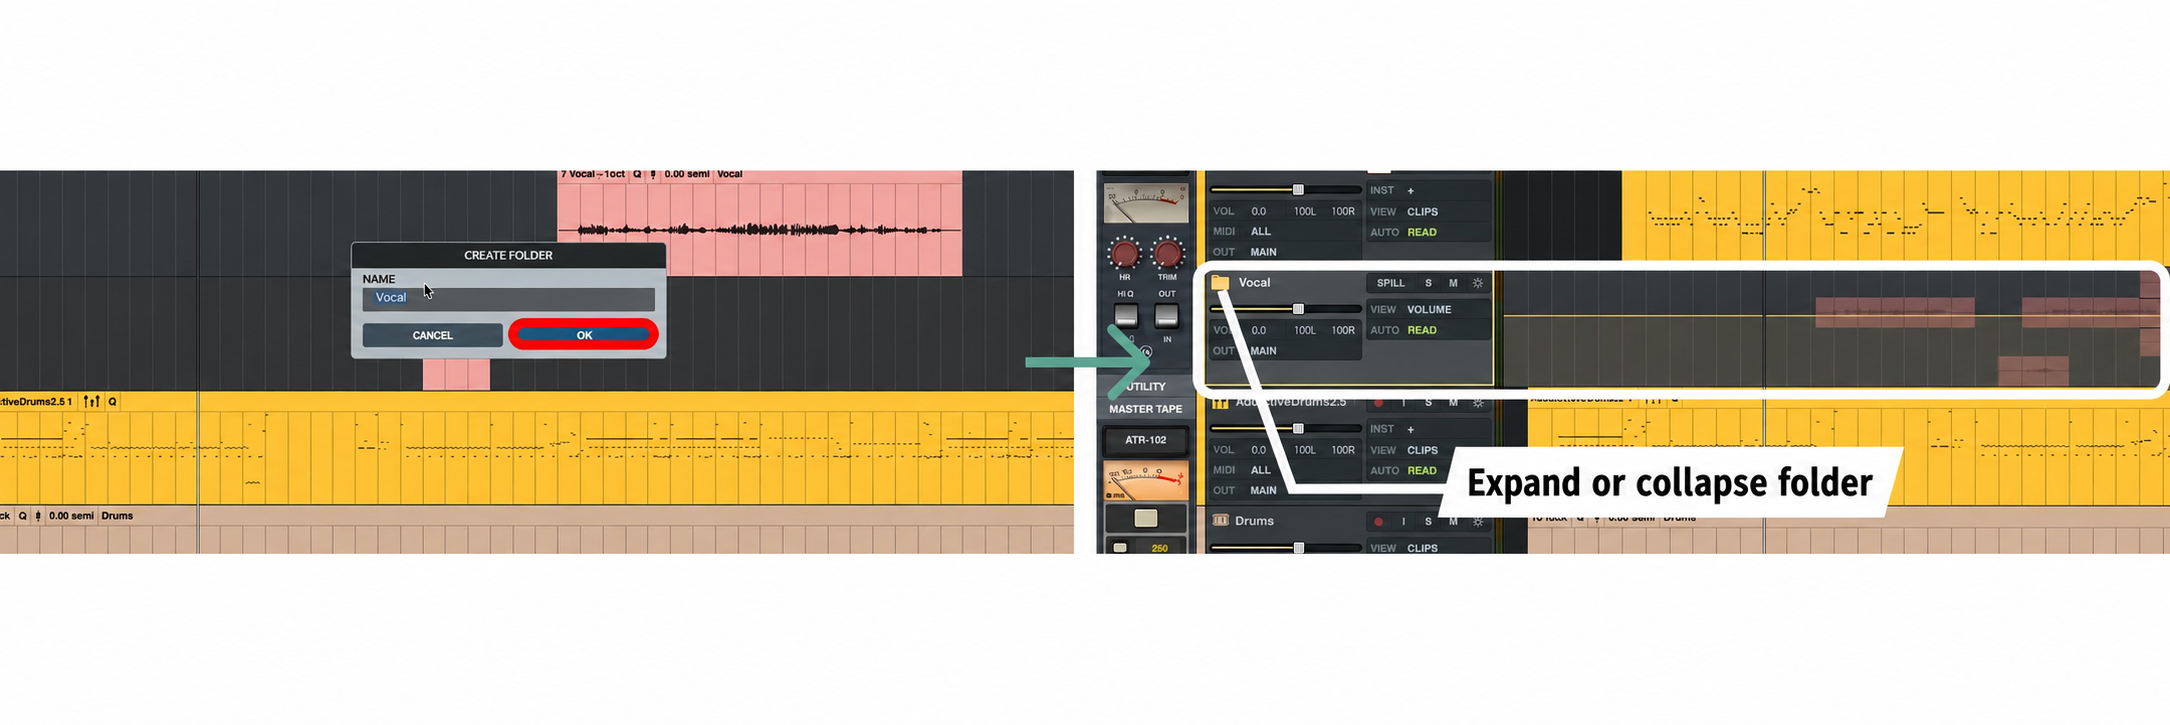
Enter a folder name and click “OK” to create a folder containing the selected tracks.
Even when the folder is collapsed, the folder track displays the waveforms of its contents together, so you can still locate the audio with a more compact view.
Click the folder icon to the left of the track name to expand or collapse it.
More new features
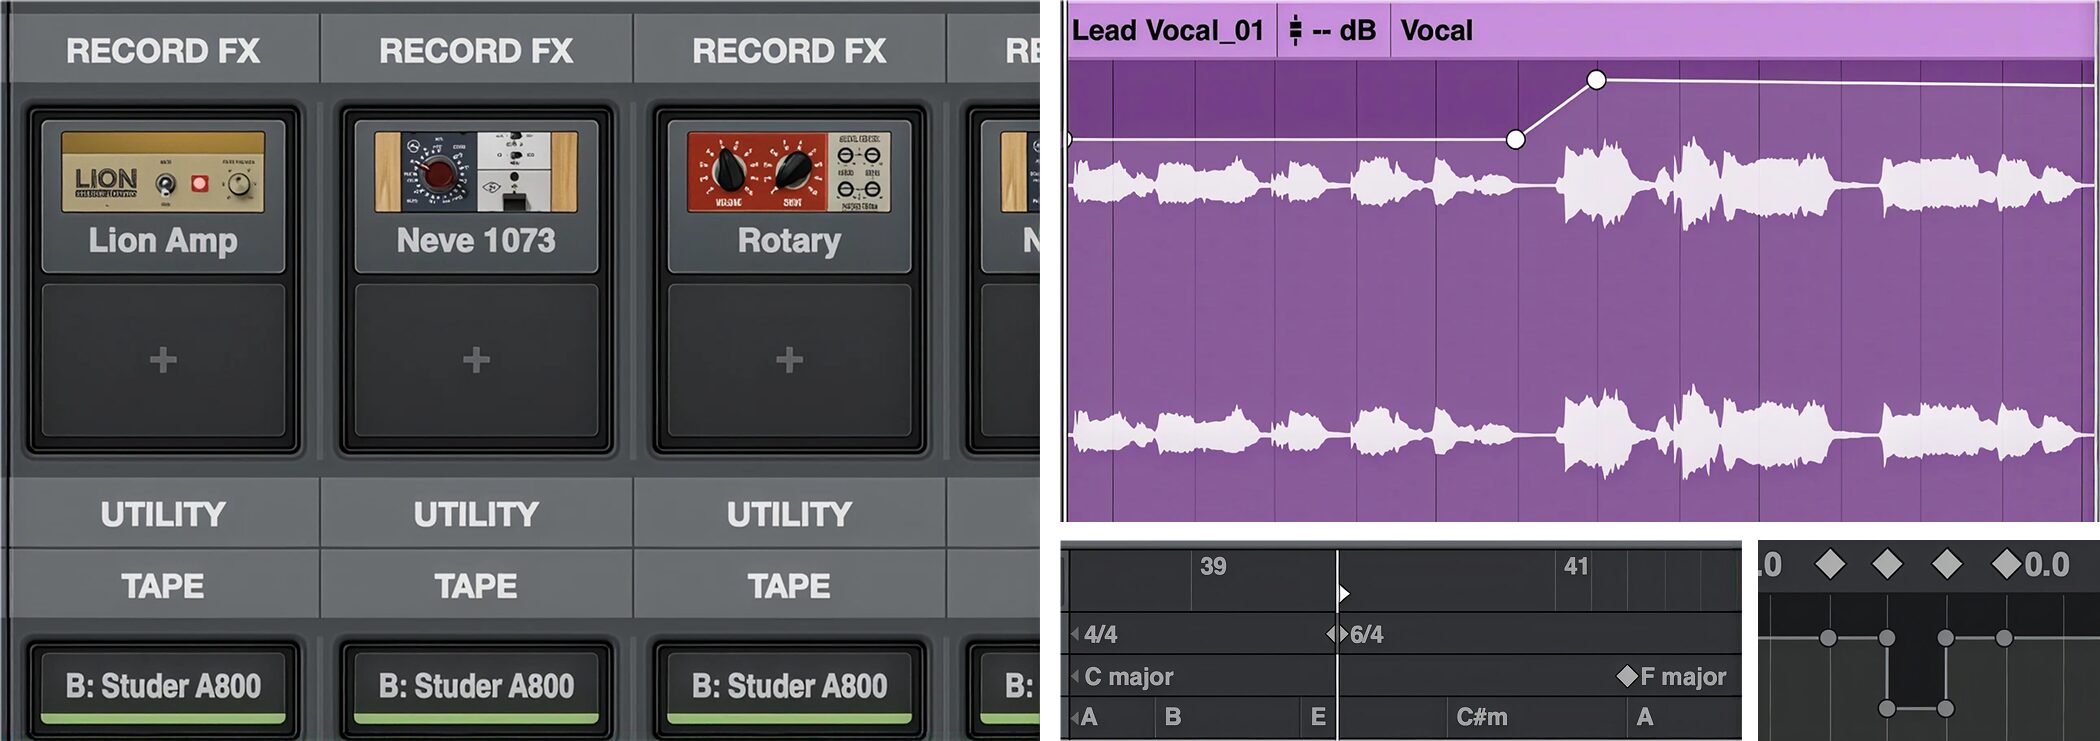
- Adaptive Grid: automatically adjusts grid resolution to the zoom level. Select “Adaptive” under “GRID” at the top of the timeline to enable it
- Clip Gain Automation: adjusts the volume within a clip before effects processing
- Record FX: records the sound through plug-ins. It is also available with hardware other than Apollo
- Click Track Automation & Export: adjusts click volume throughout the song and includes it in exports
- Mono Inputs for Stereo Tracks: records a mono source onto a stereo track without additional routing
- Key, Time Signature & Chord Rulers: shows changes in key, time signature, and chords on the timeline
Software bundled with LUNA Studio
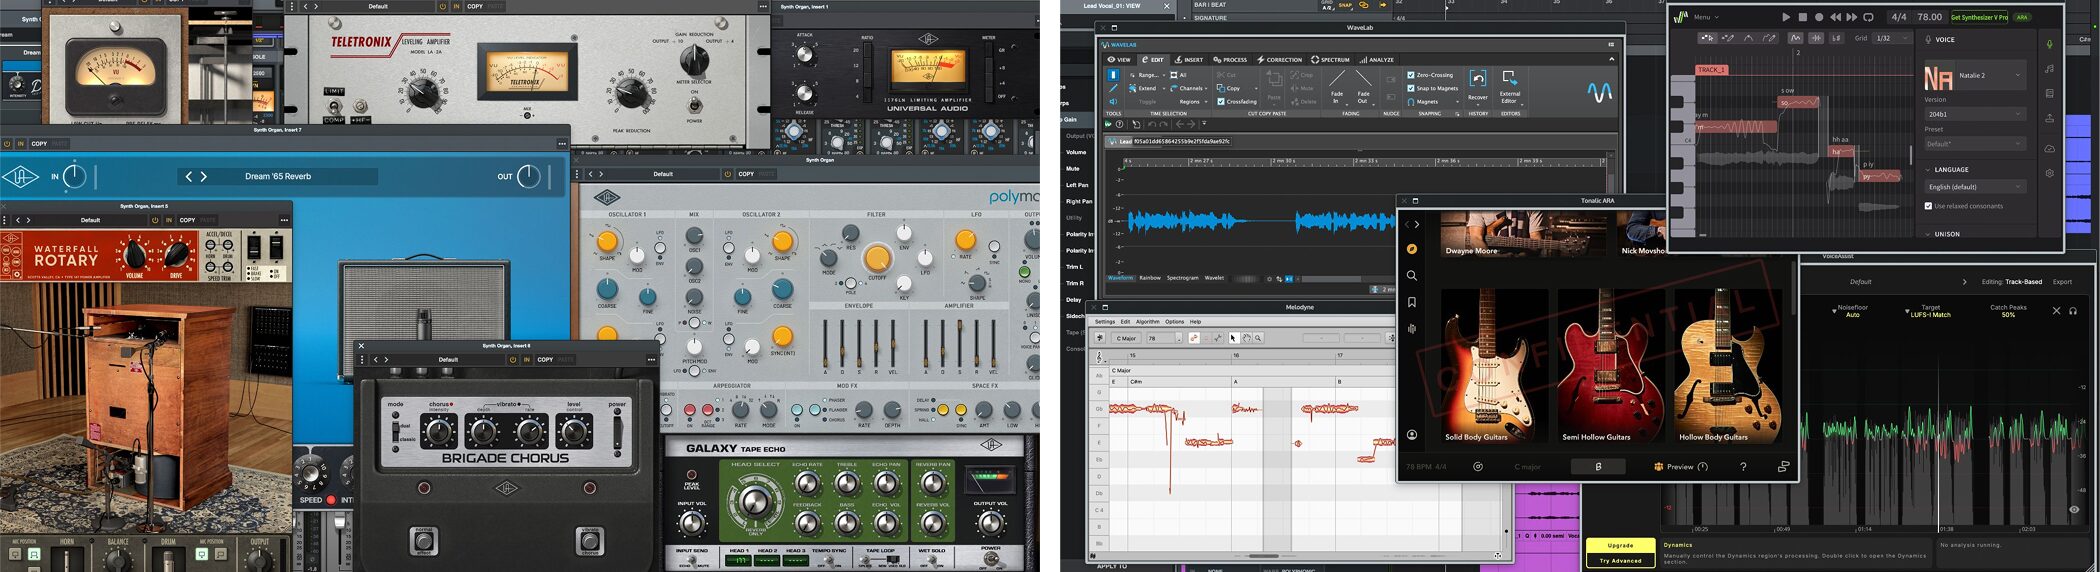
LUNA Studio includes 30 Universal Audio plug-ins and seven third-party software titles.
With preamps, compressors, EQs, tape machines, reverbs, guitar amps, and software instruments, the bundle covers the workflow from recording to mixing.
It also includes LUNA Extensions, which recreate tape machines and consoles, letting you add the character of Studer and Ampex tape machines and API consoles to your mix.
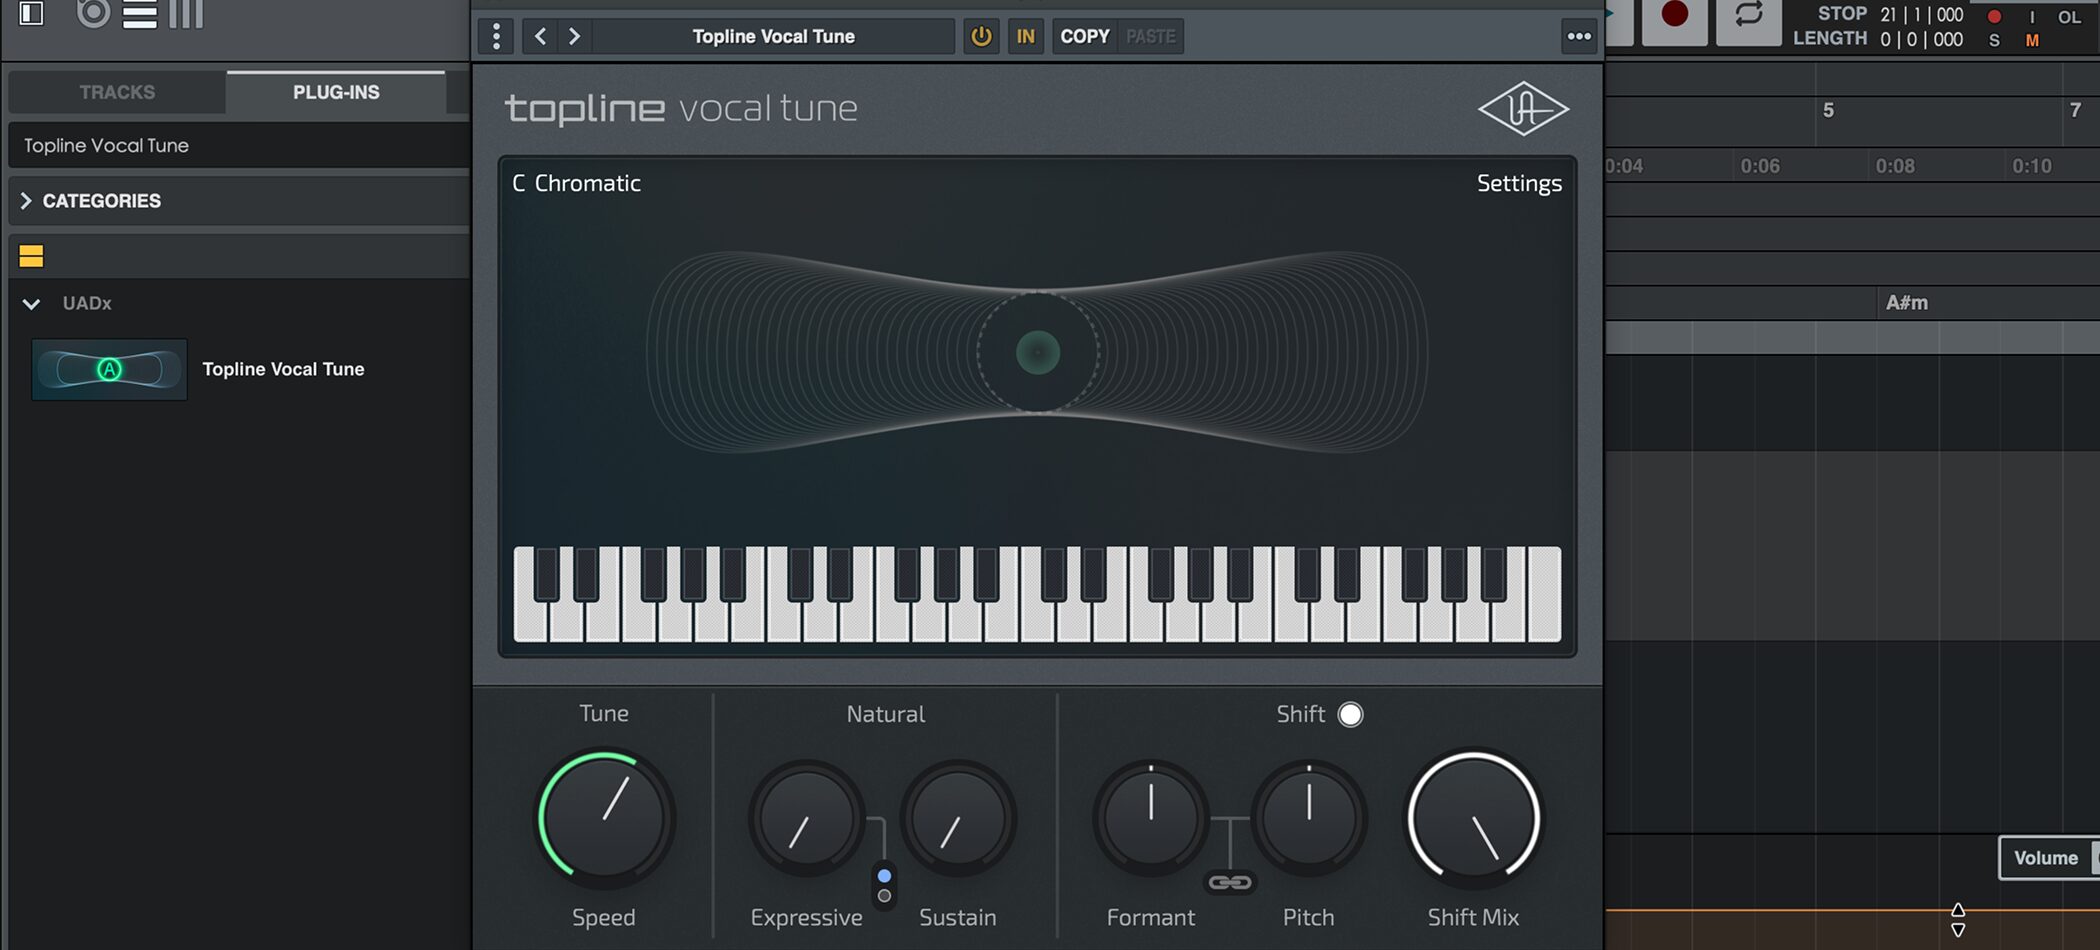
Topline Vocal Tune joins the Universal Audio plug-in lineup in this version.
It corrects the pitch of recorded vocals, letting you fix intonation without recording the performance again.
Of the seven third-party software titles, two are new additions in LUNA 3.
- Dreamtonics Synthesizer V Studio 2 Core (new)
- Celemony Tonalic Essential (new)
- Celemony Melodyne 5 Essential
- ChordAXE Lite
- NoiseWorks VoiceAssist-Basic
- Steinberg SpectraLayers Go
- Steinberg WaveLab Go
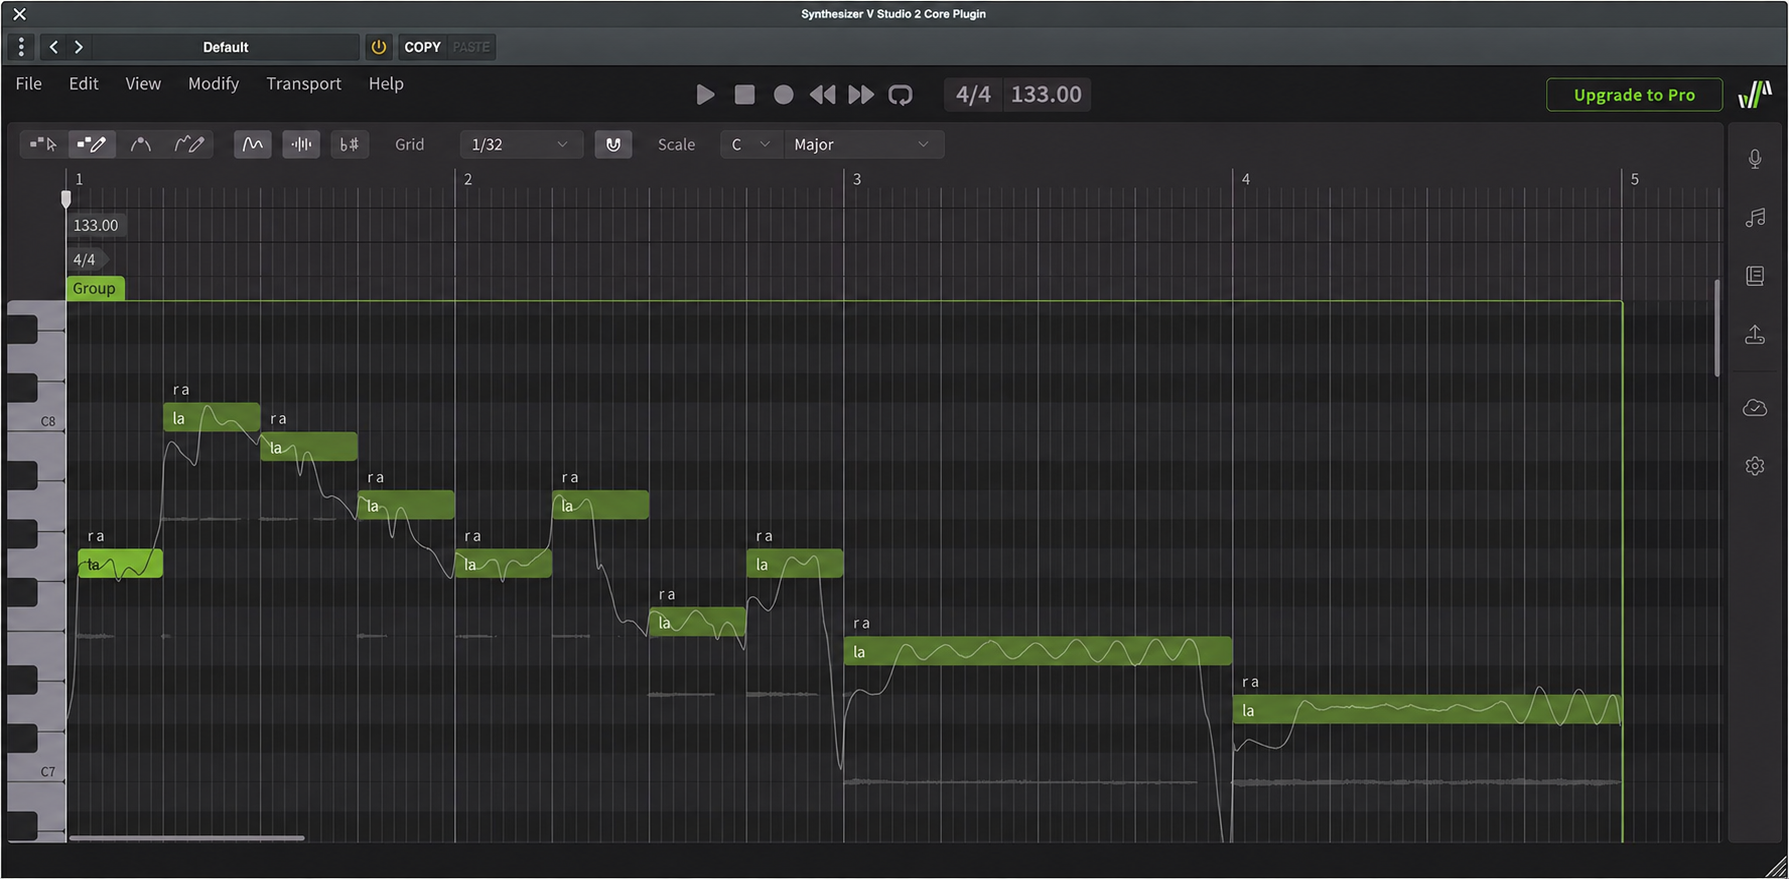
The newly added Synthesizer V Studio 2 Core is a streamlined version of the vocal synthesis software Synthesizer V Studio 2 Pro, and includes one singing voice.
Enter a melody and lyrics to have it sing them, allowing you to create guide vocals or backing vocals on the spot.
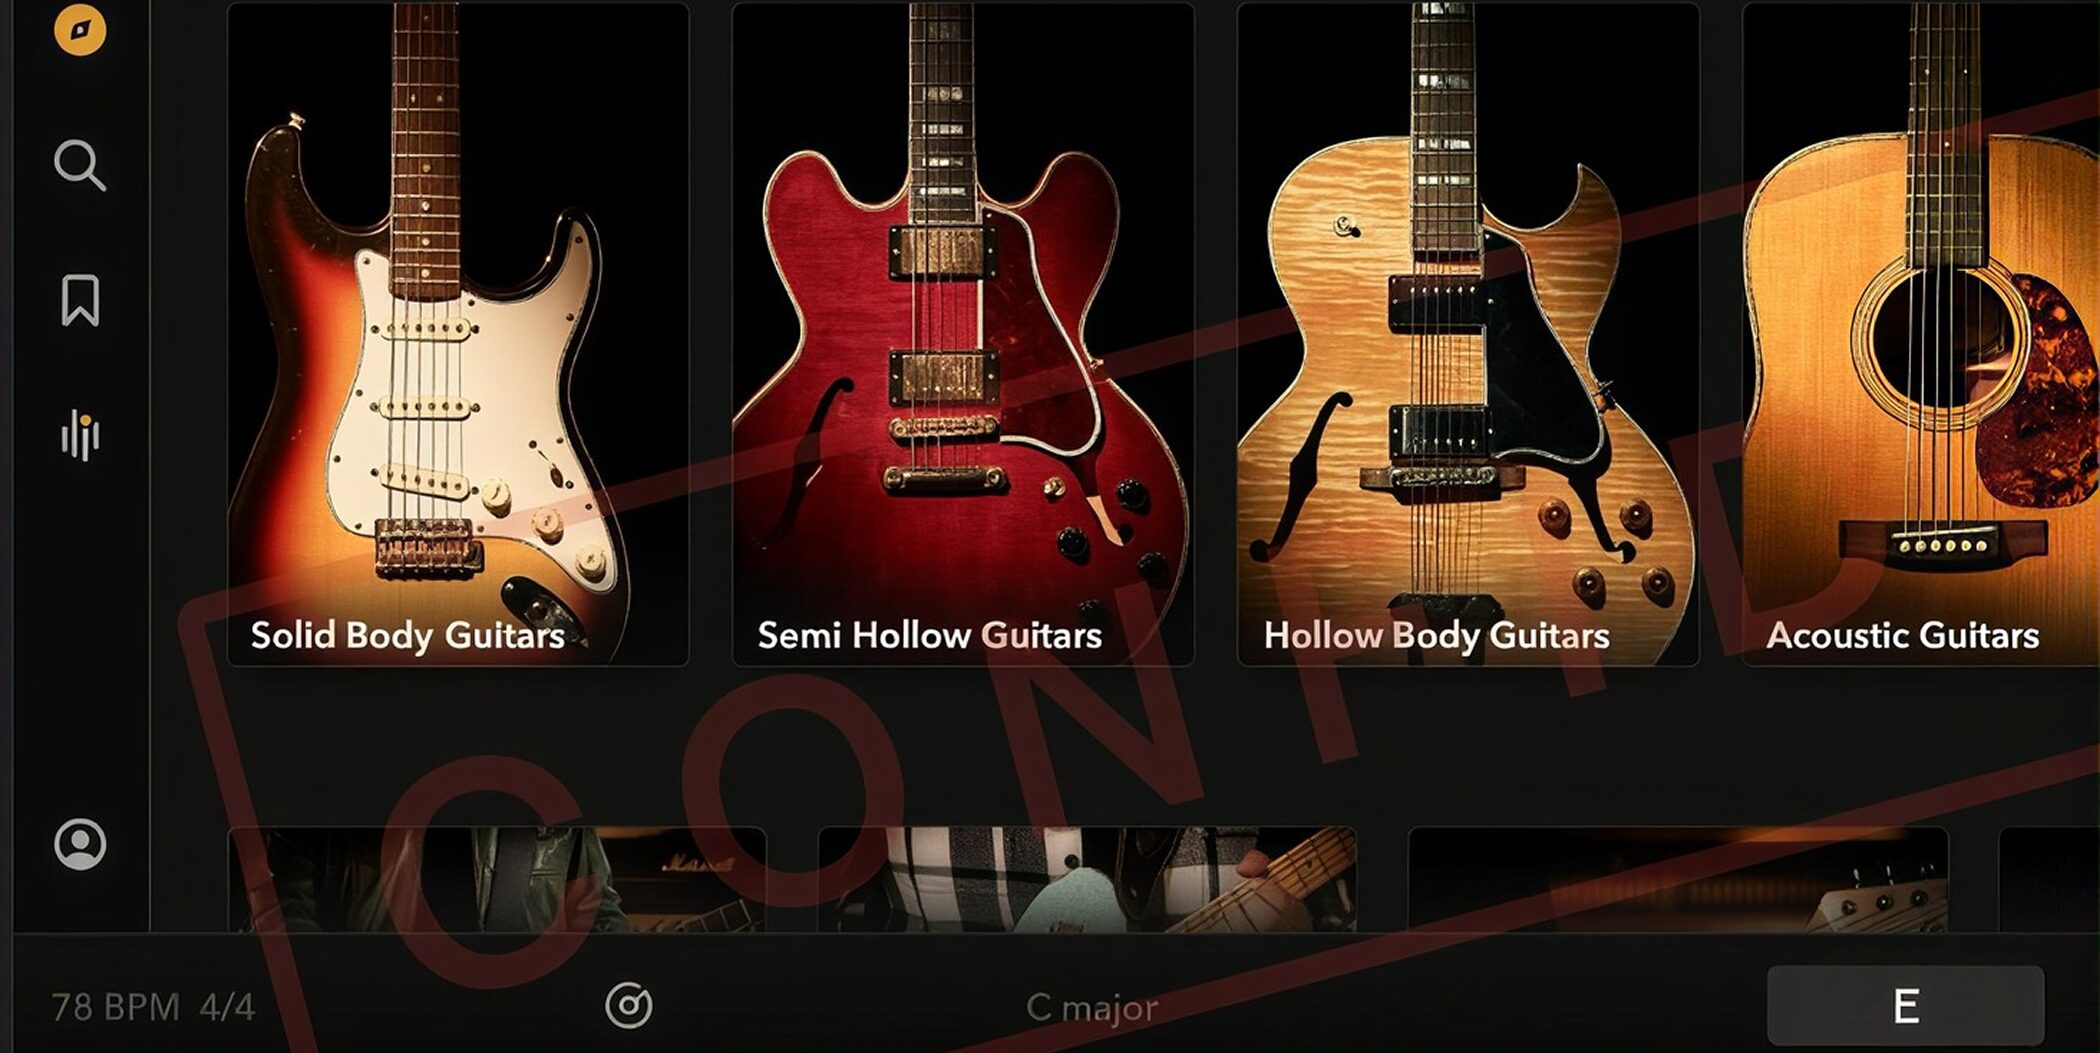
Celemony Tonalic Essential is a virtual session player that performs along with your song.
It is made by Celemony, the developer of Melodyne, and its included material focuses on guitar.
This special edition is not sold separately, and has no feature restrictions or expiration date.
Pricing
LUNA Free and LUNA Play are free to use.
The price of LUNA Studio is ¥29,850 excluding tax.
Existing LUNA Pro users need to purchase an upgrade license. It is also available from retailers in Japan.
Prices are as of September 2026. Check the retailer's website for current pricing.
You can start for free, separate your favorite songs to practice, and continue straight into recording and editing.
The paid edition adds lyric and chord analysis, along with vocal synthesis software and a session player.
If you are unsure which DAW to choose, try starting with the free version.