
Logic Pro X 10.5 was a major Apple update that introduced Live Loops, new samplers, and Step Sequencer. Drum Synth, Sampler, and Quick Sampler can work together: drag audio into Quick Sampler, slice a rhythm automatically, and edit its pitch, filter, and other settings. Send the slices to Drum Machine Designer to process individual sounds on separate channels. Version 10.5 was a free update for existing Logic Pro X owners. This 2020 guide explains the new features and how the instruments interact, with practical workflows for both new and experienced producers.
Live Loops, Sampler, Step Sequencer, and More
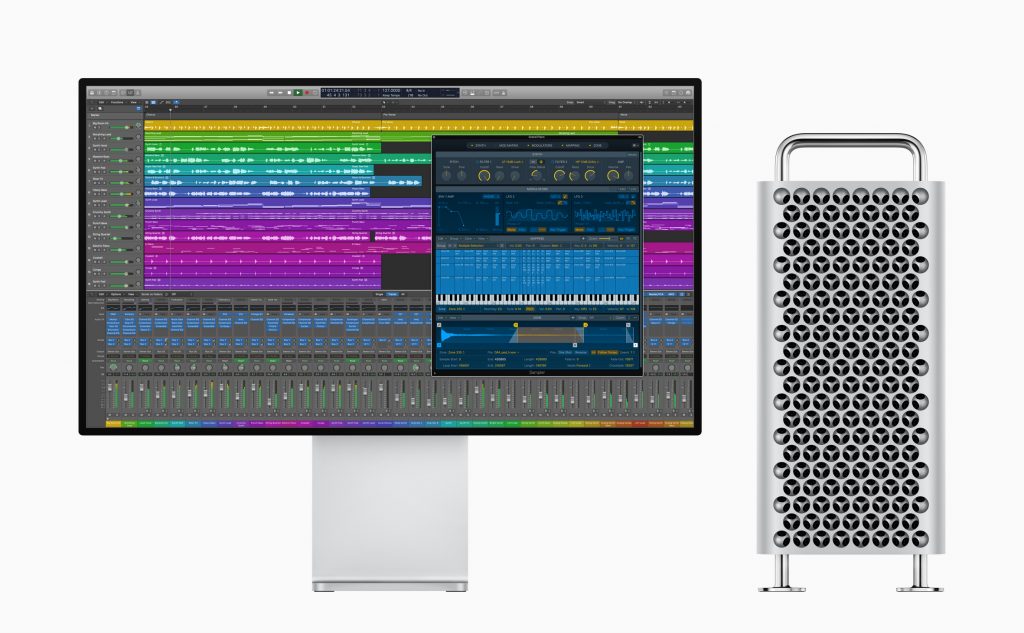
Apple develops the popular DAW Logic Pro X.
Version 10.5 arrived as a major update in May 2020. It was available at no additional cost to existing Logic Pro X owners.
Our original livestream explored the updated Logic Pro X and shared our first impressions of its new features.
◆ Original Logic Pro X 10.5 purchase/download link
https://apple.co/2YXuV6o
◆ Minimum system requirements for version 10.5 at release
• OS: macOS 10.14.6 or later (64-bit).
• Free storage: 6 GB for the minimum installation.
72 GB for the full Sound Library. These are the historical requirements for version 10.5, not the requirements for the current release.
Logic Pro X 10.5: New Features
Selected Questions and Answers from the YouTube Video

I have not updated yet. Could updating delete my data? Please let me know!

We did not encounter any loss of Logic projects when updating. For this broadcast, we used a project created for another purpose in the earlier version. This describes our experience at the time, not a guarantee for every setup.
Can controllers for FL Studio or Ableton be used with Logic? That would seem very convenient.
Novation's Launchpad was listed as officially compatible. At the time of the broadcast, we planned to test whether Ableton Push would work and report back; no test result is included here.
It feels like Stylus and Battery are no longer needed! Is the imported data saved in the project? Will the project become much larger?
In our testing, Logic appeared to reuse the same audio file internally wherever possible for operations such as slicing, rather than creating unnecessary duplicates. We did not see excessive growth in file size. This observation does not specify how every project's assets are stored.
Does this update add support for pad controllers such as the Launchpad Pro MIDI controller?
We did not have those controllers available for testing at the time, so we said we would ask support and post an update. No follow-up confirmation is included in this article.
Are you planning a tutorial on programming the guitar instruments included with Logic?
At the time, we had no plans for a tutorial using Logic's included guitar instruments. If we covered the topic, it was more likely to use a third-party product.
Thank you for the archive! The update is great, and having such a clear explanation in Japanese is wonderful. It will really help my music production! Have you encountered any plug-ins that no longer work after updating?
Thank you for watching. At the time of the broadcast, we had not encountered any plug-ins that stopped working after the update. This was our test experience, not a compatibility guarantee for all plug-ins.
Hello. I am a university student who sings and plays guitar in an original band. I would like to start producing music, but I am not comfortable with computers and know little beyond needing a PC. Even after researching, I am unsure which software I need, especially DAWs and plug-ins. My goal is to make a complete band recording by myself. Could you explain the equipment and software I need to get started? Sorry for the sudden question.
We have collected information about the equipment needed to start producing music on the page below. Please take a look: https://sleepfreaks-dtm.com/category/start-dtm/
Getting to Know the New Instruments
The update introduced three instruments. Understanding them is an important step toward getting the most out of Logic Pro X 10.5.
Before exploring the instruments, download the additional content, including the new Apple Loops.
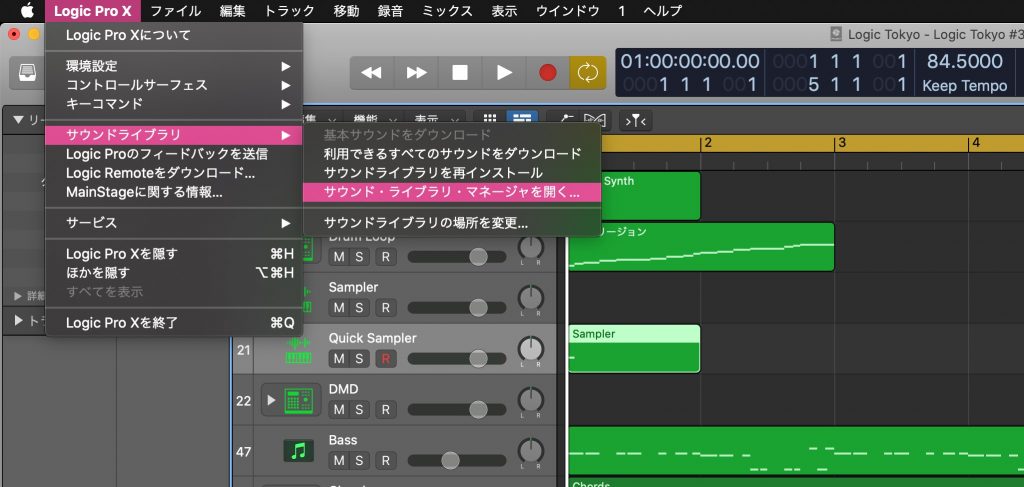
From the menu bar, choose Sound Library > Open Sound Library Manager.
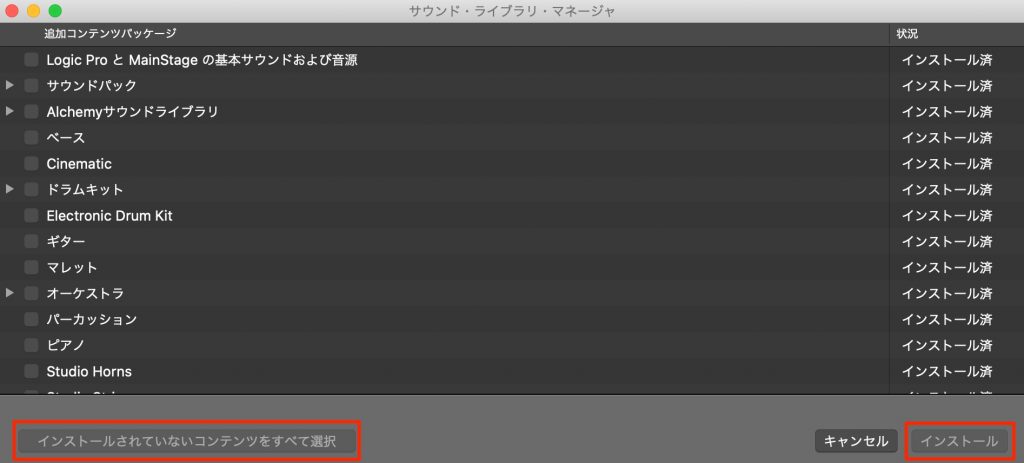
Choose Select All Uninstalled, then click Install.
Drum Synth
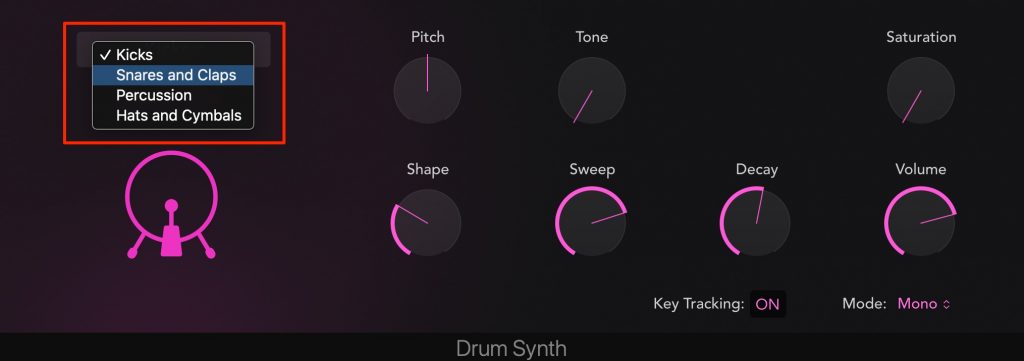
Drum Synth lets you design individual drum and percussion sounds.
Choose the sound category you need: kick, snare/clap, percussion, or hi-hat/cymbal.
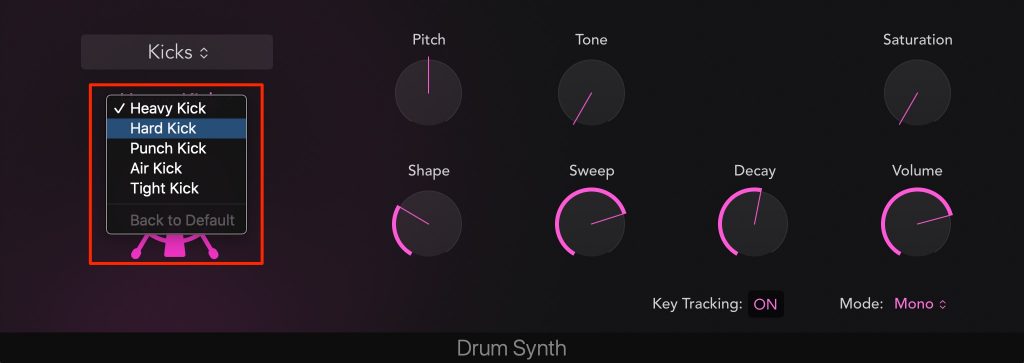
Below the selected category, choose a sound type.
Then shape the sound with the parameters on the right.
Sampler
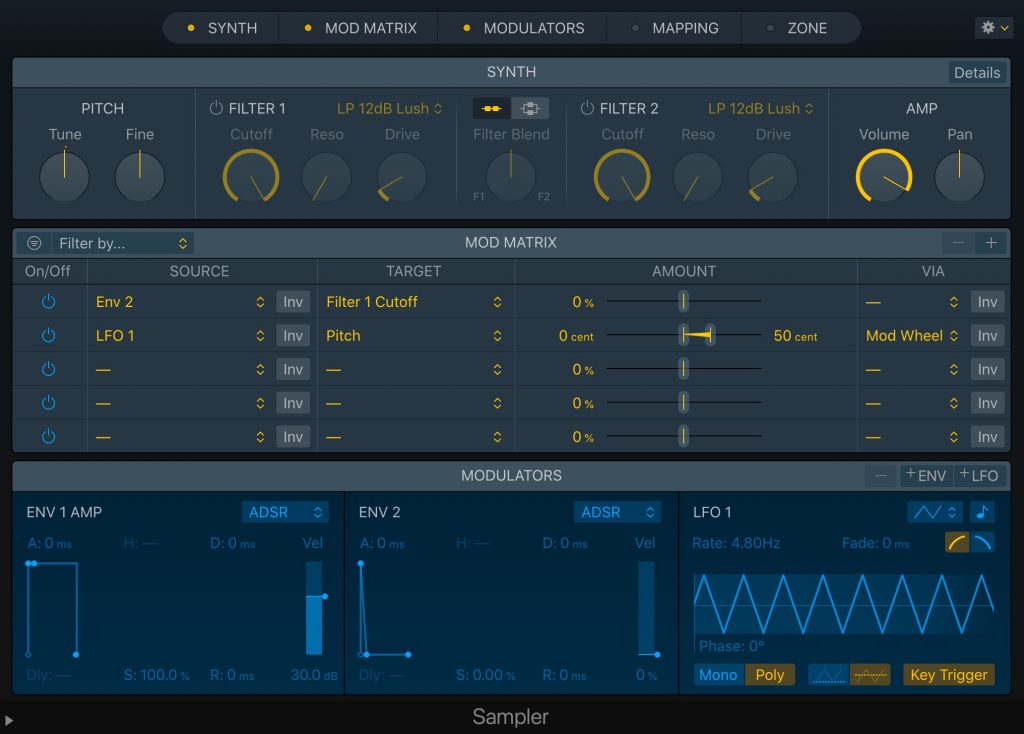
In this update, EXS24 was replaced by Sampler, its redesigned successor.
Earlier projects can continue to use their existing EXS24 instruments through Sampler.
The SYNTH, MATRIX, MODULATORS, MAPPING, and ZONE sections at the top provide a broader set of sound-editing tools than EXS24.
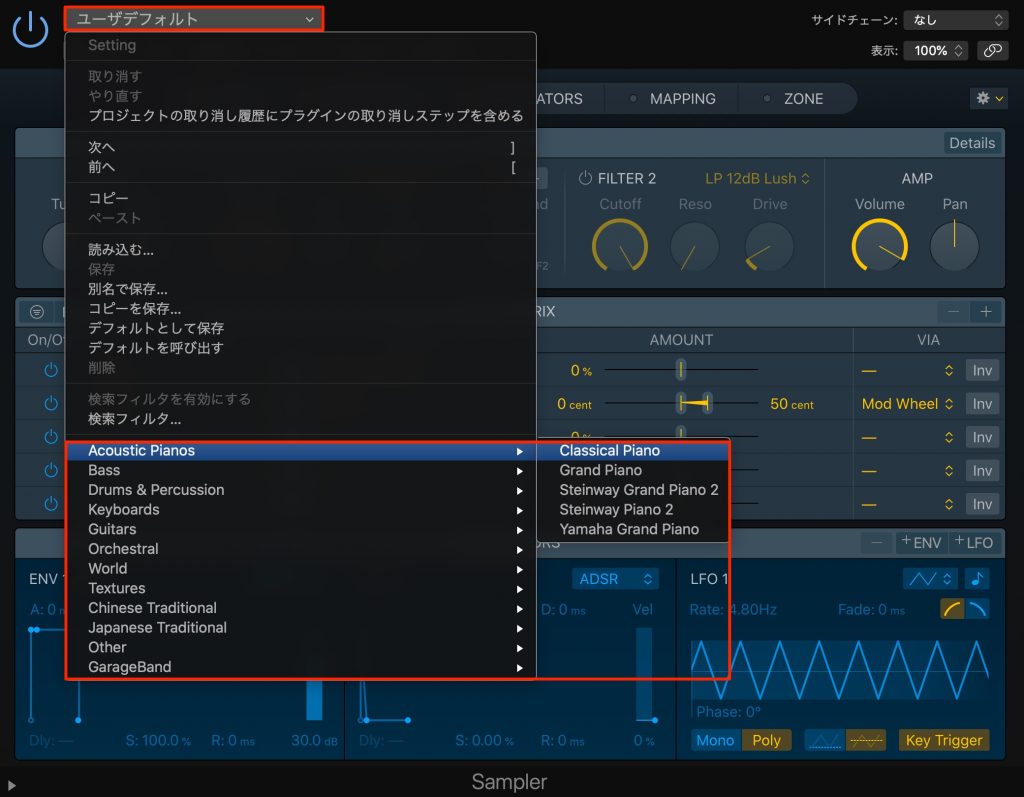
Use the preset field at the top to load sounds, including a wide range of acoustic instruments.
Sampler also works closely with Quick Sampler, discussed below.
Drum Machine Designer
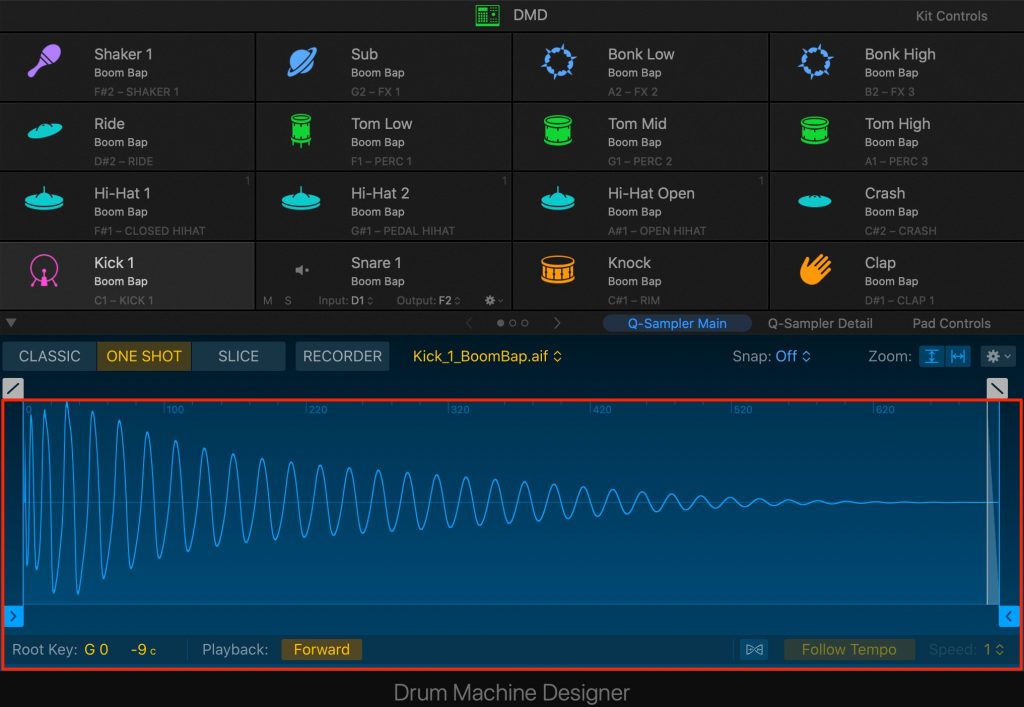
Drum Machine Designer existed in earlier versions, but version 10.5 adds seamless interaction with Quick Sampler.
Quick Sampler

As its name suggests, Quick Sampler makes it easy to turn source material into a playable sampled sound, including material imported from audio or MIDI regions.
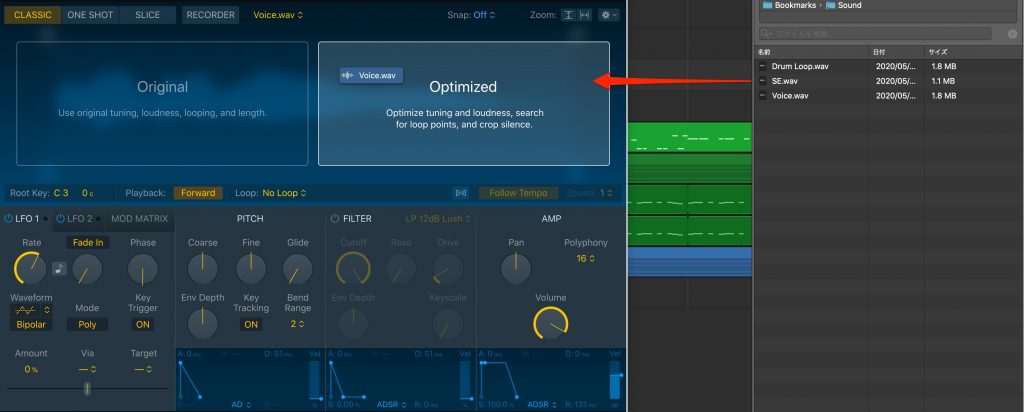
Simply drag the material you want into Quick Sampler.
The screenshot shows material imported from the browser. You can also drag an audio or MIDI region from a track into it; the resulting audio becomes the sample.
There are two import options:
- Original: imports the source with its original settings.
- Optimized: analyzes and optimizes properties such as tuning, loudness, loop points, and leading or trailing silence.
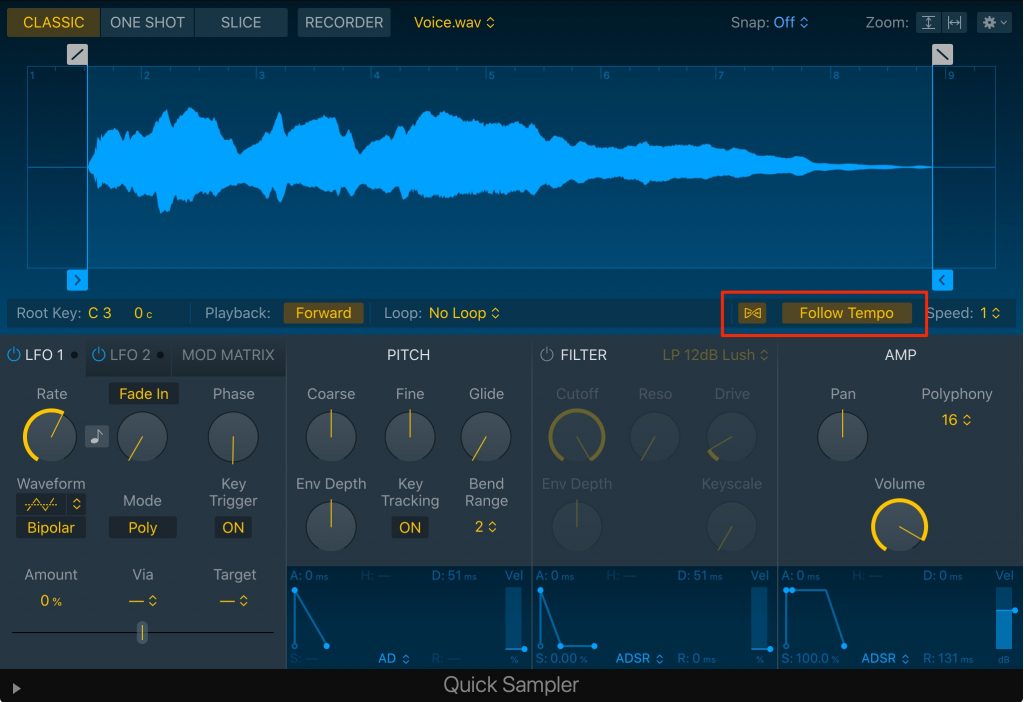
Turn on FLEX so that sample playback can follow the current project tempo.
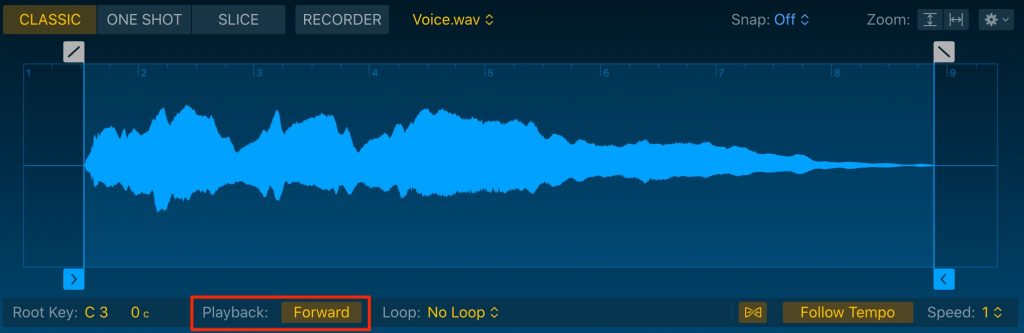
In the Playback section, you can choose Forward or Reverse playback.
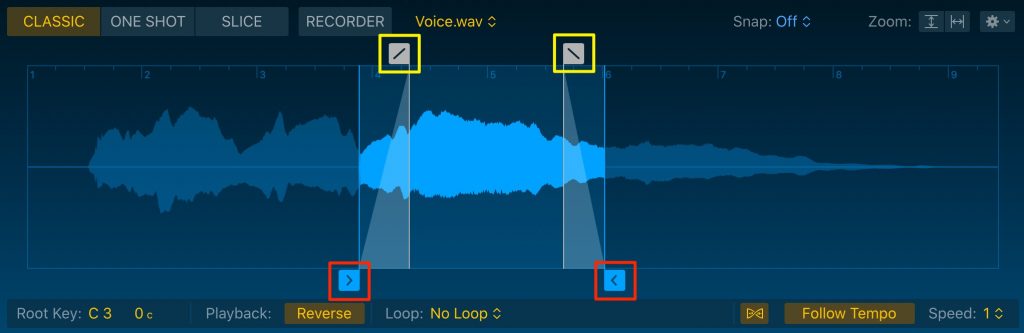
Drag the controls outlined in red to set the sample's playback range.
Material outside the highlighted range will not play.
Use the controls outlined in yellow to apply fades at the sample's start and end.
This helps avoid clicks at the playback boundaries.
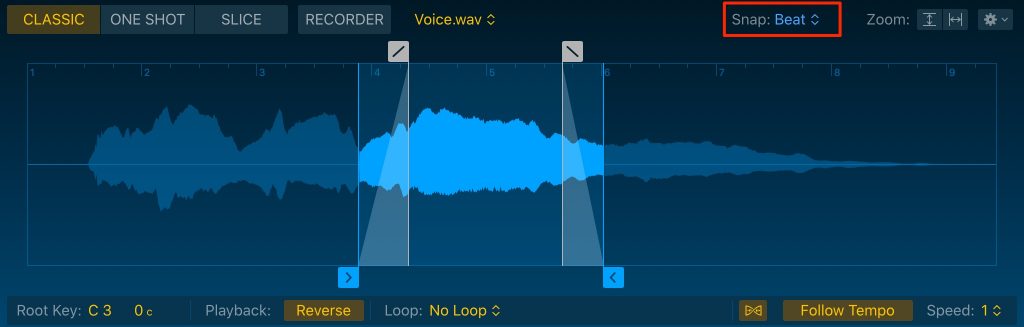
Set Snap to Beat to adjust the playback boundaries in time with the project beat.

With Loop enabled, you can repeat a selected section while holding a key.
- Forward: loops in the forward direction.
- Reverse: loops in the reverse direction.
- Alternate: alternates between forward and reverse playback.
You can also set the loop range freely by dragging its boundaries.
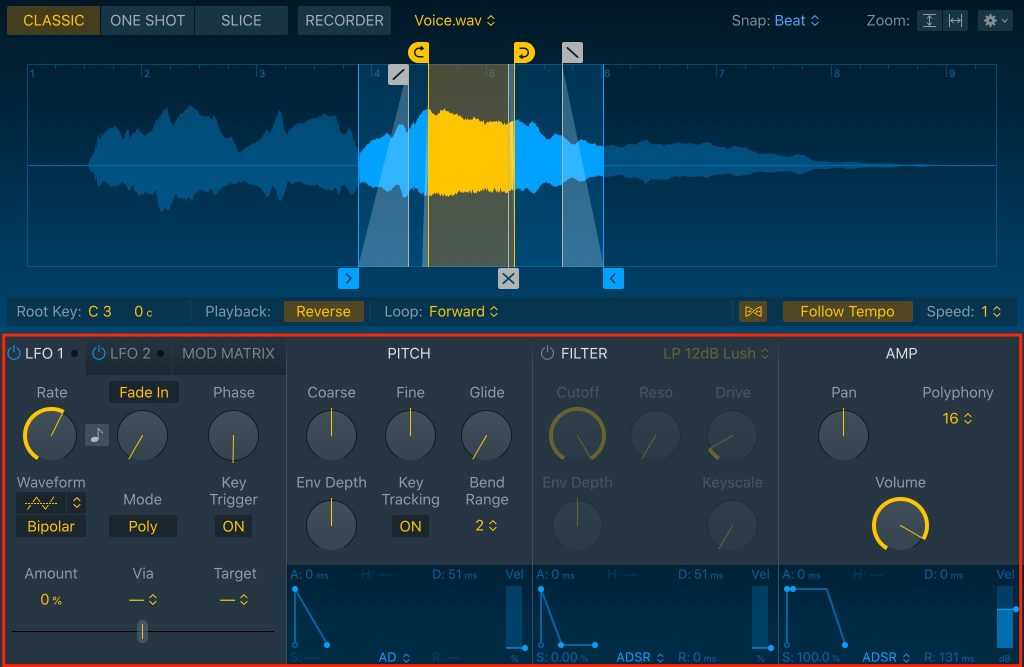
The lower section provides modulation, pitch, filter, and AMP (volume) controls.
Quick Sampler also offers another very useful mode.
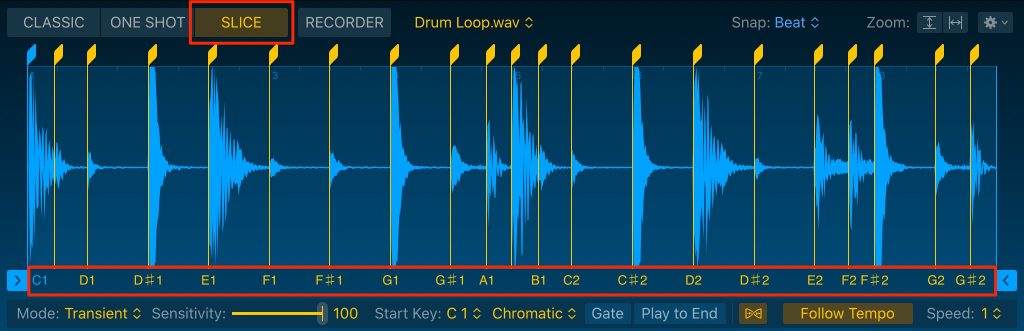
Import a rhythmic source and choose SLICE.
Quick Sampler detects transients and maps the marked slices across the keyboard.
This is useful for rearranging a pattern or isolating particular drum hits.
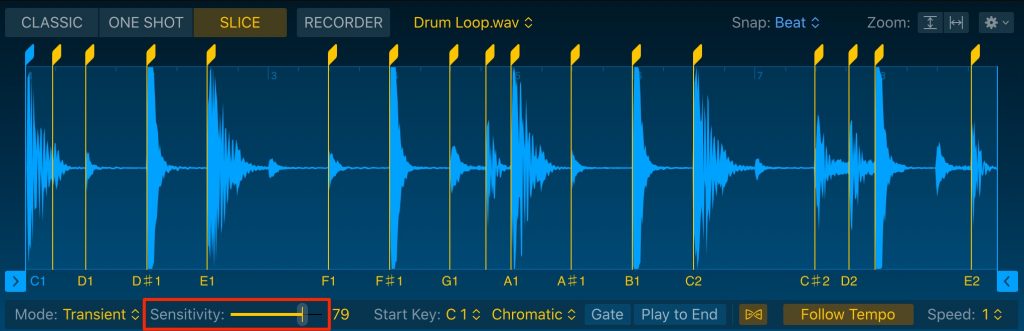
Use Sensitivity to adjust transient detection until the markers suit the material.
You can also edit markers manually:
- Double-click a marker to delete it.
- Click an empty location to add one.
These controls allow more precise adjustments.
Making the Instruments Work Together
The instruments described above can interact in several ways.
Here are a few examples.
Quick Sampler → Drum Machine Designer
You can take rhythm slices created in Quick Sampler and place them on Drum Machine Designer pads.
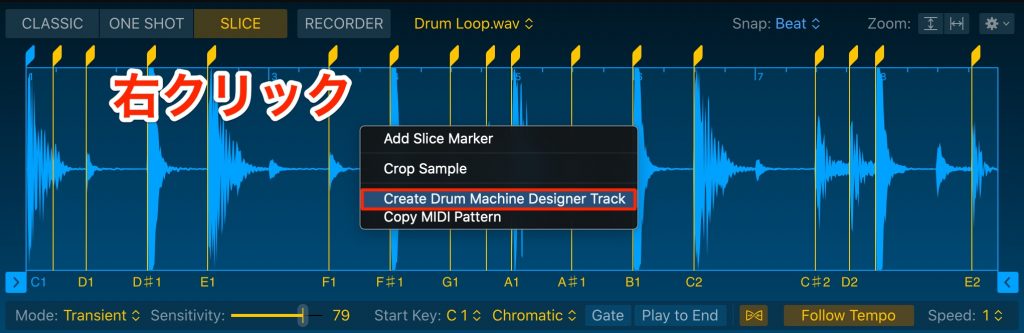
Control-click an empty part of the slice display and choose Create Drum Machine Designer Track.
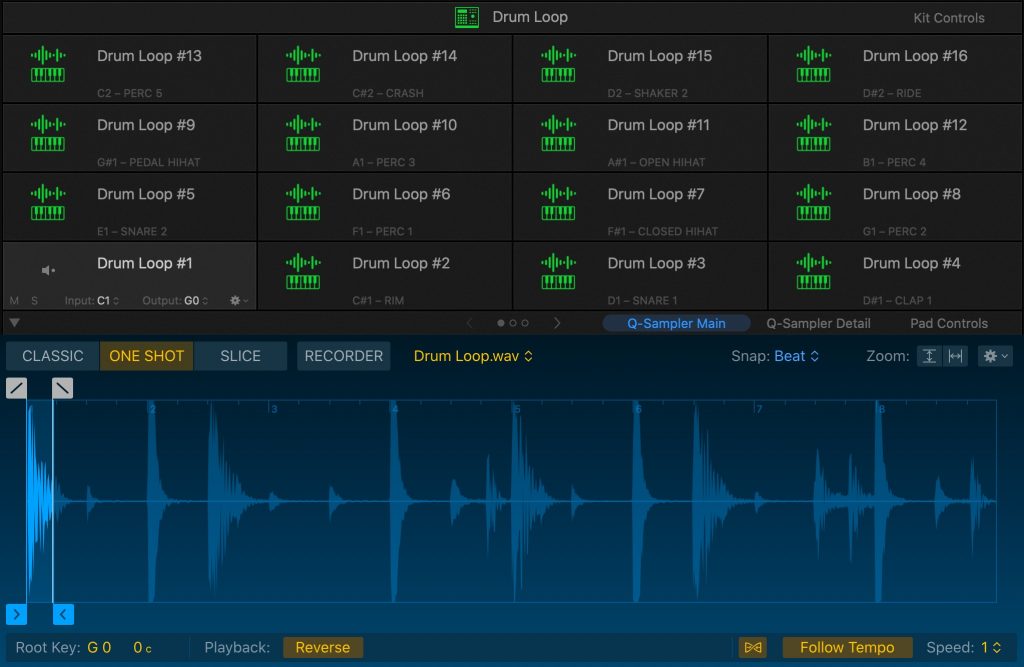
A new Drum Machine Designer track is created with the individual slices arranged across its pads.
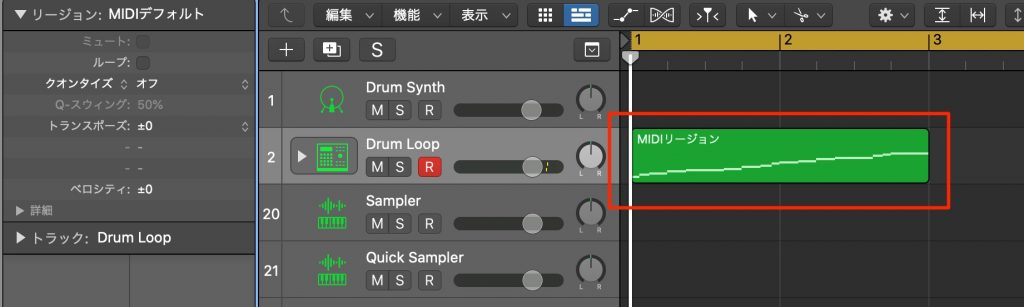
A MIDI region is also created to reproduce the source rhythm.
Rearrange its notes to create your own pattern.
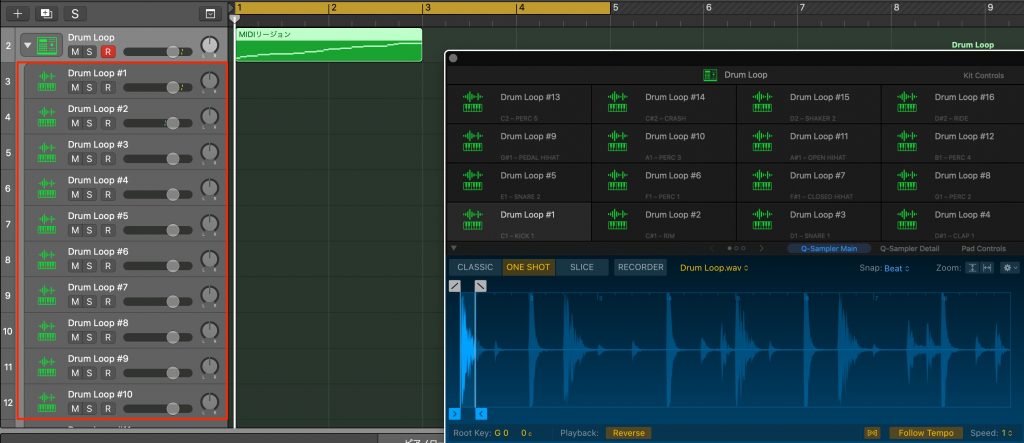
The individual pads are automatically routed to separate channels, which is convenient for processing.
For example, you can apply EQ only to the kick, add reverb to the snare, or pan the hi-hat to the right.
This greatly expands your sound-editing options.
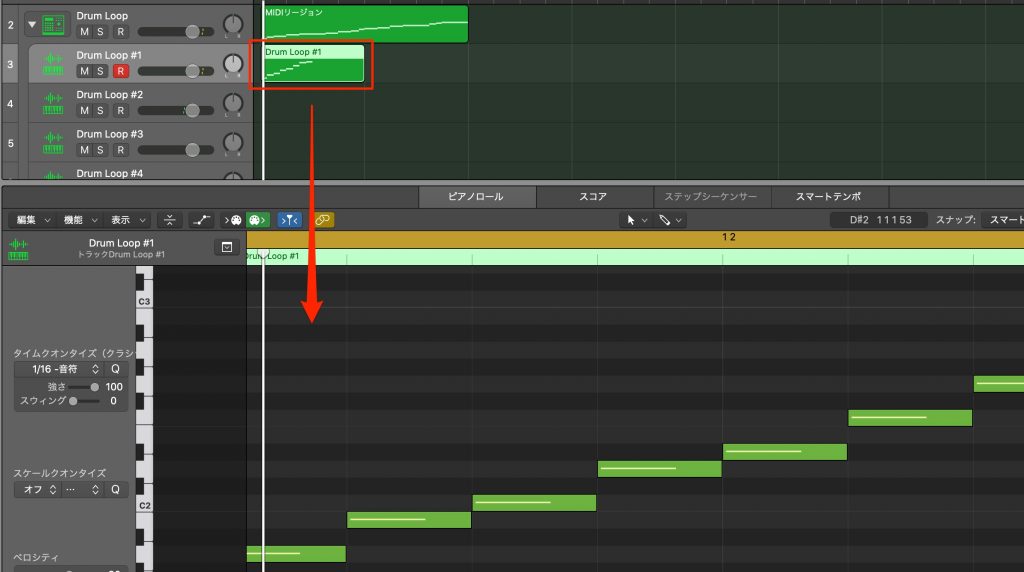
Create a MIDI region on one of the individual instrument subtracks.
Enter notes in that region to change the sound's pitch.
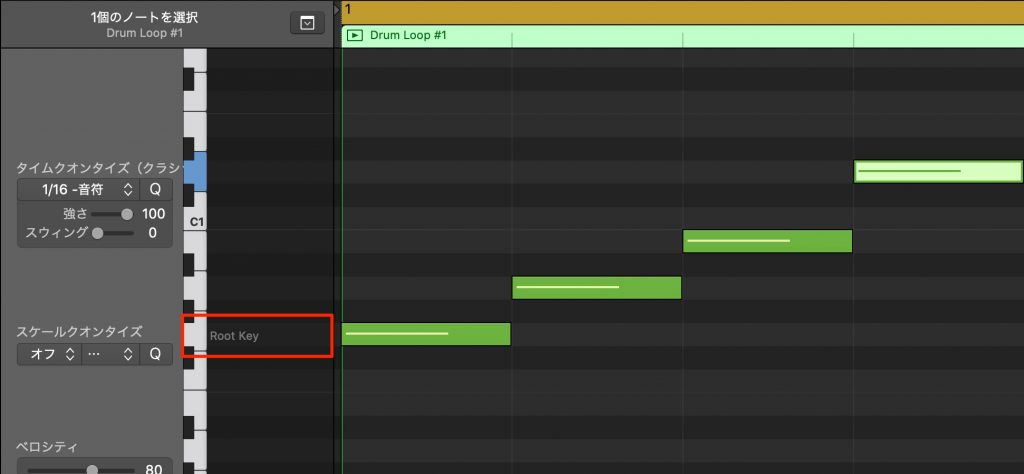
The original pitch is indicated by Root Key, which serves as the pitch reference.
This is useful for varying a hi-hat pattern or creating an ascending snare roll, among many other applications.
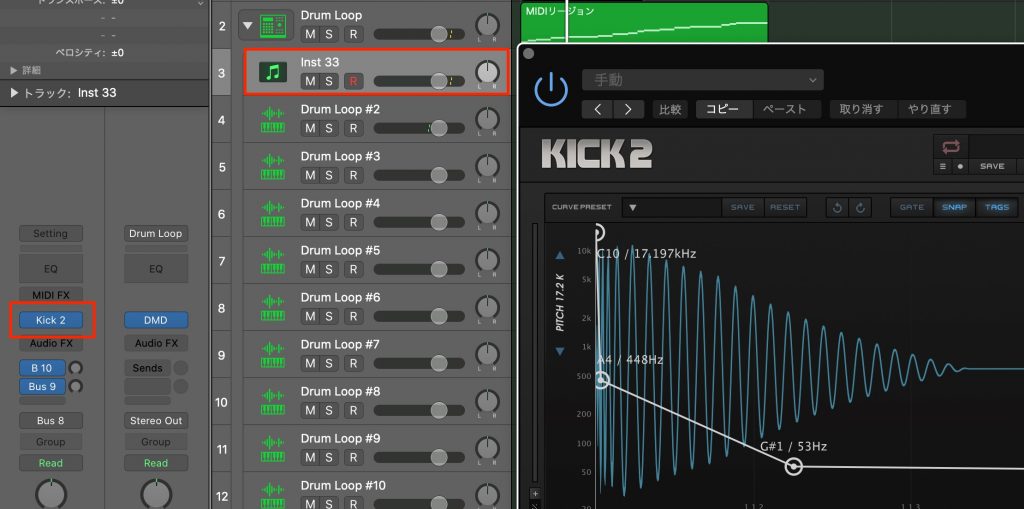
Each pad's underlying instrument is independent.
You can therefore replace just the kick instrument, for example.
The screenshot shows the kick subtrack replaced with the third-party instrument Kick 2.
Drum Synth → Drum Machine Designer
You can also bring a Drum Synth sound into Drum Machine Designer.
There are several ways to do this; the following is a straightforward example.
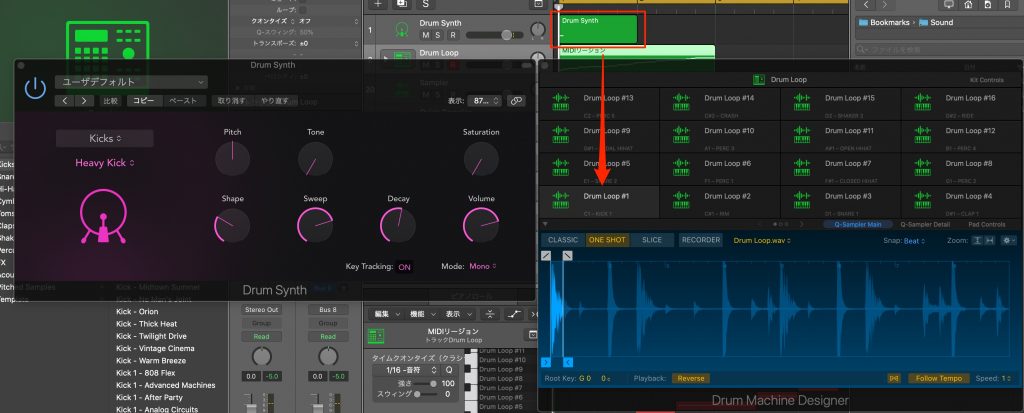
Enter a single note on a Drum Synth track, then drag its region onto the desired pad.
Use this to replace part of the sliced rhythm kit with a Drum Synth sound.
For example, you might want to replace only the kick.
Quick Sampler → Sampler
Layer a sound created in Quick Sampler with a Sampler instrument to build a new sound.
In this example, we load a piano preset in Sampler.
We then layer it with our original Quick Sampler sound.
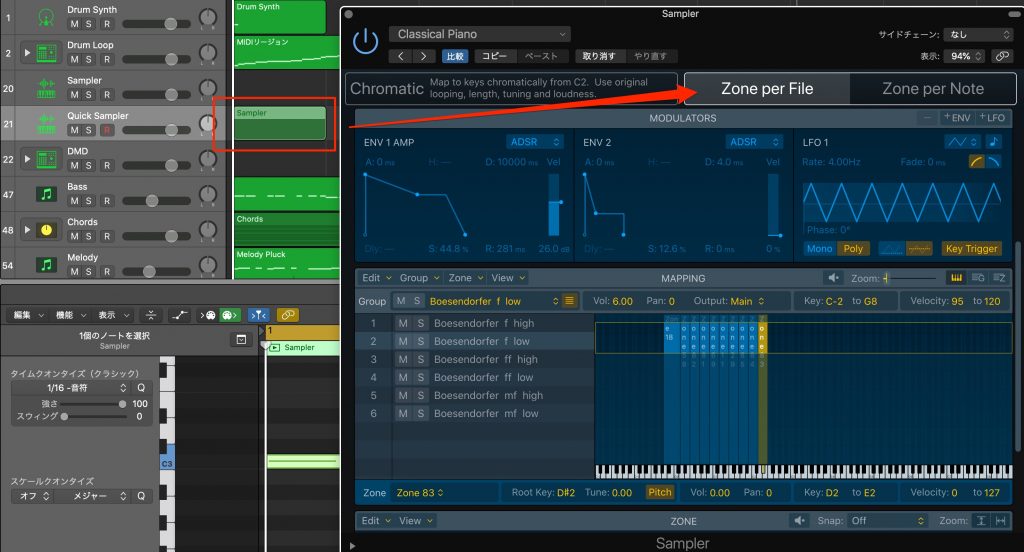
Create a region on the Quick Sampler track and enter a note.
Drag that region to the upper part of Sampler.
The layered sound is now ready.
Importing Apple Loops and Other Material
Drag material into the empty space below the track headers to choose which instrument should load it.
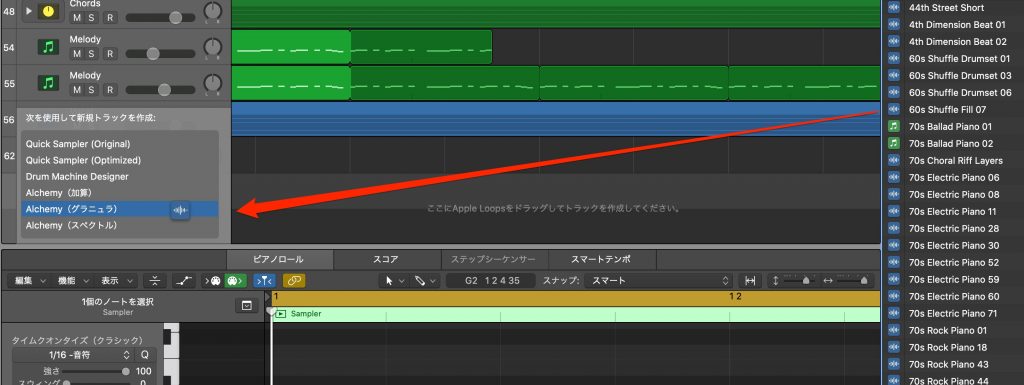
Being able to choose how the source opens makes this workflow much more efficient.
Step Sequencer
Version 10.5 introduced Step Sequencer for creating patterns quickly and efficiently.
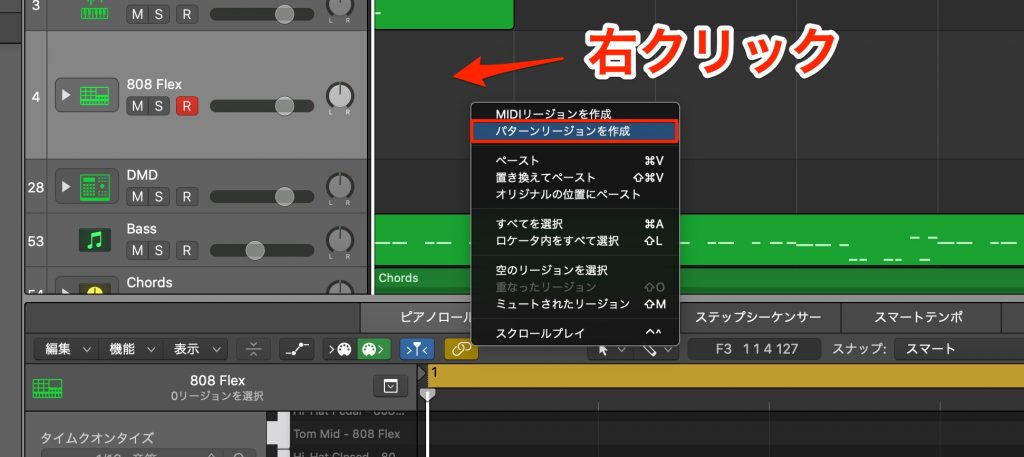
Control-click an empty area of an instrument track and choose Create Pattern Region.
Editing in Step Sequencer
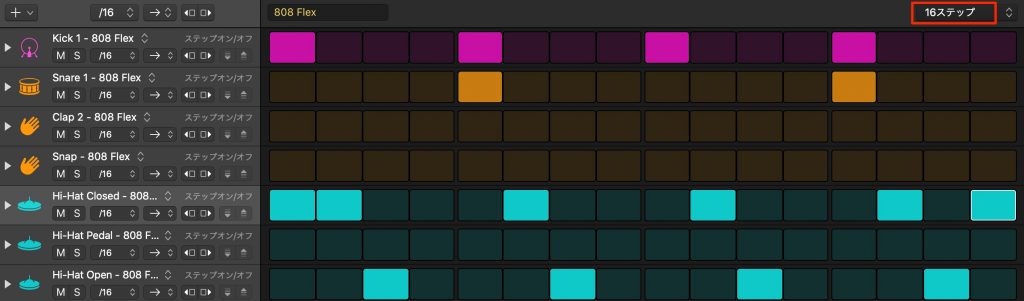
By default, each step is a sixteenth note. Click a step to enable it; click an active step again to disable it.
Choose the pattern length at the upper right, up to 64 steps.
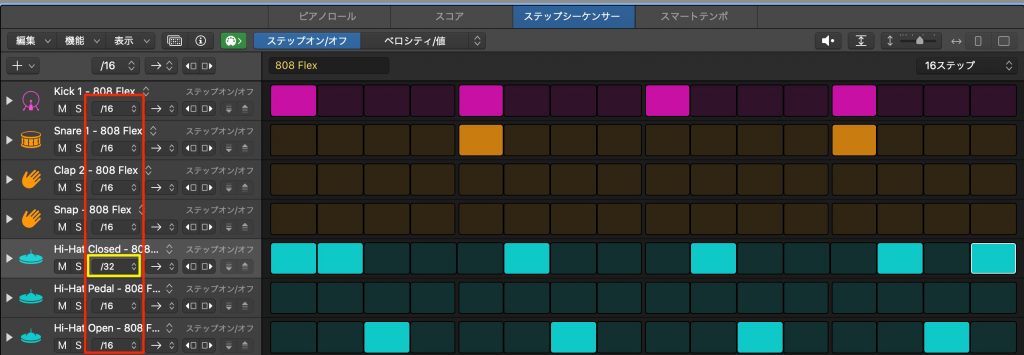
The default step rate is 1/16, but you can change it using the control outlined in red.
In this example, we set only the hi-hat row to 1/32.
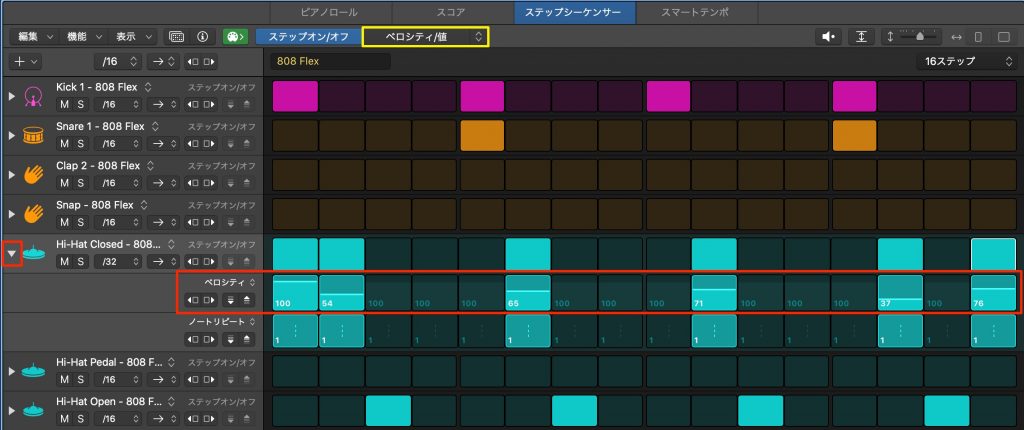
Click a row's disclosure triangle to edit step parameters such as velocity.
Enabling the corresponding edit mode at the top, outlined in yellow, lets you edit that parameter across all rows.
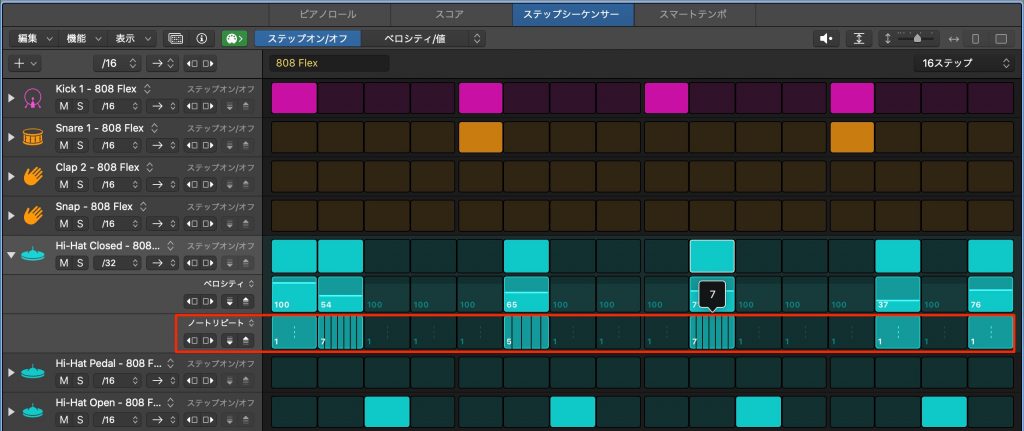
Note Repeat retriggers a step a specified number of times within that step.
It is useful for trap-style hi-hats and snare rolls.
Applying Swing
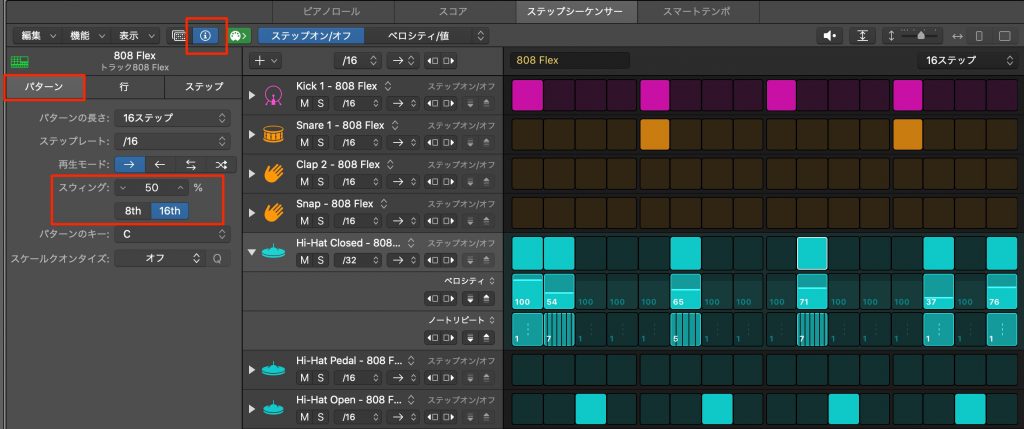
Open the inspector and select Pattern.
Choose an eighth- or sixteenth-note basis, then adjust Swing.
Editing can target the pattern, a row, or a step:
- Pattern: affects the entire Step Sequencer pattern.
- Row: affects only the selected instrument row.
- Step: affects only the selected step.
Choose the scope appropriate to the adjustment you want to make.
Using the Included Patterns
Step Sequencer includes ready-made instrument and rhythm patterns.
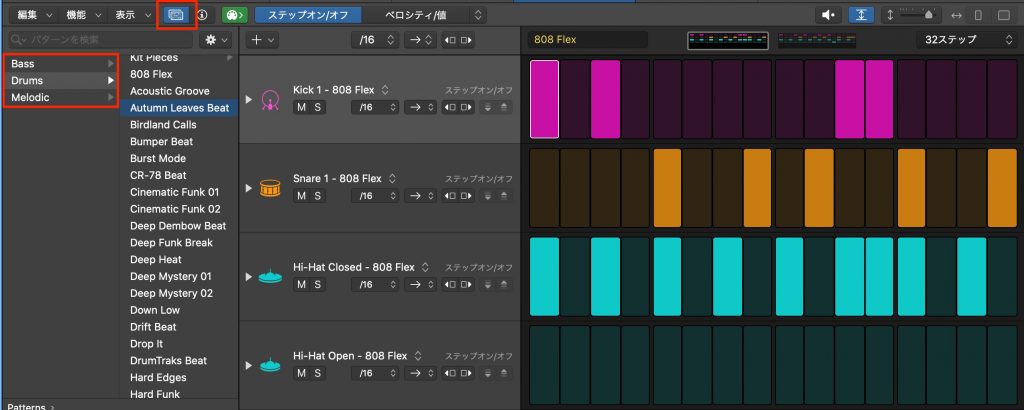
Open the Pattern Browser and choose an instrument category.
Double-click a listed pattern to load it into Step Sequencer.
Customizing Step Sequencer for Other Instruments
You may want to customize the note rows when using a third-party instrument.
Here, we use the third-party drum instrument Battery as an example.
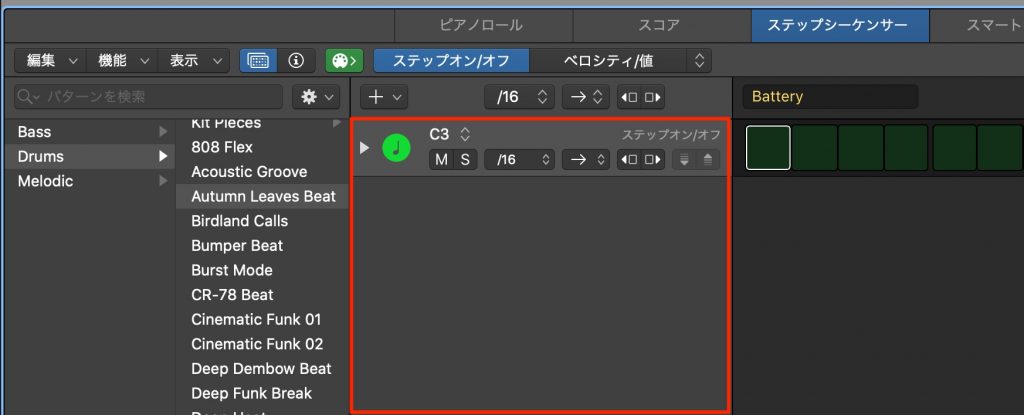
First, select unwanted rows and press Delete to remove them.
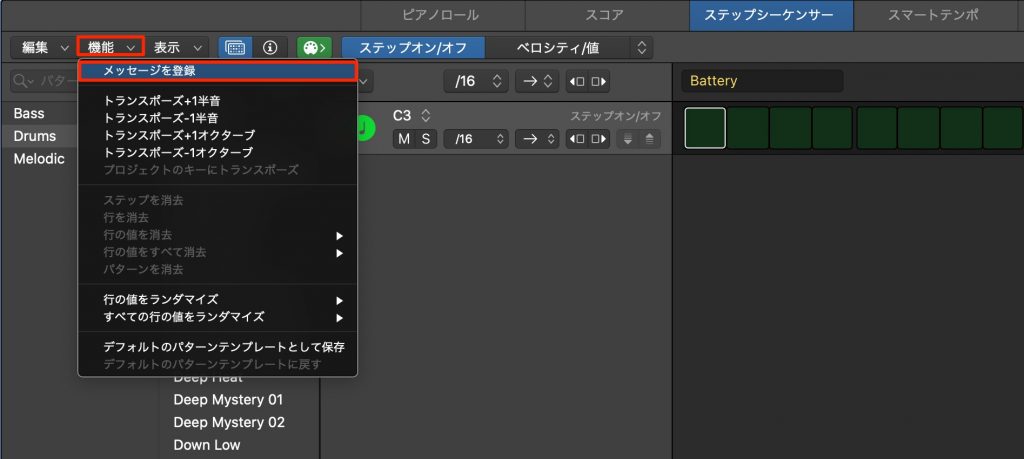
From Functions, choose Learn to add note rows from incoming MIDI.
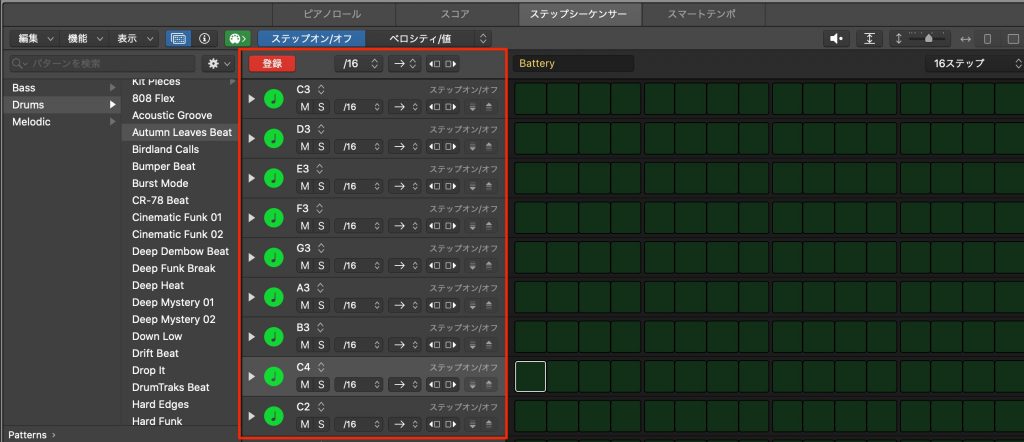
Play the notes you want to use on your MIDI keyboard.
The played notes are added as rows.
When finished, click Learn again to leave learning mode.
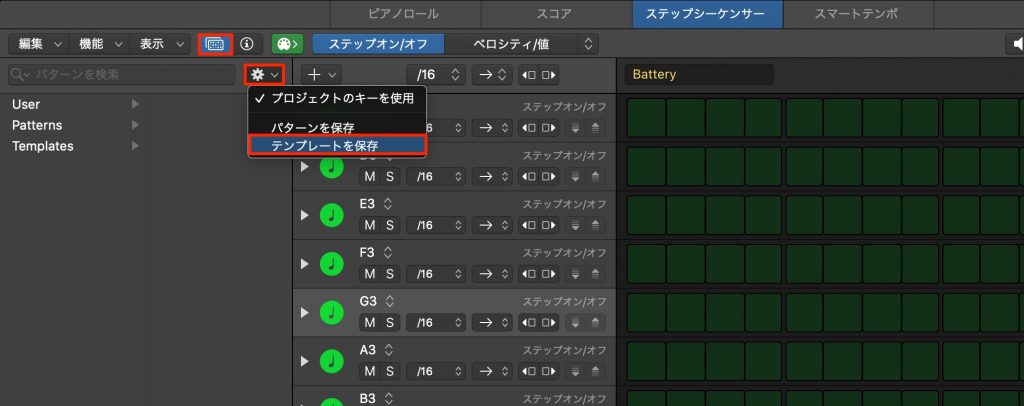
You can save this setup for quick reuse.
Open the Pattern Browser menu and choose Save Template, as shown in the screenshot.
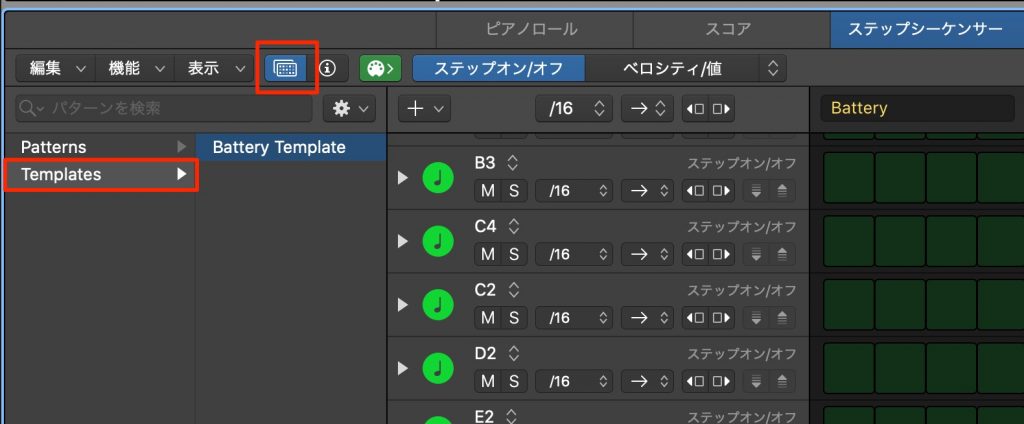
Select that template to recall the row setup.
Live Loops
Next, let's explore Live Loops, a headline feature of this update.
The Live Loops grid is an editing area that works alongside the regular timeline.
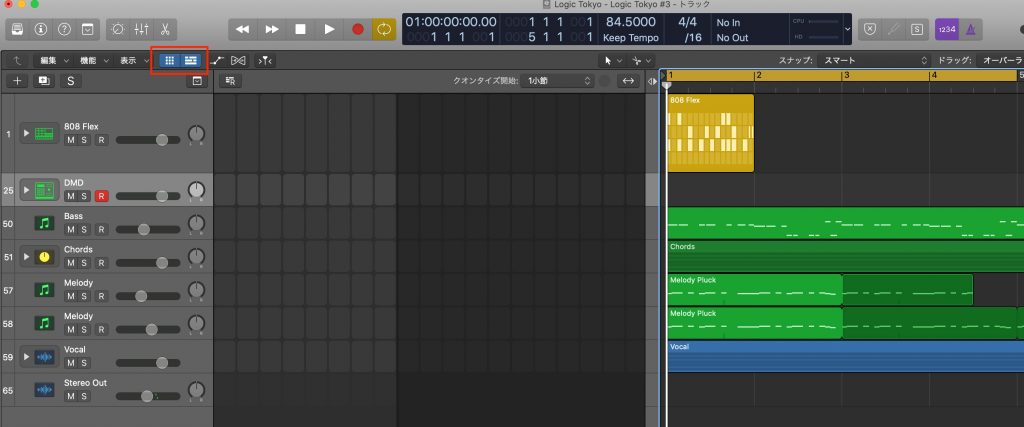
Click the highlighted button to show or hide it.
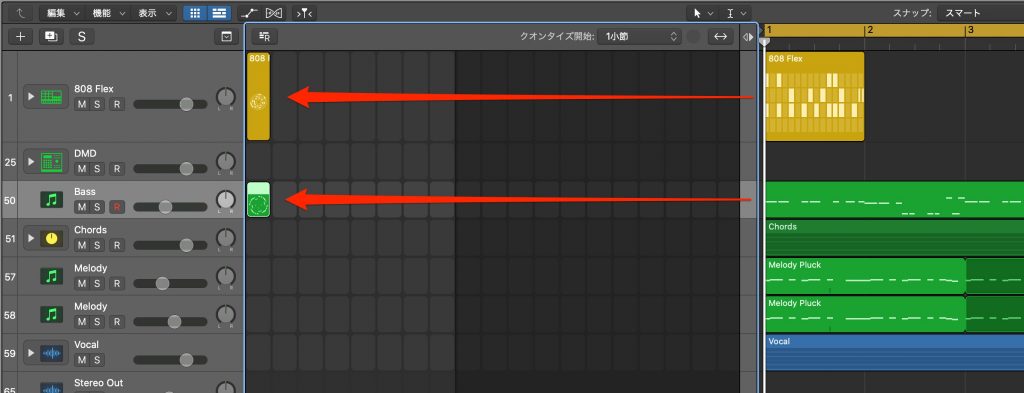
Each square is called a cell. Drag a region into a cell to add material.
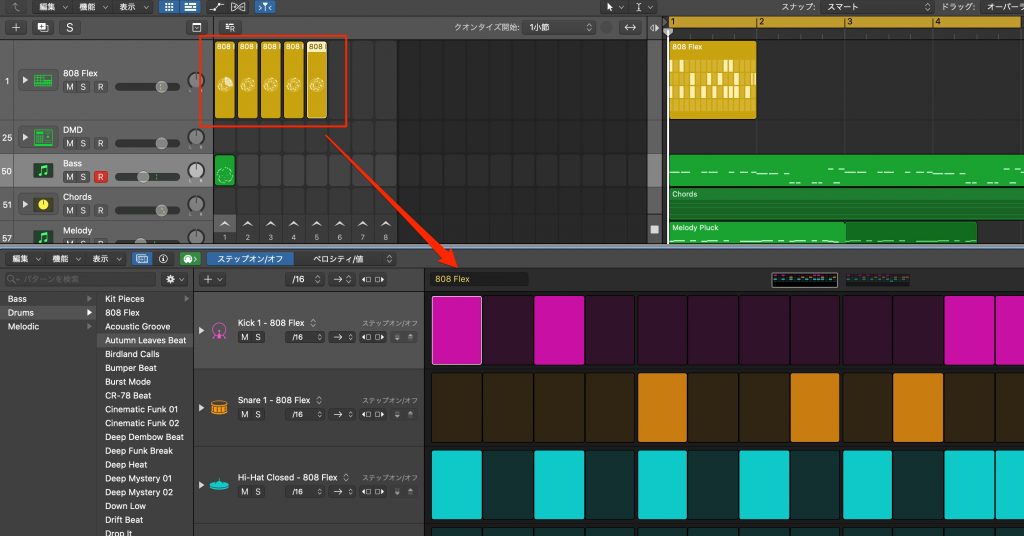
You can Option-drag a cell to copy it, then edit the copy to create a variation.
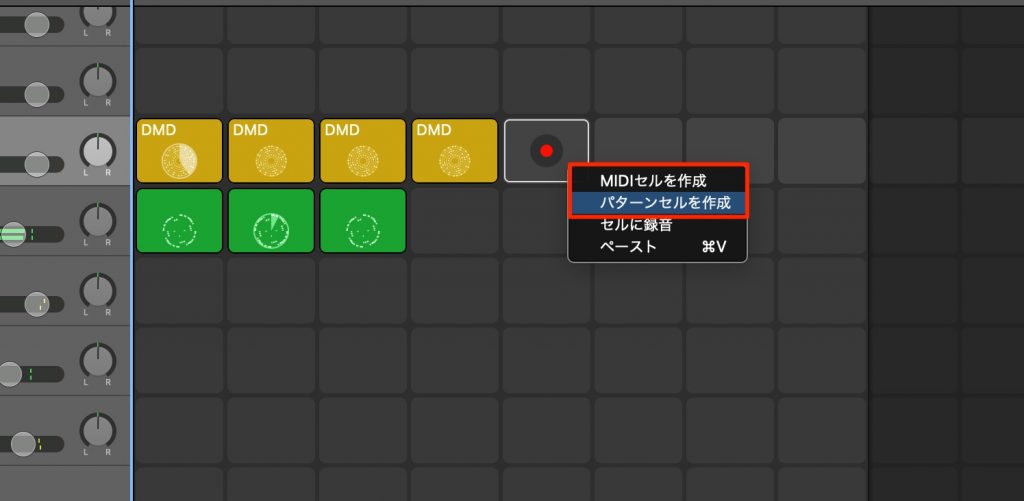
Control-click a cell slot to create an empty cell.
A MIDI cell works with a regular MIDI region, while a pattern cell uses Step Sequencer, described above.
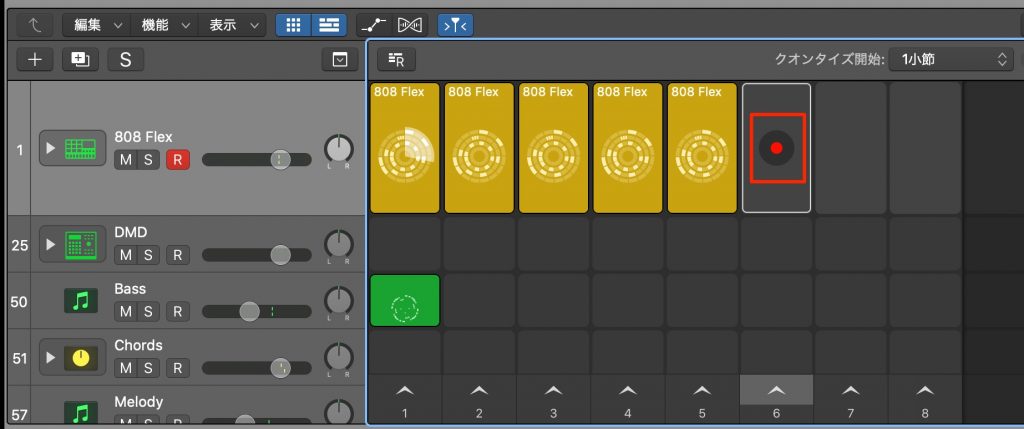
Record-enable the track to record a performance directly into a cell.
Audio recording is also supported.
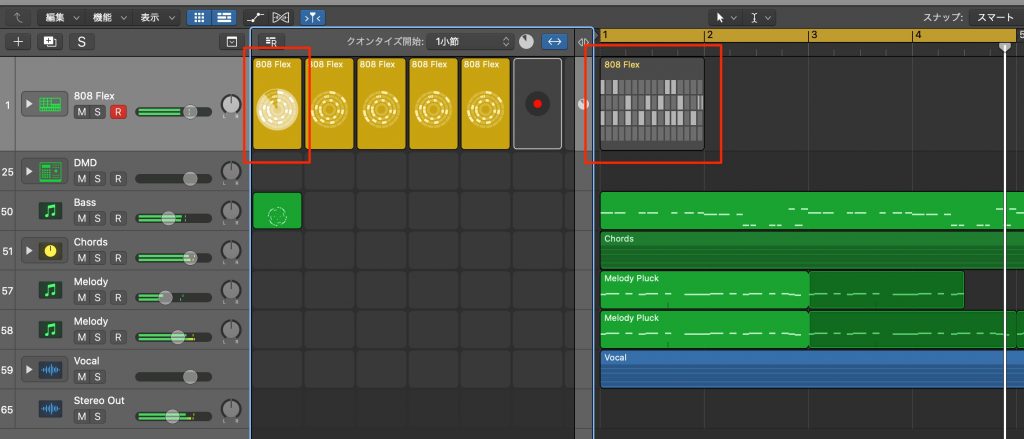
Click a cell to play its contents.
Playback on other tracks can continue at the same time.
When a cell plays, the corresponding track's timeline playback is automatically silenced.
This prevents the cell and the timeline region on that track from playing over each other.
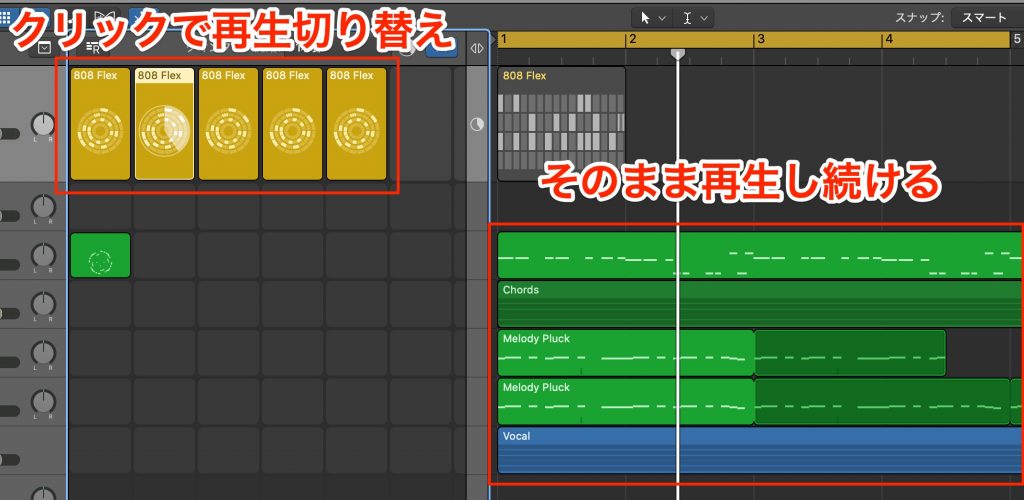
With this approach, you can keep other tracks' regions playing while auditioning different cells on the selected track.
It is an efficient way to hear which patterns work together.
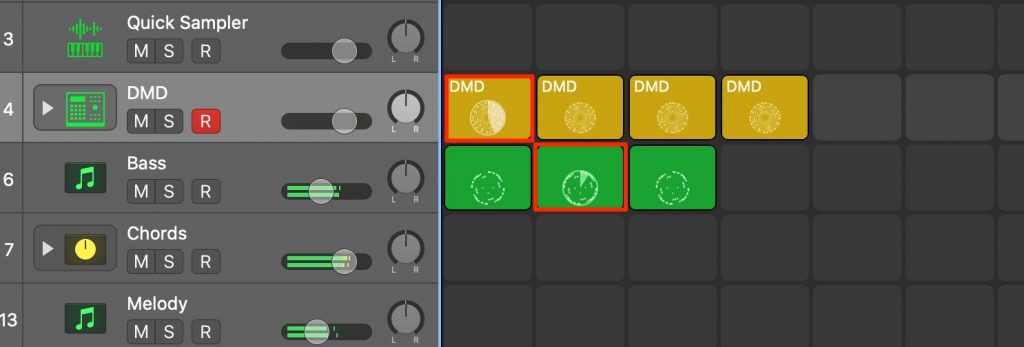
You can also combine cells on several tracks to test how the phrases interact.
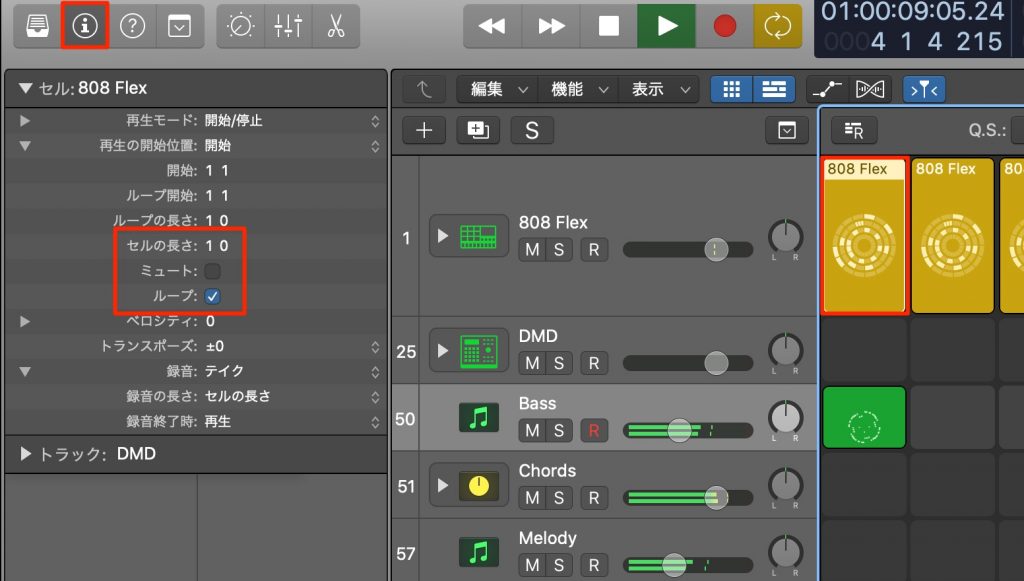
Open the inspector and select a cell to view its settings.
Here, you can turn looping on or off and set the cell length.
- Repeat only one bar of a two-bar cell.
- Play a sound effect once without looping.
These are examples of when the settings are useful.
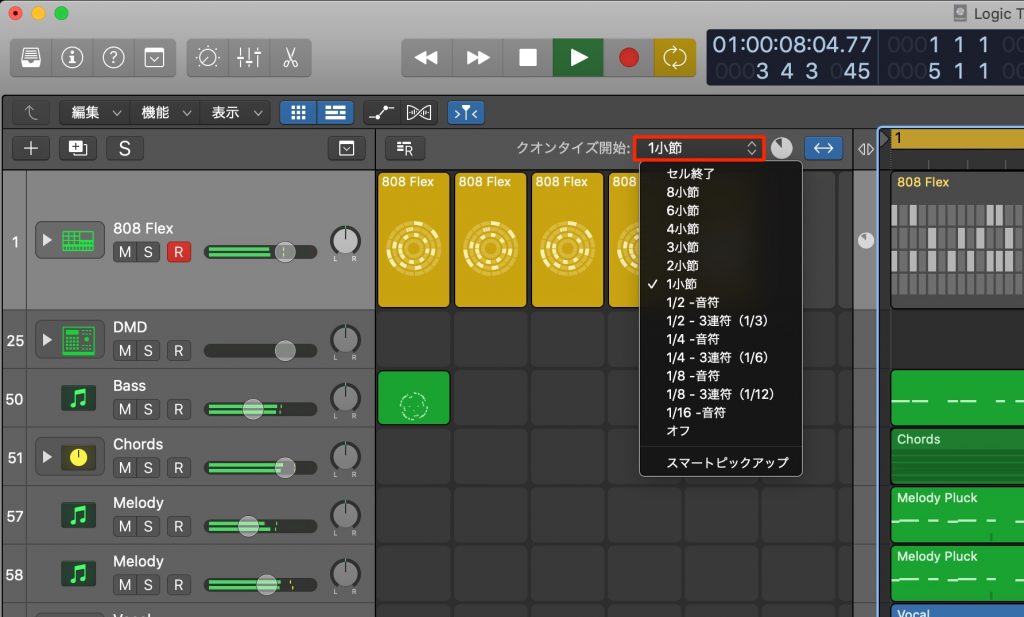
If cells switched immediately whenever you clicked them, their timing could fall out of sync with other tracks.
Quantize Start determines when a cell change takes effect, keeping playback aligned across tracks and cells.
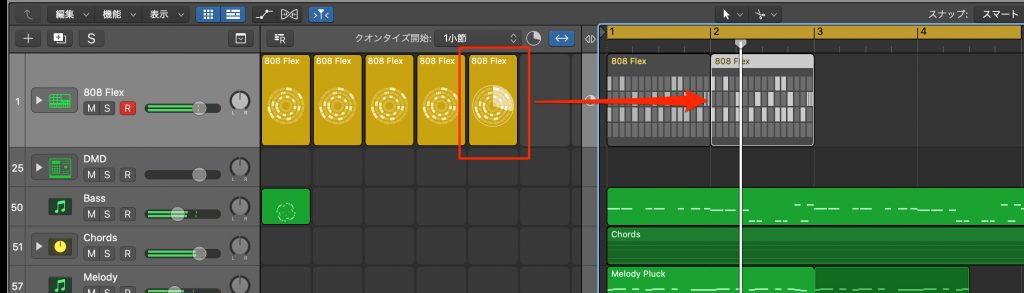
Once you have chosen the patterns you want to use, drag the cells into the timeline.
This provides a flexible connection between the two editing approaches.
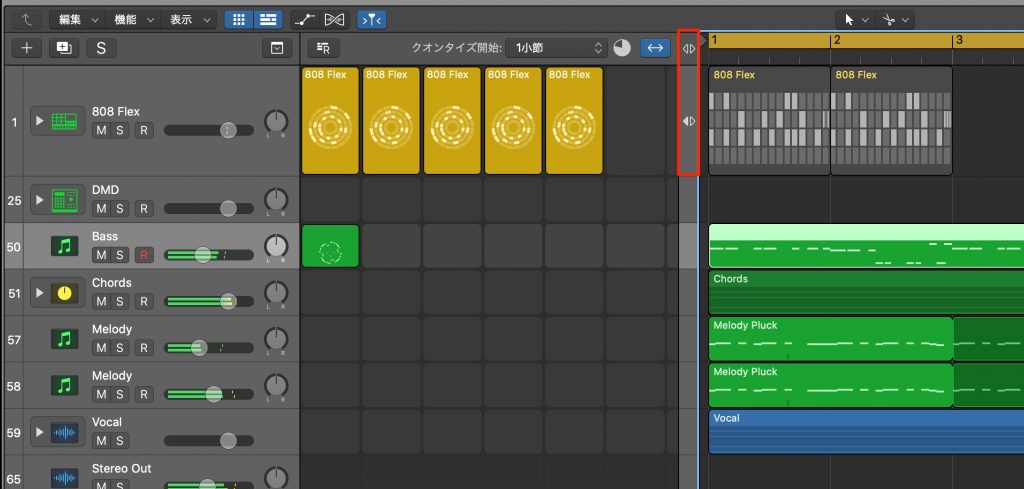
To return playback to the timeline, click the arrow shown in the screenshot.
Timeline regions on that track take over, and its Live Loops cell stops playing.
The arrow at the top switches playback for all tracks together.
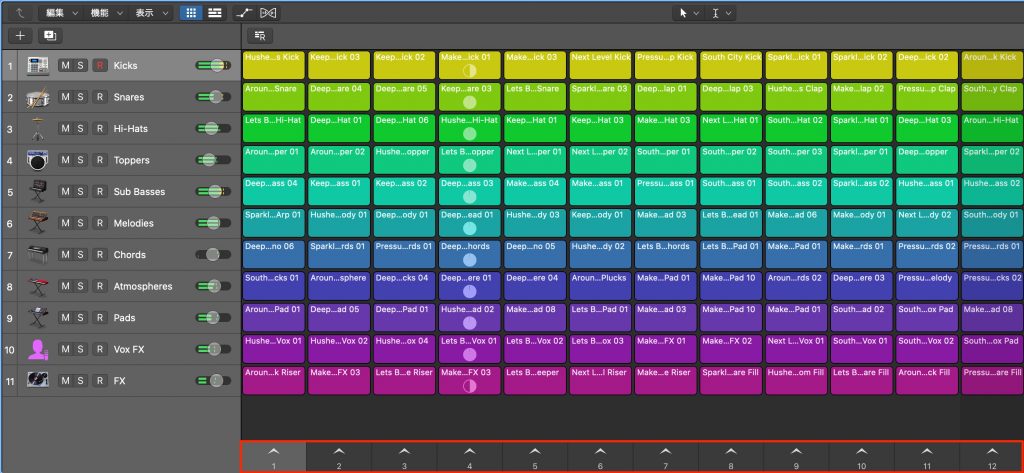
Click a scene trigger below the grid to launch the cells in that column together.
Organizing columns as verse, pre-chorus, and chorus sections can be useful.
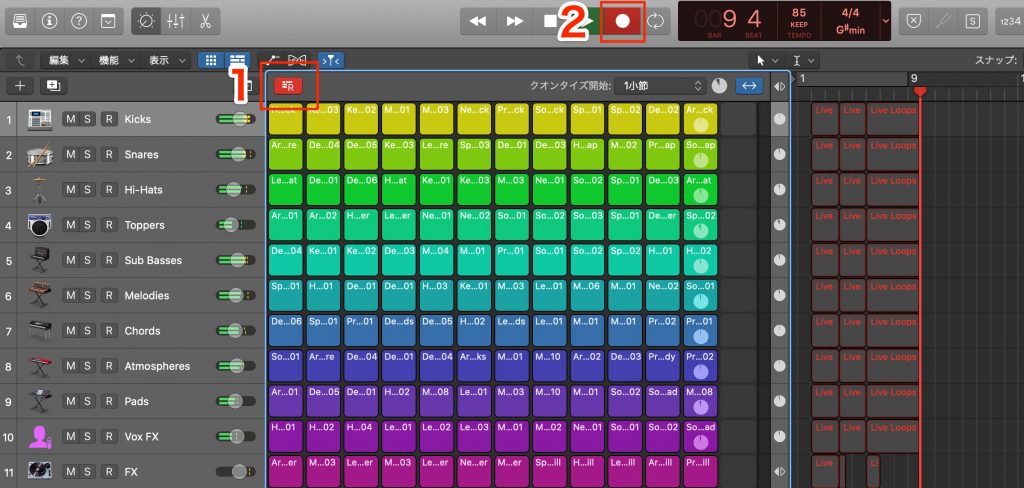
Enable the R button above Live Loops, then start recording from the transport to record the performance, including cell changes, into the timeline.
This is a convenient way to capture the arrangement in one pass.
Working with iPad
Version 10.5 also expanded integration with iPad through Logic Remote.
Original download link: https://apple.co/2WsWSBk
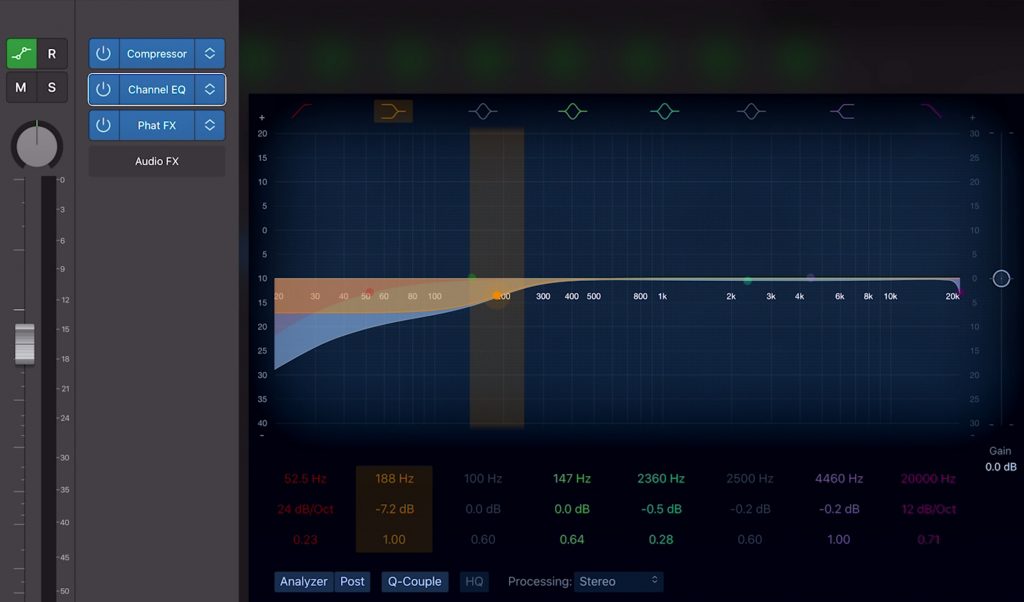
Adjust EQ with intuitive touch controls.
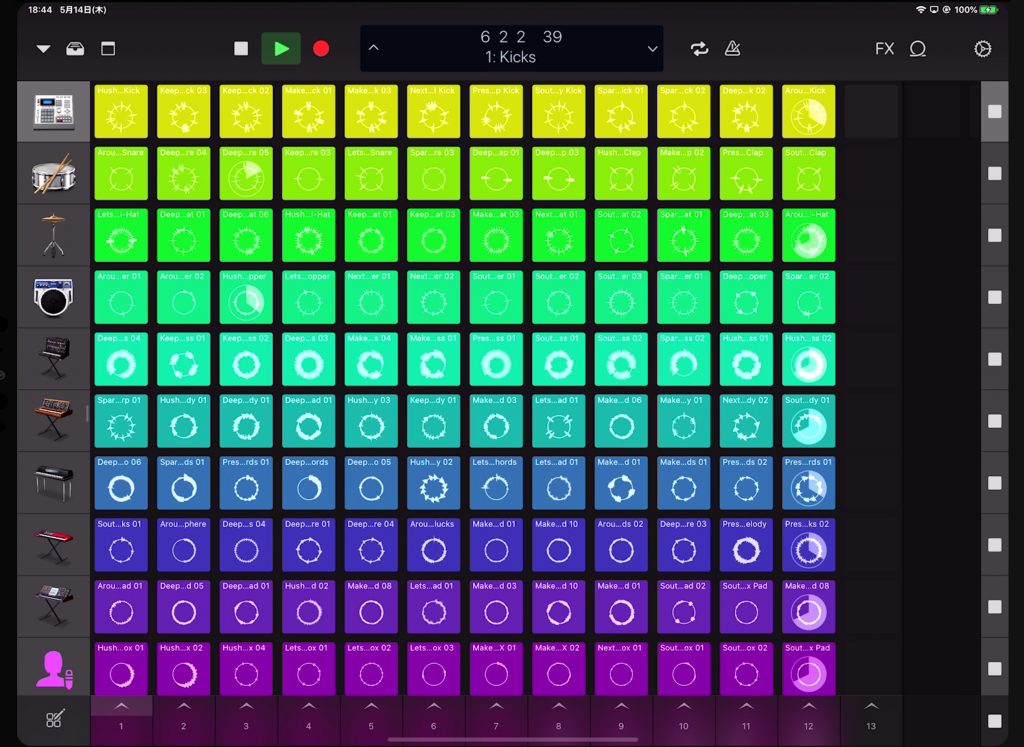
Control Live Loops directly from the iPad.
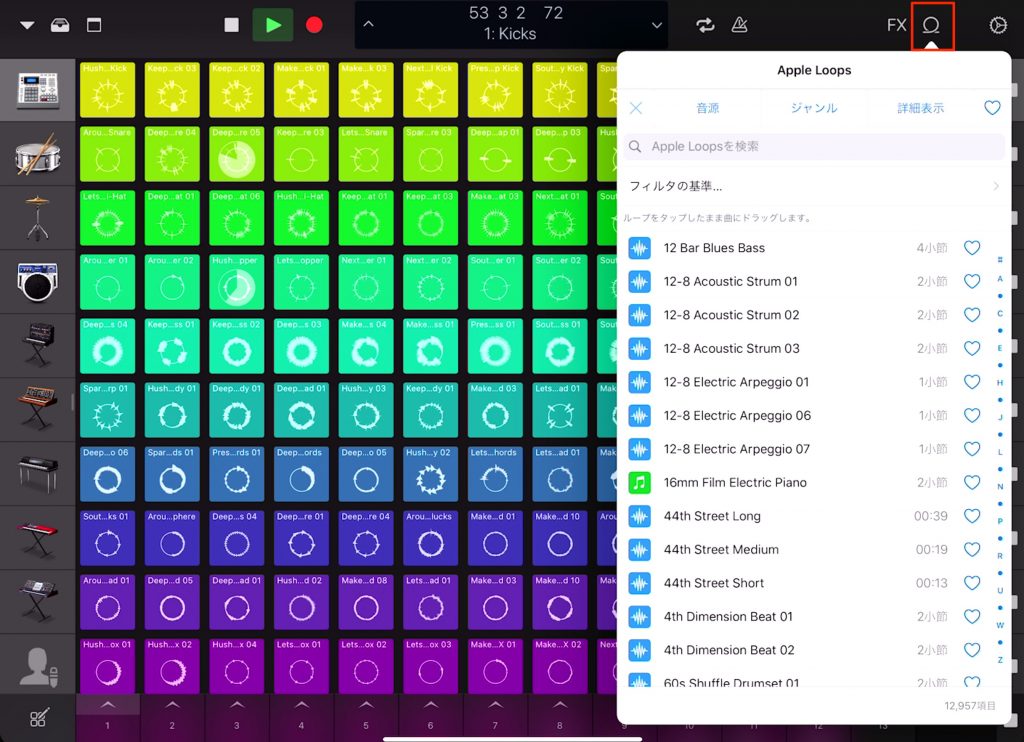
Audition and load Apple Loops.
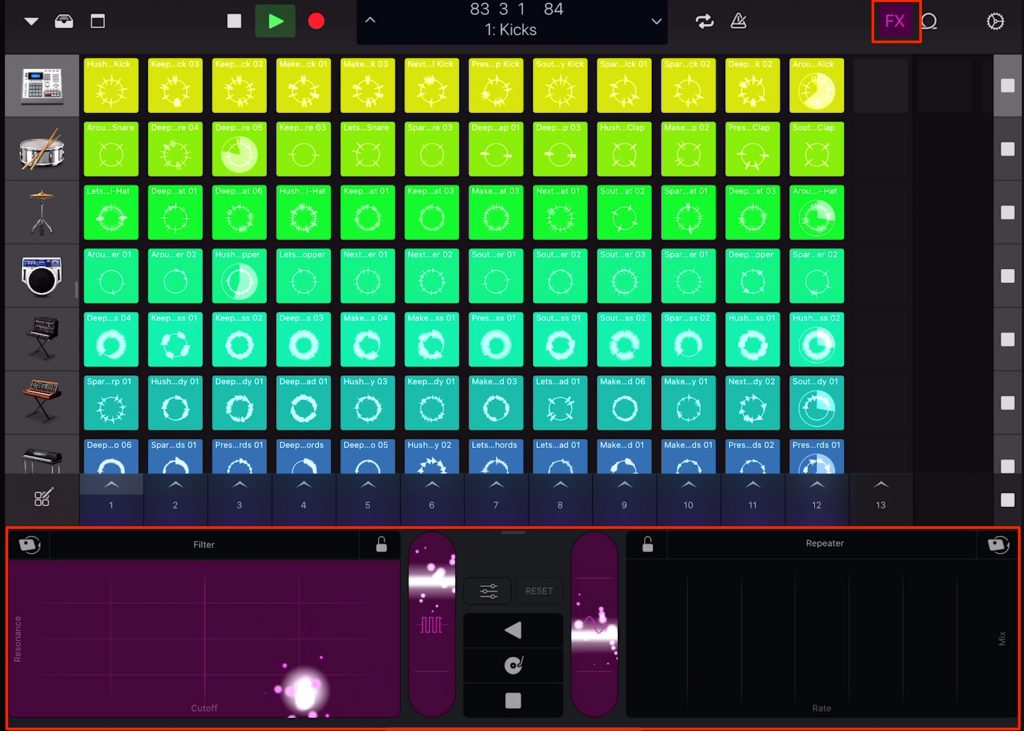
Remix FX on the master output lets you apply striking effects quickly with touch gestures.
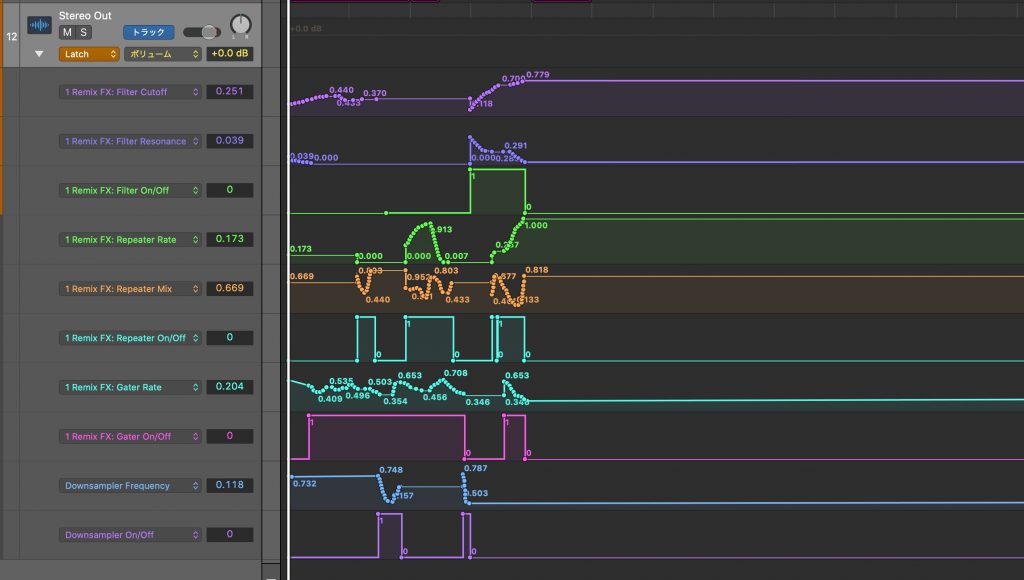
These effect changes can also be recorded as automation and edited afterward.
Frequently Asked Questions
Q1. Did Logic Pro X 10.5 require another purchase?
No. Version 10.5 was a free update for existing Logic Pro X owners. New users needed to purchase Logic Pro X. The original store link above is retained; it does not promise that this historical version is currently available to download.
Q2. What does Quick Sampler's Optimized import option do automatically?
It analyzes and optimizes properties such as tuning, loudness, loop points, and leading or trailing silence before loading the sample.
Q3. How do Drum Machine Designer and Drum Synth differ?
Drum Synth generates and shapes individual drum sounds. Drum Machine Designer combines multiple drum instruments into a kit for playing and programming patterns.
Q4. Are slices sent from Quick Sampler to Drum Machine Designer independent?
Yes. The pads have independent instruments and channels, so you can replace only the kick instrument or apply effects separately.
Q5. Could Logic Pro X 10.5 run on macOS versions earlier than 10.14.6?
No. The minimum requirement for version 10.5 was macOS 10.14.6 or later (64-bit). This historical requirement does not describe the current Logic Pro release.
NEW ARTICLES
Latest English Articles











