Soundtheory Gullfoss is an innovative AI-powered equalizer plug-in that automatically analyzes tracks and optimizes their frequency balance. This article explains its five main parameters—RECOVER, TAME, BIAS, BRIGHTEN, and BOOST—and provides practical guidance for intuitive sound shaping, whether you are a beginner or a more experienced producer. We also show how to use the limit markers to restrict the processing range, with applications ranging from individual tracks to mastering.
A Fresh Approach to EQ for Beginners and Experienced Producers Alike
Continuing from the previous article, we will explore Gullfoss from Soundtheory.
This time, let’s look at the main parameters that help bring your sound closer to what you have in mind.
Its excellent sound analysis can help you achieve the kind of sound quality that normally calls for considerable expertise.
The responsiveness and precision with which it optimizes the sound as you adjust each parameter are well worth experiencing!
Gullfoss 2: Parameters and Sound Shaping
- 1Automatic EQ Overview and Applying the Plug-in
- 2Parameters and Sound Shaping
- 3Authorizing Soundtheory Gullfoss with iLok
Selected Questions and Answers from YouTube

I don’t urgently need it right now, so I’ll pass for the moment, but I would definitely like to use it. Was the introductory price for the Windows version also $99?

Yes. As of March 15, 2019, the Windows version is available at an introductory price of $99 (¥11,000).
Gullfoss Parameters

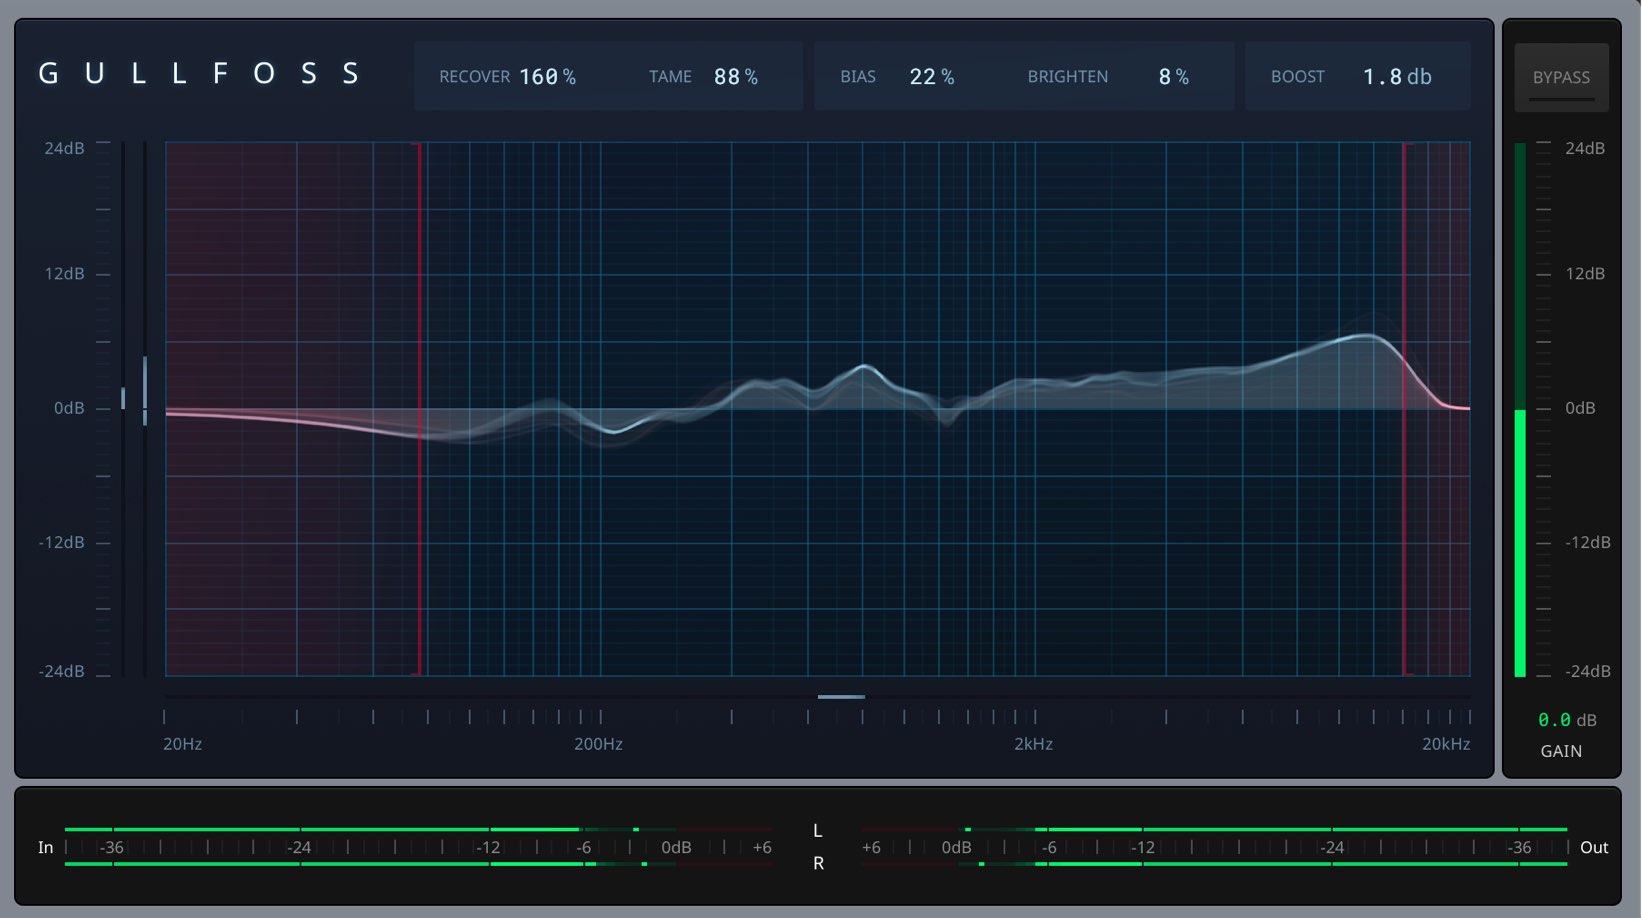
Use the five parameters at the top to shape the sound.
Unlike a conventional EQ, there is no concept of placing EQ points. This is a new type of equalizer.
RECOVER / TAME
Gullfoss automatically analyzes the track and divides its sound into two groups:
- The dominant frequency ranges that form the main character of the sound
- All other frequency ranges
A kick drum, for example, gets much of its character from its low-frequency content.
RECOVER and TAME work as follows:

- RECOVER: Raises the frequency ranges outside the dominant ones
- TAME: Reduces the dominant frequency ranges
These controls therefore help reduce imbalances across the spectrum and produce a more balanced track.
An important point is to choose your source sounds carefully during the mixing stage.
Making the most of the original material is a fundamental principle of equalization.

The display shows the frequency changes produced by each parameter.
Hovering the mouse over a parameter also highlights the meter associated with that control.
BIAS

When the dominant frequencies are less clear—for example, in mastering—BIAS determines whether RECOVER or TAME has the stronger influence.
- Positive values: Moving toward 100 increases the influence of RECOVER
- Negative values: Moving toward -100 increases the influence of TAME
It is best to make small adjustments while listening to the sound.
BRIGHTEN

This adjusts the brightness and definition of the sound.
It only works when RECOVER or TAME is set to a value other than 0.
- Positive values: Moving toward 100 produces a brighter sound that cuts through more clearly
- Negative values: Moving toward -100 produces a rounder, darker sound
Even at 0, the software automatically adjusts the sound toward an optimal balance.
Unless you have a particular reason to do otherwise, avoid extreme settings and make small adjustments within the range of -15% to +15%.
BOOST

This adjusts the perceived frequency balance associated with changes in listening level.
Increasing the value emphasizes the lows and reduces the mids.
Lowering the value has the opposite effect: the lows are reduced and the mids are raised.
Use this to control the overall sound to suit the genre and your preferences.
Using the Limit Markers

Drag the left and right limit markers to restrict the frequency range in which the equalizer operates.
For example, you may want to leave the low end unchanged during mastering,
avoid having the EQ interfere with sidechain processing between the kick and bass,
or reduce frequency masking mainly in the midrange.
The limit markers allow you to apply processing only within a specific range in situations like these.
Note that even when limit markers are set, changing the BOOST parameter still affects the sound.
GAIN

This controls the overall volume after equalization.
Keyboard Shortcuts

To reset a Gullfoss parameter to 0%:
- Mac: Option-click
- Windows: Alt-click
Try these shortcuts when checking the sound.
What did you think?
We tried Gullfoss on several tracks, and the results were consistently musical. It also made fine adjustments that would be difficult with other equalizers feel effortless.
Because it lets you shape sounds intuitively, we feel that even beginners can enjoy adjusting their sound with it.
Give it a try!
Frequently Asked Questions
Q1. Where can I use Gullfoss in my DAW workflow?
It can be used for a wide range of track-processing tasks, from adjusting individual tracks during mixing to processing multiple tracks during mastering. It handles fine adjustments that are difficult with conventional EQs smoothly, making it useful across genres.
Q2. What is a suitable setting for BRIGHTEN?
Avoid extreme settings and make small adjustments within the range of -15% to +15%. Working within this range can produce a natural, musical sound while complementing the software’s automatic optimization.
Q3. What should I keep in mind when using the limit markers?
Even if the limit markers restrict the processing range, changing BOOST still affects the overall sound. If you want to limit the effect to specific frequencies, pay attention to the BOOST setting as well.
NEW ARTICLES
Latest English Articles