Edit Multiple Vocal Tracks in One Window: A Complete Guide to VocAlign 7
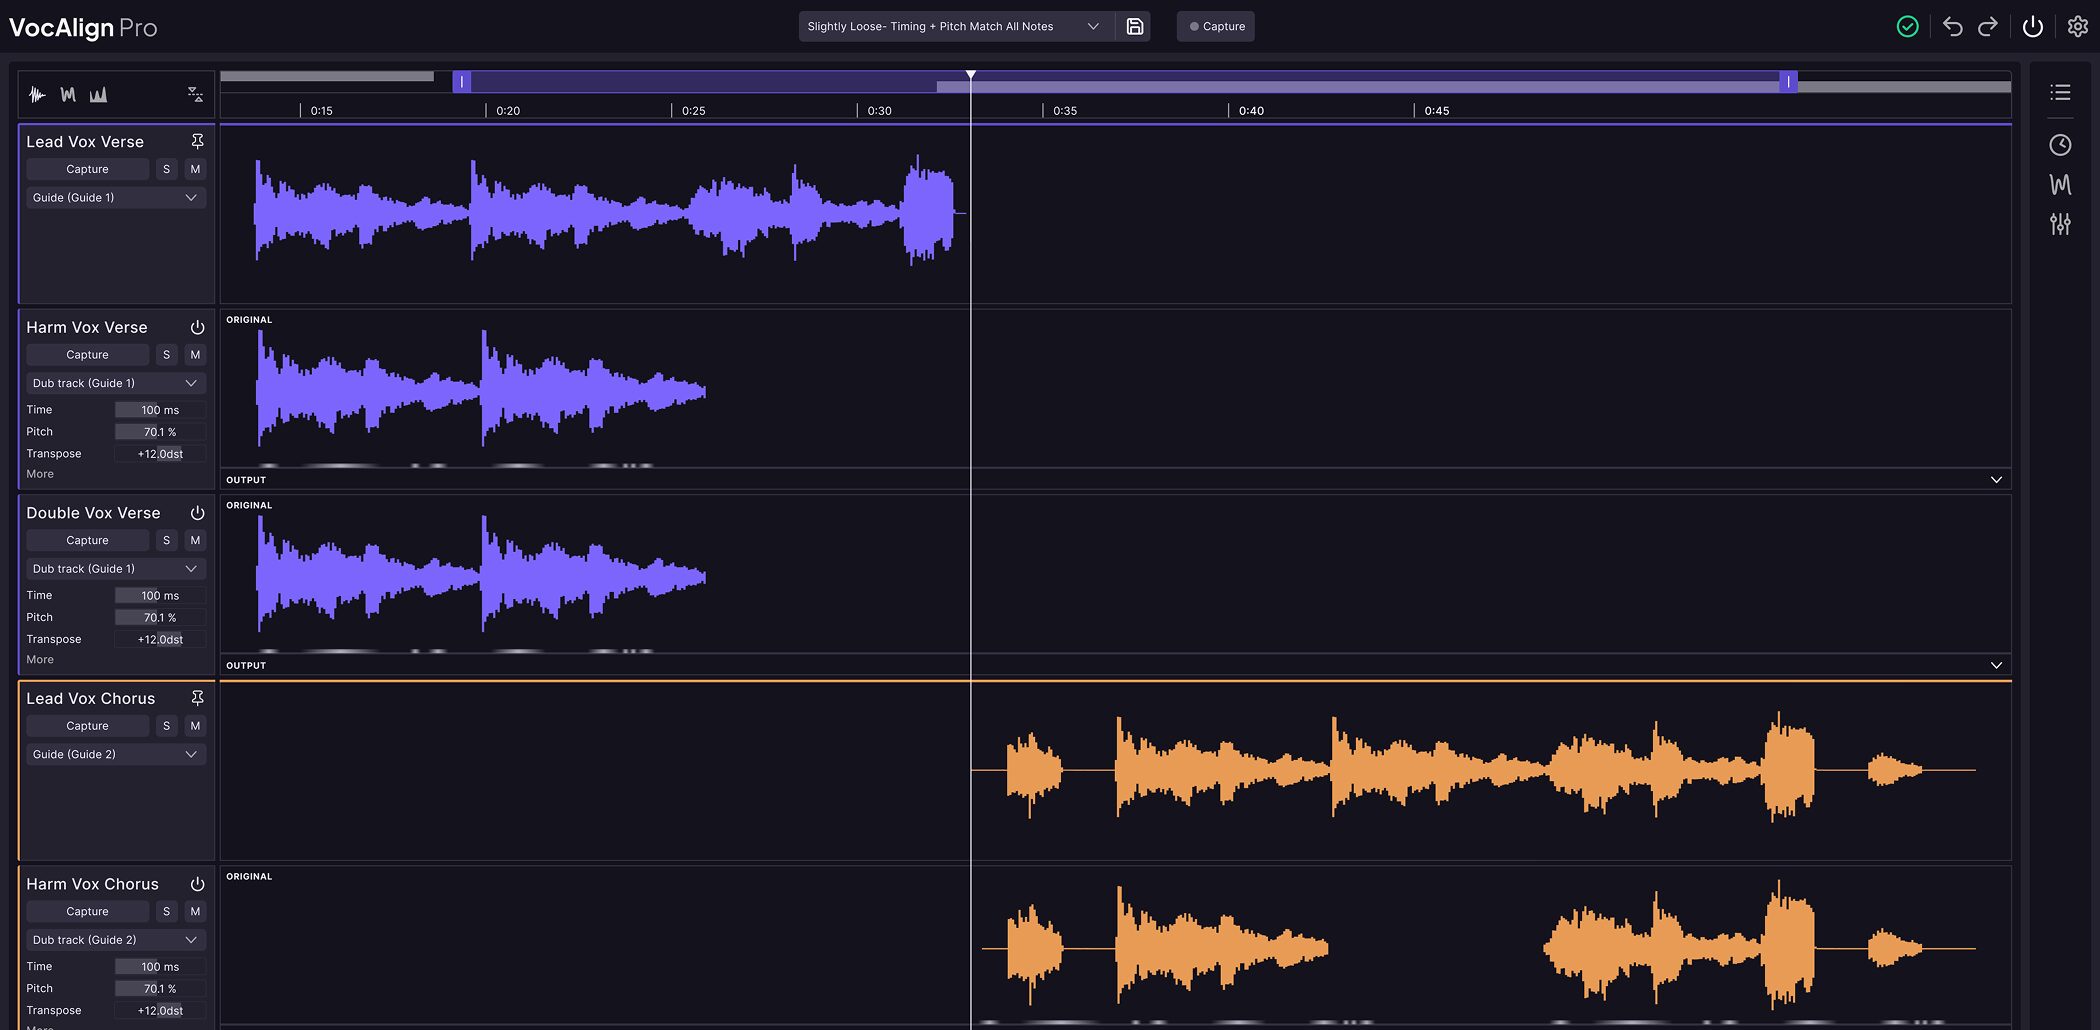
When you layer harmonies or doubles, their words may not line up with the lead vocal, leaving the parts less cohesive than you intended.
This is a common situation when mixing vocal songs or covers.
Fixing it by hand means zooming in on waveforms, finding the start of each syllable, moving it a little, then listening again. The more harmony and double tracks you have, the longer this painstaking process takes.
That is where Synchro Arts’ VocAlign comes in.
It is an alignment plug-in that automatically matches the timing of vocal performances.
Compared with earlier versions, the latest VocAlign 7 has a more intuitive interface, designed to make aligning vocal timing easier.
VocAlign 7 Features

VocAlign 7 is available in Standard and Pro editions.
The main features and highlights of this version are:
- Multitrack support: Process leads, doubles and harmonies together in one window.
- Flexible guide selection: Change which track serves as the reference, even partway through your work.
- Track Panel: See which tracks are assigned to which guides at a glance.
- More efficient capture: Even in DAWs without ARA support, capture all tracks together in a single playback pass.
- SmartPitch: Correct pitch only where needed while preserving the pitch differences between harmony parts (Pro).
- Formant control: Adjust each track independently, including for creative sound design (Pro).
- SynchroLink: Integrate with RePitch to handle pitch correction and alignment in one workflow (Pro).
Compare Before and After
We have prepared some examples so you can hear what VocAlign can do.
Lead Vocal and Double

This is a typical double-tracking situation: the same phrase was sung twice, but the starts and ends of the words do not line up.
The vocal performances are out of sync, making the words sound less defined.
The starts of the words now line up and the timing differences are resolved. The result sounds so focused that the stereo recording almost seems mono.
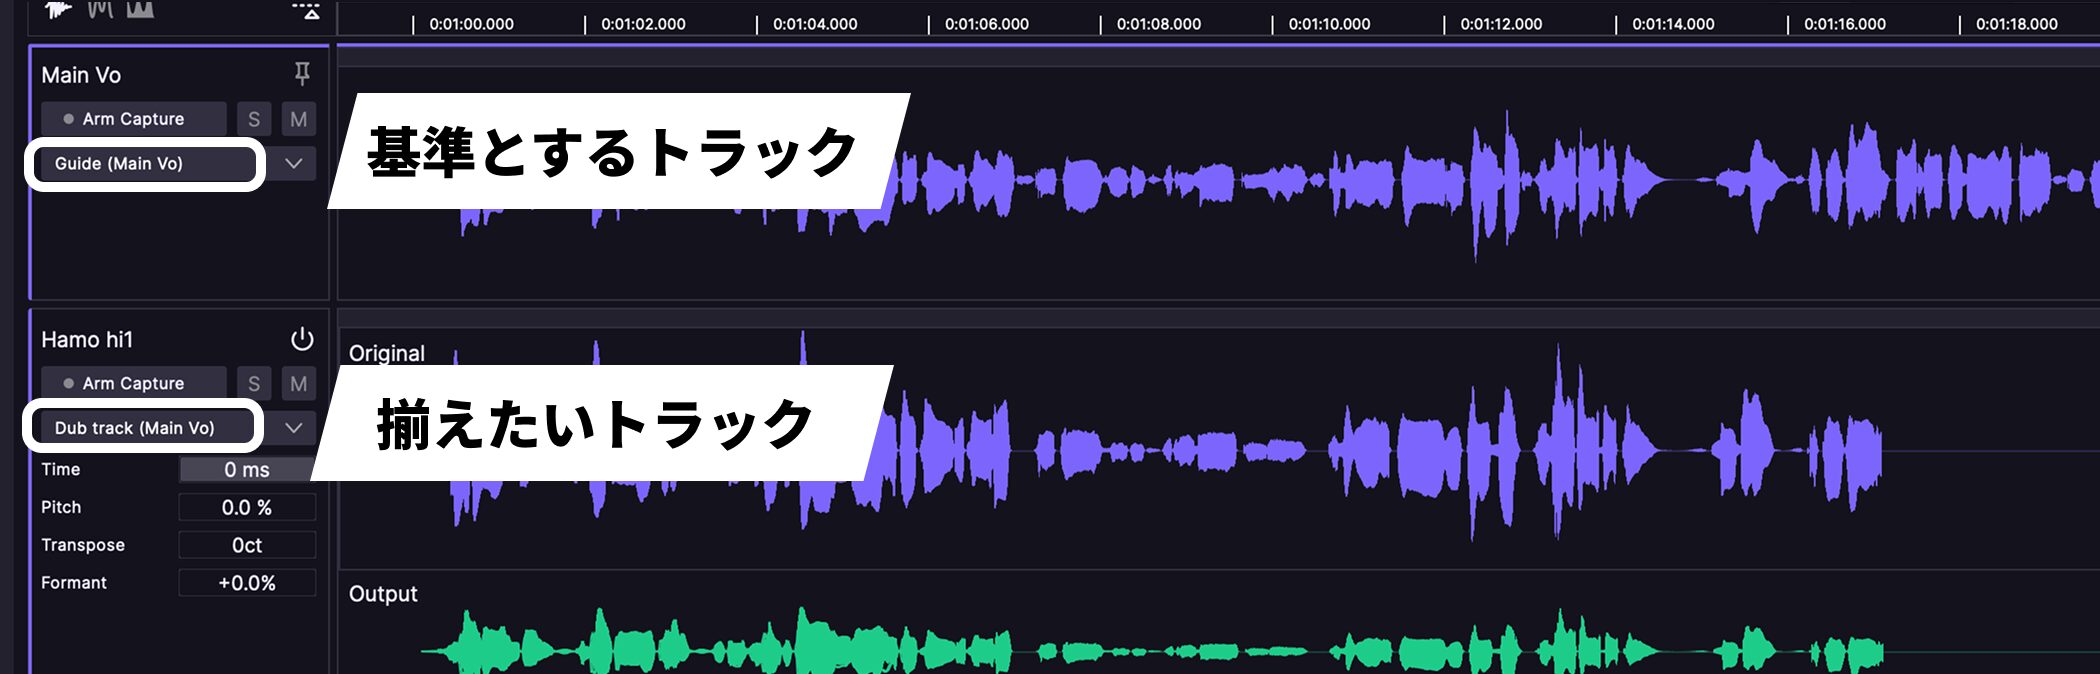
All we did was capture the lead vocal and double in VocAlign, then assign the Guide (reference track) and Dub (track to align).
We did not adjust any parameters.
One of VocAlign’s biggest strengths is that you can align vocals quickly to this standard without special knowledge or techniques.
Multiple Harmony Parts
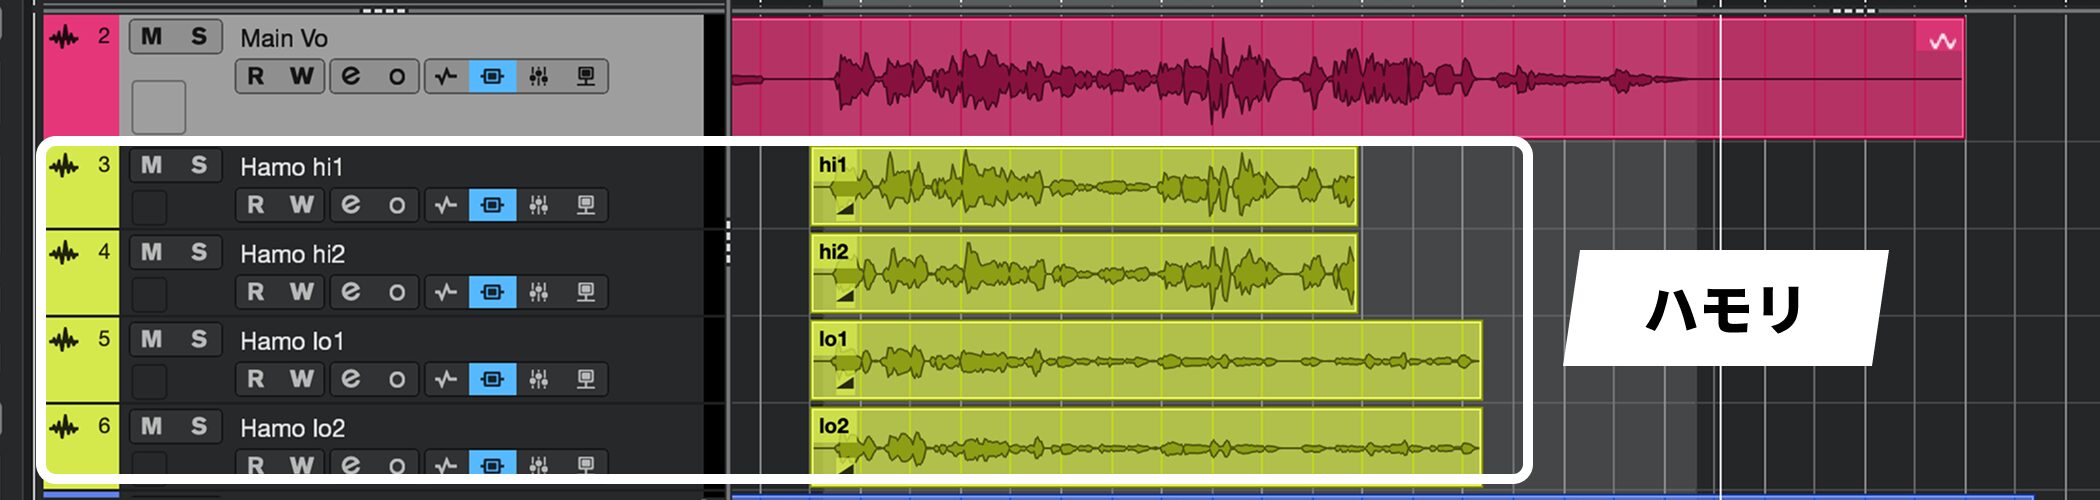
Harmonies generally involve at least two tracks, and more are added when a thicker sound is needed.
Aligning them manually one at a time takes a considerable amount of work.
Each harmony is out of sync with the lead vocal, so the parts sound disjointed.
All the harmony parts now line up with the lead, making the harmony easier to hear.
In VocAlign 7, simply assign the Guide and Dubs to align multiple harmony parts together.
If something still needs attention, you can then adjust each track individually.
Two Ways to Open VocAlign in Your DAW
From here, we will use Cubase to demonstrate the actual workflow and features.
You can open VocAlign either as an ARA extension or as an insert plug-in.
Open as an ARA Extension
ARA (Audio Random Access) is a DAW integration feature available only in supported DAWs.
Because the plug-in can access audio files in the DAW directly, waveforms load quickly and the integration is convenient to work with.
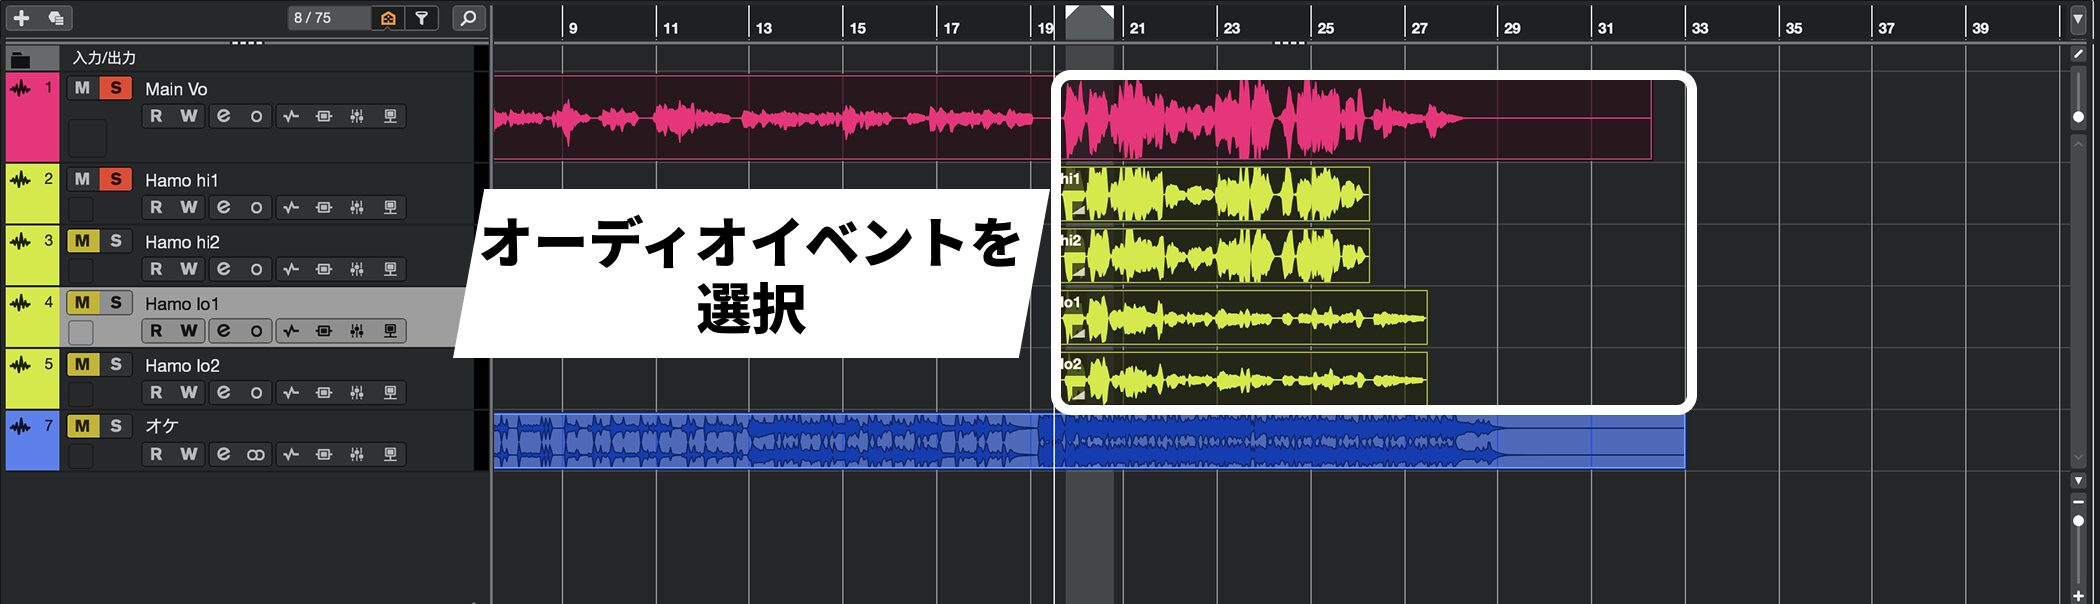
Select the audio events you want to process with VocAlign.
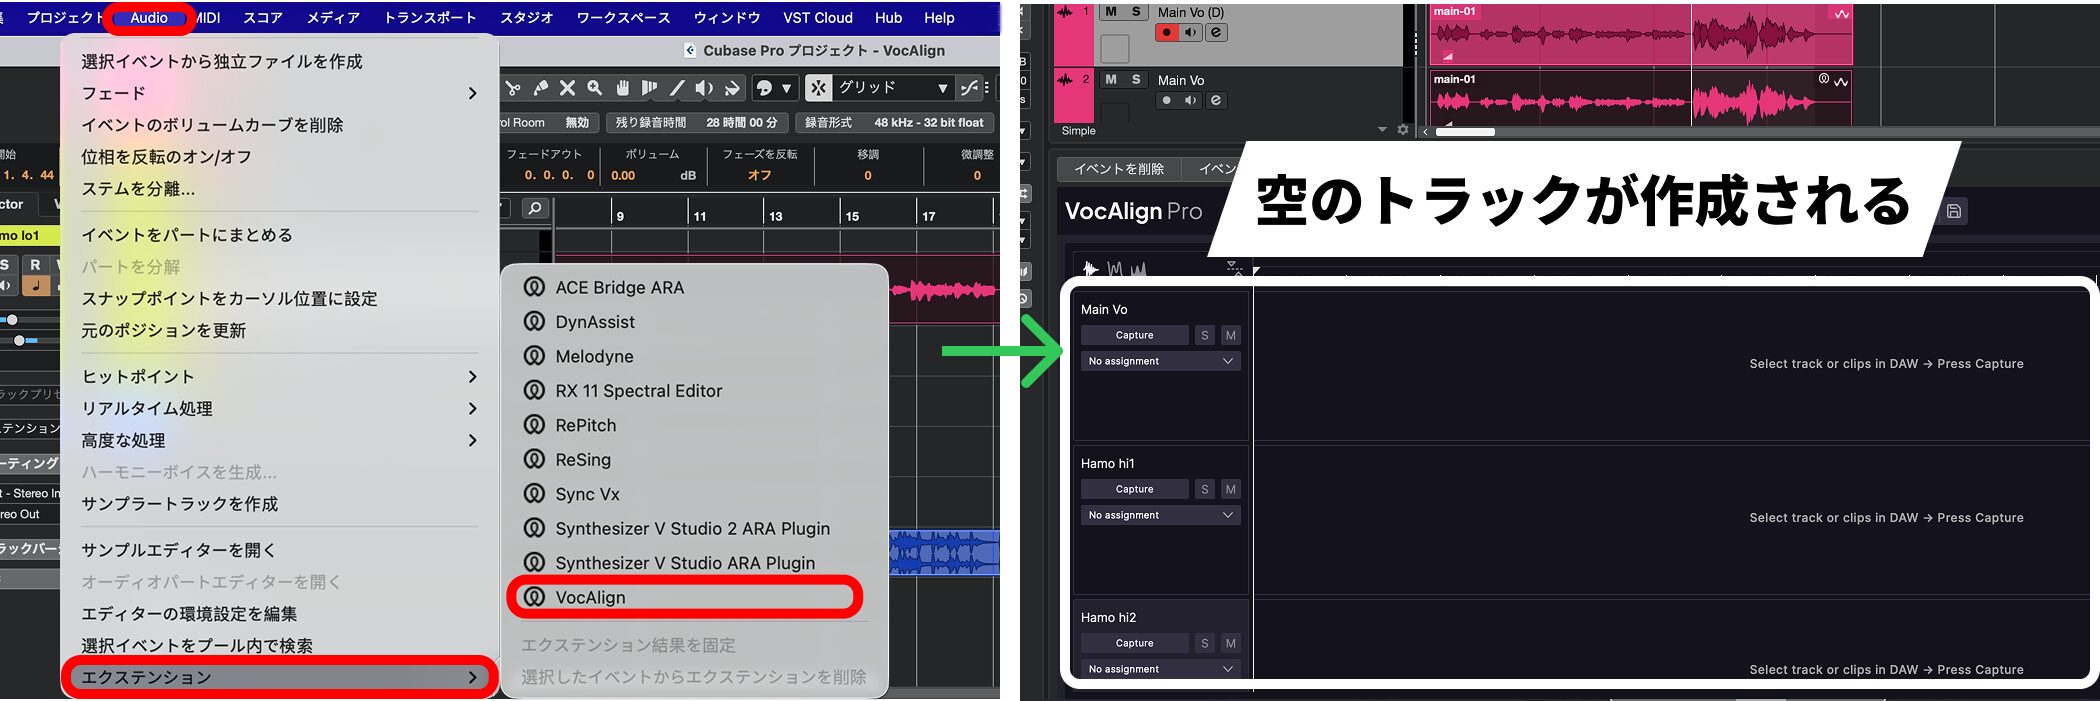
Choose VocAlign under Audio → Extensions. Tracks will be created for the selected audio.
The tracks are initially empty.
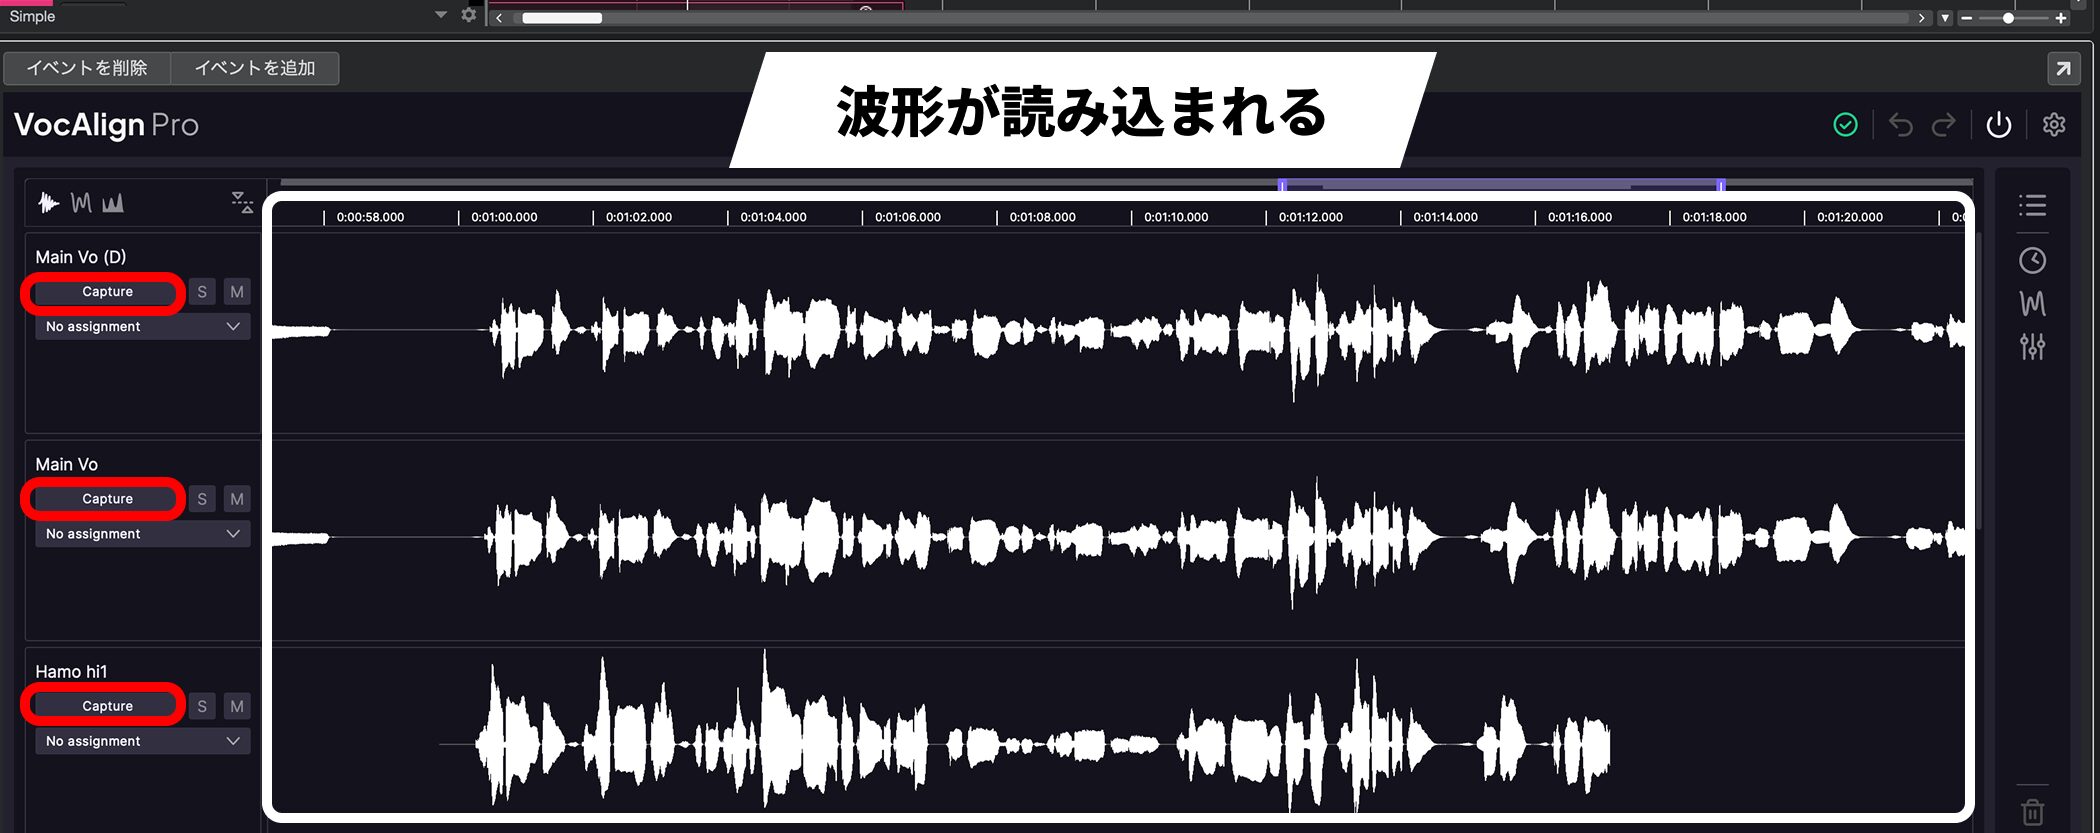
Click Capture on each track to load its waveform instantly.
Ableton Live and FL Studio, for example, do not support ARA.
When using VocAlign in a DAW without ARA support, open it as an insert plug-in.
Open as an Insert Plug-in
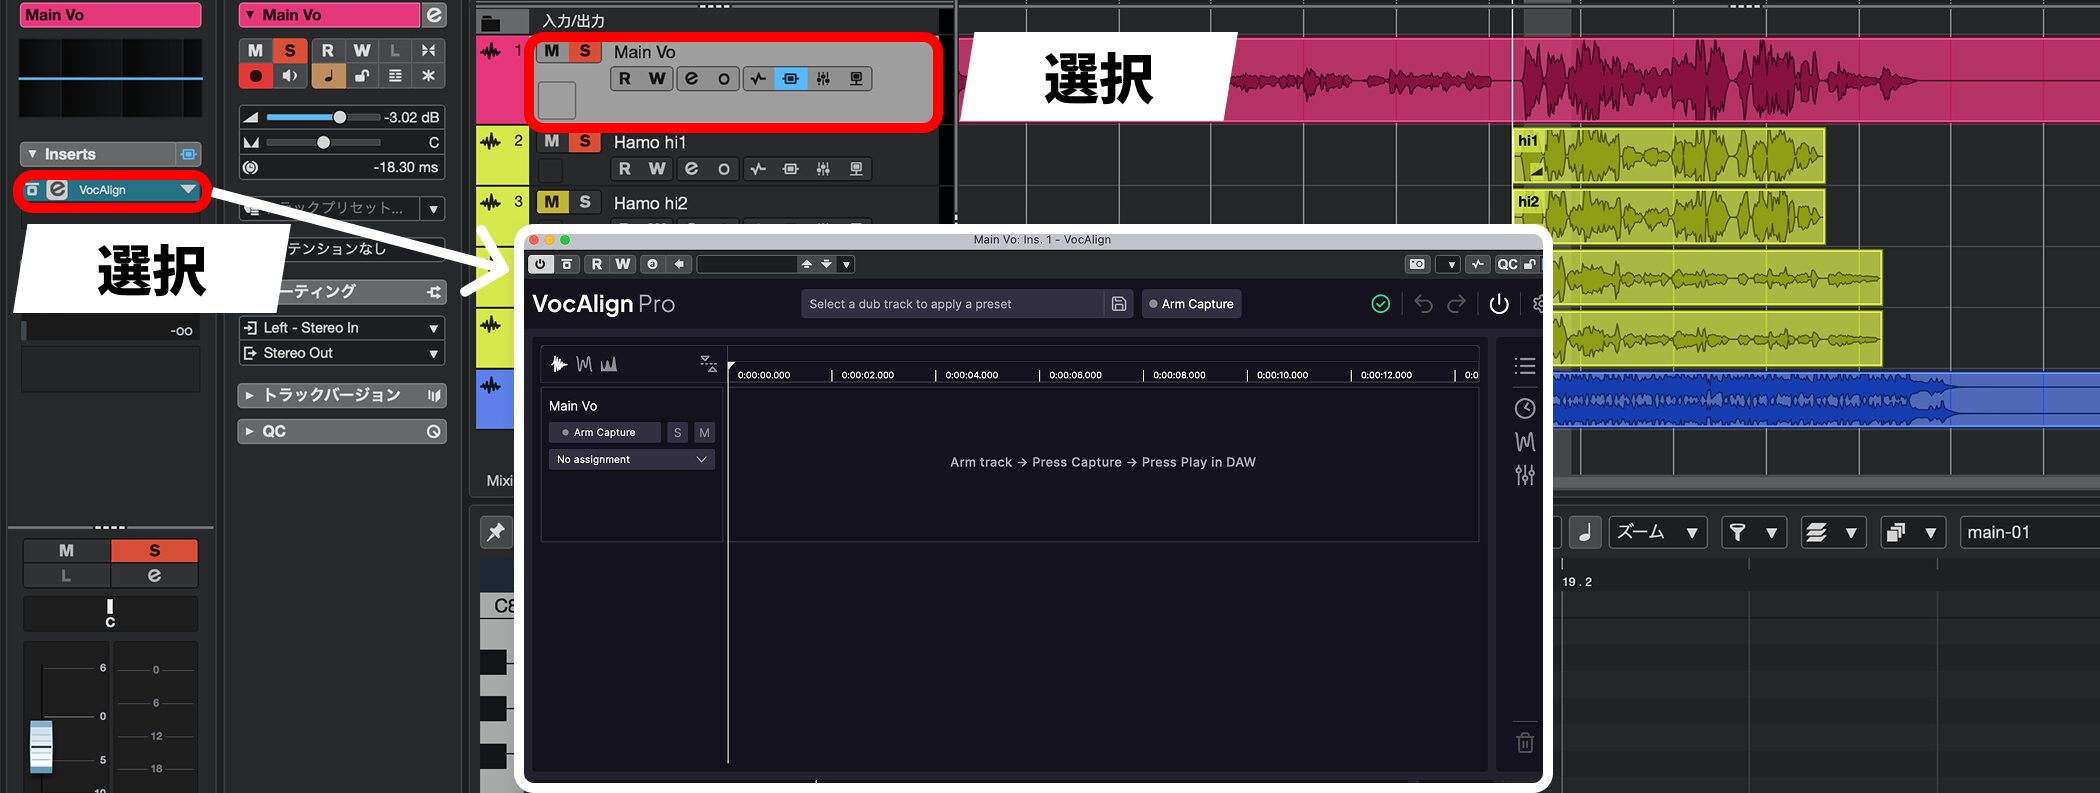
Choose VocAlign in the Inserts section of the track you want to process. It opens in a separate window.
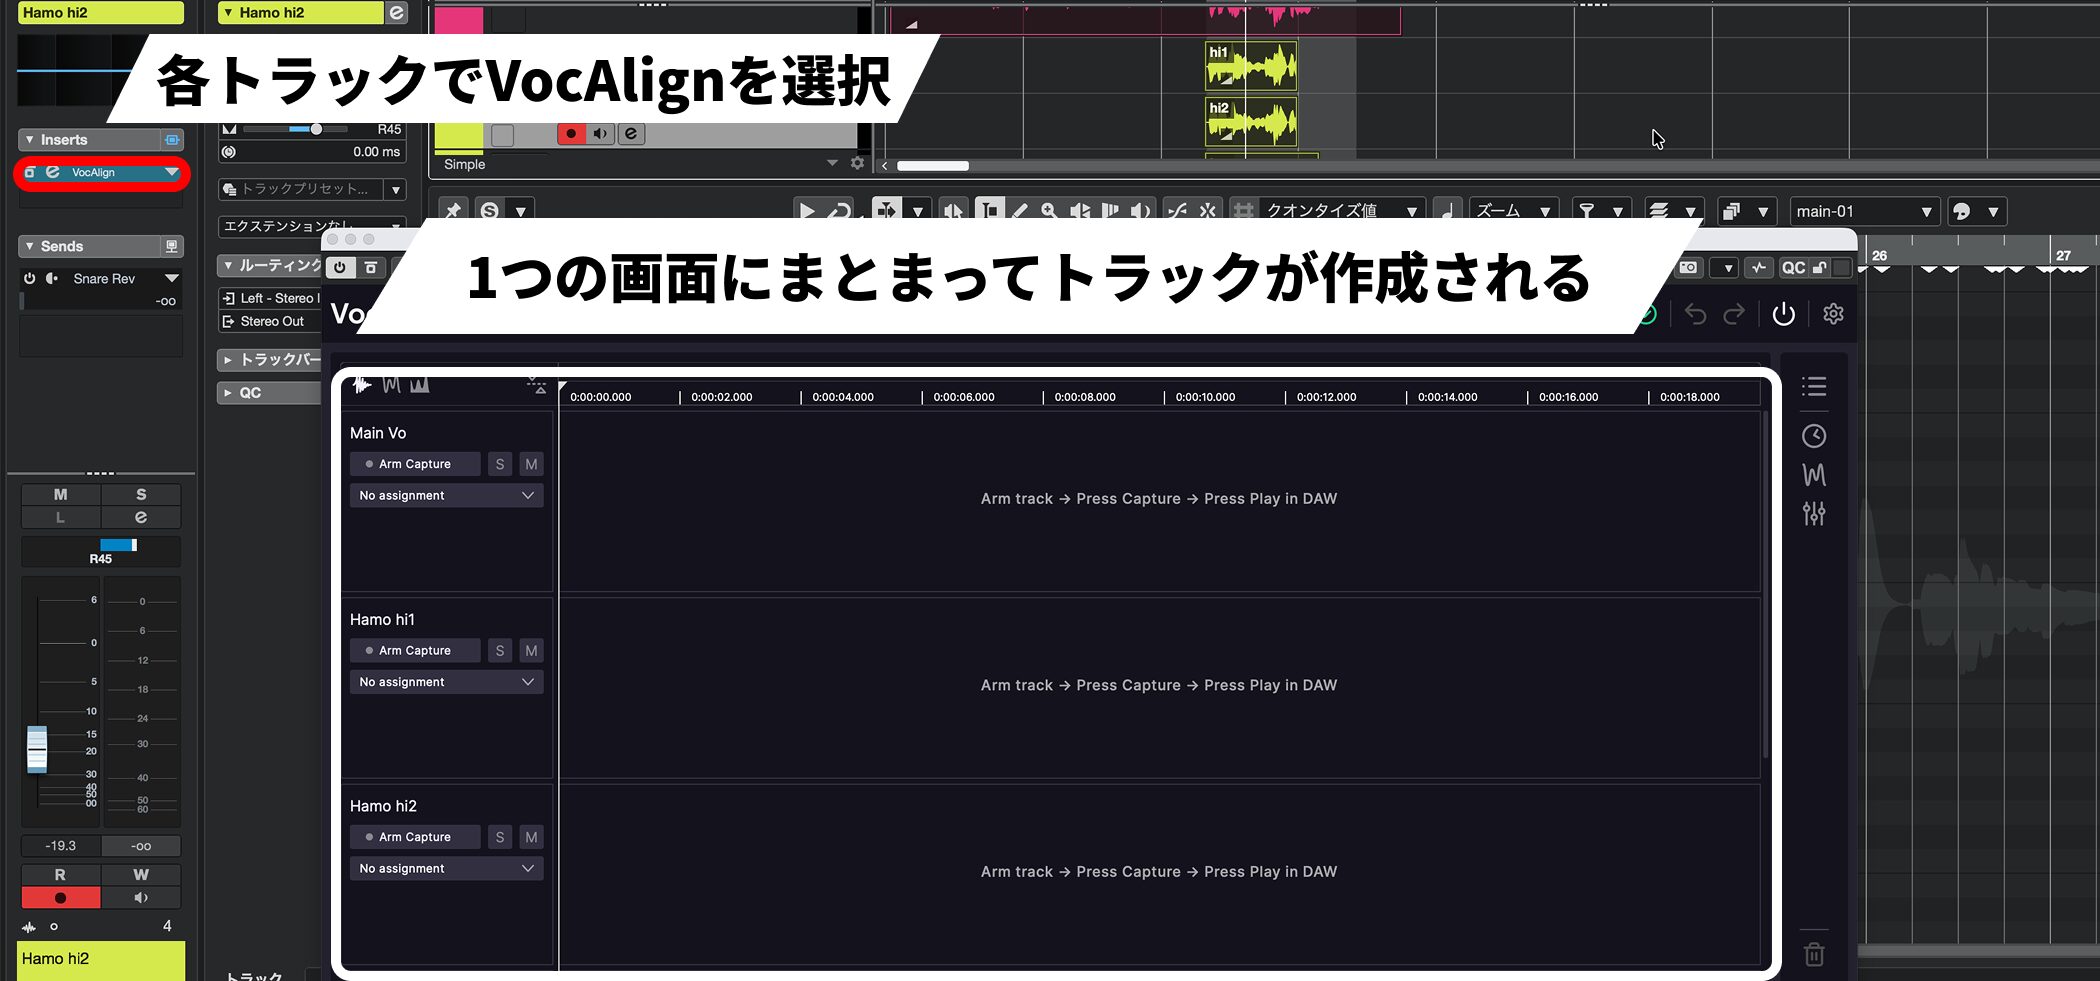
To process several tracks together, insert VocAlign on each one. They will all appear in a single window.
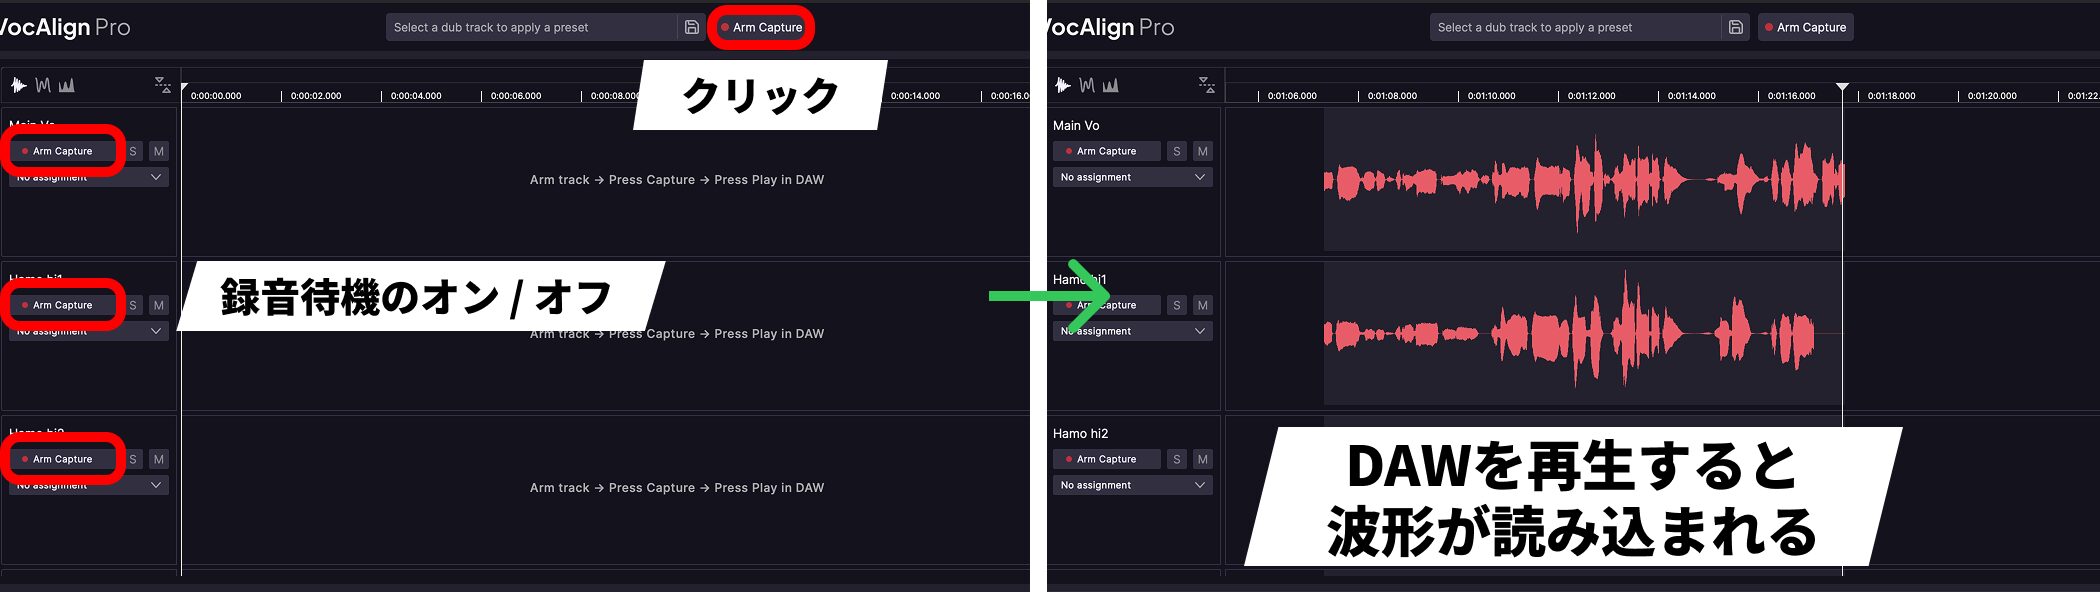
Click Arm Capture at the top of the window to arm all tracks for capture together.
To arm individual tracks, toggle Arm Capture on or off for each track.
Then play your DAW to capture the waveforms from the section played.
The Basic Workflow in Two Steps
Once the waveforms have been captured, the basic workflow takes just two steps.
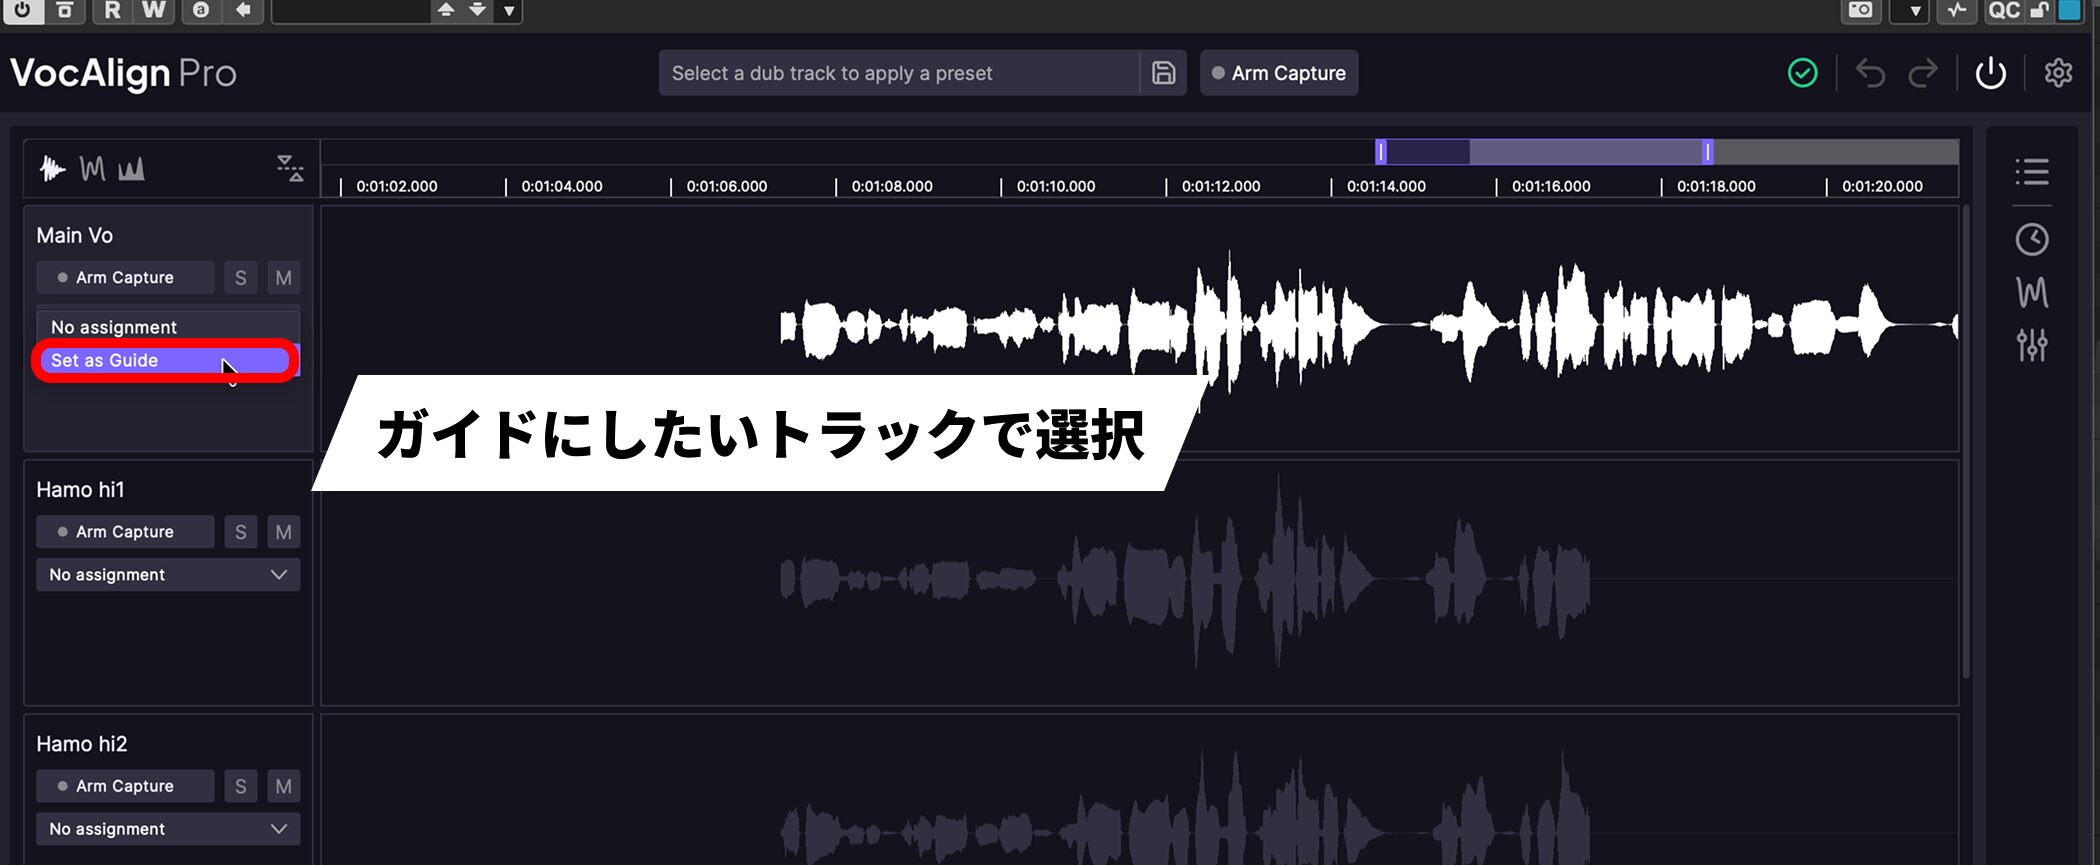
Open the drop-down menu on the track you want to use as the Guide (reference), and choose Set as Guide.
Here, we have set the lead vocal as the Guide.
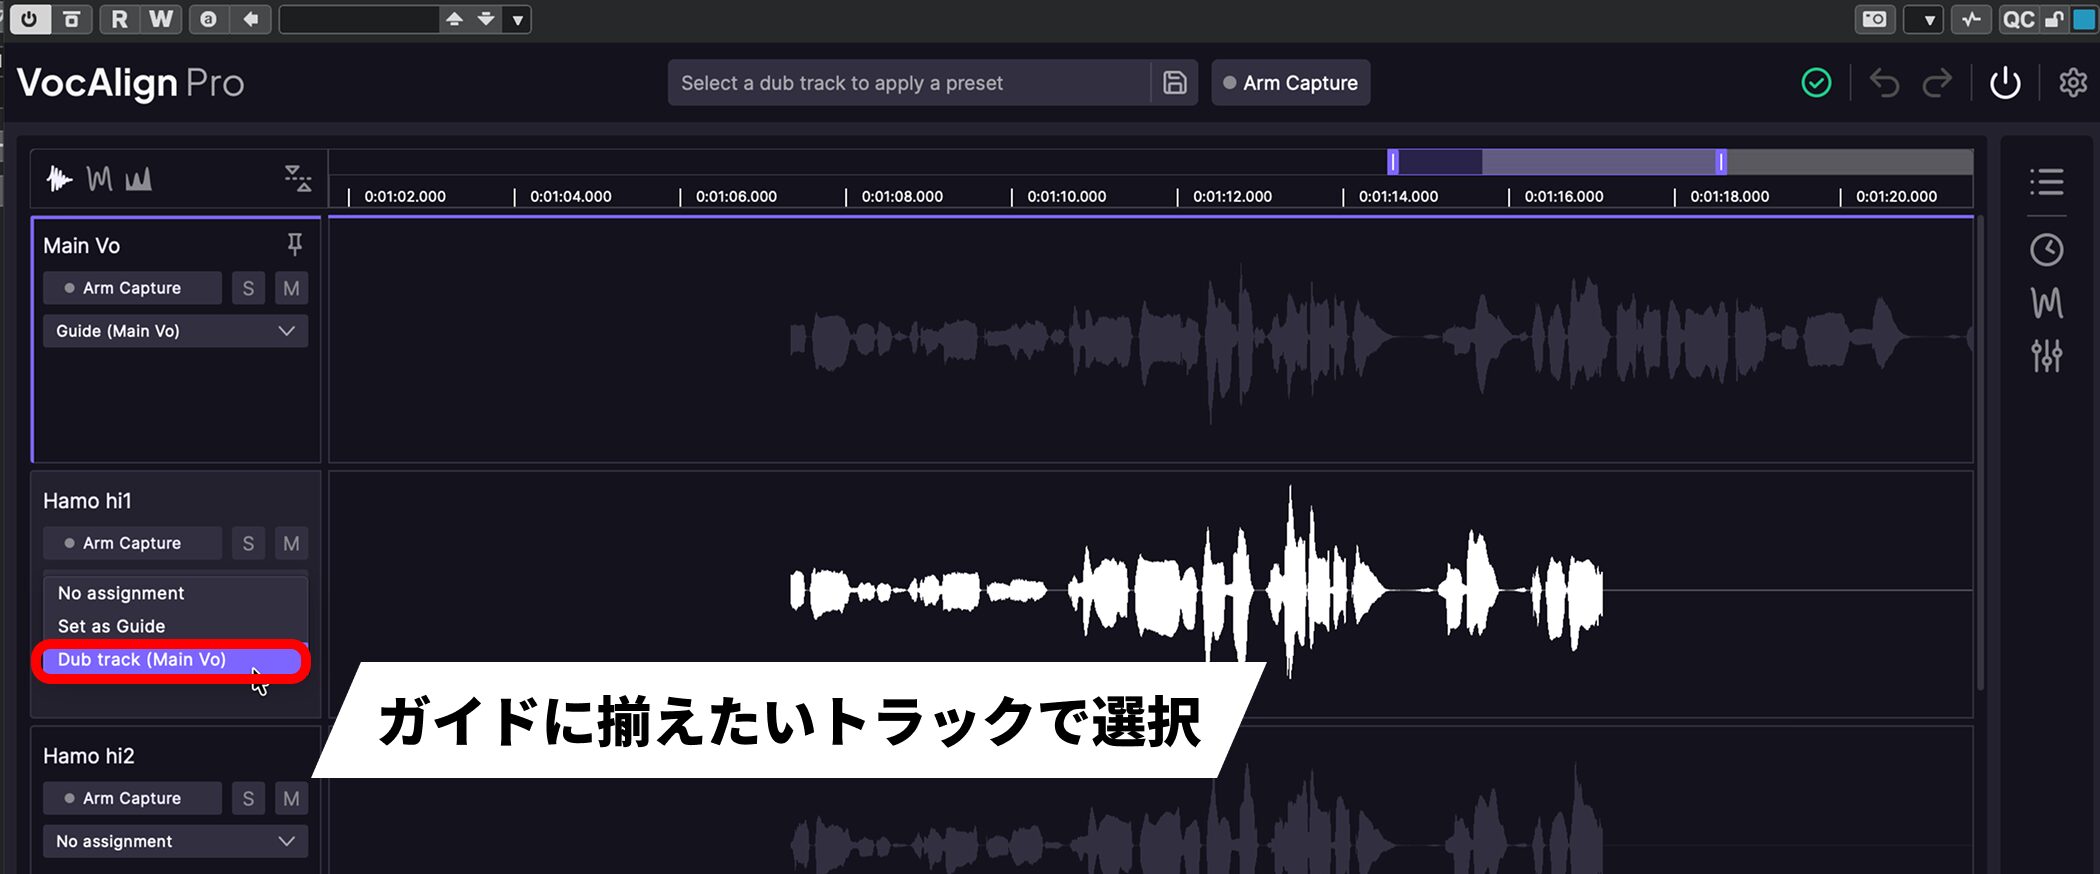
Open the drop-down menu on a track you want to align to the Guide, and choose Dub track.
We have assigned the harmony as a Dub.
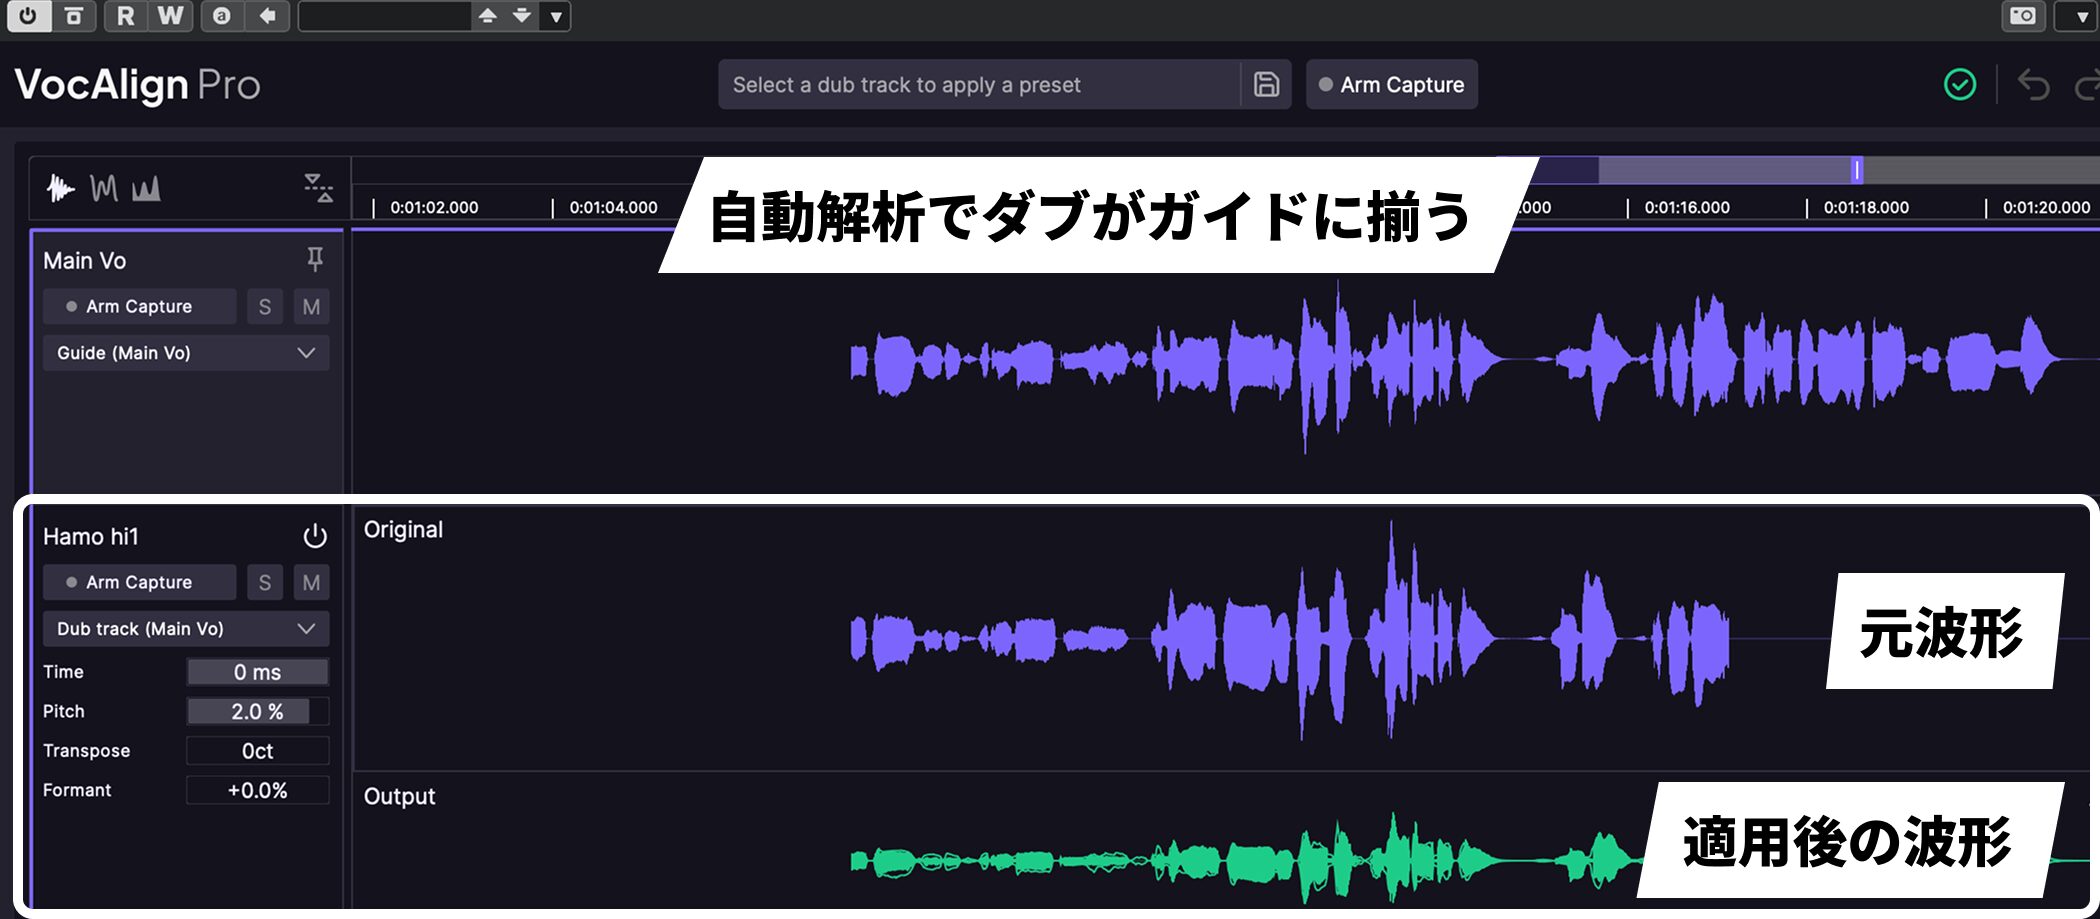
Analysis runs automatically as soon as the assignment is made, aligning the Dub audio with the Guide audio.
After analysis, Original shows the waveform before processing and Output shows the processed waveform, so you can also see how much has changed.
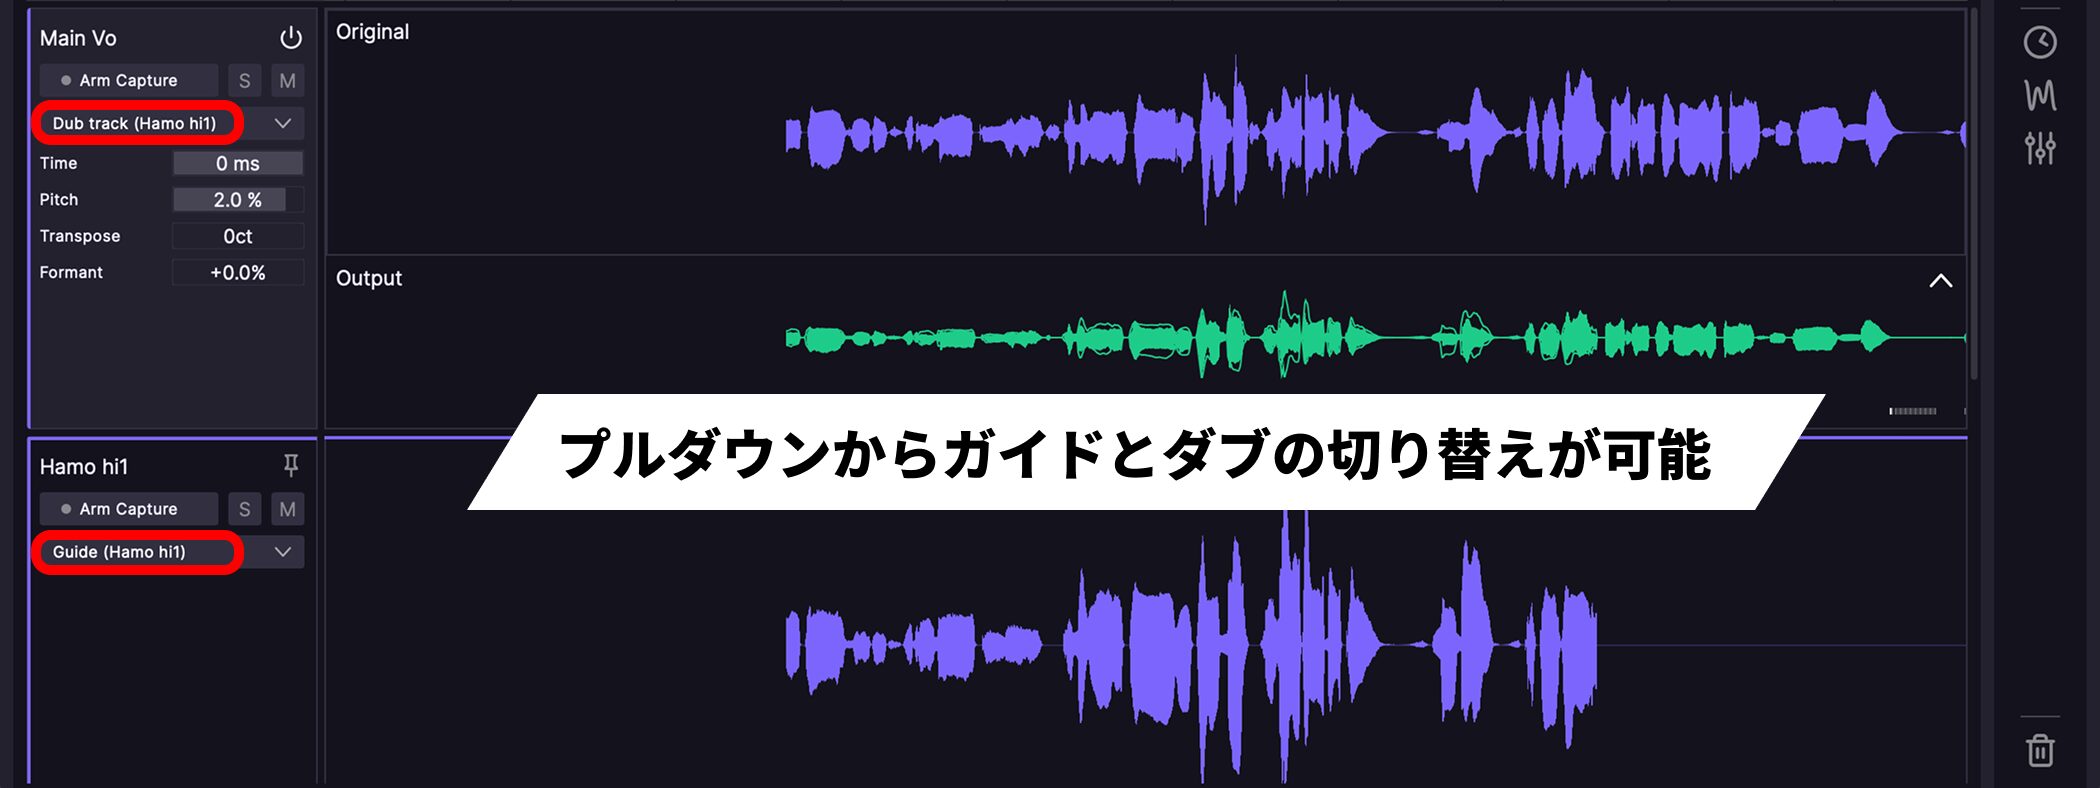
Change the Guide or Dub by selecting a different assignment from the same drop-down menu.
For example, when aligning doubles or several harmony parts, you can switch which is the Guide and which are Dubs even after reviewing the analysis results.
Work with Multiple Tracks Together
You can align multiple tracks entirely within this window.
Here, we will use the lead vocal as the Guide and assign several harmony parts as Dubs.
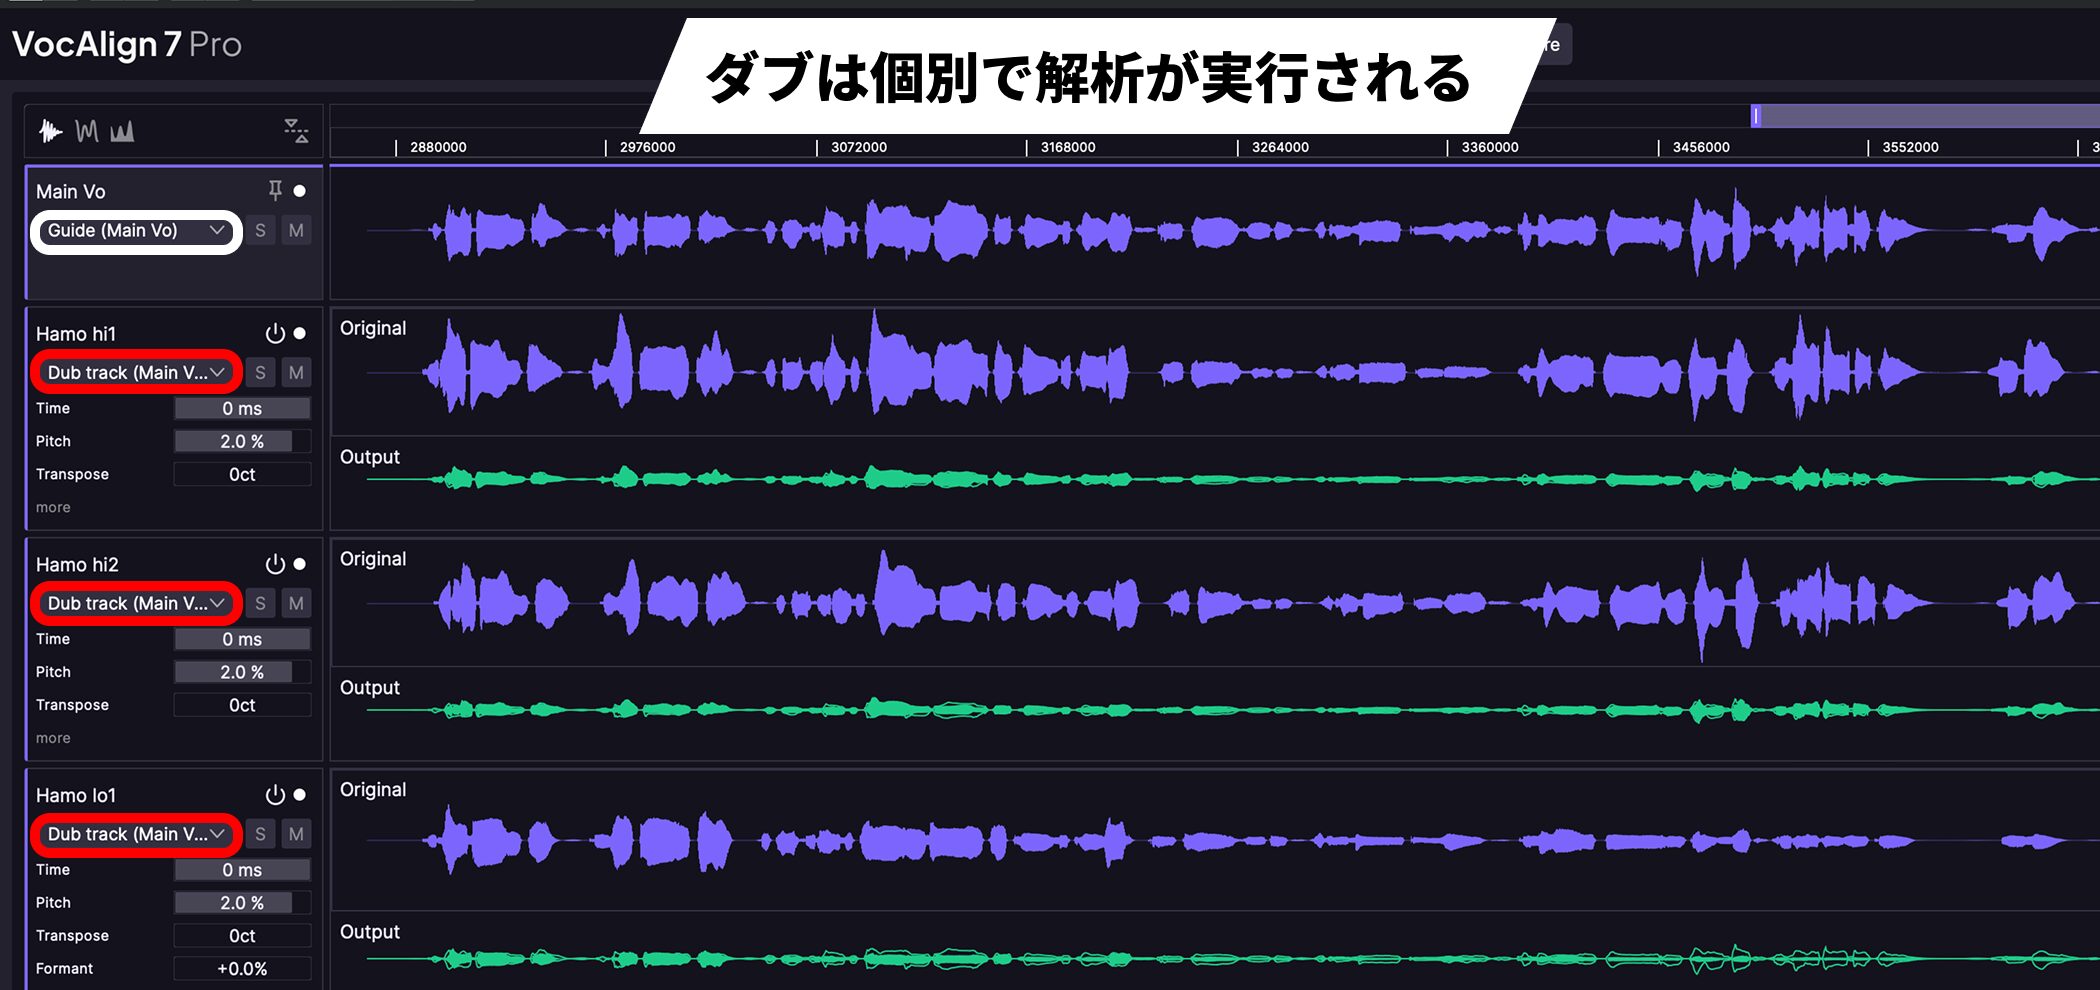
Choose Dub track for each captured harmony track. Each is analyzed independently, and its Output is displayed.
The settings are also independent for each track, so you can vary the amount of processing for each Dub.
See the Whole Setup in the Track Panel
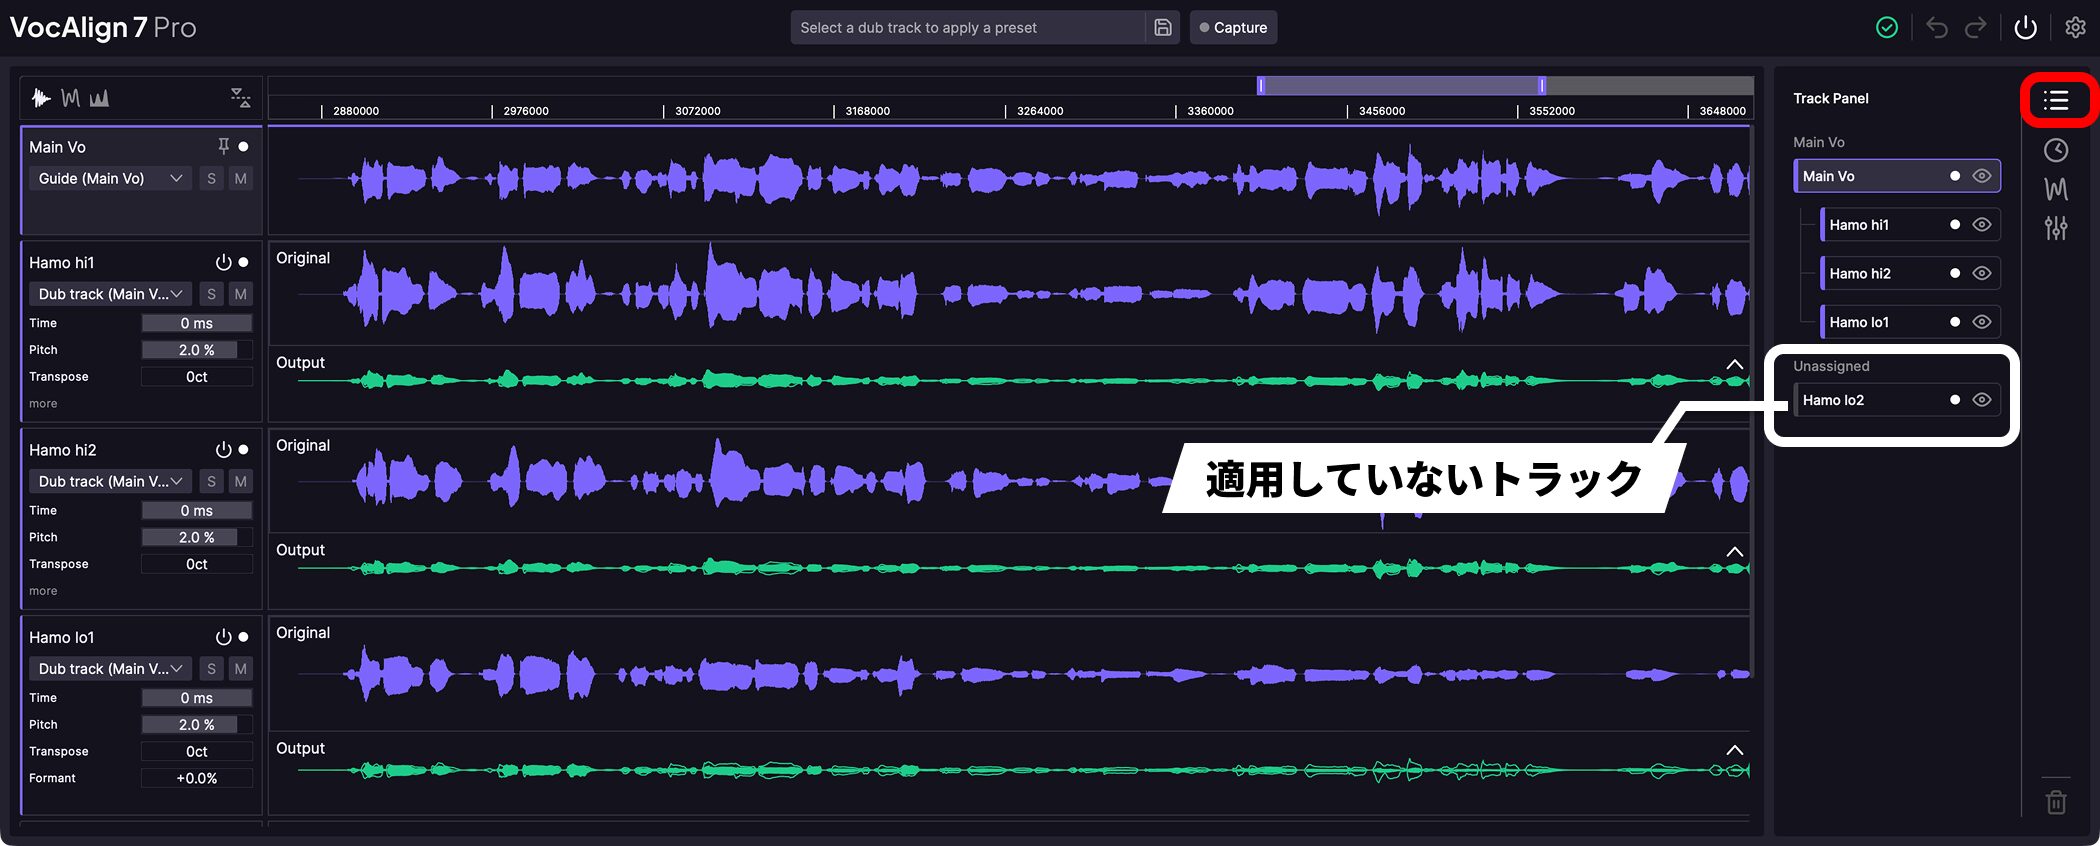
To see how everything is connected, open the Track Panel using the icon on the right.
Dubs appear in a hierarchy beneath their Guide, making it easy to spot tracks that have not yet been processed.
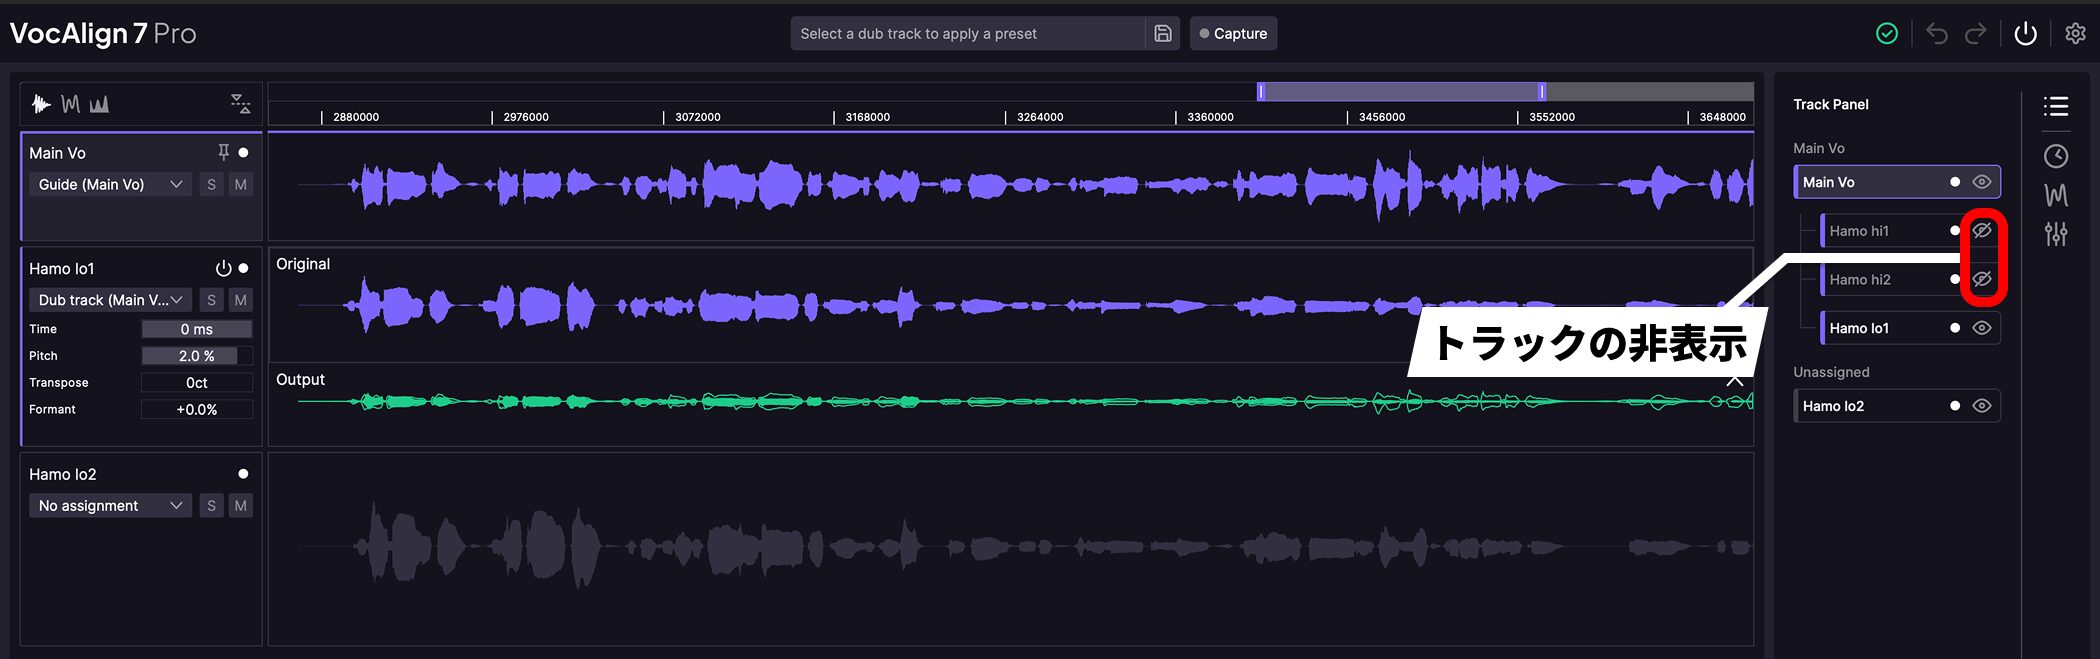
Click the eye icon to hide a track, reducing the need to scroll through the window.
Even with many tracks, you can keep an overview of your work and proceed efficiently.
Use Presets
There are many settings, but presets are provided for different types of material.
Choosing a preset first is a useful shortcut before adjusting each setting individually.
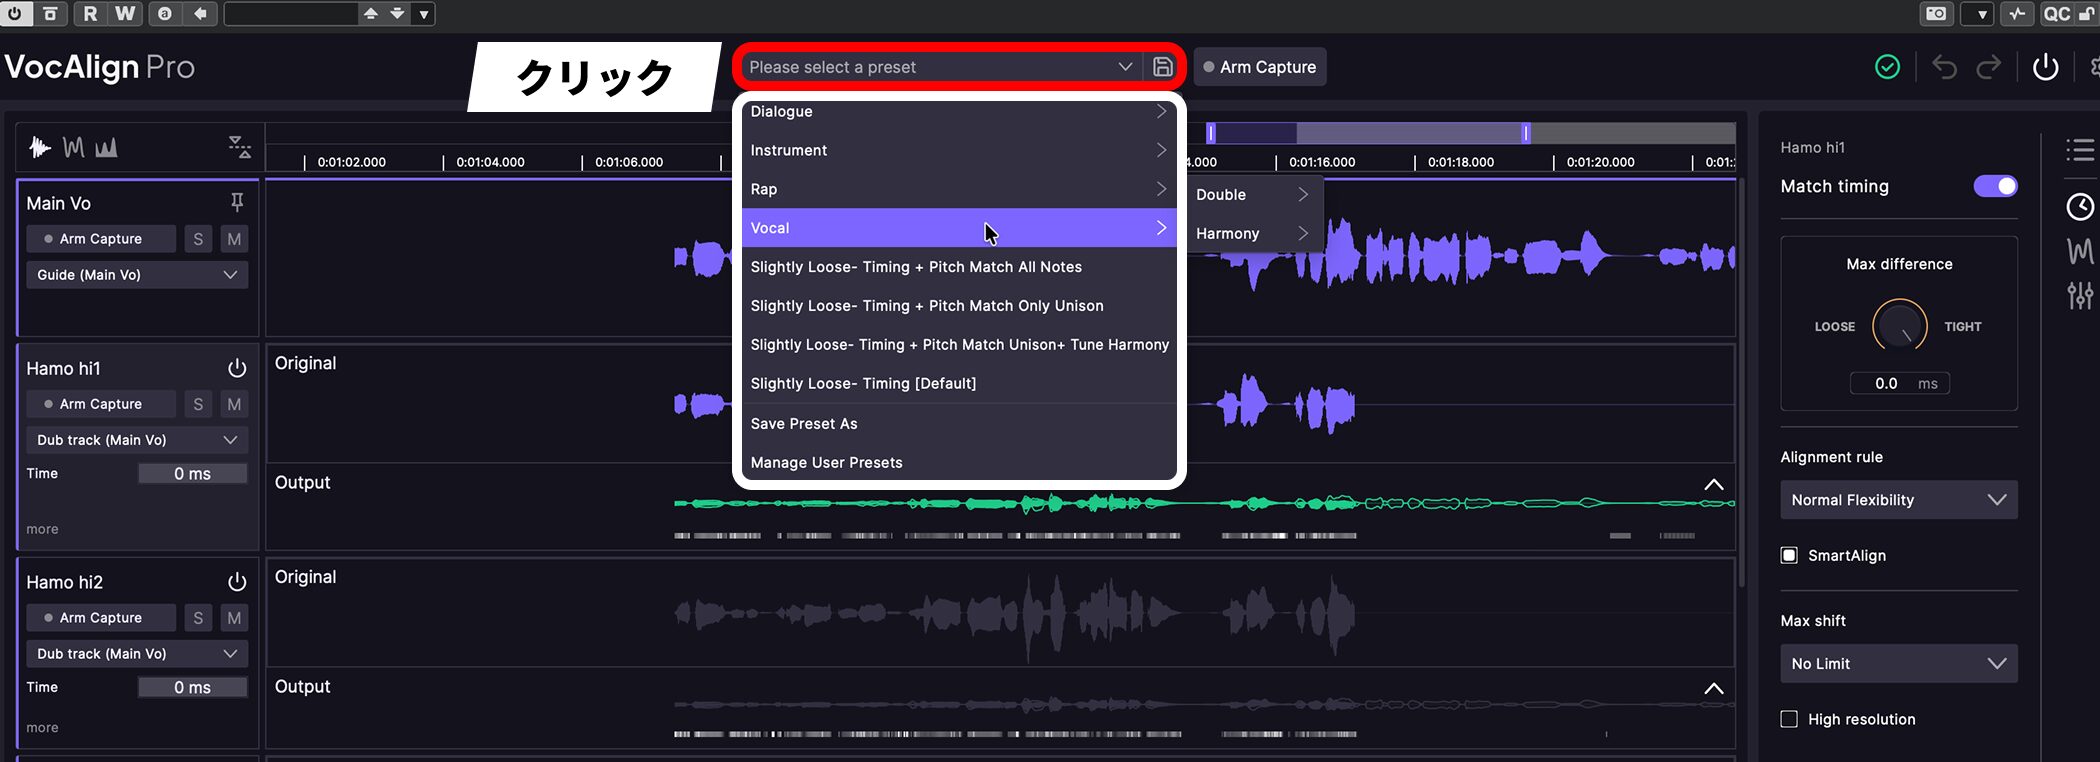
Select a preset from the drop-down menu at the top of the window.
This menu is available when a track assigned as a Dub is selected.
Presets are grouped into Dialogue, Instrument, Rap and Vocal. Vocal is further divided into Double and Harmony.
The Processing Settings Panels
The default settings can already produce good results, but additional controls let you tailor the processing to your goal.
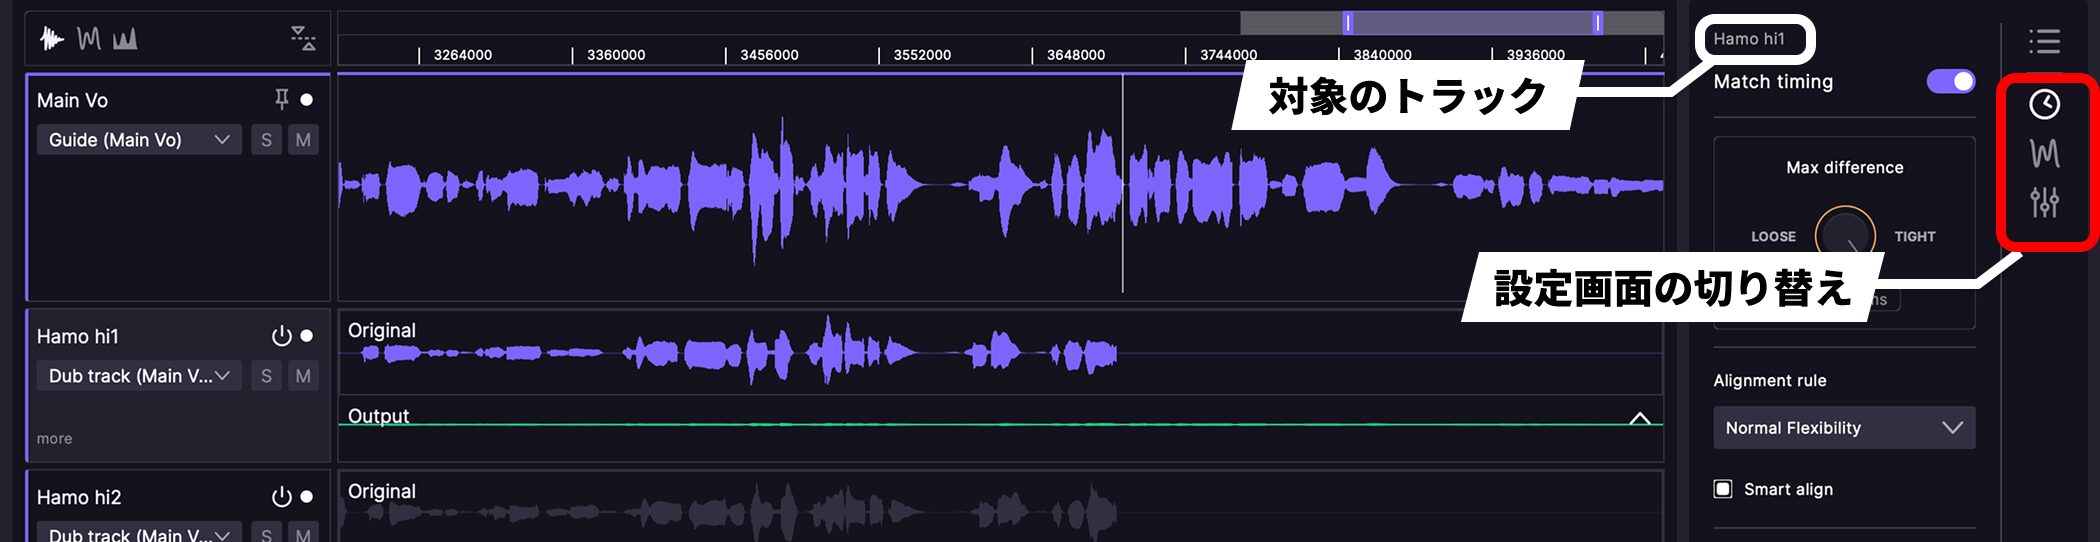
Use the icons on the right to switch between the three panels: timing, pitch and other settings.
The selected track’s name appears at the top of the panel.
Each track has its own settings, so you can change the processing independently.
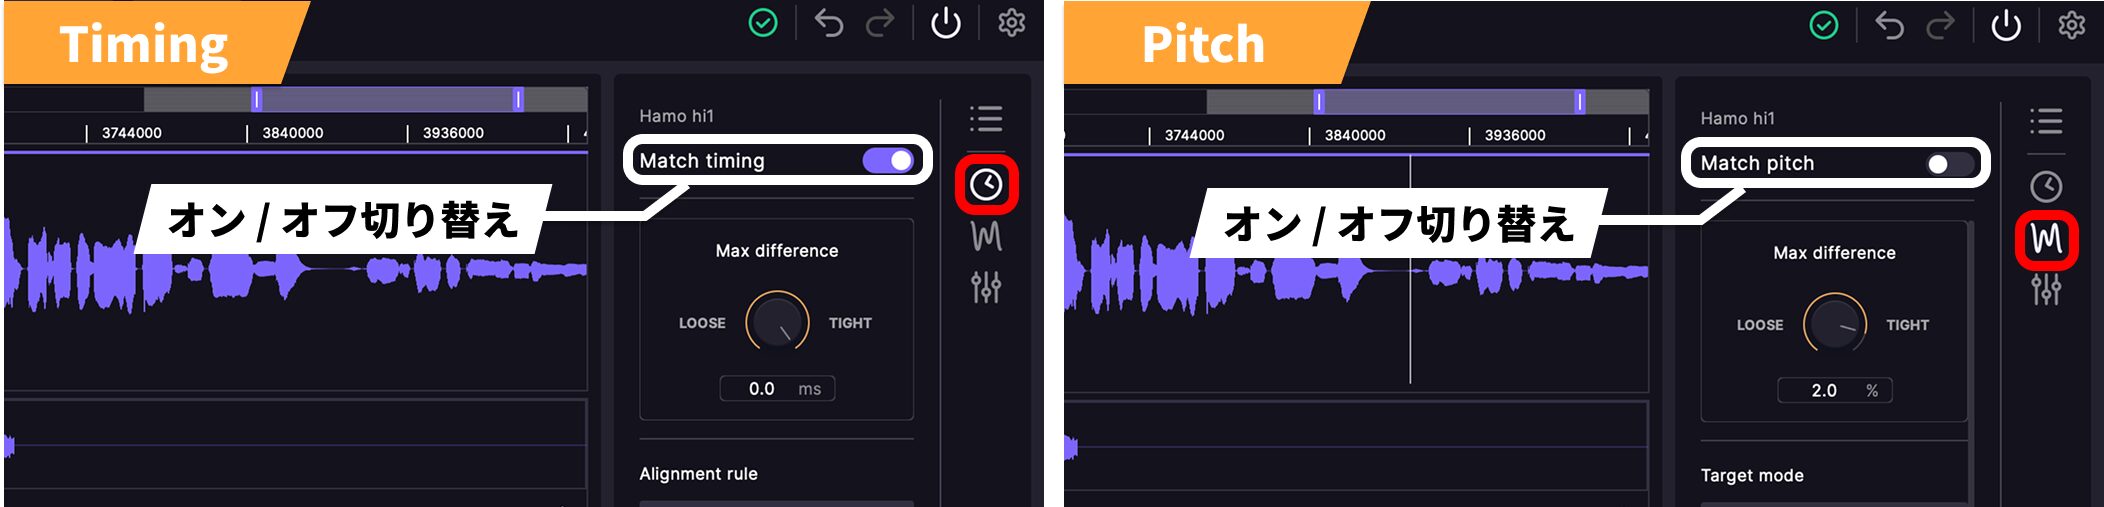
Timing and pitch correction can each be switched on or off independently.
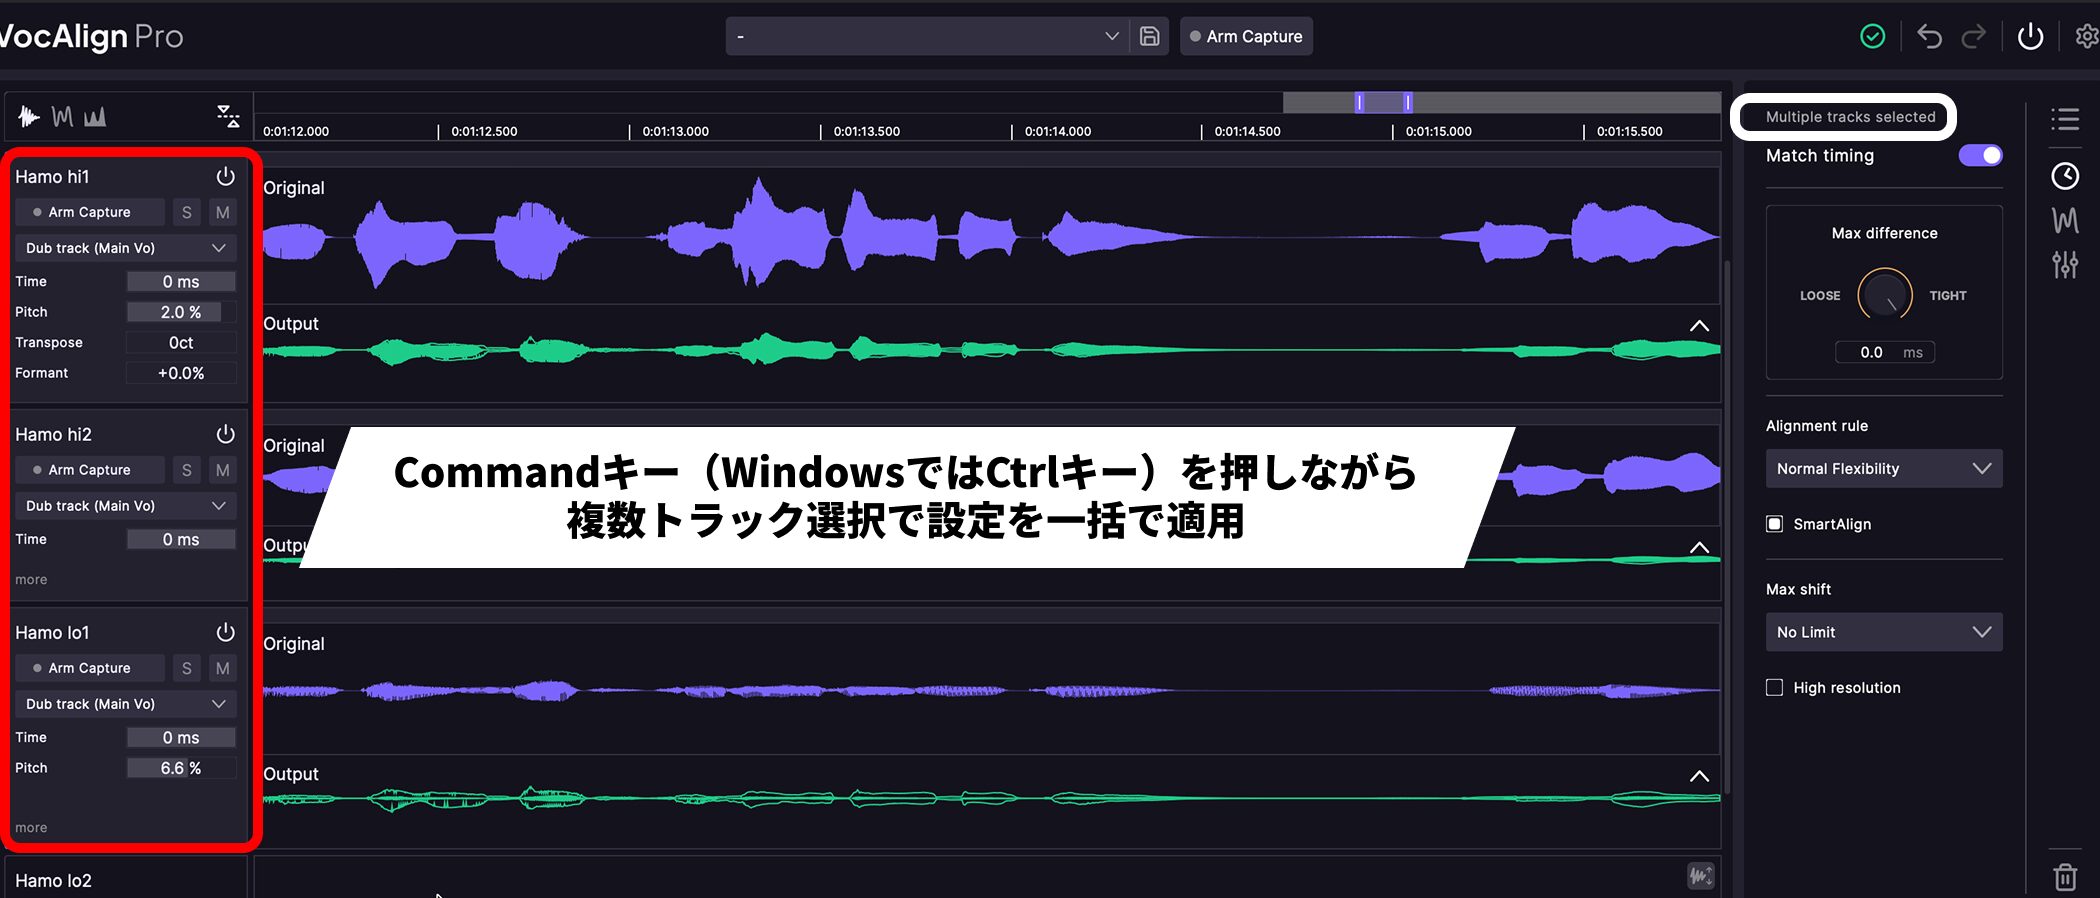
Hold Command (Ctrl on Windows) while selecting tracks to select several at once.
The panel changes to Multiple tracks selected, allowing you to apply settings to all selected tracks together.
Timing Correction
The timing panel controls how the Dub’s timing is aligned to the Guide.
Max difference
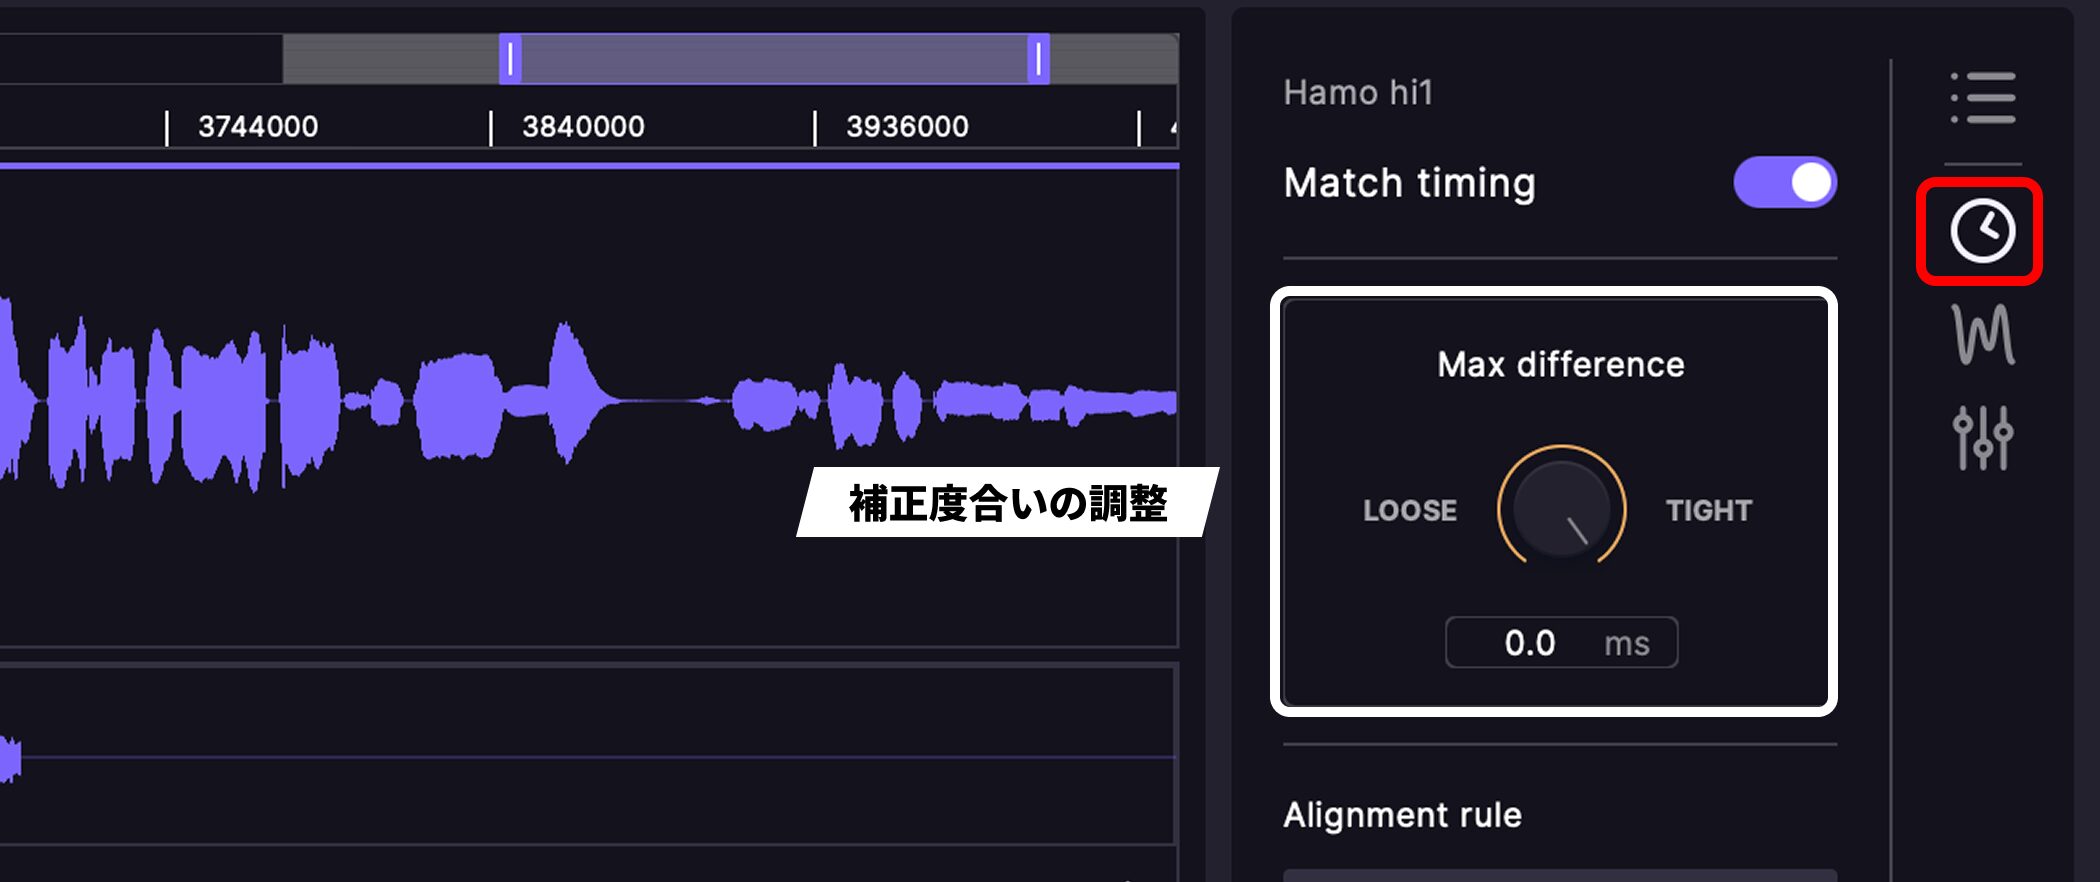
This knob adjusts the amount of timing correction.
Toward LOOSE, less correction is applied. Turning it toward TIGHT applies more.
Perfect alignment does not always produce the best result. This control is useful when you want to adjust the processing to suit the material.
Alignment rule
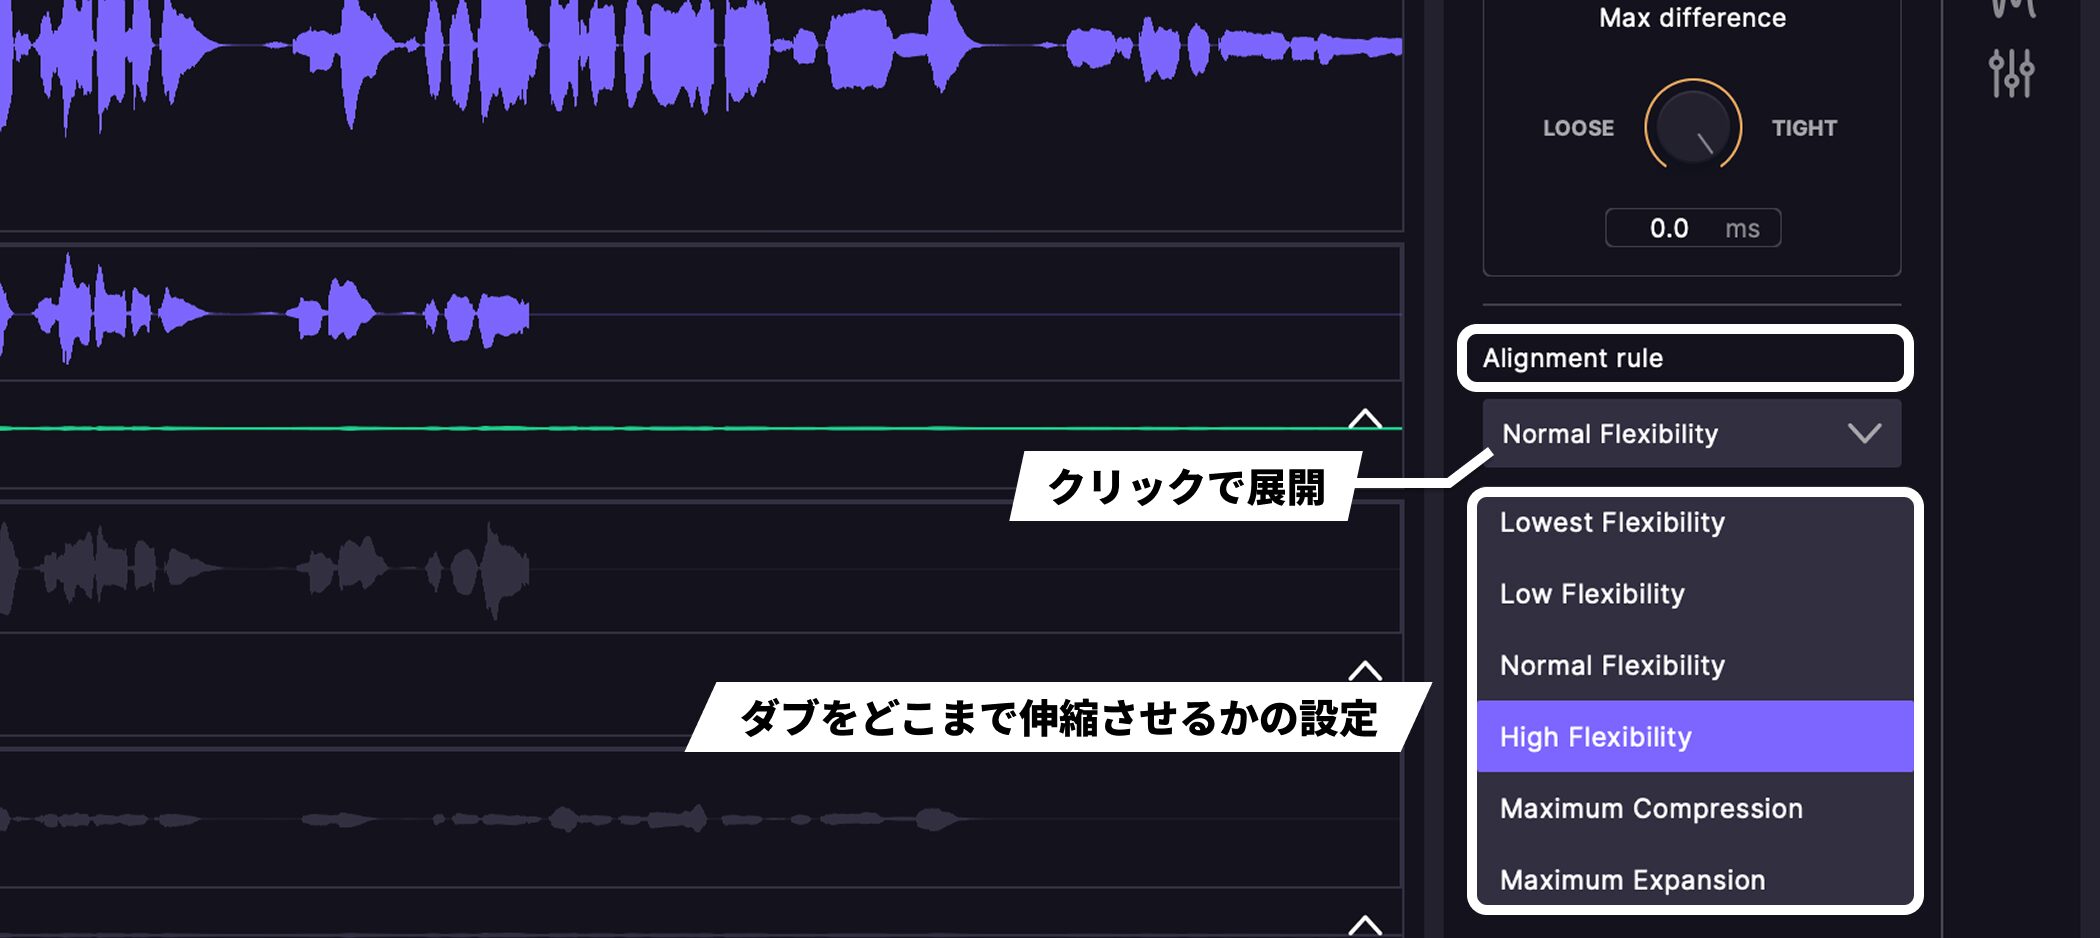
This determines how much the Dub may be stretched or compressed during timing alignment.
- Lowest Flexibility / Low Flexibility: Allow only small adjustments, resulting in looser alignment.
- Normal Flexibility: The standard setting, which works well in many situations.
- High Flexibility: Allow more stretching and compression than the standard setting. Alignment is tighter, but sound quality may be affected.
- Maximum Compression: Place no limit on compression; expansion remains the same as the standard setting.
- Maximum Expansion: Place no limit on expansion; compression remains the same as the standard setting.
Start with Normal Flexibility, then try High Flexibility if timing differences remain. Reserve the two Maximum options for material that is still too far out of sync.
Other Timing Settings
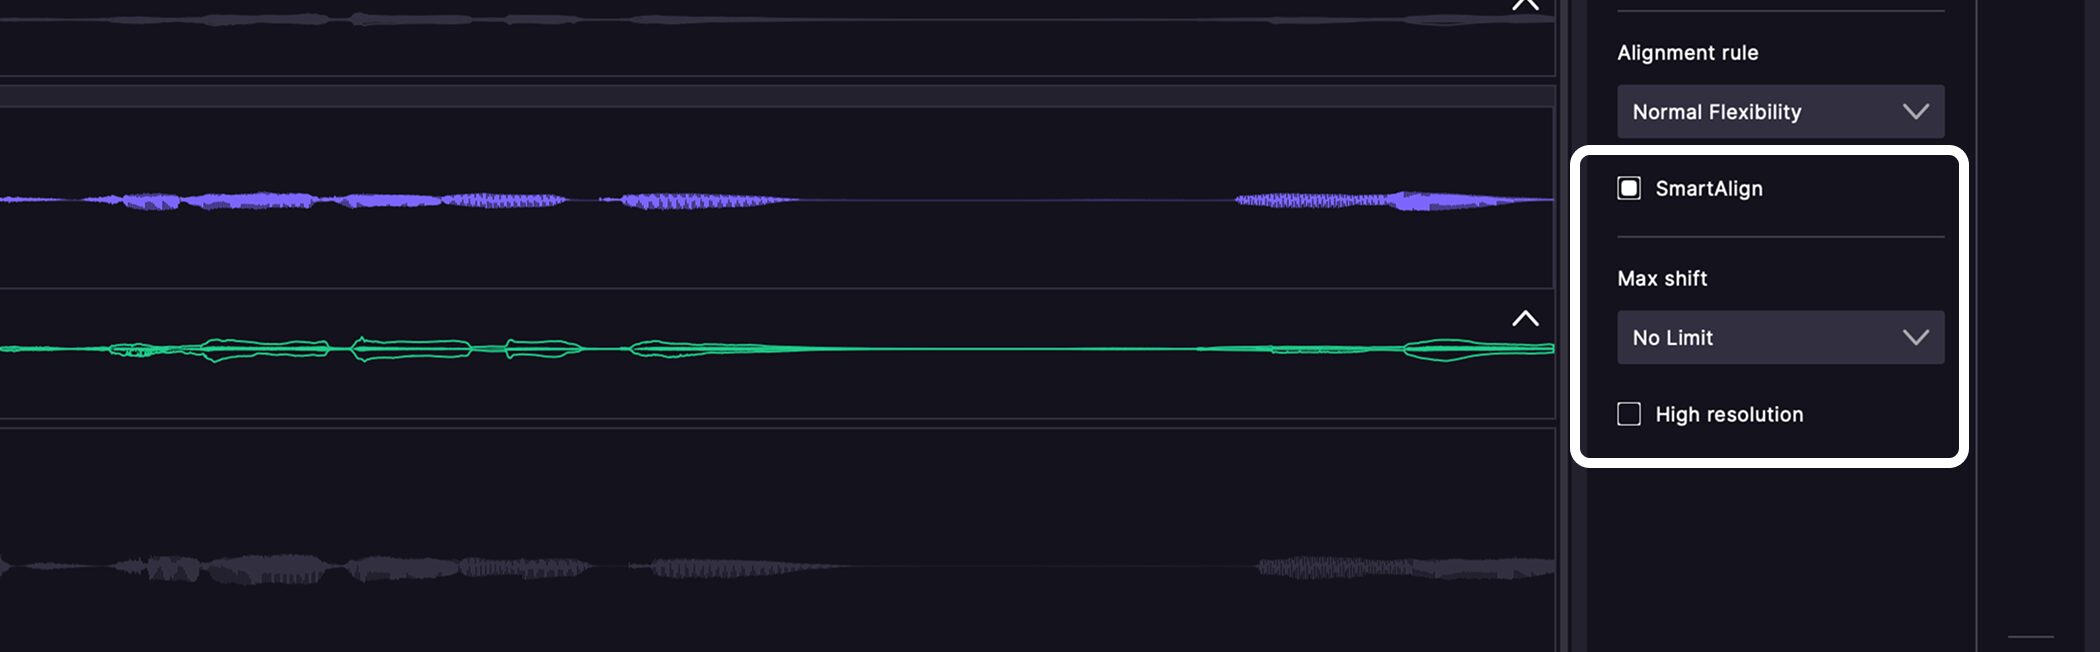
The same panel also includes these three controls:
- SmartAlign: Find corresponding sounds in the Guide and Dub and align only those sections, leaving long silences or breath-only sections untouched.
- Max shift: Limit how far the Dub may move from its original position. Use this when you want to avoid large shifts.
- High resolution: Use higher-resolution internal processing to reduce artifacts caused by stretching and compression.
These are useful when needed for material with large timing differences or where sound quality is a concern.
Pitch Correction
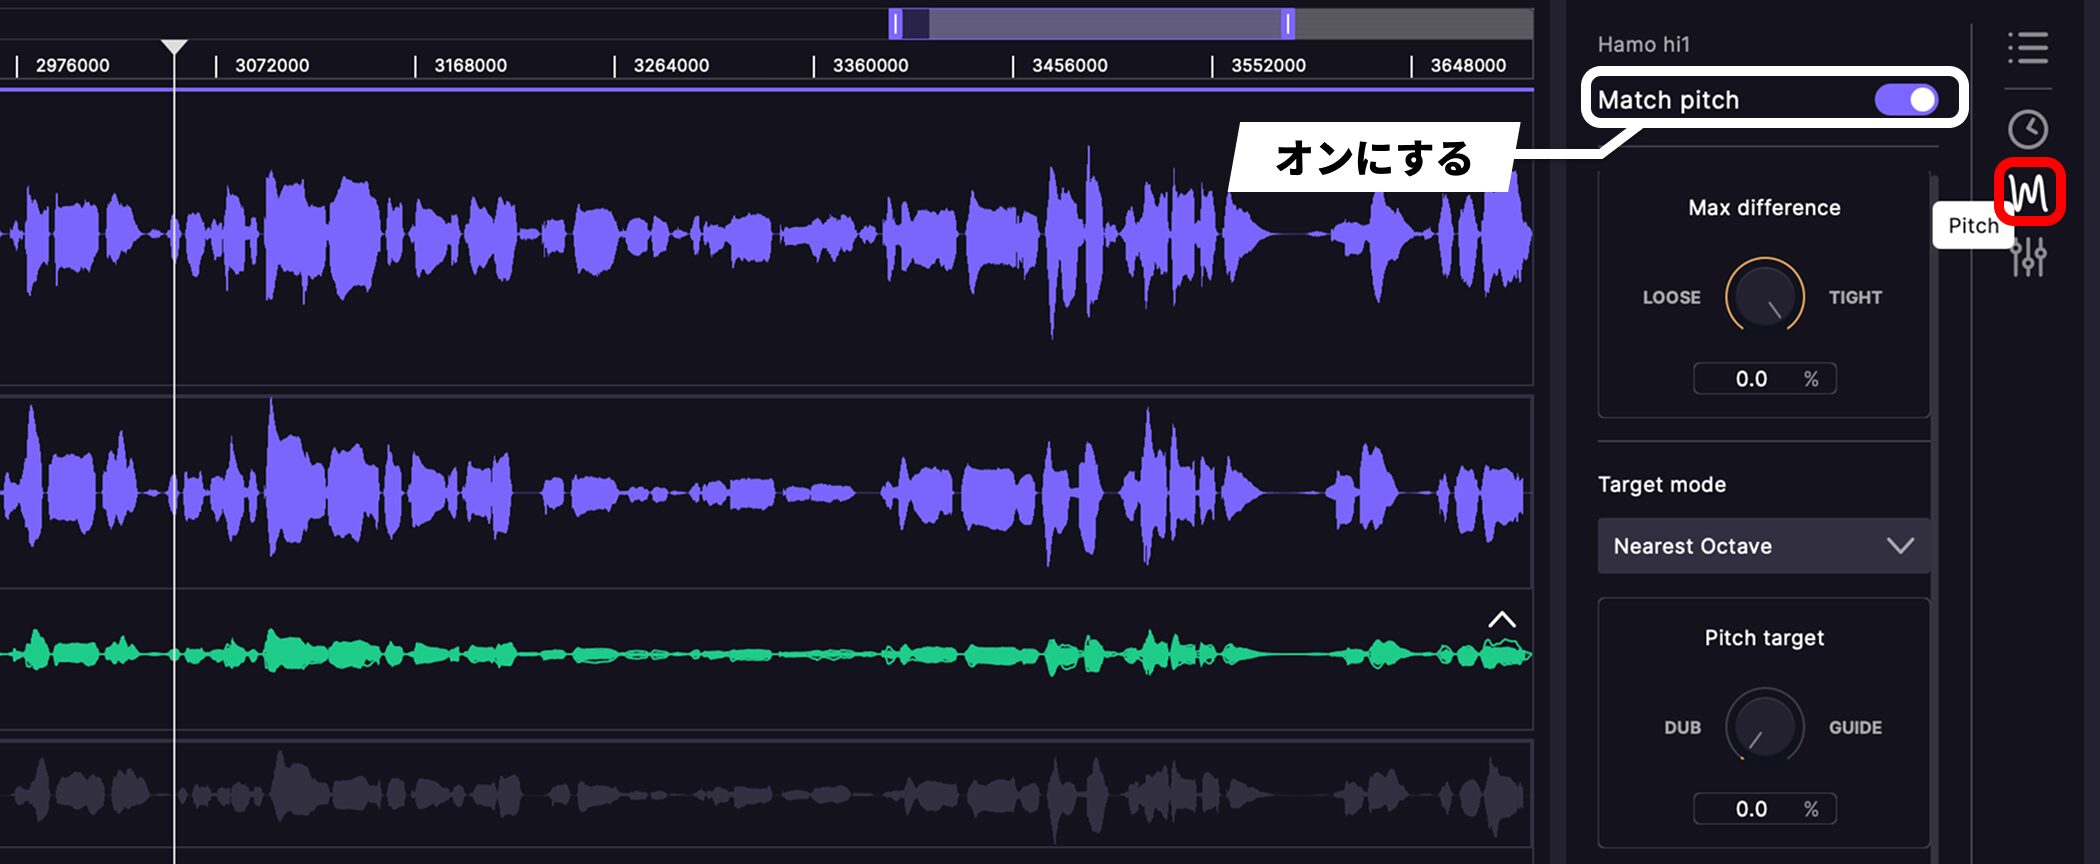
The pitch panel controls how the Dub’s pitch is matched to the Guide.
It operates independently of timing correction, so you can use it only when needed.
Turn on Match pitch to enable pitch correction.
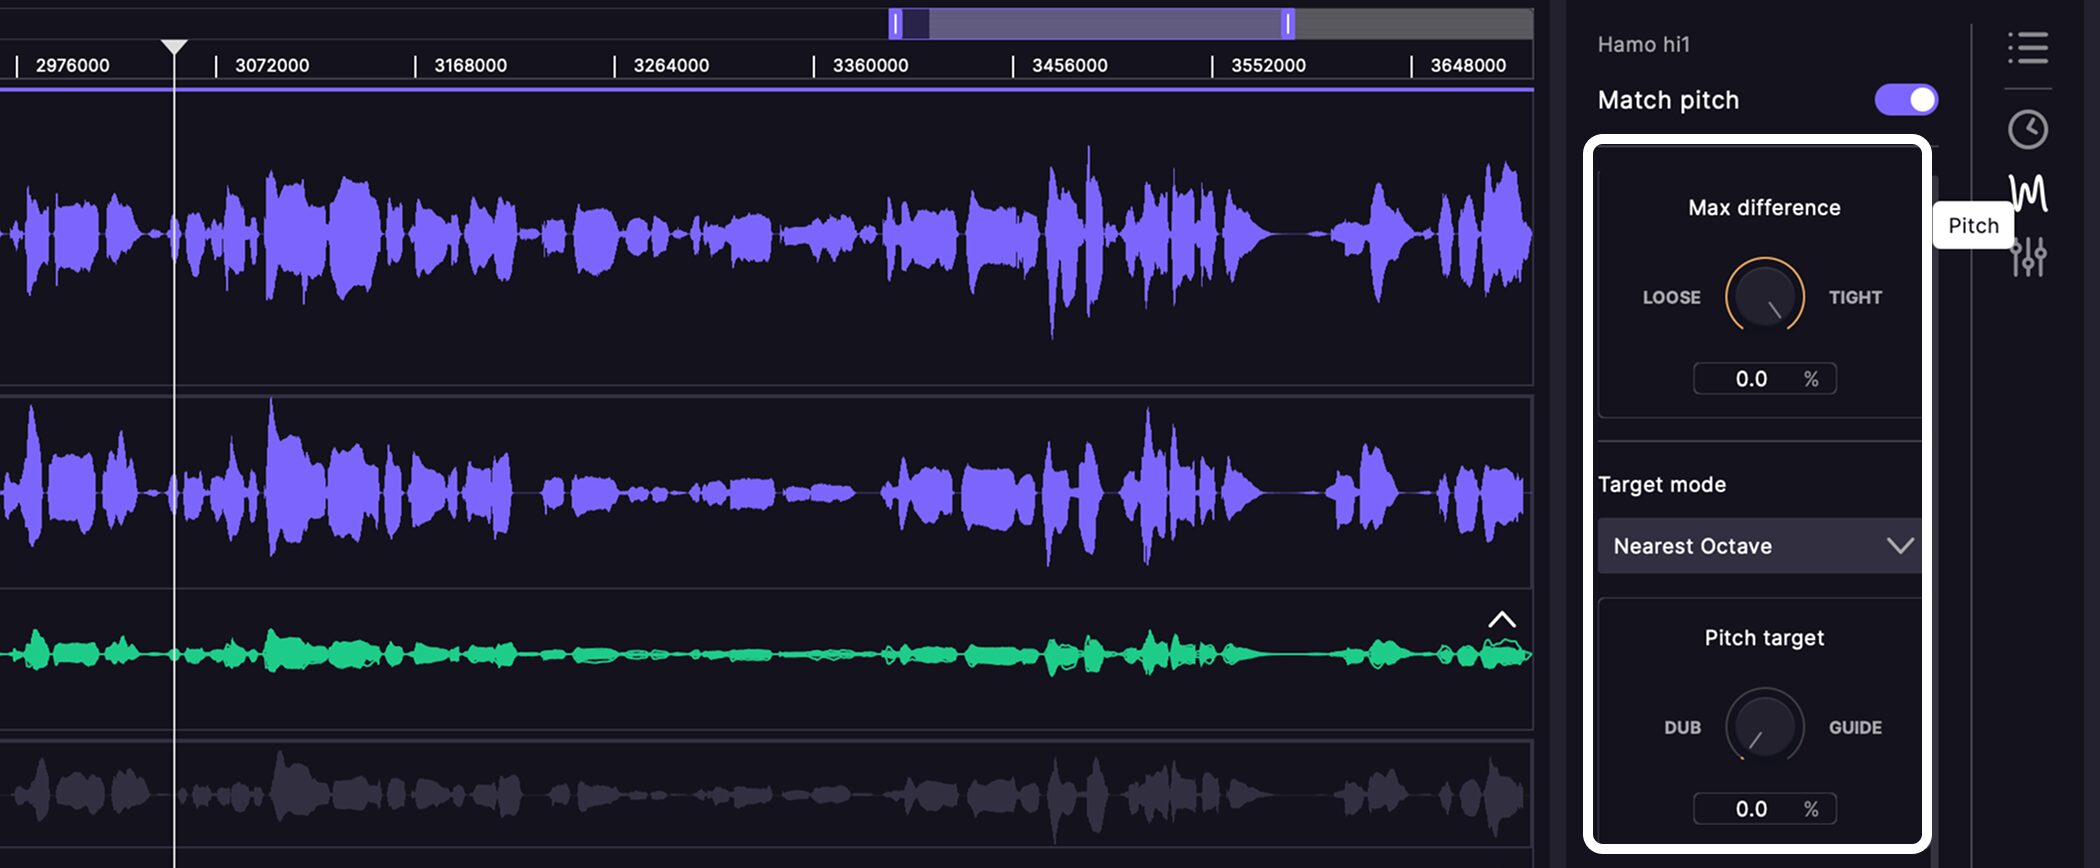
The controls work as follows:
- Max difference: Set how much pitch difference from the Guide is allowed. Turning toward TIGHT applies stronger correction.
- Target mode: Choose the correction approach. The default Nearest Octave setting matches the Dub while keeping it in its original register.
- Pitch target: Set how closely the Dub follows the Guide. At 100%, it fully matches the Guide.
SmartPitch
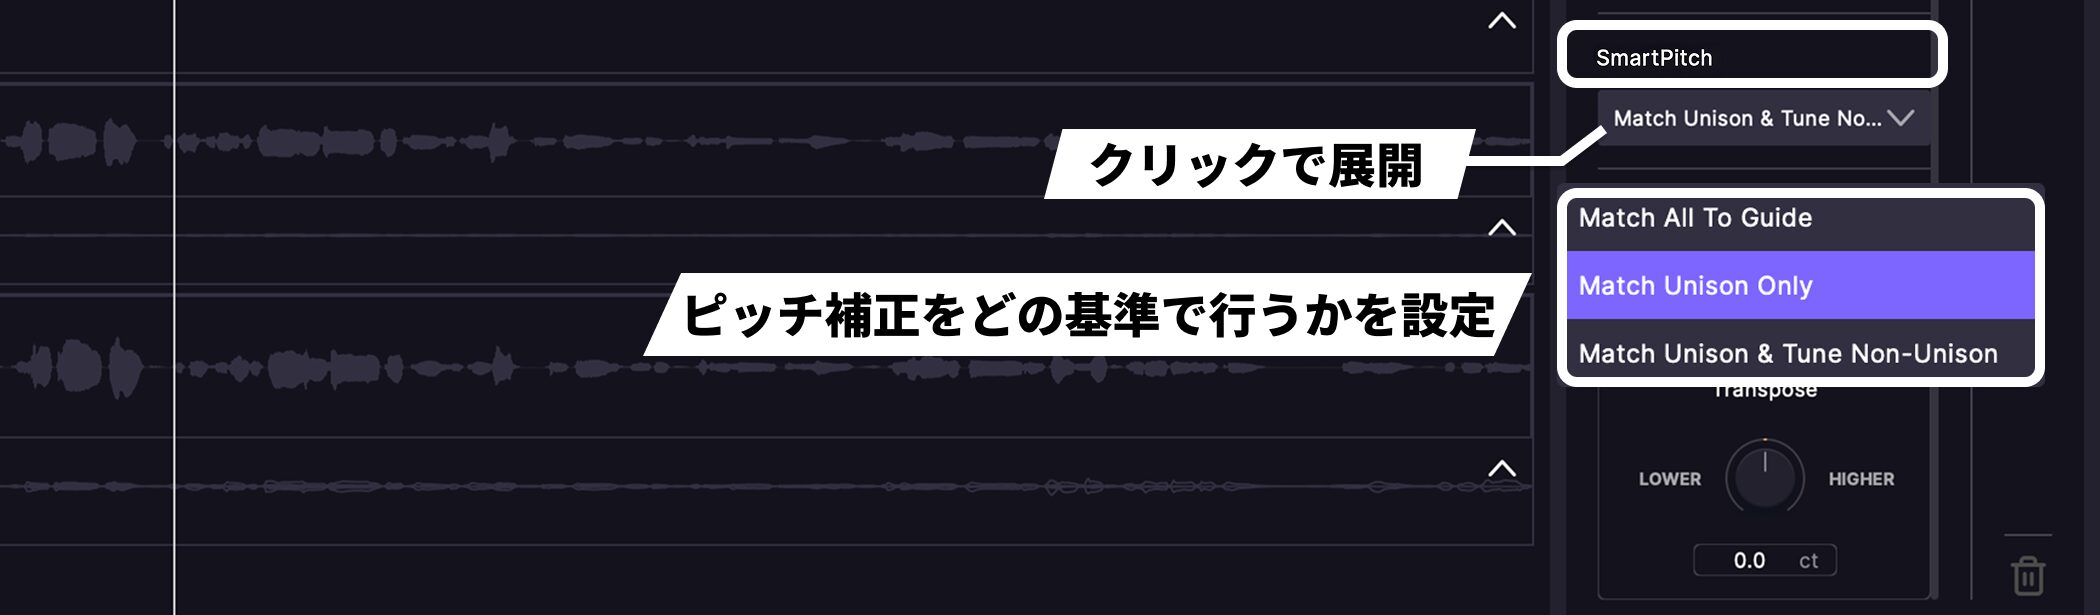
For a track assigned as a Dub, you can choose the basis for pitch correction.
- Match All To Guide: Match all pitches to the Guide. This is the default.
- Match Unison Only: Match only sections close in pitch to the Guide, leaving harmony parts untouched.
- Match Unison & Tune Non-Unison: Match unison sections to the Guide and apply tuning correction to the other sections.
Pitch matching works most directly when the Guide and Dub sing the same pitches.
When the Guide and Dub are doubles or parts singing the same line, the default Match All To Guide setting can align their pitches together.
When the lead vocal is the Guide and a harmony part is the Dub, be careful: you can lose the harmony.
In that case, choose Match Unison Only.
SmartPitch is available only in the Pro edition.
Transpose
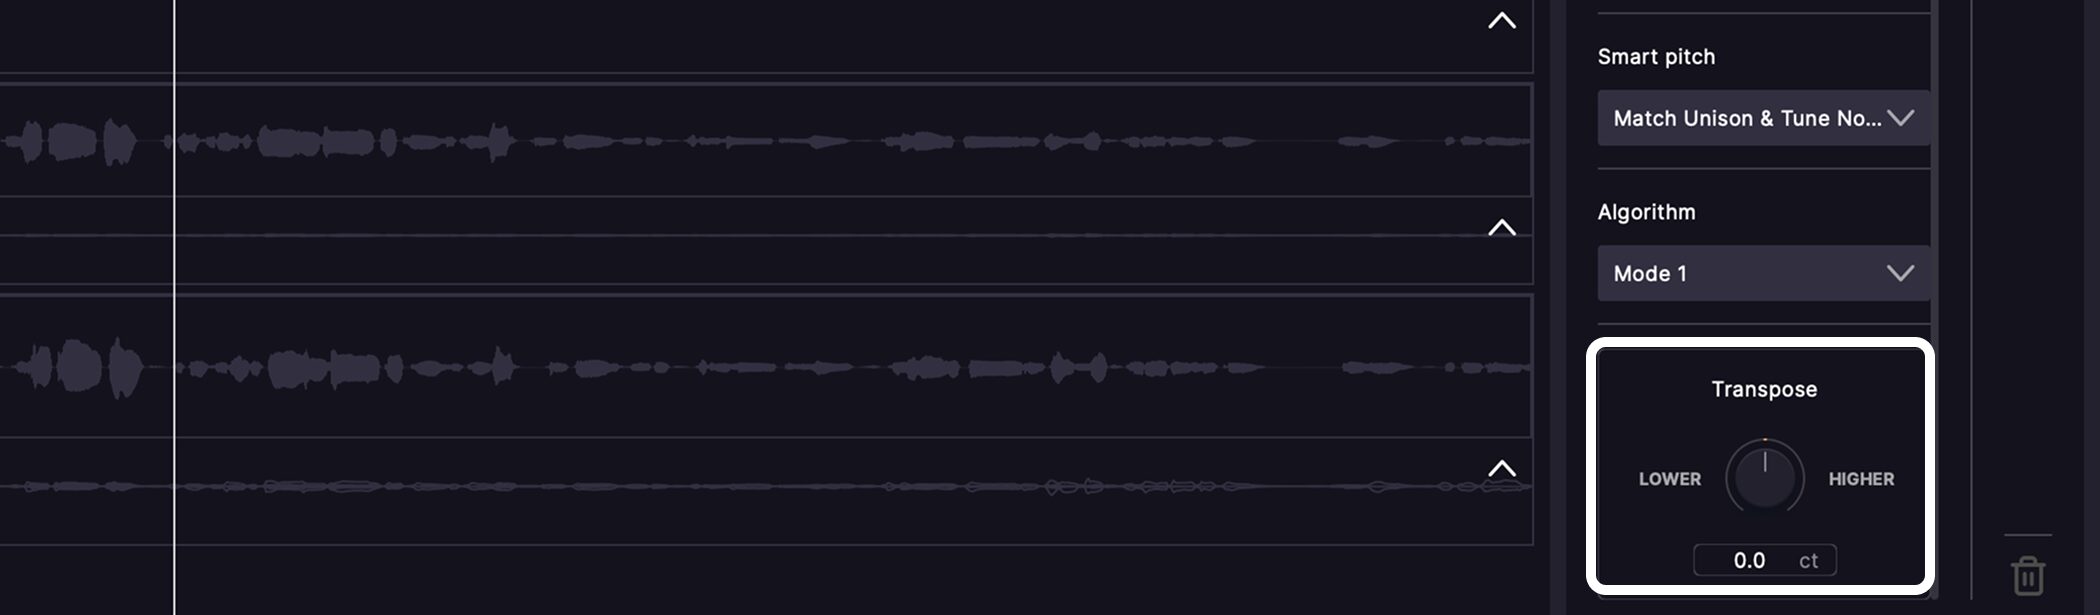
This shifts the Dub’s pitch up or down.
It allows transposition of up to one octave (±1200 cents). Use it to shift the Dub’s actual pitch independently of matching it to the Guide.
Other Settings
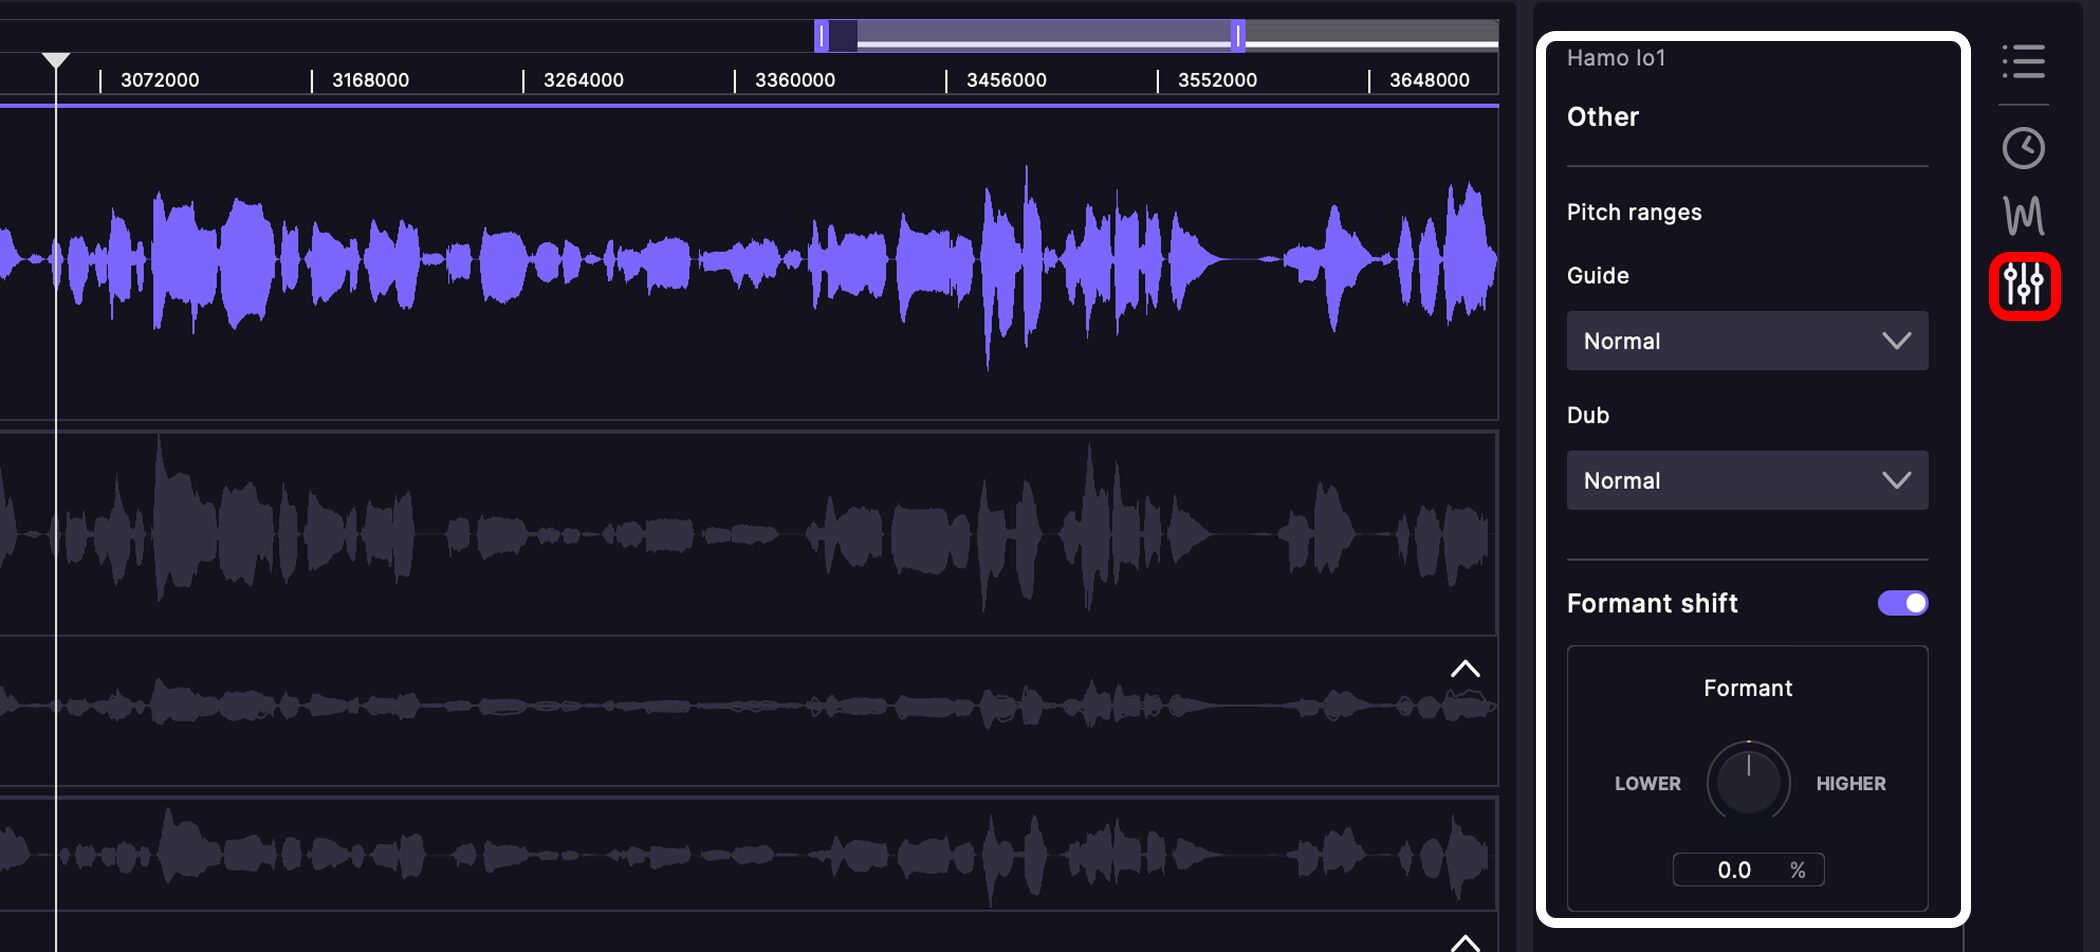
The other settings panel contains controls for the type of source material and vocal character.
Pitch ranges
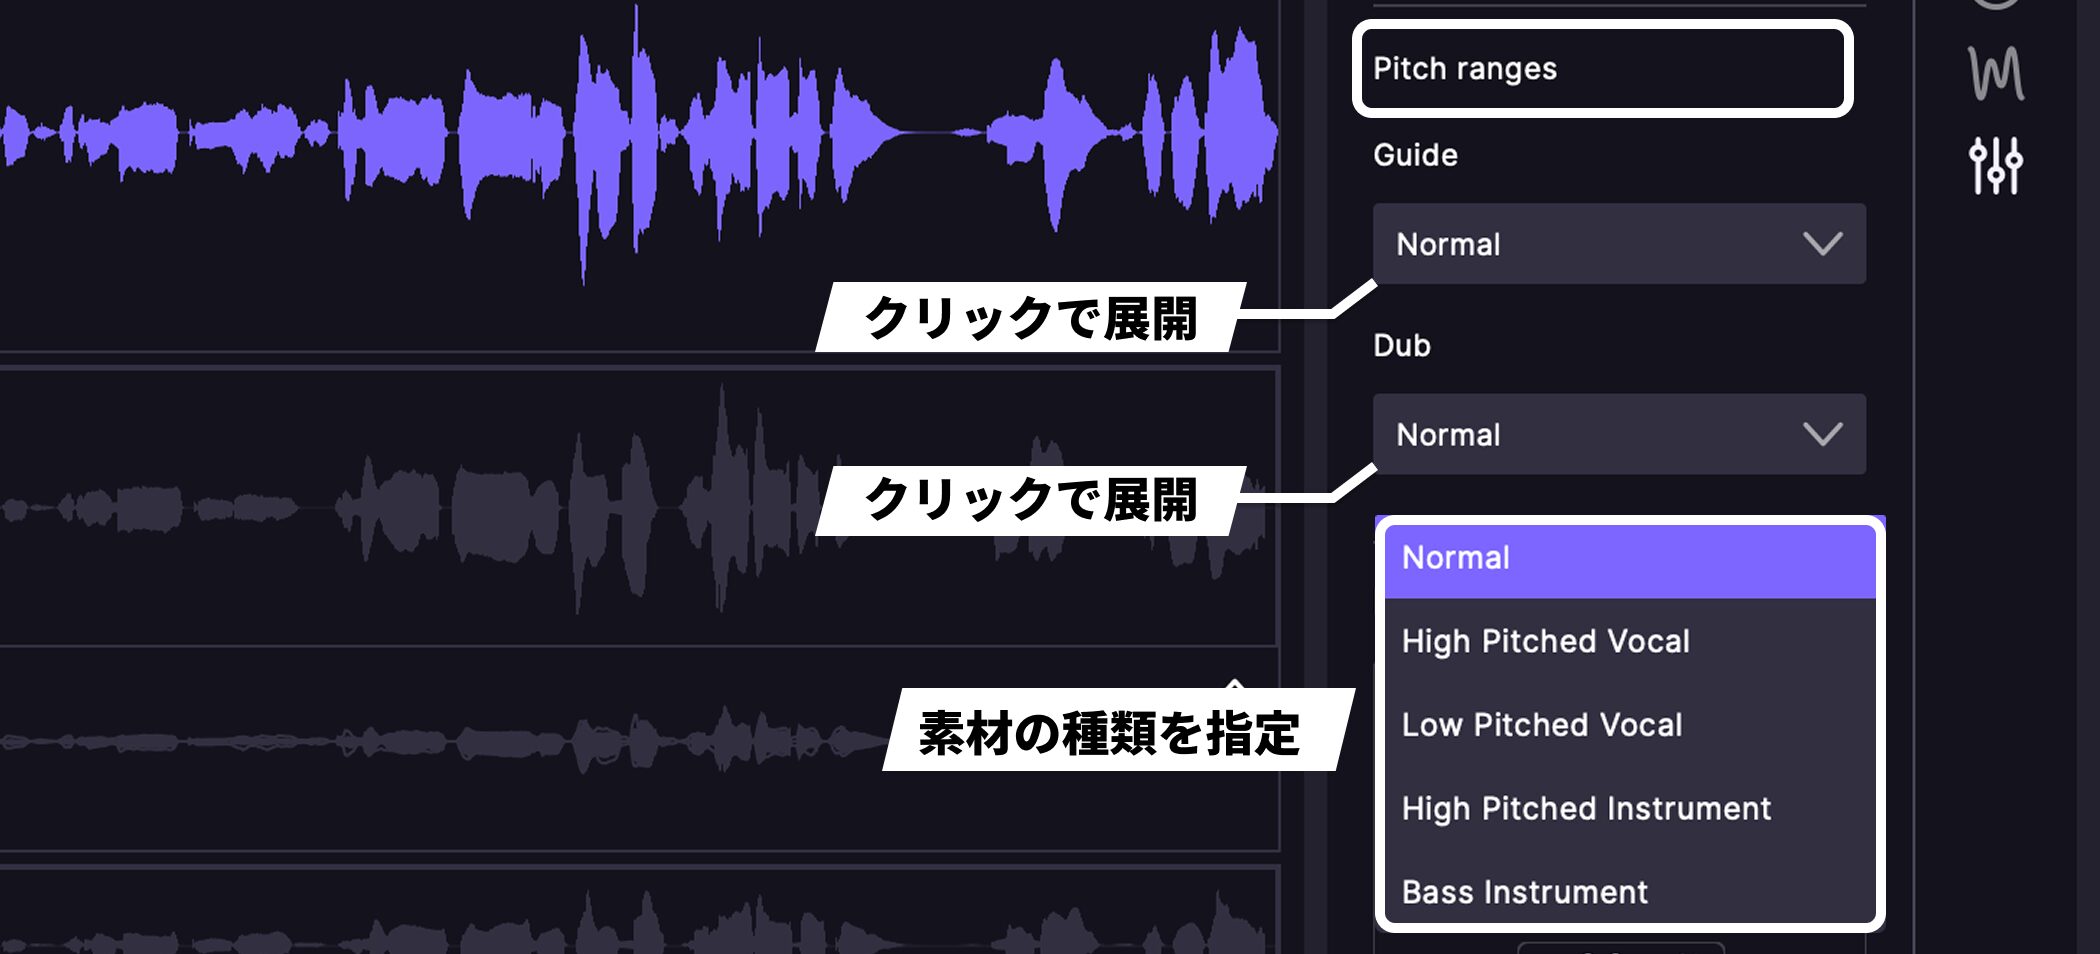
Specify the type of material for both the Guide and Dub.
Pitch detection is optimized for the selected source type.
- Normal: Vocals in a typical range. This is the default.
- High Pitched Vocal: Vocals in a higher-than-average range.
- Low Pitched Vocal: Vocals in a lower-than-average range.
- High Pitched Instrument: Instruments focused on higher frequencies, such as violin, flute or lead guitar.
- Bass Instrument: Low-range instruments such as bass, cello or bass synth.
Normal works well in many situations, but it is worth changing the setting for vocals in an unusually high or low range.
Formant Control
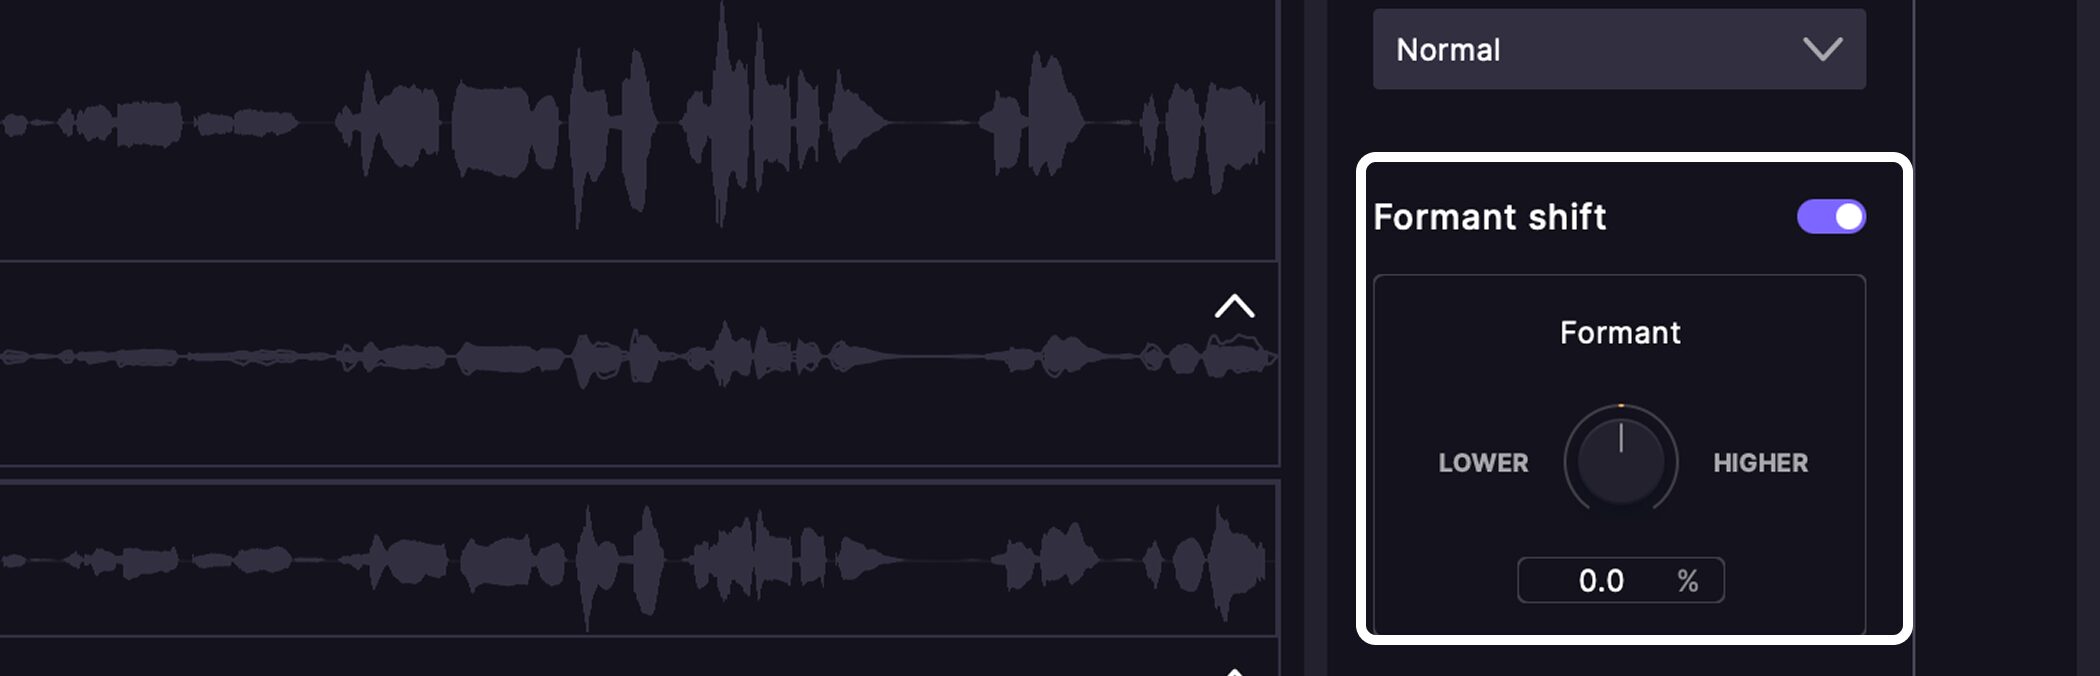
Adjust the formants (vocal character) independently for each track.
Turning toward LOWER makes the voice fuller and more masculine; turning toward HIGHER makes it thinner and more feminine.
Applying a small amount to doubles or harmonies sung by the same voice gives them a slightly different character, which can help create a wider vocal sound.
Formant control is also available only in the Pro edition.
Adjust Settings Directly on the Tracks
The settings described above also appear on the left side of each track.
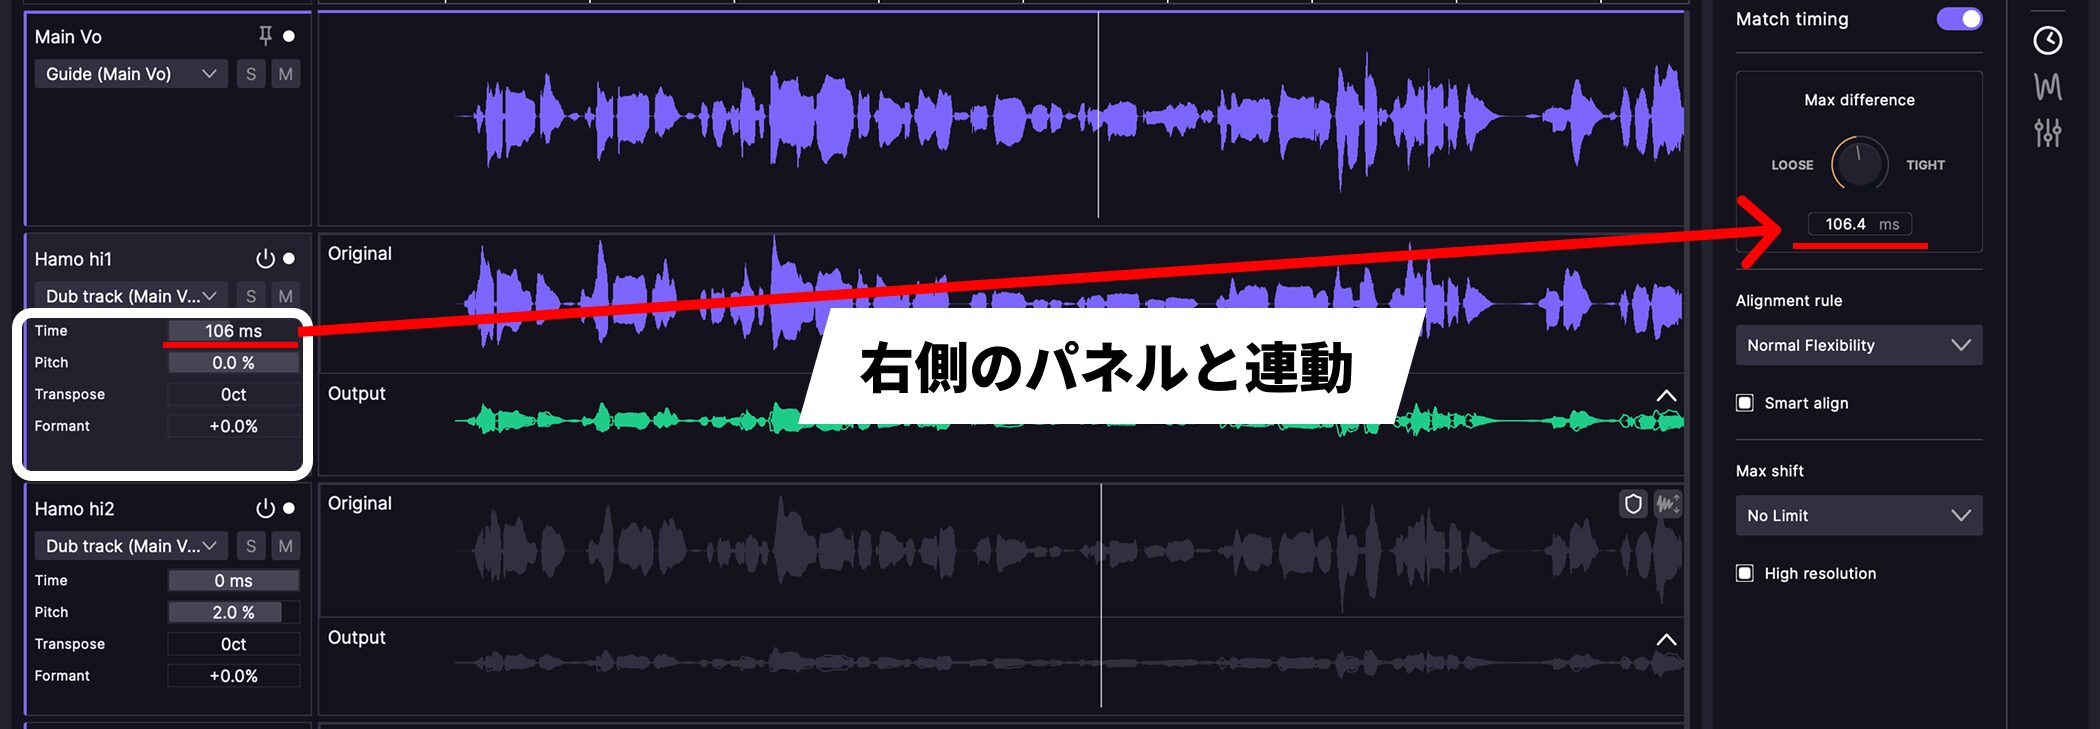
A Dub track displays Time, Pitch, Transpose and Formant, reflecting that track’s current settings.
Time corresponds to Max difference in the timing panel; Pitch corresponds to Max difference in the pitch panel.
Drag up or down to change them directly. They are linked to the panel on the right, so either location can be used.
Without reselecting tracks in the panel, you can compare and adjust multiple tracks side by side. The more tracks you have, the more convenient it is to work directly here.
Make Manual Adjustments to Specific Sections
When similar sounds are close together, automatic analysis can sometimes align the wrong positions.
In these cases, you can specify timing points manually.
Sync Points
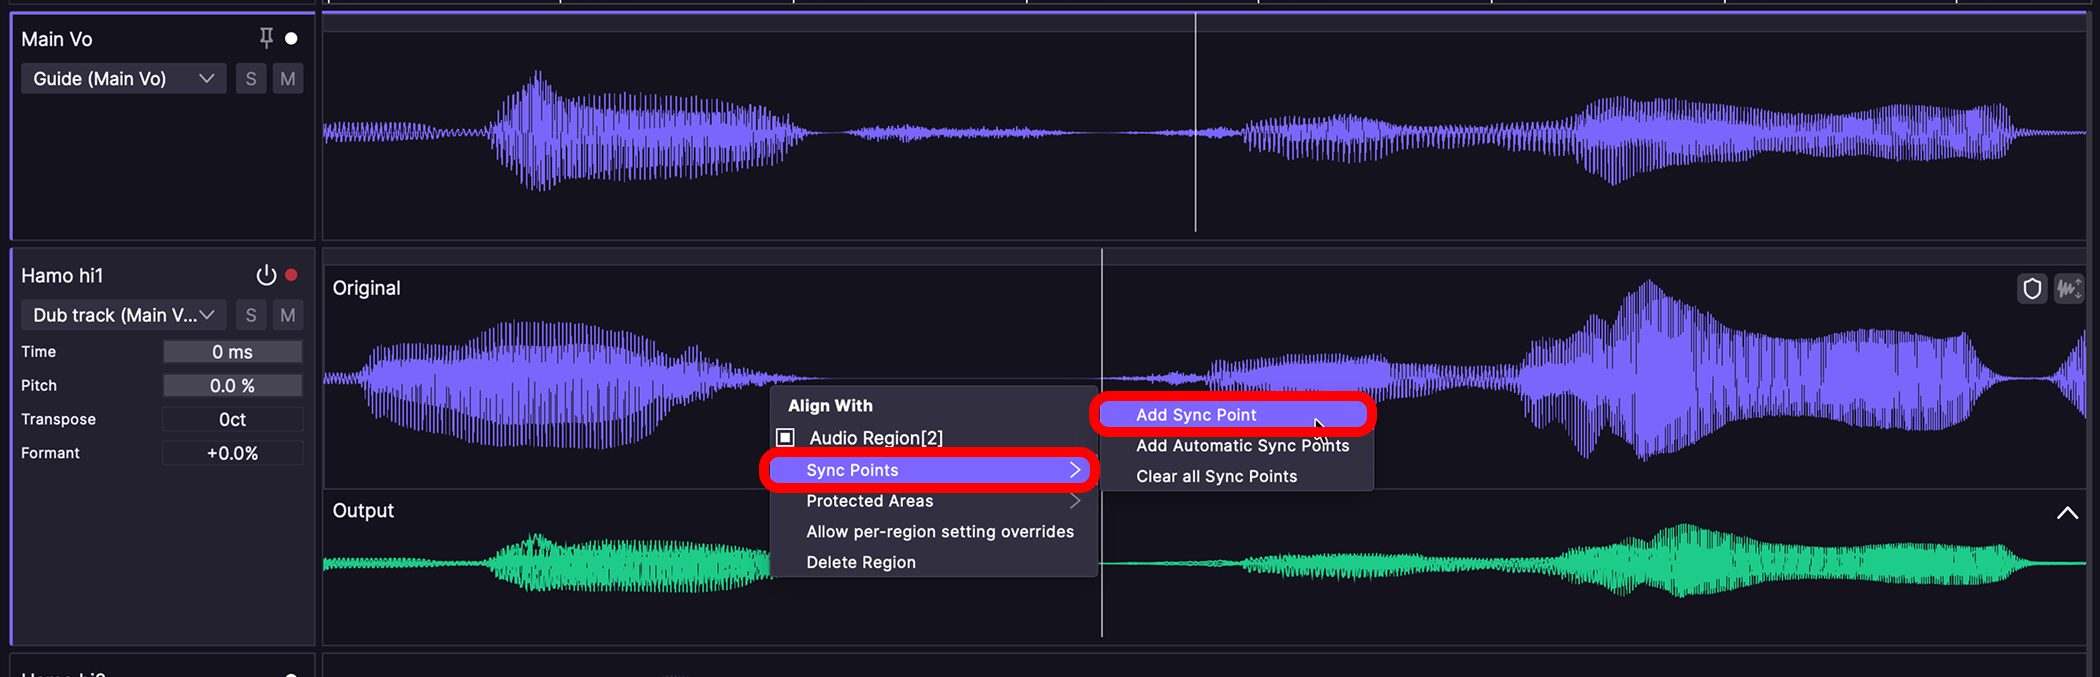
Right-click the Original waveform and choose Sync Points → Add Sync Point from the menu.
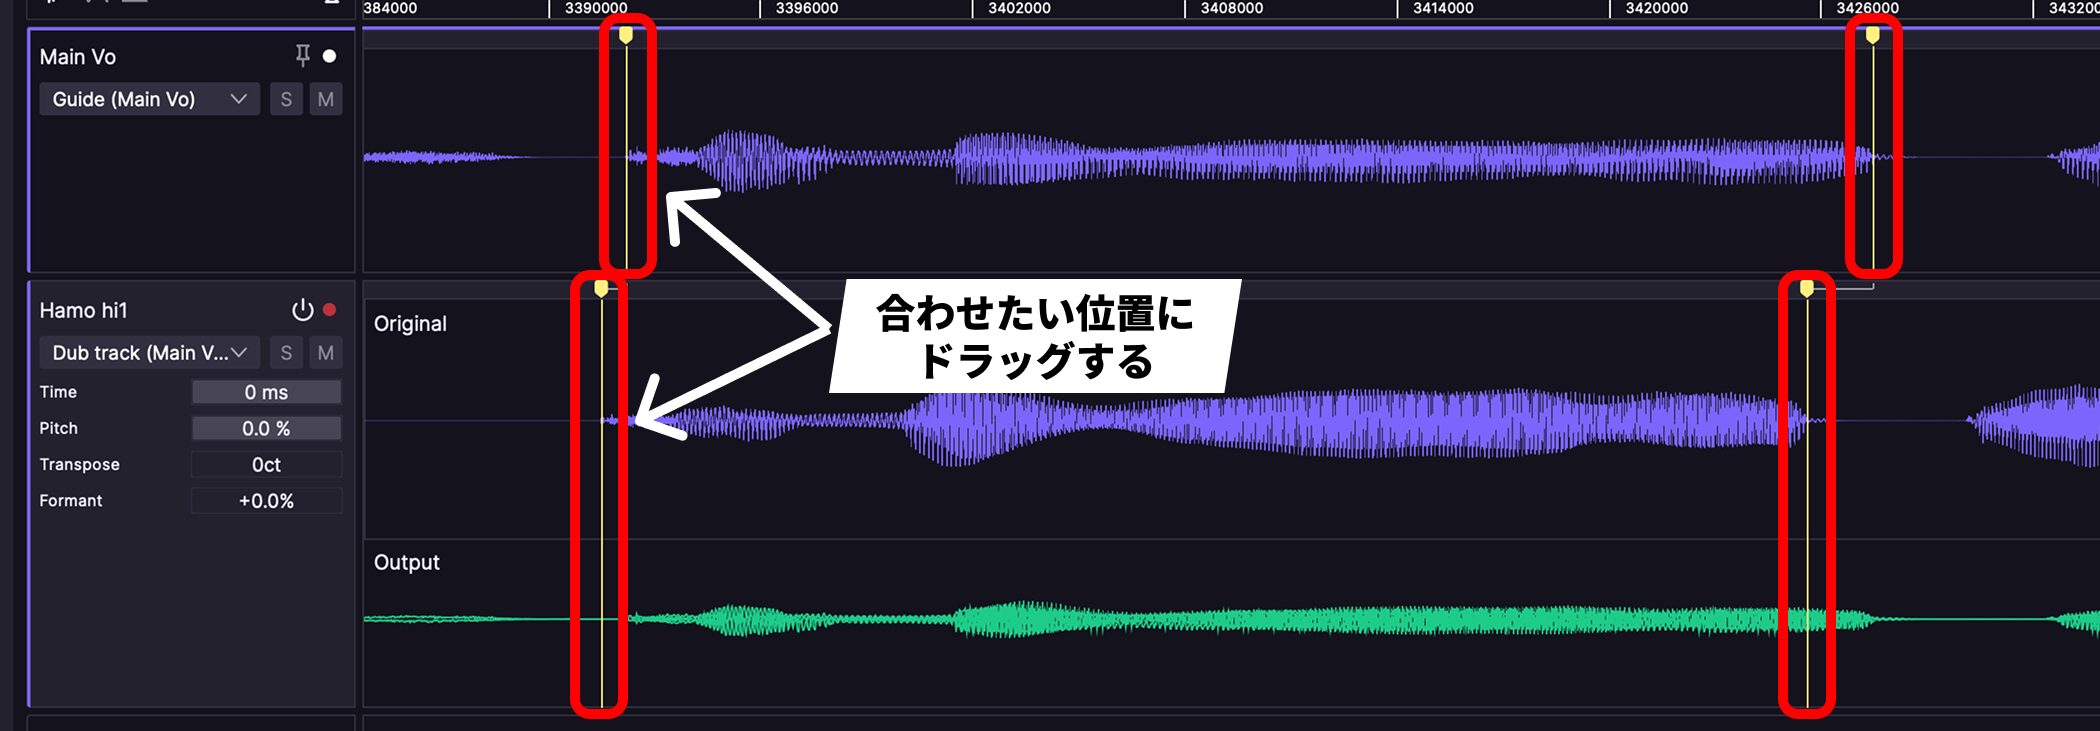
A linked pair of markers appears on the Guide and Dub. Drag each marker to the position you want to align. The audio before and after them is stretched or compressed to connect the two points, aligning the intended positions.
You can specify an end point in the same way.
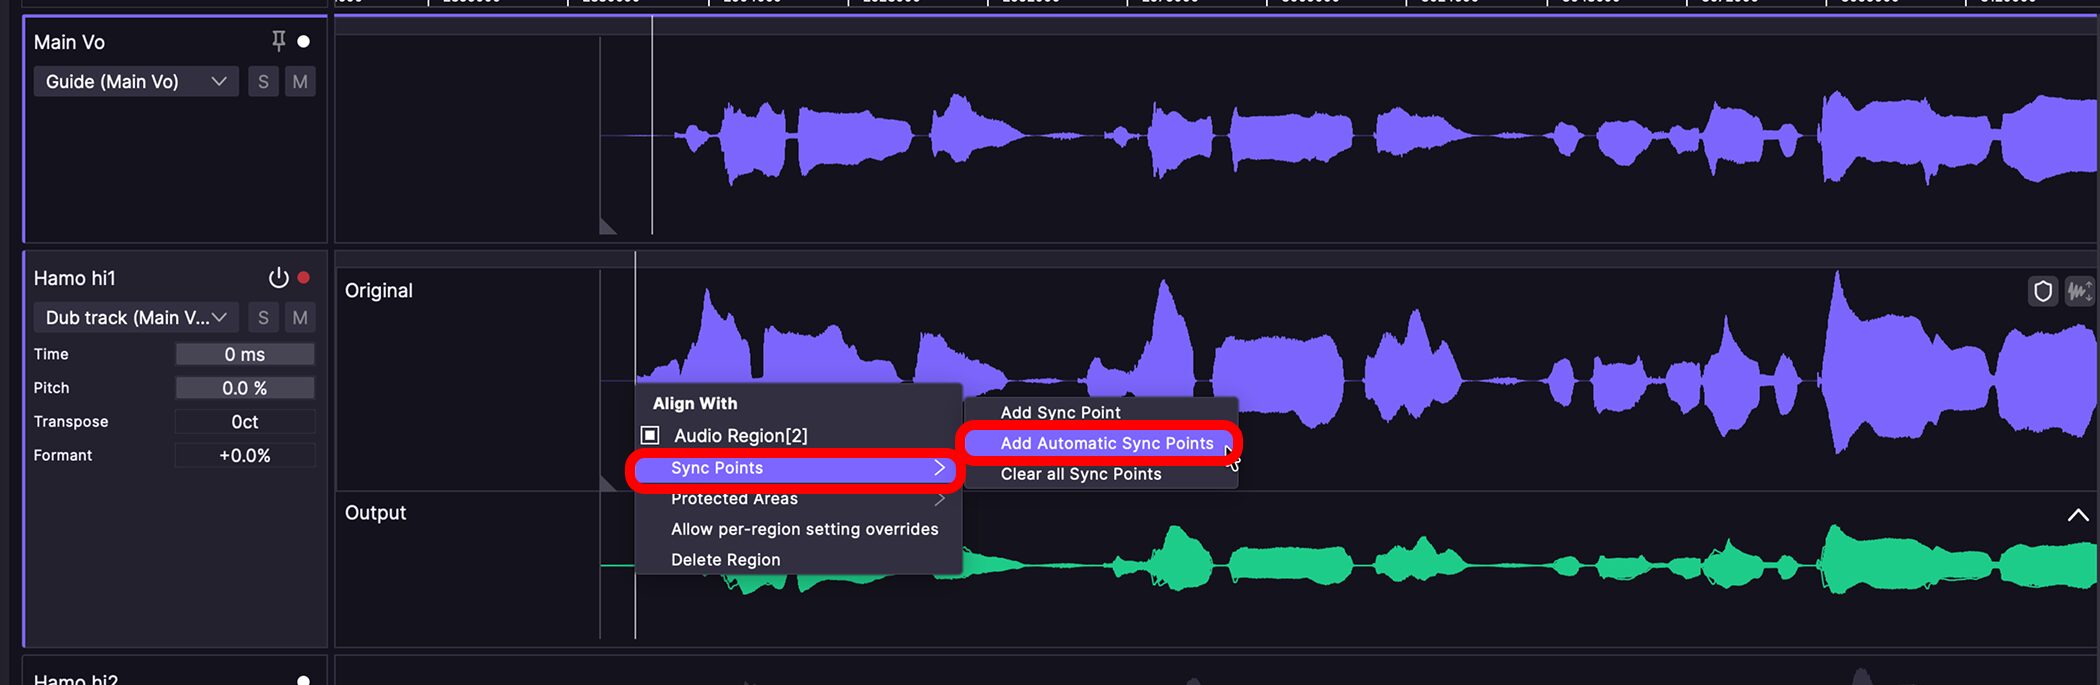
Add Automatic Sync Points lets VocAlign place points where it determines that further timing correction is needed, based on the current alignment.
If the audio is already well aligned, nothing happens.
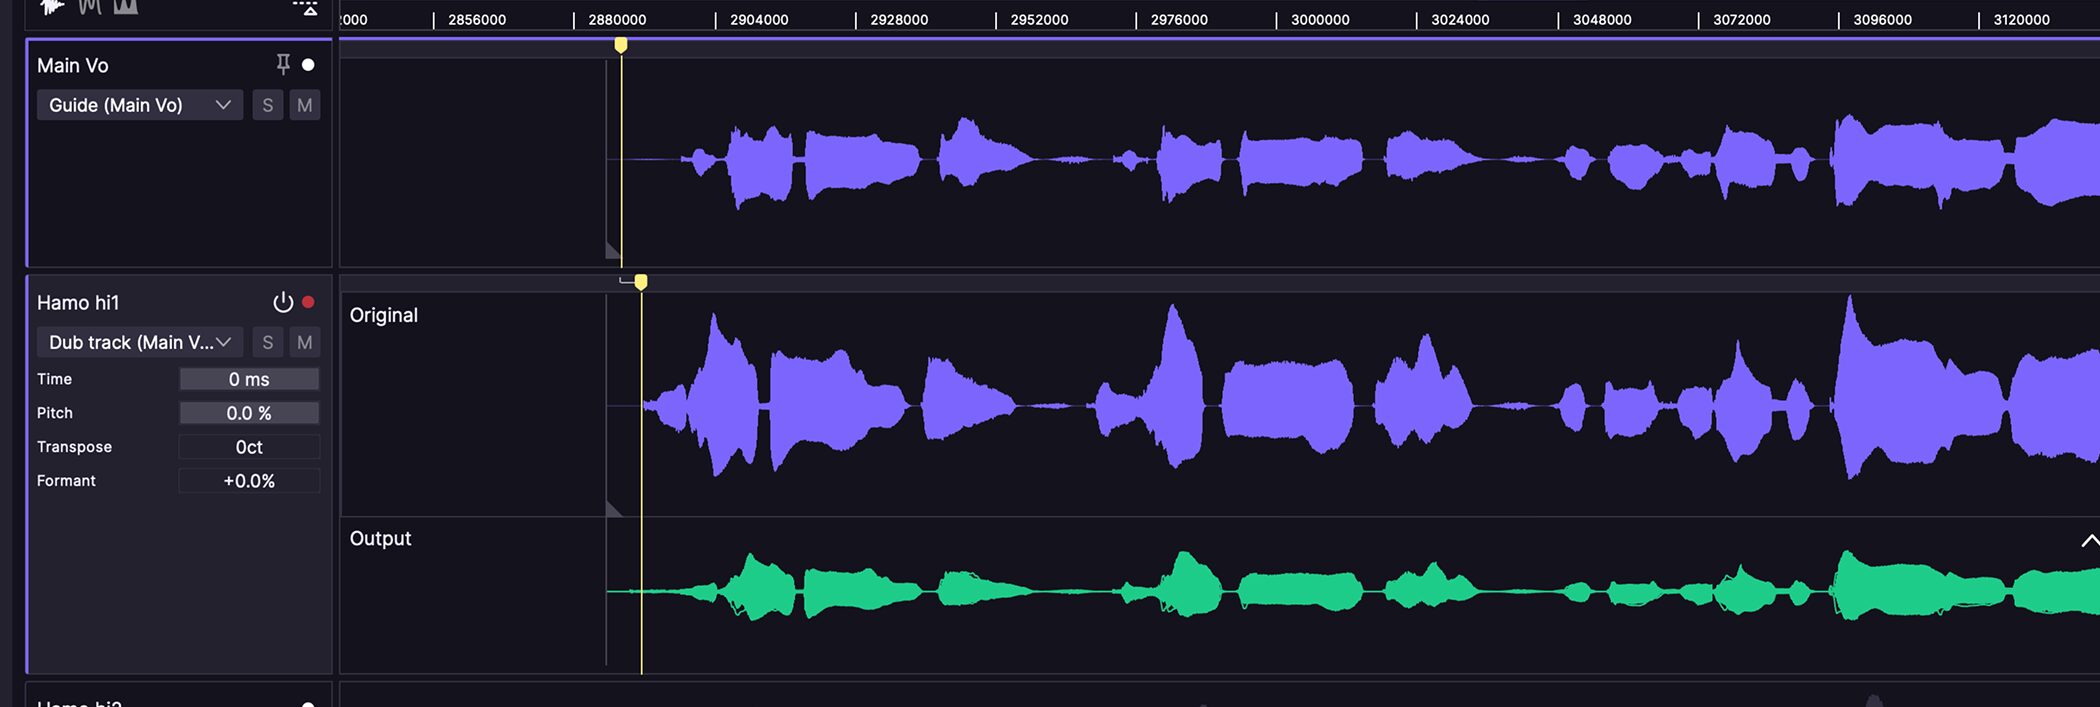
In our example, a marker appeared at the start of the singing. However, the software cannot know which part you want to fix, so listen and adjust it if needed.
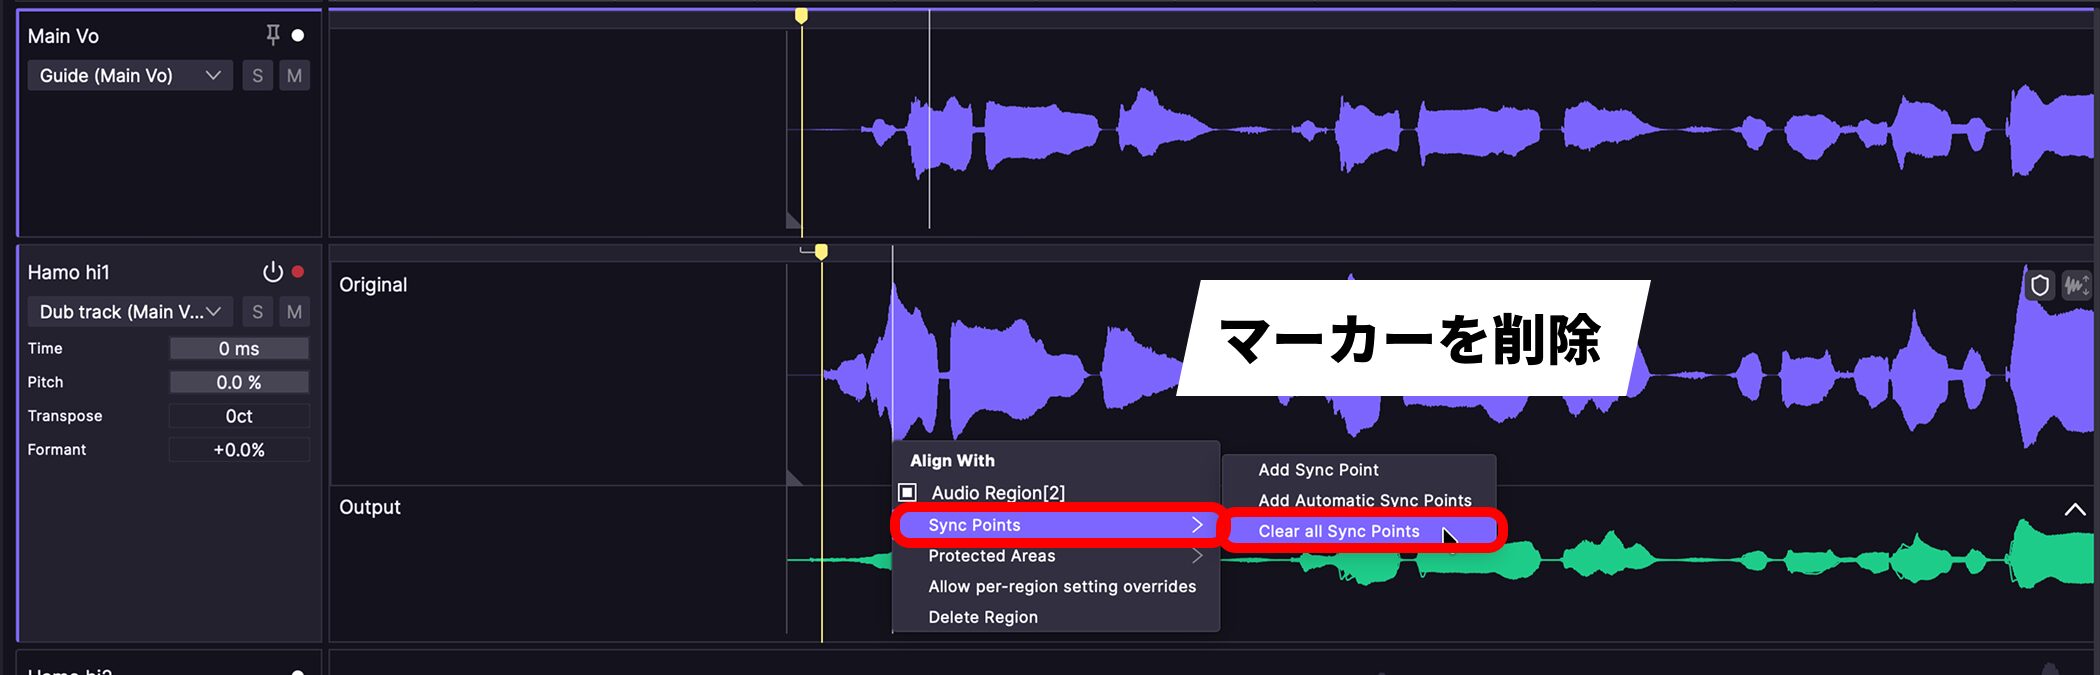
To remove all markers, choose Clear all Sync Points. To delete one, place the cursor over the marker and Shift-click.
Integration with RePitch
Combining VocAlign with RePitch, also from Synchro Arts, lets you handle the entire vocal editing process in one workflow.
This integration, called SynchroLink, is available only in the Pro edition.
You can use a lead vocal edited in RePitch directly as VocAlign’s Guide.
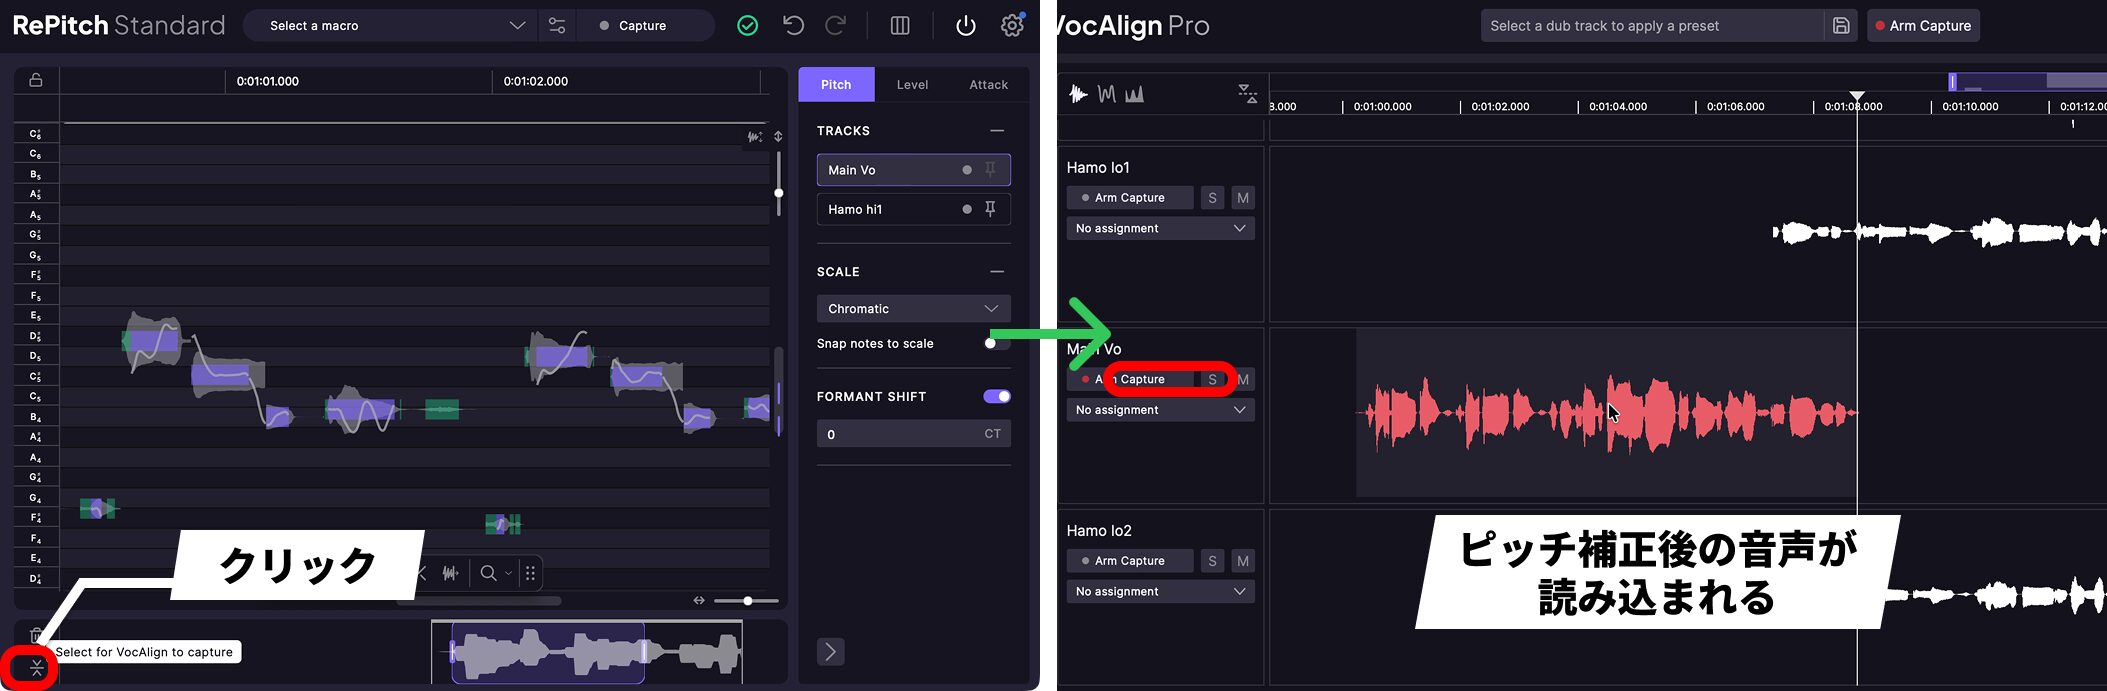
Click Select for VocAlign to capture at the bottom left of RePitch, then capture it in VocAlign. The pitch-corrected lead vocal is loaded as the Guide.
After trying it ourselves, we found it convenient to achieve alignment almost instantly with such simple controls.
Working with multiple vocal tracks in one window also helps reduce editing time.
We recommend it for anyone who regularly works with harmonies and doubles, or has been aligning vocal timing manually.
Give it a try.
NEW ARTICLES
Latest English Articles