
Steinberg's latest DAW, Cubase 15, introduces innovative AI-powered features and significant production workflow improvements. Stem separation can automatically extract individual parts from a stereo mix, while the Melodic Pattern Sequencer can generate melodies and chord progressions. A redesigned Hub, plug-in scaling, and volume and pan controls directly in the track list are among the many everyday productivity improvements available across all editions. Cubase has evolved into a DAW that can help beginners and professionals alike get more from their creativity and time.
New features and workflow improvements to expand your creativity
Steinberg's Cubase DAW is used by everyone from professionals to beginners around the world.
Its latest version, Cubase 15, has now been released.
Version 15 adds AI-powered stem separation and vocal synthesis—new features that expand creative possibilities—alongside many improvements that streamline everyday production workflows.
The main new features are:
- AI stem separation extracts individual parts from a stereo mix
- The Melodic Pattern Sequencer generates melodies and chord progressions
- Yamaha's Omnivocal Beta vocal synthesizer is included
- A redesigned Hub makes project management easier
- Major improvements to automation workflows
Selected questions and answers from the YouTube video

I have a question. I'm using Cubase 15 with Kontakt 8 and other VST plug-ins that provide multiple channels from one plug-in. When I select several channels for export, Cubase only seems to recognize the Kontakt instrument track and exports all the sounds from Kontakt together. How can I export them separately?

If all the instruments in Kontakt are routed to the same output, Cubase treats them as the combined sound of Kontakt when exporting. To export them separately, assign each instrument to a different output in Kontakt. The steps are: 1. Create multiple stereo outputs in Kontakt's Output section. 2. Route each instrument to a separate output, such as st.1, st.2, and st.3. 3. Activate Kontakt's additional outputs in Cubase. 4. Select the relevant Kontakt output channels when exporting. If that setup is difficult, loading each instrument in a separate Kontakt instrument track also makes separate exports easier.
Question: Are there changes to the UI colors or similar aspects?
Cubase 15 seems to focus more on display improvements, such as resizing the interfaces of included plug-ins, than on a major change to UI colors. As before, you can adjust the UI colors under Preferences > User Interface > General Colors.
Cubase 15 highlights: AI-powered creativity and a more efficient production workflow
This update brings many new features and refinements. Here, we'll focus on the most significant additions.
Let's take a closer look at the highlights.
New Hub: Redesigned startup Hub (all editions)
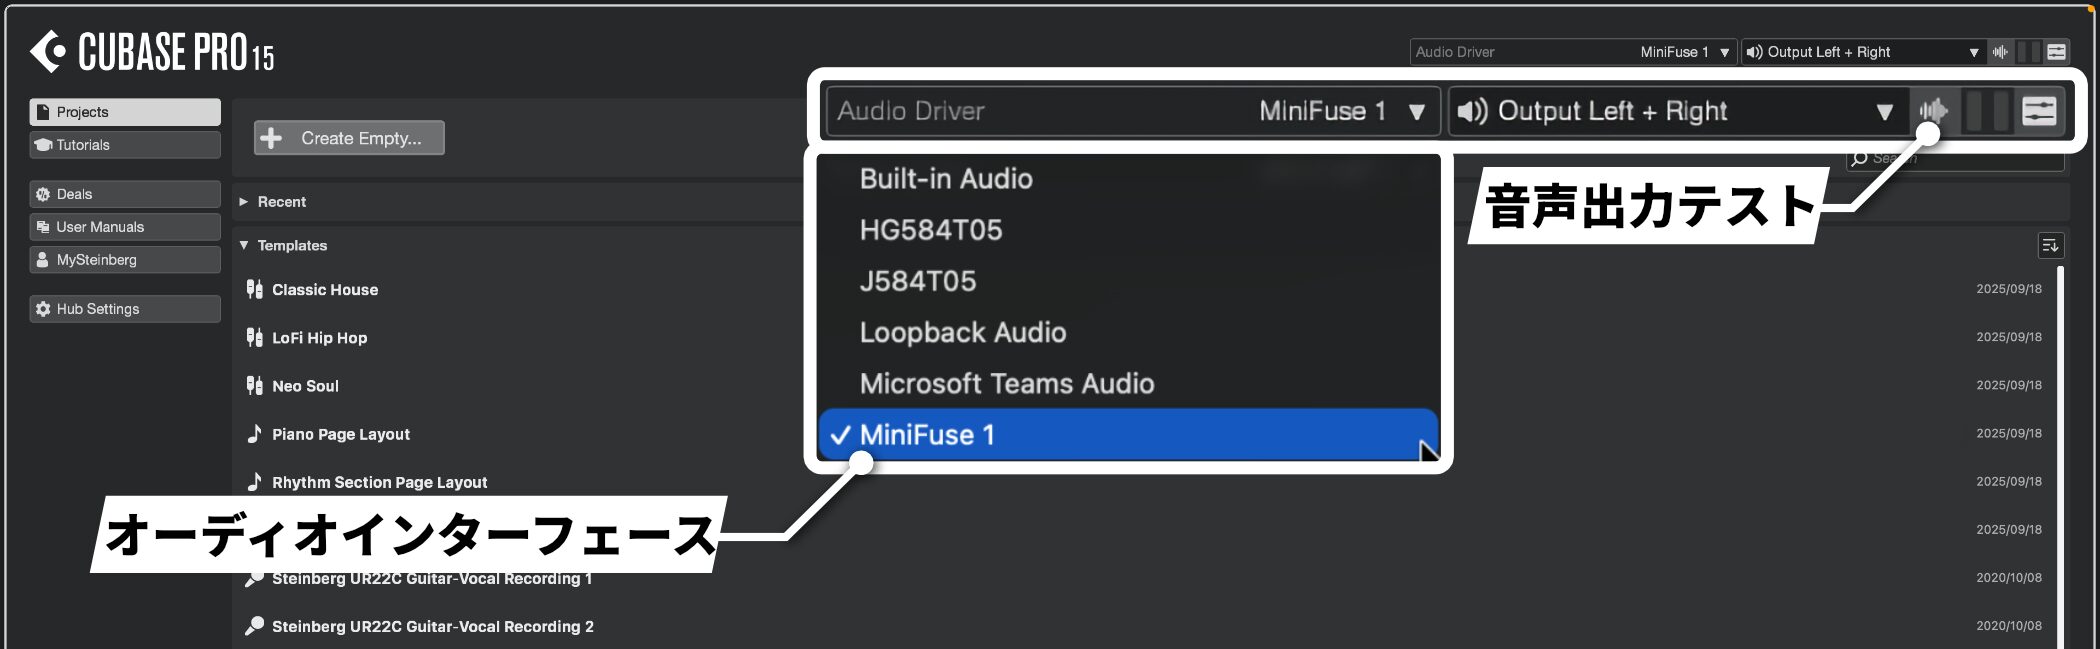
The first thing you see when starting Cubase 15 is the substantially improved Hub screen.
In the new Hub, you can select an audio interface and test audio output directly from the startup window, making setup smoother.
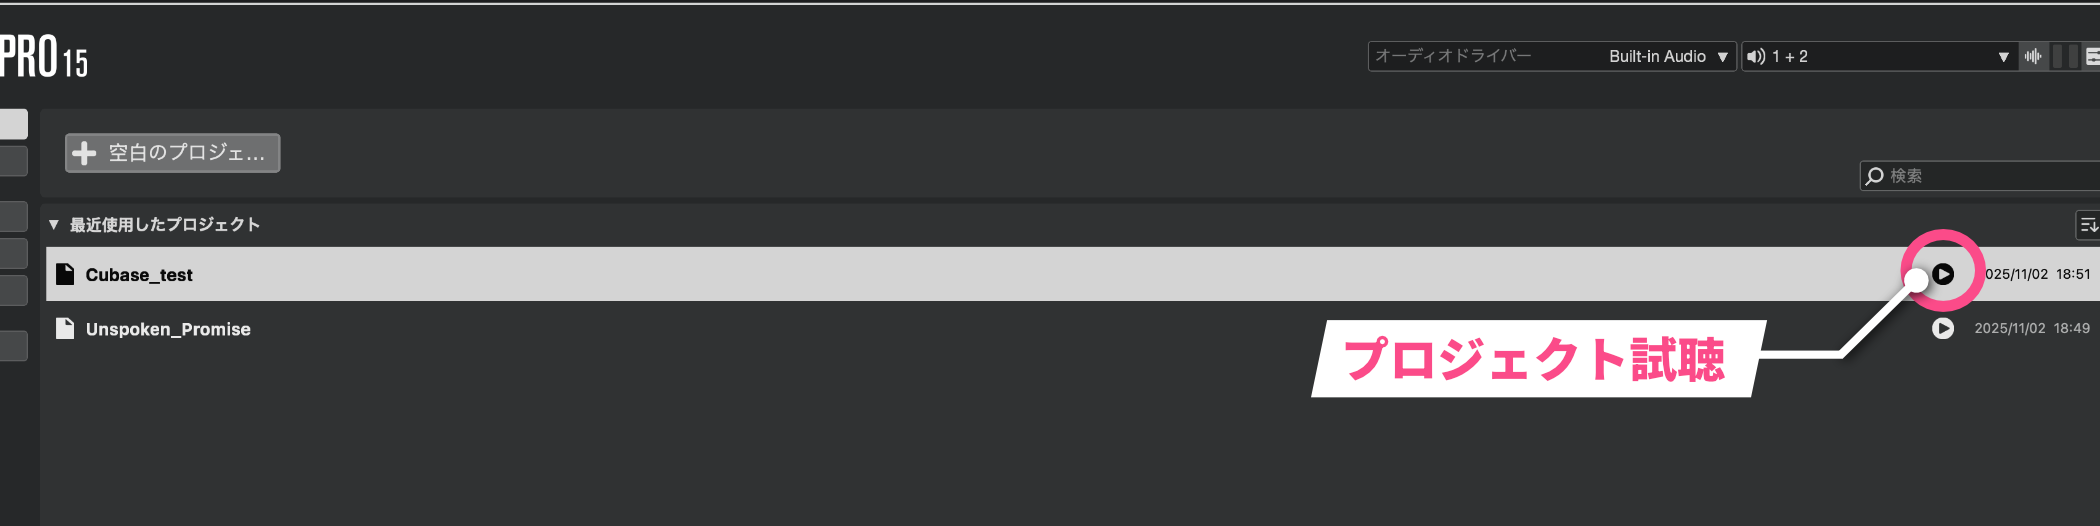
One particularly useful addition is Project Preview.
Click the play button next to a project file to listen to a five-second preview without opening the project.
Even if you manage multiple versions, you can quickly identify the track you want, improving efficiency.
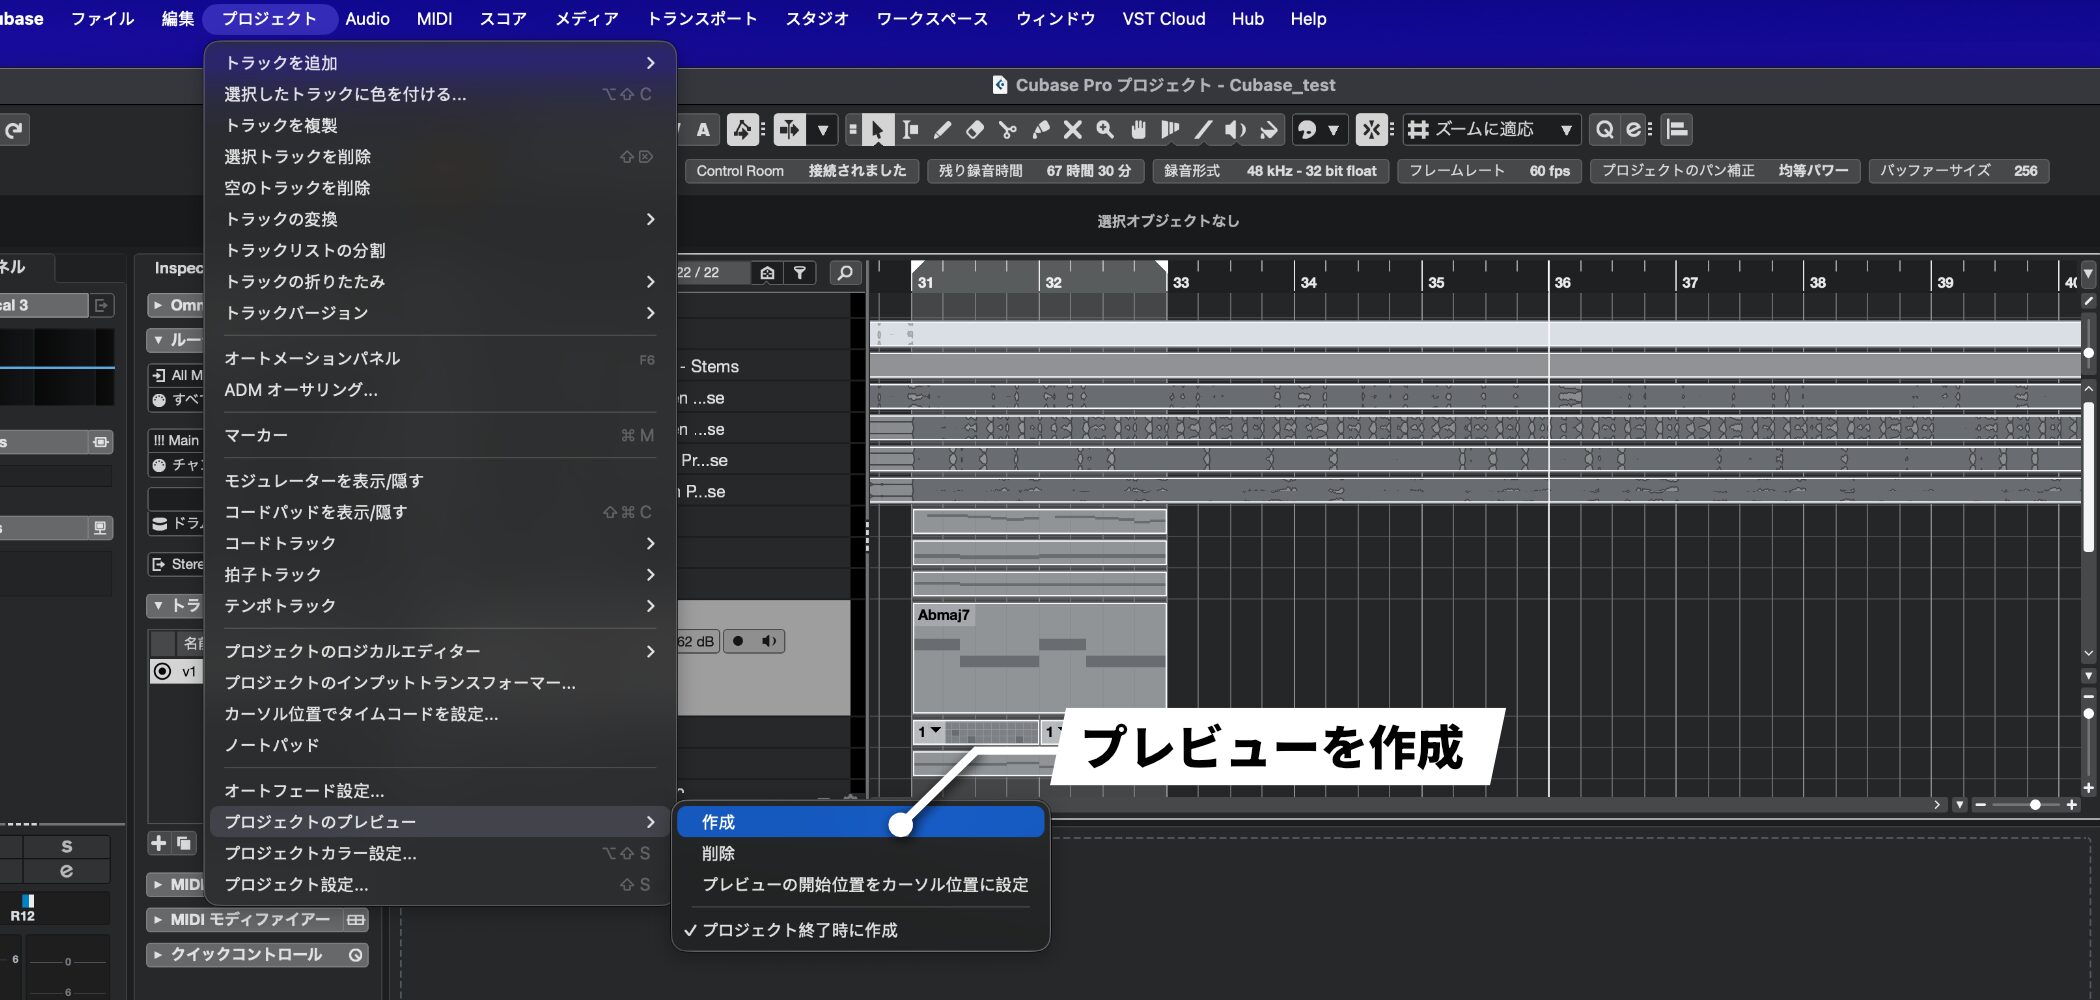
To enable previews, open a project and select Create under Project > Project Preview.
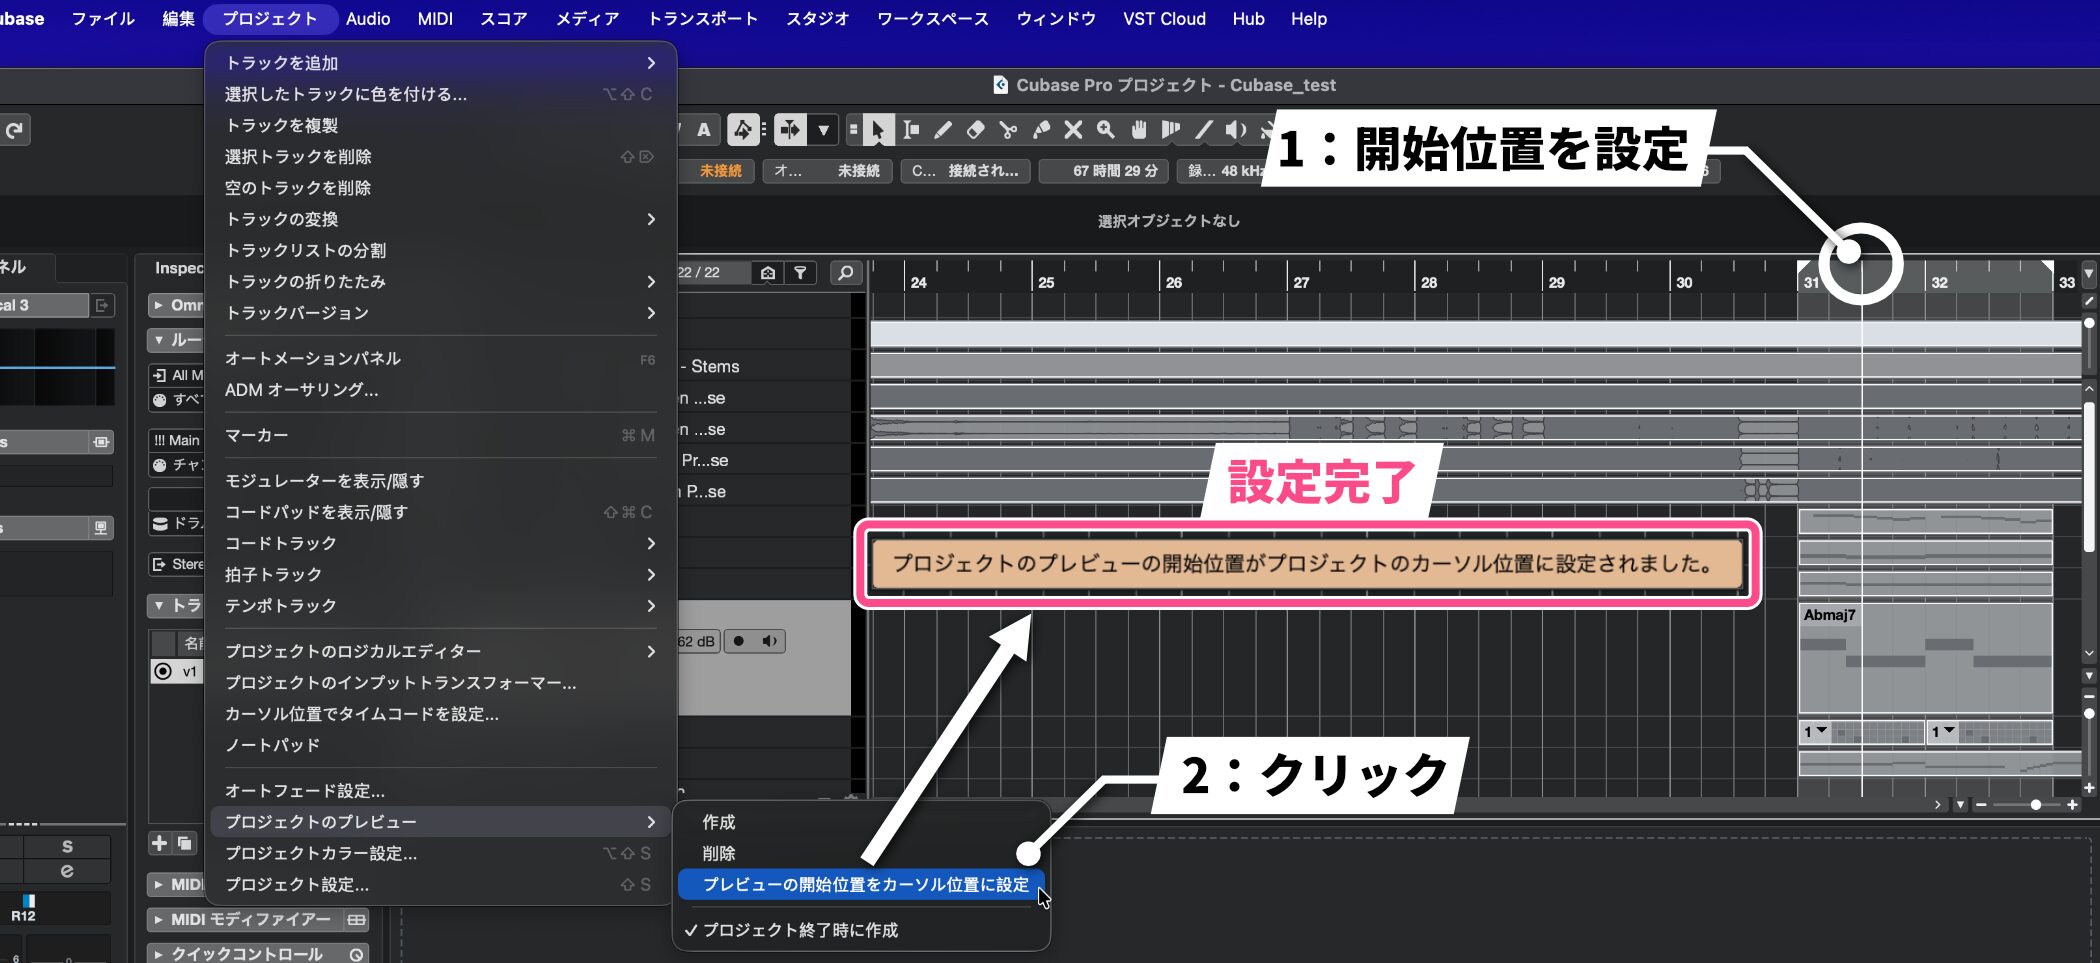
To preview from a particular point, such as the chorus or intro, move the cursor to the position where playback should begin.
Then select Set Preview Start Position to Cursor Position from the same menu.
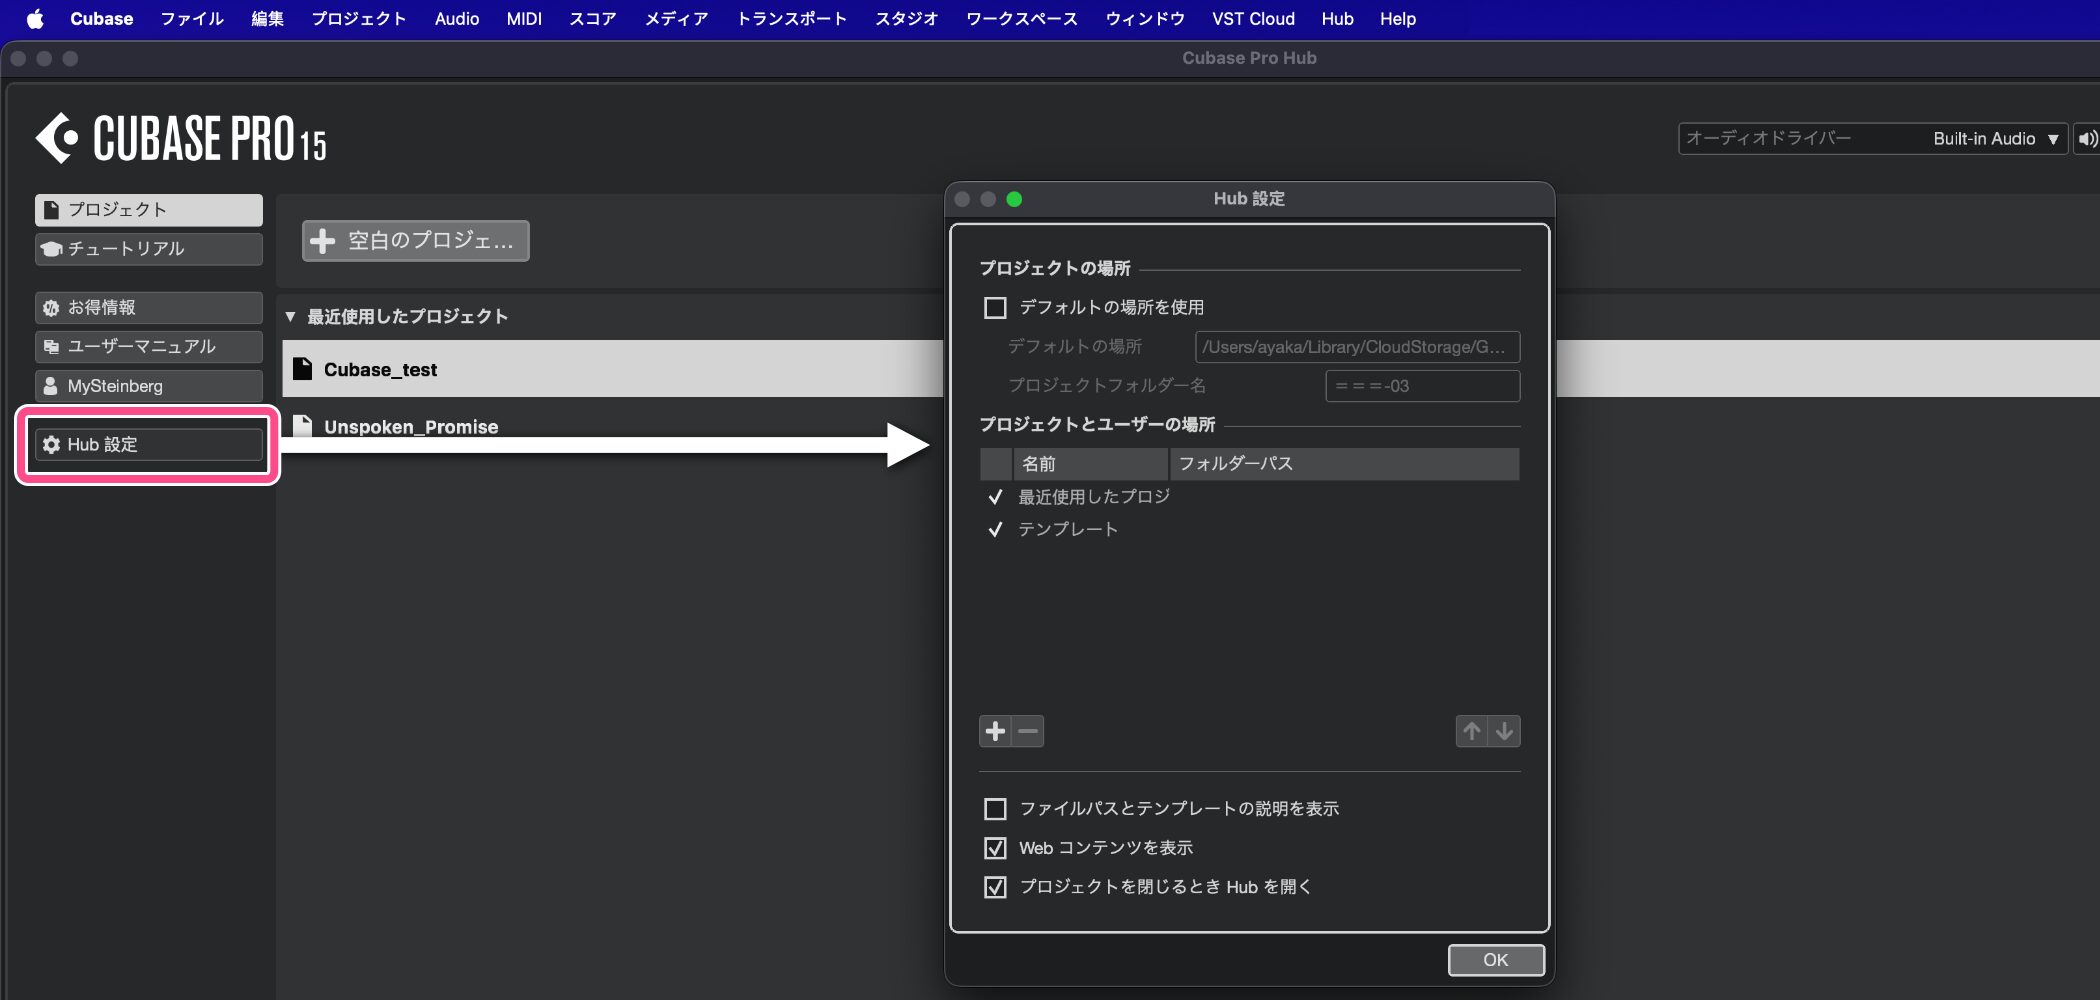
The Hub Settings option for automatically choosing where to save projects has also been moved to a more accessible location.
Mac Full Screen: Native full-screen support on Mac (all editions)
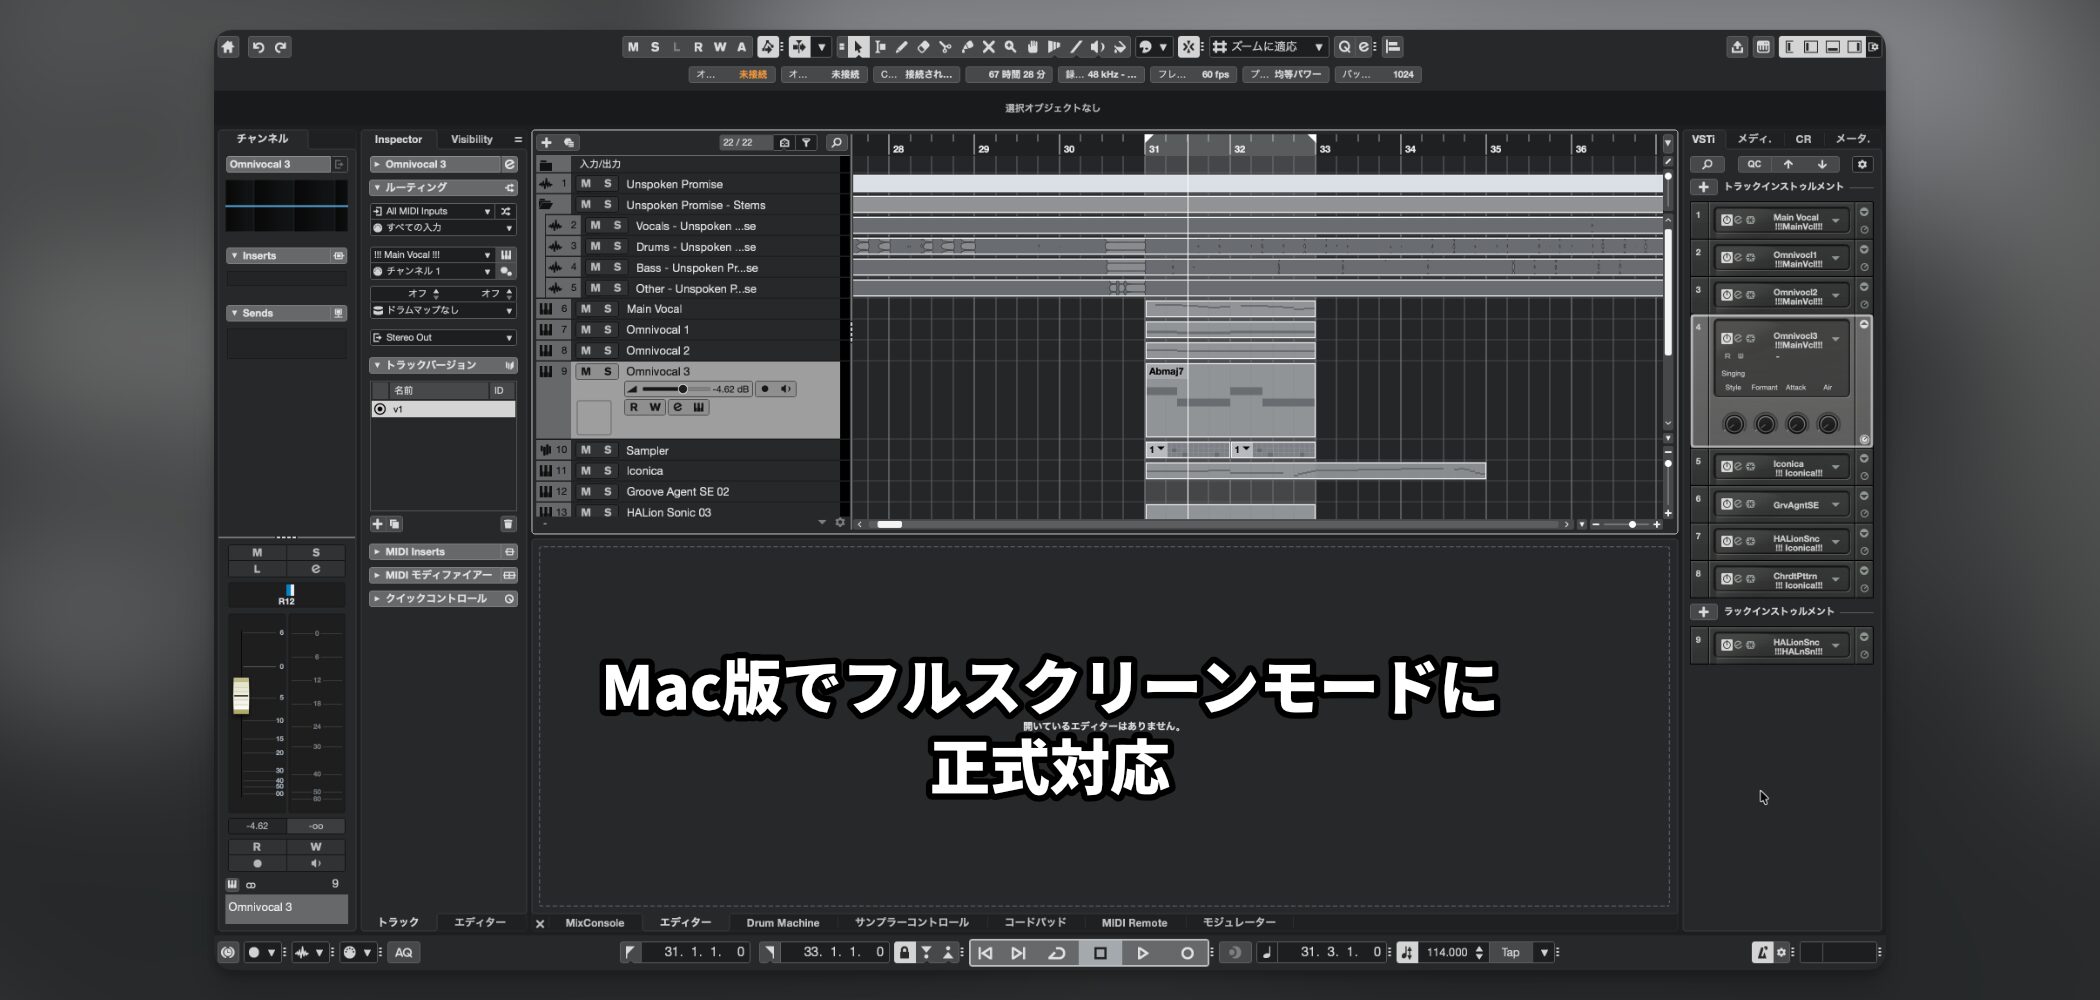
Cubase 15 for Mac now officially supports native full-screen mode.
You can display the Project window or MixConsole full screen for more immersive editing and mixing.
Plug-in Scaling: Resize plug-in interfaces (all editions)
All included effect plug-ins now support user-interface scaling.
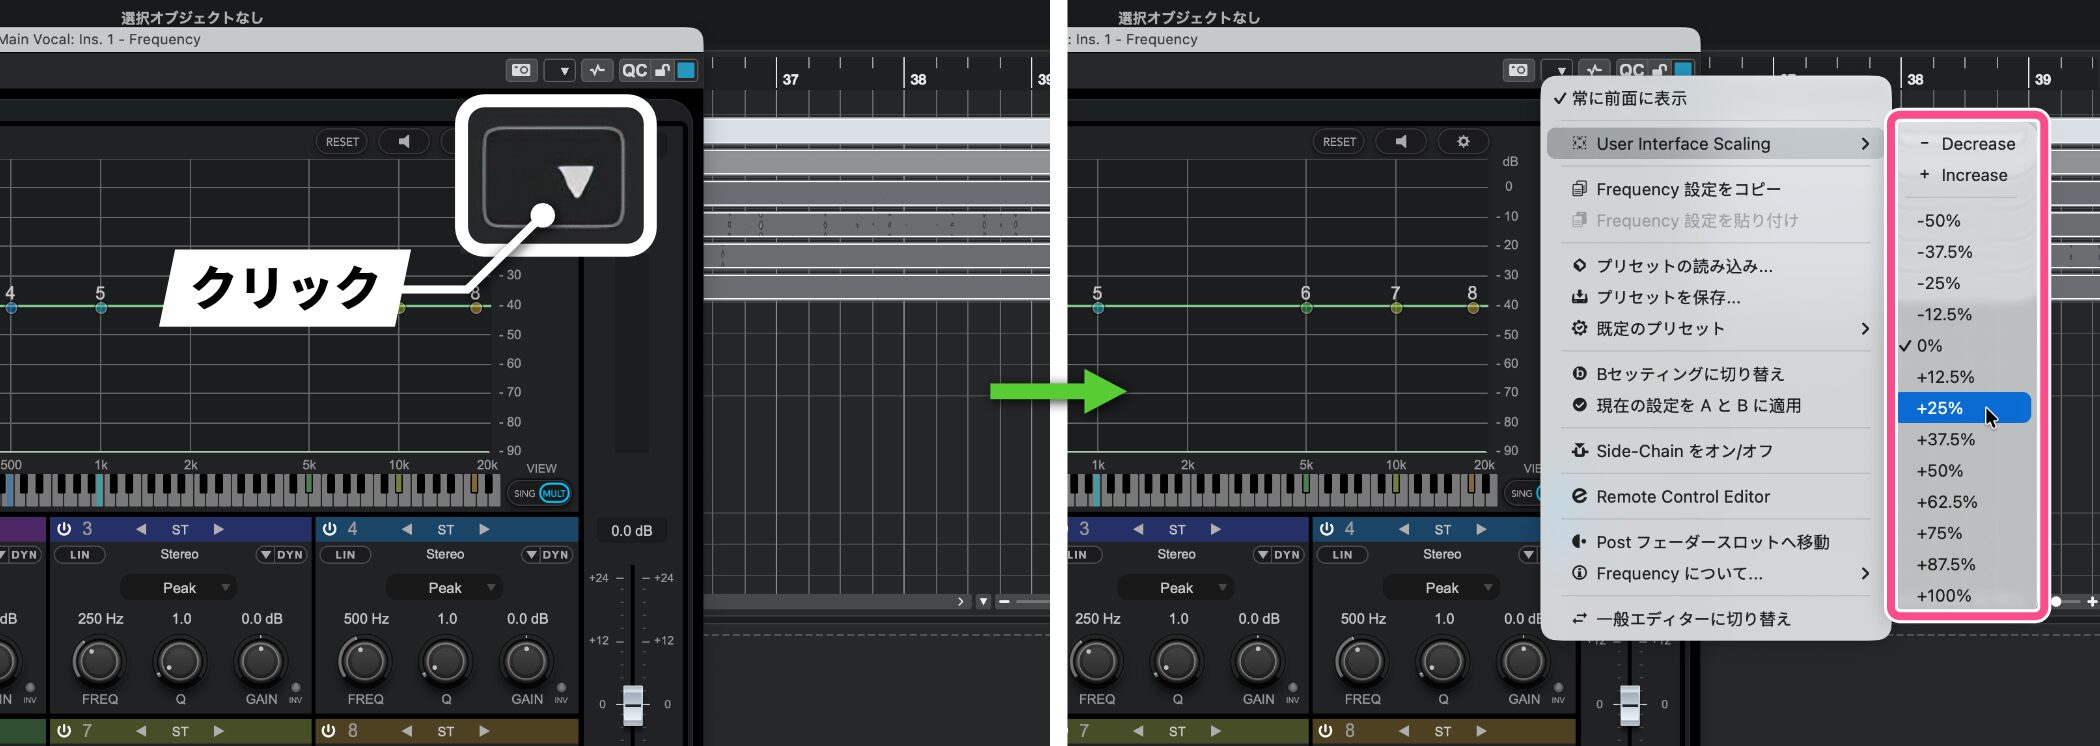
Click the arrow in the upper-right corner of a plug-in window and adjust its size under User Interface Scaling.
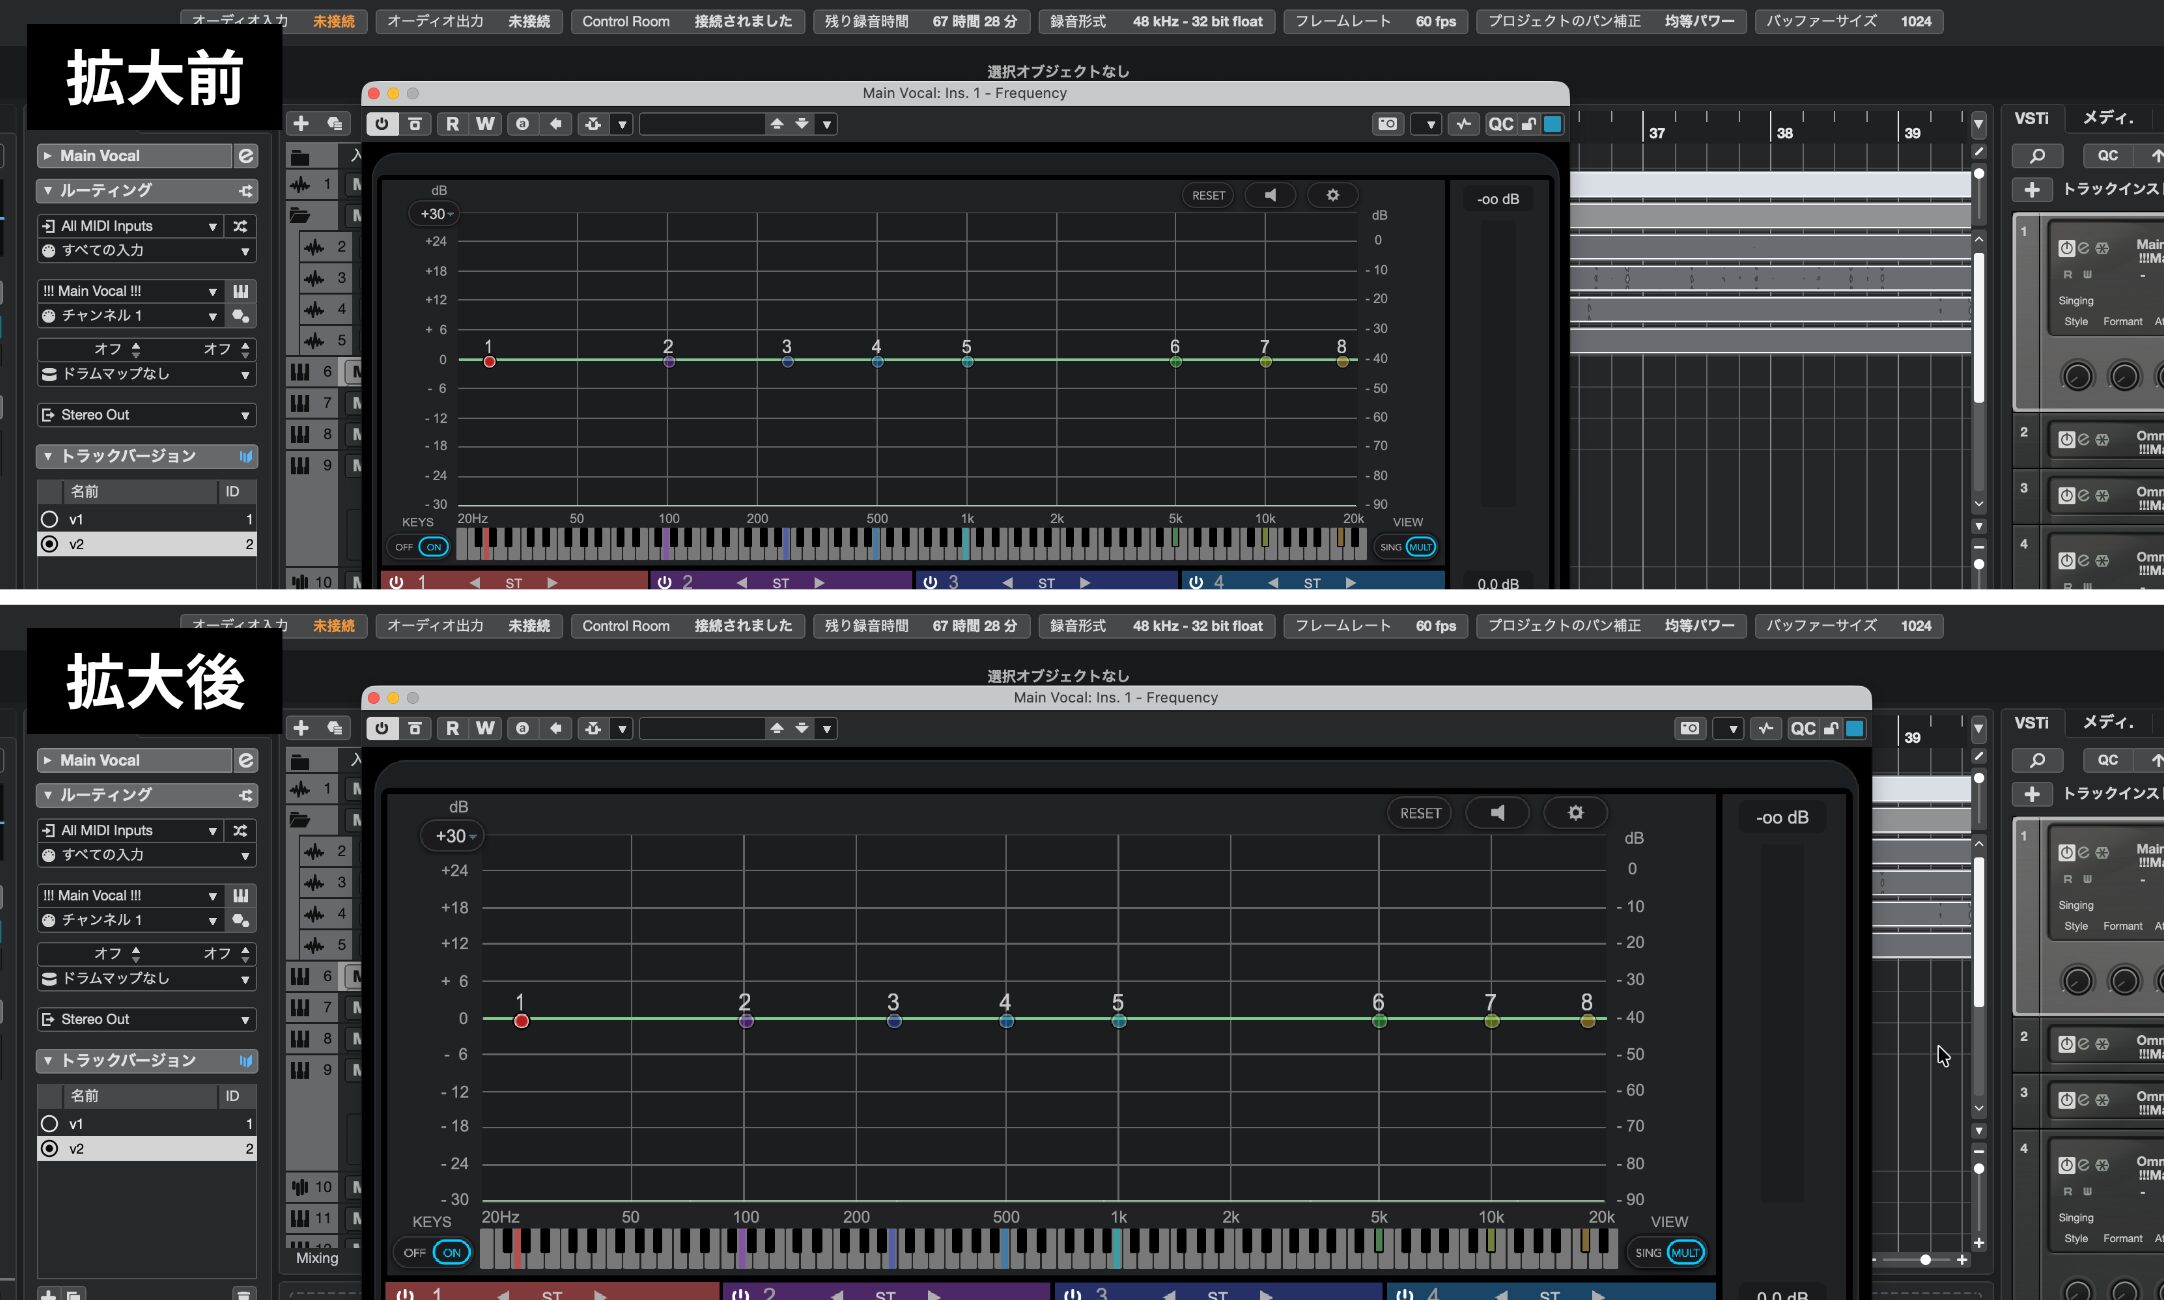
For example, you can enlarge an EQ when you need a closer look at a particular frequency range.
At the time of this article, instrument plug-ins such as Groove Agent, HALion, and Retrologue are planned to receive support later.
Track Controls: Adjust volume and pan directly from tracks (all editions)
You can now add volume and pan controls to the track list.
This lets you adjust them directly in the track controls area even when the Inspector on the left is closed.
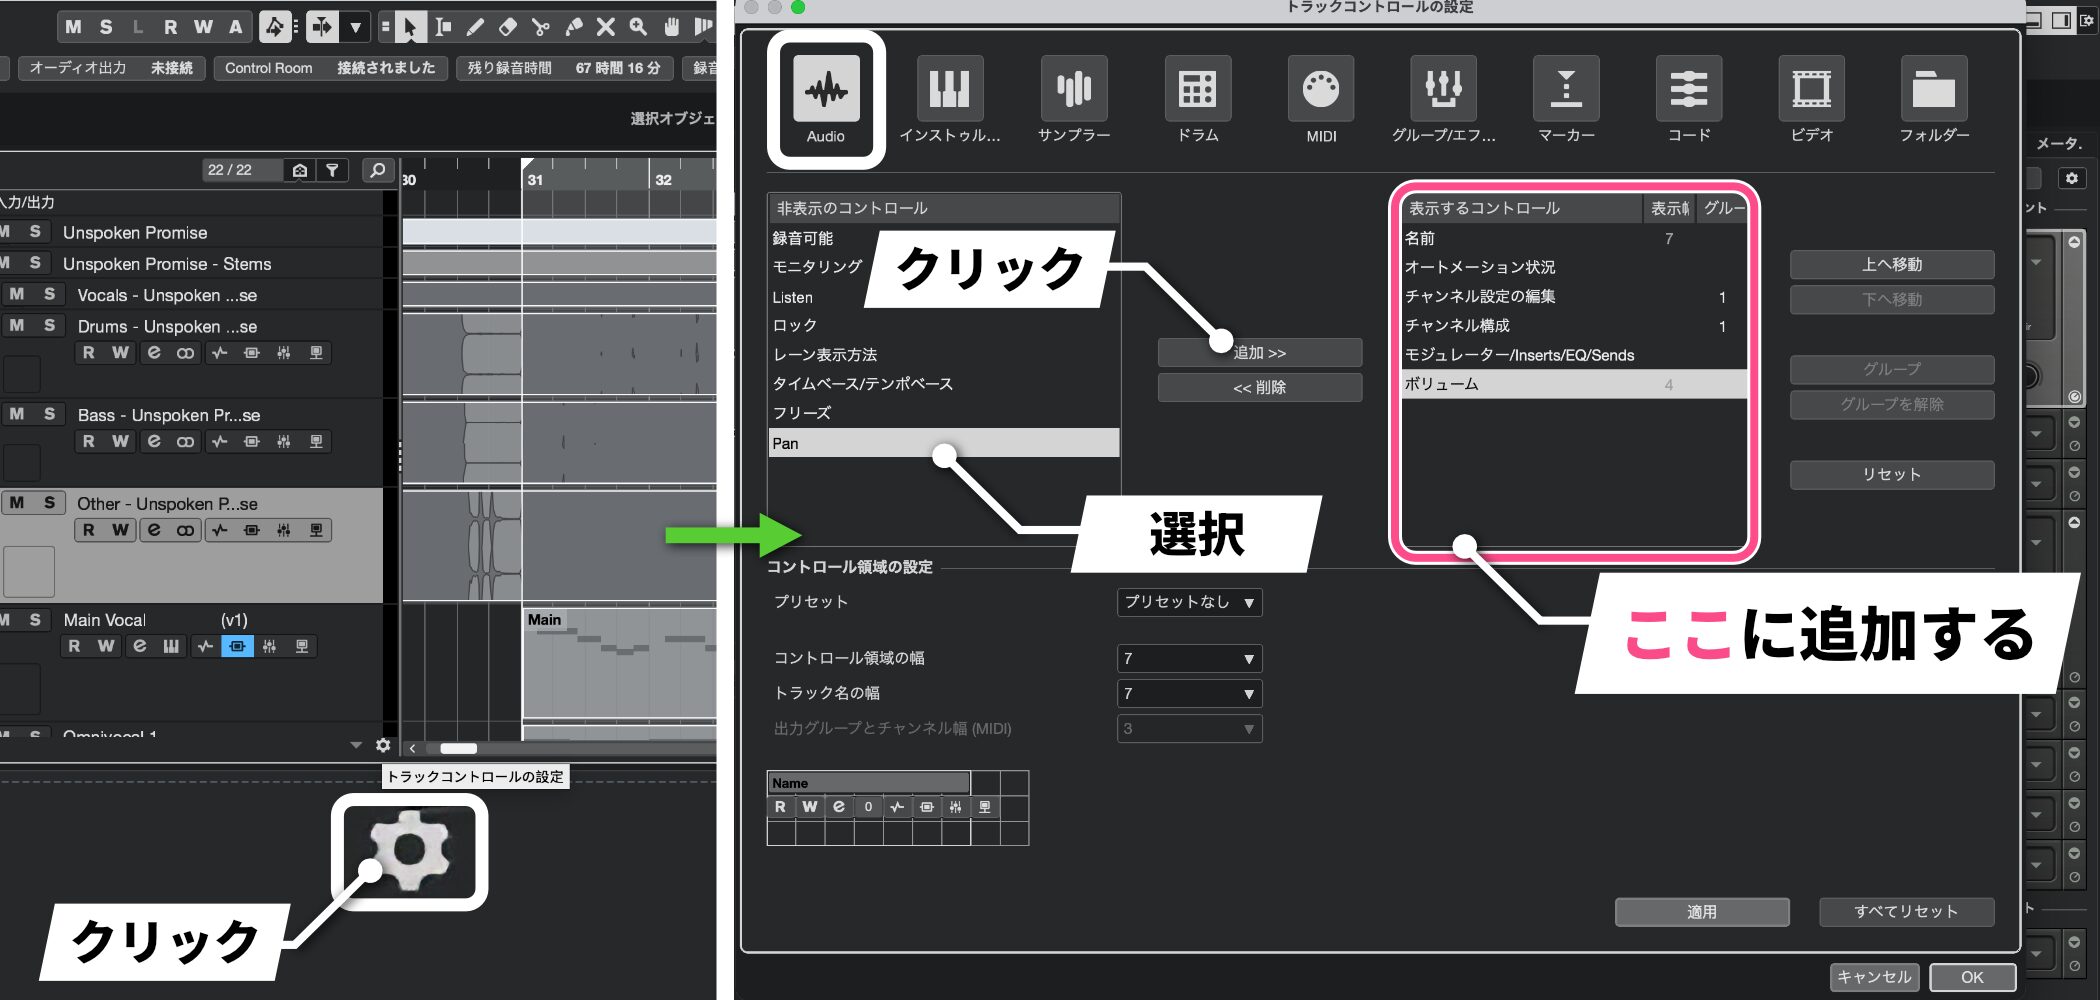
Setup is straightforward.
Click the settings button at the lower-right of the track list, choose a track type (Audio in this example), and add Volume and Pan to the controls shown.
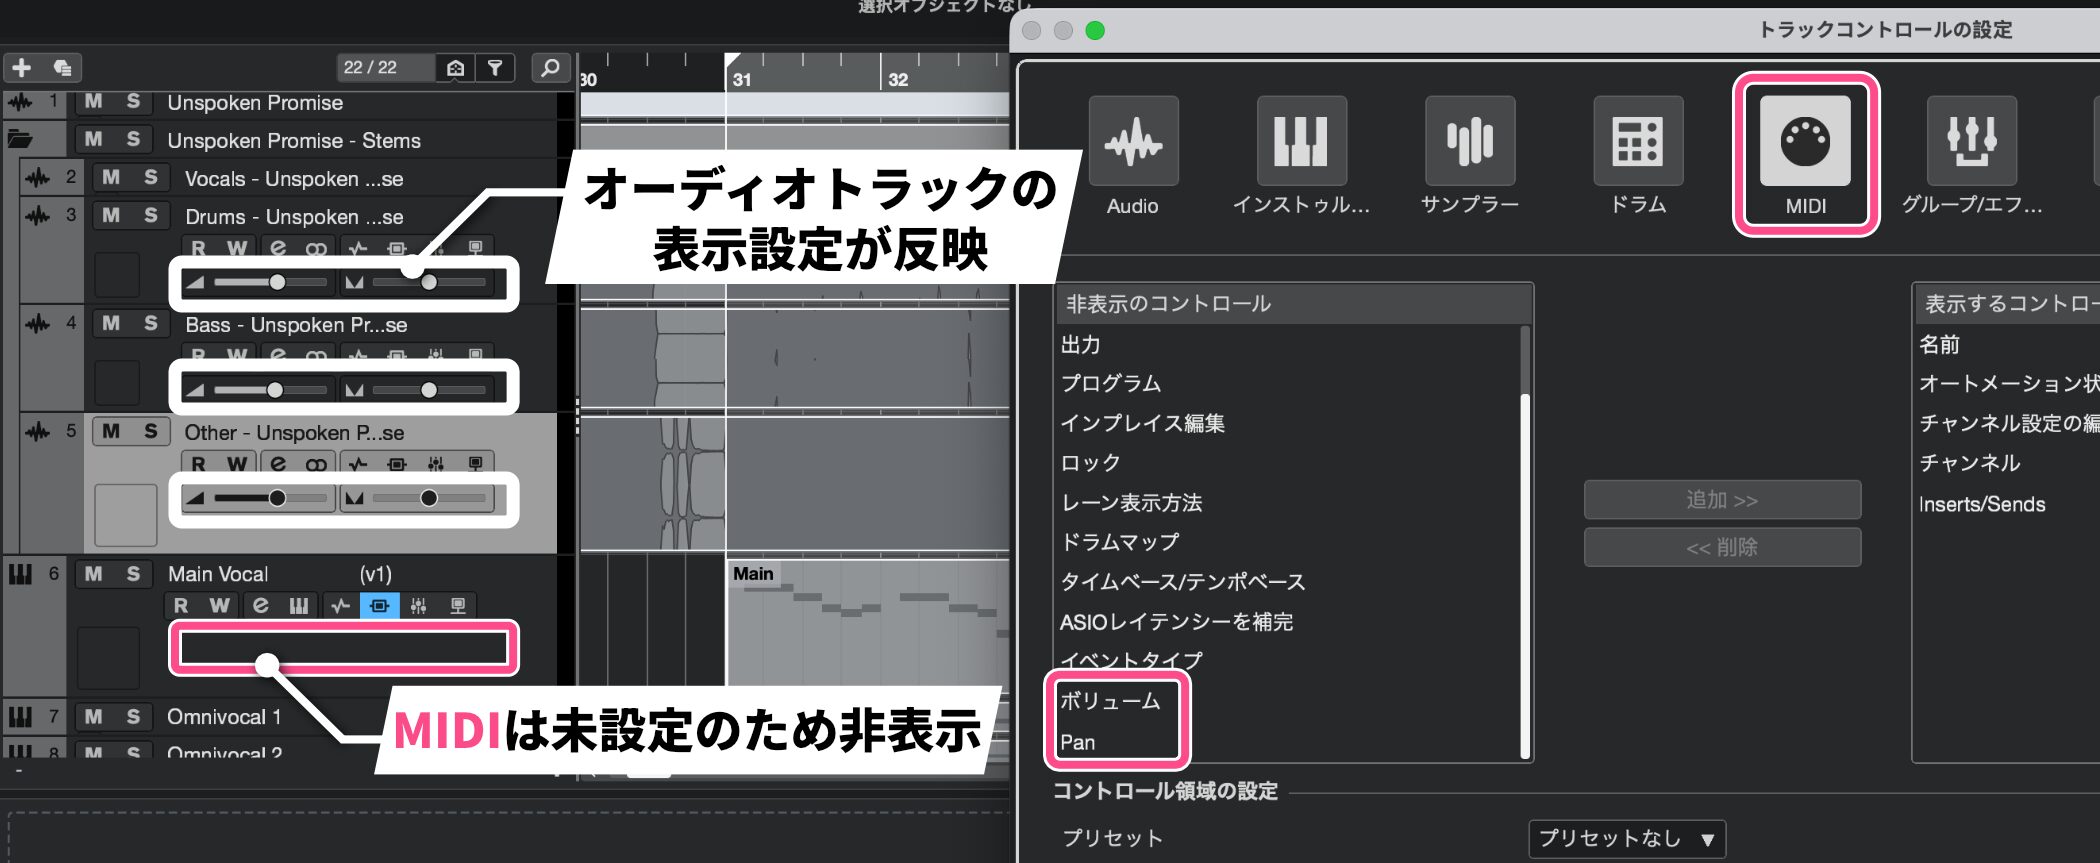
The volume and pan parameters are now visible only on audio tracks.
You can configure the controls separately for each track type to suit your workflow.
Stem Separation: Split a stereo mix into parts with AI (Pro only)
Cubase 15 Pro adds AI-powered stem separation.
It can automatically separate vocals, drums, bass, and other instruments from a stereo mix.
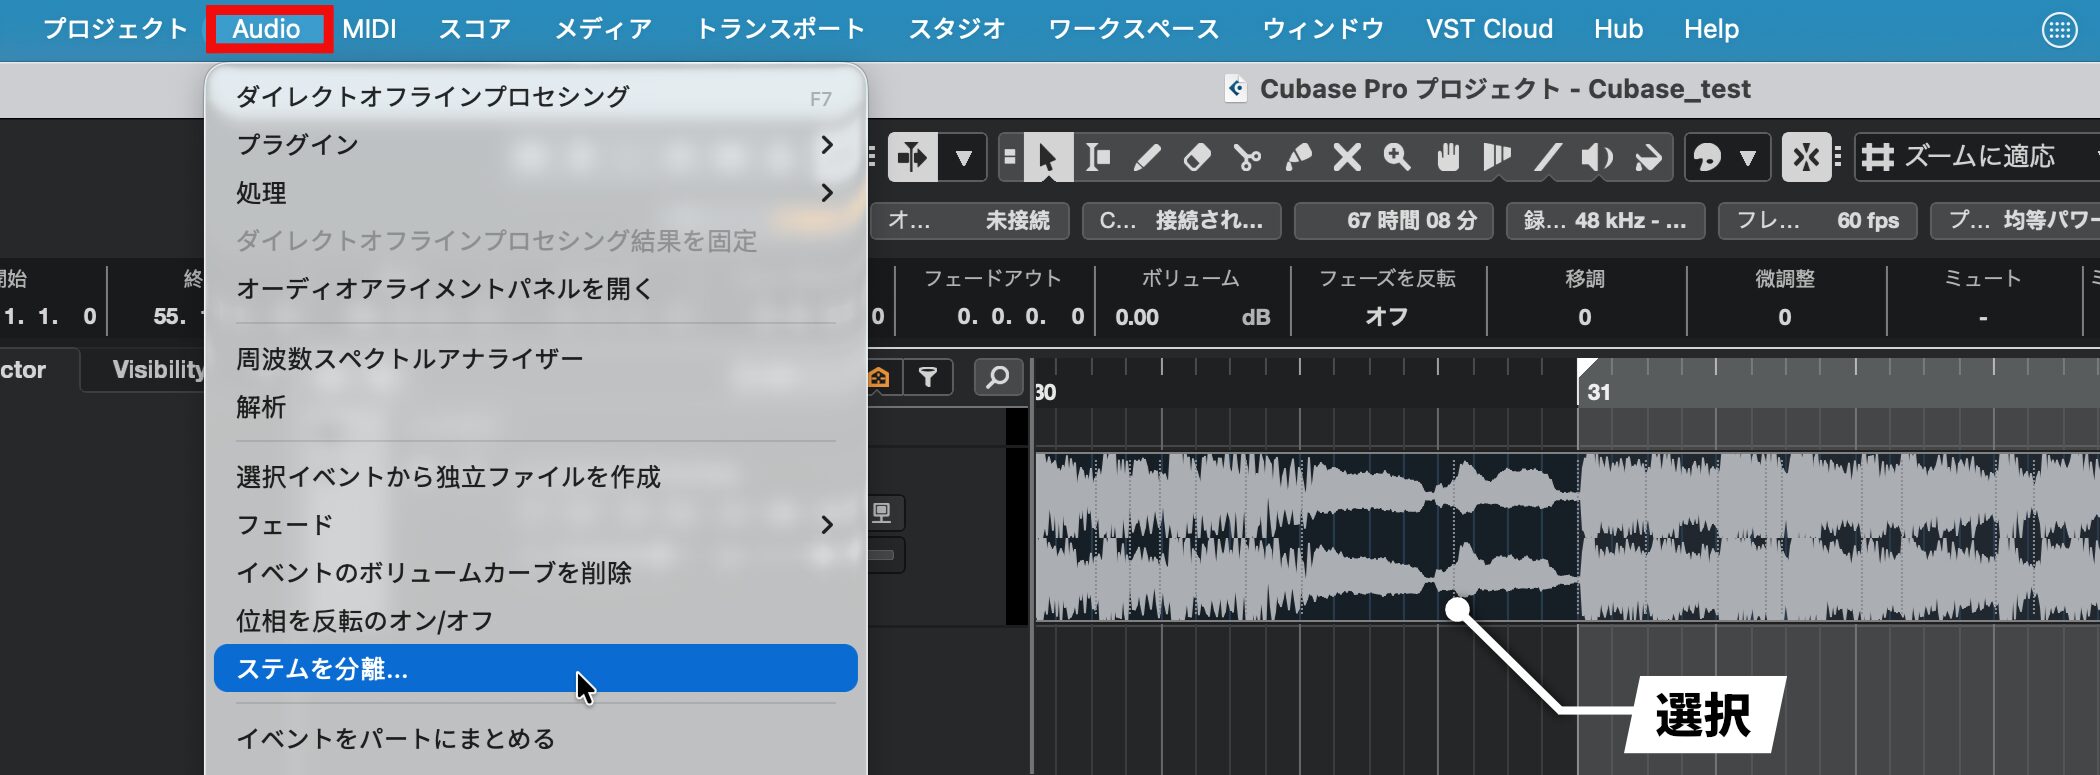
Select the audio file, then choose Separate Stems from the Audio menu at the top of the screen.
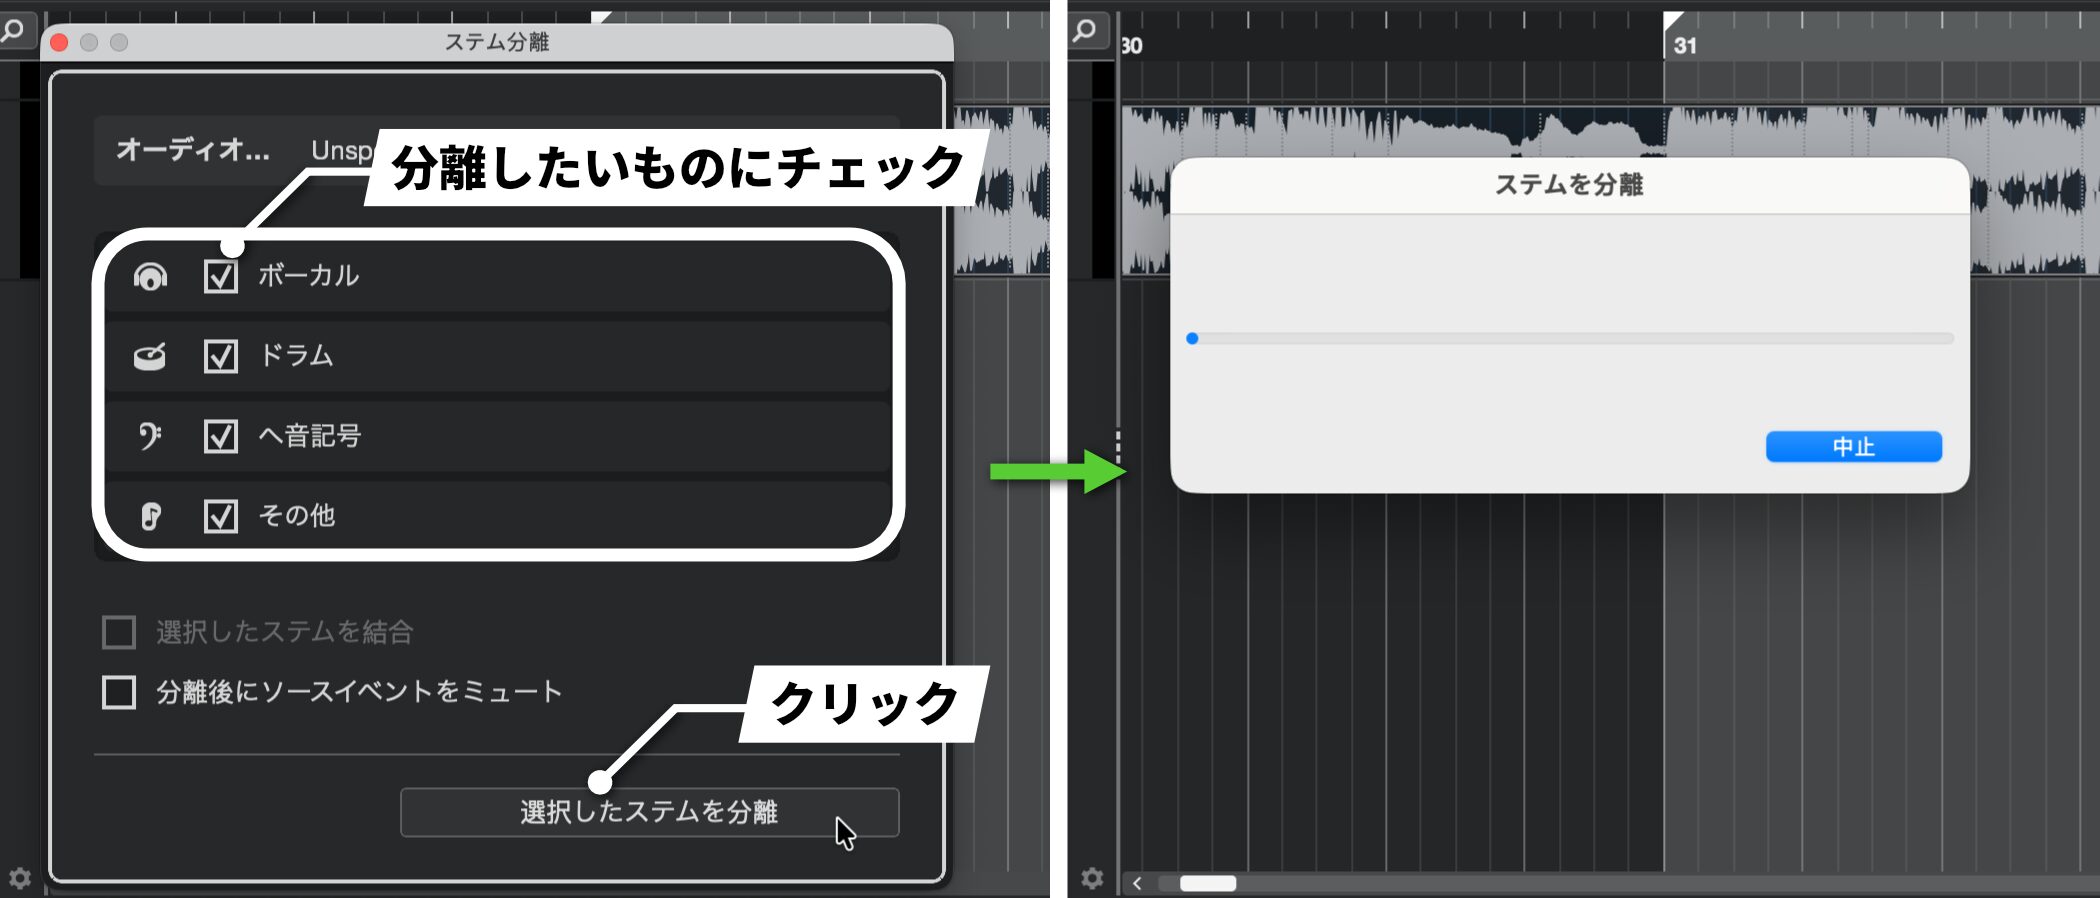
Check the elements to extract (vocals, drums, bass, or other), then click Separate Selected Stems.
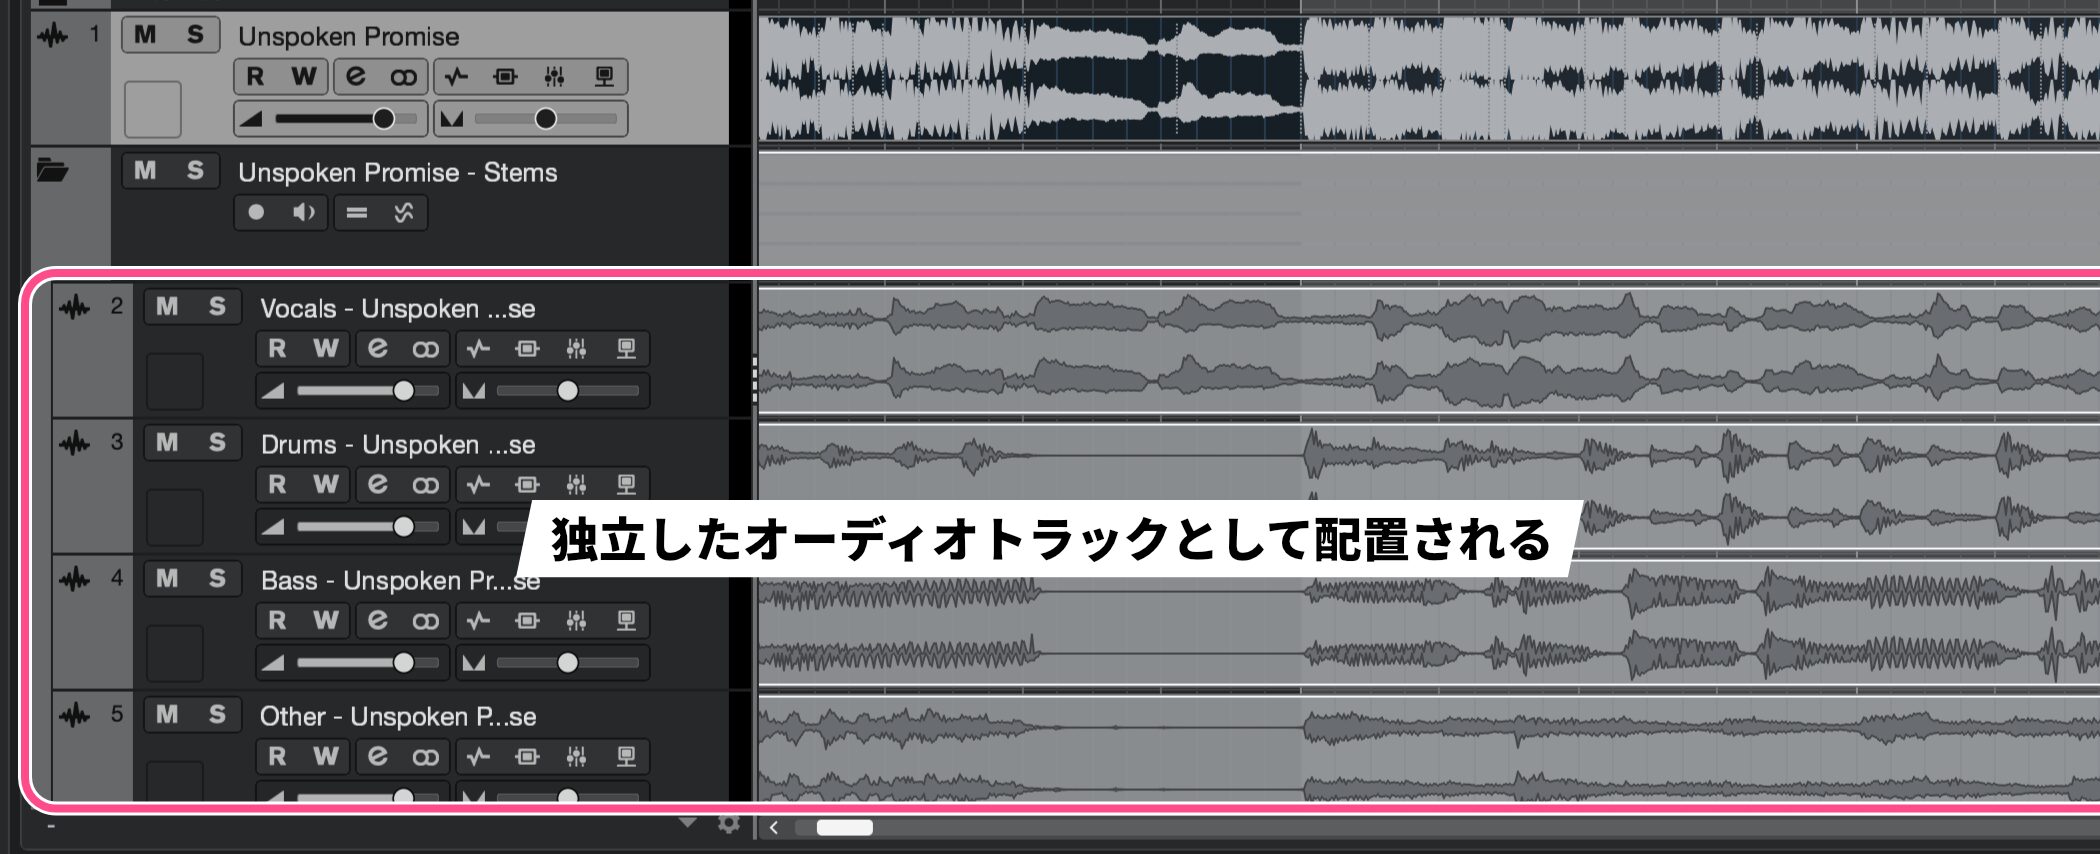
The separated stems are placed on individual audio tracks, so you can mix and edit them independently.
This opens up creative options for remixing, sampling, and rebalancing existing music.
Melodic Pattern Sequencer: Generate melodies and chords (Pro/Artist)
The Pattern Editor gains a Melodic Mode for creating pitched melodies and chord patterns more easily.
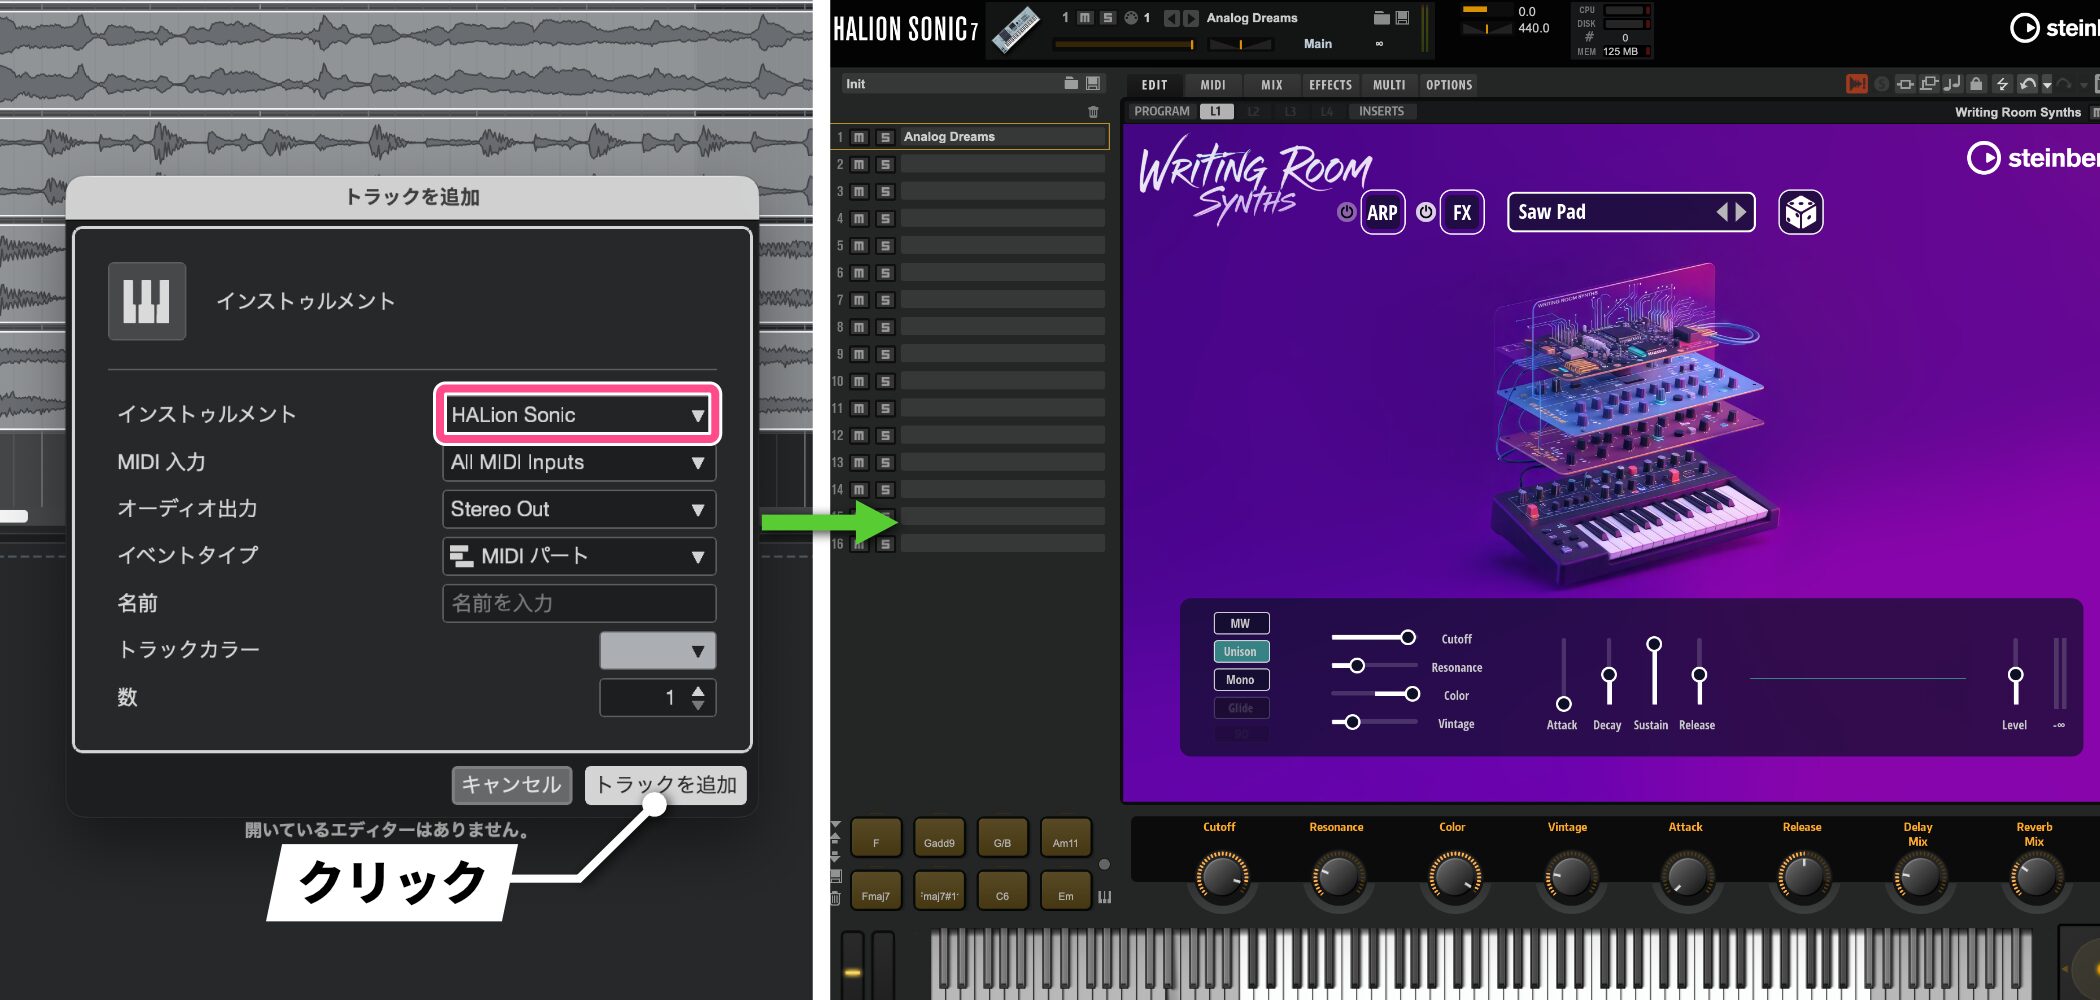
First, create an instrument track.
For this example, select the new Writing Room Synths sound in HALion Sonic.
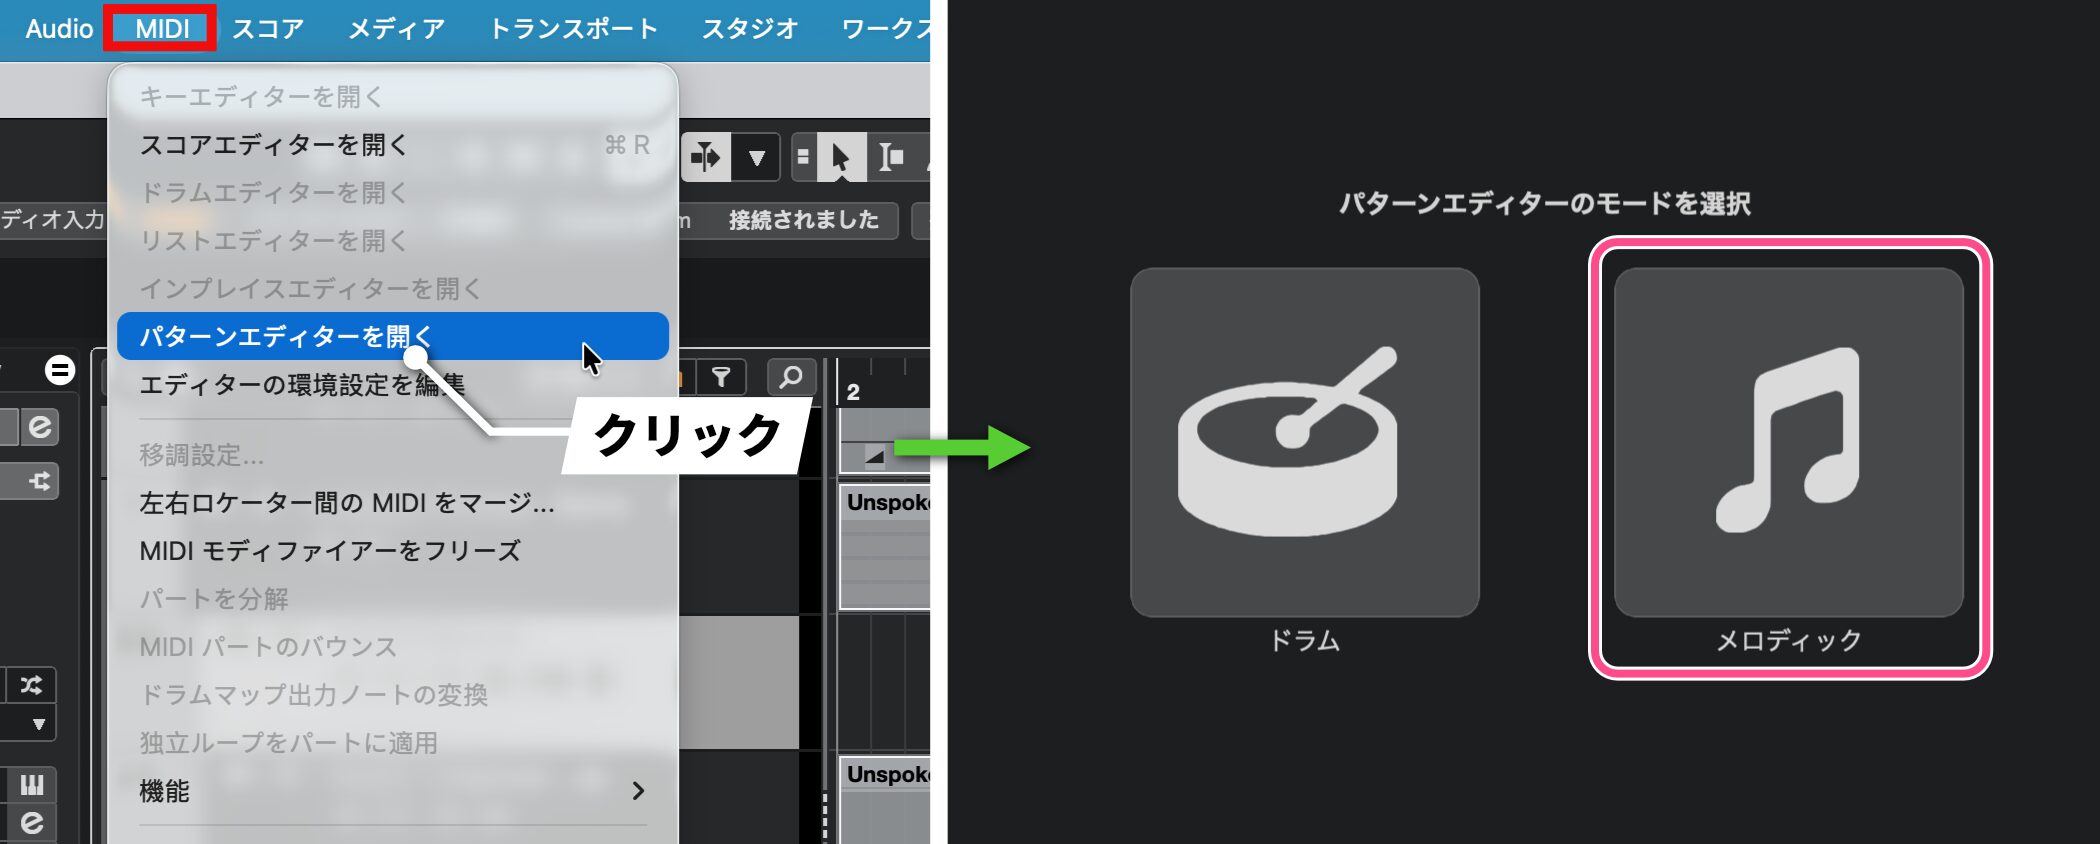
Choose Open Pattern Editor from the MIDI menu to switch between the existing Drum Mode and the new Melodic Mode.
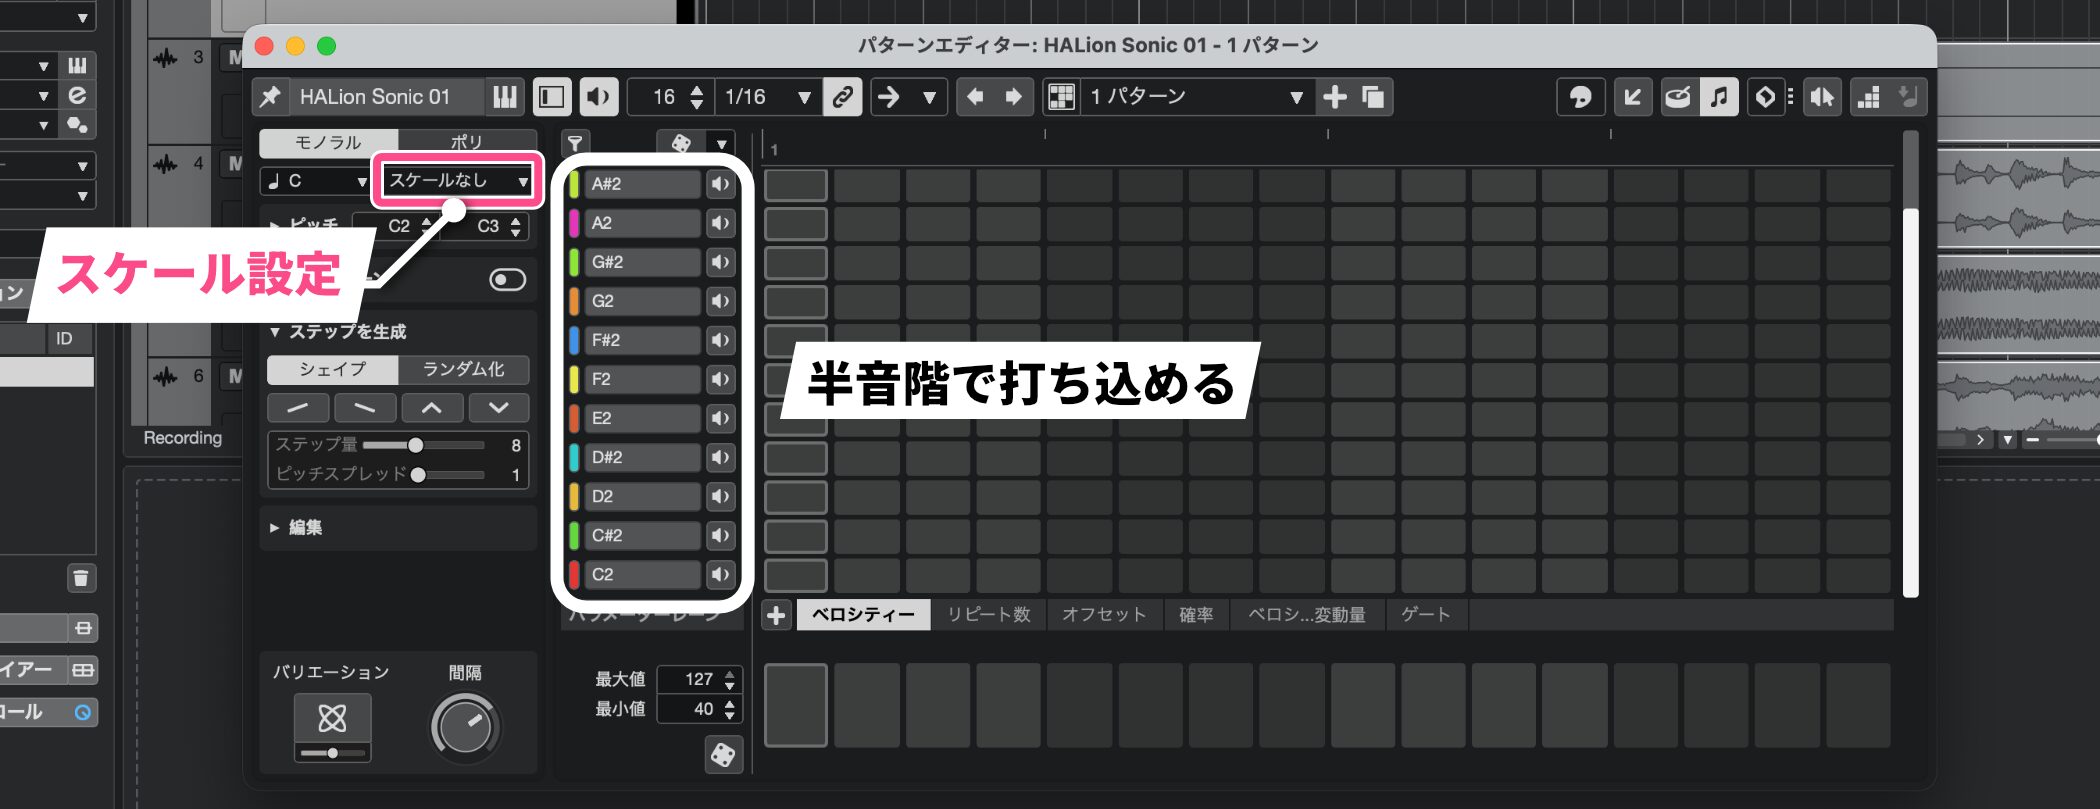
In Melodic Mode, you can program a melody chromatically.
Setting a scale makes note entry easier.
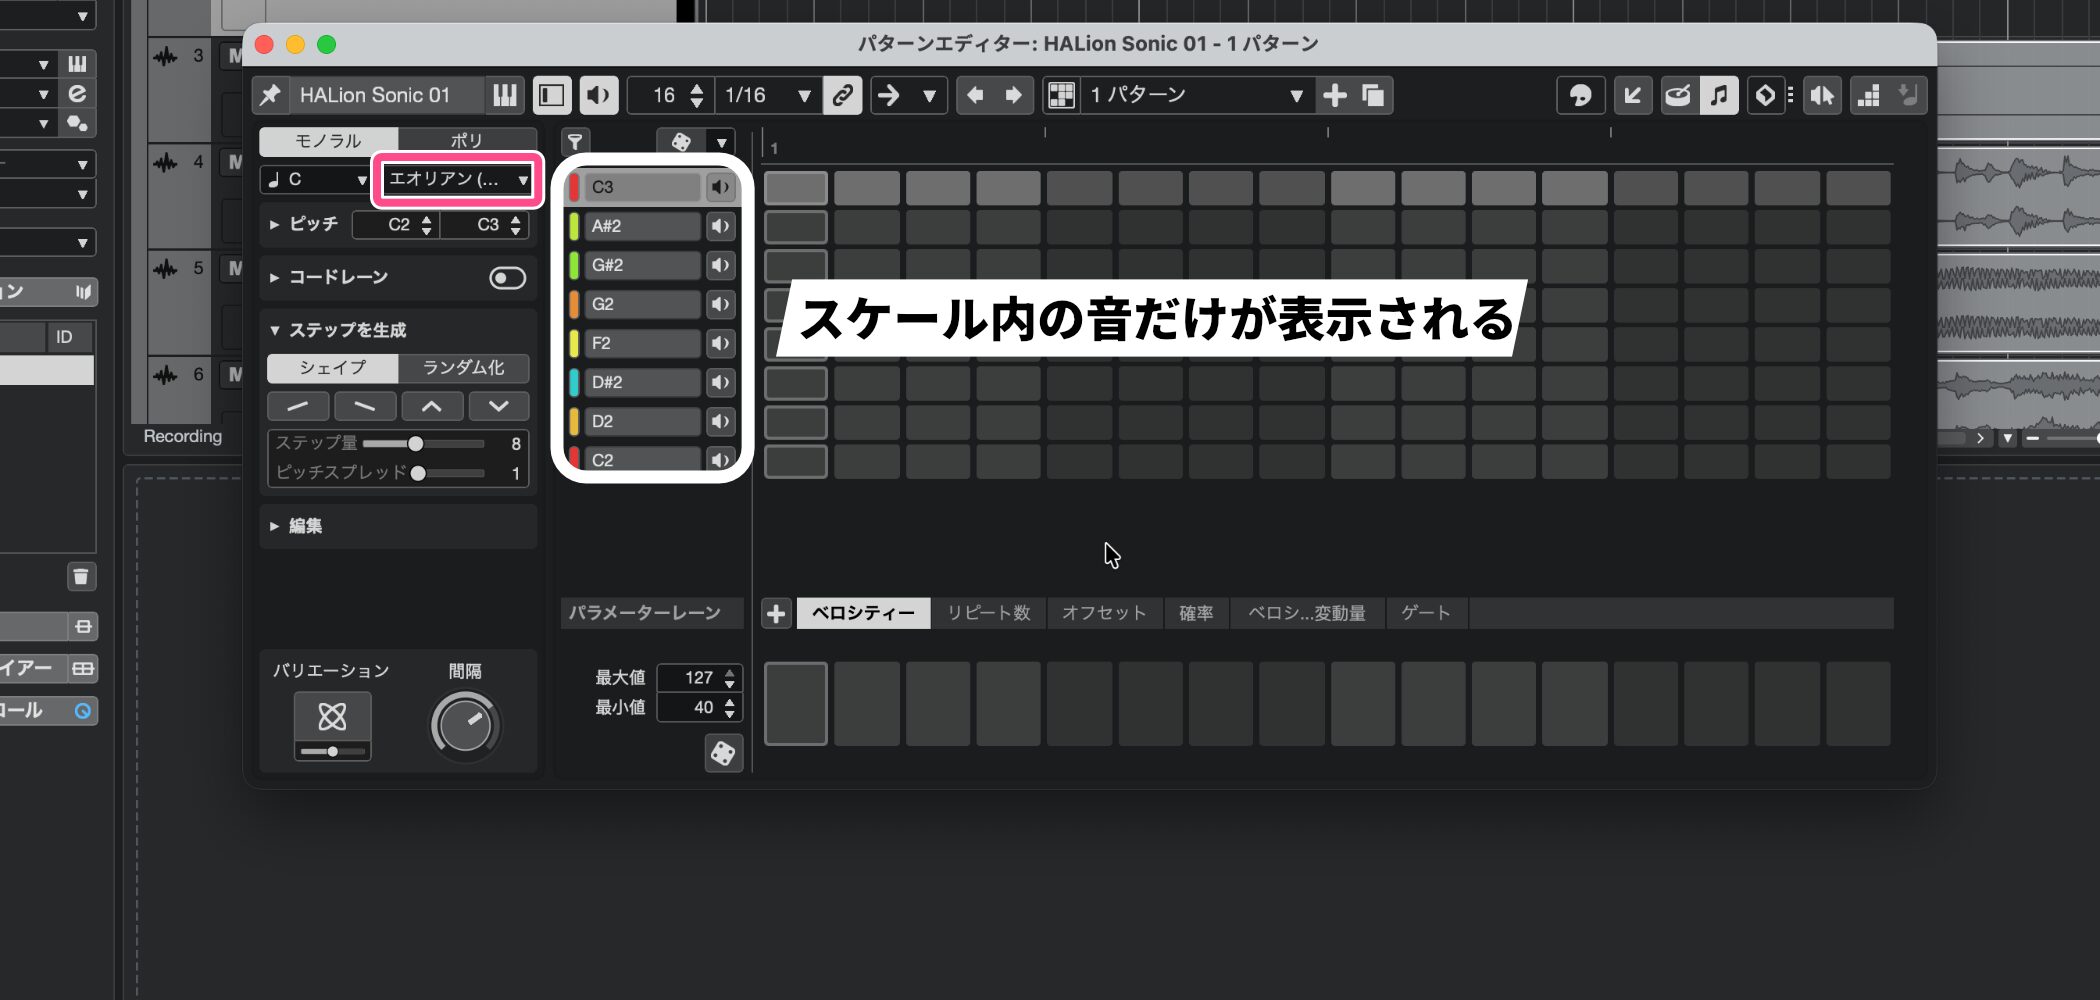
For example, for a song in C minor, choose Aeolian from the scale list to hide notes outside the scale and display only notes within it.
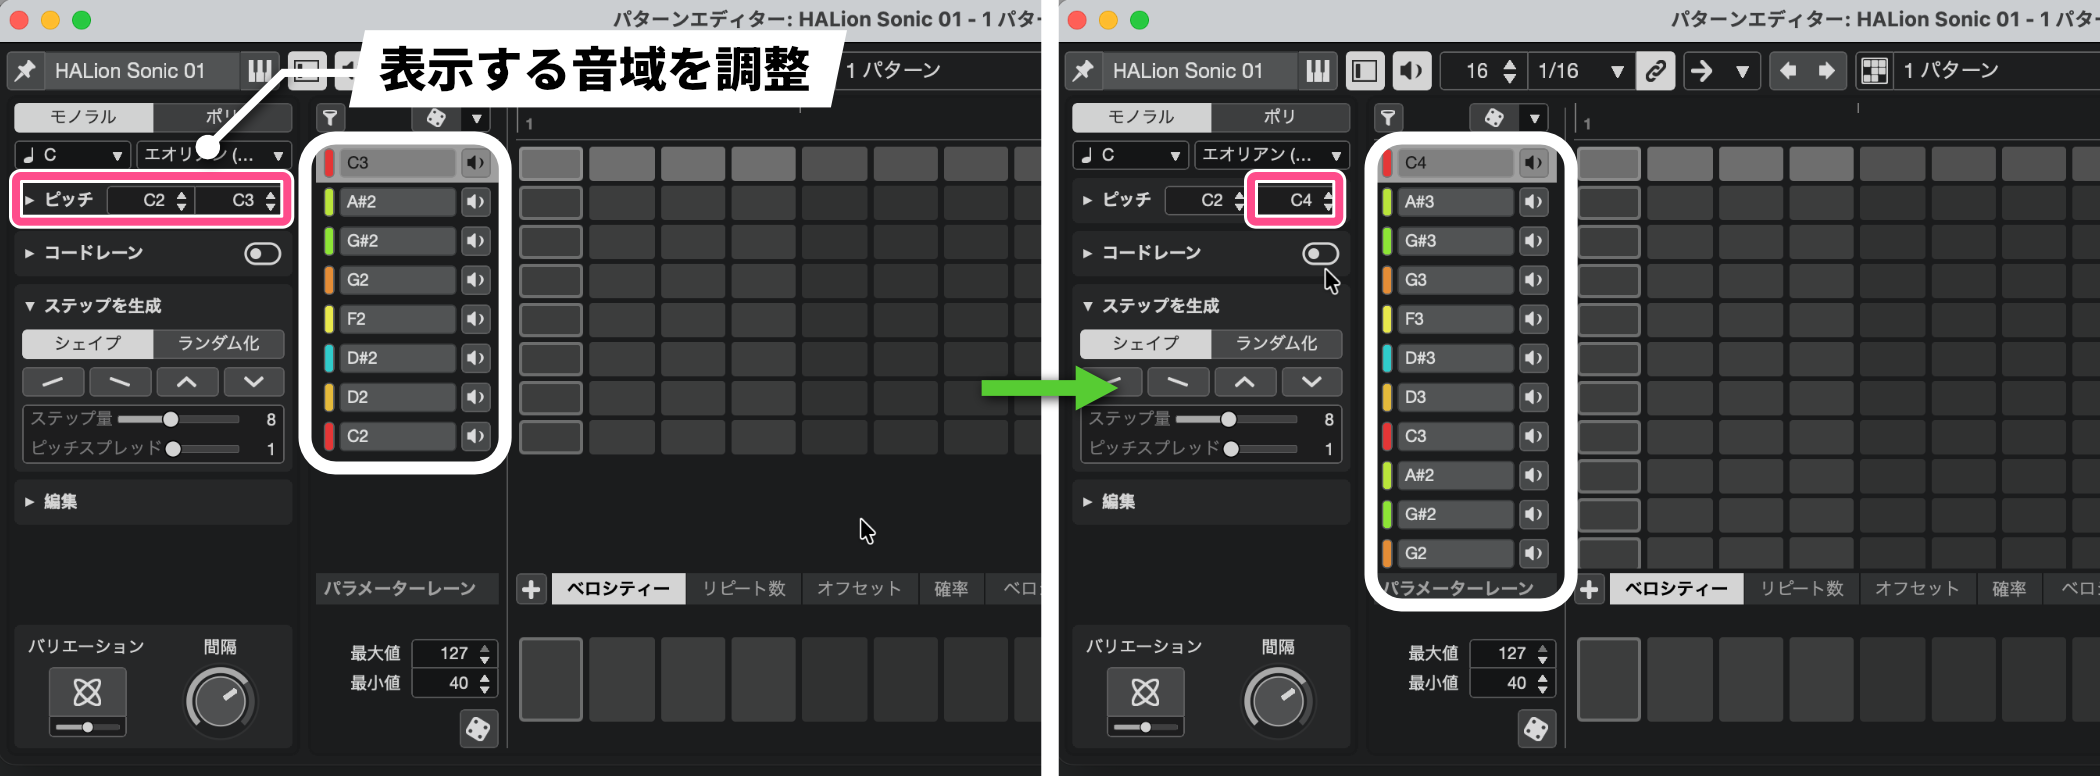
Use Pitch to adjust the displayed note range.
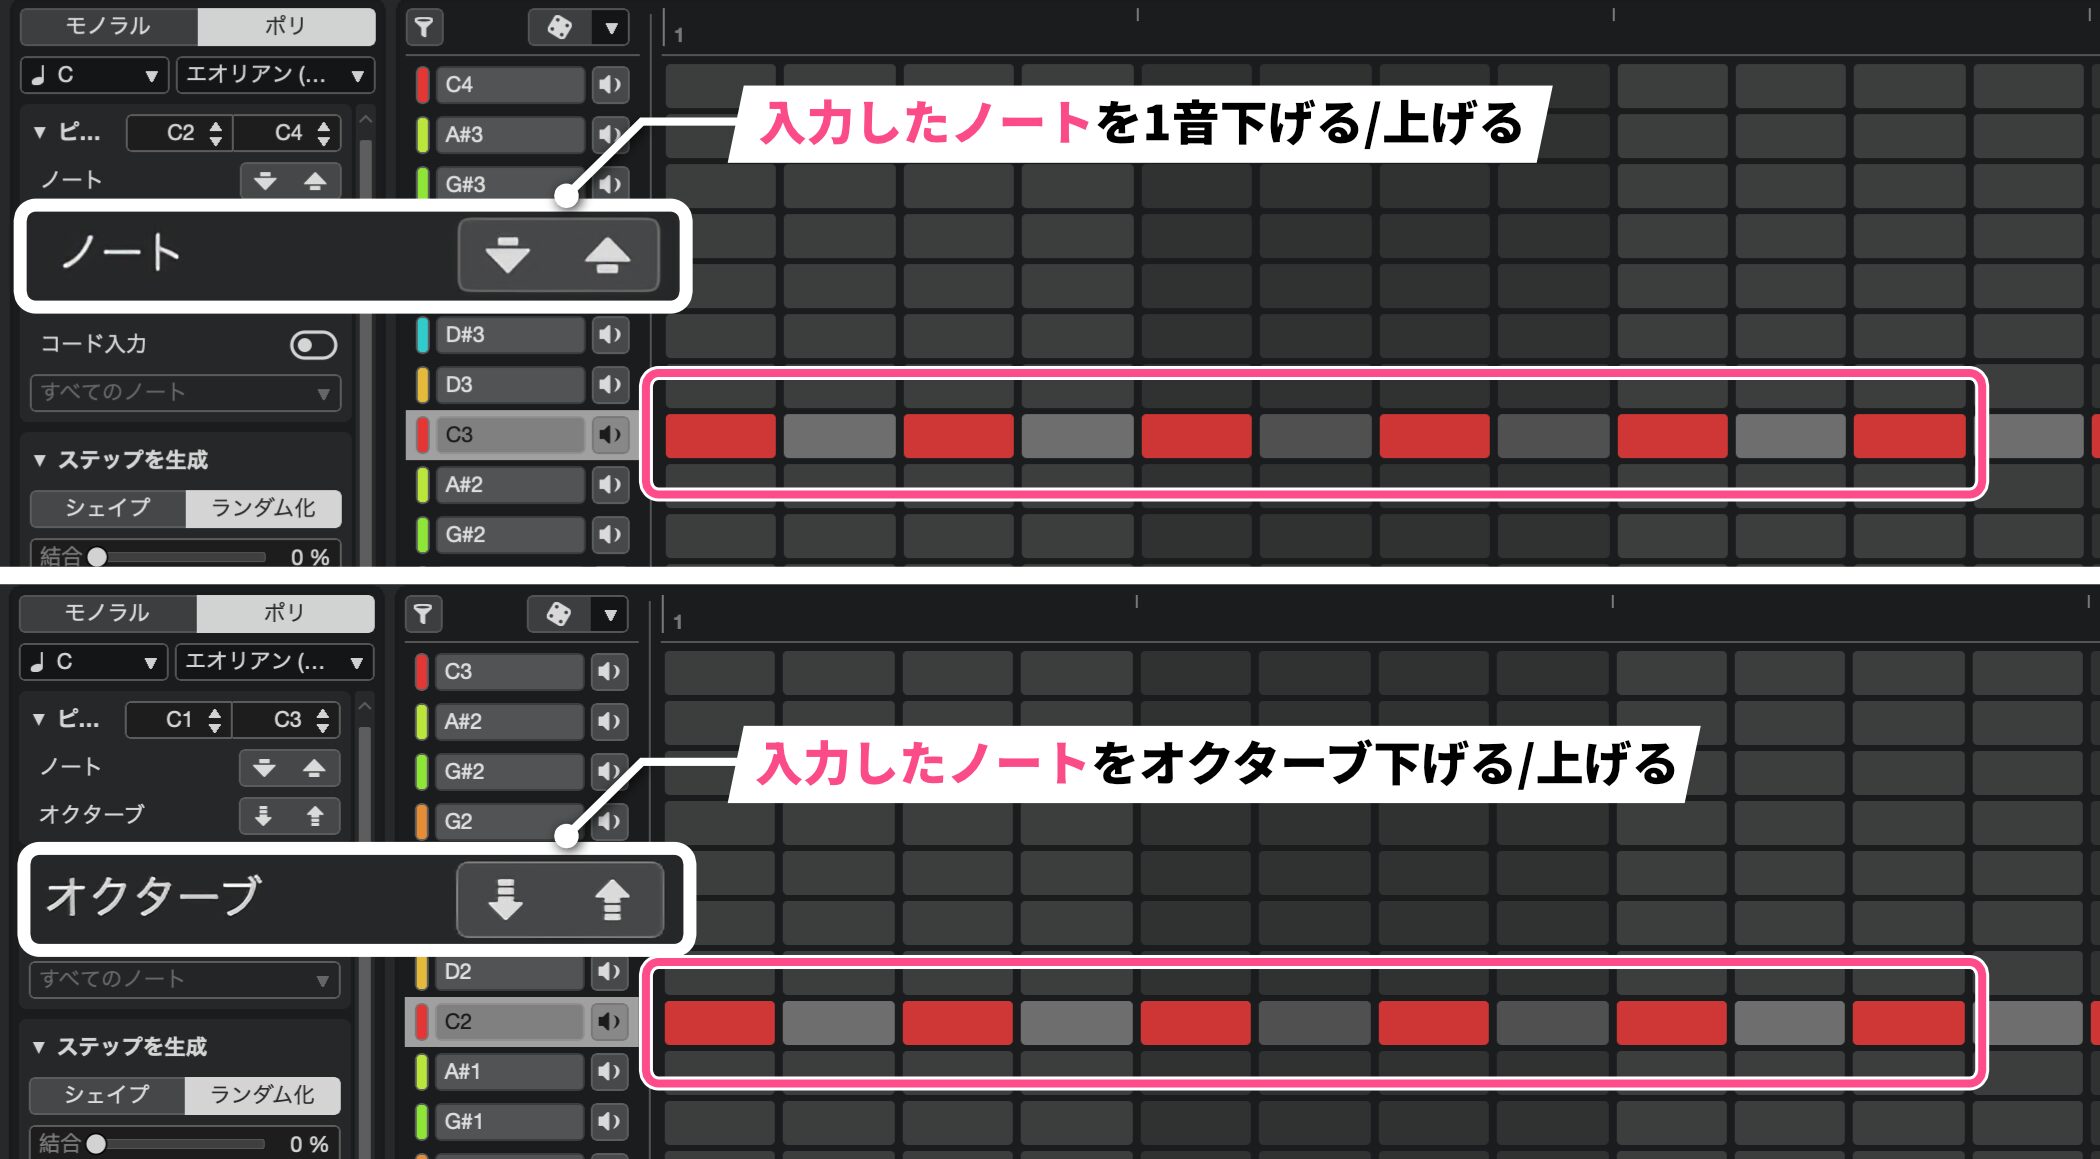
Expand Pitch to find Note and Octave, which change the pitch of the notes you enter.
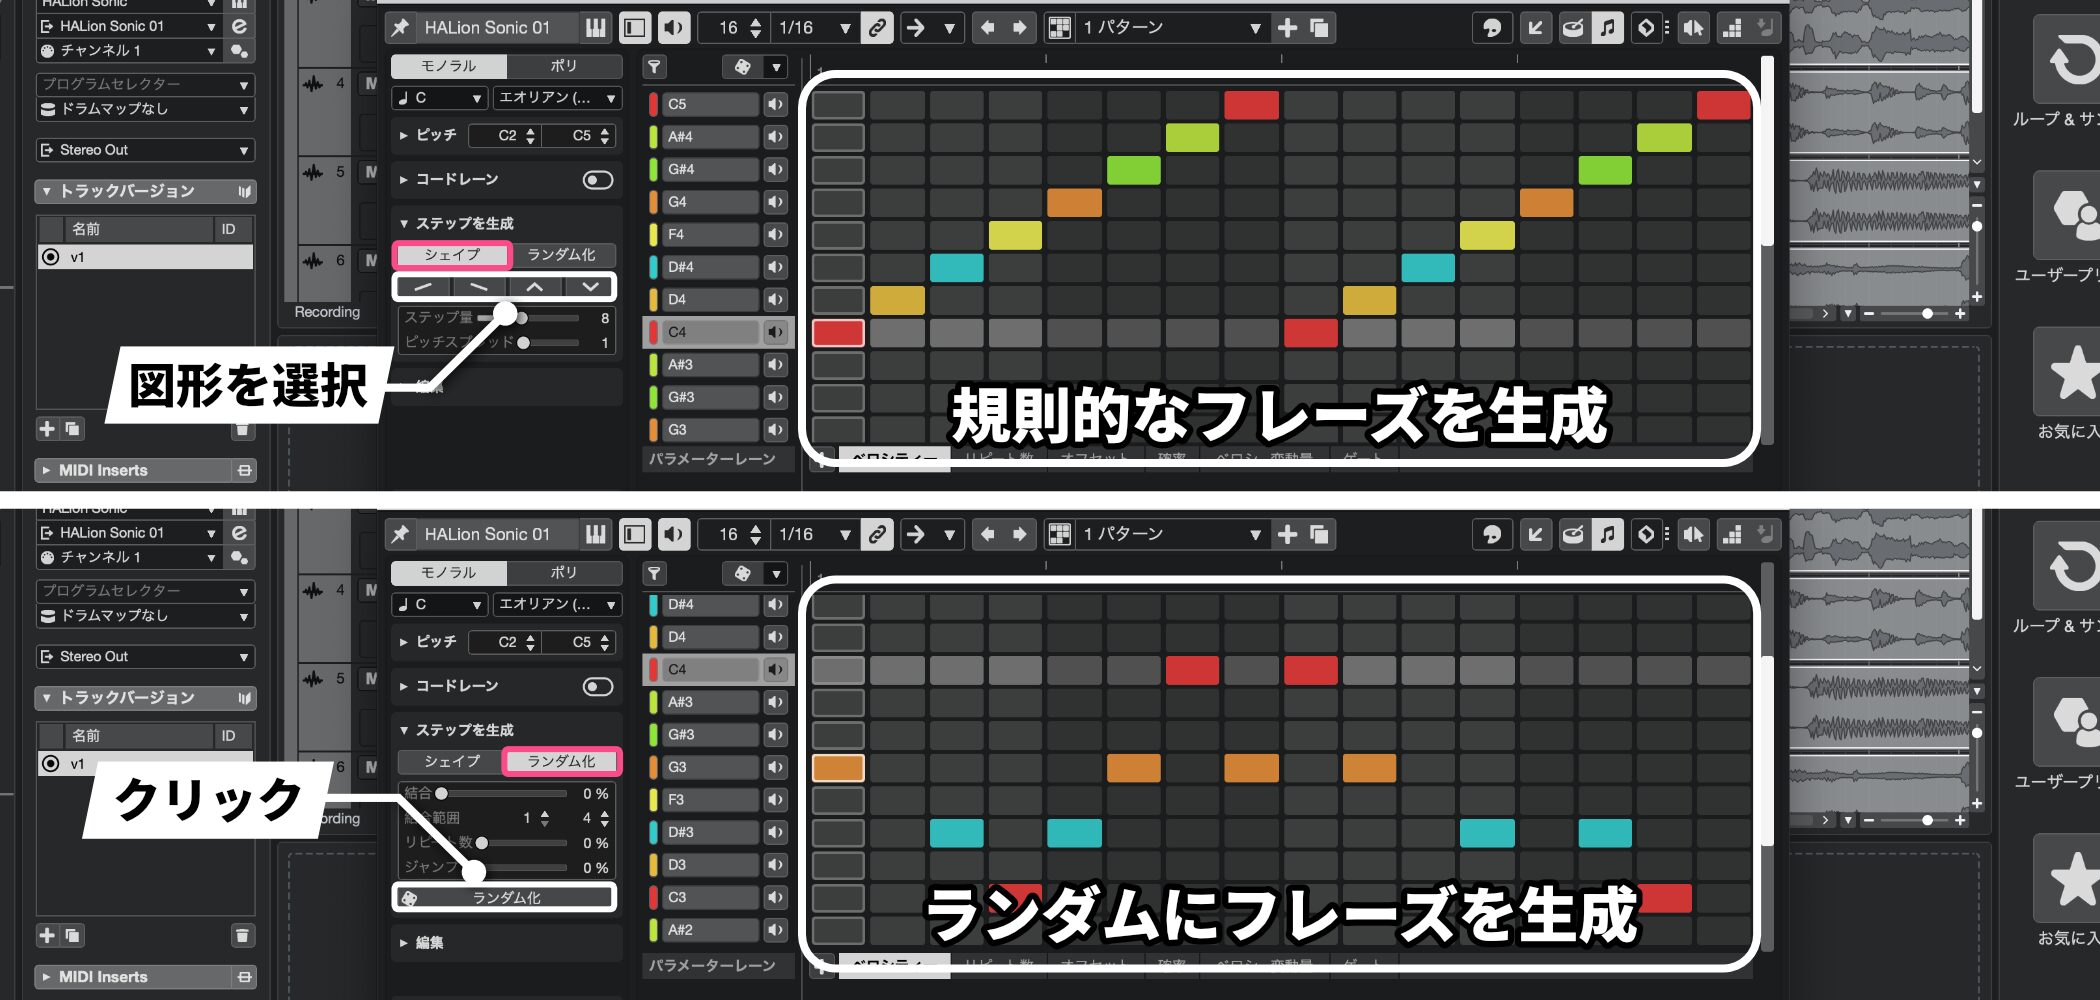
There are two ways to generate patterns: specify a shape, such as an ascending or descending contour, for a regular phrase, or generate one randomly.
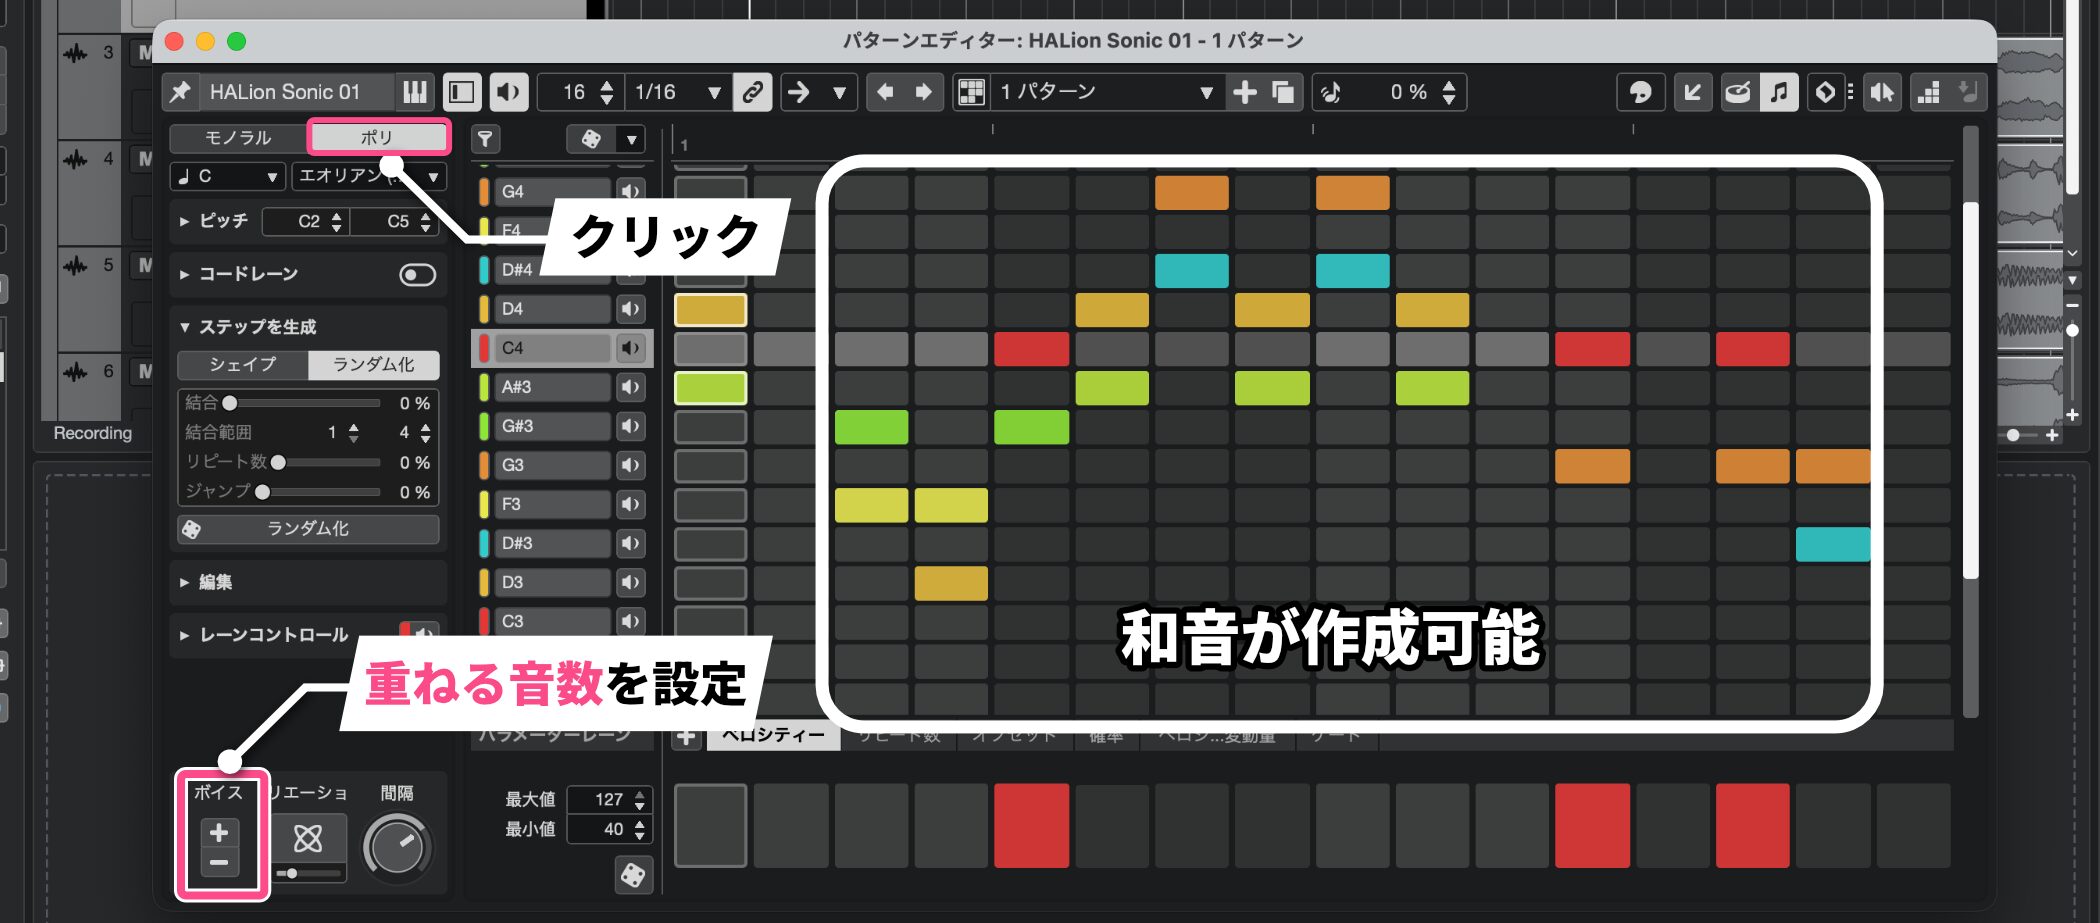
Switch from Mono to Poly to reveal the Voices setting.
By setting the number of layered voices, you can create chords easily.
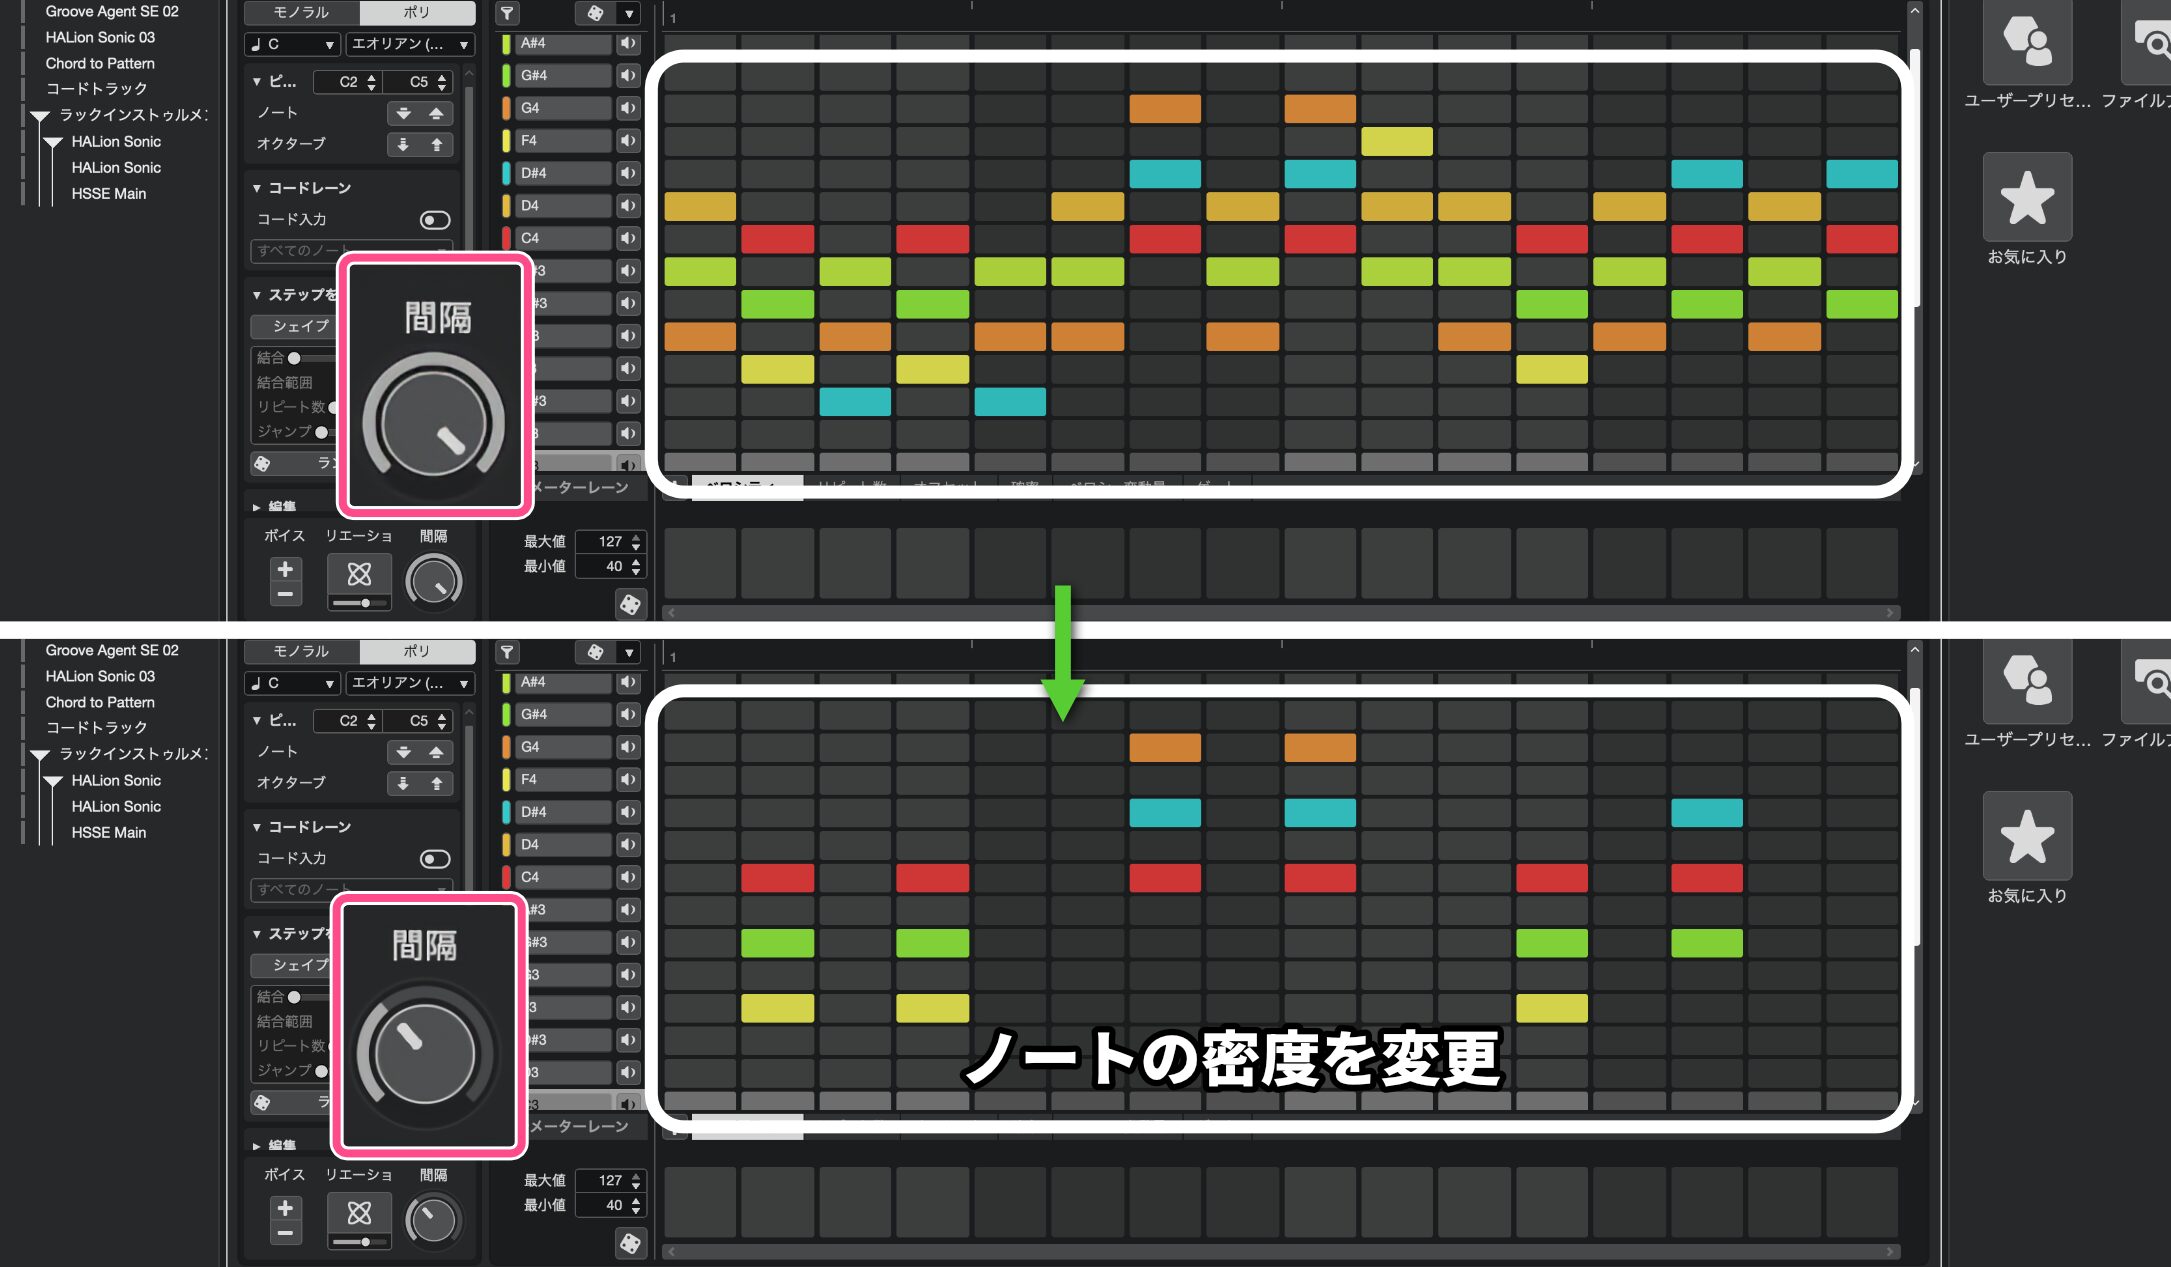
Adjust the Interval knob to change note density.
Turning it left reduces the number of notes and creates a more spacious phrase.
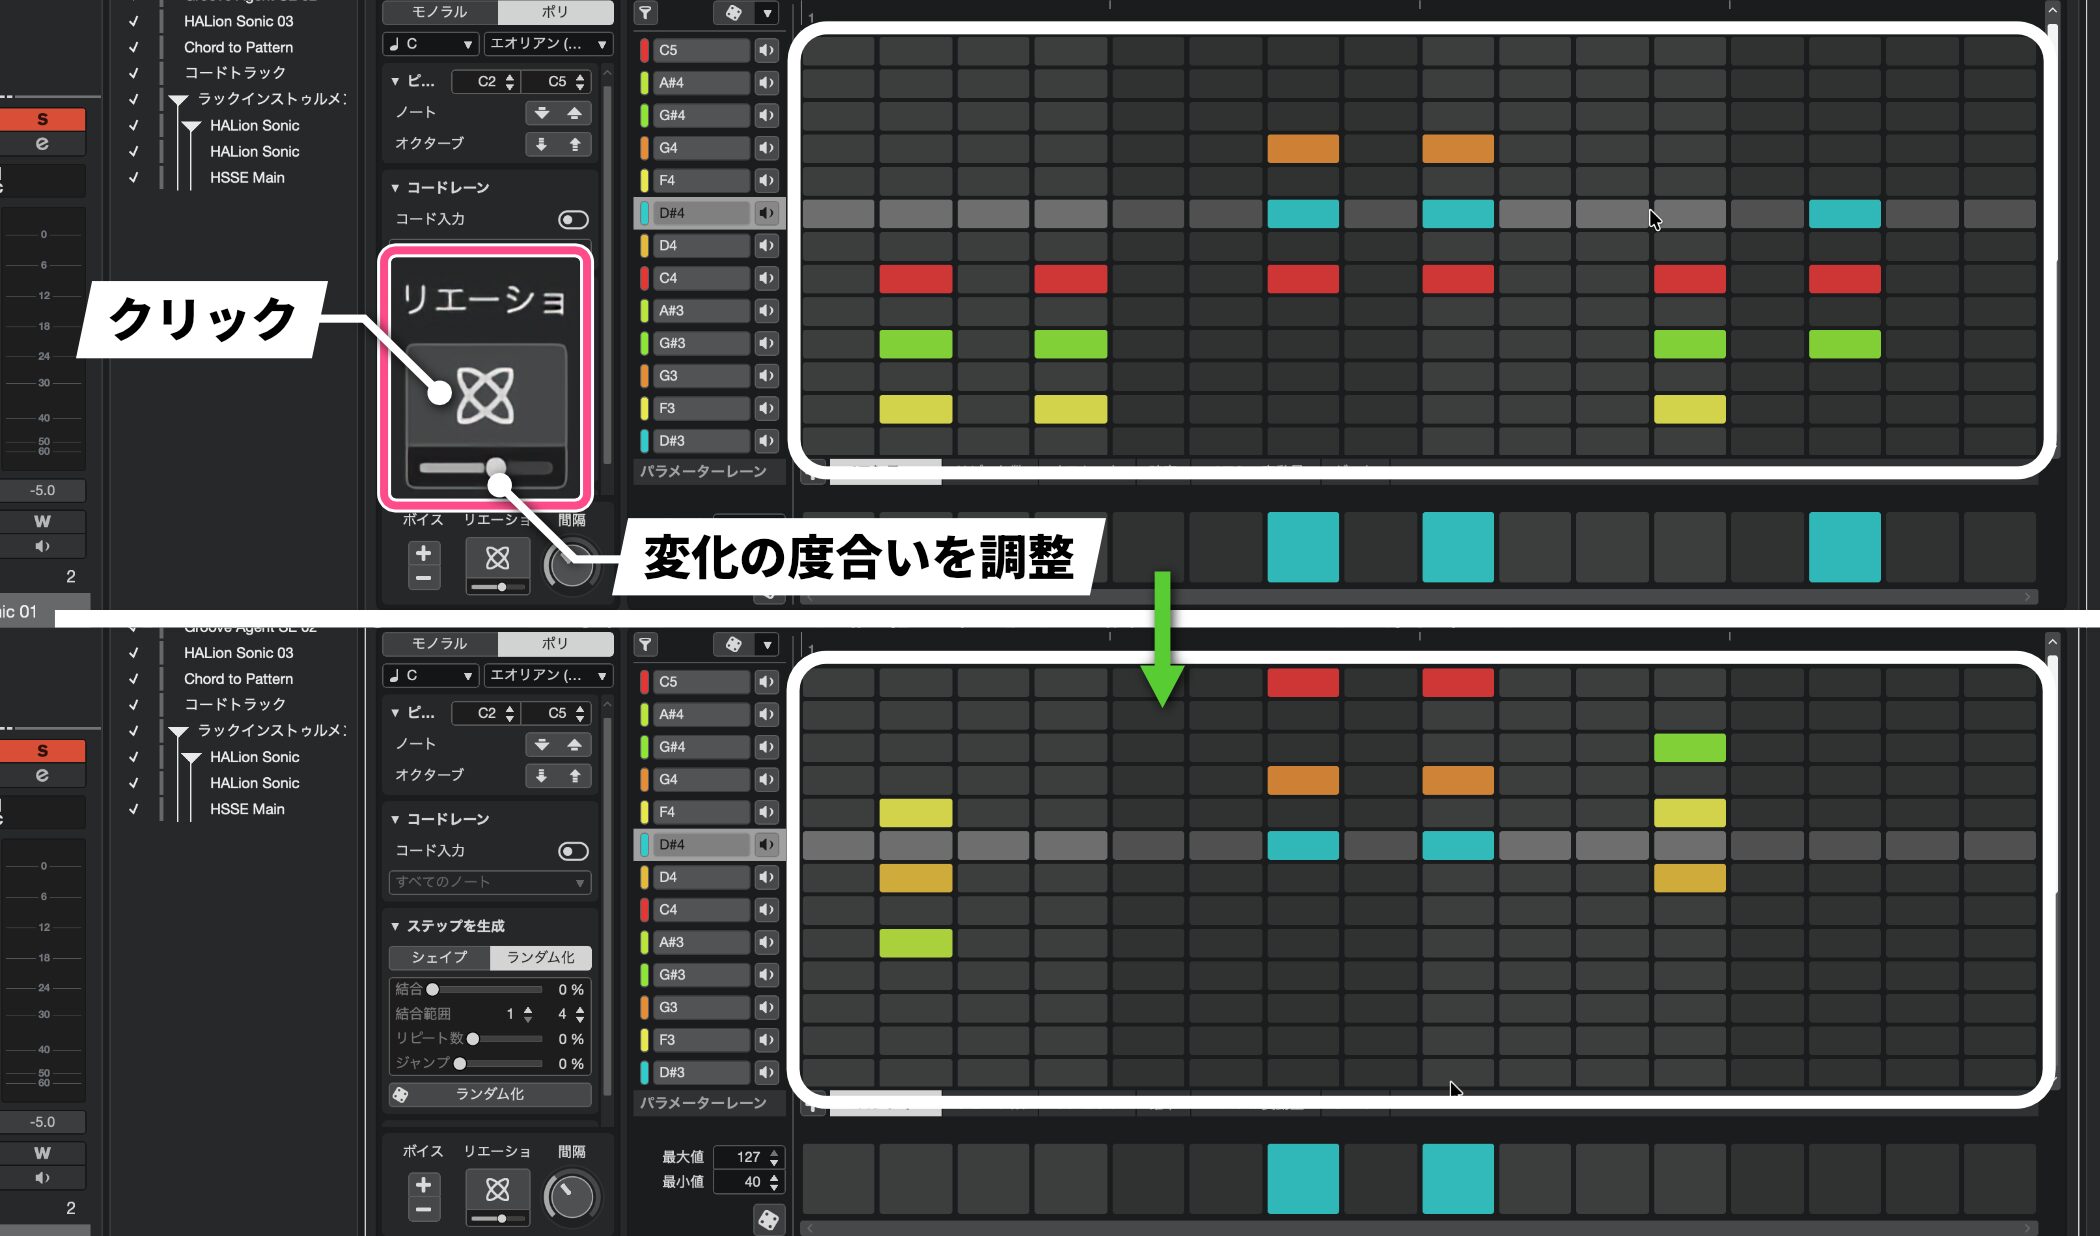
To change a generated pattern slightly, use the Variation button to regenerate it.
You can set the amount of variation with the controls below.
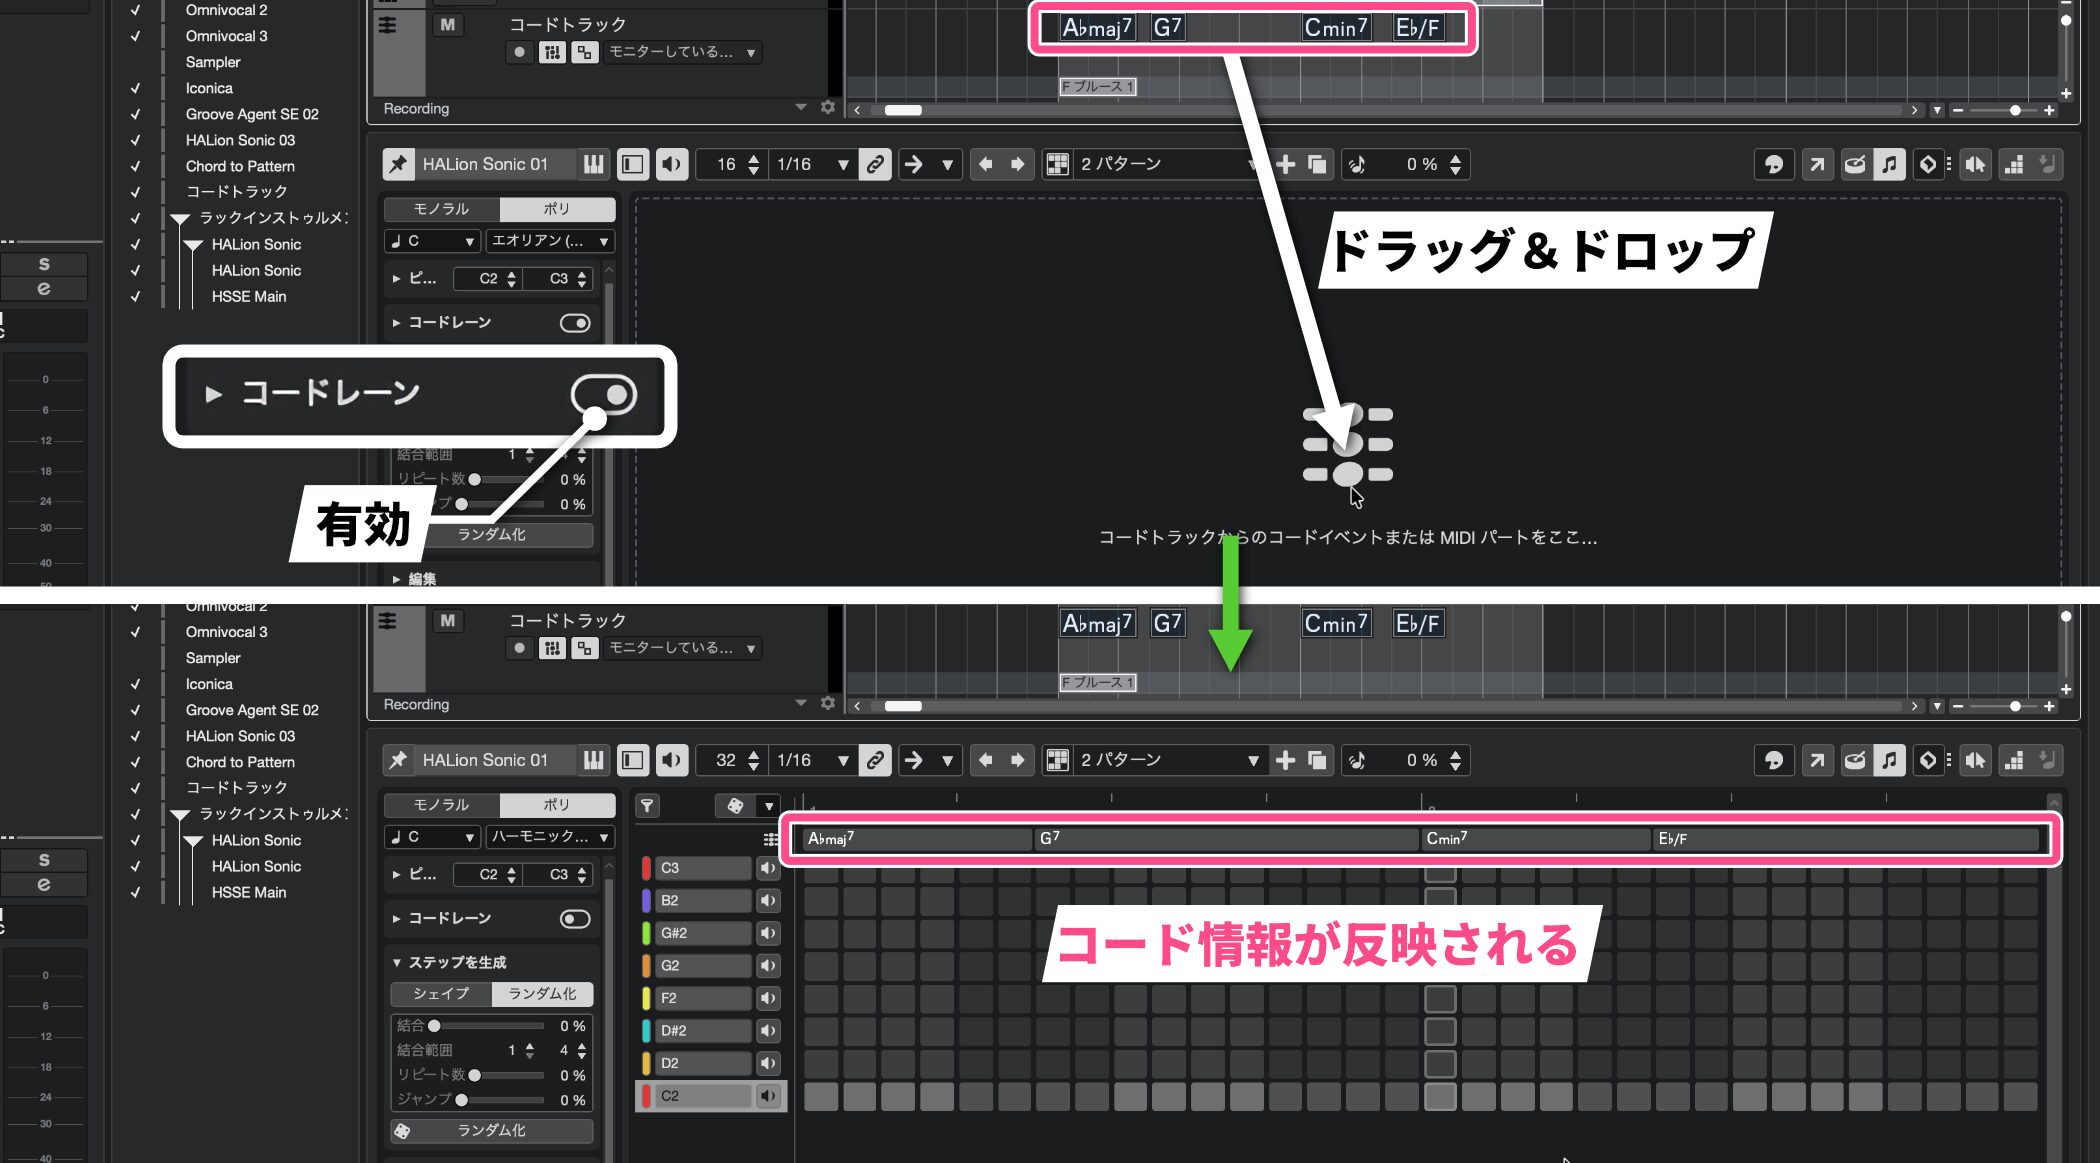
The editor also integrates with the Chord Track.
Enable the Chord Lane and drag a chord event from the Chord Track to bring its chord information into the Pattern Editor.
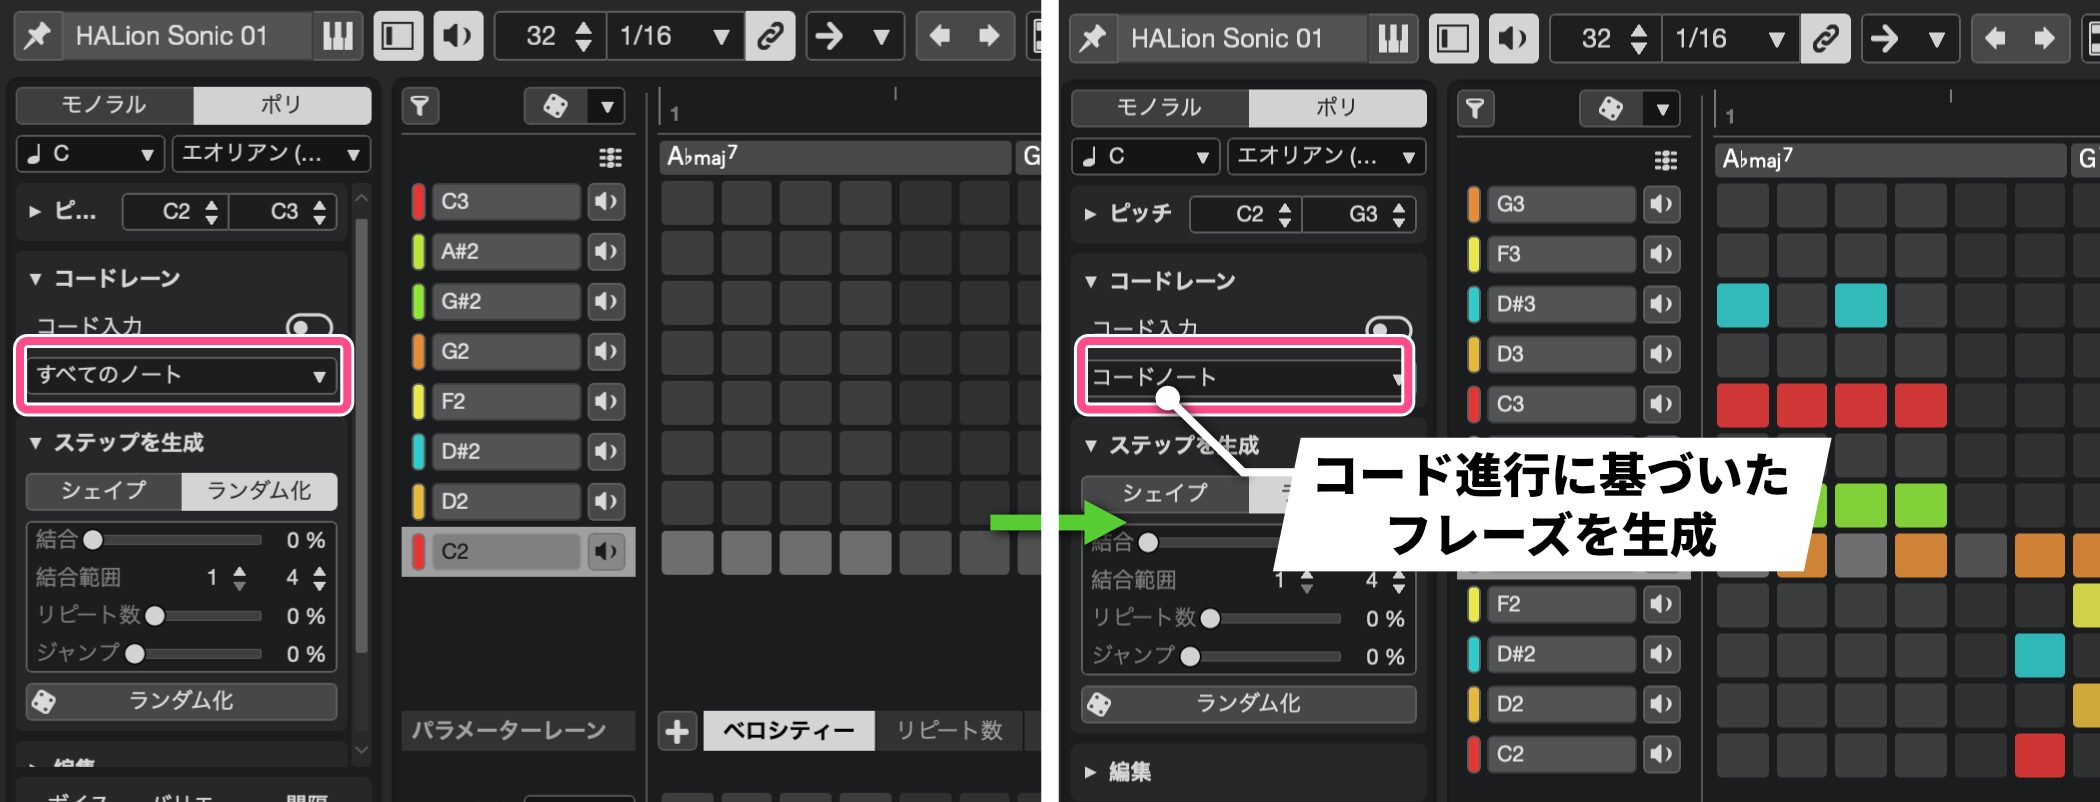
Expand the Chord Lane and choose Chord Notes from the dropdown beneath the chord input to generate a phrase based on the chord progression.
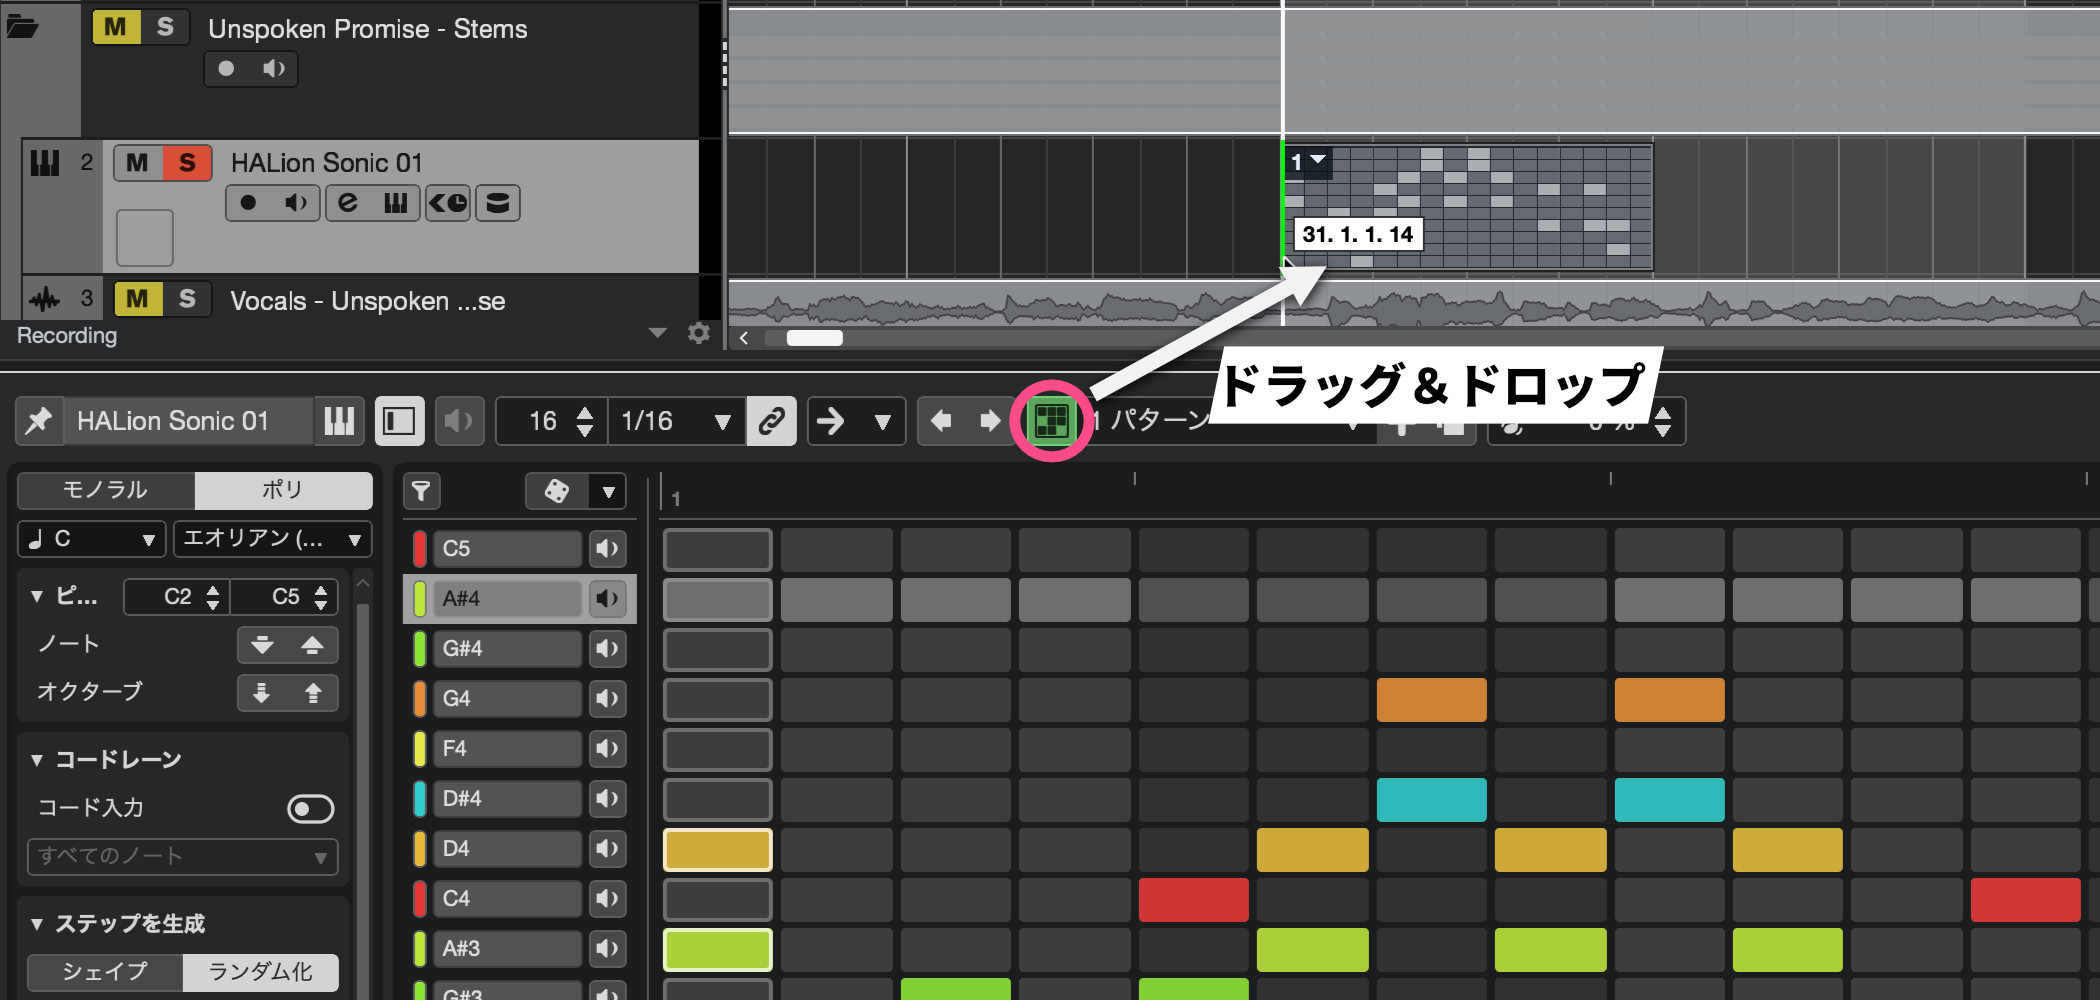
Drag the finished pattern onto a track with the Drag Pattern to Project button.
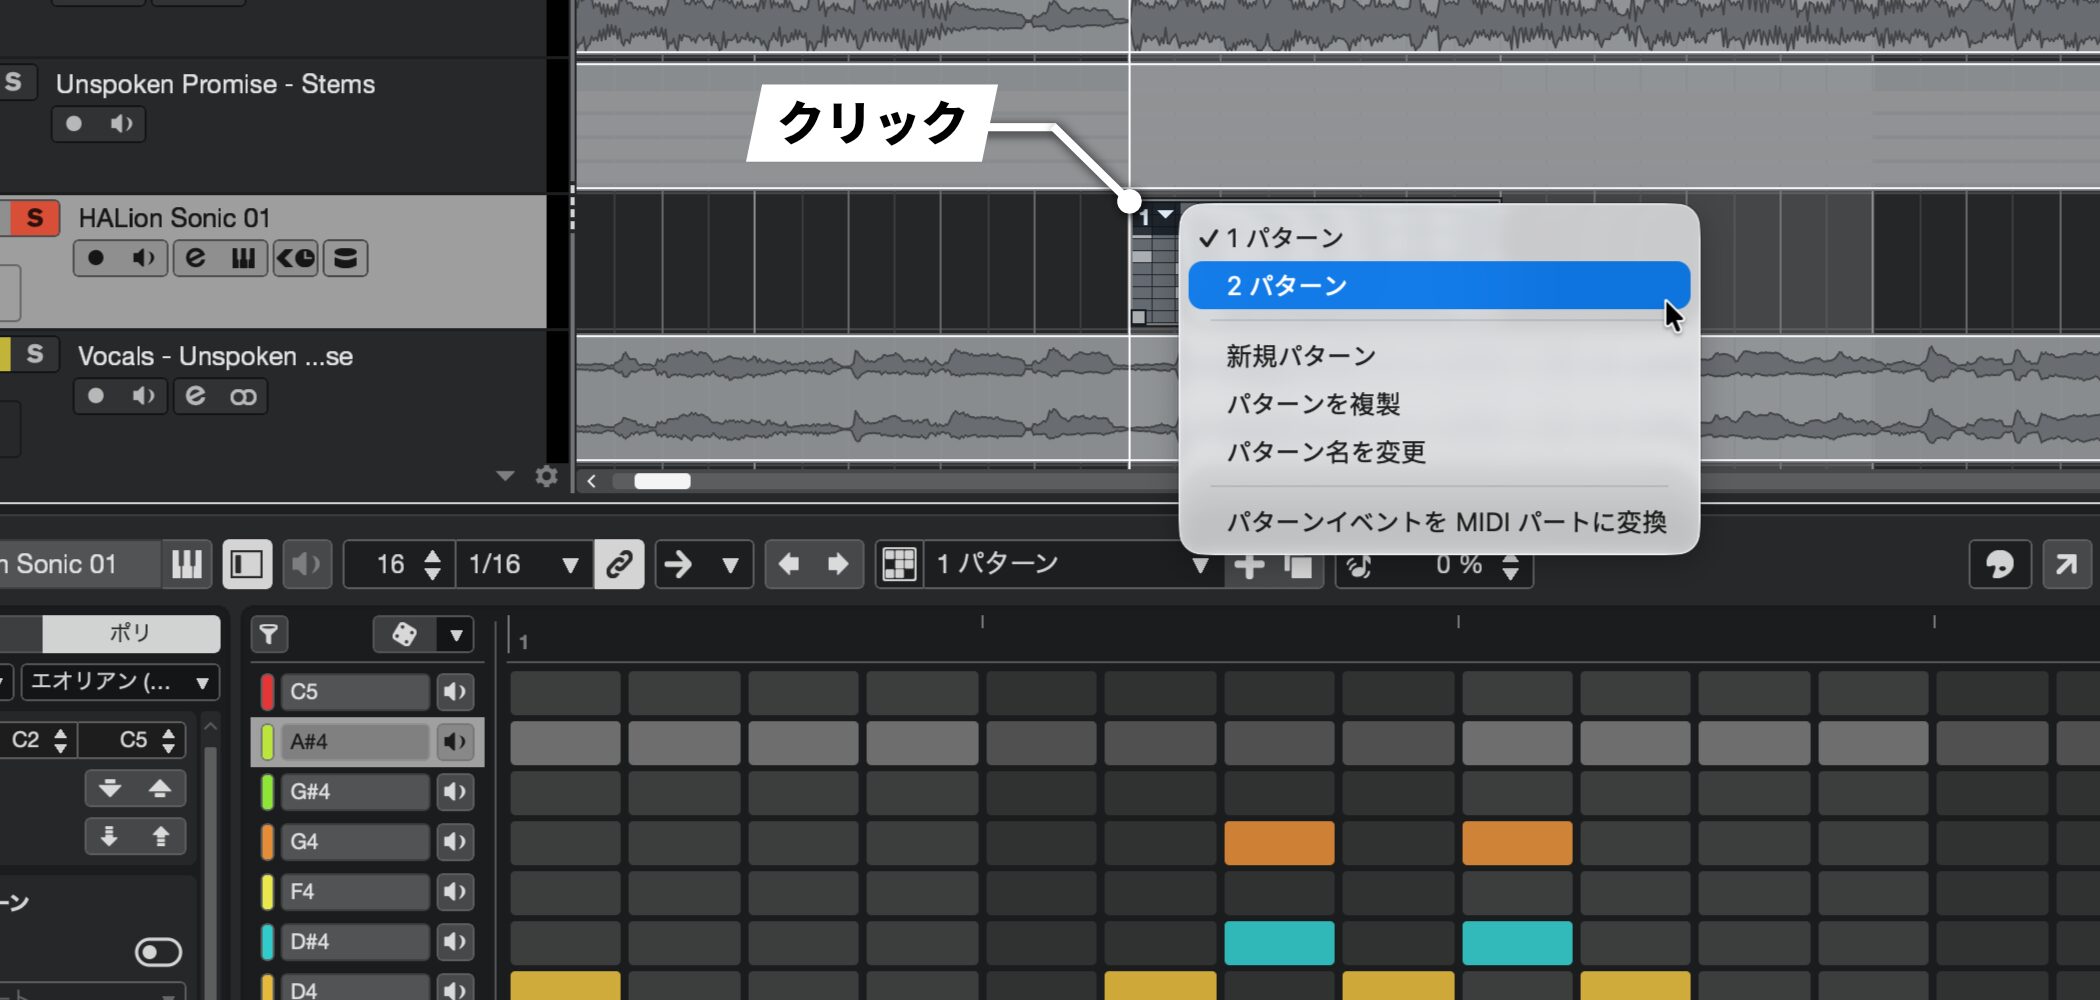
You can create several patterns and use different ones for different sections.
Omnivocal Beta: Generate vocals from MIDI (all editions)
Cubase 15 includes a Yamaha-developed vocal synthesizer, Omnivocal Beta.
It lets you play back a MIDI melody as a singing voice.
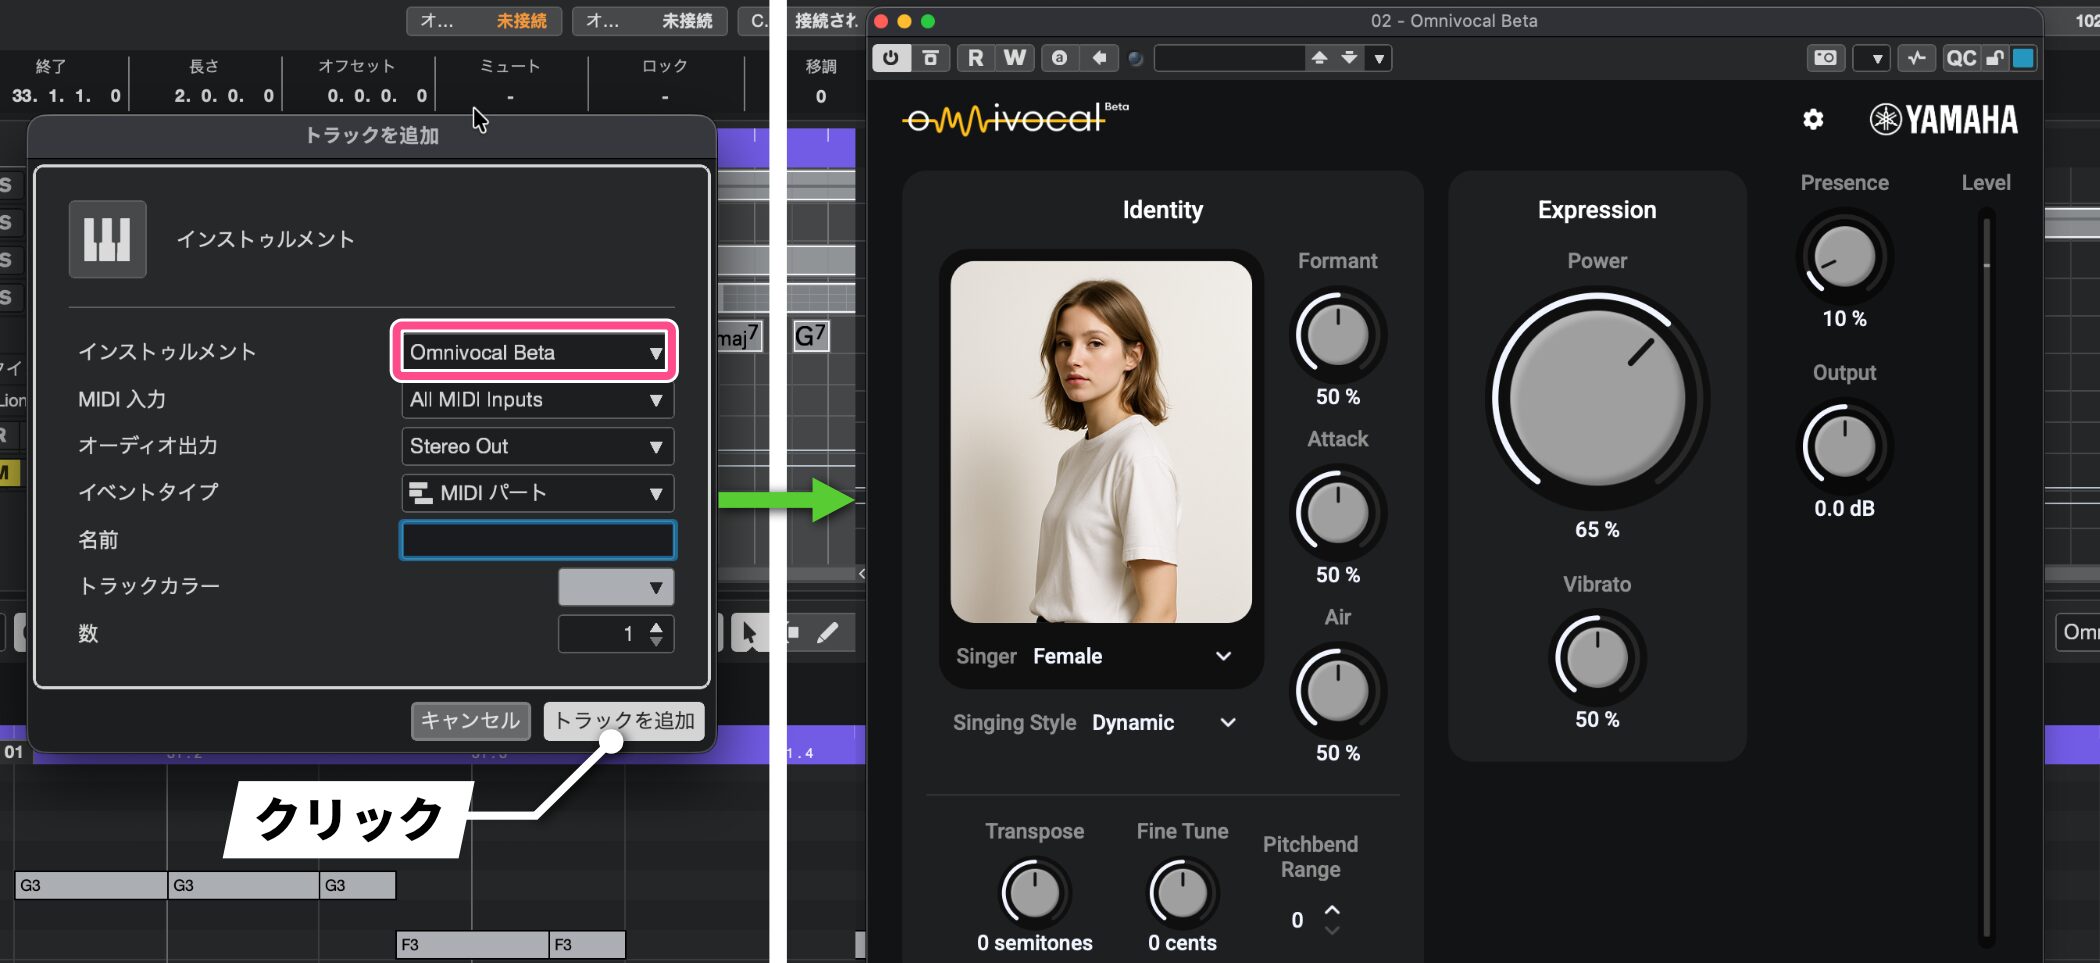
Omnivocal Beta is an instrument plug-in that you load on an instrument track.
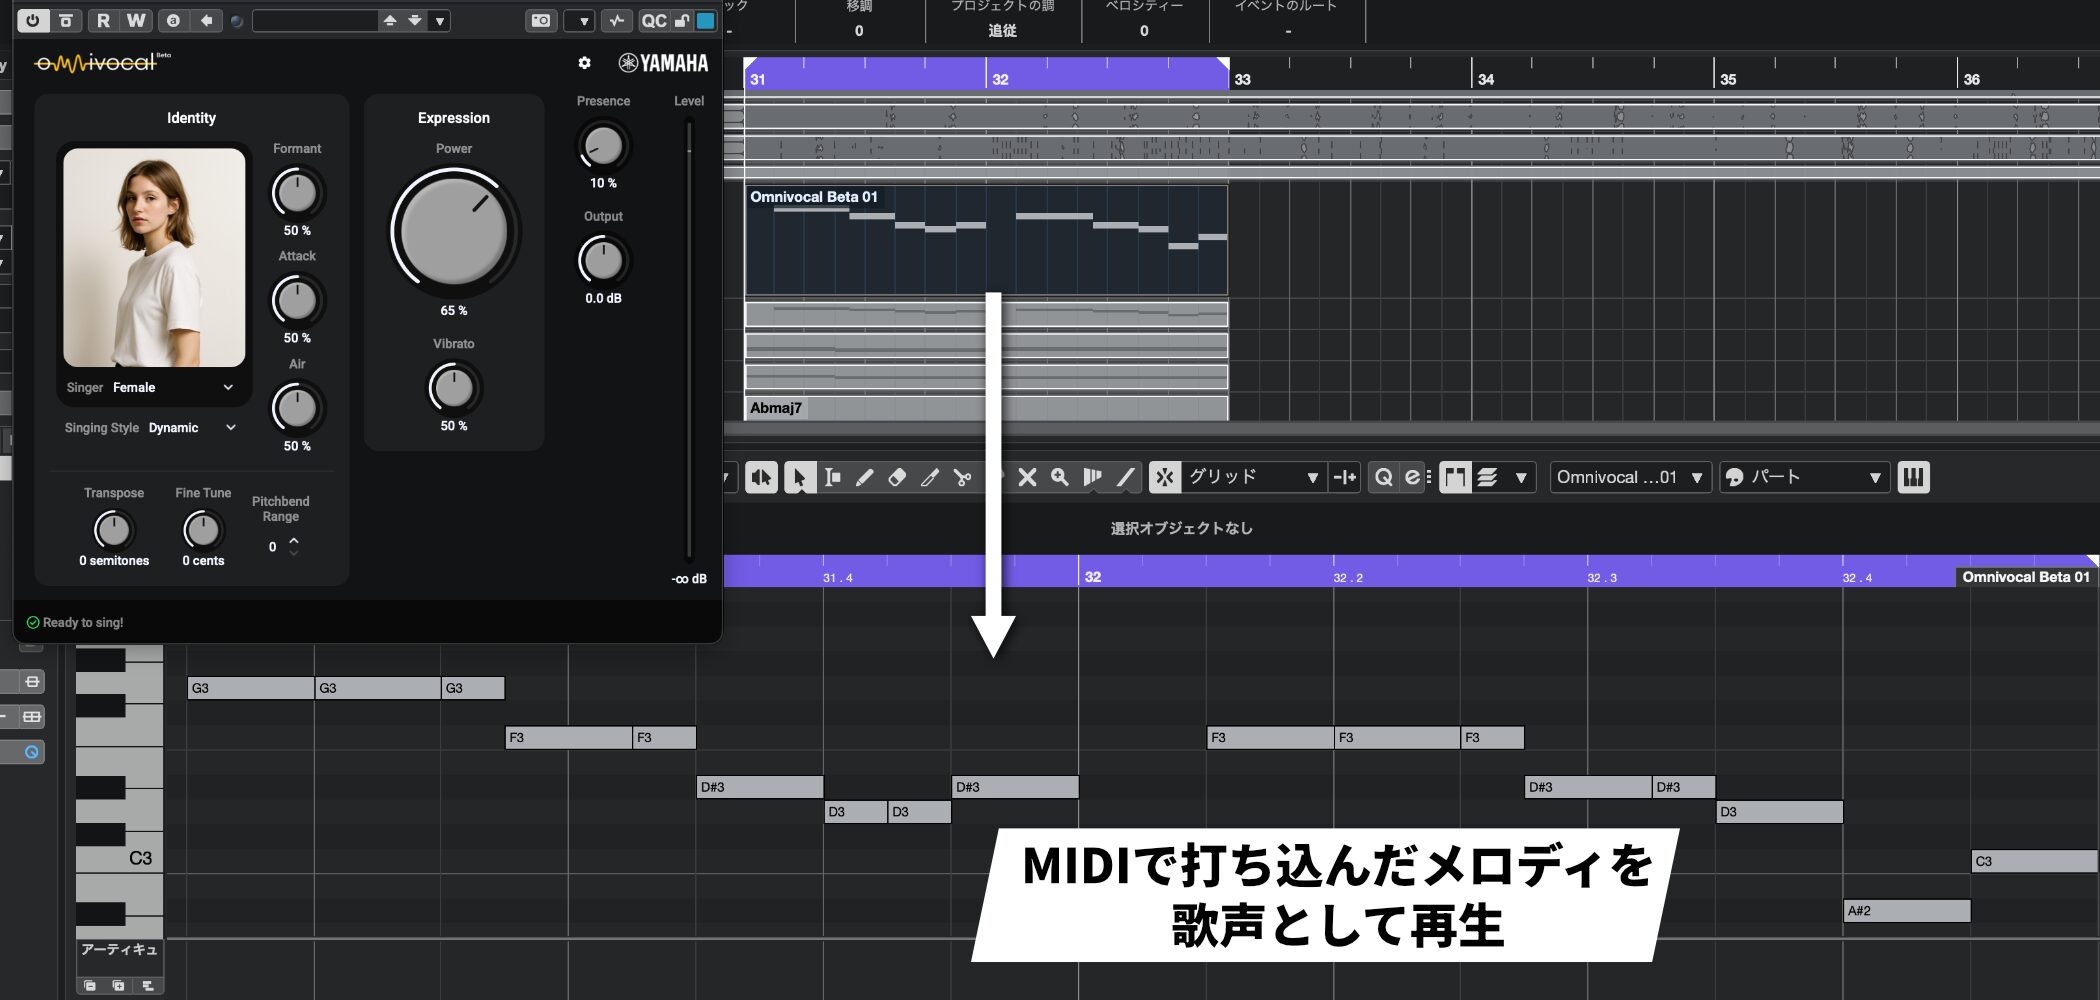
Enter a melody in the MIDI editor and it will immediately play back as vocals.
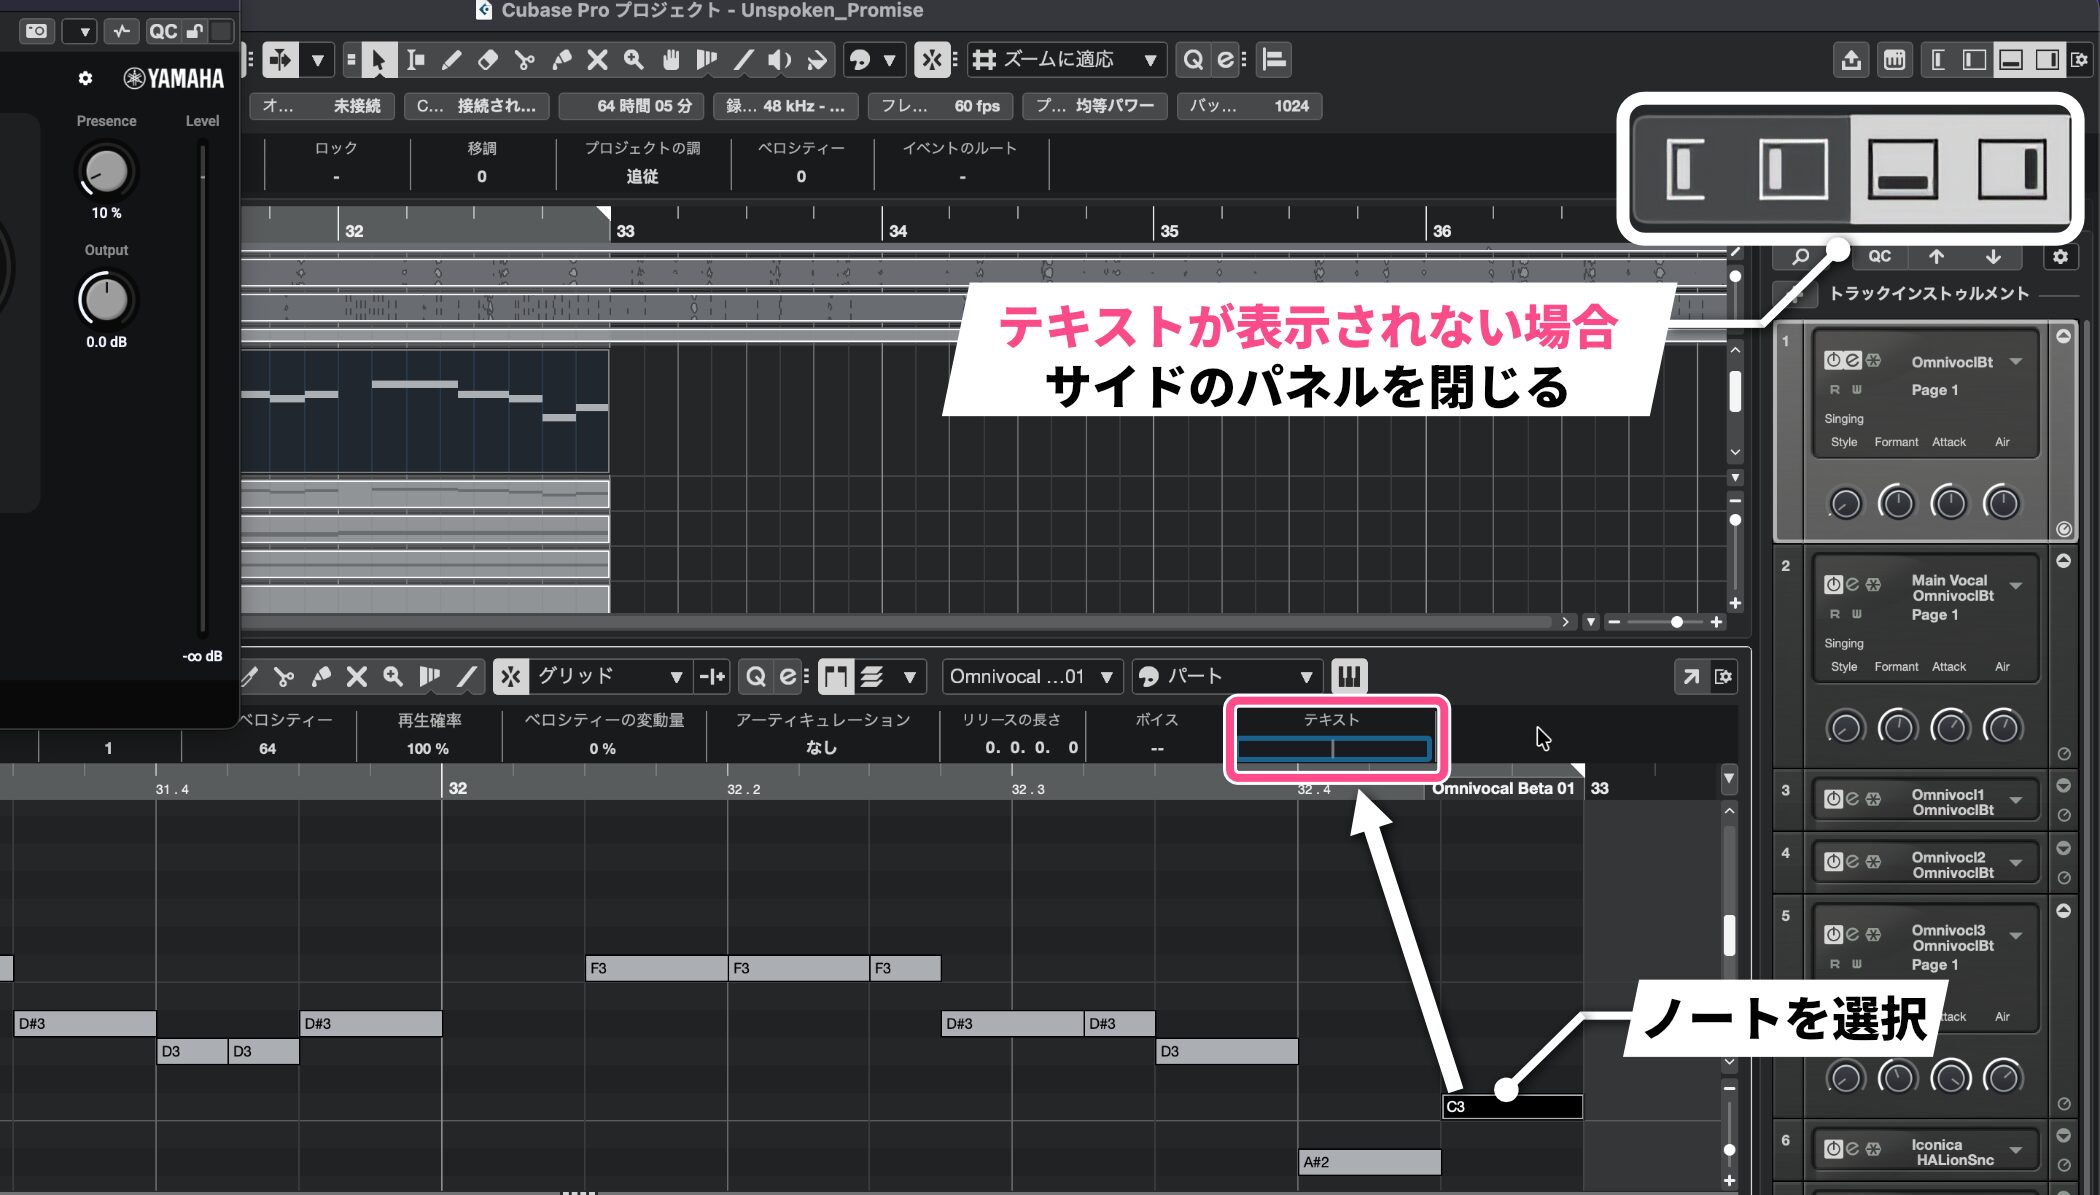
You can also enter lyrics. Select a note to display the Text field on the right side of the screen.
If the field is not visible, close the side panel to give the editor more room.
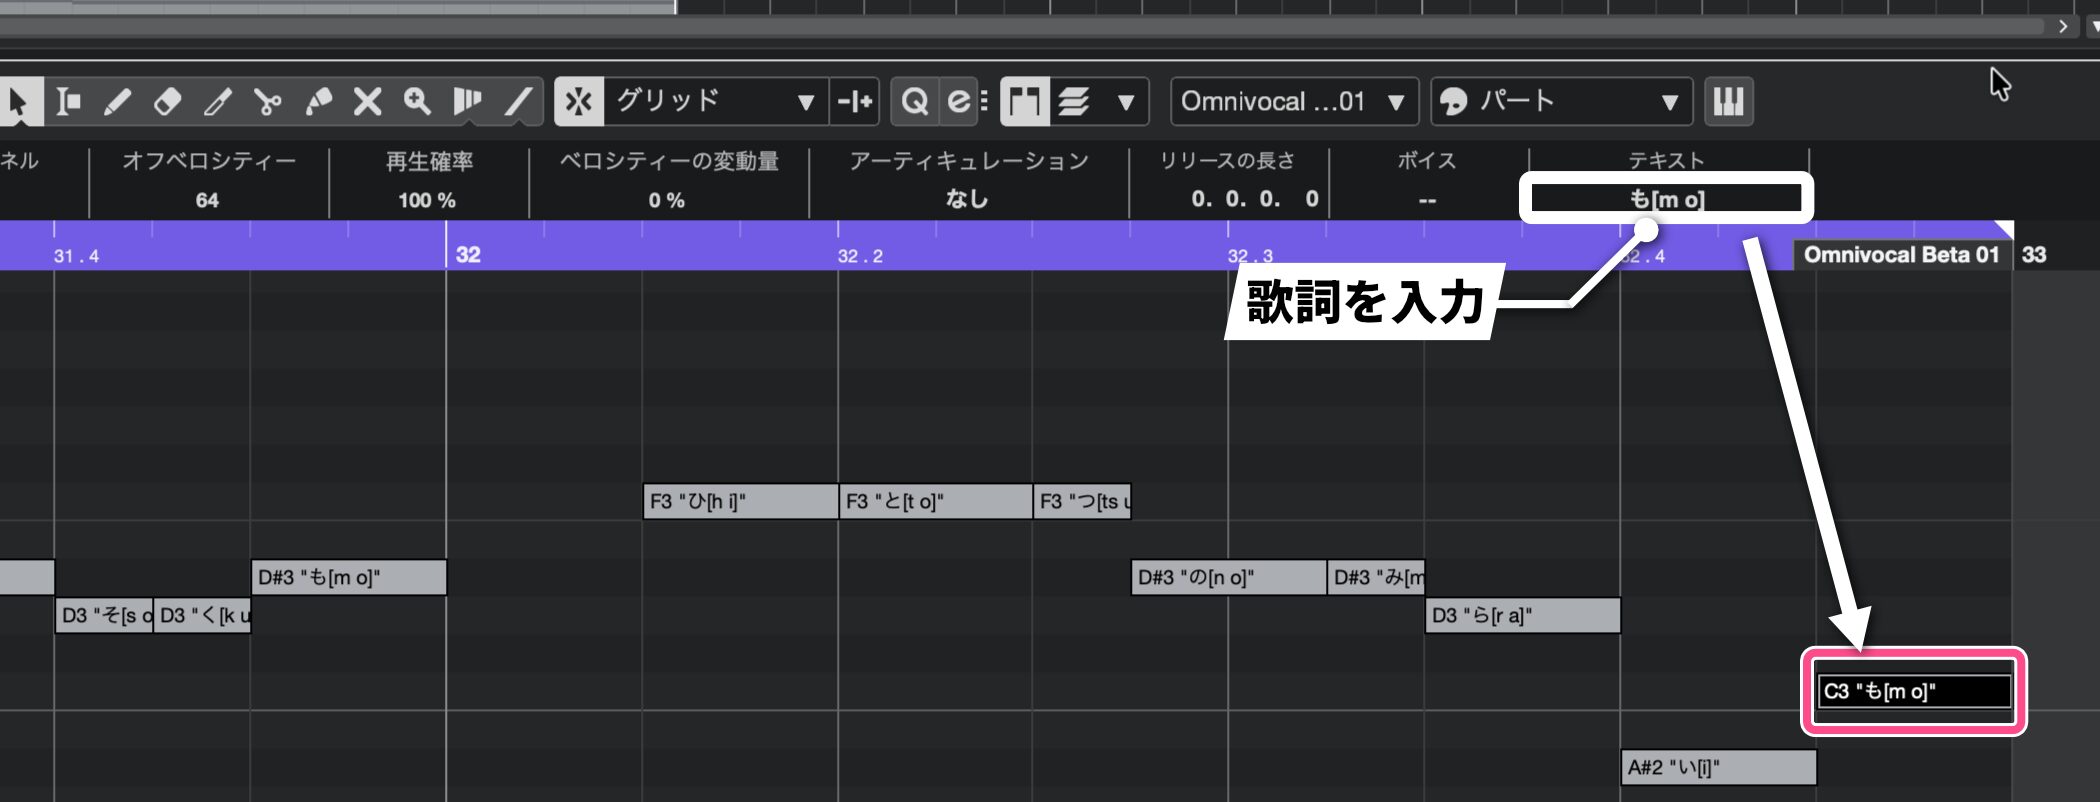
Enter lyrics in the Text field to assign them to the selected notes and create a vocal track with words.
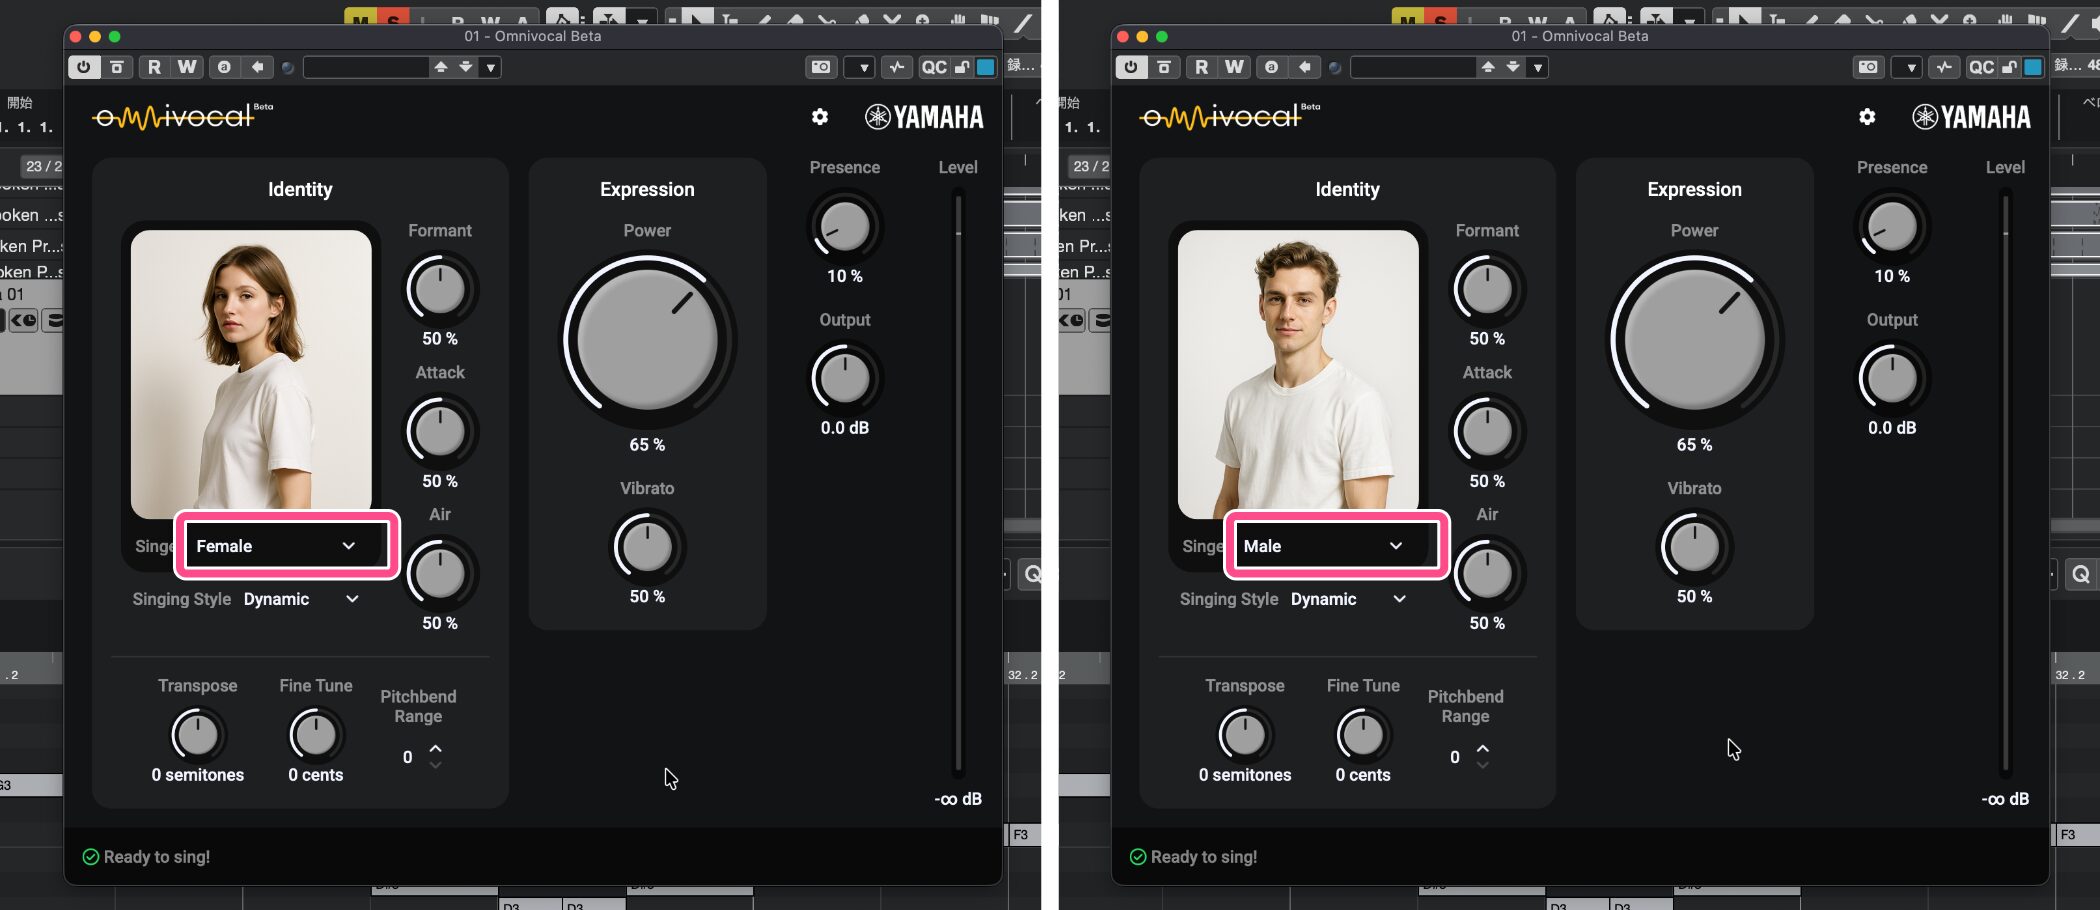
The instrument's controls are simple: start by choosing a male or female voice type.
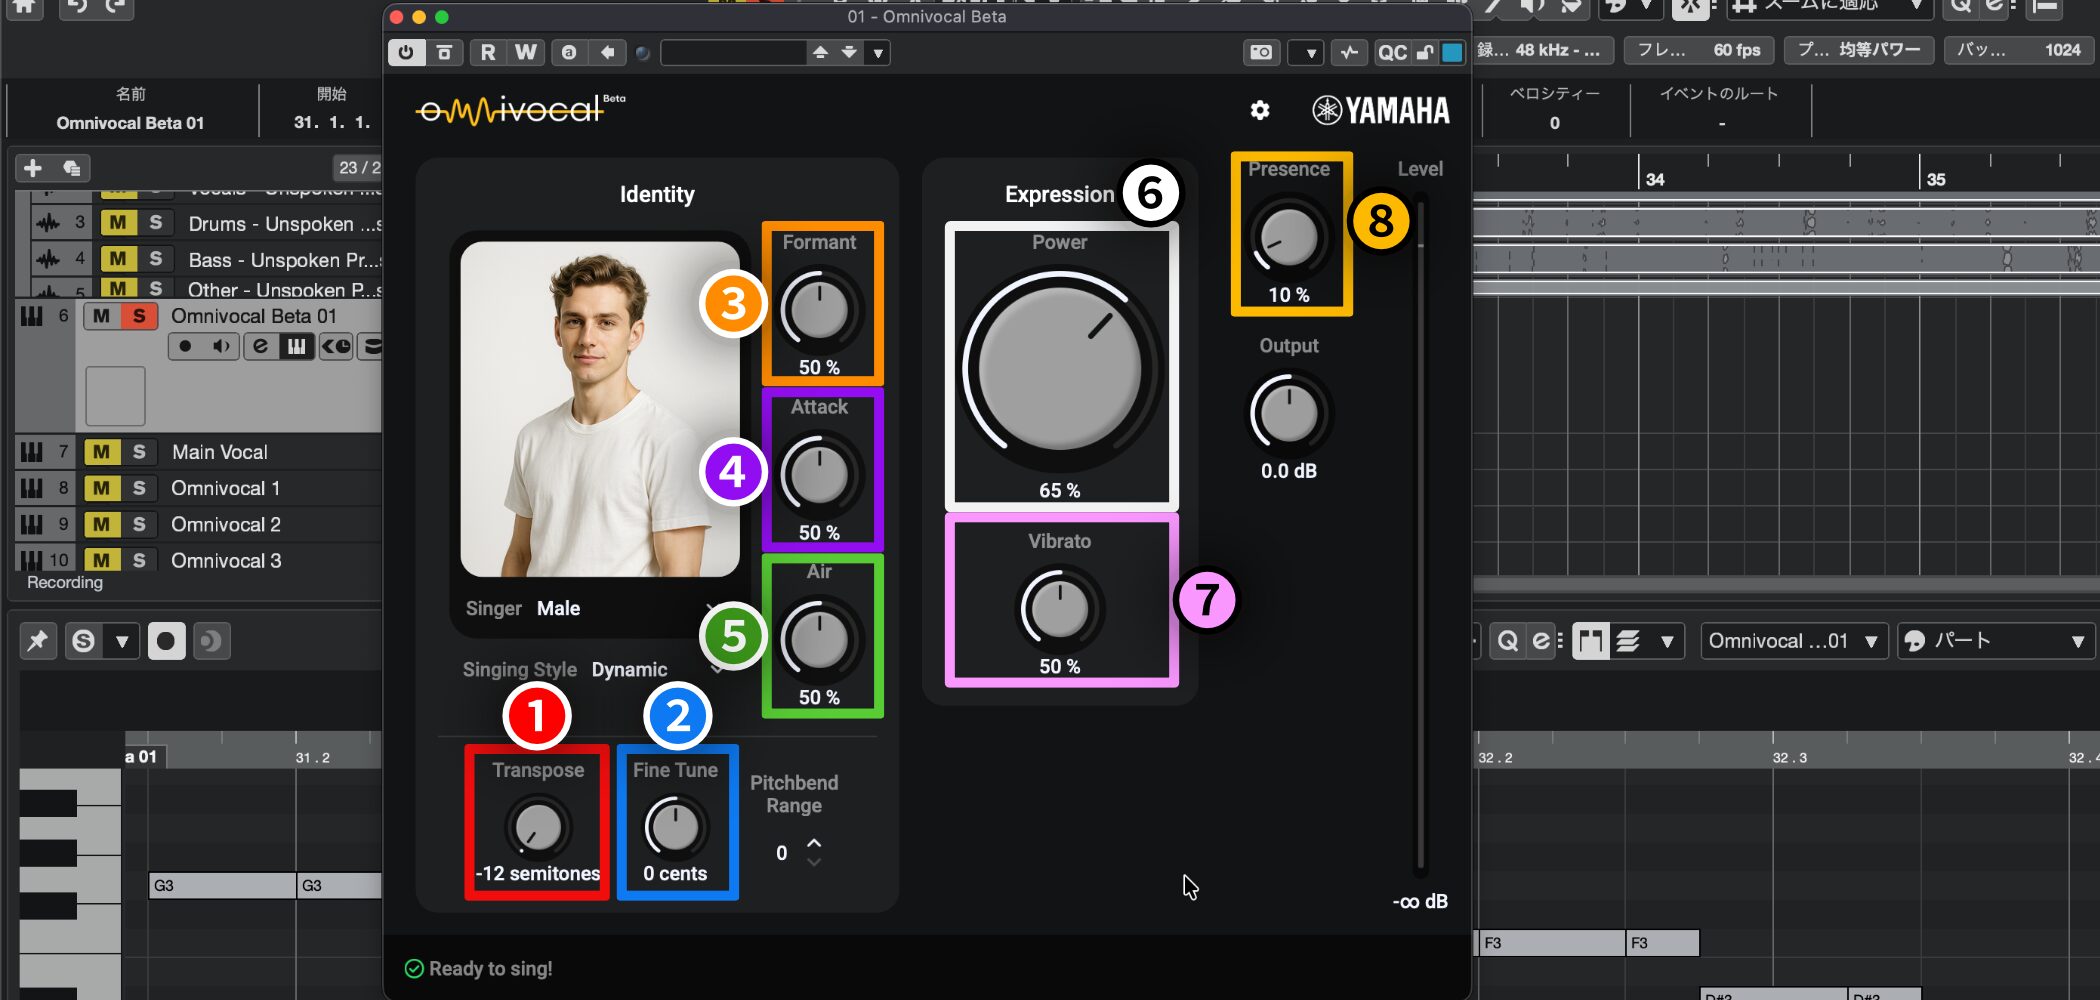
You can also adjust the following parameters:
1. Transpose (red): Shifts the overall pitch in semitones
2. Fine Tune (blue): Fine-tunes pitch in cents (1/100 of a semitone)
3. Formant (orange): Adjusts vocal character
4. Attack (purple): Adjusts how quickly and strongly the voice starts
5. Air (green): Adjusts the breathiness or air in the voice
6. Power (white): Adjusts singing intensity and nuance
7. Vibrato (pink): Adjusts the amount of vibrato
8. Presence (yellow): Adjusts vocal clarity and how well it cuts through the mix
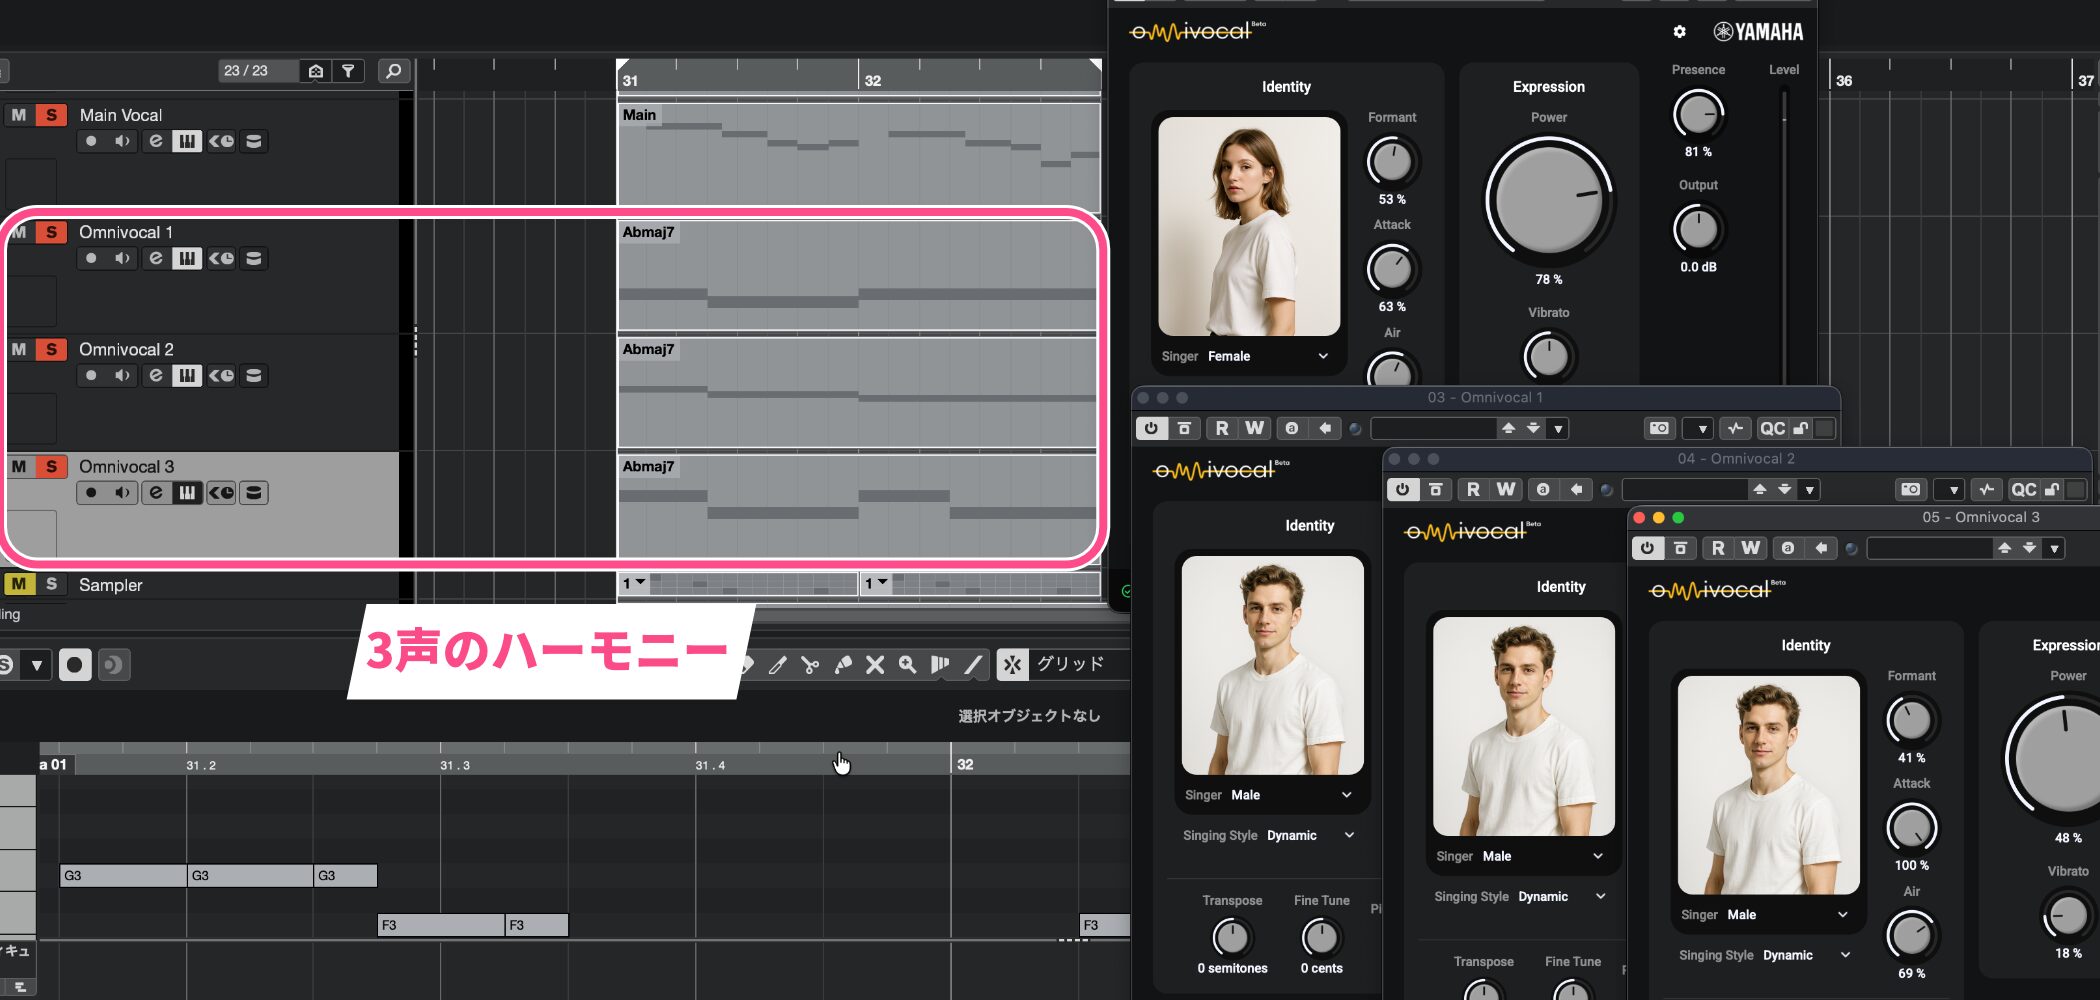
You can also create three-part harmony by making multiple tracks and entering different notes of the same chord.
At the time of this article, Omnivocal Beta is still a beta with only two vocalists. More vocalists are planned for future updates.
Automation Enhancements: Work with automation as soon as you touch a parameter (all editions)
Previously, recording automation meant first switching to Write mode and then changing a parameter.
Cubase 15 significantly improves this automation workflow.
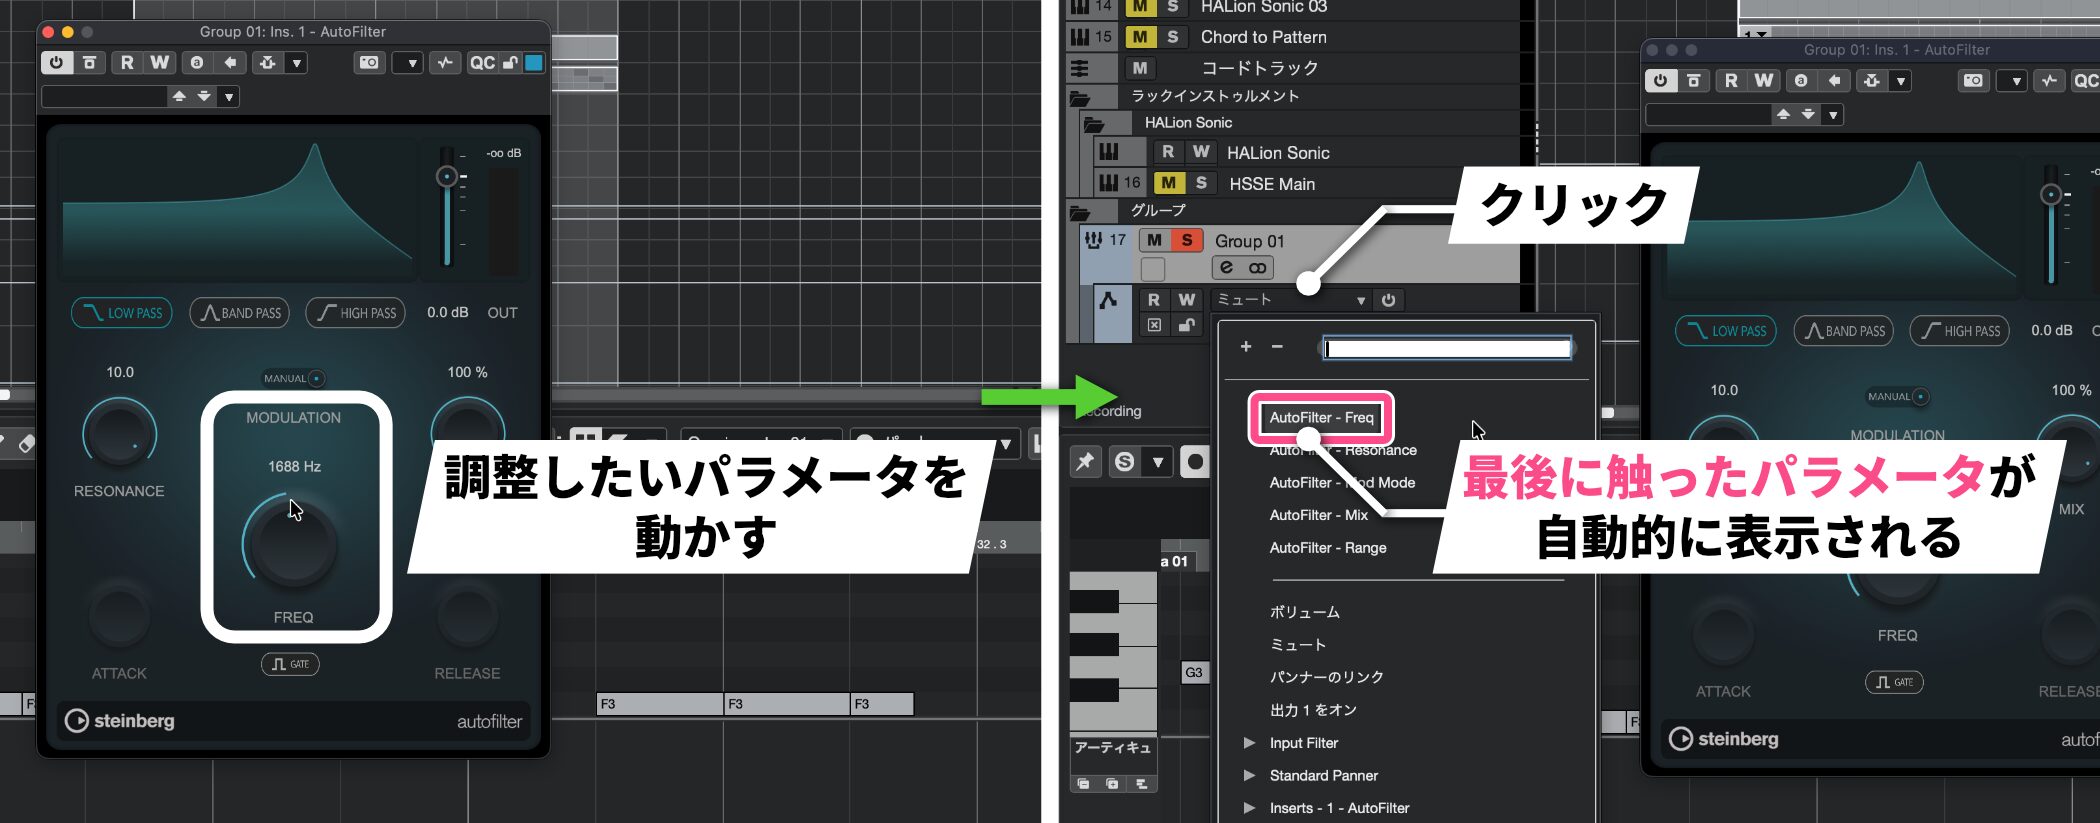
Simply move the parameter you want to adjust and its automation lane automatically appears at the top.
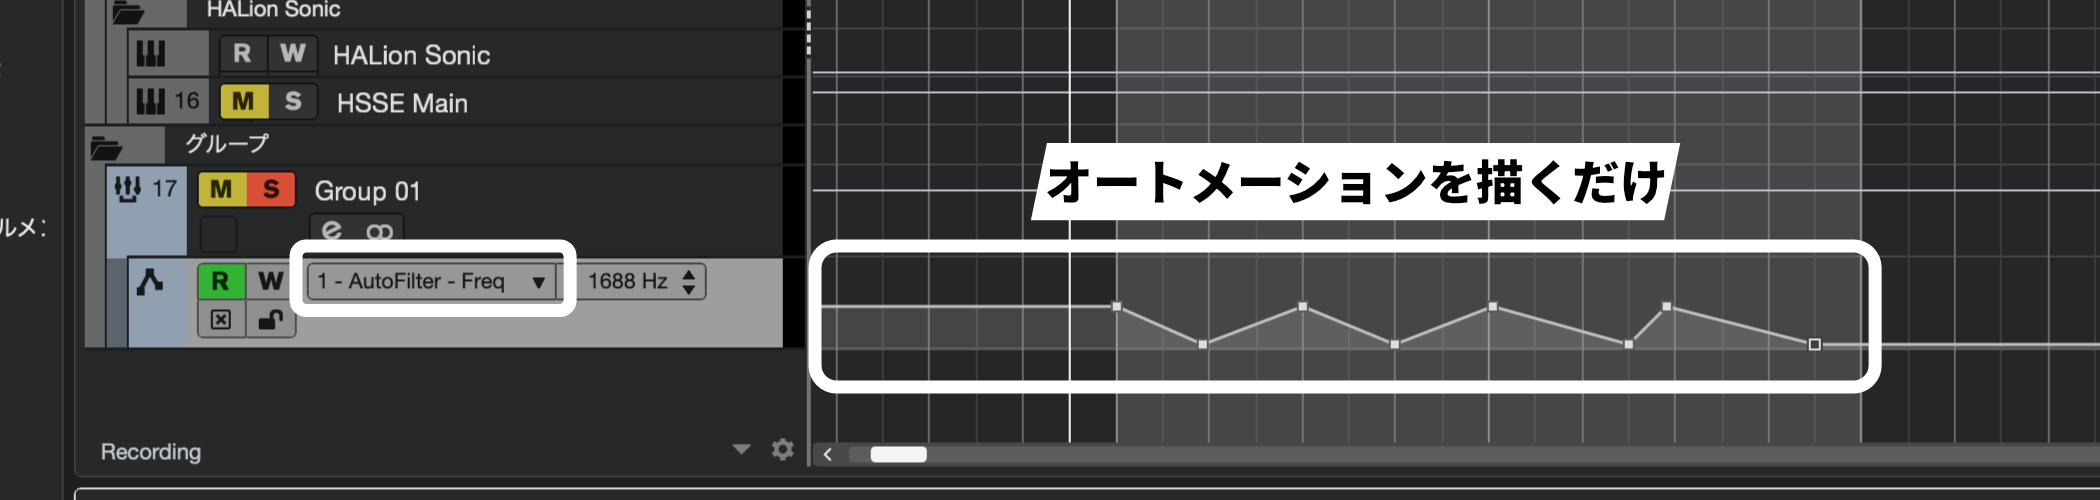
Then select the lane and draw an automation curve.
This makes automation more direct and faster to work with.
Expression Maps Improvements: Better articulation management (Pro only)
Creating Expression Maps for included instruments is now much easier.
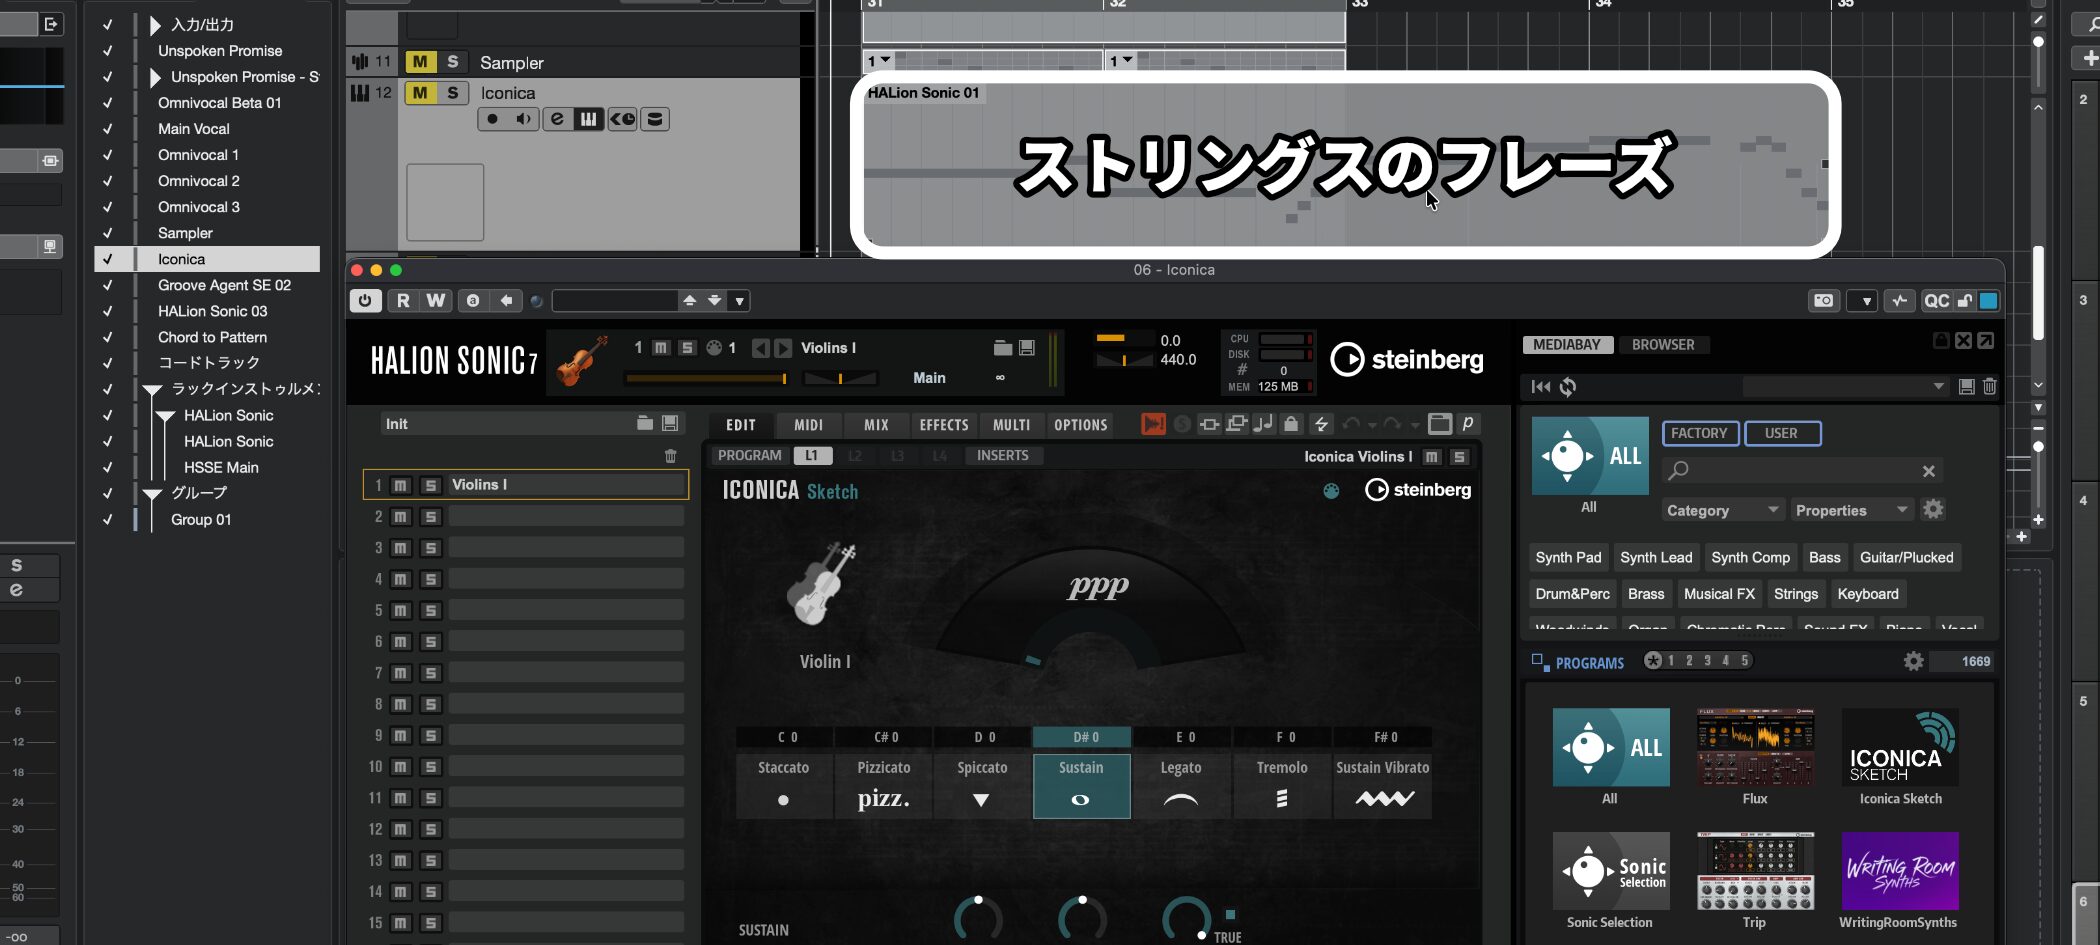
For example, prepare a string phrase and load Iconica Sketch in HALion Sonic.
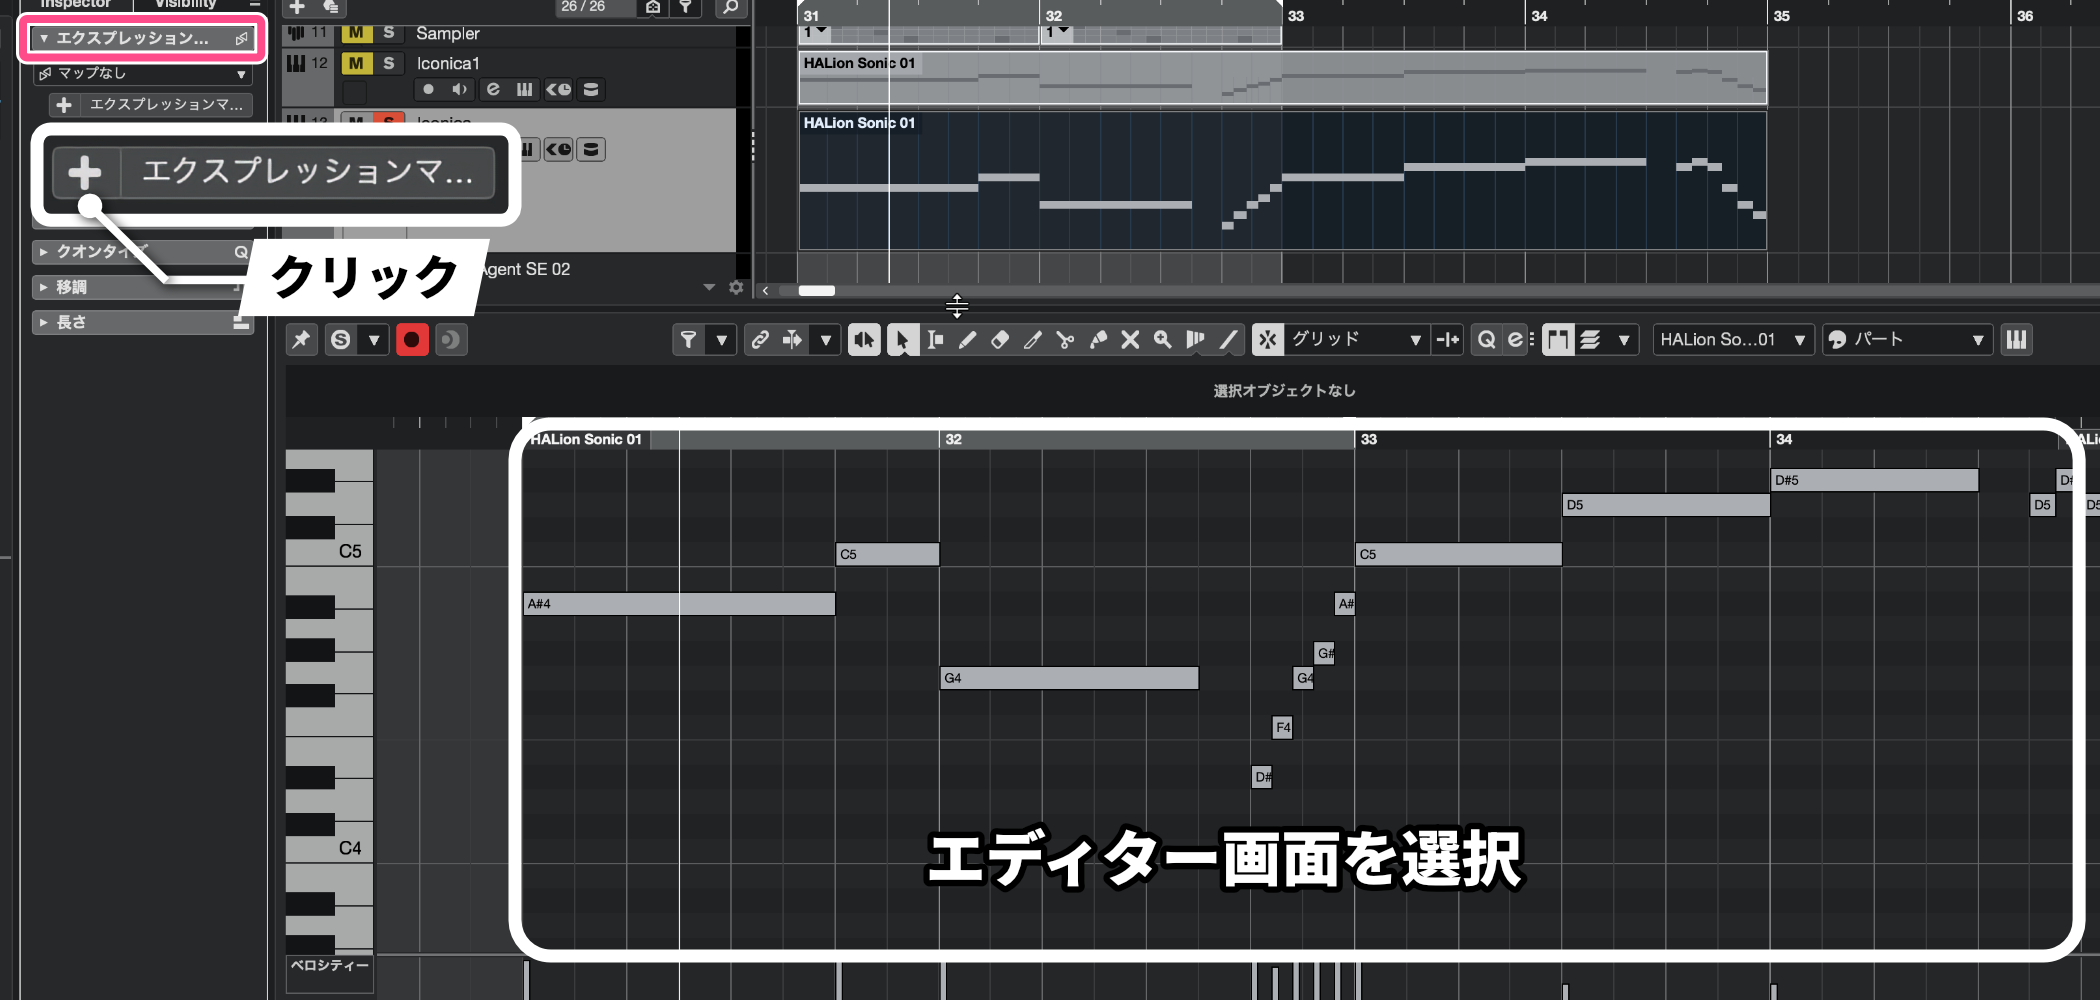
Select the editor to find Expression Maps in the Inspector on the left.
To add a map where No Map is shown, click the plus button in Expression Map Setup.
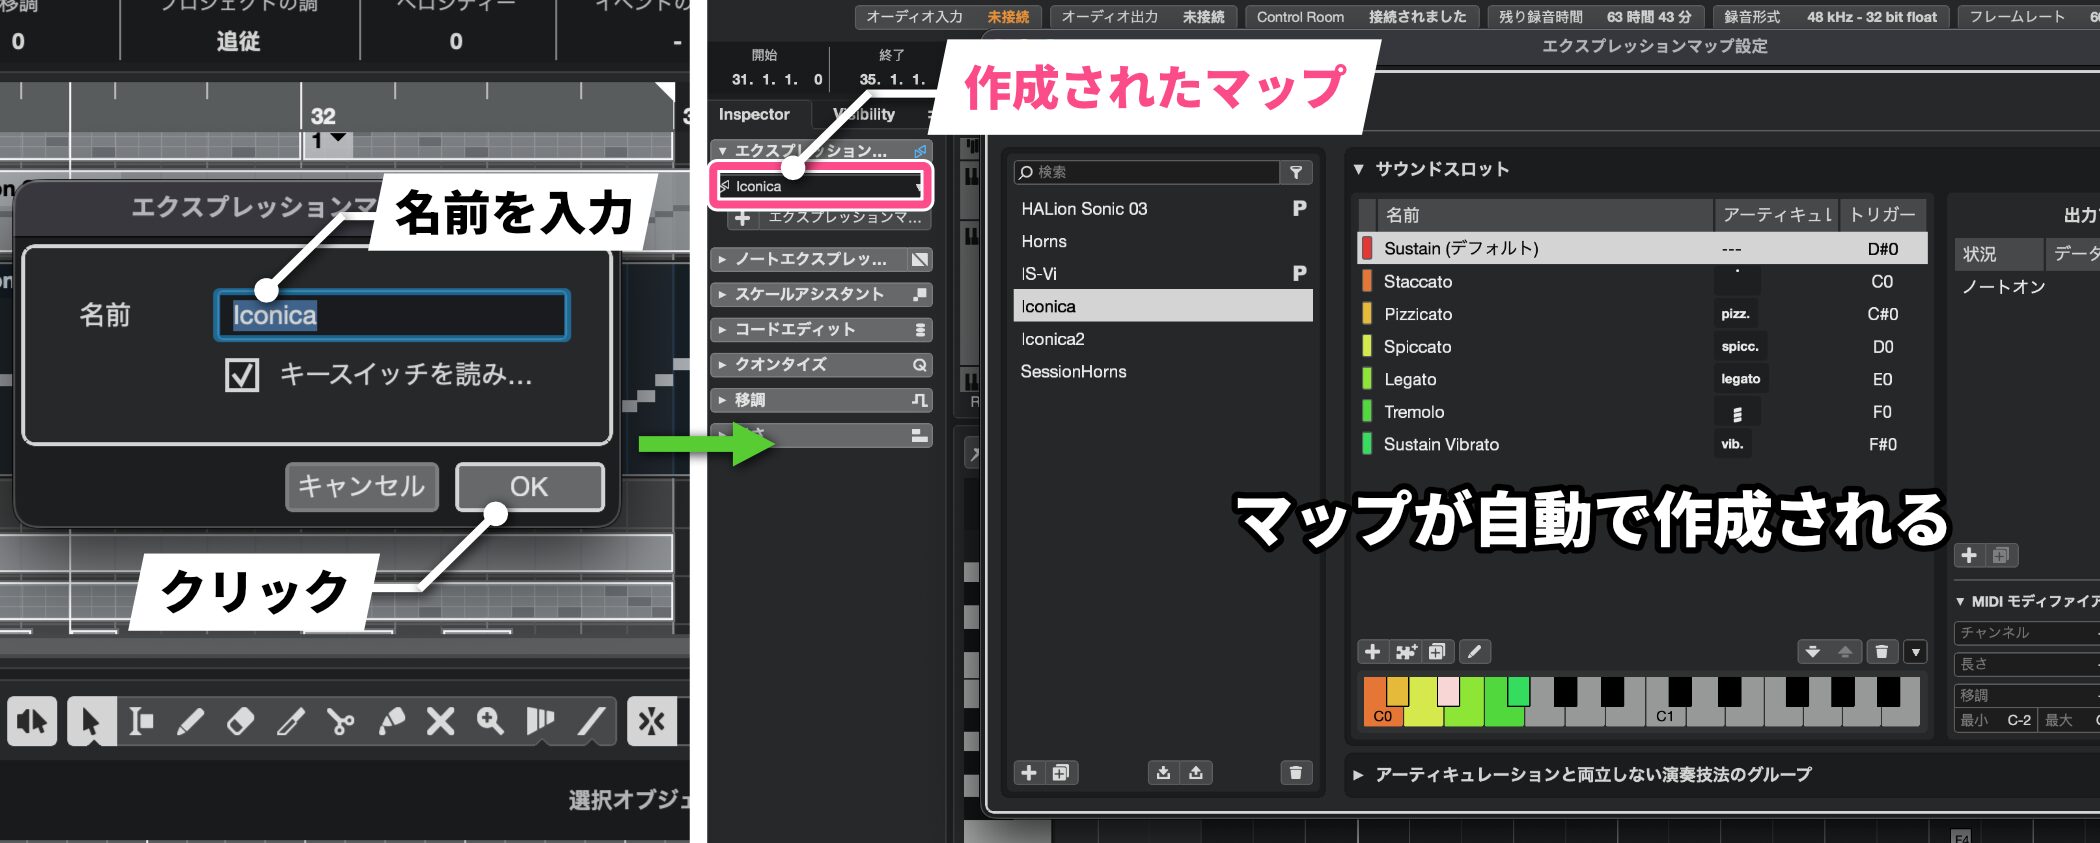
In the Add Expression Map window, give it a clear name and click OK to create the map.
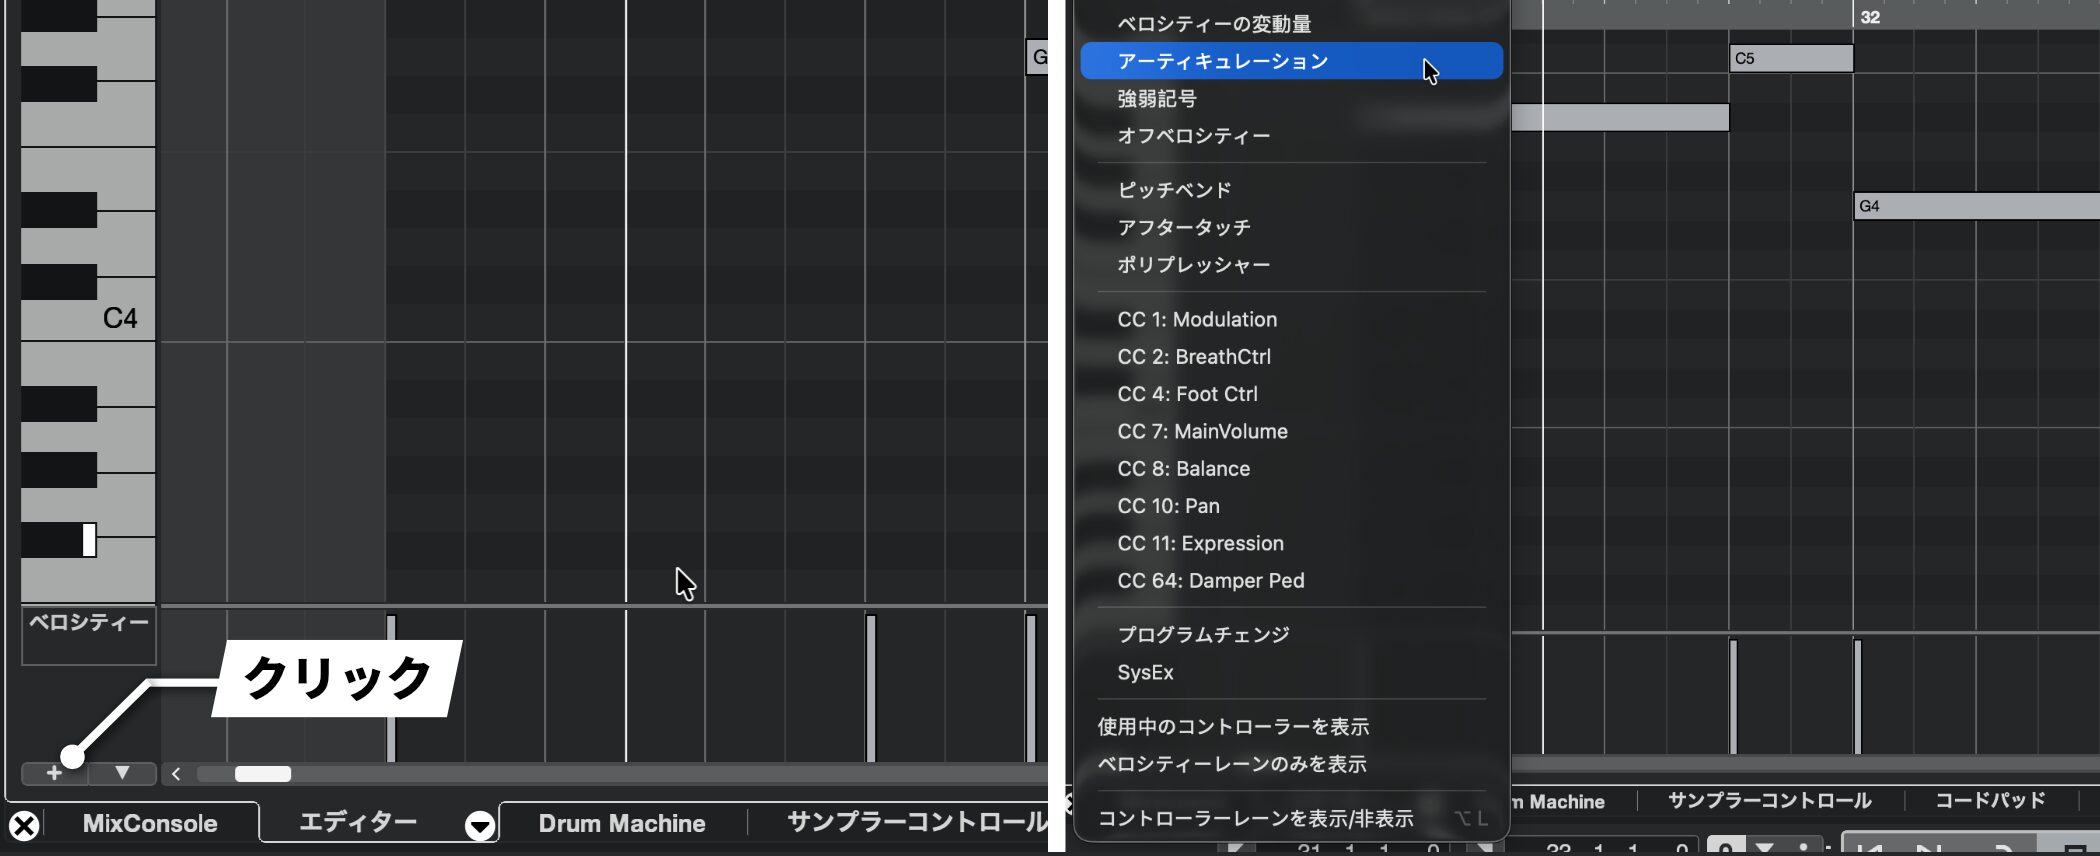
Next, apply articulations to the track.
Choose Articulation from the plus button to display an articulation lane as before.
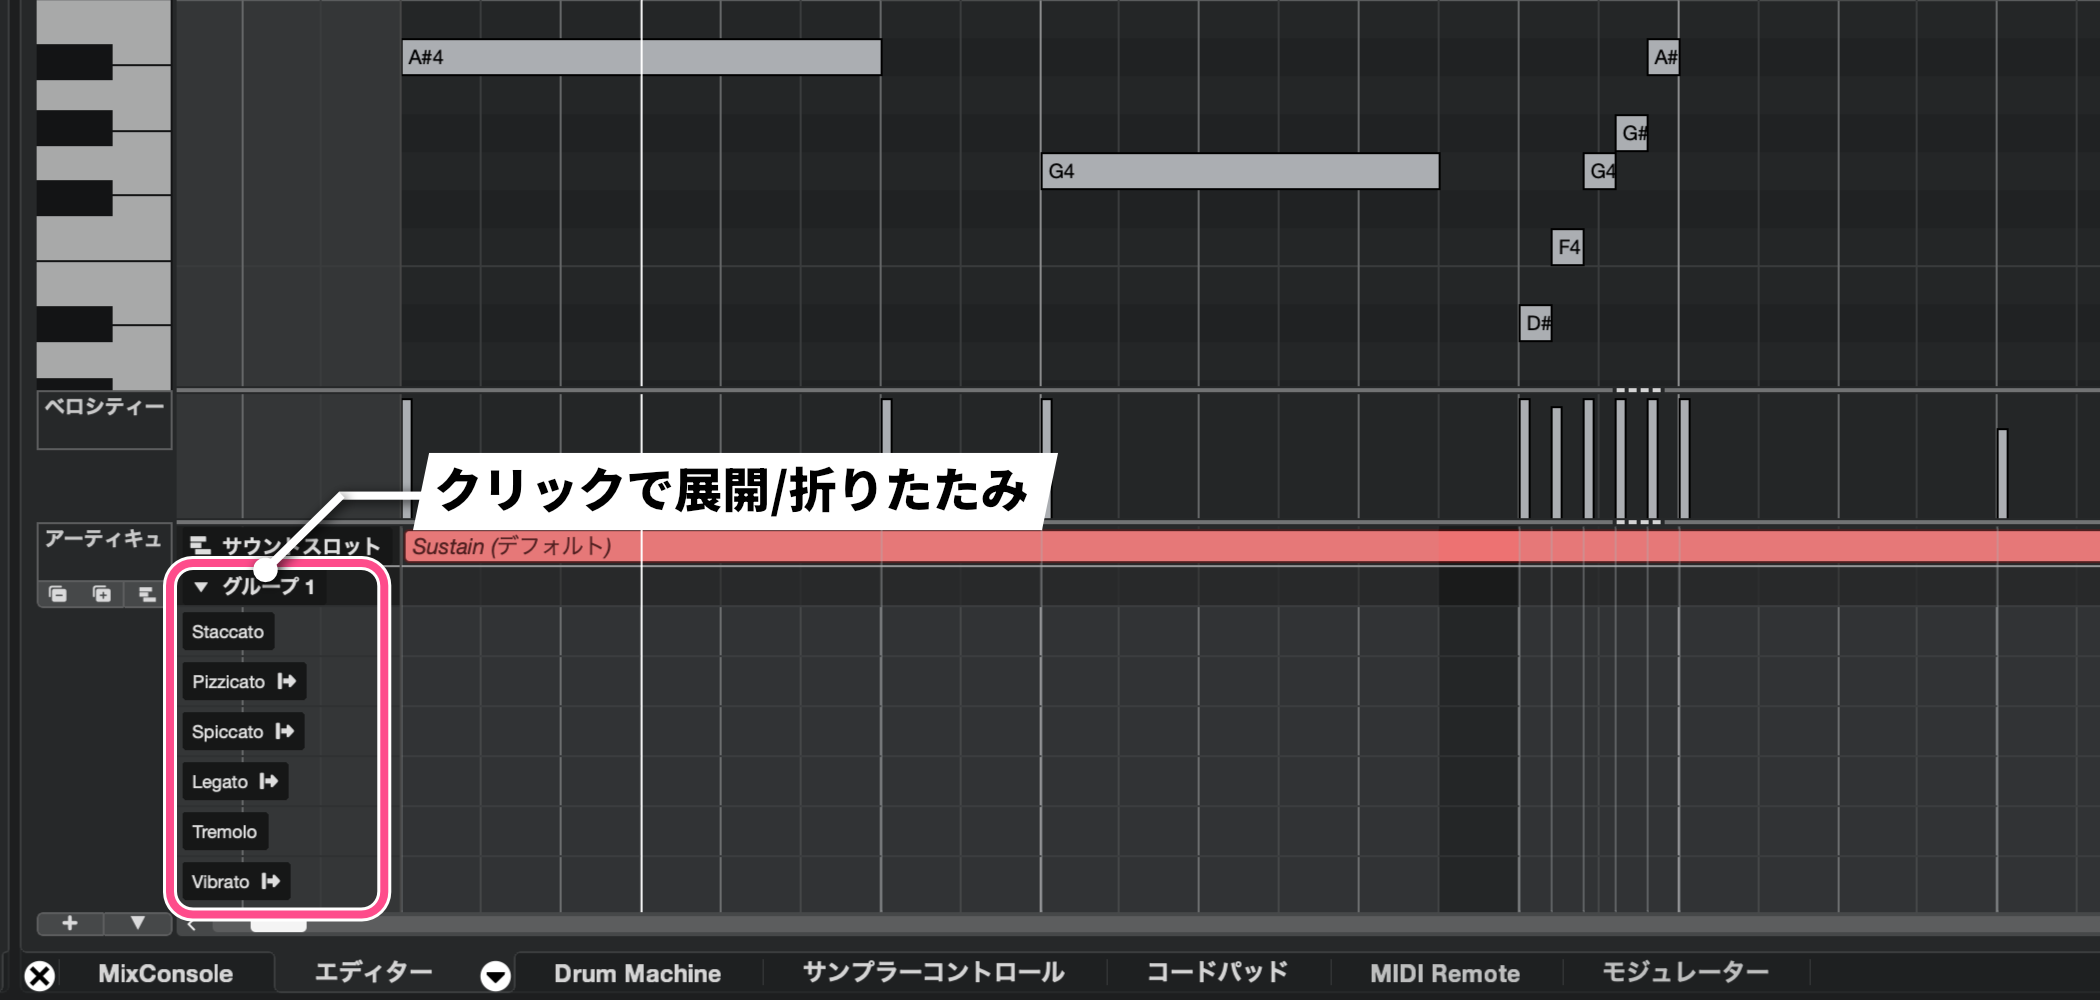
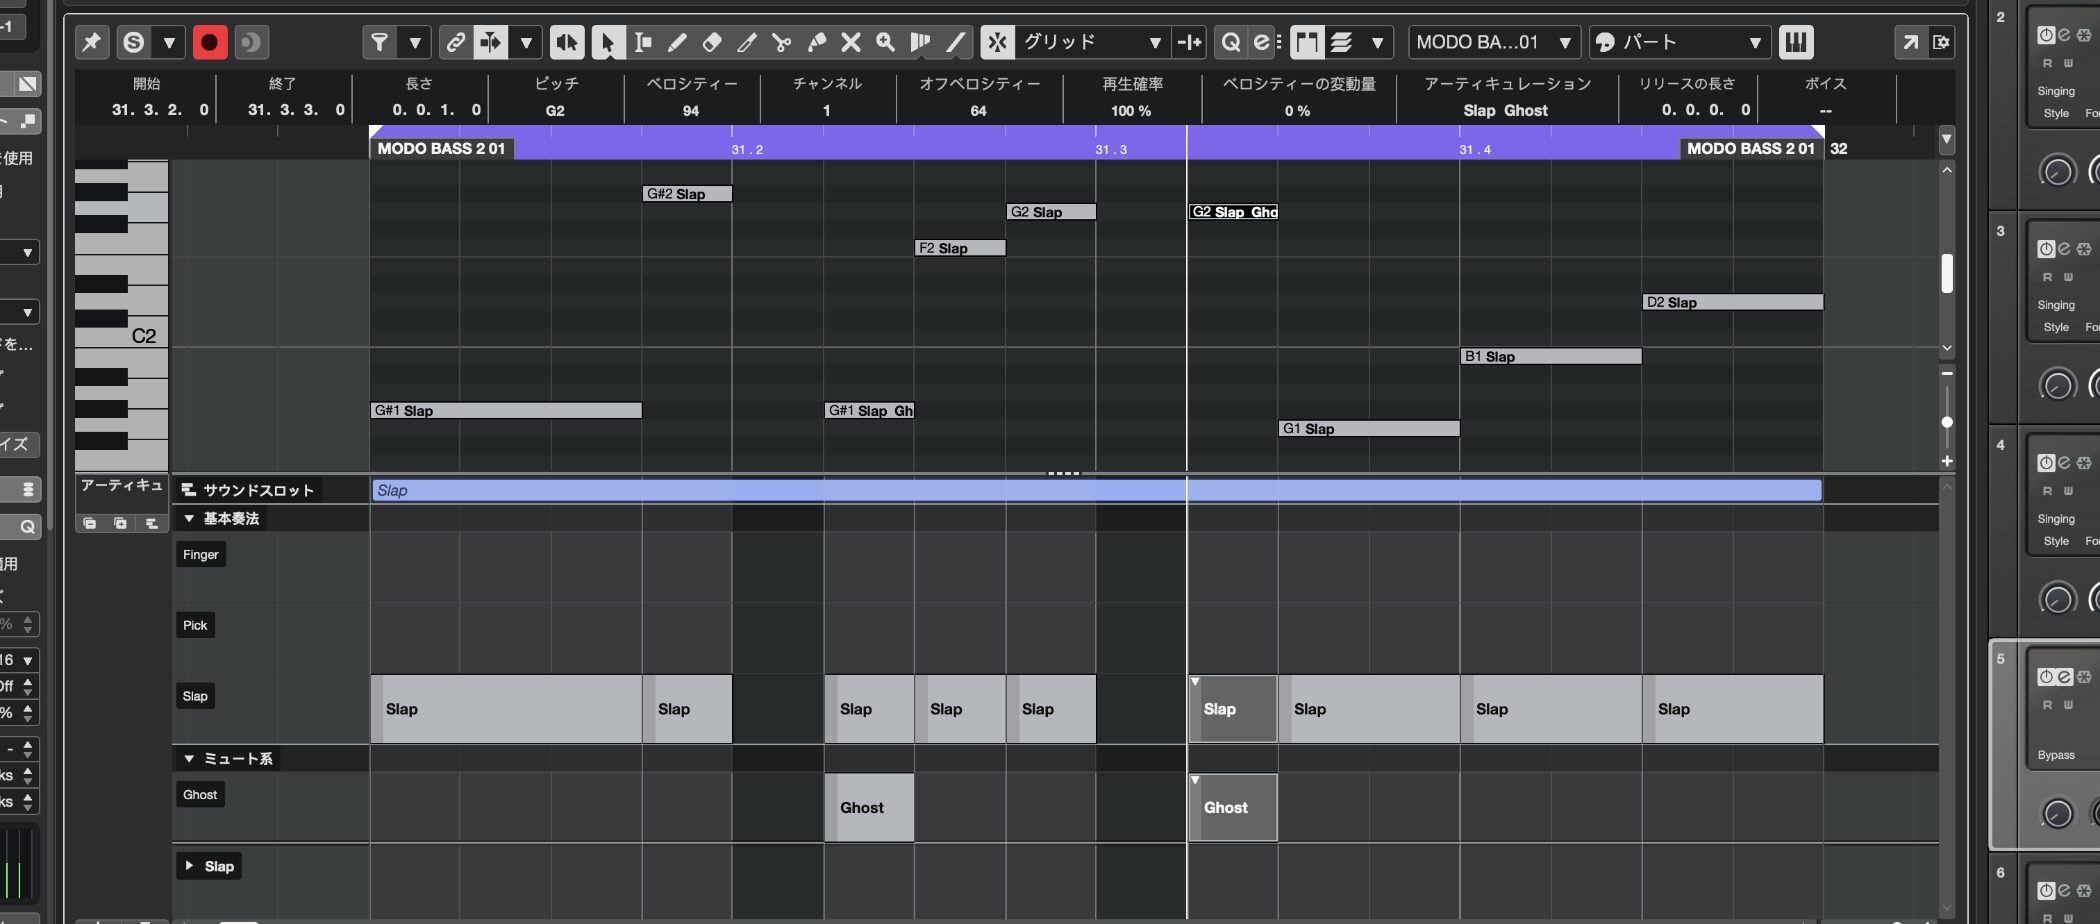
A new feature is the introduction of articulation groups.
The six articulations loaded here, including Staccato, Pizzicato, and Spiccato, are automatically saved as Group 1.
Groups can be expanded and collapsed, keeping instruments with many playing techniques organized in the editor.
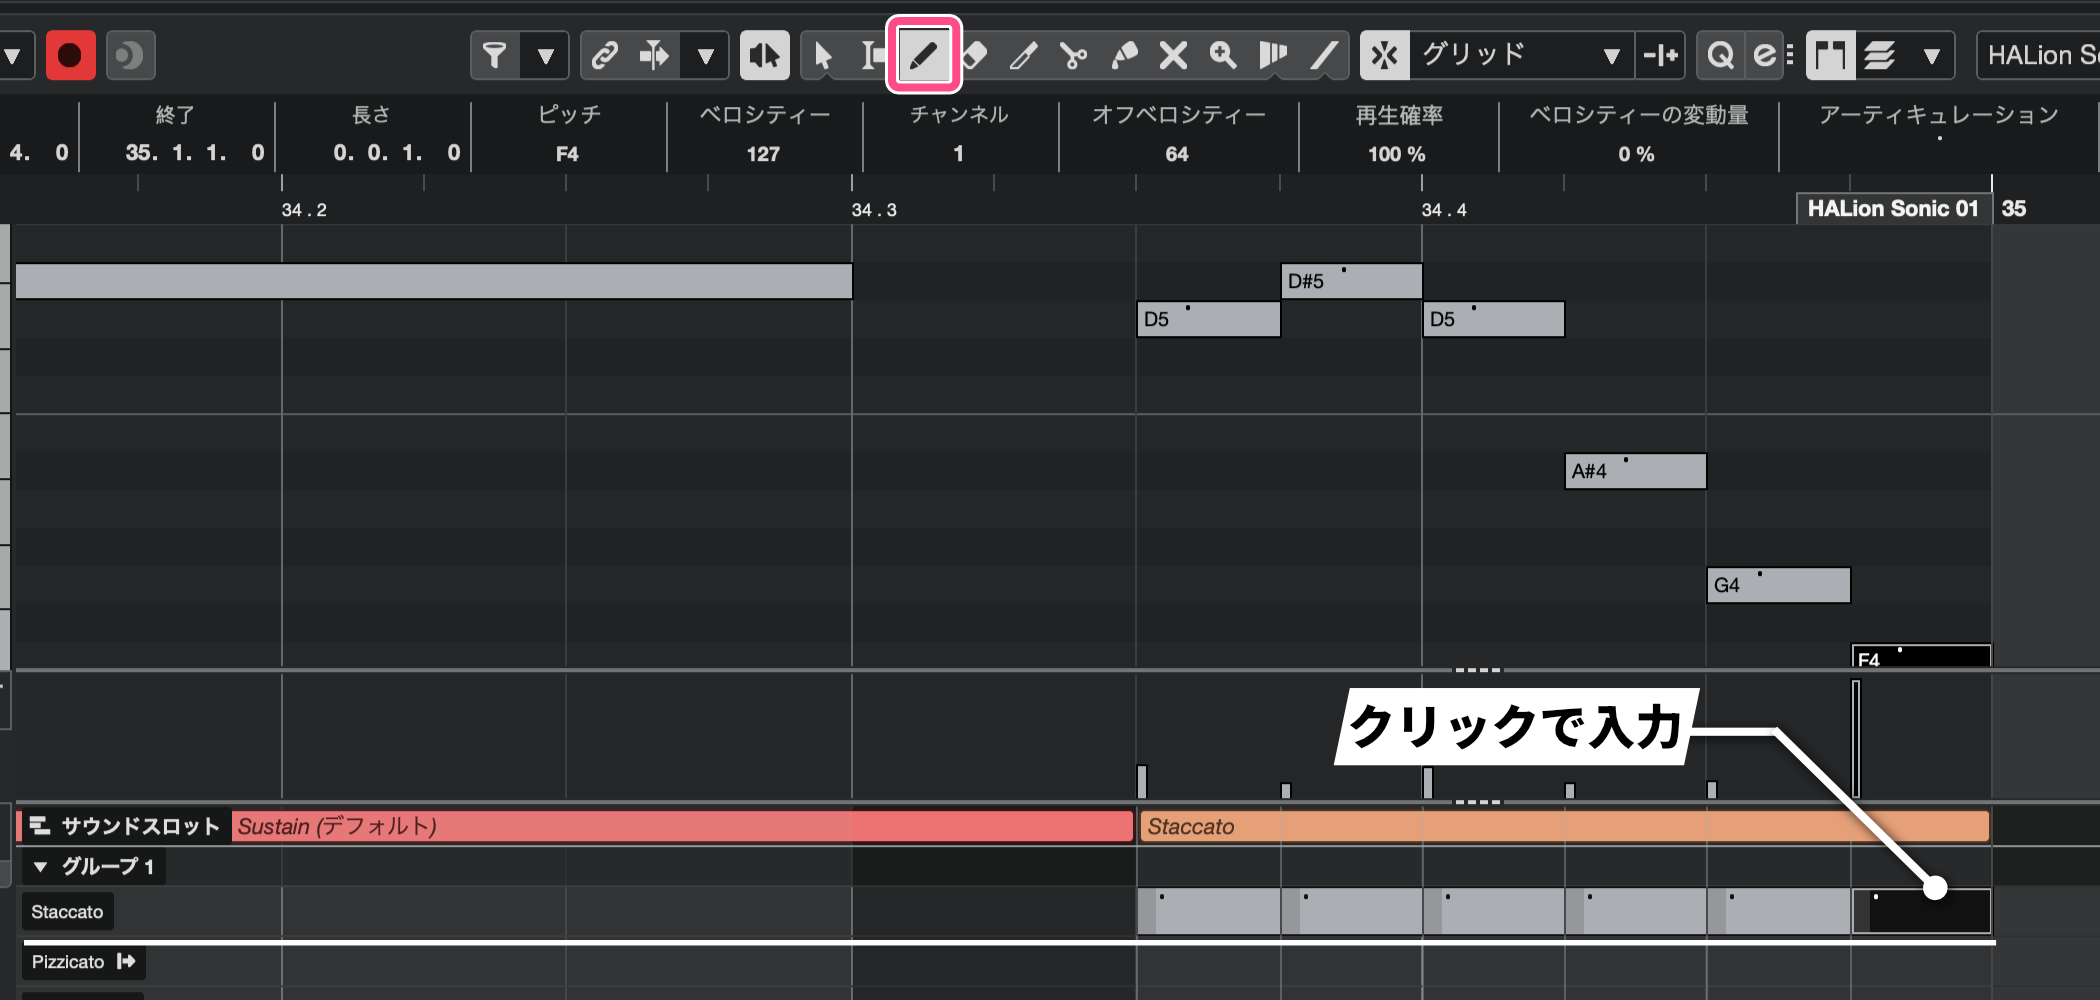
To switch articulations, select the pencil tool and click the articulation lane you want to enter.
The result is color-coded and labeled with the articulation name for easy reference.
Creating maps for third-party instruments
For a third-party instrument, you can register articulations manually.
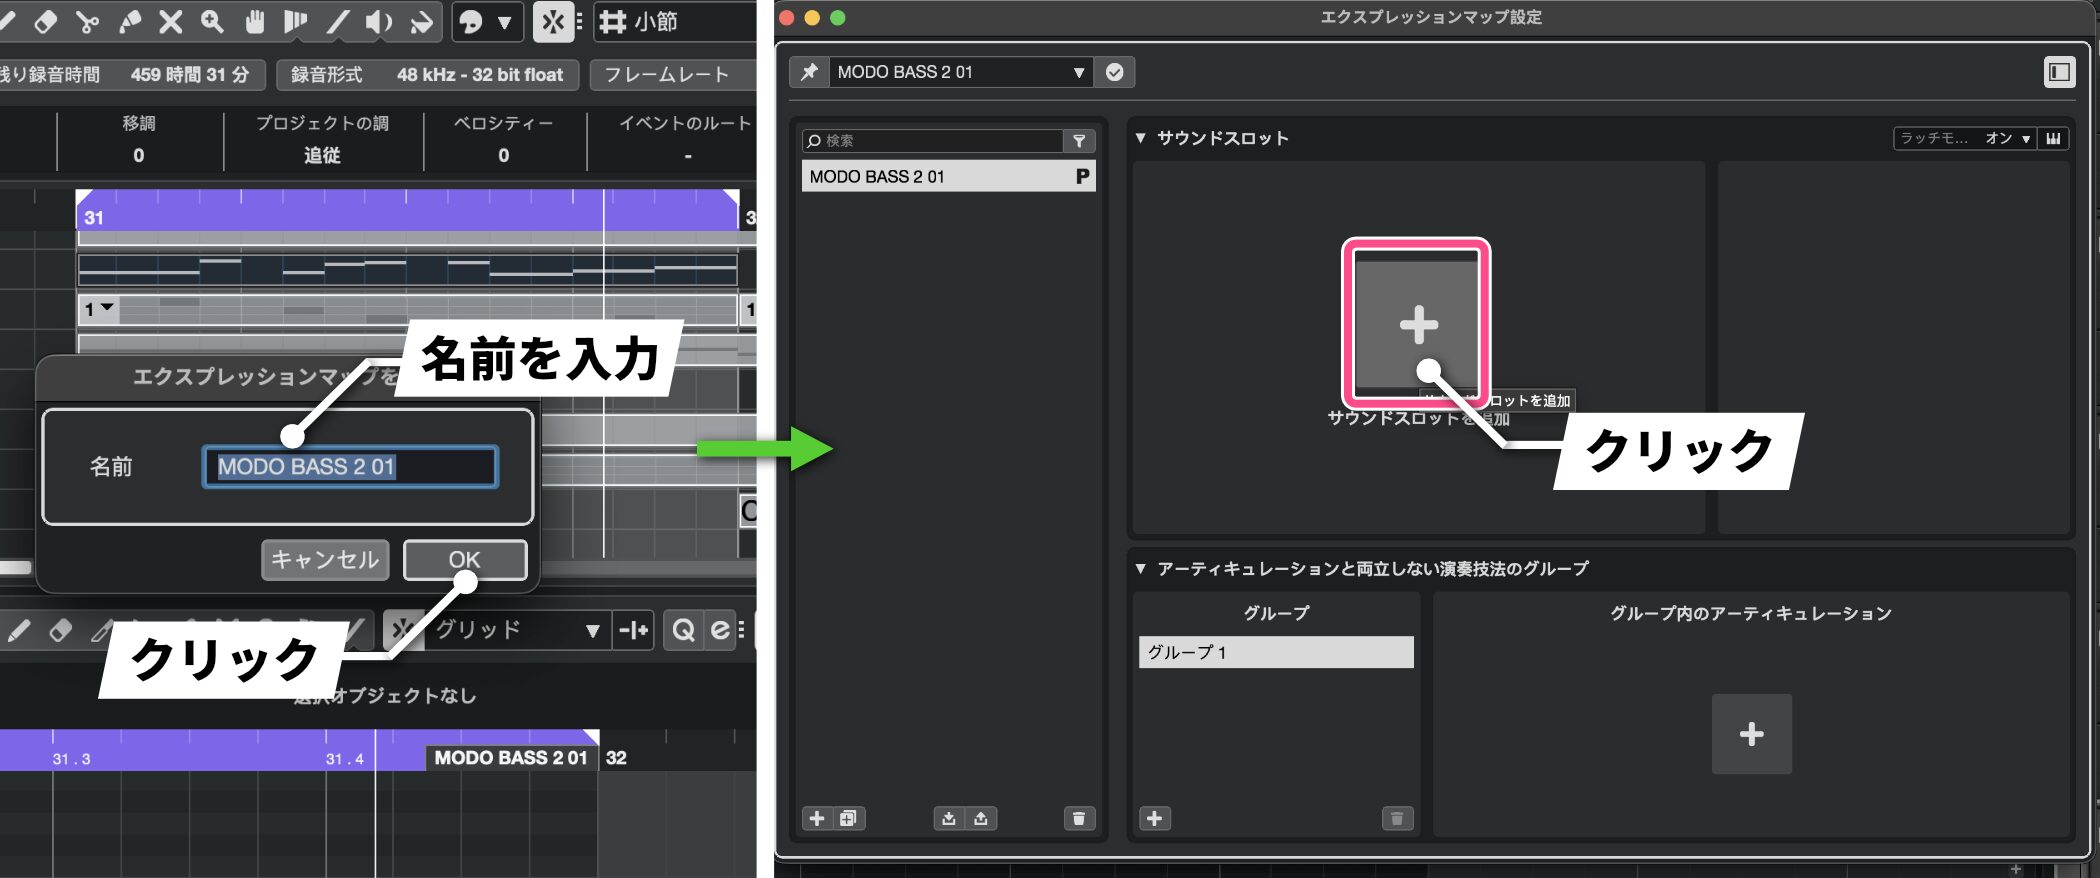
Using a bass instrument as an example, first add an Expression Map as you would for an included instrument.
Next, click Add Sound Slot.
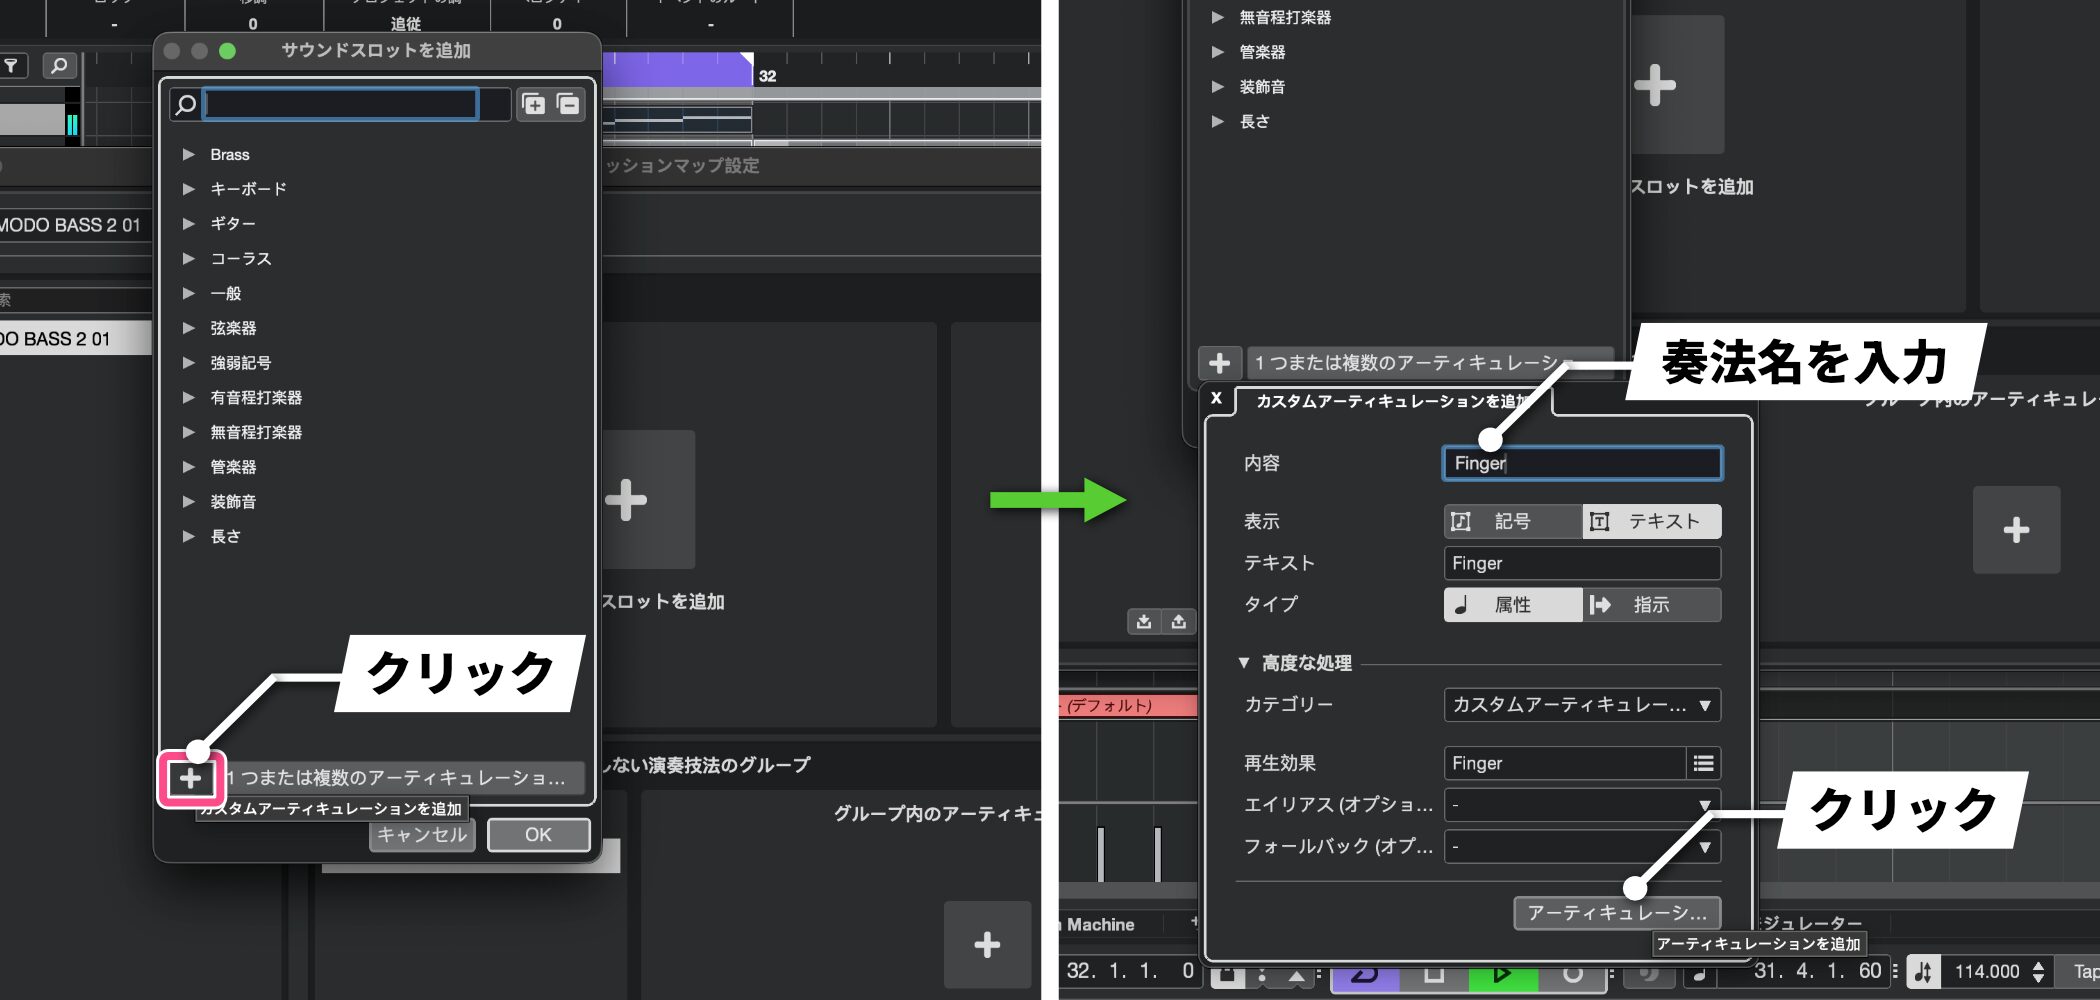
Click the plus button to add a custom articulation.
Enter a playing-technique name or other details, then click Add Articulation.
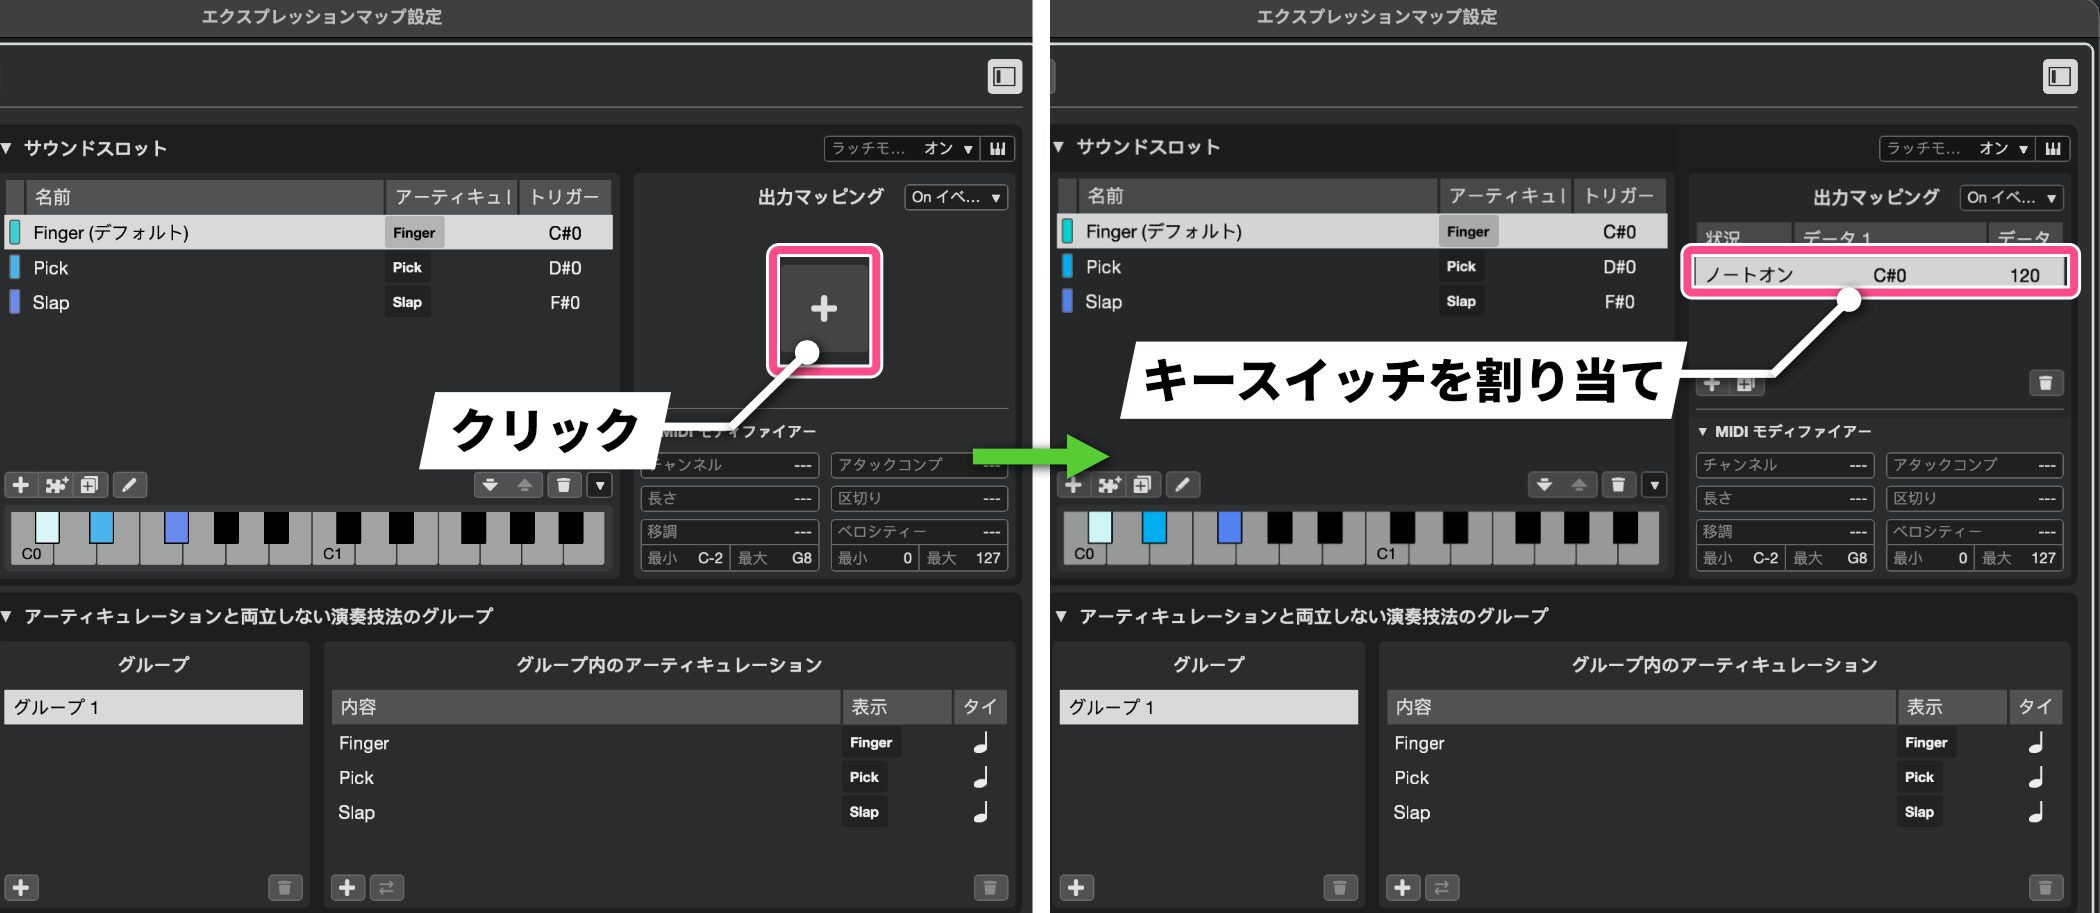
Under Output Mapping, set the key switch assignments that trigger the articulation.
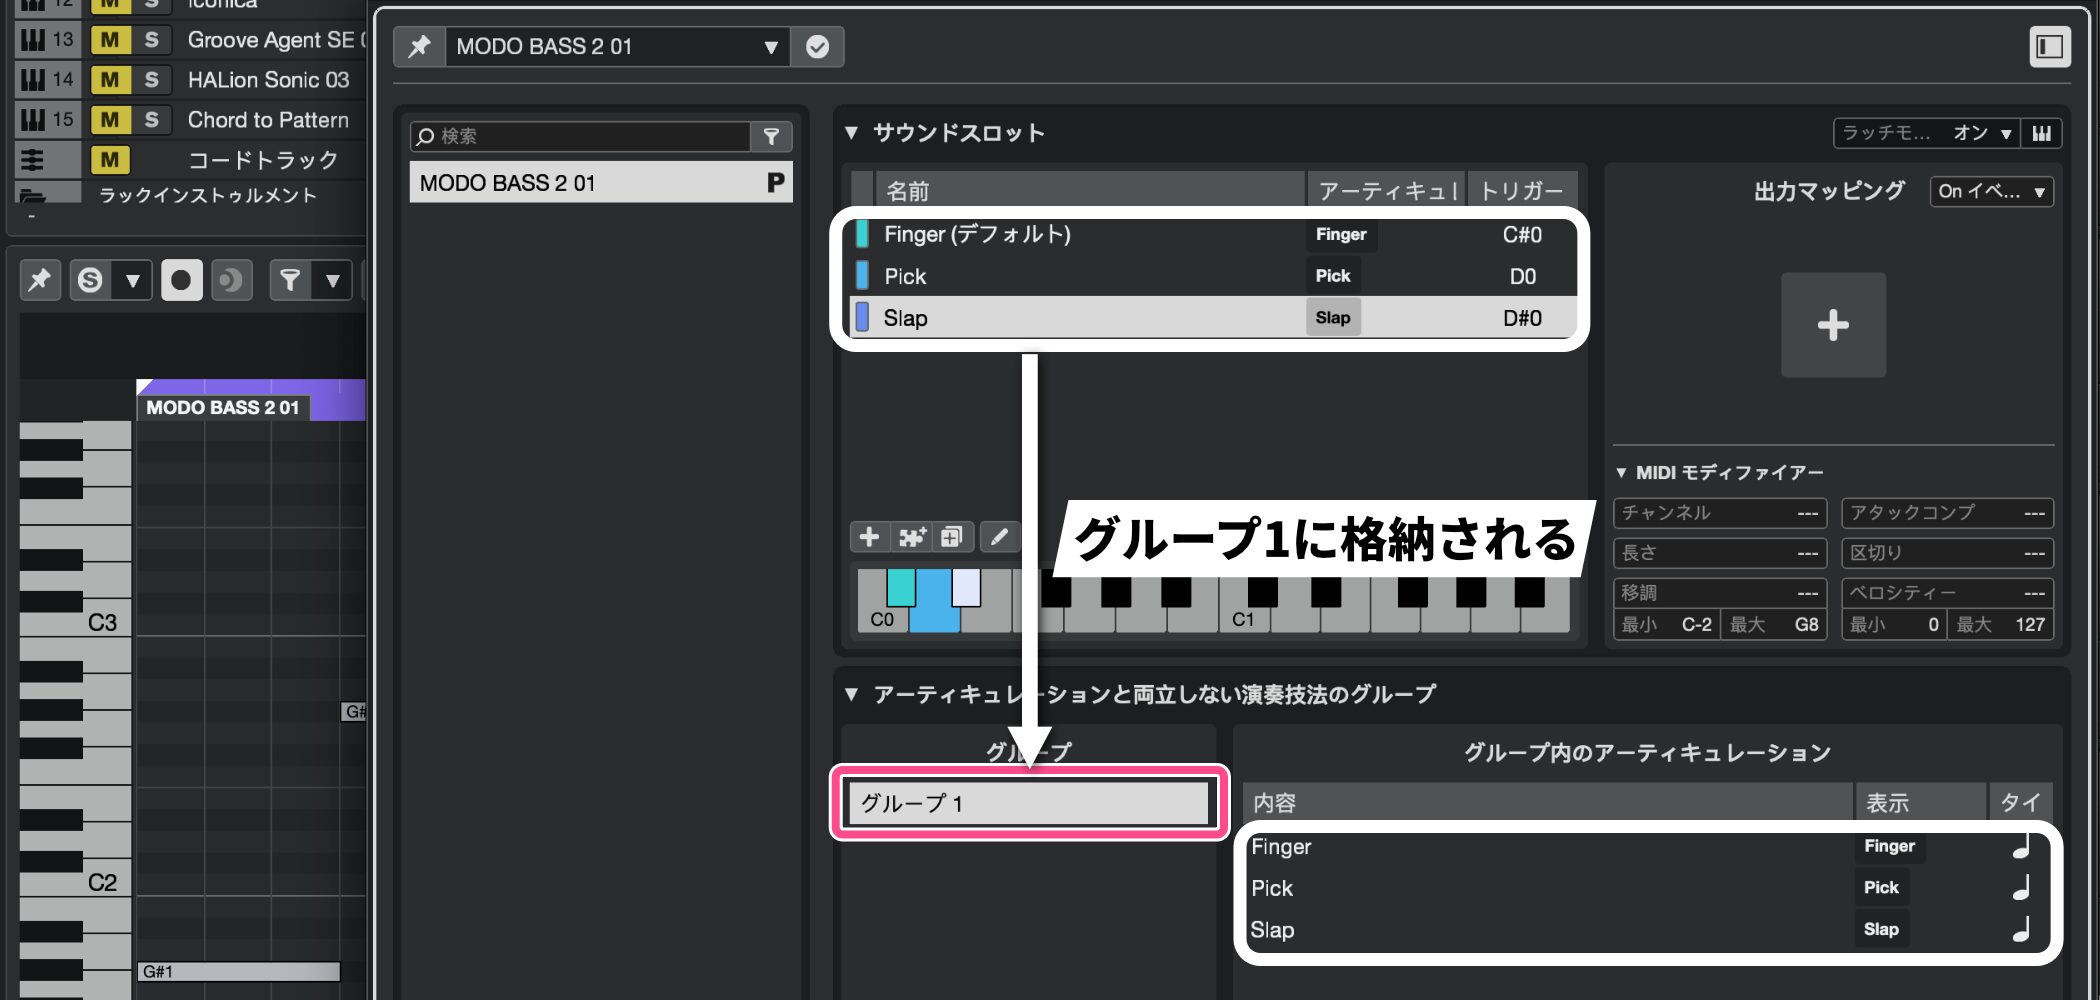
New custom articulations are saved to Group 1 by default.
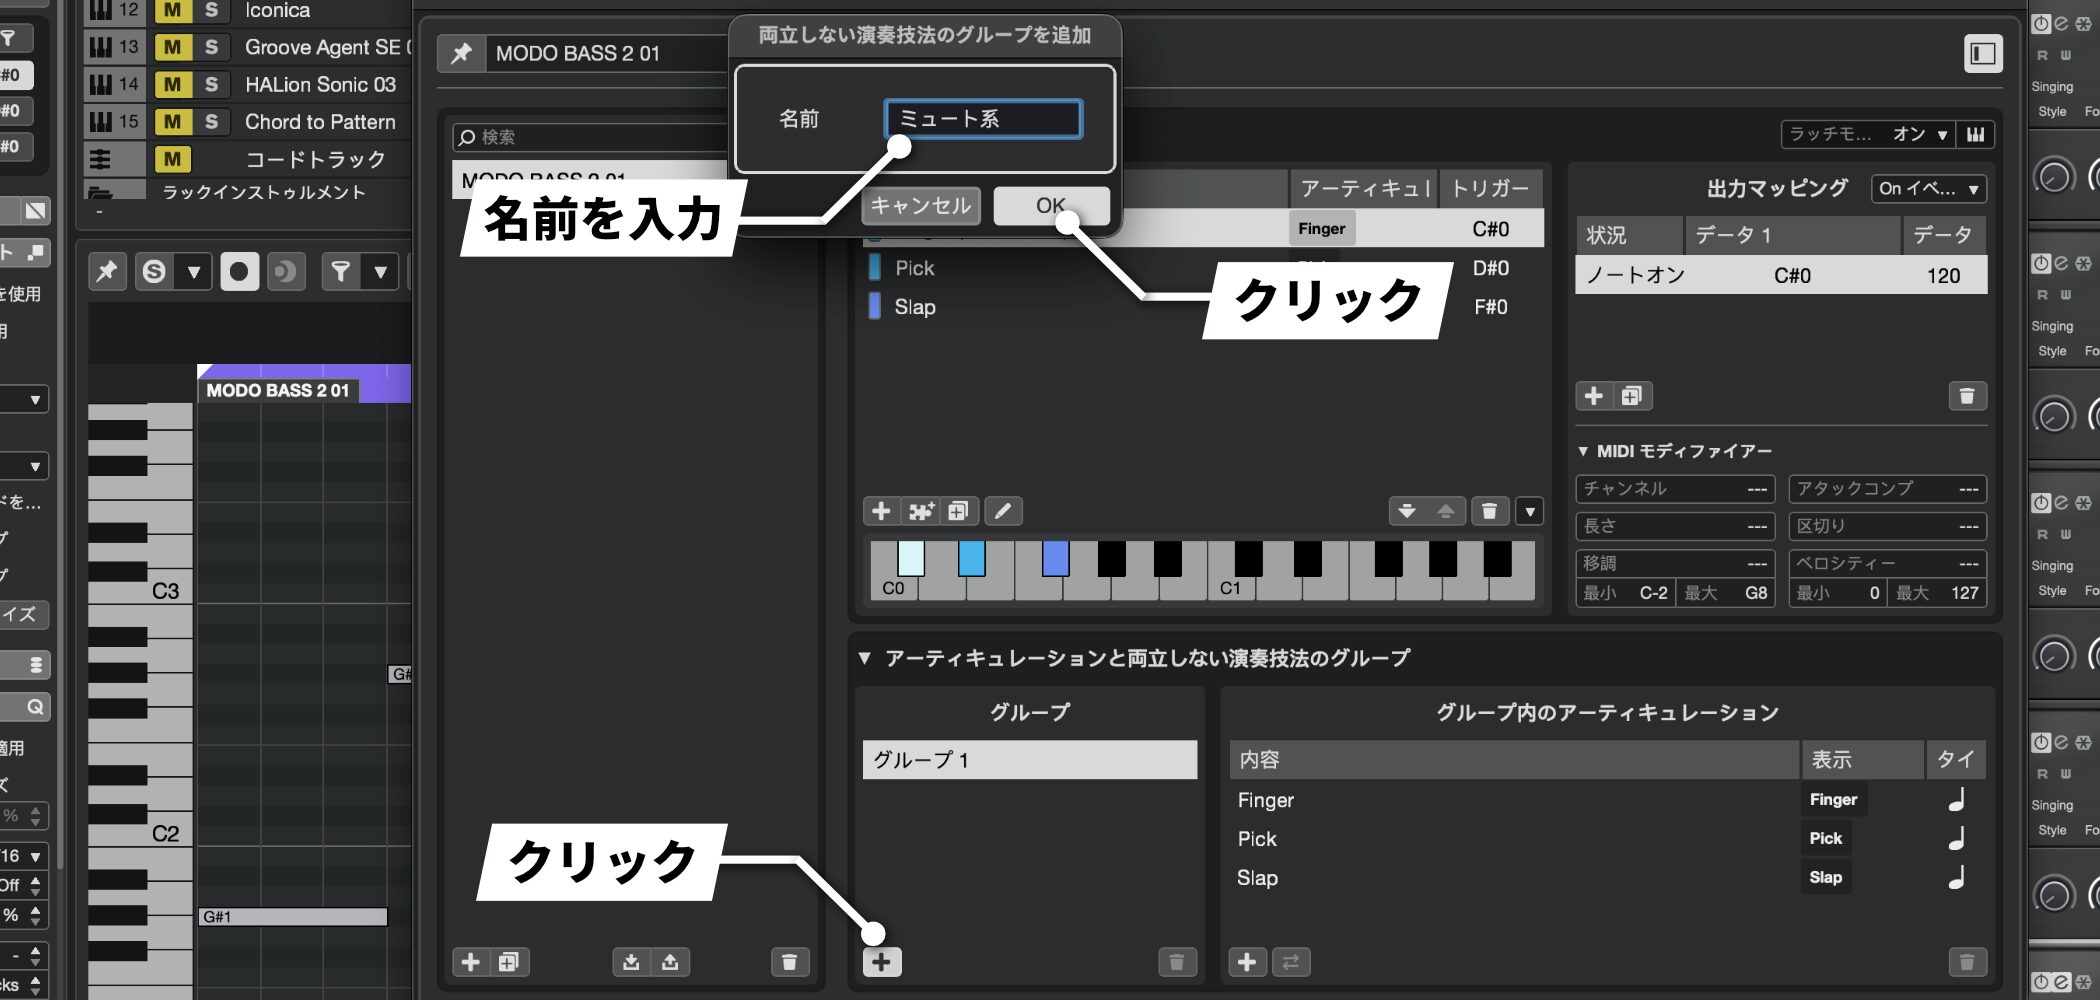
Click the plus button below the group frame to open the window for adding a new group.
Enter a name and click OK to add it.
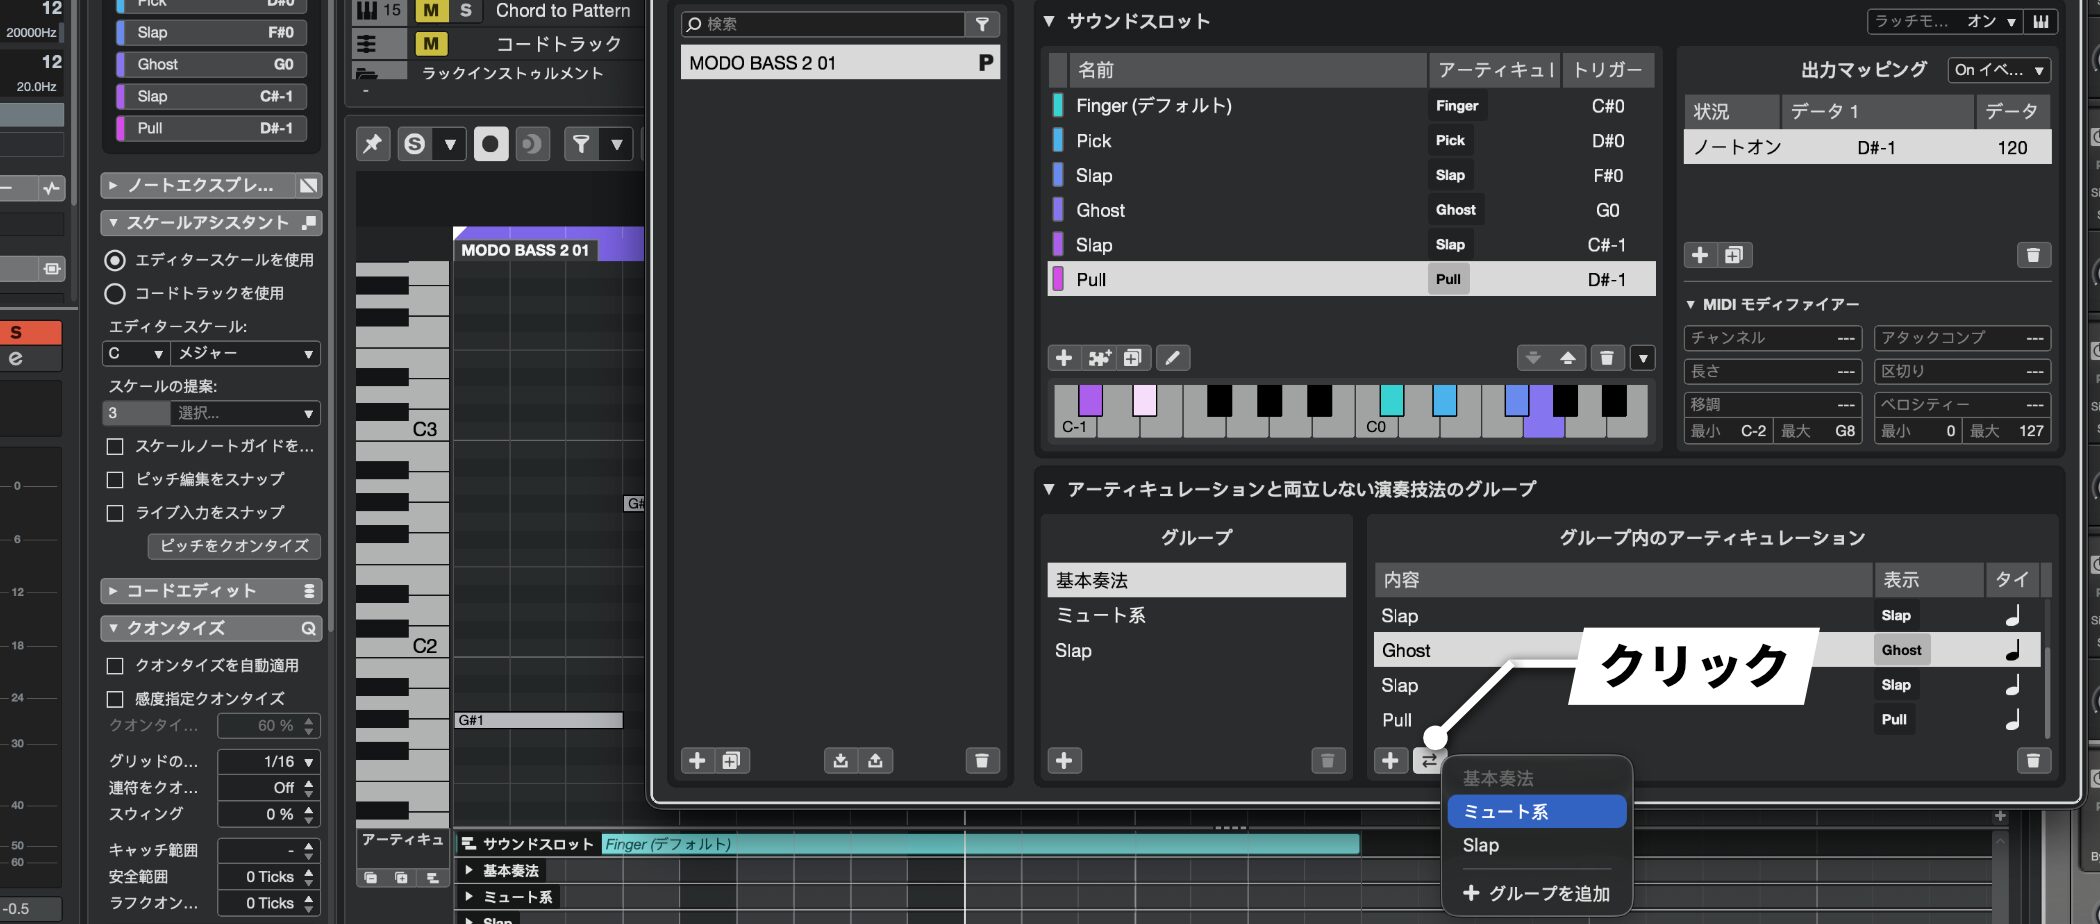
Use Move Articulation to Group to move an articulation to a different group.
Once created, an Expression Map can be reused across multiple projects.
Quick Export: Export audio rapidly (Pro/Artist)
Audio export is now faster.
Previously, you had to set a loop range and choose Audio Mixdown. Quick Export exports automatically from the beginning to the end of the song.
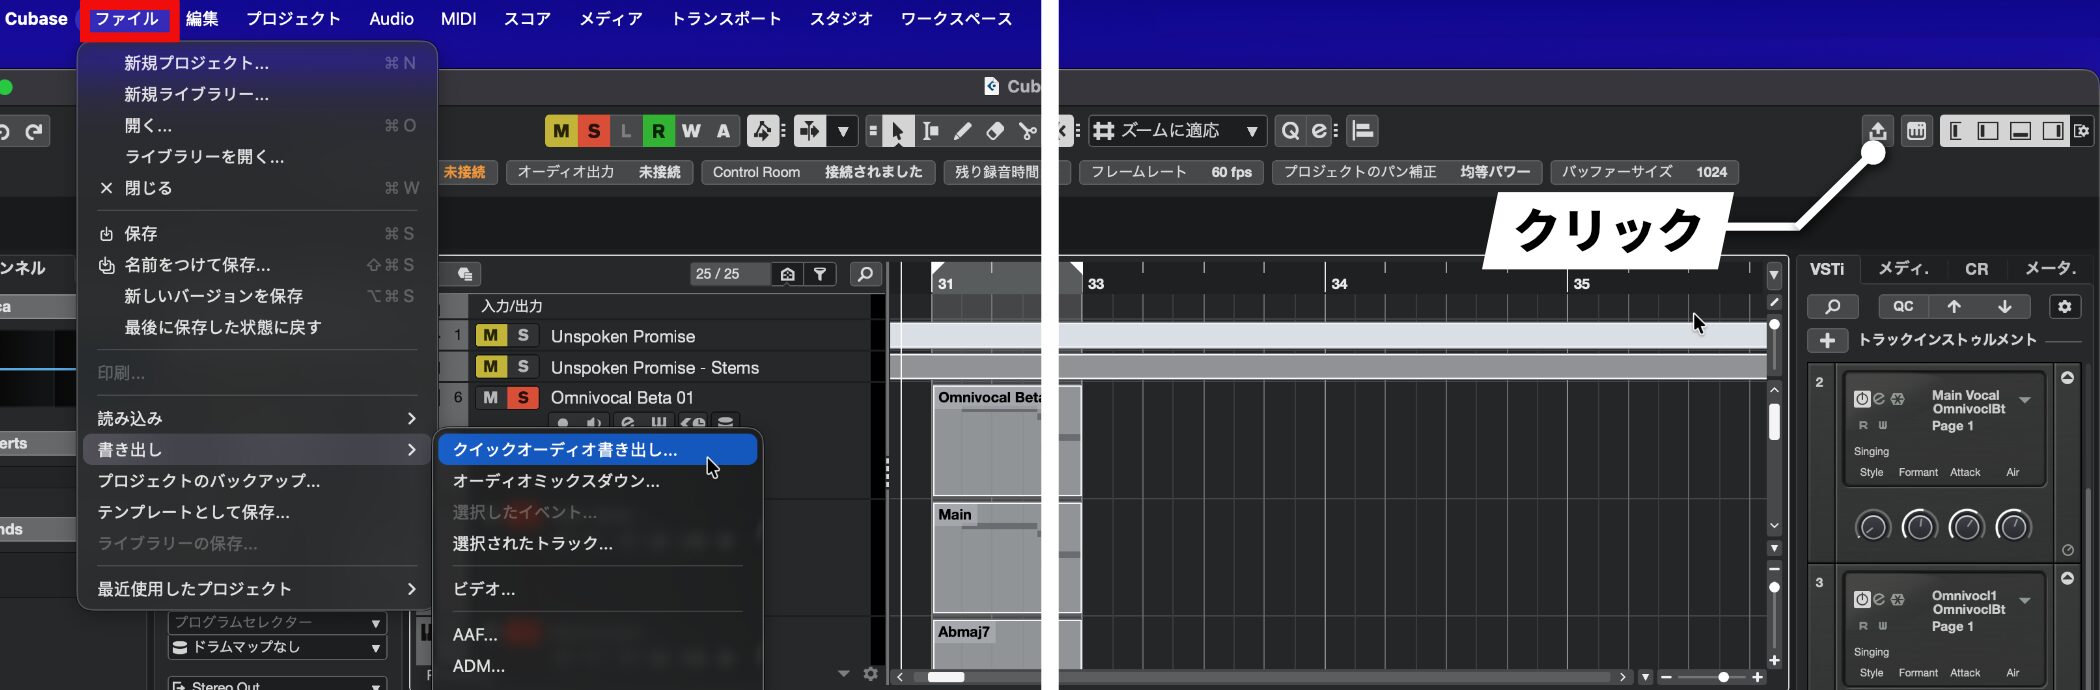
Choose Quick Audio Export under File > Export, or click the toolbar button.
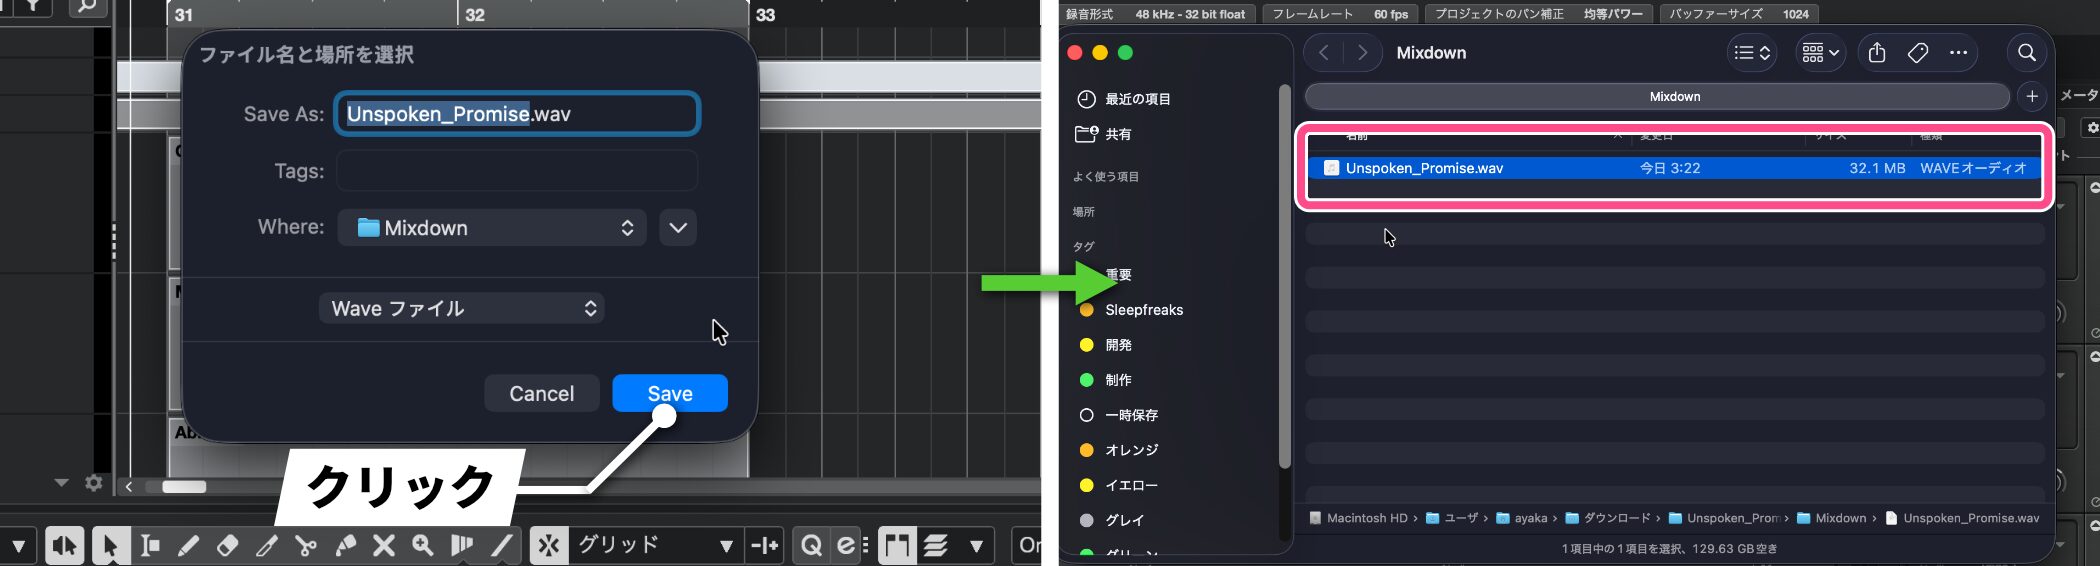
Set the file name, format (WAV or MP3), and save location, then click Save to complete the export.
This is useful for quickly creating a preview or bounce during a session, whether you want to check work in progress or share a track by email.
Other new features and improvements
Beyond the headline features, Cubase 15 includes three more tools that can improve production.
PitchShifter: Edit pitch curves with MIDI (Pro/Artist)
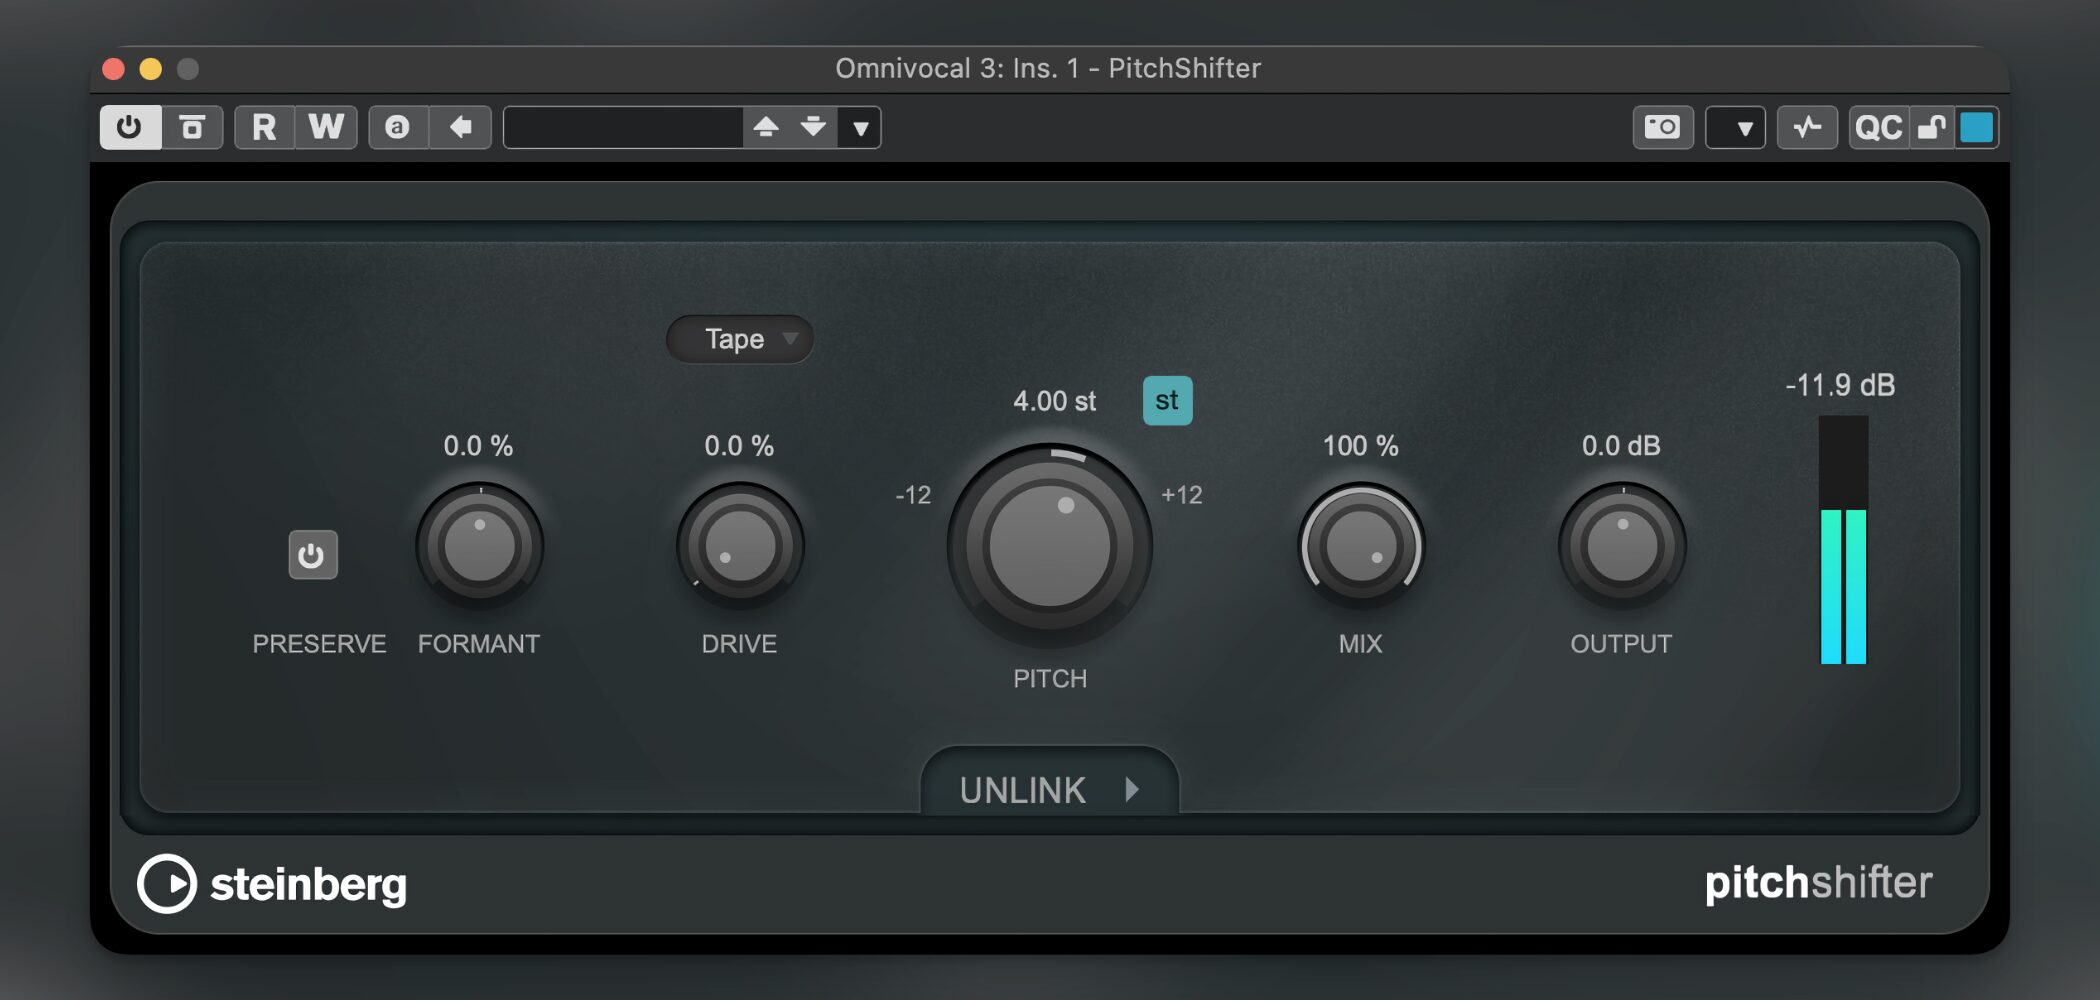
Real-time pitch shifting can now be applied to MIDI tracks with this new plug-in.
It can shift pitch across a wide ±24-semitone range and includes formant preservation, saturation modes, and the ability to unlink stereo channels.
Previously, you had to render to audio; now you can draw pitch curves while keeping the track as MIDI, greatly improving the workflow.
Pitch-shifted audio also sounds natural, at a quality comparable to audio processing.
It can be used for creative sound design and pitch correction.
Groove Agent SE 6: Redesigned interface and mixer (all editions)
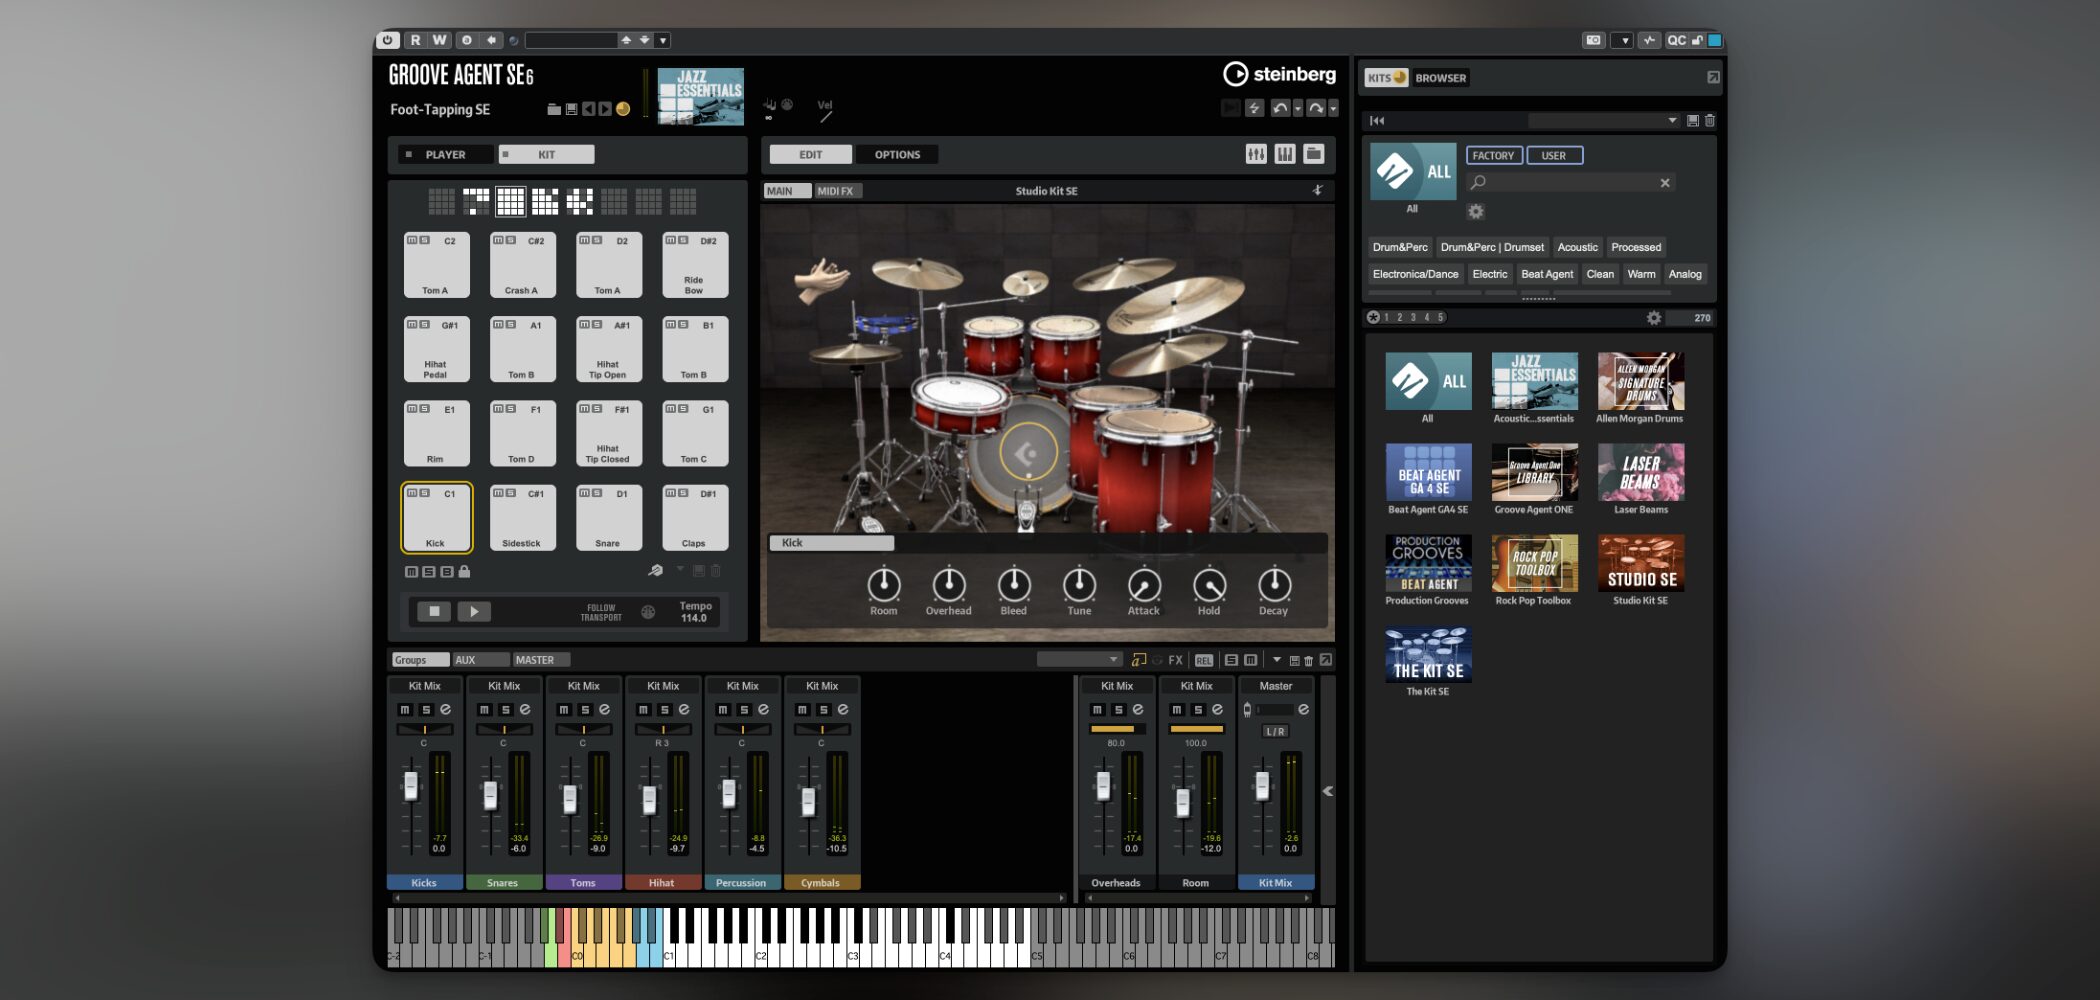
The Groove Agent SE drum instrument has been updated to version 6.
A scalable user interface joins a new mixer and enhanced effects, making drum production in Cubase more efficient.
You can manage the mixer and patterns on one screen, streamlining the drum-programming workflow.
UltraShaper: A versatile dynamics effect (Pro only)
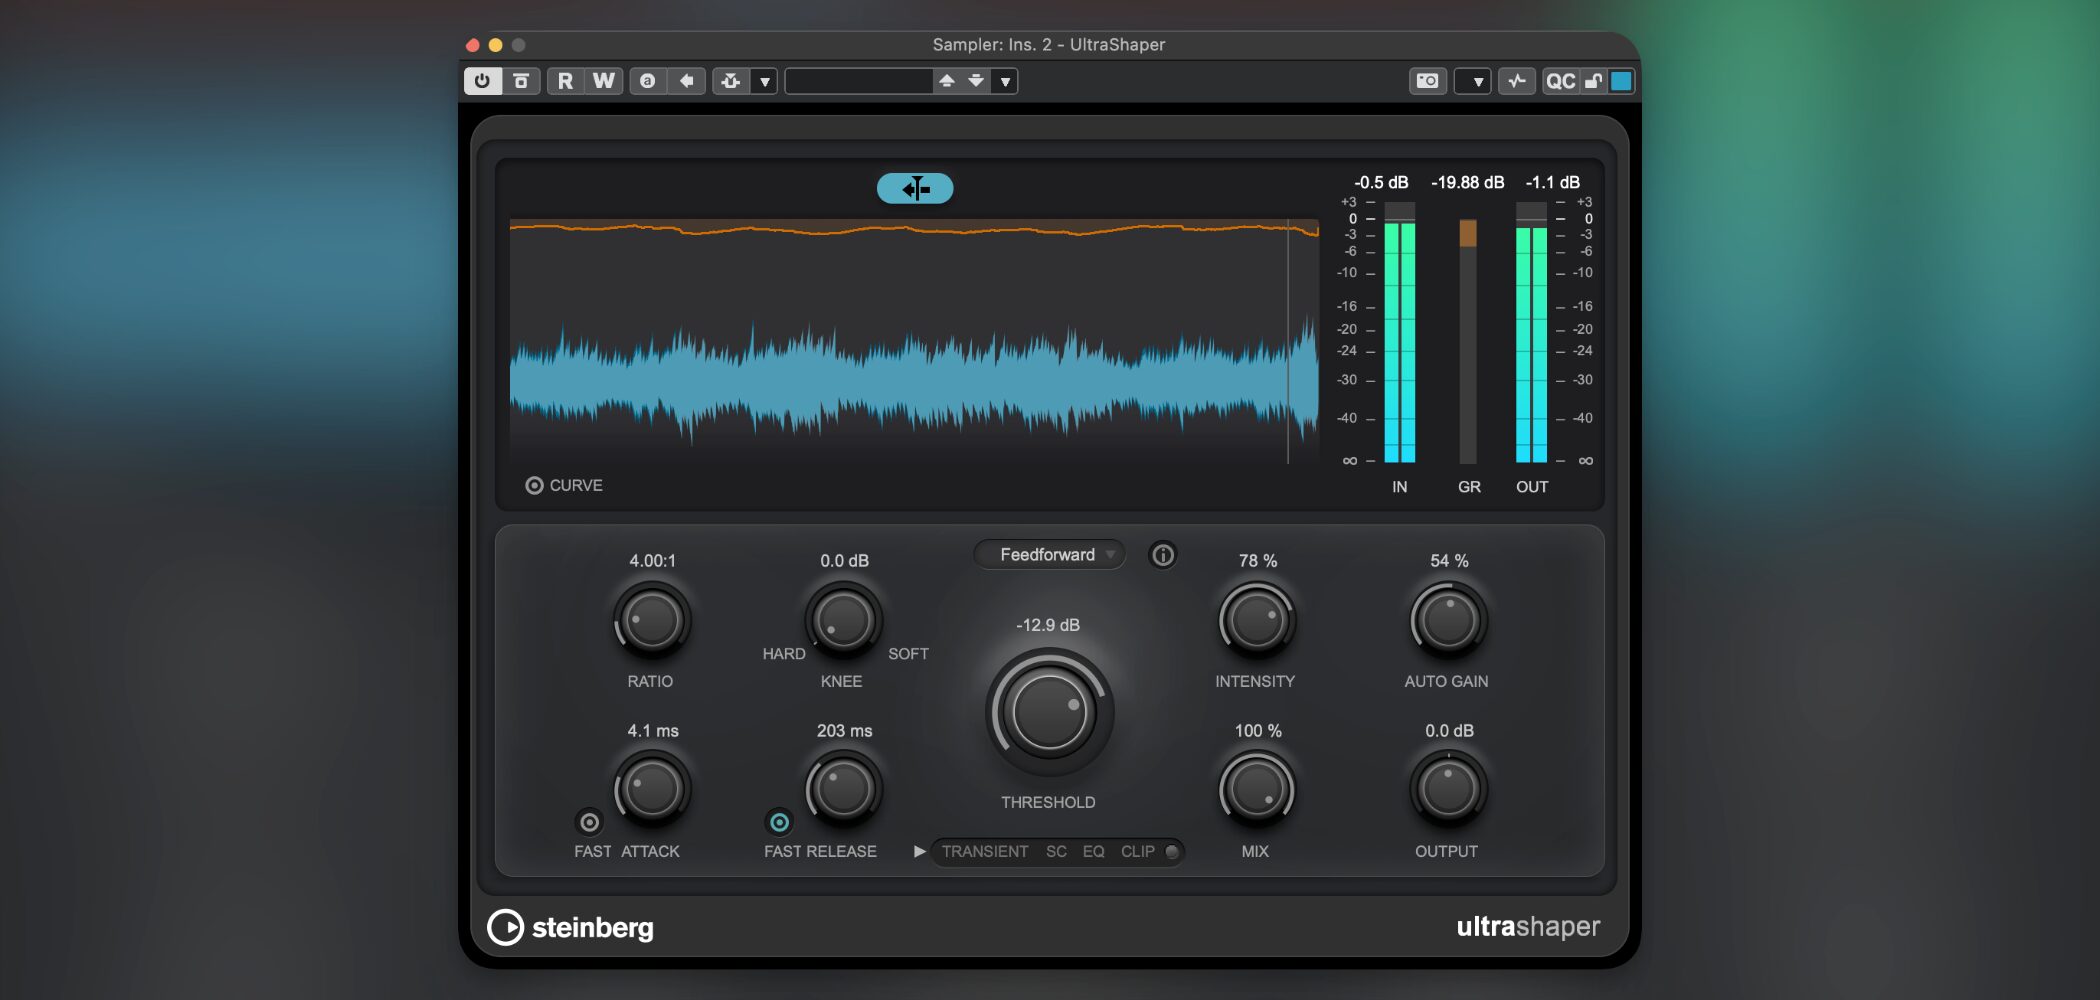
A new dynamics effect called UltraShaper has been added.
It combines transient shaping, clip limiting, and EQ sculpting in one professional-level sound-control plug-in.
It can function as an automatic correction compressor, making it easier to achieve a polished sound.
System requirements

Windows
OS: 64-bit Windows 11 (version 24H2 or later) or 64-bit Windows 10 (version 22H2 or later)
CPU: Intel Core i5 (8th generation), AMD Ryzen 3000 Series, or a Windows on Arm processor
Mac
OS: macOS Sequoia or macOS Sonoma
CPU: Intel Core i5 (2018 or later) or Apple Silicon
Apple Silicon Mac: Runs as both a native app and a Rosetta 2 app
Common requirements
CPU cores: 4 or more
Memory: 8 GB or more
Storage: At least 85 GB of free space
GPU memory: At least 4 GB for a 4K display
Conclusion

Cubase 15 combines AI-powered ways to expand creativity with workflow improvements that respond to production needs. For a broad range of users, this looks like a practical update.
For the Cubase 15 release, users who activated an earlier version within a specified period can upgrade to Cubase 15 at no additional cost.
Specifically, the following conditions apply:
- Eligible period: October 8, 2025, or later
- Eligible products: Cubase 14 or an earlier version (full, educational, upgrade, or update editions)
Whether you qualify for the free update or are considering Cubase for the first time, take a look at what this release offers.
Frequently asked questions
Q1. Which Cubase 15 edition includes stem separation?
Stem separation is exclusive to the Pro edition. It automatically separates vocals, drums, bass, and other instruments from a stereo mix so you can mix or edit them individually. It can support creative workflows such as remixing and sampling.
Q2. What are the main benefits of the Melodic Pattern Sequencer?
Scale settings hide notes outside your chosen scale, making it easier to create melodies. Shape-based or random generation and chords in Poly mode can also speed up composition.
Q3. What has improved with full-screen mode in Cubase 15 for Mac?
Cubase 15 officially supports native full-screen mode, letting you use the Project window or MixConsole full screen for a more immersive editing and mixing experience.
Q4. How can Project Preview in the new Hub help?
You can listen to a five-second preview without opening a project file, making it easier to find the track you want when managing multiple versions. You can also set the preview's starting position.
NEW ARTICLES
Latest English Articles






















