ミックスが上手くなるTIPS Waves Abbey Road Collection 活用術①
現代の音楽にもマッチする歴史的ハードウェアをプラグイン化
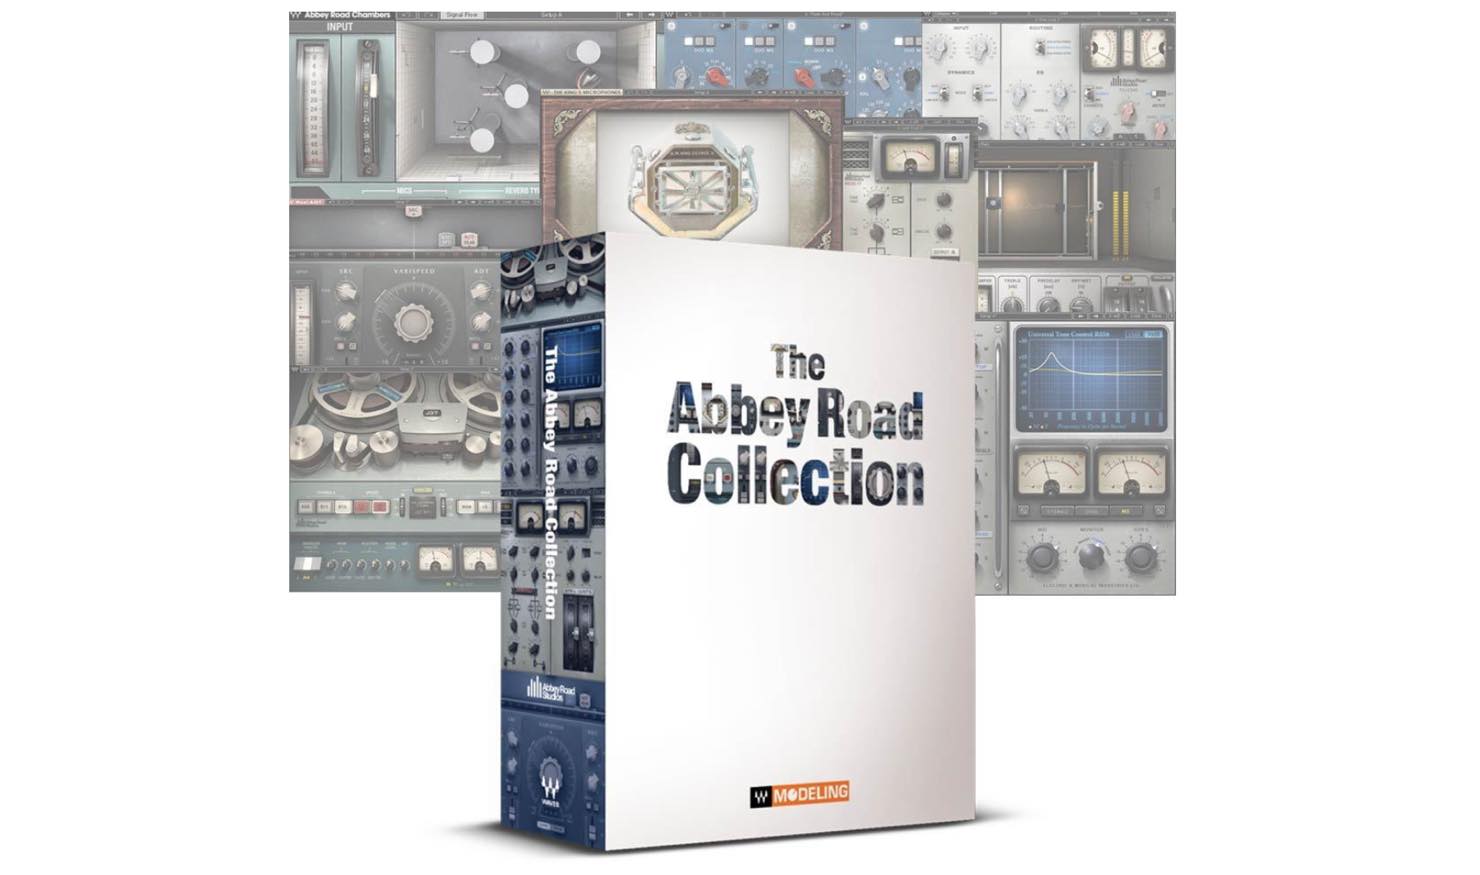
今回からのTIPSは、Waves Abbey Road Collectionから魅力的なプラグインをピックアップし、お送りしていきたいと思います。
Abbey Road Collectionは、数々の歴史的名盤を刻んできたAbbey Road StudiosとWavesとの共同開発で、そこにしかない貴重なオリジナル・ハードウエアをモデリングしたプラグインのバンドルです。
このTIPSをご覧いただければわかると思いますが、そのワークフローやサウンドは、現代的な音楽にも驚くほどマッチします。
それでは、各プラグインの詳細を見ていきましょう。
ミックスが上手くなるTIPS Waves Abbey Road Collection 活用術① 動画
製品のご購入:Waves Abbey Road Collection
TG Mastering Chain
最初にご紹介するのは、Abbey Road TG Mastering Chainです。
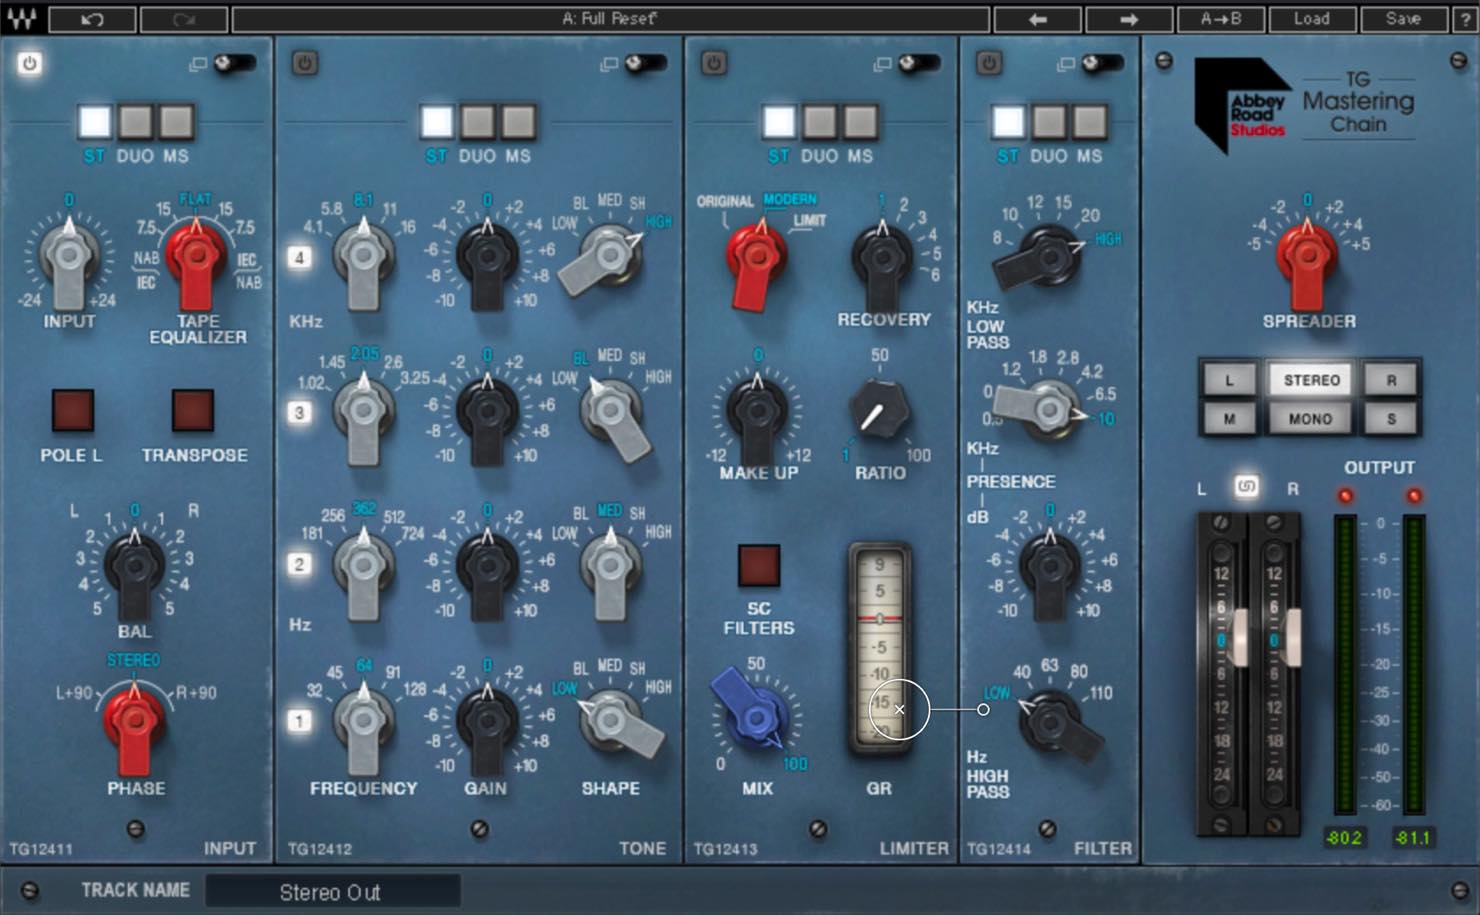
これはAbbey Roadのマスタリングスタジオ Room 5に設置されている、ソリッドステート構成のモジュール式システム、EMI TG12410を精巧にプラグイン化した製品です。
EMI TG12410は現在もなお稼働中で、 Pink Floyd / The Dark Side of the Moon、Nirvana / In Utero、 Radiohead / OK Computerといったビッグタイトルのマスタリングで使用されてきました。
一見するとツマミが多く、いかにもヴィンテージ機材といった見た目のため、難しいそうに感じるかもしれません。ところが実際に使ってみると非常によく考えられており、意外に手早く直感的にマスタリングを行うことができます。
TG Mastering Chainは、INPUT、TONE、LIMITER、FILTER、OUTPUTの5つのモジュールで構成されています。
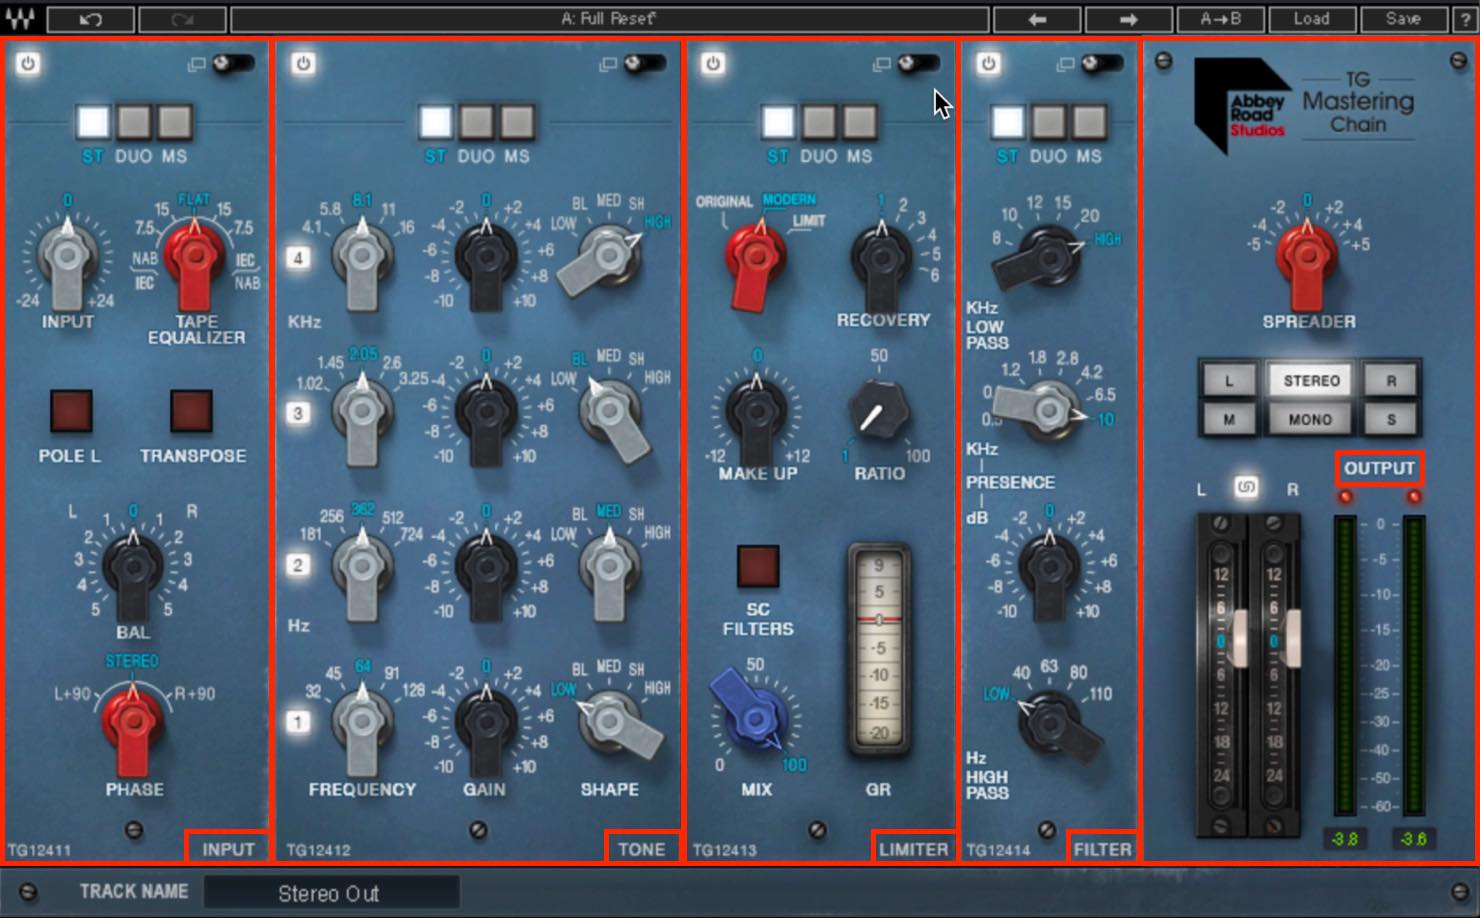
TONE、LIMITER、FILTERは順番を入れ替えることもできます。
それぞれは、右上の拡大縮小ボタンで拡大表示することが可能です。
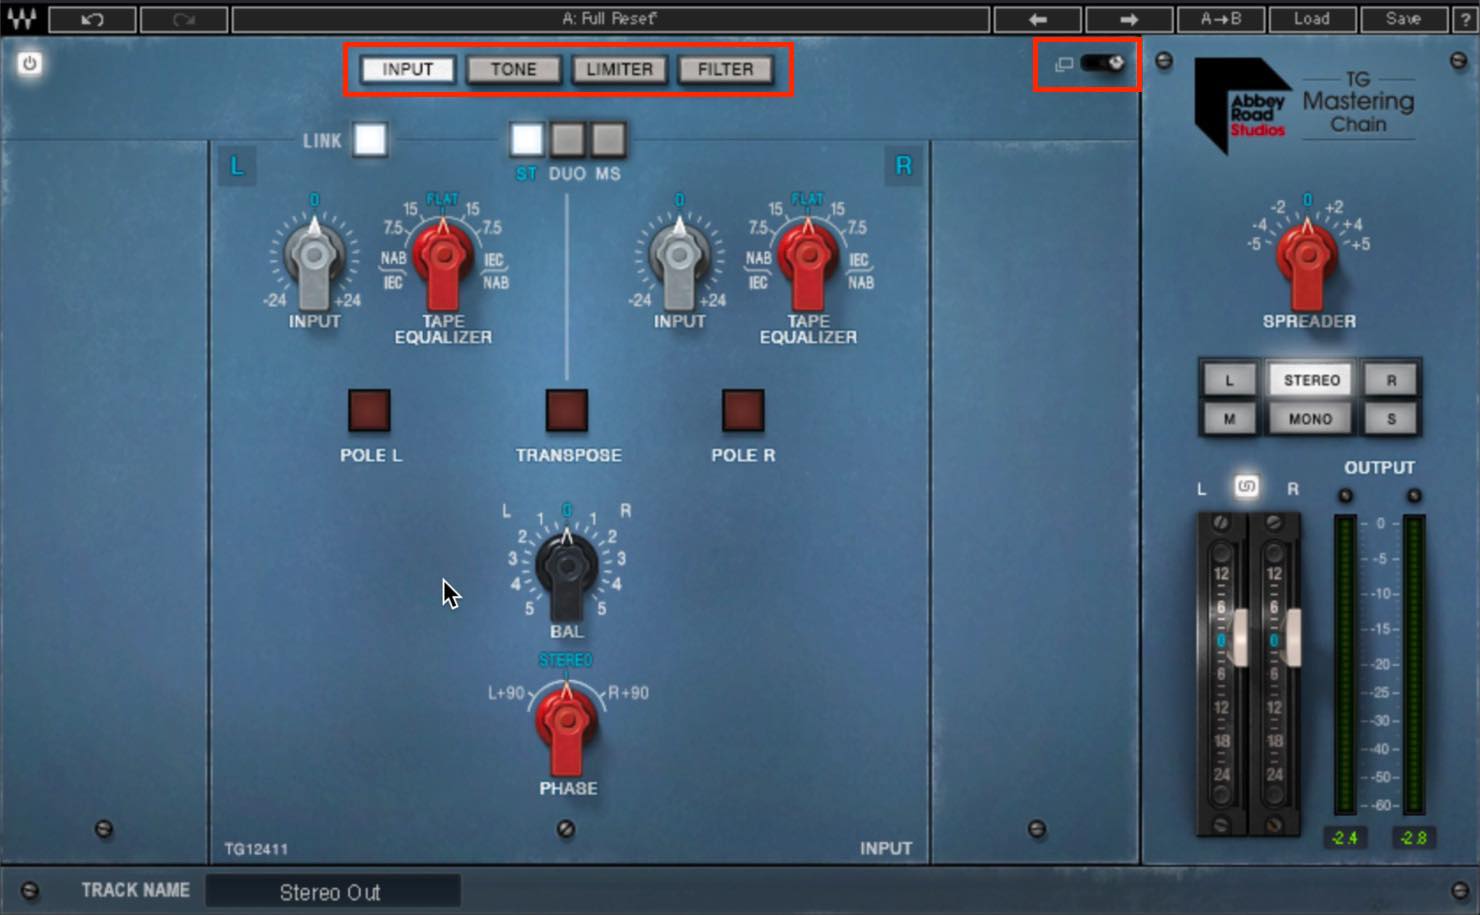
拡大しなくても簡易的な操作はできますが、このプラグインの真骨頂はMS処理とも言えますので、ほぼ拡大しながら操作することになります。
拡大した状態でも、各モジュールへ手早く切り替えることが可能です。
今回はマスターにリミッター以外何も挿していない状態から、このTG Mastering Chainを使ってマスタリングを行ってみたいと思います。
INPUT
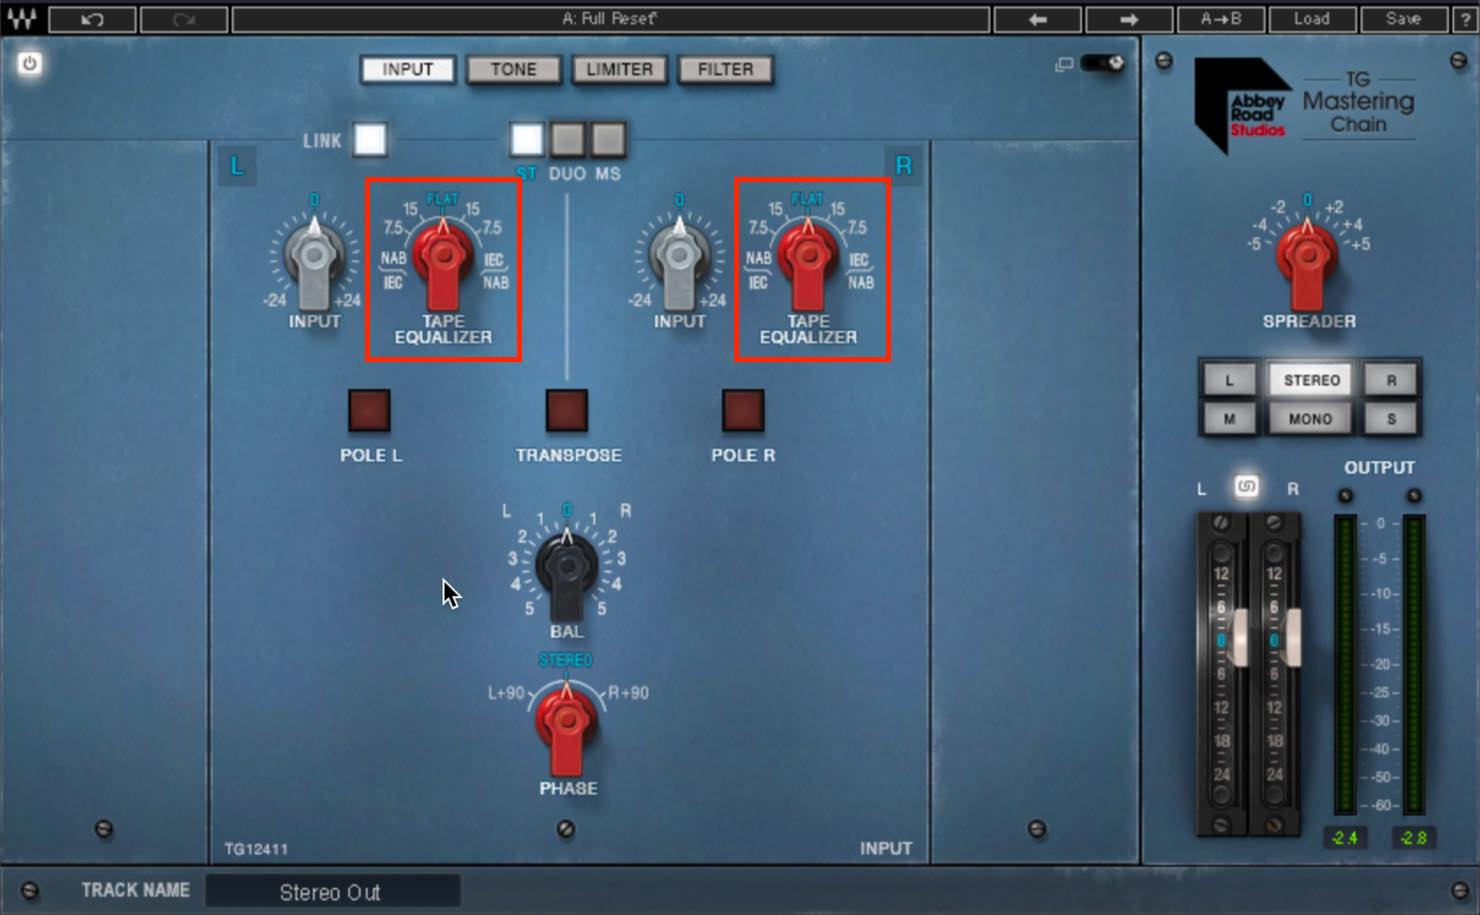
ここでは入力音量を調整したり、バランスや位相の調整などを行うことができますが、何と言っても特徴的なのはTAPE EQUALIZERです。
これは、元々は規格の違うテープ間で音質補正を行うための機能ですが、これを操作することで独特の音質を得ることもできます。
IEC to NABの15ipsでは低域寄り、7.5ipsではドンシャリ傾向です。
NAB to IECの15ipsでは、主に高域に伸びのあるサウンドになり、7.5ipsでは中域に集中するような印象になります。
このいずれかが楽曲にハマったなら、それをベースにTONEモジュールで微調整するというのもアリでしょう。
今回はTONEで細かな設定を行いたいため、FLATとしておきます。
TONE

これは見た目でお分かりの通り、イコライザーです。
4バンドで構成されており、上から高域、中高域、中低域、低域となっています。
パラメーターは左からフリーケンシー、ゲイン、シェイプとなっており、シェイプではローシェルフ、ハイシェルフと、3種類のベルタイプを選択できるようになっています。Bluntが広め、Sharpが狭め、Mediumがその中間です。
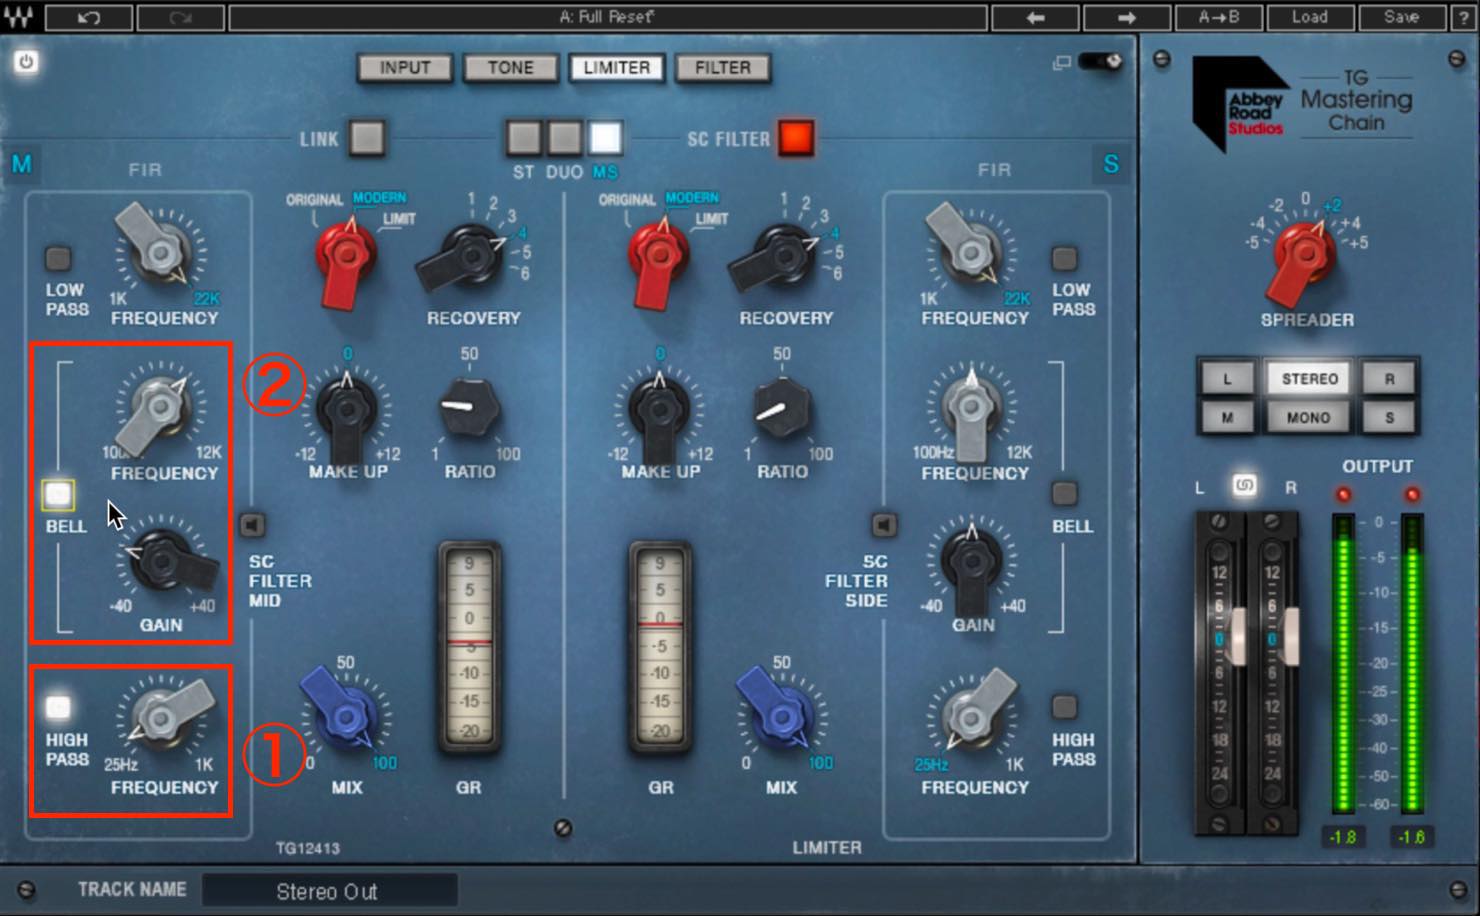
今回はこのTONEで、MSイコライジングを行ってみましょう。
上の3つのボタンから、MSを選択します。すると左がM、右がSへと変化します。
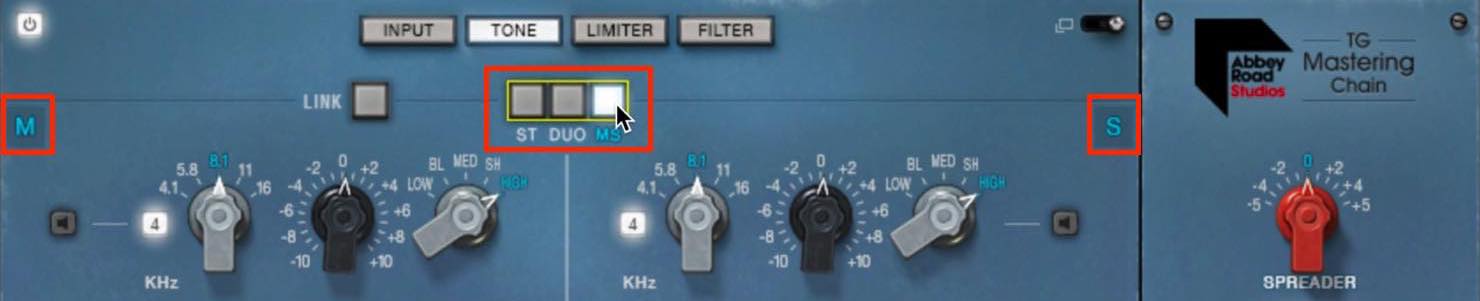
MSイコライジングを行う前に1ステップ行っておきたいことがあります。定番のサイドの音量アップですね。
これをTG Mastering Chainで行うには、OUTPUTモジュールのSPREADERを使用します。
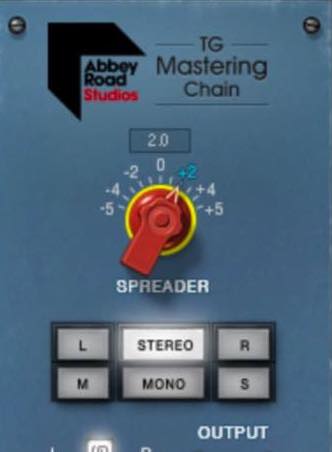
このツマミは非常に効きがいいので、マスタリングの微調整ならば+2程度でいいでしょう。これでサイドの音量を上げたのと同じ効果を得ることができます。
それでは、イコライジングに入ります。
フリーケンシーを決める際は、ソロボタンを活用しましょう。
ソロボタンをオンにしている間は、フリーケンシーの値がどのような帯域を対象としているかを試聴することが出来ます。
イコライジングのポイントは、楽曲によって異なってくるものではありますが、おおよその目安を以下に示します。
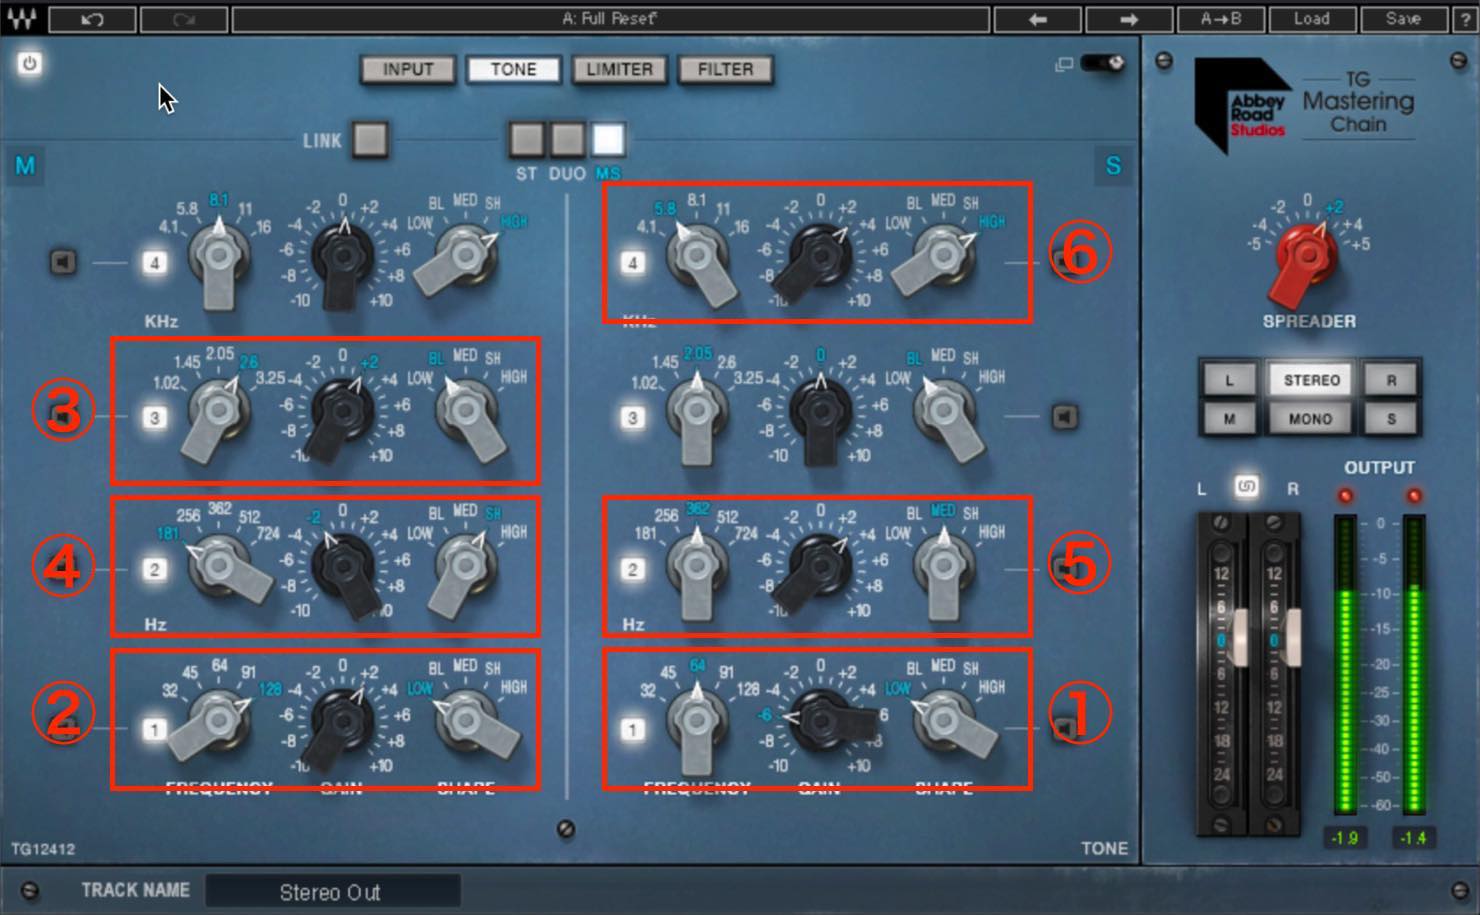
- ①低域のサイドは多めにカットします。ベースやキックの定位がはっきりとします。
- ②低域のミッドはSPREADの影響でやや引っ込みますので、若干ブーストしておきます。
- ③中高域のミッドもSPREADの影響でやや引っ込みますので、若干ブーストしておきます。
- ④低域がこもり気味に聞こえる場合は、中低域のミッドを若干カットします。
- ⑤ギターの骨太な雰囲気を出すため、中低域のサイドを若干ブーストします。
- ⑥高域のサイドを若干ブーストすることで、さらに音像をワイドにします。
上記の結果として、SPREADER0、TONEモジュールオフと比べてみましょう。
▶︎SPREADER0、TONEオフ
▶︎SPREADER+2、TONEオン
程よい分離感で、迫力も出てきましたね。
LIMITER
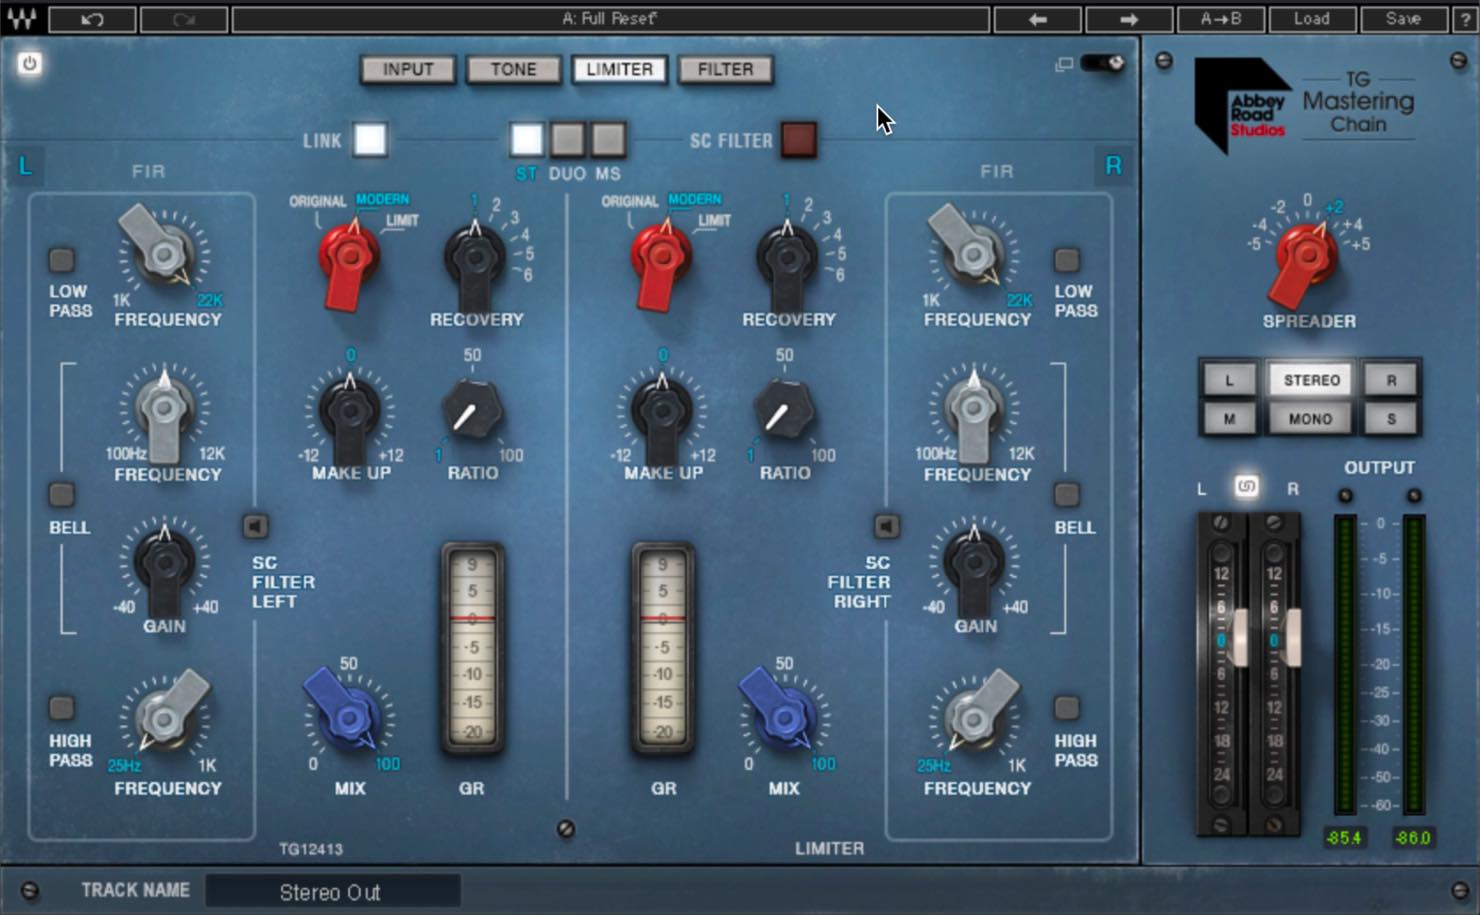
名前はLIMITERですが、中身はバスコンプに近いかと思います。
Limitを選択しても、ブリックウォールリミッターにはならない仕様です。つまりこの後に、別途リミッターやマキシマイザーを使用するべきということですね。
設定のおよその目安は以下の通りです。
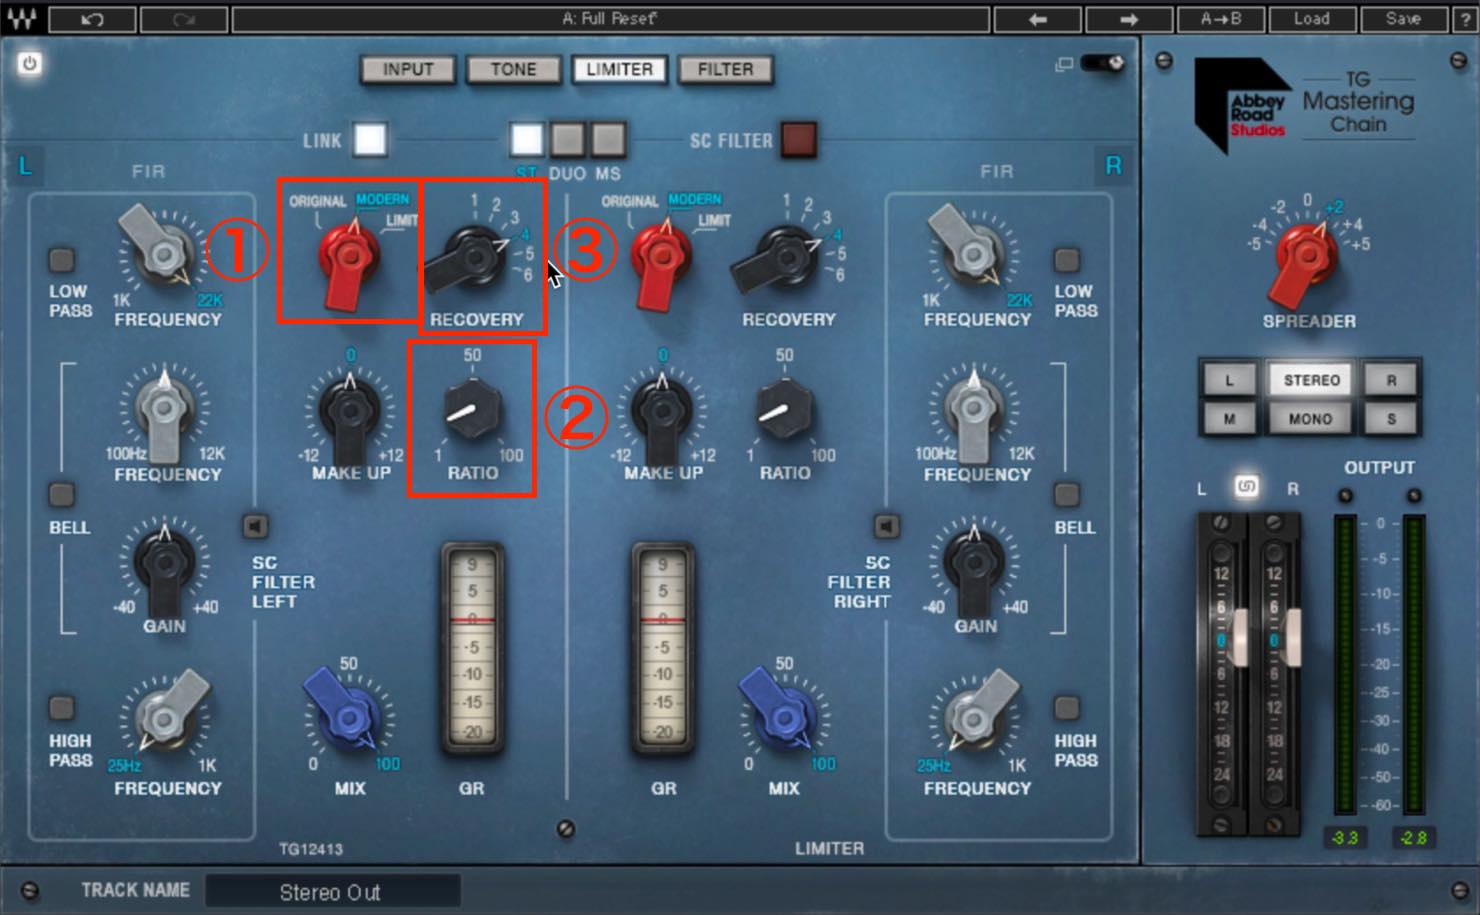
- ①TYPE:コンプレッサーの種別を選択します。OriginalはTG12413に搭載されたツェナーダイオードコンプレッサーです。Limitはそのリミッター版で、Originalに比べてよりハードなニー設定となっています。Modernは現代のマスタリング要件を満たすために、新しく設計されたVCAベースのコンプレッサーです。
- ②RATIO:コンプの効きの強さを設定します。目安としてはGRメーターが-2〜-3dB程度振れるくらいです。
- ③RECOVERY:アタックとリリースの速さを決めるもので、数値が大きいほどどちらも遅い設定となります。スネアのトランジェントに注目すして設定すると良いでしょう。
次に、MSコンプレッションに切り替えてみましょう。
ゲインリダクションメーターを見てみると、この時点でミッドの方が強くコンプがかかっているのがわかると思います。
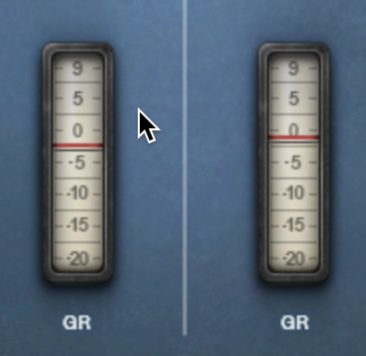
これでサイドのコンプレッションはミッドに引っ張られなくなったわけです。サウンド的にも少しワイドになりましたね。
ここから更に、サイドチェインと組み合わせて、ミッドにきつめのコンプをかけてみましょう。
ミッドのRatioを上げていくと、潰れながらもメイクアップが効くため存在感が上がってくるように感じます。ただし、やはりボーカルやキック、スネアはのっぺりしてきますね。
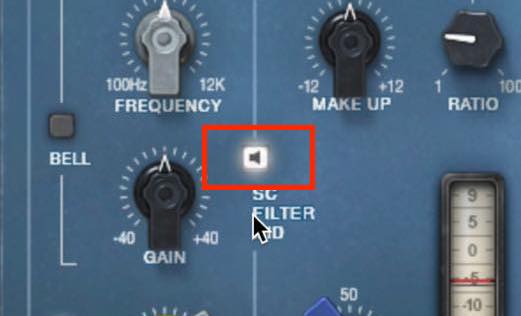
これに対してメリハリを付けるため、サイドチェインを使用します。これはインターナルサイドチェインで、コンプの検知対象に対してフィルターをかけ、コンプのかかり具合を調整するものです。
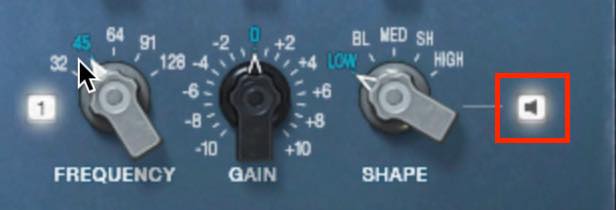
サイドチェインのフリーケンシーを探る際は、このスピーカーマークをオンにし、検知対象のみをモニターできるようにすると便利です。
サイドチェインでは以下のような設定を行ないました。
これも楽曲によって異なってくると思いますので、参考までにご覧ください。
- ①ハイパスフィルターで低域を逃しています。キックのインパクトを狙い、90Hzあたりとしています。
- ②ベルフィルターで中域を対象から少し削ります。一旦ブースとしてからポイントを探し、カットするとわかりやすいです。狙いとしてはボーカルの抜けとスネアのアタックです。
これで一通りの設定が済んだので、LIMITERモジュール全体のオフと比べてみましょう。
▶︎LIMITERオフ
▶︎LIMITERオン
適度なダイナミクスを残しながらまとまり感もあり、迫力が増していますね。
FILTER
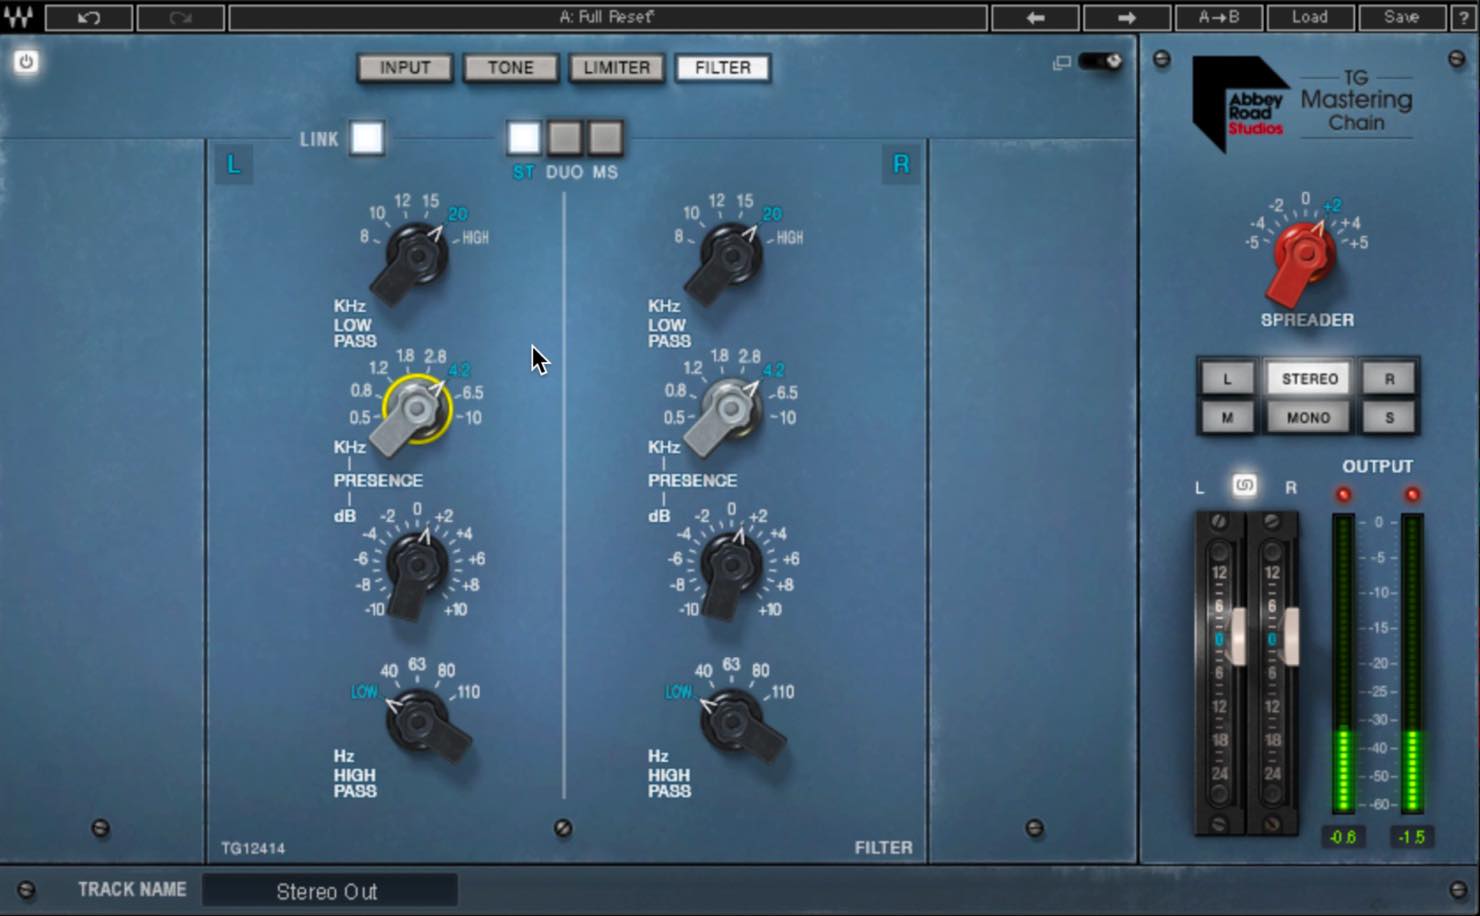
こちらはシンプルで、Low Pass、Presence、High Passの3バンドで仕上げを行います。
Low Pass、High Passは不要部分のカットに使えますが、音質に影響が出ないよう慎重に行いましょう。なしならなしでOKです。
Presenceはベルタイプのフィルターで最後のちょっとした調整に使えますね。もうここまでで音はほぼ出来ていますので、やるとしても1〜2dB程度の微調整でいいでしょう。今回は4.2kHzを1dBほどブーストしてみました。
では、TG Mastering Chain全体のバイパスと適用後を比べてみましょう。
▶︎バイパス
▶︎適用後
見違えるようにサウンドに磨きがかかりましたね。使い方や特性を掴んでしまえば、かなり手早く思い描いた音に近づけることができると思います。
Reel ADT
アビイ・ロード・スタジオが先駆けとなったダブル・トラッキング・エフェクトに使われたハードウェアをそのままプラグインにした初めての製品です。
ダブル・トラッキングと言えばビートルズの時代から現代まで、非常に多用されるミックステクニックと言えますが、Reel ADTは単なるダブル・トラッキング用プラグインではなく、真空管テープの質感や、独特の挙動により、これにしか出せない耳馴染みのあるサウンドを提供してくれます。
何より操作が非常にシンプルでわかりやすいのも魅力です。
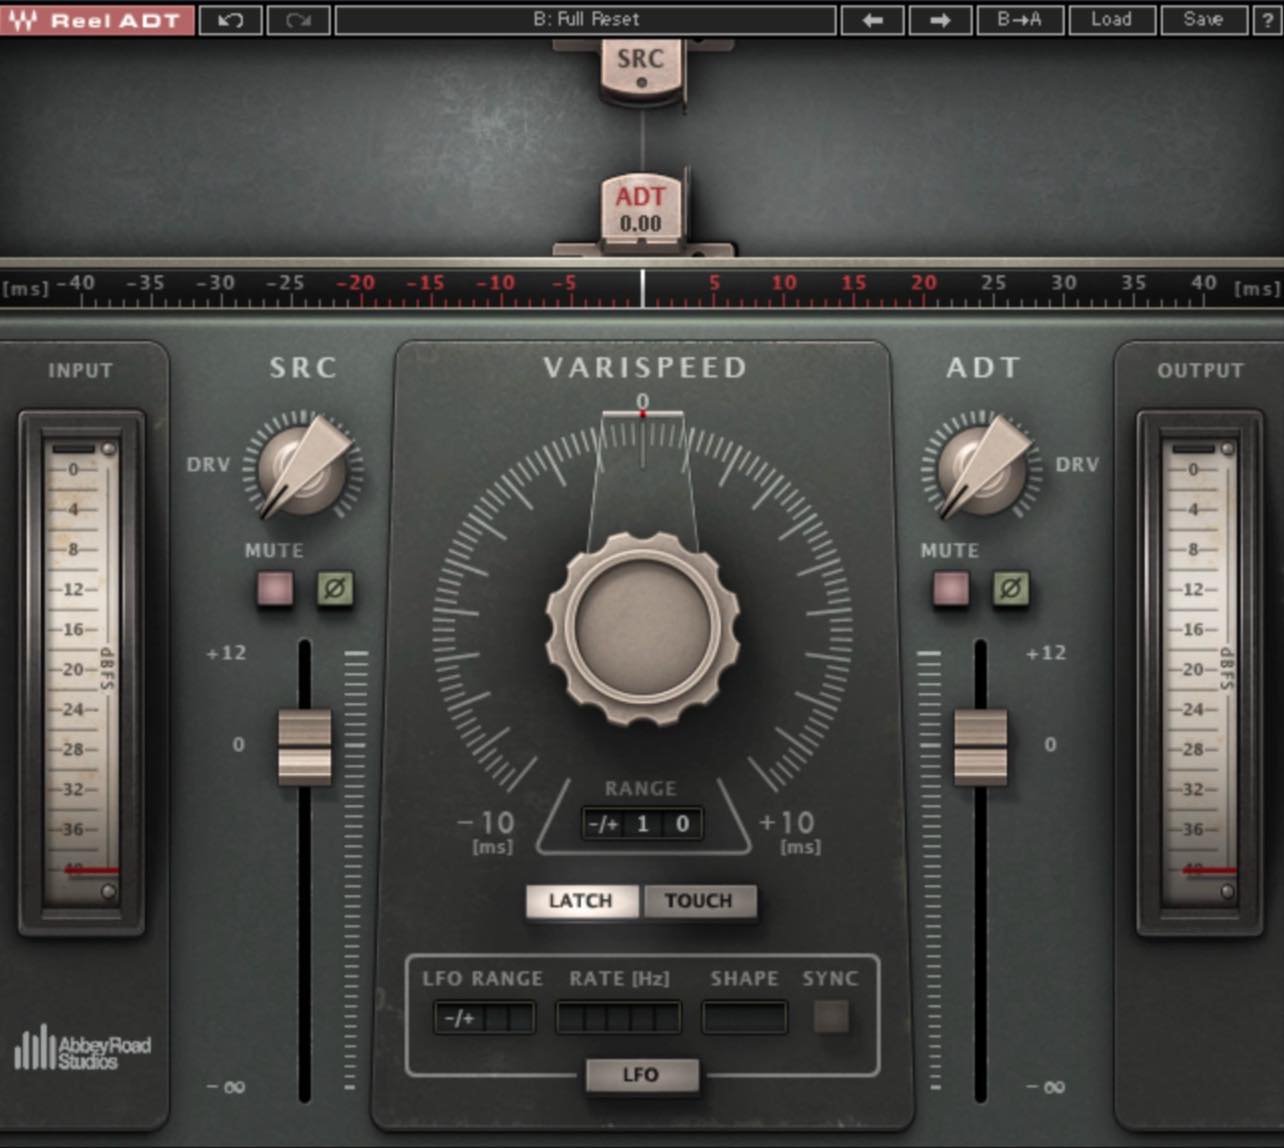
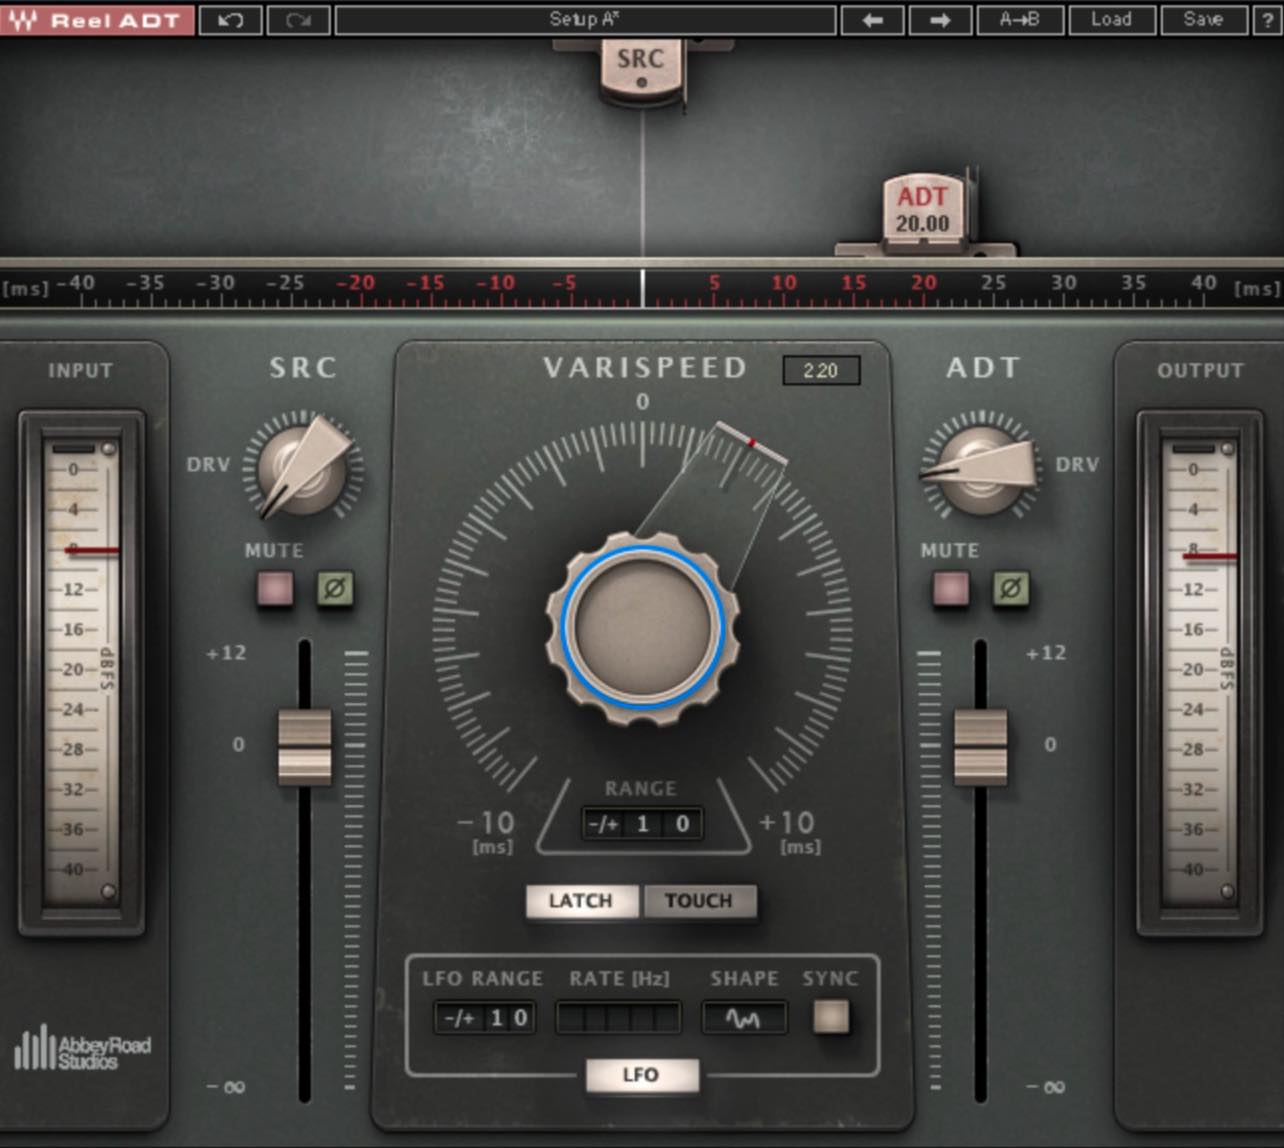
まず画面上のセクションを見ていただきたいのですが、中央にSRCというマークがあります。
これが、ダブルトラッキングを行う際の基準となるソース、つまり原音ということになります。
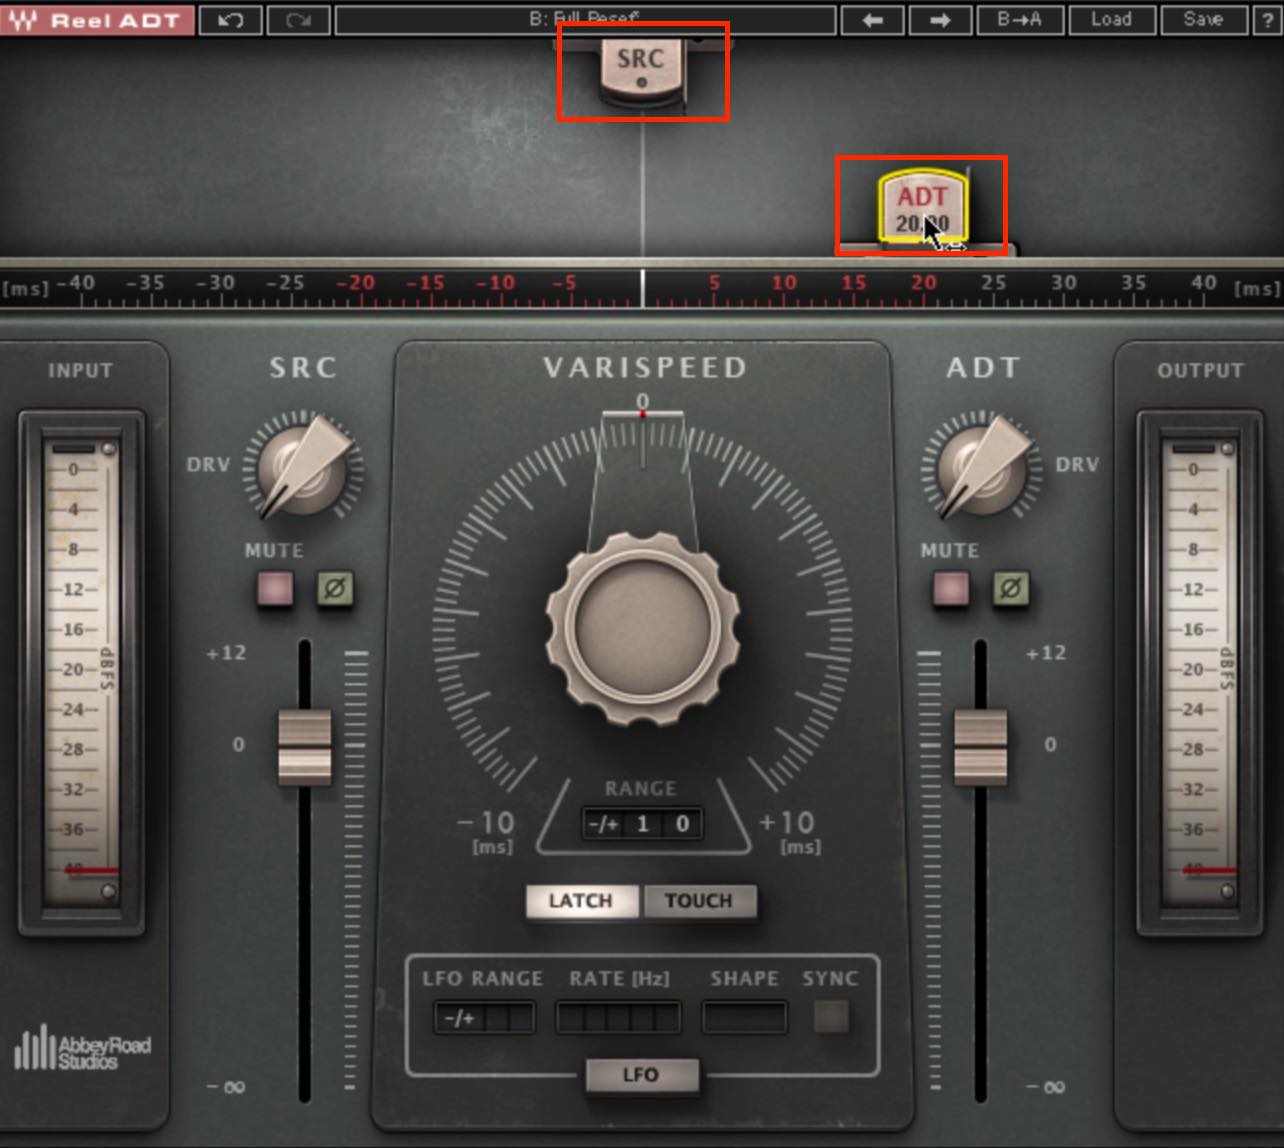
これに対し、下にあるADTというマークをずらす、つまり短いディレイをかけることで、擬似的にダブルトラッキングを起こすわけです。±20msの範囲で、大きくずらした方がダブル効果は大きくなります。
ただ、単純にずらすだけだと、位相の関係などでどうしても嘘くさいダブルトラッキングに聞こえてしまいます。そこで登場するのが、ADTを基準としてディレイタイムを前後させるVarispeedというパラメーターです。
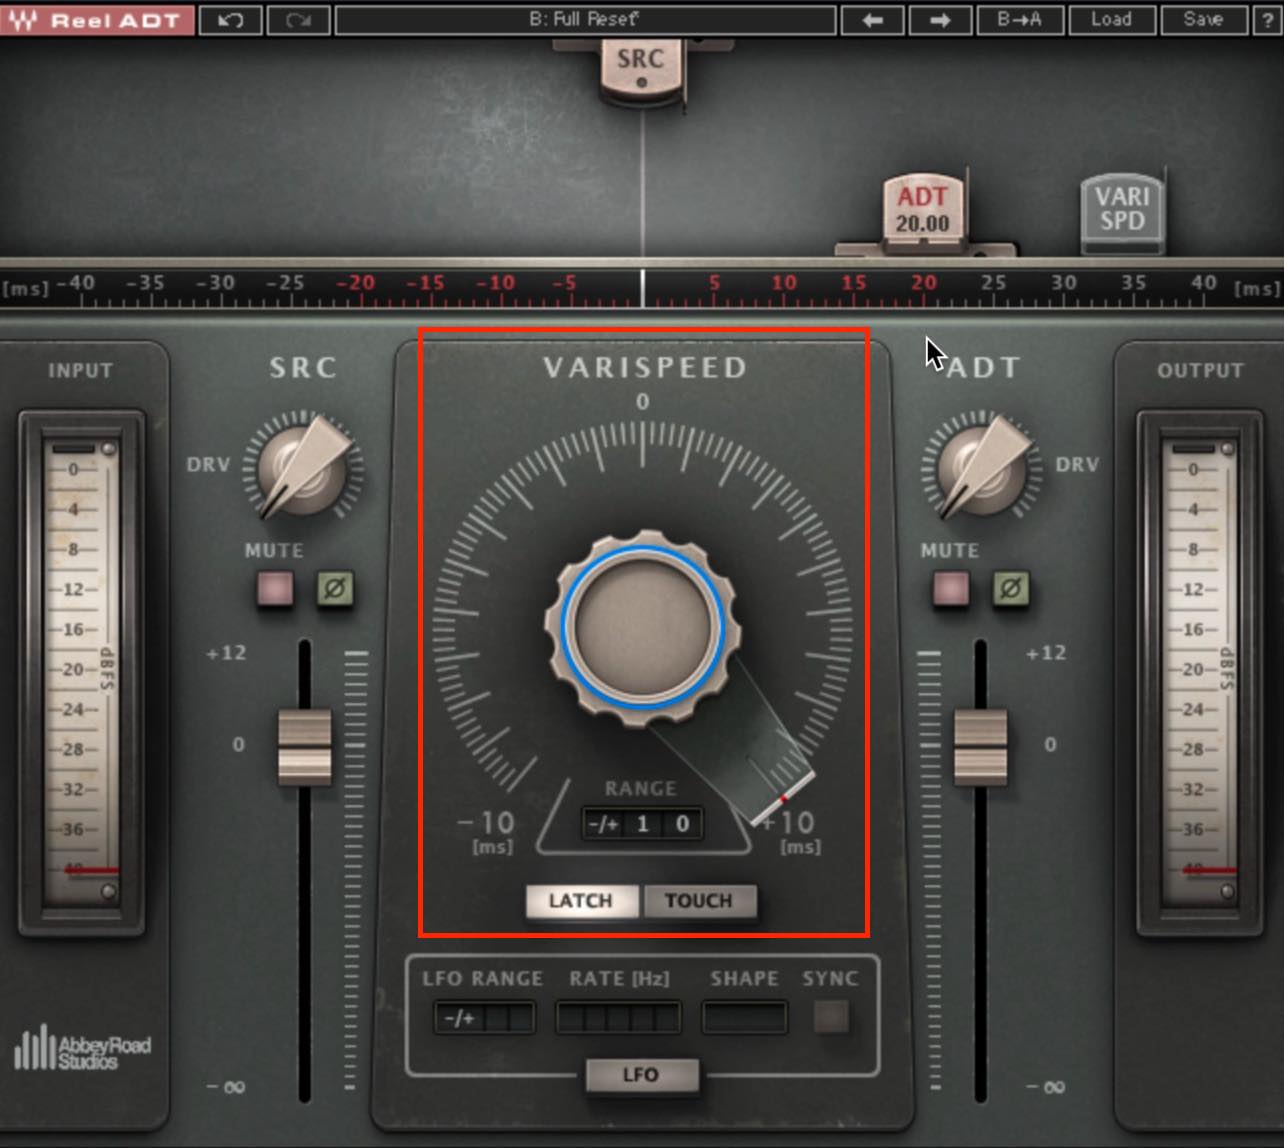
中央の大きなツマミを動かすと、ADTの後ろから別のマークが出てきます。
この動きがADTに微妙な変化を与え、単なるショートディレイでは出ない独特のダブル感が生まれるわけです。
このVarispeedの動きの範囲は、デフォルトでは±10msですが、±20msまで拡大することもできます。
動かしてみると、リニアではなく慣性がついたような動きをし、タイミングとともにピッチも動いていることがわかります。
これはテープの時間軸をずらす際の回転むらによるもので、このピッチの揺れがリアルなダブル感を生み出しています。
このように動くことが前提のVarispeedですが、手動でずっと動かすというわけにもいきません。オートメーションを書くという手もありますが、ちょっと手間ですよね。
そこで使っていきたいのが、その下のLFOセクションです。
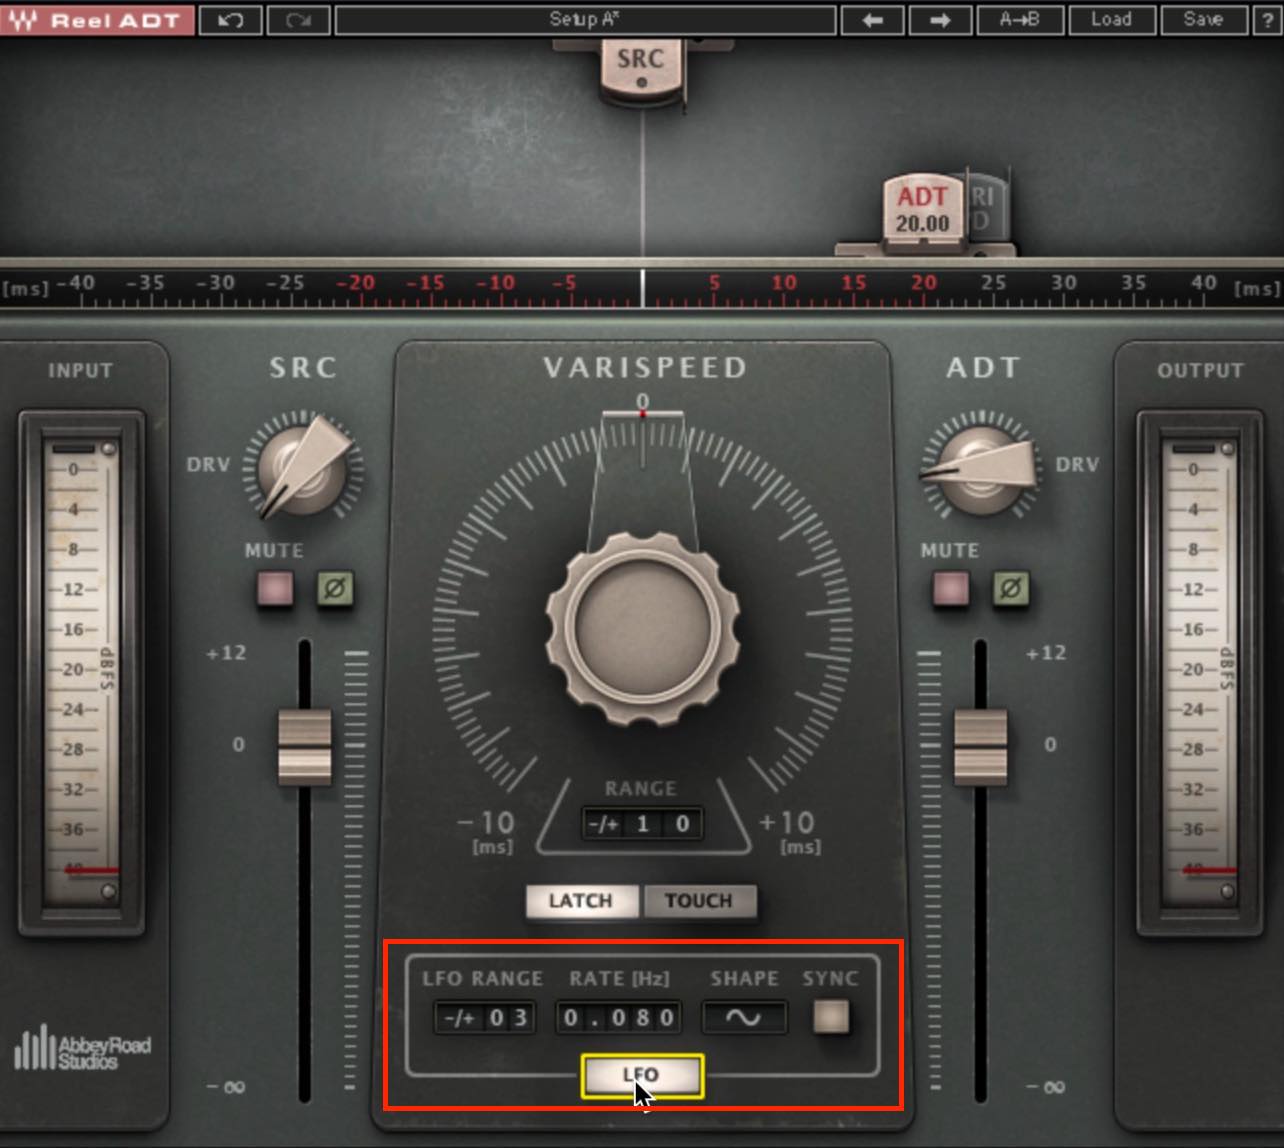
こちらでVarispeedに周期的な動きを与えることができます。LFO Rangeは時間軸の動きの幅、Rateは周期です。Shapeは動きの特性を決める波形ですね。SYNCでテンポシンクさせると、楽曲のテンポに合わせて音符単位で周期設定することもできます。
ボーカルのダブル・トラッキングでお勧めしたいのが、ShapeのRandomです。
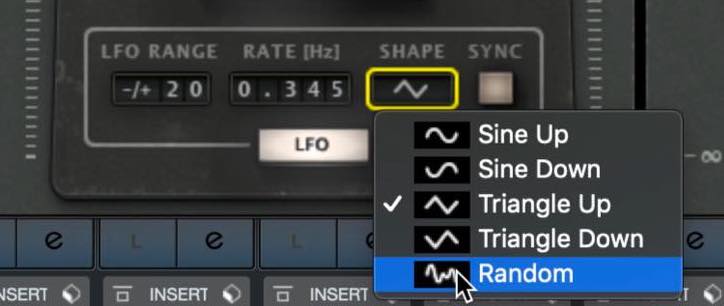
これはSYNCをオフにしておかないと選択できません。Randomにすると一定周期ではなくなりますから、Rateは設定できなくなります。Rangeのみ設定可能ですので、適度な値に設定してみましょう。この際、Varispeedのつまみは、動きの中心をずらすオフセットの役割として機能します。
このように、タイミングとピッチがランダムにずれるということは、最も本物のダブル・トラッキングに近い状態だと言えます。
さらにもう一つ、あると意外と嬉しい機能として挙げたいのが、ソースとADT個別に歪みを加えられるDRVつまみです。

軽いサチュレーションから、しっかりとした歪みまでかけることができます。サチュレーションでちょっと存在感を出してあげるのもいいですし、ADTのみを強く歪ませれば、生声と歪んだ声とのダブル・トラッキングが簡単に出来てしまいます。
オケと混ぜてみると、歪ませた方が比較的馴染みがいいことがよくわかると思います。
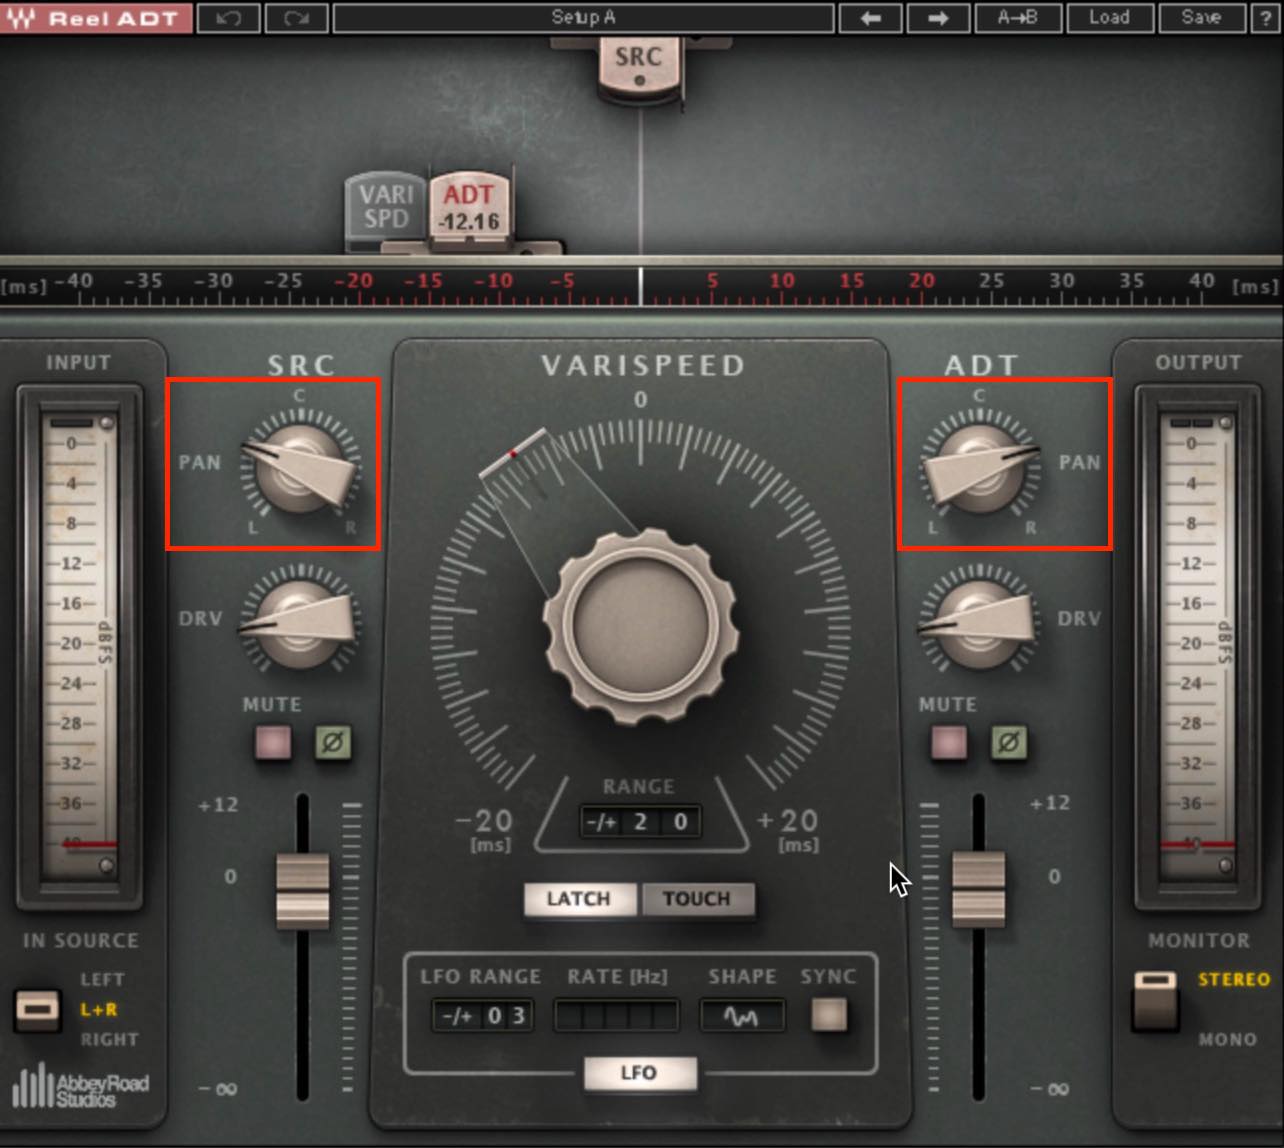
なお、ステレオトラックにてReel ADTのステレオバージョンを適用した場合、このようにパンの設定もできるようになります。
以上今回は、Abbey Road Collectionから、TG Mastering ChainとReel ADTの二つのプラグインを取り上げました。
Abbey Road Collectionには他にも魅力的なプラグインがありますので、次回引き続きご紹介していきたいと思います。
製品URL:https://bit.ly/3c1pfeK
数々の歴史的名盤を刻んできたアビー・ロード・スタジオとWaves社との共同開発で、貴重なオリジナル・ハードウエアをモデリングしたプラグインは、現代的な音楽にもマッチします👍
>WAVES Abbey Road Collection 活用術①
📝記事:https://t.co/EUGf33meJR🎥YouTube:https://t.co/yNza2pTdmX pic.twitter.com/bohOIASljB
— SLEEP FREAKS (@SLEEPFREAKS_DTM) December 21, 2019
記事の担当 大鶴 暢彦/Nobuhiko Otsuru