Avengerの使い方 【Vengeance Sound】Ver2にも対応
高品質で即戦力のプリセットを備えた万能シンセサイザー
根強い人気を誇る「Avenger」は、900種類以上のプリセットを搭載し、EDMやDubstepなど様々なジャンルの音楽制作にすぐに活用できる万能型シンセサイザー音源です。
今回はAvengerの機能や魅力、使い方を解説していきます。
製品を使用するまでの流れは下記の記事にてご確認ください。
Avenger 2の新機能解説はコチラで行なっています。
Avenger 動画 : 概要とプリセットの読み込み
Avengerに備わっている豊富なサウンドを使用する
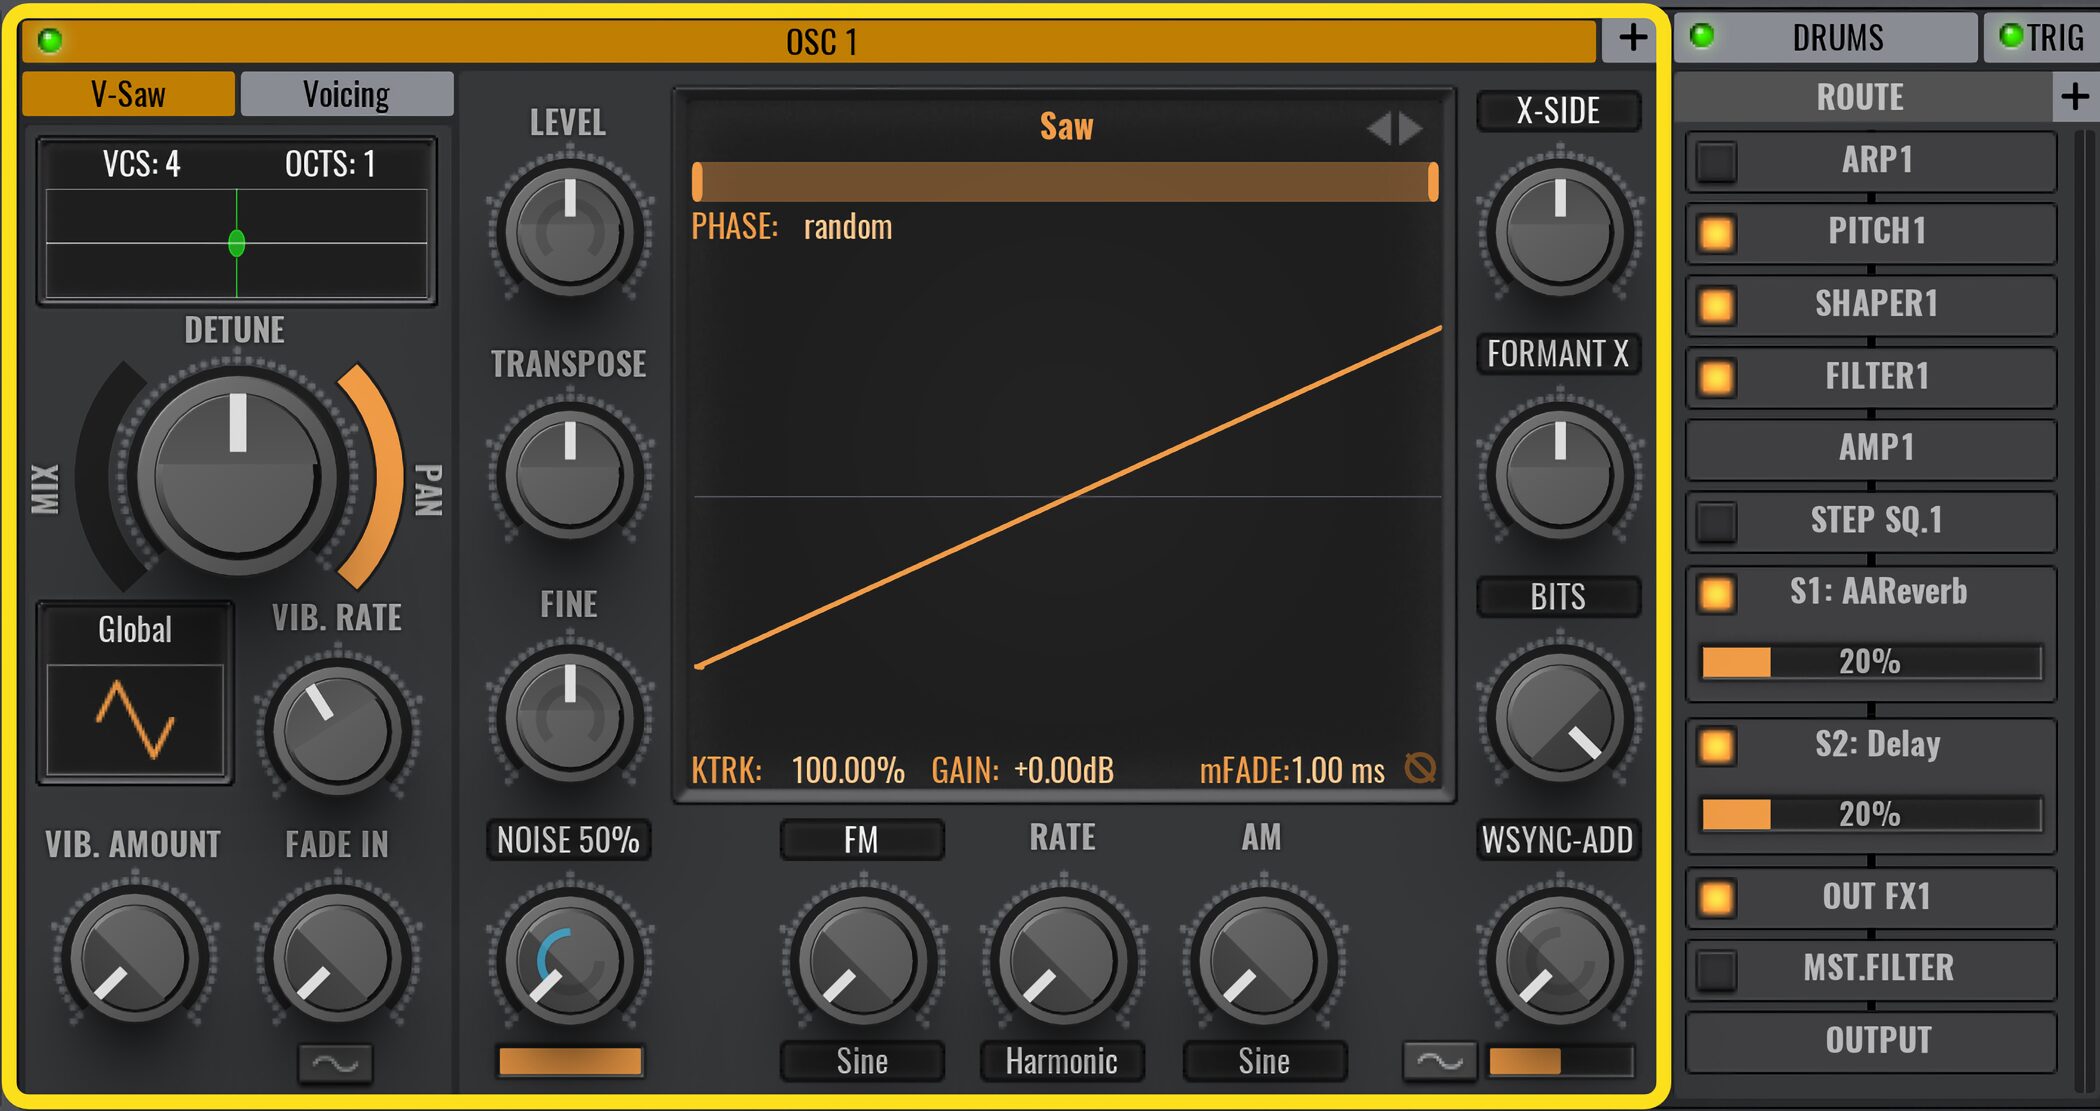
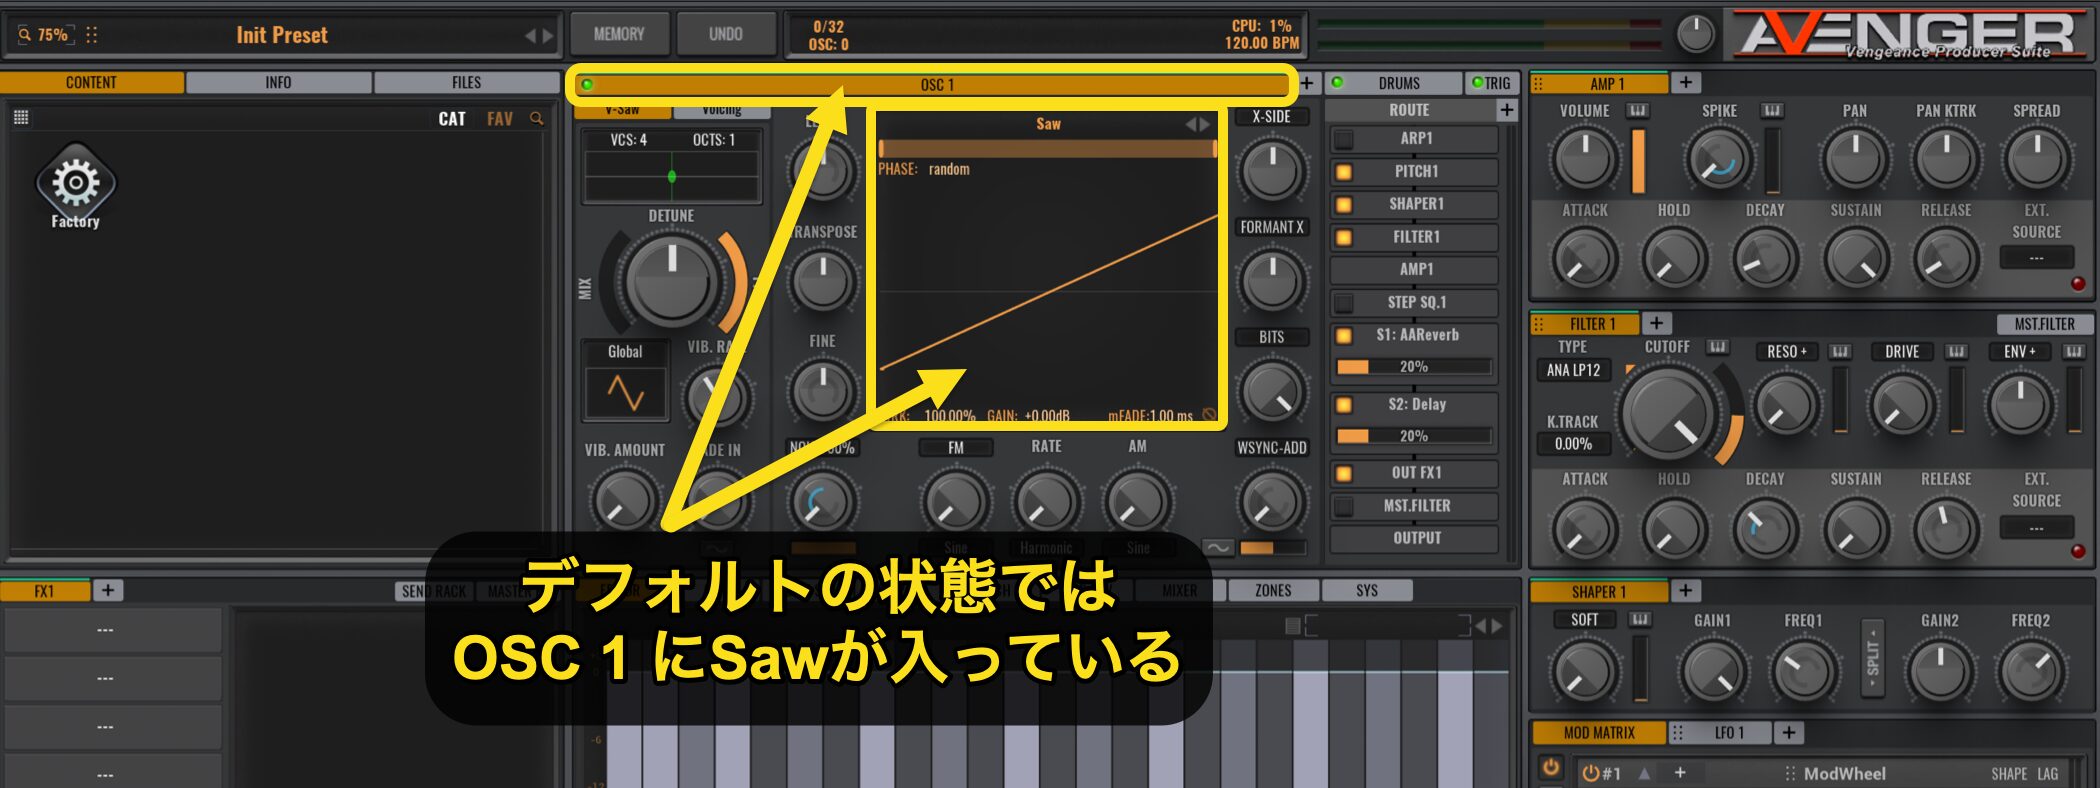
Avengerを立ち上げると、「OSC1」に「Saw」が入った状態で立ち上がります。
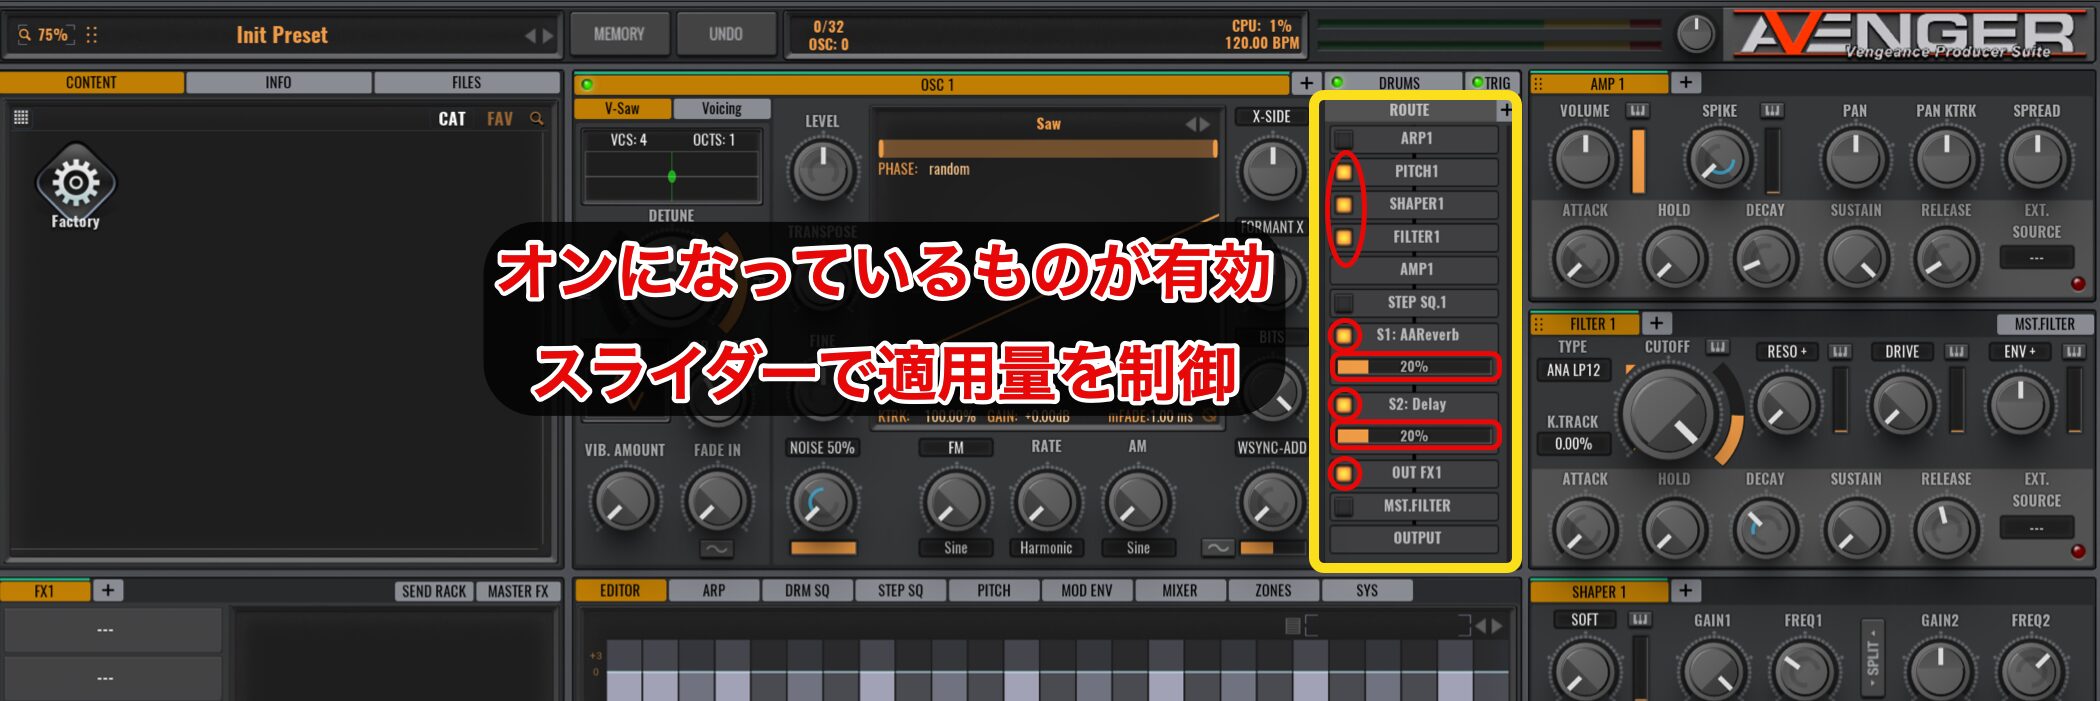
薄くリバーブやディレイも適用されています。
リバーブやディレイは、中央部のOSC(オシレーター)エリアの右にある「ROUTE」よりオン/オフを切り替えることができます。
その下のスライダーを左右にドラッグすると、エフェクトの適用量を調整できます。
それではプリセットを選んでいきましょう。
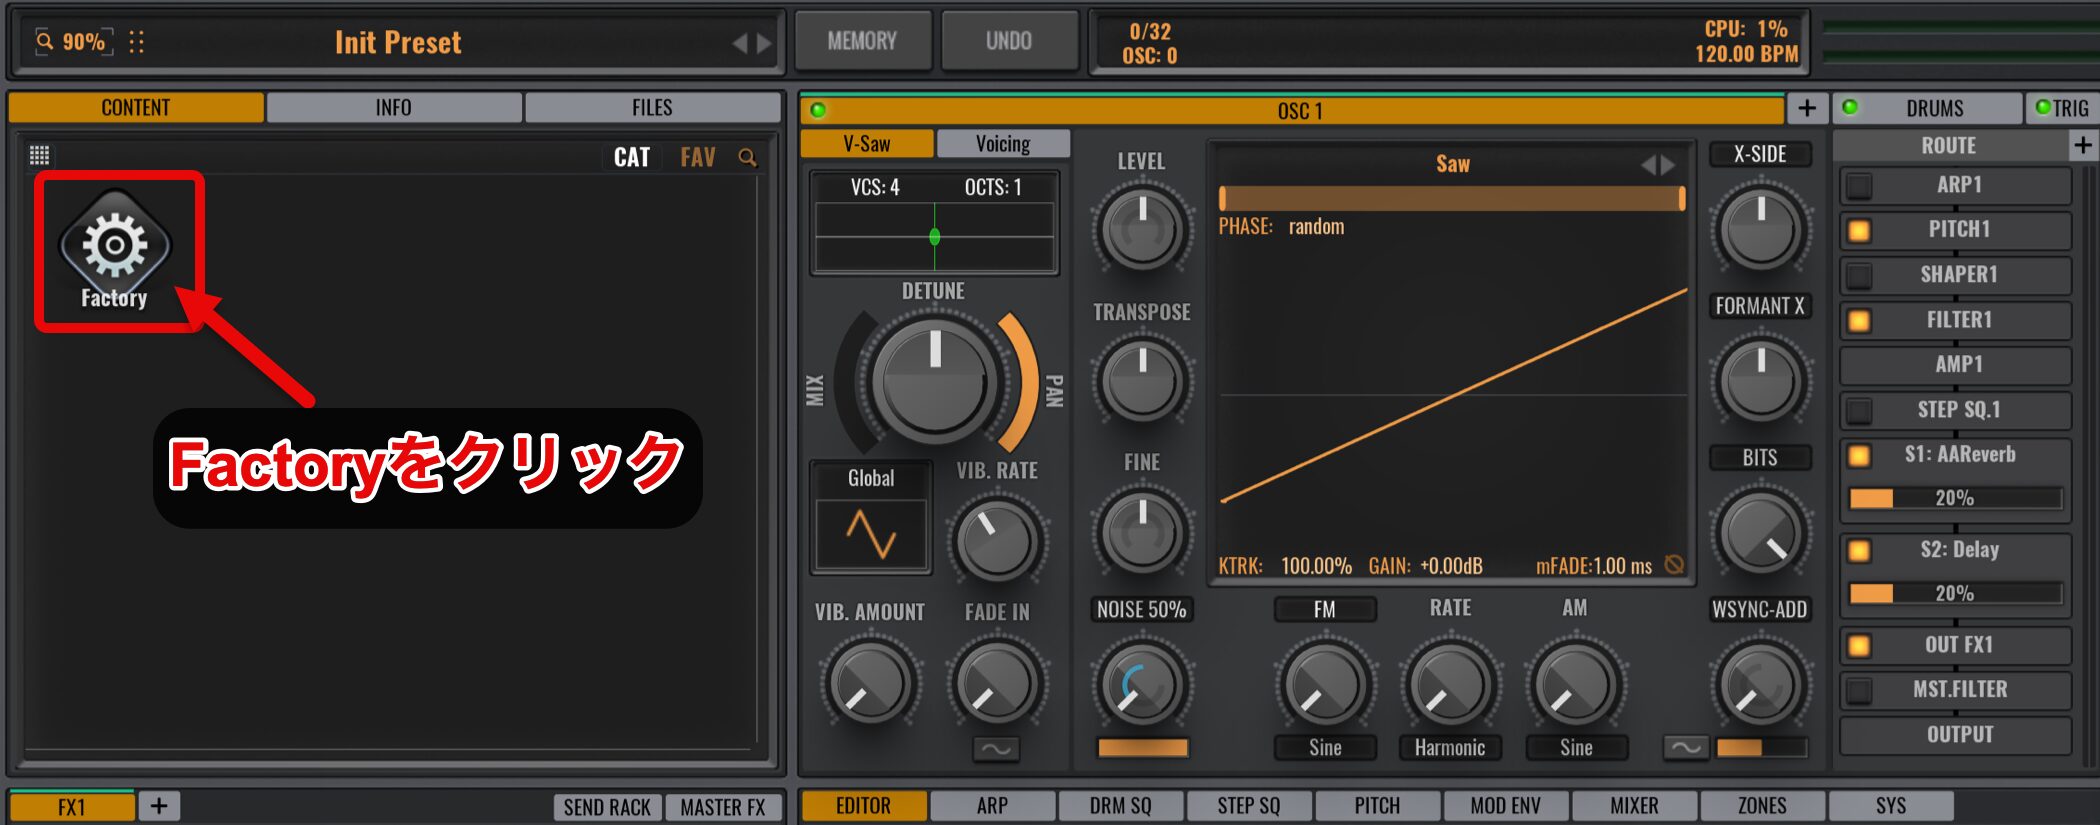
まず「Factory」と書いてあるアイコンをクリックします。
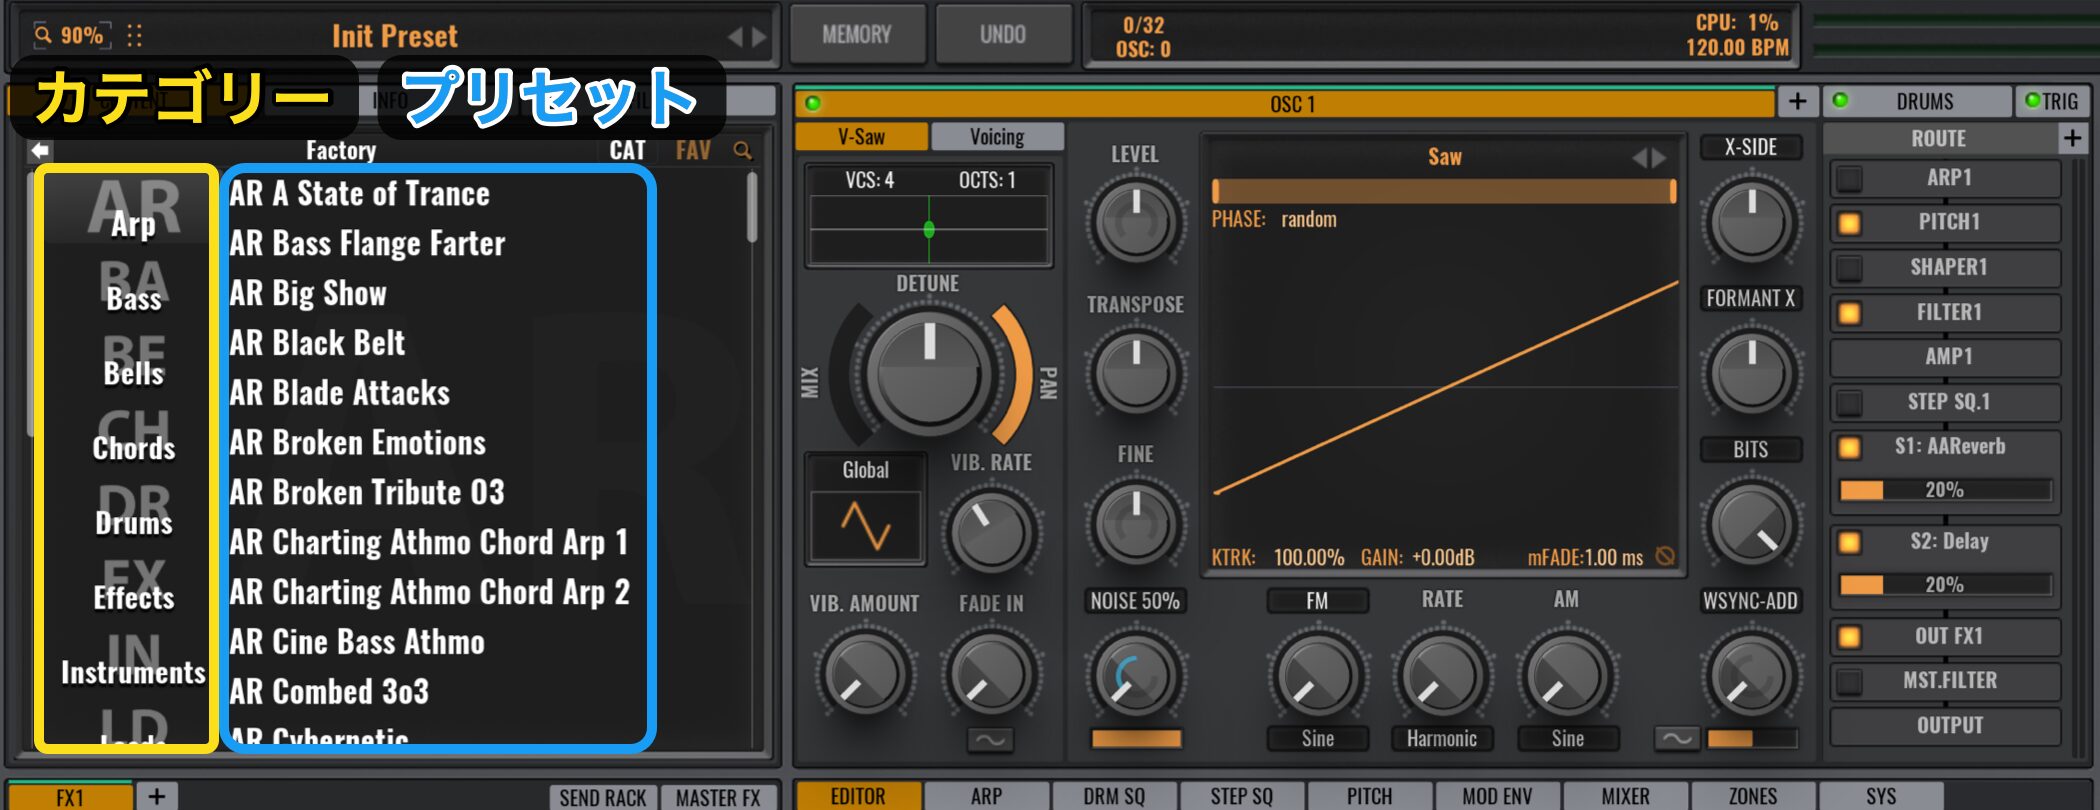
左側にカテゴリー、右側にプリセットという並びで表示されます。
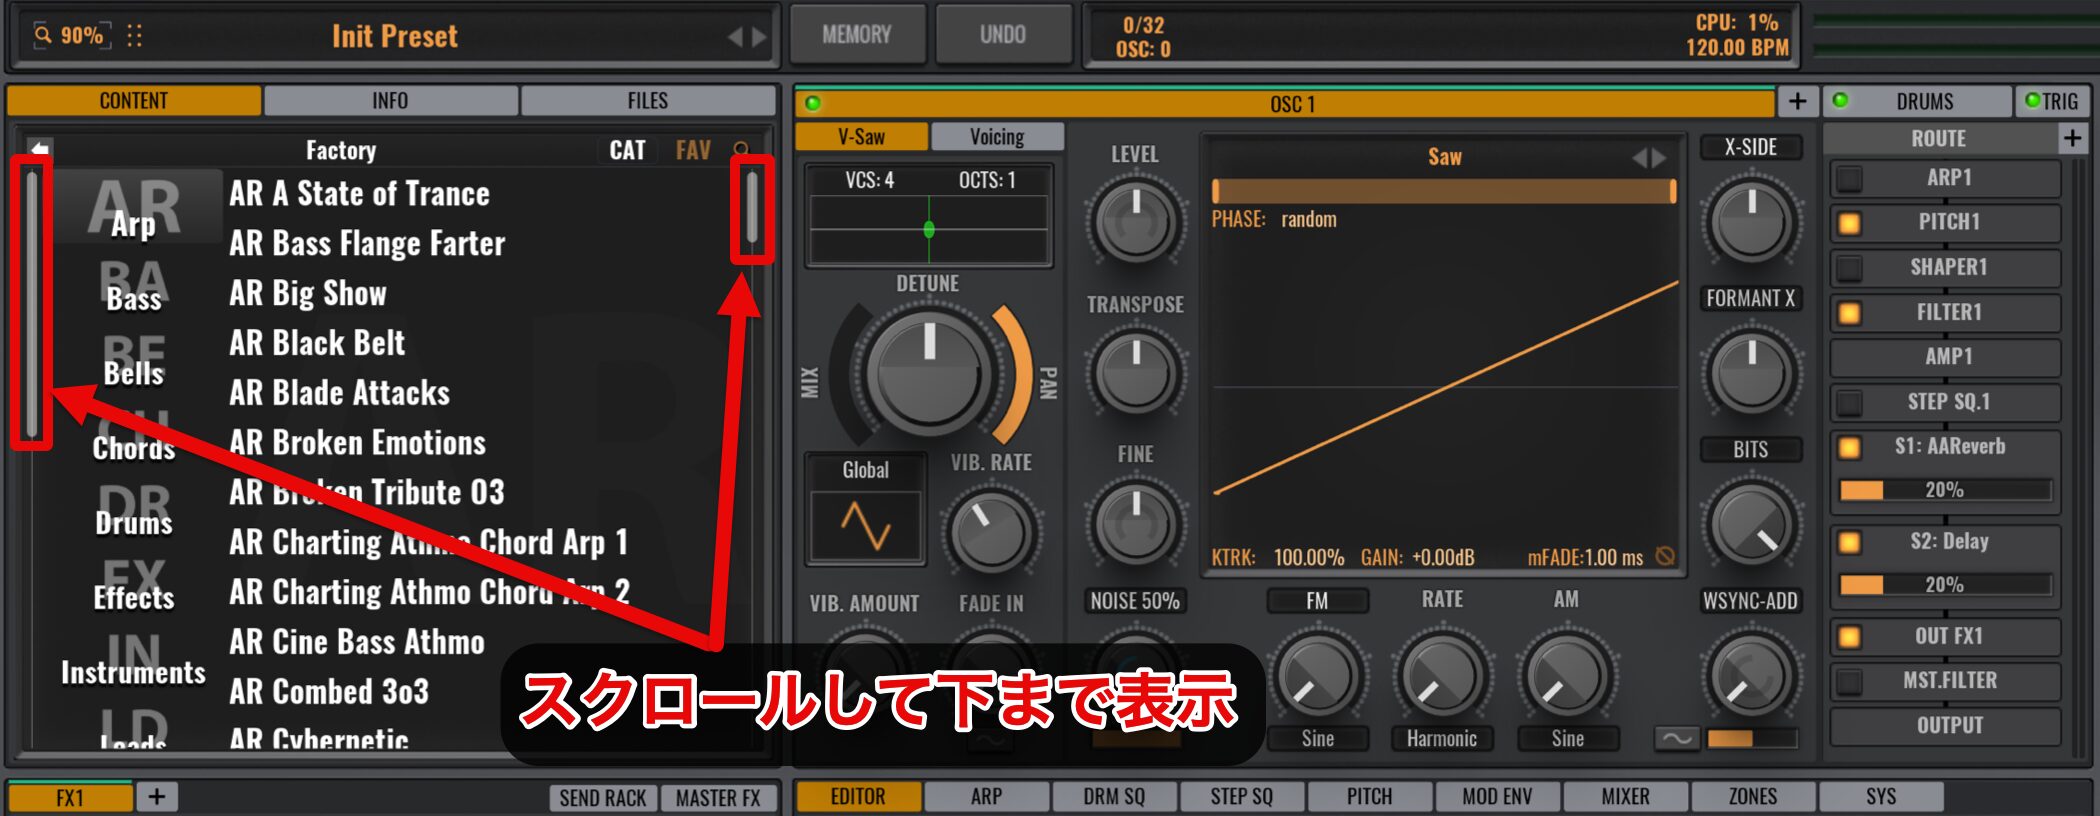
カテゴリーやプリセットは、スライドバーを上下にドラッグすることでスクロールできます。
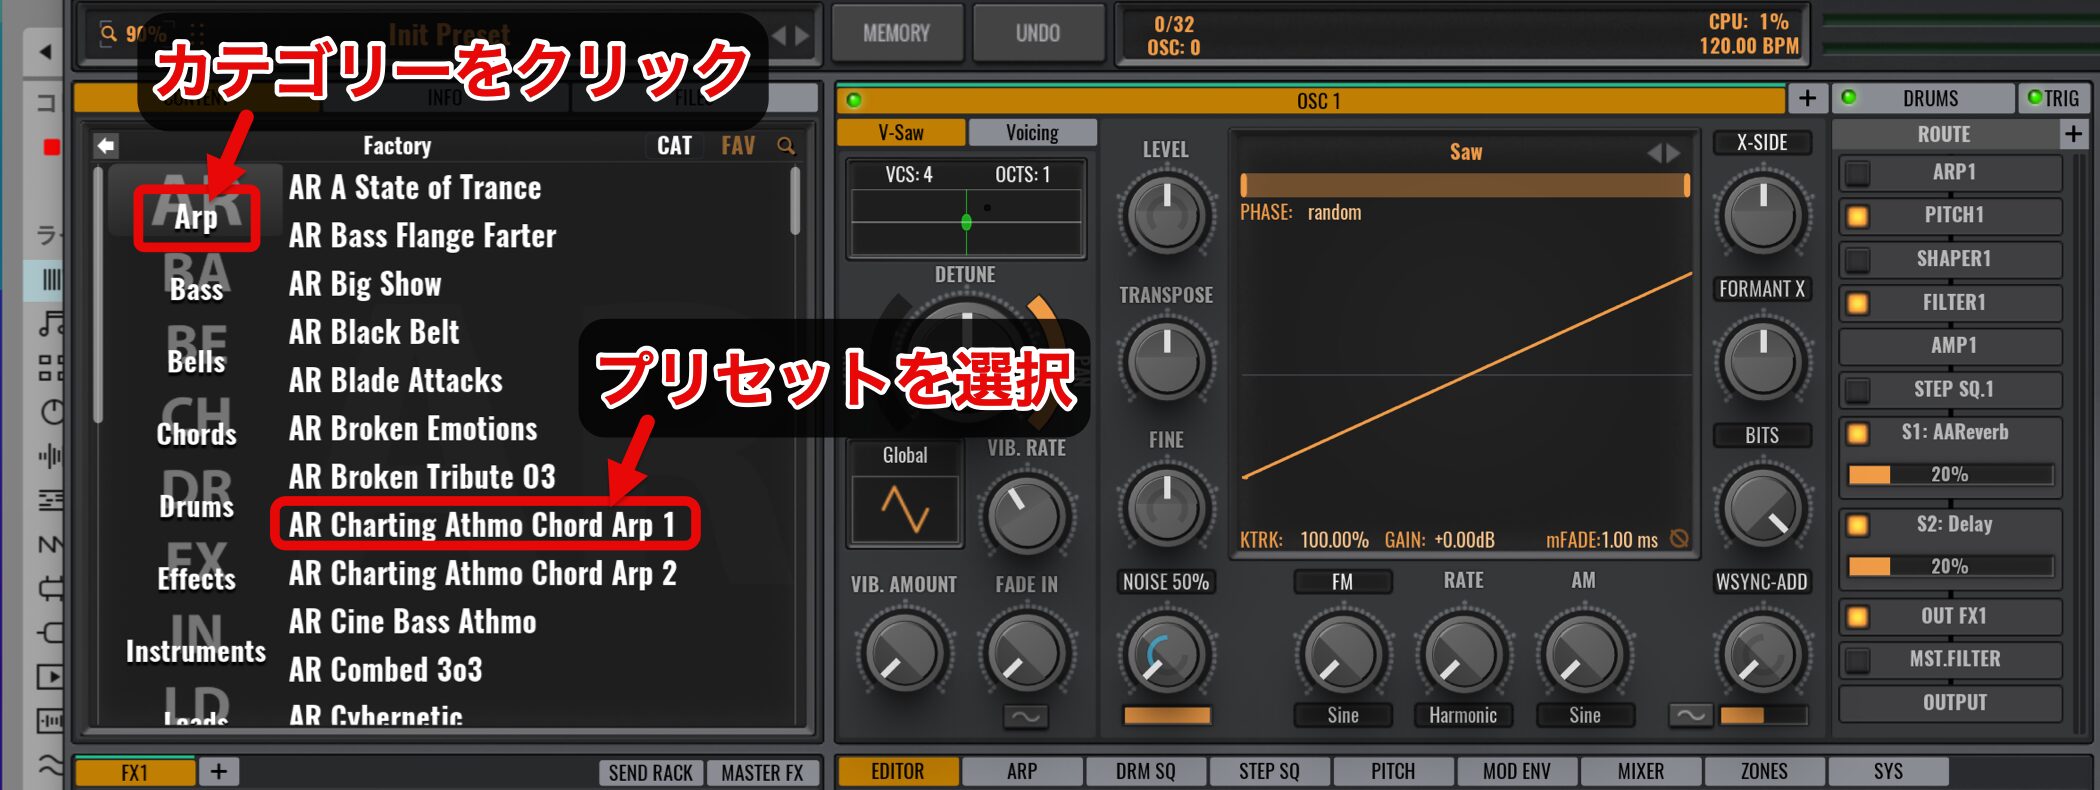
カテゴリーをクリックして、プリセットを選択します。
Macroを使った音色コントロール
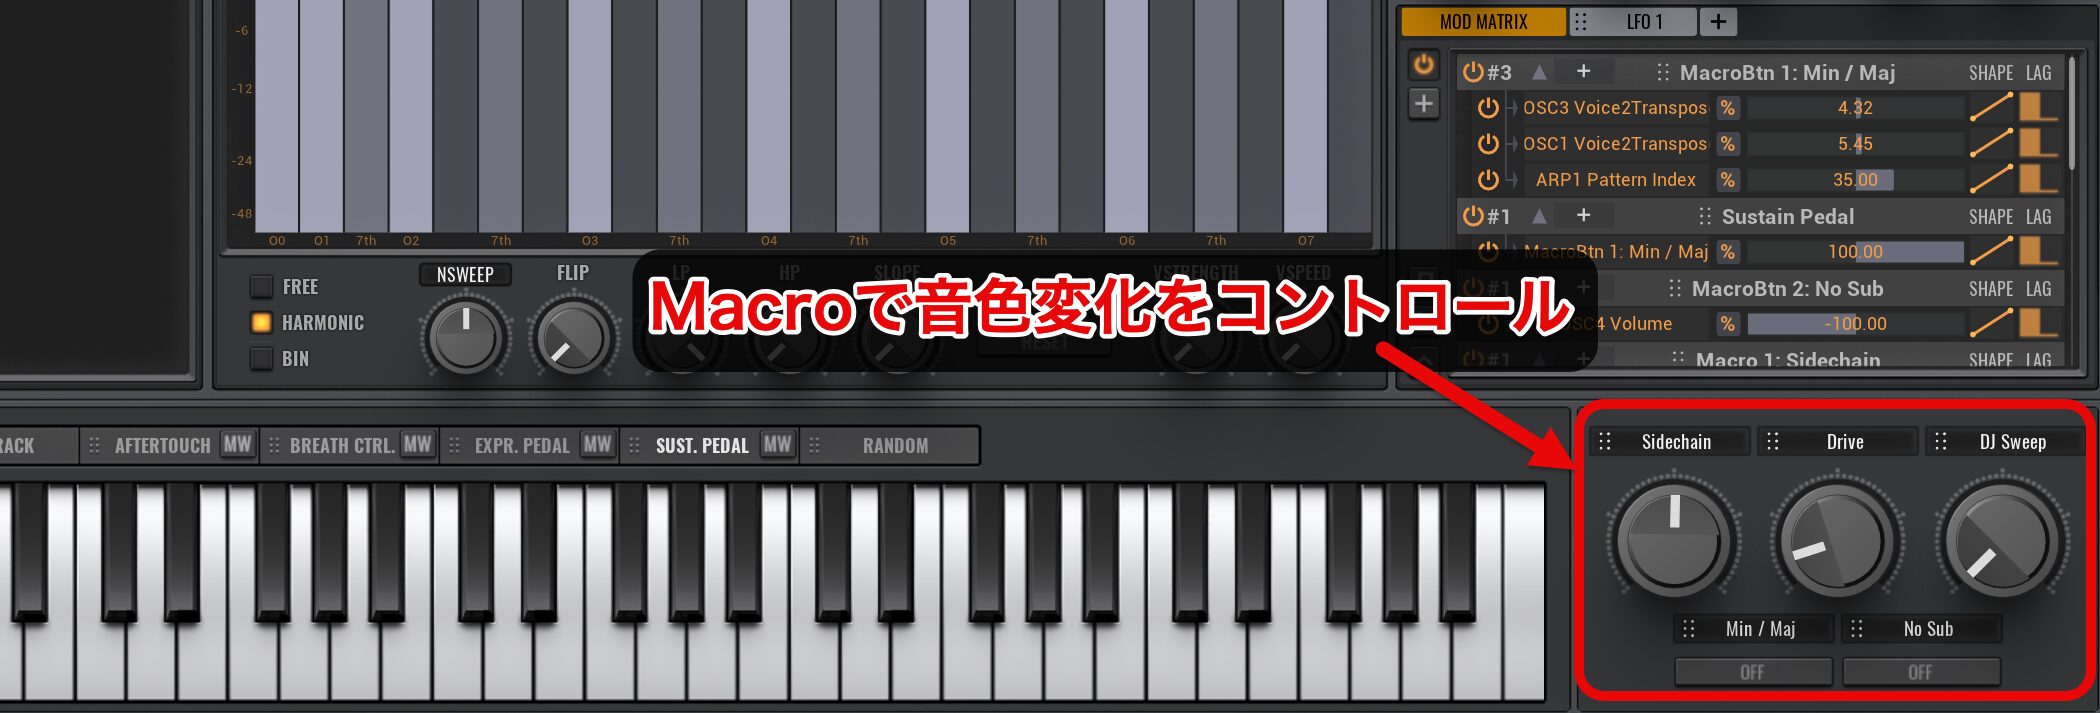
読み込んだプリセットの右下にある「Macro」では、各プリセットに適した音色変化を与えるパラメーターがアサインされています。
これにより簡単に音色を微調整することが可能です。
このプリセットの場合は、「Sidechain」と「Drive」と「DJ Sweep」です。
Sidechainはその名の通り、ボリュームにうねりを与えるクラブミュージック定番の手法です。
各DAWにおけるサイドチェインの使用方法については、以下のリンクで詳しく解説しています。
DJ Sweepは、DJプレイでよく使うテクニックの1つで、HP FilterとPhaserが合わさったようなもの。
ノブを回すとローがカットされ、軽いウネリが出てきます。
カテゴリー別プリセットを読み込む
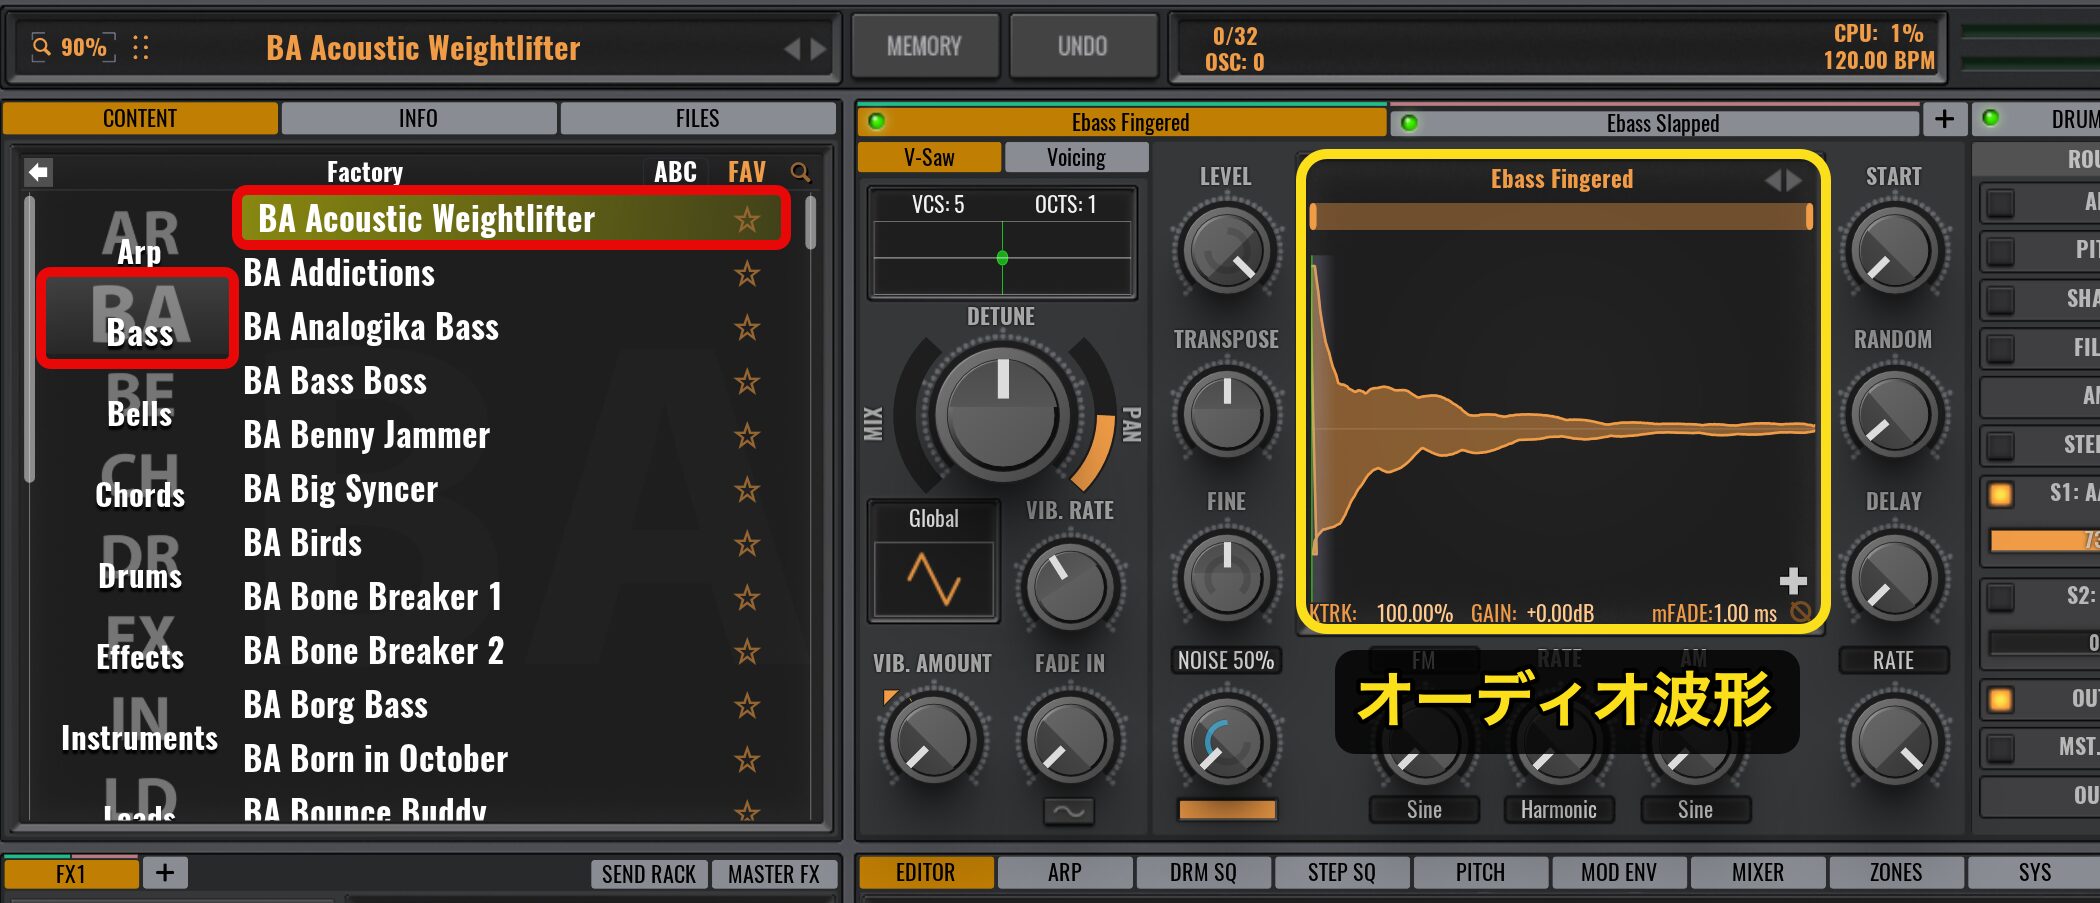
今度はカテゴリーで「Bass」を選択し、一番上のプリセットを見てみましょう。
このプリセットの場合、オーディオ波形が読み込まれています。
Avengerはサンプルベース、すなわち実際の音をサンプリングしたものがプリセットに含まれているので、シンセサイザーで作成が難しい生楽器のサウンドにも対応しています。
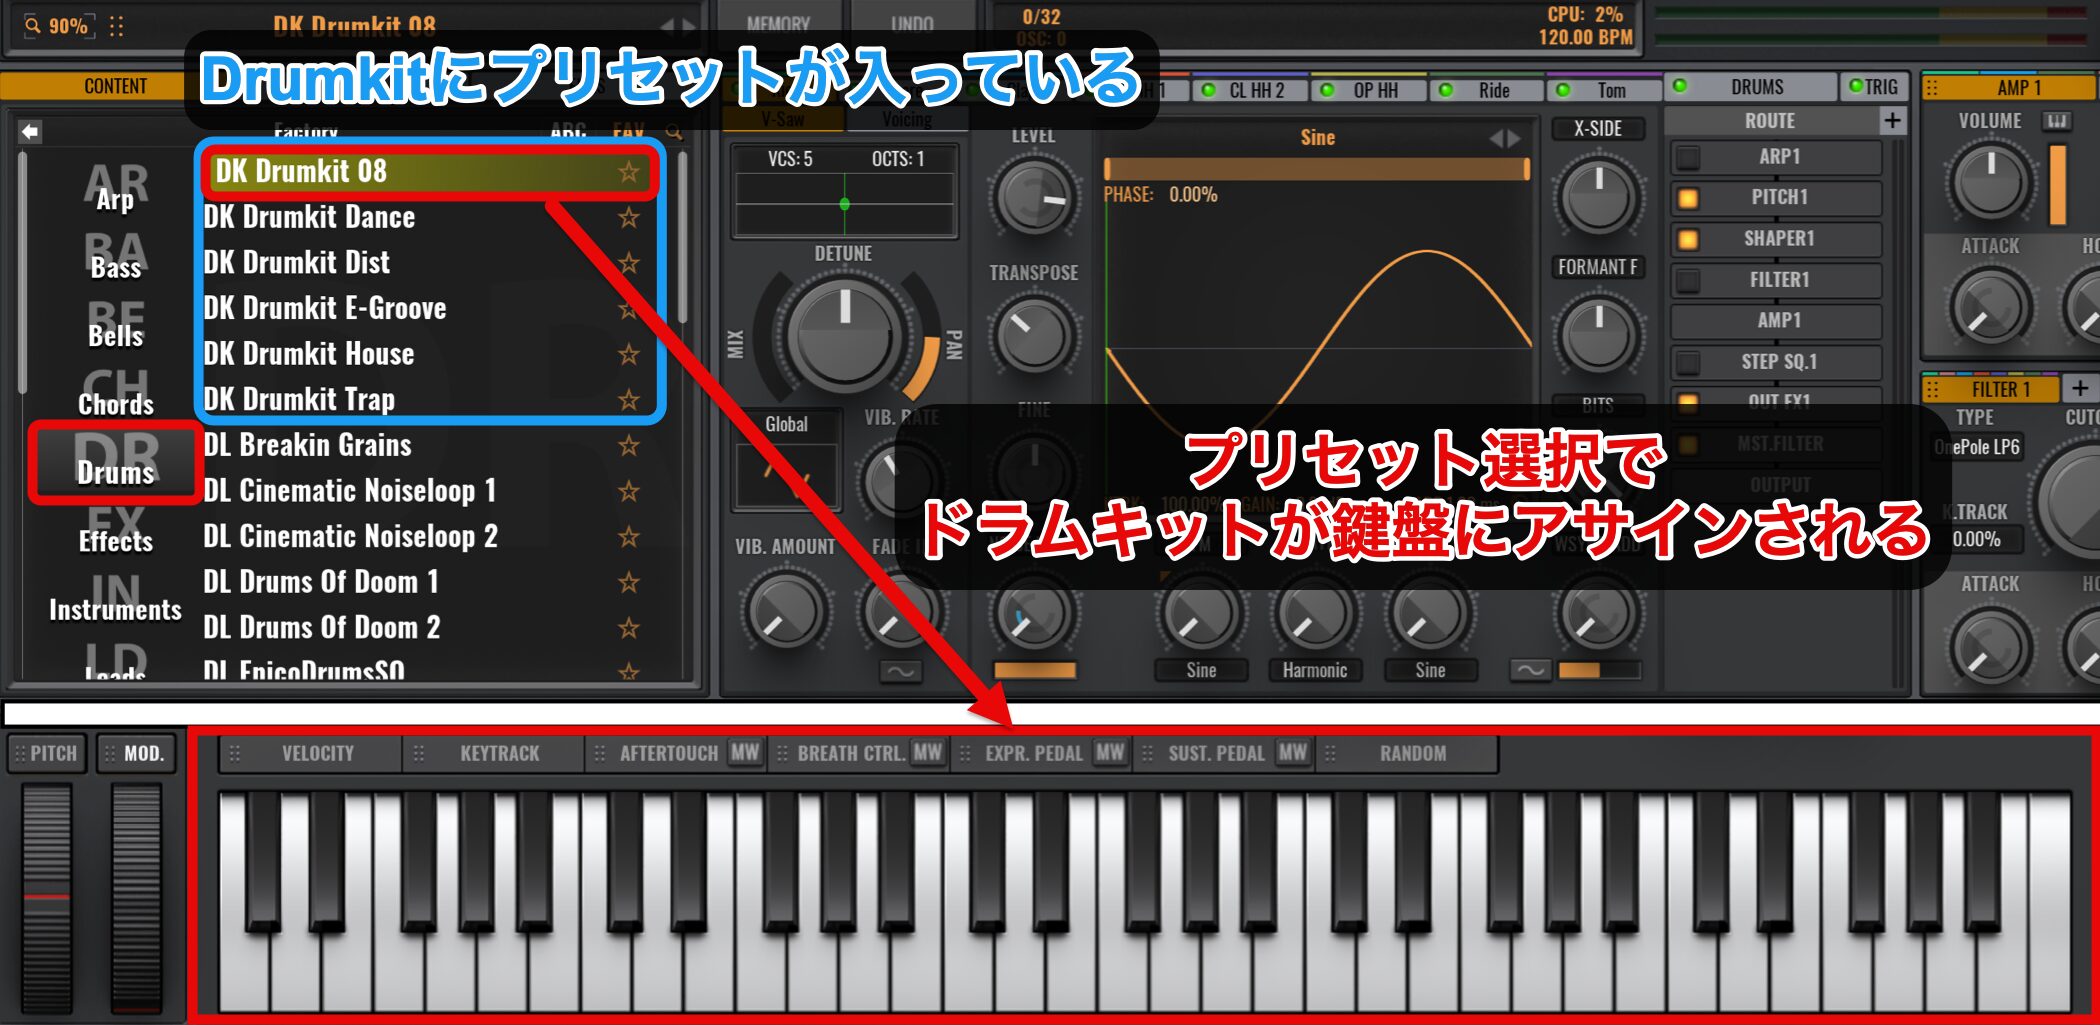
この他にも、Avengerにはドラムシーケンサーを備えたドラムキットも搭載しています。
「Drums」カテゴリーを選択すると、「Drumkit」と記載されているフォルダにプリセットが用意されています。
プリセットを選択すると、キックやスネアなどのドラムキットが鍵盤にアサインされているので、好みのパターンを打ち込むことができますね。
しかし、パターンをわざわざ打ち込むのが面倒という方もいらっしゃると思います。
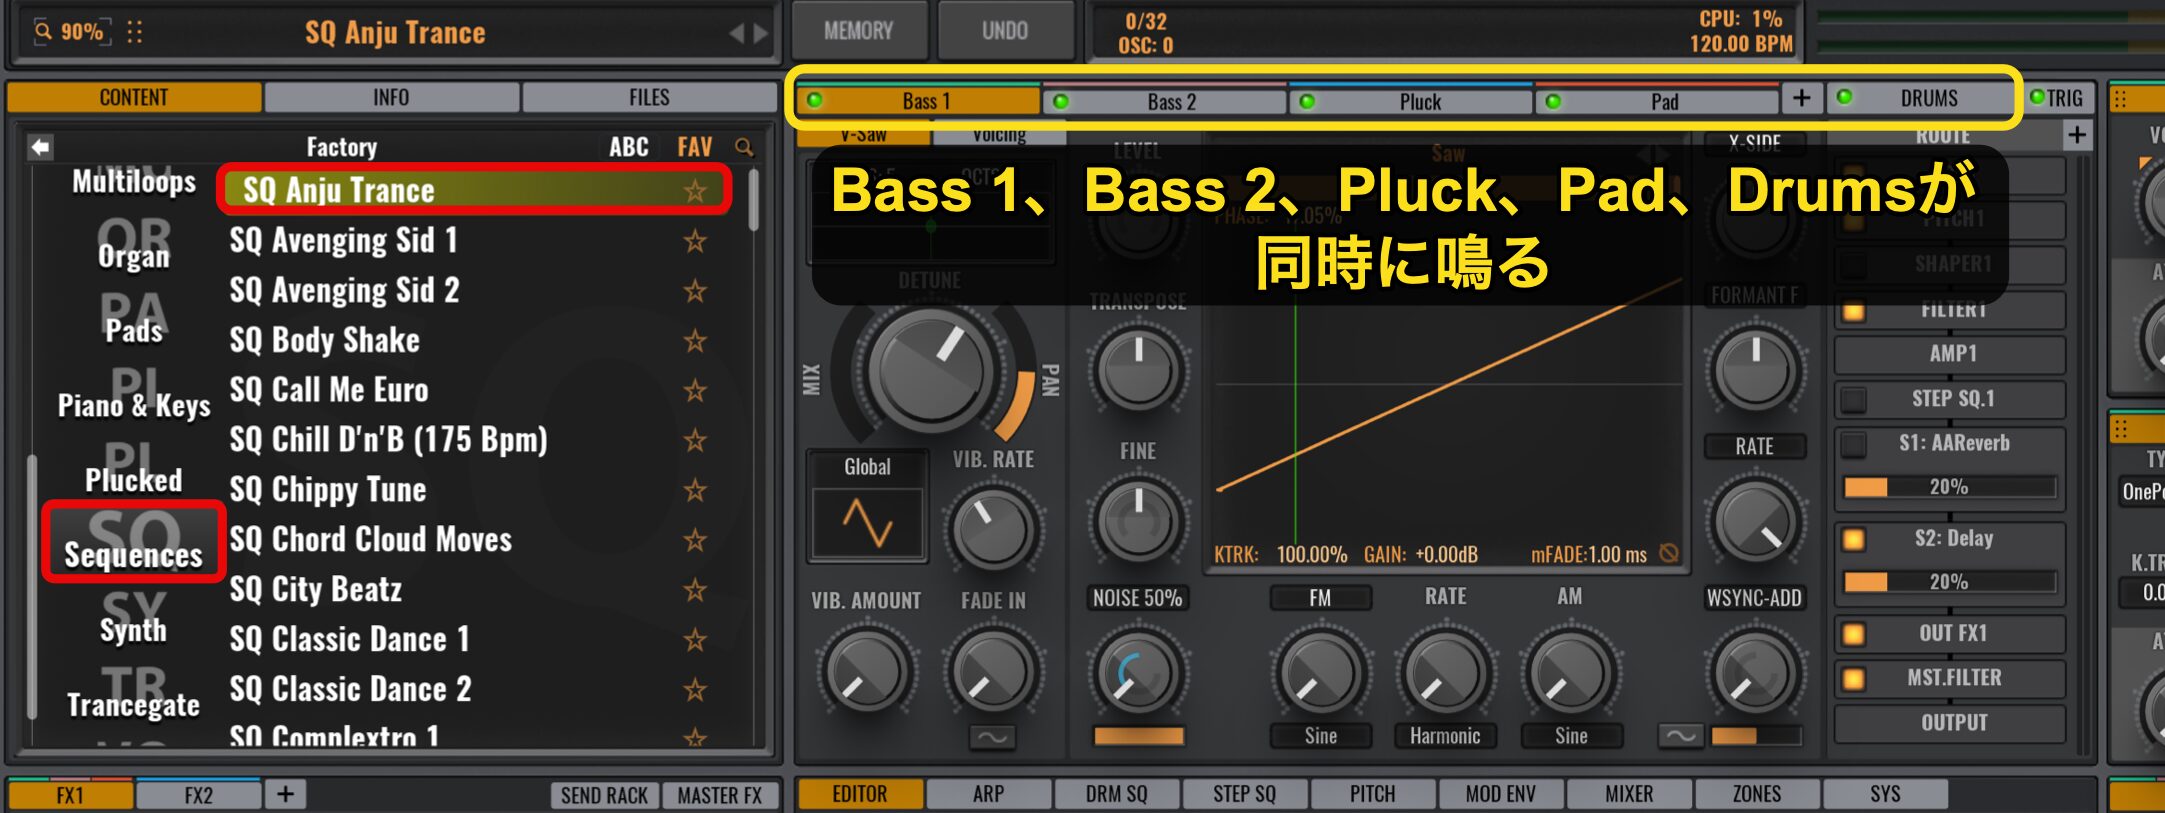
この場合にとても便利なのが、カテゴリーの「Sequence」です。
Sequenceから一番上のプリセットを選んでみましょう。
OSCエリアを見てみると、「Bass 1」と「Bass 2」、「Pluck」、「Pad」、そして「Drums」が同時に鳴るようになっているんですね。
しかも、このプリセットの場合、鍵盤の高いところを弾くとPluckだけになりました。
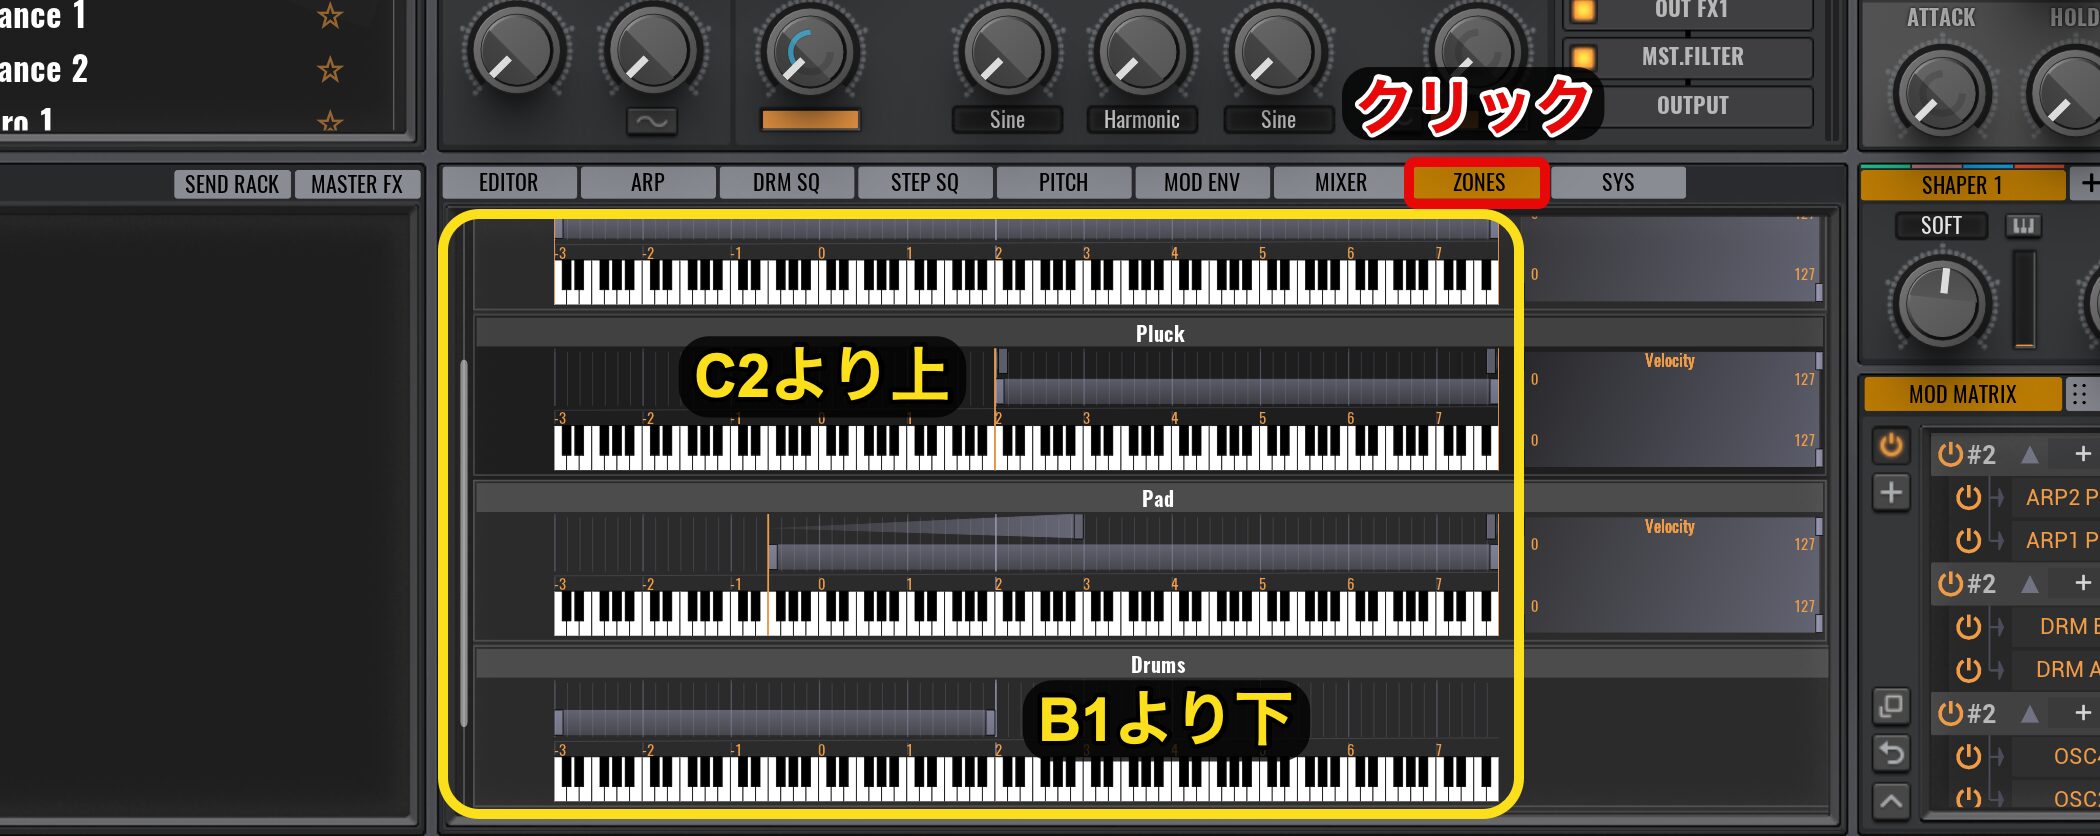
Zoneで発音が分けられているんです。
「Zones」タブをクリックすると、どの音色がどの鍵盤にアサインされているかを確認することができます。
PluckがC2より上、DrumsがB1より下になっていますね。
DAWによっては1オクターブズレていたりもしますので、この辺りの配置は弾きながら確認が必要ですね。
C1をベタで打ち込んでドラムとベースを流し、C3より上でPluckを打ち込むと、曲っぽいことが簡単にできます。
OSCエリア上部のタブへカーソルを移動すると、ミュートとソロボタンが表示されるので、Drumsだけソロにして使用するということも可能です。
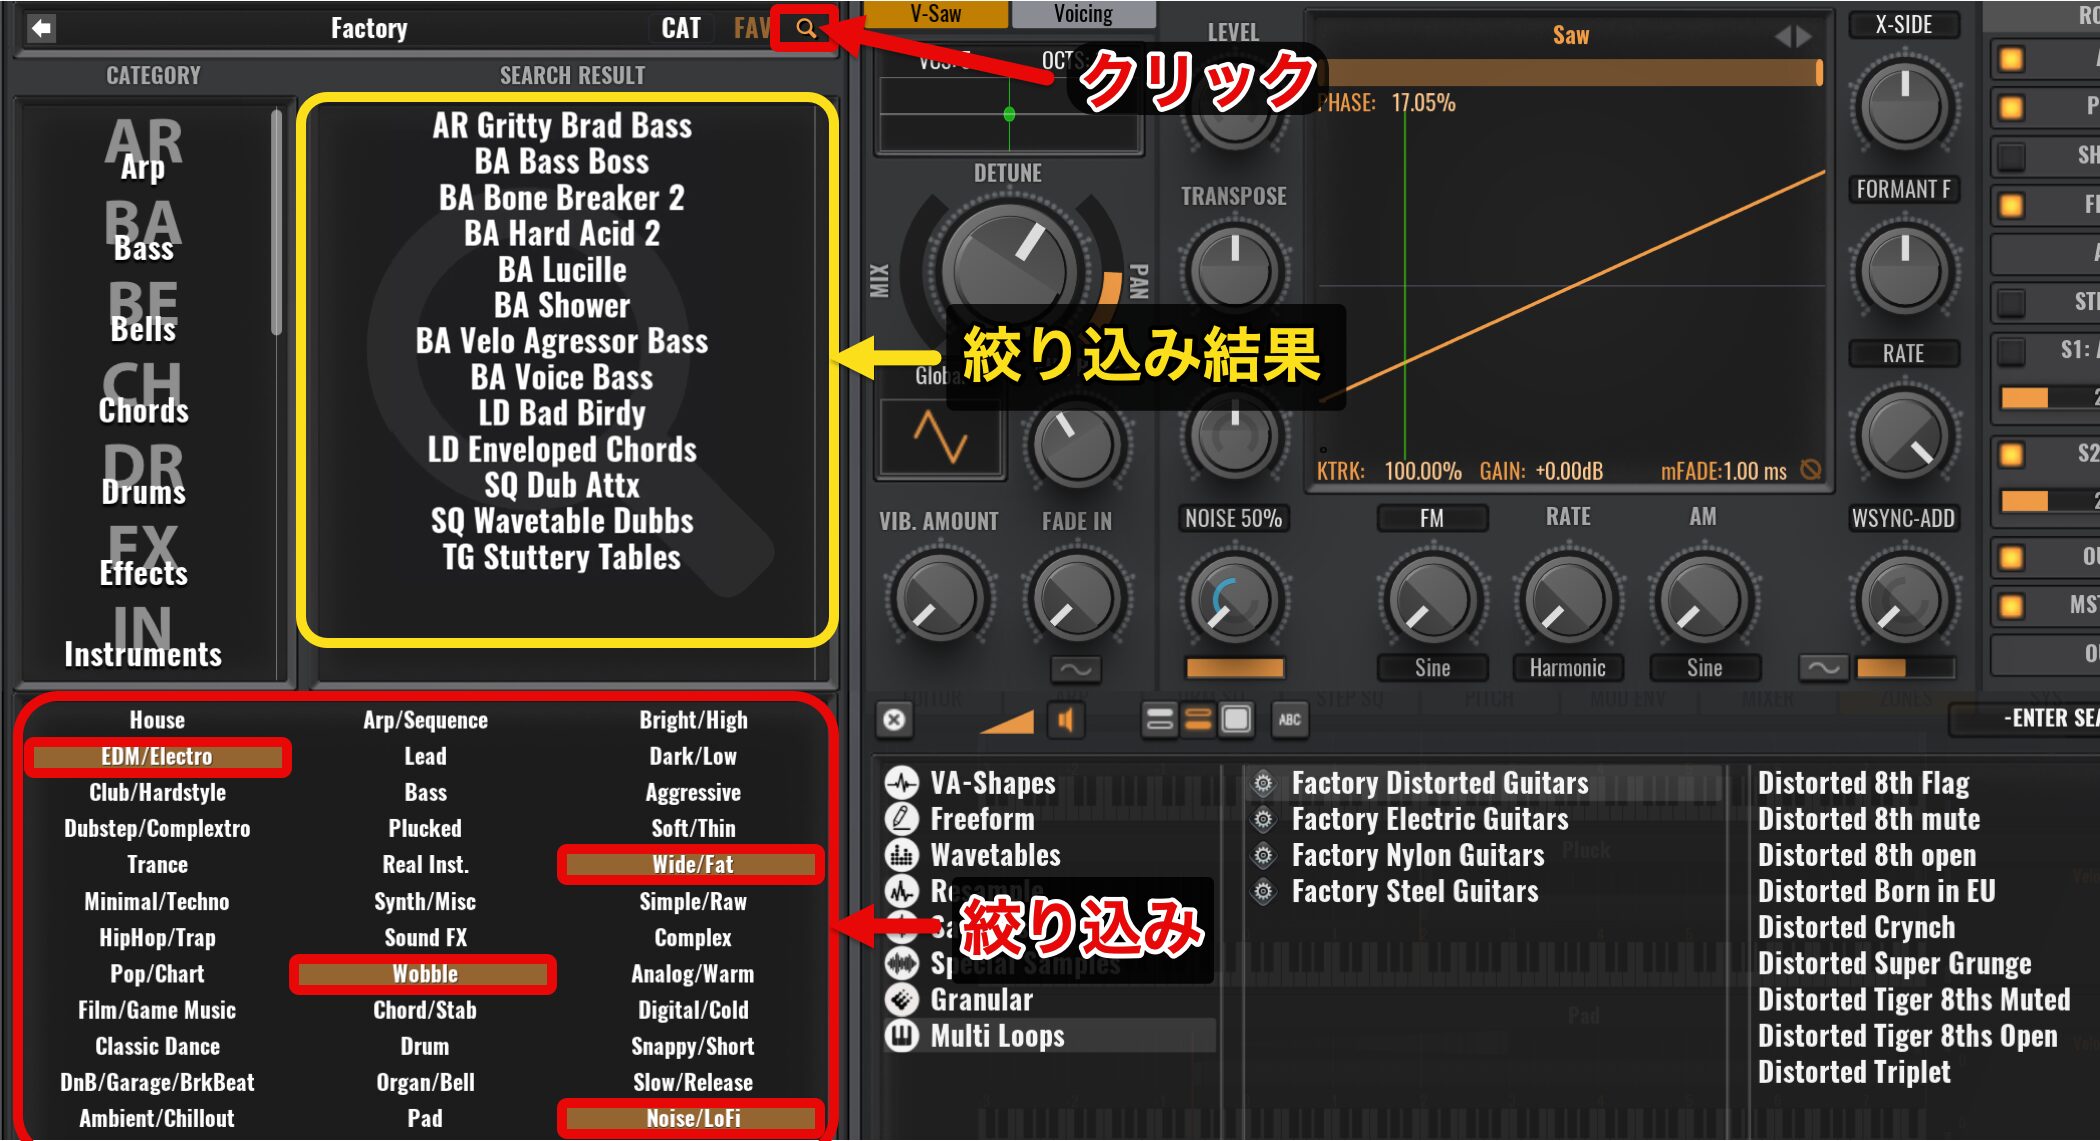
今回は左側のカテゴリーからプリセットを選択しましたが、右側の「虫眼鏡」アイコンをクリックすると、タグクラウド検索を使った、より的確で快適な検索が可能です。
下のエリアで探したい項目にチェックを入れるだけです。
プリセットのお気に入り機能
数あるプリセットからお気に入りを登録しておくことができます。
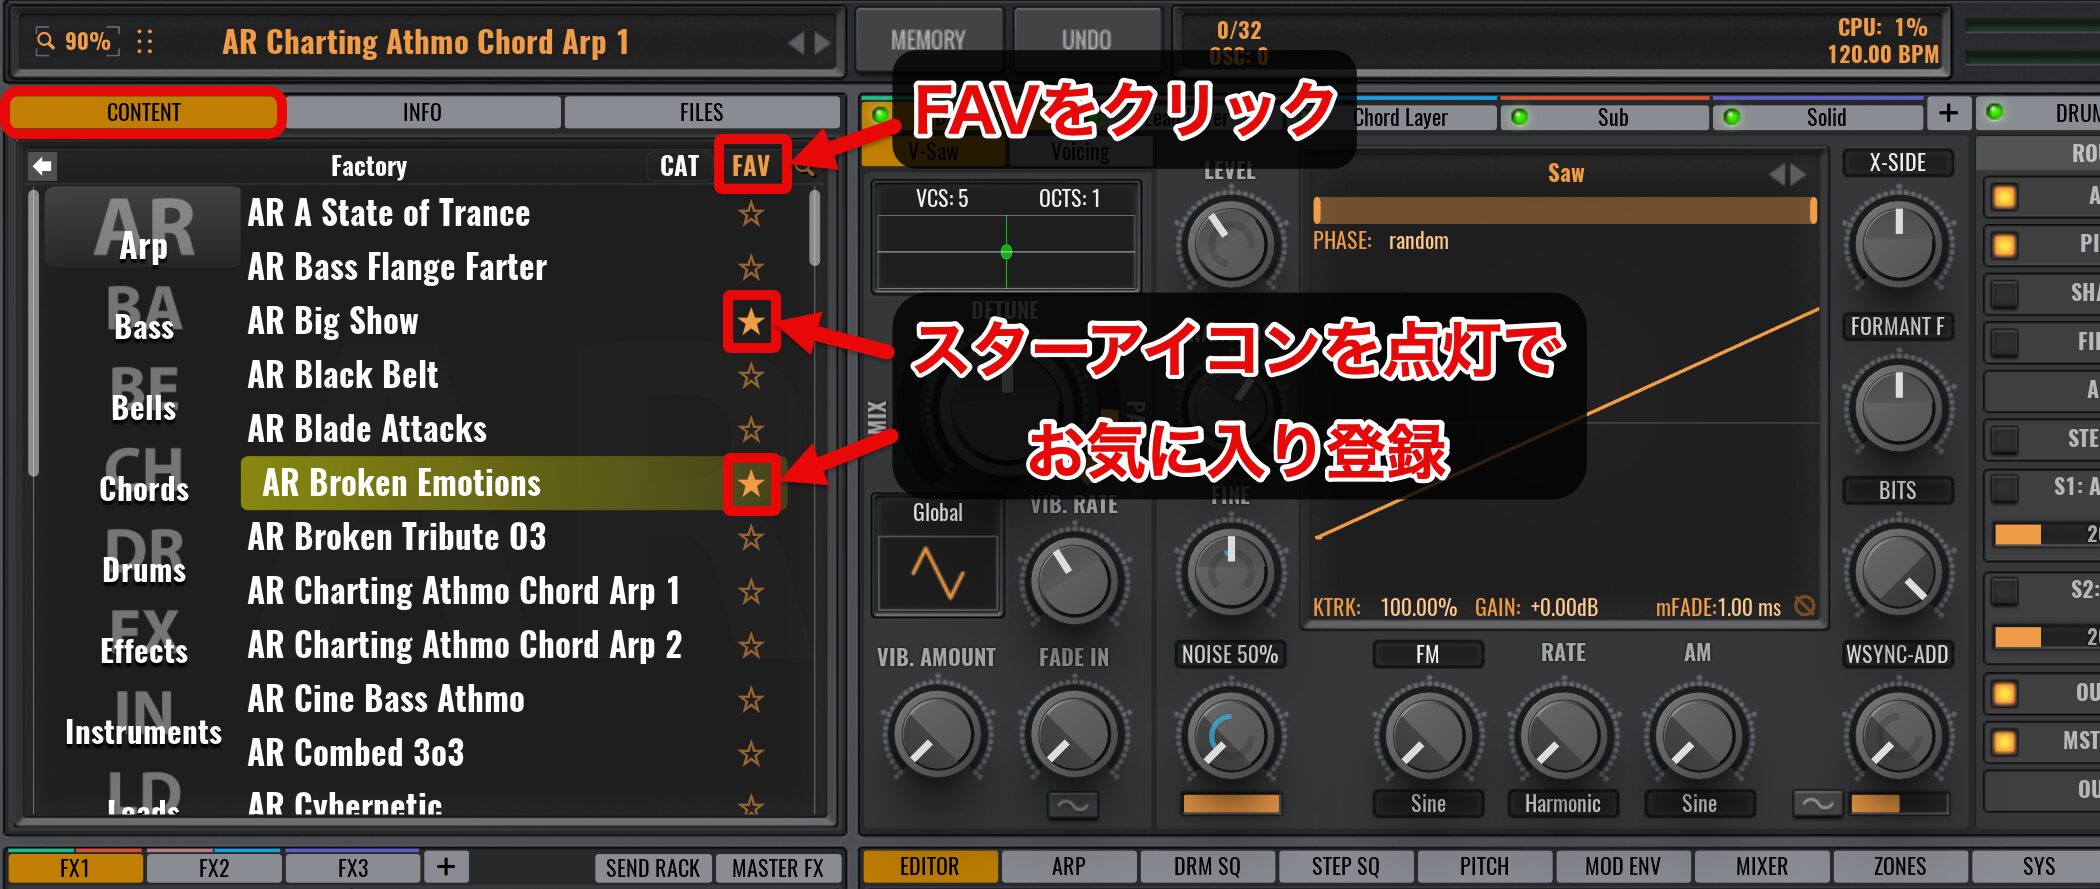
「FAV」をクリックし、お気に入りのプリセットサウンドの「スター」アイコンをクリックして点灯させます。
素早くお気に入りのプリセットを探す際に便利です。
オリジナルプリセットとして保存する
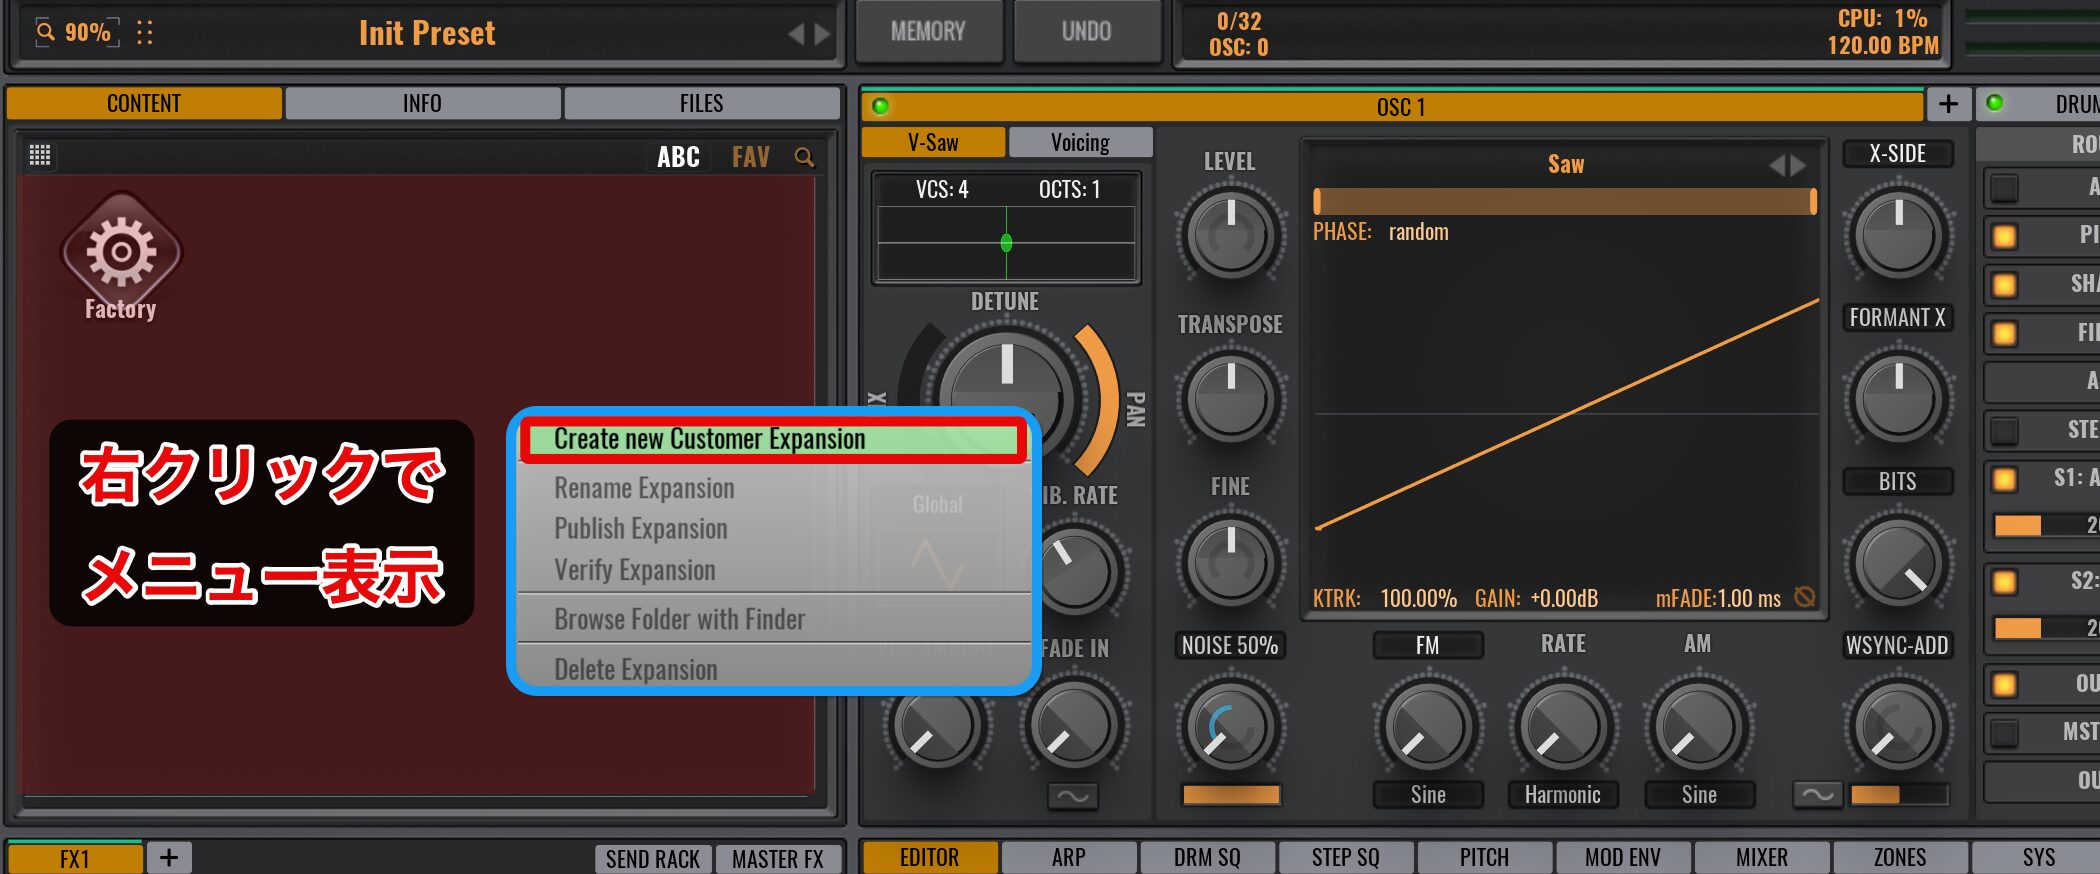
既存のプリセットを自由にまとめたり、オリジナルサウンドを保存する際に便利なコンテンツフォルダを作成できます。
コンテンツ部分を右クリックして、「Create new Customer Expansion」を選択します。
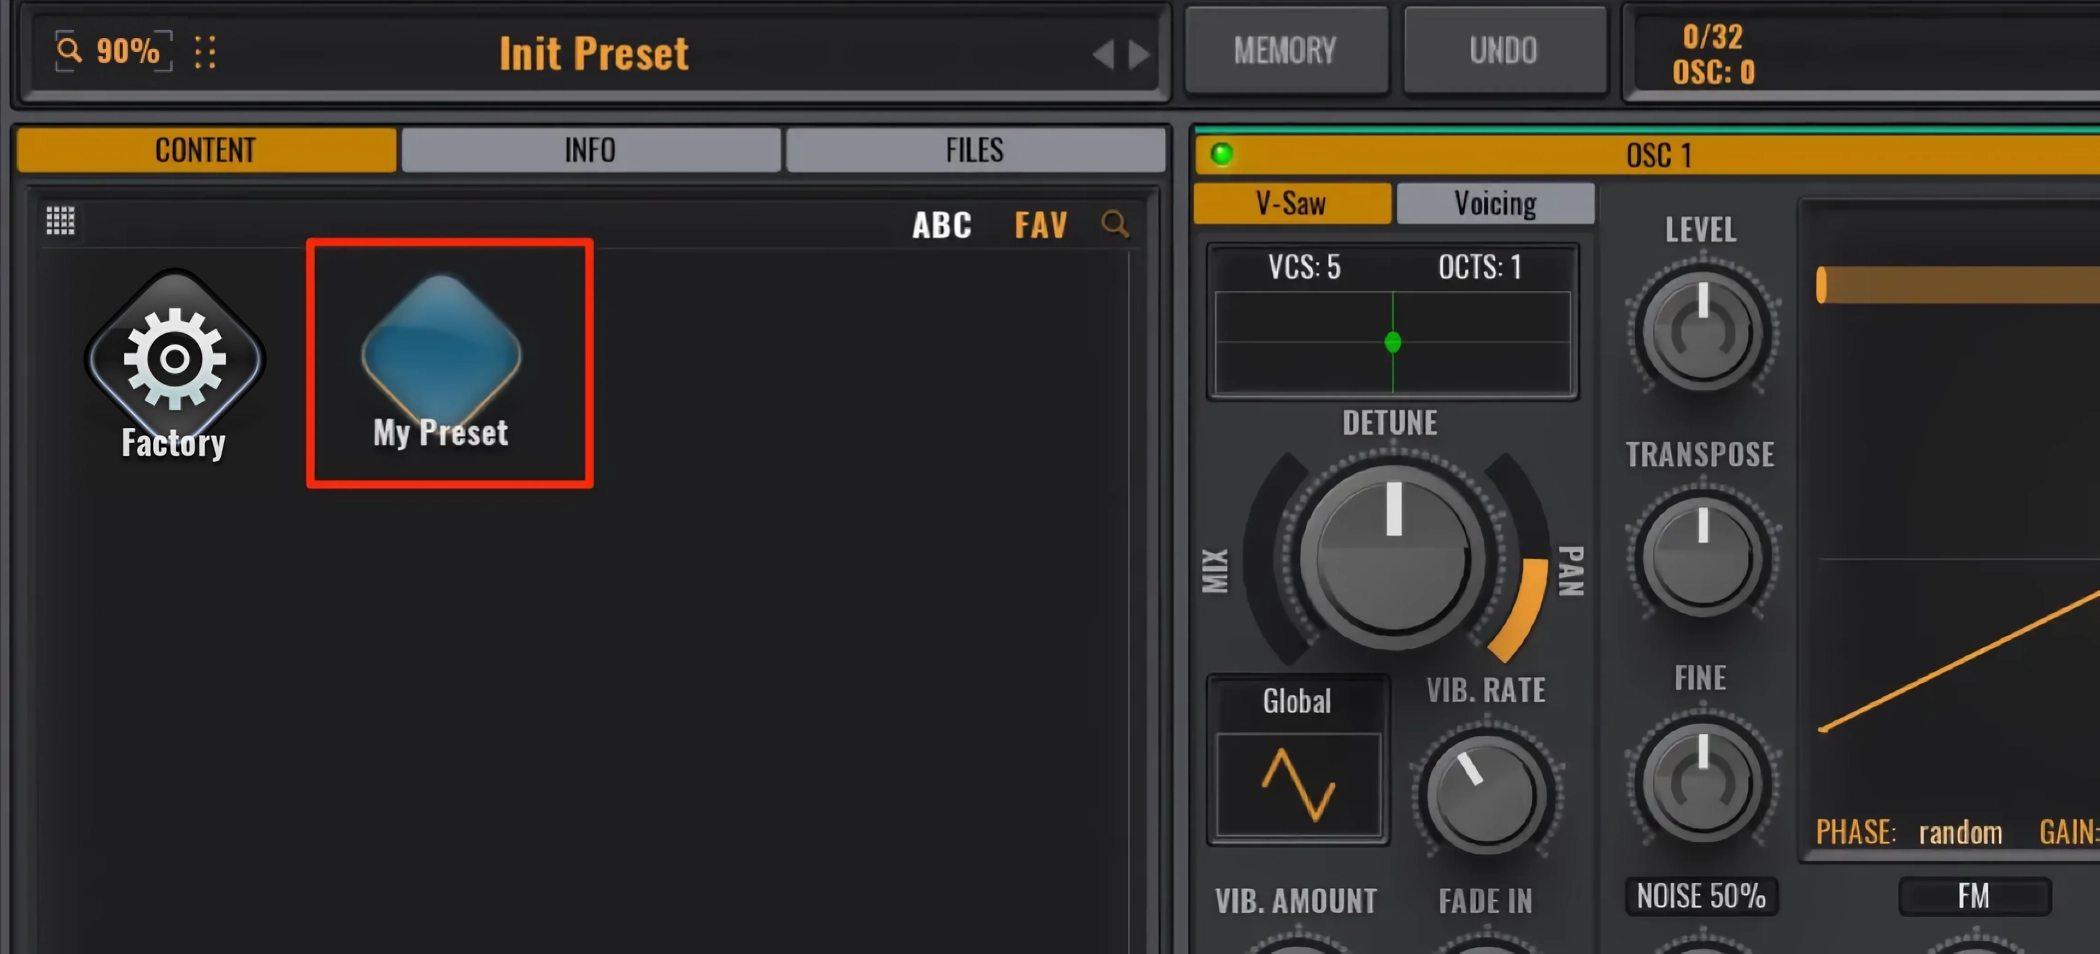
このようにコンテンツが作成されます。
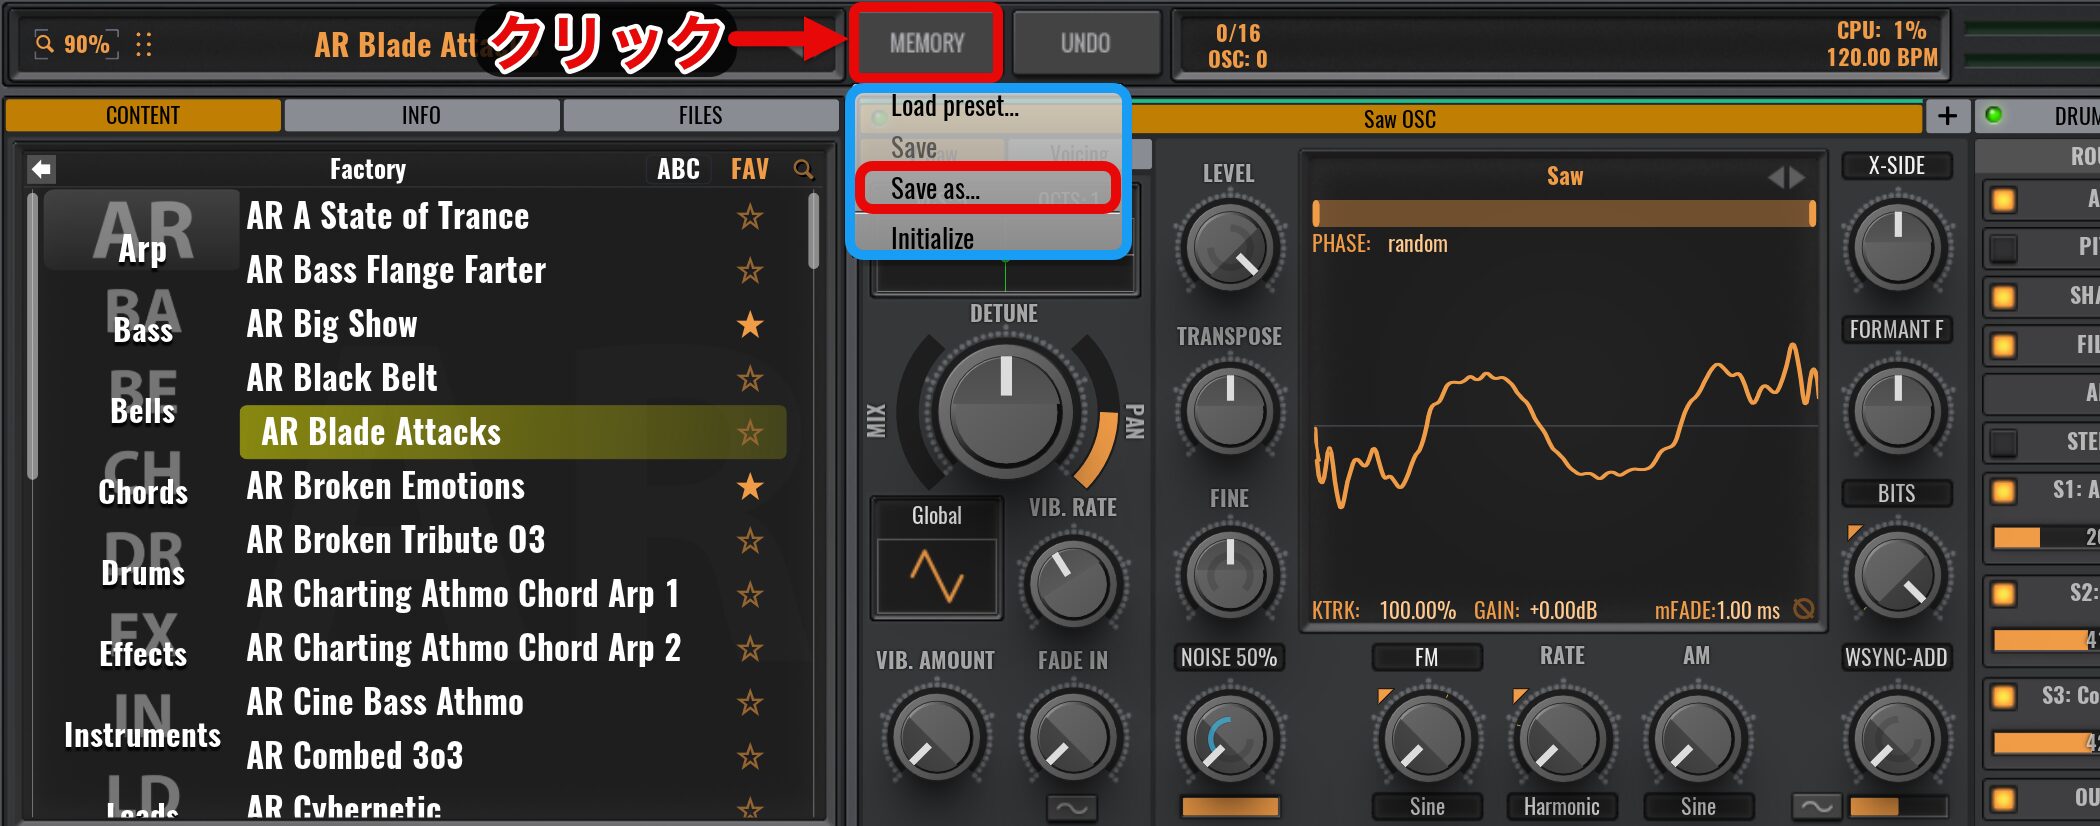
まとめたいプリセットやオリジナルサウンドを作成し、「MEMORY」をクリックします。
このメニューから「Save as」を選択します。
初期プリセットが収められている「Avenger」→「My Preset.avxp →「presets」を選択します。
保存したいプリセットカテゴリーを選択して、保存を行います。
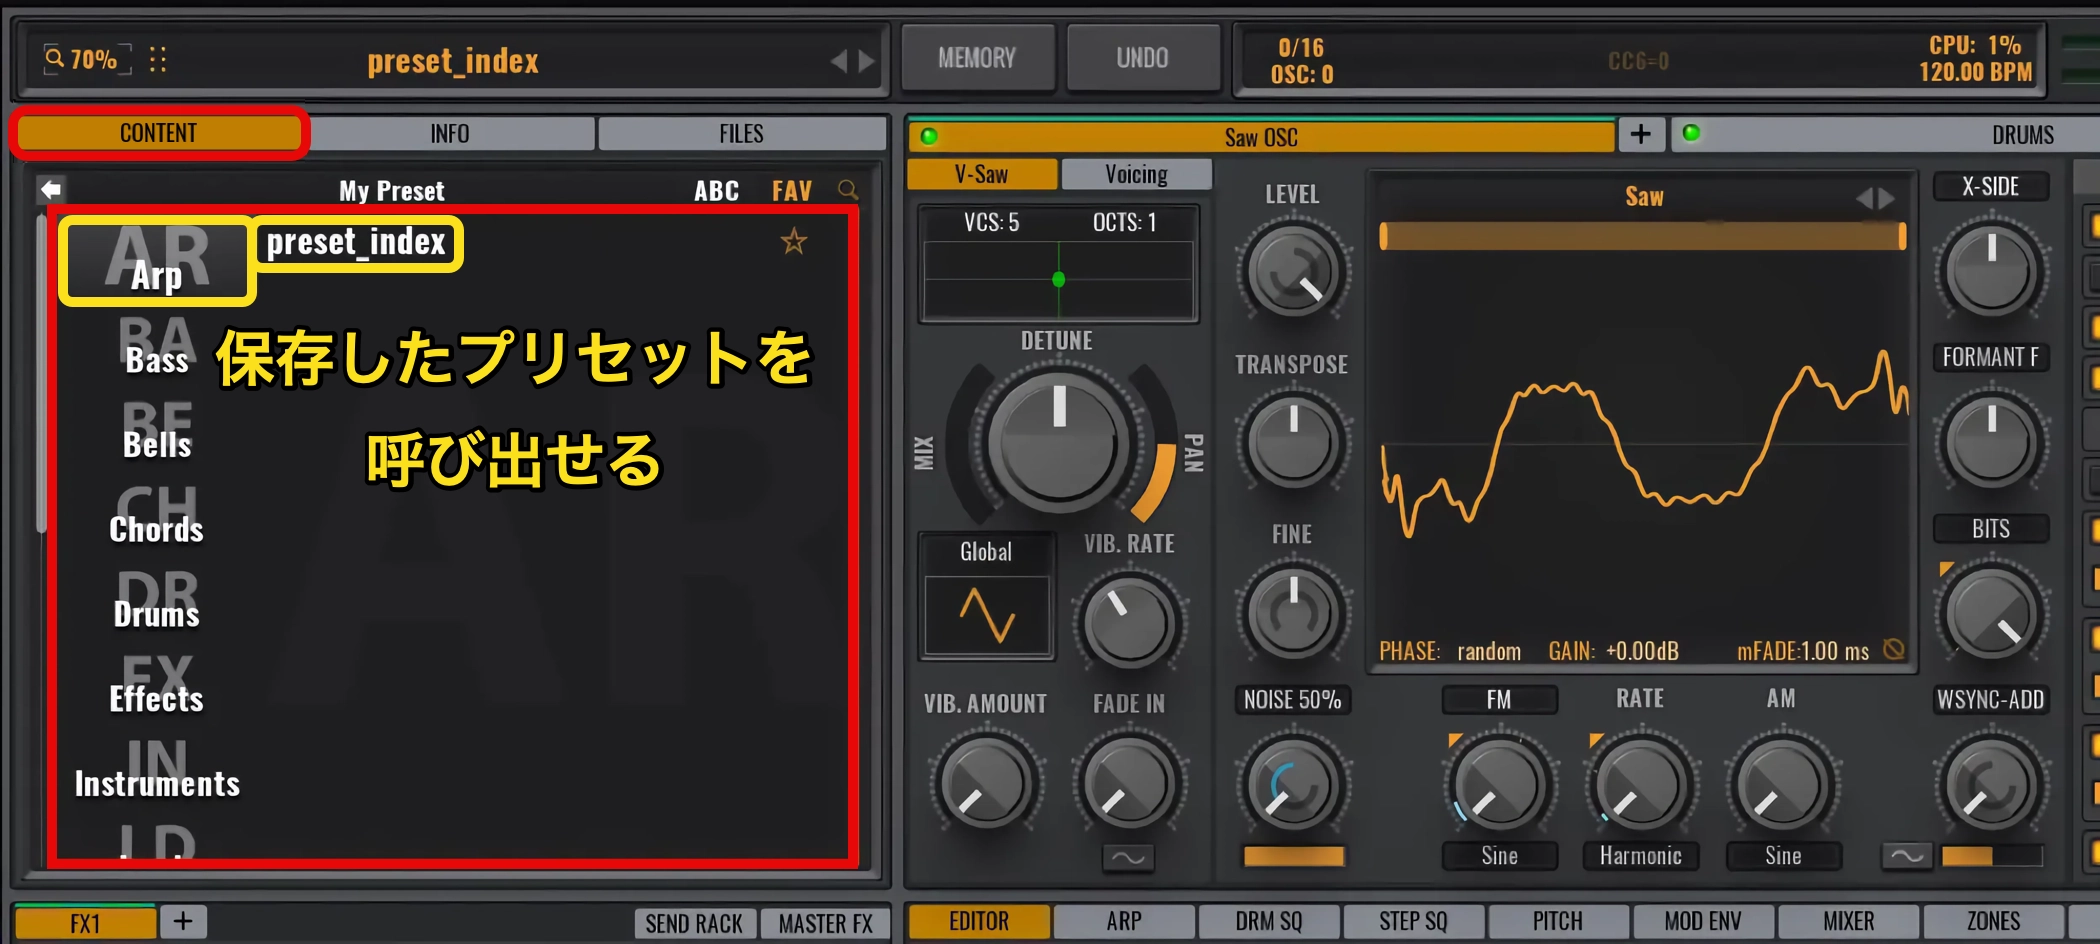
オリジナルのコンテンツフォルダから、保存したプリセットを呼び出すことができます。
このようにAvengerのプリセットは非常に即戦力揃いで、高いカスタマイズ性を備えています。
普通のJ-Pop的な曲のブレイクで、ちょっとDubstepっぽい、EDMっぽいビートを入れたいとか、Wobble Bassっぽいのを一瞬入れたい、なんて時には最強のシンセサイザーです。
Avengerはシンセだけではなく優秀なリズム音源としても大活躍
次に、AvengerのOSCエリアとDrums音源のシーケンスエディットについて、解説を進めていきます。
Avengerは、シンセサウンドもさることながら、ドラムシーケンサーとしても非常に優秀です。
リズムパターンを楽曲に取り入れて、フレーズを構築していくことが可能です。
Avenger 動画 : Drumsの音源とシーケンスのエディット
OSCエリアとドラムセクション
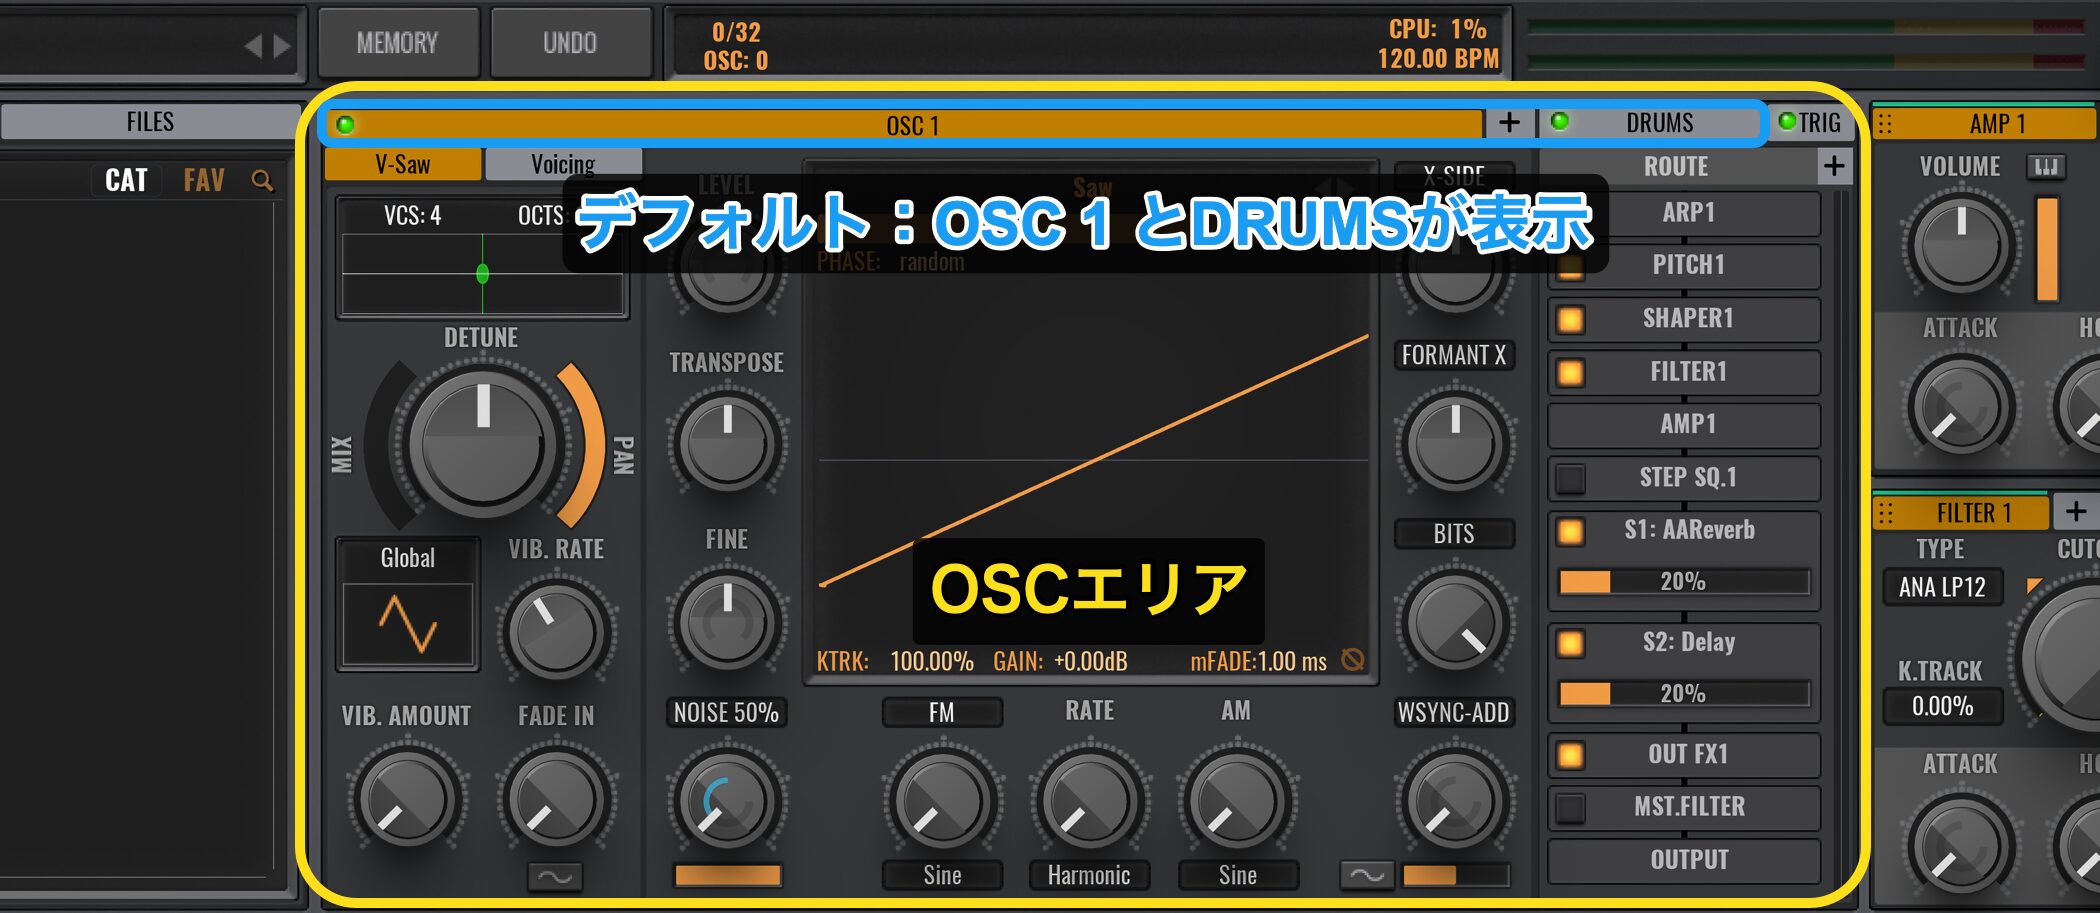
画面の中央上部がAvengerのOSCエリアになっており、デフォルトはOSC1とDRUMSがエリア内に表示されています。
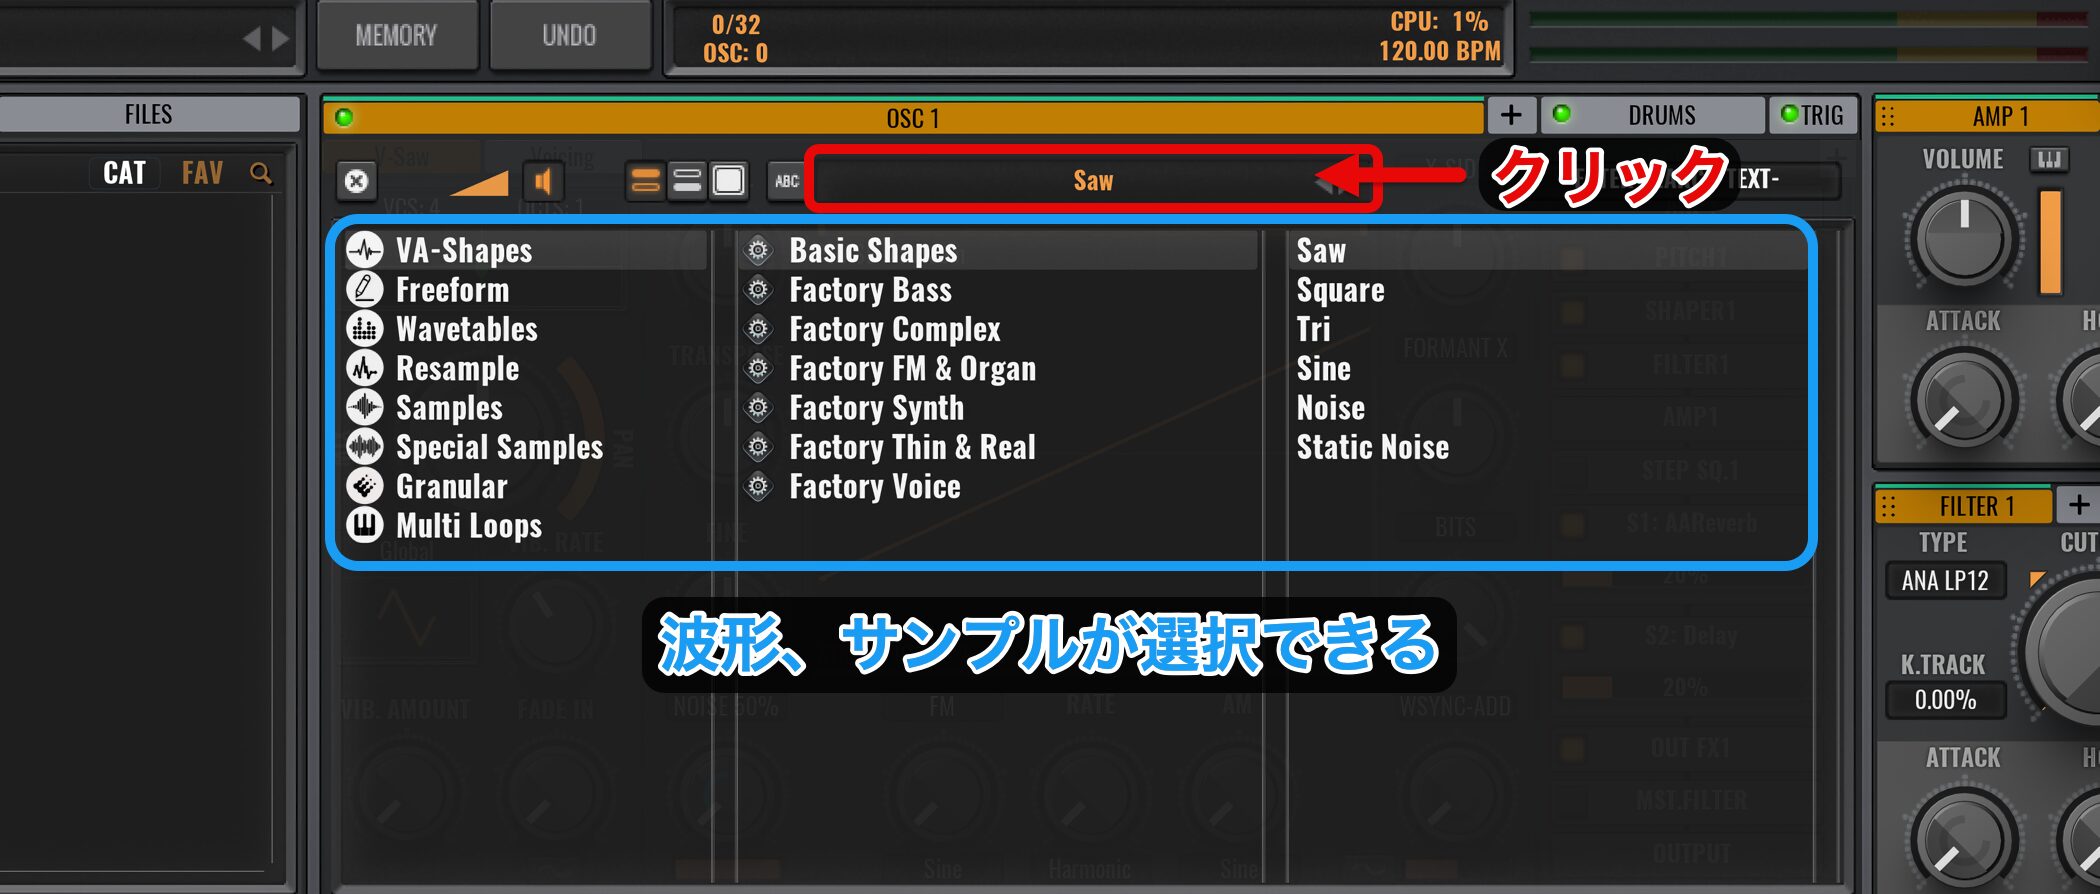
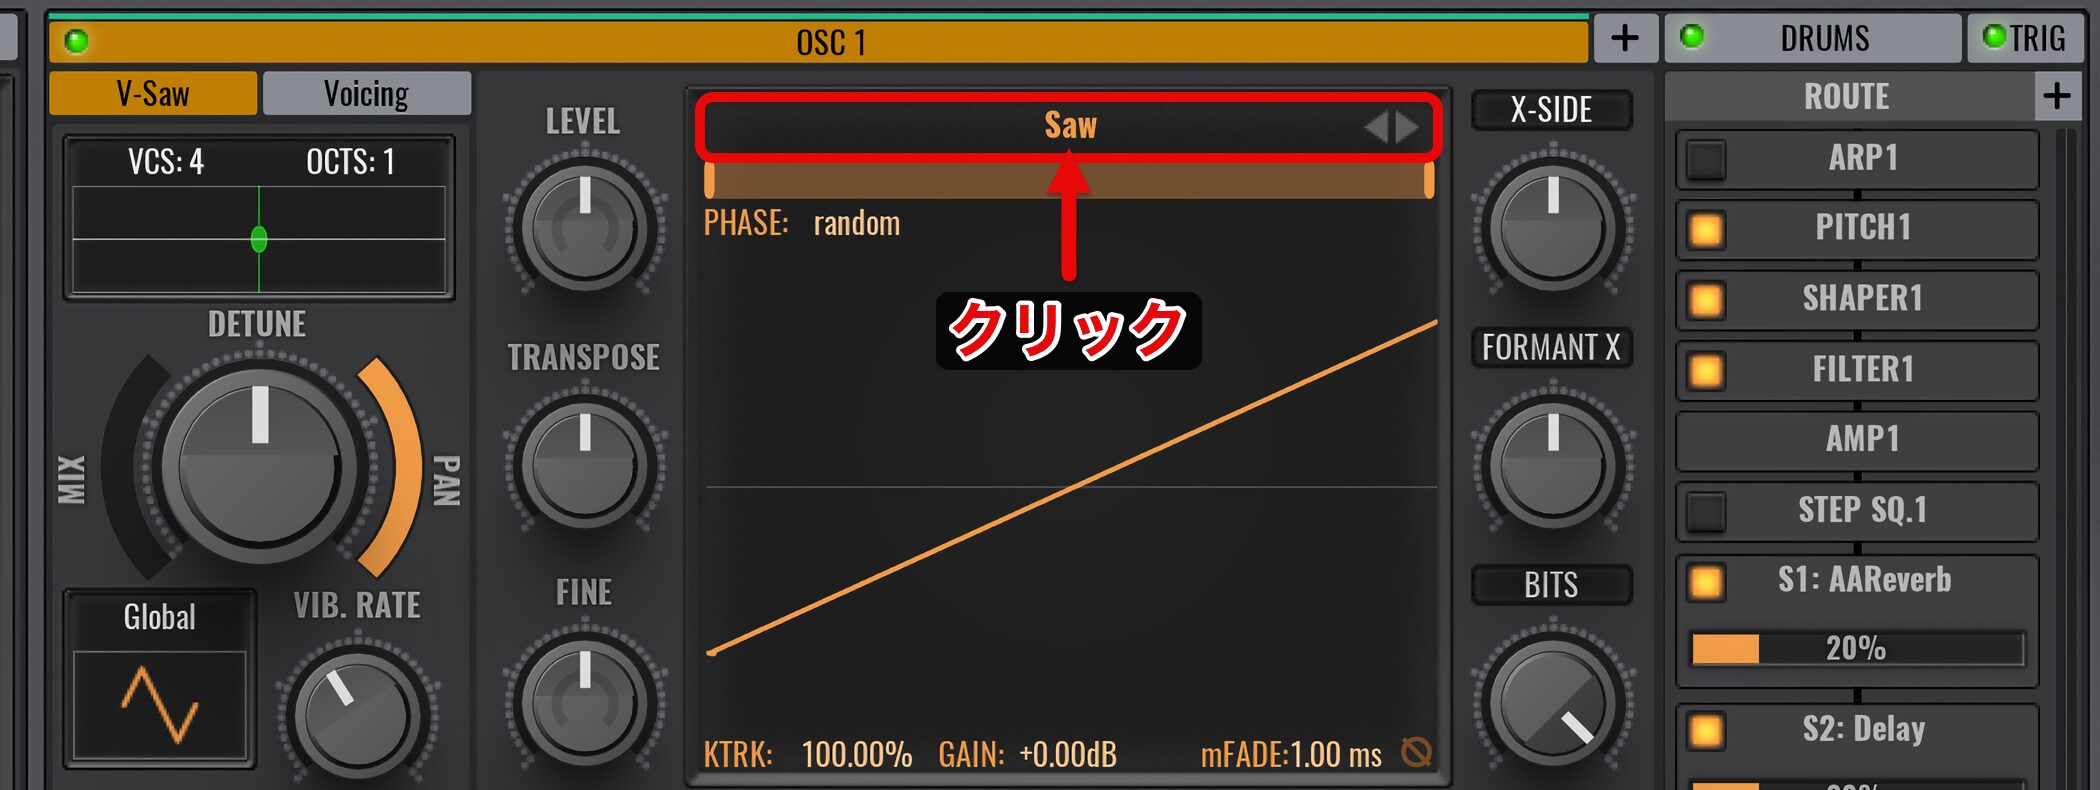
オシレーターの音源選択は、Sawと書いてある部分をクリックします。
表示されるメニューから多彩な波形、またはサンプルが選択可能です。
FREEFORMでオリジナル波形を作成
ユニークな機能として、「Freeform」があります。
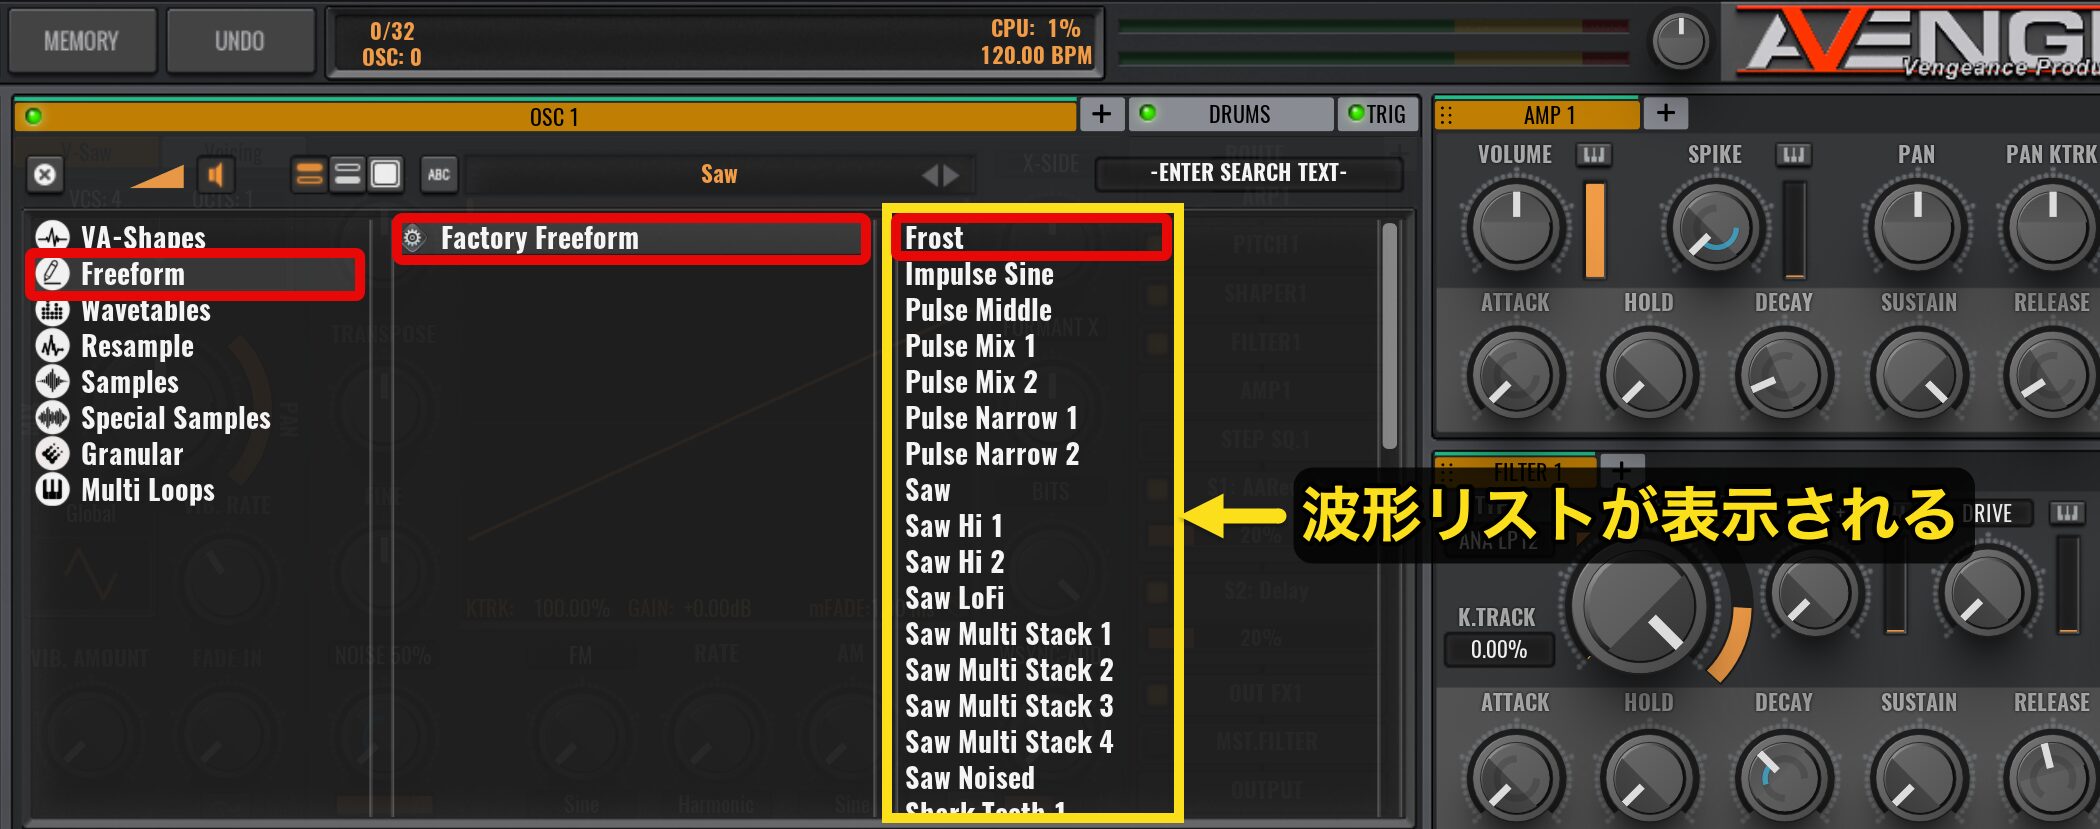
「Factory Freeform」をクリックすると、波形リストが表示されます。
試しに、1番上の波形を選択してみましょう。
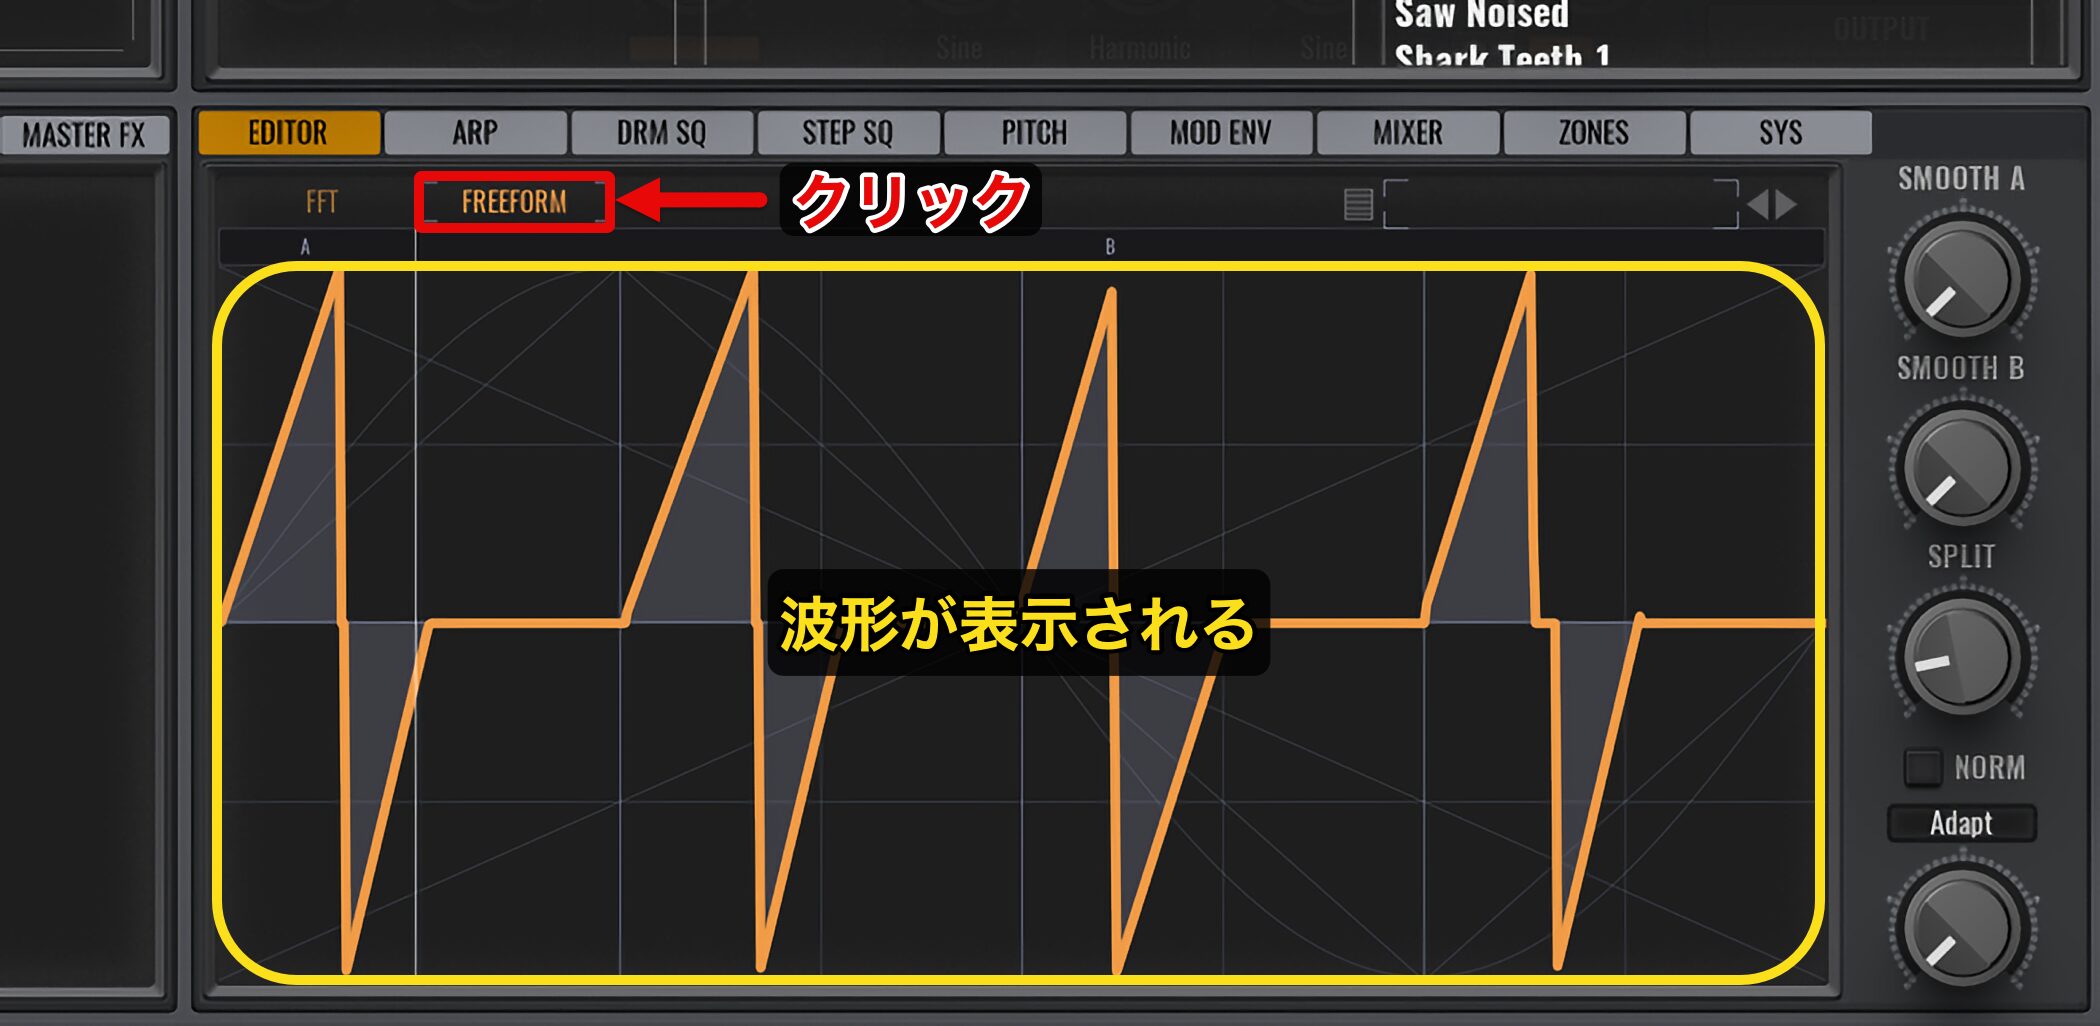
「EDITOR」の下にある「FREEFROM」をクリックすると、波形が表示されます。
FREEFORMモードでは、マウス操作で自由に波形を描くことが可能です。
右クリックしながらドラッグすると、直線を描画することもできます。
これにより、簡単かつ直感的にオリジナルサウンドを作成することができます。
OSCを追加するには、「+(プラス)」ボタンをクリックします。
クリックするたびにOSCを追加でき、最大で8個までレイヤーすることが可能できます。
分厚いサウンドも簡単に作成できますね。
このOSC内部については、後ほど解説します。
Drumsプリセットの読み込み
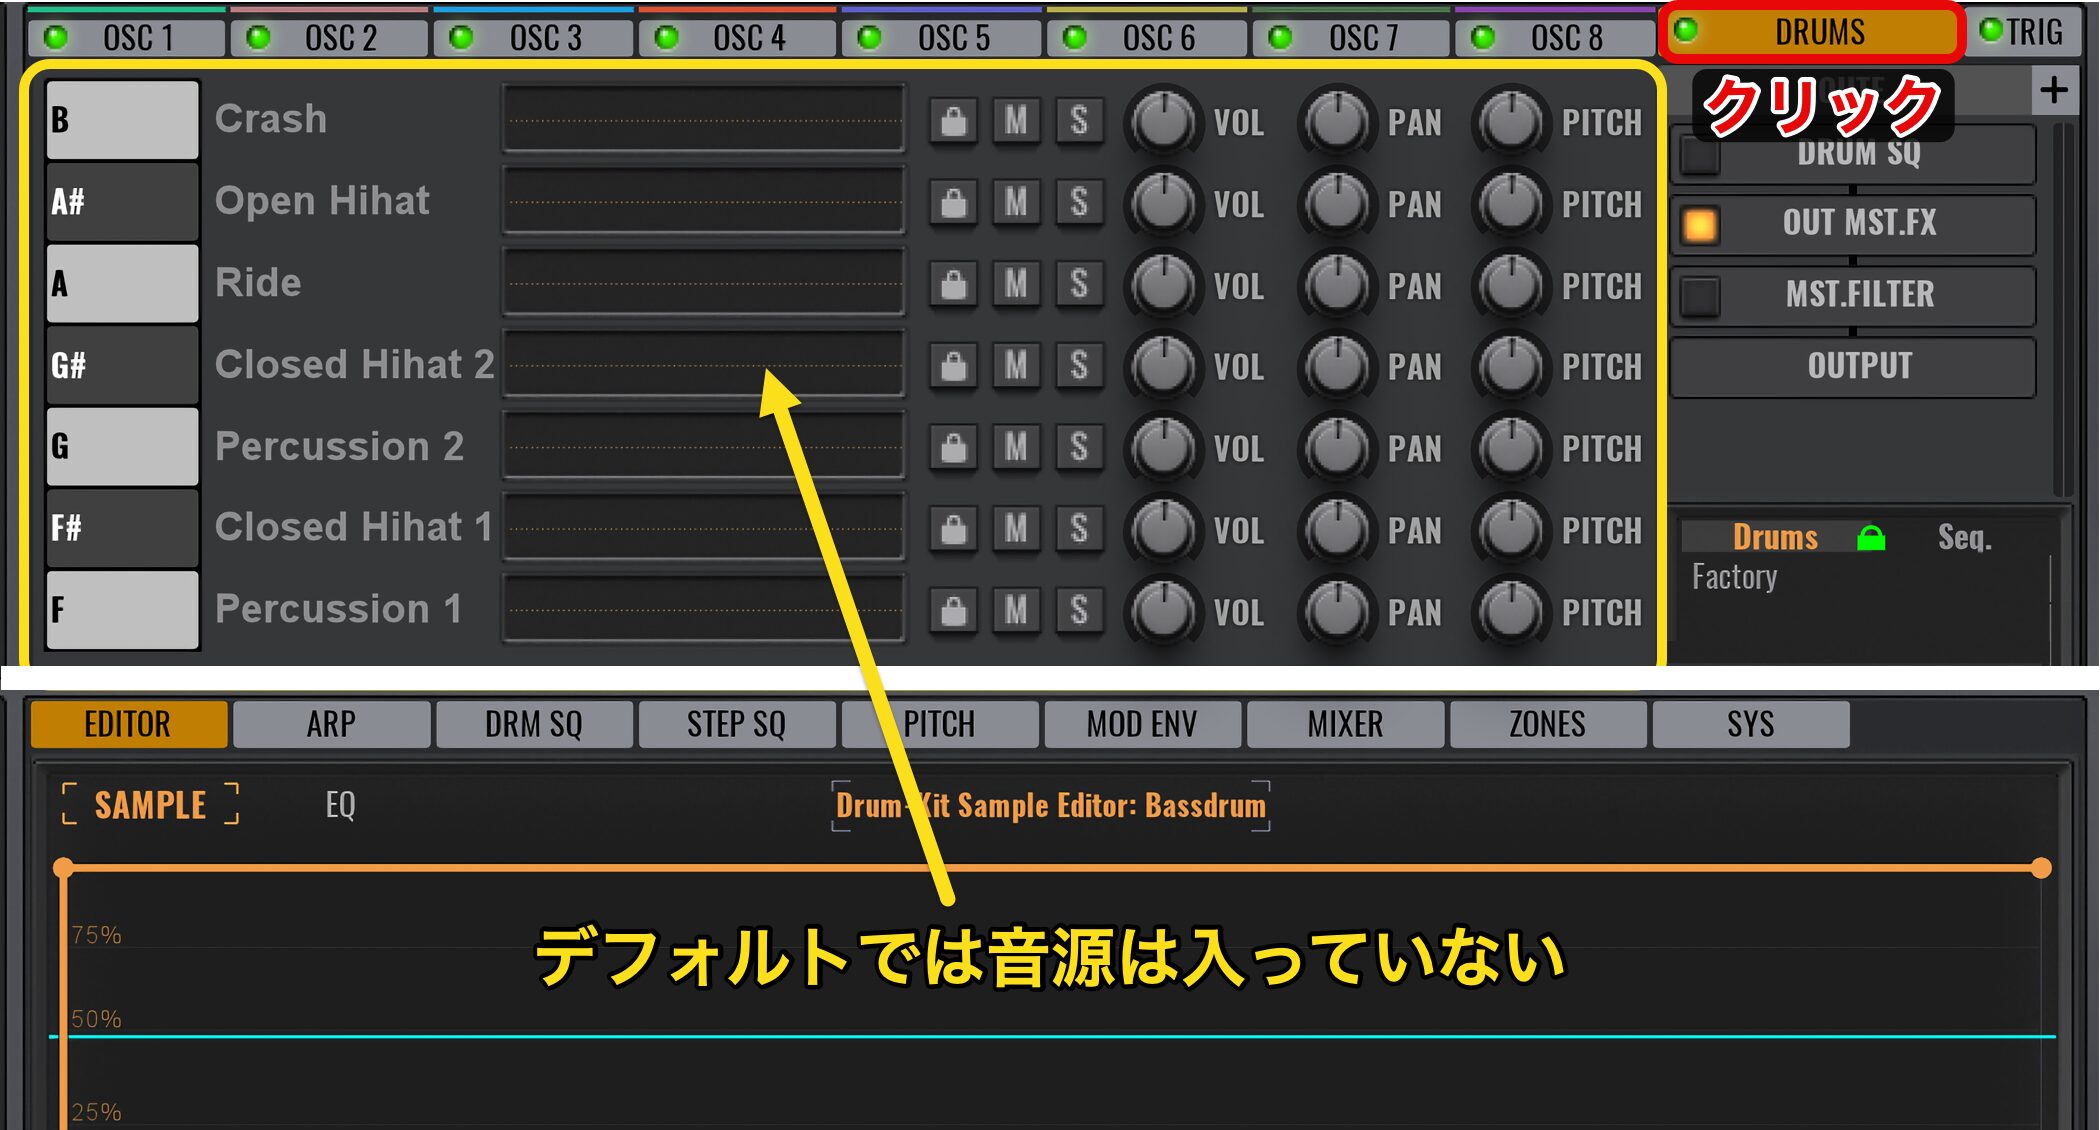
「DRUMS」タブで中身を確認してみましょう。
デフォルトでは音源が入っていません。
エリア右側の「Drums」の下にある「Factory」をダブルクリックします。
このようにDrumsのプリセットが表示されます。
右側にあるスライドバーでスクロールが可能です。
こう見ただけでも、数多くのプリセットがありますね。
これらは即戦力として使用できるビートばかりです。
読み込みたいプリセットを選択し、Avengerヘ読み込みます。
この際、音色を変更せずリズムパターンだけを読み込むことも可能です。
音色とパターンがロックされているため、両者が連動した状態で読み込まれます。
ロックを解除することで、音源やシーケンスのみを個別に変更することができます。
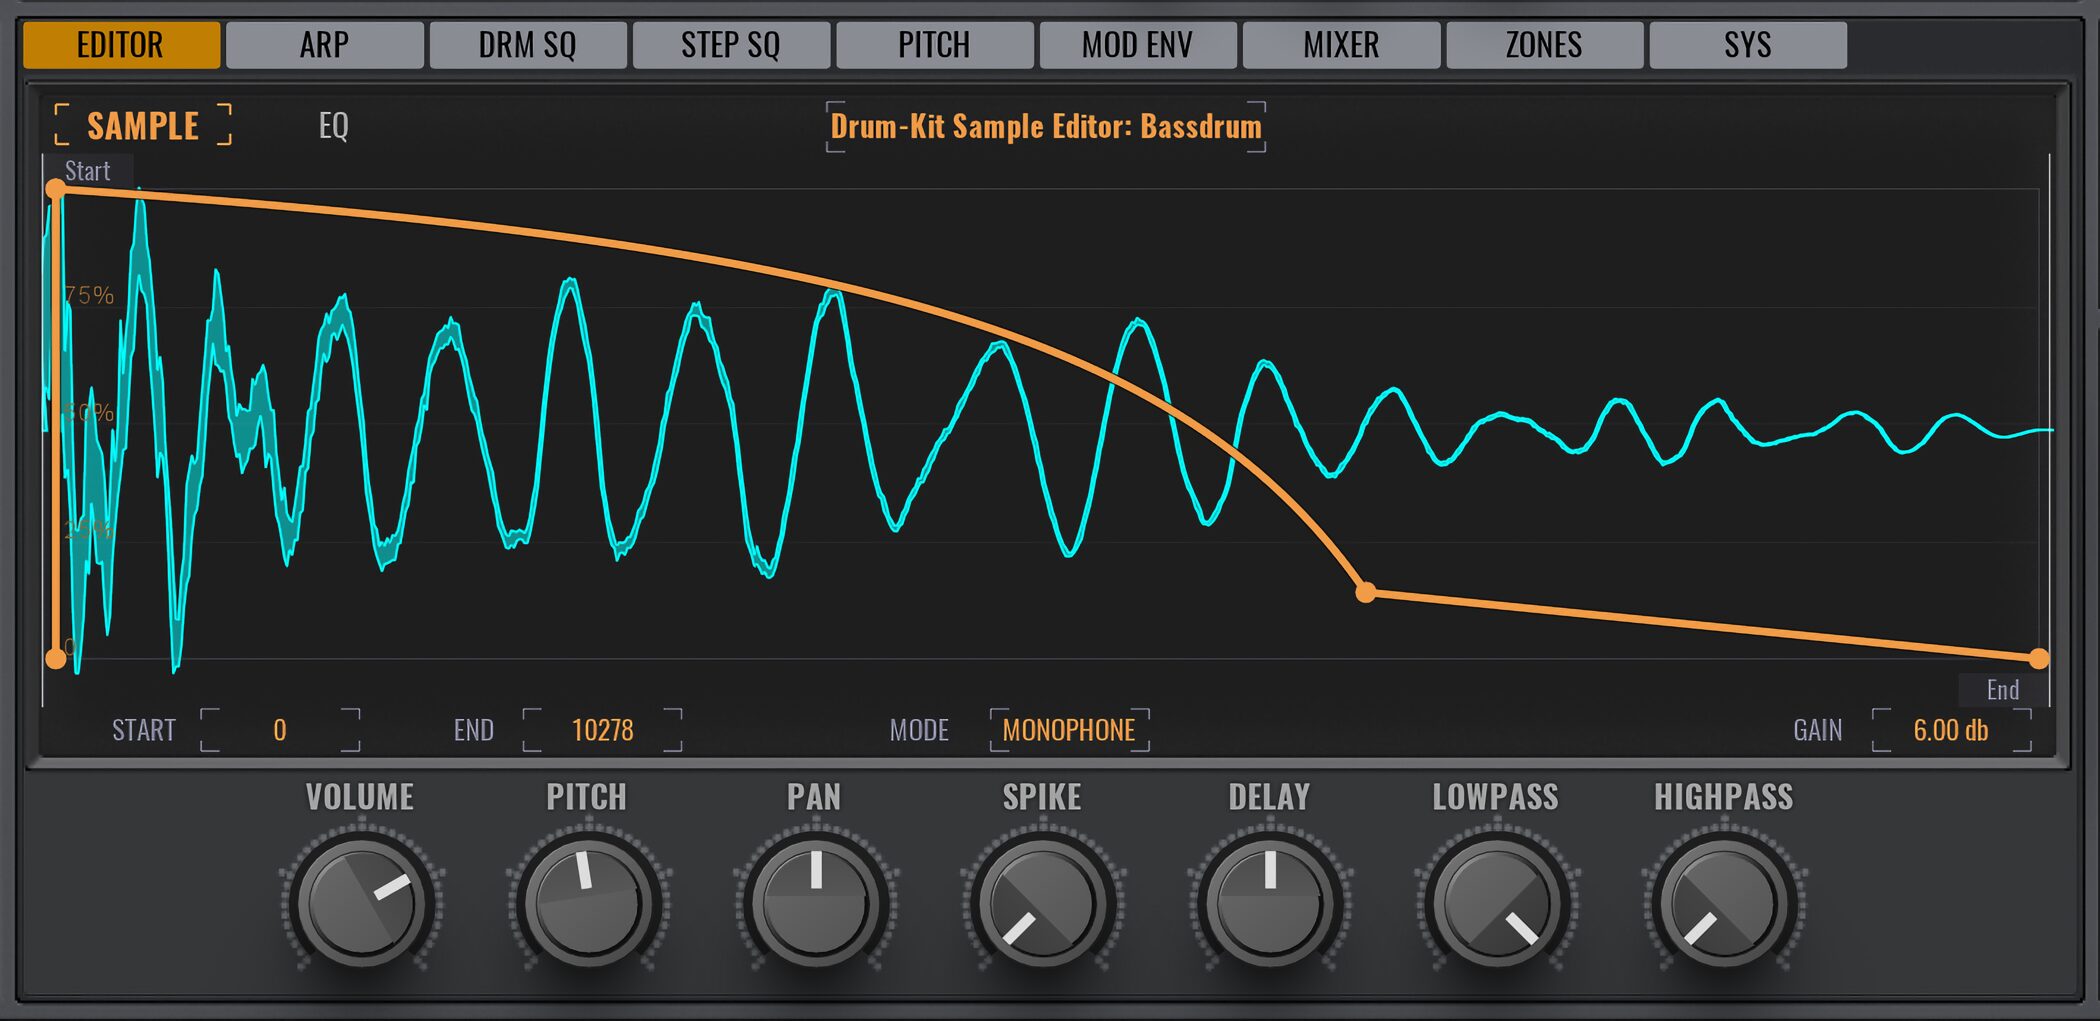
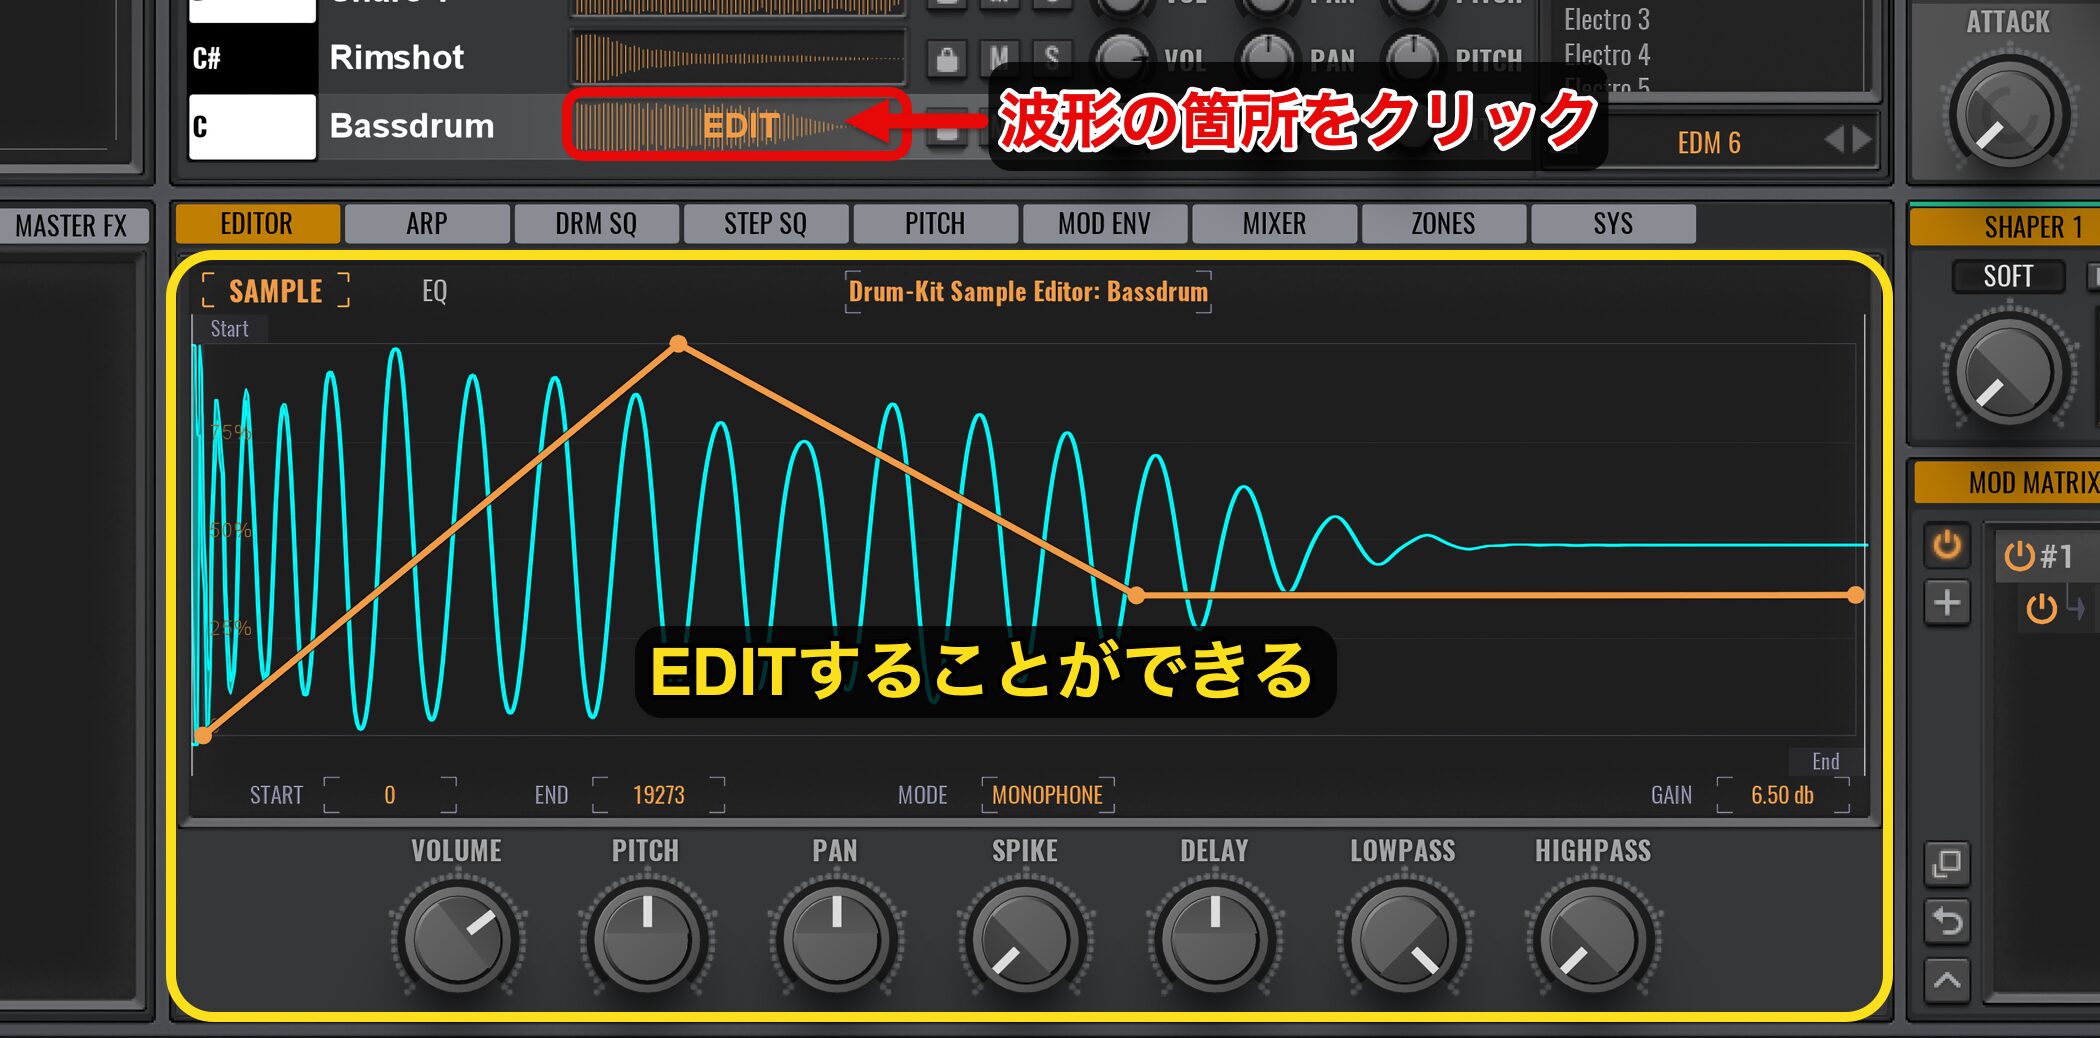
キック、スネアなど各音源の波形をクリックすると、LowPassやHighPass、Pan、Pitch、エンベロープなど詳細をEDITすることができるため、非常に細かくサウンドメイキングできますね!
もう1つ便利な機能として、Wav形式のサンプル音源を読み込むことができます。
目的のファイルを直接Avengerヘドラッグ&ドロップするだけです。
とても簡単ですね。
Drumsシーケンスのエディット
プリセットが十分とはいえ、楽曲に合わせてパターンを変更したいという場面も多いです。
次に、Drumsのシーケンスエディットに進みましょう。
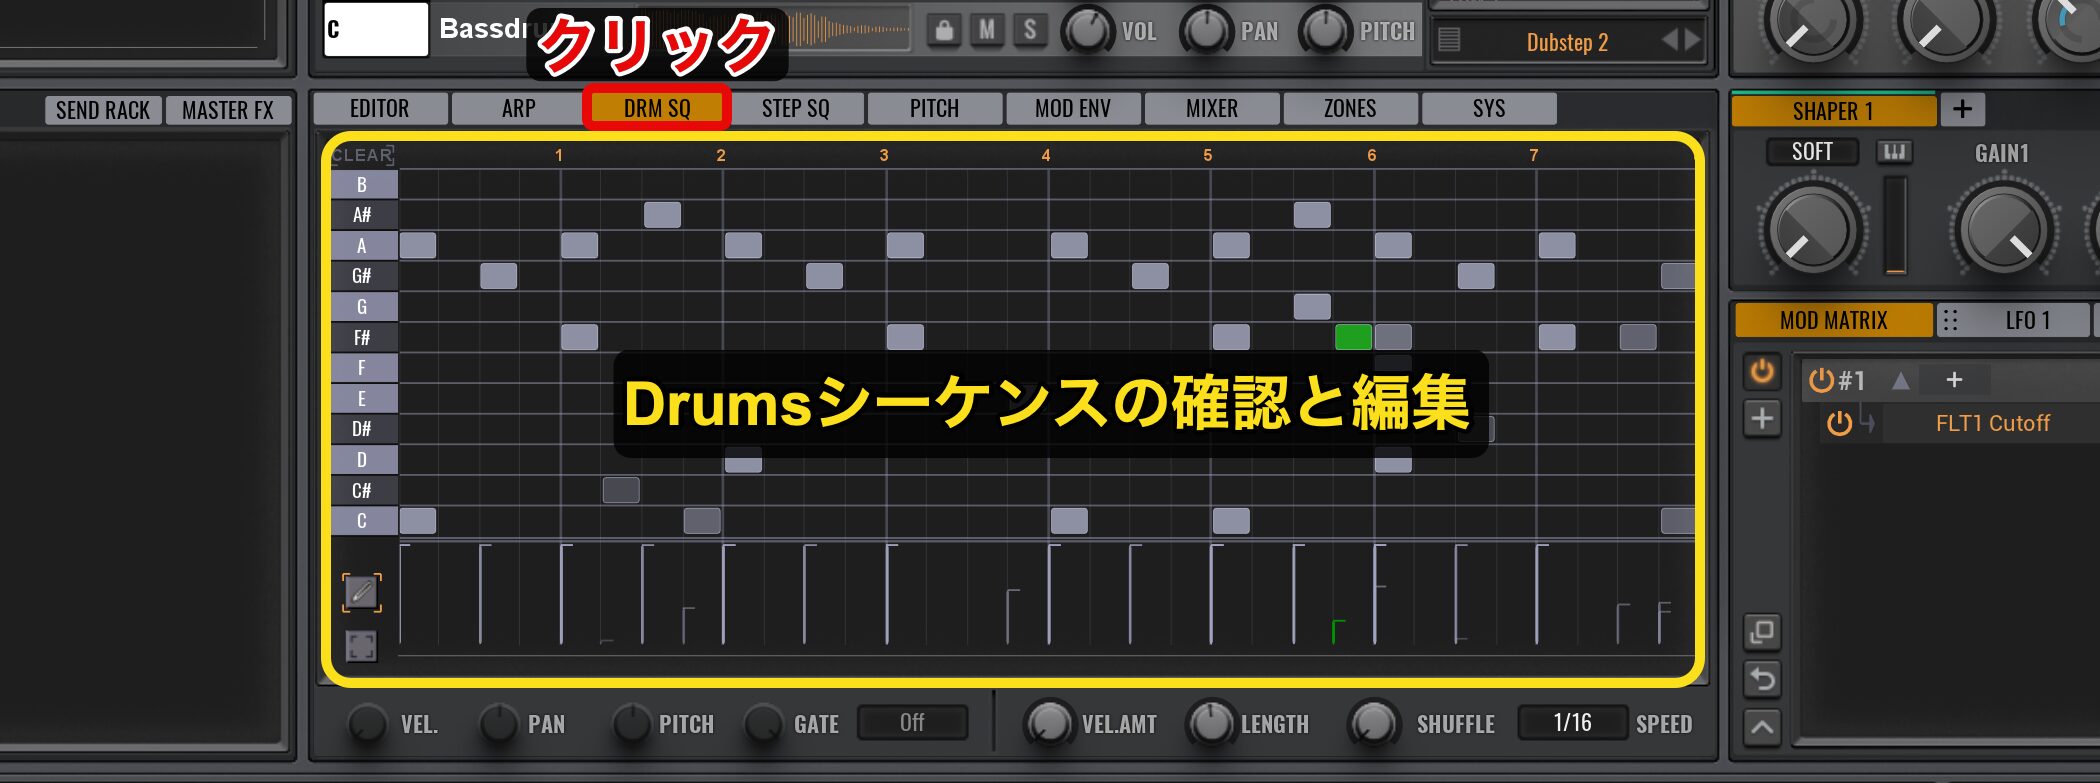
中央下部分にある「DRM SQ」タブをクリックすると、Drumsシーケンスの確認と編集が行えます。
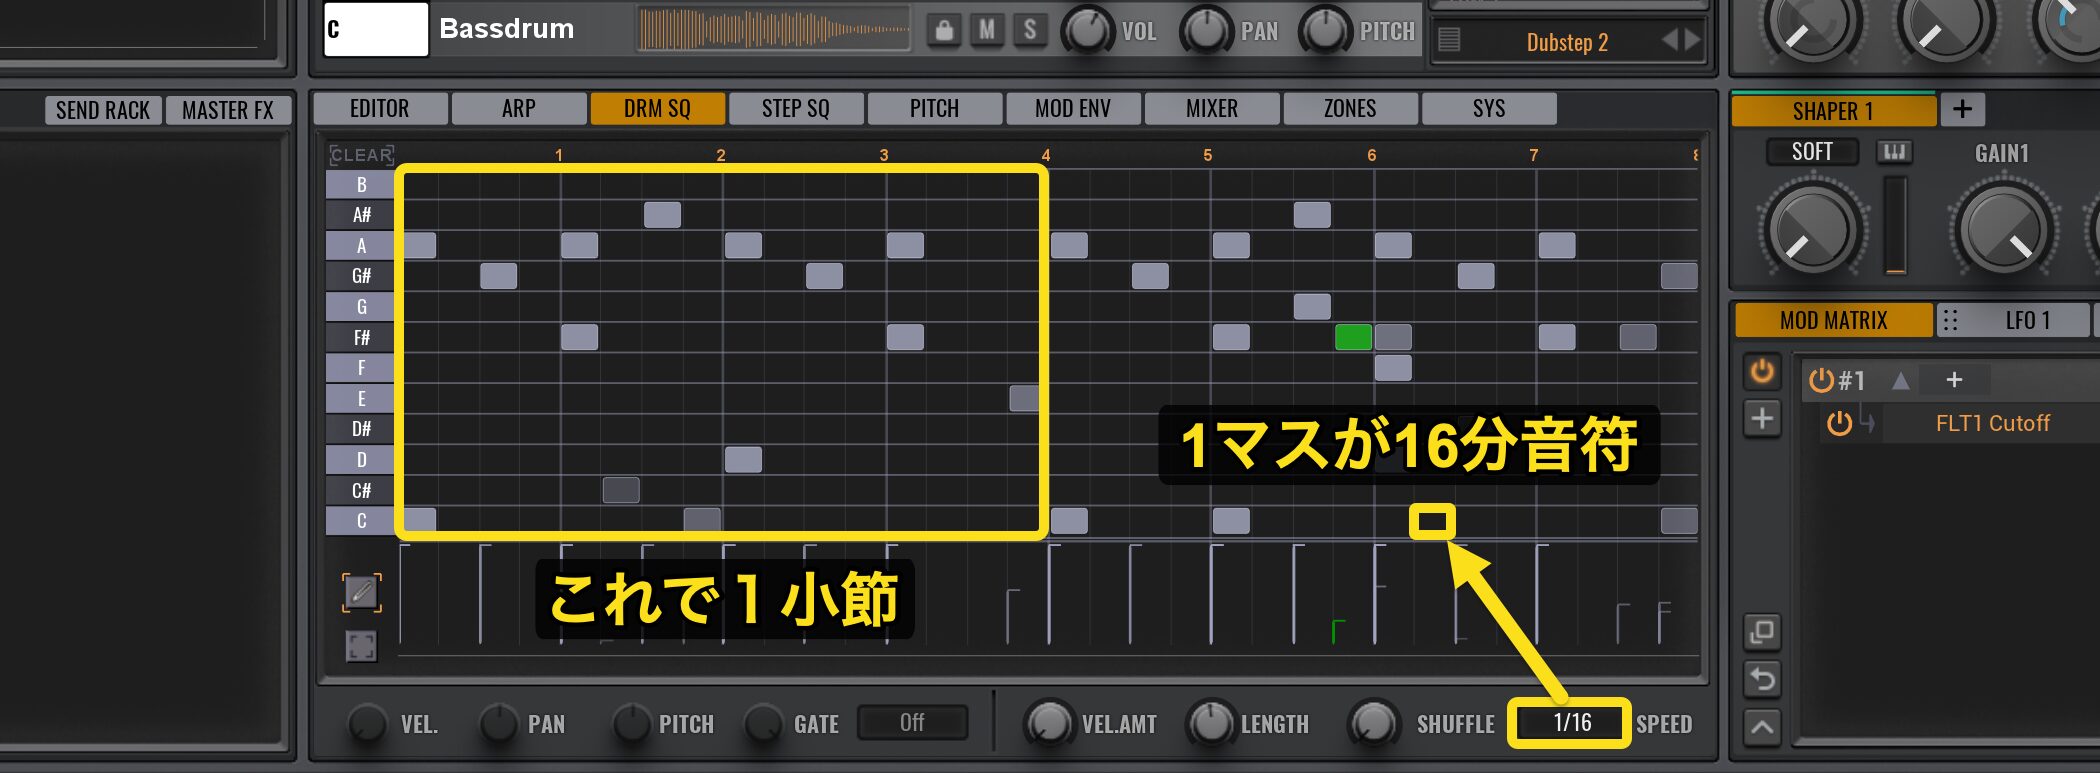
現在は右下にあるSpeedが1/16になっているため、マス目1つが16分音符で表示されています。
もちろん他の音価(音符が持つ長さ)を選択して、表示を変更することも可能です。
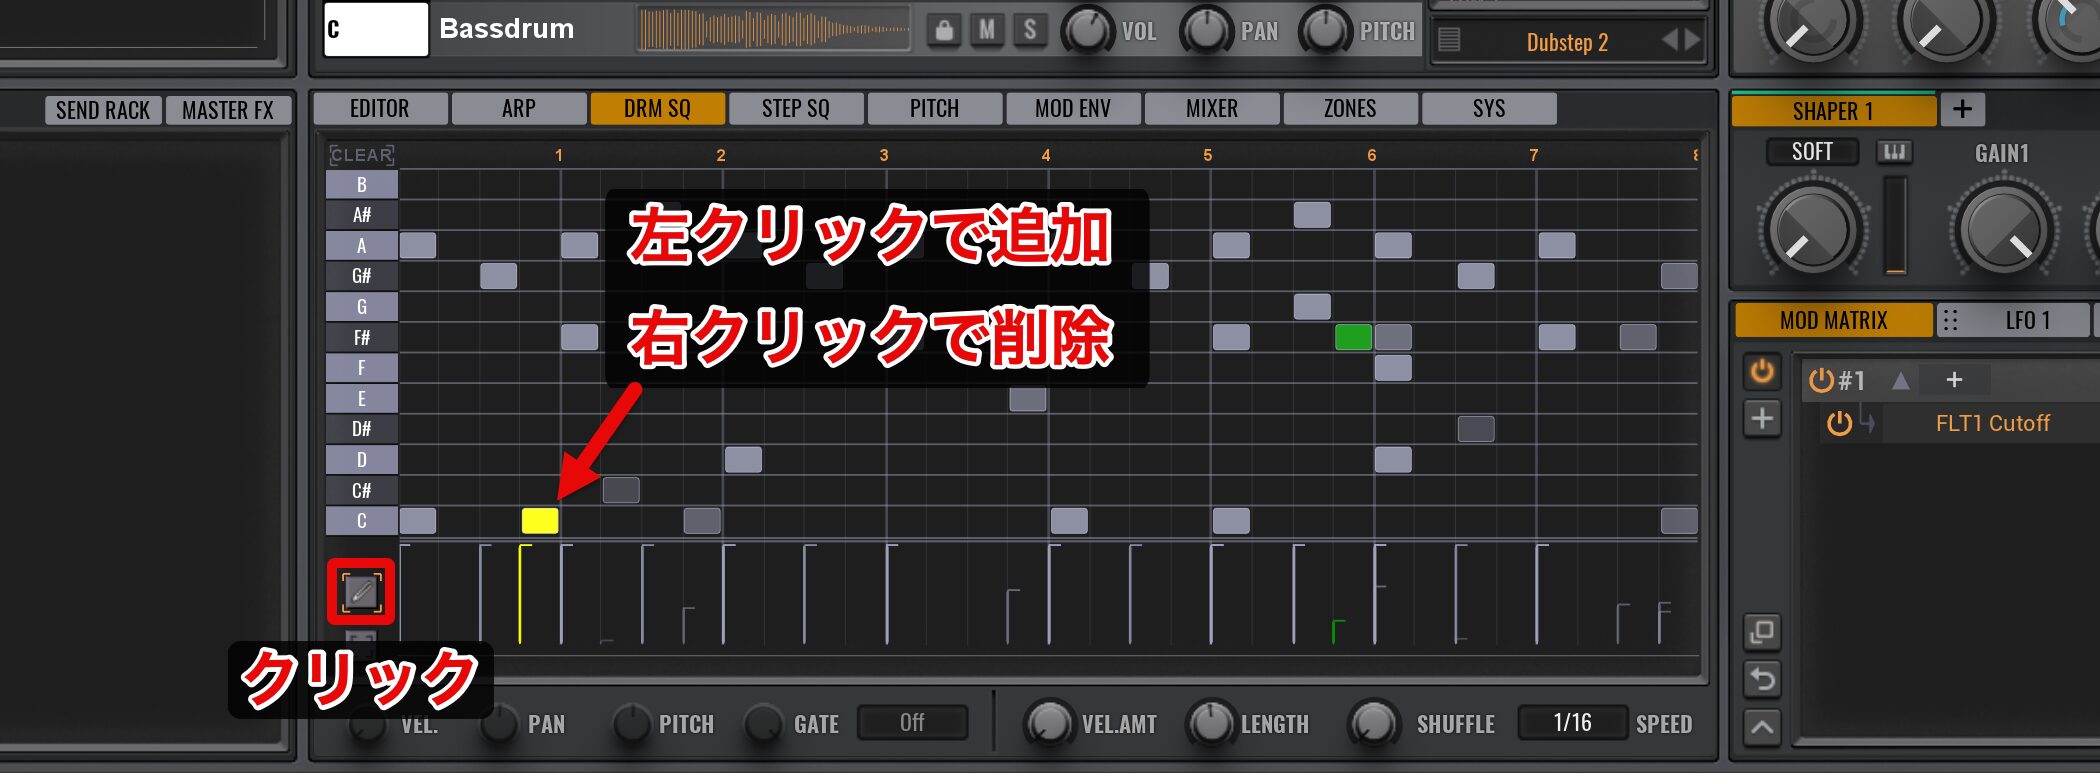
演奏を増やしたい場合は、鍵盤の下にあるペンマークをクリックして、打ち込みたい箇所を左クリックするだけです。
演奏を削除する場合は、ペンツールのまま目的のノートを右クリックします。
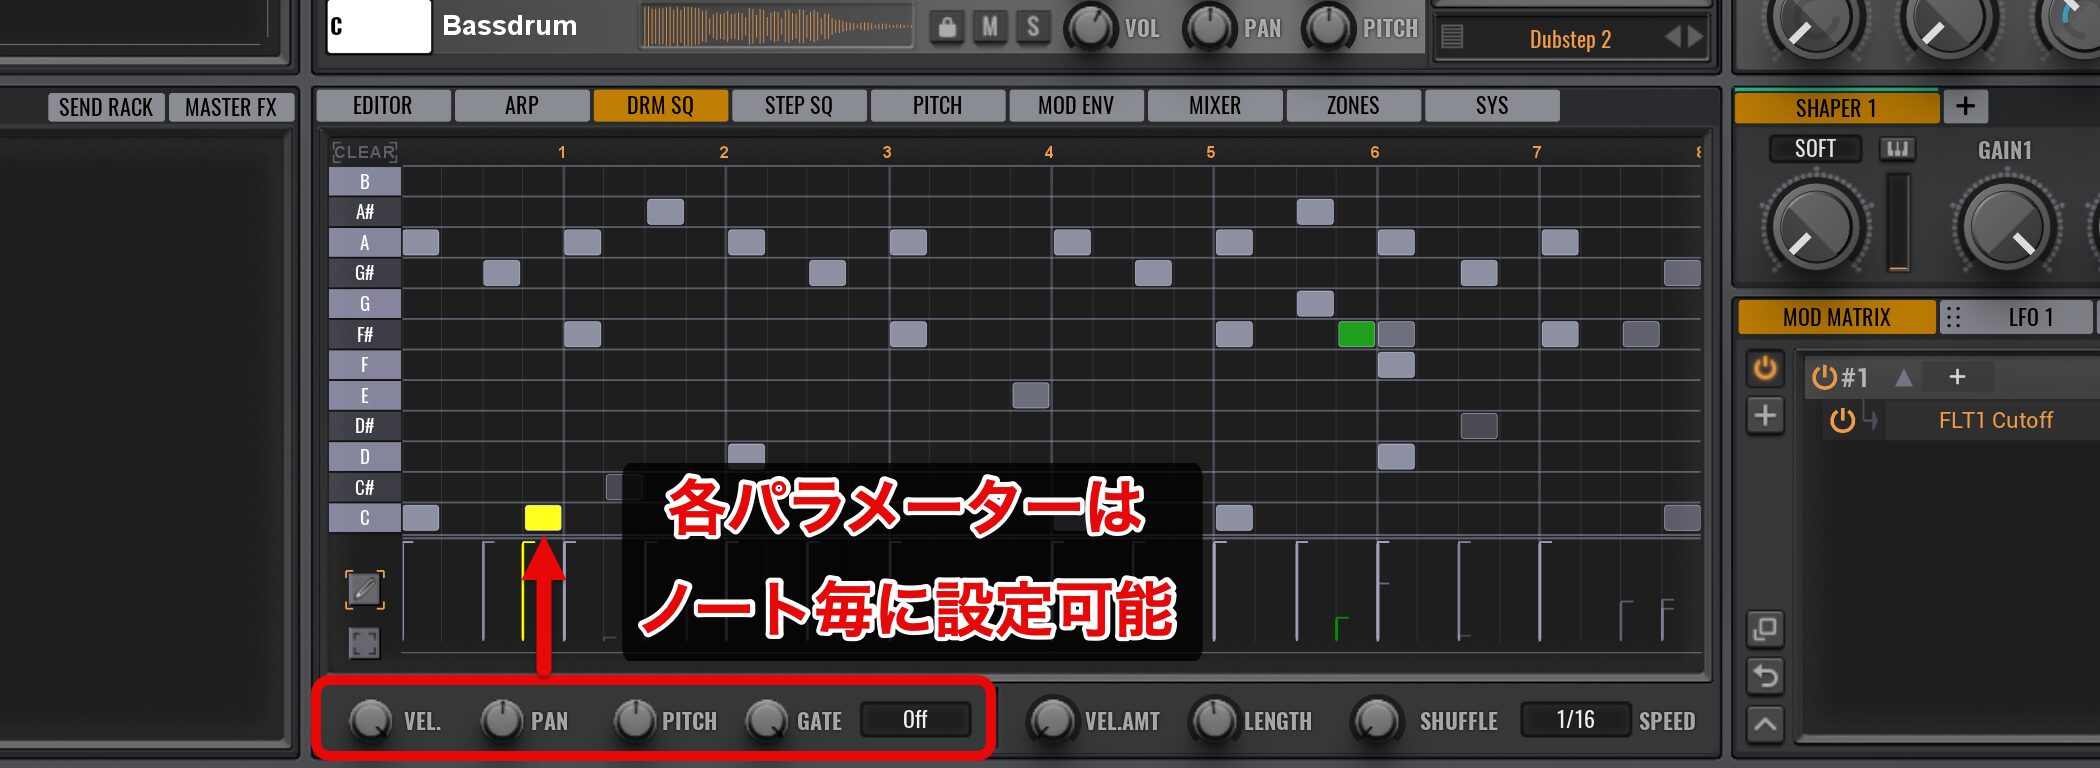
下にあるパラメーターのうち、左側の4つとReverse、Roll(Offの箇所)は、それぞれ打ち込んだノート毎に個別設定が可能です。
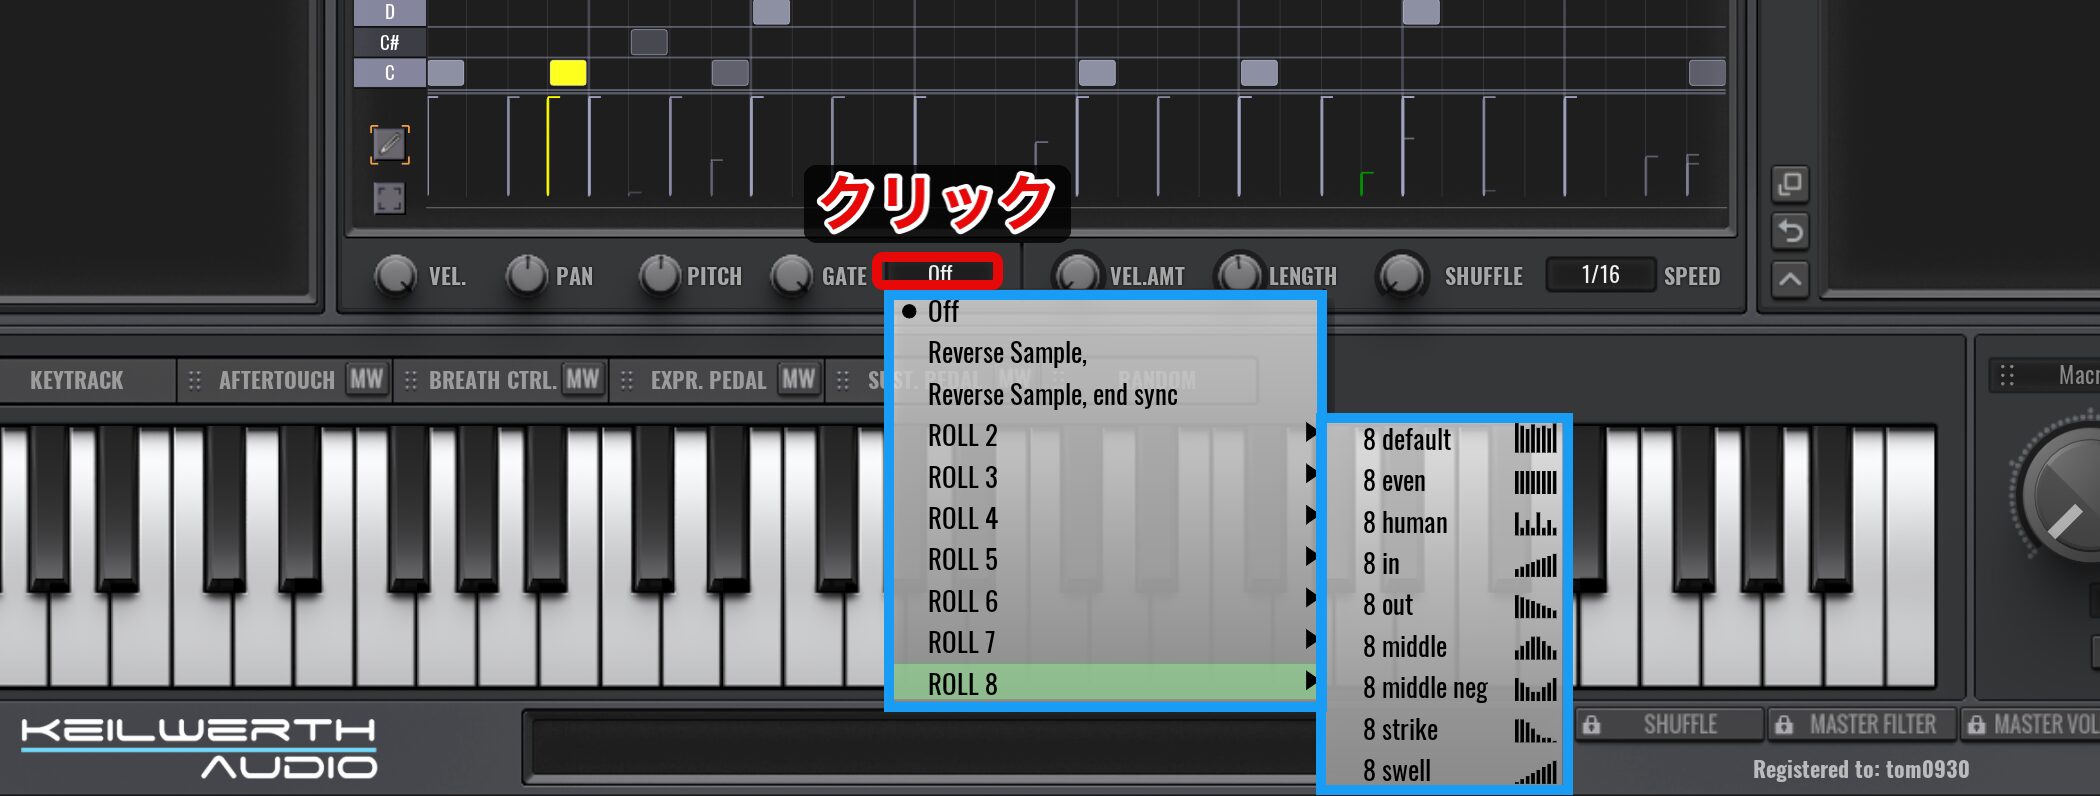
Offの箇所をクリックすると、ReverseとRollを適用することができます。
Rollでは、回数や細かいニュアンスを指定できます。
連打も簡単に表現できますね。
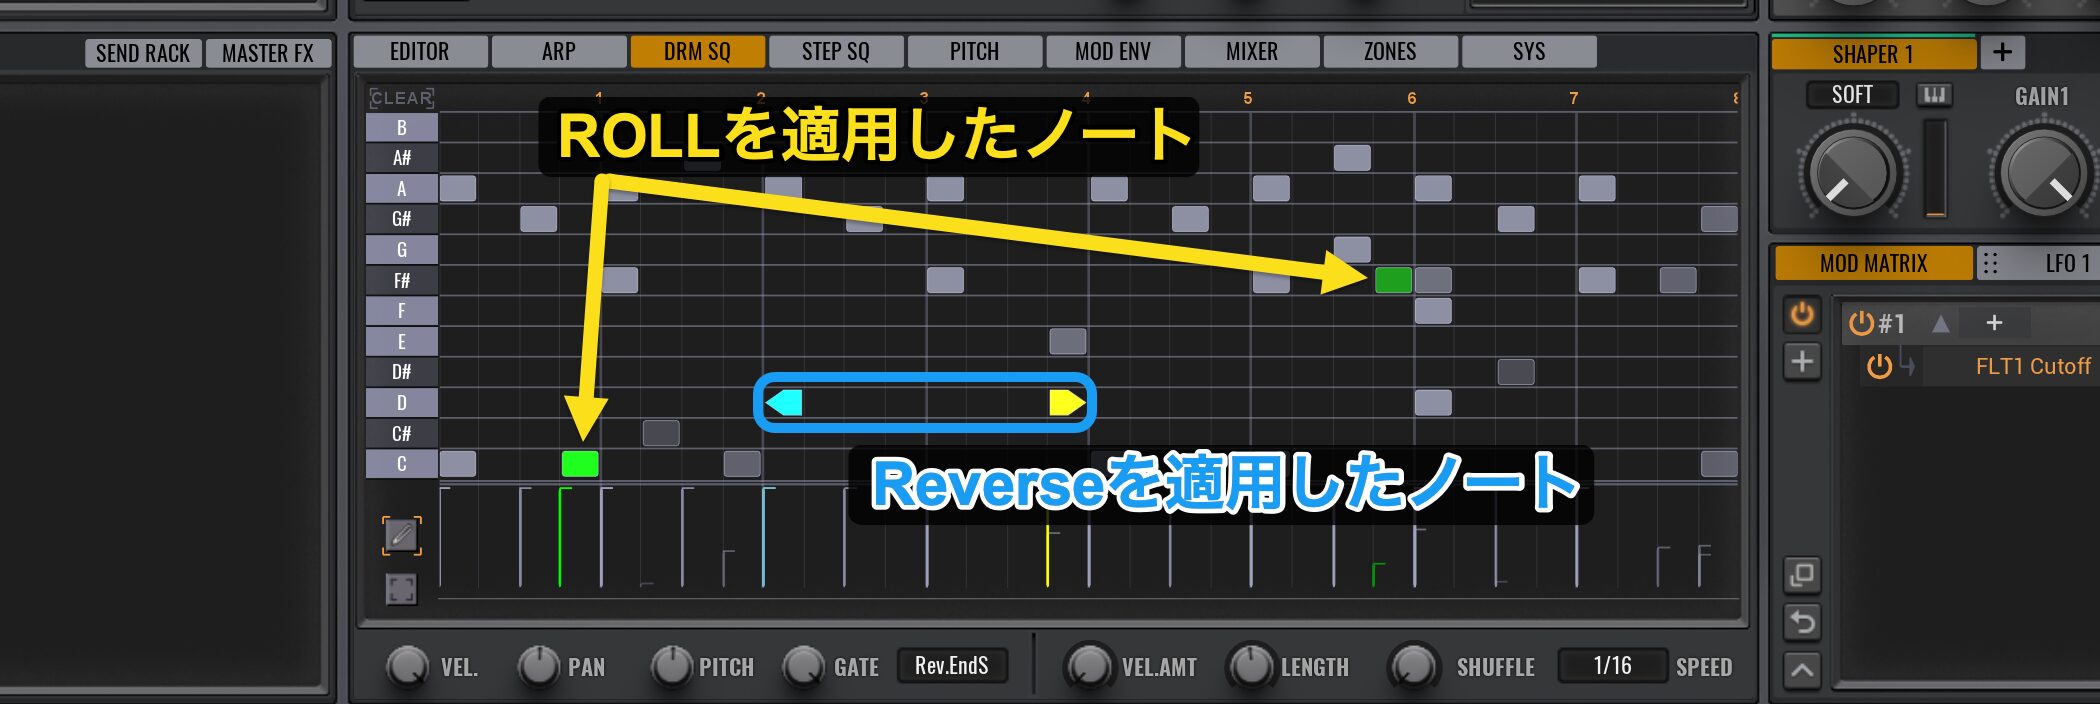
Rollがオンになっている場合は、ノートが緑色で表示されます。
また、Reverseの場合は、ノートの形が変わるのでわかりやすいですね。
現在は2小節のパターンですが、小節の長さを変更したいという場合もあります。
下に用意されている「LENGTH」から、簡単に小節数を変更できます。
パターンの複製(Repeat機能)
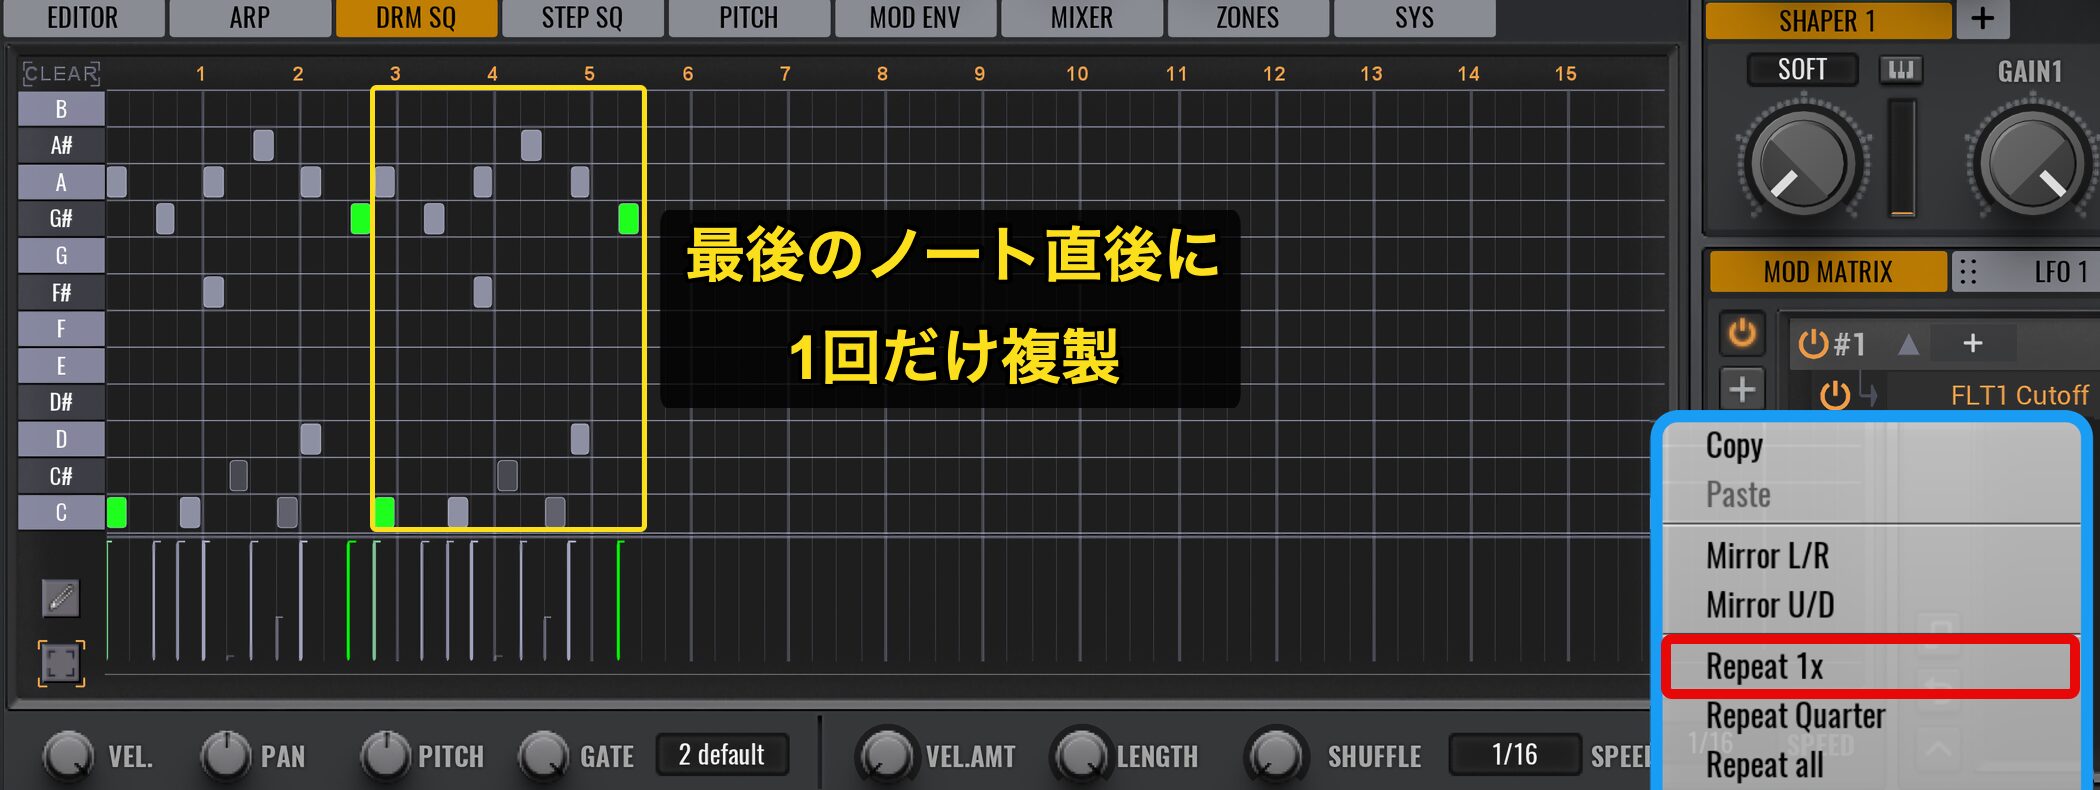
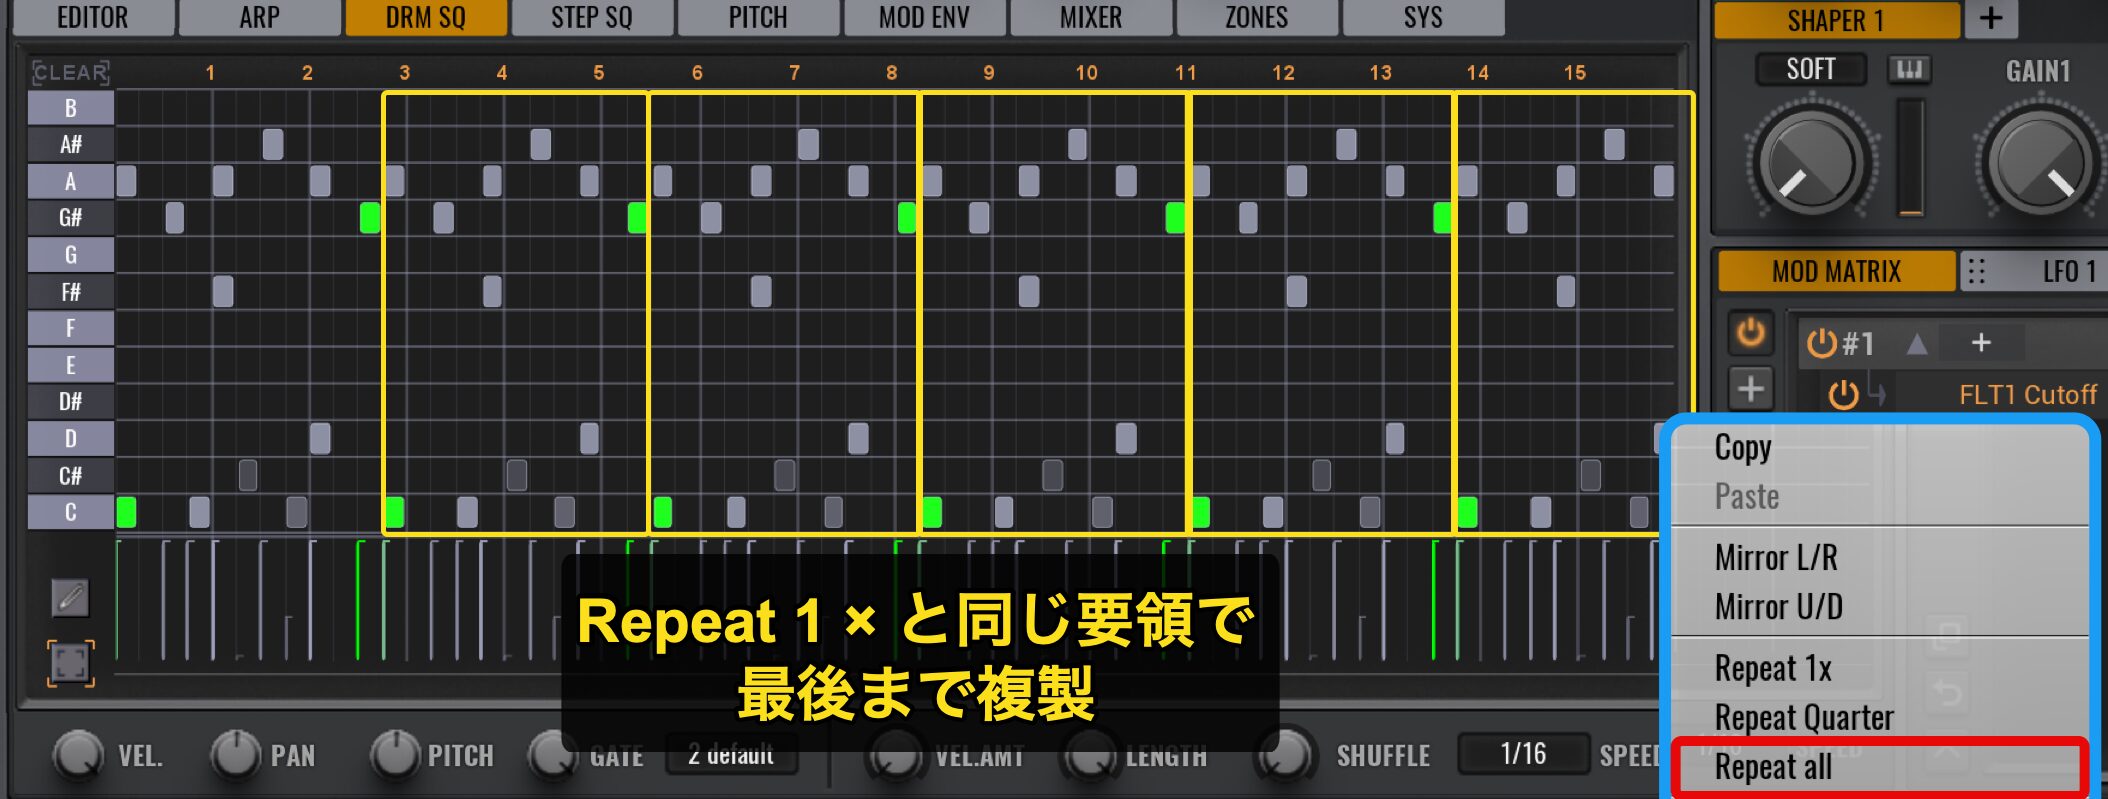
作成したパターンを複製したい場合は、ペンツールの下の箱をクリックして、複製したい範囲をドラッグします。
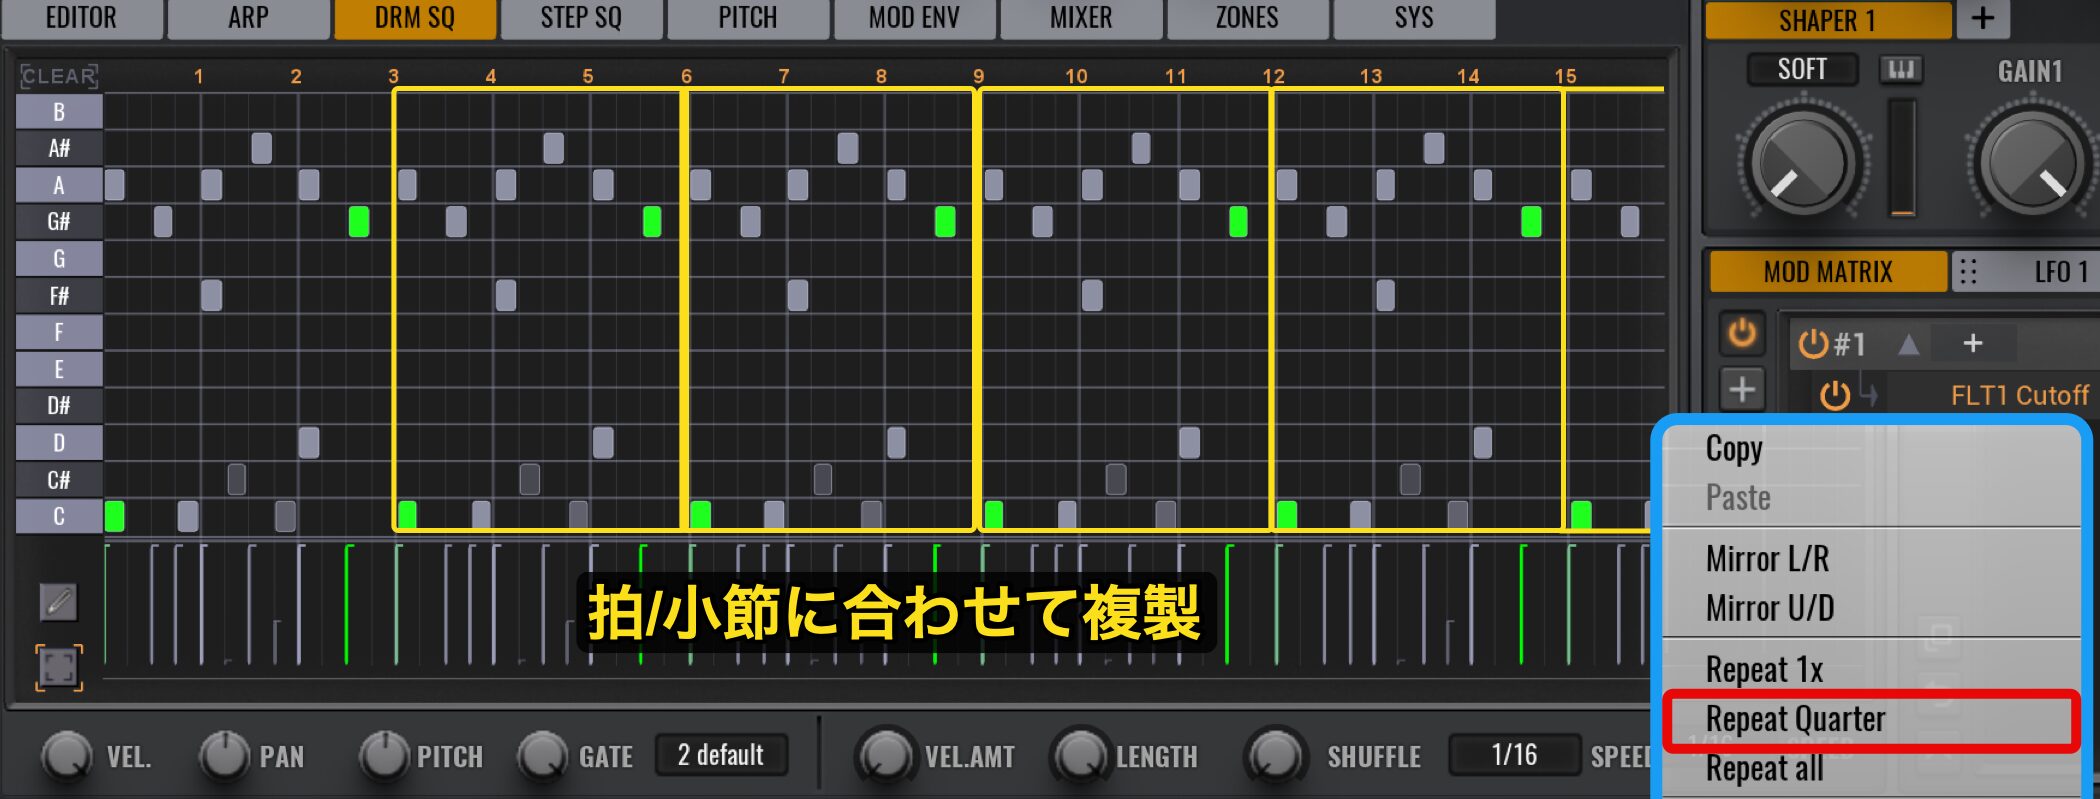
どこでも構いませんので右クリックして、「Repeat Quarter」を選択します。
このように、簡単に複製できます。
複製には、下記の3つの種類があります。
- Repeat 1×
- Repeat All
- Repeat Quarter
「Repeat 1×」は、一番最後の音の直後に、選択範囲が1回だけ複製されます。
「Repeat All」は、Repeat 1×と同じ要領ですが、パターンが小節の最後まで複製されます。
「Repeat Quarter」は、拍/小節との整合性を考慮してパターンが複製されます。
ドラム音色/パターンの保存
作成したシーケンスやDrums音色を保存しておくことも可能です。
「Save Drumkit as」で音色の保存となり、「Save Sequence as」でパターンとなります。
各キットのパラアウト
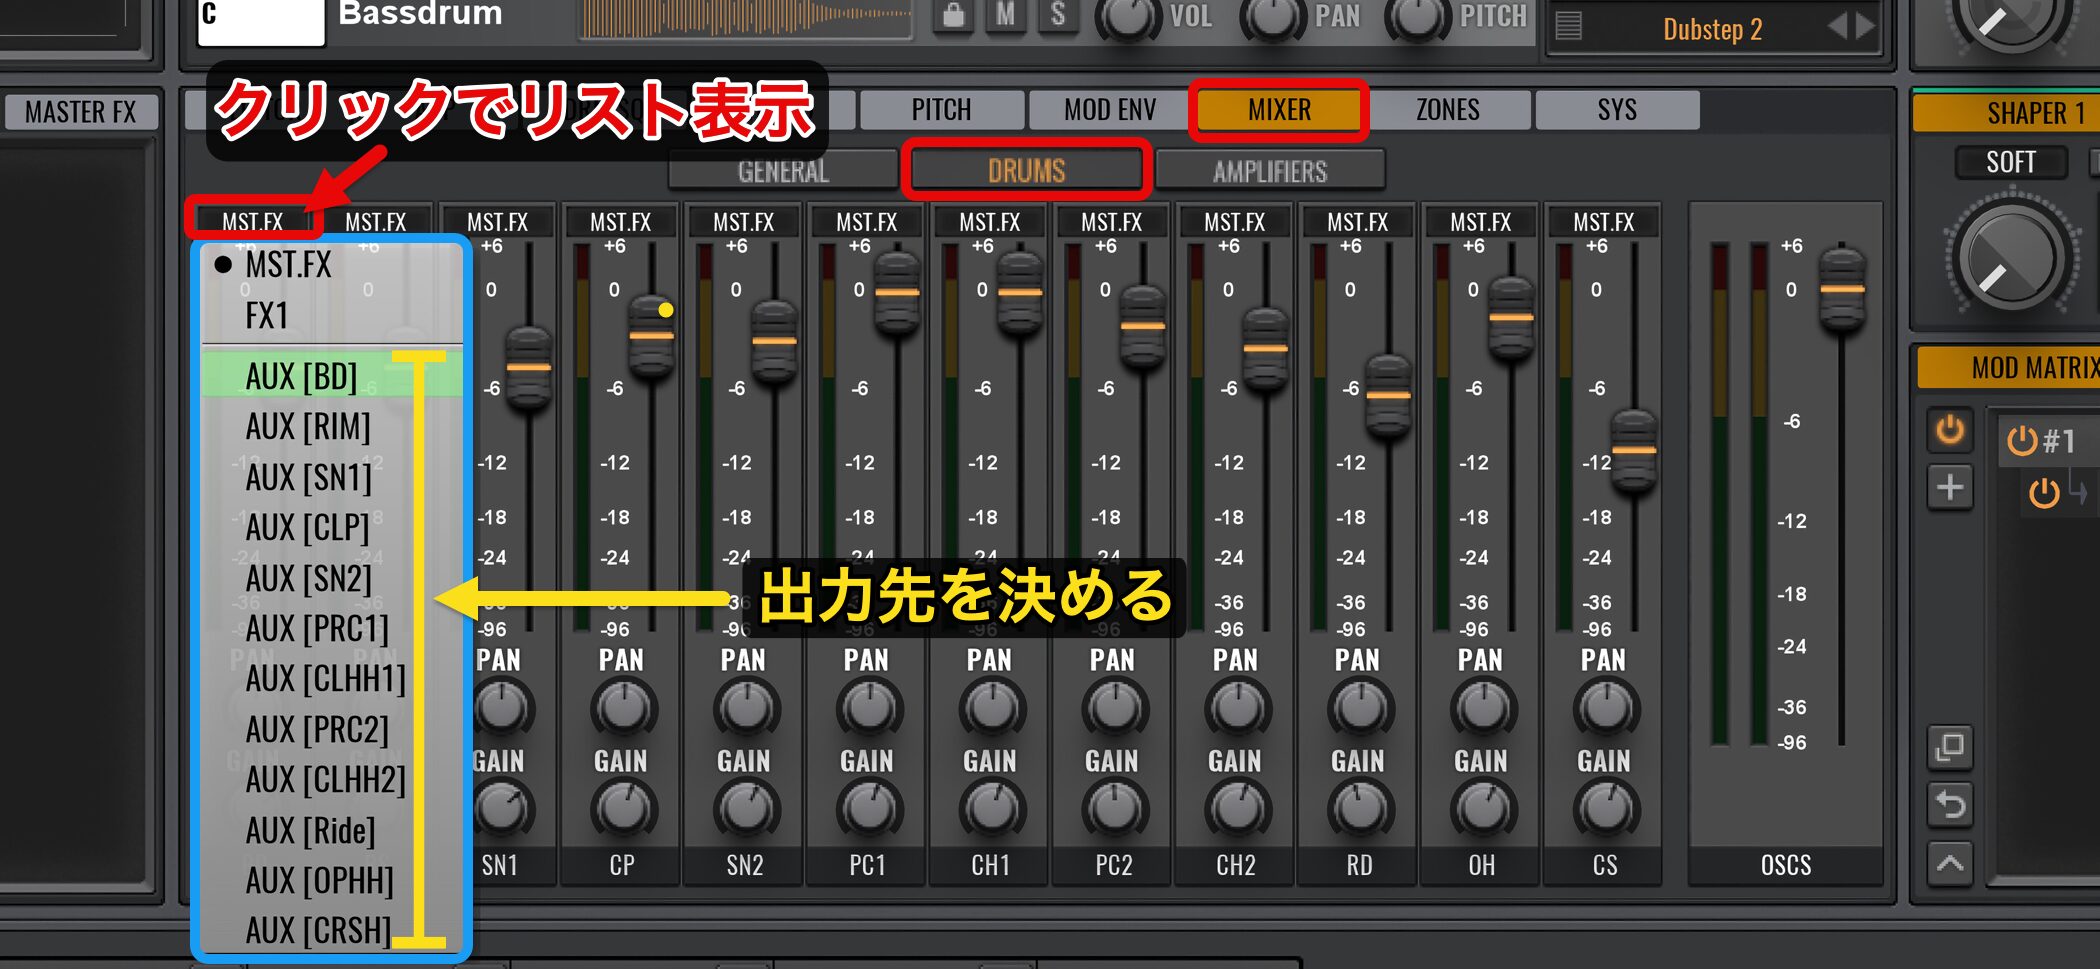
作成したビートへ磨きをかけるために、各キットに対して個別にEQ/Compを適用していくこともできます。
この方法をパラアウトと呼びます。
「MIXER」タブをクリックして、中央の「DRUMS」を選択します。
各チャンネル上部の「MST.FX」と書いてある箇所をクリックし、出力先を変更するだけです。
その後に各DAWでパラアウト設定を行います。
ソフトシンセをパラアウトする
Avengerは、プリセットも音が良く、シーケンスもそのまま使えるものが多いですね。
パラアウトを取り入れることで、MIXバランスも取りやすくなります。
まるまる一曲ループに使ってもよし、曲の一部のアクセントに使ってもよし、作曲初期段階のイメージづけのビートに使ってもよしと、幅広い活用法がありますね。
オシレーターをコントロールして目的のサウンドに近づける
続いて、Avengerの強力なオシレーター(OSC)部分について解説していきます。
サウンドの基となるオシレーターをどのように扱うか?によって、サウンドは大きく変わってきます。
目的のサウンドに素早く近づけることができるように、しっかりと習得していきましょう。
Avenger 動画 : OSCコントロール 波形/ボイス/ポルタメント
オシレーターの波形選択とユニゾン
冒頭の解説でもお伝えしましたが、サウンドはデフォルトの状態でリバーブやディレイが適用されています。
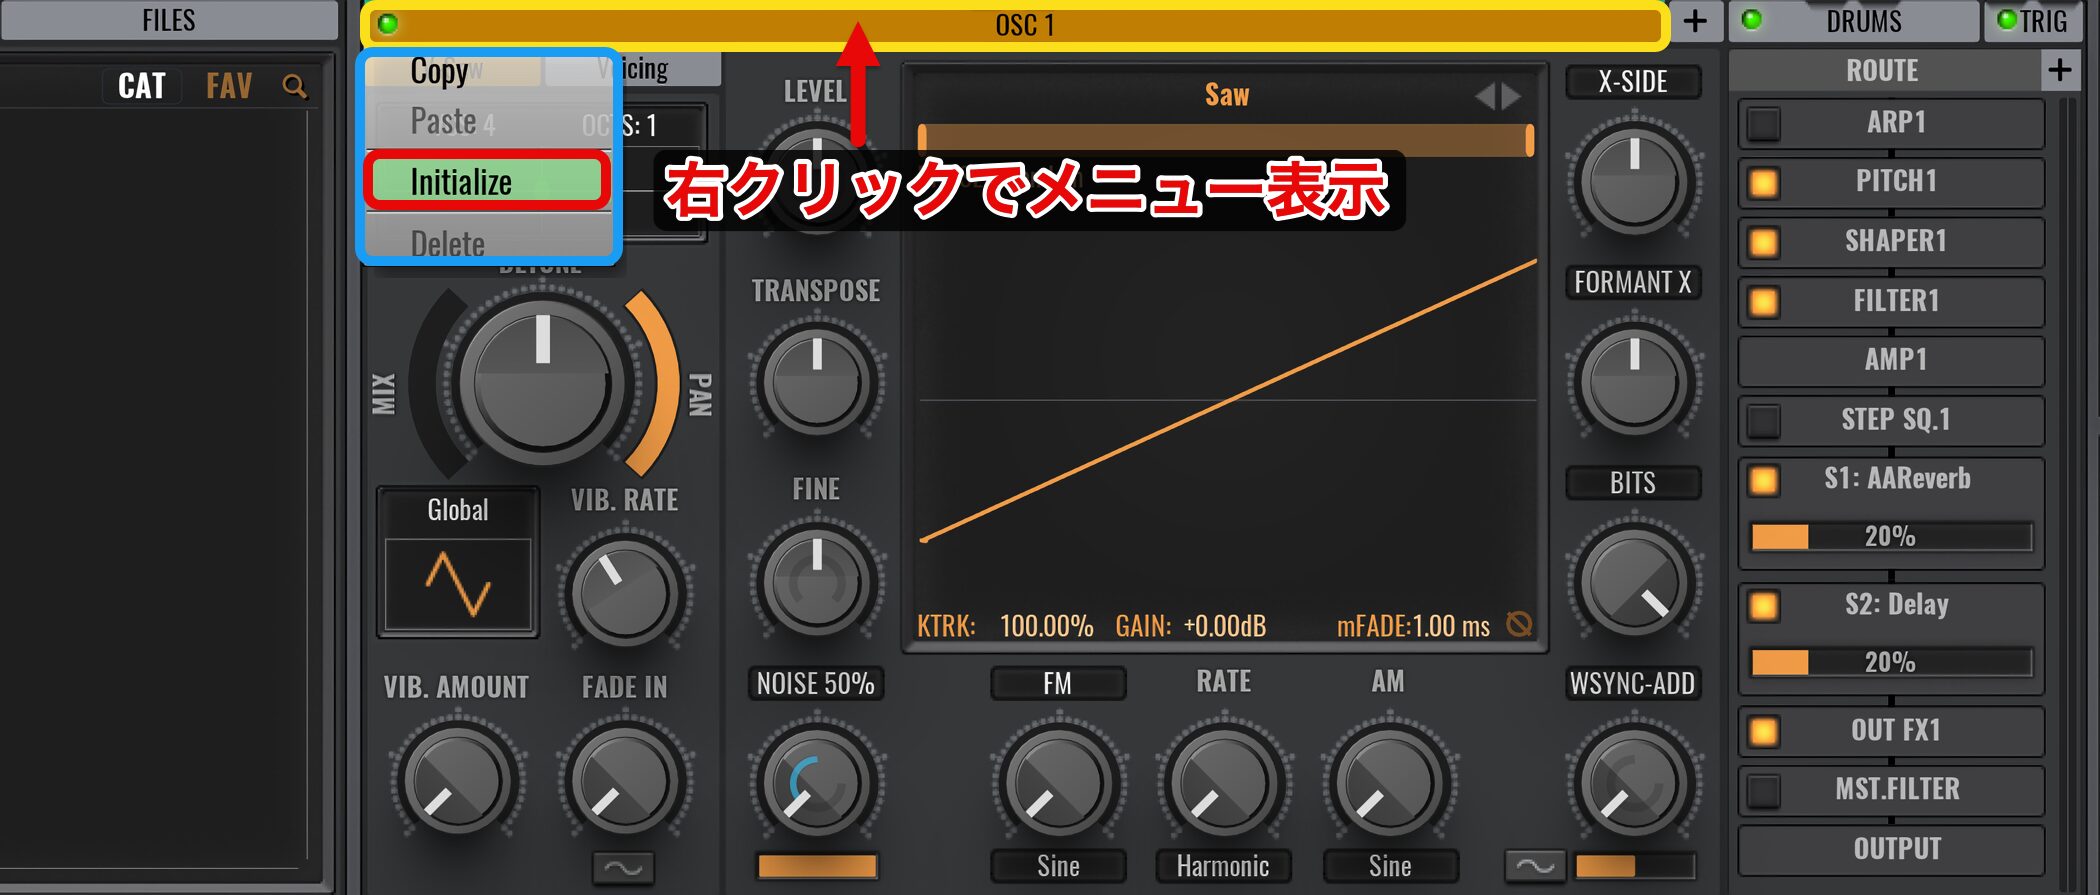
これらを解除するには、「OSC」タブを右クリックし「Initialize」を選択します。
これで着色のない純粋なサウンドを鳴らすことができます。
SuperSawを作成する
デフォルトのオシレーターはSawが選択されていますので、このまま使用し、SuperSawのバッキングを作成していきましょう。
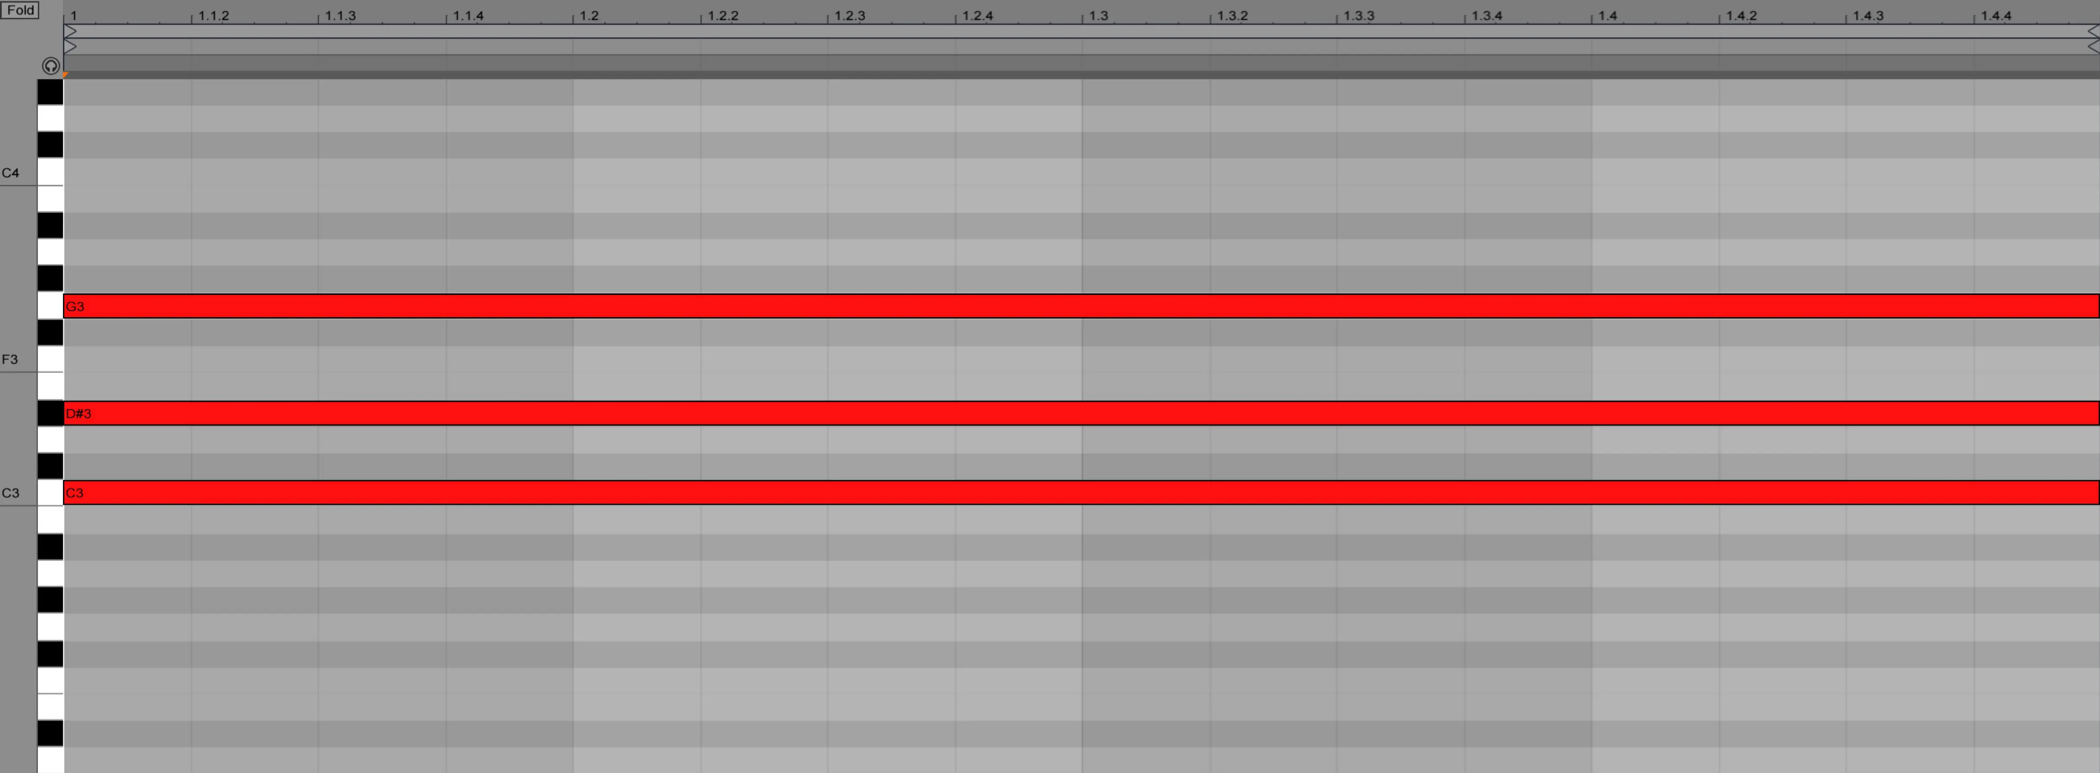
あらかじめ、和音の刻みを打ち込んであります。
Avengerの場合、SuperSawを簡単に作成可能です。
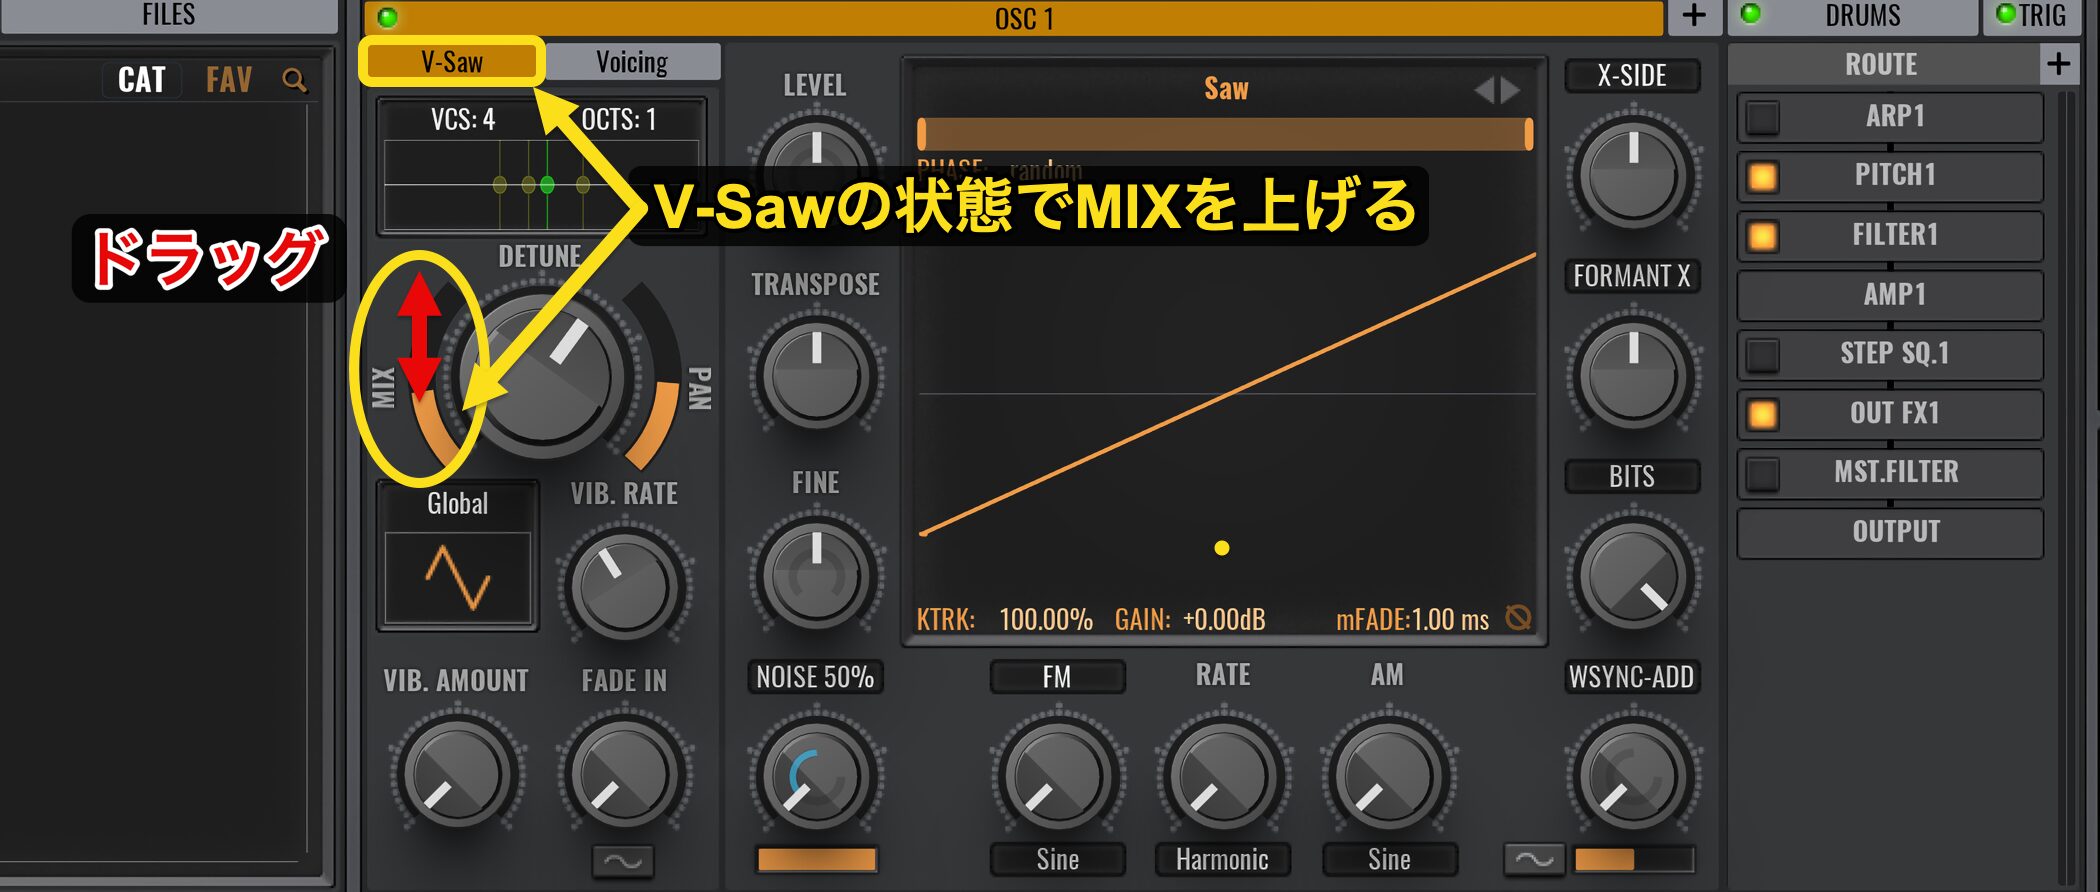
V-Sawの状態でMIXを上げるだけです。
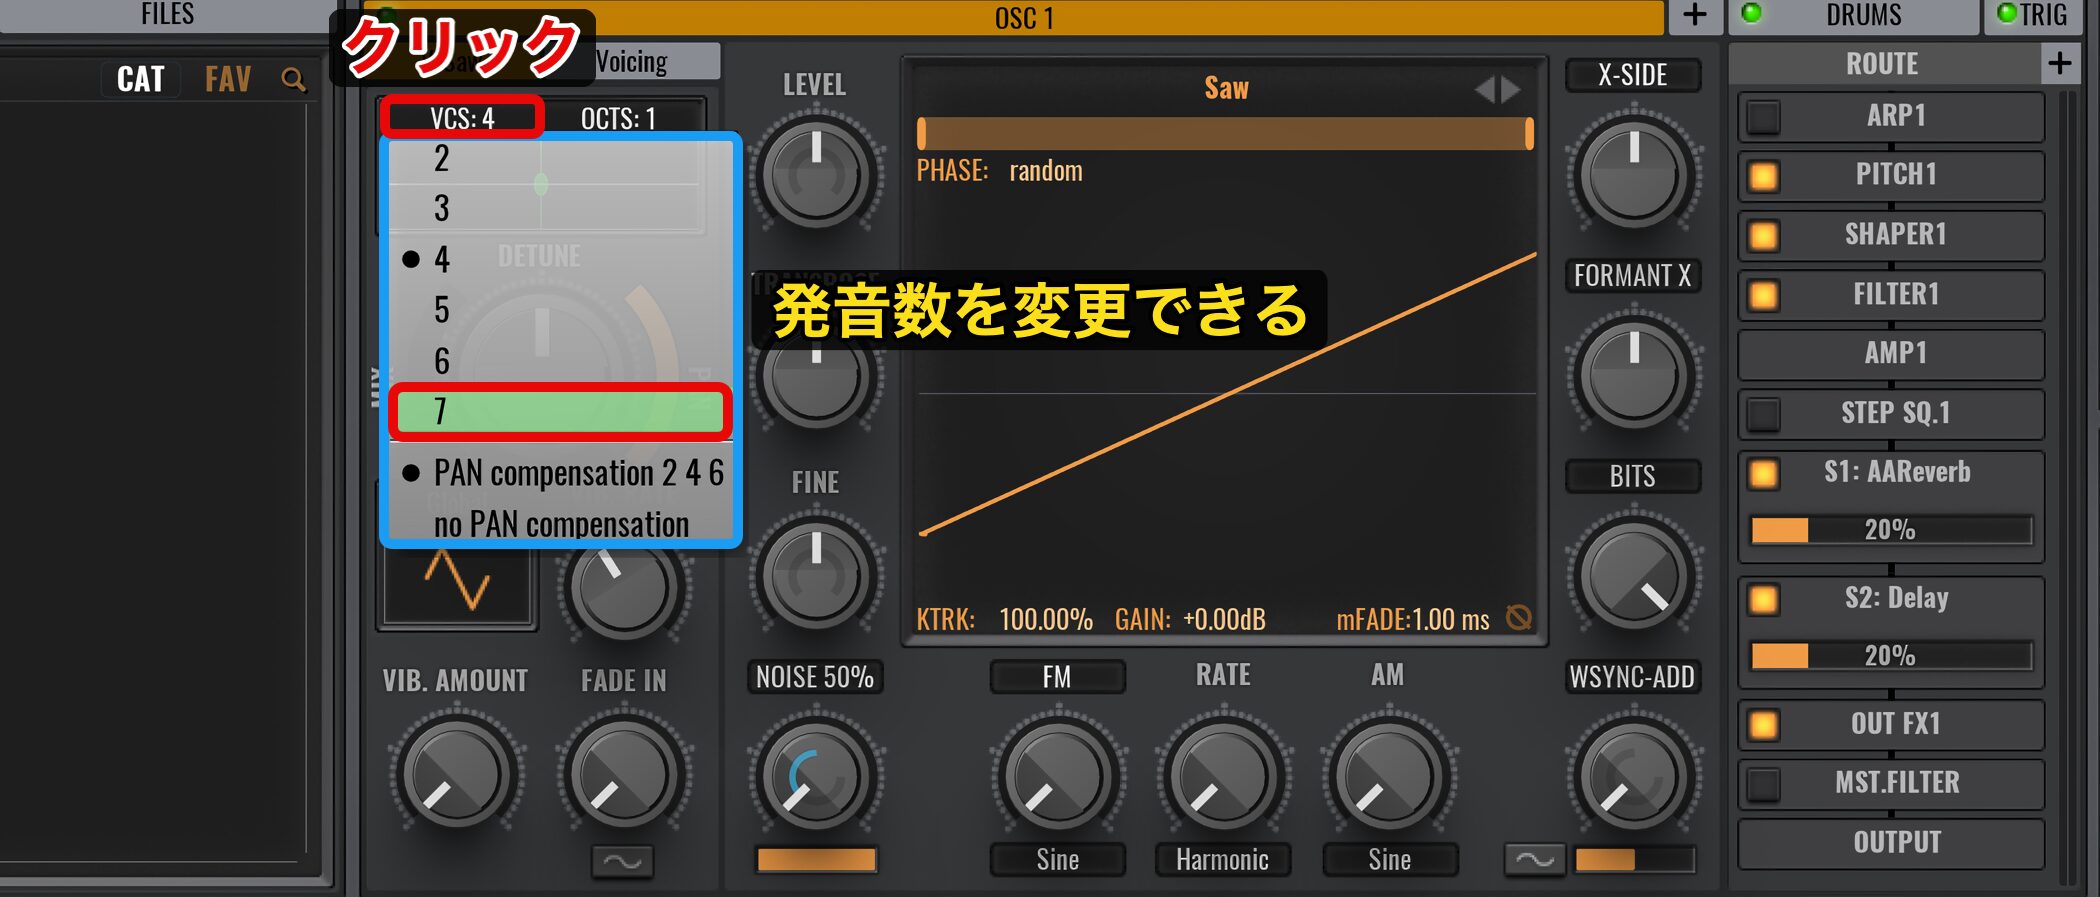
「VCS」をクリックすると、発音数を変更できます。
デフォルトでは4になっているので、最大の7にしてみましょう。
これだけでサウンドが厚くなりましたね。
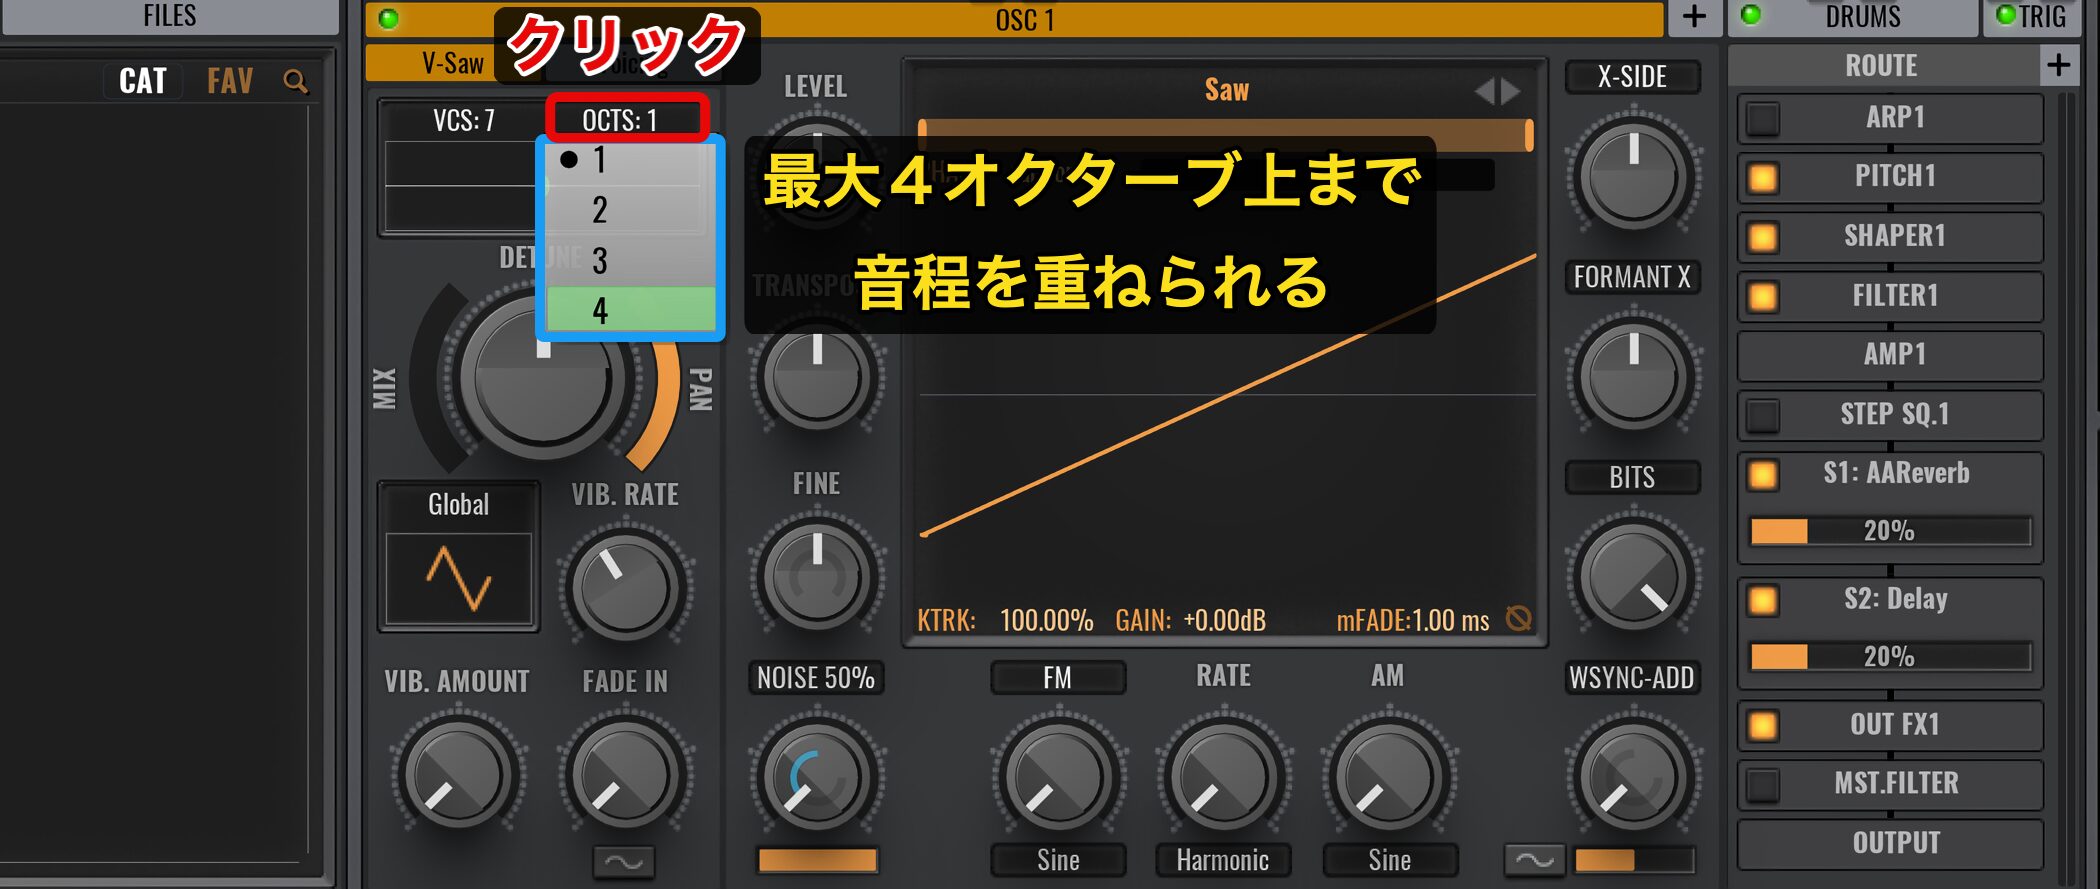
その隣の「OCTS」をクリックすると、最大で4オクターブ上まで音程を重ねることが可能です。
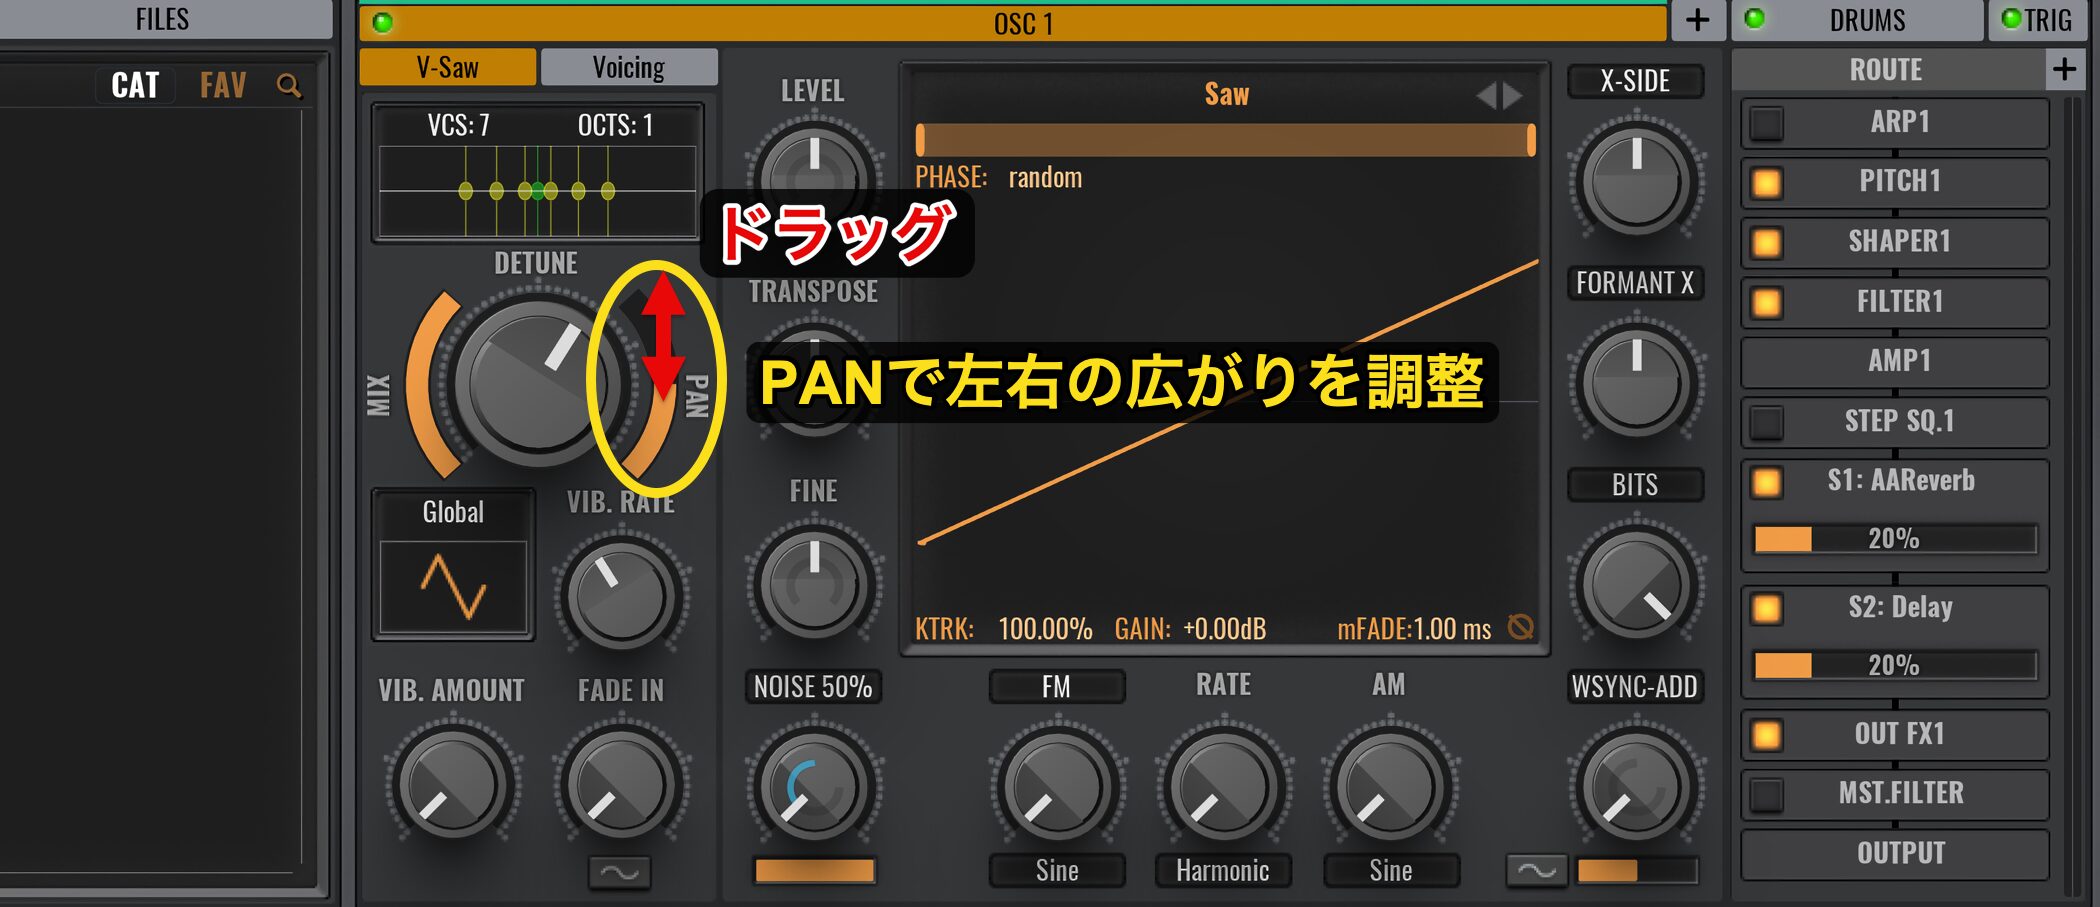
「DETUNE」では、重ねたサウンドにピッチのズレを加えます。
このズレを強くしすぎると、チューニングが合っていないような印象を与えてしまうため、11時から1時位の間で適度に適用してみましょう。
これにより、簡単に定番サウンドの響きが得られます。
その隣の「PAN」で、左右の広がりを調整できます。
非常に気持ちの良い広がり方をしますので、サウンドをワイドに聴かせたい際には積極的に使用してみてください。
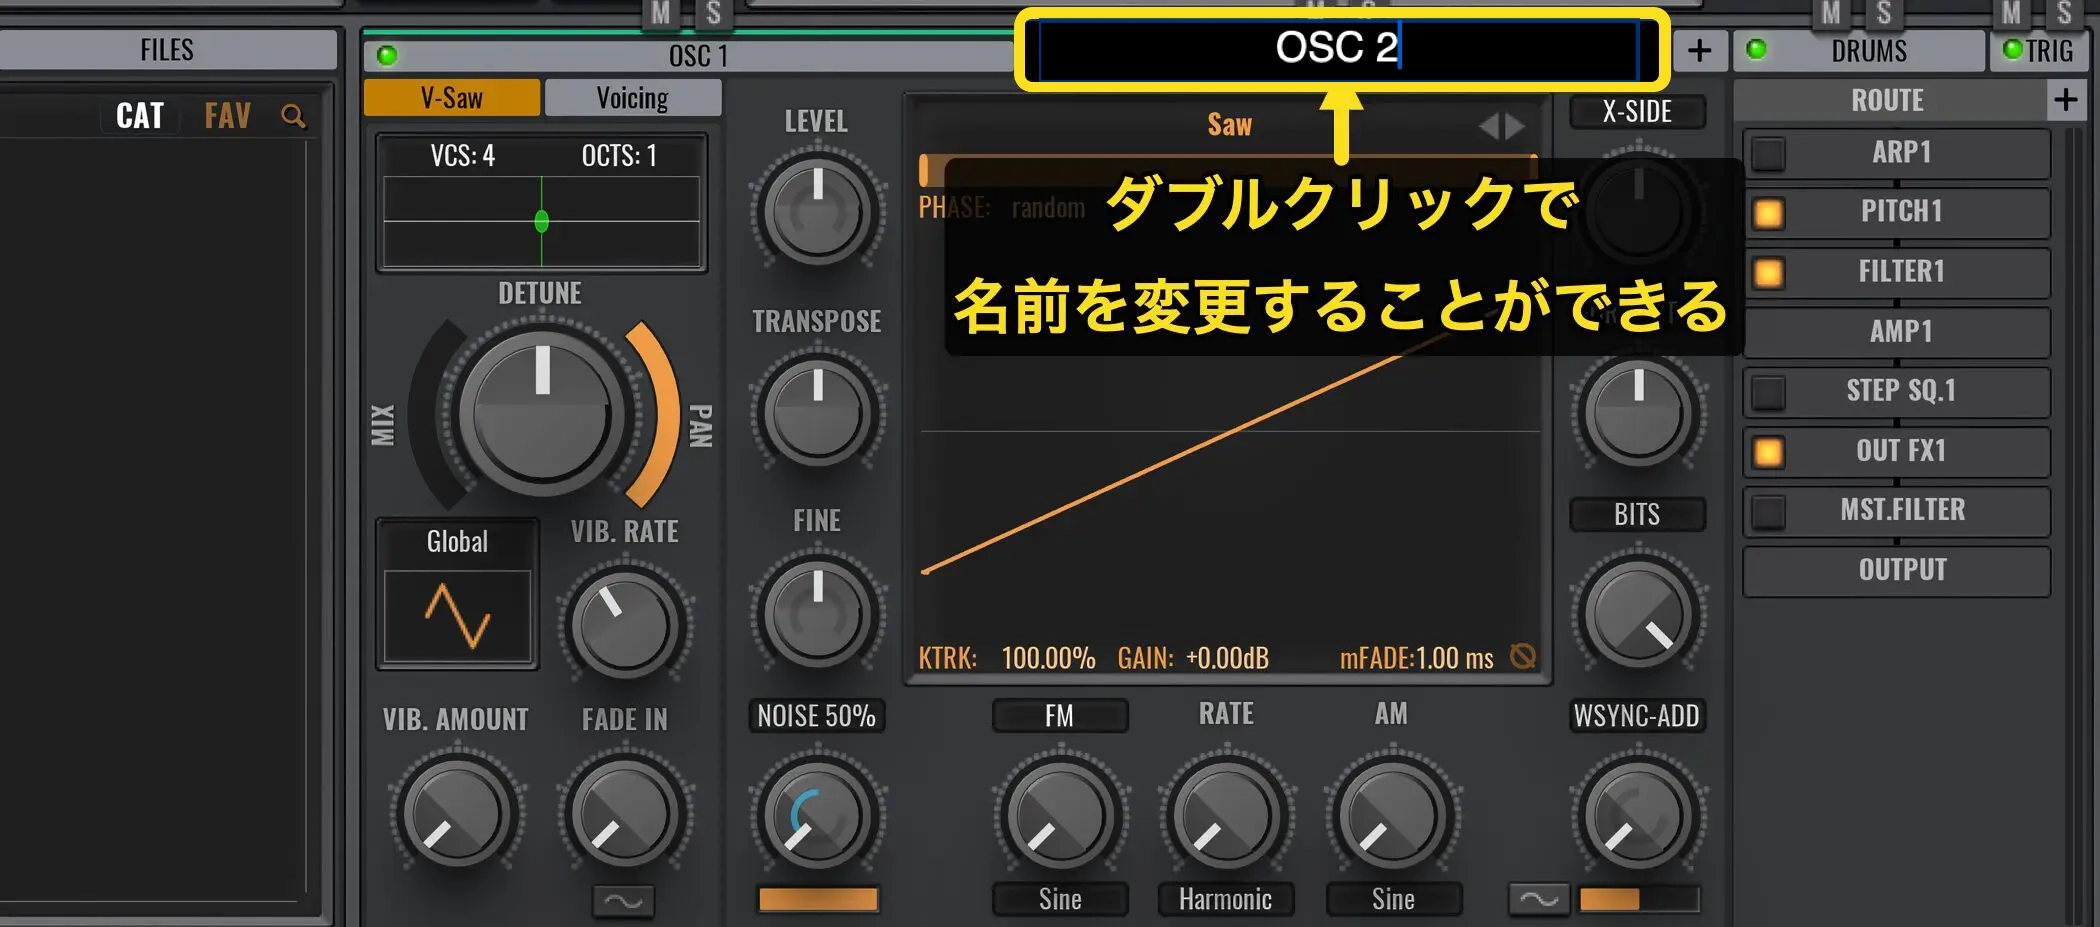
OSCタブは、ダブルクリックすると名前を変更することができます。
OSC 2としておきましょう。
CHORDERを使って和音を加える
今度は、このような単音のリードを打ち込んであります。
単音なのですが、V-Sawで4oct上まで音程を重ねた状態です。
このサウンドに対して、和音感を加えてさらに厚みを出すテクニックを使っていきましょう。
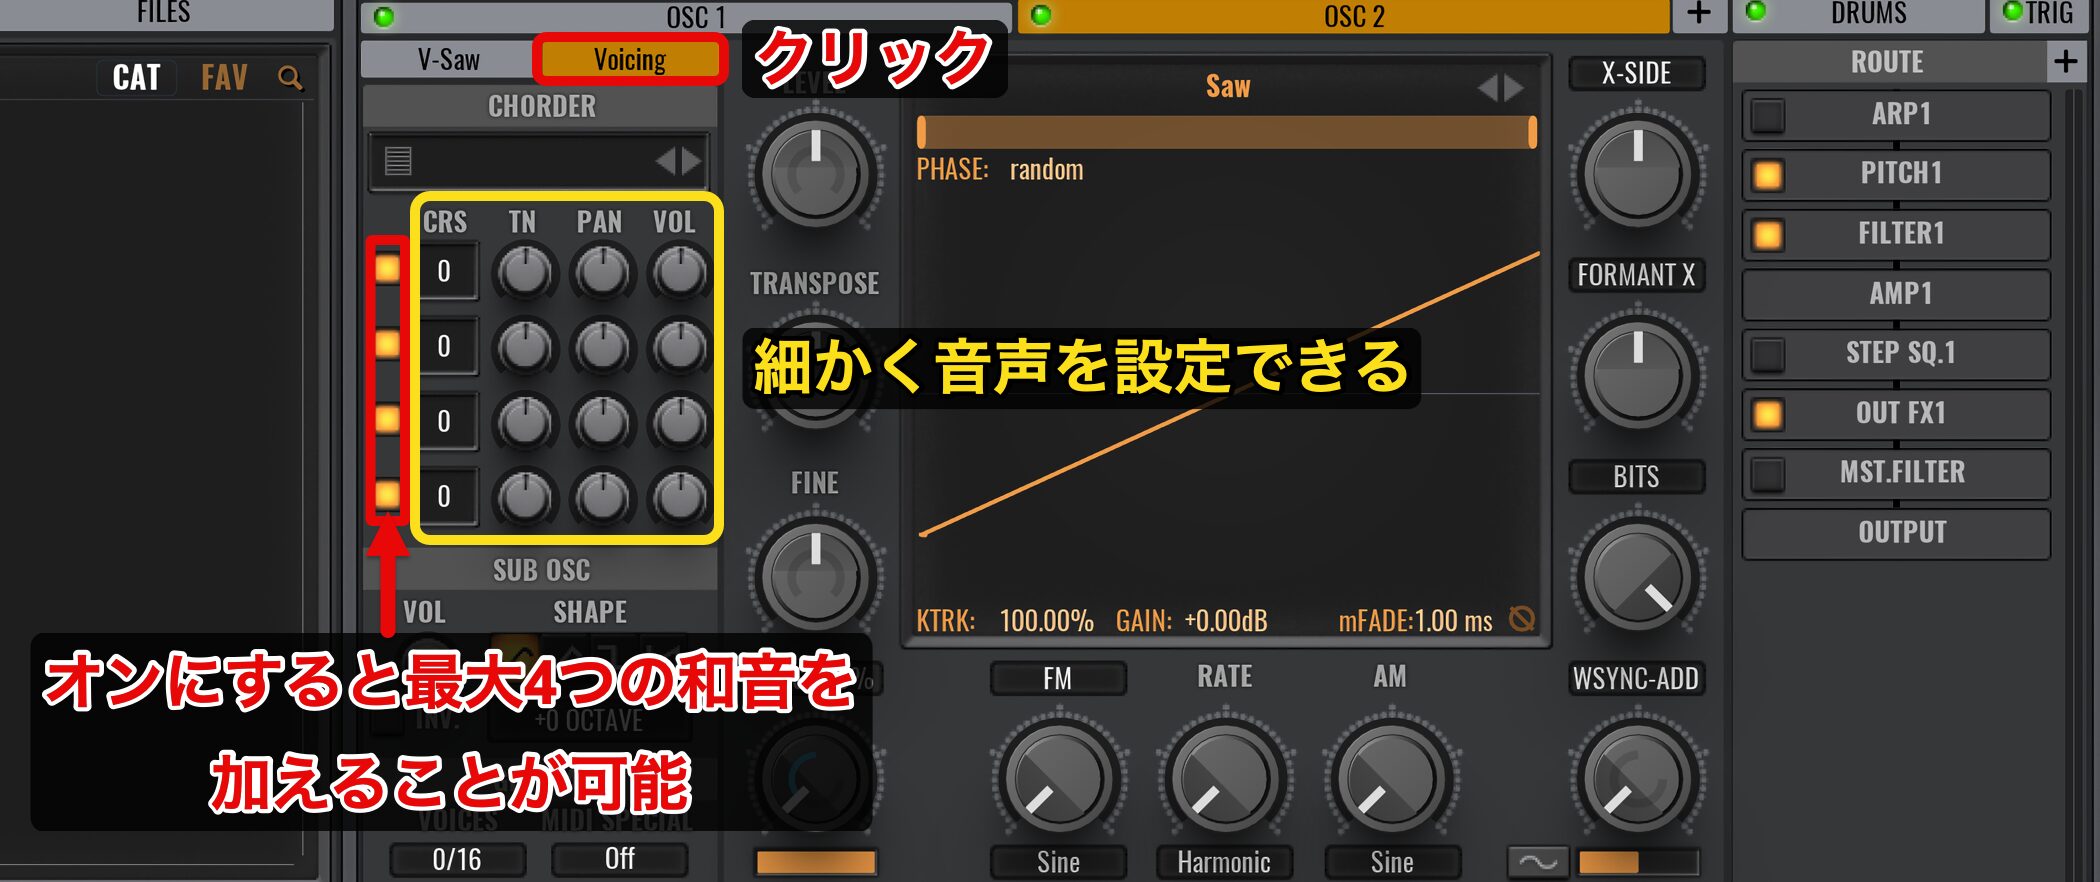
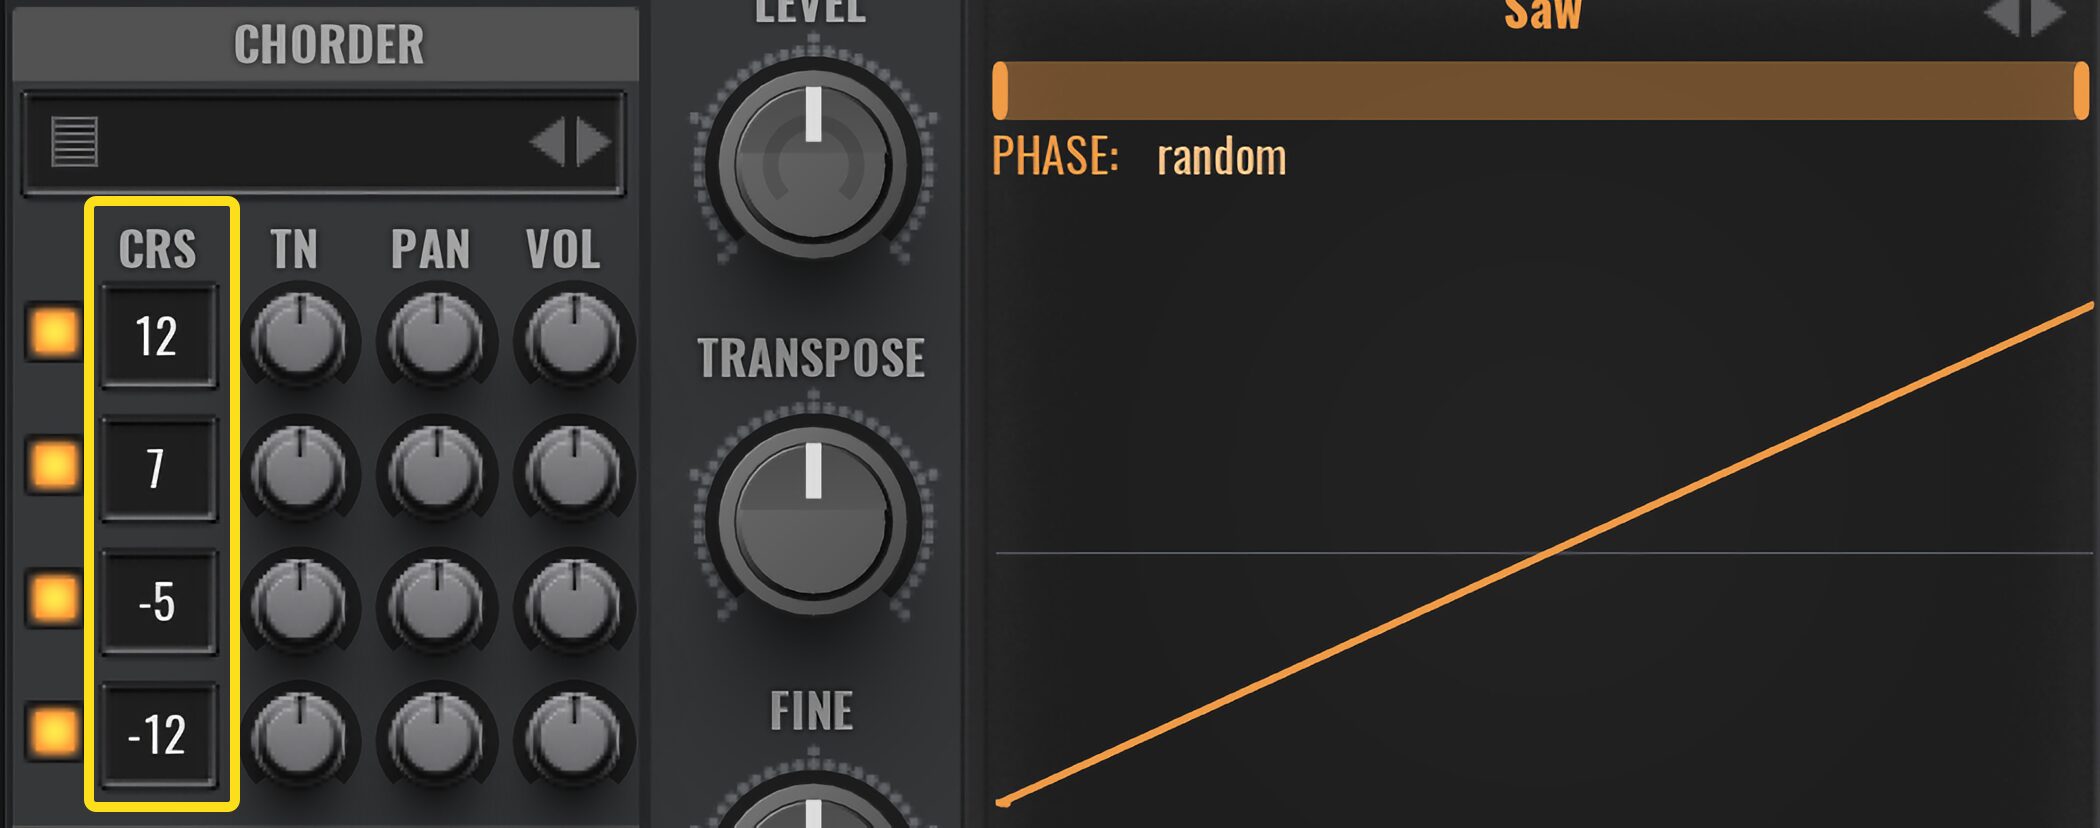
V-Sawの隣にある「Voicing」タブで「CHORDER」を開きます。
左側の箇所をオンにすると最大4つの和音を加えることができ、音声を細かく設定できるようになっています。
- CRS = 半音単位、+-24半音の範囲まで変更可能
- TN = 1/100 半音単位
- PAN = 左右のパンニング
- VOL = 音量レベル
今回は下記のように音程の設定を行いました。
1番上を1オクターブ上 12
2番目をメジャーマイナー関係ない5度上 7
3番目を2番目のオクターブ下 -5
4番目を原音のオクターブ下の-12
このようにしてサウンドを鳴らしてみると、リードサウンドも分厚くなりましたね。
音程を滑らかに繋げるグライド(ポルタメント)
シンセサイザーのリードやベースサウンドは、「グライド」という機能が頻繁に使用されます。
このグライド機能は、ノート同士の音程を滑らかに繋げるテクニックを指します。
動画 : グライドとは?
Avengerの場合、グライドを設定する場所は、OSCエリアではありません。
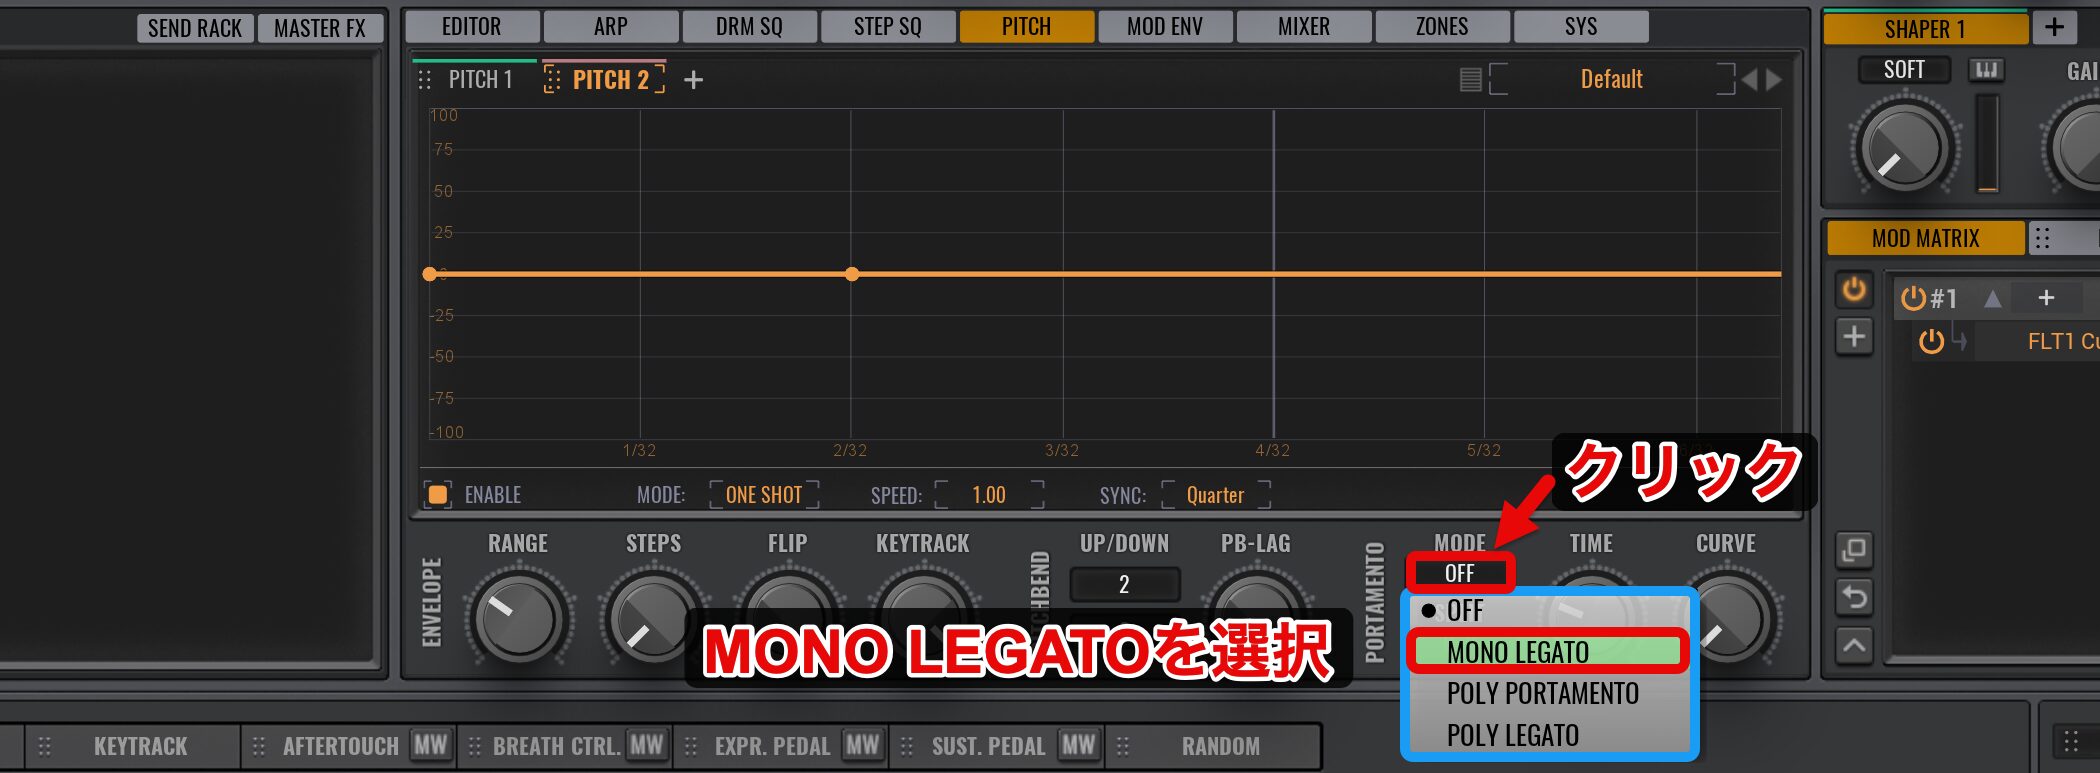
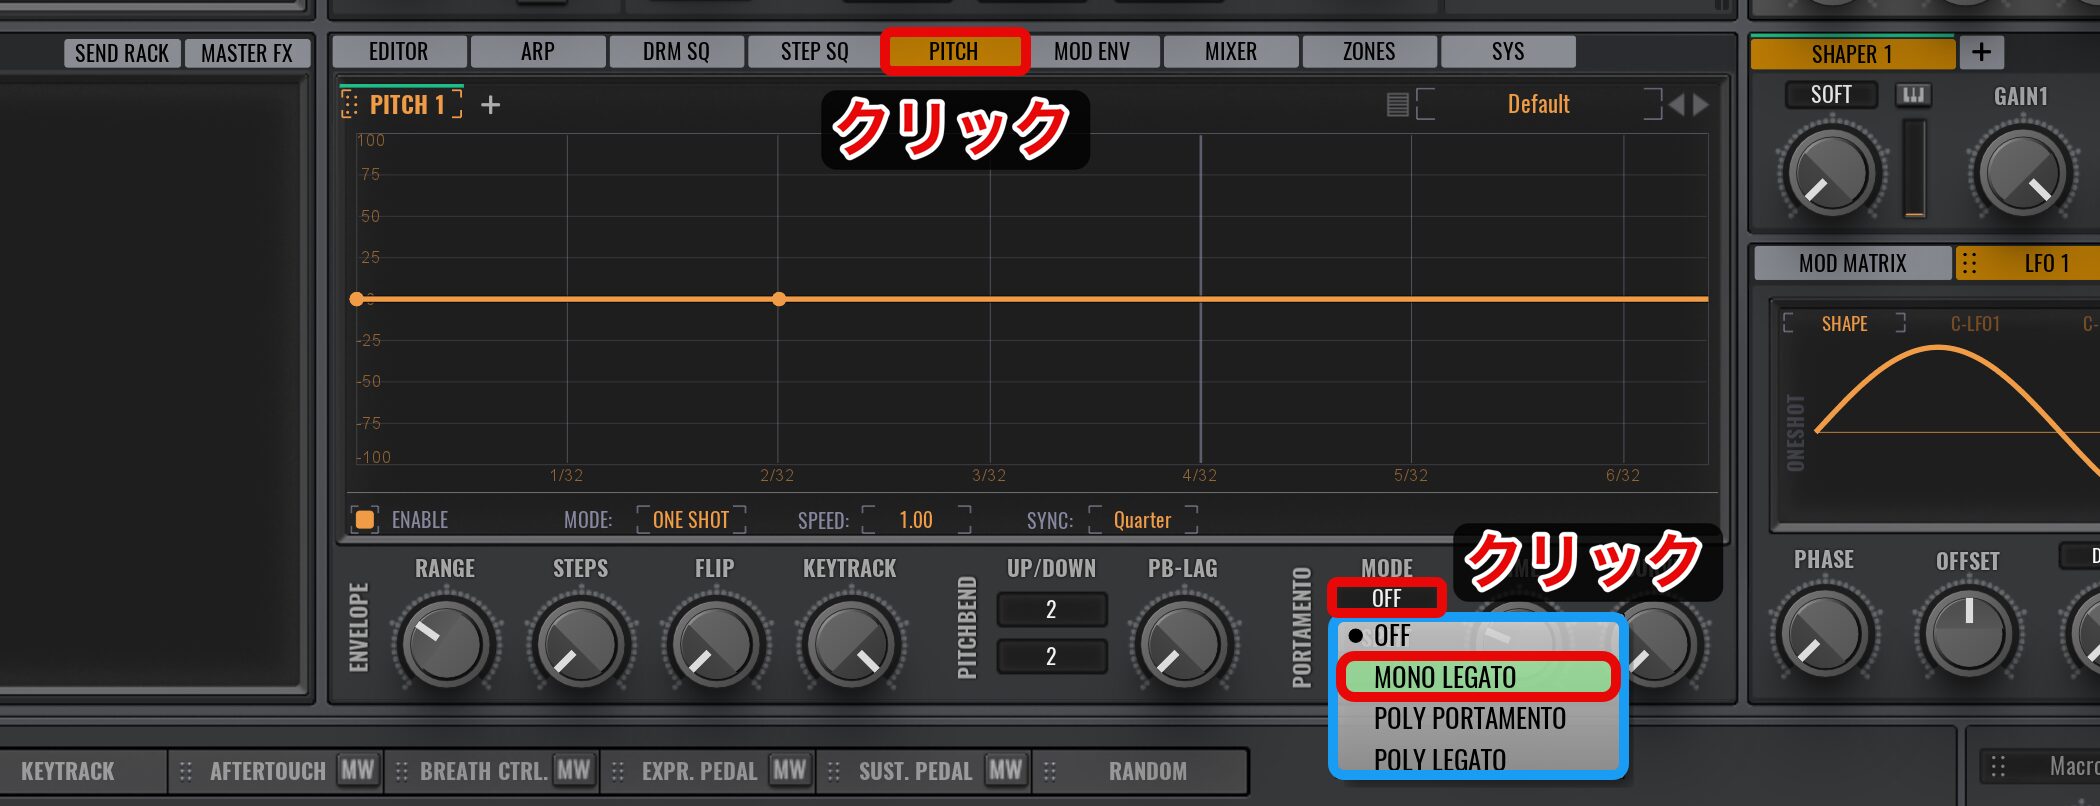
OSCエリアの下にある「PITCH」タブをクリックすると、画面の右下に「PORTAMENTO」が表示されます。
このPORTAMENTOがグライドの役割を果たします。
シンセサイザーの製品によって「GLIDE」「PORTAMENTO」と呼び名が違うのですが、効果は同様となります。
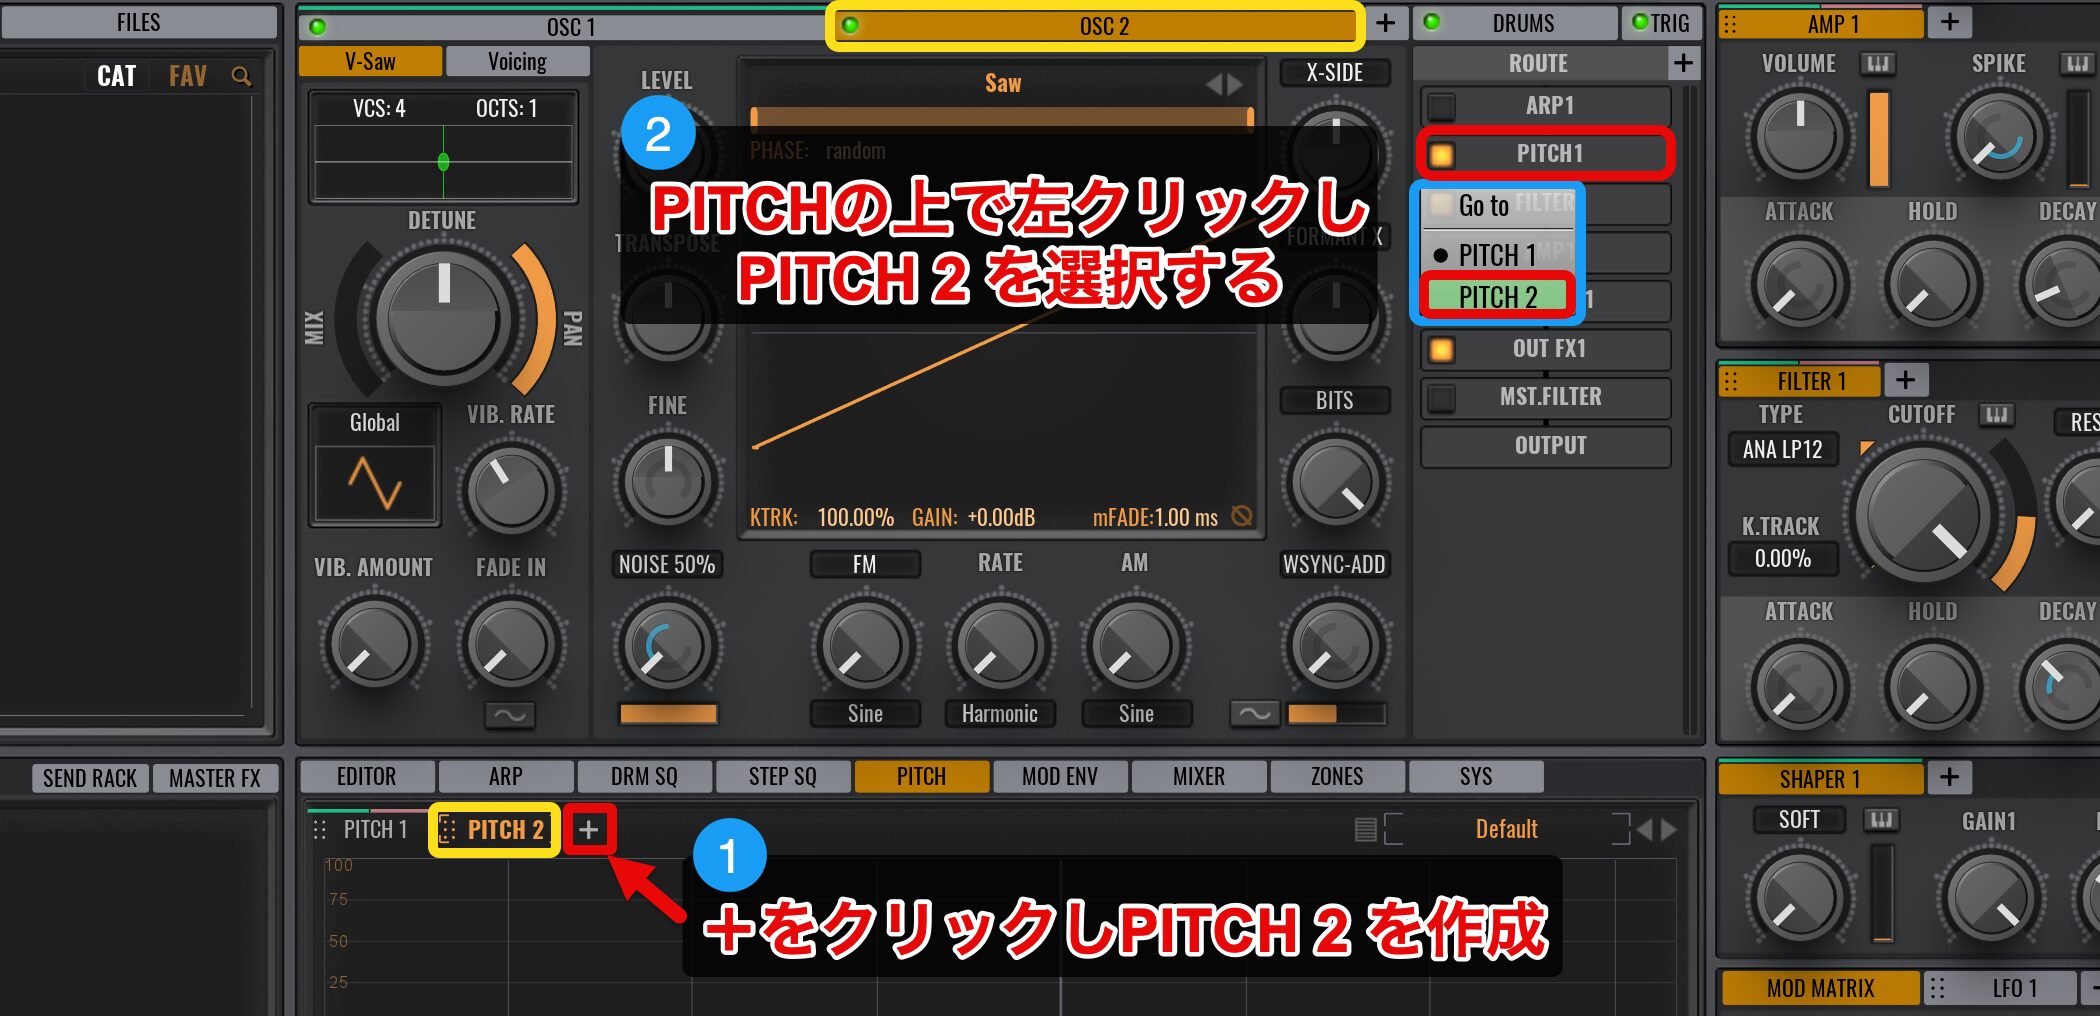
現状ではOSC 1とOSC 2が、どちらも「PITCH 1」へ出力されるようになっています。
ここでは、OSC 2のみにPORTAMENTOを適用したいため、「PITCH 2」を作成しましょう。
「+」をクリックしてPITCH 2を作成した後、OSC 2のPITCH上で左クリックし、リストからPITCH 2を選択します。
PORTAMENTOの「MODE」のOFFの箇所をクリックし、「MONO LEGATO」を選択しましょう。
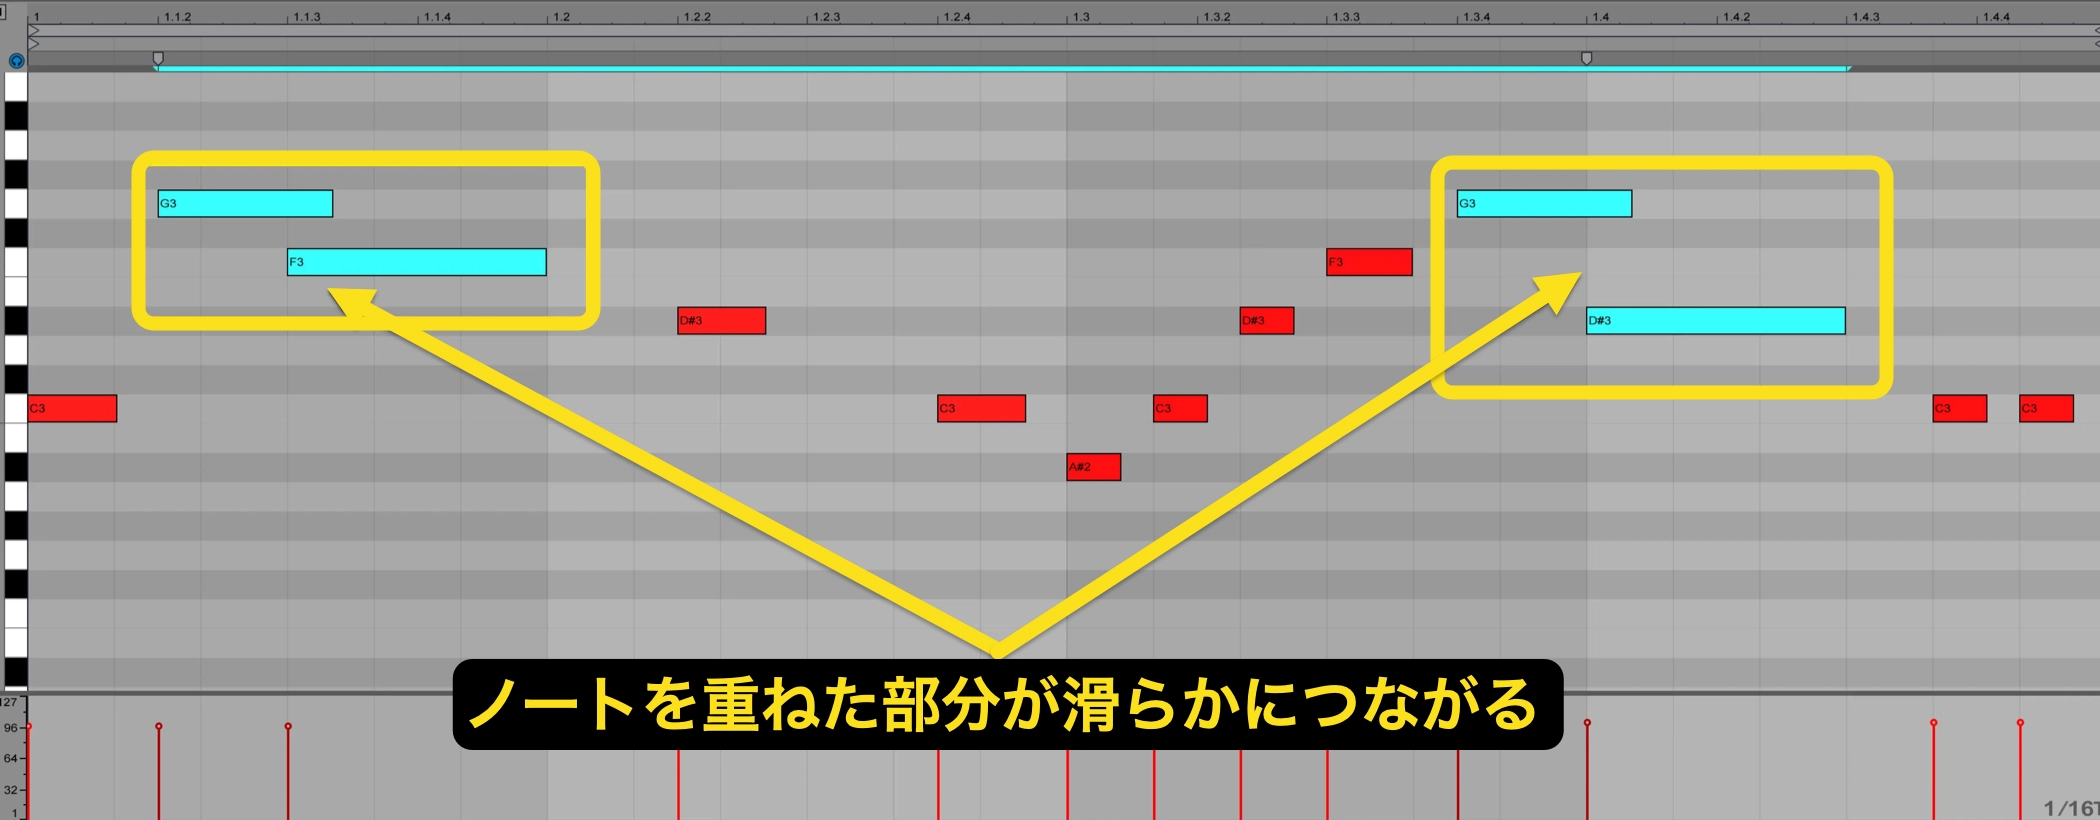
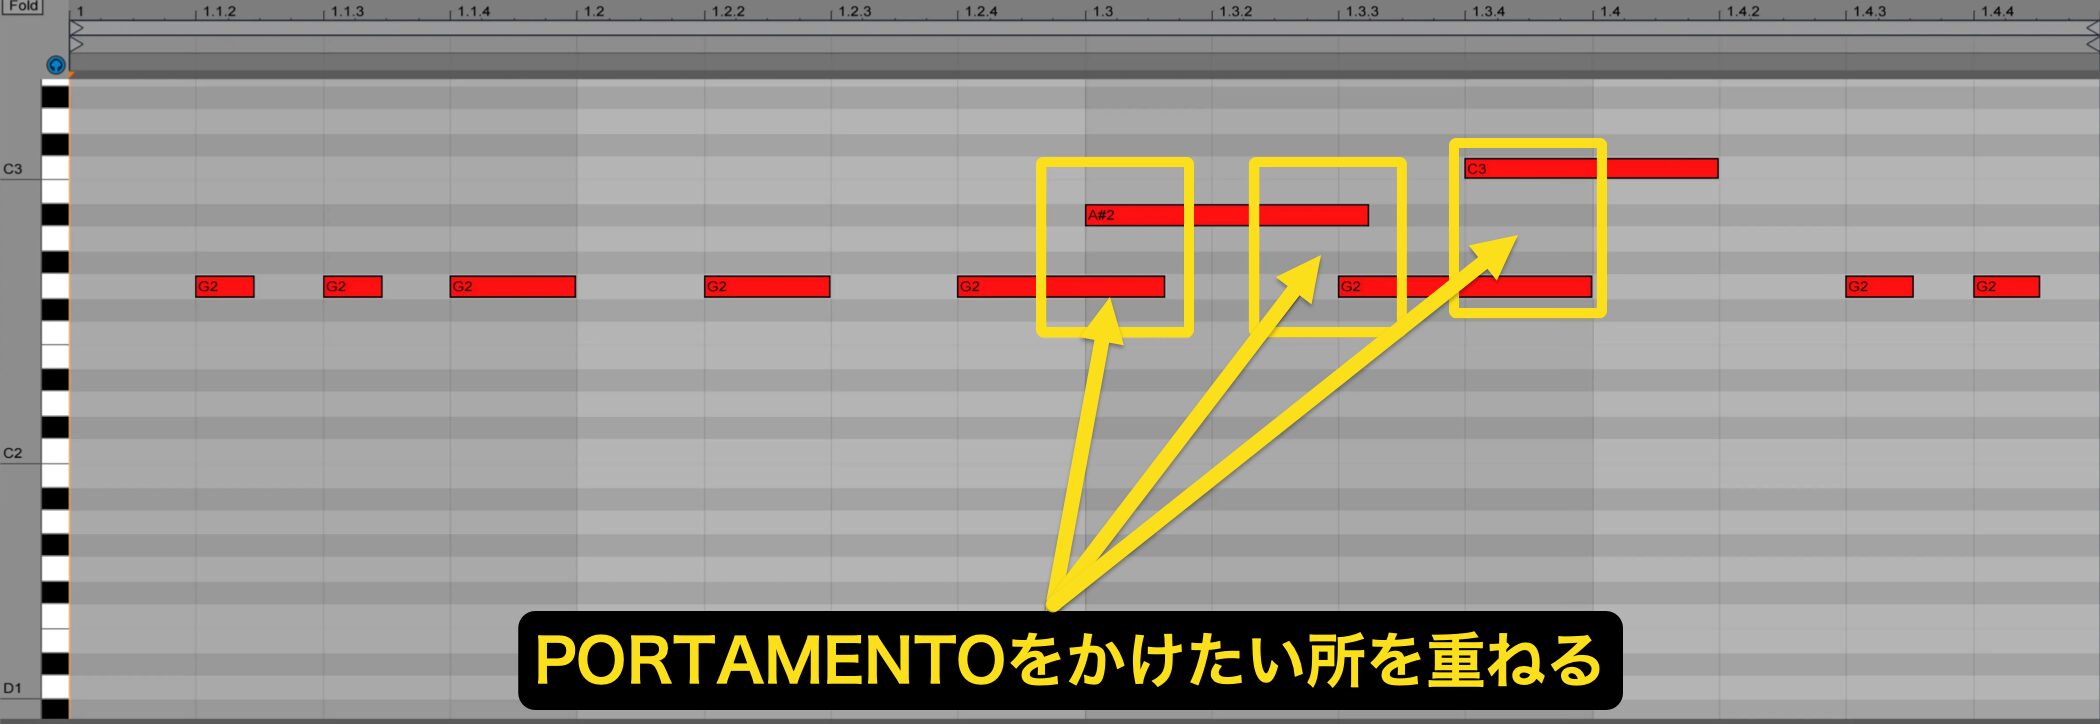
LEGATOにすることで、ノートを重ねた部分の音程のみが滑らかにつながるようになります。
そして、もう1つ重要なポイントとして、音程推移の時間を設定する必要があります。
音程の時間は「TIME」で設定します。
あまり値を高くしてしまうと、音程推移が間に合わず、次のノートが発音されてしまいます。
楽曲のテンポやニュアンスを考慮して、ベストなタイミングを探してみてください。
V-Sawで簡単にSuper Sawが作成でき、CHORDERで和音感を出せる。
これをオシレーター1つでできてしまうのが素晴らしいです。
強力なWavetable Editorを駆使したサウンドメイキング
昨今のエレクトロミュージックには必要不可欠なWavetable。
Avengerには強力なWavetable Editorが搭載されており、LFOなどのモジュレーションを使用せずとも、リズミックなシンセサウンドを簡単に作ることができます。
エディット方法を確認していきましょう。
Avenger 動画 : ウェーブテーブルを使用する
Wavetable Editorの使い方
Wavetableには、あらかじめプリセットが用意されています。
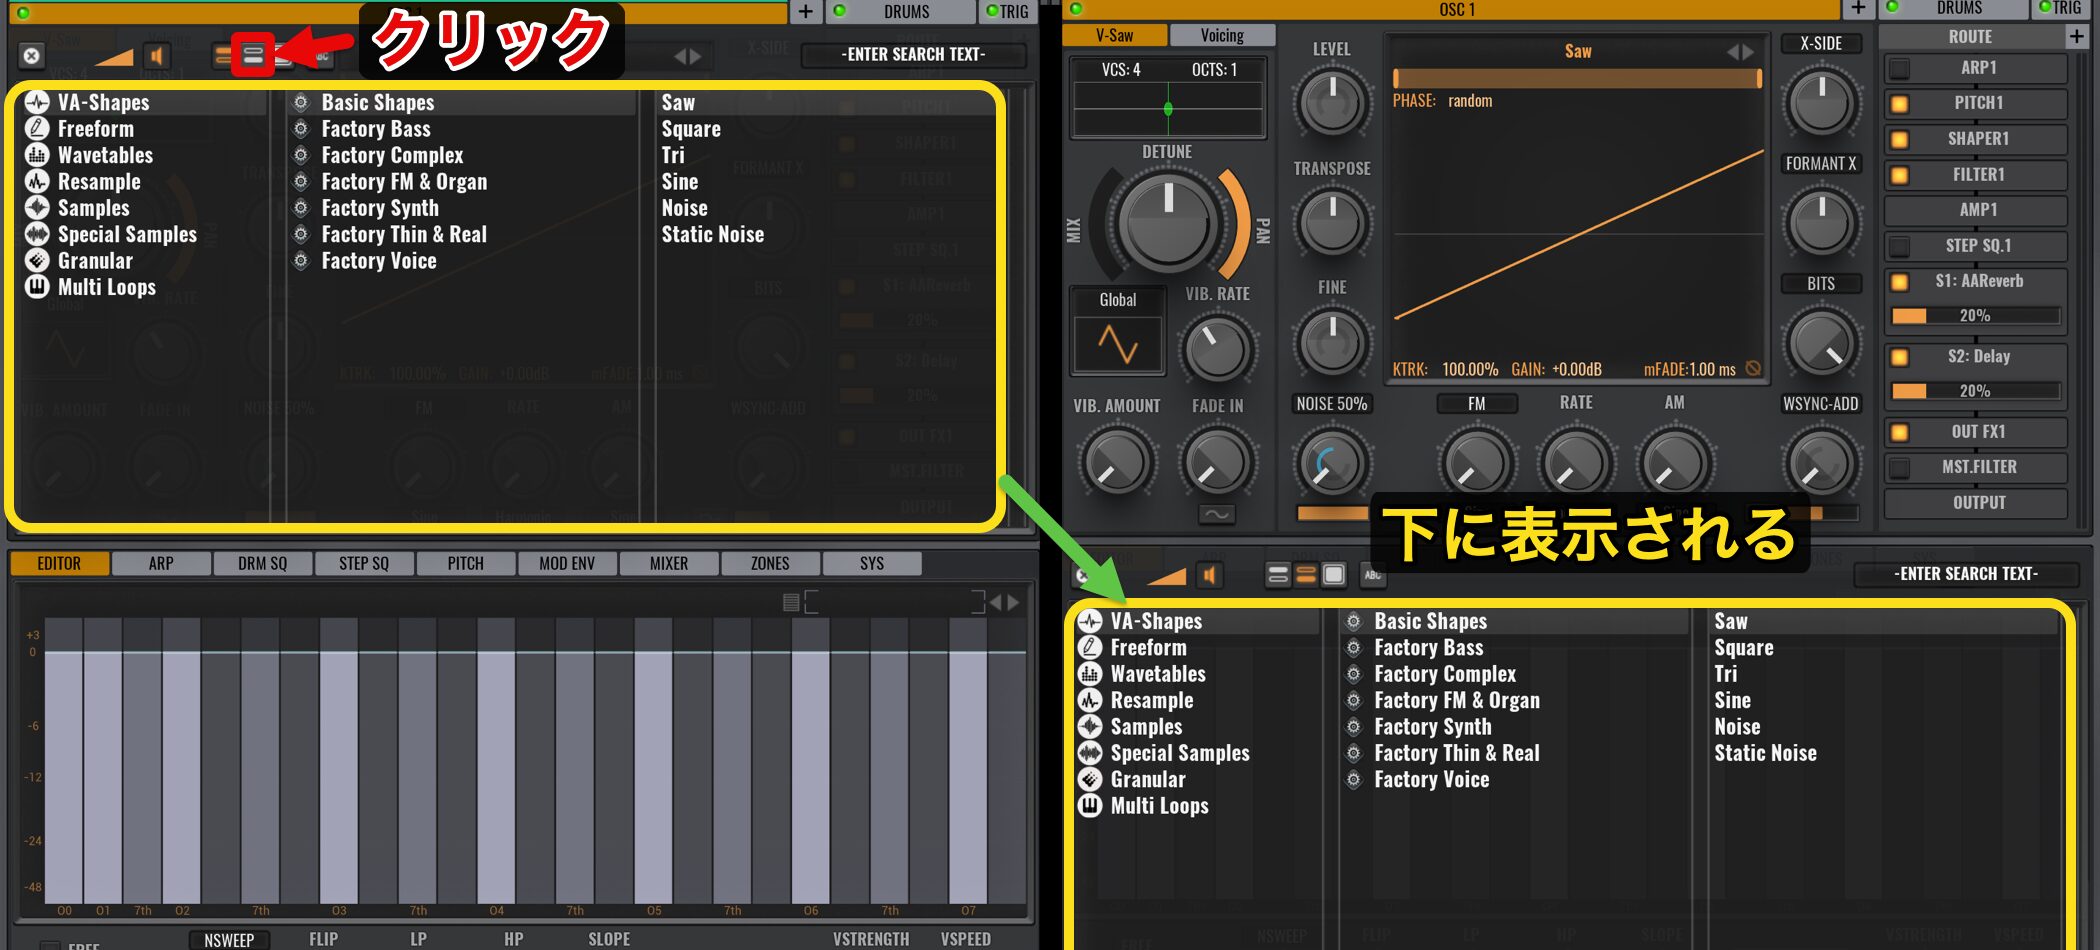
「Saw」と書いてある箇所をクリックしてプリセットを呼び出します。
プリセットメニューが上に表示されている場合は、表示切り替えアイコン(真ん中の横2本線のアイコン)をクリックすると、下に切り替わります。
Wavetablesを選択することで各プリセットを検索可能です。
プリセット名をダブルクリックし目的のプリセットを呼び出します。
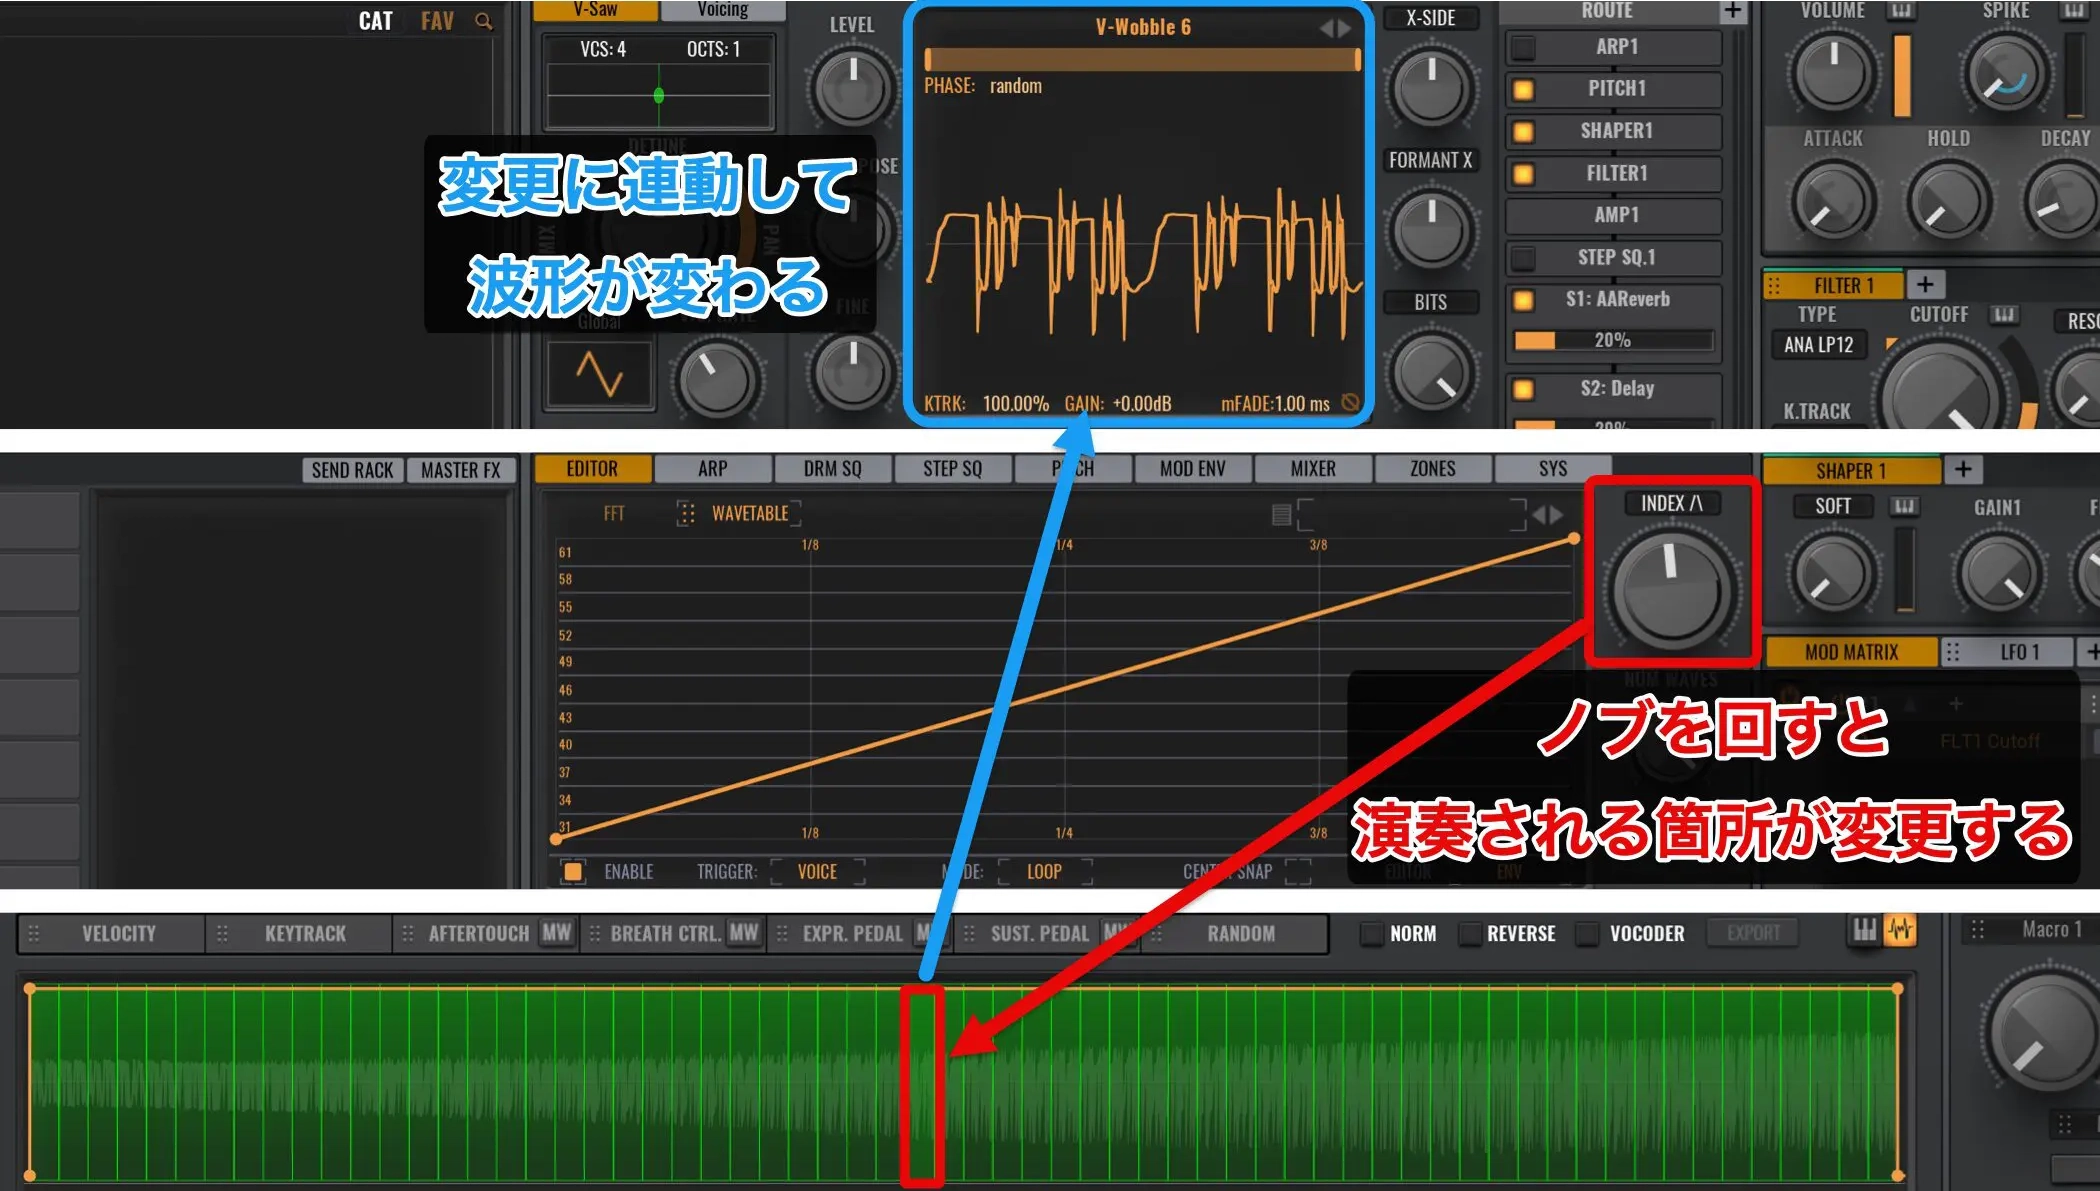
ここでは「Wavetables Hard」の中から、「V-Wobble 6」を選択しました。
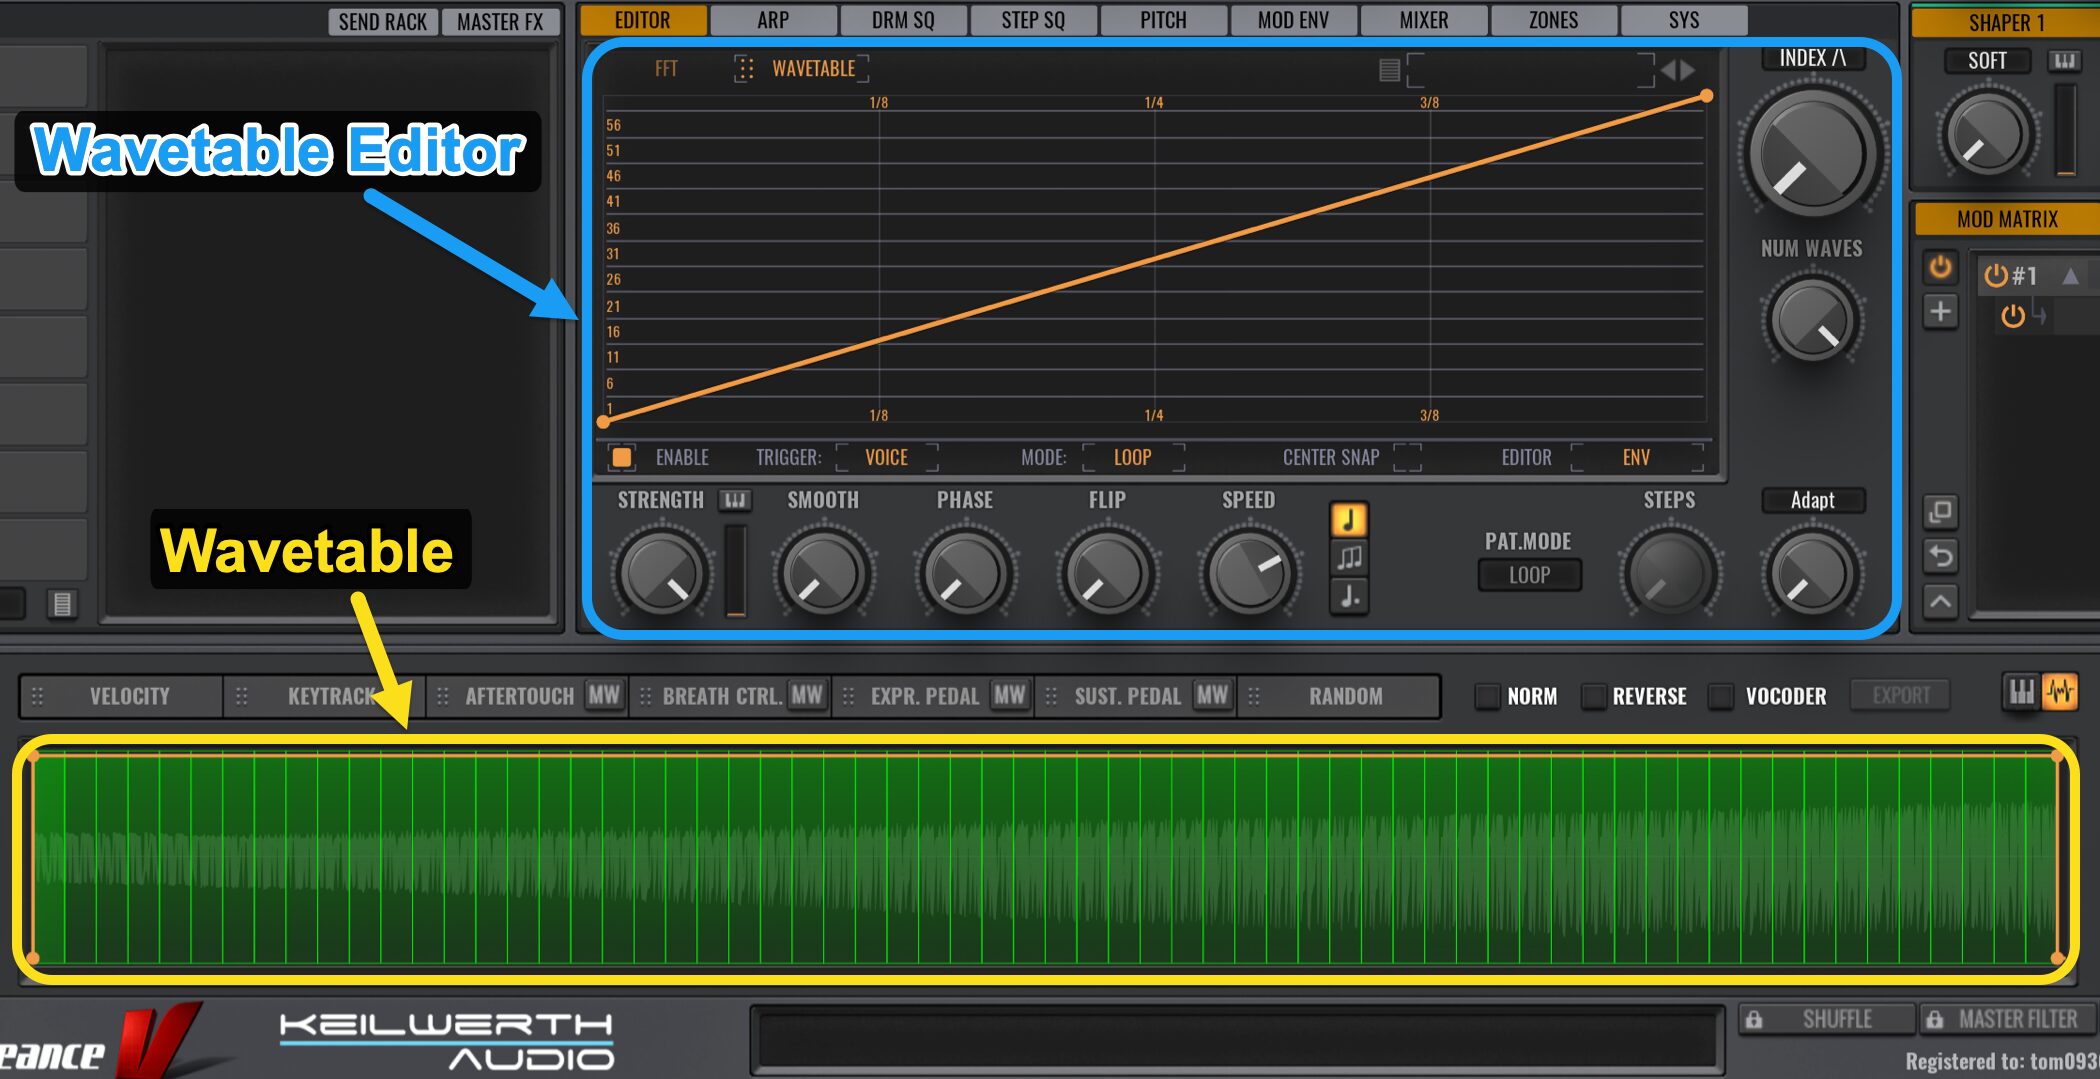
Wavetable Editorが開き、その下にWavetableが表示されます。
「INDEX」のノブを回して、再生位置を変更します。
通常のシンセサイザーは、このINDEXのノブに対し、LFOなどのモジュレーションを適用して動きをつけていきます。
しかし、Avengerの場合は、Wavetable Editorを使用して簡単にエディットが可能です。
Wavetable Editorのエンベロープ
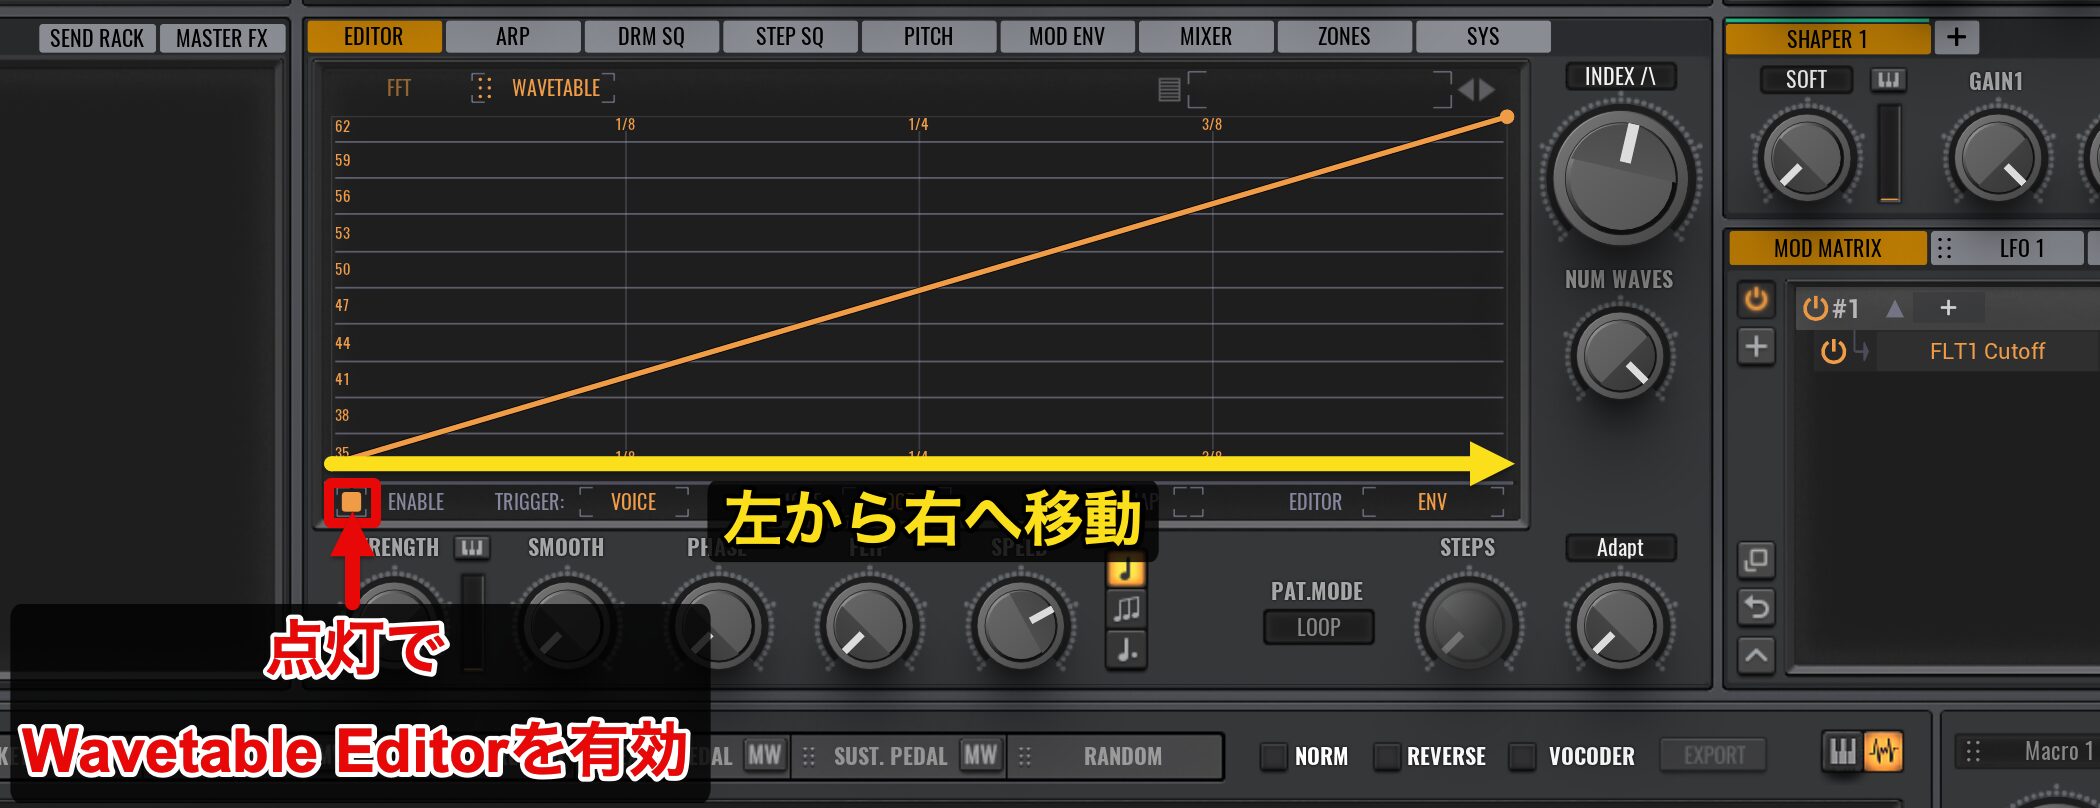
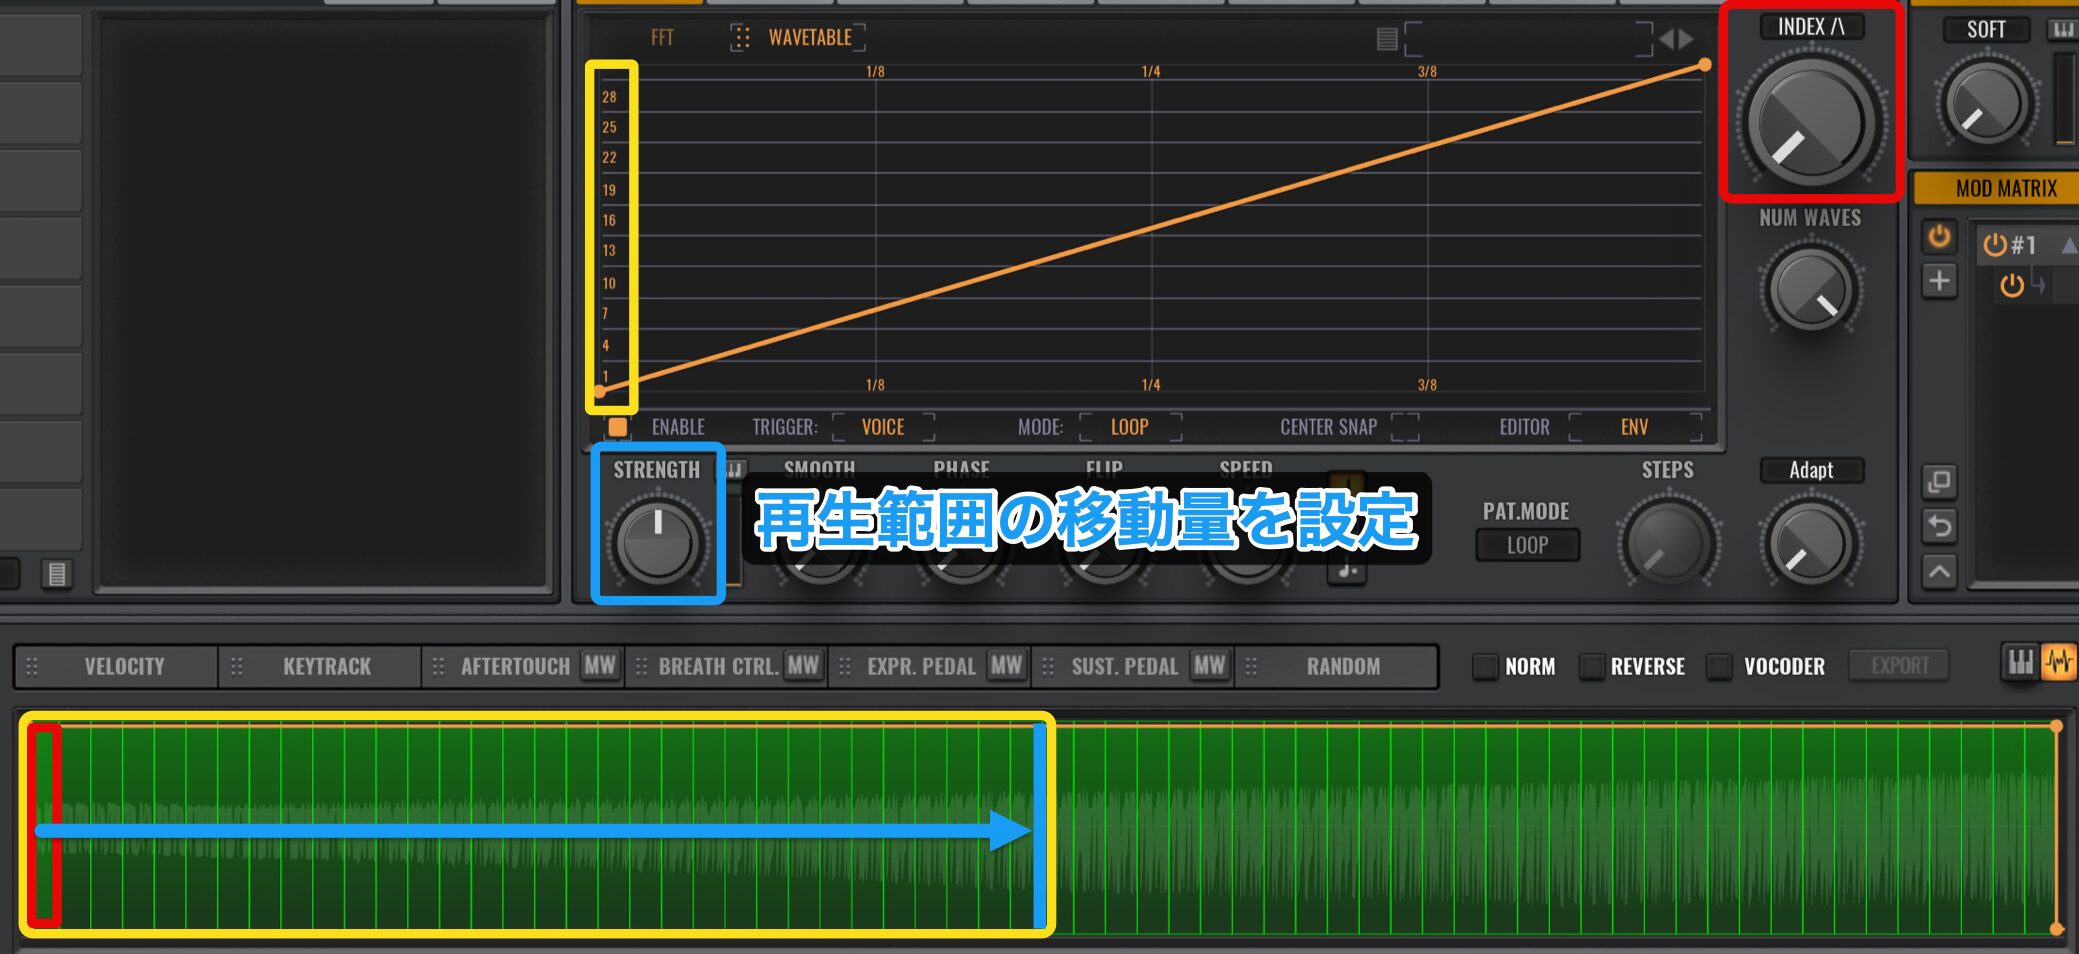
Wavetable Editorを有効にするには、左下の「ENABLE」をオンにするだけです。
EDITOR中央部にある直線はエンベロープになっており、左から右へ移動します。
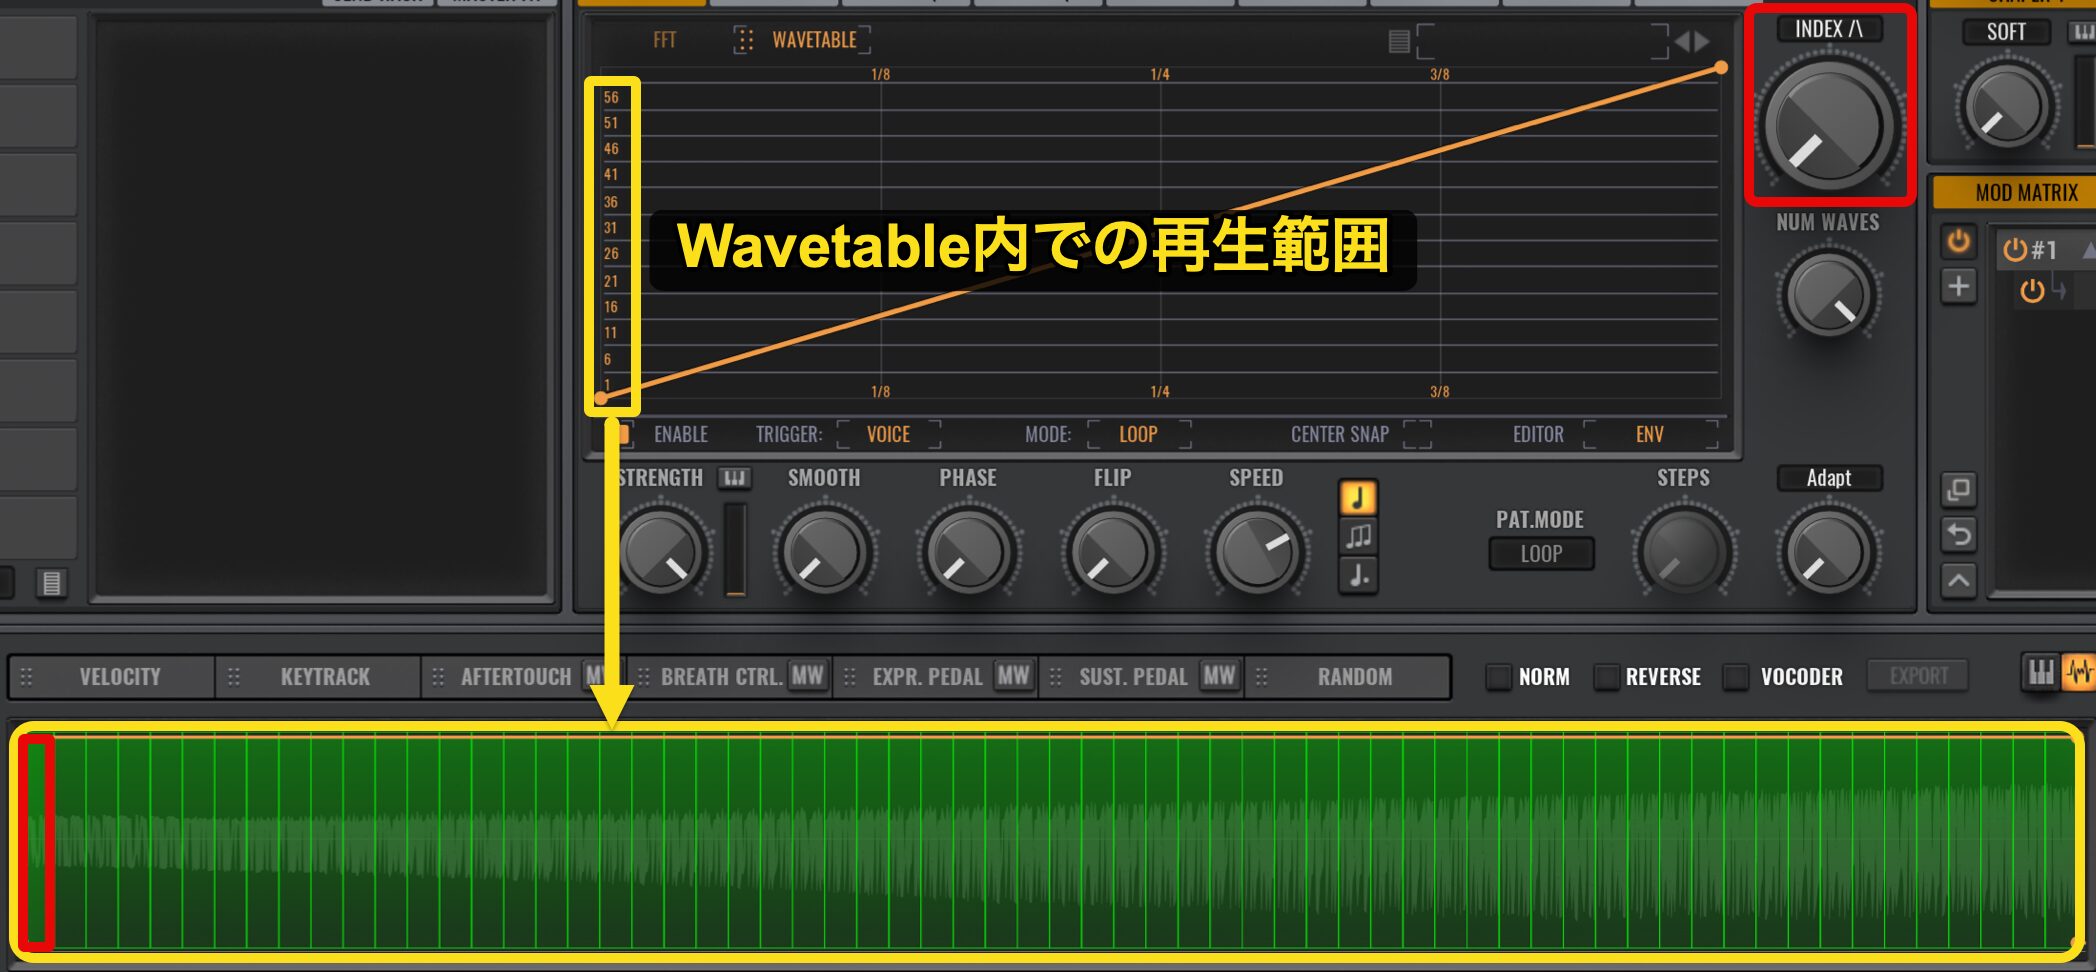
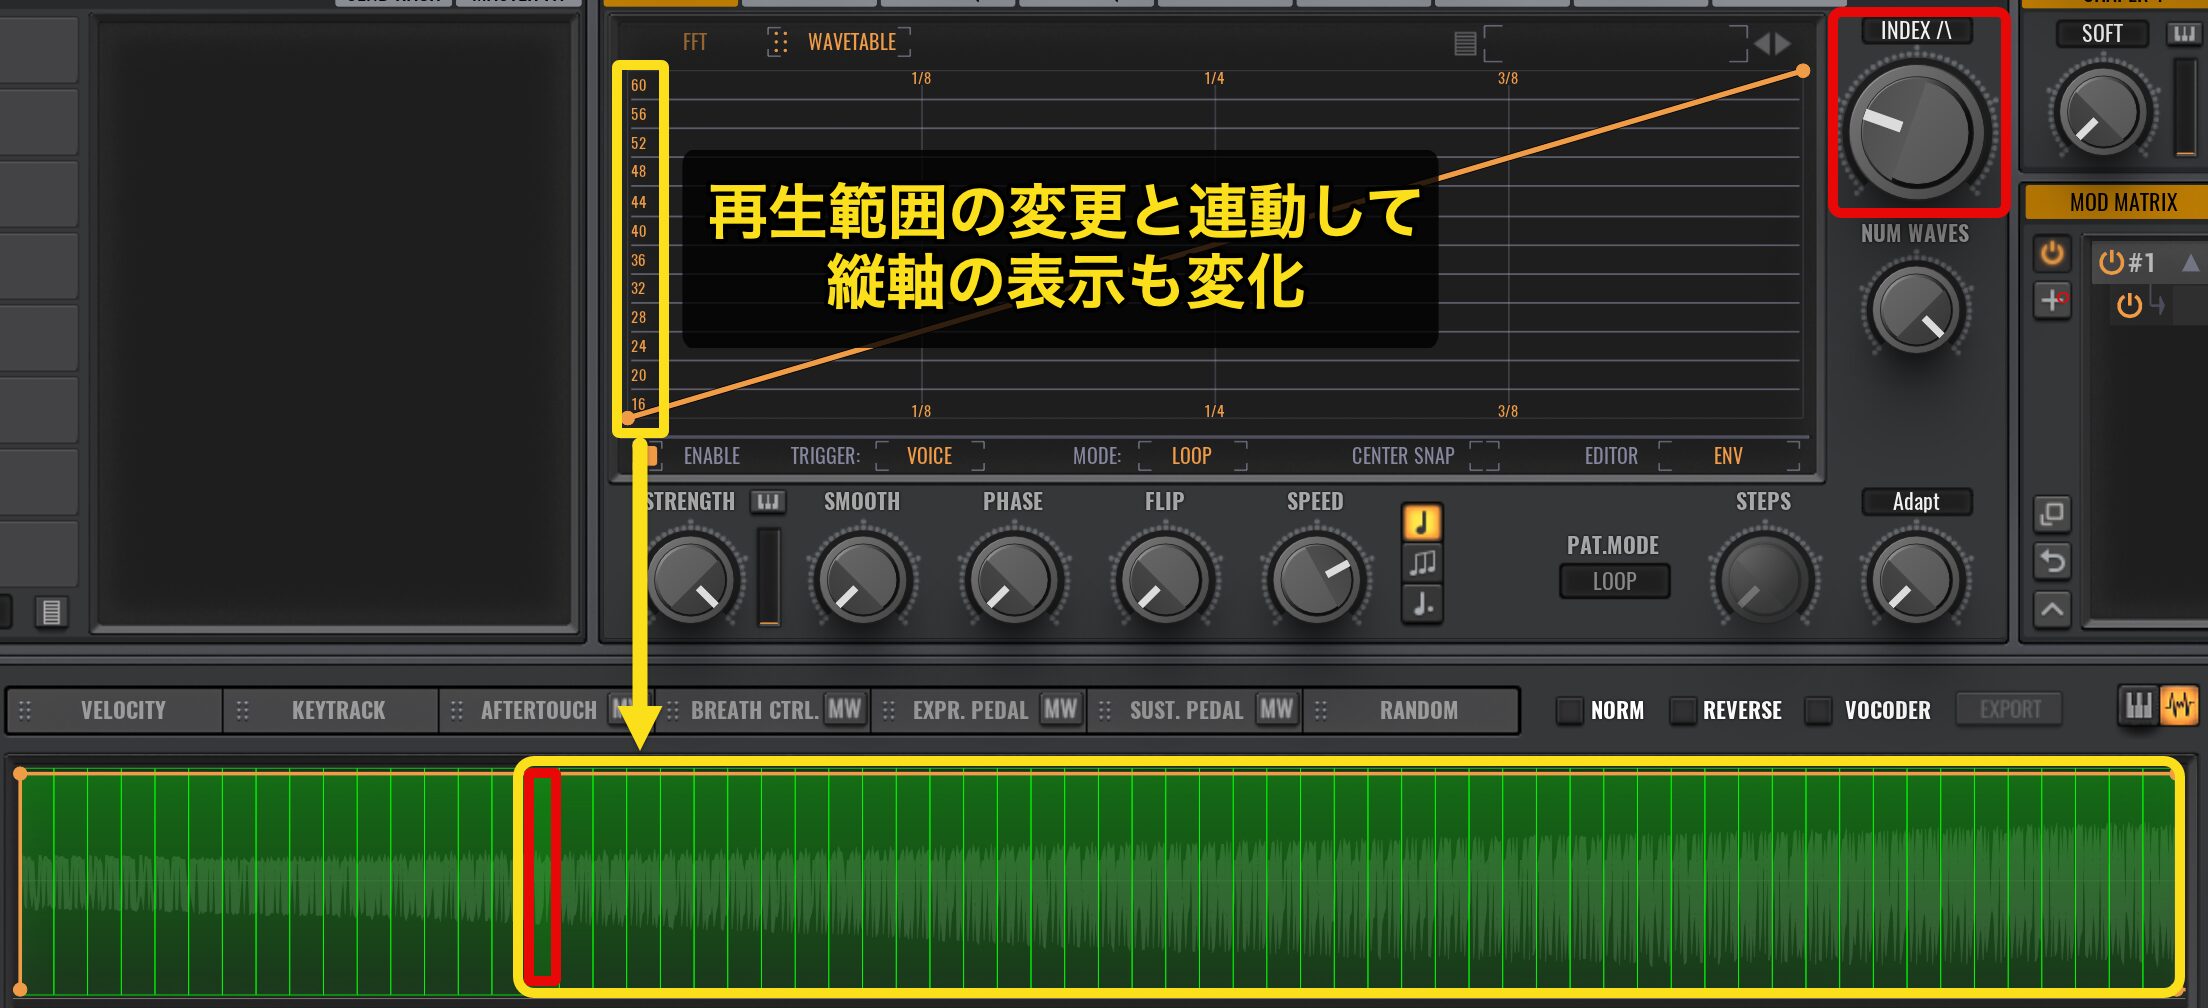
エンベロープの縦軸は、Wavetable内での再生範囲を示しています。
再生範囲が変更されると、縦軸の表示も連動して変化します。
下の「STRENGTH」では、再生範囲の移動量を設定できます。
デフォルトではSTRENGTHノブが1番右に設定されており、Wavetable全てを使用するようになっています。
これを左に回すと再生範囲の移動量が減り、範囲が狭くなっていきます。
STRENGTHノブを1番左に設定すると移動が無効となり、音色に変化がつきません。
「SPEED」からは、エンベロープの速さを調整します。
デフォルトでは4分音符が有効となっており、DAWで設定したテンポに同期されます。
SPEEDを変更すると、4分/8分/16分とスピードが変化していきます。
3連符や付点にも対応しているため、楽曲に合わせて使い分けたいですね。
エンベロープポイントは上下左右にドラッグ可能です。
フレーズを再生しながら、細かなニュアンスを付けていくと良いでしょう。
また、直線上をドラッグすることで曲線を描くこともできます。
直線上をダブルクリックすると、新しいポイントを追加できます。
目的のポイント上で右クリックして「Delete Point」を選択すると、ポイントを削除することができます。
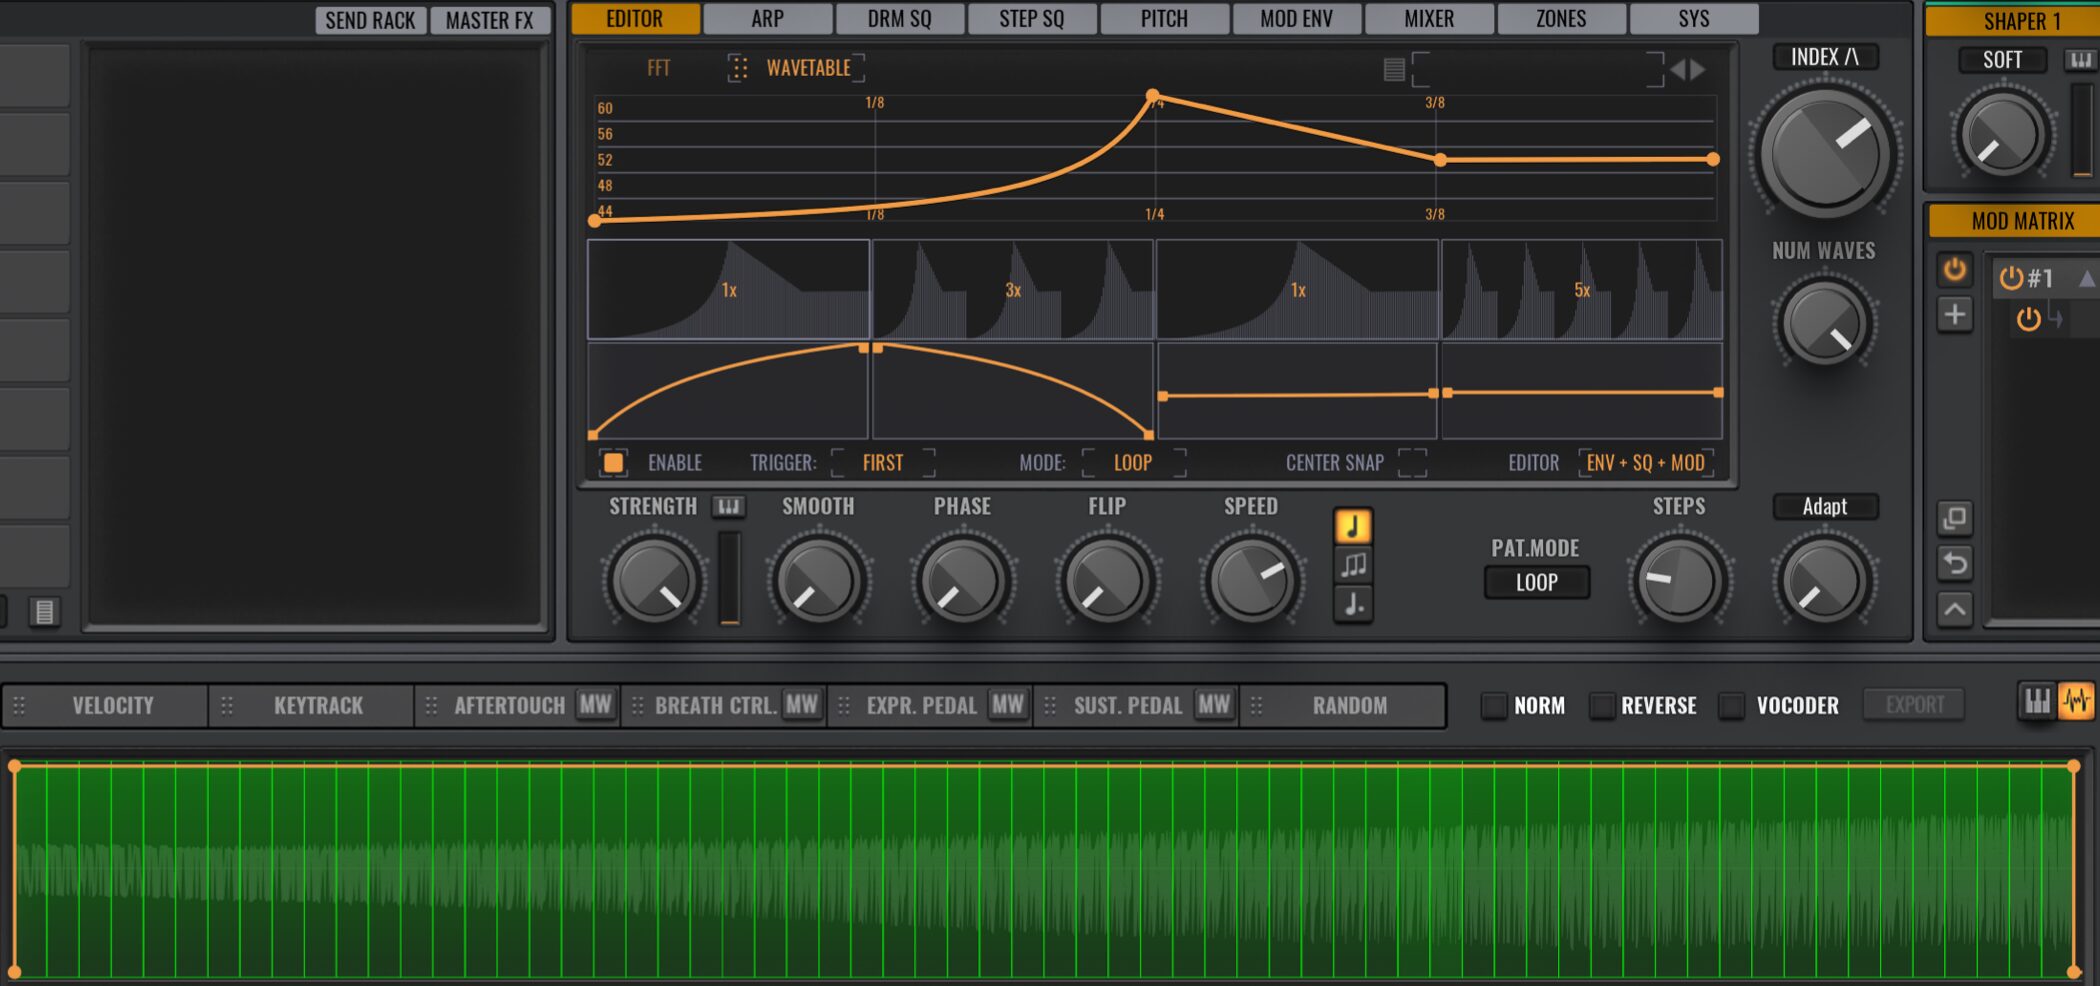
Wavetable Editorのシーケンスとモジュレーション
「ENV」の文字をクリックすると、「EDITOR」モードを切り替えることができます。
選べるモードは以下の3種類です。
- ENV
- ENV+SQ
- ENV+SQ+MOD
これまでの説明は「ENV」モードについてでした。
それでは次に、「ENV+SQ」を選択してみましょう。
エンベロープの下に「SQ_シーケンス」が表示されます。
エンベロープと同様に、シーケンスの動きも左から右に移動します。
上のエンベロープが動いていく中で、シーケンスのステップの動きも追加され、より複雑なニュアンスを作り出せるということなんですね。
同時に右下の「STEPS」も選択できるようになります。
このSTEPSを使って、エンベロープの繰り返し回数を指定します。
現在は1小節分のノートが打ち込まれており、STEPSは左から右に移動していくのですが、
シーケンスの途中で新たなノートが演奏された場合、その動きは頭に戻ってしまいます。
場合によっては思ったようなサウンドにならないという場面があると思います。
ノートが演奏されたとしても、最後までシーケンスの動きを維持する設定を行ってみましょう。
「TRIGGER」の「VOICE」をクリックし、「FIRST」に変更するだけです。
これで新たにノートが発音されたとしても、シーケンスの動きはリセットされなくなります。
STEPSで増やしたシーケンスは、上下にドラッグすることで個別に回数を設定できます。
シーケンスを右クリックして「Step Mode」を表示すると、Reverseなどの設定も可能です。
最後に「ENV+SQ+MOD」を確認していきましょう。
選択すると、シーケンスの下に「MOD_モジュレーション」が表示されます。
オレンジ色のポイントをドラッグすることで上下に移動できます。
エンベロープと同様に、直線をドラッグすることで曲線を描くことも可能です。
モジュレーションはSTRENGTHと連動しており、オレンジ色のポイントを上下させることで、STRENGTHの効果範囲も動的に変化します。
ポイントが下(青丸): STRENGTHが左(最小)になり、モジュレーションの動きが小さくなる。(0だとモジュレーションは無効)
ポイントが上(緑丸): STRENGTHが右(最大)になり、モジュレーションの動きが大きくなる。
また、STRENGTHノブを回すとグレーのラインが表示されますが、これはSTRENGTHの基準値を示しています。
上記の画像では、この基準ラインを中心にモジュレーションのポイントを上下に配置しているので、基準ラインから左右に動くということになります。
より複雑な動きをつけることができますね。
作成したサウンドはプリセットとして保存することも可能です。
四角い箇所をクリックして「Save Preset as..」を選択します。
その隣をクリックすると、EDITORのプリセットを呼び出すことができます。
Wavetable Editorを使用することで、サウンドへ複雑な音色変化を与えることができます。
Avengerならではのユニークな機能ですので、様々な設定をお試しください。
LFOを使ってサウンドメイキングを行う
続いては、AvengerのLFO機能を解説しながら、EDMで頻繁に使用されるリードサウンドを作成していきます。
シンセサイザーには必ず搭載されている「LFO」。
このLFOパラメーターを使用すると、サウンドにウネリやアクセントを付けることができます。
Avenger以外の製品にも応用可能な項目も多数ありますので、ぜひ覚えておきましょう。
Avenger 動画 : LFOセクション
LFOセクションの使い方
今回はマルチサンプルの波形を使用していきます。
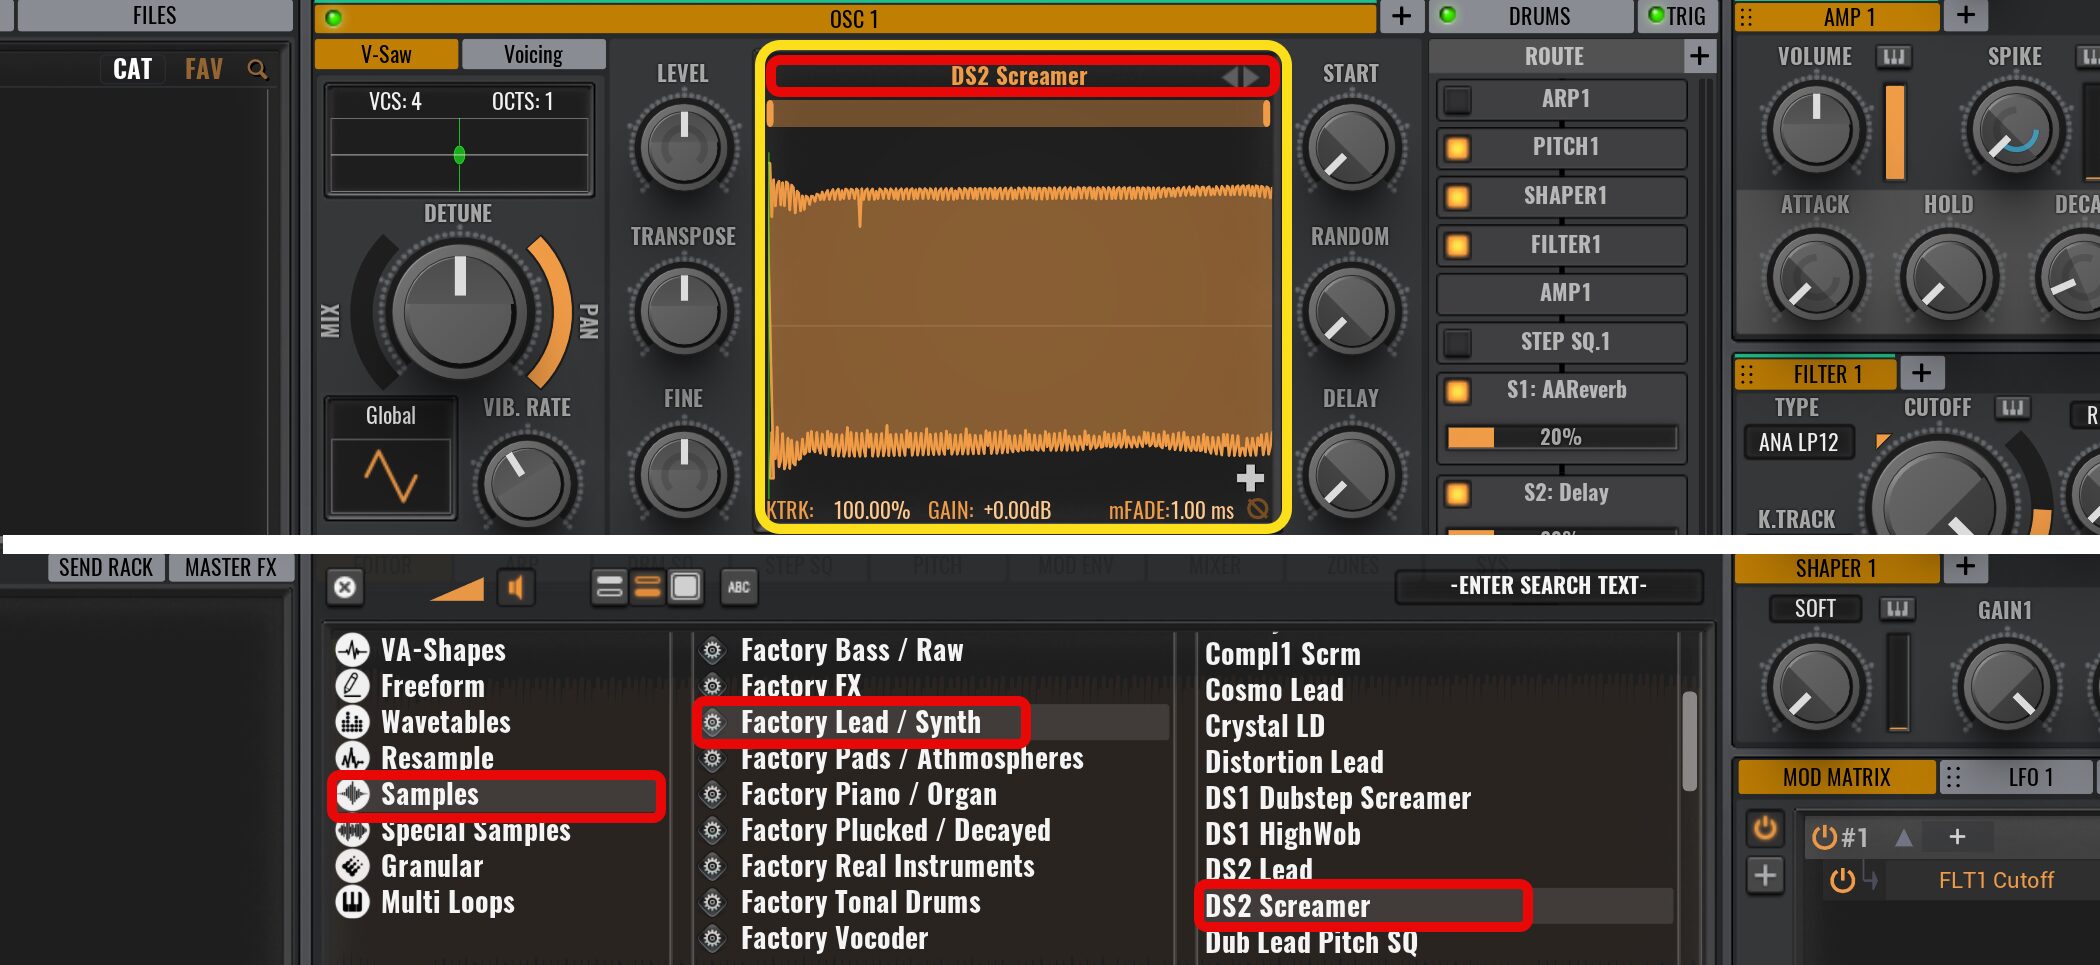
OSC 1のプリセットから「Samples」→「Factory Lead / Synth」→「DS2 Screamer」を選択します。
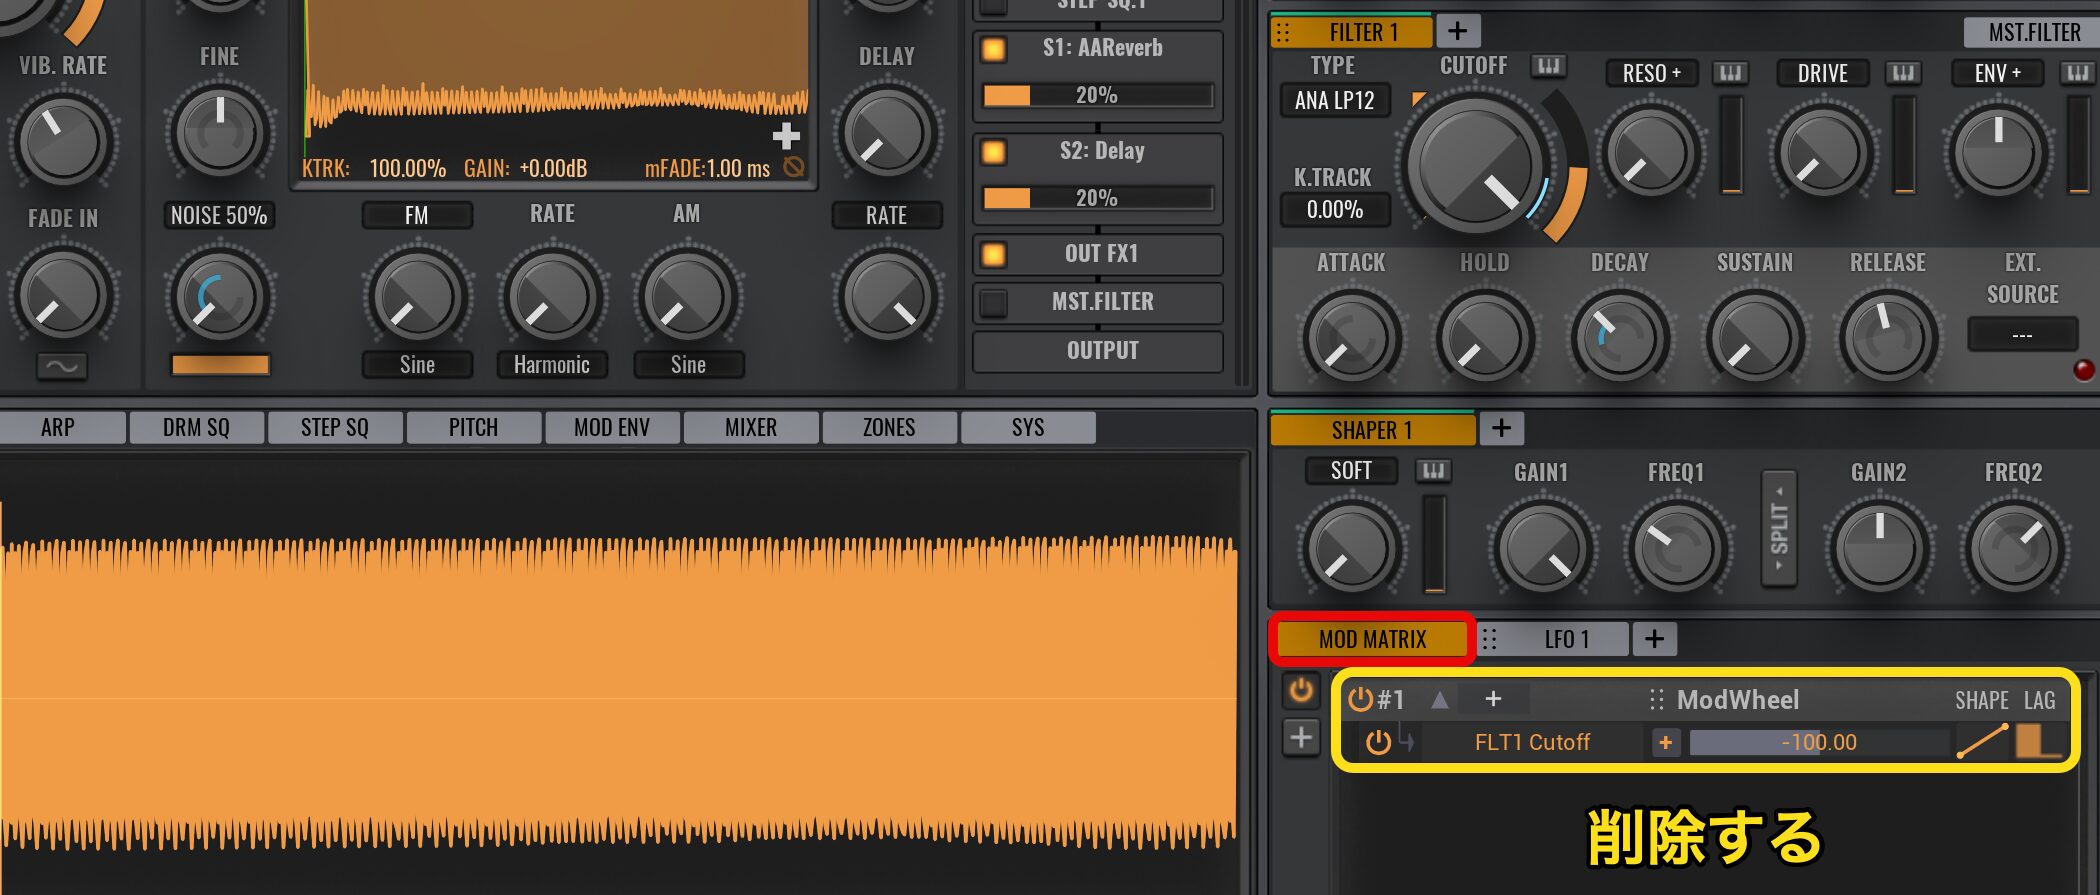
LFOの前に「MOD MATRIX」を確認してみましょう。
デフォルトの状態ですと、「ModWheel」に「Filter 1」の「Cutoff」が割り当てられています。
この割り当てを削除しておきましょう。
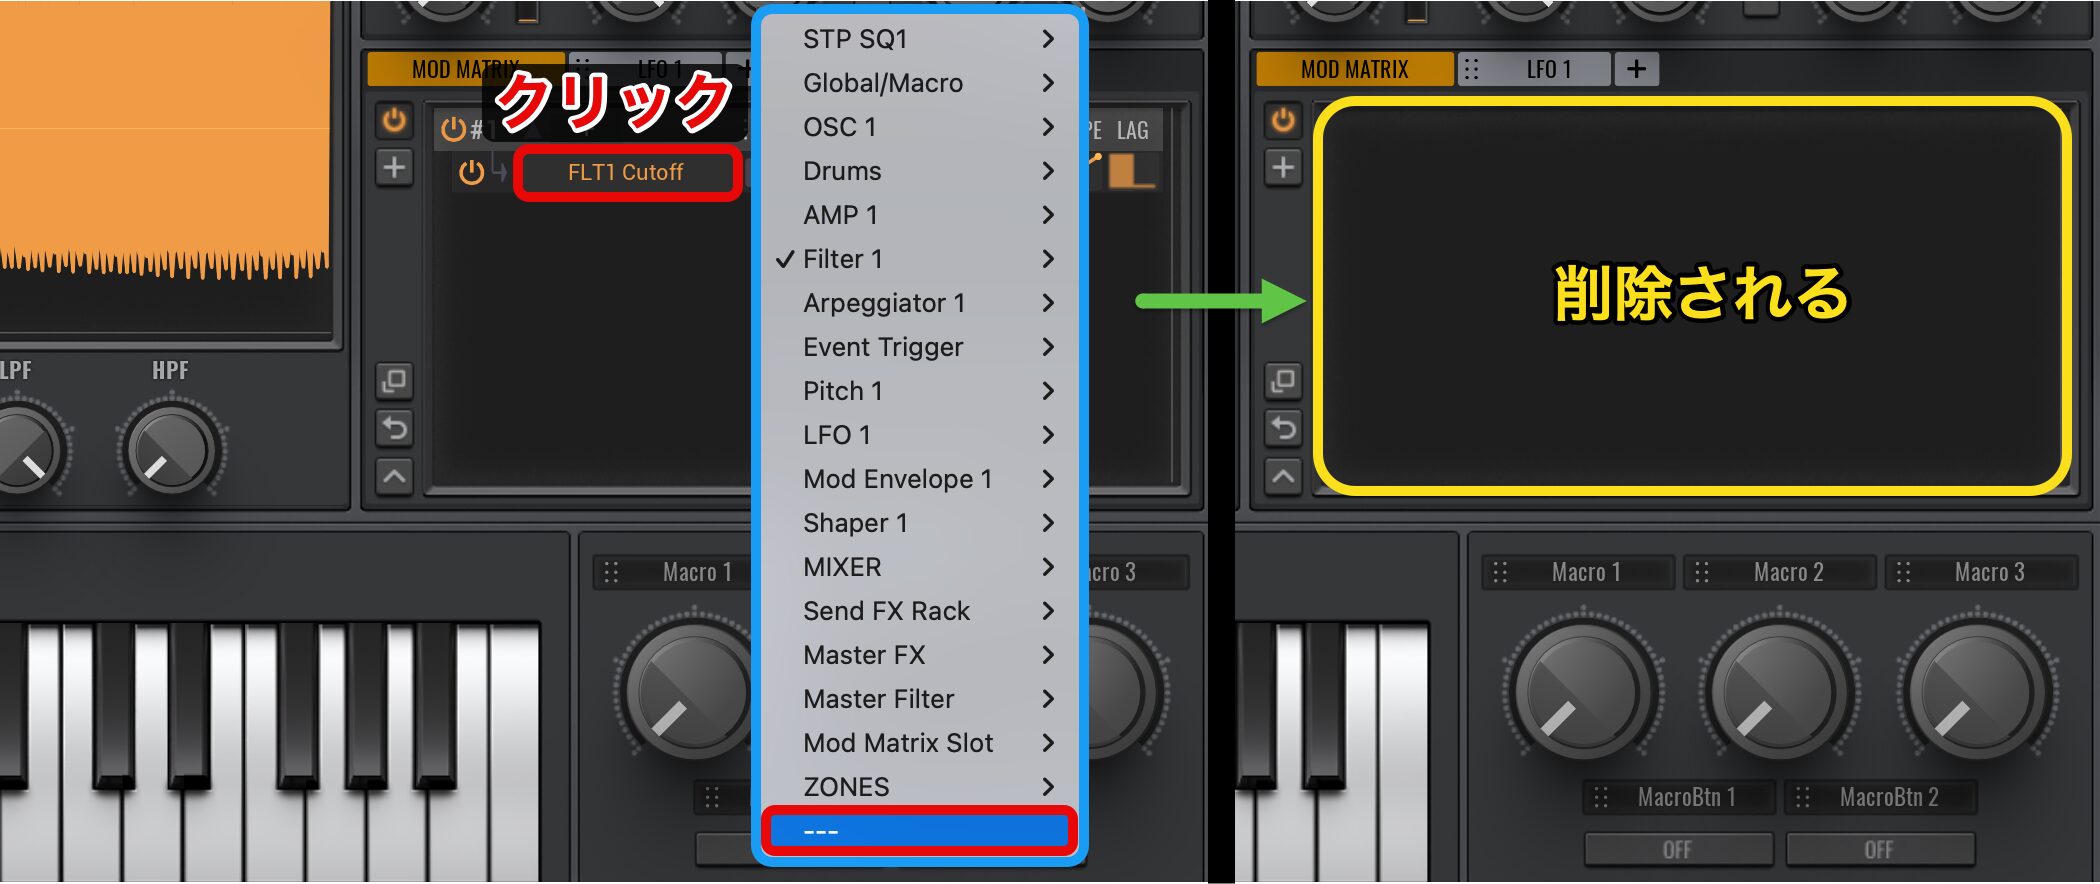
「FLT1 Cutoff」の箇所をクリックして、一番下の「—」を選択すると削除されます。
LFOの基本操作と割り当て方
LFOはMOD MATRIXの隣にあります。
「+」をクリックすることで、最大4つまでLFOを増やすことが可能です。
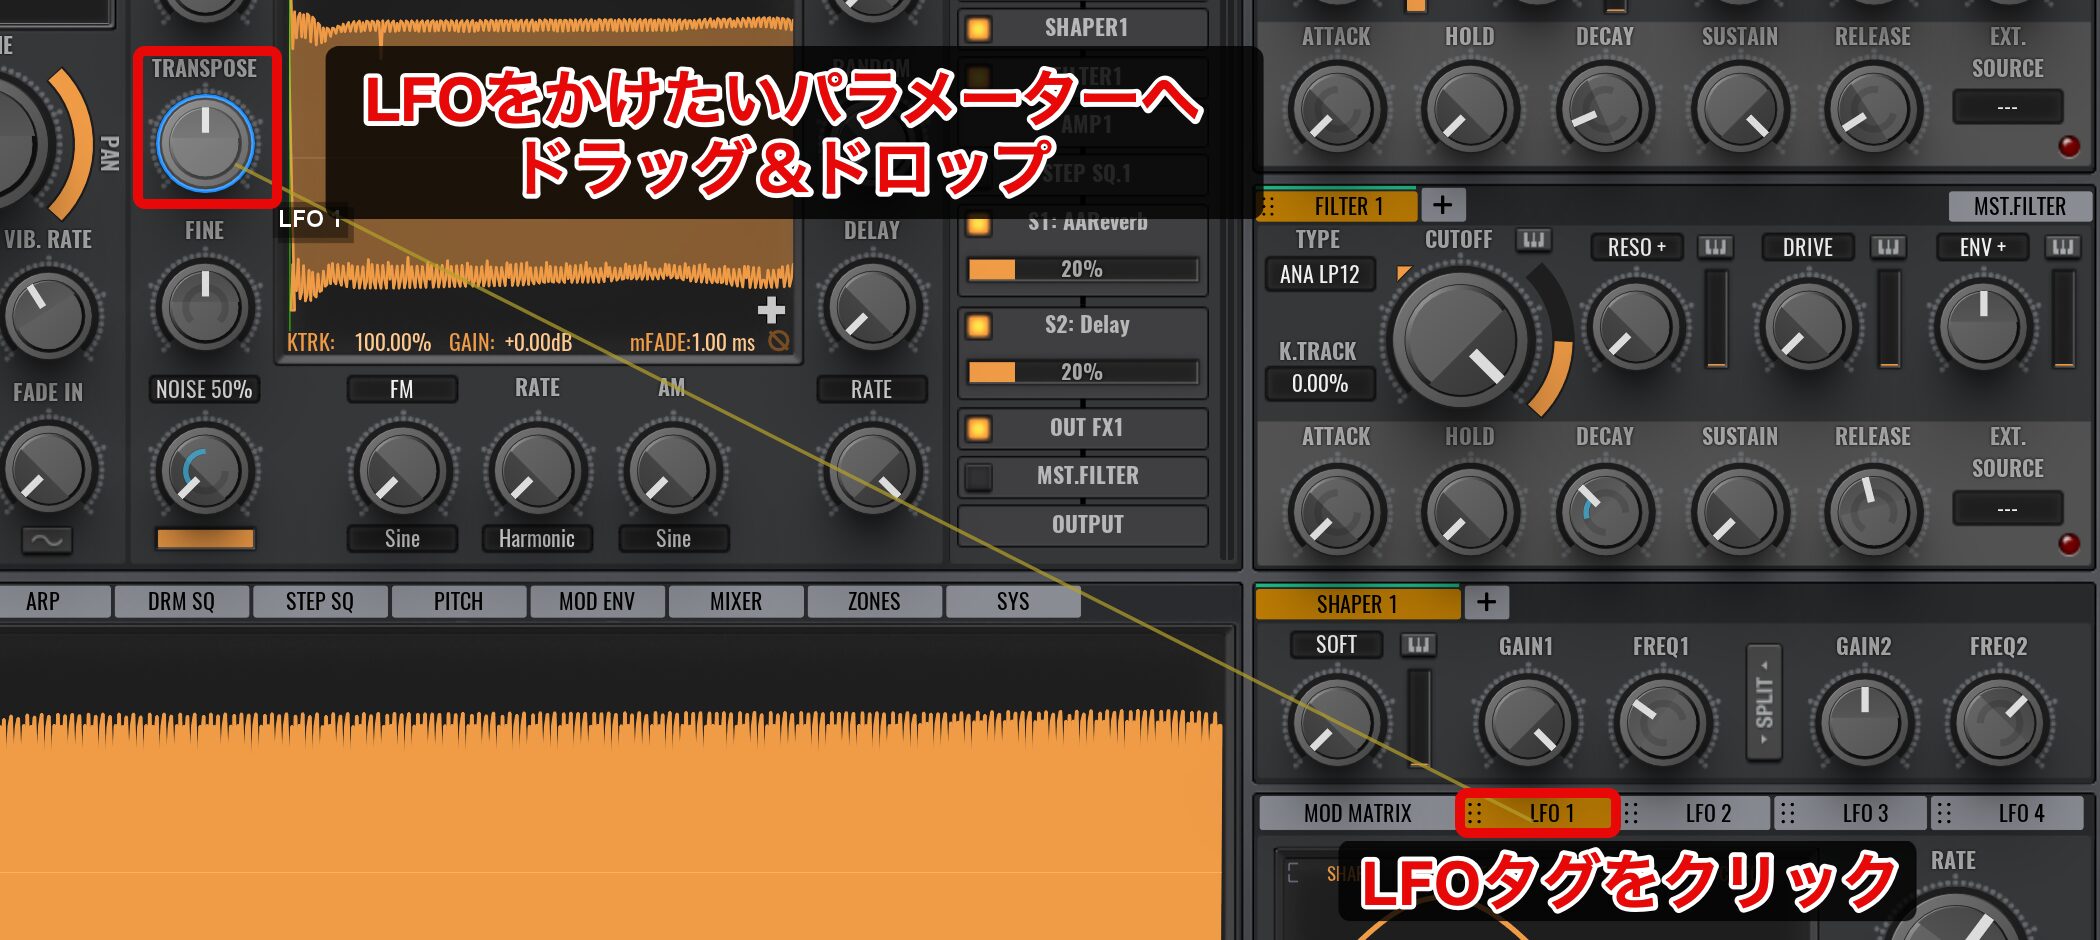
LFOをパラメーターに割り当てるには、使用するLFOタグ(ここではLFO 1)をクリックし、割り当てたいパラメーターにドラッグ&ドロップします。
この操作中に黄色い線が表示されるので、割り当て先がわかりやすいですね。
今回は、効果が分かりやすいTRANSPOSE(音程)に適用してみましょう。
先ほどのMOD MATRIXを開くと、LFO 1にTRANSPOSEが割り当てられているのが確認できます。
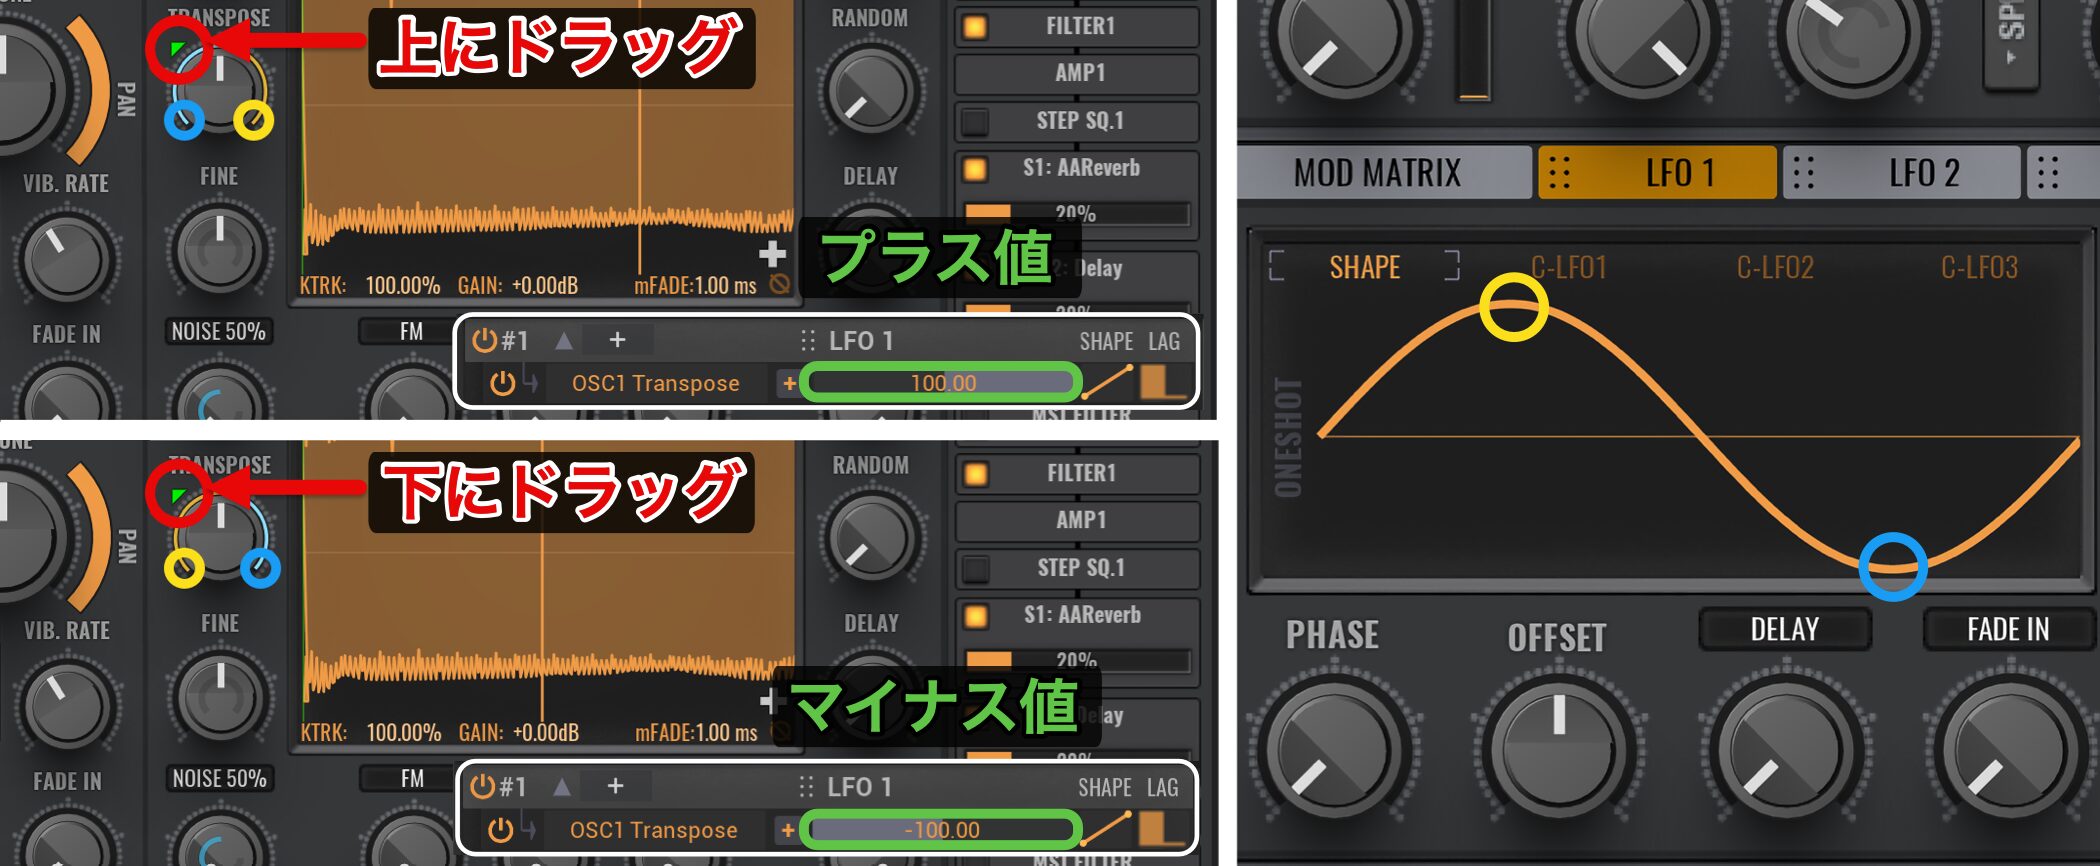
LFOに割り当てられたパラメーターは、左上にオレンジ色の▲マークが表示されます。
視覚的にも分かりやすいですね。
この▲マークを上下にドラッグすることで、LFOをどのくらい適用するか?というアマウント量を調整できます。
この調整はMOD MATRIX側のパラメーターと連動しており、直接数値を入力して設定することも可能です。
▲マークはドラッグする方向によって、LFOの適用範囲が変わります。
- 上にドラッグ: プラス値になり、LFOの最大値がTRANSPOSEノブの右端、最小値が左端になる。
- 下にドラッグ: マイナス値になり、LFOの最大値がTRANSPOSEノブの左端、最小値が右端になる。
ドラッグ方向に応じて、LFOの効果が逆になるということですね。
LFOパラメーターの詳細設定
それではLFOの中を確認していきましょう。
「RATE」でLFOの速度を調整できます。
右に進めると、LFOの周期が速くなります。
その下にあるSyncボタンは、デフォルトで有効になっており、DAWのテンポに自動で同期します。
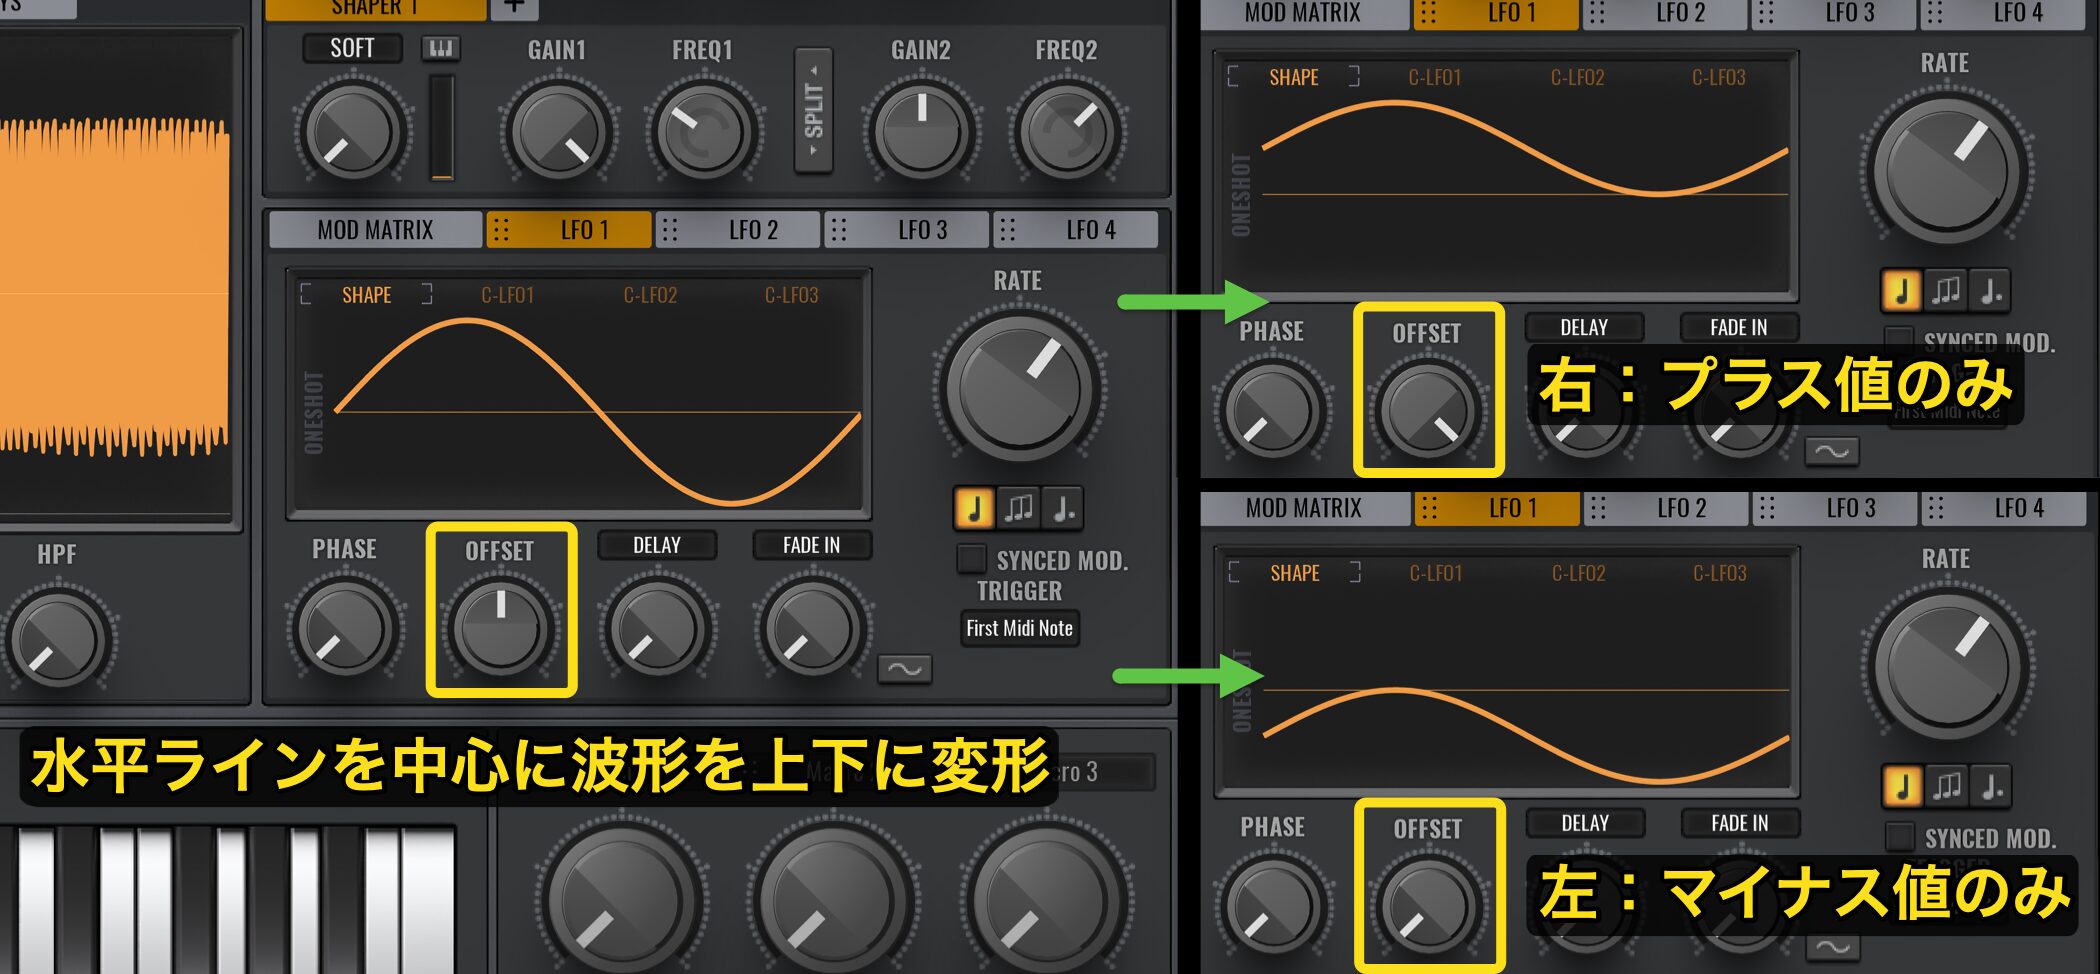
下にある「PHASE」で、LFOのスタート位置を調整できます。
「OFFSET」では、水平ラインを中心に波形を上下に変形させ、LFOにバリエーションを加えることができます。
OFFSETノブを右に振り切るとプラス値のみで出力され、左に振り切るとマイナス値のみで出力されます。
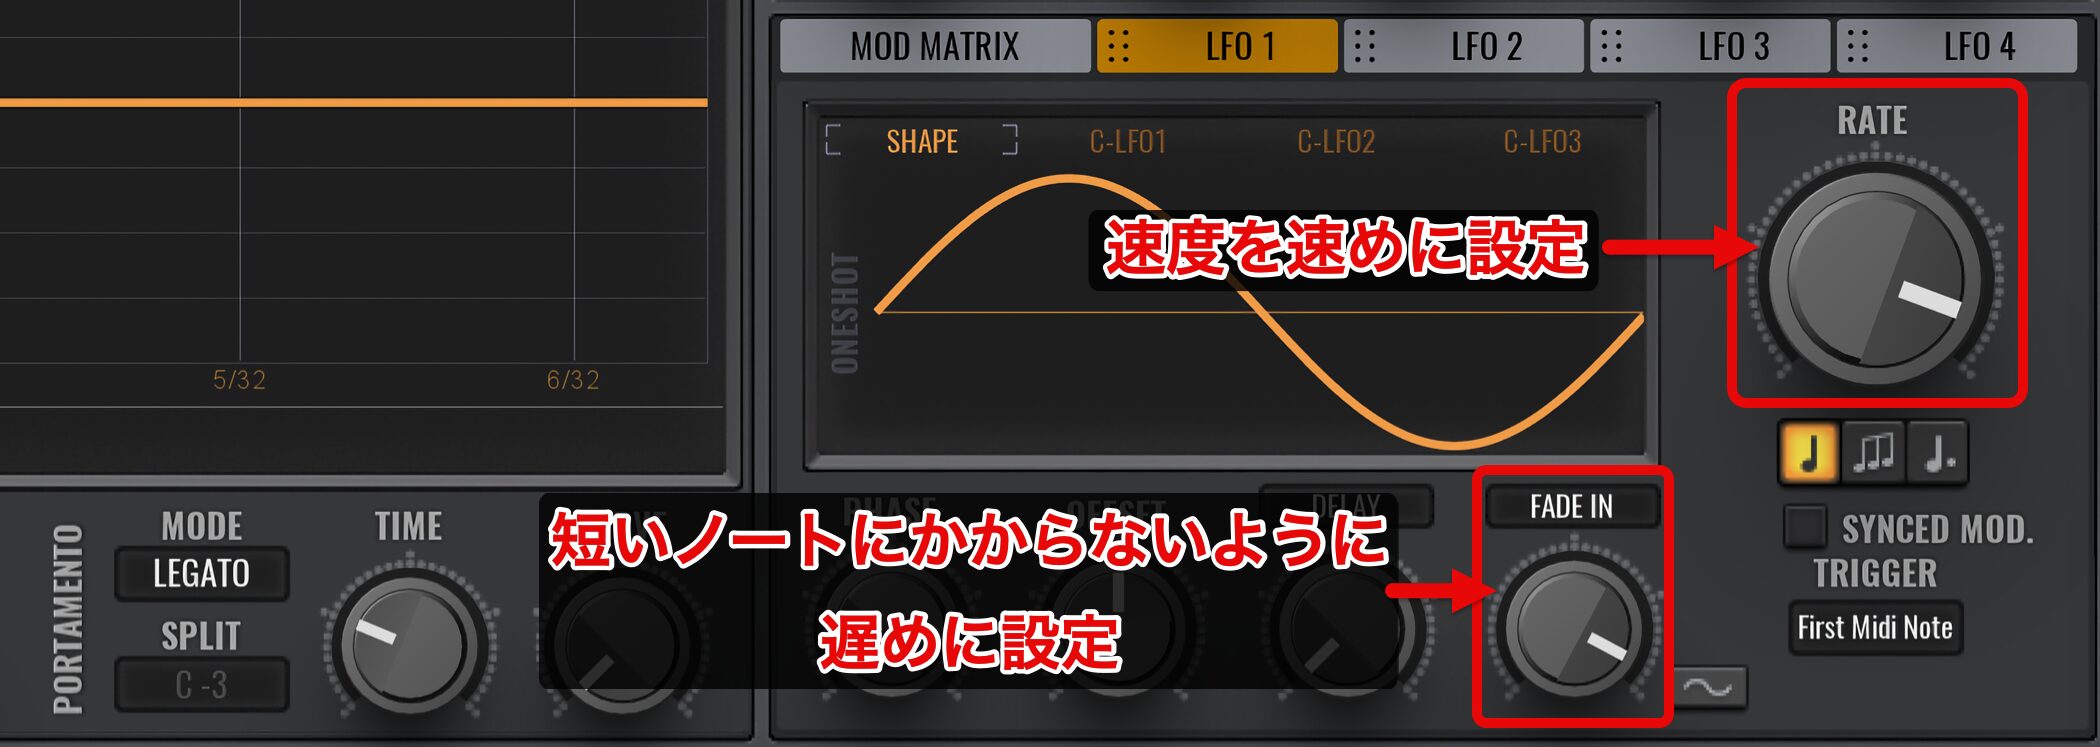
「DELAY」で、LFOのスタートするタイミングを遅らせることができます。
短いフレーズにはLFOの効果を与えずに、長いノートのみに効果を与えたい。というような場合にも便利です。
「FADE IN」では、その名の通り、LFOの効果を徐々に適用することができます。
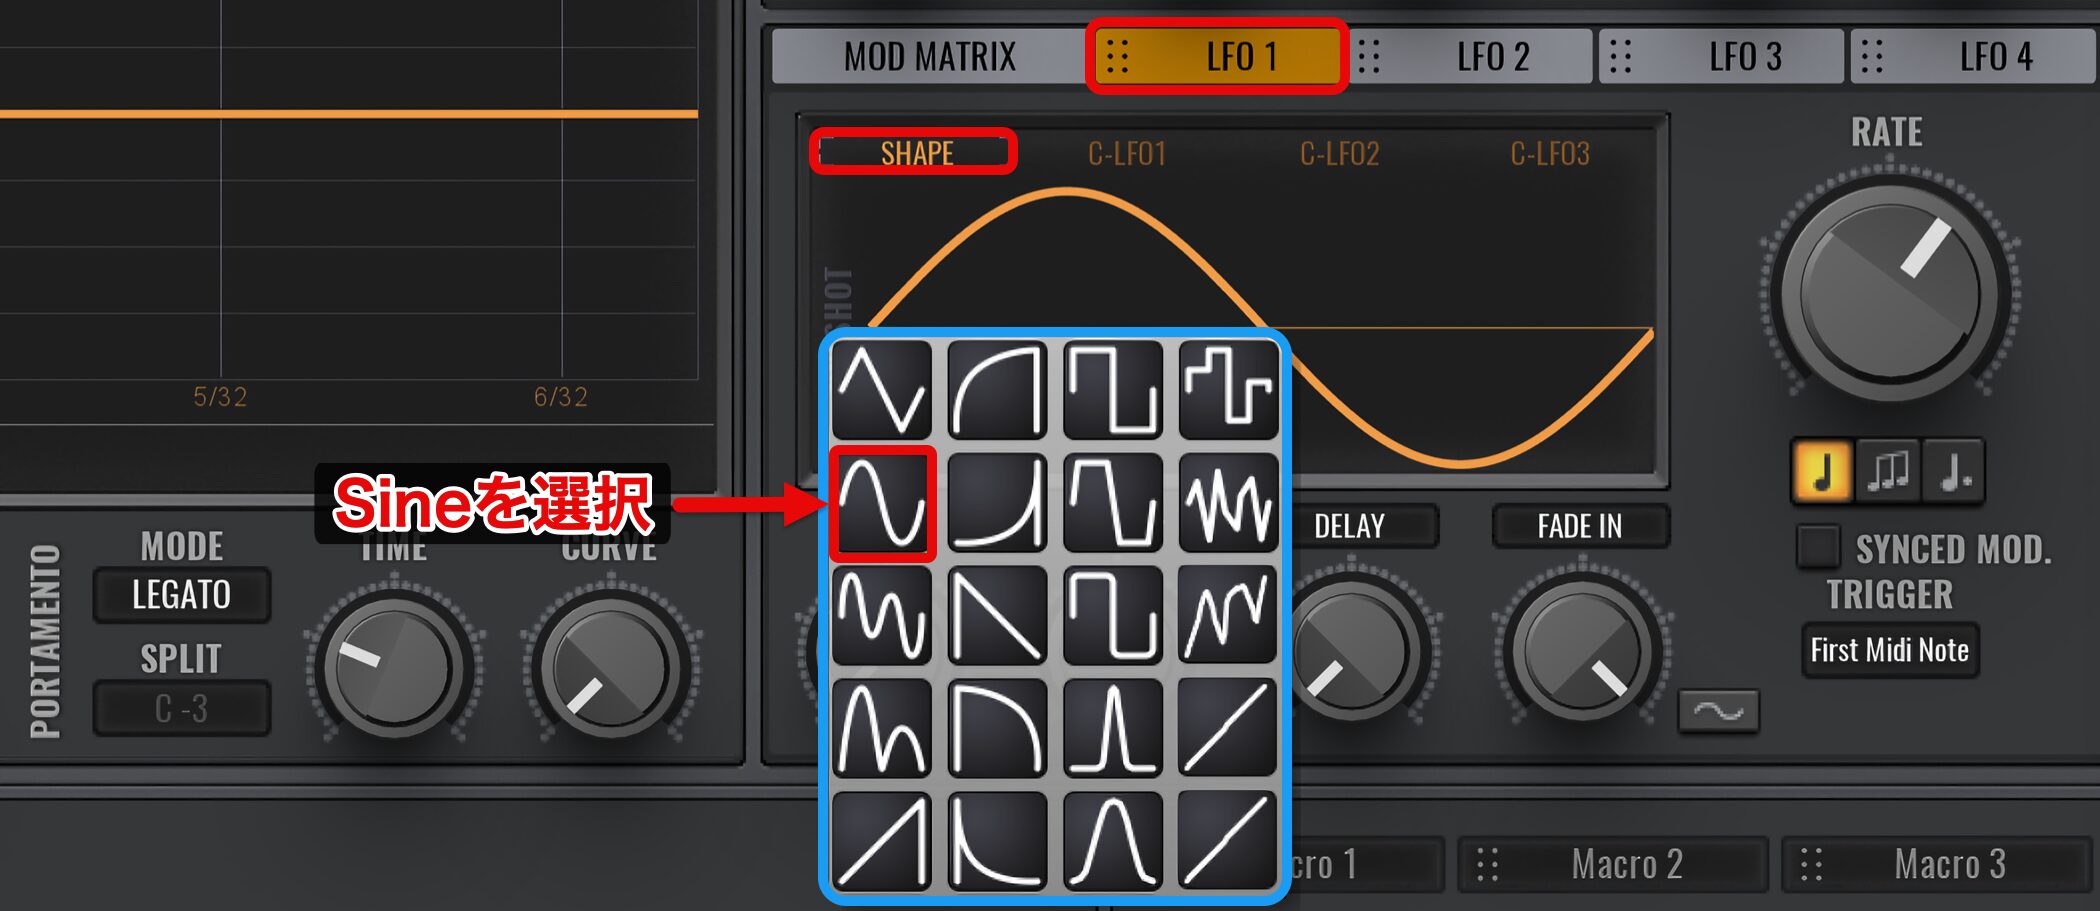
また、AvengerにはLFOの波形が豊富に用意されています。
SHAPEが選択されている状態で波形画面のどこでもクリックすると、使用可能な波形一覧が表示されます。
よく見ると、右下の3つは同じ波形ですが、これらはSHAPE隣の「C-LFO 1〜3」の波形です。
C-LFOは、自分で波形を作成できるのが特徴です。
ダブルクリックでポイントを追加、ドラッグで上下左右に移動でき、不要なポイントは右クリックして「Delete Point」を選択すると削除できます。
作成した波形はSHAPEの波形一覧に反映され、選択できるようになります。
非常に自由度が高いですね。
LFOを活用したシンセリードの作成
一通りLFOの使い方を把握したところで、これらを応用してシンセリードを作成していきましょう。
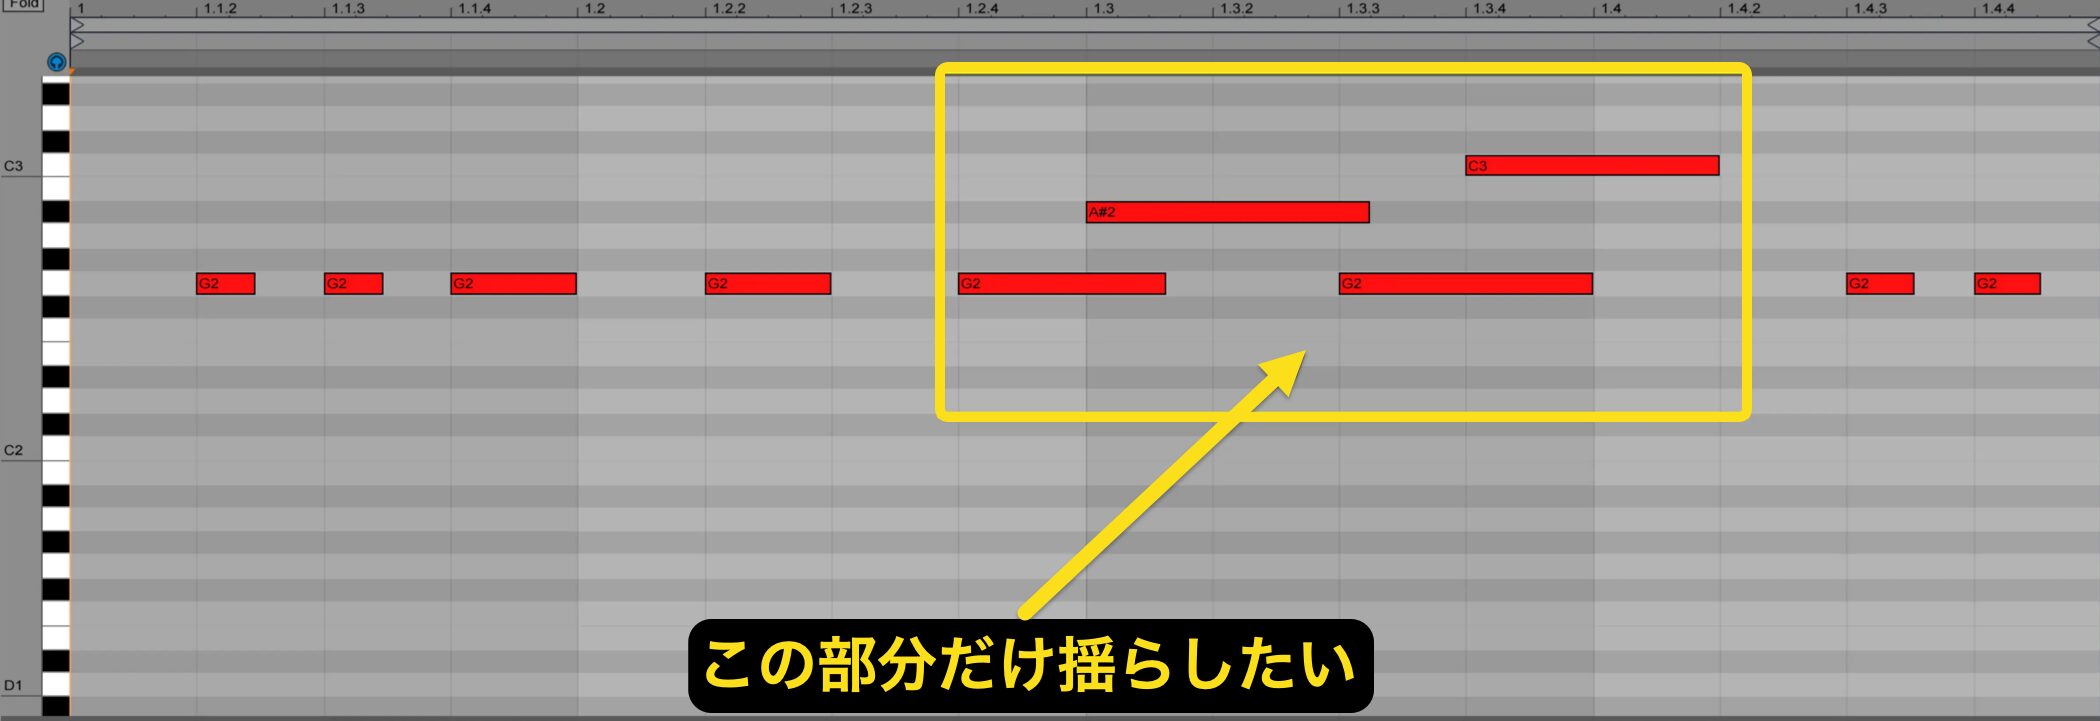
このようにMIDIを打ち込んであります。
滑らかに音を繋げたいノートはタイミングが重なるように打ち込んであります。
まず、この重なった部分の音程が滑らかに推移するように、PORTAMENTOを設定しましょう。
「PITCH」を開いて、PORTAMENTOのMODEで「MONO LEGATO」を選択します。
ノートが繋がっている箇所にLFOの効果が出るようにします。
ということは、上記で解説したDELAYかFADE INを使用すれば良いということになります。
FADE INを使用していきましょう。
まず、LFO 1のSHAPEを「Sine」にしておきます。
FADE INを遅めに設定することで、短いノートにはLFOがかからなくなります。
また、RATEで揺れる速度を速めておきましょう。
このLFO 1をどこに適用してサウンドが揺れてる感じをだすか?
TRANSPOSEに適用してビブラードのようなサウンドにしても良いのですが、今回は「FILTER」に適用してみます。
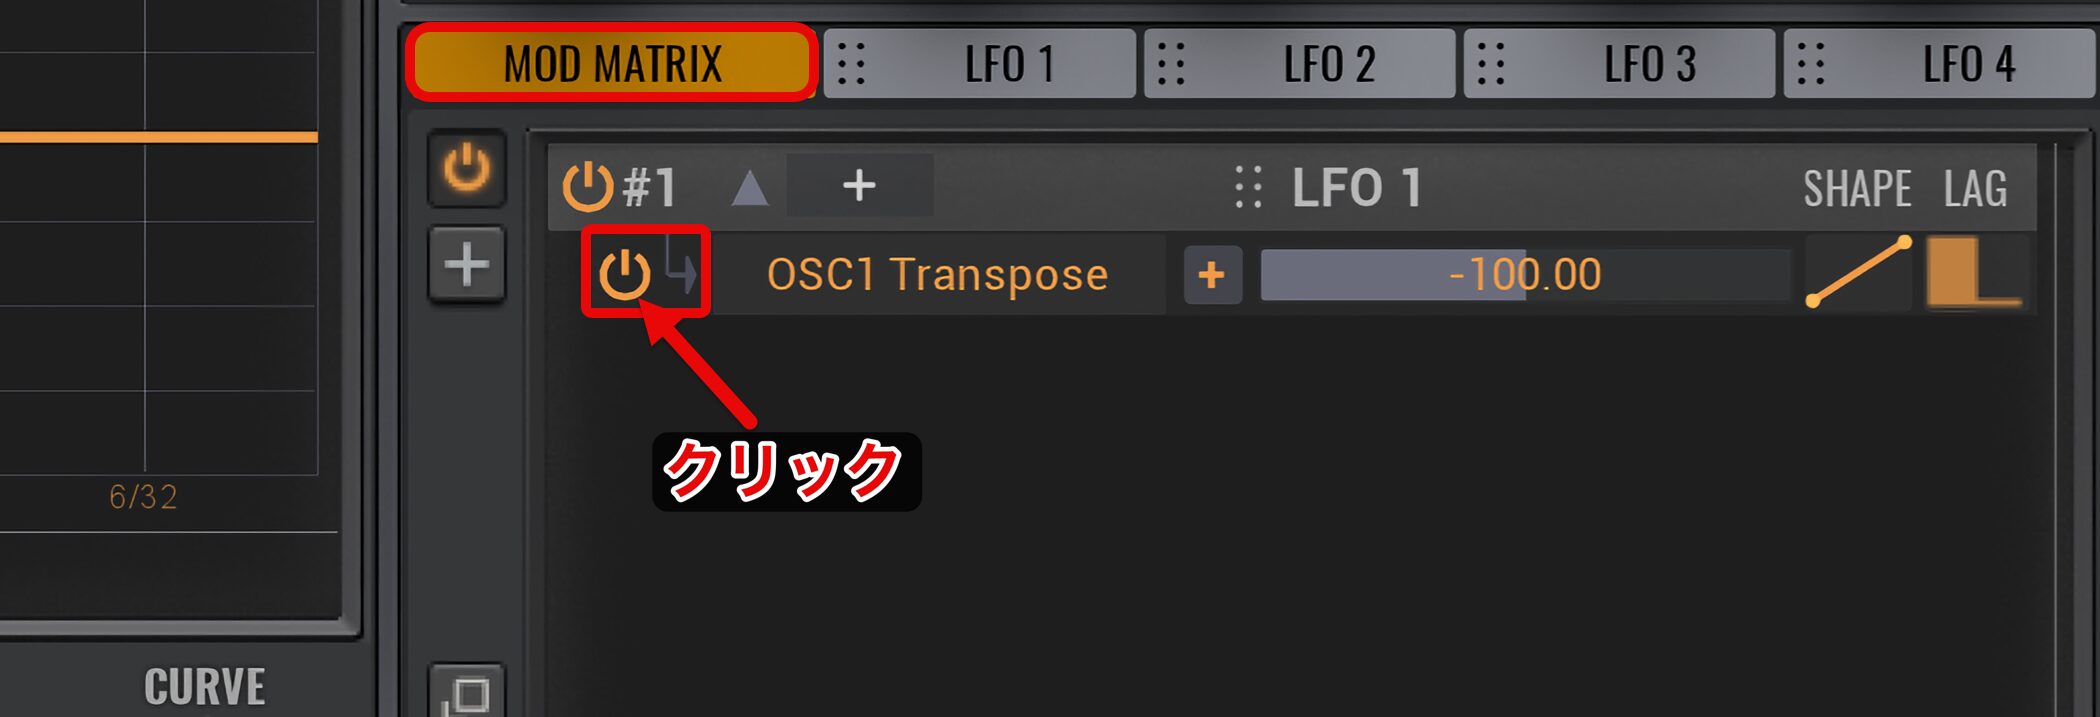
現在、TRANSPOSEに割り当てられているLFOは使用しないため、オフにしましょう。
MOD MATRIXの「OSC 1 Transpose」の電源ボタンをクリック(消灯)するだけです。
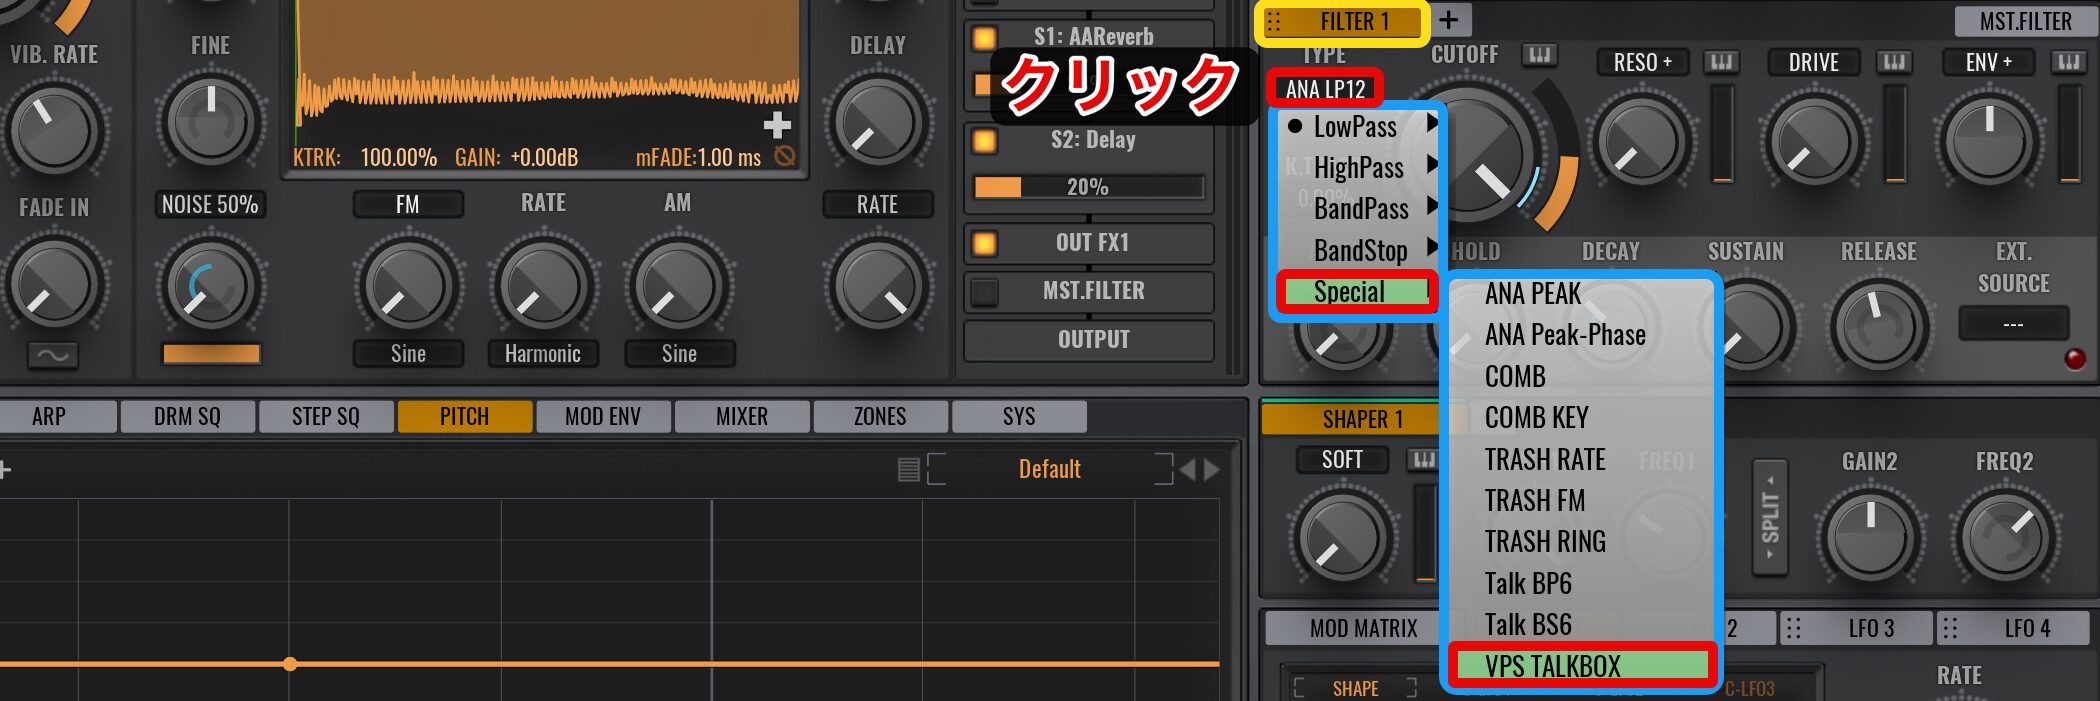
FILTER 1のTYPEからはFILTERの種類を選択できます。
今回は、「Special」の「VPS TALKBOX」を選びます。
CUTOFFが高速で動くことにより、サウンドが揺れたニュアンスを簡単に作り出すことができます。
LFO 1をクリックしてドラッグし、CUTOFFに割り当てます。
MOD MATRIXを開いて、揺れ幅をプラス値「20.00」にしましょう。
大きな値にすると揺れ幅が大きすぎて気持ち良くありません。
さりげない位がちょうど良いニュアンスとなります。
しかし、このままではCUTOFFが左側にしか動きません。
デフォルトではCUTOFFのベロシティアマウントが有効になっているため、ベロシティの強さによってLFOの動きが制御されます。
今回はLFOで狙った通りの動きが出ないため、値を下にドラッグして0%に設定し無効にします。
これでベロシティに左右されることなく、一定量のLFO効果が得られます。
次に、ノートの発音ごとに音色が微妙に変化する設定も行っておきましょう。
FILTER TYPEで選択したVPS TALKBOXでは、「RESO+」の隣に「VOWEL」が表示されます。
このVOWELを動かすと発音が変化し、サウンドに簡単にニュアンスを加えることができて便利です。
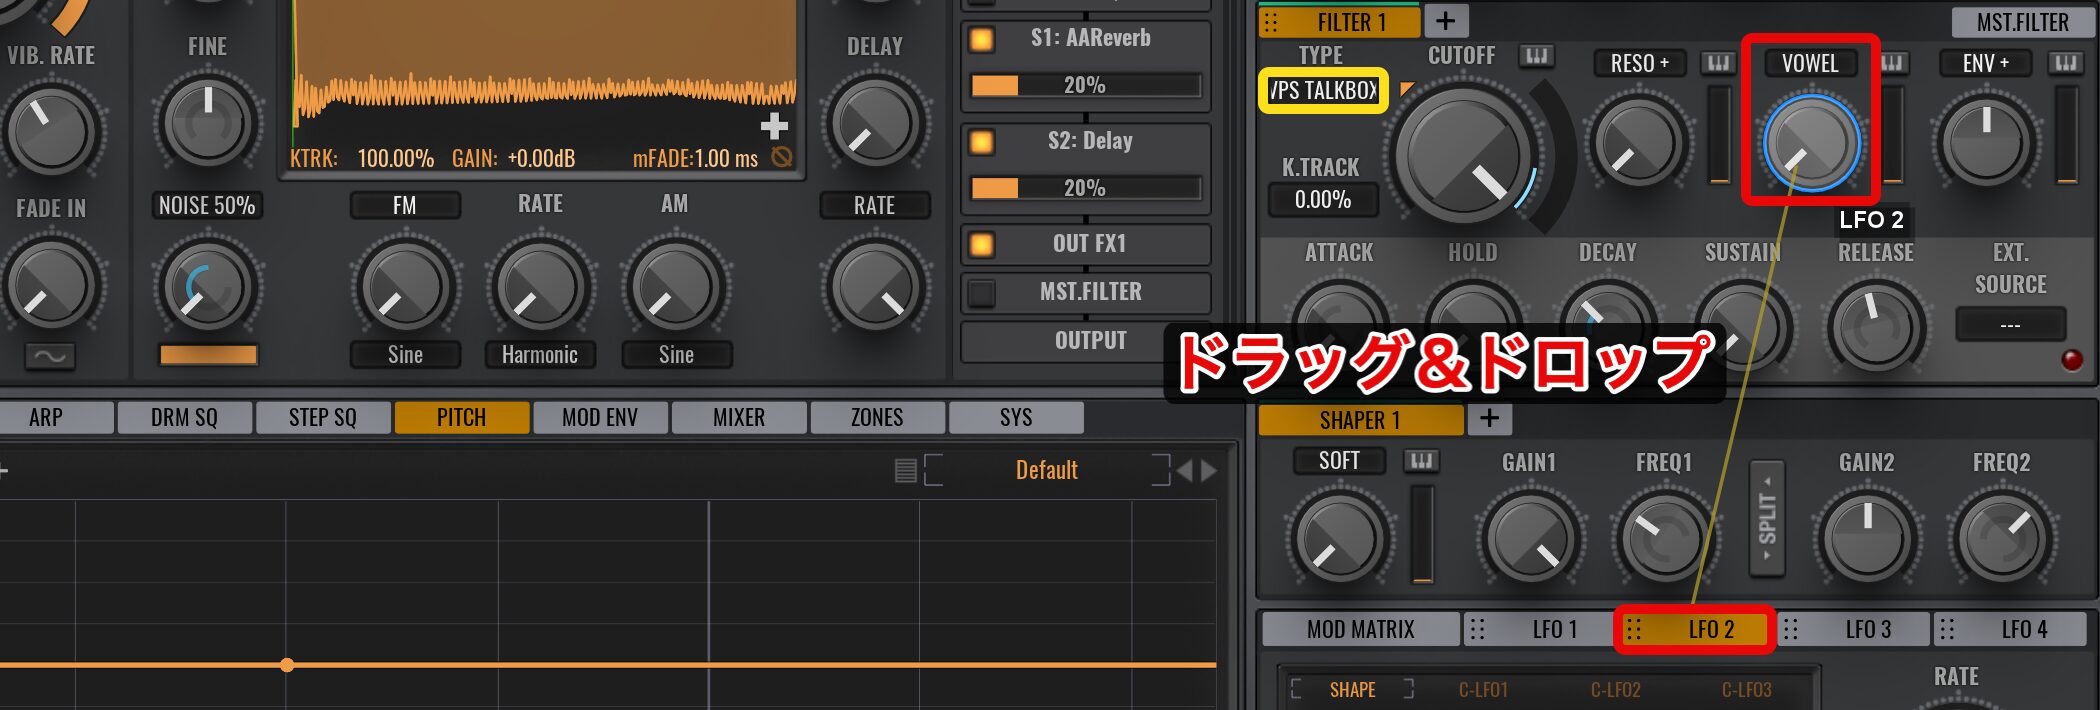
ここにLFOを適用します。LFO 2をクリックしてドラッグし、VOWELに割り当てます。
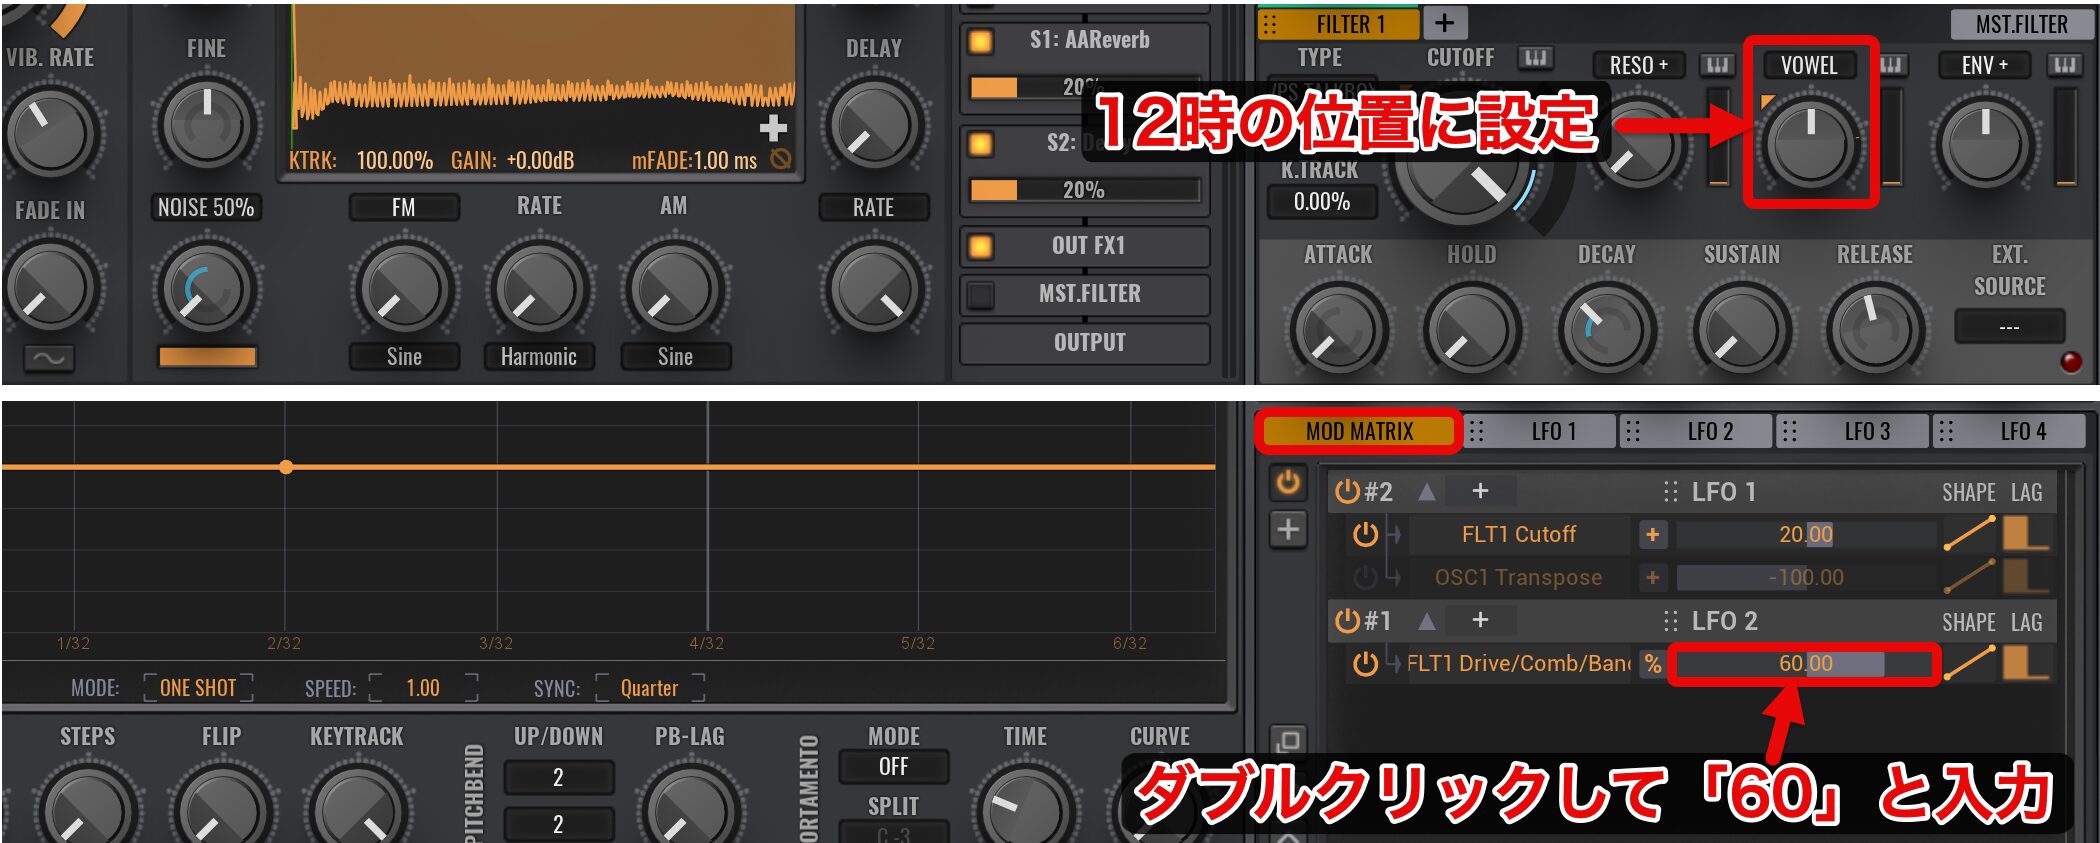
VOWELは12時の位置に設定し、この位置から左右に動くようにします。
MOD MATRIXを開いて、揺れ幅は「60.00」に設定しましたが、この幅はお好みで調整してください。
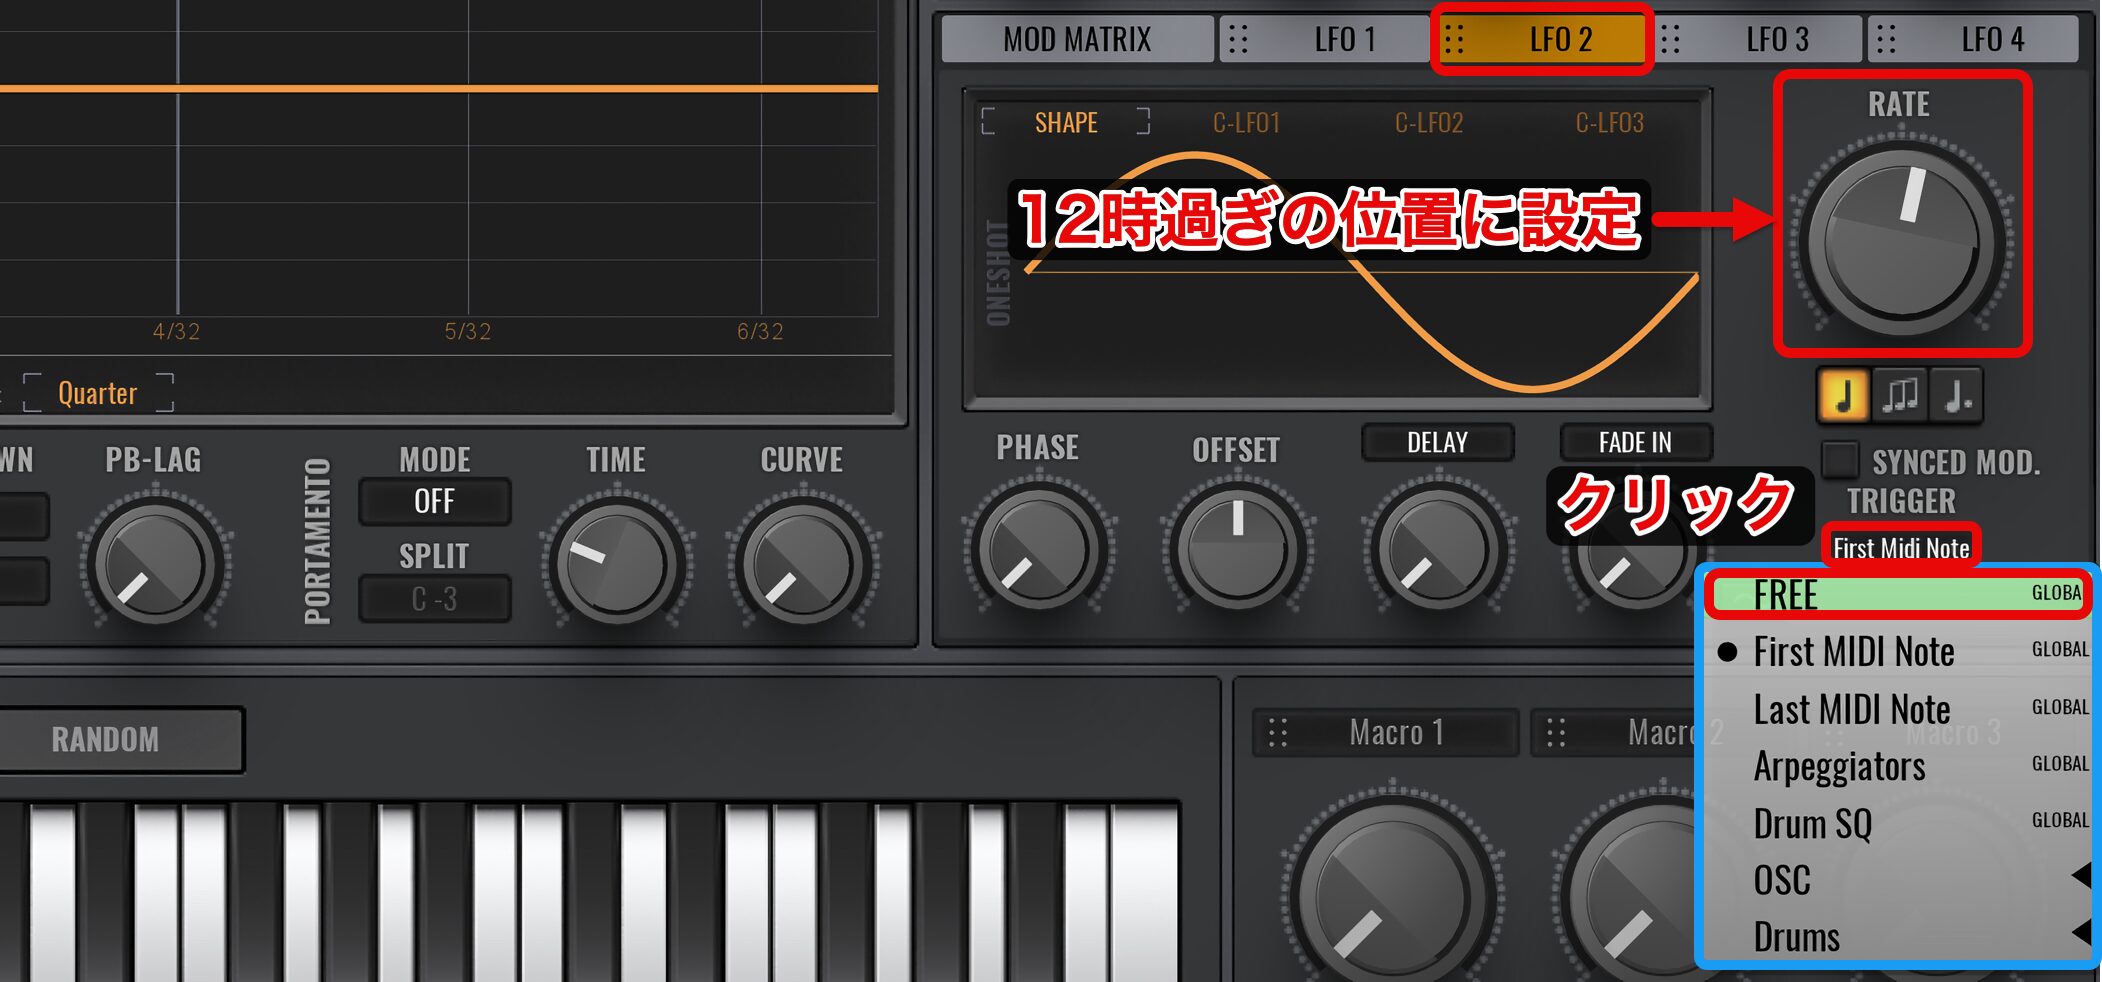
最後に、LFO 2の設定を行います。
RATEは少しゆっくりめに12時過ぎの位置に設定します。
また、発音のたびにLFOが頭に戻ってしまわないよう、TRIGGERを「FREE」に変更します。
これで完成です。
今回はLFOをFILTERに適用しましたが、アイデア次第で多彩なサウンドメイキングが行なえます。
ぜひ色々と試してみてください。
多様なフレーズを生み出す柔軟なアルペジエーター
エレクトロには欠かせないアルペジエーター。
和音を分散して演奏する機能で、誰もが一度は耳にしているはずです。
このアルペジエーターは多くのシンセサイザーに搭載されており、もちろんAvengerにも強力なアルペジエーターが備わっています。
また、Macro機能を組み合わせることで、アルペジエーターフレーズへ多くのバリエーションを与えることができます。
Avenger 動画 : アルペジエーターとマクロ
アルペジエーターの使い方とエディット
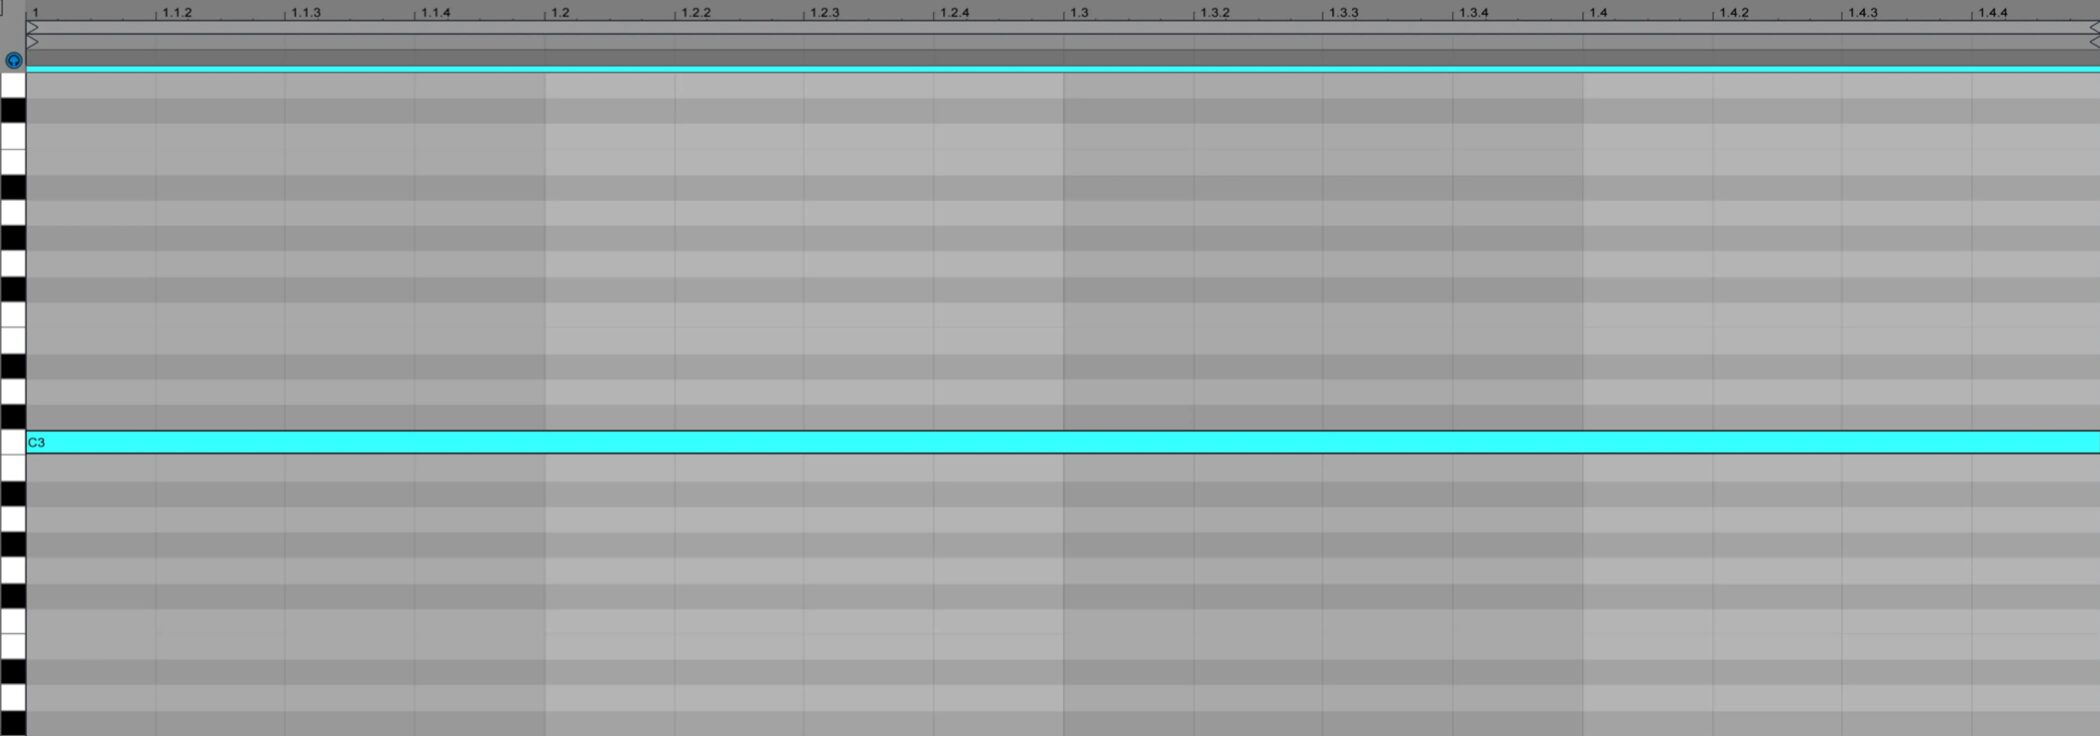
アルペジエーターを演奏させるために、和音を打ち込んであります。
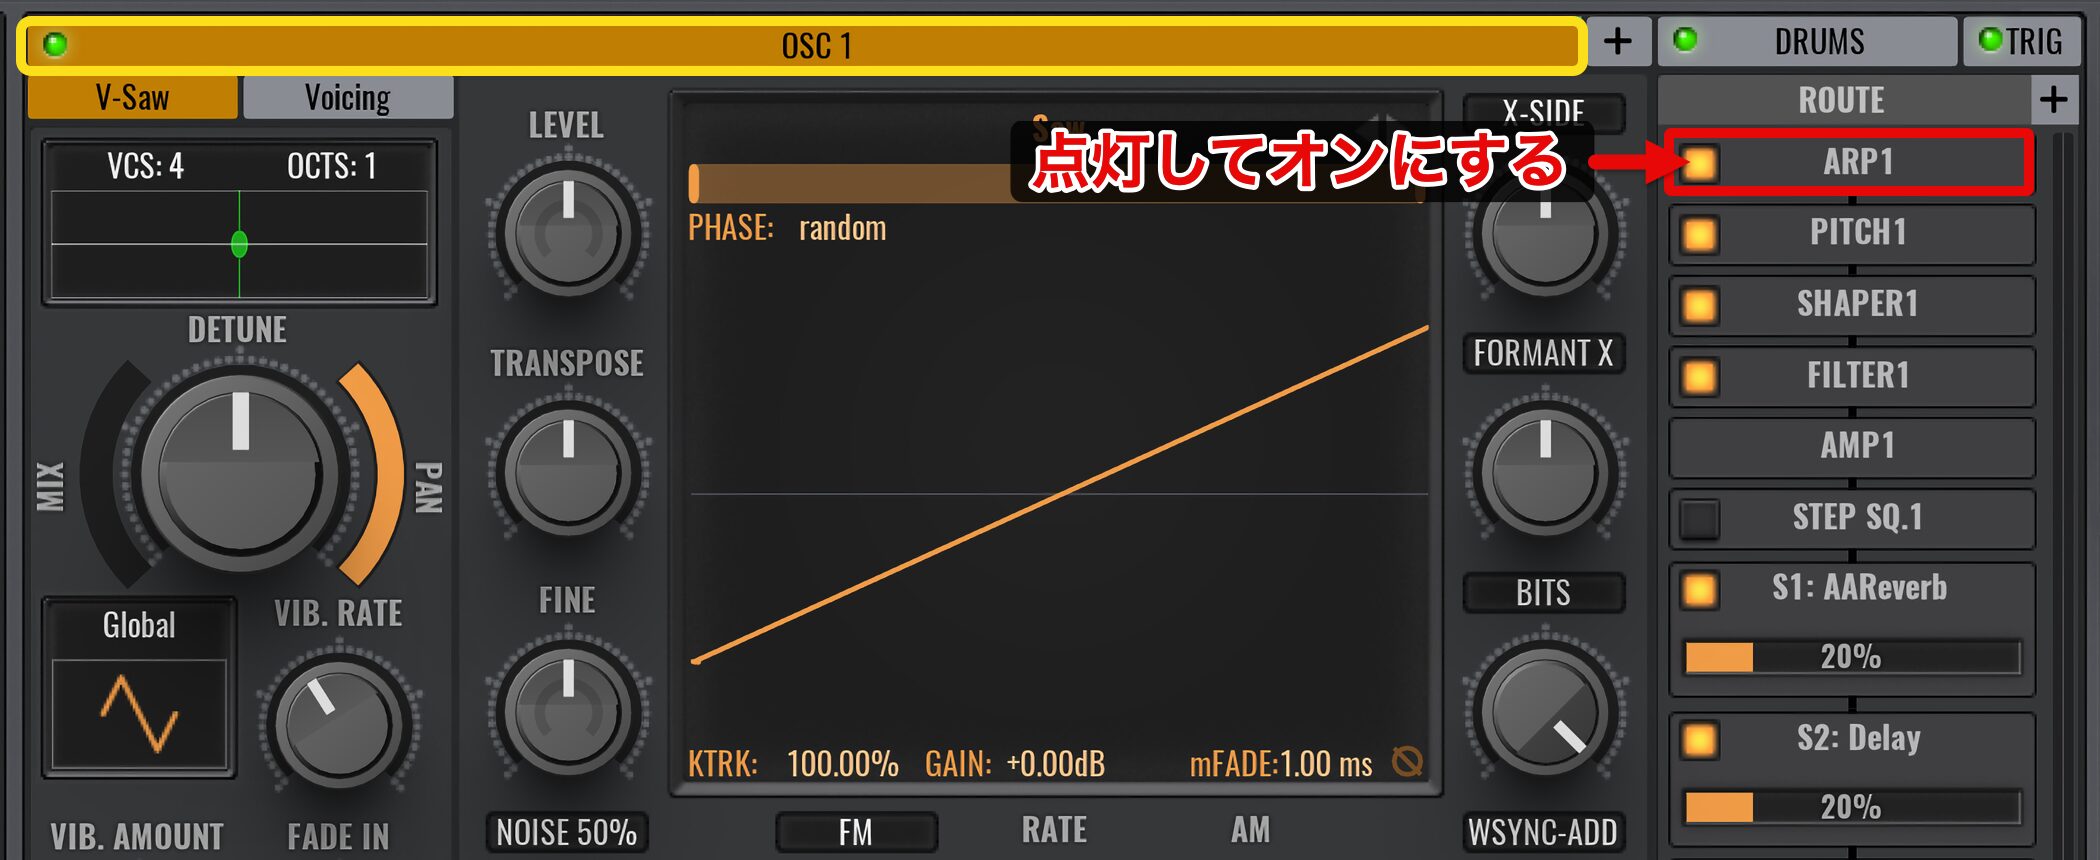
アルペジエーターを使用するには、使用したいオシレーター(今回はOSC 1)のROUTEにある「ARP 1」をオンにします。
MODEとPAT.SPEEDの設定
下の「ARP」タブからアルペジエーターの設定を行います。
それでは詳細を確認していきましょう。
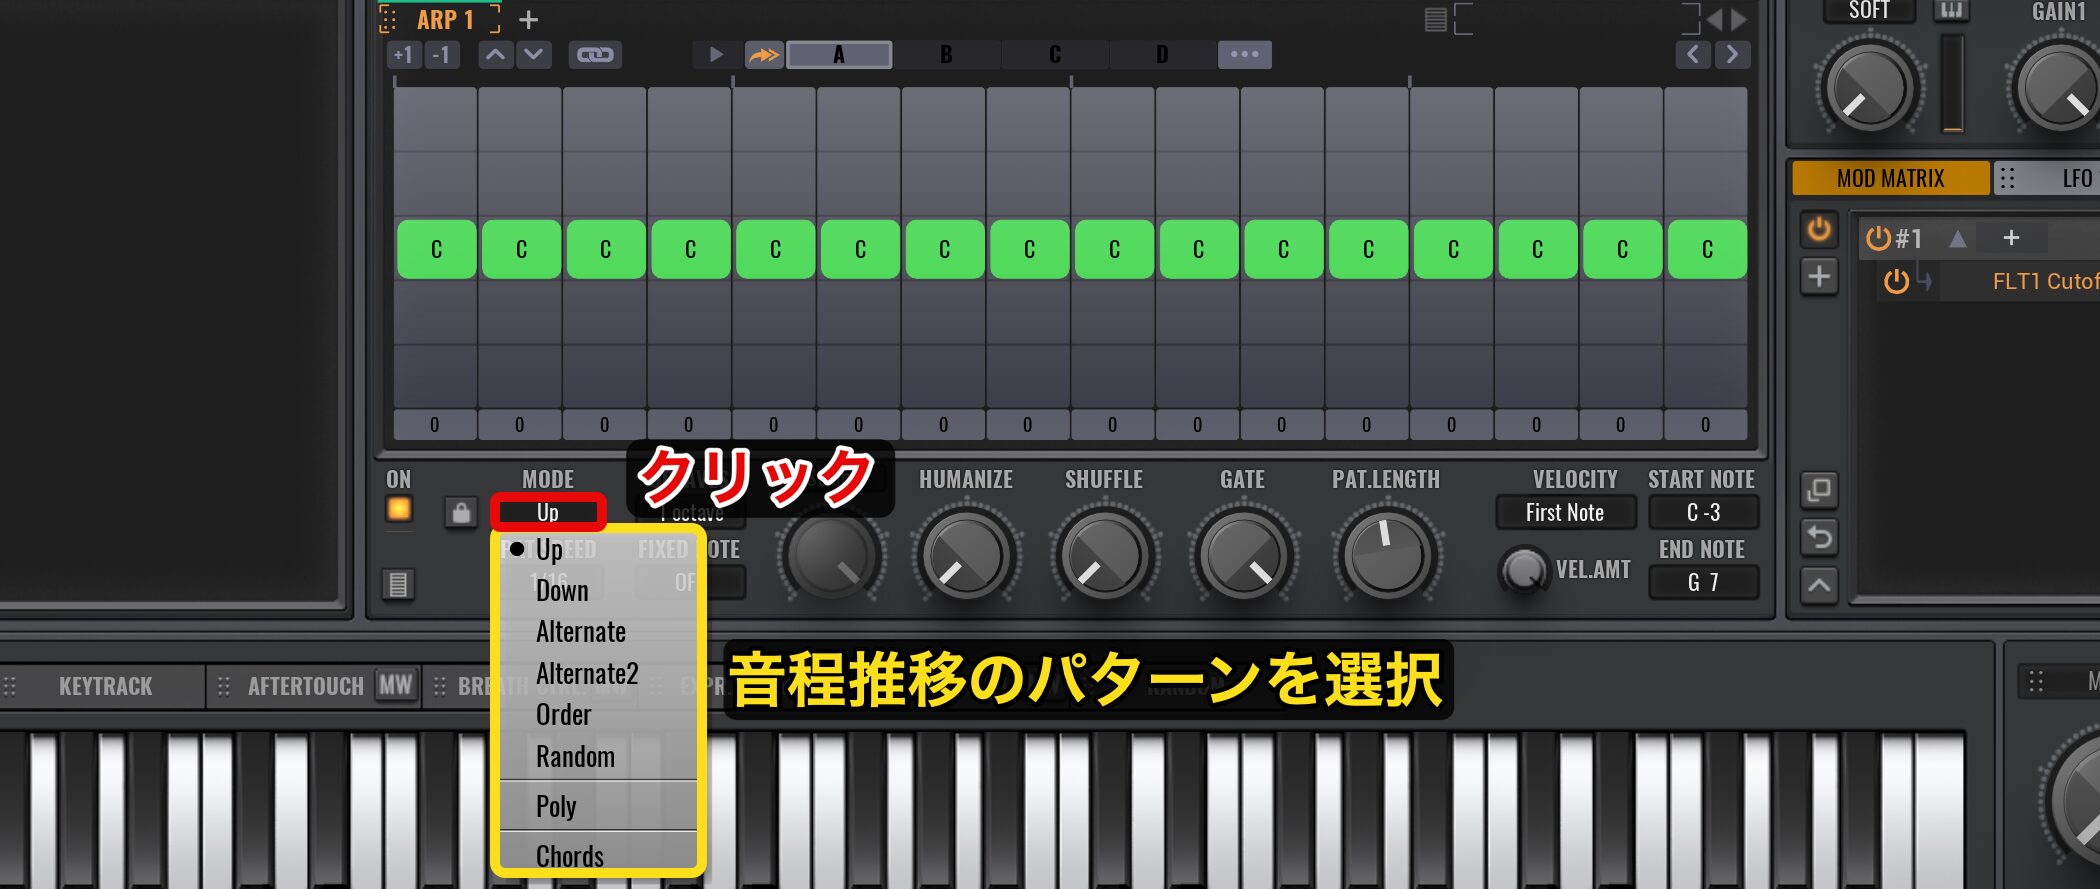
「MODE」からは、アルペジオの音程推移のパターンを選択します。
Up(上がる)/Down(下がる)/Alternate(交互に)/Random(適当に)など様々な動きが用意されています。
楽曲に合うものを探してみてください。
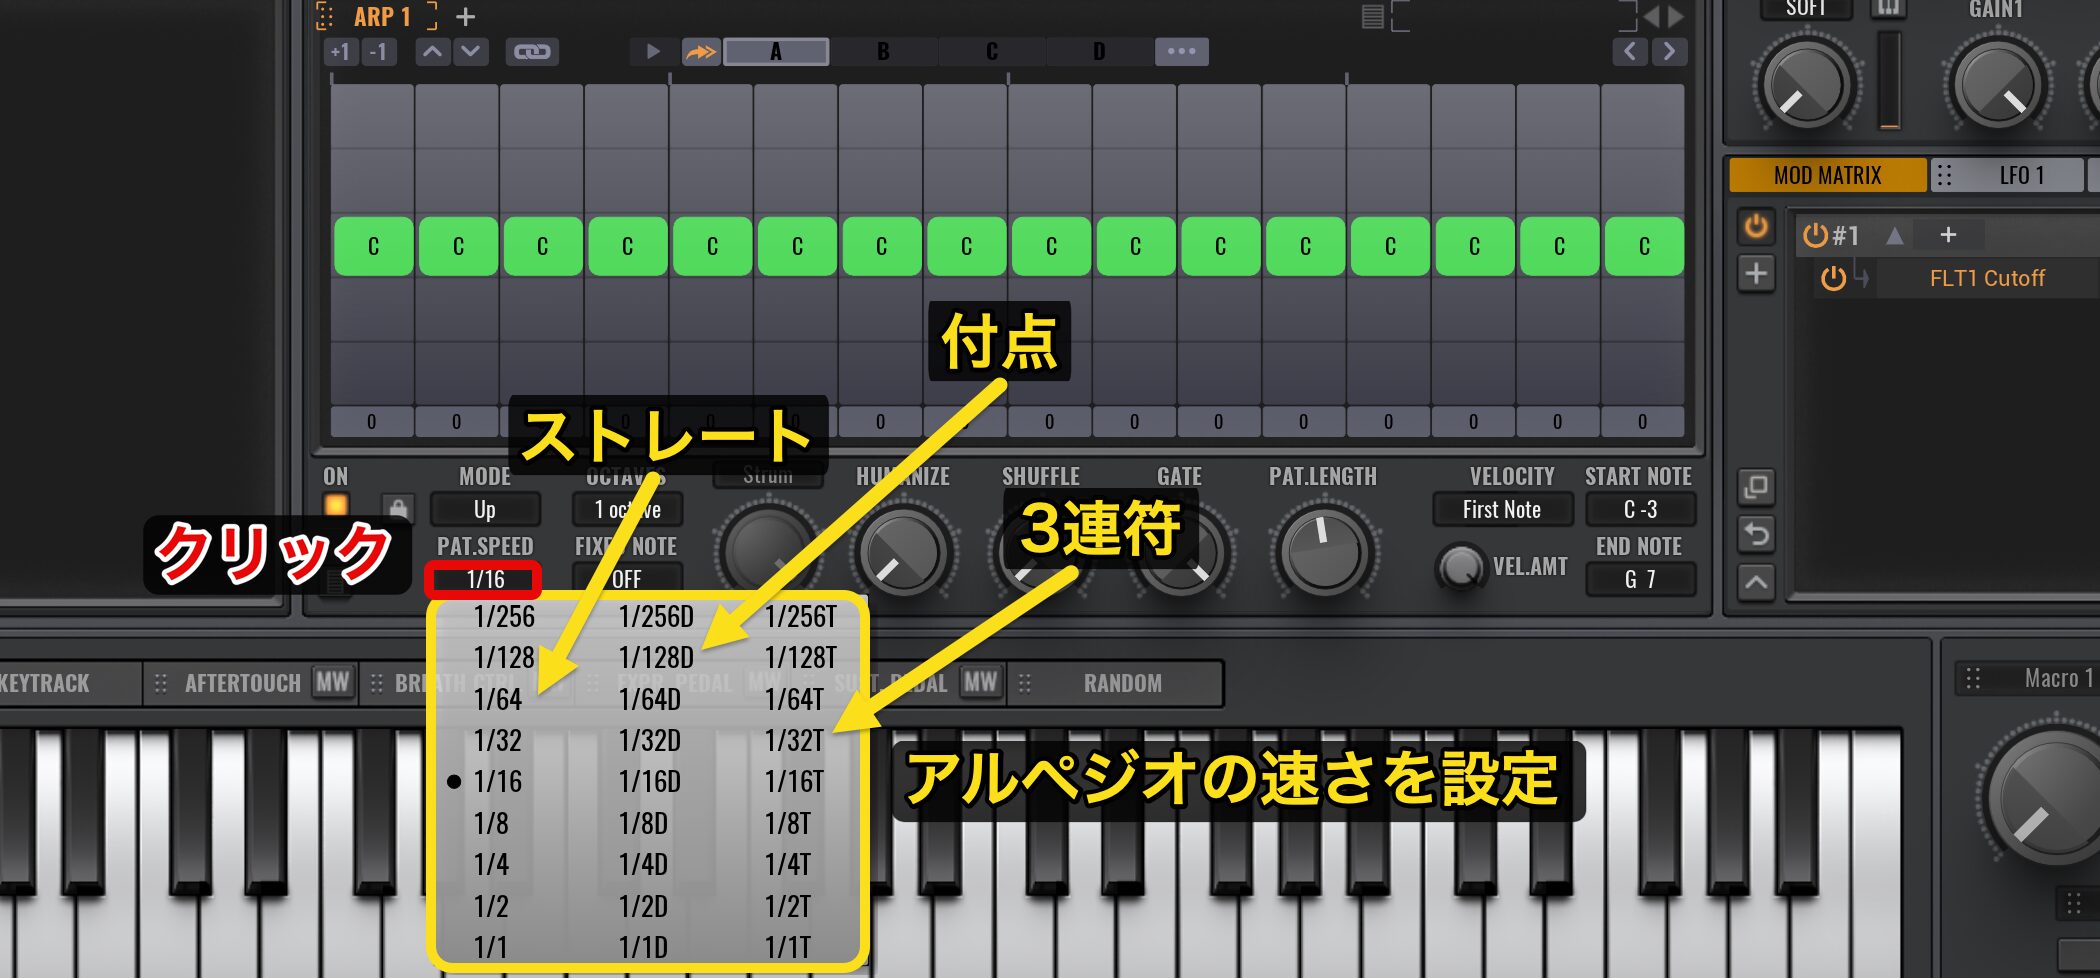
その下のPAT.SPEEDで、アルペジオの速さを楽曲テンポに基づいた音価で設定します。
左はストレート、中央は付点、右は3連符となっています。
オクターブ設定とノートエディット
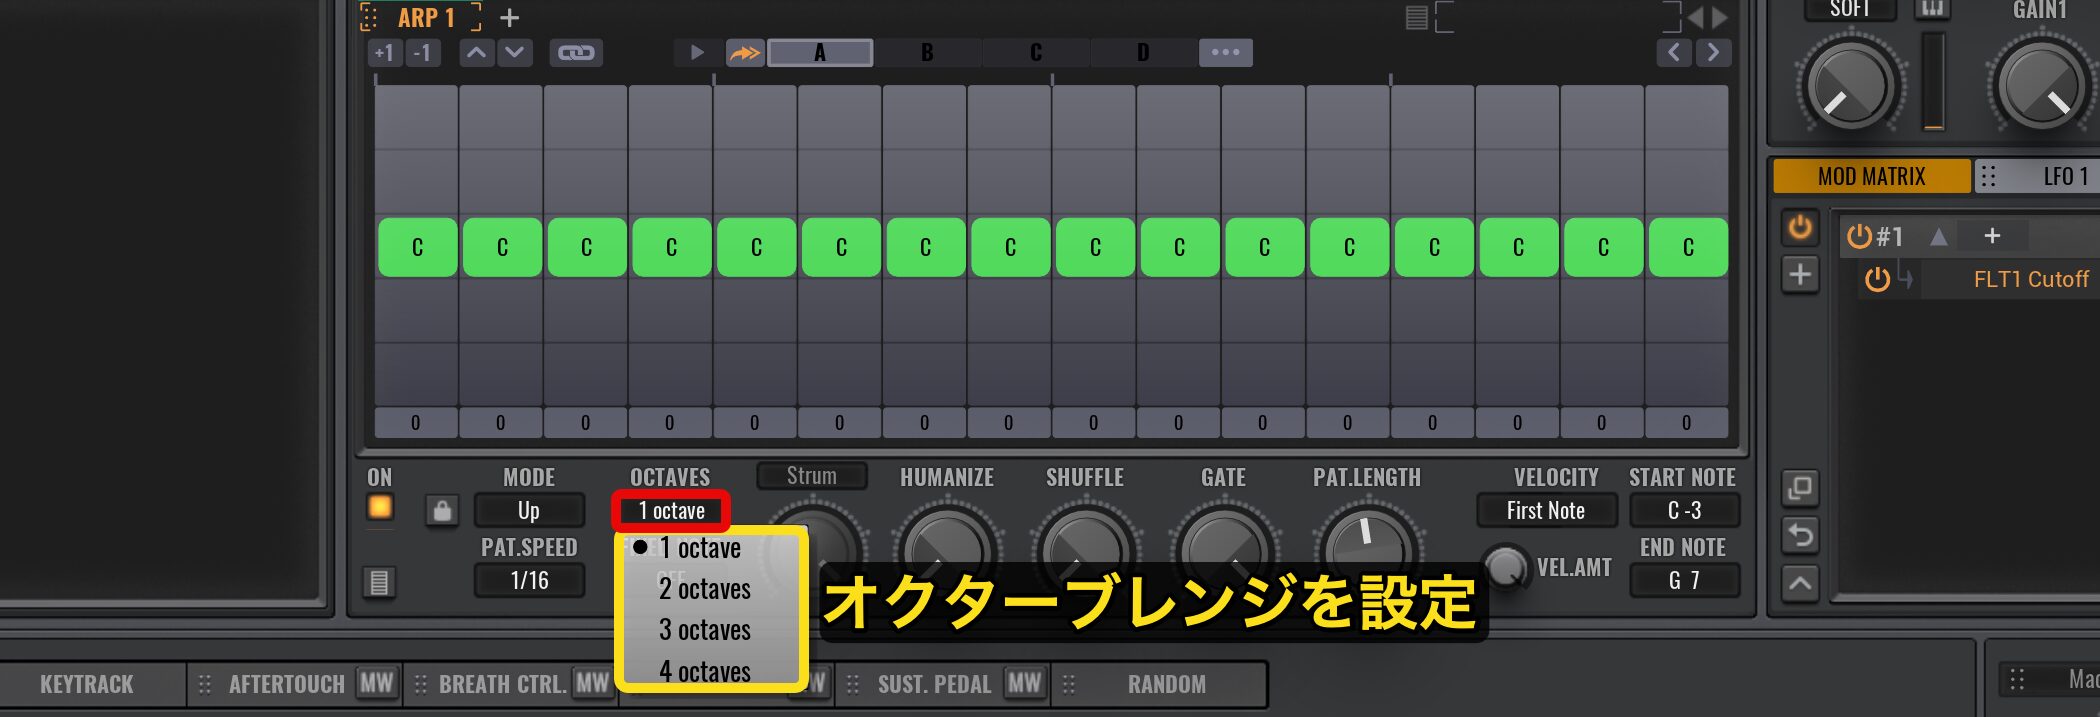
「OCTAVES」からは、音程推移を何オクターブ上まで行うのか?というオクターブレンジを設定します。
例えば 4octavesに設定するとアルペジオのフレーズが、4オクターブ上の音程まで演奏されますので、かなり派手なアルペジオとなります。
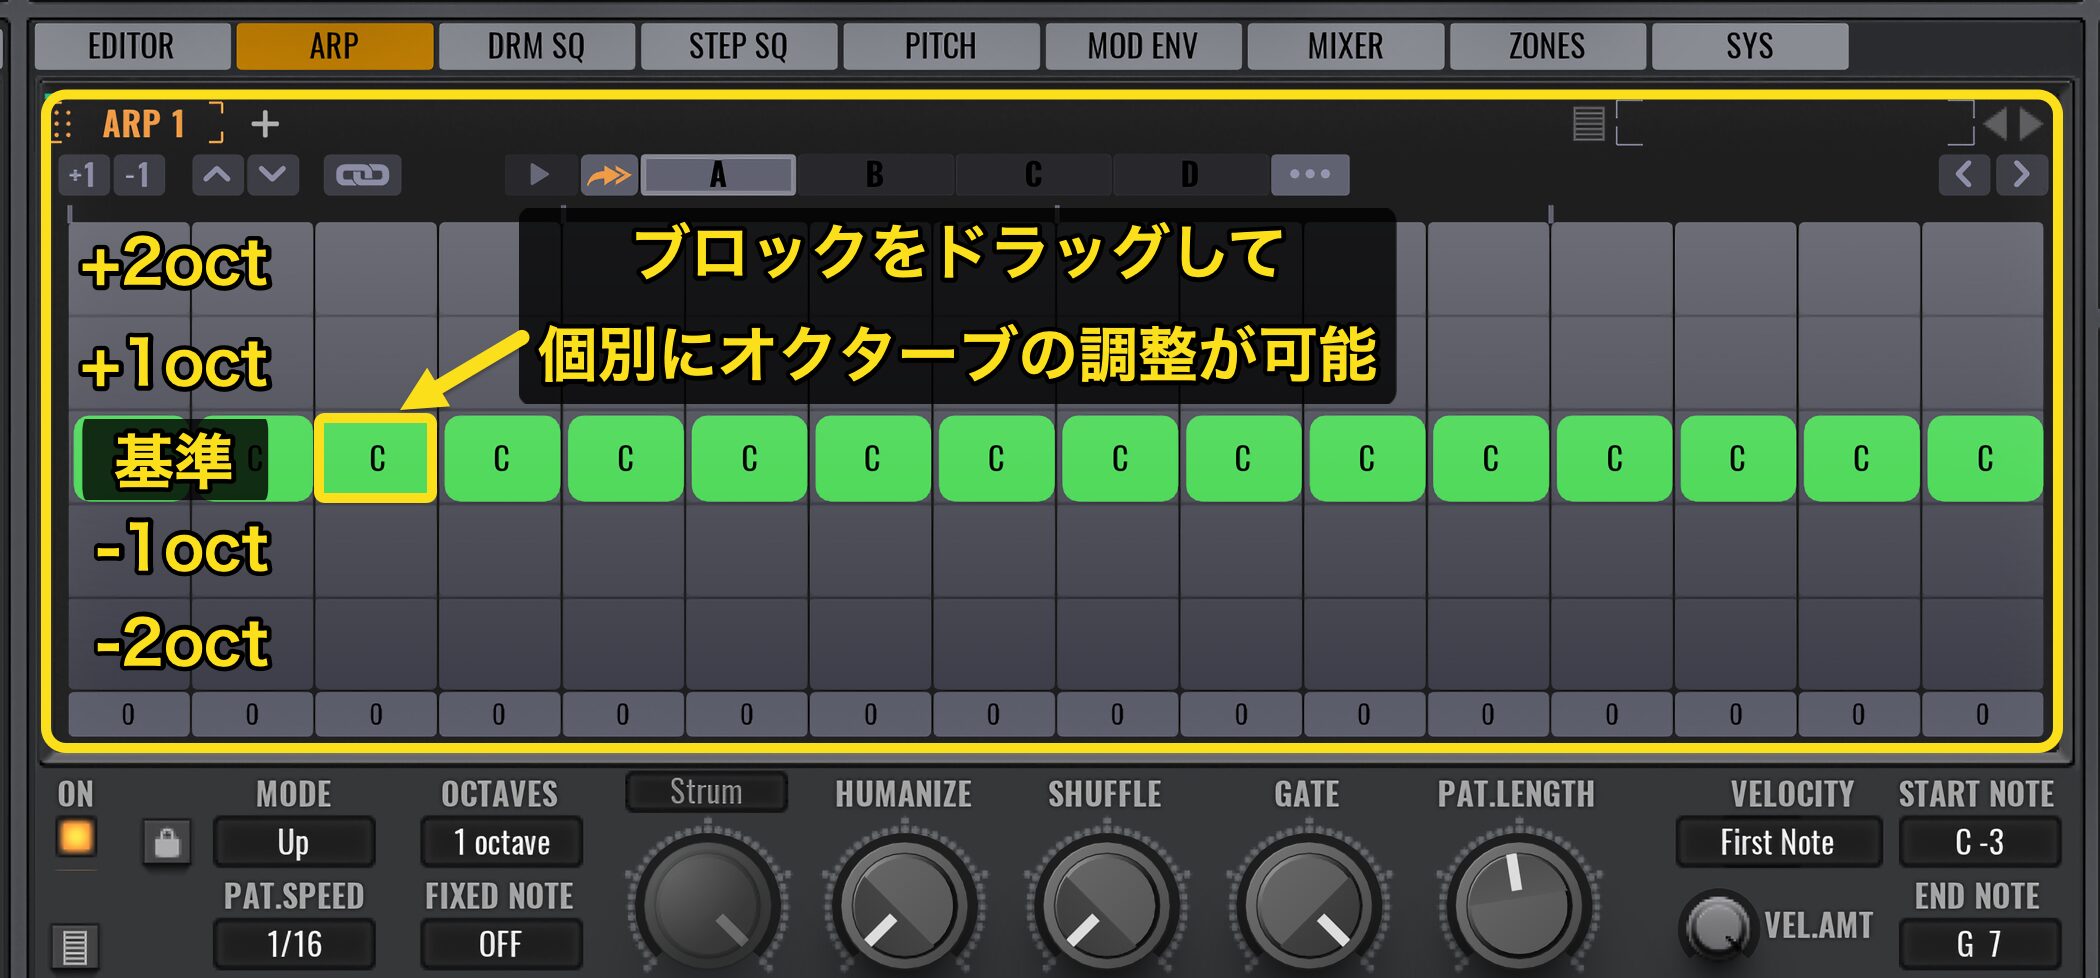
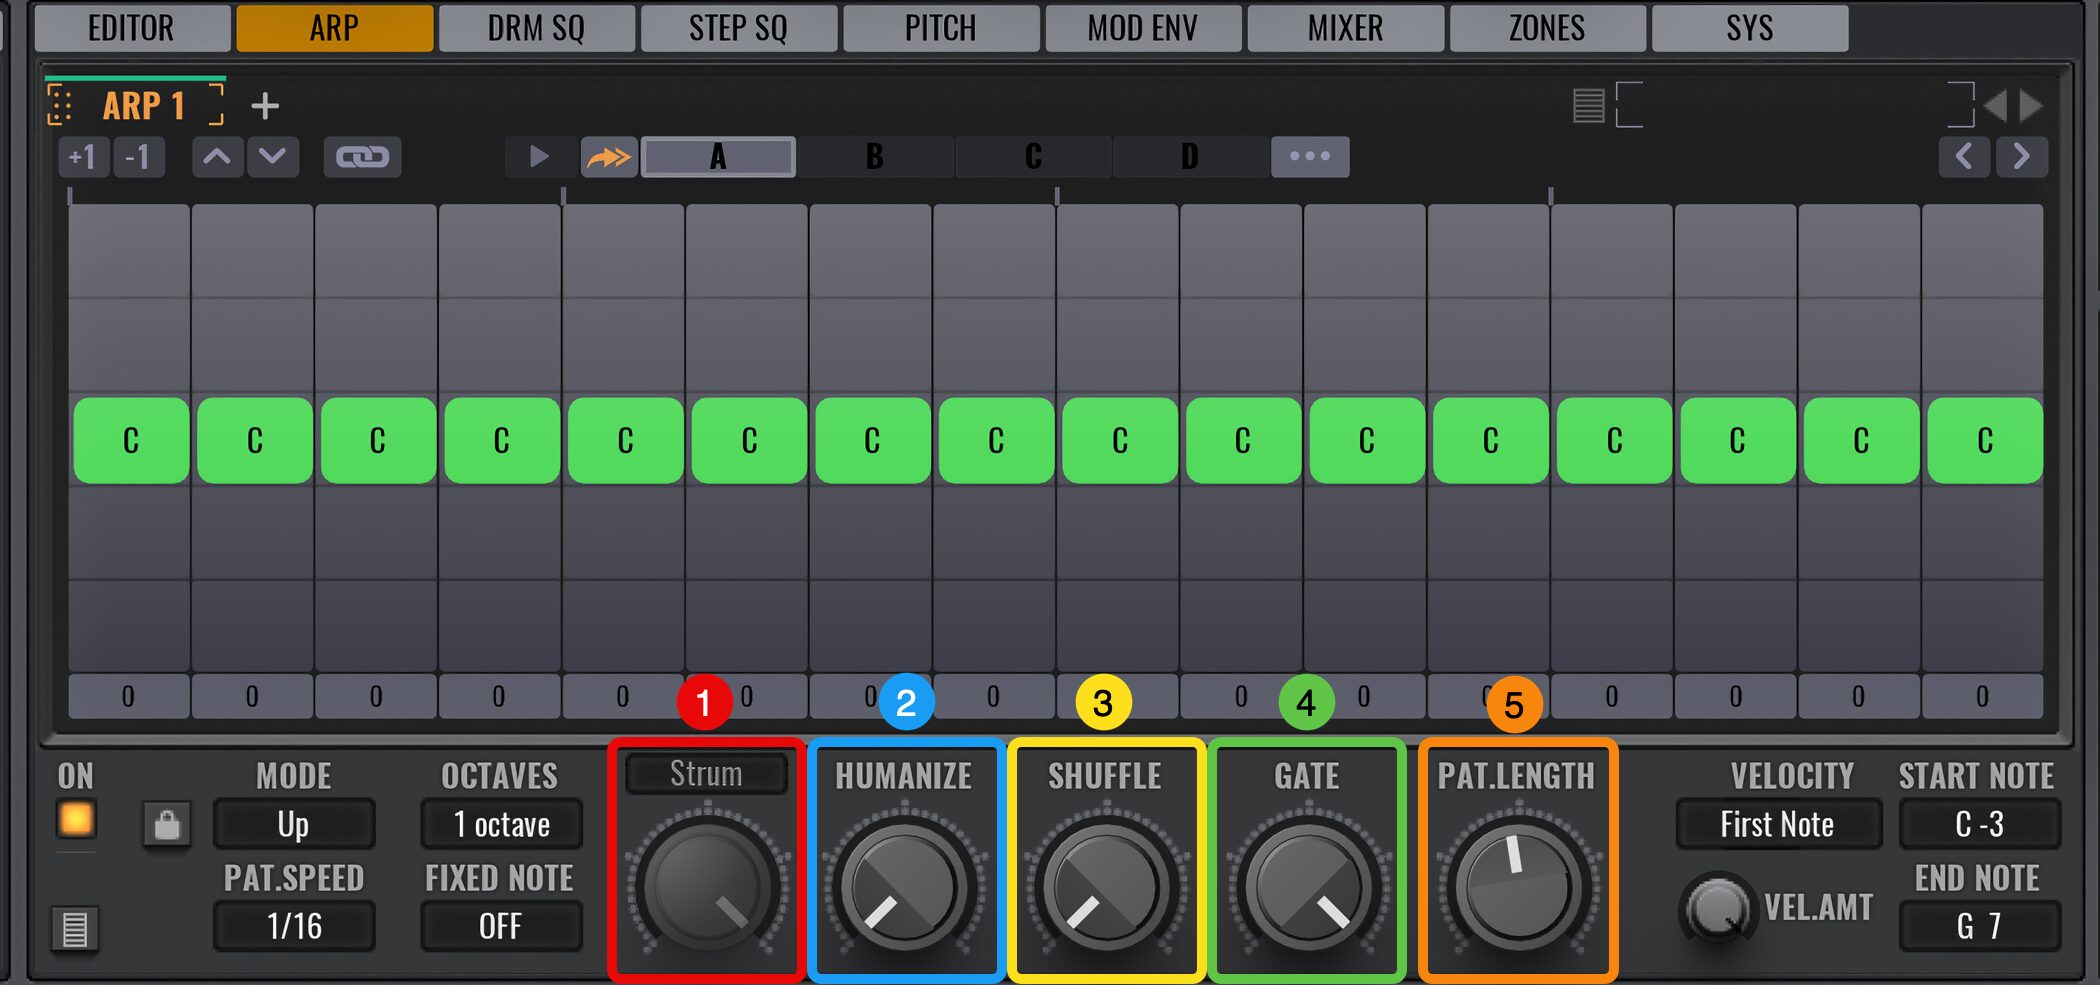
OCTAVES以外の調整も可能で、各ノートの緑色のブロックを上下にドラッグすることで、個別にオクターブを変更できます。
中央位置が基準オクターブで、上方向に移動すると+1、+2とオクターブを上げることができ、下方向に移動するとオクターブが下がります。
これらを組み合わせることで、自由度が増しますね。
アルペジオをさらに細かくエディット
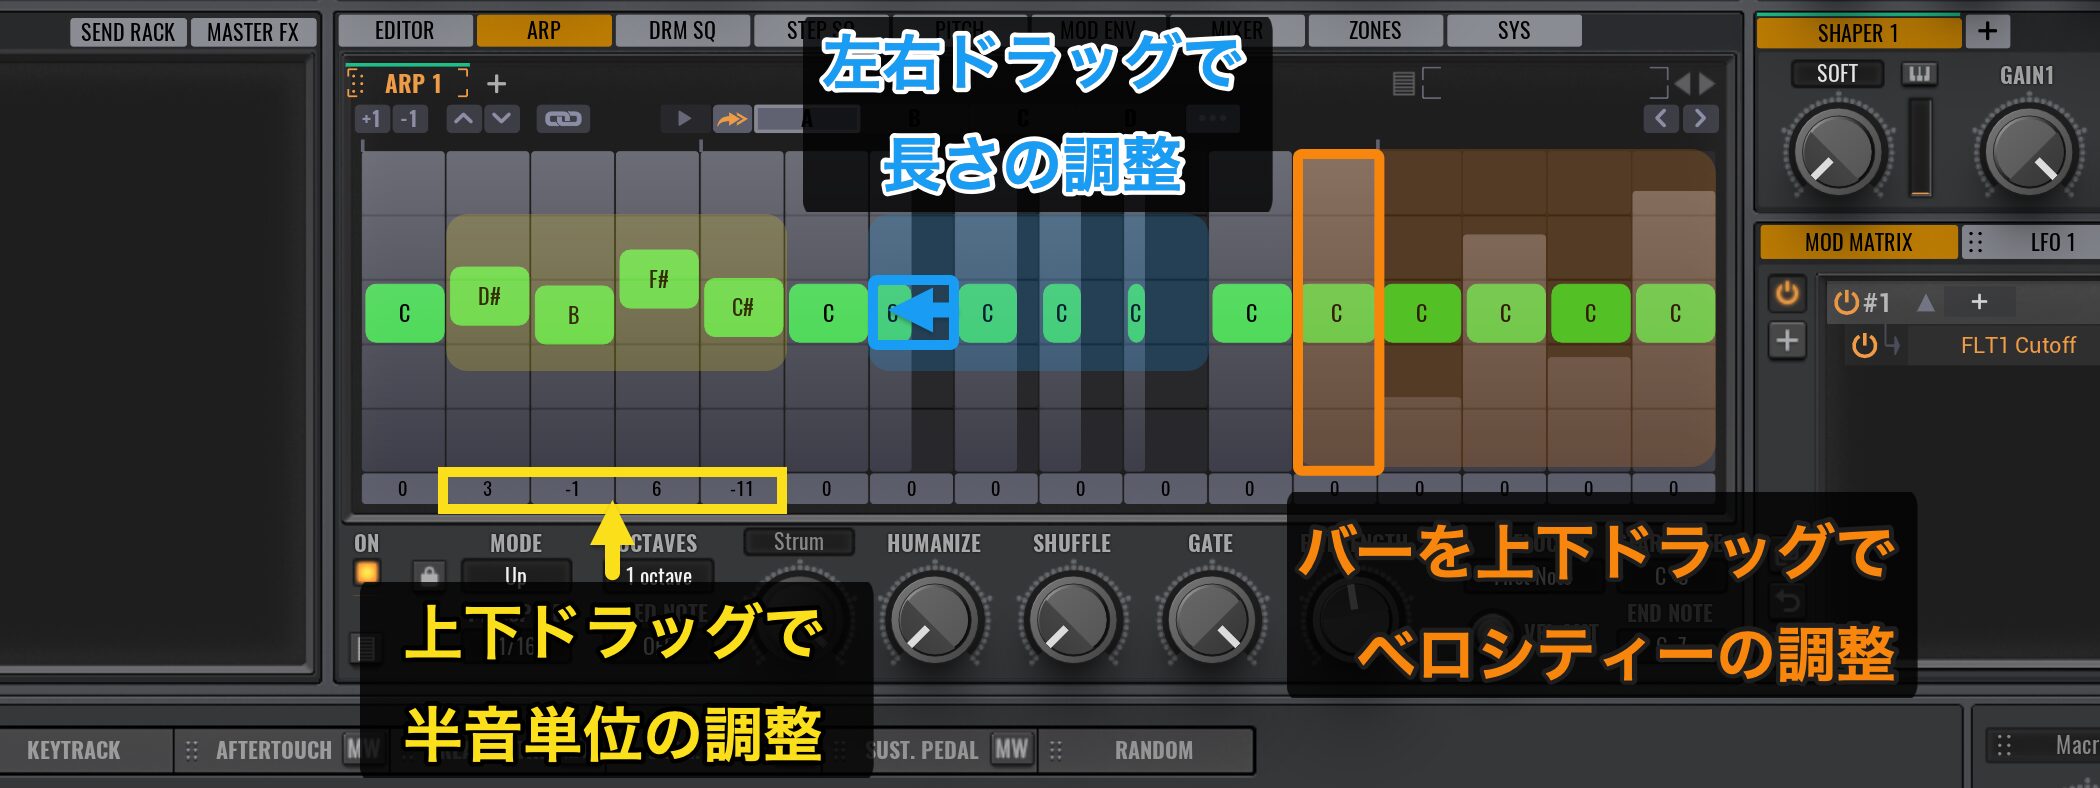
その他に、ノートは下記の調整が可能です。
- 半音単位の調整:エディター下部にある数字を上下にドラッグして変更します。
- 音の長さの調整:緑色のブロックを左右にドラッグして設定します。
- ベロシティーの調整:各ノート背面のグレーのバーを上下にドラッグして調整します。
半音単位で調整することができれば、和音ではなく1つのノートでも、ベースやリードフレーズが作成できます。
主なパラメーターの機能は下記のとおりです。
①(赤)Strum:ノートを順番に再生する間隔を調整します。
②(青)Humanize: タイミングやピッチをわずかにずらし、自然で人間らしい揺らぎを加えます。
③(黄)Shuffle: スウィング(跳ねたリズム)を加え、リズムにグルーブ感を出します。
④(緑)Gate: ノートの長さを短くしてスタッカートのような効果を作ります。
⑤(橙)Pattern Length: アルペジオの繰り返しパターンの長さ(ステップ数)を設定します。
アルペジオのパターンを作成する
Avengerのアルペジエーターでは、上部に配置されたA〜Dの4つのスロットに異なるパターンを作成し、瞬時に切り替えることができます。
アルファベットの部分を右クリックするとオン/オフを切り替え、左クリックで再生したいパターンを選択するだけです。
これは便利ですね。
パターンの複製も可能です。
コピー元のスロット(今回はA)を選択し、右端の「・・・」をクリックしてメニューから「Copy」を選択します。
次に、コピー先のスロット(今回はB)を選択し、同様に「・・・」から「Paste」を選択すると、AのパターンがBにコピーされます。
非常に簡単ですね。
パターンを複製して微妙に違うものを用意しておき、場面に合わせて切り替えるという使い方もかなり実用的かと思います。
マクロ機能でアルペジエーターをコントロール
複数のアルペジオを設定した後はMacro機能の出番です。
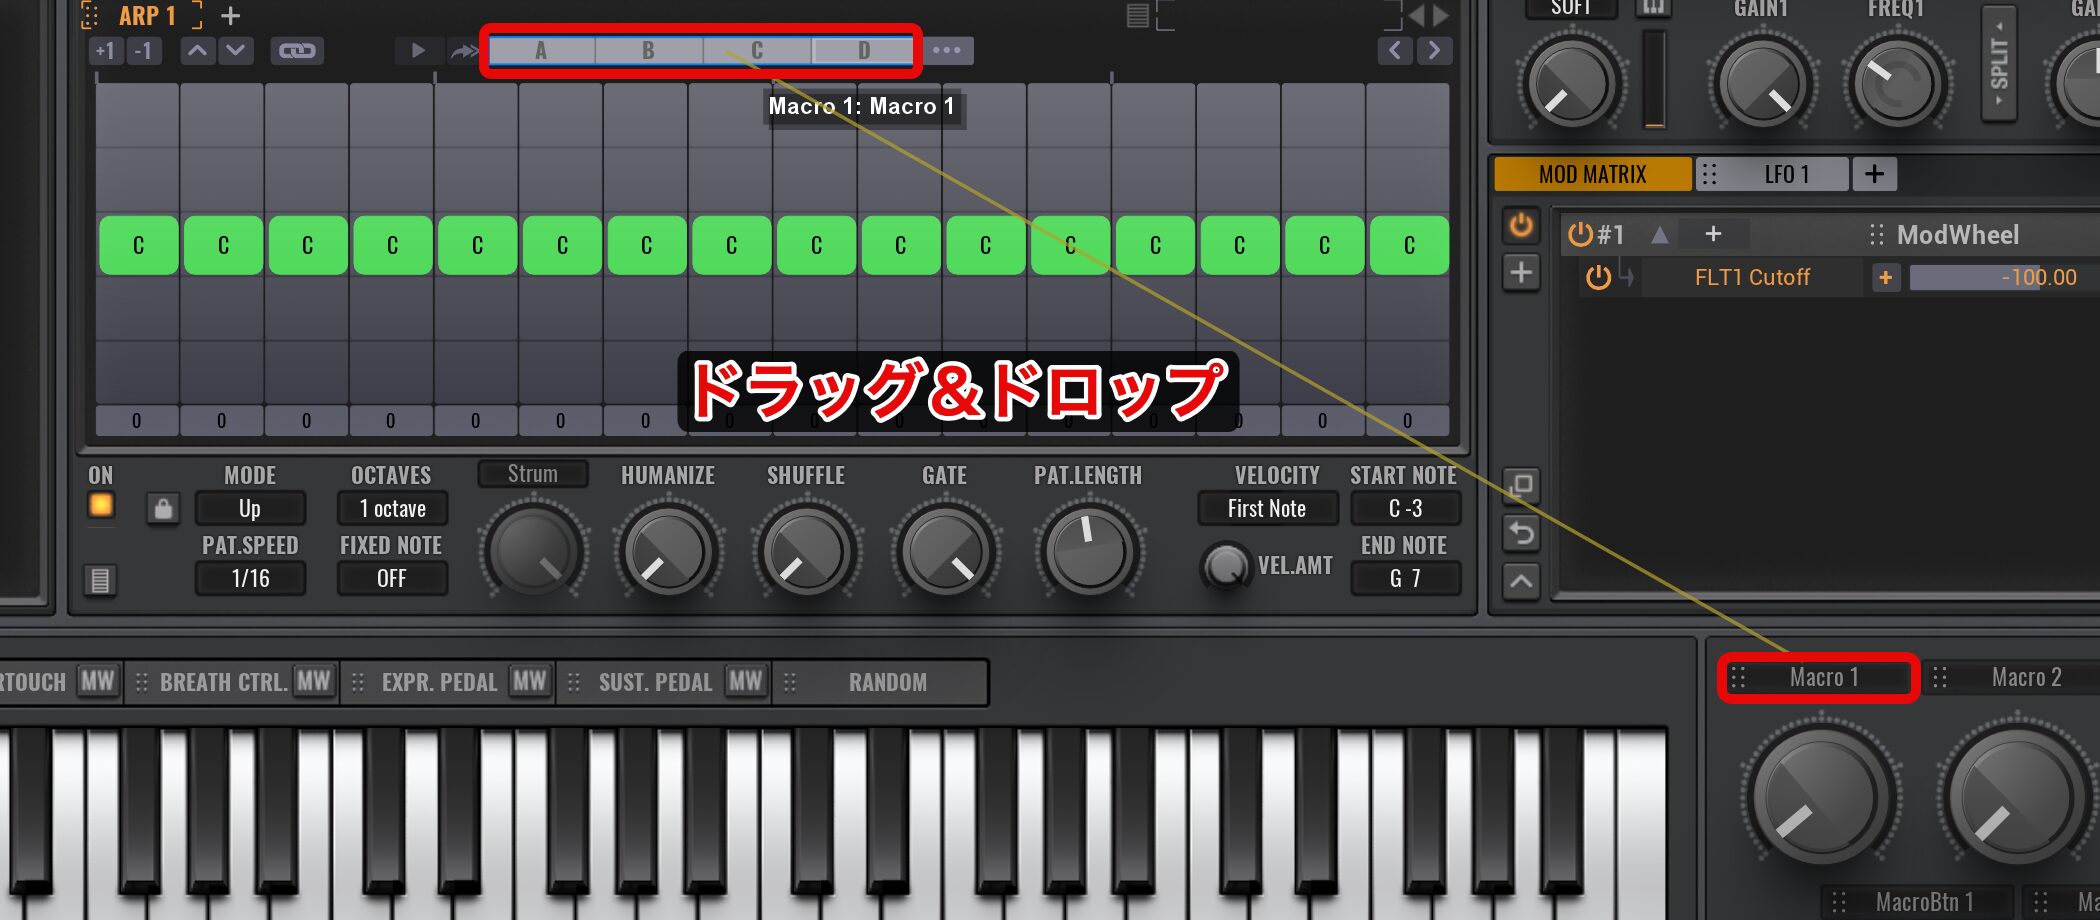
右下に配置された「Macro 1」は、希望するノブやパラメーターへドラッグするだけで簡単に割り当てができます。
ここでは、アルペジエーターの「A〜D」スロットを割り当てました。
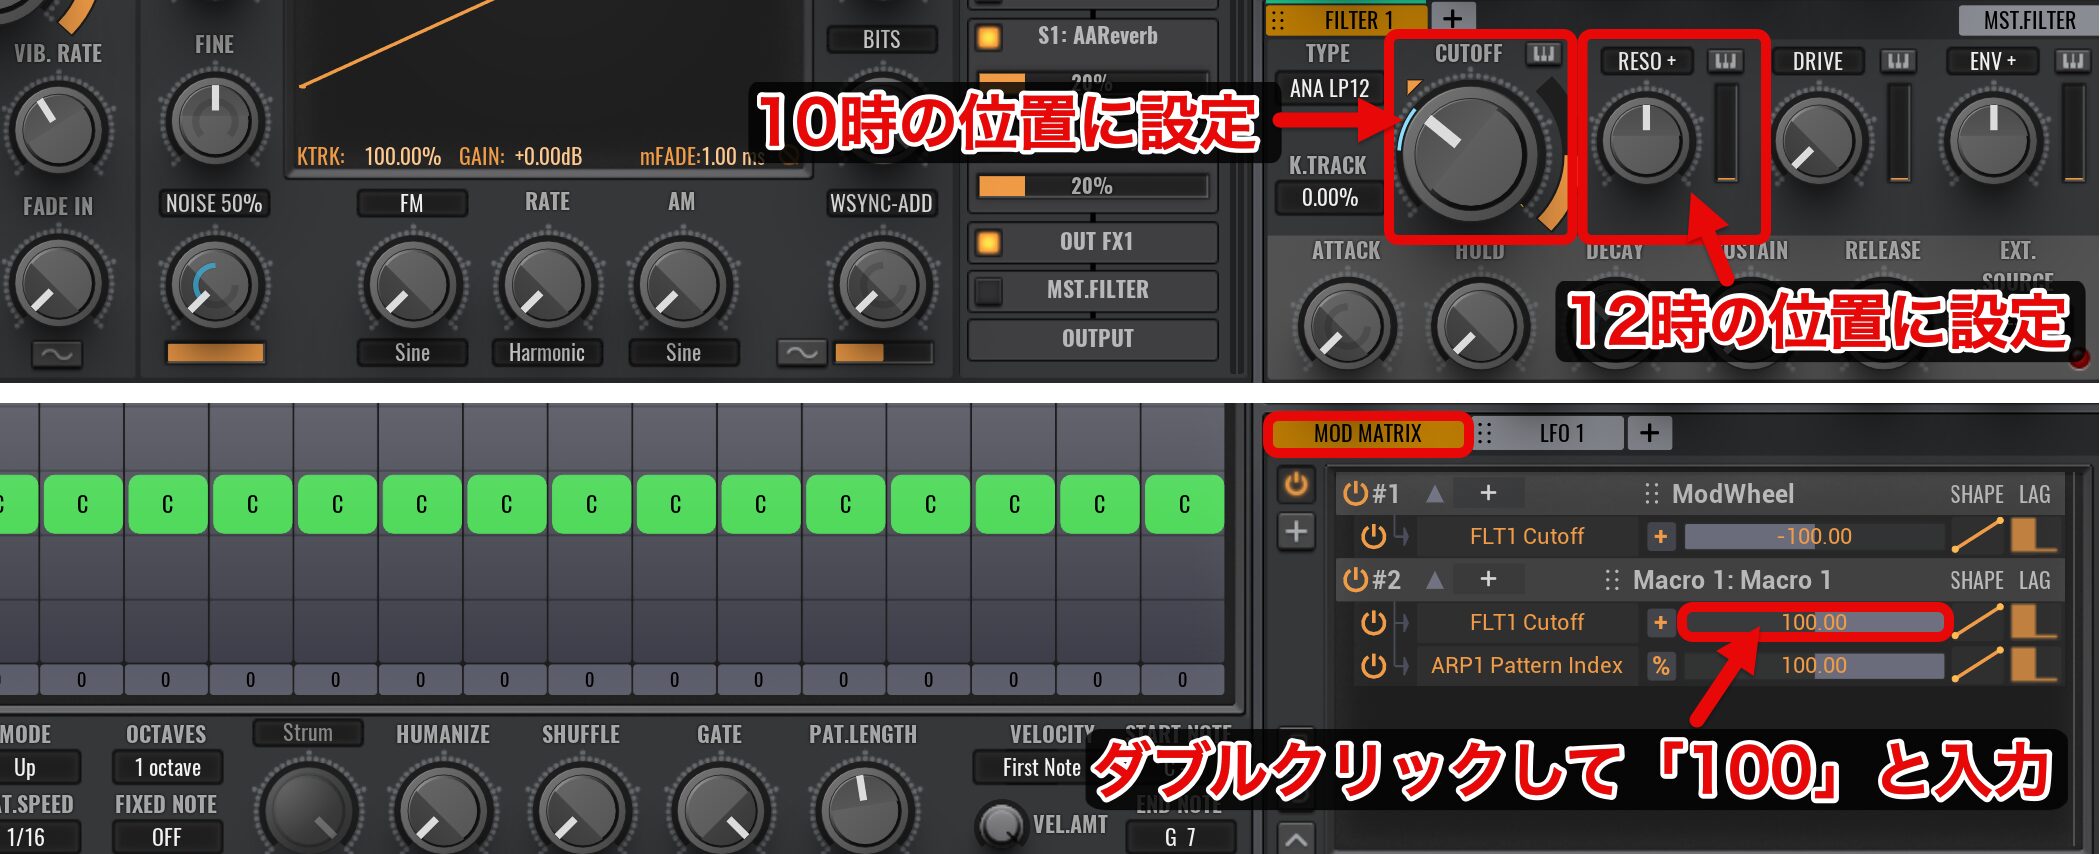
MOD MATRIXを開いて、「ARP1 Pattern Index」の値を「100.00」とします。
Macro 1のノブを左に回すとスロットAが適用され、右に回すとスロットDが適用されます。
ノブを回すことで「A→B→C→D」と順に移動し、移動に合わせてブルーのラインが表示されるため、現在の選択状態を容易に把握することができます。
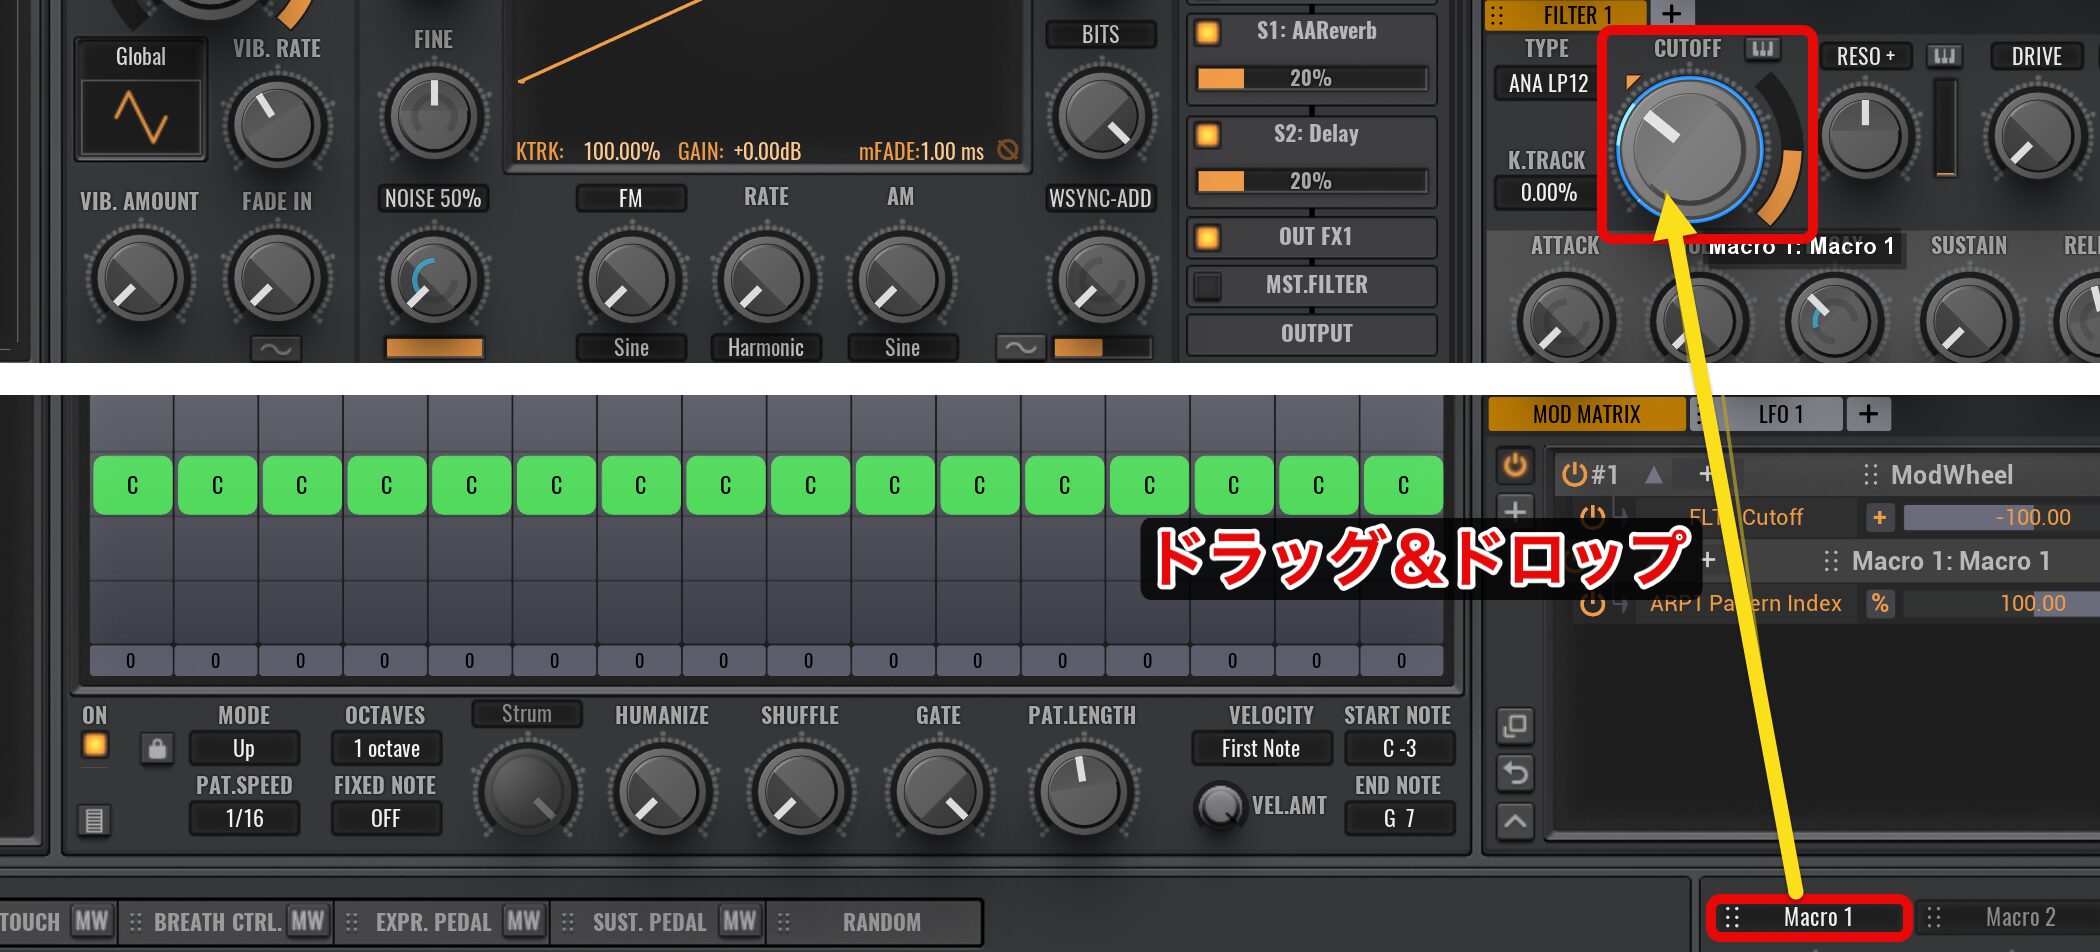
アルペジオパターンがAからDへ変わると同時に、FILTERのCUTOFFも開いていくように設定してみましょう。
同じ Macro 1をドラッグし、FILTERのCUTOFFに割り当てます。
MOD MATRIXを開いて、Macro 1の「FLT1 Cutoff」をプラス値「100.00」にします。
CUTOFFのスタート位置をおおよそ10時、RESOを12時ほどに設定してサウンドに癖をつけておきます。
これでアルペジエーターの変化に合わせてフィルターも動き、非常に面白い効果を得られます。
Avengerのアルペジエーターは自由度が高く、直感的に操作できるため、非常に楽しくエディットが行えます。
そして、Macroを駆使すると同時にいくつものパラメーターを動かすことができ、動きのあるサウンドが簡単に作成できます。
ぜひ、様々なサウンドメイキングにご活用ください。
パラアウトを活用してCPU負荷を減らす
Avengerは高品質なサウンドの反面、CPU使用率が高めです。
これを解消する方法として、OSCのパラアウトを使うと、1台のAvengerで各OSCごとに異なる出力先を指定できます。
ドラムセクションで各キットのパラアウトを解説しましたが、OSCのバラアウトは少し特殊な方法となります。
DRUMSの場合は「MIXER」→「DRUMS」から出力先を選択できましたが、GENERALで全体を見てみると、OSC 1/2共に出力先を選択することができません。
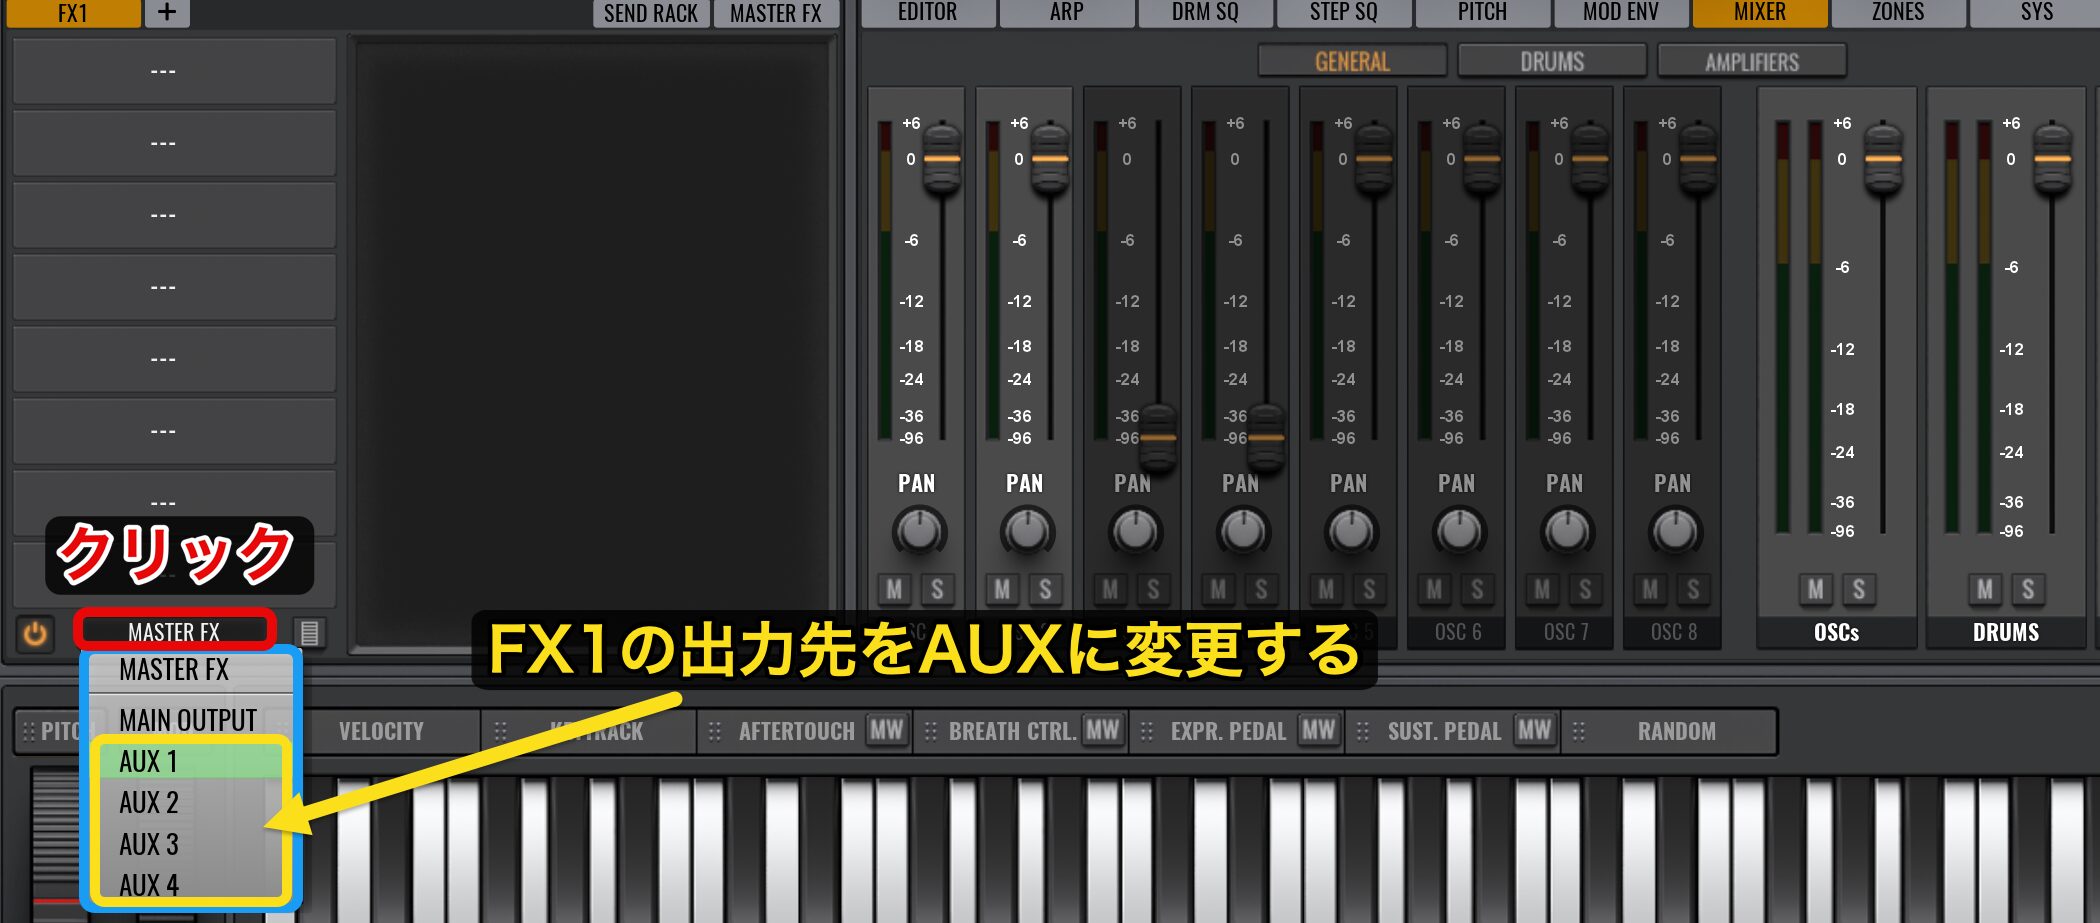
現在、OSC 2の出力はROUTEで「OUT FX1」に設定されており、FX1の出力は「MASTER FX」→「AMP 1」→「MASTER」へと流れる仕組みになっています。
このFXの出力先をAUXに変更すると、パラアウトが可能になります。
Ableton Live の場合
Audio Trackの「Audio From」で「VPS Avenger」を選択します。
次に、下部メニューをクリックすると「AUX 1〜4」のVPS Avengerが表示されます。
今回はOSC 2の出力先を設定するので、Live側、Avenger側の両方で「AUX 2」を選択しましょう。
最後に、モニターができるように「In」を有効にします。
これでパラアウトが設定されました。
OSC 1も出力の設定を行ってみましょう。
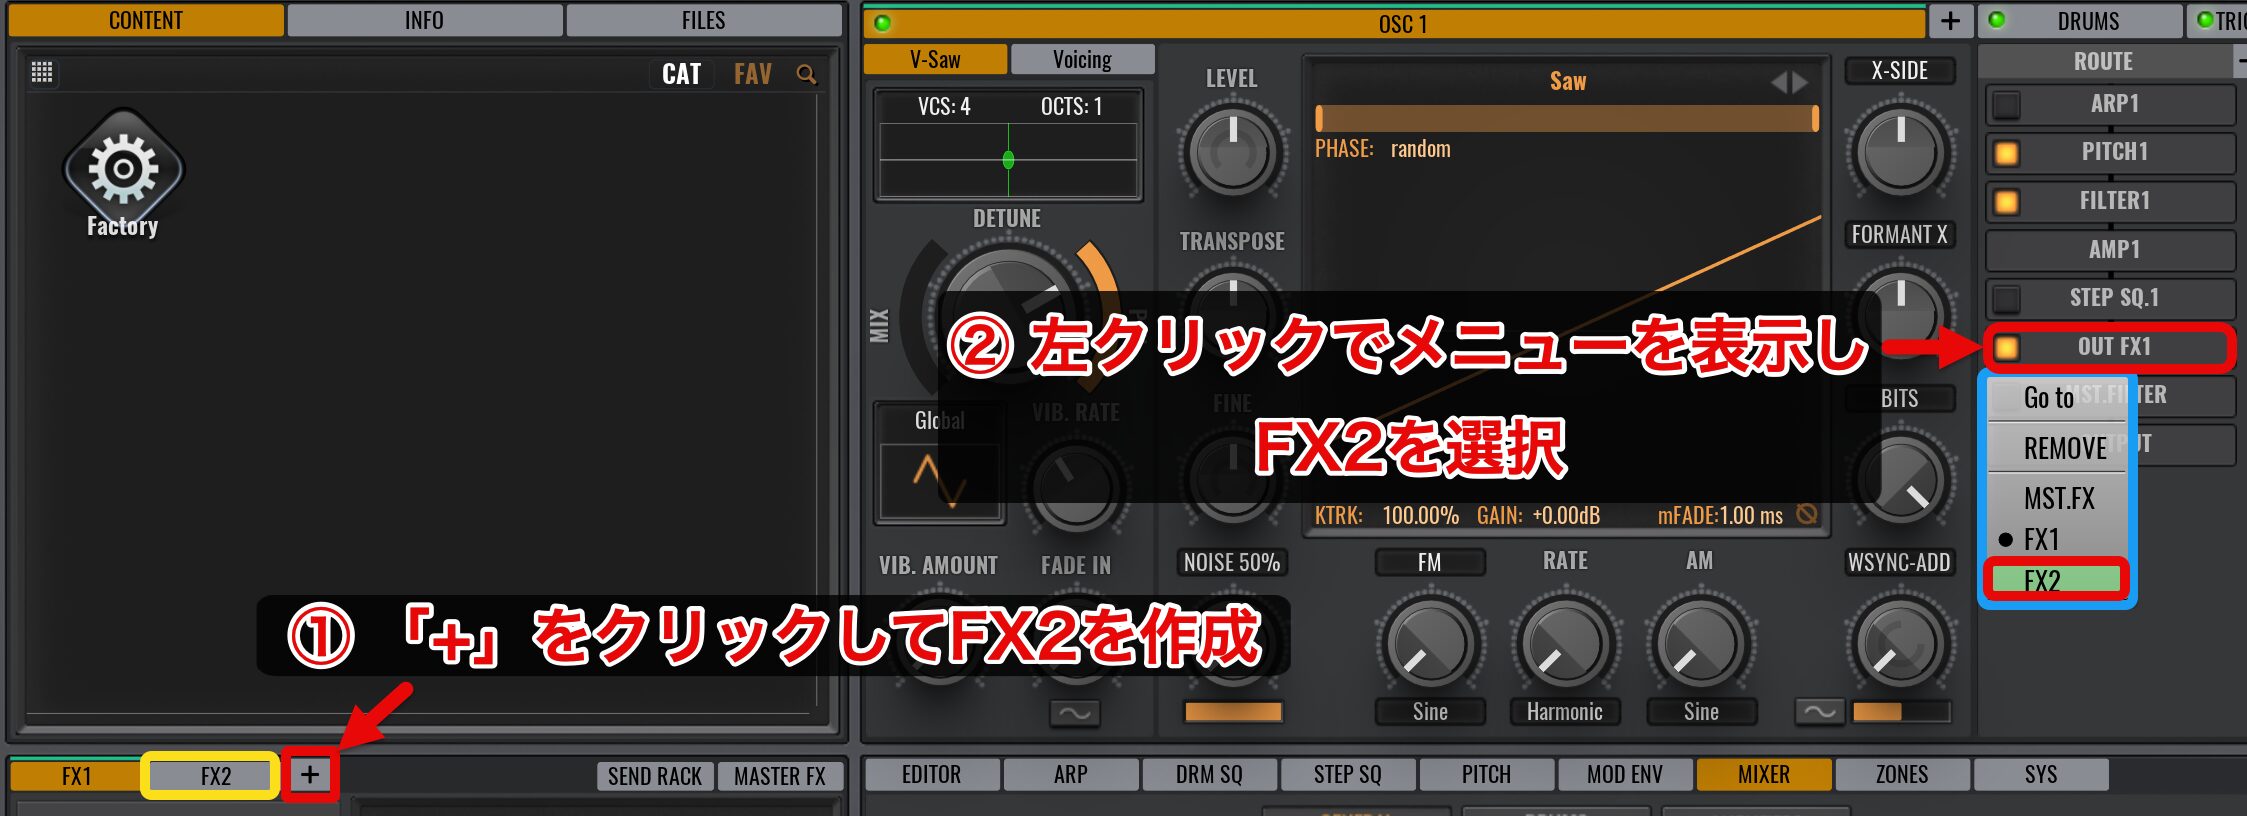
OSC 2でFX 1を使用したので、FX 1の隣にある「+」アイコンをクリックして、FX 2を作成します。
ROUTEのOUT FX 1を左クリックして、表示されたメニューからFX 2を選択します。
あとは先ほどと同じ手順です。
Live側のAudio Trackで「Audio From」を「VPS Avenger」に設定し、出力先として「AUX 1」を選択します。
最後に、モニター用に「In」を有効にすれば完了です。
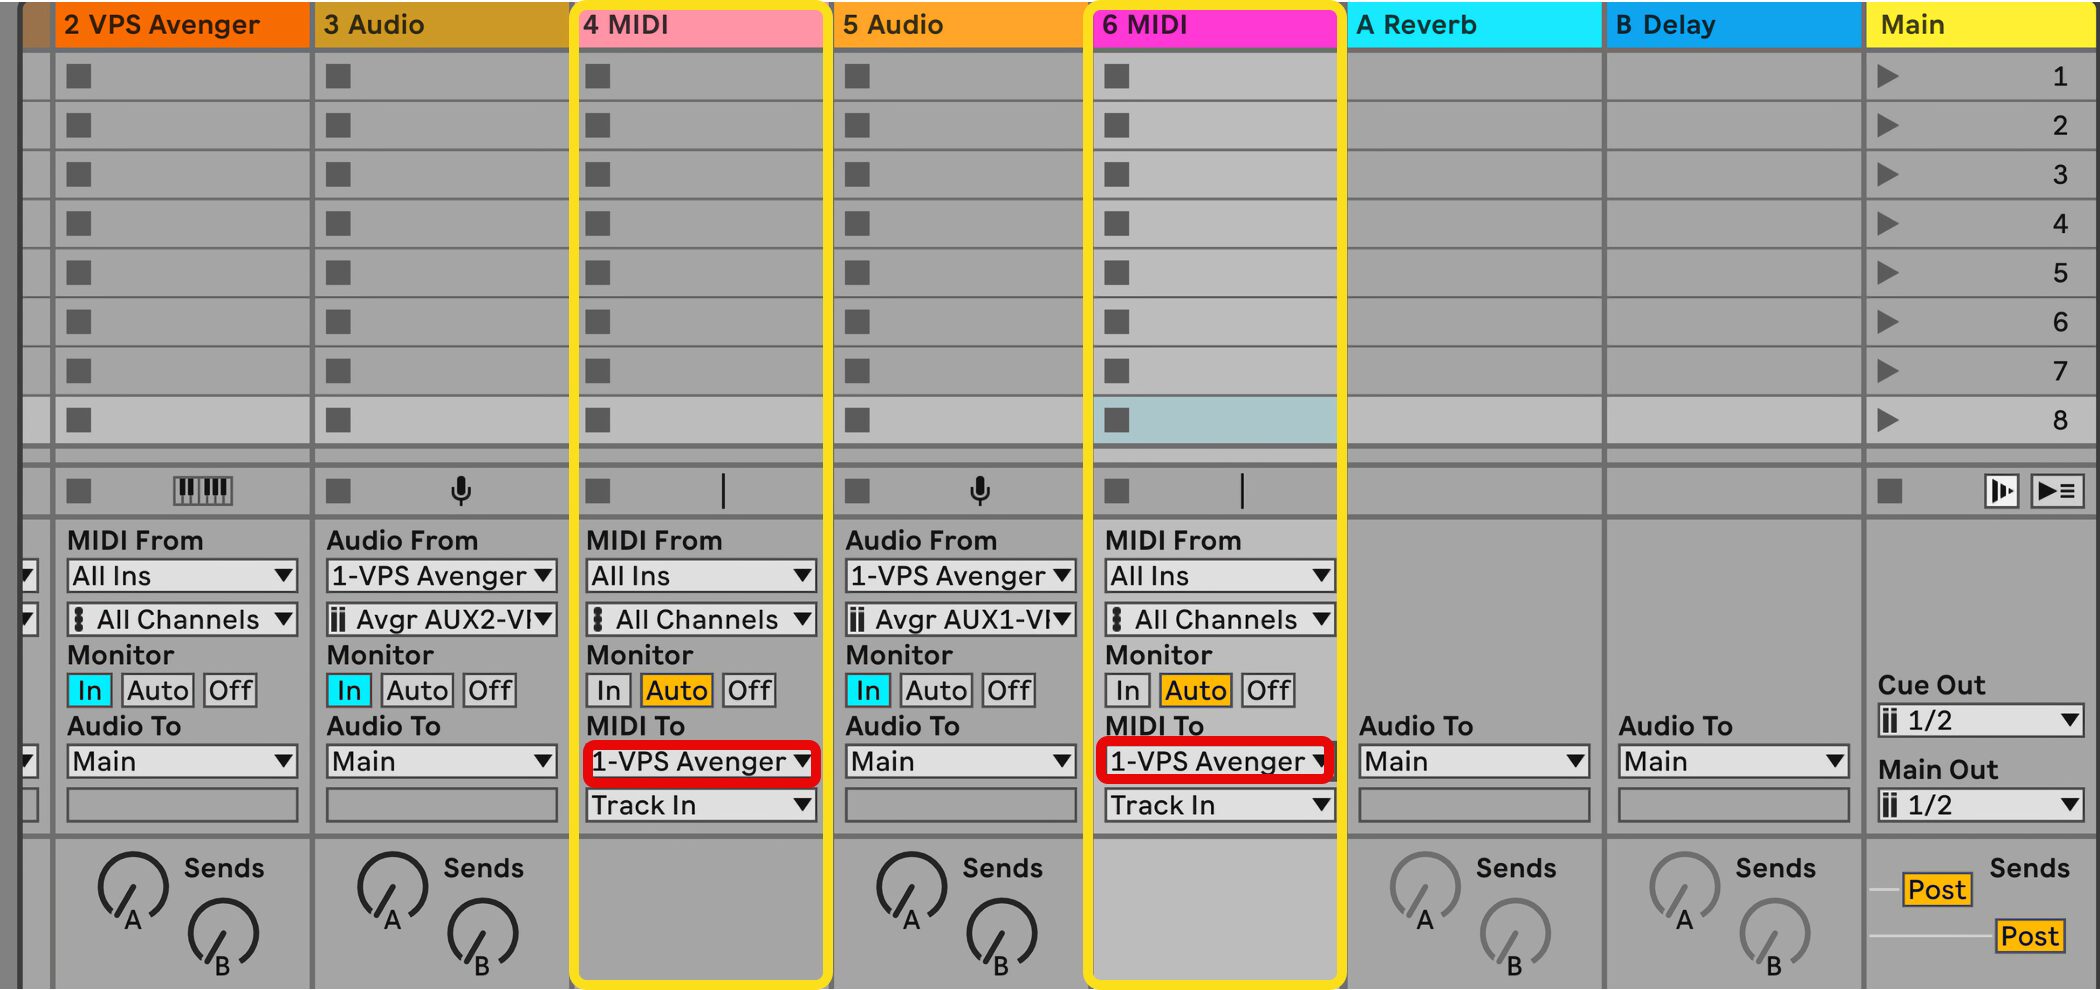
しかし、このままでは、AvengerのMIDI Trackを演奏するとOSC 1とOSC 2の両方のサウンドが鳴ります。
同じフレーズを鳴らす場合は問題ありませんが、それぞれ異なる役割を持たせたい場合は、MIDI Trackを2つ作成します。
作成後、「MIDI To」を「VPS Avenger」に設定します。
次にAvenger側の設定ですが、AvengerはOSCごとにMIDI入力の設定ができないため、ZONEで指定します。
「ZONES」タブを開き、OSC 1をC3より上、OSC 2をB2より下に設定します。
Ableton LiveではZONEが1オクターブずれているため、OSC 1で鳴らしたいノートを「C4」より上に移動します。
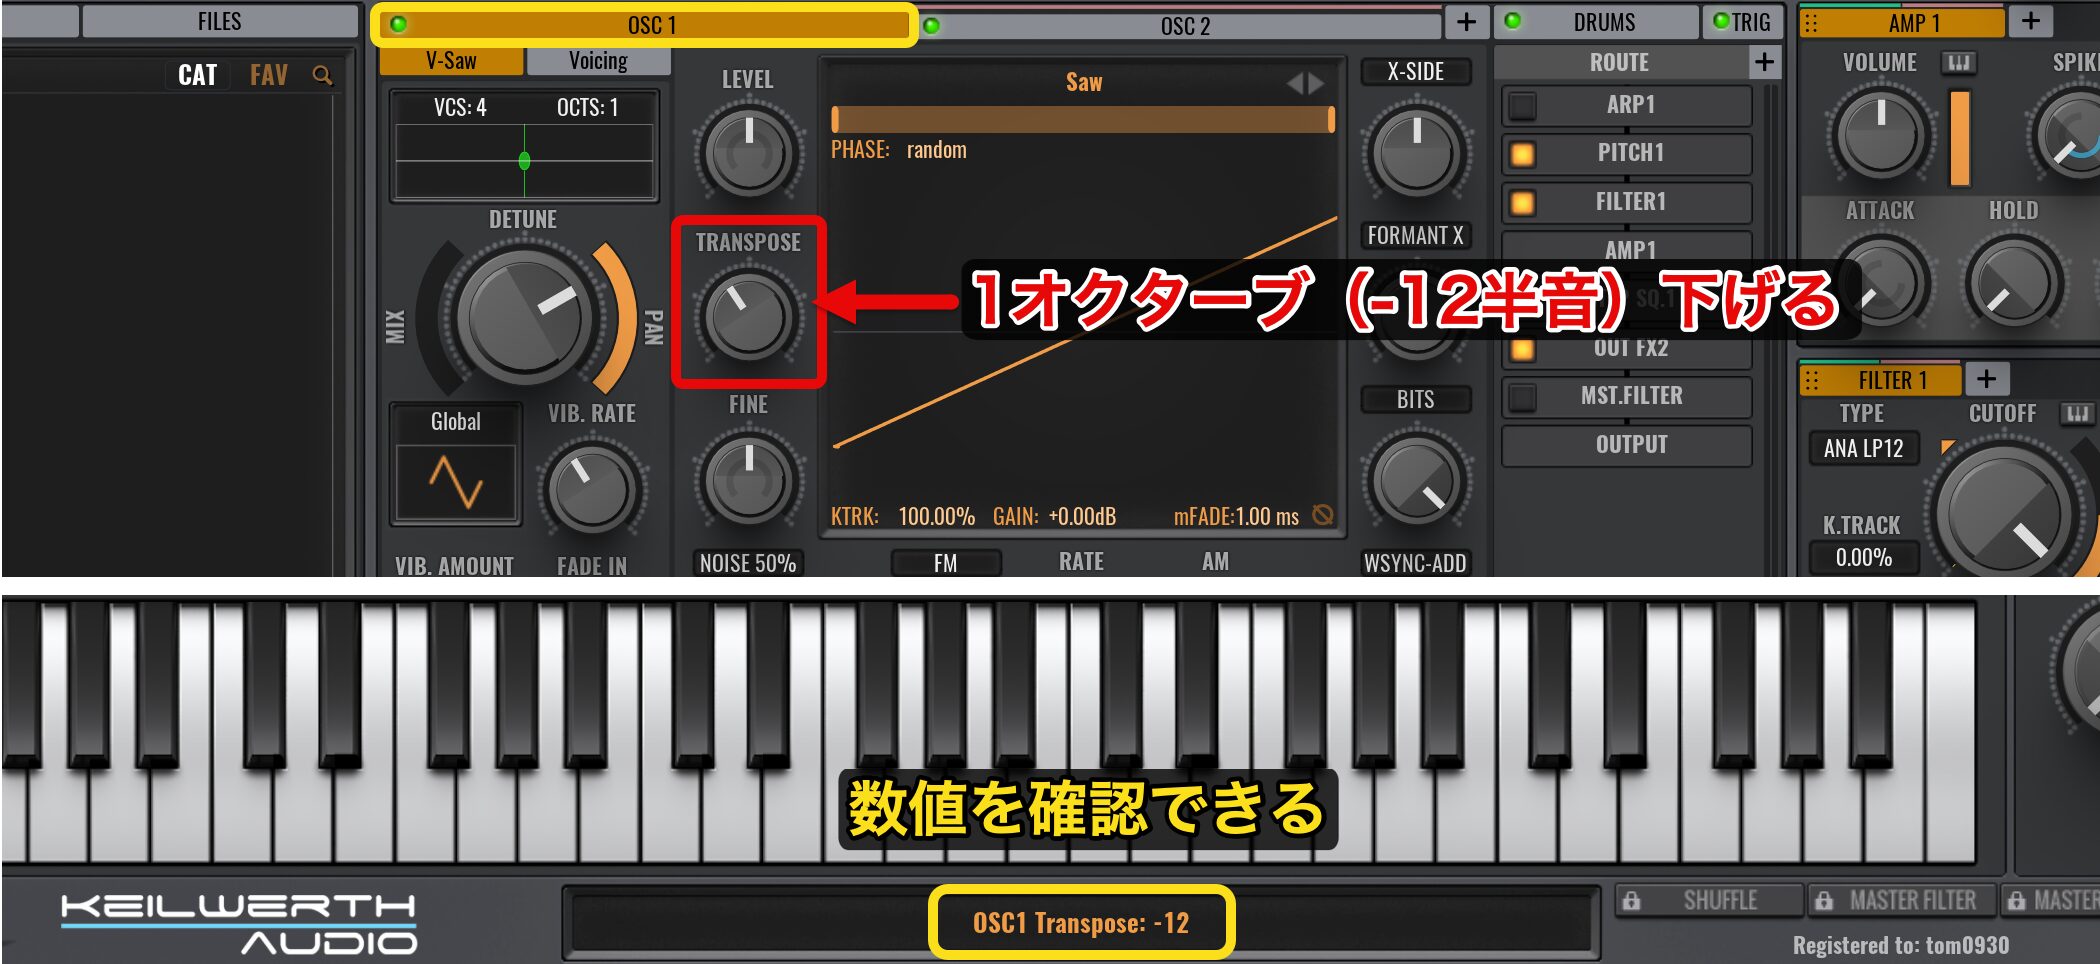
1オクターブ上げたため、OSC 1のピッチを1オクターブ(-12半音)下げましょう。
TRANSPOSEで半音単位の調整が可能です。
画面下で数値を確認して「-12」に設定します。
OSC 2はB2以下、つまりB3以下が対象です。
OSC 2で鳴らしたいノートはちょうどB3以下なので、このままで良いですね。
Logic Pro の場合
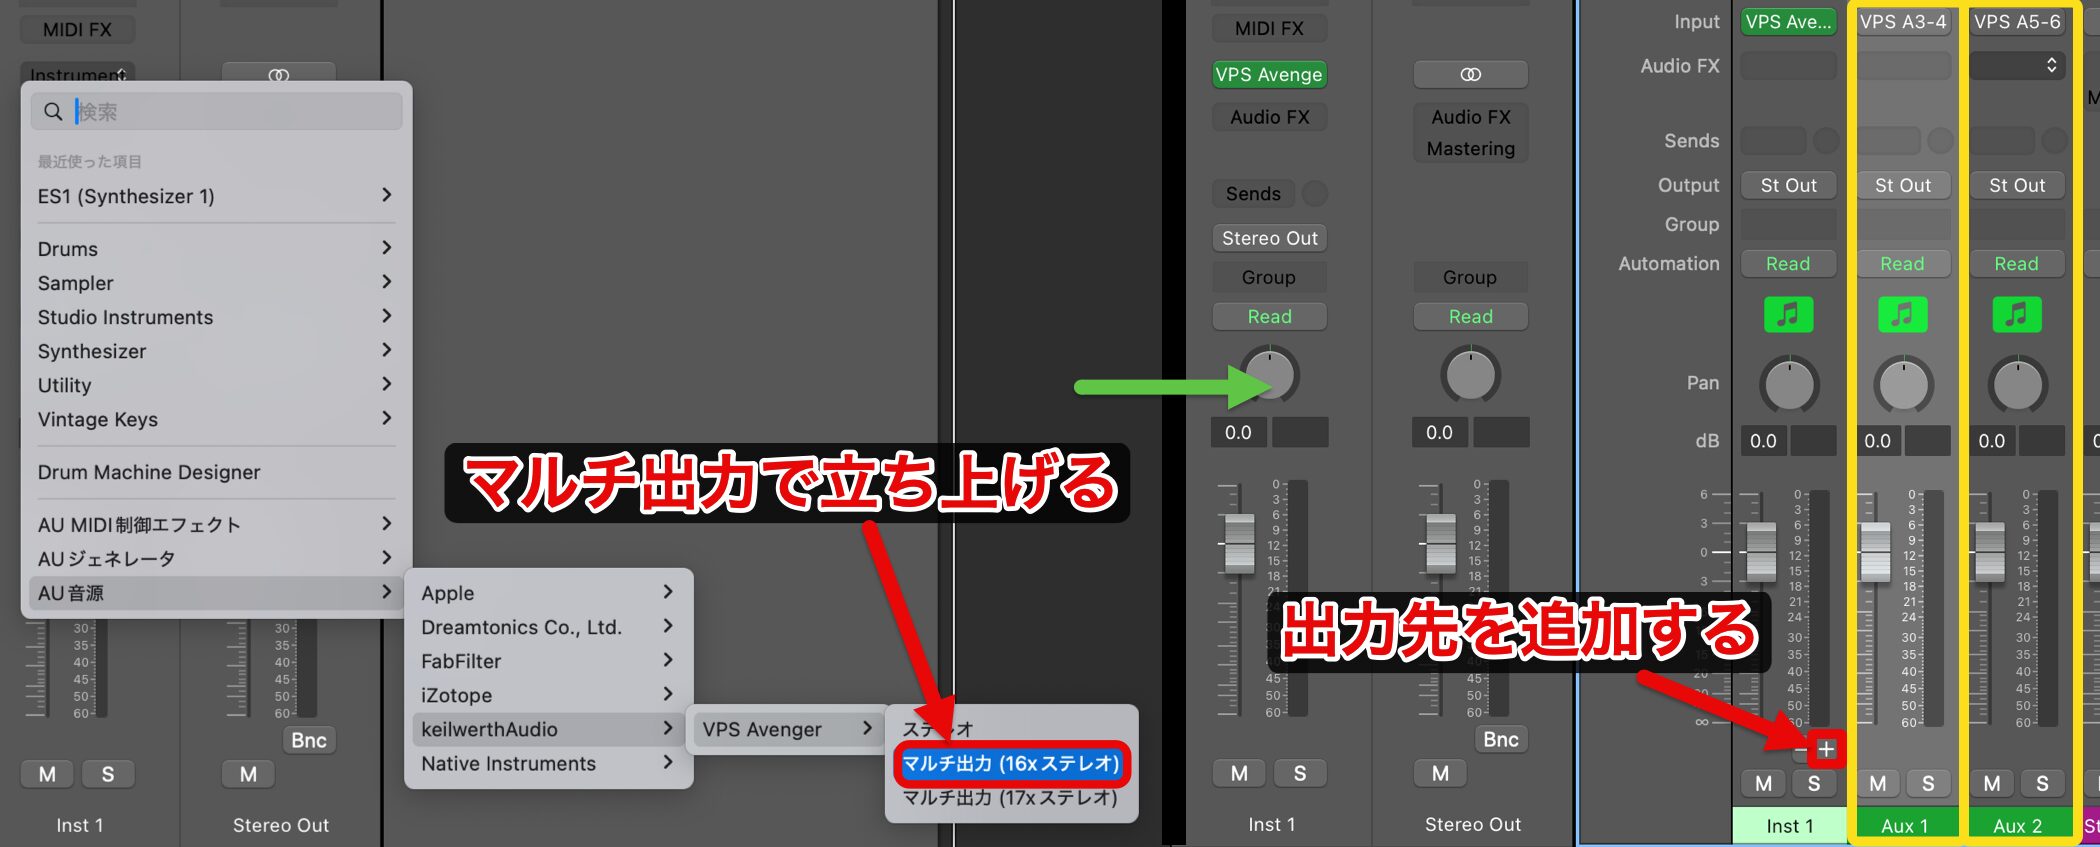
マルチ出力からAvengerを立ち上げ、出力先を「+」アイコンで追加します。
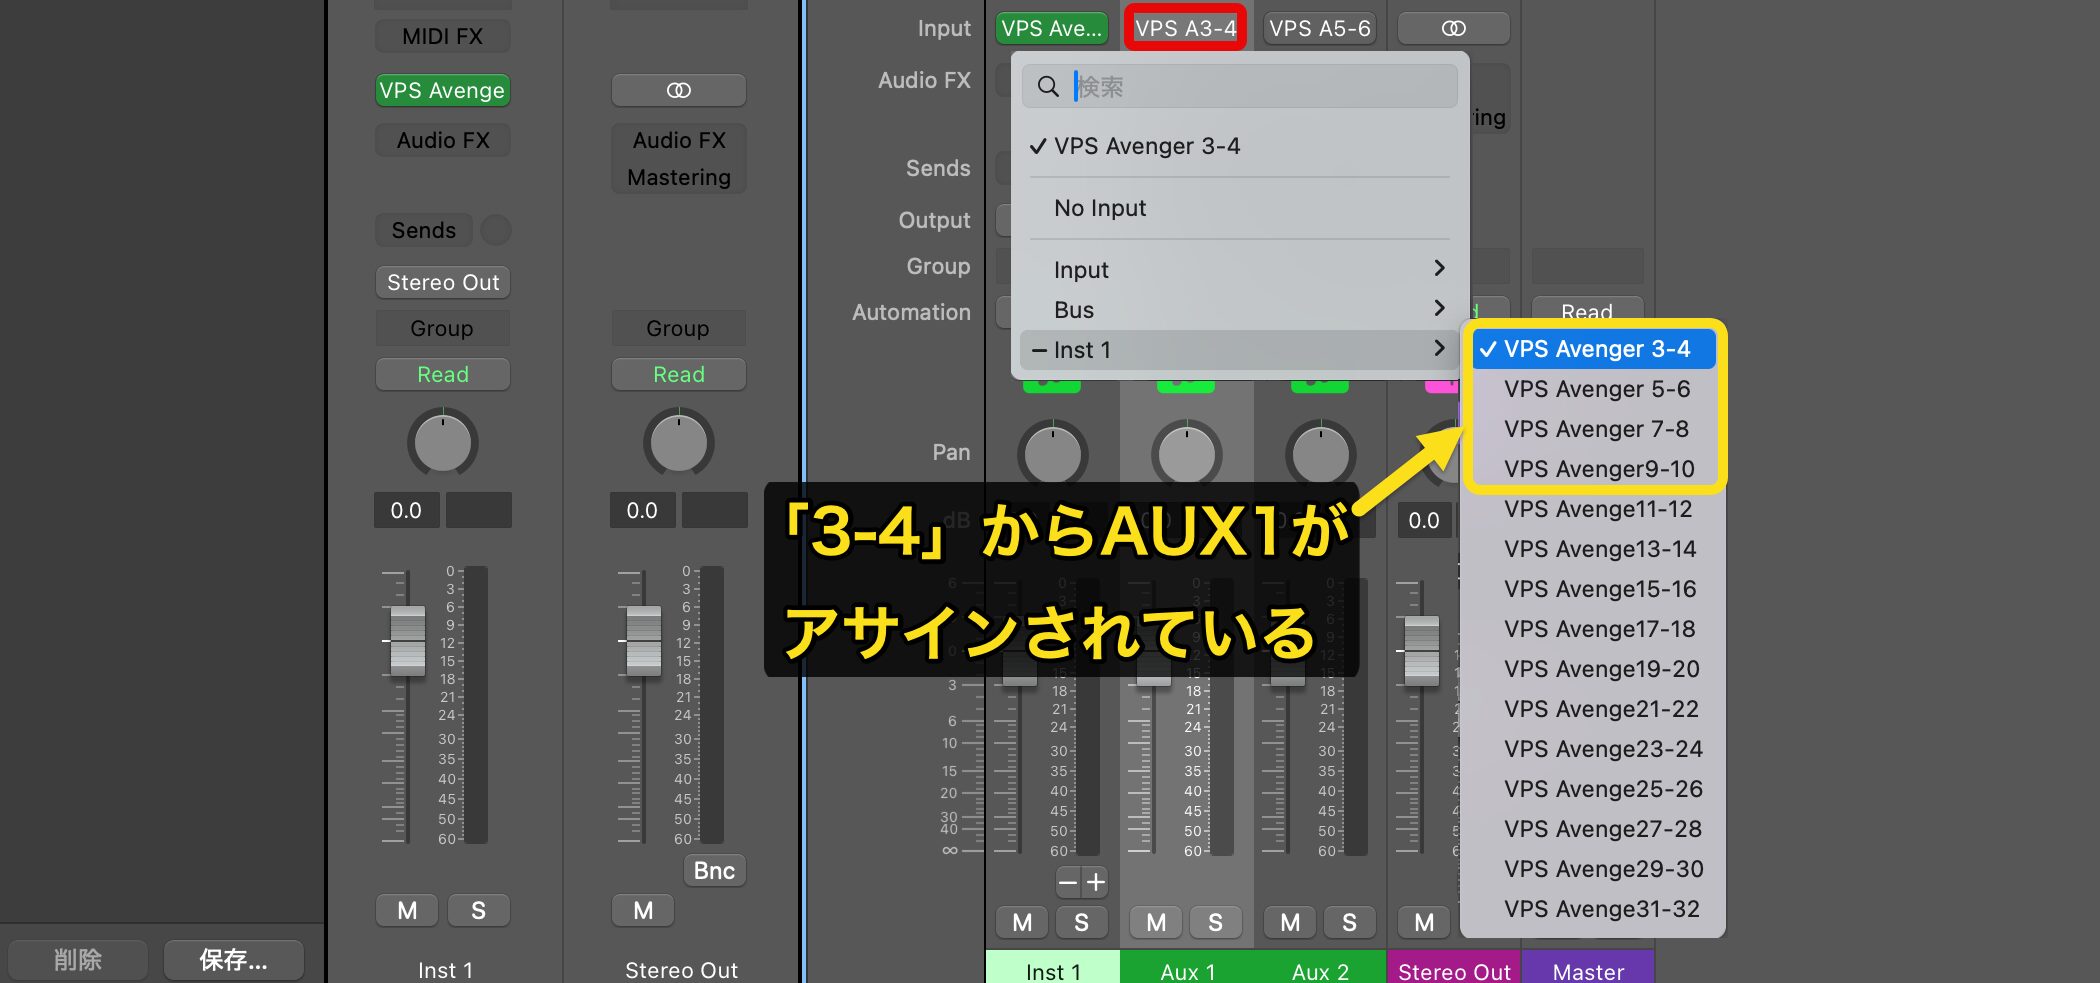
「VPS A3-4」からAUX1がアサインされています。
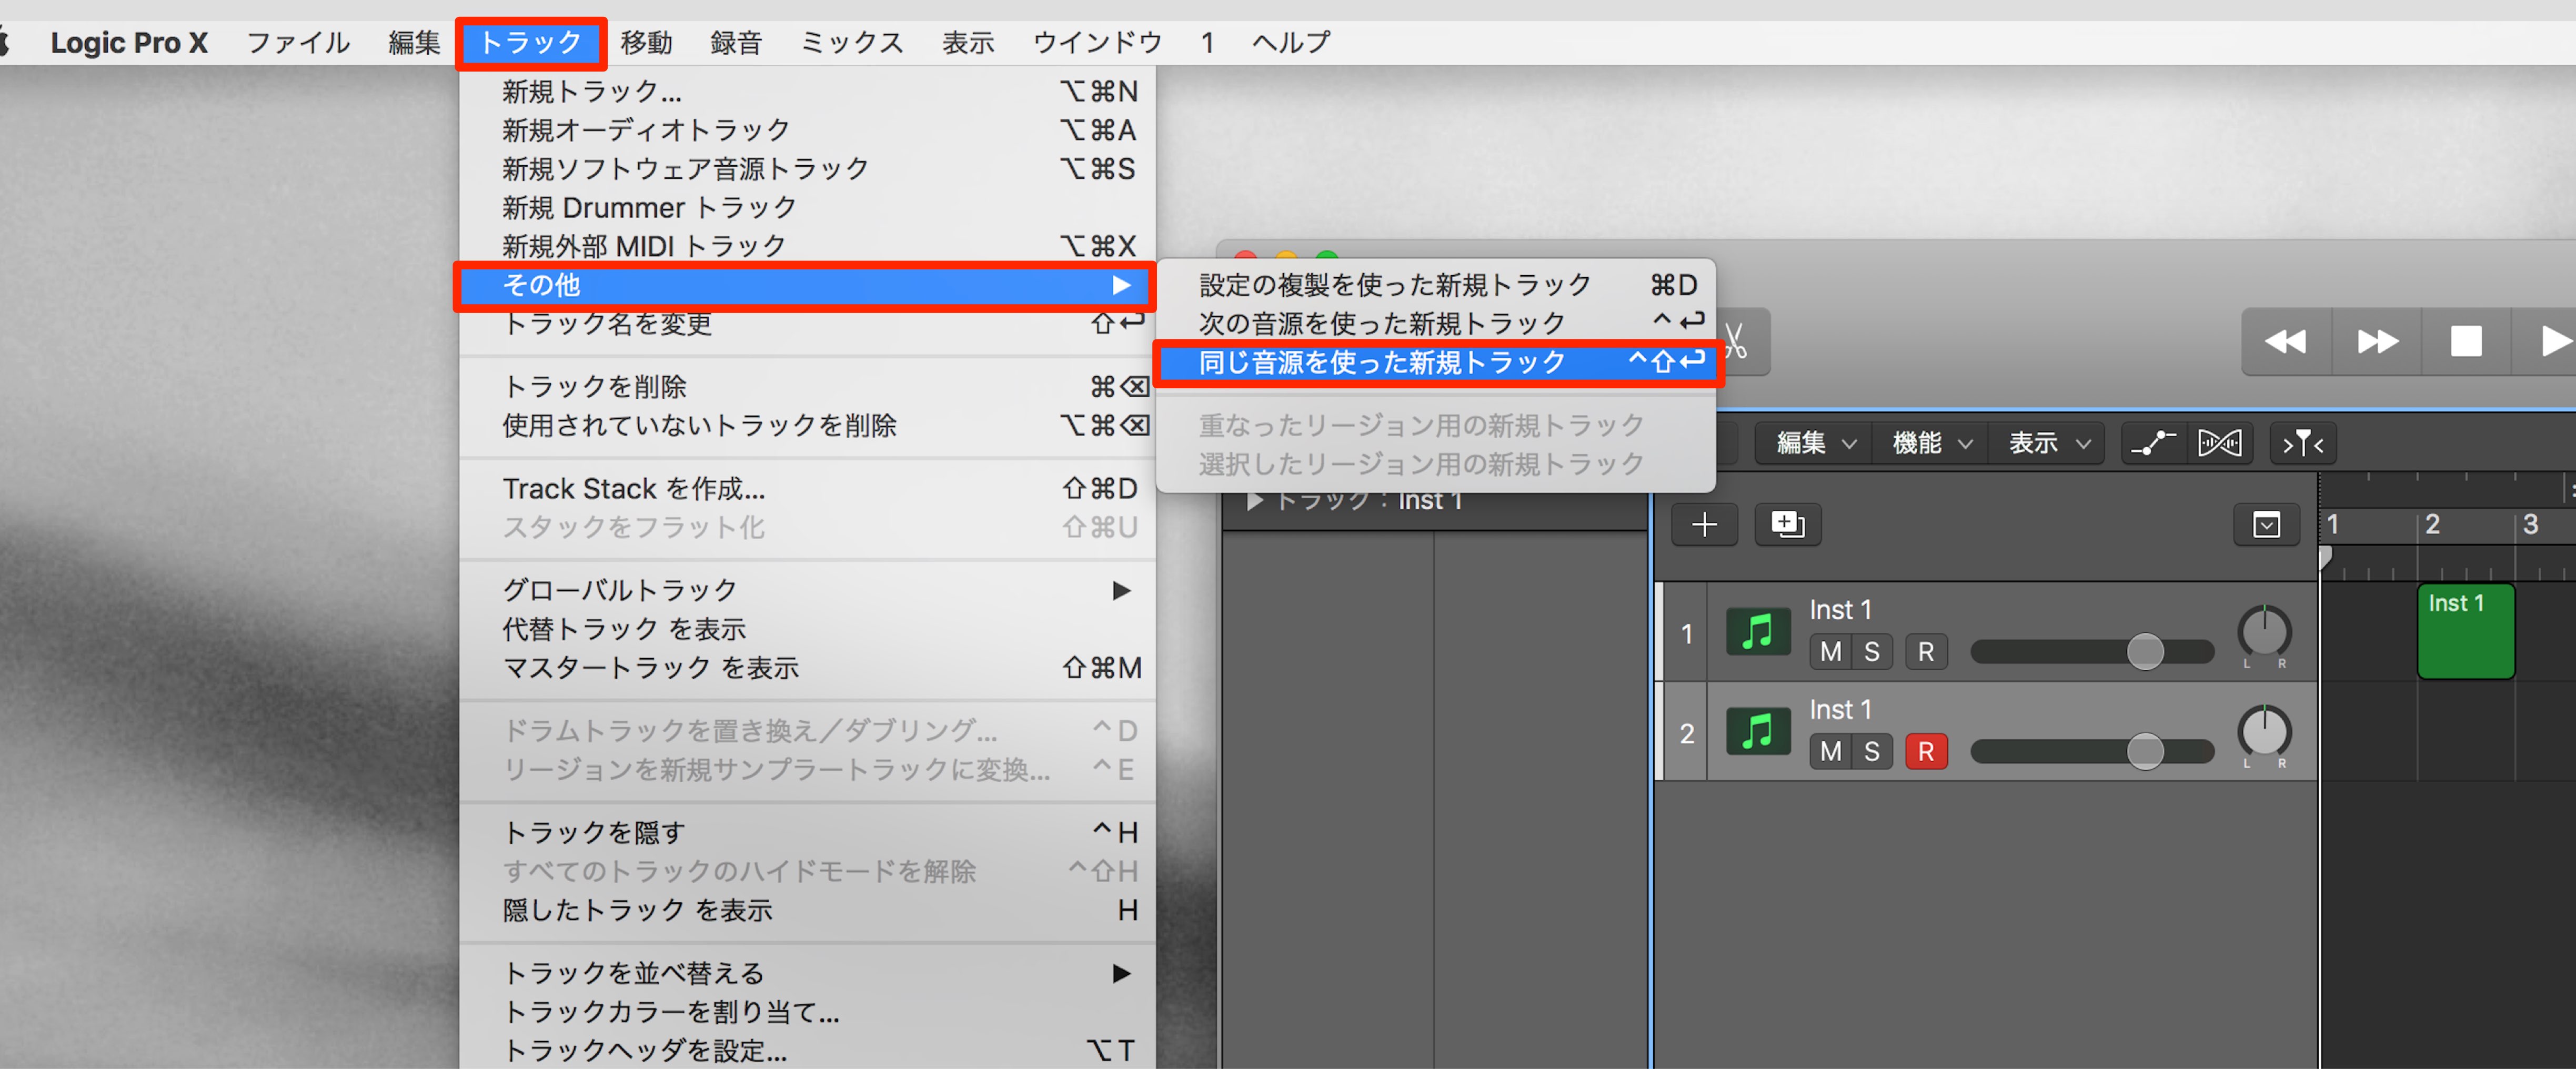
MIDI Trackを作成するには、Logic上のメニューで「トラック」から「その他」を開き、「同じ音源を使った新規トラック」を選択します。
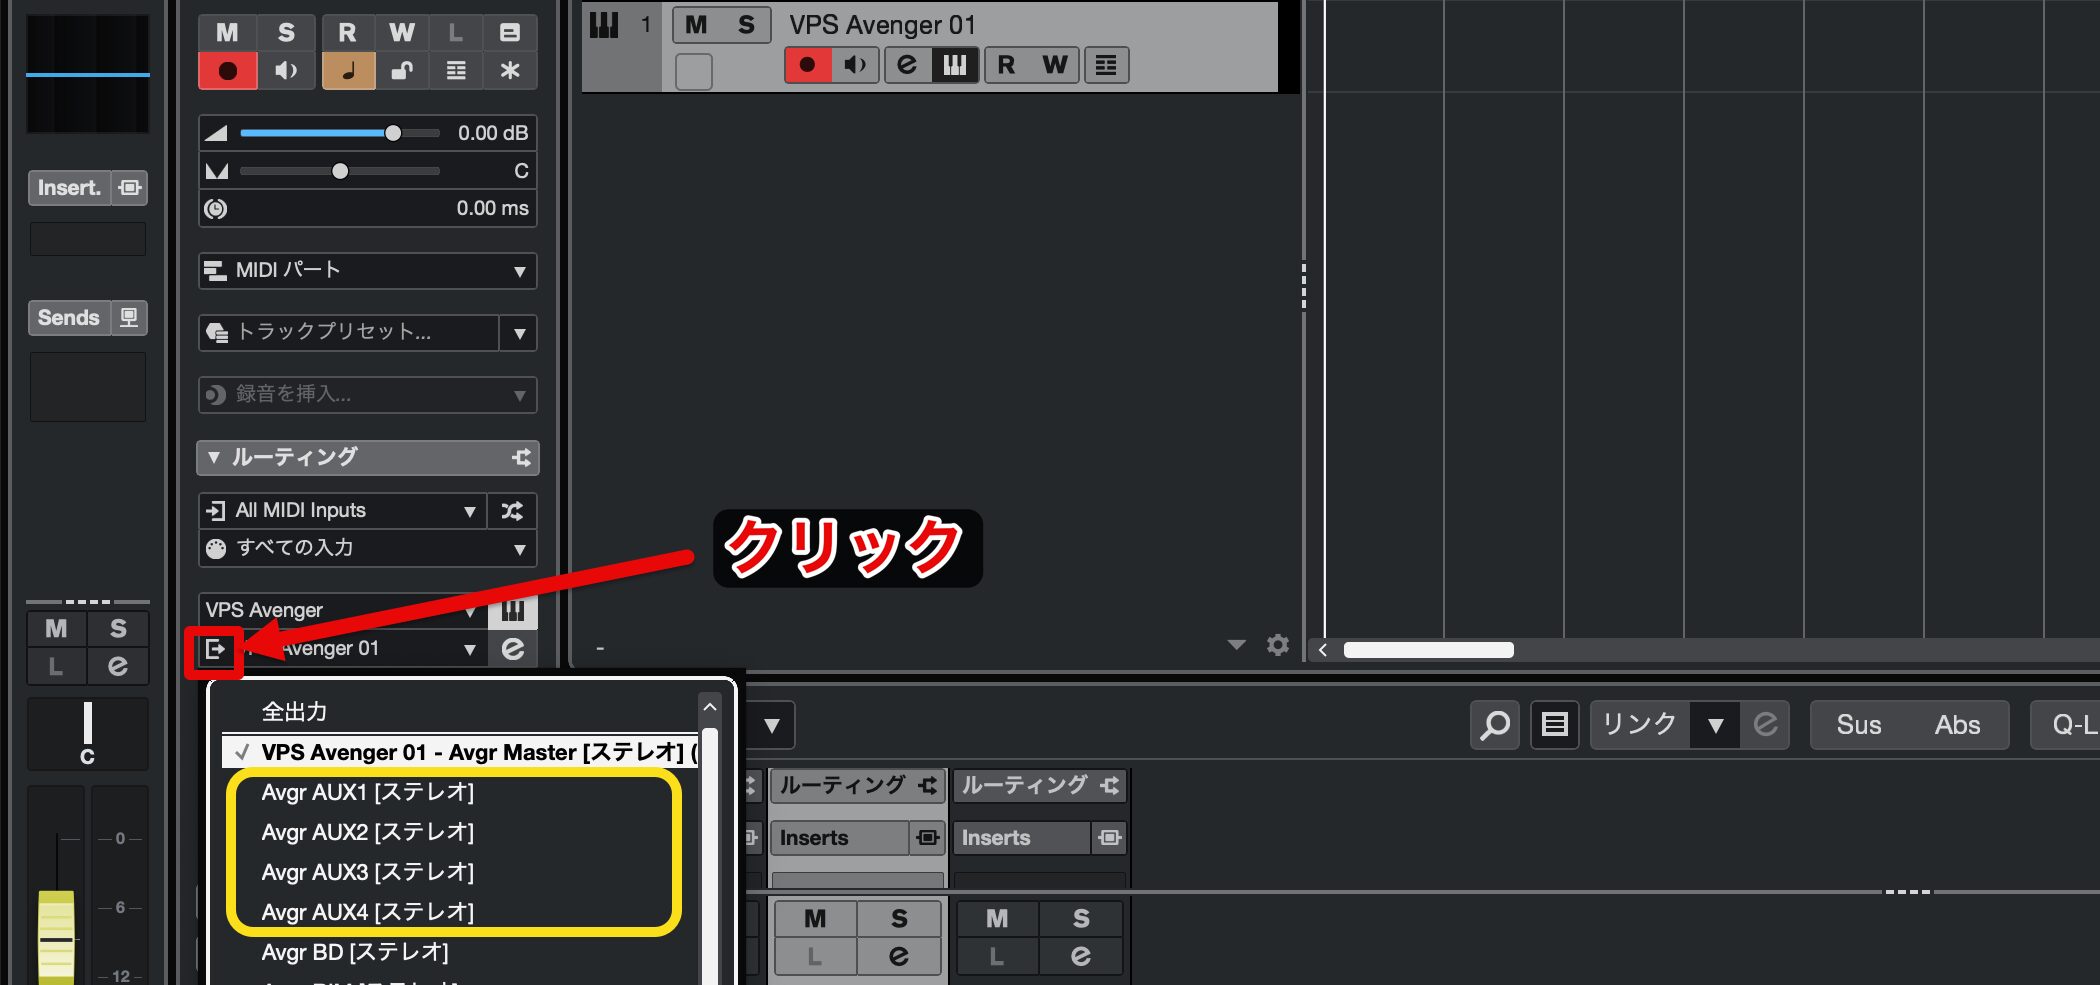
Cubase の場合
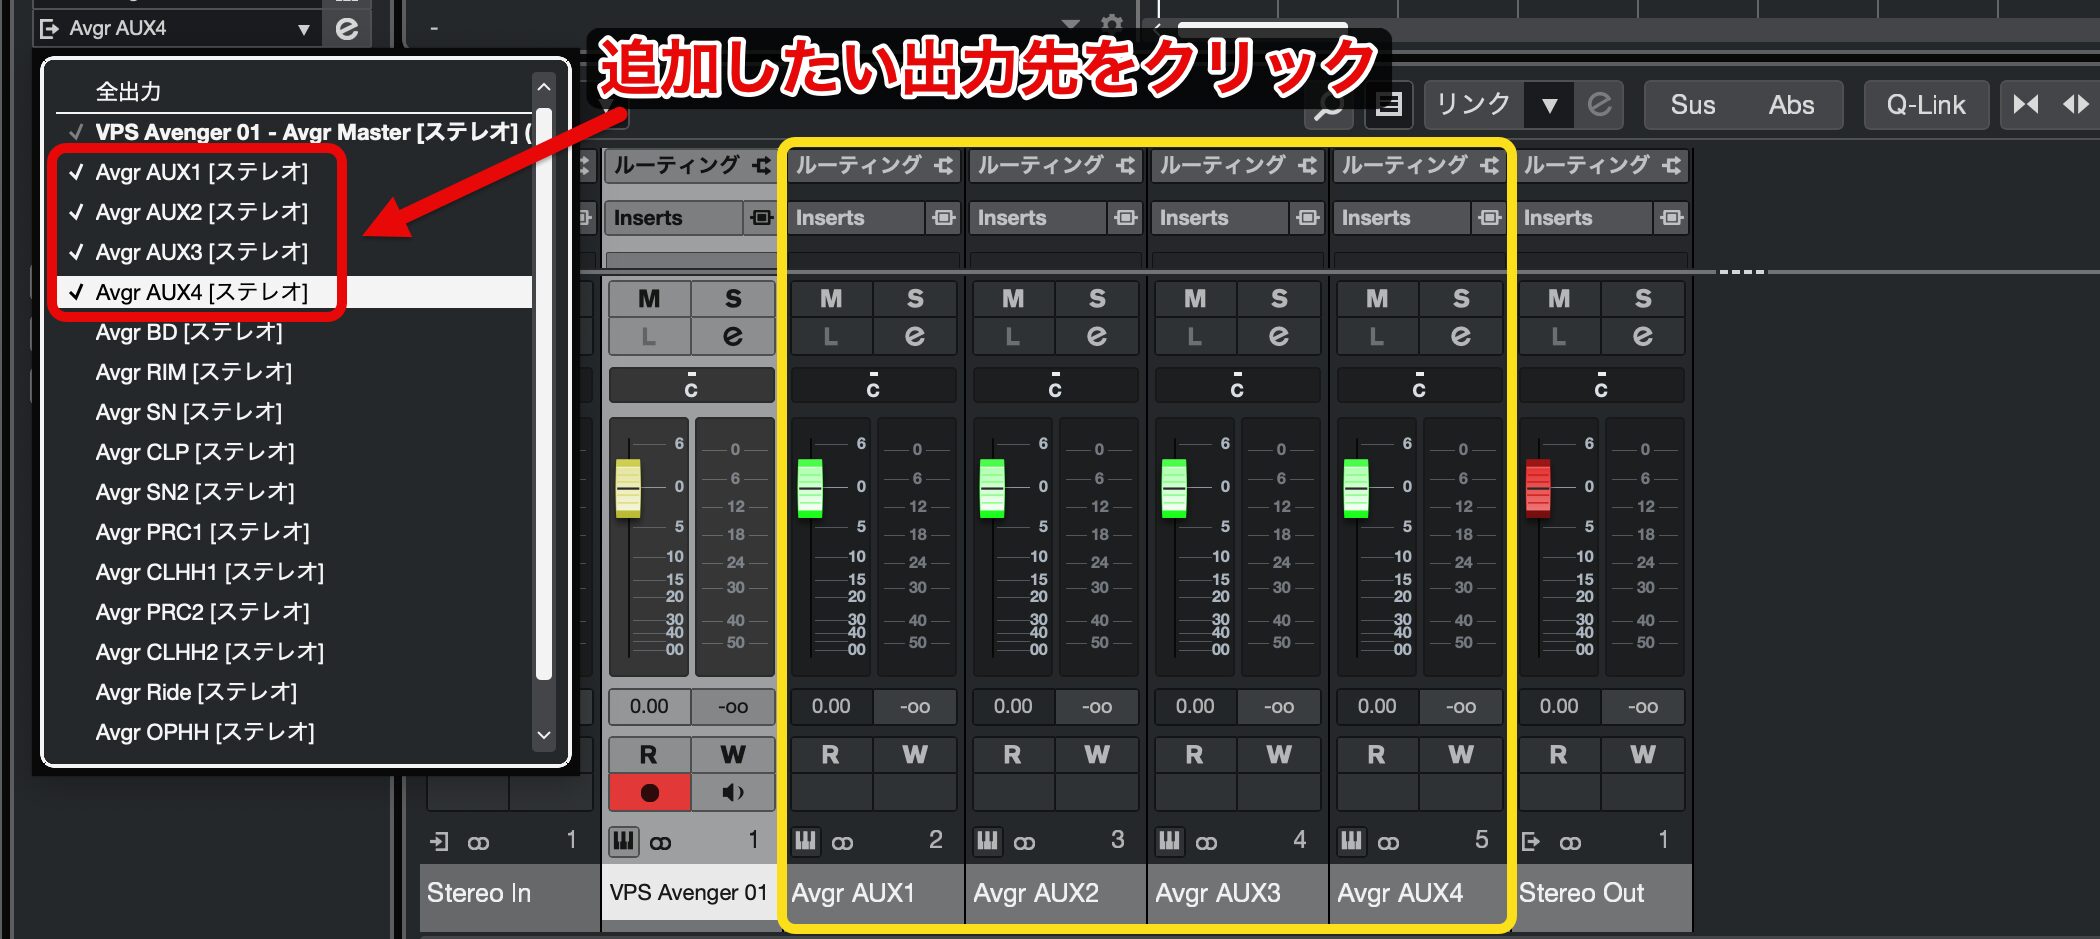
「トラックの出力先」を選択するボタンをクリックすると、出力チャンネルが表示されています。
追加したい出力先をクリックをすると、チャンネルが作成されます。
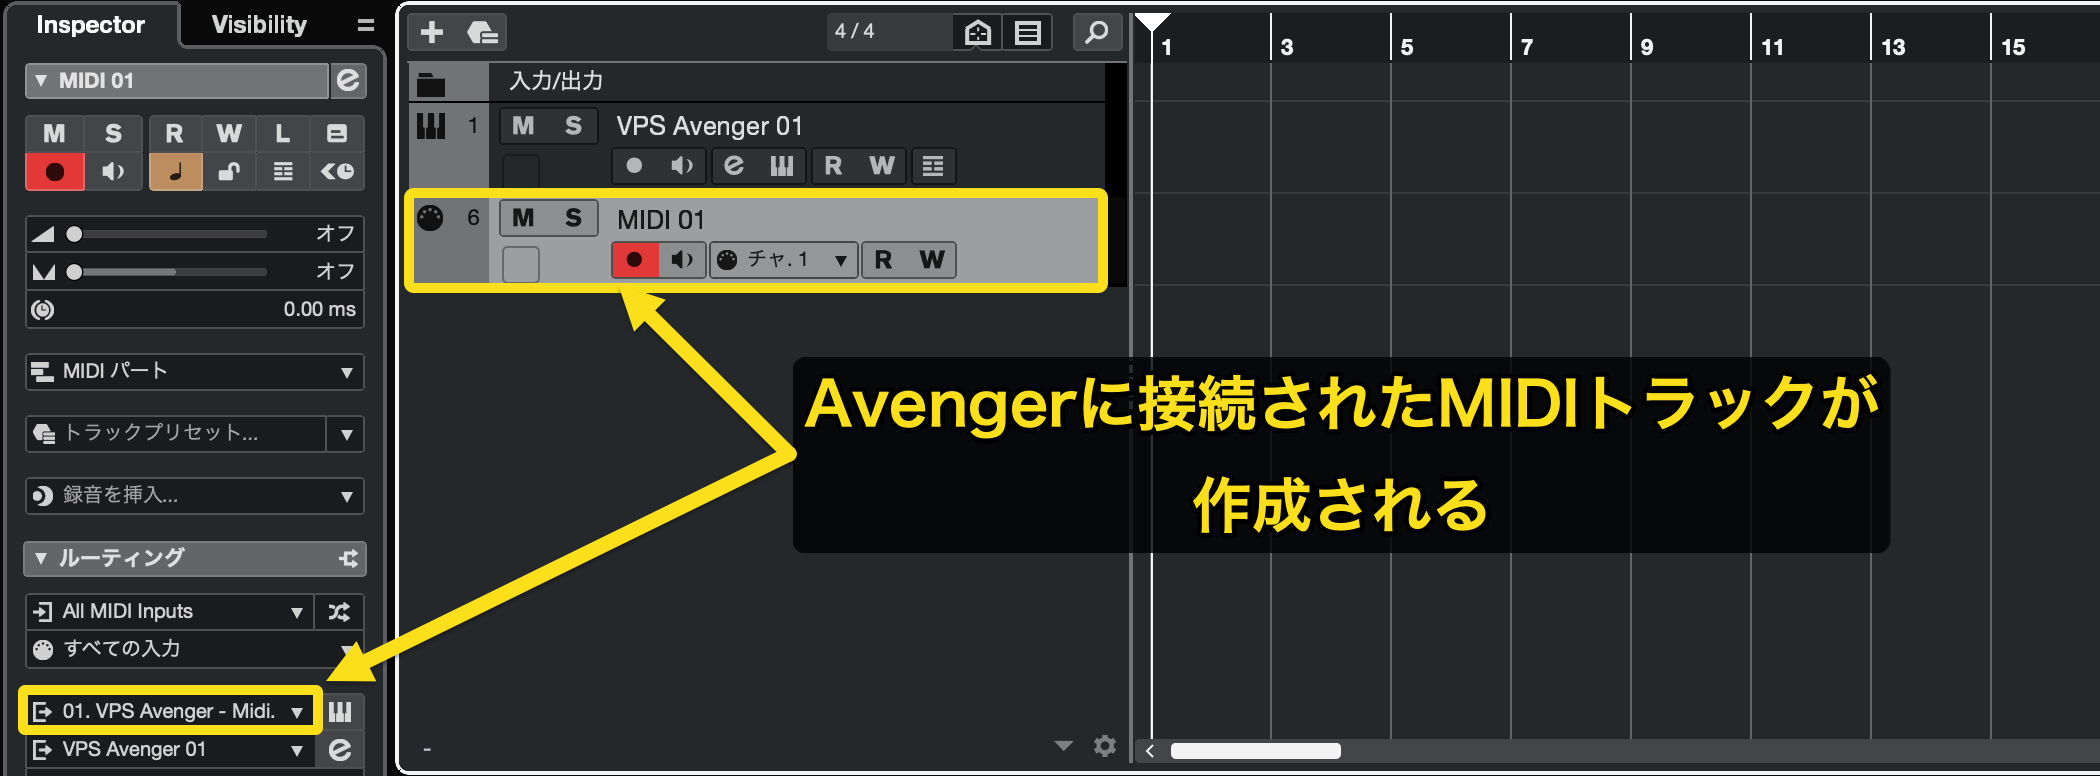
MIDI Trackを作成するには、Avengerが立ち上がっているトラックを右クリックして、「トラックを追加」から「 MIDI」を選択します。
これでAvengerに接続されたMIDIトラックが作成されます。
いかがでしたでしょうか。
パラアウトは少し面倒なのですが、一度設定を行えば快適に作業することができます。
ぜひ、お試しください。


 Logic
Logic Cubase
 Ableton Live
 StudioOne
 FL_Studio