MIXに必須の「コンプレッサー」
コンプレッサーの基本を理解する
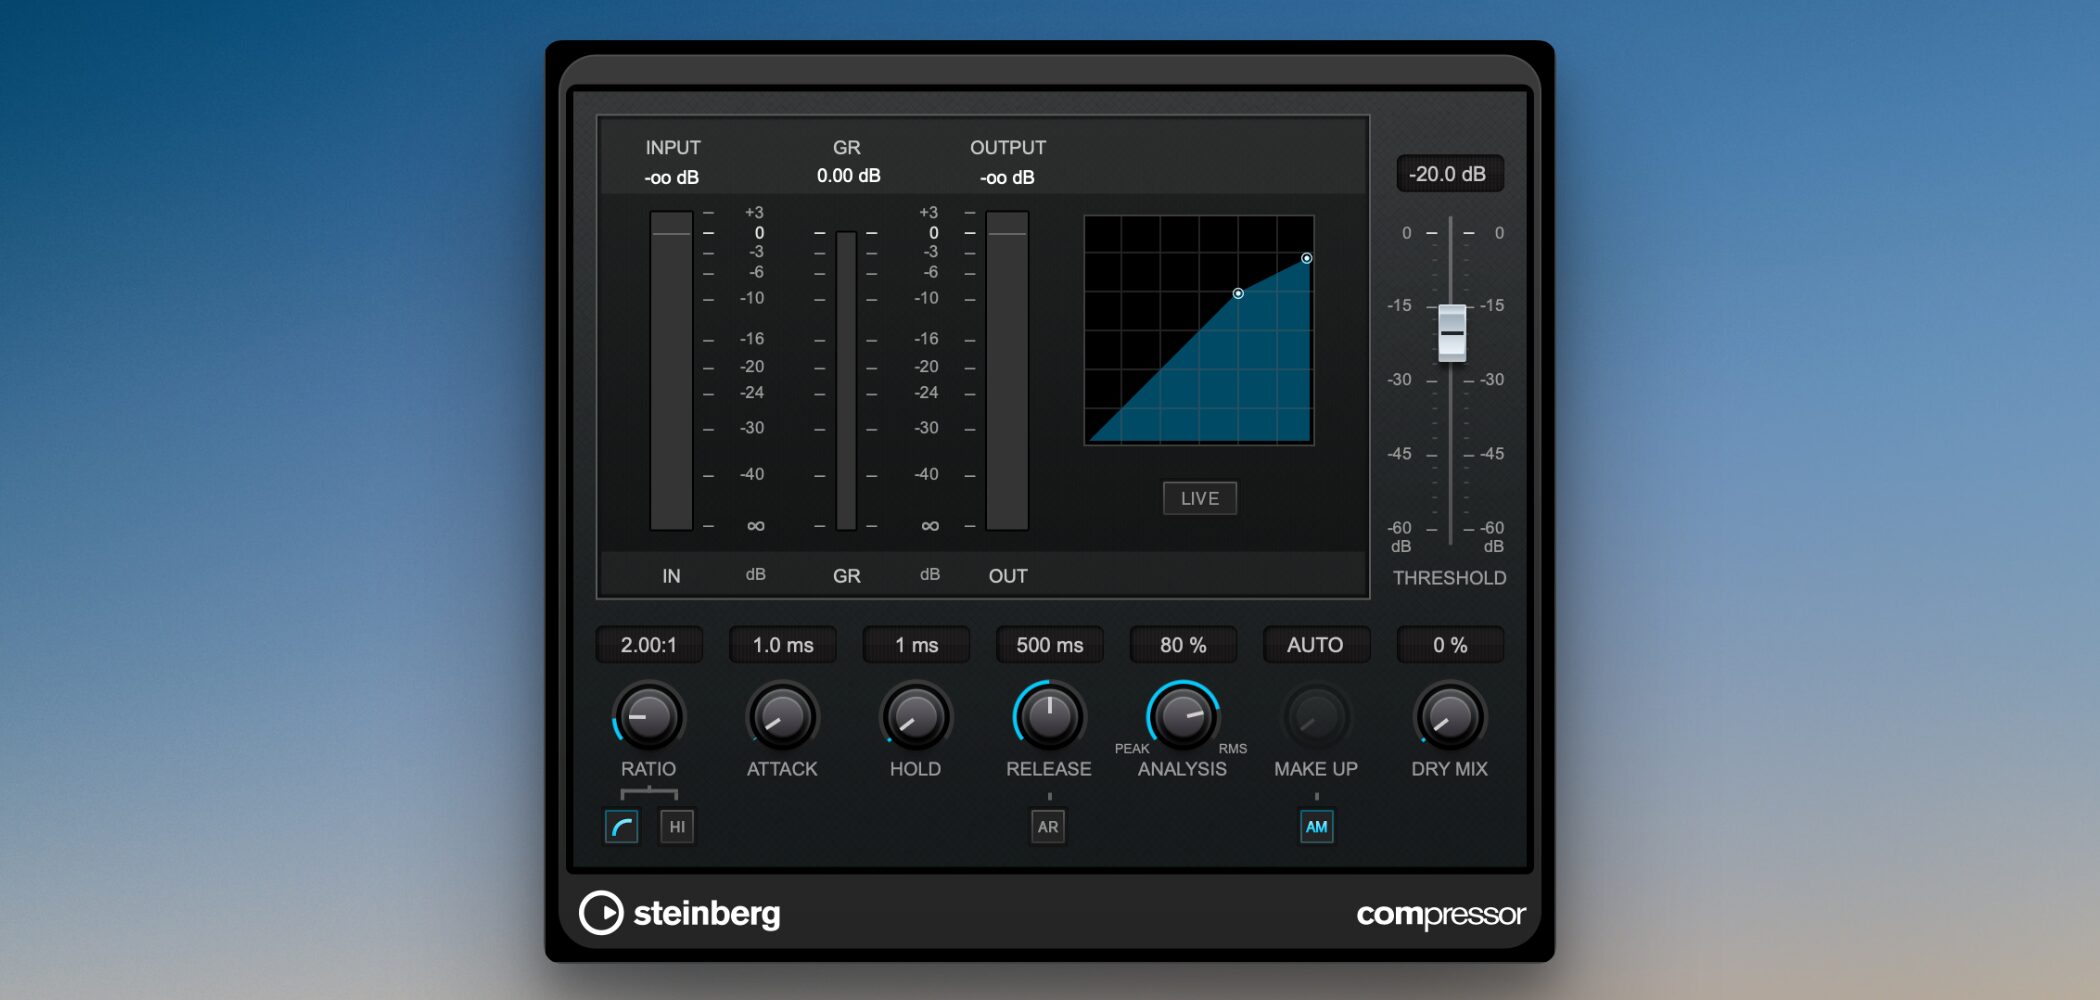
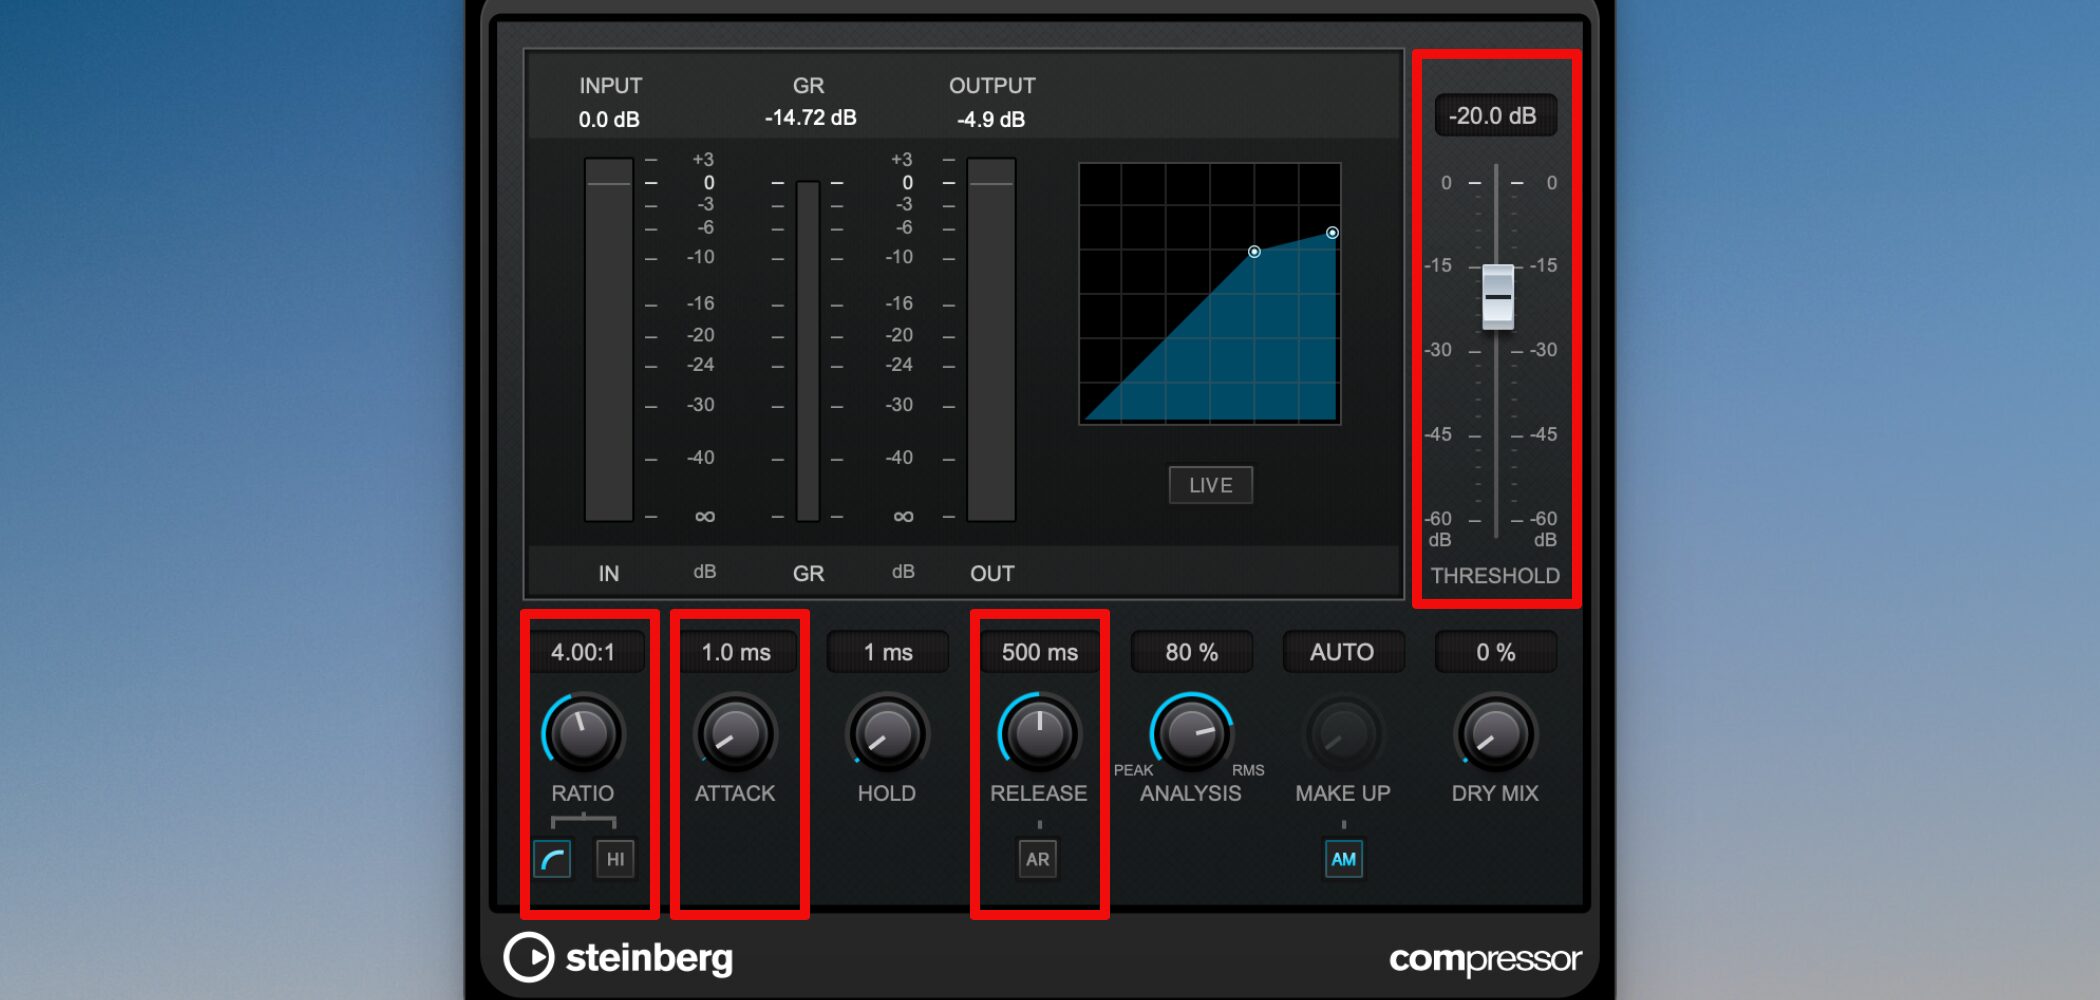
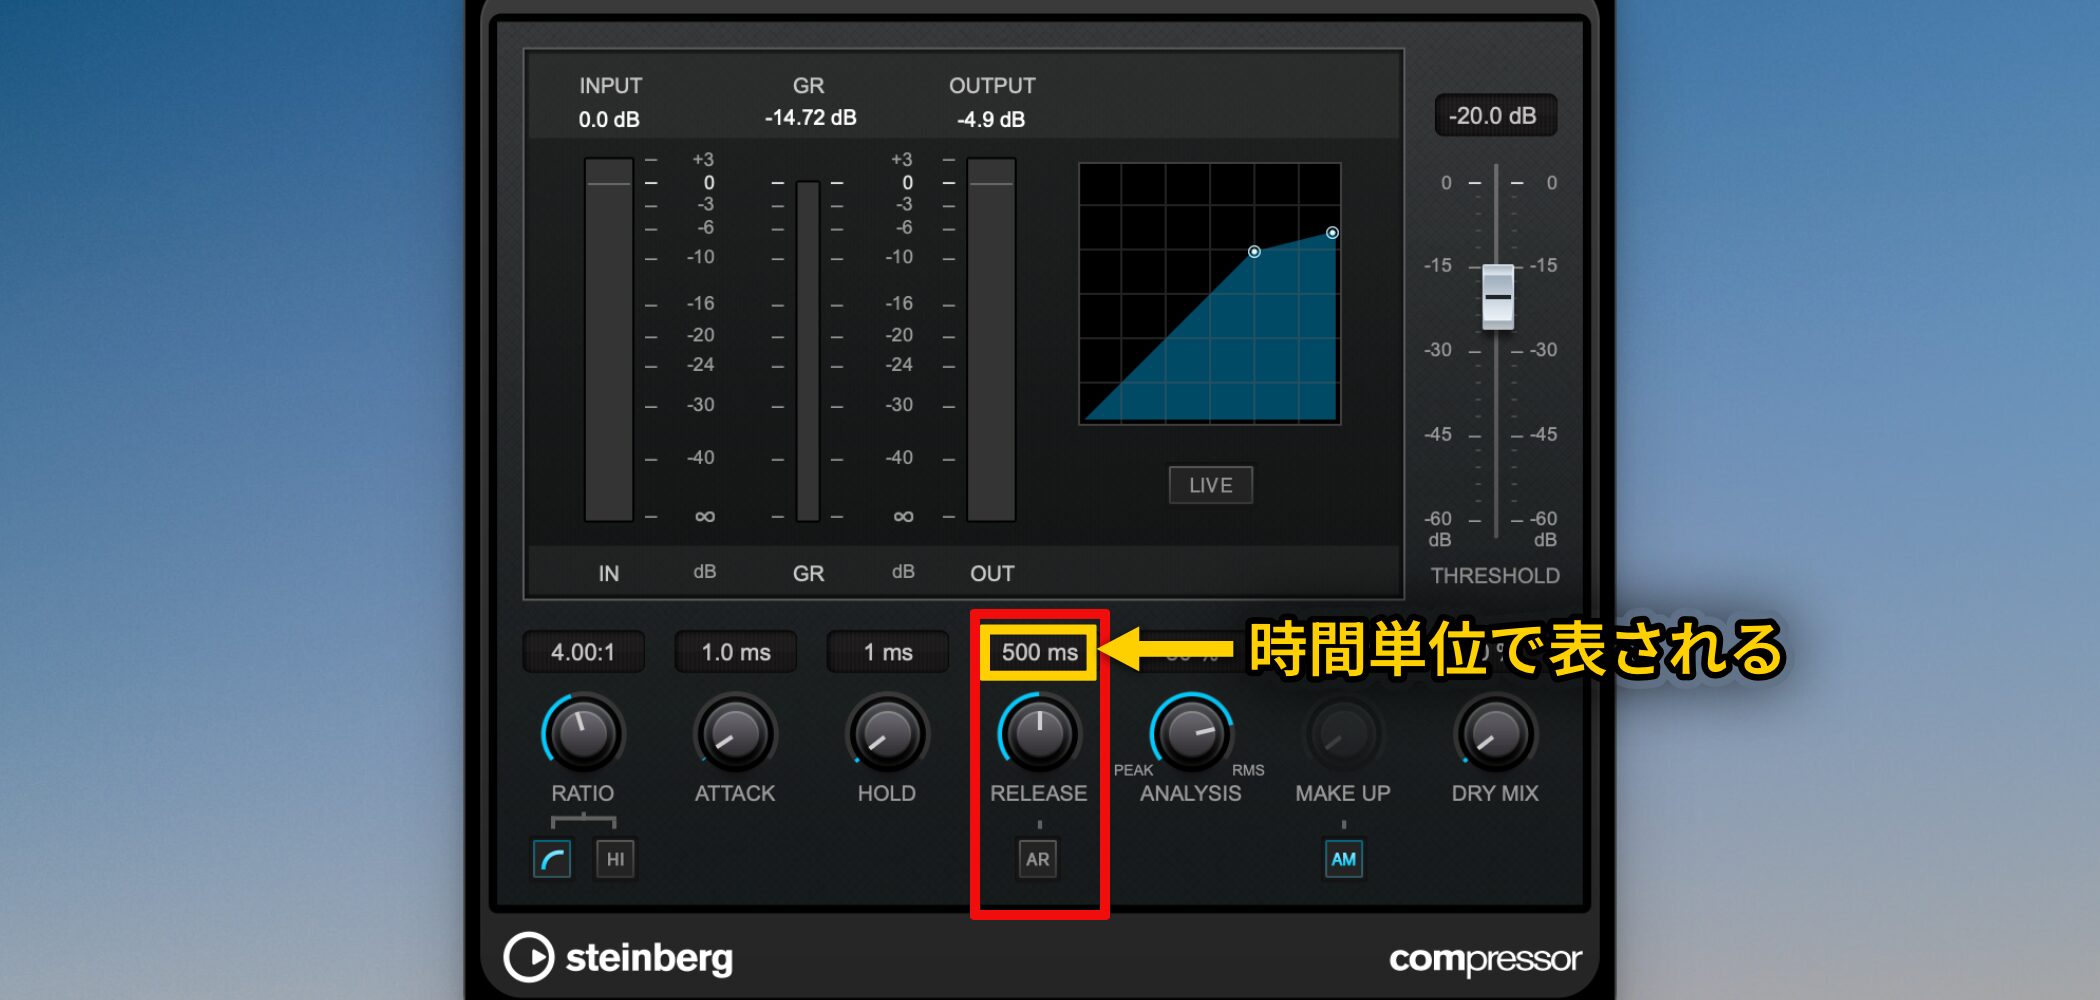
これはCubaseに付属の「コンプレッサー」で、コンプレッサーは各DAWに必ず付属しています。
DAWを使用している誰もが1度はコンプレッサーを使用したことがあると思いますが、「設定の方法がわからない」「音の変化がわからない」など、少し敷居が高く感じられるかもしれません。
EQの様に派手に音質が変わらないため、効果が分かりにくいですが、コンプレッサーをしっかり使用する、使用しないで楽曲のクオリティが大きく変わってきます。
コンプレッサーとは何か?
コンプレッサーは、小さい音はそのままで、大きい音を圧縮するというものです。
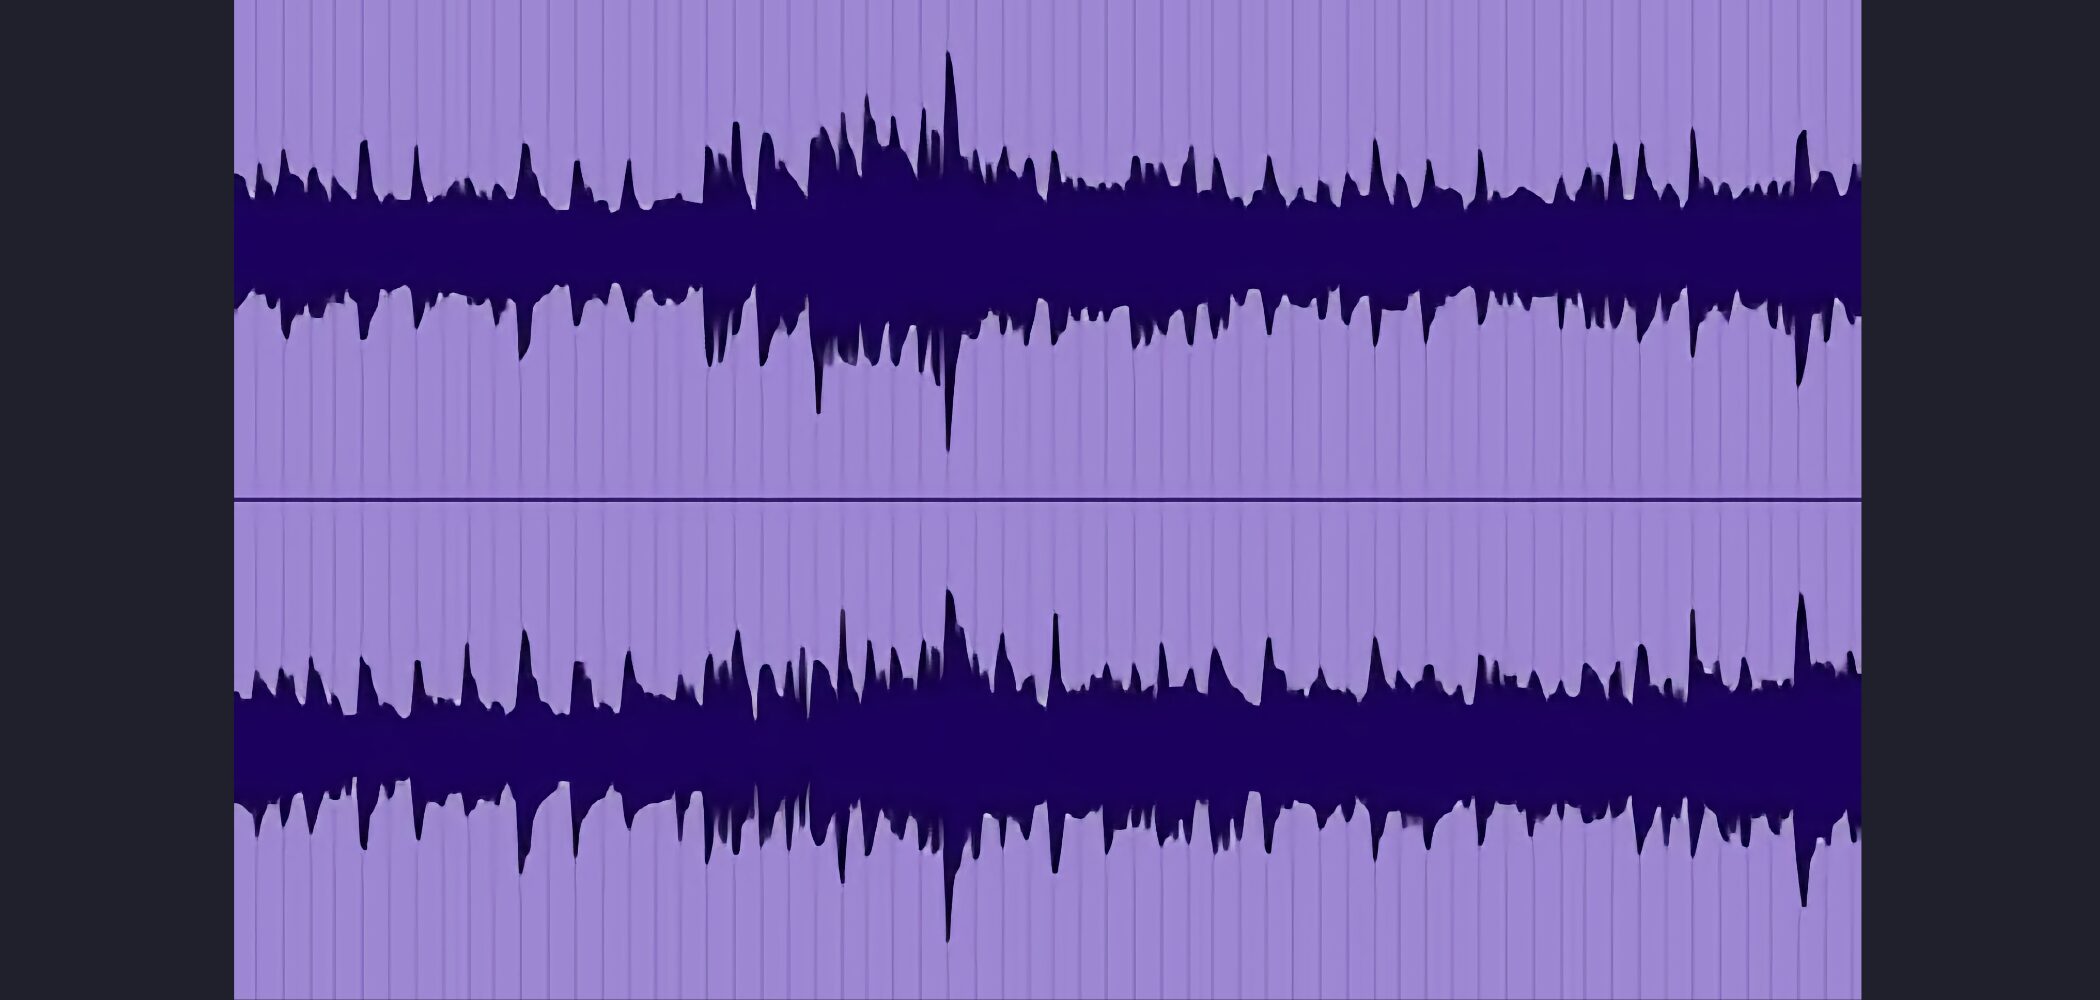
上記の画像はオーディオの波形ですが、当然ながら、波形が大きい部分、小さい部分があります。
この大きく尖った部分をコンプレッサーで圧縮し、小さい部分との音量差を少なくします。
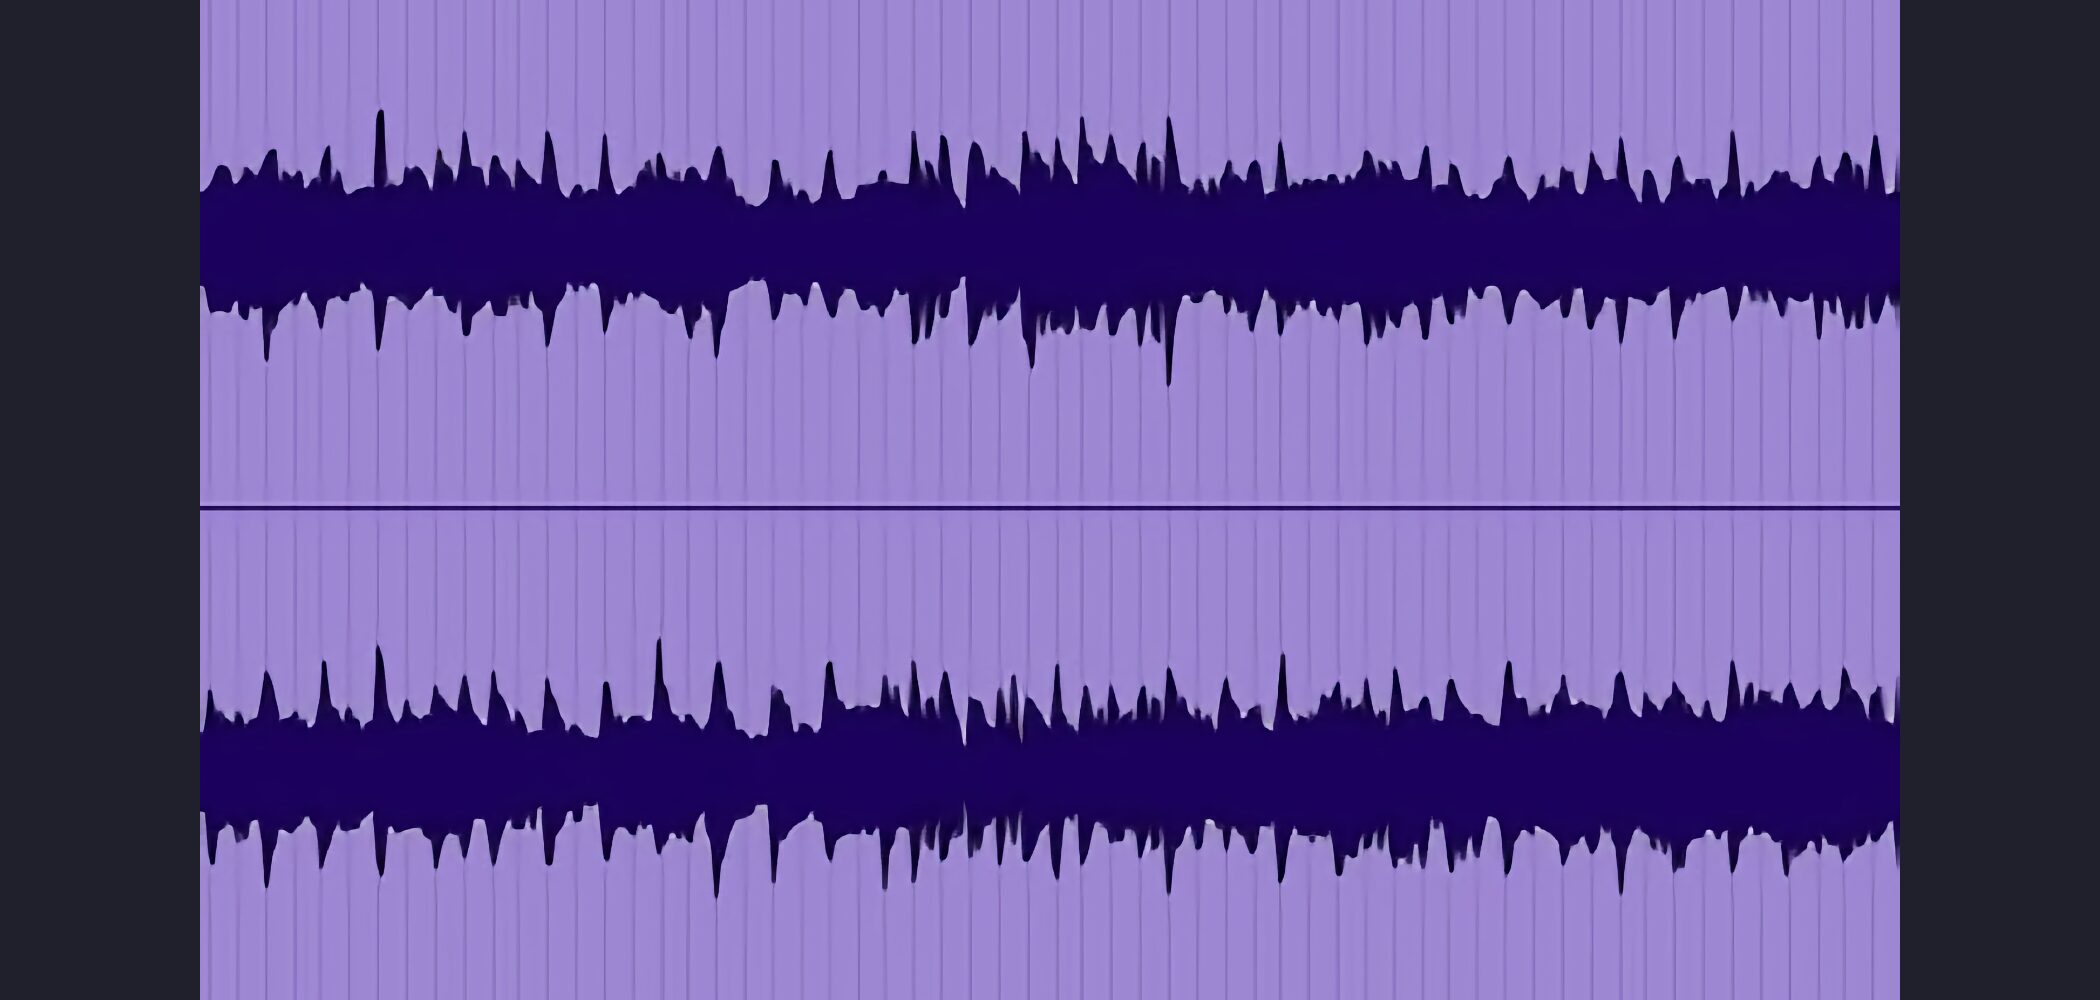
先ほどの波形にコンプレッサーを適用したものですが、波形の大きい部分が圧縮され全体が均等になったことがわかりますね。
これにより、まとまって聞きやすいトラックを作ることができます。
また尖った部分が抑えらるため、トラックの音量を全体的に上げることができるようになり、音圧を向上させることが可能です。
コンプレッサーによる音圧
「コンプレッサーで音圧を上げる」というのは、よく耳にする言葉です。
実際のコンプレッサーの機能を見ていく前に、この「音圧」について触れておきたいと思います。
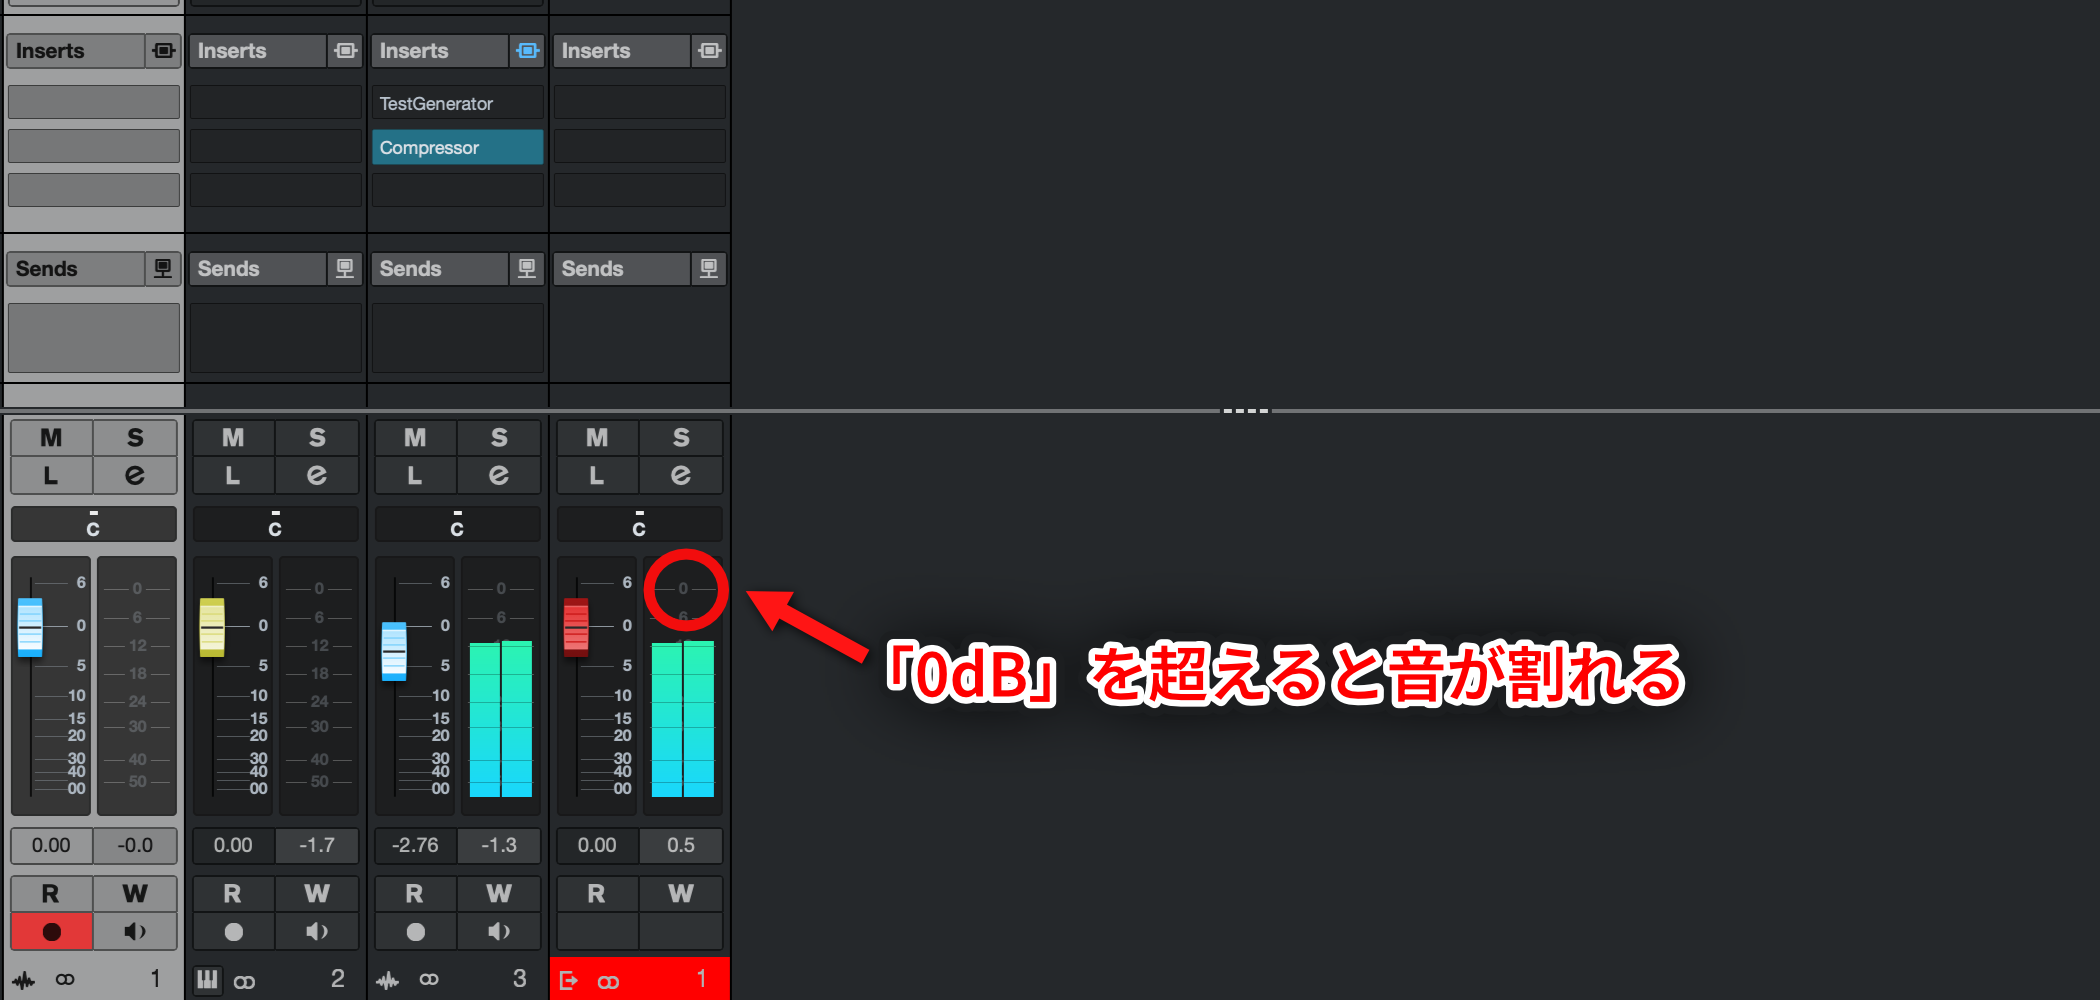
音圧が高いということは「音量が大きい」ということですが、入力信号がデジタルオーディオの最大値である「0dB(ゼロデシベル)」を超えると音が割れます。
ということは、プロでもアマチュアでも平等に使用できる音量の上限が決まっているというわけです。
では何が違うのか、それは、「音の密度」です。
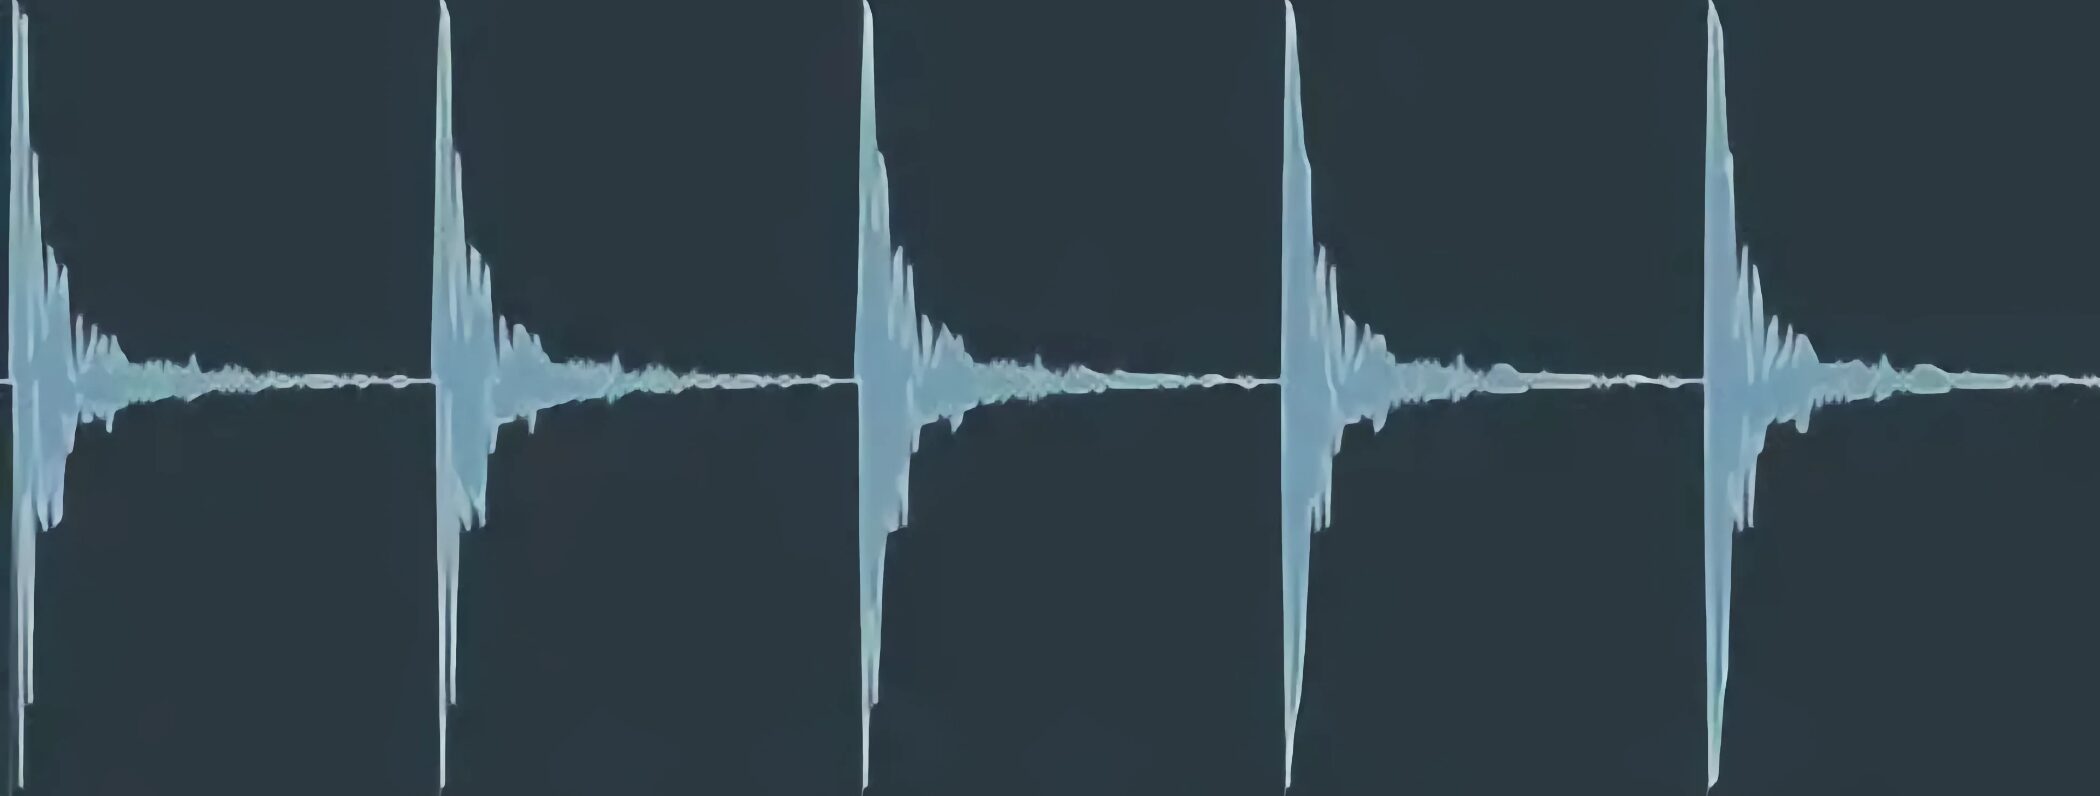
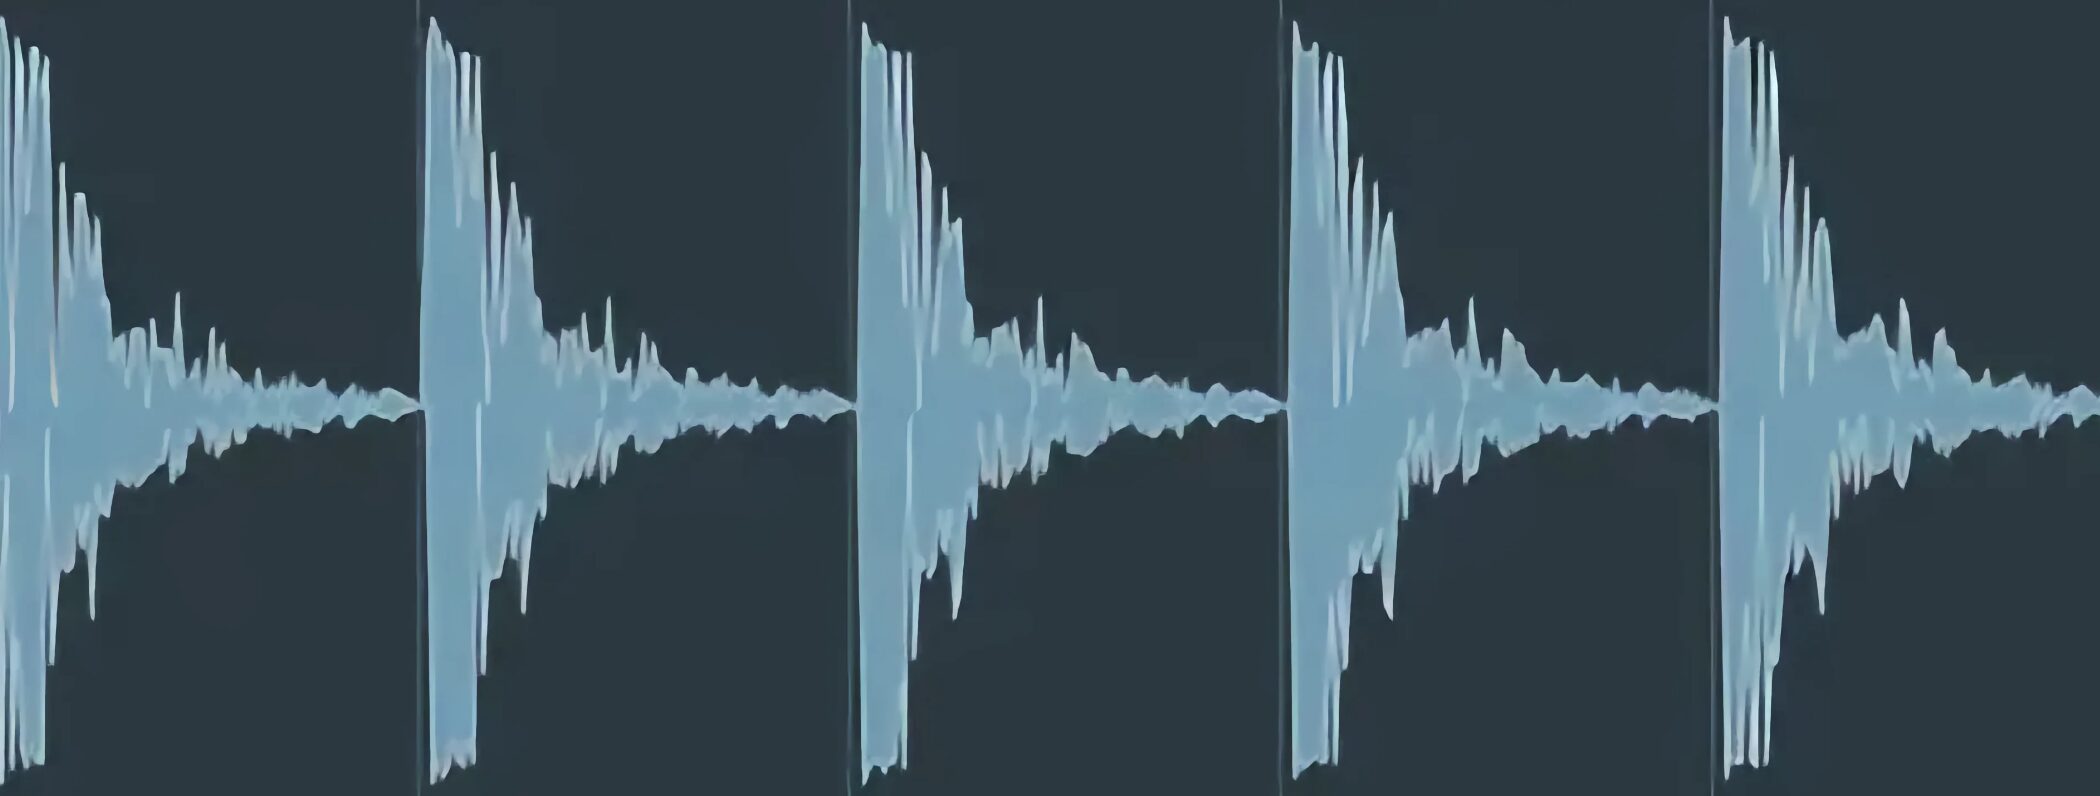
下記の2つの画像とサウンドを確認してください。
いかがでしょうか?
どちらも音が割れる「0dB」限界まで波形を上げたものですが、後者の方が大きく聴こえたはずです。
画像を見てみると、アタック部分の音量は変わりませんが、明らかに波形の空白部分が異なります。
この波形面積が音圧を左右します。
音圧アップの仕組み
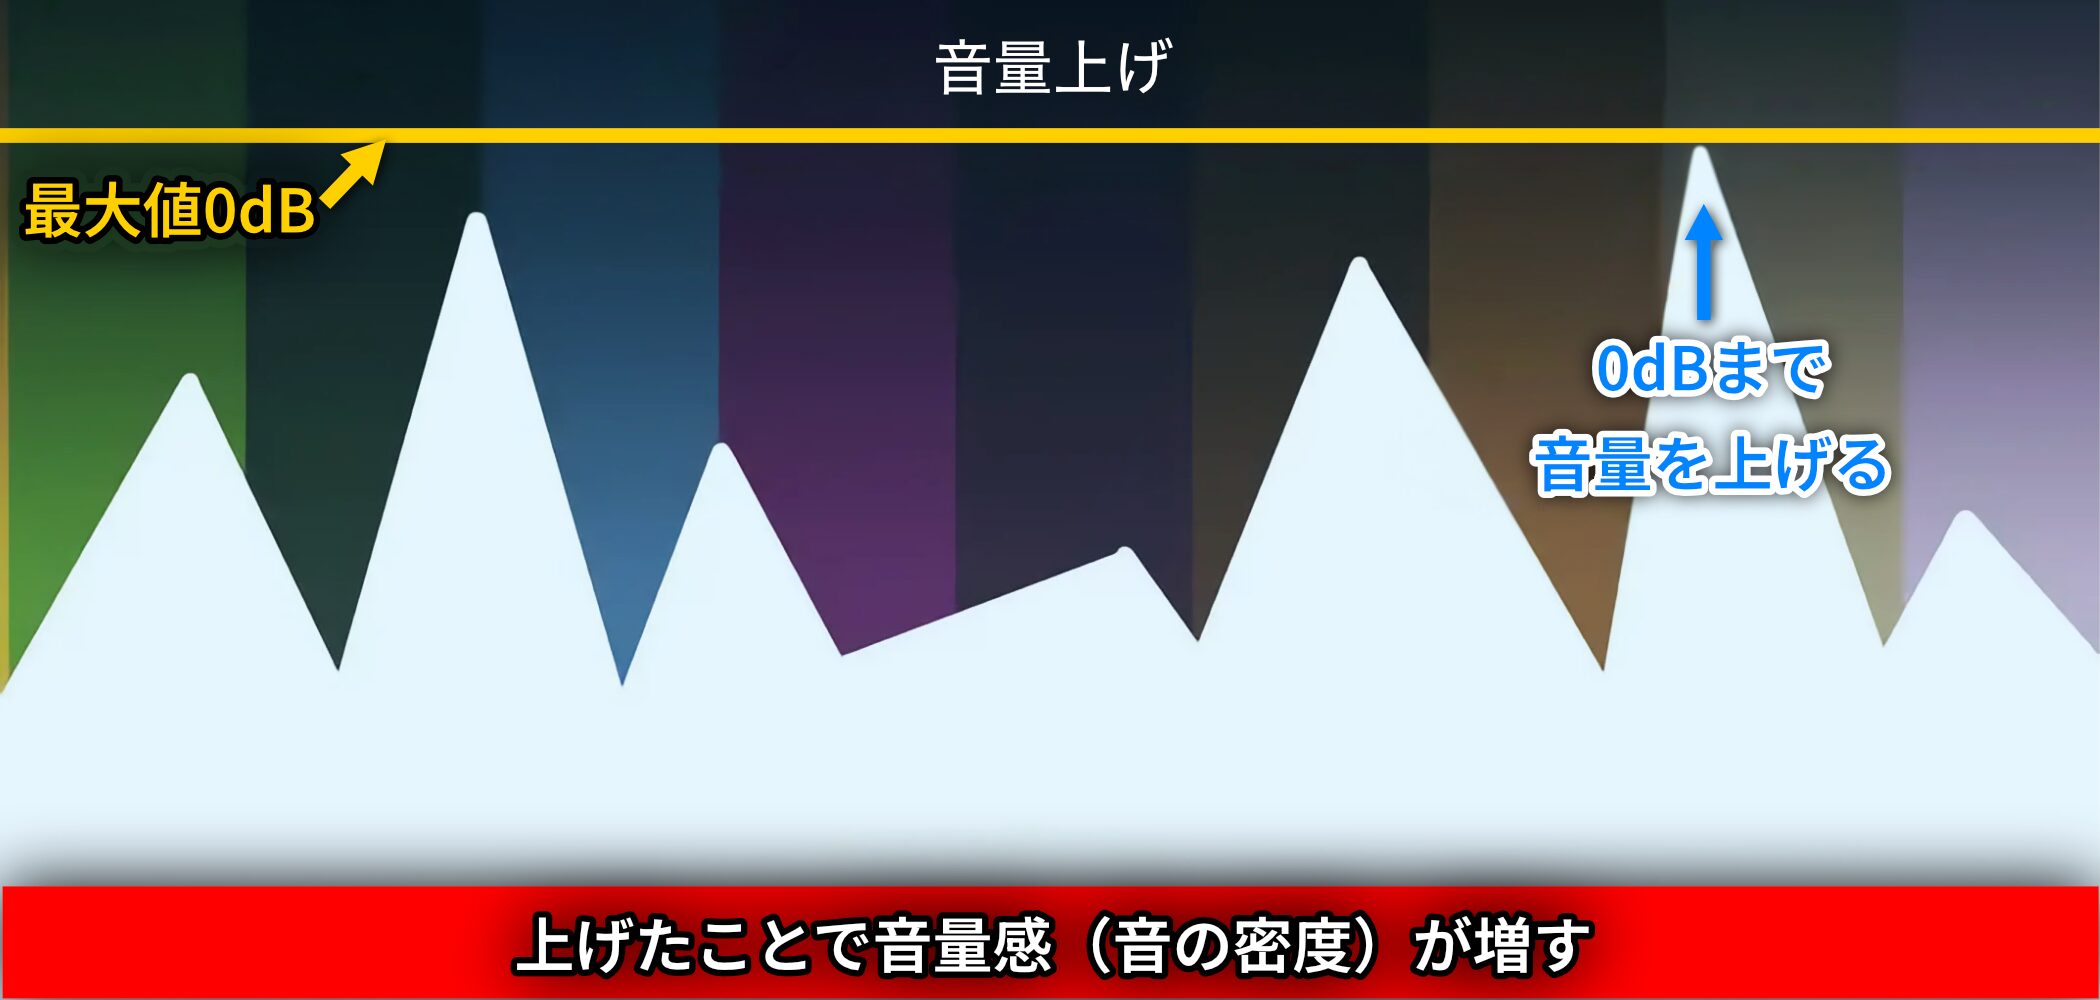
上記のような波形があったとしましょう。
音を大きくしたいため、音が割れる「0dB」ギリギリまで波形(音量)を上げると、必然的に波形面積が増えます。
画像の赤い箇所が増えた面積となり、上げた分だけ音量感(音量の密度)が増します。
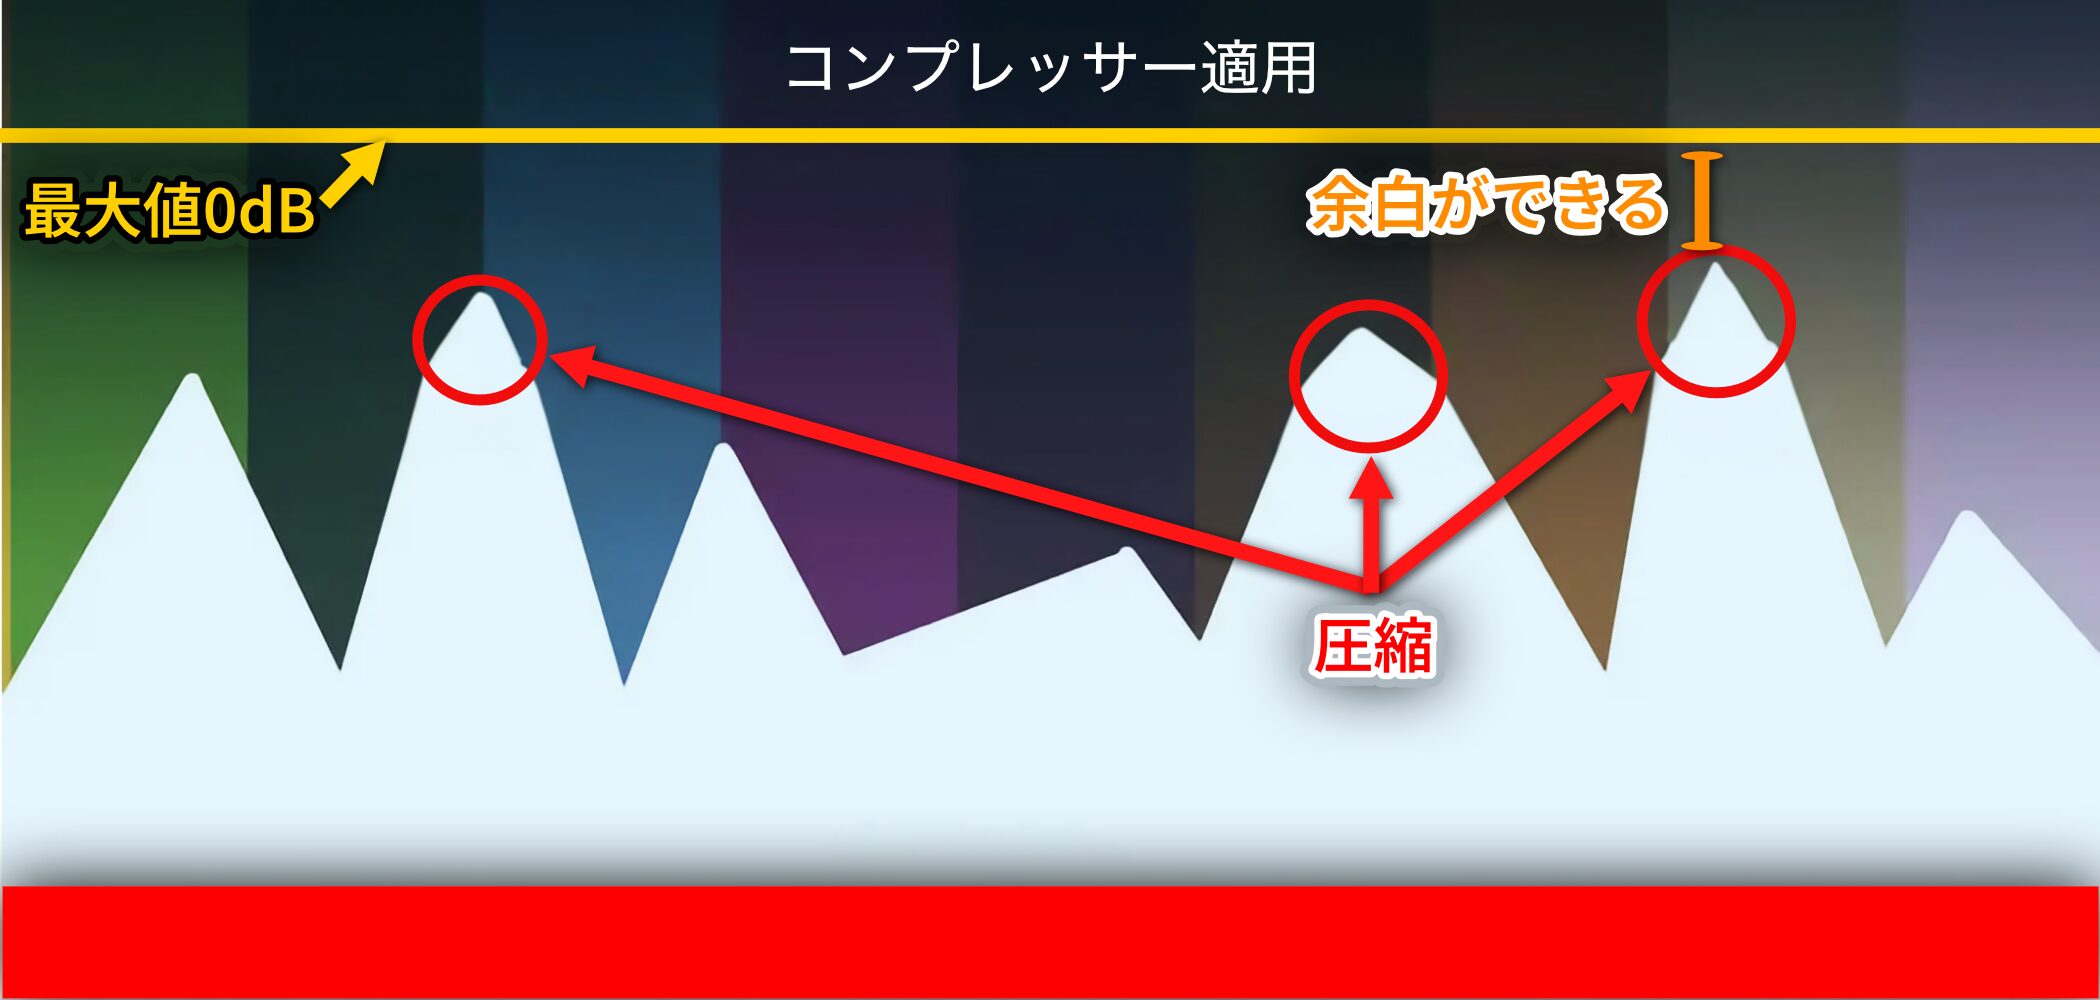
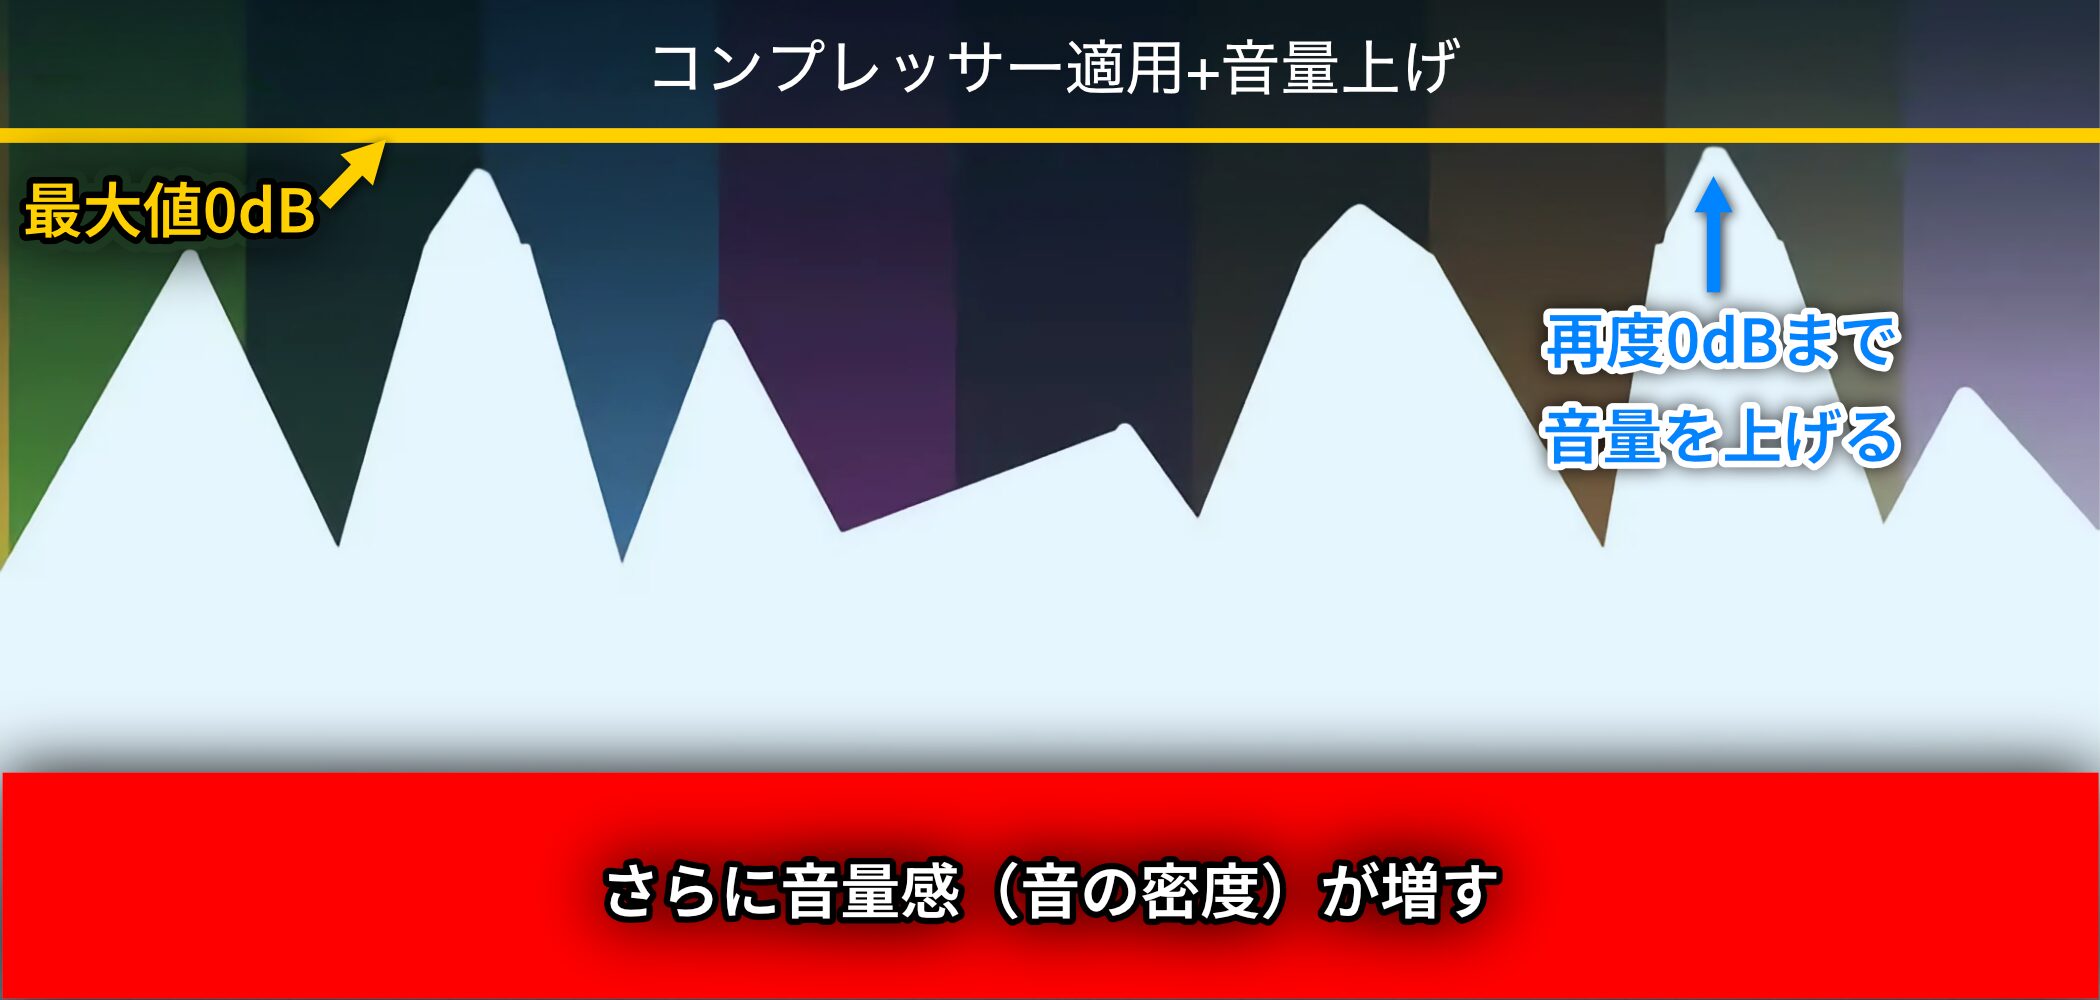
ここに「コンプレッサー」を適用し、波形の大きな部分を圧縮します。
赤マル部分が圧縮された箇所になり、圧縮したことで音が割れる「0dB」まで、かなりの余裕ができました。
そこで、再度「0dB」ギリギリまで持ち上げると、さらに波形面積(画像の赤い箇所)が増え、波形全体が占める密度が多くなりました。
これが音圧が上がったという状態です。
コンプレッサーで主要の4つのツマミ
コンプレッサーは、前述したとおり「波形の大きい部分を小さくする。そして元々小さい部分はそのまま」これが基本です。
トラック内の音量差が少なくなり、トラックを安定させるというのが狙いです。
「なかなか効果が分からない」「ツマミの意味が分からない」という方も非常に多いと思いますが、ツマミの意味を理解することがコンプレッサーの第一歩です。
ここからは、主要となる4つのツマミについて説明していきます。
これらは、Protools、Logic、CubaseなどのDAWでも概念はすべて同じです!!
Threshold(スレッショルド)
最初に、「スレッショルド」についてです。
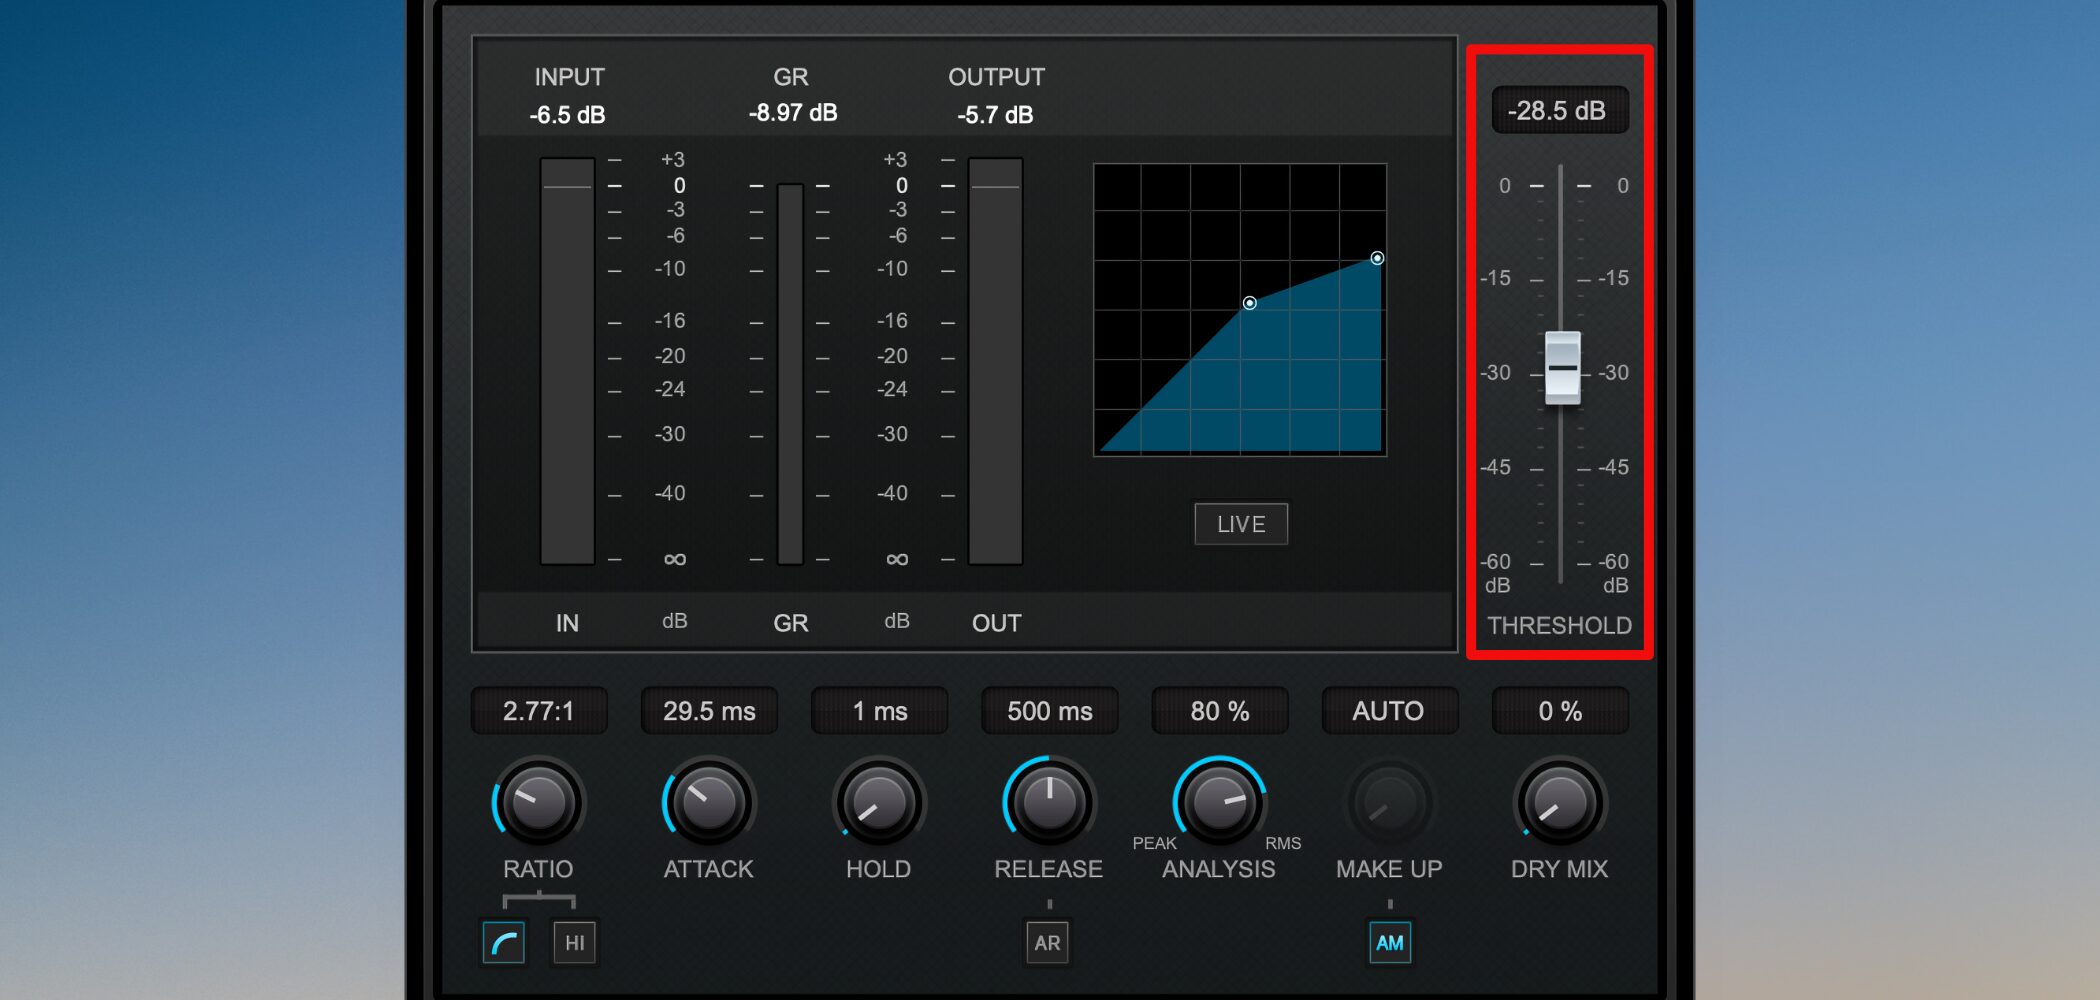
画像のスレッショルドは、操作箇所がスライダーですが、製品によってはツマミの場合もあります。
スレッショルドとは何かを端的に説明すると、エフェクトが効き始める「音量の境界線」を決定するパラメーターです。
どういうことか、具体的に見てきましょう。
動画 : Threshold(スレッショルド)の解説
スレッショルド値と圧縮される音の関係
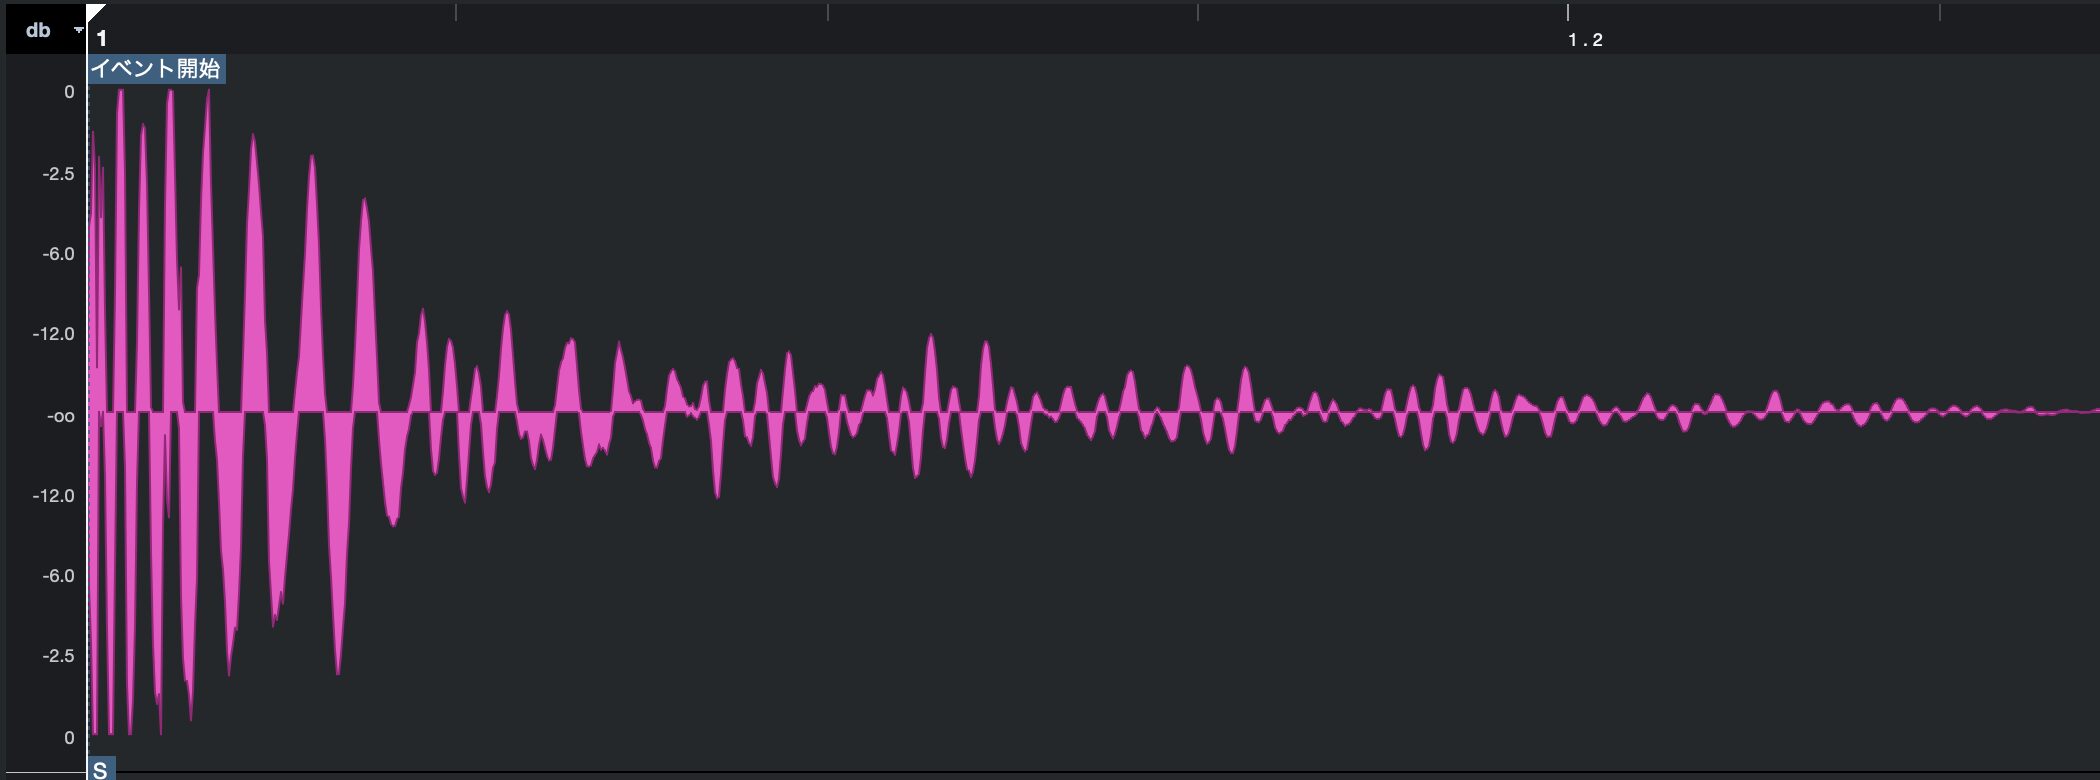
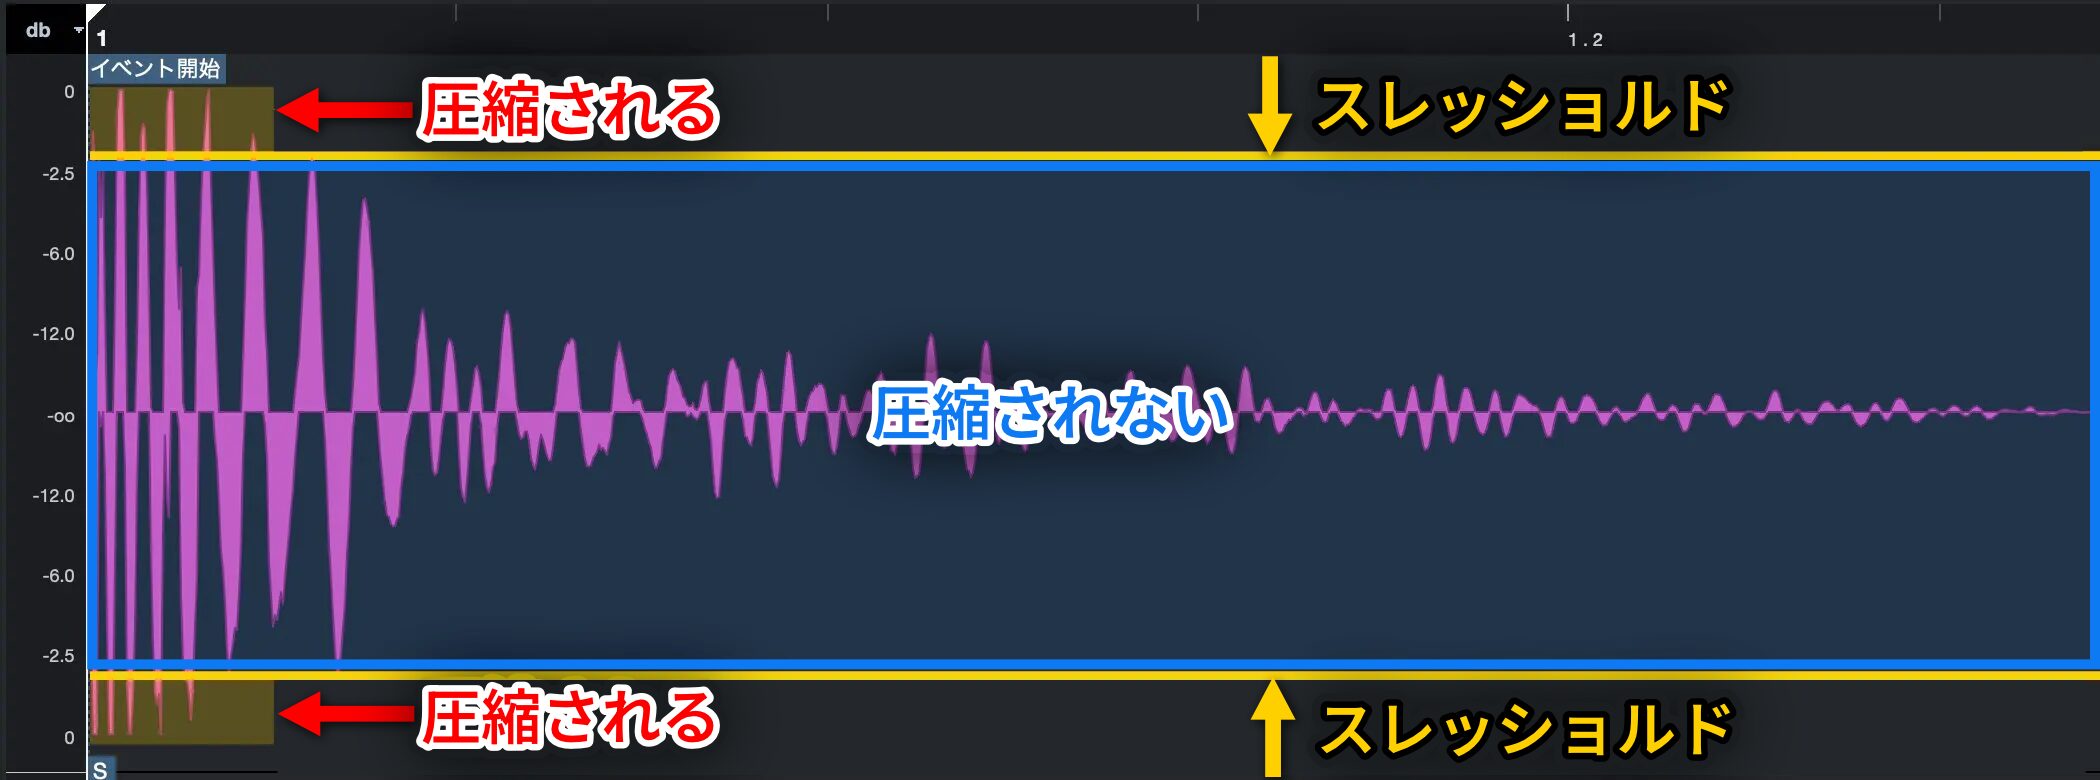
例として、キックドラムの波形を使用します。
この波形を見れば、「あ、この部分が大きいな」と分かりますよね?
頭の部分が一番大きく、時間とともに減衰していきます。
しかし、機械ではそうもいかないため、「どこを超えたら大きい音なのか」という明確な基準を教える必要があります。
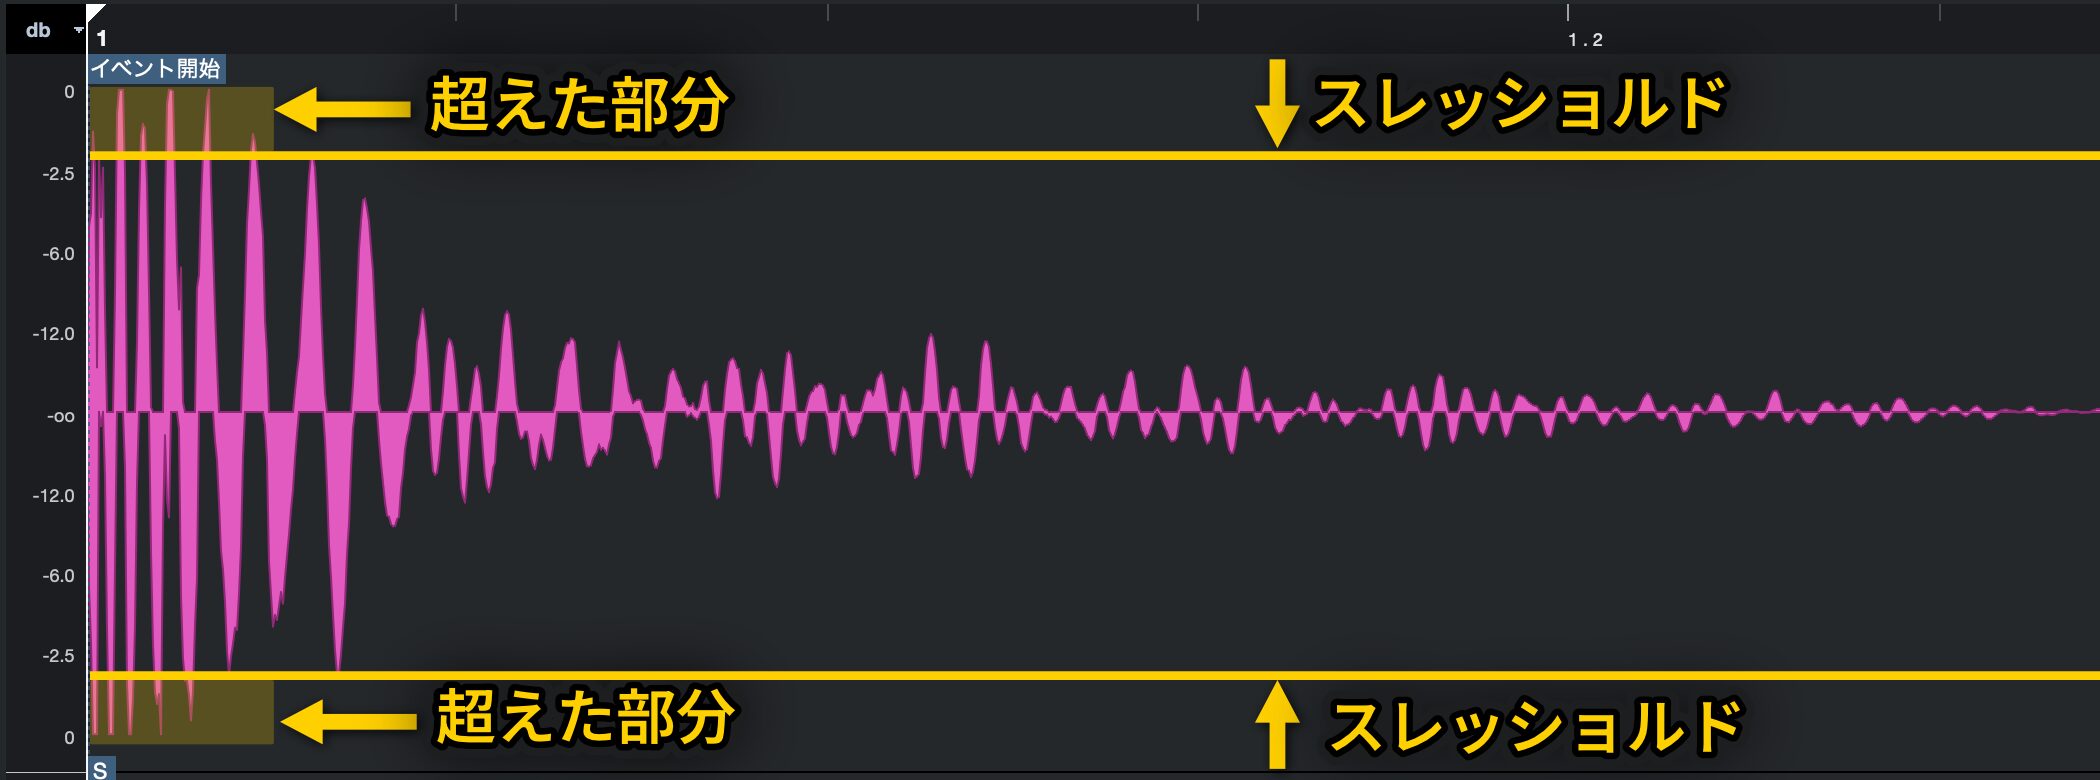
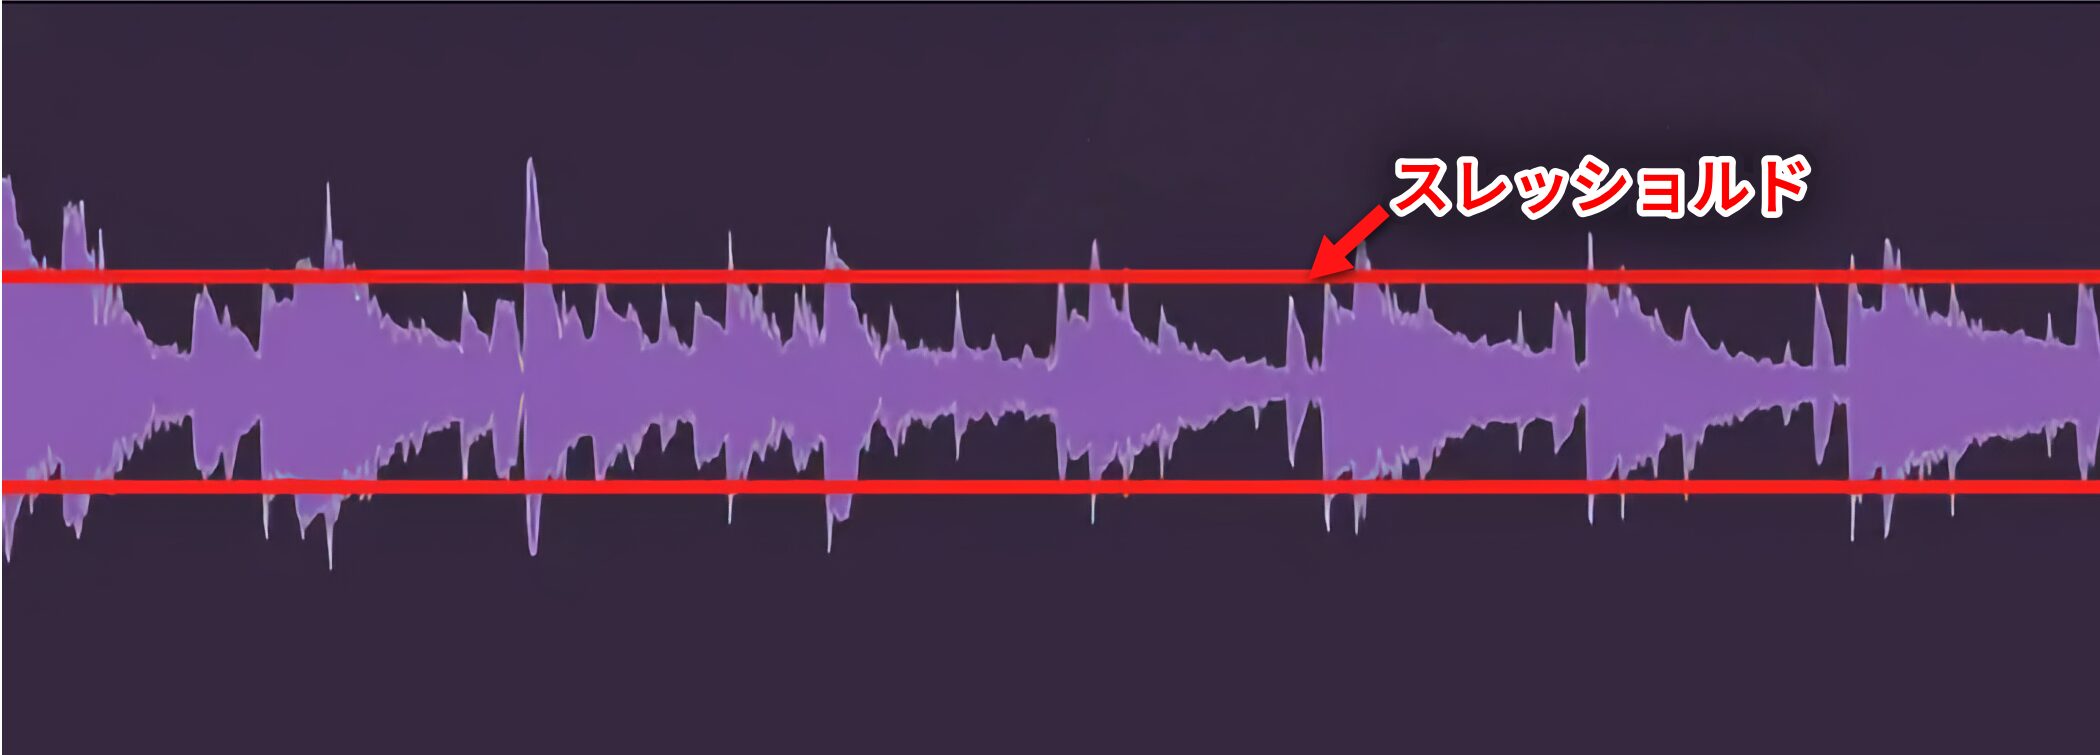
この基準値がスレッショルドで、この基準を越えた音が圧縮されます。
イメージとしては、下記のとおりです。
スレッショルドの値をマイナスにするほど、上下から波形に向かって線が迫っていきます。
そして、その線は先に波形の大きな部分に当ります。
その部分が「圧縮対象」になります。
まずは、この部分をしっかりと把握してください。
ただ、実際の作業では上記のように線がでるわけではないため、現在どの位の位置にスレッショルド線があるかが不鮮明になってしまいます。
では、圧縮対象を「どのように圧縮するか」、それを決定するのが、2つ目の重要なパラメーター「レシオ」です。
Ratio(レシオ)
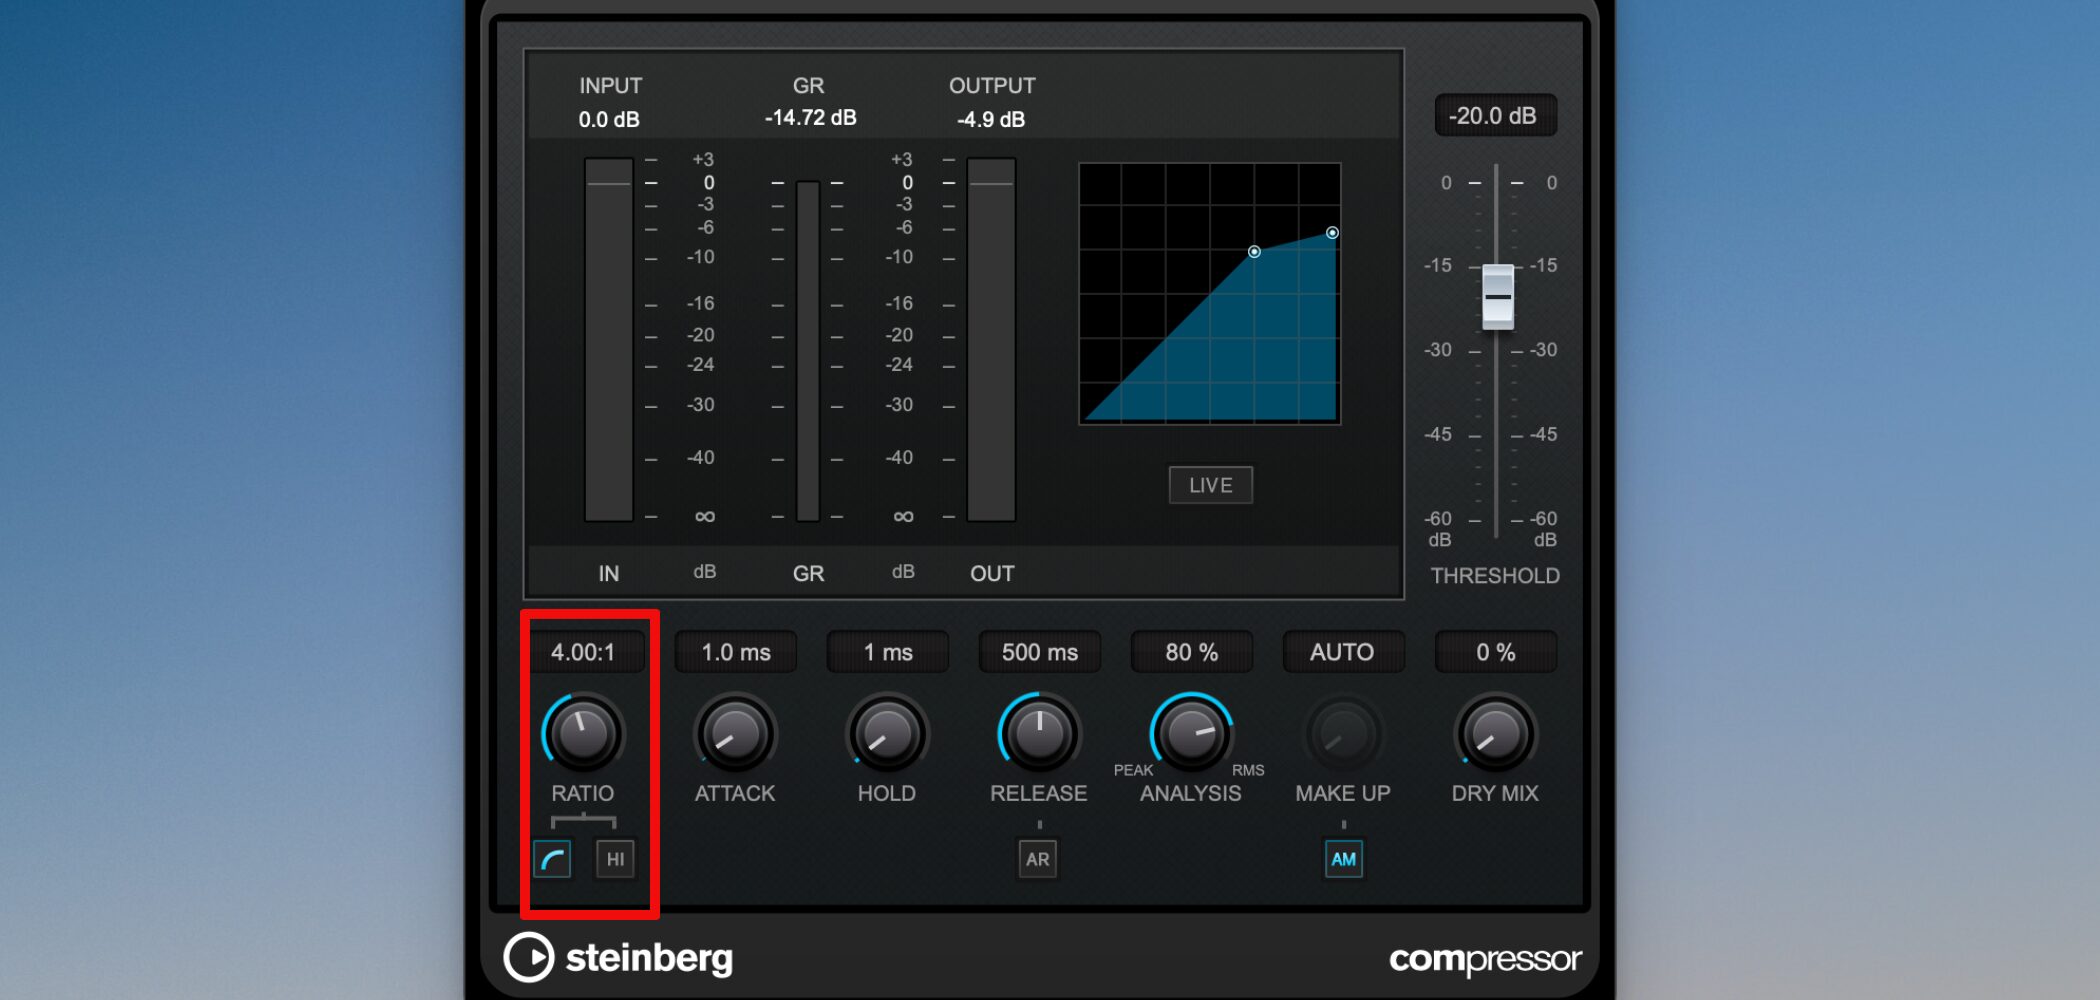
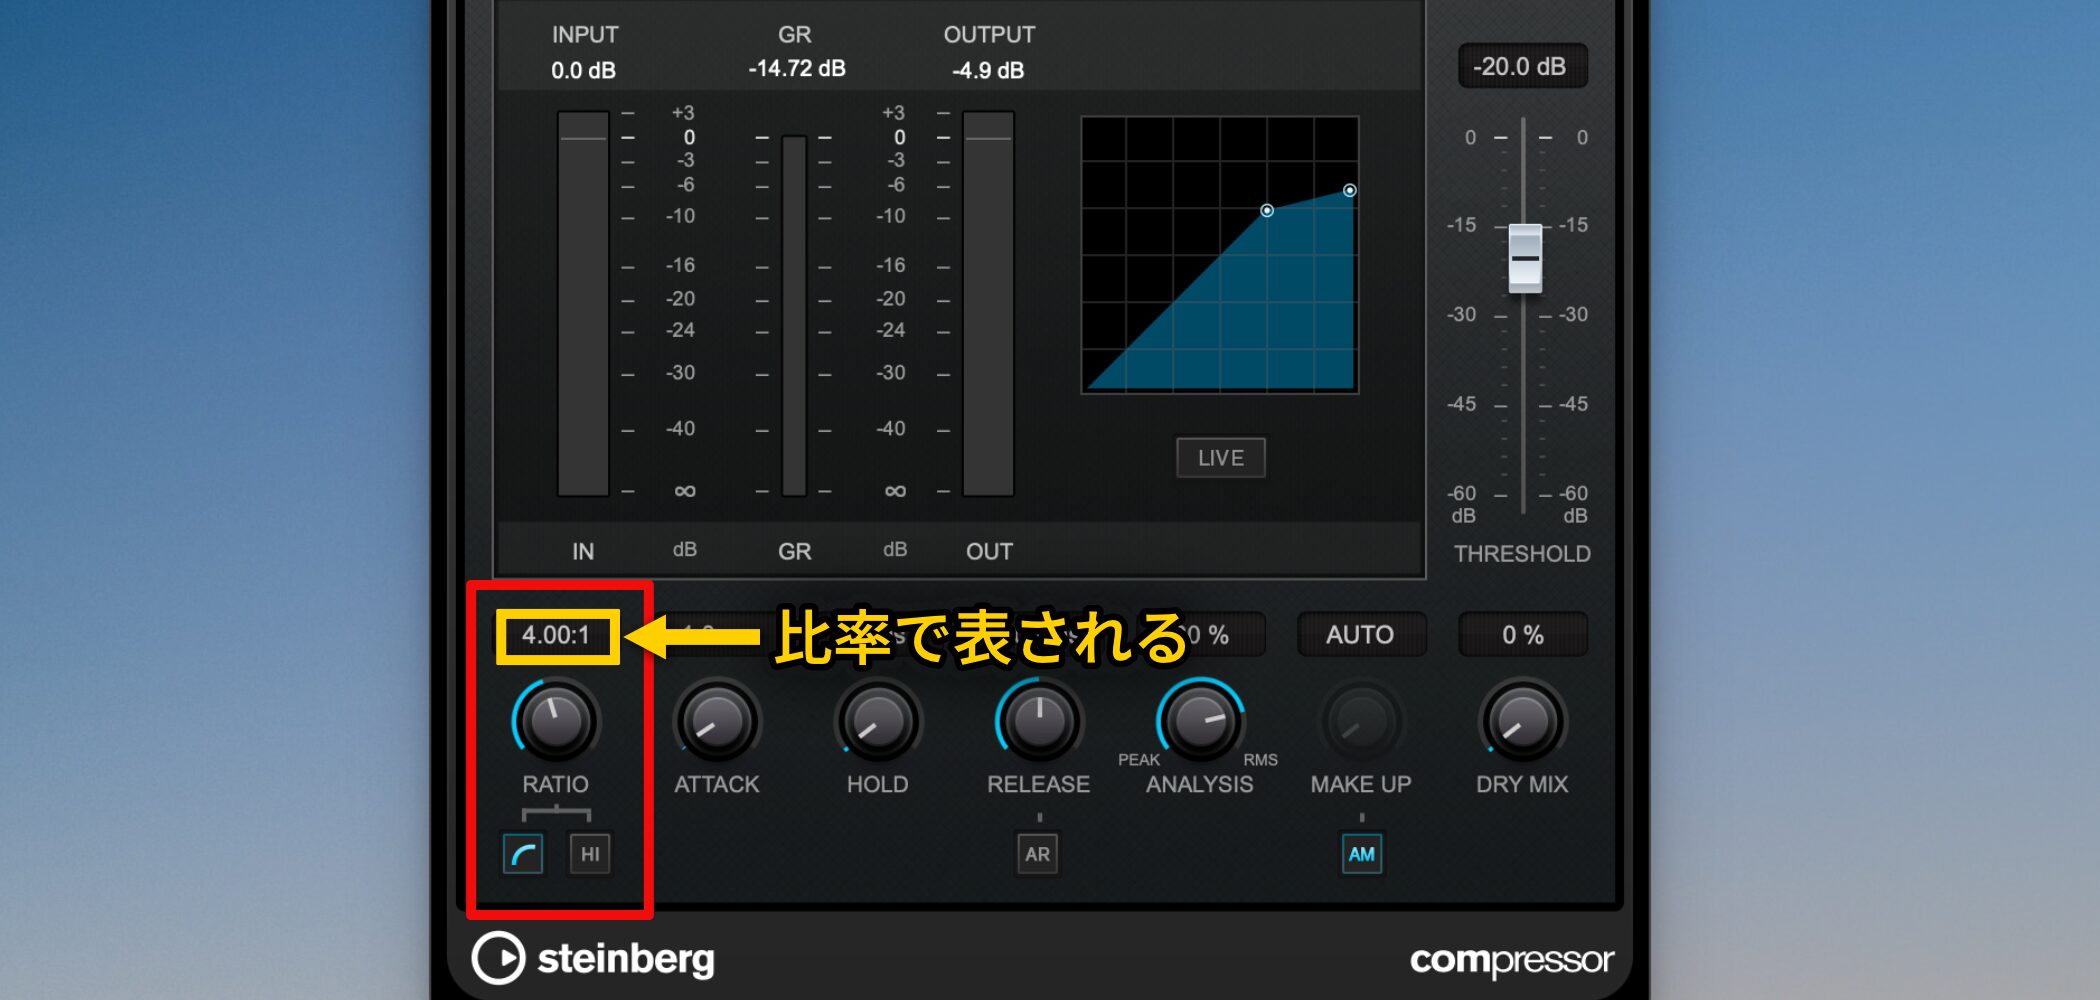
「レシオ」とは、コンプレッサーが音を圧縮する際の「圧縮率」を決定するパラメーターです。
レシオは単体で機能するのではなく、スレッショルドと密接に連携して動作します。
動画 : Ratio(レシオ)の解説
レシオの仕組みとサウンド比較
レシオは、一般的に「2:1」や「4:1」のような比率で表され、この数値が高くなるほど音は強く圧縮されます。
実際のサウンドを比較してみましょう。
▶︎素の音
▶︎レシオ 2:1
▶︎レシオ 8:1
値が大きくなるにつれて、音が凝縮されている感じを受けると思います。
「コンプ感」と呼ばれるものがこれで、圧縮により音質が変化したもののことを指します。
重要なポイントとして、この圧縮は入力された信号の音量全体に一律でかかるのではなく、スレッショルドの基準値を超えた部分の信号レベルに対して、どのくらいの比率で圧縮を行うかを決定します。
つまり、入力信号がスレッショルド値に達しない限り、レシオの値を変えても音は圧縮されないということになります。
具体的な数値例
実際に、コンプレッサーがどのように動作するのかを具体的な数値で見てみましょう。
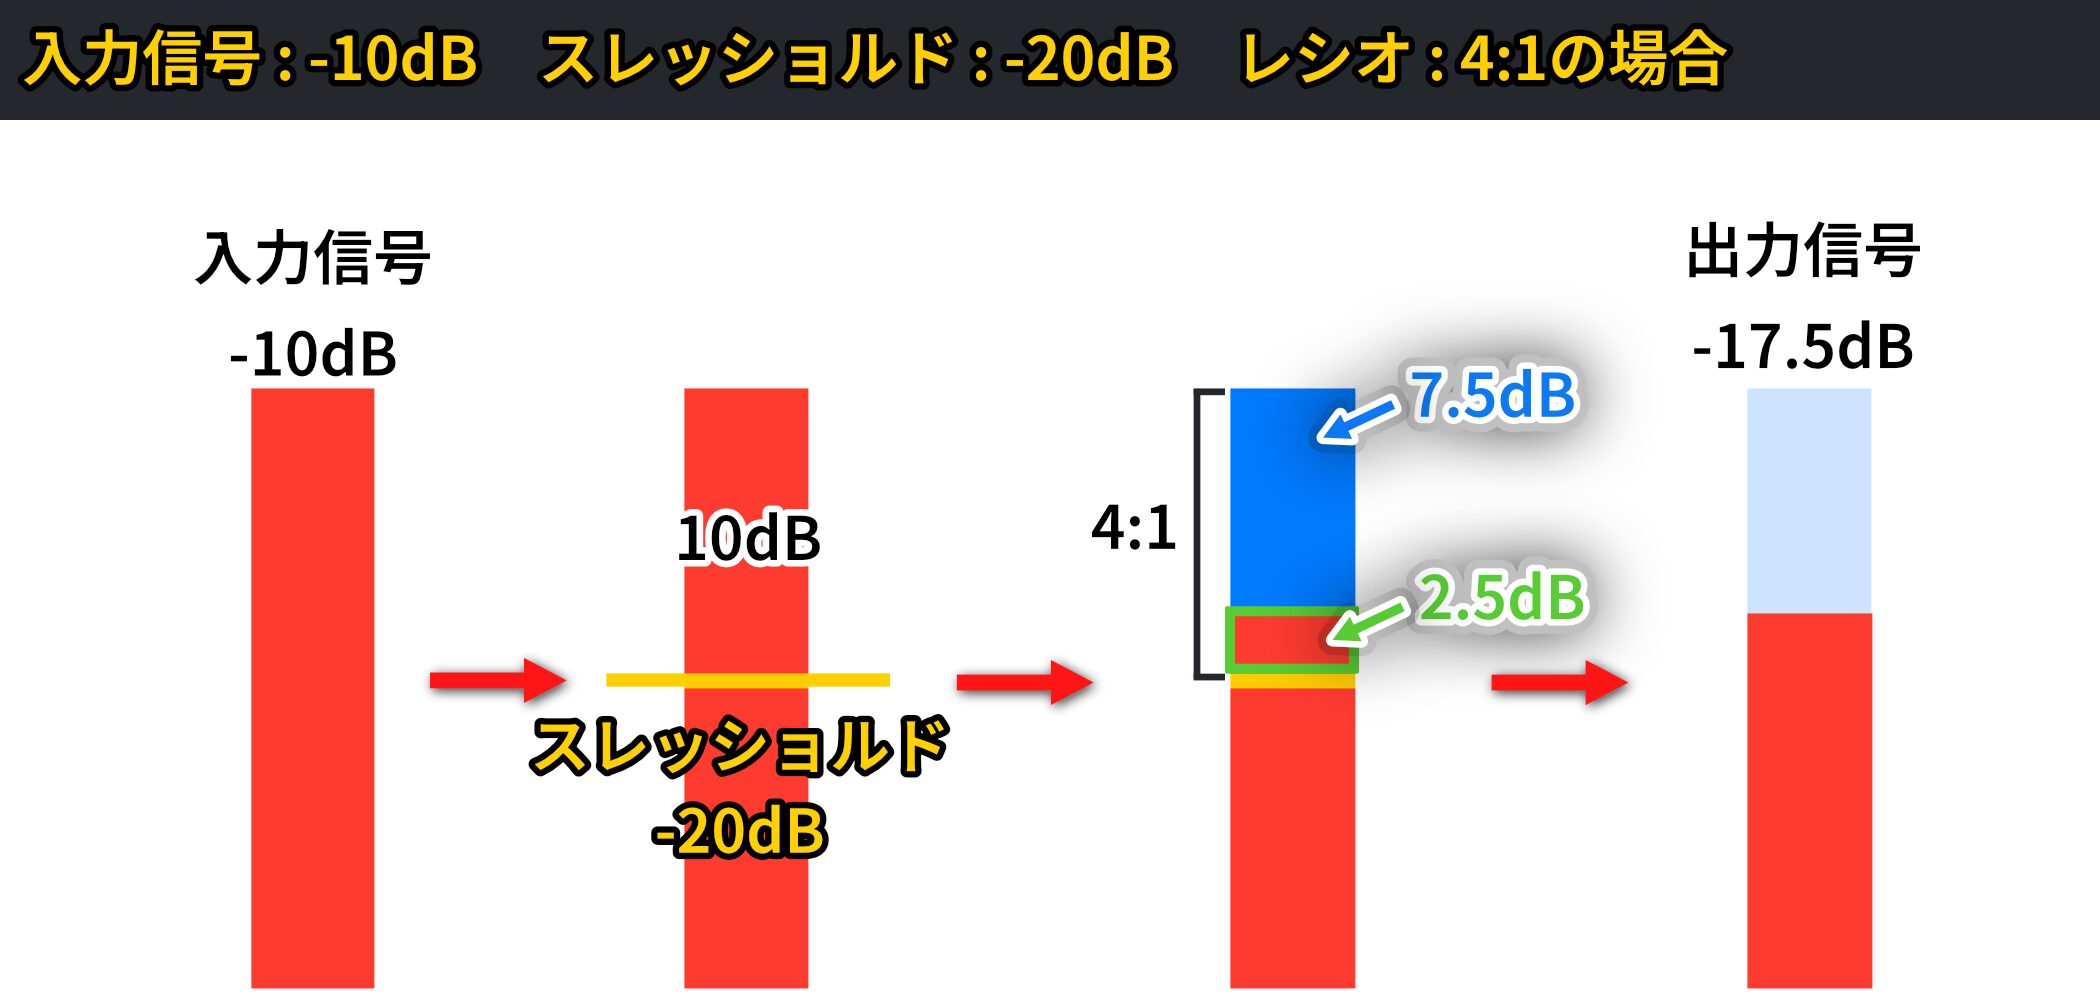
- 入力信号 : -10dB、スレッショルド : -20dB、レシオ : 4:1の場合
・まず、入力信号はスレッショルドの基準値を10dB超えています。
(計算式: -10dB – (-20dB) = 10dB)
・次に、この超過した10dBに対して、レシオ4:1の圧縮が適用されます。
その結果、超過分は2.5dBになります。
(計算式: 10dB ÷ 4 = 2.5dB)
・最後に、この2.5dBをスレッショルド(-20dB)に足し合わせることで、最終的な出力信号は-17.5dBとなります。
前述したとおり、基準値を超えた部分だけがレシオの値で圧縮されるという点が重要です。
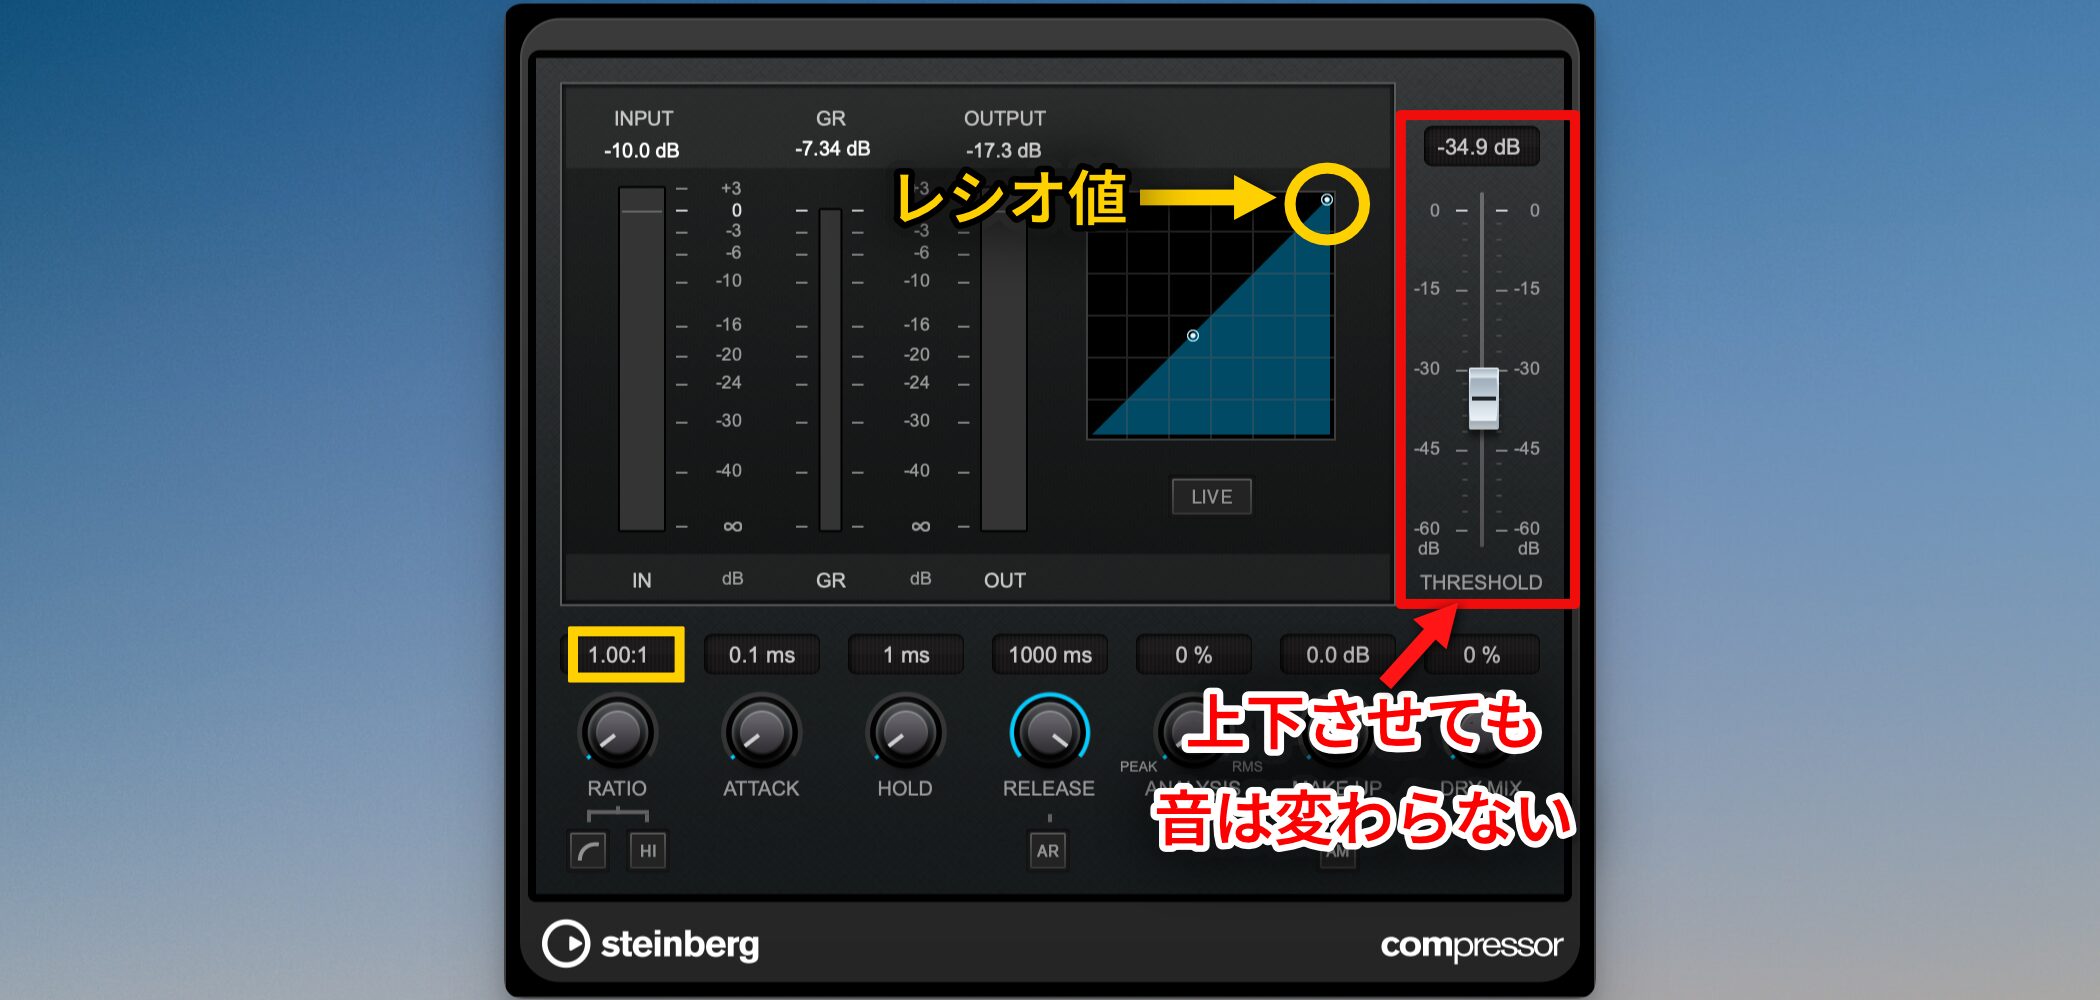
また、レシオが1:1の場合は、スレッショルドの値を変えても、計算結果は常に「入力=出力」となります。
コンプレッサーが実質的にオフになっている(何もしていない)状態と同じなので、スレッショルドを上下させても音は全く変わりません。
レシオ設定の目安
コンプレッサーは効果が分かりにくいエフェクトと言われていますが、レシオの値は、対象となる楽器や目指すサウンドによって大きく異なります。
| レシオ設定 | 圧縮強度 | 主な用途・目的 | 効果 |
|---|---|---|---|
| 1.5:1 〜 3:1 | 弱 | ボーカル、ピアノ、アコースティック楽器、マスタートラック | 自然なダイナミクスを維持しつつ、音量を整え、まとまりを出す。 |
| 4:1 〜 6:1 | 中 | ベース、スネアドラム、エレキギター、ポップス/ロック系のボーカル | 音の存在感を強調し、サウンドを前面に出す。積極的な音作りに。 |
| 8:1 〜 20:1 | 強 | ドラムのアンビエンスマイク、パーカッション、アタック感を抑えたい場合 | ダイナミクスを強力に制御し、サスティン(音の伸び)を強調する。 |
| ∞:1 (無限大) | 最強 | リミッターとしての使用、ピーク制御 | 設定したスレッショルドを信号が超えないようにする。 |
上記は、一般的な設定の目安です。
もし、レシオをどうしたら良いか分からない場合は、ひとまず値を「4:1」を目安に固定し、スレッショルドを動かして圧縮感を調整すると良いでしょう。
Attack(アタック)
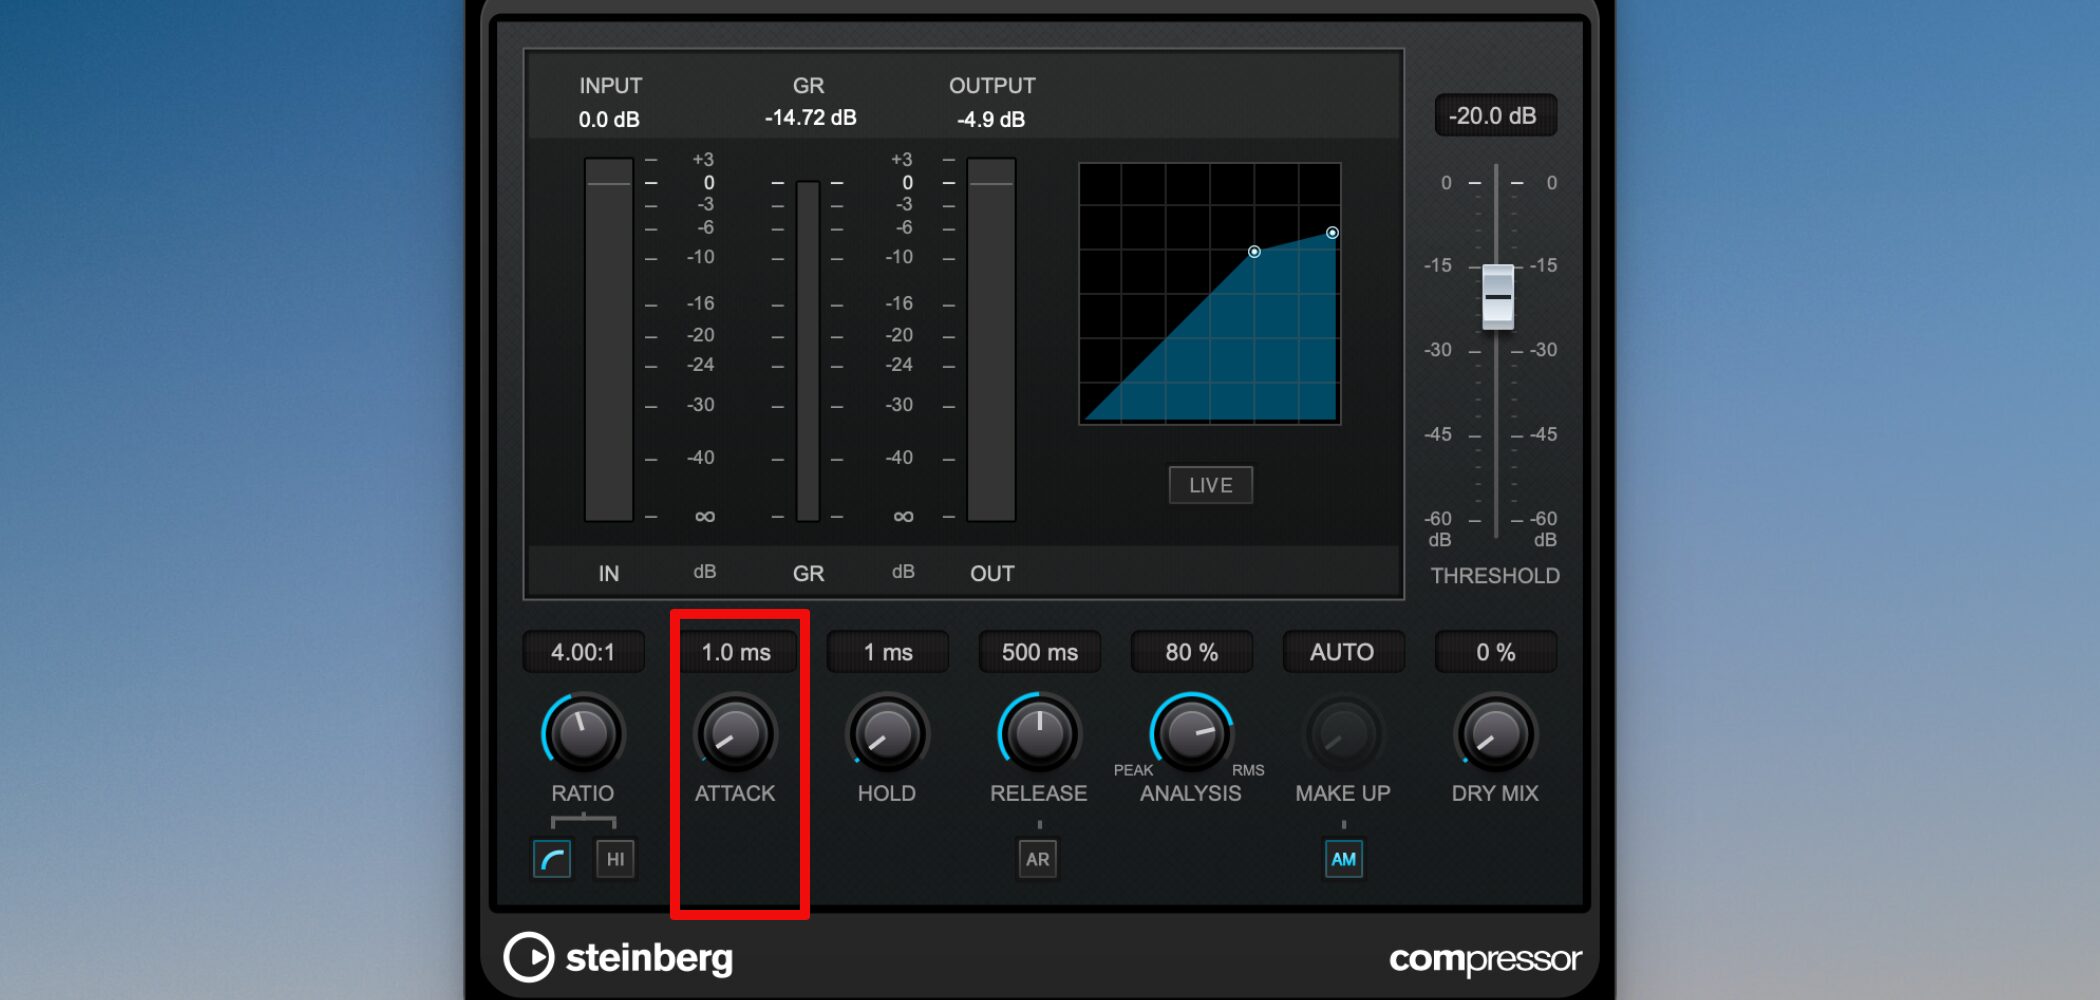
スレッショルドとレシオで圧縮の量が決まったら、「アタック」を調整します。
アタックとは、音が基準値(スレッショルド)を超えてから、圧縮率(レシオ)に達するまでの時間を決定するパラメーターです。
楽器音色で重要な要素が、この「アタック感」で、どう聴かせるのか?で音色や奥行き感が変わってきます。
動画 : Attack(アタック)の解説
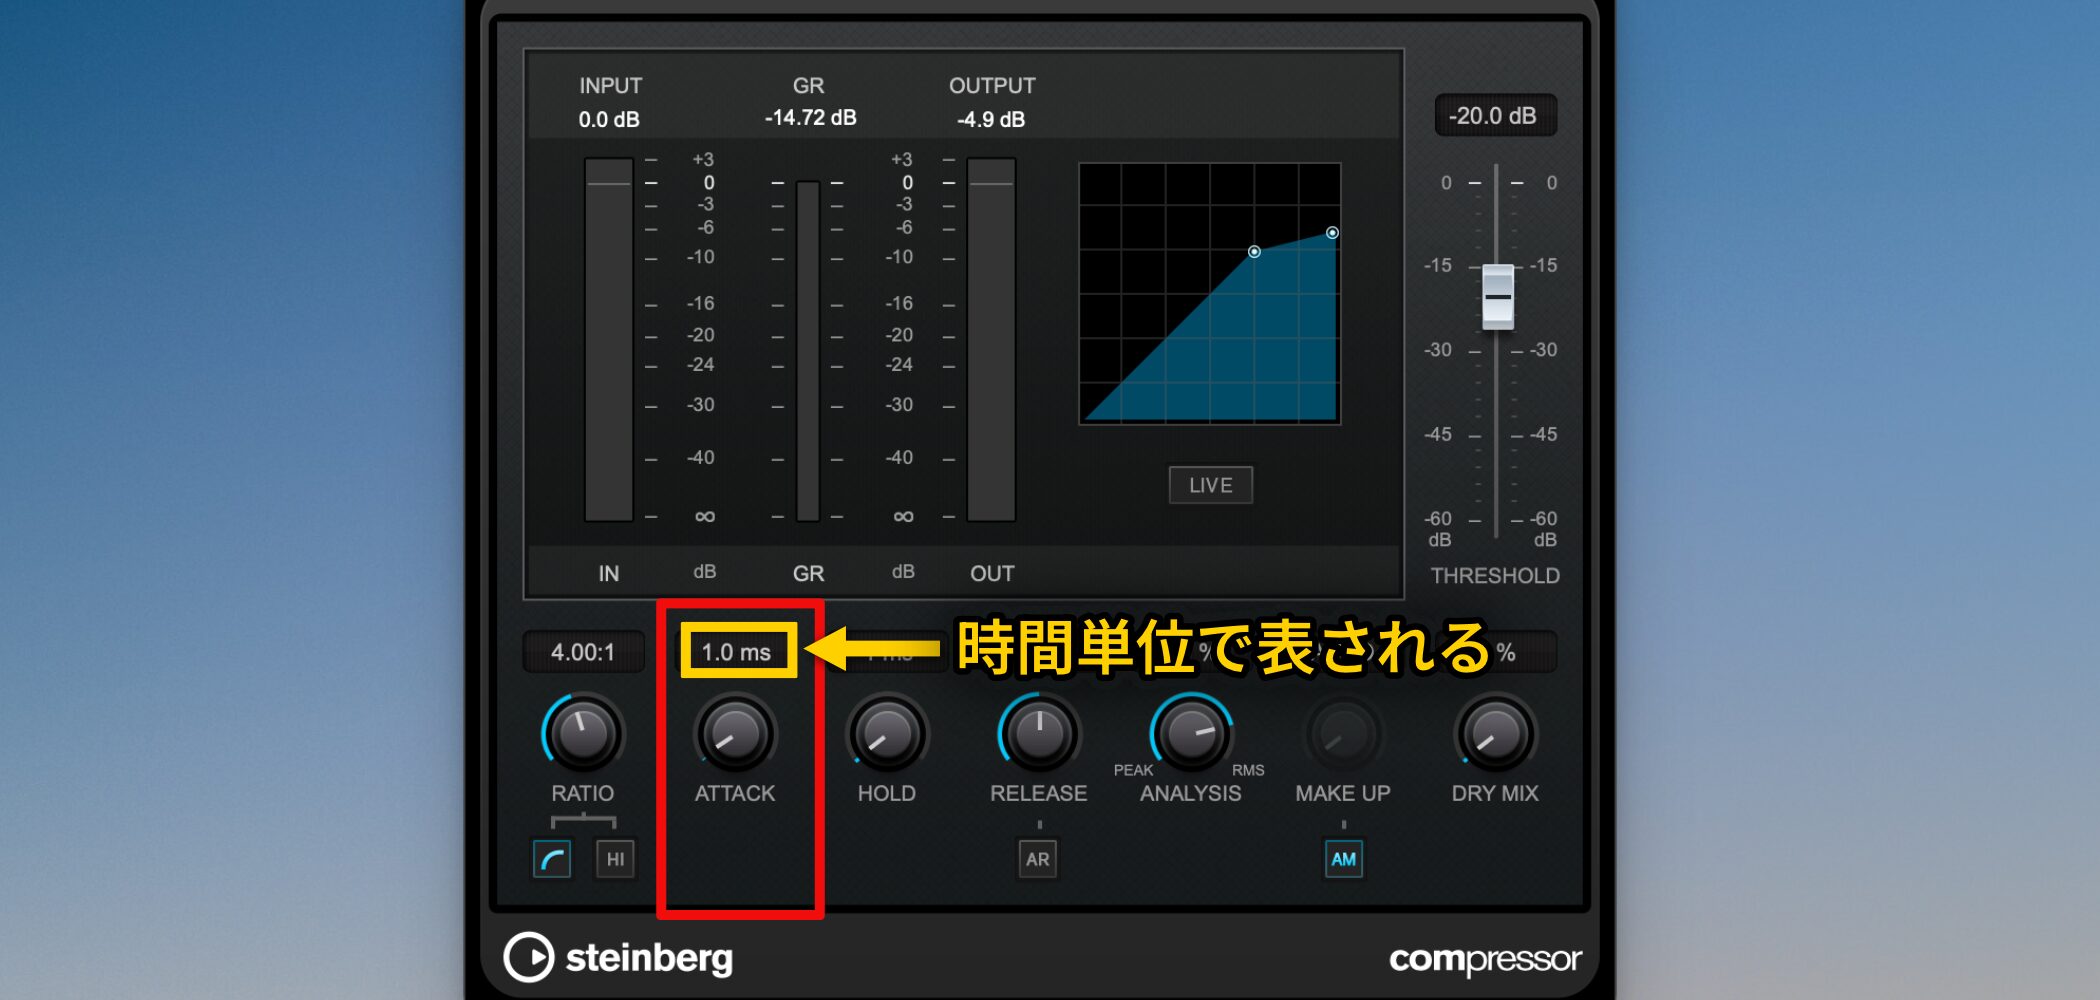
アタックの単位 : ms(ミリセカンド)
アタックは、ほとんどのコンプレッサーで「ms(ミリセカンド)」という時間単位が使用されます。
DTMではこの「ms」が頻発します。
1ms=1000分の1秒
1000ms= 1秒
となります。
ここでしっかりと覚えてしまってください。
動画 : ms(ミリセカンド)の解説
具体的な数値例とサウンド比較
アタックの仕組みについても具体的な数値例とともに見ていきましょう。
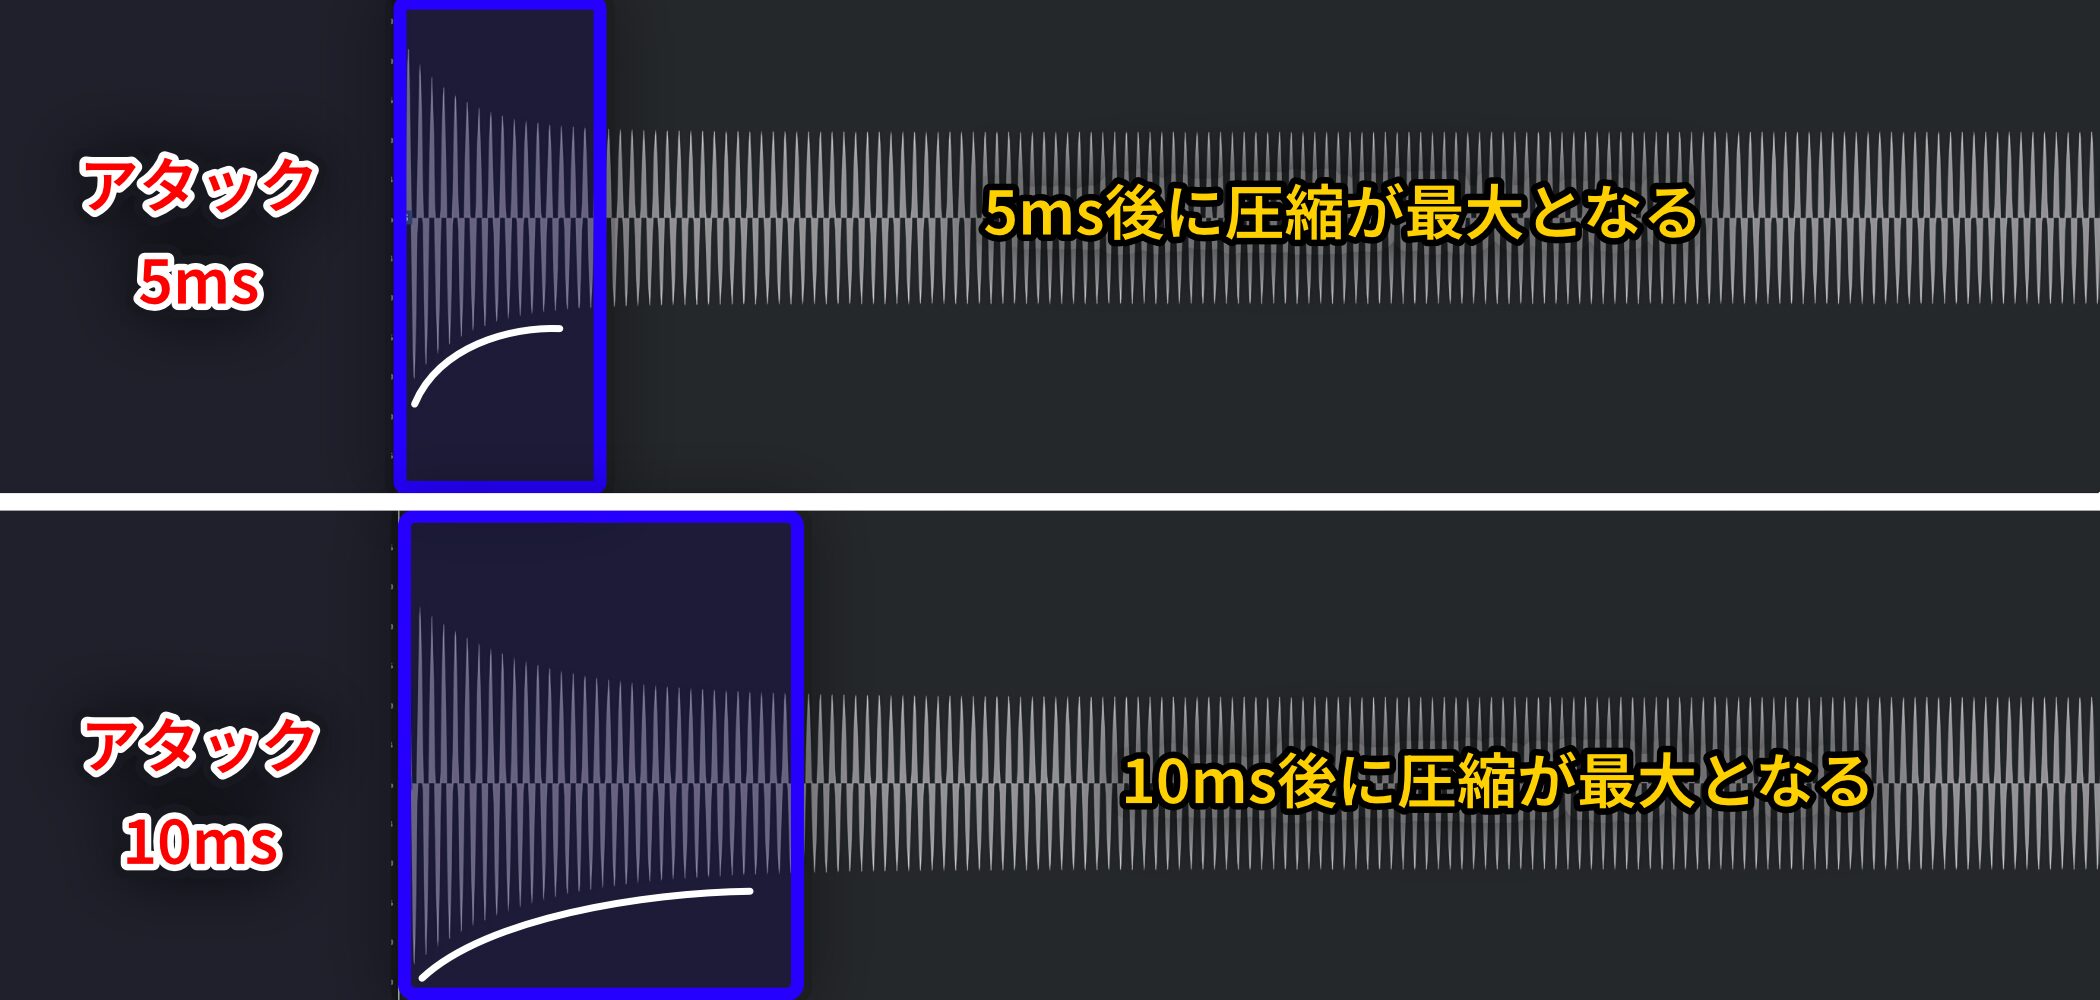
上段はアタックを「5ms」、下段は「10ms」、レシオはどちらも「8:1」で設定した波形の画像です。
アタックタイムが長いほど緩やかなカーブを描いているのがわかりますね。
このように、アタックで設定した時間をかけて圧縮されていきます。
また、設定時間を経過した段階で圧縮が最大となり、以降は常にその比率(今回であれば「8:1」)で圧縮が適用され続けます。
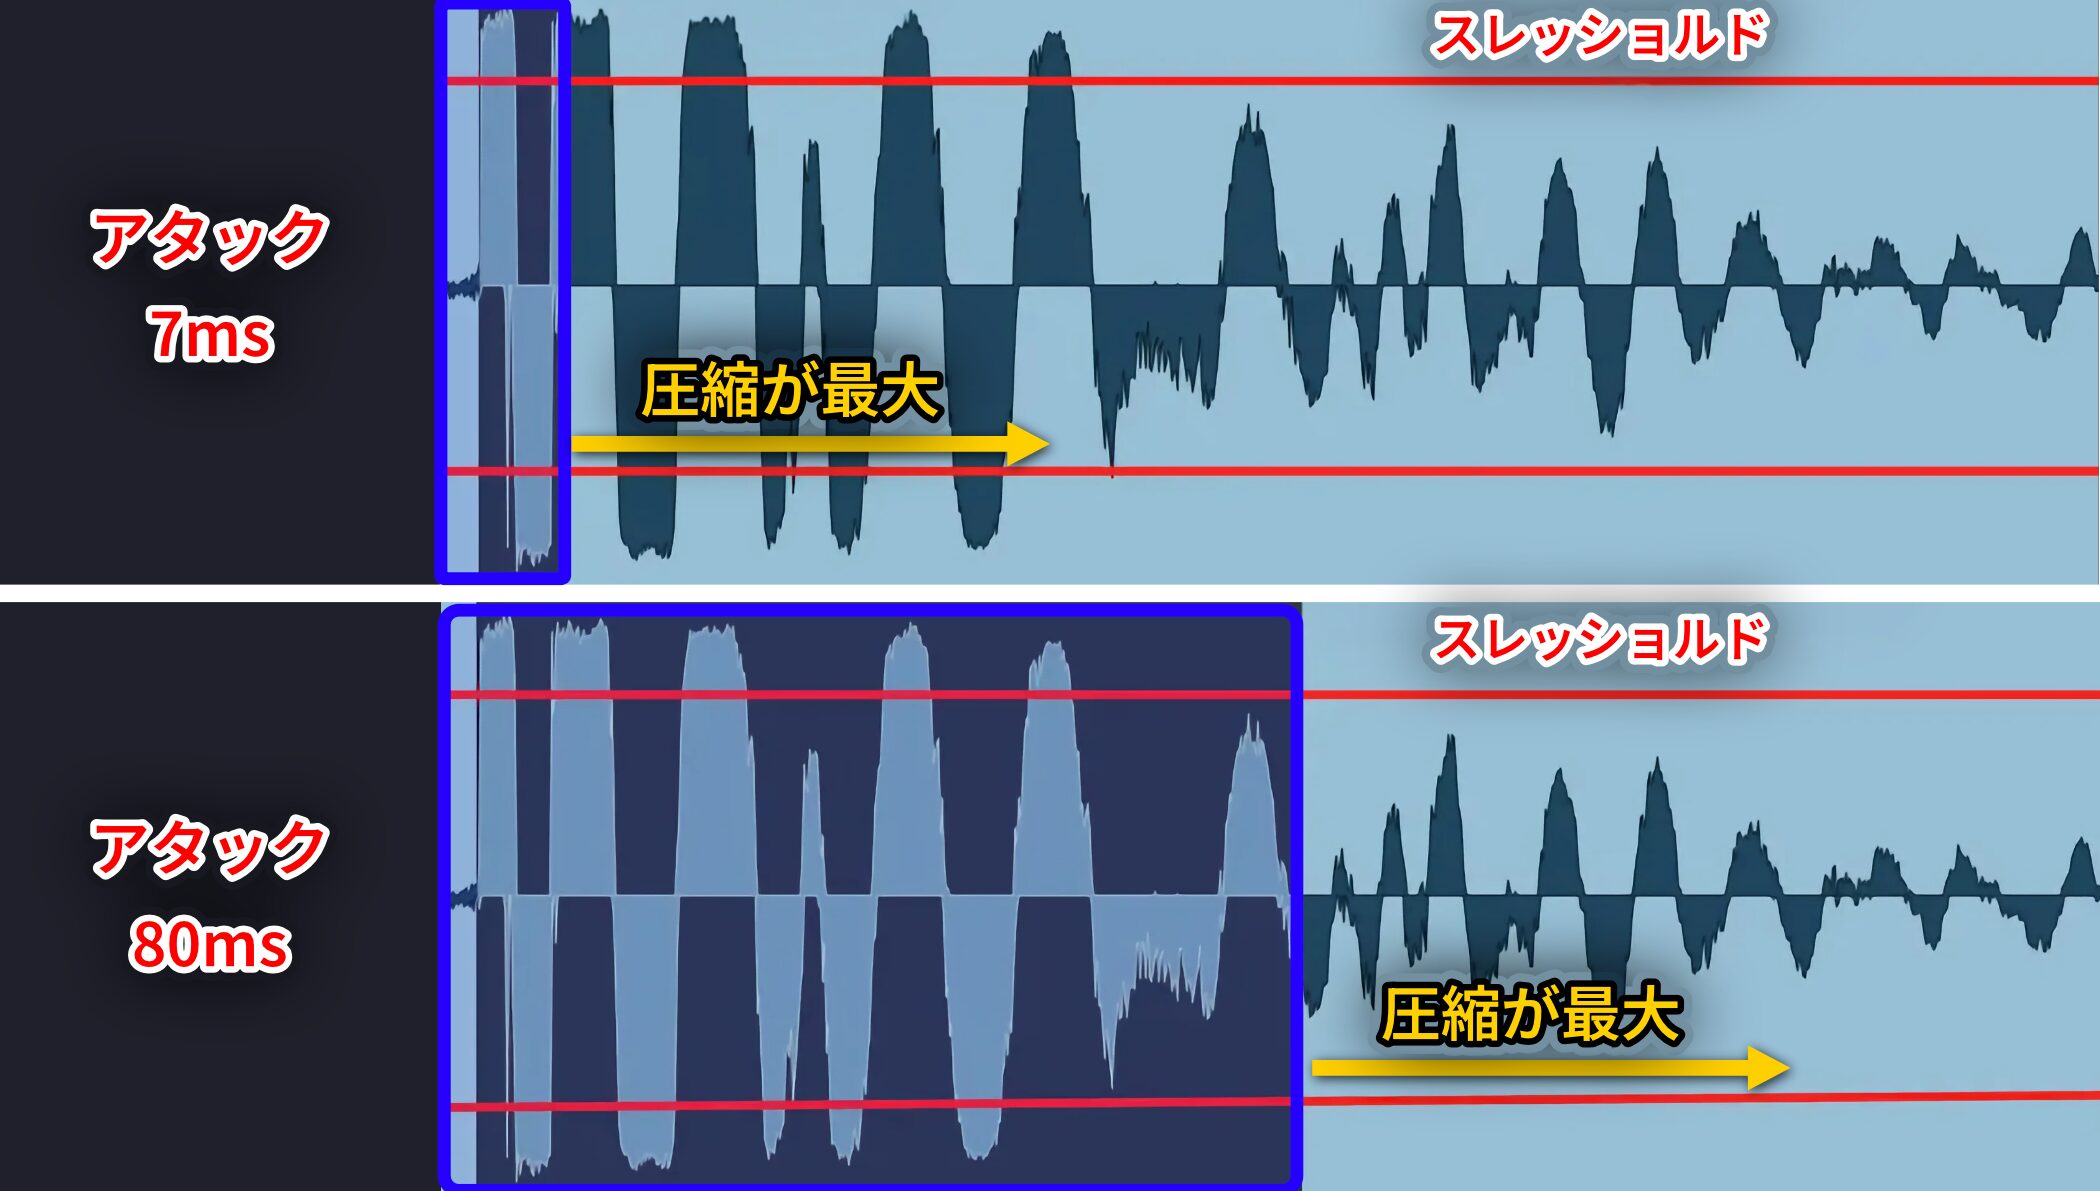
次に、スレッショルドの基準値をイメージで加え、よりアタックを遅くした場合と比較した画像です。
上段のアタックが「7ms」の場合は、圧縮が最大になった後も波形がスレッショルドを上まっている状態です。
対して、アタックを遅くした「80ms」の場合、より緩やかに圧縮されていくため、圧縮が最大となる頃には波形がスレッショルドを下回っているのがわかります。
つまり、遅いアタックでは、コンプレッサーの効果をしっかりと得られていないということです。
サウンドも用意したので、比較して聴いてみてください。
- A : コンプ無し / B : アタック値「7ms」/ C : アタック値「80ms」
早いアタック(7ms)では音が圧縮されて少し奥に引っ込み、遅いアタック(80ms)では元の印象とあまり変わっていませんね。
アタックタイムが早いと、音の立ち上がりを即座に圧縮するためサウンドがまとまりやすいですが、その反面、本来のパンチ感が失われやすいという特徴があります。
ただし、これは元音に依存し、楽曲ジャンルによっても変わってきます。
これがコンプレッサーの奥深い点であり、解説書によって推奨値が異なる理由でもあります。
もし、設定に迷った場合は、以下の基準を参考にしてください。
- アタック感を残したい場合(キック、スネアなど) : アタックタイムを遅めに設定
- サウンドを滑らかに整えたい場合(ギター、シンセなど) : アタックタイムを早めに設定
また、アタックを設定する際は、お気に入りのアーティストの音源を聴きながら、「距離感」や「音がコンプによって潰ぶされている時の音質」を意識し、何度も調整していくことがコンプレッサー上達の近道となるはずです。
Release(リリース)
最後に4つ目のつまみ「リリース」についてです。
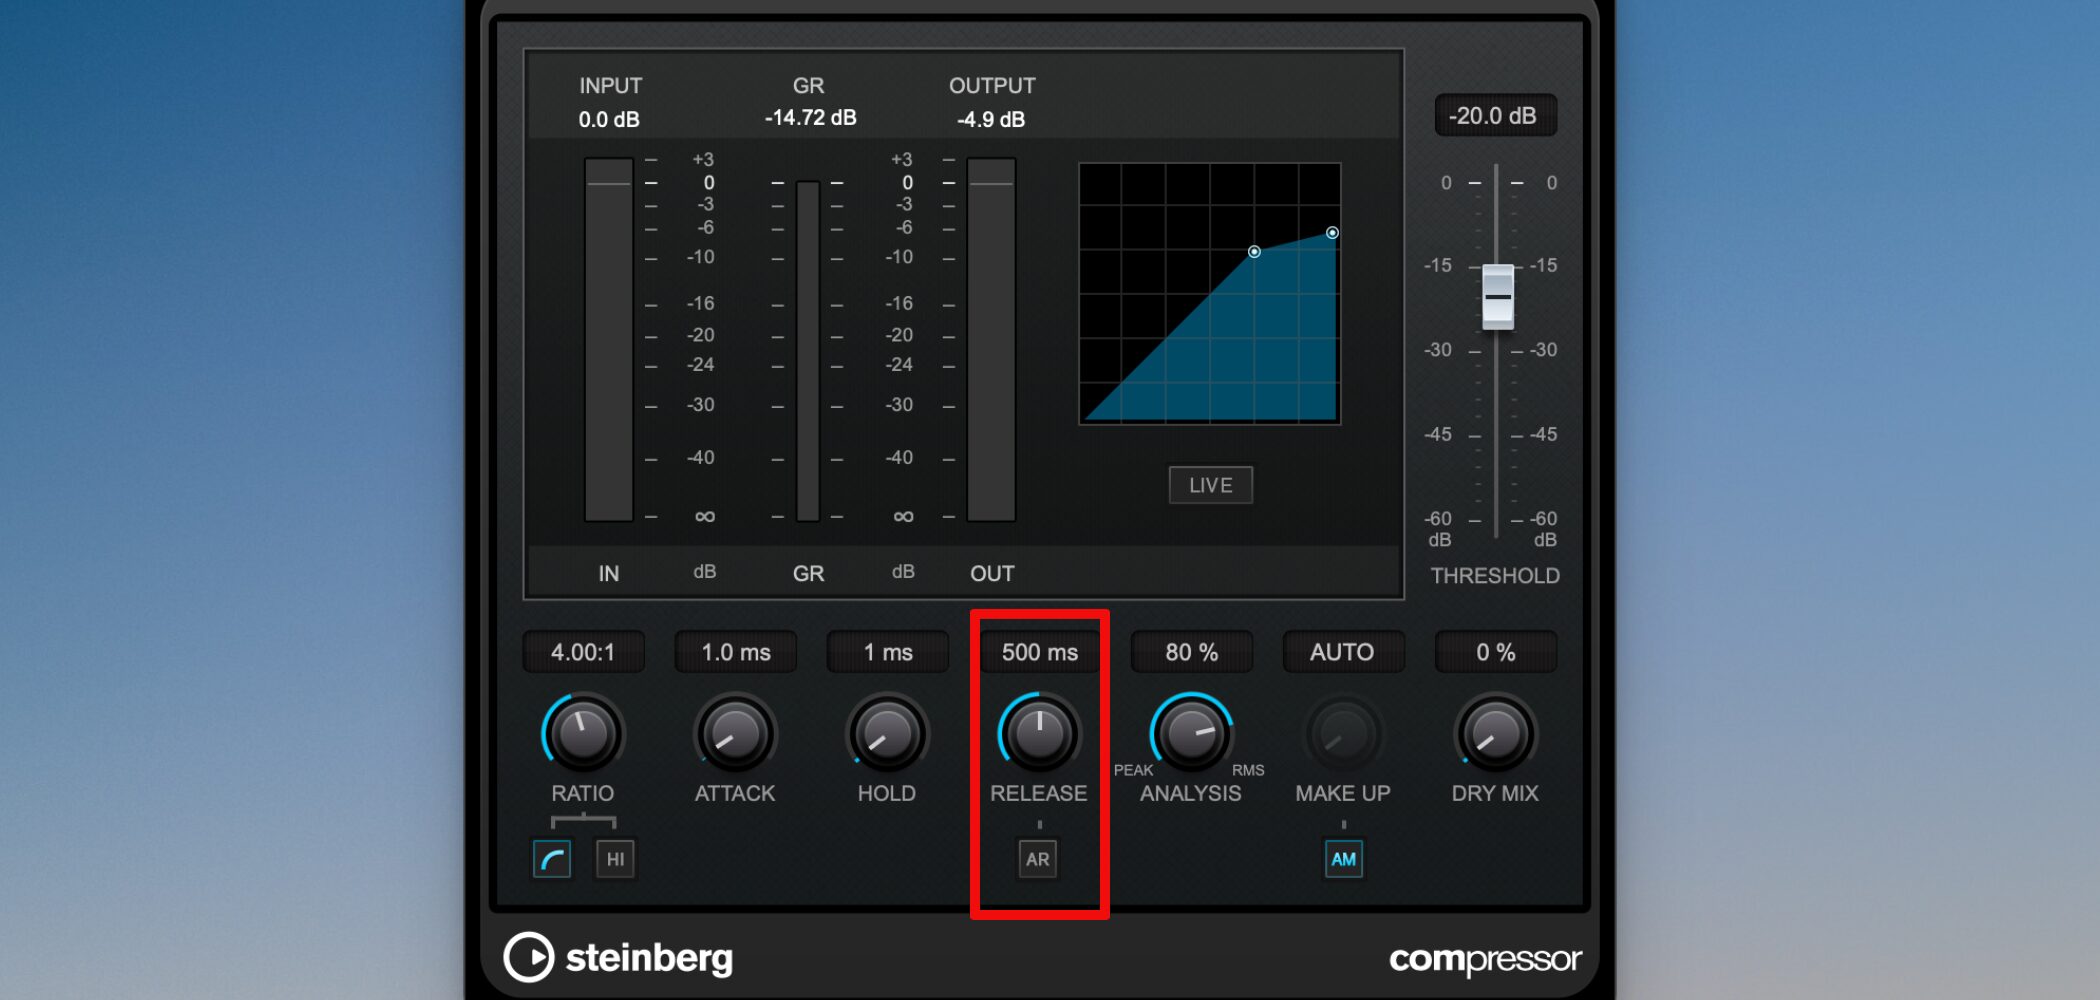
リリースとは、音量が基準値(スレッショルド)を下回ってから、圧縮がゼロに戻るまでにかかる時間を決定するパラメーターです。
アタックとともに、サウンドのキャラクターを左右します。
動画 : Release(リリース)の解説
アタックと同様に、リリースもほとんどのコンプレッサーで「ms(ミリセカンド)」という時間単位が使用されます。
1ms=1000分の1秒
1000ms= 1秒
でしたね。
もしリリースを「100ms」に設定すると、音がスレッショルドを下回ってから、圧縮が完全になくなるまでに0.1秒(100ms)かかるということになります。
リリースの意味
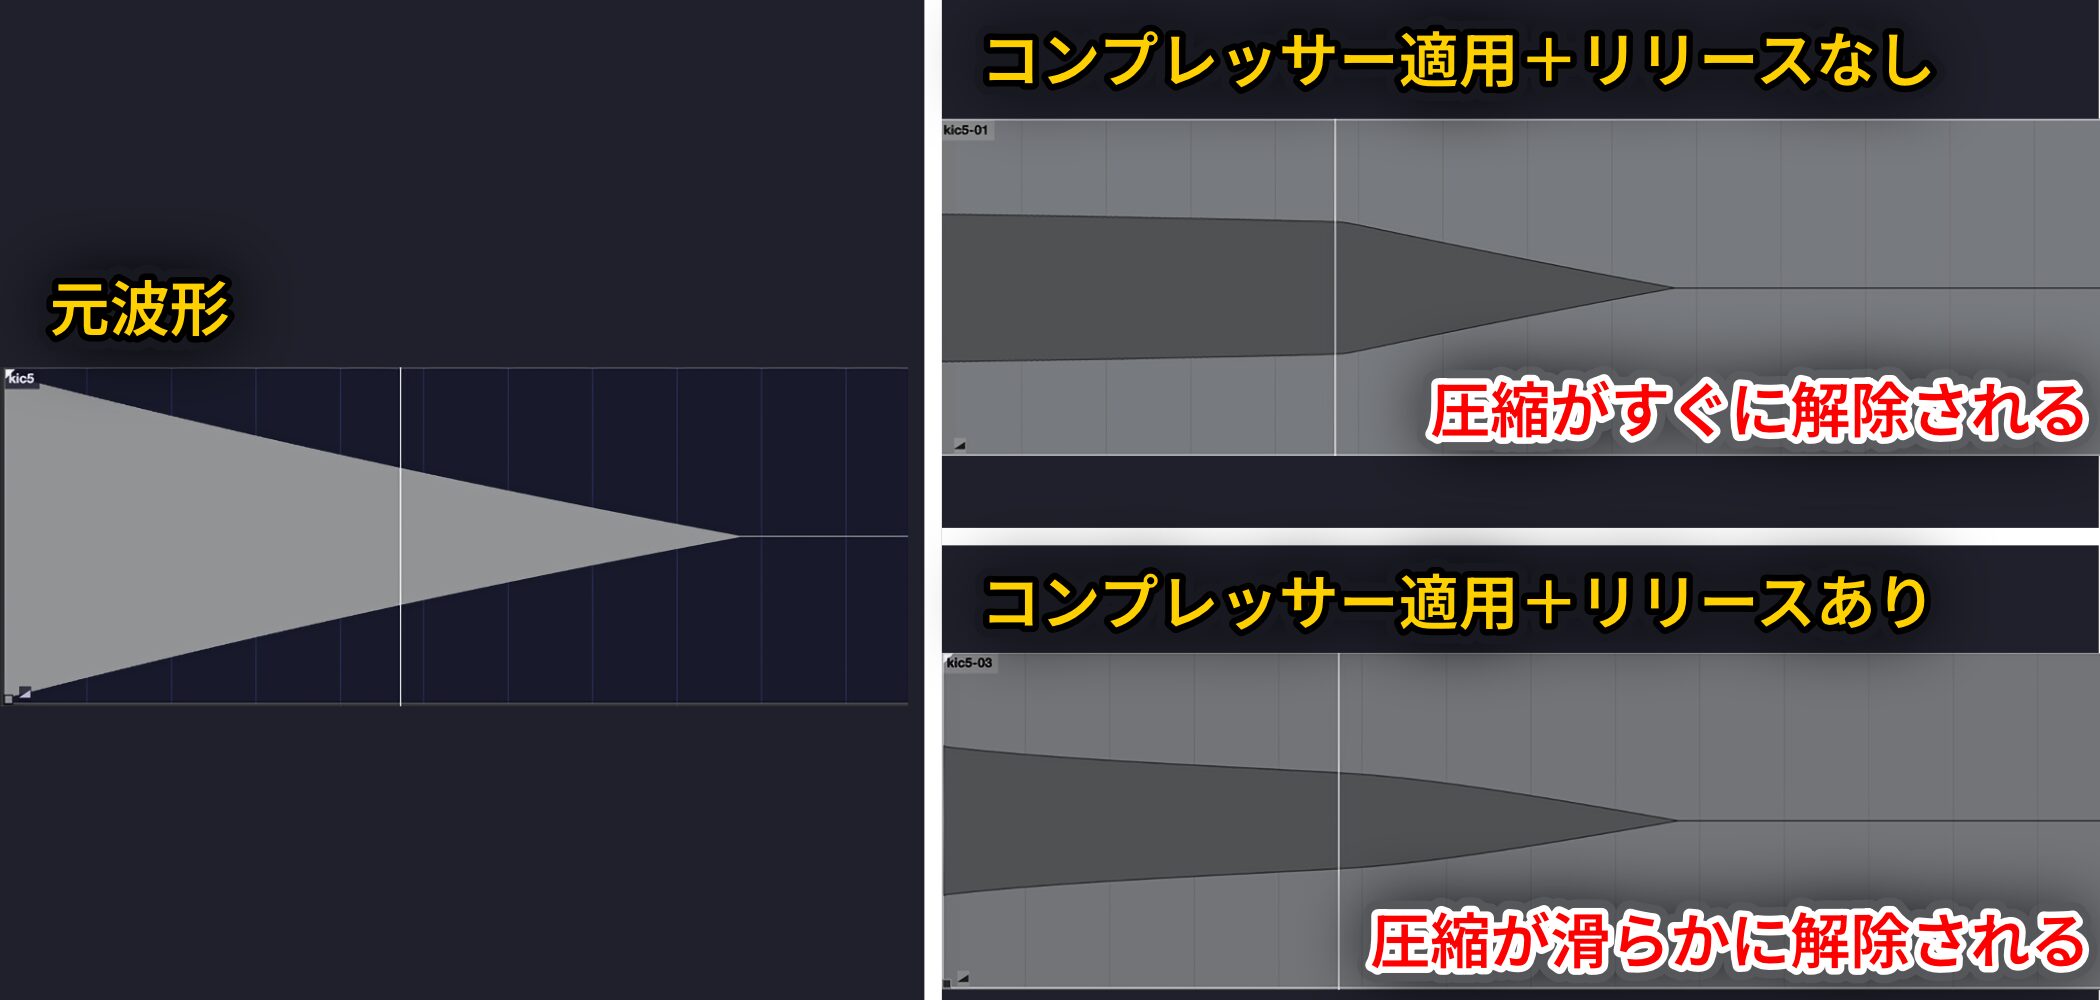
リリースを設定する意味ですが、スレッショルドを下回った後、すぐ圧縮が解除されてしまうと極端な音量差が生じ、サウンドが不自然になってしまう、これを防ぐのが本来の目的です。
「コンプレッサー」の「アフターケア」と考えられます。
現在はトラックの「距離感、音像」をコントロールするために、リリース調整を行うことが多いです。
具体的な数値例とサウンド比較
「リリース」は「短め、長め」という言い方をします。
短め
リリースを短めの「50ms」に設定した場合を見てみましょう。
画像の青く囲った箇所が「50ms」のリリース範囲となり、音がスレッショルドを下回った後、圧縮が完全に解除されるまでに「50ms」かかります。
▶︎サウンド : リリース「50ms」
サウンドを聴いてみると、早めに圧縮が解除されるため、抑揚がしっかりとつく印象です。
しっかりとダイナミクスをつけたいトラックに対しては「短め」で調整してみてください。
長め
次は長めに設定してみましょう。
リリースを「700ms」としました。
青く囲った箇所が「700ms」のリリース範囲となり、最初の音のリリースが終わる前に次のキックが入ってくる状態です。
▶︎サウンド : リリース「700ms」
サウンドを聴いてみると、かなり平たい印象です。
音の抑揚を抑え、ガッチリとまとめたい場合は、リリースを「長め」にすると良いでしょう。
強弱をあまり出さずに安定させたい場合に向いています。
空気感、音の壁を作る「PAD」あたりが良い例で、「リバーブ」も奇麗にかかります。
今回のキックは、次のキックが入る前にボリュームがほぼ「0」になるため、リリースの影響が分かりにくいかもしれませんが、たとえ無音であっても設定されたリリース時間が経過しきるまでは圧縮の解除が完了しないため、その状態で次の入力があれば、その音は影響を受けます。
このような波形に「長めのリリース」を設定すると、リリースが解除される前にスレッショルド以上の音が入り続け、継続して圧縮状態を保つことになるため、よりコンプ感が得やすくなります。
「まとまり感、距離感」を意識し、様々な音へ「コンプレッサー」をかけてみてください。


