
Logic Pro 10.7.5 is an important update with features many users had long awaited, such as the Gain tool, recording MIDI plug-in output, and support for importing 32-bit float audio files. Automatic tempo optimization for performances played without a metronome, nested Track Stacks, Ableton Link support and more greatly improve production freedom and efficiency. All these features are provided free of charge and bring practical value to many production scenarios, from vocal editing and capturing live performances to multitrack production.
A Free Update That Adds Several Long-Awaited Features
The recently released "Logic Pro 10.7.5"
It is positioned as a free minor update, but it is a meaningful update that includes several features many users have probably been waiting for.
Here, we introduce a carefully selected set of notable new features you should know.
Gain Tool
A feature that other DAWs had but Logic lacked has been added in the form of the "Gain tool."
You can adjust the gain of each audio region individually.
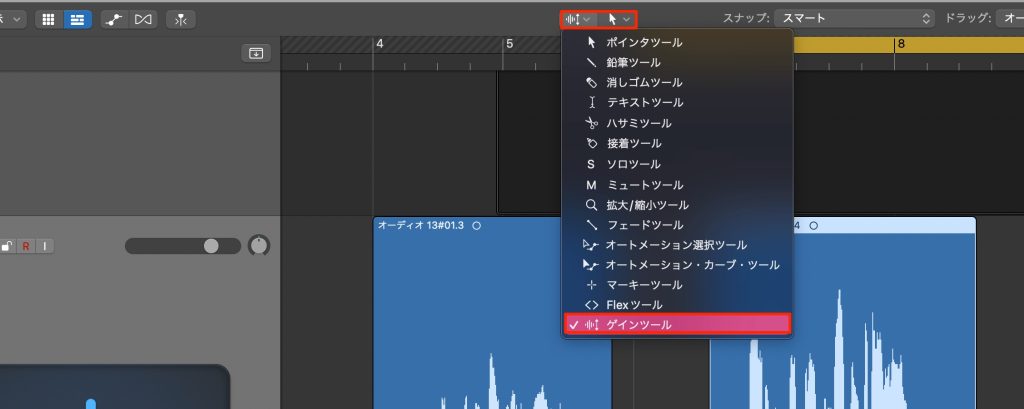
Just select the "Gain tool."
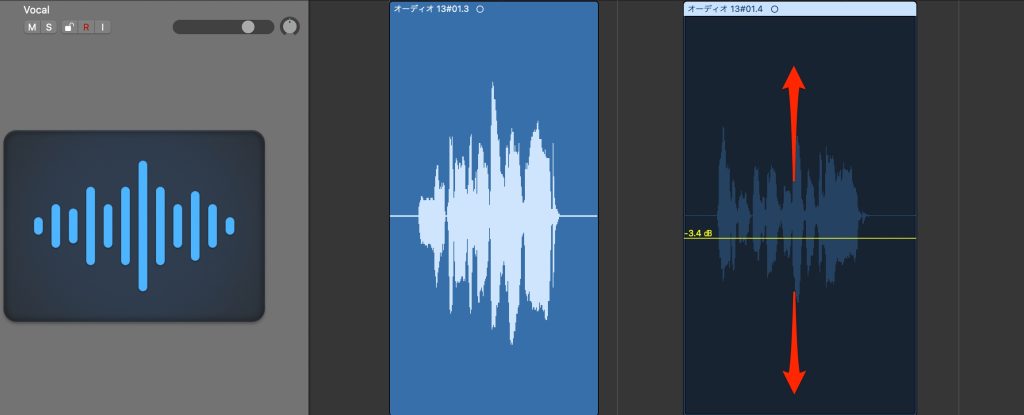
As shown, you can adjust the gain individually by dragging an audio region up or down.
It is also very handy for vocal editing.
Selecting multiple regions and dragging also lets you adjust them all at once.
Recording MIDI Plug-ins
It is now possible to record the MIDI performance generated by MIDI effects, such as the Arpeggiator and Chord Trigger, as MIDI data.
For example, suppose you use the Arpeggiator MIDI effect and record sustained notes.
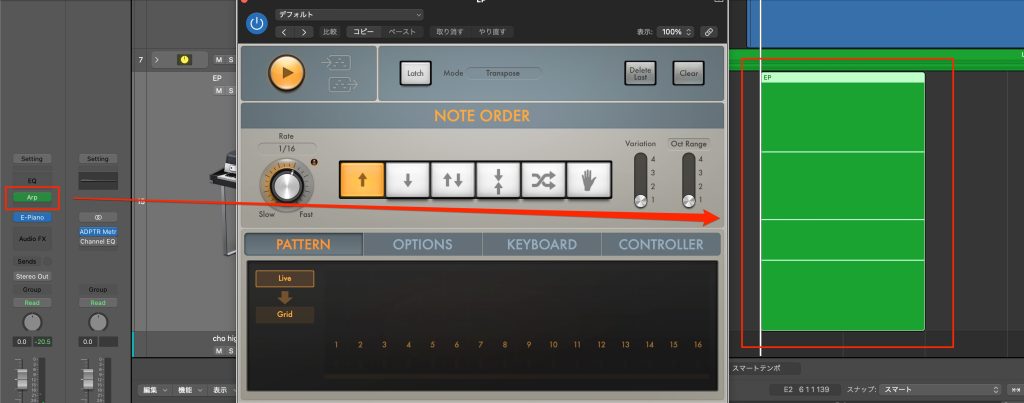
Normally, the result of the arpeggiator is not reflected in the recorded MIDI notes.
The arpeggiator's effect only appears in the output sound.
However, with this new feature,
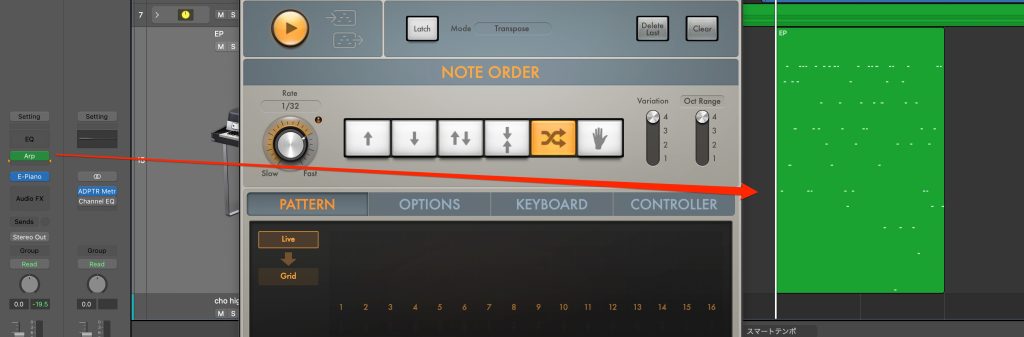
MIDI notes reflecting the arpeggiator's result are recorded like this.
The method is simple.
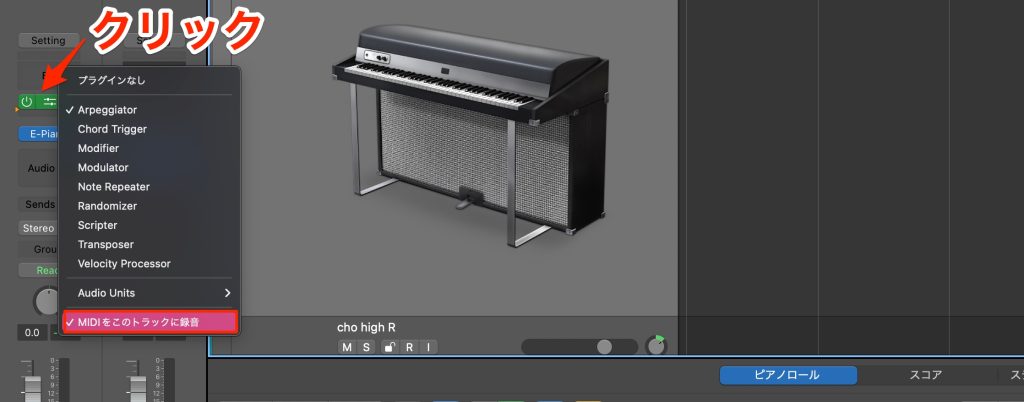
Just click the "MIDI FX" slot and enable the option to record MIDI to this track.
* You need to enable this feature after loading the MIDI plug-in you want to use.
Support for Importing 32-bit Float Audio Files
I think many users were waiting for this too.
You can now import 32-bit float audio files.
What Is 32-bit Float?
Excerpts of Questions and Answers on the YouTube Video

I use Cubase 10. Is the DAW's internal processing done in 32-bit or 64-bit float? And is there a way to check...?

It currently runs in 64-bit float. The place to check and change it is shown in the image. After changing it, you need to restart Cubase. https://app.box.com/s/qx87iplpf5jkb9817xh4a5dqfw83r51d
Is it better to export a 2-mix audio mixdown in 32-bit float? And should the project for mastering also be 32-bit float? Thank you in advance.
Whether to export in 32-bit float depends on what processing you will do afterward. If there is no further processing and the goal is to upload it somewhere, use the format that follows that site's guidelines. If you will import it again for processing later, use 32-bit float. For mastering, it depends on what you use, but if you use a DAW with 32-bit float internal processing, it is better to set the project to 32-bit float as well (so that no conversion occurs on import).
I wasn't conscious of this at all (though I had vaguely set it to 32-bit), so this was very helpful. For purposes such as uploading to video sites, I insert APOGEE's UV22HR on the master and then export at 44.1 kHz 16-bit without thinking much about it (just assuming I had to). Is there any problem with this?
I think 44.1 kHz 16-bit is fine for typical upload sites. If you are worried, please read the site's guidelines. If nothing is specified and you have had no problems so far, that is fine. Thank you.
Is 24-bit 96 kHz better sound quality than 32-bit float 48 kHz? 48 kHz × 32 bit × 2 ch = 3,072 kbps; 96 kHz × 24 bit × 2 ch = 4,608 kbps. Looking at the numbers alone, 24-bit 96 kHz seems better in sound quality, but as above, can a higher sample rate make the sound better even if the bit value is lower? Also, in the case of 24-bit and 32-bit above, is it better in sound quality to export software synths (soft synth tracks with effects applied and faders moved) as WAV in 32-bit rather than 24-bit? (Is there less chance of degradation?)
Sound quality is not something you can simply multiply out from bit depth and sample rate, so they cannot be compared simply. Raising the sample rate widens the frequency range that can be recorded and represented (though in the ultra-high range normally considered inaudible). A larger bit depth raises the resolution of normal volume levels, but if you do not manipulate volume in the first place, there is no difference in sound quality between 32-bit float and 24-bit. The biggest advantage of 32-bit float is, above all, that it does not clip within a track and does not lose bits when you lower the volume. So it is always best to use 32-bit float when exporting. Being aware of this gives you flexibility when mixing and prevents mistakes when exporting; that is the point of this video.
I-I don't get it... I want to run with 16-bit settings to reduce the load on my computer, but do I have to use 32-bit if I use effects and faders? I don't get it...
Setting the project to 16-bit does not change the load on your computer. Typical DAWs always process internally in 32-bit float regardless of the setting. What the project setting determines is the storage format of recorded files and imported files.
Thank you for a very meaningful perspective. One thing: does this mean that even if the project setting is 24-bit, exporting from software synths in 32-bit float is fine? I had it in my head that if it's 24, everything had to match at 24. Is it OK for the project setting to be 24 and the files to be 32?
32-bit float is fine. Unlike sample rates, mixing them does not cause problems. Even if the project setting is 24-bit and the files you handle are 24-bit, the DAW's internal processing is always done in 32-bit float. Likewise, even if a software synth's sample resolution is 24-bit, it becomes 32-bit float once it passes through effects and faders. That is because this avoids degradation from volume changes. To keep the same process when you export and import, you need to use 32-bit float.
32-bit float files are being handled more and more recently, so the benefit should be considerable.
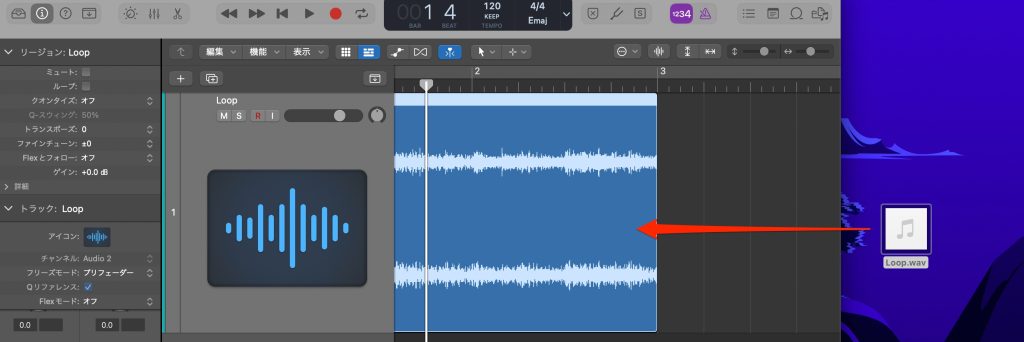
When you import 32-bit float audio files, you can use them without them being converted to 16-bit or 24-bit.
One caveat: you cannot record in 32-bit float in Logic.
It is import only.
This is a shame, but let's look forward to future updates.
Controlling the Tempo of Performances Played Without a Metronome
This feature lets you optimize the tempo for performances played without a metronome.
It is quite accurate, and I felt great potential in it.
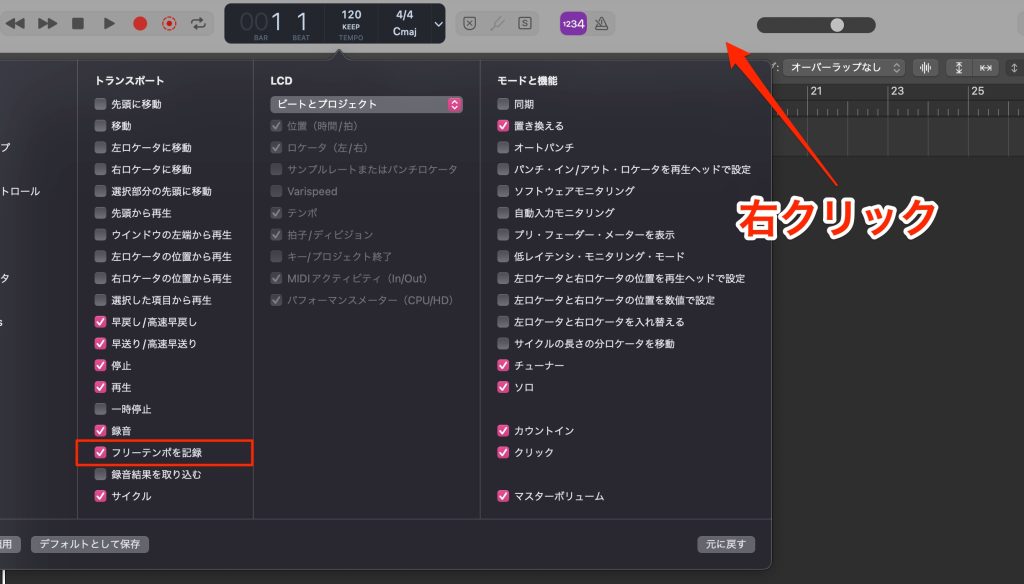
Right-click the empty space at the top and select "Customize Control Bar and Display."
Enable the free tempo recording option among the items shown.
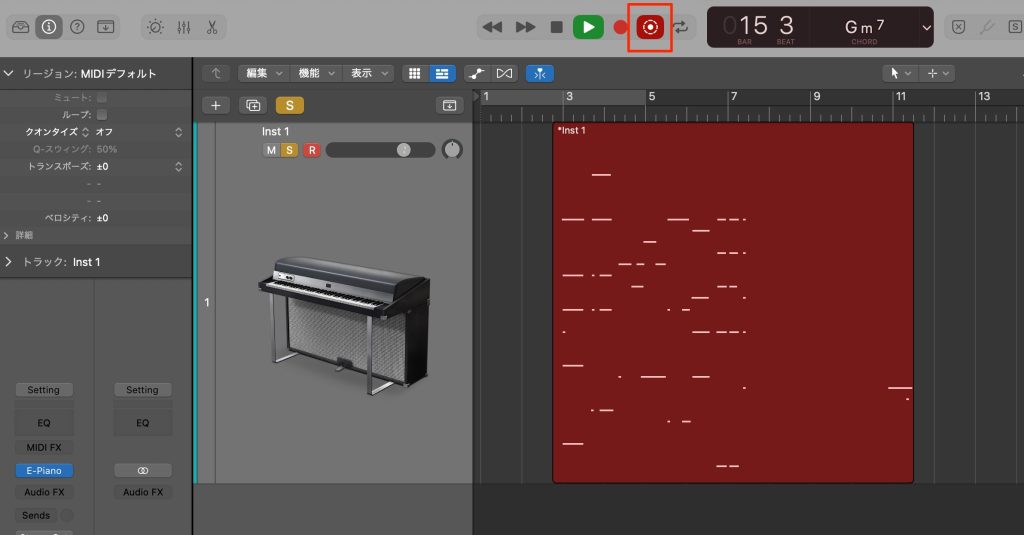
Then just click the free tempo recording button and play.
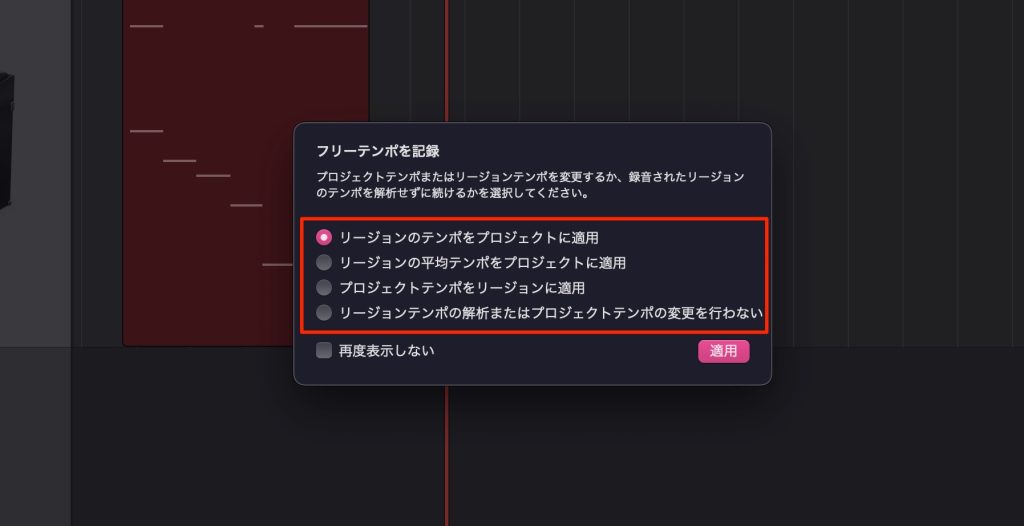
When you stop recording, options like these appear.
From the top:
- Detect the tempo of the recording and change the project tempo
- Detect the average tempo of the recording and change the project tempo
- Conform the recording to the project tempo
- Change the tempo of neither the performance nor the project
We selected the first option, "Detect the tempo of the recording and change the project tempo."
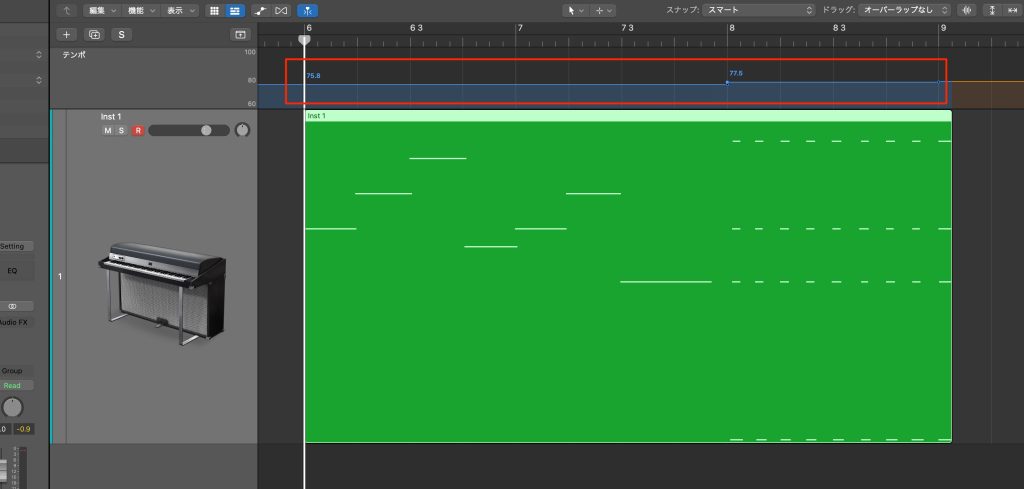
As shown, the tempo was changed to match the performance.
The accuracy is excellent.
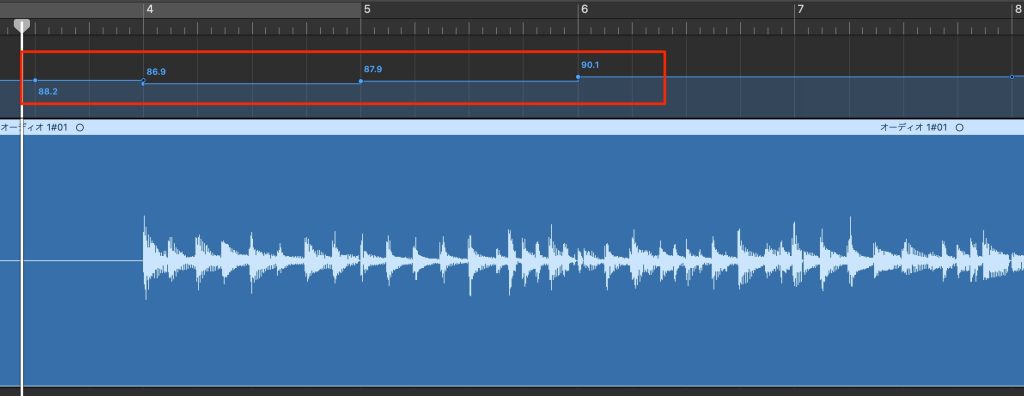
This can also be used for live performances (audio recording).
Logic's tempo syncs to your own performance, so you can program other tracks while making use of the feel of your live playing.
"Track Stacks" with More Freedom in Sound Routing
The "Track Stack feature," which lets you manage the sound of multiple tracks together.
It is very convenient, and many of you probably use it.

From this version, you can create a Track Stack from Track Stacks that already group tracks.
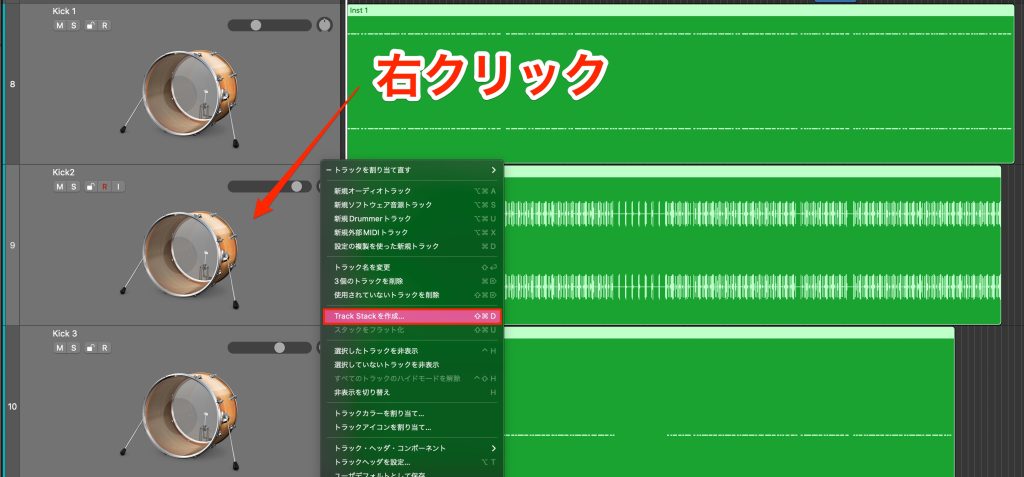
As an example, suppose we group several kick tracks with "Stack."
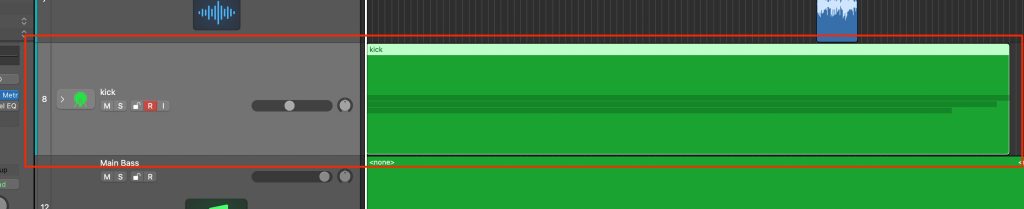
As shown, the kicks are grouped as a stack.
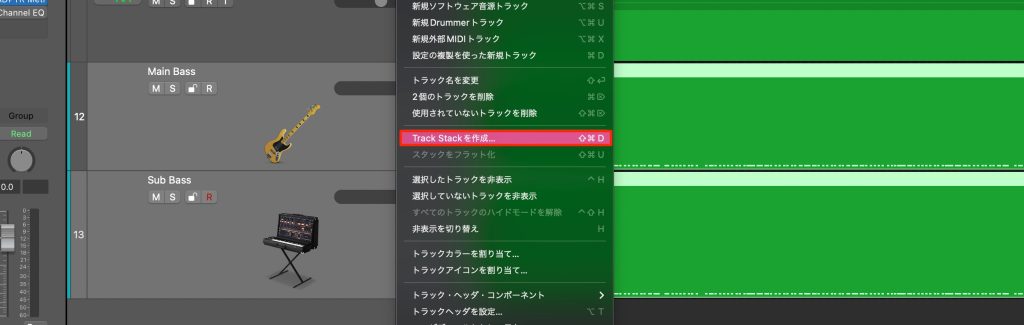
Group the bass tracks in the same way as the kicks.
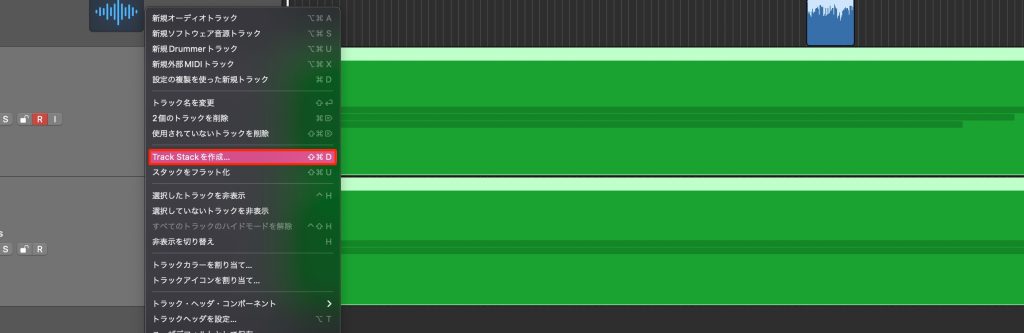
The feature lets you group these two stacks together.
As with a normal stack, just select the targets and choose stack.
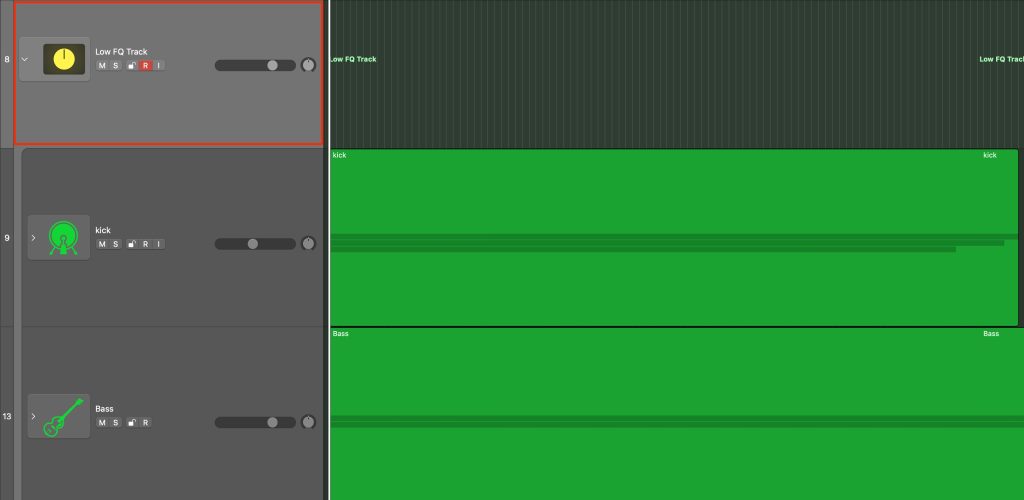
As shown, the stacked tracks are grouped together.
- Group drum kits of the same type, then group them as the whole drum track
- Group the lead vocal and backing vocals separately, then group them as the whole vocal
As you can see, it has a wide range of uses.
Ableton Link Support
Logic finally supports Ableton Link!
Ableton Live Link Feature Video Explanation
You can sync playback over Wi-Fi with software and hardware that support Ableton Link.
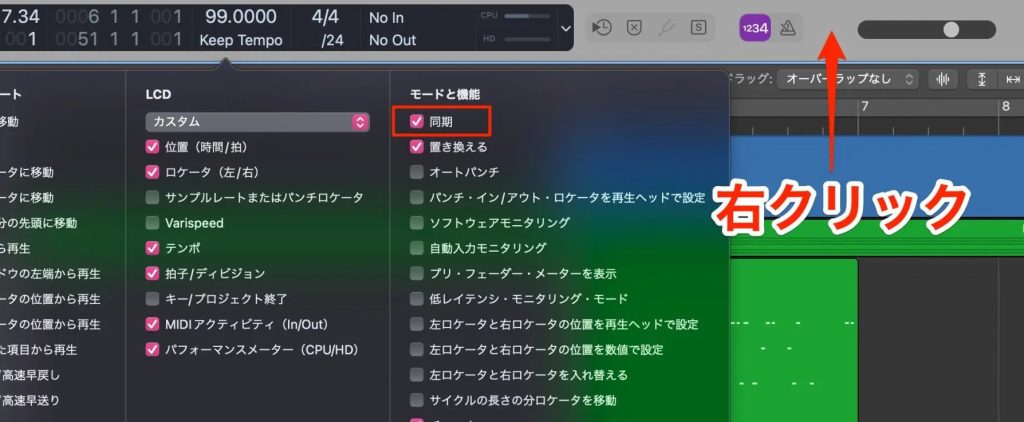
Right-click the empty area at the top and select "Customize Control Bar and Display."
Enable "Sync" among the items shown.
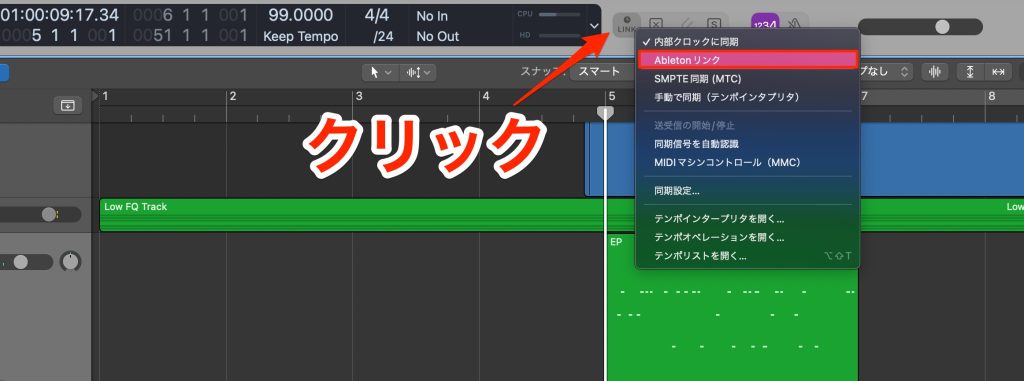
Just click the Sync icon that appears and select "Ableton Link."
It is very useful for free sessions, events and more.
Expanded Additional Content
This time too, additional instruments, presets and loops are available.
Of course, they can all be downloaded free of charge, so let's make good use of them.
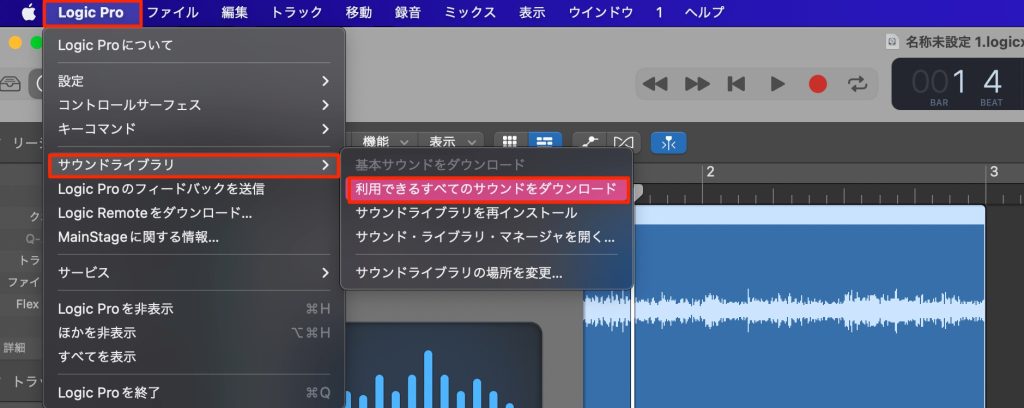
Top menu "Logic Pro" → "Sound Library" → "Download All Available Sounds"
This starts downloading the additional content.
Downloading everything may take a long time, but you can keep producing music while it downloads in the background.
How did you find it?
Personally, I was delighted by the "Gain tool" and "support for 32-bit float audio files."
We are grateful to Apple for providing a meaningful update free of charge.
Please try the new features yourself!
Frequently Asked Questions
Q1. How do I use the Gain tool in Logic Pro 10.7.5?
Just select the Gain tool and drag an audio region up or down to adjust its gain individually. Selecting multiple regions lets you adjust them all at once. It works like in other DAWs and is very handy for vocal editing.
Q2. Do I need to convert the file format when importing 32-bit float audio files?
No, no conversion is needed. You can use them in Logic as 32-bit float. However, recording in Logic is 16-bit/24-bit only; 32-bit float is supported for import only.
Q3. What settings are needed to use Ableton Link?
Just customize the control bar to enable "Sync," and select "Ableton Link" from the Sync icon. Playback syncs over Wi-Fi with Ableton Link-compatible devices.
Q4. What are the benefits of nesting Track Stacks (stacks within stacks)?
You can organize multiple related tracks hierarchically, such as the whole drum kit or all the vocals. It improves manageability when there are many tracks and greatly improves production efficiency.
Q5. What are the steps for using the MIDI plug-in recording feature?
Just load the MIDI plug-in you want (such as the Arpeggiator), then enable the option to record MIDI to this track in the MIDI FX slot.
NEW ARTICLES
Latest English Articles











