This article explains how to control the panning of reverb in Cubase. With a normal send/return setup, the reverb comes from the center no matter where the original track is placed, which blurs the stereo image and saturates the reverb in the middle. This article shows how to place the reverb at the same position as the original track, a practical technique that tidies up the space of the whole song and gives you more polished mixes.
Improve Quality by Controlling the Space
Reverb is an effect that expresses the space of a song,
and it is very important for improving a song's quality.
We introduced the classic technique of sharing one reverb across multiple tracks: send/return.
This time, we introduce a spatial technique that builds on it.
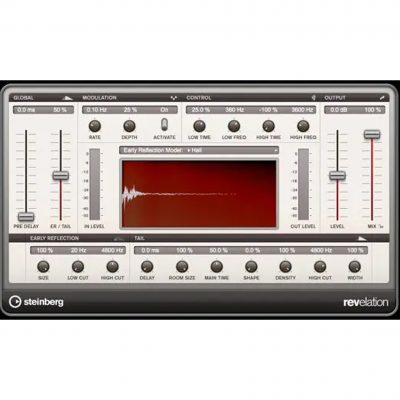
Normally, the reverb from a send/return comes from the center.
For example, even if you pan a guitar track hard right,
the guitar's reverb still comes from the center.
This causes problems such as:
- A blurry stereo image
- Reverb saturating in the center
These problems arise.
What solves them is
panning the reverb.
How to Control the Pan of Reverb in Cubase
The explanation starts at 5:20.
- Cubase 7 and later
- Cubase 6 and earlier
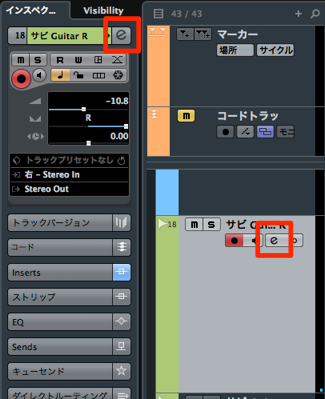
↑ Press the "e" button on the track whose reverb you want to control.
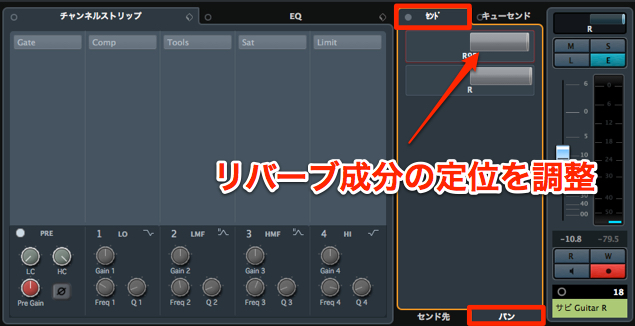
↑ The send routing appears.
Select "Sends" → "Pan" and drag to adjust the position of the reverb.
Let's check the sound.
The original guitar track is panned hard left.
- Before setting the pan (reverb panned center)
- After setting the pan (reverb panned left, the same as the original track)
It sounds much cleaner.
It is easy and very effective for tidying up the space in your song.
Be sure to try it.
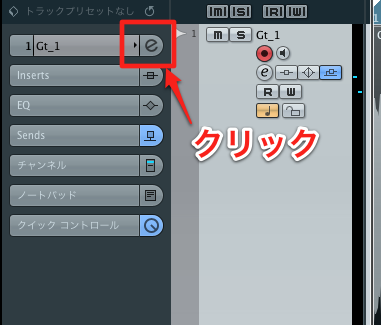
↑ Press the "e" button on the track whose reverb you want to control.
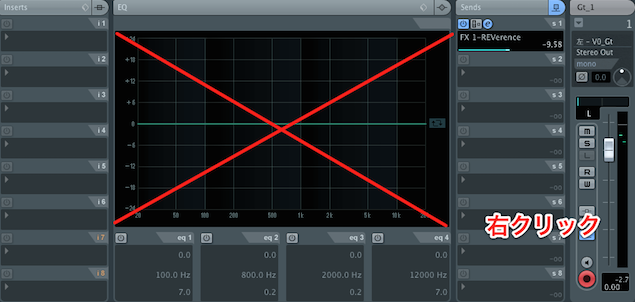
↑ Right-click anywhere other than the EQ in the window that opens.
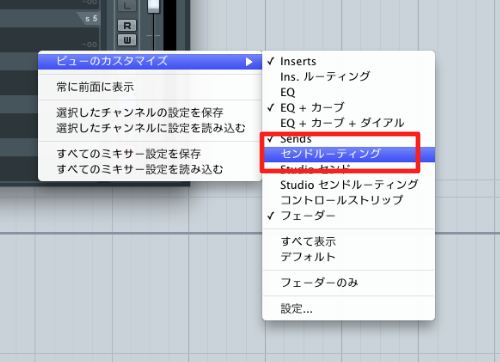
↑ Open "Send Routing" from the menu.
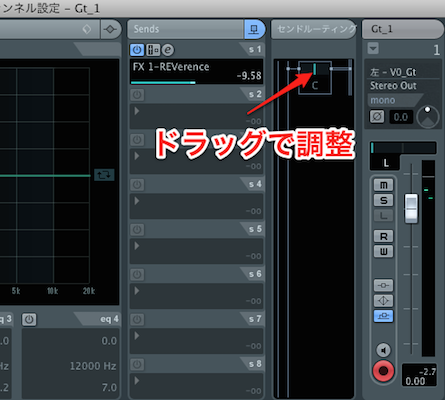
↑ The send routing appears.
Drag this area to set the reverb's pan.
Let's check the sound.
The original guitar track is panned hard left.
- Before setting the pan (reverb panned center)
- After setting the pan (reverb panned left, the same as the original track)
It sounds much cleaner.
It is easy and very effective for tidying up the space in your song.
Be sure to try it.
- Cubase 7 and later
- Cubase 6 and earlier
Frequently asked questions
Q1. What is the purpose of controlling the pan of reverb?
Because the reverb always comes from the center, it does not match the position of panned tracks, blurring the stereo image. Setting the pan places the reverb at the same position as the original track, tightening the image and tidying up the space of the song.
Q2. From which version of Cubase is this supported?
The operation differs between Cubase 6 and earlier and Cubase 7 and later, but reverb panning is possible in both. The article explains the steps for each version in detail.
Q3. What are the benefits of sharing reverb via send/return?
Reverb places a heavy load on the CPU, so sharing one reverb across multiple tracks reduces the processing load and gives efficient, consistent reverb.
NEW ARTICLES
Latest English Articles