This article explains a practical setup for fader objects in Logic Pro's Environment. You will learn how to check MIDI signals with a monitor object and freely control effect parameters such as EQ with a fader. Not only channel strips but also knobs on soft synths and plug-ins become controllable, letting you build a more efficient DTM workflow and a highly flexible mixing environment.
Various kinds of control with Environment faders
Last time, we showed what you can do with faders.
This time, we explain the actual setup to achieve it.
With a "fader object", you can of course assign and control channel strips,
and even effect parameters, freely.
- Logic X
- Logic 8/9
Controlling various parameters with fader objects (Logic X)
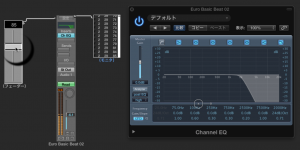
Here, we will use a fader object to control an EQ parameter.
Using a monitor
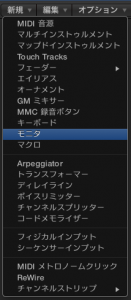
Select [New] → [Monitor] in the Environment.
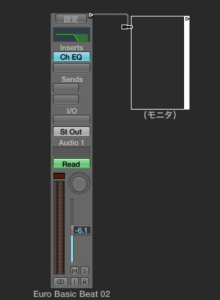
Connect the mixer channel you want to control (Euro Basic Beat 02) to the monitor.
Drag the "▷" to pull out a cable.
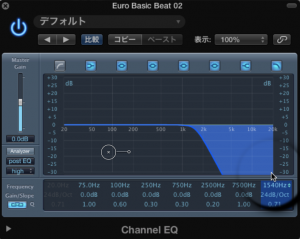
Next, click or drag the parameter you want to control.
(Here, the Low-Pass Filter of the EQ loaded on Euro Basic Beat 02)

It is harder to see than in Logic 9, but something like [F 2 29 79] is displayed.
The leftmost parameter (F) in particular has become harder to see.
Fader object settings
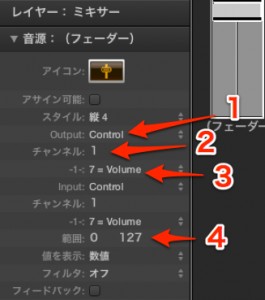
Now, apply the monitor's information to the fader object.
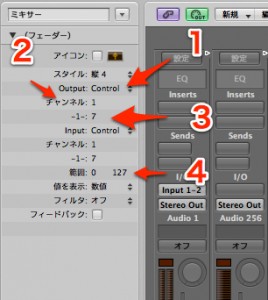
Change four of the monitor's parameters.
1: Output from Control to Fader
2: Channel from 1 to 2
3: -1- from 7 to 29
4: Leave Range as it is this time
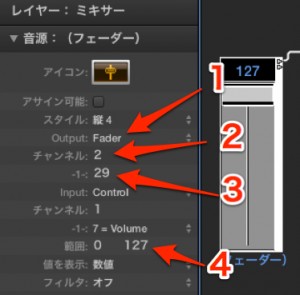
The result looks like the image above.
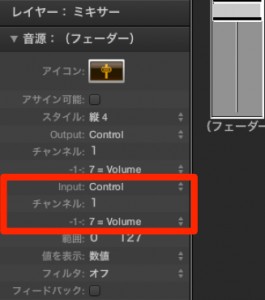
Be careful: if you change the Input side, the parameter will not move!!
Change [Channel] and [-1-] on the Output side.
Now you can control the EQ's Low-Pass Filter with the fader object.
Bonus: an example of using Range
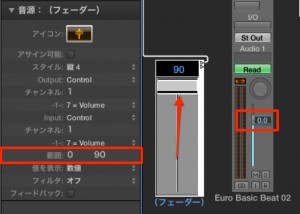
As an example of using [Range], by setting it to [0 90],
you can make the fader object's slider correspond to [±0 dB] at its top position.
Please try applying this to all sorts of things.
Video point: Placing a monitor to check MIDI signals
By placing a "Monitor" object,
you can check the MIDI channel and control number.
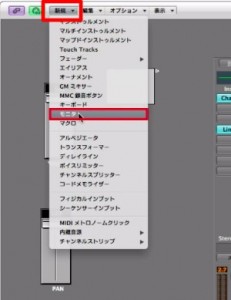
↑ Select "New" → "Monitor".
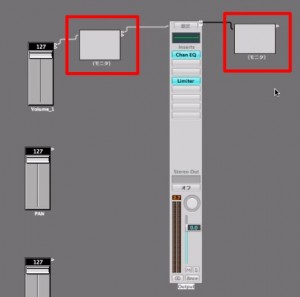
↑ Create two "monitors" and connect them as
"Fader" → "Monitor_1" →
"the track you want to apply it to (the master here)" → "Monitor_2".
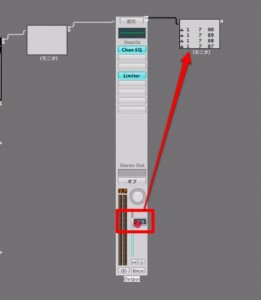
↑ When you move the knob you want to control with the fader (soft synths and plug-ins are also possible),
that knob's information is shown in the "Monitor".
Here is an enlarged view of what the monitor shows. ↓

By matching this with the numbers on the fader side below (click the fader to display them),
the link setup is complete.
The example above is a "volume fader", but as explained in the video,
"insert effects and soft synths" can be set up with the same procedure.
- Logic X
- Logic 8/9
Frequently Asked Questions
Q1. What is the difference between a fader object and a monitor in Logic Pro's Environment?
A monitor is an object for checking and displaying signal information such as the MIDI channel and control number. A fader object, on the other hand, is used to actually control parameters based on that information. It is important to check the signal with the monitor first and then match the fader's settings.
Q2. Can faders control things other than EQ parameters?
Yes. Channel strip volume and pan, other insert effects, and even soft synth knobs can be controlled by setting them up with the same procedure. If you can check the signal with a monitor, almost any parameter can be controlled.
Q3. What values should I enter for the fader's "Range" setting?
The range setting specifies the parameter's minimum and maximum values. For example, setting "0 90" limits the fader's movement to the range 0 to 90. As in the article's example, you can adjust the range when you want ±0 dB as the reference point, creating a more usable control setup.
NEW ARTICLES
Latest English Articles