
Logic Pro's automation function lets you automatically record changes to parameters such as volume, pan, and effect values by moving knobs and buttons while the song plays. You can choose from several write modes such as Read and Touch; Touch mode is especially suited to partial corrections, and Latch mode to continuous changes. Everything from recording to deleting automation is very simple, and it lets you add professional effects to your songs, making it an essential technique for beginners and advanced users alike.
Record Your Knob and Button Moves
The previous article covered recording automation using the automation graph.
This time, we show how to record the movement of knobs as you turn them while the song plays.
- Logic X
- Logic 8/9
Automation Write Modes Explained
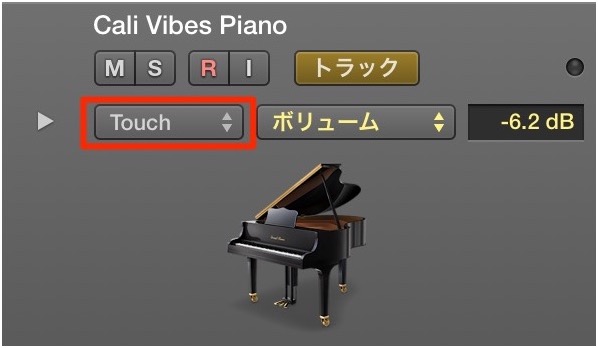
Click the area outlined in red on the track and choose a write mode.
There are four modes in total.
Read
This setting plays back the automation you have written.
Normally, after writing automation, set the mode to Read.
Touch/Latch Explained
The video uses Cubase, but the concept is the same.
Touch
Recording starts when you touch the target knob during playback.
Automation is recorded only while you are touching the knob; when you let go, the value returns to its original value.
Subsequent data is not overwritten, so this mode is suited to correcting part of a passage.
Latch
Recording starts when you touch the target knob during playback.
Writing continues not only while you touch the knob but also after you let go, holding the last value.
Previous automation data is overwritten.
Write
Unlike Latch and Touch, even if you do not move the knob during playback,
the current knob value overwrites the automation.
How to Write Automation
It is very simple.
1_Choose the mode you like from "Touch," "Latch," and "Write" above.
2_Start playback in Logic.
3_At the place where you want to write, move the knob you want to record.

4_When you have finished writing, stop playback.
The automation is now recorded.
Logic: Disabling and Deleting Automation
Disabling Automation
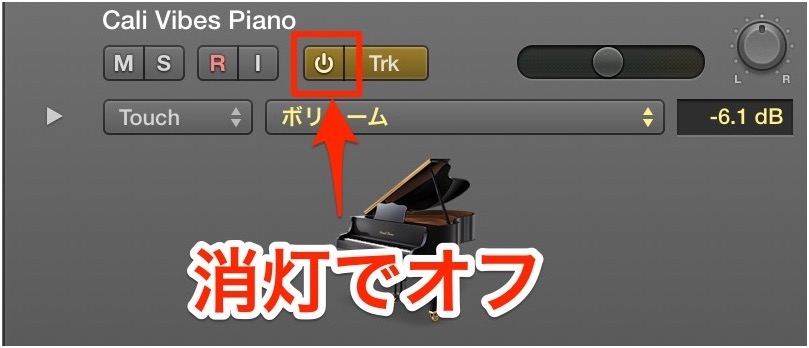
Turning off the automation icon, outlined in red,
disables the automation.
How to Delete Automation
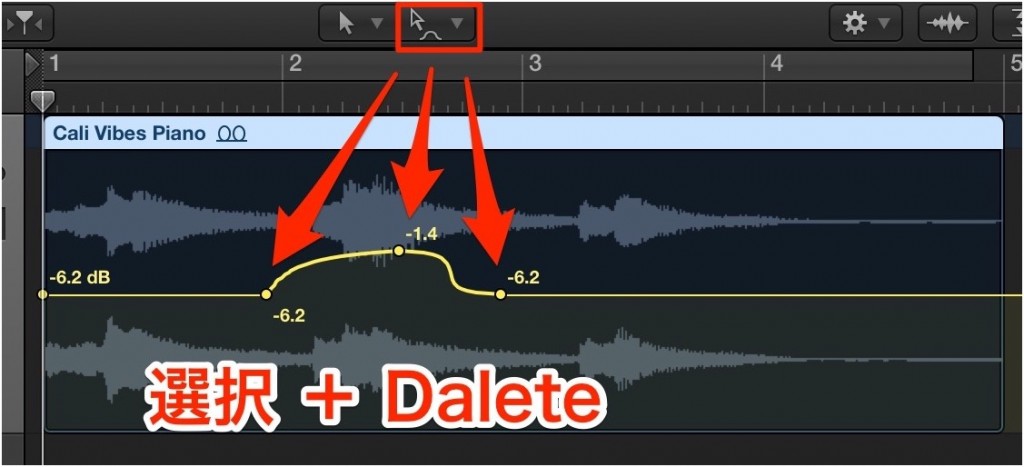
Choose the "Automation Select tool" from the Tool menu.
Select the automation you want to delete and press the Delete key.
This time we wrote volume automation, but you can record many other parameters,
such as pan and effect values.
Automation Write Modes Explained

↑ Click the area outlined in red on the track and choose a write mode.
There are five modes in total.
Off
In this state, the automation you have written is not applied.
All written automation is ignored.
Read
This setting plays back the automation you have written.
Normally, after writing automation, set the mode to Read.
Touch/Latch Explained
The video uses Cubase, but the concept is the same.
Touch
Recording starts when you touch the target knob during playback.
Automation is recorded only while you are touching the knob; when you let go, the value returns to its original value.
Subsequent data is not overwritten, so this mode is suited to correcting part of a passage.
Latch
Recording starts when you touch the target knob during playback.
Writing continues not only while you touch the knob but also after you let go, holding the last value.
Previous automation data is overwritten.
Write
Unlike Latch and Touch, even if you do not move the knob during playback,
the current knob value overwrites the automation.
How to Write Automation
It is very simple.
1_Choose the mode you like from "Touch," "Latch," and "Write" above.
2_Start playback in Logic.
3_At the place where you want to write, move the knob you want to record.

4_When you have finished writing, stop playback.
The automation has now been recorded.
Logic: Disabling and Deleting Automation
Disabling automation:
Choose "Off" from the modes above.
Deleting automation:

↑ Choose the "Automation Select tool" from the Tool menu.
Select the automation you want to delete and press Backspace or Delete.
This time we wrote volume automation, but you can record many other parameters,
such as pan and effect values.
Applying Automation to Plug-in Knobs
In Logic, you can apply automation not only to Volume and Pan but also to plug-ins such as EQ, compressor, and reverb.
- Logic X
- Logic 8/9
Frequently asked questions
Q1. What is the difference between Touch mode and Latch mode for automation in Logic Pro?
In Touch mode, automation is recorded only while you touch the knob, and the value returns to its original value when you let go, making it ideal for partial corrections. In Latch mode, recording continues after you let go, holding the last value, which suits continuous changes.
Q2. How do I delete automation completely?
Choose the "Automation Select tool" from the Tool menu, select the automation you want to delete, and press the Delete key (or Backspace). It is deleted completely.
Q3. Can I set automation for parameters other than volume?
Yes. You can apply automation in the same way to pan and to plug-in parameters such as EQ, compressor, and reverb. Almost every knob is supported.
Q4. When should I use Write mode?
In Write mode, the current value is written even if you do not move the knob during playback, so it is suited to creating settings from scratch. Avoid it when you want to keep existing data.
NEW ARTICLES
Latest English Articles











