
New in DP12—and the Distinctive DP Features We Discovered Hands-On
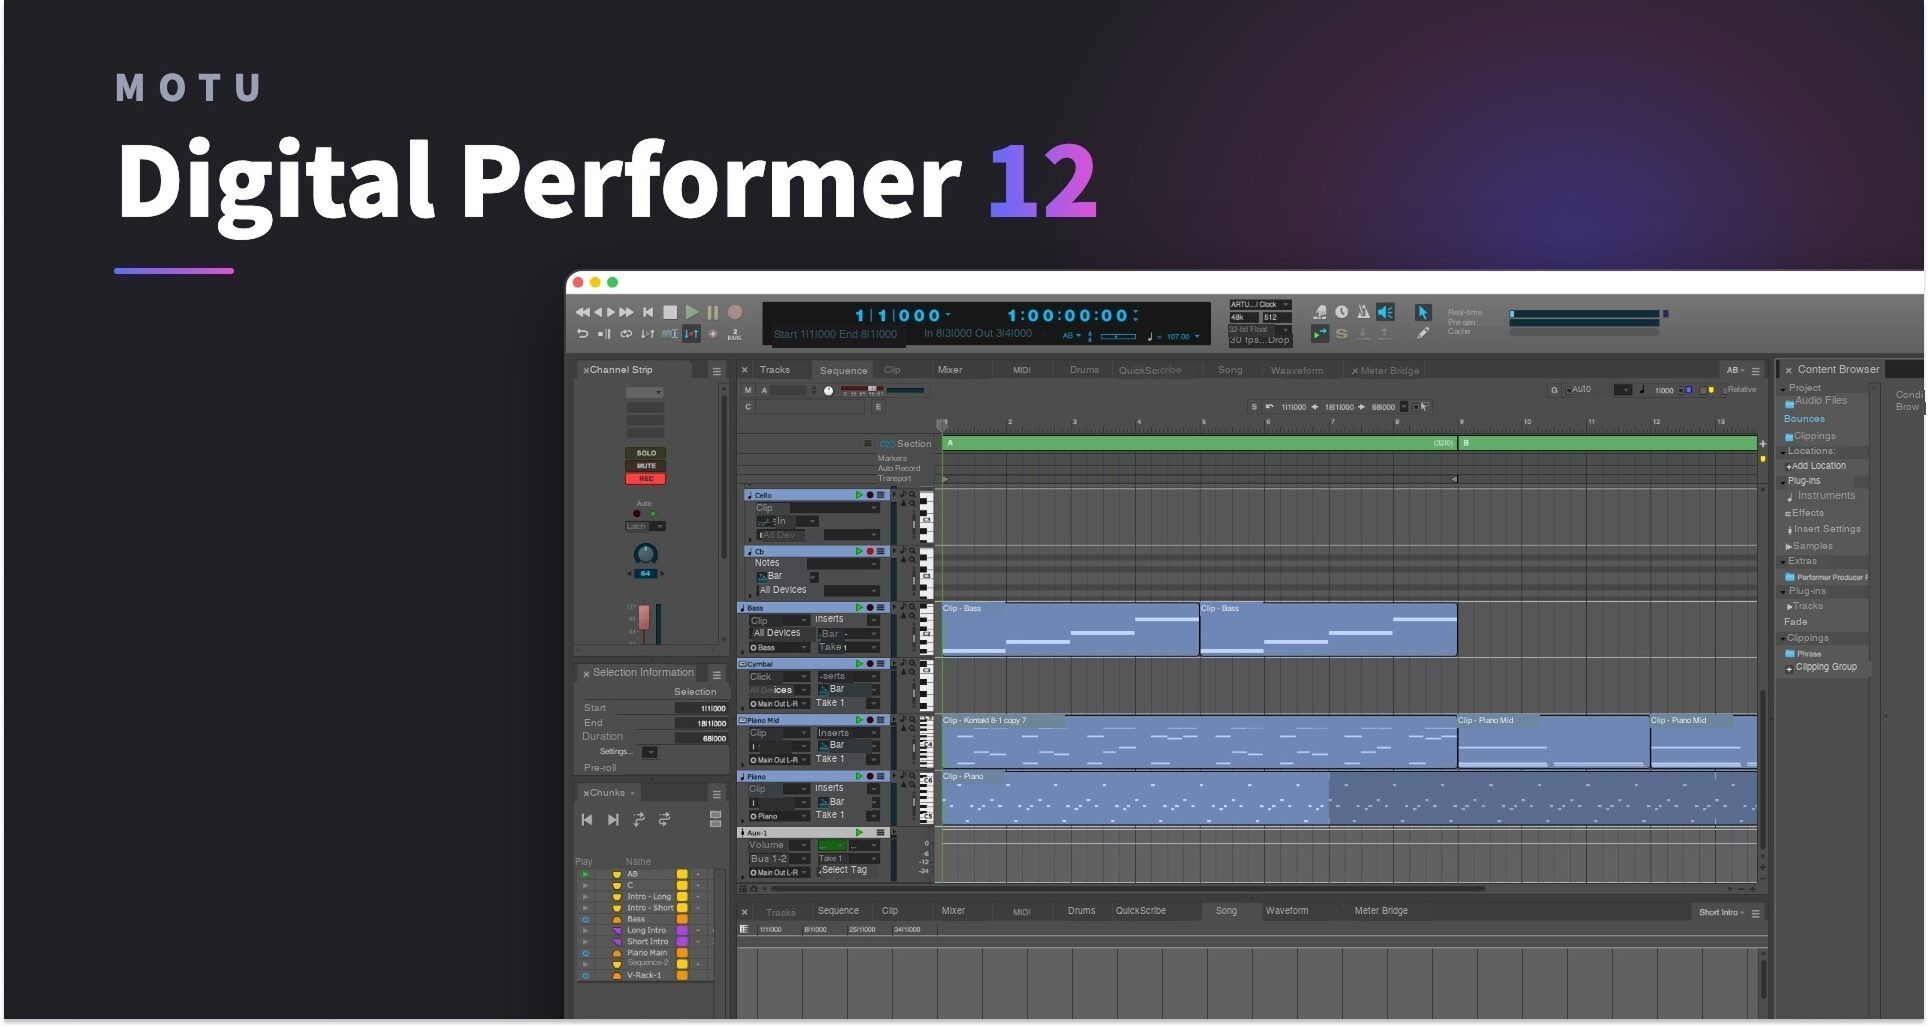
MOTU’s Digital Performer is a long-established DAW with a loyal following.
You may think of it as a specialist’s tool, favored by experienced users.
Digital Performer 12 (DP12) introduces new tools for rearranging sections and AI-powered stem separation.
For this review, we approached DP12 as users of other DAWs, trying both its new features and the established capabilities that make DP distinctive.
Key Features Added in DP12
- Arrangement Strip: Divide a sequence into sections and move each section’s performance data together across tracks.
- Track Presets: Save track settings, including I/O assignments and inserts, and recall them in another project.
- AI Stem Separation: Separate a finished mix into six instrument groups, such as drums and vocals.
- Dolby Atmos Support: A built-in renderer lets you mix and export immersive audio within DP12.
Features We Found Especially Useful
- Sequences and Songs: Manage multiple pieces or different-length versions within a single project.
- Clippings: Save phrases you have created and reuse them in other sequences or projects.
- V-Racks: Share the same virtual instruments across multiple sequences.
In practice, the biggest attraction of DP was its ability to reuse work without having to recreate it.
DP12’s new features build on that strength and expand what you can do with it.
Video
Sequences and Songs: Multiple Pieces or Versions in One Project
One of DP’s distinctive characteristics is its project structure.
Within each project, sequences and songs provide the building blocks for arranging music.
Sequences and songs are established DP features. DP12 adds the new Arrangement Strip alongside them.
How Projects, Sequences, and Songs Fit Together
In many DAWs, one project typically corresponds to one song.
A DP project is a larger container: it can hold multiple pieces of music.
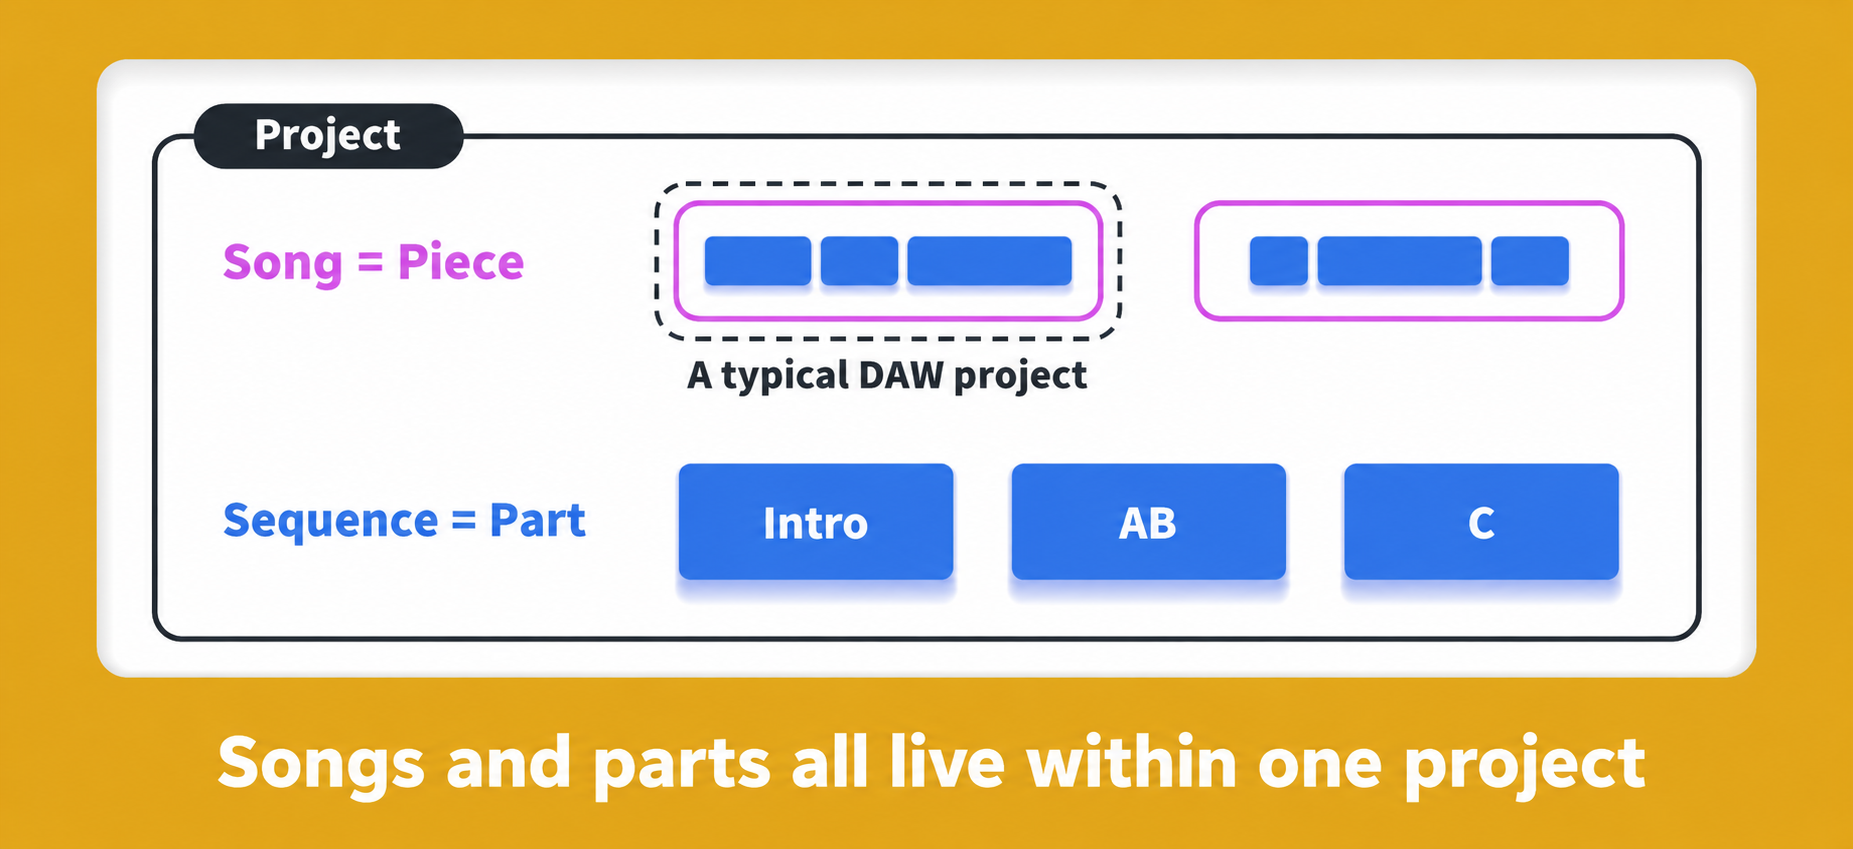
On screen, complete pieces and their component parts appear together, as shown below.
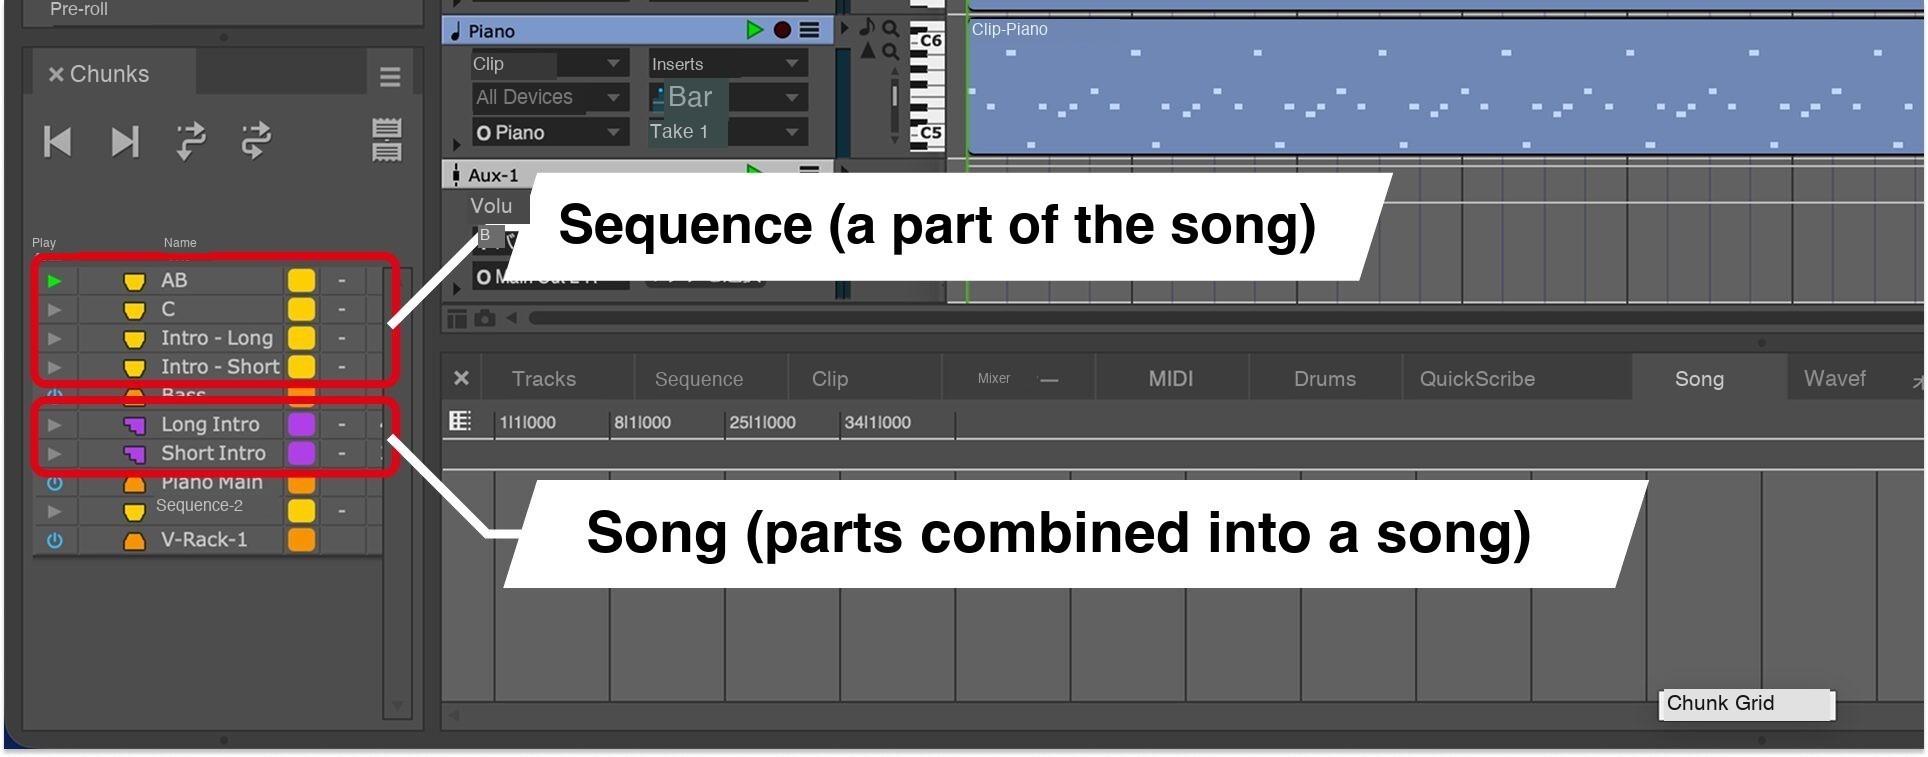
Here is what each level does.
| Level | Role |
|---|---|
| Project | The overall container for managing sequences, songs, and other project resources. |
| Sequence | A unit containing tracks and performance data. It can serve as a section of a larger piece, or contain a complete piece on its own. |
| Song | A piece assembled by combining sequences. |
For example, you could handle a commission for ten pieces—or separate cues for a film—within one project.
Keeping them together rather than in separate project files can make version management easier.
Edit Shared Material Once to Update Every Version
You can create versions of different lengths simply by changing how sequences are combined in a song.
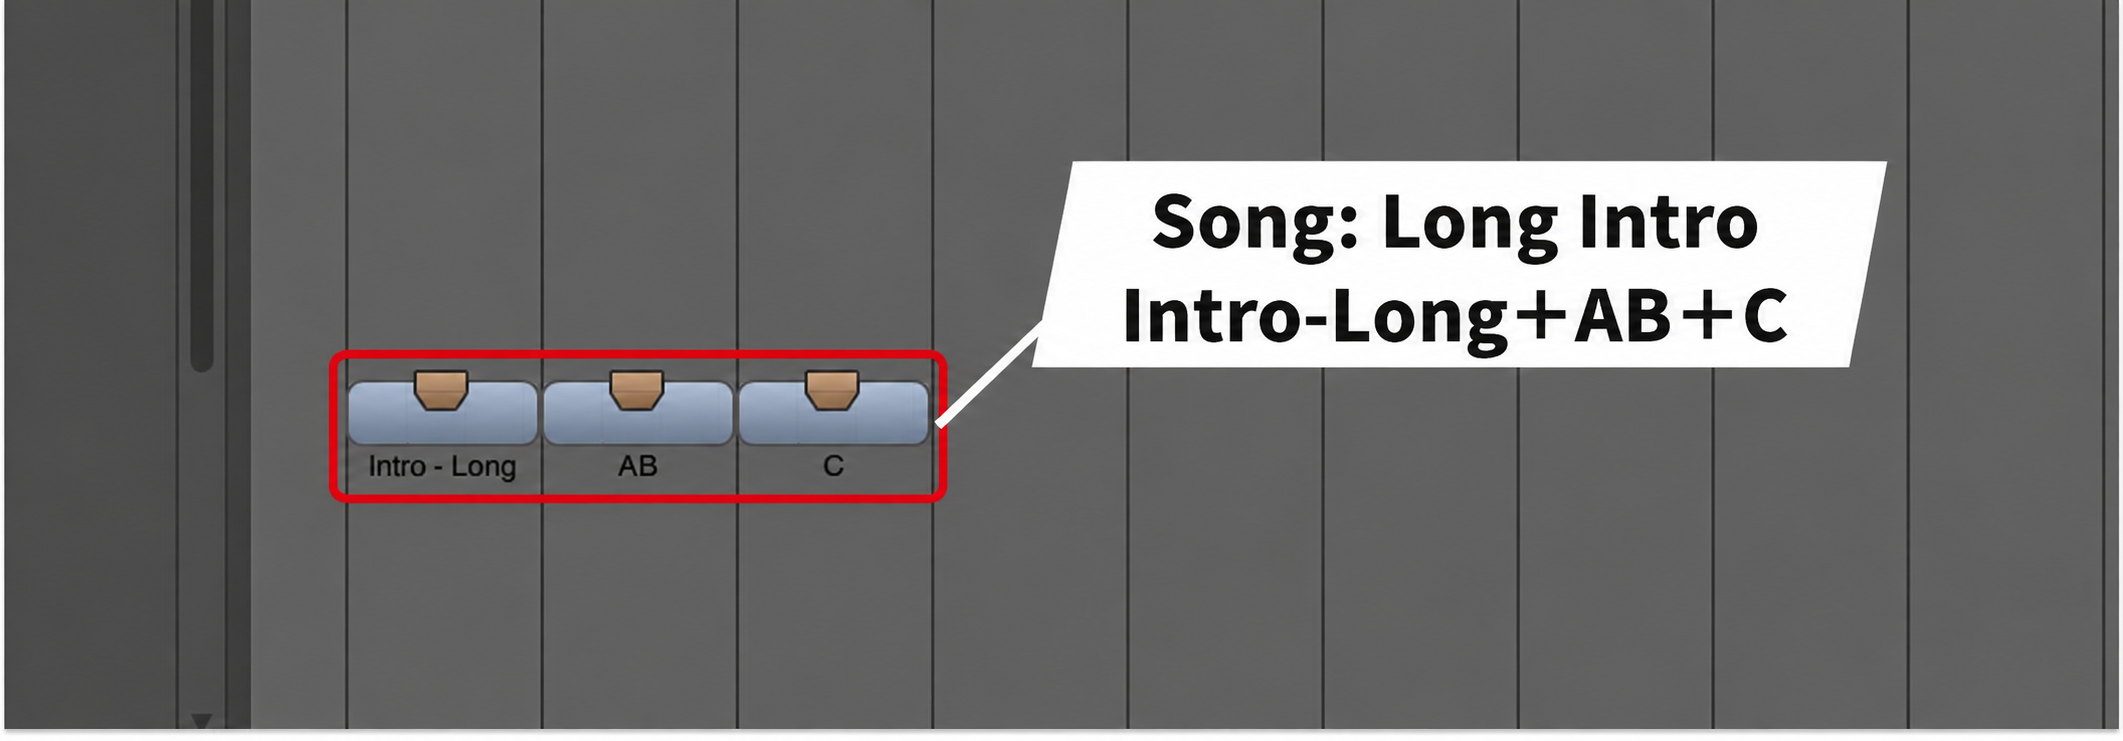
In a typical DAW, you might save a separate version and then modify it.
In DP, for example, a “long intro + verse through chorus” version can be built from separate “long intro” and “verse through chorus” sequences.
If you need a shorter version, just replace the intro sequence.
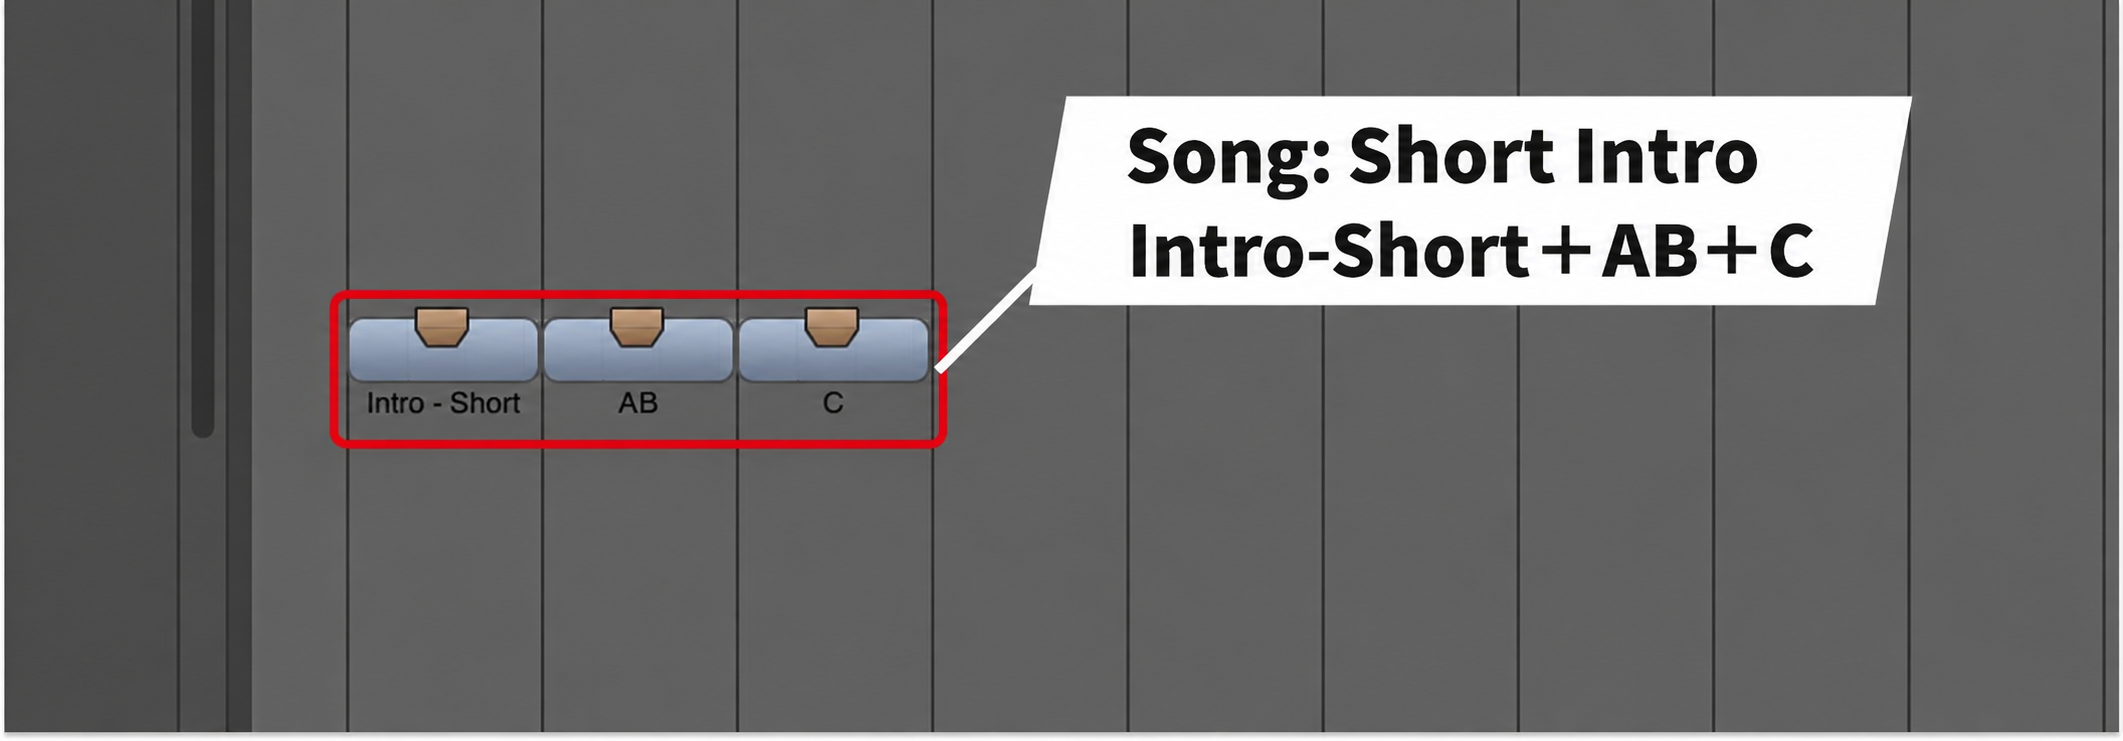
The verse-through-chorus sequence is shared by both versions. If you want to change a note in the chorus melody, editing it once updates both versions.
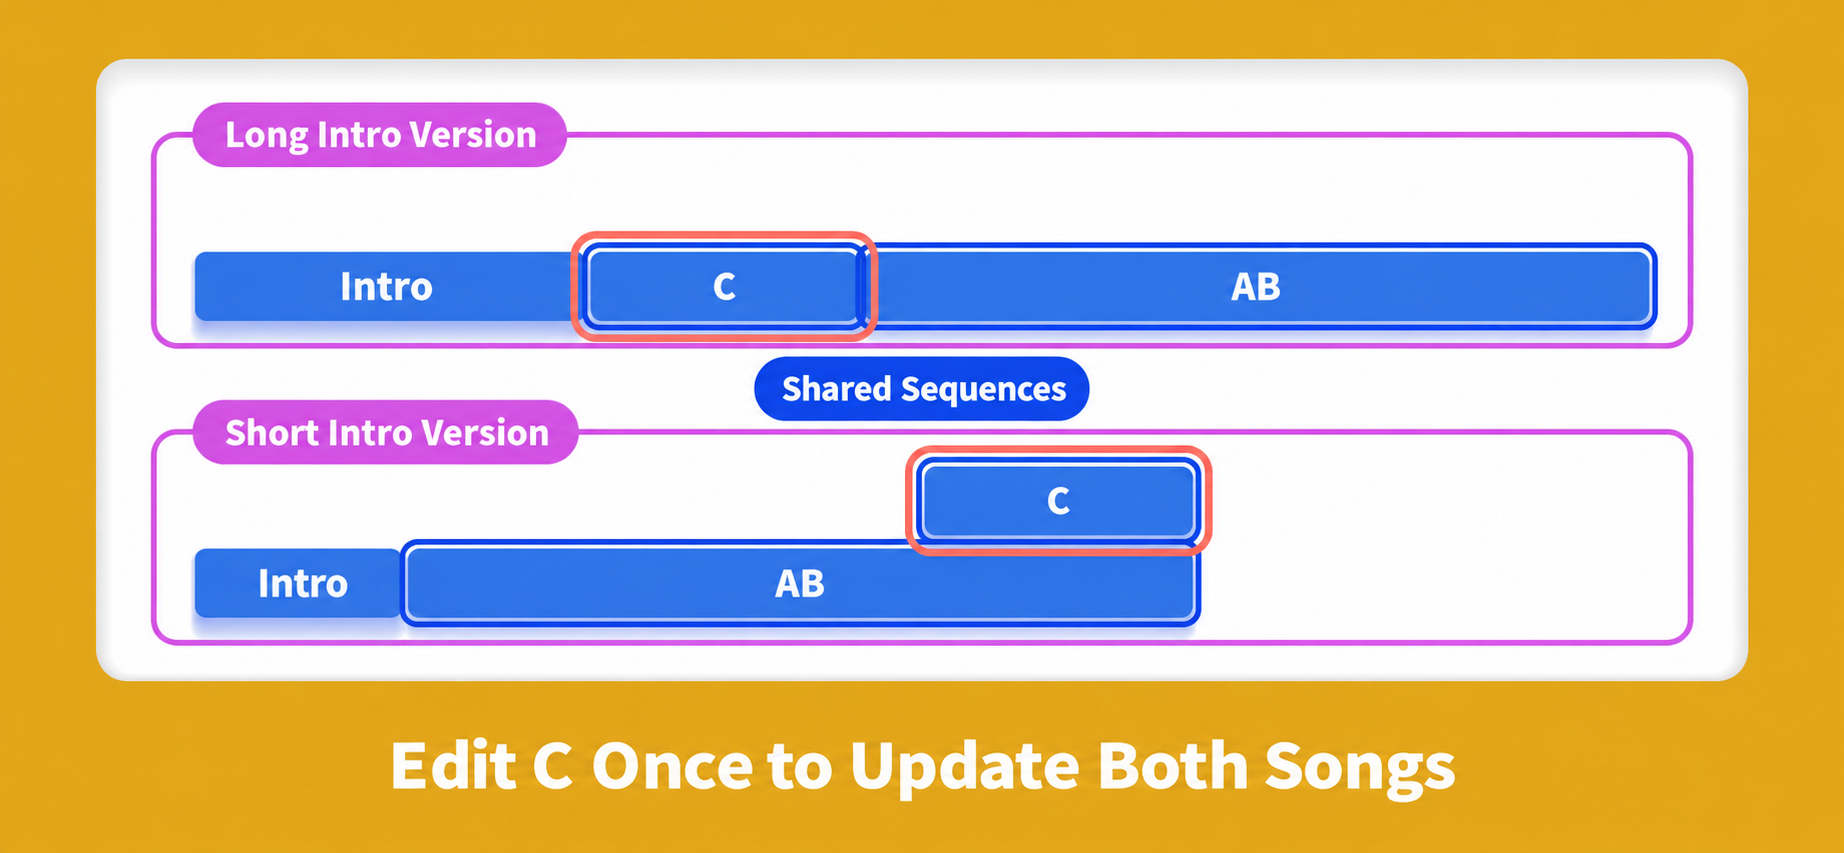
This becomes particularly valuable when revisions arrive after you have created multiple versions.
Layer Sequences and Play Them Together
Sequences can also overlap within a song.
Overlapping sequences play simultaneously. For example, you can layer a phrase from a separate sequence over a looping verse-and-pre-chorus section.
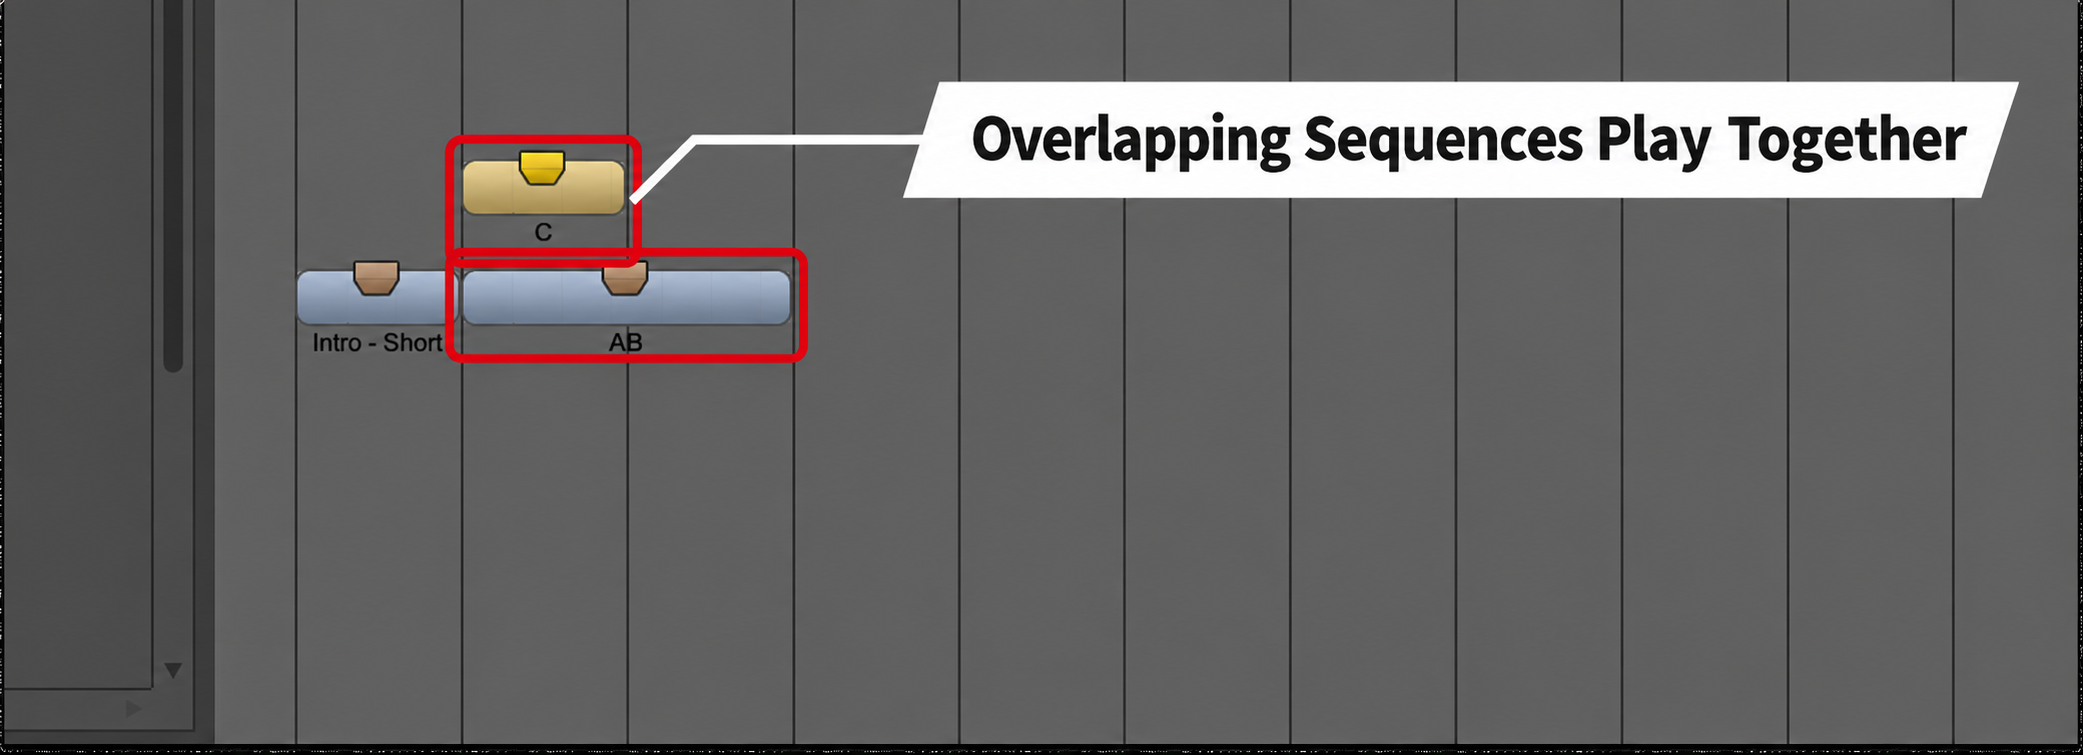
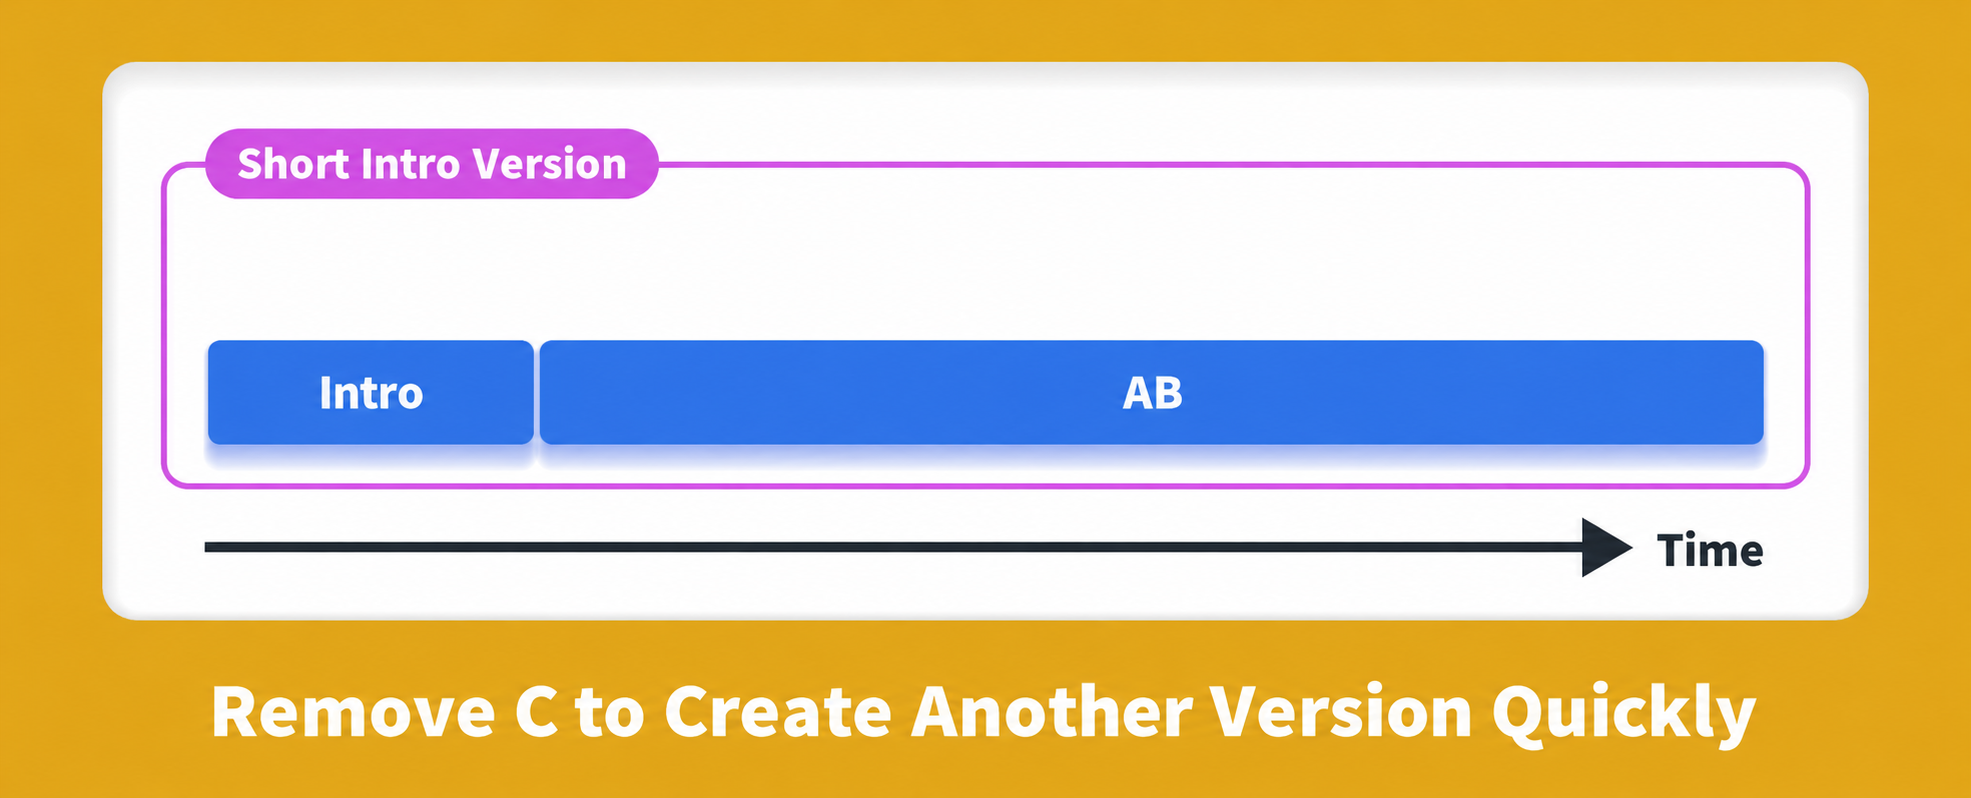
If you keep the main melody in a separate sequence above the accompaniment, a request for a melody-free version for narration is easy to handle: create a song without that sequence.
For a vocal track, keeping the vocals separate lets you create an instrumental version in the same way.
Being able to deliver alternate versions quickly is a major advantage.
Rearrange a Sequence With the Arrangement Strip (New in DP12)
To adjust the structure within a sequence, use DP12’s new Arrangement Strip.
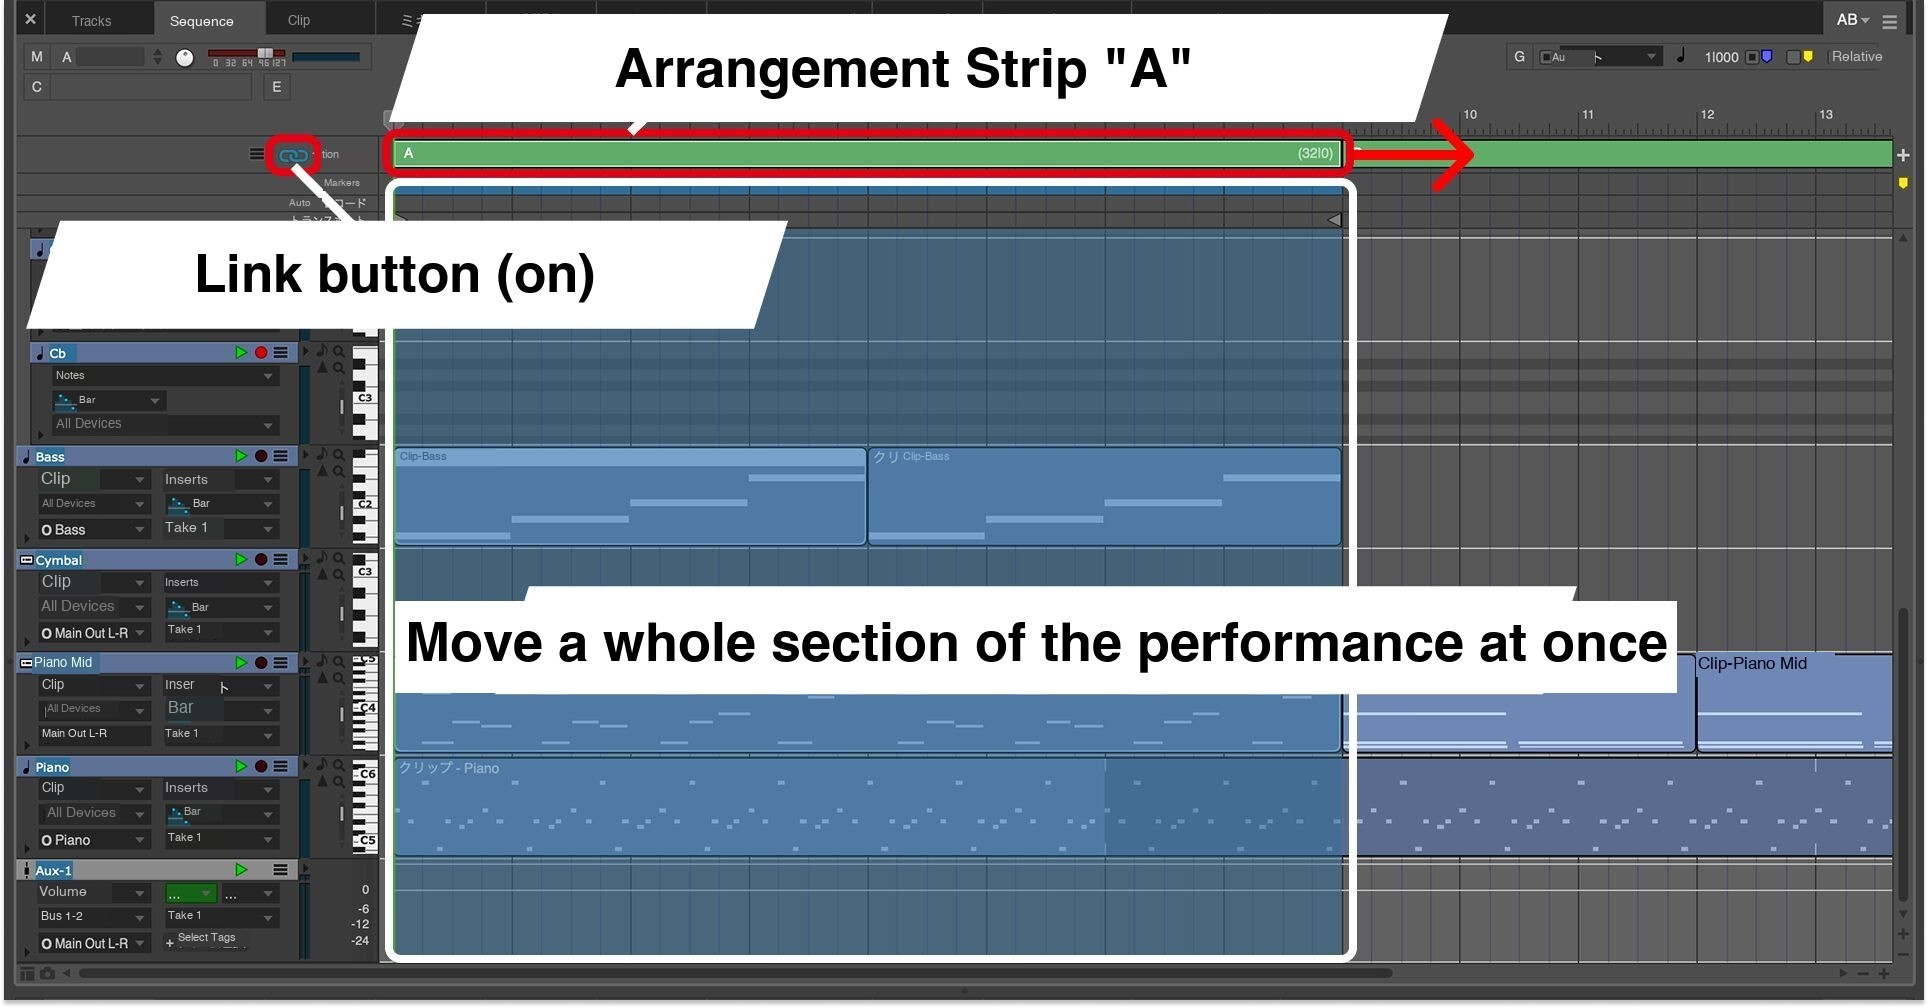
Enable the link button to the left of the strip to link sections to their performance data. Dragging a strip then moves the data within that section across all tracks together.
You can also remove a section’s performance data as a group, making structural changes almost as simple as moving markers.
Think of the Arrangement Strip as a way to organize the sections within a sequence, and a song as a way to combine prepared sequences into different versions.
Expand Sketches Into Parts—and Reuse Finished Phrases
DP has long offered tools for developing rough sketches into arrangements and carrying useful phrases into other musical contexts.
Drag Notes From a Sketch Into Separate Parts
Suppose you want to develop a rough piano sketch into an orchestral arrangement.
You can grab notes directly in the Sequence Editor and drag them to another track.
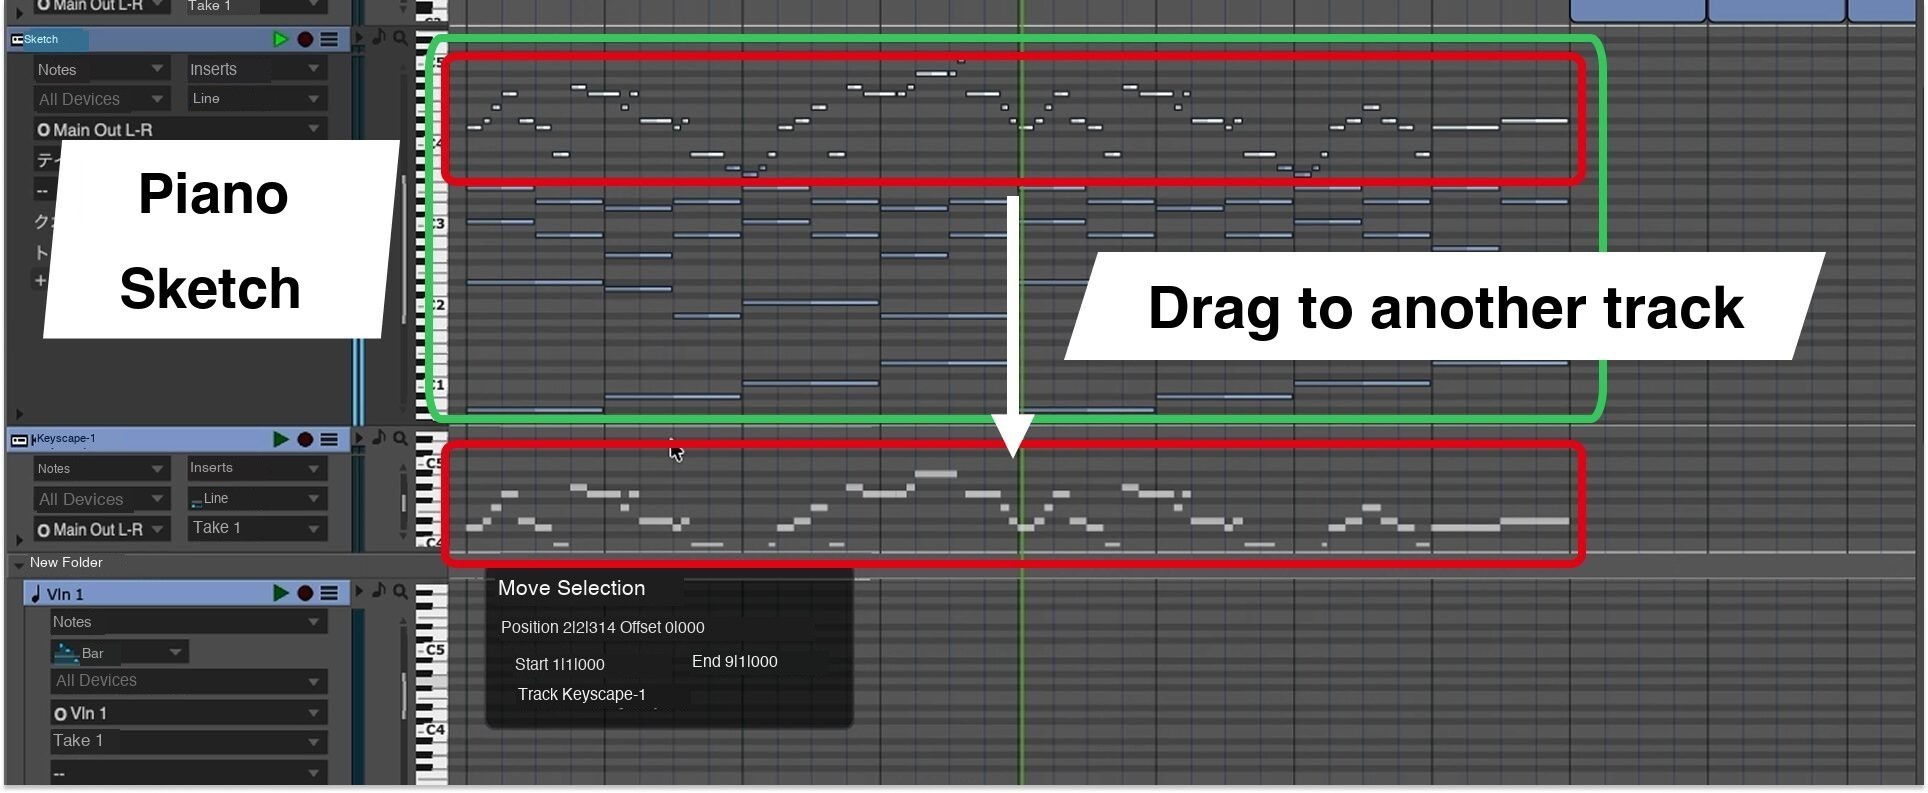
If the destination track has a different instrument assigned, you can quickly develop the sketch into separate instrumental parts.
This is also useful for moving the low notes of a synth phrase to a bass track, or layering another instrument.
Split the Window to View the Big Picture and the Details
For detailed editing, open the MIDI Editor from the MIDI menu.
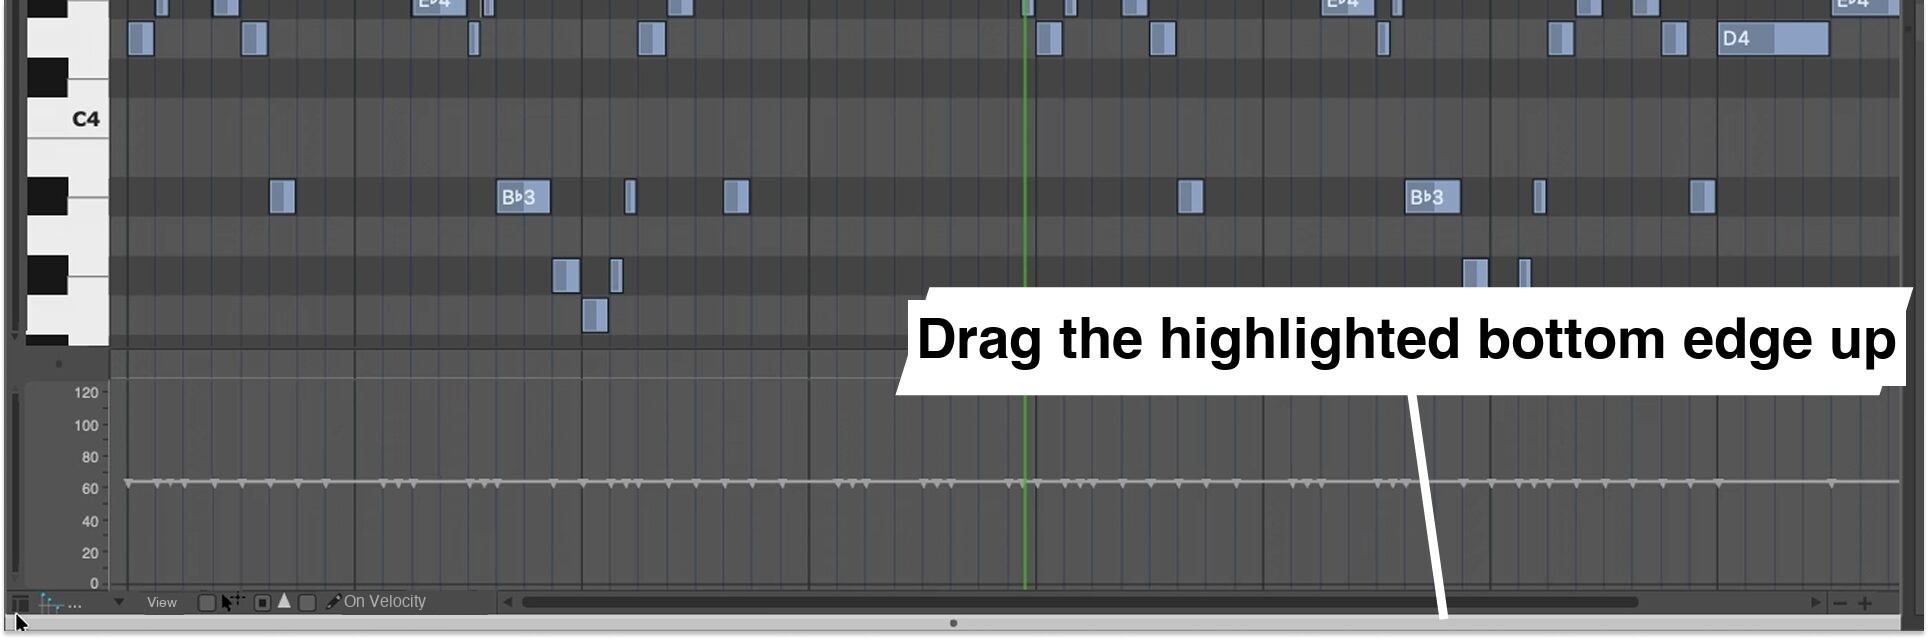
DP lets you split a single window into upper and lower panes.
Move the pointer to the bottom edge of the window. When the edge turns white, drag it upward to create the split.
The split window displays two views, as shown below.
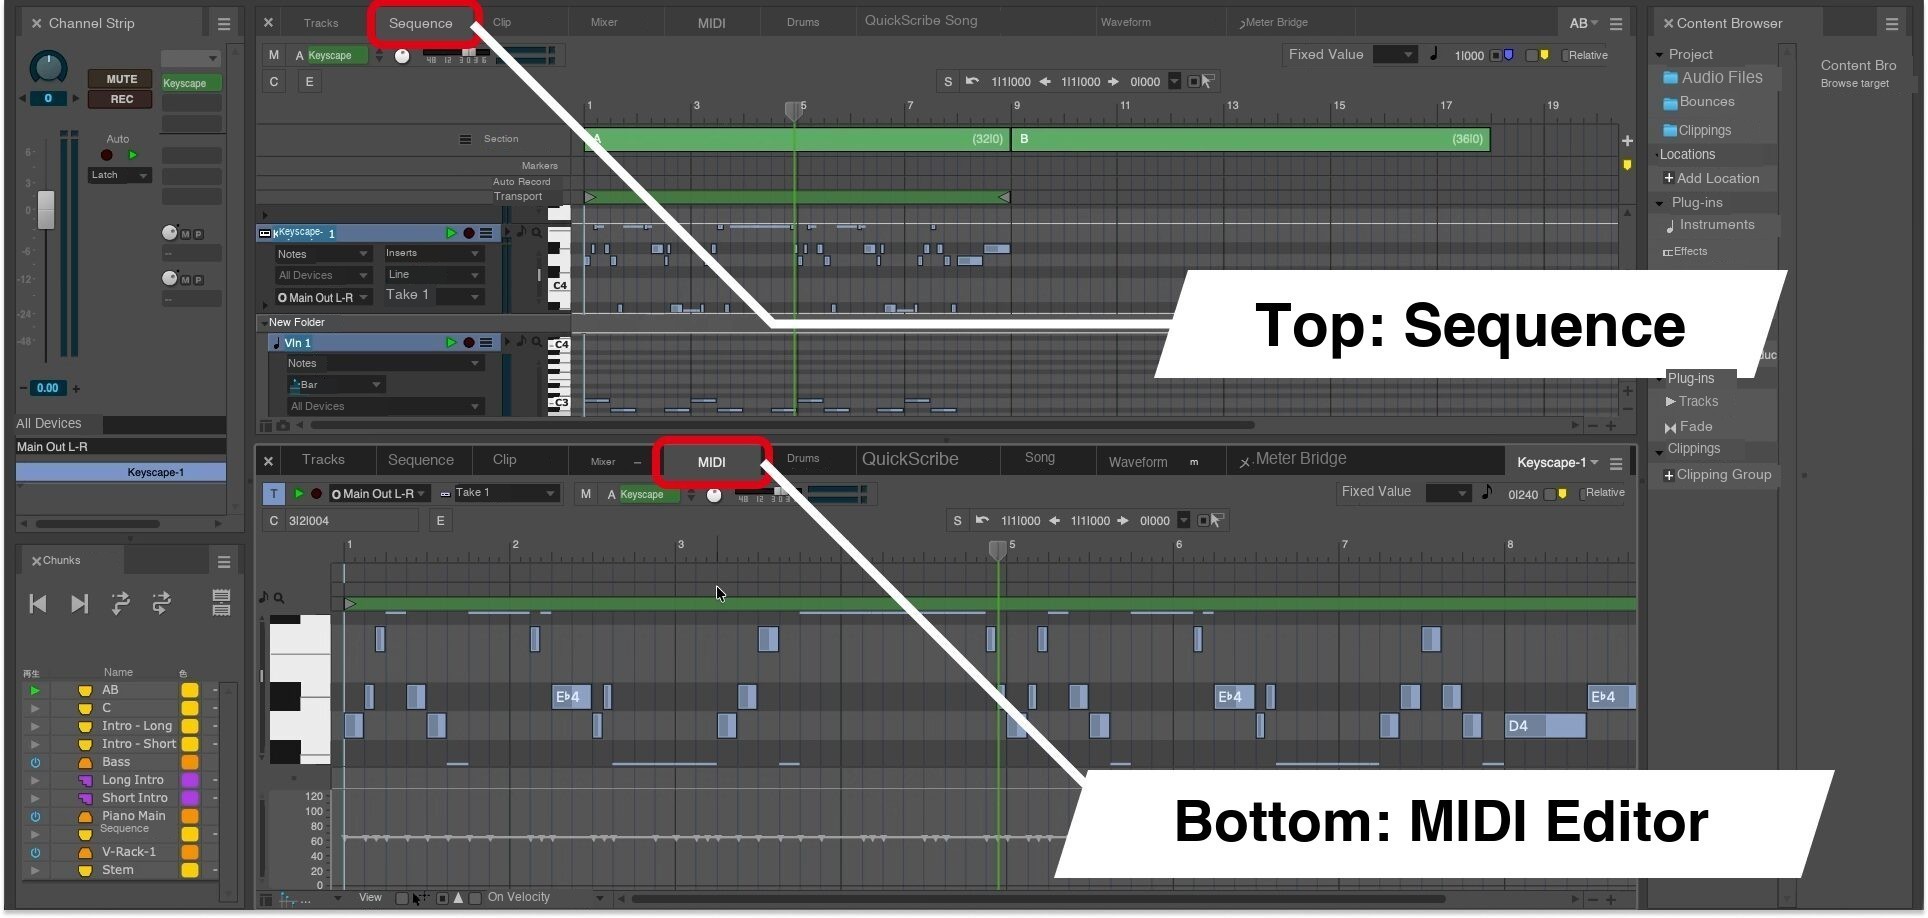
You can choose which view appears in each pane, and swap their positions.
A spacious display, such as a widescreen monitor, makes this particularly useful.
The Tracks window also provides an overview of information such as each track’s inputs.
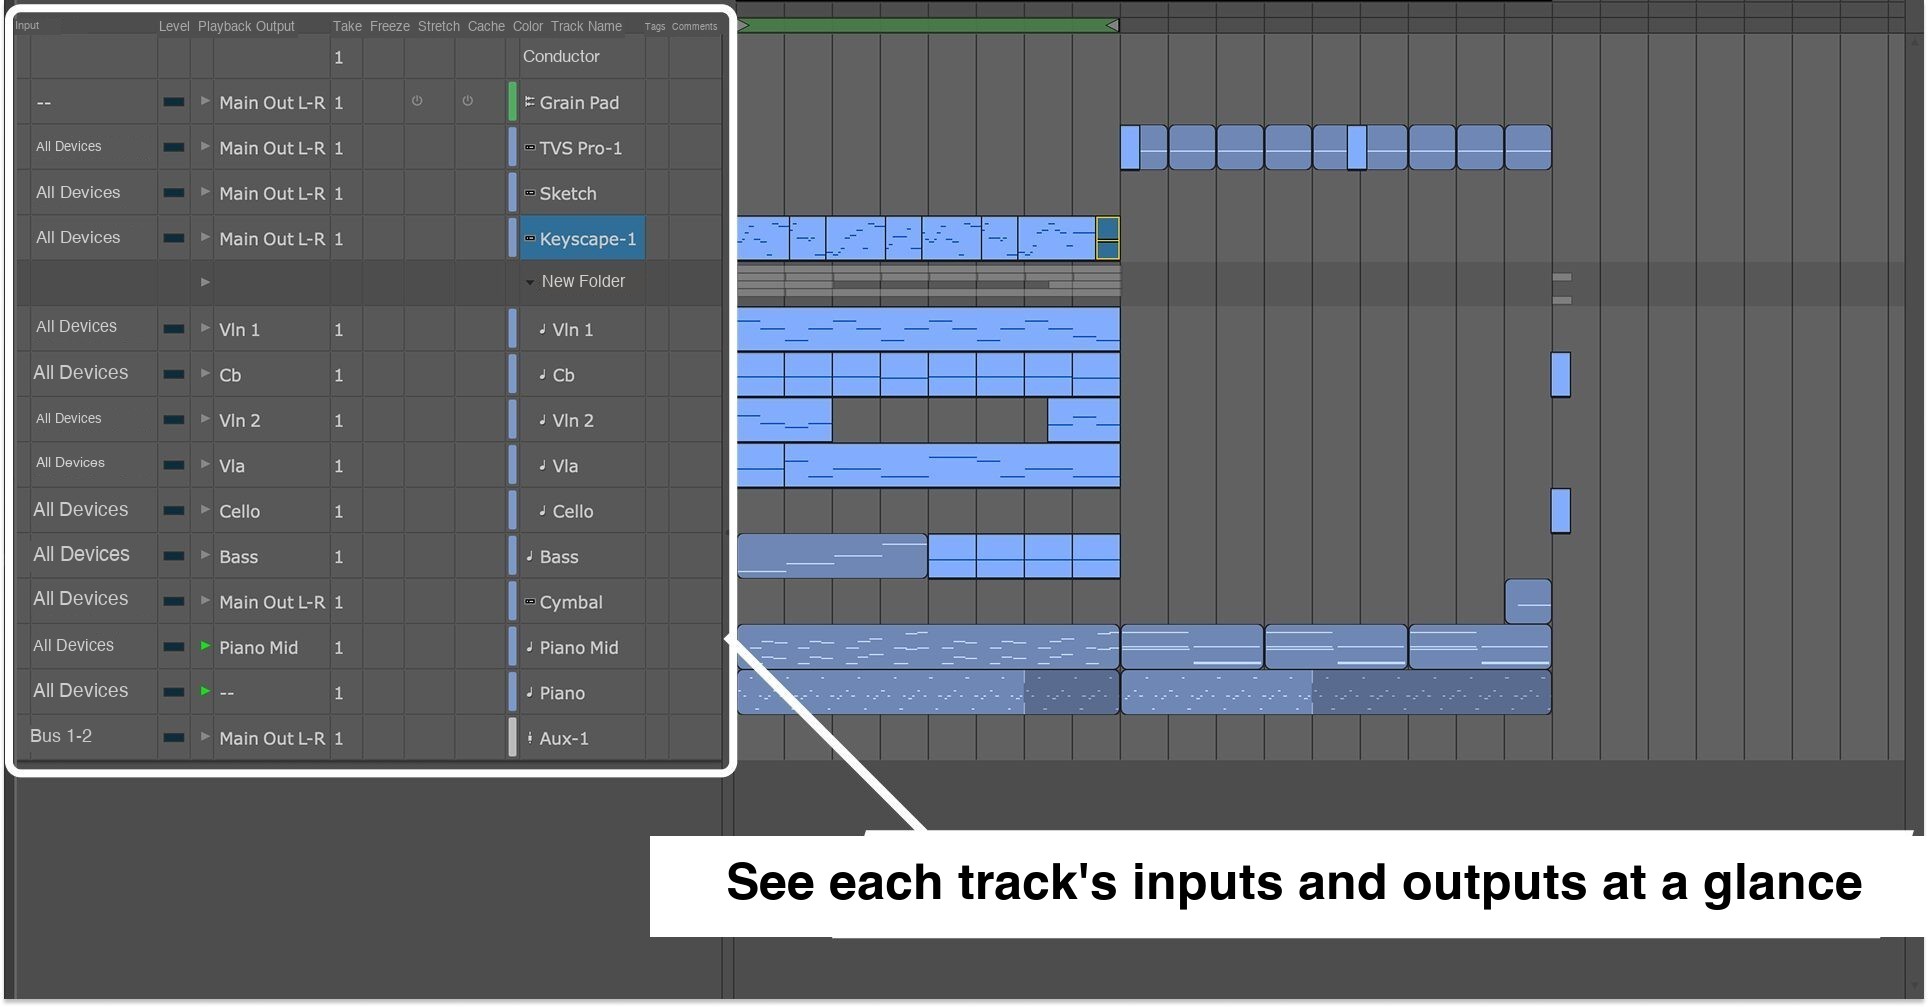
We found this presentation unusual compared with many other DAWs. Keeping it in one pane lets you work while retaining an overview of the project’s setup.
Save Phrases as Clippings for Later Use
Clippings are useful for reusing phrases you have created.
You can keep a collection of MIDI and audio phrases, then reuse them in other sequences and contexts.
First, create a Clippings window to hold your phrases.
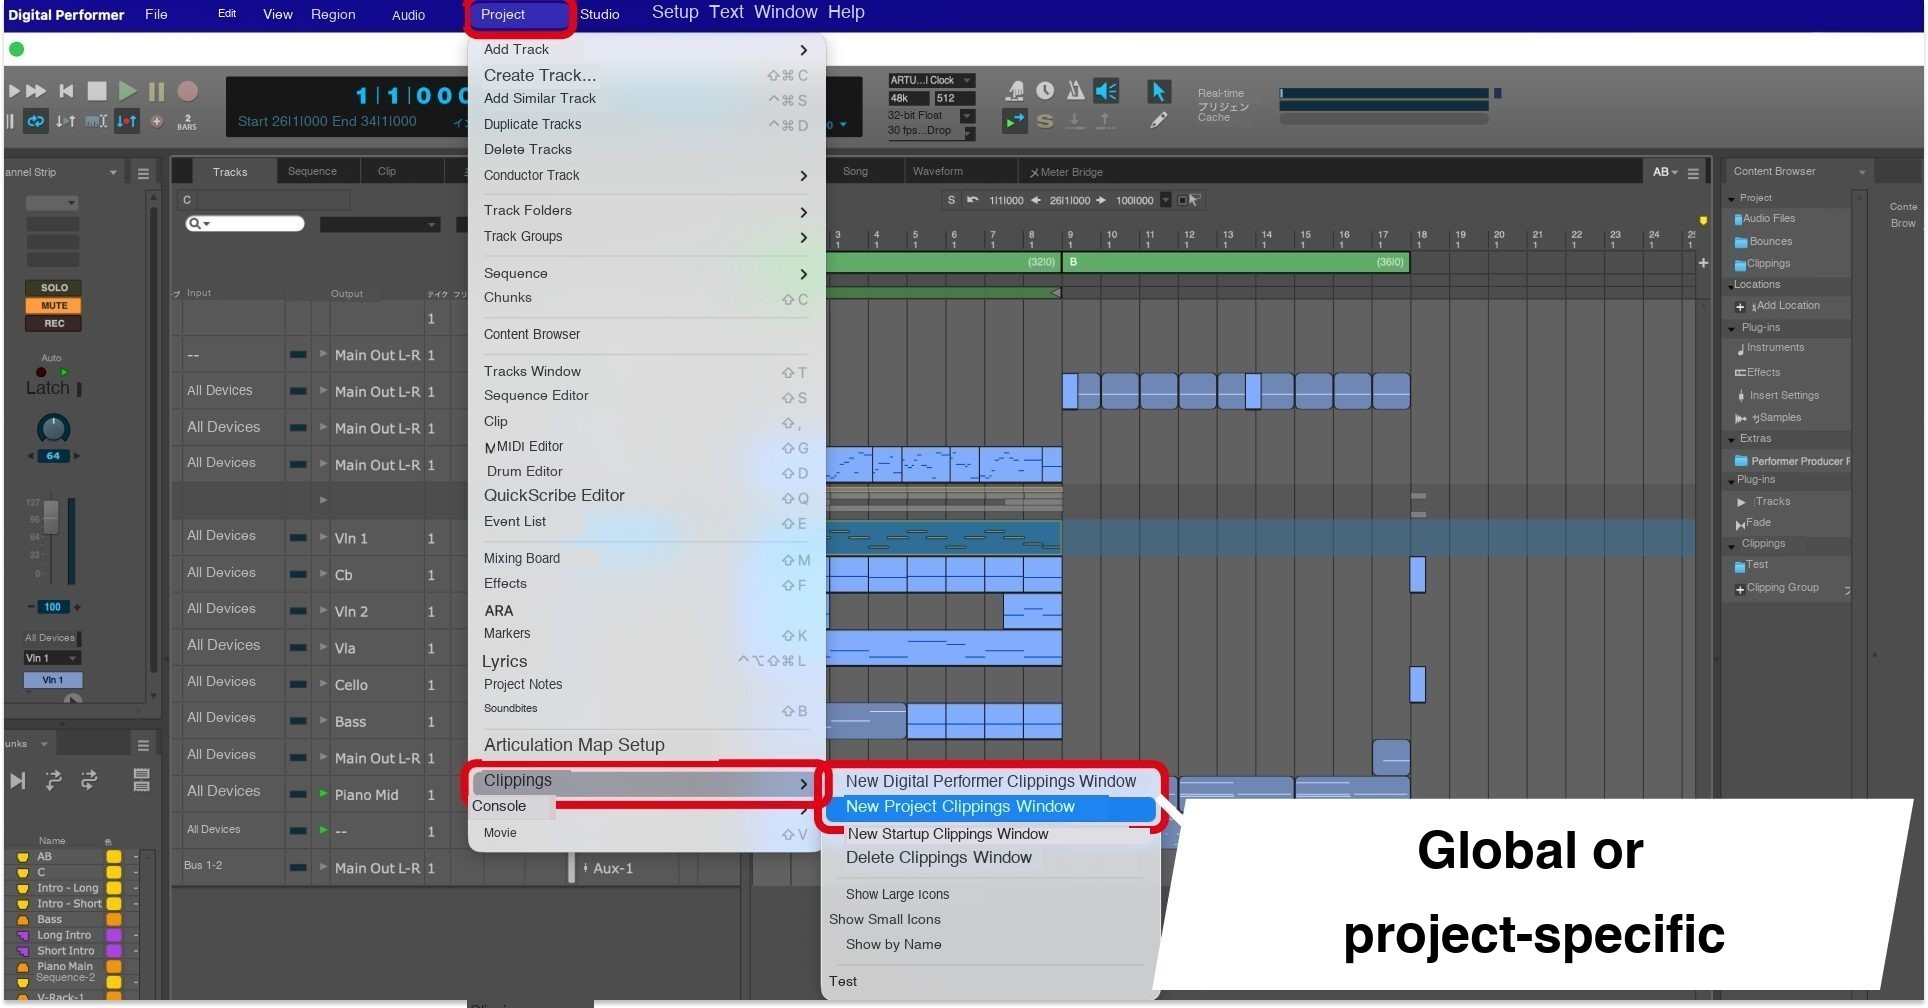
Choose “New Digital Performer Clipping Window” for a collection shared across DP, or “New Project Clipping Window” for a collection used only within the current project.
A DP-wide collection lets you reuse the same phrases across projects.
You can also create several collections organized by category, such as melodies or sound effects.
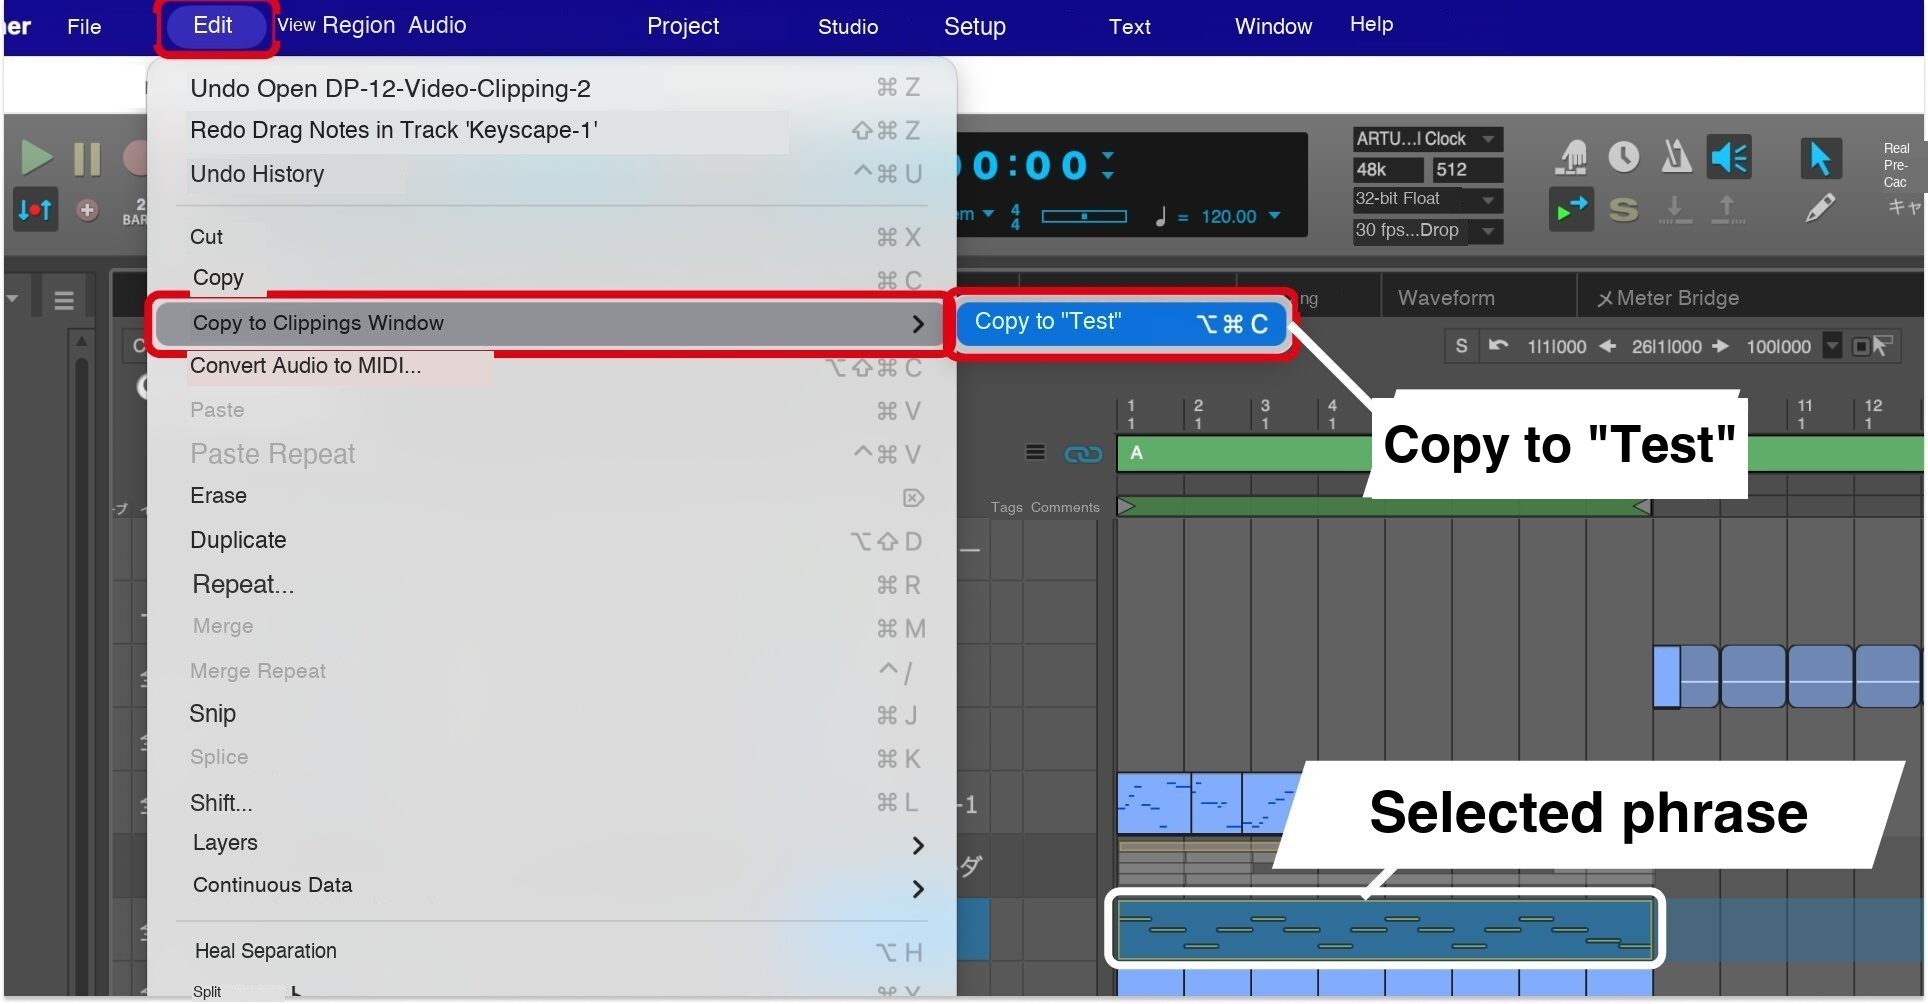
Select the phrase you want to save, then use the Edit menu to copy it to a Clippings window.
Saved phrases are also accessible in the Content Browser on the right.
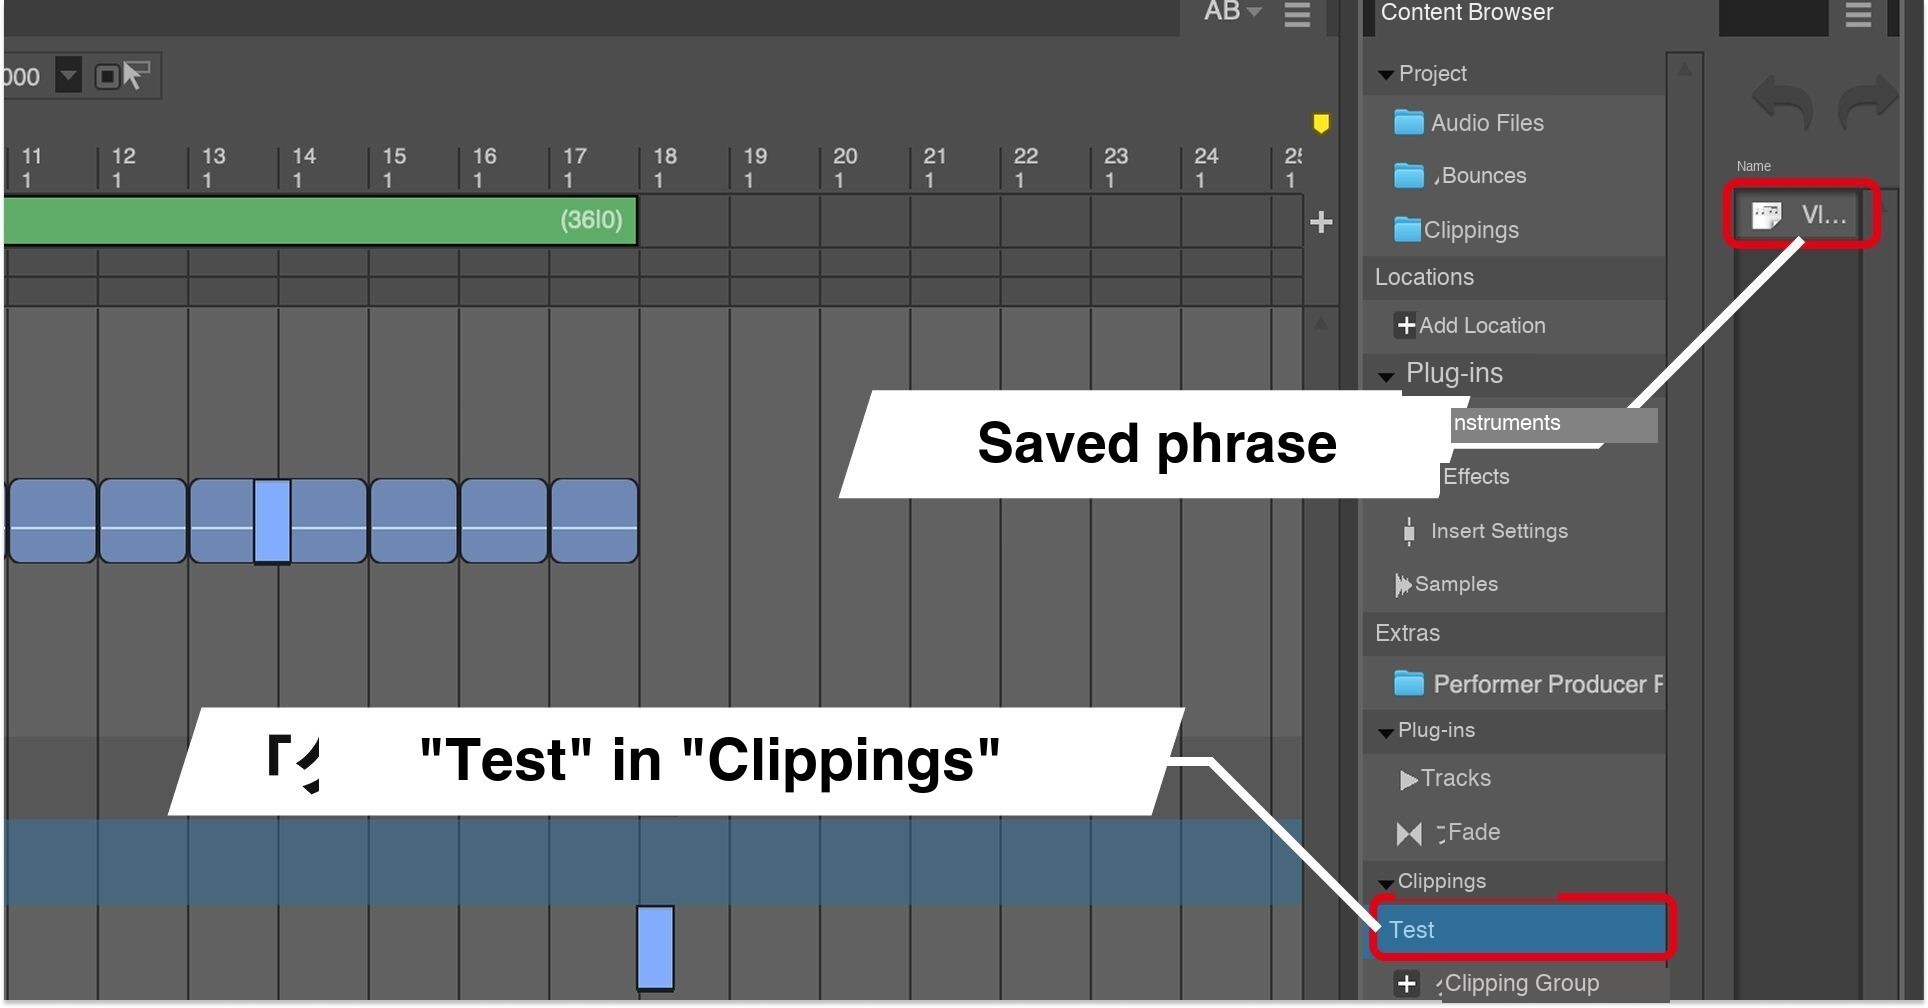
Drag a saved phrase to the desired location to use it immediately.
If you place a MIDI phrase on an existing MIDI track, it plays through that track’s assigned instrument.
This can be particularly convenient when creating variations with different sounds.
Other DAWs also let you save MIDI phrases, but the ease of reusing them here impressed us.
Reuse Instruments and Sound Setups With V-Racks and Track Presets
You can reuse virtual instruments and sound setups as well as phrases.
V-Racks are an established DP feature; Track Presets are new in DP12.
Use One Set of Instruments Across Sequences With a V-Rack
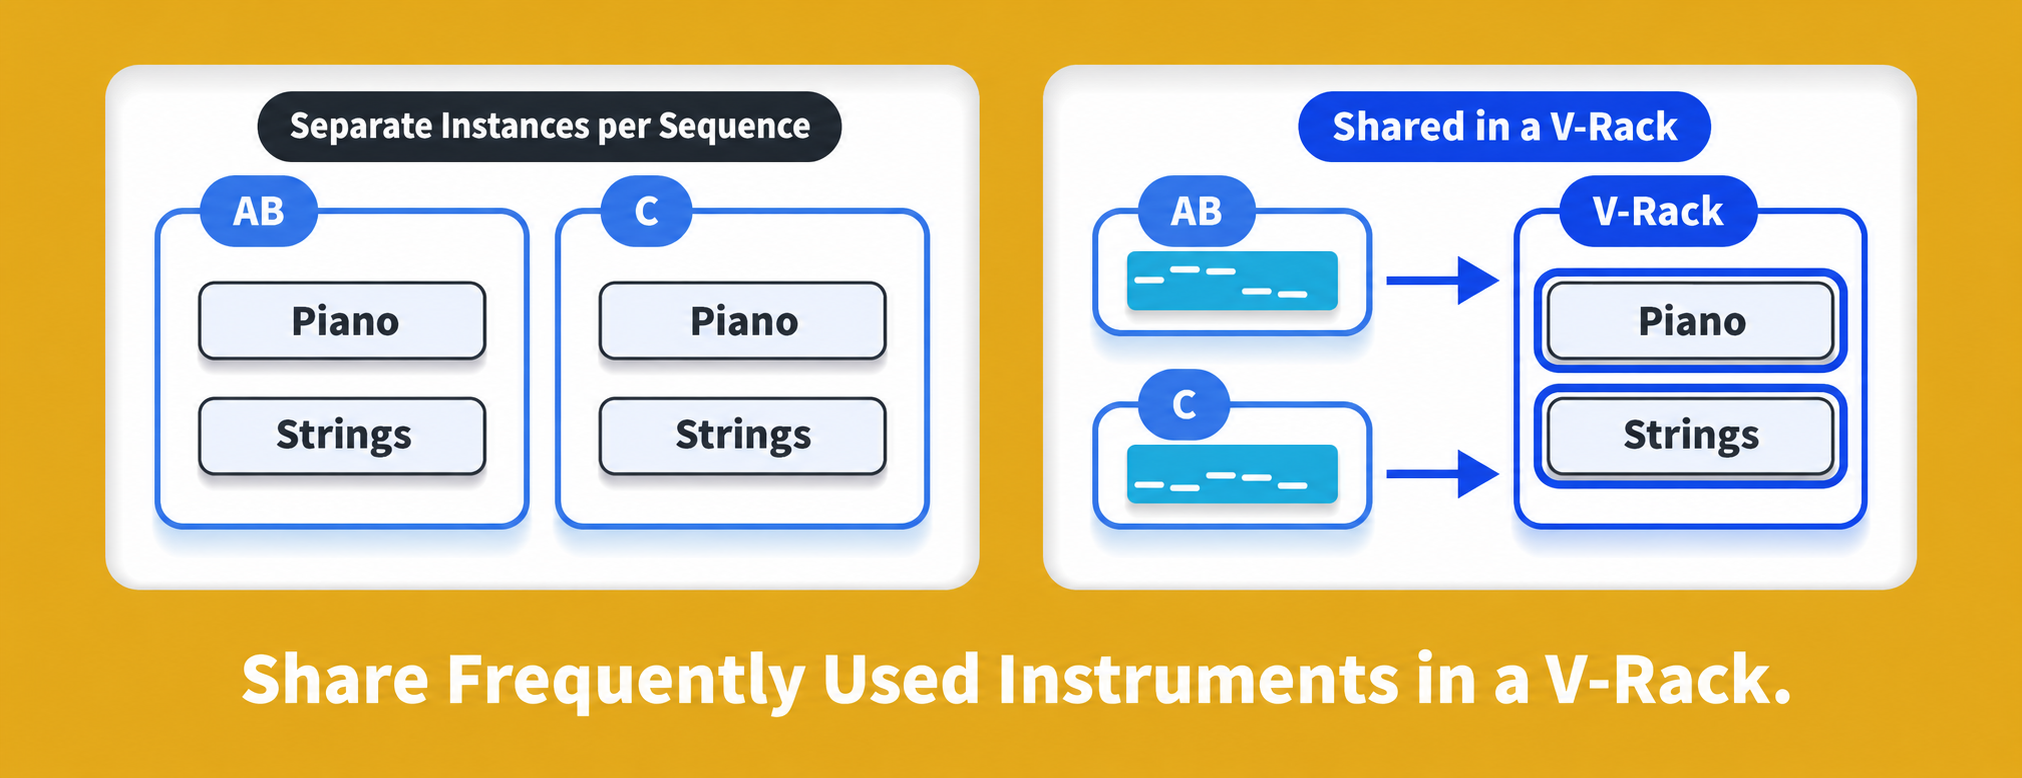
Ordinarily, you load virtual instruments separately for each sequence.
For example, if both AB and C use piano, each sequence would need its own piano instrument.
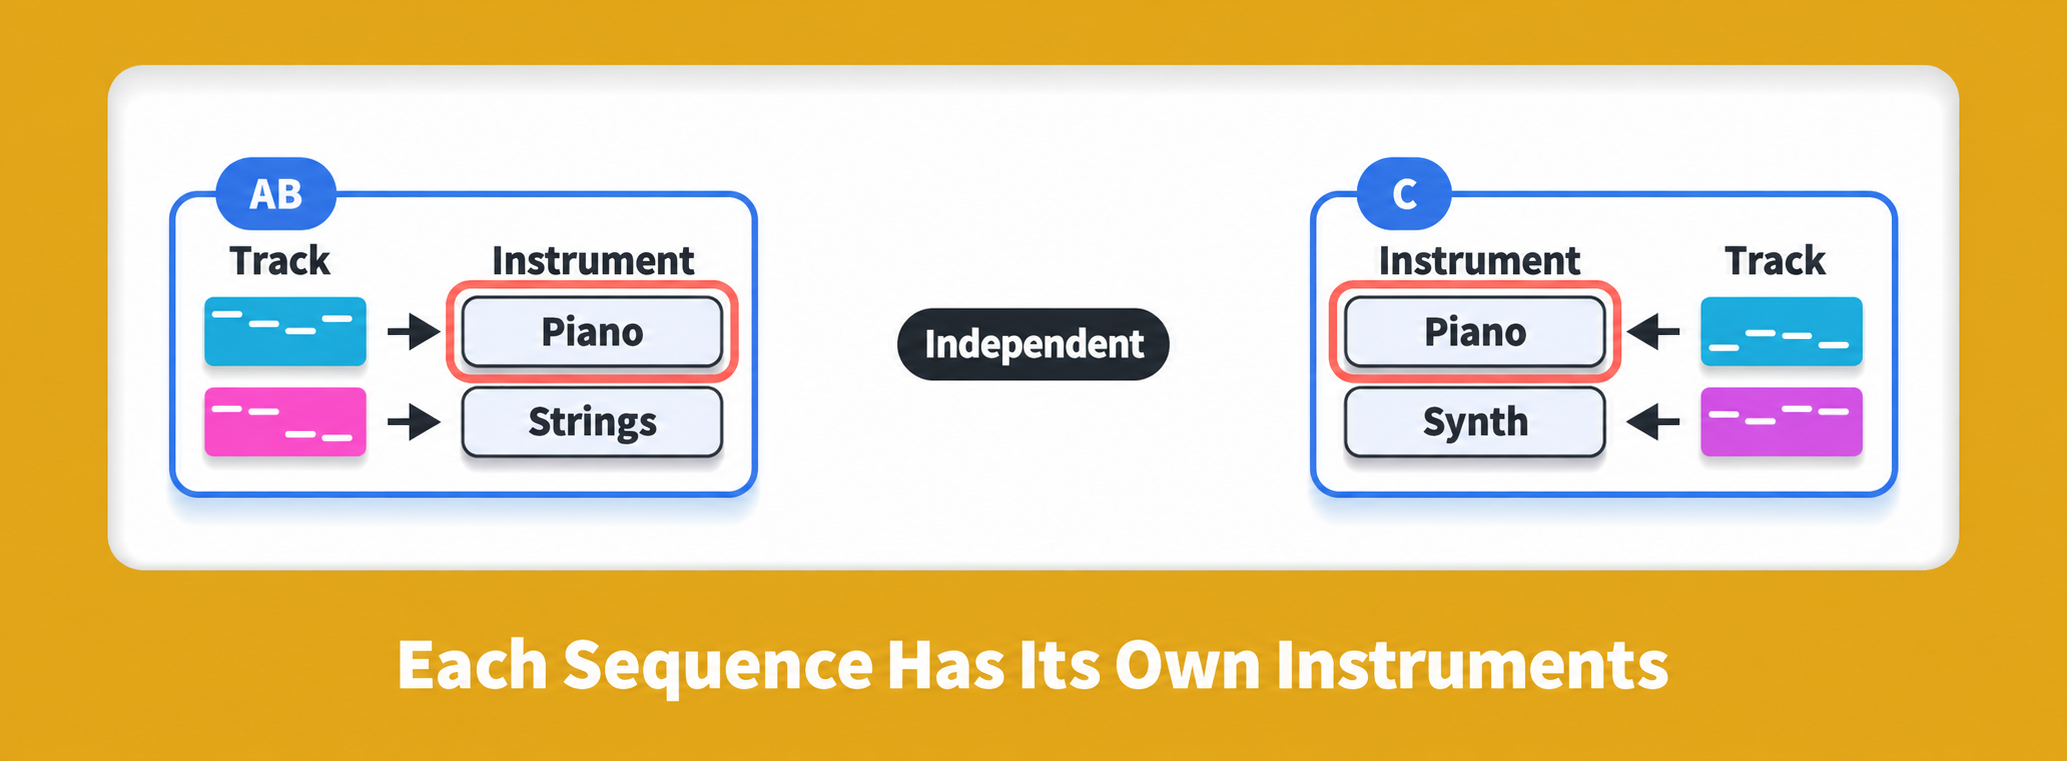
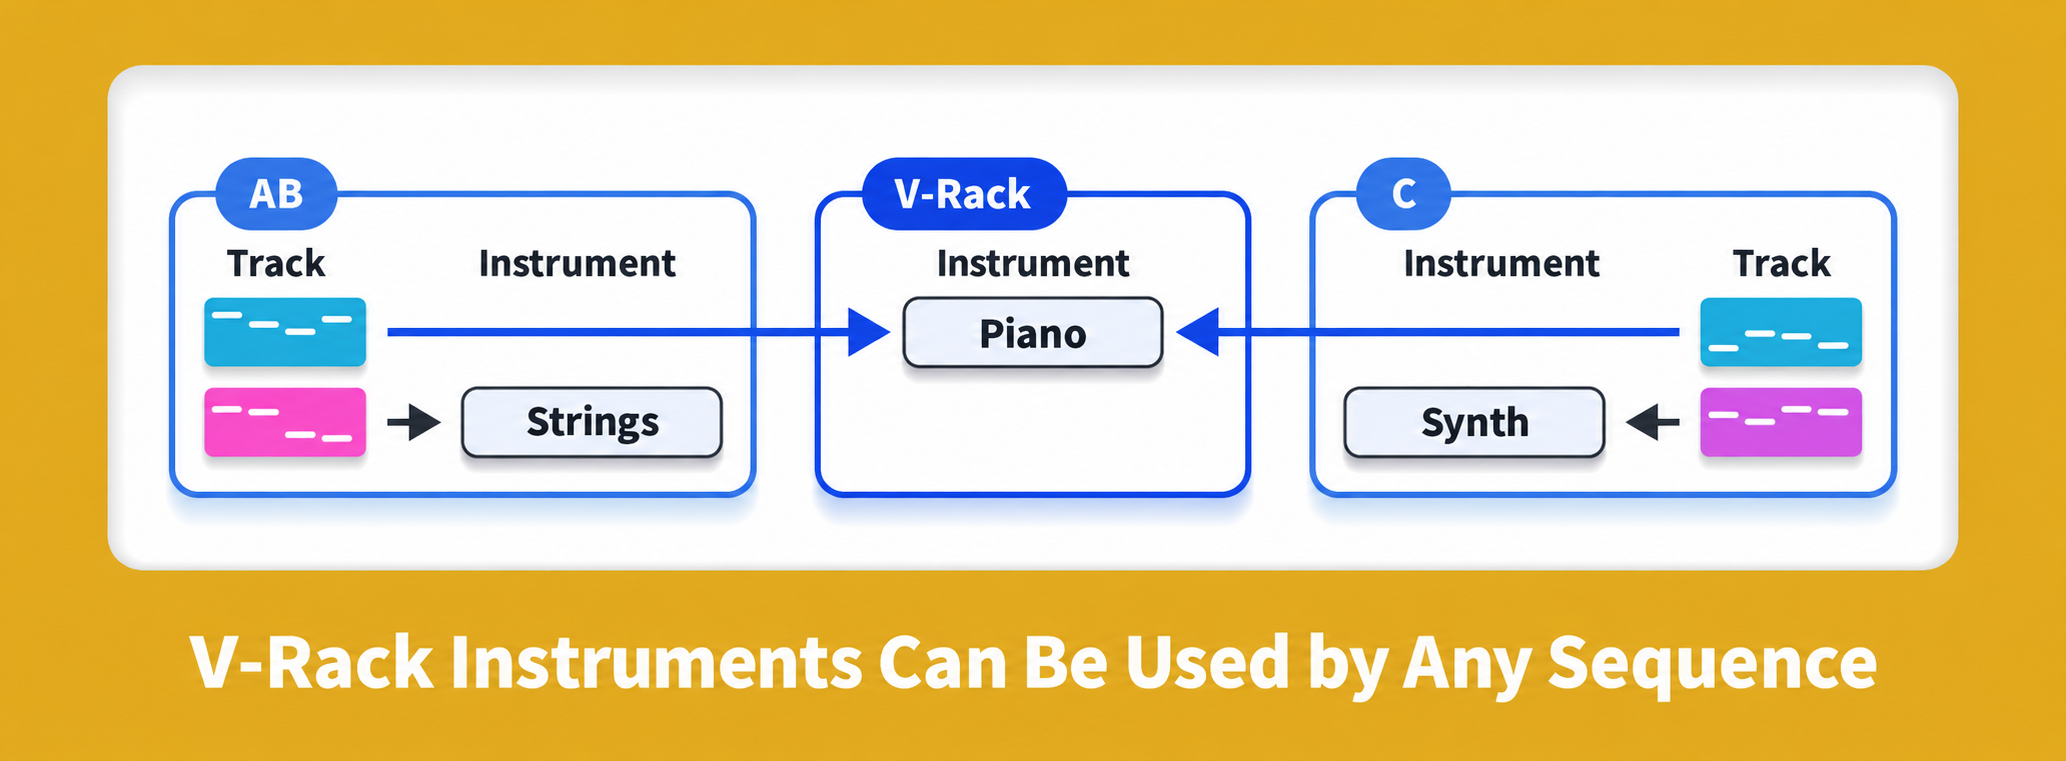
A V-Rack provides another approach.
Virtual instruments placed in a V-Rack can be shared across sequences.
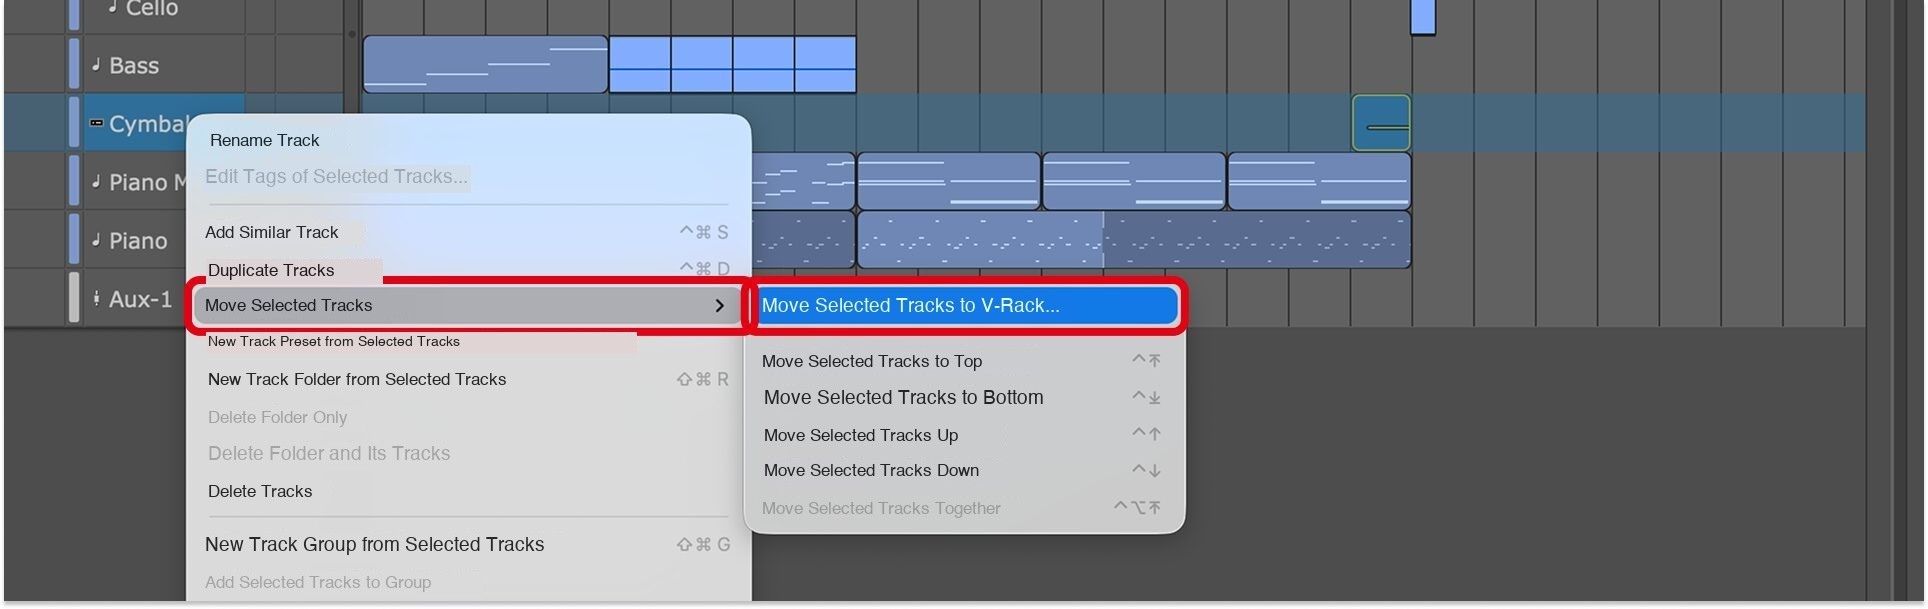
Move instruments into a V-Rack from the track’s context menu.
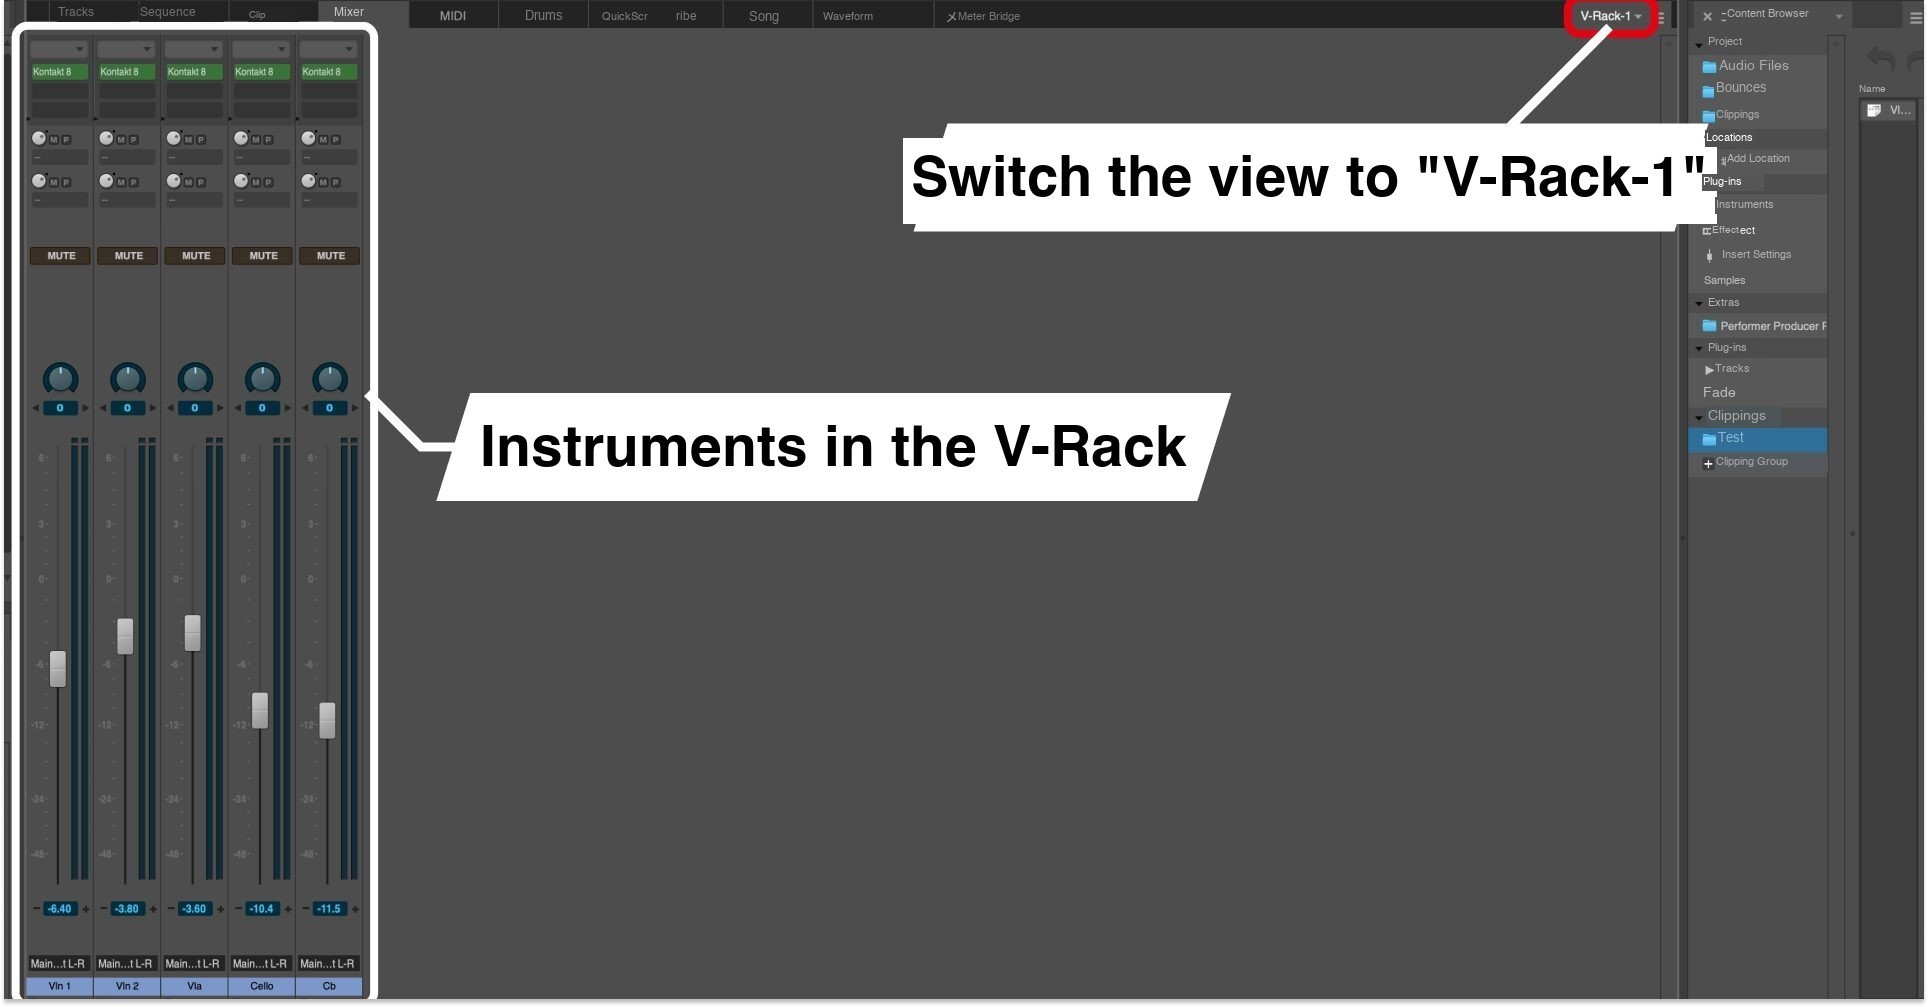
You can adjust the instruments moved into a V-Rack together in the Mixing Board.
For frequently used sounds such as piano or strings, setting up the instruments in a V-Rack before assembling your sequences can save time.
Carry Track Setups Into Other Projects With Track Presets (New in DP12)
DP12 introduces support for Track Presets.
Save a track’s setup and recall it in another project.
Track Presets store settings such as inserts (effects), sends, input and output assignments, and track colors.
They do not include the performance data—the phrases themselves.
For example, if you use several keyboards and specify which keyboard controls each instrument, presets can reduce repeated setup work.
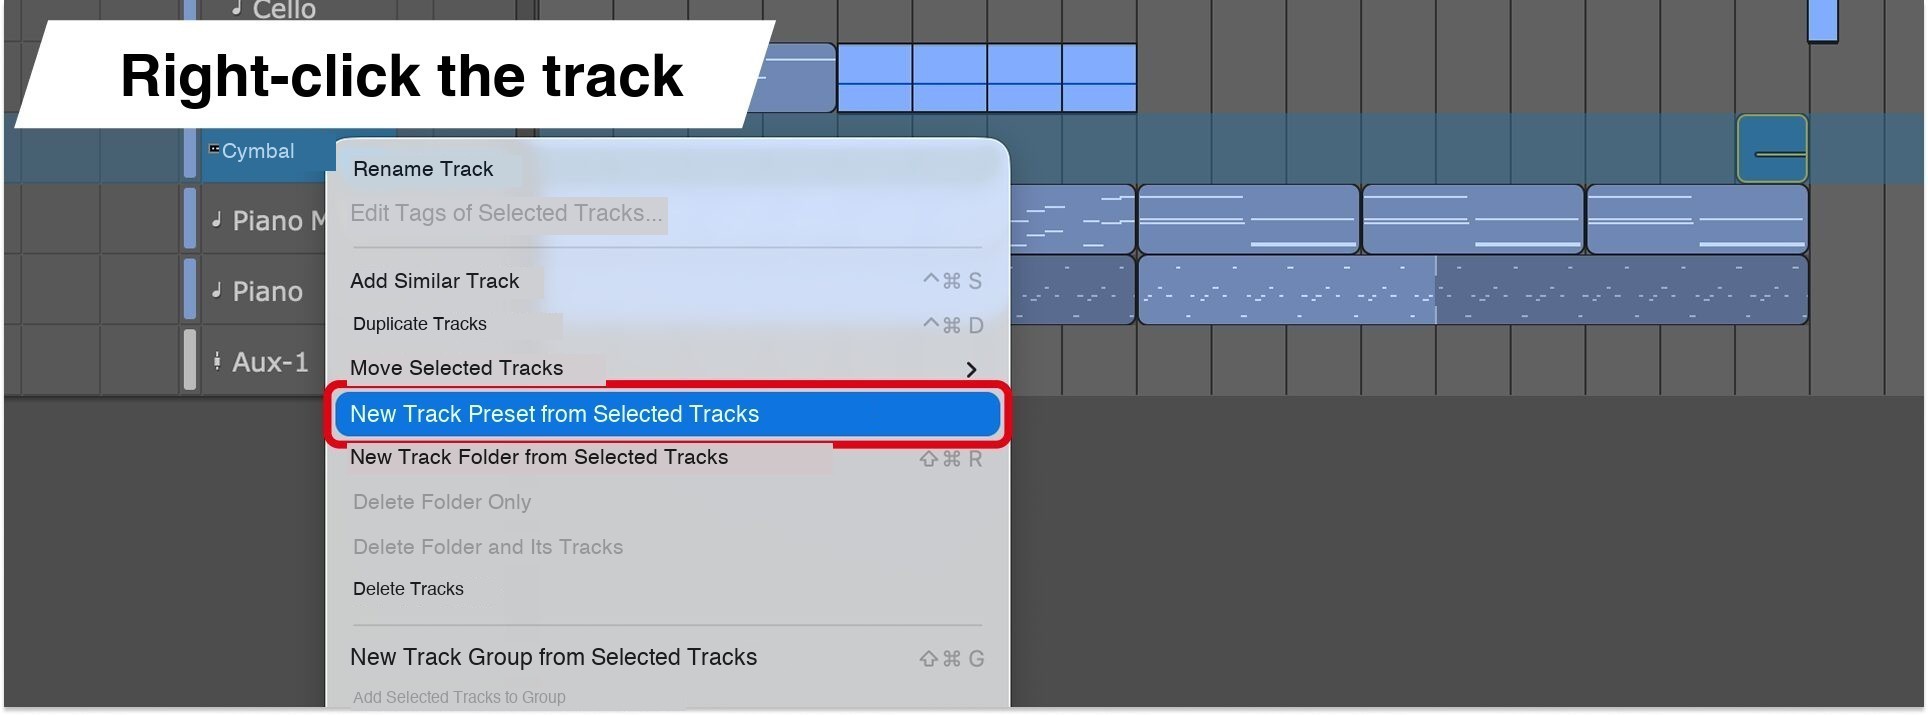
In the save dialog, choose which settings to include, such as I/O assignments, inserts, and automation.
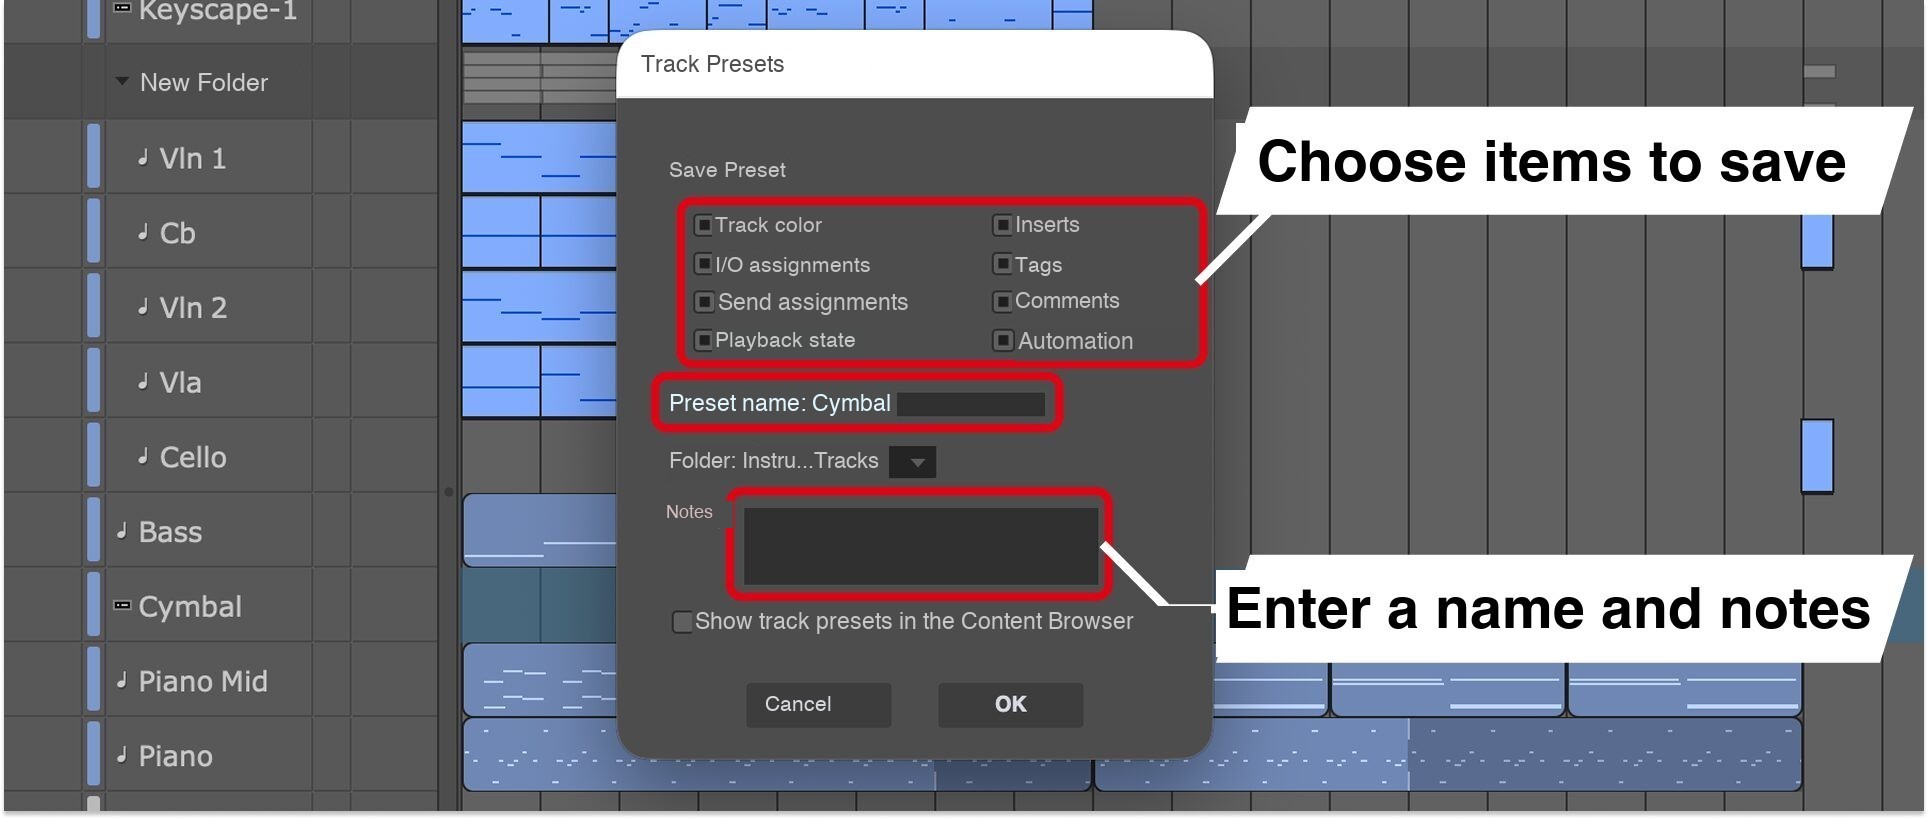
To recall a setup, select a preset from Apply Track Preset on another track.
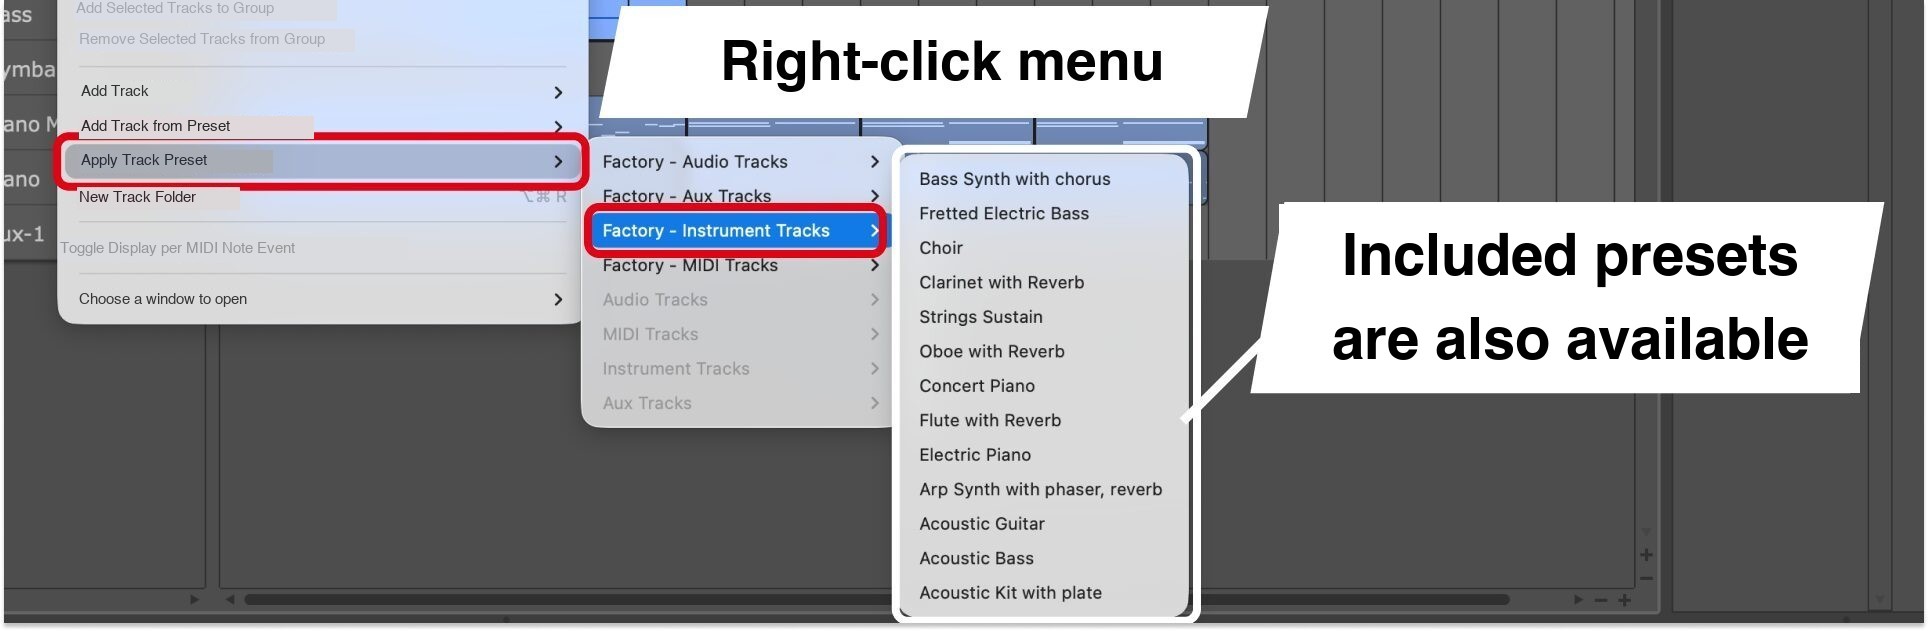
Factory presets are also available, so they are worth trying before creating your own.
Combining V-Racks and Track Presets helps keep a sound setup ready for your next production.
New Audio Processing and Mixing Features in DP12
Alongside its workflow tools, DP12 adds new audio processing and mixing capabilities.
AI Stem Separation (New in DP12)
DP12’s new AI Stem Separation can divide a finished mix into six stems: drums, bass, vocals, guitar, ensemble strings, and ensemble brass.
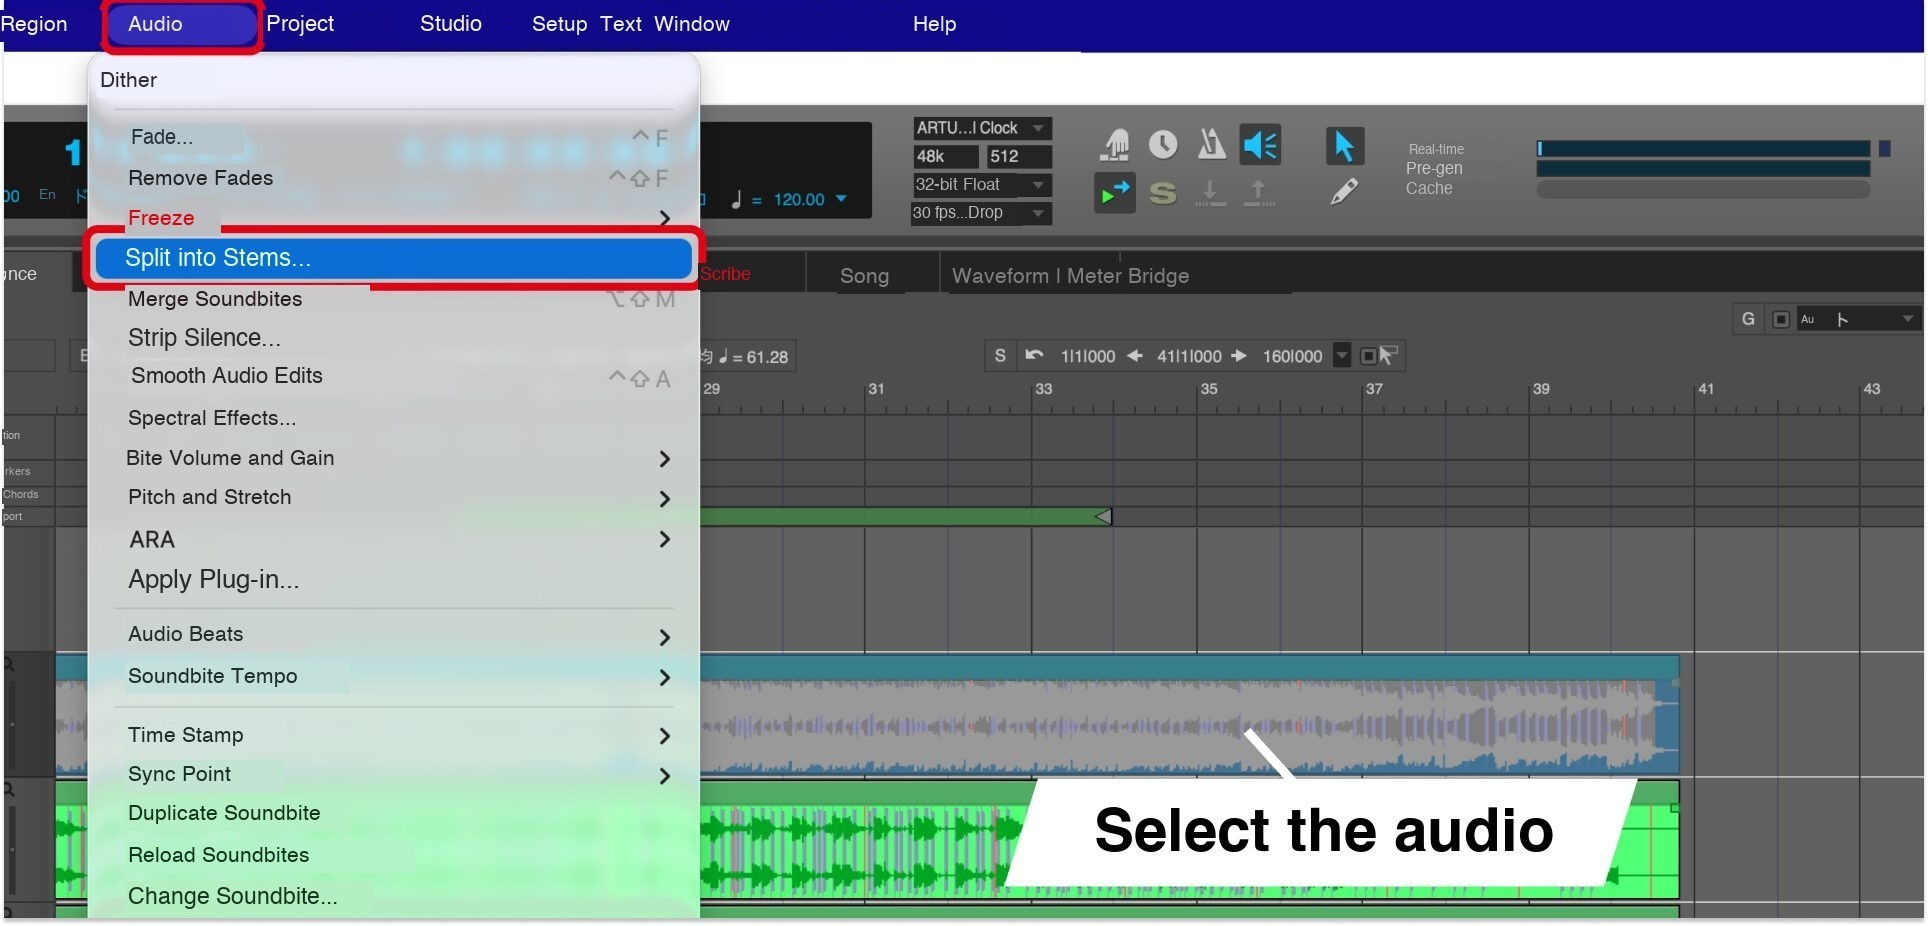
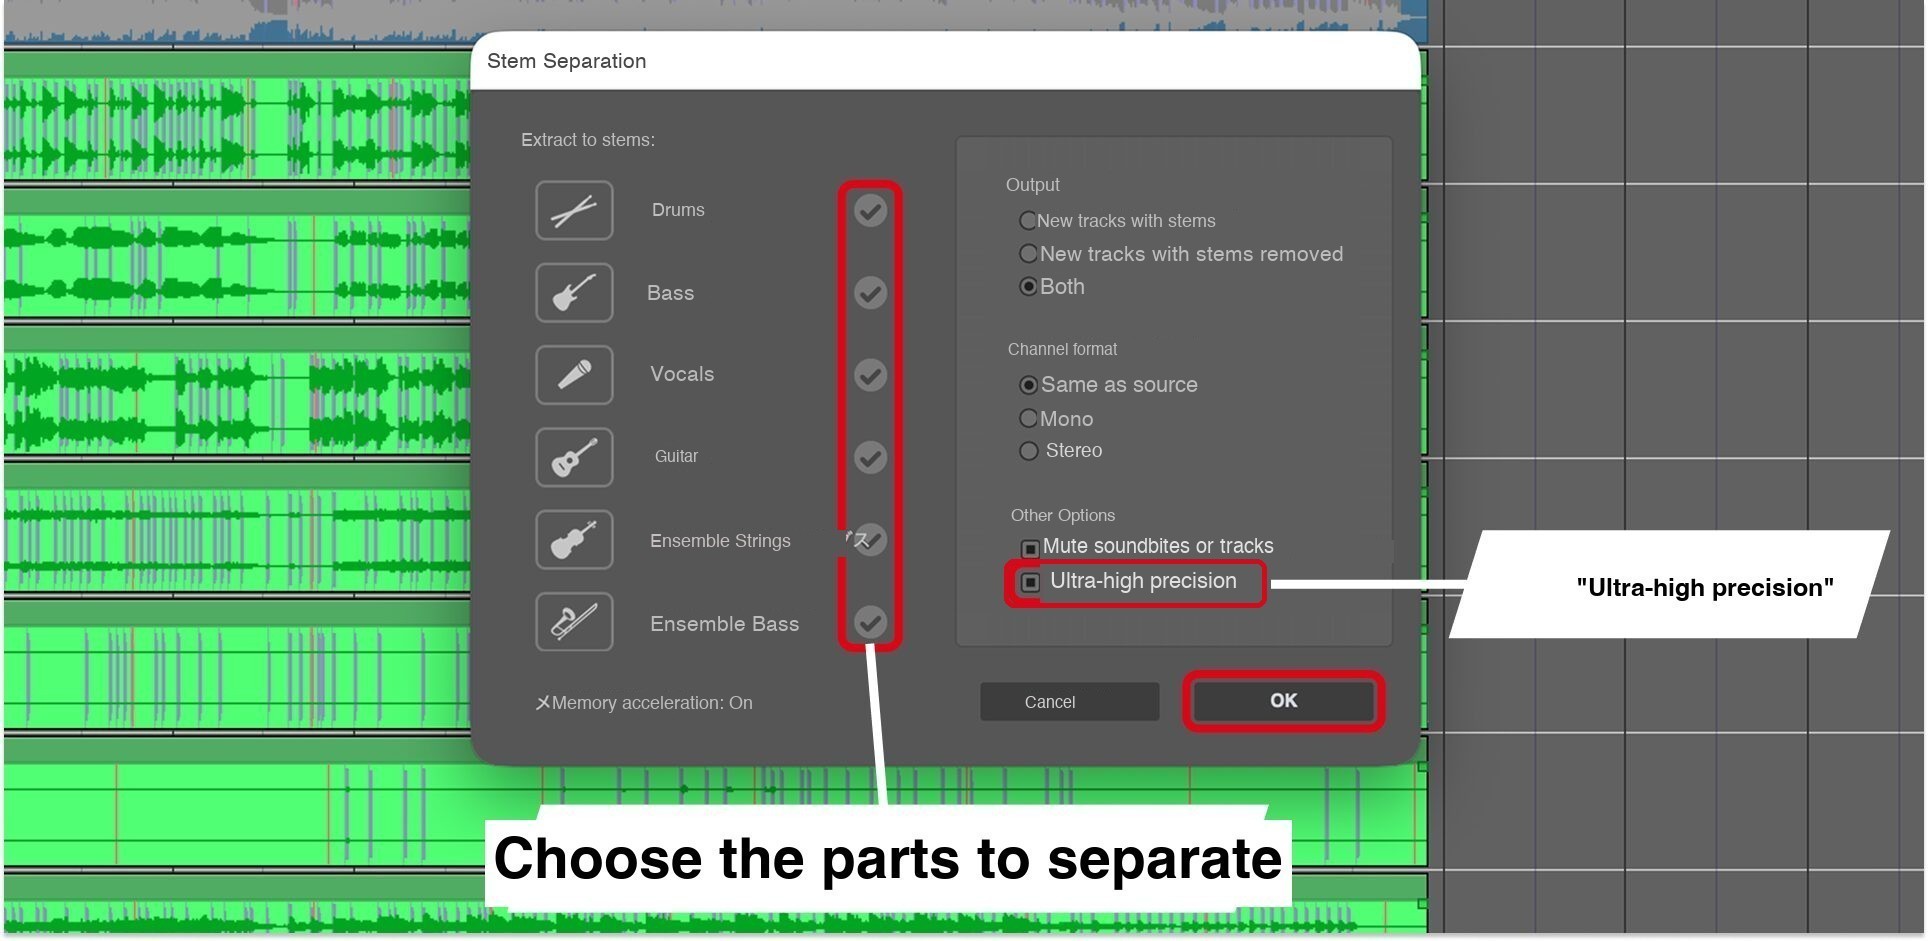
The brass part corresponds to Ensemble Brass. The original Japanese interface labels it inconsistently; it is not a second bass stem.
Enabling the high-precision option can slightly improve the result for some material, but takes longer to process.
In our test, separating a song about one minute long took approximately two and a half minutes.
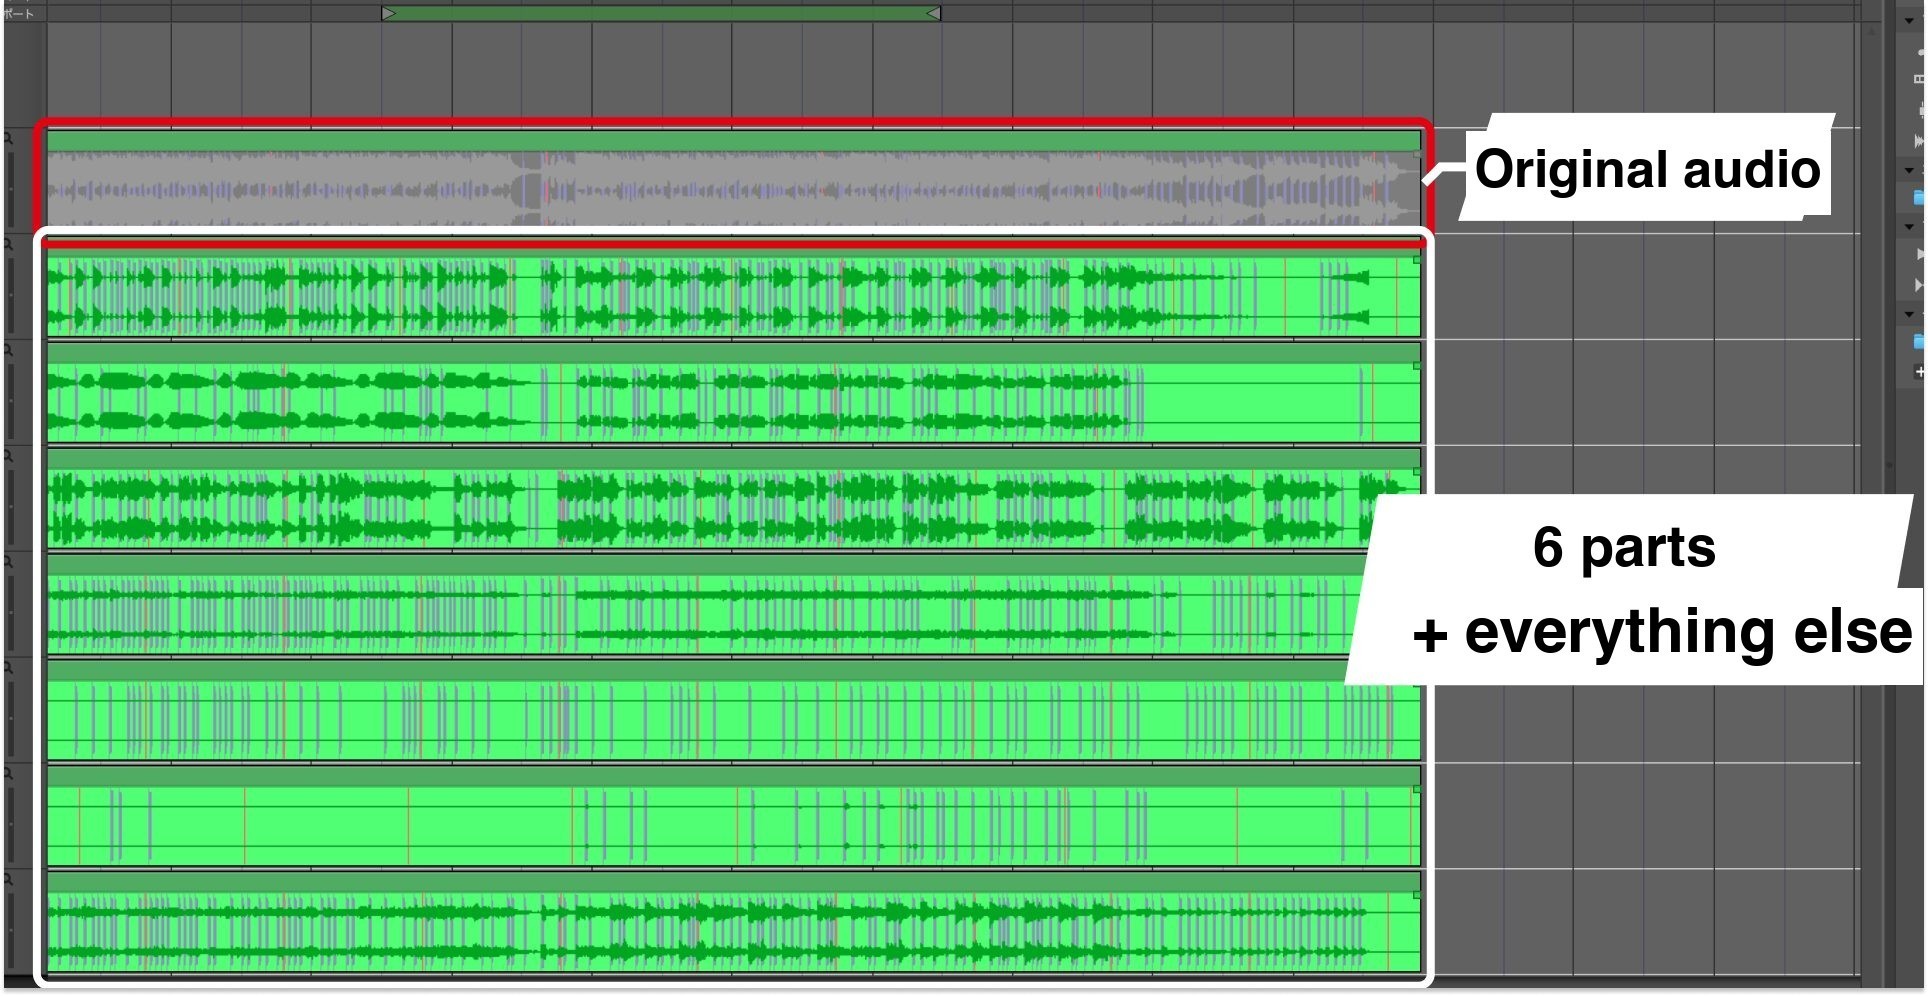
Setting Output to Both creates tracks for the selected parts and another track containing the remaining audio.
In our hands-on test, drums and bass separated particularly cleanly, and the overall result was usable for our purposes.
Extracting parts from a finished mix also fits DP’s broader emphasis on reusing material.
Dolby Atmos Support (New in DP12)
DP12 supports Dolby Atmos, allowing you to mix and export immersive audio within the DAW.
Open the Dolby Atmos settings from Studio > Bundles.
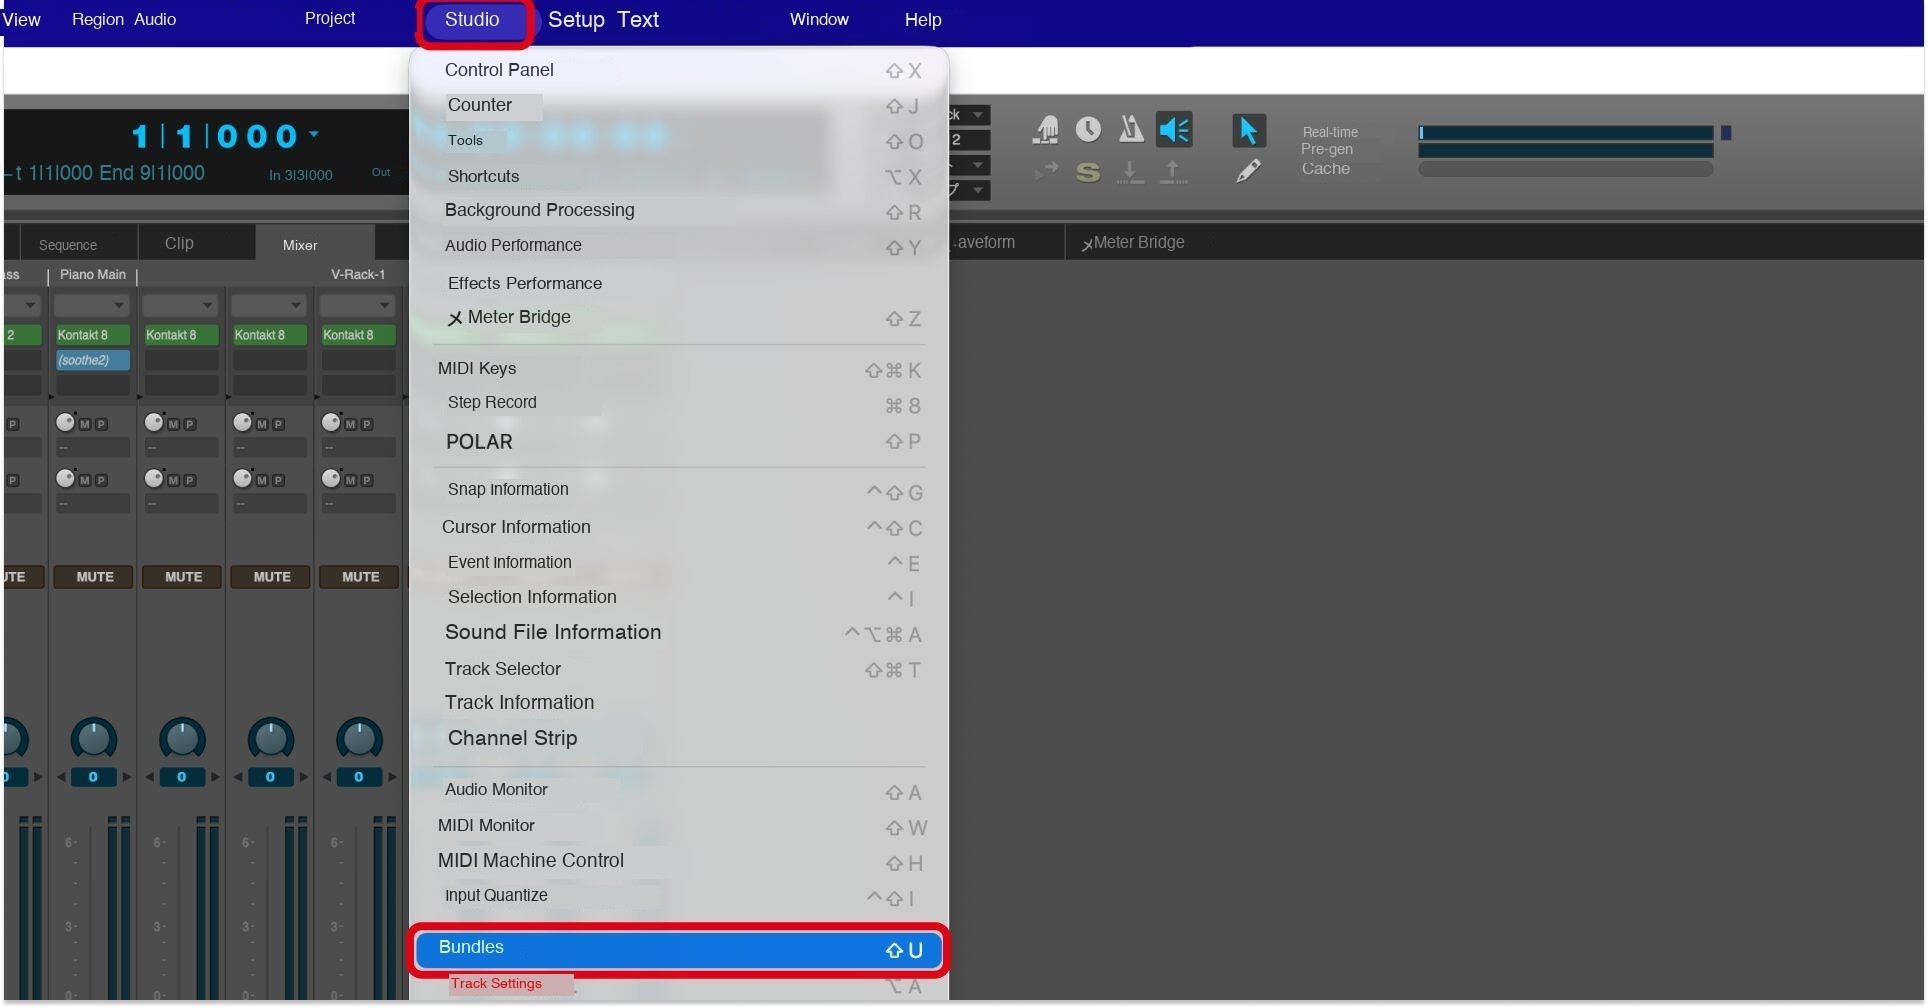
Enable Dolby Atmos in the Dolby Atmos tab to activate the related features.
You can also add beds and objects in this tab.
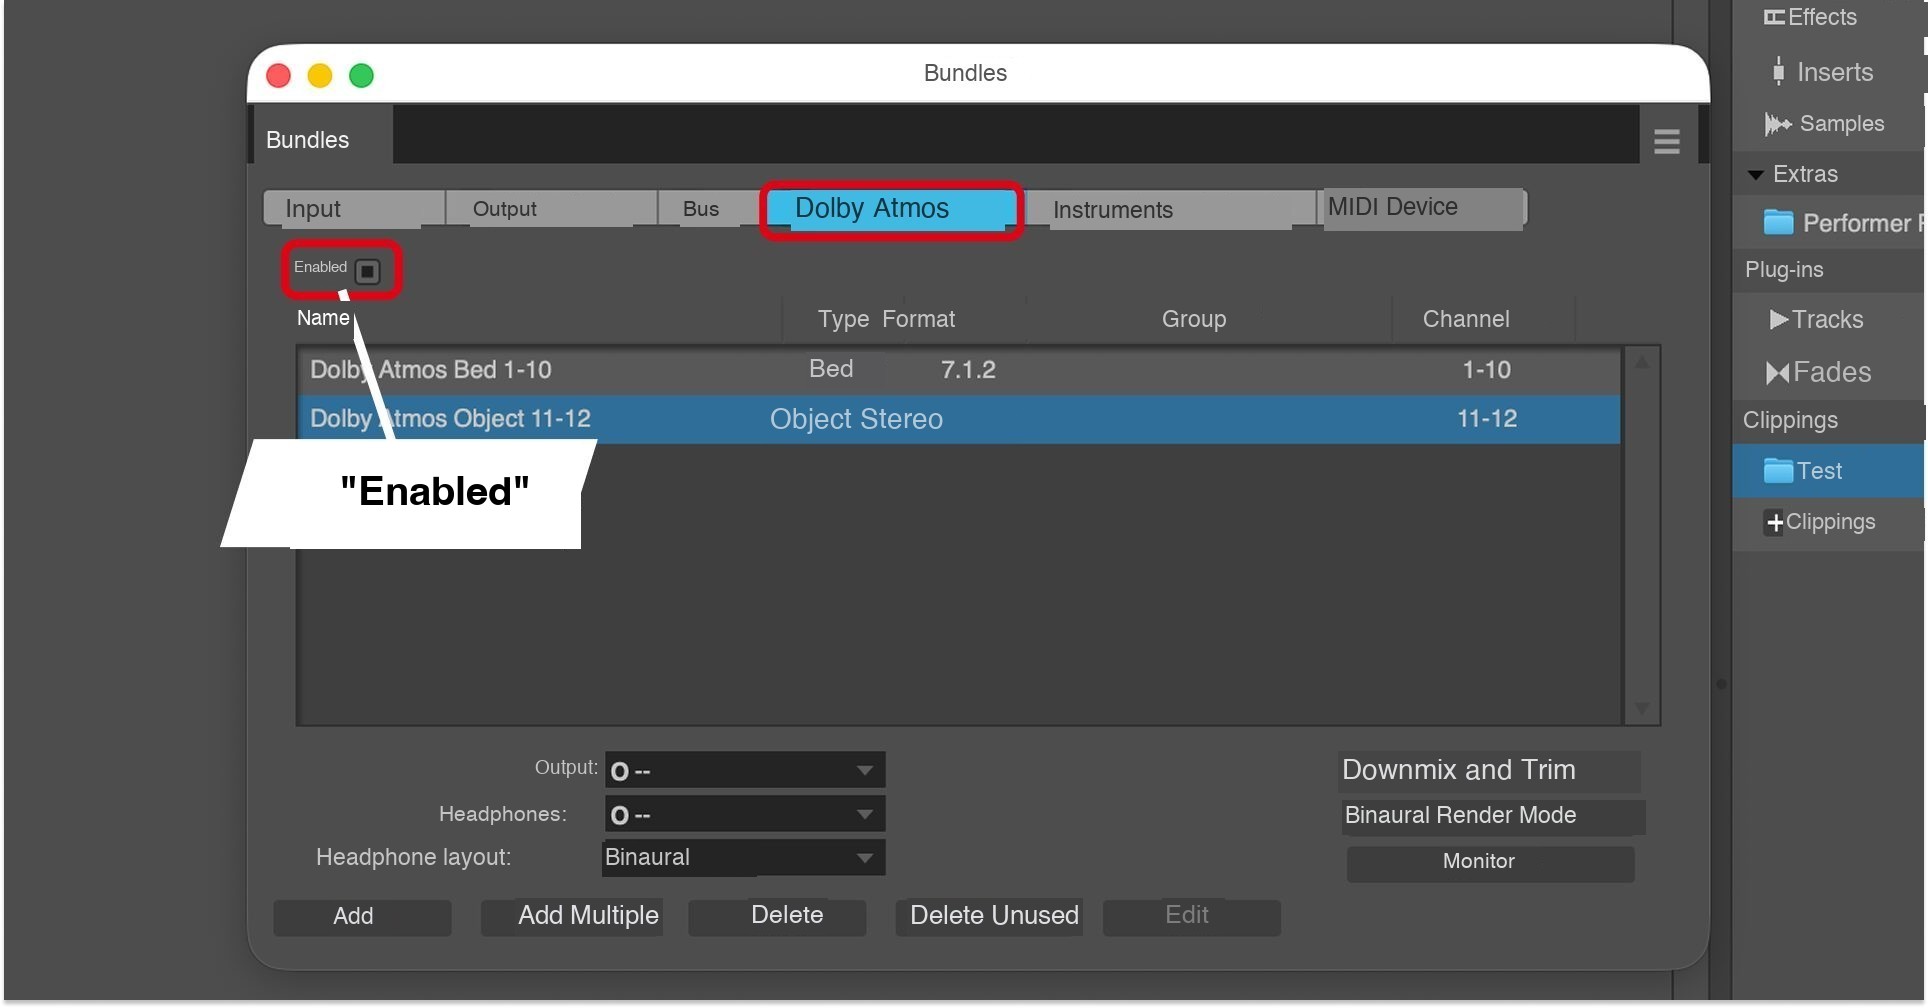
The project must use a sample rate of 48 kHz or 96 kHz.
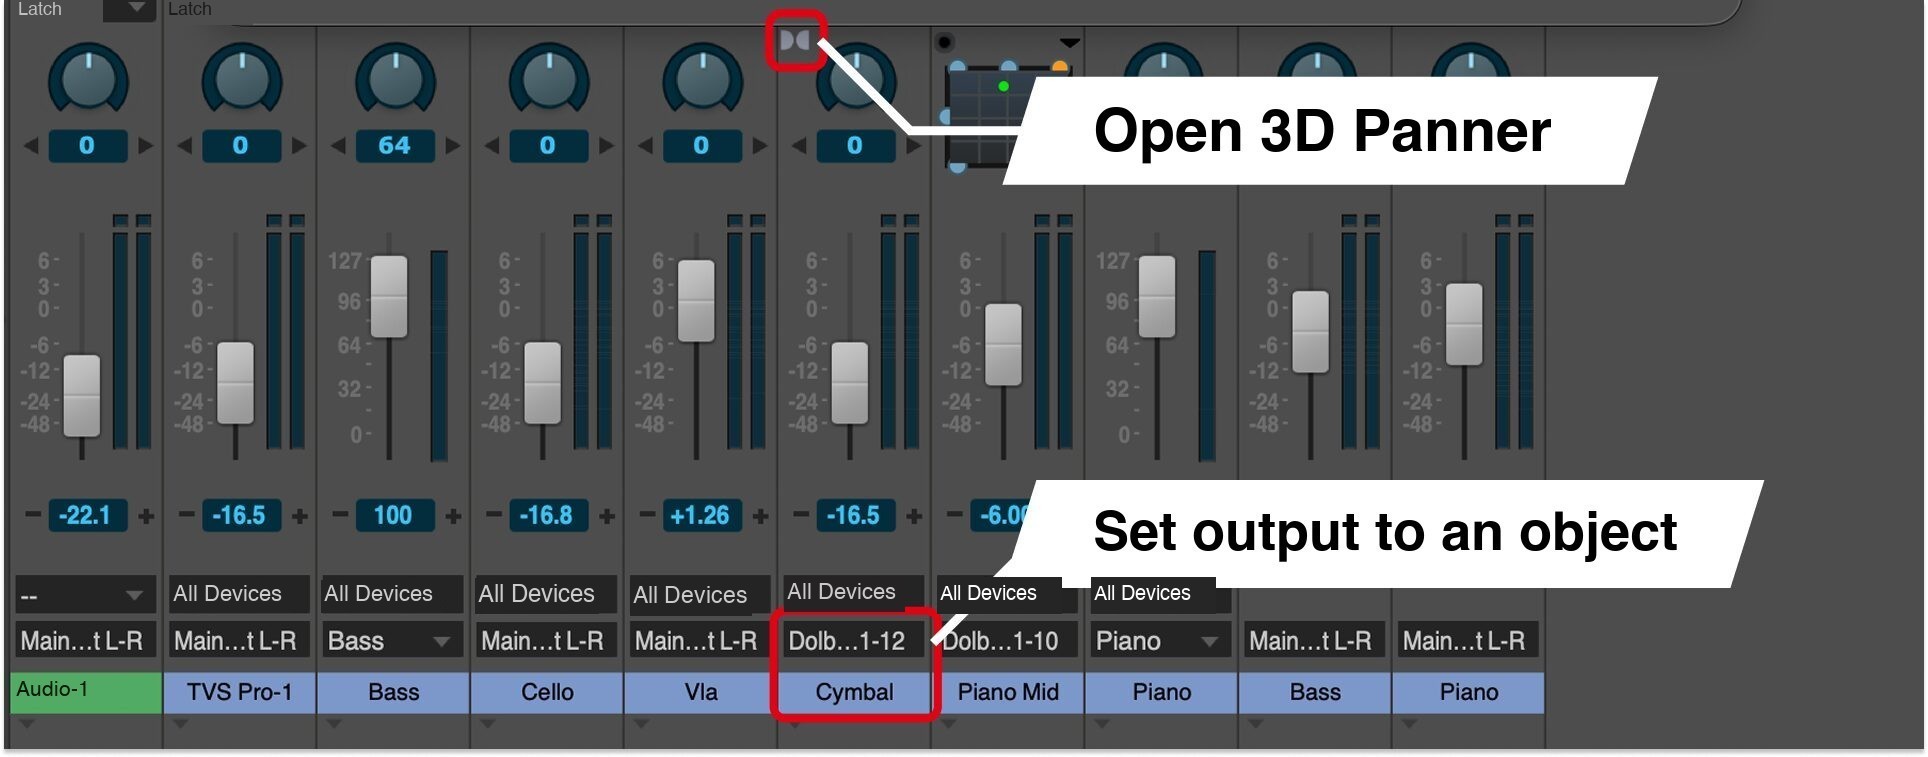
To position a sound in three dimensions, assign its track output to a Dolby Atmos object.
For an assigned track, open the Dolby 3D Panner using the button to the left of the pan knob in the Mixing Board.
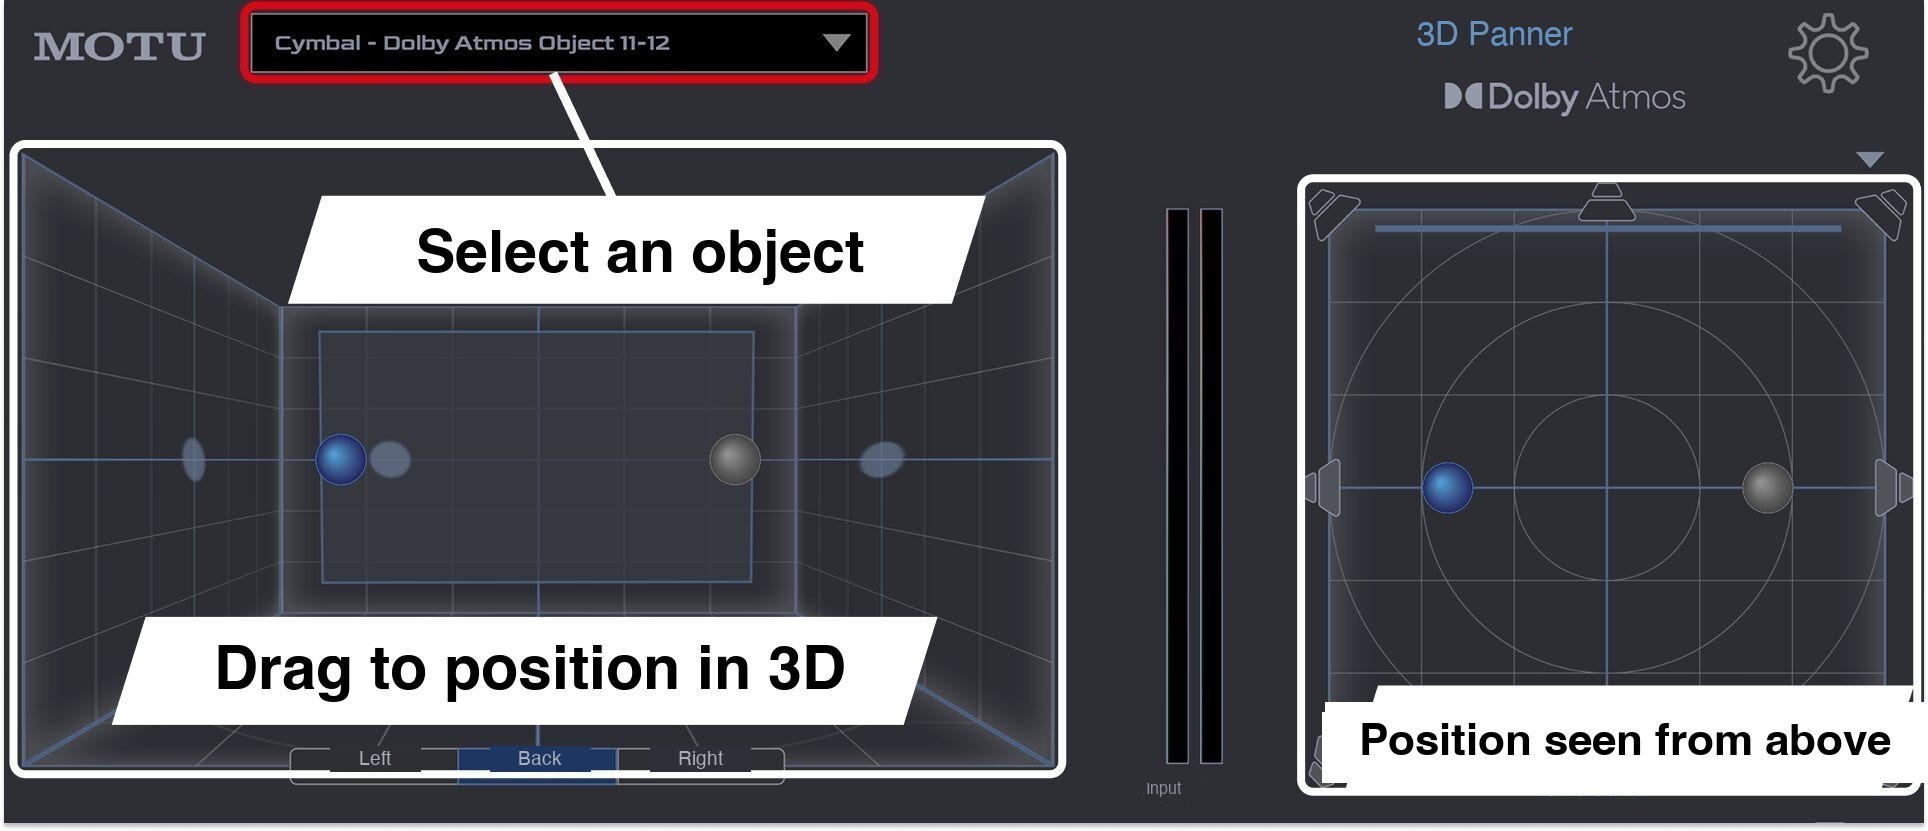
In the Dolby 3D Panner, you can position sounds in three dimensions.
Drag the object in the room’s perspective view or overhead view to set its position.
You can also make precise adjustments with knobs or numerical entry.
DP12 includes a Dolby Atmos renderer. With binaural output, you can monitor the immersive mix on headphones without a multichannel speaker system.
Configure headphone output using the Headphones and Headphone Layout settings in the Dolby Atmos tab.
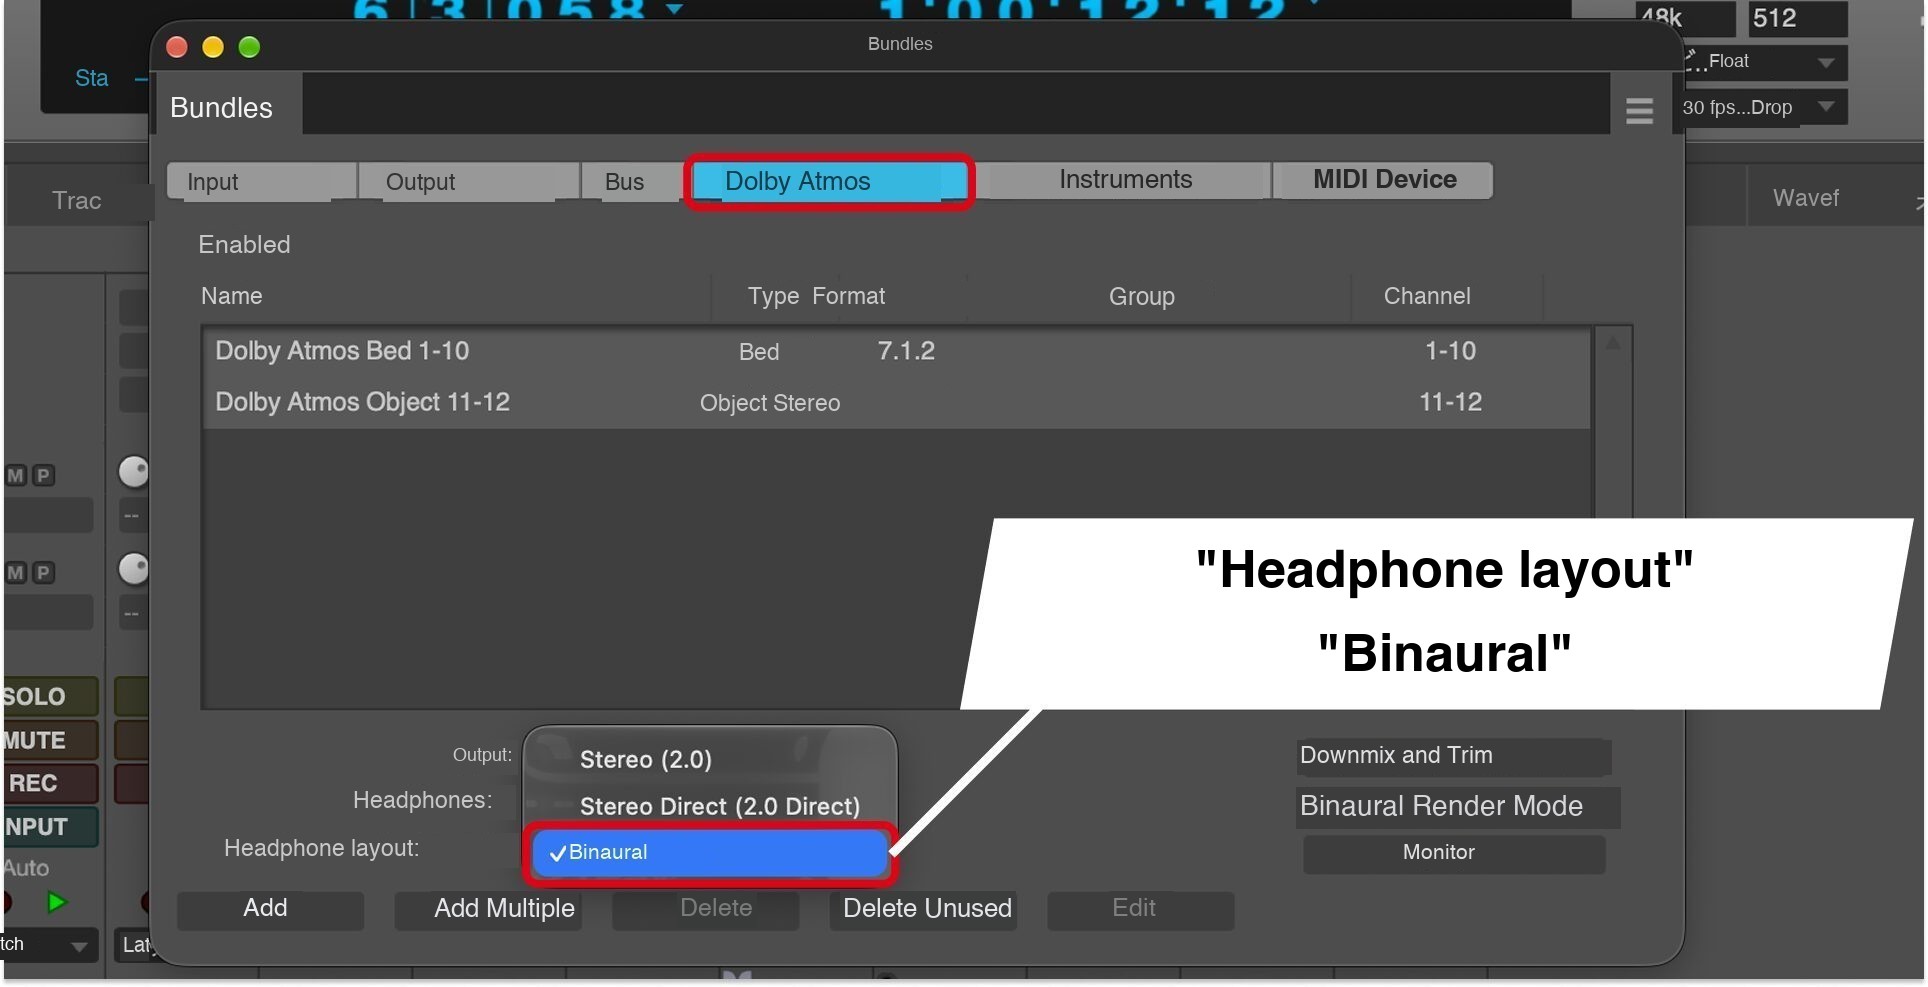
Binaural headphone monitoring requires a buffer size of at least 512 samples.
System Requirements
Windows
• OS: Windows 11 (24H2) or later
Mac
• OS: macOS 12.7 or later (Apple silicon recommended)
Both Platforms
• Memory: At least 4 GB (8 GB or more recommended)
Pricing
The following are the Japanese retail prices for Digital Performer 12.
| Edition | Price (Including Japanese Tax) |
|---|---|
| New License | ¥87,780 |
| Crossgrade (for Users of Eligible DAWs) | ¥69,850 |
| Academic | ¥69,850 |
| Upgrade From an Earlier Version | ¥32,780 |
Prices reflect the information available in September 2026.
Check the retailer’s website for the latest prices. These are Japanese-market prices; regional pricing and eligibility may differ.
Our Take: DP12 From Another DAW User’s Perspective
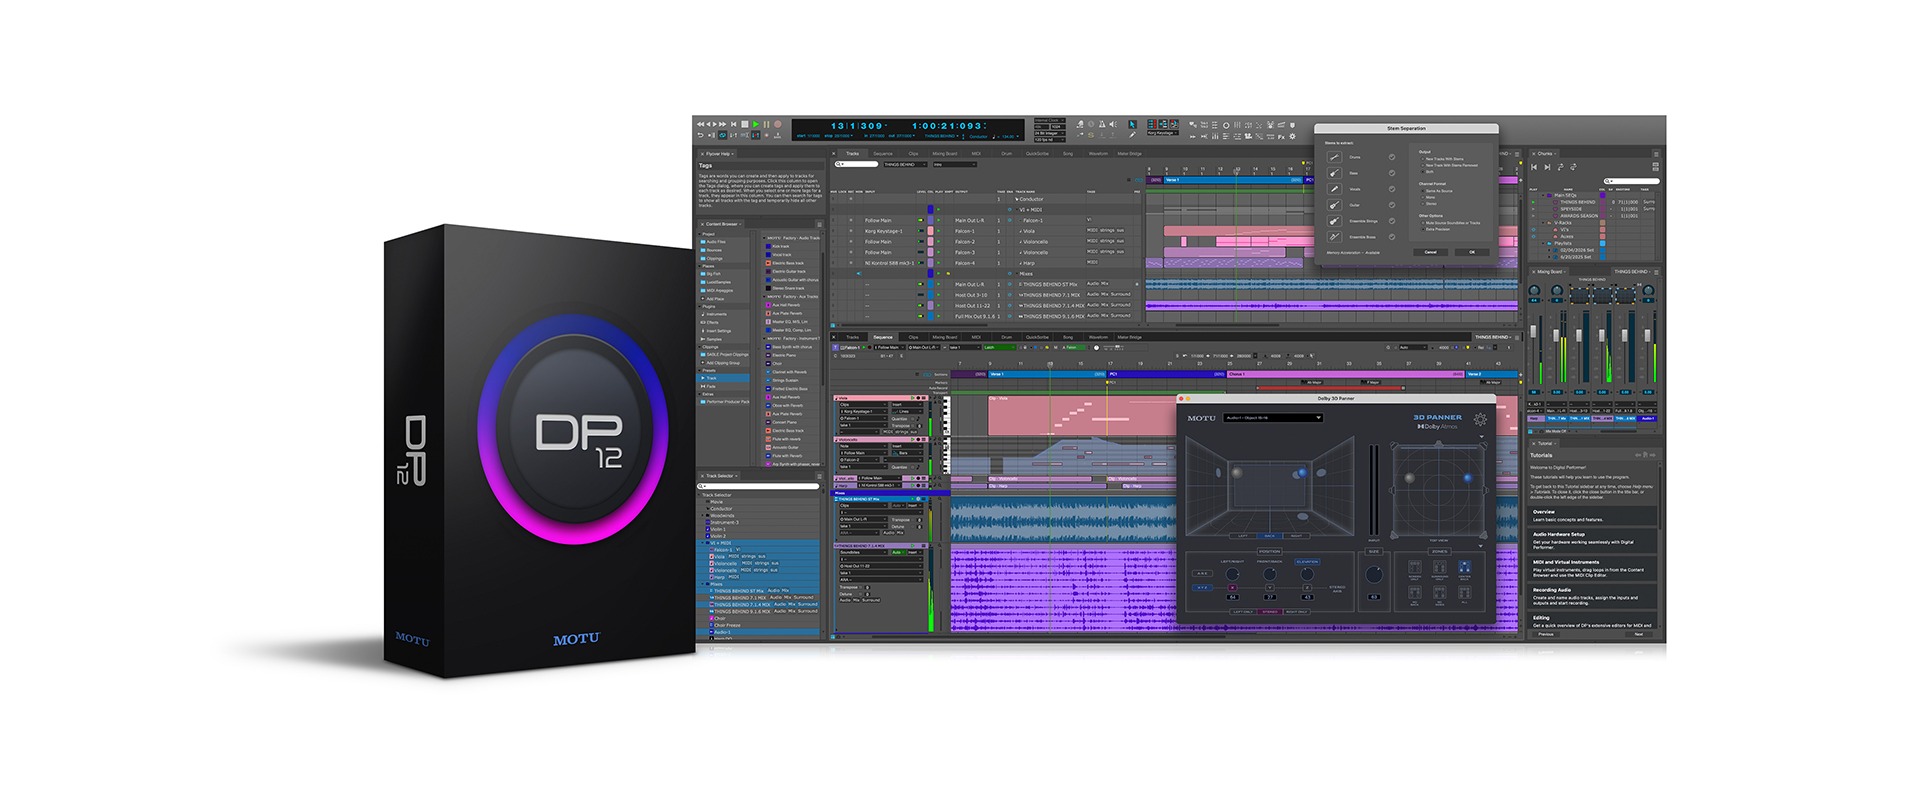
DP differs from many other DAWs, so you may initially need time to find the tools you want.
Once you become familiar with it, however, sequences and Clippings prove extremely useful for creating alternate versions of a piece.
DP’s structure—a large project containing pieces assembled from smaller parts—is useful not only for film and incidental music, but also for creating alternate versions of pop songs.
DP12 adds the Arrangement Strip for quick structural changes, making its distinctive project structure even more useful.
With AI Stem Separation and Dolby Atmos support, this long-established DAW also incorporates tools relevant to modern production.
Try DP12 for yourself to explore both its new features and the flexibility of its reuse-focused workflow.
NEW ARTICLES
Latest English Articles











