
CABINETRON Released
Three-Body Technology, a rising up-and-coming manufacturer known for Kirchhoff-EQ, which has become a new standard EQ, has released CABINETRON, an IR loader and cabinet simulator.
It is packed with the company's characteristic attention to detail, and it looks like a product that can take your guitar sound to new heights. Let's take a look right away!
What Is CABINETRON?
Understanding IRs
To understand CABINETRON's features, you need to know about IRs (impulse responses).
An IR is a piece of audio data around 0.2 to 0.5 seconds long that captures the characteristics of equipment, acoustics, spaces and so on. Examples include the reverberation of a church or the sound coming from a guitar amp's cabinet. IRs are also what convolution reverbs use.
Let's listen to the difference with and without IR data (a cabinet simulator).
Without IR data
It sounds very much like a line signal, with no depth, stuck to the front.
With IR data
You can feel the air of the room and the body of the amp.
The Appeal of CABINETRON
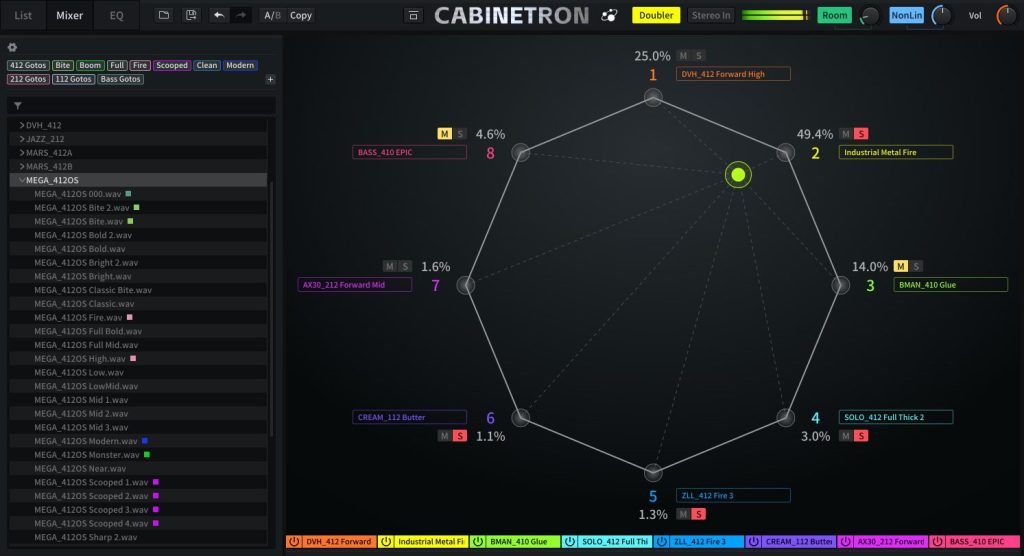
CABINETRON is an IR loader that loads these IRs, specialized mainly for guitar and bass cabinets.
In fact, many amp simulators already have an IR loader. If there is a load function, you can load IRs made by manufacturers, by users around the world, or by yourself.
So why do you need a dedicated unit?
It is because even with exactly the same IR data, sound quality differs depending on the IR loader. Even if you have good IR data, some loaders cannot bring out its true value.
CABINETRON makes a more three-dimensional tone reproduction possible, for example by developing a dedicated noise-shaping algorithm. In addition, it allows detailed tone shaping only a dedicated unit can offer, such as a dimension mixer, miking and tone matching.
It is said that the cabinet has a greater influence on guitar sound than the amp. The hint for getting closer to "that sound" you admire may lie here.
Basic Usage
Here, we explain the method using an amp simulator plug-in.
* When using a tube amp, speaker out and so on, failing to use a dummy load or similar properly can cause damage. Please be careful.
Connection
Connect the guitar to the audio interface.
If the guitar is a passive type (no battery), use the Hi-Z switch or its equivalent if available.
If it is an active type (uses a battery) or you are going through effect pedals and so on, do not use Hi-Z.
* There are exceptions, so please refer to each manual.
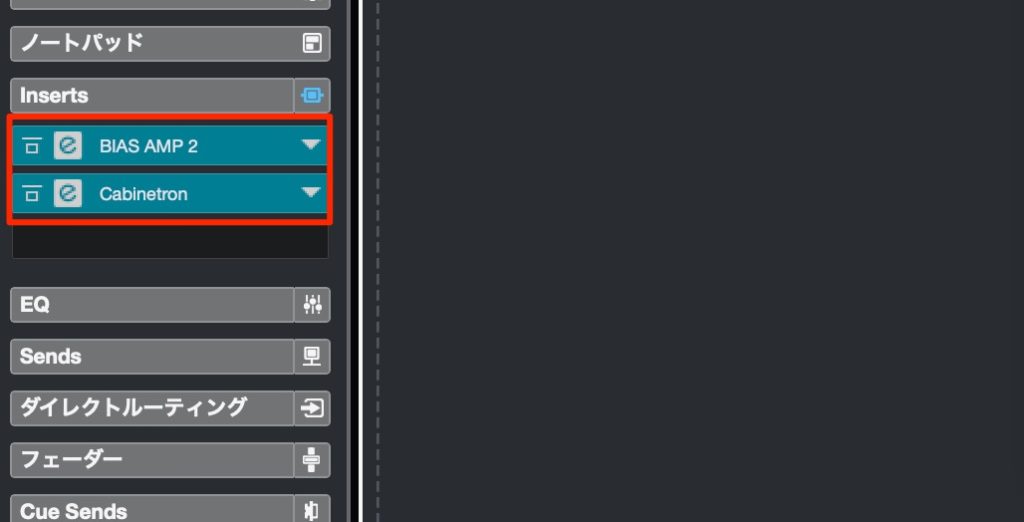
Next, inside the computer: insert the amp simulator, then CABINETRON, in that order.
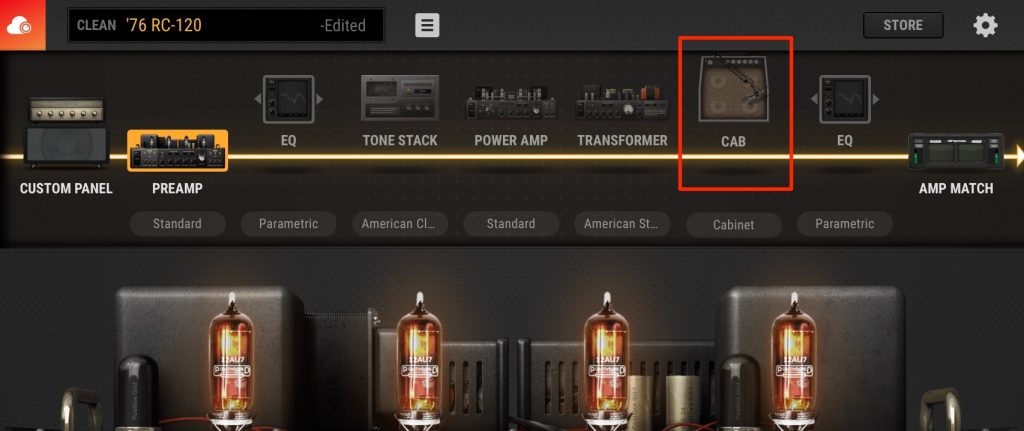
If the amp simulator's cabinet and mic are on, the signal will pass through them twice, so turn them off.
Switching Between Three Panels

You can switch between three panel views at the top left of the window.
- List:IR List
- Mixer:Dimension Mixer
- EQ: EQ & Tone Matching
Here is one example of a workflow. Load and adjust IRs on the main List screen, mix multiple IRs intuitively in Mixer, and then shape the sound further with detailed frequency adjustment and tone matching in EQ.
On the left is the IR file browser.
More than 400 IR presets are included, and by sorting with the tags at the top, you can smoothly reach the sound you want.
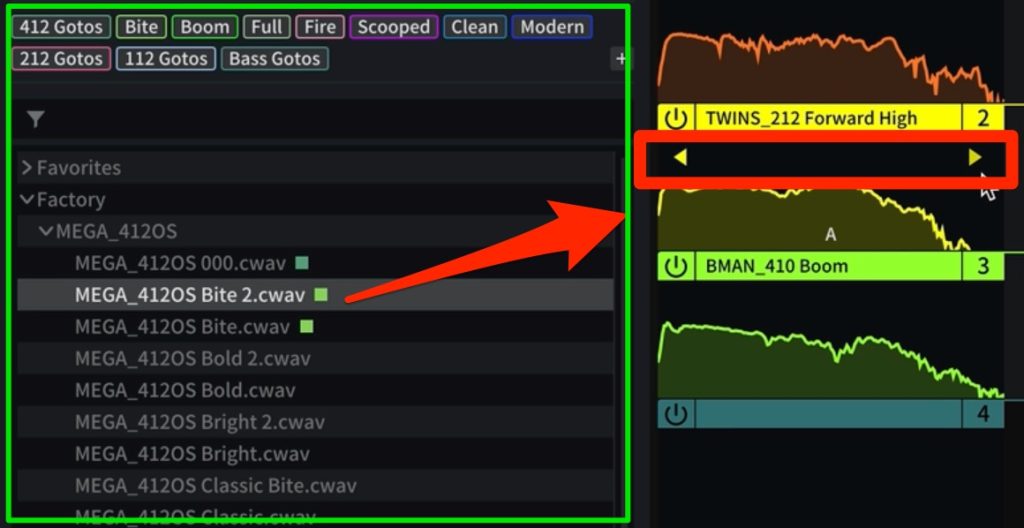
By dragging and dropping into the spectrum window, you can load up to eight IRs into each window. After loading, you can use the left and right arrows in the spectrum window to switch sounds even faster, making it stress-free.
Let's switch to the Mixer panel.
The dimension mixer becomes a polygon according to the number of IRs loaded.
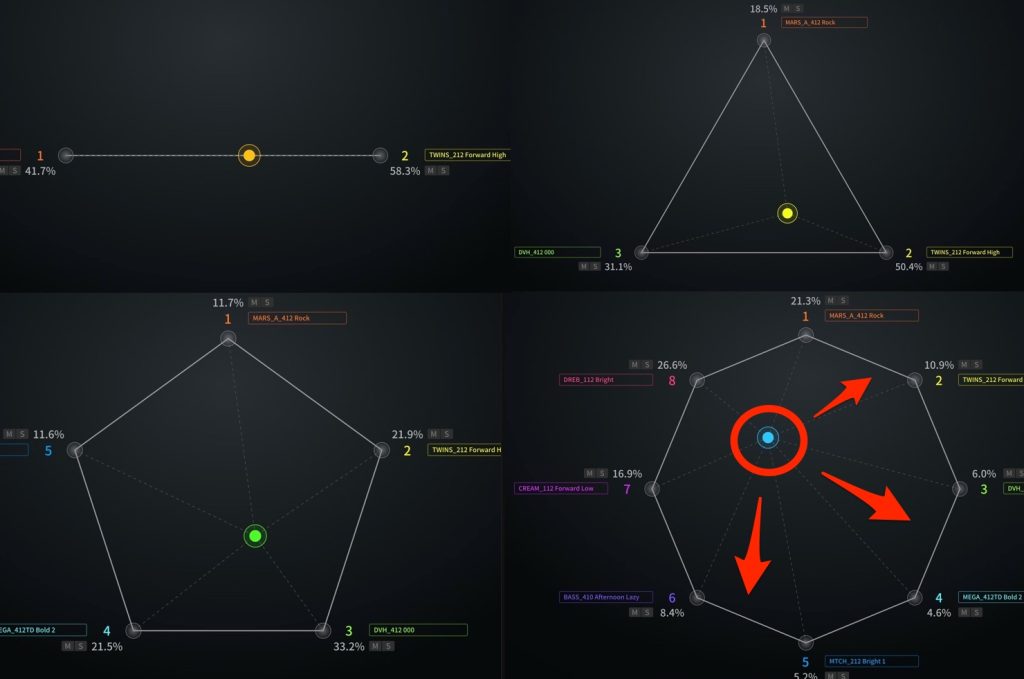
By freely dragging the anchor point, you can intuitively adjust the ratio of each IR.
Rather than being bound by your image of each IR, it is a good idea to listen and look for the point that sounds good.
Let's choose a few presets and listen.
MARS_A_412 Rock
A crisp rock sound in the style of Marshall.
TWINS_212 Dark
A darker sound in the style of the Fender Twin Reverb.
BMAN_410 Boom
A sound in the style of the Fender Bassman, focused heavily on the lows to low mids.
In this way, you can switch between IRs with a wide variety of characters, and this alone makes it ready for immediate use.
Next, let's blend these. This is where the dimension mixer comes in handy.
As mentioned above, we set the anchor point without being bound by the numbers.
MARS_A_412 Rock: 67.8% / TWINS_212 Warm: 32.2%
This sound has a crisp component while also having a solid core in the mids. It could be used for prominent backing in the intro or chorus.
MARS_A_412 Rock: 11.7% / TWINS_212 Warm: 25.6% / BMAN_410 Boom: 62.6%
Its center of gravity is low, yet it still cuts through. It could be used for backing that does not get in the way of the vocals, such as in the verse.
We hope this shows that you can easily combine multiple IRs to create an even deeper sound.
Shaping the Sound Further
Now that we understand the basic operations, let's do more detailed sound shaping.
We start with the panel at the top right.

- Doubler: simulates a guitar doubling effect.
- Stereo In: it operates in mono by default, but turn this on when using a stereo input, such as doubled guitars.
- Room: lets you use a room reverb. Turning the knob up increases the amount of reverb.
- NonLin: adds a simulation of the nonlinear behavior of a guitar cabinet. The higher the knob, the greater the nonlinear distortion.
- Vol: adjusts the output level.
Let's check the differences in sound.
Here it is with everything turned off.
We turn on each function individually and listen.
Doubler On
A phase difference between left and right makes it spread wide.
Room On
A short room sound is added to the IR, giving it depth.
NonLin (default setting) 50%
NonLin 100%
You can hear that as the knob goes up, the distortion component increases and the sound becomes tighter.
Next, let's look at the right side of the spectrum window.
On the left and right, the basic parameters are laid out: Mute, Solo, Volume, Pan, Phase Invert, EQ, HP (high-pass filter) and LP (low-pass filter).

- Phase: applies 0 to 3 ms of latency to simulate phase differences.
- Dry: mixes in the dry signal. This is useful, for example, when blending in a bass's line signal.
- Mutation: applies 31 EQ curves commonly used in guitar mixing.
- Smooth: by deliberately reducing the IR's comb filtering (blurring of the sound caused by phase misalignment), which is normally considered part of the tone, you can reduce the room sound and sense of realism.
- FRED: simulates a miking technique using two microphones. You can adjust the balance ratio of the two signals.
- Pos: adjusts the horizontal position of the miking.
- Dis: adjusts the vertical position of the miking (distance from the speaker).
Let's check these sounds as well.
Default setting
Mutation knob fully left, preset name: Heavy
Mutation knob fully right, preset name: Sharp
Turning it left gives a thicker sound, and turning it right gives a sharper sound.
Smooth 50%:
Smooth 100%:
As you raise Smooth, the sound gets closer to that of 1990s digital guitar effects. It could be used for distinctive genres and sound design.
FRED 50%:
FRED 100%:
Raising FRED emphasizes the highs, but with a nuance that EQ cannot produce.
Pos 50%:
Pos 100%:
Dis 50%:
Dis 100%:
The change in sound recreates what it is like to actually move the mic.
EQ and Tone Matching
EQ
Let's open the EQ panel. The top is the EQ section and the bottom is the tone matching panel.
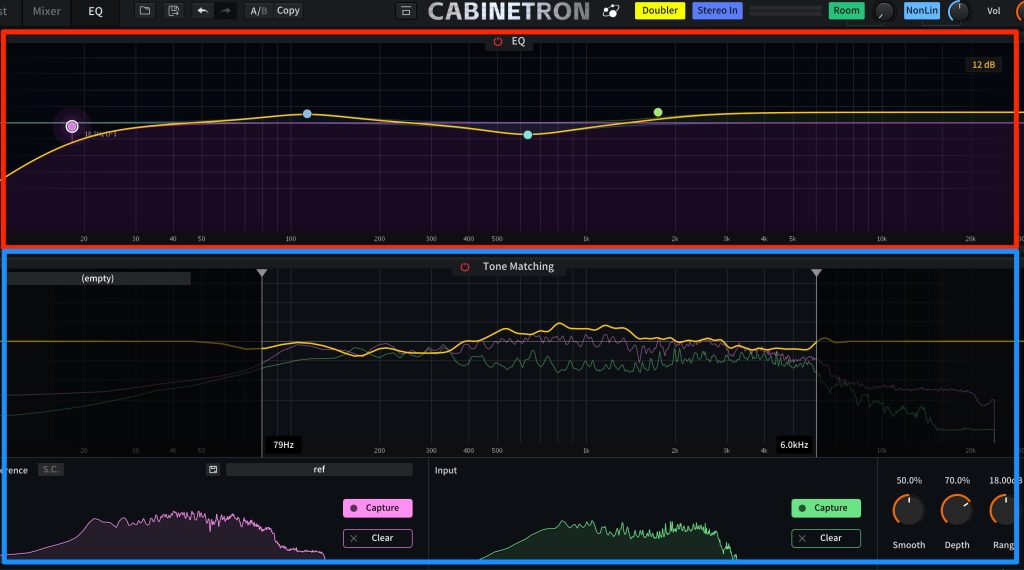
The basic operation of the EQ is the same as the company's popular Kirchhoff EQ.
We explain it in a previous article, so please check it here.

Tone Matching
Tone matching is a feature that can match your guitar sound to a reference you capture, or to the tone of one of more than 100 included presets.
The procedure is very simple. Let's actually try it.
Drag and drop the reference audio data into the reference section.
If it is too long, lag can occur, so it is a good idea to prepare data that has been trimmed short in advance.
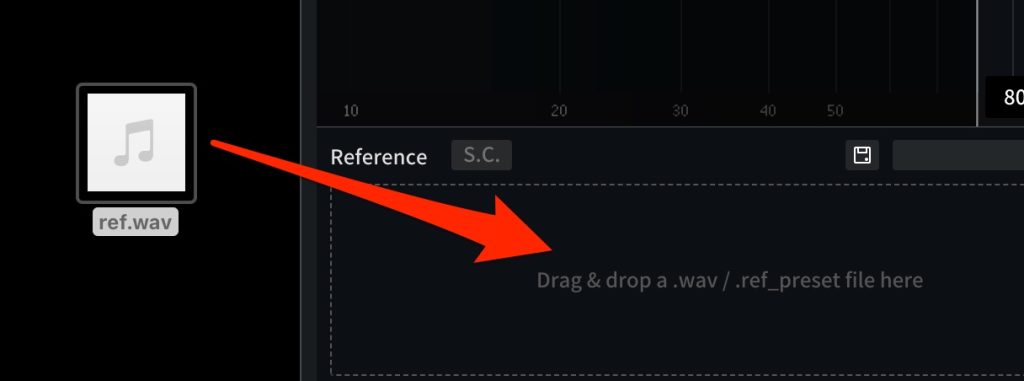
Reference audio data
This sound has strong mids.
Next, play your own guitar track in the DAW and capture it with Capture and Stop in the input section.
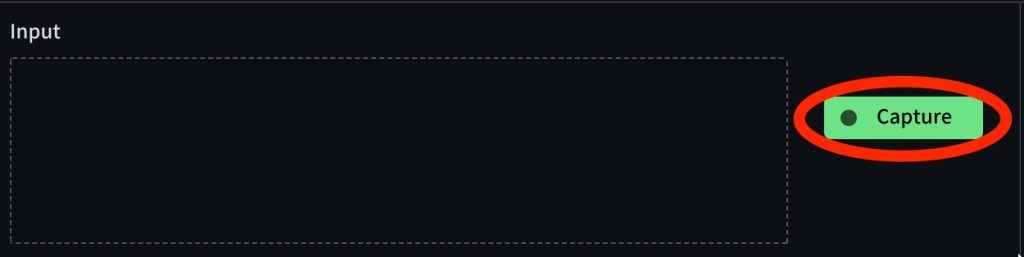
Input audio data
This is a so-called "scooped" tone, with the lows and highs emphasized.
Once both sections have been captured, it calculates the difference and generates the tone matching.
The analyzer display is also very easy to understand.
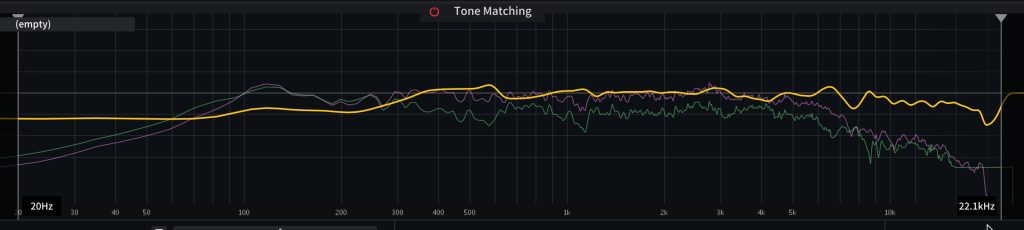
- Yellow: shows the difference between the reference and the input
- Pink: the reference's spectrum curve
- Green: the input's spectrum curve
Let's listen to the tone-matched sound.
It moved from the original scooped tendency toward the reference's mid-focused sound. It is surprising that matching can be this easy.
We make adjustments to finish the sound. By dragging the vertical lines on the left and right, you can adjust the range to which tone matching is applied.
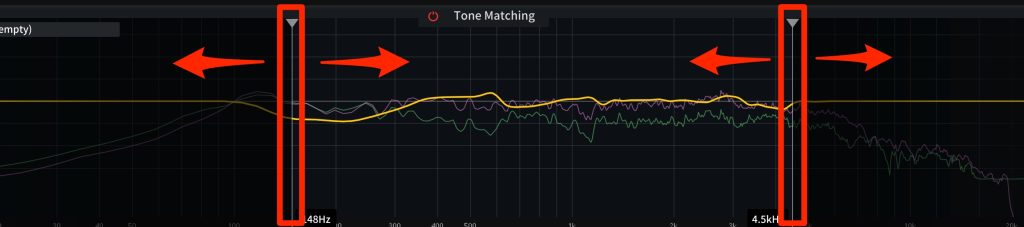
We set it so that tone matching does not affect the lows up to 250 Hz.
The low-end body returned to its original state, resulting in a thick guitar sound.
If you want to refine it further, detailed editing is possible in the bottom right panel.

- Smooth: adjusts the smoothness of the spectrum curve.
- Depth: adjusts how deeply tone matching is applied.
- Range: adjusts the maximum dB range affected by tone matching.
That concludes our introduction to the features and functions of CABINETRON.
It may seem like a somewhat niche product, but I felt it has the potential to dramatically change the sound of the amps and amp simulators you already own.
If you are thinking about further polishing your guitar sound, why not give it a try?

NEW ARTICLES
Latest English Articles











