
This article explains how to produce music using a synthesizer and vocal samples in Ableton Live 12. It introduces practical techniques that beginners can learn step by step, from the basic concept of arpeggios and understanding Racks to using the innovative MIDI generator tool "Seed" and implementing tonal changes with automation. Mastering these techniques lets you add width and color to an existing basic track for more polished music production.
Adding More Width and Color to the Song

The basic tracks, drums, bass, piano and acoustic guitar, are complete.
Now we add a synthesizer and vocal samples to bring in more width and color.
Notice the width added by the synthesizer that plays throughout the song, and the vocal sample that comes in as an accent before the chorus.
Demo song with synthesizer and vocal samples added (piano and acoustic guitar off)
Live 12 Programming Synthesizer and Vocal Samples Video Explanation from 1:06:47
Topic
- Arpeggios / Racks
- The MIDI generator tool Seed
- Changing tone with automation
- Creating an original instrument / Simpler
Arpeggios / Racks
First, we program the synthesizer.
The synthesizer we add uses a playing technique called an arpeggio.
Let's learn it together with the concept of Racks.
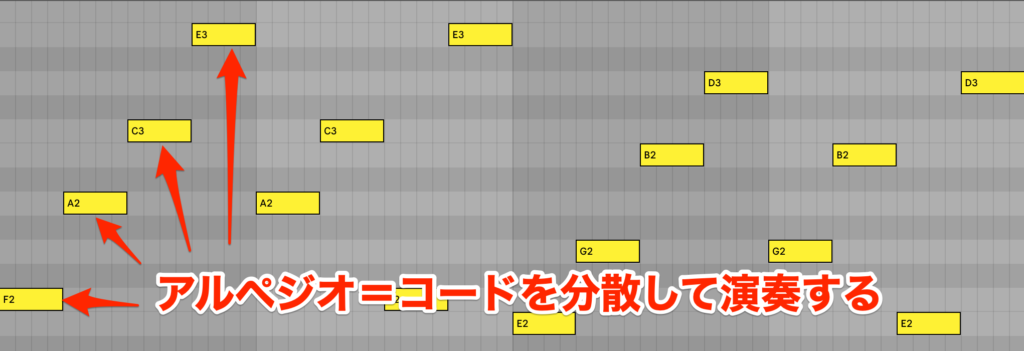
An arpeggio is a way of playing in which, rather than sounding a chord all at once, the notes of the chord are played one at a time in order.
Normal chord playing
Arpeggio playing
Because the notes pile up one after another, a synthesizer sound that sustains its volume becomes muddy.
A sound that sustains its volume
To avoid this, it is good to choose a sound whose volume naturally decays.
A short sound whose volume decays
These short sounds are called plucks, and they are often included in synthesizer sound categories, so remember the term.
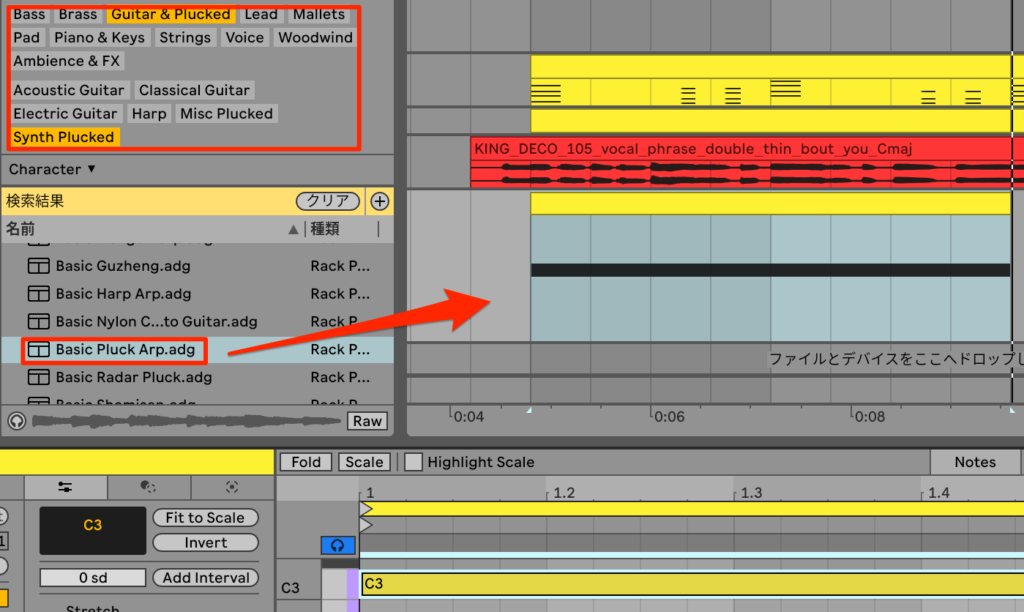
Let's choose a sound.
Select the tags "Guitar & Plucked, Synth Plucked" and use the preset "Basic Pluck Arp."
Create a two-bar clip, enter a two-bar long C note and listen.
Even though only a single note was entered, an arpeggio is played.

Let's check the contents of the assigned instrument.
If a device is shown in compact form, double-click it to expand it.
There are three MIDI effects before the synthesizer, and the MIDI effect called "Arpeggiator" plays the arpeggio automatically.
There are also devices after the synthesizer; these are audio effects that change the sound.
In this way, MIDI effects, instruments, audio effects and so on housed together in one box are called a Rack.
Putting them in a Rack lets you perform operations not possible with individual devices, such as turning devices off at the same time or controlling multiple devices together.
The MIDI Generator Tool Seed
The arpeggio phrase earlier is not bad, but we want a more original pattern.
That is where the MIDI generator tools, which we also used for entering piano chords, come in handy.

The MIDI transformation tools we used for the guitar only change MIDI data you have entered yourself, while the MIDI generator tools generate MIDI data from nothing.
They create the "zero to one" that is hard for beginners, making them very useful creative new features.
Since we are using a MIDI generator tool, the MIDI effects "Chord" and "Arpeggiator" are not needed.
Select those devices and delete them with the Delete key.
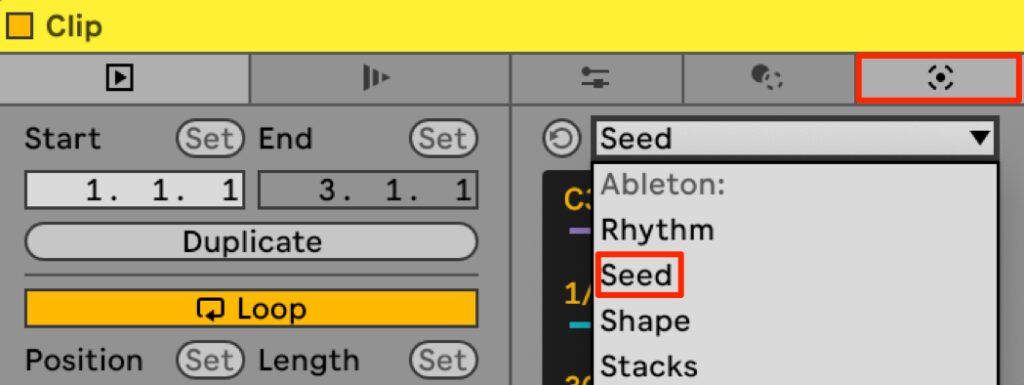
Also delete the MIDI notes entered earlier, select the MIDI generator tools in the tab, and open the down triangle to see many MIDI generator tools.
Choose "Seed" from among them.
Seed is a mode that randomly generates phrases based on specified conditions.

To keep notes from straying out of the song's key, check that the scale function is on, then turn "Generate" off and on again.
MIDI data has now been generated.
Arpeggio phrase generated with Seed
How was that?
You may be surprised that a musical phrase was created in an instant.
If you do not like the phrase, click Generate again to turn it off, and you return to the empty state before generation.
Click again and you can generate as many times as you like, so you can keep trying until you get a phrase you like.
If you like the phrase but something feels slightly off, it is good to edit it yourself after generating.
In this way, generator tools act as assistants that support production, providing creative stimulus and contributing to more efficient work.
You probably will not get the same phrase as the demo song, so once you have a phrase you like or a similar pattern, move on.
Changing Tone with Automation
Listening to the whole song, the arpeggio phrase sounds good, but it repeats without change and sounds flat.
To add variation and avoid monotony, besides changing the phrase, you can also change the tone.
Before tonal change (filter)
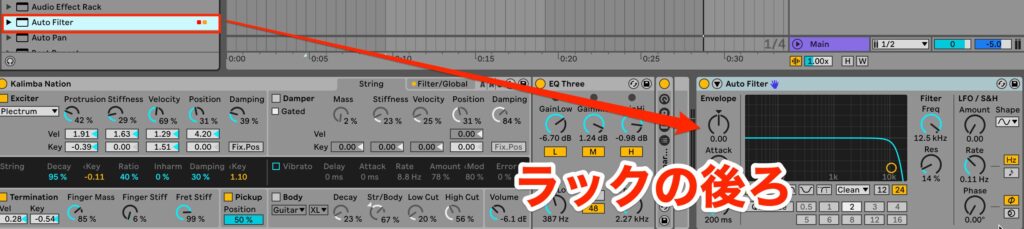
Assign "Auto Filter" from the audio effects category after the Rack.
A filter is an effect that changes the frequency balance of a sound, such as the lows, mids and highs.
As the name Auto Filter suggests, this device can also be controlled automatically, but this time we set it manually.
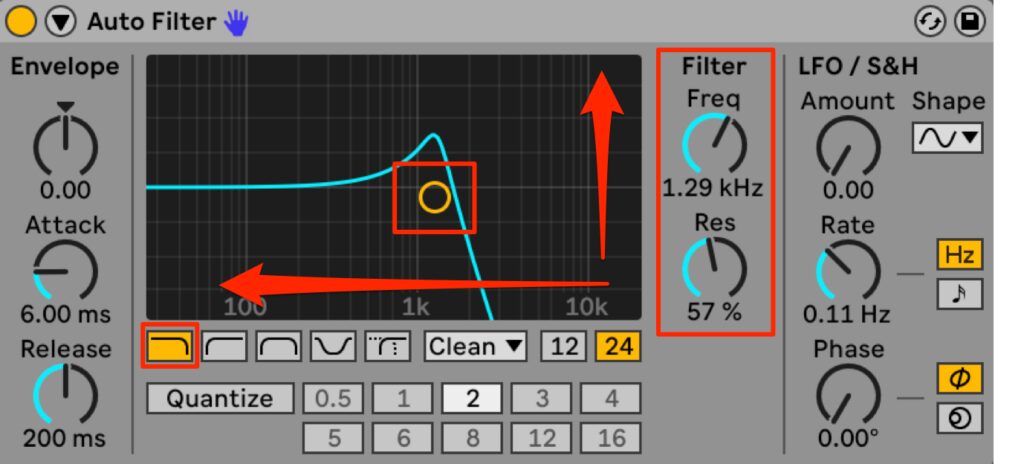
A low-pass filter is selected by default, and we use it as is.
Low-pass means passing the lows, that is, a type that keeps the low end and cuts the highs and mids.
The knob labeled "Freq" is frequency, which sets the frequency to cut.
"Res" below it is resonance, which emphasizes the frequency set with Freq and can give the sound character.
You change the sound by operating these two, but you cannot move both parameters at the same time.
That is where the XY controller in the center of the screen comes in handy.
Dragging the circle inside the XY controller lets you intuitively control two parameters at the same time.

The movement of parameters can be captured in real time in Arrangement View; to record it, use automation.
Turn on the Automation Arm at the top so that parameter movements can be recorded.
When recording, if it starts immediately after pressing the button, you may not be ready in time.
In that case, setting the "Count-In" lets you adjust the time between pressing the record button and the start of recording.
Select the start position with the cursor, then click the circle in the transport to start the count.
Keep the filter closed for a restrained verse, and move the XY controller to open the filter toward the chorus for a build.
After tonal change (filter)
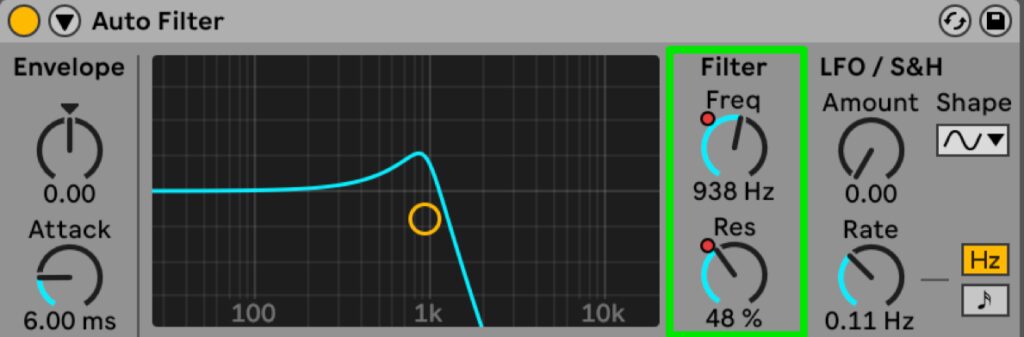
Adding tonal change has given it movement.
Looking at Auto Filter, red dots have been added to the frequency and resonance we operated.
This is a sign that automation data has been recorded in Live.
We recorded it in real time, but there are some places we want to fix, so we show the automation data and edit it in detail.
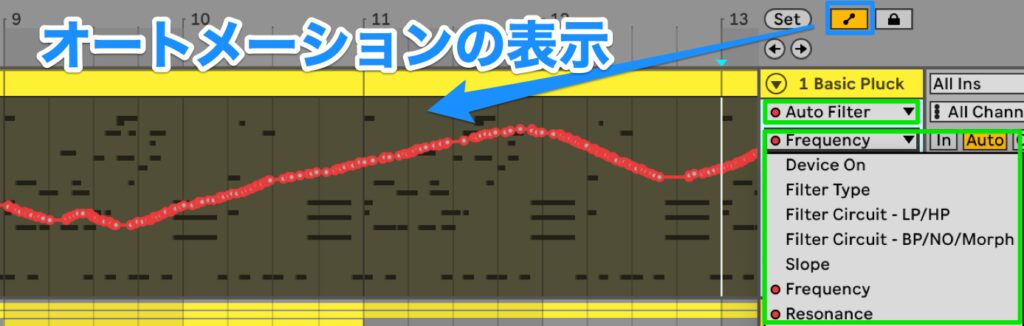
Click Automation Mode at the top of the screen, and the automation data is shown as a red line in the main lanes.
Switch the device shown below each track name, and then the parameter shown below that.
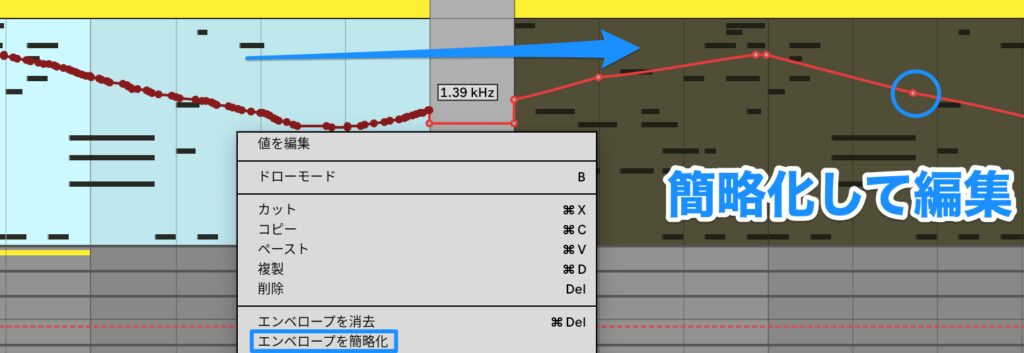
Zooming in, the automation data recorded in real time has too many points to edit easily.
In that case, there is a handy function to simplify the points.
Select a range and click "Simplify Envelope," and the points are reduced to the important ones, making editing easier.
Points can be moved freely by dragging.
Click a point to delete it, and double-click on the line to add a point.
You can also select a range and delete the points all at once with the Delete key.
When selecting a range, note that if you also select the clip above, the clip itself will be deleted.
Now that the automation data is edited, let's listen.
In this way, by first adding human, musical changes with real-time input and then combining it with detailed mouse editing, you can get the best of both.
Also, using a filter on a looping phrase to add swells and contours, as we did here, is a standard technique in club music.
Incorporating it into typical pop music can give a song a cool, club-music feel, so remember it.
Creating an Original Instrument / Simpler
Before the chorus, we add a vocal sample, which is often heard these days, as an accent.
Rather than just pasting the vocal sample, let's turn it into an original instrument and then program it.
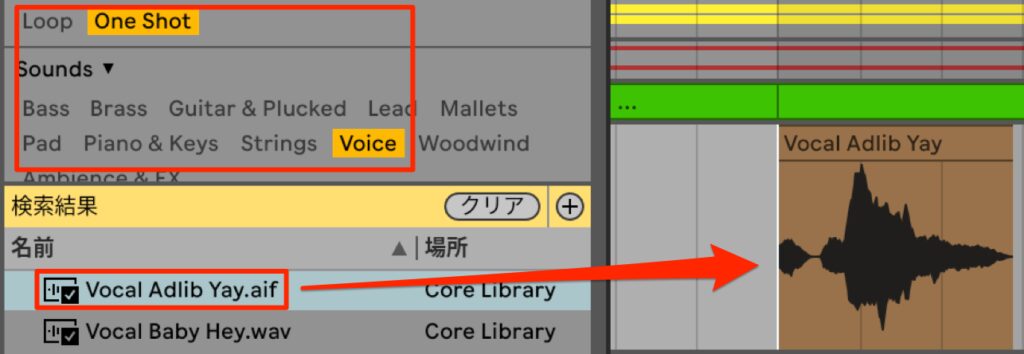
Look for an audio sample to use as material.
From the library's samples, narrow down with "one shot, Voice."
We use the sample "Vocal Adlib Yay," so place it in the main lanes for now.
Audio sample used as material
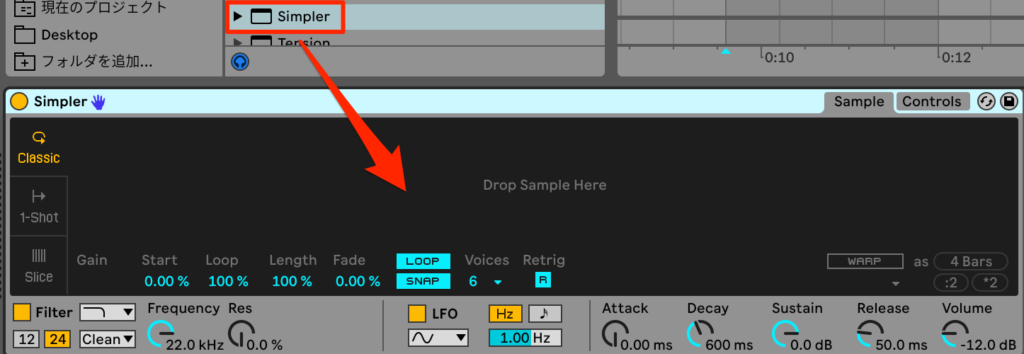
We make the material playable at different pitches.
Assign the device called "Simpler" from the instruments.
Simpler is a simplified version of Sampler, built into Live.
The word sampler is also commonly used to refer to a type of instrument.
A sampler can import audio data and assign pitches to it or edit it.
The instrument we used for programming the piano is also a piano sound imported into Simpler and edited.
With Simpler or Sampler, you can import sounds you like and create your own instruments.
Sampler has many functions and is therefore harder to operate, while Simpler is narrowed down to the necessary functions, so it is easy to use and recommended for beginners.
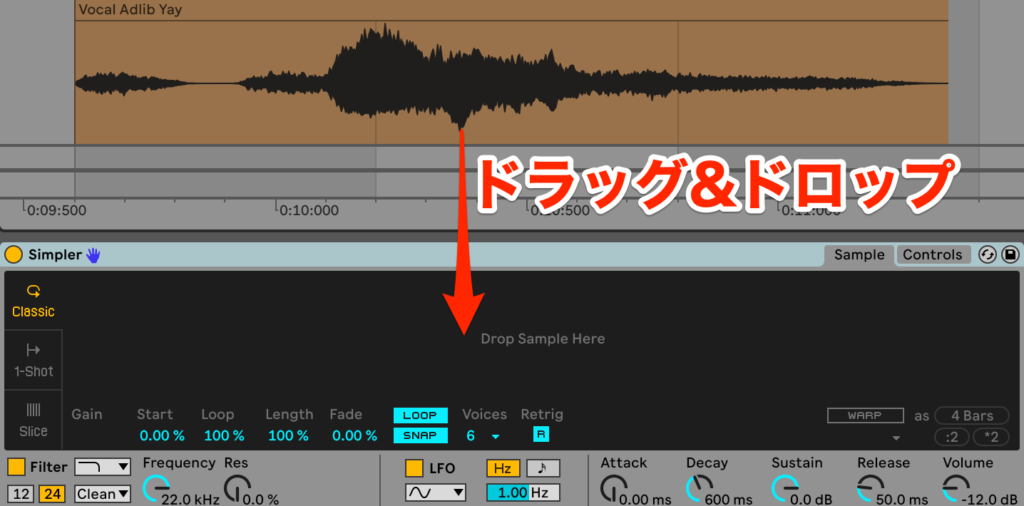
Let's create the instrument.
Drag and drop the audio data from earlier into the center of Simpler.
After importing, you can delete the original audio track.
Create a two-bar MIDI clip before the chorus and check the sound in the Piano Roll.
The pitch now changes according to the key position.
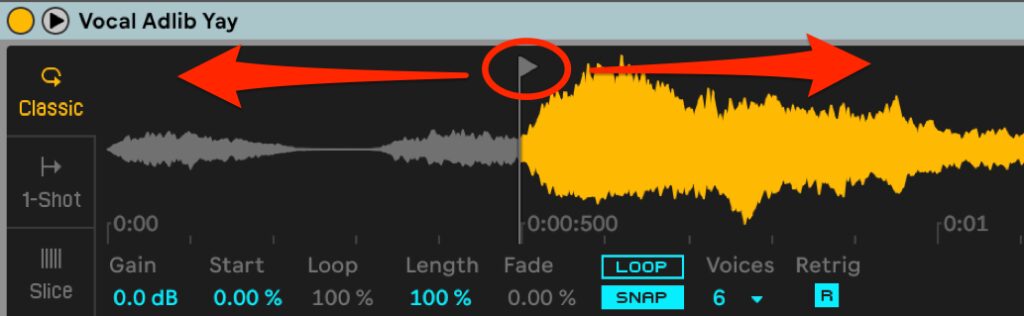
Next, the breath at the beginning is not needed this time, so we edit the playback start position.
Move the triangle to set the start position.
Before editing the start position
After editing the start position
With the start position adjusted, let's program performance data into the clip.
We want a rhythmic phrase, so enter A4 as sixteenth notes on the eighth-note off-beat of beat 1 and the sixteenth-note off-beat of beat 2.
Next, enter A3, one octave lower, at the start of beat 3 as an eighth note.
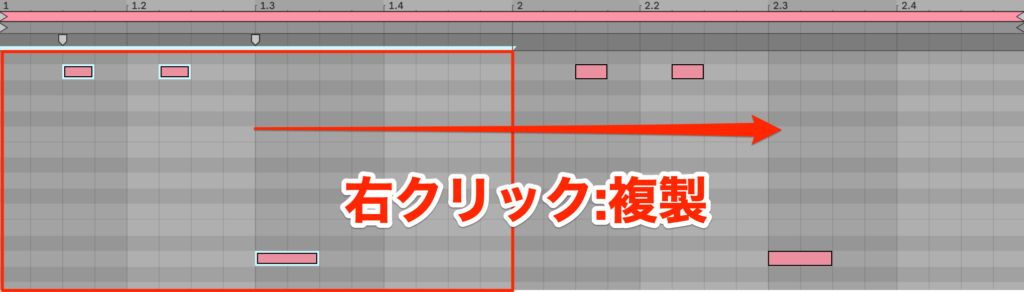
The second bar uses the same phrase, but let's duplicate the MIDI data rather than the clip.
Select the range and choose "Duplicate" from the right-click menu.
Let's listen to the finished phrase.
It makes a good accent before the chorus.
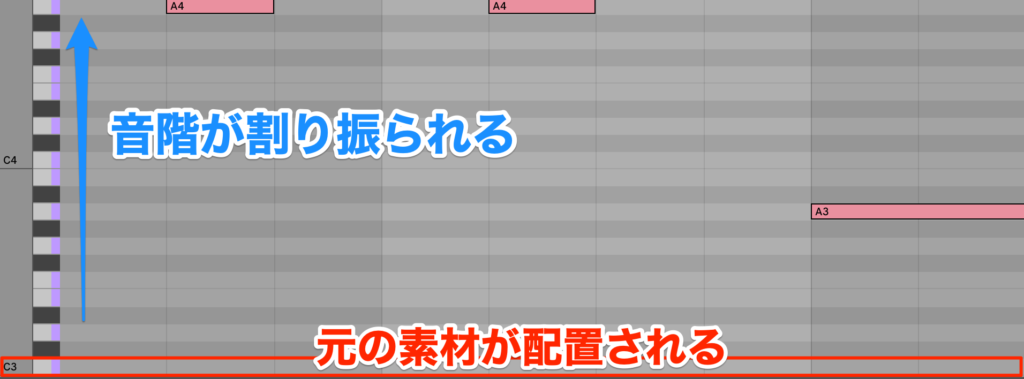
We programmed A notes earlier, but with Sampler and Simpler, an A note (la) is not necessarily what comes out.
The imported audio material is placed on the C in the middle of the piano (C3), and from there pitches are assigned relatively.
In other words, if the imported material is a C at C3, the notes match the Piano Roll keys.
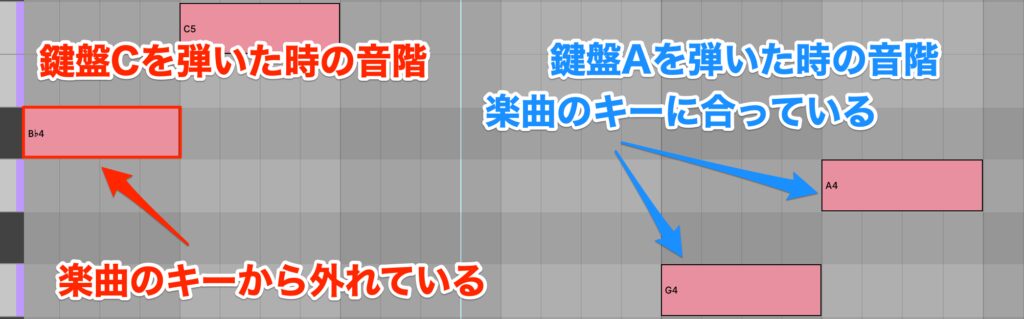
The audio material used this time is a phrase whose pitch moves from B♭ to C, and the B♭ is outside the key.
Looking for notes that fit the song, playing A in the Piano Roll gives a phrase that moves from G to A, which matches the song's key.
It may be difficult at first, but it is good to check the pitch of the imported audio material and, in this case, look for white-key notes that fit the key.
Another important point is not to rely only on music theory but to listen and judge by feel.
Sometimes notes that are out of key can have a good effect on a song.
With free thinking, keep repeating trial and error.
We now have a rhythmic, memorable phrase, but we want to add a slightly more robotic, effect-heavy character.
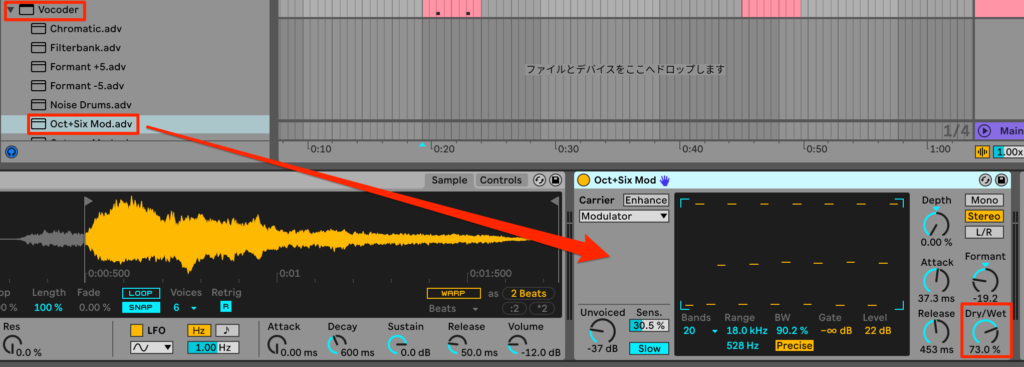
We use "Vocoder" from the audio effects.
Expand it with the triangle to show the presets, and assign "Oct+Six Mod."
A vocoder analyzes a voice with a synthesizer and resynthesizes it, giving it pitch or turning it into something like a robot voice; it is an effect that transforms the voice.
You may have heard it in techno-pop and club music.
Dry/Wet balances the original sound and the effect sound.
This time we want only the effect sound, so turn it all the way to Wet.
After applying the vocoder
It now has a slightly muffled sound that evokes a retro-futuristic feel, making it more memorable.

The vocal sample programming is done, but we like this vocal instrument we created, so we want to save it for use in other songs.
In that case, we use the Racks introduced earlier to create an original preset.
Select the relevant devices while holding Shift, right-click and click "Group."
The separate devices are then joined into one box, forming a Rack.
Double-click the front to expand it, and it has the default name "Instrument Rack."
Right-click the name and choose "Rename" to give it any name you like.
Next, so that the finished Rack can be loaded at any time, save it to the User Library.
Just drag and drop the Rack into the User Library in the Browser.
You can now use the original Rack you created at any time.
What did you think?
This is the last installment using MIDI step recording; next time we explain real-time recording.
There is more and more to learn, which may be tough, but experiencing the whole flow up to finishing a song will show you the big picture, so once you understand to a certain extent, move on.
Frequently Asked Questions
Q1. What is an arpeggio?
An arpeggio is a way of playing in which the notes of a chord are played one at a time in order rather than sounded simultaneously. When using it with a synthesizer, it is important to choose a "pluck" sound whose volume decays naturally to avoid muddiness.
Q2. What does the Seed tool do?
Seed is a MIDI generator tool in Ableton Live 12 that automatically generates phrases at random based on specified conditions. The scale function keeps notes within the song's key, providing creative stimulus while improving production efficiency.
Q3. What is a Rack?
A Rack is a function that integrates MIDI effects, instruments, audio effects and more into a single package. It enables advanced operations not possible with individual devices, such as turning multiple devices off at once or linking parameters.
Q4. How do I change the tone with automation?
Turn on the Automation Arm and record in real time the movements you make manually on effect parameters such as Auto Filter. Using the XY controller lets you control multiple parameters at the same time for more natural tonal changes.
NEW ARTICLES
Latest English Articles











