
Session View in Ableton Live 12 is the ideal view for turning a finished song into a live performance set. By copying and pasting clips from Arrangement View into Session View, you can loop multiple tracks simultaneously. One-shot material and vocal clips containing pickups need to be edited in advance by consolidating or splitting them to make loops. In Session View, you can play and stop individual clips or group tracks, and you can also change the arrangement by adding new audio material such as drum loops, greatly increasing the freedom of live performance.
Session View
We will turn the finished song into a set for live performance.
We use Session View, which is suited to live performance.
Live 12 Expanding into Session View Video Explanation from 1:54:20
Topic
- Basic Session View operations
- Adding material and recording in Session View
- Recording a performance into Arrangement View
"Chapter 2: Overview" also briefly explains Session View, so if you have not read it yet, please check it first.

Basic Session View Operations
Let's learn the basic operations first while expanding clips from Arrangement View into Session View.
Basic Operations
We copy clips from Arrangement View into Session View.
Let's start with the drum track.

Select the drum track's clip and, while dragging it, press the "Tab key."
The screen switches to Session View, so drop it into a slot.
Alternatively, right-click the clip to "Copy" it, then right-click in Session View and "Paste."
To move clips within Session View, likewise use drag and drop or copy and paste.
Using shortcuts also makes things smoother.
* [Cmd+C (copy), Cmd+V (paste)] on Mac, [Ctrl+C (copy), Ctrl+V (paste)] on Windows
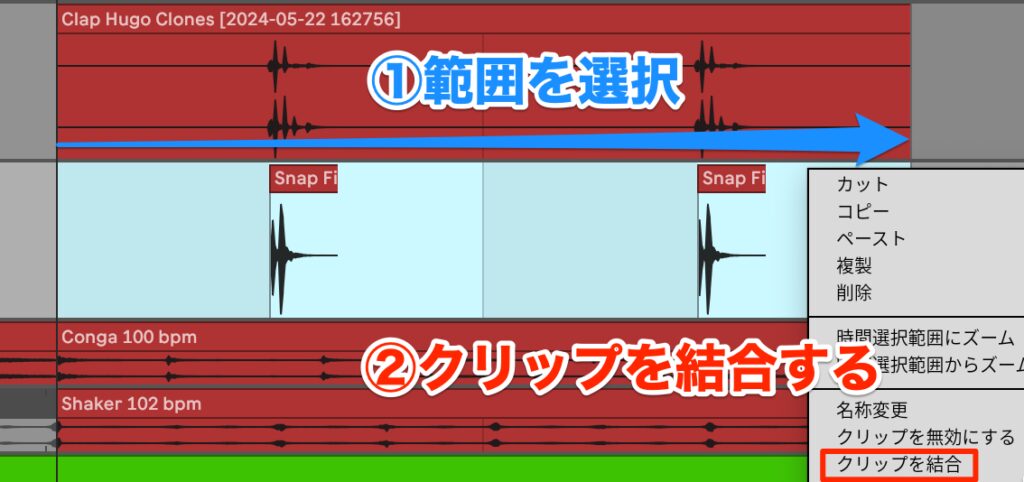
Next, we want to copy the clap, but this is one-shot material, so it will not loop properly as it is.
First, it needs to be converted into loop material.
Select the appropriate length, right-click and choose "Consolidate" to make it a looping clip.
Consolidate the snap in the same way and place it in a Session View slot.

Copy the clips from the other tracks into Session View as well.
If you select multiple clips while holding Shift, you can copy several clips at once.
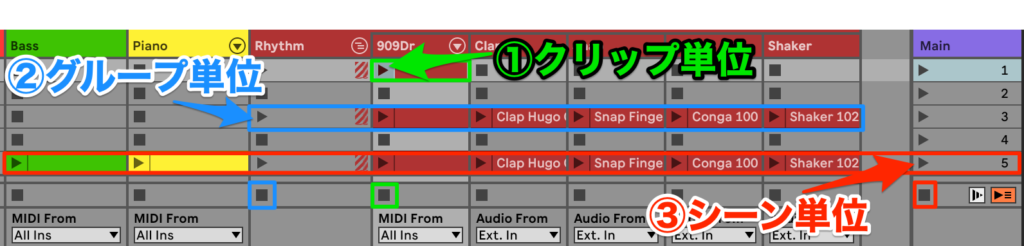
To play, click the "▶" on each clip; to stop, click the "■."
Clicking a group track plays or stops all the clips in the group at once.
On the Main track, you can play a whole horizontal scene at once or stop all tracks.

Within the same track, sound cannot come from both Session View and Arrangement View; output is always from one or the other, but on a per-track basis, you can mix output from Session View and Arrangement View.
As in the image, you can have the bass, pluck and rhythm tracks looping in Session View while the piano plays along the horizontal timeline of Arrangement View.
Tracks playing from Session View are grayed out in Arrangement View.
To return to Arrangement View playback, click the "▶" on each track.
To return all tracks to Arrangement View, click the "▶" at the very top.

Also remember that even while Session View is playing, the Arrangement View timeline is always moving in sync.
You can check the current Arrangement View position with the bar and beat counter at the top.
The timing at which clips start playing is set with the quantization menu at the top.
With the current setting of 1 bar, playback starts at the beginning of the next bar after you click a clip.
A setting of 1 bar is usually fine.

When playing Session View, mixing it with Arrangement View clip playback can be confusing, so for now place the cursor where there are no clips in Arrangement View.
Editing Clip Loops
We edit clips other than one-shots that do not loop.

When we play the piano clip, it does not loop but stops.
To make it loop, turn on "Loop" in the clip and set the loop length with "Length."

Next, check the synth lead clip recorded with MIDI real-time recording.
The clip's start and end positions are not aligned to the grid, so copying it as is would leave the start misaligned and it would not loop cleanly.

In such cases, tidy it up so that it loops.
Select the relevant range, right-click and choose "Consolidate."
Then copy it into Session View in the same way.

Next, check the verse of the vocal track.
The vocal comes in slightly before the start of the bar.
This part that comes in early is called a pickup (anacrusis).
Vocal: pickup (a click is added for clarity)

When there is a pickup, split the clip and adjust it so that it aligns with the start of the bar.
Excluding the pickup, select the part you want to loop and consolidate it.
If you want to keep the pickup, copy and paste the pickup section at the end of the loop and consolidate it together with the base section.
Even with this method, note that the first pickup is not played when playback starts.
Vocal: looped playback, no pickup at the start (a click is added for clarity)
Pickups can be handled with complex settings, but remember that because Session View fundamentally starts clips from their beginning when played, clips with pickups are hard to handle.
Adding Material and Recording in Session View
We have finished copying clips from Arrangement View to Session View, but for the performance we want to try new sounds different from the existing arrangement.
We add audio material and do MIDI real-time recording.
Adding Audio Material
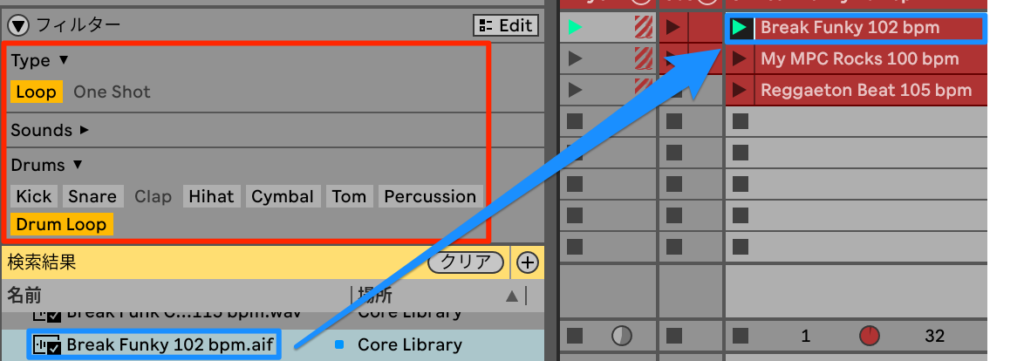
We change the rhythm arrangement using audio material.
First add a new track, filter the Browser by "Loop, Drum Loop," and drag and drop drum loops that seem to suit the song into slots.
Even if the tempo differs, it matches the tempo automatically, which is very smooth.
Let's listen to a few.
Reggaeton Beat
My MPC Rocks
Break Funky
How was that?
Changing the rhythm track changes the impression quite a lot.
In this way, placing and combining loops with free thinking can generate new ideas.
Not only a player's perspective of creating from scratch but also a DJ's perspective of finding good material is important.
Make active use of the included loop material and clips as well.
This time we use "Break Funky."
We will not use the existing drum track (909 Core Kit), so turn the track off.
MIDI Real-Time Recording in Session View
Inspired by the new drum loop, we want to add a new phrase on the synth lead.
This time, we add clips by doing MIDI real-time recording in Session View rather than Arrangement View.

First, light up the Arm button on the track you want to record on.
Recording starts when you click the "●" in each slot where you want to create a clip.
To stop, press the "■" in the transport at the top or the Space bar shortcut.
We will not do it this time, but real-time audio recording also uses the same steps.

When we recorded, we forgot to play one note.
To record additional notes while keeping the original data, click the "○" in the transport at the top to overdub.
With overdub, you can switch between recording additional notes and playing at any time by clicking "○" during playback.
Then correct the rhythm drift with quantize.
This completes adding a phrase that loops cleanly.
Added synth lead
Organizing Clips
Arrange the other clips for the performance with copy and paste as well.
As clips increase they become hard to see, so it is a good idea to organize them by changing clip names and colors.

Right-click a clip and choose "Rename," and you can change its color from the color palette.
This completes arranging the clips for the performance.
Recording a Performance into Arrangement View
Now let's actually perform.
You can just perform, but you can also record your Session View performance into Arrangement View.
You can edit it after recording or try out ideas for the structure, so let's record it.

Simply start recording with the "●" in the transport at the top and play each clip.
When operating with a mouse, you can only play one clip at a time, but with a controller such as Push, you can play and stop multiple clips at the same time.
Session View: performance

The performance is finished.
Checking Arrangement View, the clips have been recorded exactly as performed.
From here, you can add to or edit the performance in Arrangement View, and you can also copy the edited material into Session View.
In this way, Live lets you move seamlessly between the intuitive operation of Session View and
the detailed work of Arrangement View, so please make use of it in music production and live performance.
How did you find "How to Use Ableton Live 12"?
I think Live's greatest appeal is that you can engage with music casually, as if playing with an instrument or gadget.
Also, I have shown various production methods this time, but there is no right answer in music production.
I hope you enjoy making music with your own free ideas, and that this article helps you do so.
Frequently Asked Questions
Q1. What is the difference between Session View and Arrangement View?
Arrangement View is suited to producing songs along a timeline, while Session View, where clips can be played and stopped freely, is suited to live performance. In Session View, loop material can be played simultaneously and the performer can change the arrangement in real time.
Q2. How can I use one-shot material in Session View?
One-shot material does not loop as is, so select the appropriate length, right-click and choose "Consolidate" to convert it into a loopable clip, then place it in a Session View slot.
Q3. How can I handle vocal pickups (parts that start before the beginning of the bar)?
Split the clip to exclude the pickup, then select the part you want to loop and consolidate it. However, because Session View starts clips from their beginning when played, handling pickups is complicated.
Q4. Can I copy multiple clips at once into Session View?
Yes. If you select multiple clips while holding the Shift key, you can copy them at once and paste them into Session View.
Q5. What happens when I use a drum loop with a different tempo in Session View?
Ableton Live 12 matches the tempo automatically, so even drum loops with different tempos are synced to the song's tempo automatically.
NEW ARTICLES
Latest English Articles











