
Programming rhythms in Ableton Live 12 can be done efficiently with Drum Rack, a drum instrument. After assigning Drum Rack to a MIDI track by drag and drop, you build basic patterns such as four-on-the-floor with step input in the MIDI Clip View. By placing each drum sound, such as the bass drum and hi-hat, on the grid in Draw Mode, you can create a hybrid sound combining synth drums and acoustic sounds. Thanks to its intuitive UI, even beginners can produce full-fledged dance music rhythm tracks without complicated operations.
Programming the Rhythm Track
Let's start by programming the rhythm.
The demo song combines inorganic synth drums with organic acoustic sounds, aiming for the hybrid sound often used in recent pop music.
Demo song rhythm track
Live 12 Programming Rhythms Video Explanation from 15:35
Assigning a Drum Instrument / Drum Rack
We start with the synth drum part.
Live has a very easy-to-use drum instrument called Drum Rack, so let's use it.
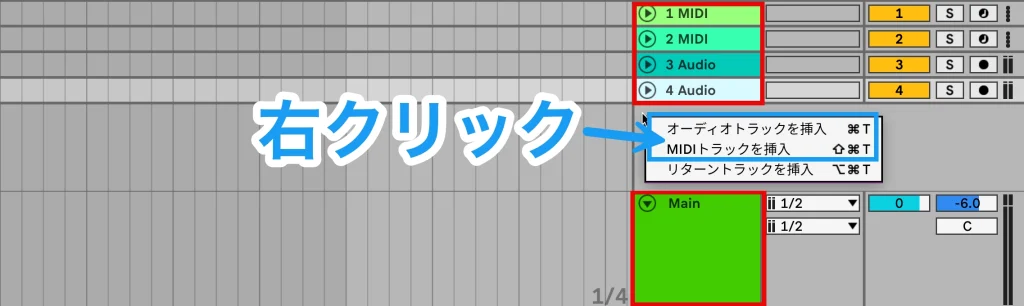
First, you need a track to assign the instrument to.
When you launch Live, the default setup provides four tracks: two MIDI tracks and two audio tracks.
At the very bottom is the Main track, the final output where the sound of every track is gathered.
Four tracks will soon not be enough.
To add tracks, right-click an area with no tracks and choose "Insert Audio Track" or "Insert MIDI Track."
Use a MIDI track to assign an instrument.
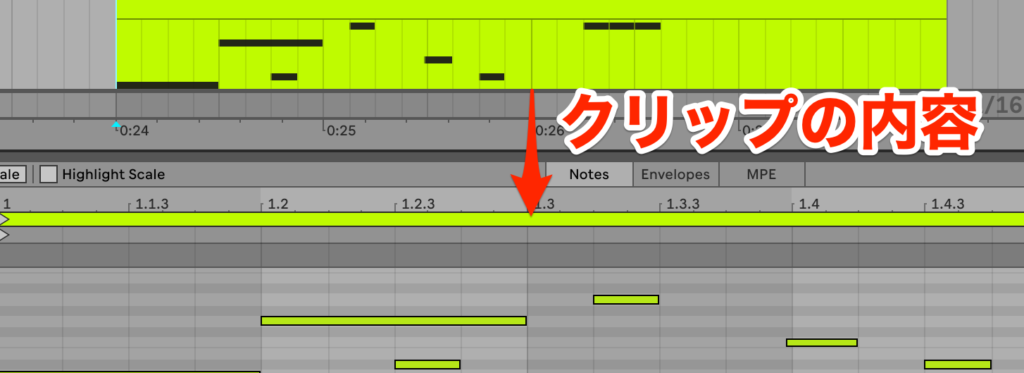
A MIDI track uses MIDI data to play software instruments such as the drums, synthesizers and pianos built into Live.
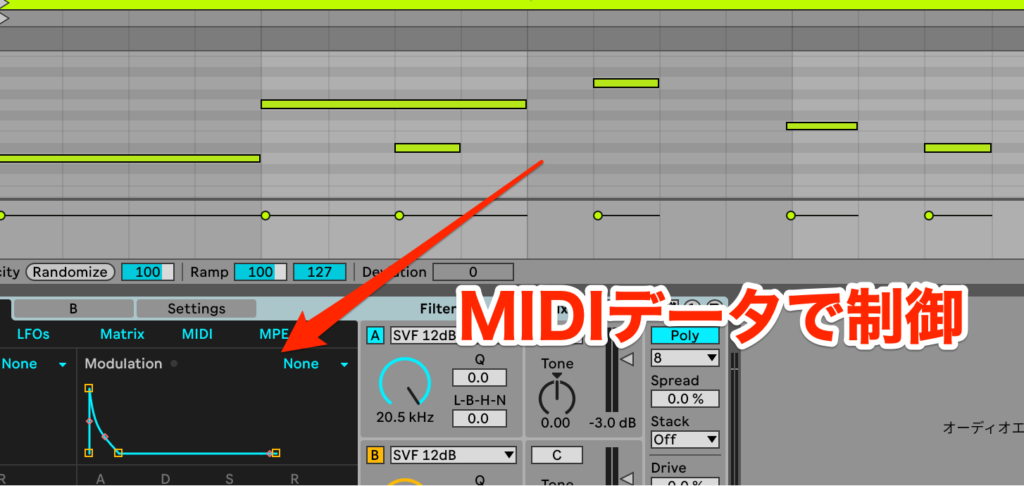
Because performance information can be controlled with MIDI data, it offers a high degree of freedom.
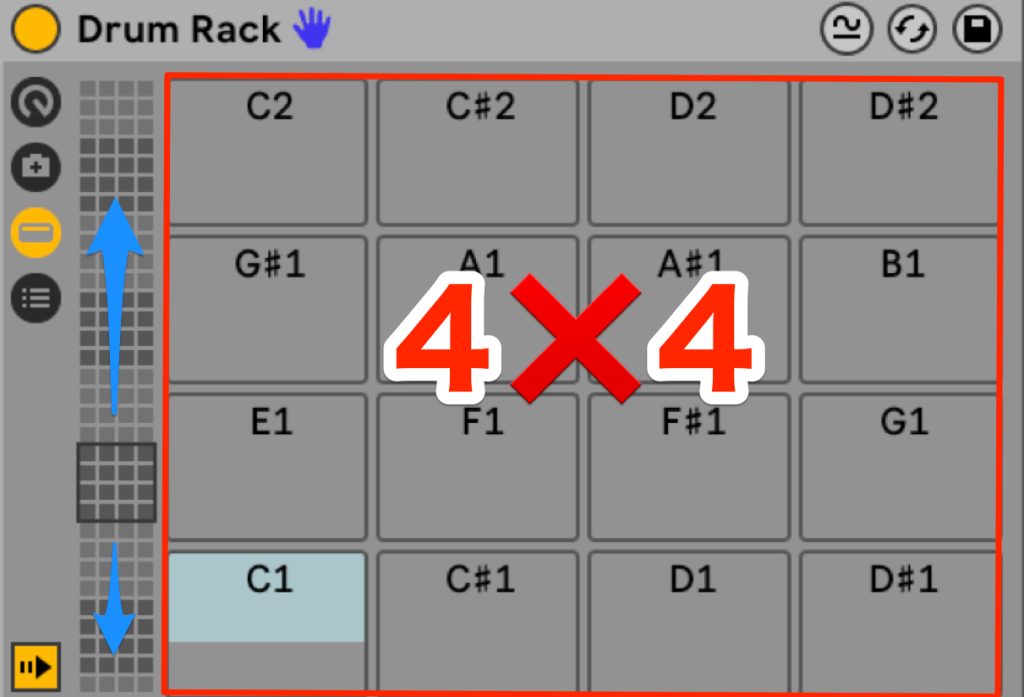
The instrument we are about to assign is a drum instrument called "Drum Rack."
"Drum Rack" lets you assign various sounds to a 4×4 grid of pads.
By scrolling, you can apply up to 128 sounds.
Despite the name "Drum Rack," sounds other than drums can also be used.
It also works well with MIDI input devices known as drum pads, making it suited not only to programming drums but also to intuitive music production such as club music.

Now let's apply it.
Select "Drums" in the Browser, and an empty "Drum Rack" appears at the top of the detail list, followed by presets below.
There is a huge number, from synth drums to acoustic drums, so it can handle a variety of genres.
Turning on the "headphones icon" lets you preview while choosing, which is very efficient.
You can adjust the preview volume in the Mixer.

As it is, there are too many to choose from easily, so narrow them down with "Filters."
This time we want synth drums, so we choose "Drum Kit, Drum Machine Kit."
We will use 909 Core Kit, modeled on the Roland TR-909, a staple drum machine of dance music.
To use it, simply drag and drop it onto a MIDI track.
One of Live's concepts and characteristics is that it is very intuitive.
When you try something thinking "maybe this will work," it usually works just as you expect.
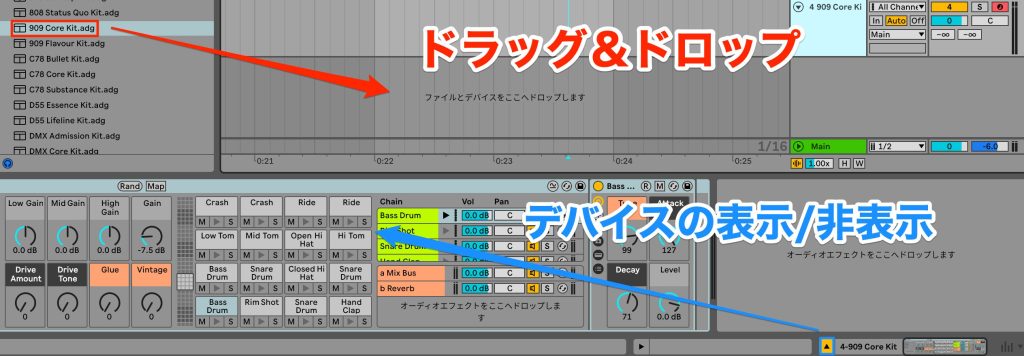
Also, if you drag and drop onto the area at the bottom of the main lanes that says "Drop Files and Devices Here," it instantly creates the corresponding track for you.
The display of the instruments applied to each track can be shown or hidden at the very bottom of the screen.
Because the user interface is so well thought out, you can focus on making music without being distracted by DAW operations.
The drum instrument is now assigned.
MIDI Step Input / Editing Velocity
There are two ways to enter MIDI data: "real-time recording," which records a performance on a MIDI keyboard or similar, and "step recording," which enters data with the mouse or similar.
This time we explain step recording.
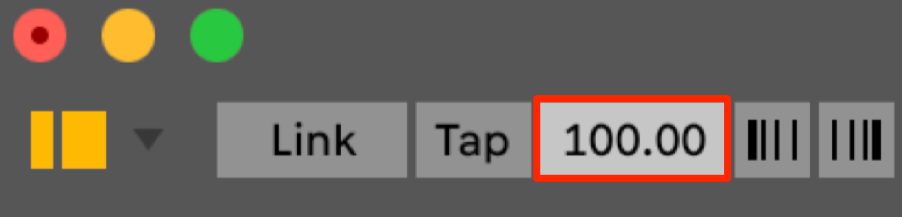
Before entering a drum pattern, first set the song's tempo at the top left of the screen.
This song's tempo is 100, so enter 100 here and confirm with Enter.
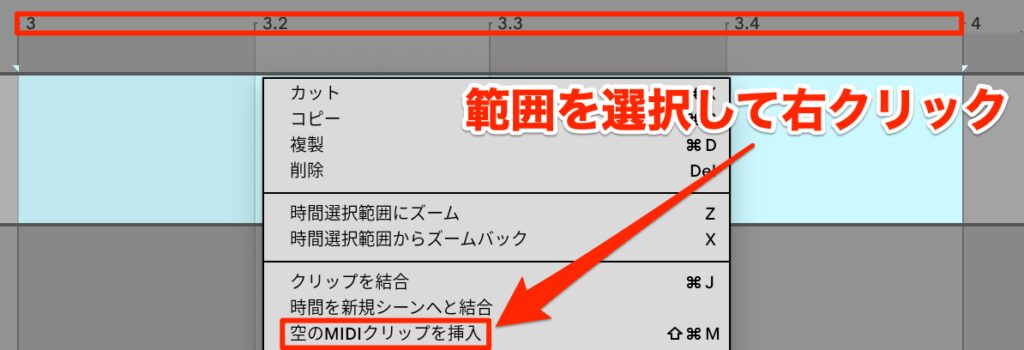
Next, you need a clip, the container for MIDI data.
MIDI data is handled by MIDI clips.
Select the range of numbers 3 to 4 at the top, right-click and choose "Insert MIDI Clip."
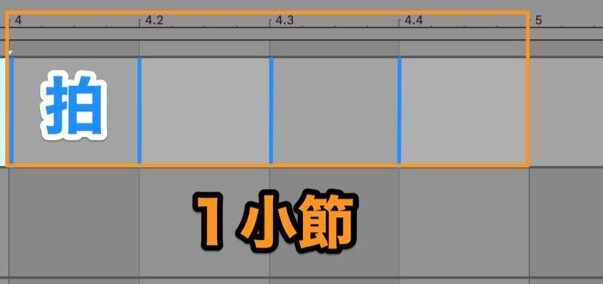
The numbers at the top represent bars.
A bar is a division of the music; in popular music, it usually consists of four beats, which is called one bar.
A beat is the basic unit repeated at regular intervals when keeping rhythm.
If you count "1, 2, 3, 4" or clap along while listening to music, that roughly matches the beat.
Having bar numbers shown makes song production smoother, as in "let's add four bars to the verse" or "record from bar 35."
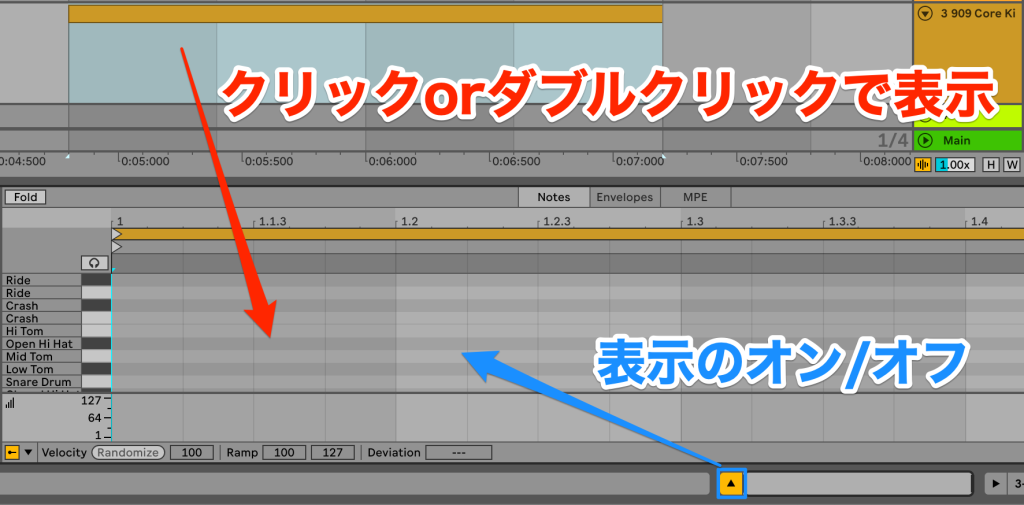
Next, let's look at the editor screen for entering MIDI data.
Click the MIDI clip, or double-click if nothing appears, and the MIDI Clip View, where MIDI is edited, appears below.
You can switch the Clip View on and off with the "▲ button" at the bottom of the screen.
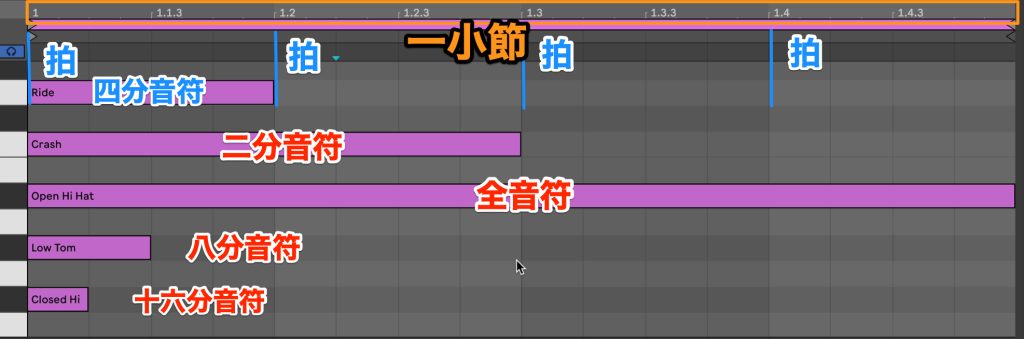
As in the main lanes, there are vertical lines.
These are called the grid and show timing divided at equal intervals.
In general, one beat is represented by a quarter note.
Doubling the quarter note gives a half note, and doubling that again, four times a quarter note, gives a whole note.
In most cases, this makes up one bar.
Dividing a quarter note in half gives an eighth note, and dividing an eighth note in half gives a sixteenth note.
However, how these lengths are used can differ depending on the time signature of the song.
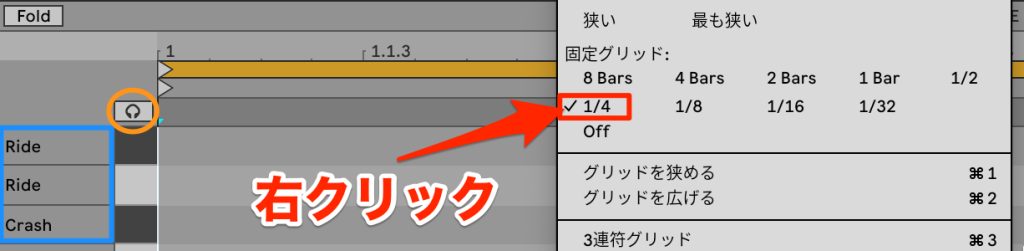
Right-click an empty area of the editor to specify the grid spacing.
This time, choose 1/4, which corresponds to a quarter note.
On the left, the names of the parts assigned to each pad of the "Drum Rack" are shown.
Turning on the "headphones icon" lets you hear sounds when you click the keys and when you enter data, which is convenient.
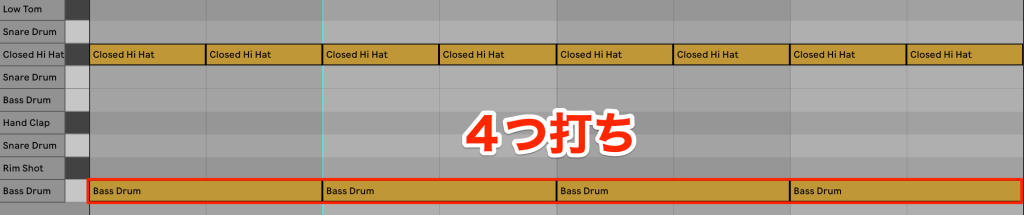
Four-on-the-floor is the standard pattern we will create.
It refers to a rhythm in which the low-end accent, the bass drum, plays on every beat, four times per bar; it is a rhythm pattern that appears frequently in dance music and other genres.
Double-click the start of each beat to enter the bass drum.
Next, add the hi-hat, the high-frequency accent, in eighth notes.
Against the four-on-the-floor bass drum, this adds a slightly busier eighth-note feel.

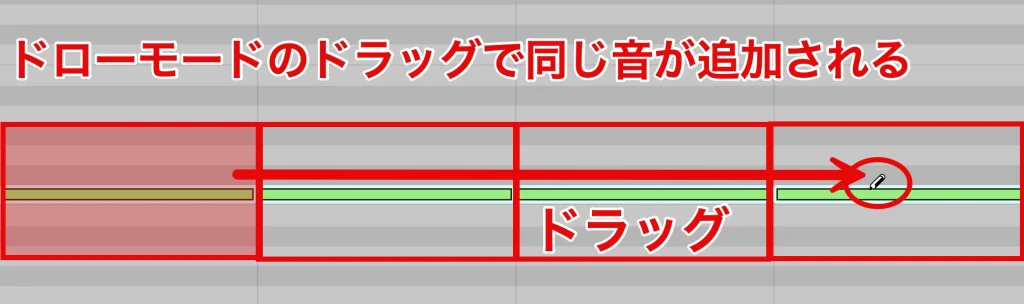
Turning on the "pencil icon" at the top switches to Draw Mode, letting you enter notes with a single click.
Dragging in Draw Mode also enables continuous input, which is smooth.
If you enter something by mistake, select it and press Delete, or go back one step with "Undo" in the "Edit" menu at the top.
Conversely, to redo something you undid, choose "Redo" in "Edit."
Shortcuts
- Undo: [Cmd+Z] on Mac, [Ctrl+Z] on Windows
- Redo: [Cmd+Shift+Z] on Mac, [Ctrl+Shift+Z] on Windows
Four-on-the-floor, before editing
It is not bad, but it feels a little flat, so let's make it a more rhythmic beat.
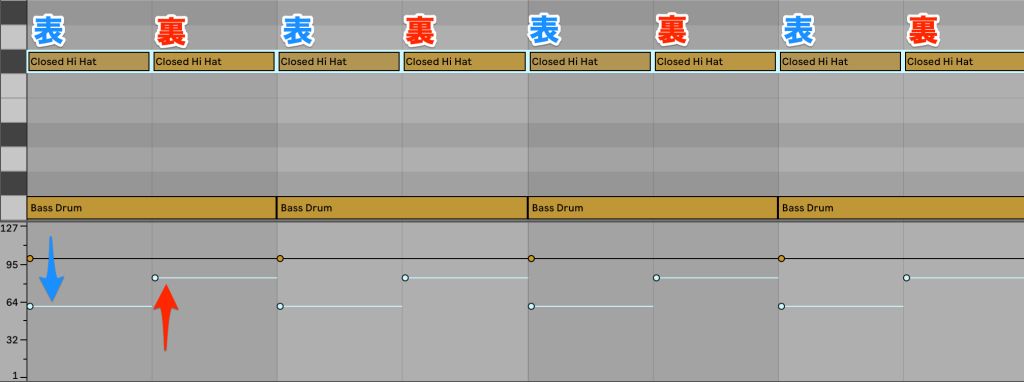
Rhythm has downbeats and upbeats, which alternate.
With the hi-hat in eighth notes, eighth-note downbeats and eighth-note upbeats alternate.
Emphasizing the upbeats makes the beat more rhythmic and danceable.
To emphasize them, use velocity, which corresponds to how hard each note is played.
To change velocity, drag the handles up or down at the bottom of the note editor.
First, the hi-hat is loud overall, so lower it.
If you select notes with a range selection or while holding Shift, you can change several at once.
Next, lowering the velocity of the eighth-note downbeats relatively emphasizes the eighth-note upbeats.
Four-on-the-floor, after editing
It has become a more rhythmic beat than before.
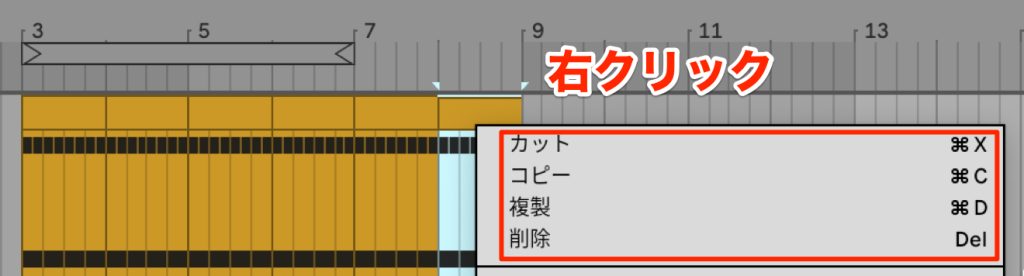
Here we want to get the big picture, so we increase the clips to match the length of the song.
Select a clip, right-click to copy it, and you can paste it at the cursor position.
You can also duplicate it right after the clip.
Shortcuts
- Copy & paste: [Cmd+C] + [Cmd+V] on Mac, [Ctrl+C] + [Ctrl+V] on Windows
- Duplicate: [Cmd+D] on Mac, [Ctrl+D] on Windows

Checking the whole song, the section from just before the chorus into the chorus feels a little lacking, so we add a busier rhythm that builds into the chorus.
Let's add a snare roll, finely subdividing the snare drum, which is the midrange accent.
Change the grid to 1/16 and enter sixteenth notes.
Snare roll, before editing
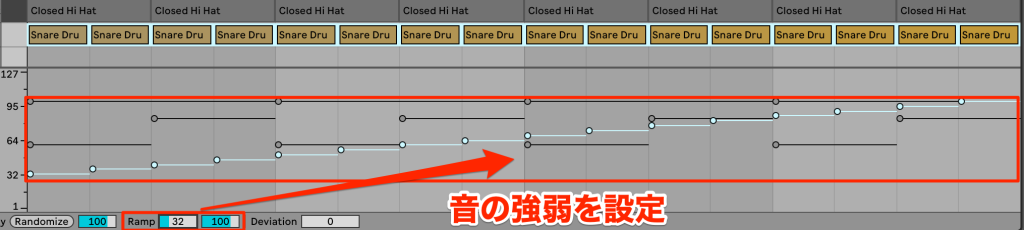
It feels flat rather than building up.
This is because all the velocities are the same, and there are no dynamics.
We edit it so that it gradually gets stronger.
This is usually a very tedious task, but it is very easy in Live.
Just select the notes and set the start and end values of "Ramp" at the bottom of the screen.
Set them by dragging up and down, or by entering a value and pressing Enter.
Snare roll, after editing
That gives a nice build.
Even complex tasks like this can be edited smoothly by making use of Live's features.
That concludes the explanation of MIDI step recording.
Using Audio Samples (One-Shots and Loops)
We also want to add energy to the chorus, which felt lacking earlier.
This time, instead of MIDI data, we paste in audio data in formats such as WAV or MP3.
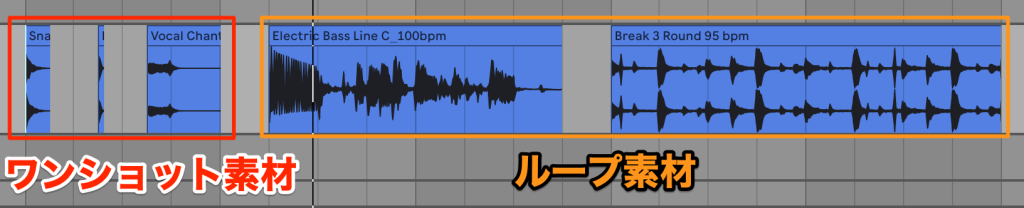
There are two main types of sound material. One is one-shots, data that records just a single note or hit.
The other is loops, which record a performance and can be played repeatedly.
One-shot material
Loop material
You can change the performance, but doing so affects sound quality, so it offers less freedom than MIDI.
However, this does not apply when aiming for special effects, as in club music.
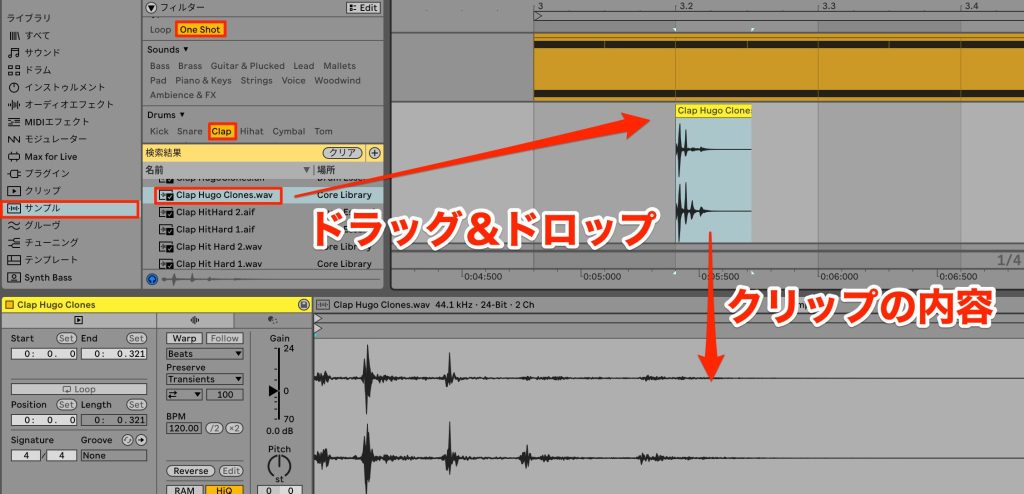
Now let's look for sound material.
The Browser's Samples contain many audio files.
Unlike the synth drums we added earlier, we want a one-shot acoustic clap that sounds like a person actually played it, so we filter by "One Shot, clap" with "Filters."
Once decided, drag and drop it onto an audio track, which handles audio data.
When you paste audio data onto a track, it becomes an audio clip, which can be processed and edited in various ways.
As with MIDI clips, click it, or double-click if nothing appears, and the Audio Clip View appears below.
You also switch the clip display on and off at the very bottom in the same way.
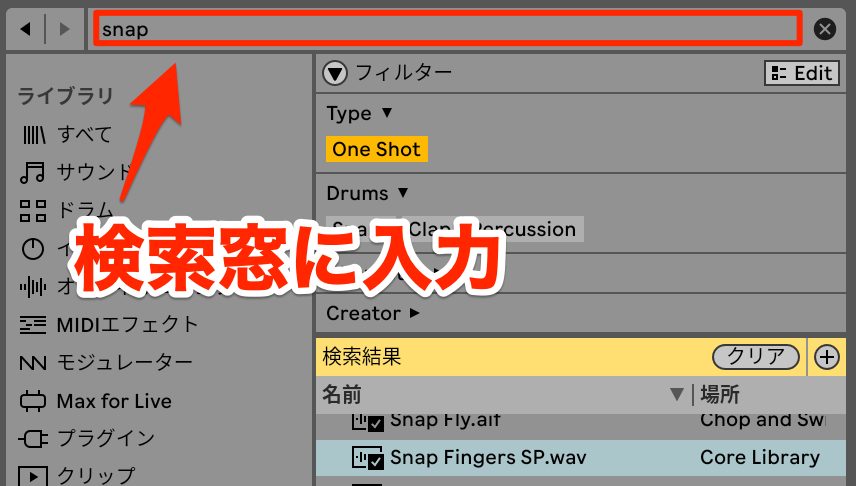
We also add a finger snap, the sound of snapping fingers, to vary the sound.
Using the Browser's search field together lets you search more efficiently, so give it a try.
Set "Filters" to "One Shot" only, type snap in the search field, and assign the material to an audio track.
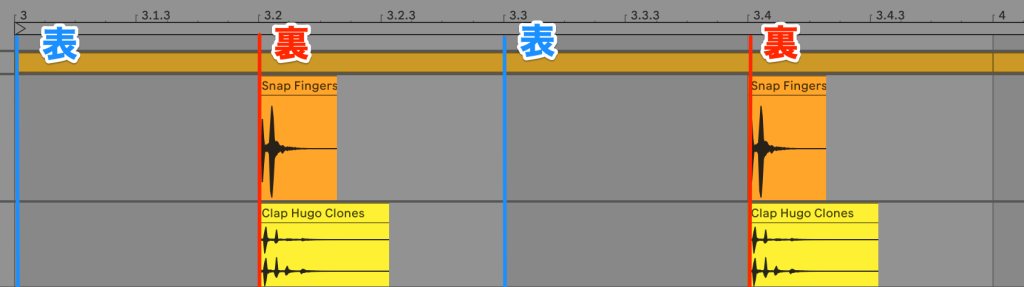
With the hi-hat we emphasized the eighth-note upbeats, but in the chorus we add accent claps on the backbeat, that is, beats 2 and 4, the off-beats of the quarter notes.
It now has energy and the core of the drums is done, but the level balance is not good.
As you proceed with music production like this, you will need to balance levels and other aspects between tracks.
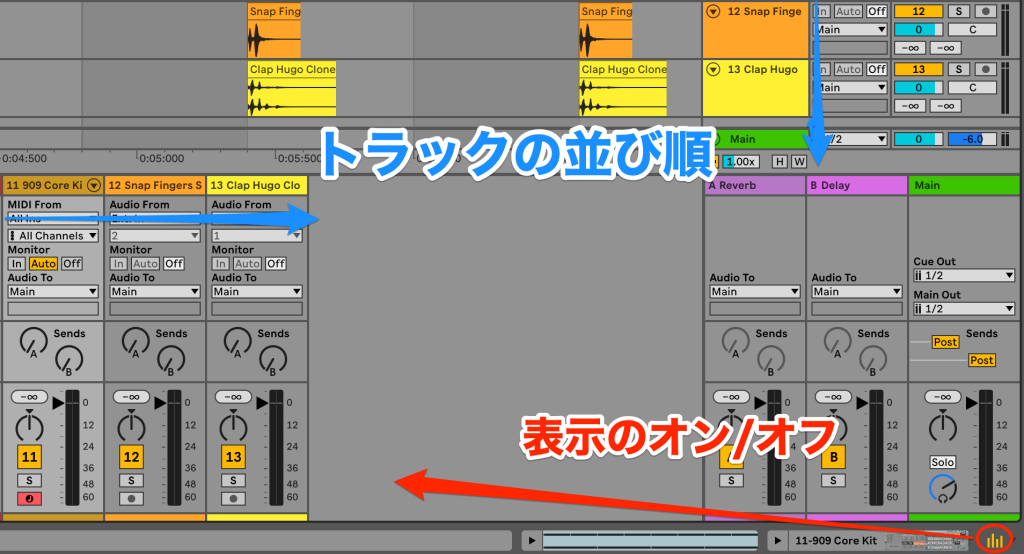
The tool for that balancing is the Mixer.
You can switch the Mixer on and off at the bottom right of the screen.
In the Mixer, as in Session View, tracks are lined up from left to right, with the Main track at the far right.
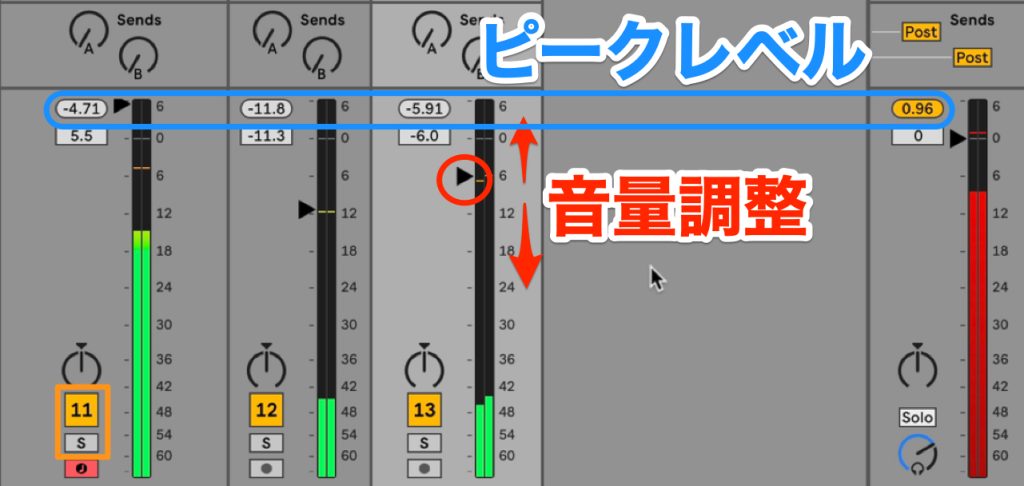
As in the main lanes, you can turn each track on and off at the area with its number.
"S" is the Solo button, and only the selected track plays.
Move the slider up or down to adjust the volume.
You can check the current level after the slider visually on the meter.
In DTM, volume is expressed in dB (decibels), a relative value, basically with 0 as the maximum and negative values below it.
Exceeding 0 dB can cause unintended changes such as distortion, so adjust each track's meter and, when all tracks are playing, make sure the Main track's meter does not exceed 0 dB.
If the Main track exceeds 0 dB, it is shown in red.
Above the fader, the peak level, the maximum level reached on each track, is shown, which is useful for checking whether 0 dB has been exceeded.
Click it to reset the display.
With all that in mind, let's adjust the levels.
Now the balance is good.
How to Use Warp
The acoustic-sounding claps added some softness, but we want to add an even more organic groove to the song.
In such cases, adding percussion works well.
This time we paste in audio loop material.
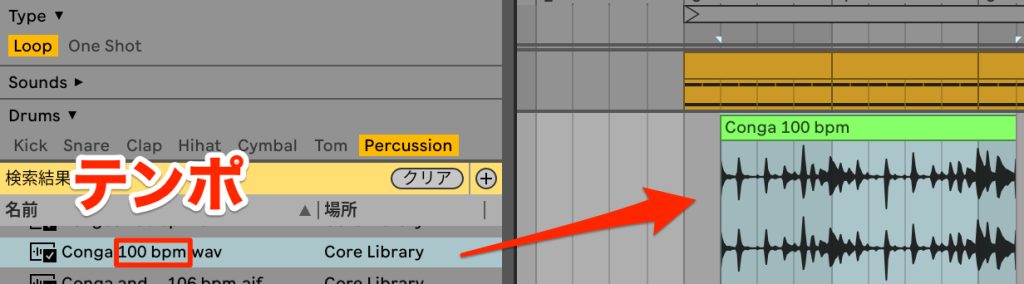
We look for loops of live-played material.
Select "Loop, Percussion" in "Filters."
Loop material lists its tempo, which is helpful when choosing.
We pasted in a conga loop at the same tempo.
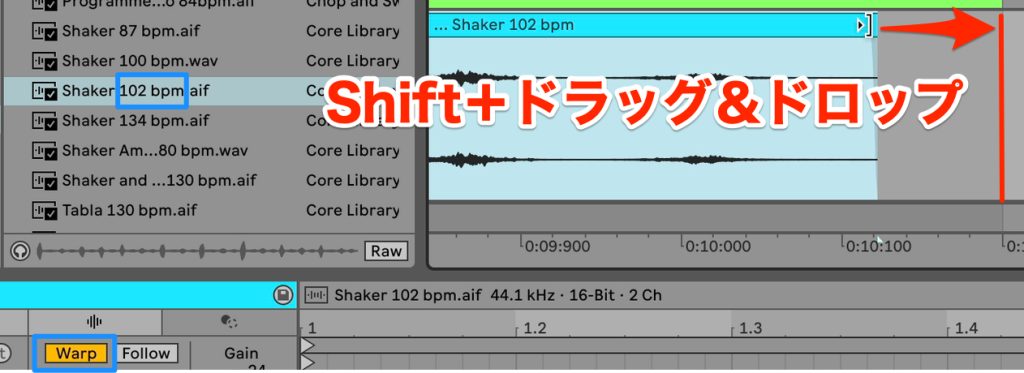
The congas fill the midrange, so we also add a shaker in the high range.
Unlike the previous material, its tempo is not the same as the song's.
However, unless the tempo or length is extremely different, Live automatically matches the tempo for you.
If it does not match, "Warp," the function that aligns tempo, may be off, so turn "Warp" on and, holding Shift, align the end of the clip to the end of the bar.
Shaker, before editing
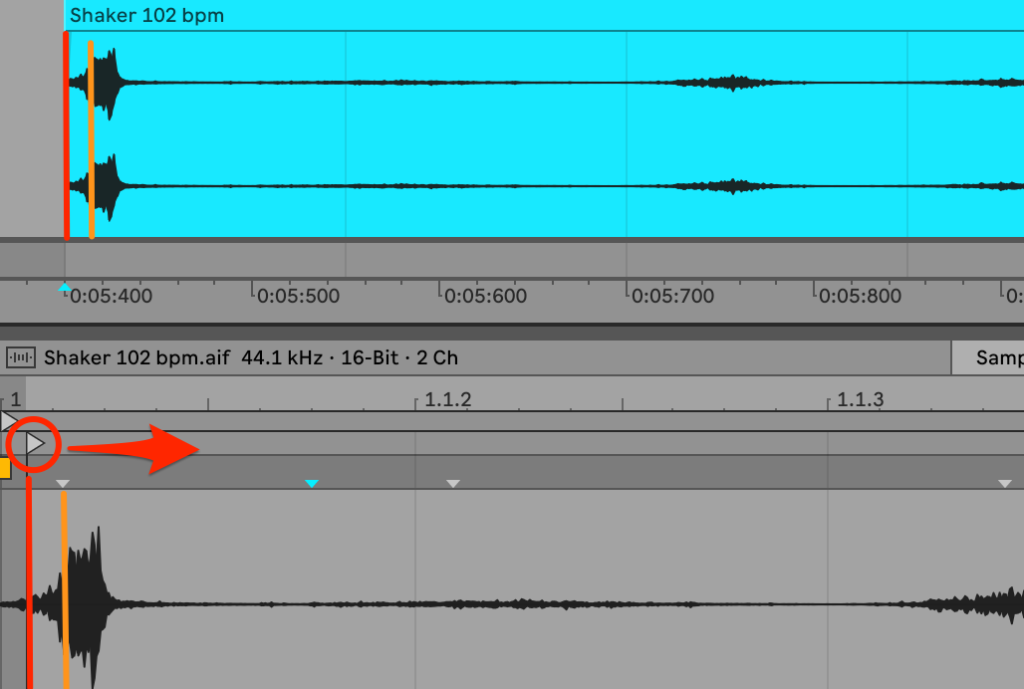
Listening to it, the length matches, but the shaker sounds late.
Zooming in and comparing with the grid clearly shows that the start position is late.
In this case, shift the start position within the clip to align it.
Shaker, after editing
Now that the timing matches, we copy the percussion.
To add contrast, we want the shaker alone to come in from the chorus.
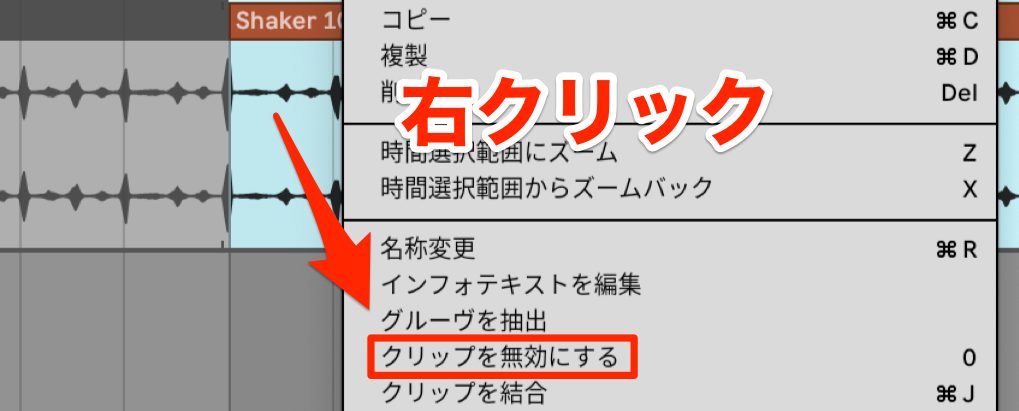
You could delete the clips, but if you might use them later, deactivate the clips.
To do so, select the clips you want to deactivate, right-click and choose "Deactivate Clip."
Alternatively, select the clips and press the shortcut [0 (zero) key] to deactivate them in the same way.
There is one thing to watch out for when using audio samples.
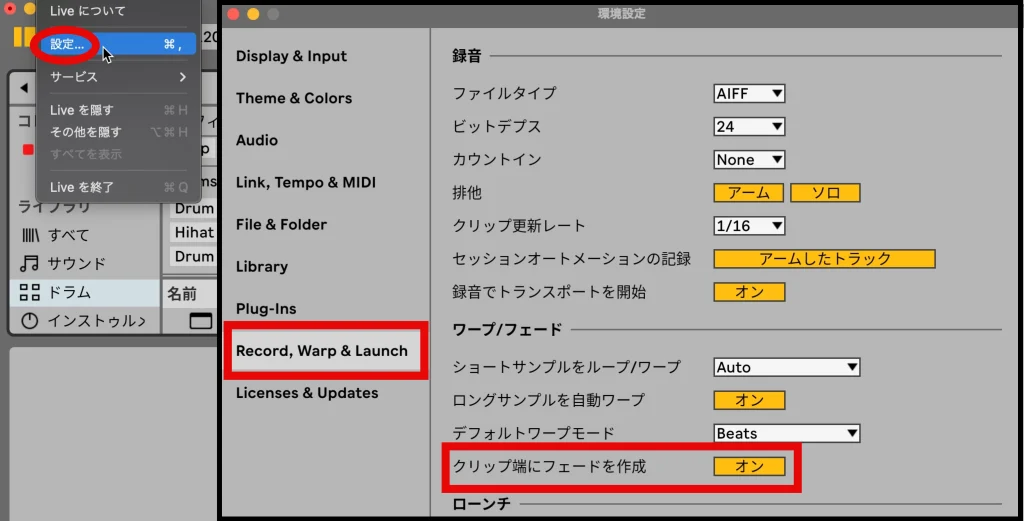
If "Create Fades on Clip Edges" is turned on under "Record, Warp & Launch" in Live's "Settings," fade-ins and fade-outs are automatically created at both ends of clips.
This helps avoid the noise that can occur when using loops, but with one-shots and similar material, it cuts into the attack and dulls the sound.
Listen for the difference in the shaker's attack.
With fade-in
Without fade-in
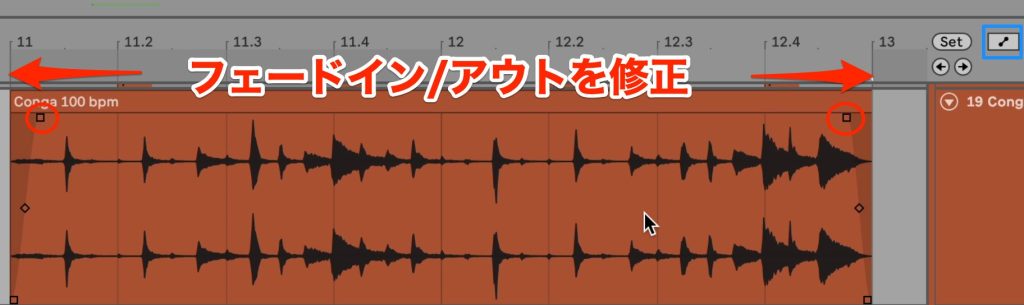
If it bothers you, turn off "Create Fades on Clip Edges" and fix fades that have already been set individually.
You can edit them at the edges of the clip.
If fades are not shown, you are in Automation Mode, so turn off the button at the top right.
This completes the hybrid drums combining synth drums and live rhythms.
That concludes programming the rhythm.
What did you think?
Let's get used to handling both MIDI data and audio data.
Next, we will program the bass, which supports the song together with the drums.
Frequently Asked Questions
Q1. What is Drum Rack in Ableton Live 12?
Drum Rack is Ableton Live's standard drum instrument, which lets you assign various drum and synth sounds to a 4×4 grid of pads. You can apply up to 128 sounds by scrolling, and a rich set of presets is provided, from synth drums to acoustic drums.
Q2. What is the difference between a MIDI track and an audio track?
A MIDI track controls performance information with MIDI data and operates software instruments such as drums and synths. An audio track, on the other hand, is used for editing and processing audio files. A MIDI track is needed to program drums.
Q3. What is the difference between step input and real-time recording?
Real-time recording records an actual performance on a MIDI keyboard or similar. Step input places notes on the grid with the mouse; it makes precise timing easy and is suitable for beginners.
Q4. What do grid spacings such as 1/4 and 1/8 mean?
Grid spacing indicates note length: 1/4 is a quarter note and 1/8 is an eighth note. Choosing 1/4 shows marks at each beat position, making basic patterns such as four-on-the-floor easy to enter.
NEW ARTICLES
Latest English Articles











