
This article explains techniques for programming acoustic guitar in Ableton Live 12. Starting with the difference in tone between folk and classical guitars, it introduces step by step how to enter chords by reusing an existing piano clip, how to express variations in volume by editing velocity, and how to adjust note timing with the MIDI transformation tool "Strum." By using these features, even beginners can achieve an acoustic guitar sound with a realistic performance feel.
Acoustic Guitar Arrangement

In typical pop arrangements, acoustic guitar is, alongside piano, one of the most frequently used instruments, covering everything from accompaniment to melody.
In the chord playing, notice the calm long tones in the verse and the energy created by strumming in the chorus.
Demo song: acoustic guitar (with rhythm & bass and guide vocal)
Live 12 Programming Acoustic Guitar Video Explanation from 53:14
Topic
- Types of acoustic guitar and assigning a sound
- Easy chord programming / long tones
- Easy chord programming / strumming
Types of Acoustic Guitar and Assigning a Sound
Before assigning a sound, let's look at the types of acoustic guitar.
Depending on materials and shape, acoustic guitars come in two types: folk guitar and classical guitar.
Folk Guitar
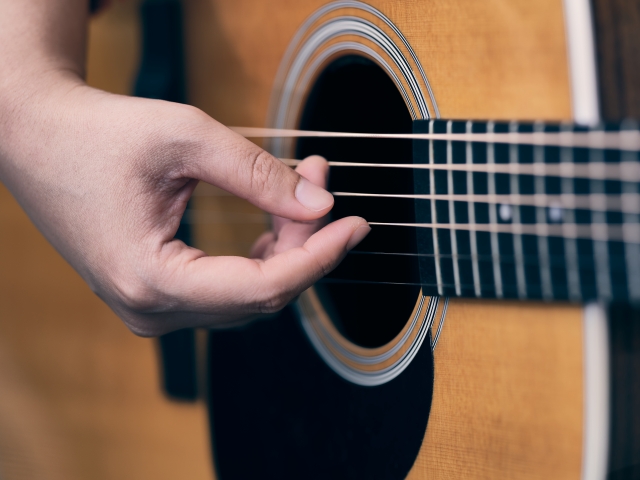
A folk guitar is strung with steel strings, a hard material, and has a bright, crisp sound with lots of high-frequency content.
This is the type mainly used in J-pop and singer-songwriter performances.
Folk guitar
Classical Guitar

A classical guitar is strung with nylon strings, a soft material, and has a mellow sound.
As the name suggests, it gives a classical, mature atmosphere.
Classical guitar
In the demo song, we wanted a calm feel, so we used a classical guitar.
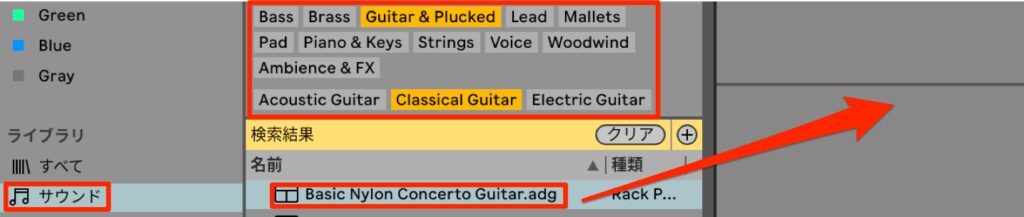
Let's choose the sound.
Select "Sounds" and sort with "Filters" by "Guitar & Plucked, Classical Guitar," and "Basic Nylon Concerto Guitar" appears, so choose it this time.
Easy Chord Programming / Long Tones
Guitar is the most difficult kind of instrument to program, but Live 12's features make it possible to achieve a realistic sound easily.
At first, we recommend aiming not for perfect reproduction but for reproducing the important points.
Reusing an Existing Clip
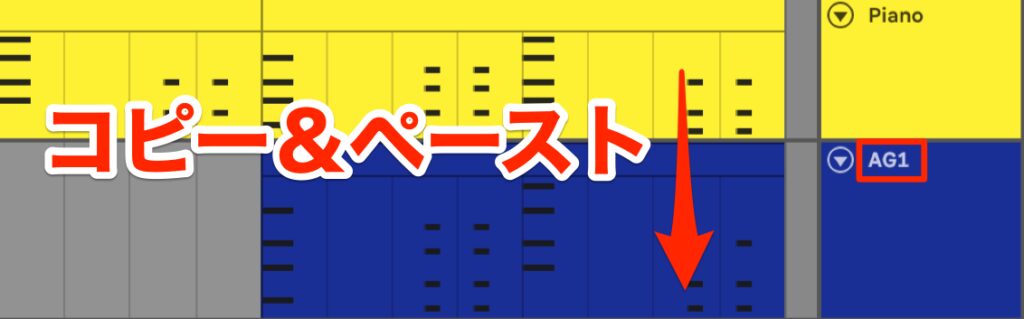
We enter the long-tone chords for the verse.
Because the guitar is played on six strings, its chord voicings are distinctive, unlike the piano, and they are a high hurdle even for intermediate users and above.
This time we focus our edits on other, more important points, namely the guitar's rhythm and expressiveness, so we skip the chord voicings.
We save effort by reusing the chords from the clip created for the piano.
Copy and paste the piano clip, change the track and clip color to blue to avoid confusion, and rename them.
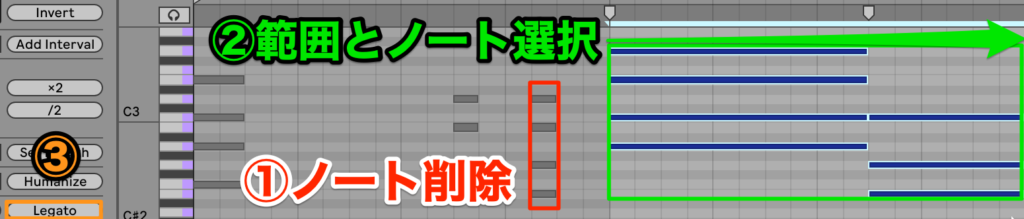
We want to turn the piano part, edited to a tight rhythm, back into long tones, but editing each chord by dragging is a bit tedious.
Here, the "Legato" function is very convenient.
First, delete the chord on the sixteenth-note off-beat of beat 4, which is not at a chord change.
Then simply drag to select the notes and range you want to apply "Legato" to and click the "Legato" button, and the notes are extended to the next note.
Back to long tones with "Legato"
Compared with a real acoustic guitar, the sound is hard and strongly feels programmed.
Let's bring it closer to a real performance.
There are two key points: velocity, the strength of playing, and the timing of notes.
Editing Velocity
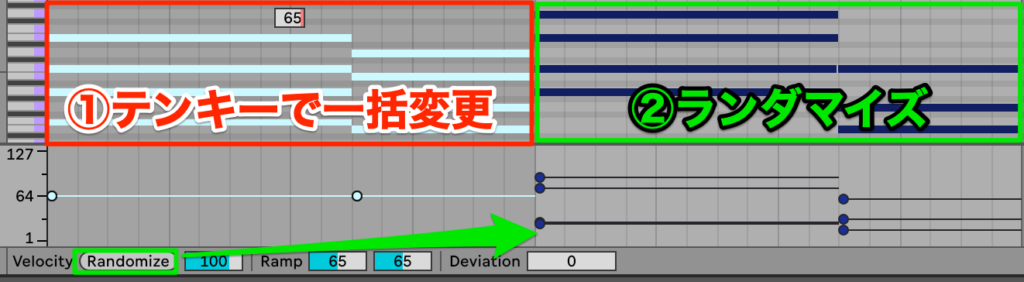
First, we edit velocity.
The sound is too hard overall, so, contrary to the piano, lower the velocity to 65 for now.
Select all notes, type 65 on the numeric keys and press Enter to change them all at once.
Since the volume also changes, adjust the volume in the Mixer.
Next, a real human performance always has variations in volume, so we reproduce that.
Select the notes in the range you want to vary and click the "Randomize" button, and the velocities are scattered randomly.
After applying Randomize: 100
There is now variation in volume, but it is so large that the performance sounds unstable.
The randomization range was 100, which was too wide.
Choose "Undo" from the "Edit" menu to return to the previous state.
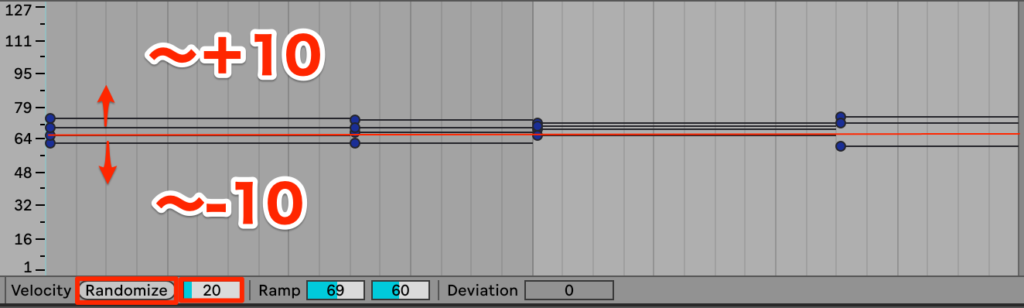
Enter 20 this time and run "Randomize" again.
After applying Randomize: 20
You can probably hear that randomizing velocity within a range of 20, +10 and -10 from the set value of 65, gives moderate variation while keeping stability.
Editing Note Timing
With velocity edited, next we edit the timing of the notes.
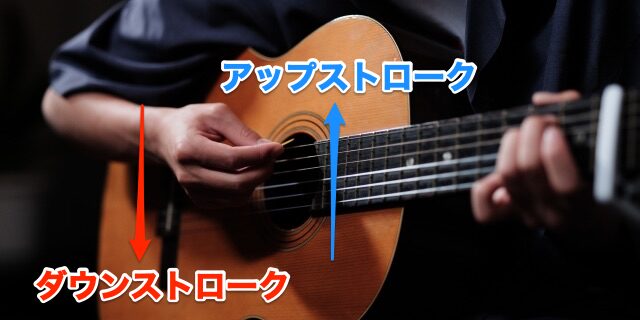
When playing chords on a guitar, the left hand generally holds the chord while the right hand strikes the strings, and there are two ways: the downstroke, striking the strings from top to bottom, and the upstroke, striking them from bottom to top.
Physically, it is impossible to sound all the strings at exactly the same time: with a downstroke, notes sound from the low strings to the high strings, and with an upstroke, from the high strings to the low strings.
Downstroke (slowed down for clarity)
Upstroke (slowed down for clarity)
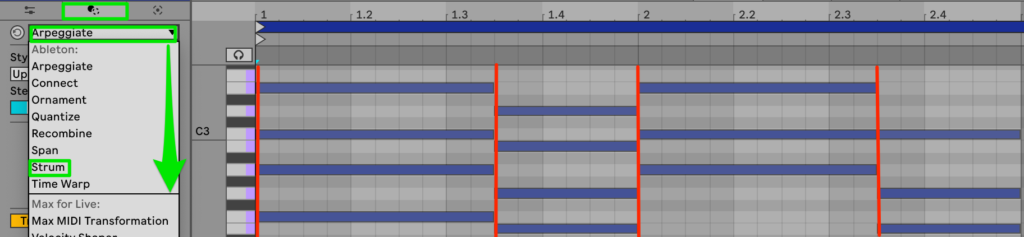
Looking at the current MIDI notes, all the chord notes are perfectly aligned to the grid, which is why it sounds programmed.
You could edit by moving notes one by one, but that would be very time-consuming.
However, Live 12's new MIDI transformation tool "Strum" makes editing easy.
Select the MIDI transformation tools from the tabs in the MIDI clip.
MIDI transformation tools are, as the name suggests, functions that apply changes to MIDI data that has already been entered.
Open the window below the tab to show many MIDI transformation tools, and choose "Strum."
"Strum" means to sweep across the strings of an instrument, and it is very useful when programming guitar.
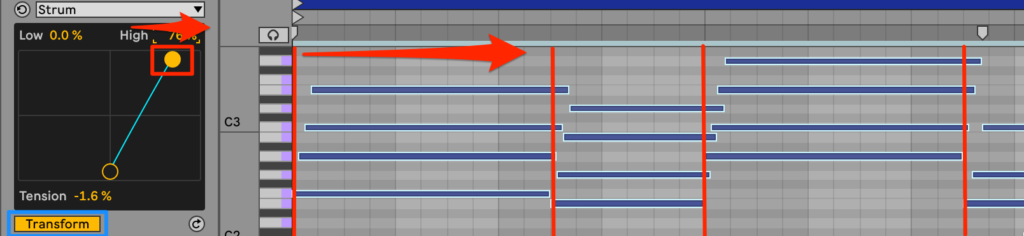
If "Transform" is not lit, turn it on, and select all the notes whose timing you want to offset.
Drag the upper circle inside the box to offset it, and the timing of the MIDI notes spreads out, easily reproducing a downstroke.
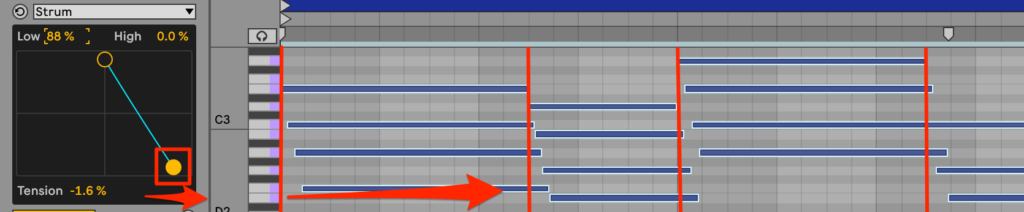
Using the lower circle as well also enables upstrokes.
The display updates in real time, so it is very easy to understand visually.
This time we make them all downstrokes.
After editing to downstrokes with Strum
How was that?
You can probably hear that offsetting the timing instantly makes it sound like a live performance.
In this way, even guitar programming, said to be difficult, can easily reproduce a realistic performance by editing velocity and timing with Live 12's features, so give it a try.
Easy Chord Programming / Strumming
Next, we add the playing technique of sweeping across chords, called strumming or stroking, to the chorus.
It not only gives the song the sound of chords but can also add a percussive element.
Reusing an Existing Track
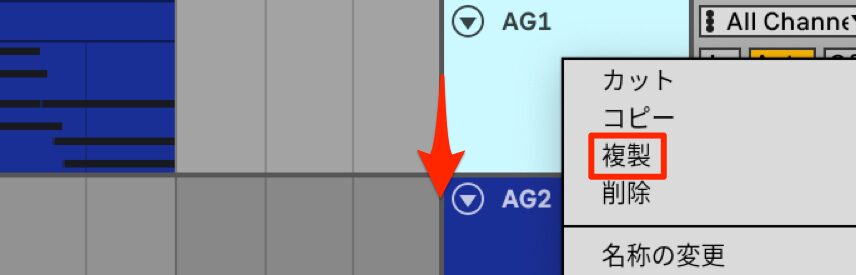
This uses a different programming method, so we program it on a separate track.
The sound assignment is the same as before, so let's reuse the existing track.
Right-click the guitar track we programmed and choose "Duplicate" to duplicate the track.
Delete the programmed clips and rename the track.
Duplicating tracks like this saves the effort of assigning sounds when creating a new track, which is efficient.
The MIDI Effect Chord
Programming strumming involves many notes and finer rhythms, so it takes even more effort than the long tones earlier.
But there is a very convenient feature for this too, so let's use it.
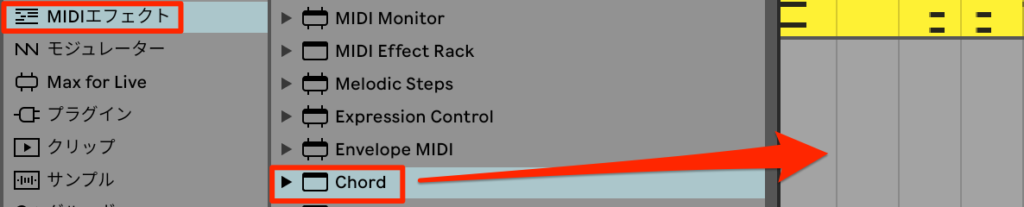
This time we use a "MIDI effect."
A "MIDI effect" is an effect that applies some kind of change to MIDI data and outputs MIDI data.
For example, it can change pitch or be used for automatic performance.
Remember that it acts only on MIDI data.
"MIDI effects" are in the Browser category called "MIDI Effects."
Choose "Chord" from among them and drag and drop it.
"MIDI effects" are always placed at the start of the chain.
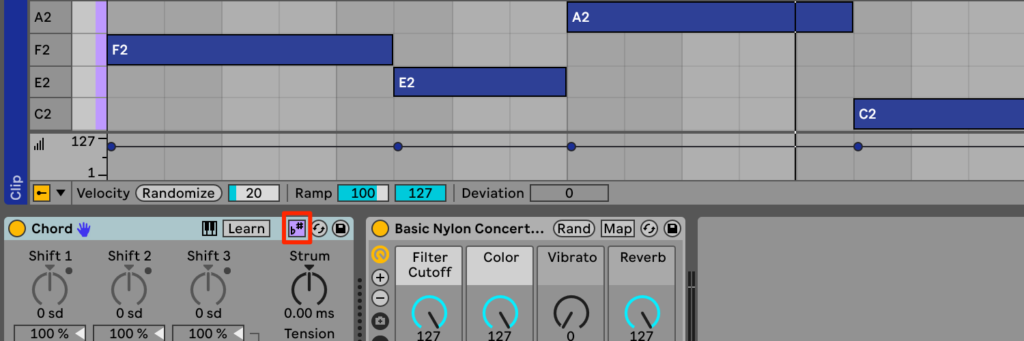
As its name suggests, "Chord" outputs a chord when you enter a single note.
First, so that the chord tones fit the song's key, light the "#♭" button in Chord purple to turn on the scale function.
Then create a two-bar clip and enter the chord roots [F, E, A, C] as long tones.
Long tones entered
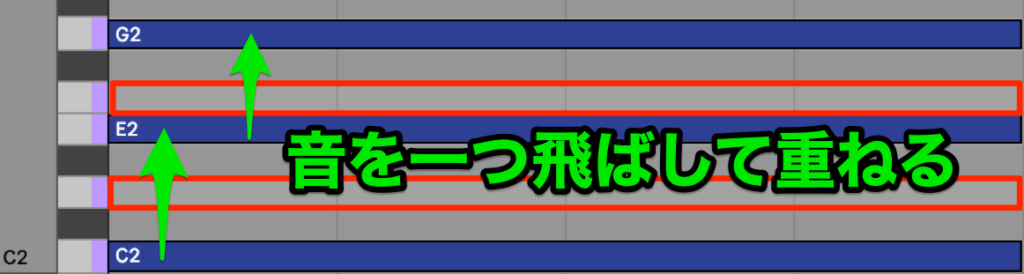
Right now they are still single notes.
Chords are basically built by stacking every other note that fits the key.
For example, in a song in the key of C, the white keys are the notes that fit the key.
For a C major chord, the root is C; skipping D, the next white key, gives E; and skipping F, the next white key, gives G, forming a triad.
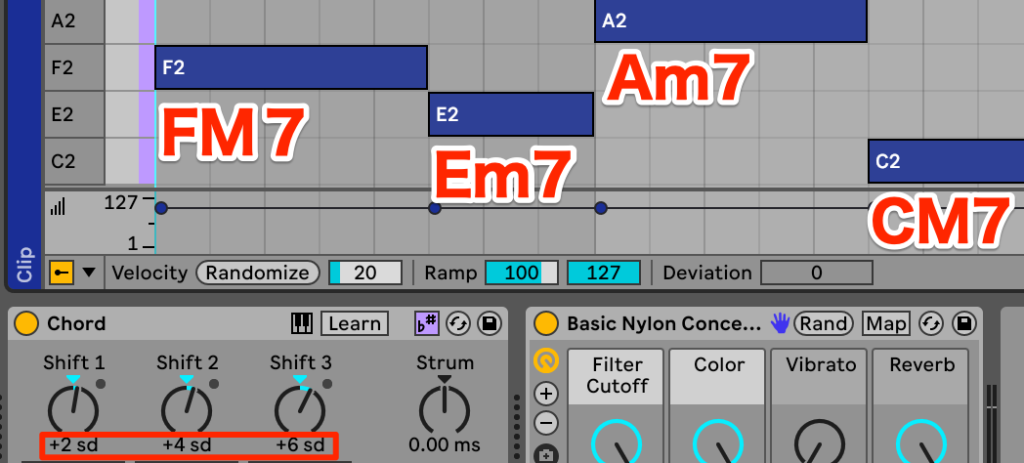
To make chords, turn the knobs labeled Shift to add the specified chord tones.
Shift sets how many notes away, among the notes that fit the key, the output note is from the incoming MIDI note.
The root note, the input signal, is output as is regardless of the settings.
Shift 1 shows 0sd; this sd represents the distance between notes.
At 0 it stays the root, so we set them skipping one each time.
Skip 1, the next after 0, and change it to +2sd.
Continue adding notes skipping one each time.
Set Shift 2 to +4sd, skipping 3, and Shift 3 to +6sd, skipping 5.
After setting Chord
Now four-note chords are output, as you can hear.
Because Scale Mode is on, major seventh and minor seventh chords that fit the key are output automatically.
In this case, they are F major seventh, E minor seventh, A minor seventh and C major seventh.
When using "Chord," remember to stack every other note.
Creating a Guitar Strumming Rhythm Pattern
Let's listen to the current long-tone chords together with the drums and bass.
We add rhythmic variation to this to reproduce guitar strumming and give the chorus movement.
The bass and piano share the same rhythm pattern, so we add a busier, percussive rhythm that differs from it.
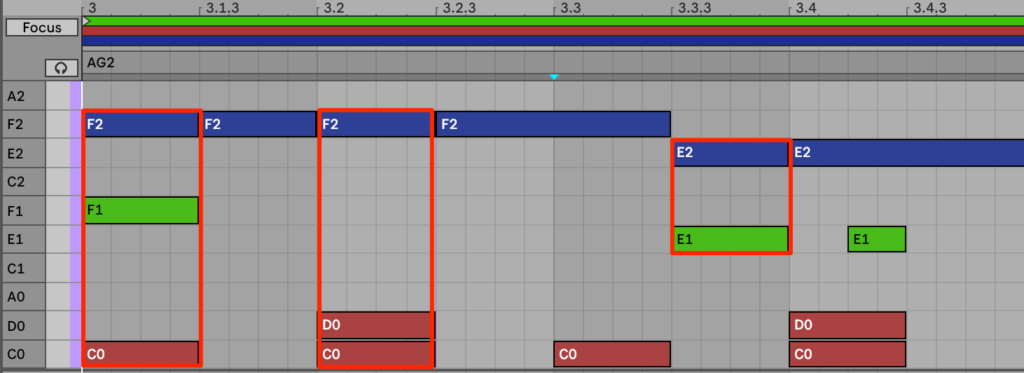
To create a guitar strumming pattern, it helps to refer to the movement of the drums and bass.
Let's overlay the drum and bass patterns on the guitar to check.
The kick and snare, the core of the drum rhythm, are shown in brown, and the bass in green.
(For visibility, the bass is shown one octave lower than its actual pitch.)
From these, choose the notes that will be the center of the rhythm for the guitar strumming.
Too many will feel restless, so it is good to choose about three per bar.
This time, we choose the starts of beats 1 and 2 and the eighth-note off-beat of beat 3.
At those timings, cut the guitar notes into eighth notes, and do the same in bar 2.
Central notes cut into eighth notes
The rhythm has started to move.
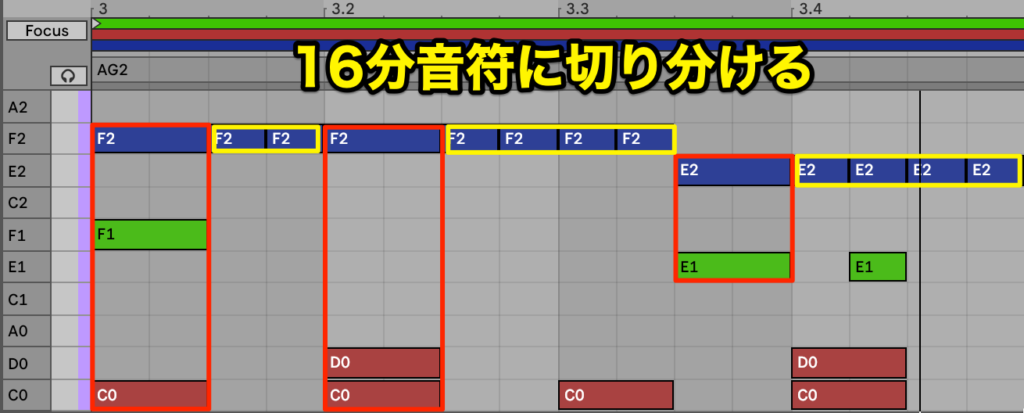
Right now there is only an eighth-note pattern, so we want to add finer sixteenth-note rhythms.
Leave the central notes we cut earlier as they are, and cut the other parts into sixteenth notes.
After adding sixteenth-note cuts
It is a little too busy, and the rhythm feels like it stalls.
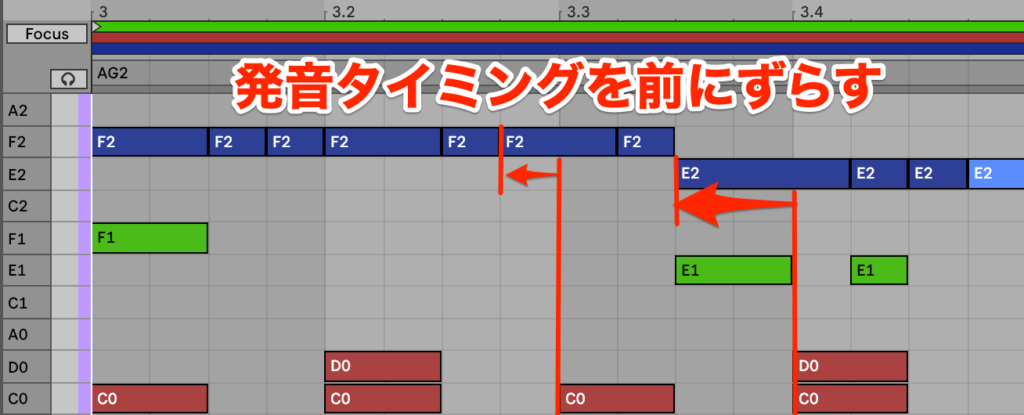
In this case, we add syncopation.
Syncopation means that notes that would normally fall on the beat are shifted, such as at the start of a beat, creating rhythm patterns that cross the beat and give a greater sense of complexity and forward drive.
Extend the note at the start of beat 3 so that it begins a sixteenth note earlier.
The note that was there is overwritten.
Likewise, extend the note at the start of beat 4 so that it begins an eighth note earlier.
Make the same edits in bar 2.
After adding syncopation
How was that?
The overly busy rhythm now has room to breathe, and it feels more energetic.
It is getting quite good, but the chord notes are too perfectly aligned, which weakens the live-performance feel.
As with the "Strum" MIDI transformation tool, we offset the note timing here too.
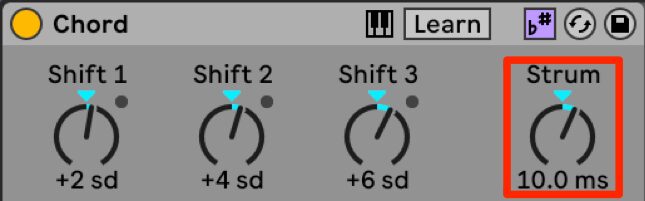
It is very easy: just turn the knob called "Strum" in "Chord."
The knob setting lets you reproduce anything from fast to slow strokes.
Strum setting: 25 ms
This time we are playing a busy rhythm, so if it is too slow, the performance cannot keep up.
Set it fairly fast, around 10 ms.
Strum setting: 10 ms
In this way, guitar can be programmed easily not only with the "Strum" MIDI transformation tool but also by using a "MIDI effect."
It is a good idea to use them as appropriate for each situation.
That concludes the explanation of programming acoustic guitar.
How did you find programming guitar?
Strum and Chord in Live are convenient features rarely seen in other DAWs, and they lower the hurdle of programming guitar, so make full use of them.
Next time, we will add a synthesizer and vocal samples to give the basic track width and accents.
Frequently Asked Questions
Q1. Is programming acoustic guitar difficult in Ableton Live 12?
Guitar programming is complex, but with Live 12's features, even beginners can handle it. We recommend starting not with perfect reproduction but with edits focused on the important points.
Q2. How should I choose between folk guitar and classical guitar?
Folk guitar has steel strings and a bright sound, suited to J-pop and singer-songwriter styles. Classical guitar has nylon strings and is characterized by a mellow, mature sound. Choose according to the mood of the song.
Q3. When should I use the "Strum" function?
Use it to reproduce guitar downstrokes and upstrokes. It can automatically adjust the timing of multiple MIDI notes, removing the unnatural feel of programmed parts.
Q4. What value is best for randomizing velocity?
In the article's example, "Randomize: 20" is recommended. This creates moderate variation in volume while keeping stability, bringing it closer to a human performance.
Q5. What is the advantage of reusing piano clips for guitar?
Because the chord information can be reused, you save the effort of entering the guitar's complex chord voicings from scratch. You can then focus on adjusting velocity and timing.
NEW ARTICLES
Latest English Articles











