
This article explains in detail how to create professional drum sounds and a synth bass using only everyday materials, a plastic bottle and a rubber band, without using the instruments included with your DAW. By using pitch shifting, a sampler, and effect processing such as distortion and EQ, you can learn techniques for creating original sounds. By learning the concrete steps from recording audio to processing it with effects, you gain the practical insight that even DTM beginners can produce high-quality tracks through creativity and ingenuity.
How to Make Sounds with Everyday Objects
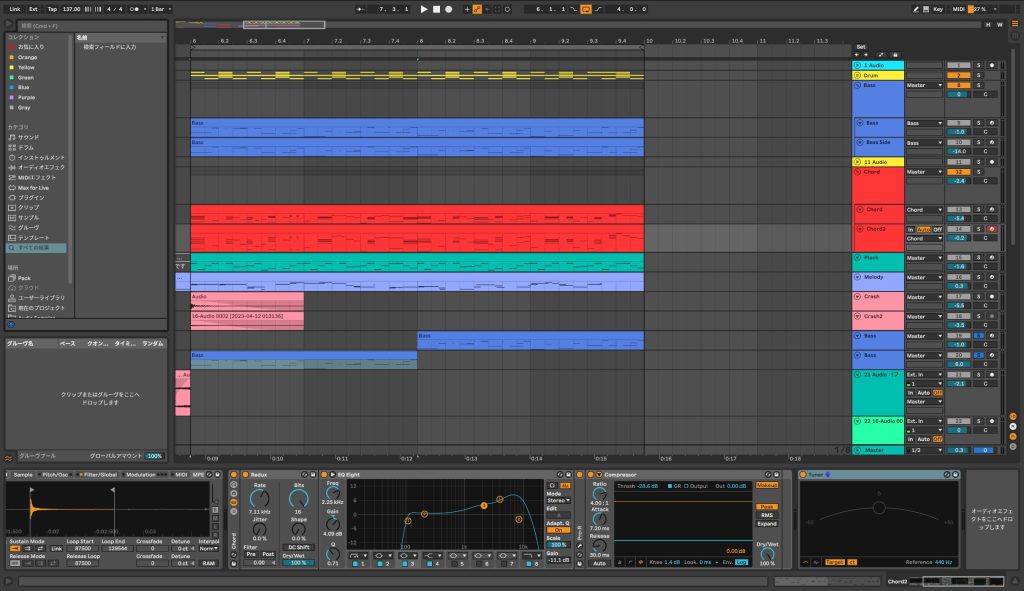
This time, we explain techniques for making sounds with everyday objects.
Even without using the instruments included with your DAW or commercial ones, you can create original sounds with various methods and ideas.
In music production, clean sound is by no means always right.
Whether you can properly give shape to the sound image in your head is essential for originality and for expressing your world.
We hope this article lets you feel [the possibilities and fun of making sounds].
About the Demo Song
This track uses only a plastic bottle and a rubber band as sound sources.
Making Drum Sounds from a Plastic Bottle
The sound sources we prepare this time are the sound of hitting a plastic bottle, recorded with a microphone,
and the sound of plucking a rubber band, recorded with a microphone.
We use only these two sounds.
The Kick Sound
For the kick, we use the plastic bottle sample, which has percussive qualities.
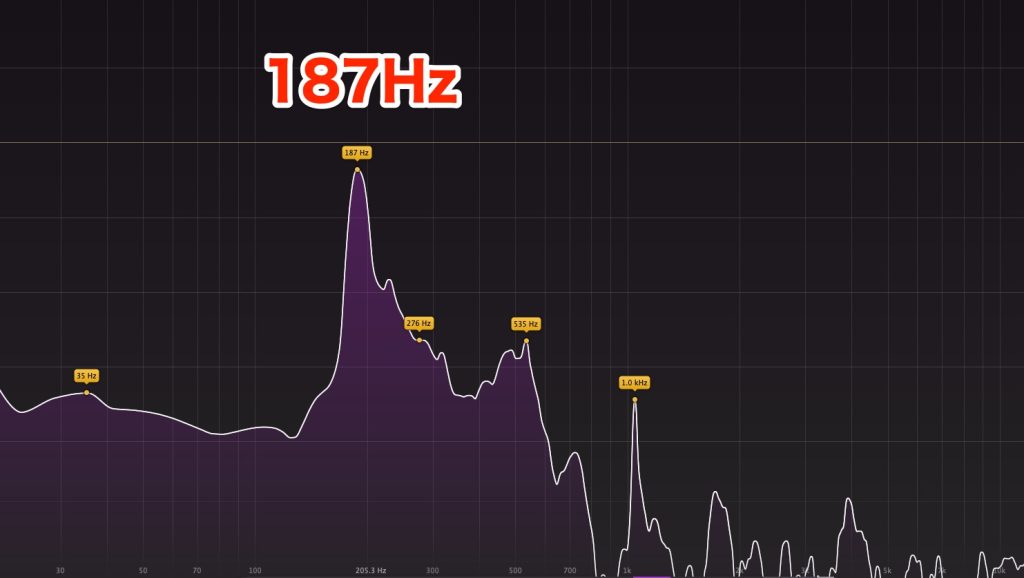
Checking the spectrum of the original sound shows that the peak is at 187 Hz.
A kick usually has its peak around 40 Hz, or around 80 Hz at the highest.
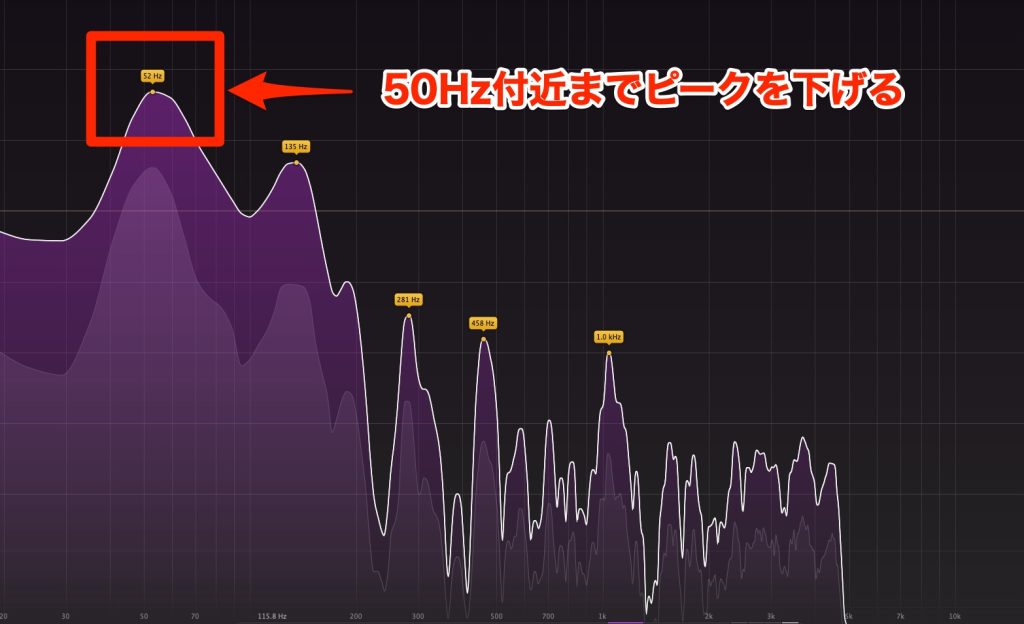
To get closer to this characteristic, we lower the pitch of the audio sample to move the frequency peak to a kick-like position.
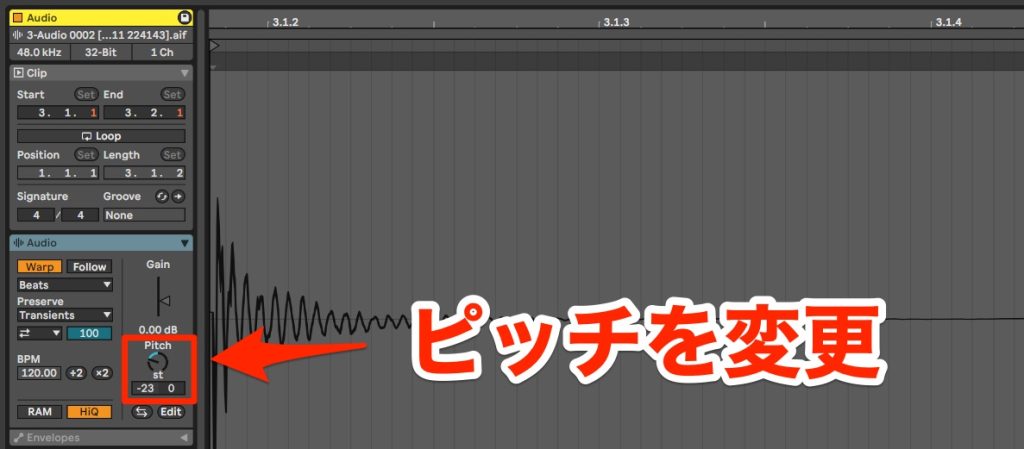
In Ableton Live, select the sample and lower the [Pitch] value shown in the Clip View.
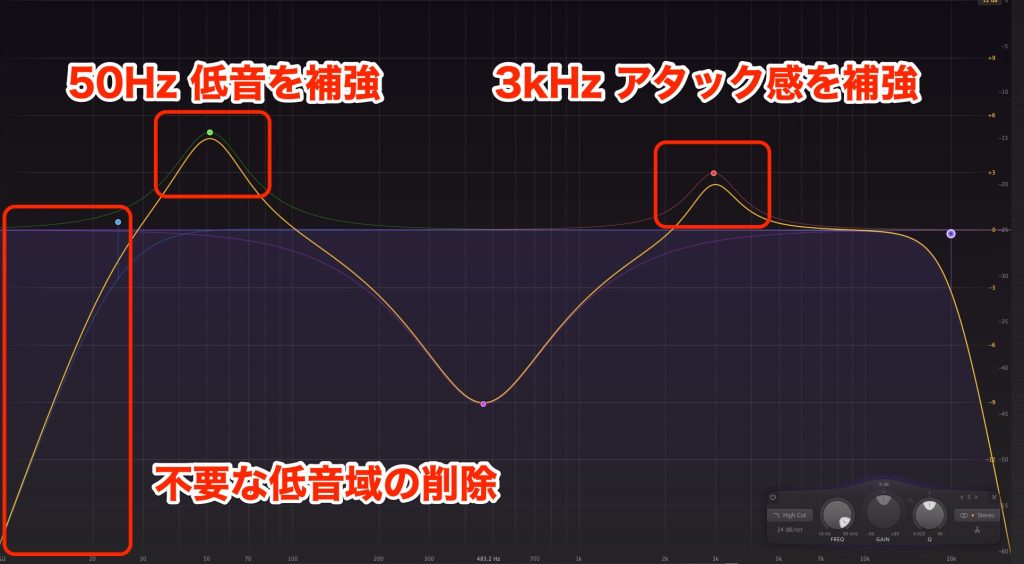
Then, as shown in the image, use EQ to reinforce the lows and attack and cut unnecessary lows contained in the original sample, and you can finish it as a powerful, kick-like sound.
The length of the sound also plays an important role in the nuance of a kick.

We used the DAW's fade function to make the sound decay quickly, finishing it as a tight sound that matches the song.
The Snare Sound
As with the kick, we use the plastic bottle sample for the snare.
Structurally, a snare consists of
- The drum sound of the snare body (head)
- The gritty sound of the snares (wires)
and we hear these two sounds mixed together.
The drum sound of the snare body has characteristics similar to the plastic bottle, so here we think about recreating the sound of the snares.
First, we add distortion.

We use Soundtoys' "Decapitator," a standard saturation plug-in that can add various distortion characters such as tape, preamp and tube.
Other plug-ins can be used instead, but Decapitator is very easy to use and offers a wide range of sound design, so it is a product we recommend.
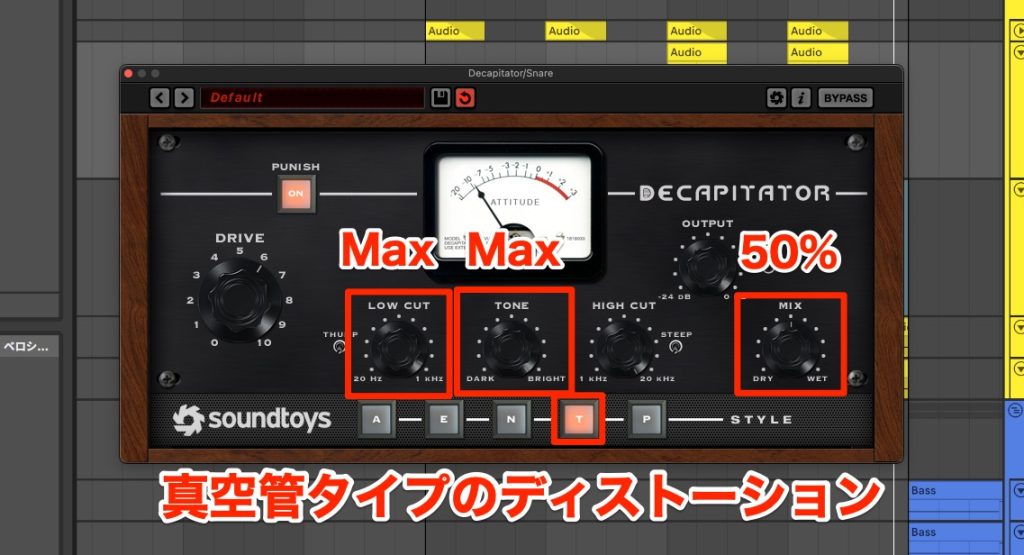
We distorted it heavily with the tube-type distortion and reduced the low-frequency content with [Low Cut] to emphasize the highs.
[Tone] is set to maximum for a bright distortion.
As it is, the drum component would become inaudible, so we set [Mix] to 50% so that it is heard half and half with the distortion imitating the snares.

Finally, process it with effects used in snare mixing, such as compression and reverb, and it is complete.
The Hi-Hat Sound
Let's make the hi-hat from the plastic bottle sound too.
This instrument is made of metal and is characterized by being made up mainly of high frequencies.
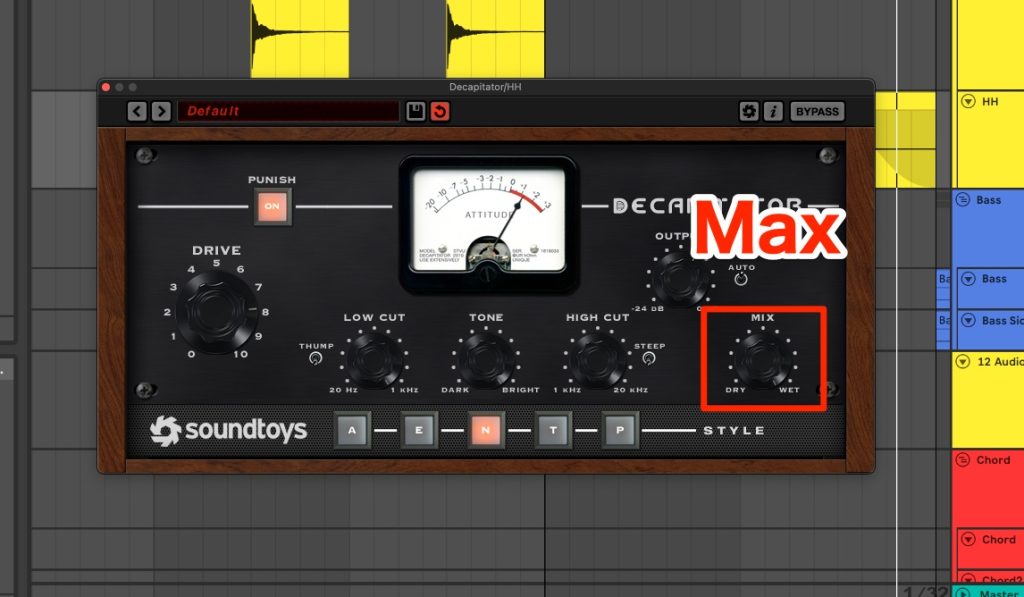
Here too, we use Decapitator to add highs through distortion.
The settings are similar to the snare, but the key point is that Mix is set to 100% so that only the distortion component is used.
To avoid losing the attack of the original sample, the distortion type is set to the preamp type [N].
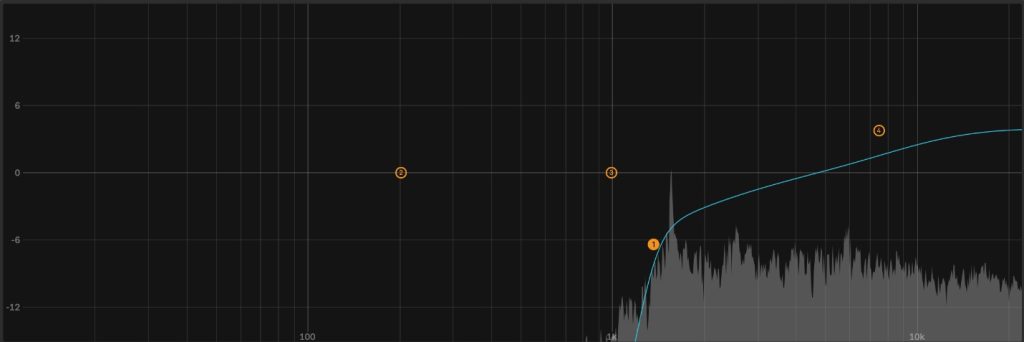
Cut the unnecessary lows to mids with EQ, and the hi-hat is complete.
Making a Synth Pluck from a Rubber Band
Synthesizers have a standard sound called a [Pluck].
It is a sound similar to plucked string instruments such as the guitar or koto.
The sound of a plucked rubber band has the same characteristics as a pluck sound, so we judged it to be the ideal material.
Sampler Settings
Unlike the rhythm instruments so far, we want to express chord playing.
Naturally, it needs to play at the intended pitch.
This is where the [sampler] comes in.
It is a device that gives audio material pitch and lets you assign it to keys.
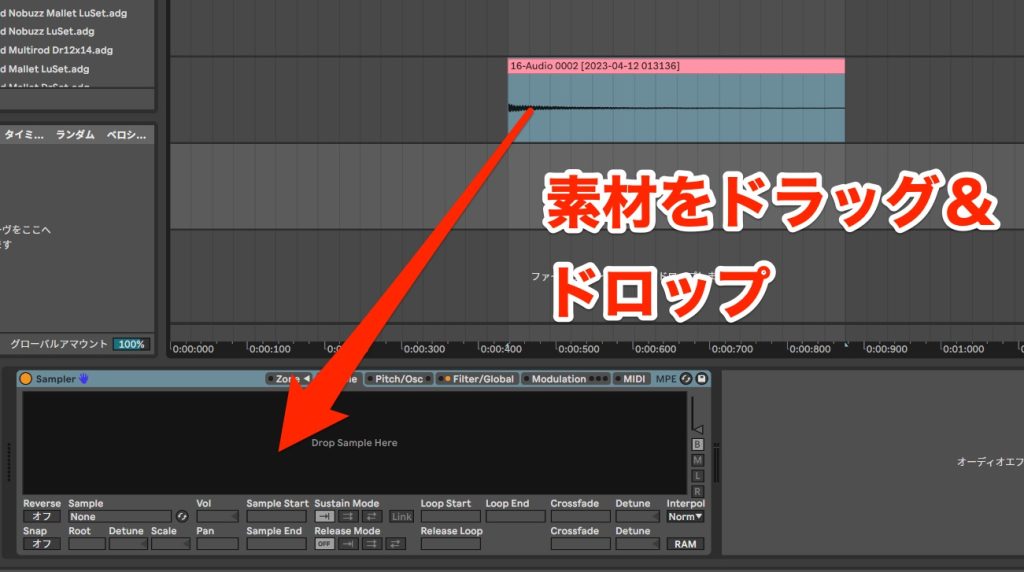
Many DAWs include a sampler as standard, and Ableton Live also has a device called [Sampler].
You can import audio material easily by drag and drop and start playing right away.

However, when playing pitched material with a sampler, you need to match the pitch of the MIDI notes with the pitch that actually sounds.

For material whose pitch you do not know, as in this case, it is a good idea to analyze the pitch with a tuner plug-in.
Effect Settings
We give the sound more synthesizer-like characteristics.
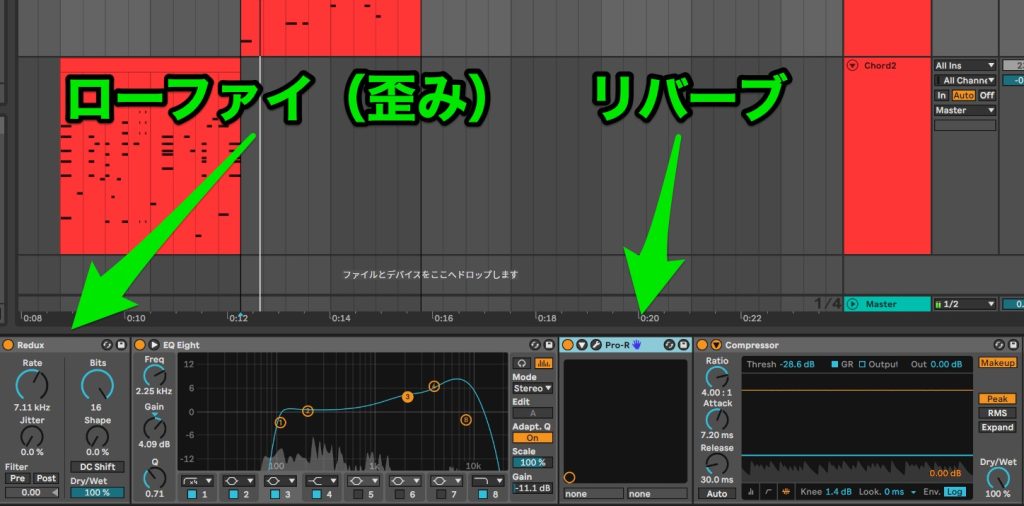
We use a lo-fi plug-in that lowers the sample rate and bit depth resolution and adds distortion to the sound.
After that, we used reverb to create spatial width and depth so it blends into the song.
Because the sound of a plucked rubber band contains many instrument-like elements, you can bring it into a song right away with just simple effect processing.
Making a Bass by Processing Audio with a Sampler
Last is the bass sound.
The bass also plays phrases with complex pitch changes, so we use a sampler.
First, load the plastic bottle sample.
Here, we use the sampler's [loop function].

The loop function lets you repeatedly play only a specific section of the imported sample.
It is effective when you want to sustain a sound longer than the original material.

Besides sustaining sounds, there is also a method of creating sounds by extracting a short span of the waveform.
A single-cycle waveform has no change over time, so it gives an impression closer to electronic sound and produces a synthesizer-like sound.
Because you can control the length of the sound freely, it can be called a device you can use like a synthesizer.
Here too, we use effects to bring it closer to the intended sound.
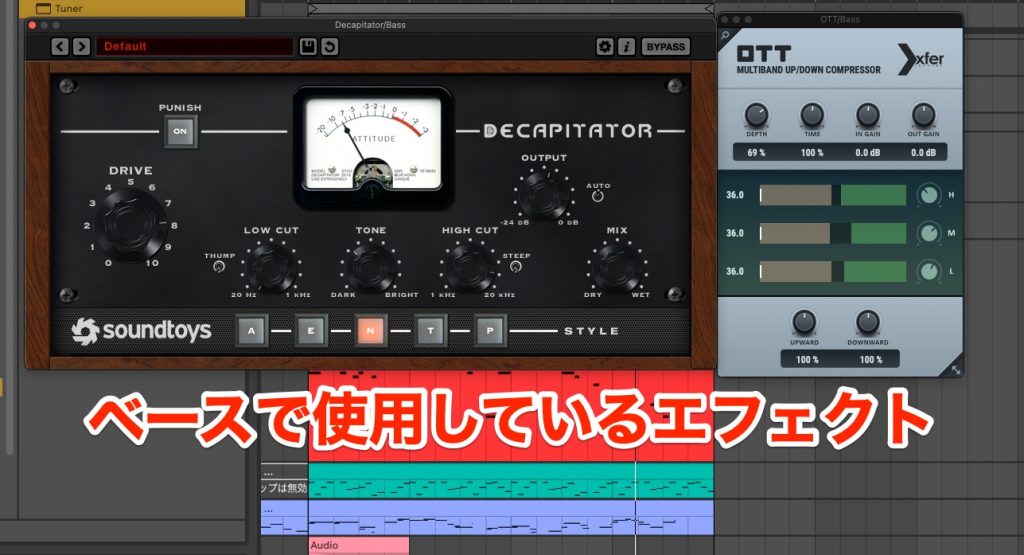
What defines the sound is the distortion from Decapitator and [OTT], a multiband compressor that tightens up the whole bass sound.
OTT in particular is an effect typical of recent EDM, and it is a popular free plug-in with many users.
It sounds like a bass even without effects, but you can hear that these effects change it into a striking sound that covers a wider frequency range.
How did you find it?
We introduced how to design sounds using the sounds around you.
Using your own samples lets you create original sounds unlike any other.
This can be useful when you want to add spice to a song, so please create sounds that are yours alone!
[Tokyo Shandy Rendezvous] with a plastic bottle and a rubber band
Depending on your methods and ideas, you can create original sounds. We hope this lets you feel [the possibilities and fun of making sounds].
Article: https://t.co/29jn71HgOpVideo: https://t.co/mGY97KEf7N#DTM #composing #sampler pic.twitter.com/7EkUvpVeyY
— SLEEP FREAKS (@SLEEPFREAKS_DTM) April 21, 2023
Frequently Asked Questions
Q1. Can I record the sounds of everyday objects with an ordinary microphone and audio interface?
Yes. This article uses sounds of a plastic bottle and a rubber band recorded with a microphone. With a USB condenser microphone or an audio interface, you can capture high-quality sound material from any object around you.
Q2. How can I use a sampler to play a sound source of unknown pitch at specified pitches?
By analyzing the pitch with a tuner plug-in, you can identify the exact pitch of the source. Setting up the MIDI notes in the sampler based on that information lets you play at the pitch you want.
Q3. Can the same techniques be used in DAWs other than Ableton Live?
Yes. Using the sampler, EQ, compressor and other plug-ins included as standard in most DAWs, you can achieve similar sound design. The specific operations differ by DAW, but the basic processing concepts are the same.
NEW ARTICLES
Latest English Articles











