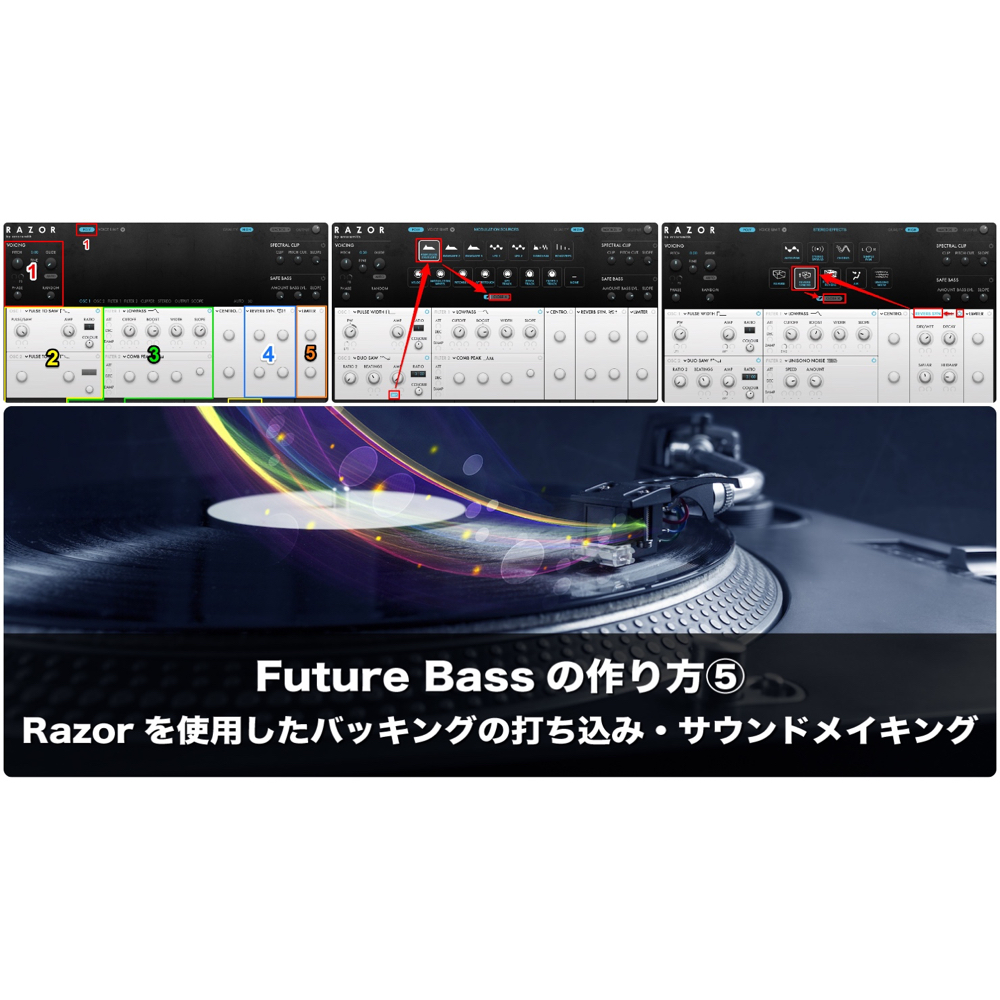
This article explains in detail how to design the sound of a backing track using the Razor synth when producing Future Bass. You'll learn step-by-step parameter settings, from the voicing settings to adjusting the oscillator and filter sections. By mastering practical, professional sound design techniques such as GLIDE, PULSE WIDTH, LFO1 modulation, the DUO SAW oscillator and using multiple envelopes, you can greatly improve the quality of your Future Bass productions.
Programming and sound design for the Future Bass backing
Up to the previous article, we introduced programming the drum and bass tracks and example chord progressions.
This time we'll introduce sound design for the backing track using Razor.
First, you need to create a user preset.
For details, see the earlier article "Preparing a Razor User Preset".
We'll adjust things in the order 1 to 5 shown in the figure below.
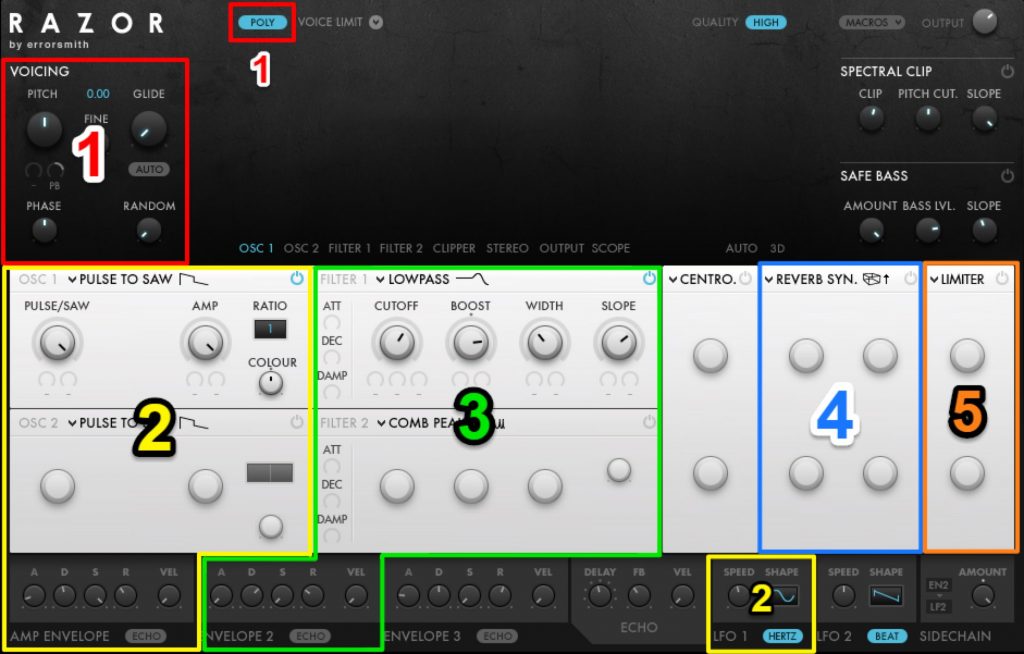
1 Voicing section
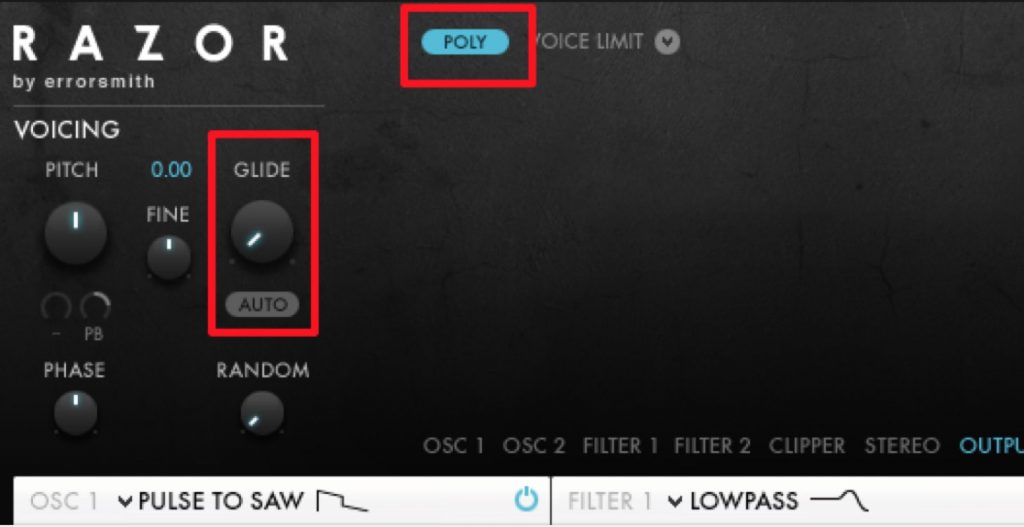
I'd like to make a sound that pushes straight to the front.
Set "GLIDE" to "0" and turn the "AUTO" button off.
Also, switch the mode from "MONO" to "POLY" so it can play chords.
The sound now is like this.
This plays the "chorus" section with the bass muted.
2 Oscillator section
Let's adjust the oscillator section.
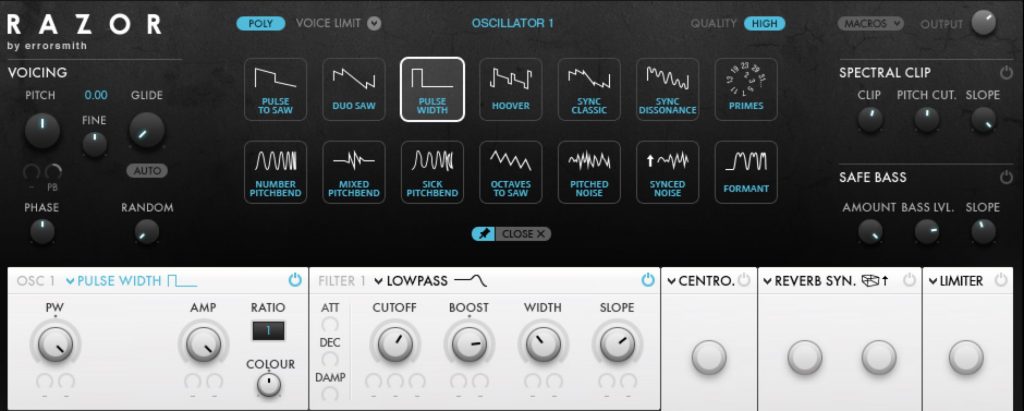
Click "PULSE TO SAW" next to "OSC 1" to change the oscillator.
Let's select "PULSE WIDTH."
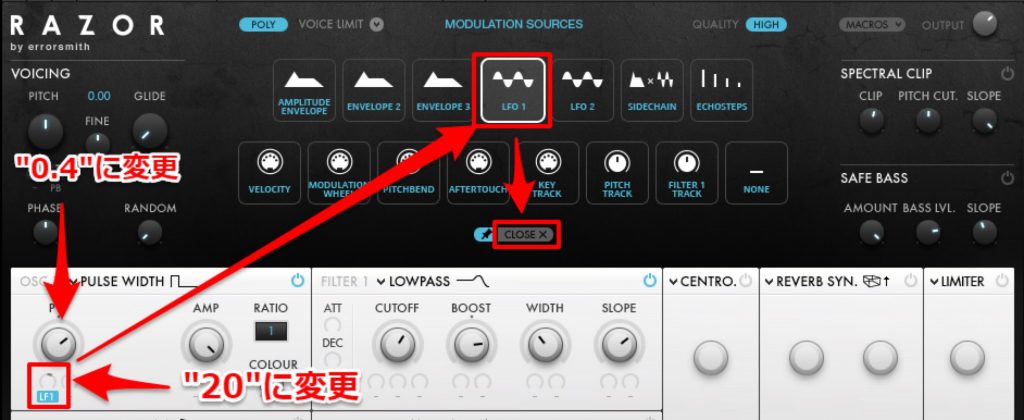
Change "PW" to "0.4."
Click the "-" area below, select "LFO1," and set the modulation amount (how strongly it's applied) to "20."

I adjusted the frequency of "LFO1," which we just assigned to "PW," to "1.00."
Up to this point, the sound is like this.
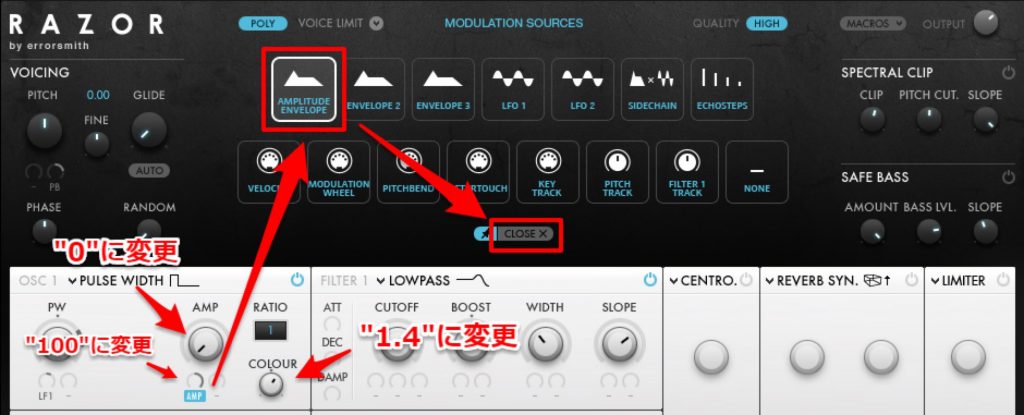
Next, we'll change the other parameters.
To reflect the volume envelope 100%, I set "AMP=0," then selected "AMPLITUDE ENVELOPE" in the gray circle below it, and set the amount (how strongly the envelope is applied) to "100."
I also set "COLOUR=1.4."
Next, we'll set the envelope.
I want to make a sound for backing, so I'm aiming for a short attack with a little release.

I set the values to "A=-12/D=50/S=0.9/R=55/VEL=0.4."
Up to this point, the sound is like this.
Next, let's add "OSC2."
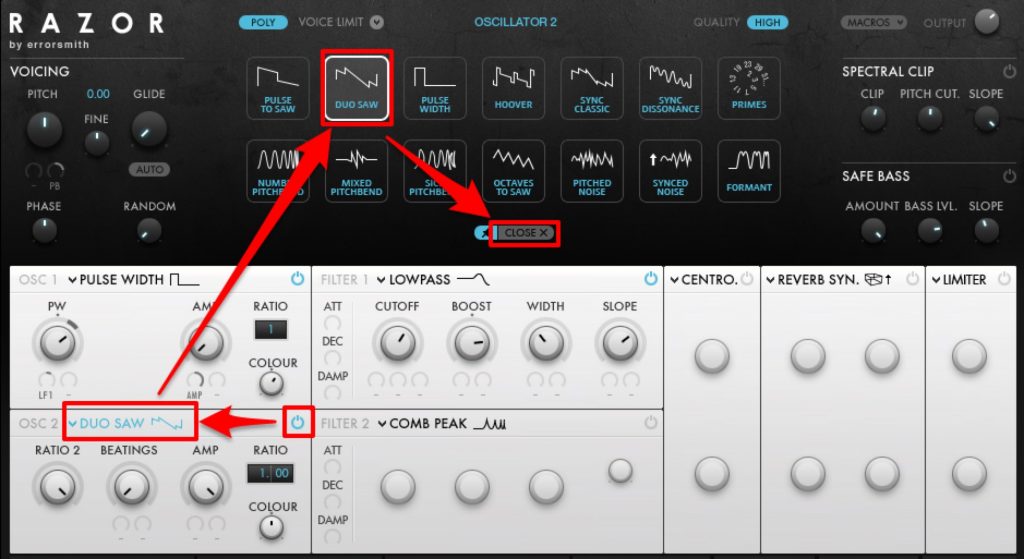
Click the power button and choose "DUO SAW" from the oscillator selection button on the left.
As the illustration of overlapping triangle waves shows, this "DUO SAW" plays two triangle waves at the same time.
You can handle two oscillators in one oscillator section, so you could say this alone allows fairly complex, rich sound design.
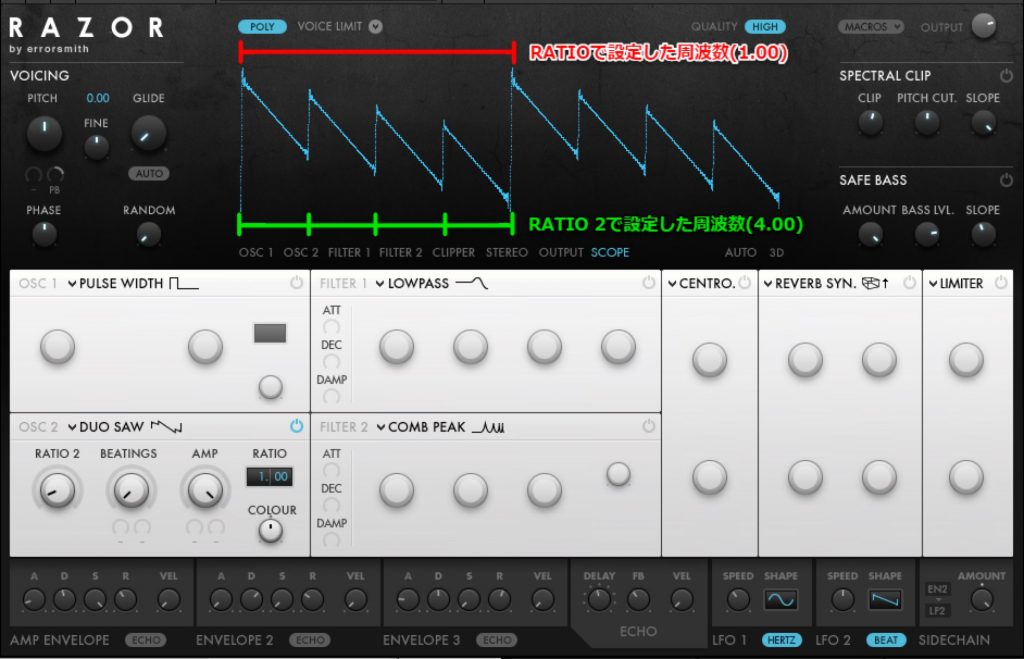
Set the pitch of the first oscillator with "RATIO" and the pitch of the second oscillator with "RATIO 2."
The figure above shows the screen with settings changed to make it easier to explain. For example, with "RATIO=1.00/RATIO2=4," the first oscillator's pitch stays at the note received via MIDI, while the second oscillator's pitch is four times the frequency, that is, two octaves higher.
Checking with "SCOPE," you can see that the two oscillators are sounding as set.
"BEATINGS" is a parameter that gives the second oscillator a chorus-like effect.
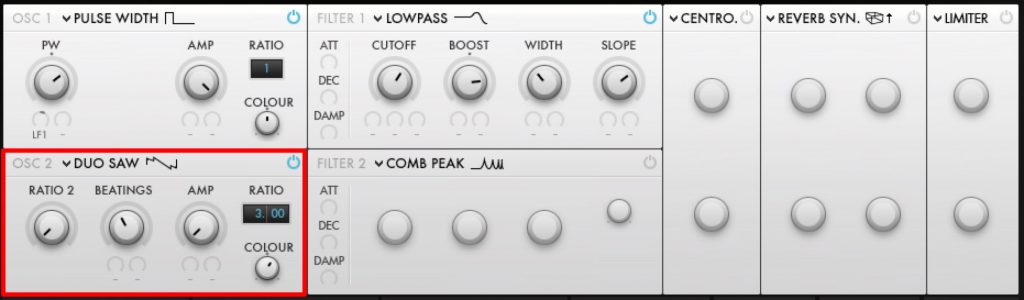
I changed the "DUO SAW" parameters. Here I set "RATIO2=1/BEATINGS=4/AMP=0/RATIO=3.00/COLOUR=1.4."
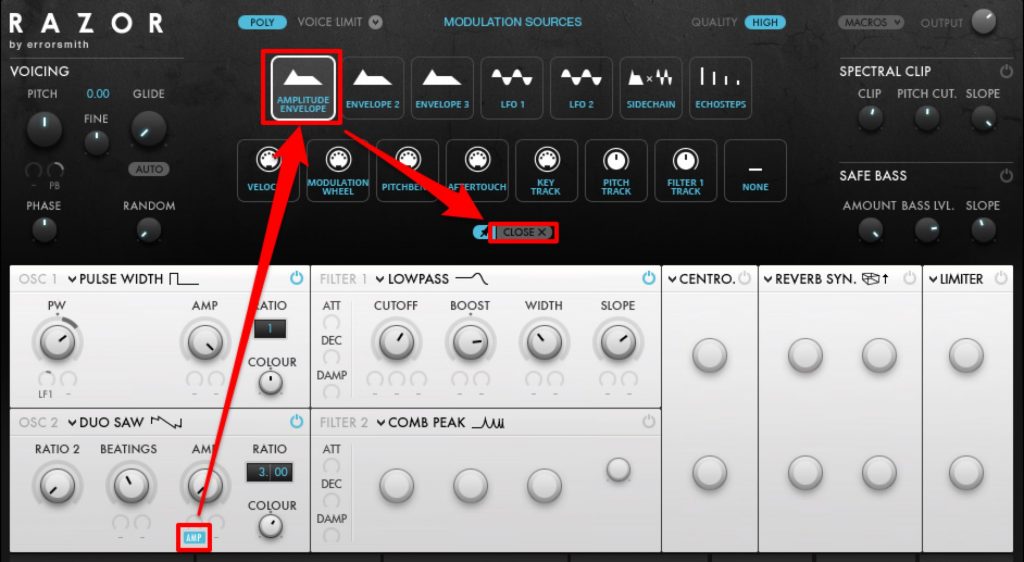
Next, assign "AMP ENVELOPE" to the "AMP" parameter.
Click the "-" below the "AMP" knob and select "AMPLITUDE ENVELOPE."
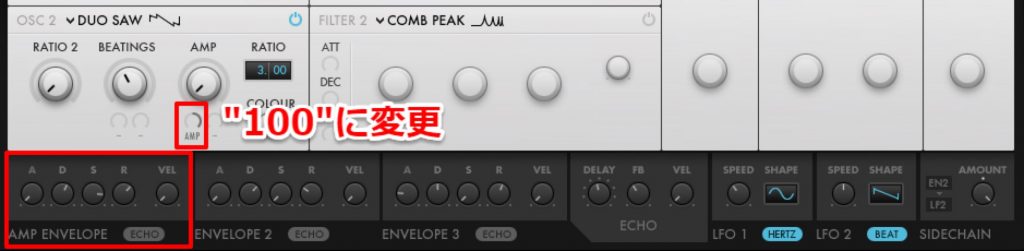
Set the modulation amount to "100."
We already set the "AMP ENVELOPE" values earlier, so there's nothing to do here.
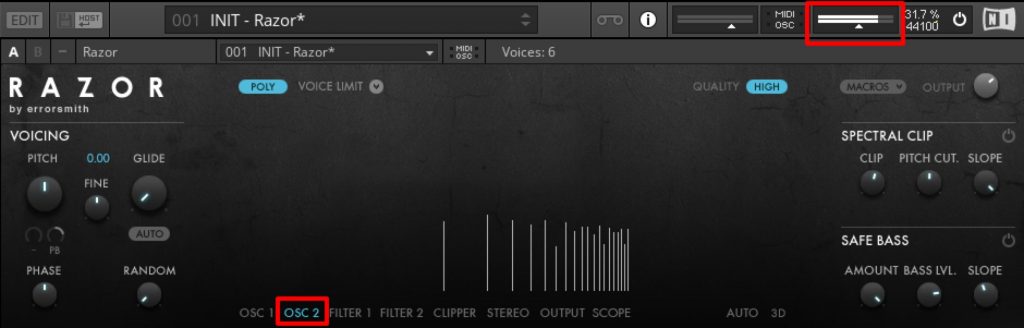
Let's check the sound so far. If the level is high, it may clip and distort, so adjust it with the volume at the top right.
*To check the sound's spectrum, the screen in the figure above has been switched to "OSC 2."
3 Filter section
Next, let's look at the filter section.
As with the bass section, we'll use two filters this time too.
Here I'll design the sound with "a sound with just a little filter feel and grit" in mind.

For the first filter, we'll use "LOWPASS," which is preset in the initial preset.
I want more sparkle than the sample we just heard, so let's open the cutoff for a brighter sound.
Here I'll use the second envelope to make the cutoff open.

I set the knobs to "CUTOFF=50/BOOST=0.15/WIDTH=18/SLOPE=-28."
"BOOST" is a parameter for how much to boost the point at the cutoff frequency; negative values reduce it.
"WIDTH" is a parameter that decides how wide the boosted area is.
"SLOPE" sets how much the sound above the cutoff frequency is attenuated. The higher the value, the more extreme the attenuation.
Next, let's assign an envelope.
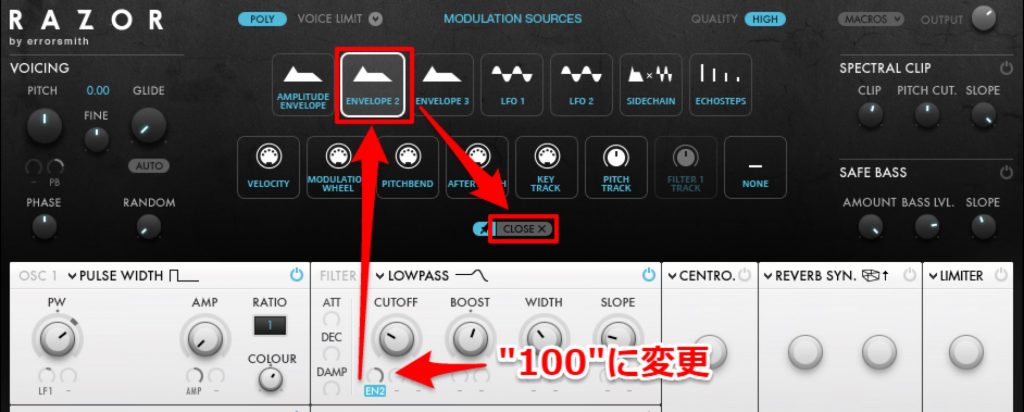
We'll use the second envelope, so click the "-" below "CUTOFF" and select "ENVELOPE 2."
Also change the envelope amount to "100."

Next, set the "ENVELOPE 2" parameters.
As with the "AMP ENVELOPE," I have a backing sound in mind, so I set "A=0/D=45/S=0.8/R=45/VEL=0.8" to bring the attack forward.
Up to this point, the sound is like this.
Next, let's set up the second filter.
We set the filter feel in the previous section, so here I'd like to set the grit.
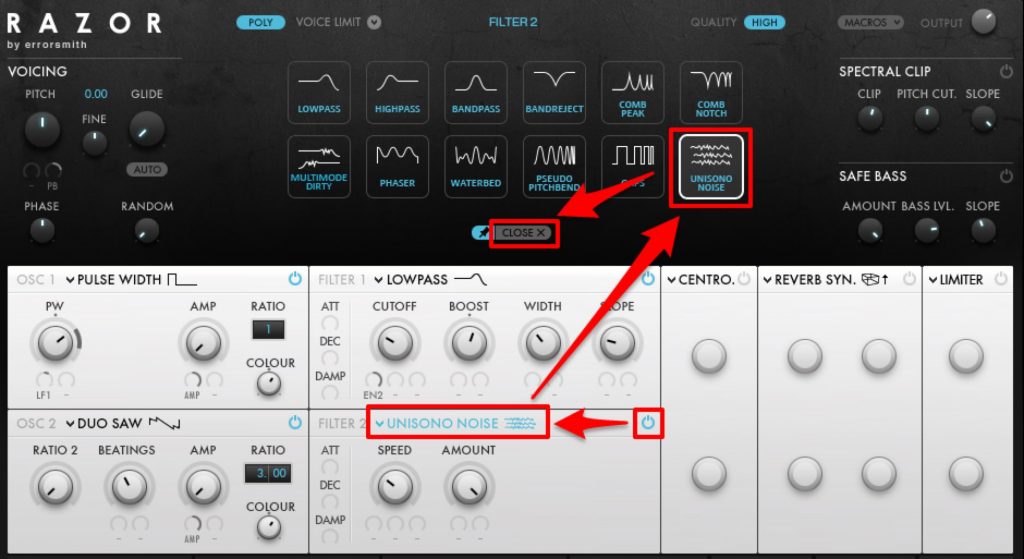
Click the power button at the top right of the section, click the filter name on the left, and select "UNISONO NOISE."
This filter is quite unique.
It applies a different amplitude modulation to each of the harmonics that make up the sound.
"SPEED" sets the overall speed of the modulation, and "AMOUNT" sets its depth.
The larger either value, the closer the sound gets to noise.

Here I set them as follows: "SPEED=-55/AMOUNT=0.25"
4 Reverb section
Next, set up the reverb.
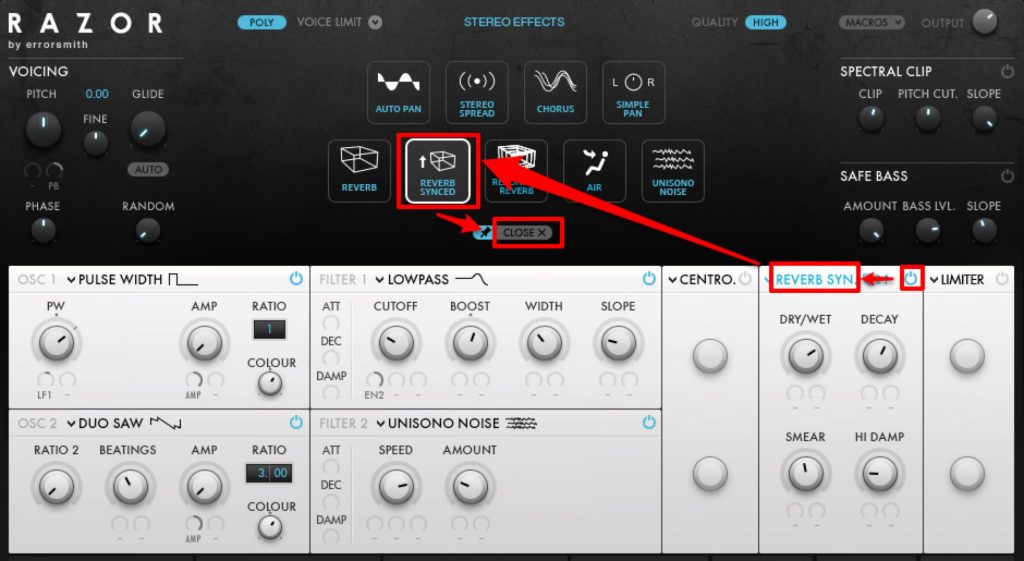
Turn on the power button at the top right of the reverb section, then click the name on the left and select "REVERB SYNCED."
This reverb is also quite unique.
A normal reverb adds reverberation to all sounding notes, but this reverb cancels the previous reverberation the moment it receives new MIDI note information.
In other words, "reverb is applied only to the sound whose note signal is currently being sent." That lets you add dynamic reverberation while keeping the outline of the sound.
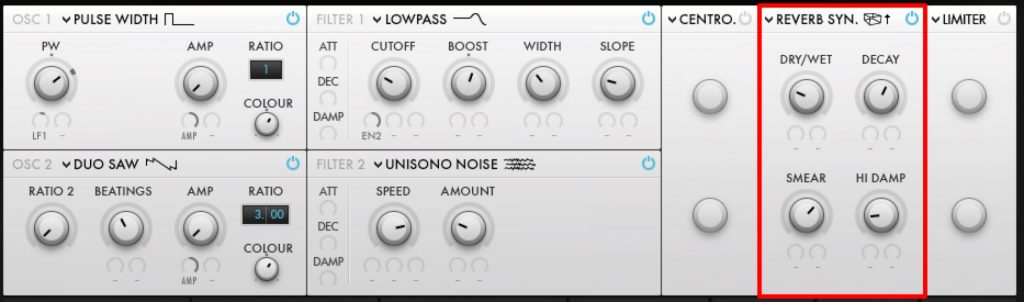
I set the parameters as follows: "DRY/WET=0.25/DECAY=60/SMEAR=65/HI DAMP=0.15"
As for "SMEAR," which you don't often see in reverb parameters, it means "to stain" or "to smudge."
Here it sets "how long the reverberation takes to be canceled."
The larger the value, the later the reverberation is canceled.
5 Compressor section
Finally, let's look at the compressor section.
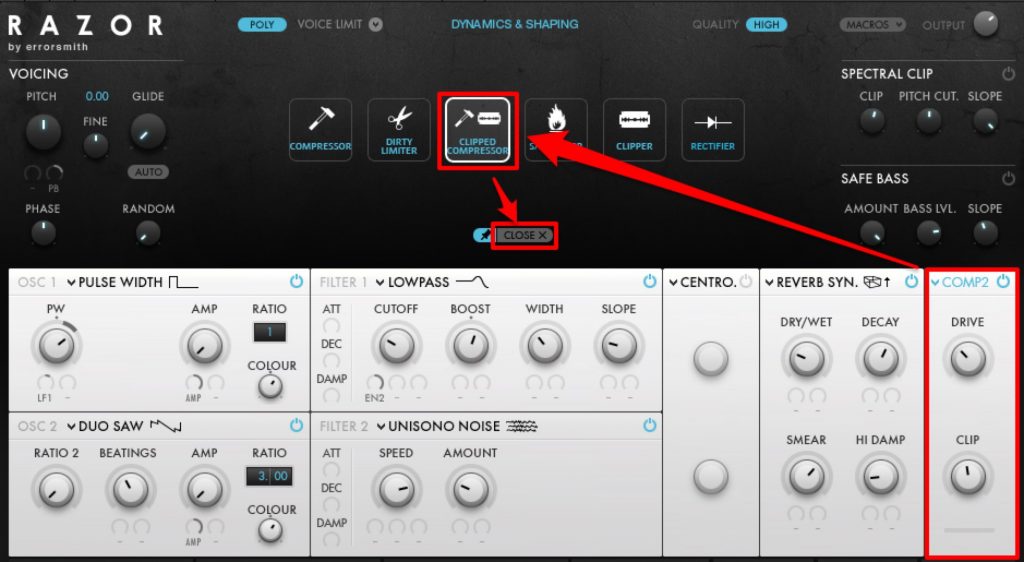
Turn on the power button at the top right of the section and select "CLIPPED COMPRESSOR" on the effect selection screen.
It's an effect that creates soft clipping (distortion) above a certain level of the input signal.
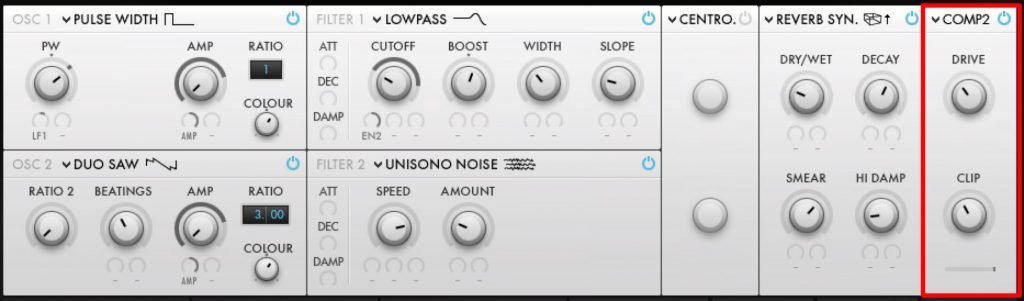
Here, to slightly compensate the loudness of the original sound, I set it as follows: "DRIVE=5/CLIP=0.4"
Supplement: the filter arrangement before the chorus
The explanation above focused on the "chorus" part.
In the track you heard at the very start of this article, you probably got the impression that the backing track gets brighter from the "verse" into the "chorus."
That's because the cutoff of the "FILTER 1" low-pass filter we set earlier is automated in the DAW.
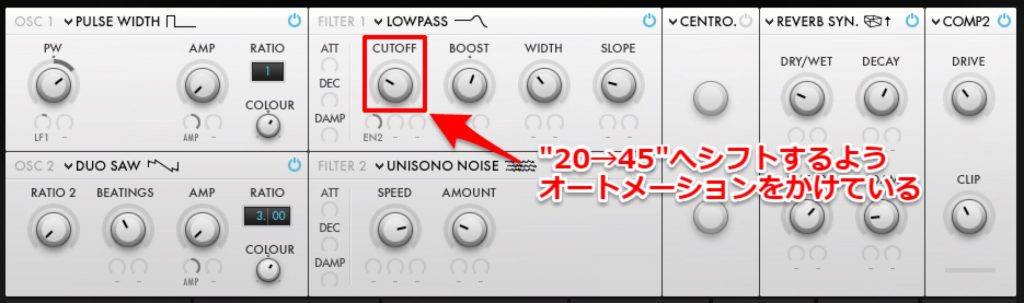
The "CUTOFF" parameter changes from "20→45."
Finally
This time, through designing the sound of the backing track, we introduced some quite unique oscillators, filters, reverb and more built into RAZOR.
Next time we'll introduce the lead synth part.
Thank you for reading.
About the author

Takumi Kadode
A track maker, VJ and audiovisual artist from Osaka.
Got into music after making noise/tape collage pieces with cassette tapes and MiniDiscs in high school.
While later majoring in architectural acoustics in graduate school, began making dance music influenced by acid house, ambient, breakcore and more.
Live performances center on "audiovisual" expression, with the linking and fusion of sound and visuals as a motif.
Uses self-programmed software in REAKTOR, Pure Data, TouchDesigner and more.
Administrator of the REAKTOR fan site "Native Instruments REAKTOR Users Japan" (www.niru.jp).
Website: http://stereotypeone.com/
Frequently asked questions
Q1. What's the difference between Razor's POLY mode and MONO mode?
MONO mode plays one note at a time, while POLY mode can play multiple notes at once, allowing chords. Future Bass backing needs chords, so POLY mode is suitable.
Q2. What's the purpose of assigning LFO1 to PULSE WIDTH?
Giving the oscillator change over time with an LFO creates a dynamic, thick sound that doesn't get monotonous. This technique is effective for creating the loudness characteristic of Future Bass.
Q3. What's distinctive about DUO SAW?
It's an oscillator that plays two triangle waves at the same time; you can set separate frequencies with RATIO and RATIO2 and add a chorus effect with the BEATINGS parameter. It enables a complex, rich sound in a single section.
Q4. What do the envelope's A/D/S/R parameters do?
A (attack) controls how long the sound takes to rise, D (decay) the initial fall, S (sustain) the held level, and R (release) how the sound ends. For backing, a short attack and a somewhat longer release are common.
Q5. What do the filter's BOOST and WIDTH adjust?
BOOST determines how much the cutoff frequency is emphasized, and WIDTH how wide that emphasis is. Adjusting them lets you finely control the filter's character.
NEW ARTICLES
Latest English Articles