
This article explains embellishment techniques for completing a song's arrangement in Logic Pro 11. You can learn practical methods step by step for adding dynamics and expressiveness: adding drum fills, managing tracks with Track Stacks, flexible editing with the Mute tool, adding accents with crash cymbals and creating reverse cymbals by reversing playback. By mastering these techniques, you can turn a monotonous beat into a dynamic, polished song.
Advanced Techniques for Adding Dynamics to a Song

Miyakawa
The arrangement of the song is finally reaching its last stage.
We introduce several practical techniques to make the result even more polished.
If you find any you like, please try using them in your own songs!
Advanced Techniques Video
Adding Variation to the Rhythm with Drum Fills
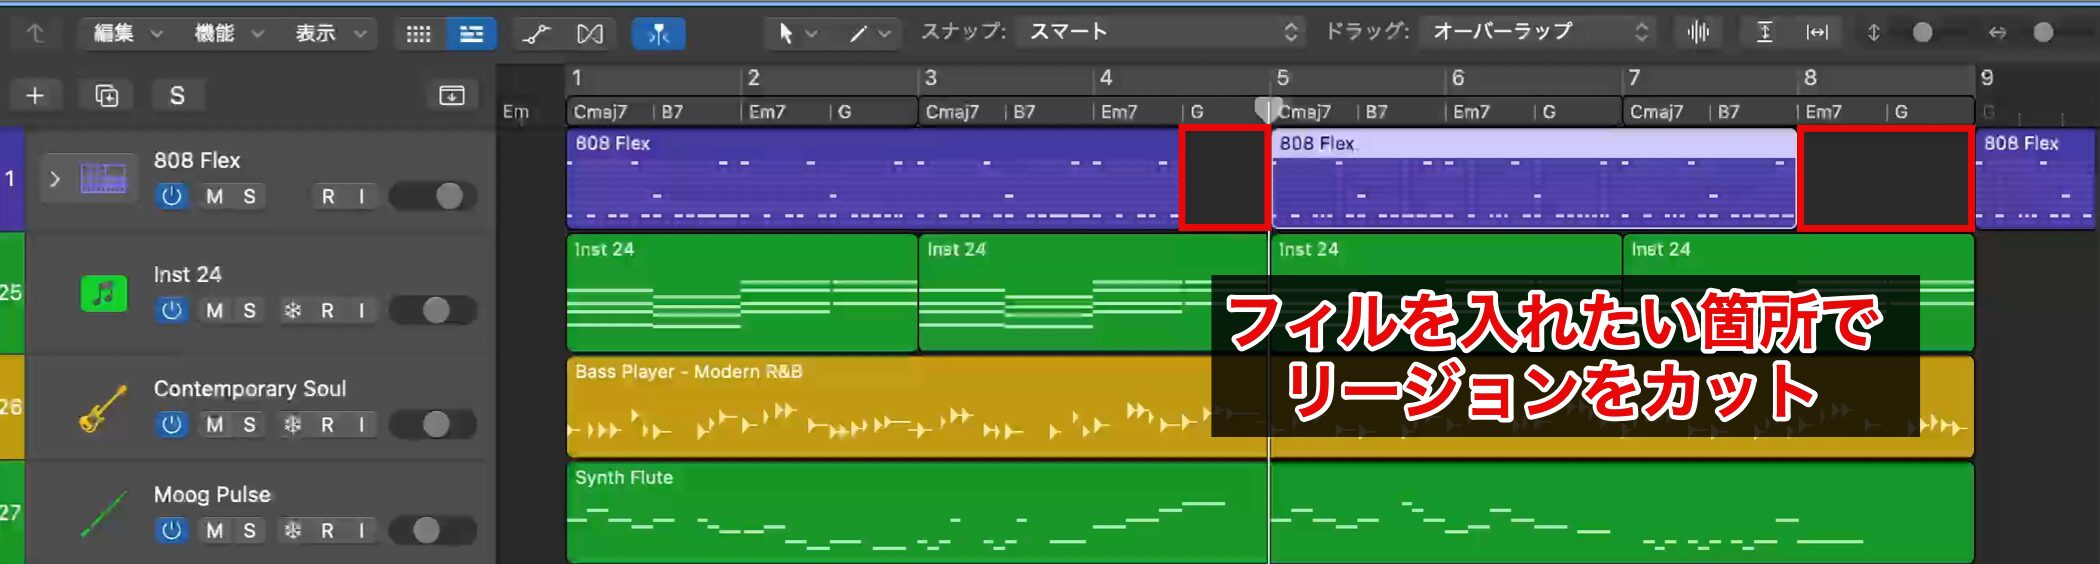
The first point for adding dynamics is to add drum fills.
The drum pattern we created in Part 2 consists only of repetition and contains no fills.
So first, split the region where you want to add a fill.
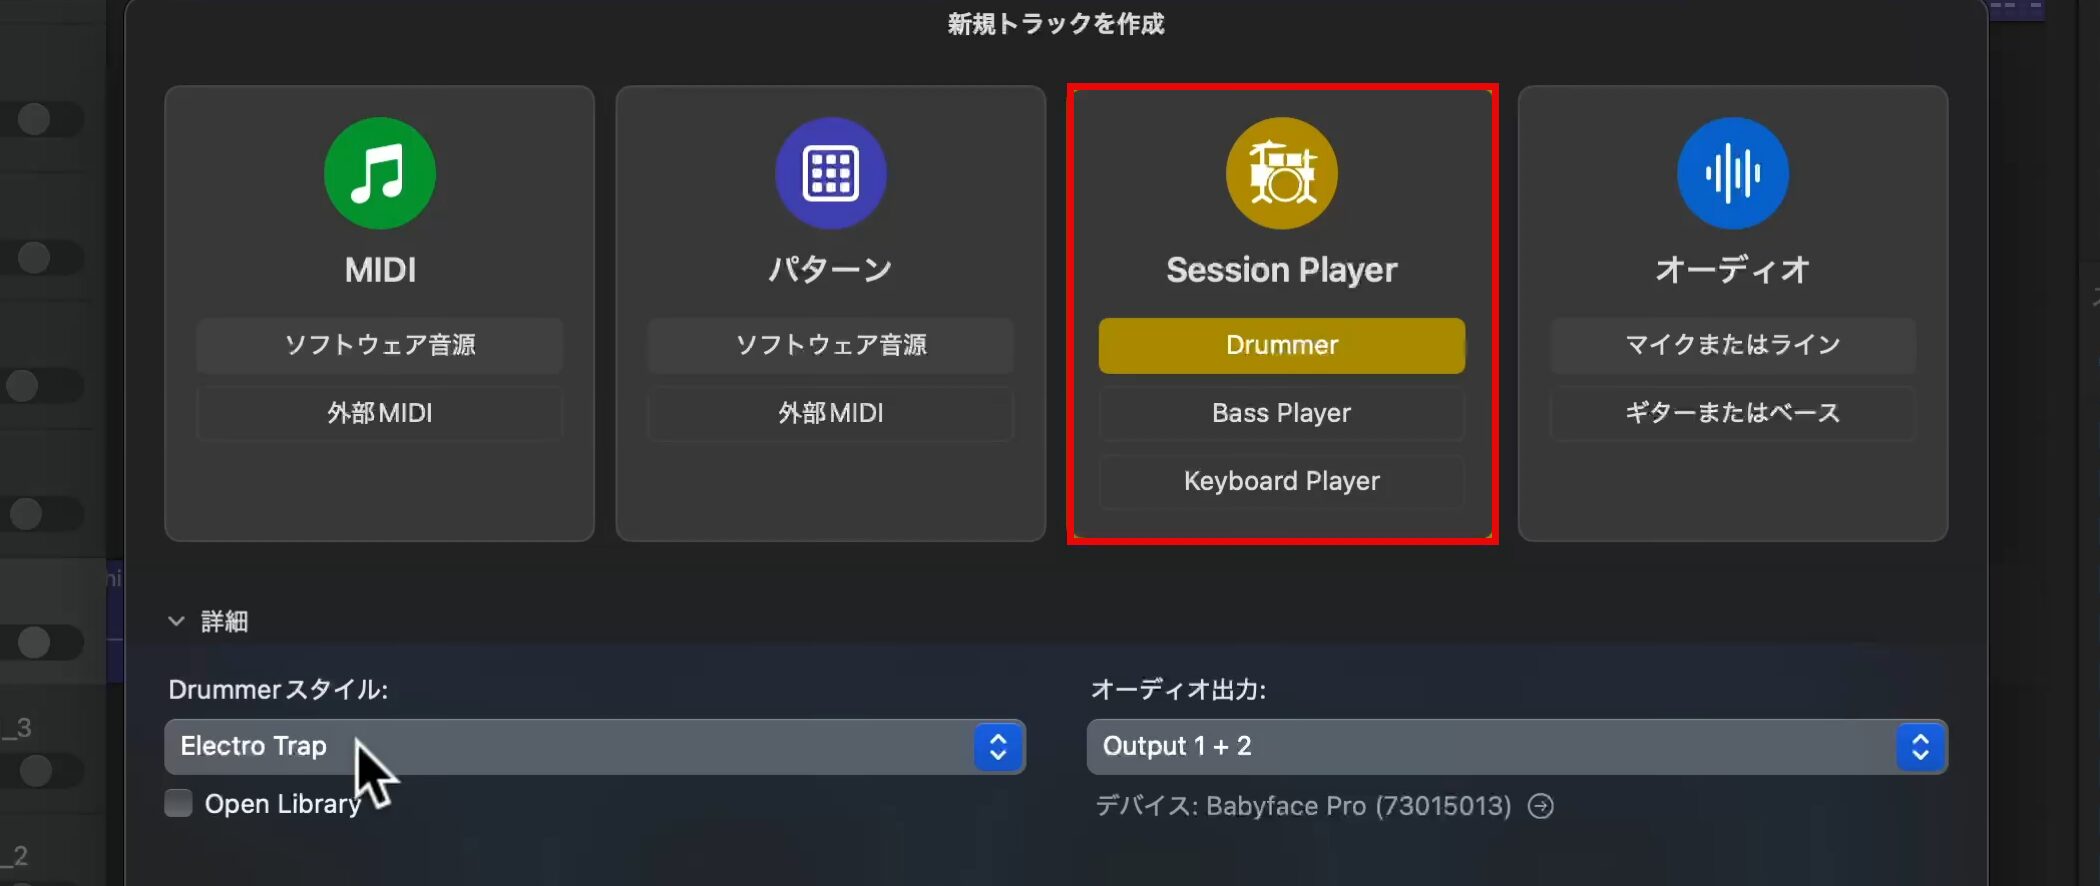
This time, we add a new track dedicated to fills and enter a pattern on it.
The Session Player "Drummer" can generate fill patterns automatically, so we choose it.
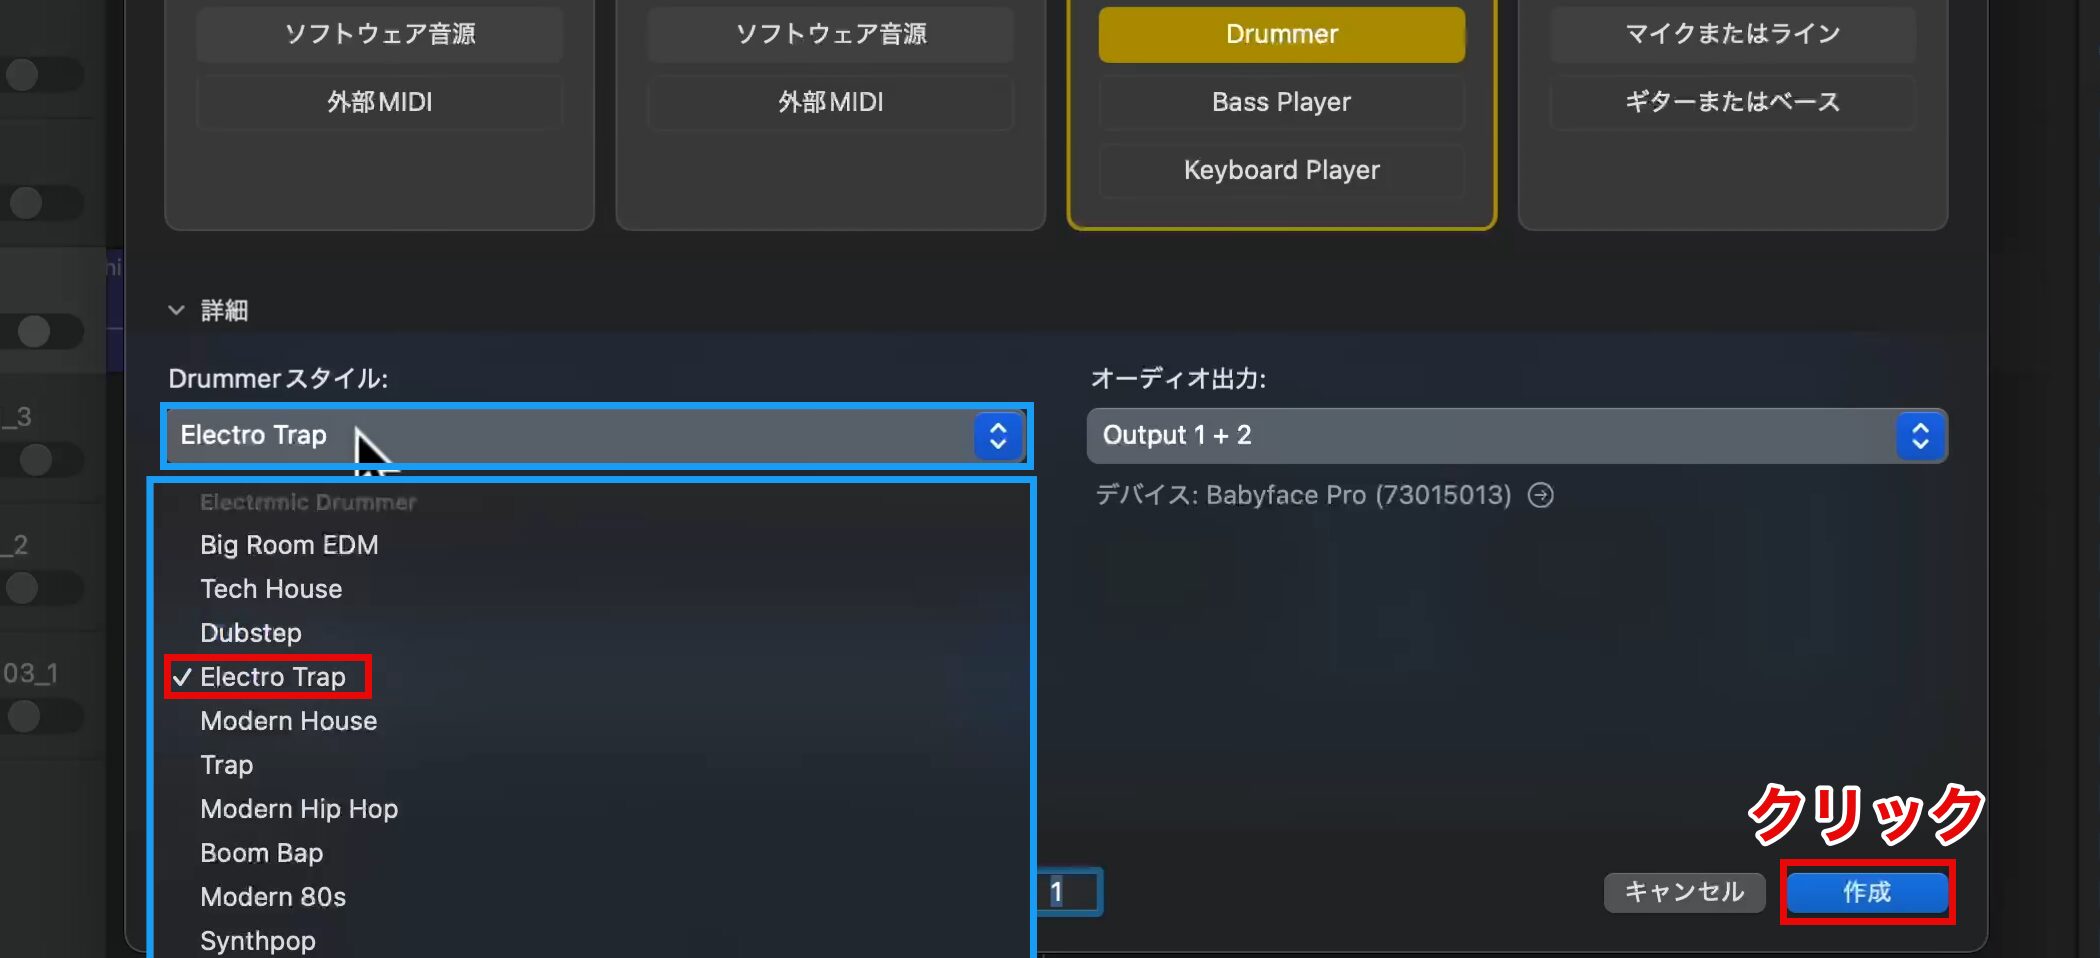
Drummer styles broadly include both acoustic drums and electronic drums.
This time, we choose "Electro Trap," which suits the mood of the song, and click "Create."
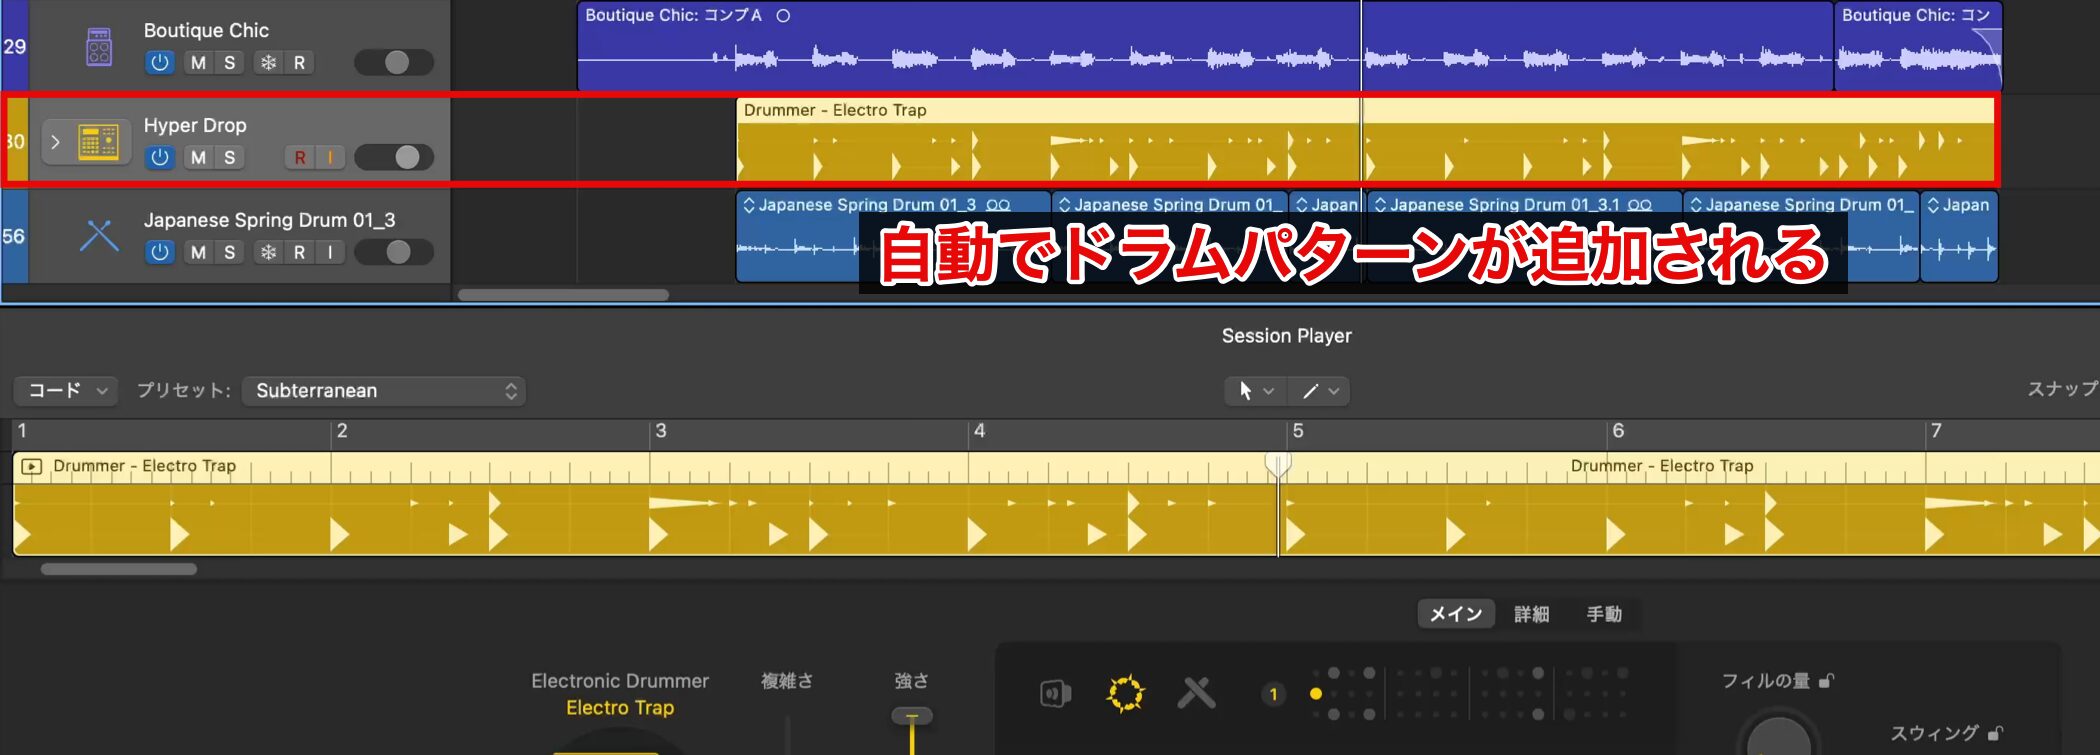
A drum pattern is added automatically.
Let's listen to the drum pattern that was created.
As it is, the two drum patterns simply overlap and the rhythm becomes too busy, so we change the Session Player settings and adjust it so that only the fills are played.
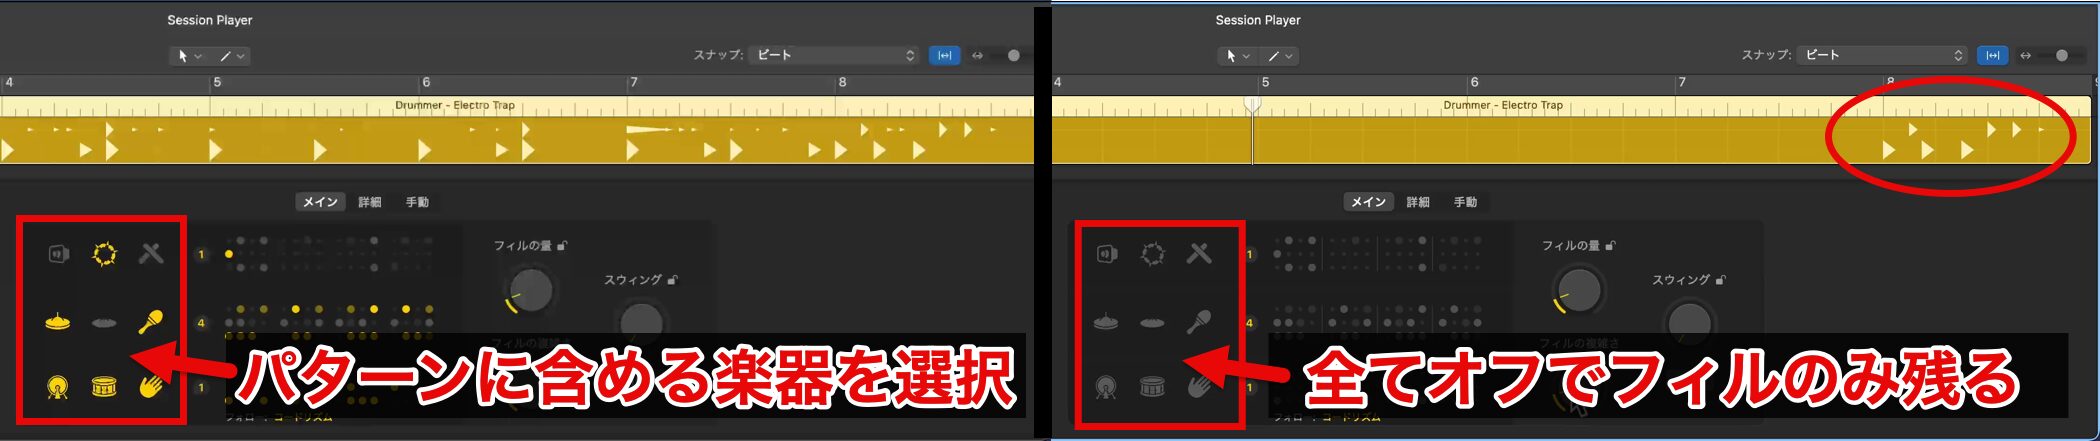
The instrument icons shown in the center of the editor let you set whether each instrument is included in the pattern.
If you turn all the icons off, the pattern stops playing and you can keep only the fills.
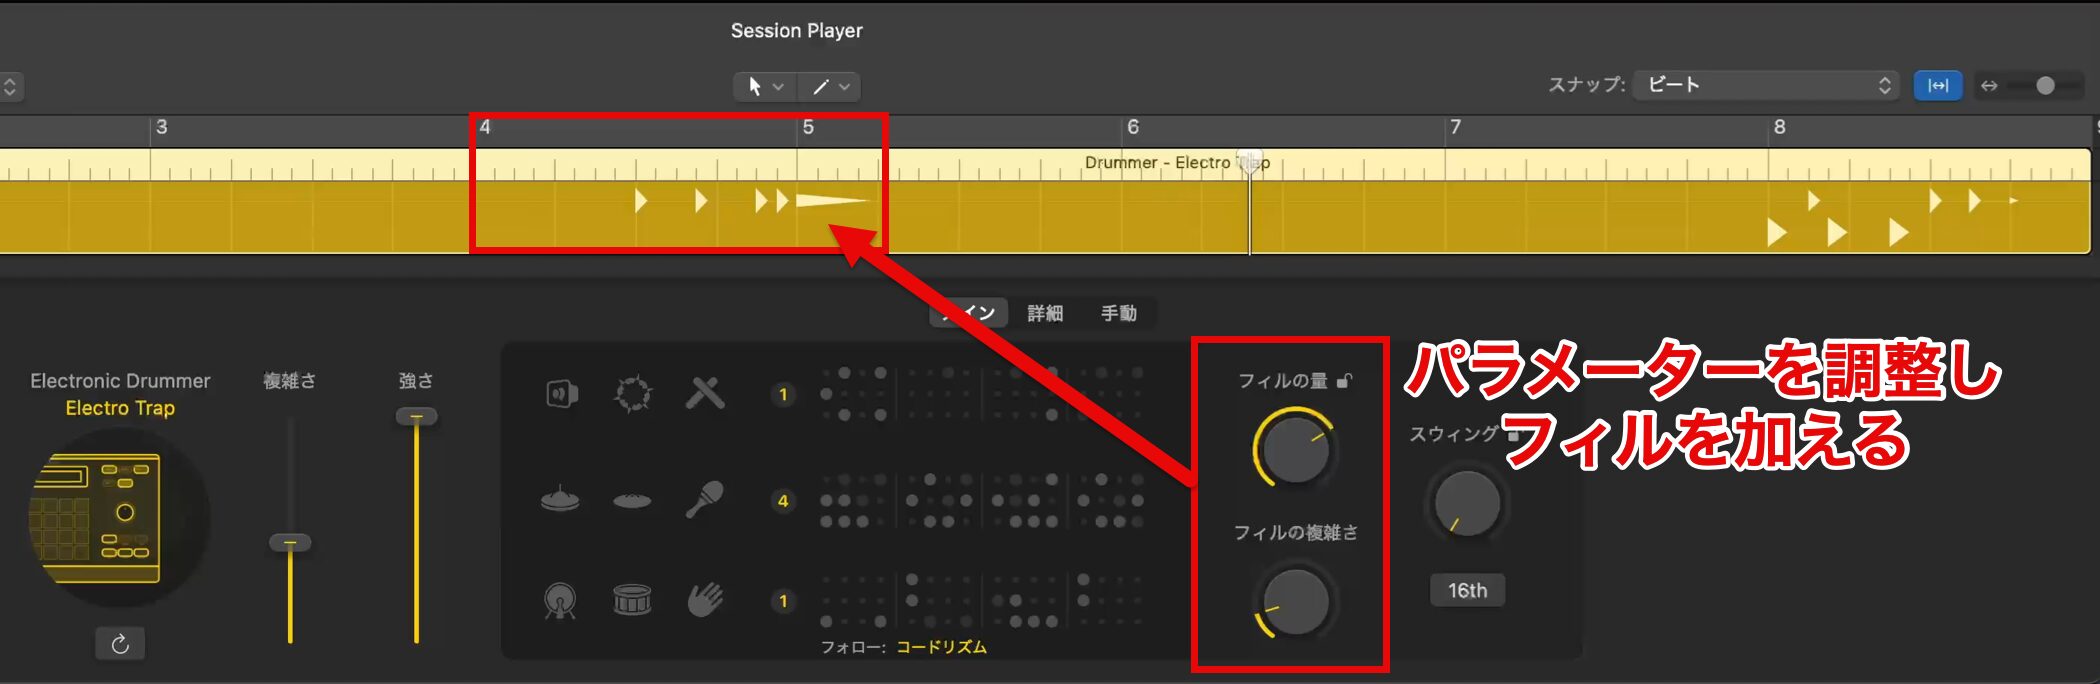
Adjust "Fill Amount" and "Fill Complexity" to create a fill close to what you have in mind.
This time, we add a fill on the last two beats of bar 4, so we chose settings suited to that section.
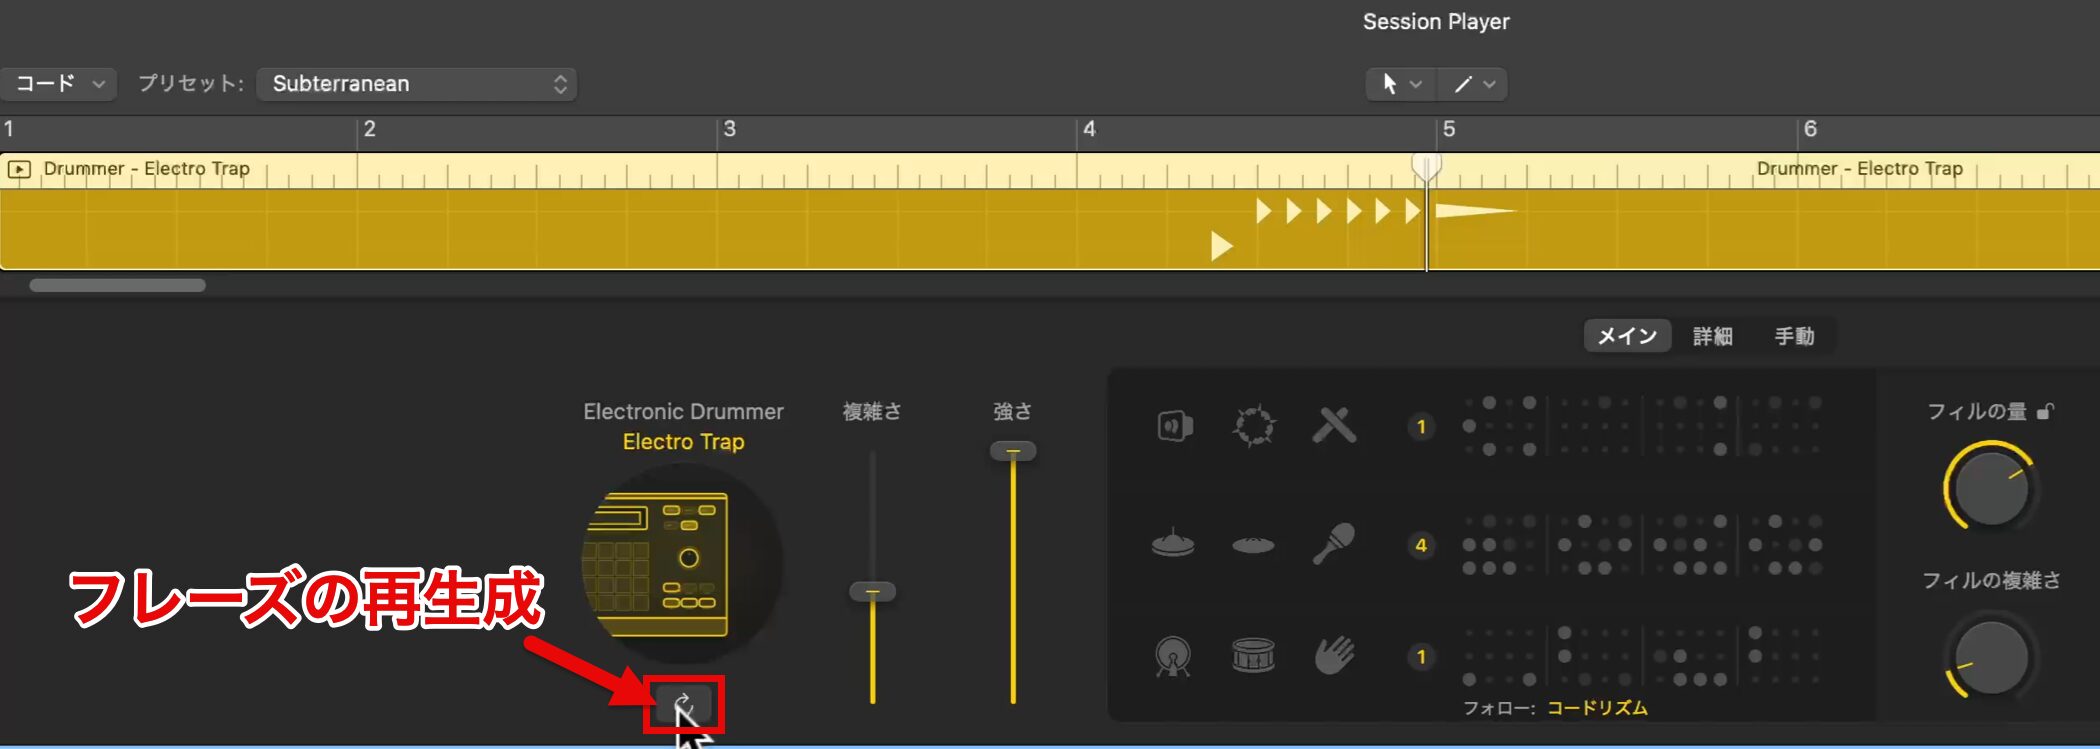
Once the shape of the phrase is set and you only want small changes, generate variations with the phrase regenerate button.
Let's listen to the fill we created.
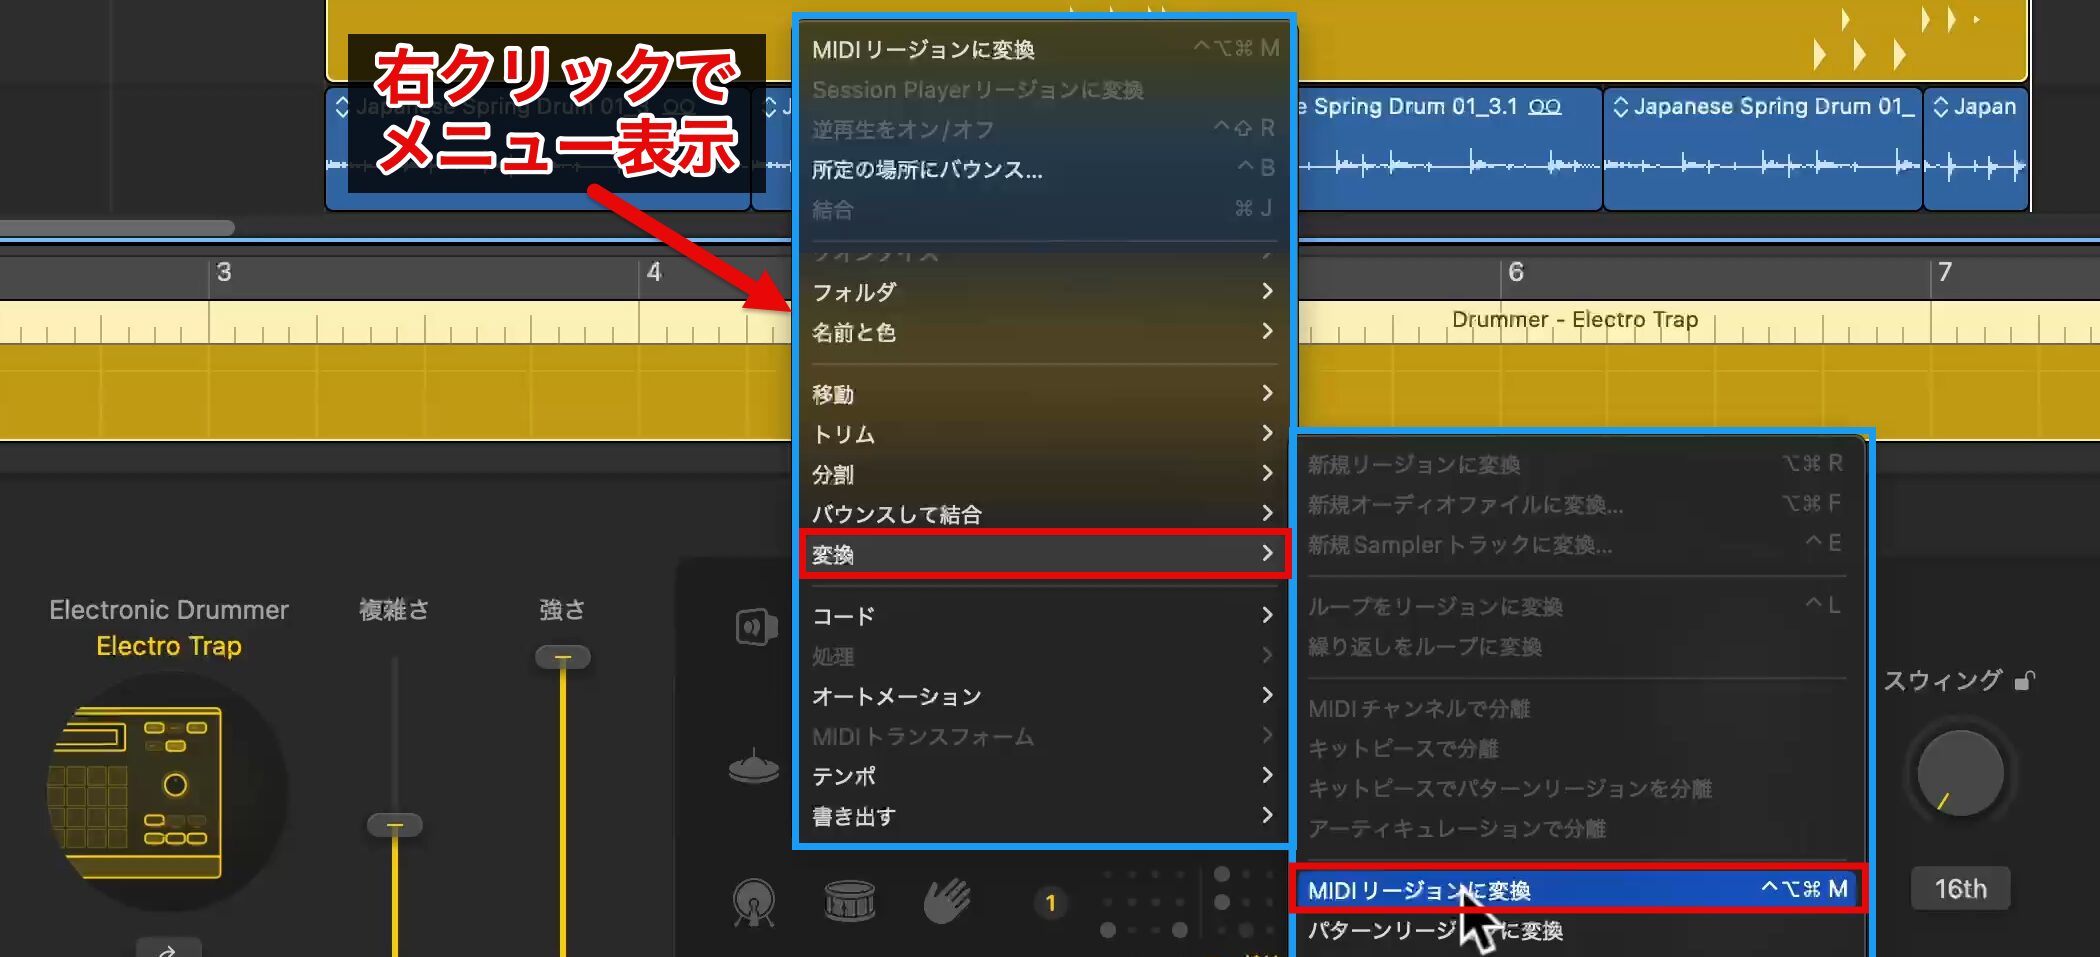
Once the performance is decided, right-click the region to open the menu and choose "Convert to MIDI Region" from "Convert" to convert the Session Player region into a MIDI region.
Using Track Stacks
When you want to hear only the rhythm tracks, soloing tracks one by one is time-consuming.
In such cases, it is convenient to use a "Track Stack," which lets you control multiple tracks together.
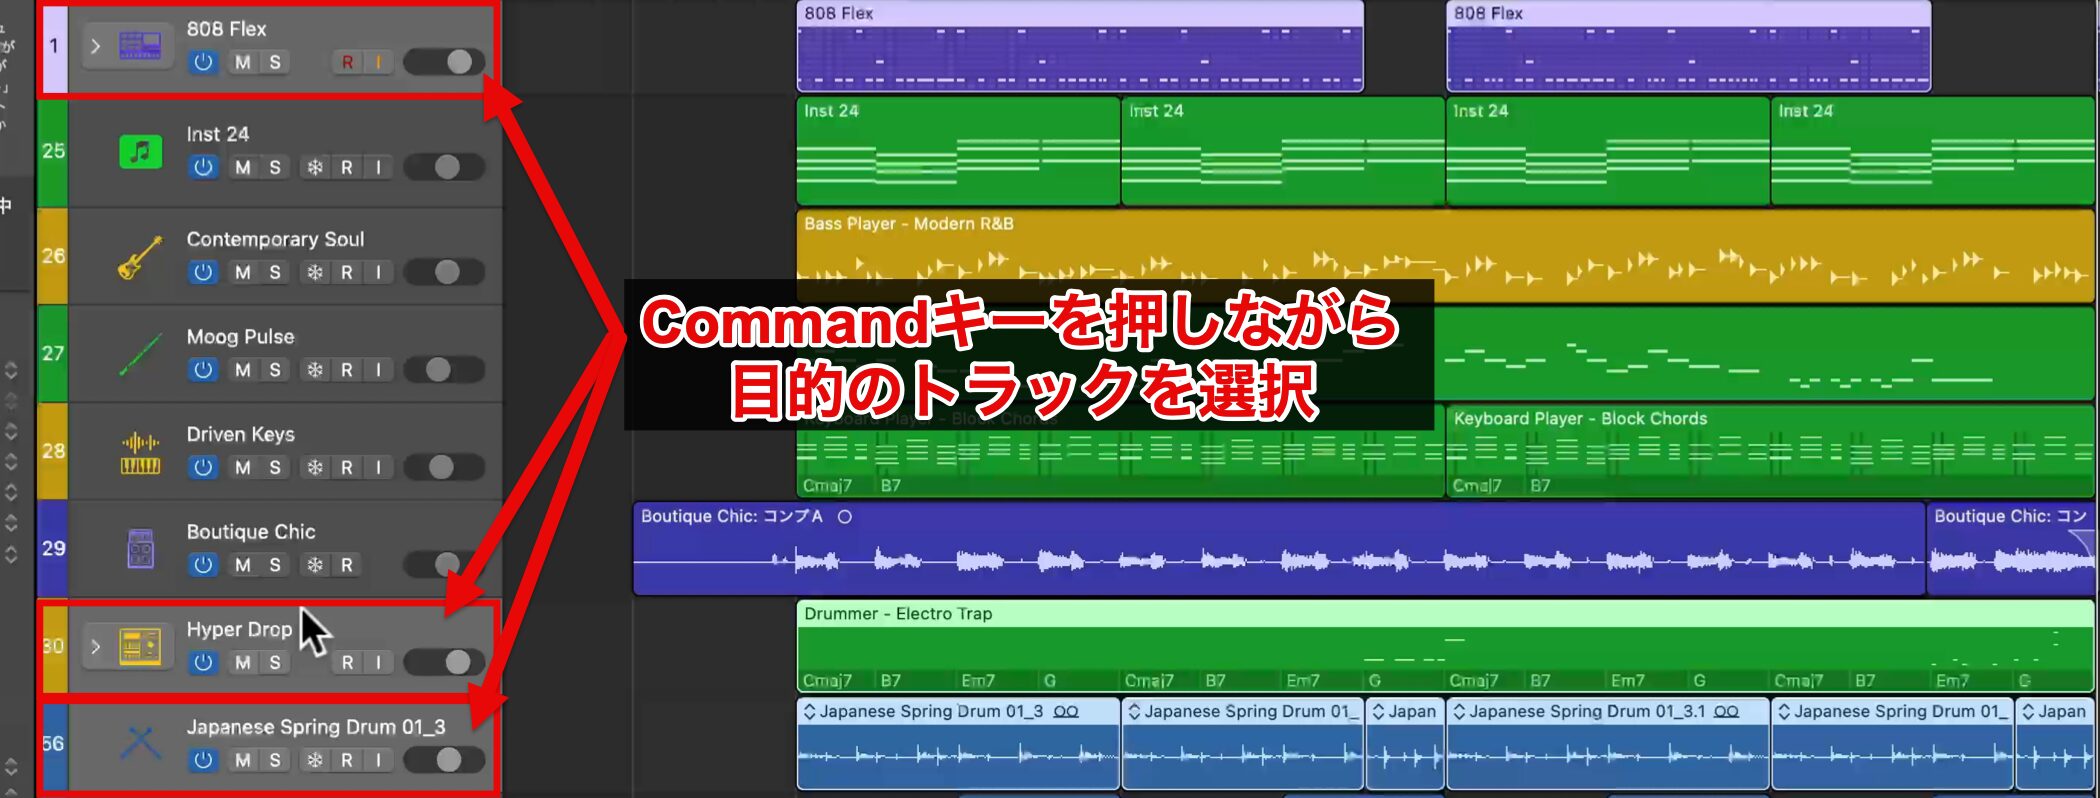
To use a Track Stack, hold down the Command key and select the target tracks.
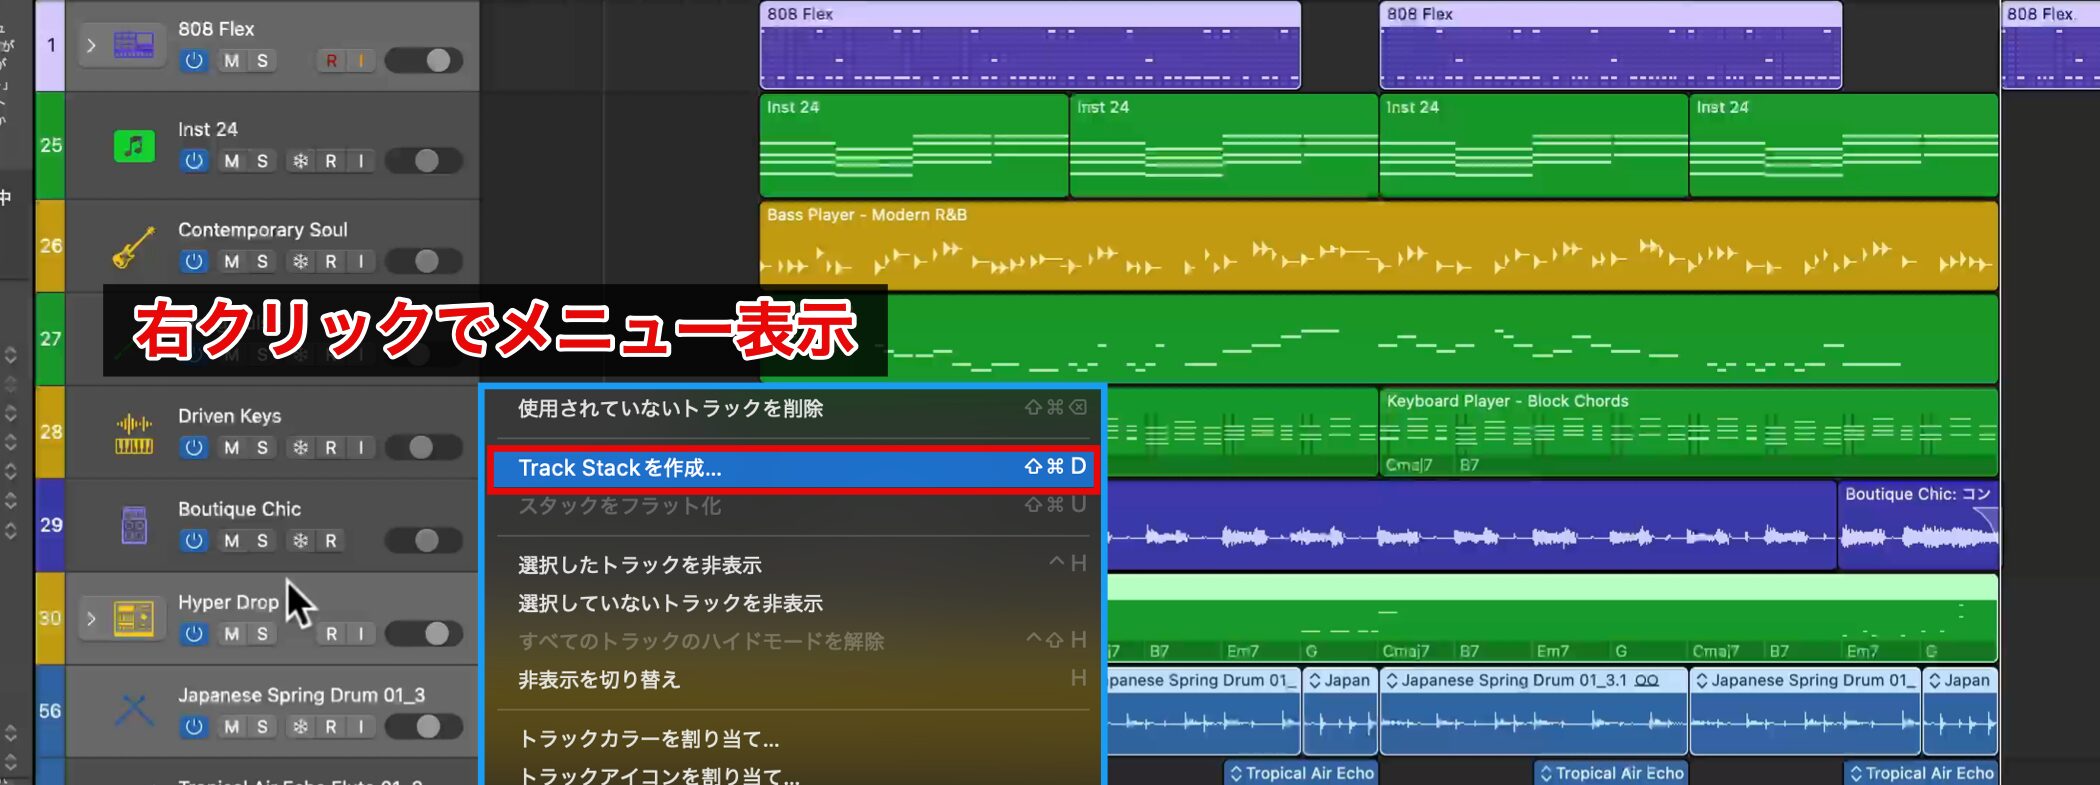
Choose "Create Track Stack" from the right-click menu.
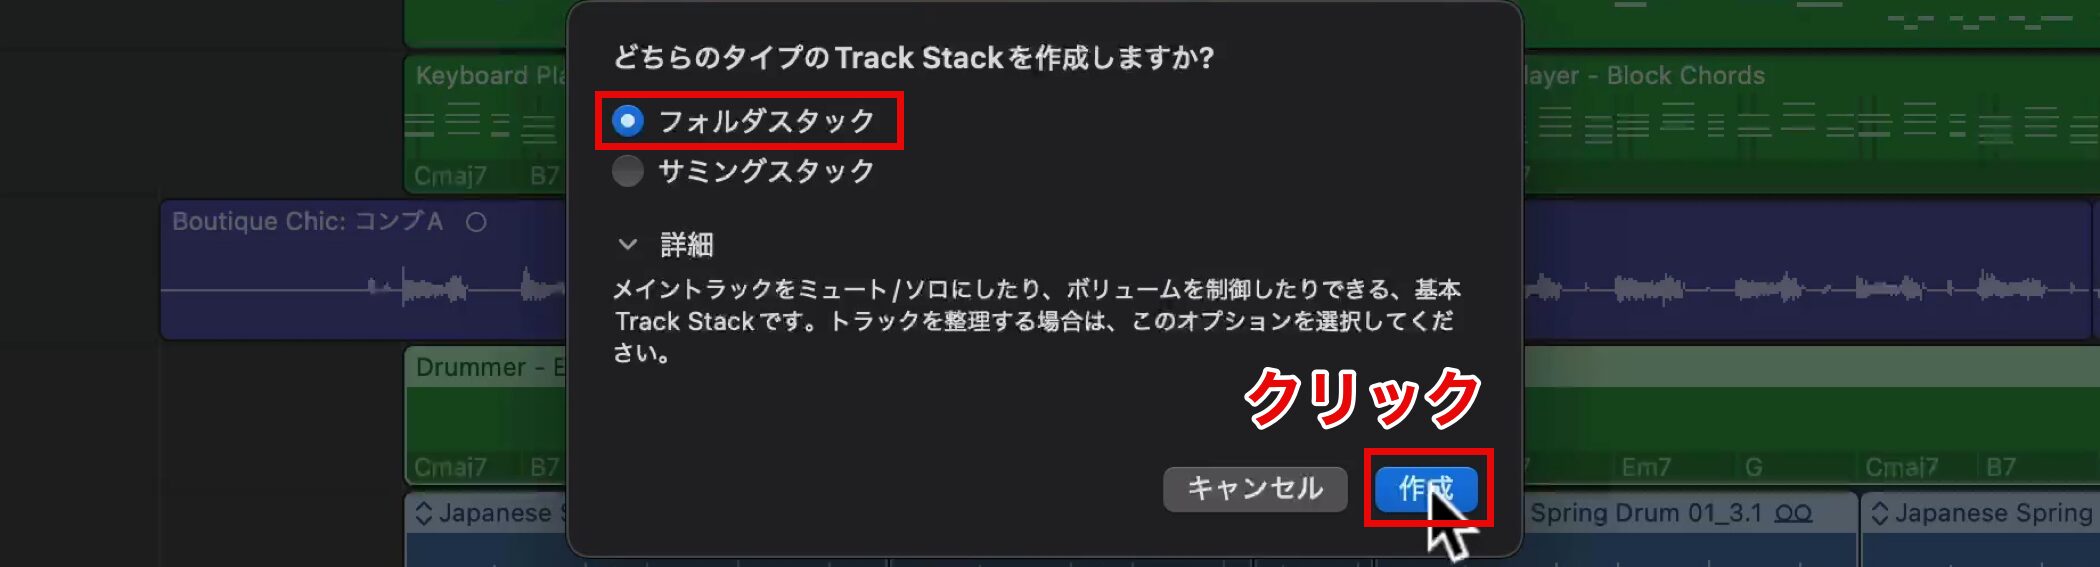
A dialog appears; choose "Folder Stack," which suits our purpose here, and click "Create."
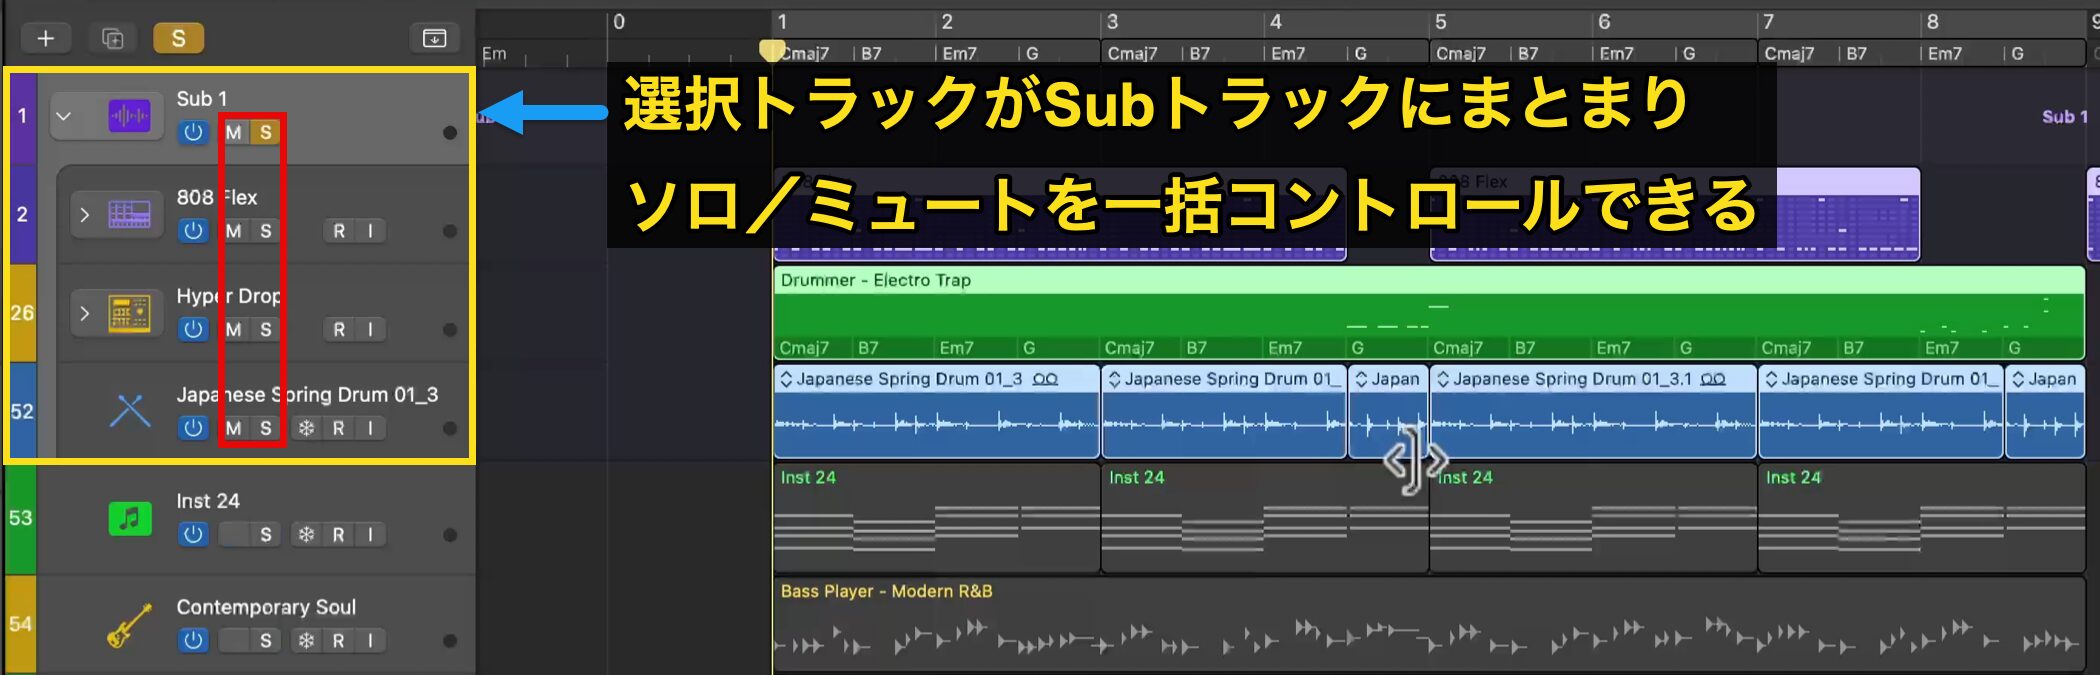
The tracks you selected are grouped under a track called "Sub."
By soloing or muting the Sub track, you can control all the tracks inside it at once.
You can also still adjust each grouped track individually.
Now let's solo the Sub track and listen to the rhythm tracks as a whole.
The Mute Tool
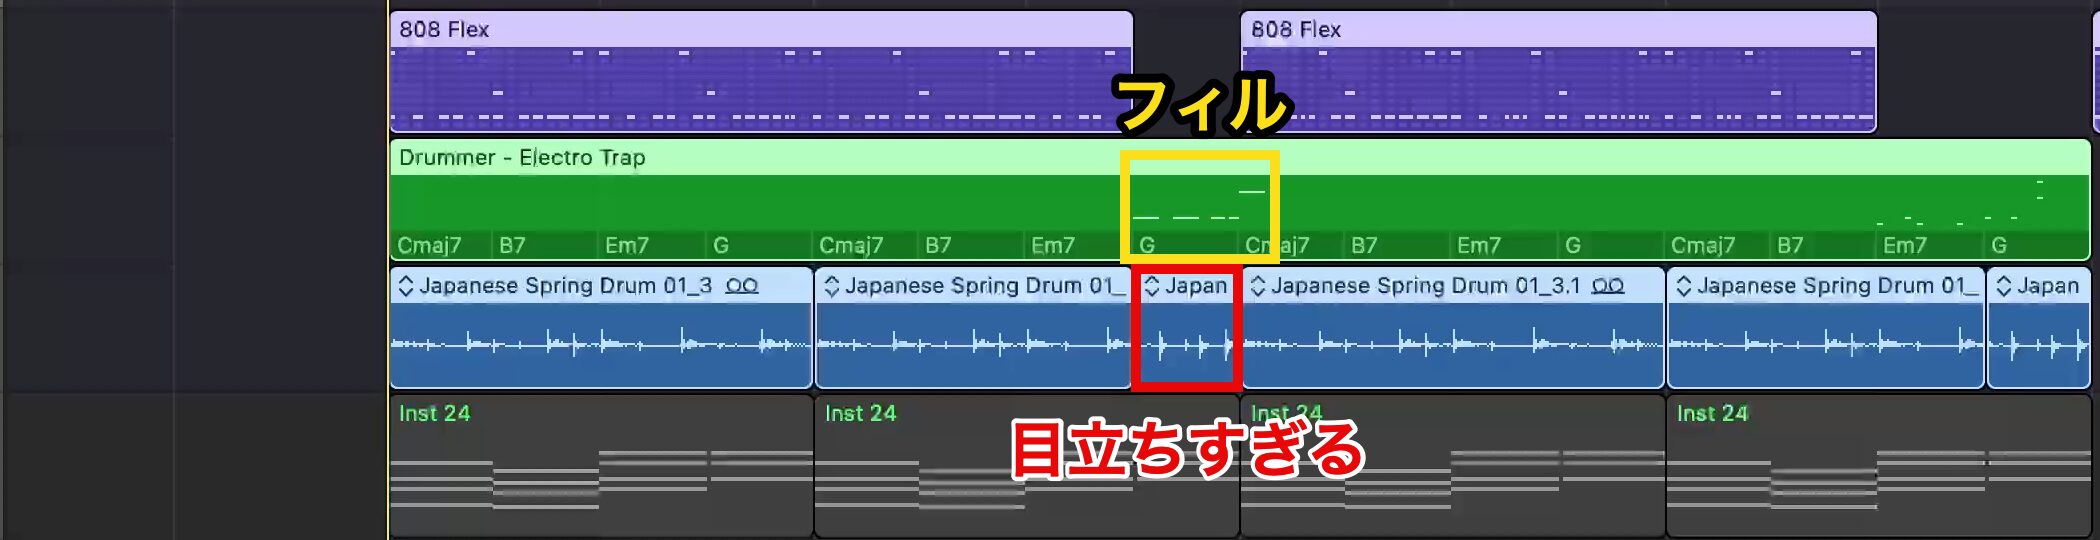
Listening to the rhythm tracks as a whole, the percussion track felt a little too prominent where we added the fill.
So we want to stop the percussion from playing in that section.
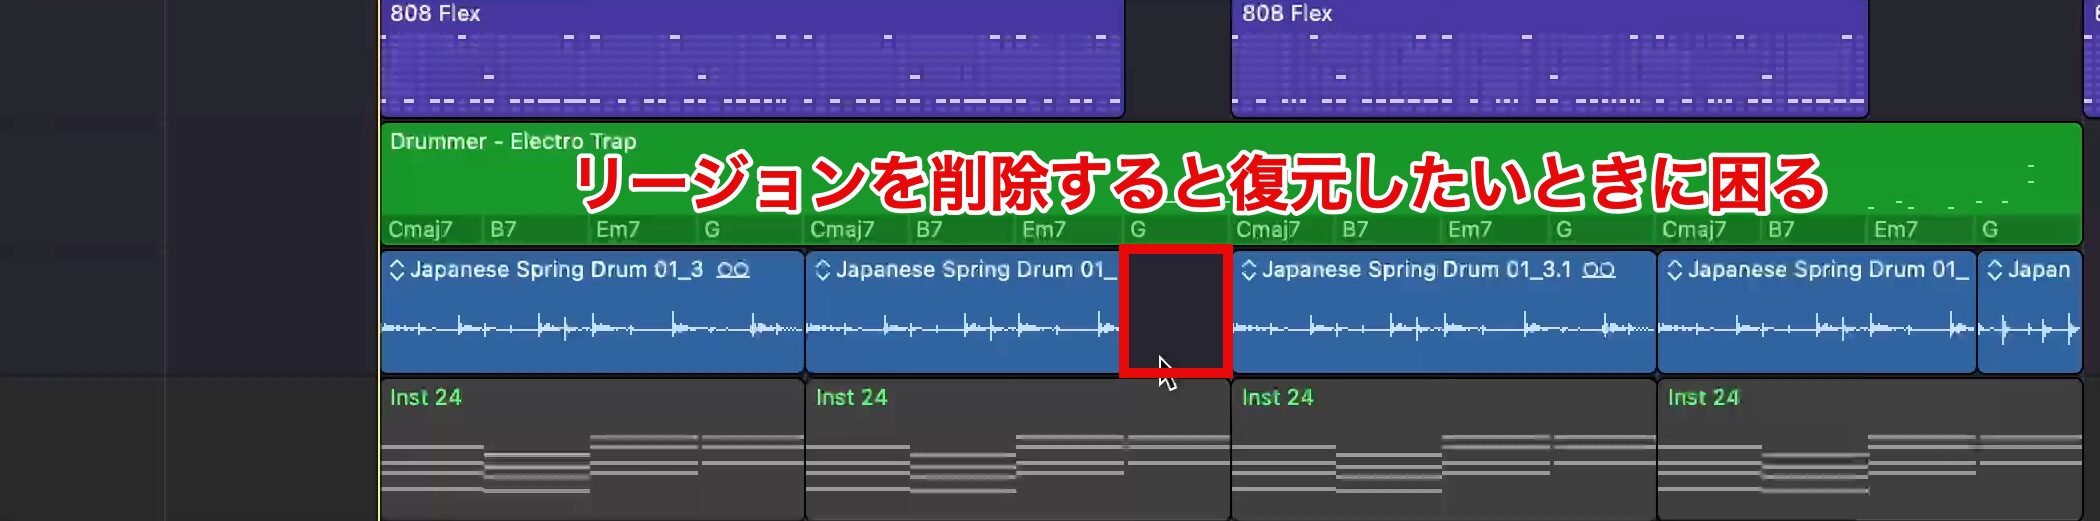
If you delete the region at this point, it could cause problems if you need to restore it later.
So here we use the Mute tool to stop it temporarily.
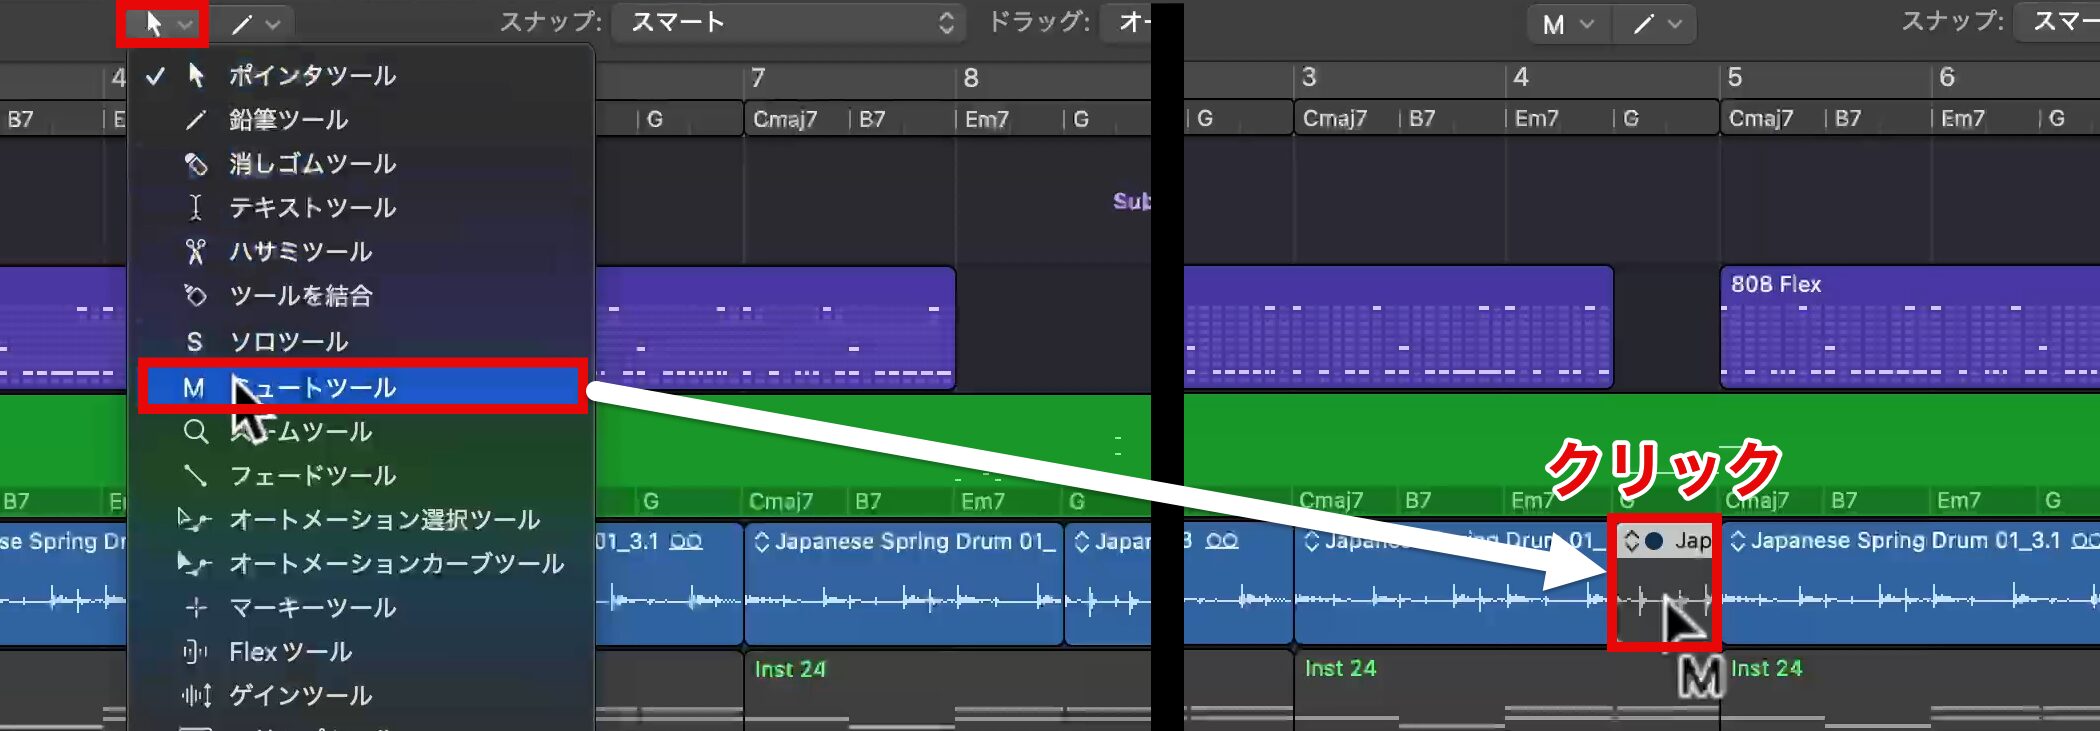
Choose the "Mute Tool" from the Tool menu and click the region you want to stop, and its playback is temporarily muted.
Click it again to easily restore it.
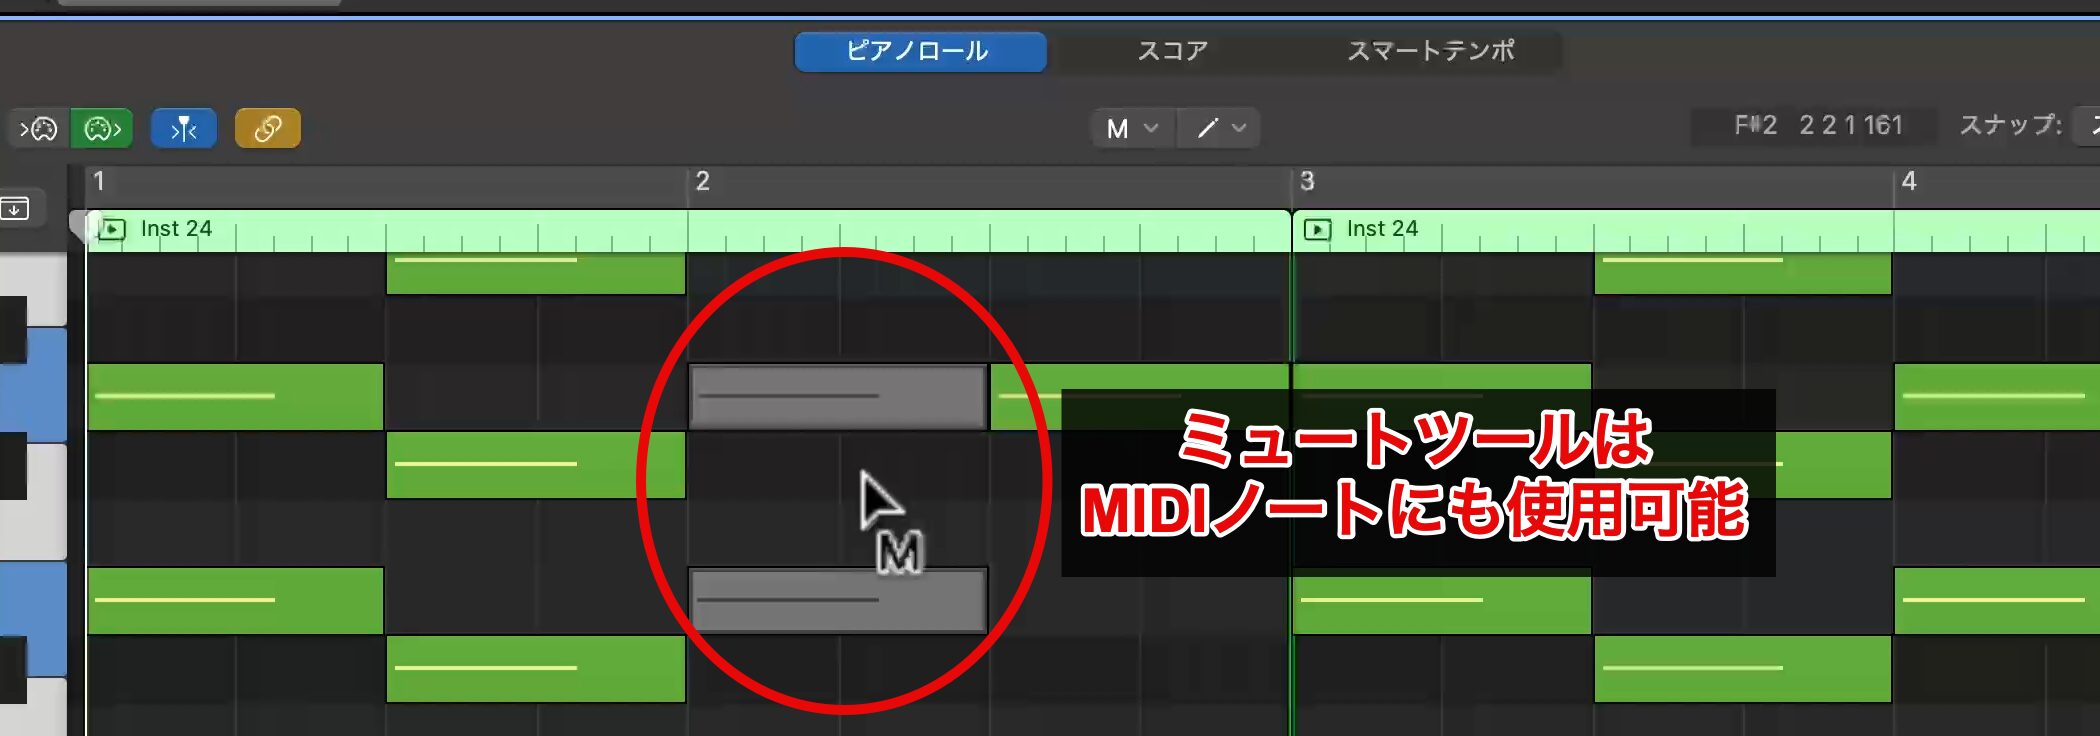
The Mute tool can be used not only on regions but also on MIDI notes.
Adding Accents with a Crash Cymbal
After the fill, we add sounds that act as accents to create dynamics.
This time, we choose a crash cymbal, one of the standard accent sounds, from a drum kit.
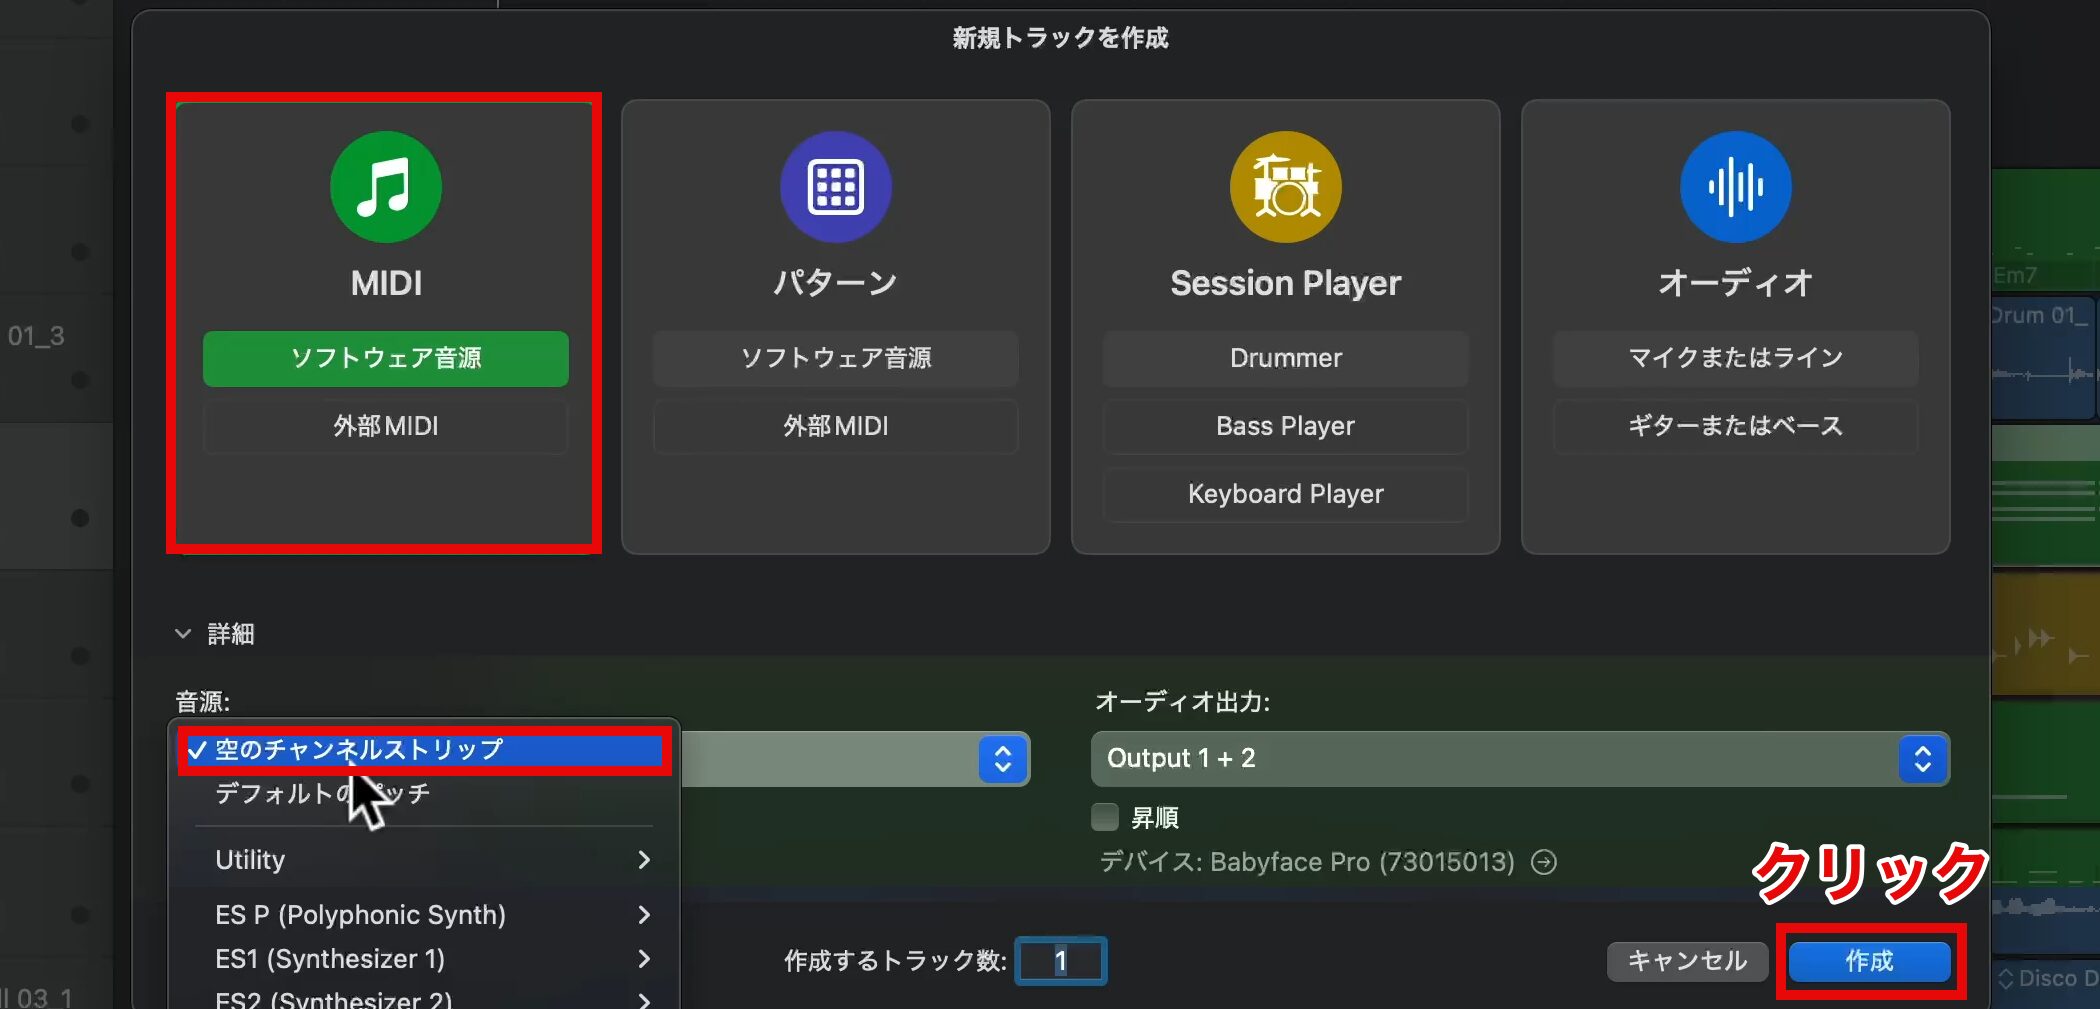
First, add a new MIDI track.
We want to take our time choosing the sound, so we choose "Empty Channel Strip," which loads no instrument, and click "Create."
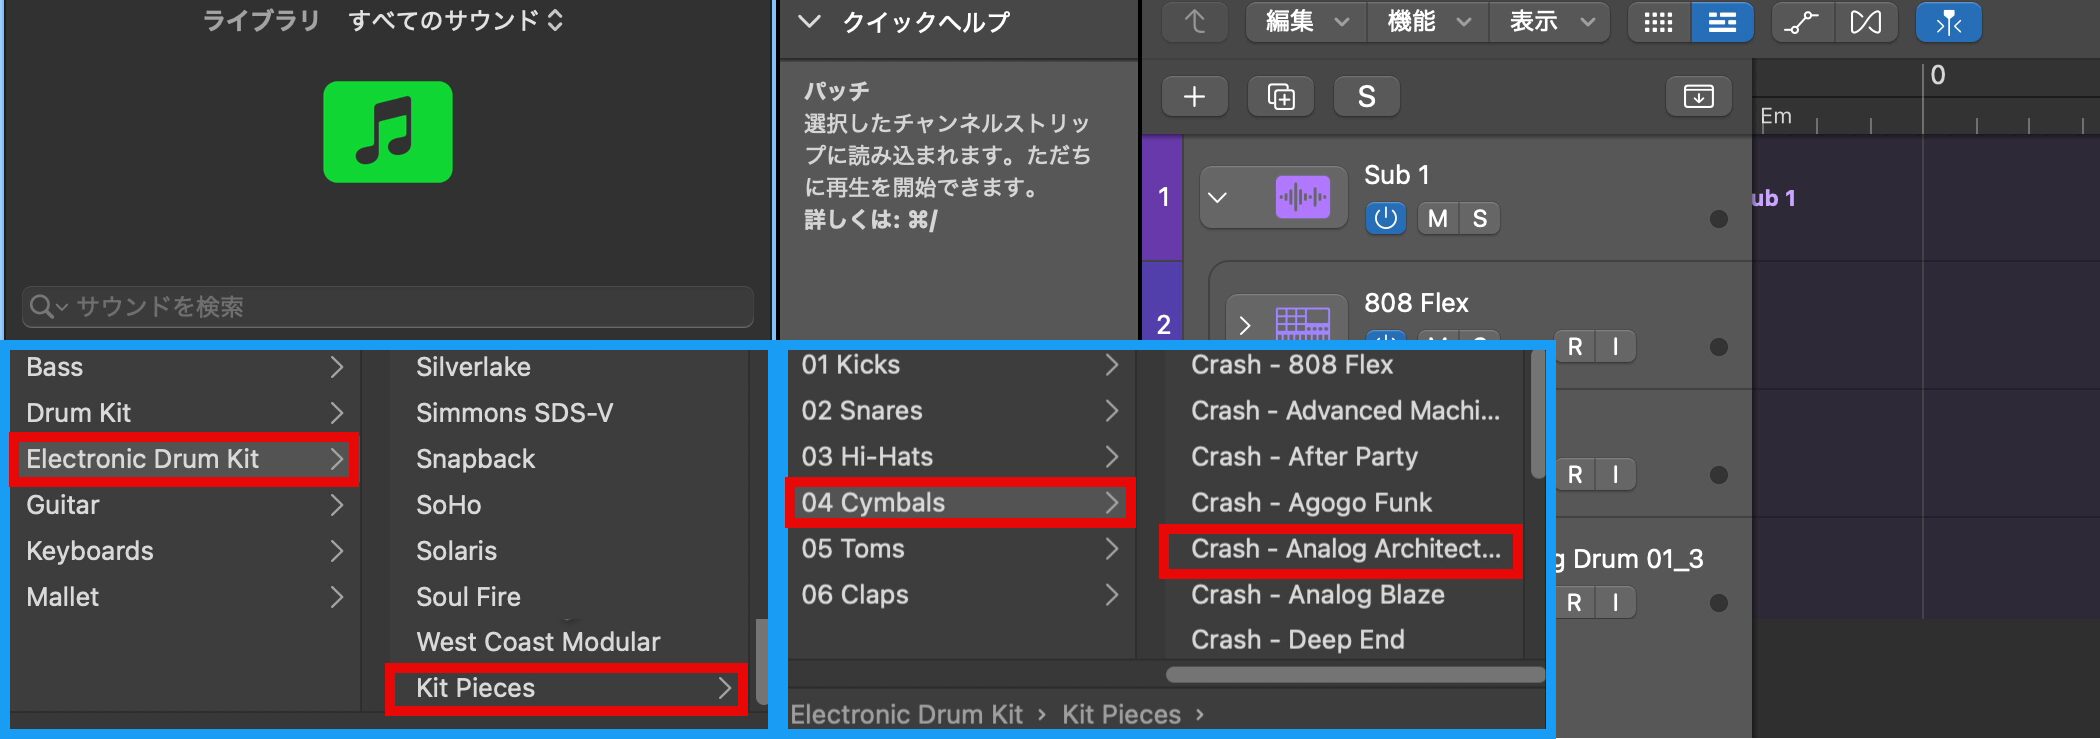
Open "Cymbals" from "Kit Pieces" in "Electronic Drum Kit" in the Library, and choose a sound you like.
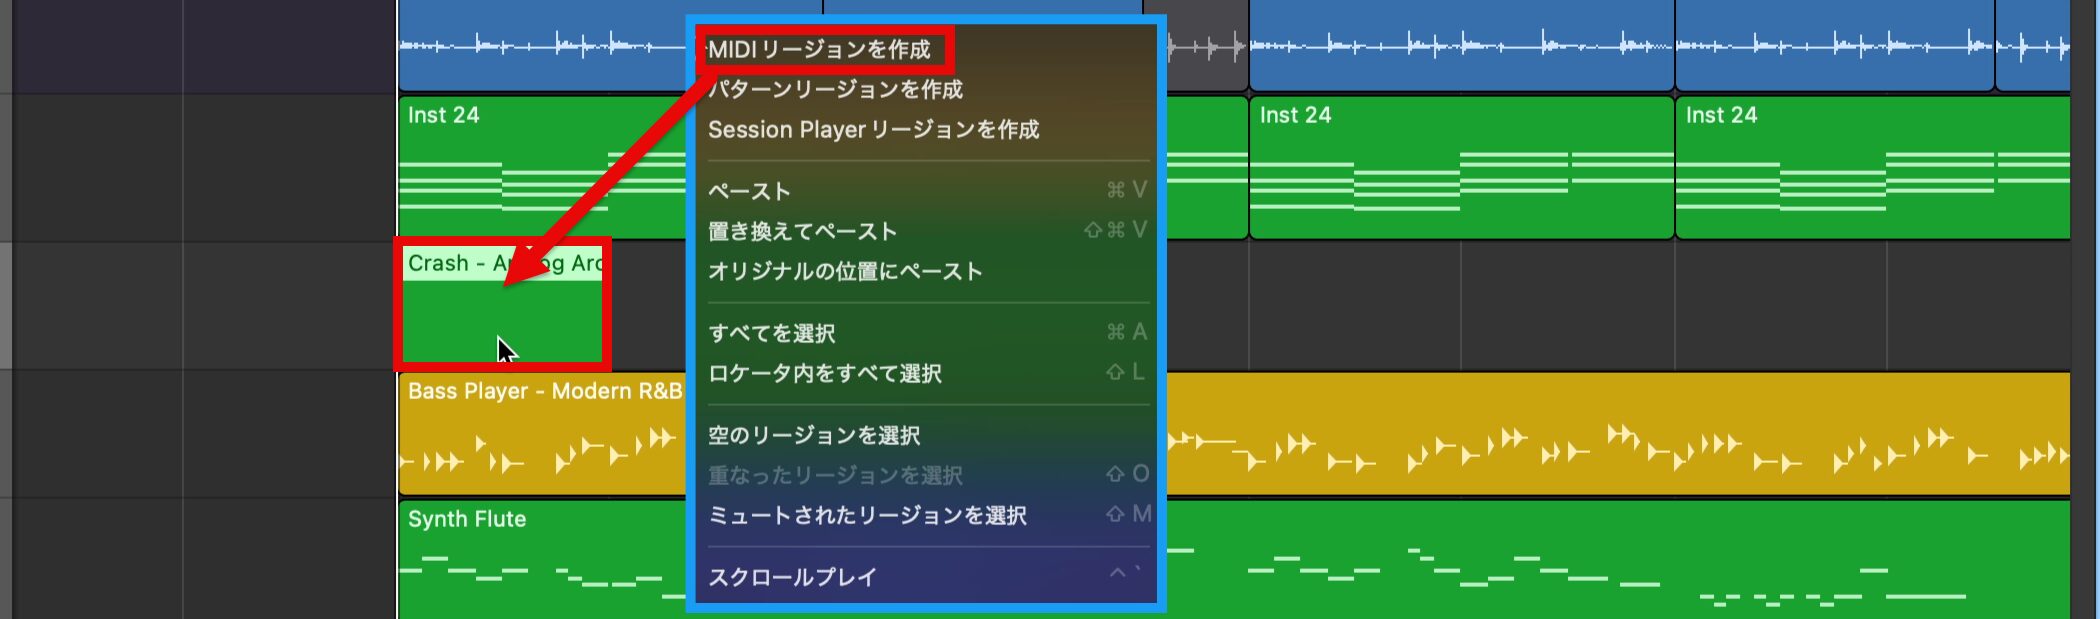
Create a MIDI region to check the sound.
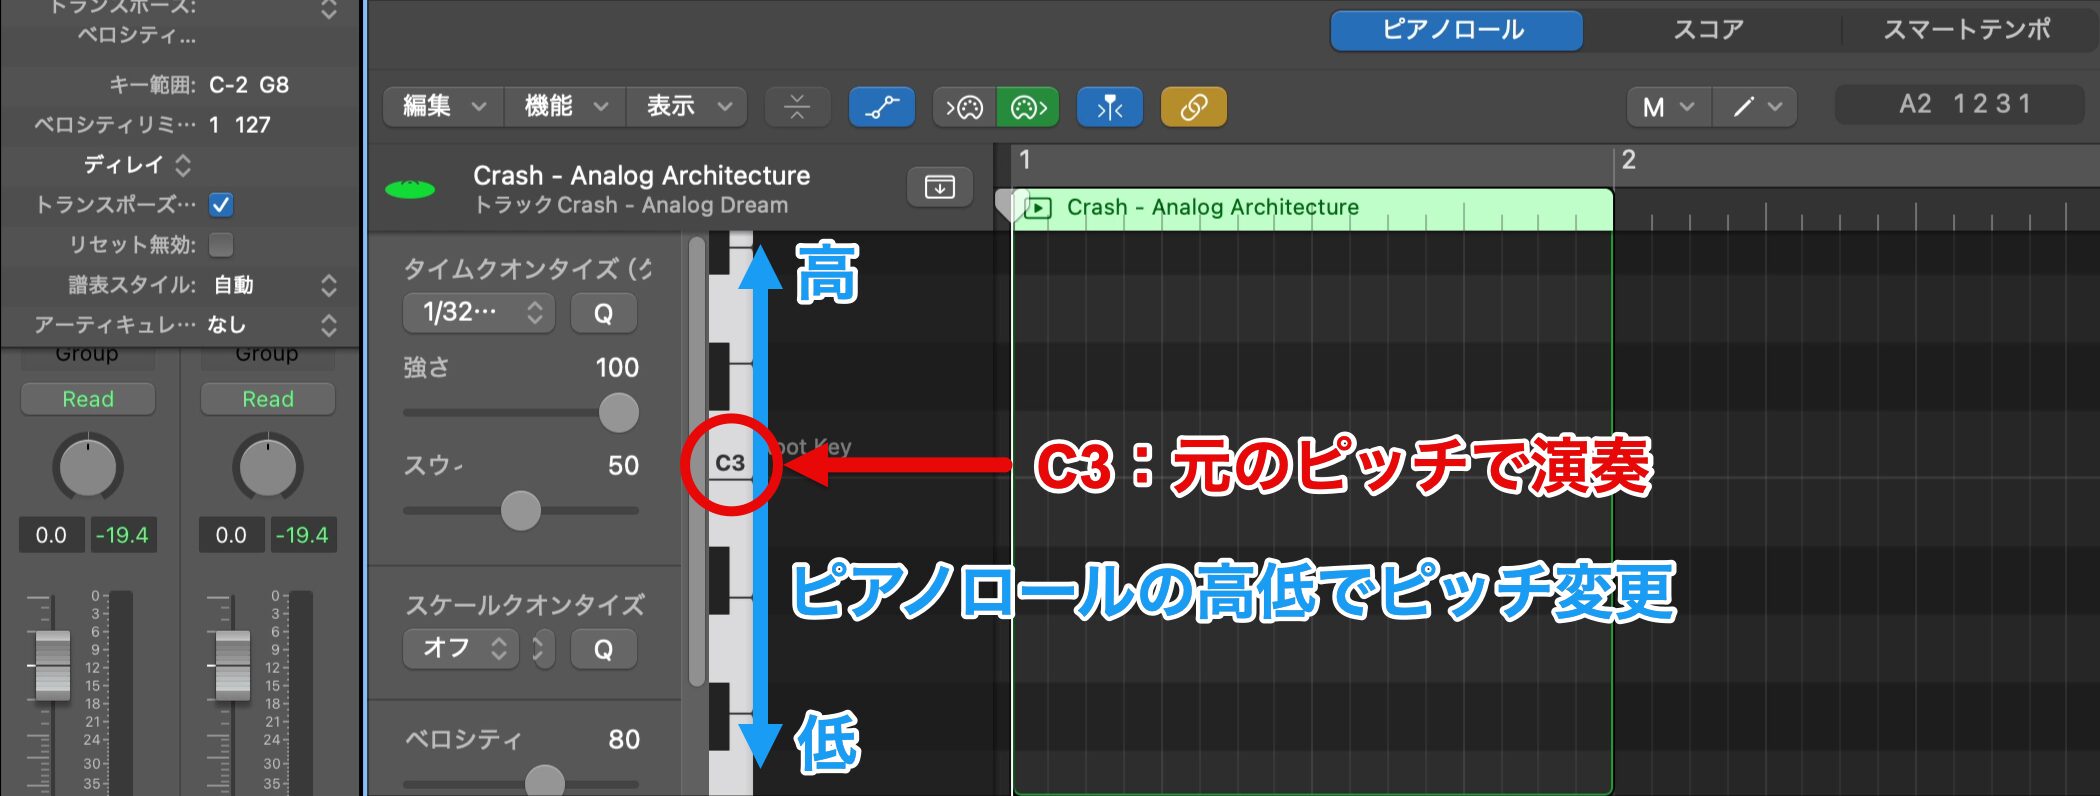
Unlike a drum kit, a single drum sample plays at its original pitch at C3, and you can adjust the pitch up or down from there.
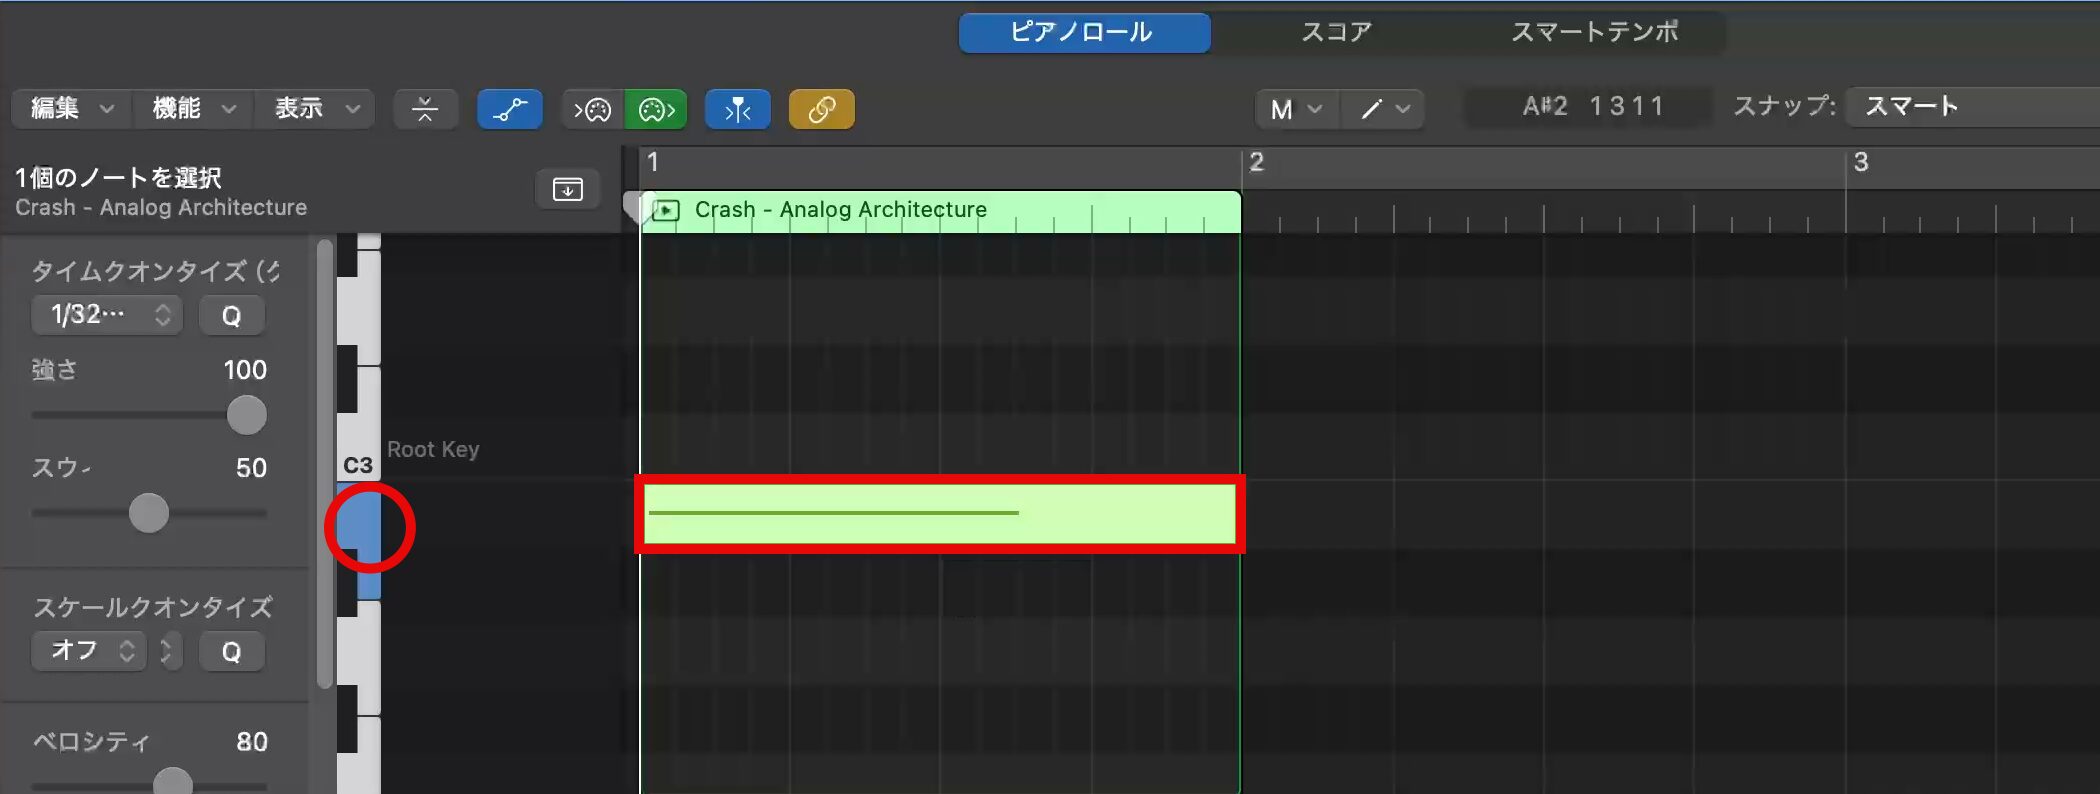
This time, we enter the sound at a slightly lower pitch than the reference.
Changing pitch is effective for adding variation to drum sounds such as snares and toms.
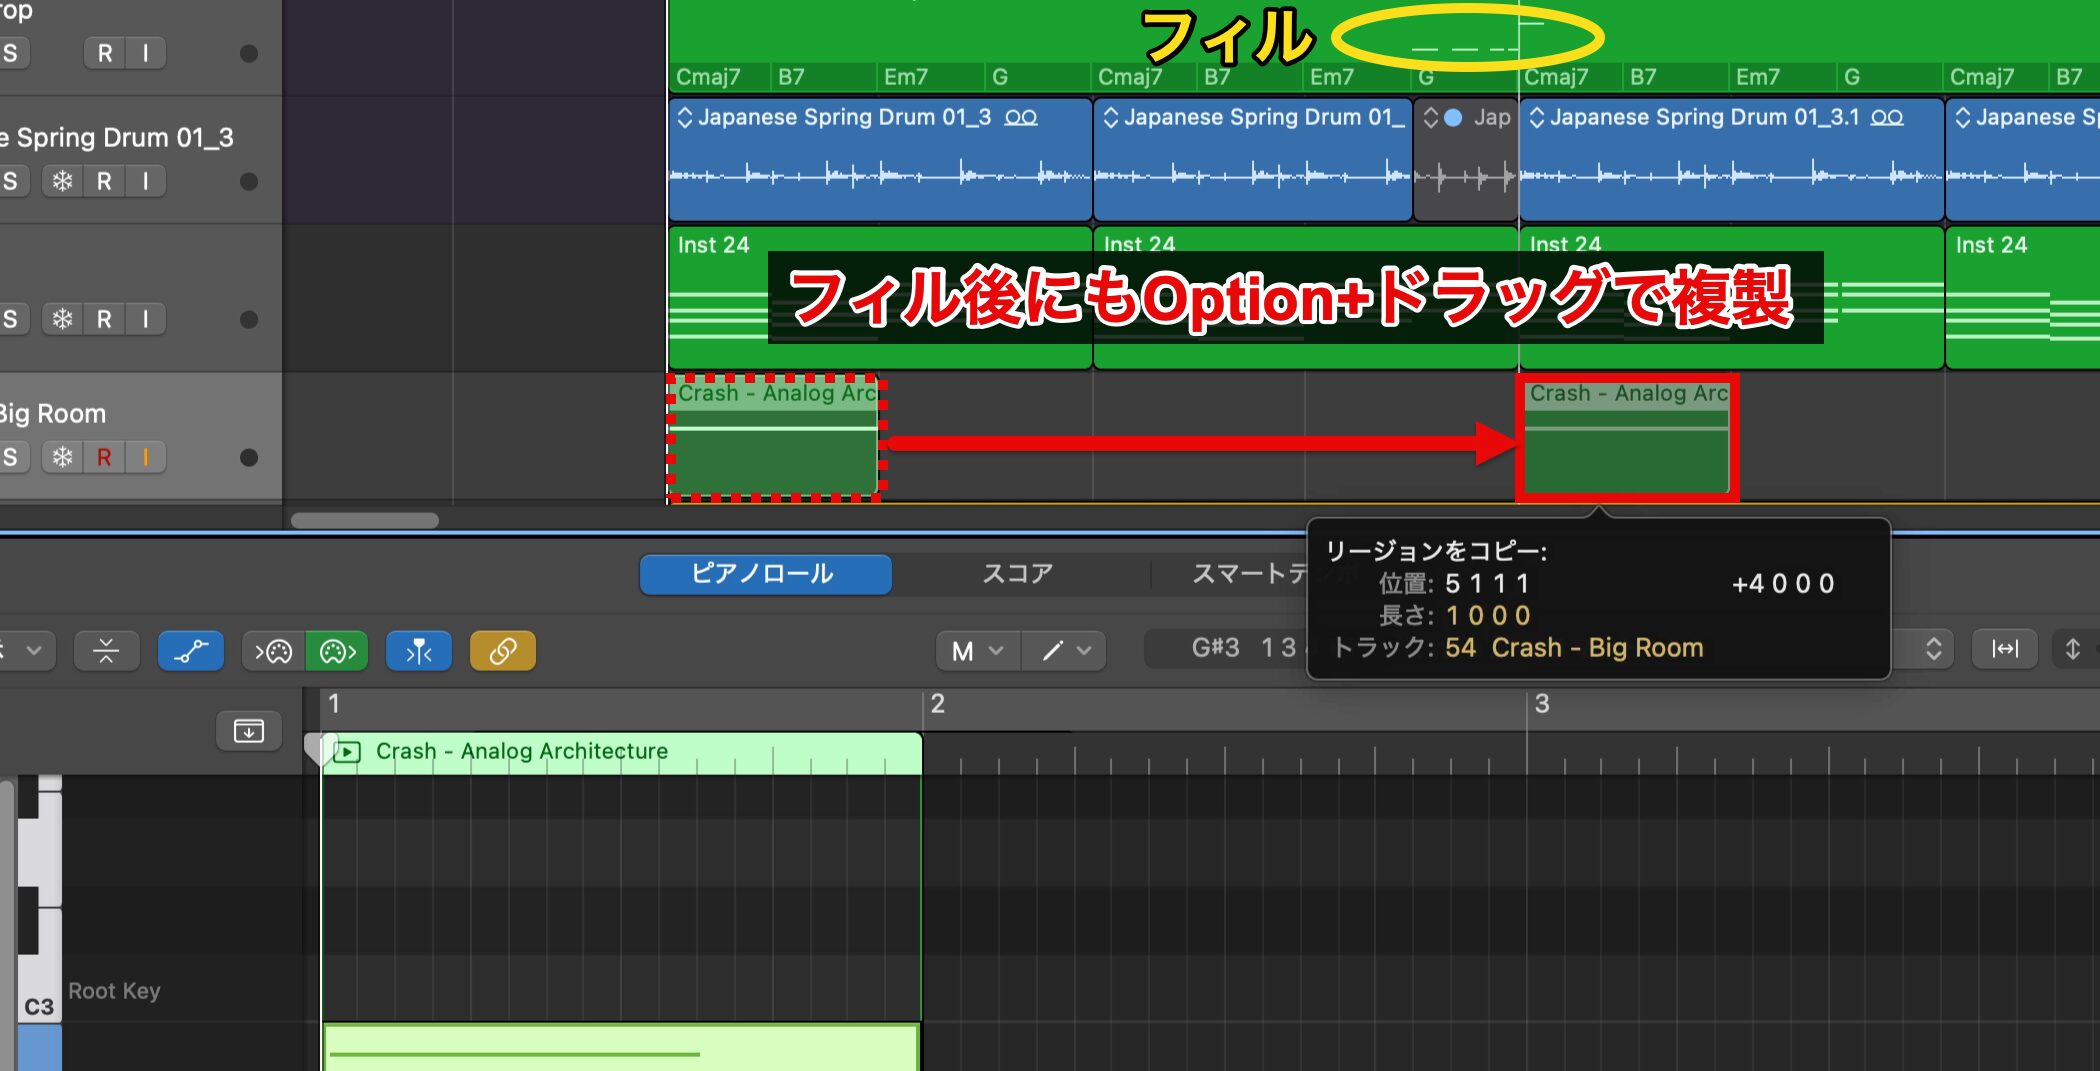
Accent sounds create a smooth flow not only at the start of a section but also after a drum fill, so we duplicate it.
Let's check the sound.
Creating a Reverse Cymbal by Reversing Playback
As the third point for adding dynamics, we add a reversed sound effect.
Reversed sounds are a common technique for building excitement.
Here, we reverse the crash cymbal we just entered to create a reverse cymbal.
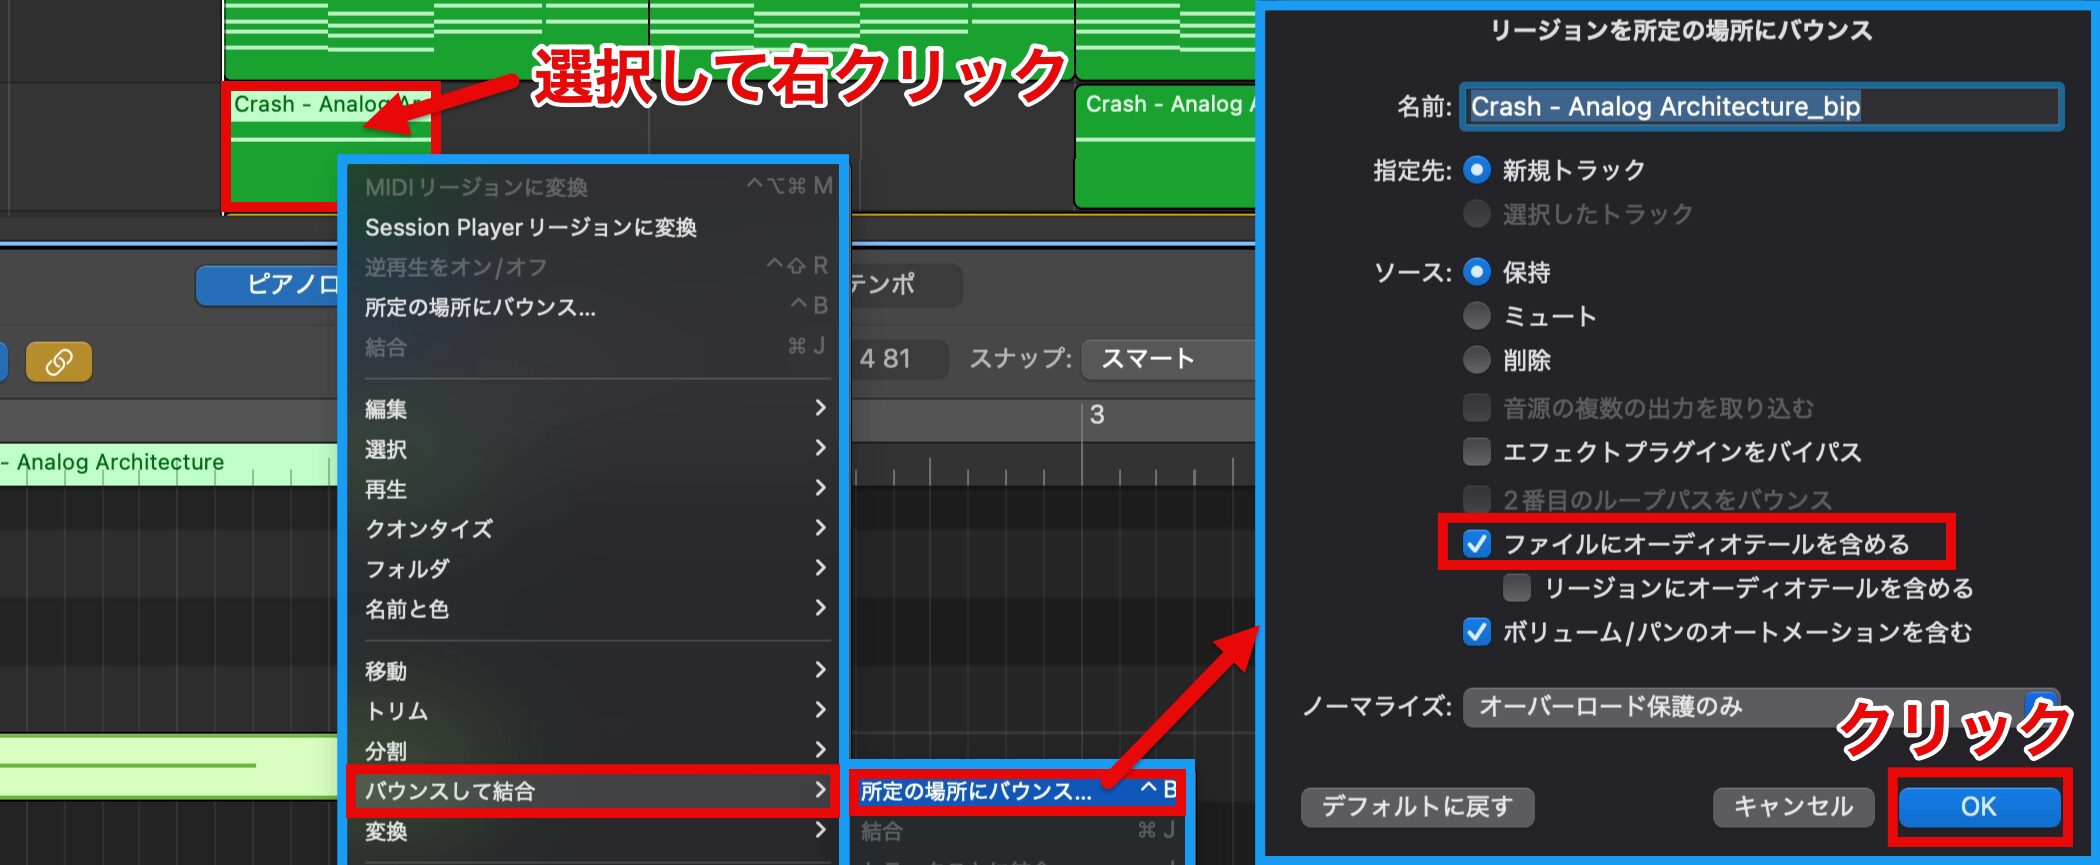
To create a reverse cymbal from a cymbal made on a MIDI track, you need to convert it to an audio region first.
Select the MIDI region, open "Bounce and Join" from the right-click menu, and choose "Bounce in Place."
In the dialog that appears next, check "Include Audio Tail in File" and click "OK."
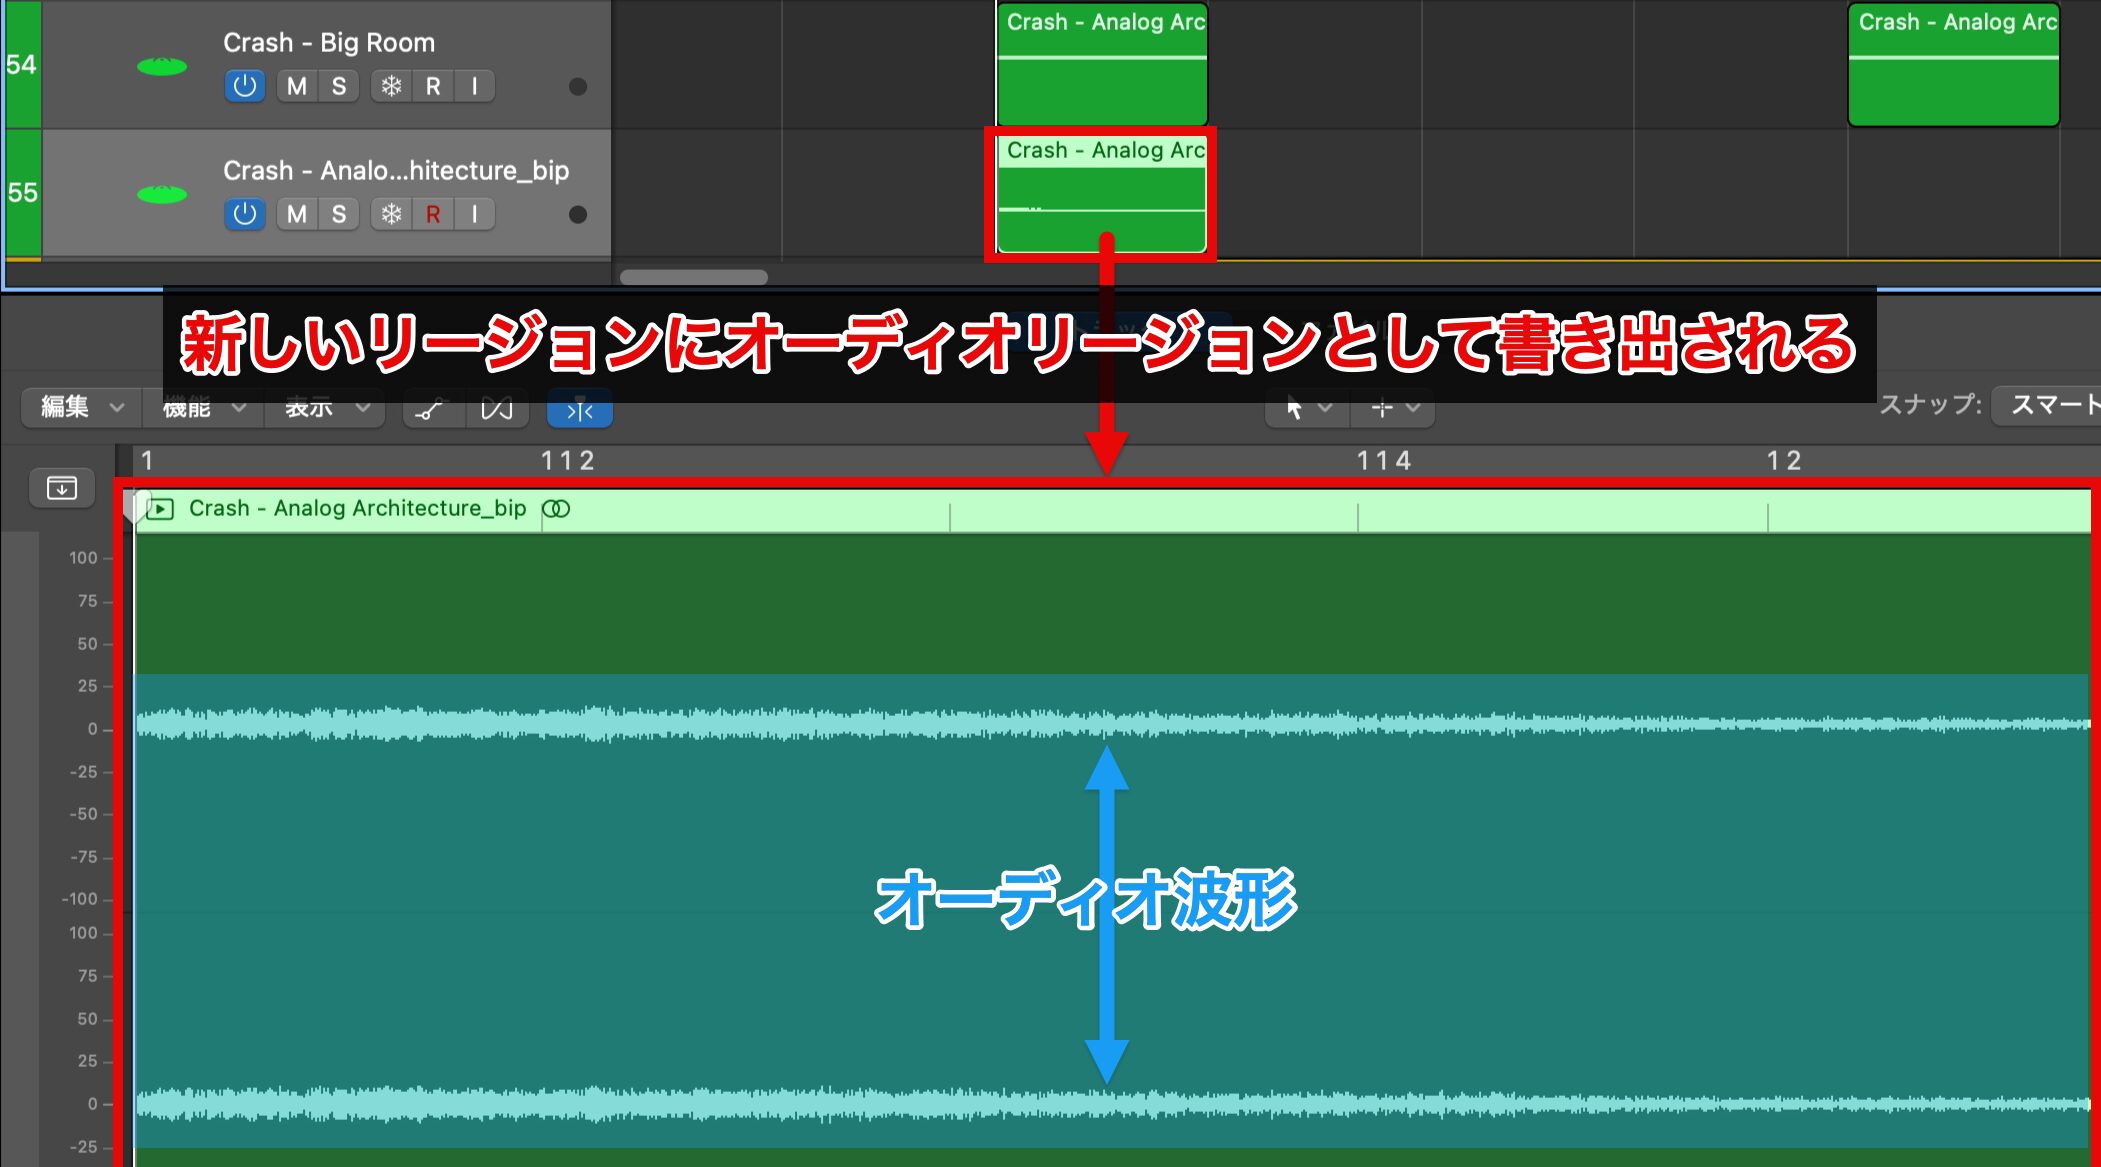
A new track is created, and the region is rendered as an audio region.
If the audio waveform is hard to see after conversion, it is a good idea to go back to before the conversion, raise the level on the original track and convert again.
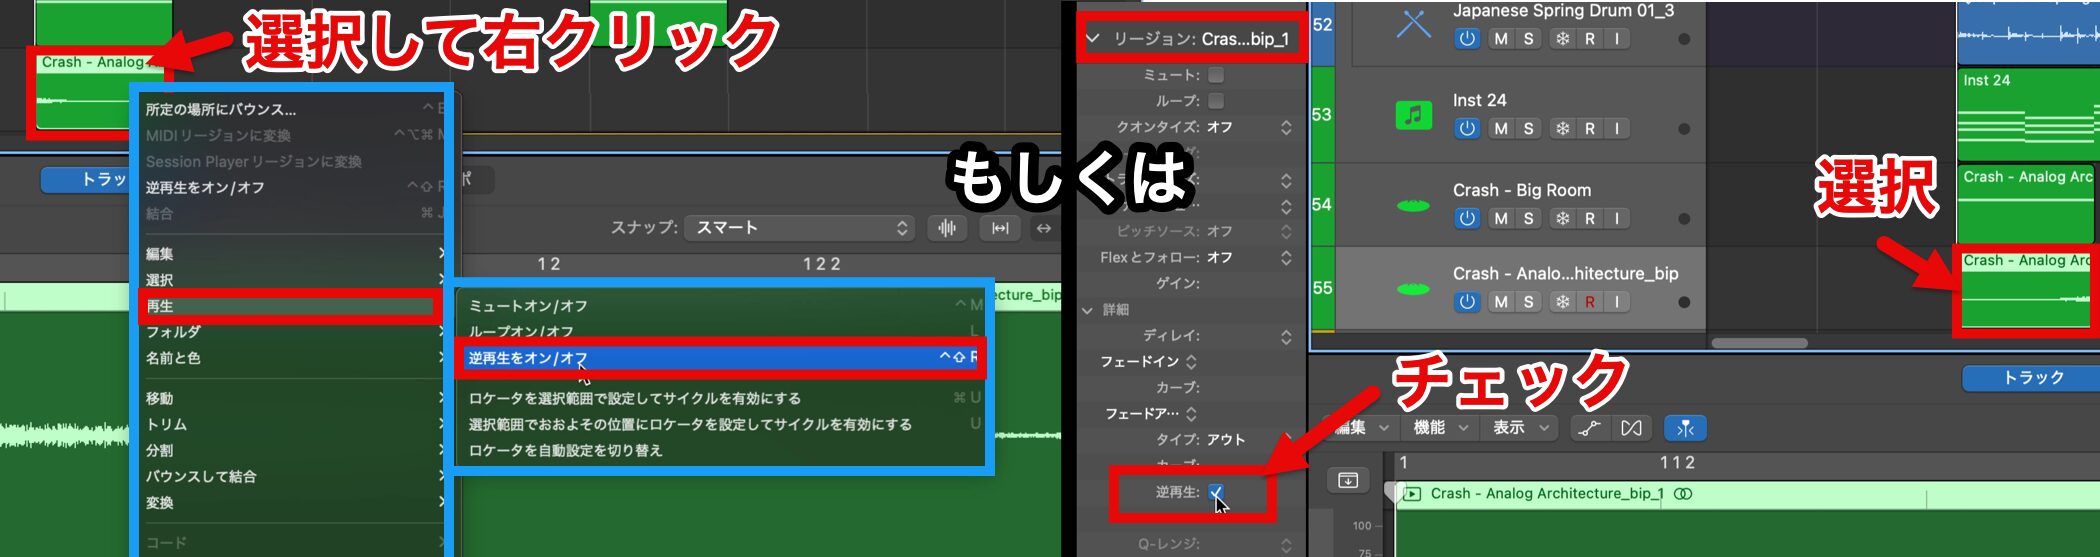
Then simply select the audio region and choose "Reverse Playback On/Off" from "Playback" in the right-click menu, or check "Reverse Playback" in the region settings in the Inspector, and you can easily create a reversed sound.
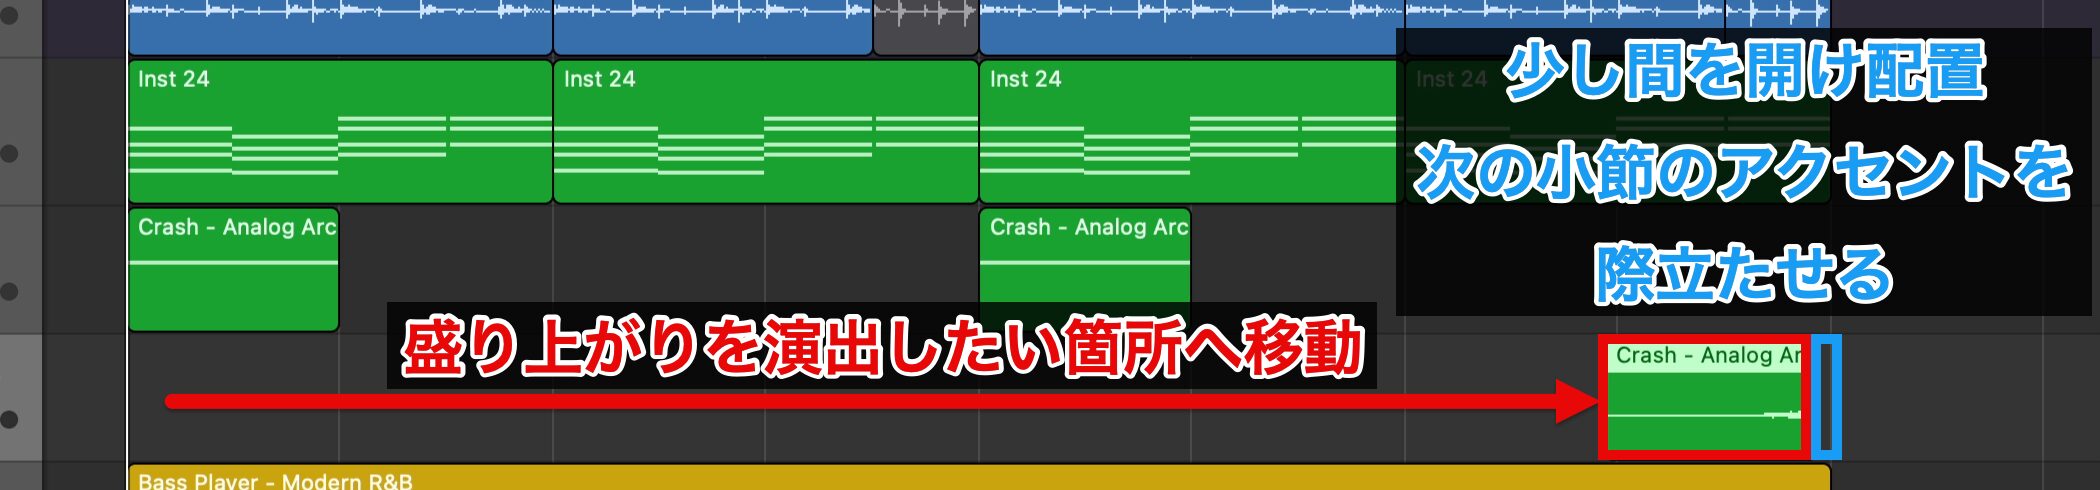
This time, we move the finished region to build excitement toward the end of the section.
Leaving a little space rather than placing it right at the end of the bar makes the accent in the next bar stand out more.
Using the Arpeggiator on Strings
With a variety of embellishments added, the arrangement is nearly complete.
Finally, let's go one step further and add an organic nuance like a live performance.
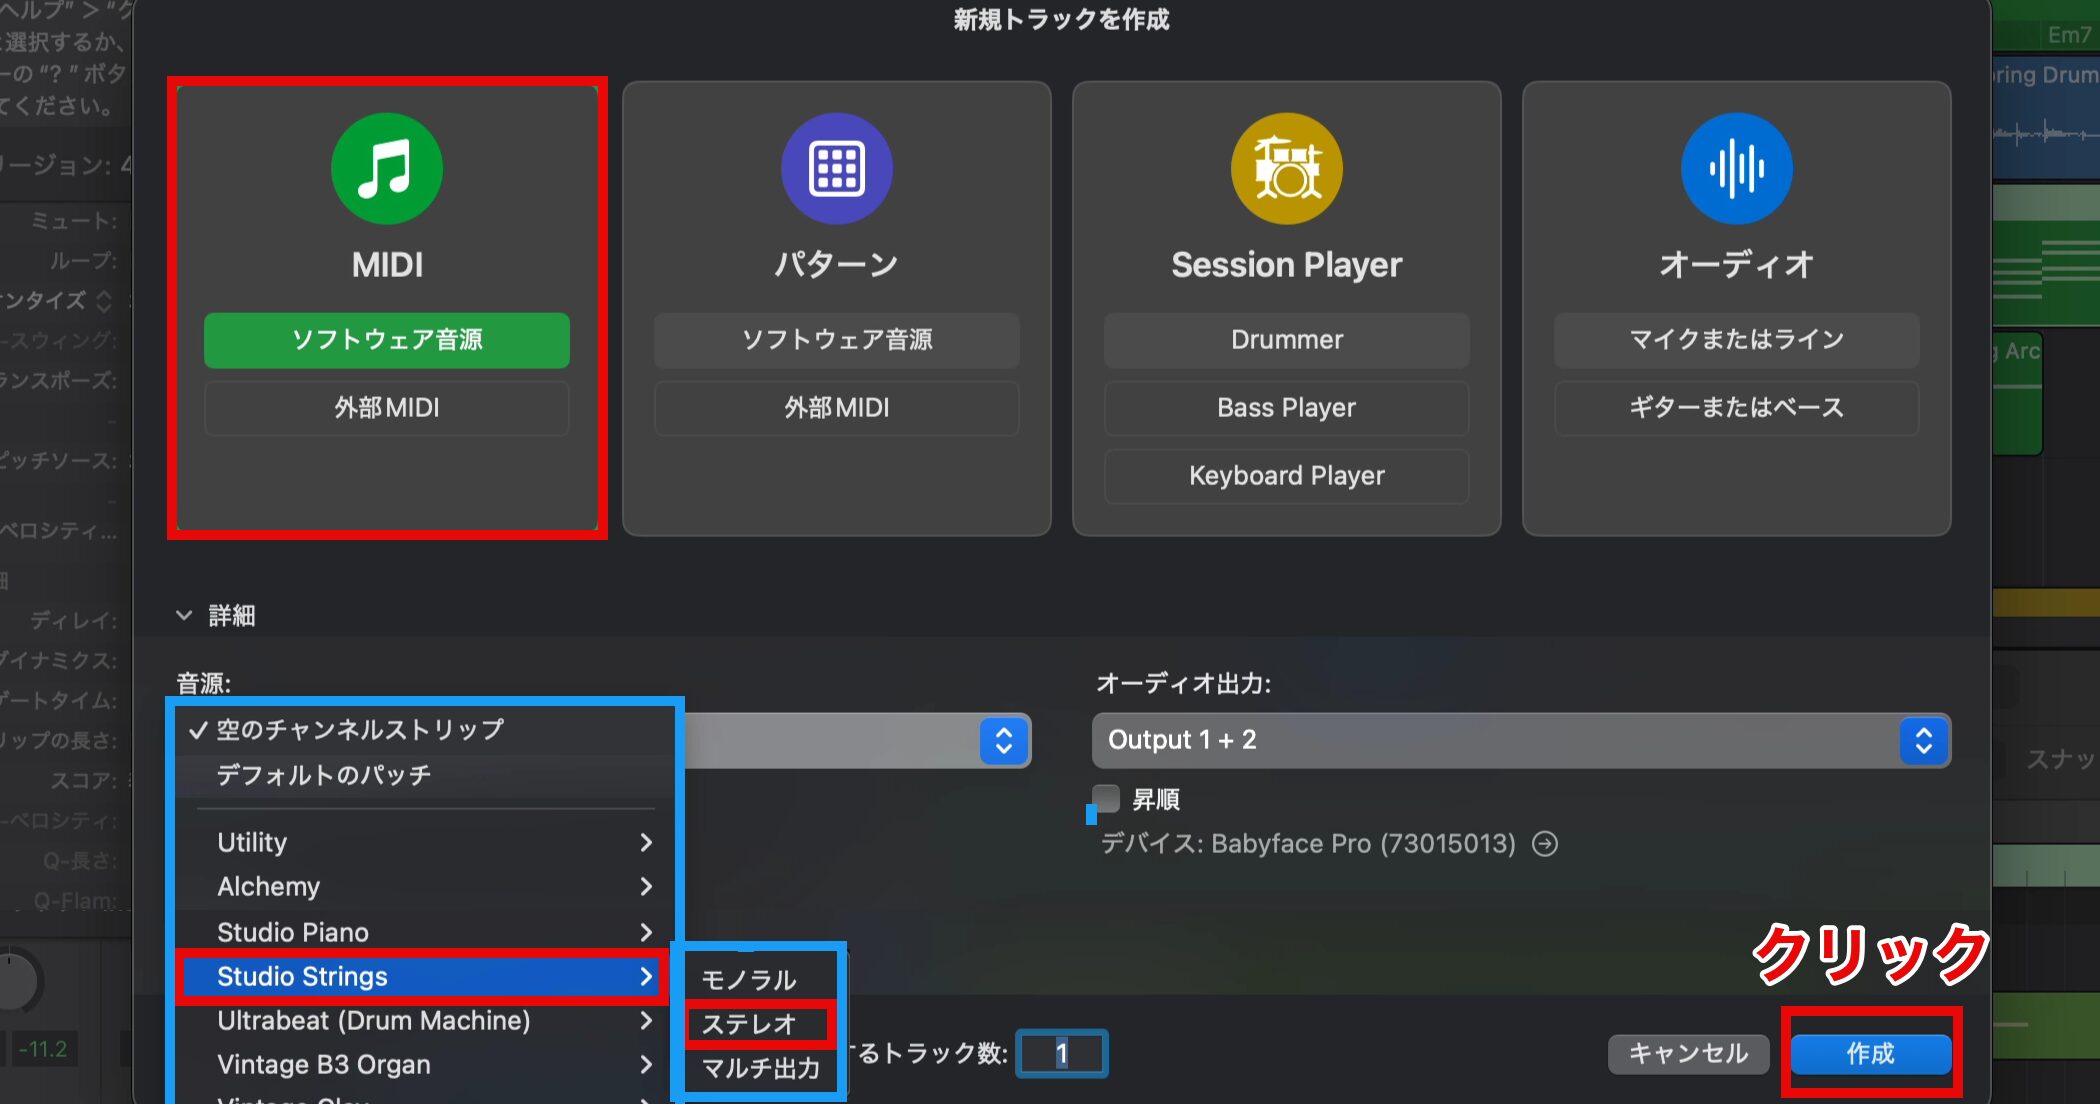
From the software instruments, choose "Studio Strings," which includes string instruments such as violin and viola.
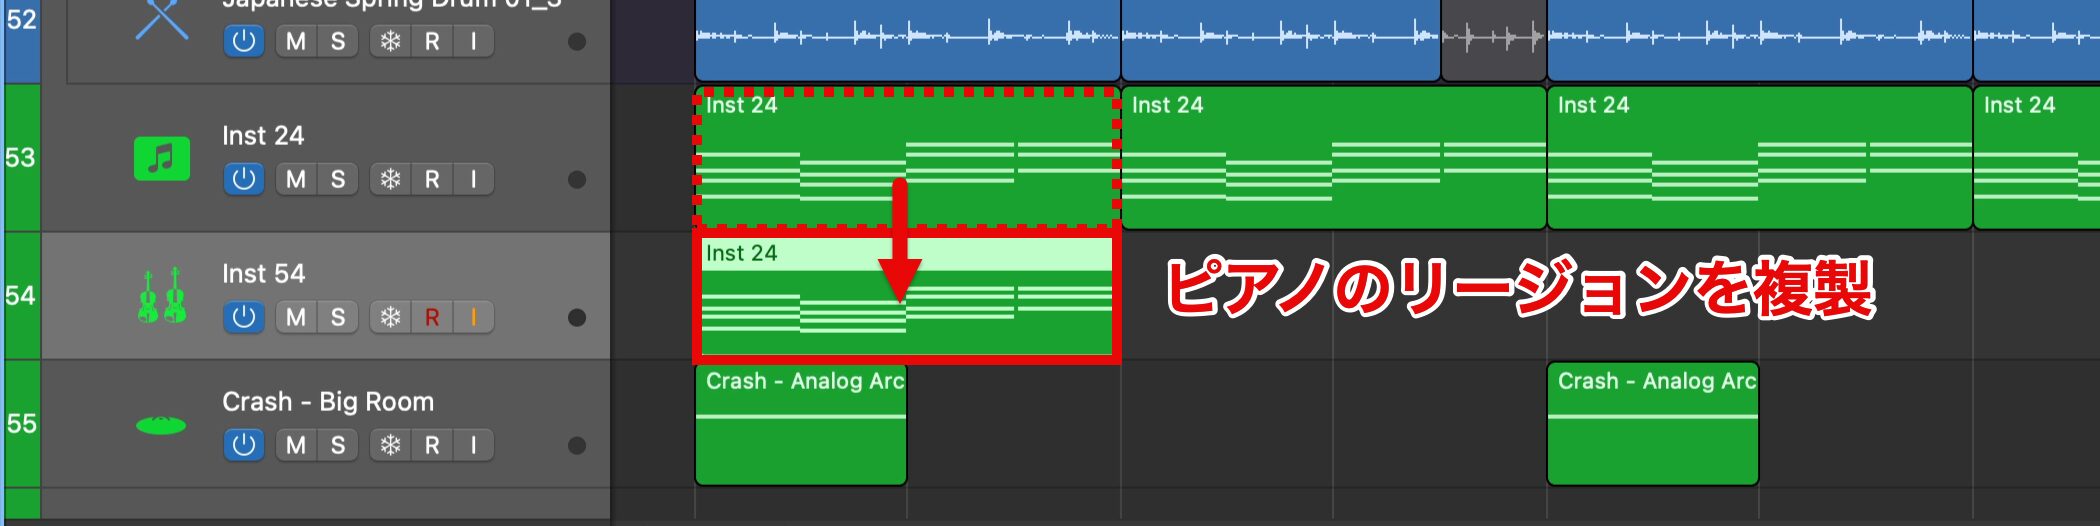
We want these strings to play the chord accompaniment, so we duplicate the region entered for the piano and set the sound.
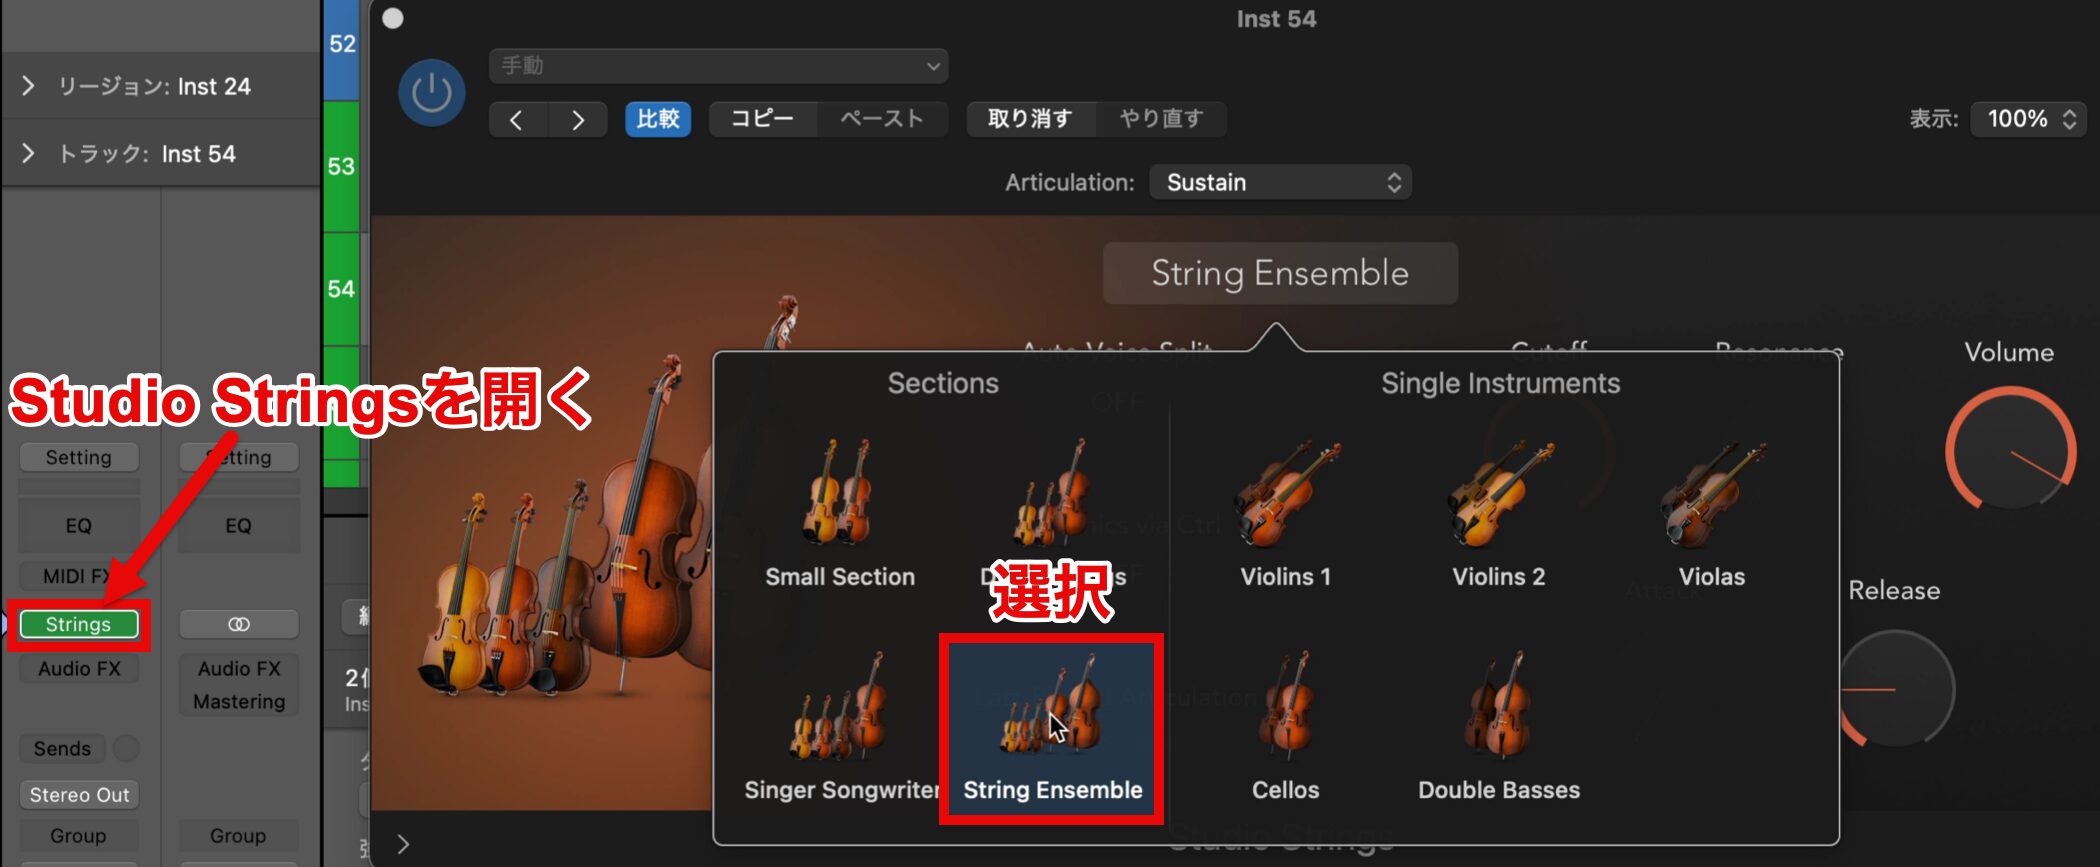
Open the Studio Strings window and choose "String Ensemble," which includes viola and cello.
Let's check the sound.
From here, we add movement to the performance.
You could edit directly in the Piano Roll, but this time we use a function that easily modifies existing MIDI data.
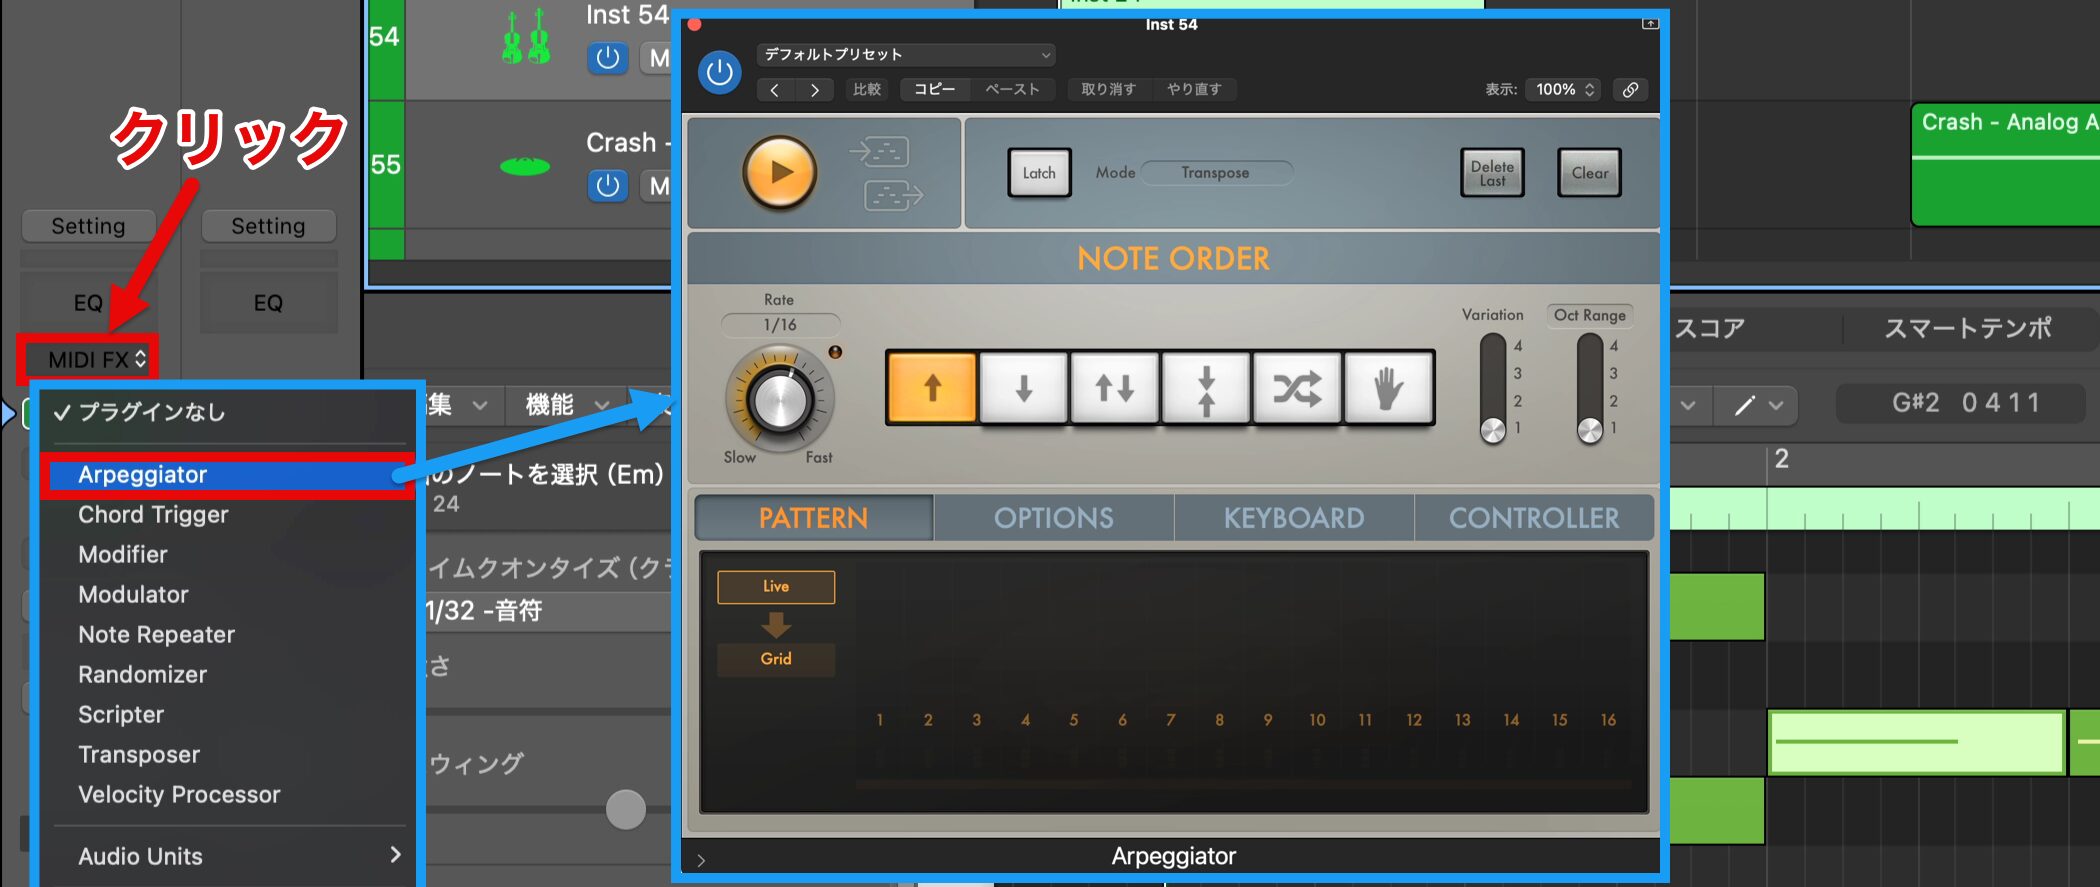
Select the strings track and click "MIDI FX" in the Inspector, and various options appear.
From these, choose "Arpeggiator," which plays chords as broken notes.
Let's listen with it applied.
In this way, the Arpeggiator lets you easily create a rhythmic performance without editing the MIDI data directly.
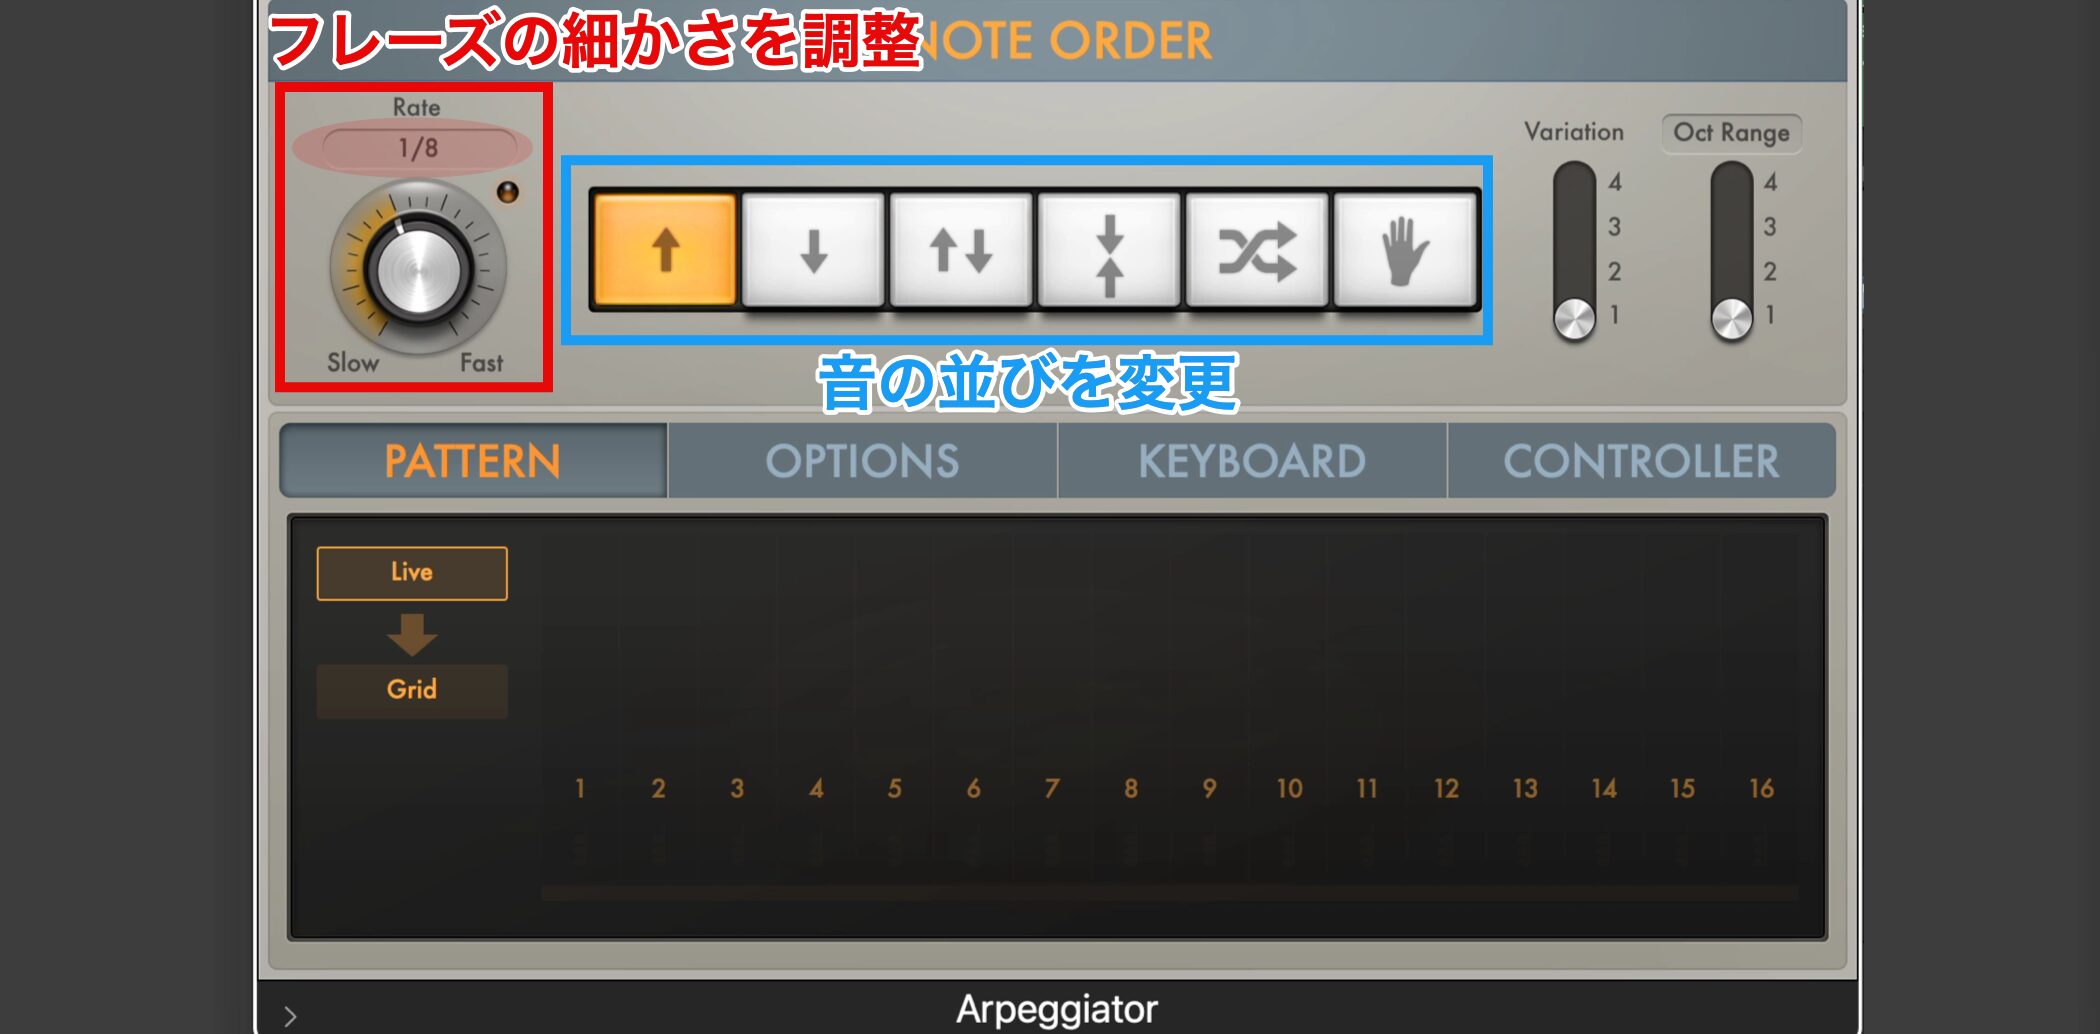
The Arpeggiator's "Rate" lets you adjust the speed of the performance, and the buttons in the center let you change the order of the notes.
This time, we set Rate to 1/8 and chose Up (↑) for the phrase pattern.
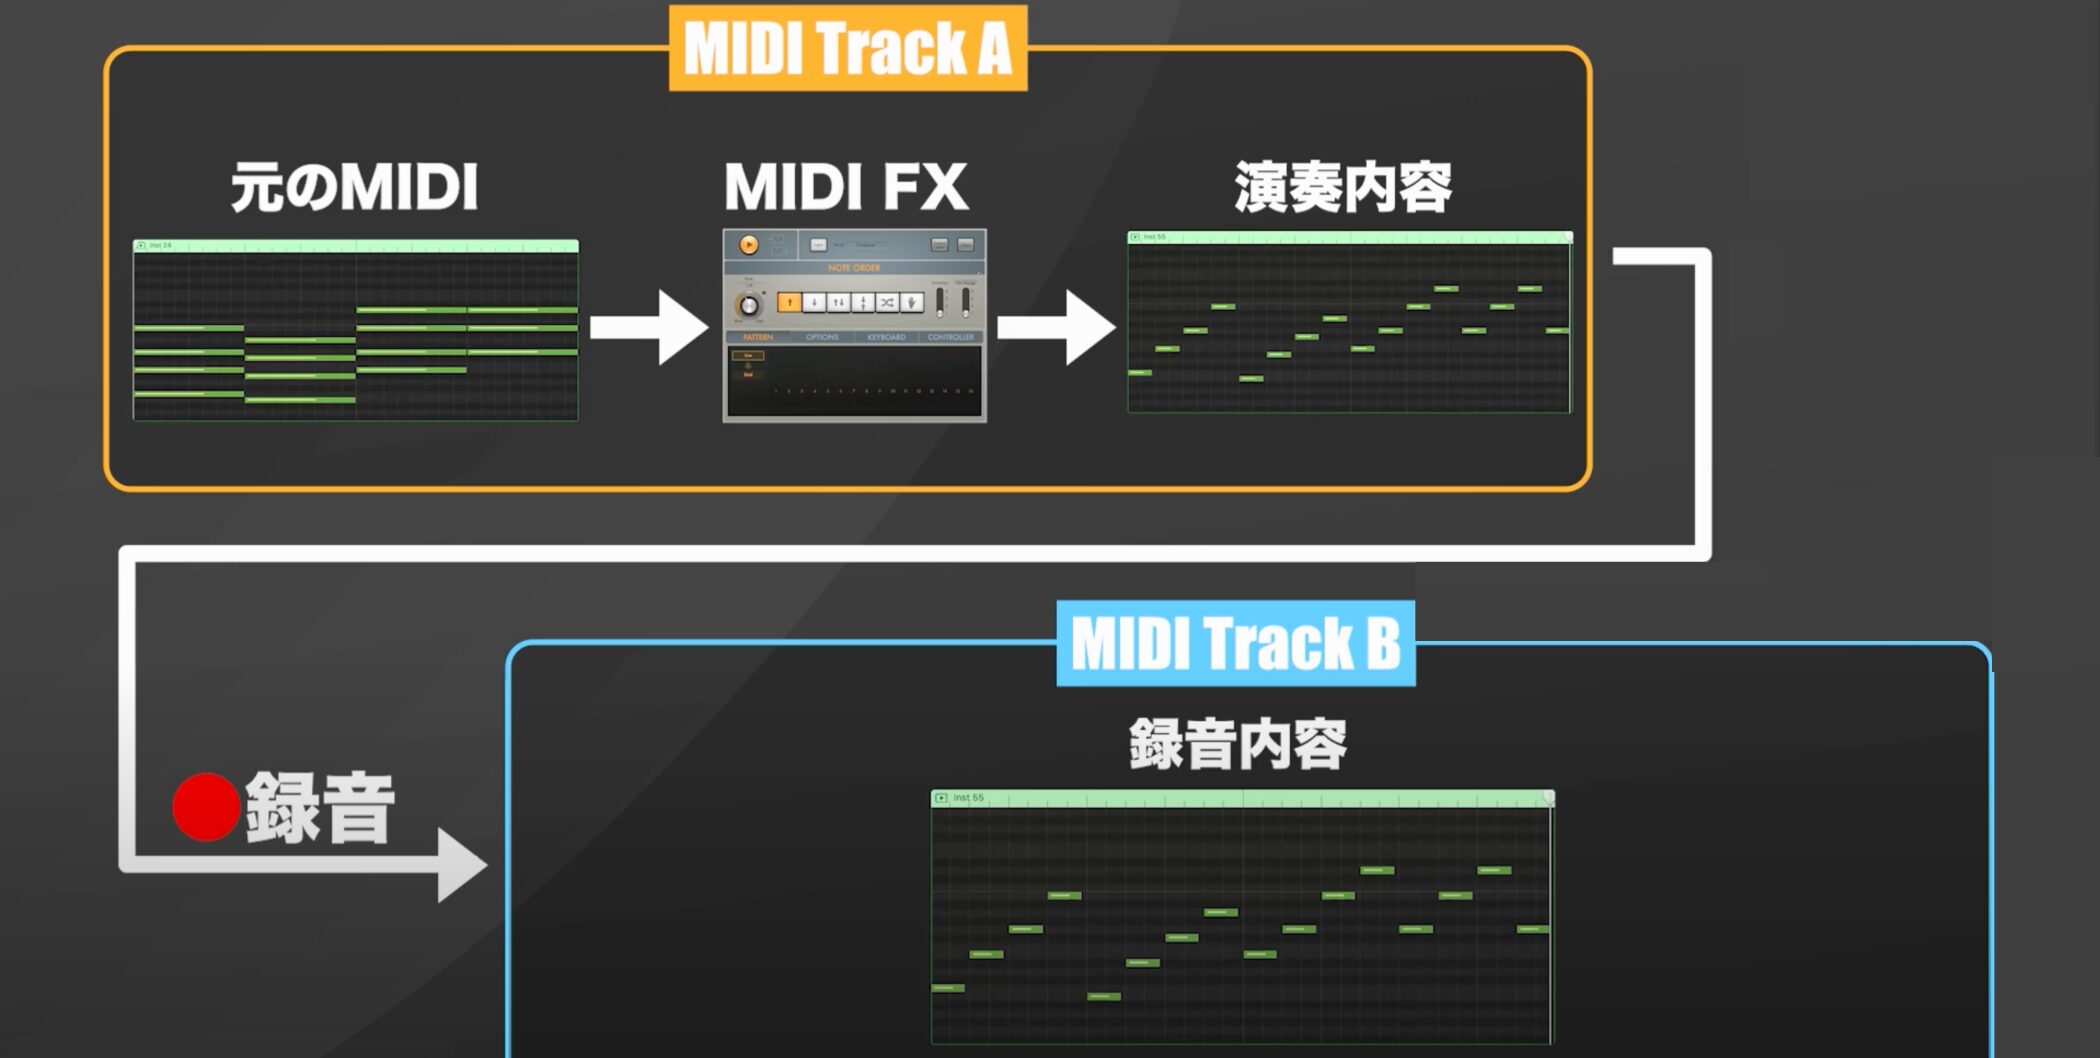
We would like to adjust it further, but performances created with MIDI FX such as the Arpeggiator are not reflected as MIDI notes.
So we use a function that records what a MIDI track plays onto another MIDI track.
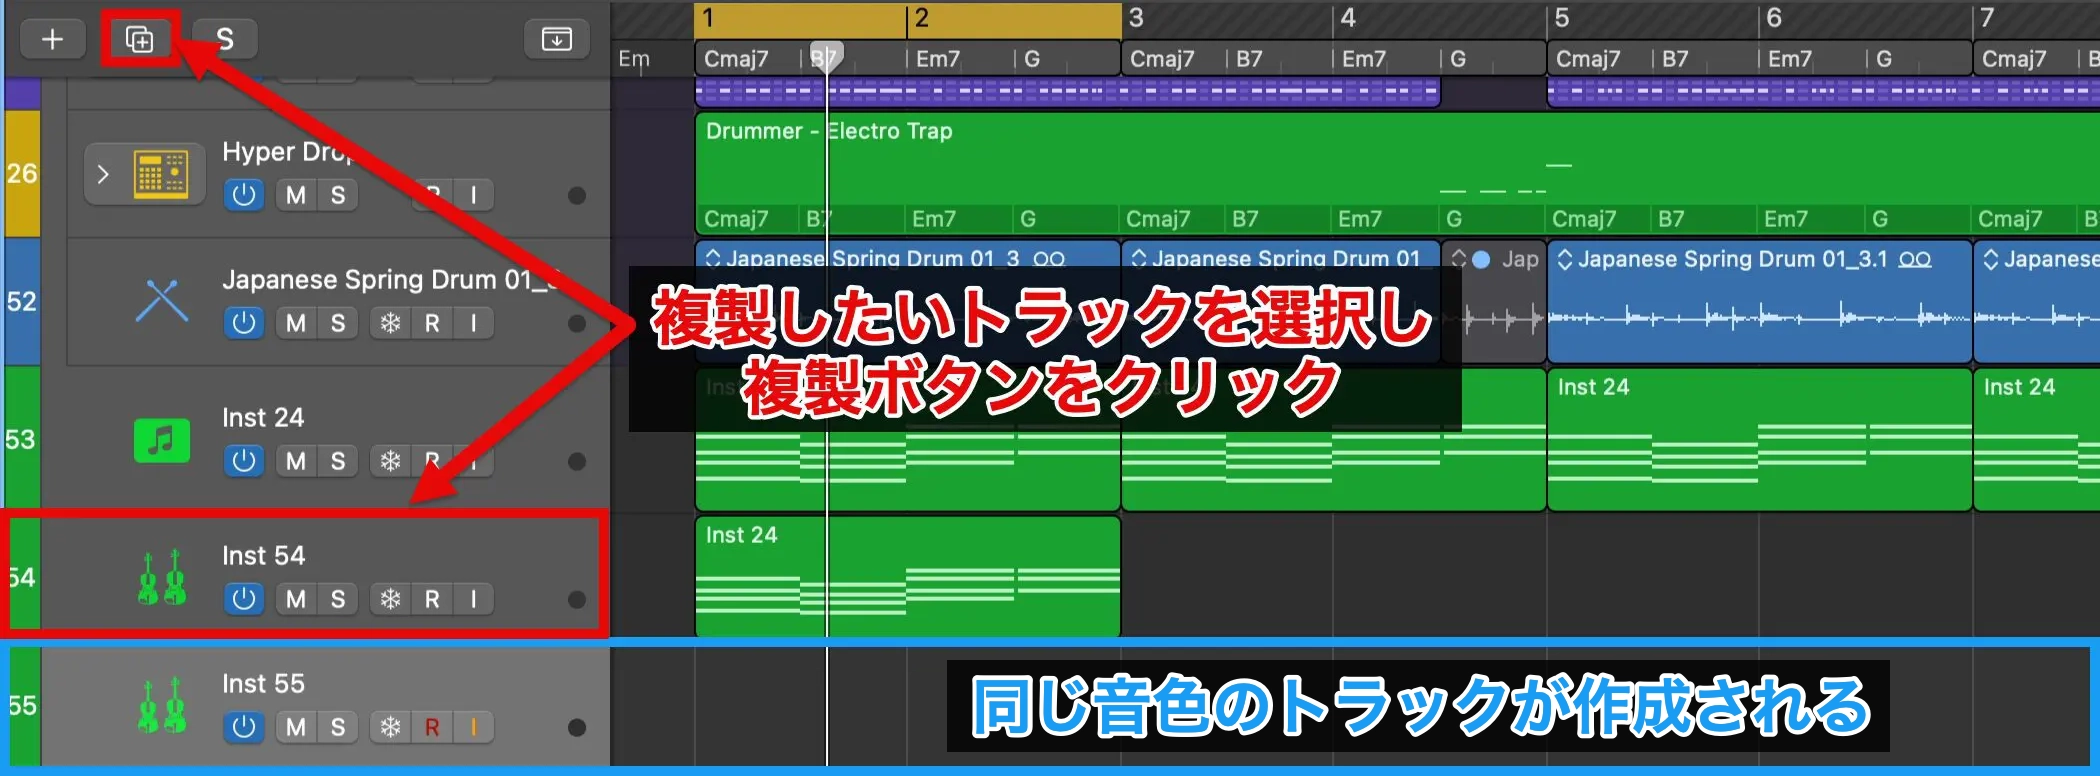
Select the track you want to duplicate and click the "Duplicate" button, and a track with the same sound is created.

Select the new track and click "Instrument Input" in "Internal MIDI In" in the Inspector.
From the list of MIDI tracks that appears, choose the track using the Arpeggiator.
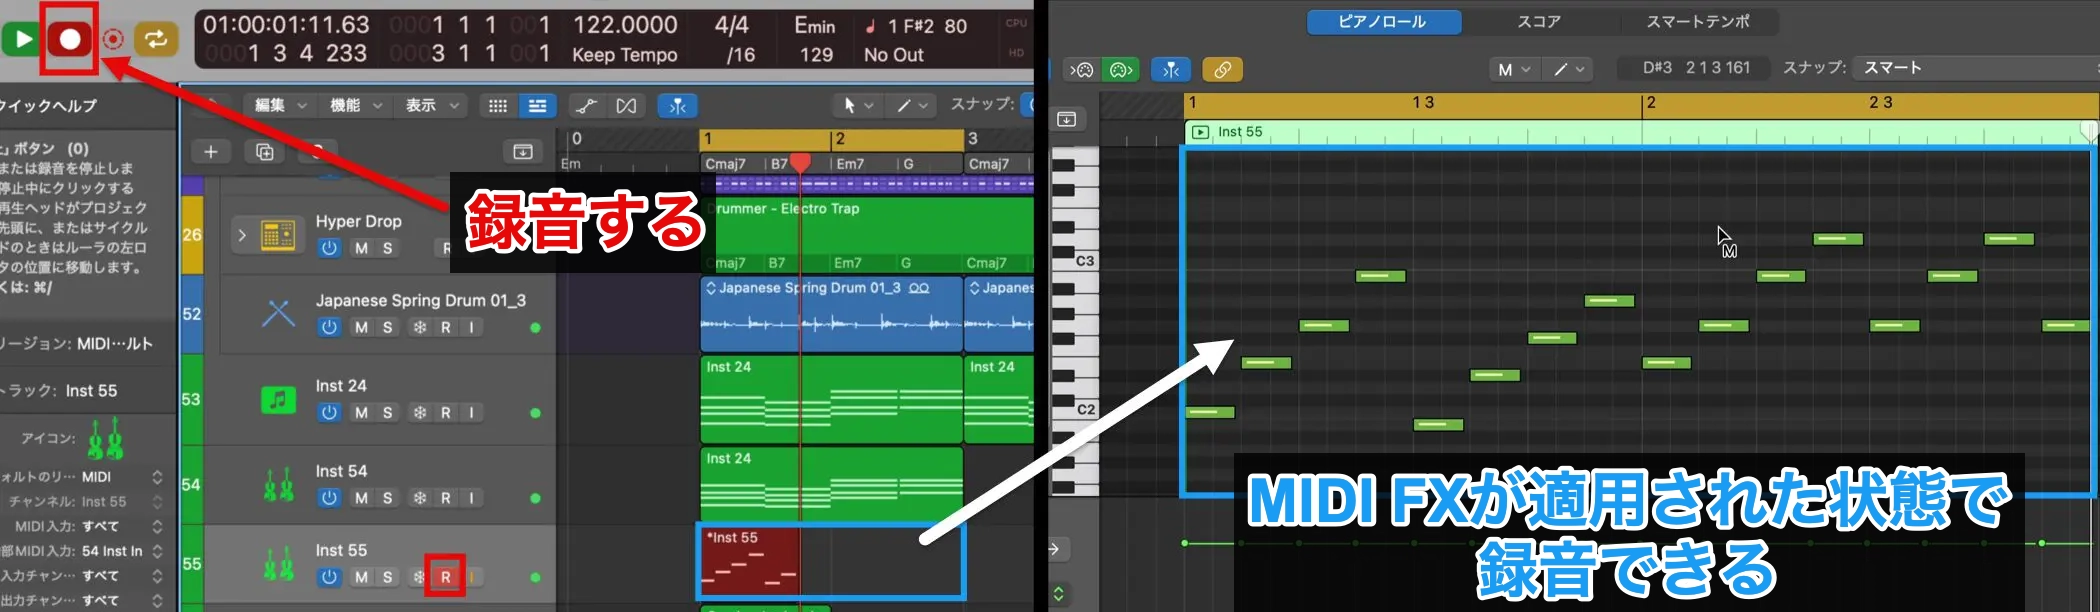
This lets the track receive the performance data so that you can record the performance including the Arpeggiator.
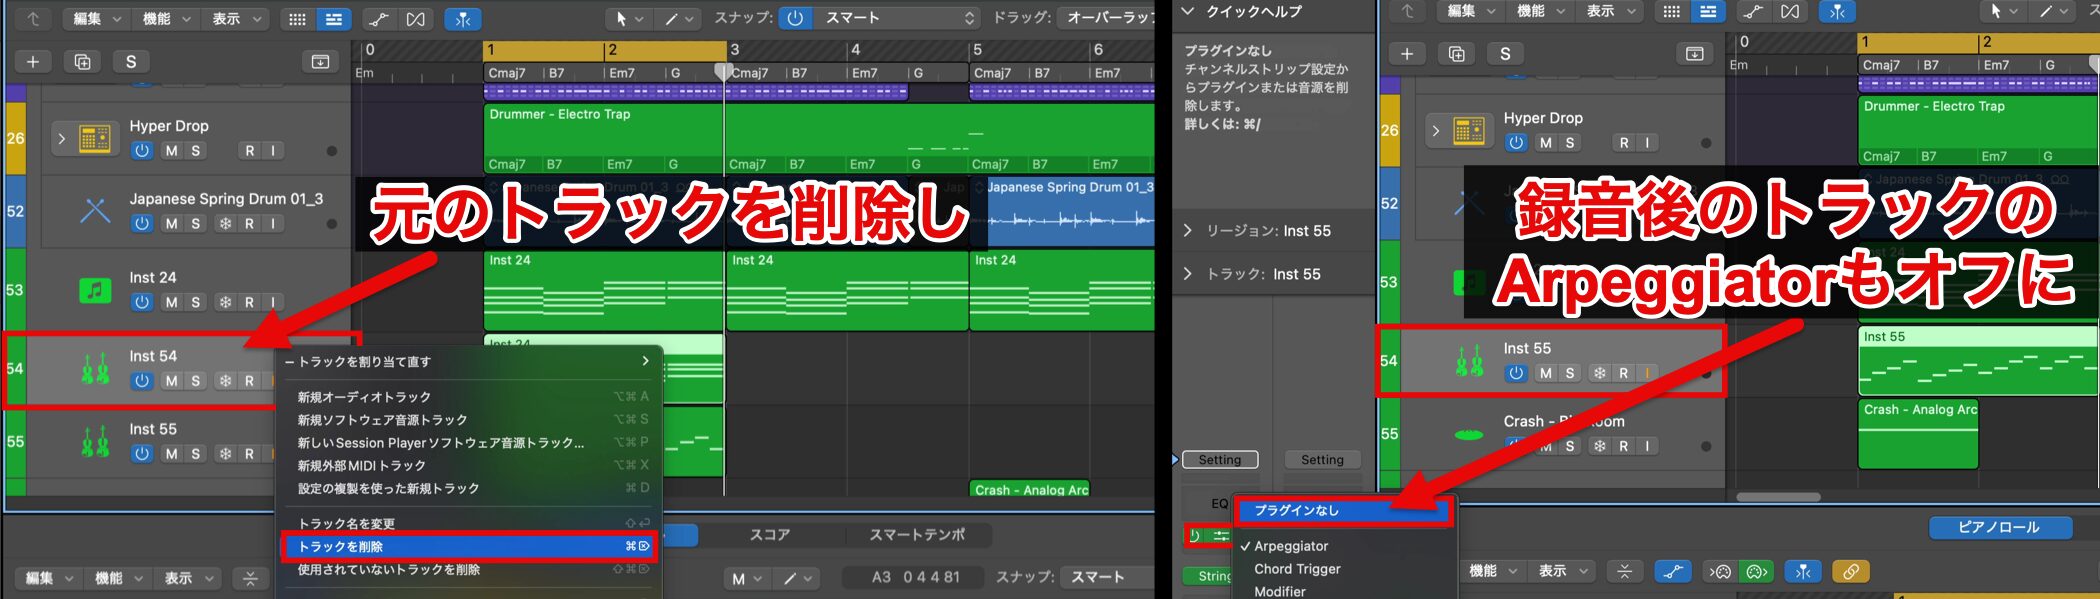
Once recording is complete, delete the original track and turn off the Arpeggiator on the recorded track.
Now the performance can be edited, so we change the phrase from here.
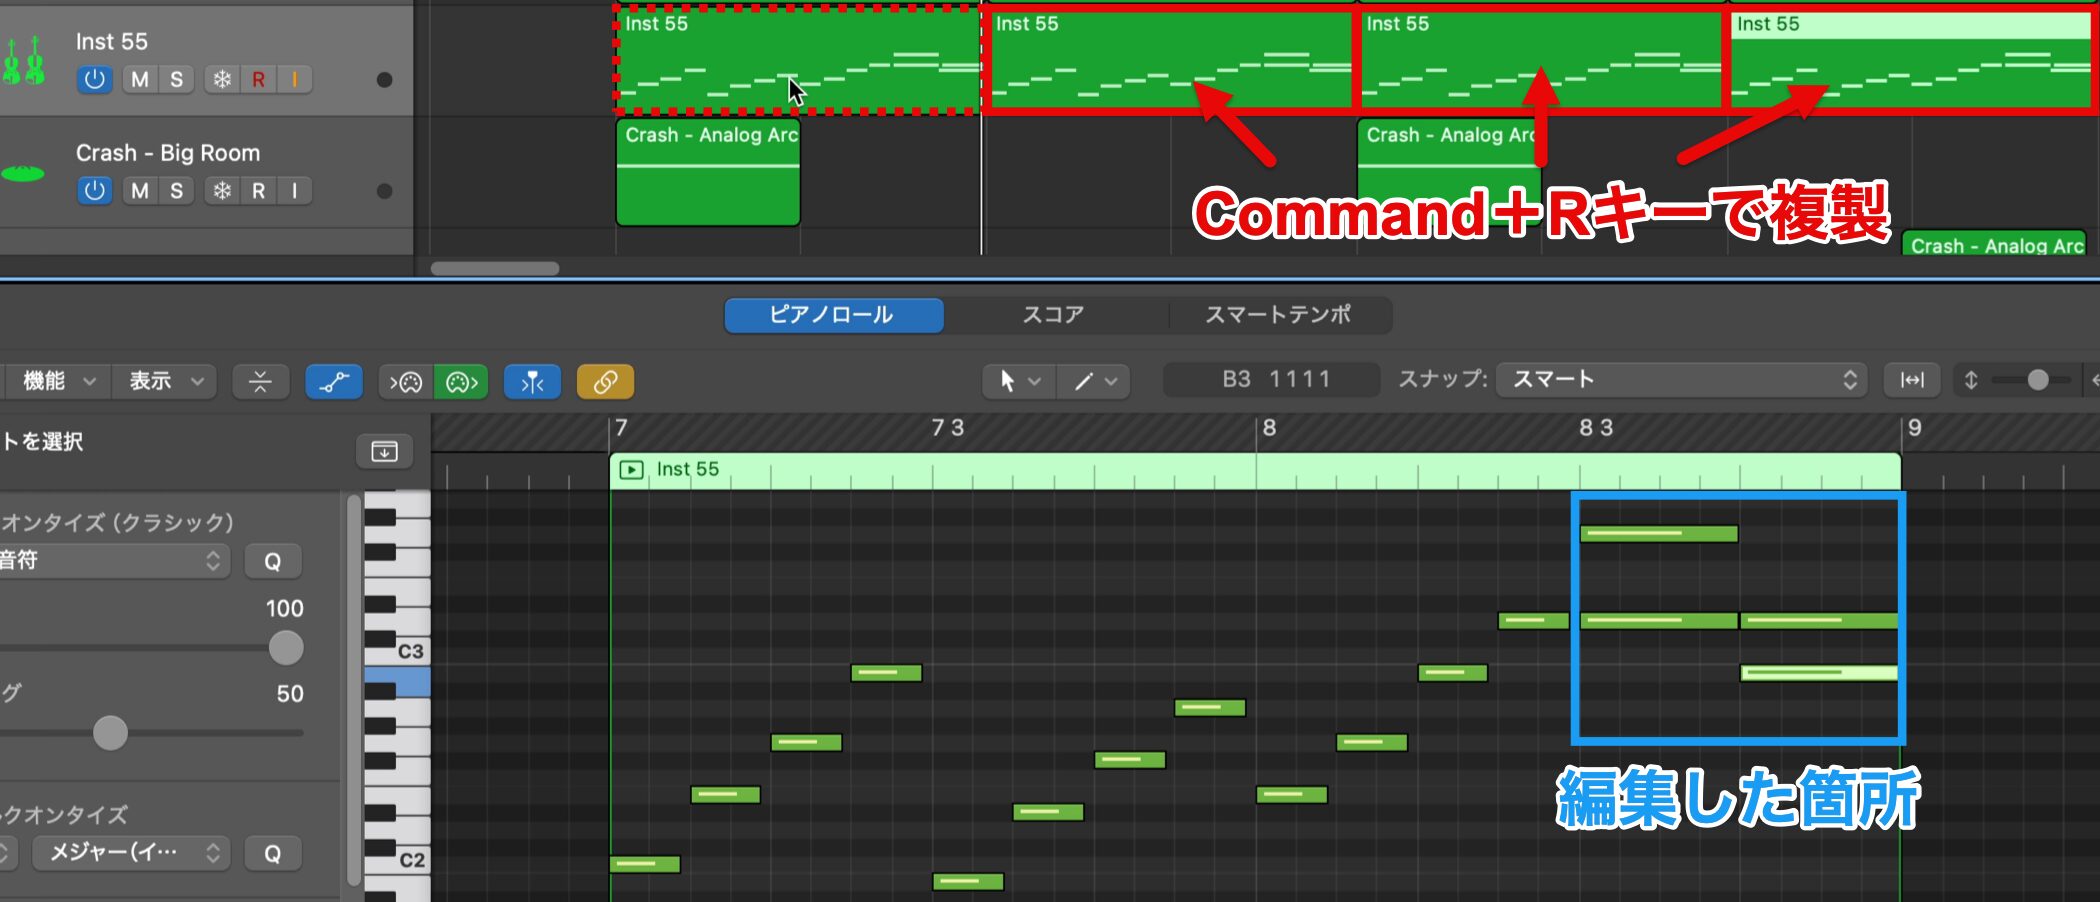
This time, we turned some parts into chords and adjusted note lengths.
When editing is complete, select the region and duplicate it with Command-R.
Adding Expressiveness by Changing Articulations
The phrase is as intended, but we felt it could be a little crisper.
Live instruments such as strings have an "articulation" function for switching playing techniques.
We use it to give the performance a lighter feel.
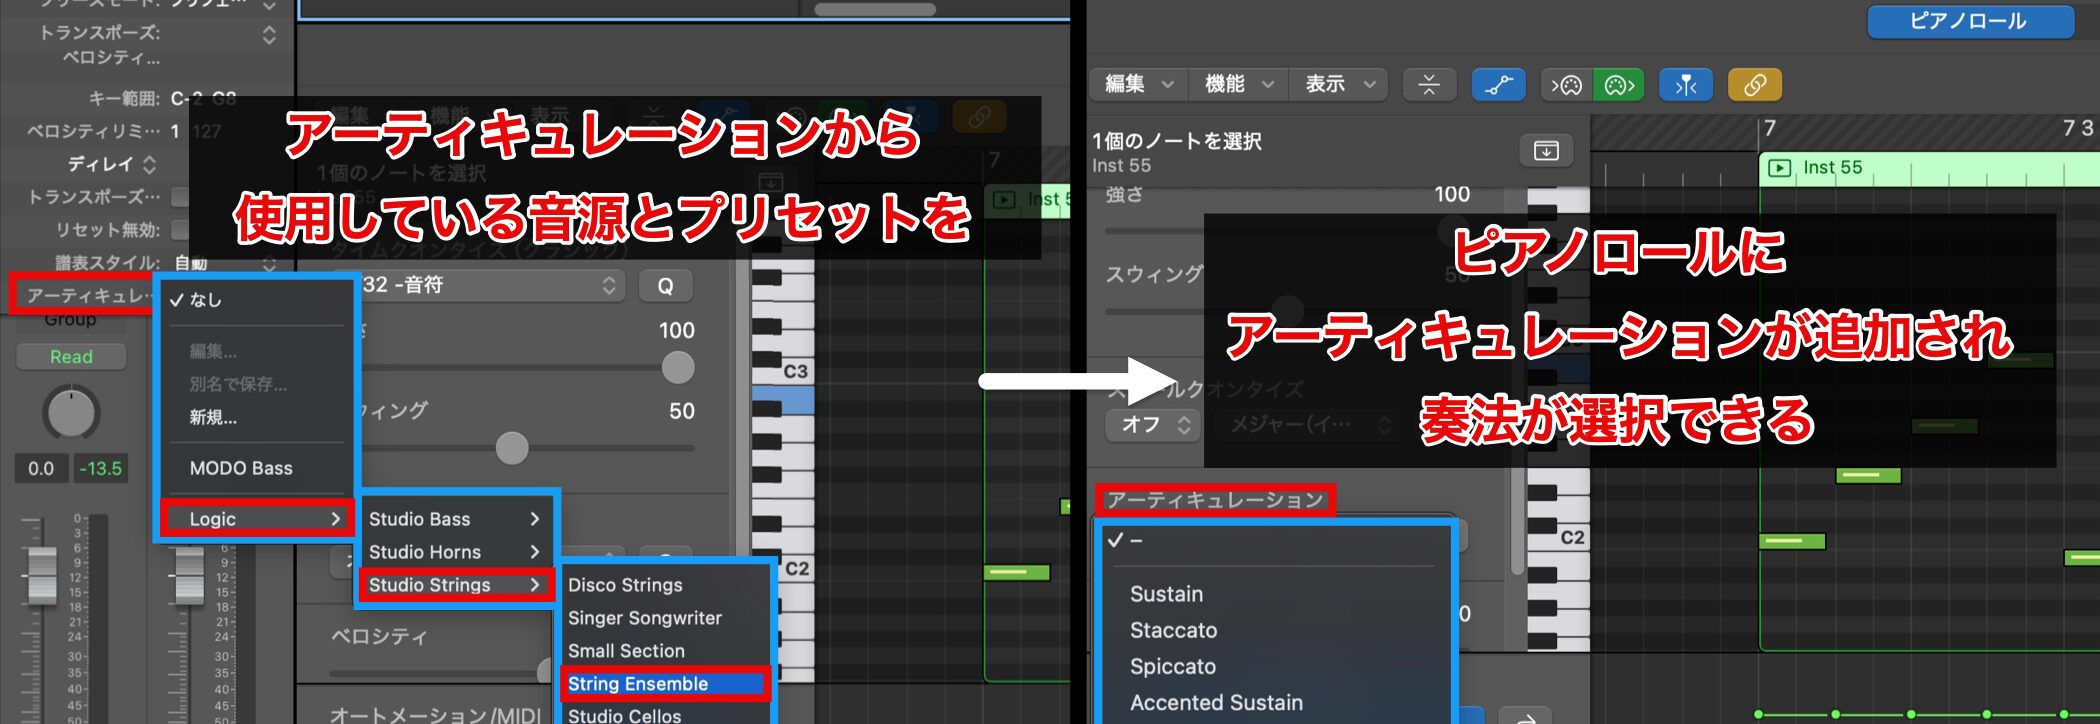
From "Articulation" at the bottom of the track settings in the Inspector, choose the instrument and preset currently in use.
This adds an articulation item to the Piano Roll as well, letting you choose various playing techniques.
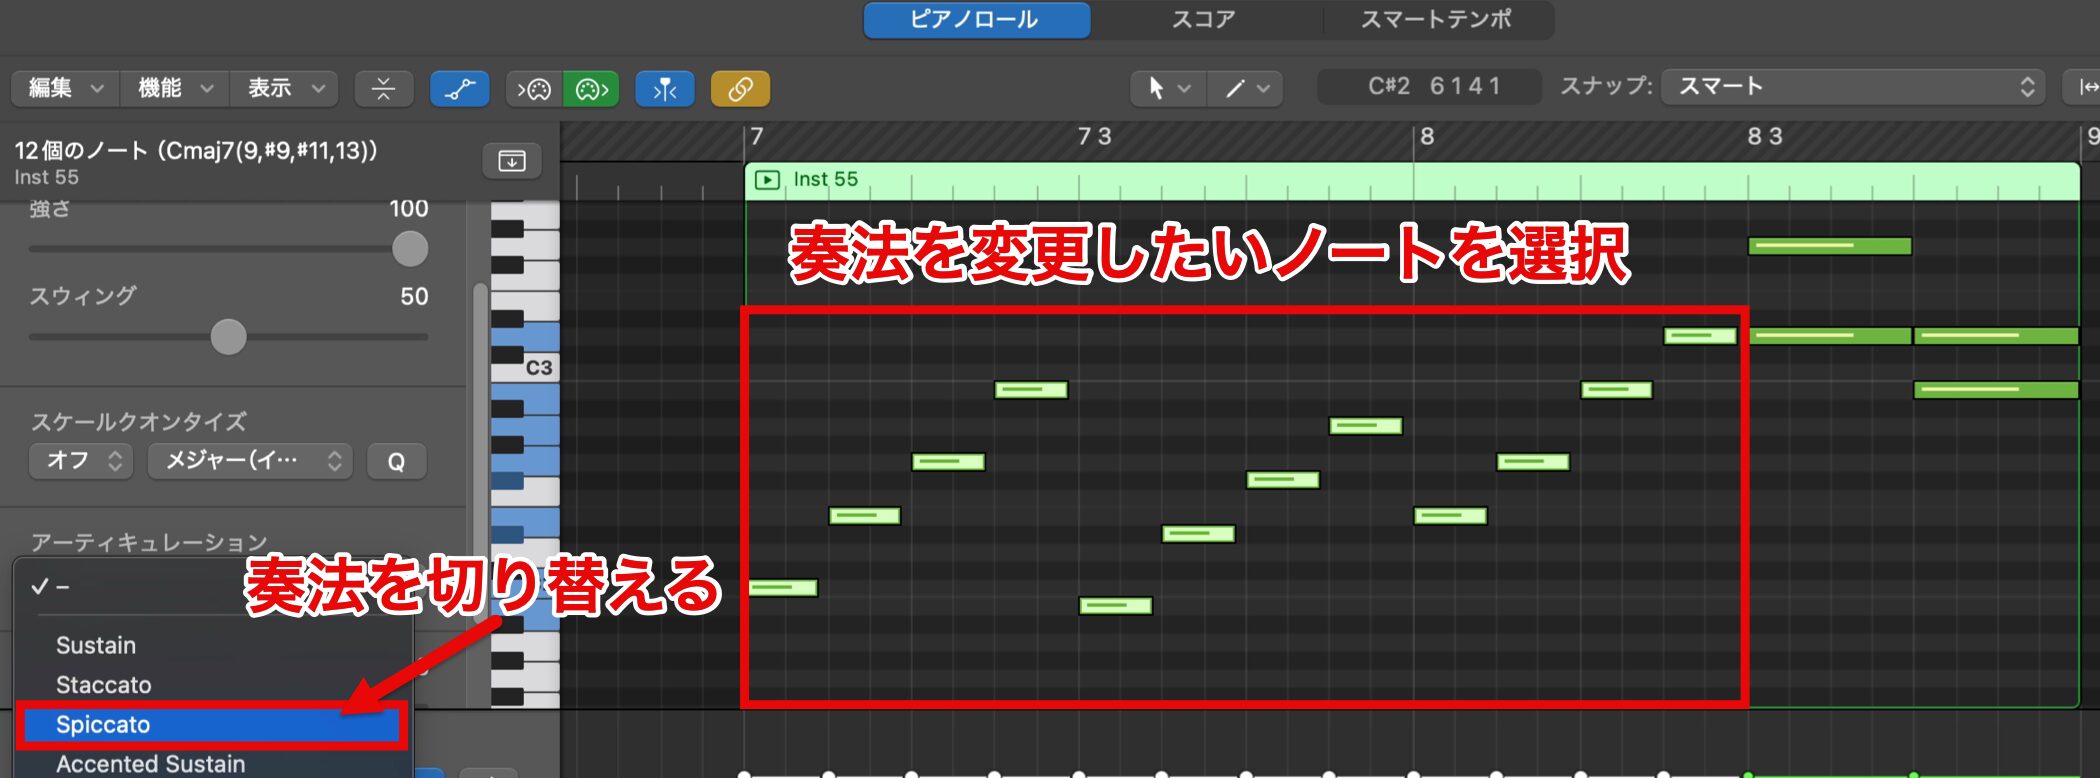
This time, we want only the short notes to be played with a light technique, so we select those notes and change the articulation to "Spiccato."
Let's play it again to check.
It sounds good, so we also replace the region we duplicated earlier with the region that has the articulation applied.
Adjusting the Piano Sustain

We could call it finished here, but let's add movement to the piano performance as well to match the strings.
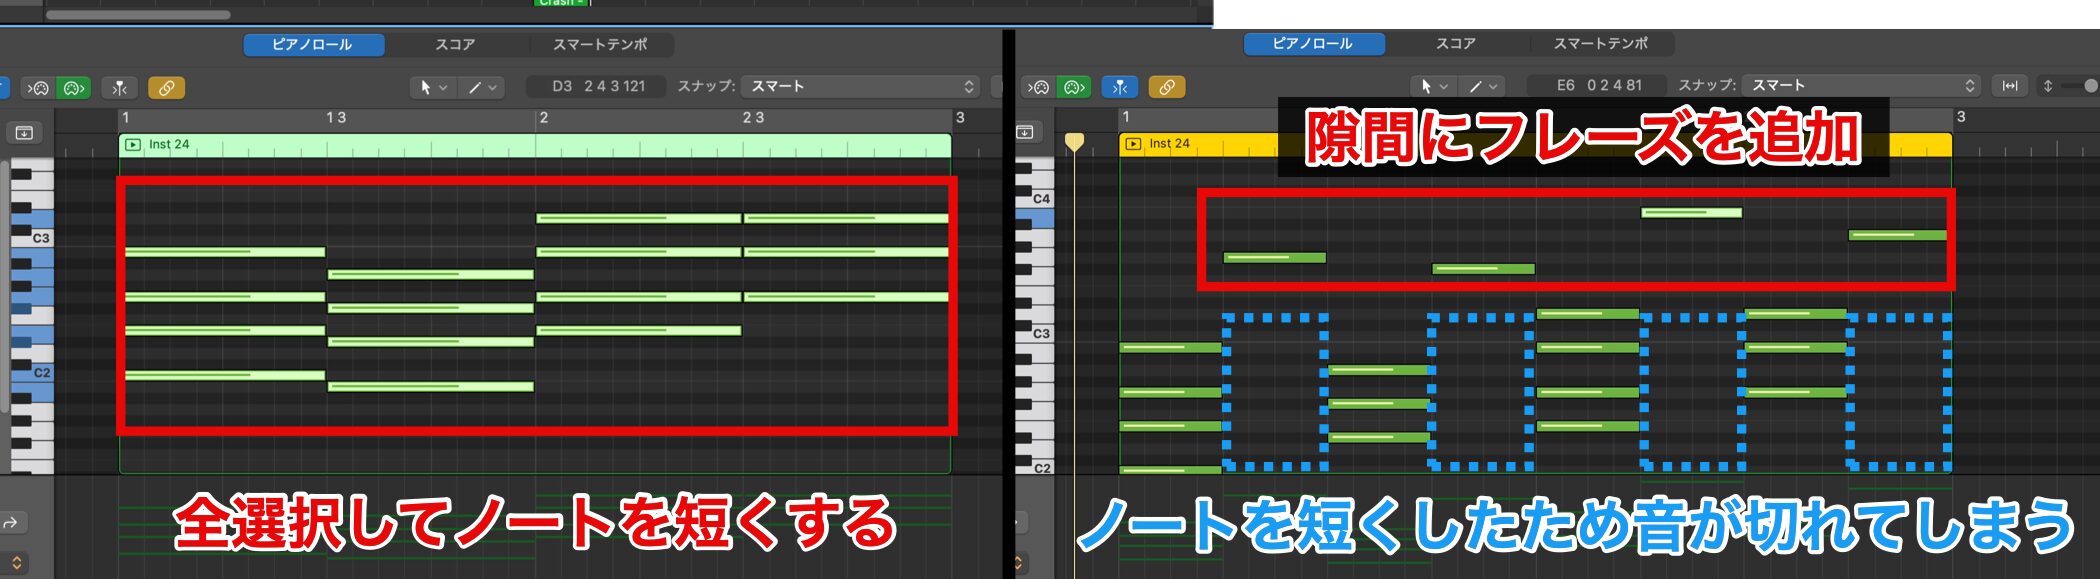
We shortened the latter half of the notes in each chord and added a moving phrase in the gaps, but as a result the chords cut off unnaturally.
When playing a phrase like this smoothly on a real piano, you use the "sustain pedal".
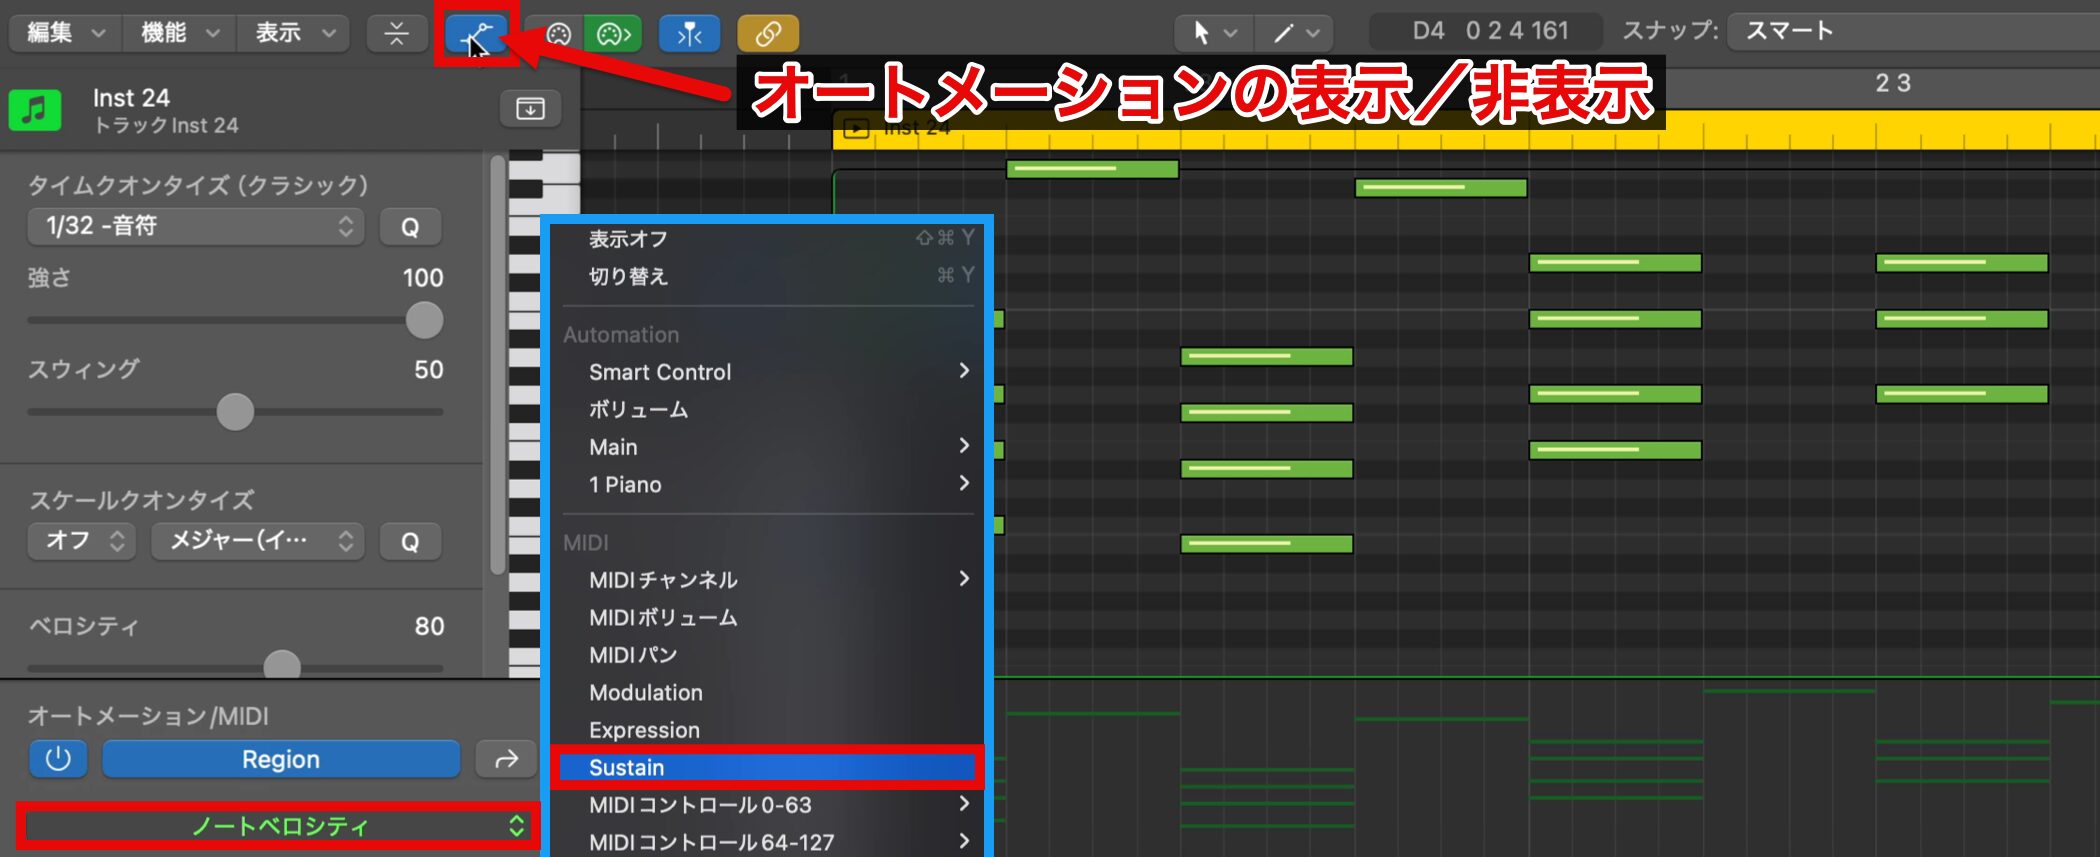
To reproduce playing with the sustain pedal, turn on the "Automation" button and switch the "Note Velocity" item to "Sustain."
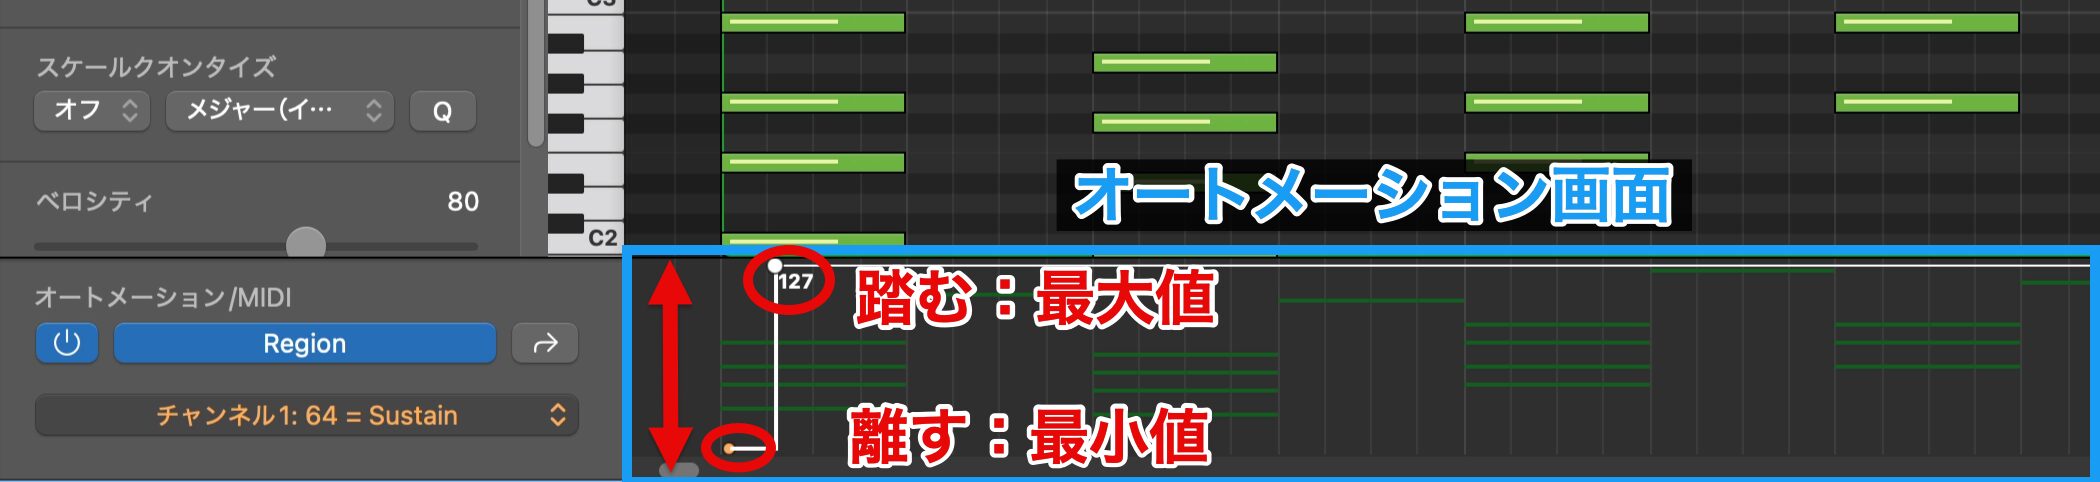
In the Sustain automation view, you can set how far the sustain pedal is pressed as a number.
Enter the minimum value (0) for not pressed and the maximum value (127) for fully pressed.
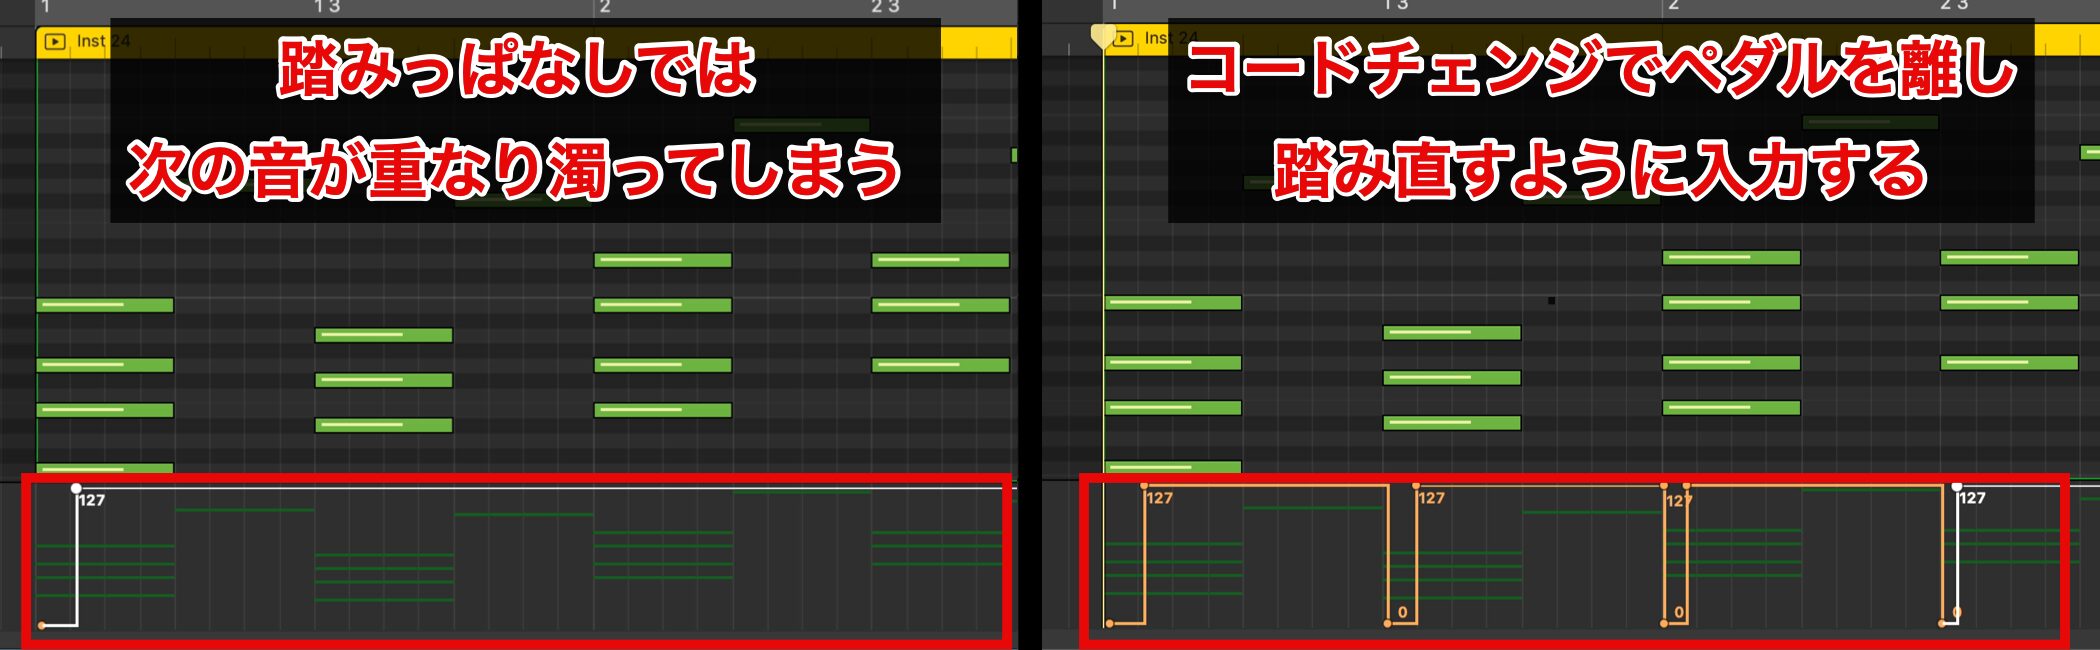
However, holding the pedal down continuously can make the sound muddy, so set it to release the pedal and press it again when the chord changes.
This completes the arrangement of the whole chorus.
Frequently Asked Questions
Q1. How do I customize a drum pattern generated automatically by Drummer in Logic Pro?
In the Session Player settings, turn off the icons of individual instruments to remove unneeded sounds, and adjust "Fill Amount" and "Fill Complexity." You can also generate variations with the phrase regenerate button.
Q2. How do I create a Track Stack to manage multiple tracks efficiently?
Hold down the Command key to select multiple target tracks, then choose "Create Track Stack" from the right-click menu. Choose Folder Stack and create it, and you can control the tracks together with the Sub track.
Q3. How do I reverse a cymbal sound created with MIDI?
Convert the MIDI region to an audio region with "Bounce and Join," then choose "Reverse Playback On" from the right-click menu or check "Reverse Playback" in the Inspector.
NEW ARTICLES
Latest English Articles











