Apple Loops in Logic Pro 11 is a feature for efficiently finding the loops you need in a huge library of audio material and incorporating them into your song. This article explains how to use the Loop Browser, how to narrow down loops by instrument, genre and descriptors, how to combine multiple loops to add variation, and techniques for creating a three-dimensional sound with panning. Even beginners can add material intuitively by drag and drop, and by learning editing methods that avoid monotonous repetition, you can achieve professional music production.
Adding Depth to Your Song with Loops

Miyakawa
This time, we use the "audio material" called Apple Loops included with Logic Pro to make the song more colorful.
You can easily add phrases from a wide variety of instruments, so please make use of them!
Apple Loops Video
How to Use Apple Loops
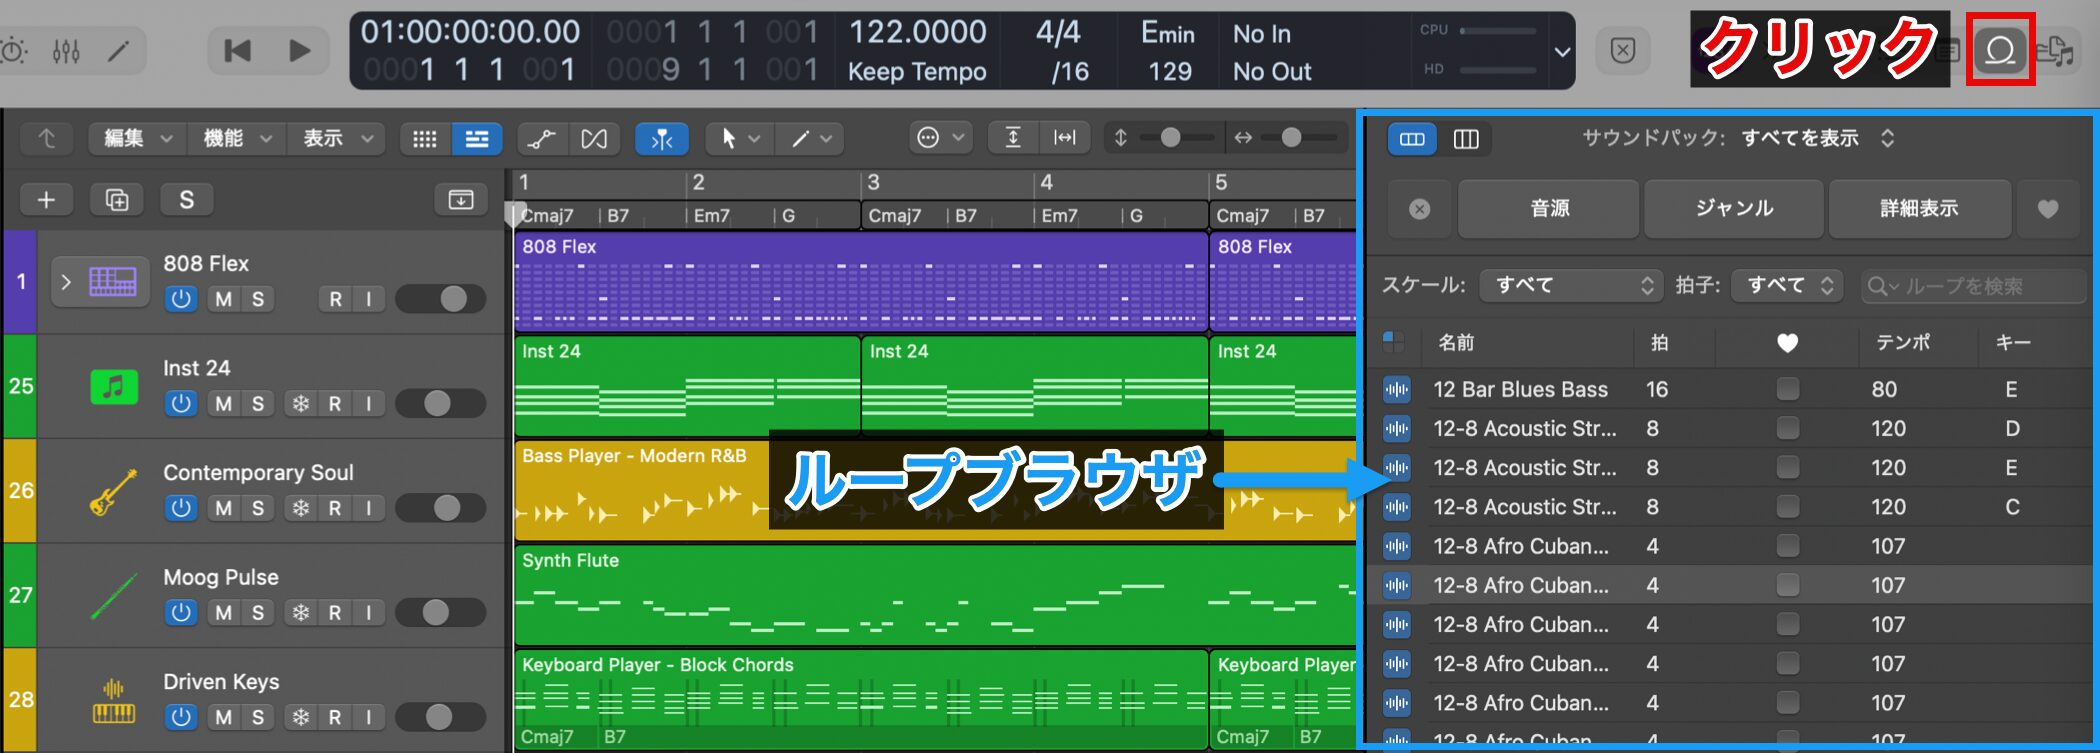
Click the "Loop Browser" button, and loops are shown for each region type, such as MIDI regions and audio regions.
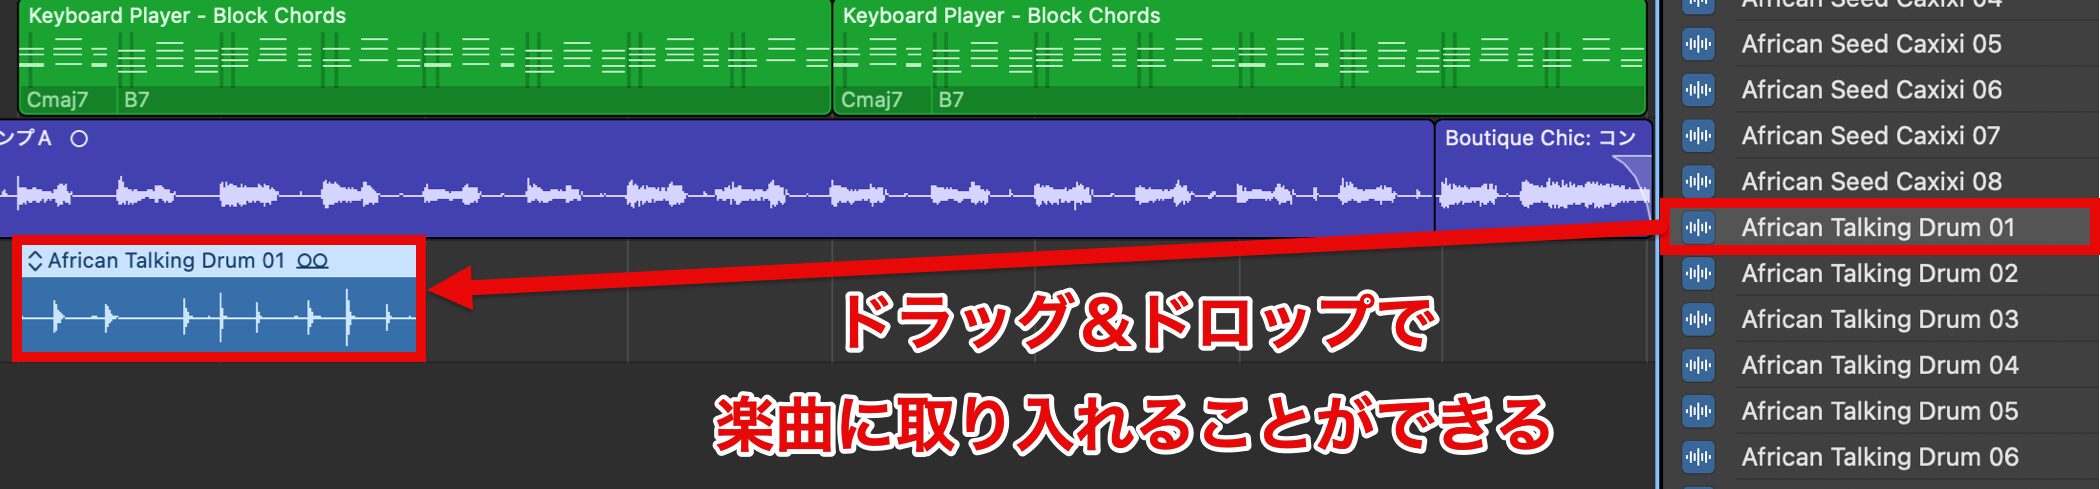
Select a loop to preview it, and you can easily add the ones you like to your song by drag and drop.
Filter Settings
To find what you want among the huge number of loops, use the filter function.
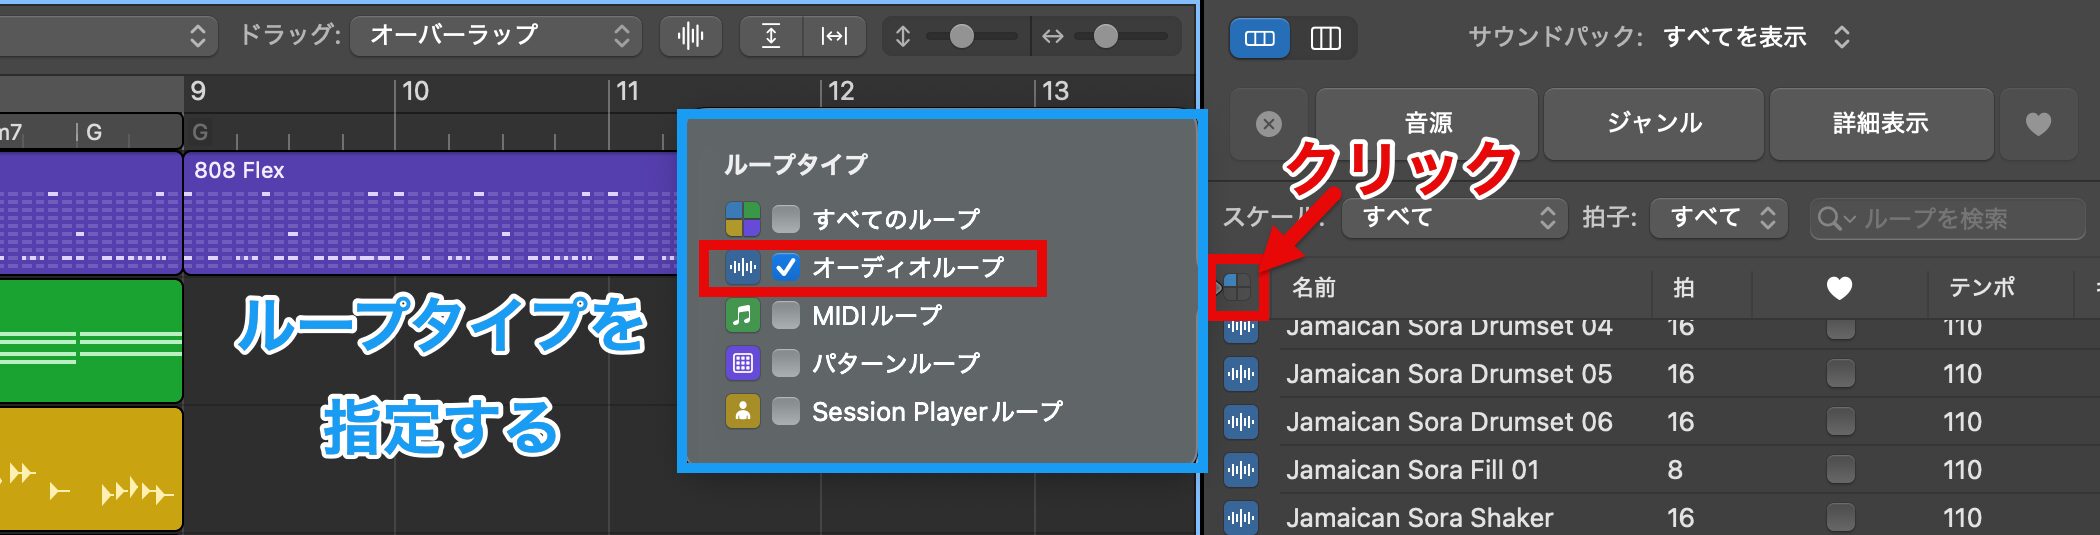
First, specify the loop type.
Click the button to the left of "Name" to show the loop type menu.
MIDI loops and pattern loops can be edited freely after loading, but this time we prioritize realistic sound and choose "Audio Loops," which contain recordings of actual performances.

Next, we use three filters: "Instrument," "Genre" and "Descriptors."
Instrument
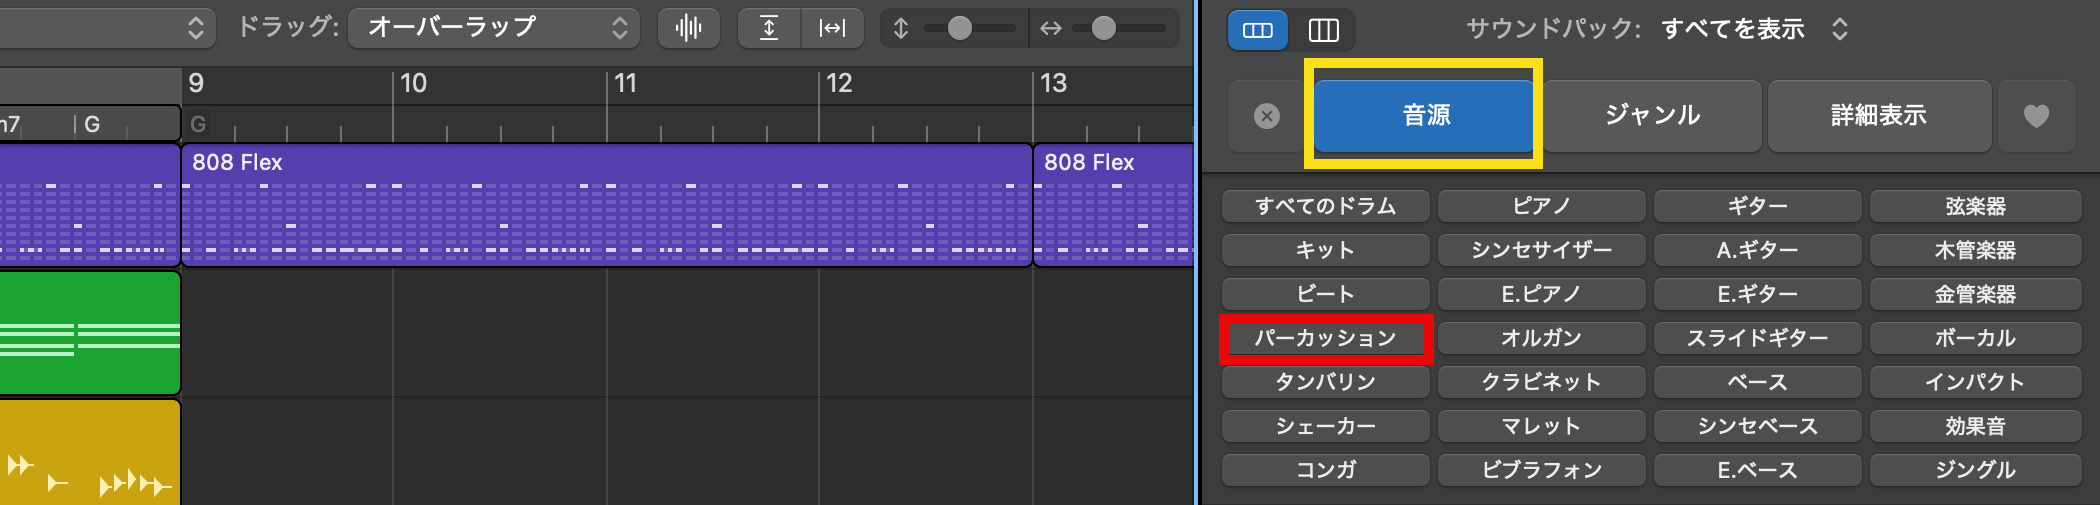
"Instrument" lets you narrow down by instrument from a list.
The main drums are already done, so this time we choose "Percussion."
Genre
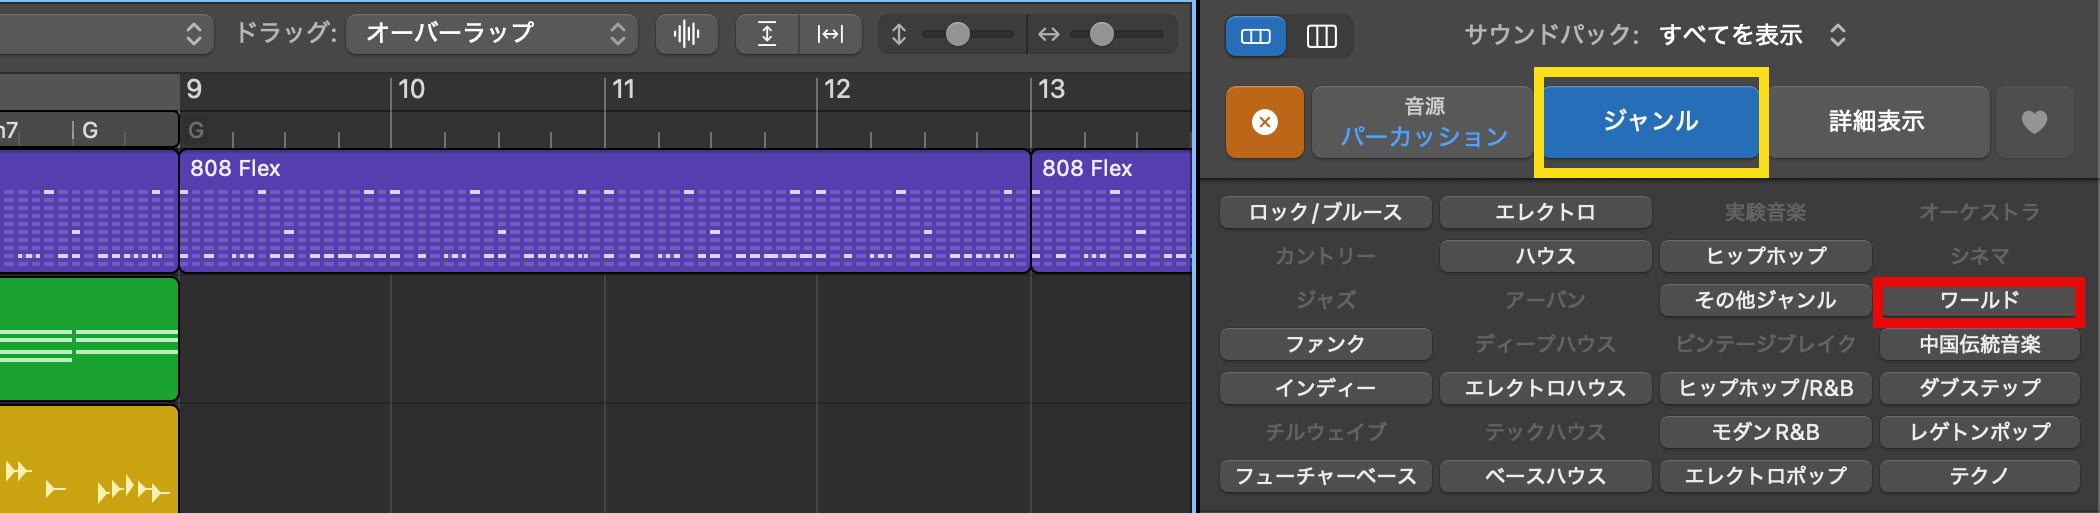
"Genre" lets you narrow down loops by genre.
This time we want to add an ethnic feel to the song, so we choose "World."
Descriptors
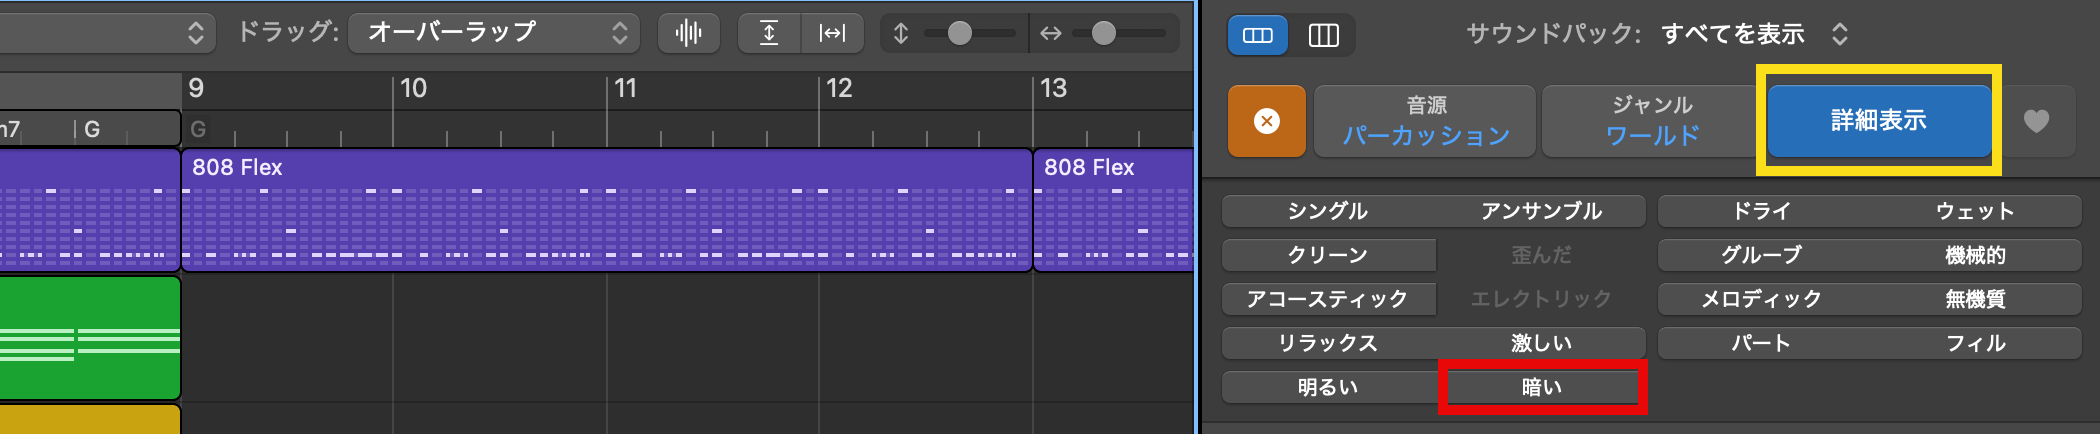
"Descriptors" lets you narrow down by keywords close to the sound you have in mind.
This time we want loops with a calm nuance rather than flashy ones, so we choose "Dark."
Filter Results
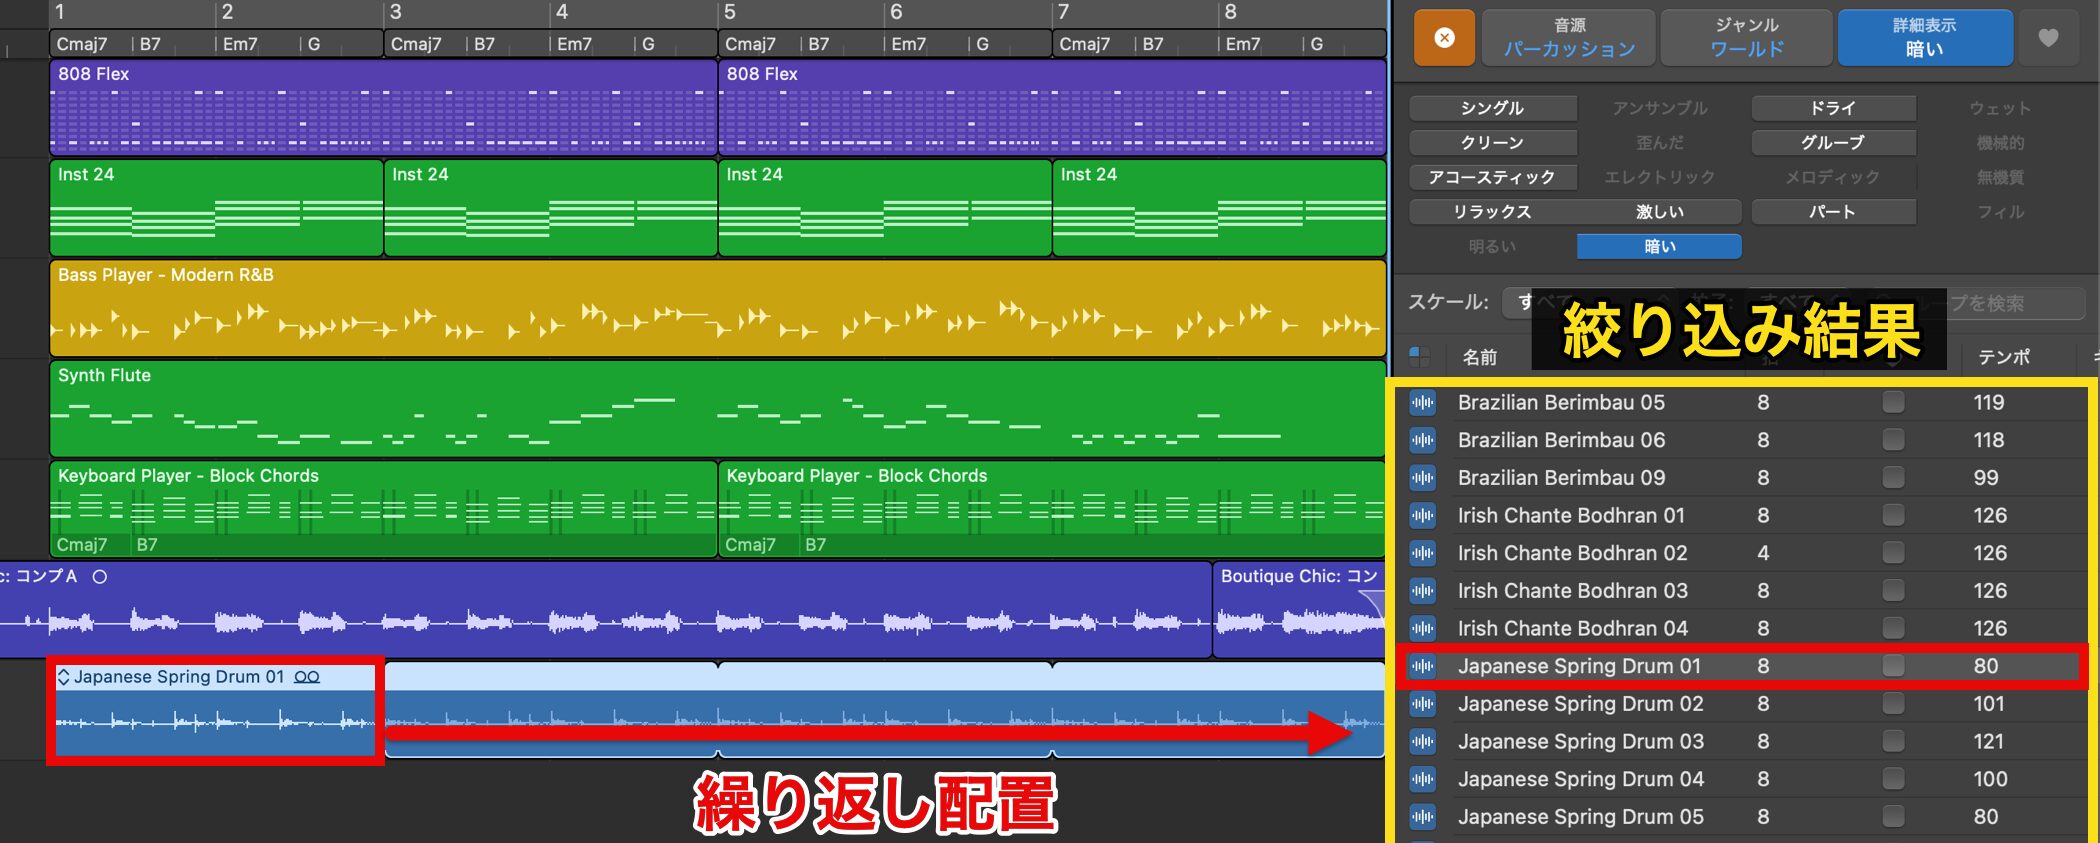
Once the filtering is done, preview the loops shown in the results along with the song and add the ones you like.
You can adjust the volume even while previewing, so it is a good idea to set it a little louder when choosing.
This time, we choose "Japanese Spring Drum 01" and place it repeatedly.
Adding Fills
We placed the loop repeatedly, but repeating the same phrase tends to become monotonous, so we add variation.
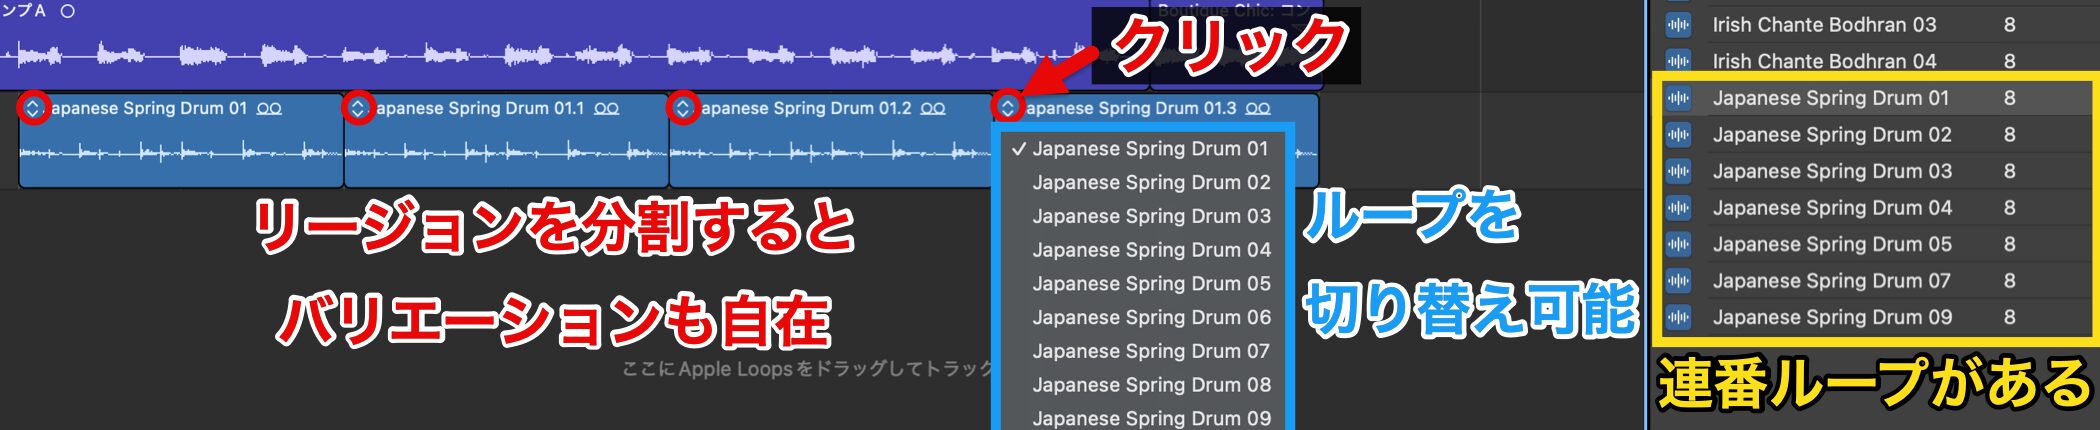
When there are numbered loops with the same name, clicking the up/down arrow button at the top left of the region shows the numbered loops so you can easily switch between them.
By splitting the region, you can also change the variations freely.
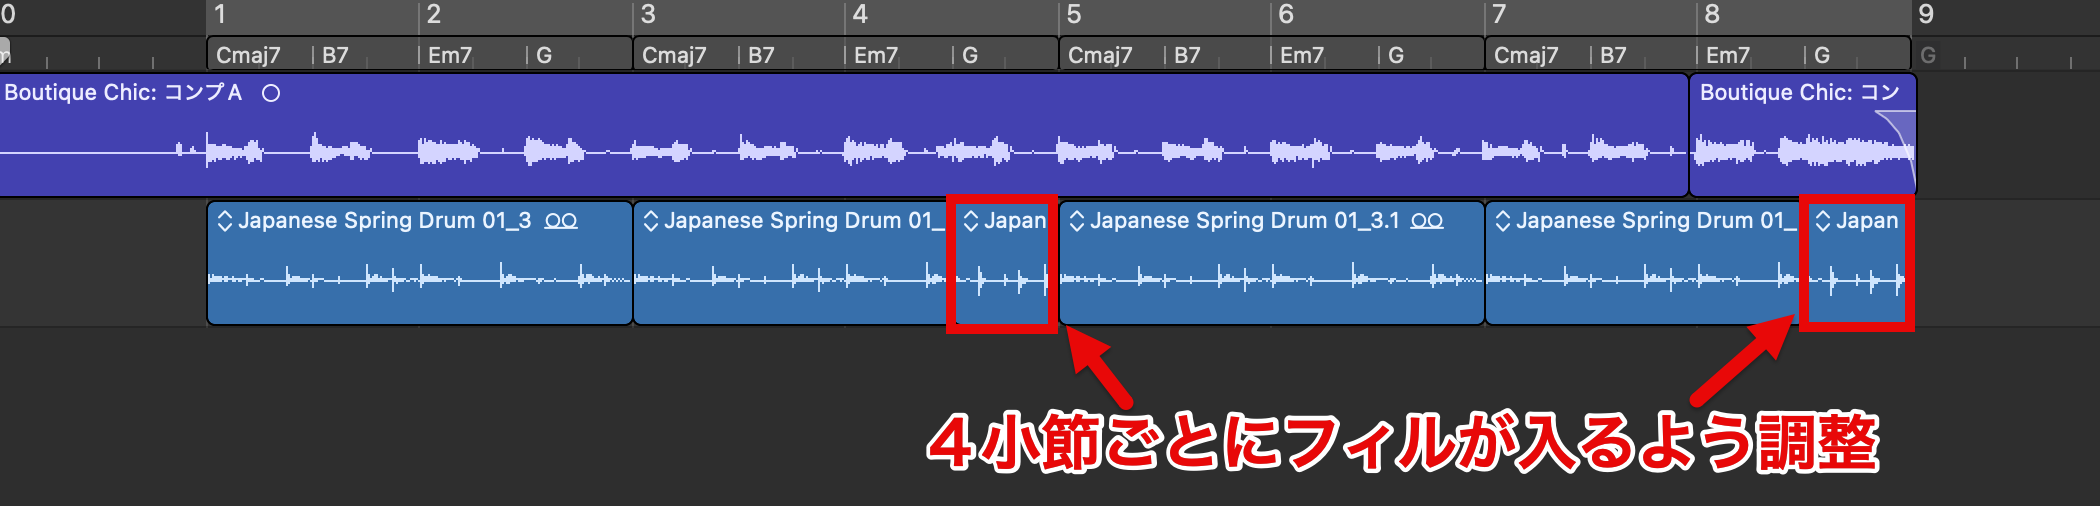
This time, in addition to cutting every two bars, we cut the second half of bars 4 and 8 to bring in a fill every four bars.
Let's listen.
Replacing the Melody Instrument
To make things a little livelier in addition to the rhythm, we add a melodic phrase.
We have a flute sound in mind, but the melody also uses a flute, so we change the melody's sound.
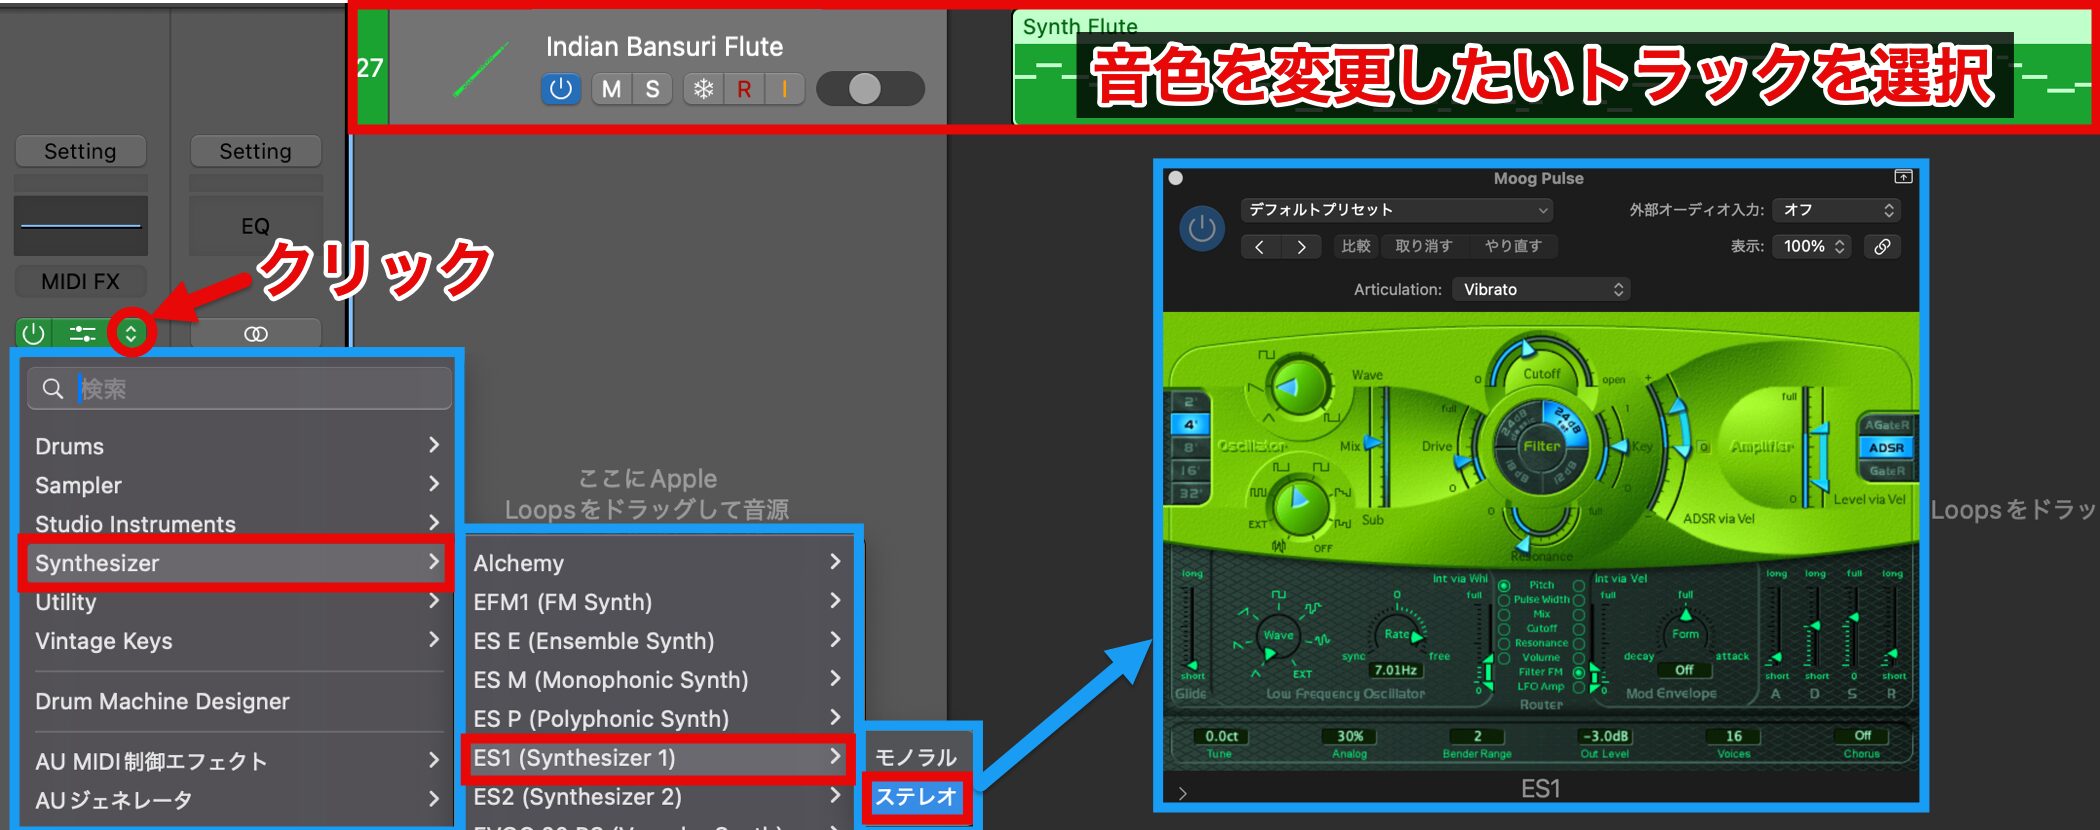
On a MIDI track, you can replace the sound not only from the Library but also by clicking the up/down arrow button at the right end of the loaded instrument to show a list.
This time, since we use many acoustic instrument sounds, we change the melody's sound to the electronic synthesizer "ES1."
For the instrument options, you basically choose "Stereo".
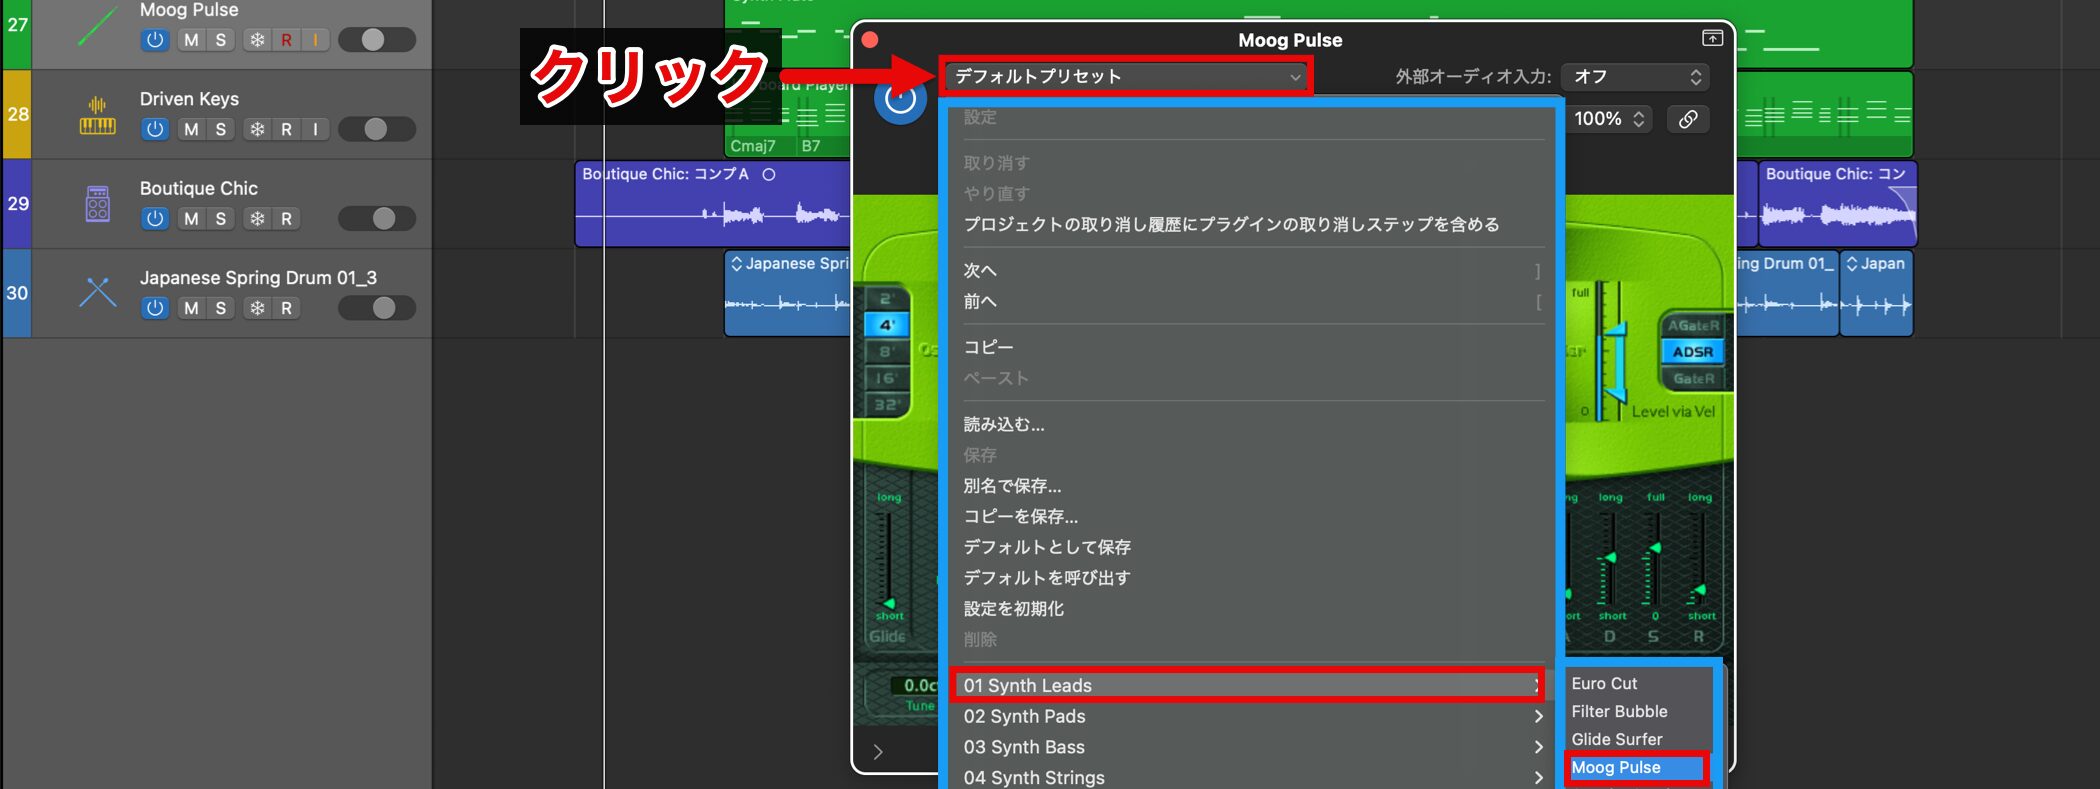
Each instrument comes with presets, so open "Default" and choose a sound that is easy to use for a melody.
With the melody sound decided, we use the filter function again to look for a flute sound for the melodic phrase.
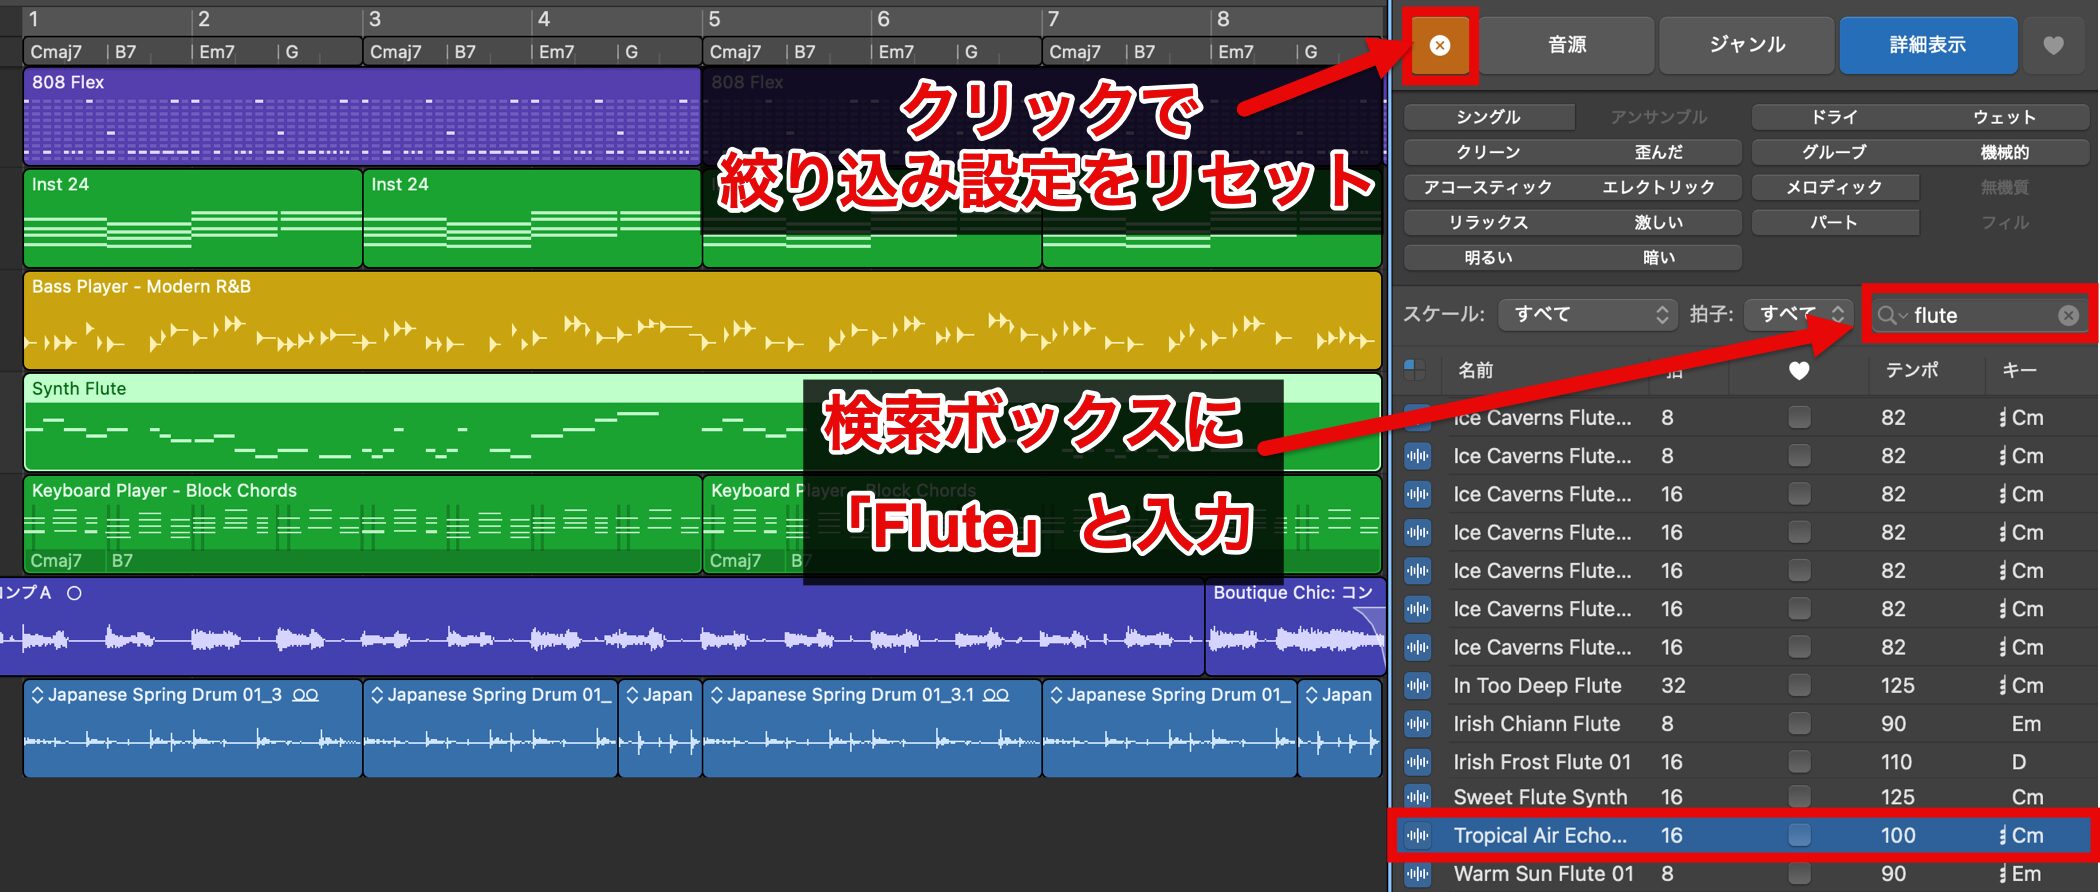
Reset the previous search results by clicking the "×" mark.
Type "Flute" directly in the search box to filter.
This time we use "Tropical Air Echo flute," but again, rather than making a simple loop, we add variation.

However, the loop we chose has no numbered variations like the earlier one, so we split the long phrase into small pieces and scatter them across the eight bars.
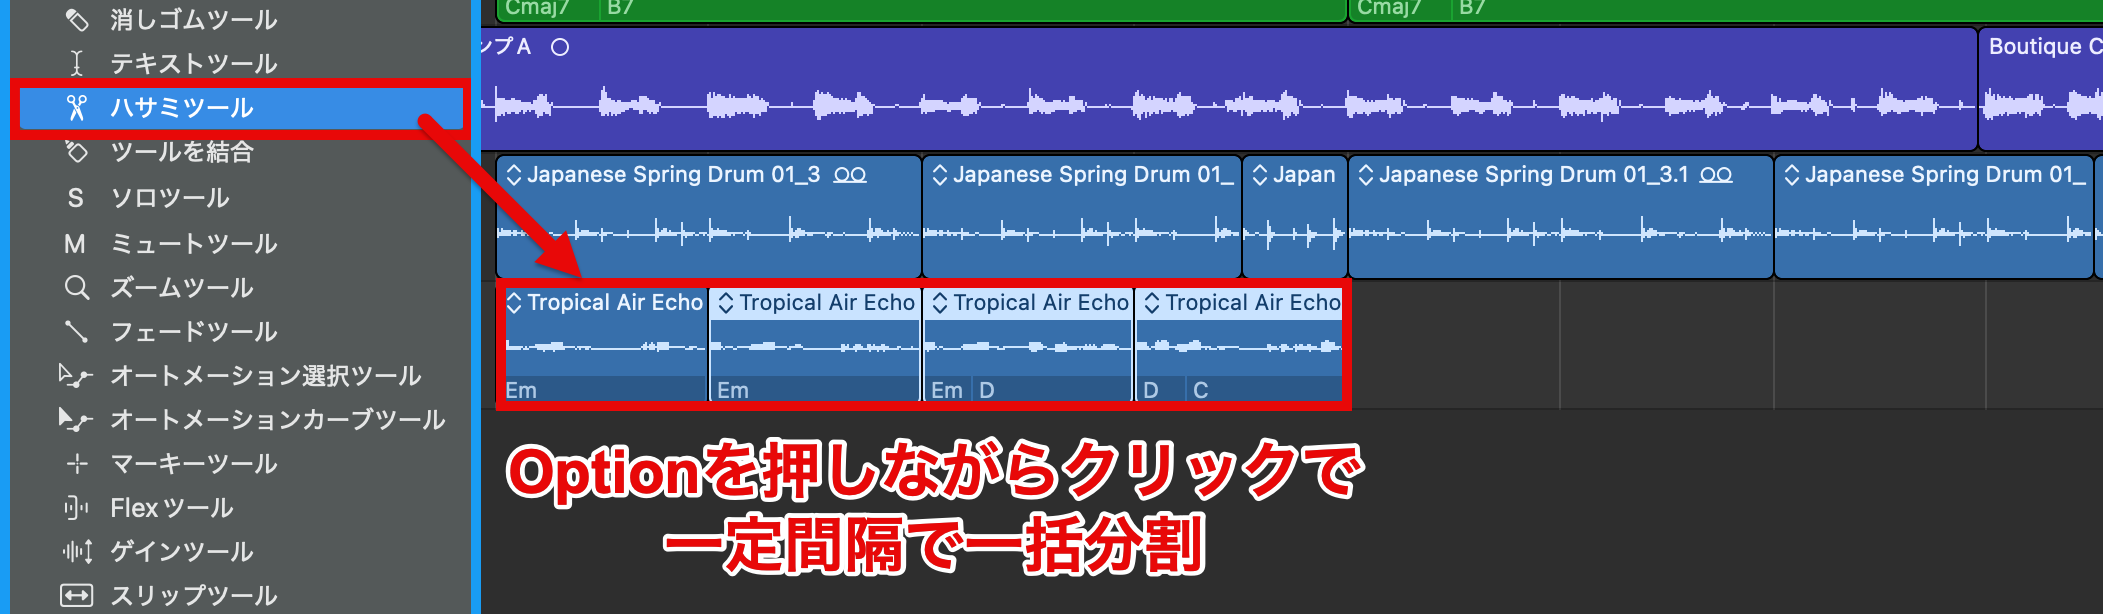
To split a region into small pieces at regular intervals, choose the Scissors tool and Option-click; this lets you split it repeatedly in one go.
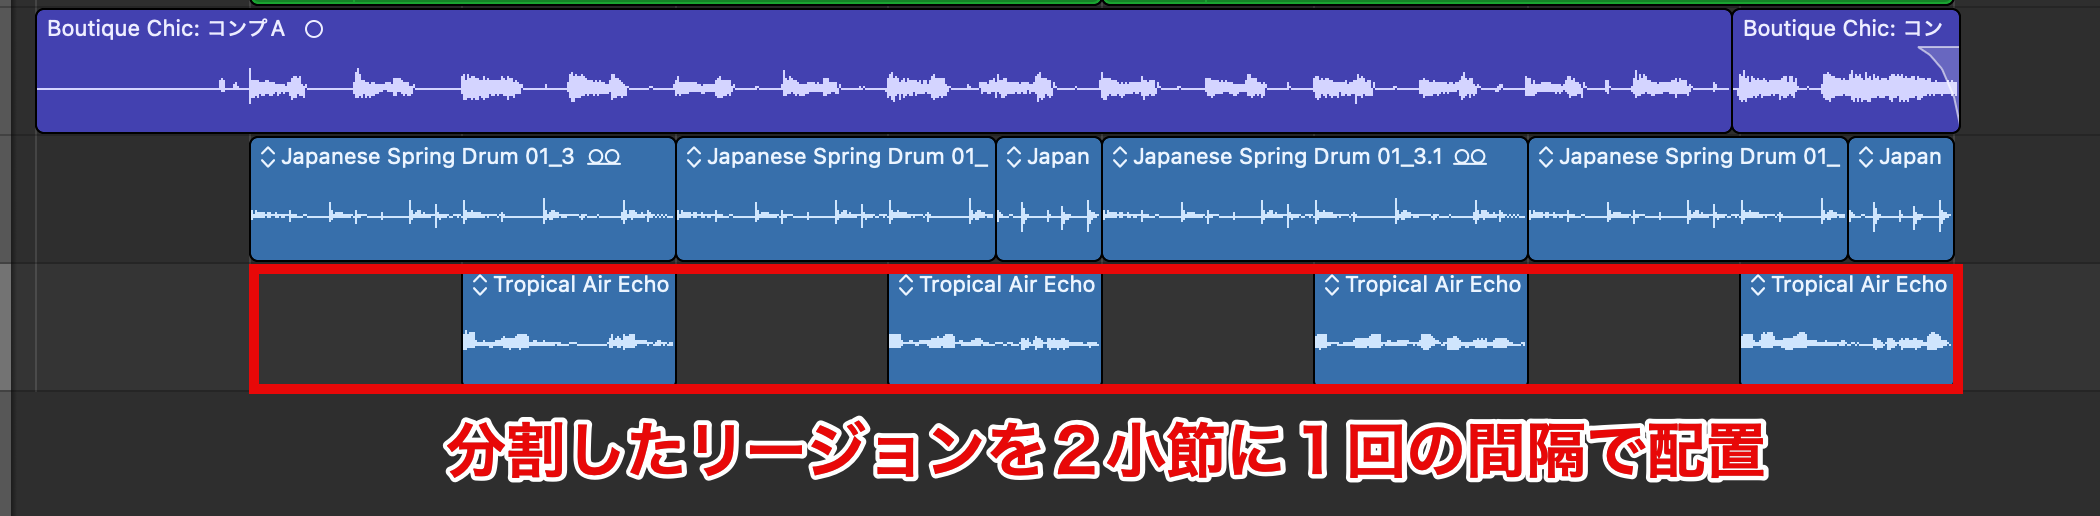
Let's listen to it placed once every two bars.
Boldly leaving out certain sections like this is also an effective way to add contrast to a song.
Please give it a try.
Adding a Guitar Loop
As more sounds are added to the song, our ideas are expanding, so we add a new guitar phrase.
The guitar we recorded last time mainly played broad rhythms, so this time we look for a phrase with a finer rhythm.

We filtered by "Instrument: Electric Guitar" → "Genre: Funk" → "Descriptors: Clean, Dry, Groove," and chose the following loop from the results, which matched our idea perfectly.
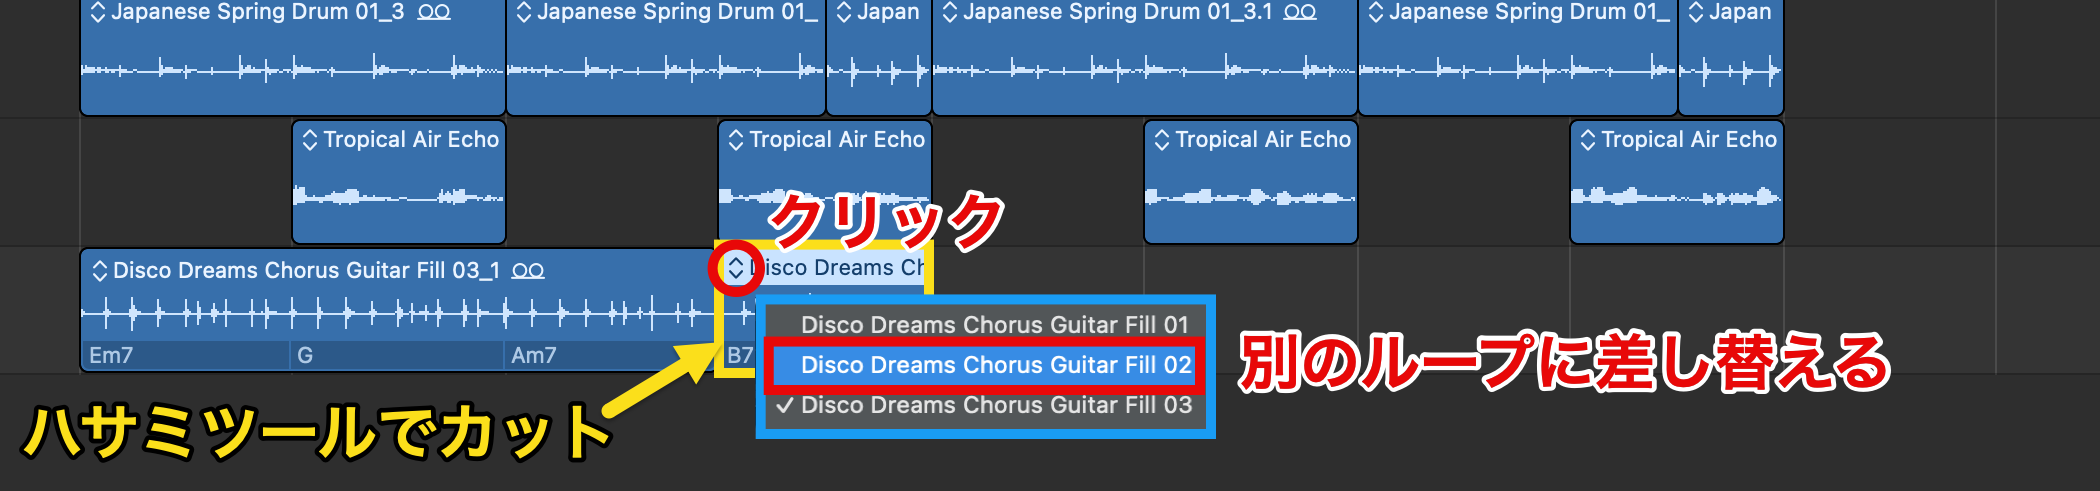
We cut it with the Scissors tool and replace parts with other loops to add variation.
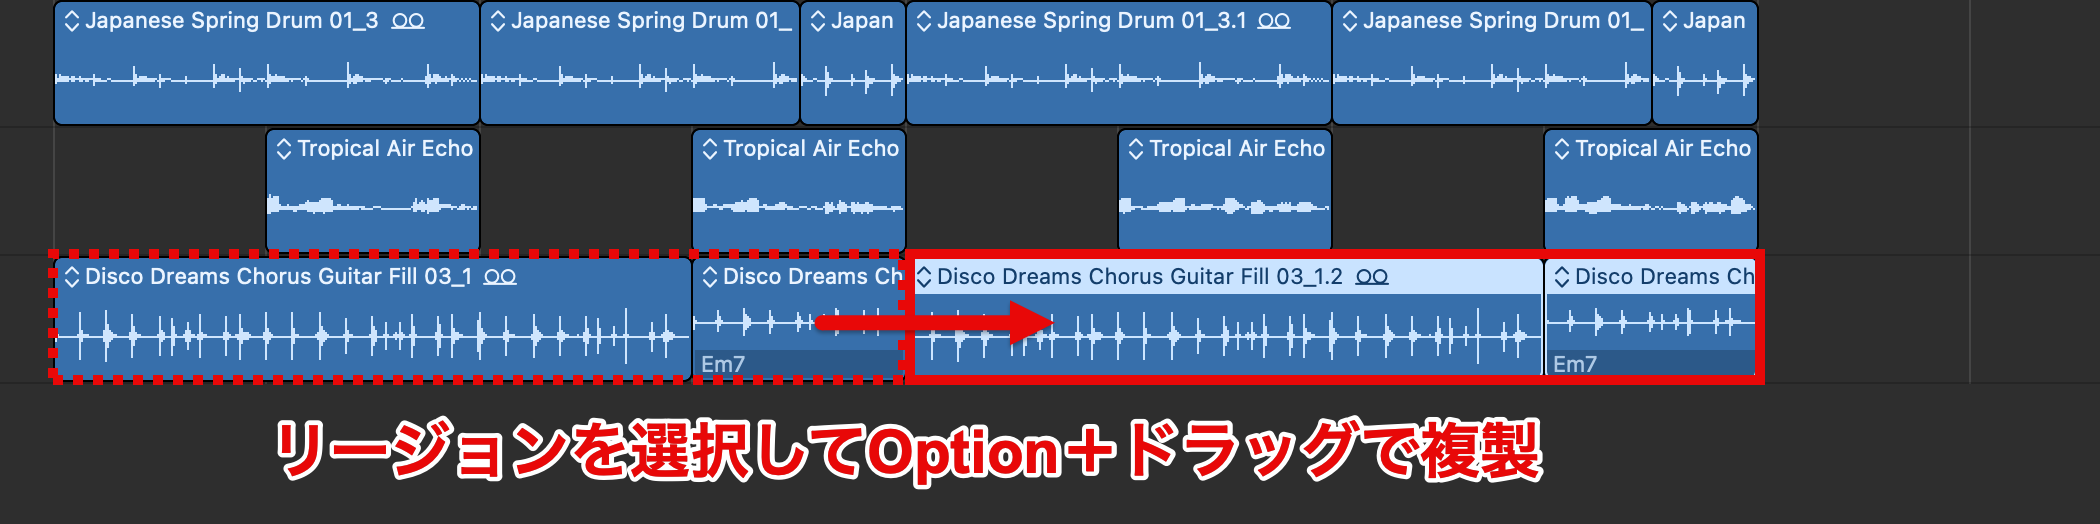
Once the pattern is decided, duplicate it by Option-dragging.
Panning
As the number of tracks grows, instrument sounds blend together and can become hard to hear individually.
In such cases, we recommend placing sounds to the left and right.
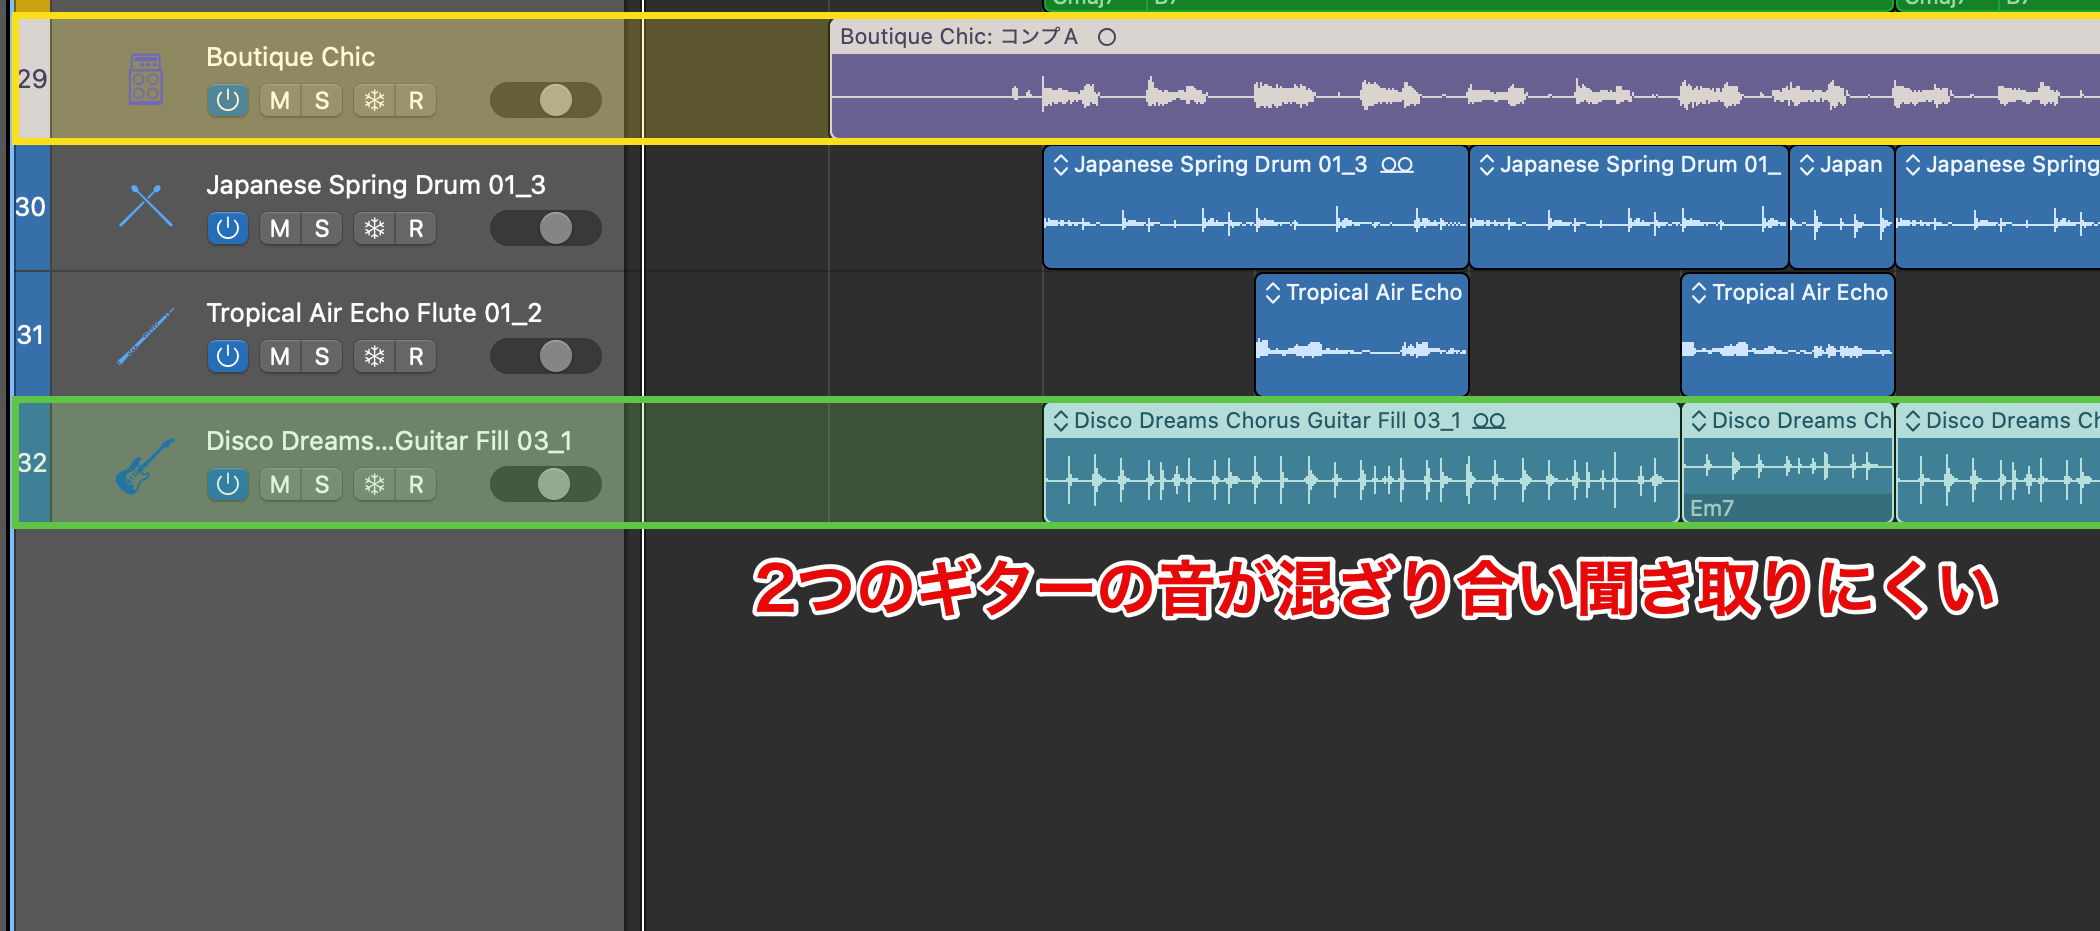
This time, the sounds of the two guitar tracks are blending, so we fix that.
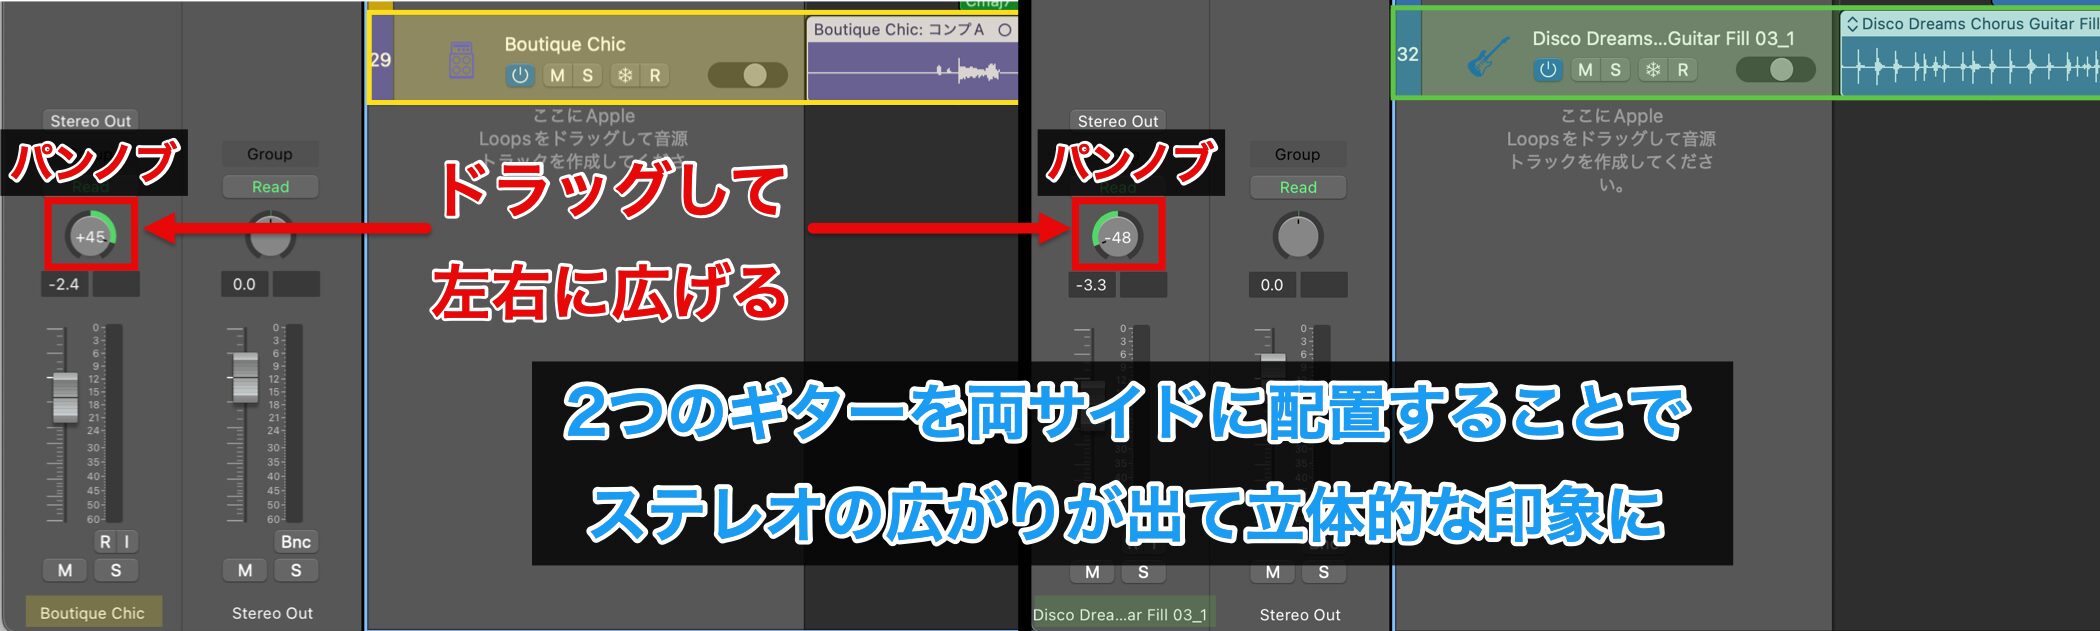
Drag the "Pan knob" in each guitar's Inspector to spread them left and right.
Placing the two guitars on either side creates stereo width and a three-dimensional impression.
Frequently Asked Questions
Q1. Should I choose MIDI loops or audio loops in Apple Loops?
Audio loops contain recordings of actual performances, so they sound highly realistic, while MIDI loops can be edited freely after loading. We recommend audio loops if you prioritize sound texture, and MIDI loops if you value customizability.
Q2. Repeating the same phrase sounds monotonous. What should I do?
Adding variation is effective: switch to numbered loops with the up/down arrow button at the top left of the region, split loops finely with the Scissors tool and scatter different variations, or boldly leave out certain sections.
Q3. The sounds of multiple tracks blend together and are hard to hear. What can I do?
Spreading each instrument left and right with the pan knob creates stereo width and a three-dimensional impression. We especially recommend placing tracks on either side when there are multiple tracks such as guitars.
NEW ARTICLES
Latest English Articles