
When making music with Session Player in Logic Pro 11, adjusting the key of the melody and creating chord backing are important steps for raising the quality of a song. This article explains how to edit MIDI notes in the Piano Roll, change pitch region by region, and use the Pitch Source function that automatically follows key changes. It also shows how to generate chord accompaniment automatically with the Session Player Keyboard Player and achieve a polished arrangement that brings out the melody by choosing Block Chords and rhythm patterns and using the track sync function. Beginners and intermediate users alike can learn efficient arranging techniques and produce songs with a professional finish.
Key Adjustment and Session Player Arrangement

Miyakawa
You have a melody, but "the key doesn't fit and it's hard to sing" is a common situation in songwriting.
Here we explain how to deal with that, and how to make the song's accompaniment even more colorful!
Arrangement with Keyboard Player Video
Changing Pitch Manually Note by Note
The melody is complete, but considering that it will actually be sung as a song for a female vocalist, the range is a little high and may be hard to sing.
So this time, let's lower the key by five semitones and adjust it to a range that suits the vocalist.
There are two ways, manual and automatic, to change the pitch of what you have entered.
Let's look at each method.
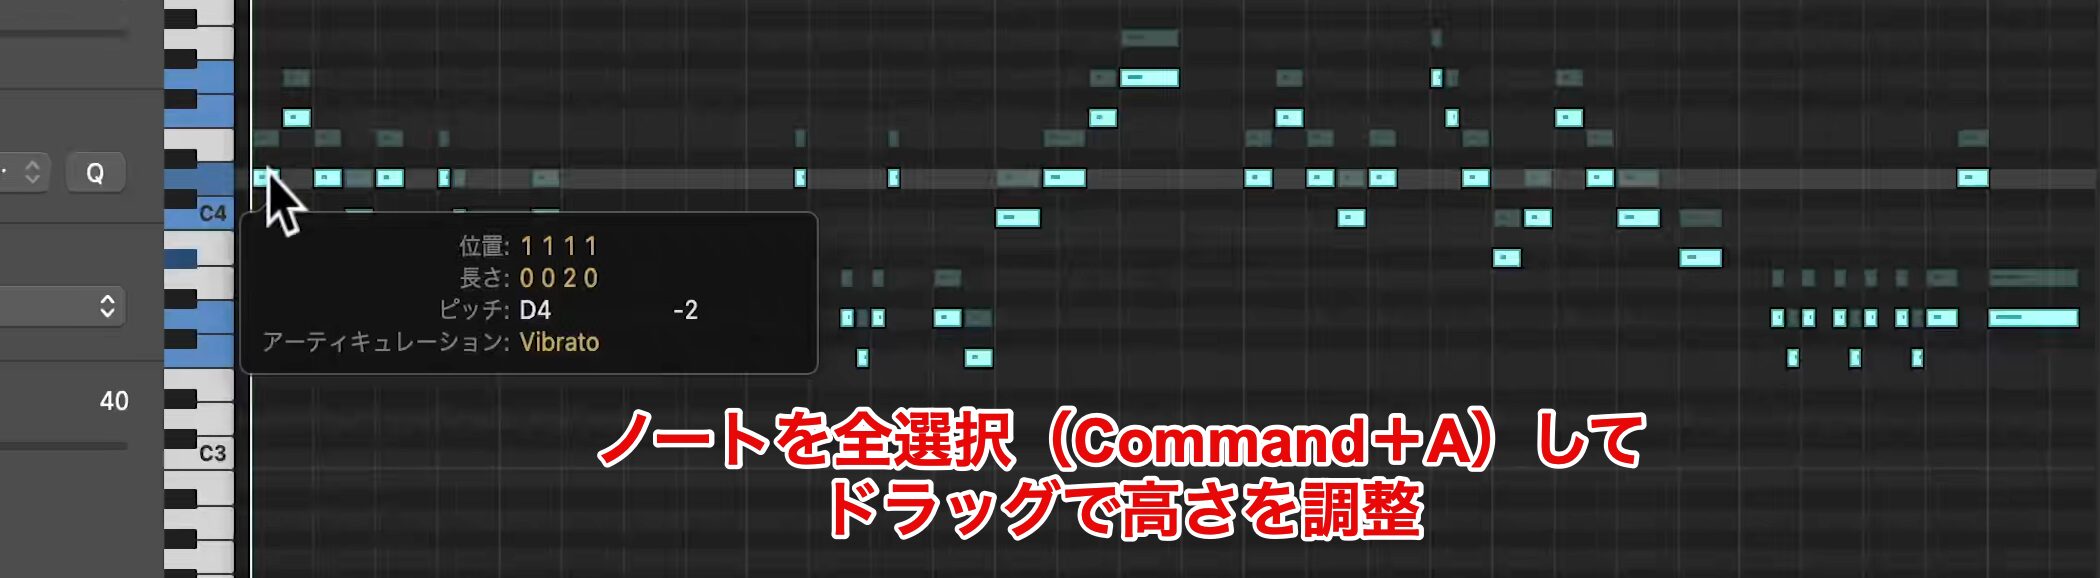
First, we introduce how to edit MIDI notes directly in the Piano Roll.
Press Command-A to select all notes at once.
After selecting them, you can easily adjust the pitch of the notes by dragging.
You can also change pitch efficiently with shortcuts.
- Option + Up/Down Arrow: changes pitch by a semitone
- Shift + Option + Up/Down Arrow: changes pitch by an octave
These shortcuts are very convenient when you want to adjust quickly.
Changing the Pitch of Regions All at Once
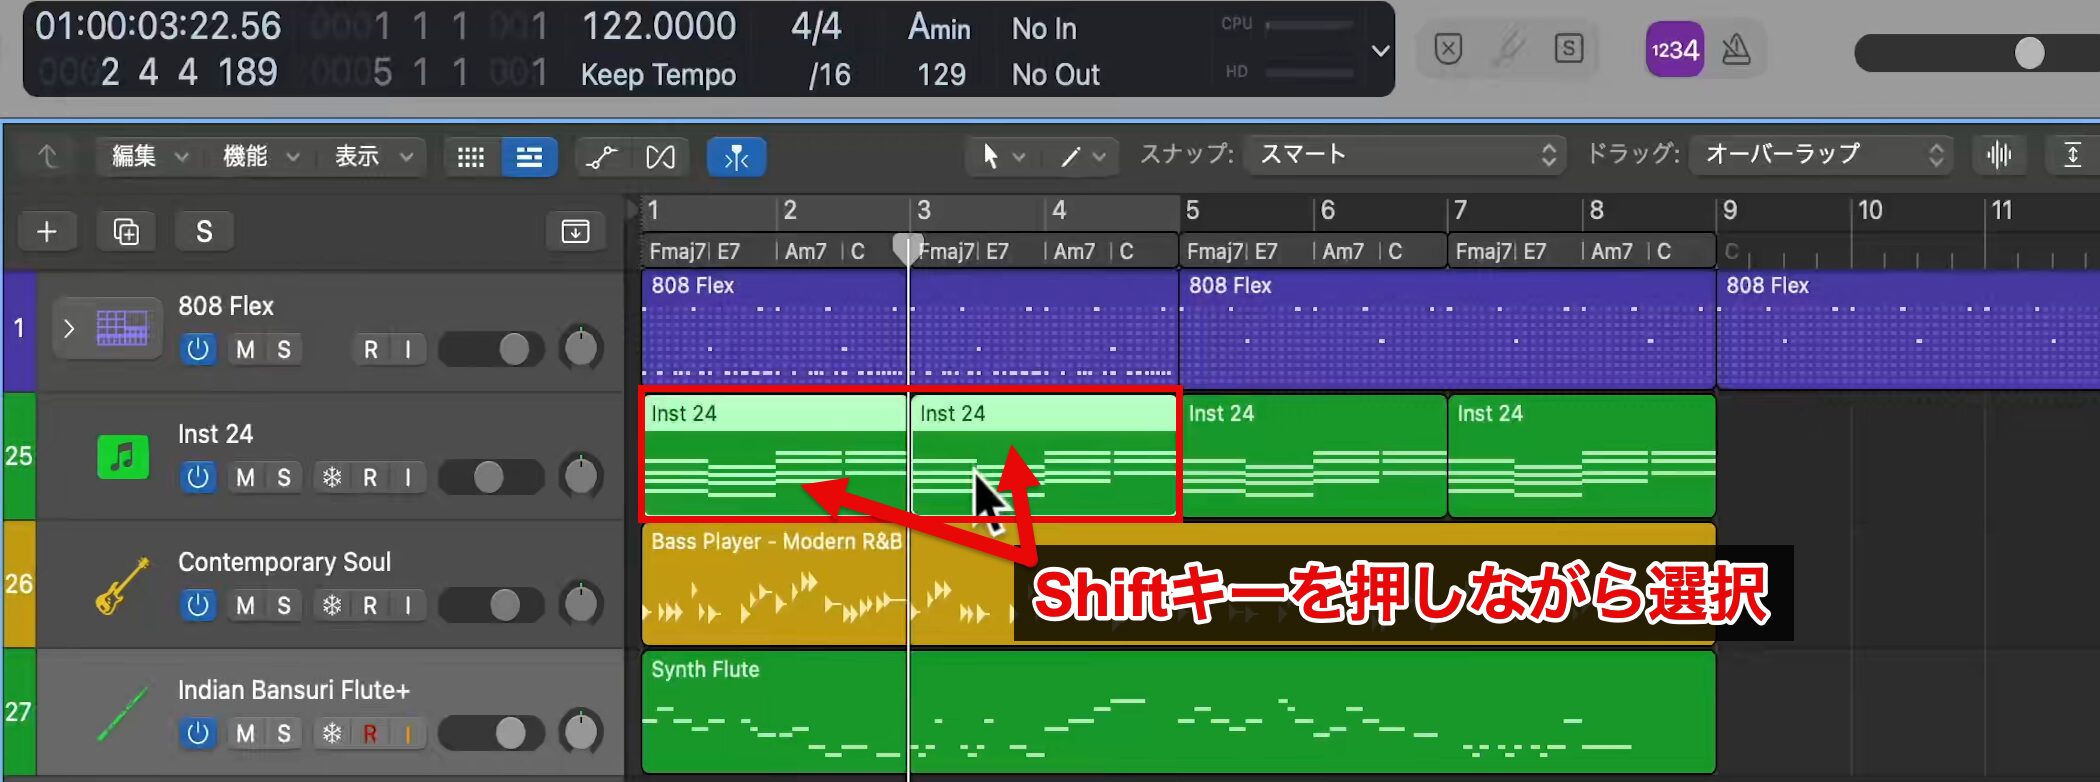
There is also a way to change pitch all at once without using the Piano Roll.
First, hold down the Shift key and select multiple regions whose pitch you want to change.
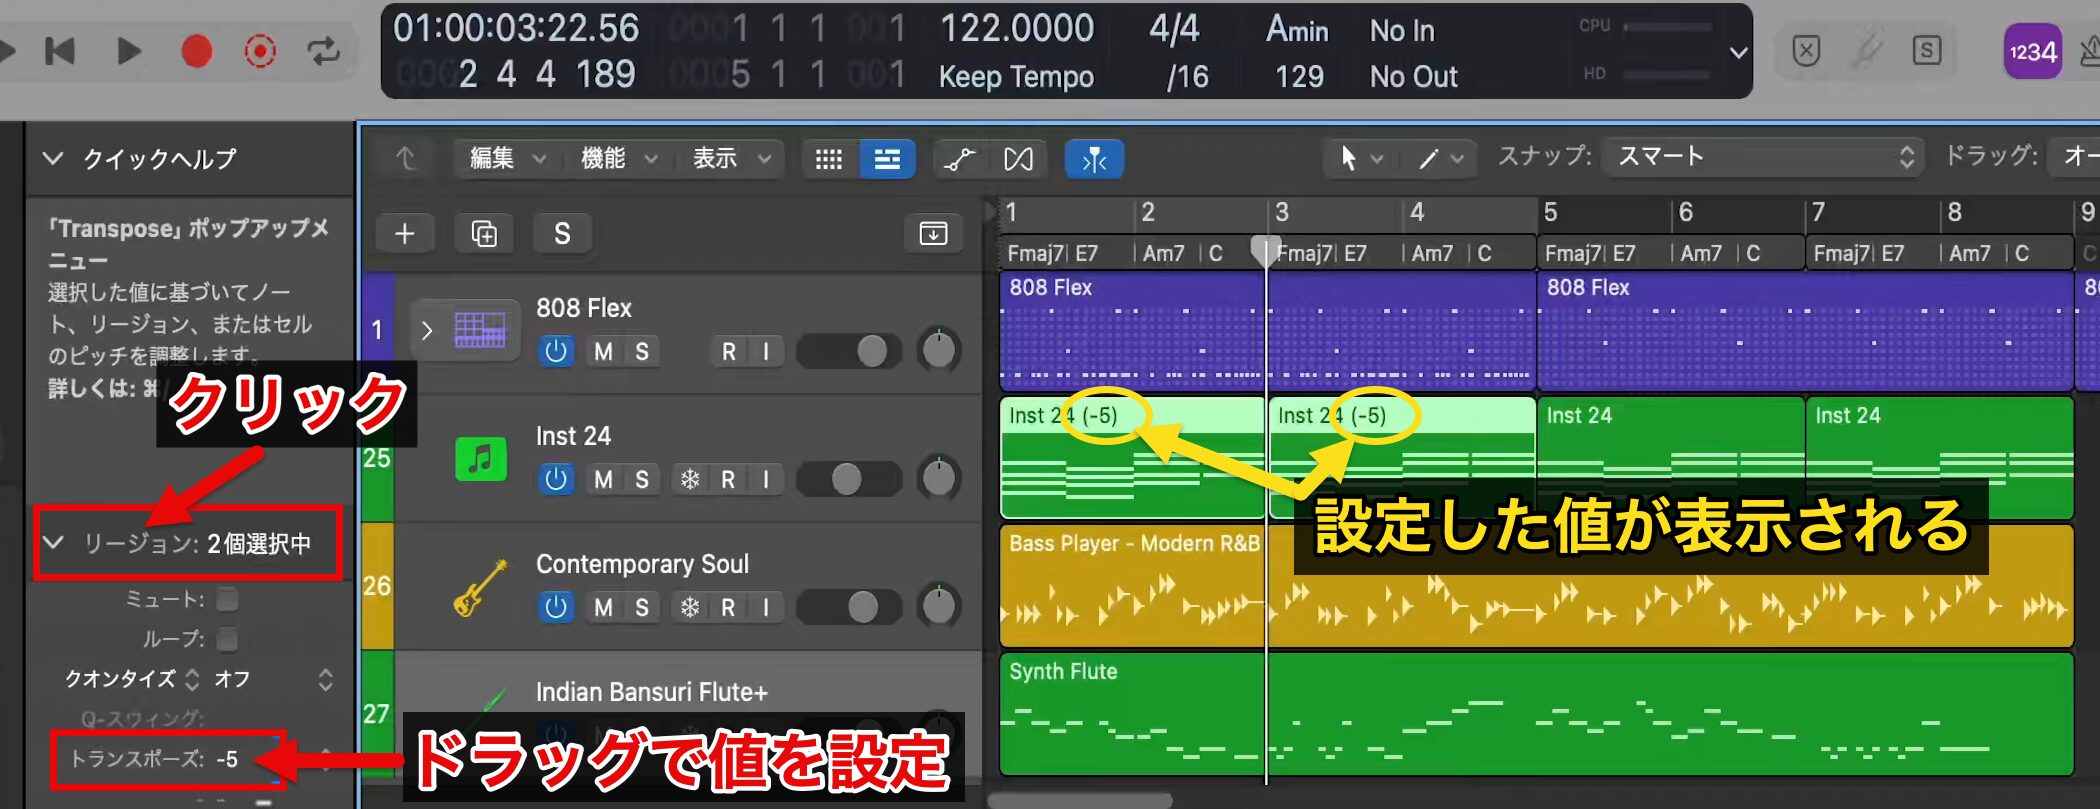
Next, click "Region" in the Inspector.
Drag the "Transpose" value shown there and set it to "-5." (You can also enter the value directly.)
This lowers the pitch of all selected regions by five semitones.
This method is very convenient for adjusting multiple regions efficiently.
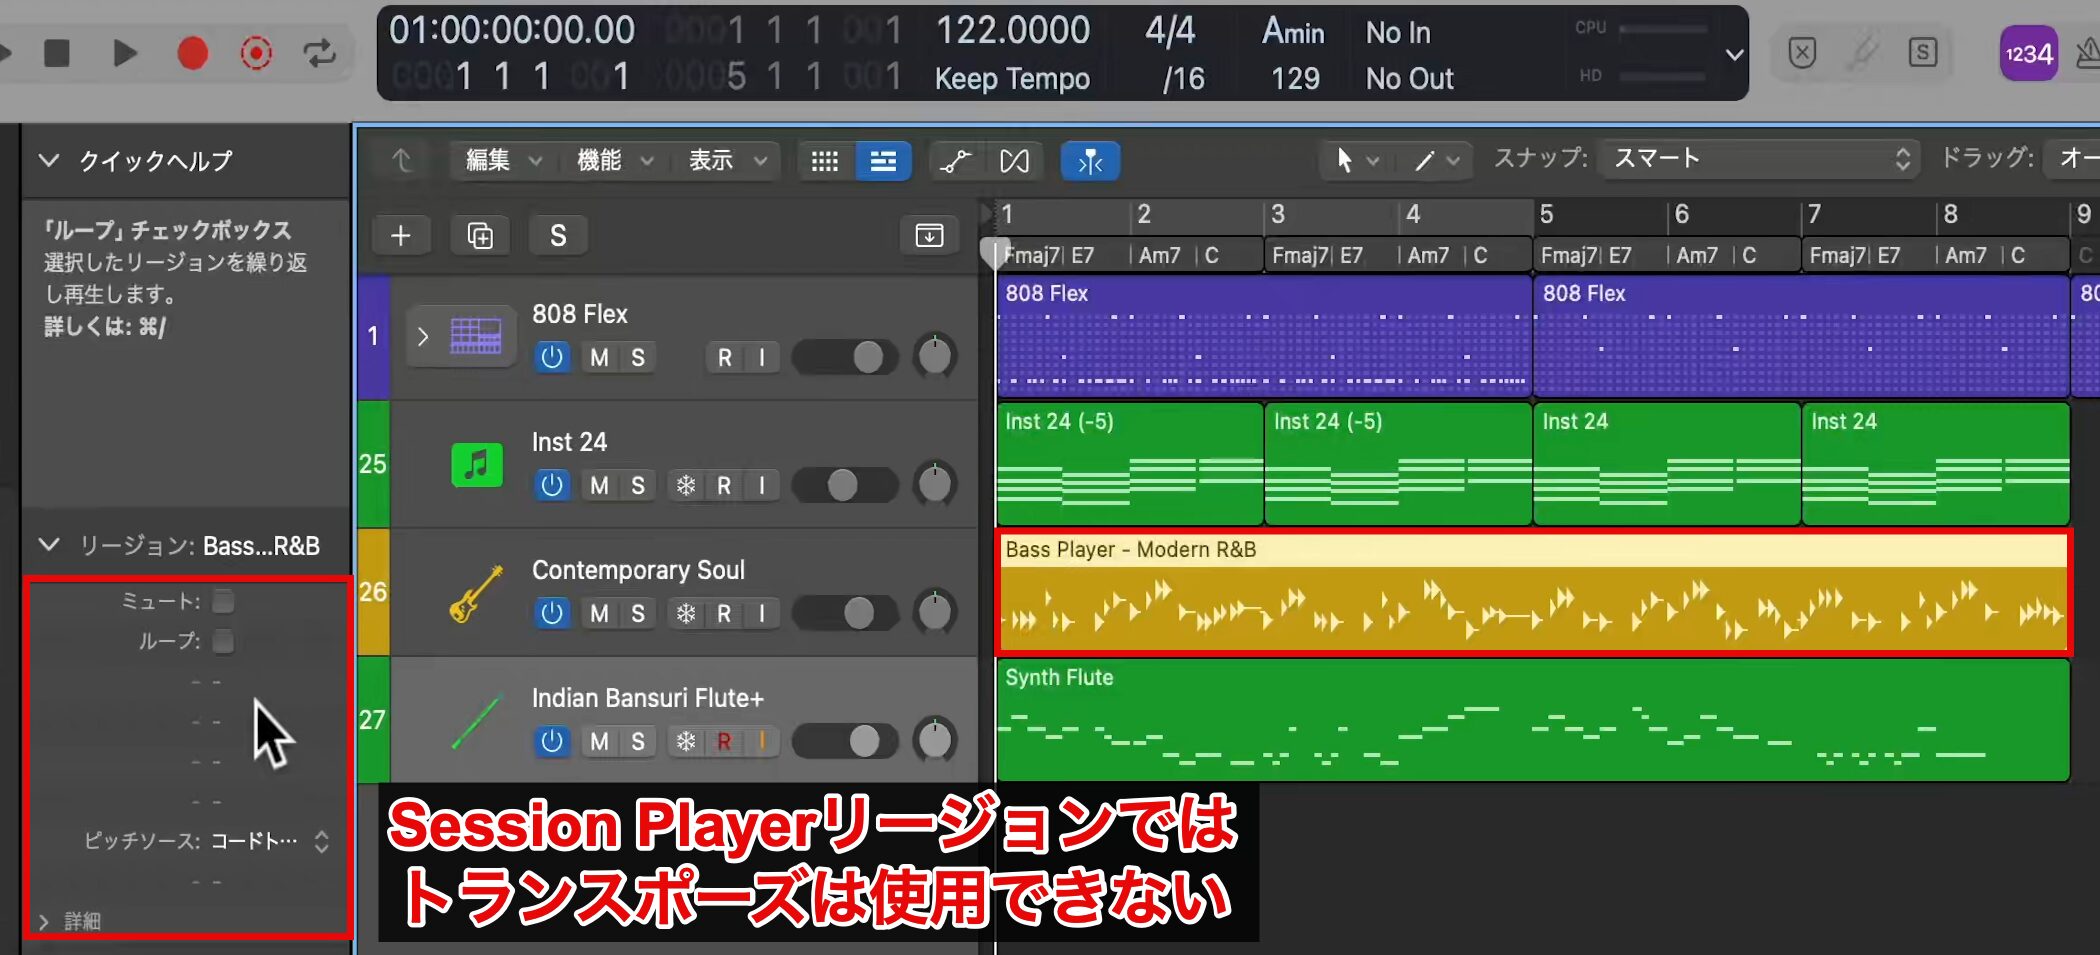
However, it cannot be used on Session Player regions, so be careful when adjusting.
Changing Pitch Automatically
Next, let's use the function that sets pitch automatically to change the remaining regions.
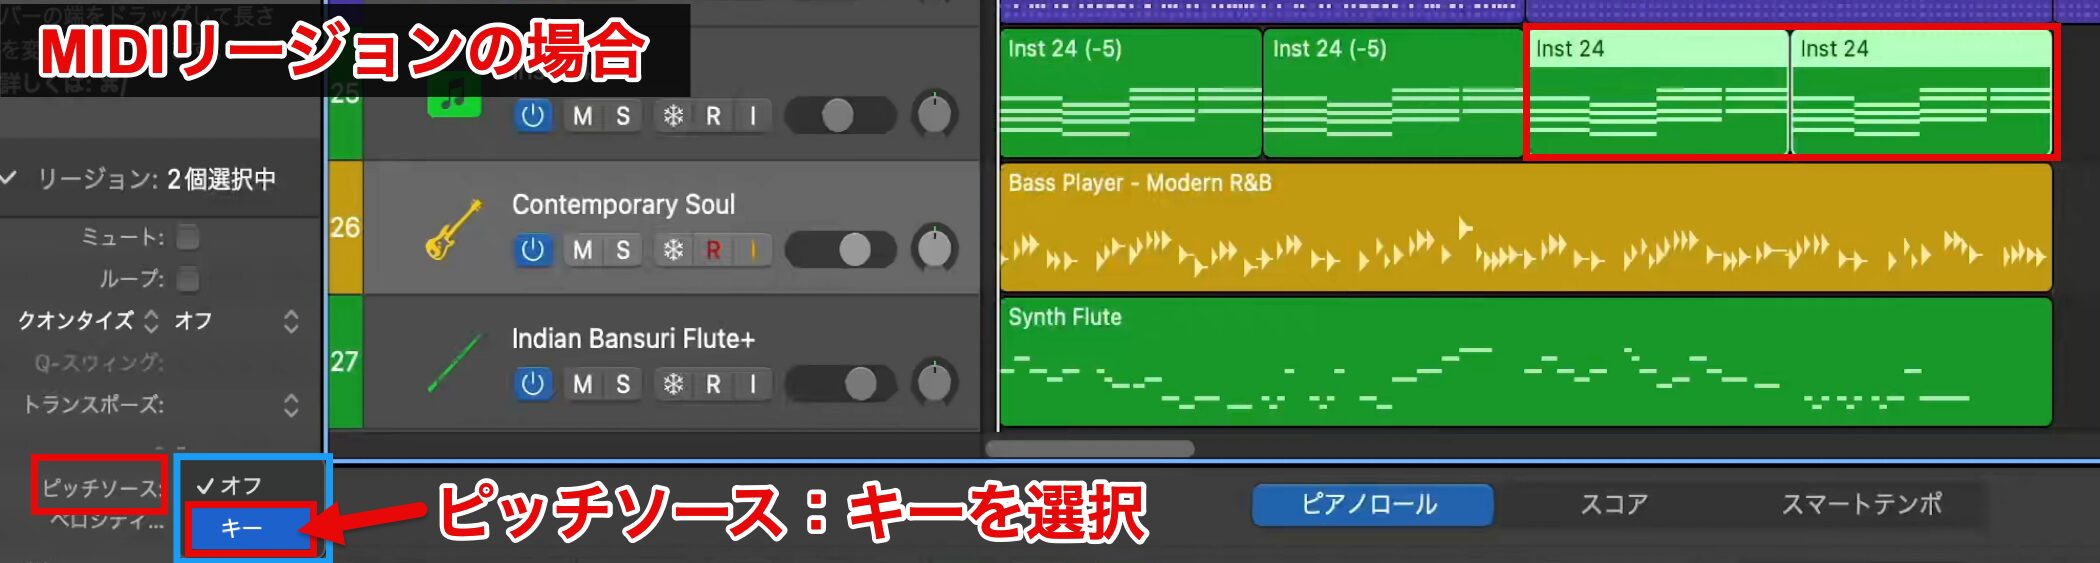
Each region we have used so far has an item called "Pitch Source" in its region settings.
With this function, you can make the performance automatically follow the song's key.
For MIDI regions, it is set to "Off" by default.
Select a region and change Pitch Source to "Key," and when you change the song's key, the selected region automatically changes its performance.
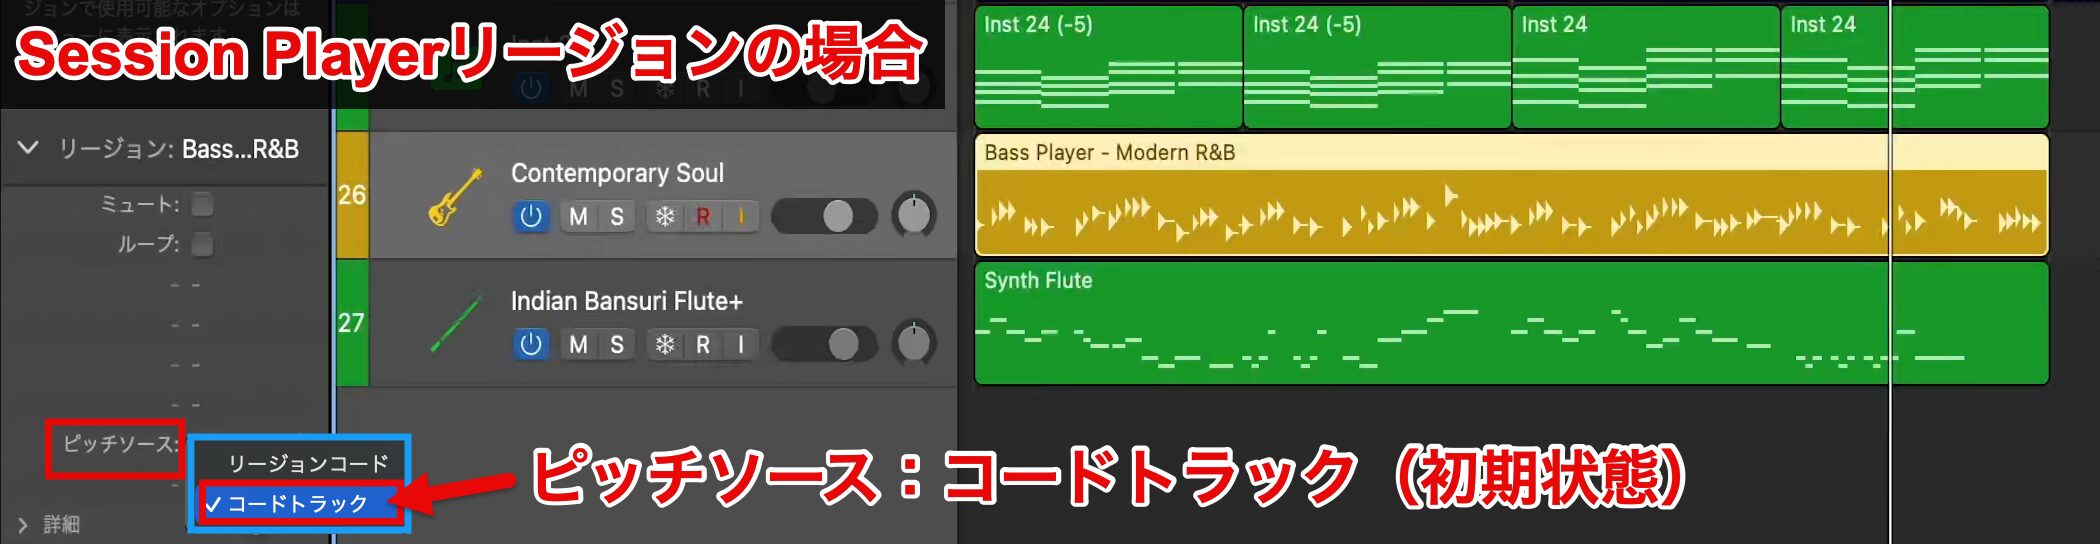
Session Player regions, on the other hand, generate their performance by following the chord track from the start.
So they are set to "Chord Track" by default, and there is no need to change this.
With this setting, the performance is adjusted automatically based on the chord progression.
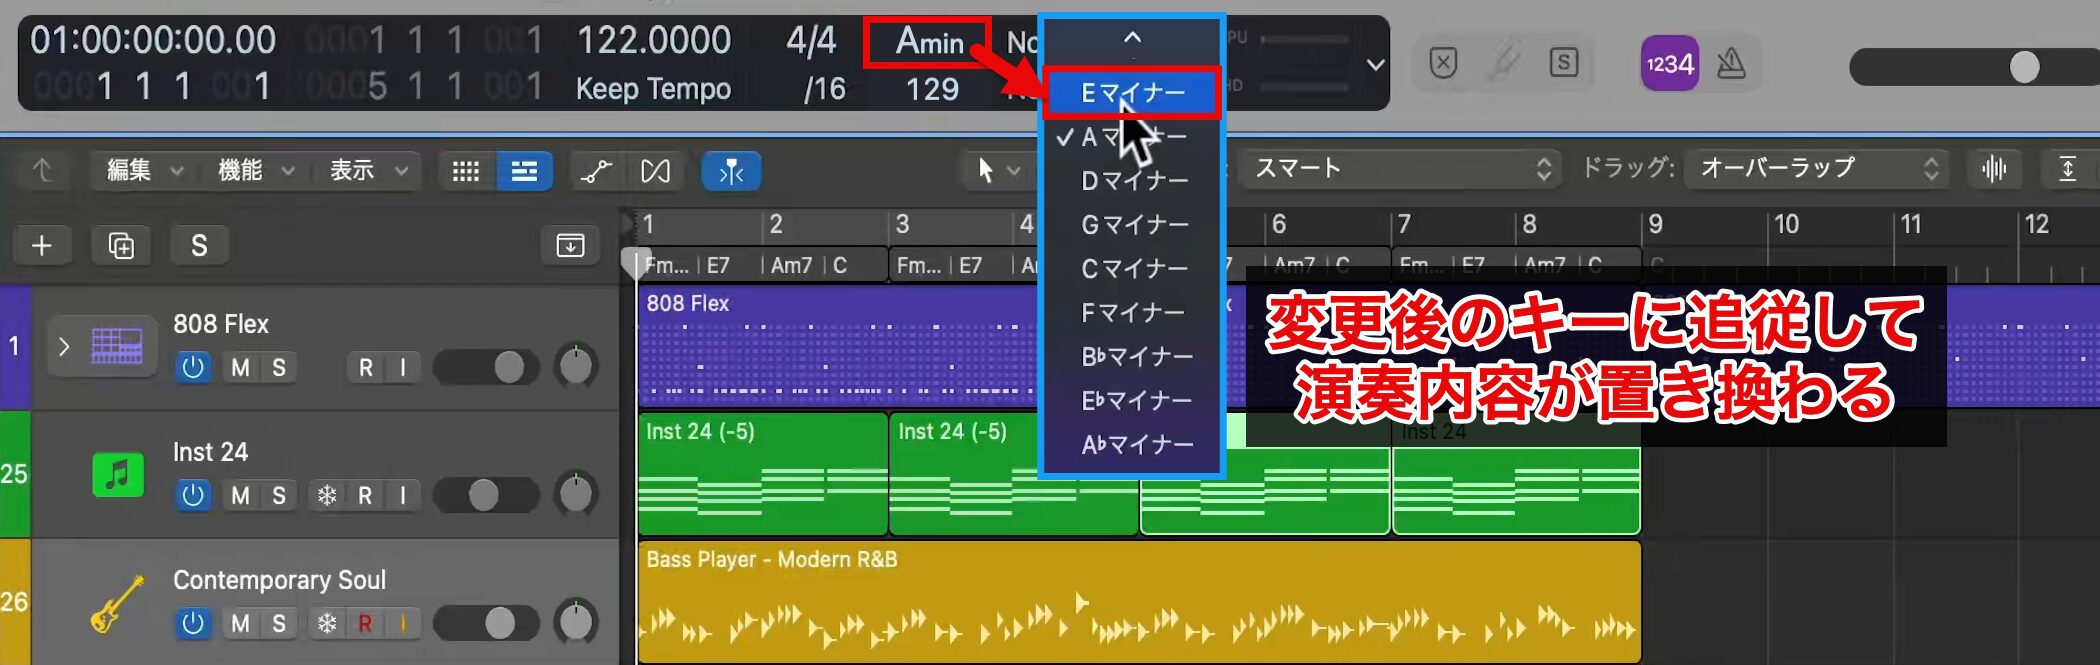
Change the key from A minor to E minor, five semitones lower.
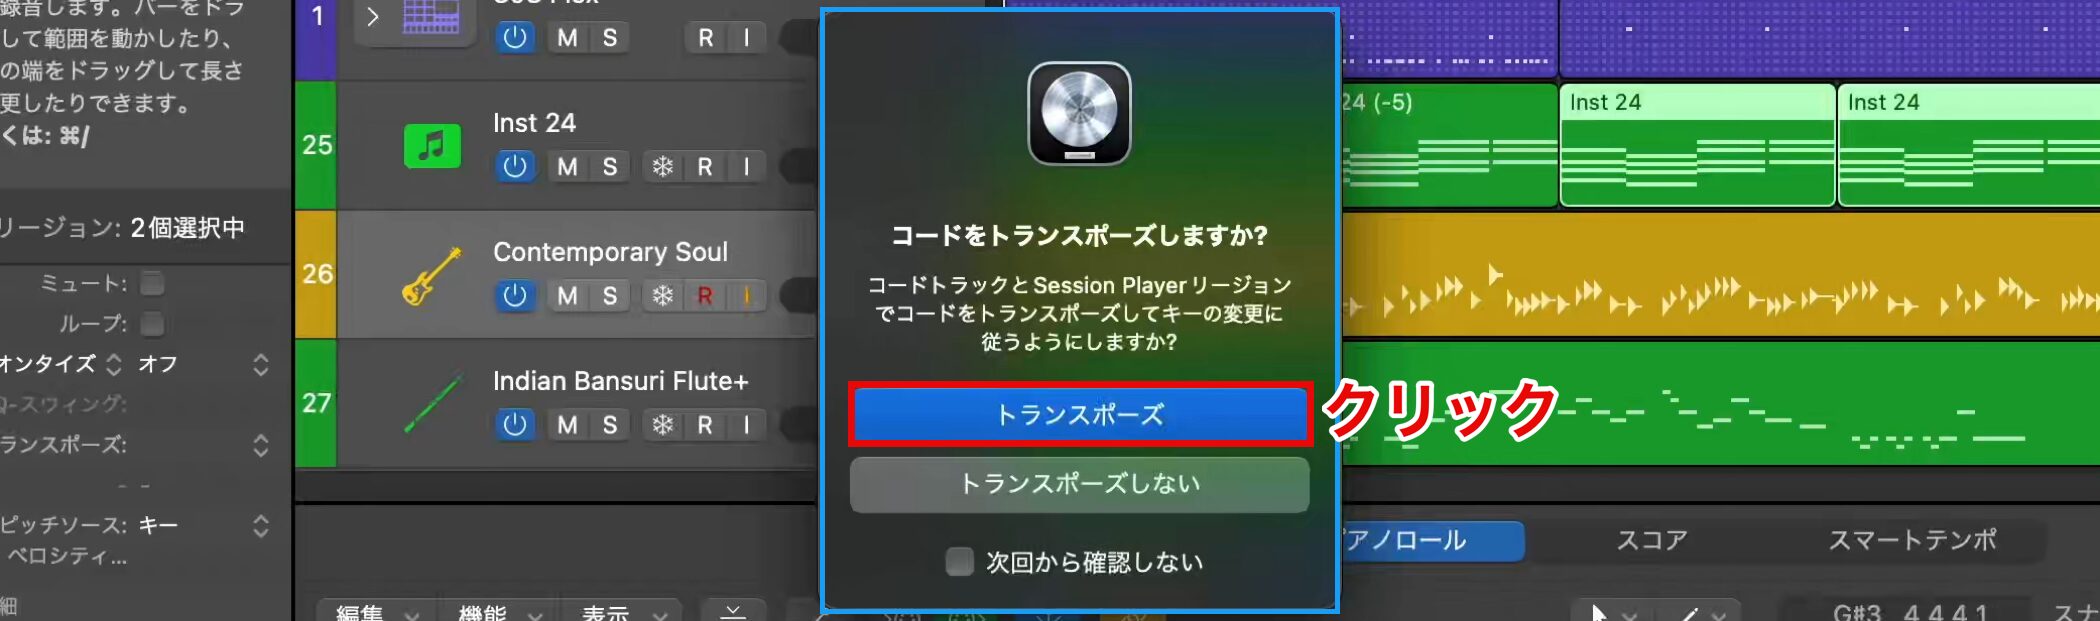
You are asked whether to make the chord track follow the new key, so here choose "Transpose," which means changing the key.
Both the Session Player regions and the MIDI regions then automatically change their performance to match the new key.
Creating Chord Backing with Session Player
Next, we move on to arranging to bring out the melody and add color and energy to the song.
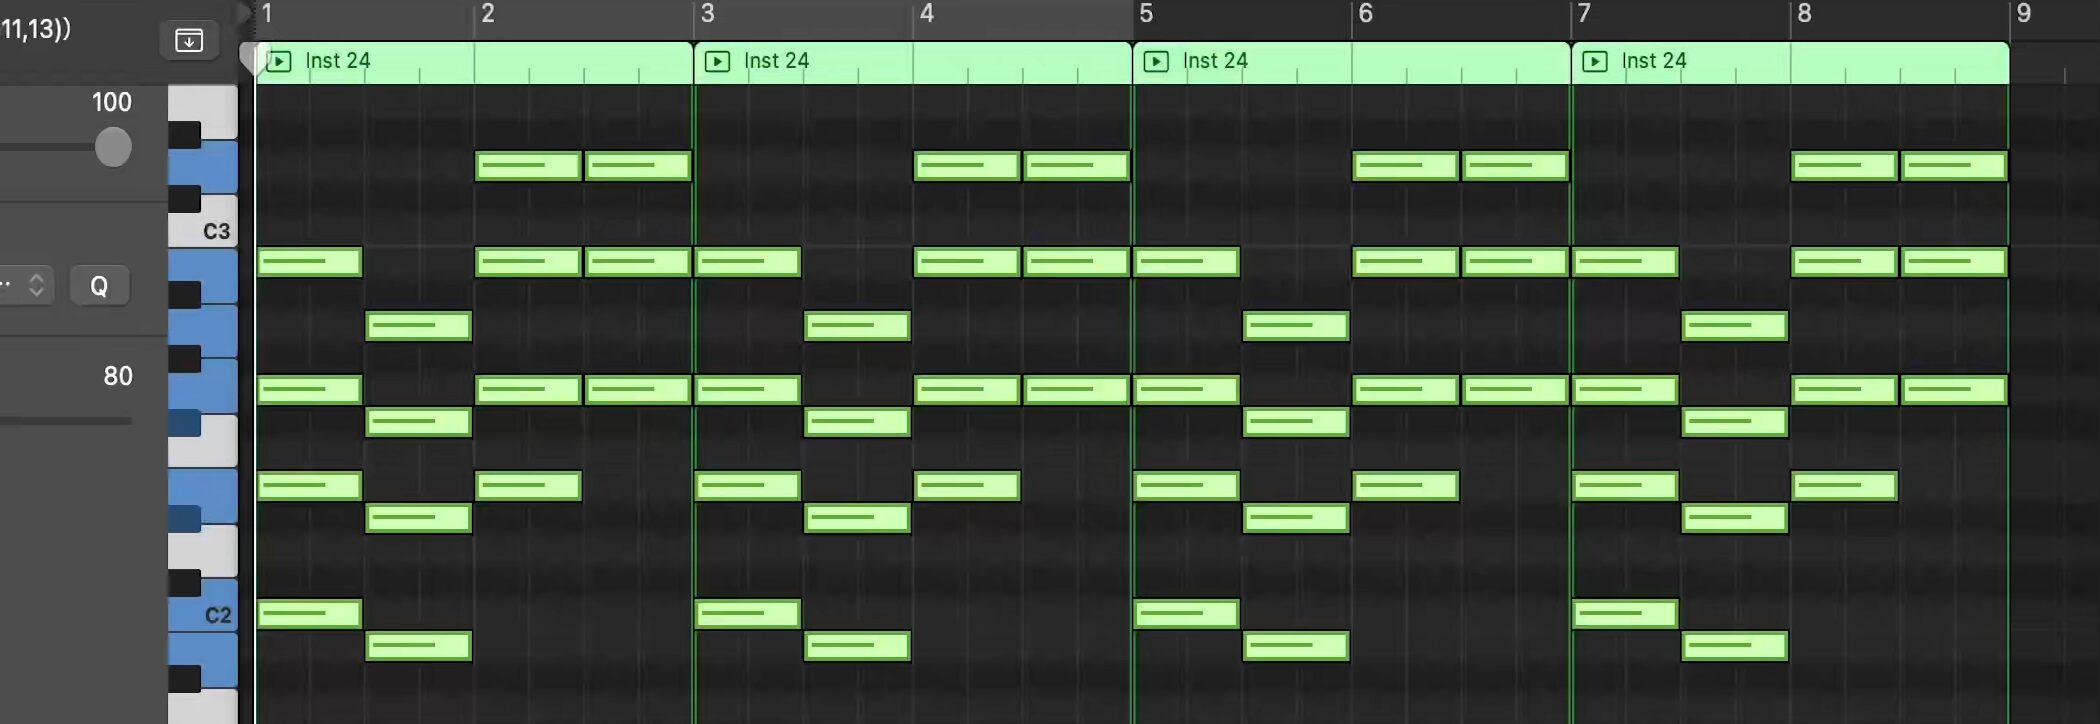
The current chord accompaniment is a simple one entered to check the chord feel of the song.
It simply holds the chords, so it sounds a little monotonous.
From here, we add rhythmic chord accompaniment to give the song movement.
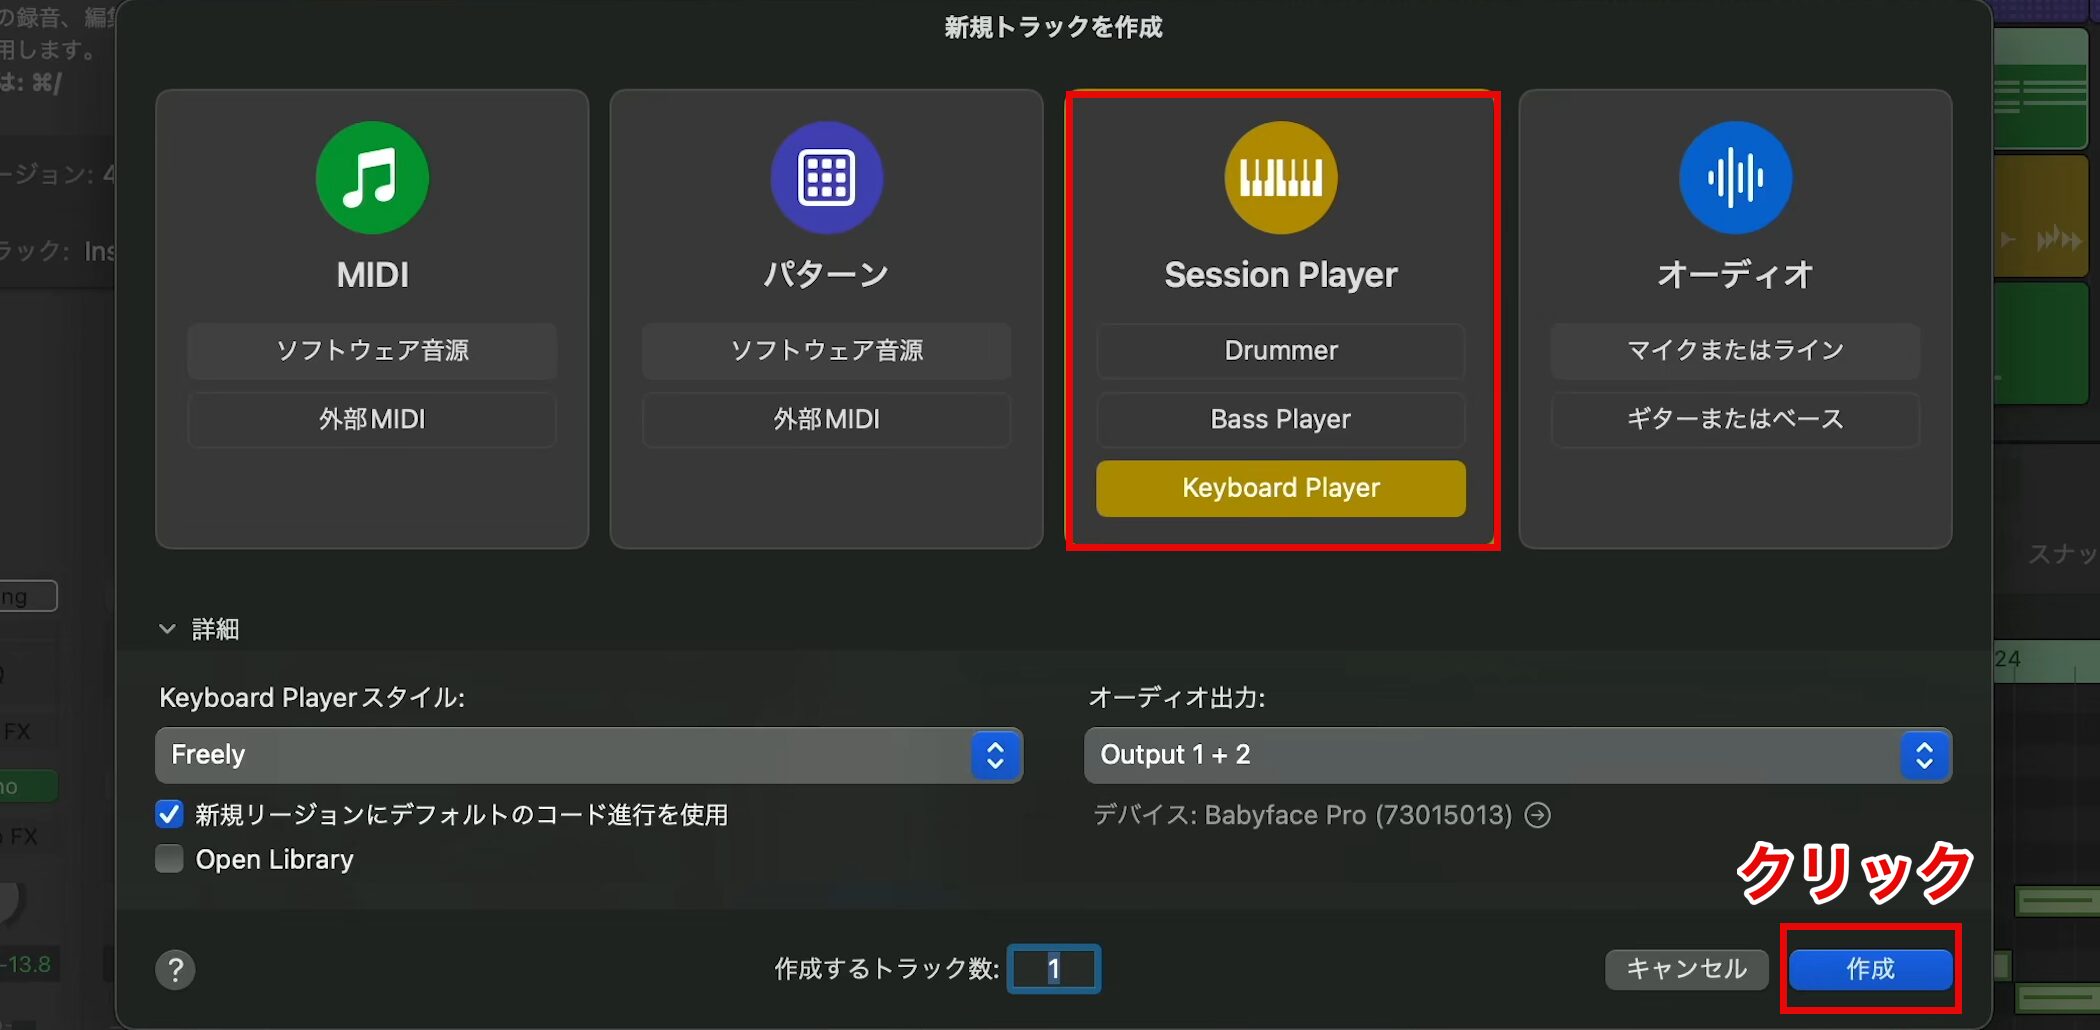
This is where the "Session Player track" we used for the bass comes in.
Session Player offers a track called "Keyboard Player" that plays chords automatically.
Select this track and create it with the default sound.

First, enable the "Solo button" and check what it plays.
In this way, a piano accompaniment is created automatically that sounds just like a live performance.
The current performance is not bad, but this time we create a rhythmic pattern that matches the bass rhythm.
Changing What Session Player Plays
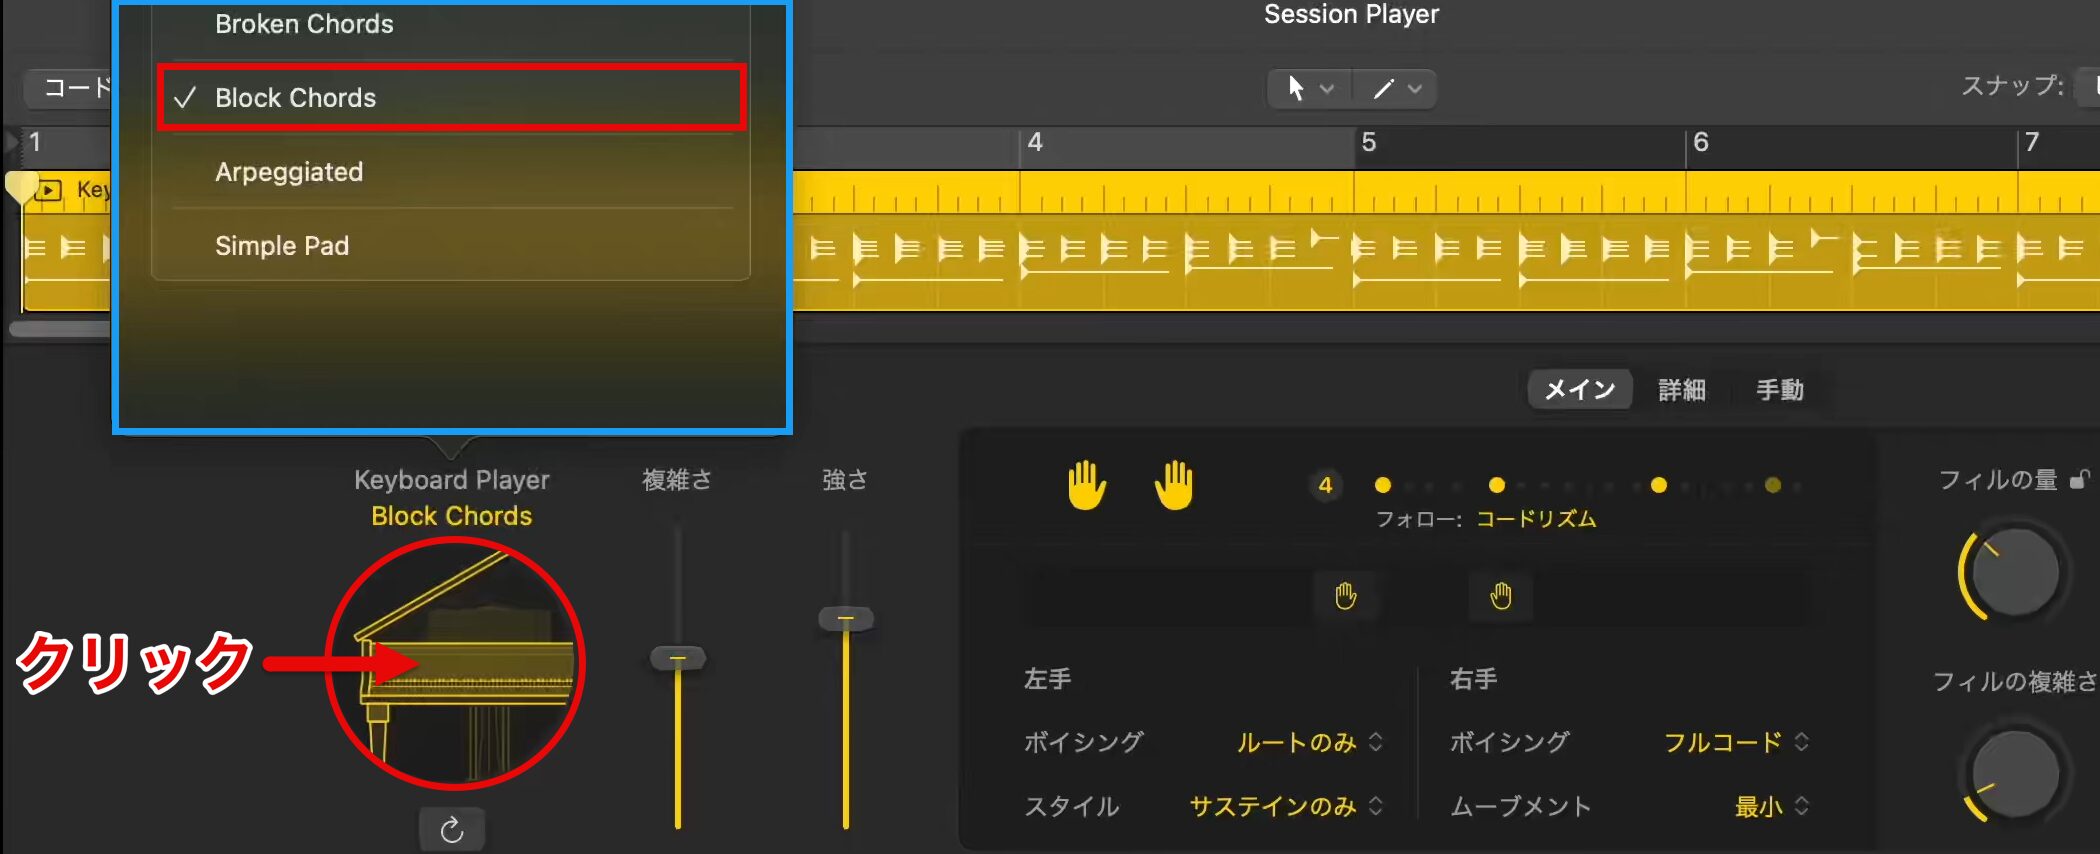
When creating the pattern you have in mind with Session Player, we recommend starting from a simple performance and gradually making it more complex.
First, change the "Keyboard Player" type to "Block Chords," which generates simple chord playing.
The chord accompaniment now plays at regular intervals, so from here we make the rhythm more complex.
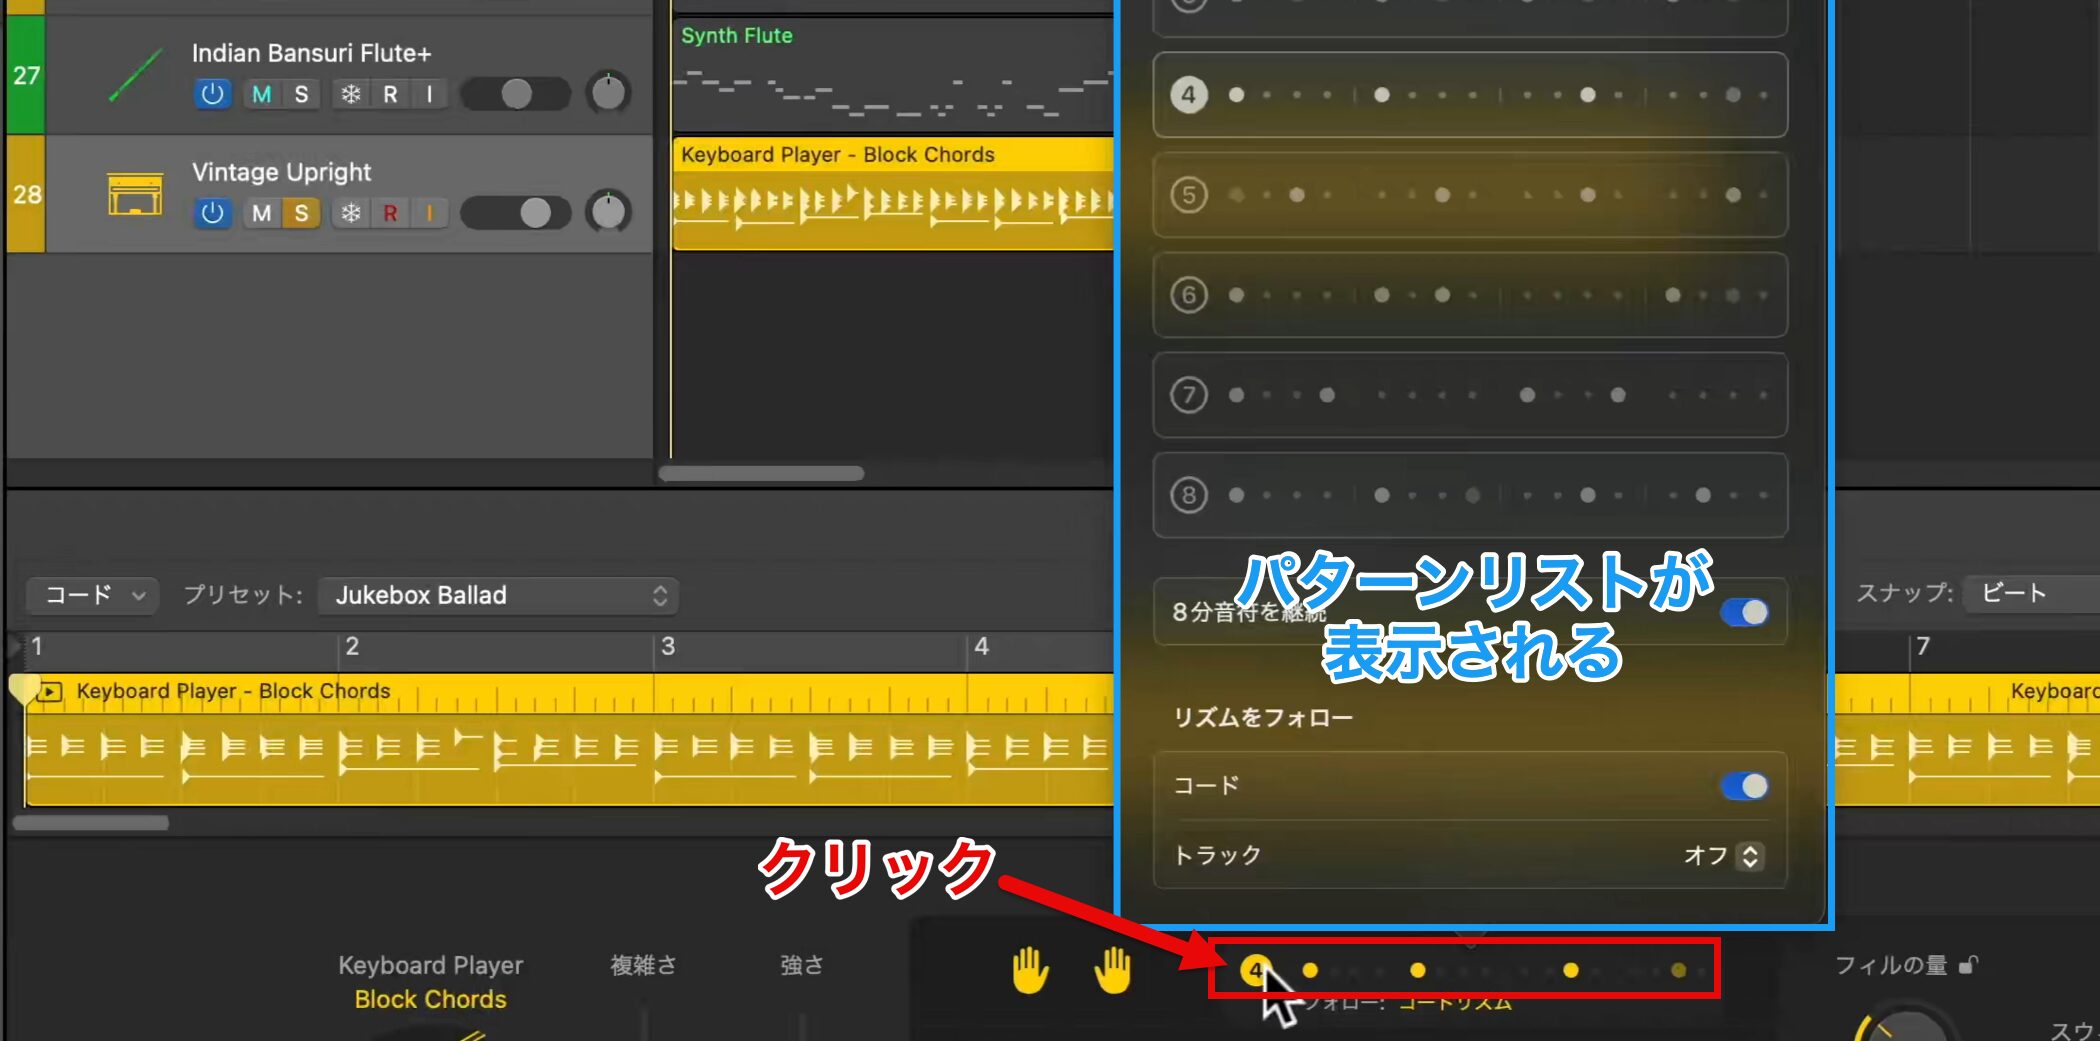
To choose a rhythm manually, click the area marked "(4)" in the center of the screen.
A list of rhythm patterns appears, from which you can choose a different pattern.
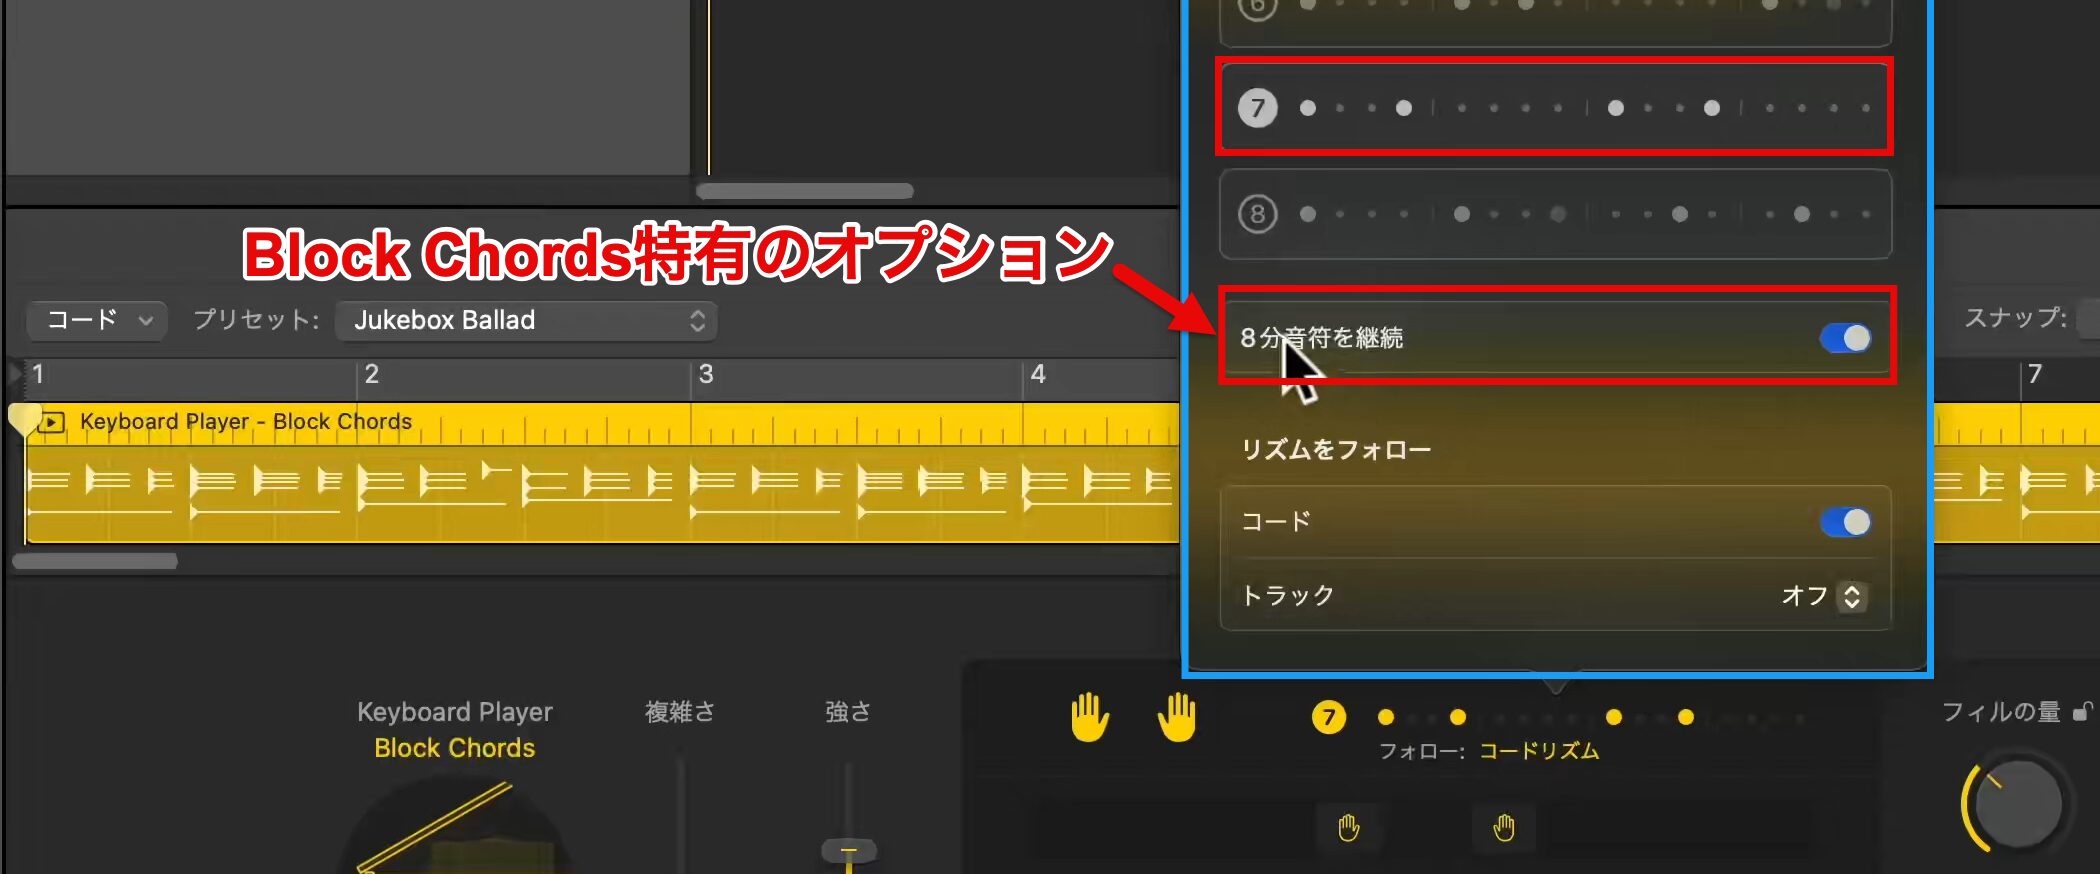
Each plays a rhythm with its own character; here we adopt number (7), which is closest to the image of the song.
The continuous eighth notes option shown below is an option specific to Block Chords, which is currently selected.
When this option is enabled, whichever pattern you choose, the gaps in the rhythm are filled with eighth notes, so it plays without gaps.
This time we want finer rhythmic nuance, so we enable the continuous eighth notes option.
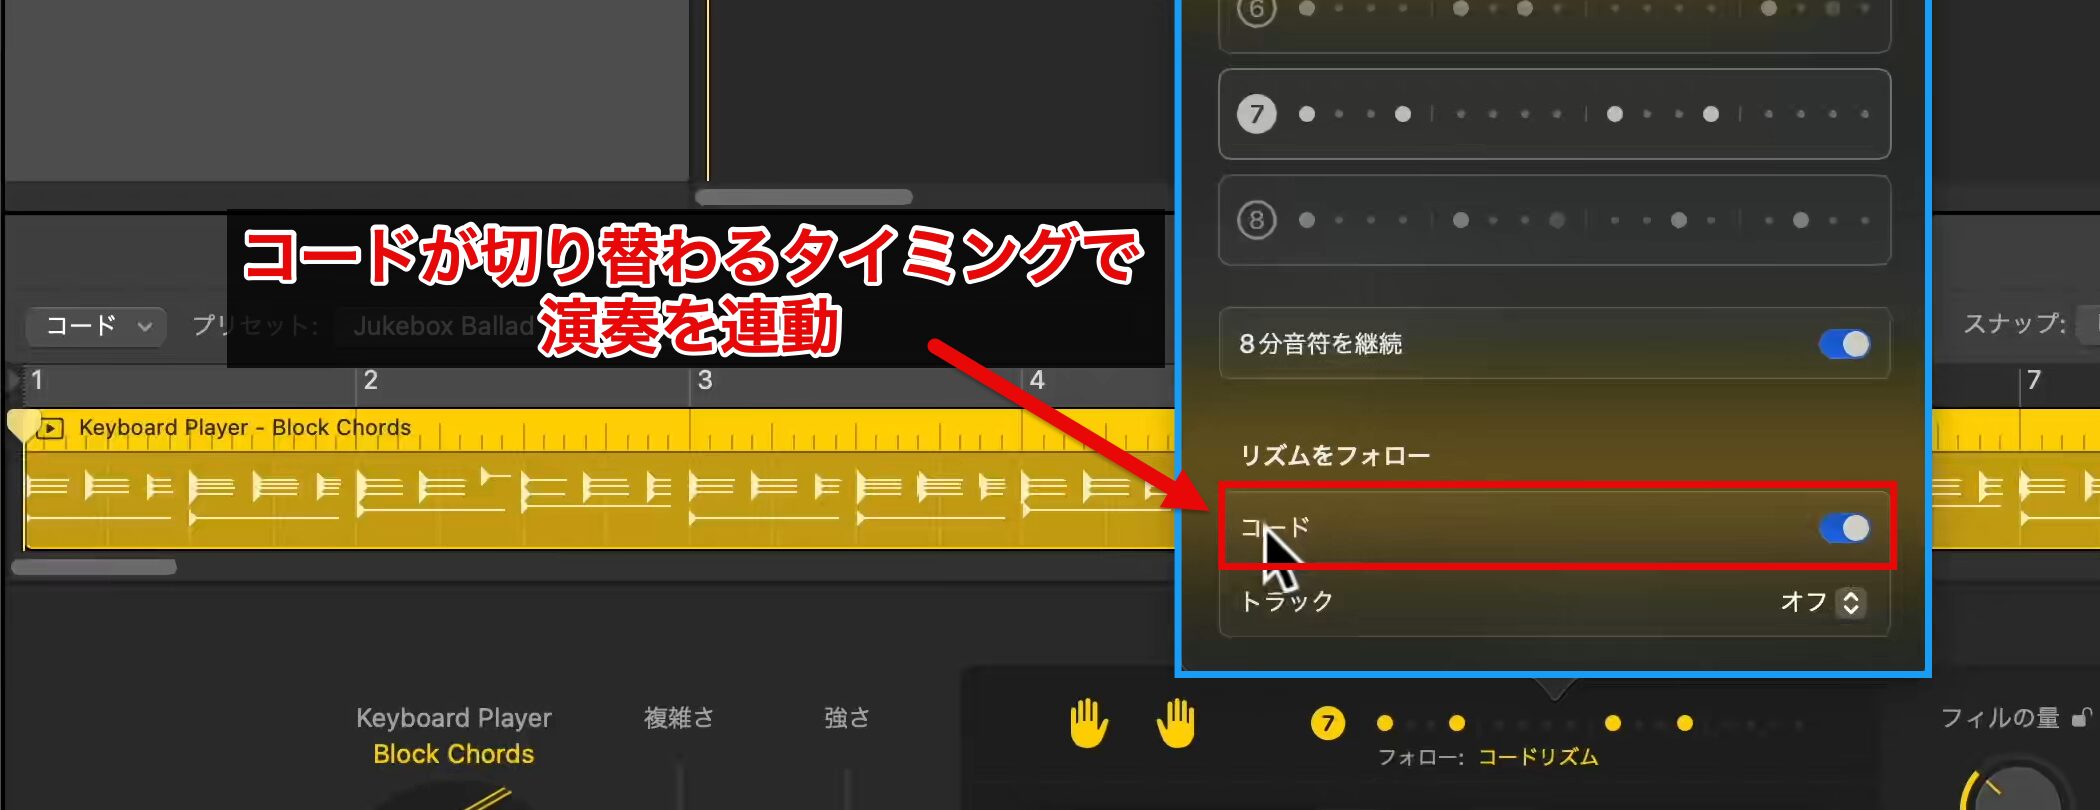
Next, enable "Chords," which makes the performance automatically follow changes in the chord progression.
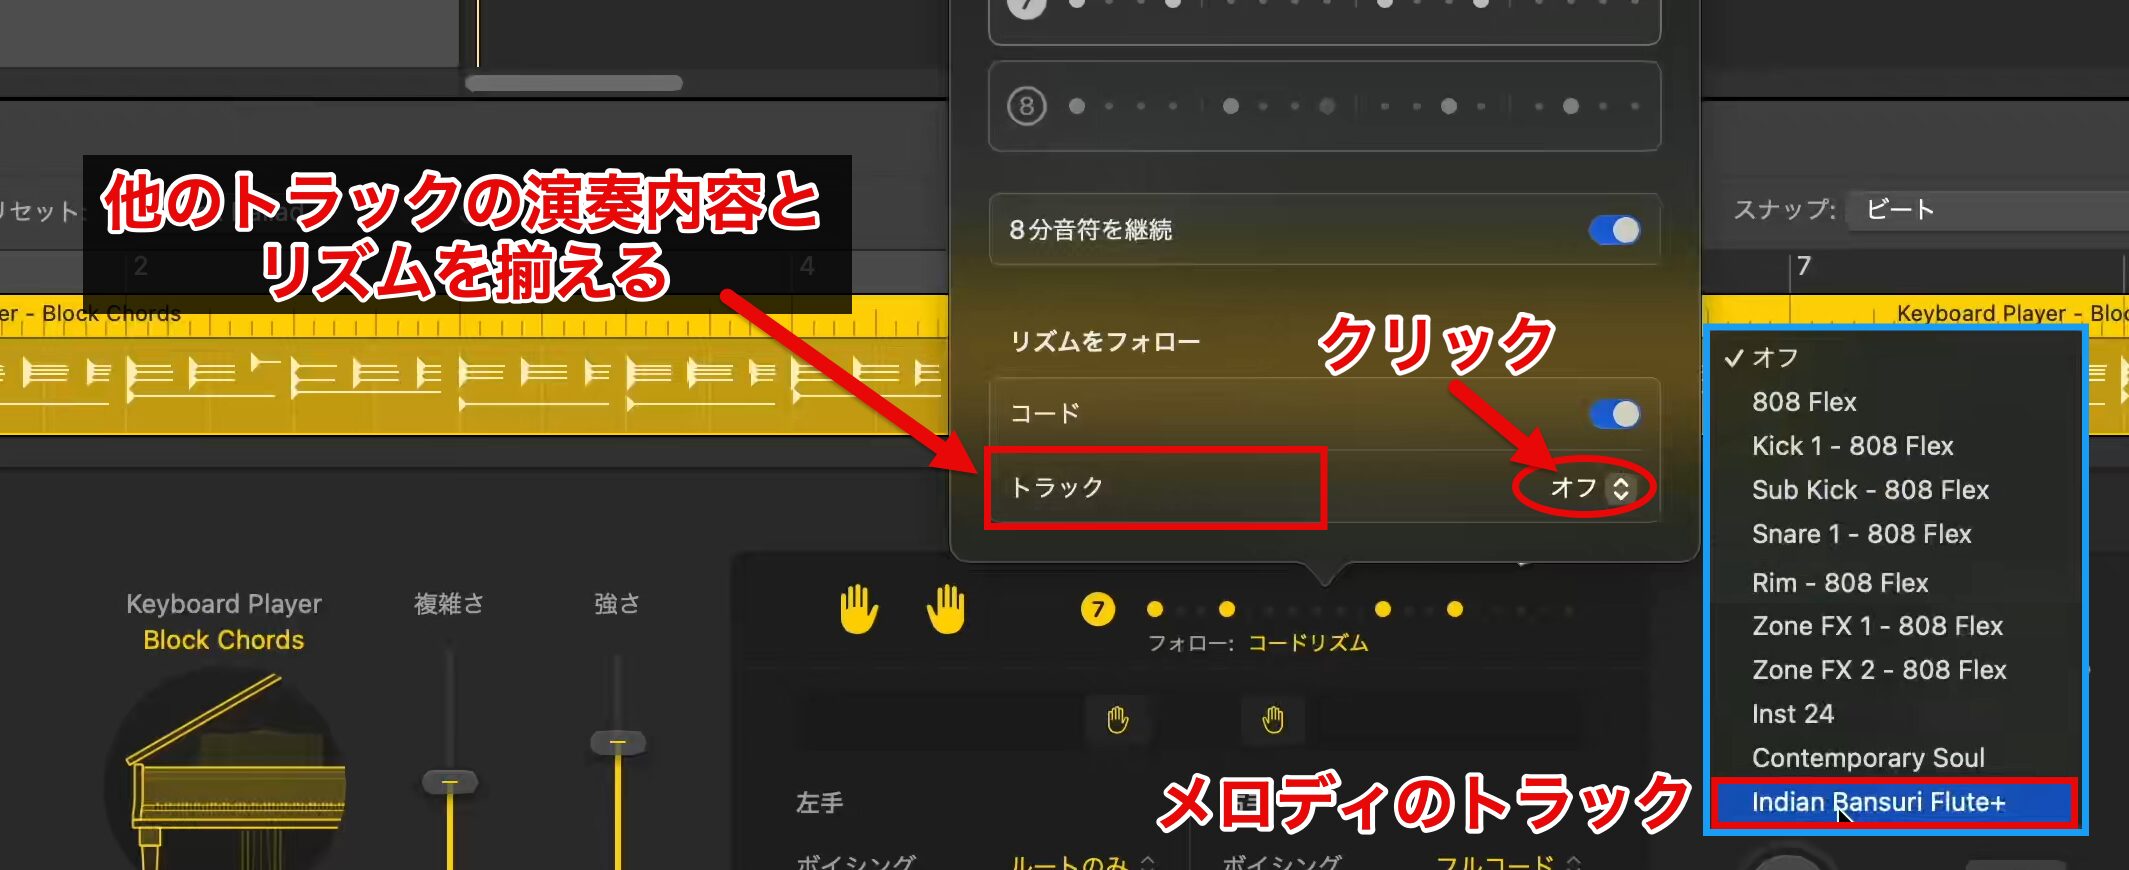
"Track" lets you sync with the performance and rhythm of another selected track.
Click the area marked "Off" to show the track list, and select the track whose rhythm you want to match.
As a test, let's listen to the rhythm matched to the melody.
In this way, with the Track function, even when several phrases overlap and the song lacks cohesion, you can easily create a sense of unity.
This time we want it to play an independent rhythm, so we turn the Track function off and continue.
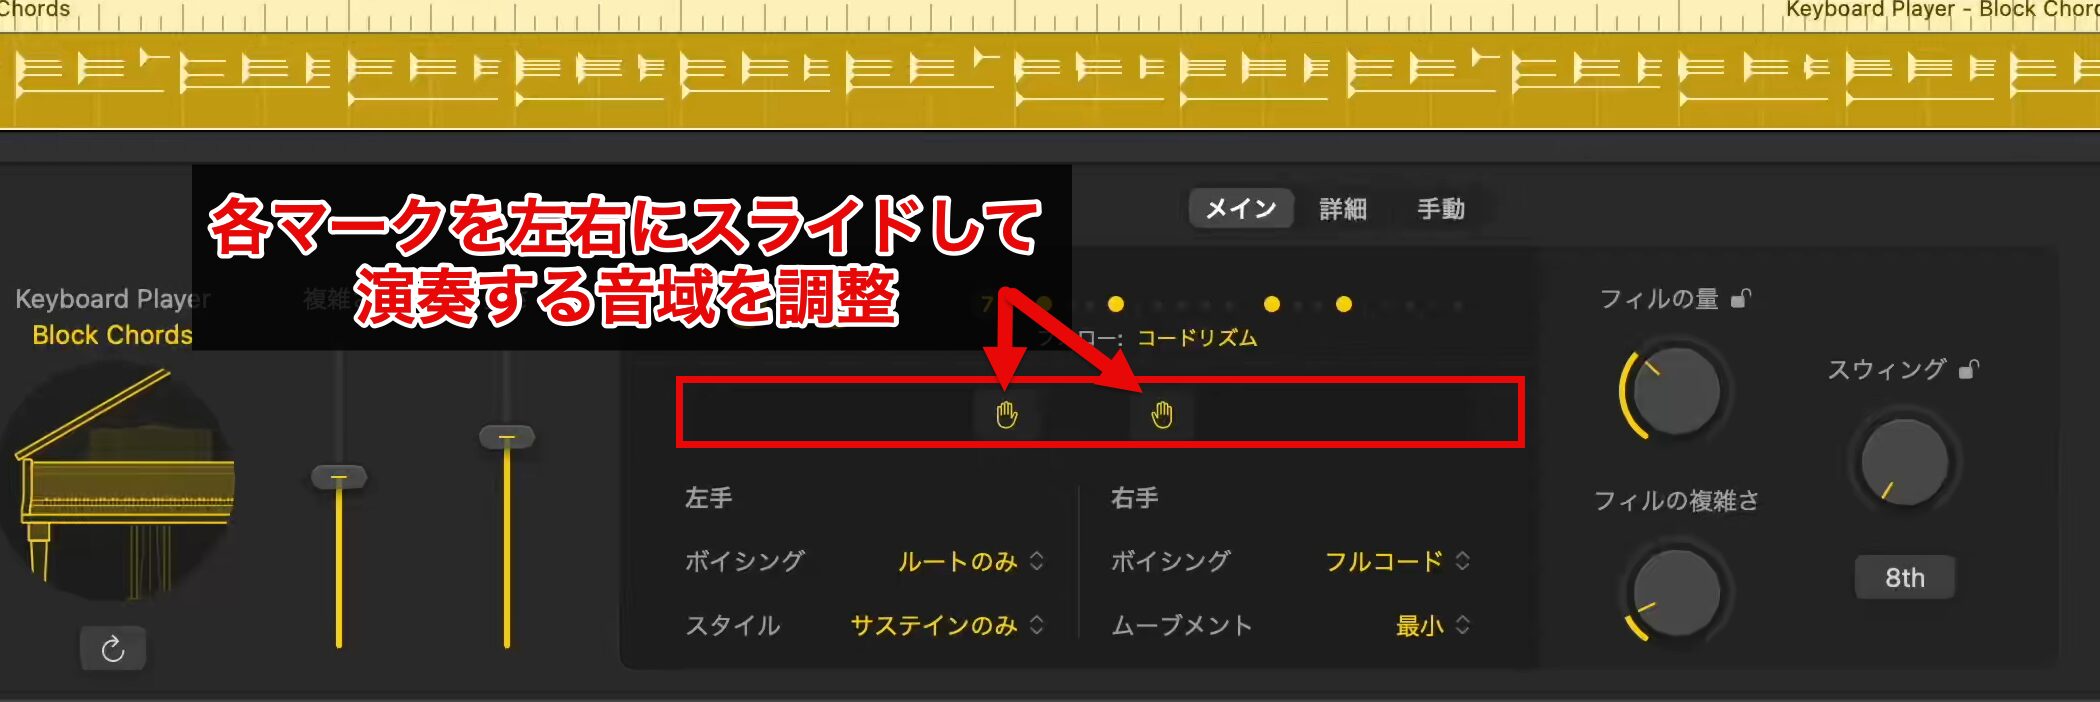
The track we created feels a little flashy within the whole song, so we lower its range for a calmer sound.
To change the range, use the slider with the "both hands" icon in the center of the screen.
- Slide left: plays in a lower range
- Slide right: plays in a higher range
Simply dragging the slider lets it play in a different range.
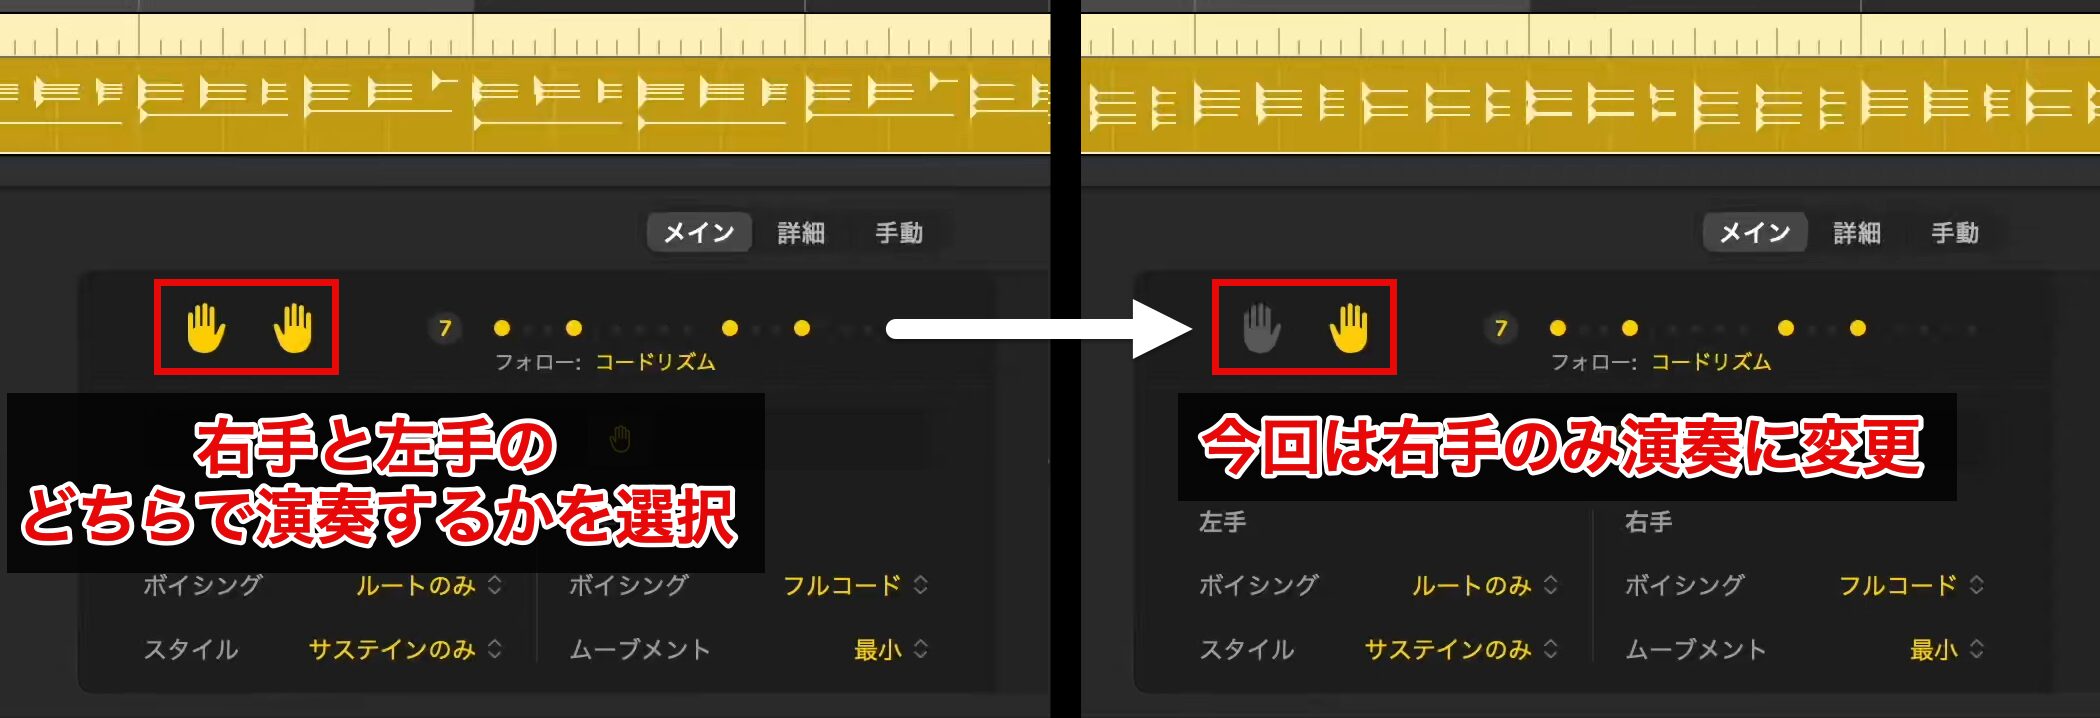
The "both hands" icon at the top left of the slider lets you choose which hands (left and right) are used for the performance.
This time, lowering the right-hand range made the overall piano sound a little heavy, so we adjust it by removing the left-hand part.
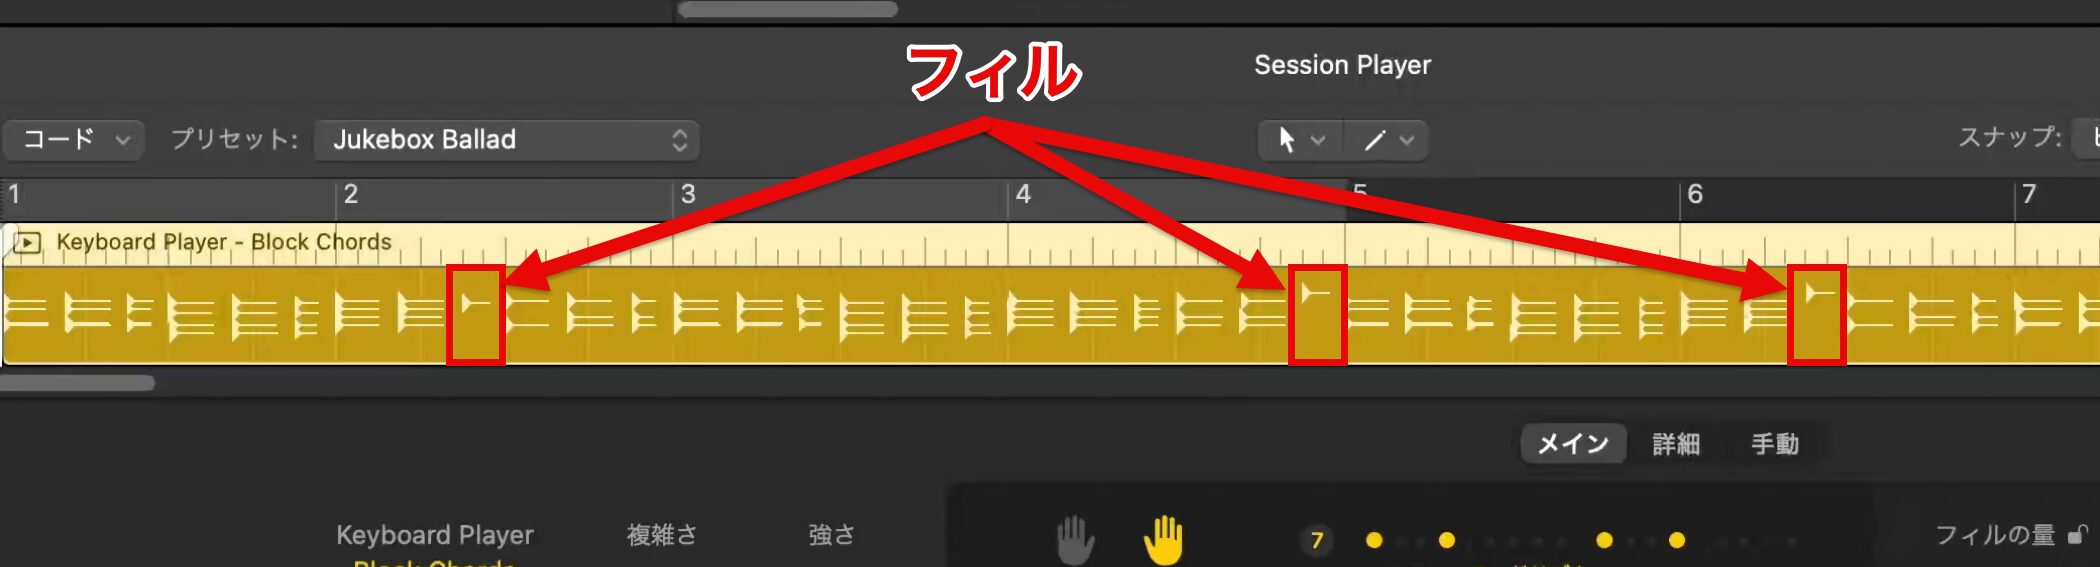
Right now, some phrases have fewer notes in their chords, so the sound feels a little thin.
These changing sections are called "fills," and their role is to build excitement in the song.
This time we want to keep a consistent fullness, so we adjust the fills.
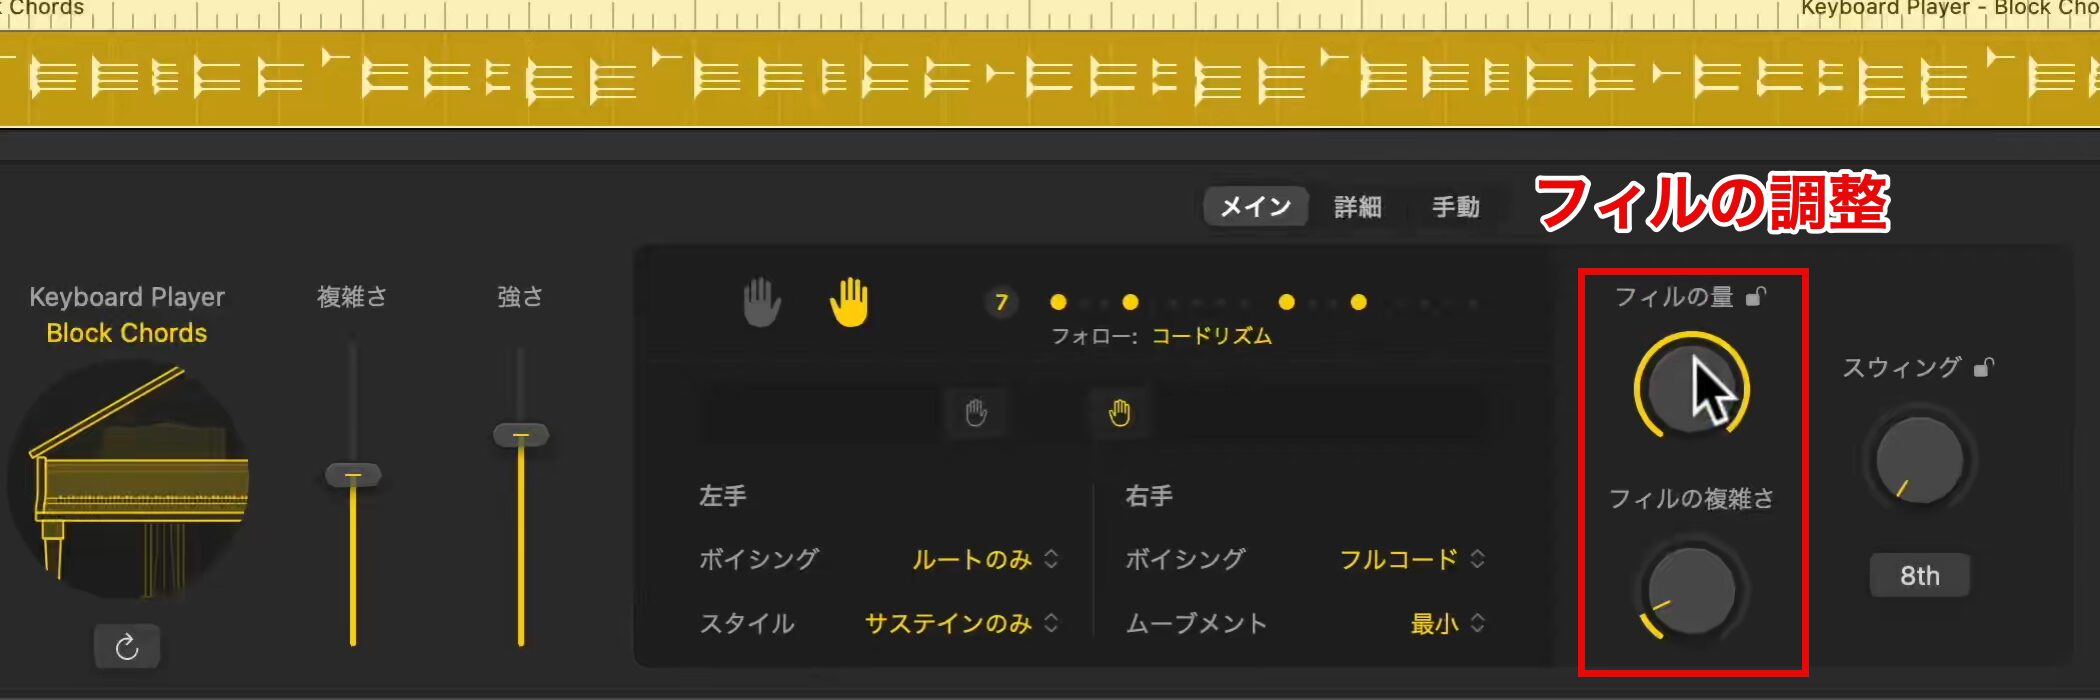
Fills can be adjusted with the "Fill Amount" and "Fill Complexity" knobs on the right side of the screen.
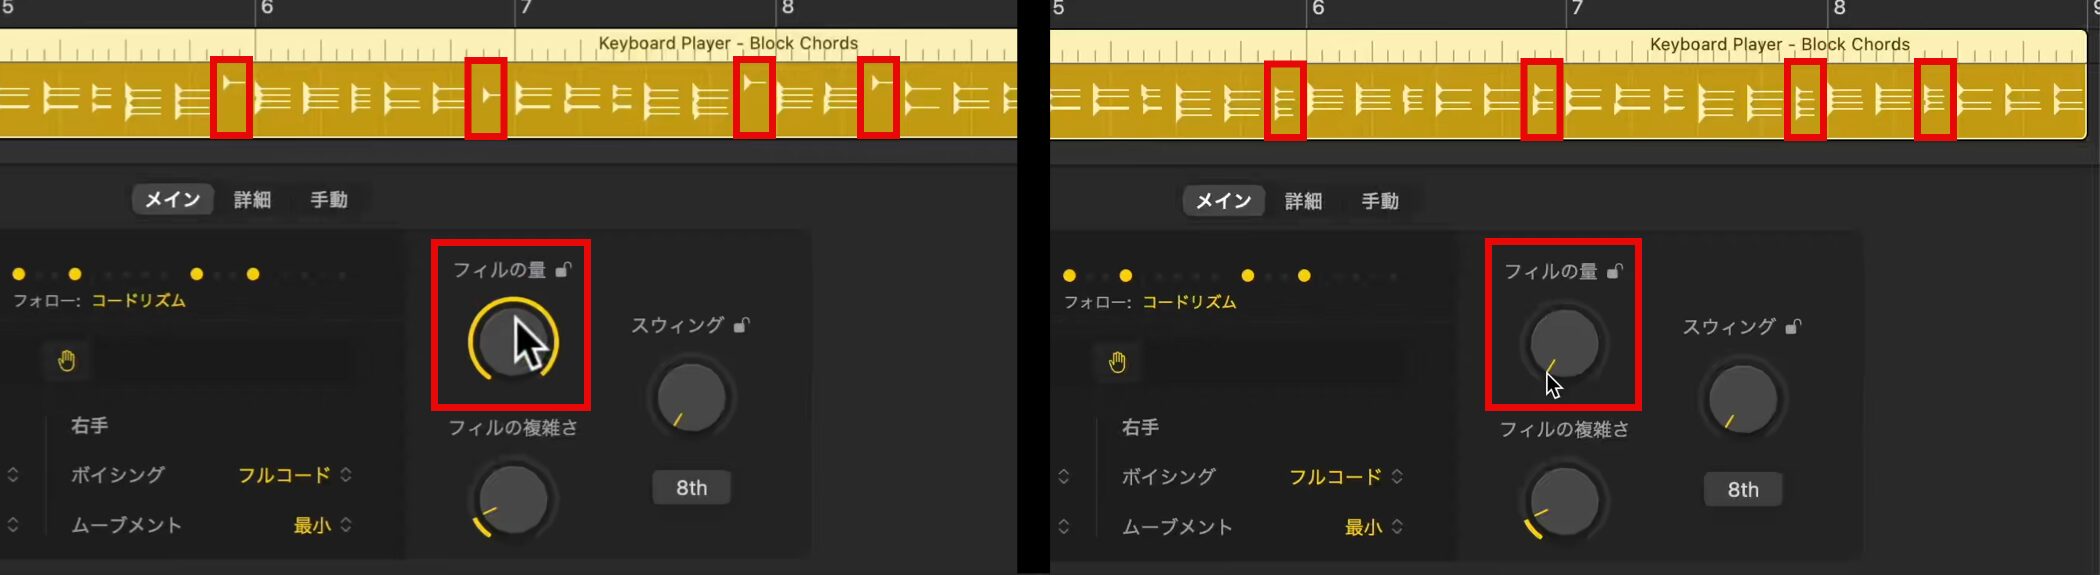
Raising Fill Amount makes fills more frequent; setting it to the minimum removes the fills so that only the accompaniment repeats.
Splitting and Setting Session Player Regions

Next, we split the Session Player region to vary the movement of the rhythm.
First, use the Scissors tool to split the region where you want a change.
Then change the settings for each split region.
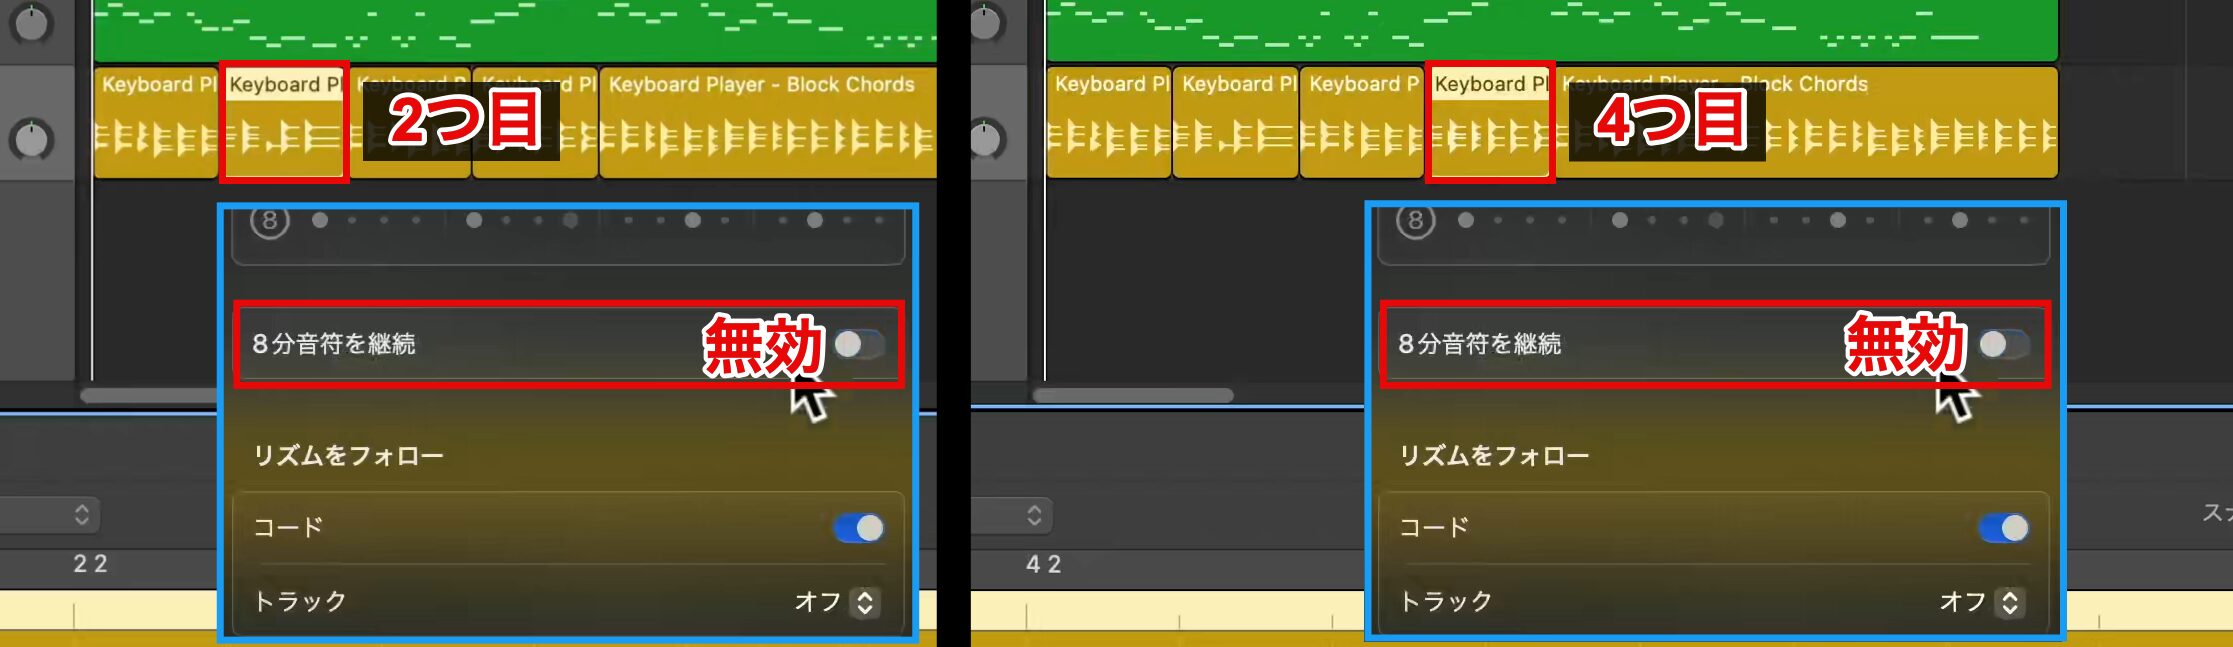
This time, we disable the continuous eighth notes option on the second and fourth regions.
Alternating between the patterns turned a monotonous impression into one with movement.
Converting to MIDI Regions and Editing
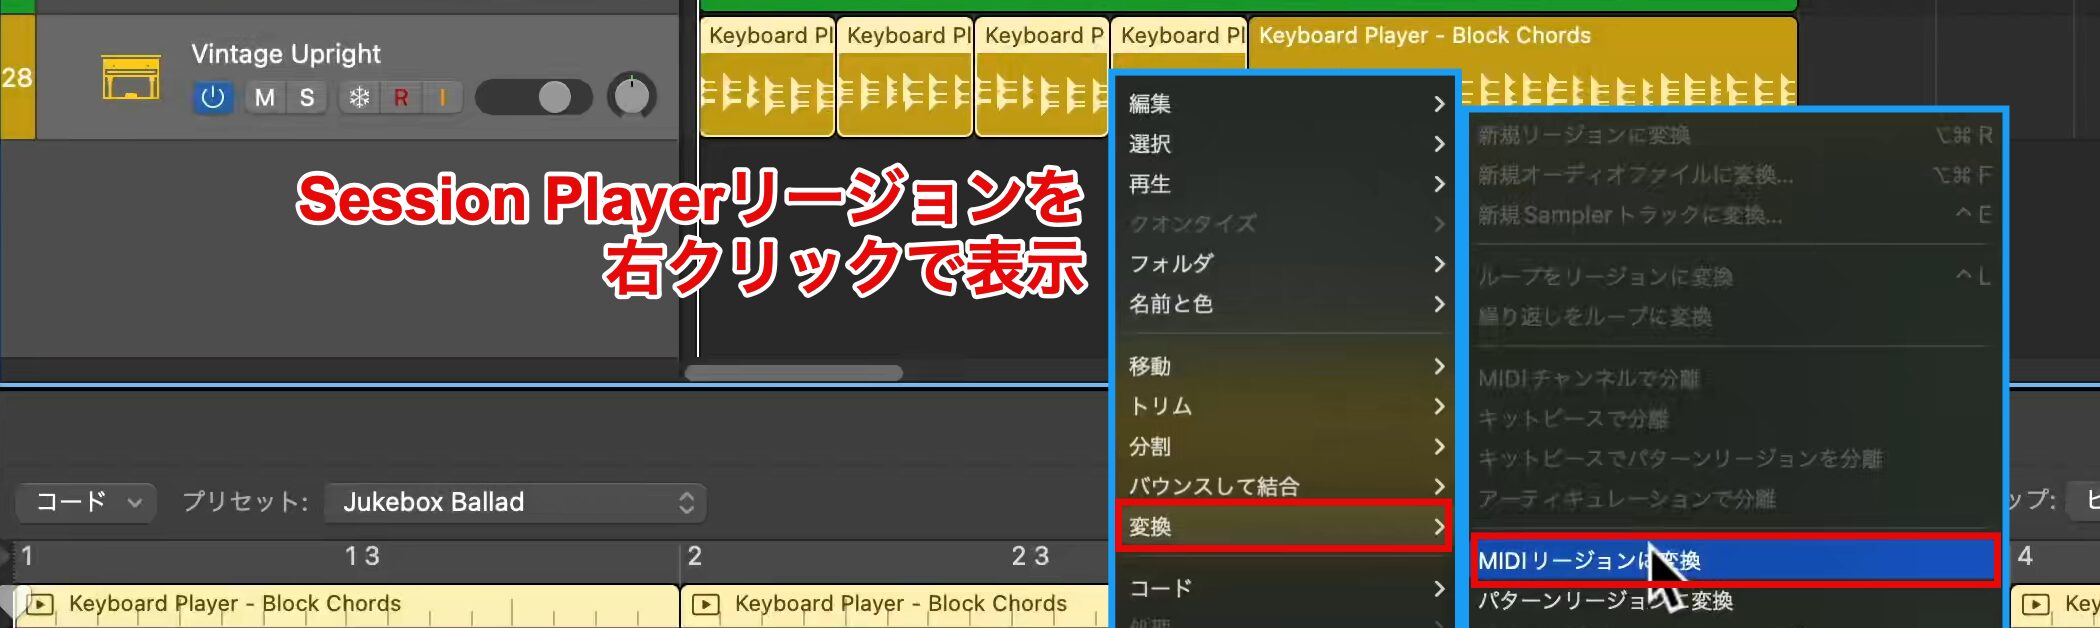
With the rhythm nearly finished, we want to adjust the pitches in more detail, but notes cannot be edited manually in a Session Player region.
So right-click the Session Player region and choose "Convert to MIDI Region" from "Convert."
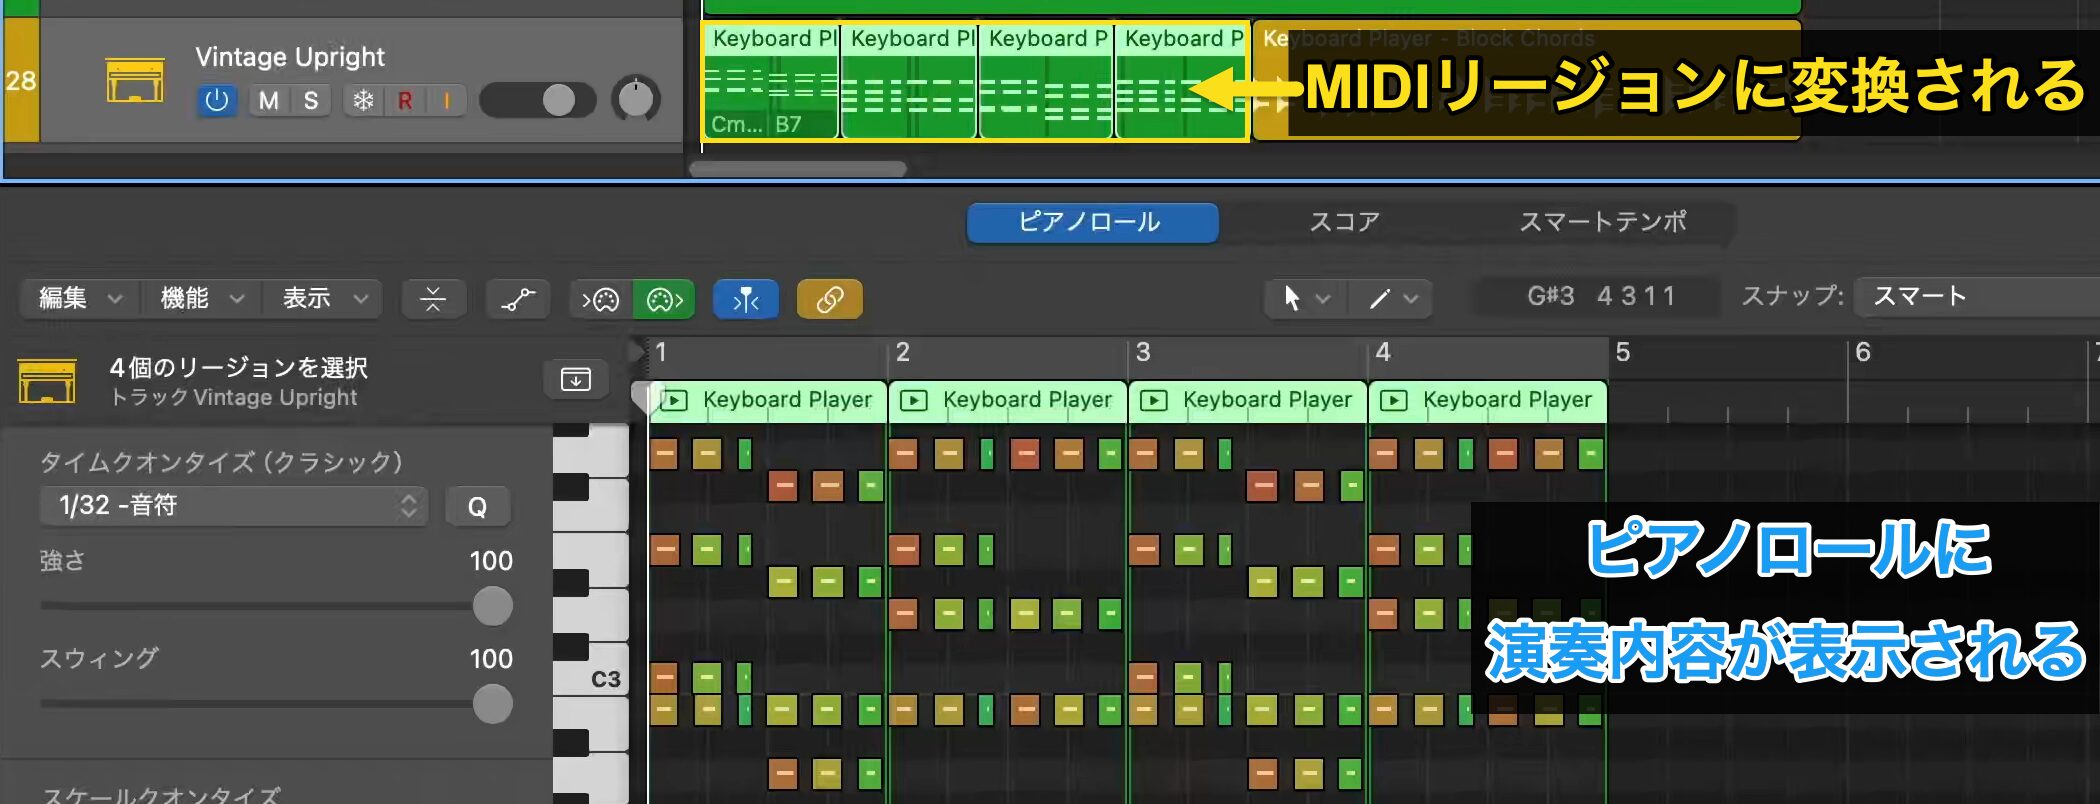
The performance now appears in the Piano Roll and can be edited.
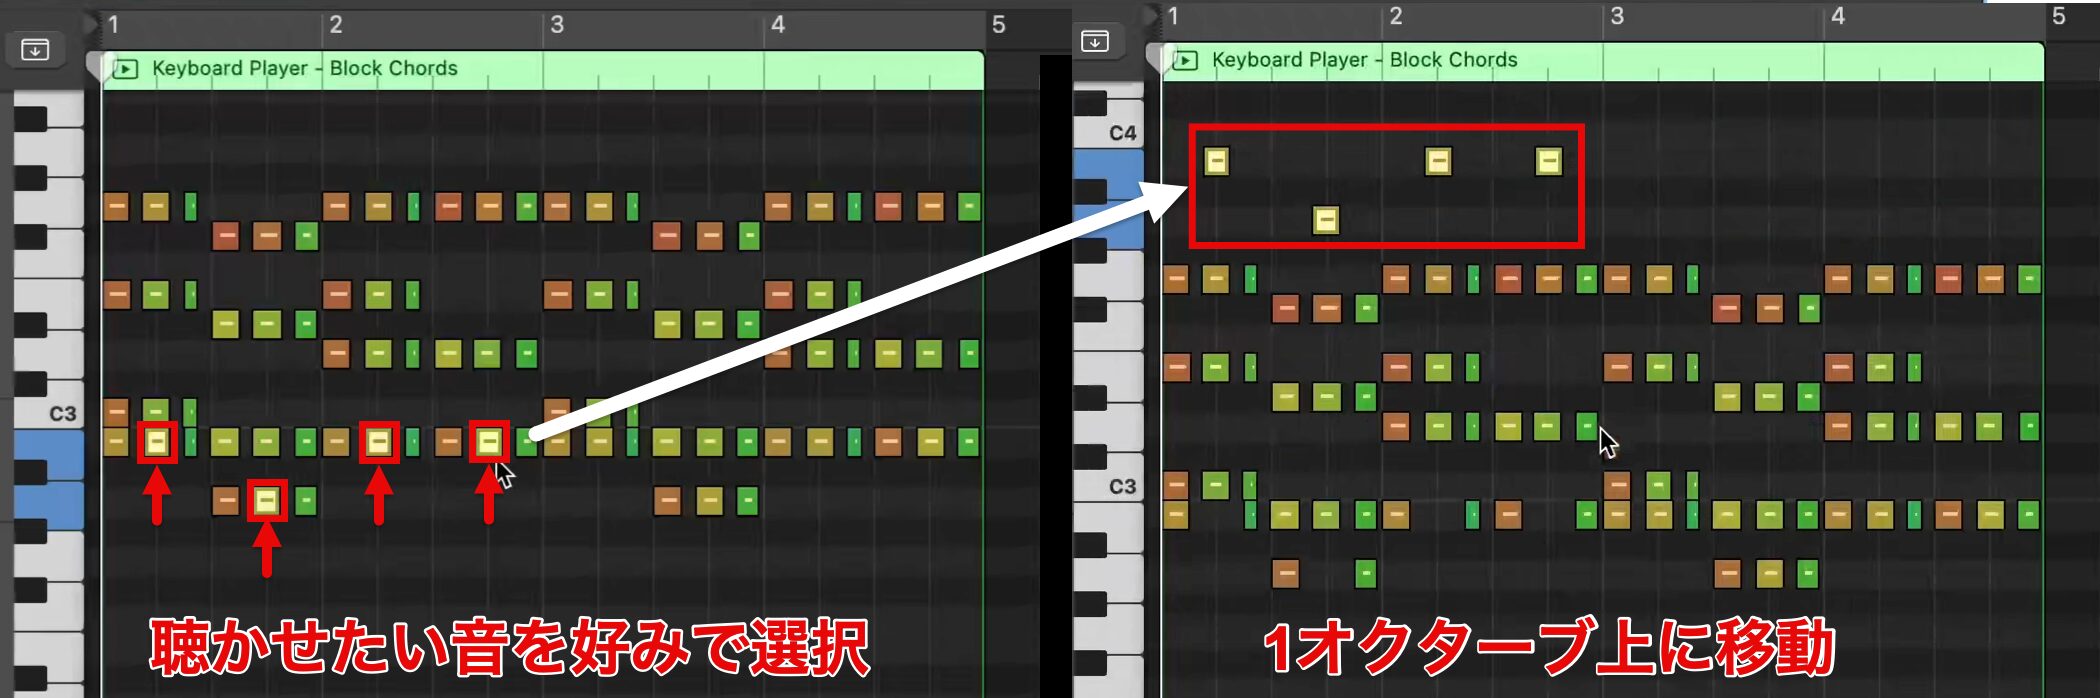
Chords are played with multiple notes stacked, and you can freely change the order in which the notes are stacked.
In particular, the highest note is heard most clearly, so choose which note to put on top according to your taste.
Raise the chosen note by an octave, and repeat the same steps to adjust.
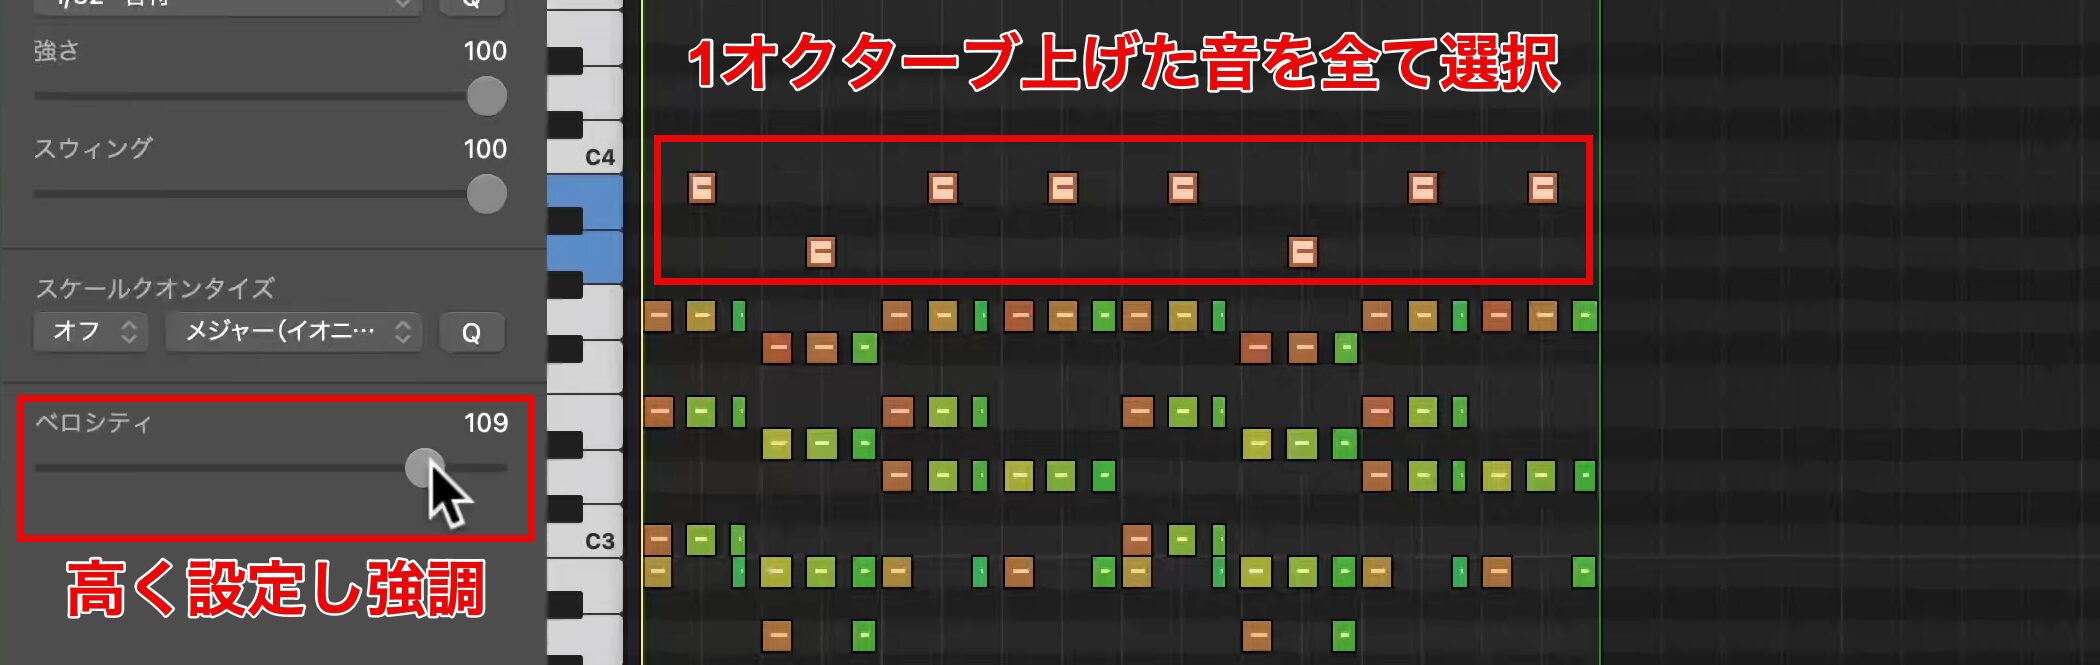
When you finish adjusting, select the changed notes and set a higher velocity to emphasize them further.
Changing the Sound and Effects
The performance is now complete, so next we change the sound.
A piano sound is currently set, but we already use piano for the chords entered first, so let's look for a different sound in the Library to avoid overlap.
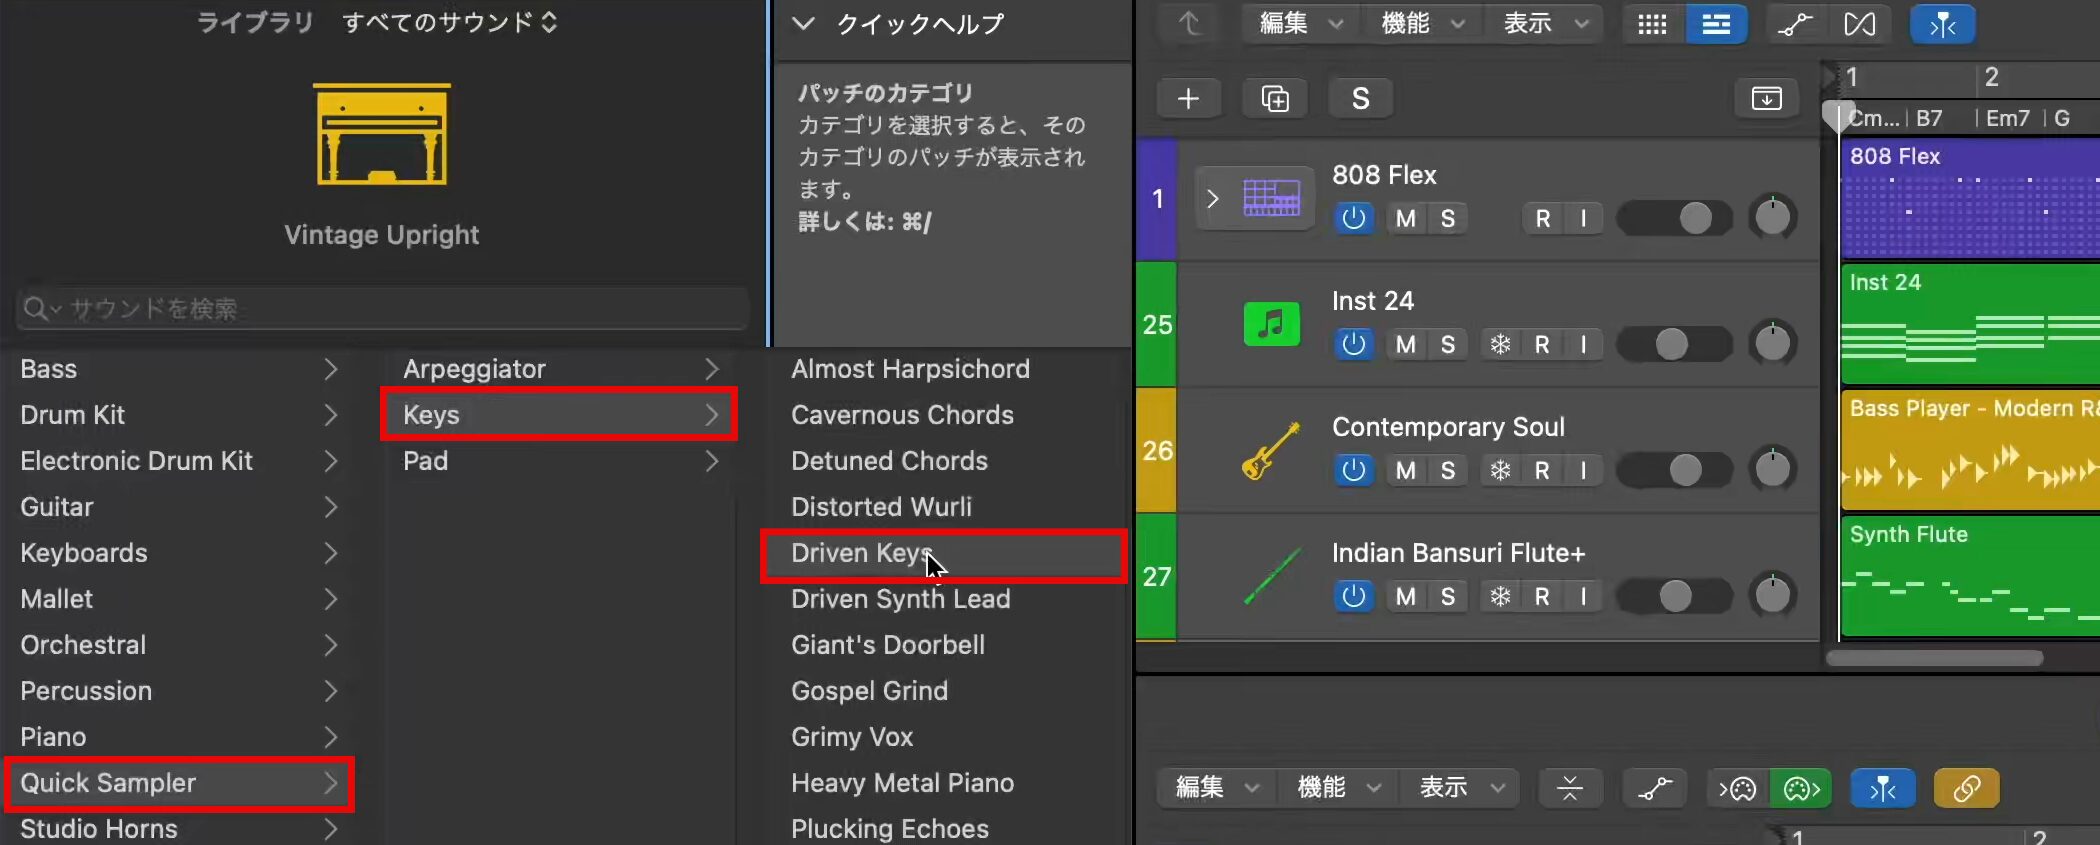
This time, we choose presets for the instrument called "Quick Sampler," which is lightweight and includes modern presets.
In the "Keys" category, we like the sound of "Driven Keys," but felt we wanted a little less distortion.
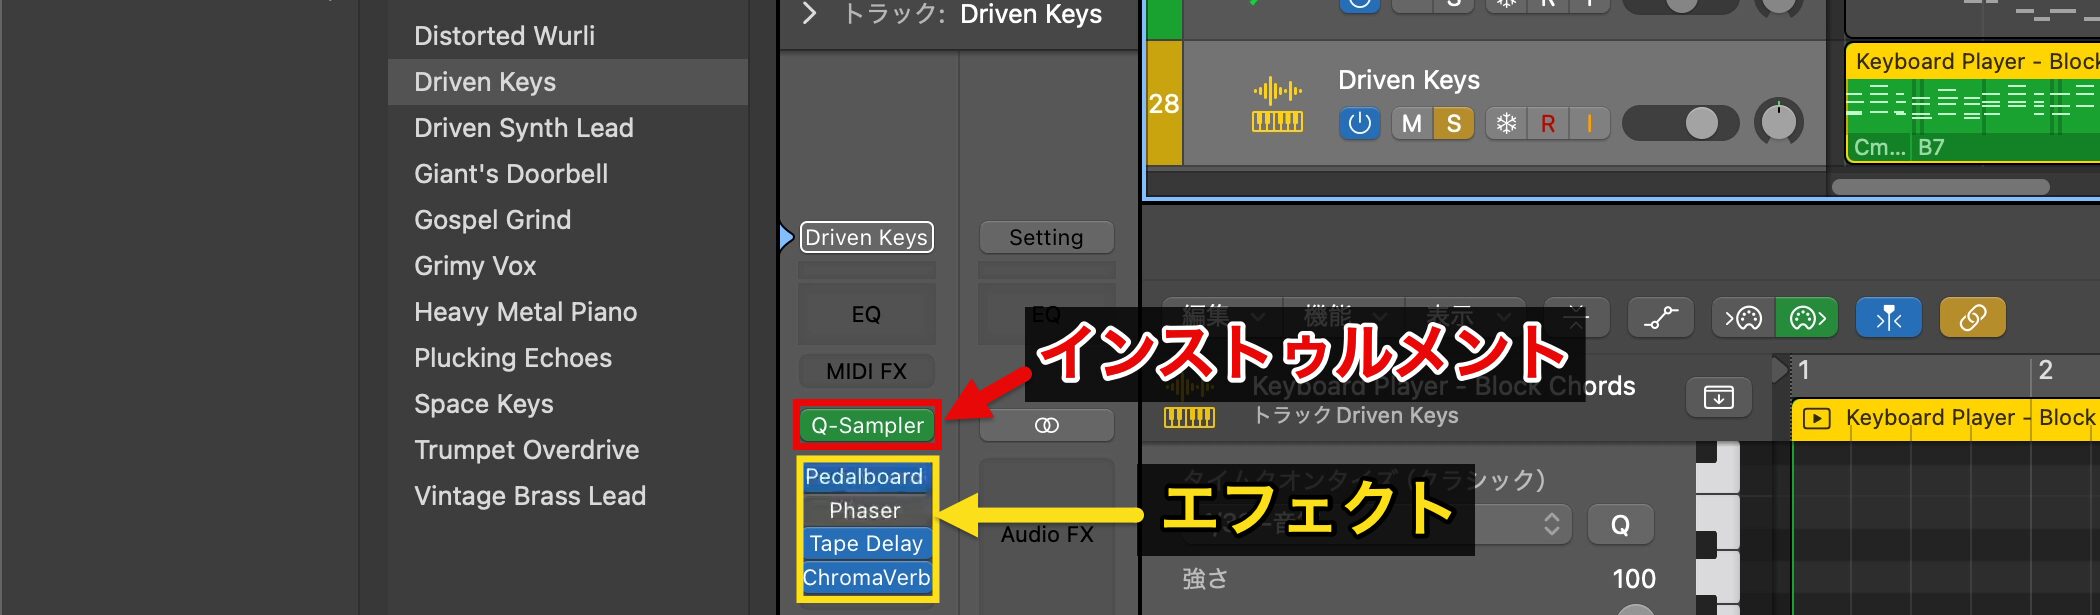
A sound preset chosen in the Library is played by the "Instrument" shown in the Inspector.
The sound is then processed in the "Effects" section below it, and together these create a single sound.
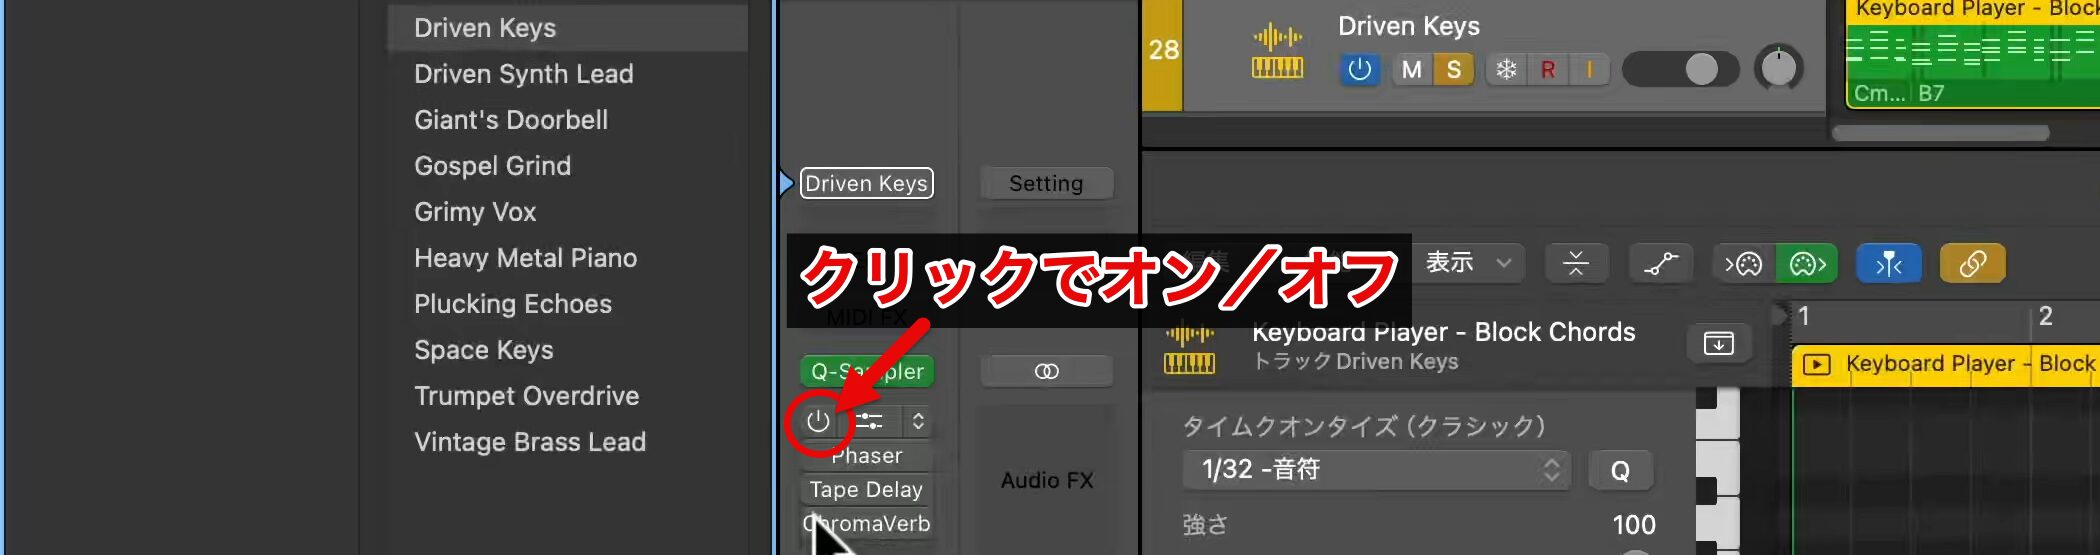
Click the power button at the left end of each device to switch it on or off.
Let's listen with all the effects turned off.

The distortion that bothered us is gone, so we turn the effects back on one by one and use only the ones we need.
For heavily processed sounds, this procedure lets you get closer to a natural sound.

Finally, copy and paste the edited region into the second half and balance the levels across the whole song.
Frequently Asked Questions
Q1. Can I have the key of the melody adjusted automatically in Logic Pro with Session Player?
Yes. If you set the Pitch Source of a MIDI region to "Key," its performance automatically follows when you change the song's key. Session Player regions, on the other hand, follow the chord track, so they are adjusted automatically with the default settings.
Q2. How do I change the pitch of multiple regions all at once?
Hold down the Shift key to select multiple regions, then set the "Transpose" value in the "Region" section of the Inspector. For example, entering "-5" lowers all selected regions by five semitones. However, this cannot be used on Session Player regions.
Q3. How do I change the Keyboard Player's rhythm pattern?
Click the rhythm pattern number, such as "(4)," shown in the center of the Session Player settings to display the list of patterns. You can choose a pattern that matches the image of the song, and further adjust the fine rhythmic nuance with the continuous eighth notes option.
NEW ARTICLES
Latest English Articles











