
This article explains the full workflow for recording a melody in real time in Logic Pro 11, from choosing a sound to editing. By using features such as performance input with a MIDI keyboard, managing multiple takes, timing correction with quantize and combining takes, you can efficiently create high-quality melody lines regardless of your playing skills. It also introduces practical correction features such as "Capture as Recording" for when you forgot to record, packed with techniques useful for DTM beginners and experienced users alike.
Melody Production from Choosing a Sound to Recording and Editing

Miyakawa
This time, we explain how to enter a melody line in real time by playing a MIDI keyboard, and how to "tidy up" the performance after recording.
Even if you are not a skilled player, the correction functions let you enter phrases quickly, so please give it a try.
Melody MIDI Recording Video
Choosing a Sound
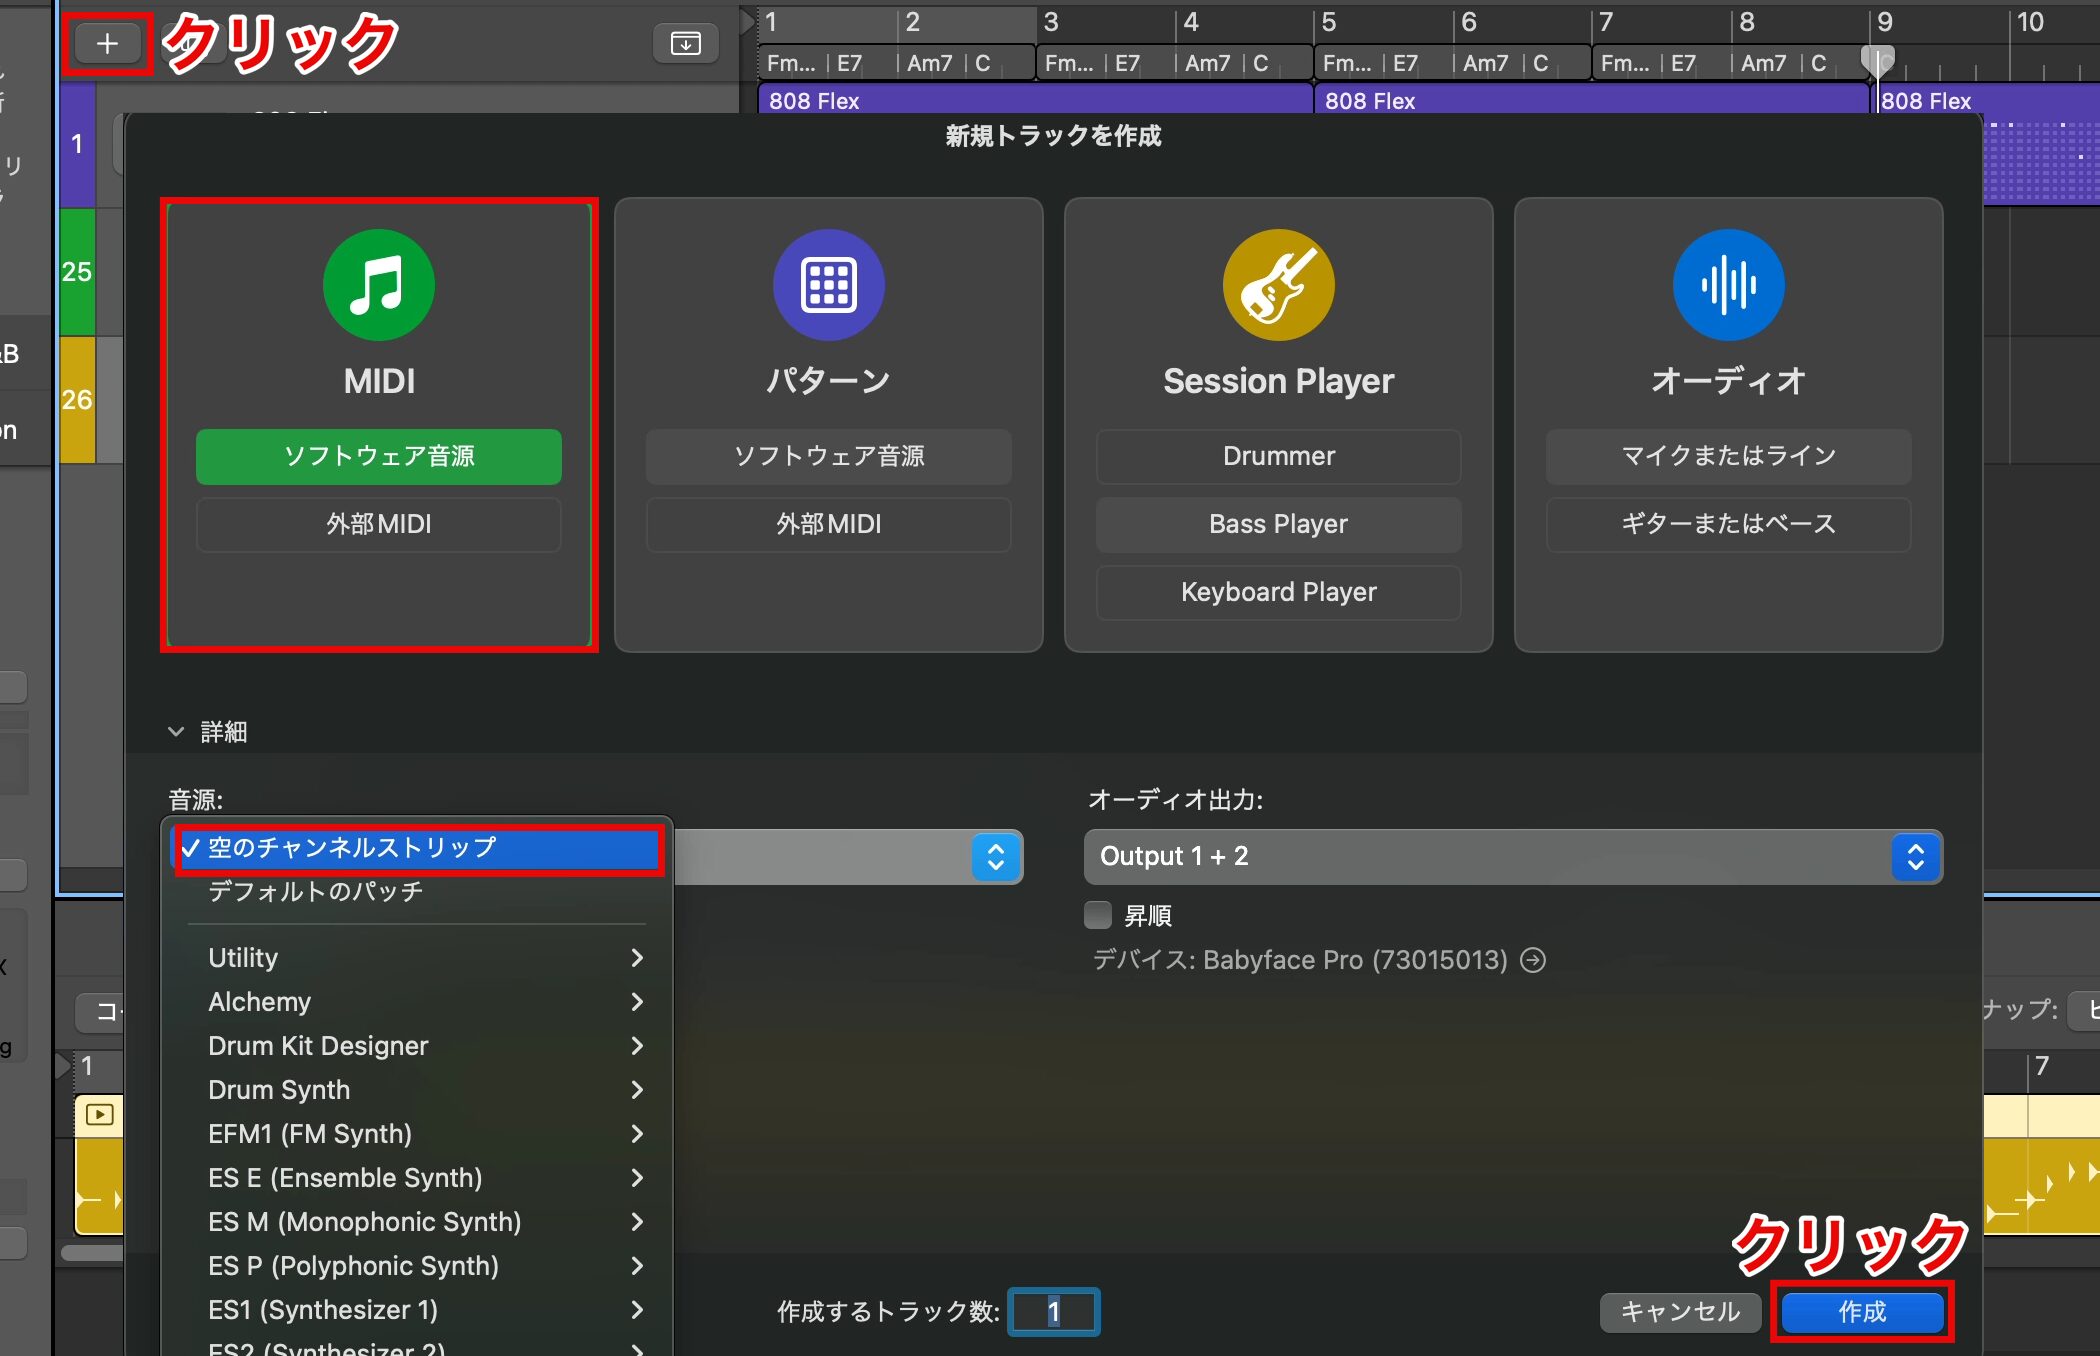
Now that the chords and accompaniment are done, the next step is entering the melody.
First, create a new track and choose "Software Instrument" for the MIDI track.
This time we want to take our time choosing the sound later, so we choose "Empty Channel Strip" as the instrument and click "Create."
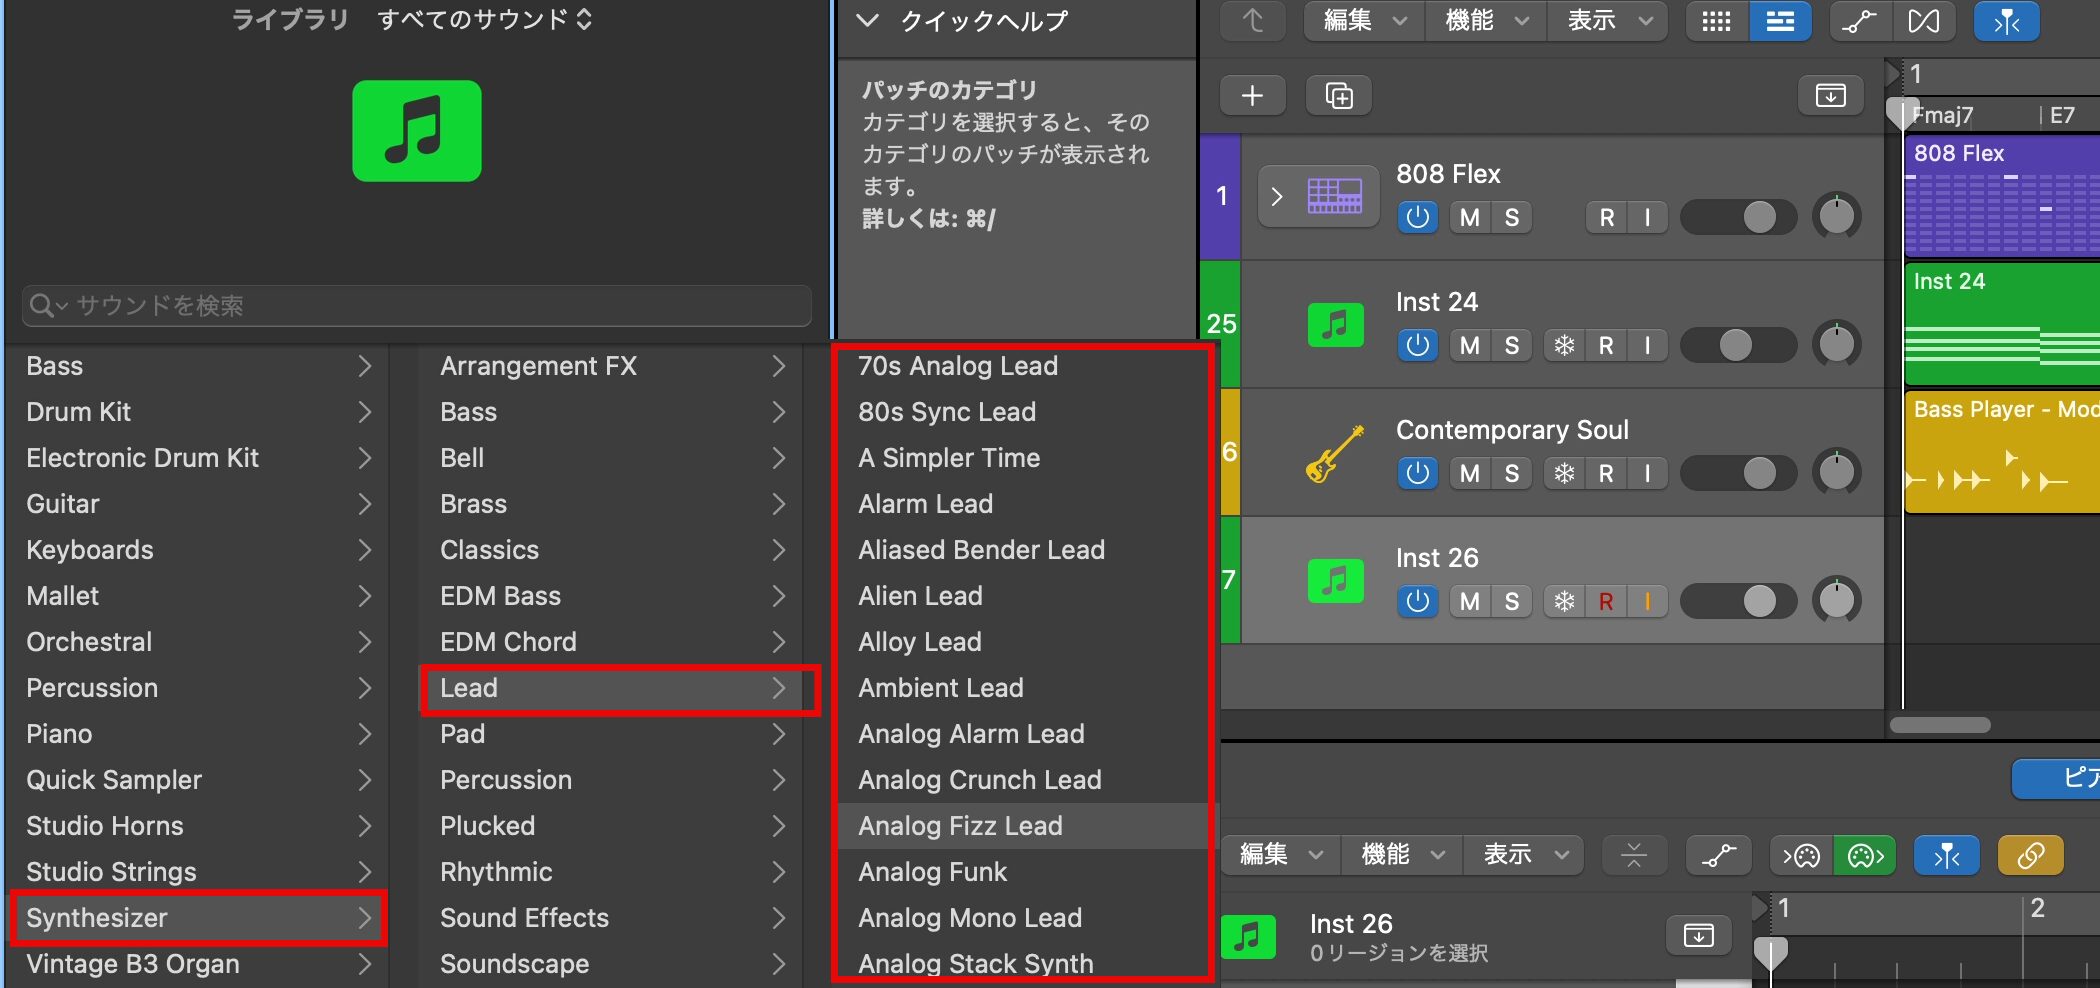
Next, choose "Lead" in the "Synthesizer" category of the Library, which suits melodies, and look for a sound.
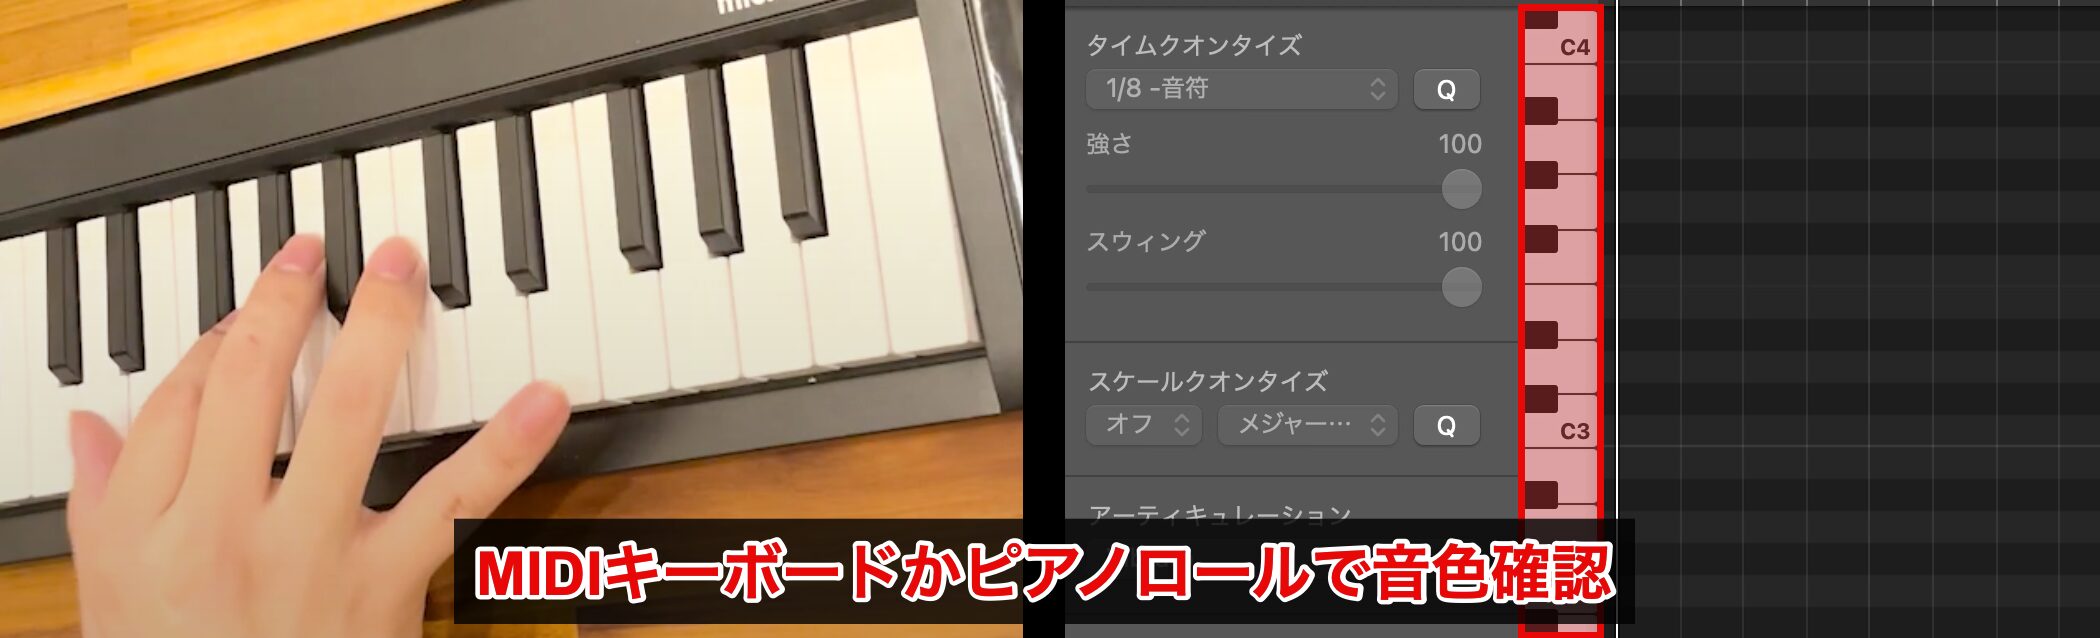
You can check the chosen sound by playing it on a MIDI keyboard or in the Piano Roll.
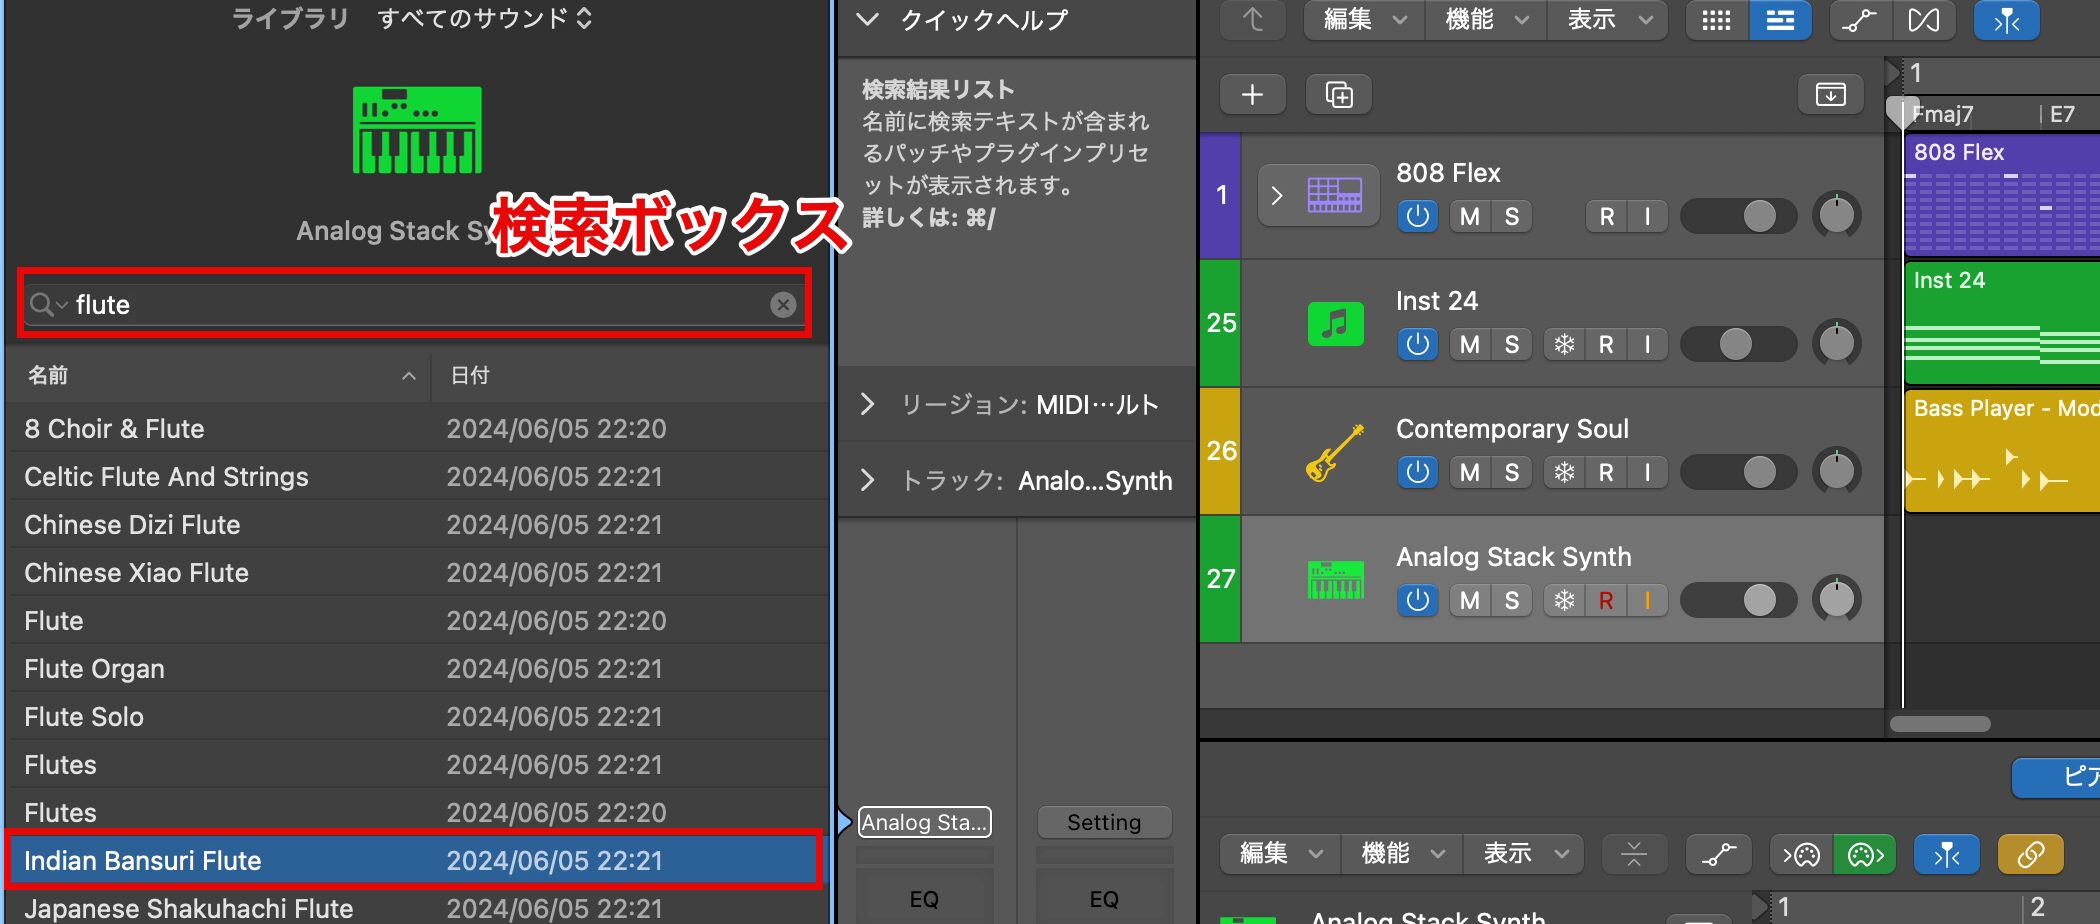
If you have a specific sound in mind, you can type text in the search box to look for it.
This time we want to create the melody with a flute sound, so we typed "flute" in the search box.
Flute sounds are listed, so choose the one you like.
MIDI Recording
If the melody phrase is not decided yet, you can record several phrases while playing the MIDI keyboard and choose the melody to use later.
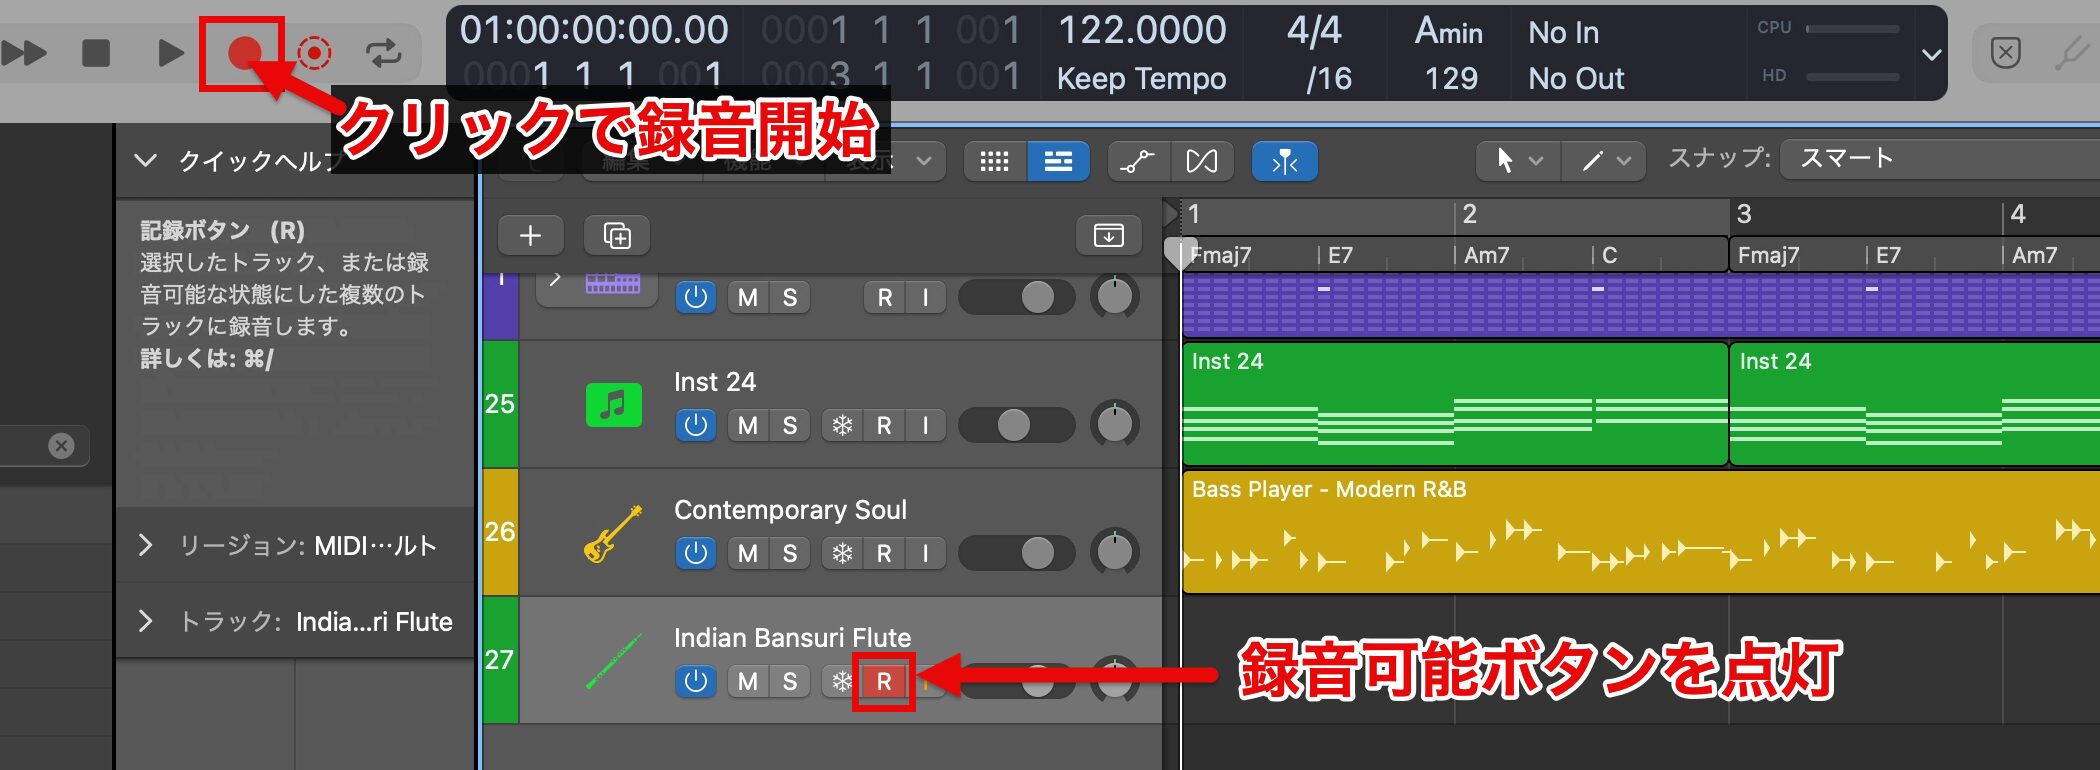
To record a performance in real time, turn on the track's Record Enable button to make it ready for recording.
Then press the Record button or the shortcut key R, and after a four-beat count-in, recording starts from the playhead position.
Stop recording with the Stop button or the Space bar.
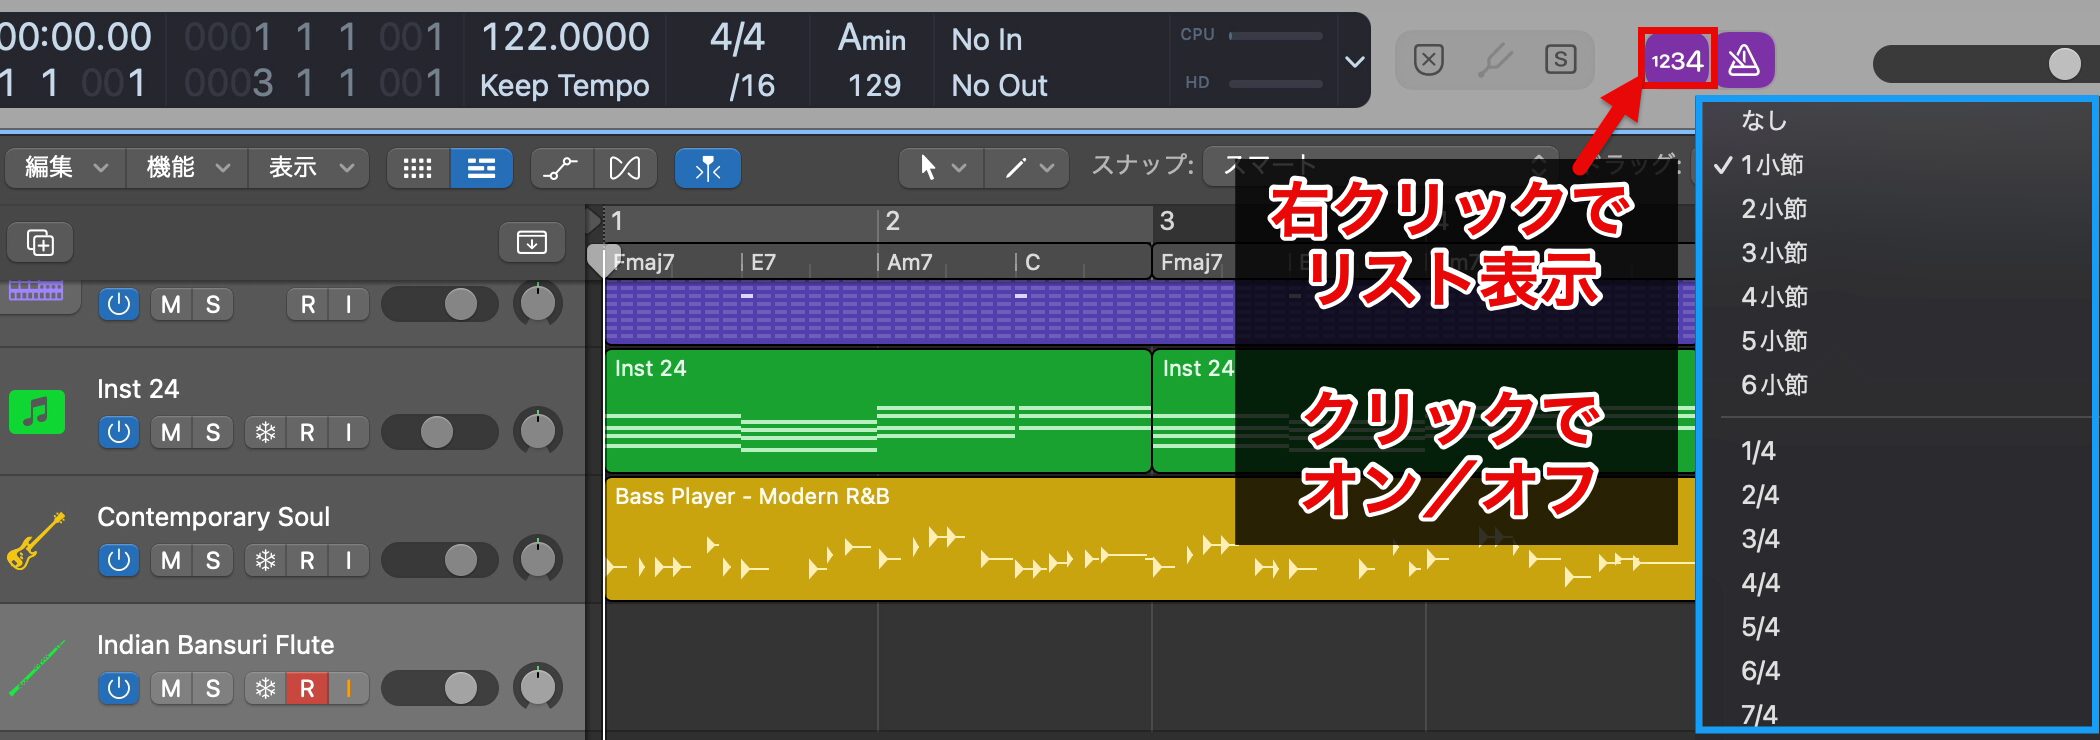
If you want to change the length of the count-in before recording, right-click the "Metronome Settings button" marked "1234" on the screen and choose the value you want from the list.
If you want more time before recording starts, it is a good idea to set a longer value, such as "2 bars."
You can also switch the count-in on (lit) or off (unlit) simply by clicking the Metronome Settings button.
Cycle Recording and Takes
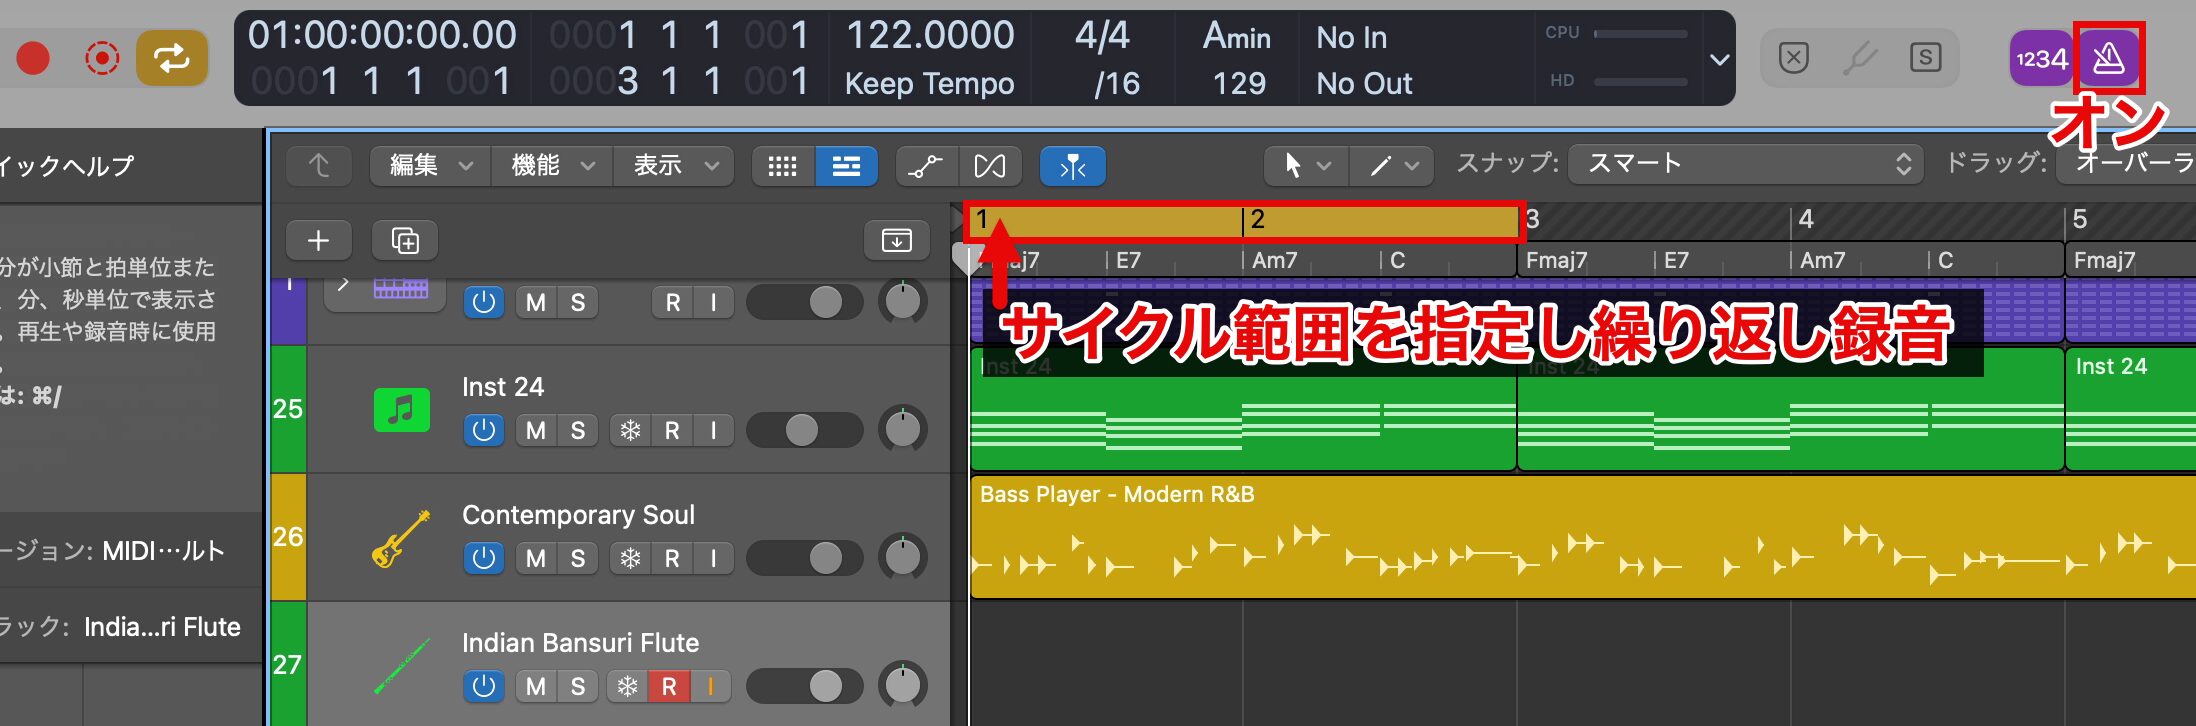
With the metronome active, let's actually record.
Even if a recording fails, you can easily return to the state before recording with "Undo" (Command-Z).
If you want to play repeatedly until you get a phrase you like, we recommend specifying a cycle range and recording that section repeatedly.
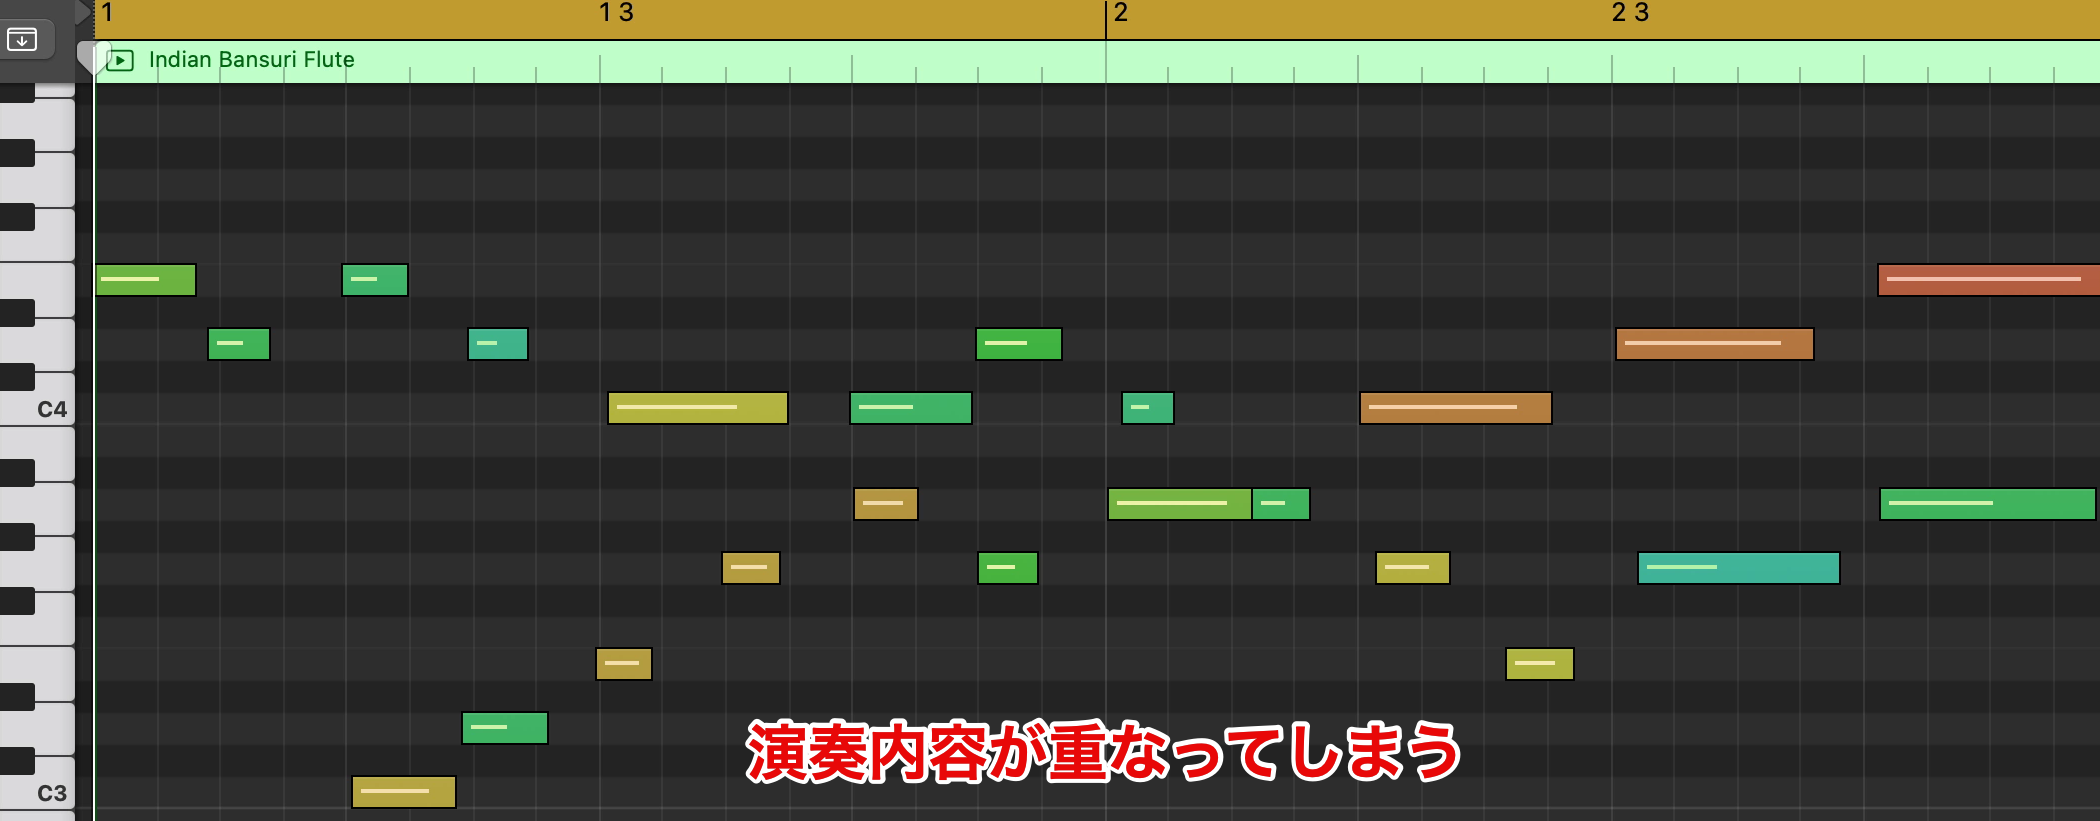
However, if you cycle record with the default settings, the repeatedly recorded performances are layered on top of each other.
So if you want to avoid overlap, you need to change the setting.
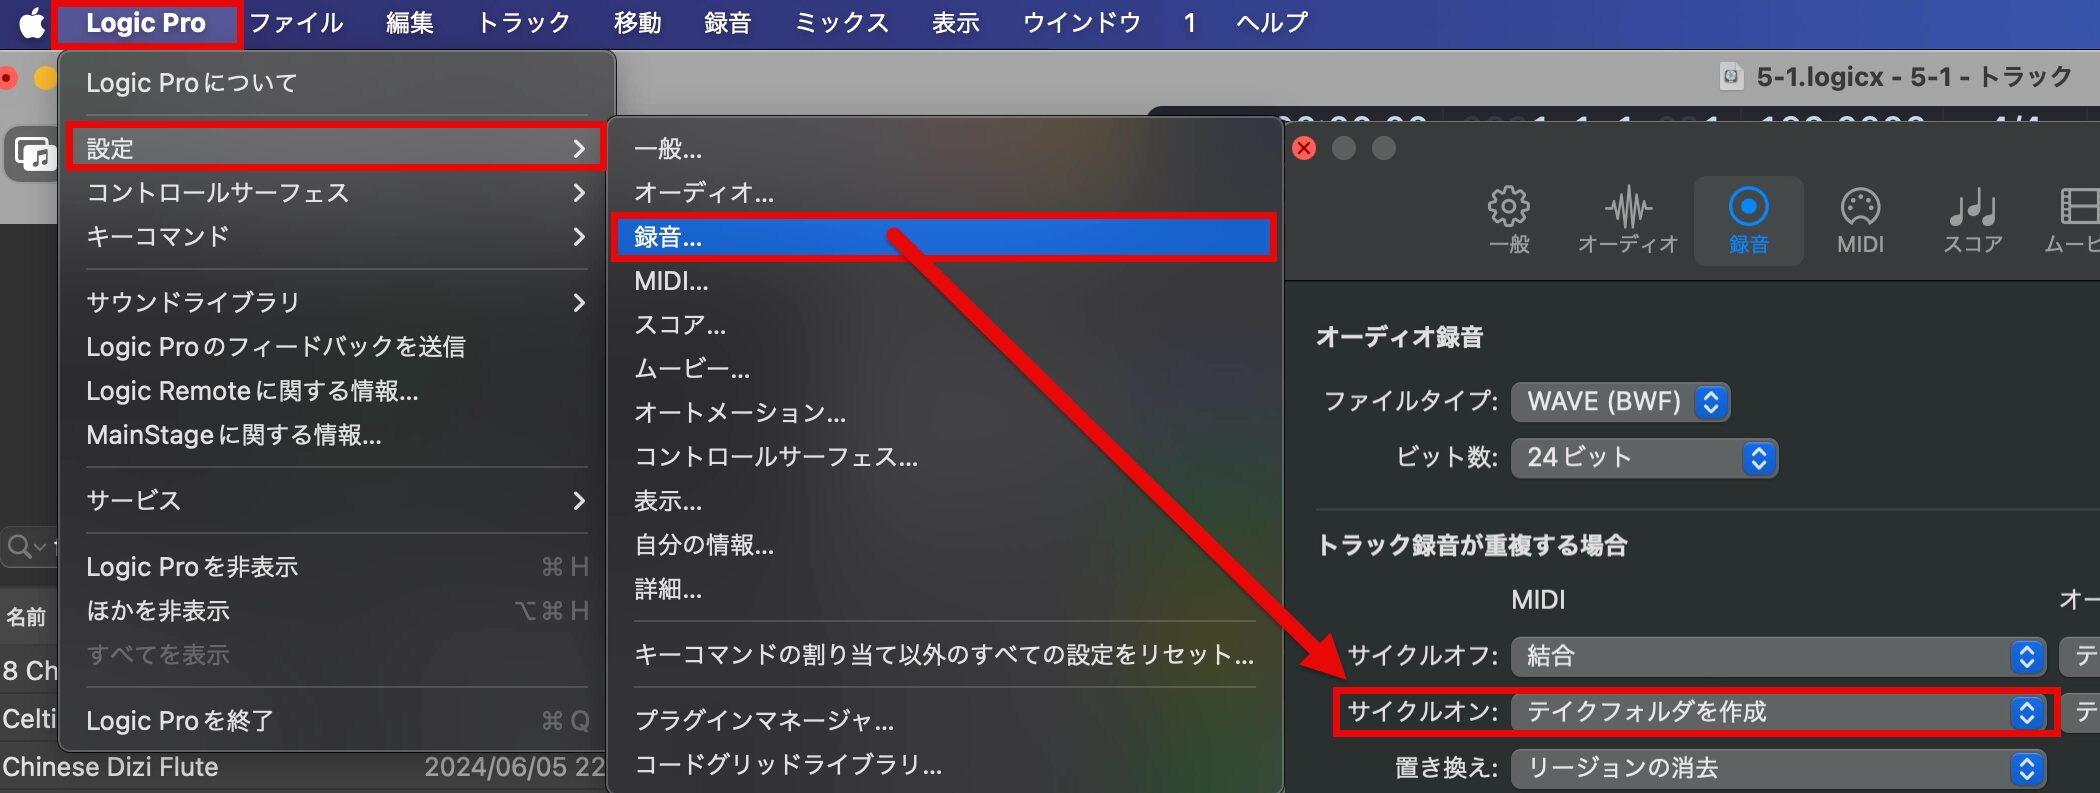
To record each pass into a separate region, open "Logic Pro" > "Settings" > "Recording" from the menu bar, and change the MIDI setting for when Cycle is on to "Create Take Folders."
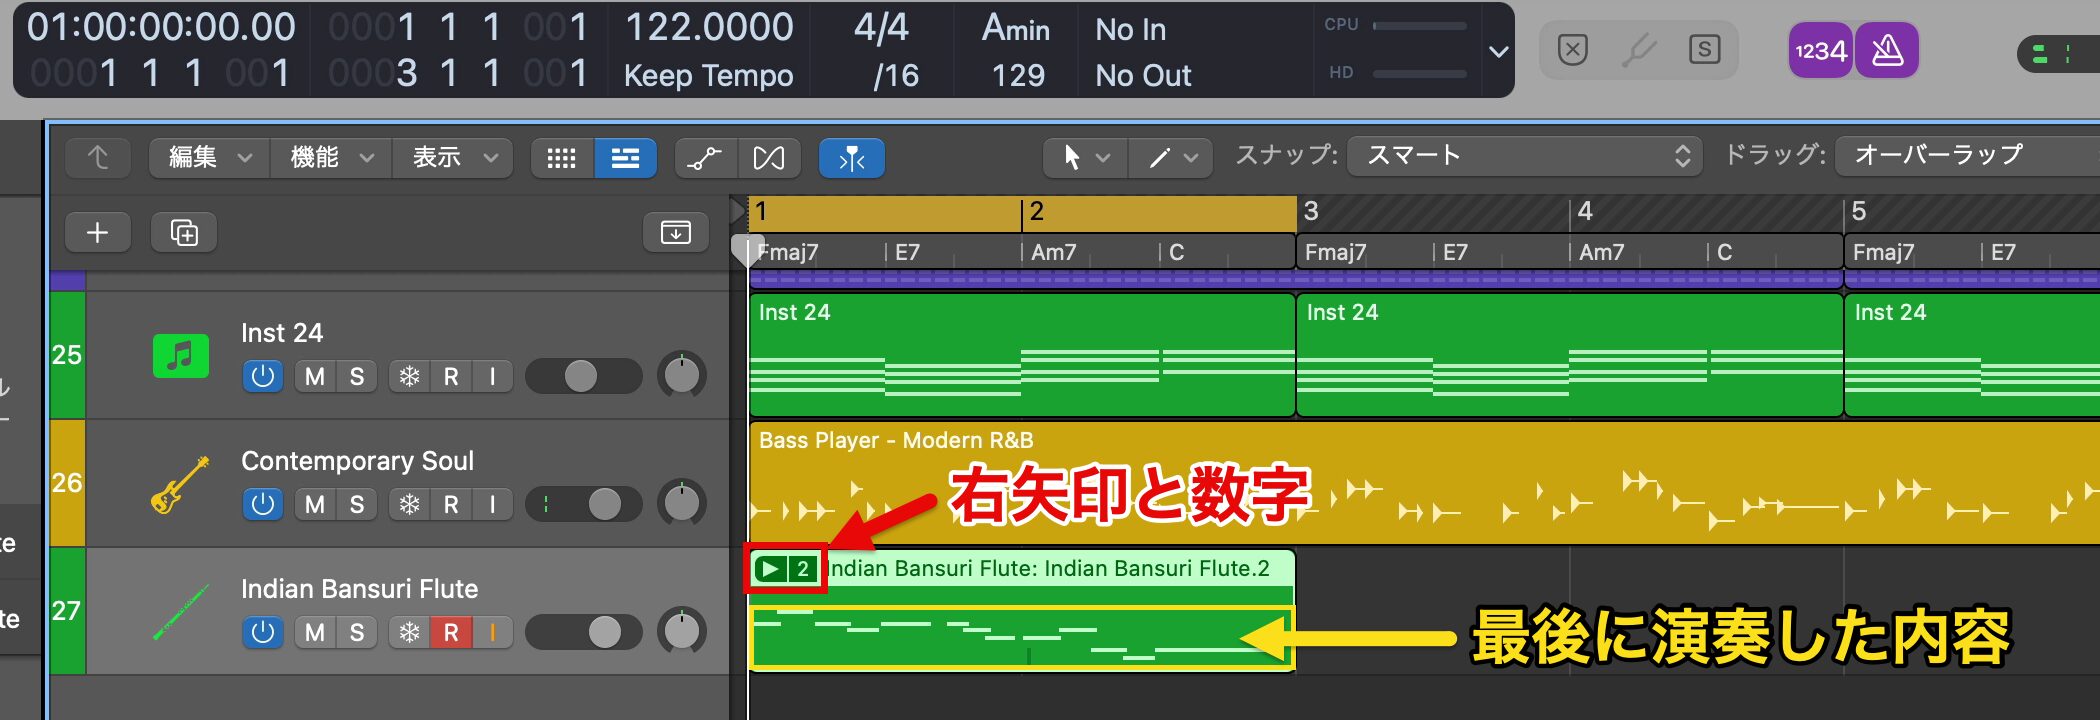
When you cycle record with this setting, only the last performance is shown.
A right arrow and a number also appear at the top left of the region.
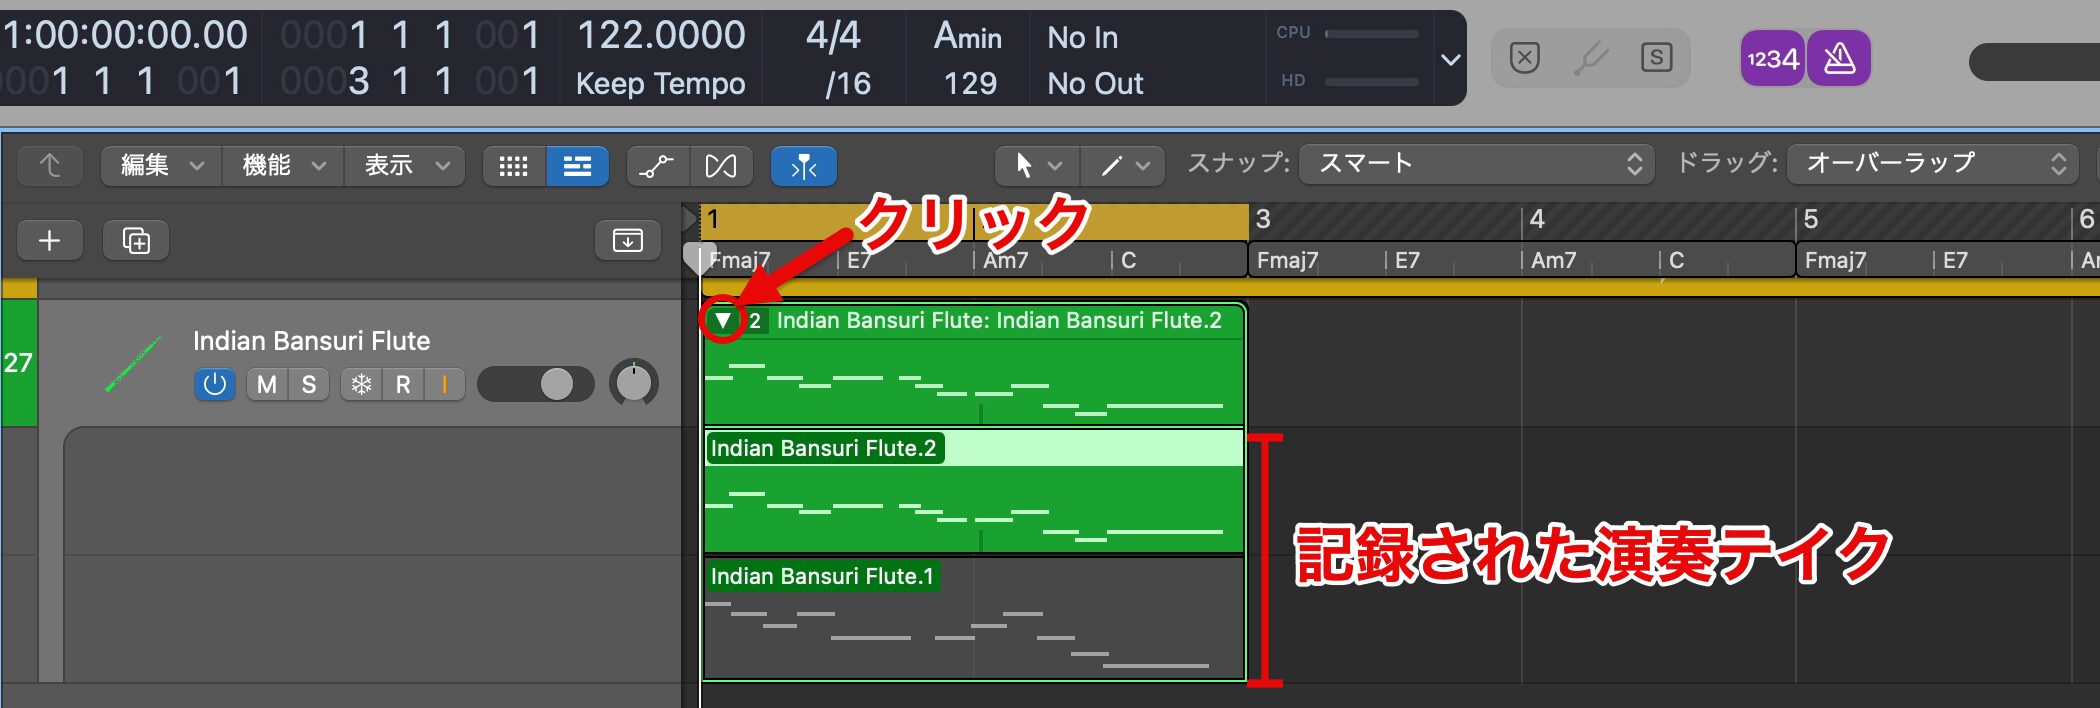
Click the arrow, and all the performances so far are shown as separate regions called "takes", from which you can choose the one to use.
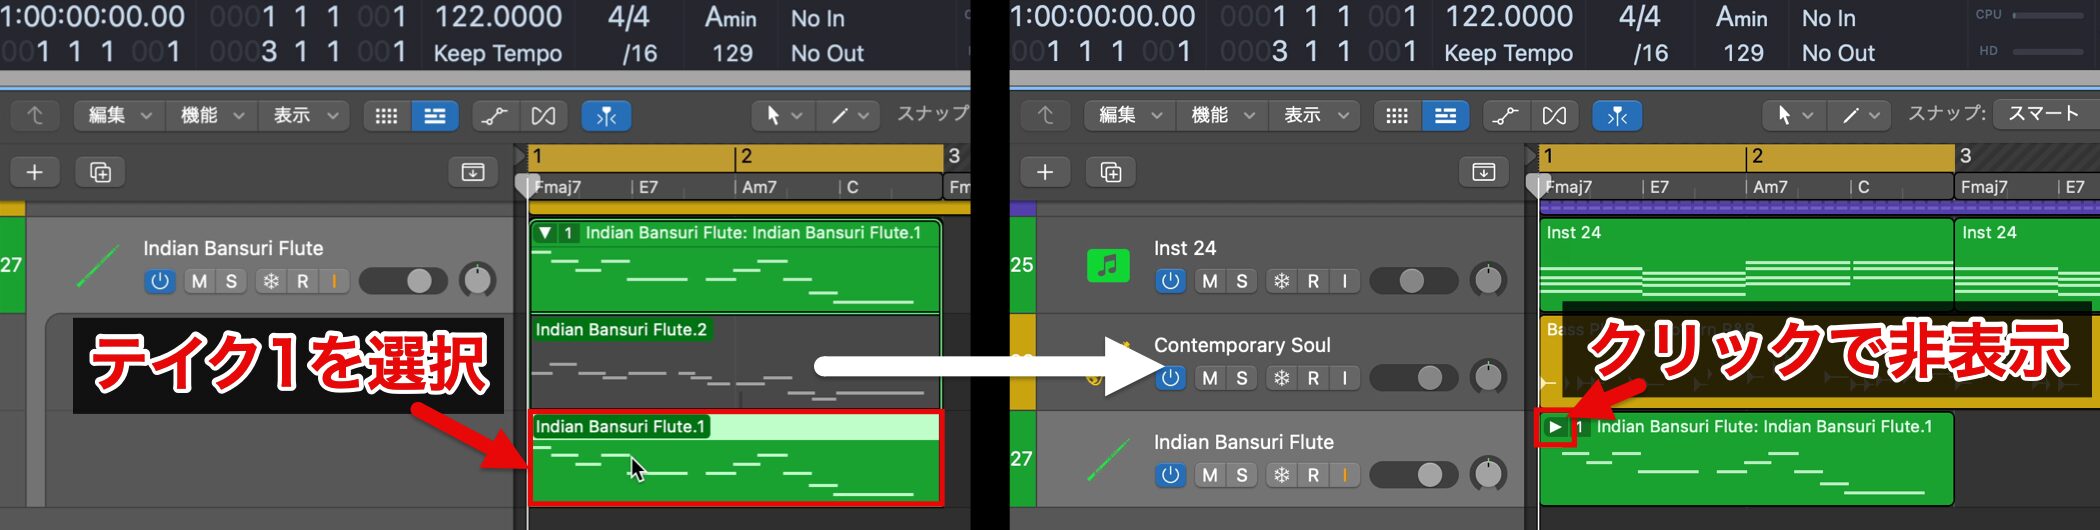
This time we chose Take 1.
After choosing, we recommend clicking the arrow again to close the view to prevent accidental edits.
Quantize
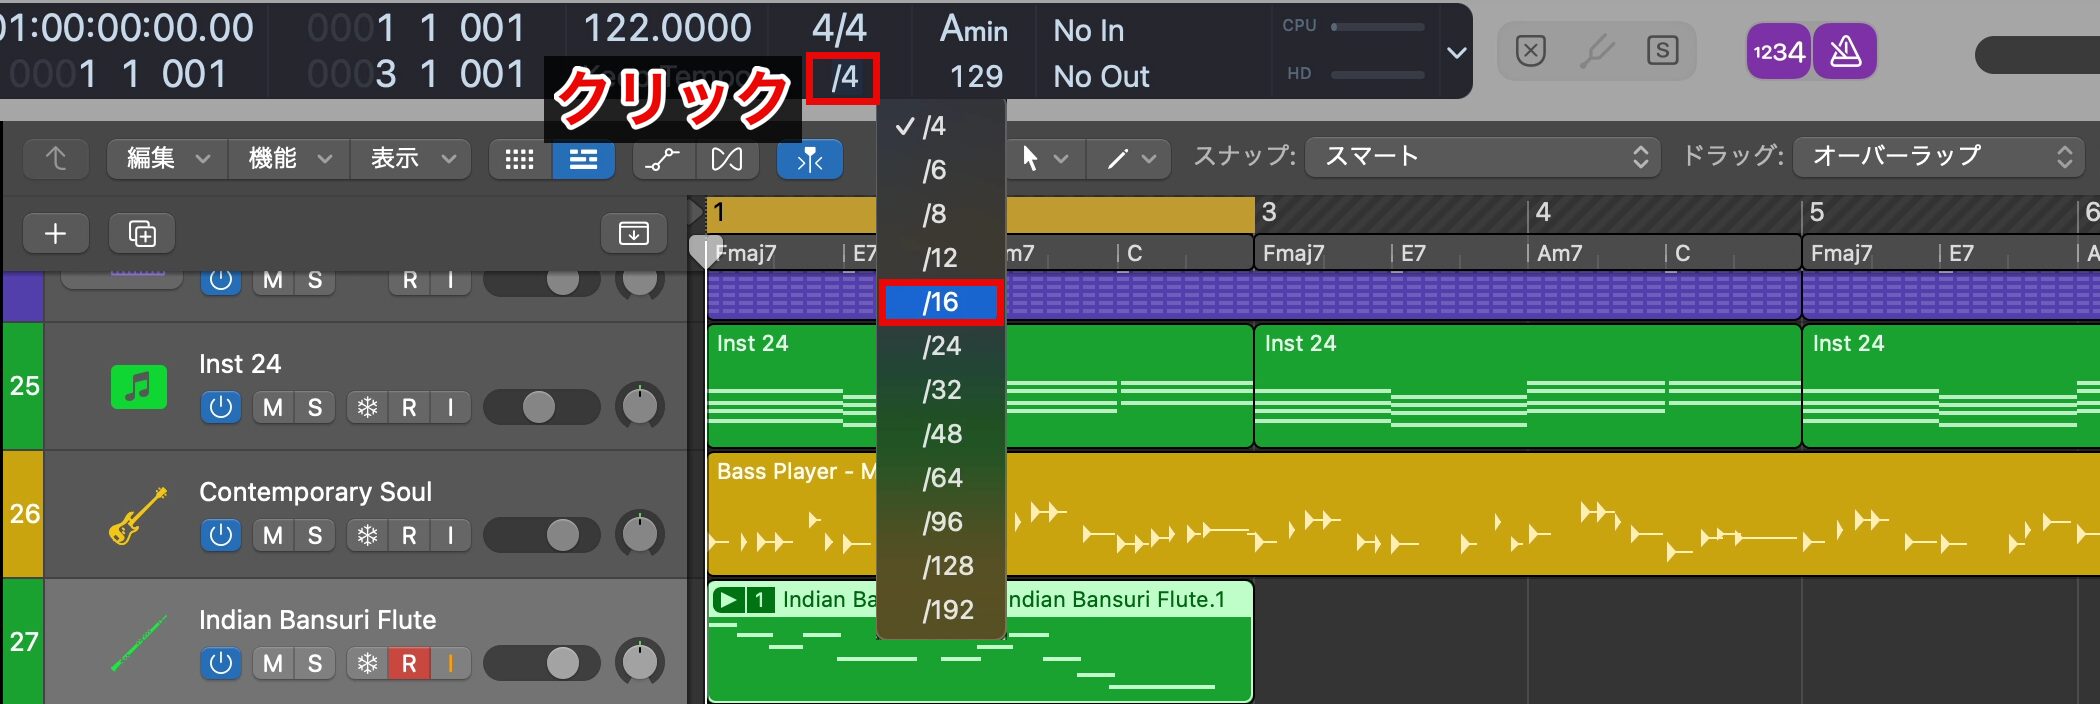
Once the performance is settled, edit the rhythmically unstable parts to the correct timing.
With the current Division setting, notes can only be moved in quarter-note steps, so change the setting to "/16" so that the finest sixteenth notes in the phrase are shown.
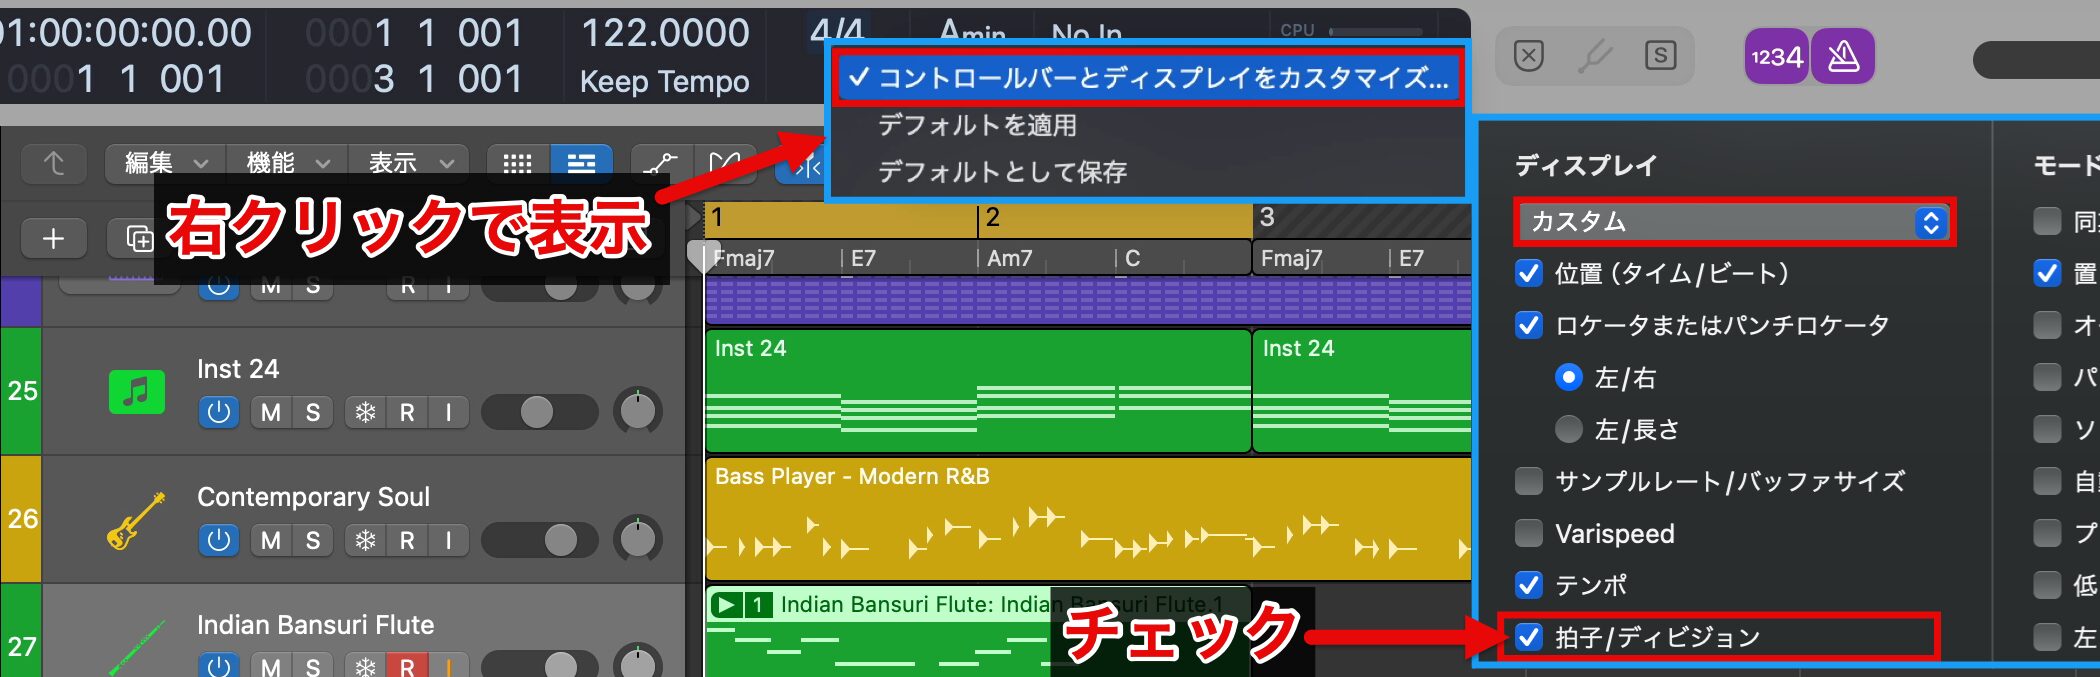
If Division is not shown, enable it by checking "Time Signature/Division" in "Customize Control Bar and Display."
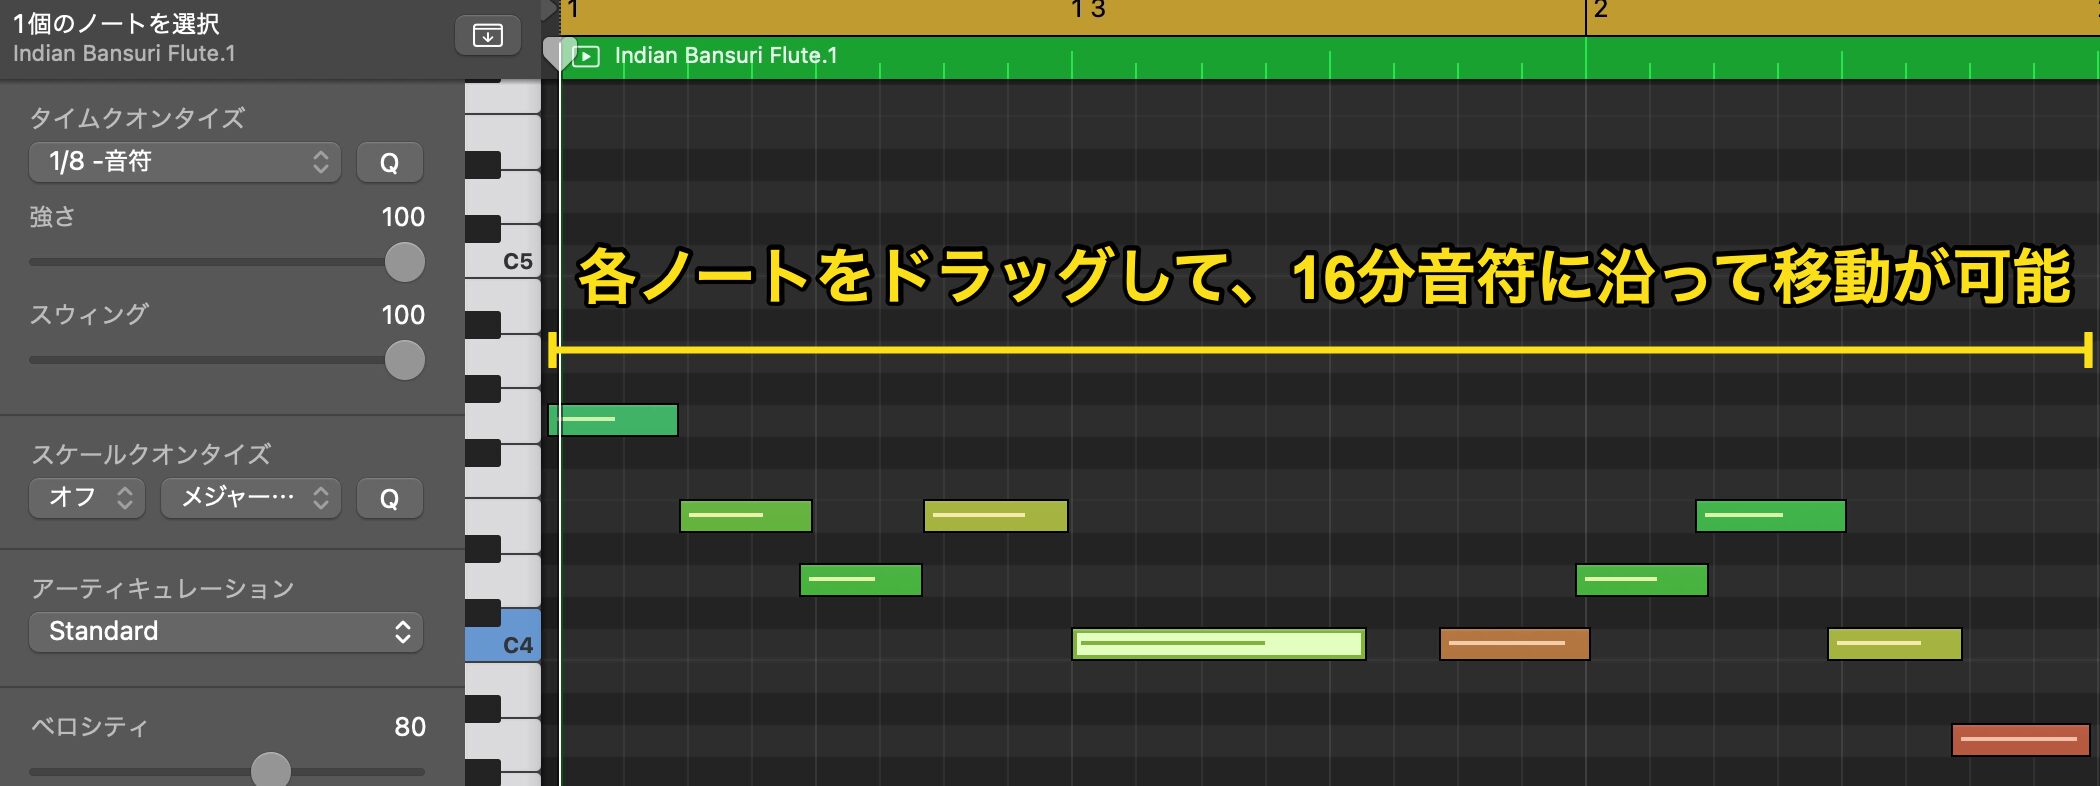
Now you can drag even fast-moving notes to the correct position.
However, correcting every note one by one is time-consuming.
In such cases, the quantize function is convenient.
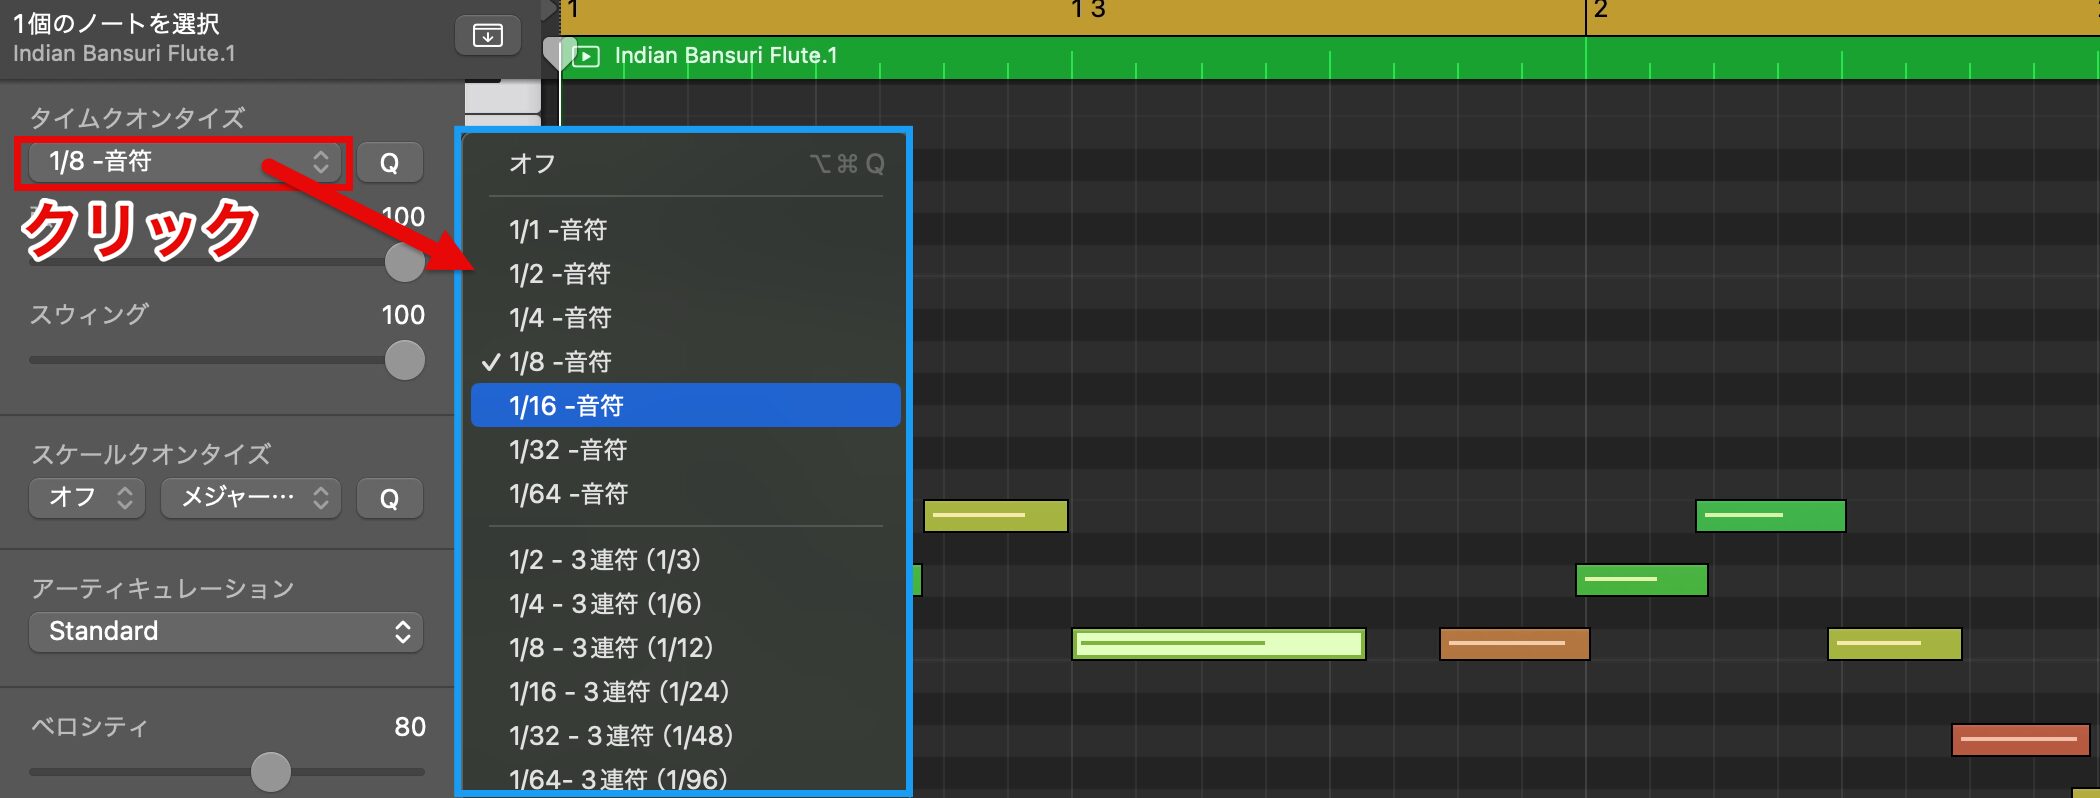
Quantize is a function that aligns the selected notes to the timing of the specified note value all at once.
To use it, choose from "Time Quantize" on the left of the Piano Roll the finest note value in the performance you are correcting.
This time we choose sixteenth notes, but you can also choose various other values, including triplets.
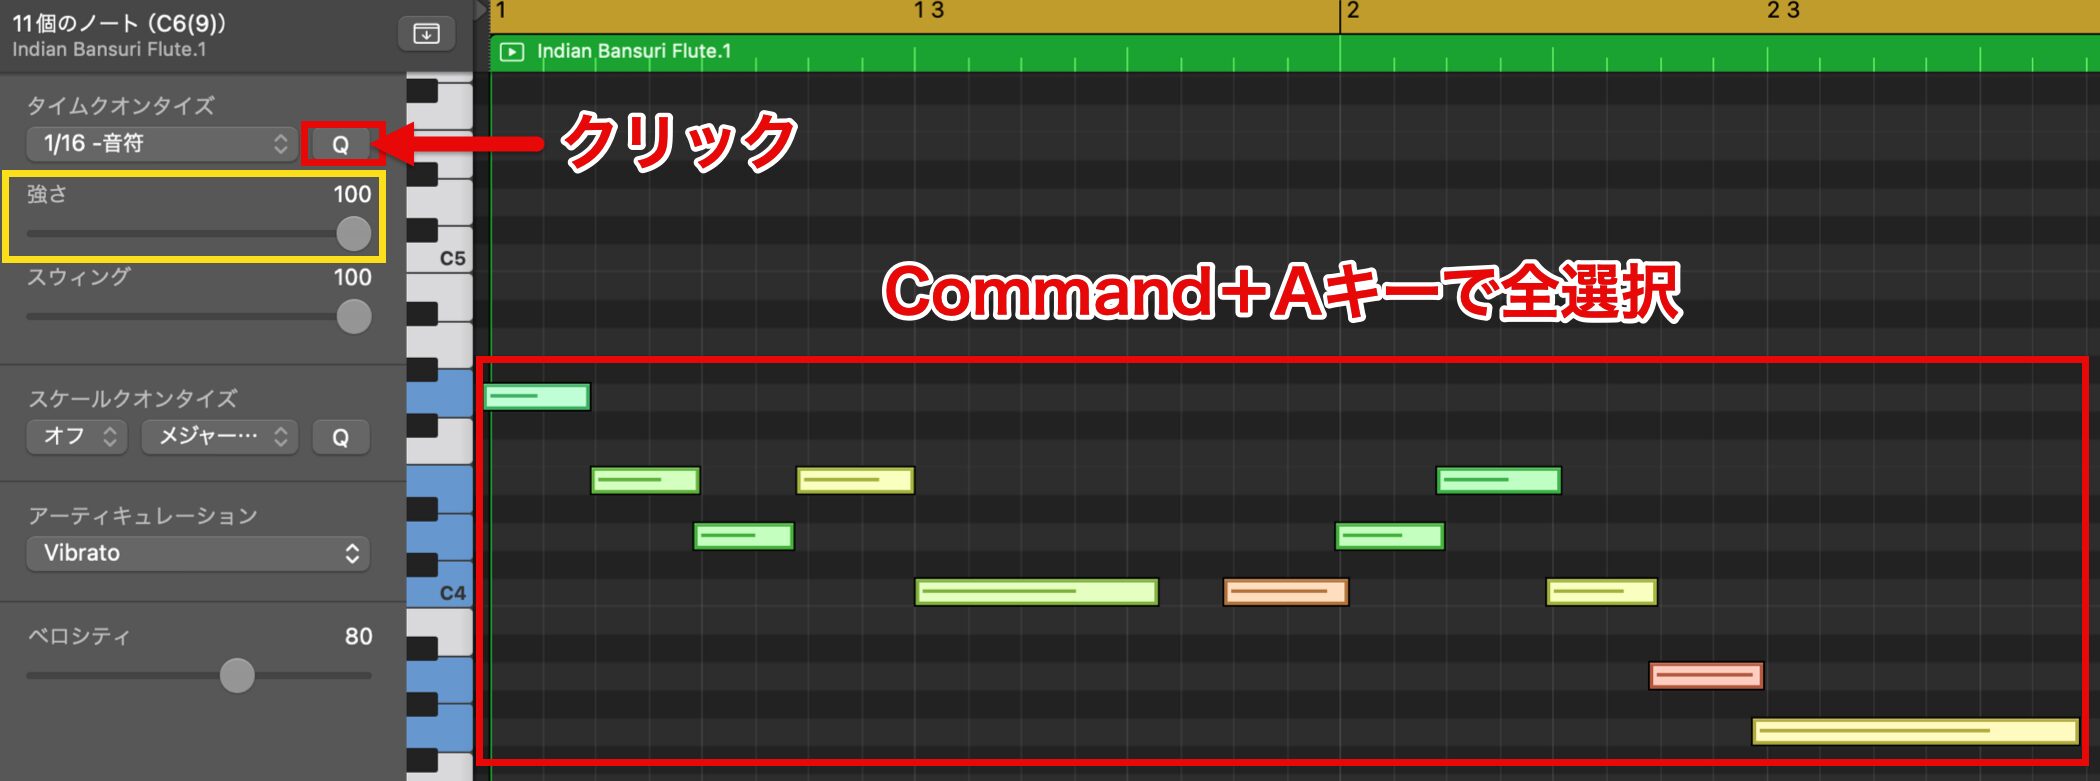
First, check that the quantize strength is set to "100."
To select all notes, press Command-A in the Piano Roll to select them all at once.
Then press the button marked "Q," and the timing of the performance is corrected to an exact rhythm.
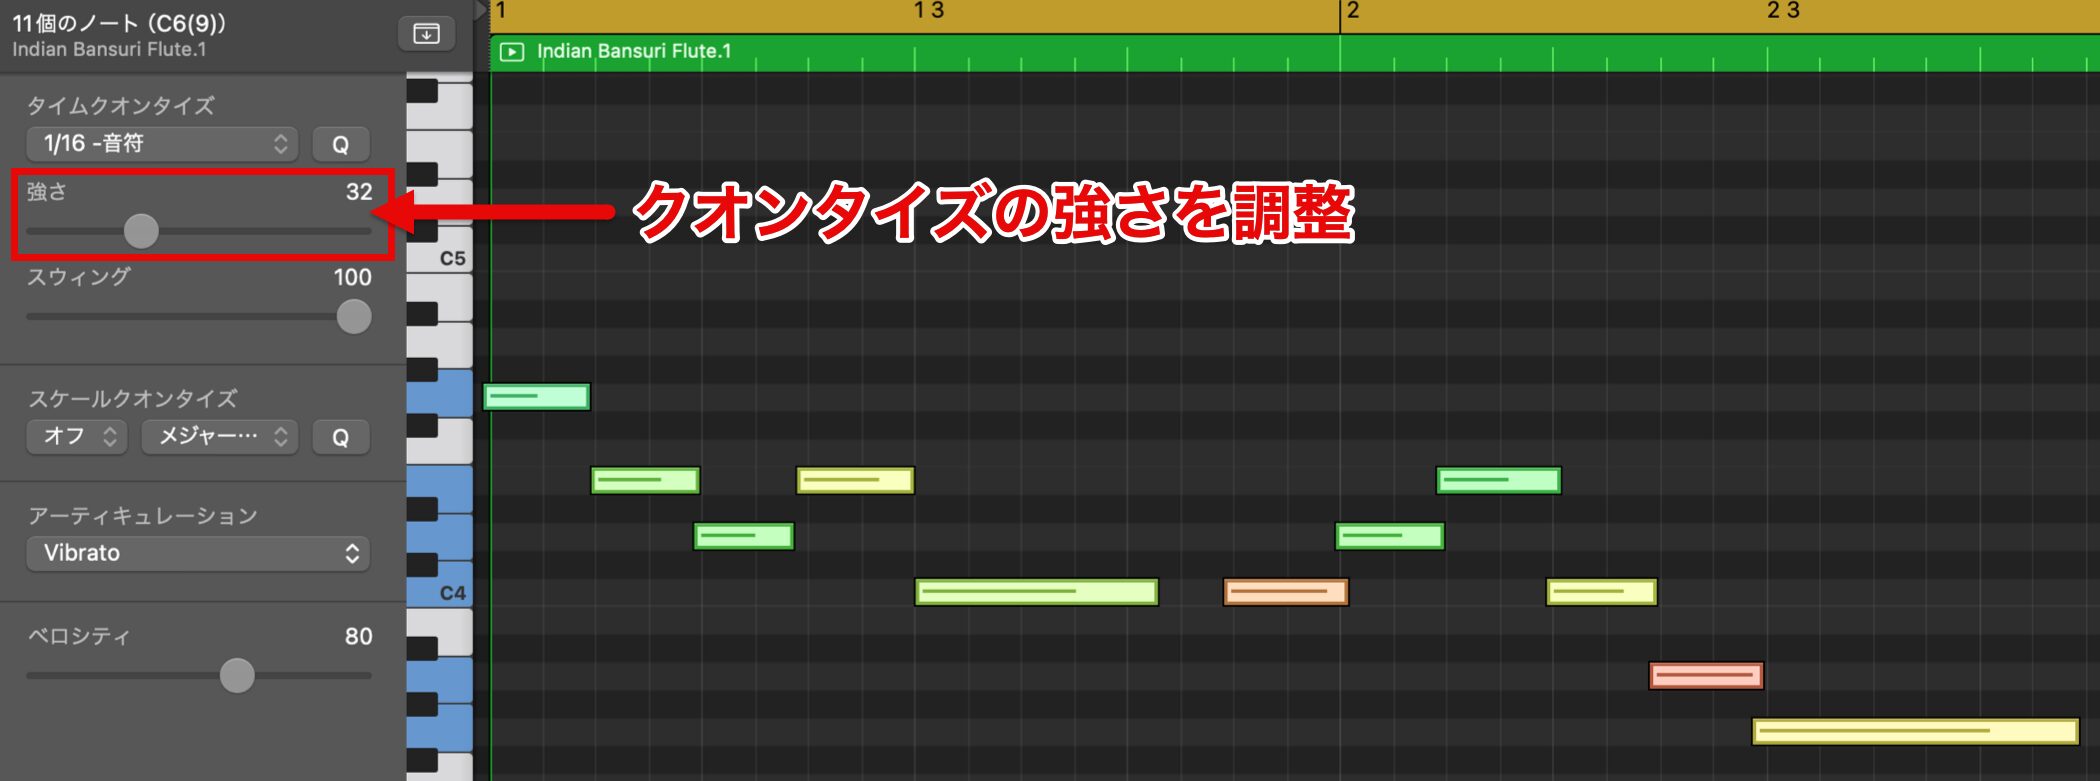
If you want to avoid perfectly exact timing and keep a human feel, select the notes and adjust the Strength slider to gradually bring the result closer to the original performance for a natural finish.
Combining Takes
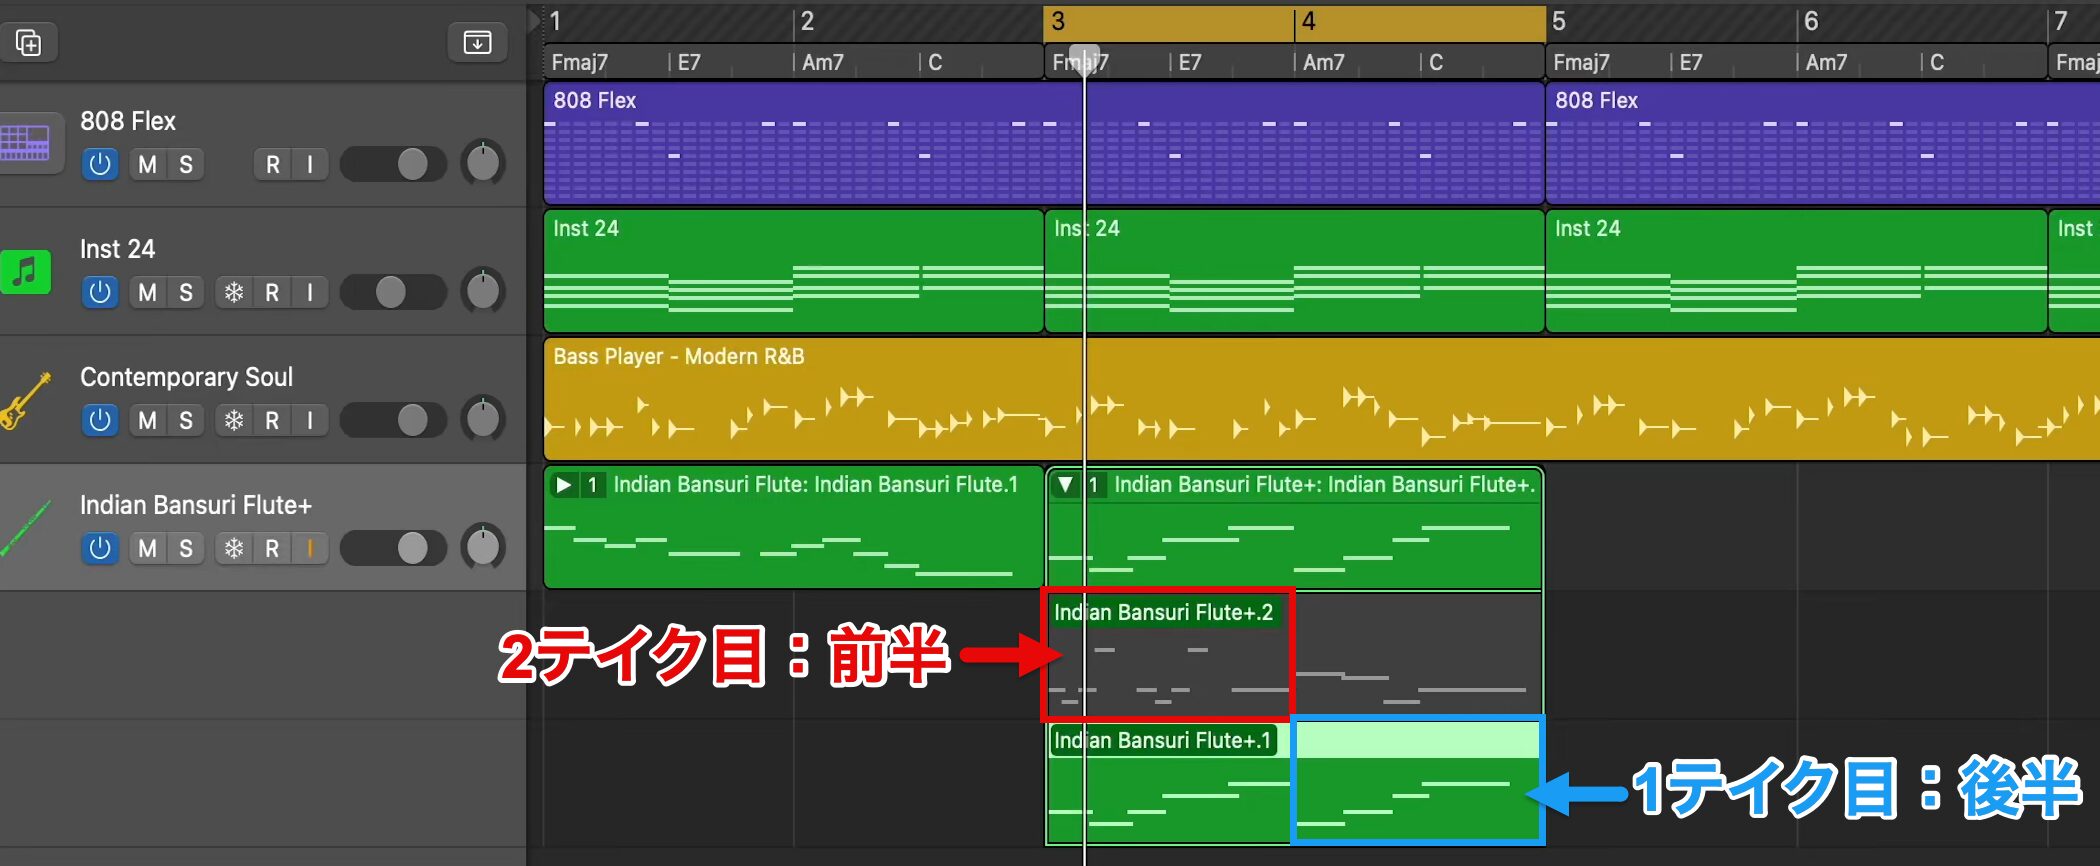
Once the performance is stable, record the following phrases with the same steps.
After recording two passes, we want to use parts of the phrases: the second half of take 1 and the first half of take 2.
In such cases, you can split the region to choose which take to use for each section.
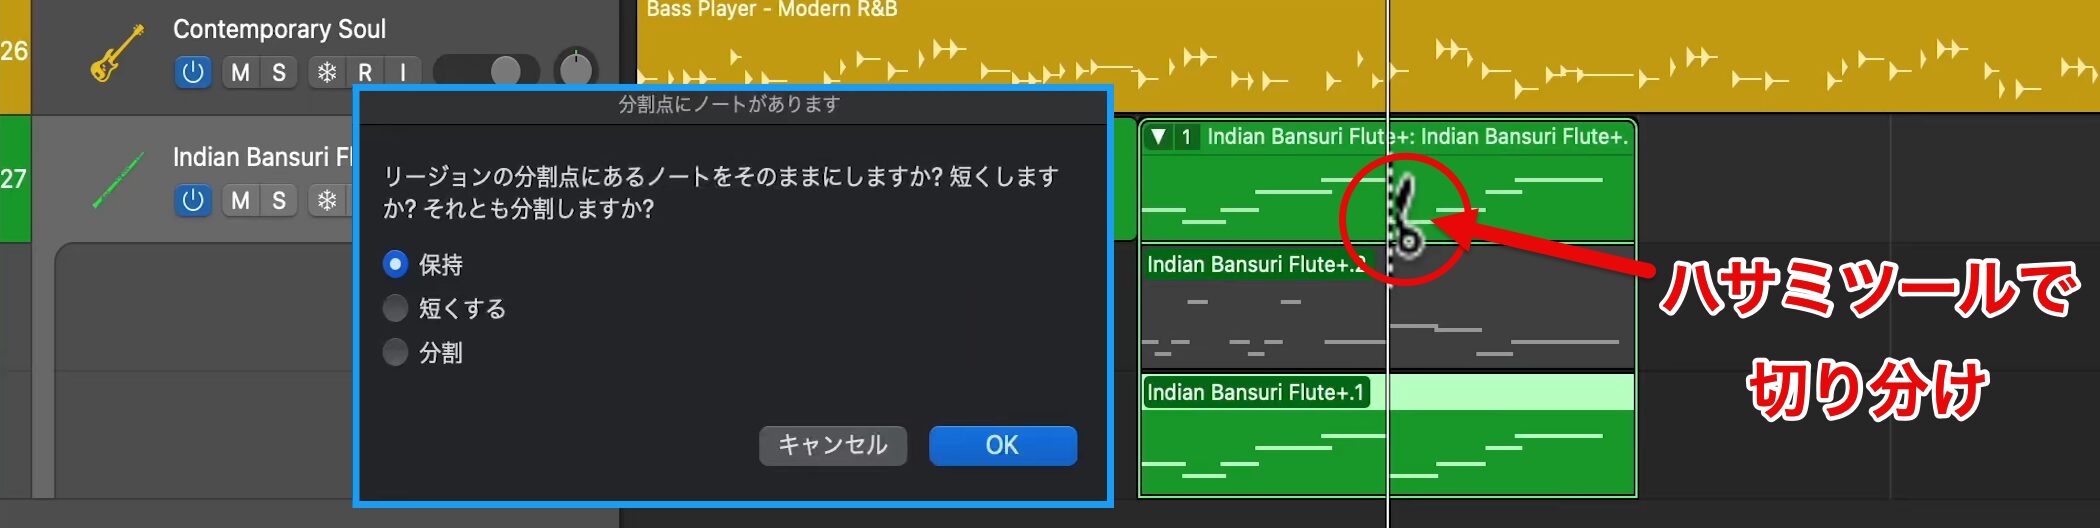
First, split the region with the Scissors tool.
If you want to switch tools temporarily, press the shortcut key T to change tools efficiently at the playhead position.
When you split a region with the Scissors tool, a screen with a blue frame may appear.
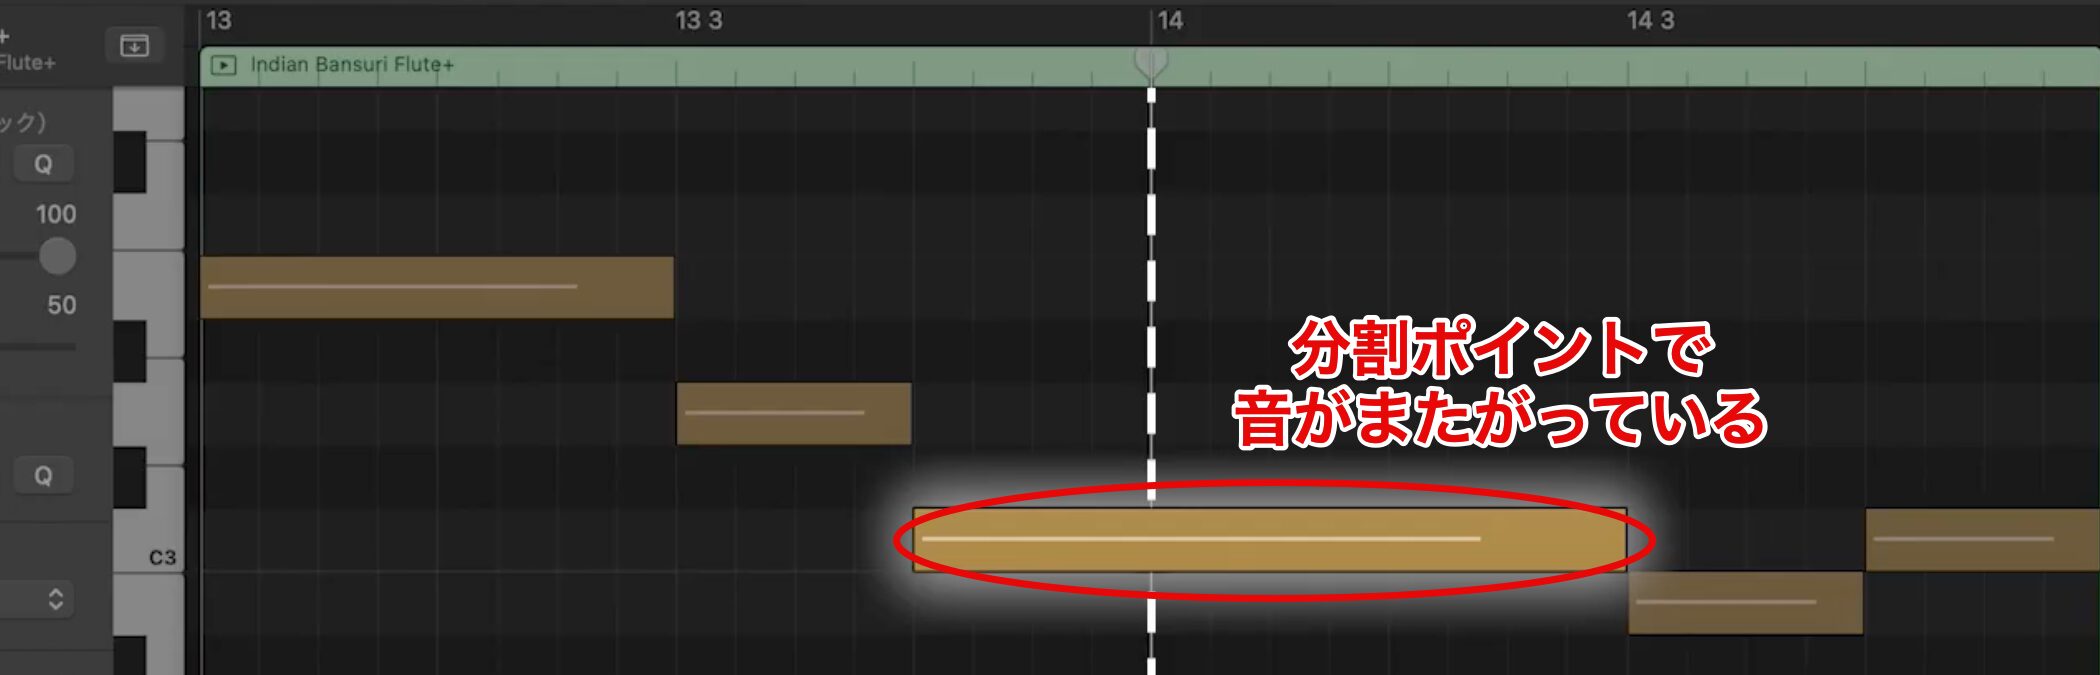
This appears when a note spans the split point, and lets you choose how that note is handled.
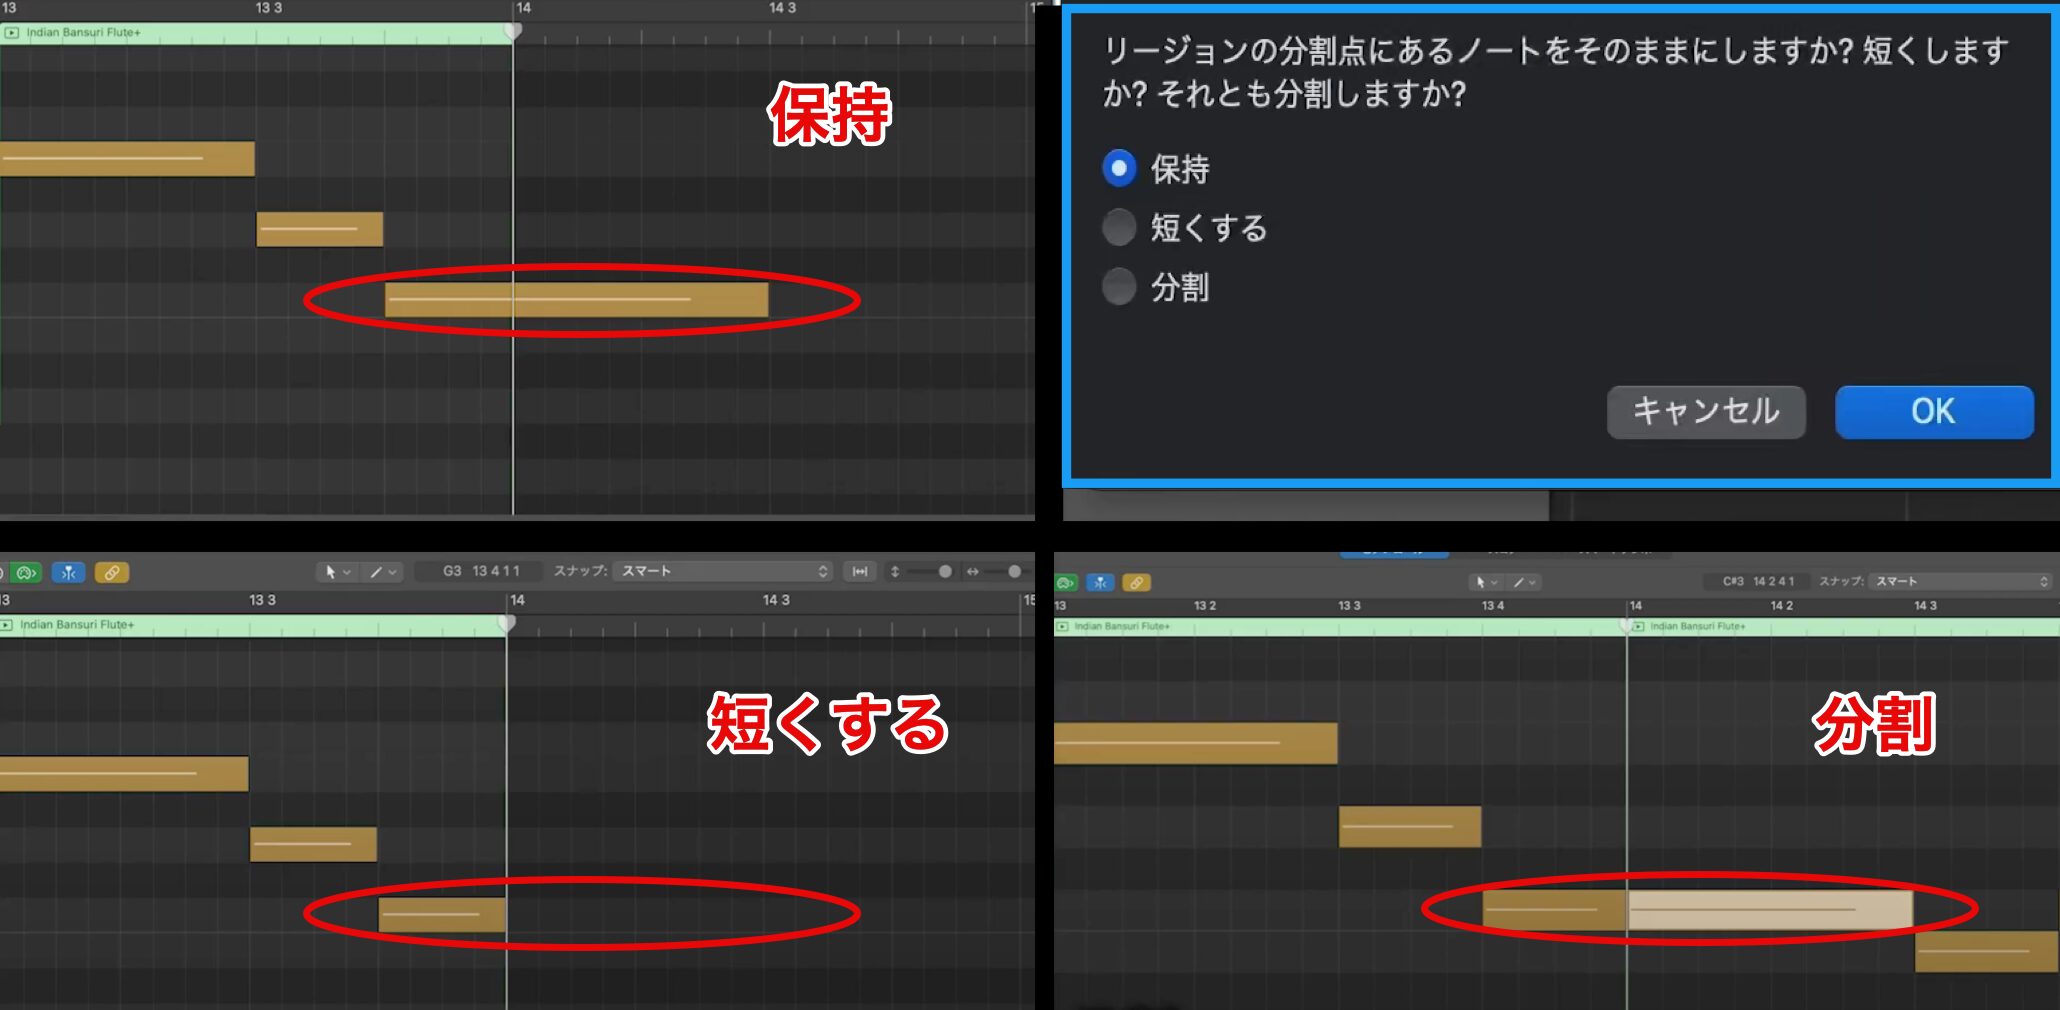
- Keep: keeps the note at its full length in the earlier region.
- Shorten: cuts the note at the split point to shorten it.
- Split: splits the notes as well at the point where the region is split.
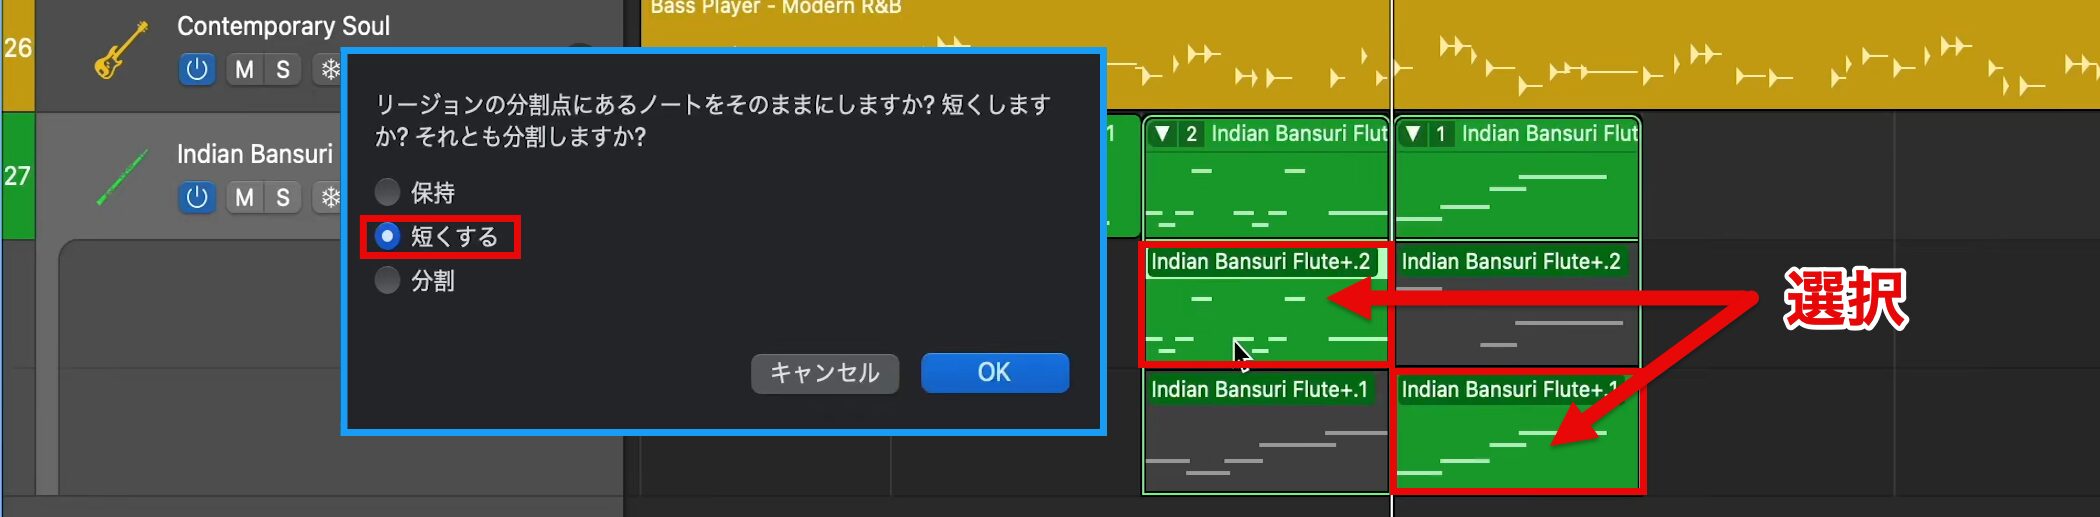
This time we choose "Shorten" and pick the take to use.
Capturing a Performance as a Recording
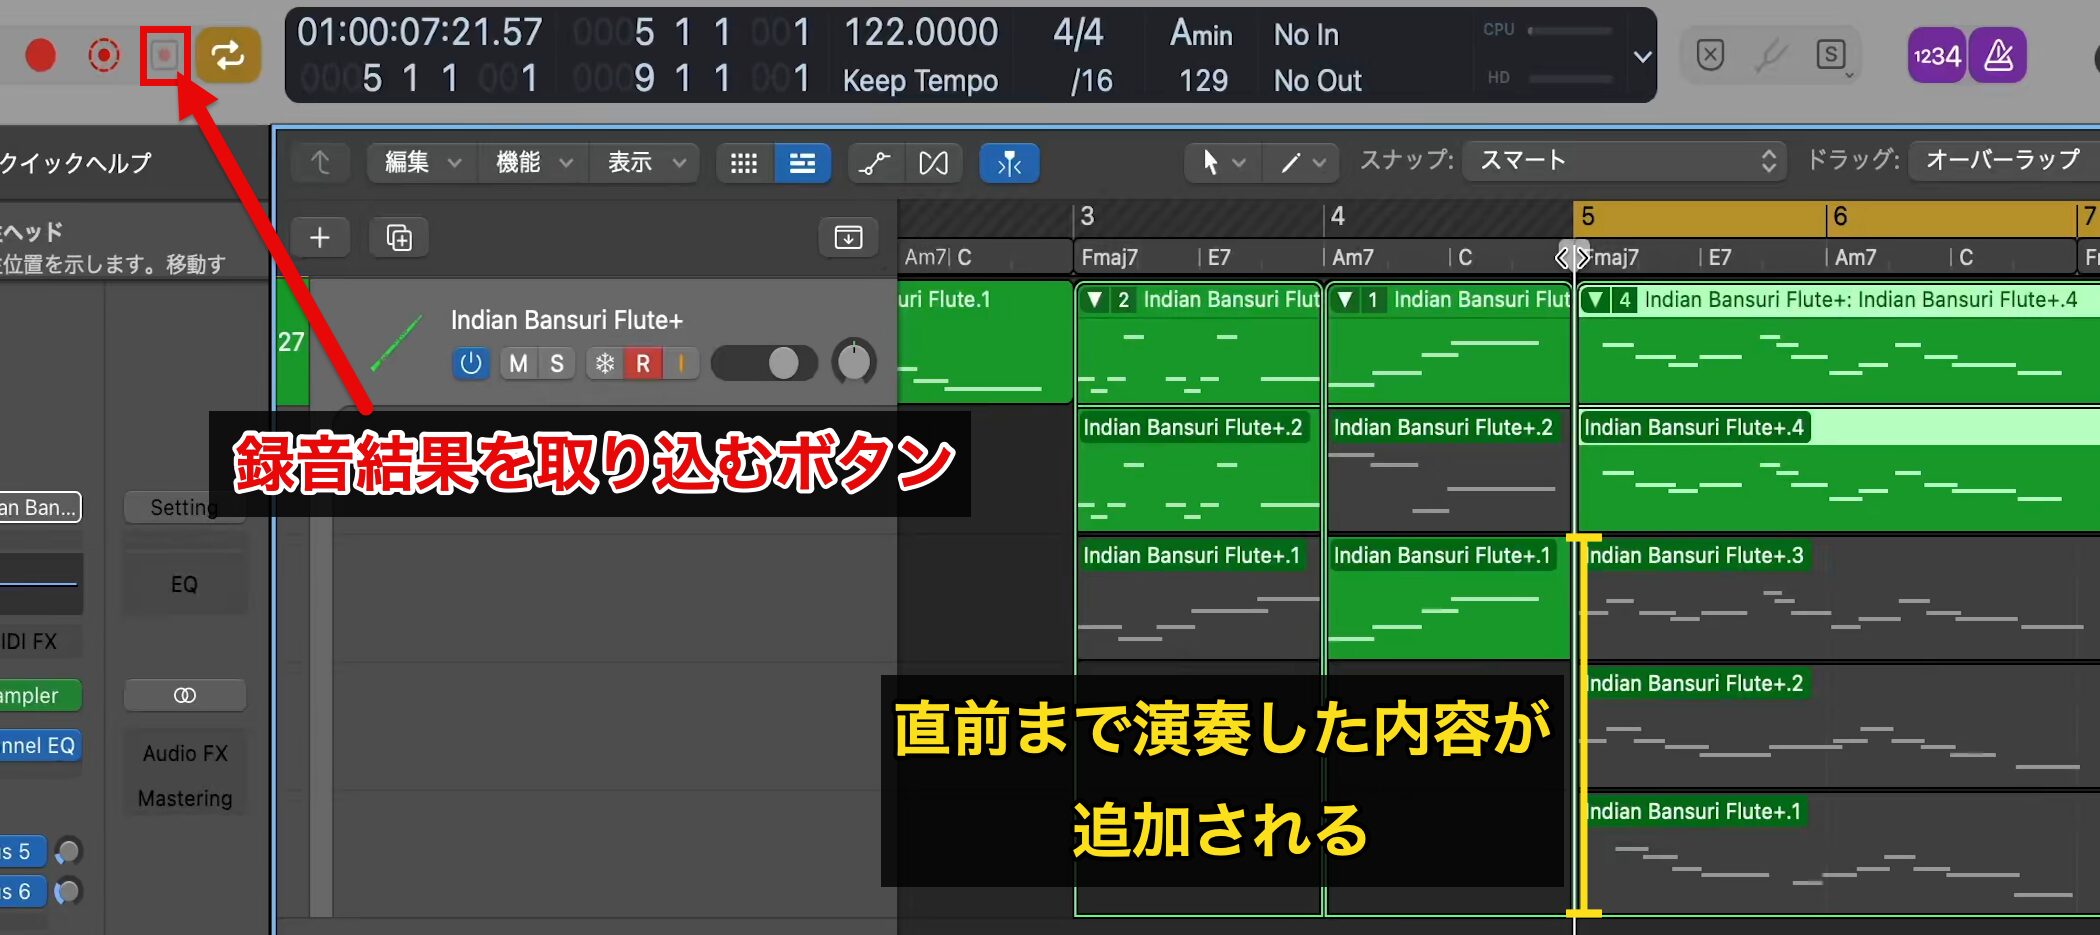
We continue recording the remaining four bars, but if you play a phrase you like without having started recording, it can be hard to reproduce.
That is when the capture recording function is useful.
Click the "Capture as Recording button" to add the most recent performance to the selected track.
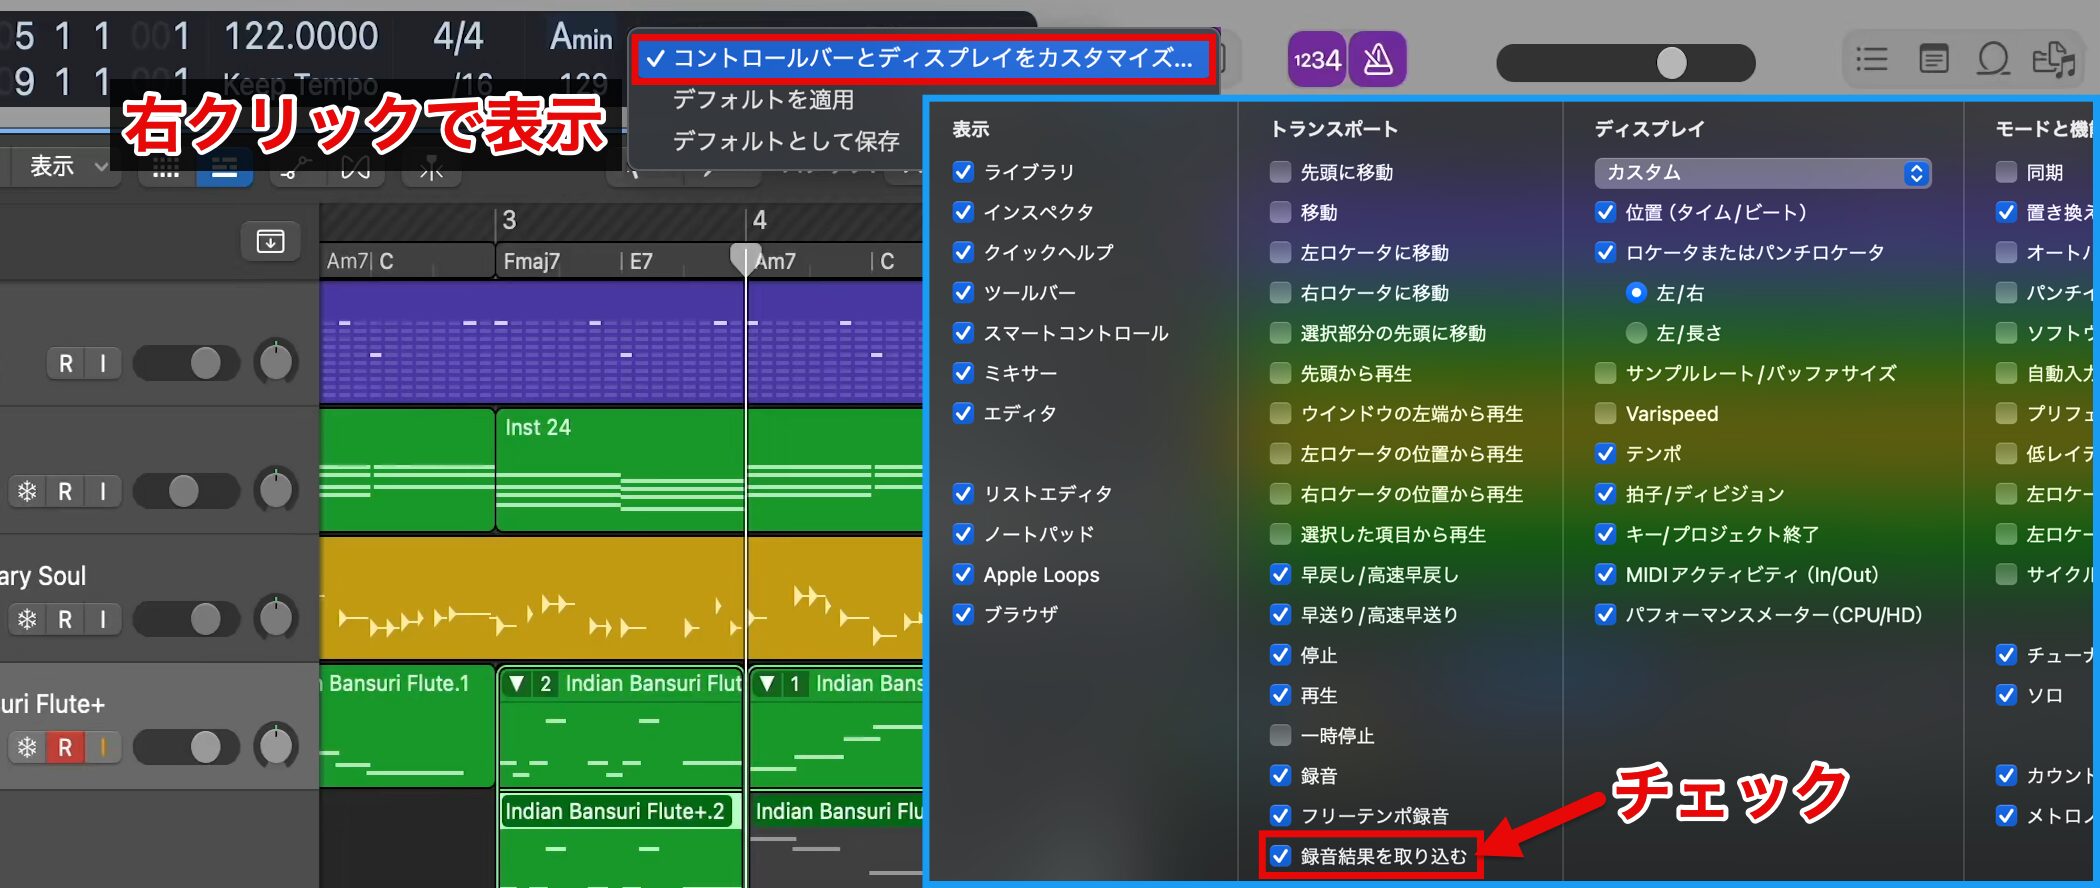
If the Capture as Recording button is not shown, open "Customize Control Bar and Display" and check "Capture as Recording" to add the button.
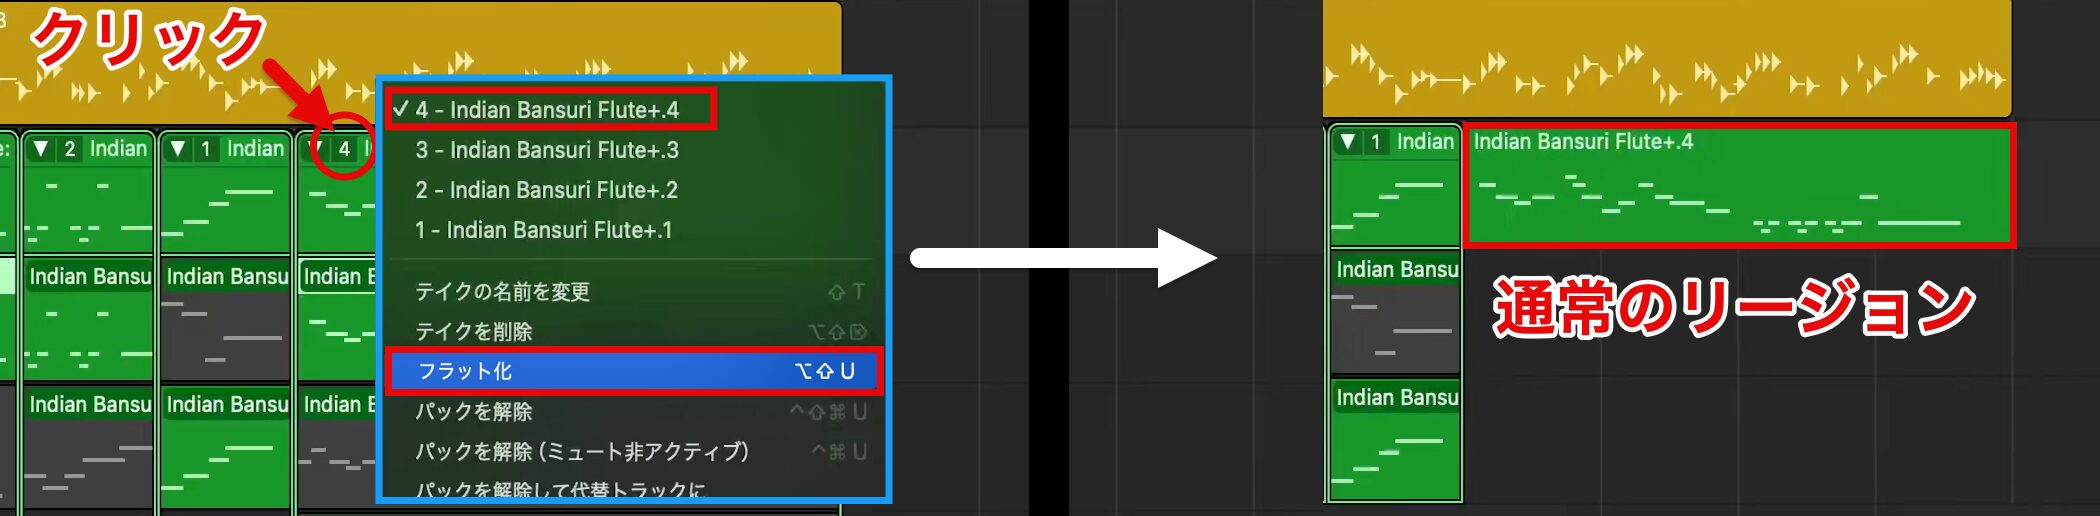
Once you have chosen the takes, join the regions into one.
To join them, you need to change the current take selection into normal regions.
Click the number on the region, choose the take to use, and select "Flatten."
The take folder is then converted into a normal region.
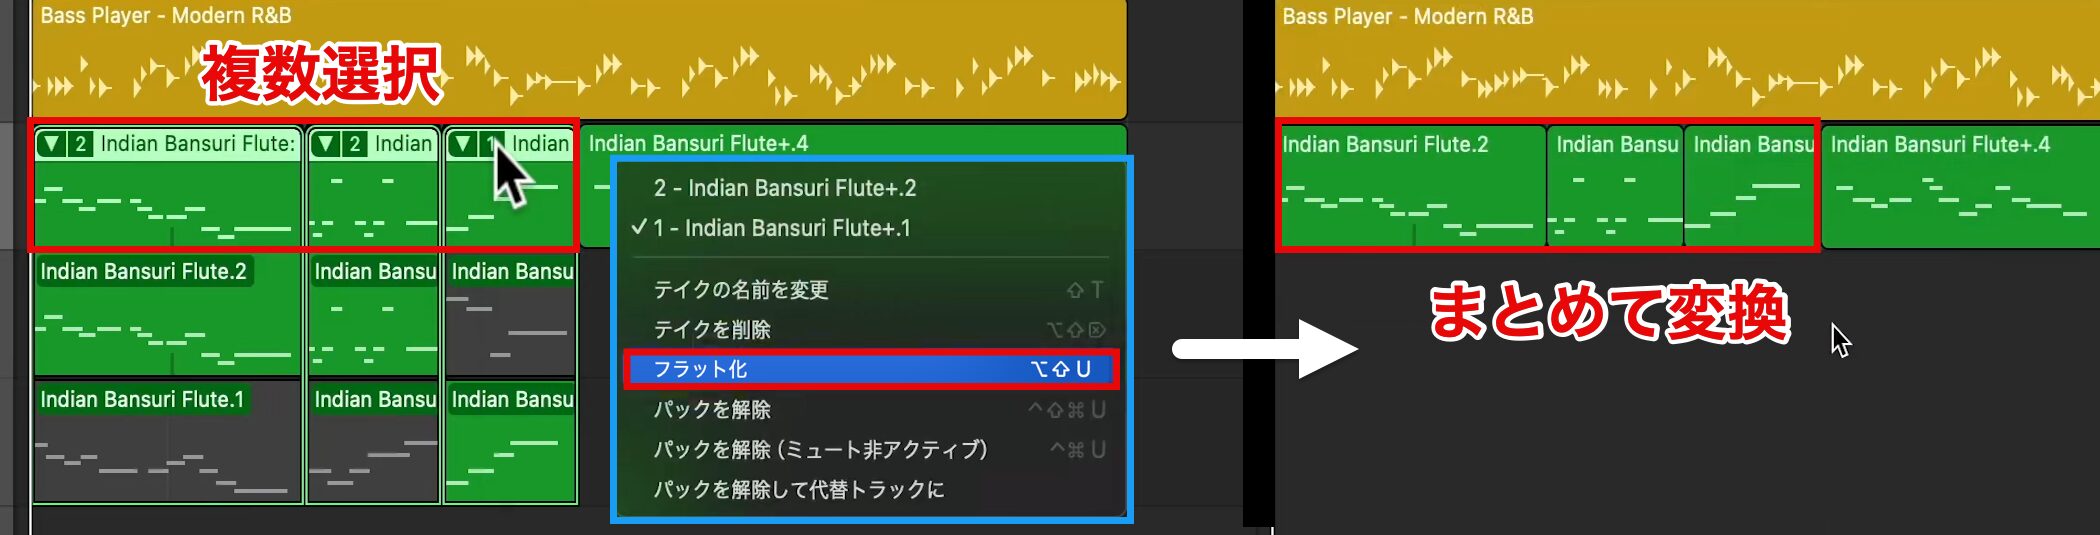
You can also Shift-click multiple regions to select them and flatten one of them to convert them all at once.
Joining Regions
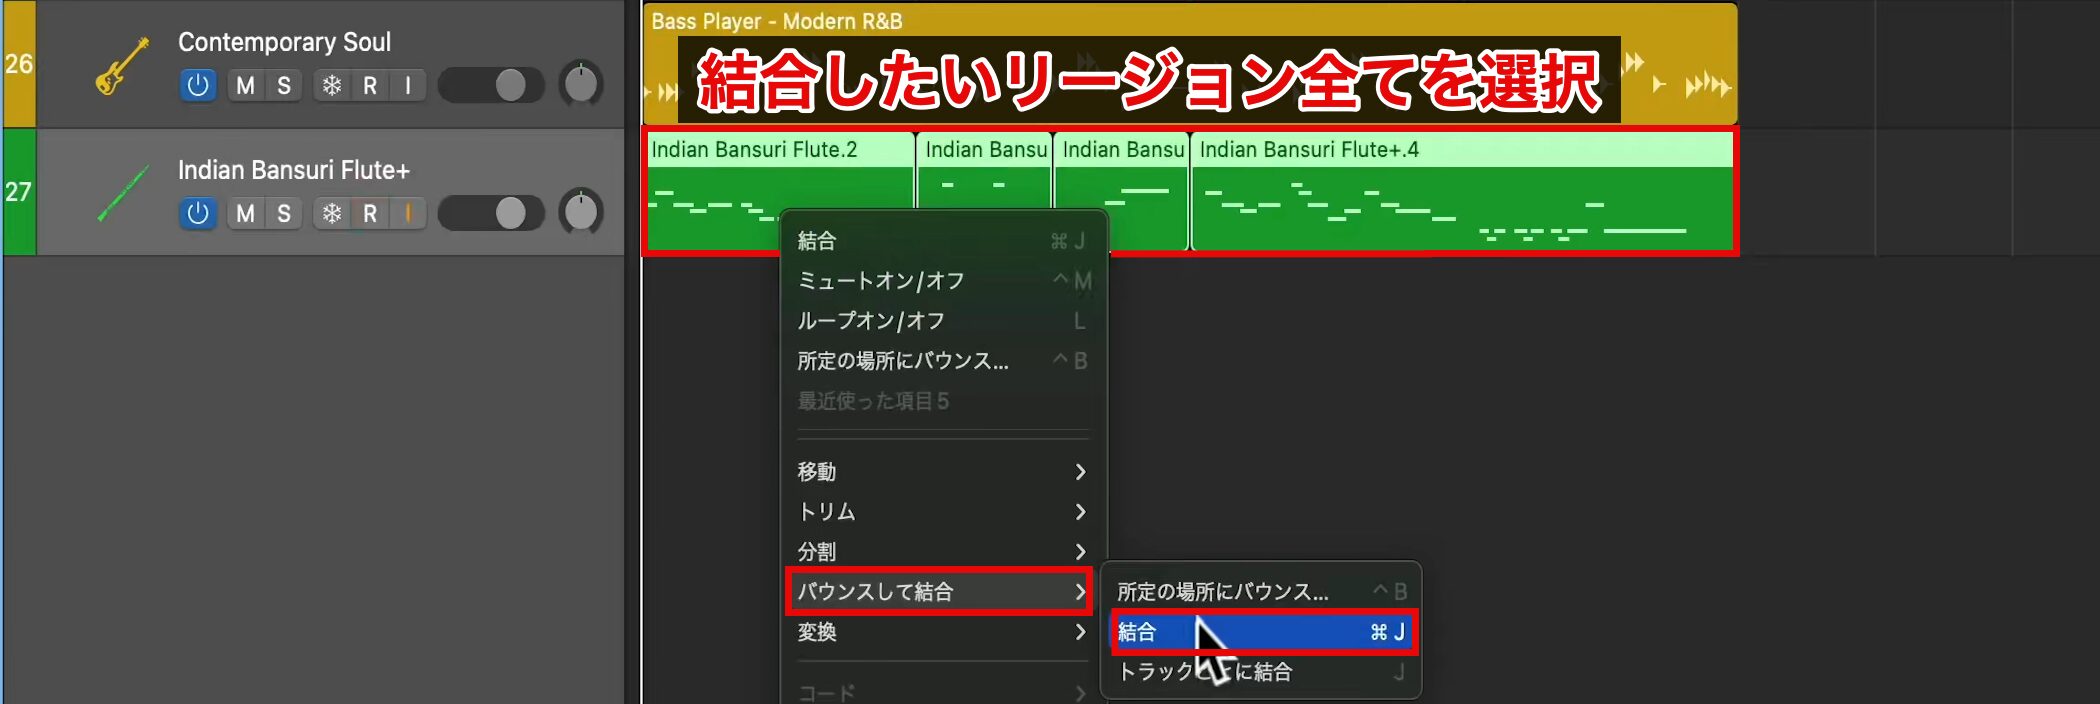
To join regions, select all the regions you want to join and choose "Bounce and Join" → "Join" from the right-click menu.
You can also do the same with Command-J.
Now they can be edited as a single region.
Adjusting Velocity All at Once
The melody we are creating will be replaced by vocals later, so we even out the volume without dynamics.
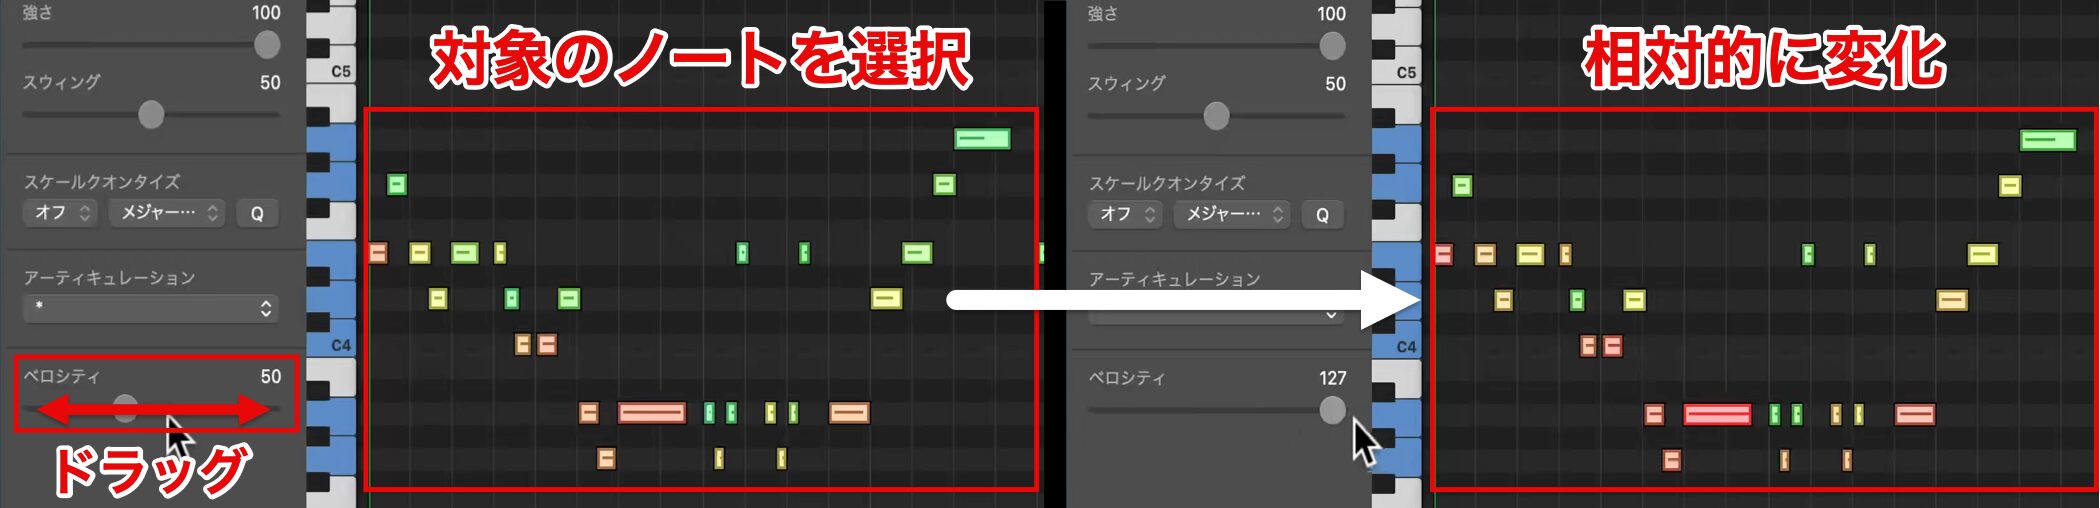
Volume dynamics are adjusted with velocity.
Select notes in the MIDI region and operate the velocity slider to change it; this can also be applied to multiple notes at once.
However, a normal drag adjusts them relatively, so they do not end up with the same value.
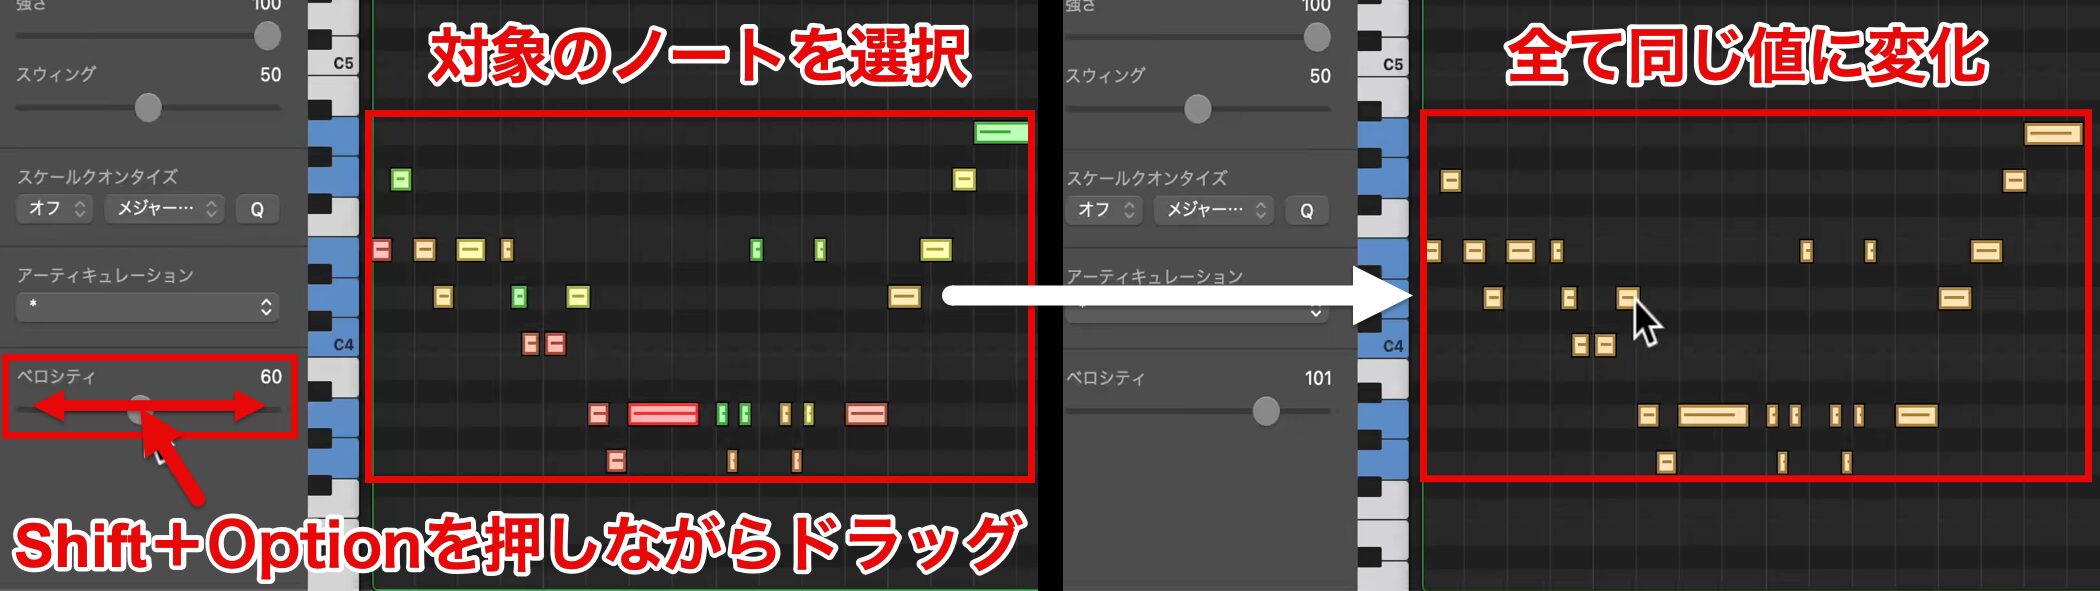
To set all notes to the same value, hold down Shift and Option while dragging the velocity slider.
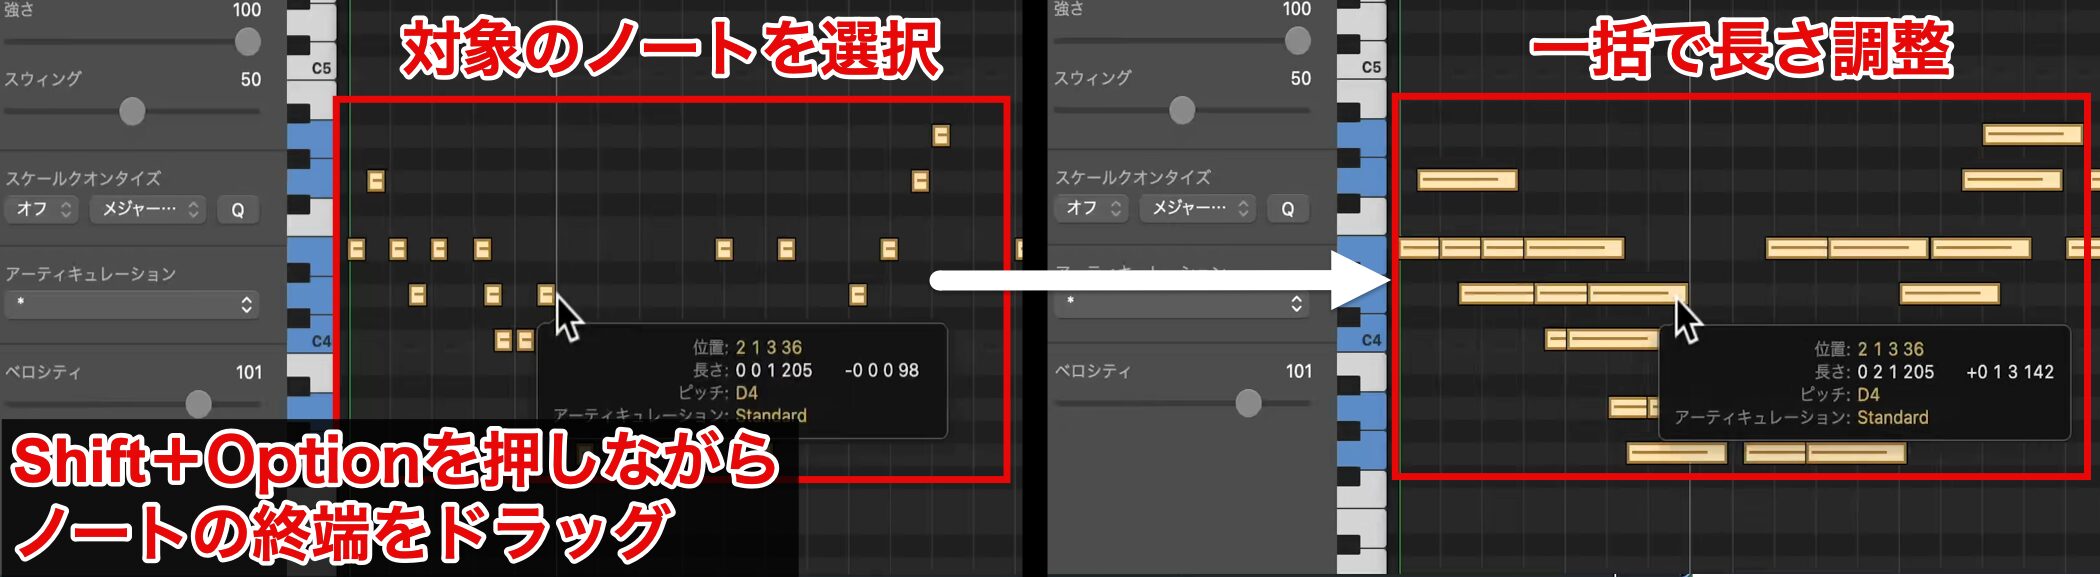
This shortcut can also be used when adjusting note lengths, so it is handy to remember it as well.
Trim
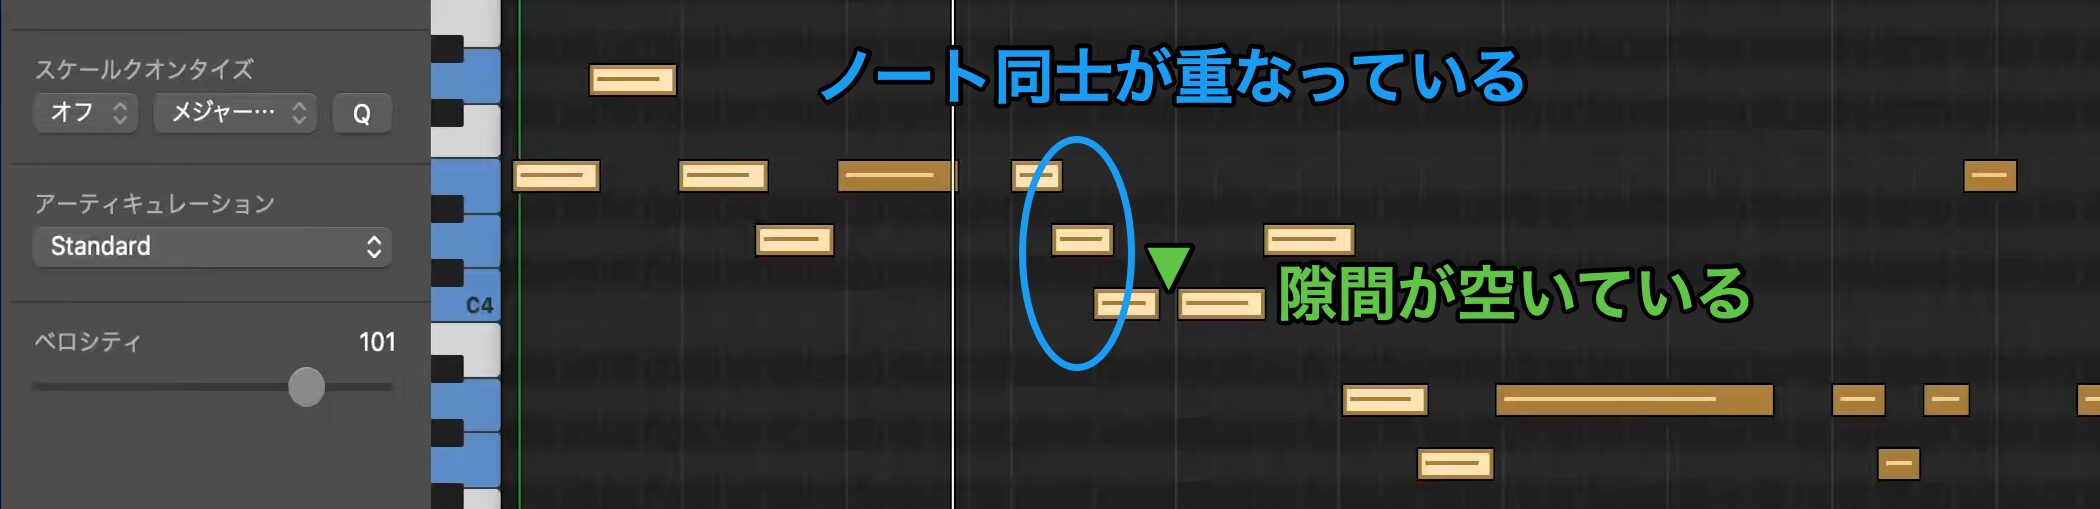
After adjusting velocity, next tidy up the note lengths.
Right now, some notes overlap and there are unintended gaps between others.
We will connect them smoothly.
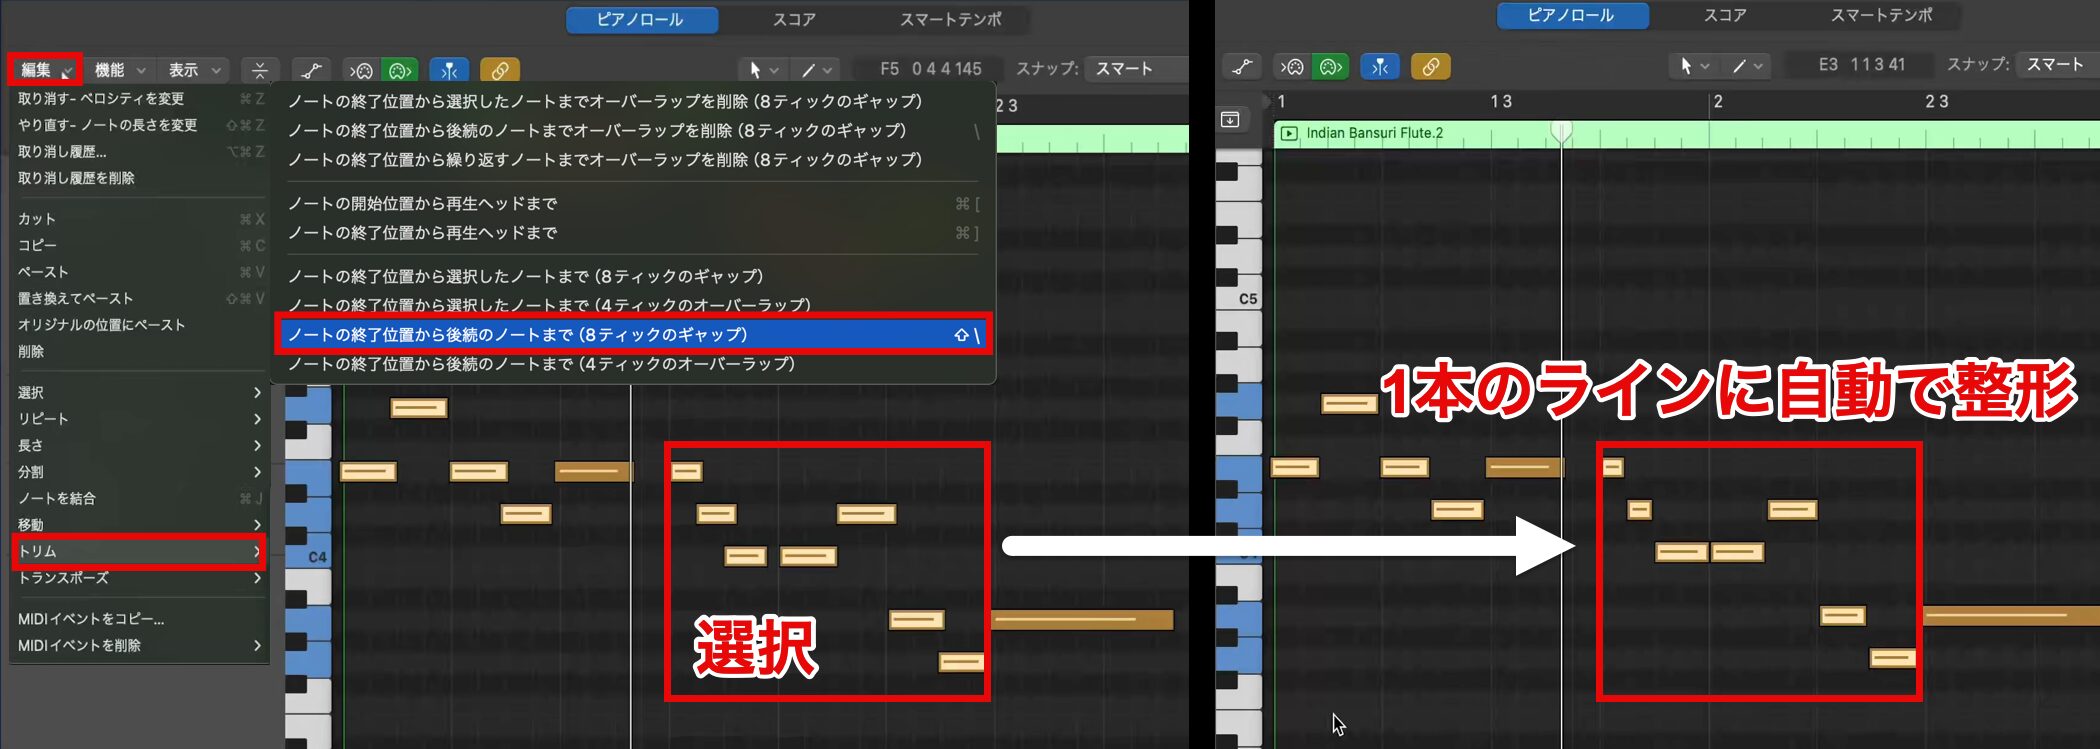
Select all the notes you want to tidy up and open "Trim" from the Piano Roll's Edit menu.
Apply "Note End to Following Notes (with 8 Tick Gap)," and the gaps between notes are connected automatically.
Overlapping notes are also resolved, and the notes are shaped into one smooth line.
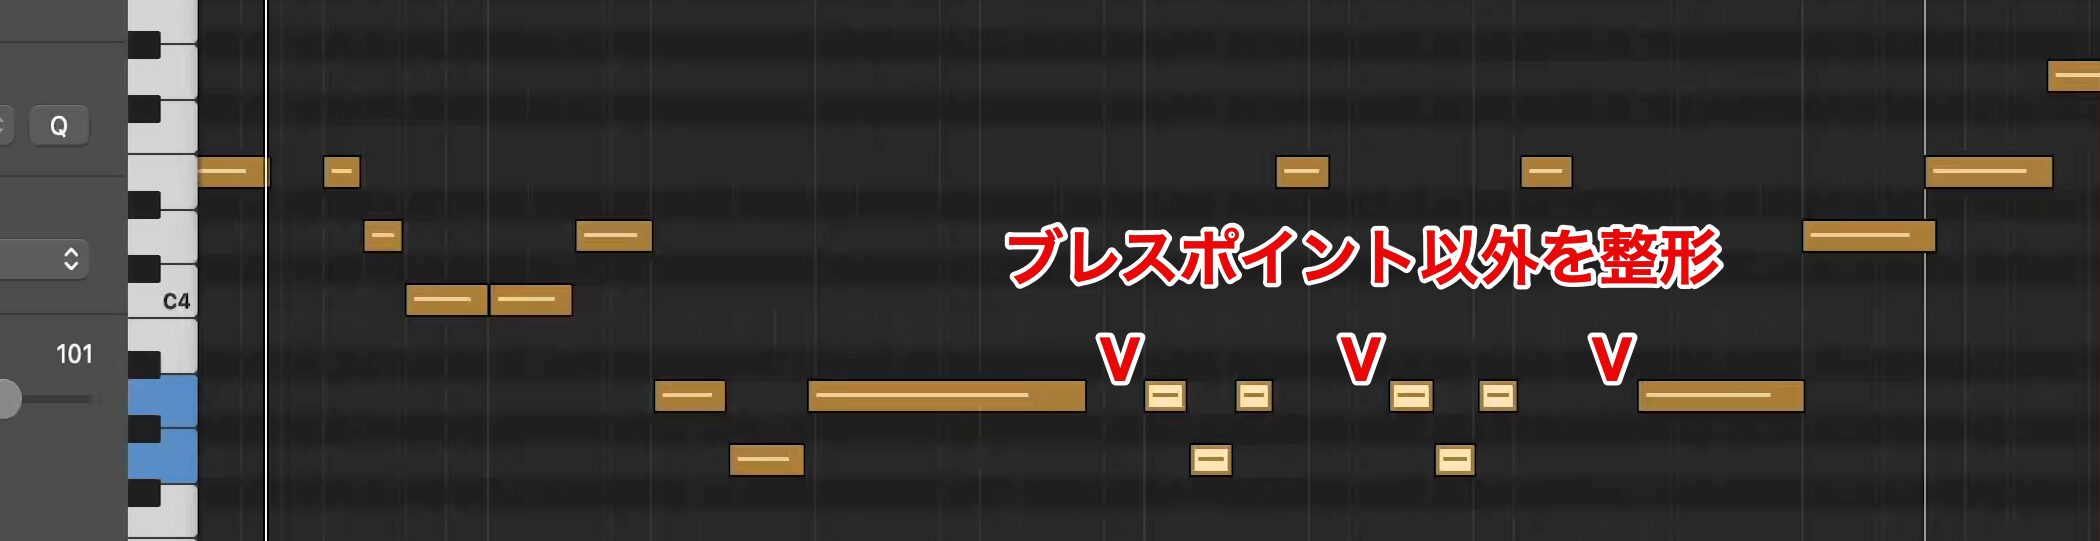
This time we are making a guide melody, so we leave gaps with the singer's breathing points in mind and shape the other parts into smooth phrases.
Finally, let's listen to the finished melody.
Frequently Asked Questions
Q1. What should I do if the timing of my performance is off when MIDI recording in Logic Pro?
With the quantize function, you can correct off-time notes to exact timing all at once. By adjusting the strength of the correction, you can also keep a human feel for a natural result.
Q2. How do I choose the best phrase from multiple takes when recording a melody?
Set cycle recording to "Create Take Folders," and each pass is recorded into a separate region. Click the arrow on the left of the region to show all takes and choose the performance to use.
Q3. Can I add a melody I liked but forgot to record?
With the "Capture as Recording button," you can add the performance you just played to the track. This lets you respond quickly even if you accidentally forgot to record.
NEW ARTICLES
Latest English Articles











