
With Logic Pro 11's Session Player feature, even beginners can automatically generate a full-fledged bass accompaniment. This article explains step by step everything from how to duplicate regions and enter chords in the chord track to the AI-powered automatic performance feature. By setting the key and chord progression, you can instantly create a natural bass line that fits the genre and style of the song, and presets and style adjustments let you customize it in detail to match the image of the song. You can also learn techniques that improve production efficiency, such as Undo and Redo and grouping chords, making this a practical guide useful for DTM beginners through intermediate users.
From Region Operations to Using AI Performance

Miyakawa
This time, we add a bass to the current accompaniment using "Session Player," a convenient new feature in Logic Pro 11 in which AI plays automatically.
Even beginners can easily create a full-fledged accompaniment, so let's learn how to use it!
Bass and Bass Player Video
How to Duplicate a Region Repeatedly
Before adding the bass, let's first repeat the piano chord pattern we created last time for the full length of the chorus.
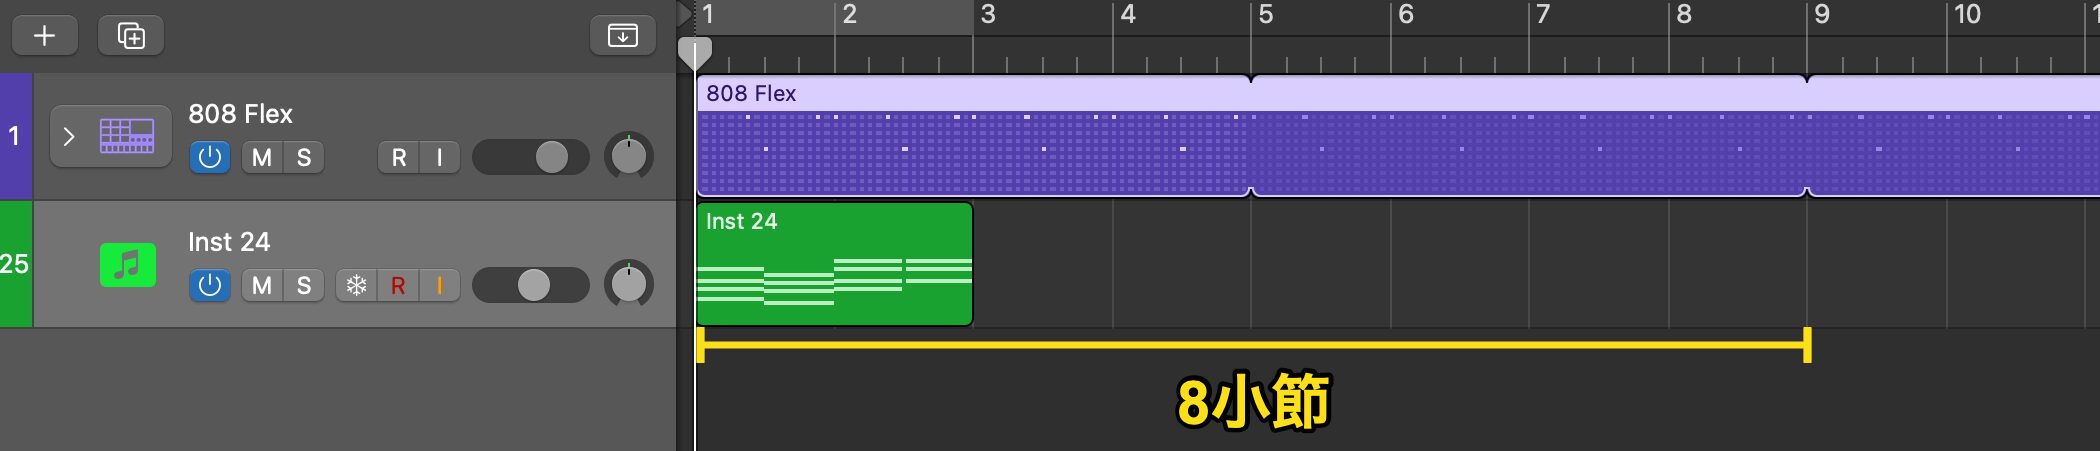
On the drum track we repeated the region to the end of the song with the shortcut key L, but this time we limit the repetition to the "8 bars" we plan for the chorus.
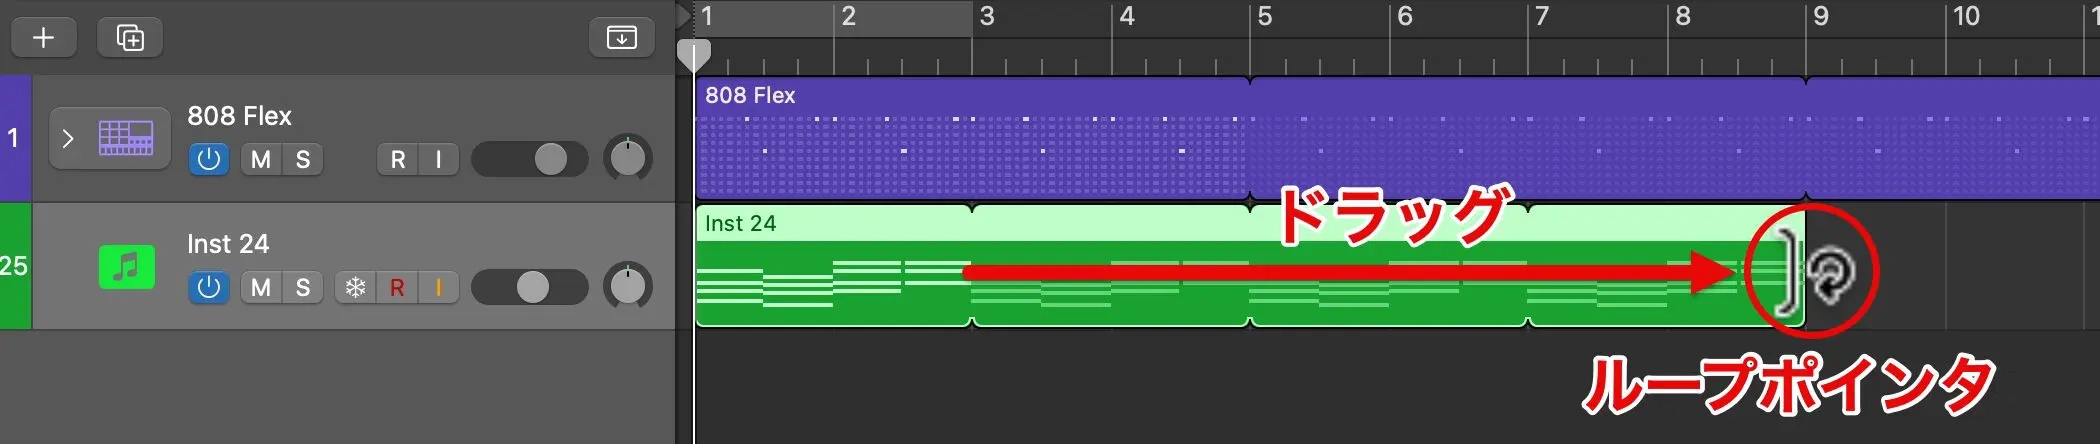
Move the cursor to the end of the region, and drag while it shows the "Loop pointer" to repeat the region for a specific length.
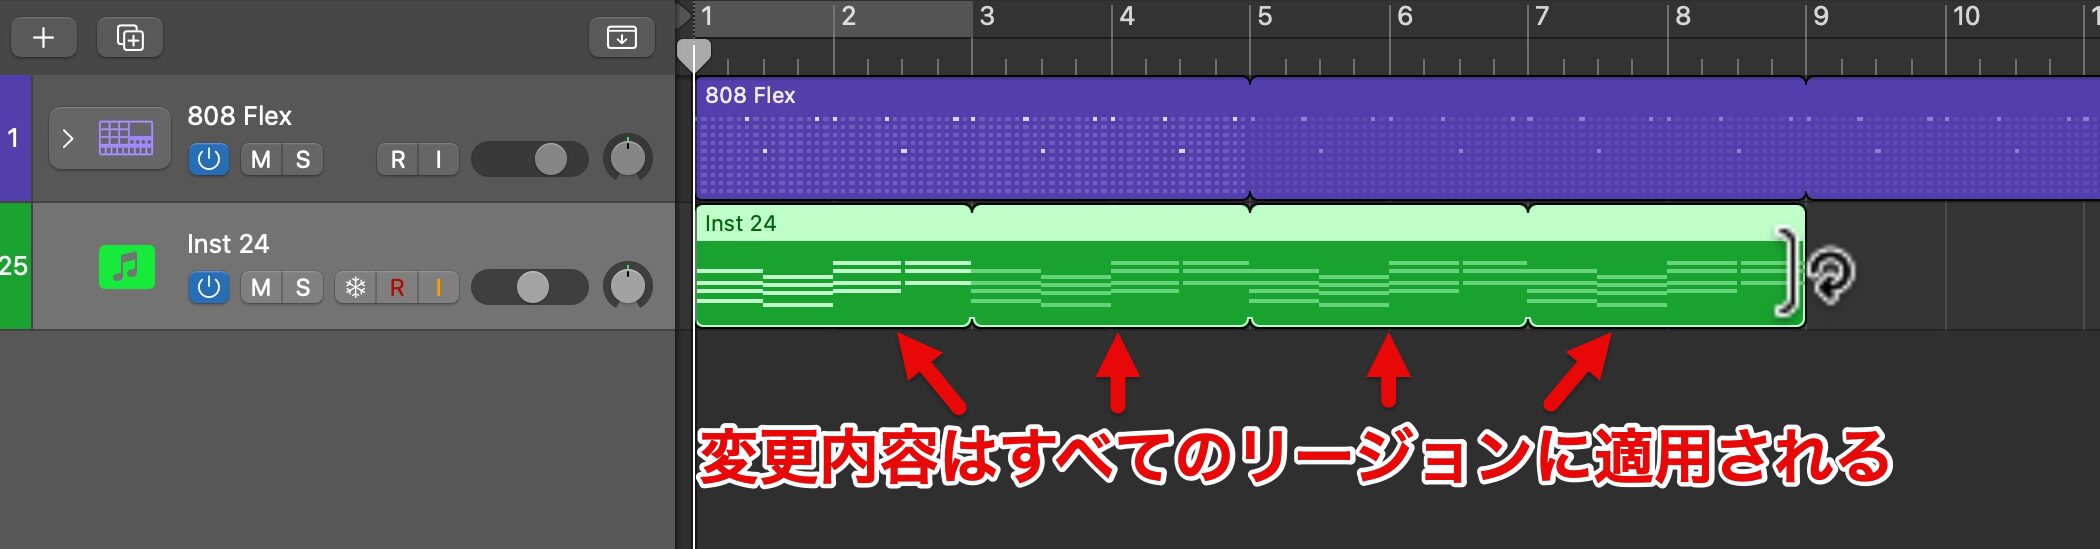
However, one thing to note when using the repeat function is that if you change the performance, the change applies to all the repeated regions.
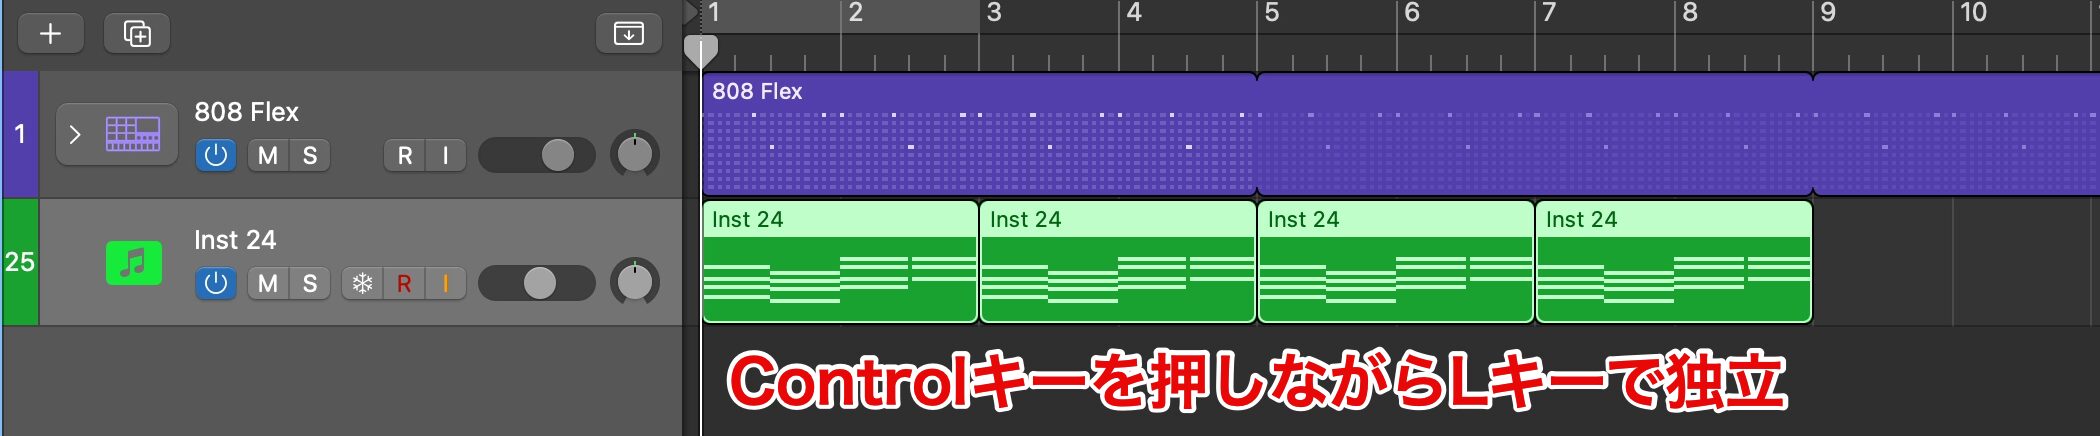
If you want to change the performance individually, select the region and press Control-L to turn the loops into independent regions.
You can do the same with the pattern regions used for the drums.
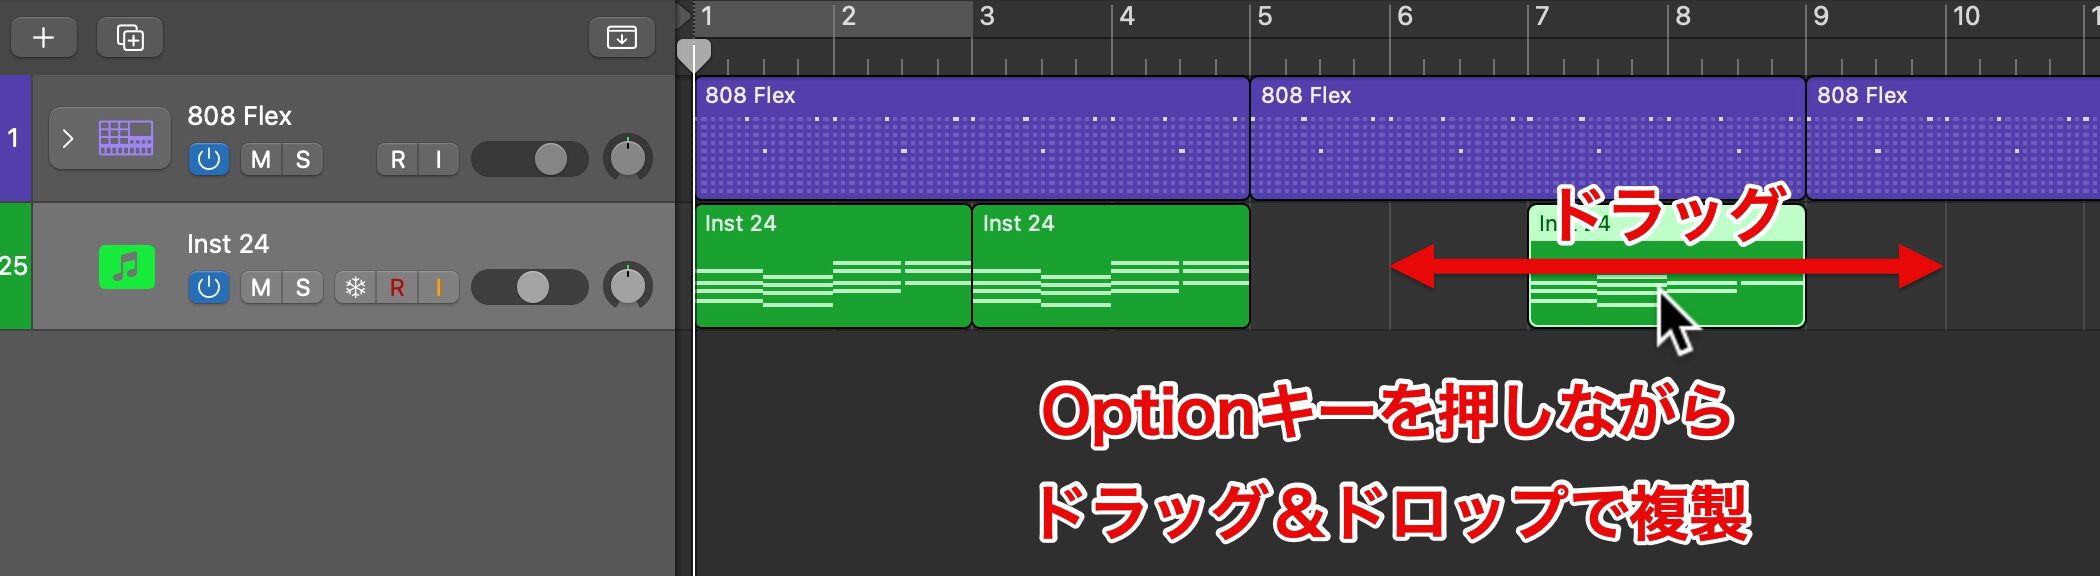
You can also select a region and Option-drag and drop it to duplicate it to any position you like, rather than right next to it.
Setting the Song's Key
Next, let's add a bass using Logic's headline feature: AI-powered automatic performance.
To have AI generate phrases that match the song, you first need to set the key and chord progression as song information.

Change the key from the "key display" at the top of the screen.

If it is not shown, right-click at the top of the screen and open "Customize Control Bar and Display."
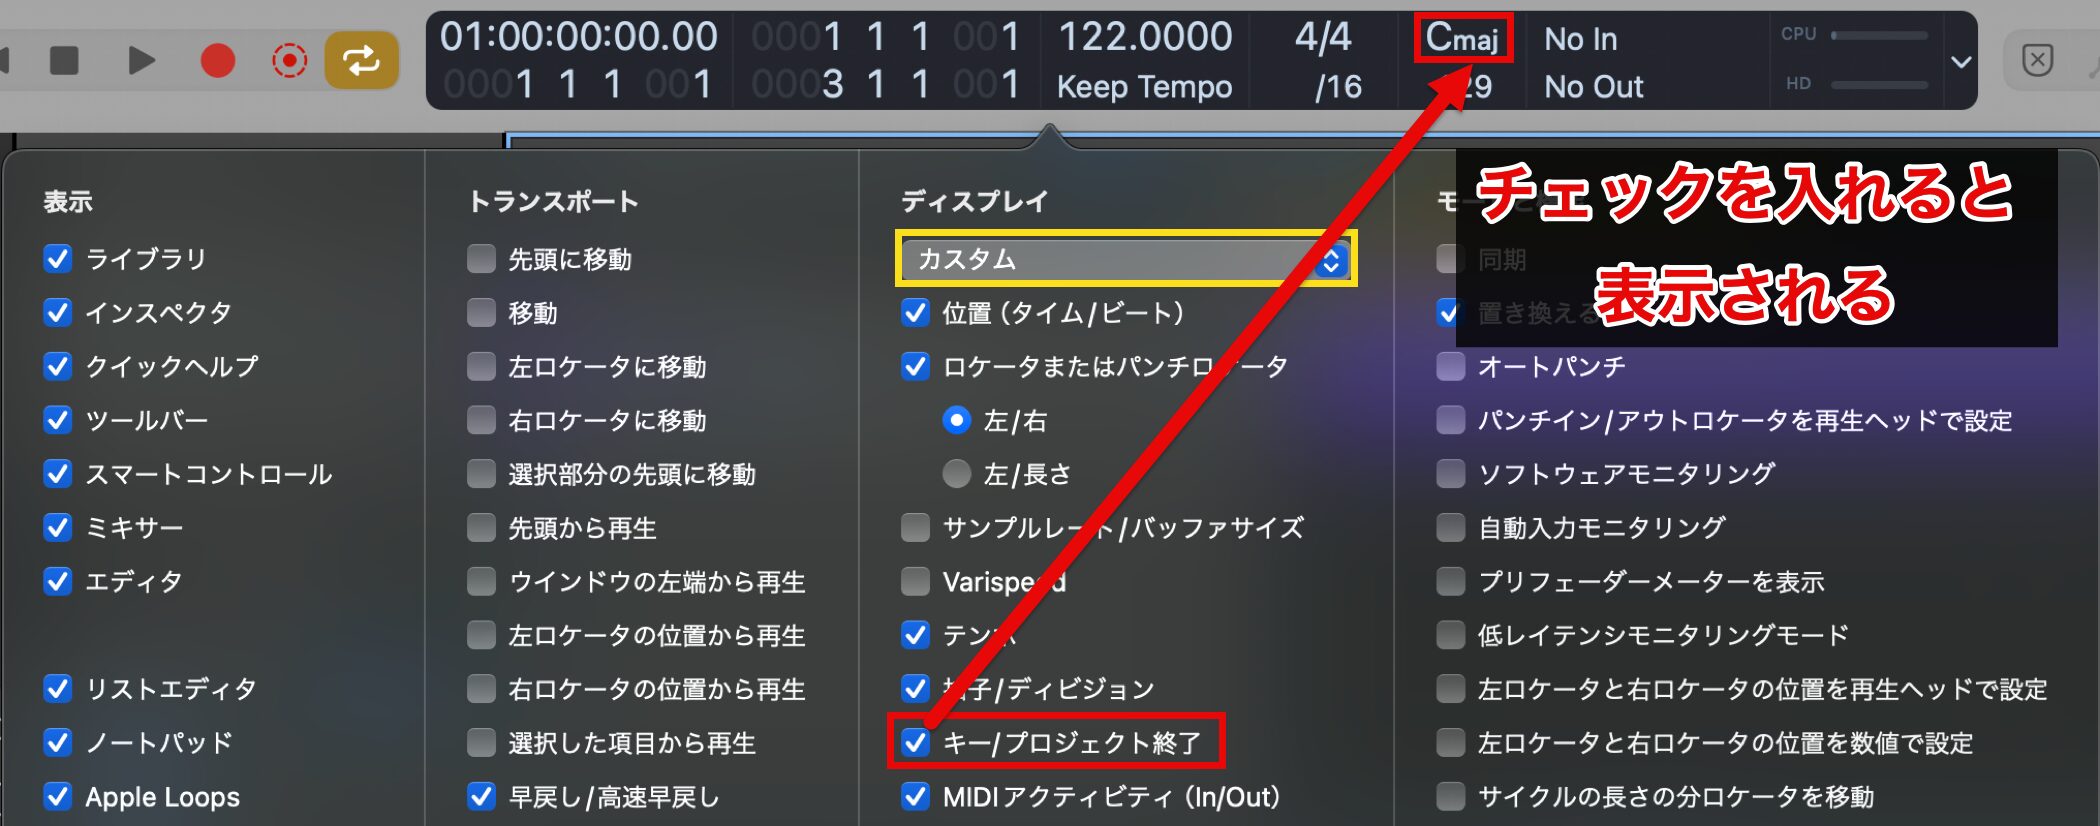
With "Custom" selected for the item below Display, check "Key / Project End" to show the key display.
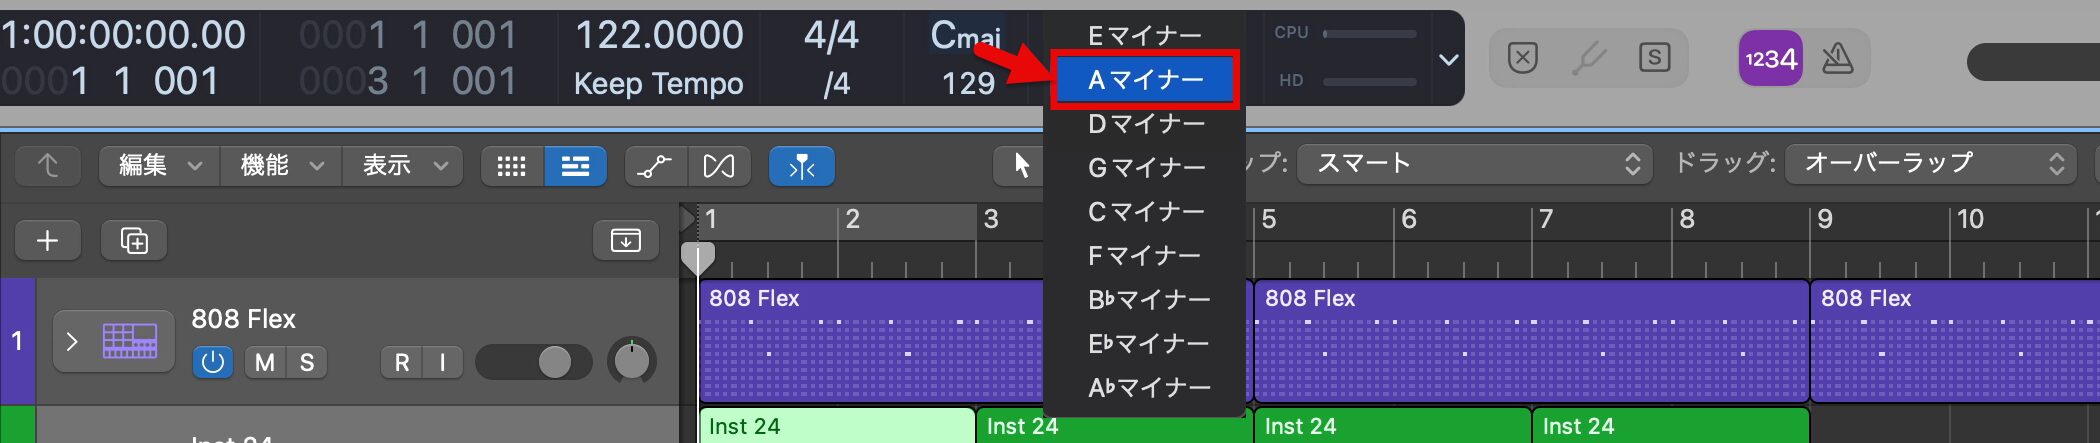
The current key is C major, but we change it to "A minor," the key of the chords entered on the piano.
Entering Chords in the Chord Track
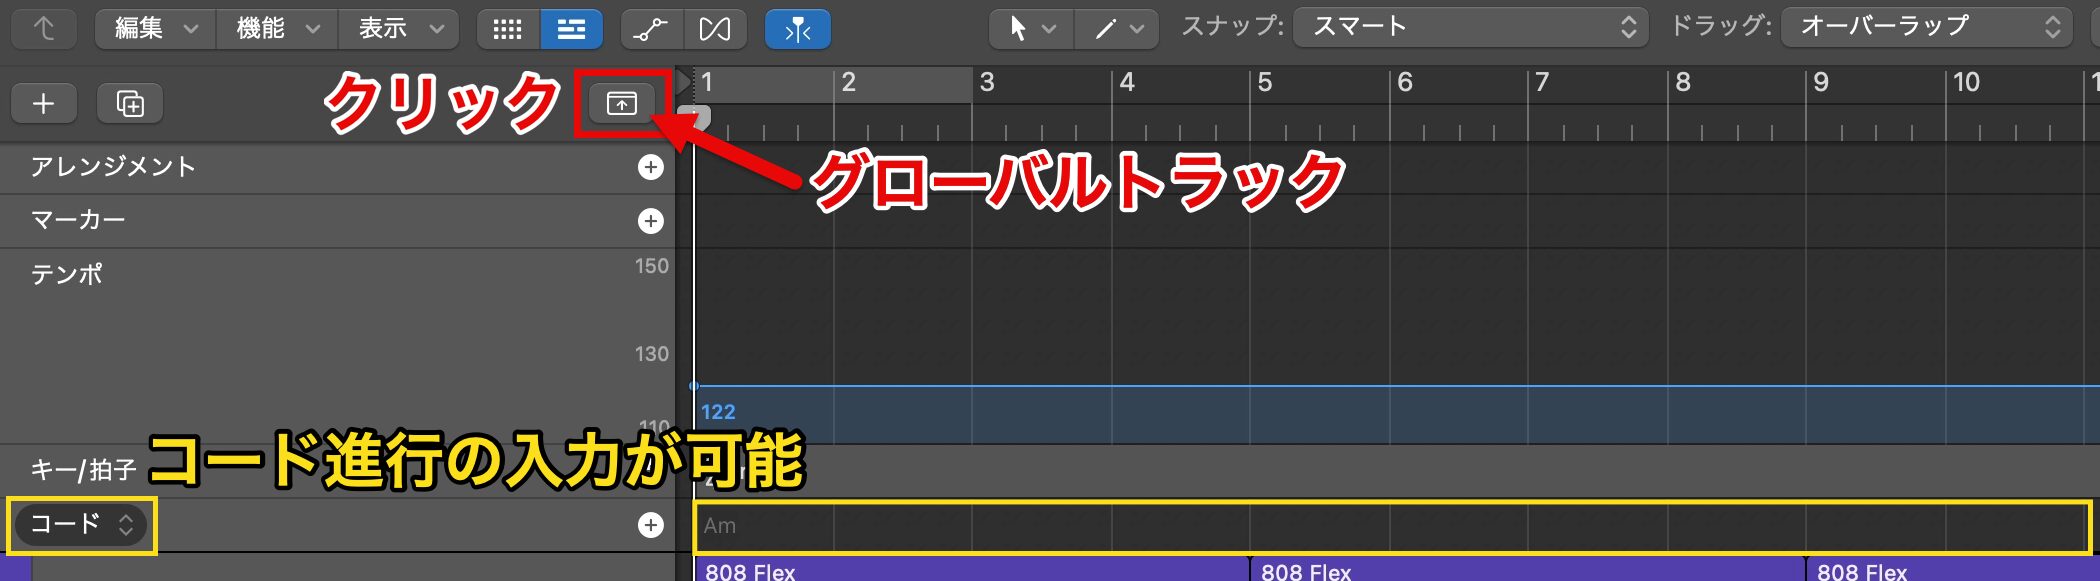
Next, enter the chord progression.
The global tracks have functions for controlling various kinds of song information, such as tempo and key.
Among them, the chord track lets you enter a chord progression.
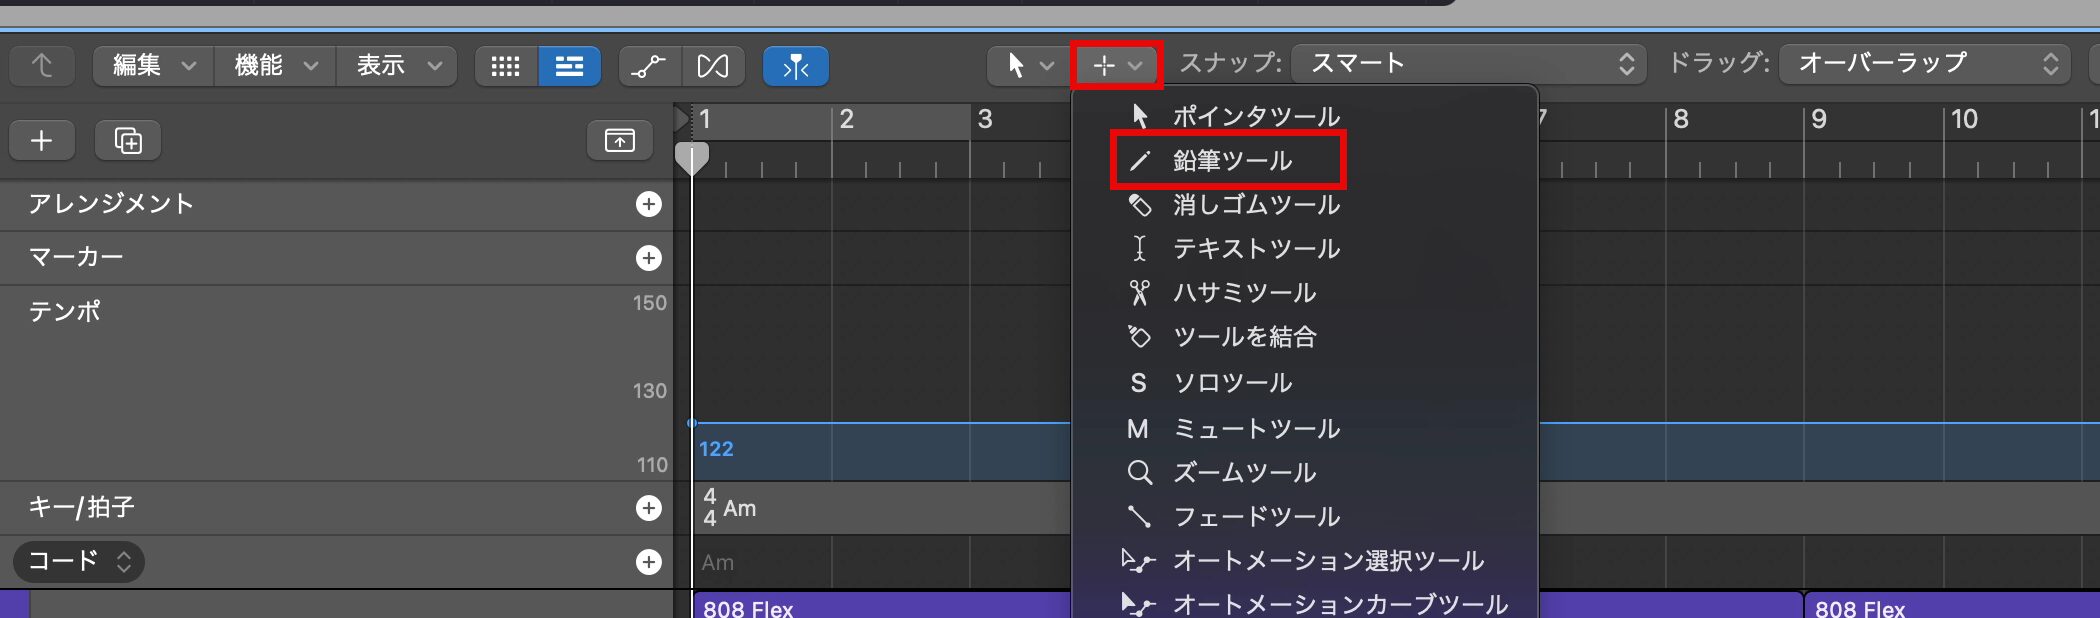
Let's enter chords using the Pencil tool as the Command-click tool.
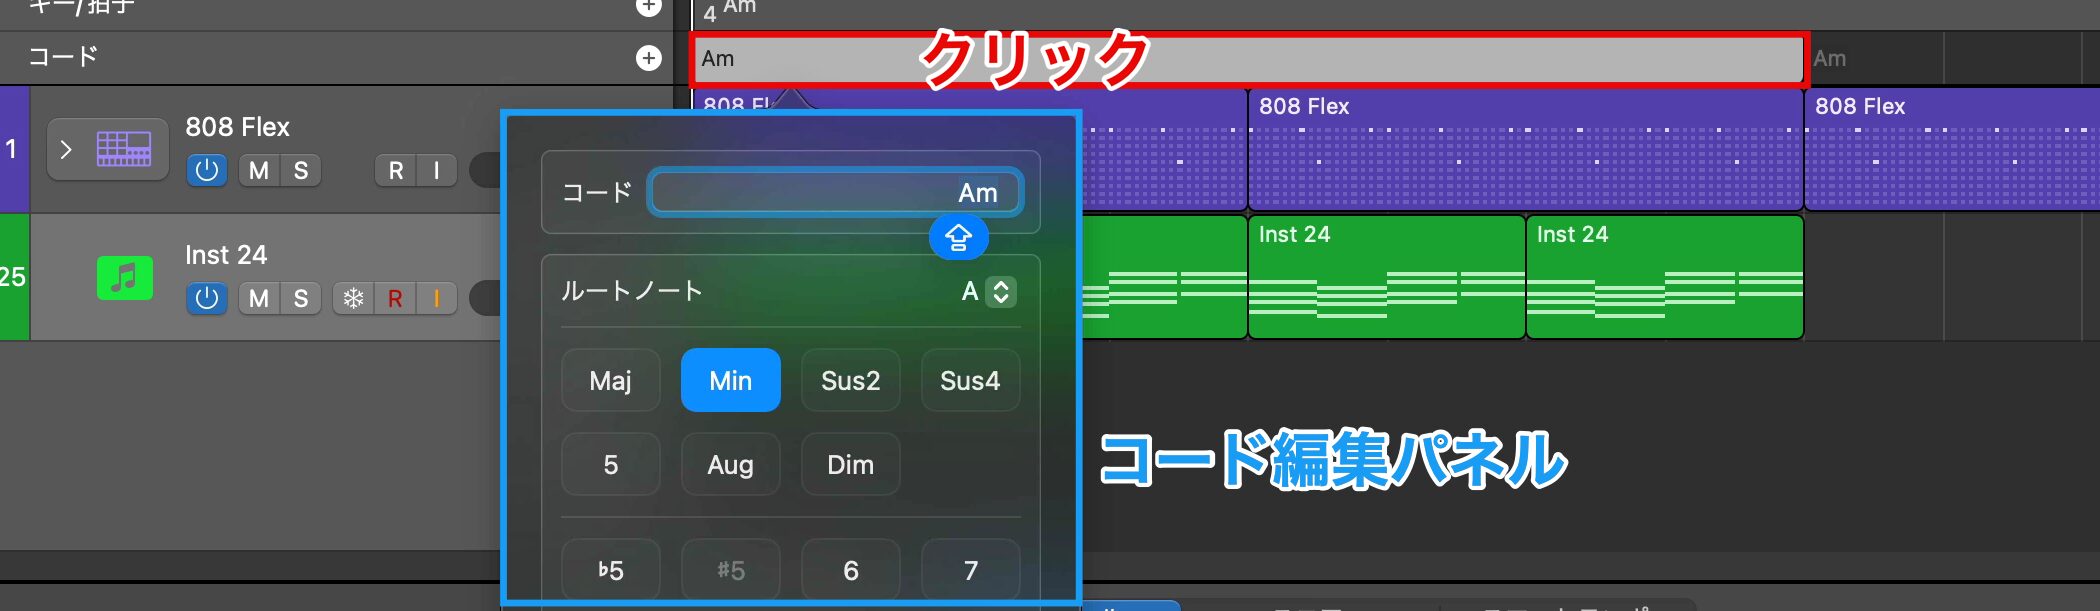
When the chord track lane is gray (chords have been added), double-clicking it opens the "chord editing panel."
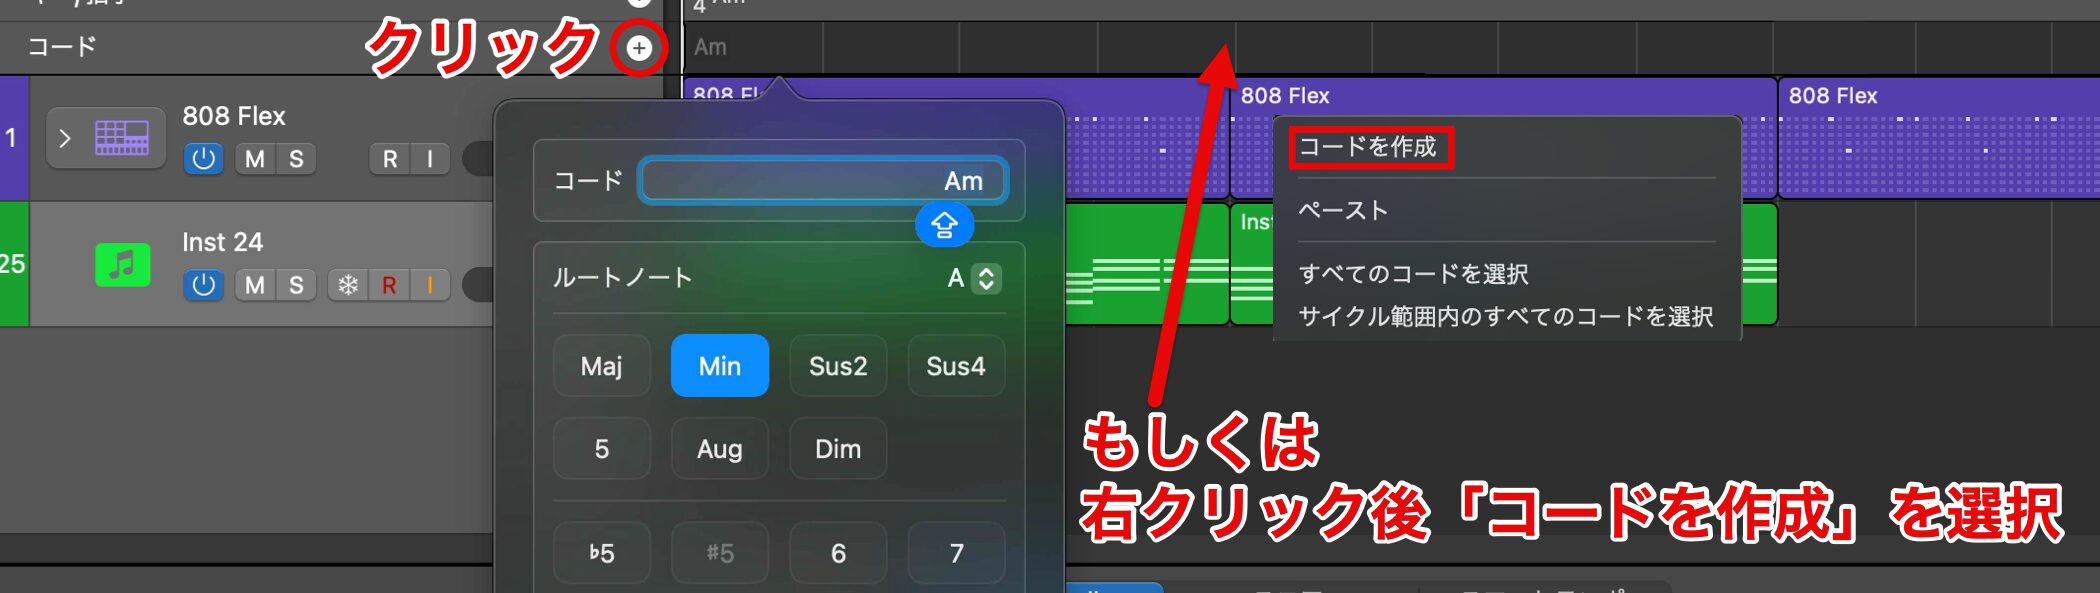
If the lane appears black, click the + mark or right-click the lane and choose "Create Chord" from the menu; a chord is added and the chord editing panel opens.
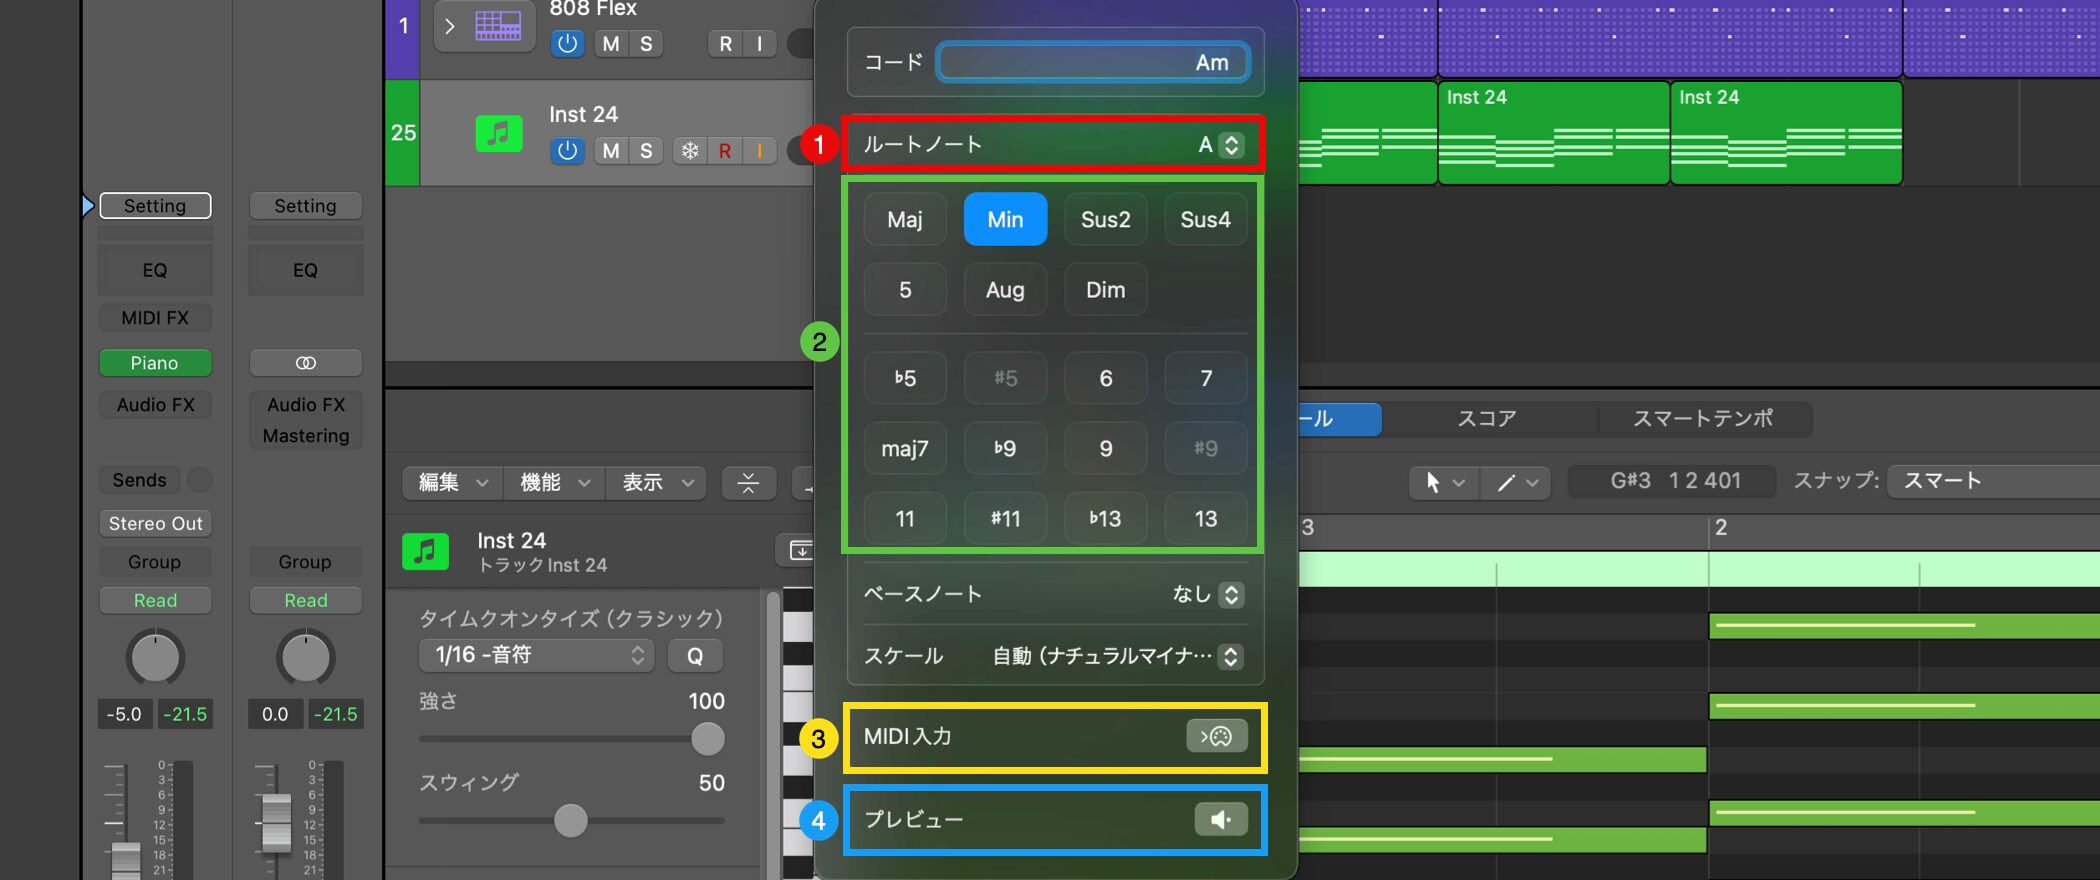
The main functions of the chord editing panel are as follows.
(1) (red frame) Root note: choose the root of the chord (A, B, C, etc.).
(2) (green frame) Chord type: set the chord type, such as "Maj" or "Min," and tensions.
(3) (yellow frame) MIDI input: lets you enter a chord by playing it on a MIDI keyboard.
(4) (blue frame) Preview: listen to the selected chord.
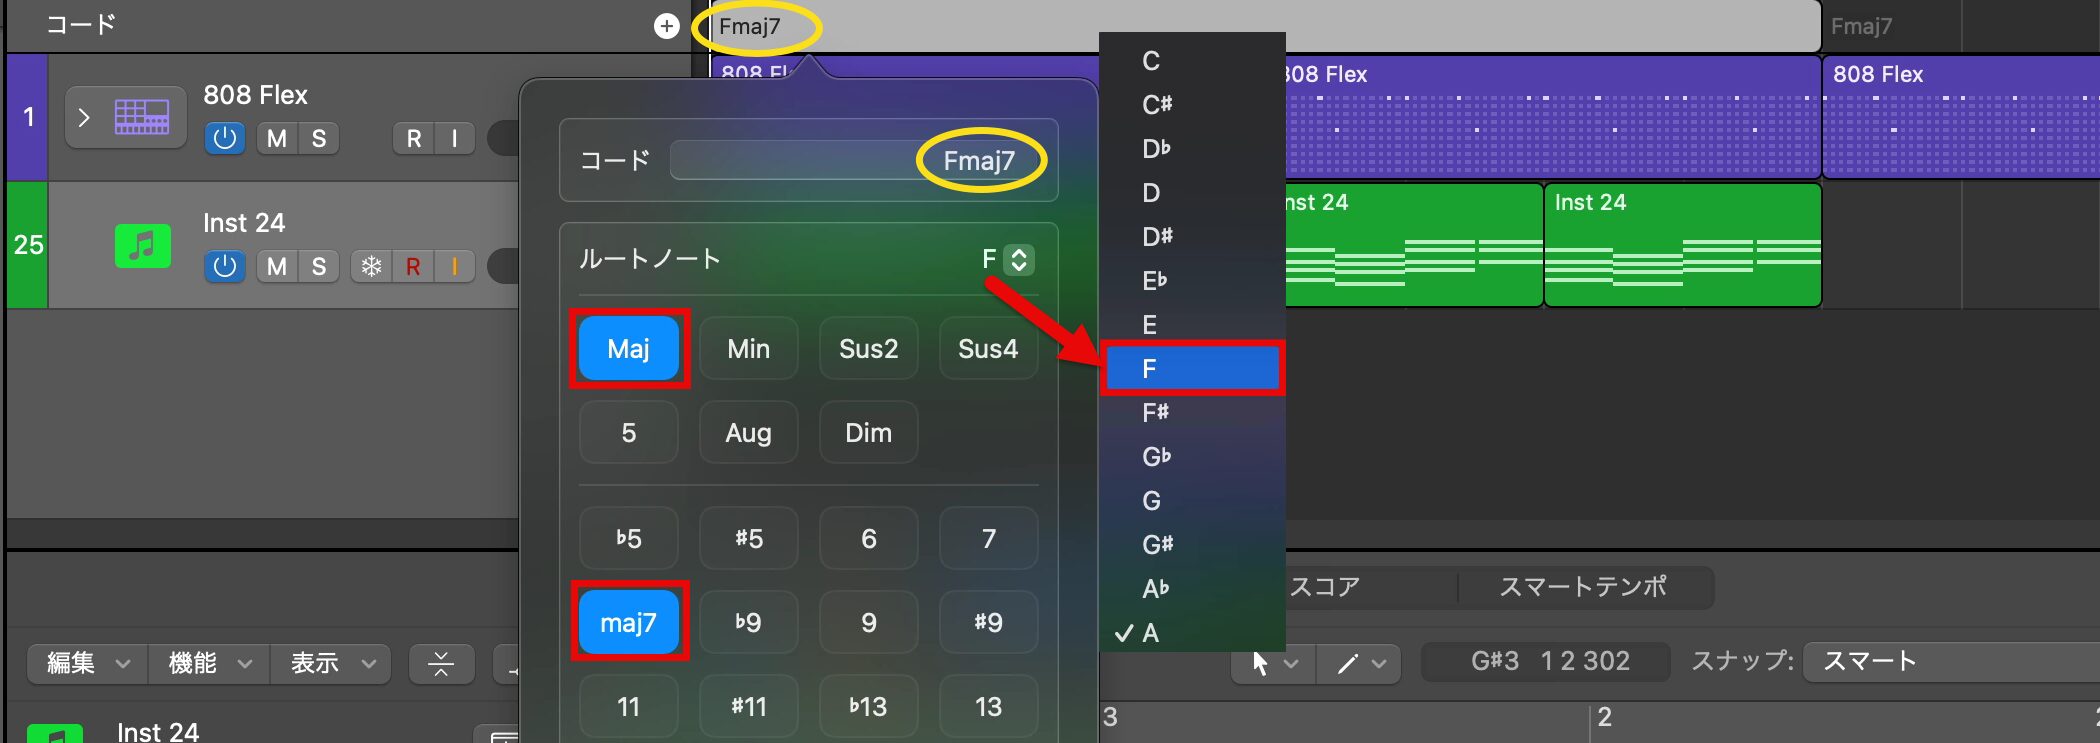
Enter "Fmaj7," the first chord entered on the piano.
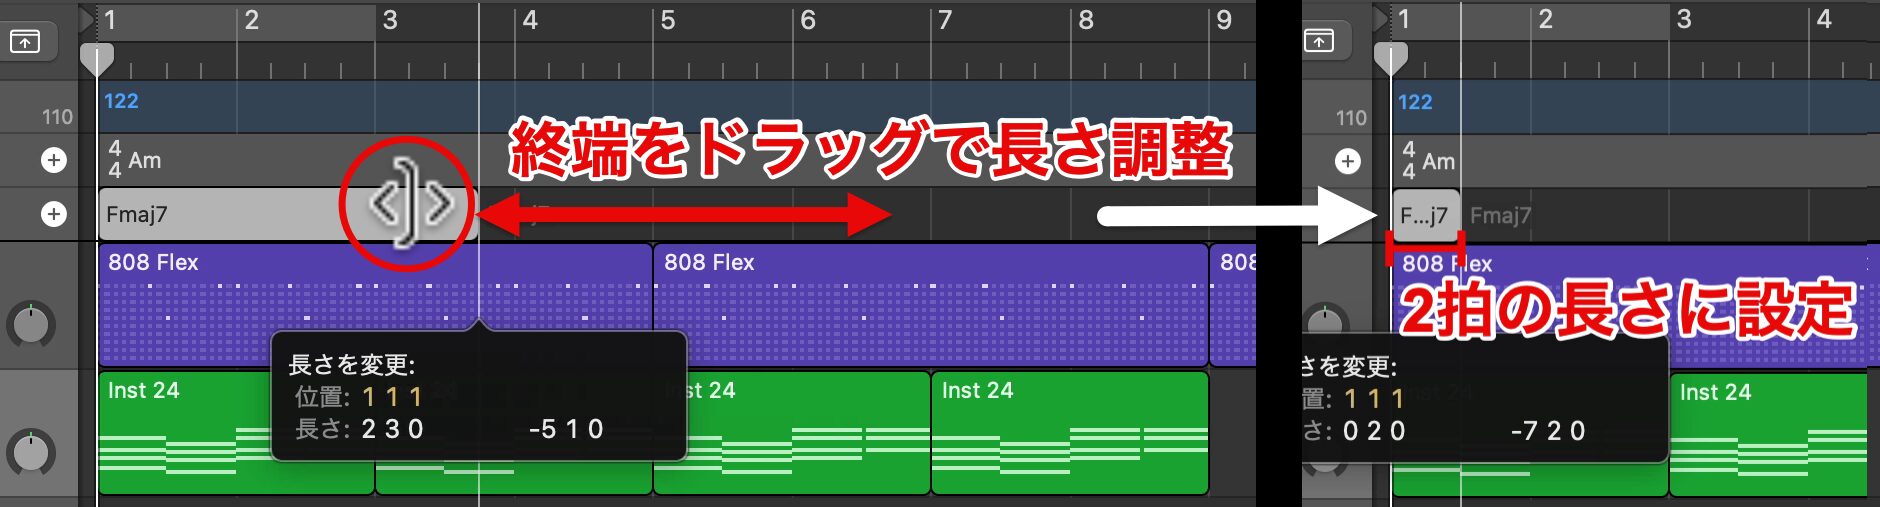
After entering it, just as with regions, you can adjust its length by dragging its end while the Resize pointer is shown.
This time we set it to two beats to match the piano.
Undo&Redo
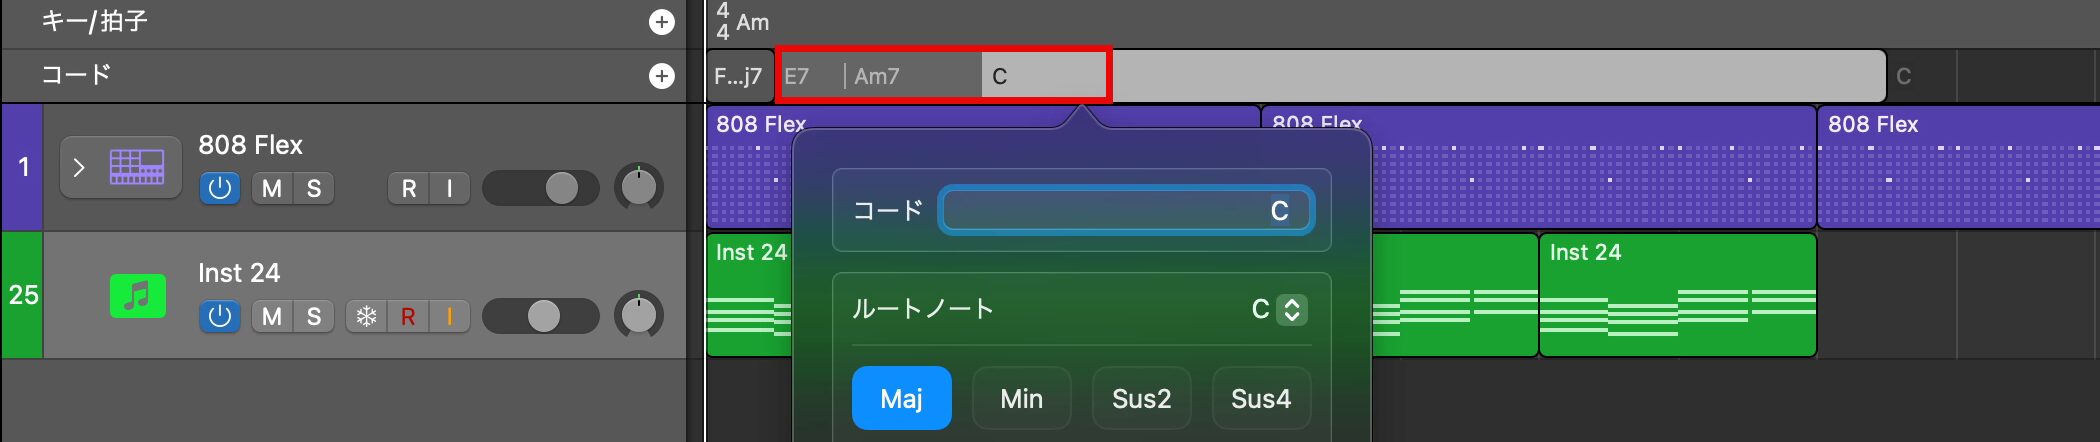
Continue by entering "E7," "Am7" and "C."
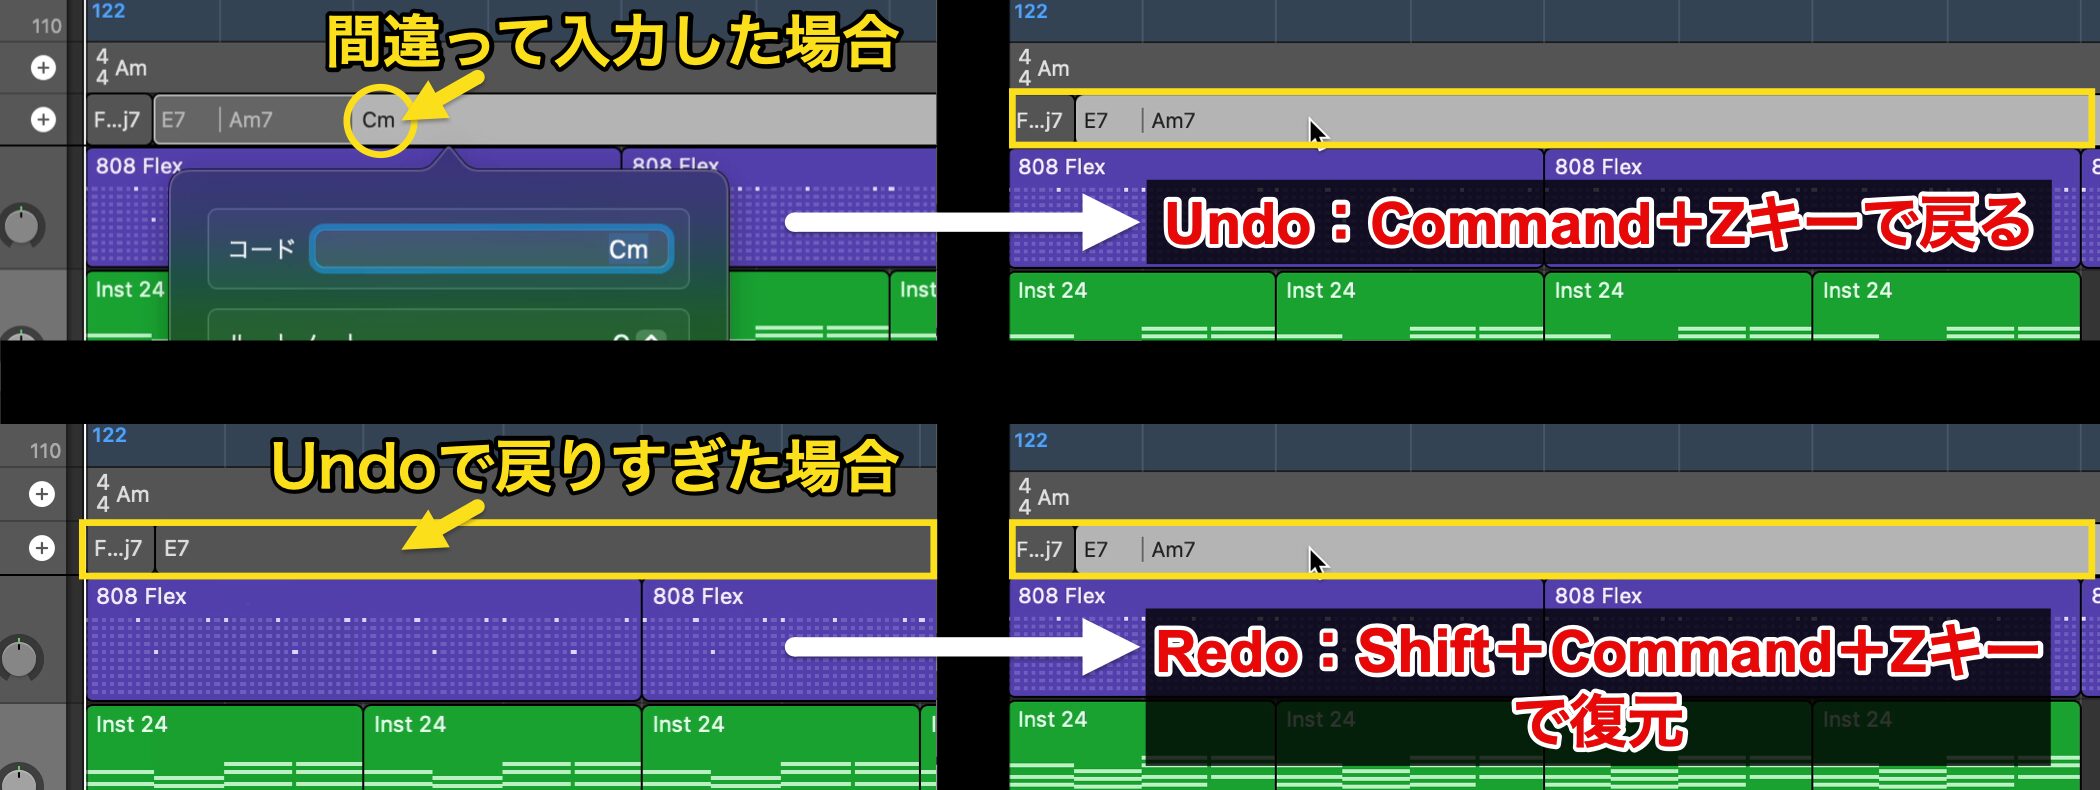
If you make a mistake, press Command-Z to undo the last action.
You can keep going back further, and if you go back too far, press Shift-Command-Z to restore it.
These "Undo" and "Redo" functions are useful in many situations in Logic Pro, starting with entering notes in the Piano Roll.
They are used frequently, so be sure to learn and use them.
Grouping Chords to Work More Efficiently

Next, we want to repeat the four chords we entered, but the first chord is separate while the following chords form a single block.
Everything is easier to handle when grouped, so we group them, including the first chord.
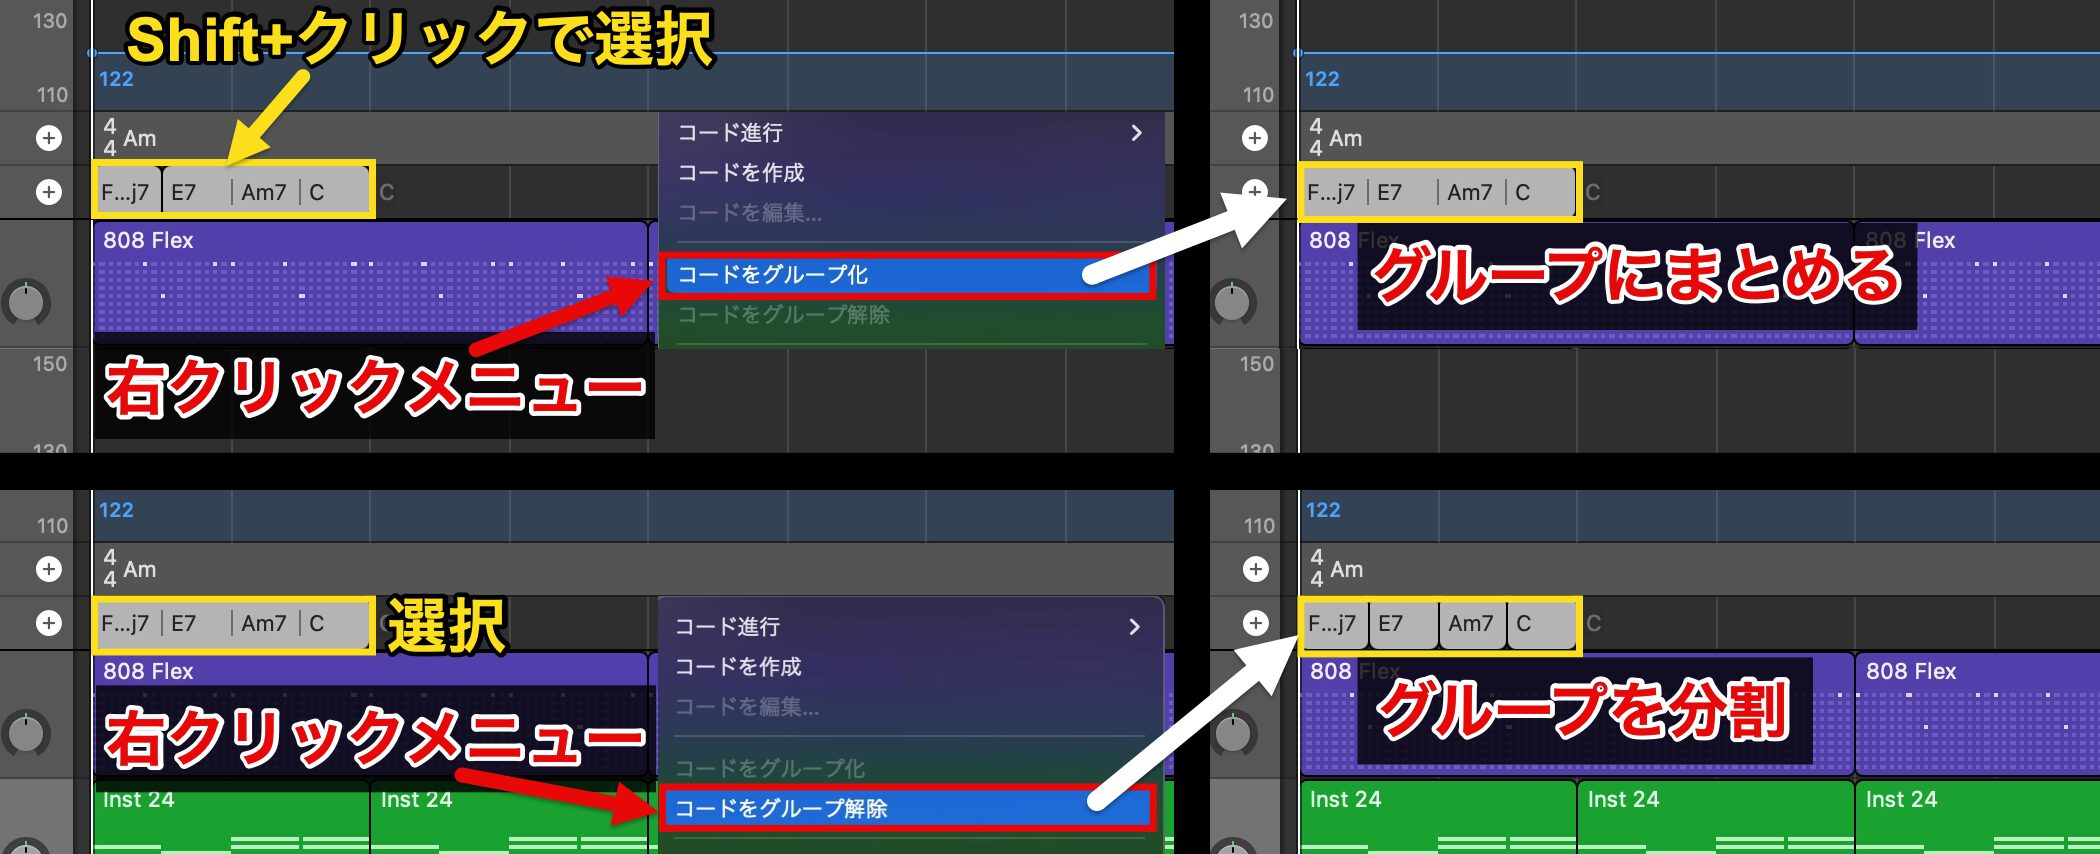
Select the chords you want to group by Shift-clicking them, then choose "Group Chords" from the right-click menu to combine them into one group.
To split a group, simply select the group and choose "Ungroup Chords" from the same menu.
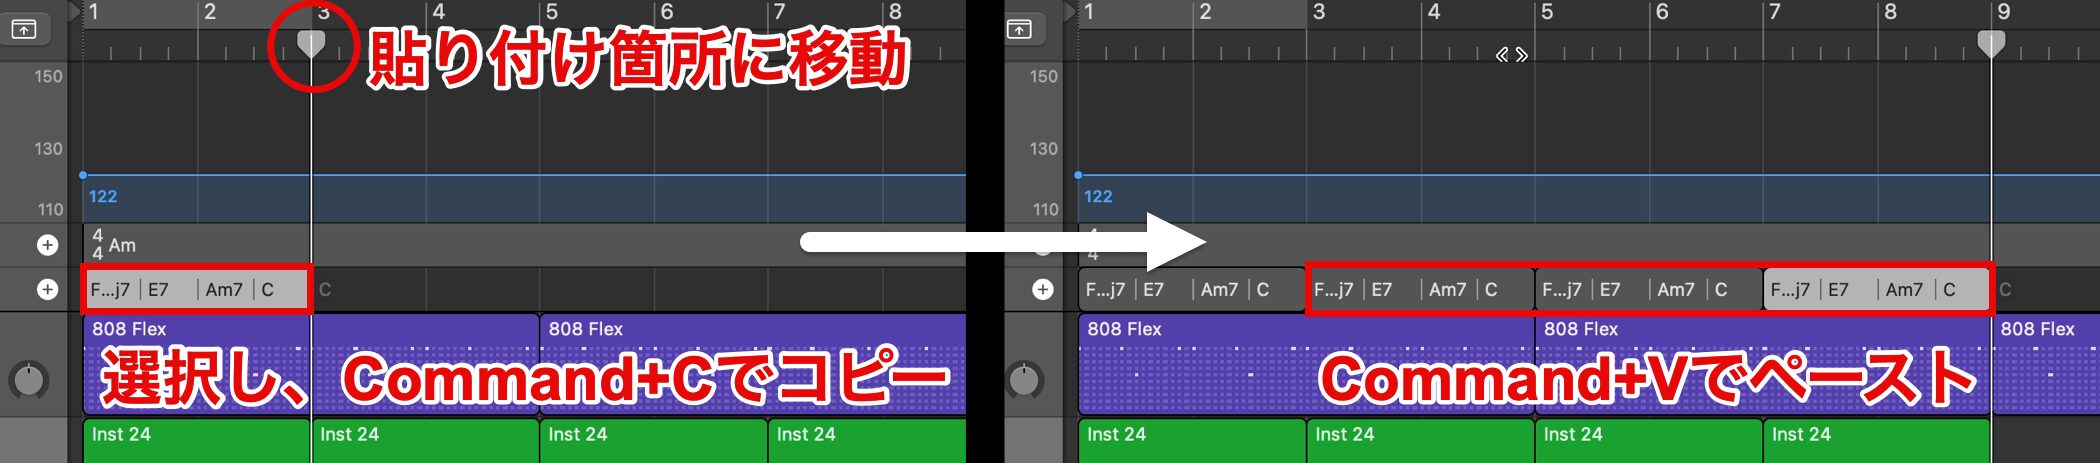
To repeat the chords, first select the chord group and copy it with Command-C.
Next, move the playhead to where you want to paste, and paste with Command-V.
After pasting, the playhead automatically moves to the end, so just repeat the paste as many times as you need.

After entering the chords, it is a good idea to close the global tracks.
Even when they are closed, the chords are shown in the ruler, so you can keep working while saving screen space.
Adding Bass with Session Player
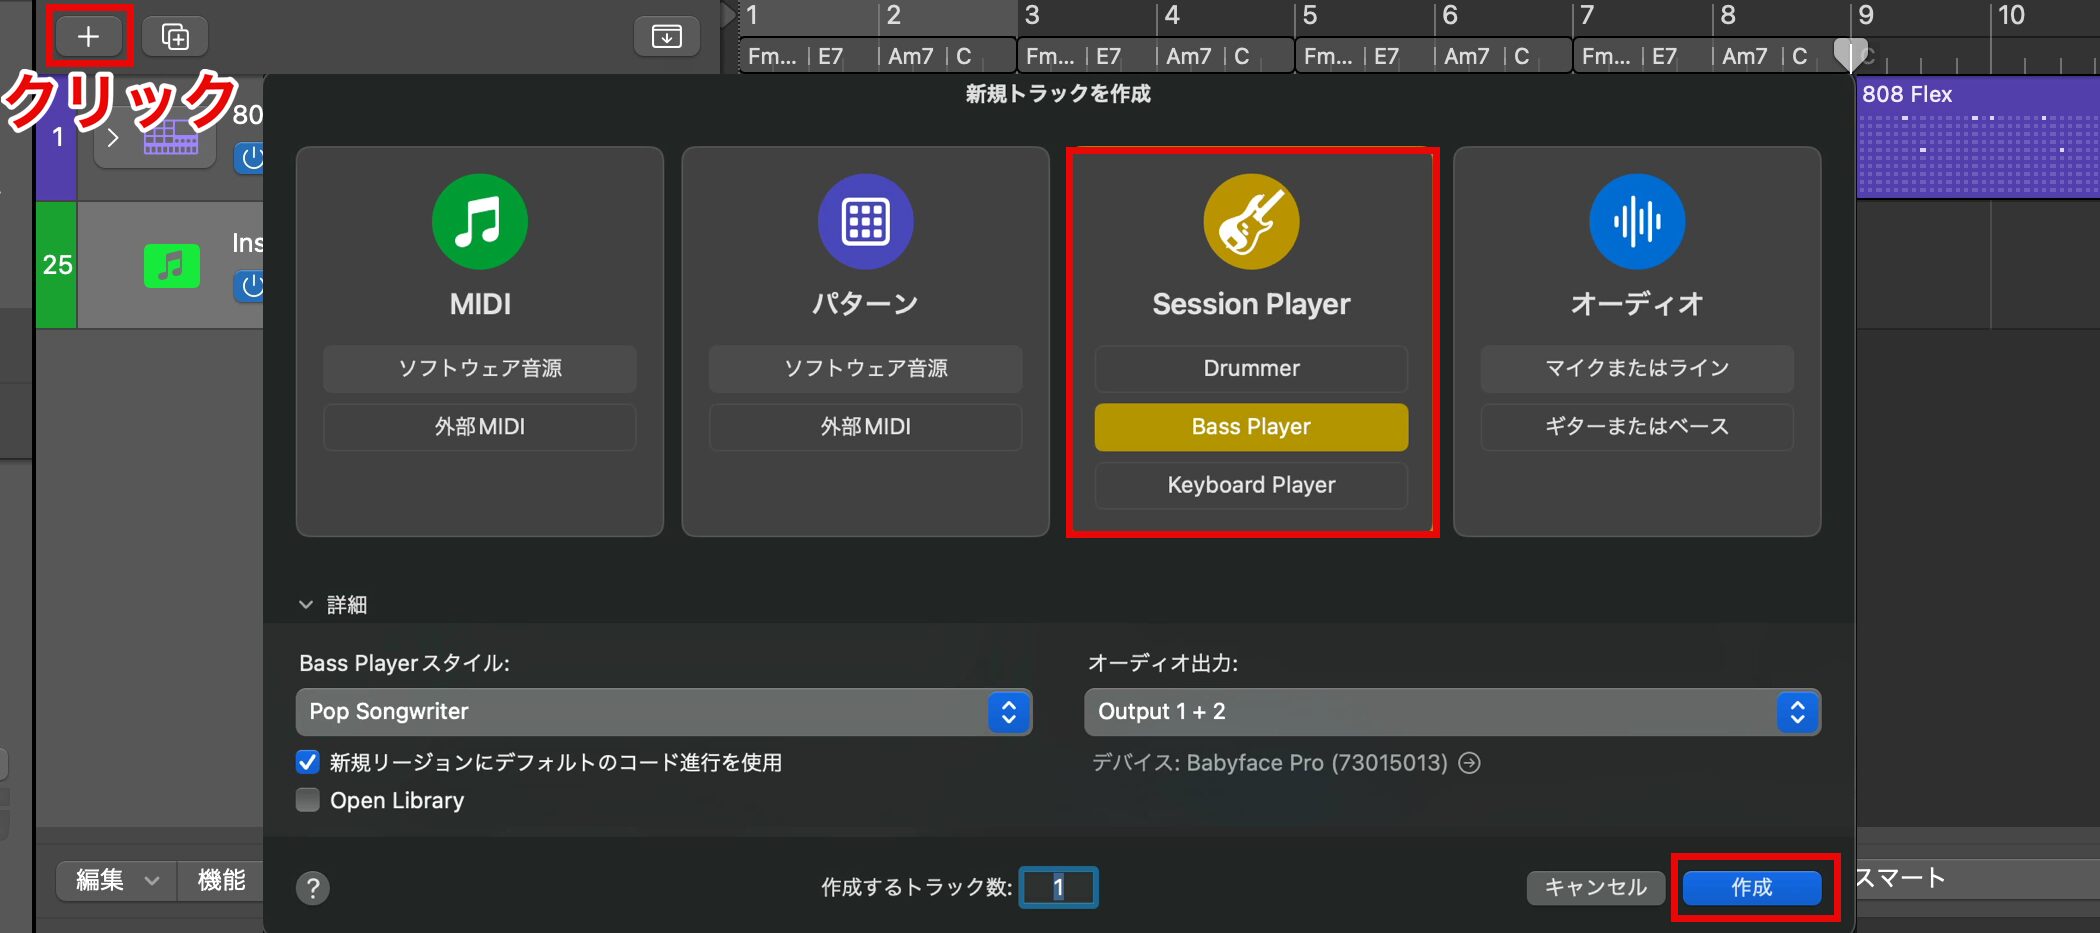
With the key and chords set, we enter the bass.
Here we use "Session Player," a track that can perform automatically.
On the new track creation screen, choose "Bass Player" under the Session Player track and click "Create."
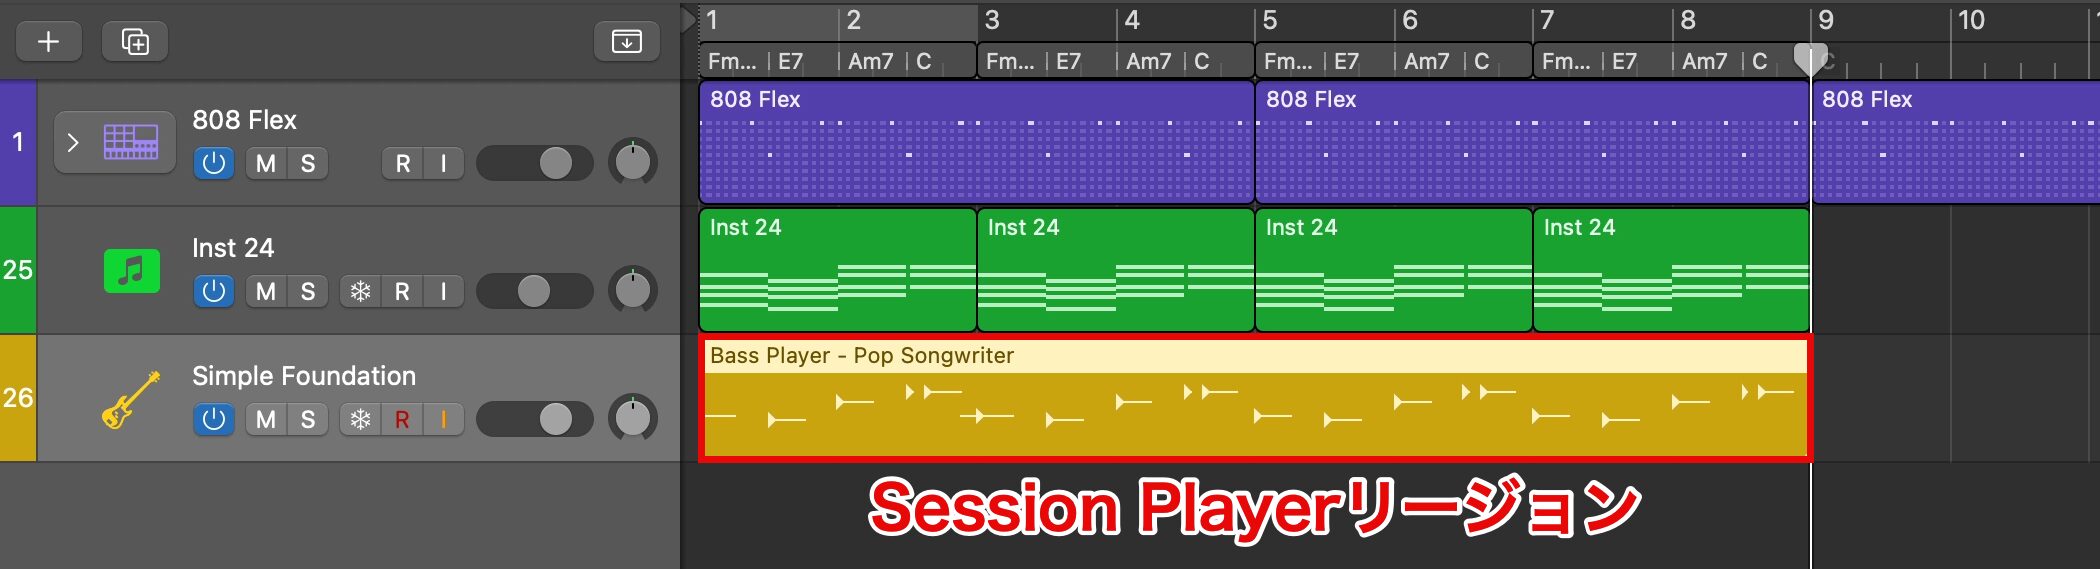
Once it loads, a new type of region called a "Session Player" region is created automatically.
Let's listen.
As you can hear, a natural performance is generated that follows the key and chord progression you set.
Of course, you can change the performance to suit your taste.
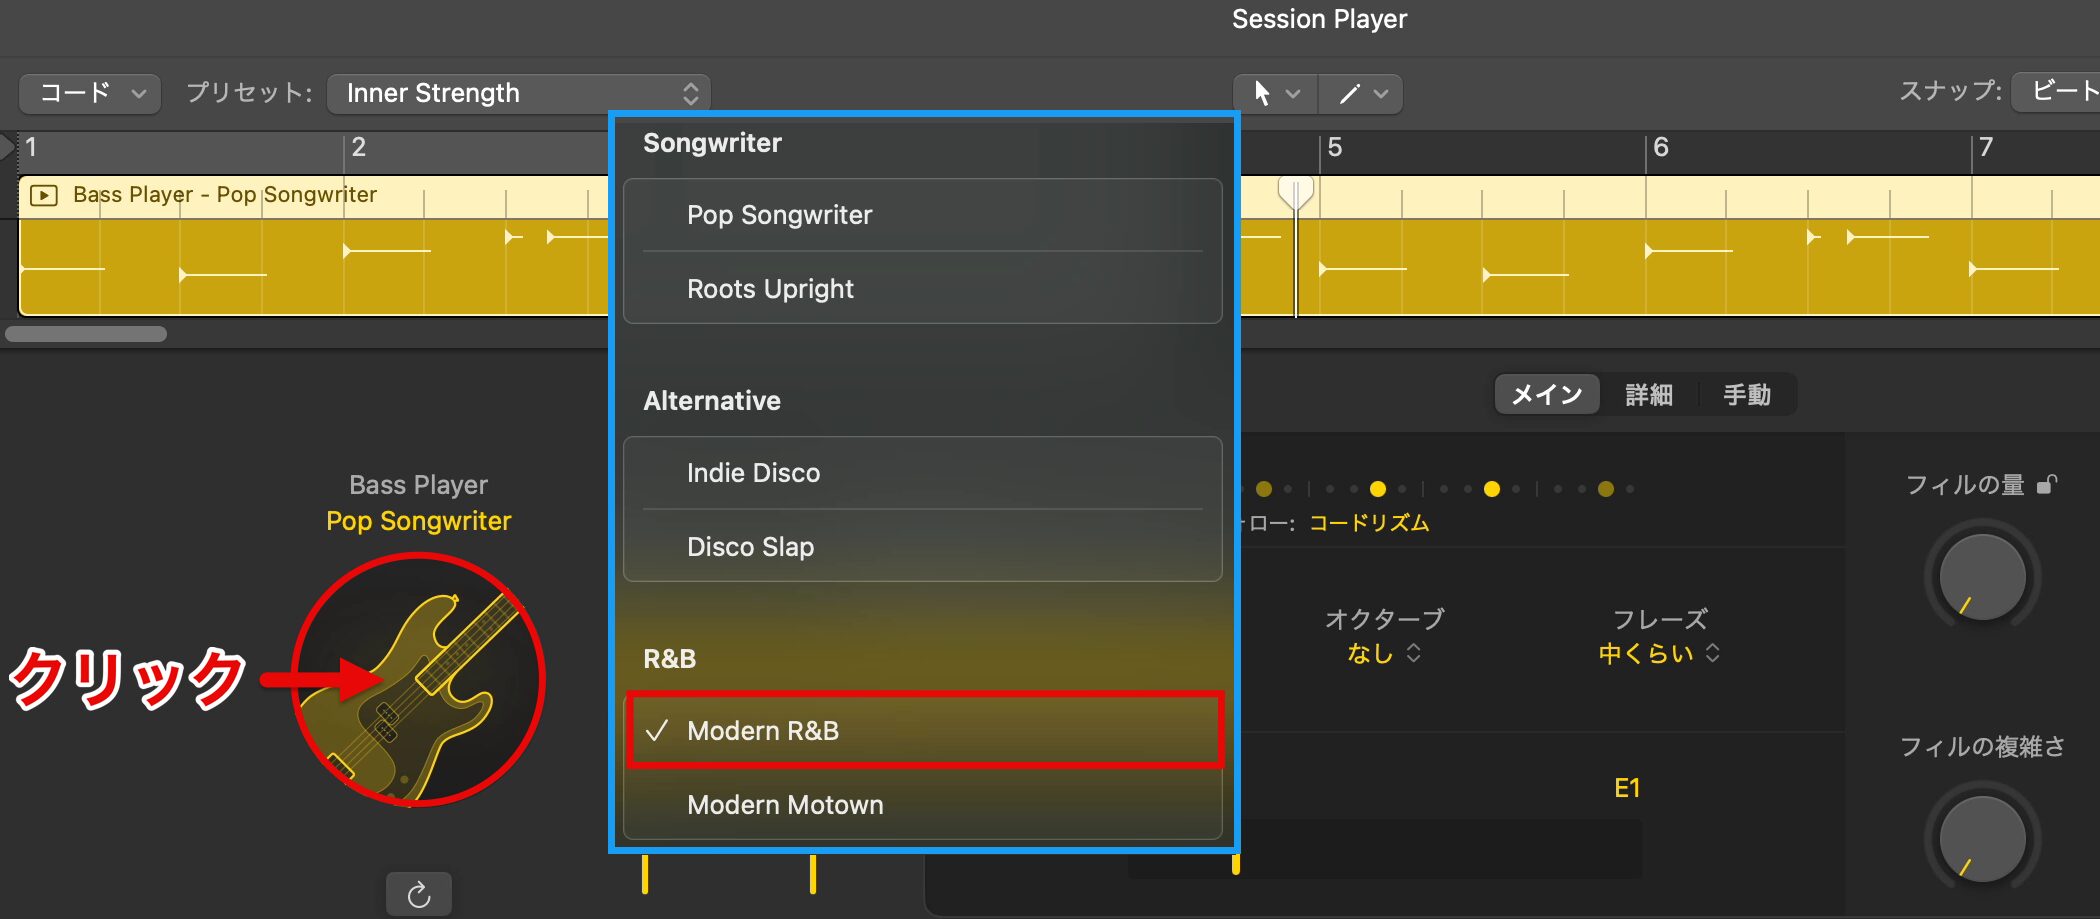
Click the bass icon in the editor to choose a "Style."
Switching styles instantly creates bass lines characteristic of each genre.
This time we chose "Modern R&B," which is closest to what we had in mind.
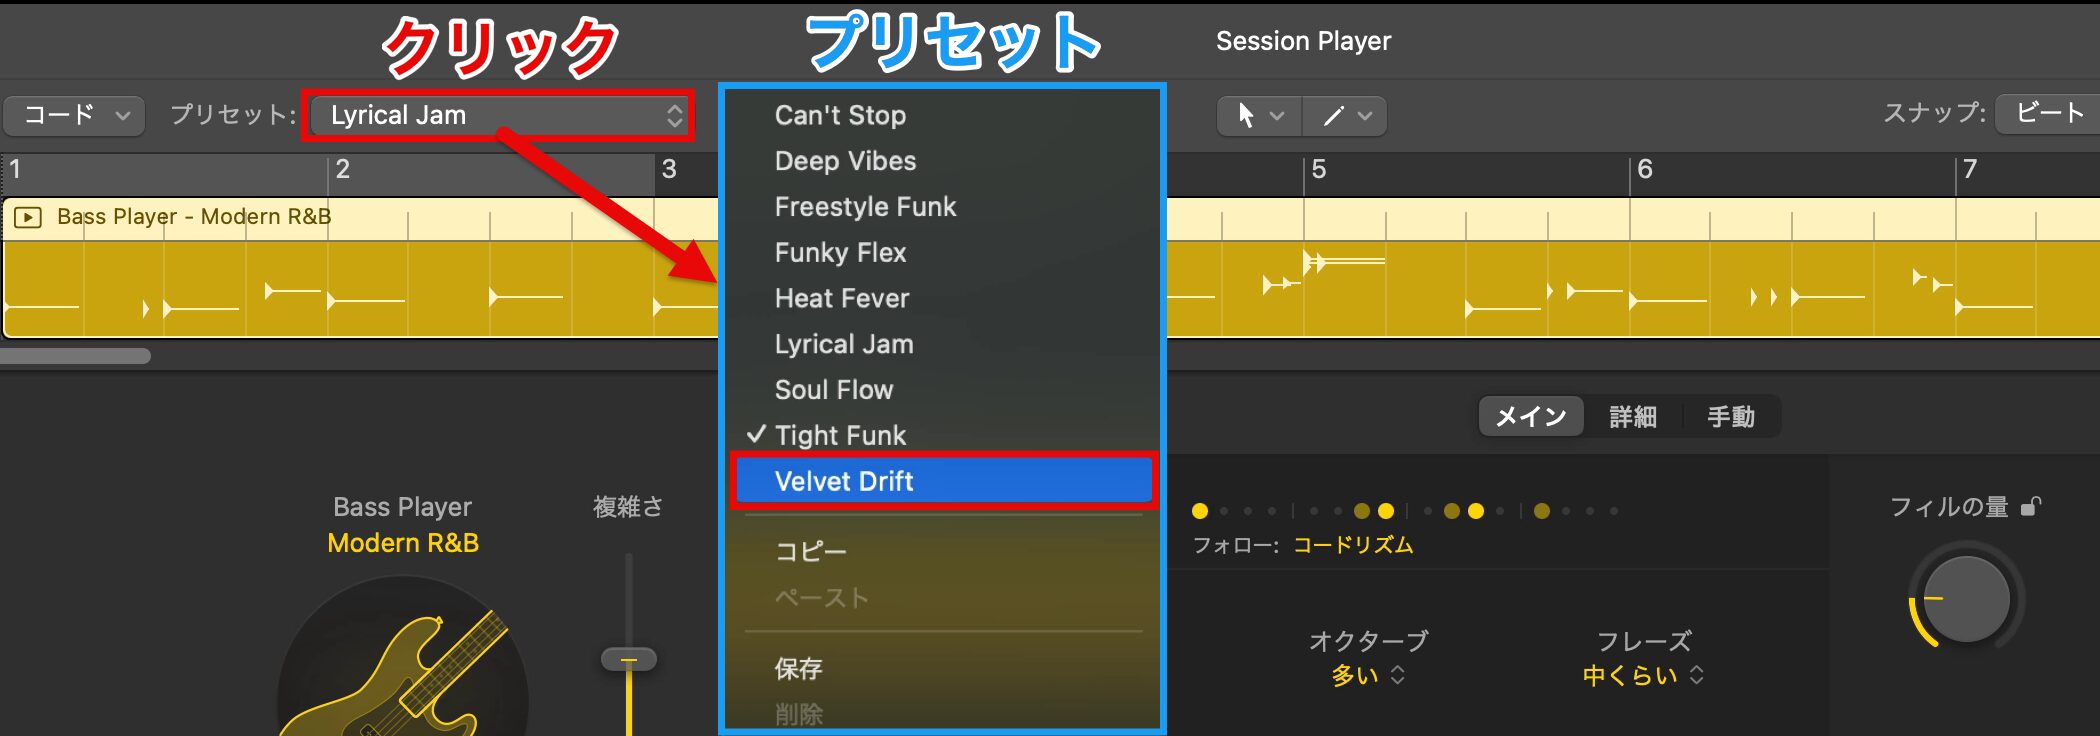
Each style comes with its own presets.
Click "Preset" to show the list, and just choosing one generates a performance with a different flavor.
This time we choose "Velvet Drift," which suits our taste best.
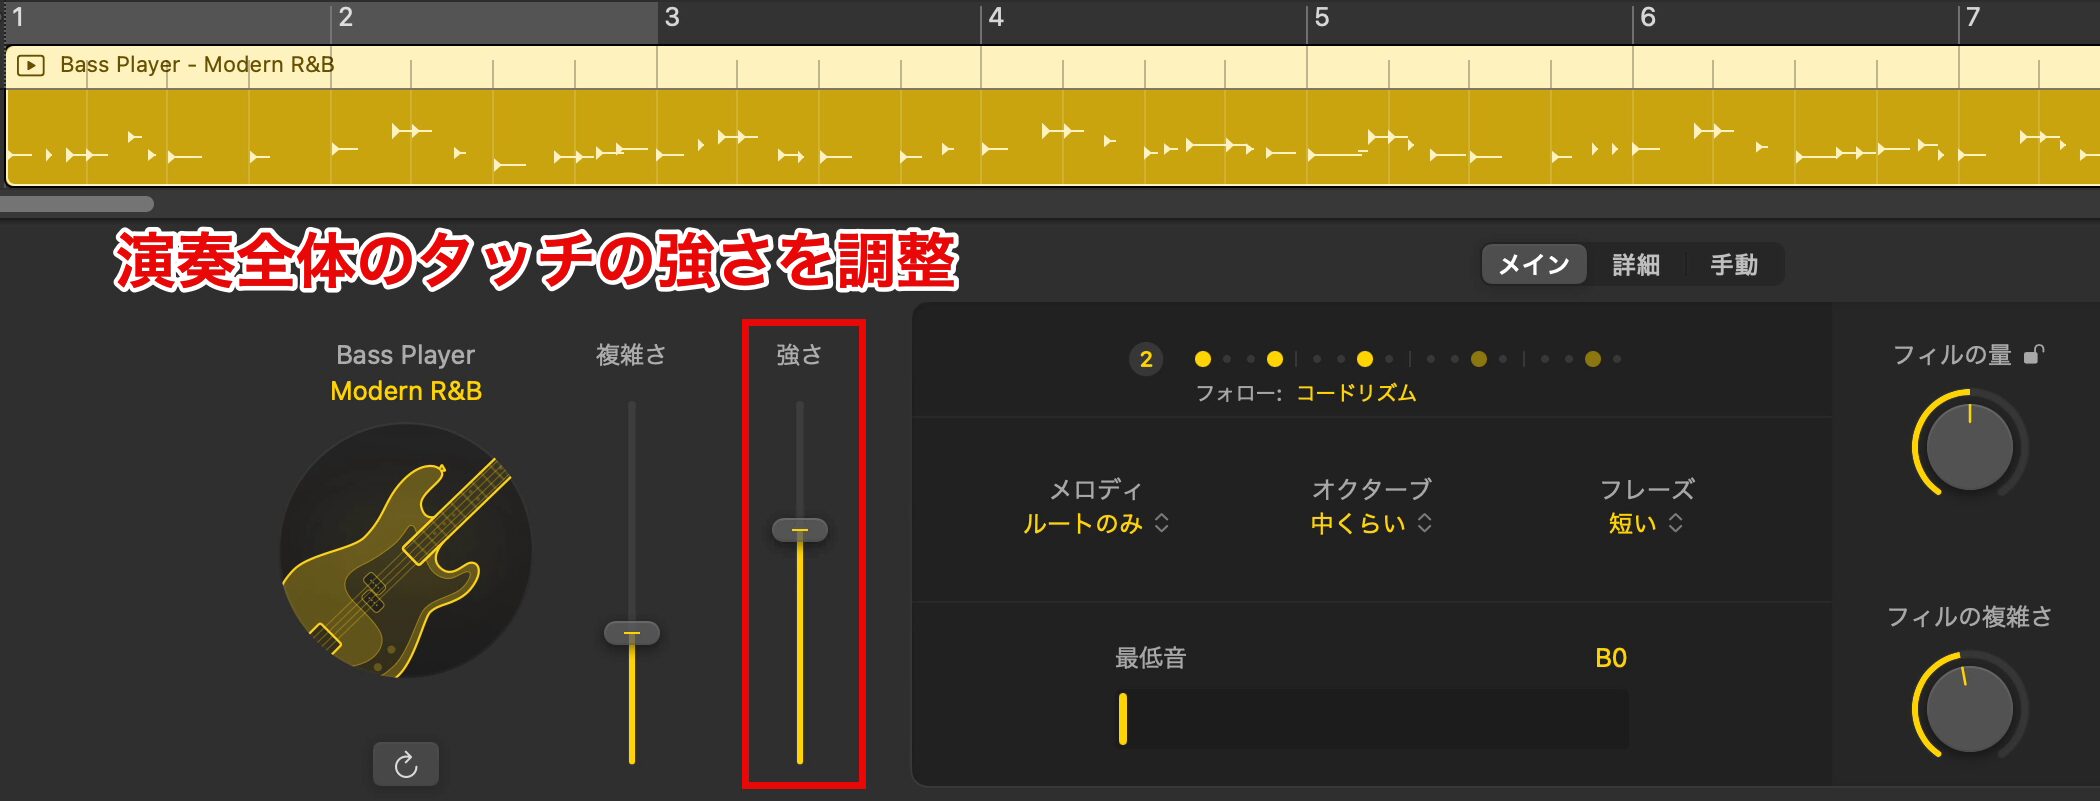
However, we felt we wanted a little more chorus-like drive.
In such cases, raise the "Intensity" slider to give the whole performance a stronger touch.
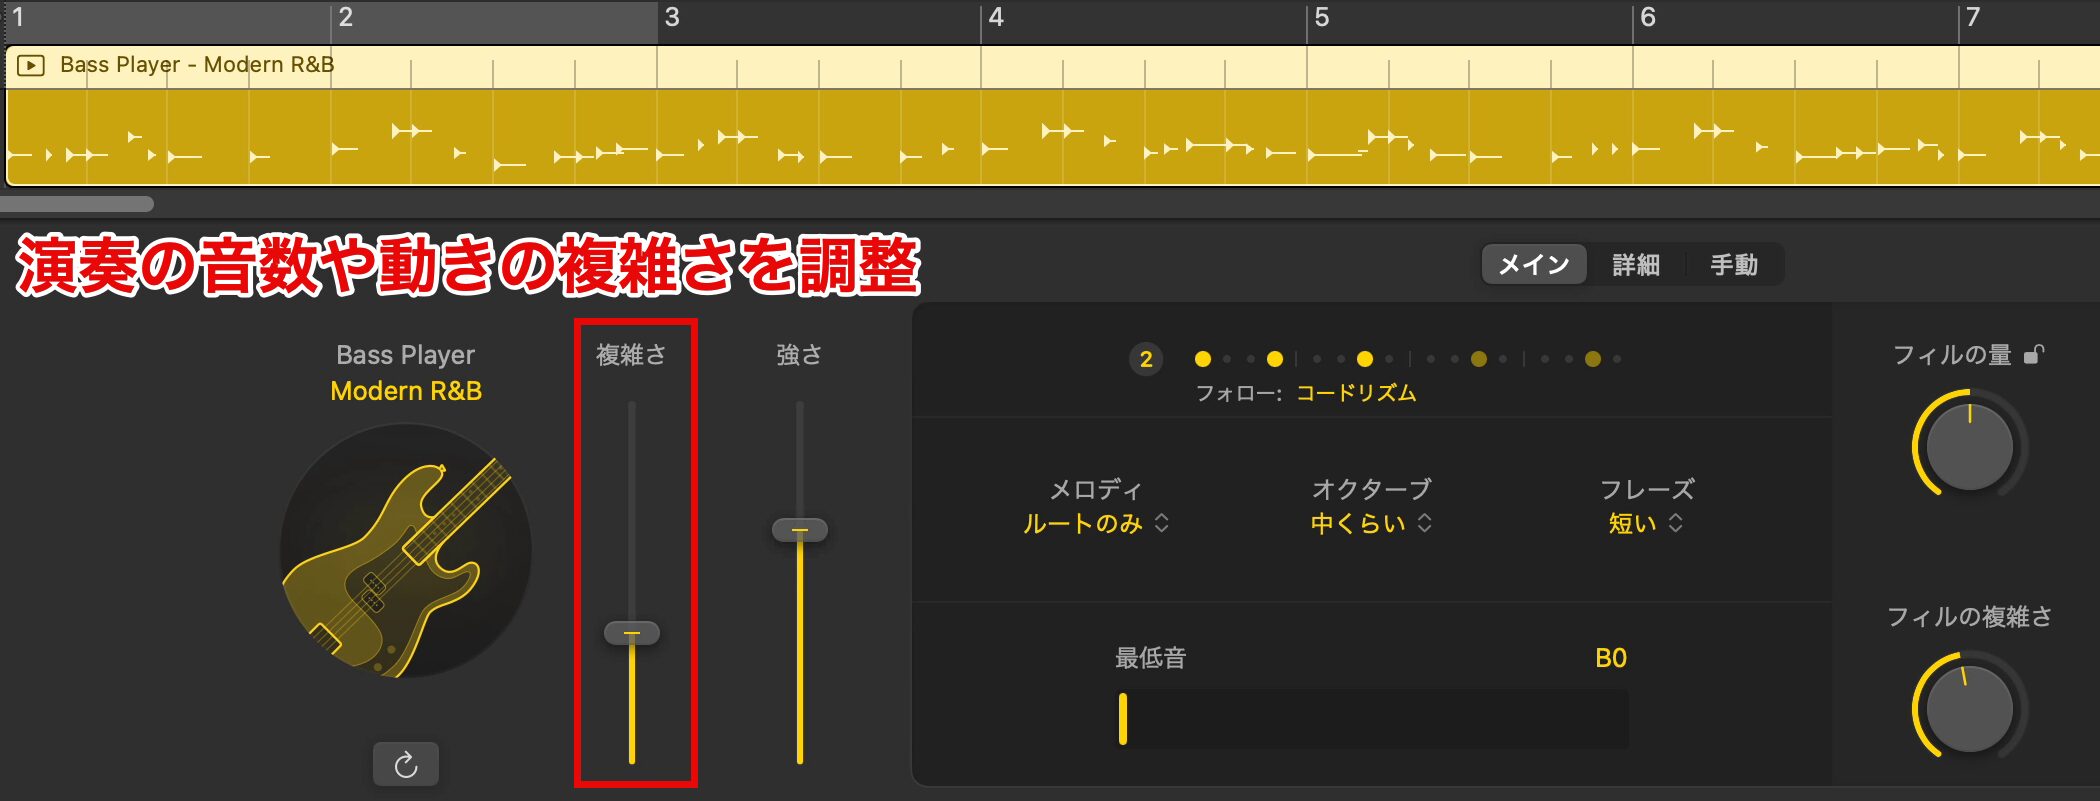
"Complexity" lets you adjust how many notes are played and whether the movement is complex or simple.
The performance changes as soon as you change it, so adjust it until it takes the shape you like.

Phrases generated by the AI are different every time, even with the same settings.
The "Regenerate" button creates a new variation pattern, so click it a few times until you find a phrase you like.
Adjusting the Level Balance
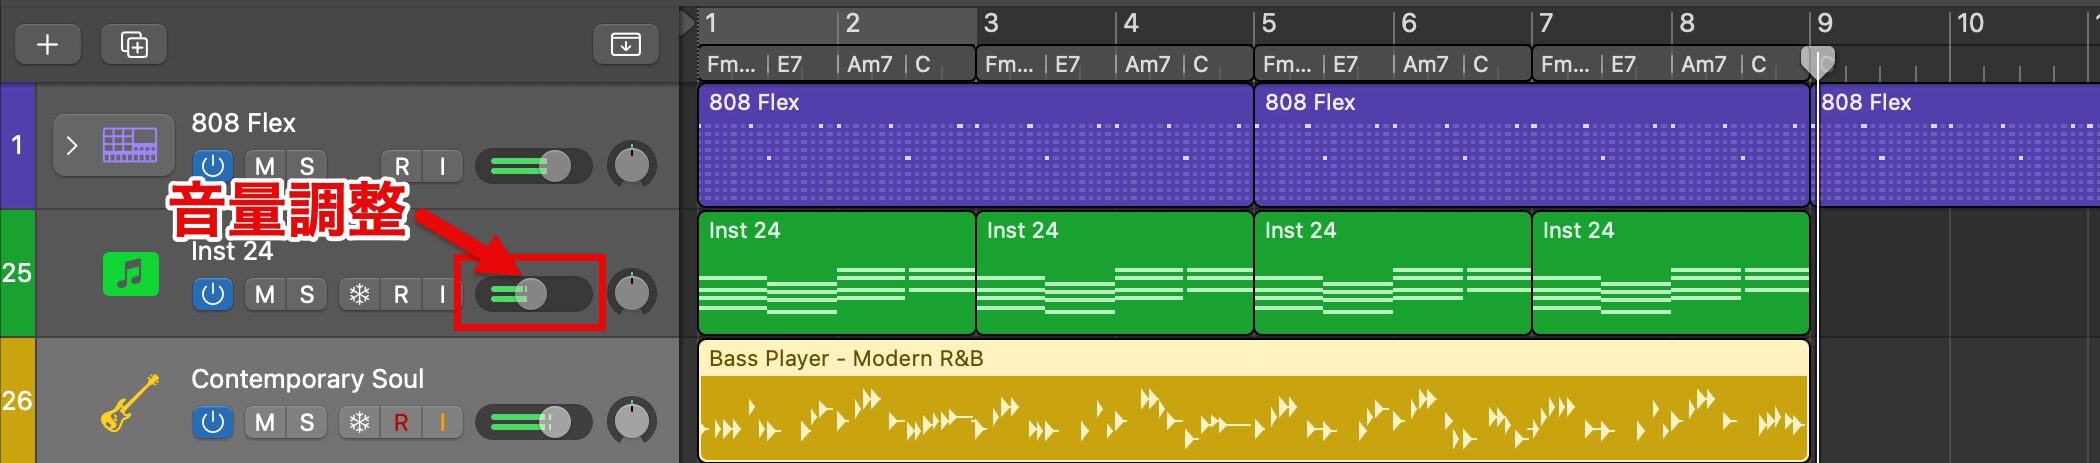
When the three finished tracks played together, the piano felt particularly loud, so we balance them.
You can adjust the level with each track's slider.
Lower the piano level once, then raise it to an appropriate level to balance the mix.
Frequently Asked Questions
Q1. What is the Session Player Bass Player?
It is an AI-powered automatic performance feature in Logic Pro 11 that automatically generates bass lines based on the key and chord progression you set. Choosing styles by genre and adjusting presets enables realistic performance expression.
Q2. What should I do if chords do not appear in the chord track?
If the chord lane in the global tracks appears black, click the + mark or right-click the lane and choose "Create Chord" to add a chord.
Q3. Can I change the performance of duplicated regions individually?
Yes. Select the region and press Control-L, and the duplicated regions become independent so that you can edit each performance individually.
Q4. How do I undo and redo?
Undo is Command-Z and Redo is Shift-Command-Z. You can go back multiple steps, and these are useful for all kinds of editing in Logic Pro.
Q5. How do I change the bass style?
Click the bass icon in the Session Player editor and choose a "Style," and a bass line for each genre, such as Modern R&B or Jazz, is generated instantly.
NEW ARTICLES
Latest English Articles











