
This article explains how to create a piano track and chord progression in Logic Pro 11. You will learn how to create a new MIDI track with Studio Piano selected and enter a chord progression in the Piano Roll with the Pencil tool. It is packed with practical techniques to help beginners work efficiently on songs, including how to enter the standard pop progression of F major 7, E7, A minor 7 and C, how to speed things up by adjusting the Division, and how to use the Command-click tool.
Entering Chords in a MIDI Region

Miyakawa
From here, we add "chords" with a piano sound.
Chords are the core of the accompaniment. Adding them makes the mood of the song much clearer, so we especially recommend that beginners enter them at an early stage of song production.
Piano and Piano Roll Video
Creating a Piano Track

Following last time's drum pattern, this time we create the accompaniment part called "chords" with a piano sound.
Click the "+" button at the top left of the screen to open the new track window.
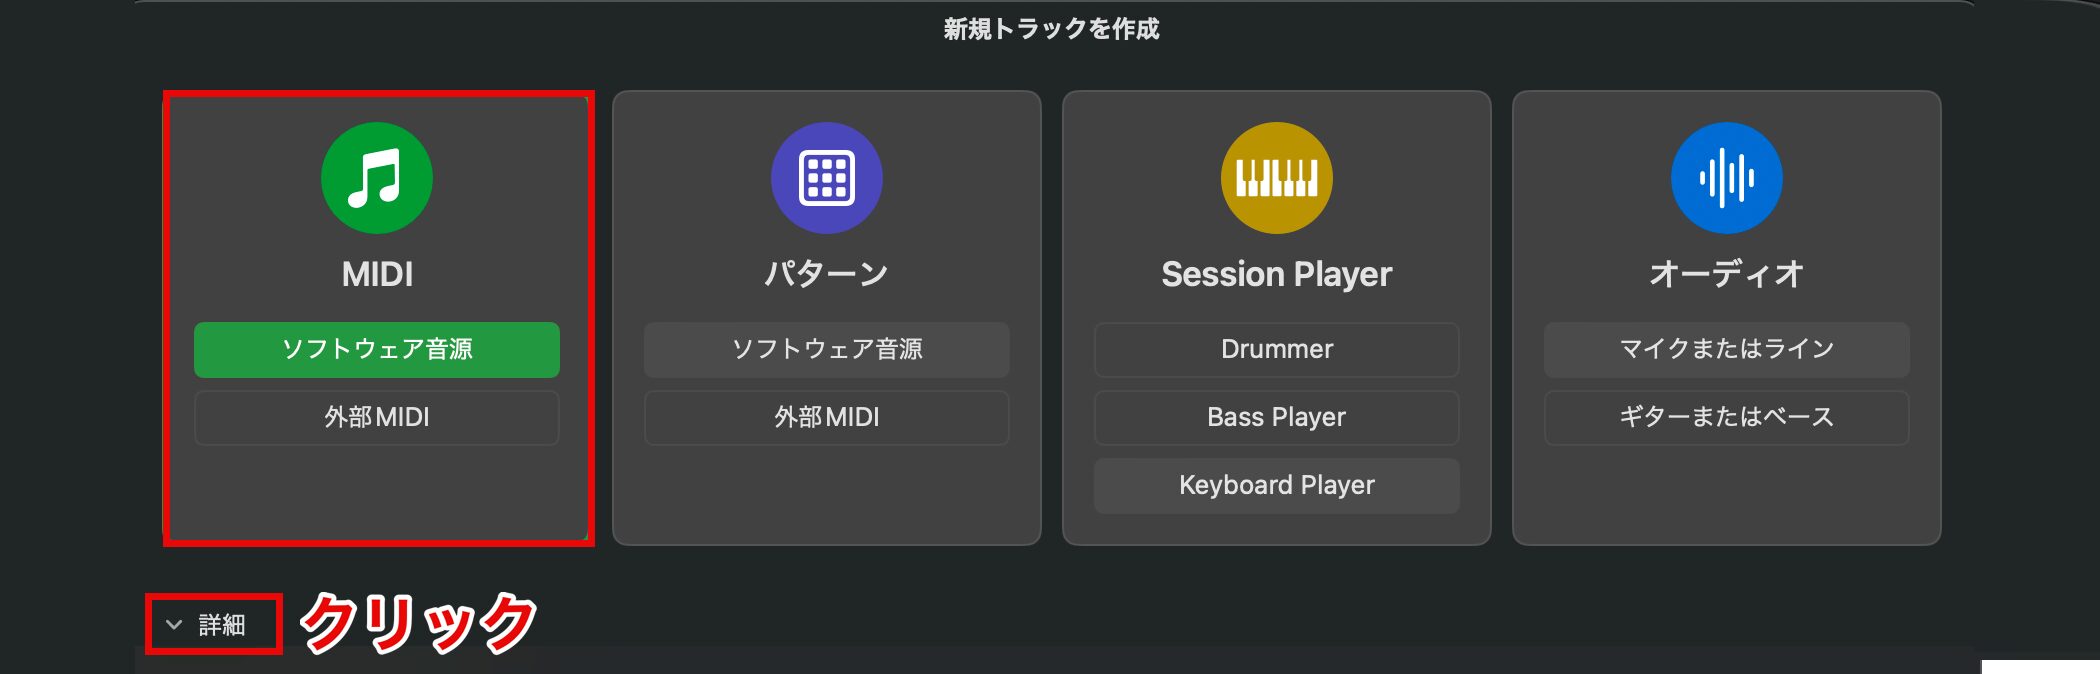
Here, choose "Software Instrument" for the MIDI track.
A MIDI track is the basic track used for the sounds of all kinds of instruments.
Next, open Details.
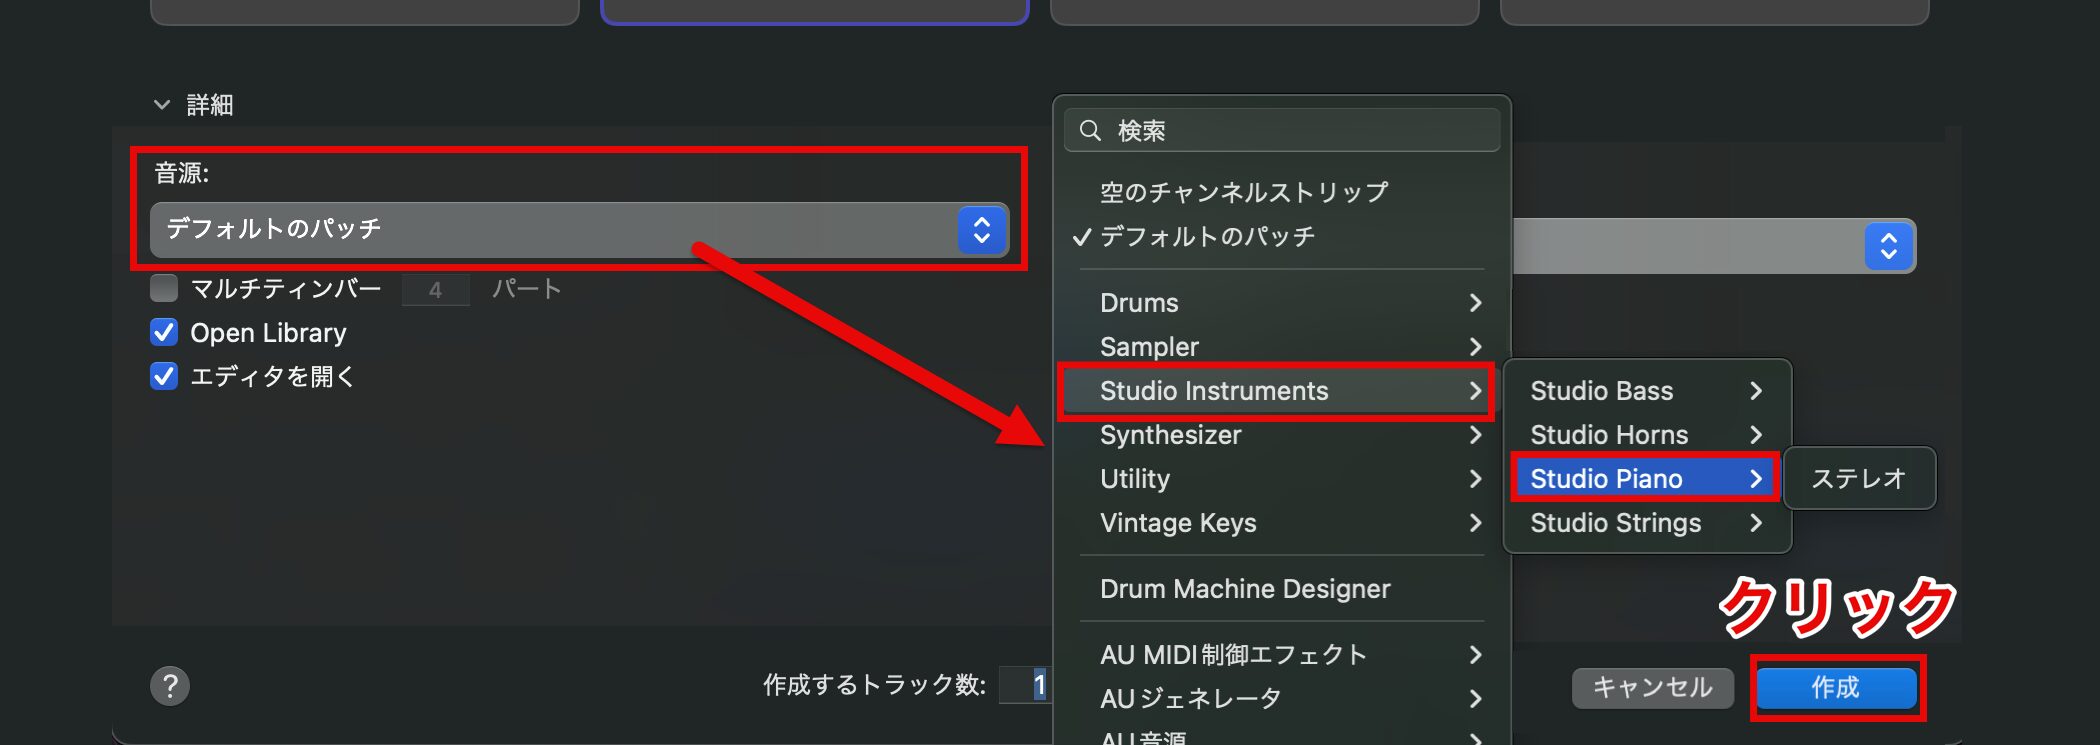
Choose the sound from the "Instrument" item.
You can choose from various instruments, but this time we choose "Studio Piano" from "Studio Instruments" and click "Create."
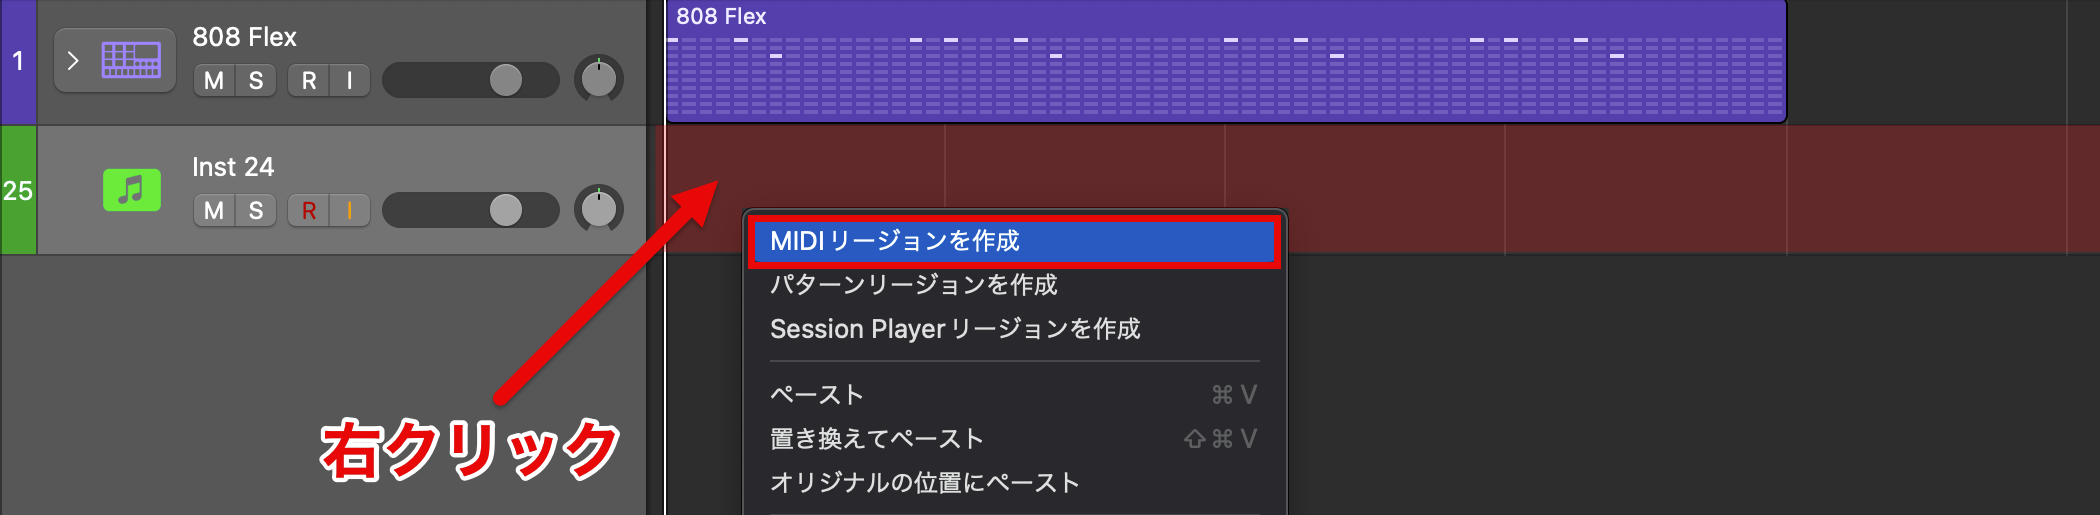
As before, we add a region.
From the right-click menu, choose "Create MIDI Region," which is suitable for entering a piano performance.
Adjusting Regions and Creating Loops

The one-bar region that was created is not long enough, so let's extend it a little.
Move the cursor to the end of the region, find the point where left and right arrows appear, and drag to easily adjust the length of the region.
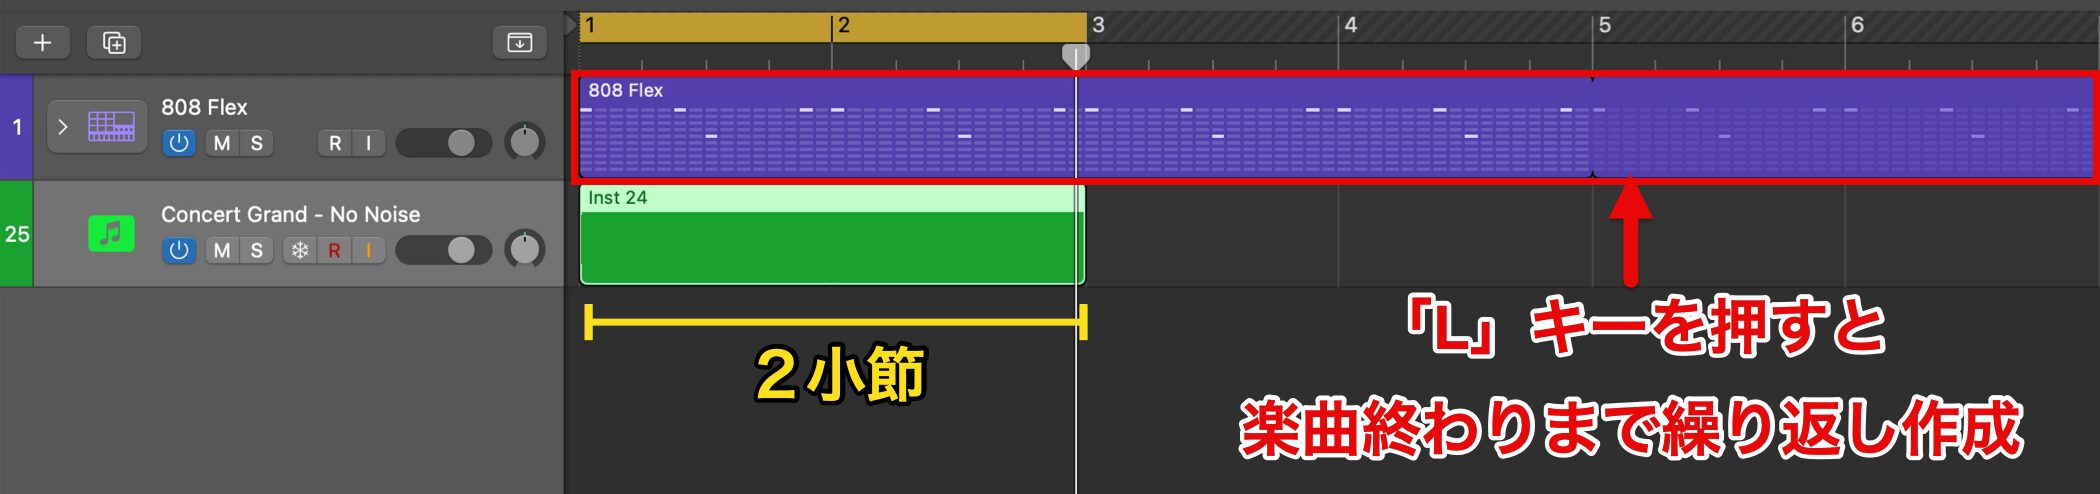
This time we make the region two bars long.
As further preparation, we repeat the drum region so that we can always hear the drums while working.
Just select the region and press the shortcut key L, and the region is repeated to the end of the song so that it plays continuously.
When you no longer need it, press "L" again to easily turn it off.
The Piano Roll
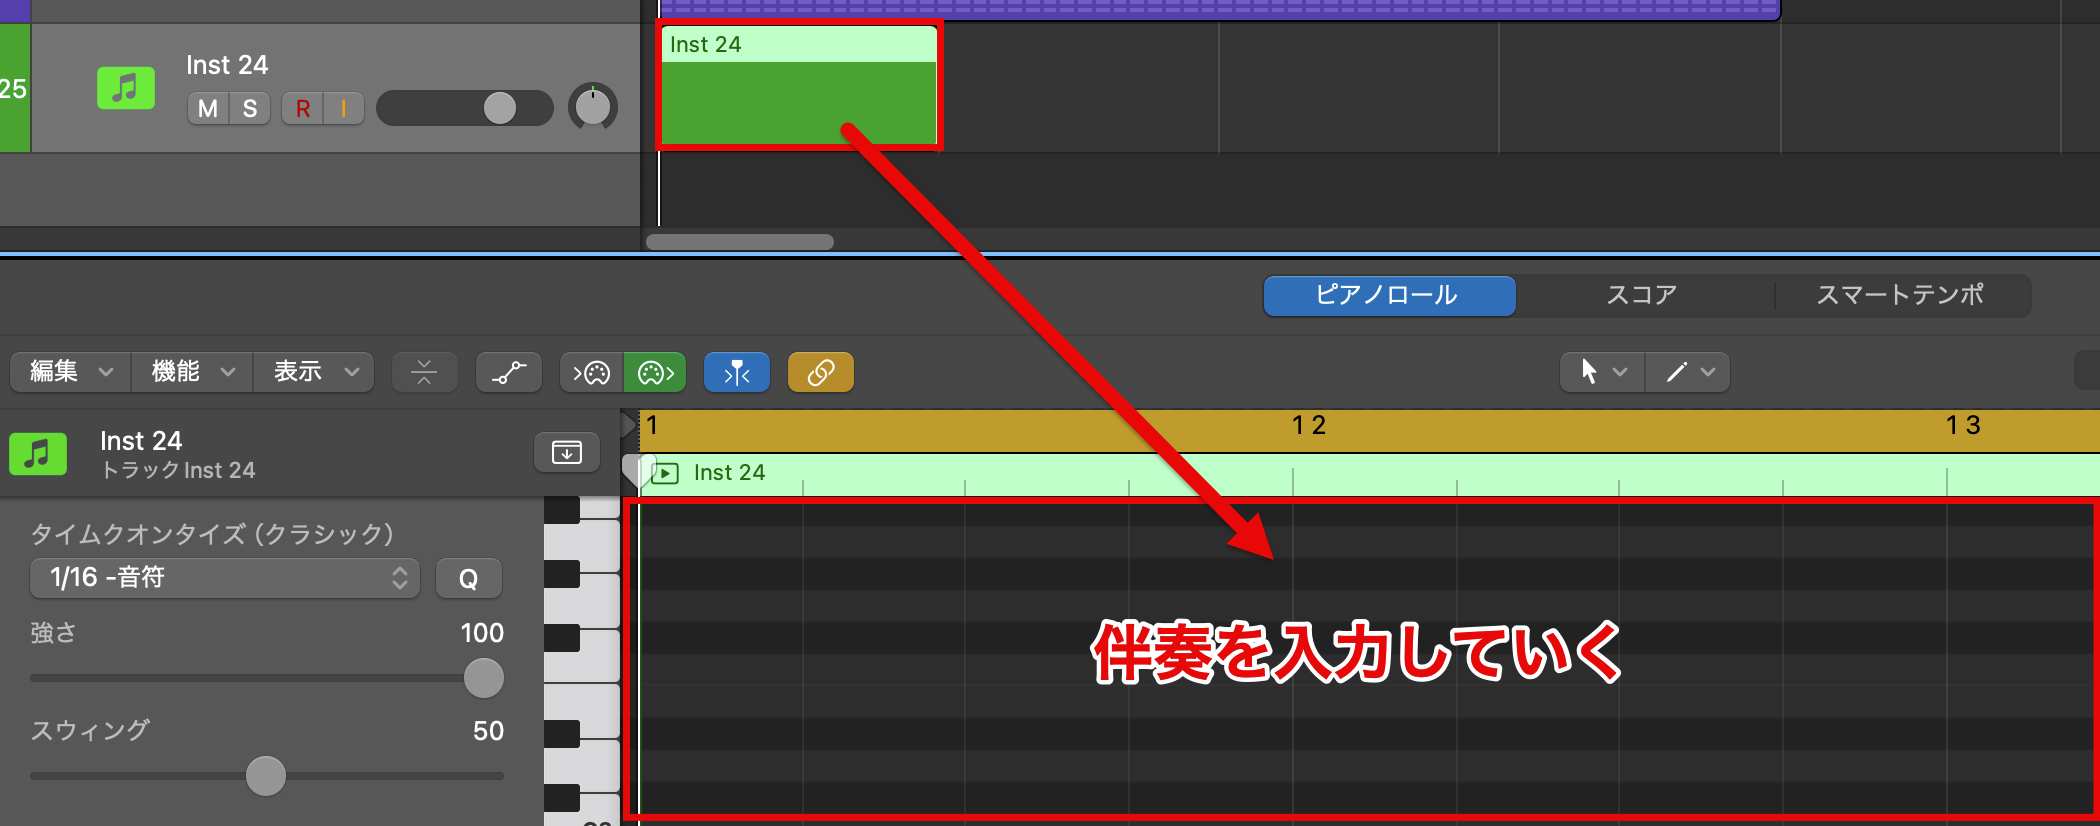
Enter the chord accompaniment in the region we created.
Click the region to show the Piano Roll.
If it does not appear, double-click the region to open it.
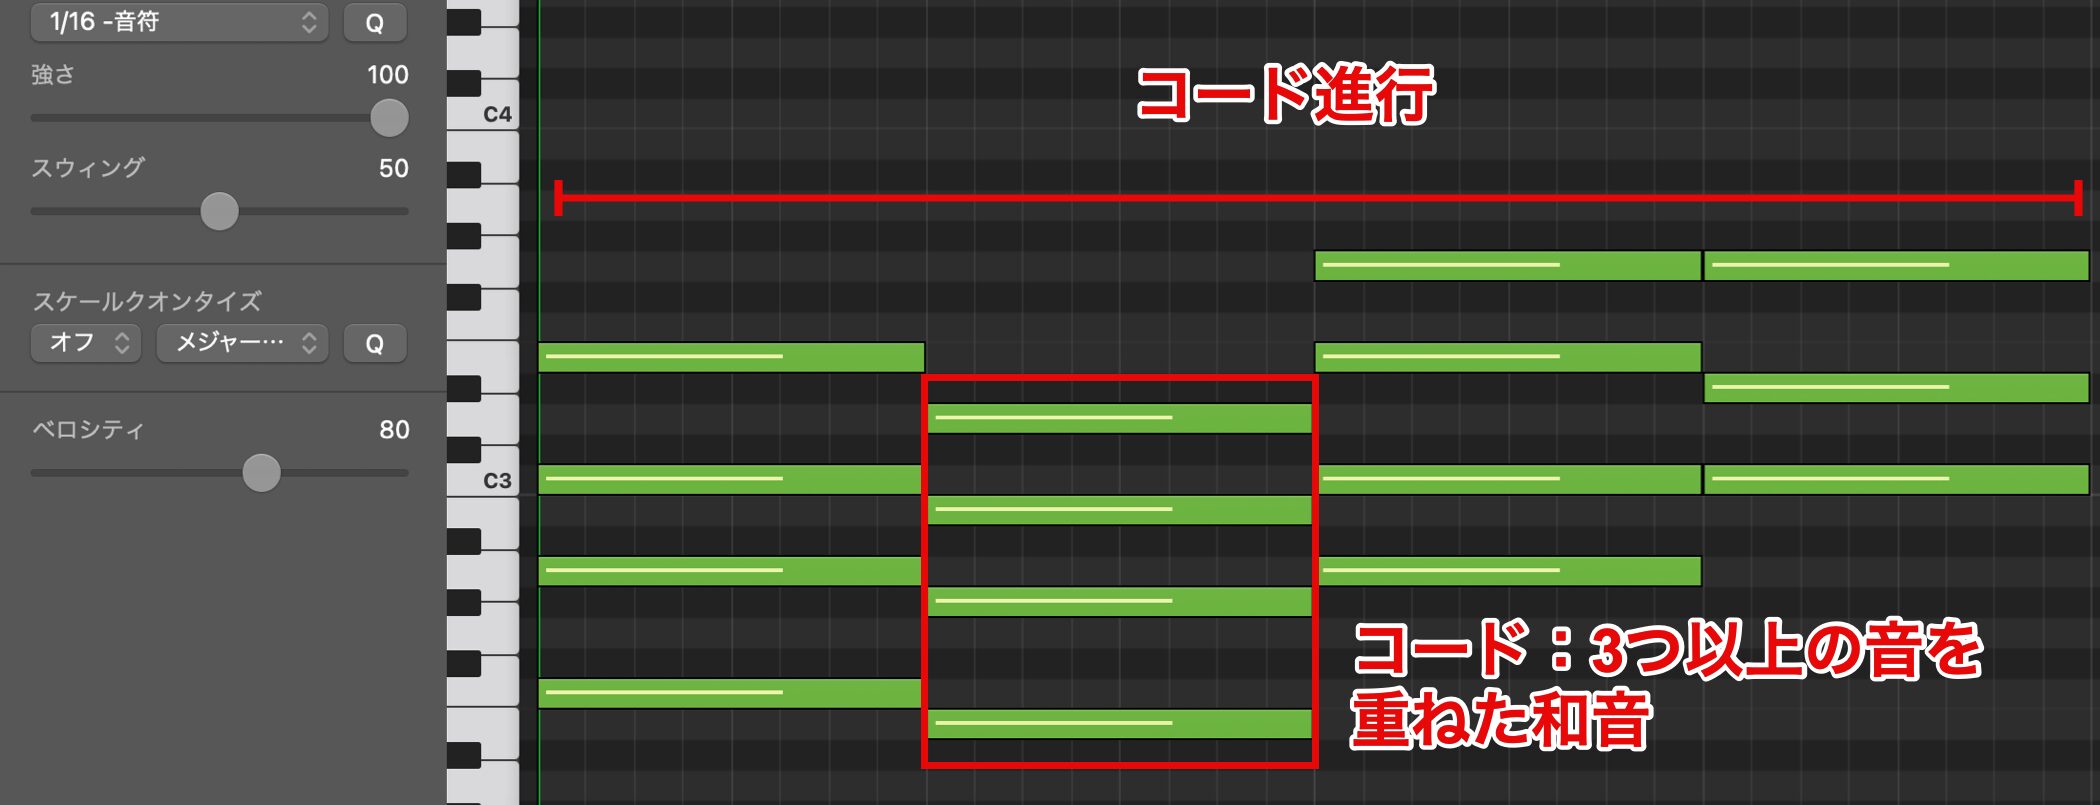
A harmony of three or more notes stacked together is called a "chord."
Several chords connected together are called a "chord progression."
The chord progression shapes the mood of the song, such as its brightness, darkness and excitement.
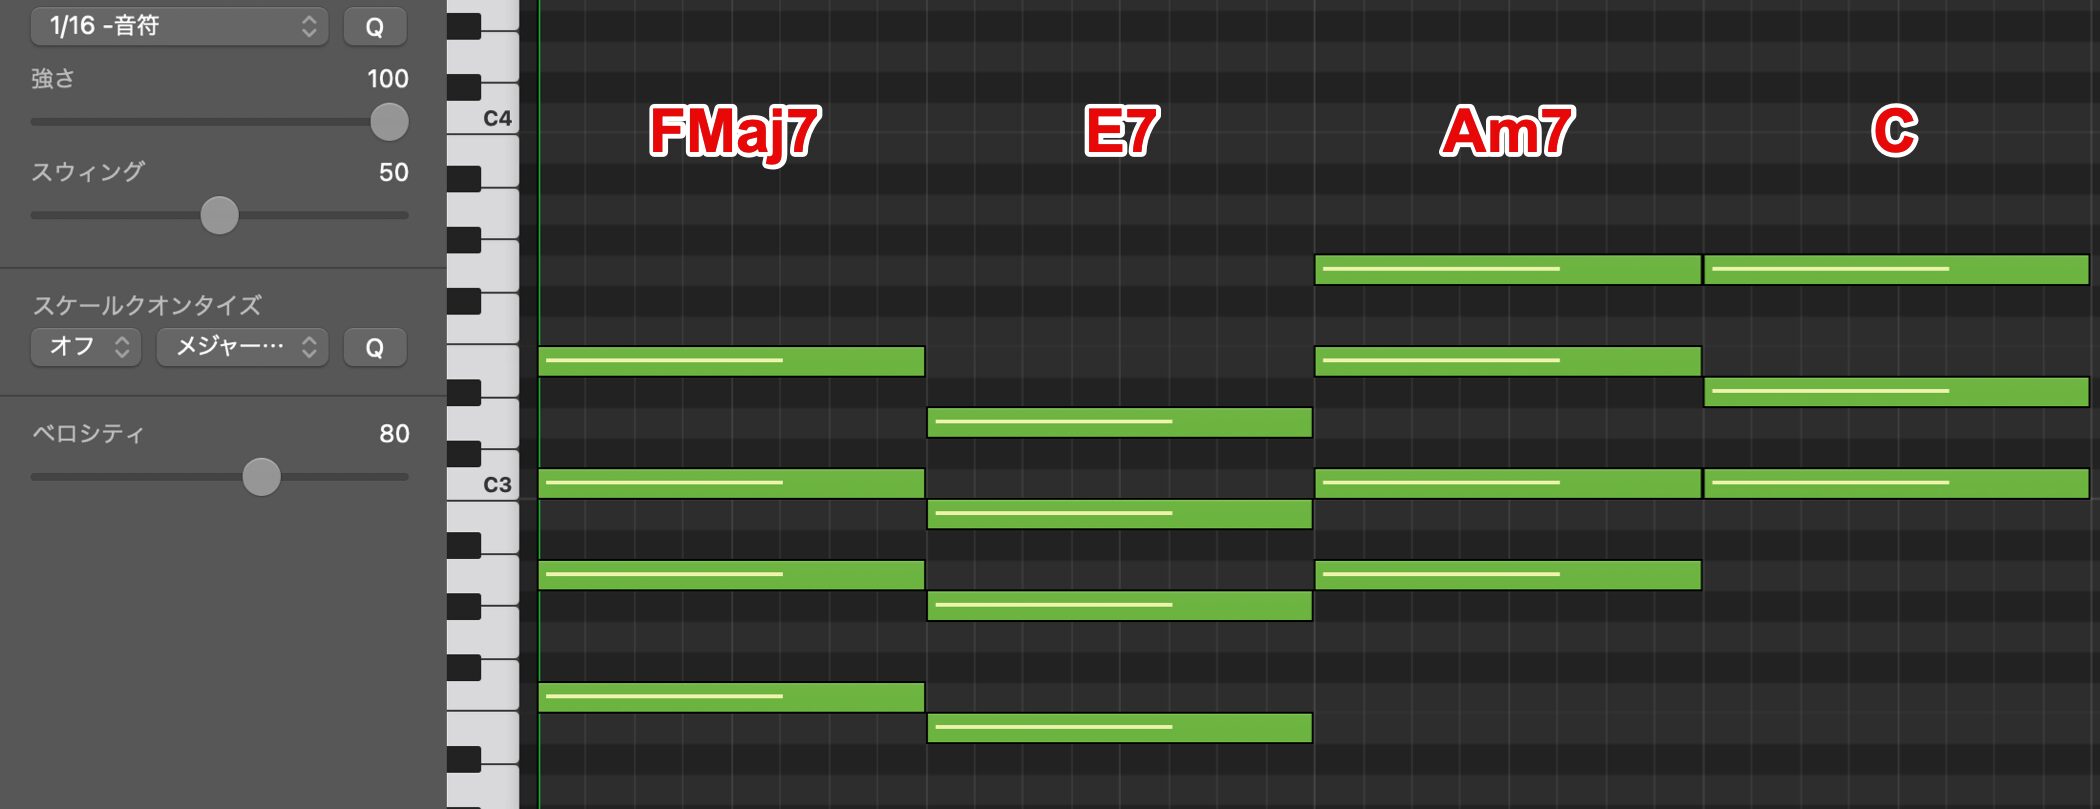
This time, we use one of the standard patterns in pop songs, the four chords [F major 7, E7, A minor 7, C].
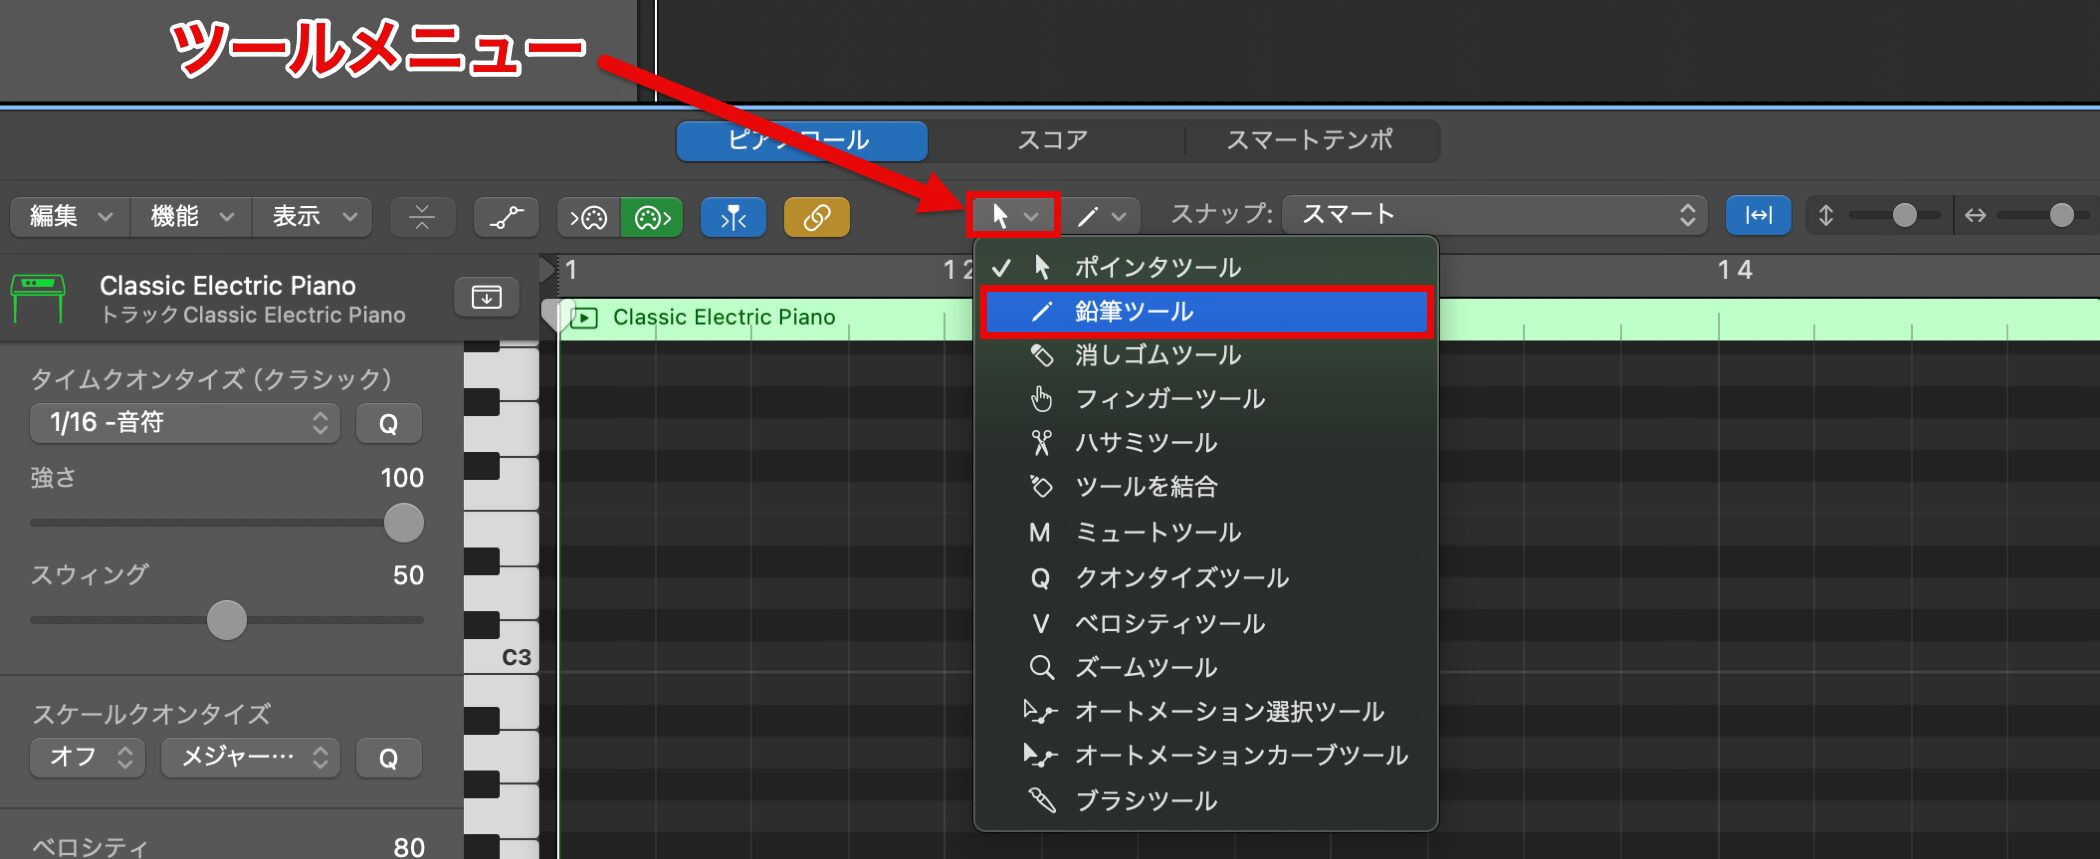
First, enter the chord F major 7.
In the Piano Roll, choosing the "Pencil tool" from the Tool menu lets you enter notes freely at any pitch and timing.
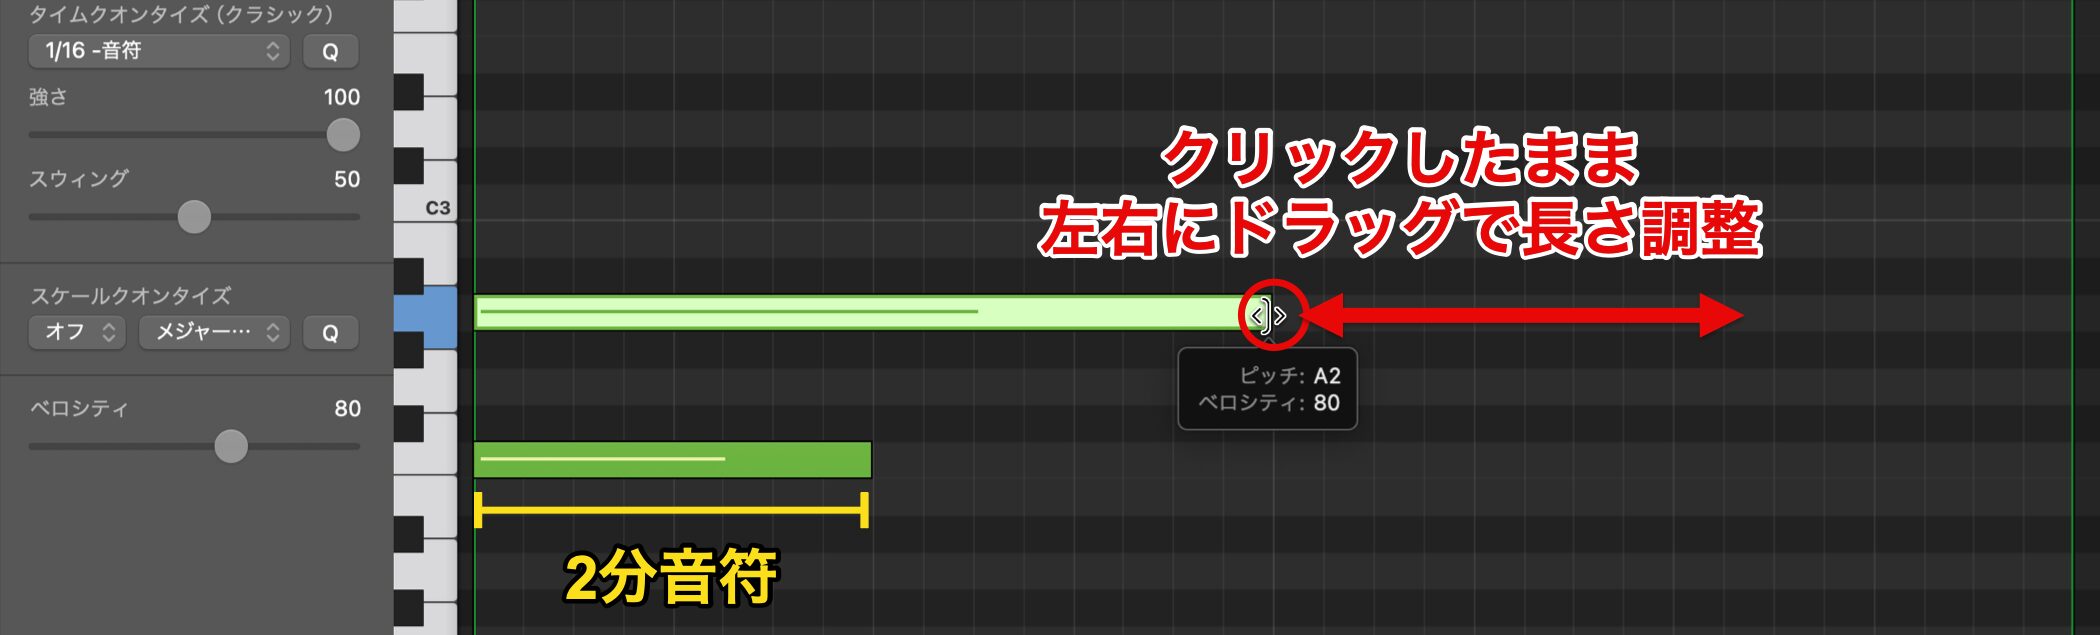
This time, we want to enter each chord as half notes.
To change the length of a note, move the cursor to the end of the note, click and drag without releasing the mouse to adjust it.
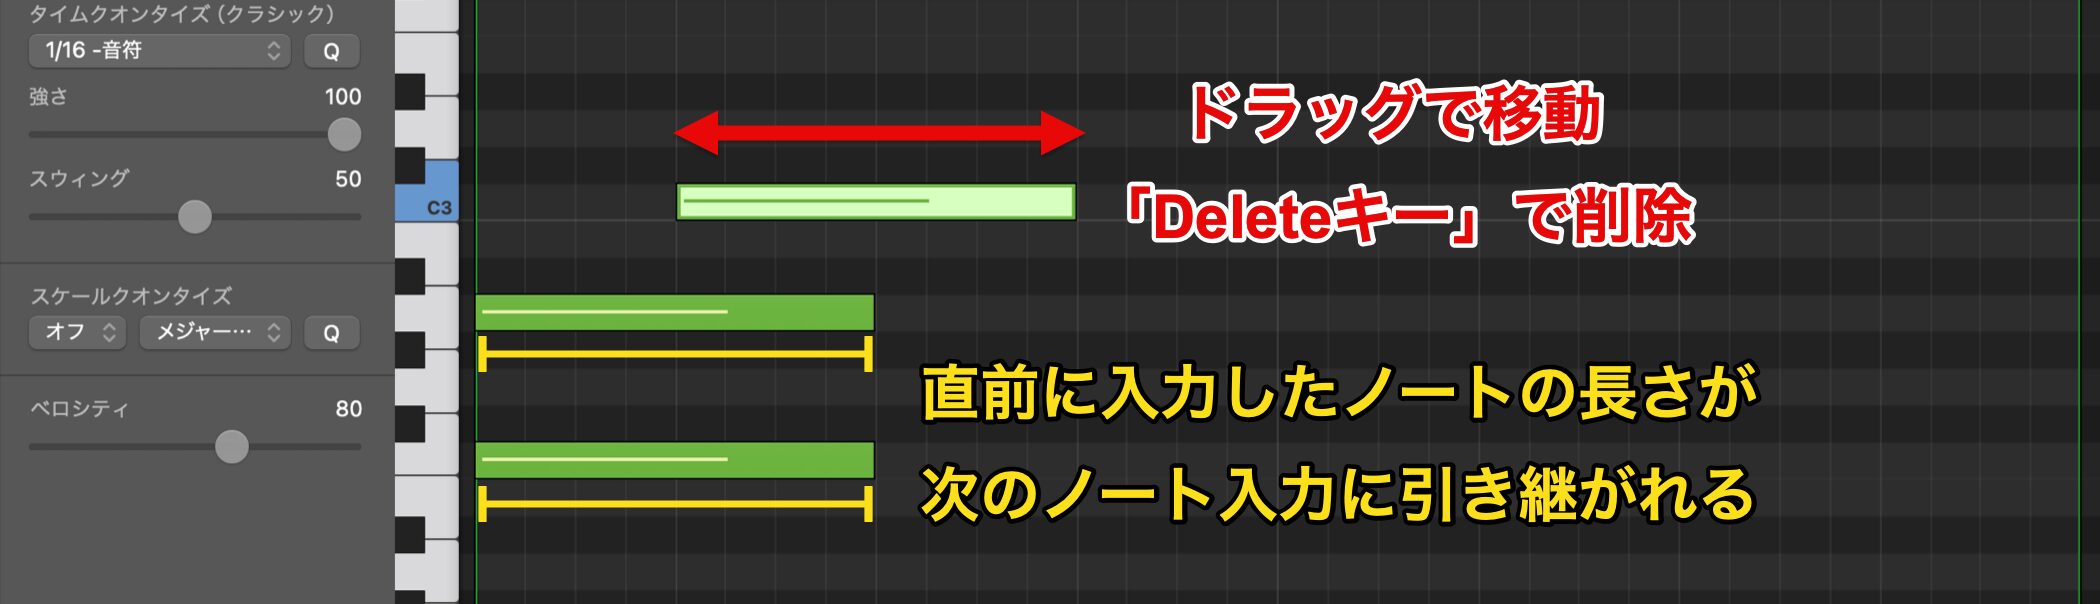
Also, in Logic Pro, the length of the note you entered last is applied to the next note you enter.
If you want to enter multiple notes of the same length, we recommend setting the length of the first note carefully.
Even if you place a note by mistake, you can click the note and drag to move it.
Unneeded notes can be deleted by selecting them and pressing the Delete key.
Changing the Division (Grid)
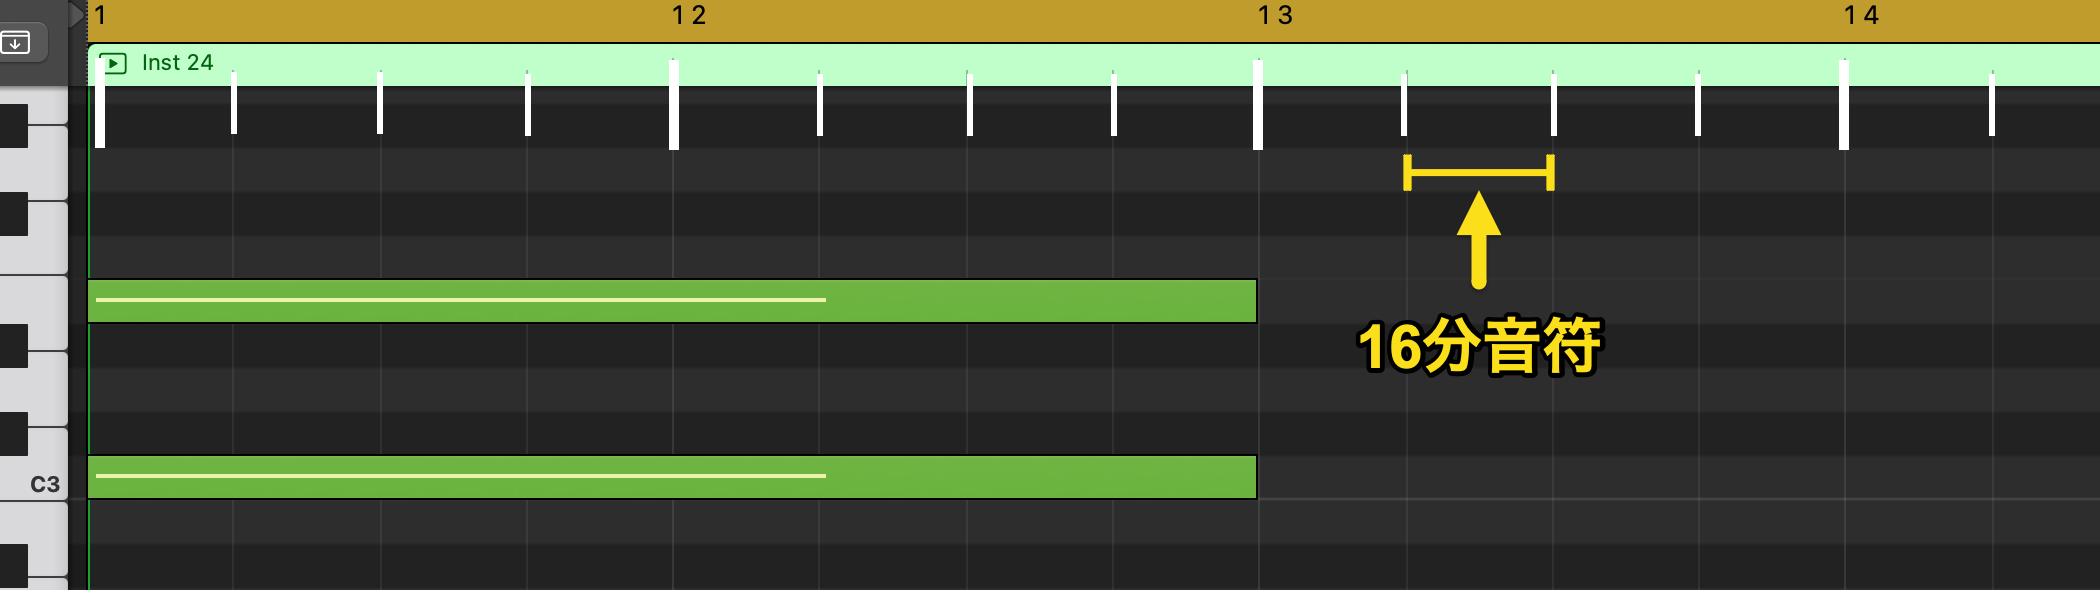
The grid for entering notes is currently in sixteenth-note units, but if you only enter long notes, as with chords, it is efficient to make the grid larger in advance.
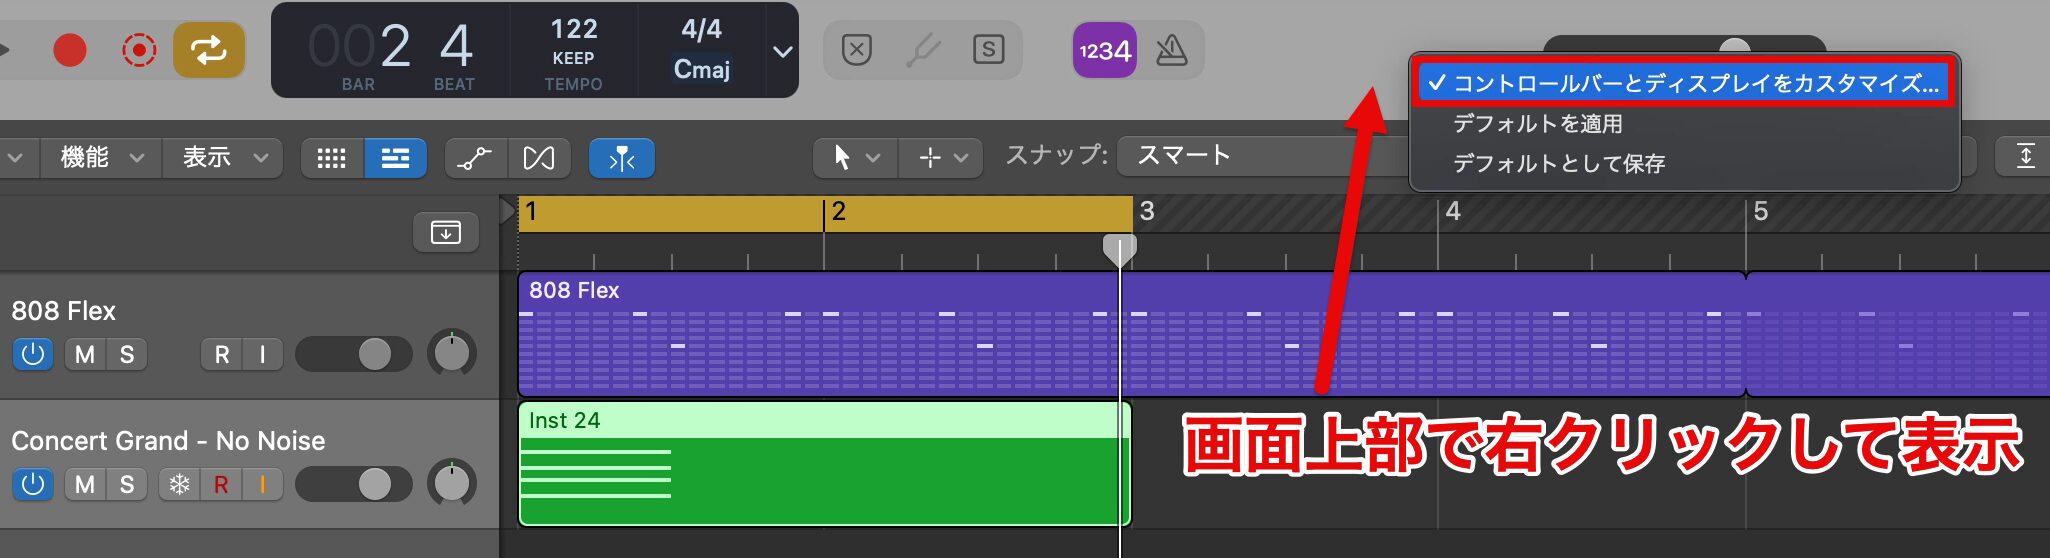
Right-click at the top of the screen and choose "Customize Control Bar and Display."
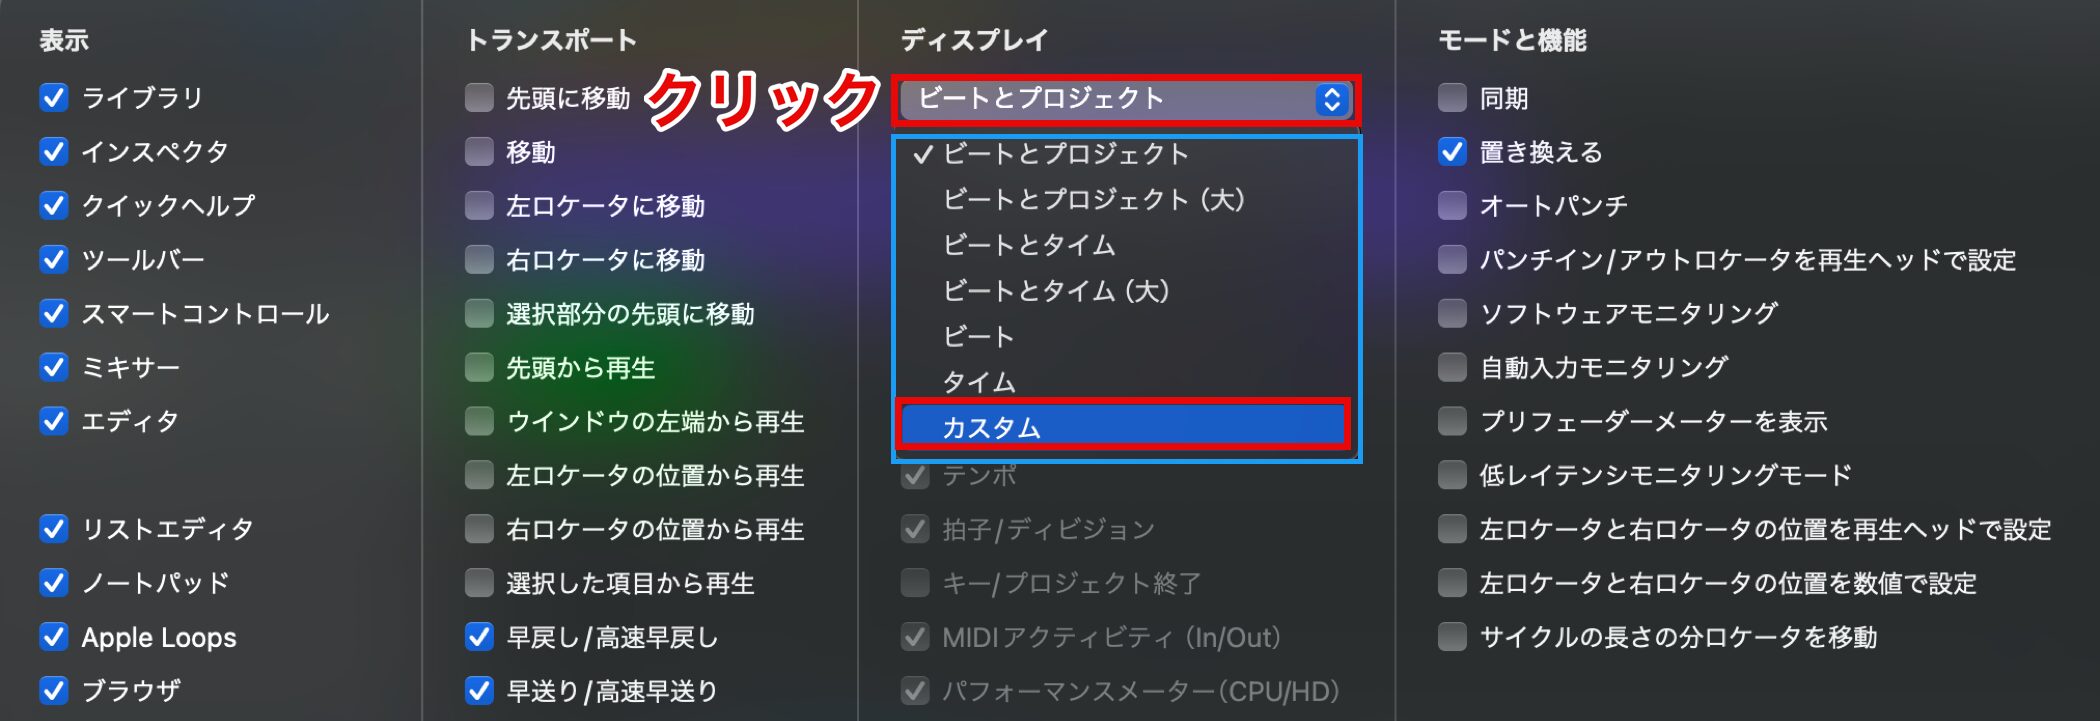
Click "Beats & Project" under Display and choose "Custom" from the list.
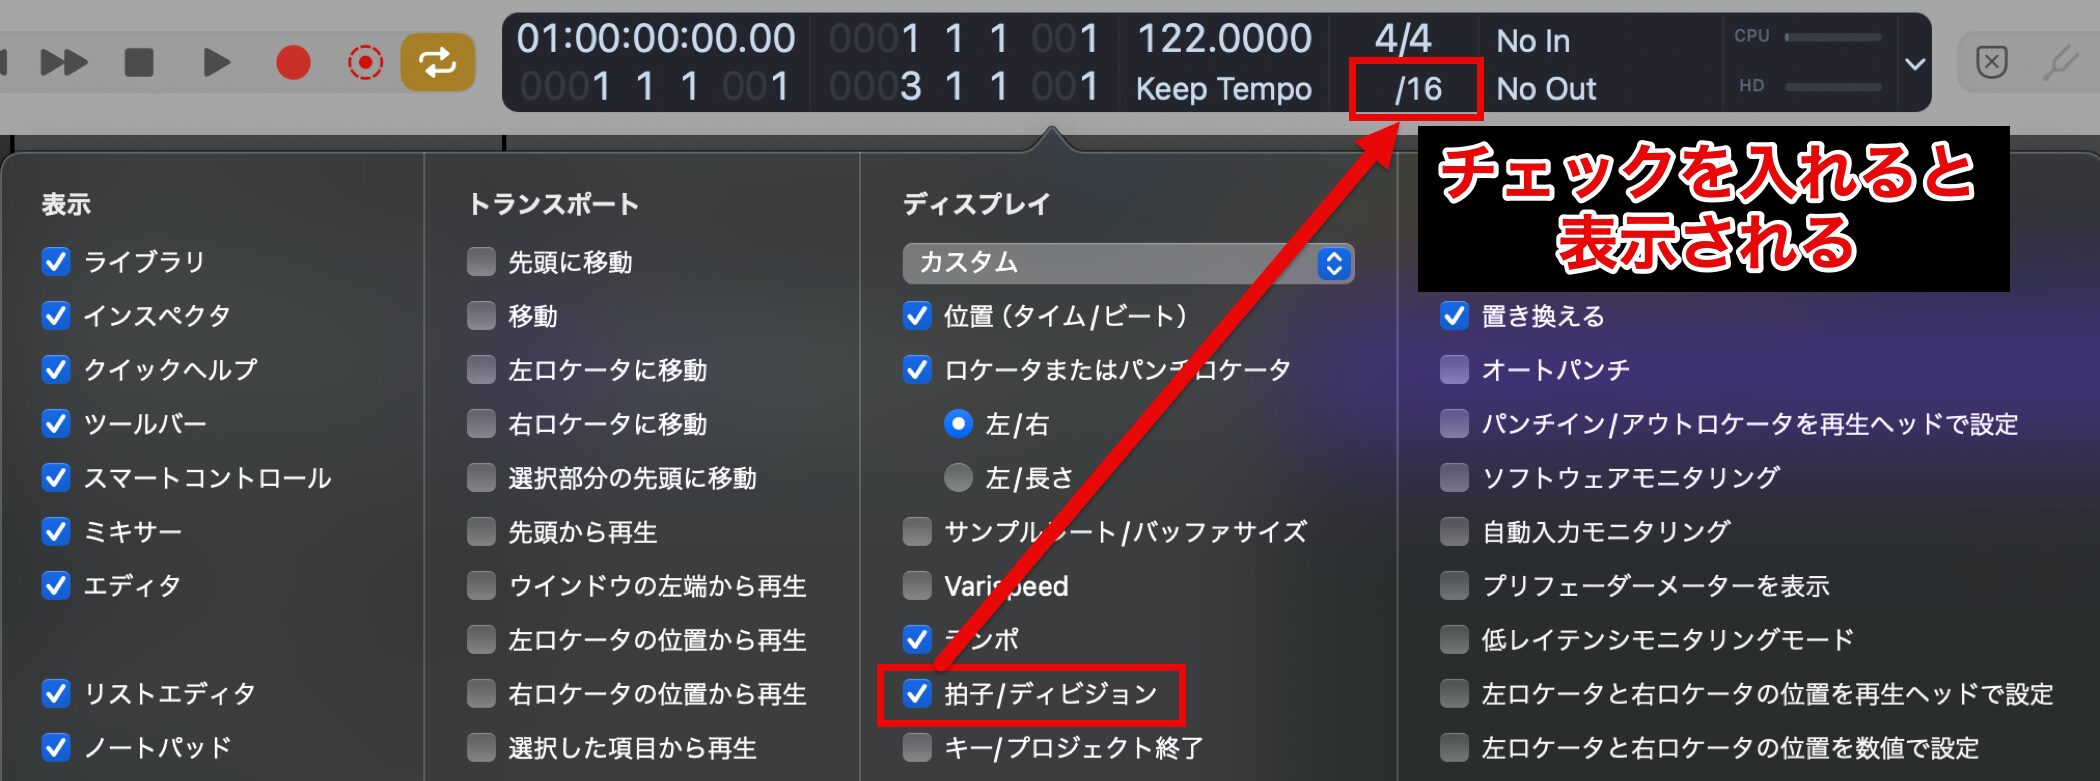
Check "Time Signature/Division," and you can change the Division, which sets how fine the grid is.
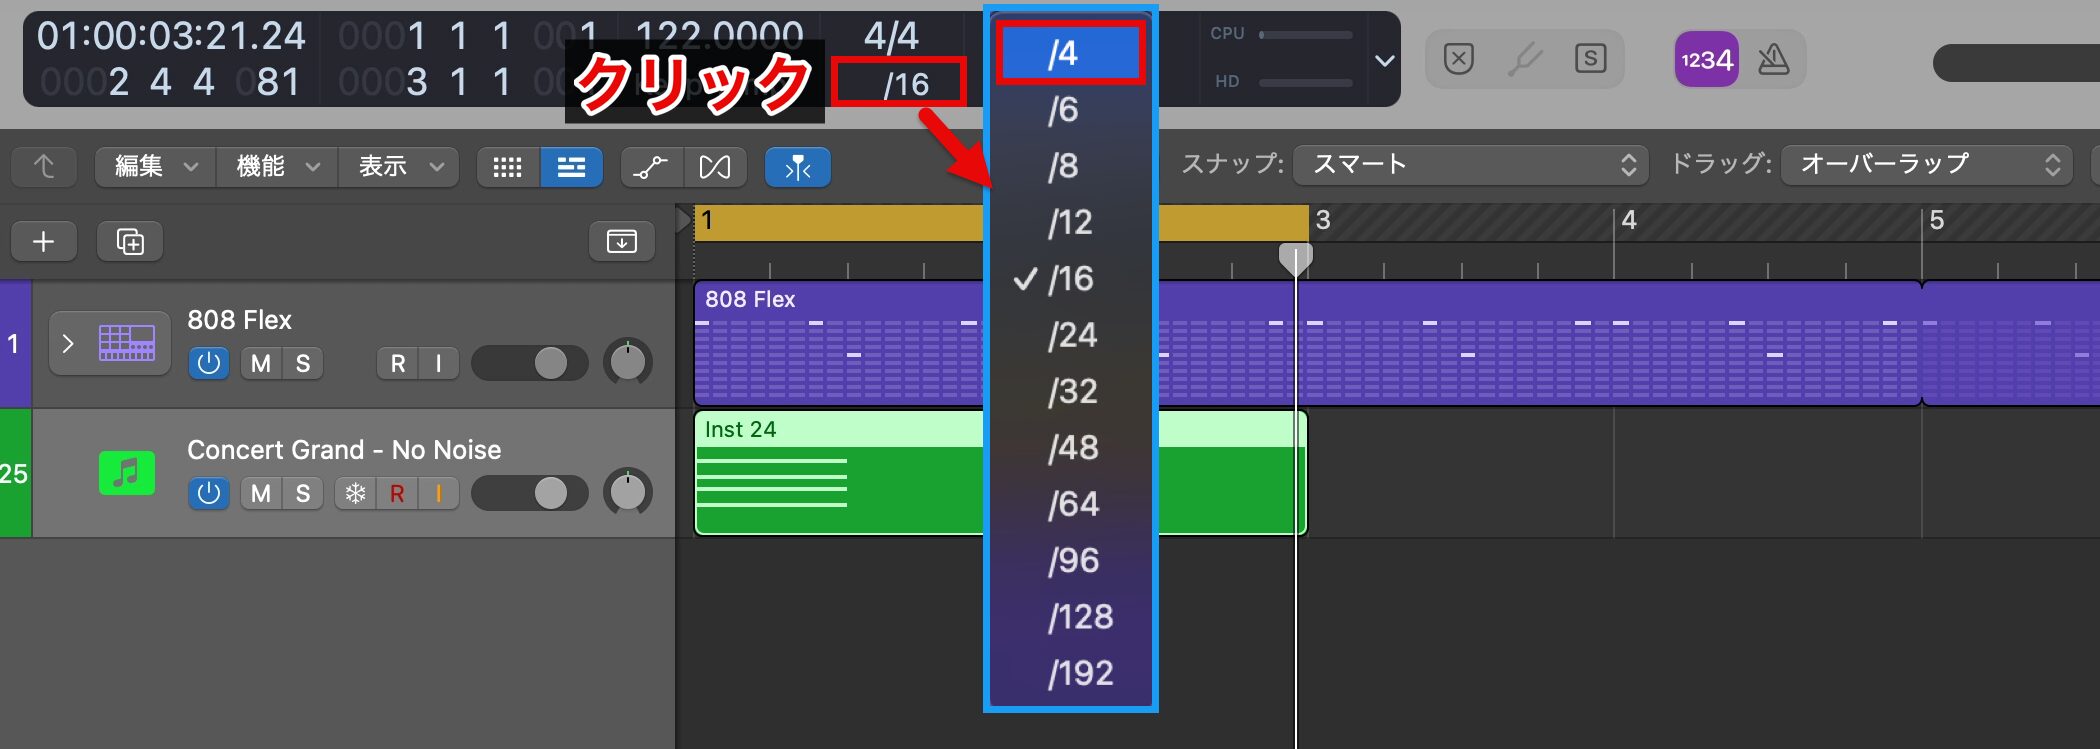
In addition to the currently selected sixteenth notes, quarter notes and eighth notes are available, and it also supports triplets such as 12 and 24.
Here, we choose the largest value, quarter notes, and enter the rest of the chords.
An Efficient Click Tool
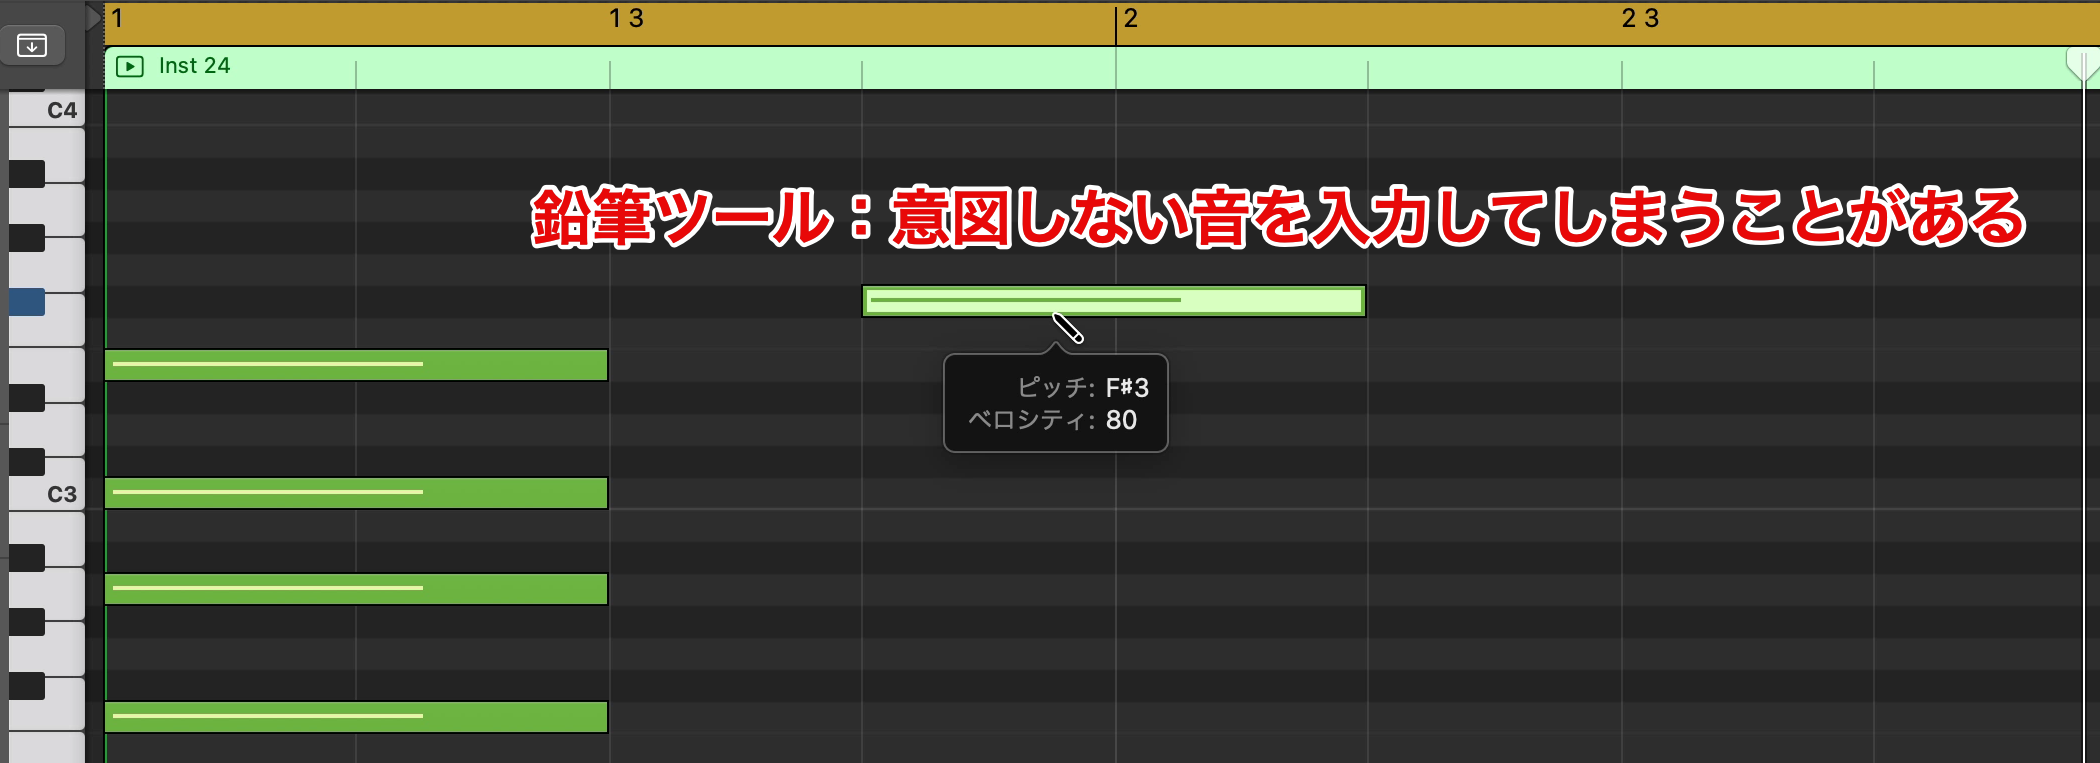
The Pencil tool is very convenient, but because a single click enters a note, you may add notes unintentionally.
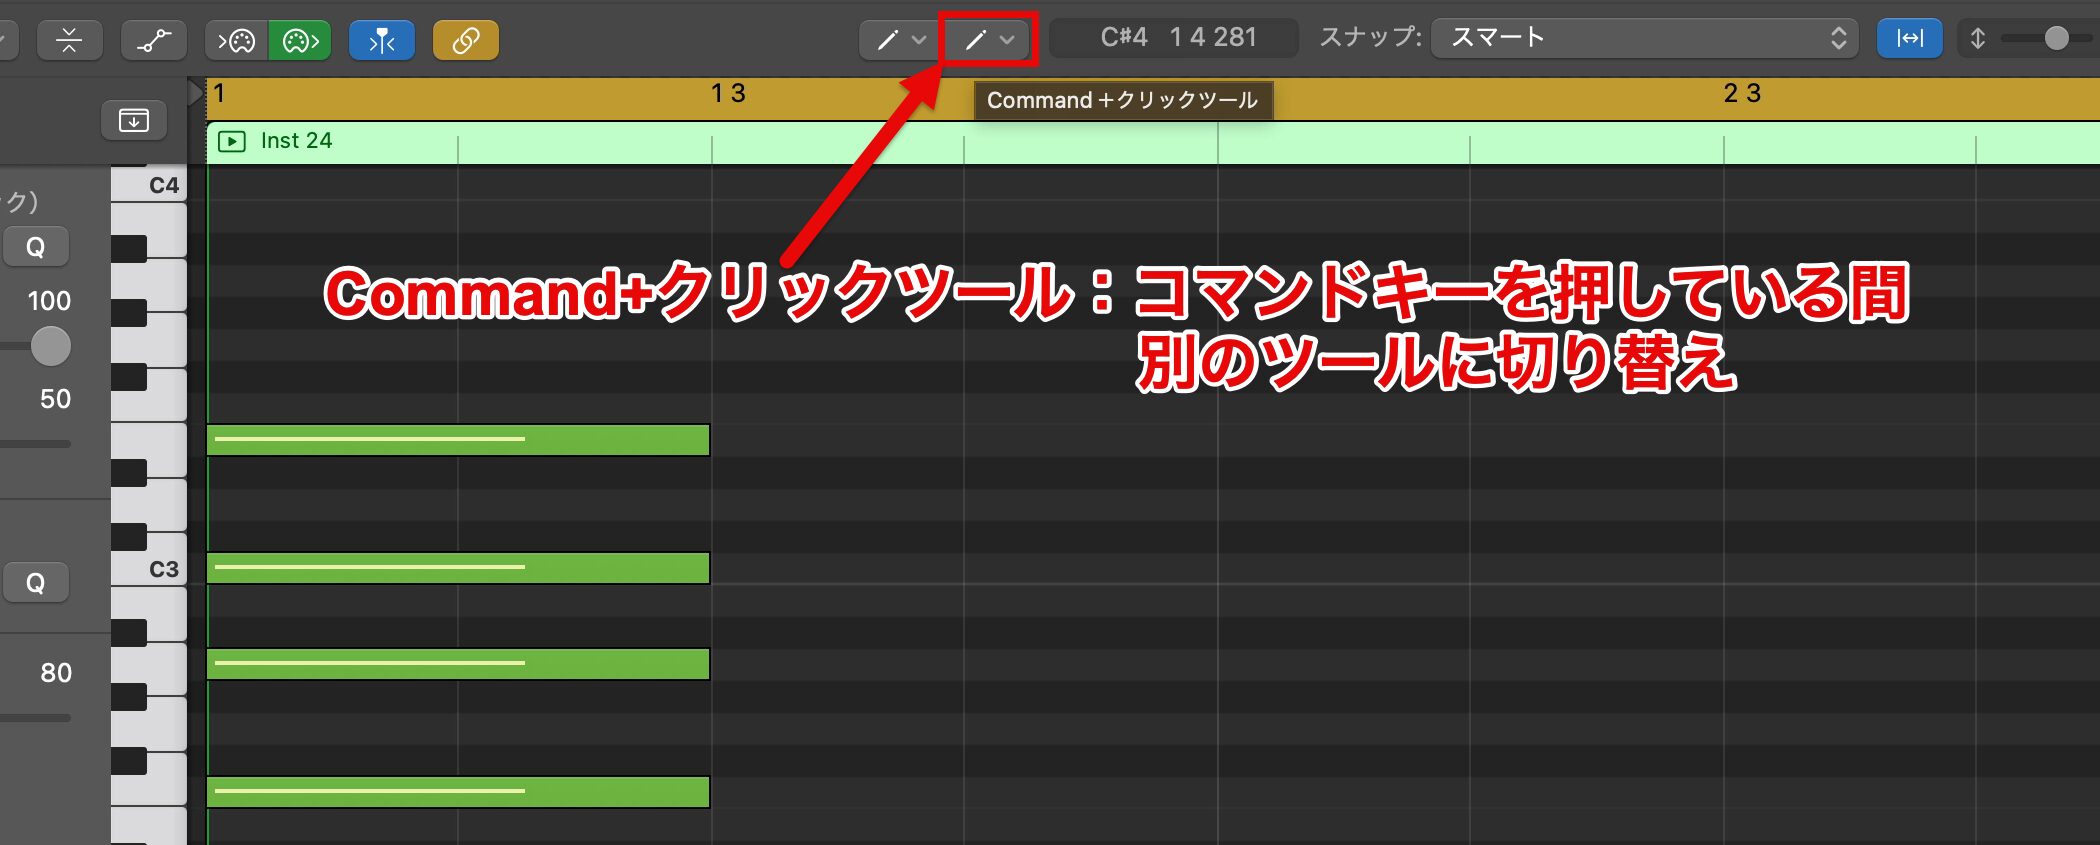
To solve this, use the "Command-click tool" shown next to the Tool menu.
This feature lets you switch to another tool only while holding down the Command key.

By setting the "Pointer tool" as the main tool and the "Pencil tool" as the Command-click tool, you can quickly switch to the Pencil tool only when entering notes, which improves your efficiency.
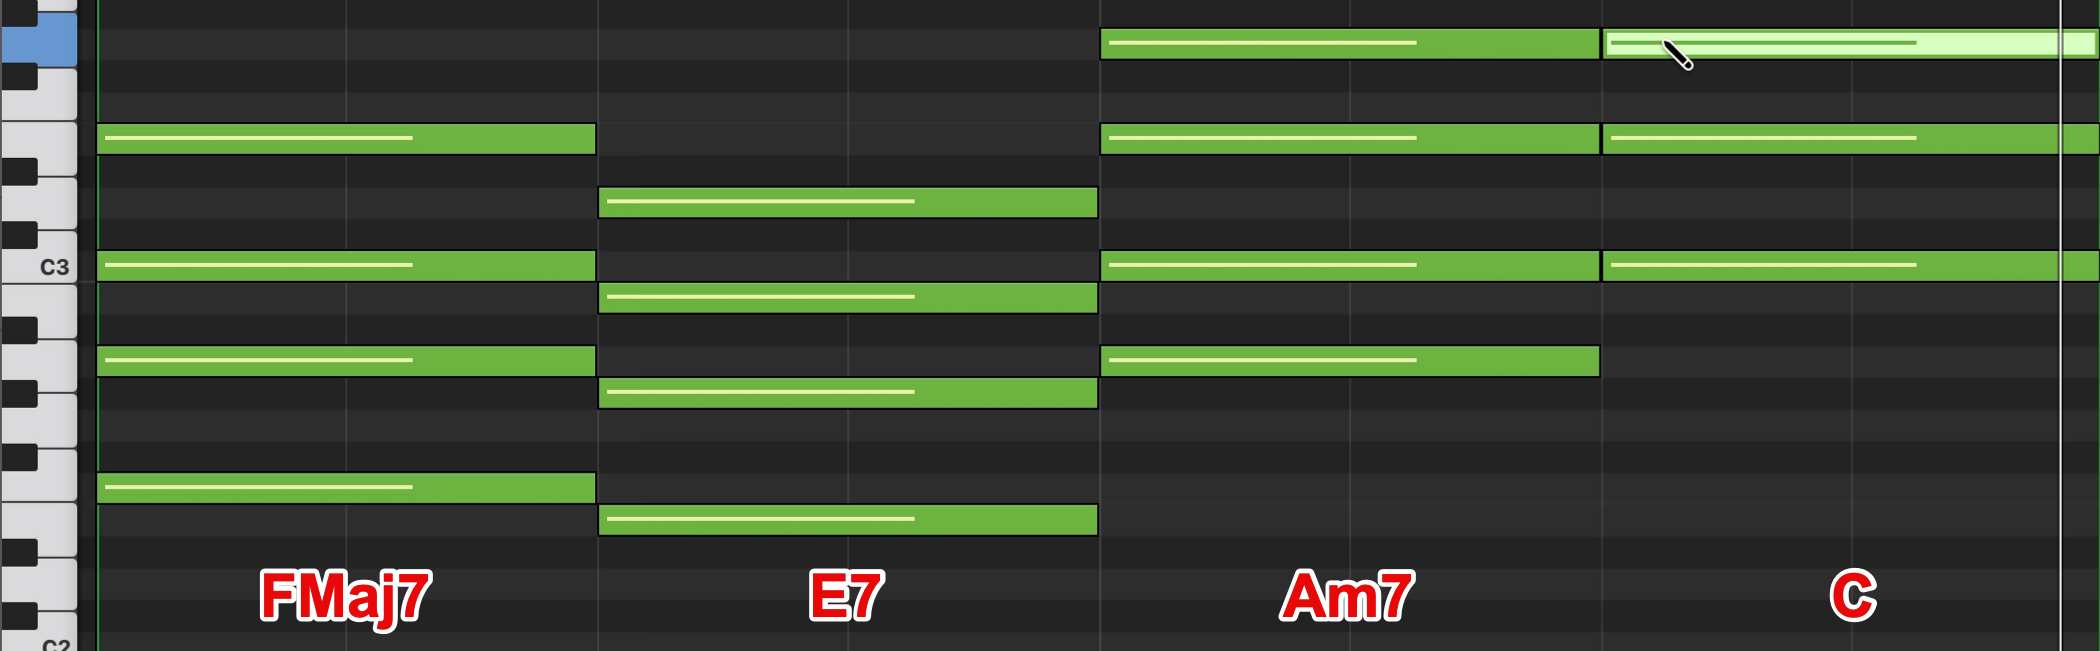
Next, enter the chords E7, A minor 7 and C.
Finally, let's listen to what we have entered so far.
Frequently Asked Questions
Q1. What are the basic steps for entering chords into a MIDI region in Logic Pro?
Create a MIDI track with Studio Piano selected and create a MIDI region. Click the region to show the Piano Roll, and choose the Pencil tool from the Tool menu to enter notes. Stacking multiple notes completes a chord.
Q2. Why adjust the grid in the Piano Roll?
The default sixteenth-note grid is suited to detailed input, but when you only enter long notes such as chords, enlarging the grid to quarter notes improves efficiency and reduces input mistakes.
Q3. How can I prevent entering notes unintentionally?
Use the Command-click tool feature in the Tool menu: set the main tool to the "Pointer tool" and the Command-click tool to the "Pencil tool," so you can quickly switch only when entering notes.
Q4. How does a chord progression affect a song?
The chord progression greatly shapes the mood of a song, including its brightness, darkness and excitement. Learning standard chord progressions improves the expressiveness of the whole song.
NEW ARTICLES
Latest English Articles











