
When starting drum production in Logic Pro 11, you can learn step by step from creating a Pattern track to the basic input methods. This article explains in detail practical techniques for building professional drum patterns, such as placing kicks and snares, creating hi-hat patterns and adjusting the dynamics of the rhythm with velocity. By using convenient features such as the metronome and cycle playback, you can edit and produce drum tracks efficiently and complete a convincing rhythm that forms the foundation of the whole song.
Making Drums with a Pattern Track

Miyakawa
Now that the initial setup of Logic Pro is complete, let's start by making the foundation of the song: the drums.
Drums and Pattern Editor Video
Creating a New Pattern Track
First, create a drum track, the most important part in pop production.
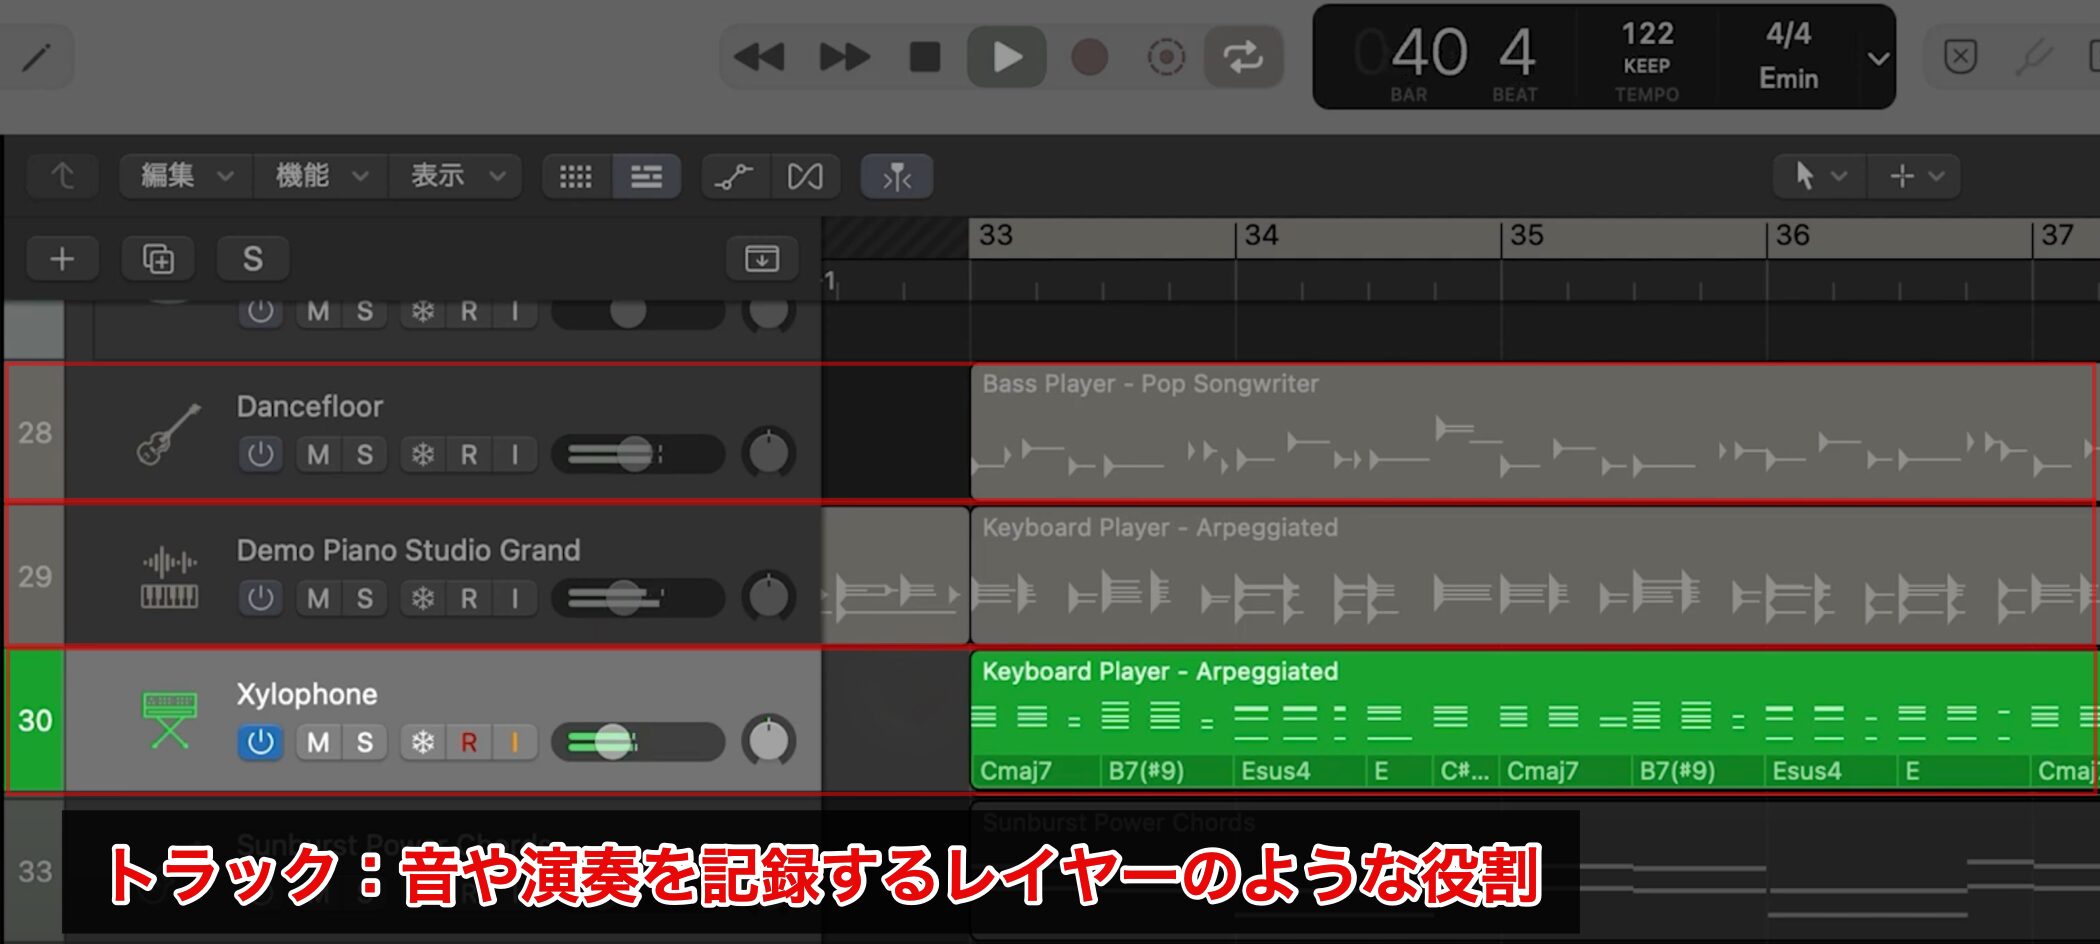
A track is like a layer for recording sounds and performances; you place different instruments and sounds on each track and layer them to complete a song.
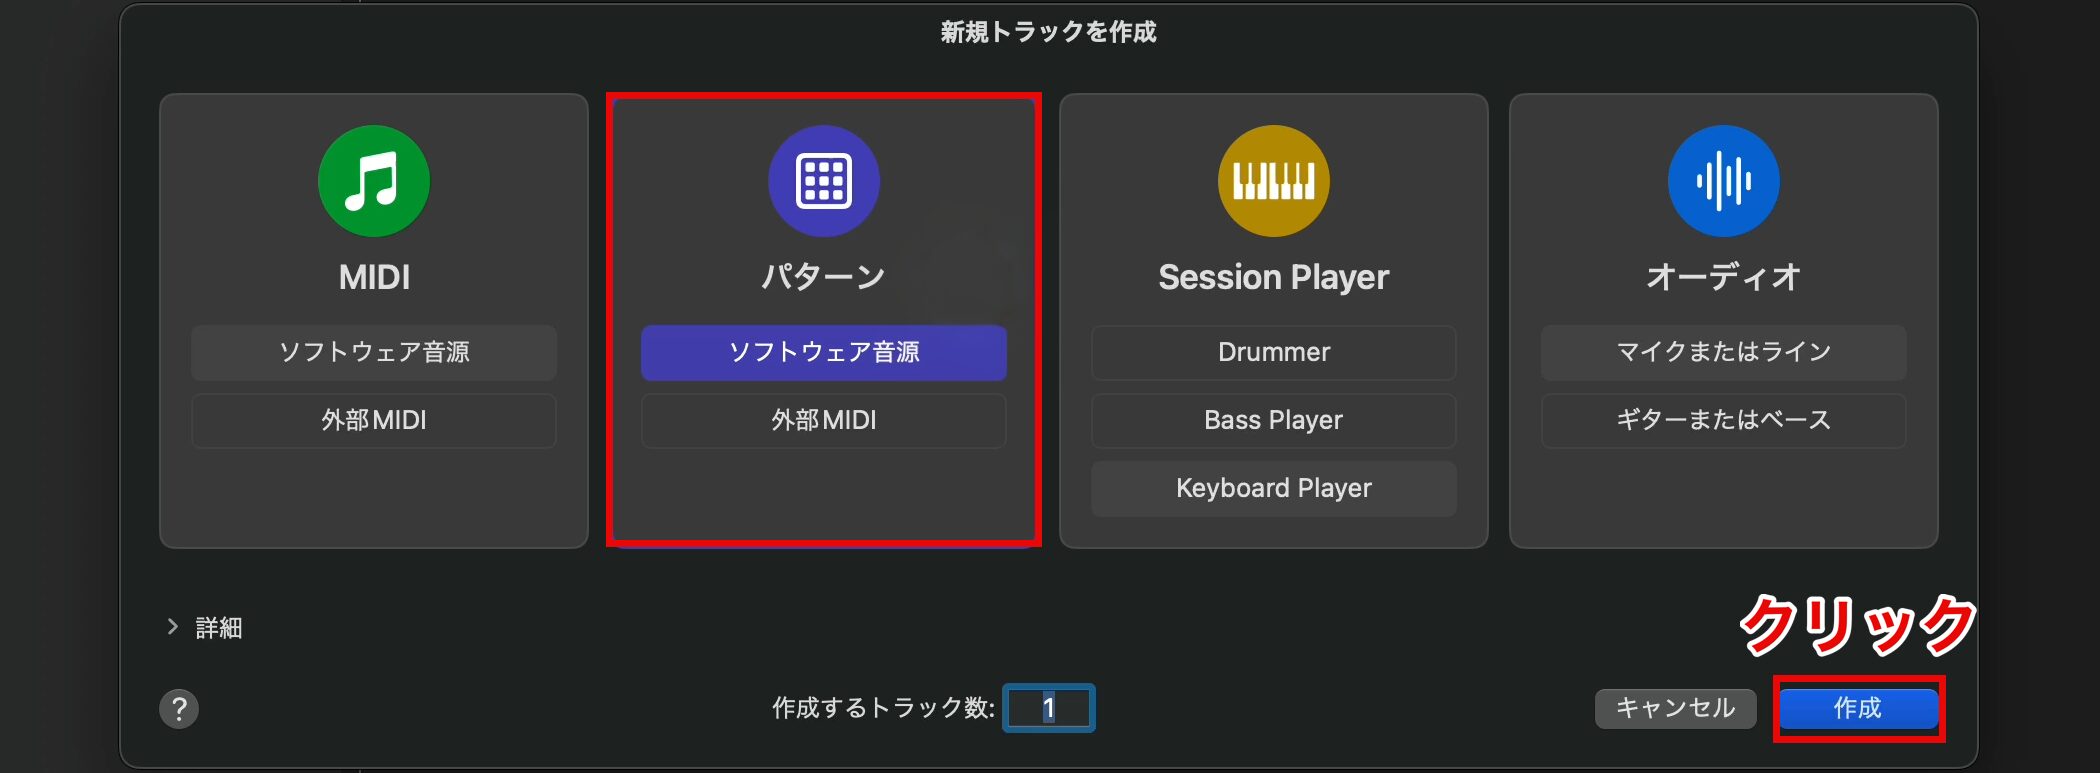
On the "Create New Track" screen, you can create tracks with various roles.
This time, choose "Software Instrument" under "Pattern Track," which is suited to rhythmic elements such as drums, and click "Create."
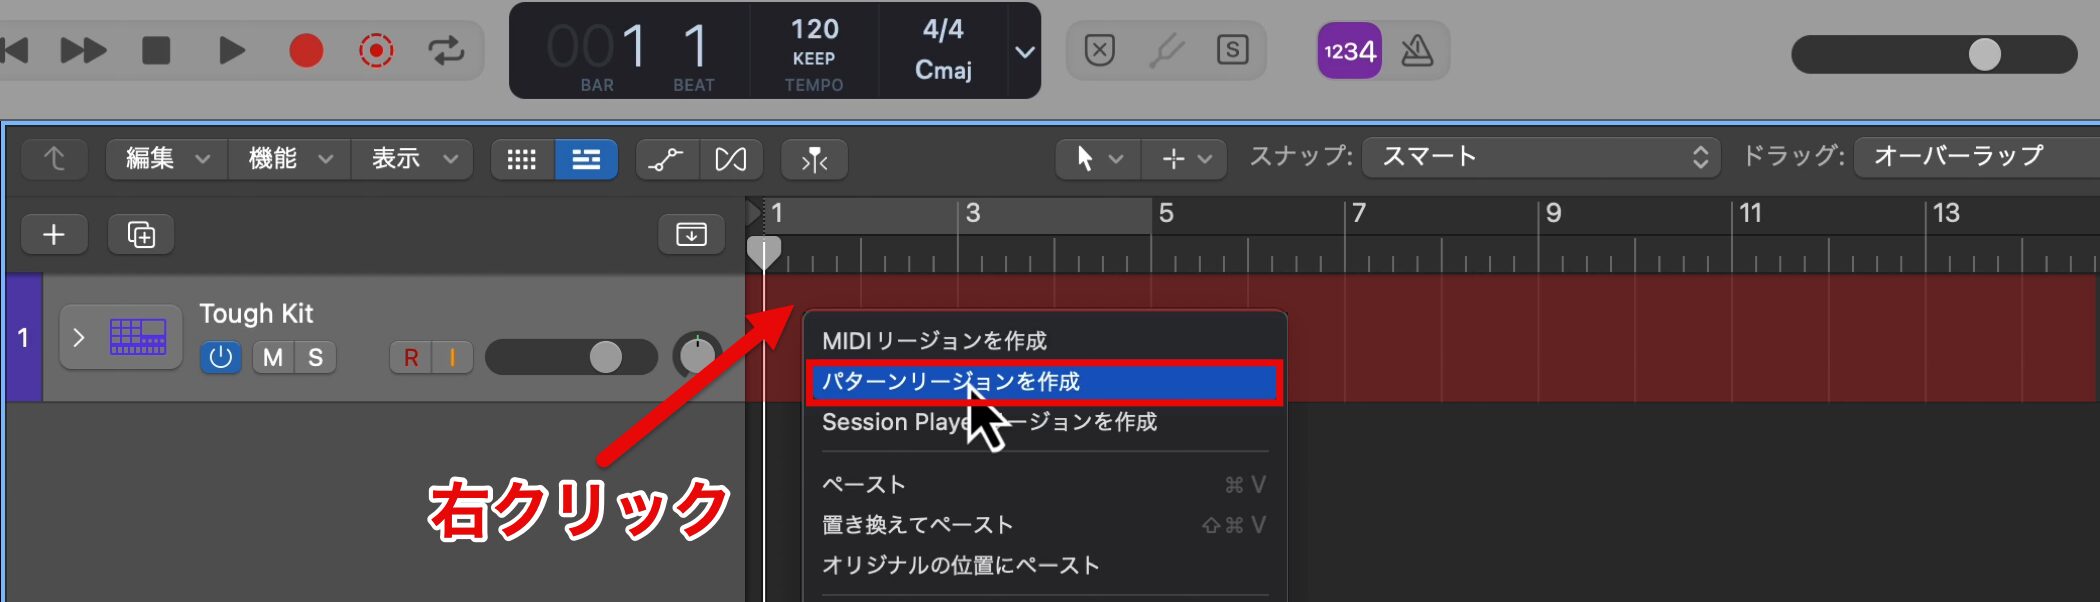
The project window opens with one track created.
Right-click the area shown in red in the image to show a menu, and choose "Create Pattern Region."
* Depending on your Logic Pro version, a pattern region may already have been created.
Working with Pattern Regions and Zooming the Screen
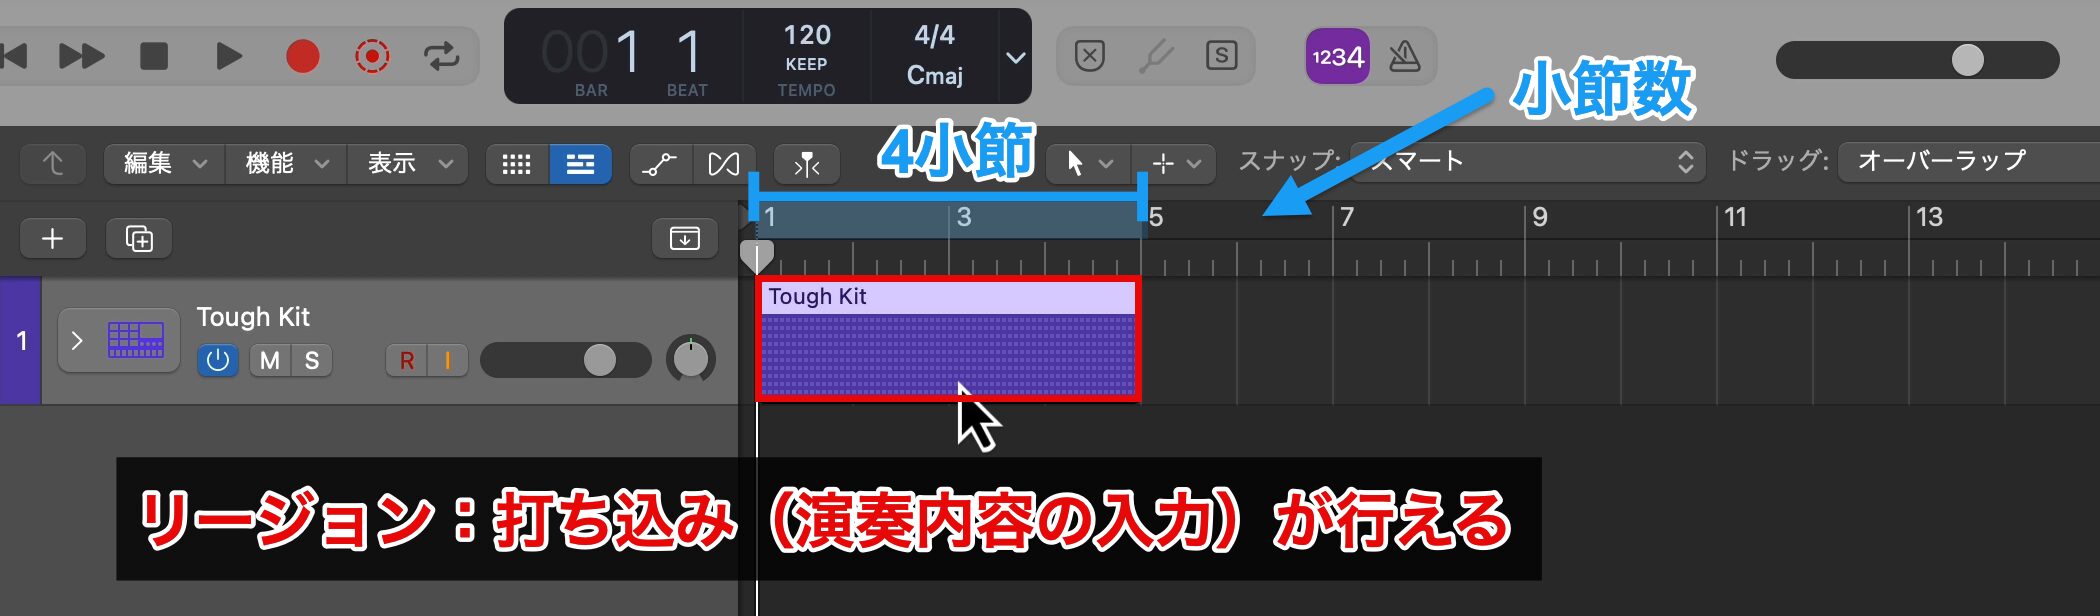
In a pattern region, you can enter performance data, which is called programming.
The numbers (1, 3, 5, 7, etc.) indicate bar numbers, and the current region is four bars long.
If bars 2 and 4 are not shown, it is because the display width is narrow.
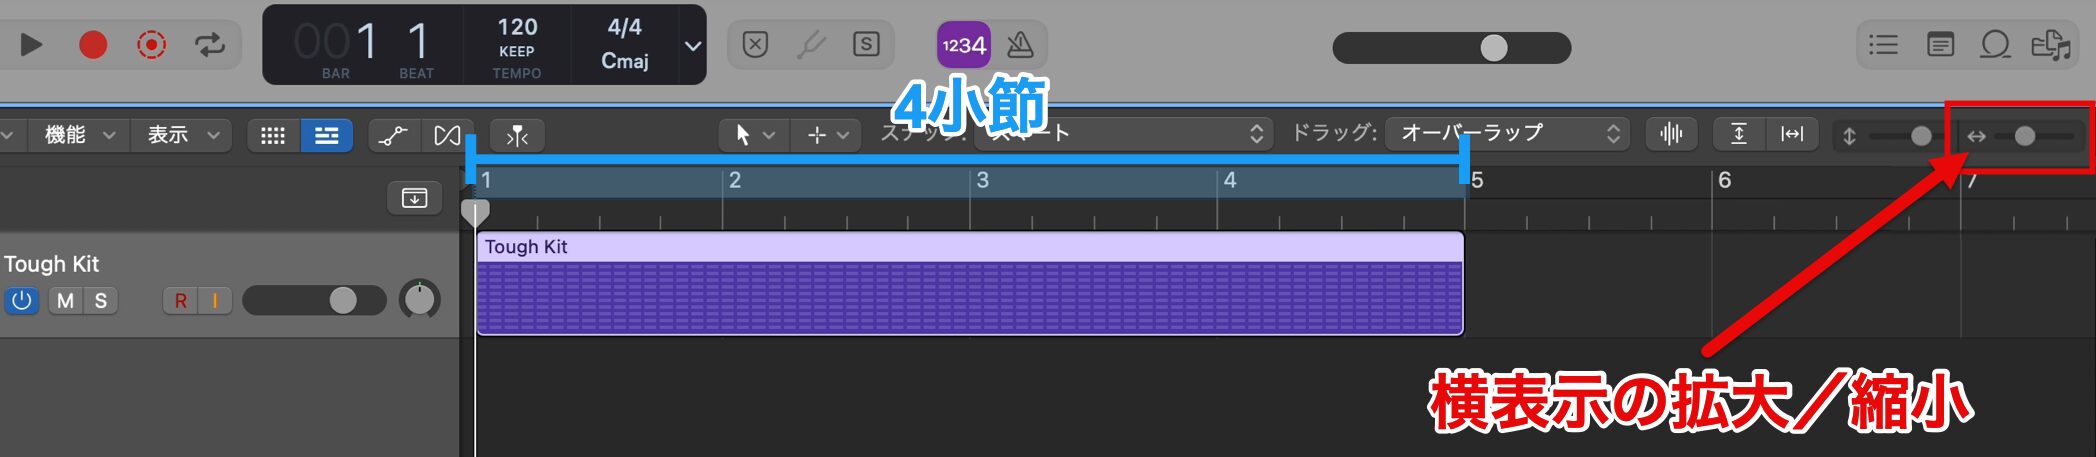
To show everything, drag the "↔ (left-right arrow)" on the right of the screen, or scroll the mouse wheel while holding down Shift and Option to zoom in and out.
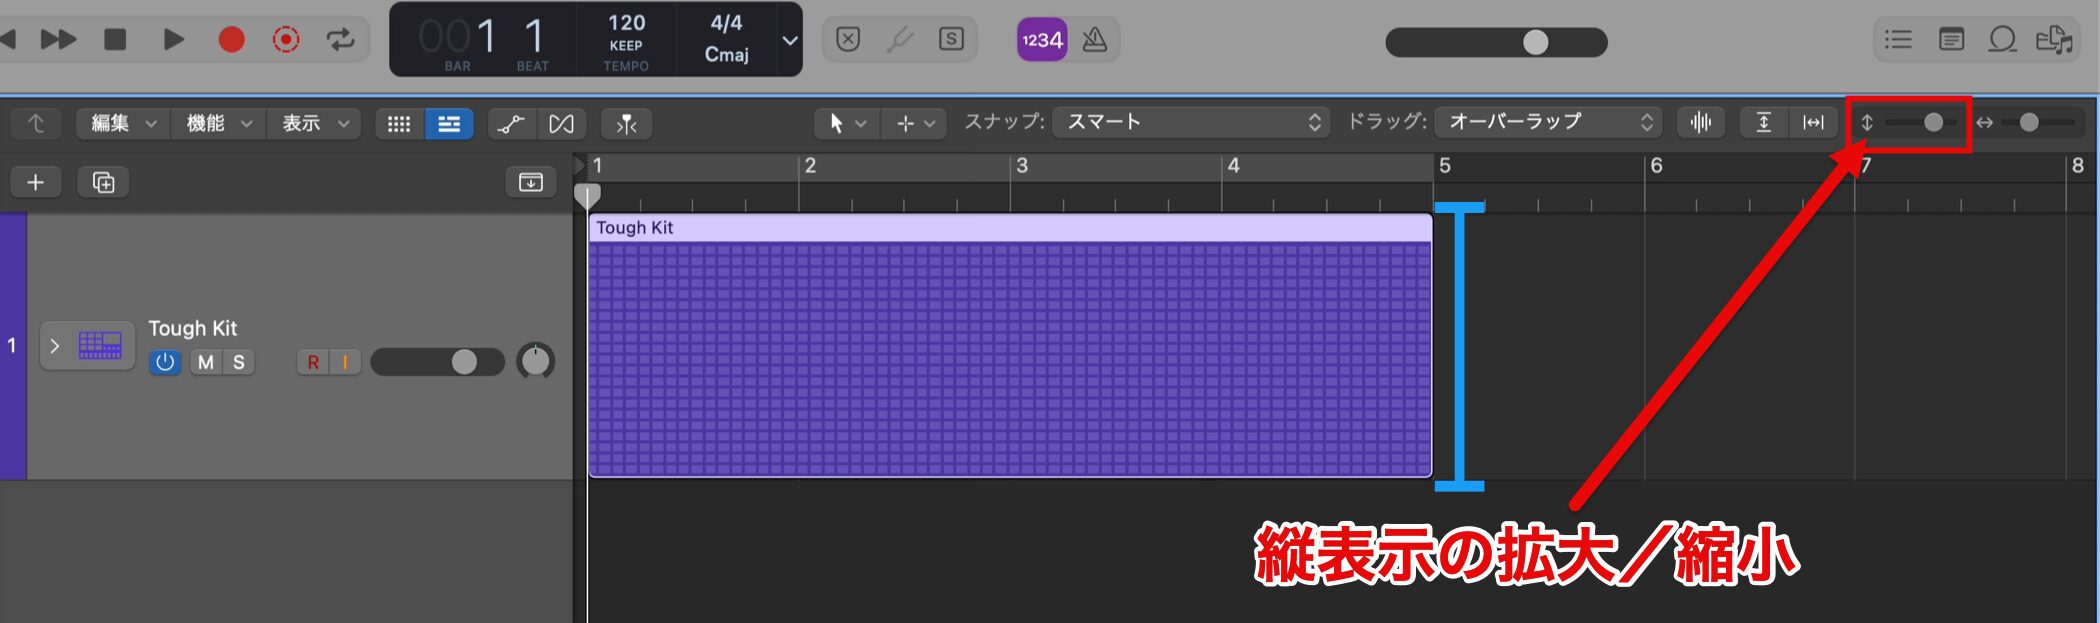
You can also zoom vertically by dragging the "↕ (up-down arrow)" or scrolling the mouse wheel while holding down Option.
Basic Drum Pattern Input
Now let's enter a drum pattern in the region we created.
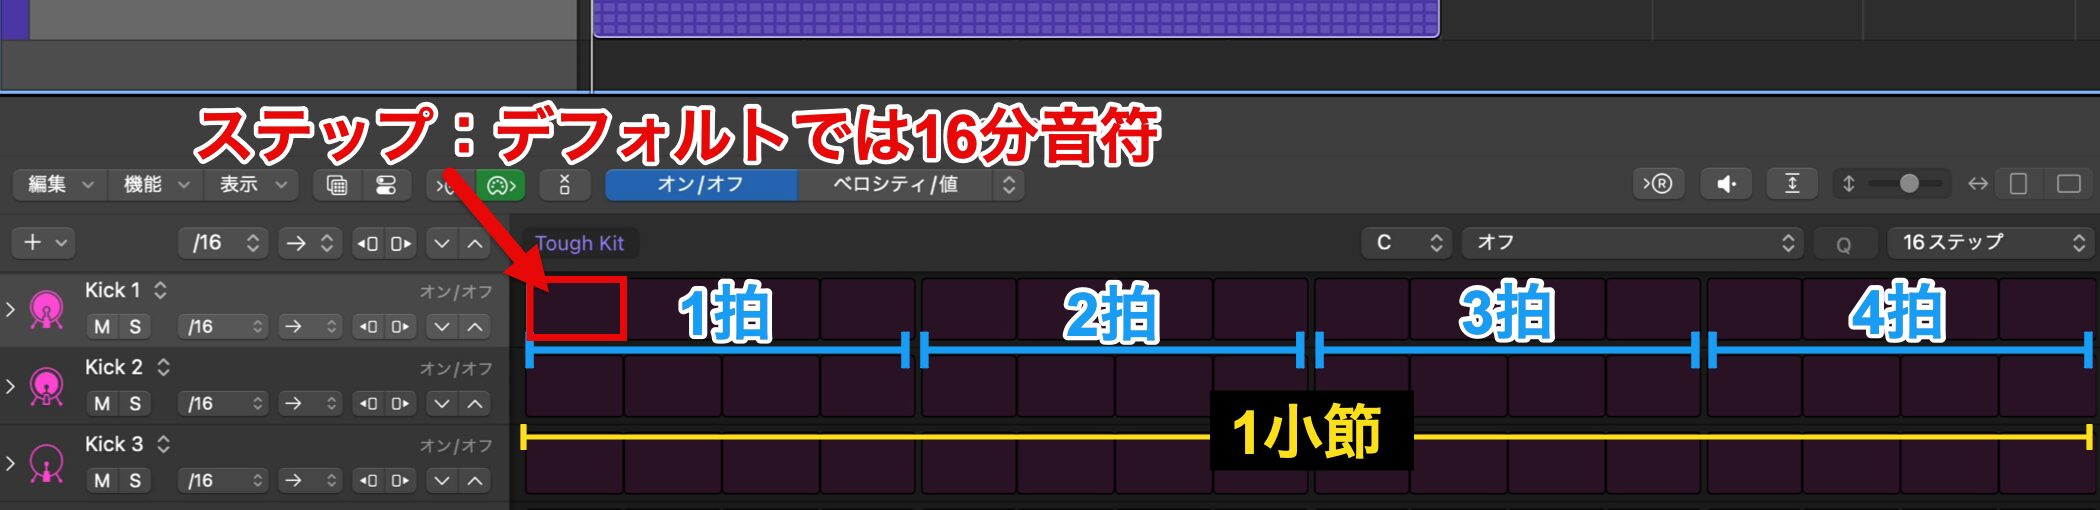
The grid cells lined up in the Pattern Editor at the bottom of the screen are called steps, and each cell lets you enter one hit.
By default, one bar is shown divided into 16 (one cell = a sixteenth note).
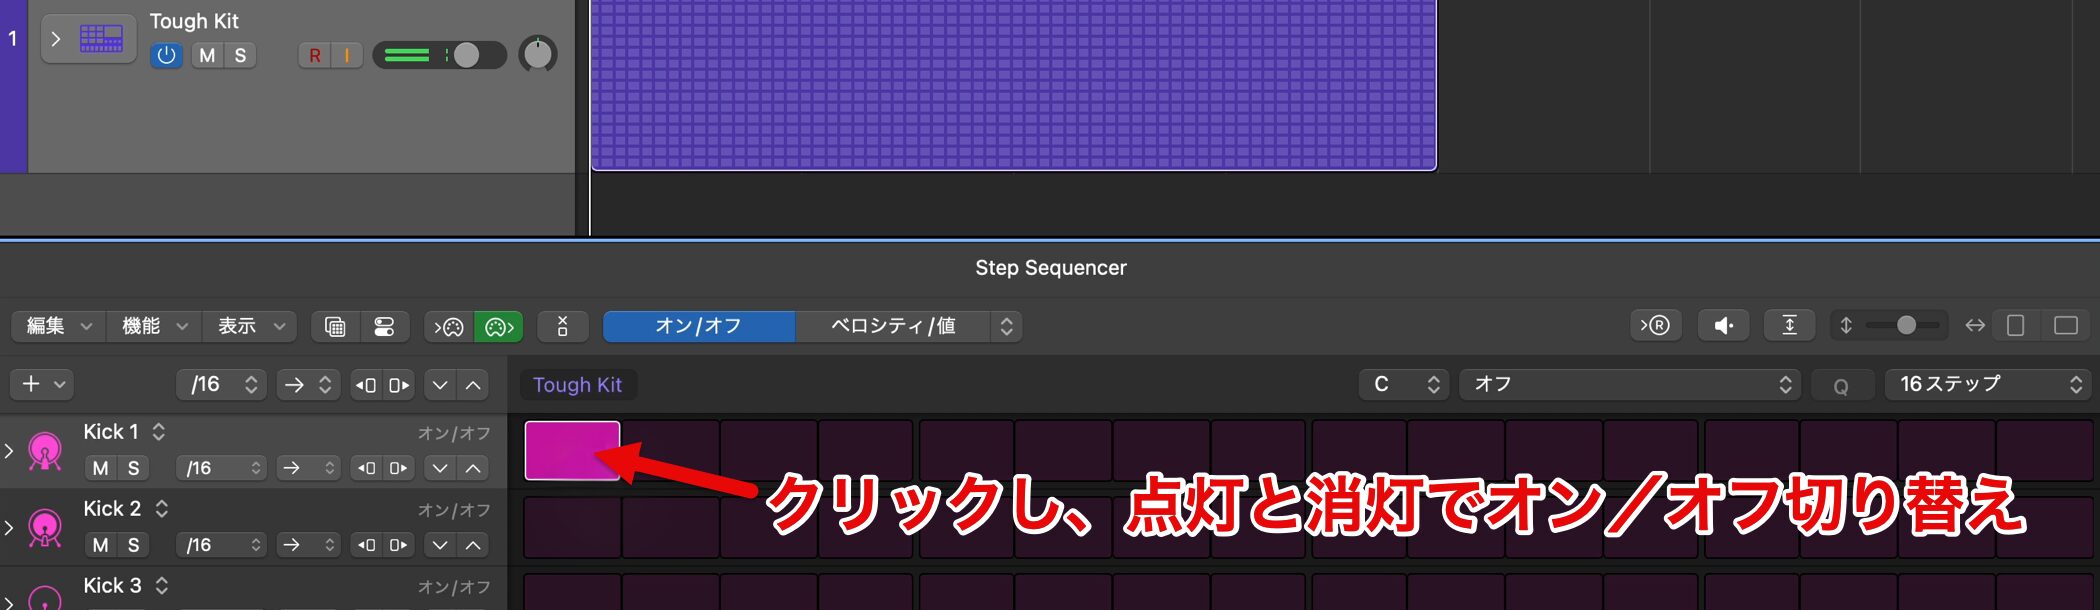
In this editor, click each step to enter a hit.
Click it again to turn that hit off.
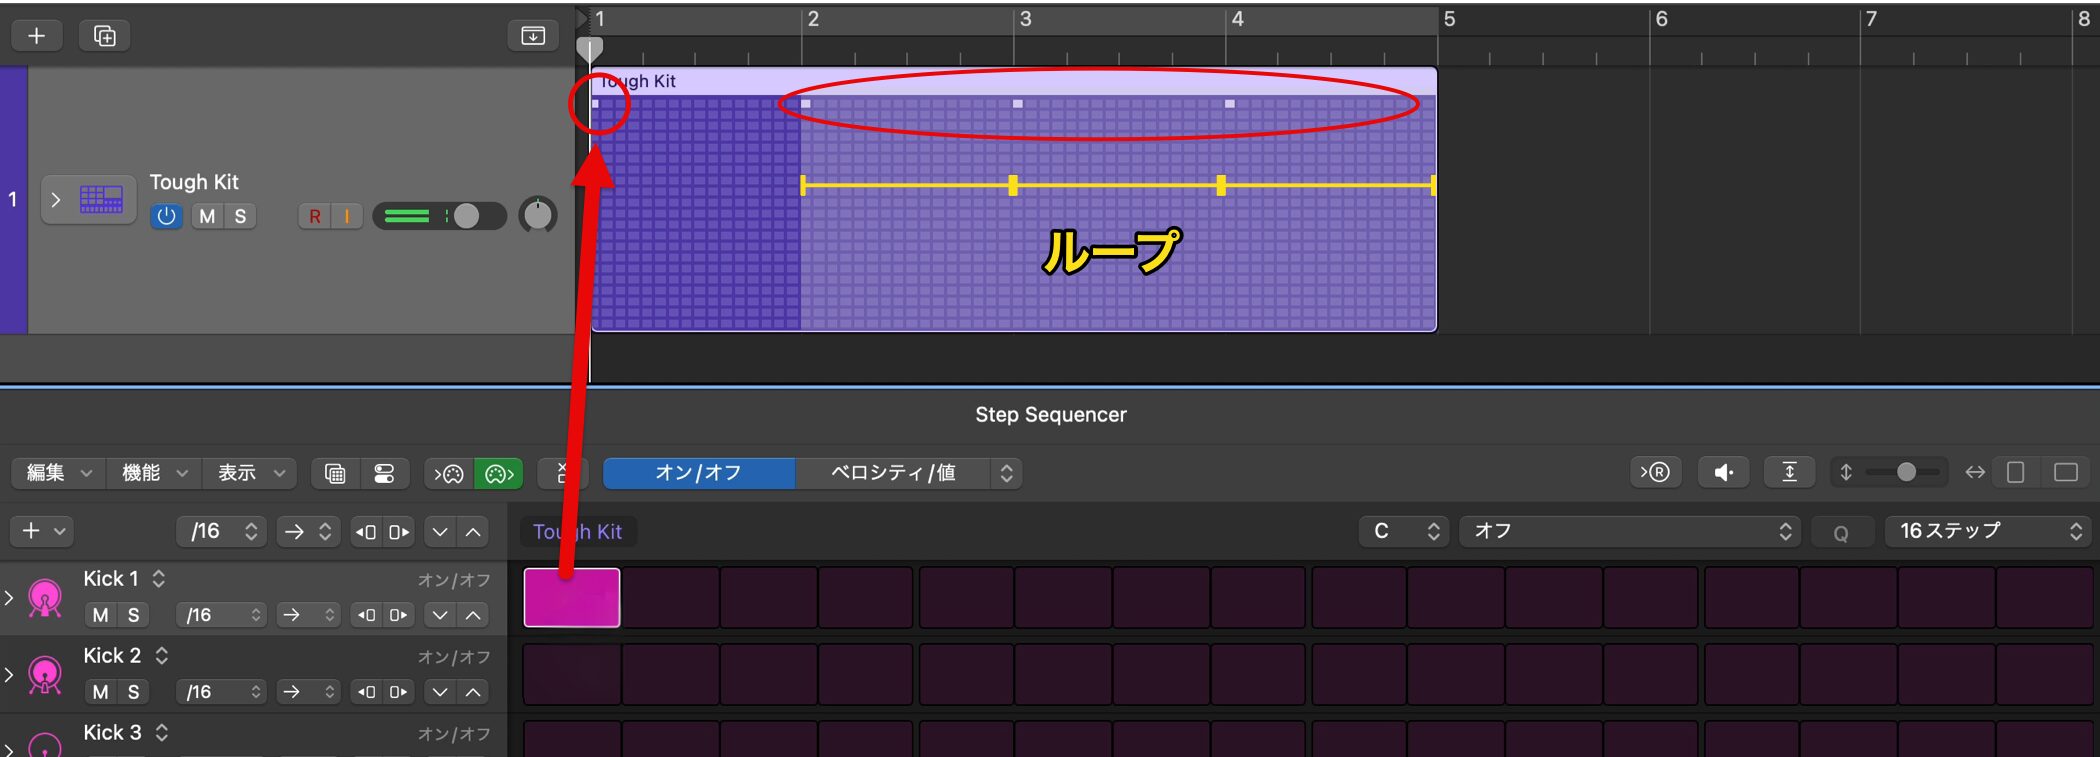
The region above appears to contain several hits because the one-bar pattern loops four times.
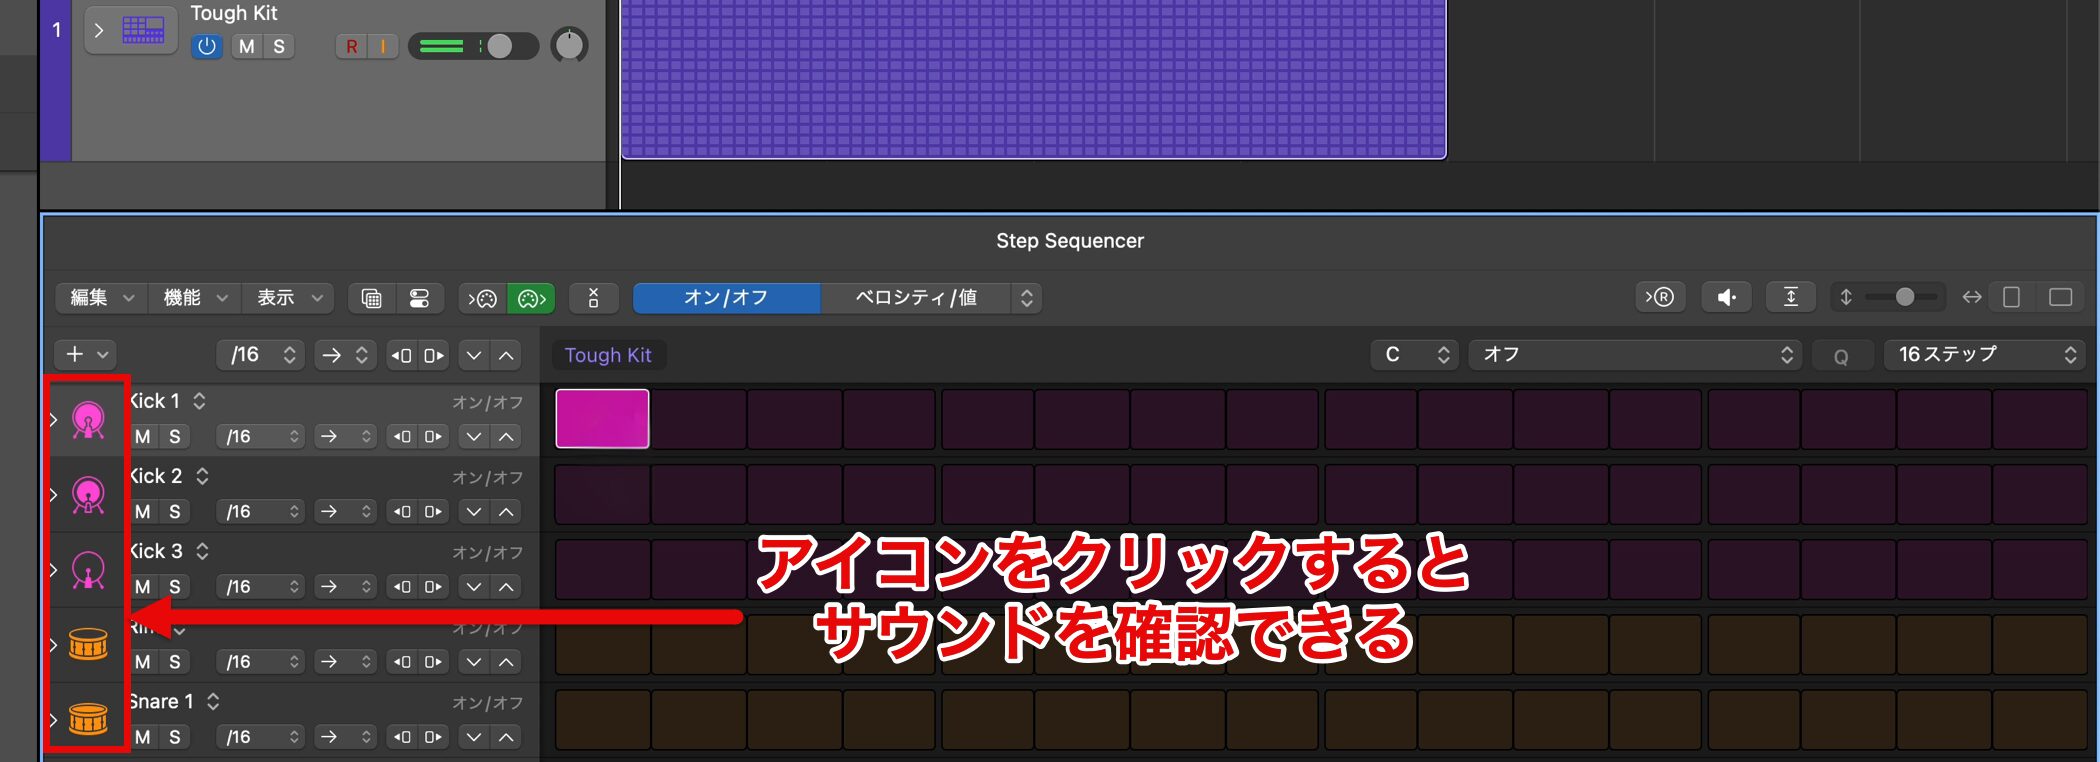
The Pattern track loads drum sounds by default, and you can click each icon to hear each sound.
Entering the Kick and Snare
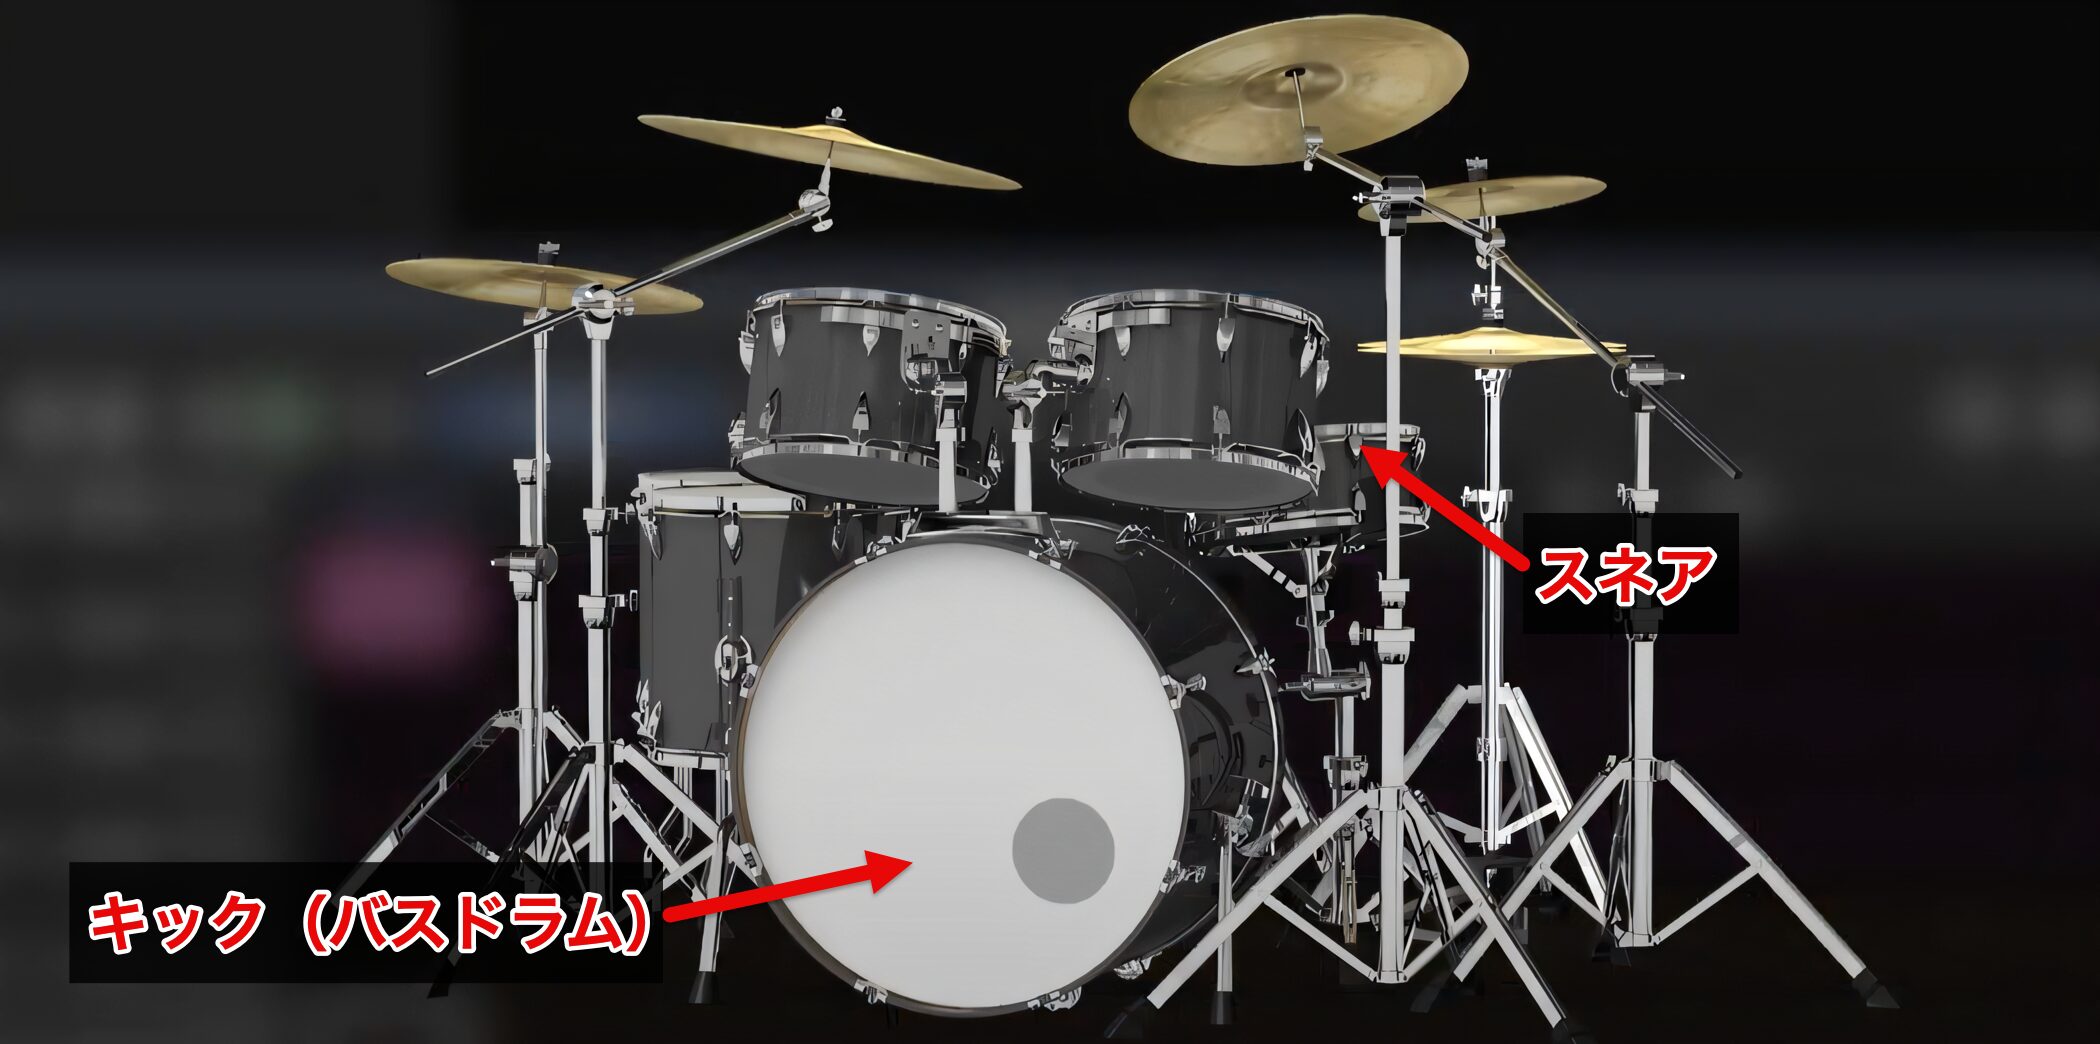
First, enter the kick and snare, which are essential for creating a drum pattern.
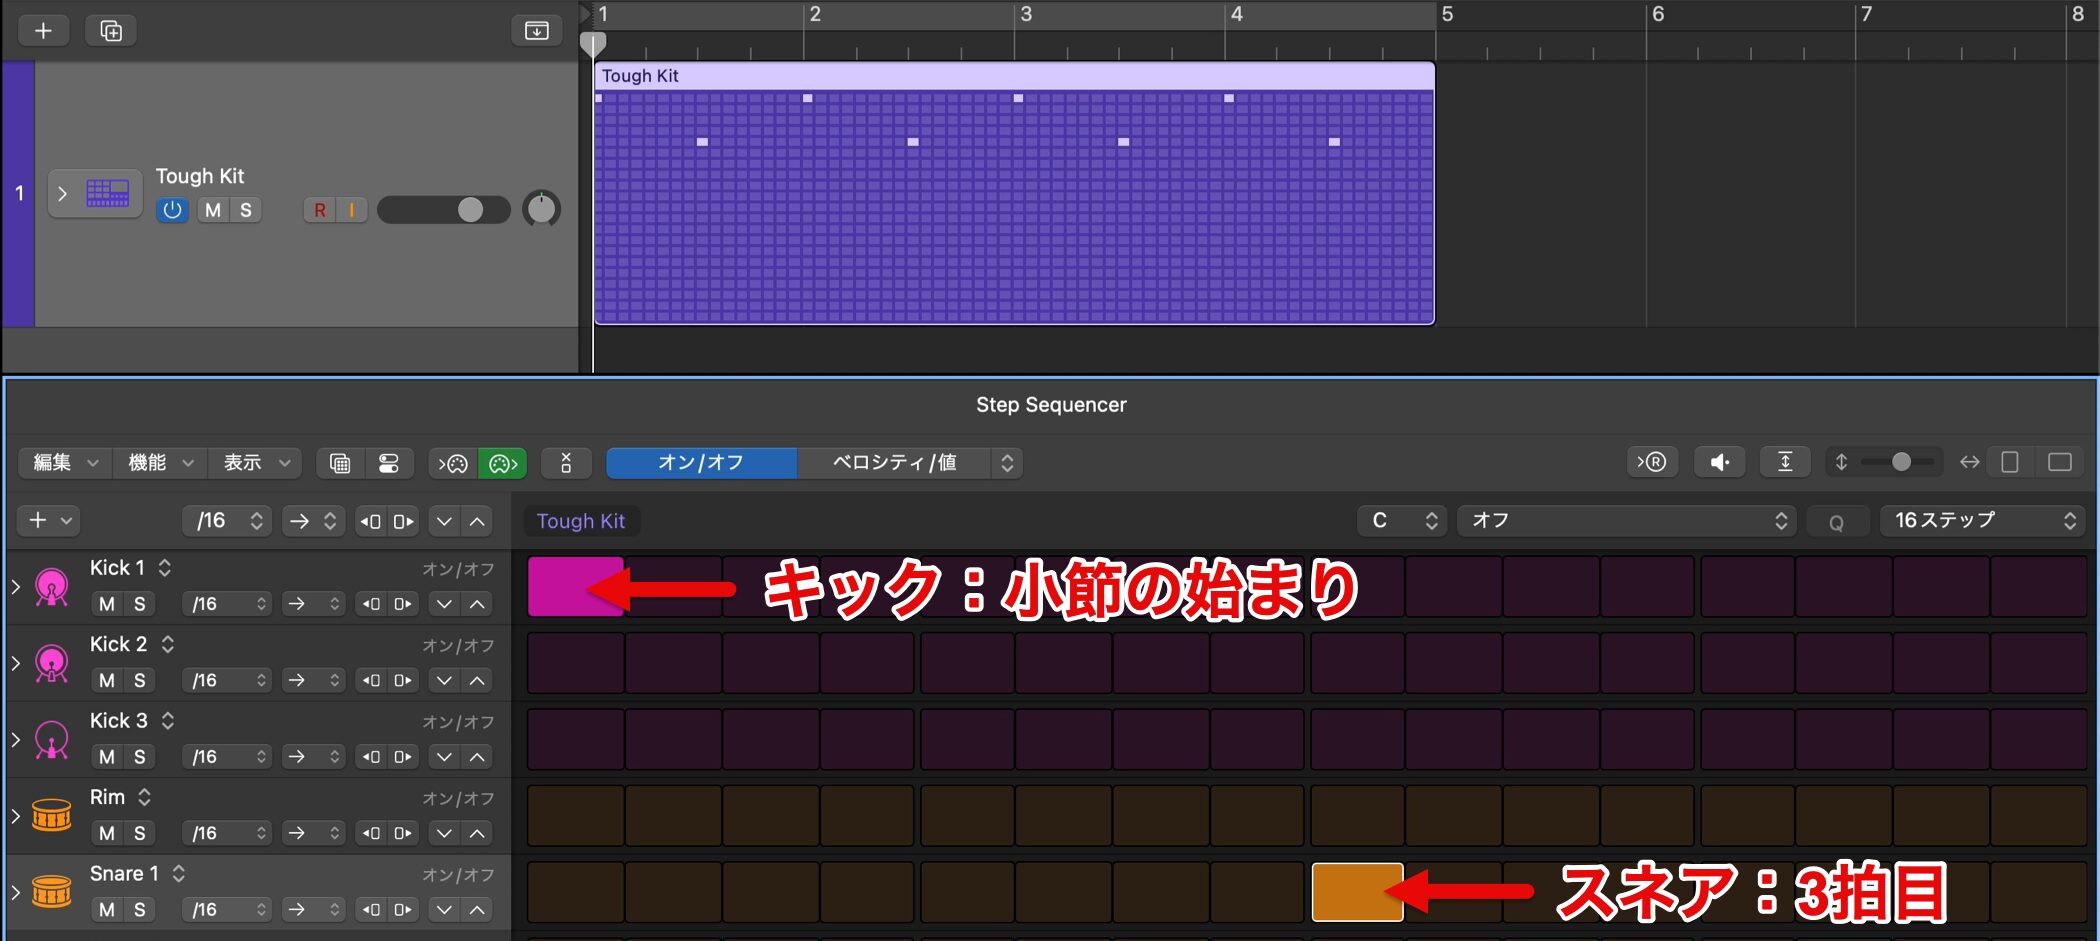
This time, we place the kick on beat 1 (the start of the bar) and the snare on beat 3 to create a half-time pattern.
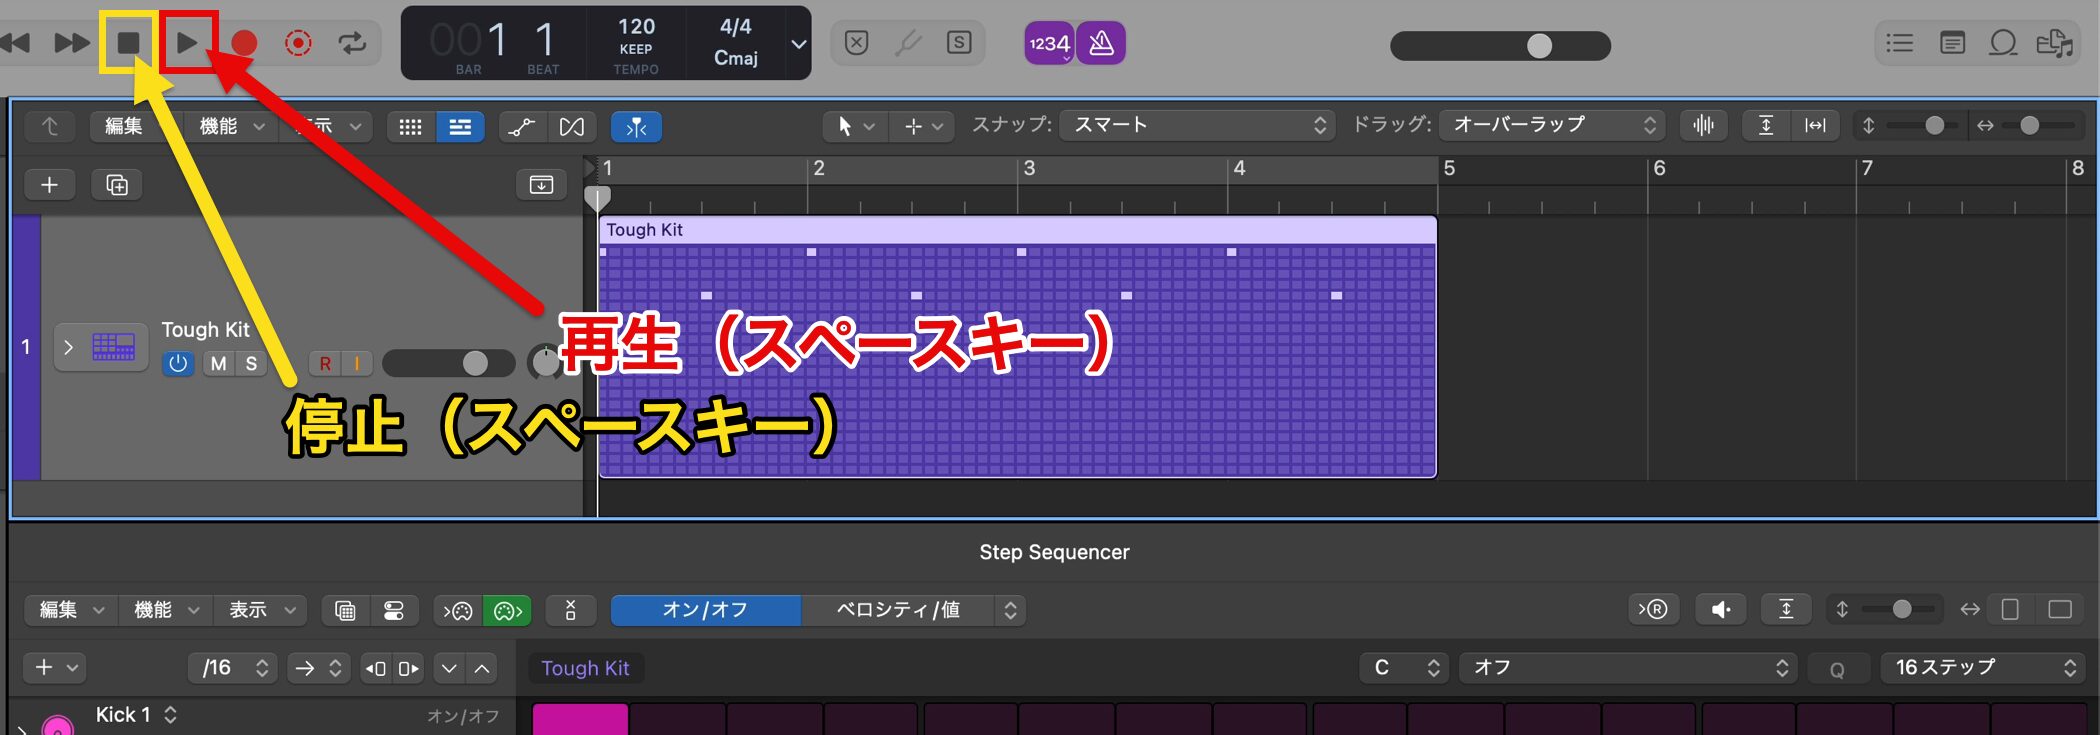
To check what you have programmed, press "▶ (Play button)" or the Space bar to play it.
To stop, press the Space bar again or click "■ (Stop button)."
Using the Metronome
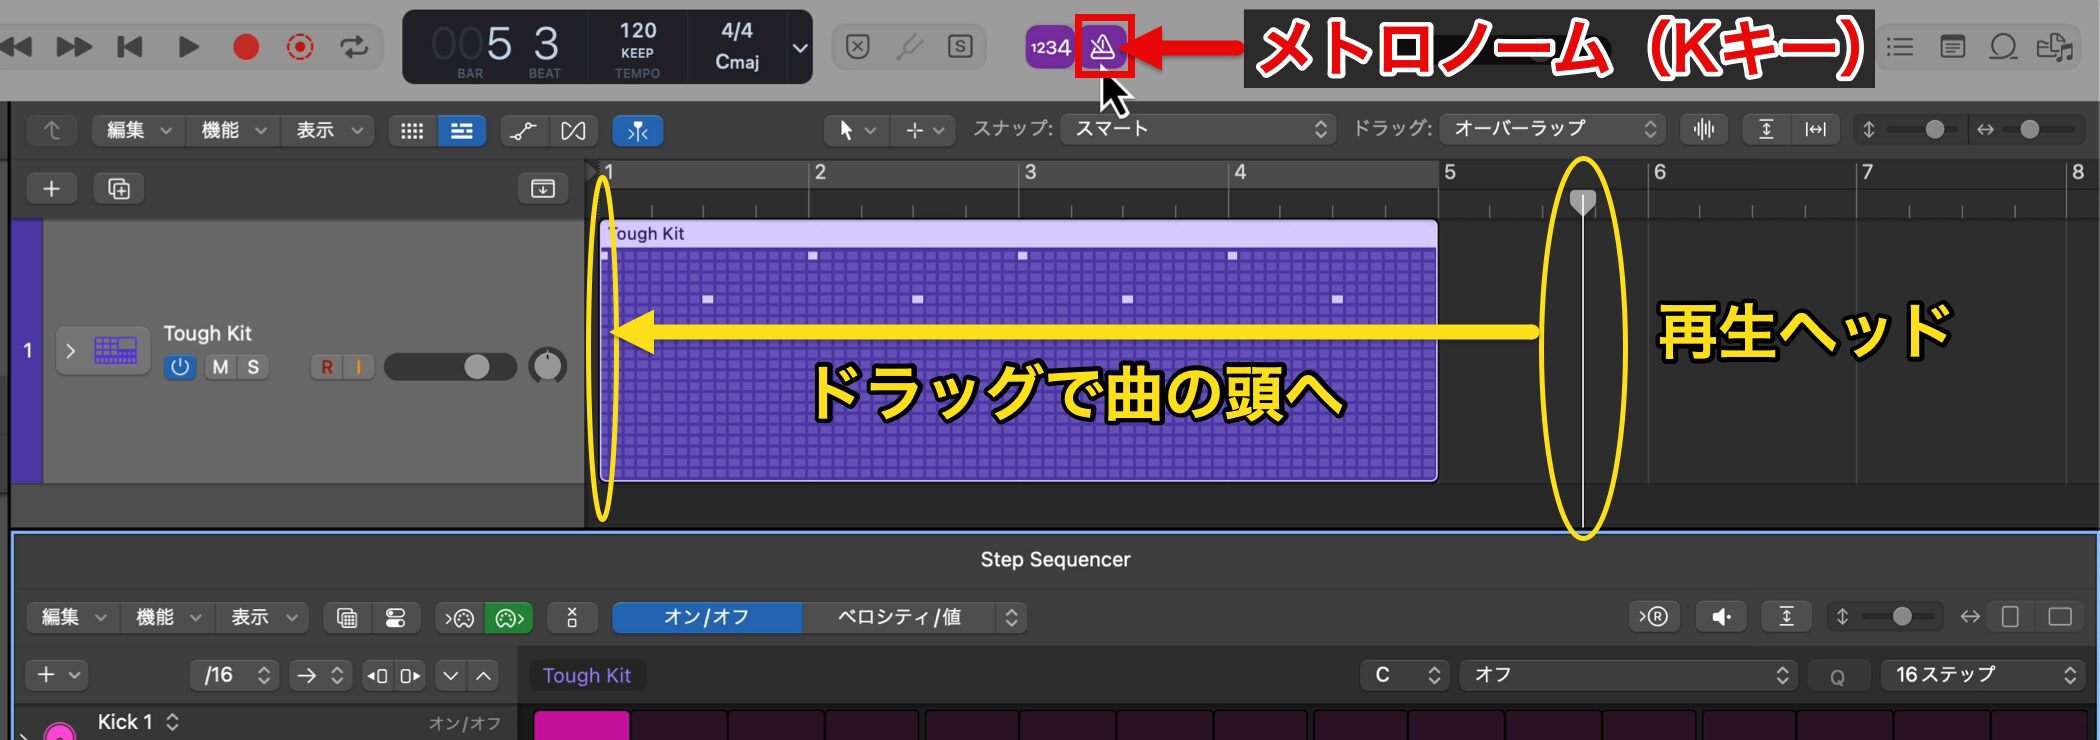
If the tempo is hard to follow, turn on the "Metronome button" or use the shortcut key K to enable the metronome.
Drag the "playhead" back to the start of the song and check the rhythm.
Once the basic drum pattern is complete, develop it by adding more hits or extending the length of the phrase.
Using Cycle Playback and Setting the Tempo
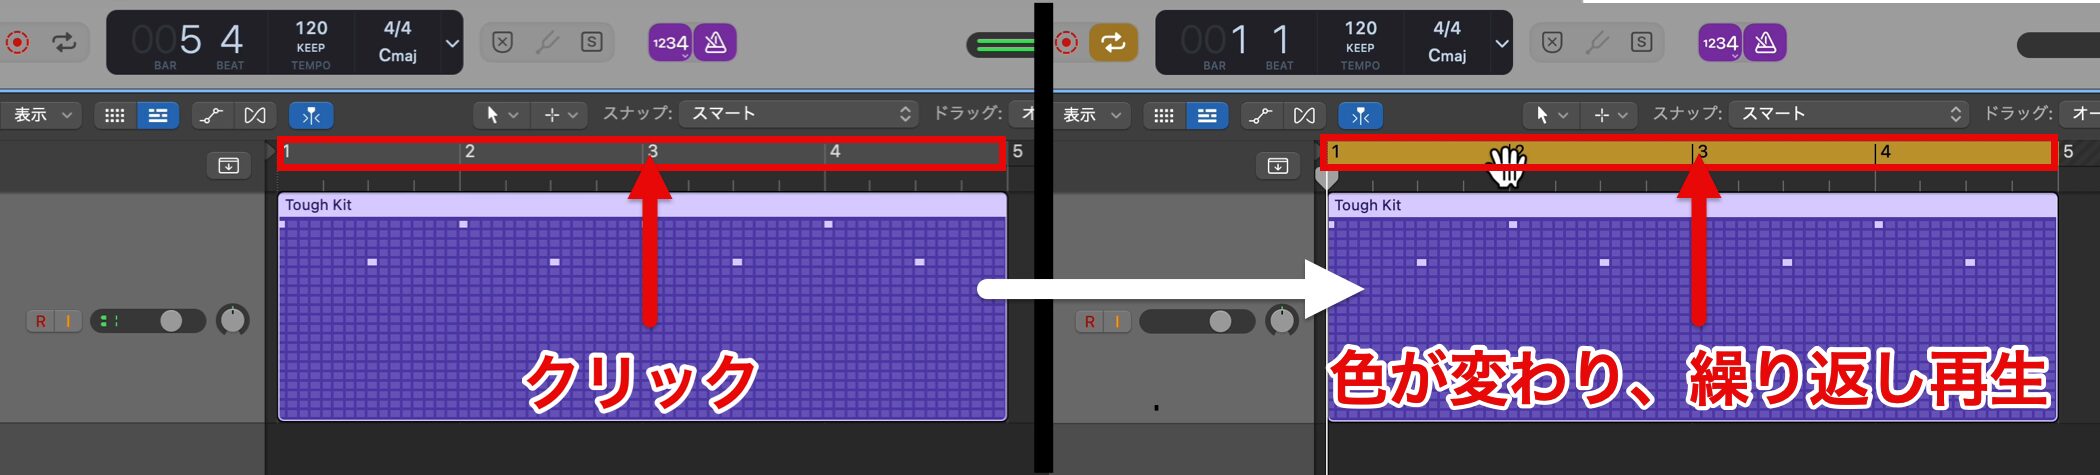
When editing while playing repeatedly, use cycle playback.
Click the "cycle area," the faded area where the bar numbers are written, and its color changes and that range is played repeatedly.
To turn off repeated playback, click the same place again.
You can also switch repeated playback on and off with the shortcut key C.
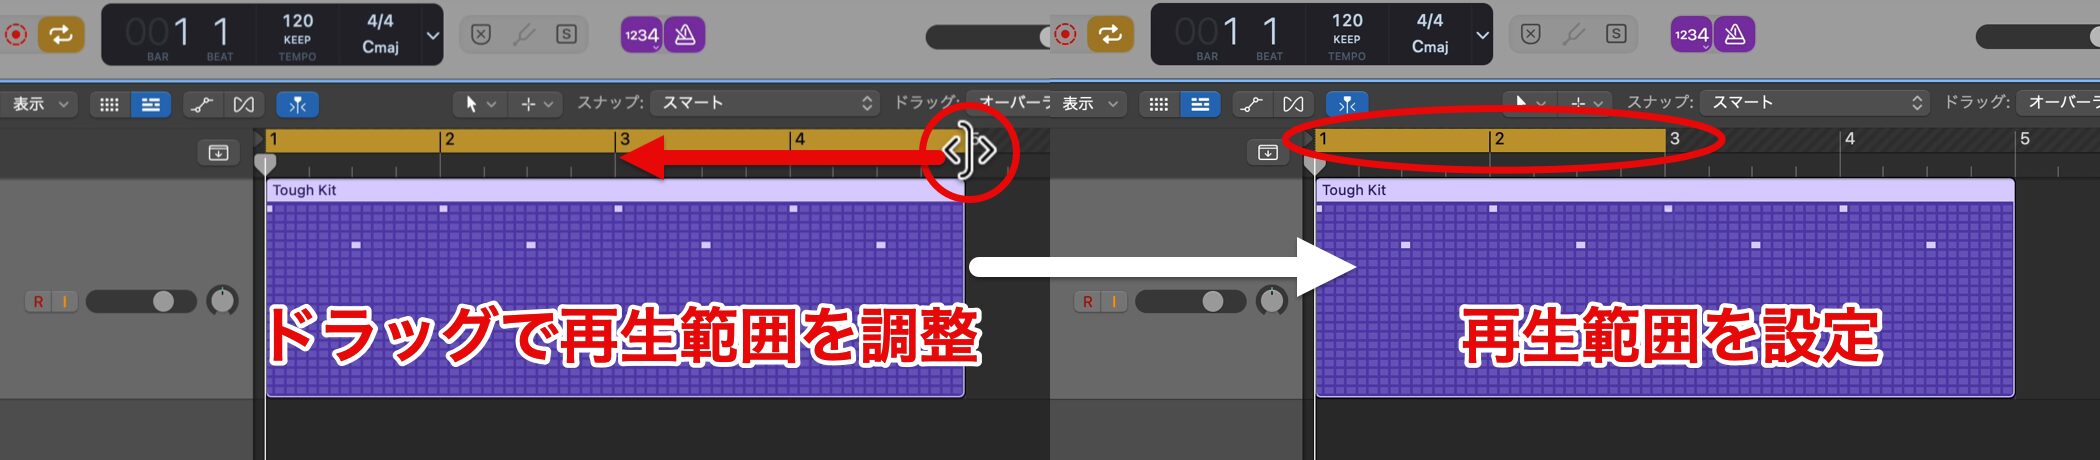
To change the cycle range, drag the edges of the range to adjust the length of cycle playback.
This time we create a two-bar drum pattern, so we set the cycle range to two bars.
When cycle playback is enabled, playback always starts from the beginning of the set range.
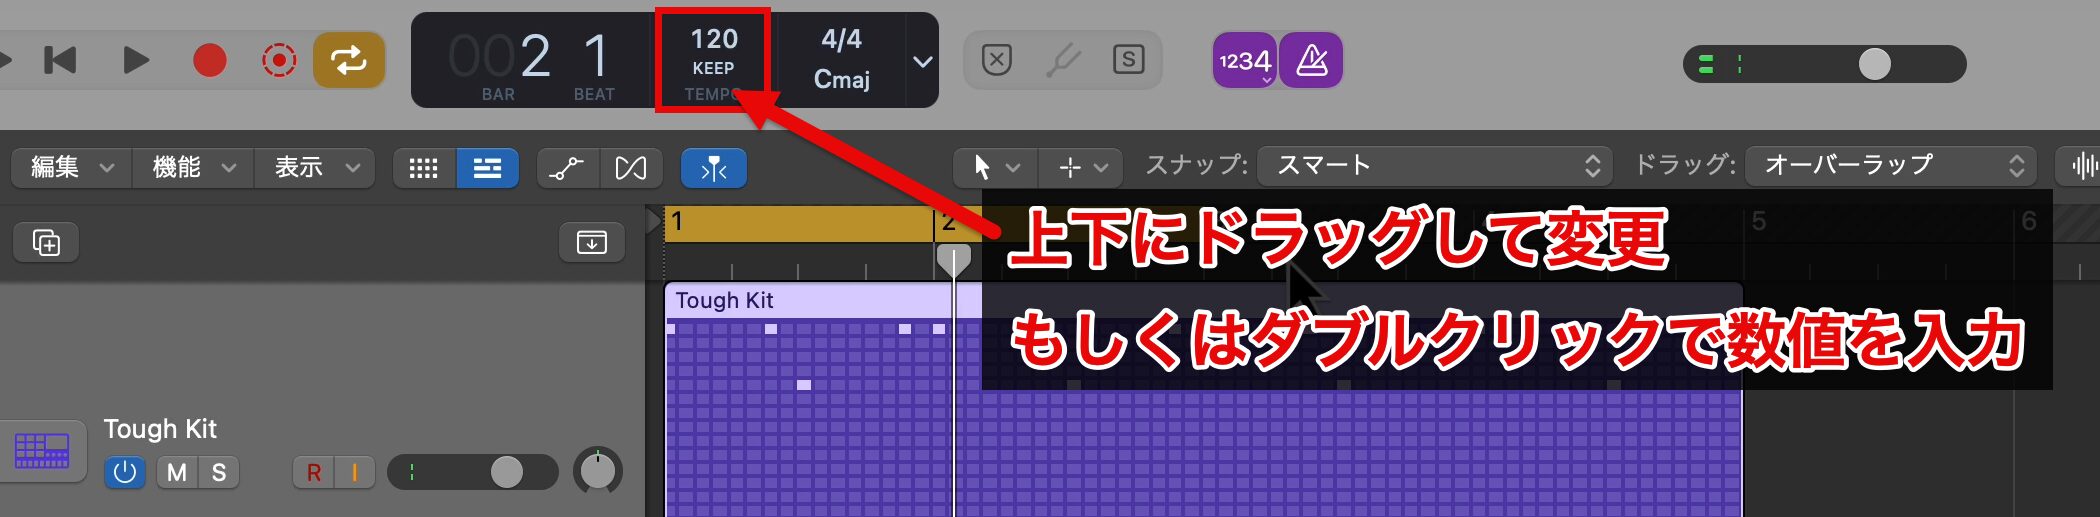
Once the pattern is complete, raise the tempo slightly to add a sense of speed.
To set the tempo, drag the value in the "tempo display" up or down, or double-click it and enter the value directly.
Adding a Hi-Hat Pattern
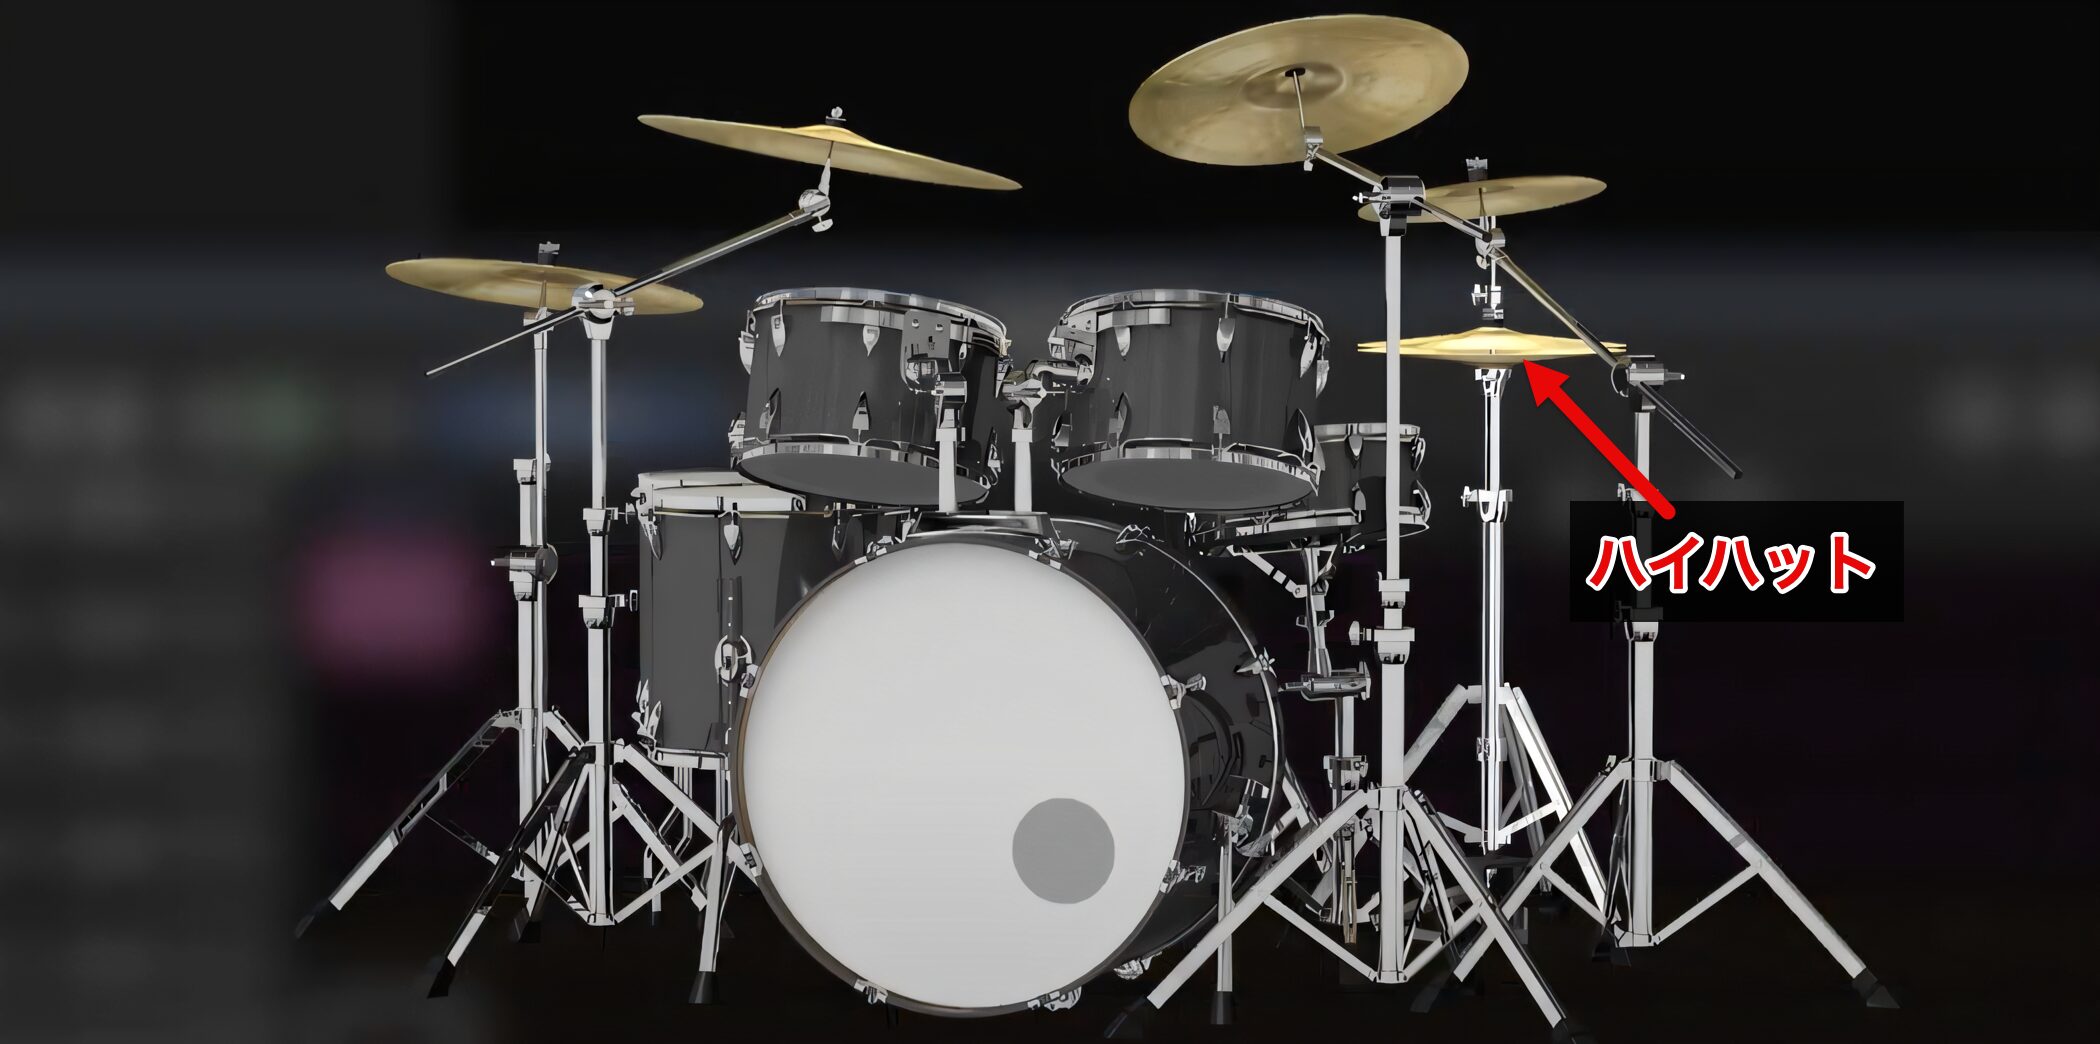
Next, add the hi-hat, the other star of the drum pattern.
Hi-hats are used in many music genres and are often played in a regular rhythm, but this time we create an irregular pattern inspired by electronic dance music such as trap and future bass.
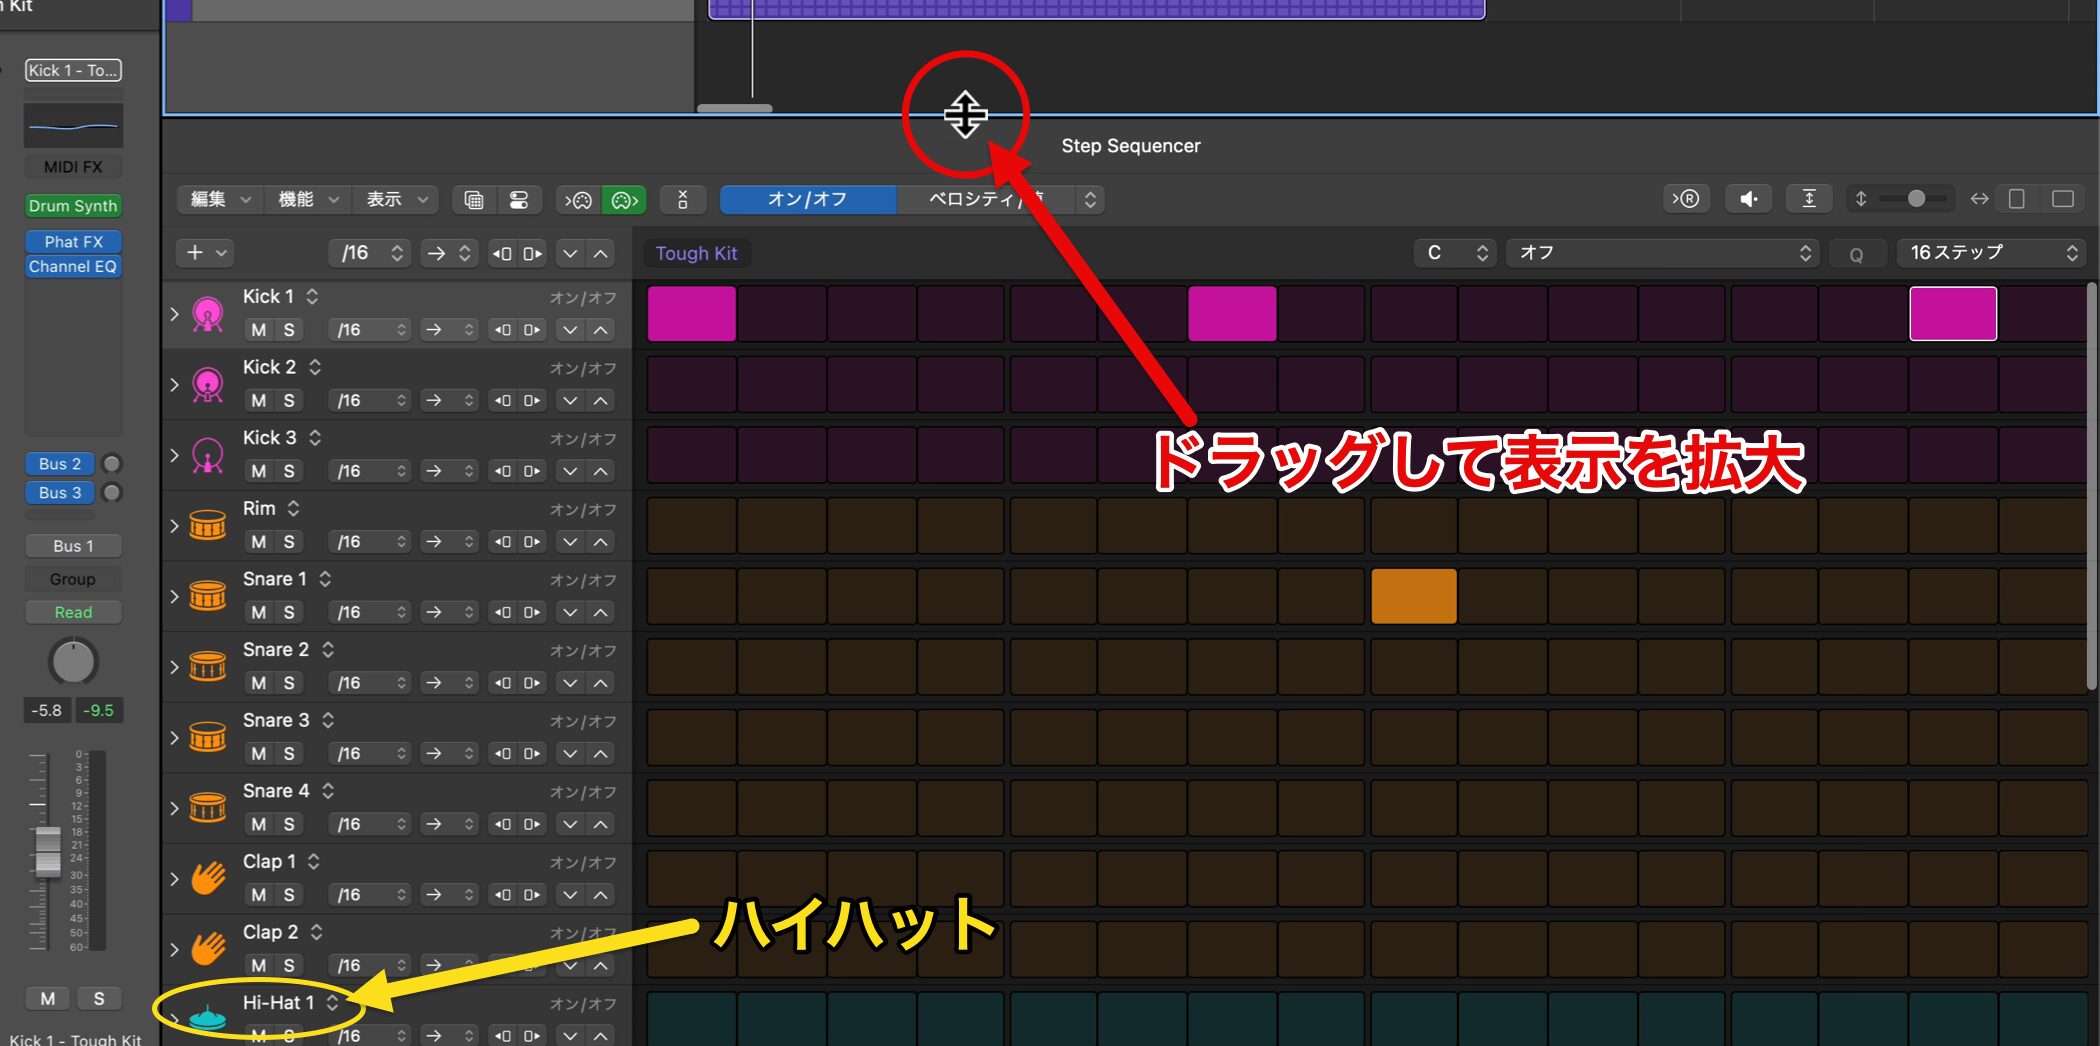
If the drum kit's hi-hat is shown near the bottom and hard to see, drag to enlarge the editing area or scroll to show it.

First, light up steps so that rests appear here and there, taking care not to repeat the same rhythm.
Entering Hi-Hat Rolls (Repeats)
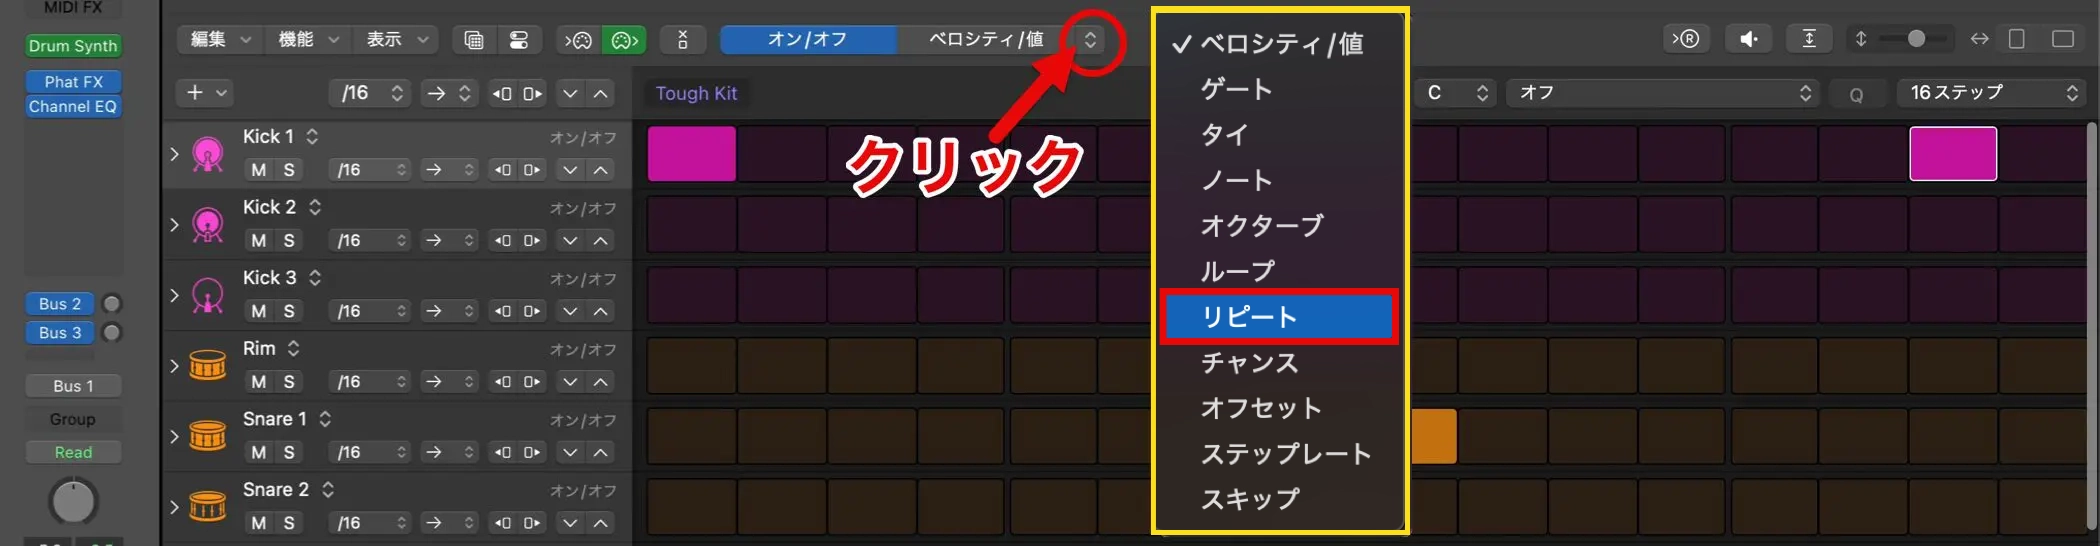
Next, add hi-hat rolls (rapid repeated hits).
Click the mark shown to the right of "Velocity/Value" at the top of the editor and choose "Repeat."
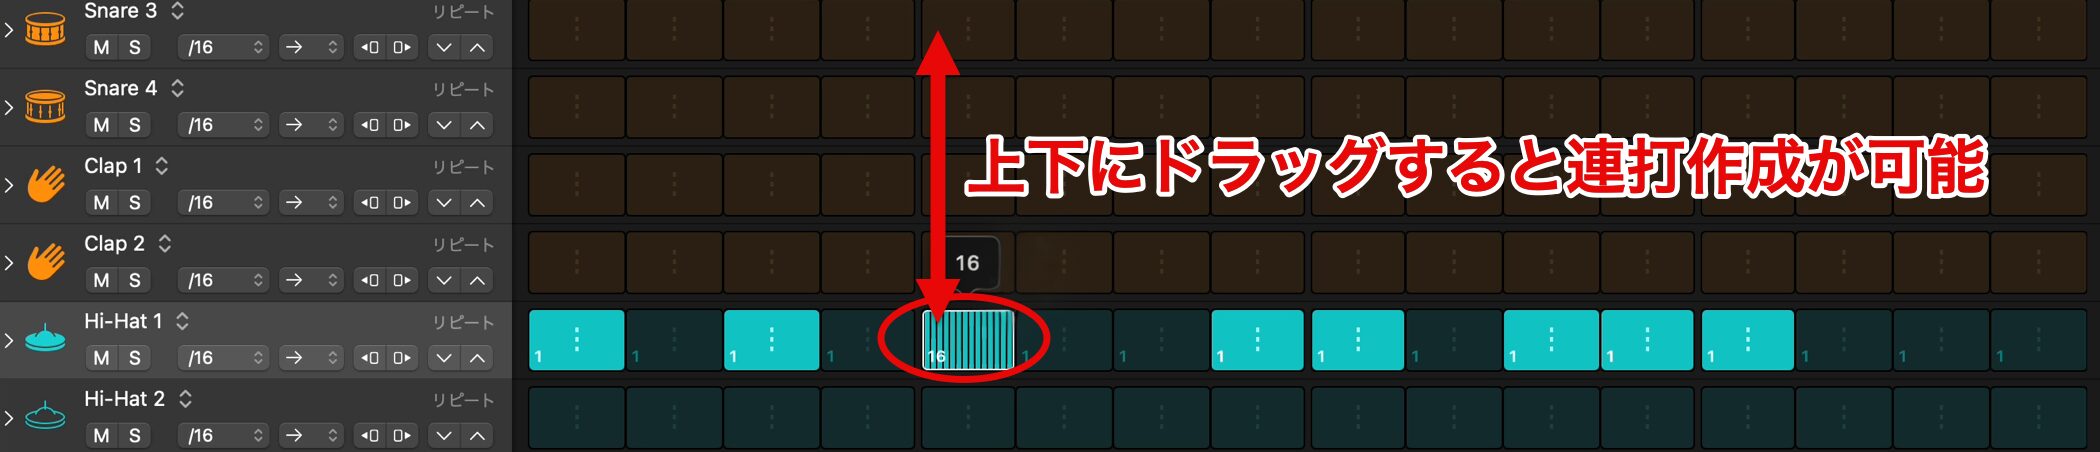
Drag each step up or down to divide the hits within a single cell and create a hi-hat roll.
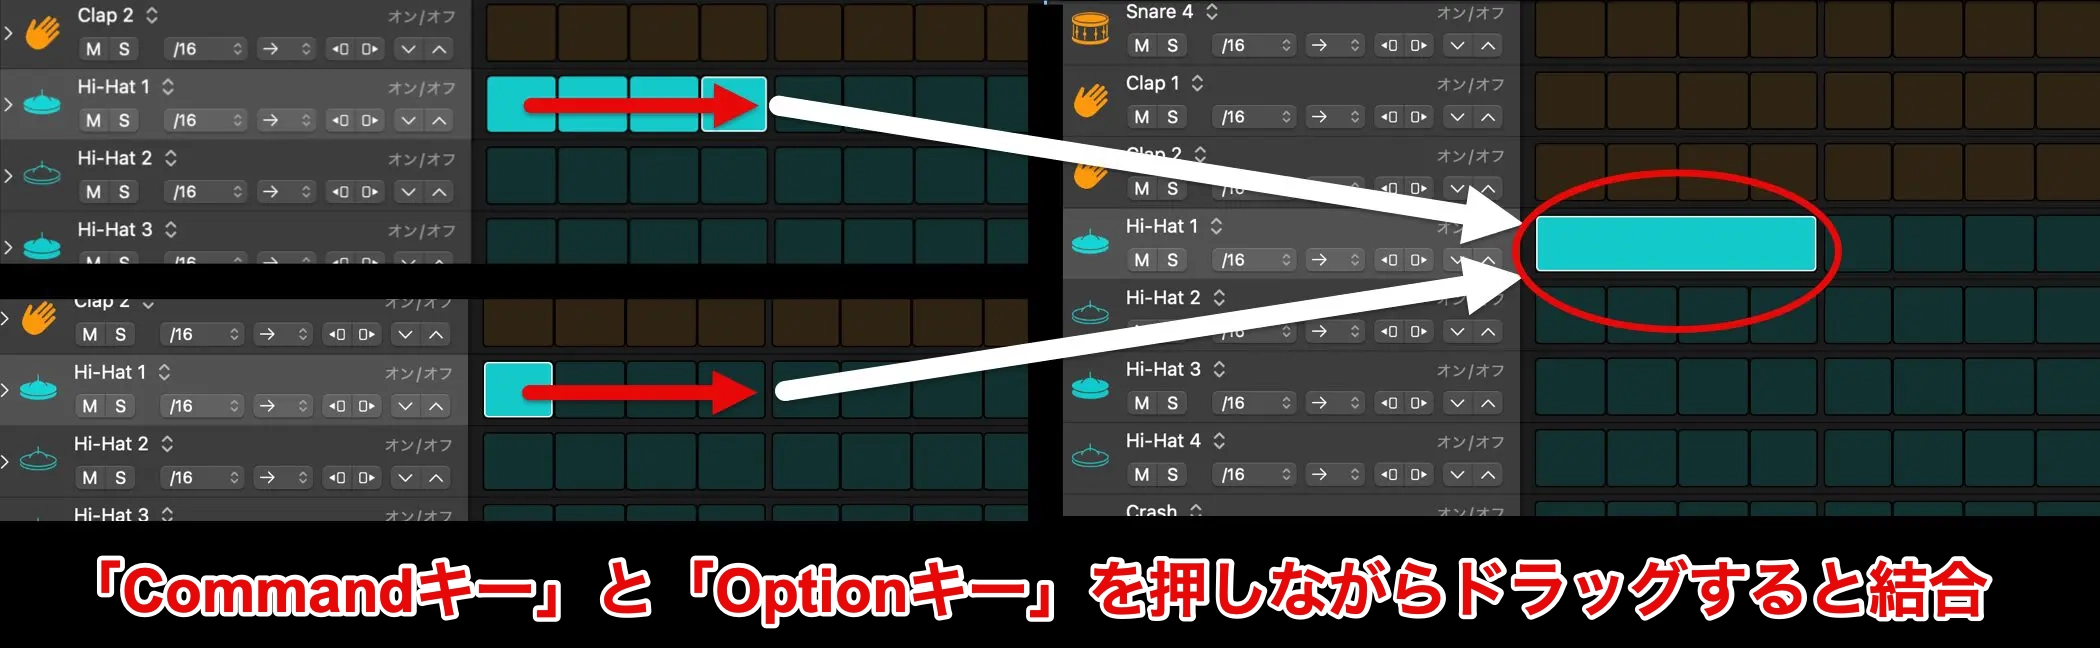
Steps can also be joined by dragging while holding down Command and Option.
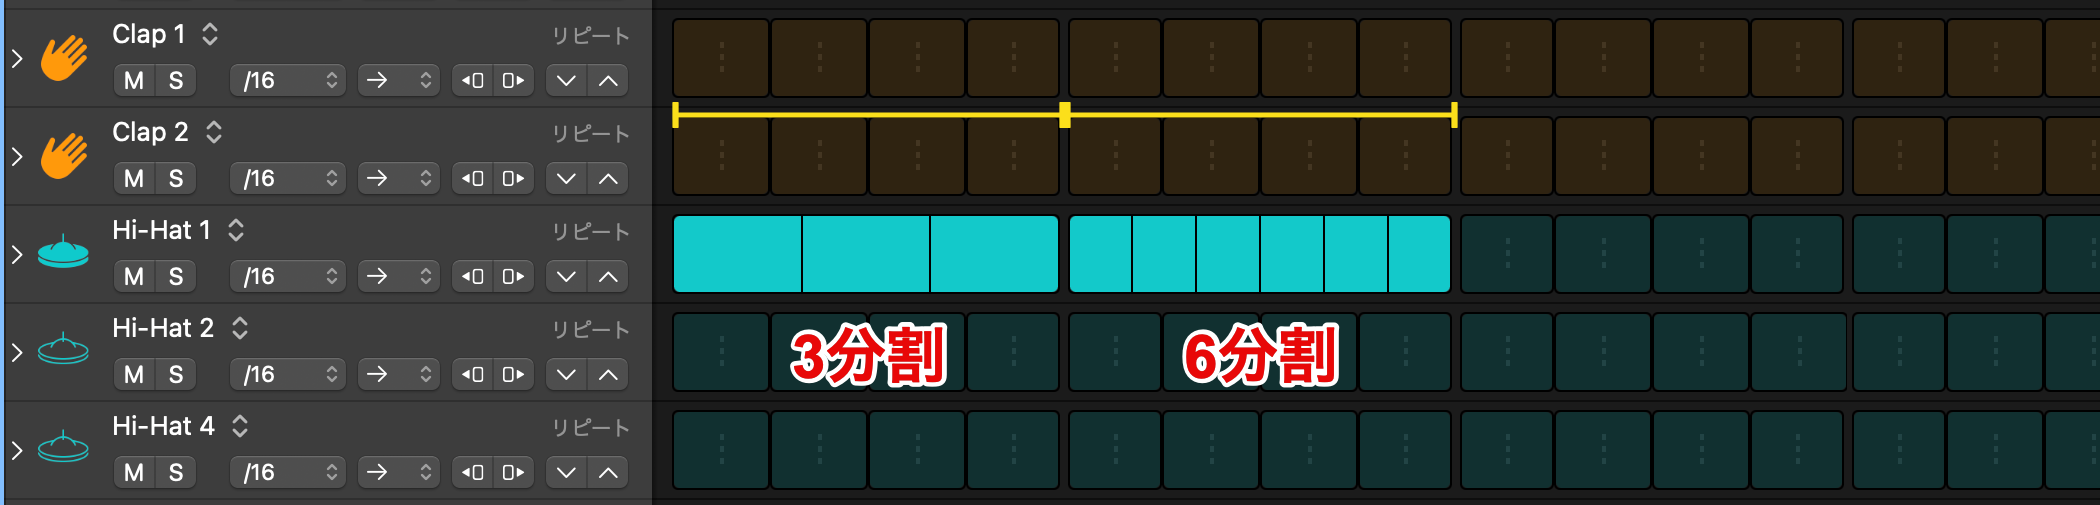
Combining step joining with the Repeat function also lets you create divisions such as three or six.
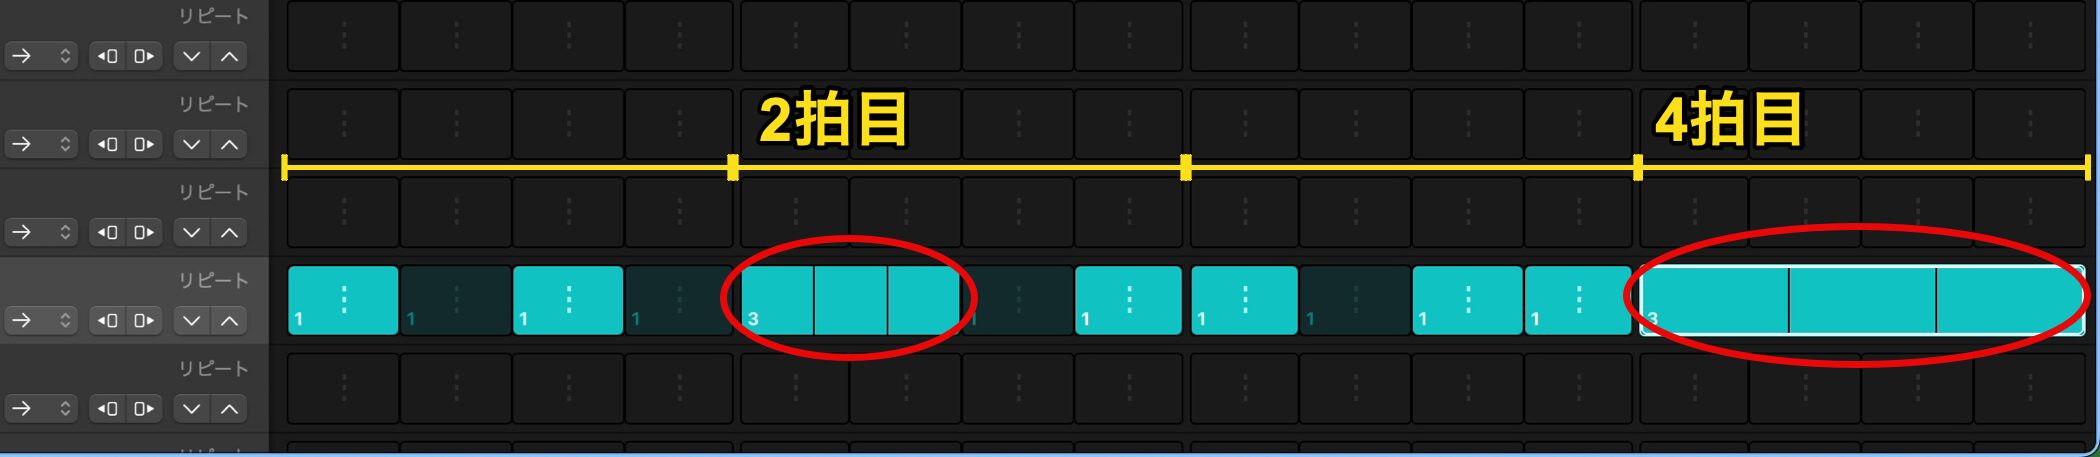
This time, we divide beats 2 and 4 into three to add a stronger change.
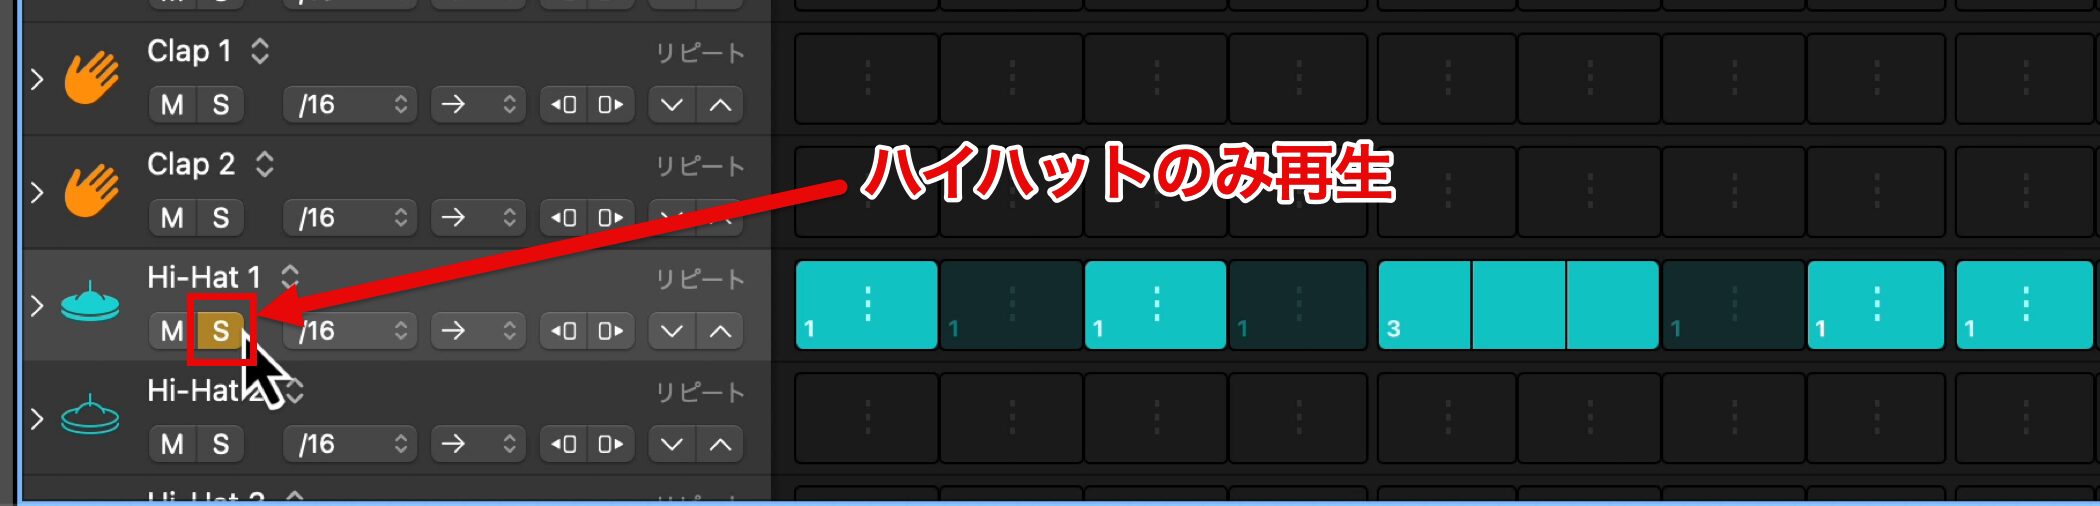
To hear only the hi-hat, use "S" (the Solo button).
Changing the Number of Steps
The pattern is already complete as it is, but repeating a single bar can feel monotonous within a song, so here we create a phrase two bars long.
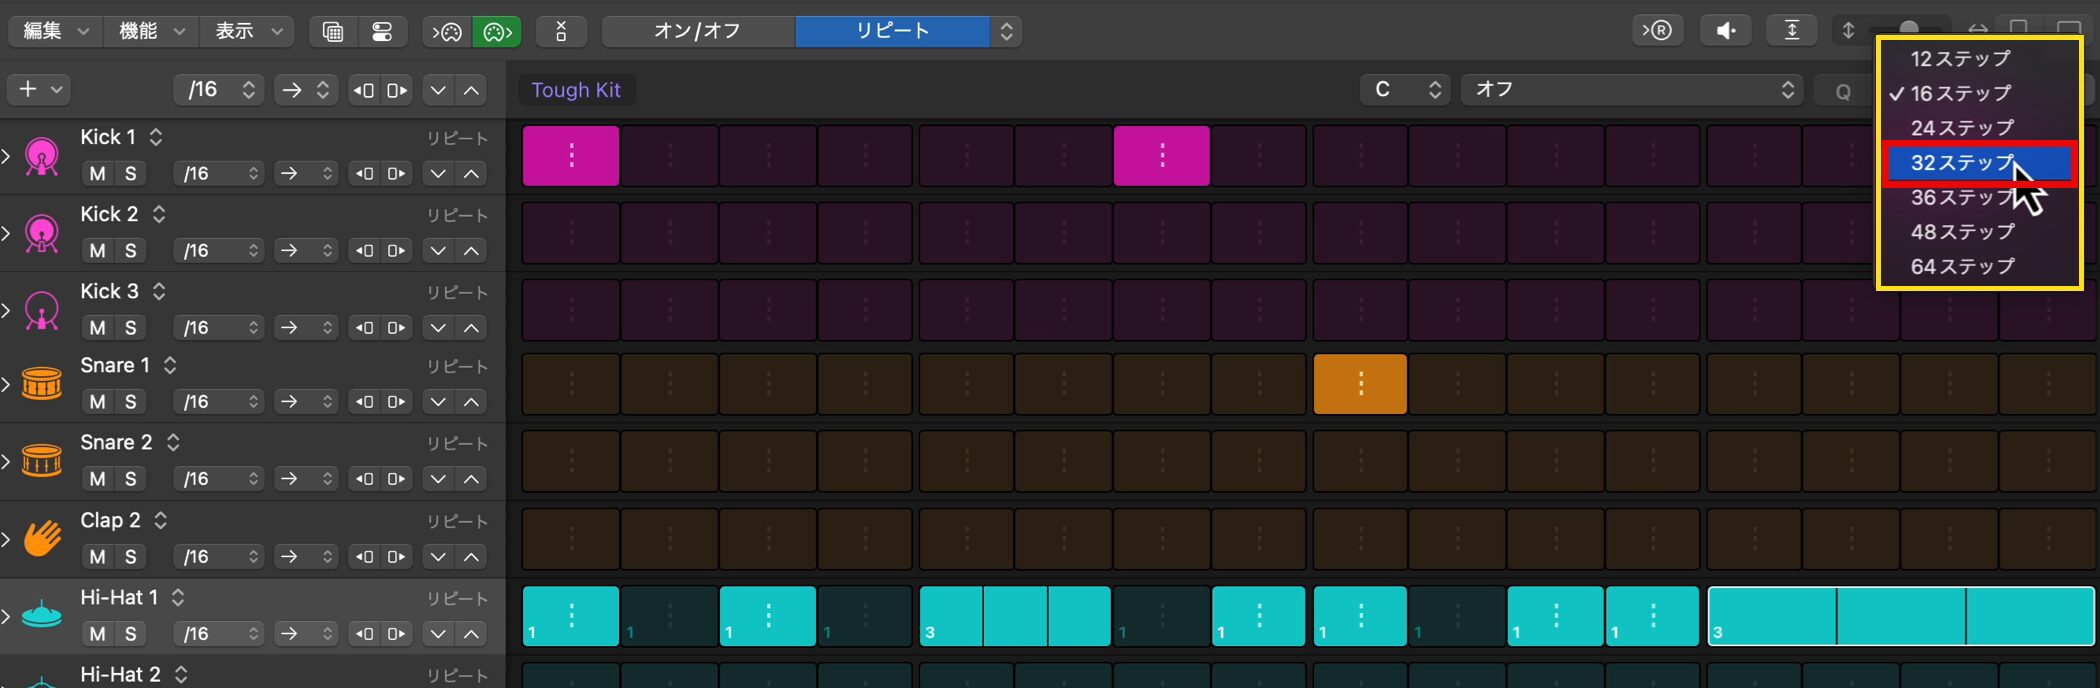
Click the area labeled "16 Steps" and change it to "32 Steps."
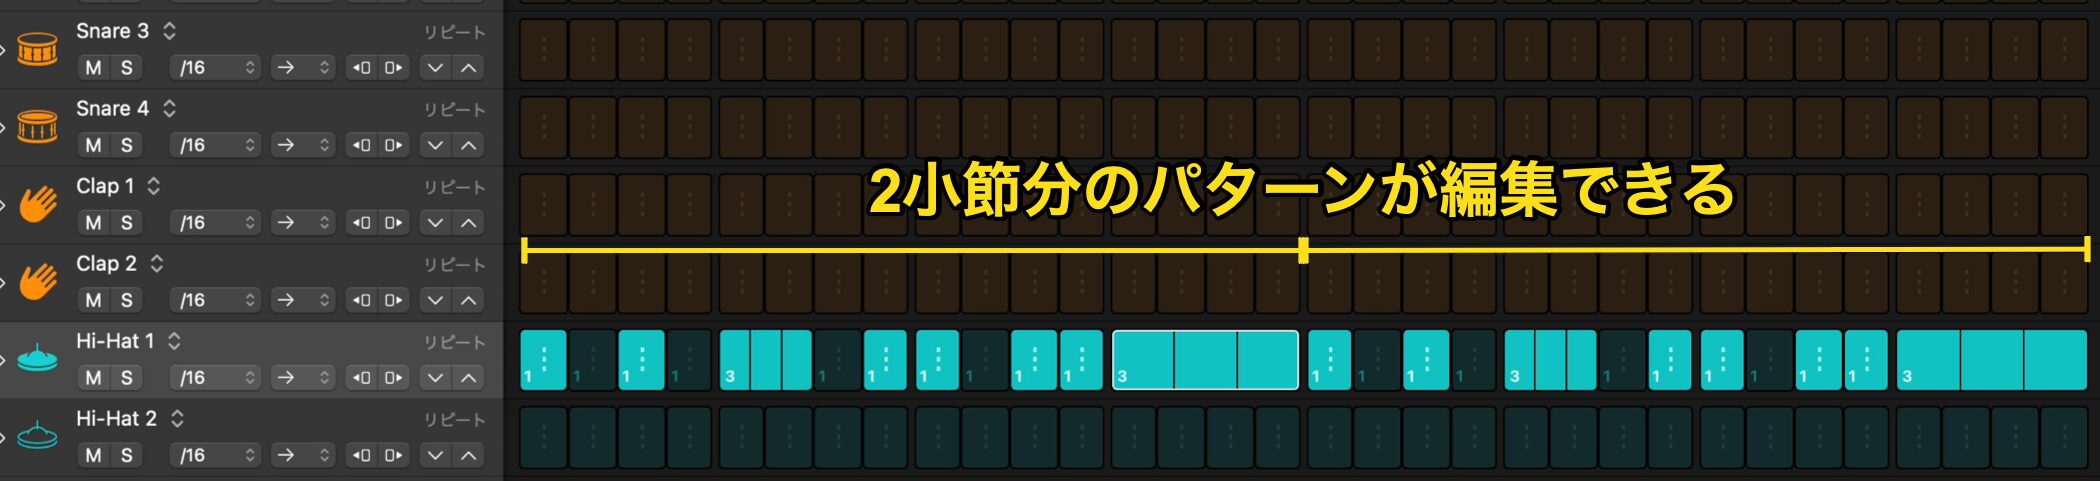
You can now work with a two-bar pattern.

Switch from Repeat mode to "On/Off" to enter new hits.
Setting Velocity and Rhythmic Dynamics
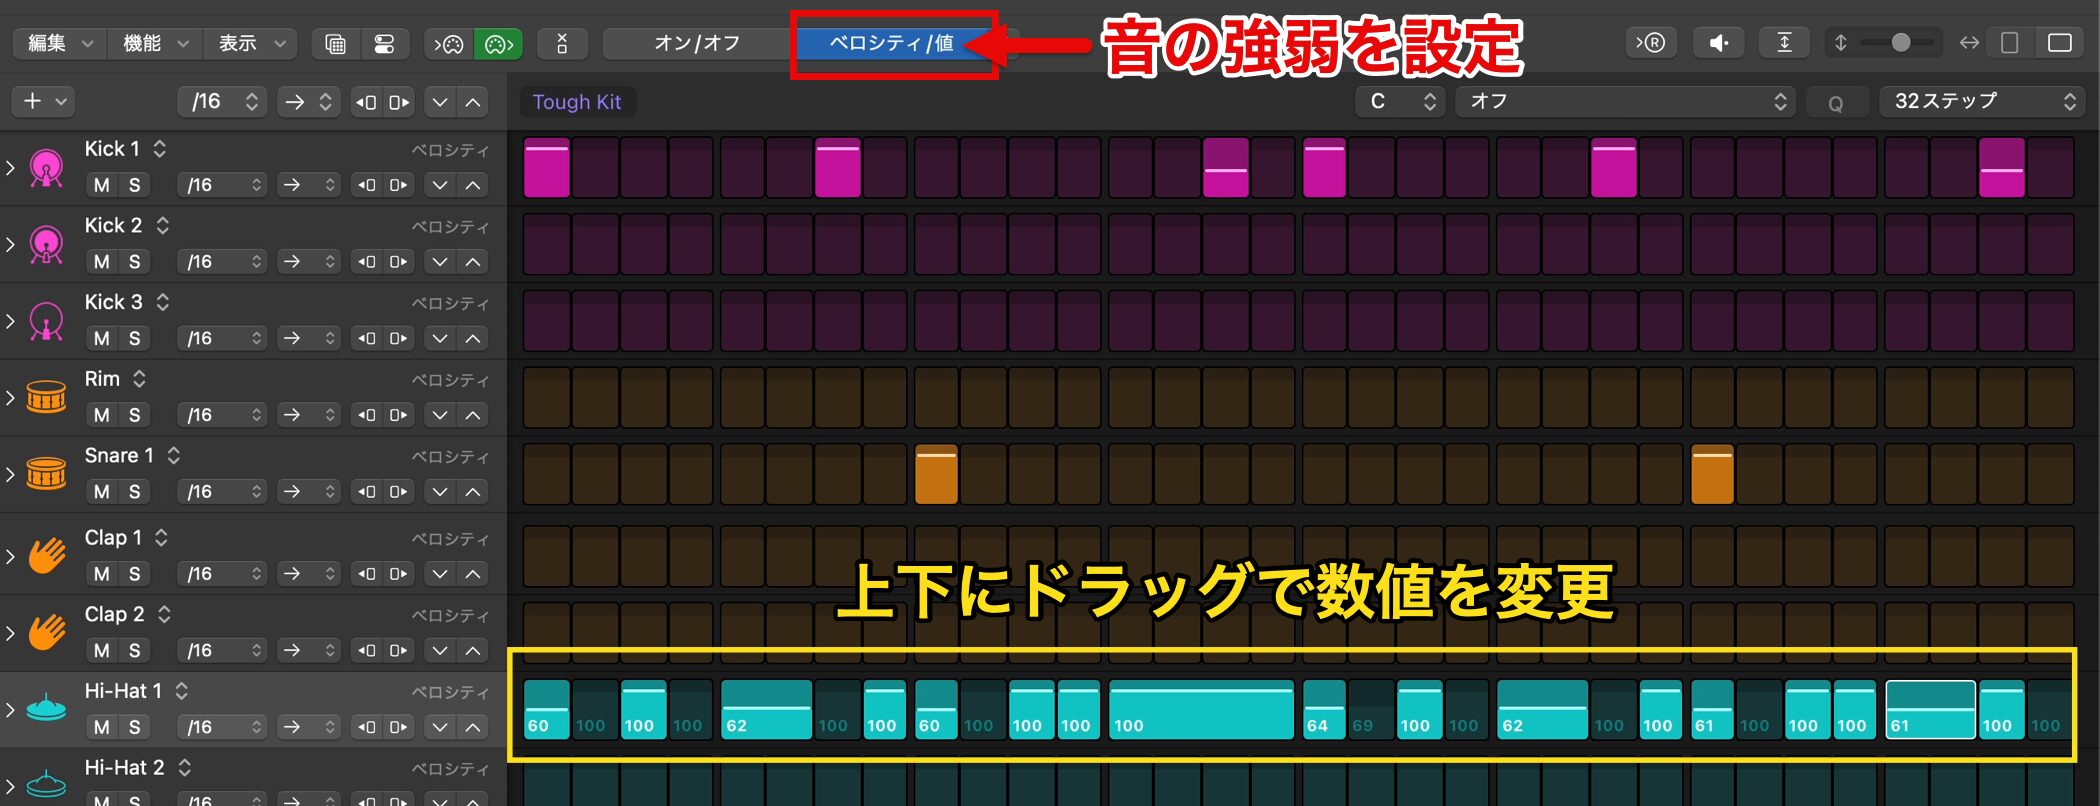
"Velocity/Value" lets you add dynamics to the hits.
Each step shows a value indicating how strong the hit is, which you can adjust by dragging up or down.
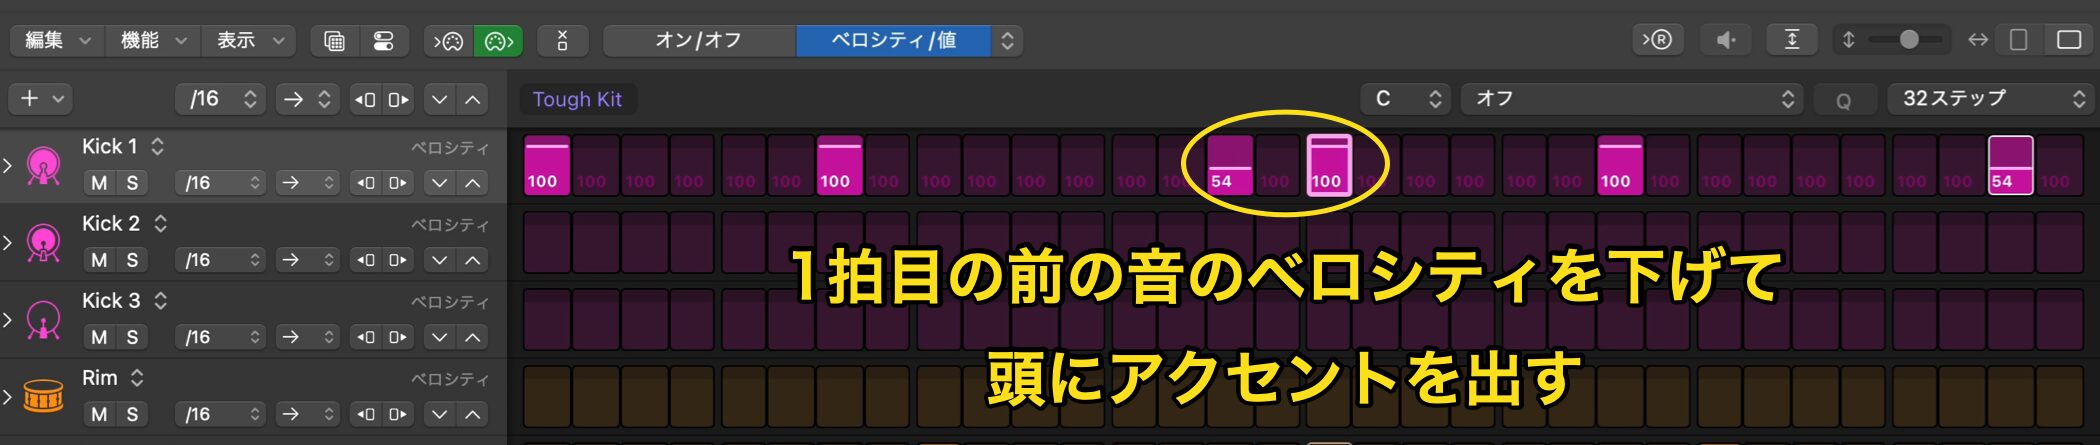
For the kick, we recommend lowering the velocity of the step just before the start of each bar slightly so that the downbeat is accented.
Adjusting velocity is a standard technique for adding energy to the rhythm.
Please try it out.
Changing the Drum Kit and Sounds
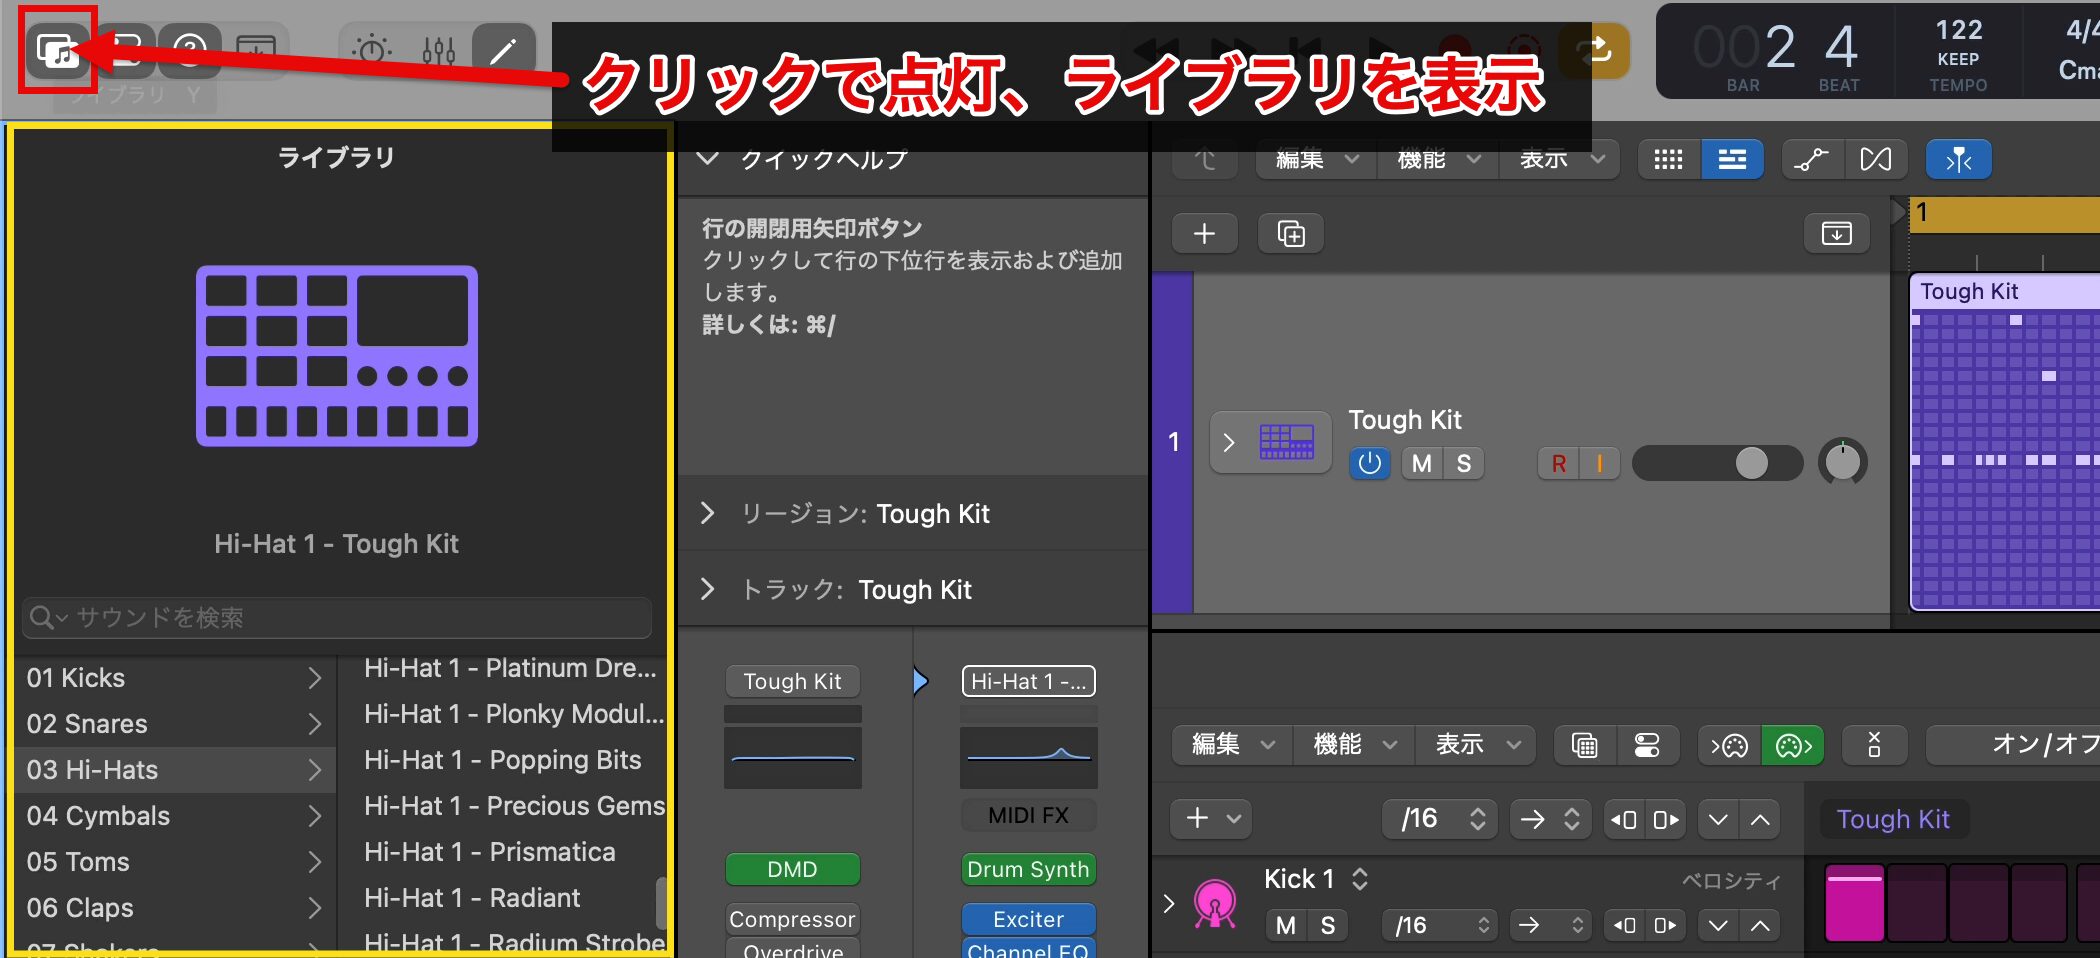
To change the sound of the whole drum kit, go to the Library on the left side of the screen.
If the Library is not shown, turn on the "button with the music note icon" at the top left.
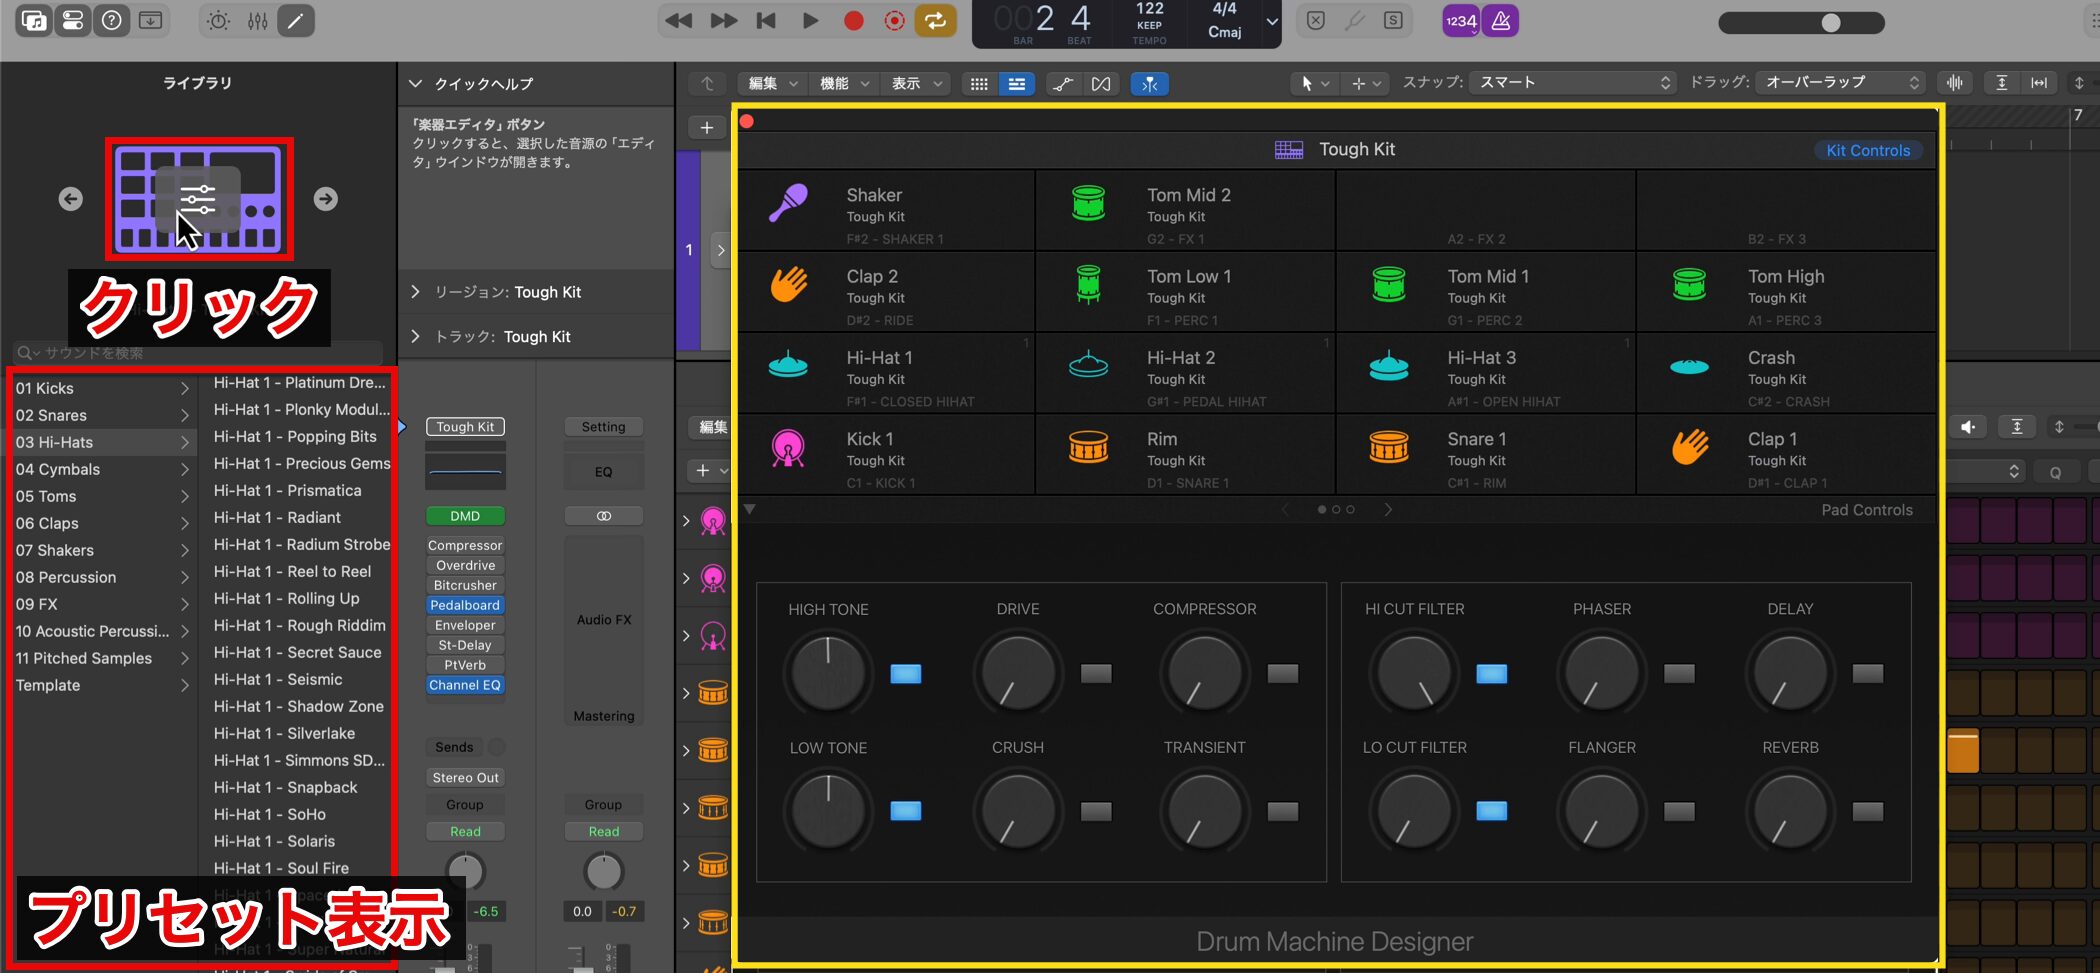
Click the Library icon to open the sound settings window, and presets for the whole drum kit are shown.
"Drum Machine Designer" also opens at the same time; we will explain it in detail in later articles.
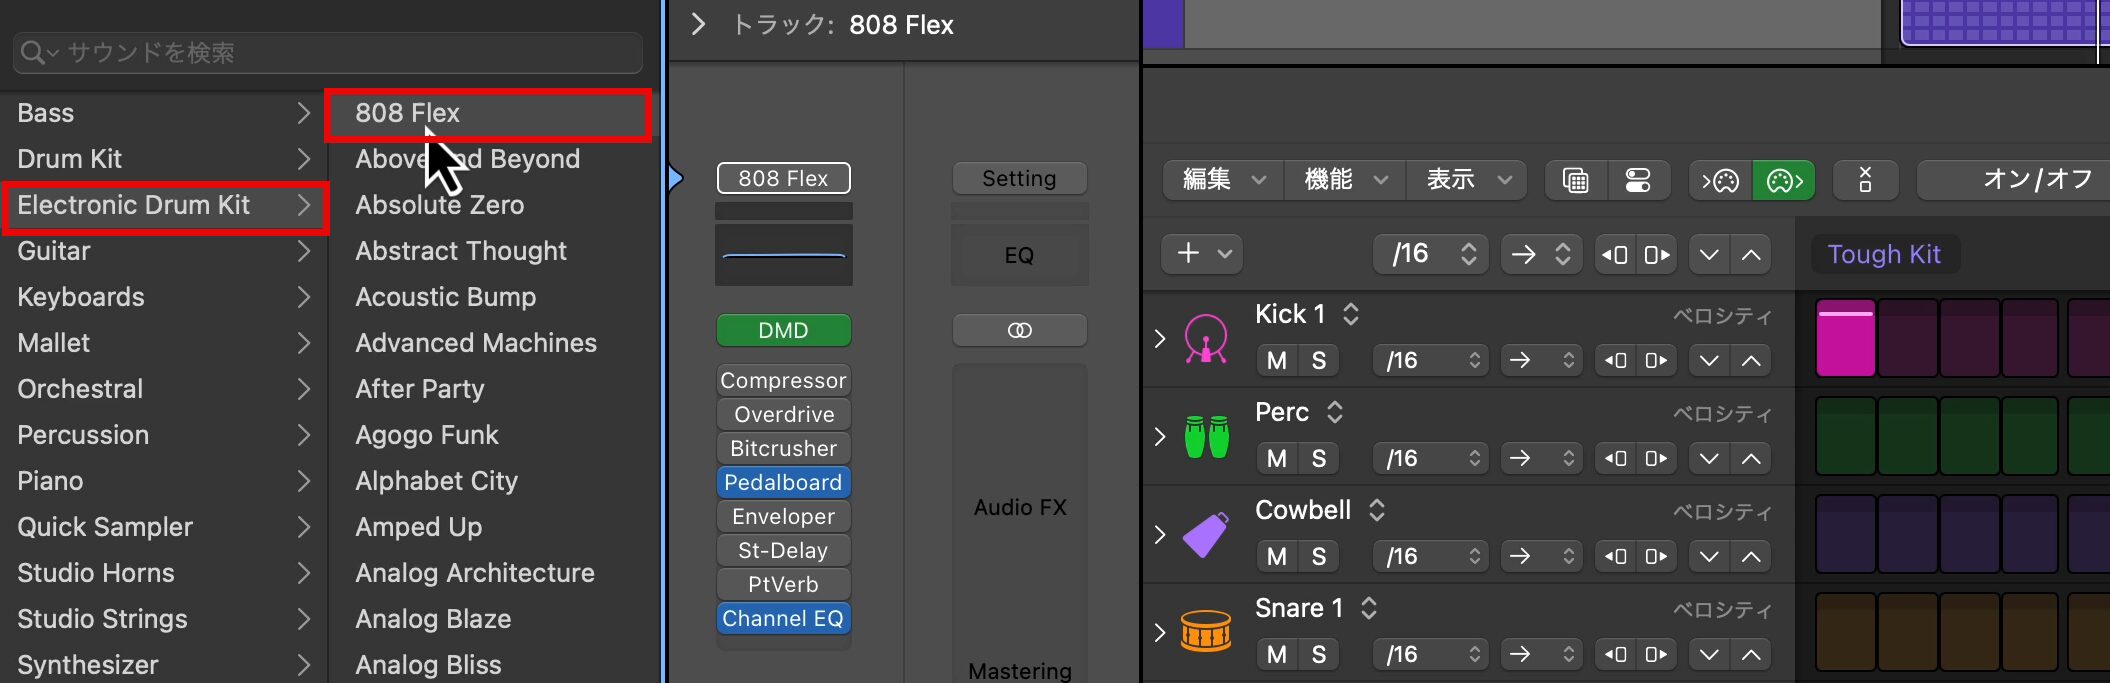
Change presets while playing to find a sound you like.
This time, we choose "808 Flex," which features a sound often heard in hip-hop.
Let's listen.
We felt the snare sound could have more character, so we replace it with a different sound.
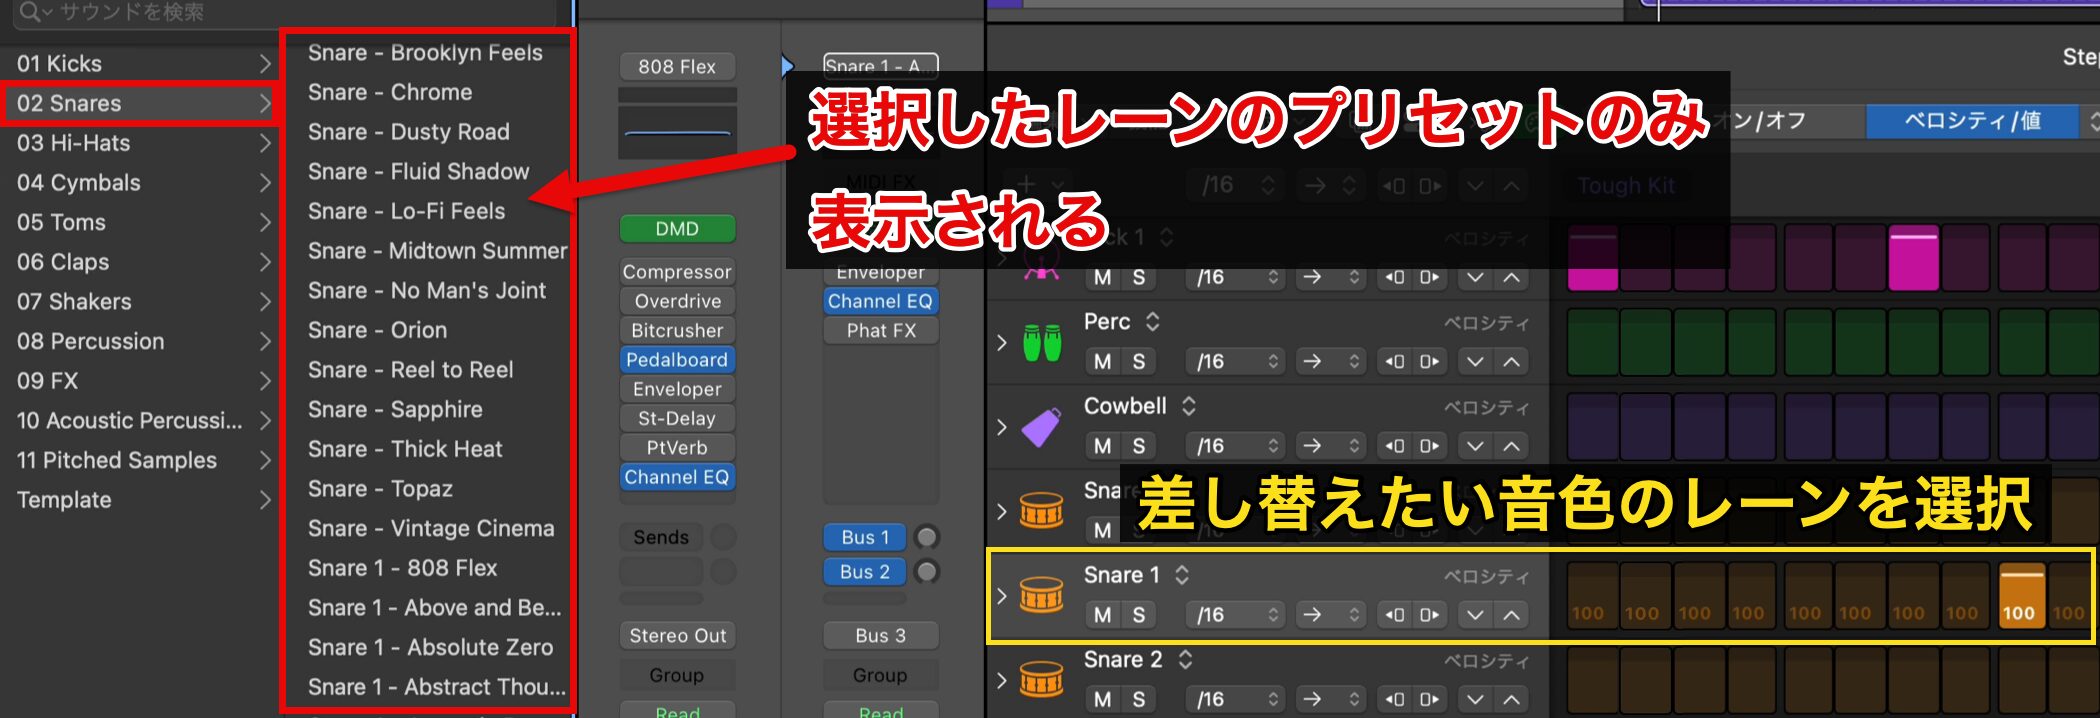
To replace a sound, first select the lane of the sound you want to replace, so that only snare sounds are shown in the Library.
Choose a sound you like from the Library and click it to replace the sound.
How to Save the Project
Now that the drums are done, let's "save" the song.
Not just DAWs but any software can unexpectedly "crash."
It is a huge shock when Logic suddenly disappears right after you have made a phrase you like.
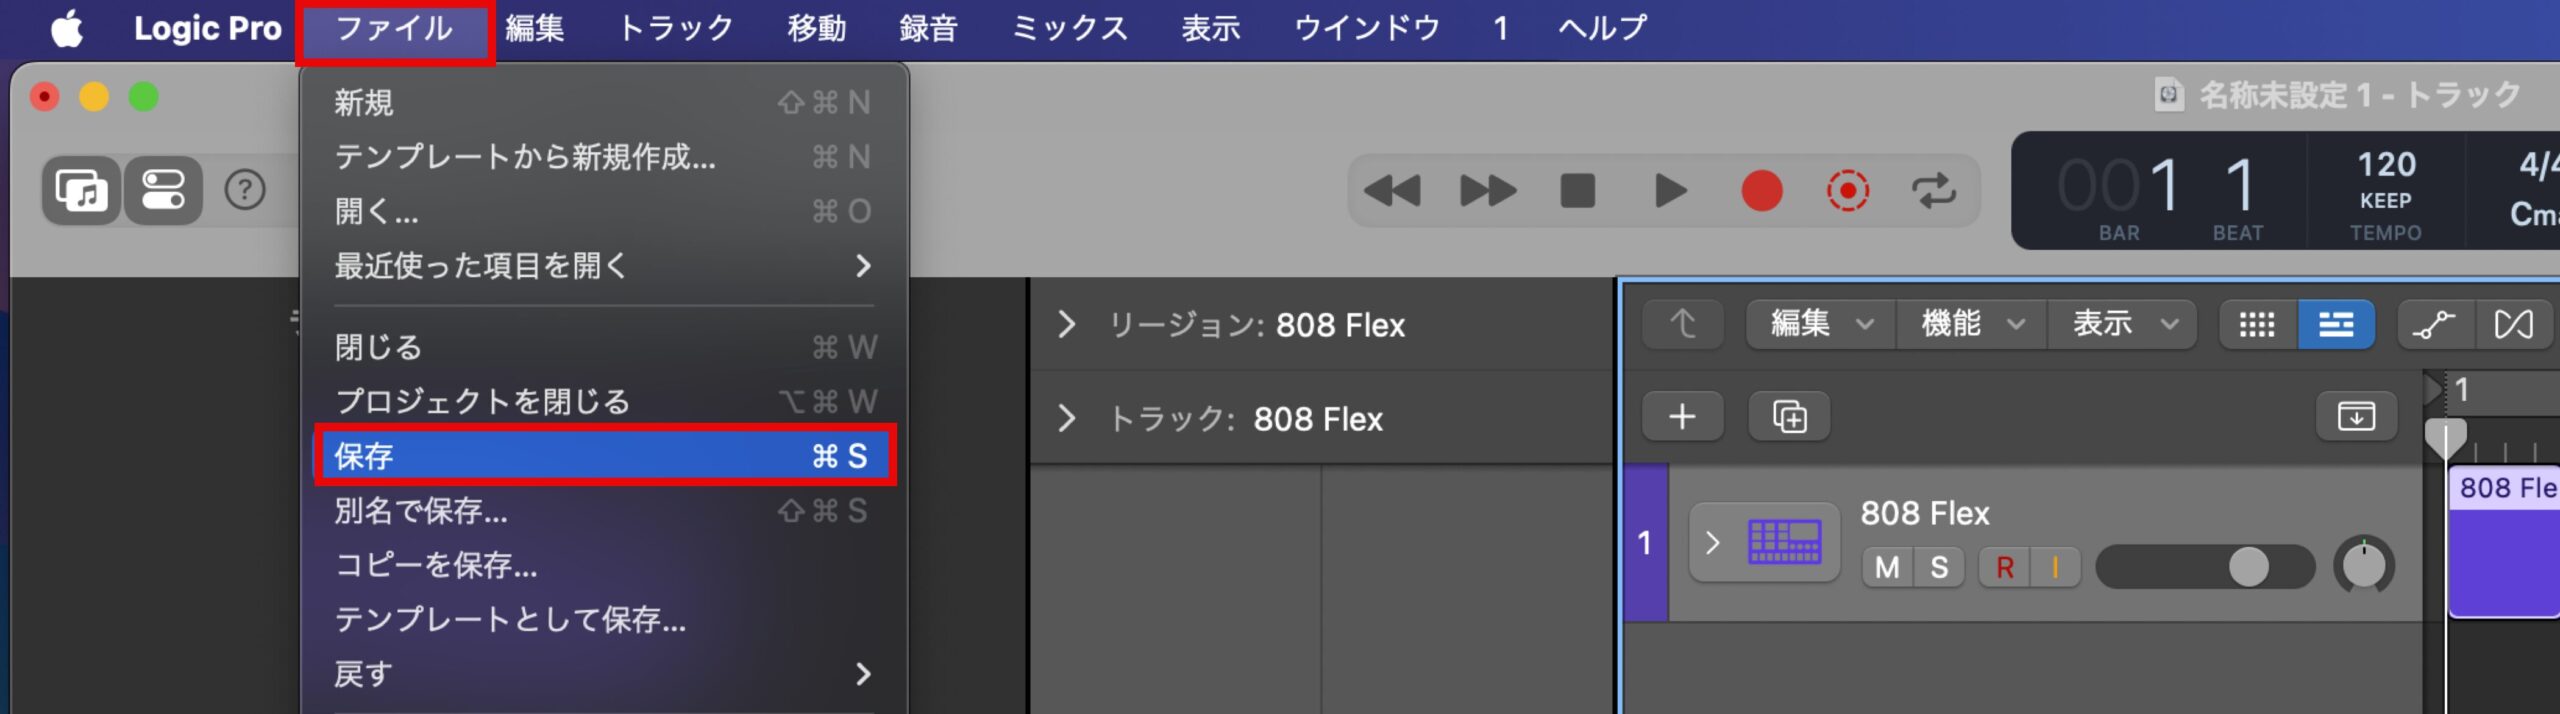
To save the project, choose "Save" from the "File" menu.
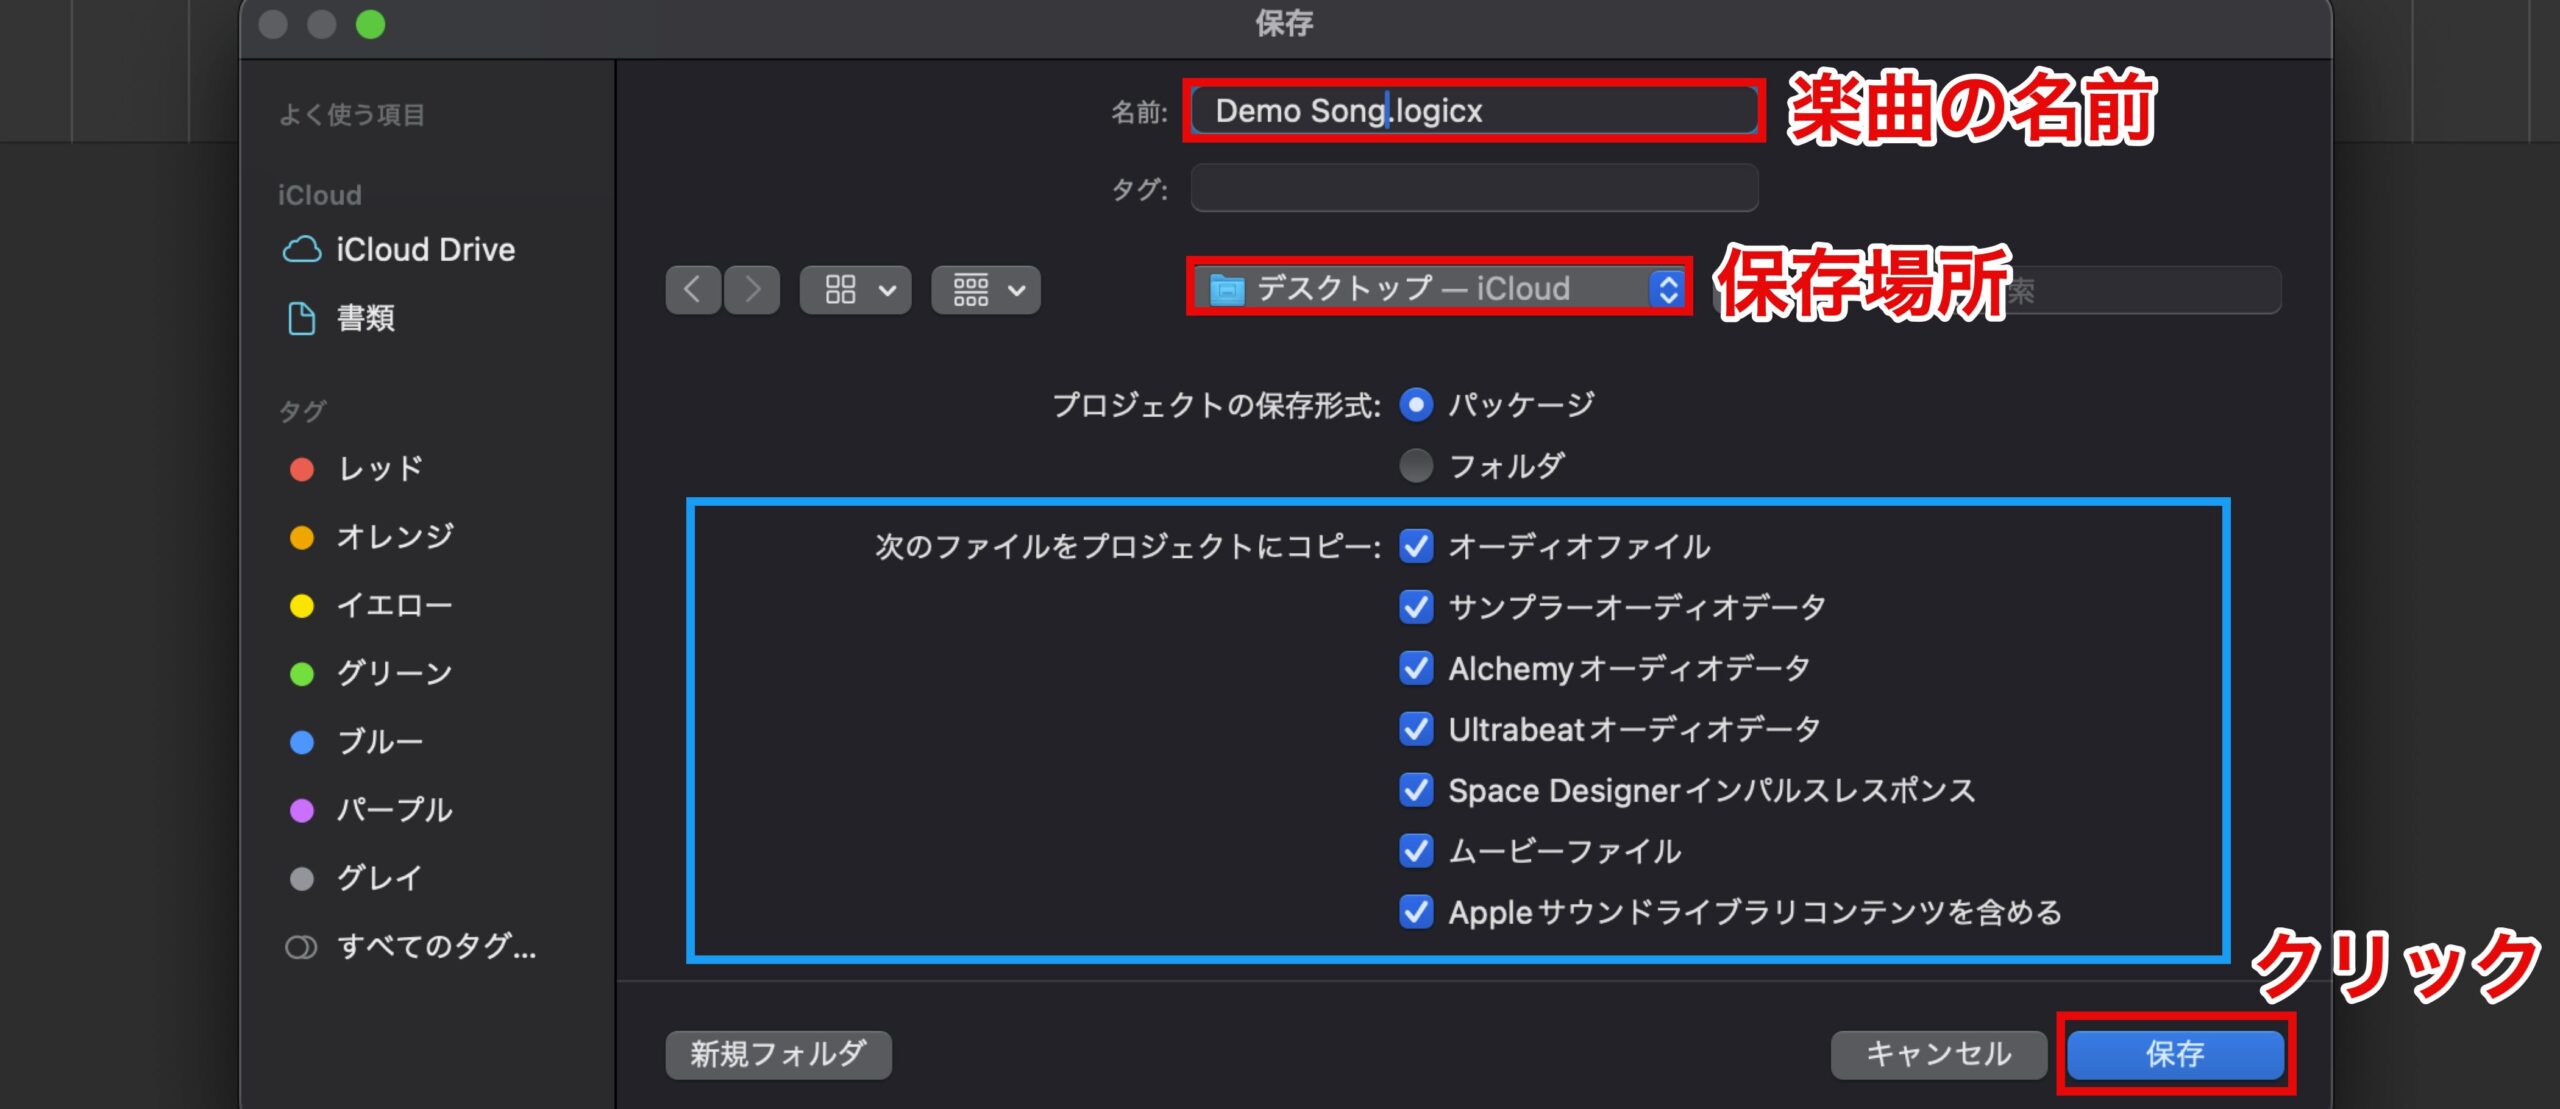
When the dialog appears, set the song's name and save location.
This time, we save it to the desktop.
The items under "Copy the following files into your project" specify whether to save all the audio material used in the song together with it.
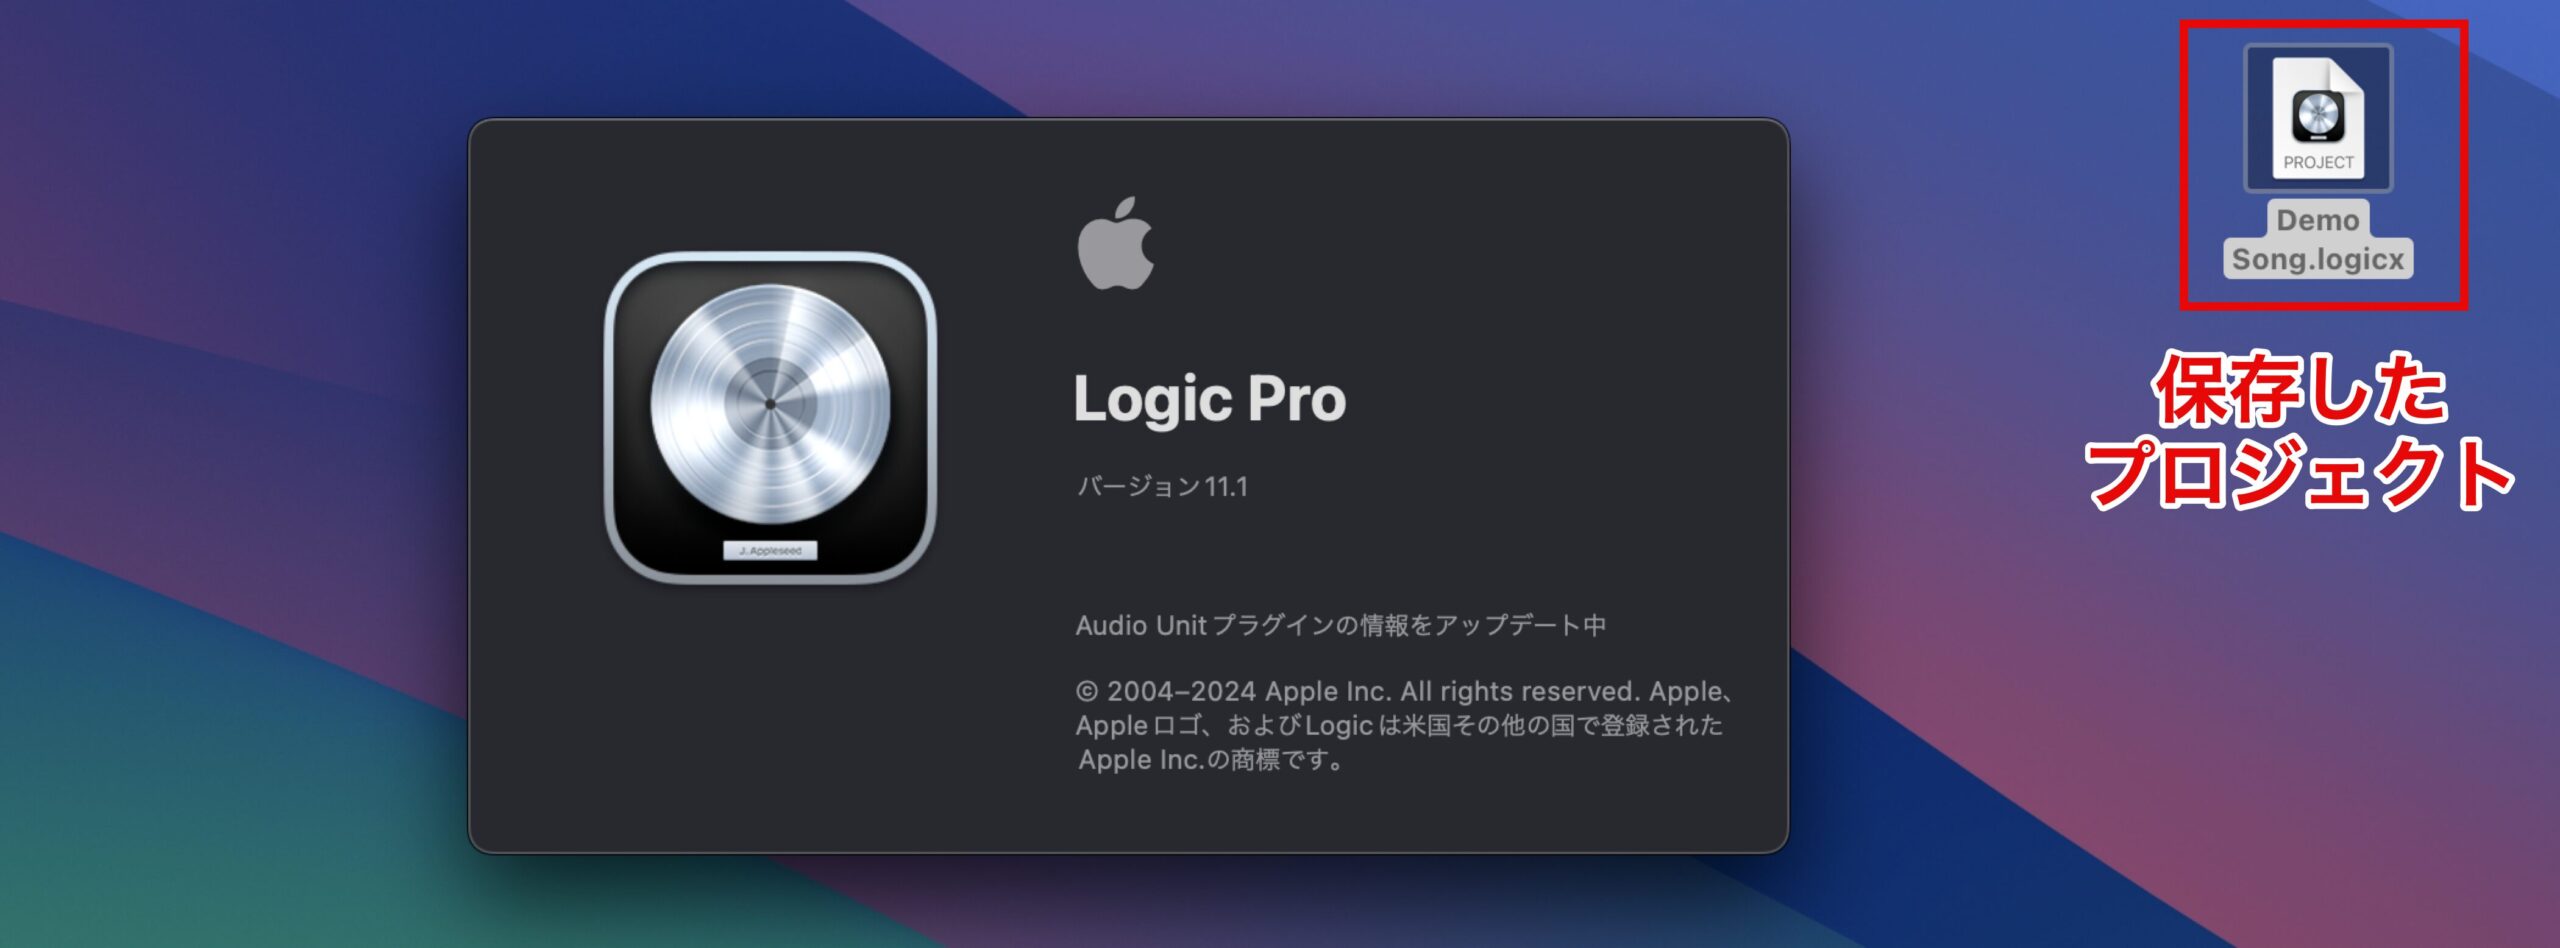
From next time on, when opening the song, just double-click the saved project's icon to resume the project.
When saving again, choose "Save" from "File," and the project is overwritten with its latest state.
You can also do this with Command-S, so make a habit of saving regularly.
Frequently Asked Questions
Q1. Which track should I choose to create a drum pattern in Logic Pro?
Choose "Software Instrument" under "Pattern Track," which is suited to rhythmic elements such as drums. Choosing these options on the new track screen loads a drum kit by default.
Q2. What are the basic step operations in the Pattern Editor?
The grid cells in the Pattern Editor at the bottom of the screen are steps, and you can click each step to enter a hit. Click again to turn the hit off. By default, one bar is shown divided into 16.
Q3. What is an important technique for adding energy to a drum pattern?
Adjusting velocity is a standard technique. Change the strength of each step's hit by dragging up or down; in particular, accenting the start of each bar on the kick gives a livelier rhythm.
Q4. How do I create rapid hi-hat repeats (rolls)?
Choose "Repeat" from the mark to the right of "Velocity/Value" at the top of the editor, then drag each step up or down to divide the hits within the cell and create a hi-hat roll.
Q5. How do I extend a one-bar pattern to two bars?
Click the area labeled "16 Steps" and change it to "32 Steps" to work with a two-bar pattern. Then switch from Repeat mode to "On/Off" to enter new hits.
NEW ARTICLES
Latest English Articles











