
In the final stage of mixing in Logic Pro 11, the key steps are adjusting the vocal level with automation, applying reverb efficiently with an Aux bus, and finishing the whole song with the automatic mastering function. By adding automation points and drawing smooth curves, you can make the vocals easier to hear, and by combining VCA faders and Aux channels you can manage multiple tracks together. The Mastering Assistant automatically suggests optimal settings, and fine-tuning Loudness, Excite and Width gives you a powerful, polished final sound.
Finishing the Song with Automation and Reverb

Miyakawa
This is finally the last installment of the series!
We explain in detail how to make fine volume adjustments with automation and how to apply reverb efficiently.
We also finish the song with the "automatic mastering function" and touch on how to export it, so please read through to the end!
Mixing Part 2: Mastering and Export Video
Adjusting Volume with Automation
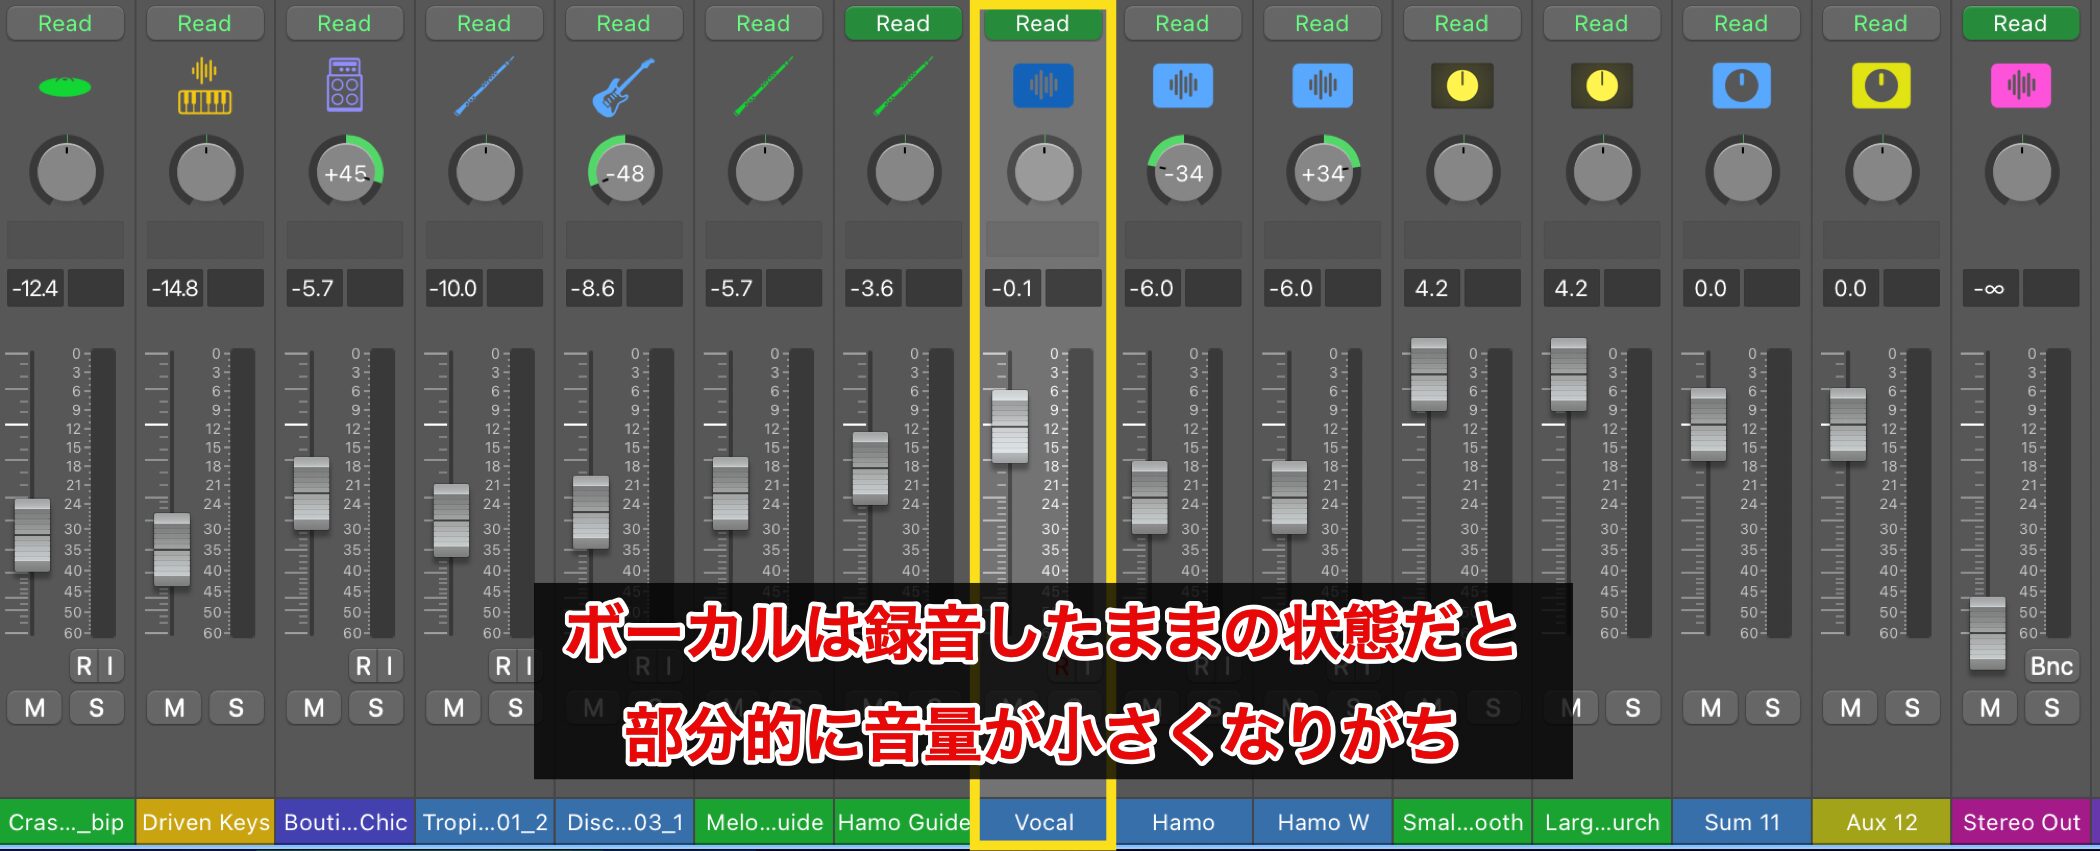
Once the EQ adjustments from the previous installment are done, we smooth out the parts where the volume is unstable using automation.
In the main vocal in particular, some lyrics may be too quiet to hear clearly, or so loud that they sound harsh.
To reduce this unevenness and stabilize the whole performance, we control the volume fader with automation to adjust it.
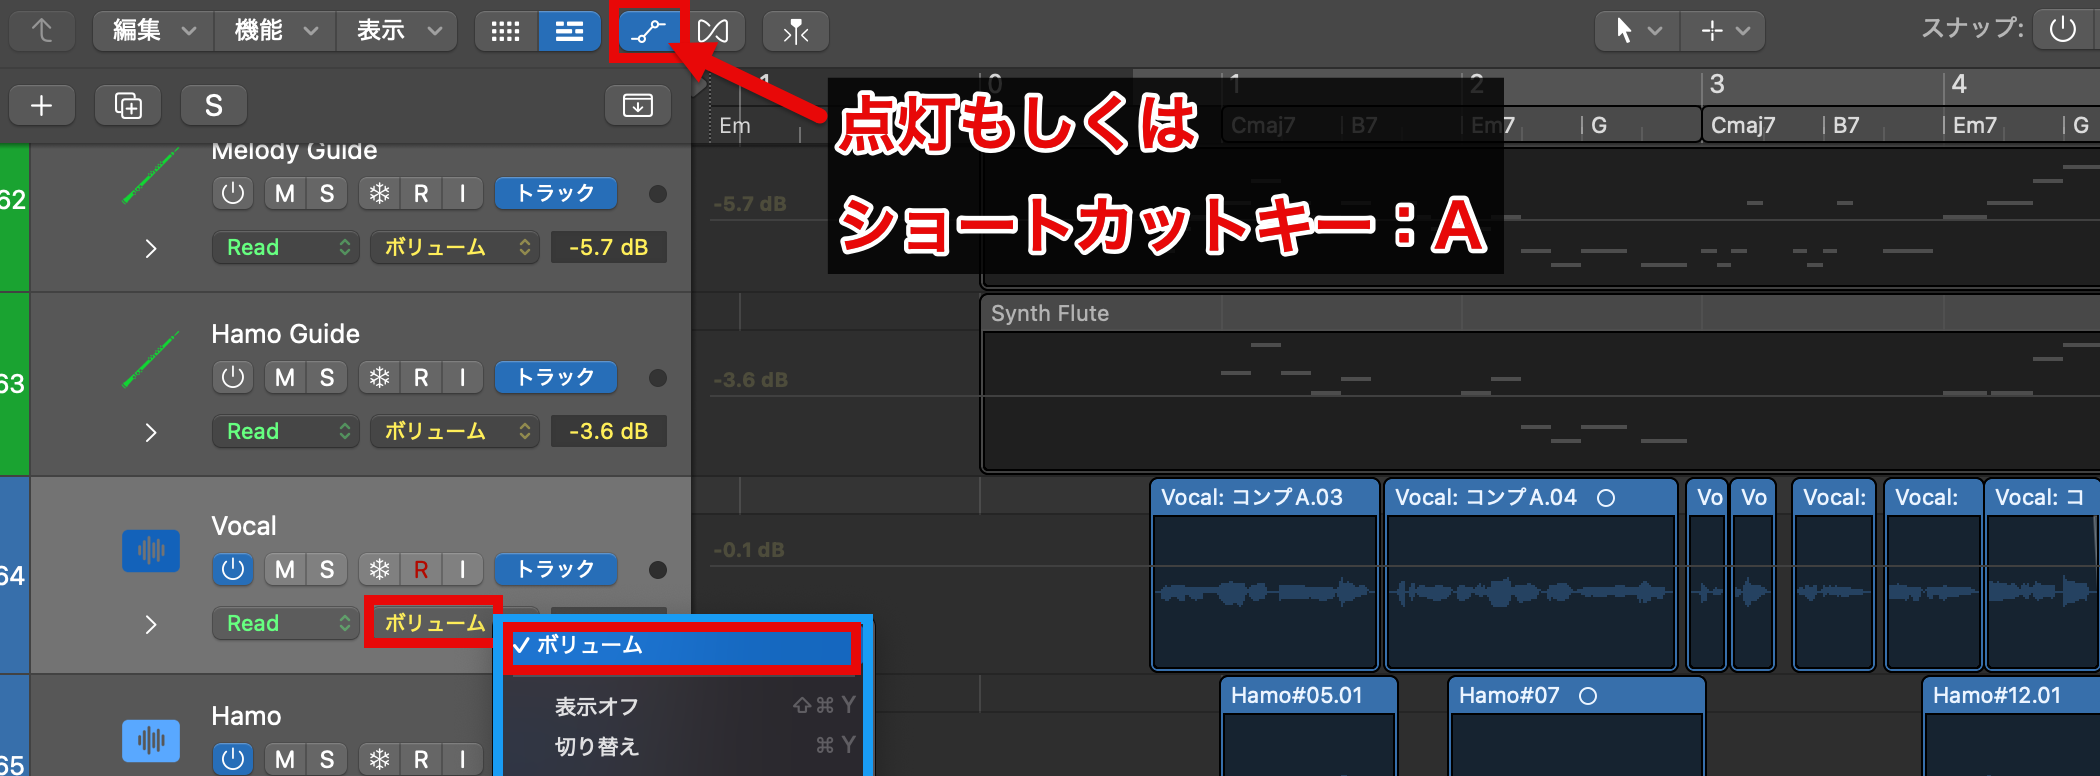
To use automation, turn on the Show Automation button at the top of the screen or press the shortcut key A to enable it.
Make sure that the parameter being edited on the vocal track is set to "Volume."
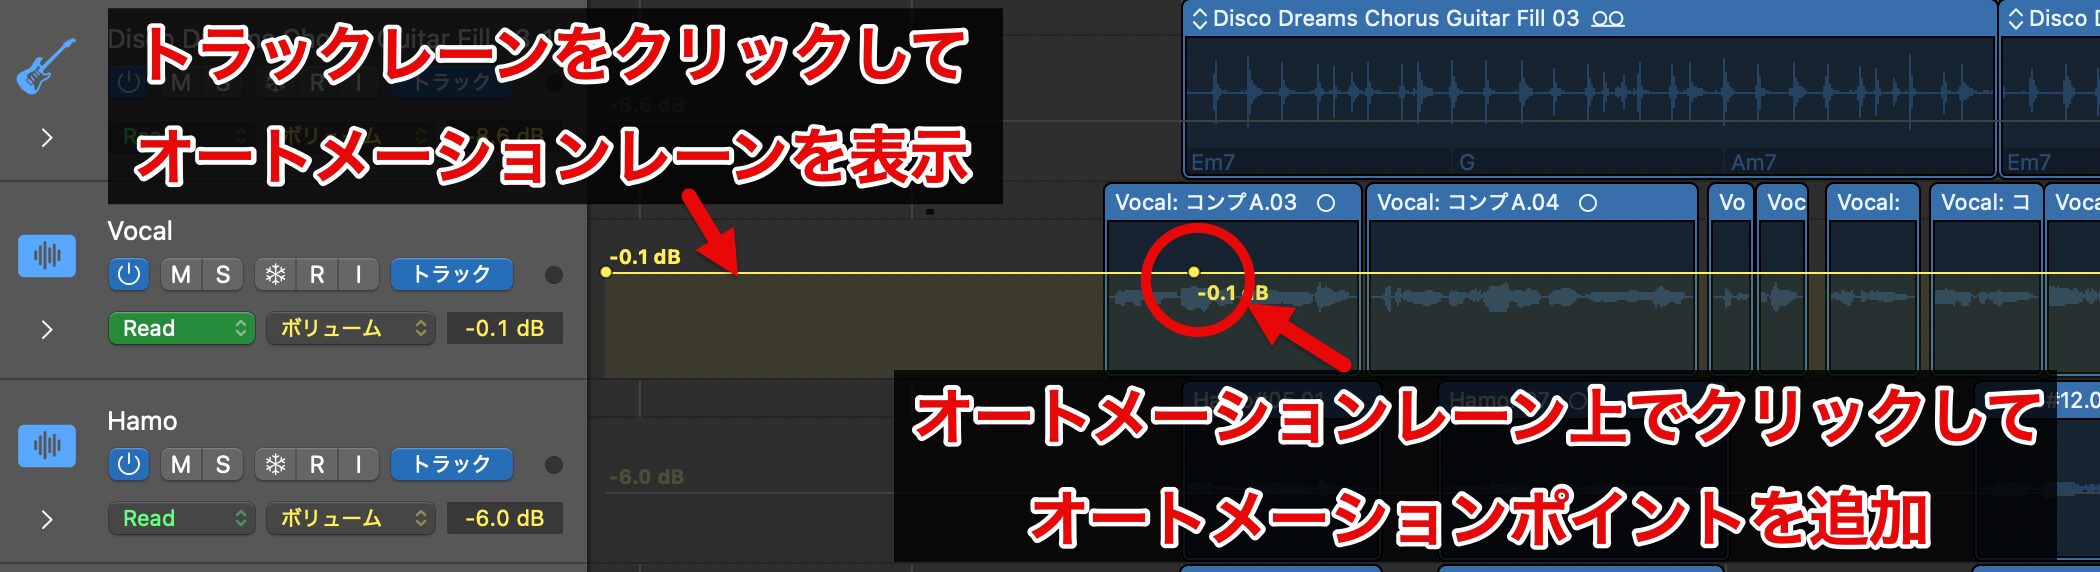
When you click the track lane, the automation lane (a yellow straight line) appears.
Click on the automation lane to add automation points (round dots).
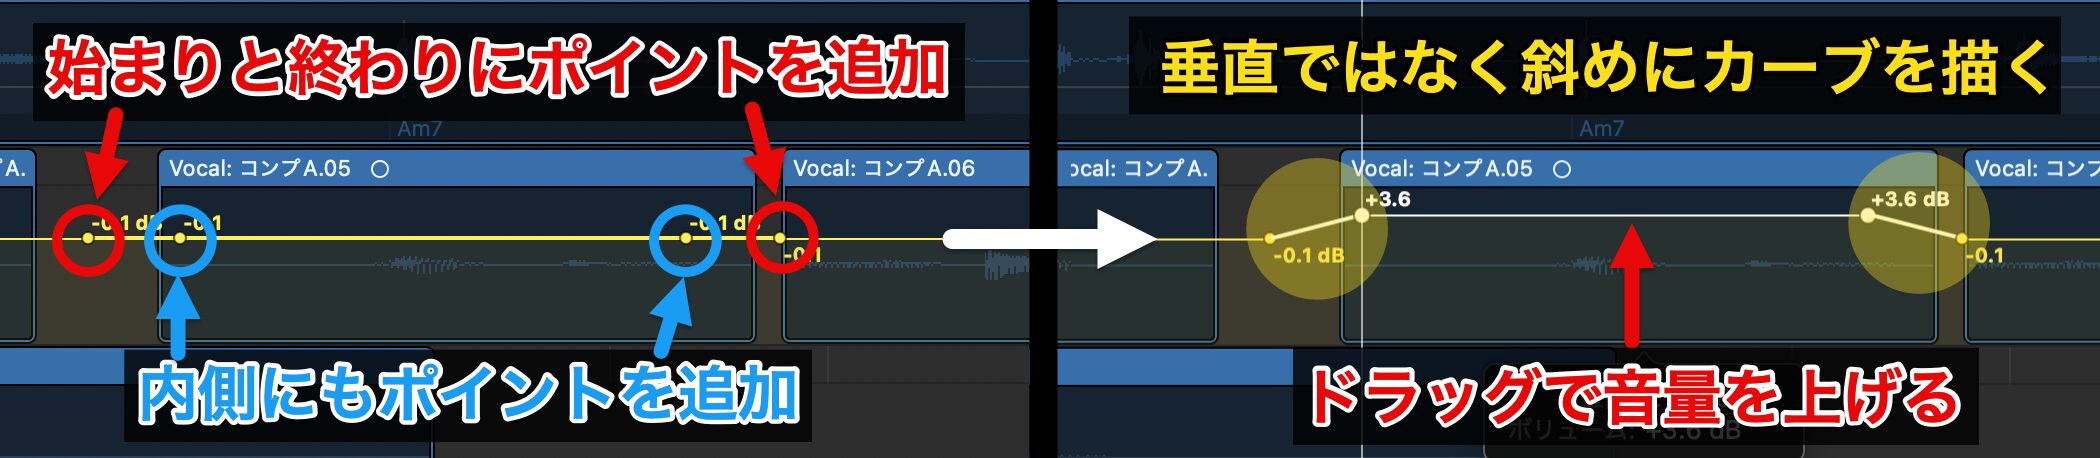
Add a total of four automation points, at the start and end of the section whose volume you want to change and just inside them, then drag to change the volume.
At this point, creating vertical lines can cause noise or an unnatural feel, so drawing diagonal curves so that the volume does not change abruptly gives a more natural result.
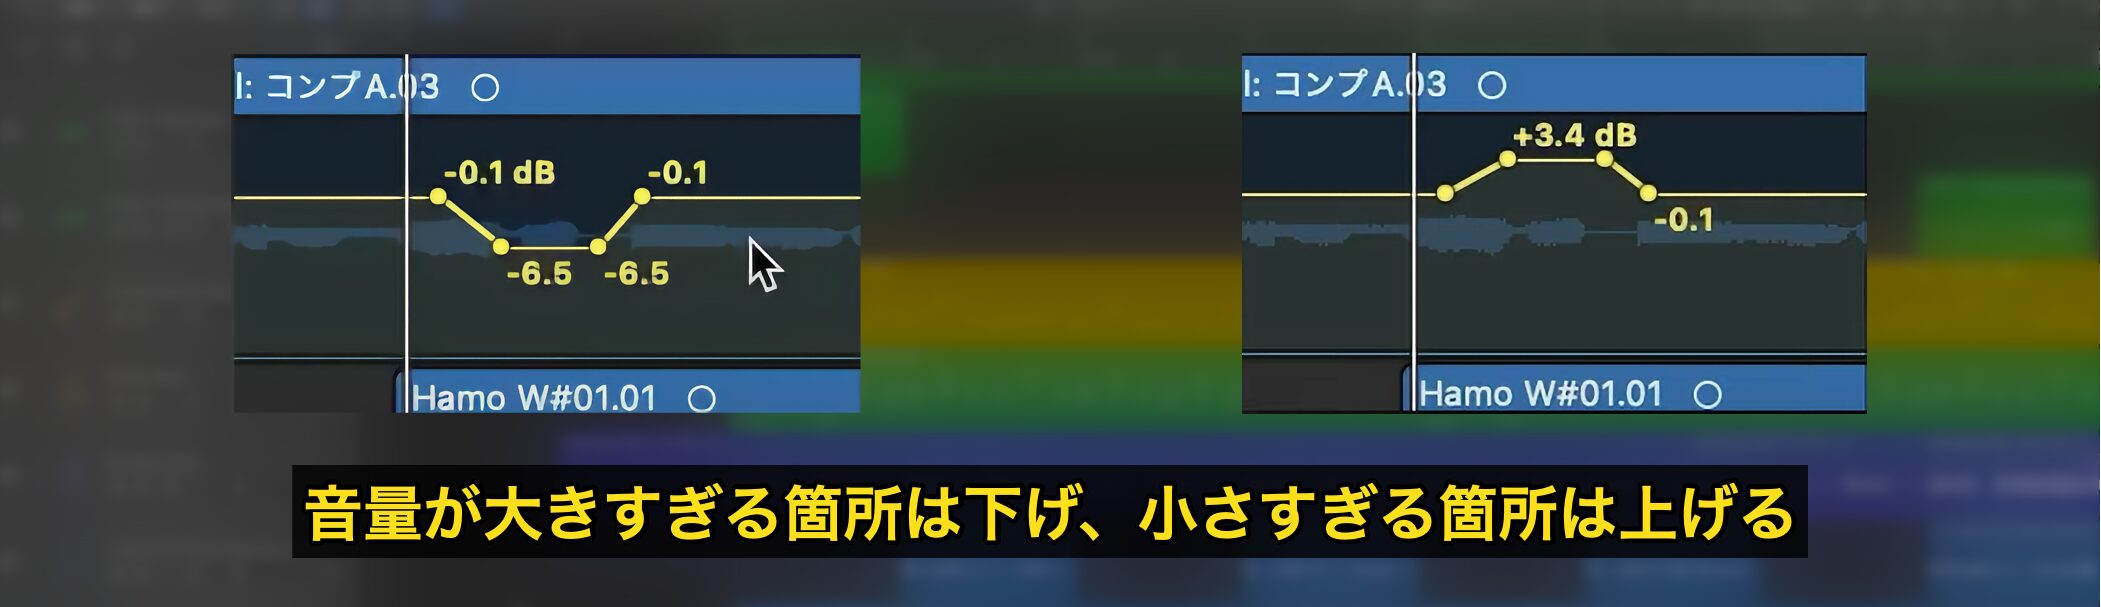
Lower the parts that are too loud and raise the parts that are too quiet to balance the whole performance.
Controlling the Whole Track with a VCA Fader
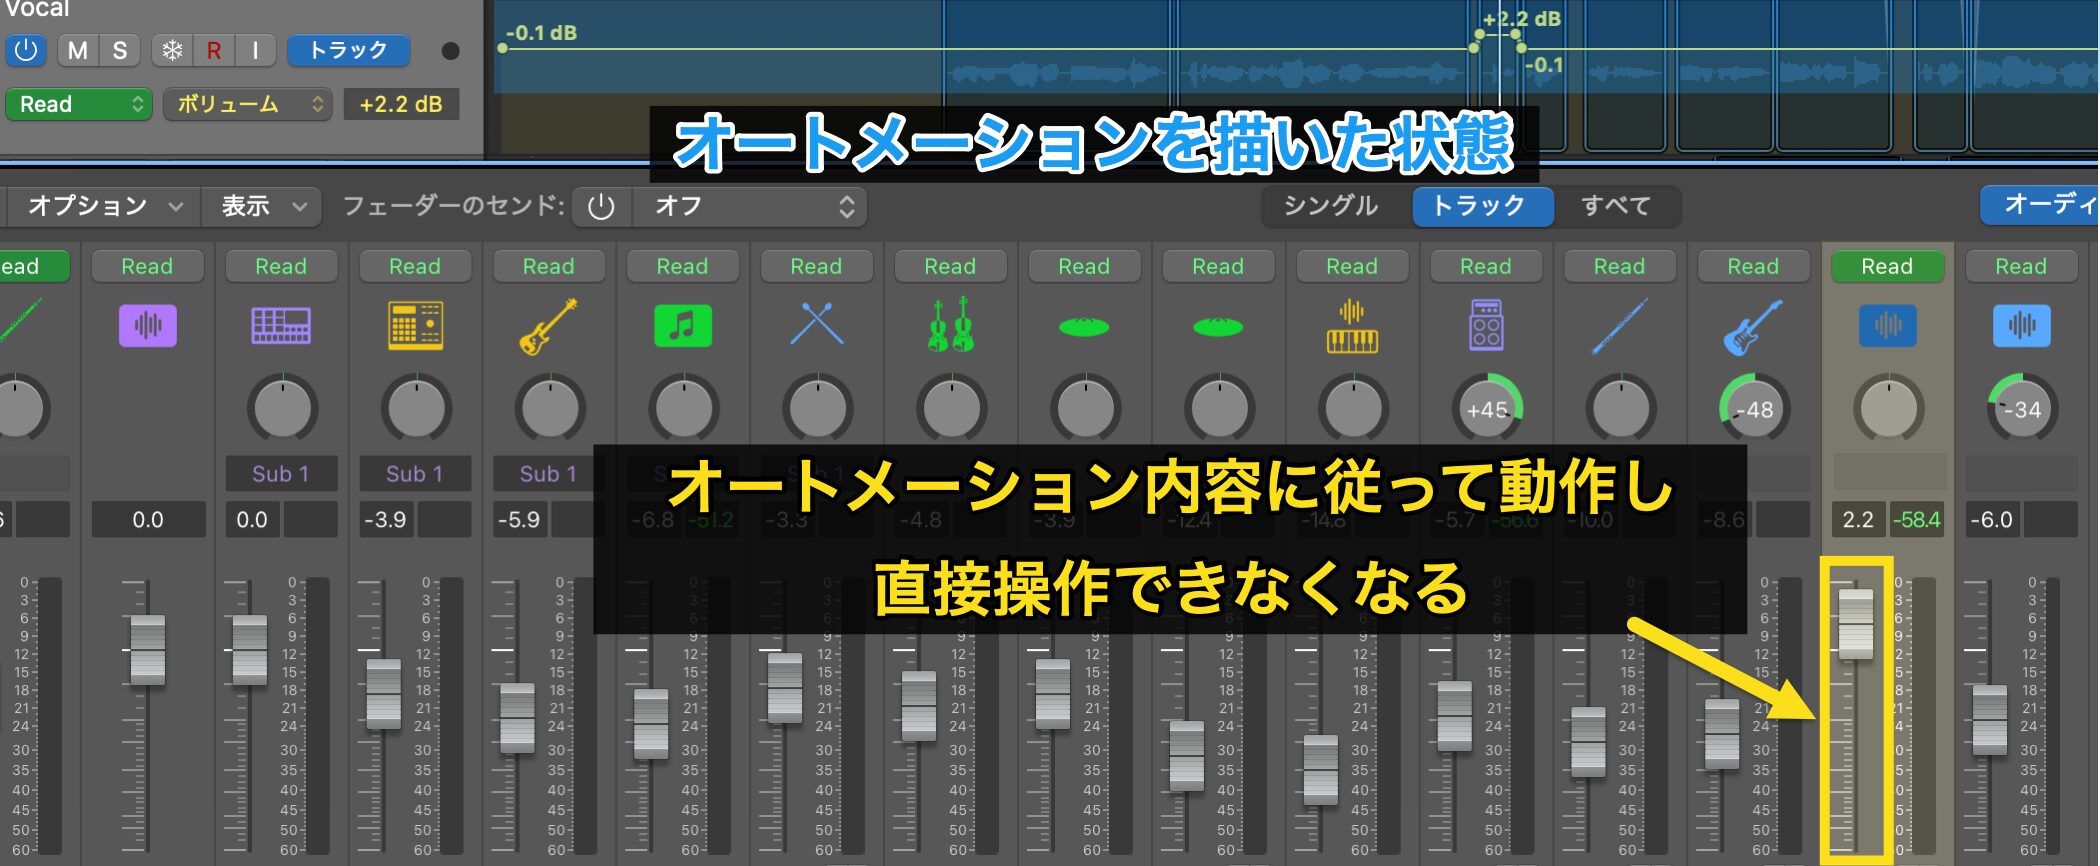
When you use volume automation, the volume fader moves according to the automation, so you can no longer operate it directly.
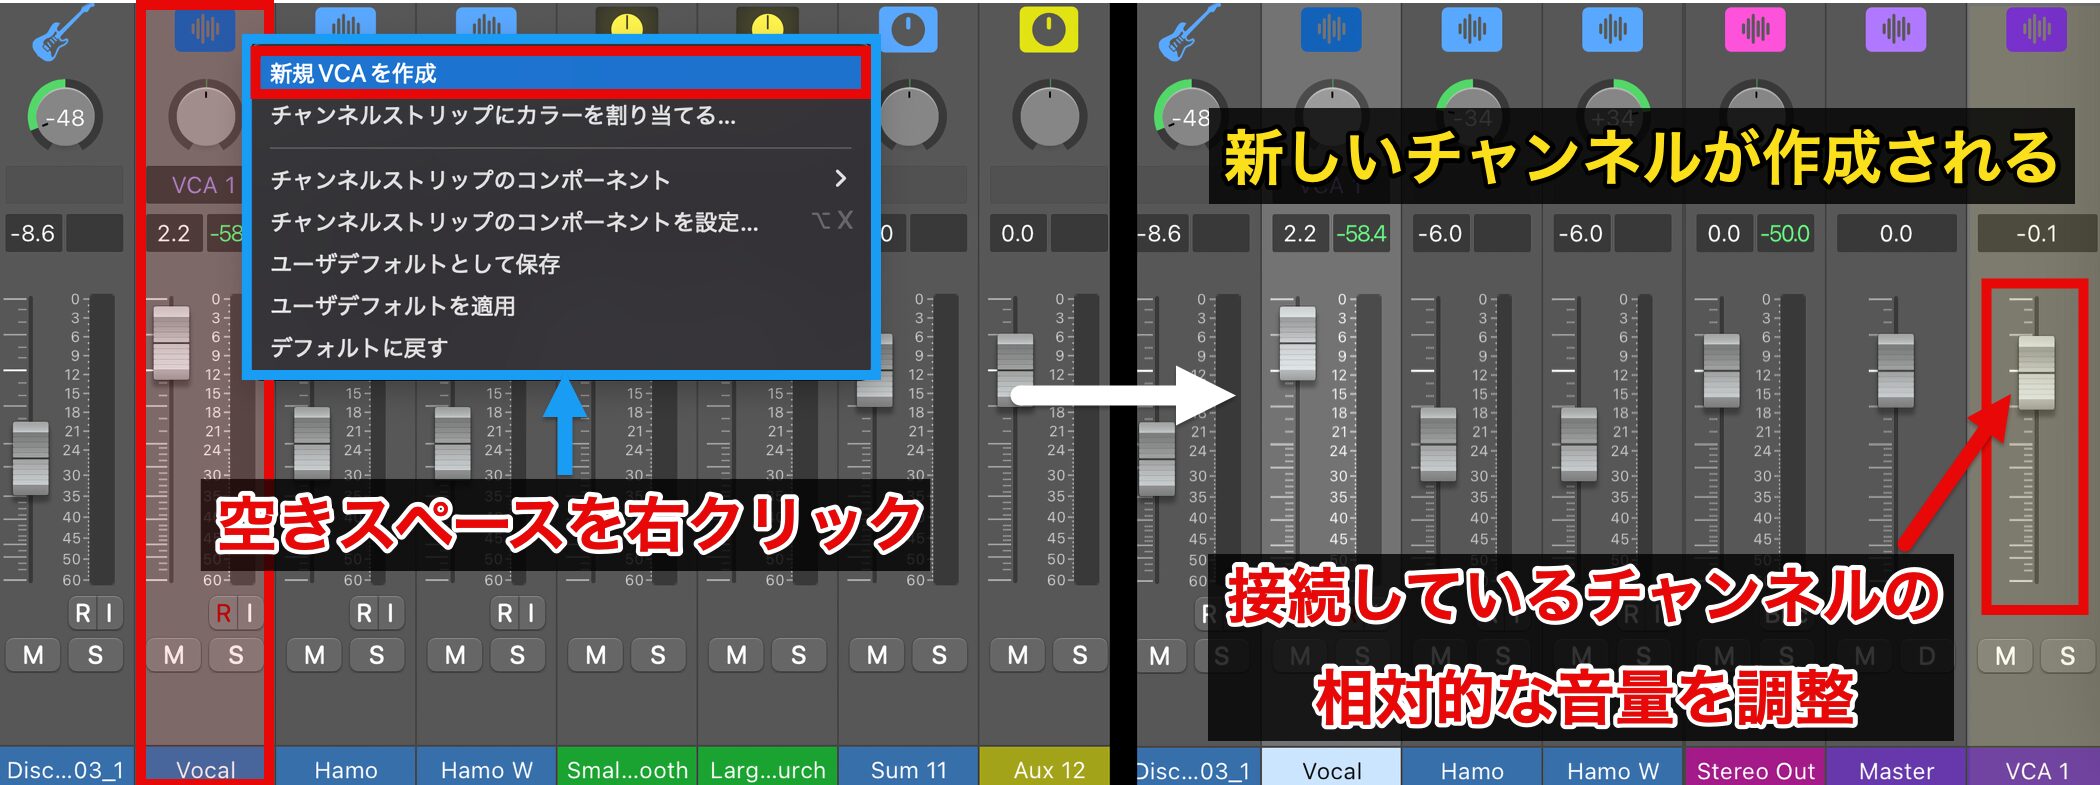
If you want to adjust the overall volume of a track after using automation, right-click an empty area and choose "Create New VCA" from the menu that appears.
A new channel is created, and with this fader you can adjust the relative volume of the assigned tracks.
Applying Reverb with an Aux Bus
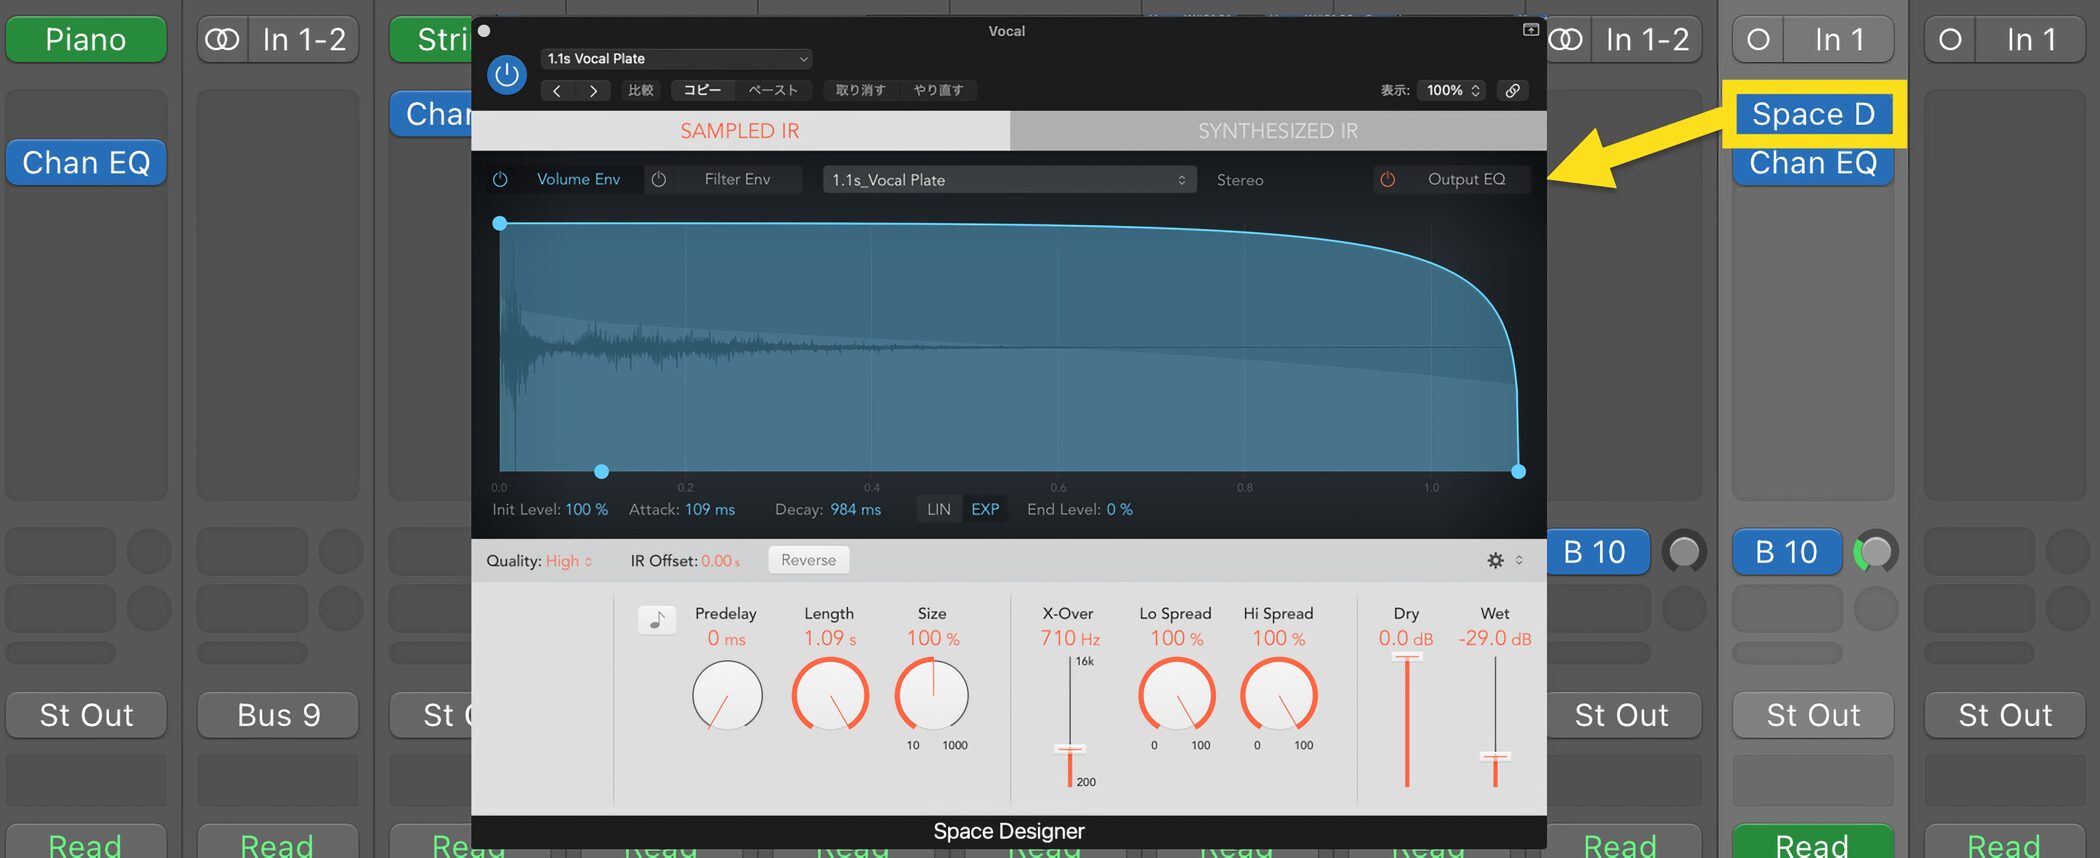
Reverb adds spatial depth to sound and is an essential effect for blending vocals and instruments naturally.
Effects can be applied directly from the Audio FX section, but this time we introduce a more efficient way to apply reverb using an Aux bus.
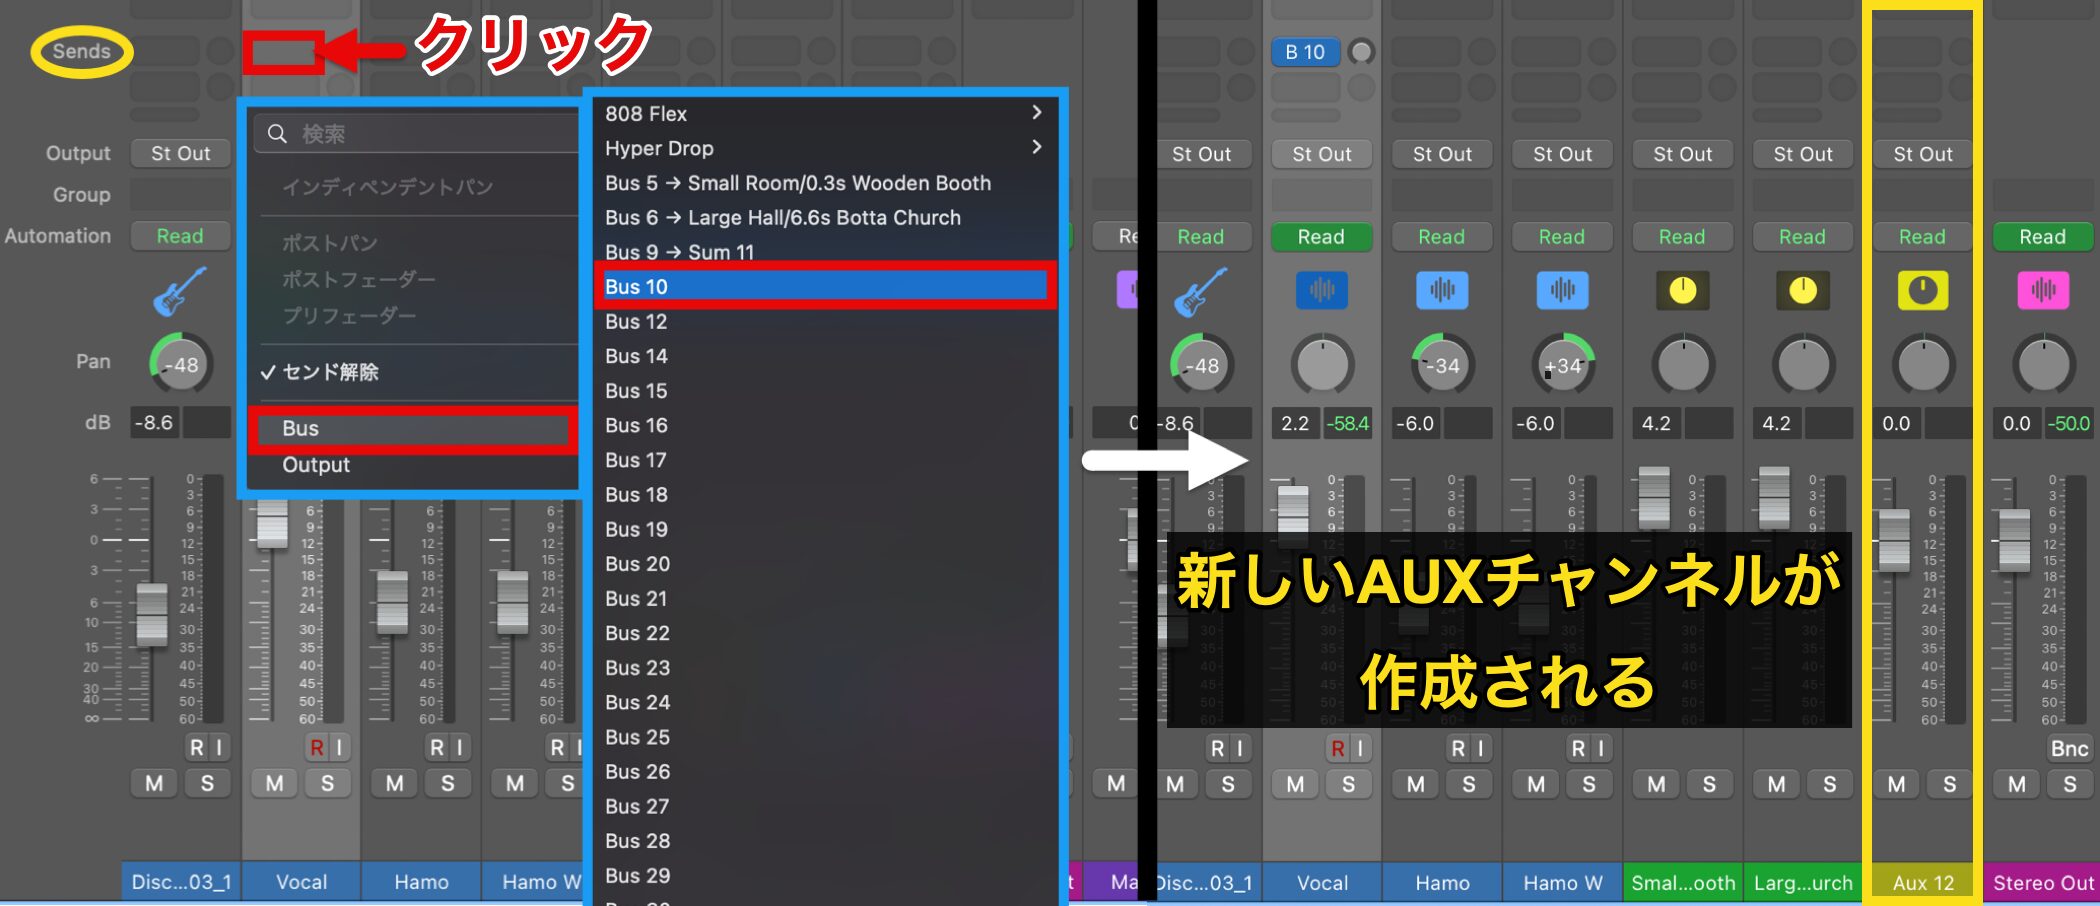
First, click the "Sends" section in the channel you want to add reverb to, and choose an unused bus from "Bus" to create a new Aux channel.
This time, we chose "Bus 10."
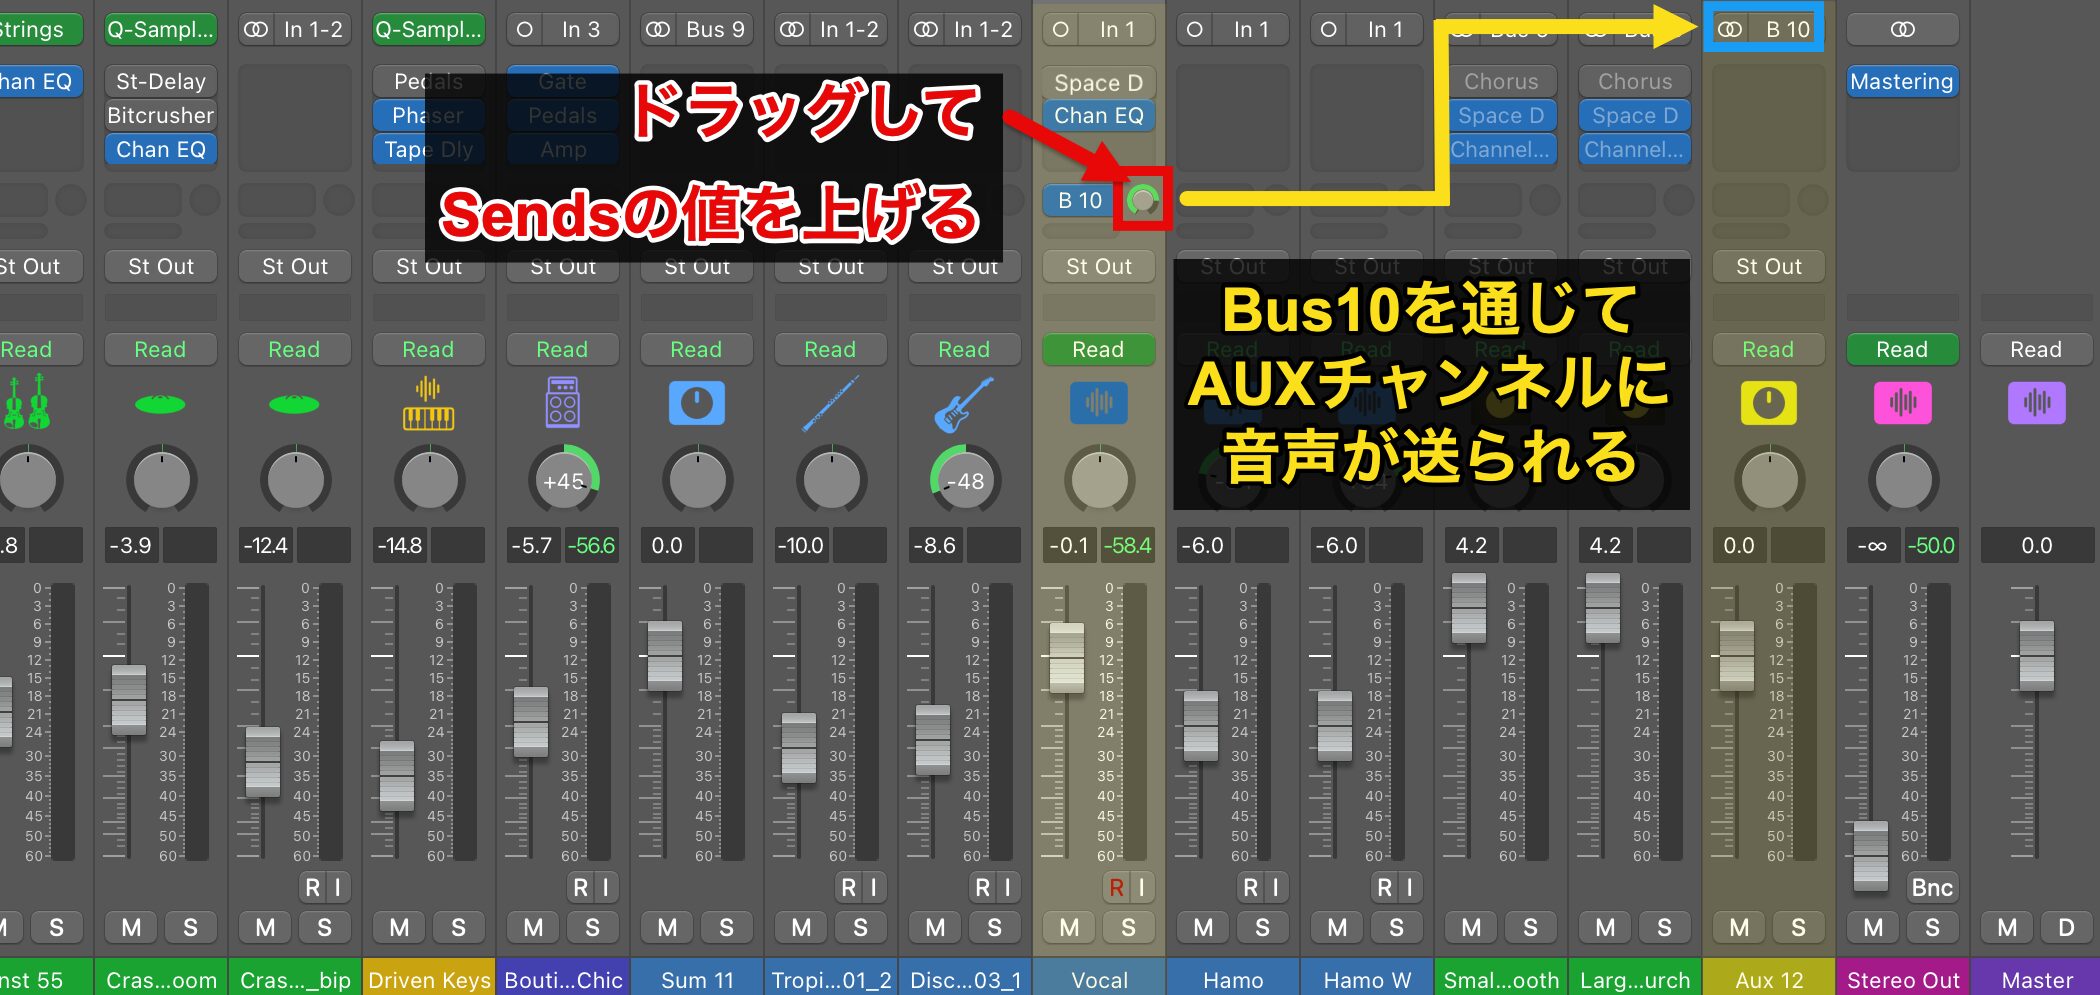
Drag the Send knob on the original channel to raise its value, and the audio is sent to the Aux channel through Bus 10, which we just selected.
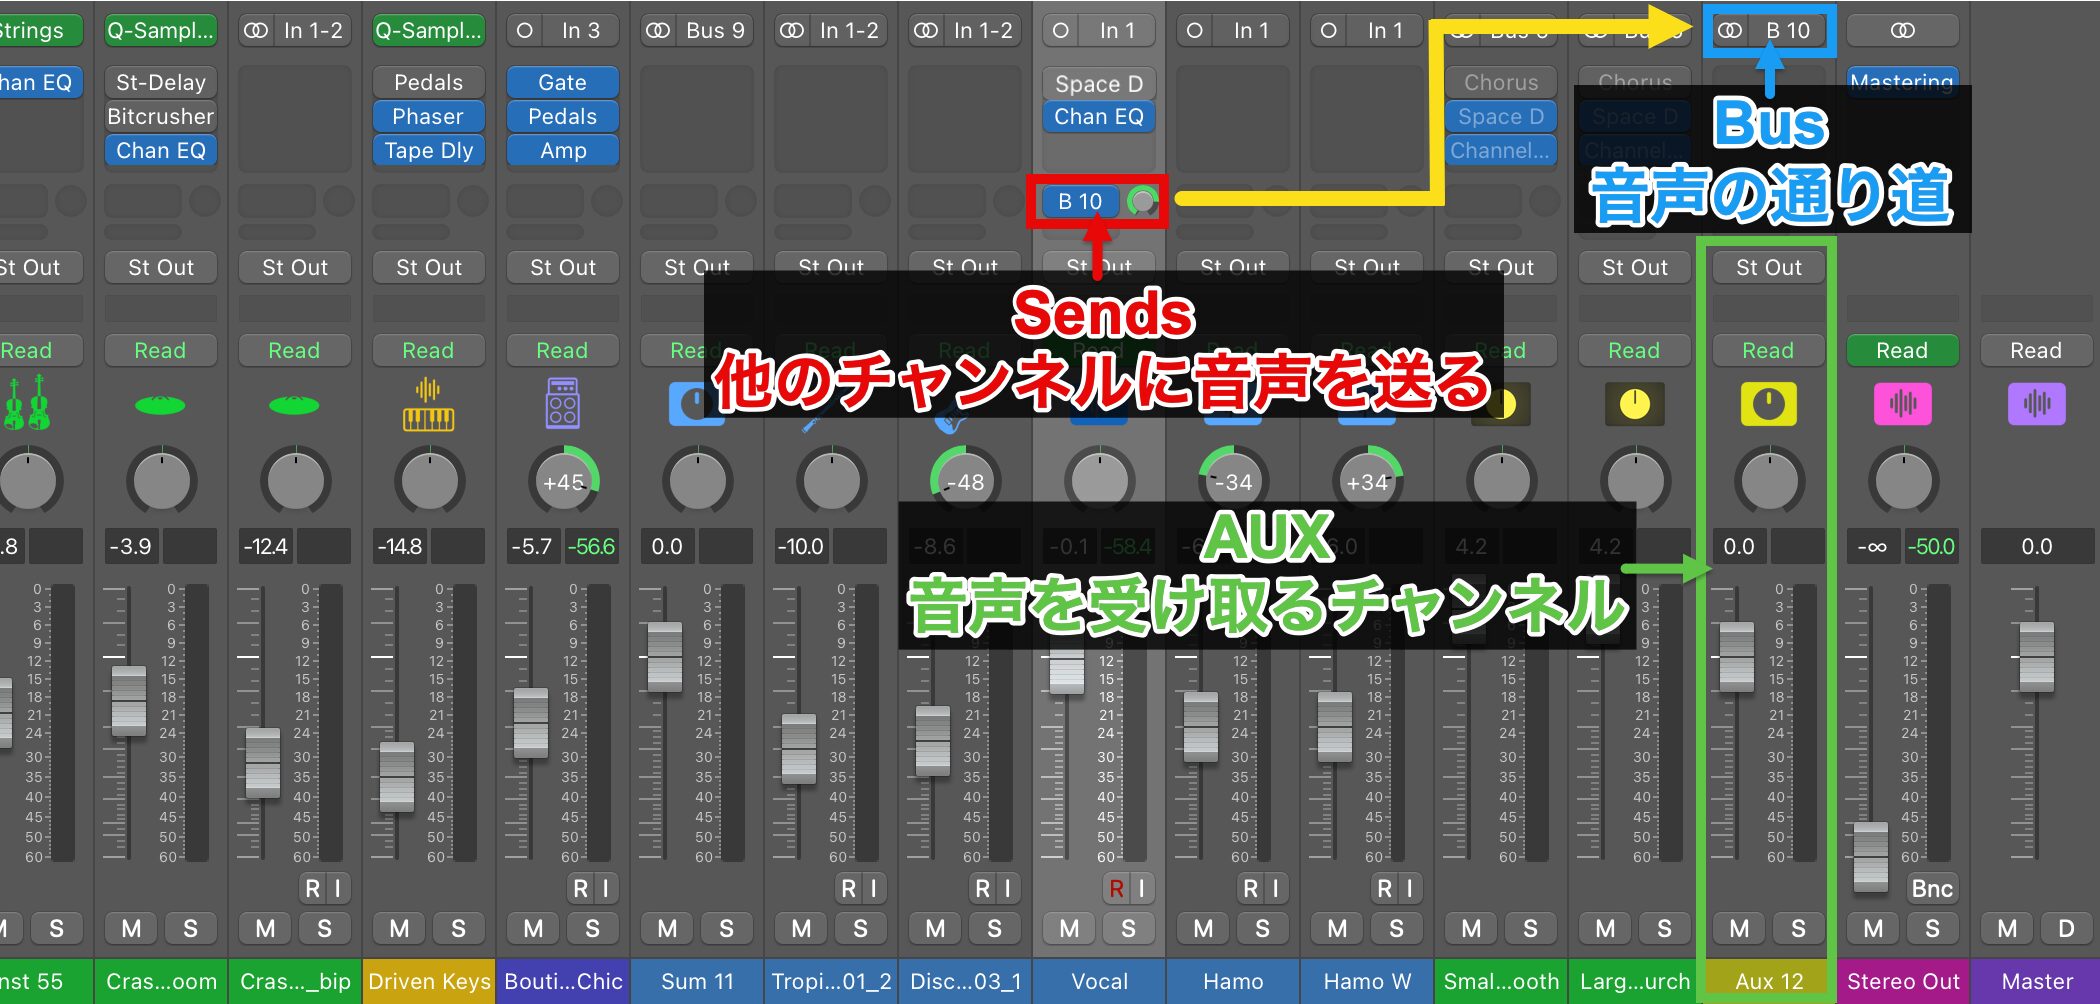
The role of each is as follows.
- Sends: sends audio to other channels
- Bus: a relay that acts as a path for the audio
- Aux: a channel that receives audio sent from other channels
With this setup, a single audio signal can be output from multiple channels.
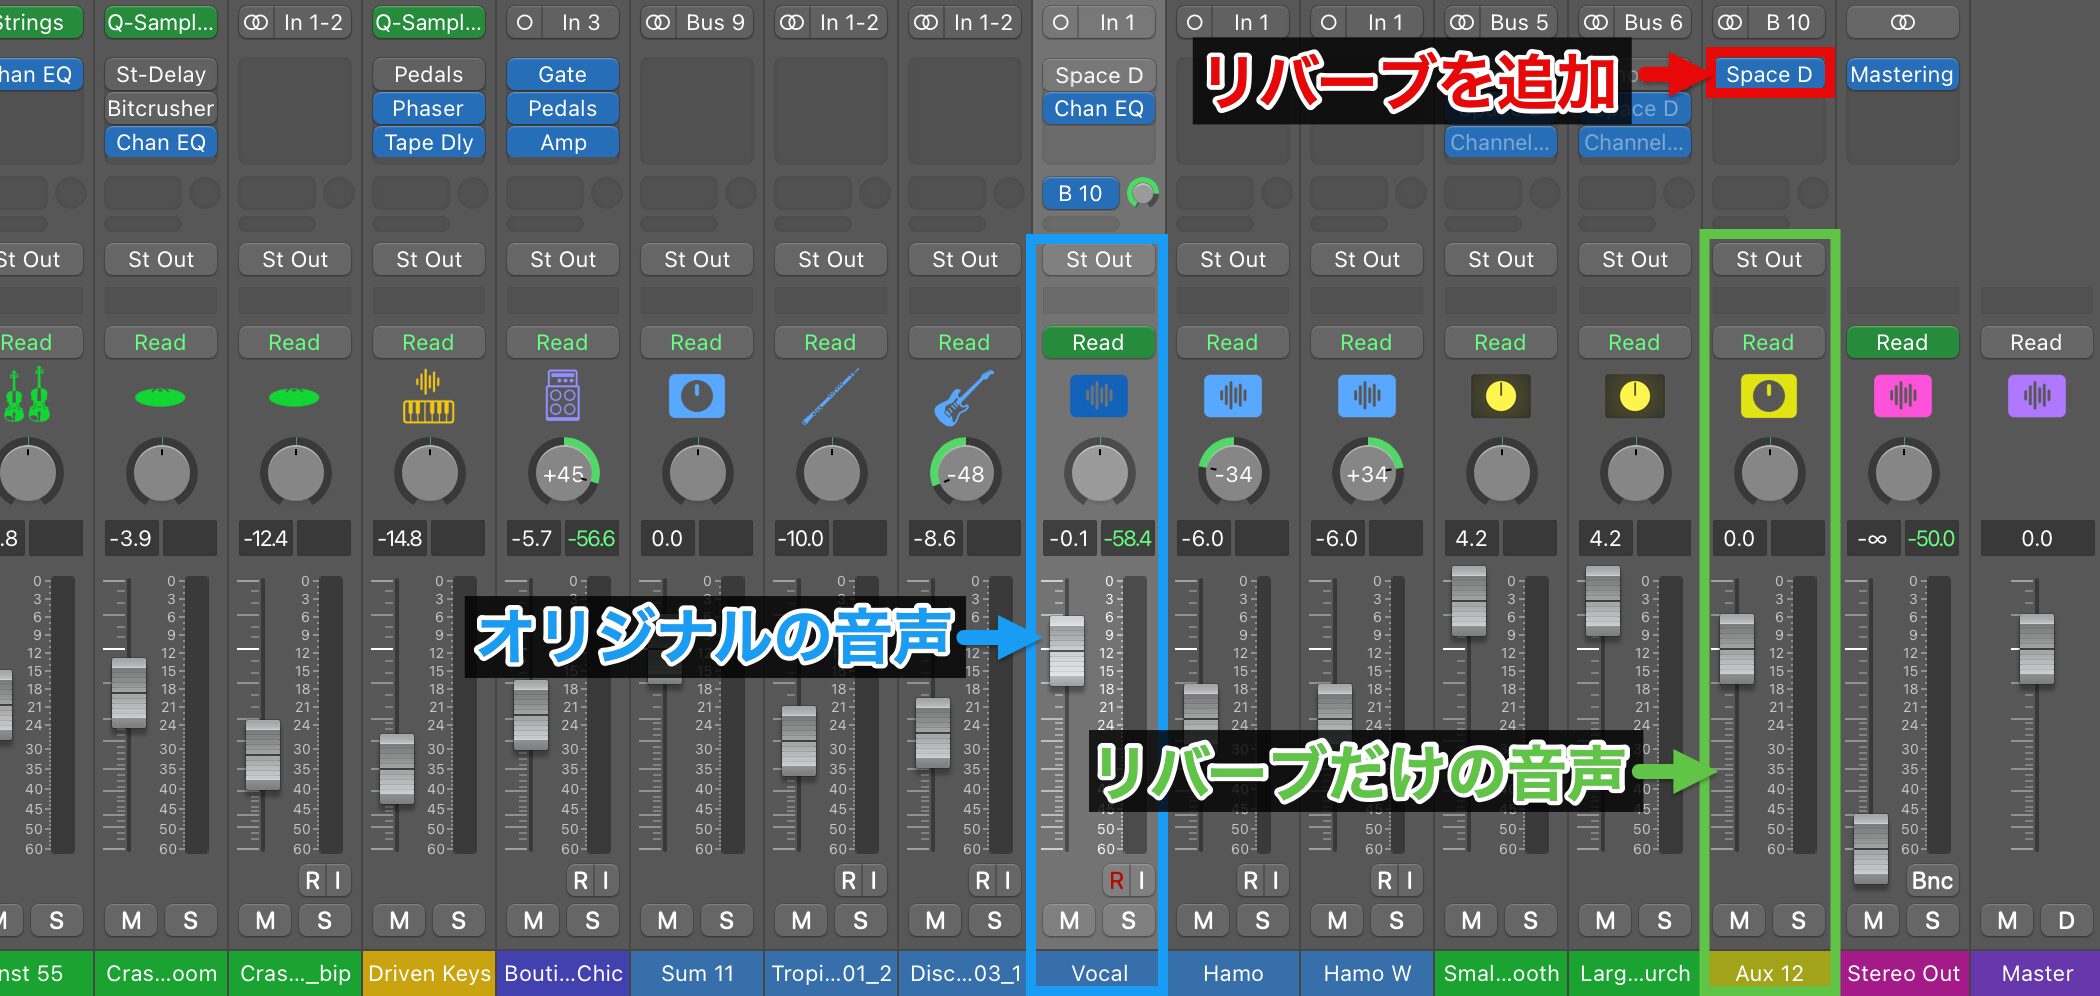
When you add reverb to the Audio FX slot of the Aux channel, the audio is processed as follows.
- Original channel: outputs the original audio as is
- Aux channel: outputs the reverb sound only
This method is convenient because the original audio stays as it is while you can adjust the reverb separately.
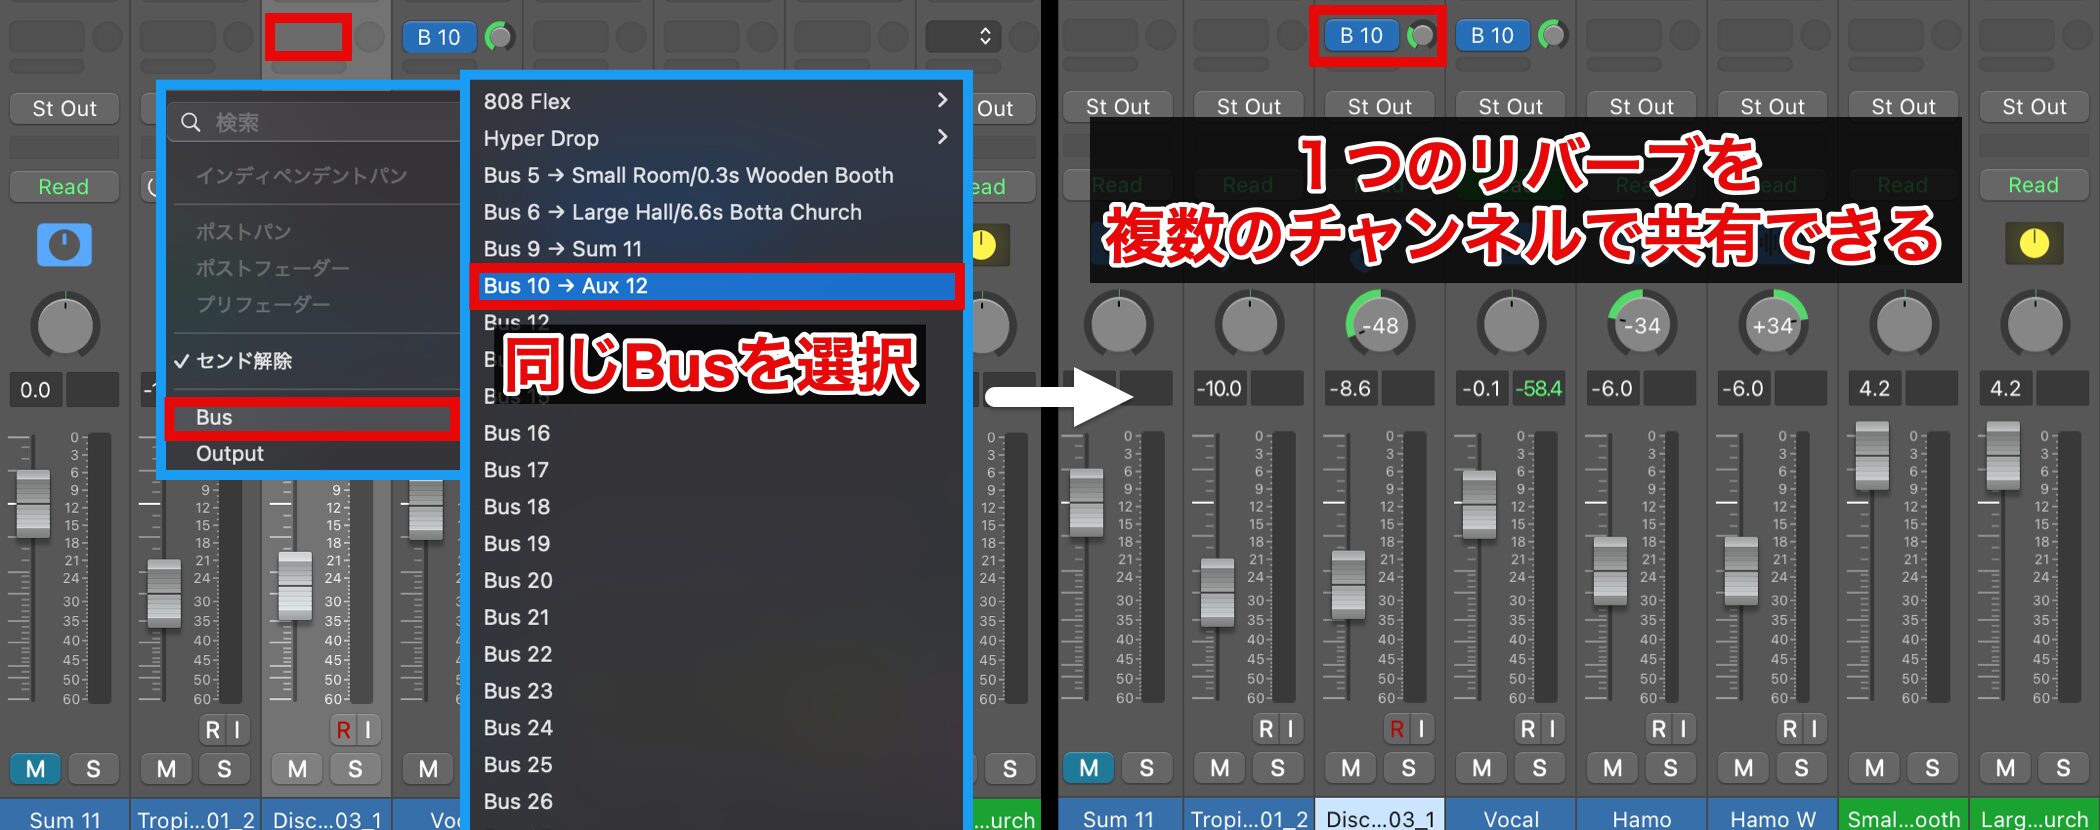
In addition, by using the same Aux bus on other tracks, they can share the same reverb, so you can mix efficiently.
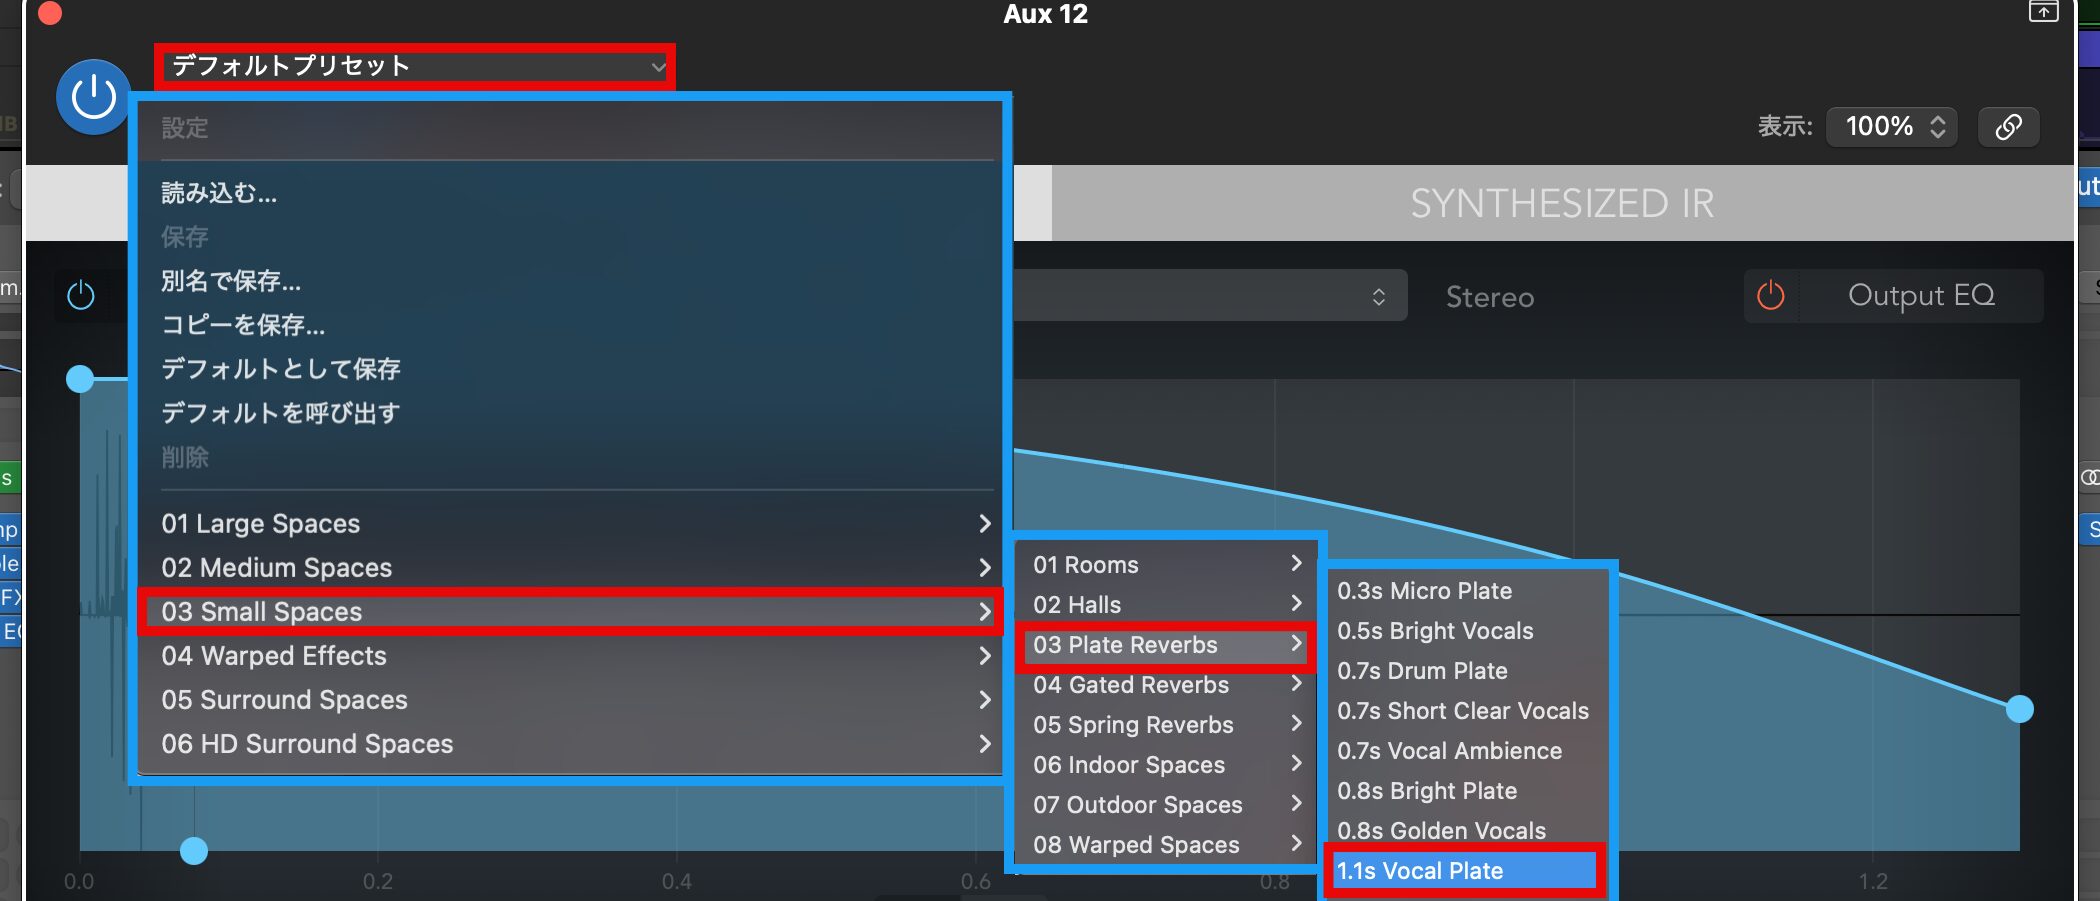
Once the setup is complete, open the reverb added to the Aux channel and choose a preset.
Since we are using it on vocals this time, we chose "Vocal Plate."
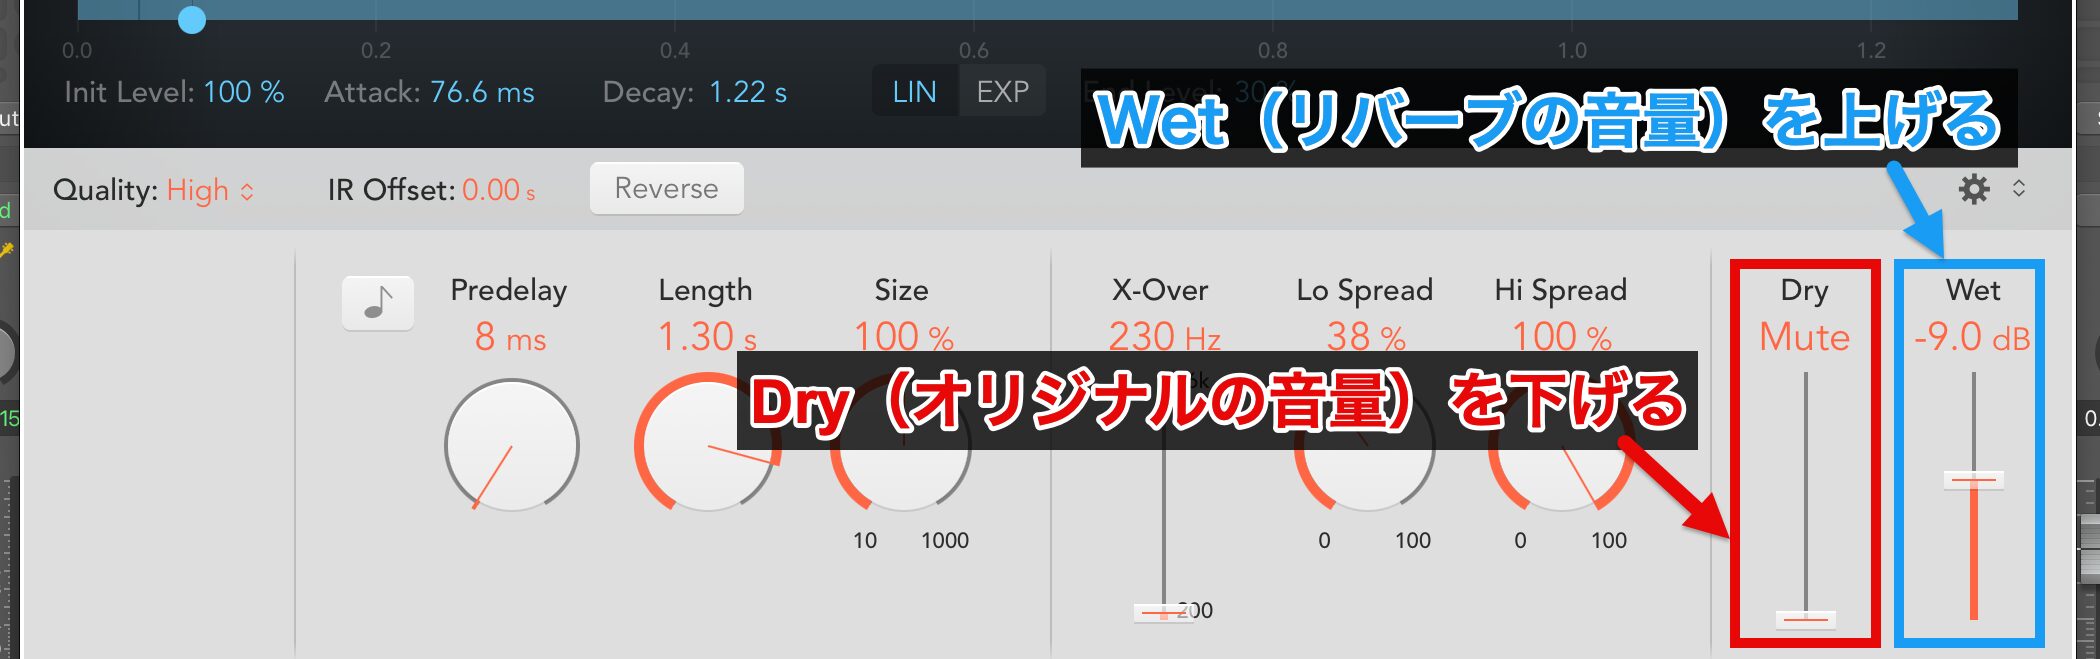
The Aux channel should be set to output only the reverb sound.
So lower Dry (the original signal level) and raise only Wet (the reverb level).

Finally, let's adjust how much reverb is applied.
You can control the amount of reverb intuitively just by turning the Send knob.
Listen to the actual sound and find the point where it blends naturally with the whole song.
Mastering
Once mixing is complete, it is time to move on to the final finishing stage: mastering.
Mastering is the process of making final adjustments to the overall volume and sound quality of the song to finish it as a pleasant-sounding final product.
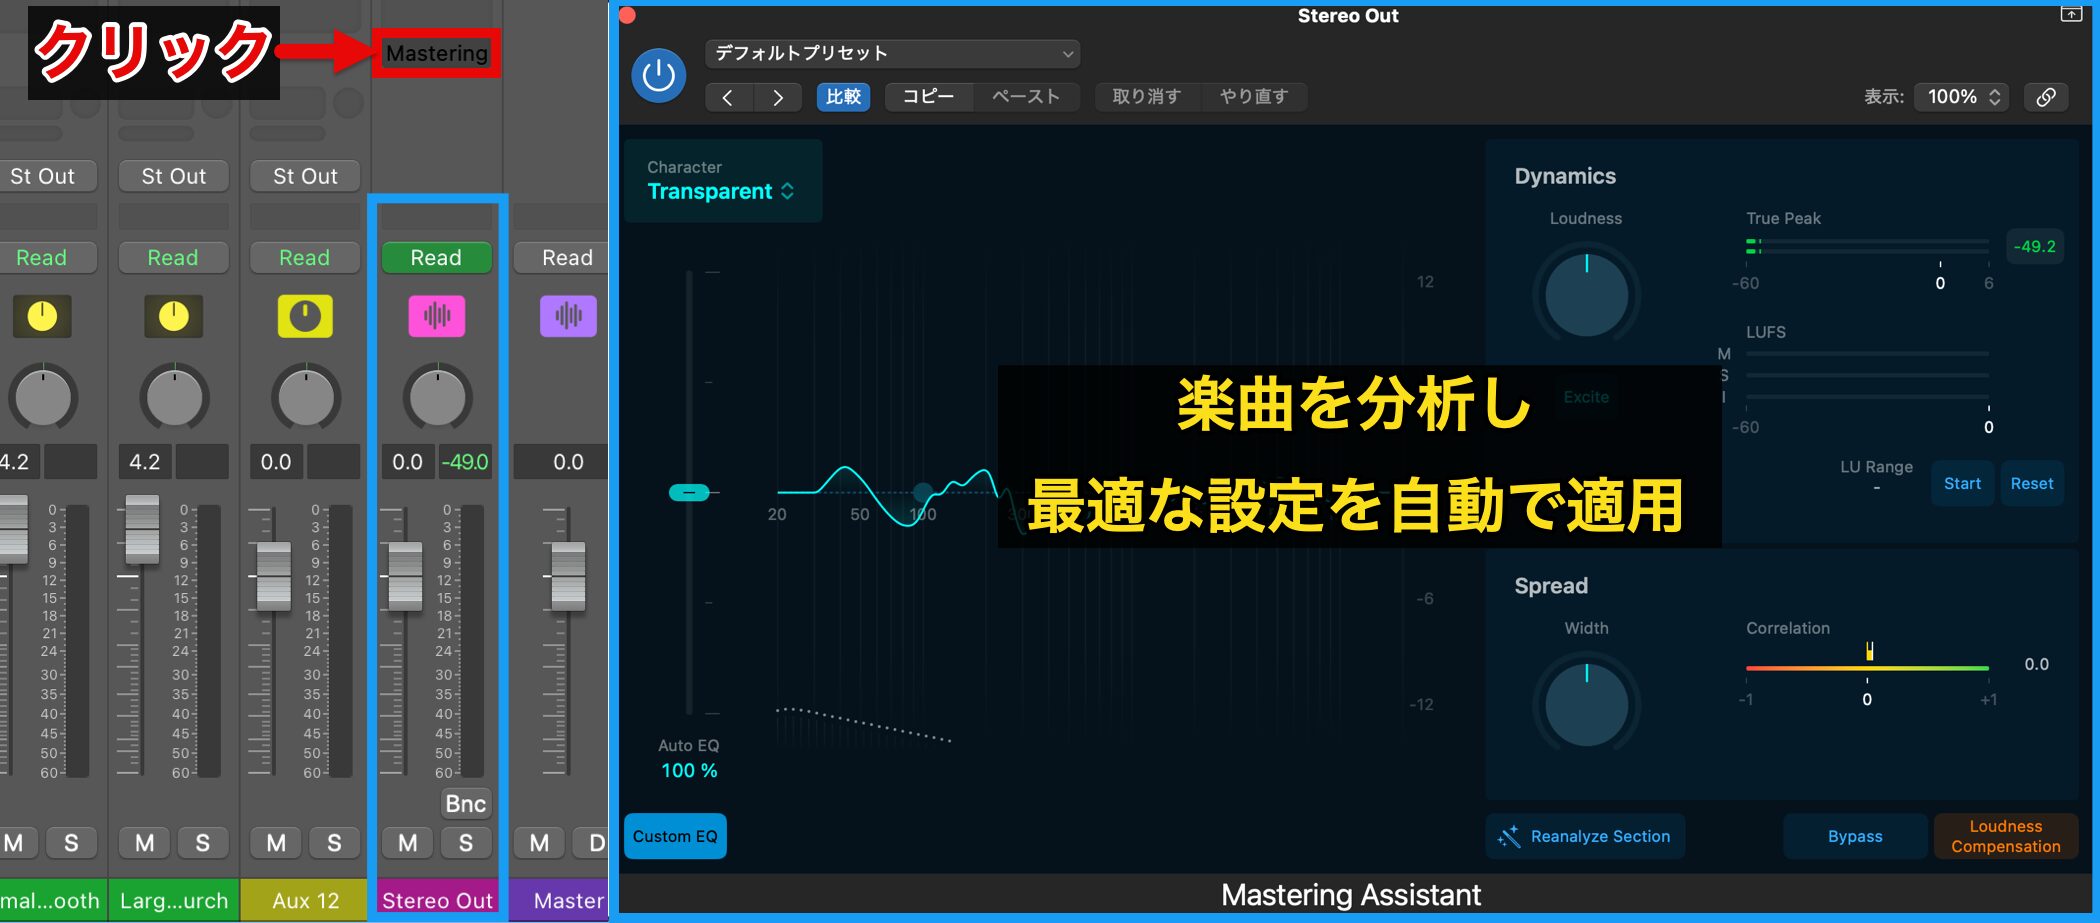
Logic Pro has an automatic mastering function. Just click "Mastering" on the "Stereo Out" channel, and the "Mastering Assistant" analyzes the song and automatically applies optimal settings for you.
Let's compare it with the original.
The sound becomes more powerful and the variation in volume is reduced, giving an overall polished impression.
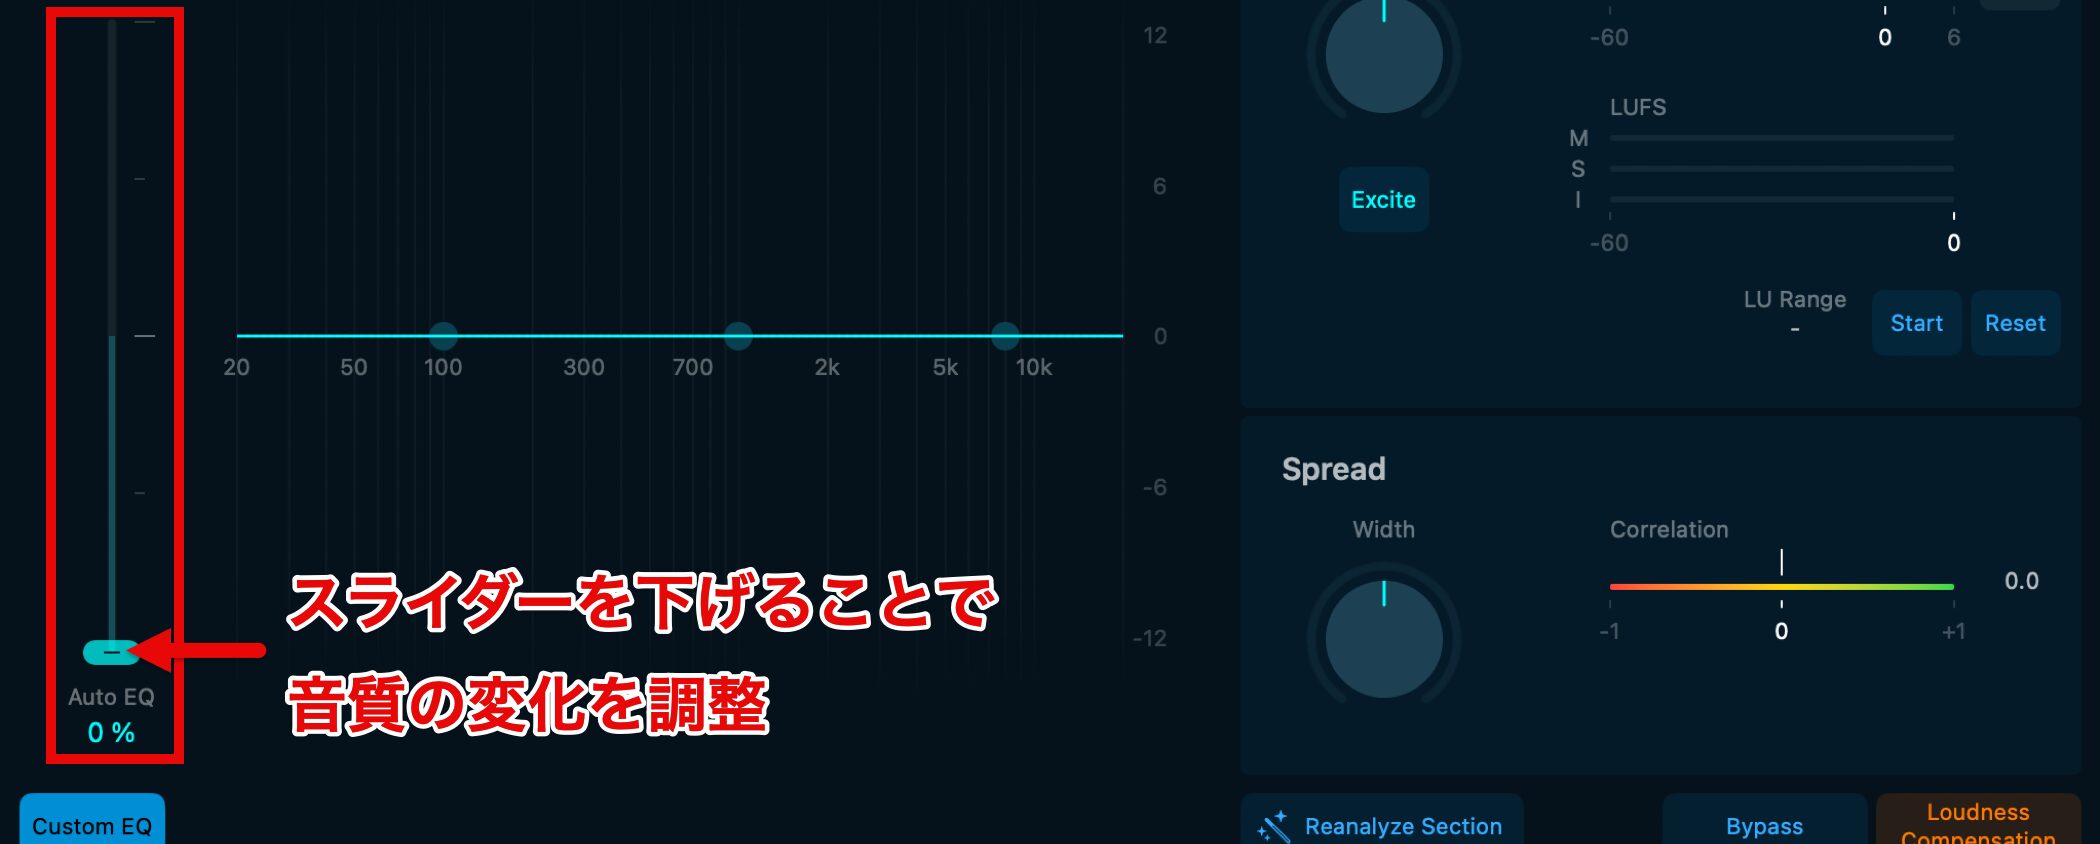
This function, which lets you master with a single button, is very convenient, but if it changes the character of the song more than you intended, you can lower the "Auto EQ" slider to reduce the change in sound caused by mastering.

You can also fine-tune the result with the following functions.
(1) (red) Loudness: adjusts the overall perceived loudness of the song. Raising the knob makes the sound more powerful and impactful.
(2) (blue) Excite: emphasizes the high frequencies and harmonics. Adds brightness and vividness to the song for a sharper impression.
(3) (yellow) Width: adjusts the stereo spread. Raising the knob increases the sense of space for a wider sound.
Preparing to Bounce
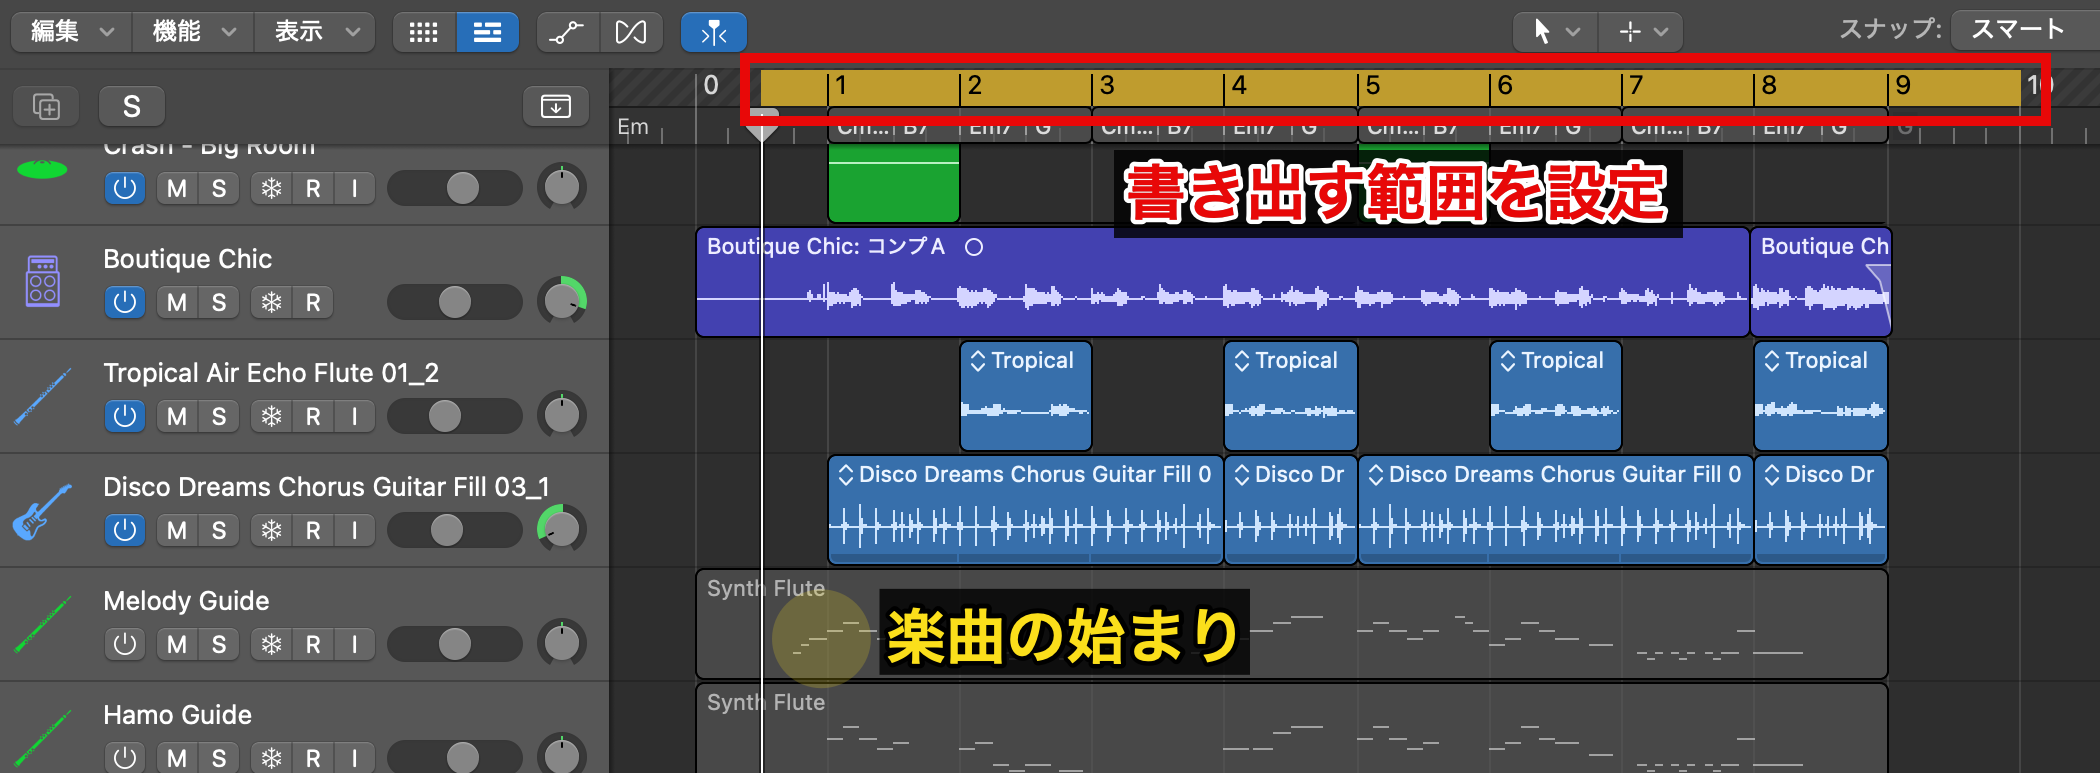
Once the song is finished, "bounce" it, which means exporting it as an audio file.
First, set the range to export.
Set the start point slightly before the song begins, and set the end point where you want the song to end while checking the actual sound.

When setting the export range, you cannot make fine adjustments while Snap is enabled, so turn Snap off.
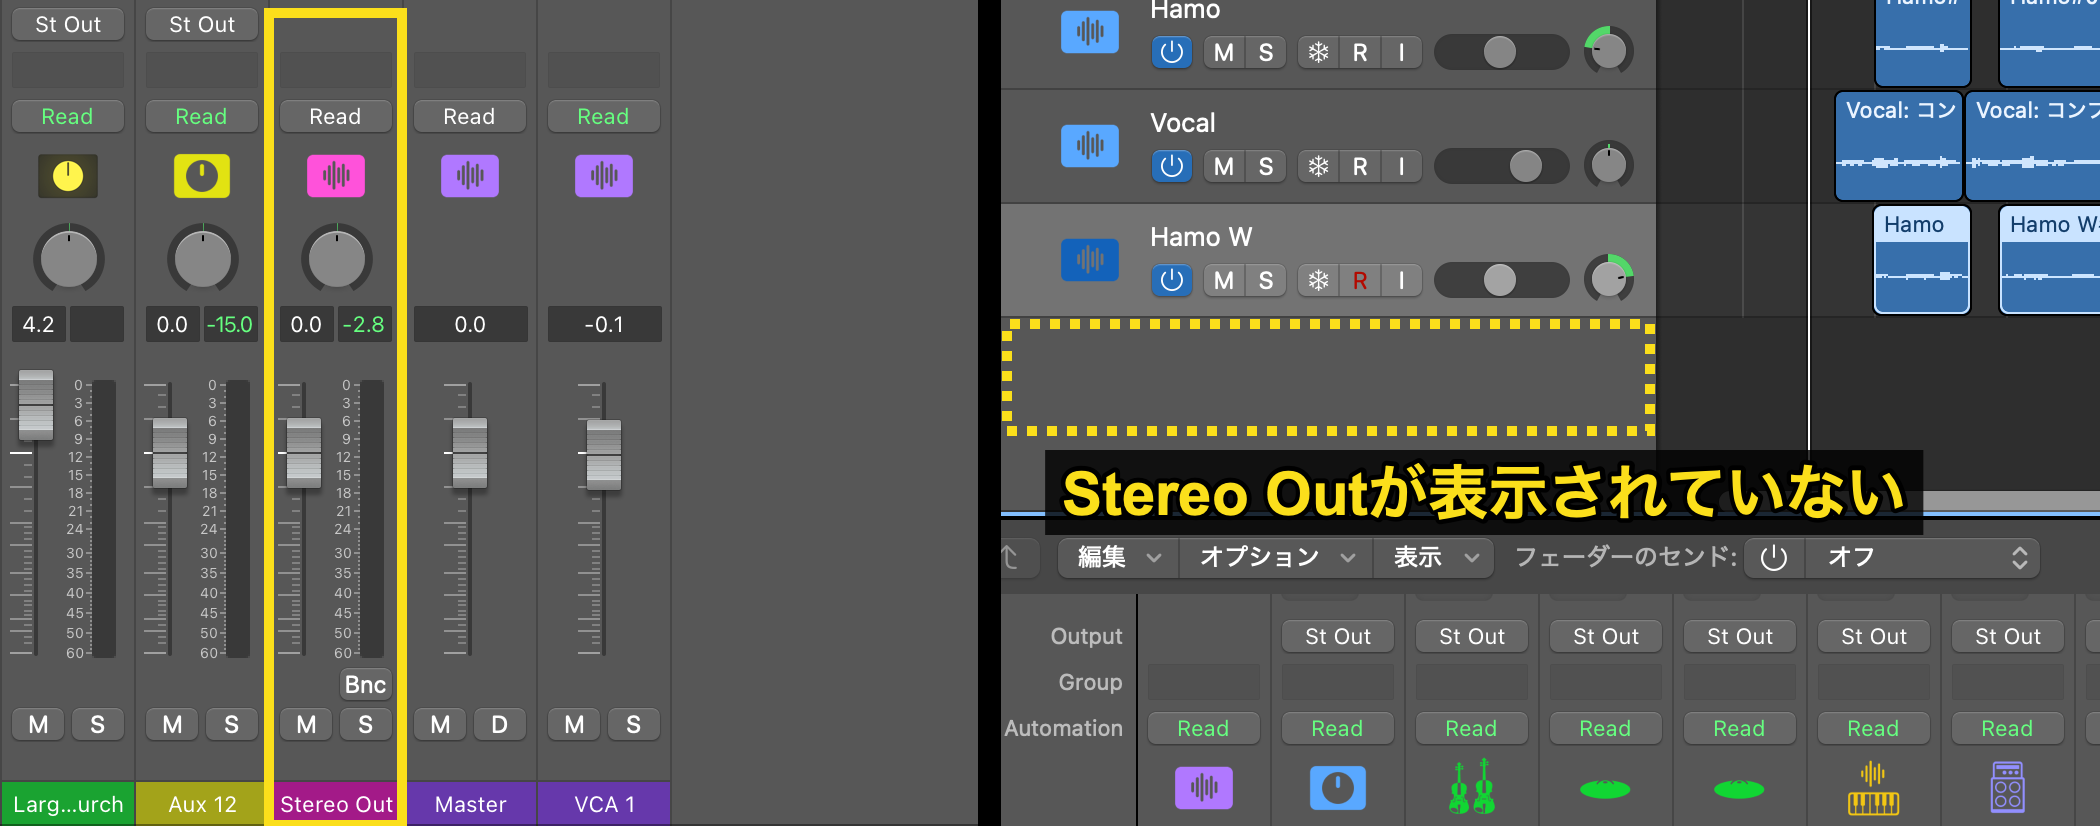
Next, so that the song does not start and end abruptly, apply automation to the fader of the "Stereo Out" channel to change the volume gradually.
However, by default, the Stereo Out channel is not shown in the track list.
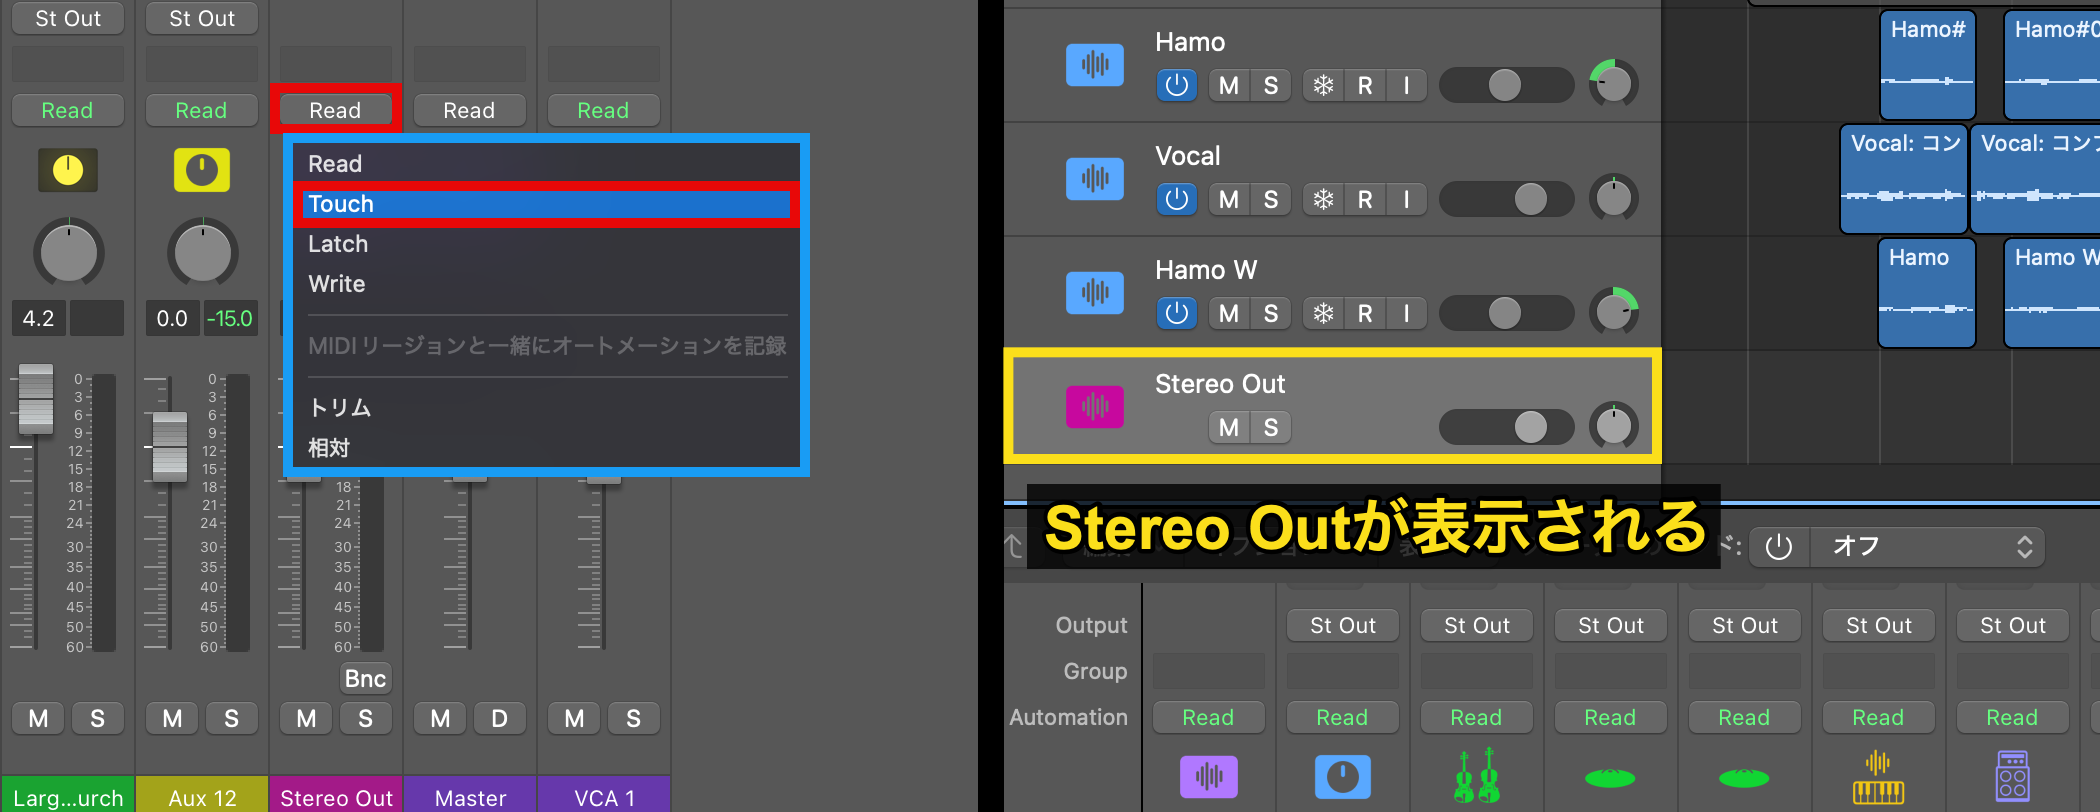
To show the Stereo Out channel, choose "Touch" as the automation mode in the mixer.
Once it is shown, set "Touch" back to "Read" and create the volume curve.
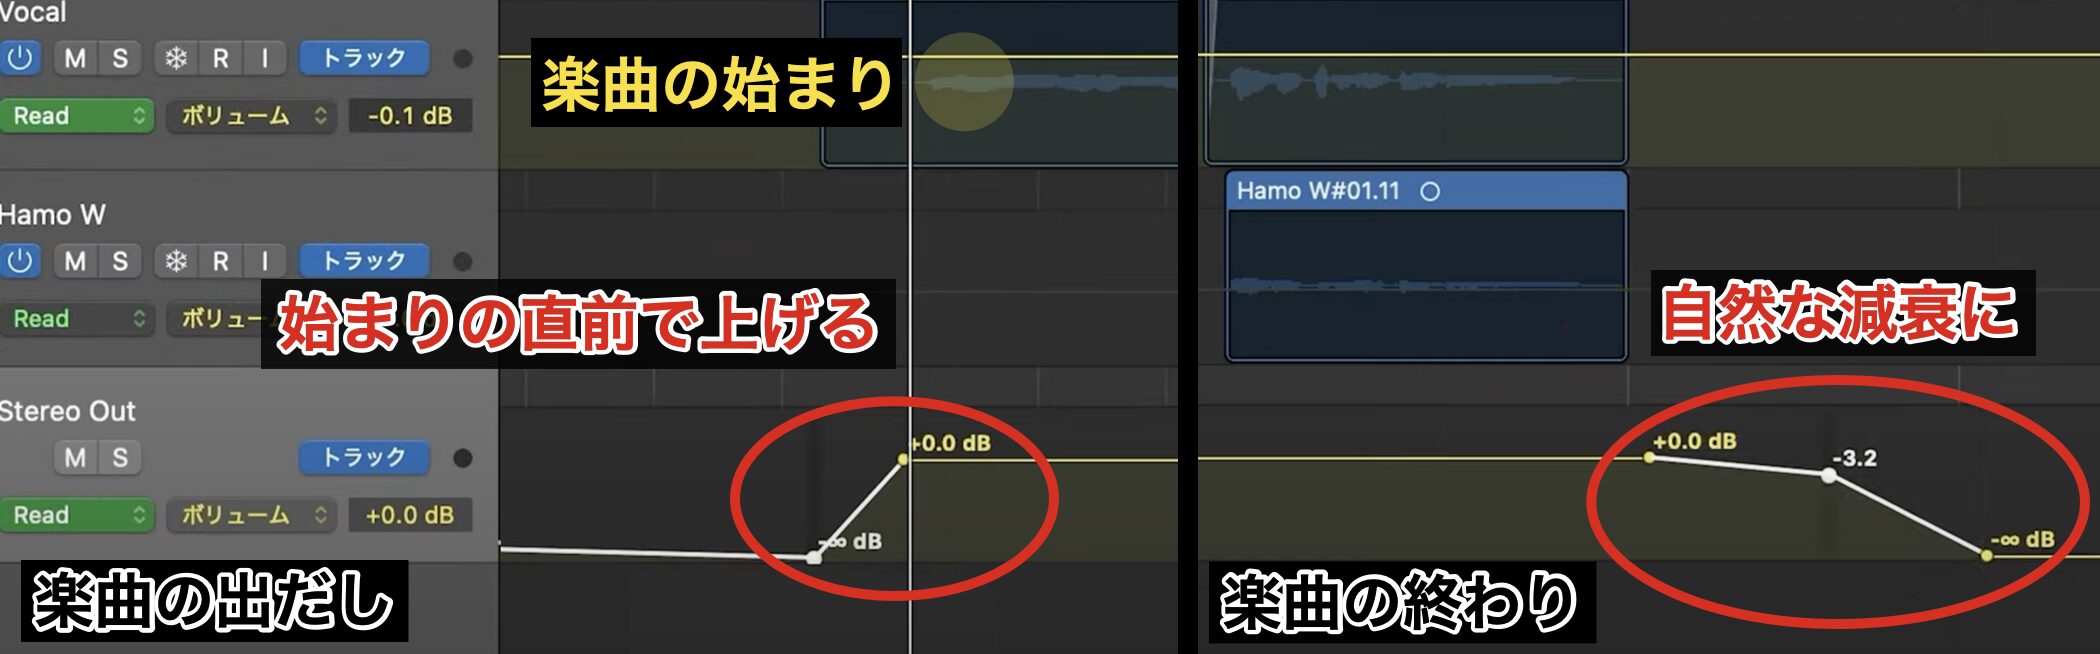
The key to creating the volume curve is to work within the range from silence to 0 dB.
At the beginning of the song, set it from just before the sound starts so that the volume rises gradually.
At the end of the song, fine-tune it while checking the actual sound so that it decays naturally.
Bouncing the Song
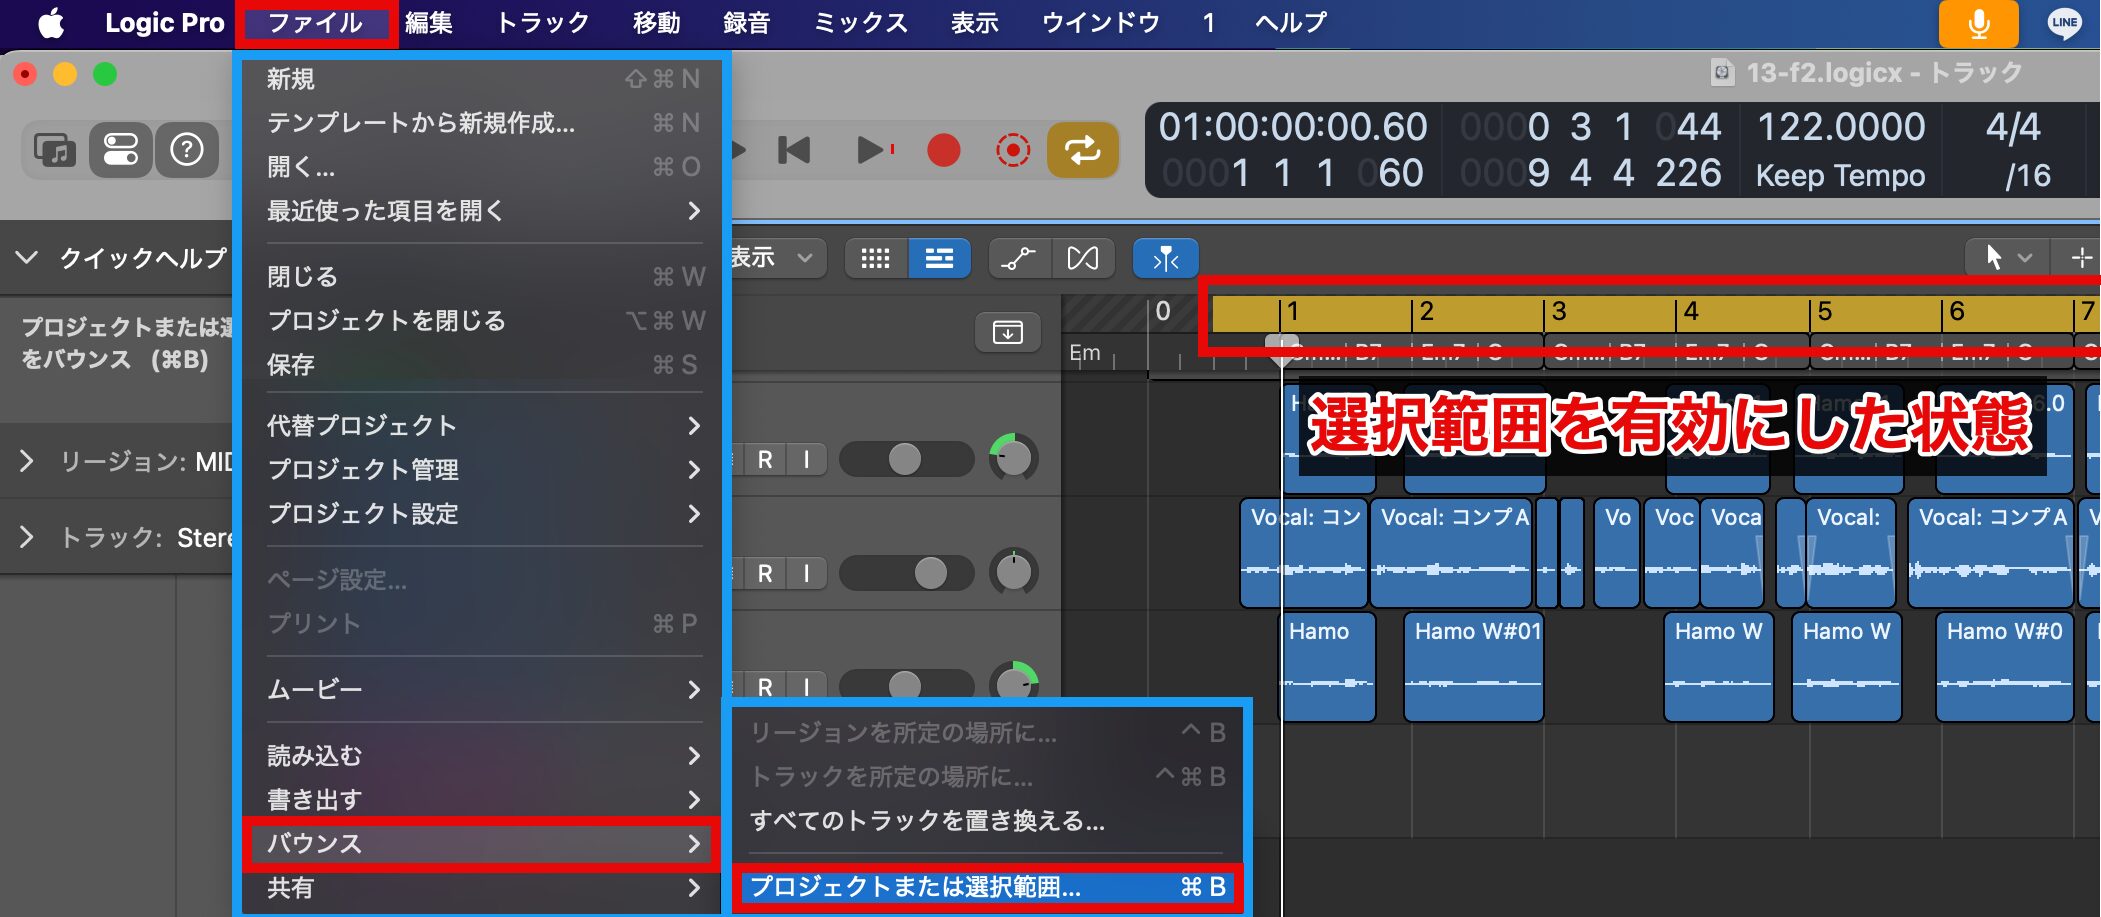
When everything is ready, export the song as an audio file.
With the selection range enabled, choose "File" > "Bounce" > "Project or Section" from the menu bar.
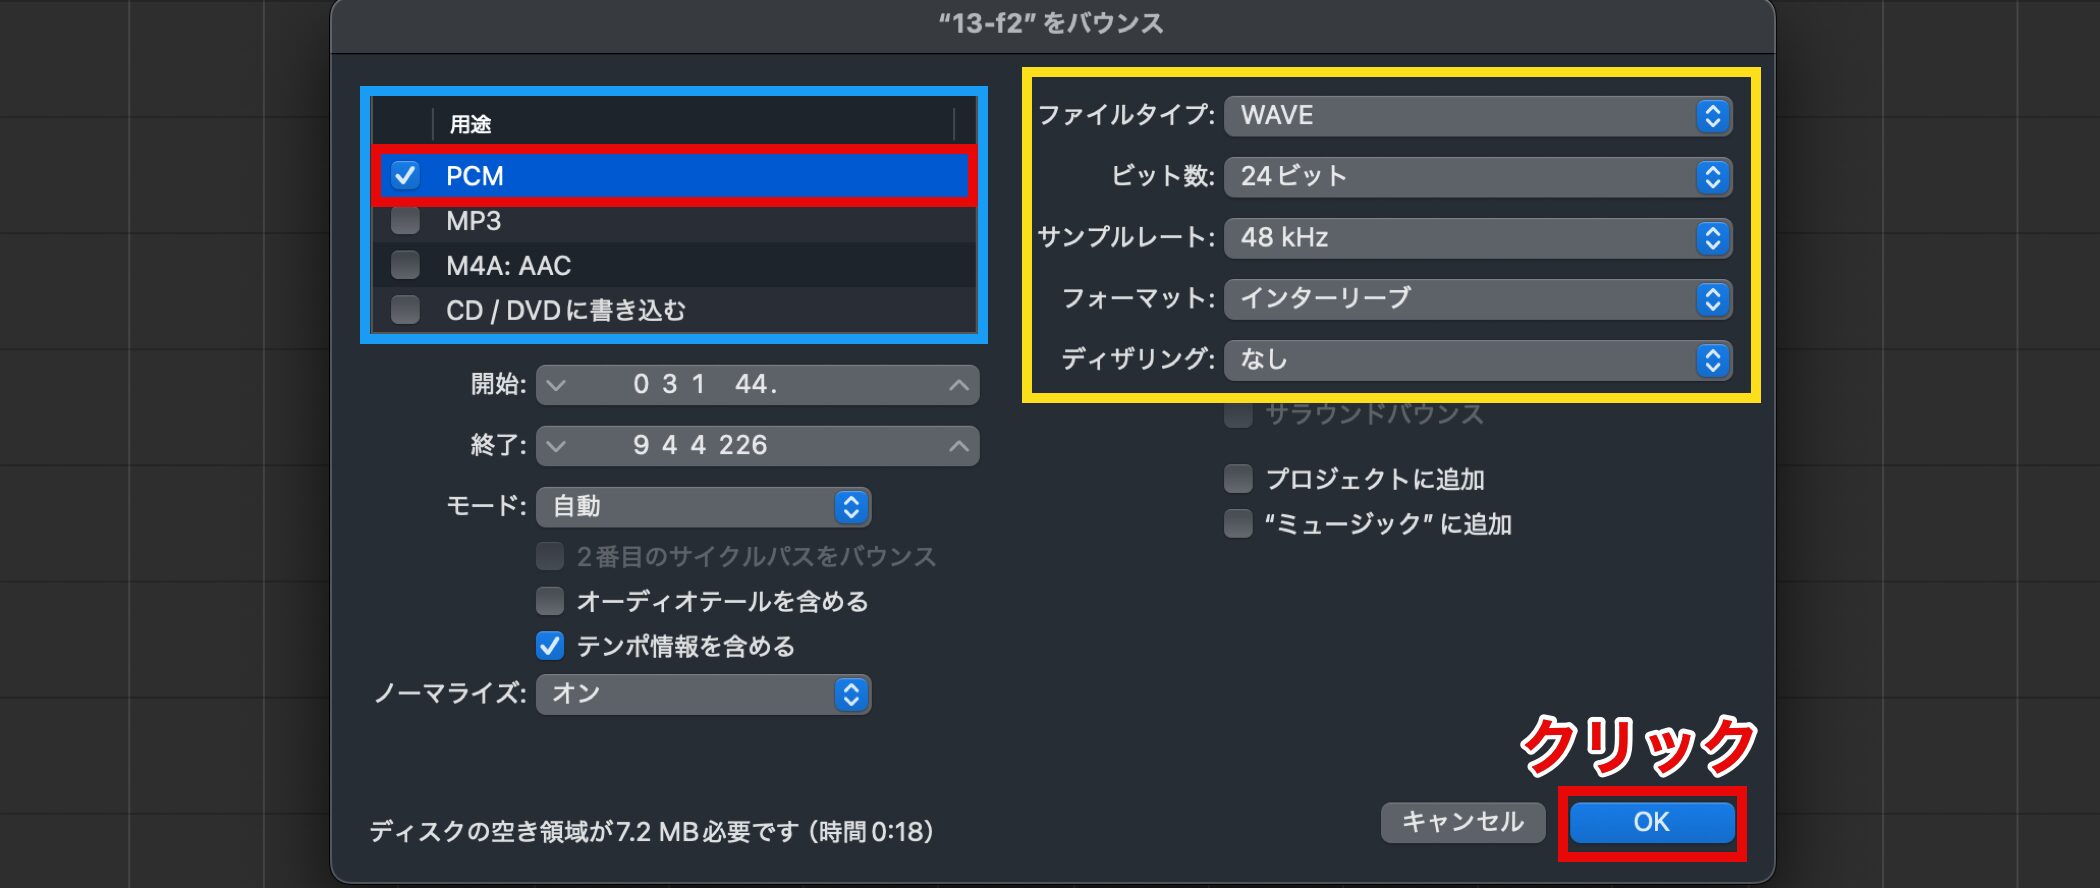
There are many settings in the export options, but here we introduce general settings suitable for distribution on streaming services such as Spotify.
Under "Destination," choose the audio file format. Choose "PCM" to prioritize sound quality.
Next, set the items on the right (yellow frame) as follows.
• File Type: WAVE
• Resolution: 24-bit
• Sample Rate: 48 kHz
• Format: Interleaved
• Dithering: None
After checking the settings, click "OK."
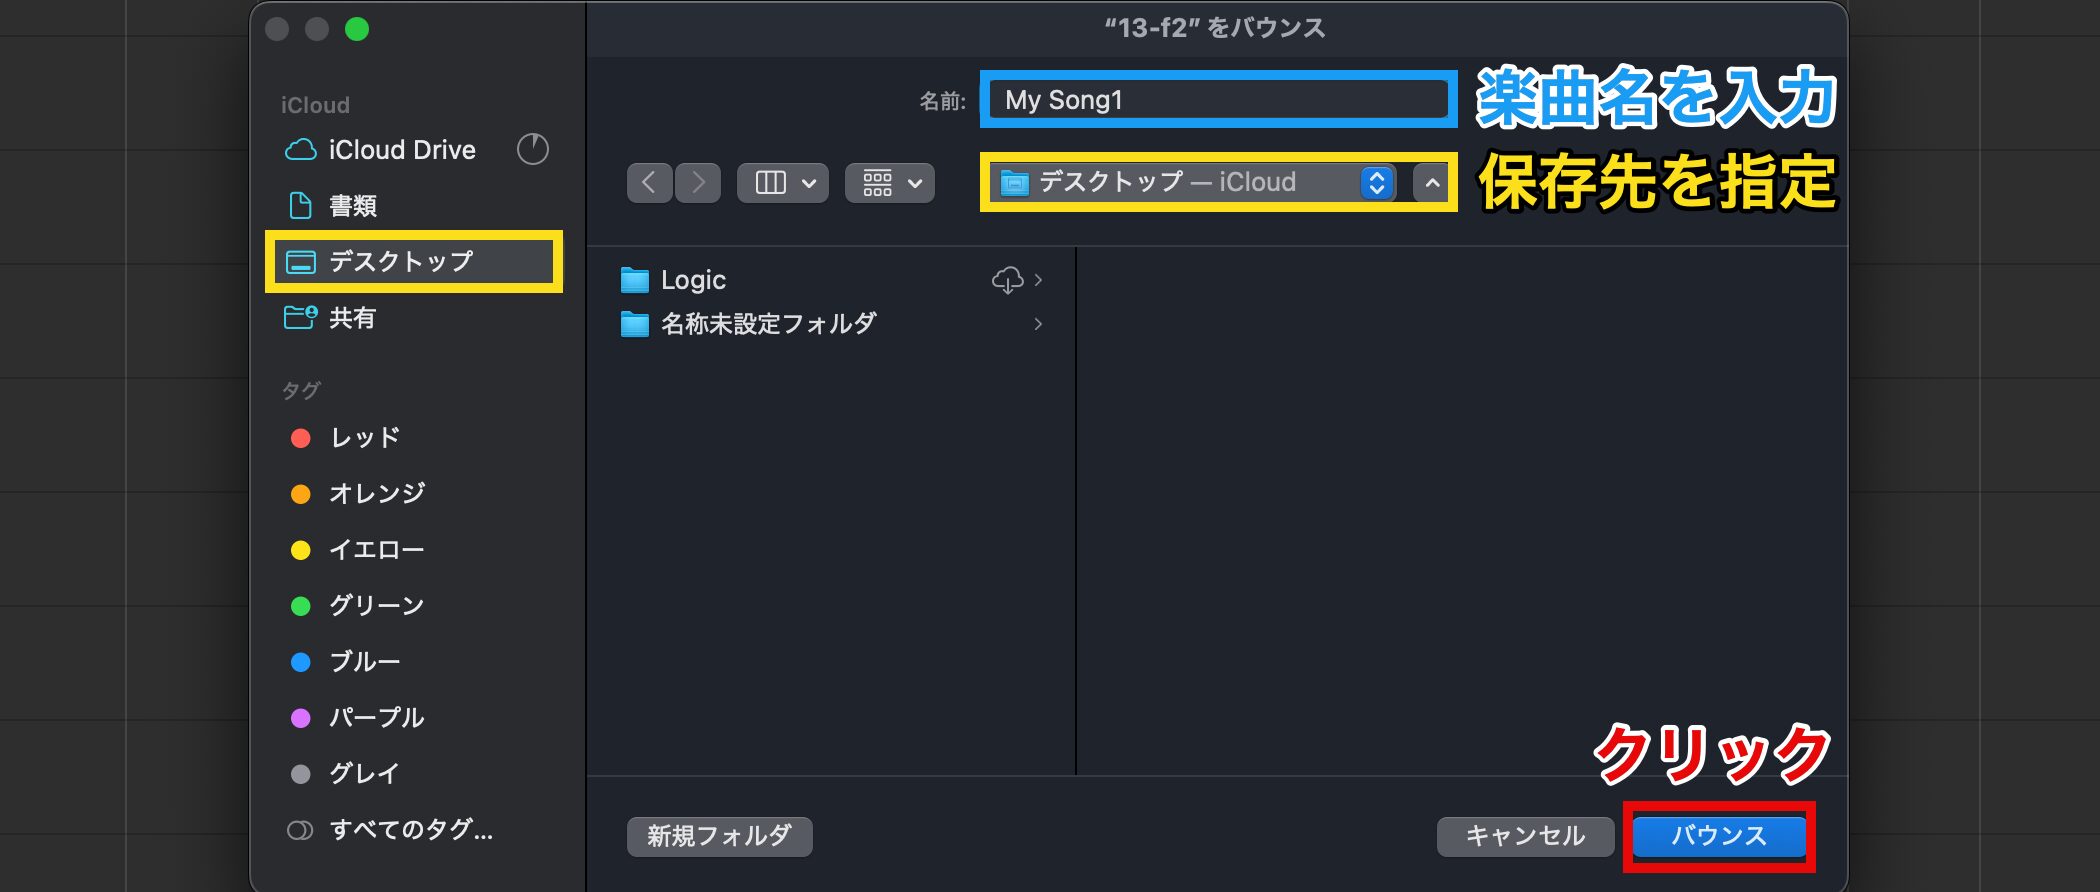
Enter the song name, specify where to save it and click "Bounce" to save the song data.
Be sure to play back the exported file and check that there are no unintended changes in sound or mistakes.
Miyakawa
Logic Pro offers Apple's characteristic stability along with advanced AI-powered accompaniment creation and a wealth of features, making it a DAW that meets the needs of many music creators.
We hope the operations and production steps introduced in this article will be of some help in your future music production.
From those trying music production for the first time to those who want to further refine their skills, Logic Pro should be a powerful tool that brings out your creativity.
Please make use of what you have learned in this series and create music that is uniquely yours!
Frequently Asked Questions
Q1. What is the trick to getting a natural result when adjusting volume with automation?
It is important to avoid vertical lines and draw diagonal curves. Abrupt volume changes cause noise and an unnatural feel, so adding four points and connecting them smoothly lets you make natural adjustments that do not feel odd to the listener.
Q2. What is the difference between a VCA fader and volume automation?
Volume automation is used for fine adjustments to specific sections, and once applied, the fader moves automatically. A VCA fader is used after automation to adjust the relative volume of whole tracks at once, while the original automation is kept.
Q3. What are the benefits of applying reverb with an Aux bus?
Sending multiple tracks to the same Aux bus reverb creates a unified sense of space and reduces CPU load. Because the original audio and the reverb can be adjusted independently, it also makes mixing more flexible.
Q4. What should I do if the Mastering Assistant changes the character of the song too much?
Lowering the Auto EQ slider reduces the change in sound caused by mastering. You can also fine-tune the result to suit the concept of the song by adjusting Loudness, Excite and Width individually.
Q5. How can I keep the song from starting and ending abruptly when bouncing?
Apply automation to the fader of the Stereo Out channel, raising the volume gradually from zero at the start of the song and lowering it gradually at the end, to create fade-in and fade-out effects.
NEW ARTICLES
Latest English Articles











