Mixing in Logic Pro 11 is an important process for balancing the levels of the whole song. This article explains how to show the Mixer and its basic operations, techniques for adjusting levels in order from kick and bass to chord instruments and vocals, and ways to work efficiently with the Solo function and channel arrangement. By learning how to set a shortcut for mixer undo, how to manage multiple channels and tips for fine fader adjustments, even beginners can finish a well-balanced song while avoiding clipping.
Mixing from the Basics to Practice

Miyakawa
Song production has finally reached its final stage, and we move on to "mixing."
In mixing, we adjust the sound and level of each track in the song to finish the whole song with a good balance.
First, we explain how to use the Mixer, adjustment techniques and EQ!
Mixing Part 1 Video
Showing the Mixer
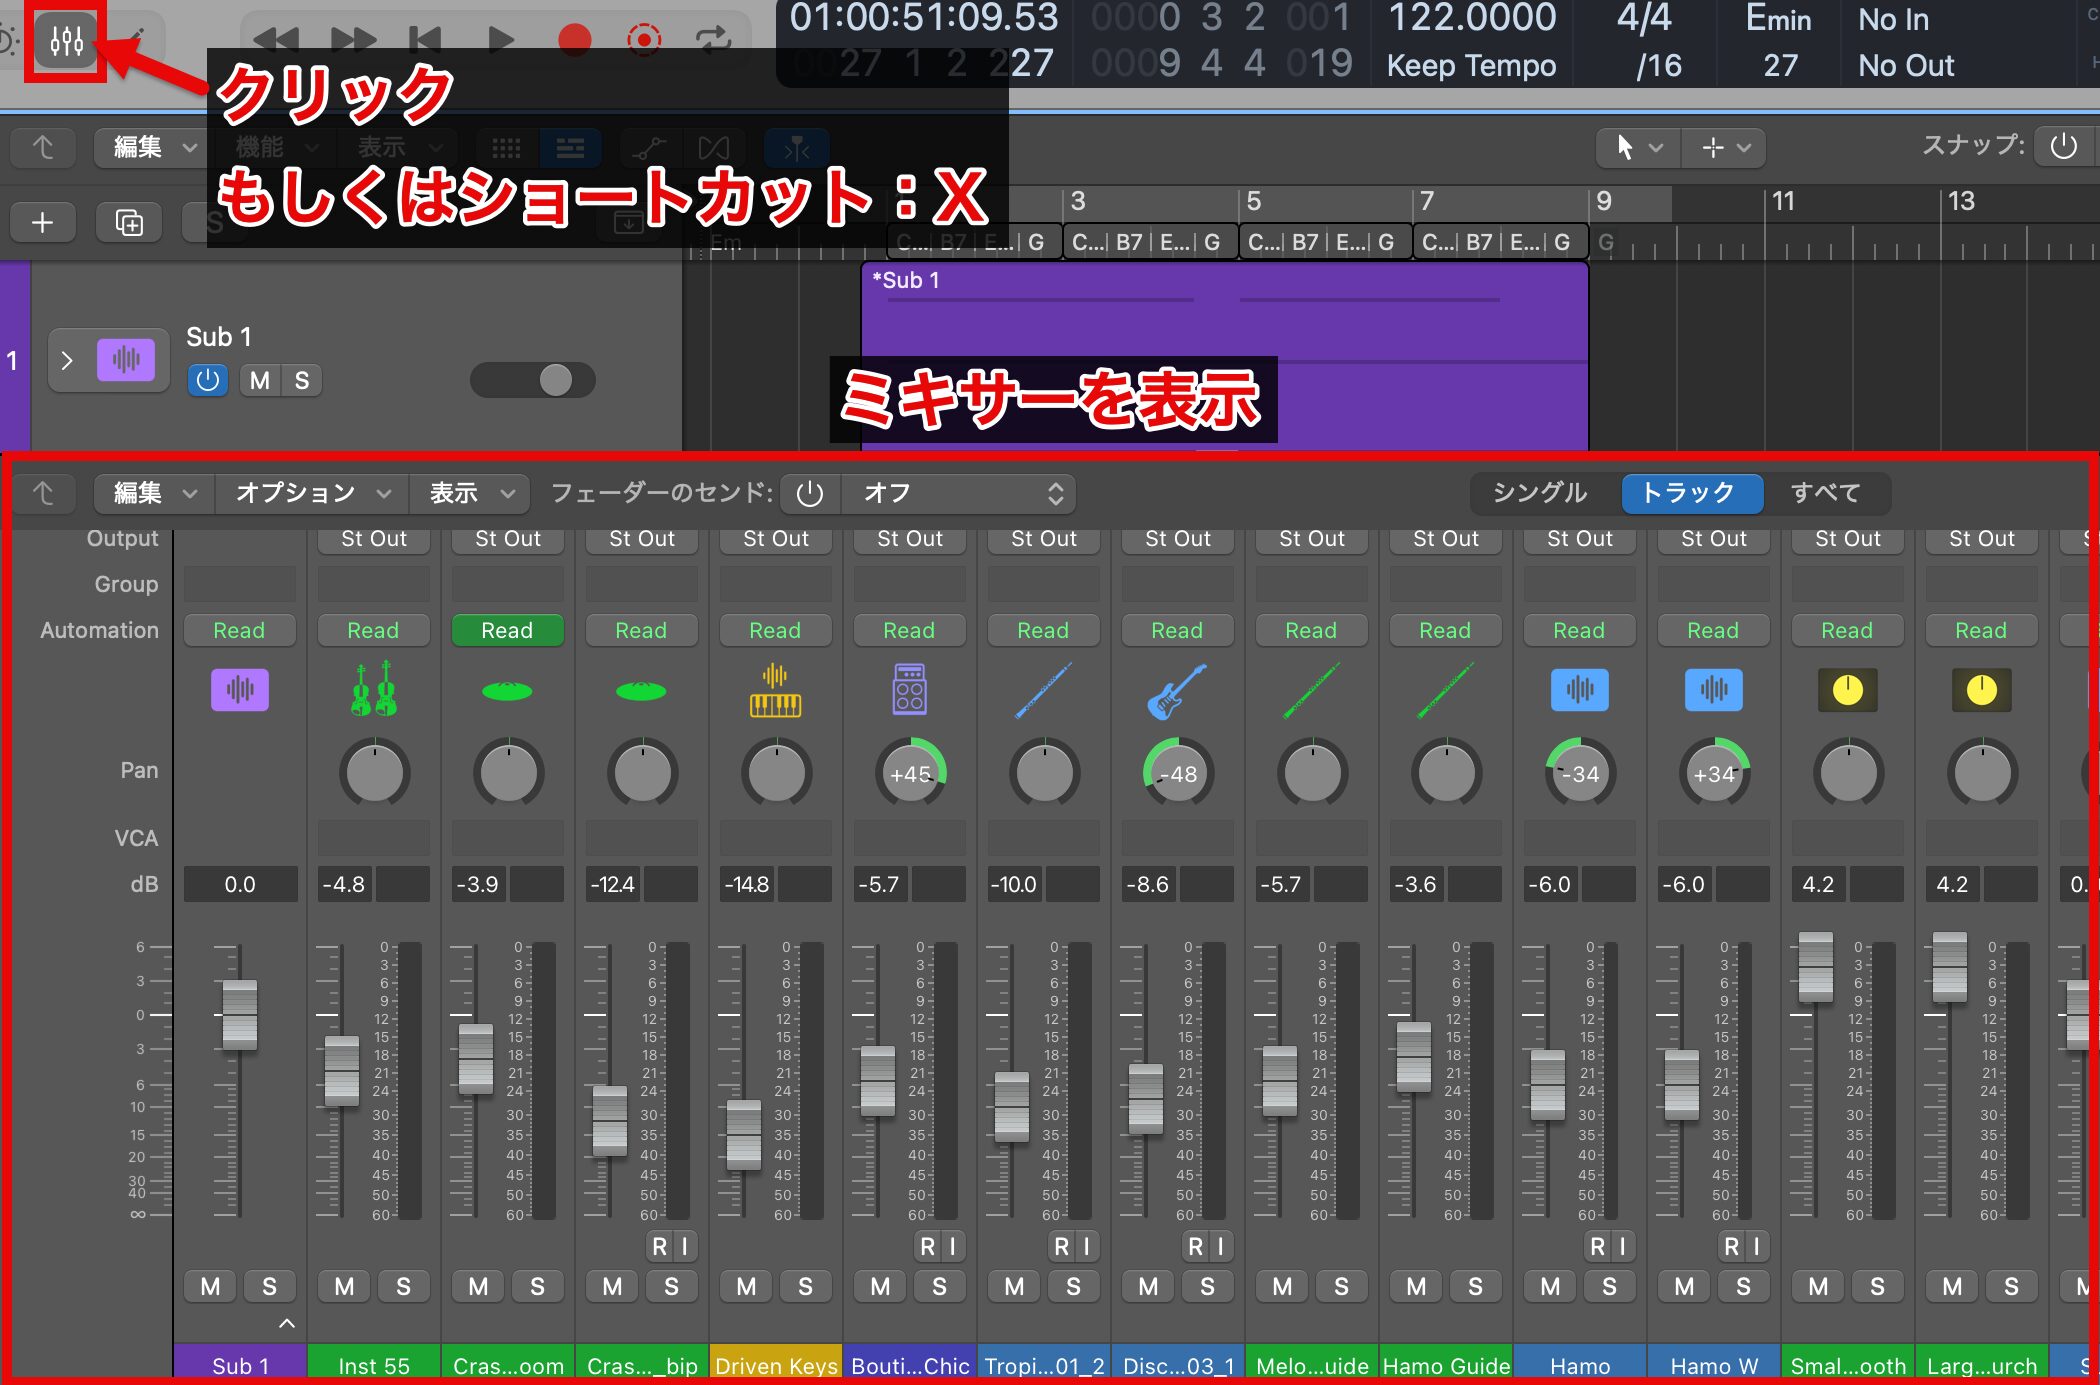
So far we have adjusted individual tracks with the fader in the Inspector, but in mixing you need to keep the balance of the whole song in mind.
So click the "Mixer" button at the top of the screen, or use the shortcut key X to show the Mixer.
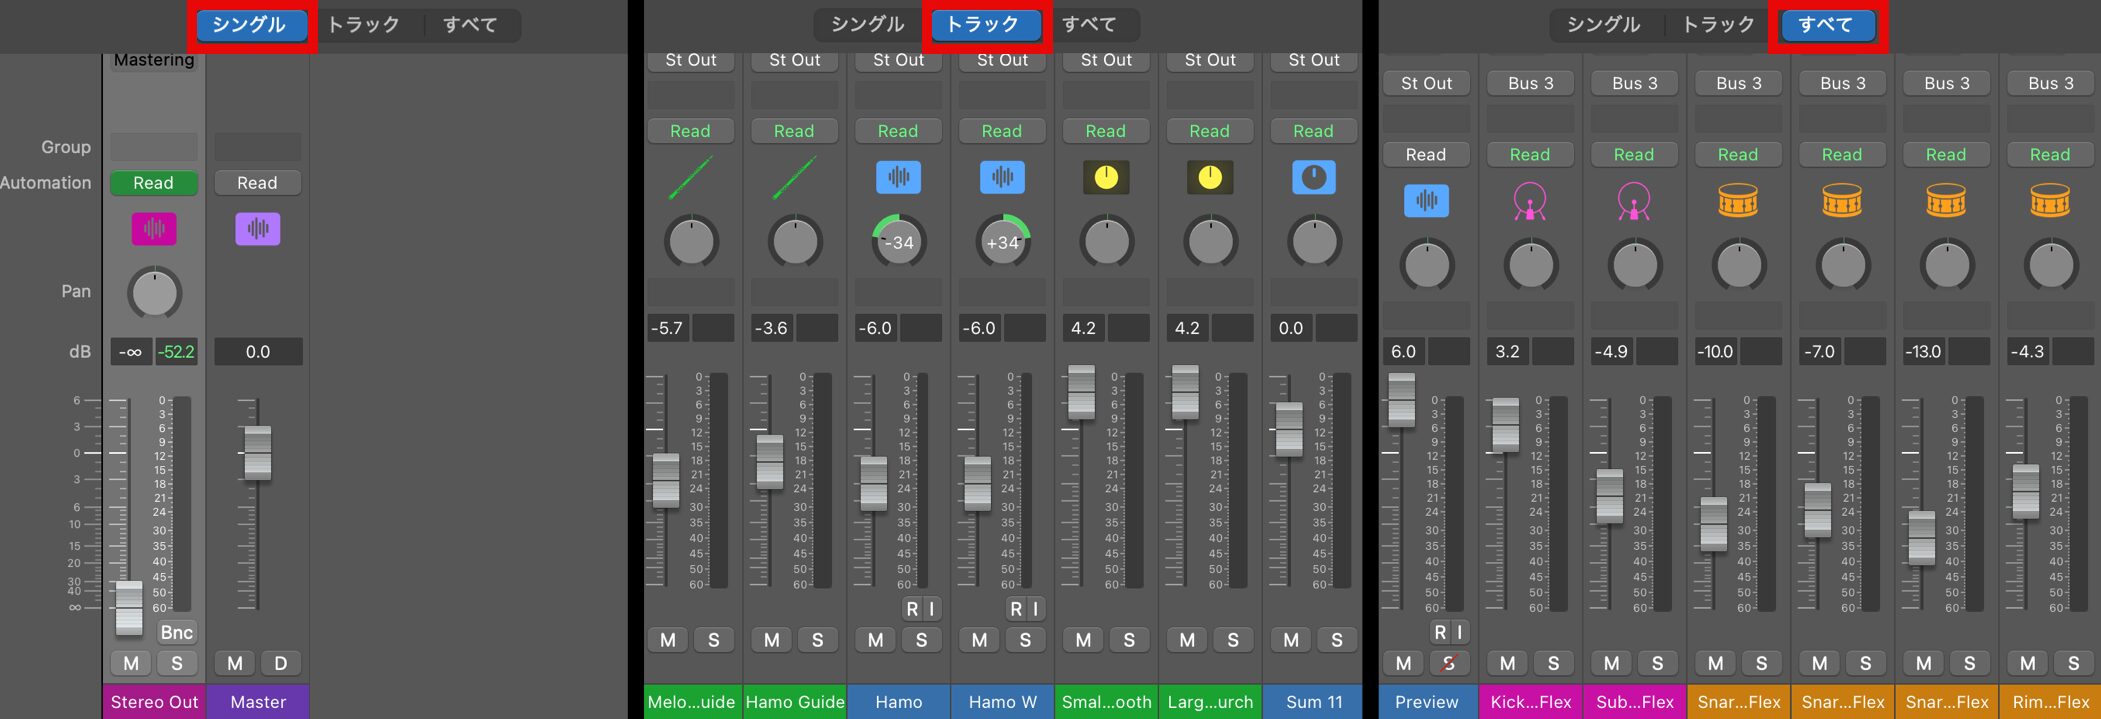
The Mixer has three view settings: "Single," "Tracks" and "All."
- Single: shows only the one selected track
- Tracks: shows all the tracks used in the song
- All: in addition to the tracks, also shows channels for grouping sounds and for overall adjustment
Here, we proceed with "Tracks" selected.
Mixer Undo and Shortcut Settings
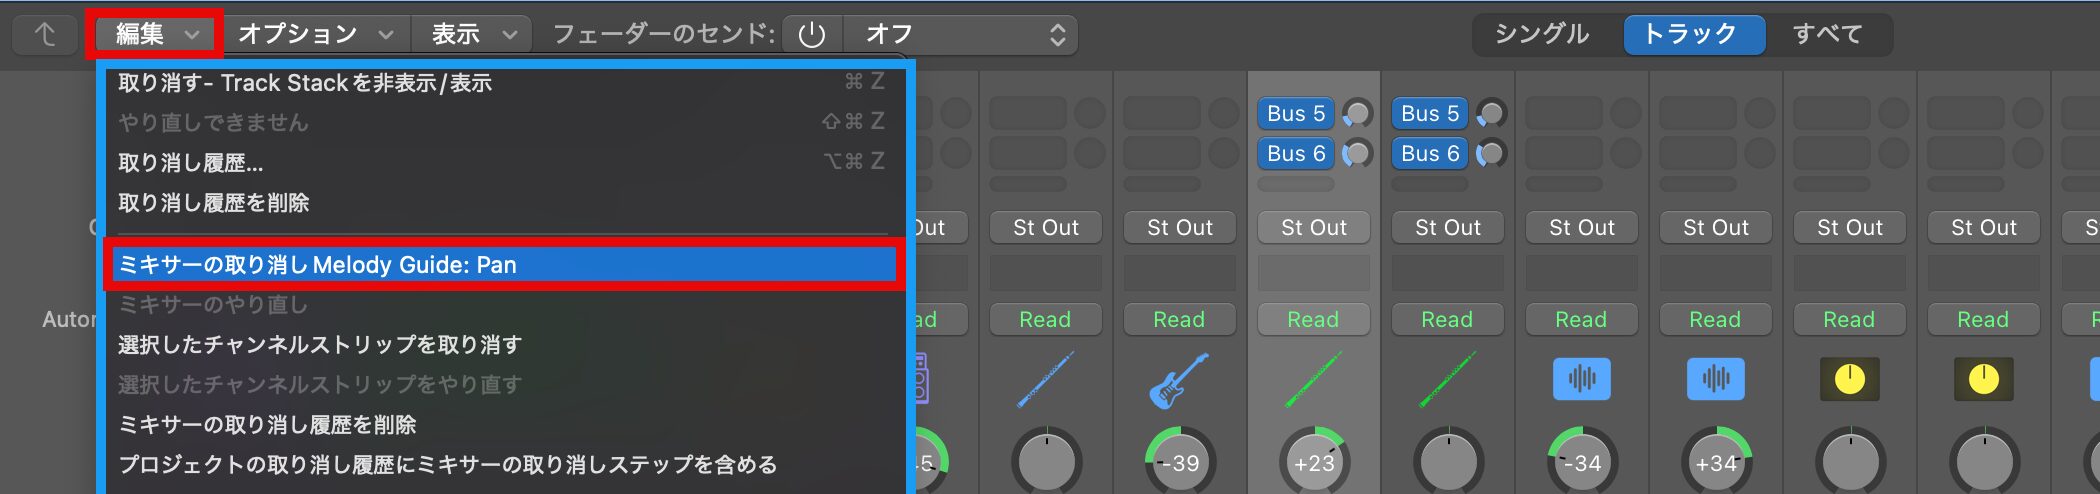
Volume adjustments (faders) and pan operations that set left-right positioning in the Mixer cannot be reversed with the normal Undo.
To return to a previous state, you need to choose the mixer undo command from the "Edit" menu.
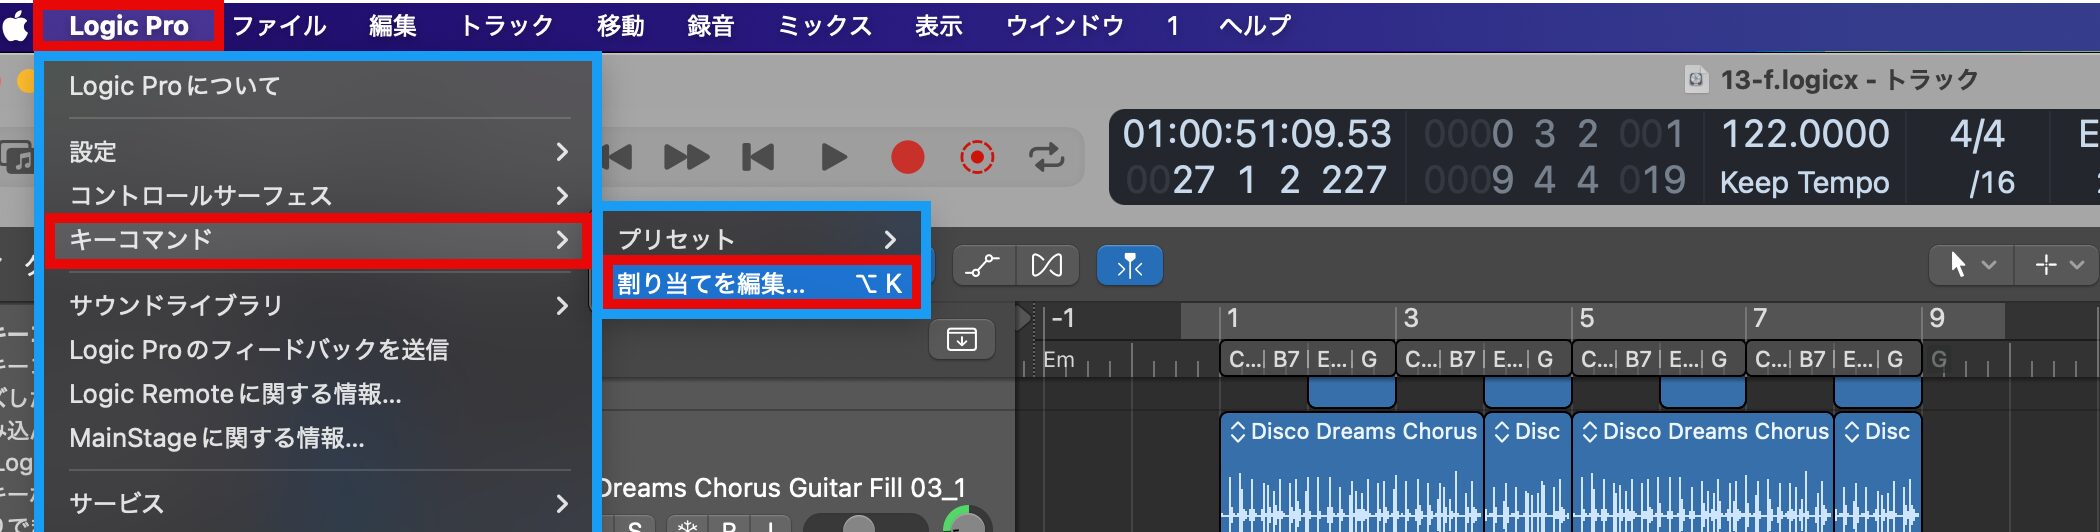
By default, mixer undo has no shortcut assigned, so it is convenient to set one if you use it often.
You can set the shortcut from "Key Commands" > "Edit Assignments" in the Logic Pro menu.
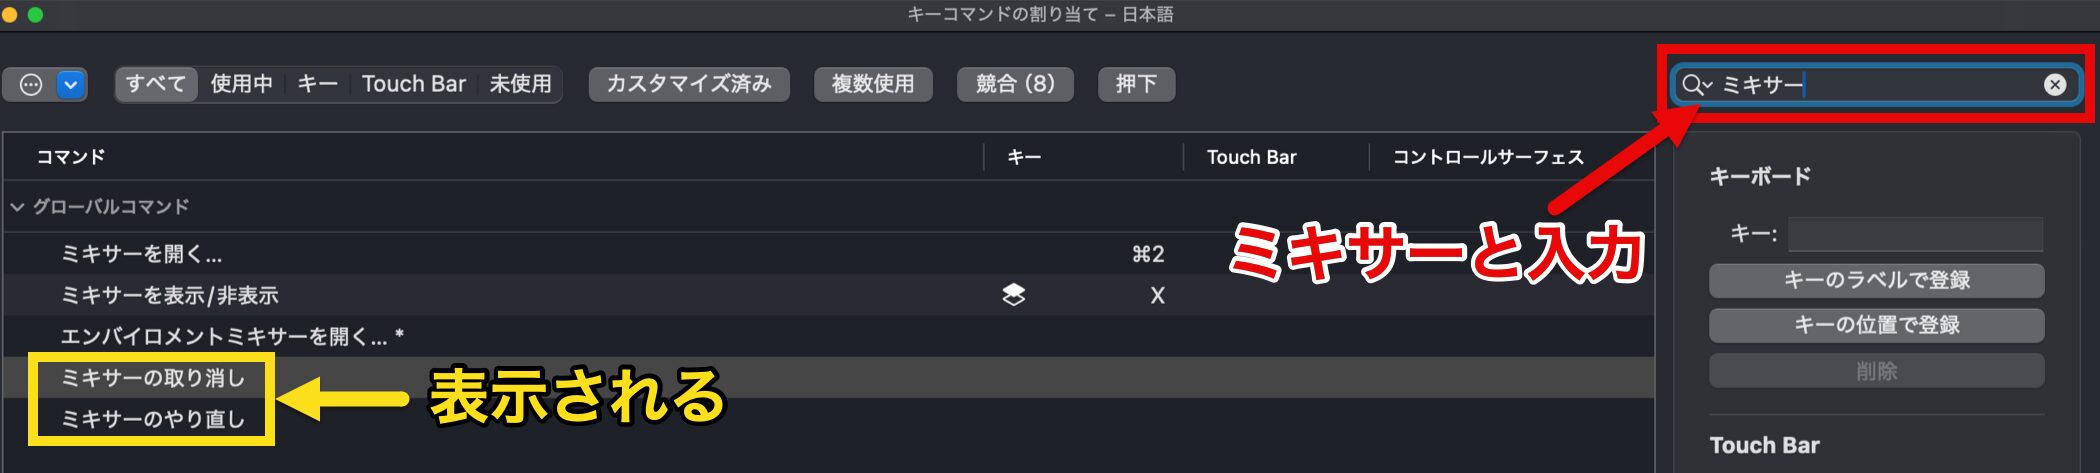
Type "mixer" in the search box, and the mixer undo and mixer redo commands are displayed.
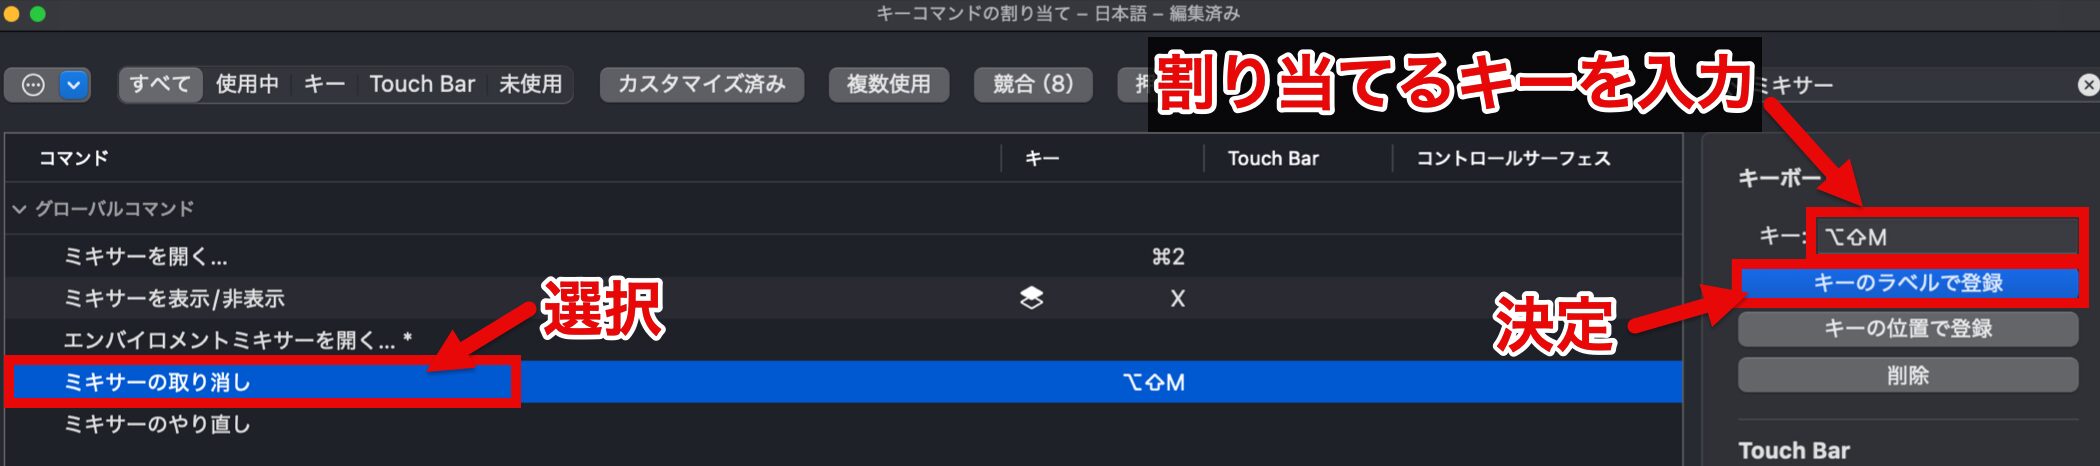
Select the command you want to set, press any key for "Key," and then click "Learn by Key Label."
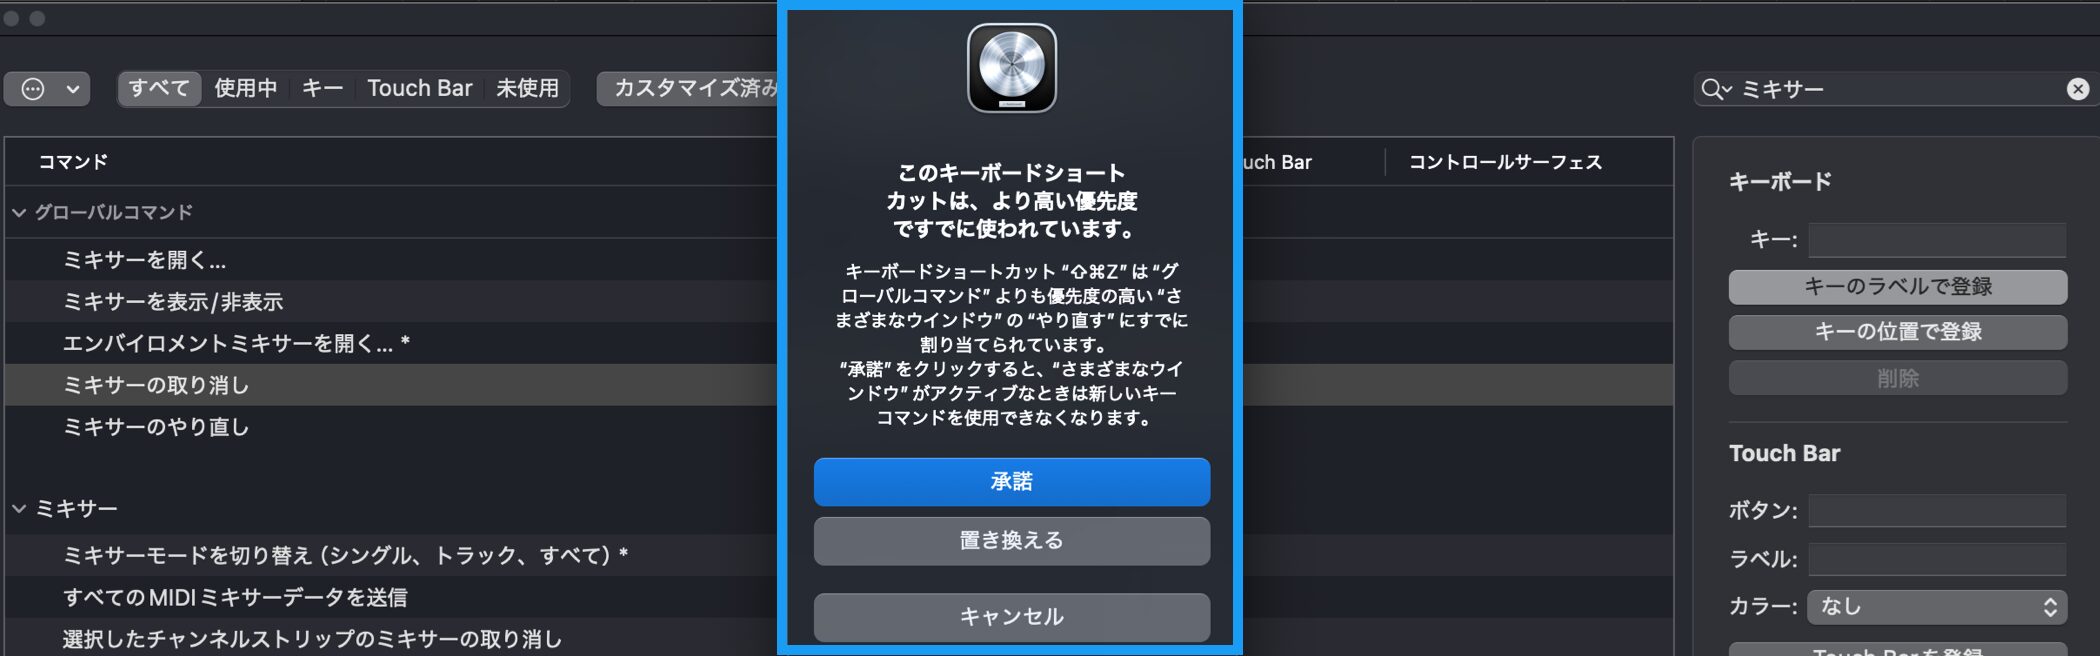
If you specify a shortcut that is already in use, a warning appears, so in that case we recommend assigning a different combination.
Adjusting the Level Balance
Until now we have mainly adjusted levels to make each track easy to hear, but in mixing we adjust with the level balance of the whole song in mind.
Adjusting the Kick
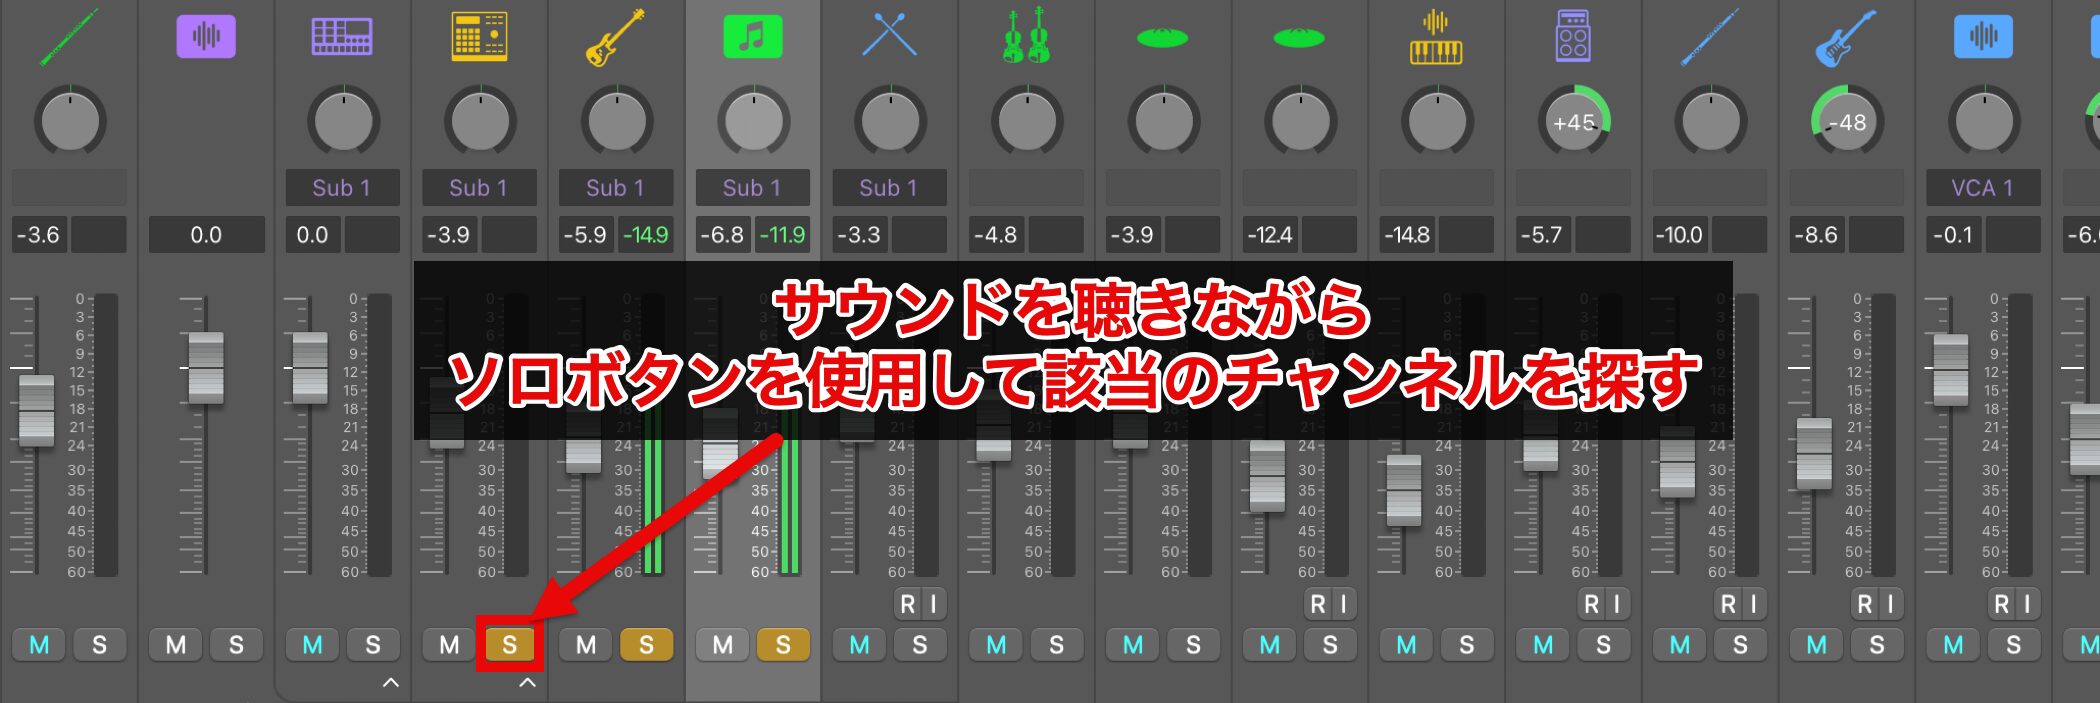
First, adjust the kick, which supports the rhythm of the song.
If you are not sure which channel is the kick, use the Solo button and listen to find it.
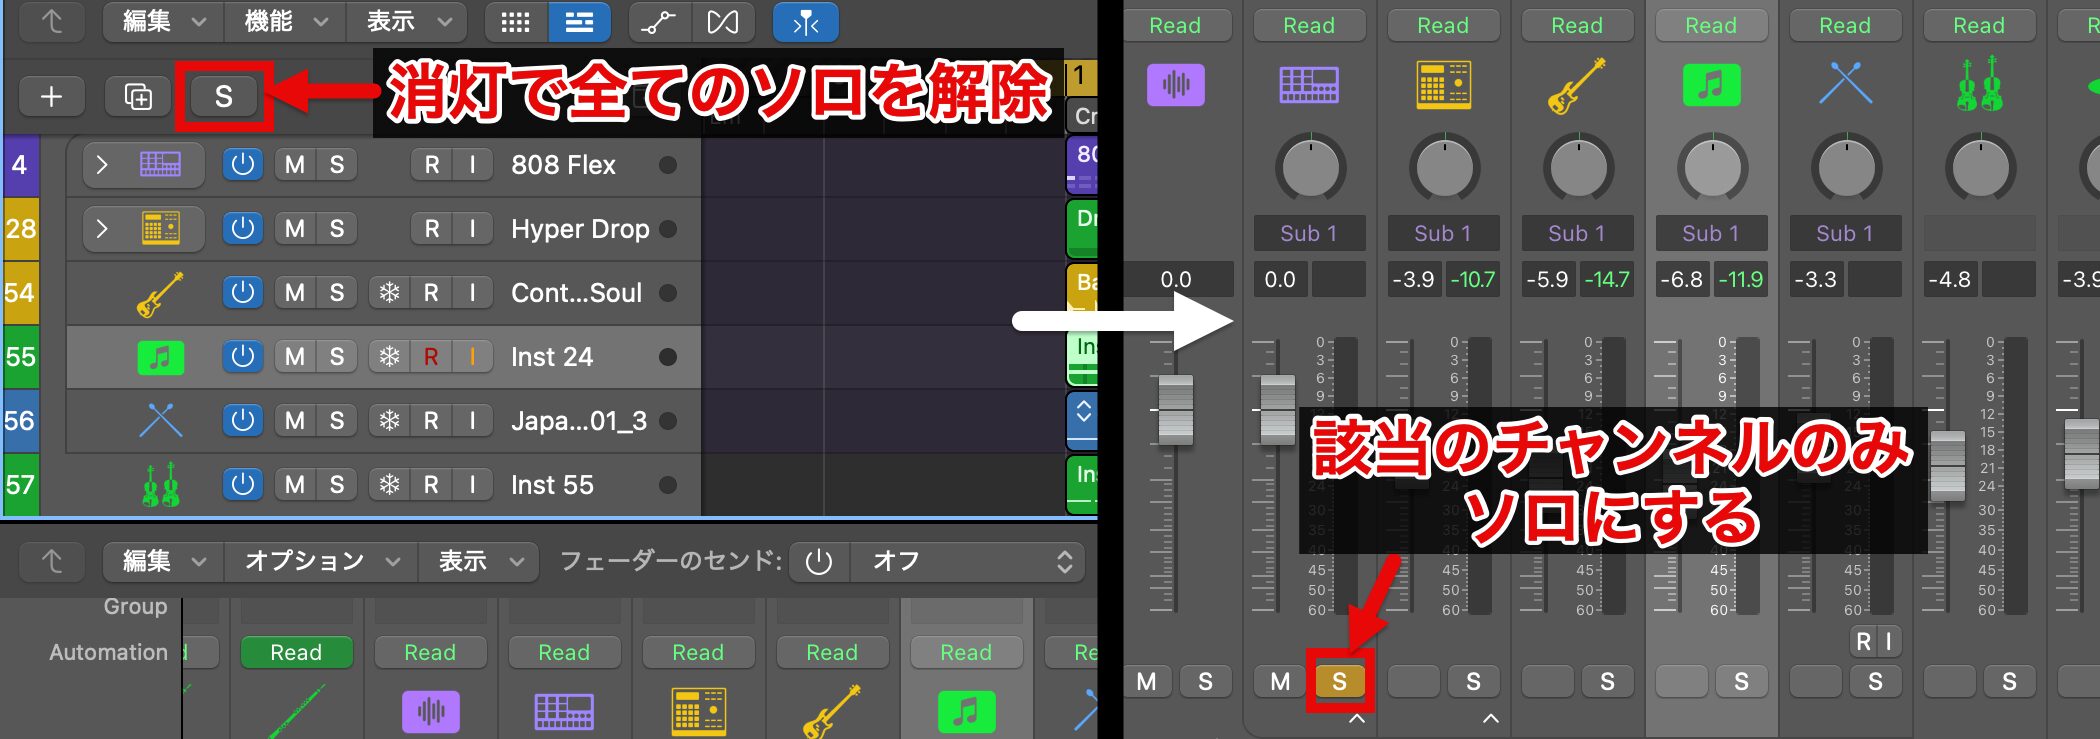
Once you find it, use the "Clear Solo" button to unsolo all channels, then set the kick channel to solo again.
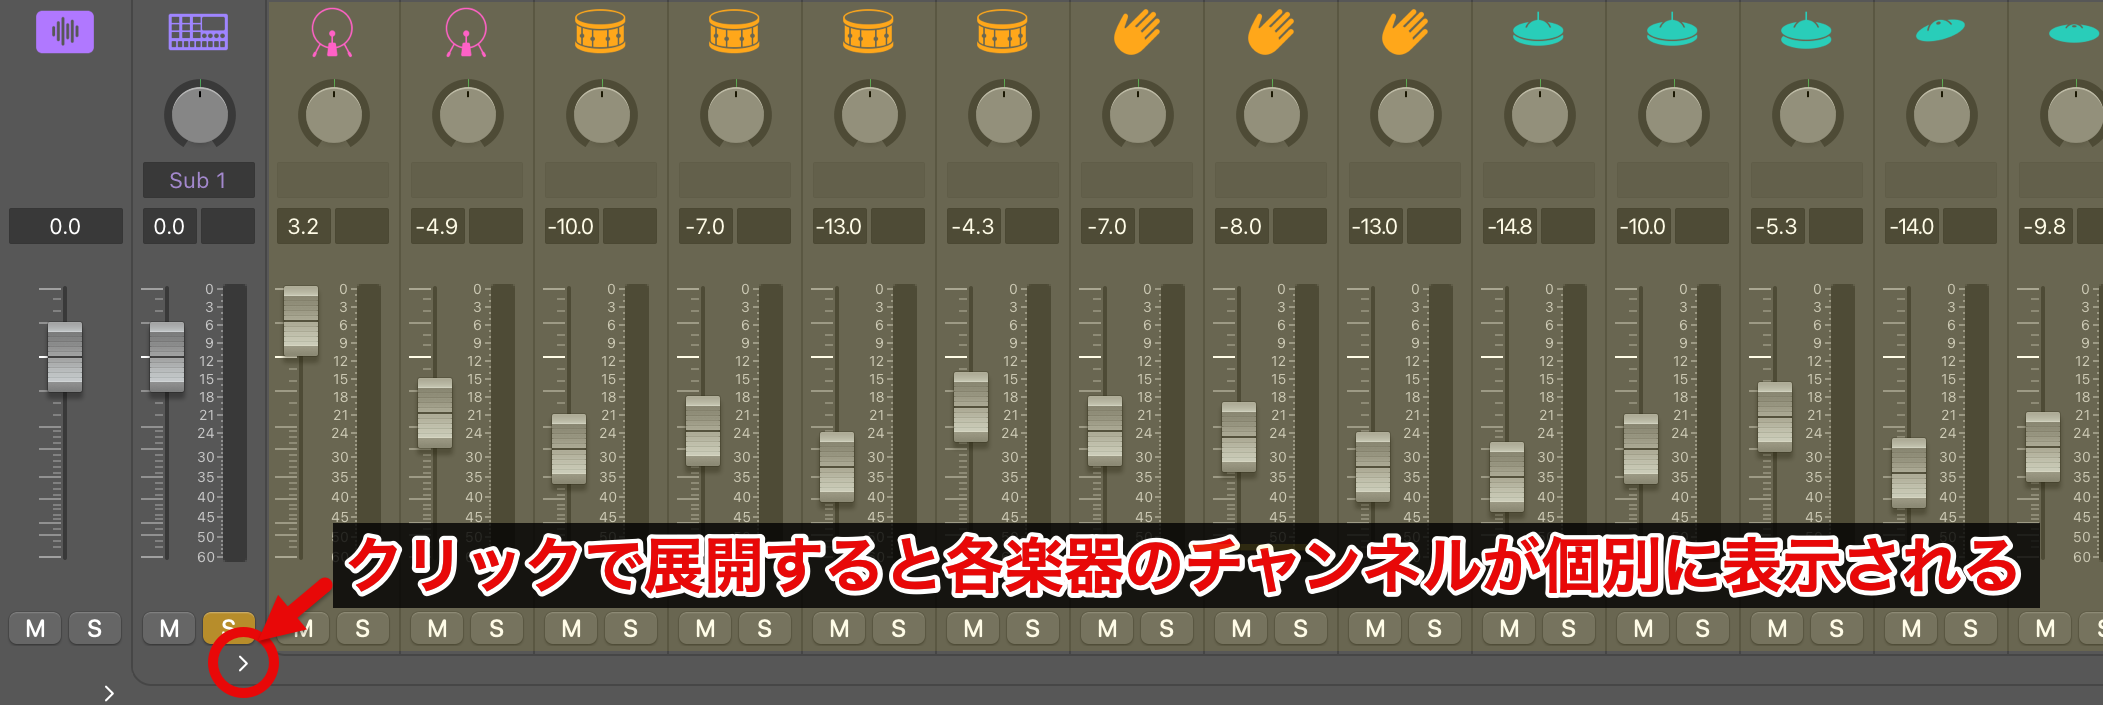
When using a drum kit, multiple instruments are combined into one channel.
Click the arrow below the channel to expand its contents, and you can show the channel for each instrument separately.
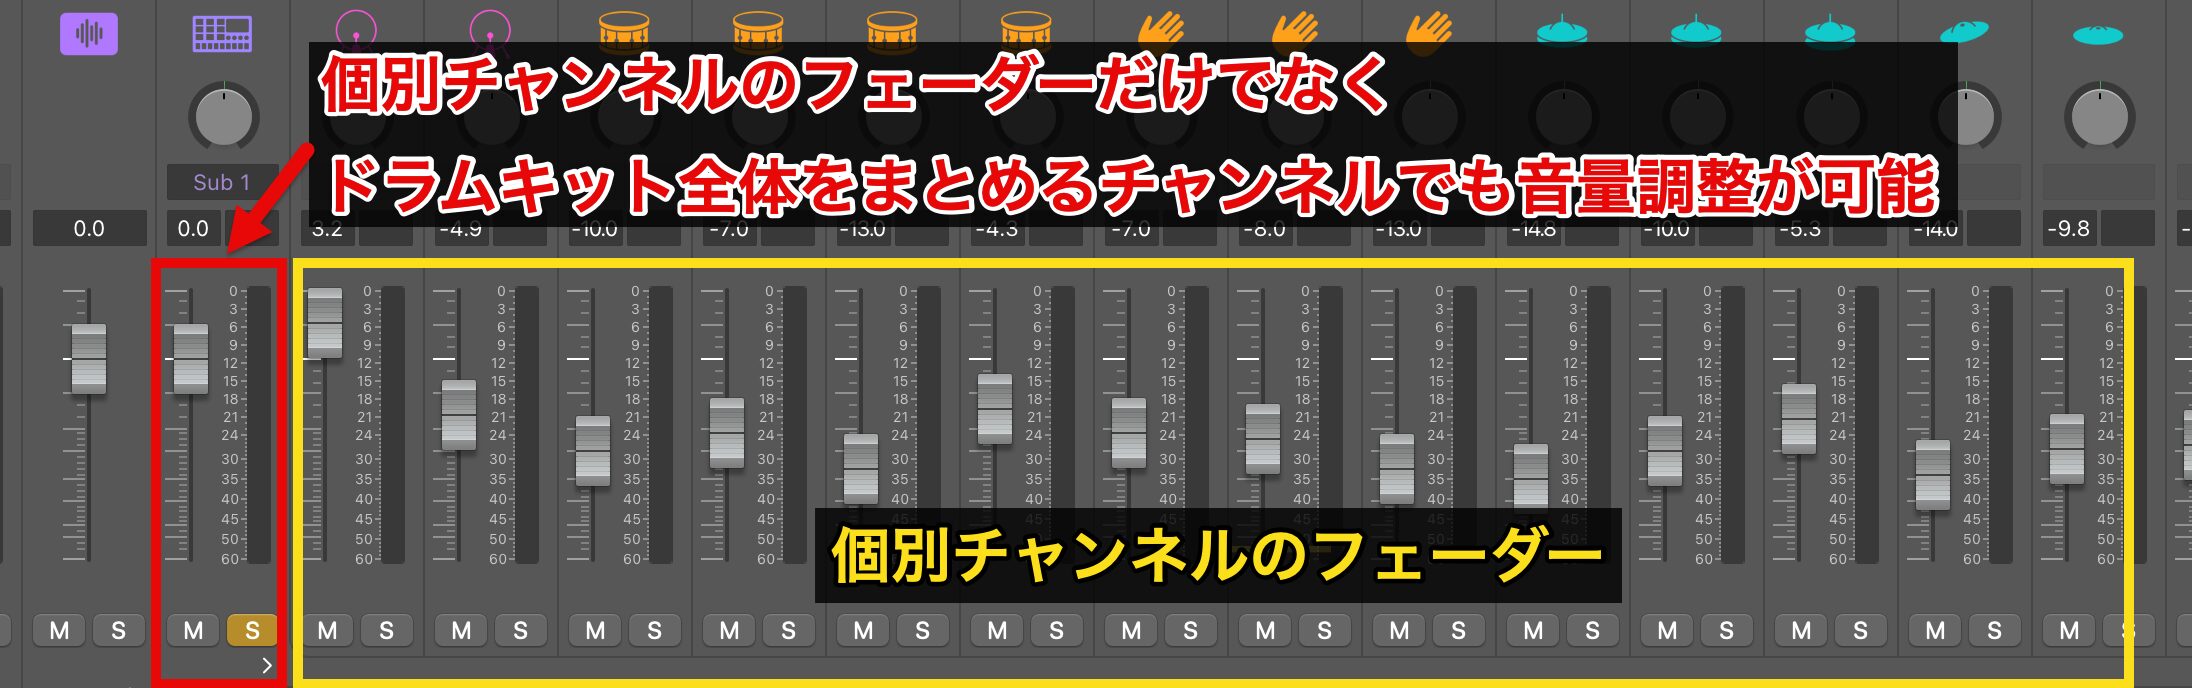
When multiple channels are combined, you can adjust the level not only with the faders of the individual channels but also from the channel that combines them all.
This can make it hard to tell later "which fader changed the level."
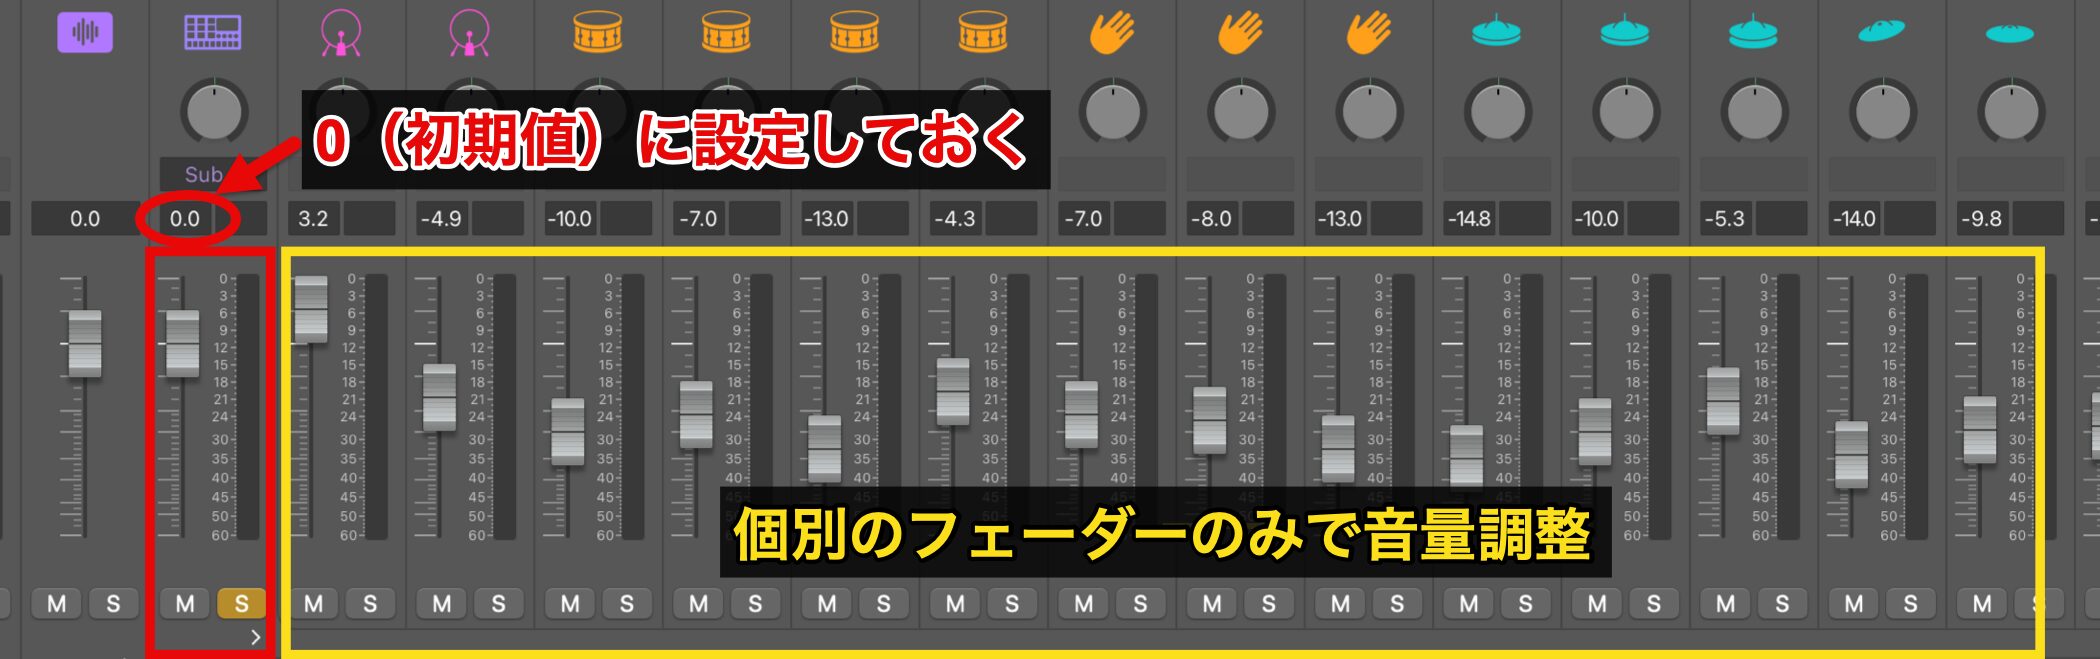
If you are not used to mixing, we recommend setting the fader of the combining channel to 0 (the default value) and adjusting levels only with the individual channels.
You can reset a fader to its default value by Option-clicking it.
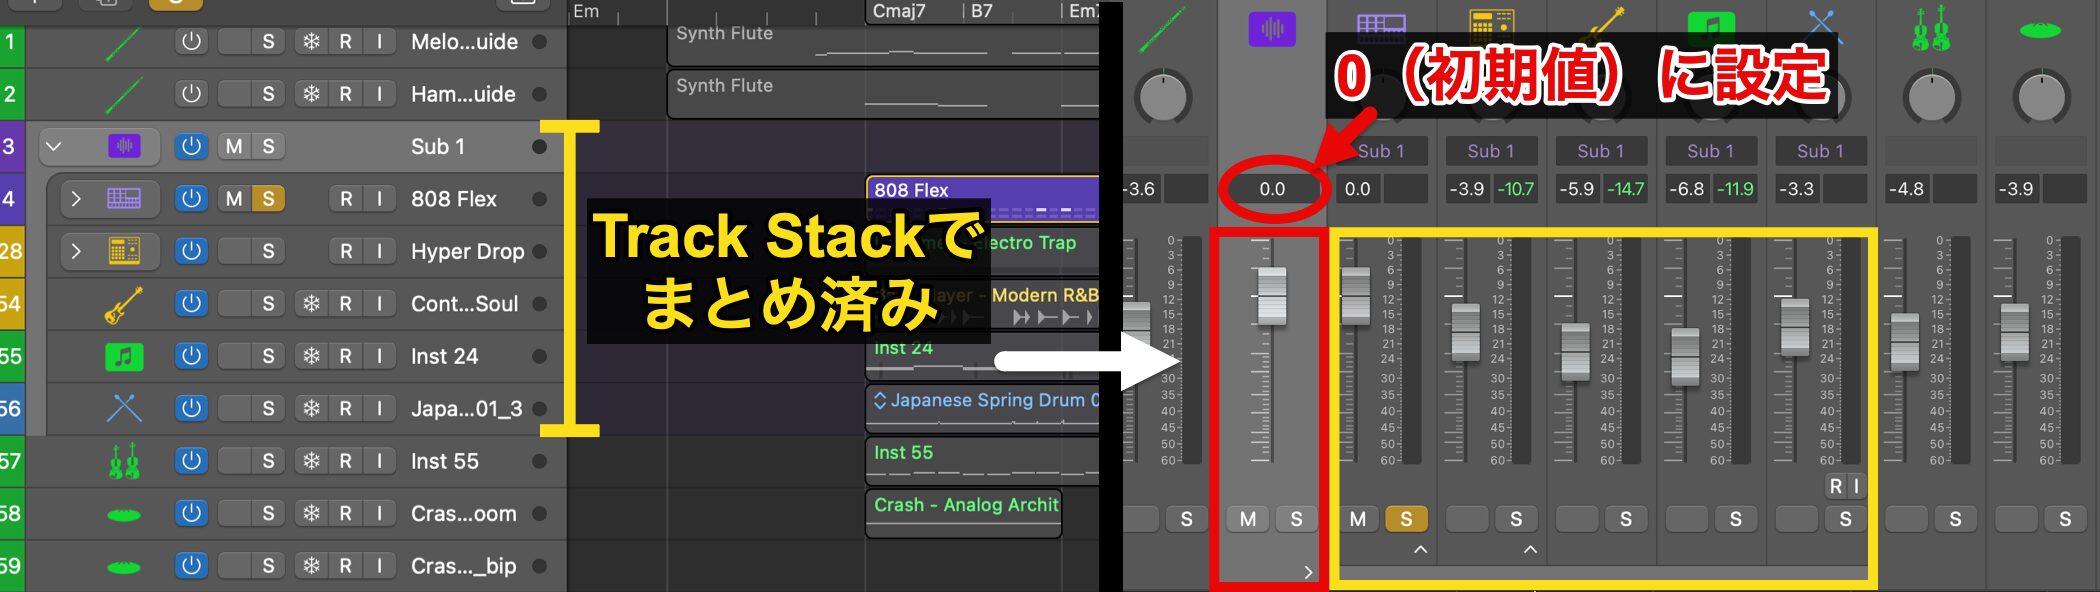
Likewise, when tracks are combined in a Track Stack, a channel for the whole stack is created.
To avoid duplicated level control, set this channel's fader to 0 (the default value) as well.
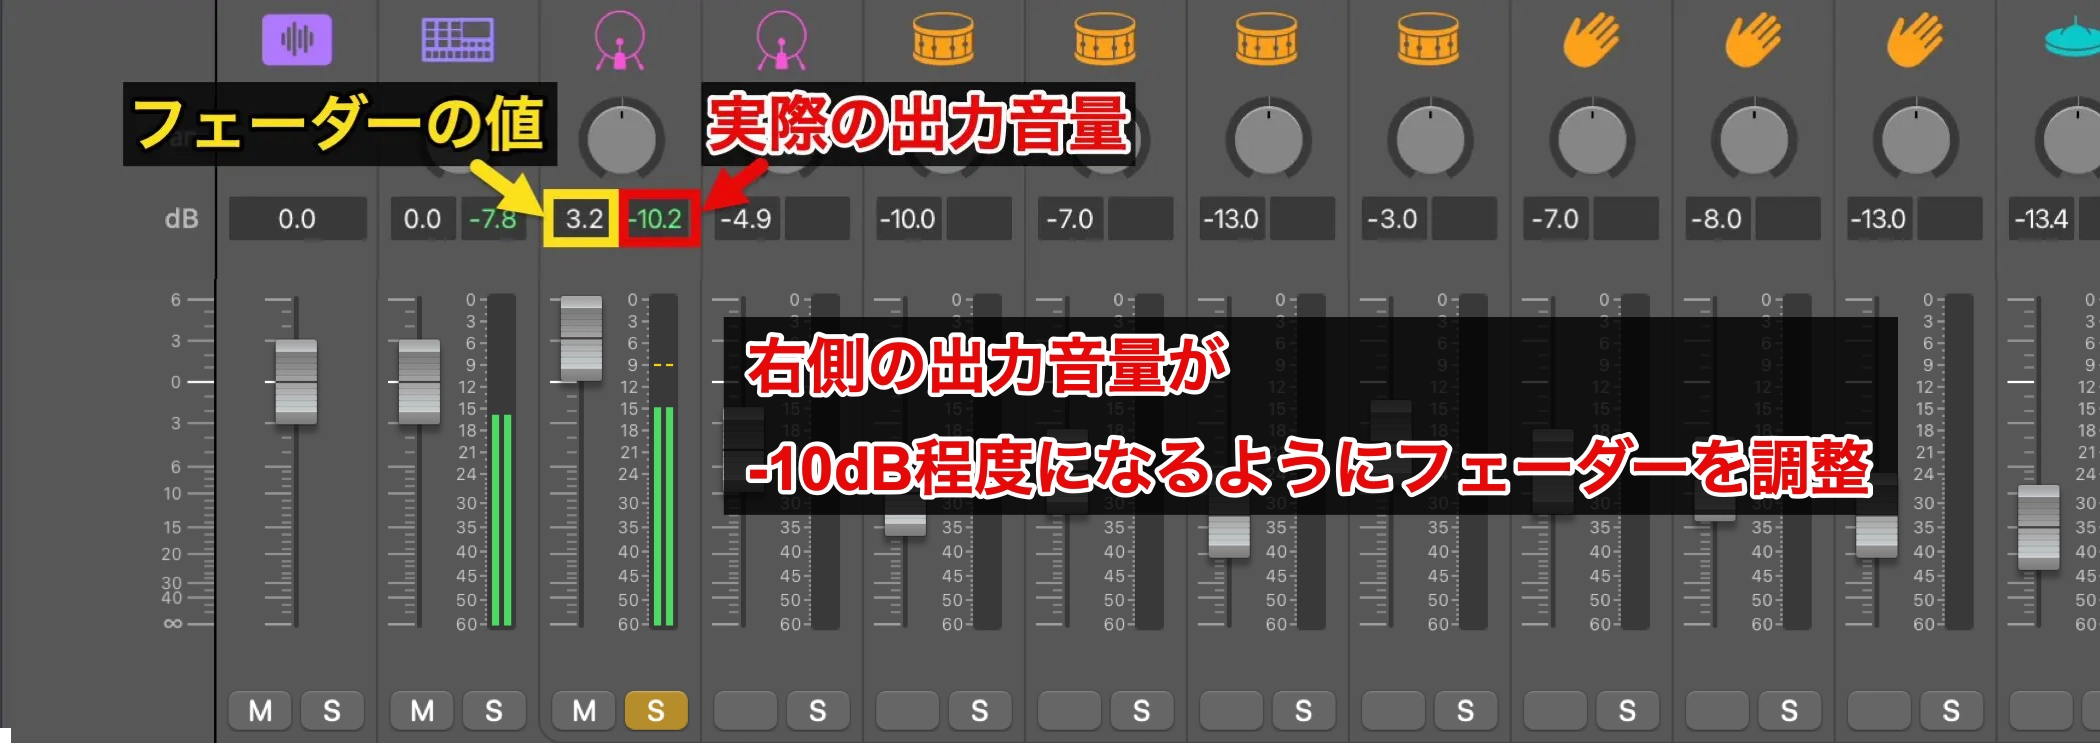
Each channel shows the fader value on the left and the actual output level on the right.
Set the kick level to about -10 dB on the output level on the right.
If you mix the other tracks using this as a reference, the overall level of the song will not exceed 0 dB, and you can get a well-balanced result while avoiding clipping.
If the fader moves too much and is hard to adjust, hold down the Shift key while dragging for finer adjustment.
Adjusting the Bass
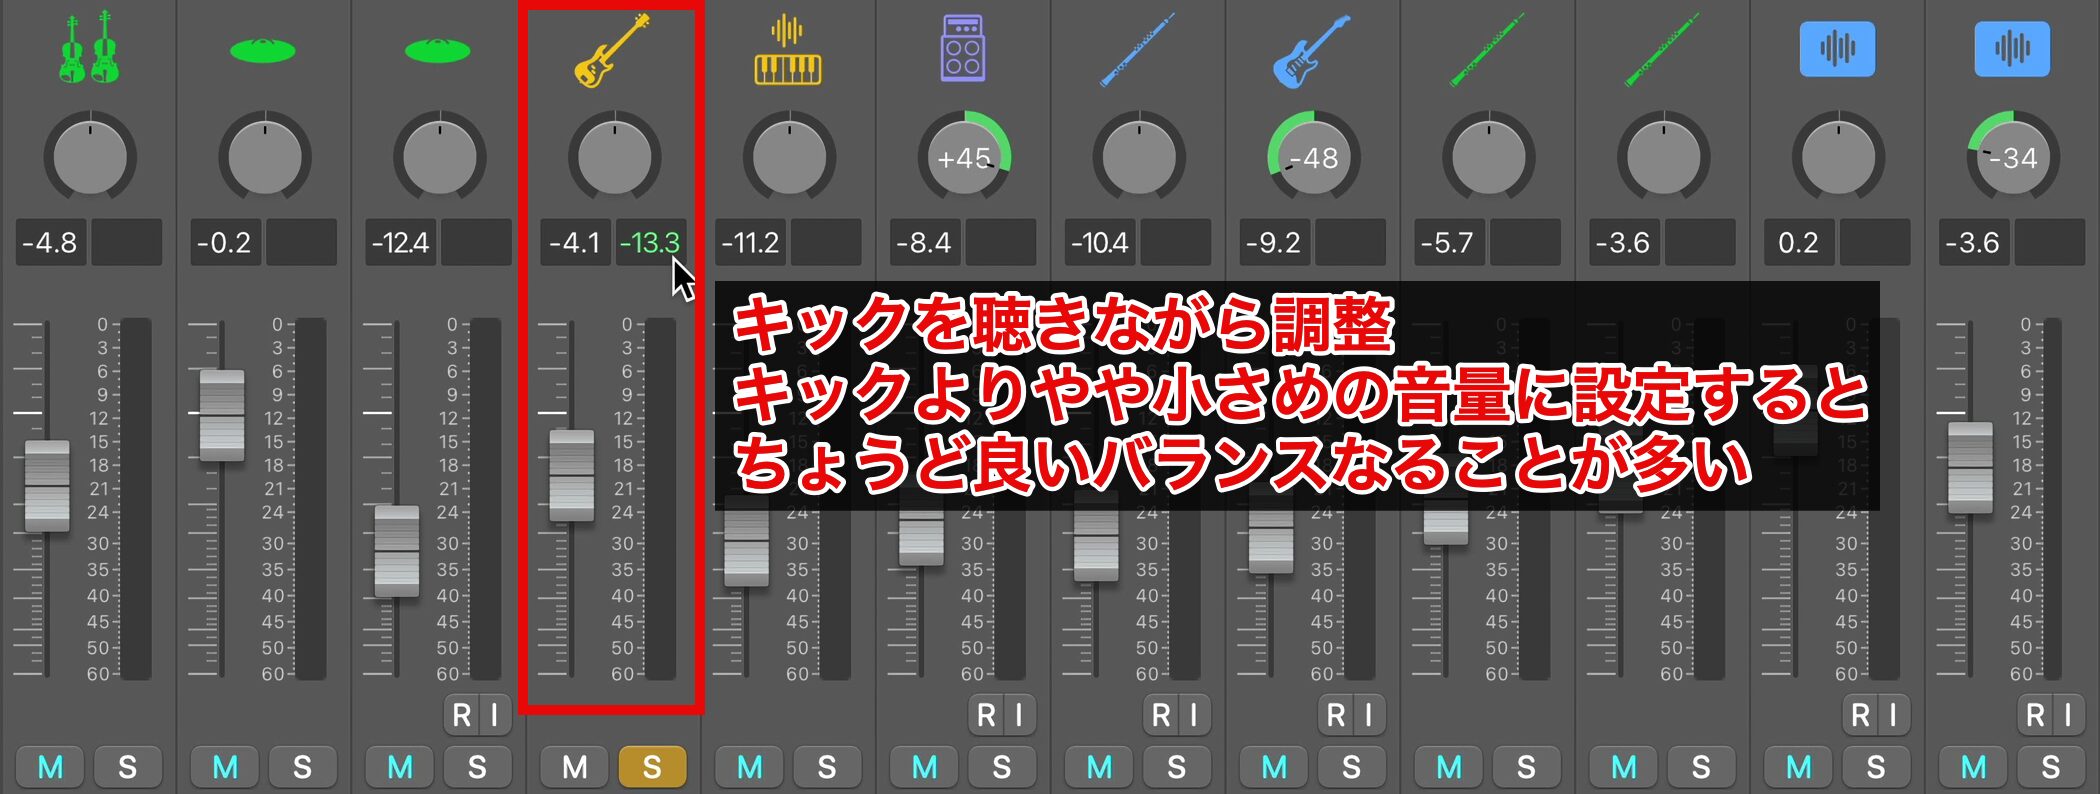
Next, adjust the bass, which supports the low end of the song together with the kick.
Adjust it while listening so that the two sound as one.
The right value differs depending on the sound, but in general, setting the bass slightly lower in level than the kick often gives just the right balance.
Adjusting the Chord Instruments
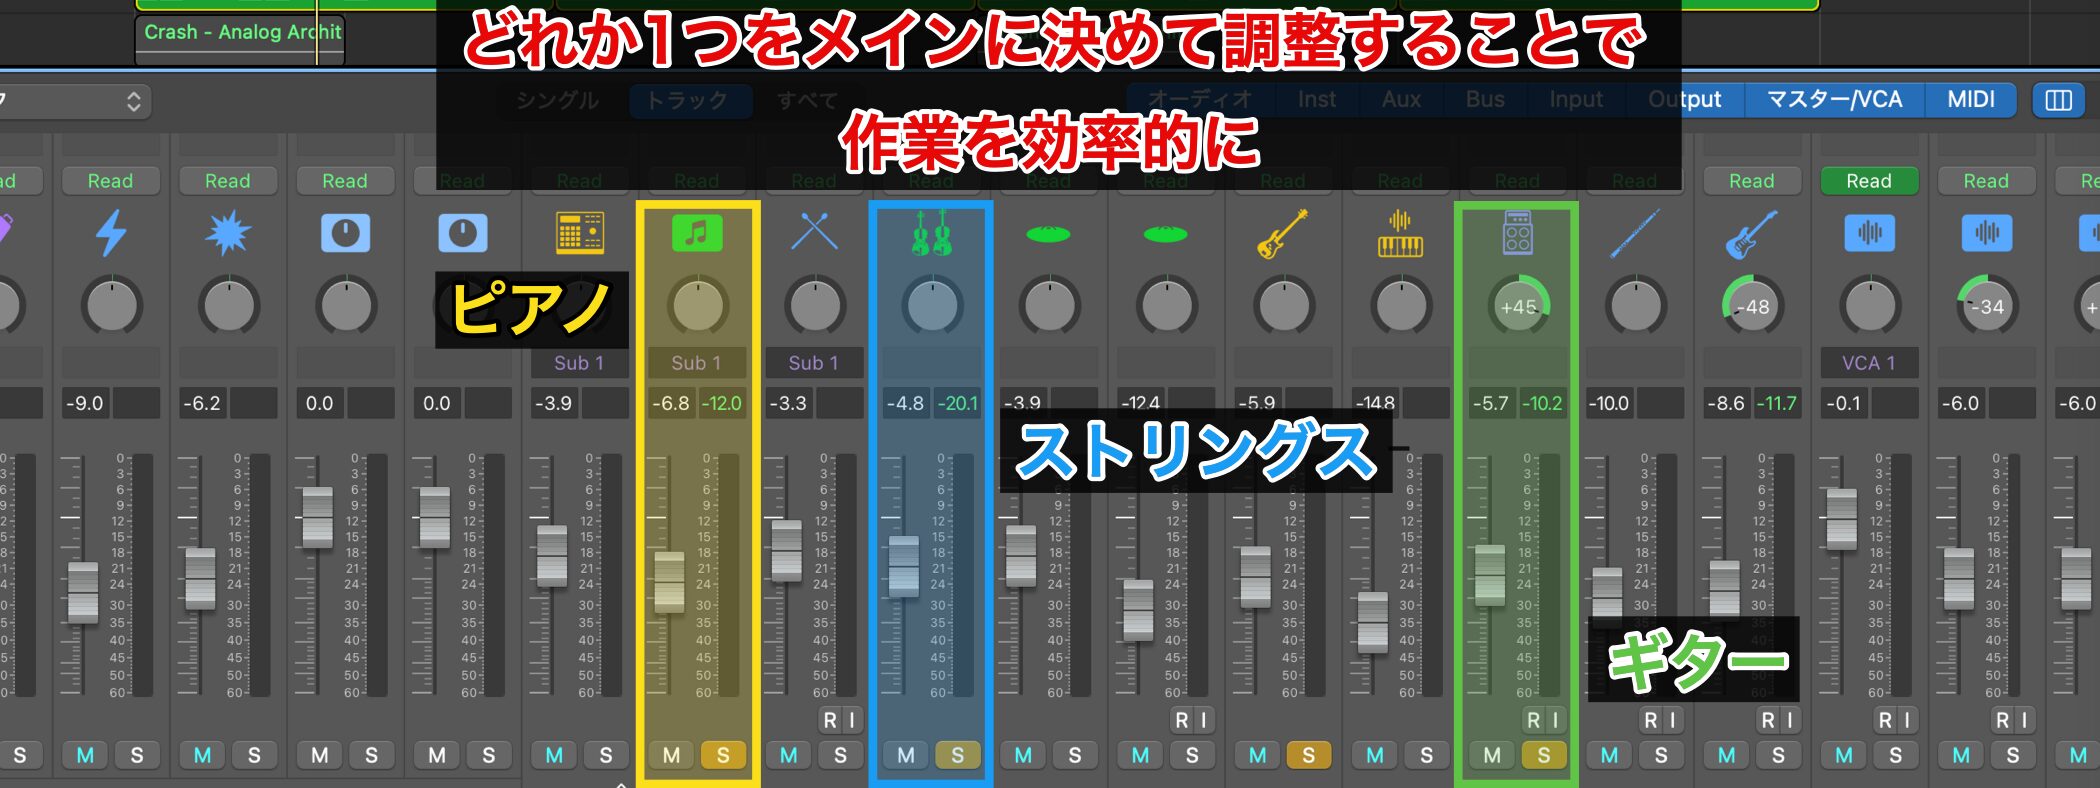
Once the low-end foundation is set, add the chord accompaniment, an important part that supports the song.
In this song, guitar, piano and, in some sections, strings play the chord accompaniment.
When multiple parts play the same role, choosing one as the main part and adjusting around it reduces hesitation and lets you work efficiently.
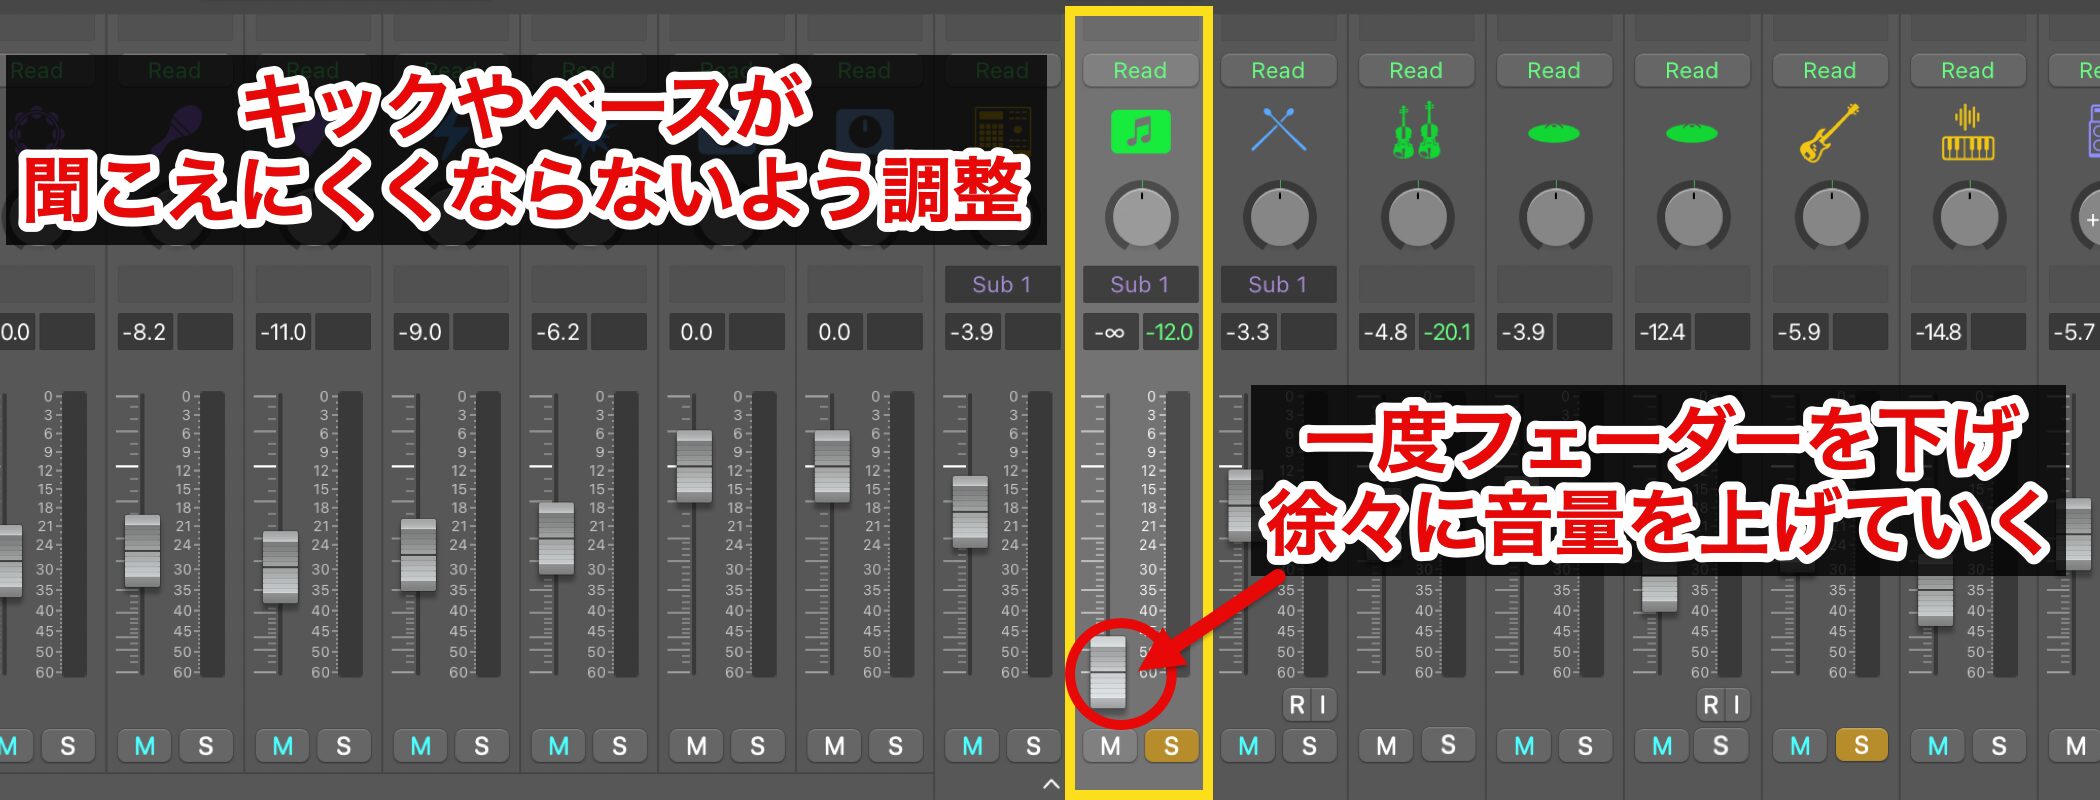
This time we build around the piano, adjusting it while taking care not to bury the kick and bass we added first.
We recommend lowering the fader once and then gradually raising the level to find the balance.
Adjusting the Vocals
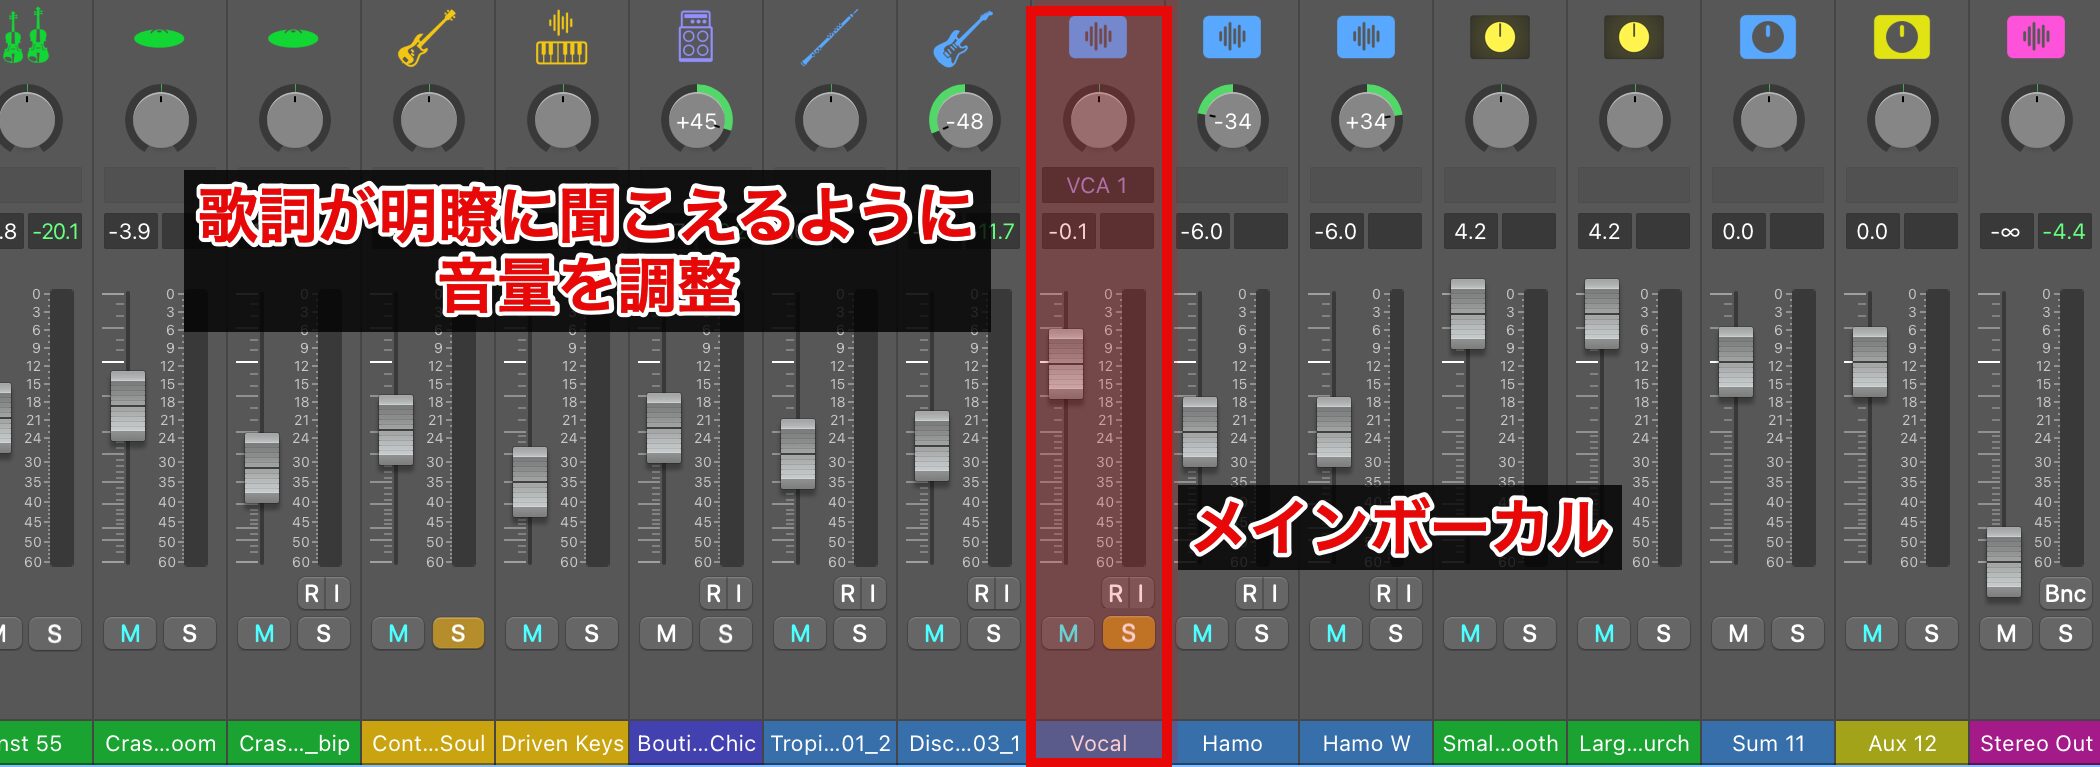
After adjusting the main chord instrument, add the vocals next.
The vocal is the part you most want to stand out in the song, so adjust its level so that the lyrics can be heard clearly.
Efficient Adjustment Techniques and Operations
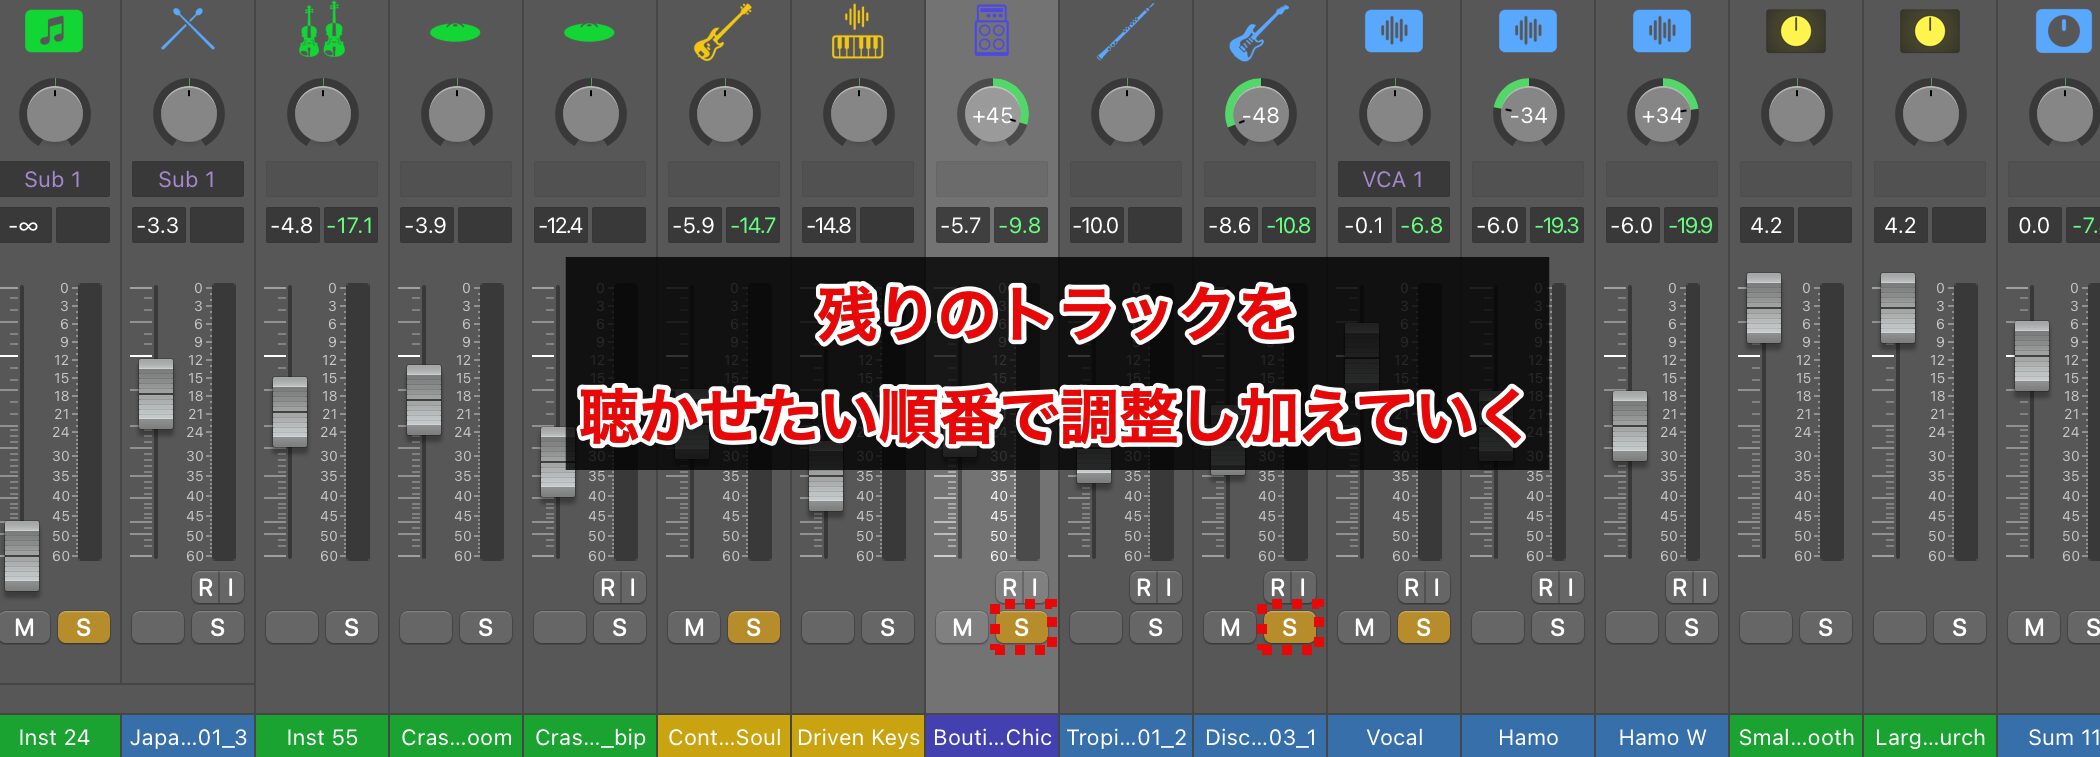
Once the balance up to the vocals is set, add the remaining tracks using the same steps, adjusting them in the order you want them to be heard.
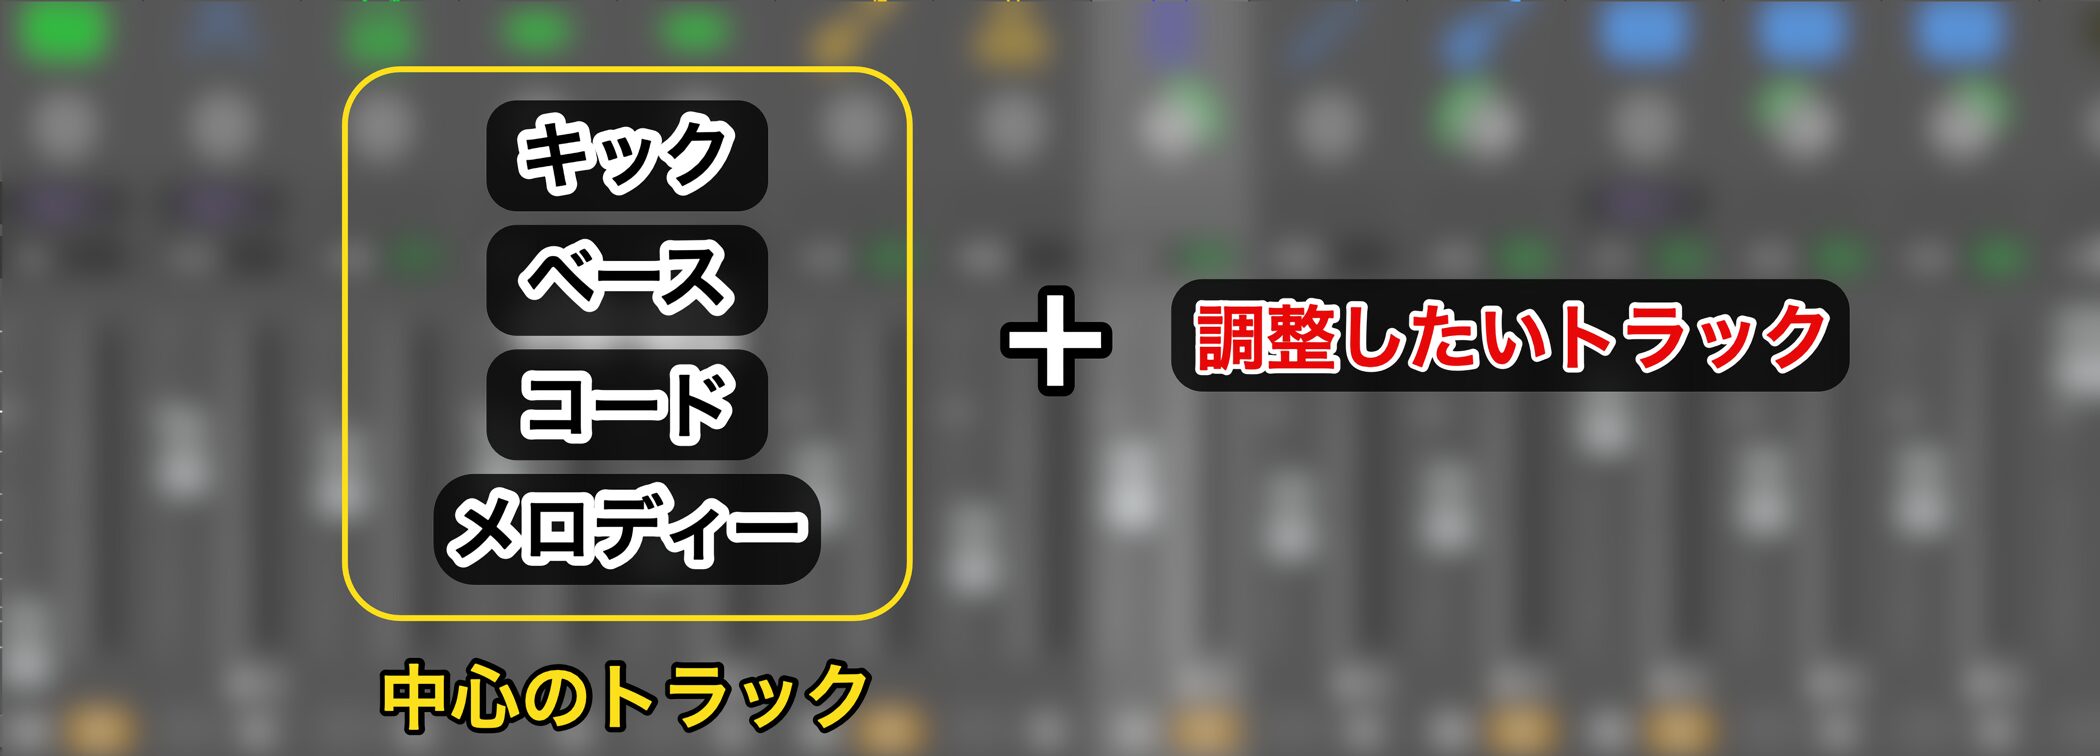
As more tracks pile up, the sound you are adjusting can become hard to hear, making it difficult to find the balance.
In that case, listening only to the core tracks, such as kick, bass, chord accompaniment and melody, together with the part you are adjusting makes it easier to judge.
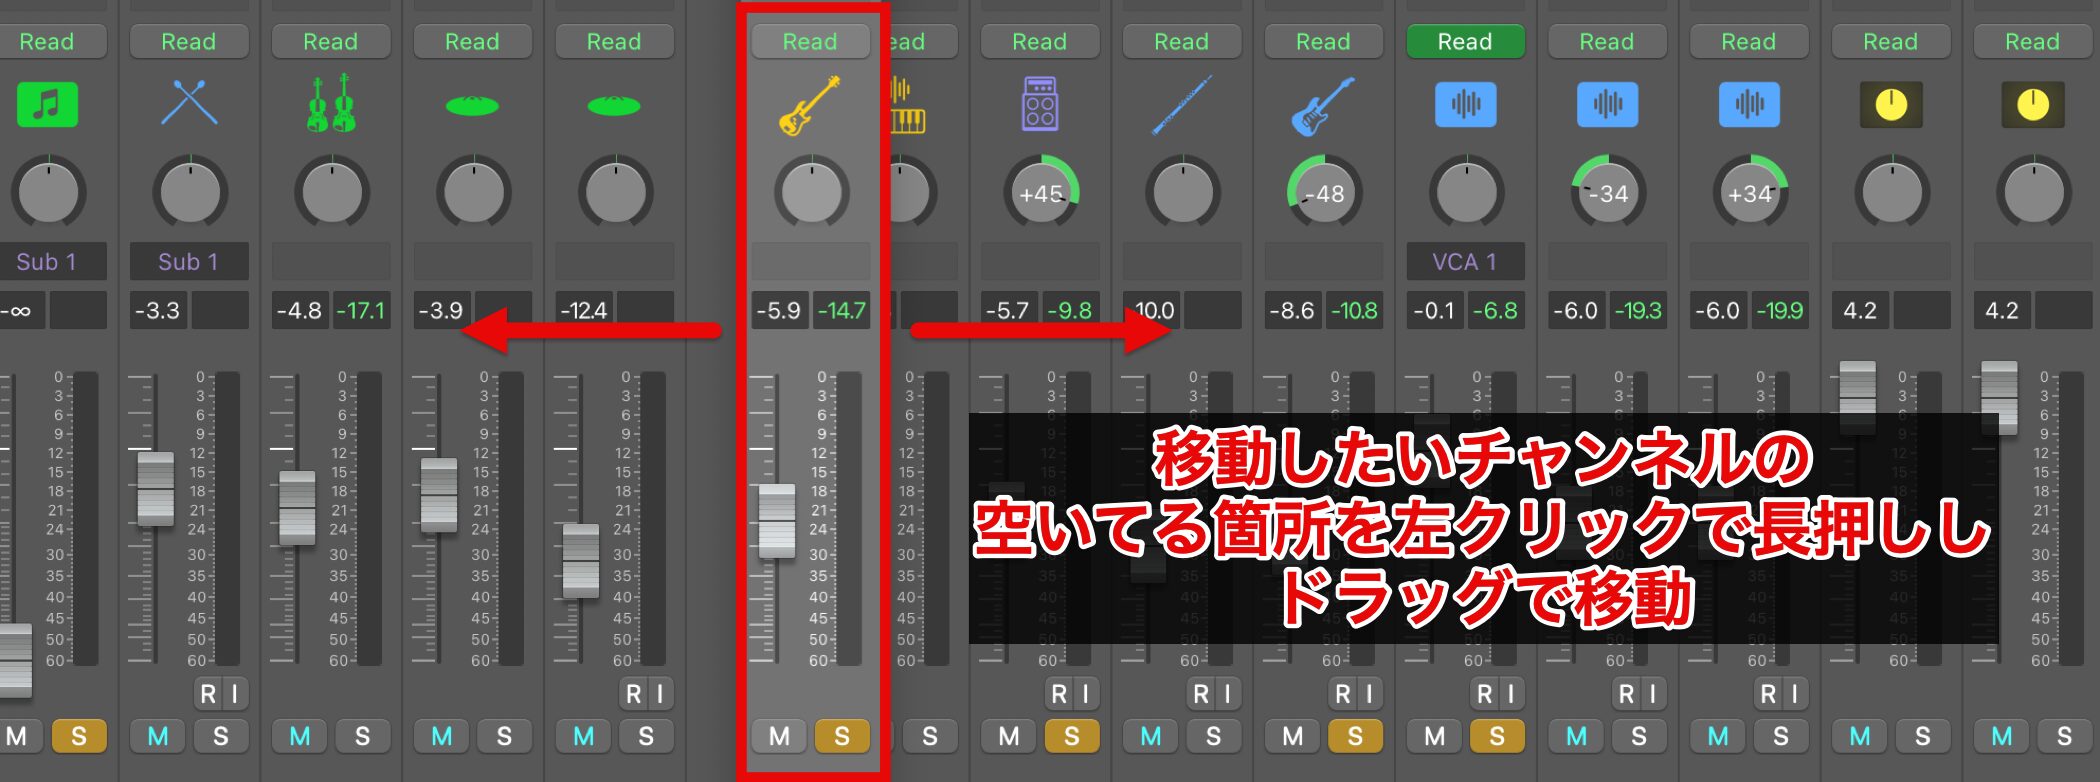
When soloing specific channels, it is tedious if they are far apart, so placing related channels next to each other is efficient.
To move a channel, click and hold an empty area of the channel, then drag it.
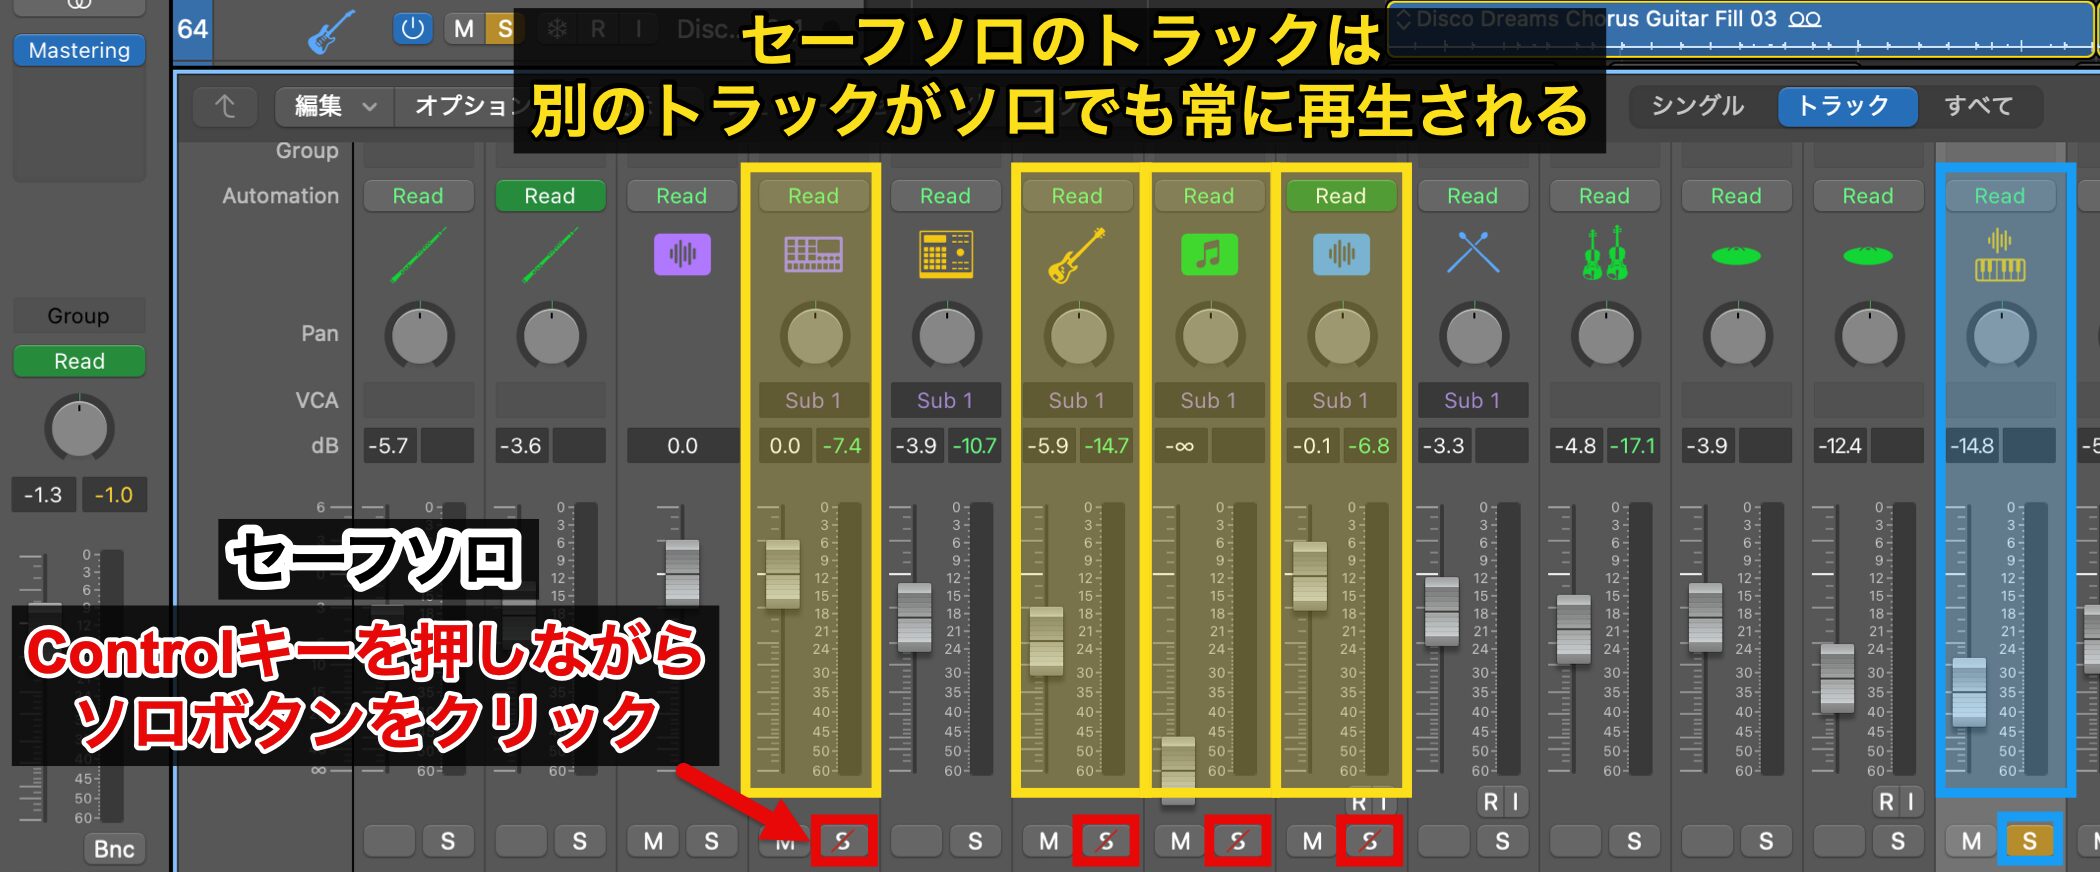
Also, Control-clicking the Solo button sets that channel to "Solo Safe."
A channel set to Solo Safe always plays, even when other channels are soloed.
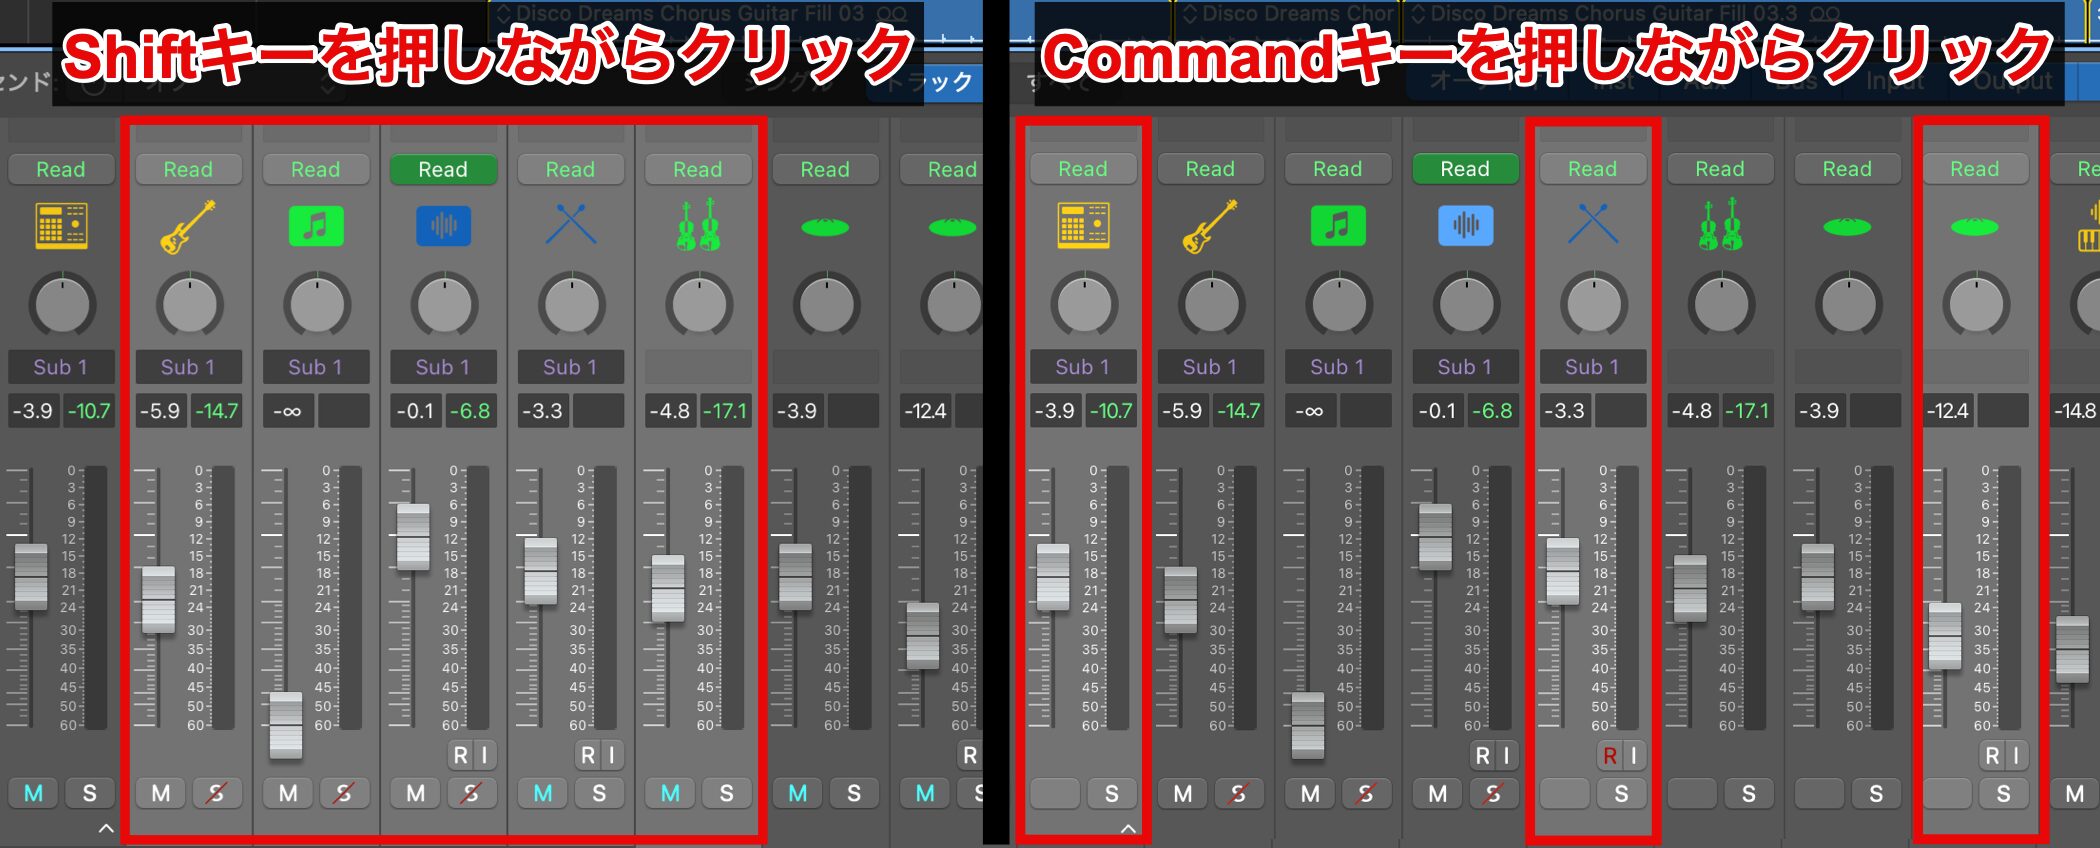
To solo or mute multiple channels at once, operate the button with the target channels selected.
This method also works for other operations in the Mixer, such as adjusting faders and pan.
You can select multiple channels as follows.
- Shift-click: selects adjacent channels together
- Command-click: also selects channels that are apart from each other
Shaping the Sound with EQ
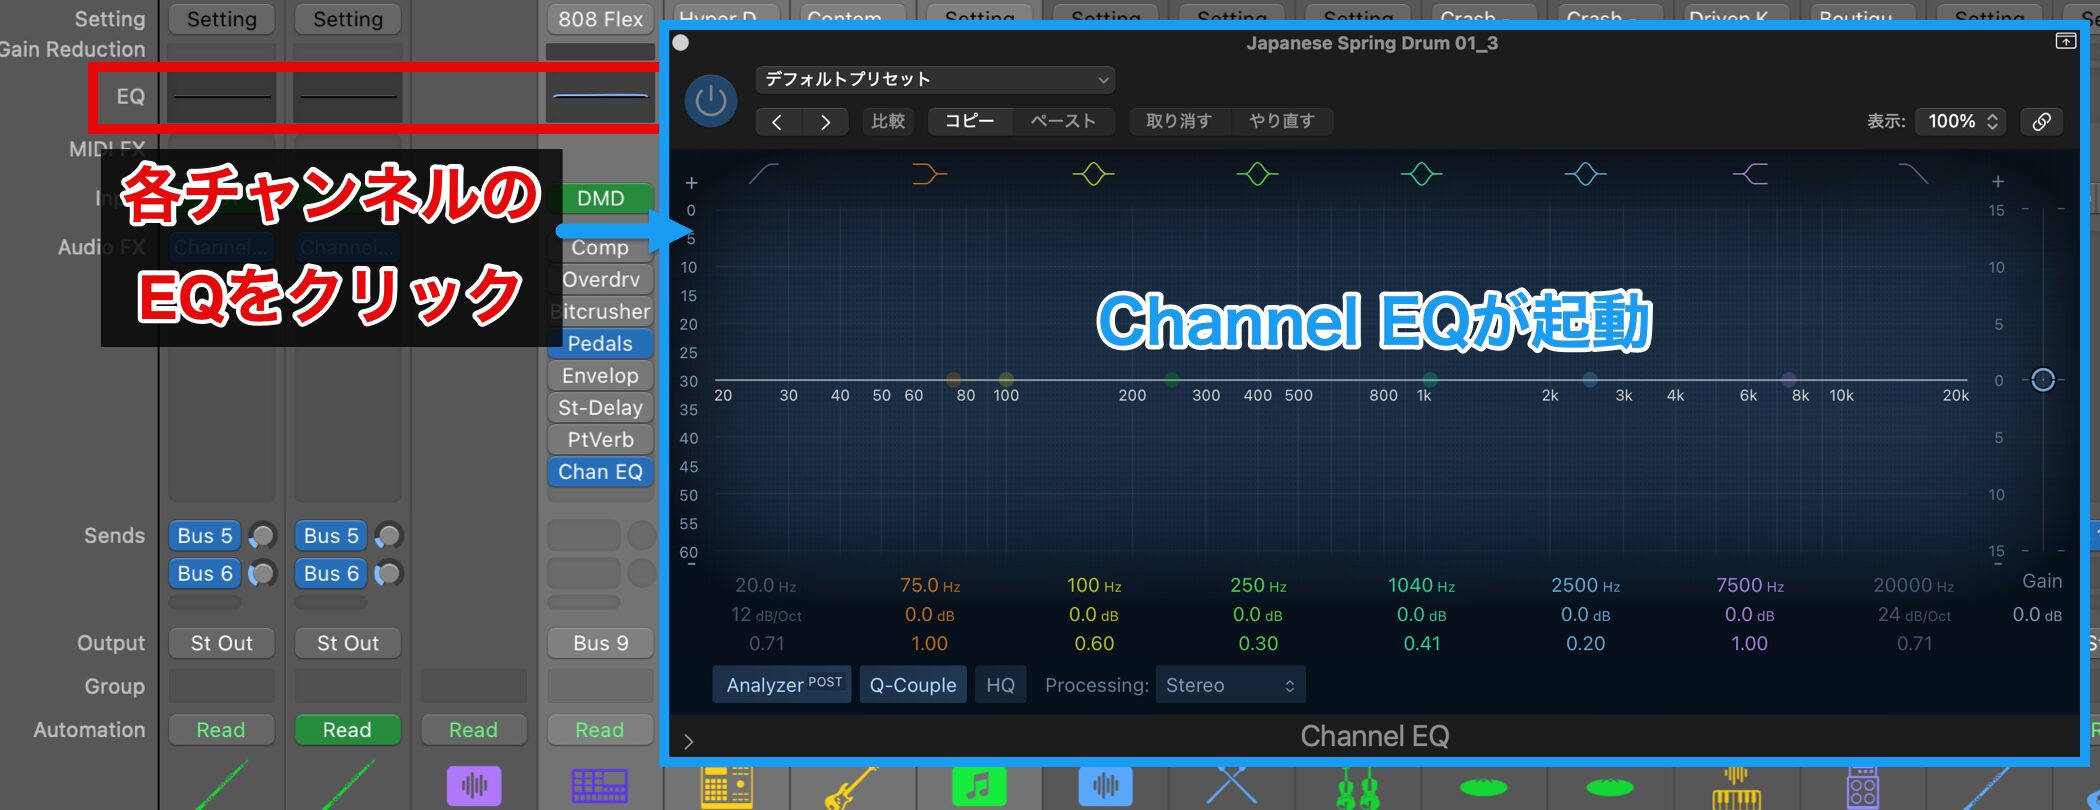
Once the level balance is set, use EQ to adjust the sound of each track.
Click the EQ display section of a channel, and "Channel EQ" opens automatically.
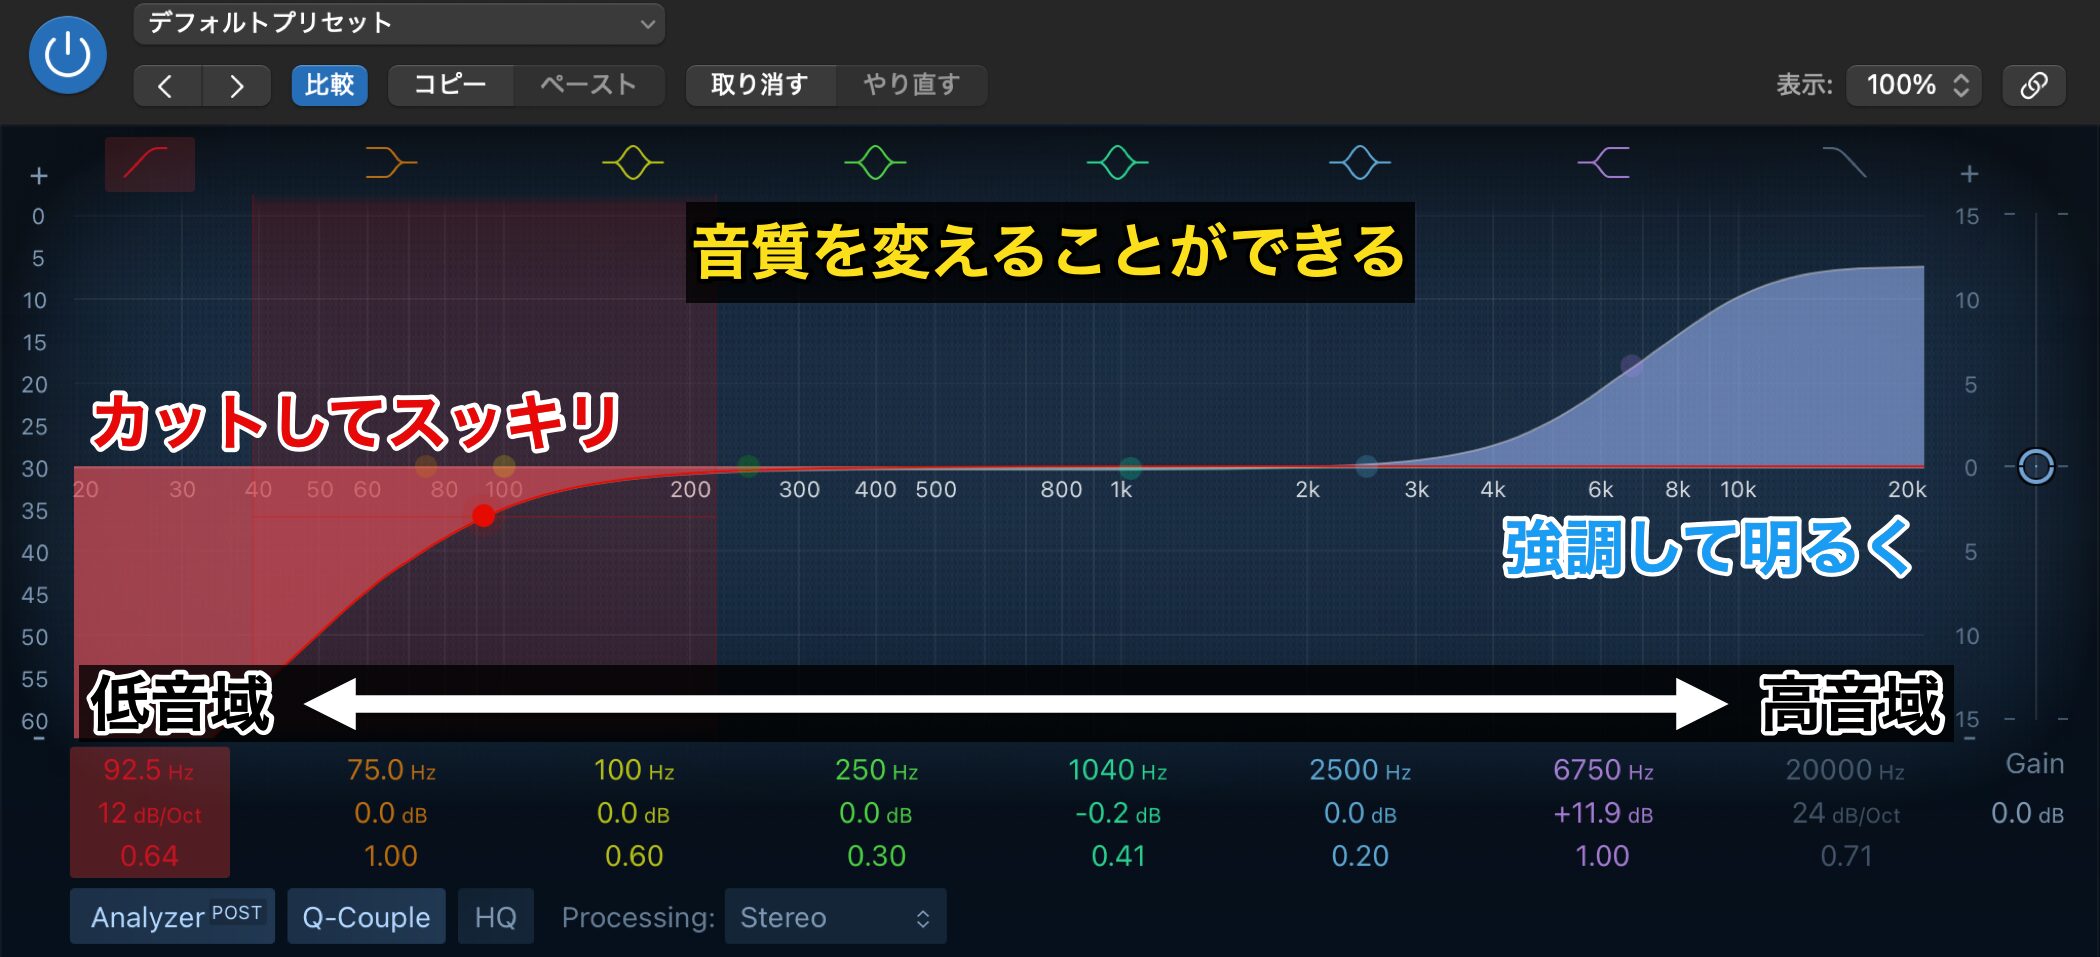
The EQ shows the low frequencies on the left and the high frequencies on the right, and you can boost or cut specific frequency ranges.
For example, you can change the tone by emphasizing the highs for a brighter sound or cutting unneeded lows to clean up the sound.
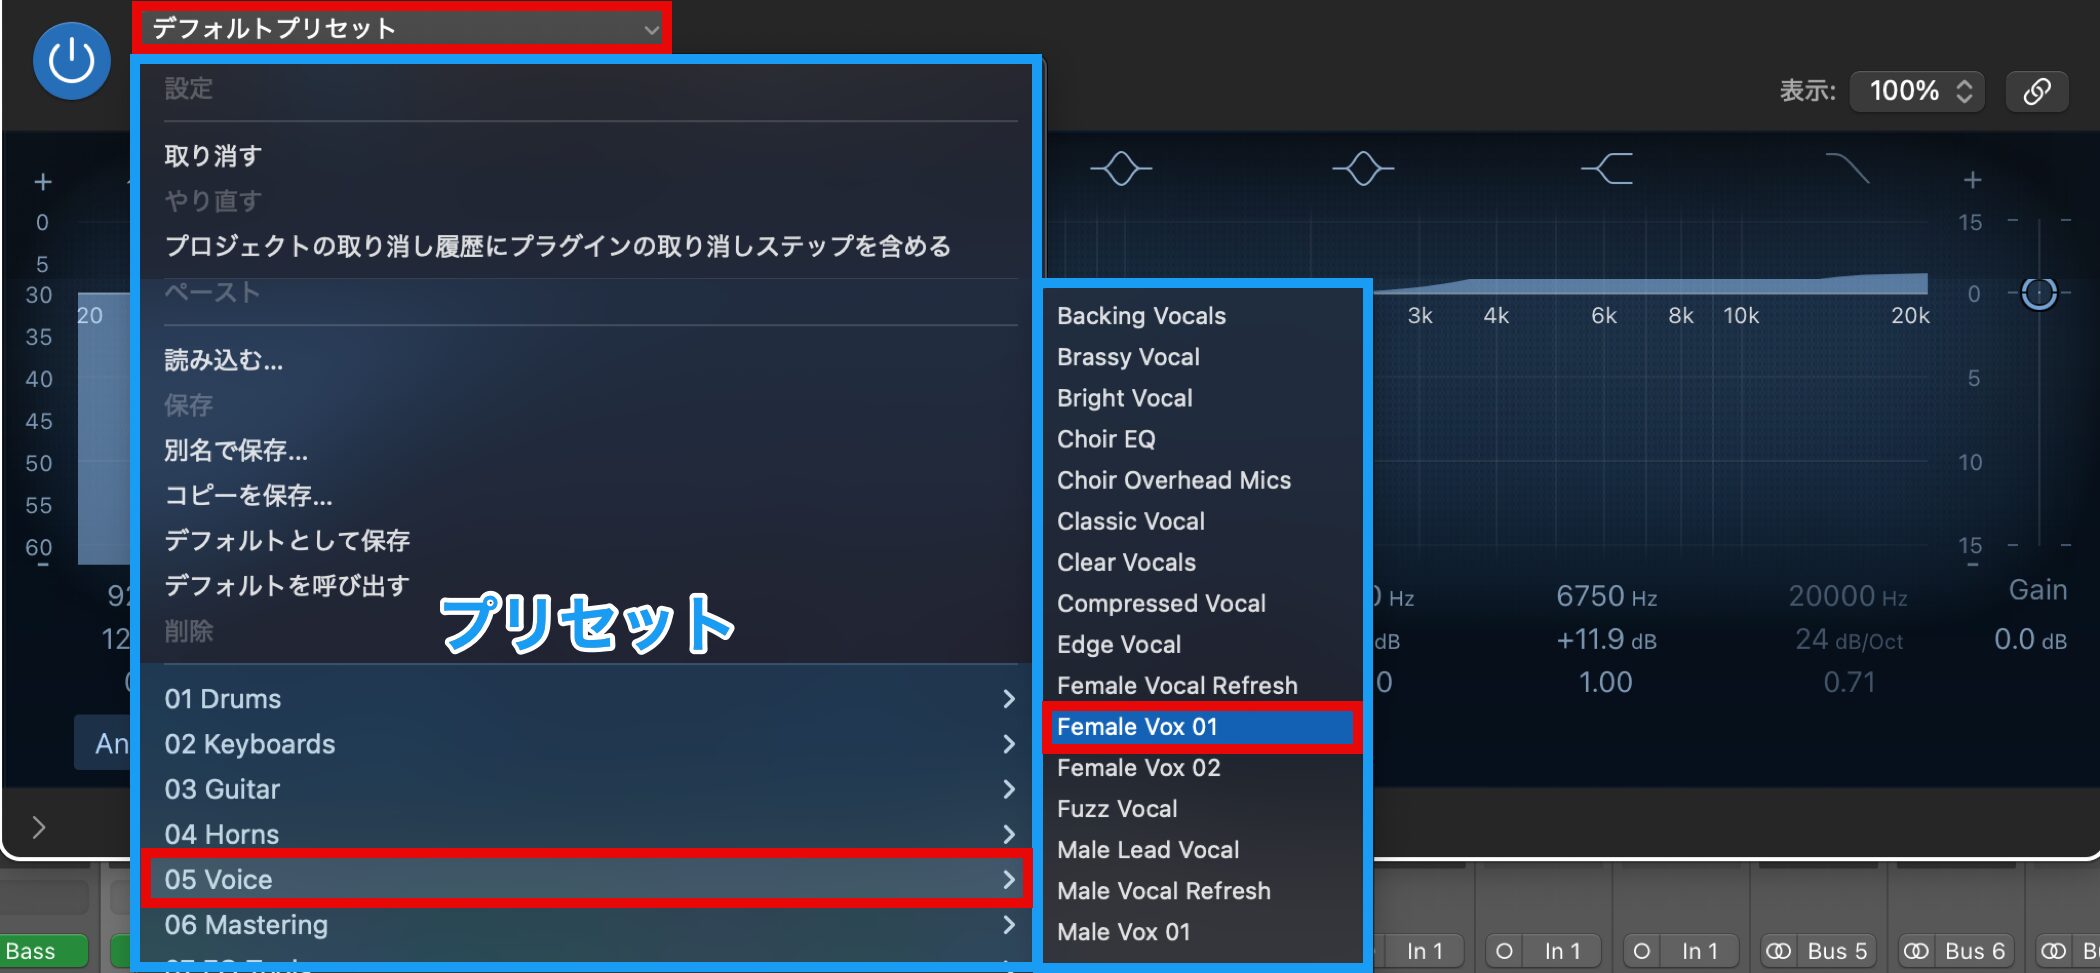
EQ comes with many presets for different instruments.
For example, let's apply "Female Vox 01" from "Voice" to the vocal.
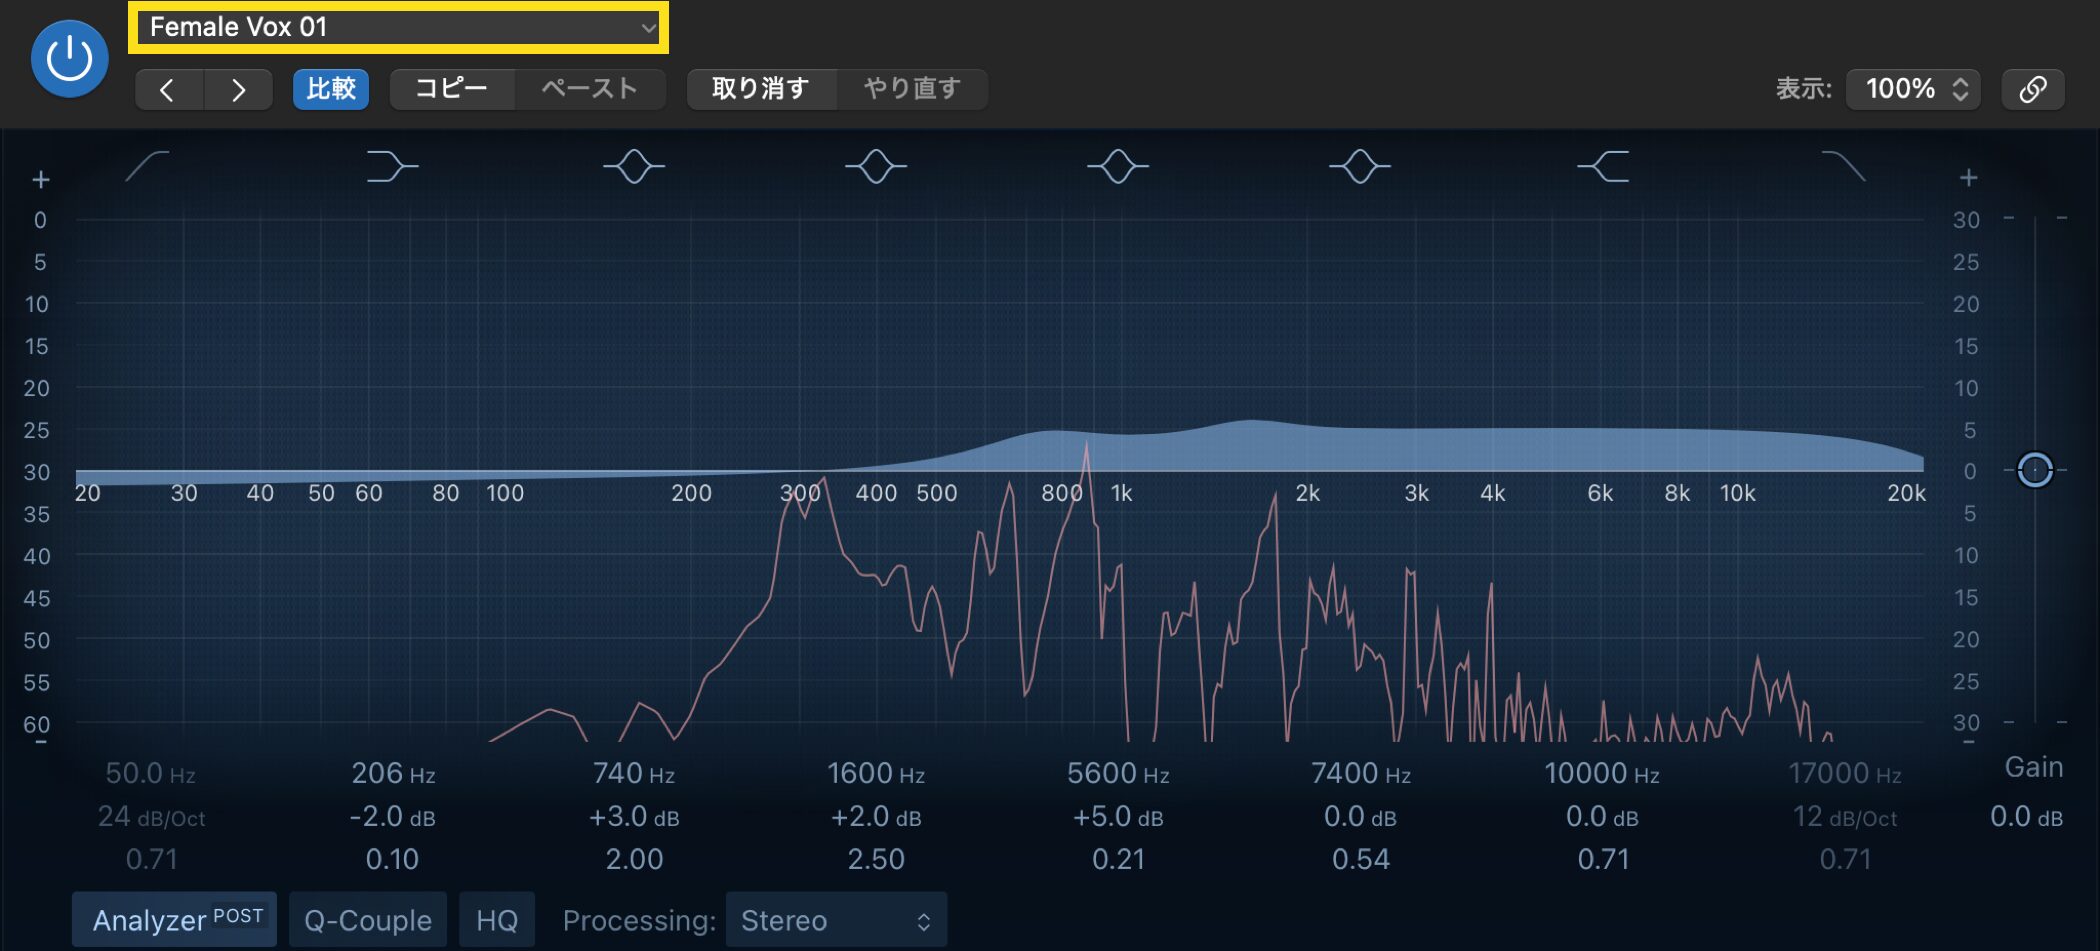
The level rises from the mids to the highs, and the vocal now stands out more in the song.
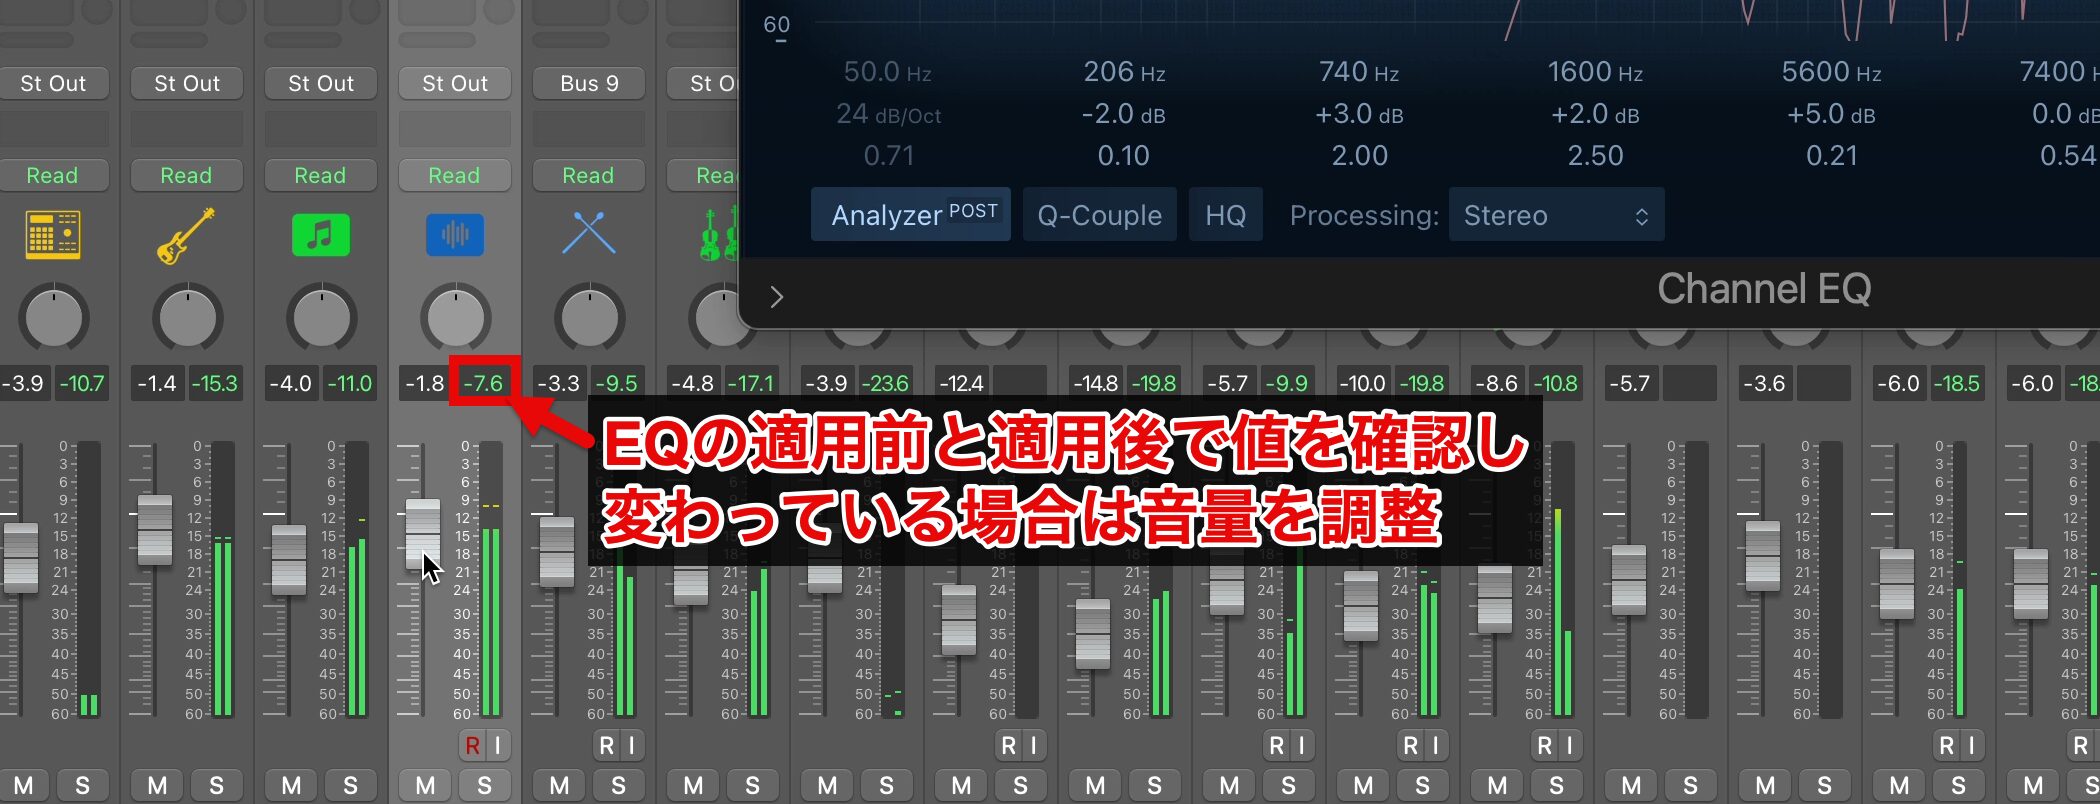
Note that using EQ can change the level and upset the balance.
So we recommend checking the peak meter value before and after applying EQ and adjusting if there is a change.
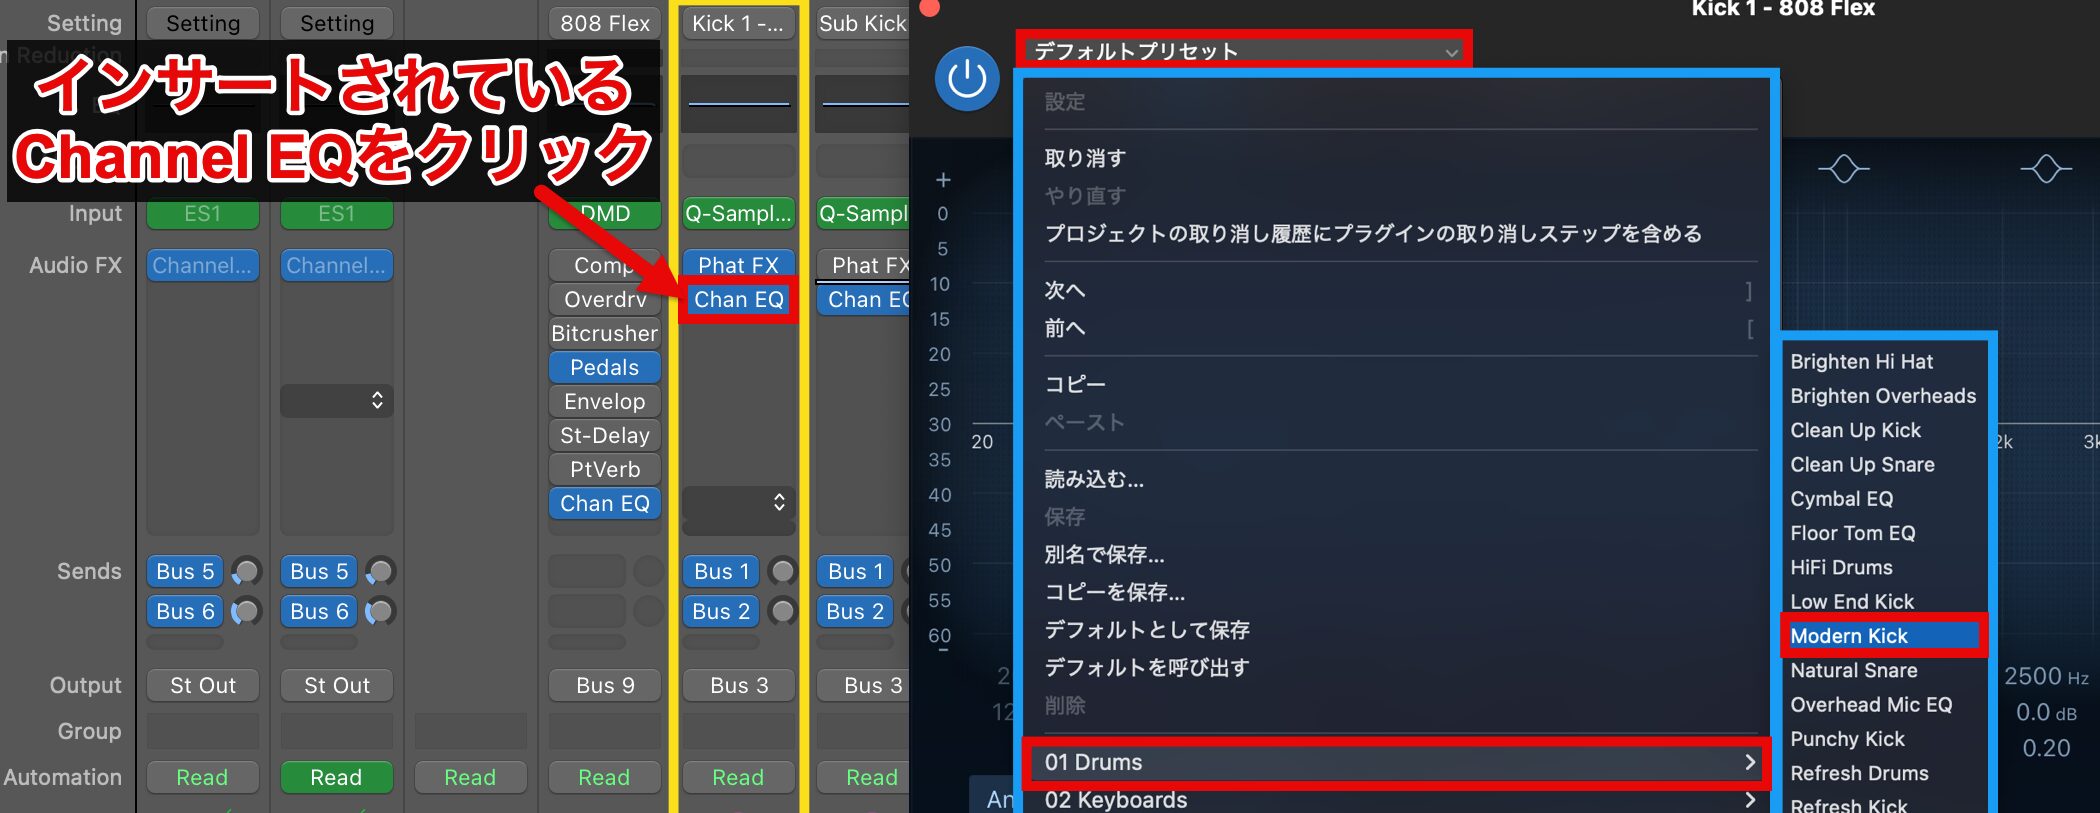
Let's use EQ on the kick as well.
A Channel EQ is already inserted, so click it to open it.
Apply "Modern Kick" from the "Drums" presets.
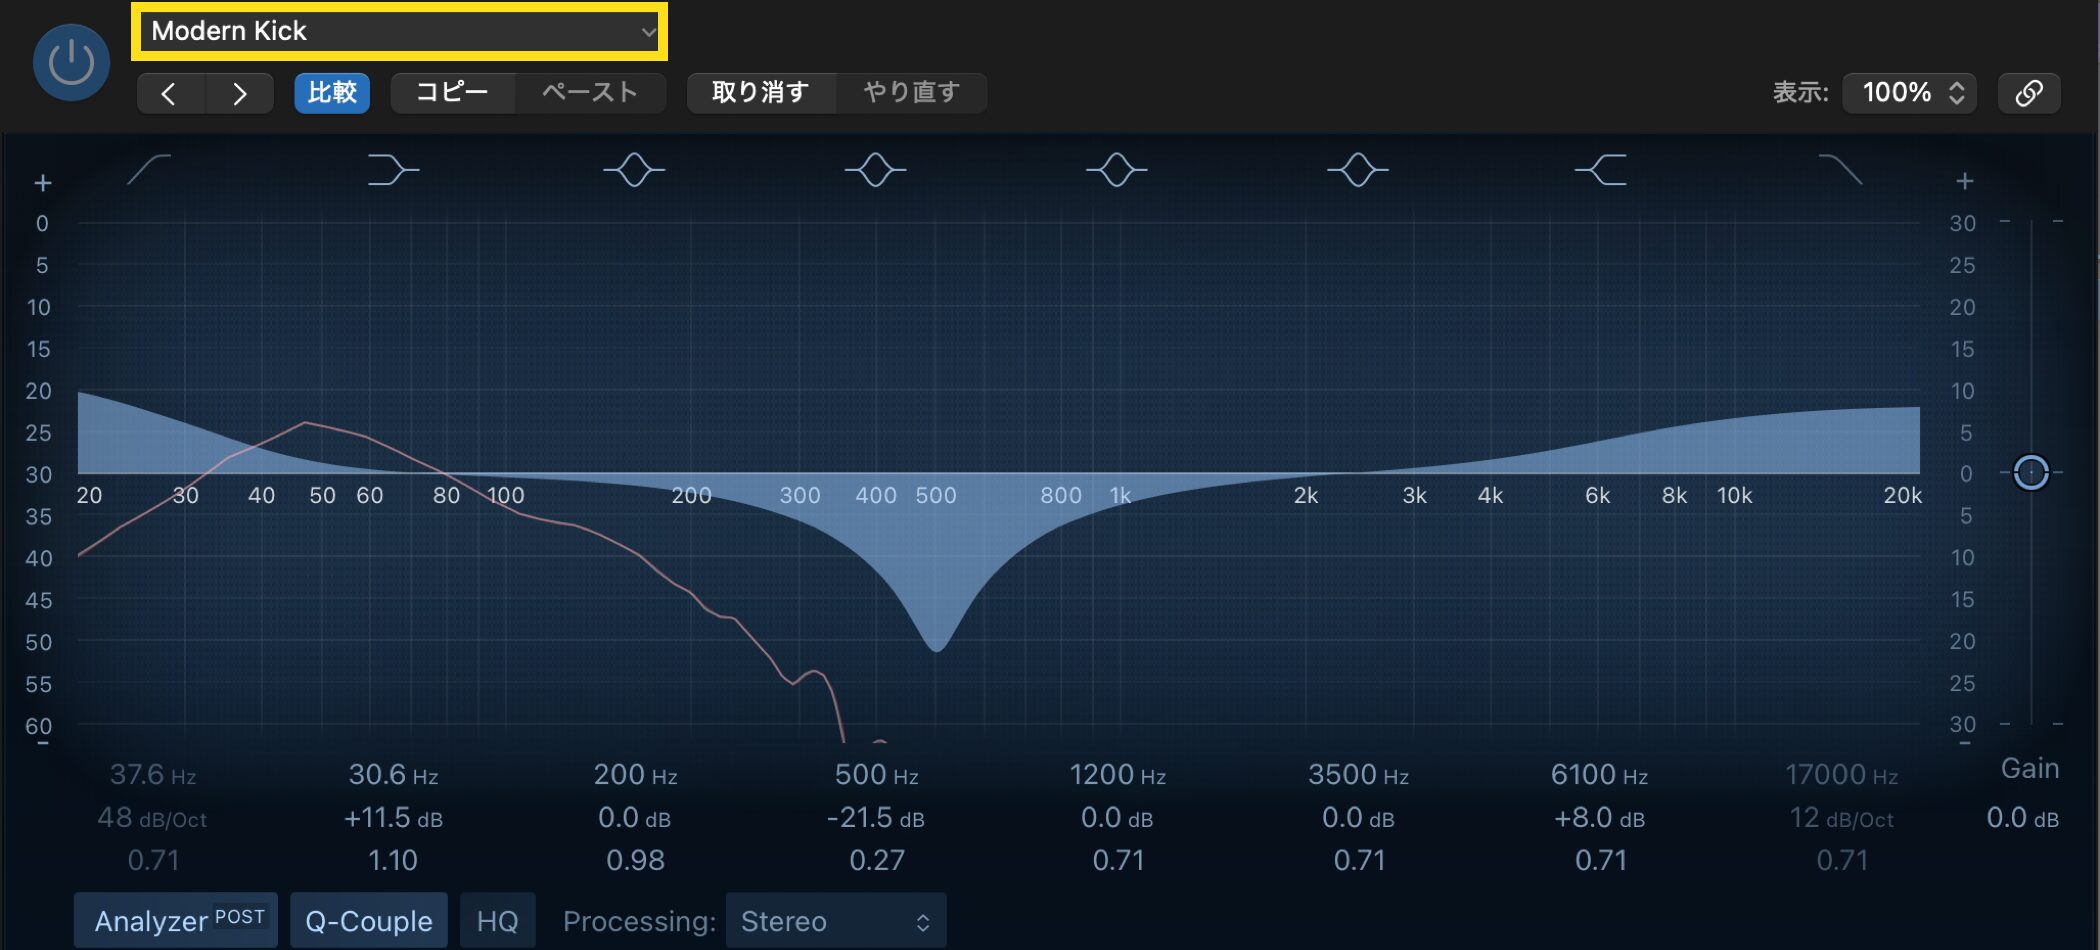
When many sounds overlap and the change is hard to hear, we recommend soloing the kick channel to compare.
Using EQ made the sound cleaner and tighter than the original.

You can use EQ on each track with the same steps, but adjusting too much can upset the balance and spoil what is good about the song.
So when using effects such as EQ, switch them on and off and decide while comparing with the original.
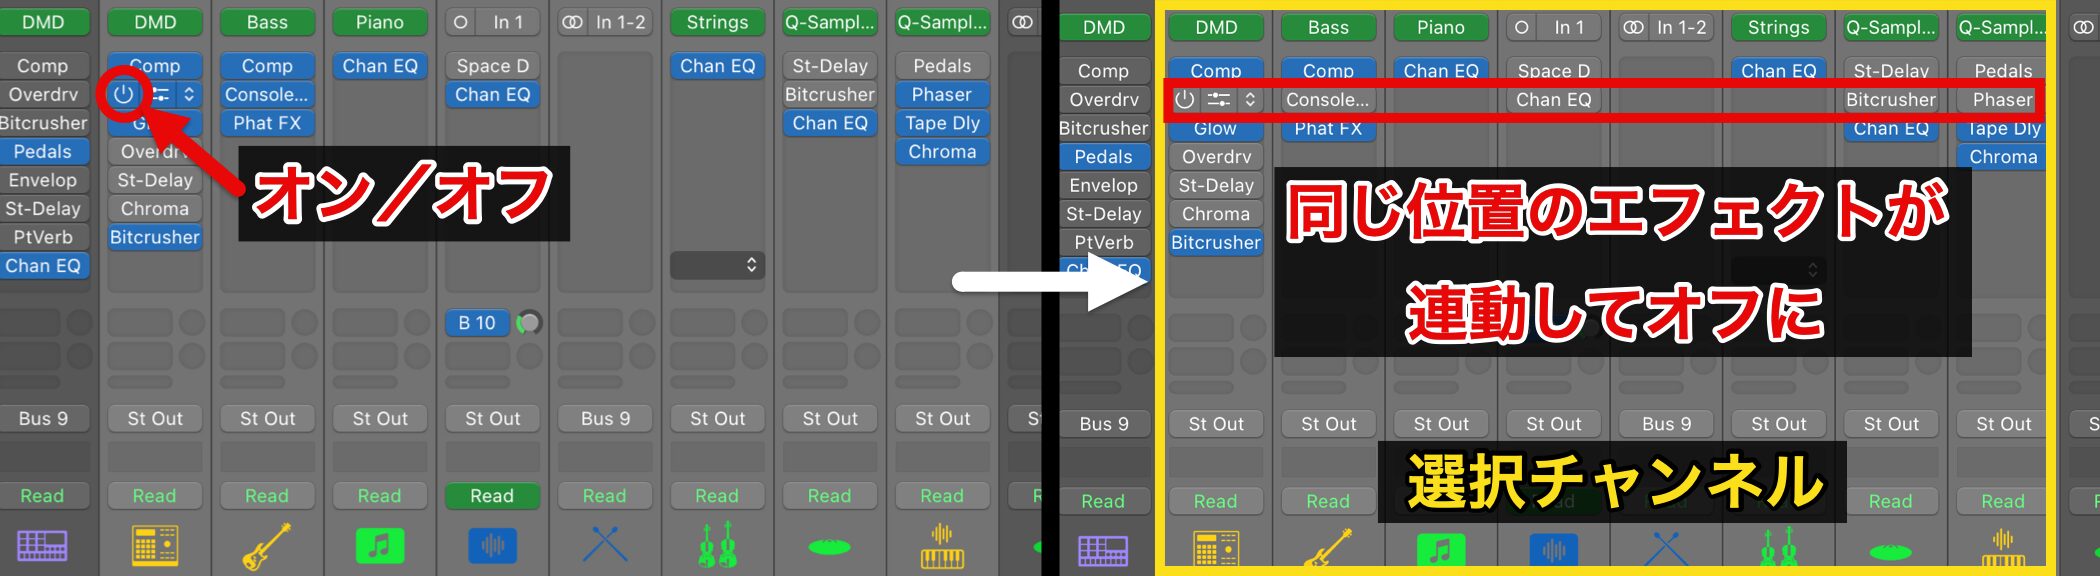
You can also switch effects on and off in the Audio FX section.
When you select multiple channels, effects in the same slot position are linked, so you can switch them on and off all at once.

If you want to control certain effects together, placing the effect in the same slot position on each channel, as shown here, lets you work efficiently.
Frequently Asked Questions
Q1. What should I do if Undo does not work in the Logic Pro Mixer?
Level adjustments and pan operations in the Mixer cannot be reversed with the normal Undo. Choose the mixer undo command from the "Edit" menu. No shortcut is assigned by default, so it is convenient to assign a key in the Key Commands settings.
Q2. How do I adjust the kick and snare of a drum kit separately?
Click the arrow below the channel in the Mixer to expand its contents, and the channel for each instrument in the drum kit is shown separately. You can then adjust the level of each instrument with its own fader.
Q3. What is a standard kick level when mixing?
A guideline is to set the kick's output level to about -10 dB on the display on the right. If you mix the other tracks using this as a reference, the whole song will not exceed 0 dB, giving a well-balanced result while avoiding clipping.
Q4. How do I solo multiple channels at once?
Select multiple target channels by Shift-clicking or Command-clicking them, then operate the Solo button to solo them all at once. The same method also applies to mute, fader and pan adjustments.
NEW ARTICLES
Latest English Articles