
By using Logic Pro 11's vocal correction feature, Flex Pitch, together with automation, you can fix pitch and timing deviations in vocals both automatically and manually, and add energy and expression to the whole song. This article explains professional audio editing techniques step by step, starting with flattening takes, then efficient automatic correction, and on to the specific procedures for detailed manual pitch adjustment, vibrato editing and timing correction. By learning the best way to correct vocals while preserving the nuance of the performance and avoiding the robotic "Auto-Tune effect" that degrades sound quality, you can produce higher-quality songs.
Correcting Vocals and Adding Energy to the Song with Automation

Miyakawa
Pitch and timing deviations in vocals have a big impact on the quality of a song.
In addition, by using automation, you can add dynamics and movement to the whole song for a more expressive result.
Here, we explain specific methods step by step, from the vocal correction procedure to expression with automation!
Flex Pitch and Automation Video
First, let's listen to how much vocal correction changes the impression of the song.
Flattening Takes
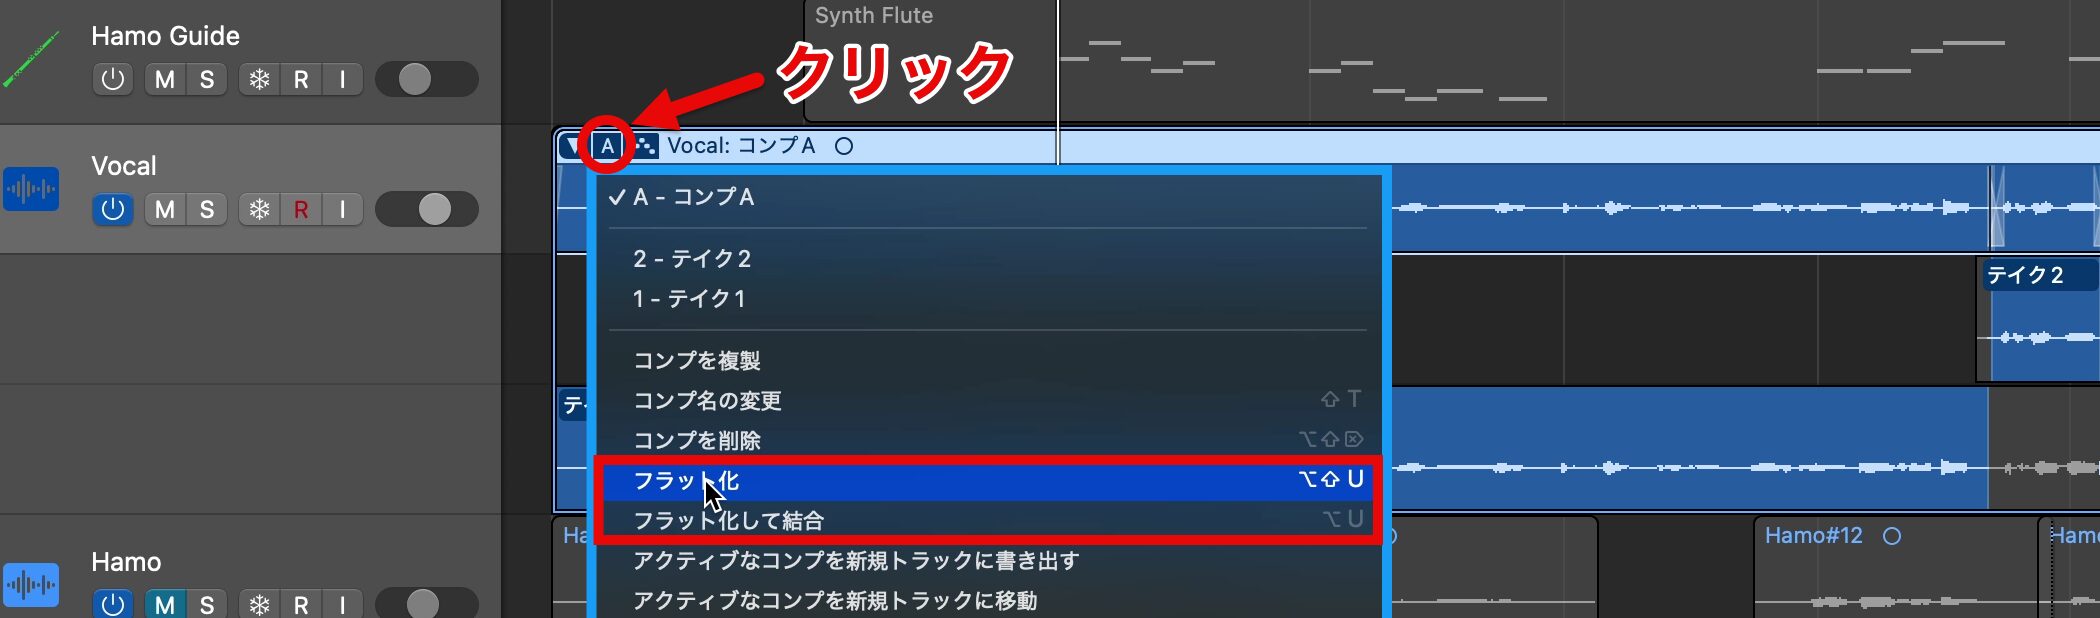
First, to make pitch and timing correction easier, combine the separate takes into one.
Choose "Flatten" or "Flatten and Merge" from the take folder menu.
- Flatten: expands the selected takes into individual regions, keeping them split
- Flatten and Merge: combines the selected takes and merges them into a single region
This time, we may adjust the joins between takes later, so we choose "Flatten."
Setting Up Flex Pitch
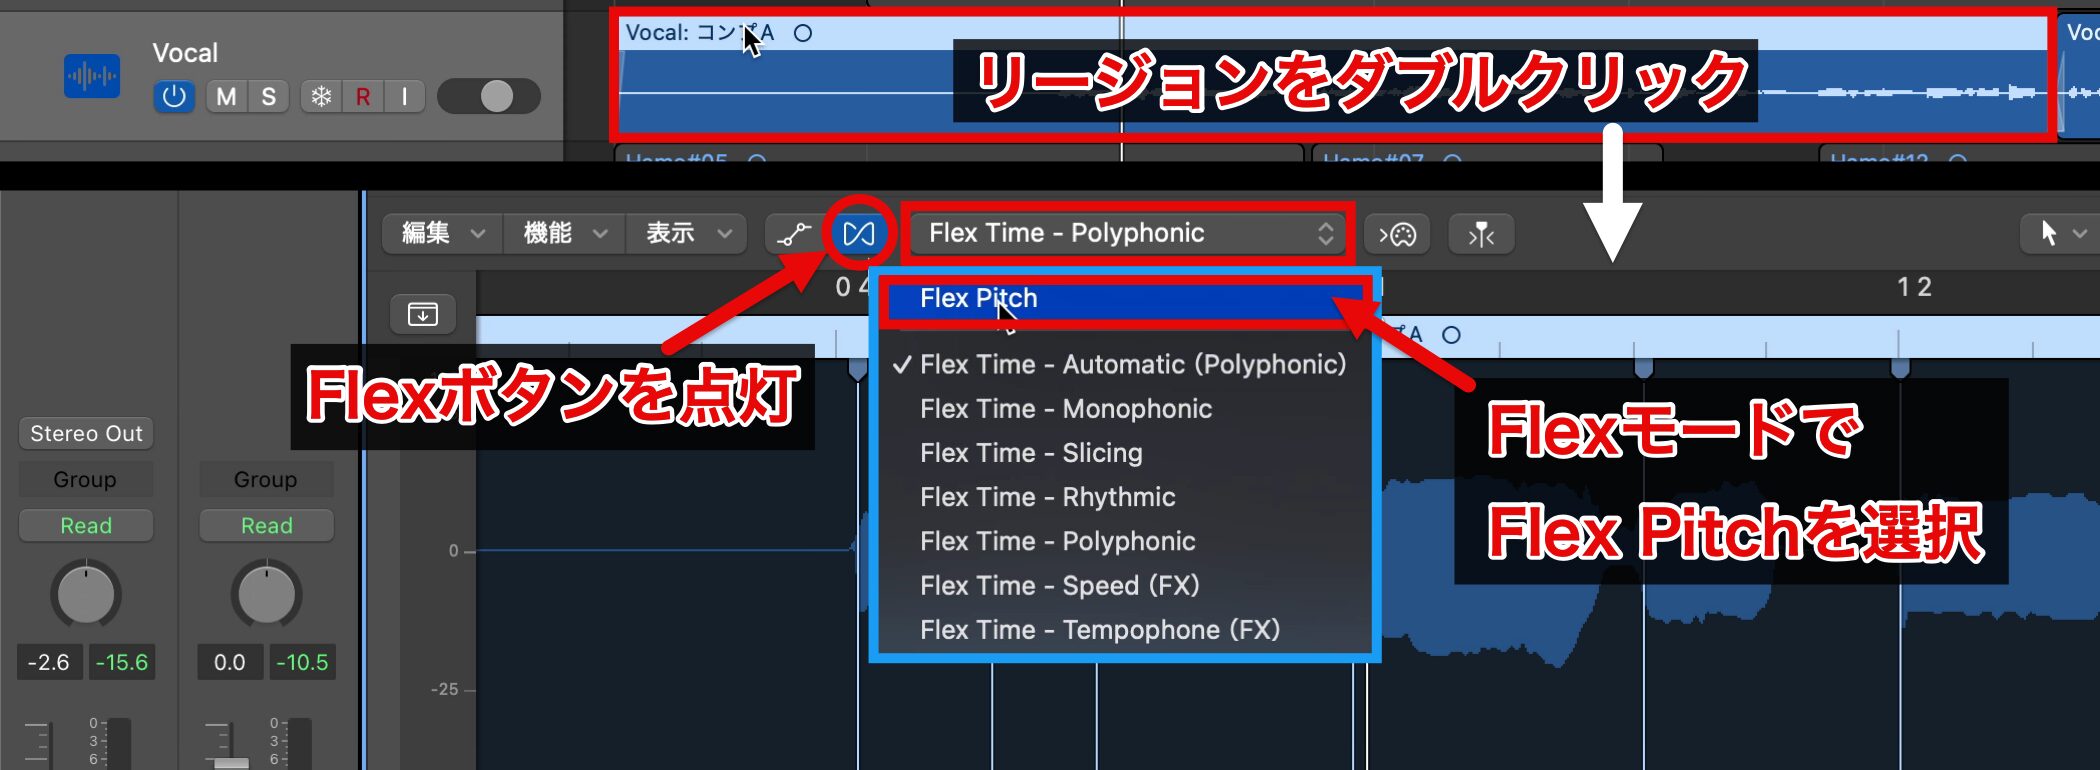
Once flattening is complete, use Flex Pitch to correct the pitch and timing of the vocals.
Double-click the region and turn on the "Flex button" in the editor to enable it.
Next, change the Flex mode on the right to "Flex Pitch."
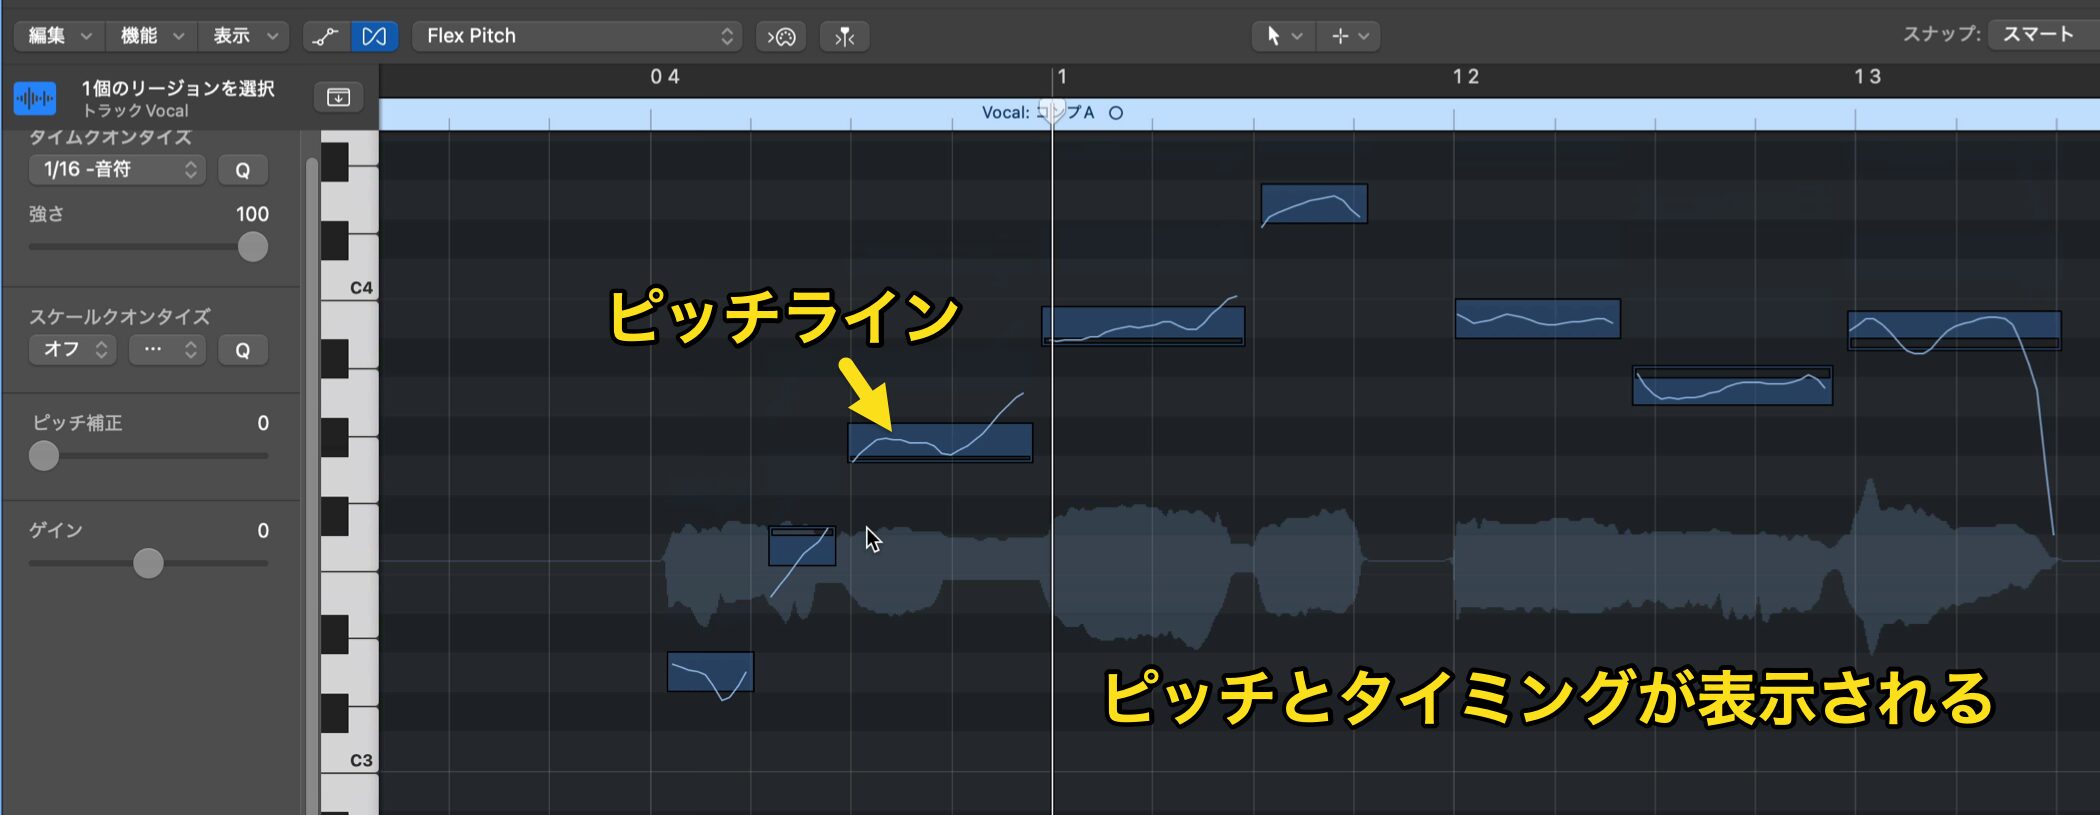
The display switches to look like a MIDI region: the average pitch of each note is shown as a bar, with the actual pitch line drawn inside it.
Correcting Pitch and Timing Automatically
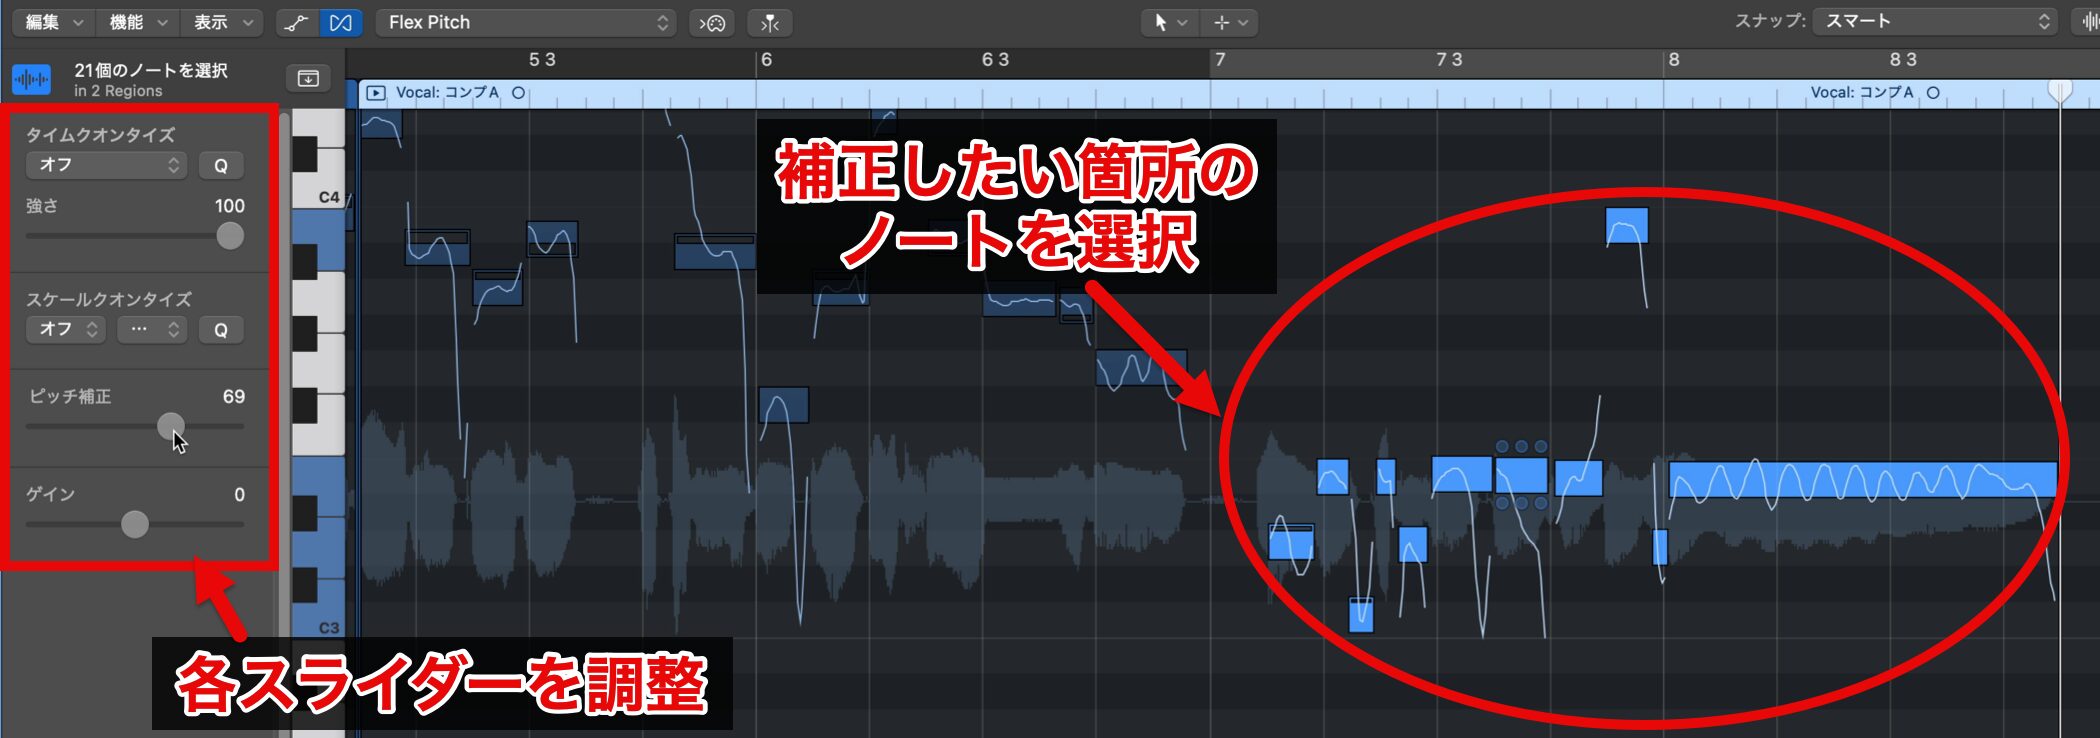
The easiest way to correct with Flex Pitch is to select the notes you want to correct and adjust the sliders on the left side of the screen.

"Pitch Correction" adjusts how strongly the pitch is corrected; raising the value brings it closer to the correct pitch.
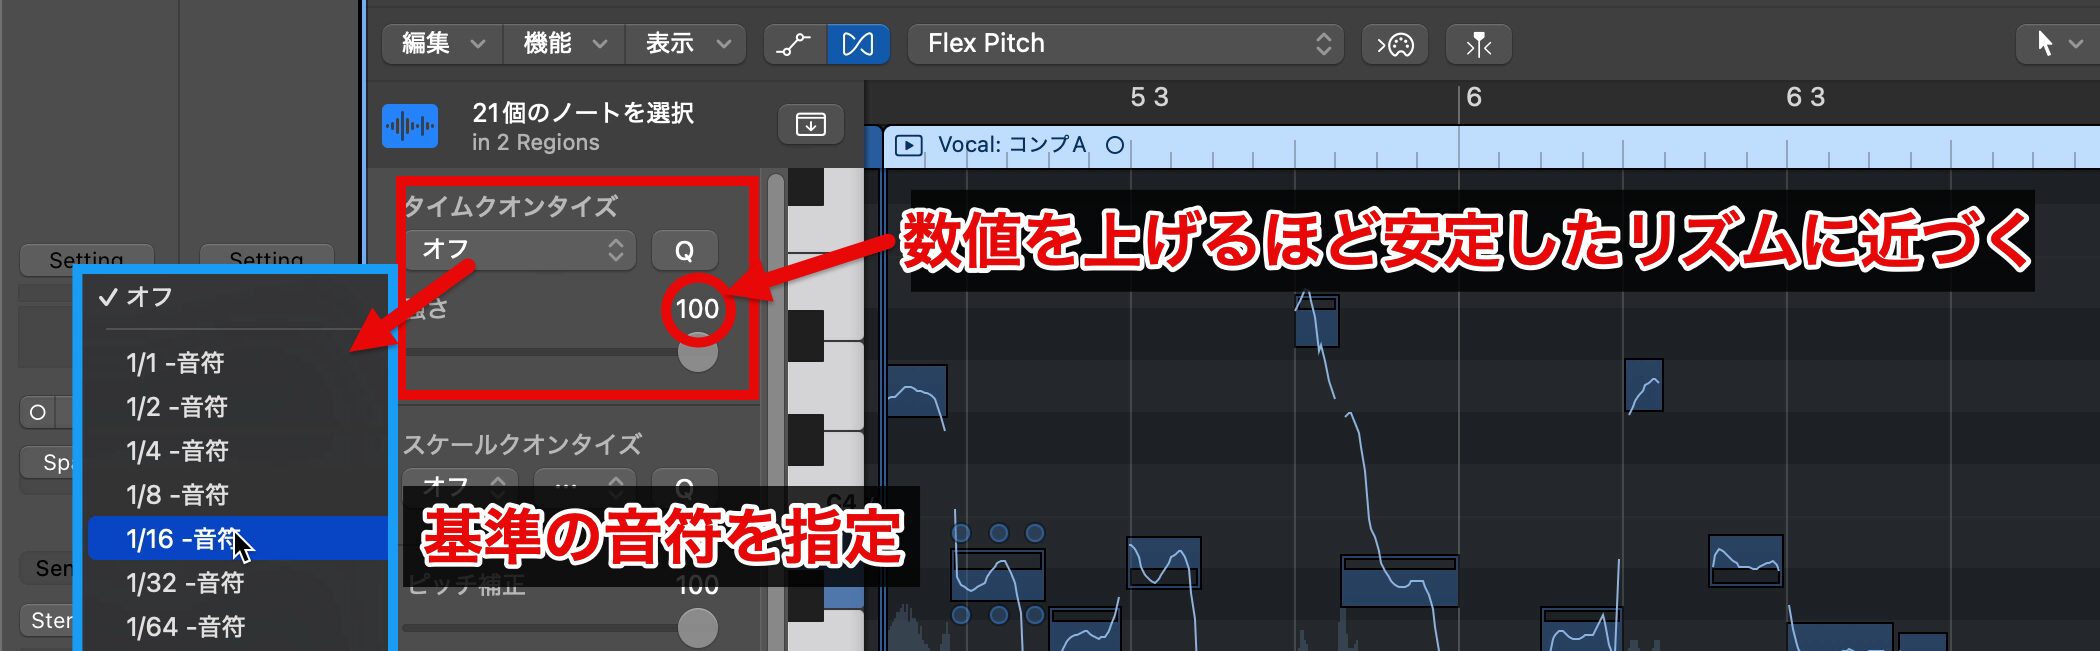
"Time Quantize" corrects timing based on the specified note value, and the higher the value, the steadier the rhythm becomes.
Automatic correction is easy to apply, but it may give unintended results in some cases.
So next, we explain how to make detailed adjustments manually.
Correcting Pitch Manually
First, check that the notes in the section you want to correct are split correctly.
For example, if two sixteenth notes are shown as a single note, unnecessary correction may be applied.
So use the Scissors tool to split the note where the phrase changes.
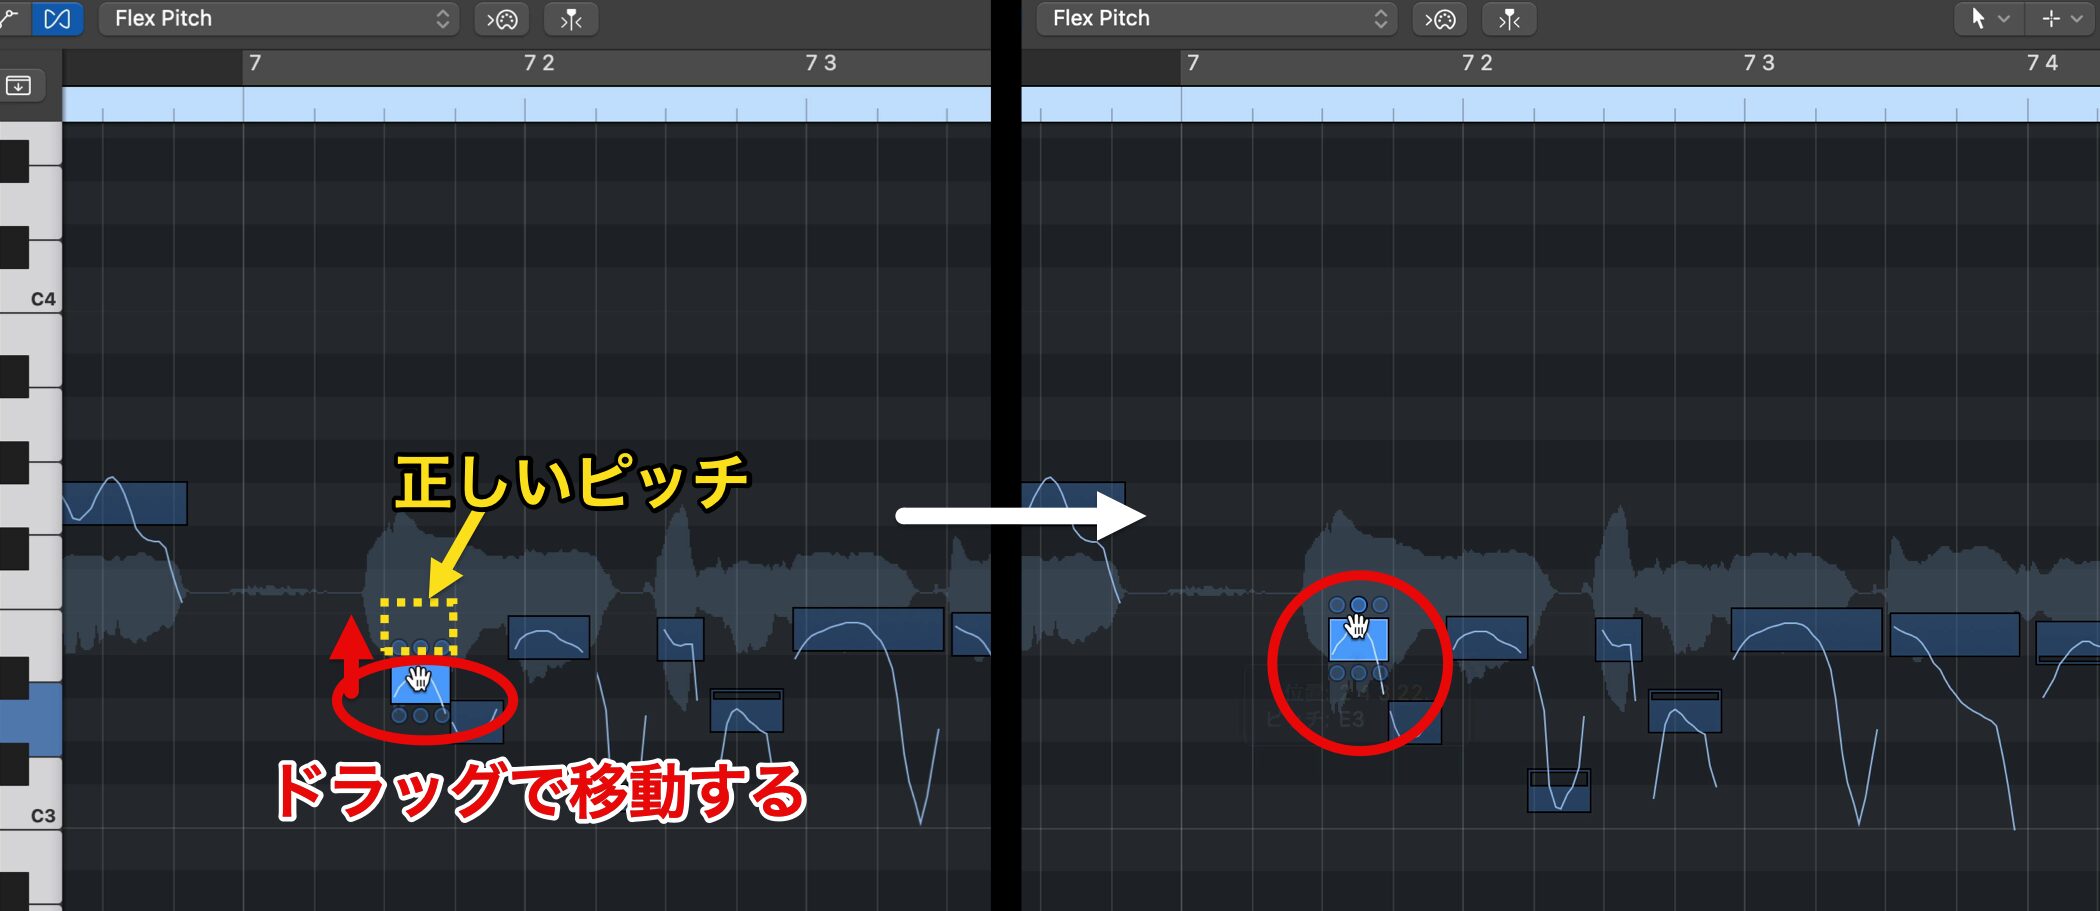
The first of the split notes is flat, so select the note and drag it to the correct position.
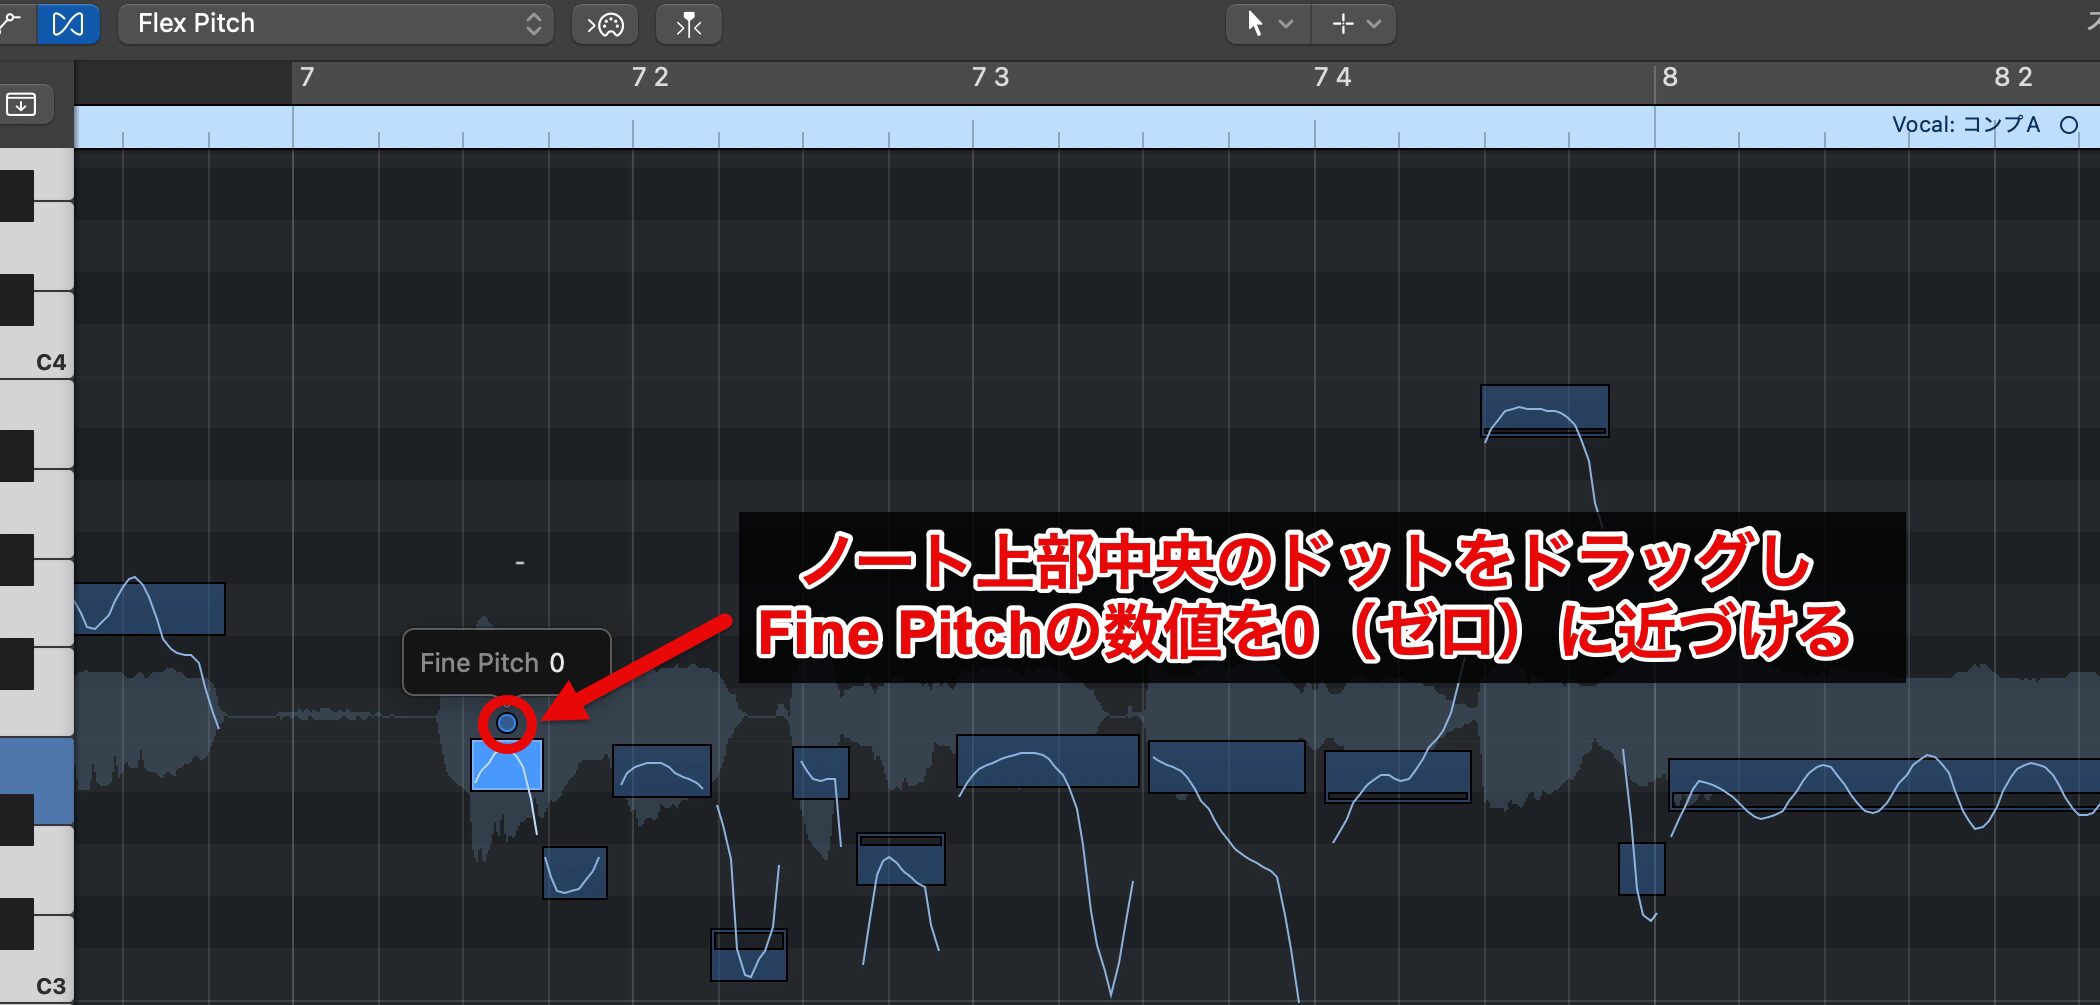
For finer adjustment, drag the dot at the top center of the note.
This "Fine Pitch" control shows the average pitch of the note, so basically adjusting the value toward 0 (zero) reduces the pitch deviation.
Let's listen once.
On average the pitch is now correct, but on playback it sounded slightly sharp, so we lowered the Fine Pitch value a little below 0.
In this way, when correcting, check the sound while playing it back and fine-tune it appropriately.
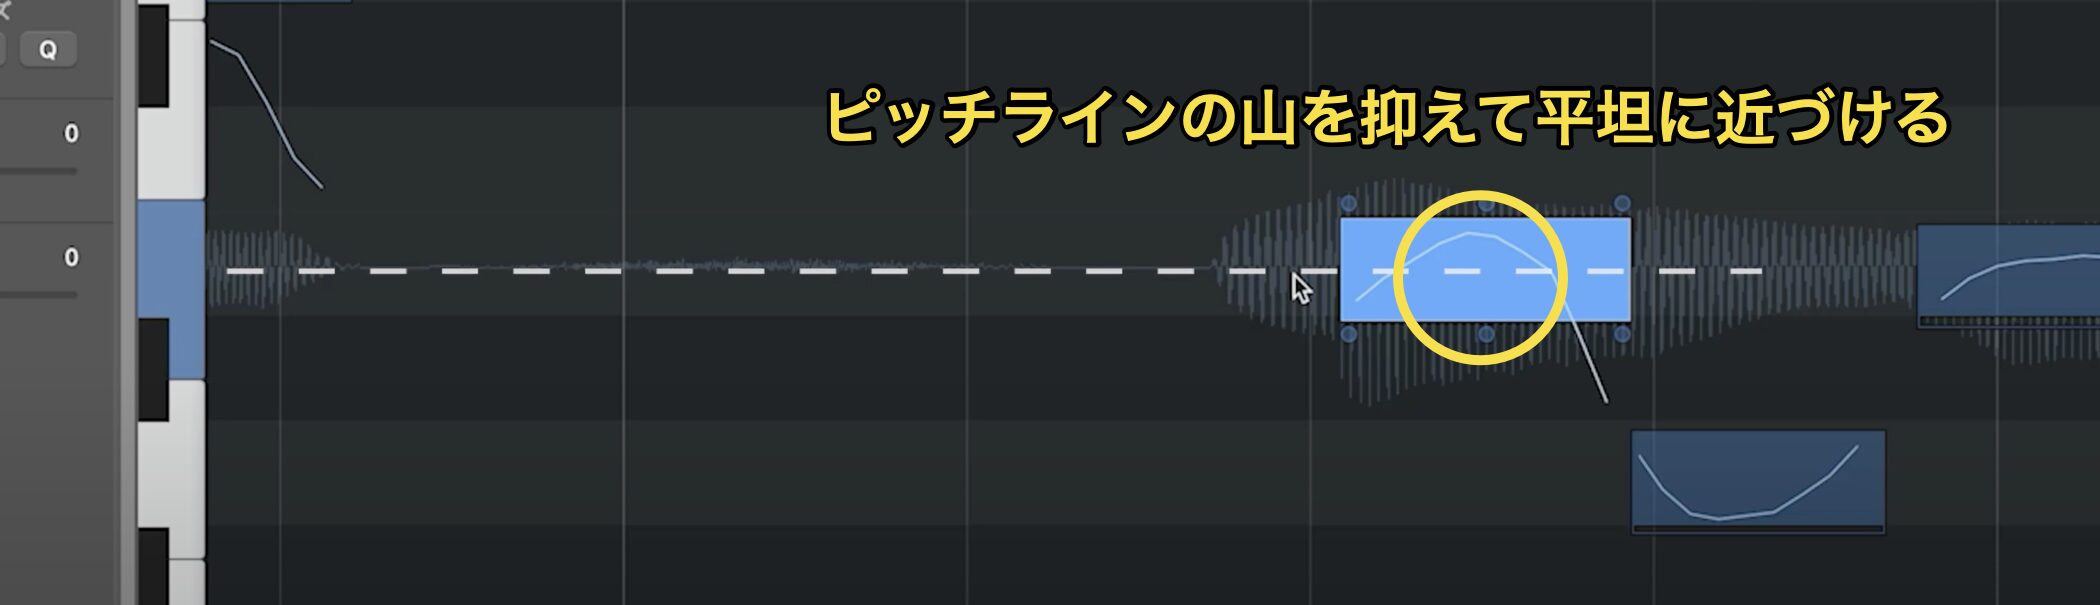
Also, setting the pitch line drawn inside the note so that it stays near the center of the target pitch for longer gives a more stable sound.
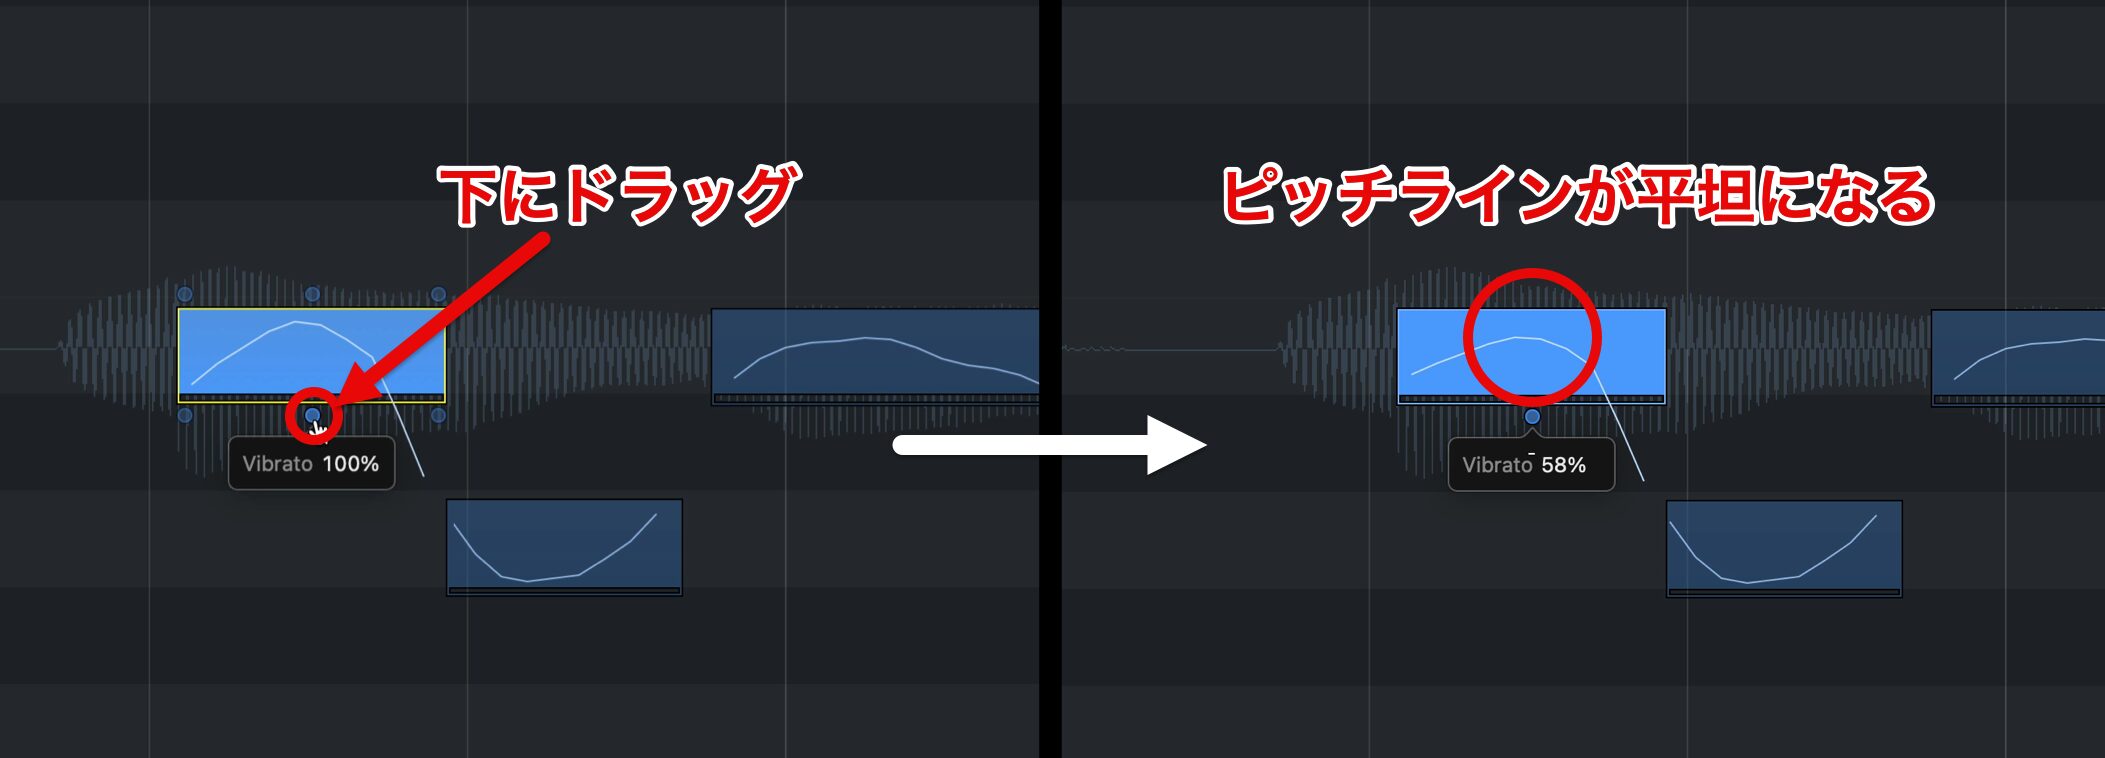
Dragging the "Vibrato" dot at the bottom center of the note smooths out the peaks of the pitch line and flattens it.
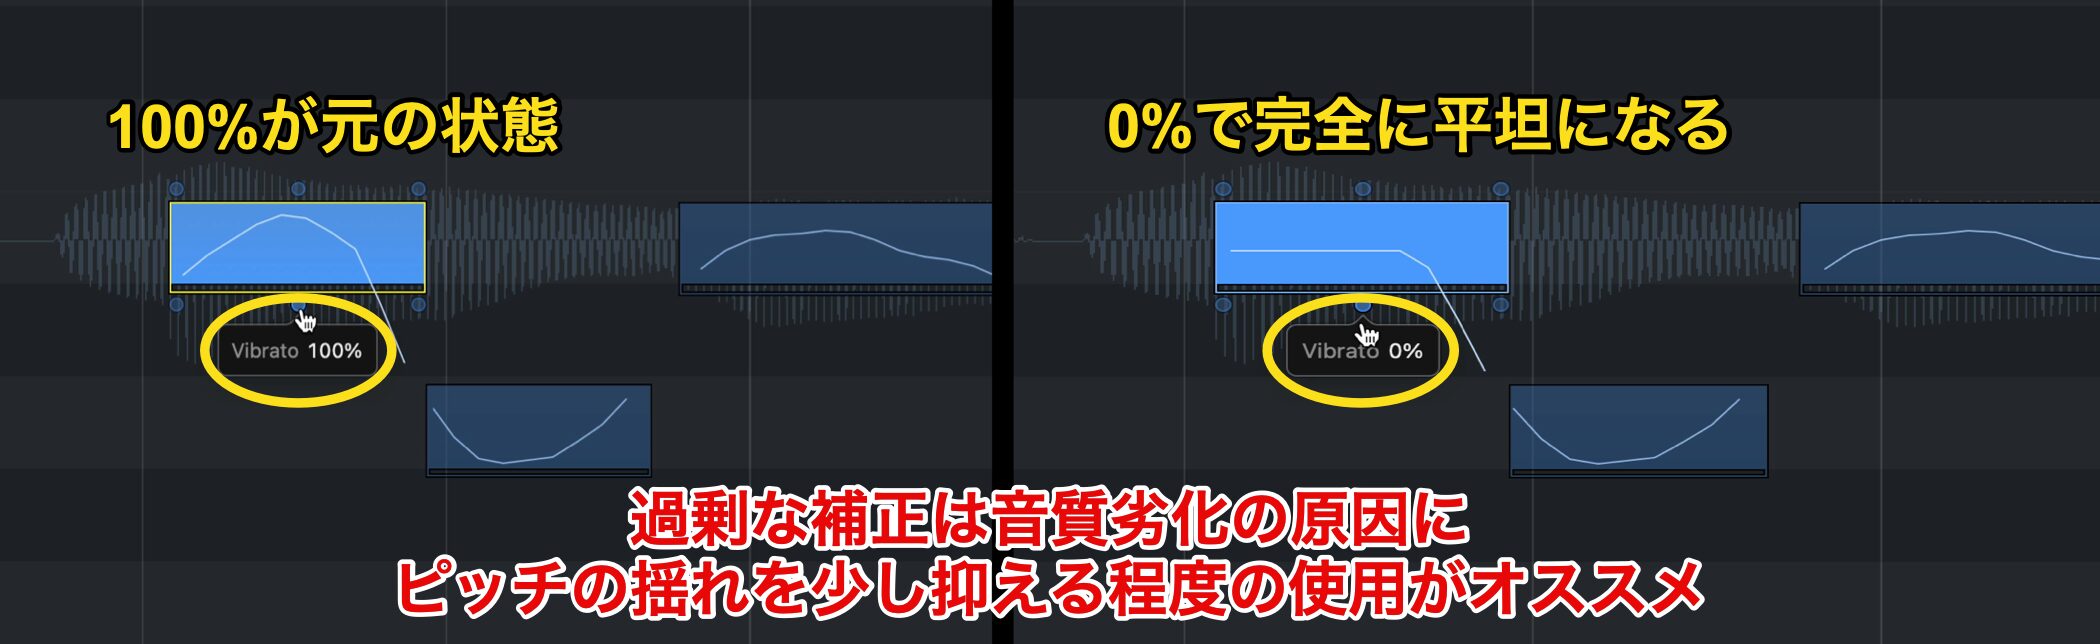
Setting the correction value from 100 to 0 makes the pitch line completely flat.
However, excessive correction can cause a degradation in sound quality known as the robotic "Auto-Tune effect", so we recommend adjusting it moderately while checking the sound.
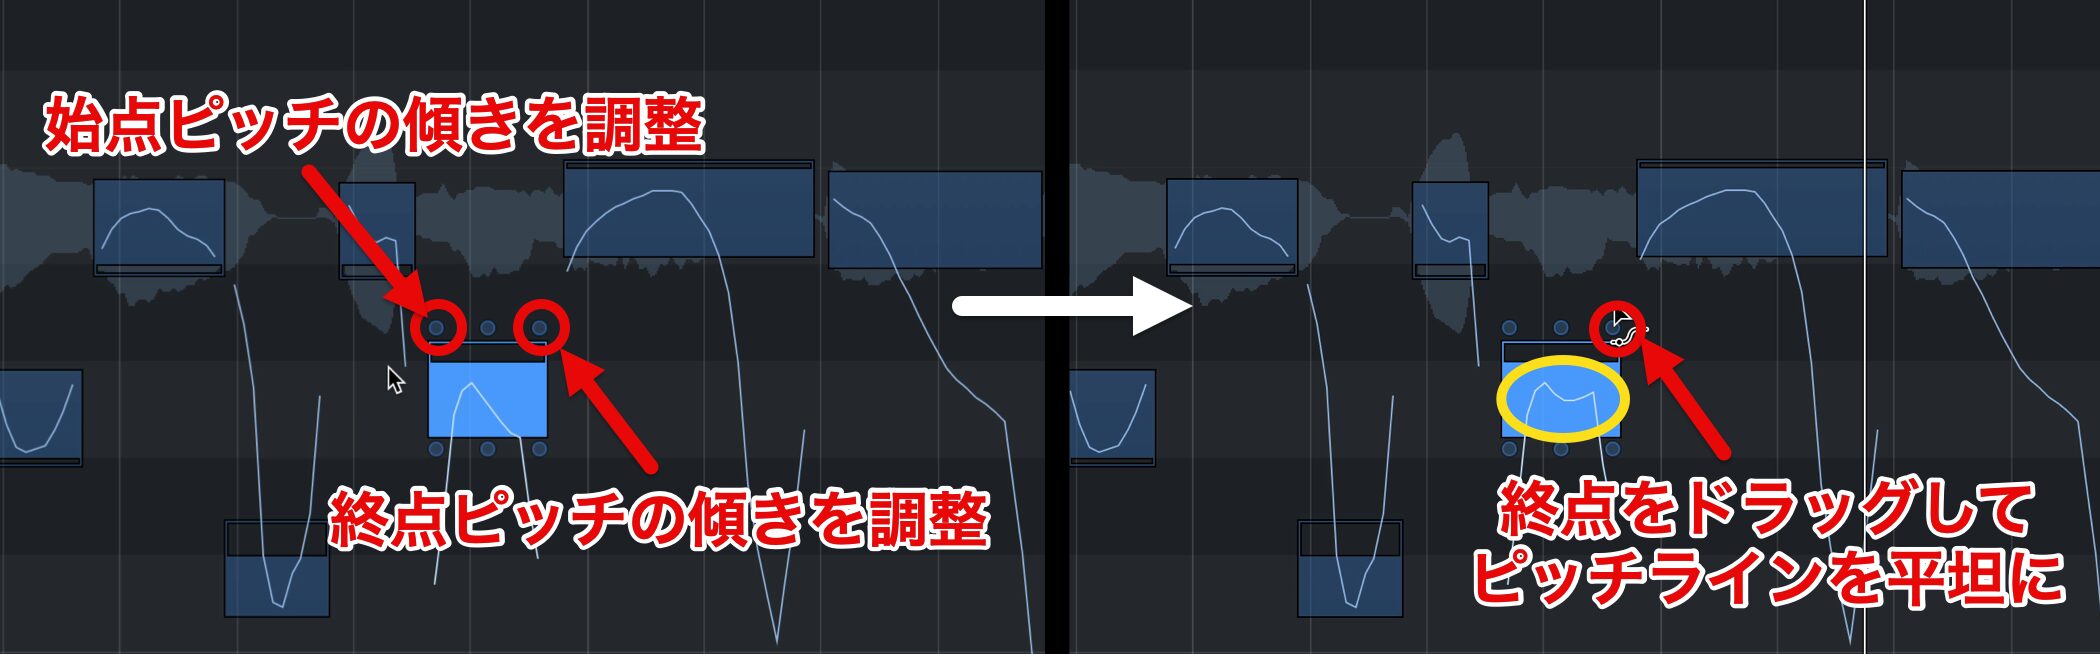
If the pitch line within a note gradually falls, you can drag the dots at both ends of the top of the note to adjust only one side, the start or the end.
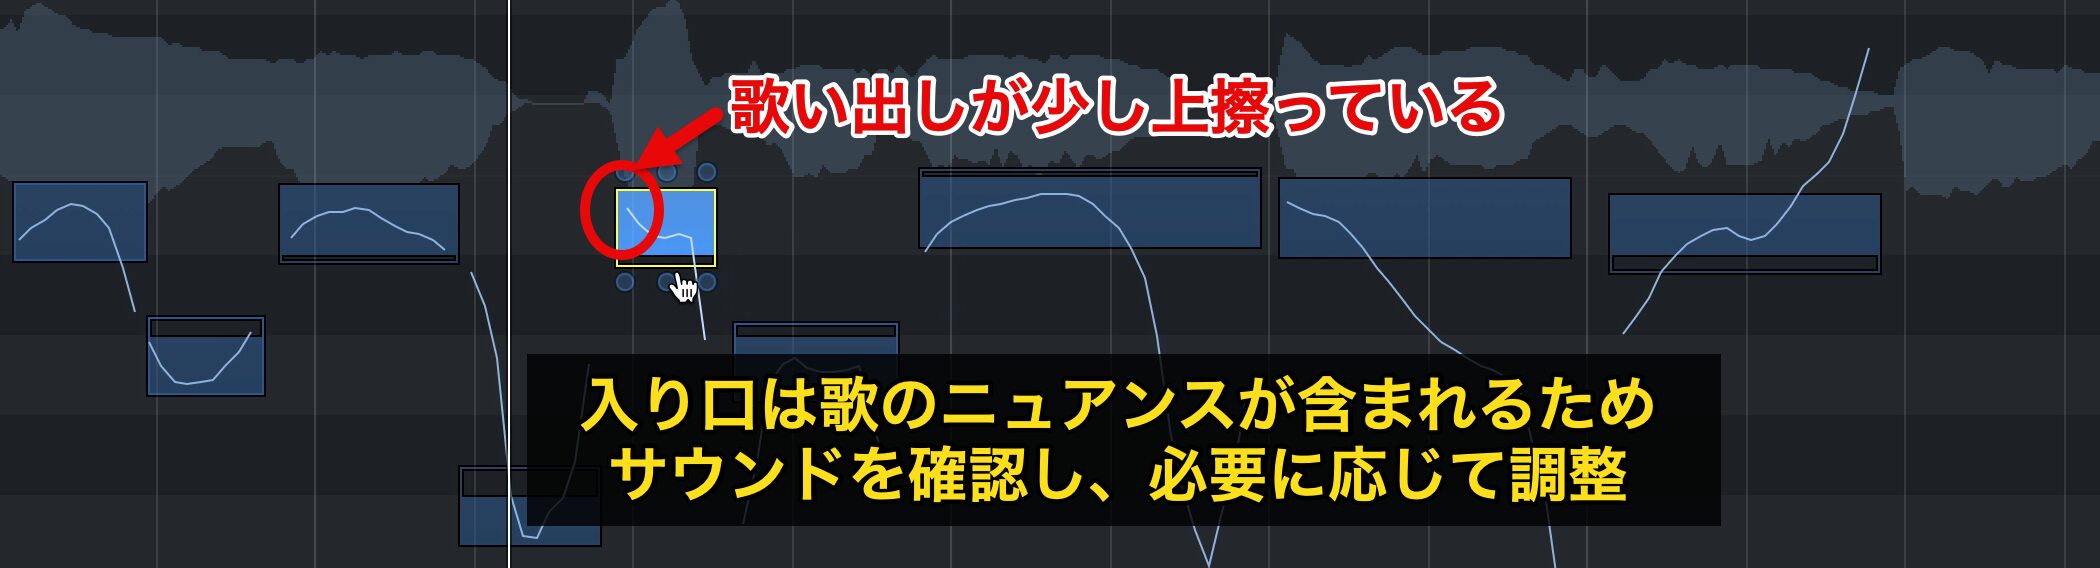
If the start of a note is sharp, you may be tempted to lower the pitch and flatten it, but the entry of a note often contains much of the singer's nuance.
So check the sound, and if it does not feel unstable, we recommend leaving it alone.
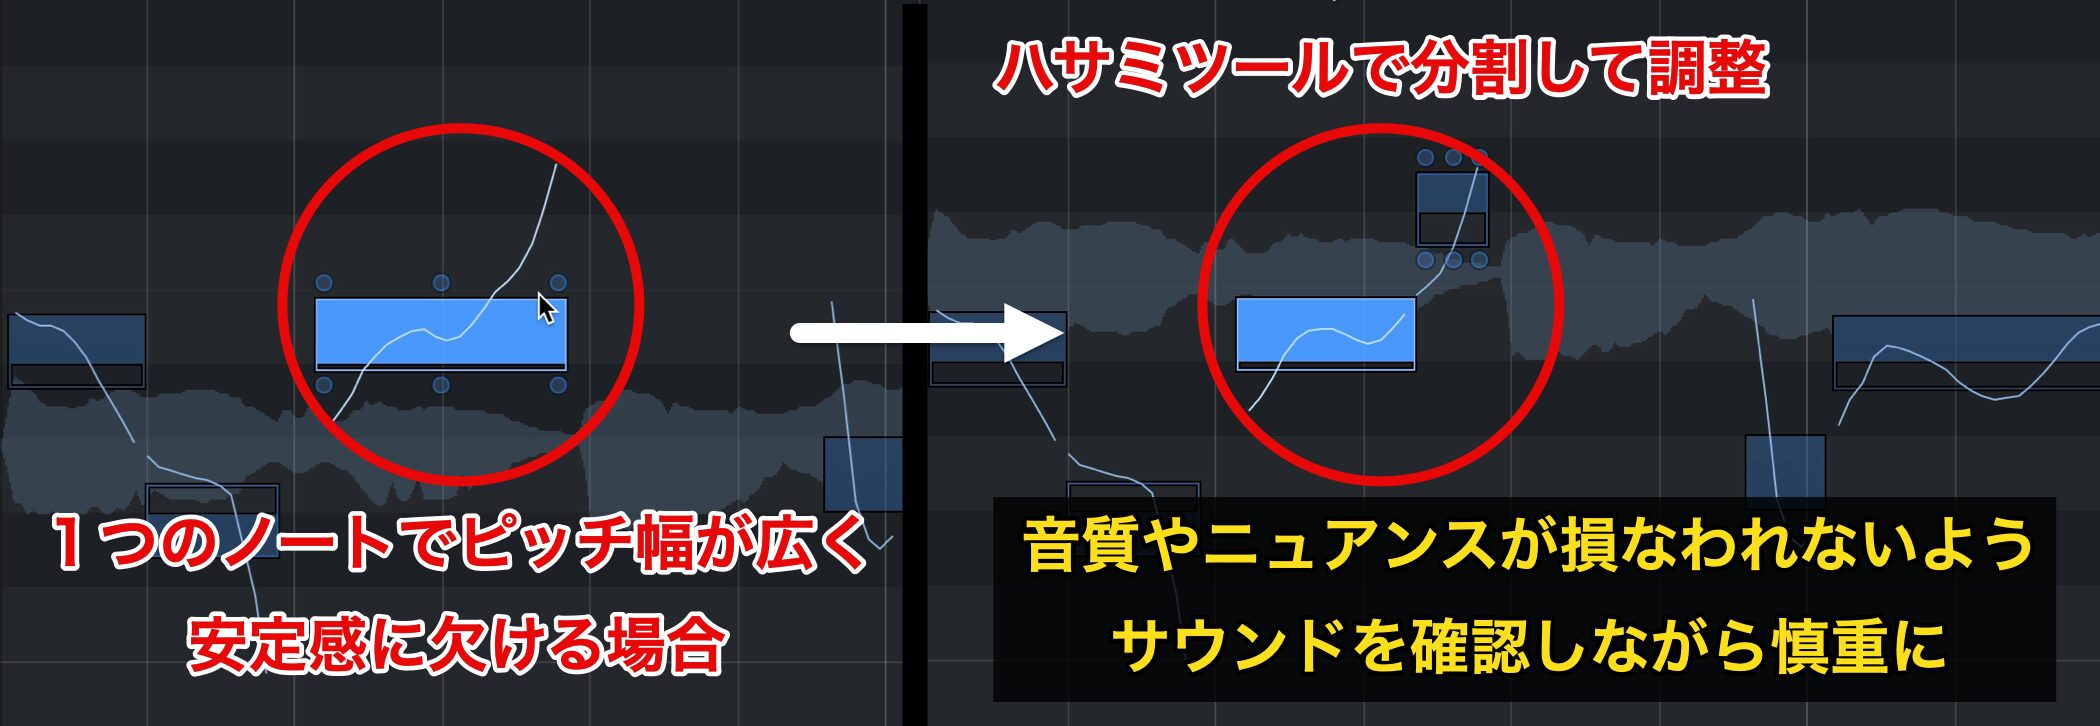
Because Fine Pitch shows the average pitch of a note, when the pitch range is wide, it is pulled toward the average and may not settle on the intended pitch.
In such cases, splitting the note and adjusting each part is effective, even if it is not at a phrase change.
When adjusting, proceed carefully while checking the sound, keeping the original curve in mind so as not to lose sound quality or nuance.
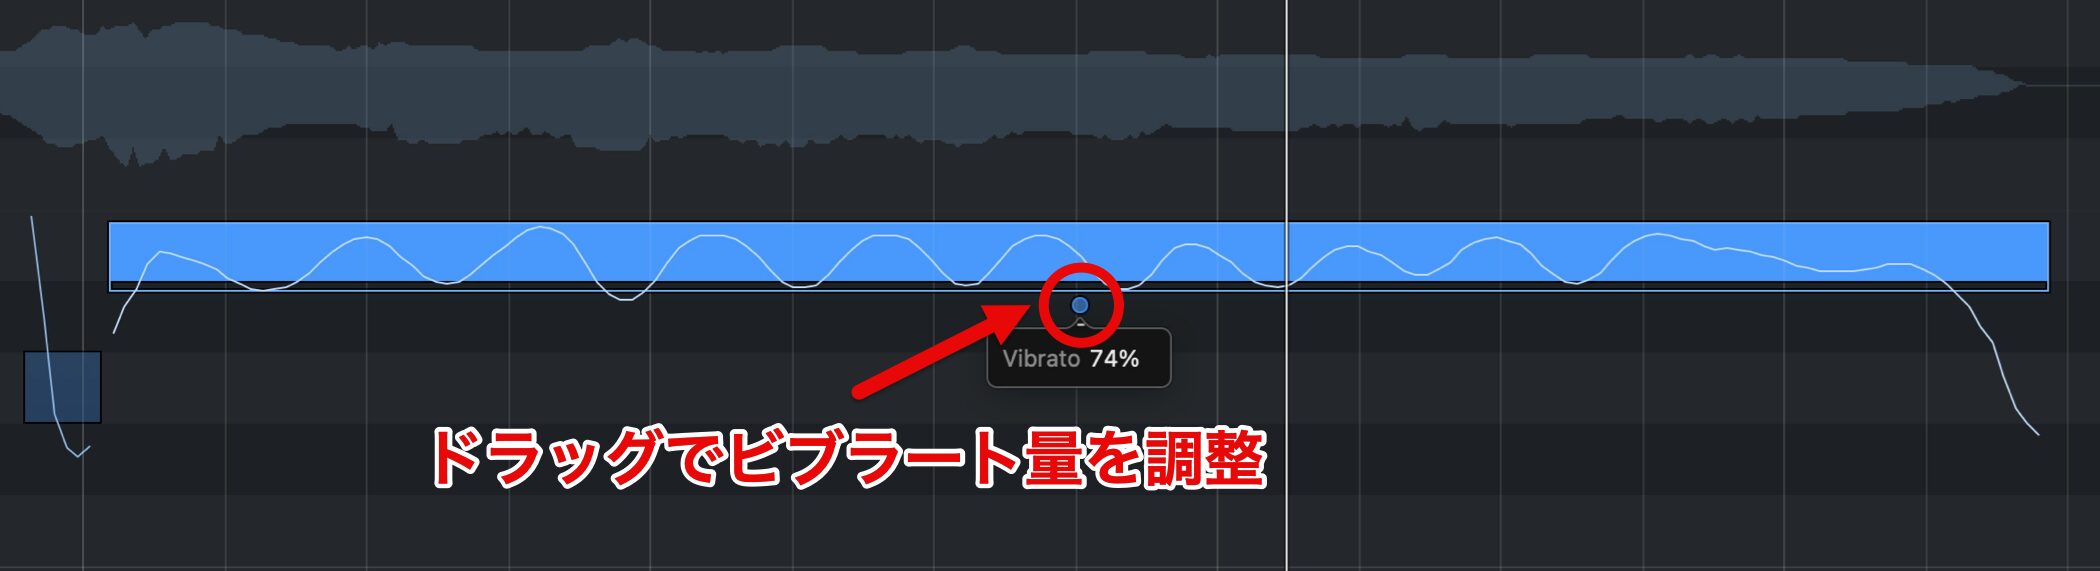
To adjust the depth of vibrato, drag the "Vibrato" dot at the bottom center of the note, the same one used to flatten the pitch.
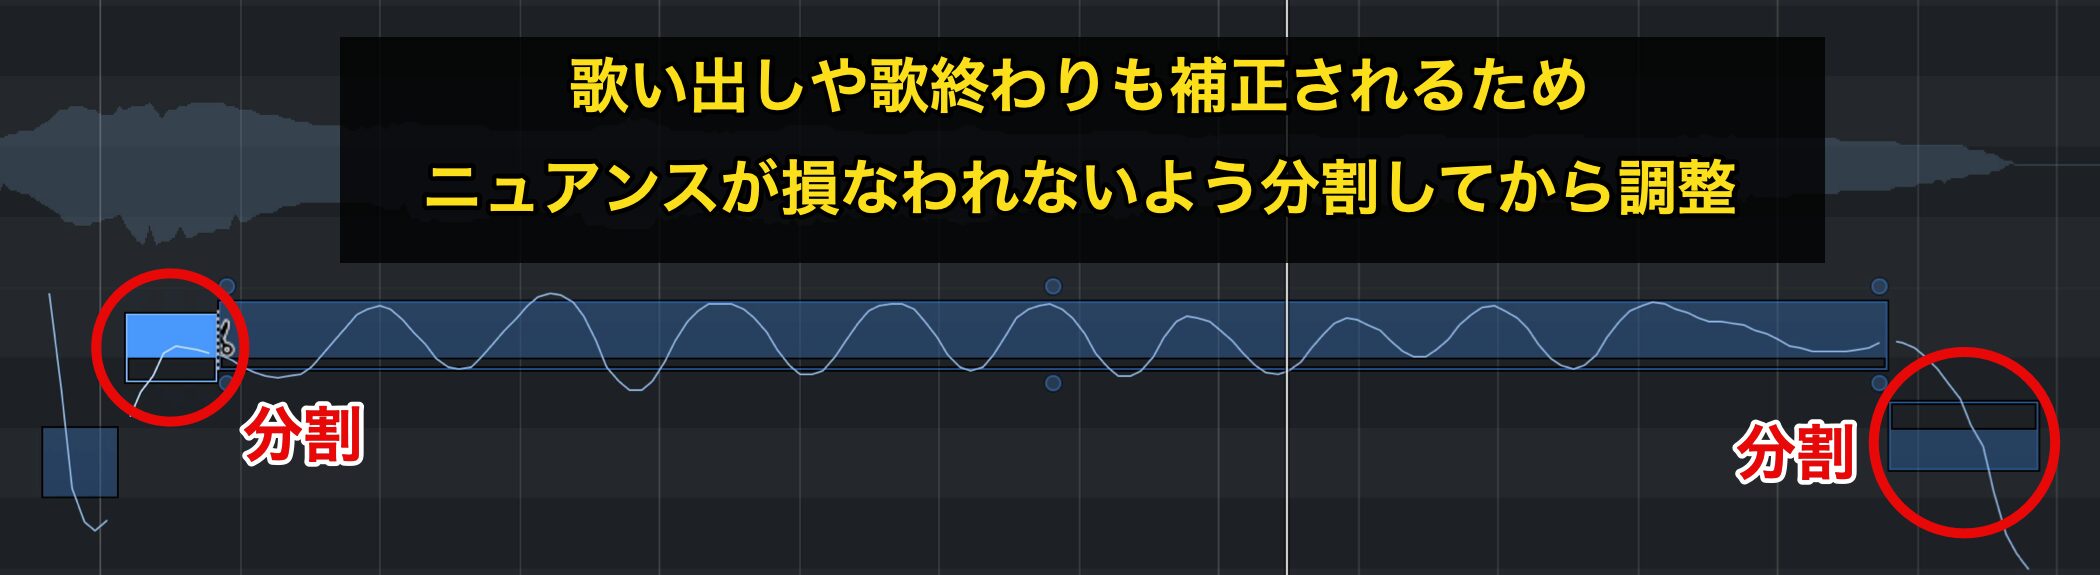
However, the beginnings and ends of sung phrases are also corrected, so the nuance of the performance may change.
When correcting pitch, keep the nuance of the performance in mind and use splitting as needed while adjusting.
Correcting Timing Manually
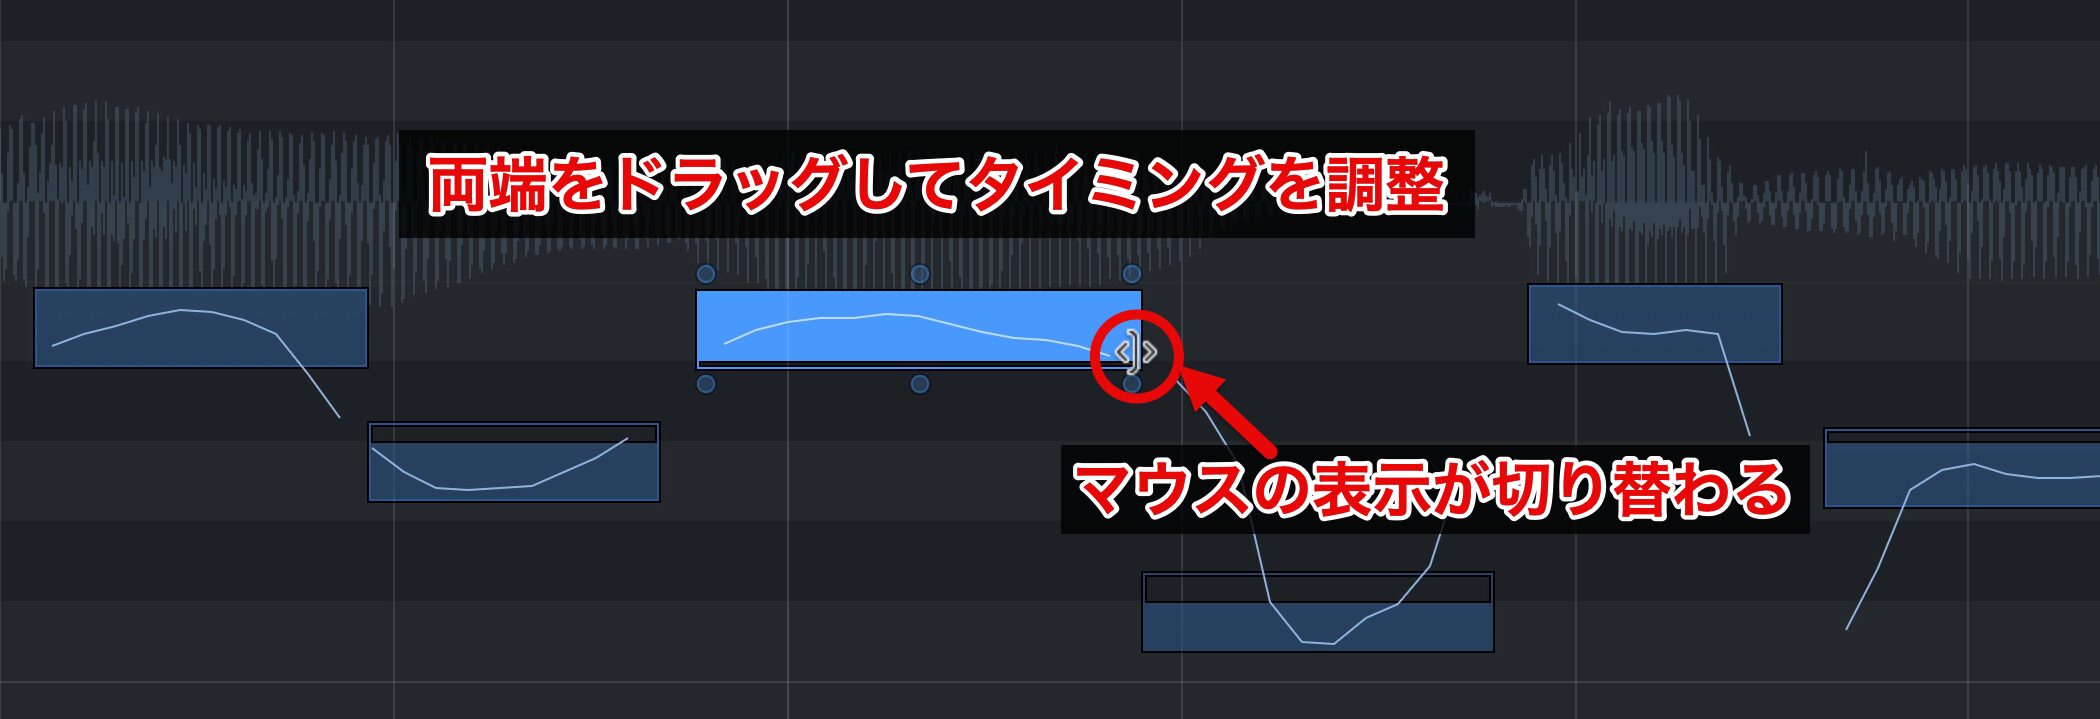
To correct timing, hover the cursor over either end of a note; the pointer changes, and you can then drag to adjust.
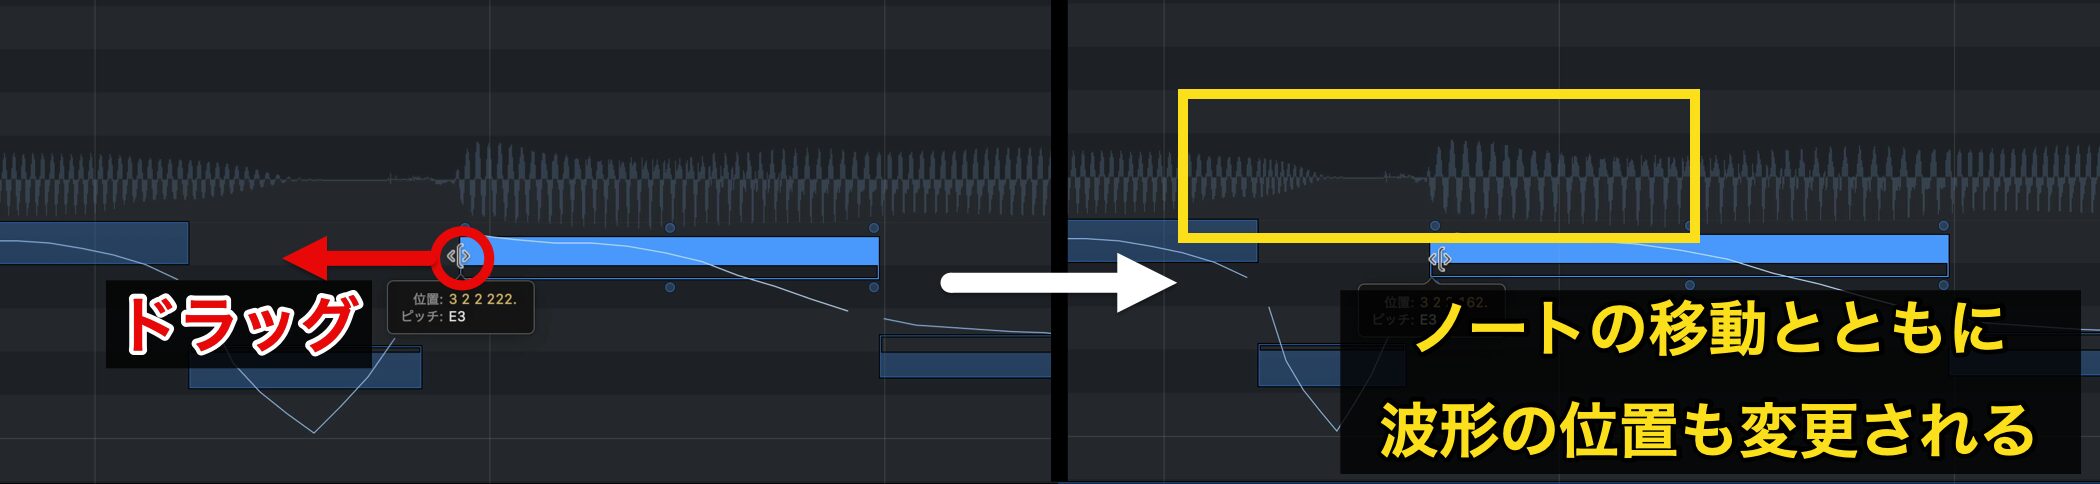
Timing correction is easy, but moving a note also moves the position of the waveform, so pronunciation and the nuance of the performance may change.
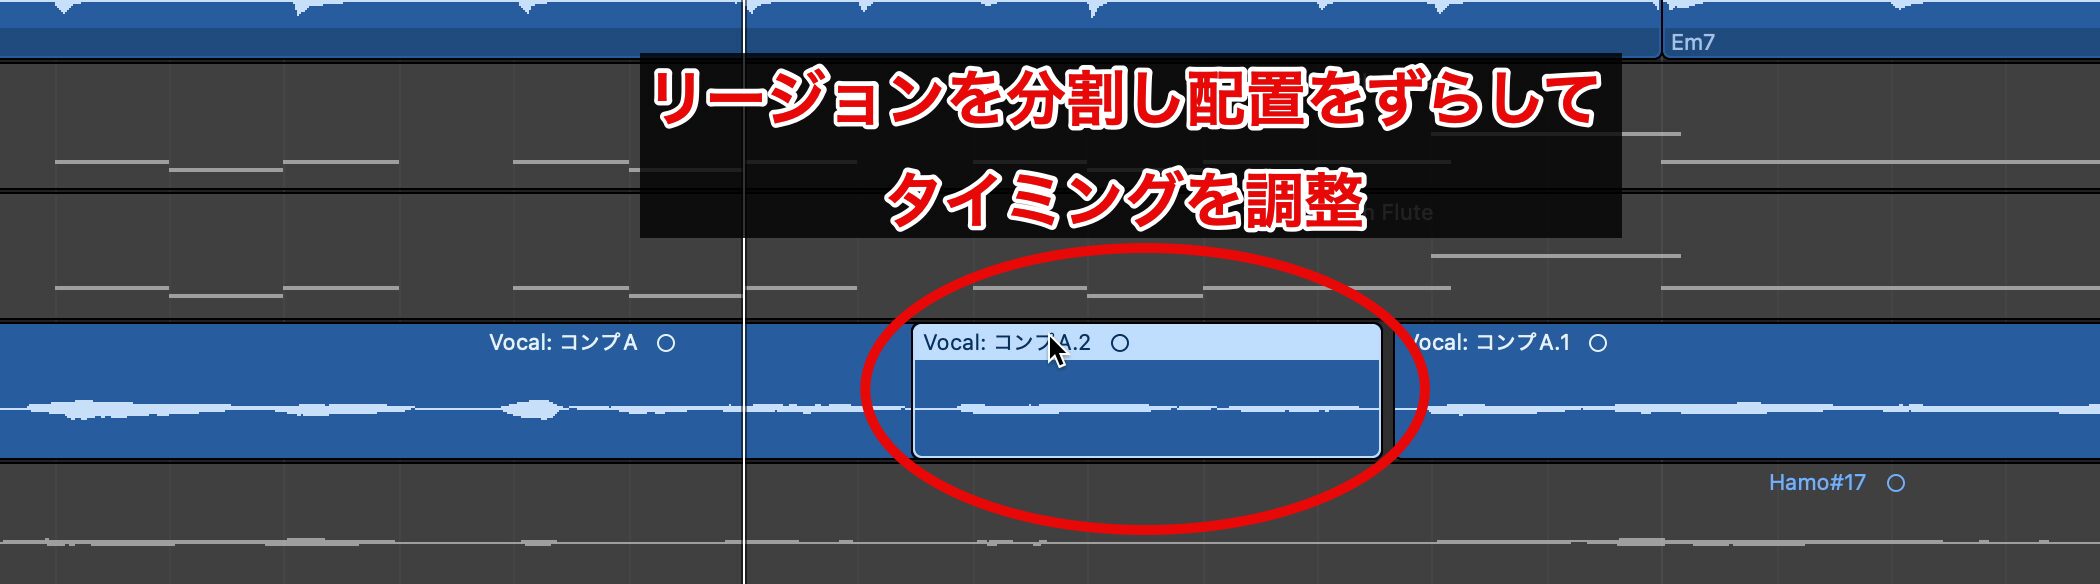
If the voice sounds unnatural after correction, we recommend splitting the region and adjusting its placement instead of moving notes.
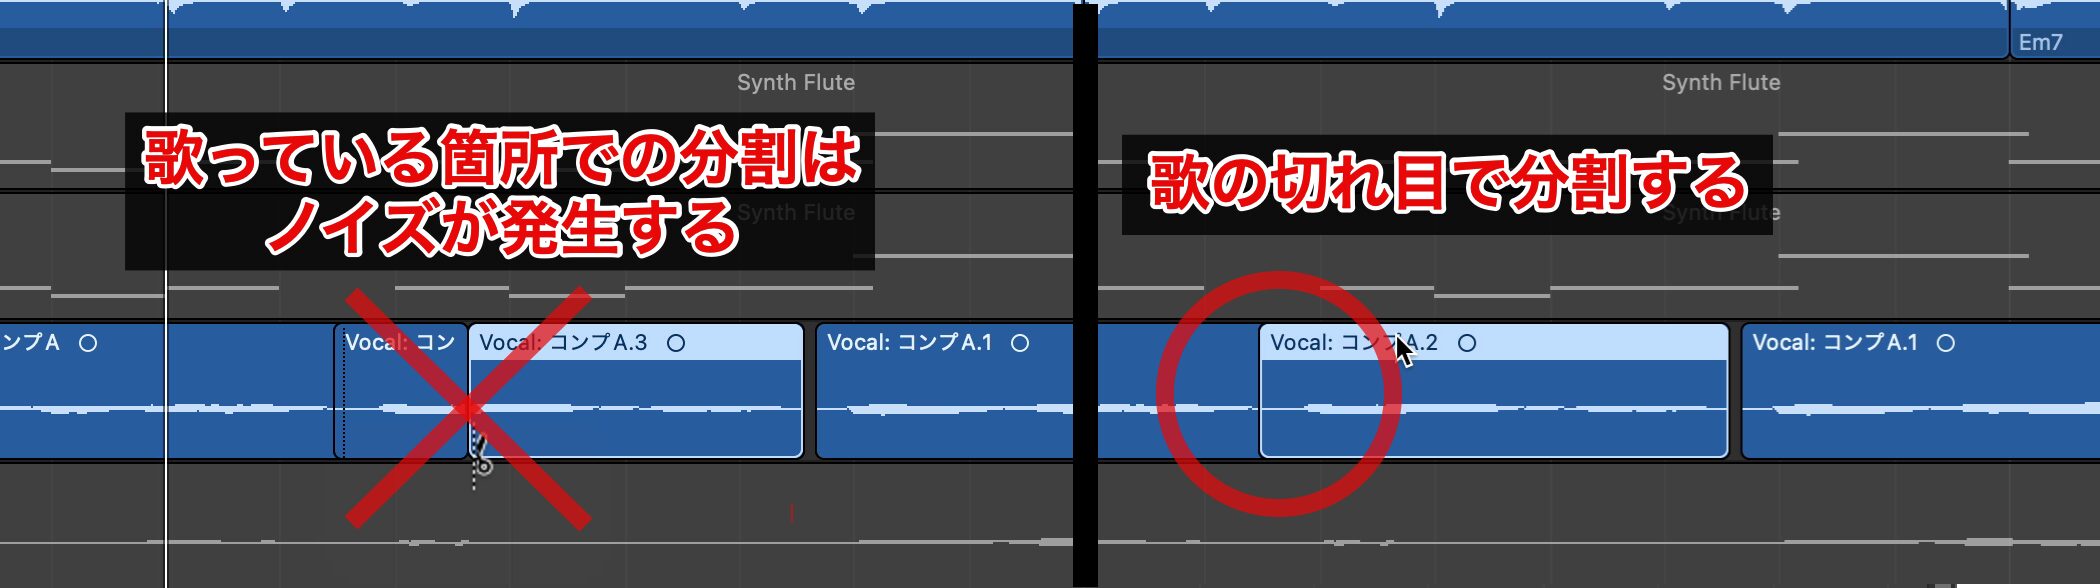
When splitting a region, splitting where the singer is singing causes noise, so always split at a break in the vocal (where the level is close to zero).
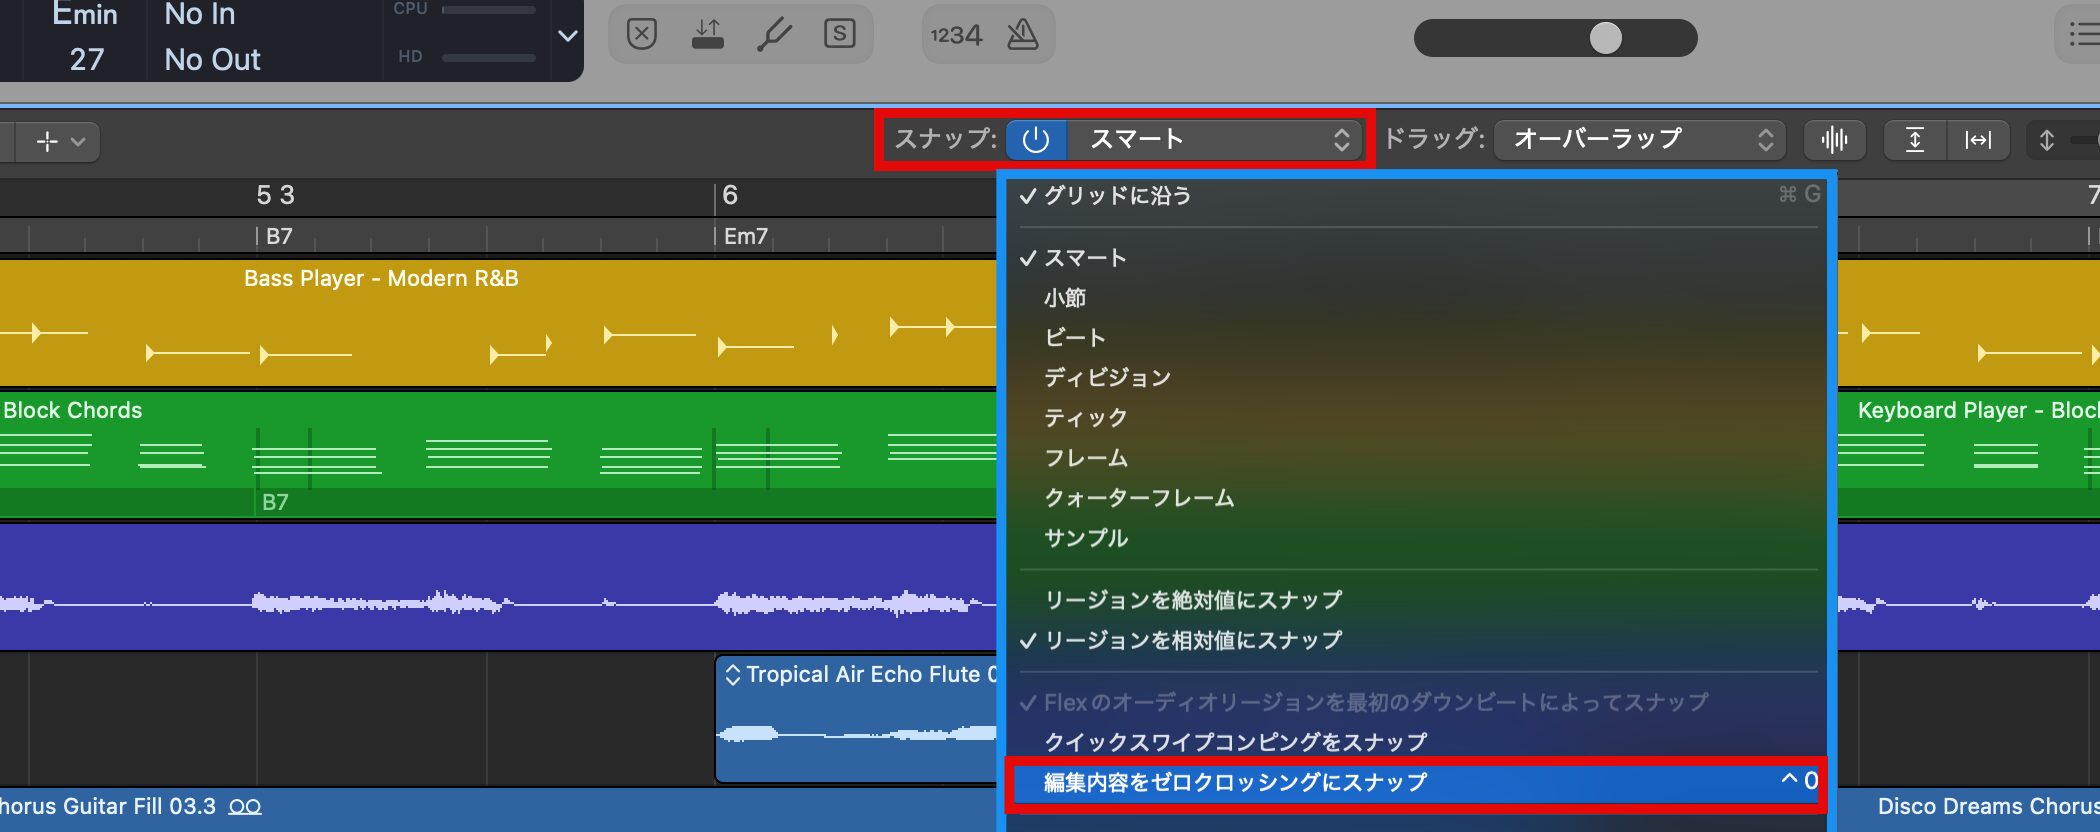
When correcting timing with regions, it is also convenient to enable "Snap Edits to Zero Crossings" in the Snap menu.
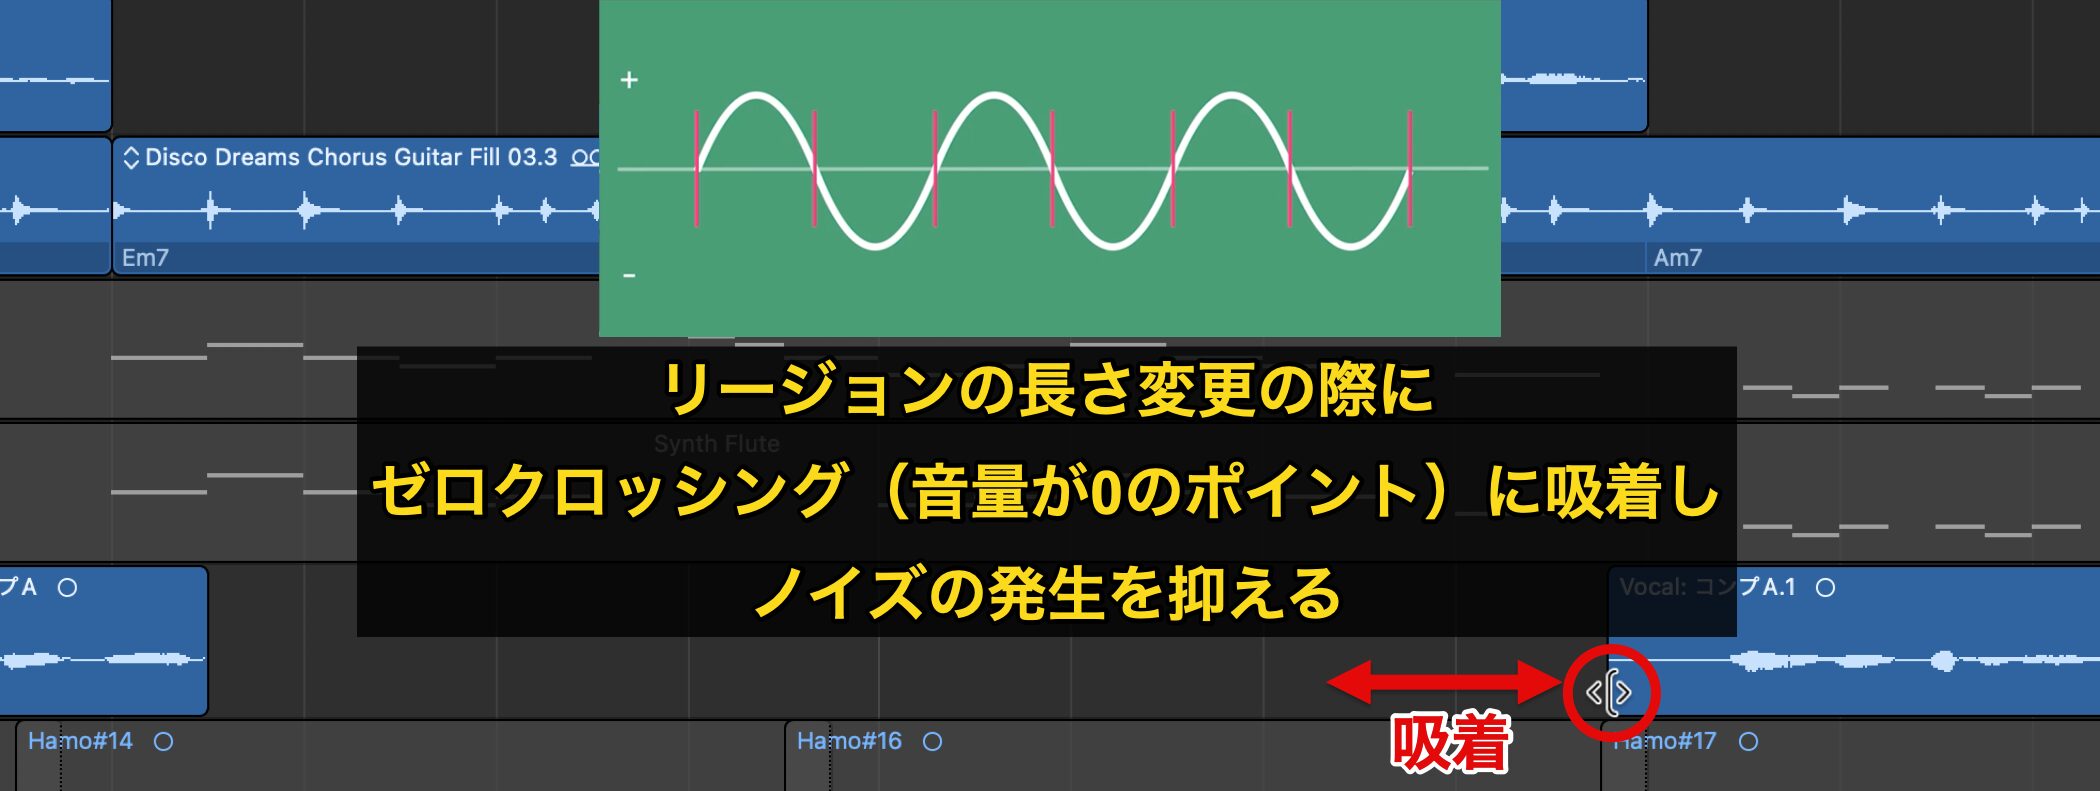
A zero crossing is a point where the waveform amplitude is zero (where the level is 0). With this setting enabled, edits automatically snap to zero crossing points when you adjust regions, which helps prevent noise.
Removing Silent Sections
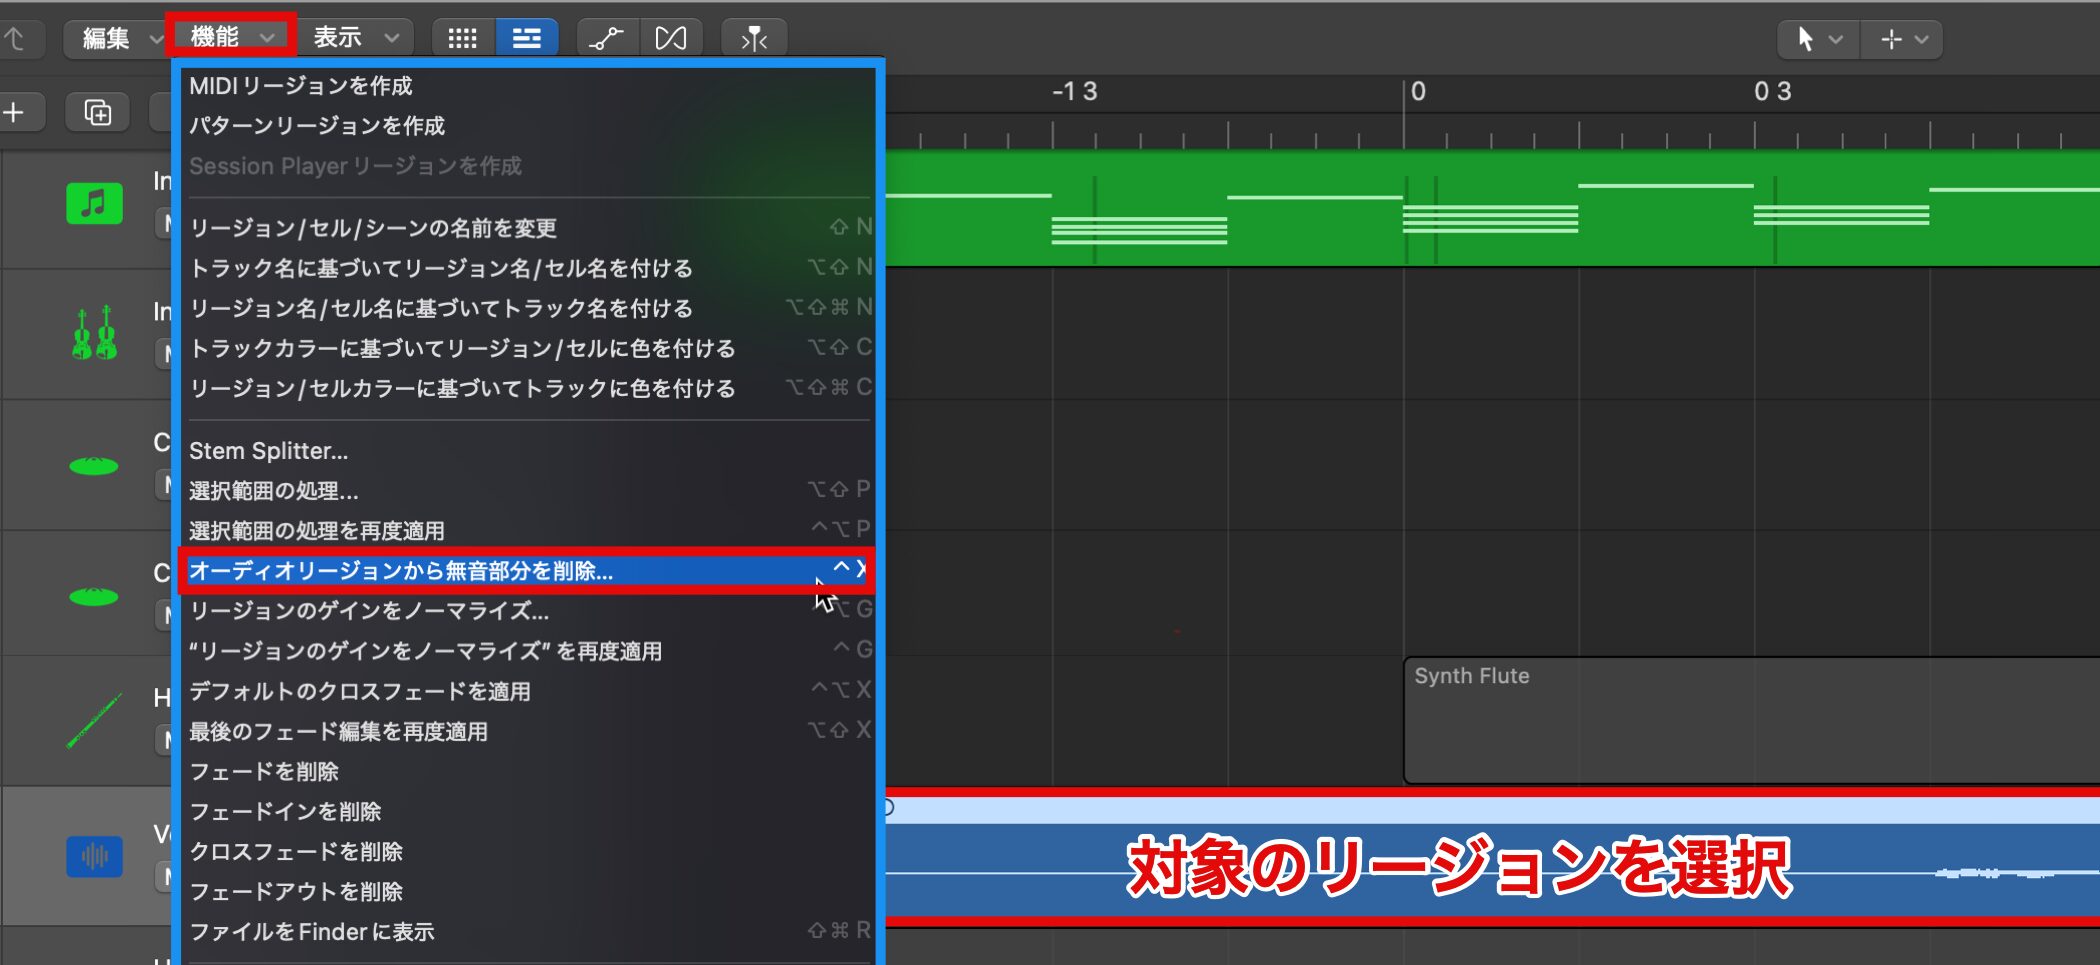
Once vocal correction is complete, finally remove the silent sections.
Select the target region and choose "Remove Silence from Audio Region" from "Functions."
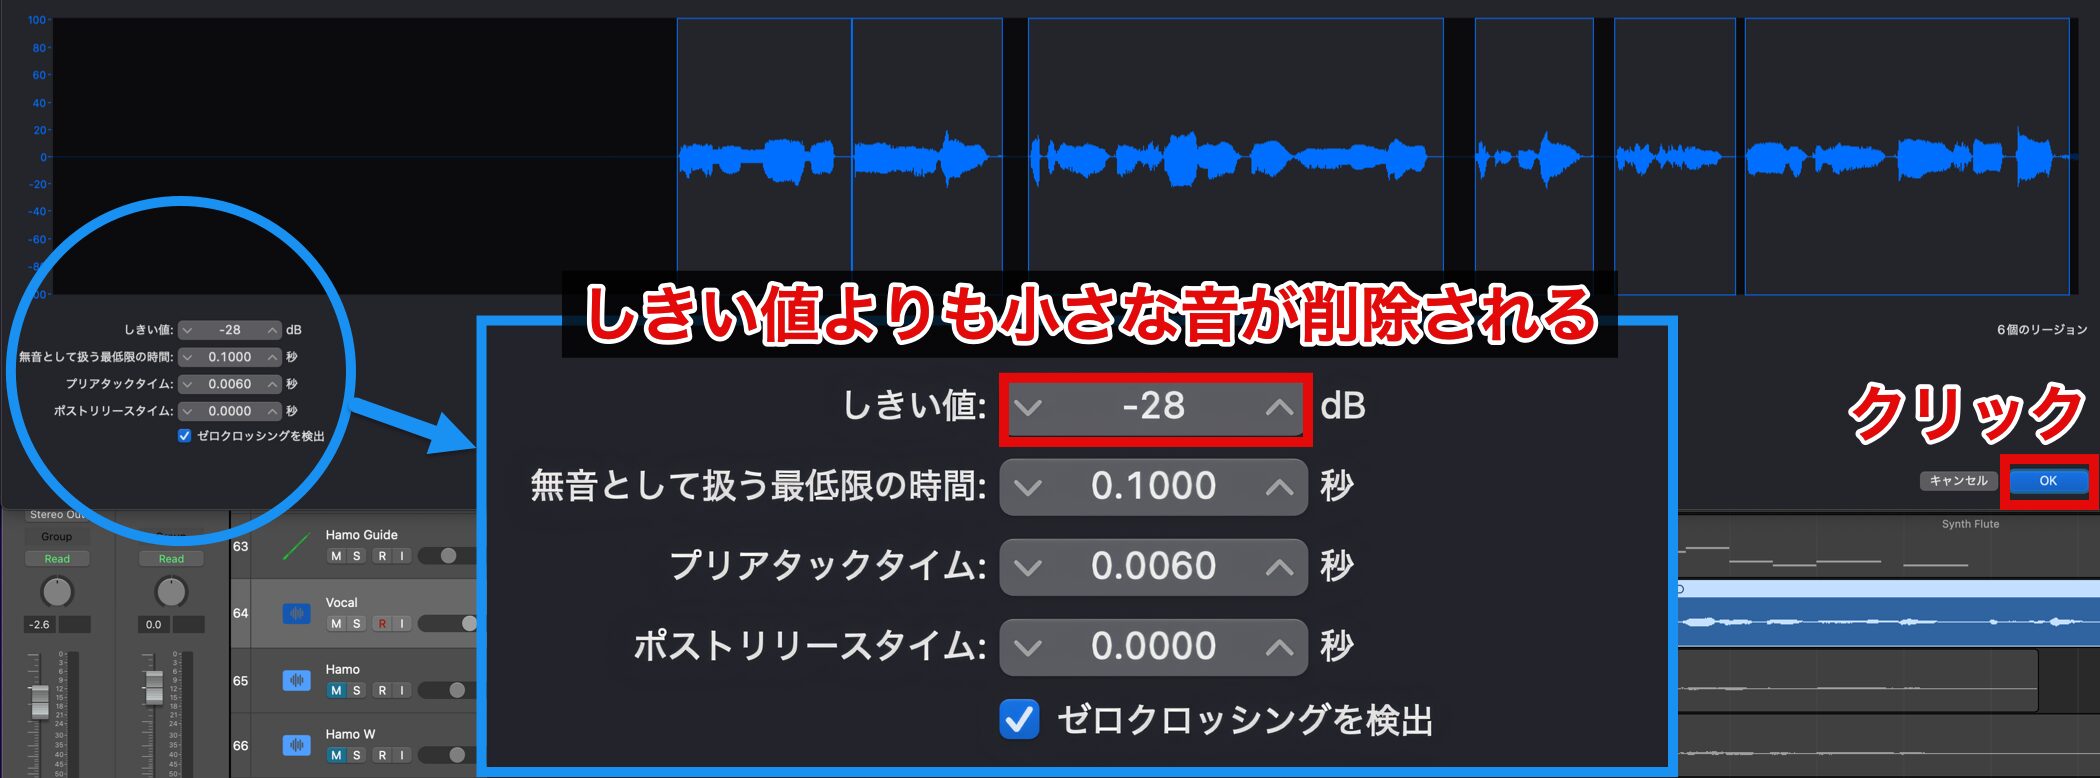
The screen above appears, and parts quieter than the value set in "Threshold" are removed automatically.
Each time you change the value, you can see which parts of the waveform will be removed, so adjust while checking the result to make sure no necessary sound is lost.
When the settings are complete, click "OK."
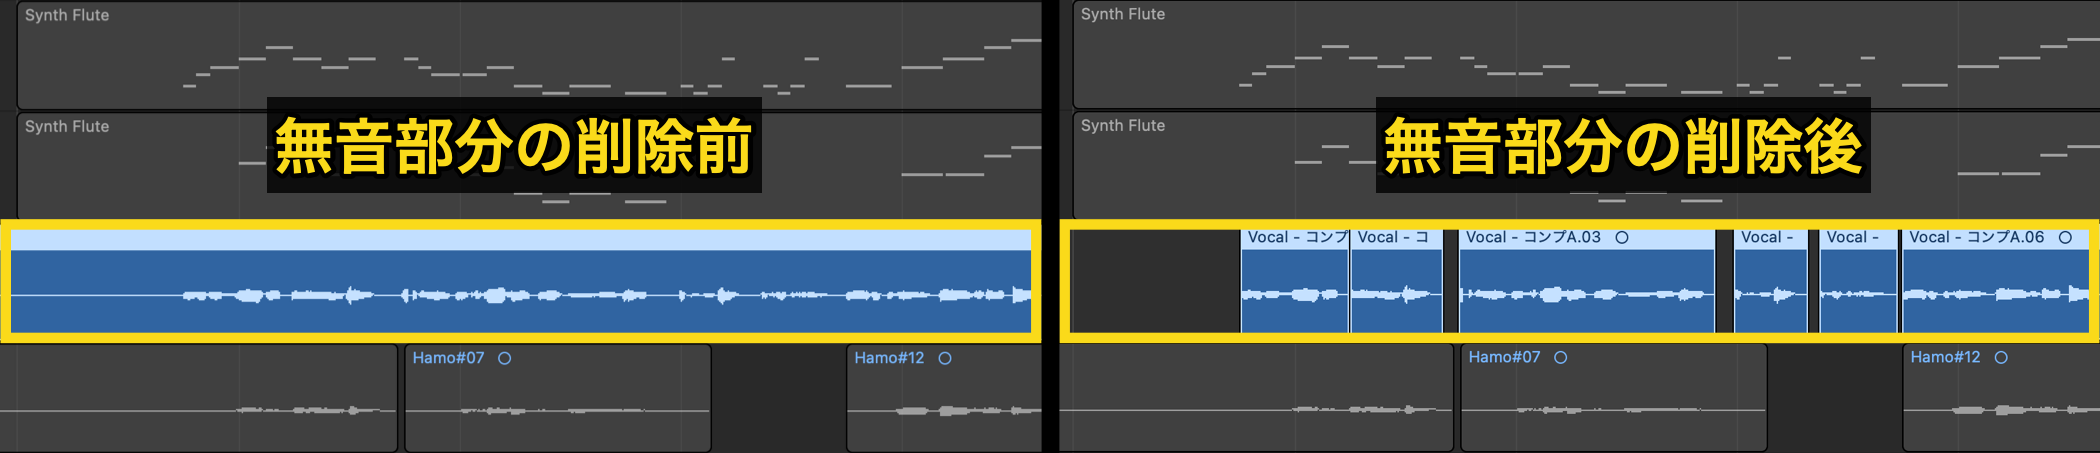
This function can be called with the shortcut Control-X.
Automation
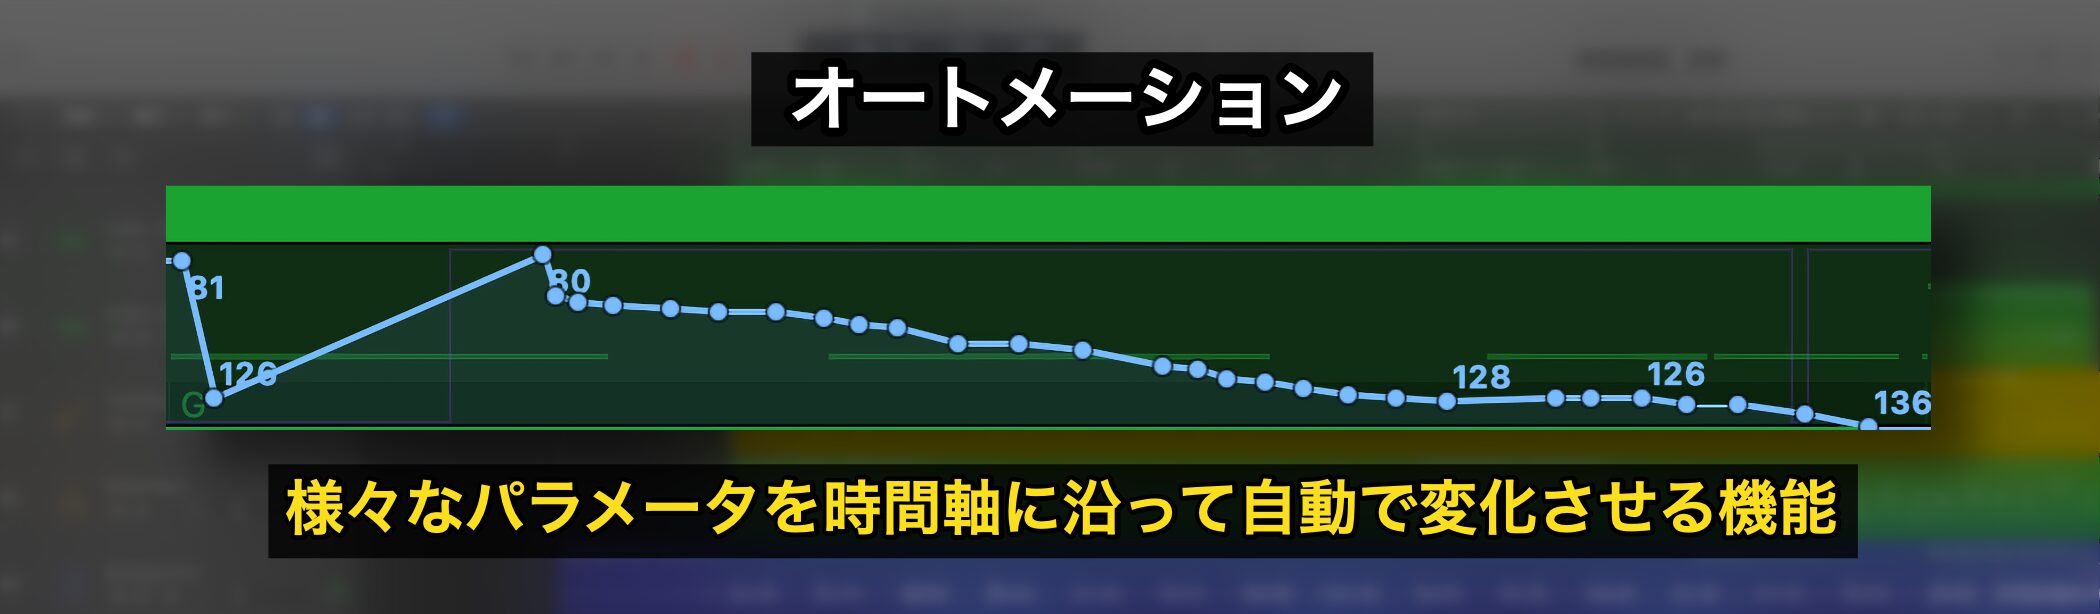
Automation is a function that automatically changes various parameters over time, such as volume, pan and effect settings within a song.
Using this function, you can add dynamics and movement to the song for a more expressive result.
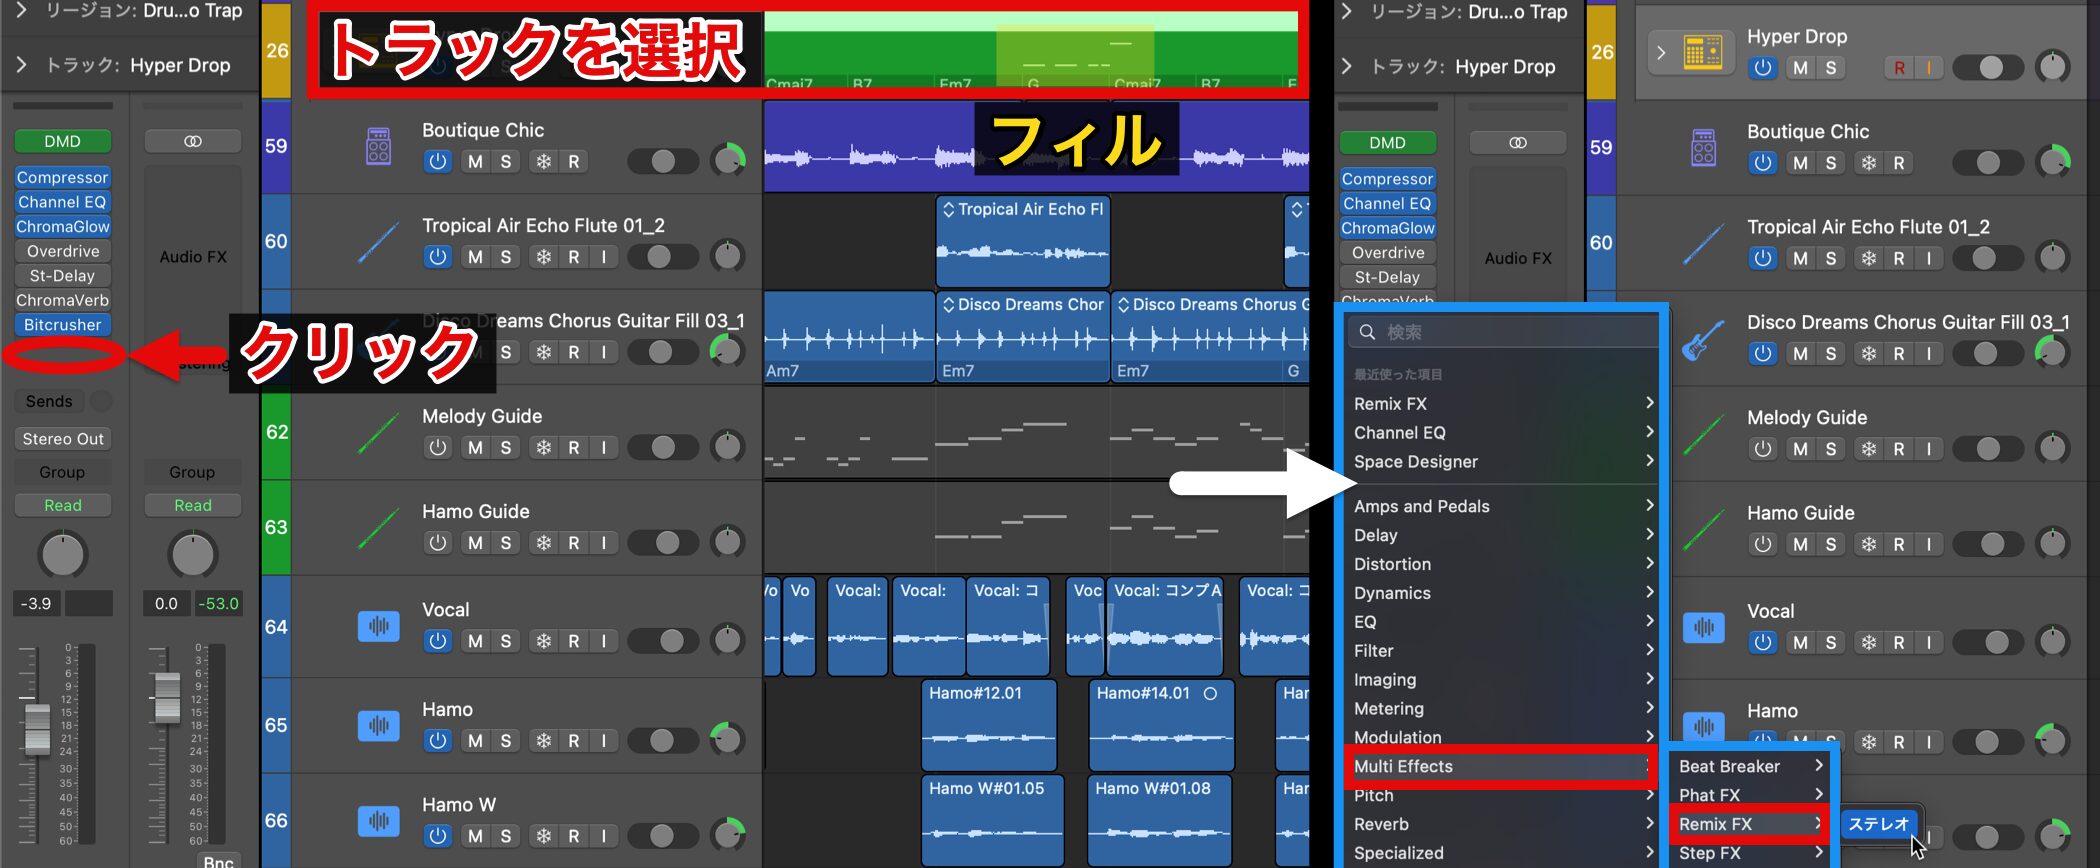
This time, we apply an effect to the drum phrase we created as a fill and add movement with automation.
Select the target track and click an empty slot in the Audio FX section to load an effect.
Here we choose "Remix FX," which is ideal for this purpose.
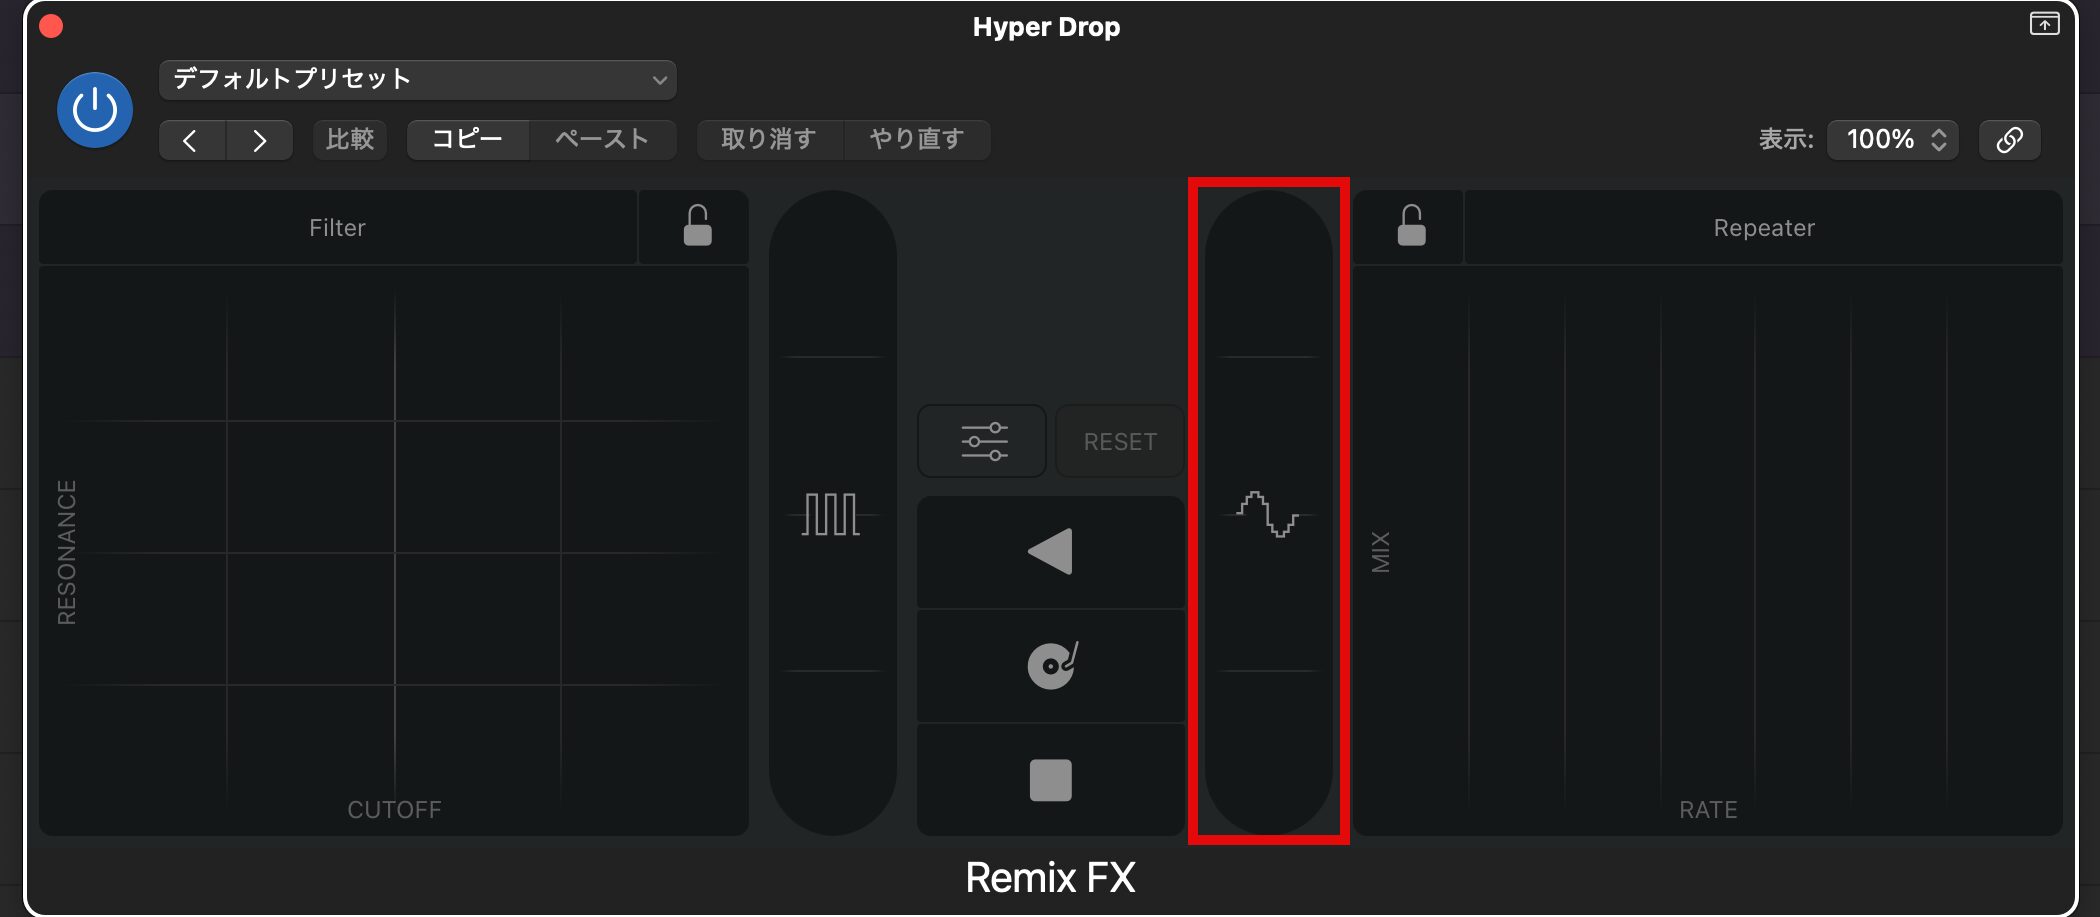
Remix FX is an effect plug-in that can add a variety of movement and changes to a sound.
This time, we operate the area outlined in red to add gritty digital noise and give the fill even more energy.
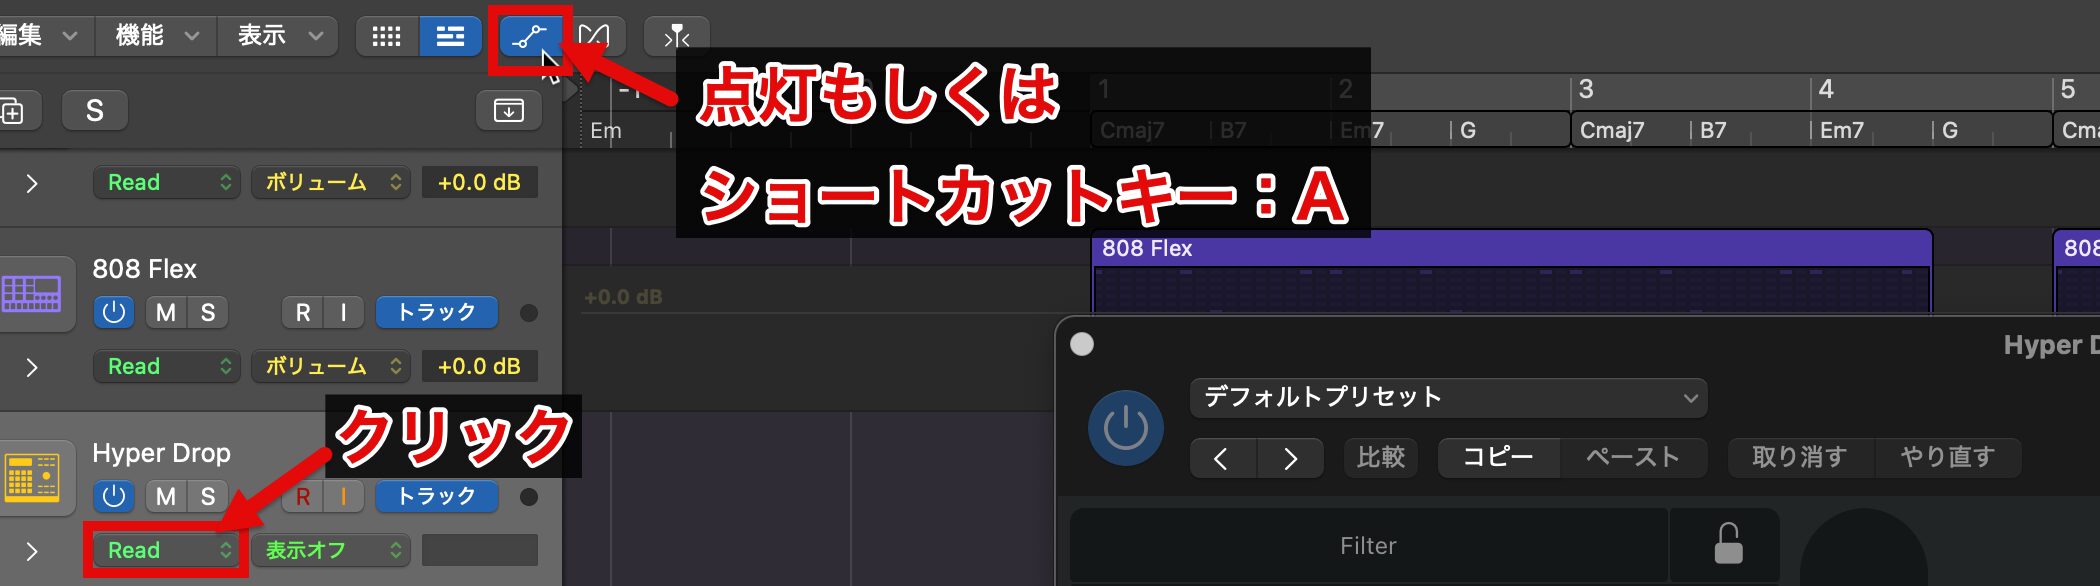
To use automation, turn on the Show Automation button or press the shortcut key A to display it.
Next, click the automation mode "Read."
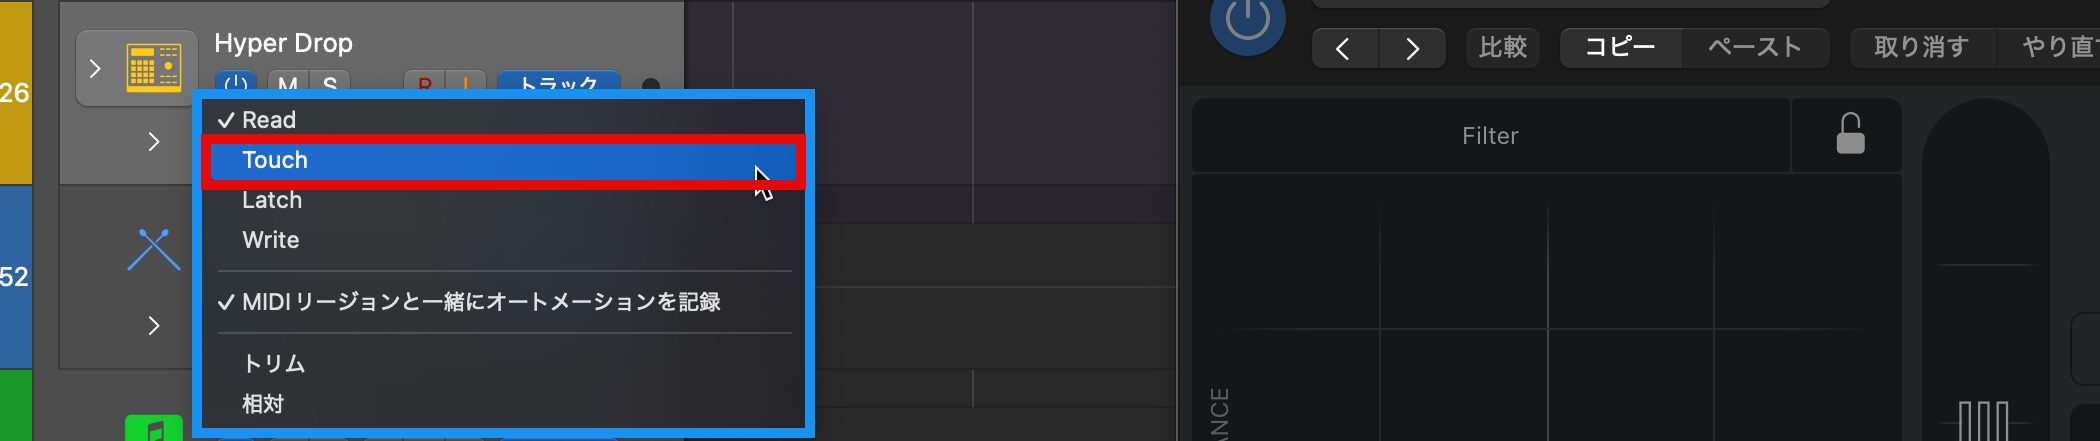
There are several automation modes, but here we proceed with "Touch" selected.
We will explain the other modes in detail later.
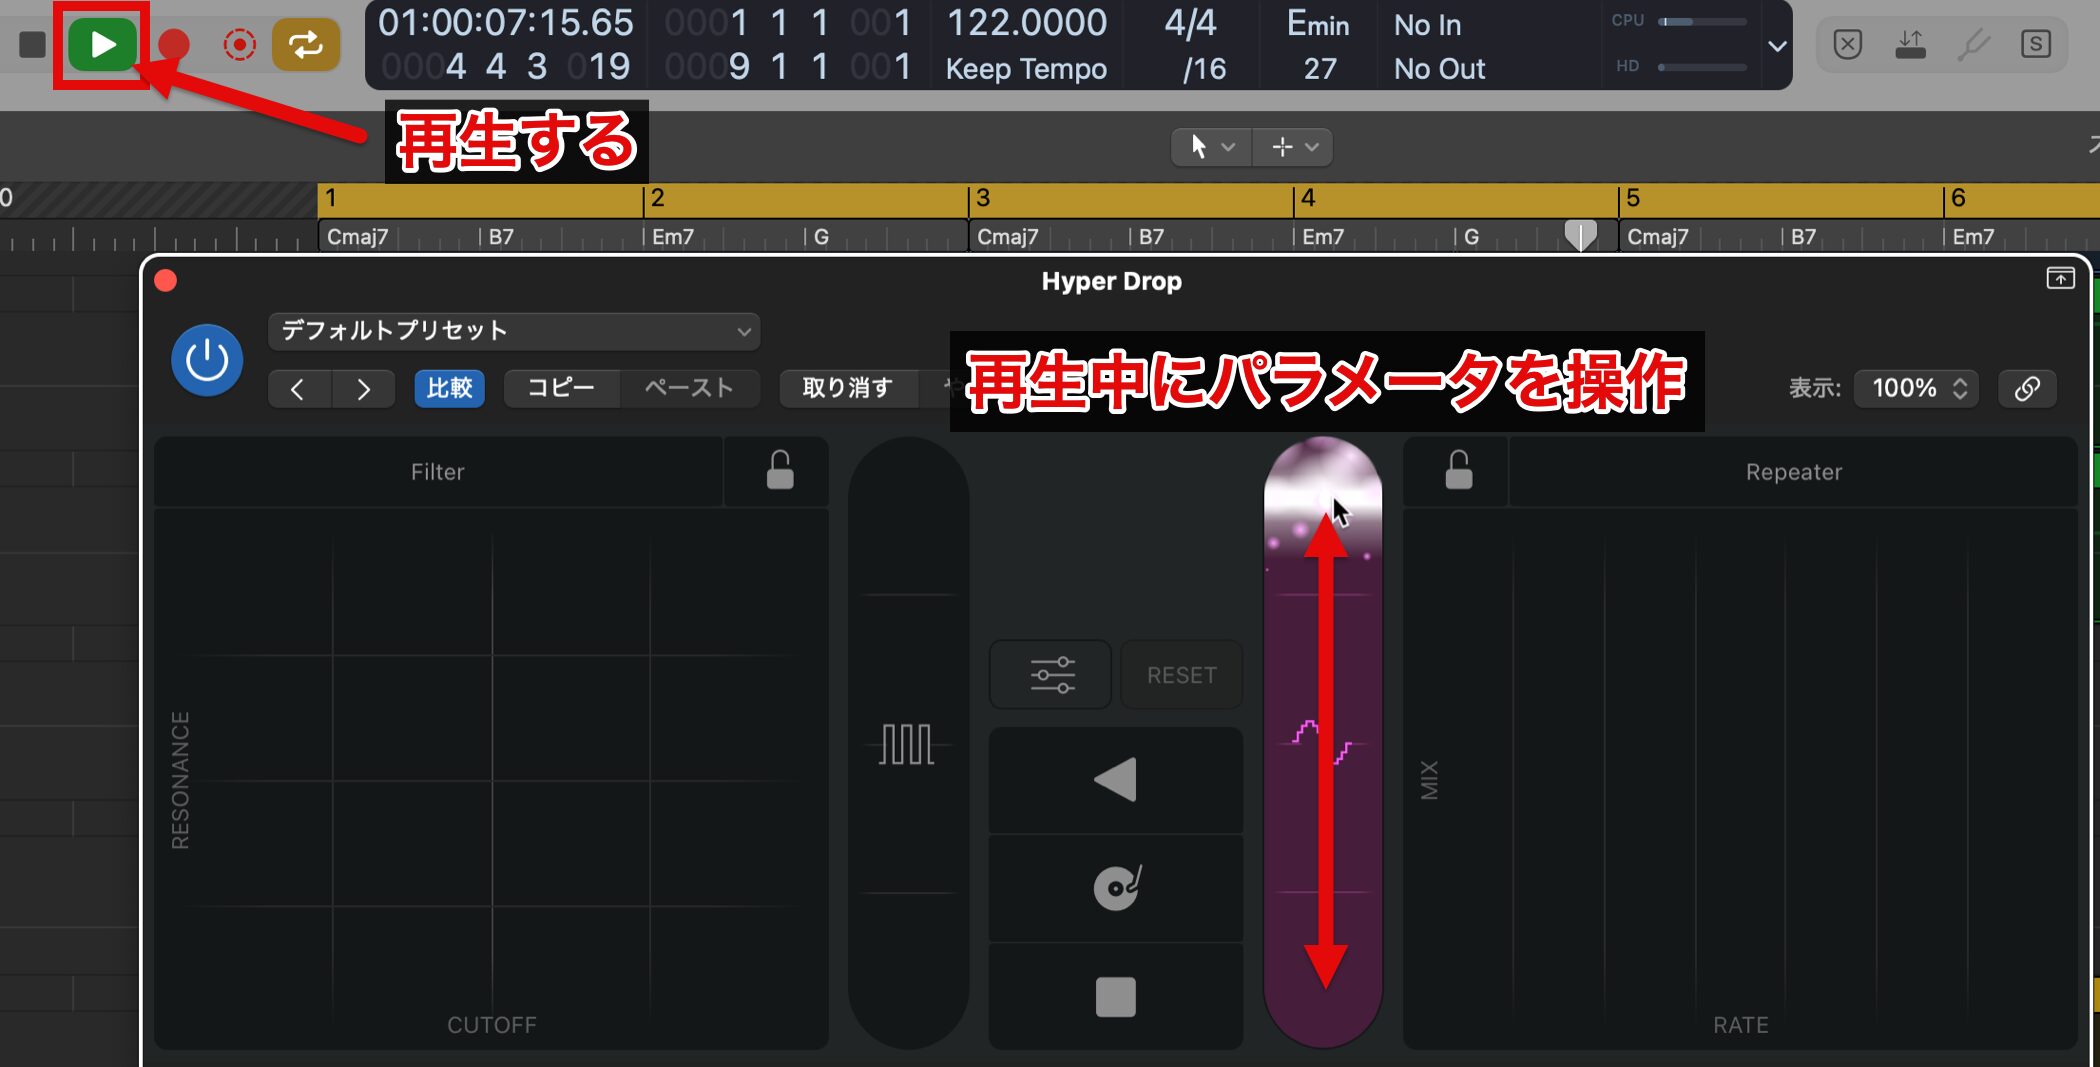
When you operate a parameter while playing the song, your actions are recorded as automation.
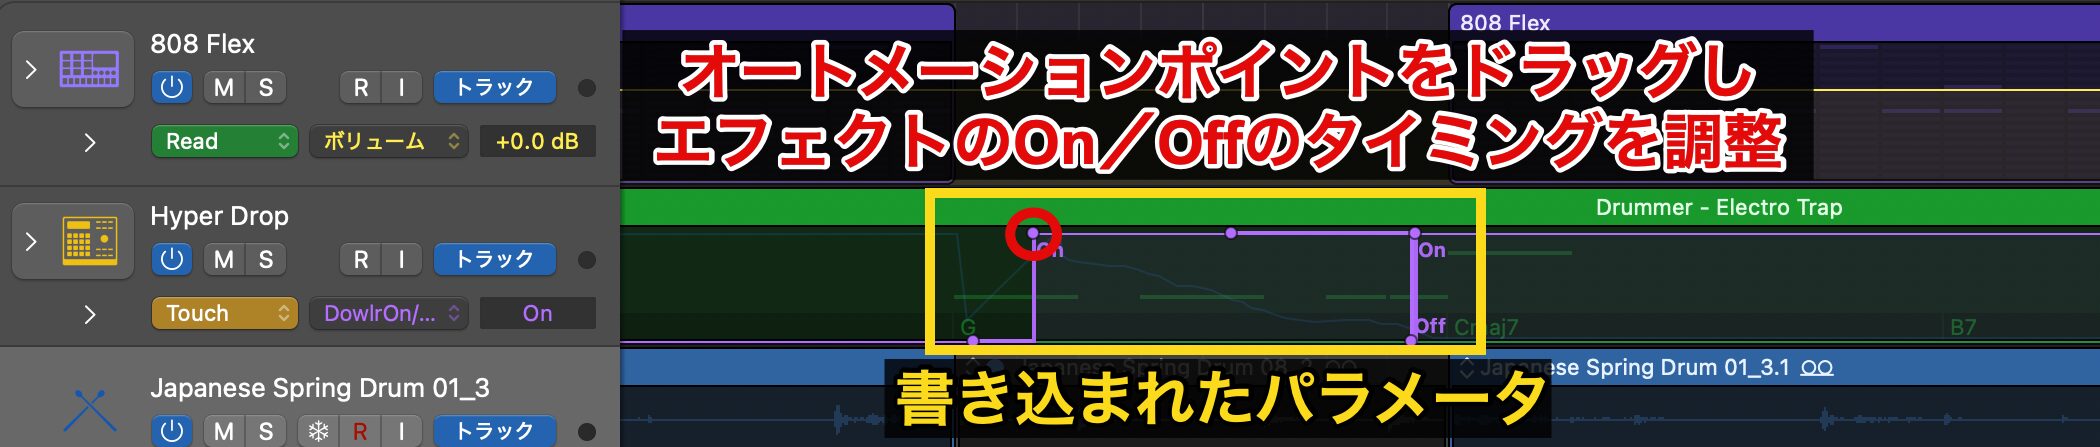
The written parameters are shown in the automation lane, where you can check and edit them.
In the example in the image, you can drag automation points (round dots) to adjust the timing of switching the effect on and off.
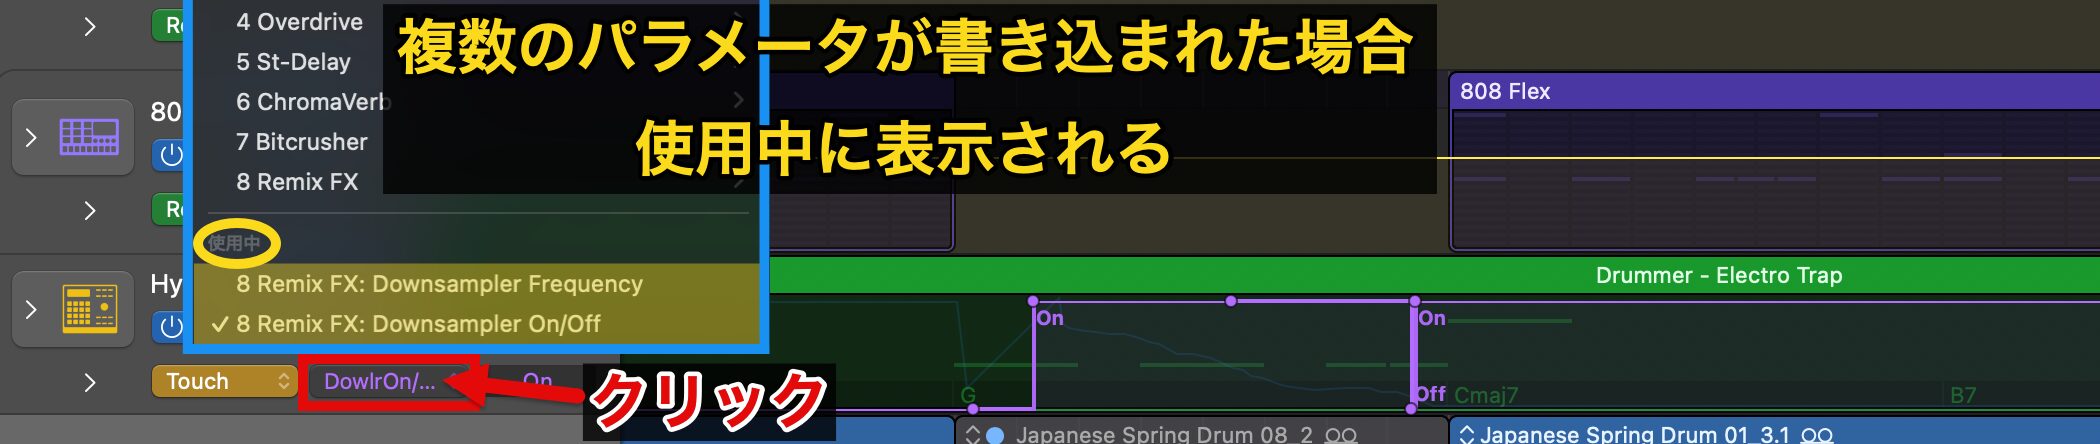
When multiple parameters are written at the same time, they are listed under the parameters in use in the automation parameter list.
Select the relevant parameter to switch between them easily.

Automation points can be moved by dragging, added by clicking and deleted with the Delete key.
Unlike the earlier on/off operation, the parameter we switched to has many finely recorded automation points.
In such cases, dragging while holding down Shift and Control lets you create smooth curves.
Adjust while listening to bring it closer to the sound you have in mind.
About Automation Modes
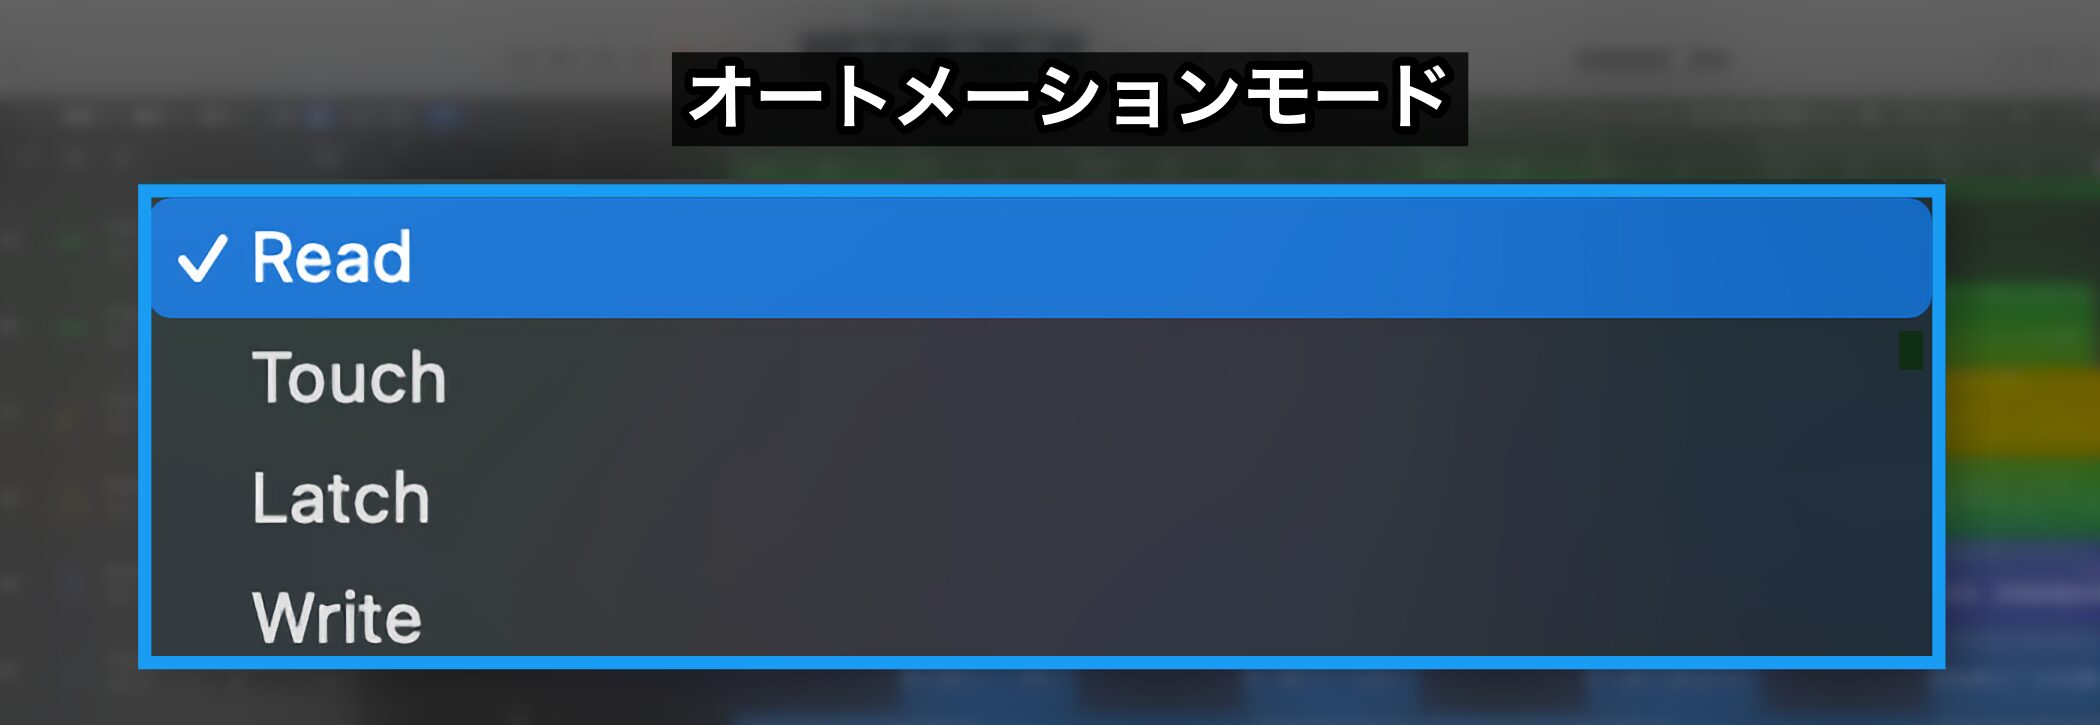
If you want to write automation in real time rather than editing with the mouse, simply operate the target parameter while playing the song, and the automation is newly overwritten.
Understanding the automation modes will help your work go smoothly.

In "Touch" mode, automation is written only while you are operating a parameter during playback.
When you stop operating it, the value automatically returns to the original value (existing automation or the default setting).

In "Latch" mode, when you operate a parameter during playback, its value is held even after you stop operating it.
Writing continues until you stop playback or change the automation mode.
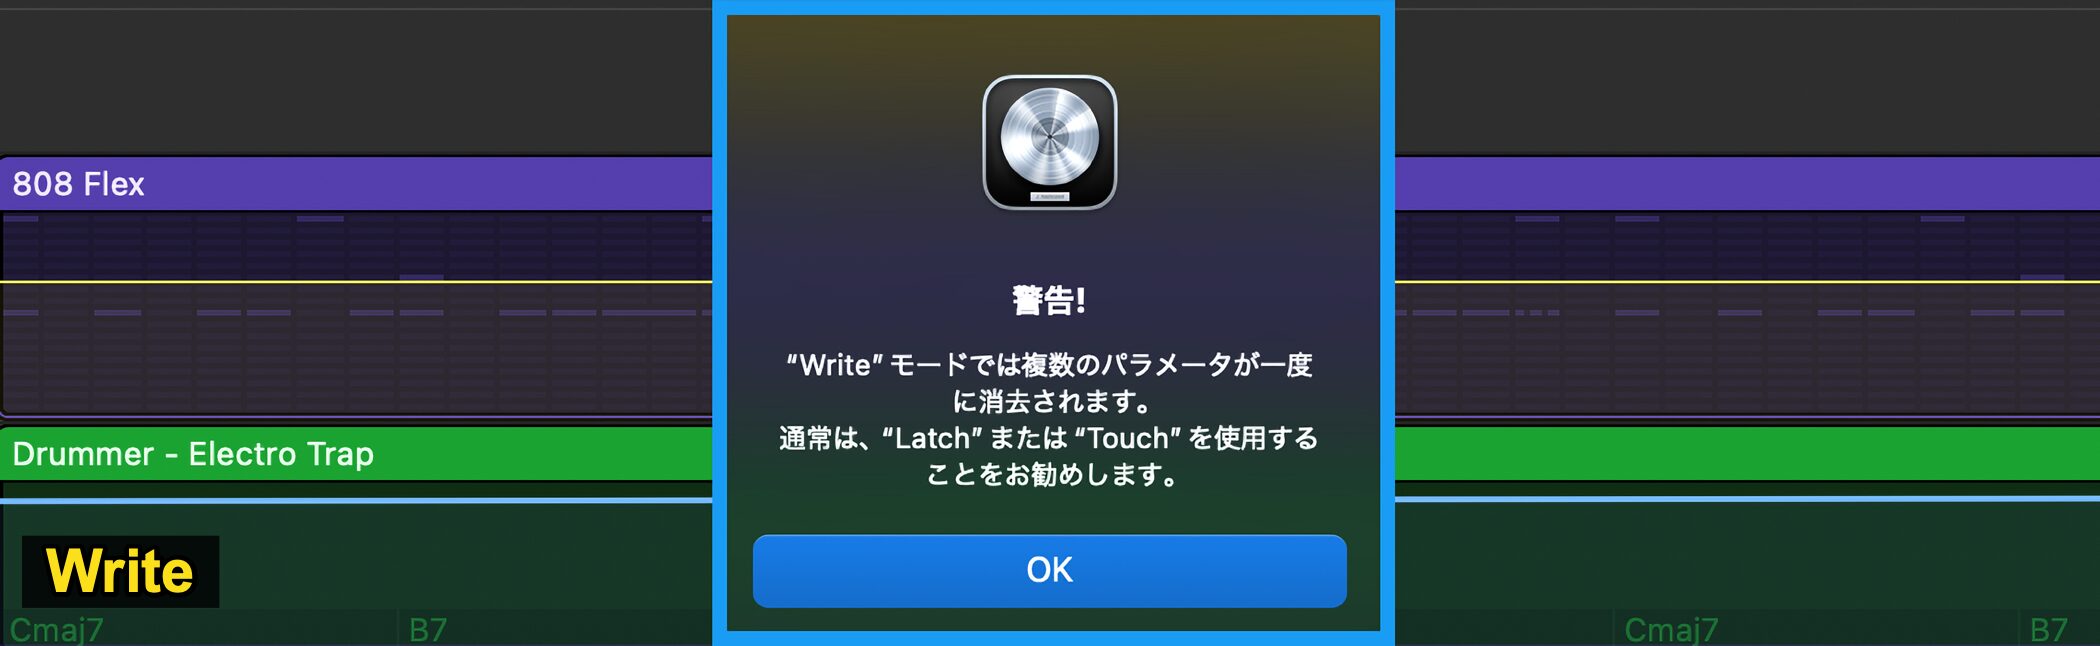
"Write" mode overwrites all automation data on the track during playback.
Because multiple parameters are erased at once, if you want to keep existing data, use Touch or Latch.
Summary of When to Use Each Mode
- Touch mode: when you want to change or fine-tune part of the automation
- Latch mode: when you want to adjust a fairly continuous movement in real time
- Write mode: when you want to overwrite the whole track from scratch
"Read" mode is for playing back existing automation data, and no real-time writing takes place.
When checking automation on multiple tracks, setting all tracks to Read mode lets you play back with peace of mind.
Frequently Asked Questions
Q1. How can I avoid the robotic "Auto-Tune effect" with Flex Pitch in Logic Pro?
Excessive pitch correction causes the sound degradation known as the robotic "Auto-Tune effect." When adjusting the vibrato correction from 100 to 0, it is important to always check the sound while playing back, keep the original pitch curve in mind, and stop at a moderate amount. We recommend careful adjustment that respects the nuance of the performance.
Q2. For vocal timing correction, is it better to move notes or split regions?
Moving notes is easy, but it also moves the waveform, which may change the nuance of the performance. If the voice sounds unnatural, we recommend splitting the region at a break in the vocal and adjusting its placement. Enabling snapping to zero crossings is effective for preventing noise.
Q3. When combining several takes into one, what is the difference between "Flatten" and "Flatten and Merge"?
"Flatten" expands the selected takes into individual split regions, so you can adjust the joins later. "Flatten and Merge" combines them into a single region. If you plan to make fine adjustments later, choose "Flatten."
NEW ARTICLES
Latest English Articles











