
Preparation is the key to successful vocal recording in Logic Pro 11. This article explains everything from creating an intro and setting up tracks while preparing the project, to adjusting input latency, using the Freeze function to reduce CPU load, balancing the levels of the backing track and vocals, and setting up effects such as reverb. It also covers efficient partial retakes with the Autopunch function, adjusting fades between takes, and techniques for recording harmonies, giving beginners and experienced users alike practical knowledge of every step needed for professional vocal recording.
From Preparing for Vocal Recording to Recording

Miyakawa
Vocal recording is one of the most important steps when producing songs with vocals.
Here we introduce the basic preparation for vocal recording and a few tips to help the recording go smoothly.
Please use it as a reference!
Vocal Recording Video
Preparing the Project
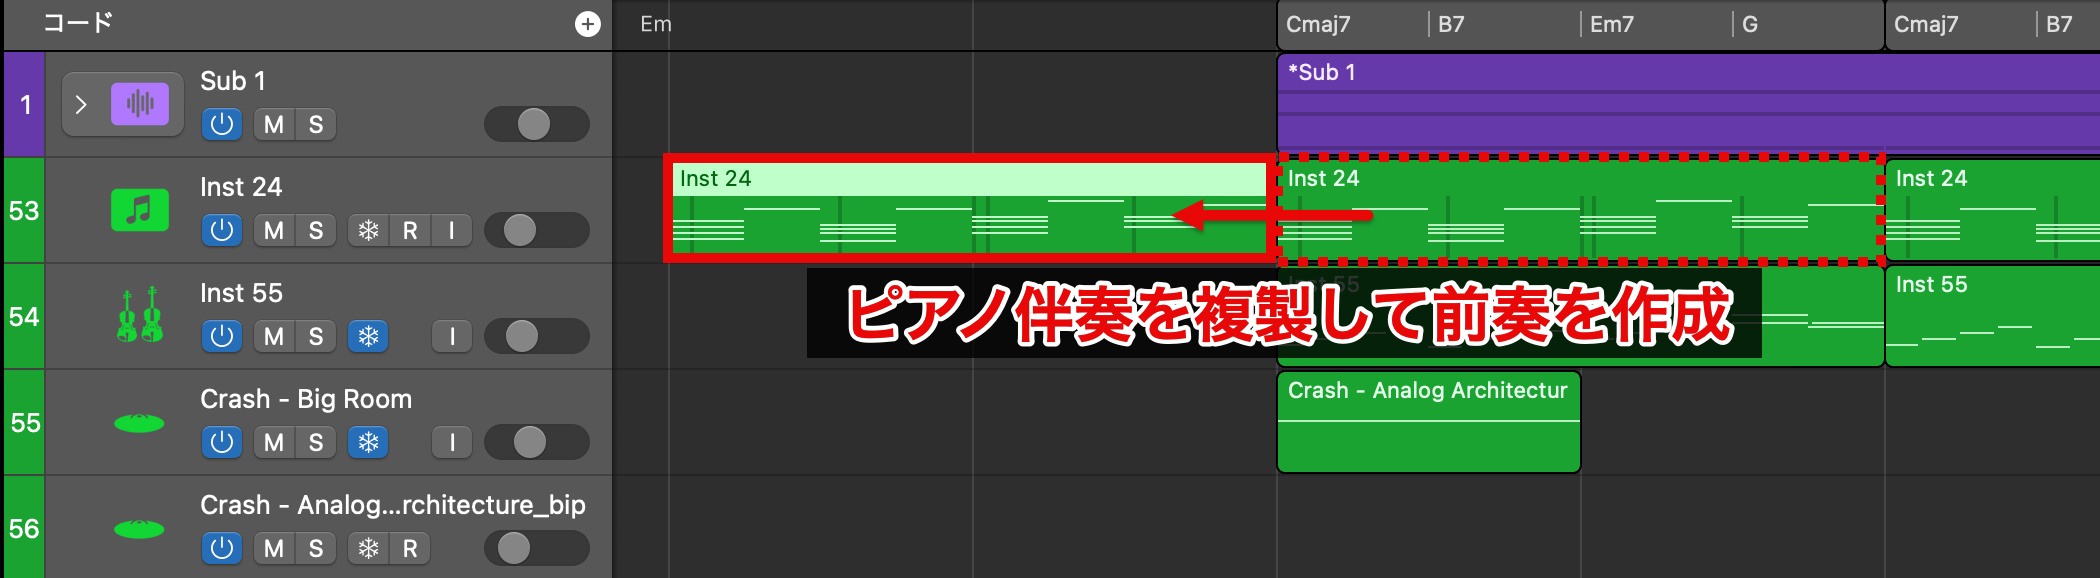
Before starting vocal recording, let's first set up a suitable environment.
If the vocal starts right at the beginning of the song, prepare an intro so that it is easier to grasp the key and tempo accurately.
This time, we created the intro by duplicating the piano accompaniment.
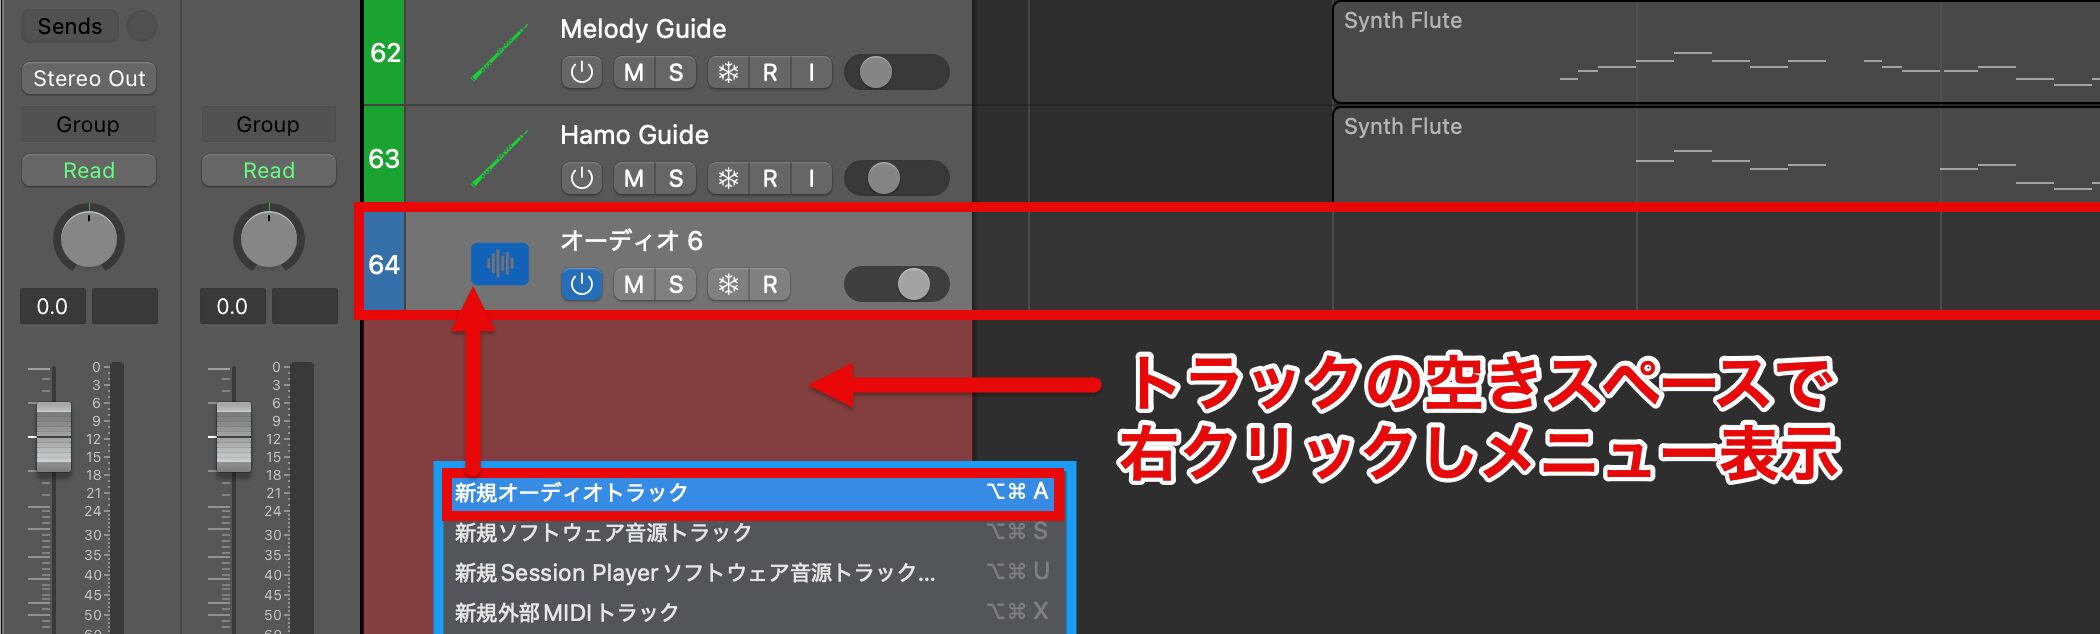
Next, create an audio track for recording the vocals.
So far we have added tracks with the + (plus) button at the top of the screen, but you can also right-click an empty area of the track list and choose "New Audio Track" from the menu that appears.
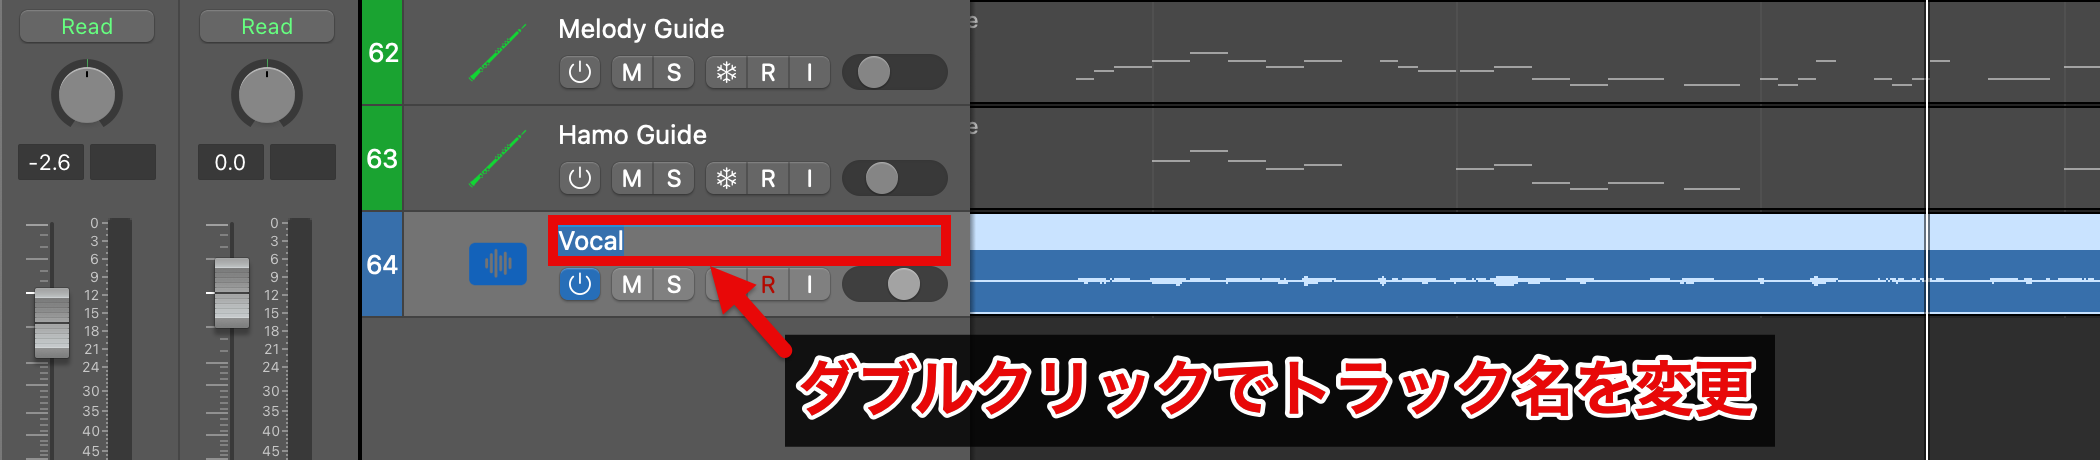
Once you have created the track, rename it to make it easier to manage.
To rename it, double-click the track name.
Here, we entered "Vocal."
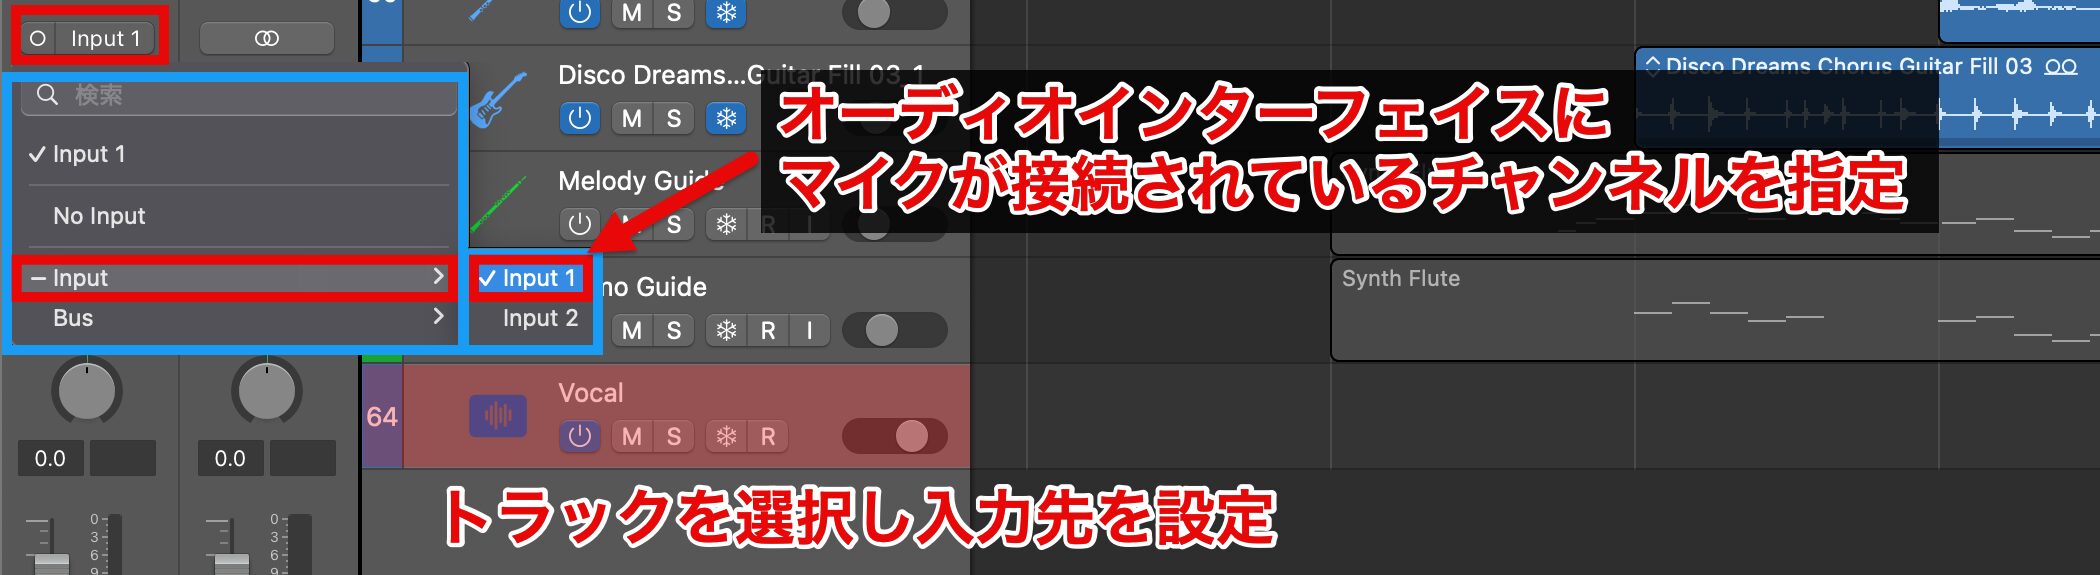
After creating the track, open the input setting in the Inspector and specify the channel of the audio interface that the microphone is connected to.
This time the microphone is connected to channel 1, so we select "Input 1."

When you enable input monitoring, the audio signal comes through.
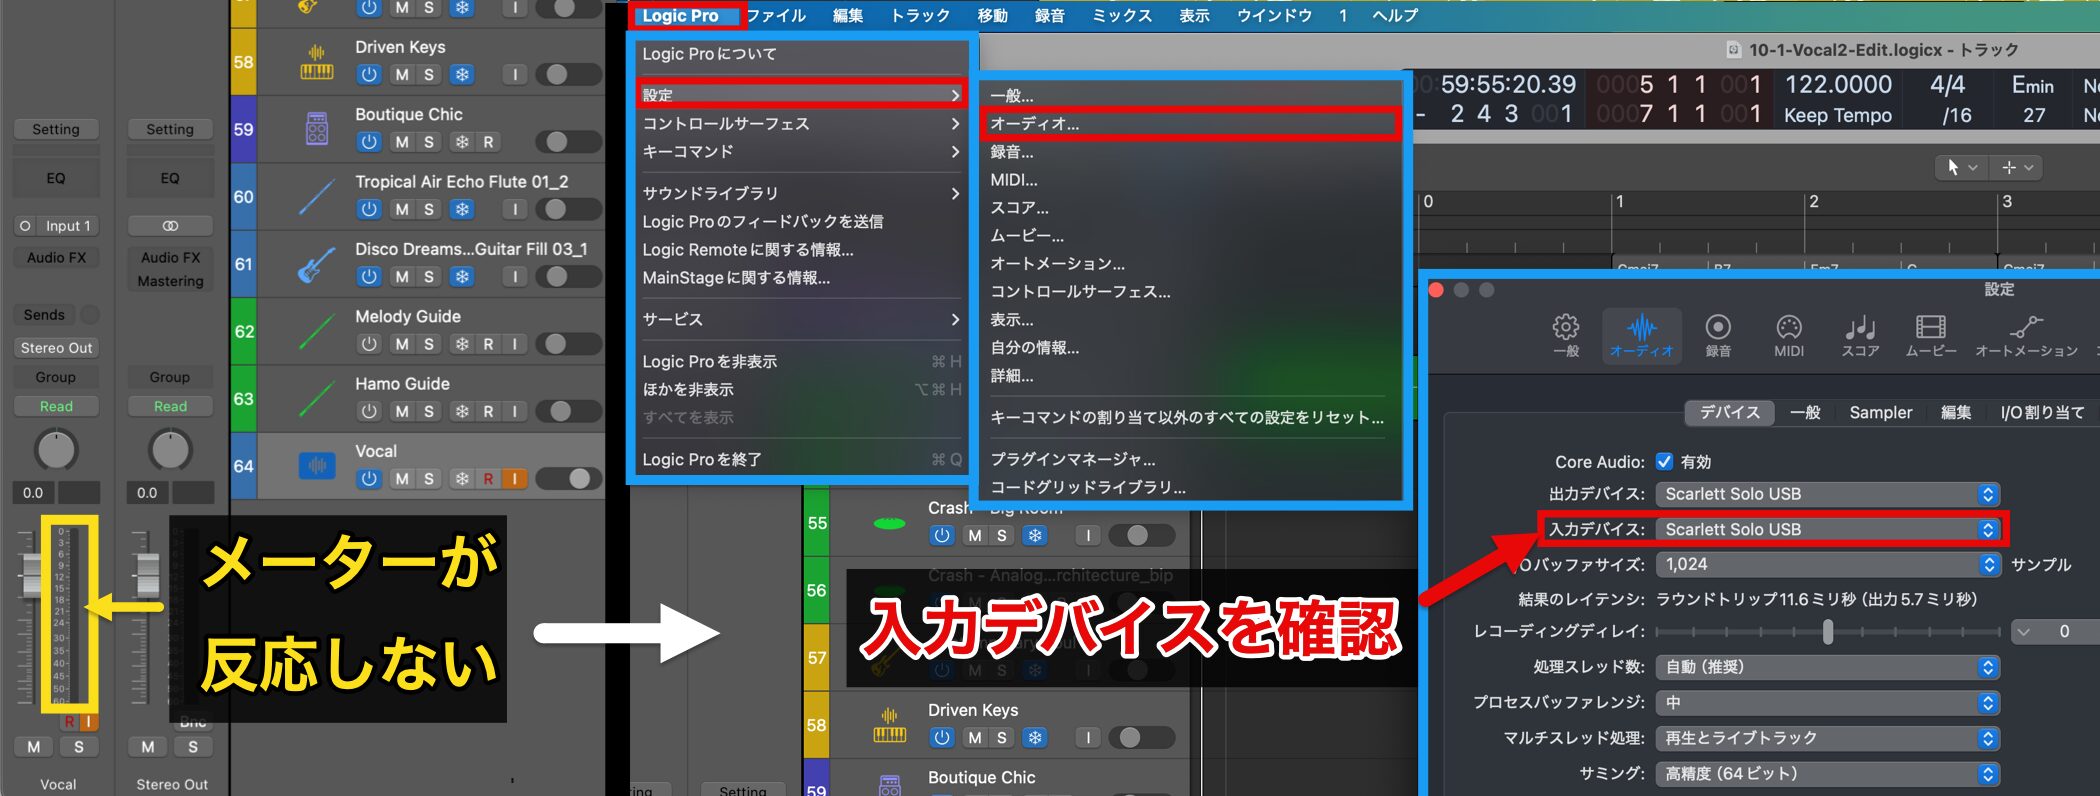
If the meter does not respond and you hear nothing back when you sing, open Logic's settings and check the audio input device.
Select and apply the audio interface you are using, and the meter will start responding.
Latency and Performance Settings
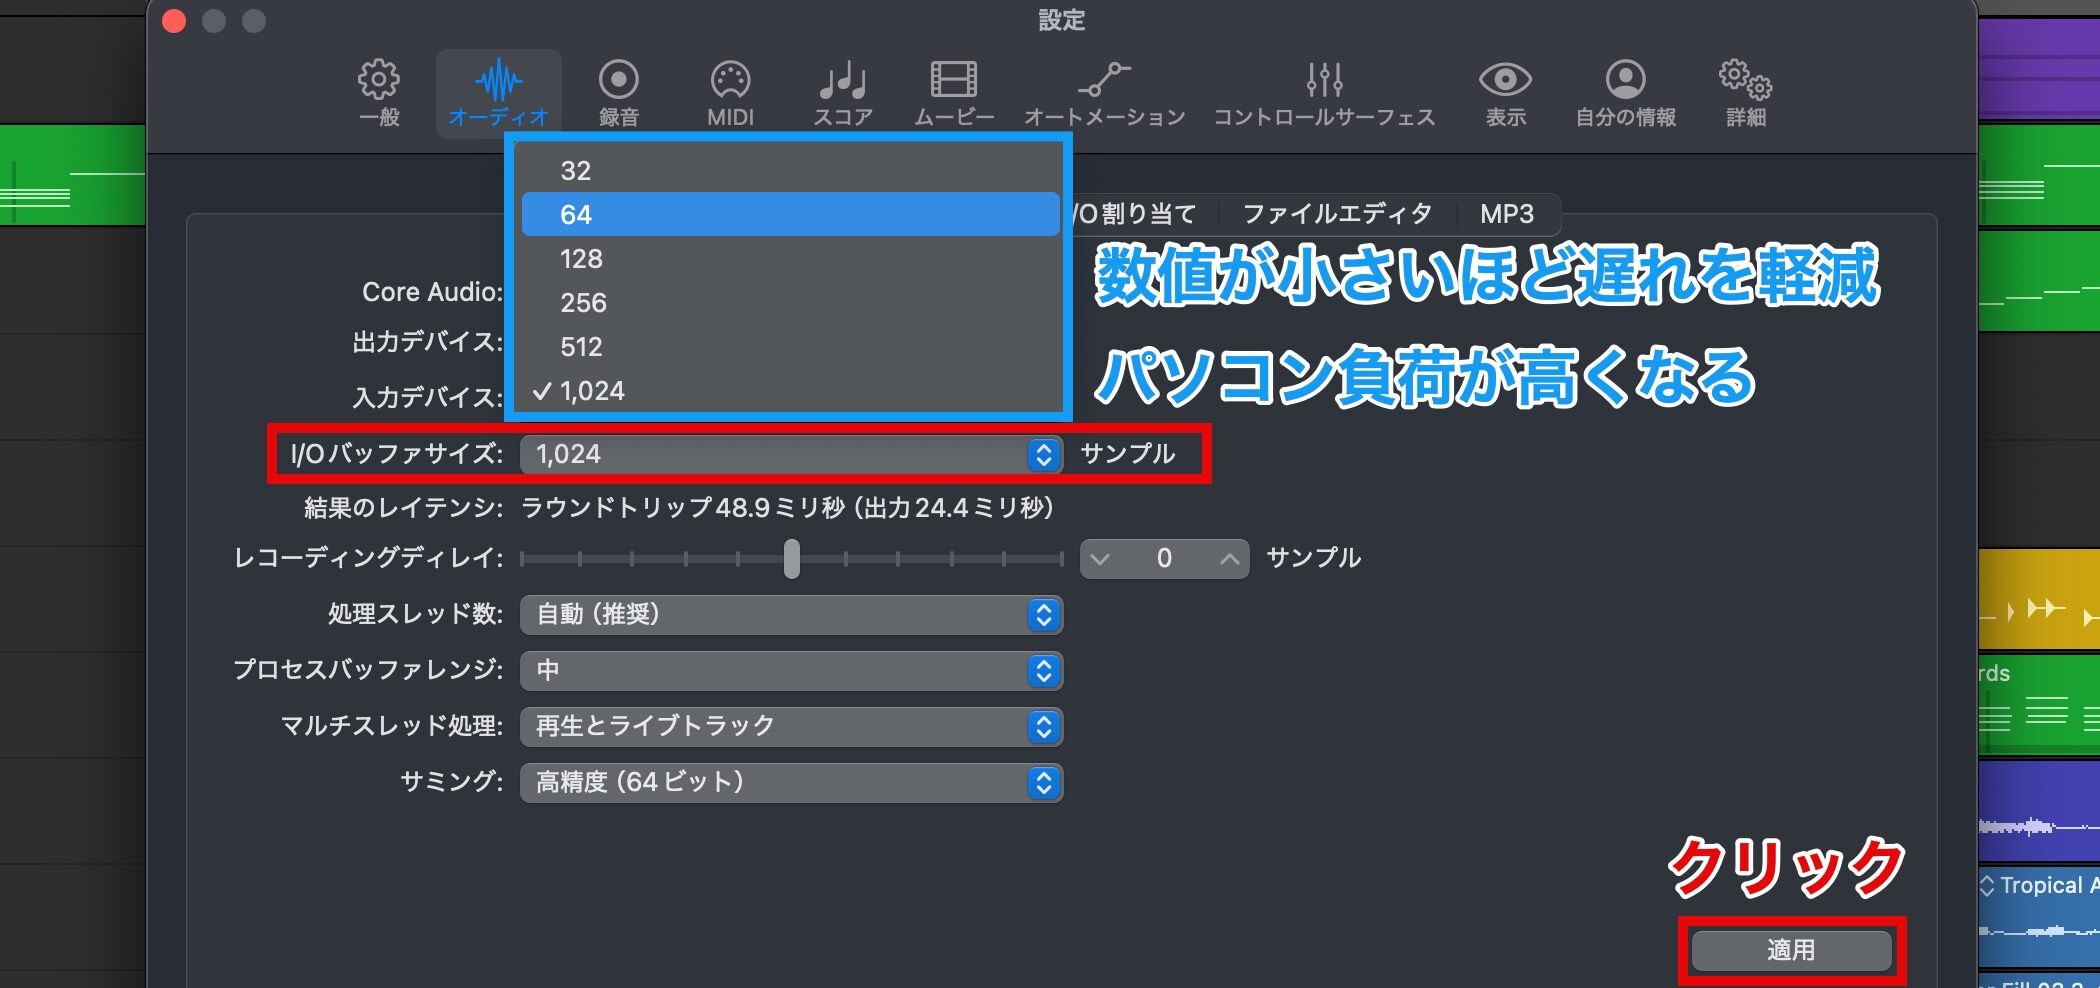
Once the input settings are complete, adjust the audio latency.
If your voice sounds delayed when you sing, change the "I/O Buffer Size."
A smaller value reduces latency, but it increases the load on your computer, so be careful if the song uses many instruments and effects.
How latency is perceived varies from person to person, but as a guideline, it is a good idea to set it to 128 or lower.

You can check the current load on your computer with the "CPU meter" on the screen.
If the meter rises close to its limit during song playback, increase the buffer size value.
The Freeze Function
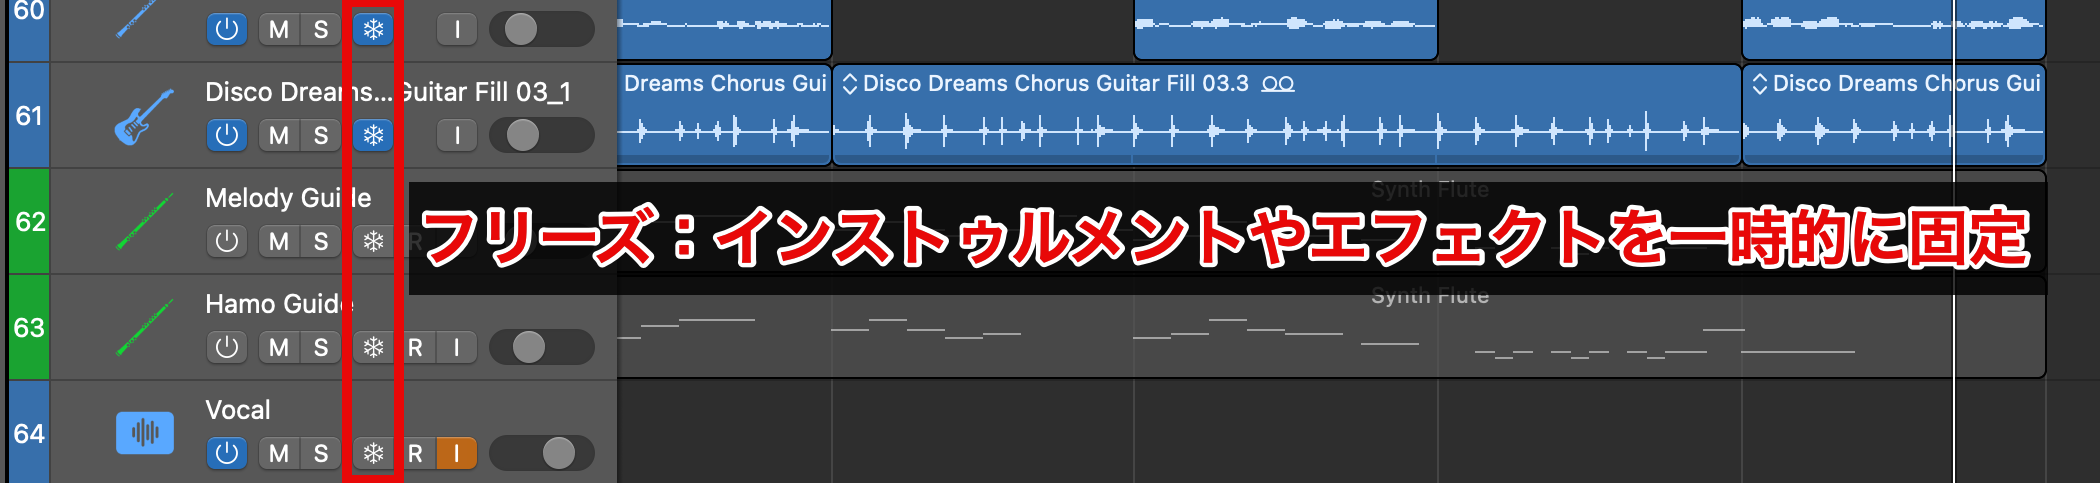
If the audio still drops out even after raising the buffer size as far as you can tolerate, try the Freeze function.
This function temporarily fixes instruments and effects in place to reduce CPU load.
Frozen tracks cannot be edited, but freezing is an effective way to keep your work running smoothly.
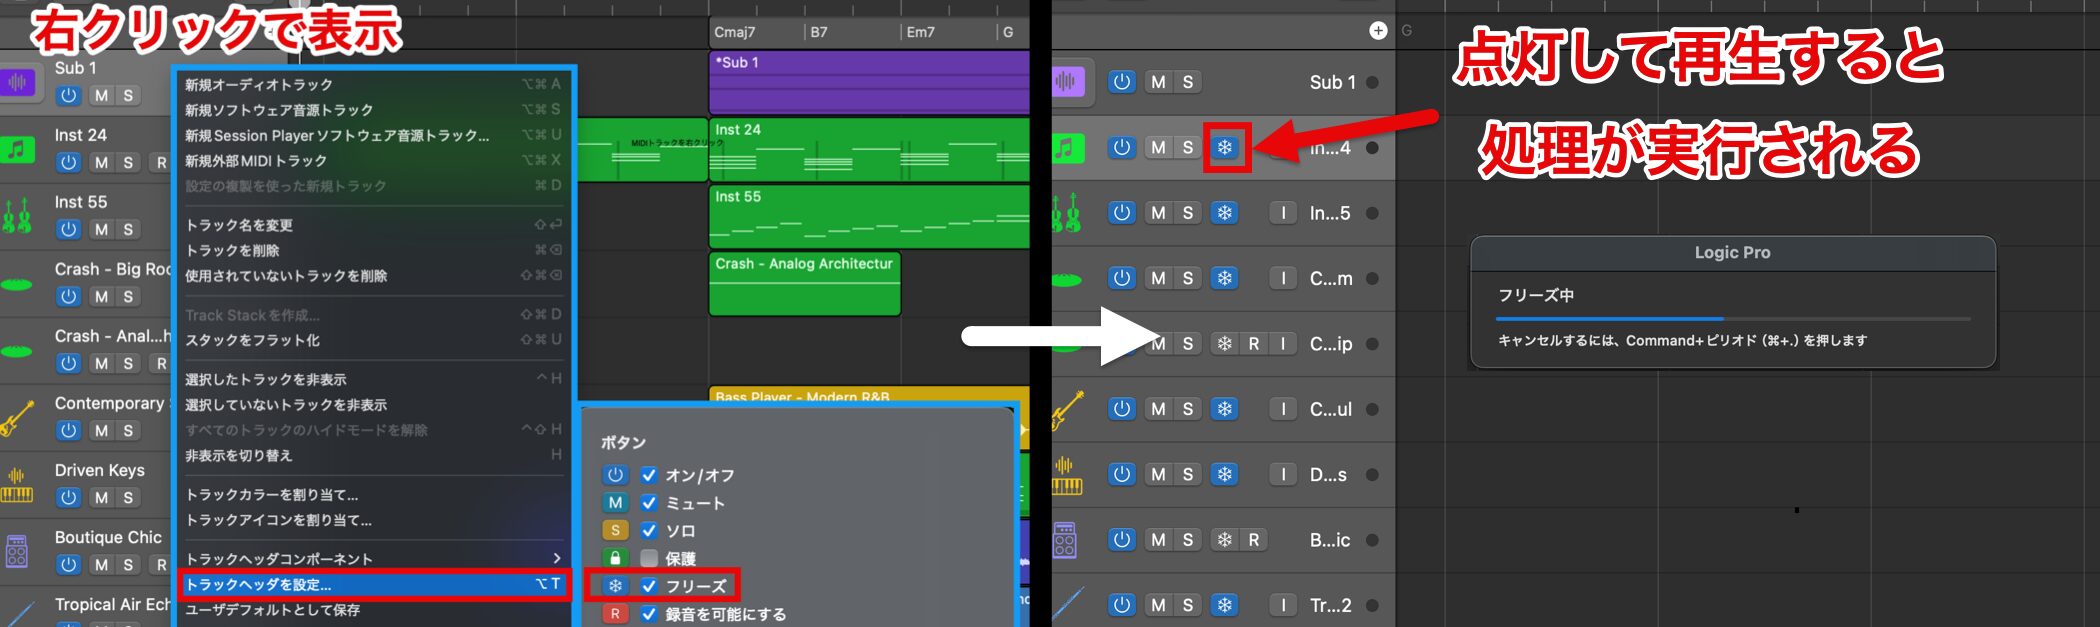
If the Freeze button is not shown, right-click a MIDI track to open the menu, and check "Freeze" in "Track Header Configuration."
Then turn on the Freeze button and start playback to run the process.
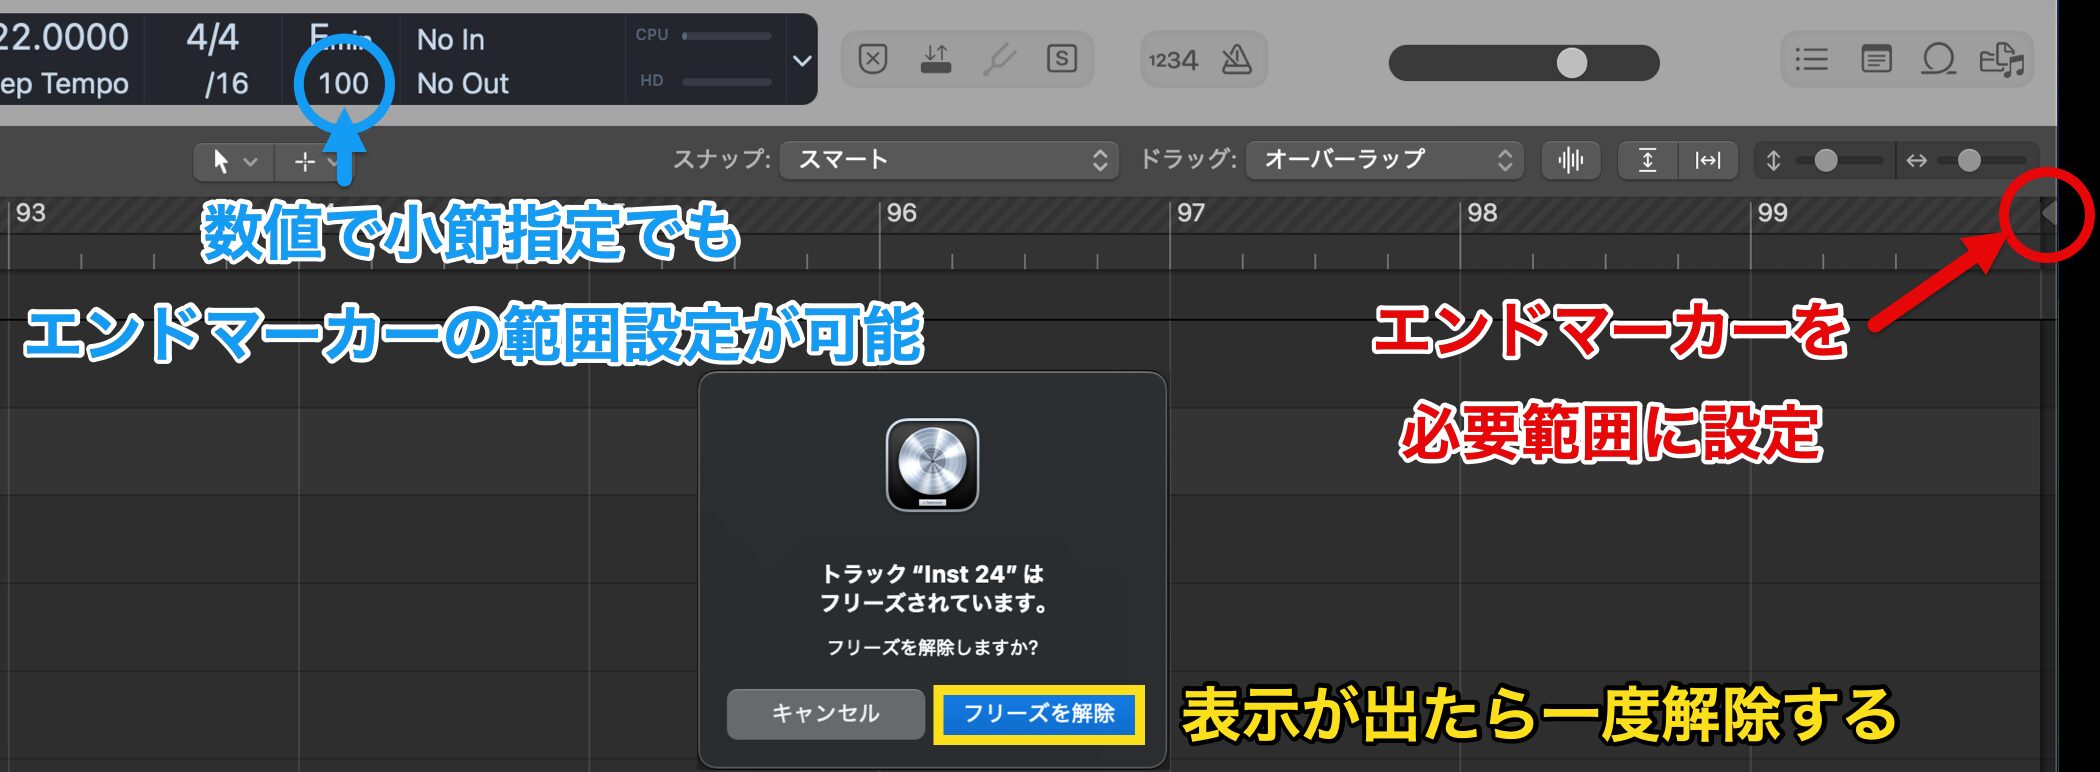
However, regardless of whether anything is being played, this process runs up to the position of the project end marker.
Depending on the range that is set, this can cause unnecessary waiting time.
To shorten the wait, set the end marker at the end of the song before freezing.
If tracks are already frozen, unfreeze them once before moving the marker.
You can set the end marker not only by dragging but also by entering the bar number directly.
Level Settings

Next, set the level of the backing track.
If the backing track is loud, adding the vocals may push it over 0 dB and cause clipping.
If it is loud, lower it in advance.
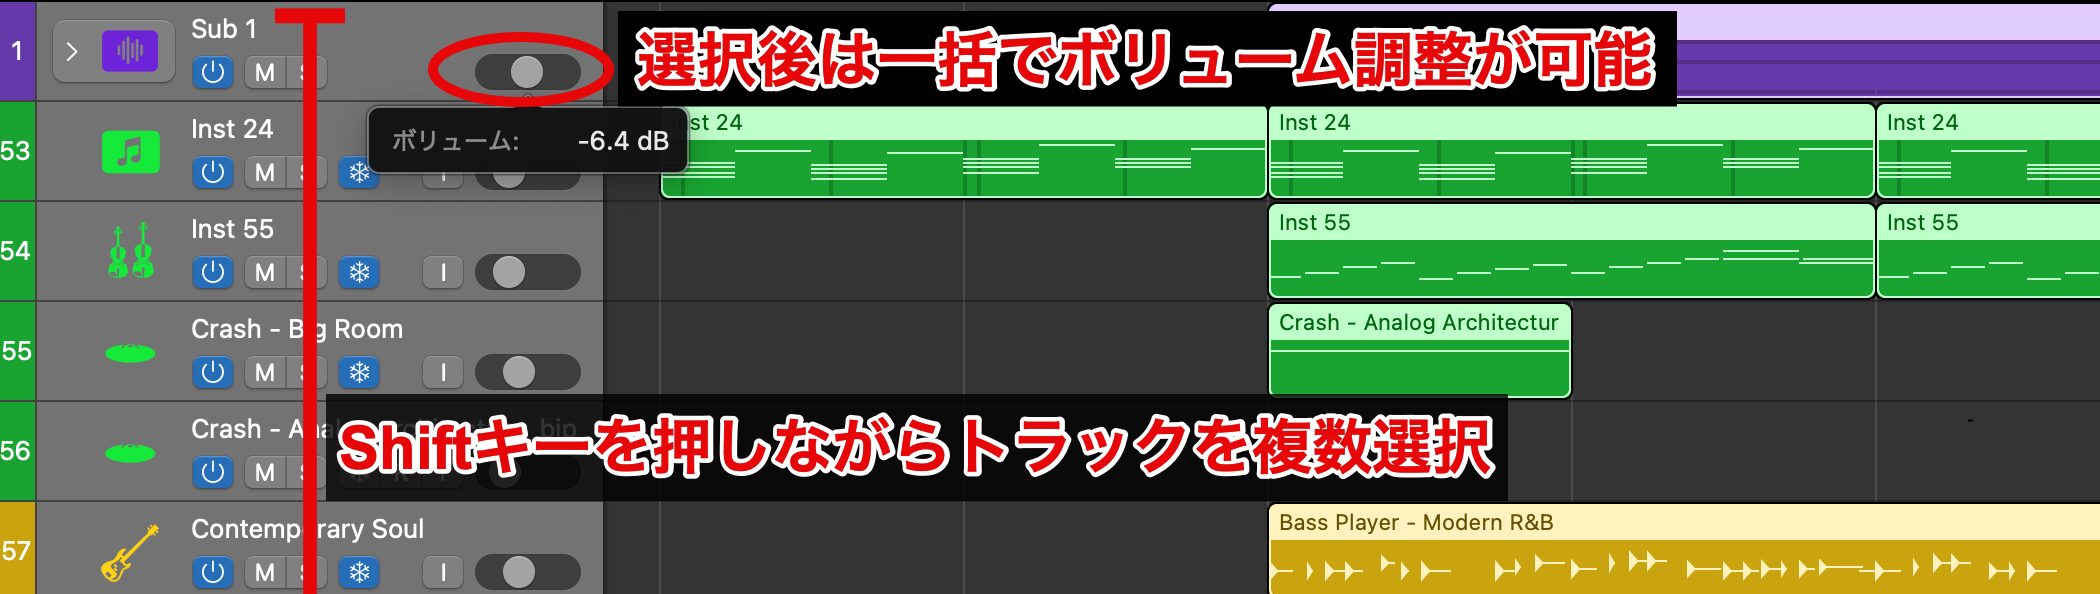
Hold down the Shift key and select multiple tracks, then adjust a volume fader to lower the volume of all of them at once.
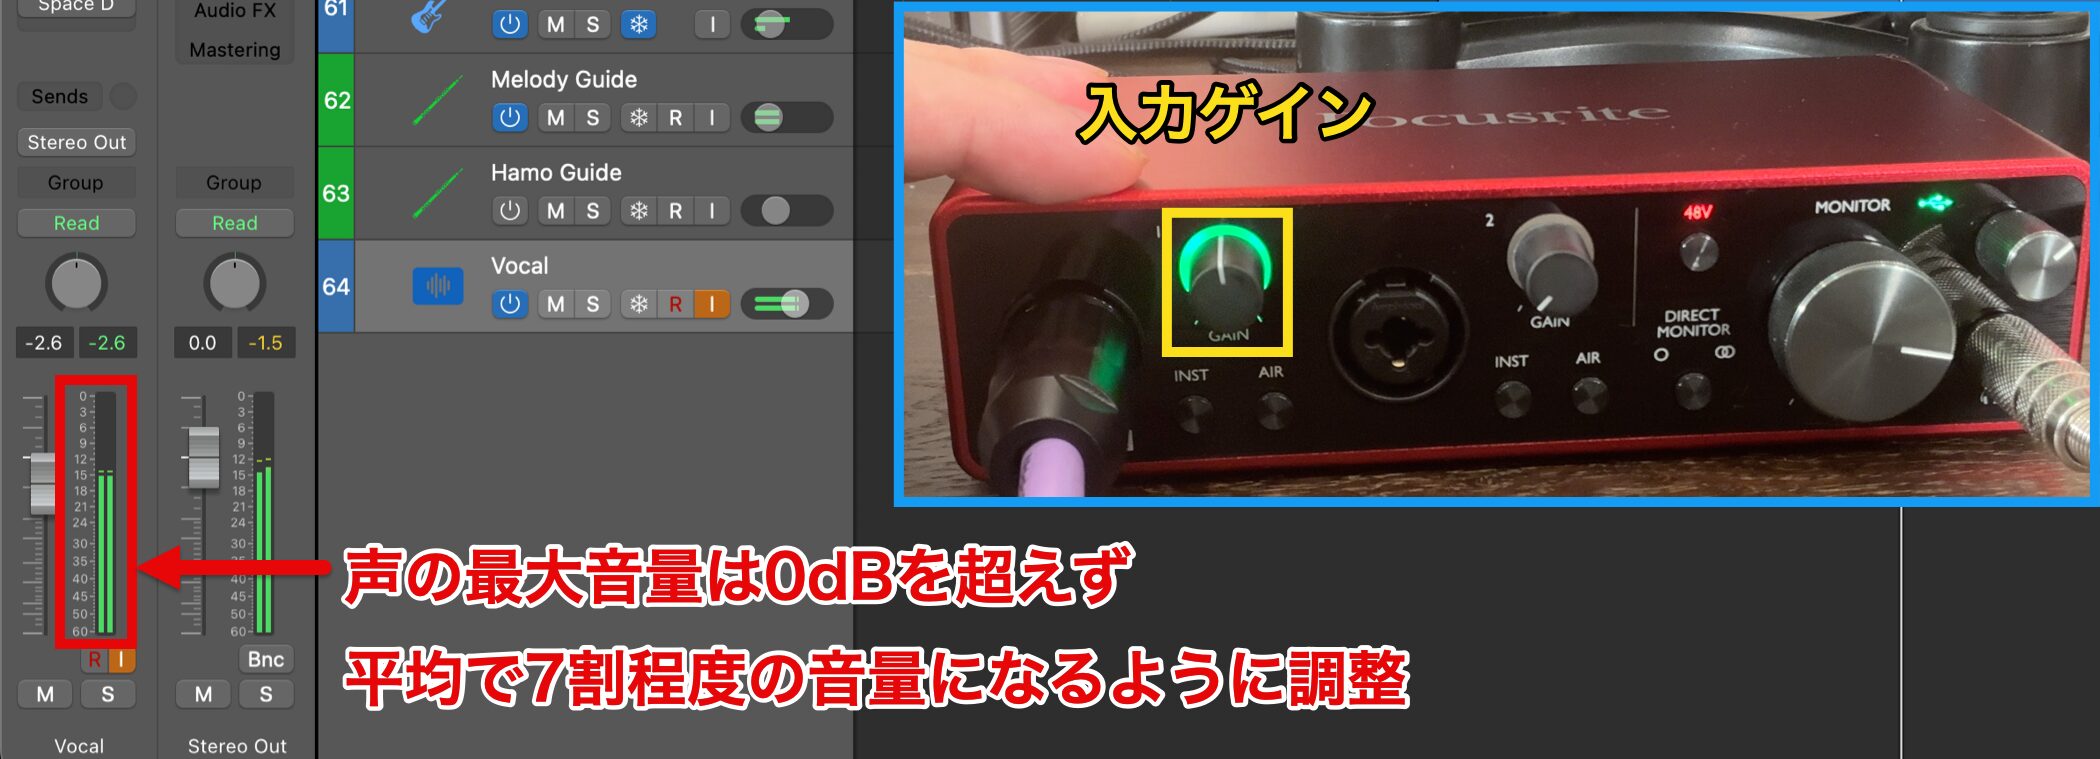
After setting the backing track level, adjust the vocal input gain.
The vocal input gain is set with the mic gain knob on the audio interface you are using.
While making sure the loudest parts of your voice do not exceed 0 dB, aim for an average of about 70% on the level meter.
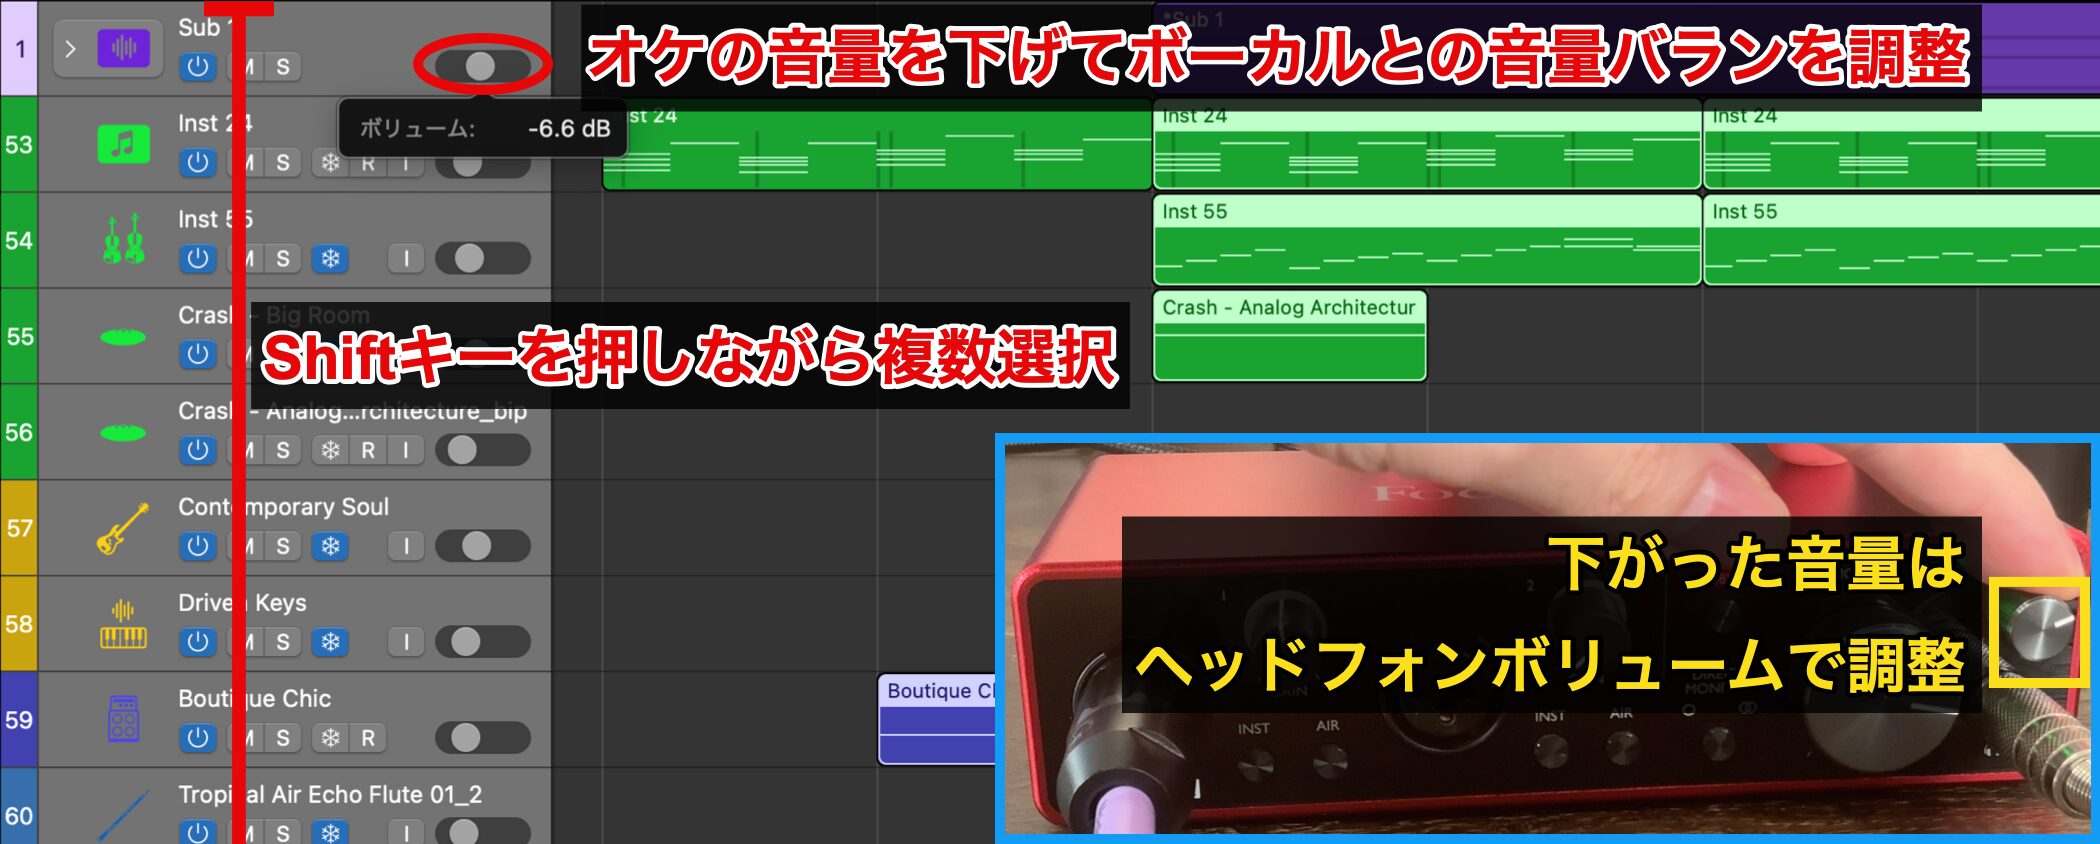
The level balance between the backing track and vocals has a big effect on how easy it is to sing.
If the vocals are hard to hear, we recommend lowering the backing track rather than raising the vocal fader.
Since this lowers the overall volume, compensate with your headphone volume.
Effect Settings
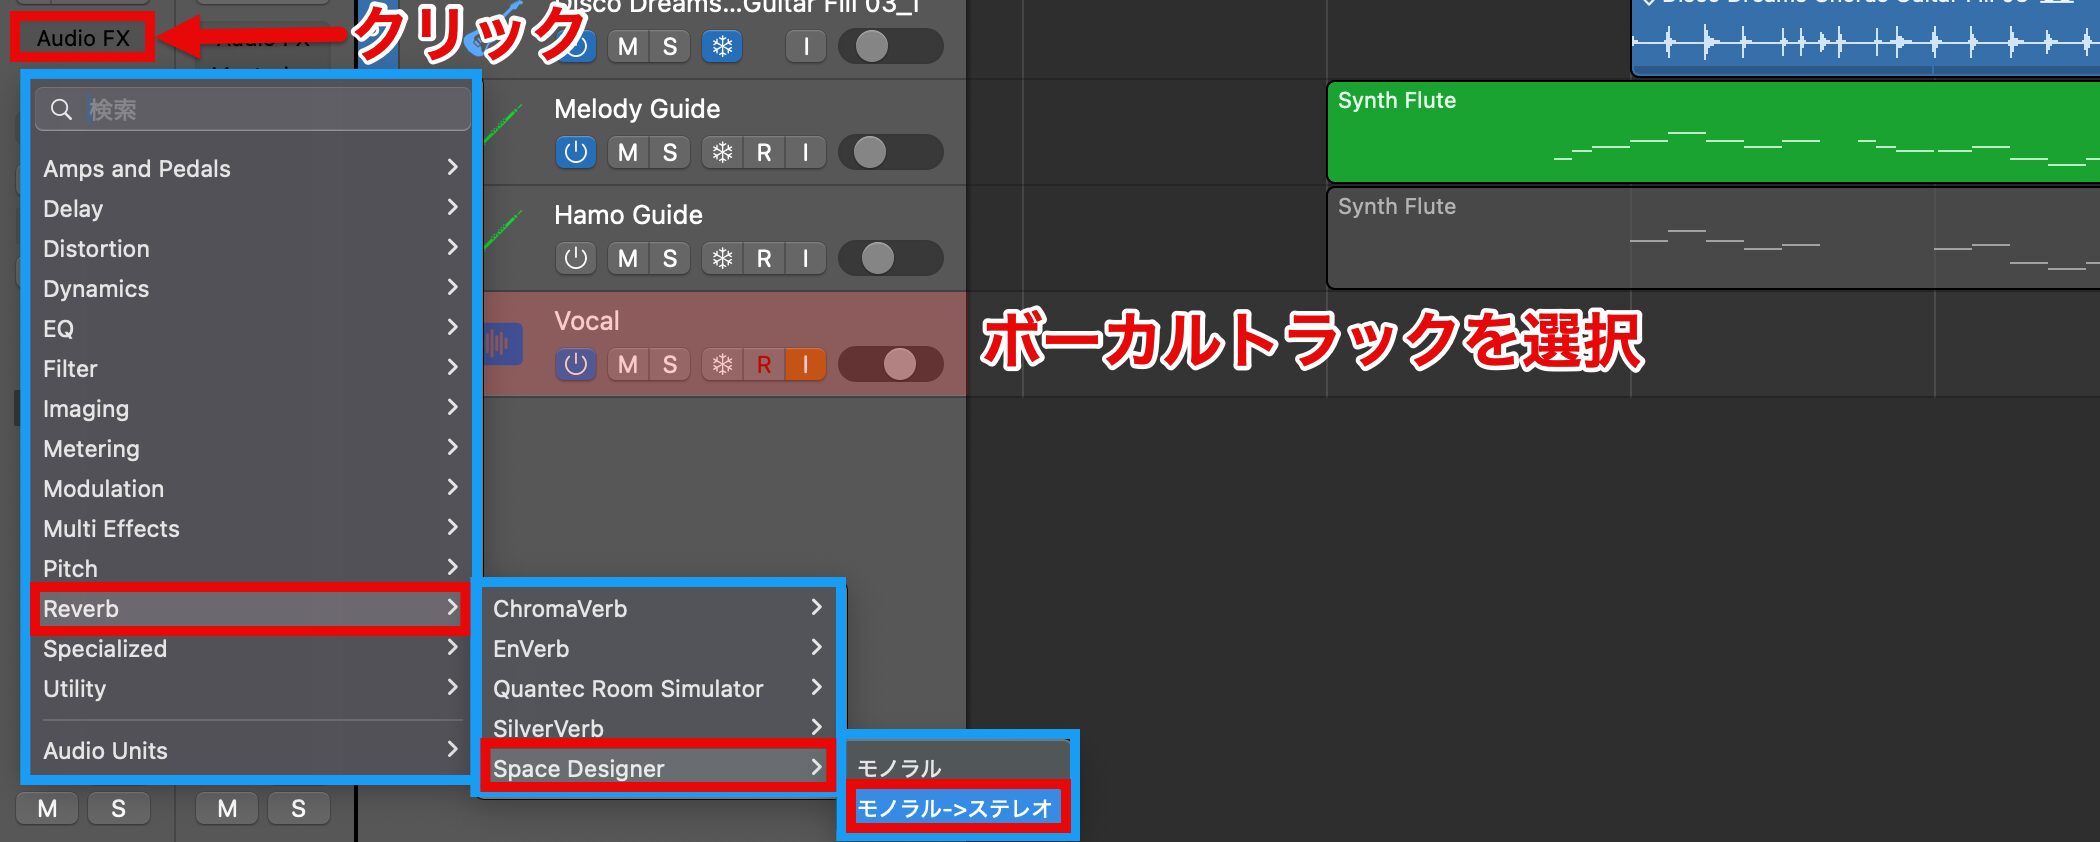
To add reverb to the vocals, choose "Reverb" from "Audio FX" on the vocal track.
Logic Pro has several reverb plug-ins, and this time we use "Space Designer."
Reverb is basically a stereo effect, so choose "Stereo."
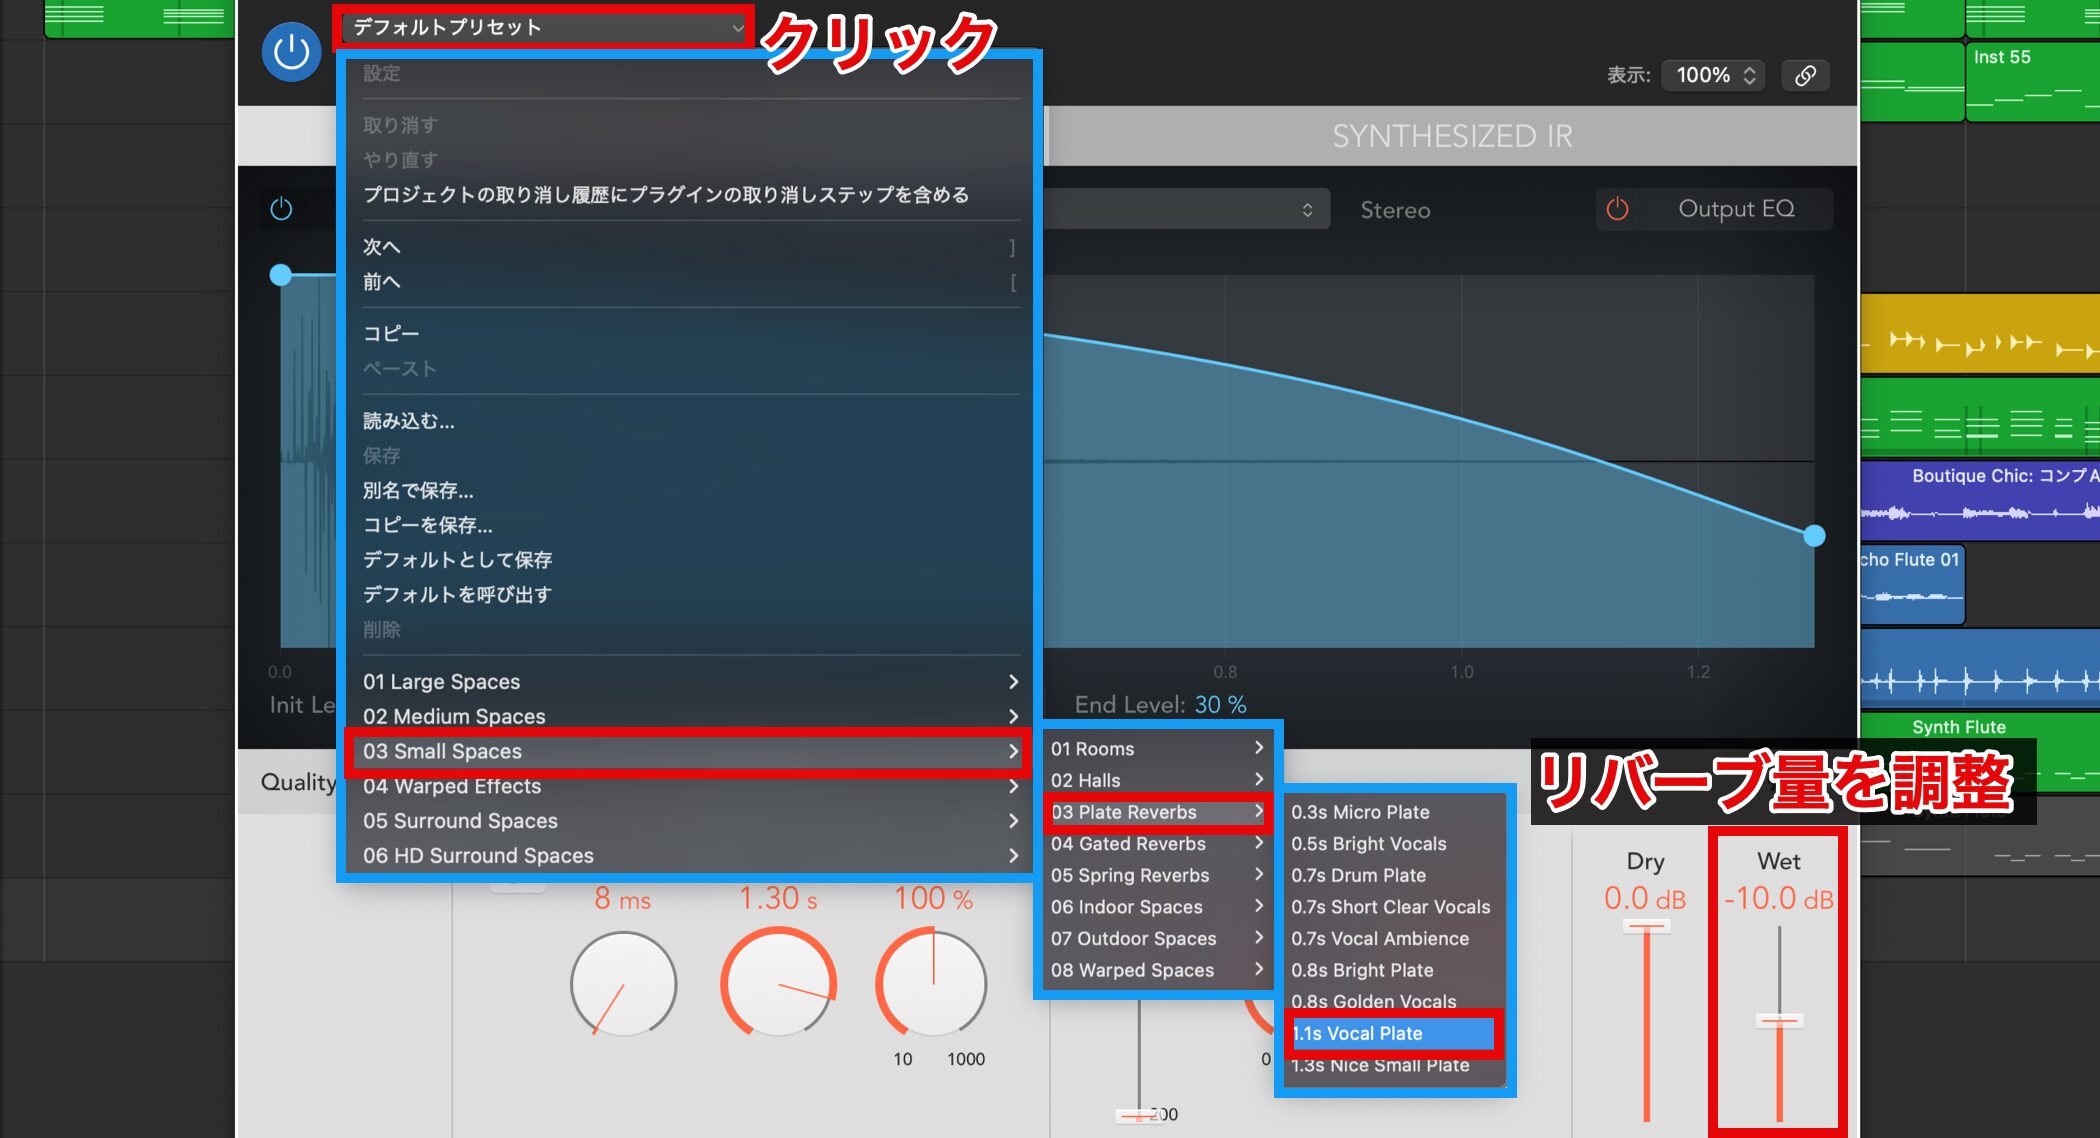
Once the plug-in opens, click "Default" to choose a preset.
This time we opened "Small Spaces" and chose "Vocal Plate" from "Plate Reverbs."
In Space Designer, adjust the amount of reverb with Wet.
Autopunch
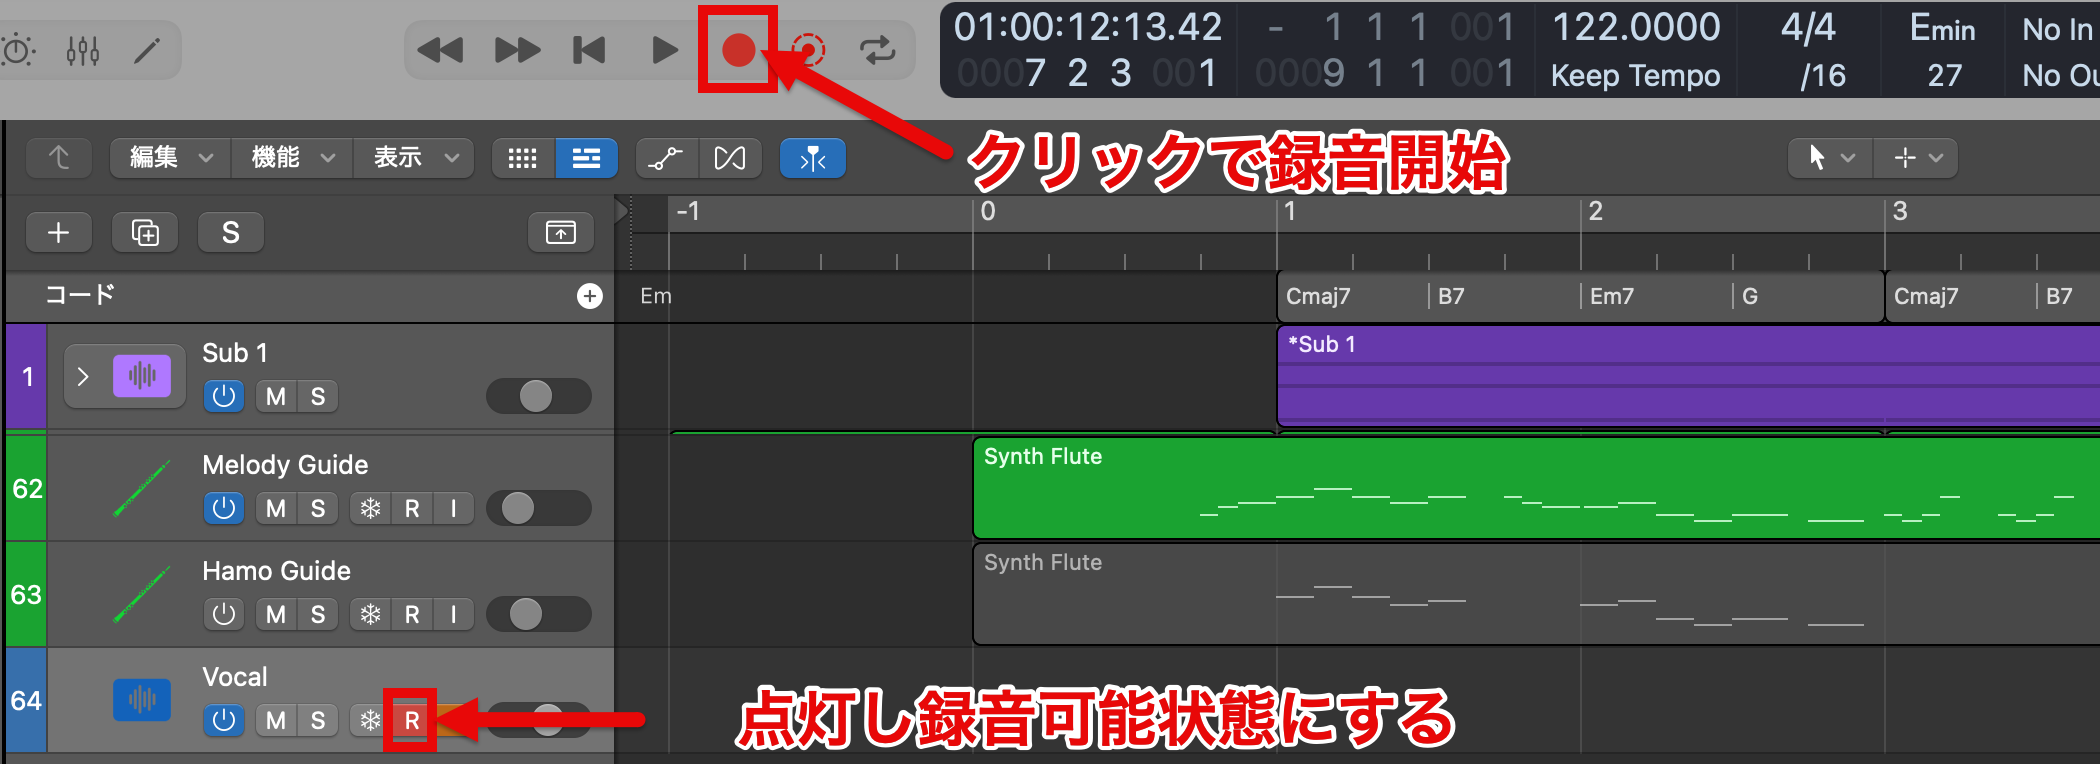
Now that the preparation is complete, let's record.
After record-enabling the track, start recording with the Record button or the shortcut key R, and stop with the Stop button or the Space bar.
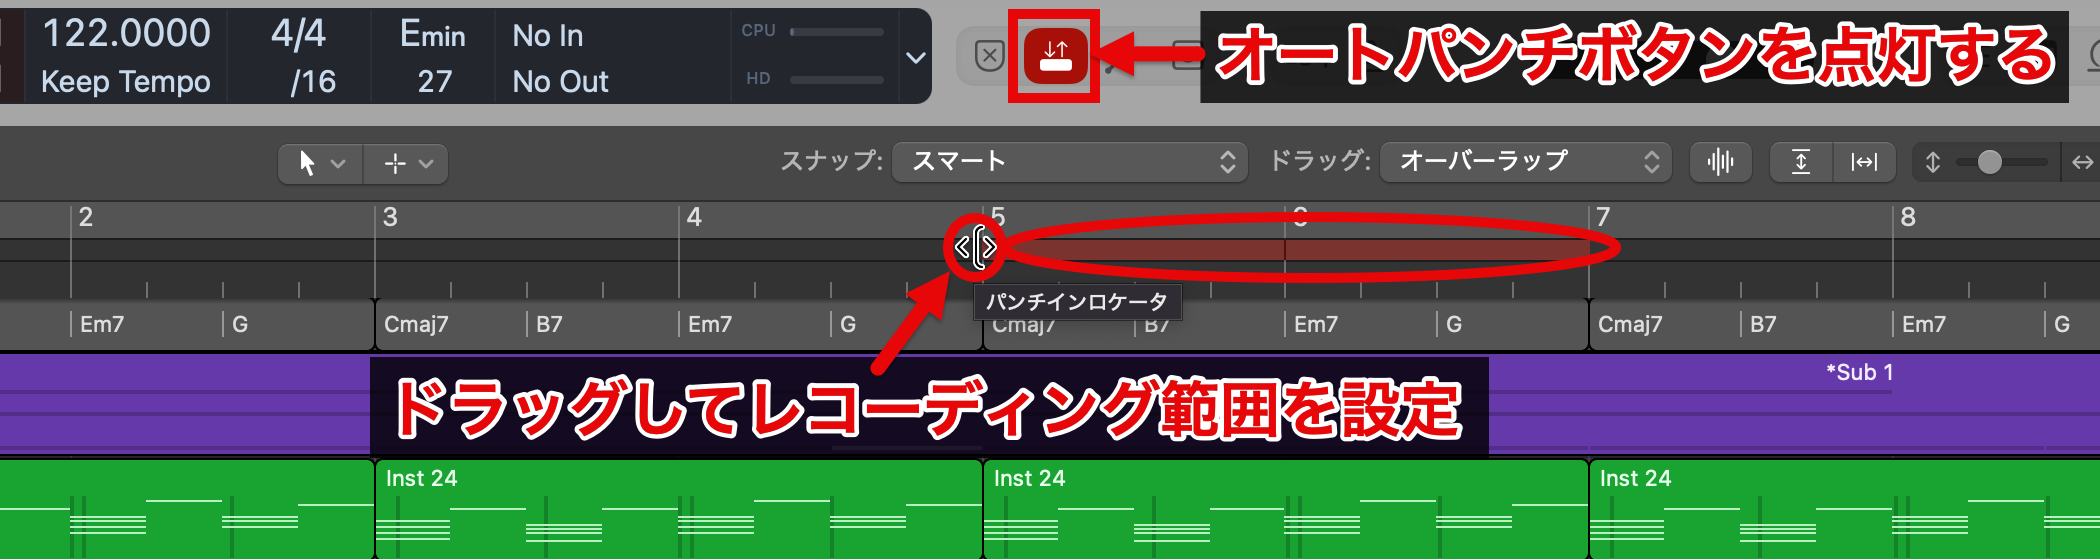
If you need to redo part of the recording afterward, enable the Autopunch button.
A red line appears; when you specify the recording range, only that range is recorded.
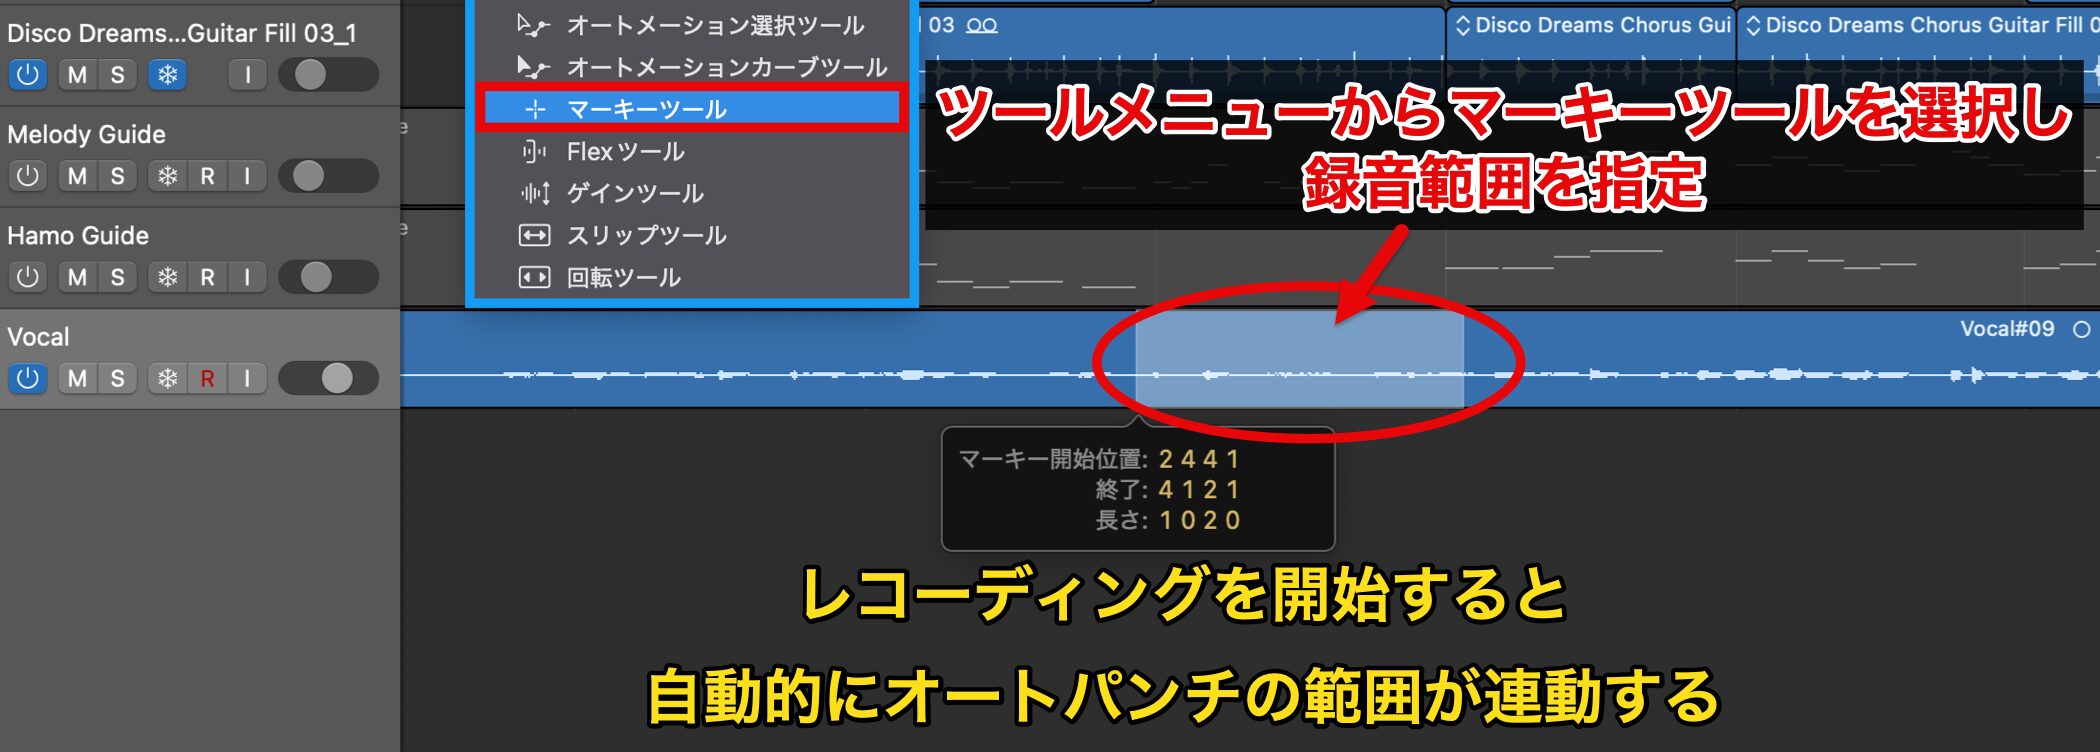
You can also use the "Marquee Tool" in the Tool menu to specify the recording range easily.
When recording starts, the Autopunch range follows automatically, and only the specified range is recorded.
Because the range can be selected so easily, this is very convenient.
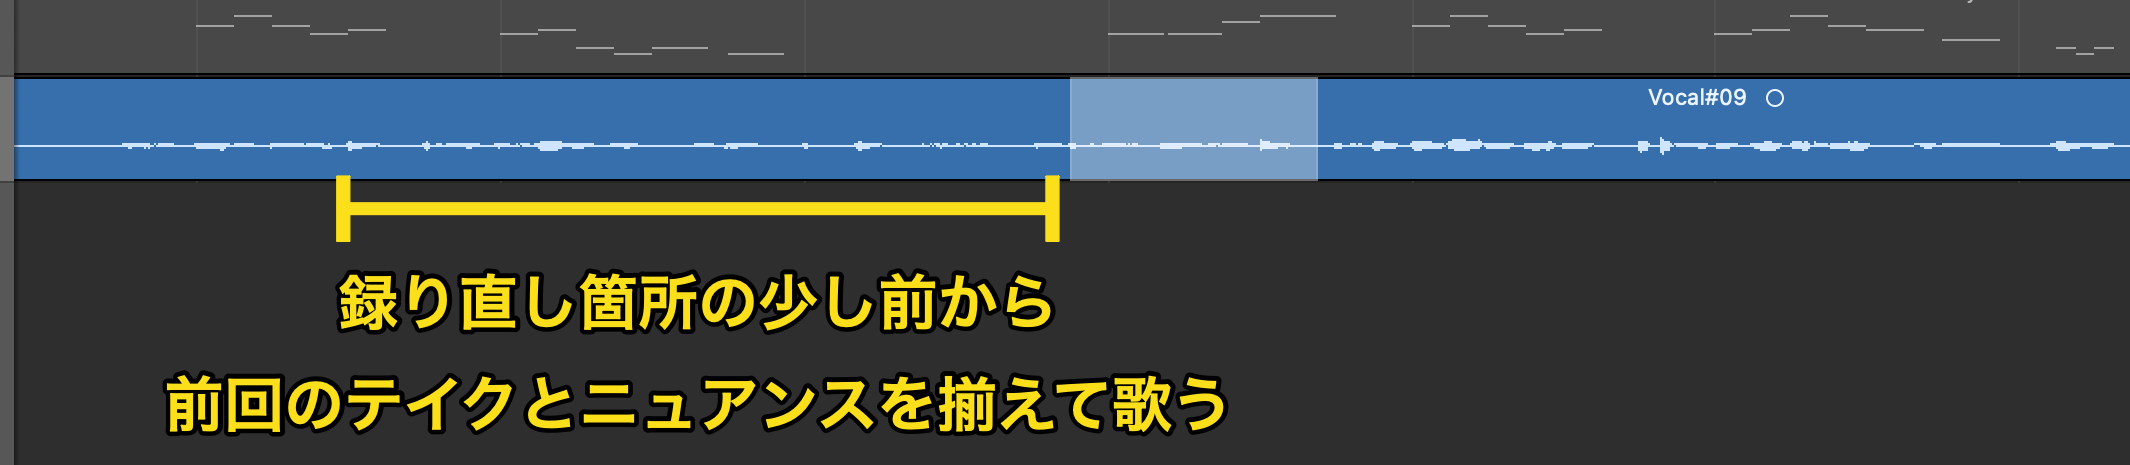
When redoing part of a recording, it is important that the previous take and the new take connect naturally.
Starting to sing a little before the section you are redoing and matching the nuance of the previous take will give a more seamless result.
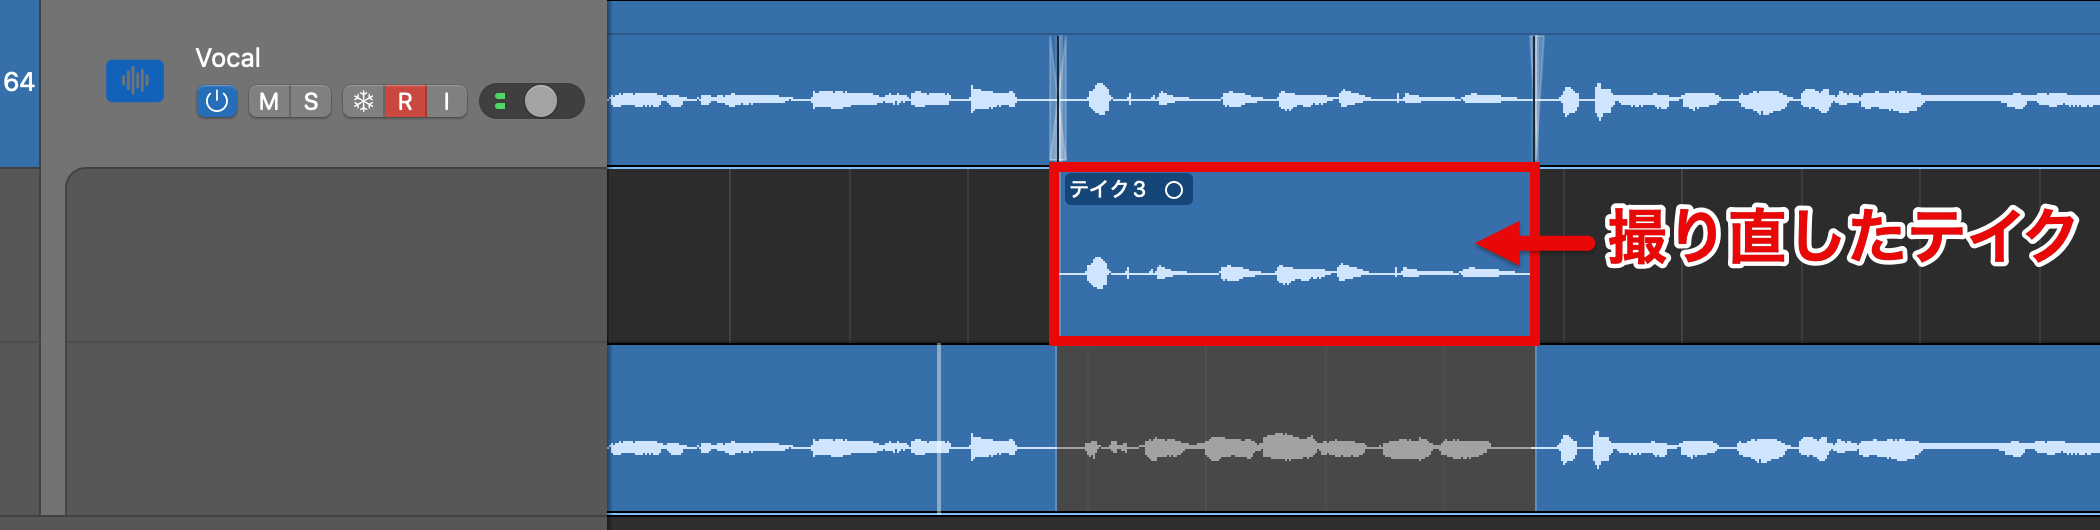
The re-recorded section is saved as a take.
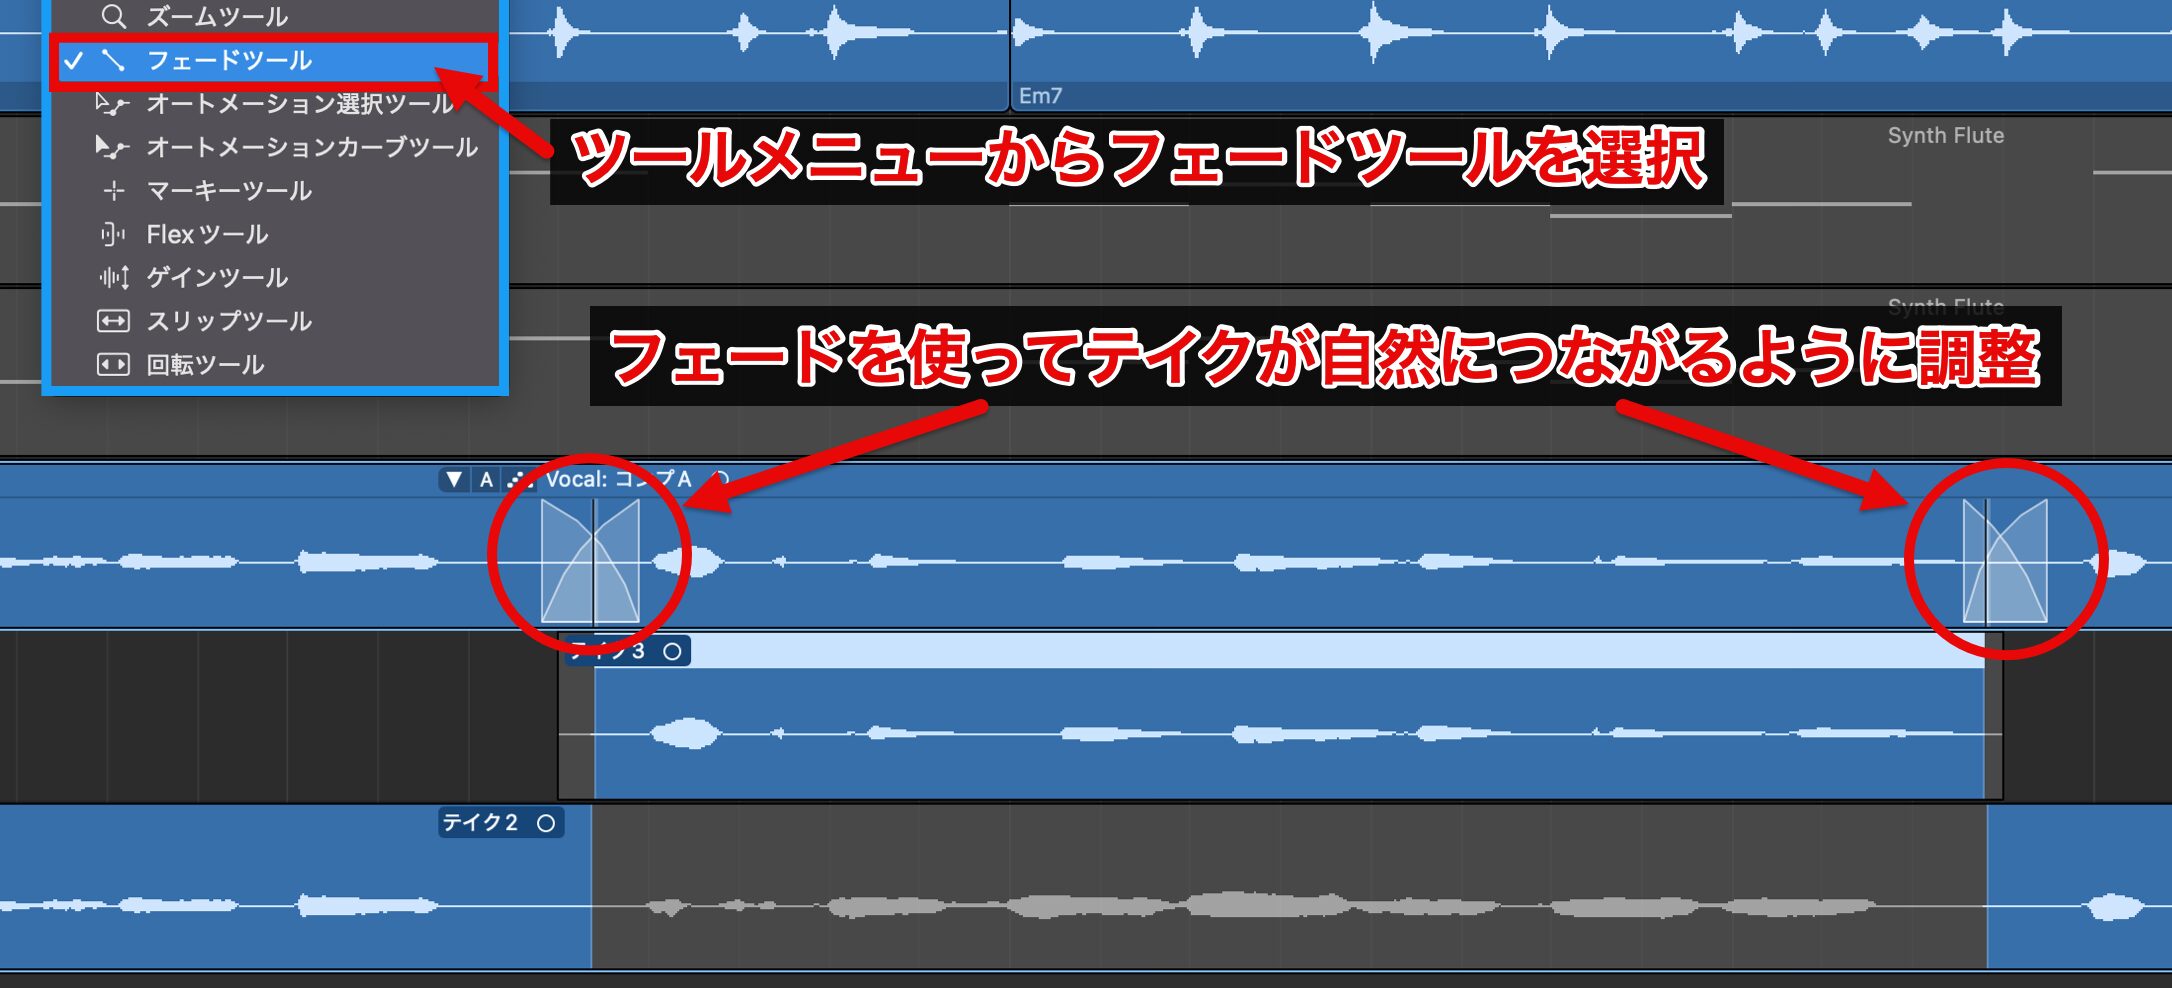
If you choose the "Fade Tool" from the Tool menu, you can fine-tune the transition between takes.
If there is a gap between the two takes, adjustment is relatively easy, but noise may occur at the switching point.
Especially when joining a section where both takes overlap, adjust the fade while listening so that they connect naturally.
Recording Harmonies
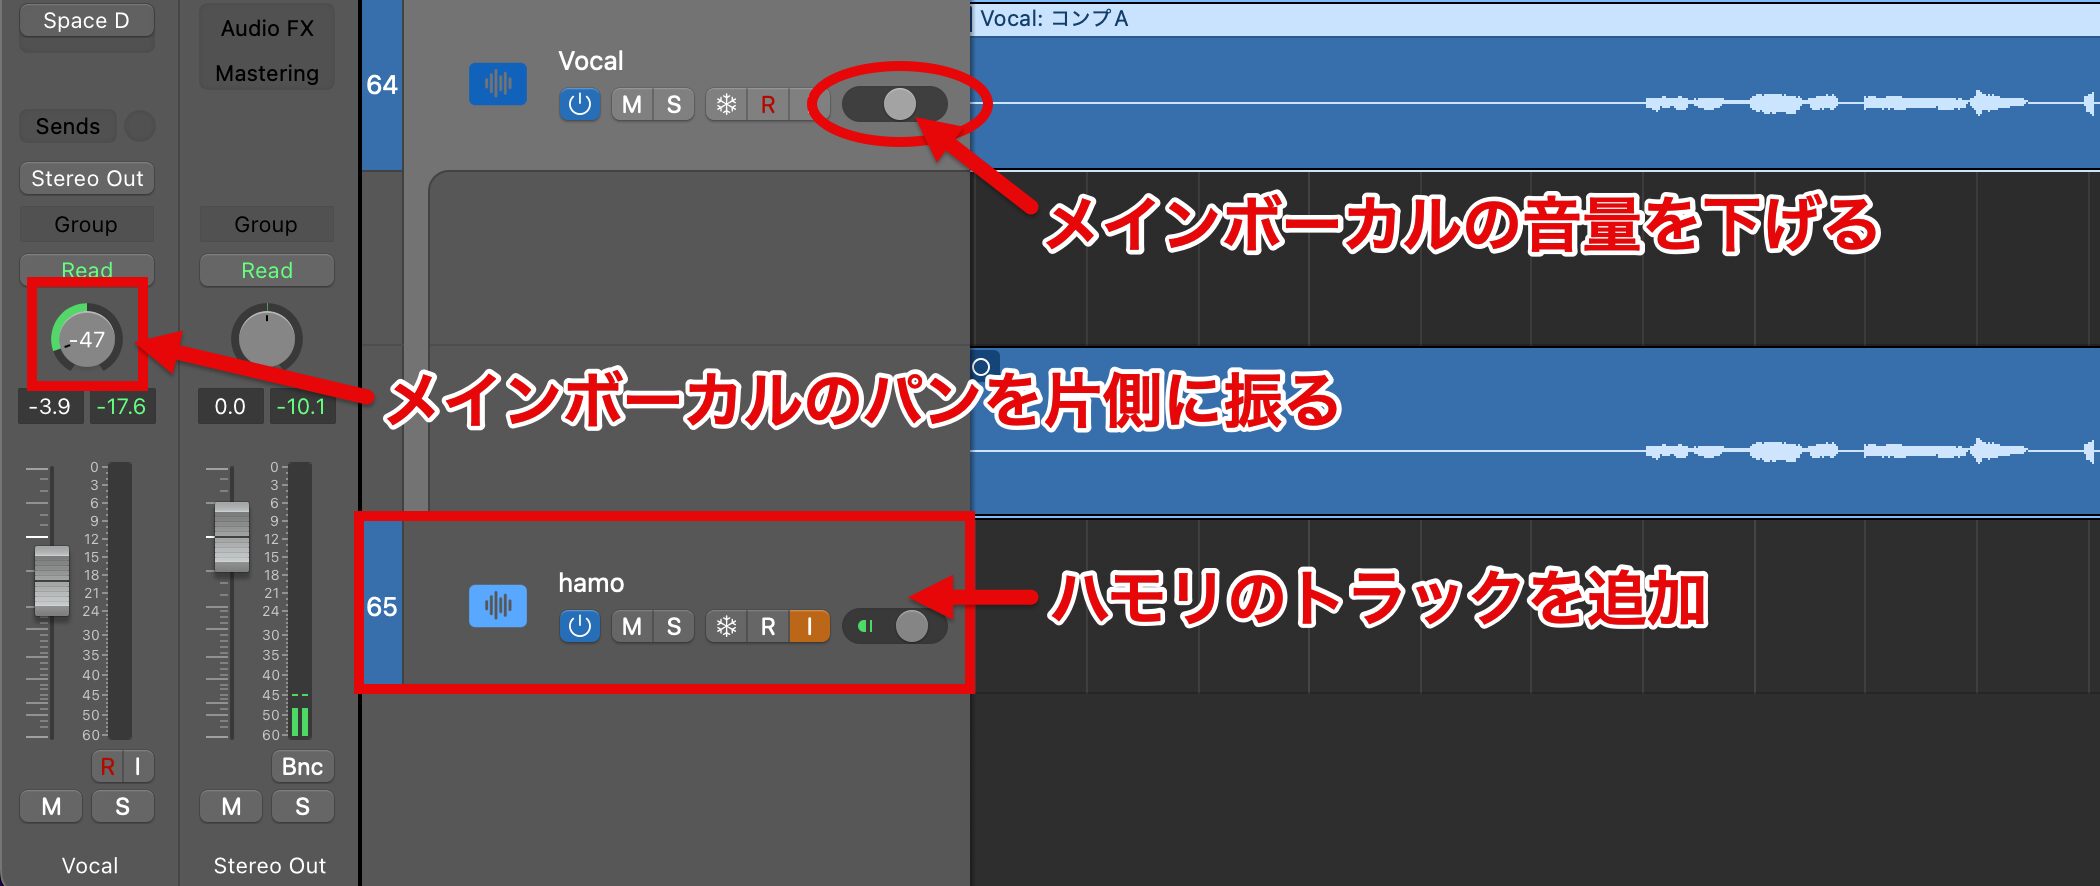
When recording harmonies, we recommend creating a new track, lowering the main vocal to a moderate level, and panning it to one side.
This makes it easier to check the timing and nuance of the main vocal while recording.
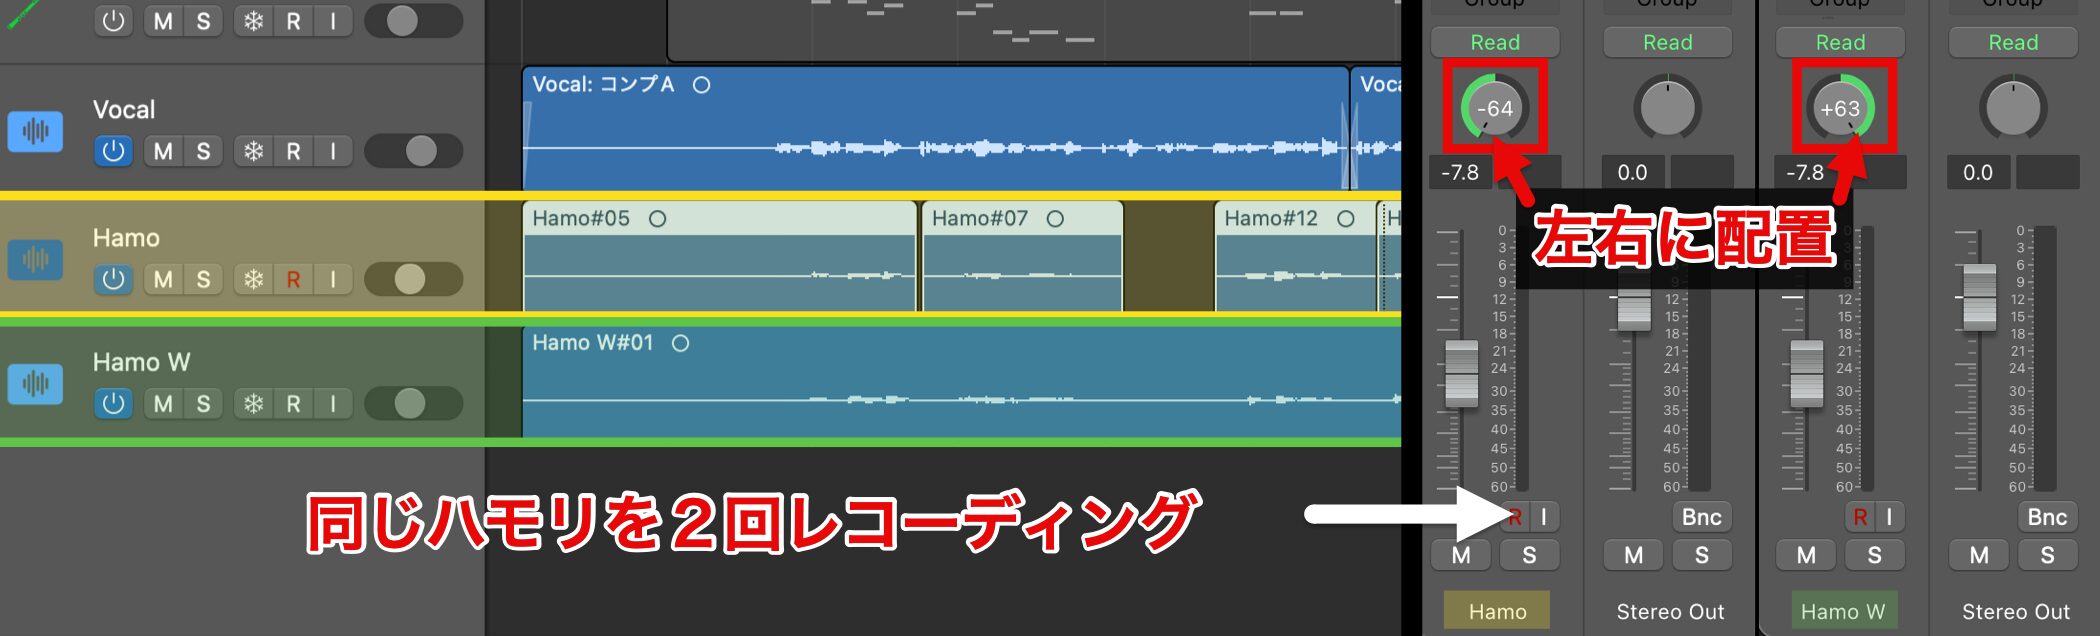
In actual pop music, doubling is often used on harmony tracks.
By recording the same part once more and placing the takes left and right, you can create a sense of stereo width.
That completes the recording.
Next, we will move on to vocal pitch correction and editing.
Frequently Asked Questions
Q1. What should I do if the sound is delayed when recording vocals in Logic Pro 11?
Reducing the I/O Buffer Size reduces latency. As a guideline, we recommend setting it to 128 or lower. However, this increases the load on your computer, so adjust it while checking the CPU meter.
Q2. What preparation is needed before recording vocals?
Important steps include creating an intro so the key and tempo are easy to grasp, creating and naming an audio track for the vocals, specifying the microphone input channel, and enabling input monitoring. Also adjust the backing track level so it does not exceed 0 dB.
Q3. What are the tips for connecting partial vocal retakes naturally?
It is important to start singing a little before the retake section and match the nuance of the previous take. In addition, fine-tuning the section where both takes overlap with the Fade Tool gives a more seamless result.
NEW ARTICLES
Latest English Articles











