

Cubase's Logical Editor is a powerful tool that searches MIDI data by specific conditions and processes it in bulk, dramatically streamlining tasks such as deleting wrong notes, randomizing velocity and inverting chords. Its structure, where you specify search conditions in the upper section and set the operations in the lower section, becomes clearer as you work through examples. Saving frequently used settings as presets and assigning them to shortcuts speeds up production even further. The Project Logical Editor also enables bulk editing of automation, track names and more, making it key to a professional production workflow.
Master the Logical Editor, a Huge Time-Saving Tool
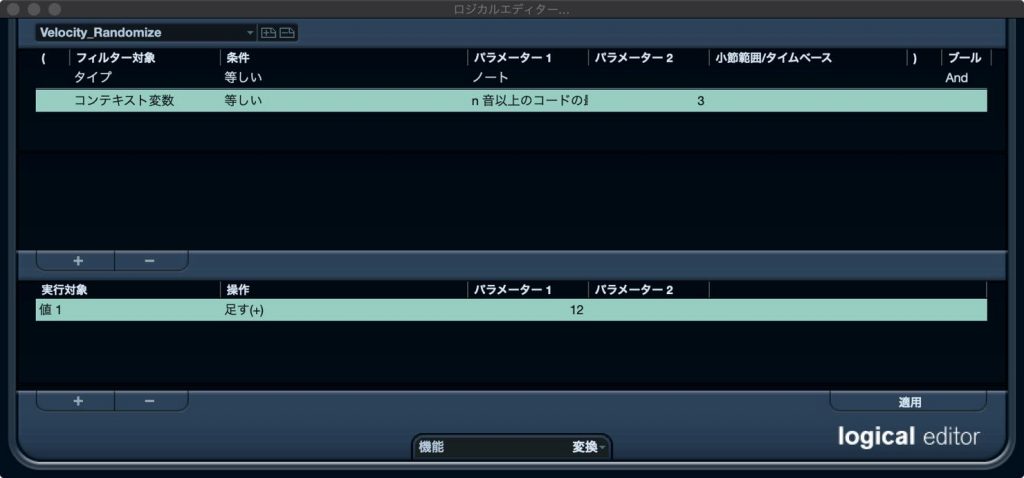
Cubase Pro includes a powerful tool called the Logical Editor.
We will explain it in detail with examples below, but in short, it is a feature that searches MIDI data, events and more by specific conditions and applies specific operations to them in bulk.
For example, you can randomize velocity or change the length of notes that match certain conditions, and you can also assign these sets of conditions and operations to shortcuts.
The Project Logical Editor, meanwhile, enables bulk operations in the Project window, such as on events, automation, track names and track colors.
With some ingenuity, you can greatly streamline all kinds of work, so be sure to master it.
How the Logical Editor Basically Works
To launch the Logical Editor, open the MIDI menu at the top and select Logical Editor.
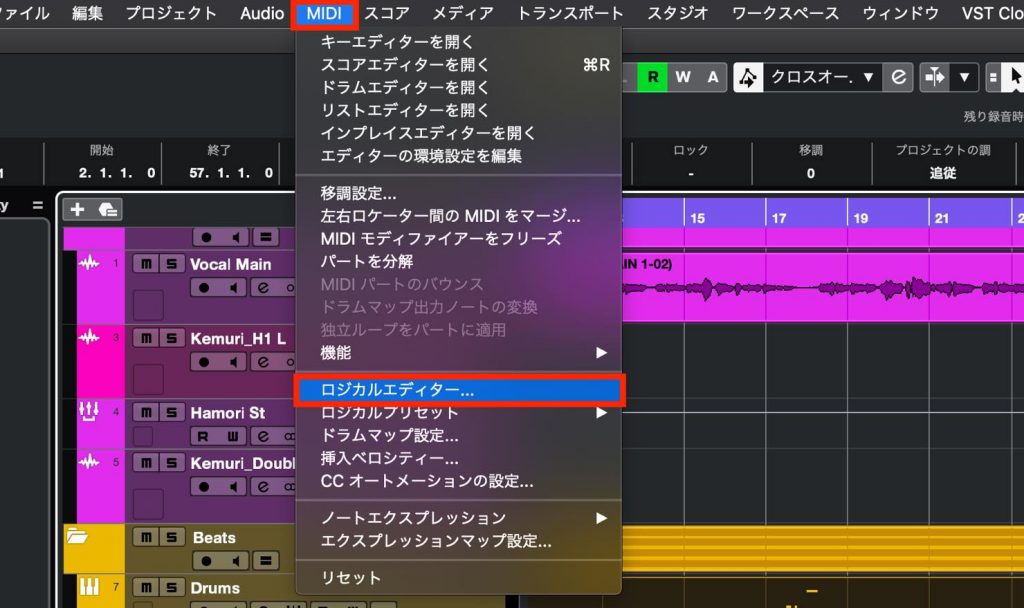
A screen like this appears.
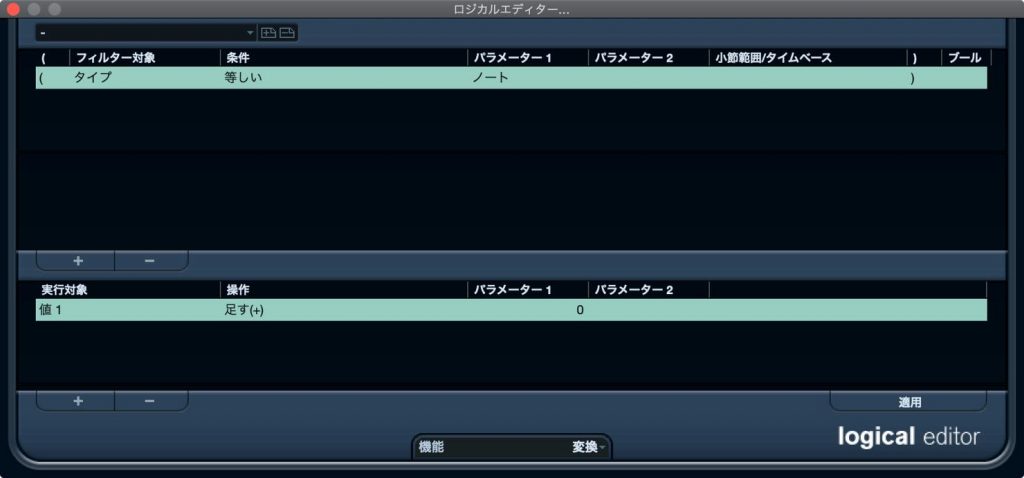
An overview of the Logical Editor screen is as follows.
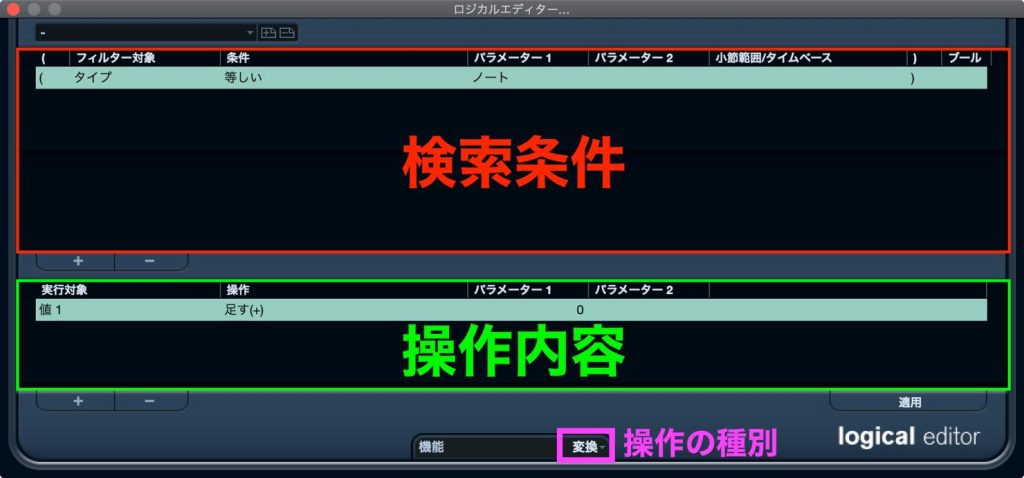
- Upper section: specify the search conditions, such as the notes you want to operate on.
- Lower section: specify the parameters to operate on and the operations to apply to the search results.
- Function: specify the type of operation.
Honestly, just looking at the structure probably gives you no idea what it can do, but keep it in mind as a premise.
Logical Editor Examples
Now, let's look at actual examples.
You can use these directly in your production, and trying them out should deepen your understanding of the Logical Editor.
Example 1: Deleting Wrong Notes
When you record MIDI in real time, small wrong notes like these can sneak in.
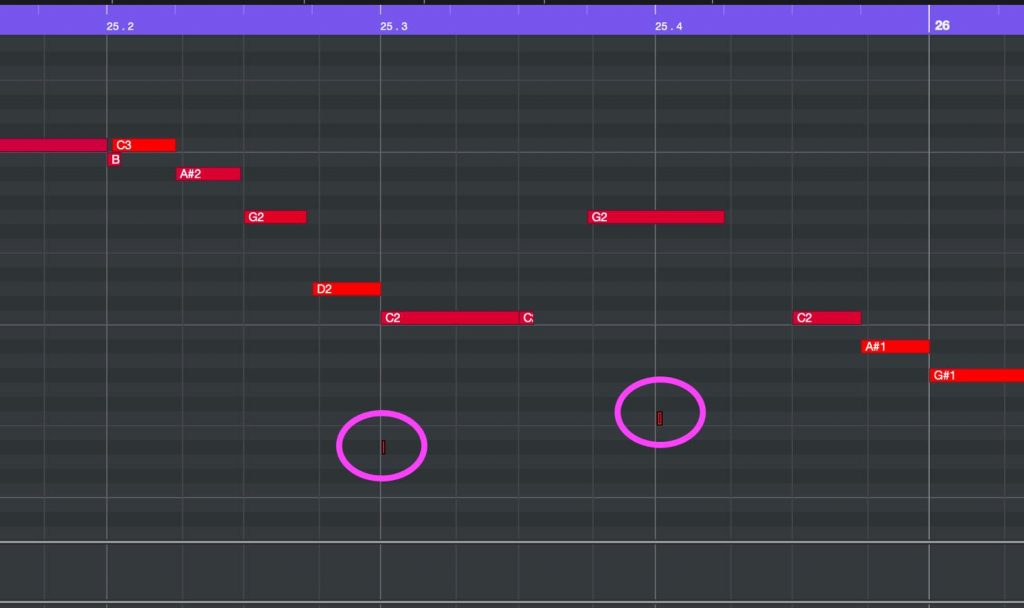
Finding and deleting them one by one is quite a chore.
So let's search for notes shorter than a certain length and delete them all at once.

The first search condition specifies that the search target is notes: Filter Target = "Type," Condition = "Equal," Parameter 1 = "Note."
In other words, with this condition alone, all MIDI notes in the currently selected events are targeted (if no event is selected, nothing happens).
Next is the second condition.
To add a search condition, click +/- at the bottom left.
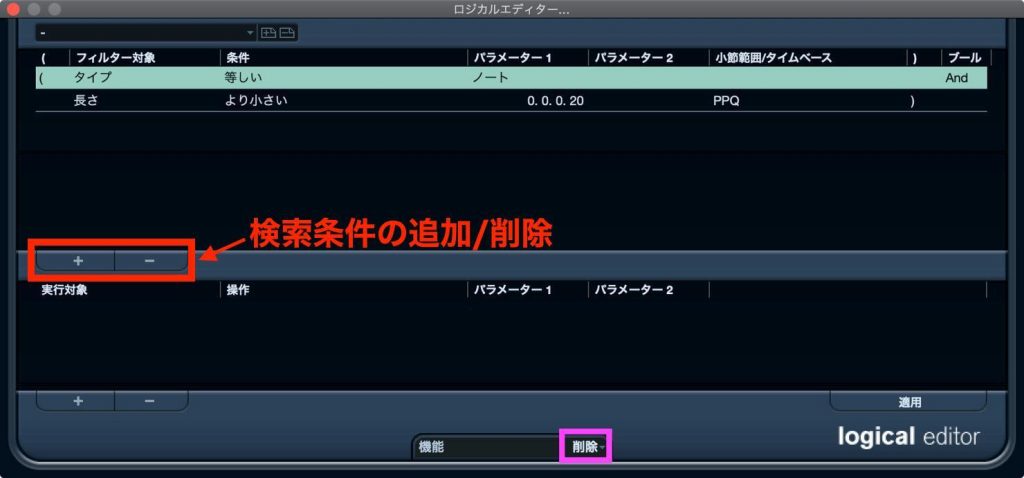
Set Filter Target = "Length" and Condition = "Smaller," and specify the threshold length in Parameter 1.
It is normally in PPQ, and 0.0.0.0 represents, from left to right, bars, beats, 16ths and ticks (16th = 120). Here, we search for notes shorter than 20 ticks.
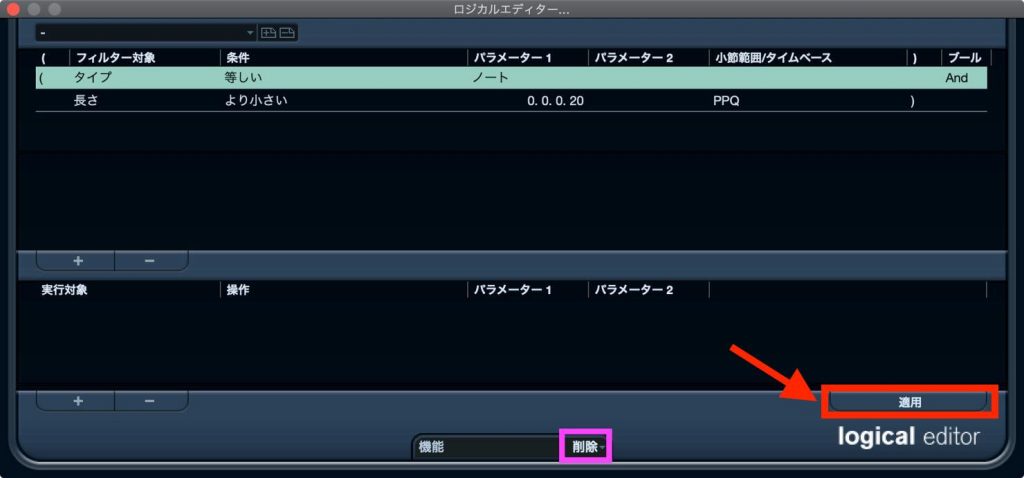
The operation we want is deletion, so we skip the action (leave it blank) and set the function to "Delete."
Now, pressing the Apply button deletes all wrong notes shorter than 20 ticks at once.
Example 2: Randomizing Velocity
Timing can be randomized with quantize, but velocity can only be randomized with the Logical Editor.
For example, let's try it on flatly programmed MIDI like this.
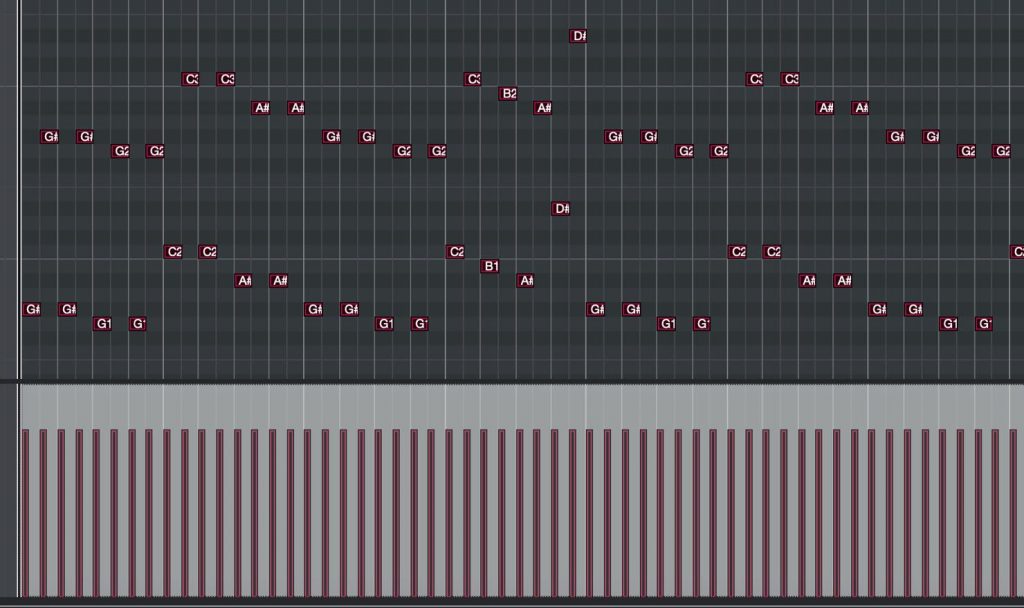
The Logical Editor settings are as follows.

The search condition is Filter Target = "Property" and Parameter 1 = "Event is selected," targeting the selected notes.
Then the velocity operation is specified in the lower section, and the action target has a mysterious name, "Value 2."
This actually represents velocity.
This is a slightly tricky point: Value 1 and Value 2 change depending on the type of search target.
- If the search target is MIDI notes: Value 1 = pitch, Value 2 = velocity
- If the search target is MIDI CC: Value 1 = CC number, Value 2 = CC value
Since these are MIDI notes, Value 2 represents velocity.
The operation is set to action target = "Add Random Number between," randomizing between the values of Parameter 1 and Parameter 2.
Then set the function, which is the type of operation, to "Transform."
Applying it gives this result.
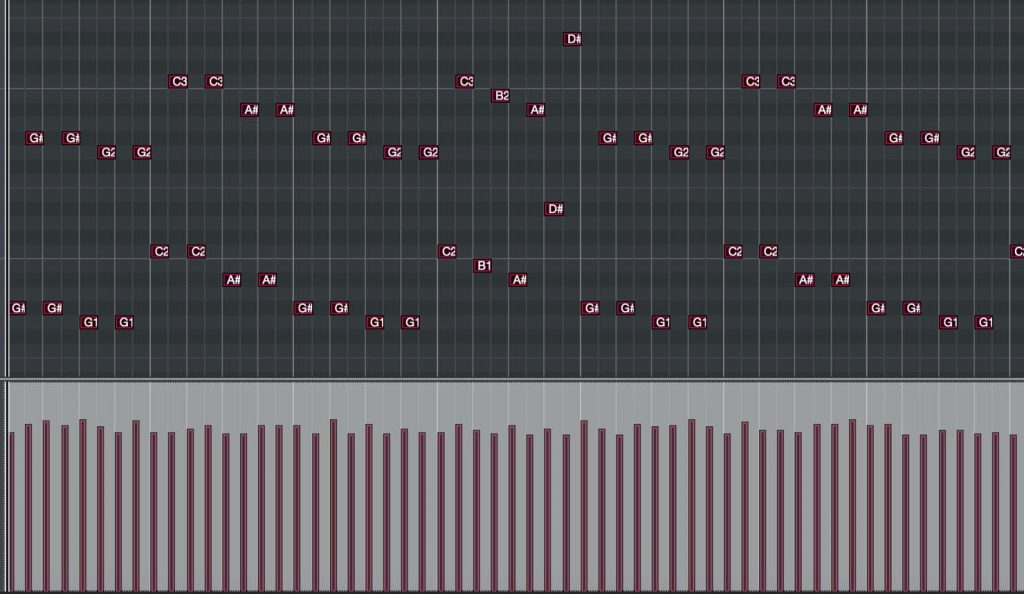
Example 3: Lowering the Highest Note in Chords by One Octave
Chord inversion is also available in the chord editing functions, but you cannot invert multiple different chords at once.
The Logical Editor does this easily.
For example, suppose chords like these have been programmed.
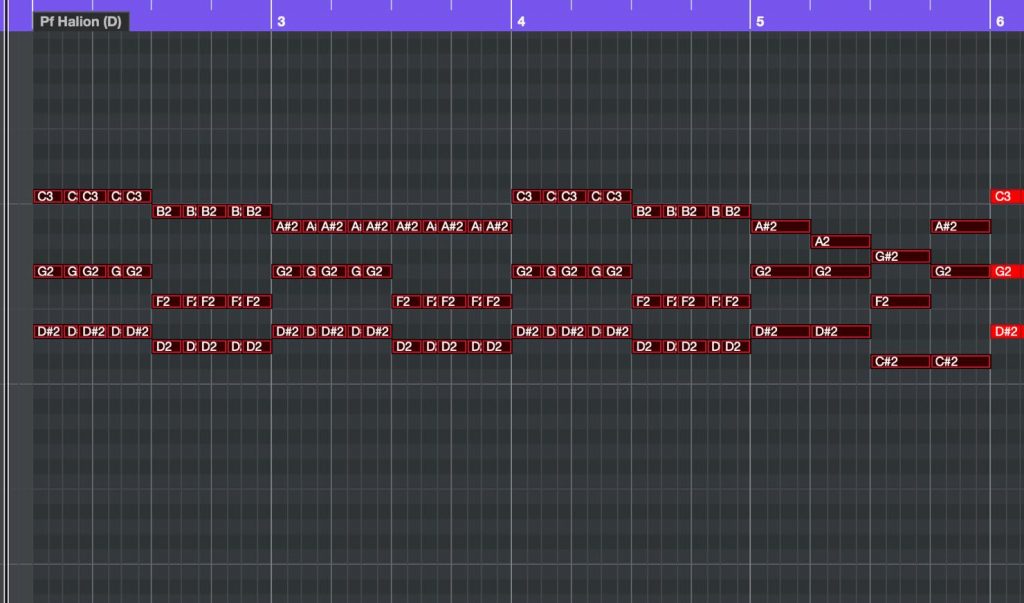
To lower the highest note of each by one octave, the settings are as follows.

The first search condition, as in Example 2, specifies the selected notes (if you want all notes in the event, follow the settings in Example 1).
The second search condition is Filter Target = "Context Variable," Condition = "Equal," Parameter 1 = "Highest Note in Chord with n or more notes," Parameter 2 = "3" (the "n" in "n or more notes").
The operation is action target = "Value 1" (= pitch), Operation = "Subtract," Parameter 1 = "12" (12 semitones = 1 octave).
The function is of course "Transform." Applying it...
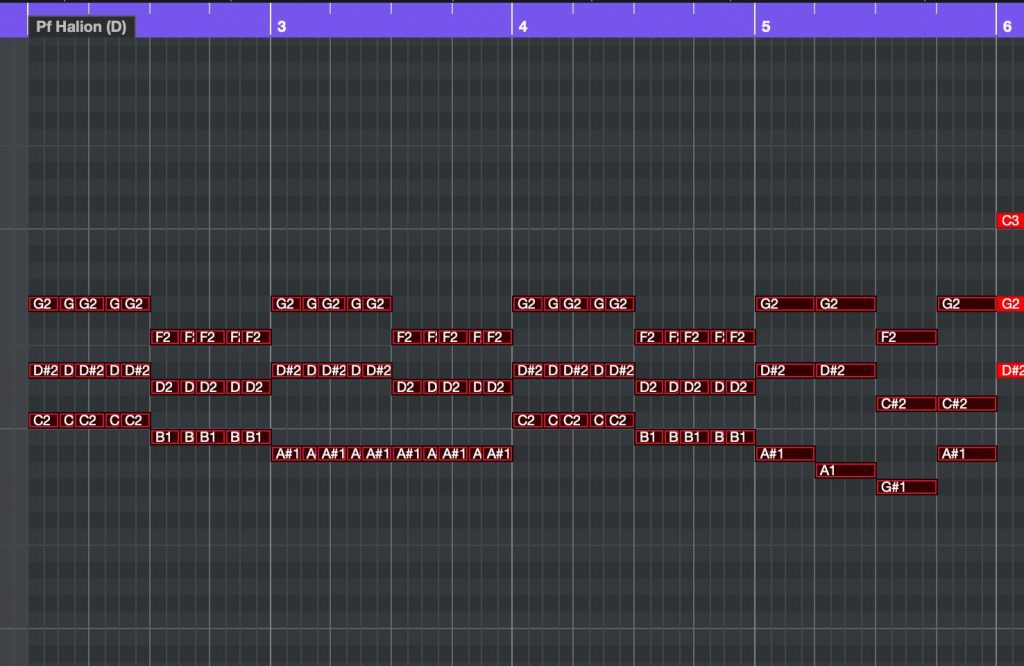
As shown, all the selected chords were correctly inverted downward.
By changing the settings, you can of course also raise the lowest note in each chord by one octave.
Saving Logical Editor Presets and Assigning Shortcuts
Save frequently used Logical Editor settings as presets.
Click the "+" button to the left of the preset menu at the top left of the screen.
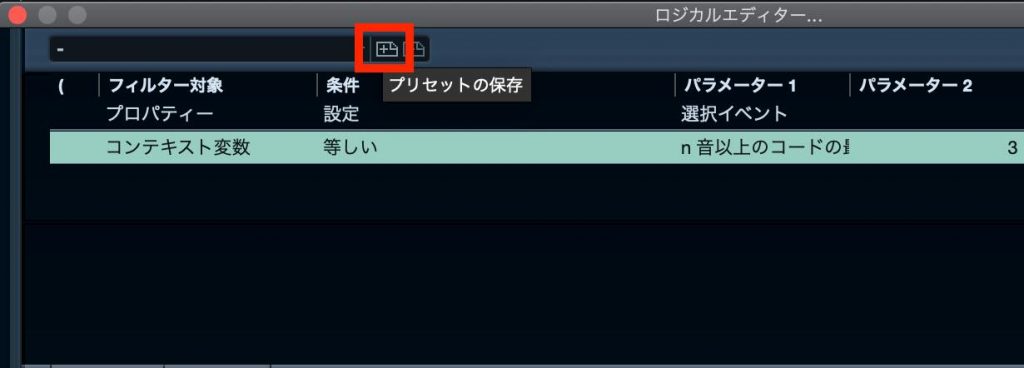
A pop-up appears, so enter a name and press OK.

When you open the preset menu, the preset has been added like this.
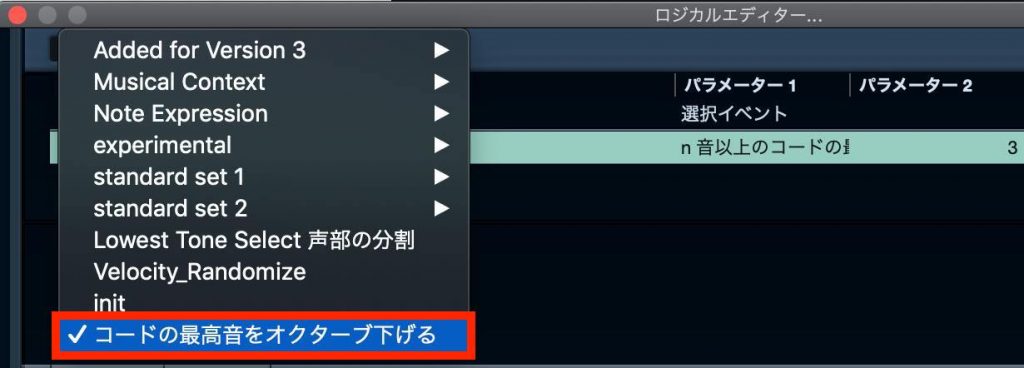
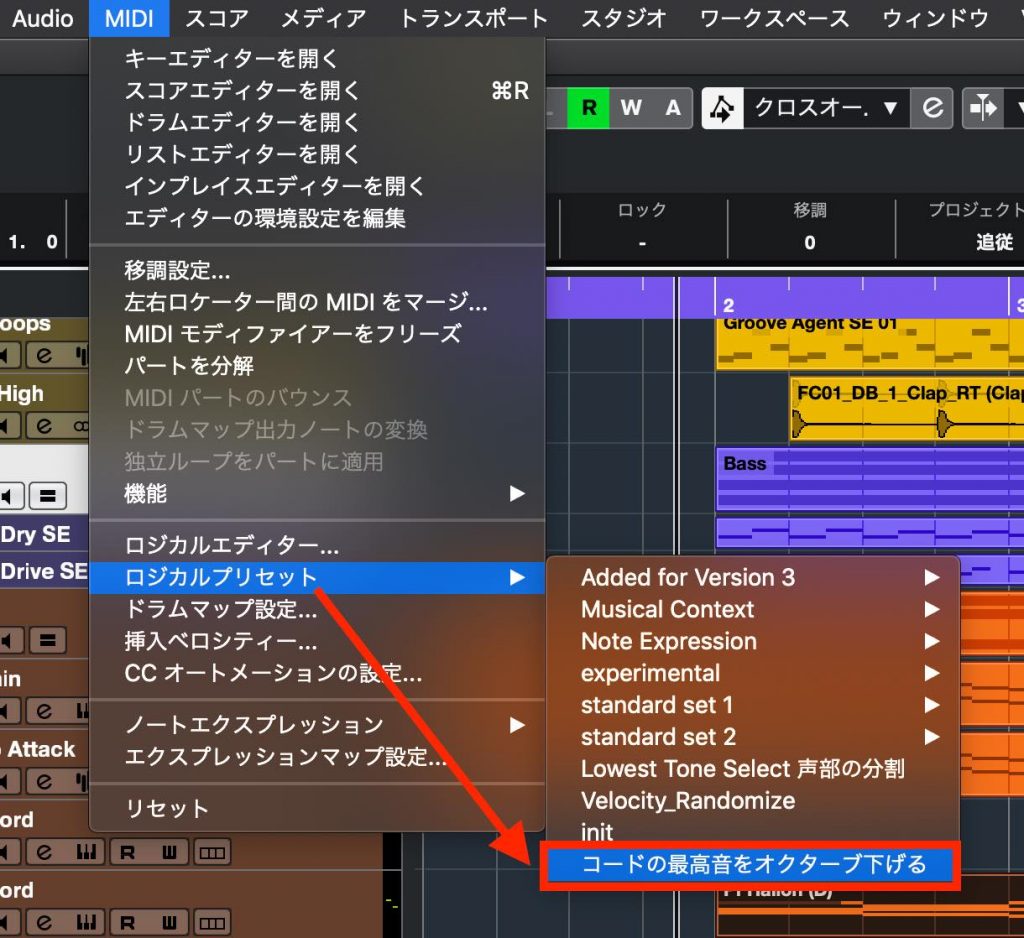
This preset is also added under MIDI menu > Logical Presets.
Selecting it there executes the processing immediately.
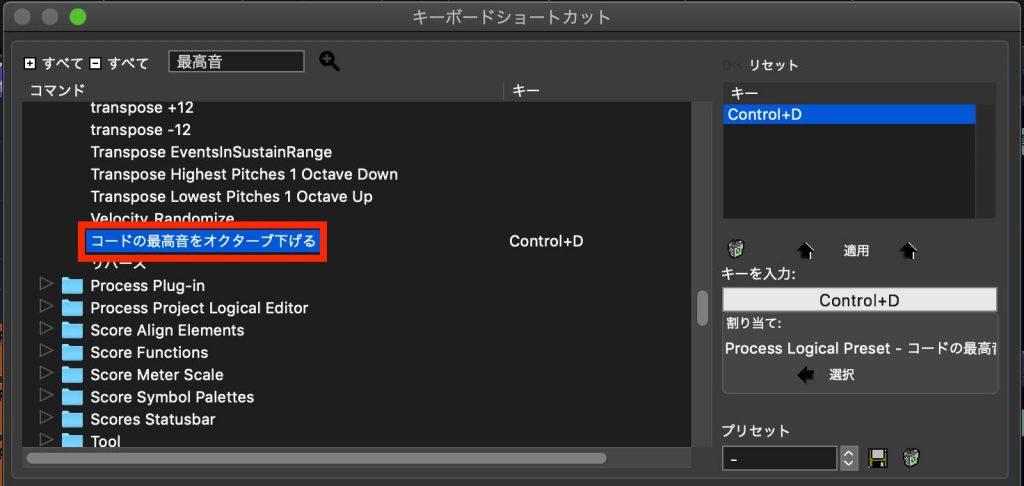
It is also added in Key Commands inside a folder called "Process Logical Preset" (you can find it quickly by searching for the preset name), where you can assign your own shortcut.
Entering the shortcut, of course, executes the processing immediately.
This lets you streamline your work even further.
Project Logical Editor
The Project Logical Editor basically works the same way as the Logical Editor; the difference is that its targets are events in the Project window rather than MIDI.
You can launch the Project Logical Editor from Project > Project Logical Editor in the top menu.

It is used in almost the same way, so let's go straight to the examples.
Example 1: Adjusting Automated Parameters in Bulk
Automation is handled in the Project window rather than as MIDI CC, so it is a target of the Project Logical Editor.
For volume, for example, raising or lowering everything after setting detailed automation like this is a bit of a hassle.
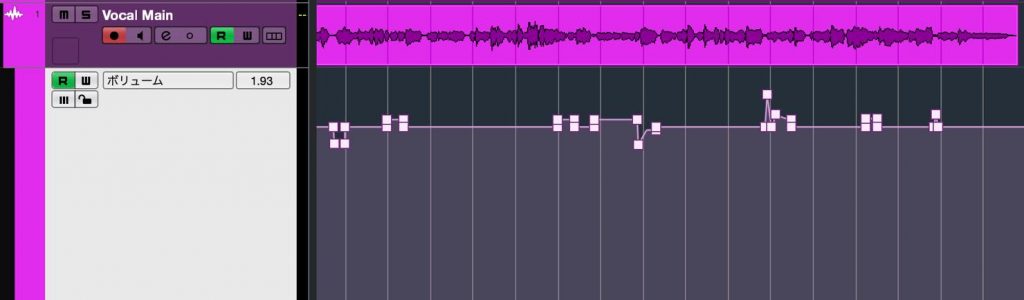
So, for example, to raise the values of the selected automation lane all at once, the settings are as follows.

The search condition is Filter Target = "Media Type," Condition = "Equal," Parameter 1 = "Automation," targeting all automation events in the selected lane (if no automation lane is selected, nothing happens).
The operation is action target = "Trim," Operation = "Multiply by," Parameter 1 = "1.0500" (= 5% increase), so each application increases it by 5%.
The function is of course "Transform." Applying it...
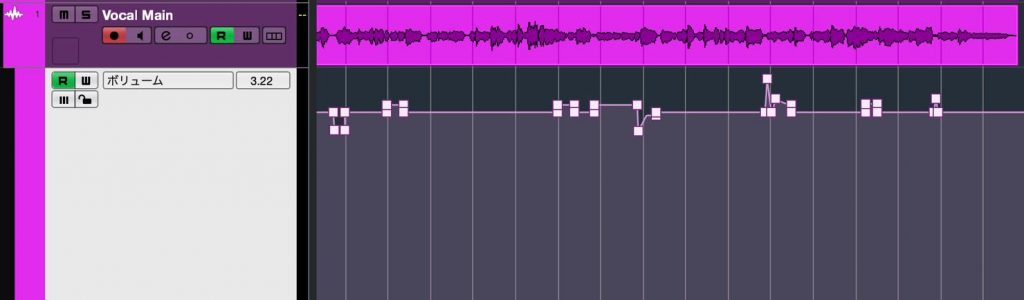
We were able to raise everything without disturbing what was written. It is handy to make one for lowering too (to lower by 5%, set the operation's Parameter 1 to "0.9500").
Example 2: Coloring Tracks That Match Conditions
For things like multitrack drum stems, where you can roughly predict the strings included in track names, you can use them as search conditions to color the tracks.
For example, suppose you have drum tracks like these.
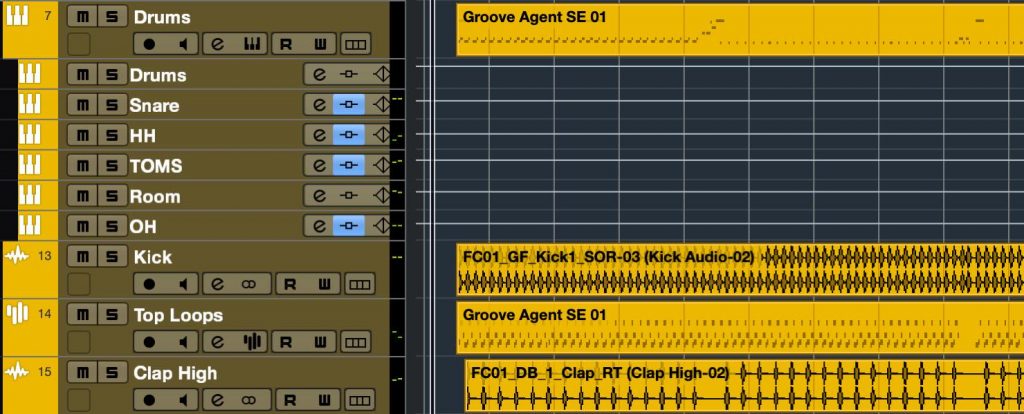
If they are neatly ordered like this, changing the colors is not that difficult, but when the order is jumbled, such as with imported audio tracks, coloring them first often makes them easier to organize.
Set up the Project Logical Editor as follows.

For the search conditions, set multiple conditions of Filter Target = "Name," Condition = "Contains," Parameter 1 = "(names likely to be in drum tracks, such as Kick)."
The important item here is "Bool" at the far right. It is "And" by default, but click it to change it to "Or." In other words, all tracks containing any of the strings set in the conditions are targeted.
The operation is action target = "Set Color," Operation = "Fixed Value" (there are no other options), Parameter 1 = "(choose any color)."
Clicking Parameter 1 shows a color palette, so you can choose the color visually.
The function is of course "Transform," and applying it...
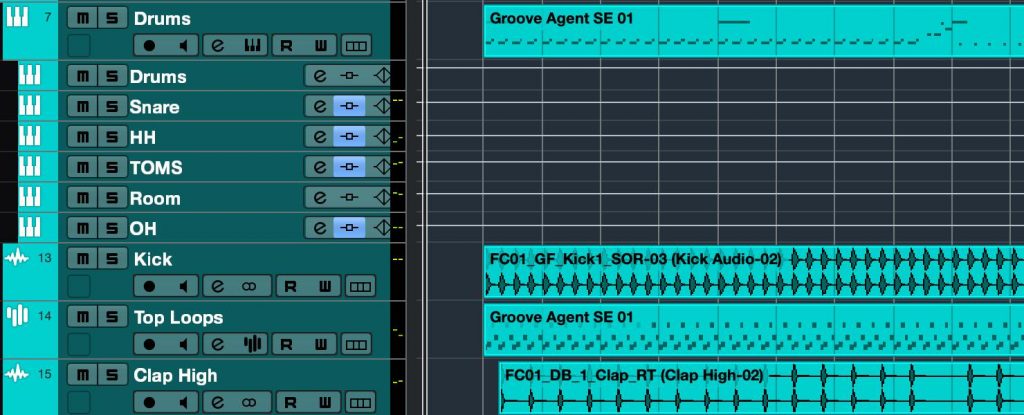
The colors should change without any problems.
Saving Project Logical Editor Presets and Assigning Shortcuts
Project Logical Editor settings can also be saved as presets.
The steps are exactly the same as for the regular Logical Editor, so refer to the relevant section above.
Saved presets appear in the preset menu as well as in Project > Process Project Logical Editor.
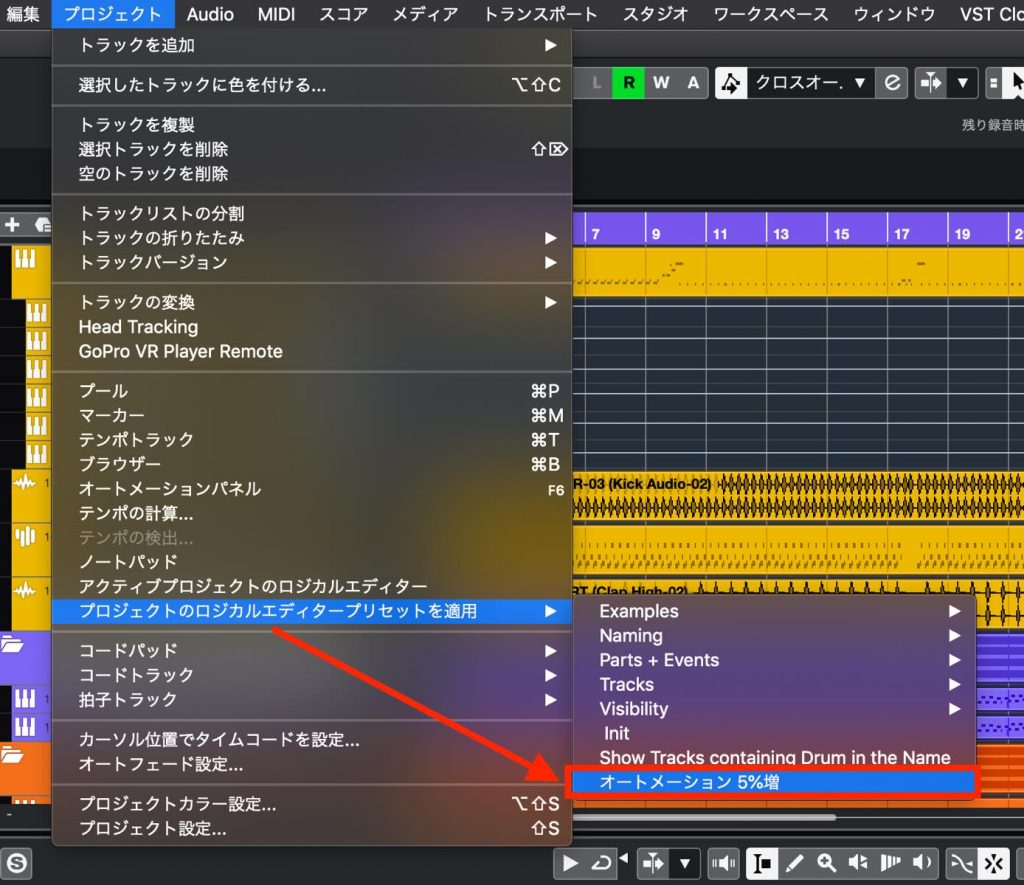
Shortcuts can be set in the same way, and the presets are added to a folder called "Process Project Logical Editor" (searching by preset name is faster here too).
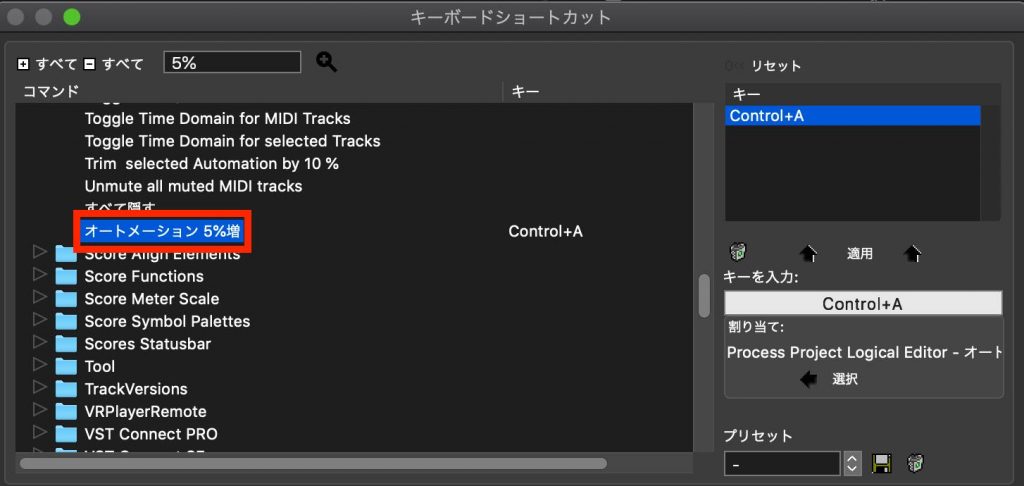
Assign whatever shortcuts you like and make use of them.
That concludes our introduction to the Logical Editor, a powerful tool unique to Cubase Pro.
First, try setting up the examples here yourself and get used to the operations. Once you get the knack, you will surely come up with all kinds of ideas and be able to create your own presets and shortcuts in quantity.
Master it and create an efficient, low-stress production environment.
Frequently Asked Questions
Q1. What is the difference between the Logical Editor and regular MIDI editing?
The Logical Editor combines multiple conditions to process matching notes and events in bulk, whereas regular editing is basically done item by item. Complex bulk operations such as velocity randomization can only be done with the Logical Editor.
Q2. Can the Logical Editor be used in all versions of Cubase?
The Logical Editor is included in Cubase Pro. It is not available in lower editions such as Elements, so check in advance.
Q3. How do I assign a preset to a shortcut?
After creating the preset, search for the preset name in the "Process Logical Preset" folder in the Key Commands settings and assign any key combination.
Q4. What can the Project Logical Editor do?
Rather than MIDI editing, it performs bulk operations on Project window events, automation, track names, track colors and more. It streamlines complex project management tasks.
Q5. What is the difference between Value 1 and Value 2?
It depends on the type of search target. For MIDI notes, Value 1 = pitch and Value 2 = velocity; for MIDI CC, Value 1 = CC number and Value 2 = CC value.
NEW ARTICLES
Latest English Articles











