If you get crackling noise, audio dropouts, or playback that stops while producing in Studio One, the main cause is high CPU usage. This article explains a concrete solution: raising the buffer size value in the Audio Setup tab of Preferences to reduce the CPU load and improve the symptoms. You'll also learn about combined countermeasures such as converting MIDI tracks to audio and adjusting the sample rate, giving you the knowledge to build a stable production environment.
Errors caused by CPU usage
During production, you may run into symptoms such as "noise," "audio dropouts," or "playback not working."
This is typical behavior that occurs when "CPU usage" gets high.
Here we'll explain how to solve it.
Solution
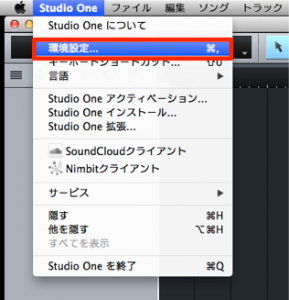
From the top menu, select "Studio One" → "Preferences."
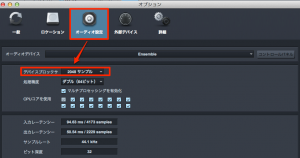
In the "Audio Setup" tab, set the number outlined in red to a higher value.
This keeps "CPU usage" down and should improve the symptoms.
*A higher number causes "latency" (audio delay) when recording.
Other solutions
Convert MIDI tracks to audio
https://sleepfreaks-dtm.com/for-advance-studioone/midi-to-audio-2/
Frequently asked questions
Q1. Why does audio drop out during playback in Studio One?
The main cause is high CPU usage. Setting a higher buffer size in the Audio Setup tab of Preferences reduces the CPU load and improves the dropouts.
Q2. Are there downsides to a higher buffer size?
The downside is that a higher buffer size causes "latency" (audio delay) when recording. You need settings that balance recording and playback.
Q3. Are there ways to solve the noise problem other than changing the buffer size?
Yes. Several measures are effective, such as converting MIDI tracks to audio, lowering the sample rate, or avoiding USB hubs.
NEW ARTICLES
Latest English Articles