
The MOTU UltraLite mk5 is a mid-range audio interface priced at about 100,000 yen that, despite its compact size, offers extensive connectivity with 18 inputs and 22 outputs. With a 125 dB dynamic range and excellent noise performance, it achieves audio quality that surpasses the RME Babyface in the same class. Its ultra-low latency (around 1 ms) allows comfortable playing, and when recording vocals and guitar it far surpasses 10,000-yen-class products in high-frequency extension and density of sound. It is a practical product combining the performance and usability to become a new standard for personal studios.
Could It Become the New Standard in the Mid-Range Class?
This time, we review the audio interface "UltraLite mk5", released with confidence by MOTU, also famous for the DAW Digital Performer.
About a year and a half has passed since its release, and we used this unit, which has been highly rated online, for about a month.
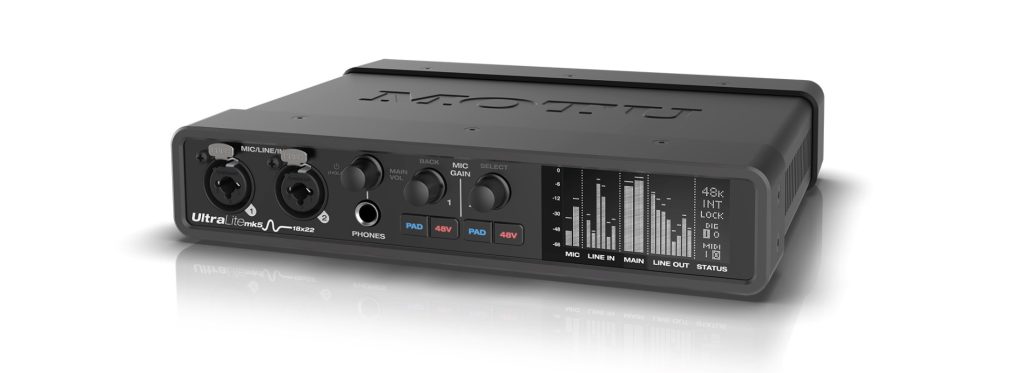
Here, we review the product's sound as well as its specs, features and usability.
Can the UltraLite mk5, priced at about 100,000 yen, become the new standard in the mid-range class?
MOTU UltraLite mk5 Review Video
UltraLite mk5 Product Features
Size and Weight
First, let's check the specifications.
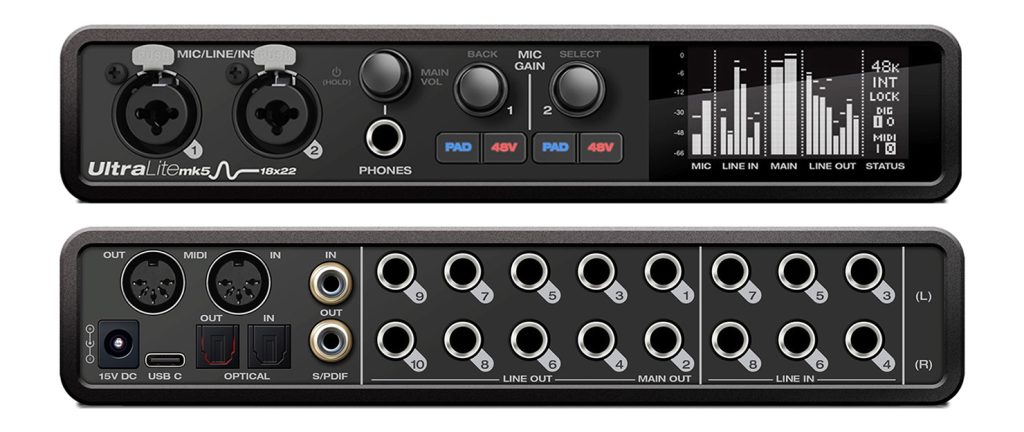
- Width: 22 cm / Depth: 17.5 cm / Height: 4.5 cm
- Weight: 1.31 kg
It is compact, made of steel with a premium feel.
It does not get in the way on a desk, and of course it is easy to carry around.
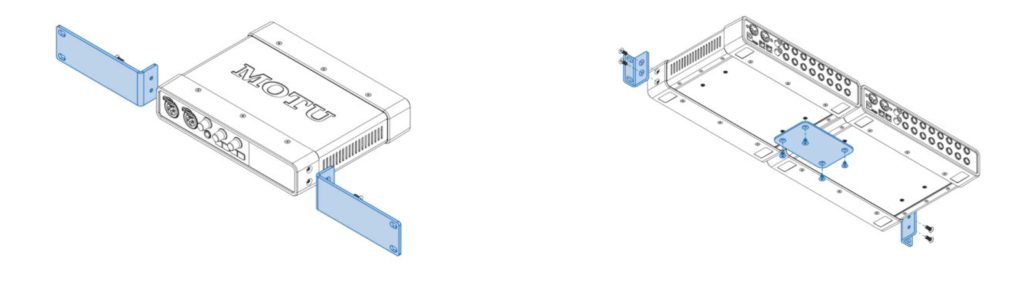
It is designed in a half-rack size.
Using dedicated parts sold separately, you can join two units together or use it as a 1U rack.
Connecting to a Computer
The process of getting the product up and running is also smooth.
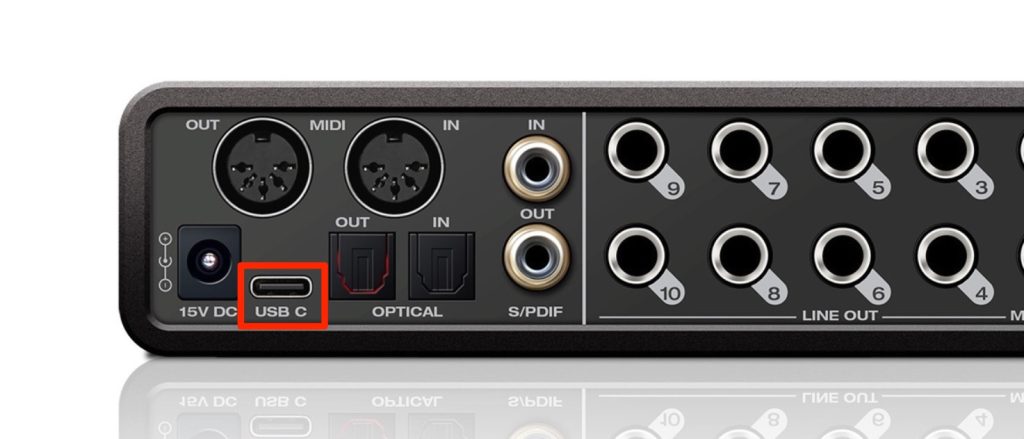
Connect the "UltraLite mk5" to your computer with a USB-C cable.
If your computer does not have a USB-C port, connect it with the Type-A to Type-C cable included with the unit.
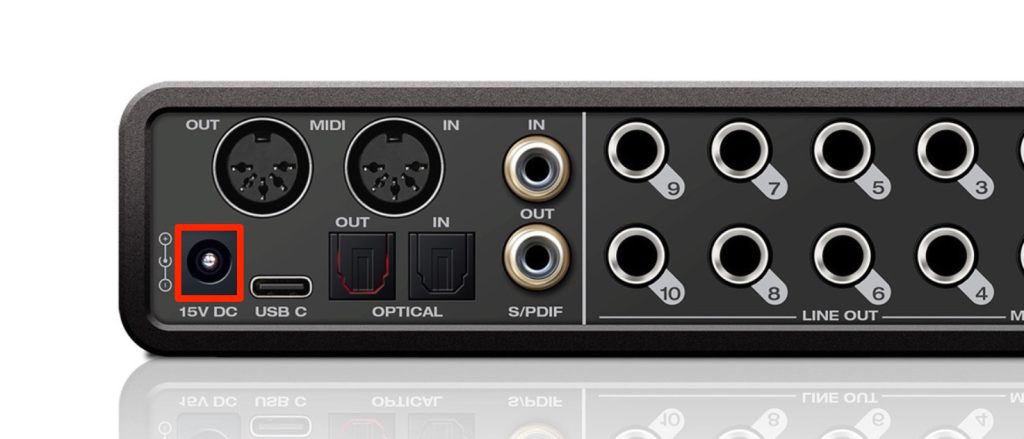
This unit requires a power supply, so use the included power adapter.
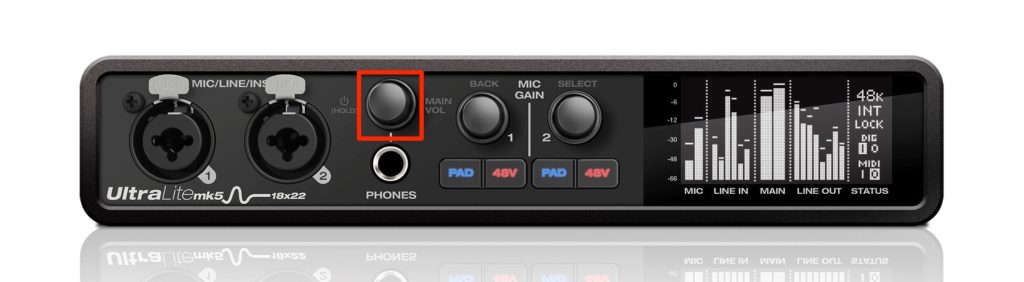
After connecting the computer and power, press and hold this PHONES button to turn it on.
If there is no response even after connecting the power adapter, check this part.
Pressing and holding it again turns the power off.
Easily Set Important Items from the Front Display
You can instantly check and change the current audio status from the front display.
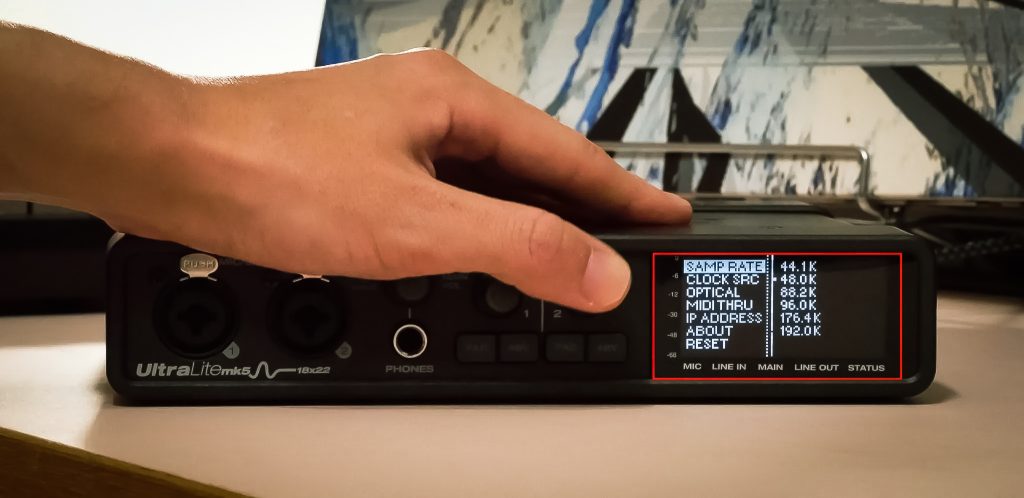
This is especially handy because the sample rate is something you change frequently!
About Inputs and Outputs
This unit can handle up to 18 inputs and 22 outputs.
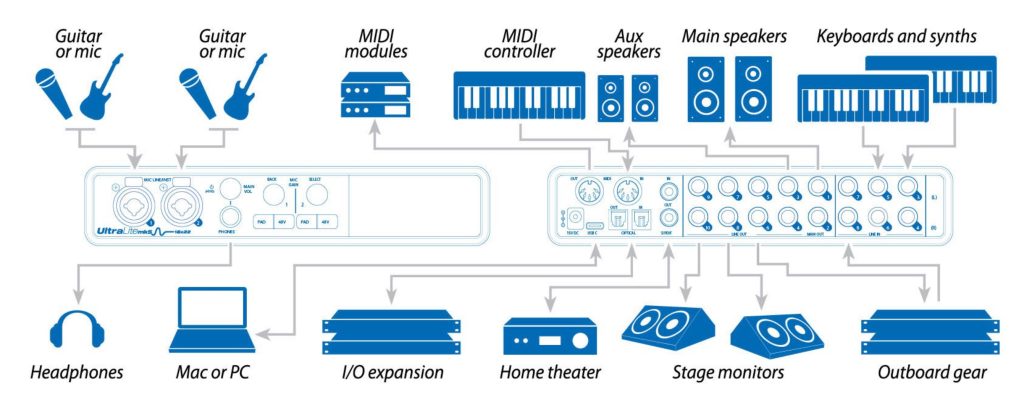
- Two mic/line/instrument inputs (+48V phantom power)
- Six line inputs / ten line outputs
- Headphone output
- Eight channels of optical I/O (ADAT)
- Supports switching to stereo TOSLink (optical S/PDIF)
- Also equipped with MIDI In/Out
You can keep multiple hardware synths and instruments connected at all times, and output to multiple speakers is also possible.
These are ample specs even for use in a personal studio.
Ultra-Low Latency for Comfortable Playing
What matters when actually playing instruments or a MIDI keyboard is the delay of the sound, "latency."
The drivers are optimized for Mac and Windows environments, achieving ultra-low-latency performance.
Here is the latency with the buffer size pushed to the limit.
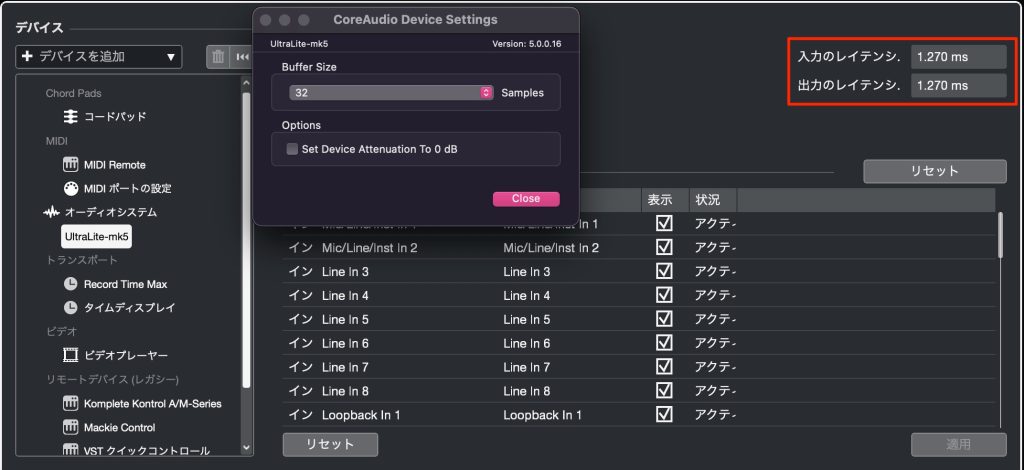
Both input and output are around 1 ms (about one-thousandth of a second), which is excellent.
I played guitar with this setting, and it was very comfortable to play.
It seems able to meet the expectations of those who demand precise playing timing.
* Please note that this varies depending on your computer's specs.
Sound Quality
Next, the sound comparison everyone wants to know about.
Here is a table summarizing the specs of the "UltraLite mk5."
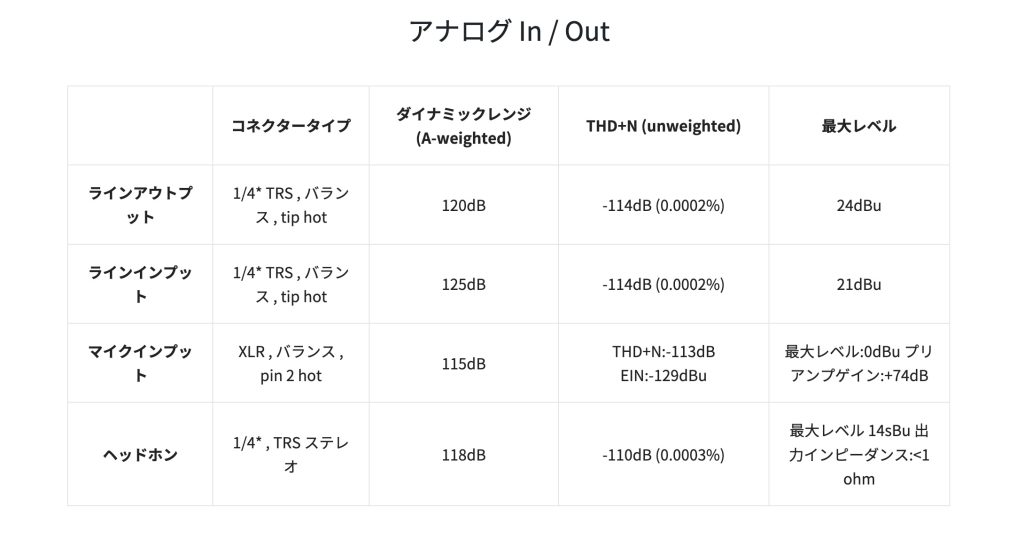
It is claimed to offer the best audio quality in its class, with excellent values recorded: "125 dB dynamic range" and "-114 dB THD+N", values that surpass RME's "Babyface" in the same class.
Now let's listen to the sound.
Here, we compare three units: a 10,000-yen-class unit, the Babyface in the same mid-range class, and the UltraLite mk5.
Vocals Only
10,000-yen class
100,000-yen class (Babyface)
UltraLite mk5
Vocals + Backing Track
Let's also check the sound together with the backing track.
10,000-yen class
100,000-yen class (Babyface)
UltraLite mk5
The highs extend well and the sound comes forward overwhelmingly. This is especially clear when mixed with the backing track.
Compared with the 10,000-yen-class sound, it has a solid core and a stable sound. This also makes later effect processing easier.
Preferences may differ versus the Babyface, but I felt the "UltraLite mk5" has the edge in fine detail.
Clean Guitar (Sound at the Line Recording Stage)
Next is the guitar sound.
10,000-yen class
100,000-yen class (Babyface)
UltraLite mk5
Crunch Guitar (Amp Simulator)
This is the material above run through an amp simulator.
10,000-yen class
100,000-yen class (Babyface)
UltraLite mk5
As with the vocals, we were able to record a dense, stable sound.
The 10,000-yen class inevitably makes ear-piercing frequencies stand out, but with the Babyface and UltraLite mk5 this part does not stand out (good balance with the other ranges), and the recordings are very easy to listen to.
This is where the biggest difference appears.
Output Sound Comparison
We also compare the output sound.
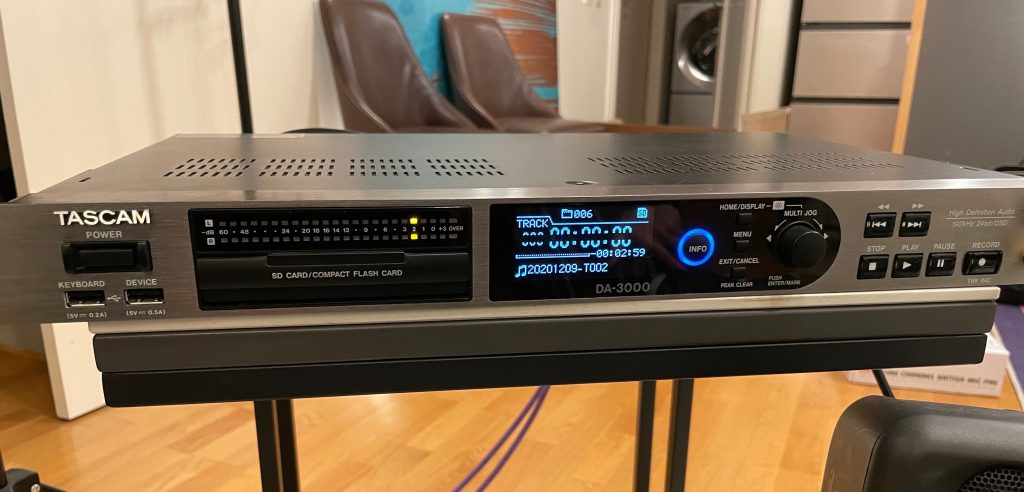
We recorded each product's output sound with the master recorder "TASCAM DA-3000."
10,000-yen class
100,000-yen class
UltraLite mk5
I felt there was a big difference here too.
The overall dynamics from lows to highs (especially lows) are clearly expressed.
It is especially effective for monitoring at the mixing stage, and I think it makes work much easier.
I also listened to several commercial songs I often listen to, and the sound was stable with little bias in any genre.
It is a little extravagant, but I even think some people might buy it just for listening to music.
CueMix 5, Which Gives Flexible Control over Sound
After the UltraLite mk5's specs and sound, let's look at the control side.
What is indispensable for controlling this product is the exceptionally excellent "CueMix 5".
The CueMix 5 download page is here.
It is free software developed to control the UltraLite mk5. Besides letting you flexibly configure the many inputs and outputs mentioned above, it offers many functions you absolutely need to know to make full use of the product.
From here, let's look at what CueMix 5 can do.
See and Change Hardware Settings at a Glance
You can see and change the hardware settings from a very easy-to-understand screen.
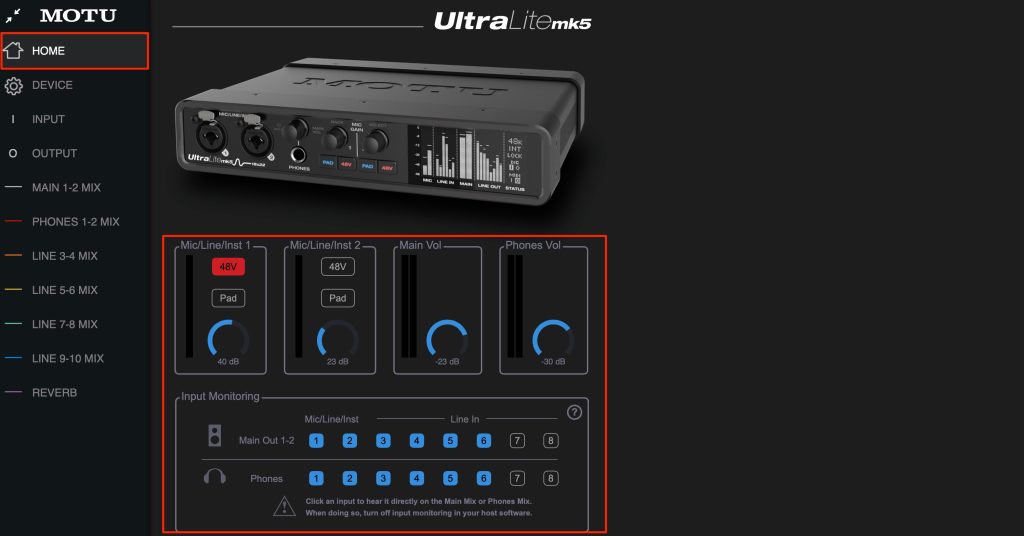
In addition to controlling the gain and 48V of the two front channels, you can change the main out and headphone volume.
In "Input Monitoring" below, you can exclude specific input sounds.
For example, suppose you are recording guitar on channel 2.
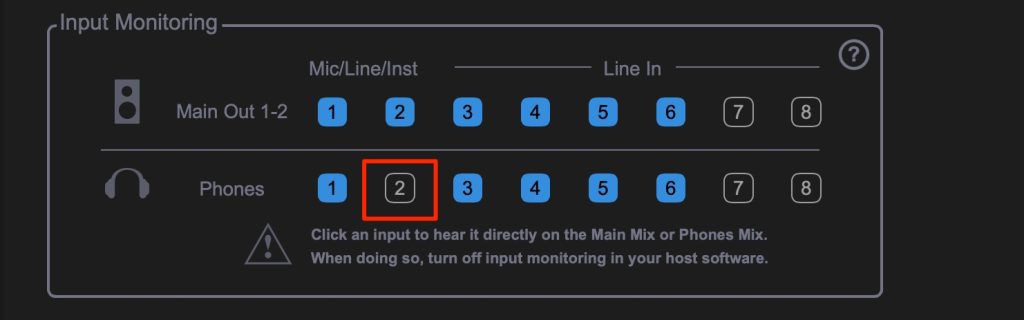
We removed it from the headphone output.
Flexible settings are possible, such as playing the guitar you are playing through the speakers but not through the headphones (not monitoring it).
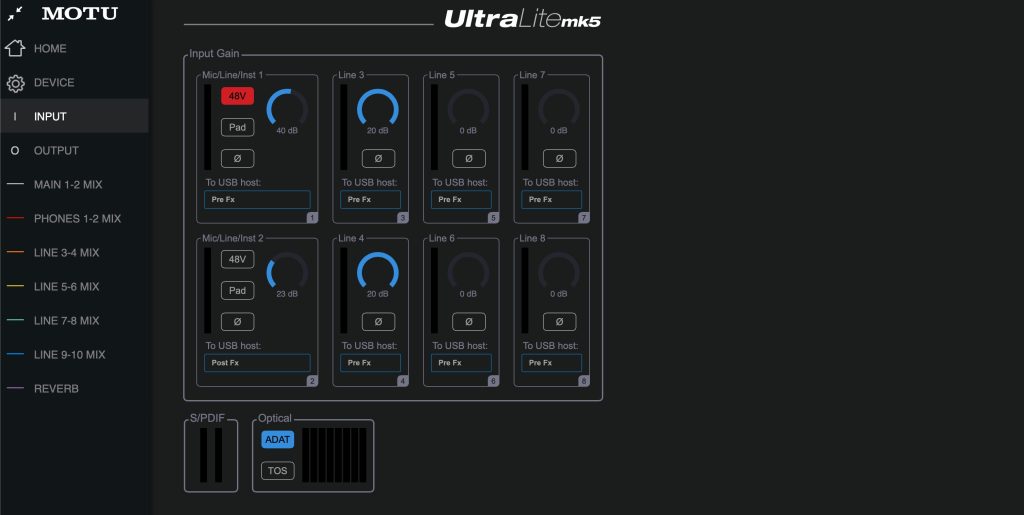
Also, you can check and change all inputs from the "INPUT" section.
DSP Effects: EQ, Gate, Comp and Reverb
Without using the computer's CPU, you can also apply the main effects inside the UltraLite mk5.
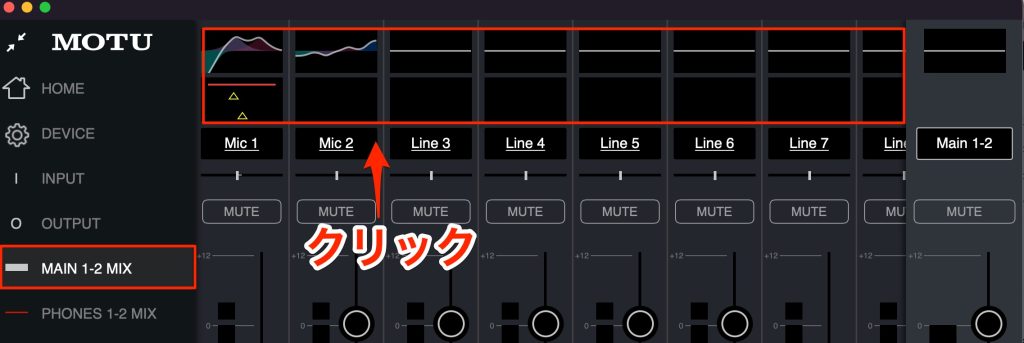
In the "MIX" section, click the top of the channel you want to apply effects to.
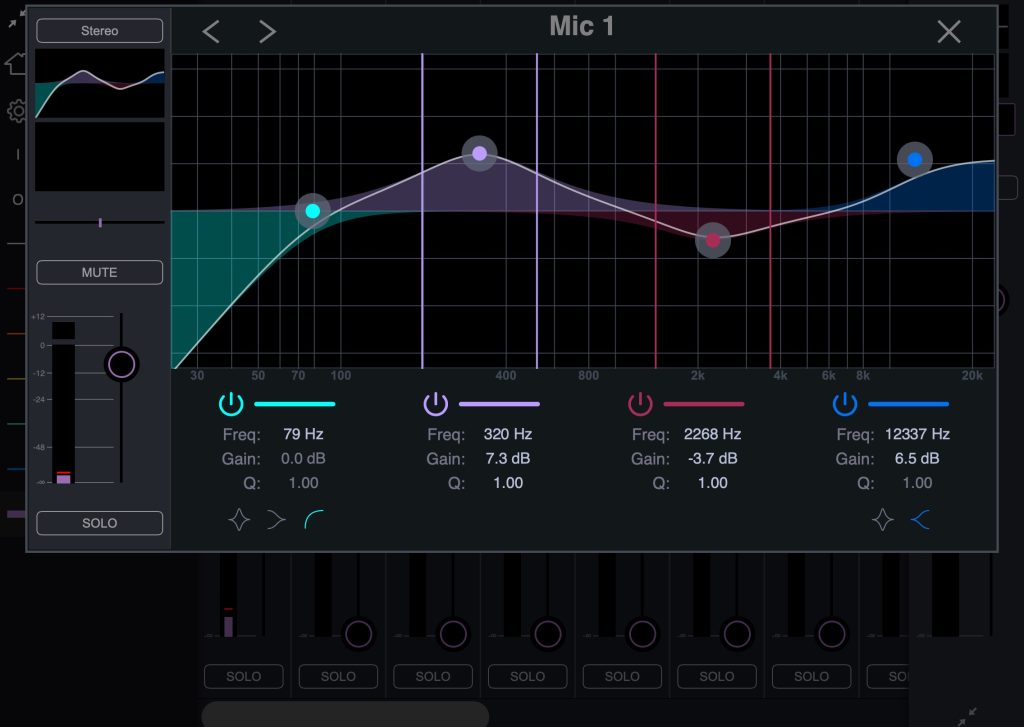
As shown, an effects screen opens that rivals DAWs and third-party plug-ins.
You can specify whether the effect sound you set is for "monitoring only" or "recorded with effects."
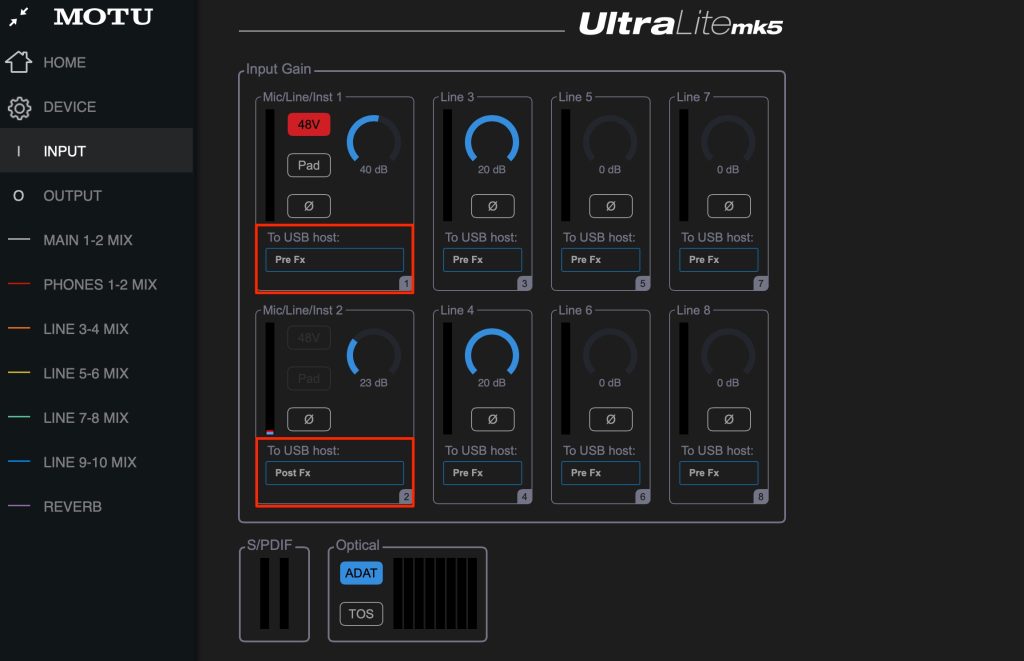
Just change Pre/Post for the target channel in the "INPUT" section.
- Pre FX: effects are applied only to the monitoring sound and do not affect the recorded sound
- Post FX: effects are also applied to the recorded sound (recorded with effects)
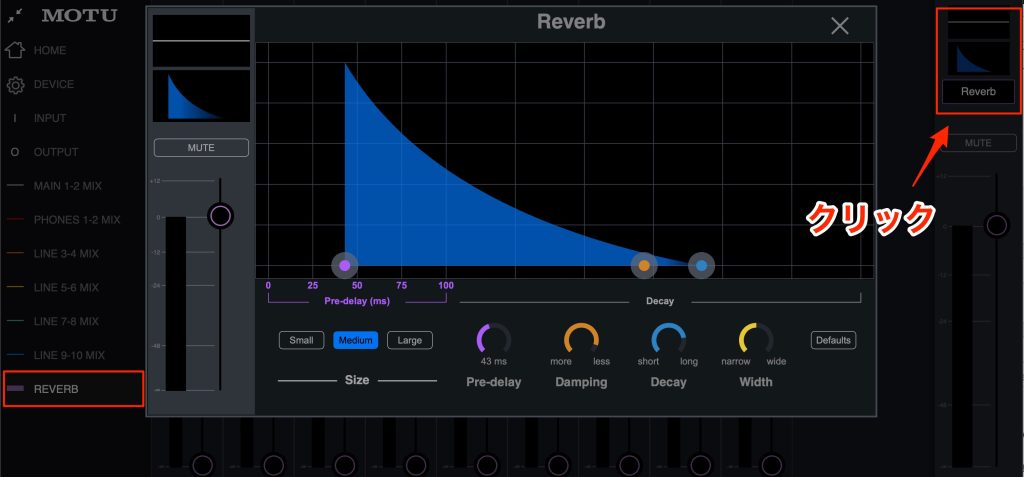
Separately from these effects, a "Reverb" is also provided on a separate channel.
Unlike the other effects, REVERB cannot be recorded with the sound.
It is for monitoring only.
When recording vocals, you take care to isolate the room and the area around the mic so no extra reverberation gets in, but when the room has little reverberation, singing itself can become harder.
In such cases, you can apply reverb to the monitoring only to support the vocalist's performance.
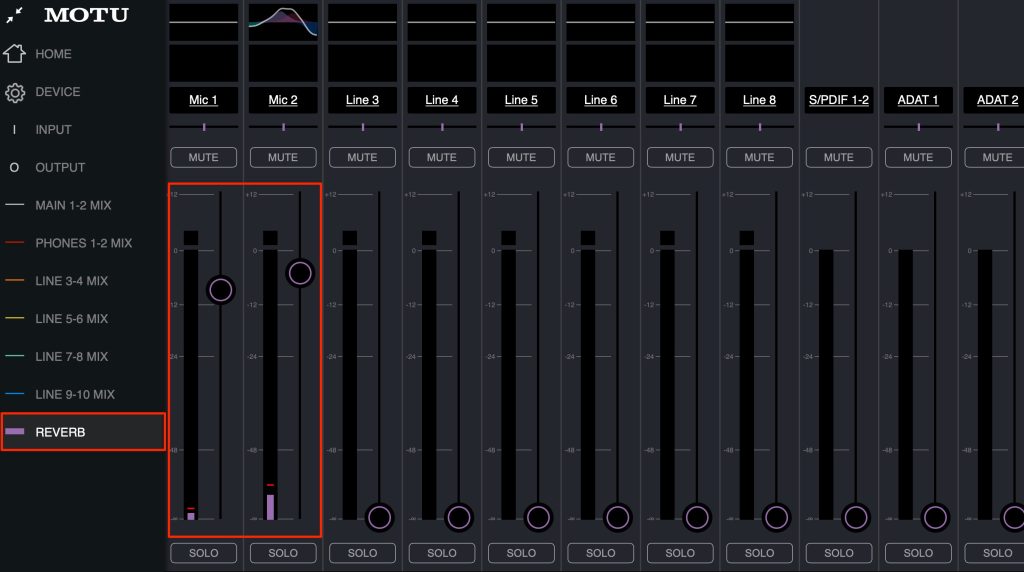
Adjust the reverb amount for each channel with the faders in the "REVERB" section.
You can also vary the reverb volume for each output, such as headphones and speakers.
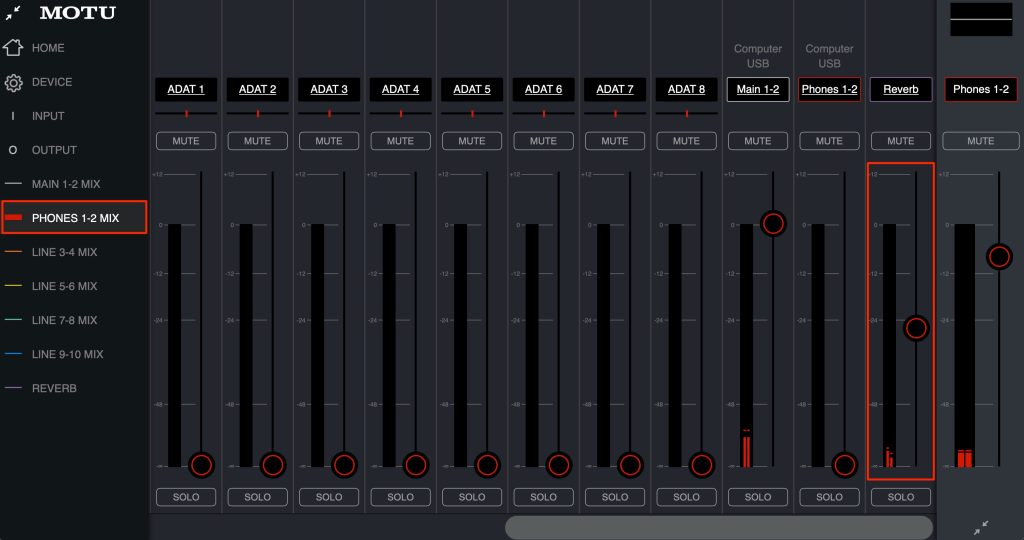
For example, you can send the reverb to the headphones the vocalist is listening to,
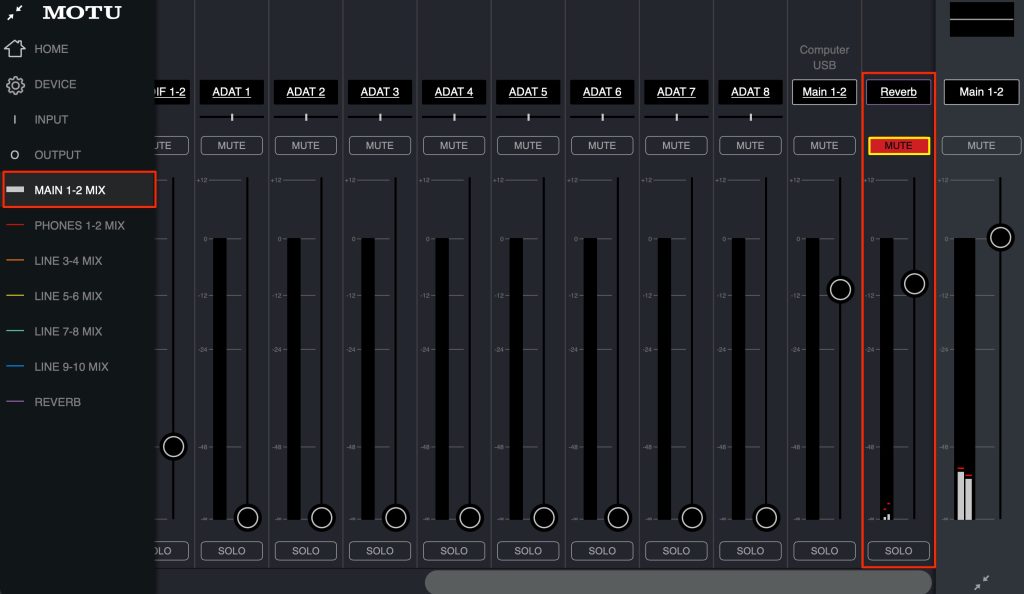
while muting the reverb on the speakers (here MAIN 1-2) used by those directing and judging takes.
Reflecting Volume Changes from Effects in the Meters
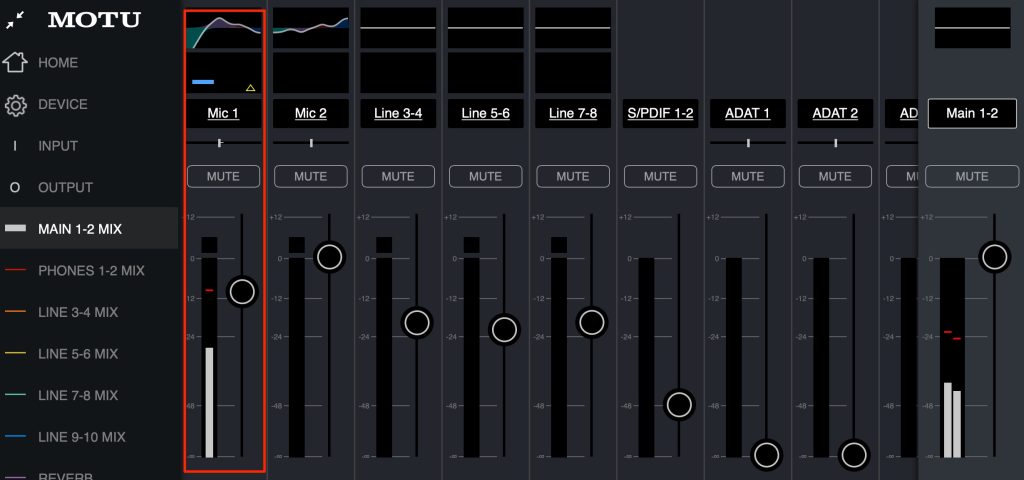
Applying effects changes the volume, and you can specify whether or not the mixer faders include this.
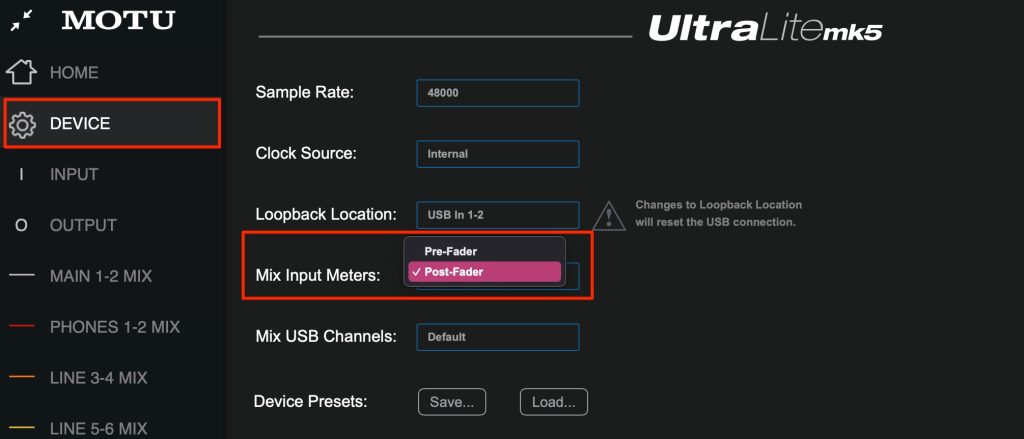
Go to "Mix Input Meters" under "DEVICE" and change the setting.
- Pre-Fader: reflects the volume from effects
- Post-Fader: the volume from effects is not reflected
That is how it works.
Especially when recording, you need to constantly watch for clipping, so do not forget to check the setting for your purpose.
Very Flexible Output Routing
The integration of the outputs with CueMix 5 is also excellent.
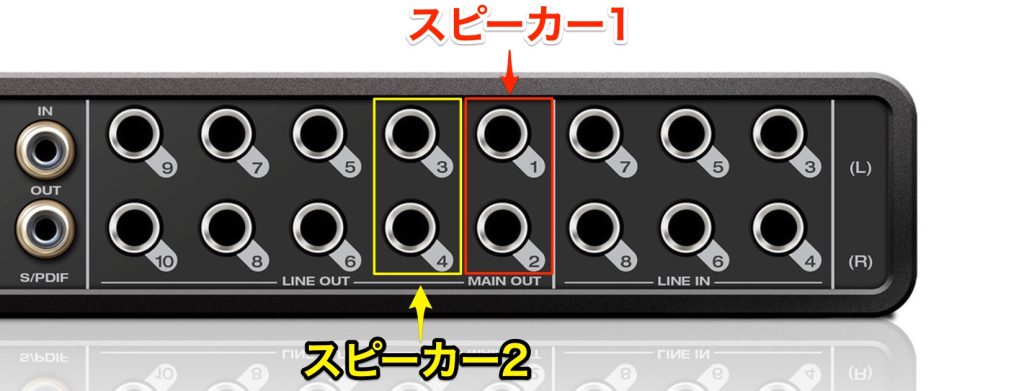
As mentioned above, you can output to multiple speakers and more from the line outputs on the back.
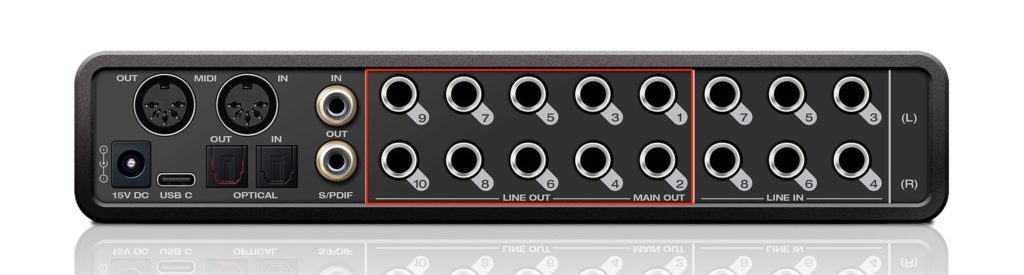
The numbers of these outputs
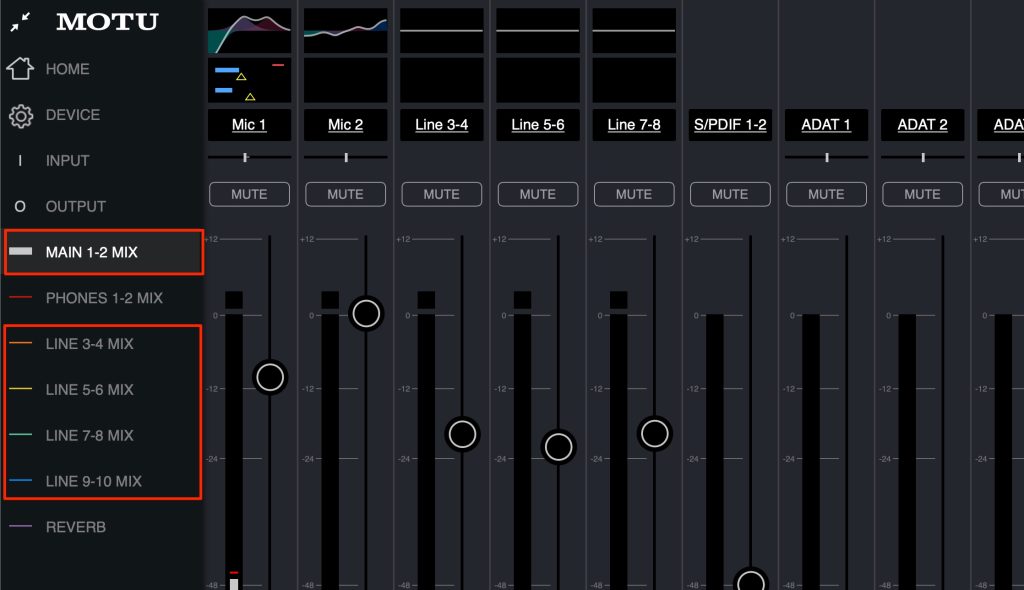
correspond to these numbers.
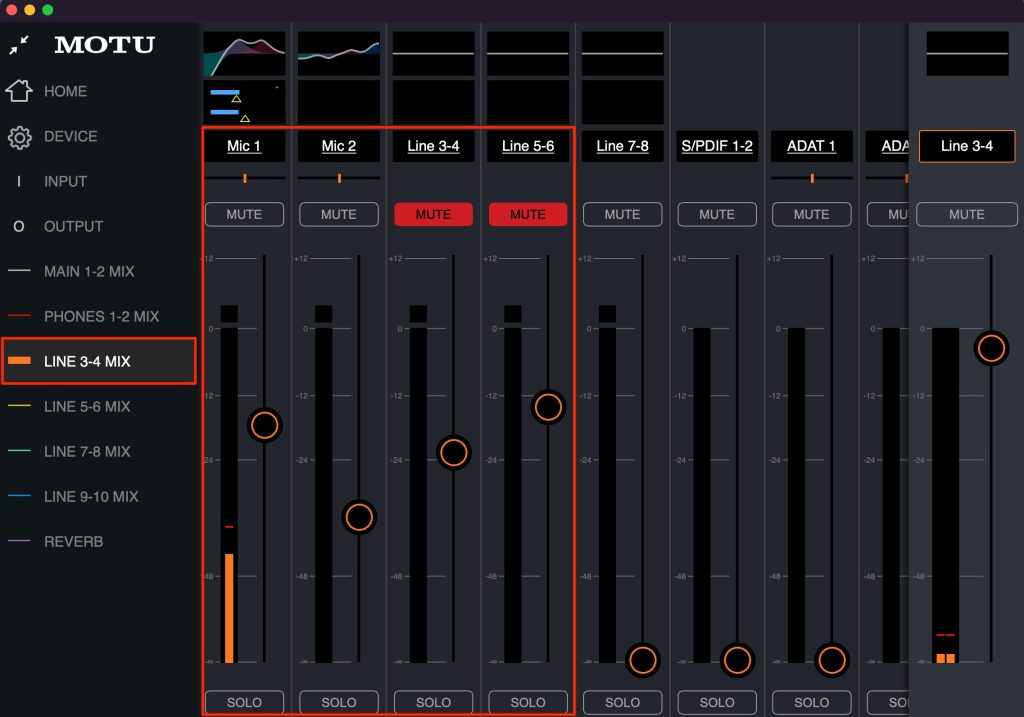
For example, for one pair of speakers (LINE 3-4), you can change or mute the volume of each connected input device, making production very comfortable for different purposes and situations.
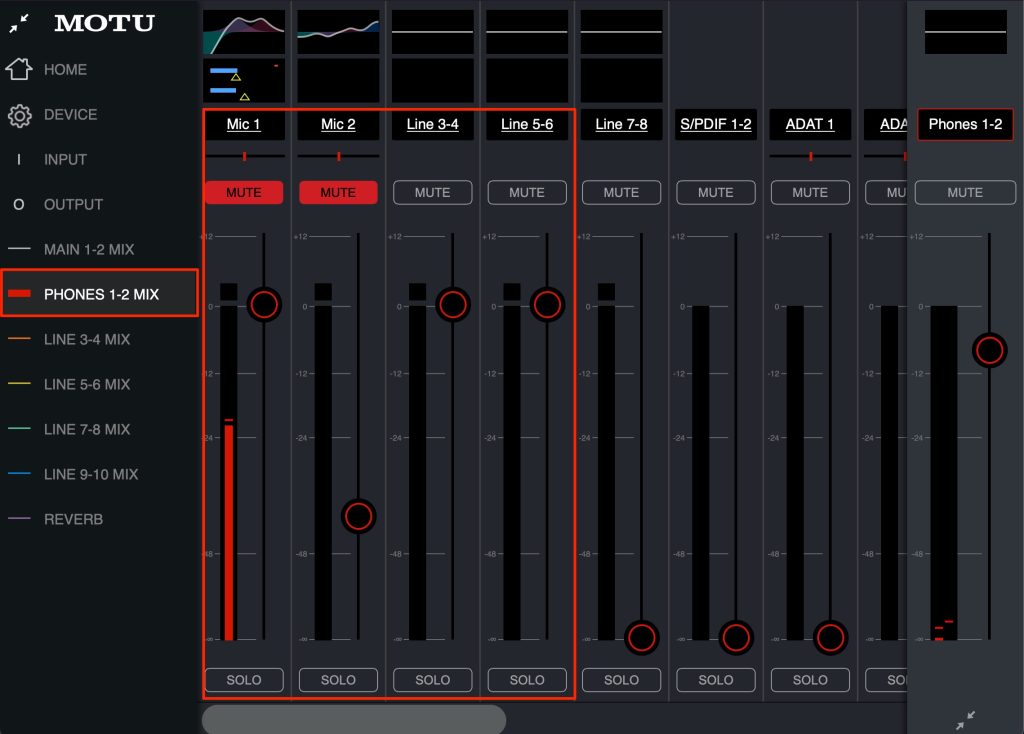
In the same way, you can adjust the devices output to the headphones.
This looks very useful for monitoring during recording too.
Items You Must Understand When Routing
The output items are convenient, but there is one slightly confusing point.
Let's look at "LINE 3-4 MIX," to which the second pair of speakers is connected, as an example.
If you scroll the channels in the "LINE 3-4 MIX" section to the right,
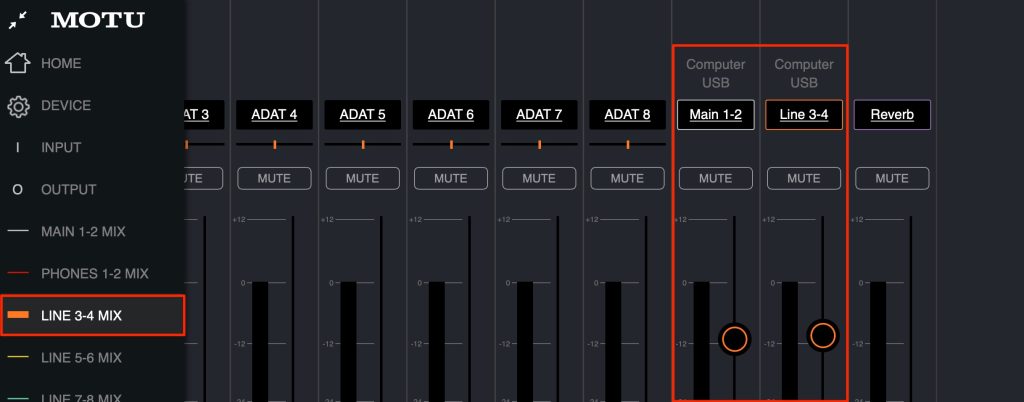
you will see an item called "Computer USB" like this.
You may get a little confused: "Line 3-4 of Computer USB??"
"Computer USB" refers to the channels output from the DAW or software on the computer.
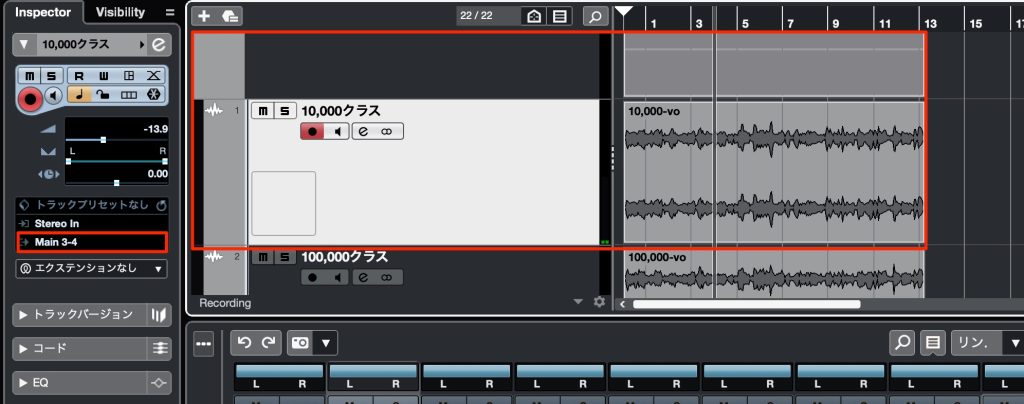
For example, suppose you route one track in the DAW to "Out 3-4."
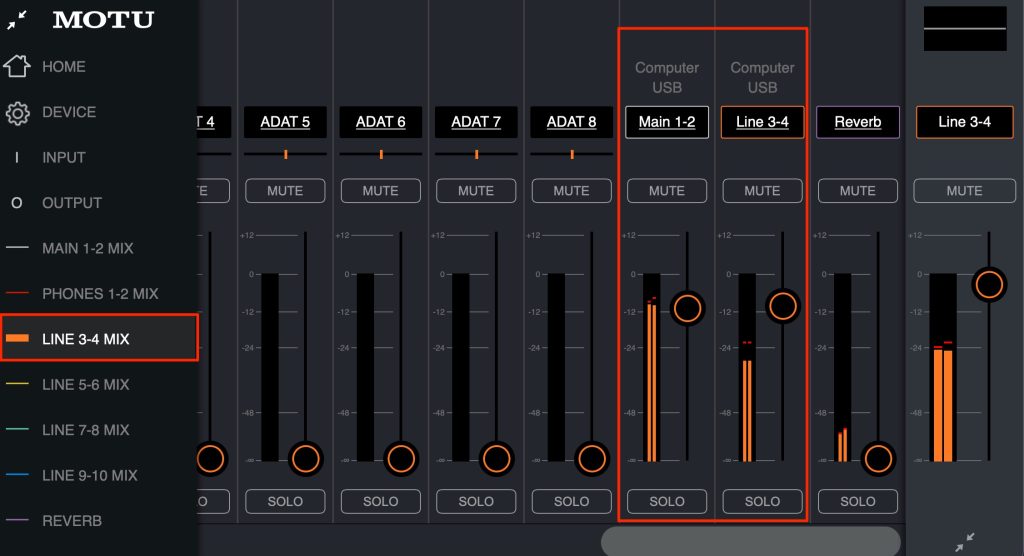
The mixer looks like this.
"Computer USB 3-4" is the sound of the one track sent to Out 3-4 in the DAW.
"Computer USB 1-2" is the sound of the other tracks.
To be clear, "Computer USB 3-4" is one of the channels inside "LINE 3-4 MIX".
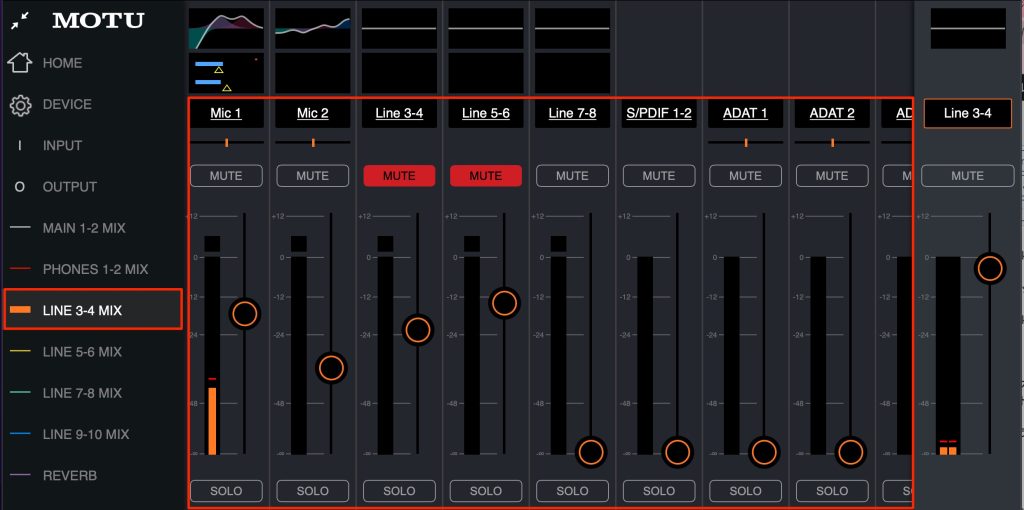
"LINE 3-4 MIX" outputs the "Computer USB 3-4" sound from the DAW together with the sounds of other devices, such as mic inputs.
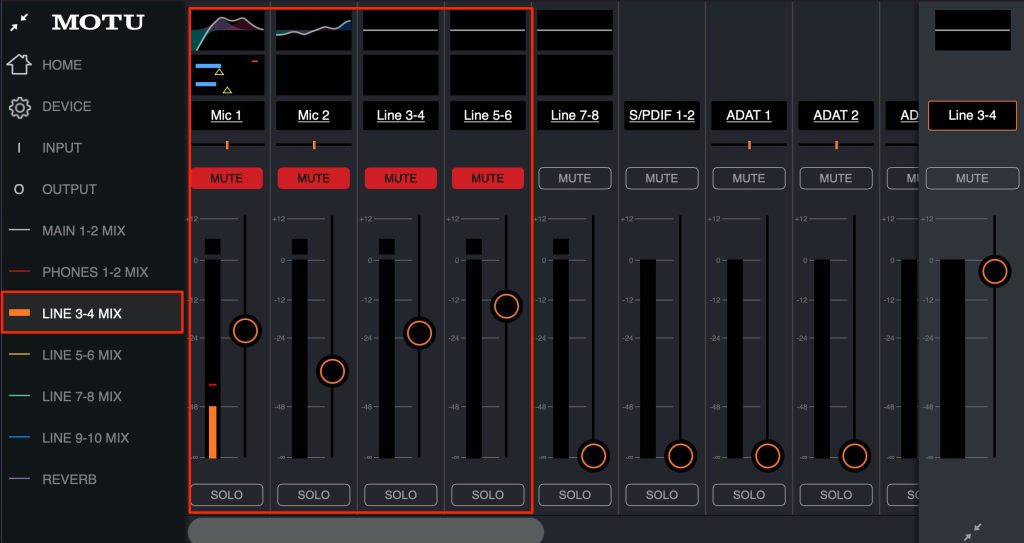
If you do not want the sound of mic inputs or connected devices to play from the "LINE 3-4 MIX" speakers, lower the fader or mute it.
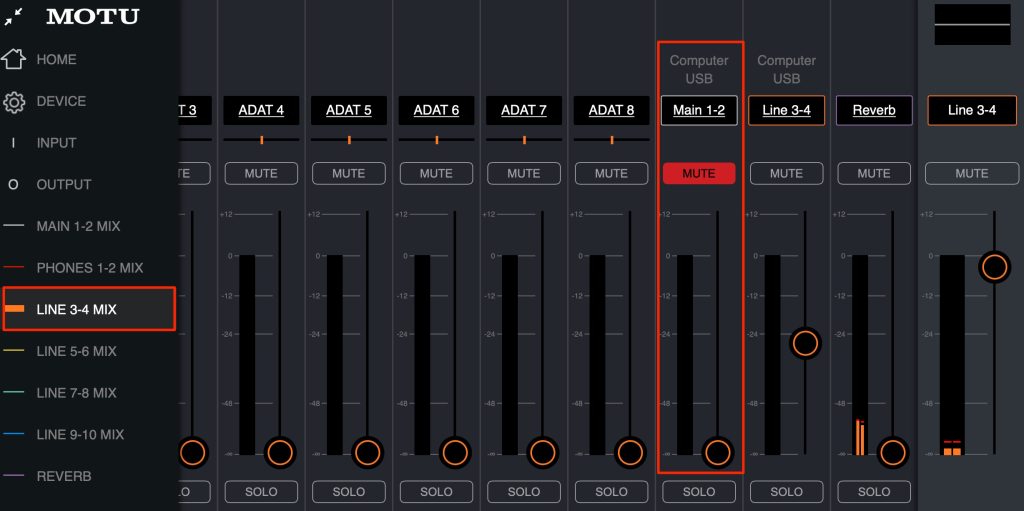
In the same way, if you do not need the "Computer USB 1-2 (normal default output)" sound in the output of "LINE 3-4 MIX," lower the fader or mute it.
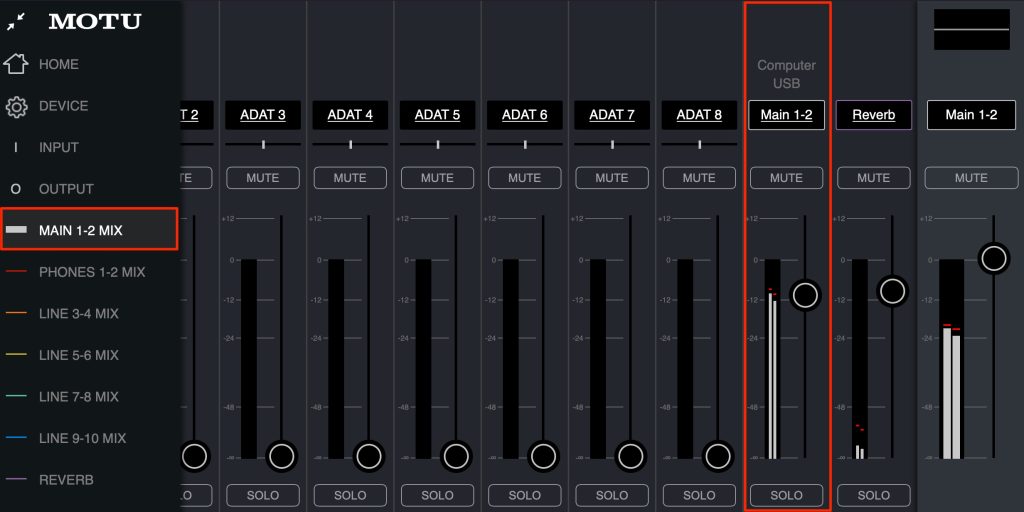
Of course, the sound from the main output, "MAIN 1-2 MIX (the other pair of speakers)," plays without being affected by what you did in "LINE 3-4 MIX."
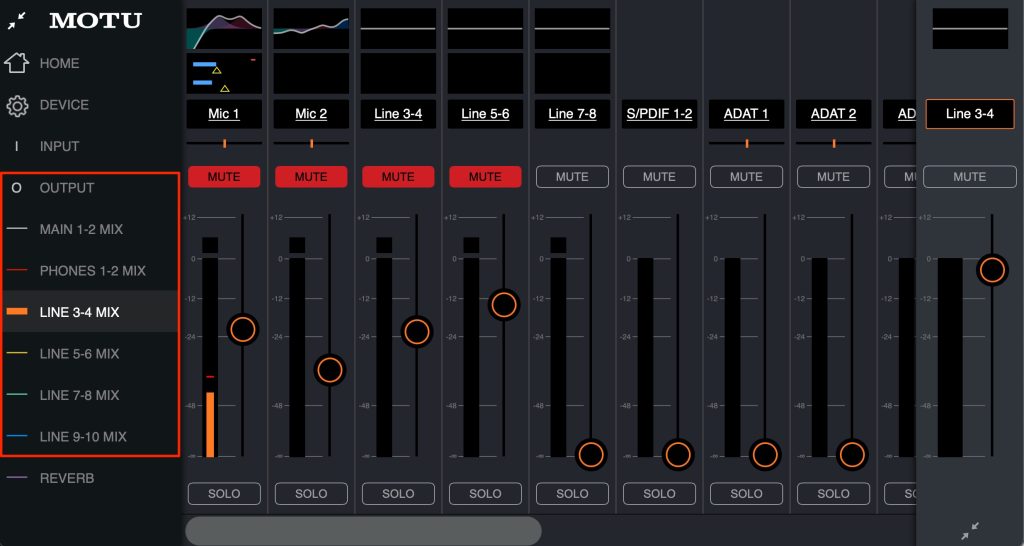
In the same way, you can make different output settings for channels up to 9-10 and for the headphone sound.
If you understand this point well, you can make full use of CueMix 5's capabilities.
Specifying the Loopback Source
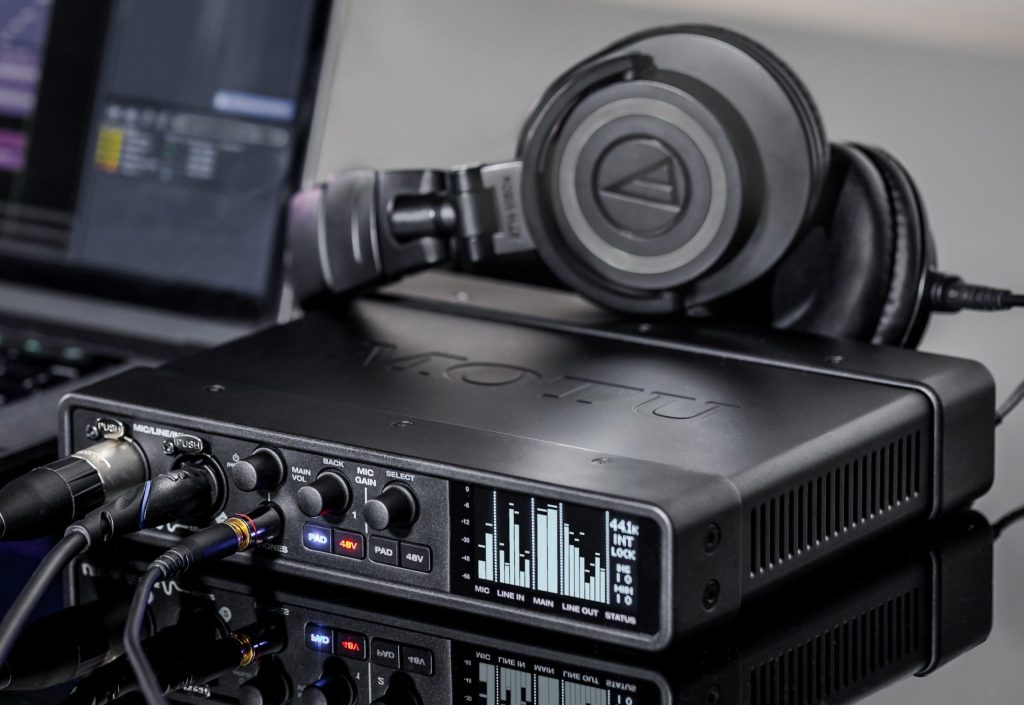
Recently, there has been growing demand to stream computer and DAW sound over the internet, such as in YouTube live streams.
The UltraLite mk5 has a "loopback function", letting you finely adjust the sound playing on the computer and send it over the internet.
In the same way, you can record all the sound playing on the computer into the DAW as well.
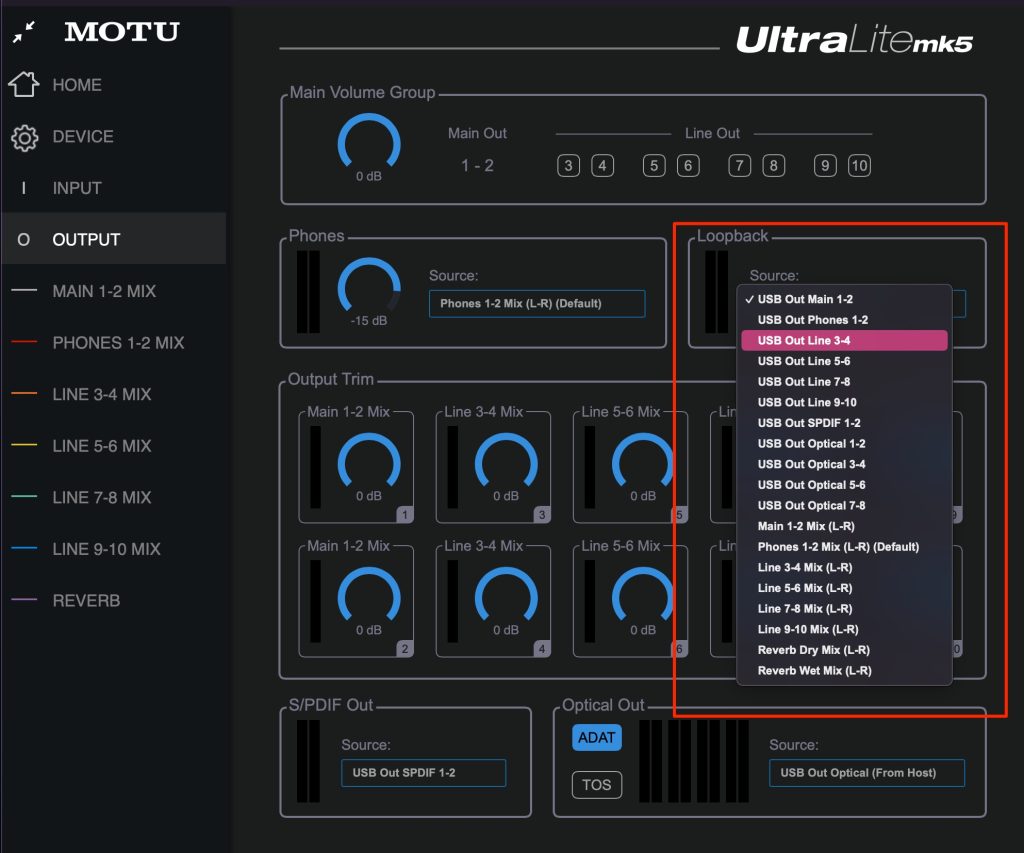
Various manufacturers now release models with loopback, but what makes this unit excellent is that you can freely choose the loopback output channel.
Specify the channel from Loopback in the "OUTPUT" section.
"USB Out," "Line Out," "Headphones" and so on: any output channel can be used.
For example, if you set it to "USB Out Line 3-4,"
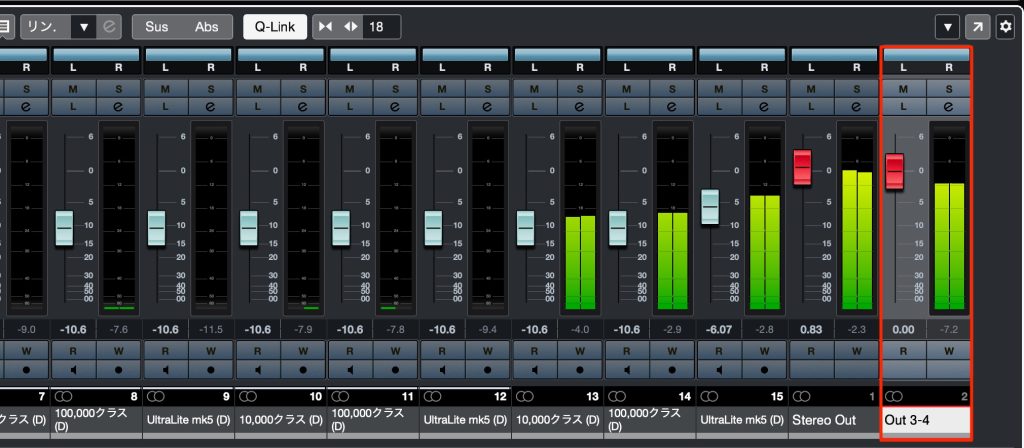
as explained above, you can send the sound output from the DAW's "Out 3-4 channel" via loopback.
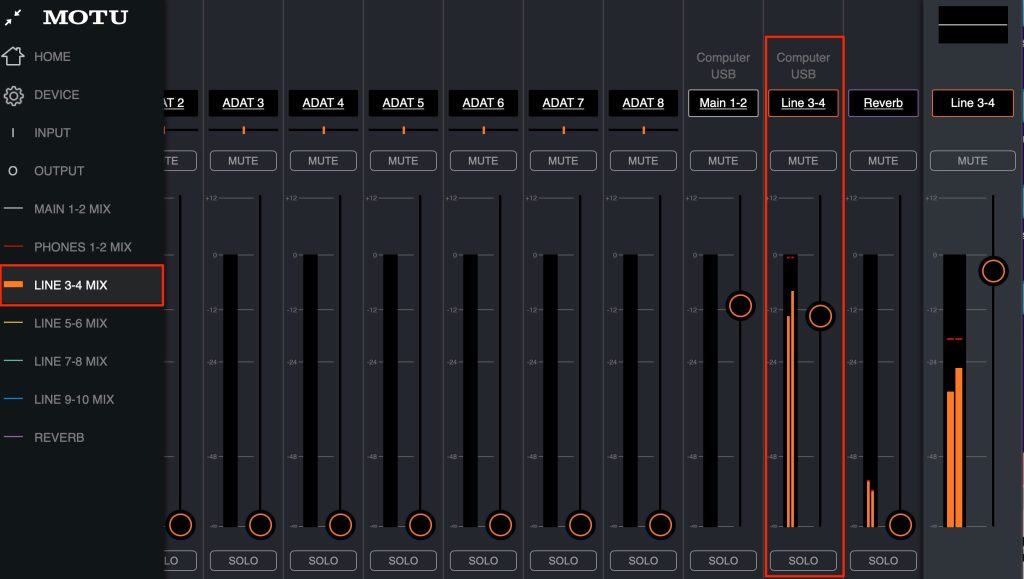
Of course, you can also adjust the output volume.
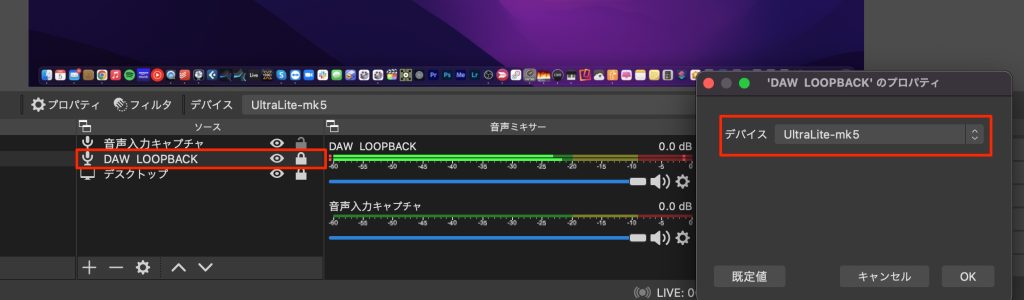
Basically, on the software side you select "UltraLite mk5," and in "OBS," an app that is useful for YouTube live streaming, settings like these are fine.
Can Also Be Used as a Standalone Mixer or Converter
Another nice point is that it can be used as a standalone mixer, letting you play the sound of instruments and music devices such as guitars and keyboards without starting up a computer.
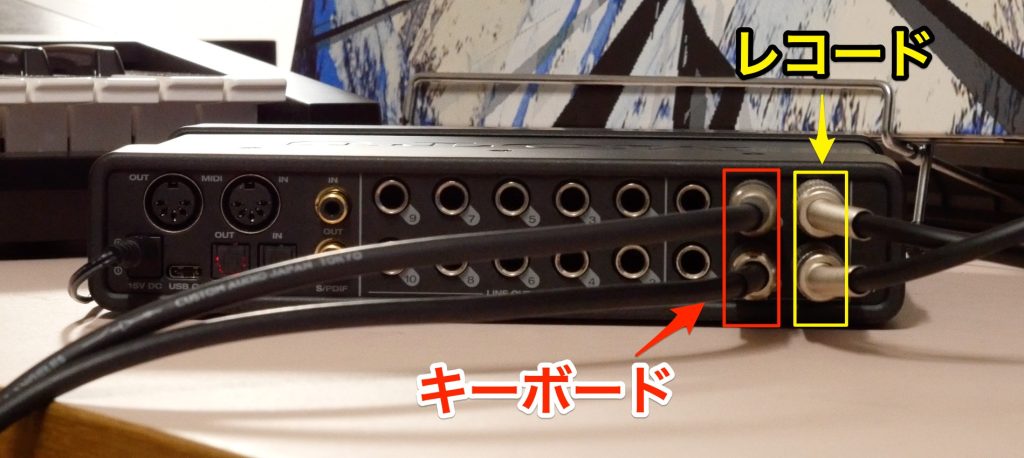
Just connect the devices you need to the inputs like this.
You can then monitor the sound from headphones or speakers at any time.
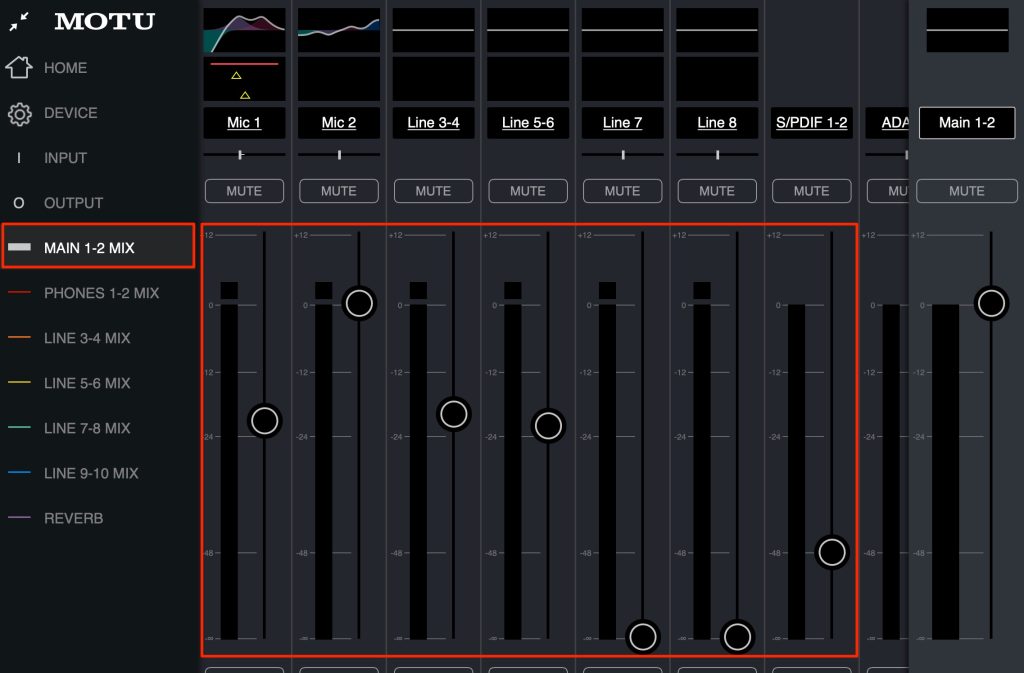
Using "CueMix 5," you can freely set the volume balance and routing of each device in advance.
Also not to be overlooked is that it can connect to iOS devices.
Control from iOS Devices
CueMix 5 can also be controlled from an iPad. You do not even need to start up a computer.
Just connect the product and the iPad with a USB-C cable and launch the app.
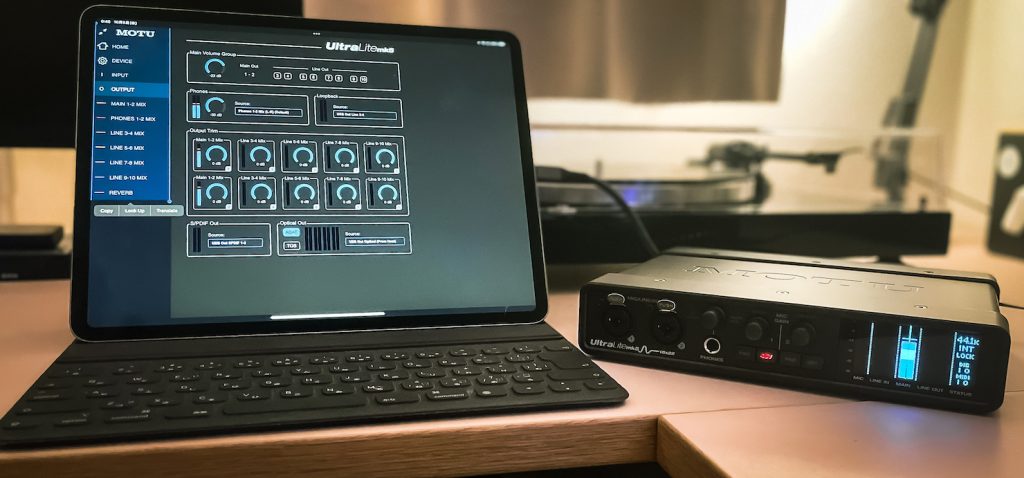
Download CueMix 5 for iOS
https://apps.apple.com/us/app/cuemix-5/id1517431570
The great thing is that it feels the same to operate as the software version.
Also, you can adjust faders, the equalizer and so on with your fingers, which is very intuitive.
Of course, you can use the product from apps on the iPad as well, so it also suits those making music on iOS or wanting to start.
Saving Presets
Finally, we look at creating presets that save the settings so far and can be recalled instantly.
This is useful when you want to use the "UltraLite mk5" differently for different situations.
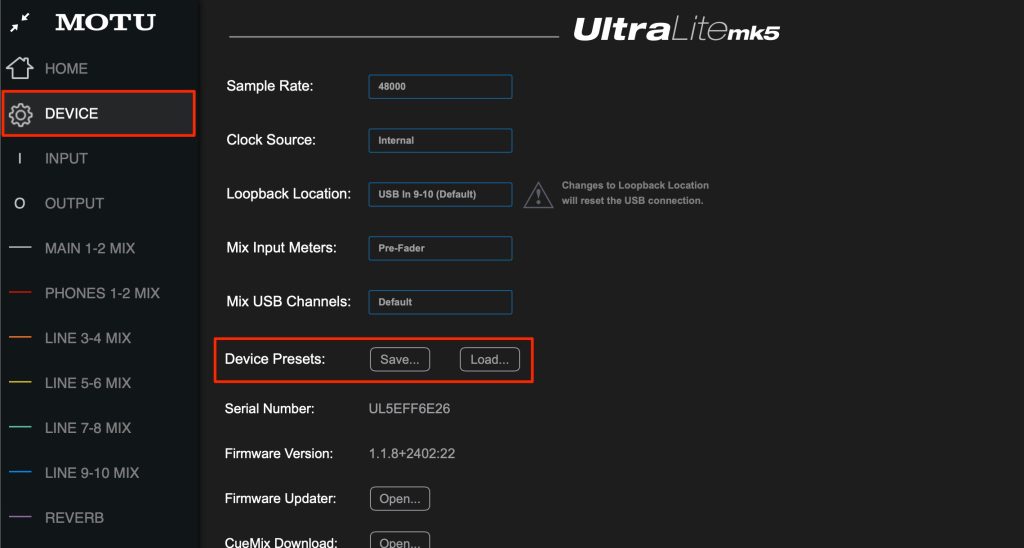
Select "Save" from the preset area in the "DEVICE" section and save the preset to any location.
Here, we saved it to the desktop.
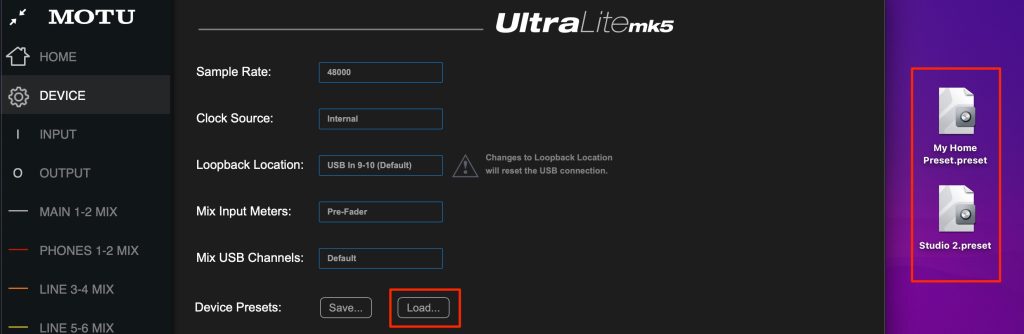
Just load the preset file from "Load."
You can instantly return to the saved state.
MOTU's labor of love, the audio interface "UltraLite mk5"
How did you find it?
What I felt after testing and using it from various angles was its "wide coverage".
Portability, audio inputs and outputs, sound quality, the easy-to-use CueMix and more: I felt it is a reliable product that does its job consistently in every respect.
If I had to ask for more, the points I personally felt were a shame are that "I want one more headphone output" and that "I want to use the frequently used CueMix over Wi-Fi".
In particular, if CueMix could be used over Wi-Fi, it could also be operated from an iPhone, which would certainly broaden its uses further.
Otherwise, there were many moments where I felt it was worth more than its price, and my impression is very positive.
For RME's "Babyface" in the same class, some stores have nearly doubled the price due to the recent weak yen, and it is currently hard to get because of stock shortages.
If you have been looking for a step-up audio interface, I felt the "UltraLite mk5" is well worth considering as one option.
A review of a step-up audio interface [UltraLite mk5 – MOTU]
We used this unit, which has been highly rated online, for about a month. Here, we review the product's sound as well as its specs, features and usability.
Video: https://t.co/8Hsb8xhs20Article: https://t.co/hRWv1GocCB#DTM pic.twitter.com/zI4Gk1HatT
— SLEEP FREAKS (@SLEEPFREAKS_DTM) November 15, 2022
Frequently Asked Questions
Q1. What is the latency of the UltraLite mk5?
With the buffer size minimized, it achieves ultra-low latency of around 1 ms (about one-thousandth of a second) for both input and output. You get a comfortable response when playing guitar or a MIDI keyboard.
Q2. Can I connect multiple instruments and mics at the same time?
Yes. It supports up to 18 inputs and 22 outputs, including two mic/line/instrument inputs, six line inputs, eight channels of optical I/O and MIDI ports, allowing multiple hardware synths and instruments to be connected at once.
Q3. Comparing the sound quality of the UltraLite mk5 and the RME Babyface, which is better?
On paper the UltraLite mk5 is superior (125 dB dynamic range), and in actual listening the UltraLite mk5 has the edge in high-frequency extension, density of sound and fine detail. However, there are also differences due to preference.
Q4. Is it easy to connect to a computer?
It connects with a USB-C cable, and if you have no USB-C port, use the included Type-A to Type-C cable. After connecting the power adapter, press and hold the PHONES button to turn it on; setup is simple.
NEW ARTICLES
Latest English Articles











