
Real-time recording of synthesizer and guitar in Ableton Live 12 is an important step for completing a song's arrangement. In this article, you will learn practical techniques from the basic settings for real-time recording with a MIDI keyboard, to adjusting the buffer size to minimize latency (delay in sound), convenient features such as Overdub and MIDI Capture, and correcting rhythm with quantize. Mastering these skills lets you accurately add obbligato phrases that interact with the vocals and percussive effects, greatly improving the overall quality of the song.
Adding Sounds with Real-Time Recording

The arrangement is finally in its last stage.
To make the chorus even more memorable, let's add a synthesizer and electric guitar.
Notice how the synthesizer fills the gaps in the vocal as an accent that keeps things interesting, and how the electric guitar plays a percussive role along with the melody.
Demo song (balanced so the relevant tracks are easy to hear)
Live 12 Real-Time Recording Video Explanation from 1:21:22
Topic
- MIDI real-time recording / buffer size settings
- Real-time audio recording
- Vocal recording settings
MIDI Real-Time Recording / Buffer Size Settings
We start with the synthesizer.
This time, instead of the MIDI step recording we have used so far, we do real-time recording by actually playing a MIDI keyboard.
In the gaps in the chorus vocal, we add single-note phrases called obbligato, which interact with the vocal.
Remember that sounds suited to single-note phrases such as solos are called Leads.
Assigning a Sound
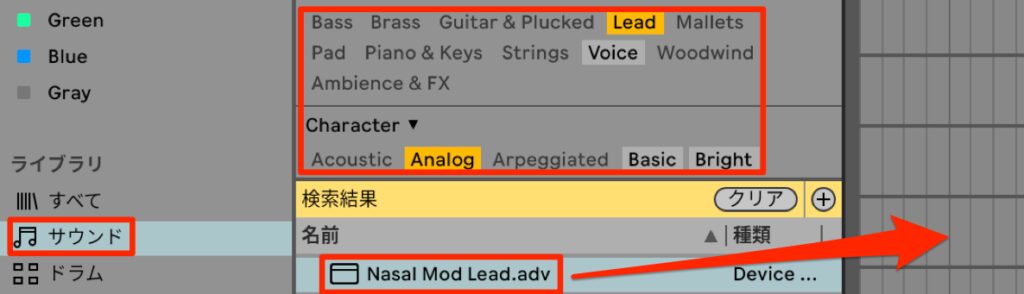
Let's assign a sound.
First choose "Lead" in the filters, and since we want a slightly warm sound, also select "Analog."
The preset "Nasal Mod Lead" sounds like a human voice, similar to the vocal sample we programmed last time.
To give the song a sense of unity, we use it.
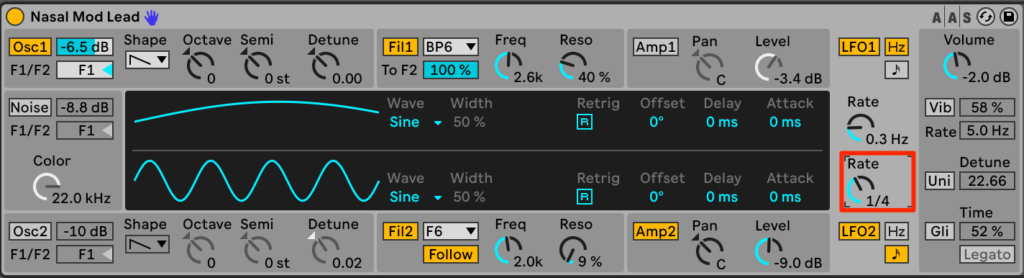
The loaded preset sounds like a human singing voice.
This is due to a function called "LFO", which moves specific parameters to create an effect of adding wobble to the sound.
However, the rhythm of this wobble feels slow for the song, so we edit it.
Checking it, "Rate," which indicates the speed of the wobble, is set to "1/2t."
"t" stands for "triplet," and "1/2t" represents a slow rhythm of half-note triplets.
To change it to "1/4 (quarter note)," select Rate and drag it, or adjust it with the up/down cursor keys.
LFO setting Rate: half-note triplets
LFO setting Rate: quarter notes
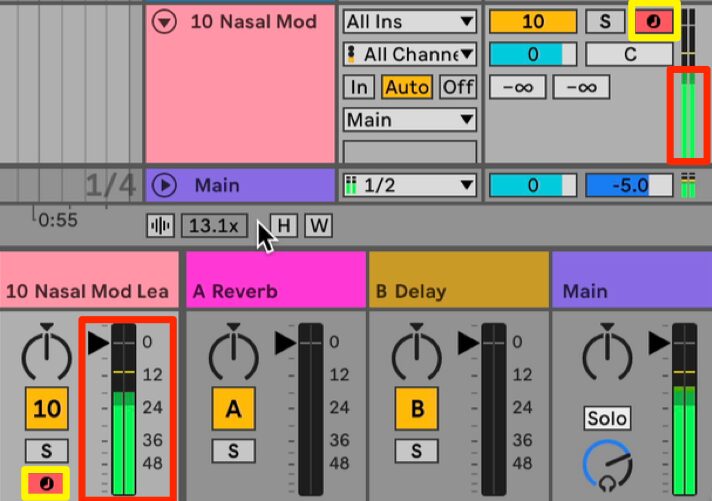
To make the assigned instrument playable from your keyboard, turn on the track's Arm button.
Check that the volume fader responds when you play the MIDI keyboard.
You can monitor your playing even during playback, so it is a good idea to work out phrases or practice before recording.
Adjusting Sound Delay / Buffer Size
The phrase for the first half of the chorus is decided, so we want to start recording, but the delay while playing bothers us.
Due to the structure of digital recording, a delay in sound called latency always occurs.
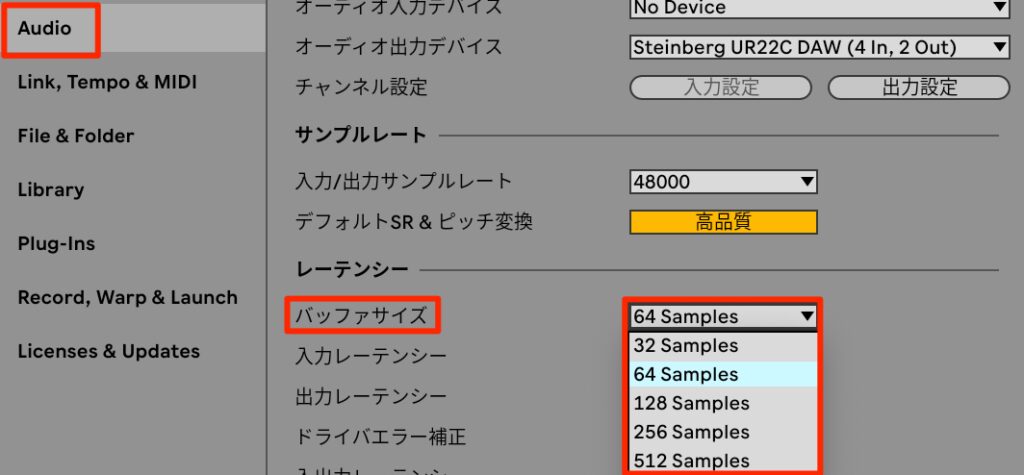
In such cases, open "Settings" from the "Live" menu and check the "Buffer Size" in the latency section of "Audio."
Setting a lower value means less delay, but it increases the load on your computer and may become unstable, for example with noise during playback.
Conversely, setting a higher value means more delay, but it lowers the load on your computer and makes operation stable.
Newer Macs with M1 chips or later may behave differently, but this is the general behavior.
Specific values vary by environment, but use the following as a guide.
- When recording in real time, set the buffer size as low as possible, and it is best to keep it at 128 at most.
- For mixing and other work that does not involve real-time recording, latency is not a problem, so setting the buffer size higher, such as 512, gives stable operation.
MIDI Real-Time Recording / Overdub
Start recording.
The method is the same as for automation: select the recording start position with the cursor and start recording with the "● button" at the top.
The count-in setting is also the same.
What differs from automation is that the track's Arm button is on.
This records the incoming MIDI data into a clip.
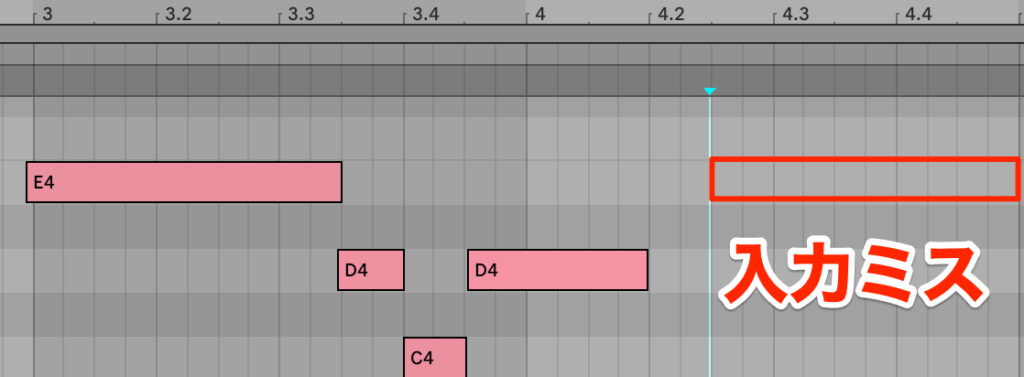
We recorded, but made a mistake and forgot to play the last note.

We could record again, but we would like to keep the earlier performance if possible.
In that case, use Overdub.
Turn on the "+ button" at the top of the screen.
When it is off, MIDI data is overwritten, but when it is on, new data is added while the original data is kept.
Record with the "● button" as before to add notes.
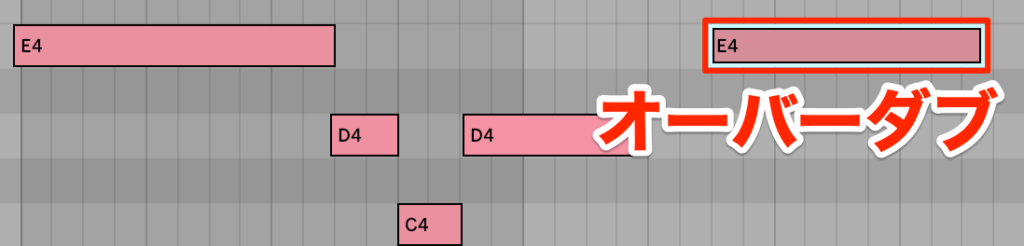
We were able to overdub the last note.
Synthesizer, first half of the chorus
Automatically Capturing MIDI Performances / MIDI Capture
Next, we work out the phrase for the second half by playing the keyboard during playback.
We happened to play a good phrase, but we were not recording and our memory of it is vague.
In such cases, a very convenient function is "MIDI Capture".
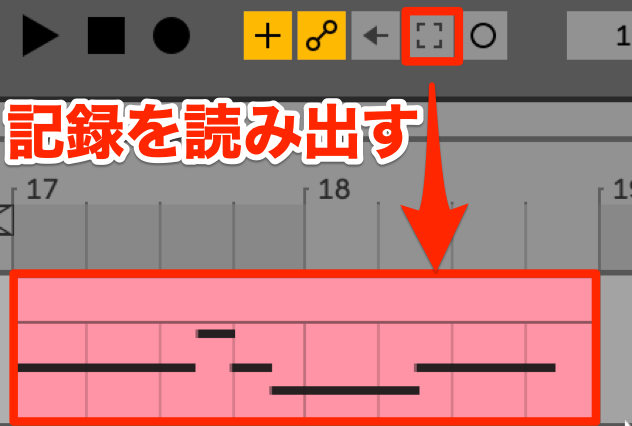
Click the "Capture MIDI button" at the top of the screen, and a MIDI clip of the phrase we were just playing is created.
In fact, Live constantly records incoming MIDI data, so you can recall the most recent data.
It is a very convenient feature for those who get nervous and cannot play well when recording, and for not missing the moment a good phrase happens by chance, so make use of it.
Correcting the Rhythm of MIDI Data / Quantize
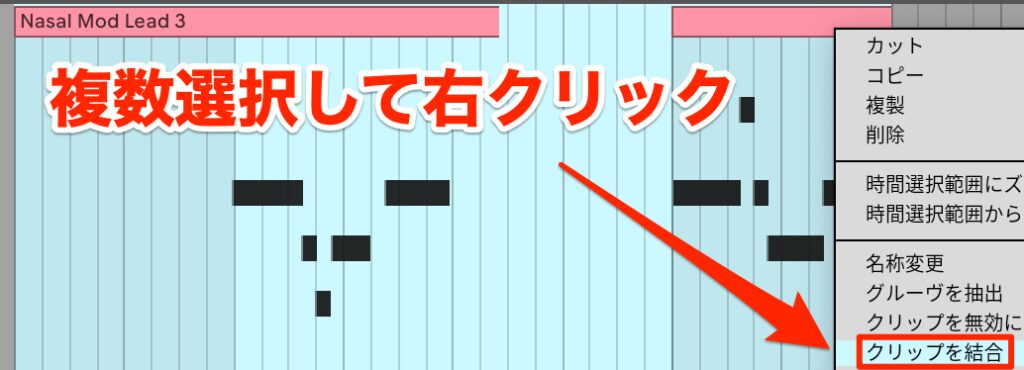
Next, to make it easier to see, we consolidate the chorus clips, which are split into first and second halves.
Select the clips while holding Shift, right-click and choose "Consolidate."
The shortcut is [Cmd+J] on Mac and [Ctrl+J] on Windows.
Let's listen to the current audio.
Synthesizer before quantize editing
The phrase is good, but especially in the second half, the timing drift bothers us.
In such cases, use quantize to correct the timing.
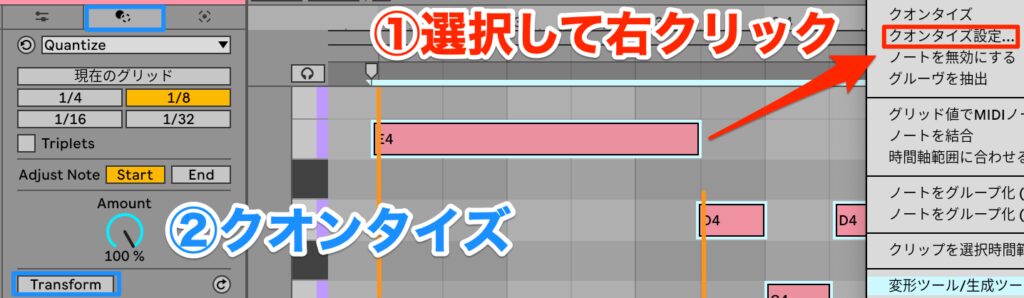
Select the notes, right-click and open "Quantize Settings," and the MIDI transformation tool "Quantize" appears.
If "Transform" is on, turn it off once.
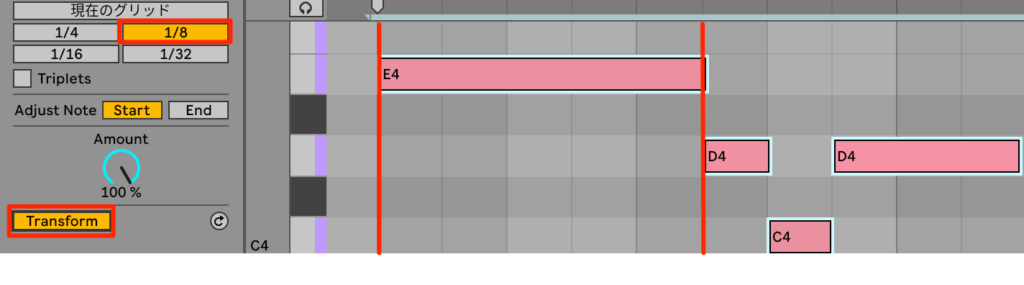
When applying quantize, it goes smoothly if you set it to the finest rhythm used in the performance.
In this case it is eighth notes, so choose 1/8 and turn Transform on.
Synthesizer after quantize editing
The timing is corrected, and the MIDI real-time recording of the synthesizer is complete.
Real-Time Audio Recording
We add electric guitar to give the chorus a looping feel and groove.
Earlier we did real-time MIDI recording; this time we do real-time recording of audio data.
Audio Recording Settings
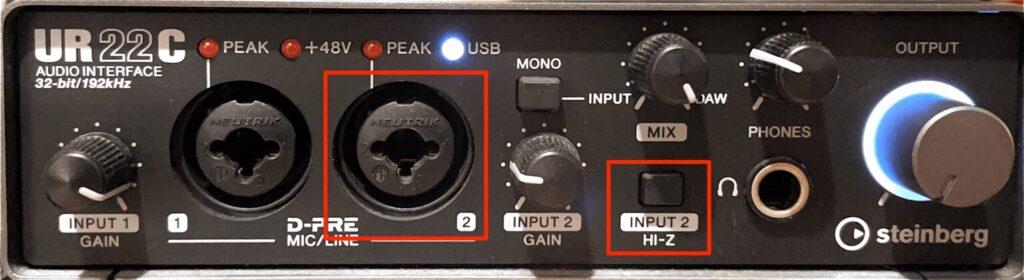
Connect the electric guitar directly to an input on your audio interface.
If there is a switch labeled Hi-Z, connect the guitar to that input and turn the Hi-Z switch on.
Turning on Hi-Z puts it in the optimal mode for electric guitar and electric bass, and improves sound quality.
Turn Hi-Z off in cases such as the following.
- When connecting a microphone or a hardware synthesizer
- When the guitar goes through a multi-effects unit or similar
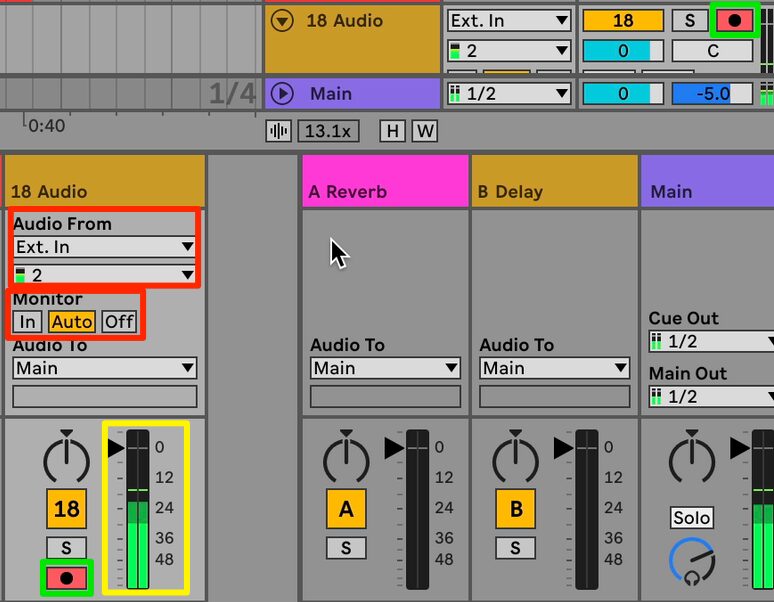
Create an audio track and, in "Audio From" in the Mixer, set where the audio input signal is received from.
Choosing "Ext. In" receives input from the audio interface you set up in the introduction.
Below that, choose which channel of the audio interface the signal comes from.
As with the MIDI track, turn on the track's Arm button.
Use "Monitor" in the Mixer to set how the input signal is monitored.
Normally, Auto is fine.
Check that the Mixer meter responds when you play the guitar, along with the sound.
Shaping the Guitar Sound
Right now it is just the raw electric guitar sound.
Normally, an electric guitar becomes the electric guitar sound we imagine through the combination of the guitar itself and a guitar amp.
Amp simulators let you reproduce a realistic sound even without a real amp.
Live includes a wide range of amp simulators, so you can easily create a variety of sounds.
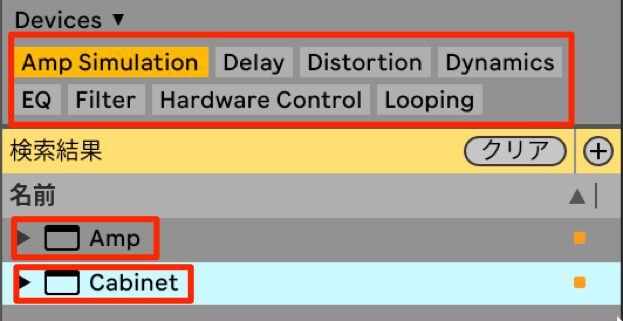
Choose "Amp Simulation" under "Audio Effects" in the library, and filtering shows "Amp" and "Cabinet"; assign both.
At this point, be careful to place Amp first and Cabinet after it.
A guitar amp consists of two parts: the amp section, which amplifies the sound, and the speaker section, which outputs the amplified sound.
Amp simulates the amp section and Cabinet the speaker section.
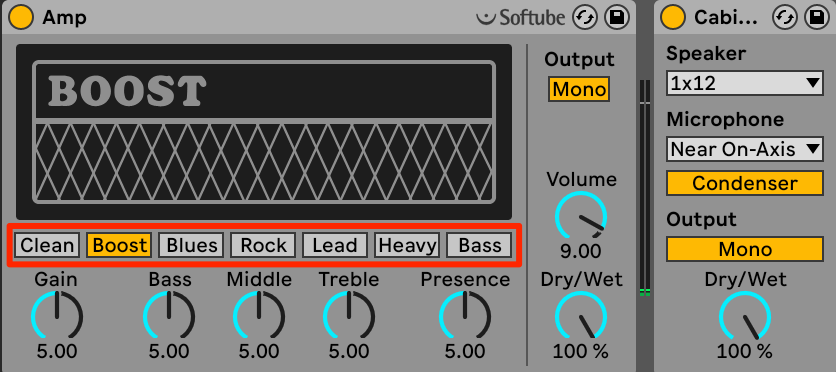
You can change the amp type below the image in Amp.
A wide range of types is available, from clean tones to distorted rock sounds and amps for bass guitar.
Amp: Clean
Amp: Rock
We felt the "Boost" type matched the song, so we choose it.
Cabinet can stay at its default settings.
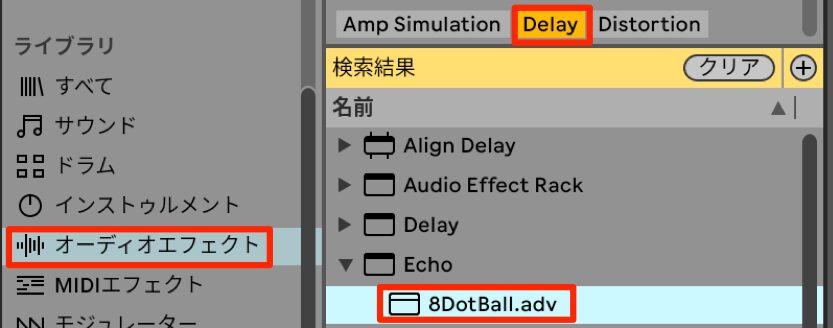
Next, so that it blends into the song, we want to add an echo effect that repeats the sound.
For that, we use an effect called delay.
Filter "Audio Effects" by "Delay" and choose "Echo" from among them.
Echo is not only a delay but an audio effect that also adds reverb (reverberation), creating more complex acoustic effects.
Assign the preset "8DotBall" after Cabinet.
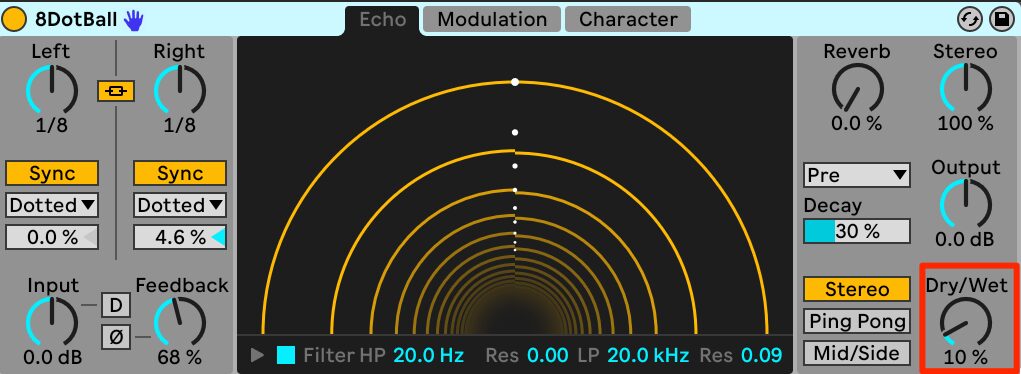
At the default settings, the repeats are too loud, so balance the original and effect sounds with the Dry/Wet parameter.
Set it to "10%" for a subtle sense of depth.
Echo Dry/Wet edited to 10%
A spacious guitar sound is complete.
Real-Time Audio Recording
We add single-note cutting to the chorus to add not only melody but also a percussive element.
We want to record several phrases and choose which to use, but repeating recording and stopping over and over is tedious.
That is where "loop recording" comes in handy.
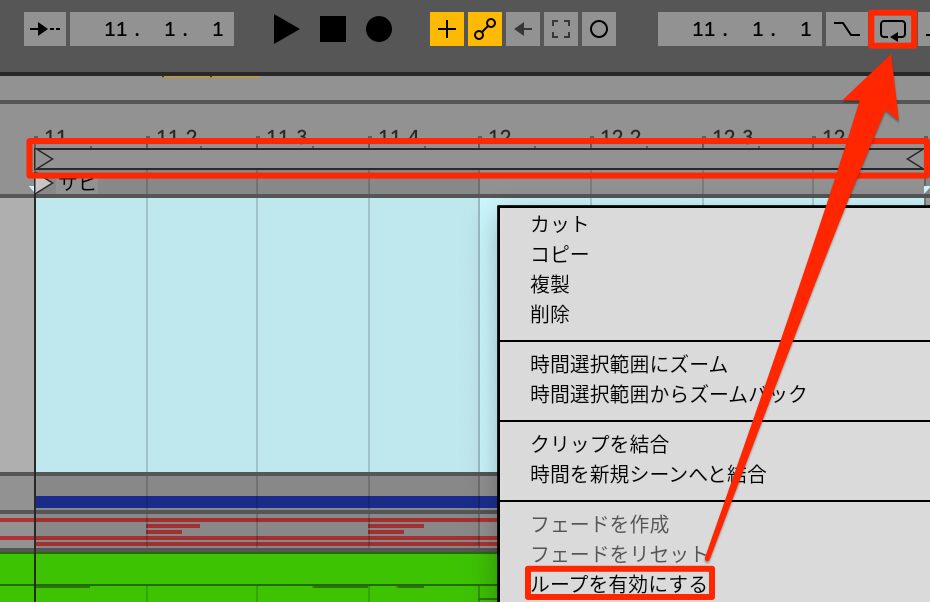
Select a range, right-click and choose "Loop Selection," and a loop bar is created over that range, and the loop switch at the top lights up to enable looping.
Turn off the loop switch to disable the loop.
This function can be used both for playback and for recording, so remember it.
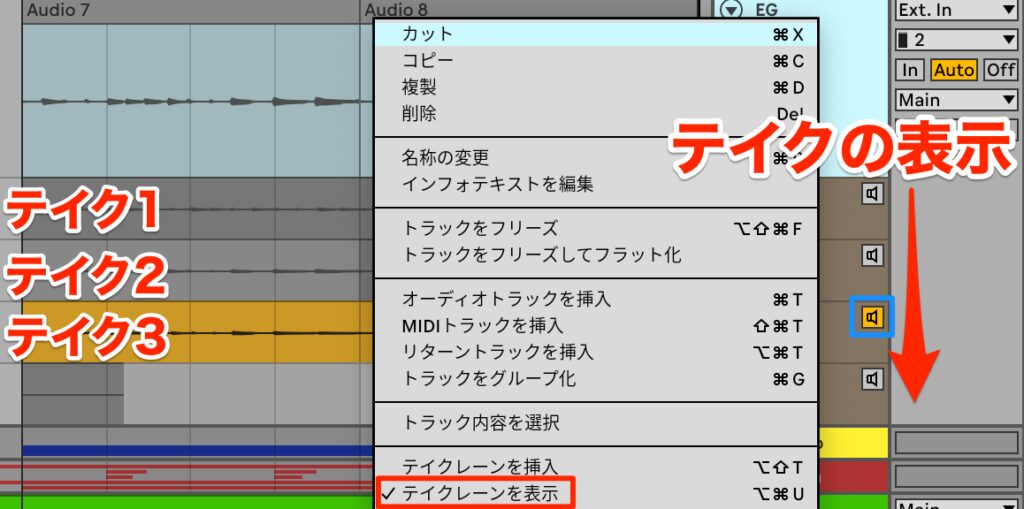
We loop-recorded three times.
The clip visible when recording stops is the last take, so we check the other takes.
Right-click the track and choose "Show Take Lanes" to show the other takes.
Clicking the "speaker icon" makes that take lane play back.
Take 1
Take 2
Take 3
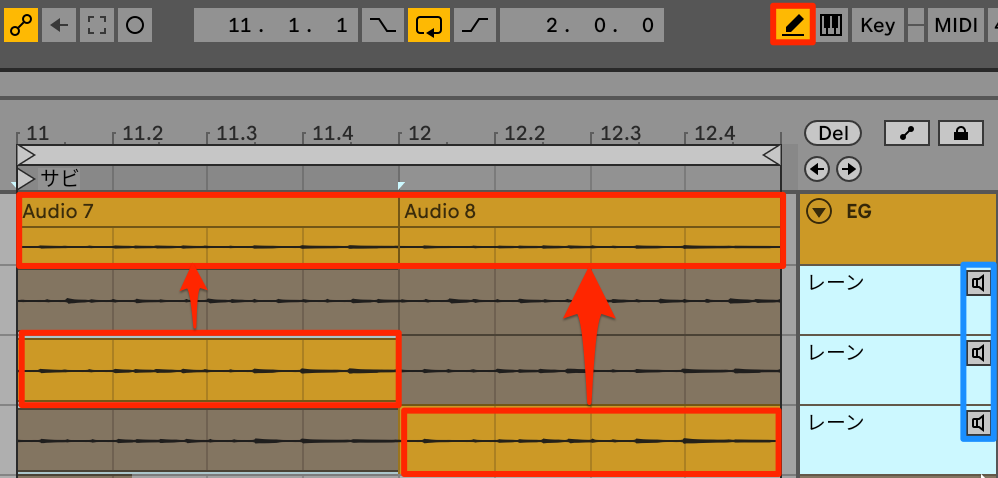
Takes 2 and 3 have slightly different notes, and we want to combine them into a two-bar phrase.
In that case, follow these steps.
- Turn off the speaker icon in the track.
- Turn on "Draw Mode" (pencil icon) at the top.
- Combine multiple takes by dragging to select the ranges you want to use.
This lets you combine different takes into a single phrase.
Guitar track: take 2 selected for bar 1 and take 3 for bar 2
The real-time recording of the guitar is now complete.
Zooming Waveforms In and Out
The waveform recorded in the guitar clip is the signal before the amp simulator, so it is small and hard to see when editing.
Here is a function to solve this.
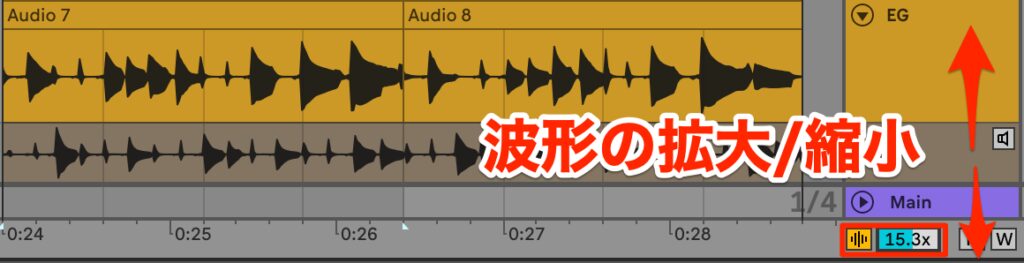
Turn on the small "waveform icon" below the "Main track" and drag the number next to it up or down to zoom the waveform vertically.
This function only changes how the waveform is displayed and does not affect the level of the output signal.
Turn off the waveform icon to return the display to normal.
It is handy when editing after recording guitar, so please make use of it.
Vocal Recording Settings
For vocal recording, we used sample material this time, but here is a brief explanation.
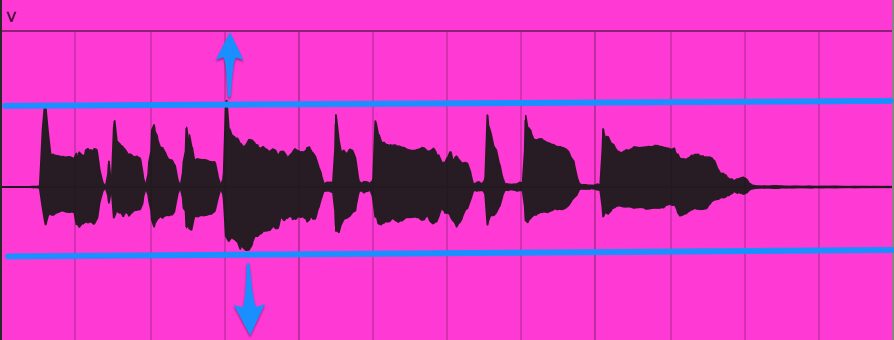
First, plug the microphone cable into an input on your audio interface.
Then adjust the knob labeled gain or level to amplify the input signal.
At this point, be careful, because forcing it too loud will distort the sound.
Make a test recording and check that the waveform is not clipped.
As a rough guide, as in the image, leave headroom at the loudest parts.
It is fine even if the waveform is smaller than you expect.
After that, the steps are the same as for recording guitar.
This completes the arrangement of the song.
Audio recording, such as playing guitar, may have difficult aspects, but doing it once deepens your understanding, so do your best and give it a try.
Next time, we will do mixing and mastering, adjusting the sound balance to complete the song.
Frequently Asked Questions
Q1. Why does the sound seem delayed during MIDI real-time recording in Ableton Live 12?
Due to the structure of digital recording, a delay in sound called latency always occurs. It can be improved with the buffer size setting; setting it to a low value of 128 or less during real-time recording minimizes the delay.
Q2. What is the Overdub function?
Overdub is a function that adds new MIDI data while keeping the existing performance. Turning on the "+ button" at the top of the screen lets you record additional notes while keeping the original data, so you can re-record only the parts with mistakes.
Q3. When is MIDI Capture useful?
If you happened to play a good phrase but were not recording, the Capture MIDI button can automatically record the most recent performance. It lets you play without getting nervous and is a convenient feature for not missing a good phrase.
Q4. How do I correct MIDI data with drifting rhythm?
Use the quantize function: select the notes and open "Quantize Settings." Set it to the finest rhythm value used in the performance (for example, 1/8 for eighth notes) and turn Transform on to correct the rhythm automatically.
NEW ARTICLES
Latest English Articles











