
Programming the piano in Ableton Live 12 is an important technique for adding thickness and depth to a song. This article explains everything from the basics of chords and chord progressions to a beginner-friendly way of entering chords with the new "Stacks" feature. By learning the difference between major and minor chords, how to set Scale Mode and how to use the MIDI generator tools, you can achieve effective piano arrangements even without music theory. Understanding that the same melody can feel very different depending on the chord progression enables more expressive DTM production.
The King of Instruments: Programming the Piano

The piano is called the king of instruments and can be said to be the instrument that appears most often in arrangements.
It has an extremely wide range, covering the entire range of orchestral instruments by itself.
It can be used for all kinds of arrangements, such as solos and accompaniment, but here we create a simple yet effective accompaniment.
Notice how a piano playing the same rhythm as the bass adds thickness and depth.
Demo song: piano (with rhythm & bass and guide vocal)
Live 12 Programming the Piano Video Explanation from 40:50
Topic
- Chords and chord progressions
- Easy chord input / the MIDI generator "Stacks"
- Triads, four-note chords and inversions
- Editing the piano part: rhythm / velocity
Chords and Chord Progressions
A chord is two or more notes of different pitches sounding together; in Japanese it is called waon.
Depending on how notes are stacked, you can create various harmonies, such as bright-sounding major chords and dark-sounding minor chords.
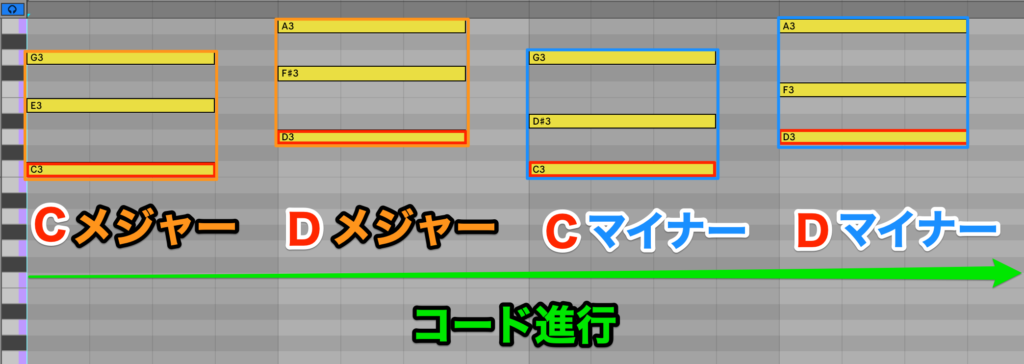
A chord name begins with a letter, which indicates the root note, the lowest note that forms its basis.
After it comes the chord's type of harmony.
Chord types are often abbreviated.
For major, the type is omitted completely, so C major is written C; for minor, it is written m, so C minor is written Cm.
To summarize:
When the root is C
- Major chord = C major (abbreviated C)
- Minor chord = C minor (abbreviated Cm)
When the root is D
- Major chord = D major (abbreviated D)
- Minor chord = D minor (abbreviated Dm)
First, learn the two basic chords: major and minor.
C (C major chord)
Cm (C minor chord)
A sequence of these chords is called a chord progression.
In terms of a film, the melody is the actor's lines and the chord progression corresponds to the story and scene changes.
Just as the same line, "I can't stop," means different things in a serious scene and a comic scene, the same melody gives a different mood depending on the chord progression.
For reference, let's listen to the demo song's chord progression made brighter.
How was that?
Even with the same melody, the impression changes greatly, becoming light and fun.
In this way, chords let you build the story of a song.
Easy Chord Input / The MIDI Generator "Stacks"
Programming chords requires music theory, which may be a high hurdle for beginners.
However, with "Stacks," a new feature in Live 12, you can easily program chords even without knowing music theory.
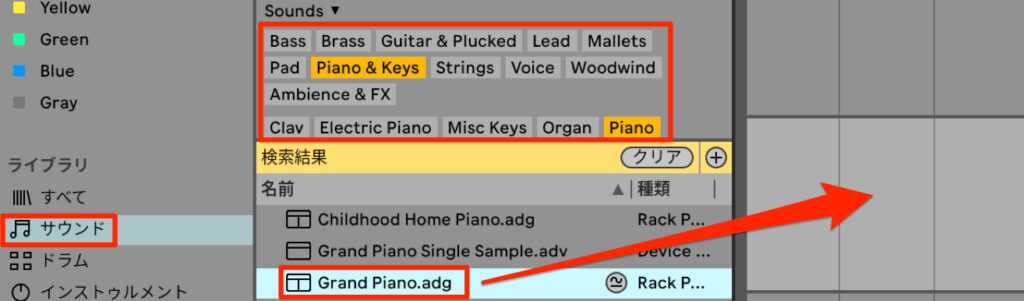
Let's choose a sound first.
Search for and assign a standard grand piano sound.
Select "Sounds" and sort with "Filters" by "Piano & Keys, Piano," and "Grand Piano" appears.
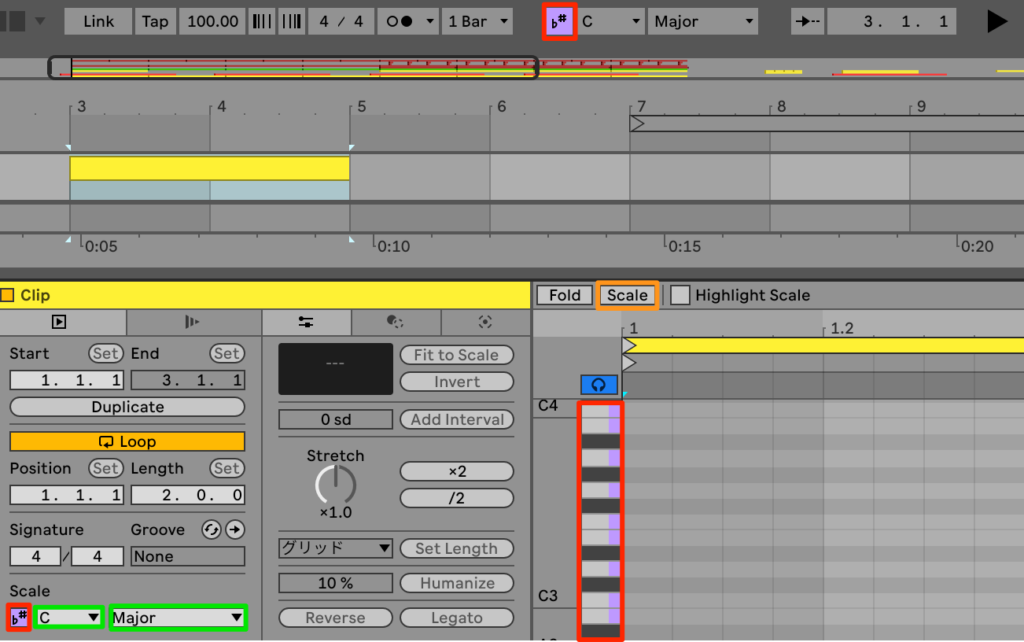
First, some preparation for programming the chords.
The demo song's chord progression is a two-bar unit, so create a two-bar MIDI clip.
If the "#♭" mark at the bottom left of the MIDI clip at the top of the screen is not lit purple, turn it on.
This is called Scale Mode, a function that, when on, has Live automatically select and highlight the notes that fit the song's key.
When it is on, notes that fit the song's key are shown in purple on the Piano Roll keyboard.
With the current setting, the white keys correspond to these, and the black keys have no purple mark.
Turning on the "Scale button" at the top of the Piano Roll also lets you narrow the Piano Roll display to only the notes that fit the key.
The key refers to the note that is the center of the whole song.
You may have heard of raising or lowering the key at karaoke.
Set the song's key at the bottom left of the screen.
This song's key is C, so it can stay as it is.
Opening the menu to its right shows many scales, the types of note arrangements, but Major and Minor alone cover almost everything.
This time we leave it as Major.
Now the chords we are about to enter are set up to automatically select and show notes that fit the song's key.
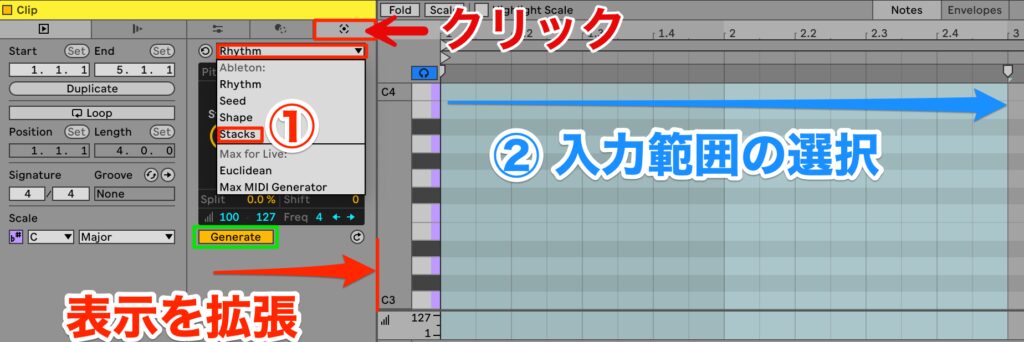
Next, we enter chords using a MIDI generator tool.
Click the rightmost icon among the tabs at the top left of the MIDI Clip View to show the MIDI generator tools.
If the display differs from the image, it is shown in compact form, so drag the border to expand it.
Check "Generate," and if it is off, light it up to turn it on.
Open the window below the MIDI generator tab to show various types of MIDI generator tools, and choose "Stacks."
Next, select the input range in the Piano Roll.
This time we enter chords over two bars, so drag to select a two-bar range.
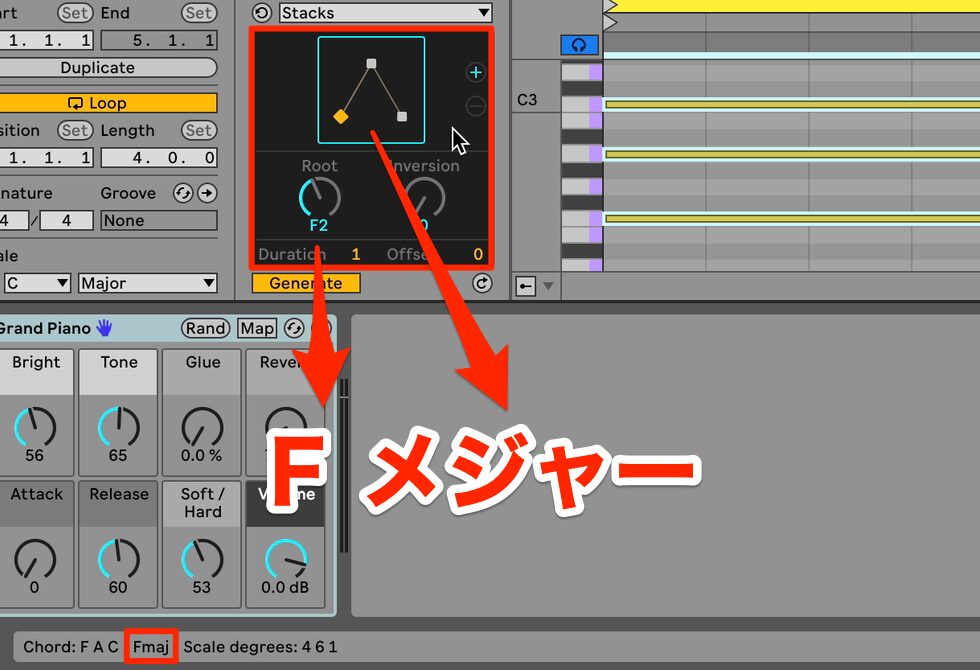
First, enter the chord type.
When you select "Stacks," a shape appears directly below it.
This shape indicates the chord type, such as major or minor, and you switch chords by dragging up or down.
You can also change it with the shortcut [Cmd+Up/Down Arrow] on Mac or [Ctrl+Up/Down Arrow] on Windows.
This time, choose the chord shaped like a triangle.
Choose the chord's root note with "Root."
Change this by dragging or with the shortcut [Up/Down Arrow keys] as well.
"Root" shows a letter, and the number after it indicates the octave of the root note; the larger the number, the higher the note.
You will mainly use "2," and "3" when you want to enter higher notes.
This time, set "F2."
You cannot tell the chord type just by looking at the shape, but hovering the cursor inside the red box below "Stacks" shows the chord name at the bottom left.
The triangle we chose represents a major chord, and checking the entered chord, it is labeled Fmaj.
maj means major chord, so this is an F major chord with F as the root.
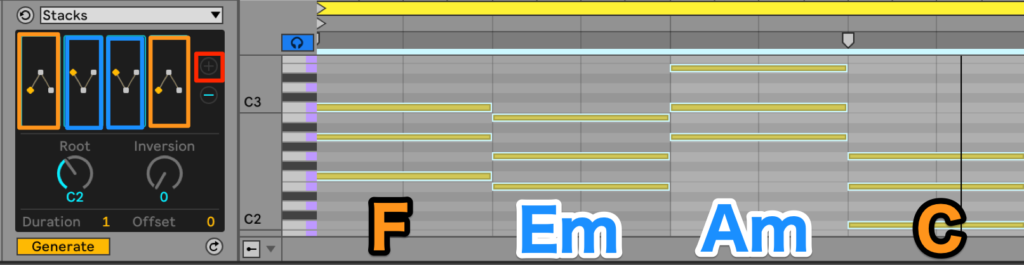
Next, we want to enter a second chord, so first create a box to put it in.
Click the "+ mark" to add a chord.
This time, set the root to E2.
The shape then changes to an inverted triangle, and the chord name shows Emin.
min means minor chord, so an E minor chord has been entered.
The reason the major chord switched to a minor chord is that Live's Scale Mode is working, automatically assigning major and minor chords that fit the song's key.
Remember that the inverted triangle means a minor chord.
Click the "+ mark" twice more to add two more chords.
"Stacks" lets you enter up to four chords in the selected range.
In this case, we enter four in a two-bar range, so each chord is two beats long.
Let's enter the remaining two chords.
Select the chord you want to change and enter A minor with "Root" set to A2 and an inverted triangle as the "shape."
For the last chord, enter C major with "Root" set to C2 and a triangle as the "shape."
We now have a chord progression using the four chords [F, Em, Am, C].
Triads, Four-Note Chords and Inversions
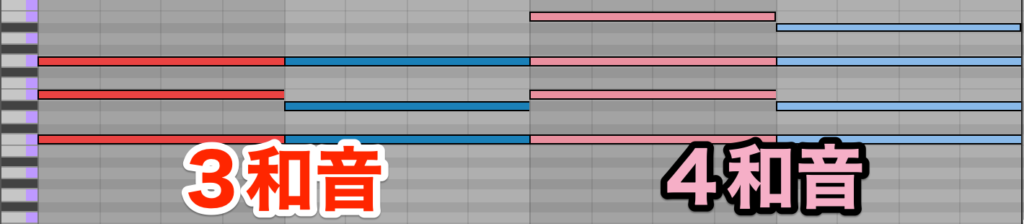
The chord progression is done, but the chords sound a little lacking.
As you can see in the Piano Roll, all the chords we created consist of three notes, which are called triads.
In terms of color, they are simple sounds like primary colors such as red and blue.
For this song, we want sounds that express more complex hues, like pale red or light blue.
In such cases, adding one more note to the chord to go from a triad to a four-note chord gives a more complex, stylish sound.
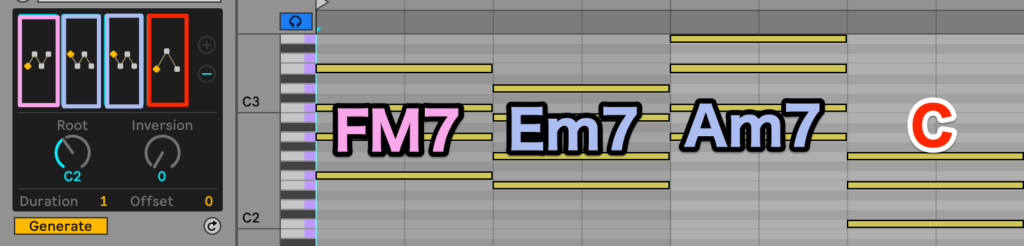
This would normally require music theory, but in Live 12 it is easy with "Stacks."
Let's start by switching the first chord.
Select the chord you want to change and, keeping the root as F, switch the chord type.
Switching to the shape of a triangle with one circle added makes the chord label show maj7.
This is a major seventh, a four-note chord, written M7.
It has become FM7 (F major seventh chord) with F as the root.
In the same way, switch the second chord to the shape of an inverted triangle with one circle added.
This time it is labeled min7, which is read as a minor seventh chord and written m7.
With E as the root, it becomes Em7 (E minor seventh chord).
Likewise, switch the third chord to Am7 (A minor seventh chord).
Only the fourth chord stays a triad.
The chord progression is now [FM7, Em7, Am7, C].
You can probably hear the complex, stylish sound that triads did not have.
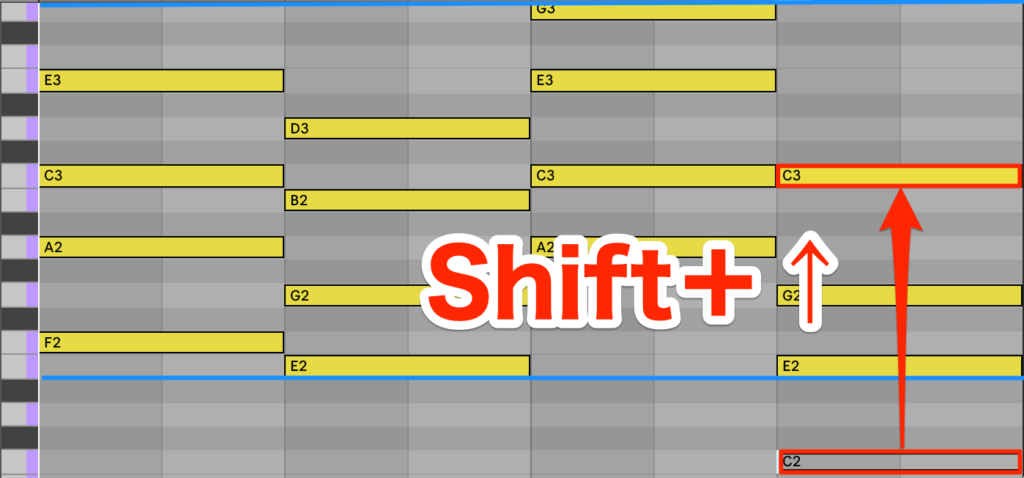
The chord progression is complete, but looking at the Piano Roll, the C2 in the last chord is lower than the other chords, so only the last chord sounds low and the progression lacks cohesion.
In such cases, rearranging the order of the notes gives the sound unity.
Zooming in to check the notes, they are arranged [C2, E2, G2].
A chord remains the same chord even if you rearrange the order of its notes, because the notes used do not change.
A chord created by rearranging the order of its notes in this way is called an inversion.
Raise the C2 by one octave.
You could drag it with the mouse, but there is a handy shortcut.
Select the note and use [Shift+Up/Down Arrow] to move it by an octave, so move it to C3 and listen.
The chord progression now sounds unified.
When the notes also fall within a certain range visually, the sound tends to be stable, so it is a good idea to adjust them.
By combining the MIDI generator tools with editing in this way, even beginners can easily create chord progressions, so please make use of them.
Editing the Piano Part: Rhythm / Velocity
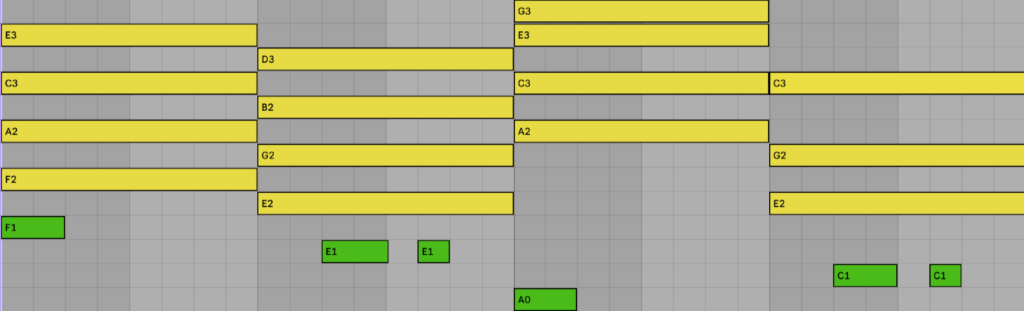
Let's listen to the piano chords we entered together with the other tracks.
To show the relationship with the bass, the bass is shown in green in the following images. (For visibility, the bass is shown one octave lower than it actually is.)
Right now it is only long sustained notes, so it feels monotonous.
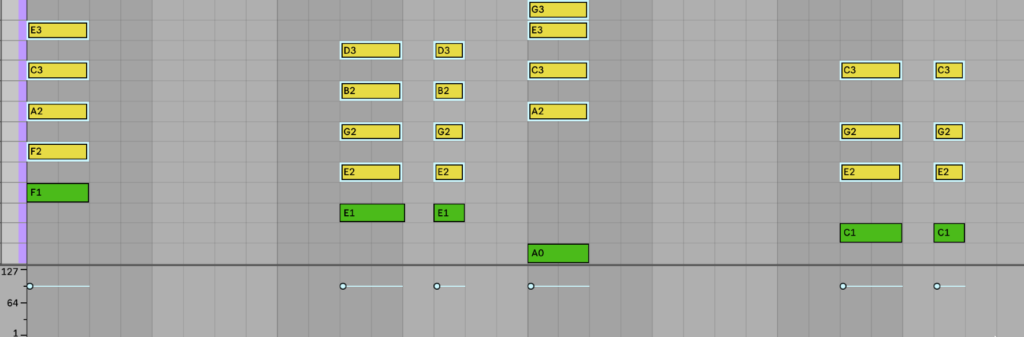
Matching the piano's rhythm pattern to the bass brings out unity and rhythm.
Let's edit the notes to the same timing and lengths while referring to the bass clip.
Piano after editing to the same rhythm as the bass
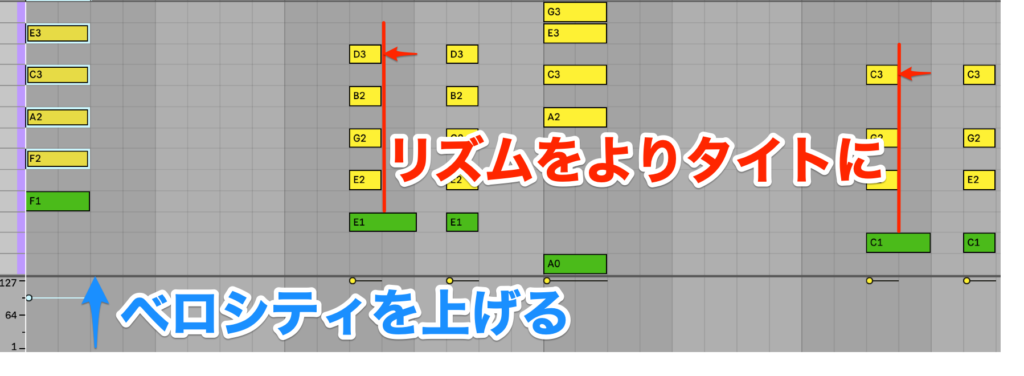
There are two points that bother us.
The first is that we want to make it a little tighter and bring out the rhythm.
Shorten the off-beat eighth note on beat 3 from an eighth note to a sixteenth note to emphasize the sixteenth-note feel.
The second is that the piano sound is too soft.
We want a crisper, harder sound to make the rhythm stand out.
Acoustic instruments such as piano and guitar produce a soft sound when played softly and a hard sound when played strongly.
How hard notes are played is adjusted with velocity.
Select the notes and raise the velocity handles below the Piano Roll to the maximum of 127.
Piano after editing rhythm and velocity
The rhythm has become tighter with more of a sixteenth-note feel, and the tone has changed to a hard, crisp sound.
The volume has probably increased too, so adjust it with the Mixer volume.
It depends on the instrument, but acoustic instrument sounds change tone with velocity like this.
Remember: adjust tone with velocity and adjust volume with the Mixer volume.
Also, how tone changes with velocity differs from instrument to instrument.
For example, playing a piano at the same velocity of 100 may give a hard sound with instrument A and a soft sound with instrument B, depending on the instrument's design.
Judge velocity strength not by the number but by listening with your ears.
That concludes the explanation of programming the piano.
What did you think?
You can probably feel how adding chords turned the song from monochrome to full color.
Next time, we will add guitar to further thicken the chords and the sound.
Frequently Asked Questions
Q1. Is music theory essential when programming piano in Ableton Live 12?
No. With the new "Stacks" feature, you can enter chords easily even without music theory. Because it lets you choose chord types and root notes visually, even beginners can create effective piano arrangements.
Q2. What is the difference between major and minor chords?
Major chords sound bright and minor chords sound dark. Major is written C, while minor adds an m, as in Cm. Even with the same melody, the chord progression greatly changes the mood of the whole song.
Q3. What is Scale Mode in Ableton Live used for?
When Scale Mode is on, Live automatically shows the notes that fit the song's key in purple in the Piano Roll. You can narrow the display to only notes that fit the key, improving the accuracy of chord input.
Q4. What is an efficient way to enter chords in the Piano Roll?
In the MIDI generator tool "Stacks," drag the shape up or down to choose the chord type, and change the root with the arrow keys or shortcuts (Cmd/Ctrl+Up/Down Arrow). To add multiple chords, create new chord boxes with the "+ mark."
NEW ARTICLES
Latest English Articles











