
Mixing and mastering in Ableton Live 12 is the final finishing process of music production. This article explains how to balance the volume, position and tone of each track to finish an easy-to-listen song. You can learn the techniques needed for a professional finish, including left-right placement with the Pan parameter, tone shaping with compressors and EQ, and using spatial effects. By comparing before-and-after audio, you can experience the effect of mixing and mastering and learn how to give a song impact and cohesion.
Finishing the Song

The arrangement is complete, so we mix and master the song to finish it.
Before proceeding, let's check how the sound changes before and after mixing and mastering.
You can probably hear that the after version has more impact and cohesion.
Demo song before mixing/mastering
Demo song after mixing/mastering
Live 12 Shaping the Sound in Mixing/Mastering Video Explanation from 1:35:03
Topic
- What is mixing?
- Adjusting left-right balance / Pan
- Shaping tone / compressor, EQ
- Macro Controls
- Adding reverberation with spatial effects
- Final finishing with mastering / exporting
What Is Mixing?
Mixing is the work of balancing the volume, position, tone and so on of each track to make the whole song easy to listen to.
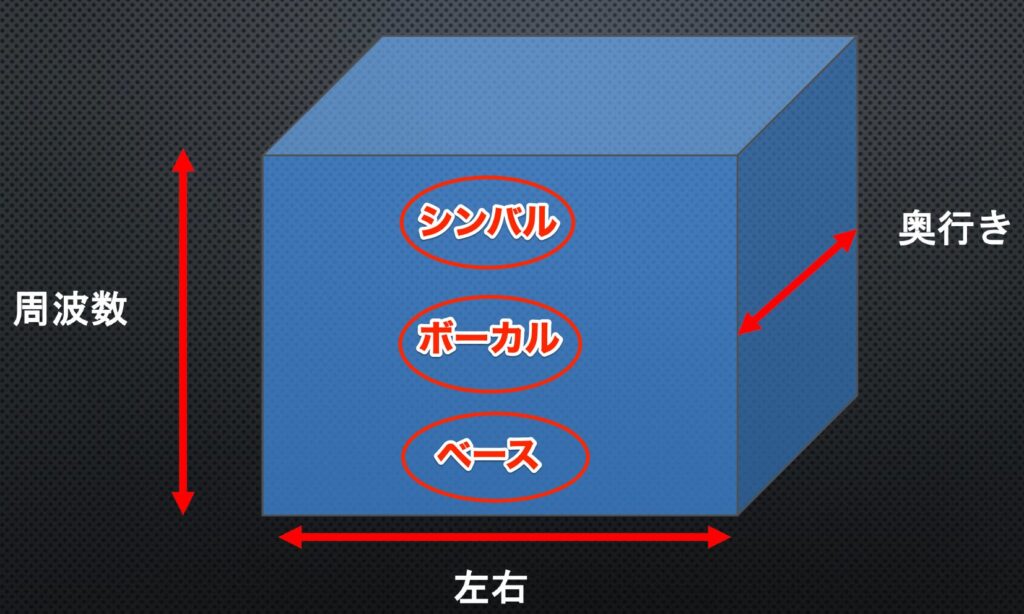
Imagining a cube in front of you and placing each instrument inside it makes the mix easier to visualize.
This cube has three dimensions: up-down, left-right and depth.
First, up-down is determined by each instrument's frequency balance.
Low instruments such as bass go at the bottom, tracks centered on the midrange such as vocals in the middle, and instruments with a lot of high end such as cymbals at the top.
Left-right position is set with a parameter called Pan in the Mixer.
Depth involves various factors, but here just remember that sounds with little reverberation are placed in front, and sounds with a lot are placed behind.
Adjusting Left-Right Balance / Pan
The volume balance of the tracks has been roughly set as we built the song, but we have not touched the left-right positions.
We place them according to the image from earlier.
A 3D diagram is hard to explain with, so we use a 2D plan view that omits depth.
Rhythm Tracks
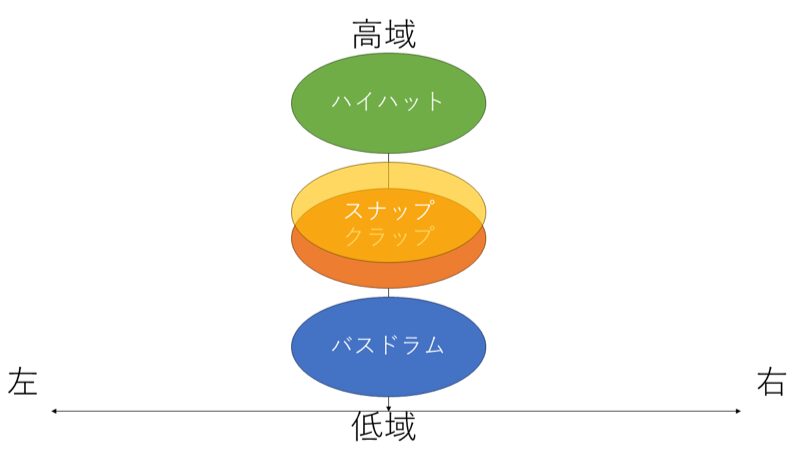
Check the current placement of the main rhythm tracks.
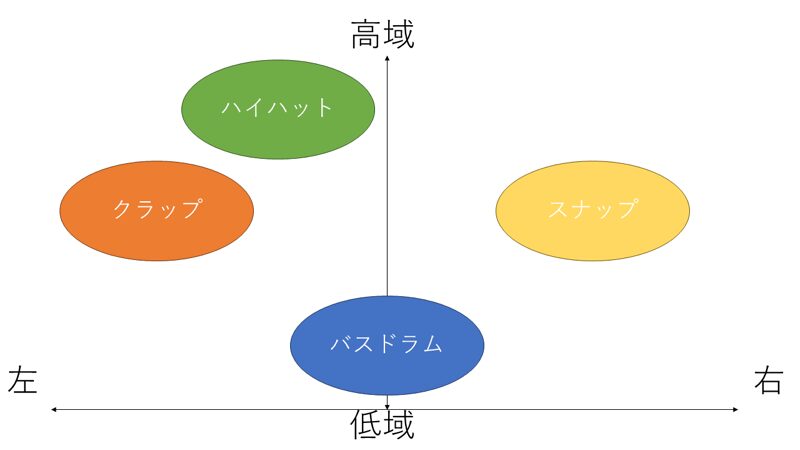
The bass drum is low and at the bottom, the two clap-type sounds are midrange in the middle, and the hi-hat is high and at the top, so they are spread vertically, but they are all centered left to right.
Main rhythm tracks, Pan: all center
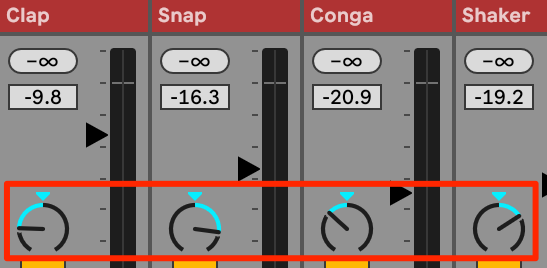
To add a sense of space and create gaps for the other tracks, we pan the two clap-type sounds left and right.
Likewise, also pan the conga and shaker, which we will add later, left and right.
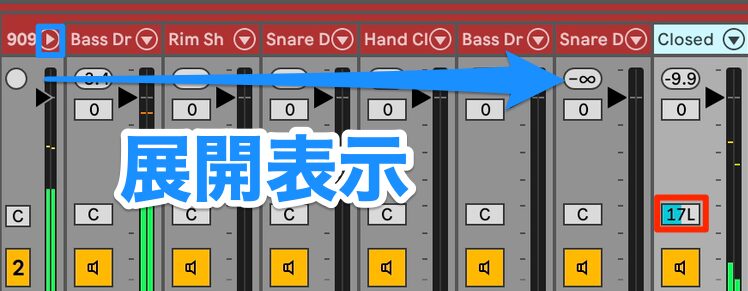
Pan the hi-hat to the left.
The hi-hat is housed in the "Drum Rack," so click the "▼ button" in the Mixer to expand it and adjust the Pan of the relevant track.
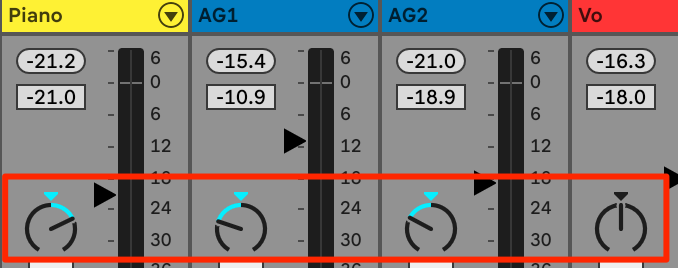
When the track width is narrow, Pan may be shown as text and numbers rather than a knob.
In that case, C means center, and L and R mean left and right.
Main rhythm tracks, Pan: after adjustment
How was that?
It sounds wider, and as in the image above, a gap has opened up in the center.
If it is hard to hear, check with headphones.
Add the shaker and conga, panned left and right in the same way, and listen to the whole rhythm section.
Rhythm tracks, Pan: after adjustment
You can hear the rhythm tracks have gained even more left-right width.
Bass
Leave the bass in the center.
To keep the overall balance stable, remember that four elements, the low instruments bass drum and bass, plus snare and vocals, should basically be placed in the center.
Melody and Chord Tracks
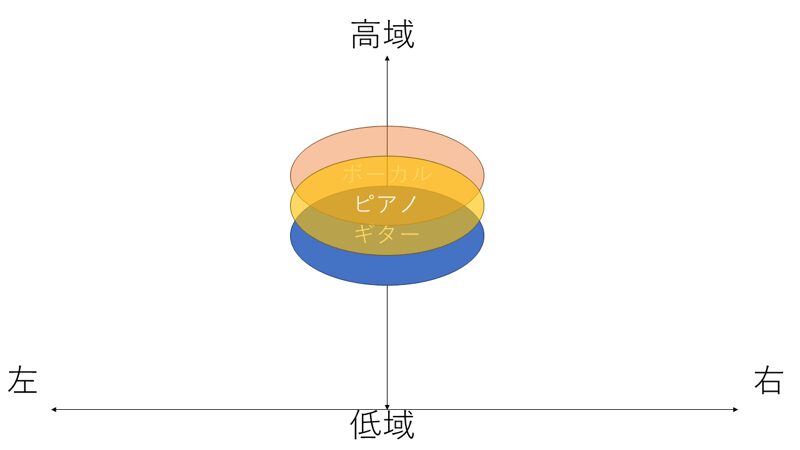
Next, check the chord and melody tracks.
Let's look at the relationship between vocals, piano and acoustic guitar.
All of these sounds are concentrated in the midrange and their Pan is set to center, so the three sounds overlap in the middle.
Melody and chord tracks, Pan: before adjustment
As you can hear, it feels a little cramped.
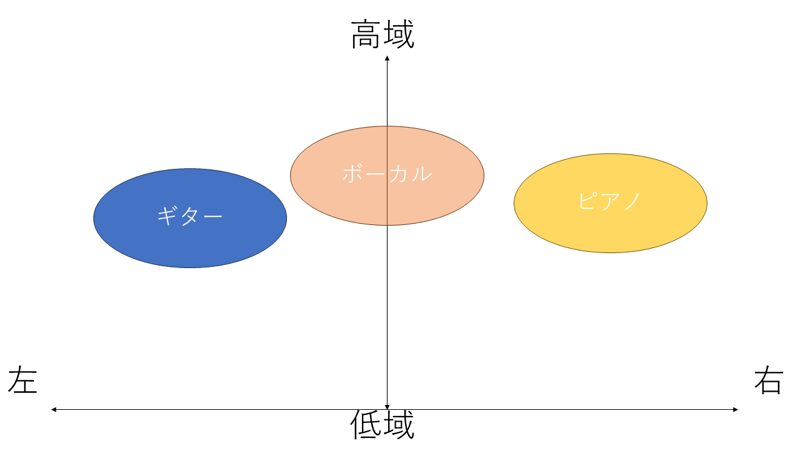
In such cases, think "which of these three do I most want to be heard?" and decide on priorities.
In a song with vocals, the vocal is surely the most important, isn't it?
So, to open a gap for the vocal, pan the piano and guitar left and right.
Pan: after adjustment
As with the rhythm tracks, the balance now has good width and separation, and the vocal is easier to hear.

Set the Pan of the other tracks with reference to the image.
This completes the left-right balance adjustment.
Shaping Tone / Compressor, EQ
Next, we shape the tone of each track to make it easier to listen to.
The main tools for shaping sound are the compressor and the equalizer, also called EQ.
Compressor
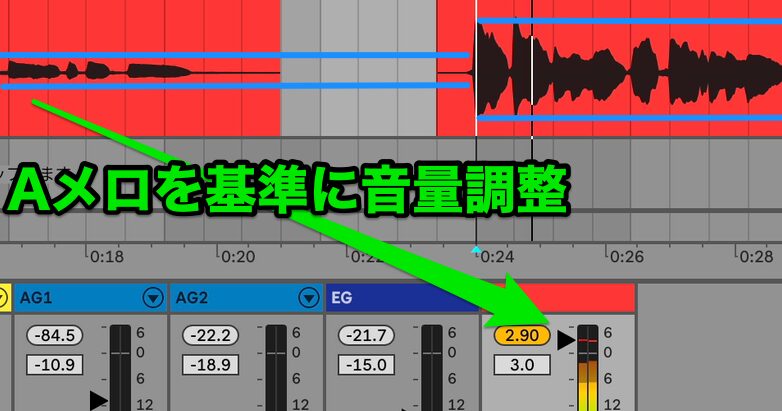
A compressor is an effect that evens out differences in volume.
For example, if the vocal is quiet in the verse and loud in the chorus, setting the verse to a good level makes the chorus too loud.
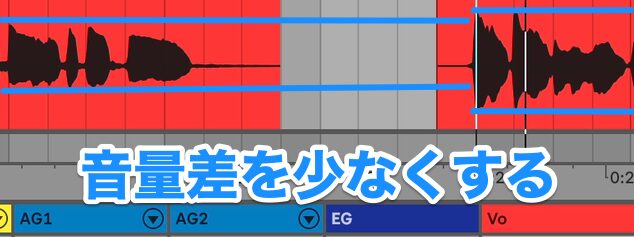
Using a compressor in such cases narrows the volume difference between the verse and chorus vocals and lets you make the whole thing easier to listen to.
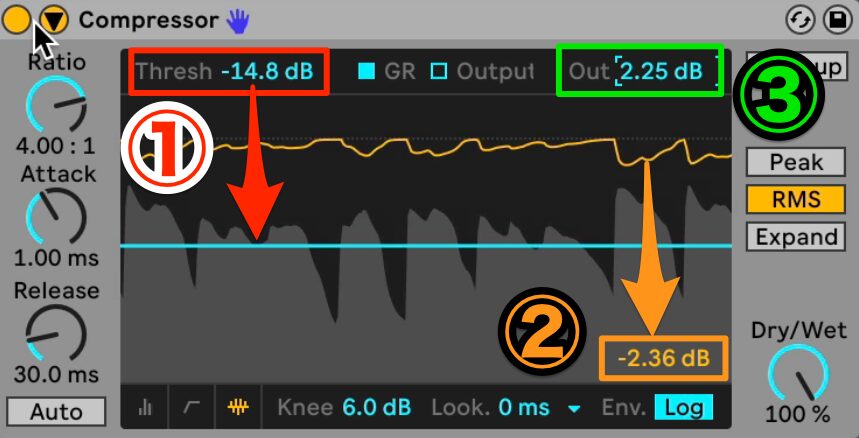
We explain by applying a compressor to the vocal track.
Choose "Compressor" from the audio effects and apply it to the vocal track.
The compressor is a difficult effect, so we skip the details, but here just remember the value called threshold.
The threshold is the value that sets the volume level used as the reference for the compressor to compress the sound.
Only the parts of the sound that exceed the set threshold are compressed.
If you drag "Thresh (threshold)" down during playback, the orange line starts moving partway, and its value is shown in dB at the bottom right.
This shows the amount of signal compressed above the threshold, and the output level drops by the amount compressed.
There is no correct amount of compression, but as a guide, start with about -3 dB at the point of greatest compression.
Make up the lost volume with "Out" so that the output level does not change when the compressor is switched on and off.
Before applying the compressor
After applying the compressor
The volume difference between the start of the vocal phrases and the tails and reverberation has narrowed a little.
The effect may be hard for beginners to hear, but you can make music without understanding it perfectly.
Let's start by learning just the minimum needed and move on.
Equalizer

An equalizer is used for adjusting frequency balance.
The change in tone is easier to hear than with a compressor.
We explain using the synthesizer arpeggio track.
Apply "EQ Eight" from the audio effects.
Expanding the display makes the frequency balance easier to see.
It shows the lows, mids and highs from left to right, and during playback the frequency balance of the sound appears graphically.
First, let's check the current tone.
Synthesizer arpeggio: before EQ
It sounds a little muddy, so we want a cleaner tone.
In this song, the bass drum and bass cover the low end, so this track does not need low frequencies.
So we remove the unneeded lows and adjust the frequency balance at the same time.
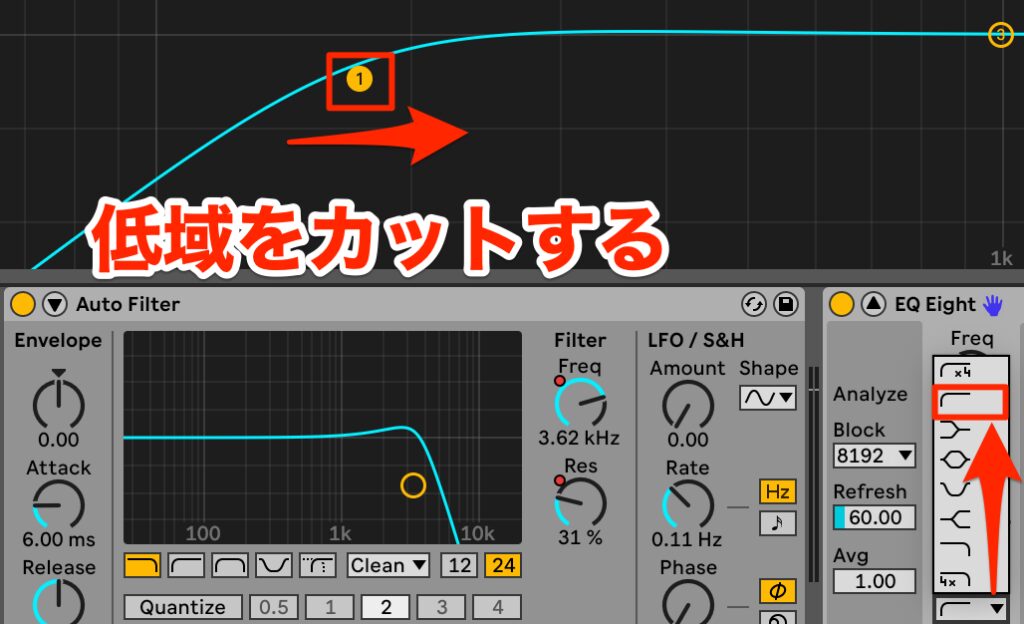
First, use band 1.
You can operate it intuitively by grabbing it with the mouse and dragging.
Changing the curve type to a cut type lets you cut the lows more strongly.
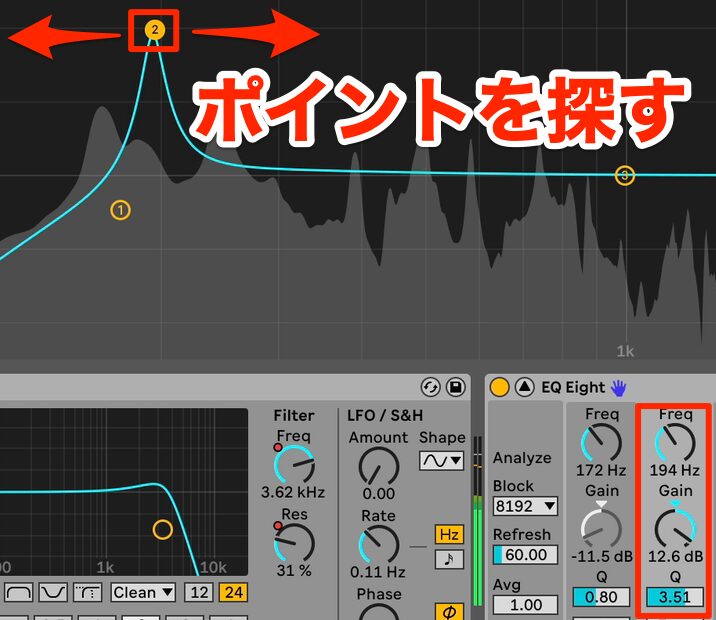
Next, use band 2 to also cut the area between the lows and mids, making it even cleaner.
While holding it with the mouse, drag vertically while holding the Option key on Mac or the Alt key on Windows to adjust Q, the range over which the equalizer is applied.
The trick to finding the point to adjust is to boost the equalizer and sweep it left and right to find the spot that bothers you.
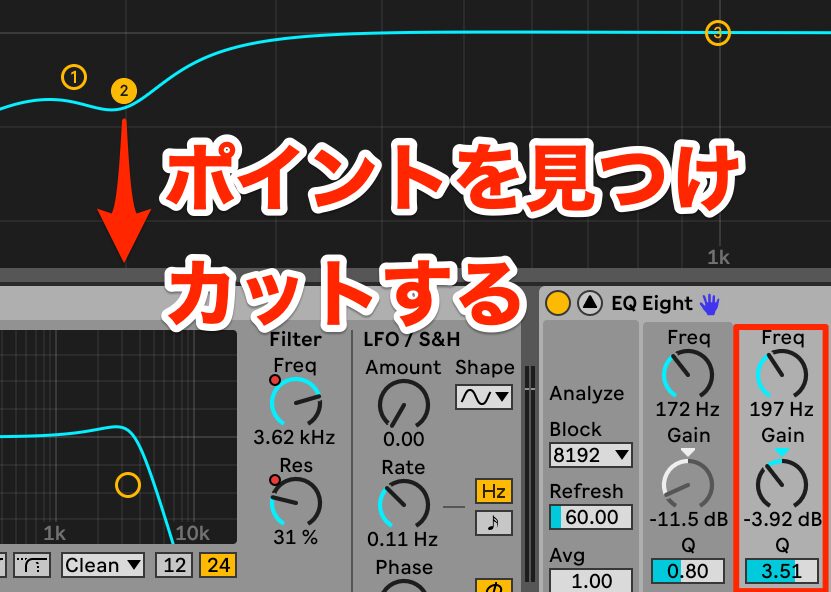
Once you have found the point, lower it until it no longer bothers you.
Synthesizer arpeggio: after EQ
It now has a clean impression.
Apply it to the other tracks in the same way.
As with the compressor, there are no fixed values for EQ, but applying too much thins out the sound.
At first, it is good to adjust with about plus or minus 3 dB as a guide.
Macro Controls
We have explained the compressor and equalizer, but there is a lot for beginners to learn, and mixing may seem like a high hurdle.
Live includes Macro Controls that allow more intuitive operation, so let's use them.
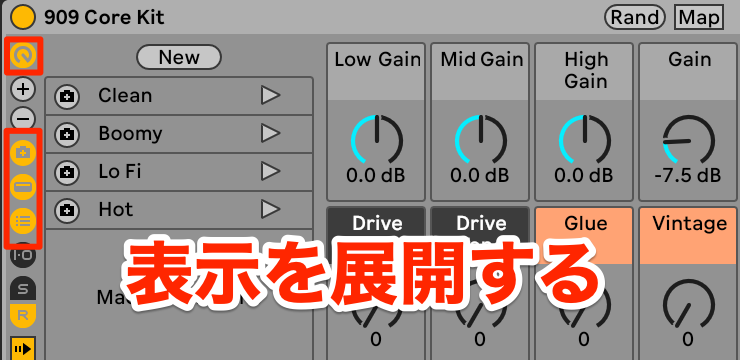
Select the drum track used for programming the rhythm, and click the four places to expand the display.
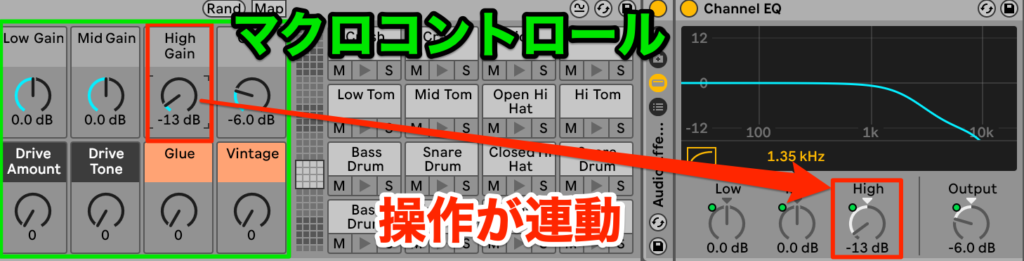
In fact, the "909 Core Kit" Rack contains many audio effects inside.
And the parameters of each effect are linked to the Macro Controls, with the main parameters gathered together.
Just adjusting the Macro Controls lets you work with each effect in tandem.
For example, moving the Macro Control "High Gain" shows that "High" on the "Channel EQ" equalizer moves along with it.
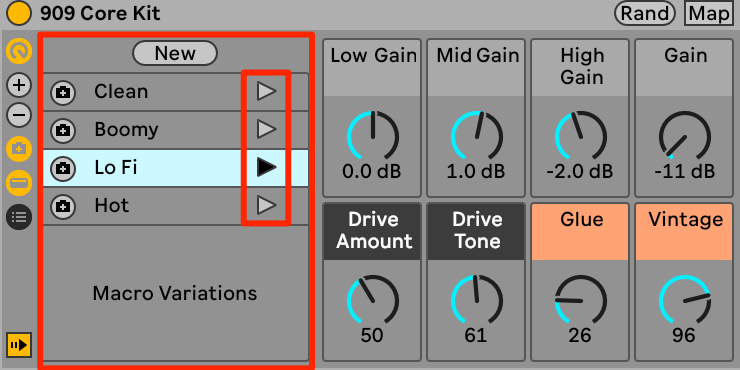
Next to them are Macro Control Variations.
These are, so to speak, presets for the Macro Controls, and you can switch between them by clicking the "▷ button."
Let's try a few.
Macro Control Variation: Boomy
Macro Control Variation: Lofi
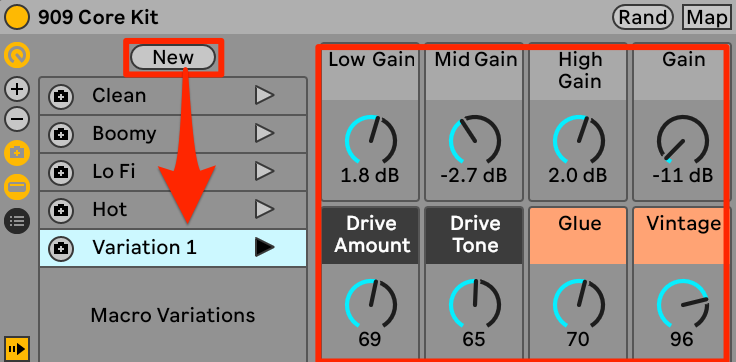
We felt "Lo Fi" matched the song, so we adjusted the Macro Controls based on it.
Macro Control Variation: Lofi, after adjustment
It sounds good, so we want to save these settings.
Click "New" to save the settings.
It is a good idea to create several variations and compare them.
Using Macro Controls like this lets even beginners mix intuitively, so remember them.
However, Macro Controls can only be used with presets that are Racks.
Live presets come as ".adg" and ".adv" files; if you want to use Macro Controls, choose ".adg."
Adding Reverberation with Spatial Effects
The vertical and horizontal placement of sounds mentioned at the start of mixing is now in order.
Next, we create depth.
First, let's listen to just the rhythm tracks and vocal.
Vocal: before applying reverb
Right now the vocal has a little reverberation, but it sounds detached from the accompaniment.
So we add more reverberation to blend it in.
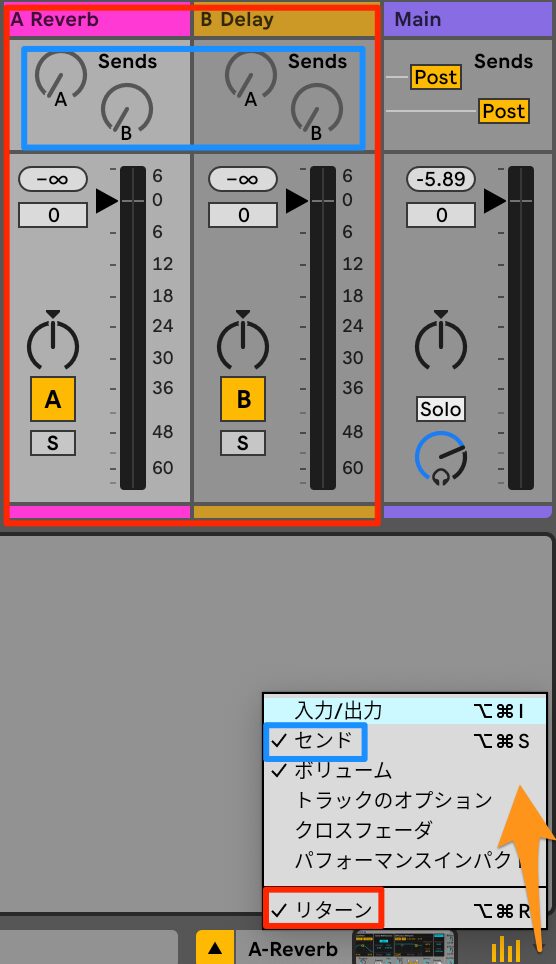
In such cases, use send & return.
Live provides two return tracks by default.
Click at the bottom right to expand the display, and you can switch the display of sends and return tracks in the Mixer on and off.
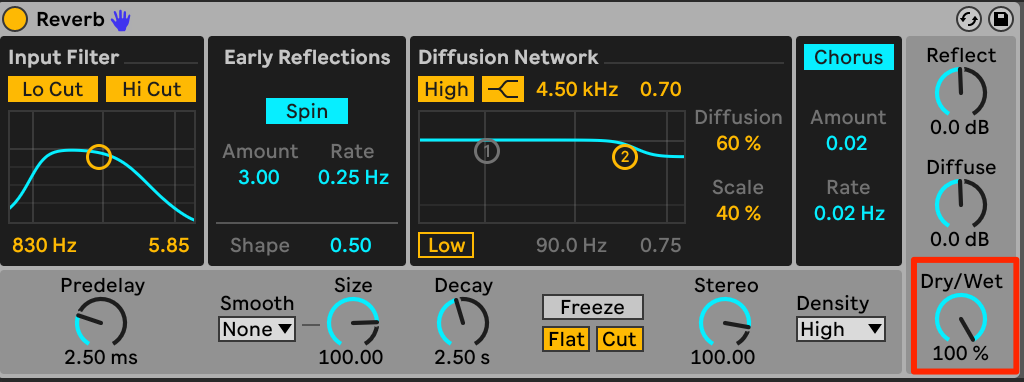
This time we use the return track "A Reverb."
An audio effect called "Reverb," which adds reverberation, is already assigned here.
What matters is the Dry/Wet balance.
Checking it, Wet is at 100%, so it is set to output only the reverberated effect signal.
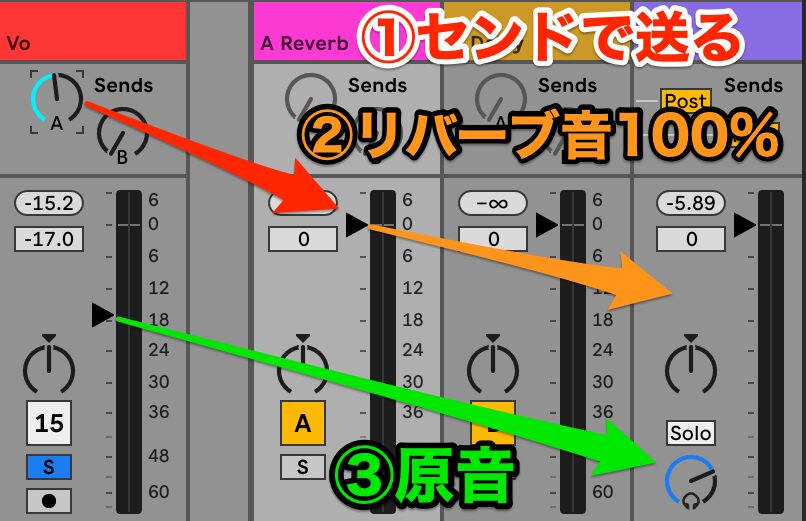
To send the source audio signal to a return track, use the "Sends" on each track.
Raising the A knob of Sends sends the vocal track's signal to return track A.
The more you send, the more reverberation there is.
Specifically, the vocal track's original sound and return track A's effect sound are each sent to the Main track, and mixing them makes it sound as if reverberation has been added.
Vocal: after applying reverb
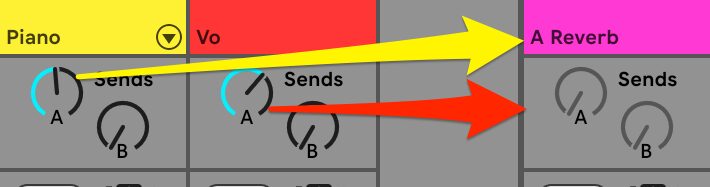
Return tracks are shared with other tracks.
If you want to add reverb to the piano as well while the vocal is being sent to the reverb, raise the Sends on the piano track.
In this way, send the other tracks you want to add reverberation to as well, and adjust the whole mix.
When using spatial effects such as reverb and delay, you can apply them directly to each track, but remember that sharing them via send & return is the standard approach.
This completes the mixing of the song.
Demo song: after mixing
Final Finishing with Mastering / Exporting
Next, we do mastering, the final finishing of the song.
Mastering is the work of shaping the sound from a slightly different perspective than mixing.
It cannot be said in general terms, but if mixing is from the artist's perspective, mastering requires a more objective listener's perspective.
Mastering
Mastering requires very advanced experience and skill and is a difficult task even for advanced users.
However, Live includes many presets for mastering, so let's use them to do a simple master.
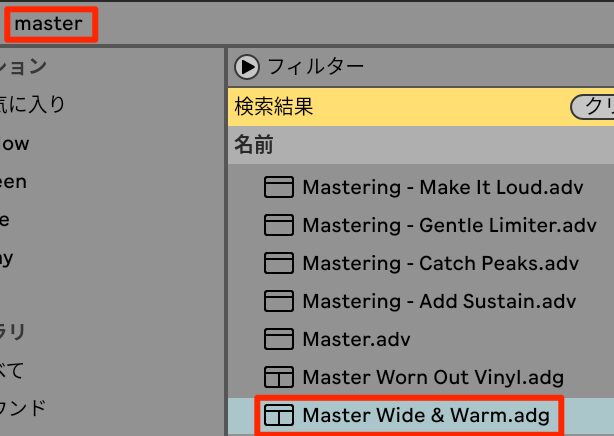
Select the audio effects and type "Master" in the search field.
Several mastering presets beginning with Master are shown, so assign "Master Wide&Warm" to the Main track.

Checking its contents, it is a simple Rack with three audio effects: an equalizer, a compressor and a Limiter.
A limiter is a stronger form of compressor and is also the part that determines the final output level.
The key to mastering is not to change the sound drastically.
Excessive processing in mastering degrades sound quality.
If excessive processing seems necessary, it is better to go back to mixing and readjust.
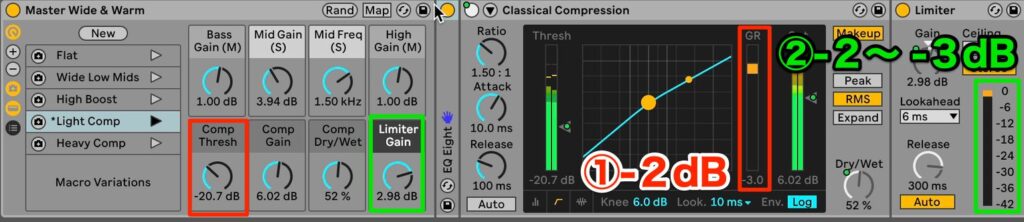
Here, too, we use Macro Variations.
The limiter raises the overall volume, so be careful when applying it.
In the article and video, the volume has been adjusted in advance.
Heavy Comp
Light Comp
Light Comp had a natural amount of processing, so we edit it slightly based on that.
Only two settings are changed.
Adjust the compressor threshold to compress by about 2 dB, gluing the overall sound together slightly.
Next, set the final level with "Limiter Gain."
Raising it increases the volume but squashes the sound, so as a guide, keep the amount of compression shown on the meter in the Limiter to about -2 to -3 dB.
Exporting
Mastering is now finished, and the song is finally complete.
Finally, we export the data so the song can be played in music apps and on smartphones.
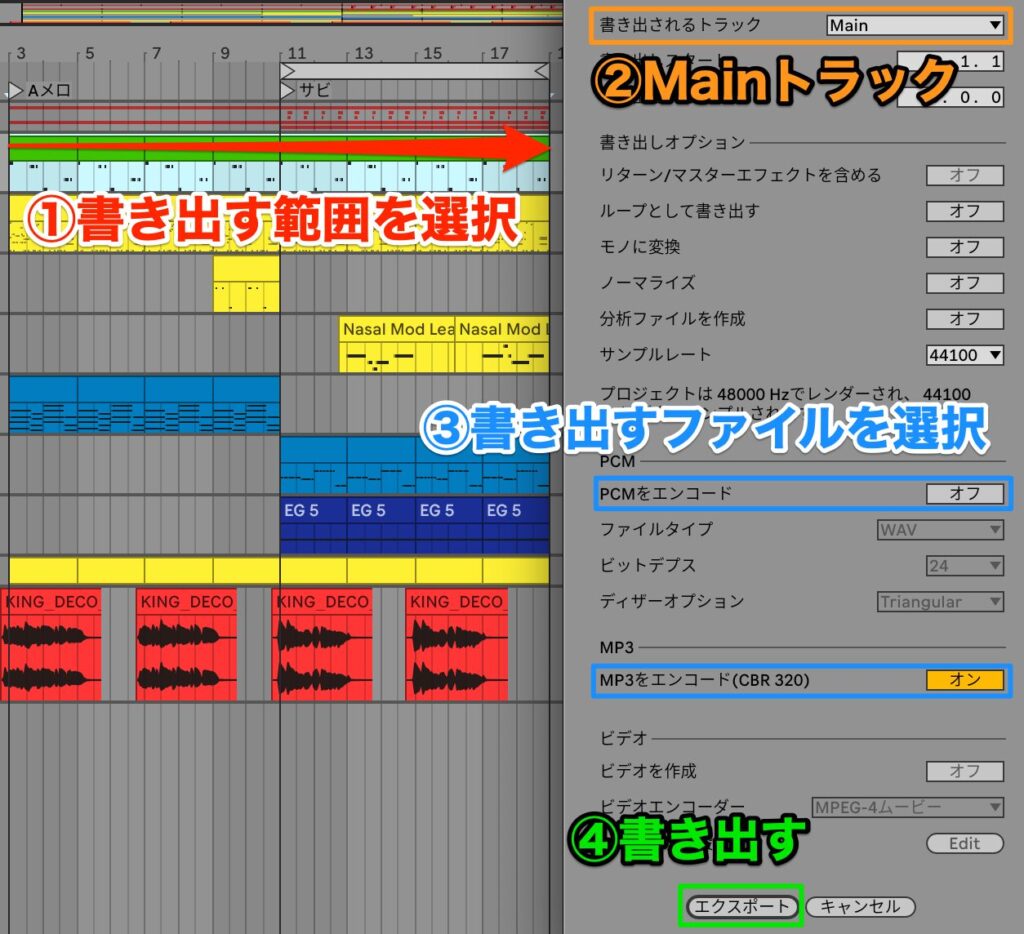
First, select the range to export.
Choose "File" from the menu and go to "Export Audio/Video" to open the dialog.
In the dialog, choose "Main" for "Rendered Track," and turn on "Encode PCM" to export a WAV file or "Encode MP3" to export an MP3.
For playback in music apps and similar, MP3 is usually suitable.
Click "Export."
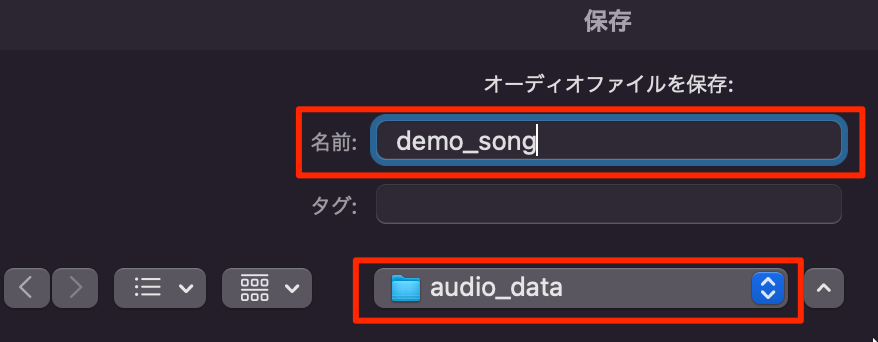
The screen changes; specify the file name and save location, and click "Save" to start the export.
After exporting, play the file to check that nothing is wrong.
That concludes the explanation of mixing and mastering the song.
The song is complete. Great work getting this far!
Did you get a feel for the overall production flow? We hope you can apply what you learned here to your own music production.
Next time, we will expand the finished song into Session View.
Frequently Asked Questions
Q1. What is the difference between mixing and mastering in Ableton Live 12?
Mixing is the work of balancing the volume, position and tone of each track to make the whole song easy to listen to. Mastering, on the other hand, is the final stage after mixing, where the finished song is further optimized and exported.
Q2. What role does the Pan control play in mixing?
Pan adjusts the position of sounds between the left and right speakers, creating a sense of space and separation. Panning rhythm tracks and melodic parts left and right creates width and lets important elements such as vocals stand out.
Q3. Why use a compressor?
A compressor is an effect that evens out differences in volume, narrowing the difference between sections such as the verse and chorus. This makes elements such as vocals sound stable and the whole song easier to listen to.
Q4. How is EQ used in mixing?
EQ adjusts frequency balance to shape the tone of each instrument. It places instruments by frequency, such as low instruments at the bottom, midrange instruments in the middle and high instruments at the top, reducing interference.
NEW ARTICLES
Latest English Articles











