
Programming the bass in Ableton Live 12 is an important process that shapes the groove of a song. In this article, you will learn how to choose and edit sounds with the Meld synthesizer, step-recording techniques with the mouse, and how to adjust the timing of notes against the drums. By understanding how to place root notes, adjust note lengths and build rhythms by combining eighth and sixteenth notes, you will be able to create lively bass phrases with a sense of depth. Its practical approach lets even beginners start by editing presets.
Creating the Song's Groove

Bass is a general term for the bass guitar or any melodic instrument that covers the low end, and like the drums, it is an important part that forms the framework of the song.
The phrases the bass plays have a big effect on the groove of the song, so please pay attention to these changes.
Demo song: rhythm & bass
Live 12 Programming the Bass Video Explanation from 32:30
Topic
- Assigning and editing a bass instrument
- MIDI step recording for the bass
- Organizing tracks
Assigning and Editing a Bass Instrument
There is a handy function for choosing sounds, so let's make use of it.
Then let's modify the sound to our liking based on the preset we chose.
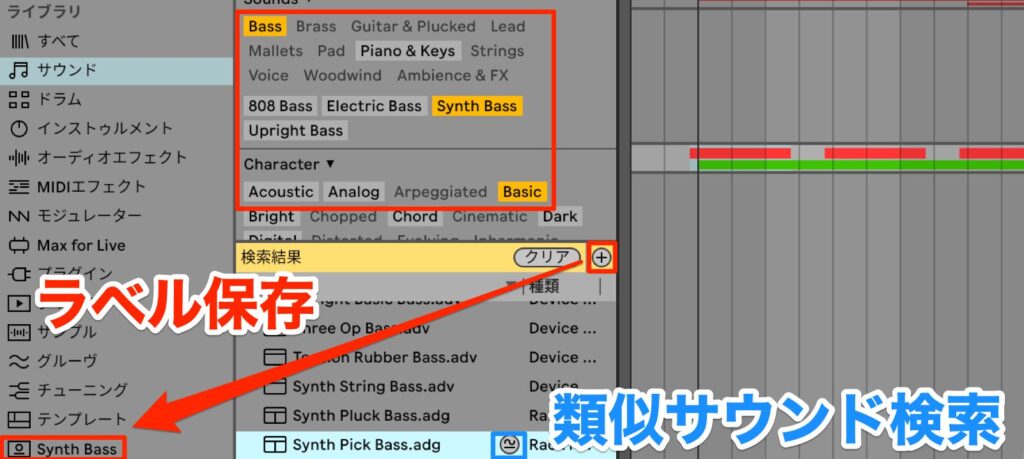
First, choose the sound.
Piano and guitar, which are acoustic instruments, will come in later, so we use a contrasting synth bass to aim for a sound that fuses acoustic and synth.
Select "Bass, Synth Bass, Basic" in "Filters."
It is convenient to save versatile, frequently used "Filters" combinations like this as labels.
To save one, click the "+" mark in the Browser.
It is then saved in the library on the left, where you give it any name you like.
Since "Filters" can be applied with one click at any time, choosing sounds becomes much faster.
It is a good idea to save the ones you use often.
Preset: Synth Pick Bass
This sound seems good, but we would also like to hear sounds with a slightly different flavor.
That is when similar sound search comes in handy.
Click the button next to a preset you like.
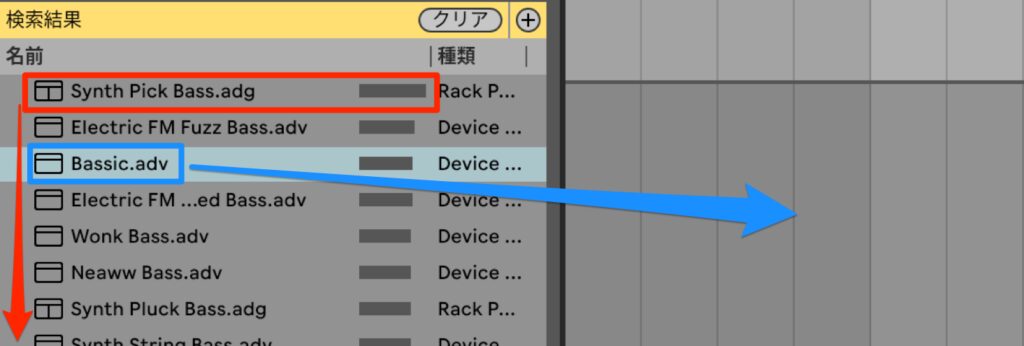
Similar sounds are shown in order of how closely they match.
Preset: Bassic, before editing
This preset named Bassic seems good, so we assign it to the track.
This is Meld, a synthesizer newly included in Live 12, which allows playful sound design.
Even beginners can get closer to the sound they like by editing presets, so let's make a few edits.
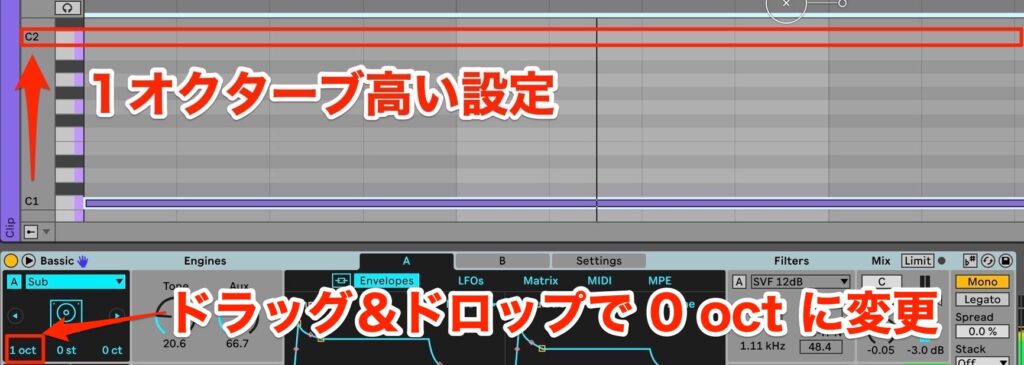
This preset is set to sound one octave higher than normal;
for example, playing C1 sounds C2, one octave higher.
To make the programming that follows easier to understand, we change this.
Change the part of Meld labeled "1oct" to "0oct" by dragging.

There is one more change.
When a long note is played, the sound changes partway through, which bothers us.
Checking inside Meld, the B meter changes partway through.
Meld has two oscillators, A and B, which are sound sources equivalent to human vocal cords, each generating a different waveform.
B is producing an unwanted sound, so we turn it off.
To turn it off, click B at the far left.
Preset: Bassic, after editing
The sound has now settled down.
Creating the sound you like based on a preset in this way is highly recommended for DTM beginners.
Step Recording the Bass
We program the bass with step recording using the mouse.
Pay attention to how the groove changes depending on the timing of the notes you enter.
Songs basically have a chord progression, and the song develops according to that progression.
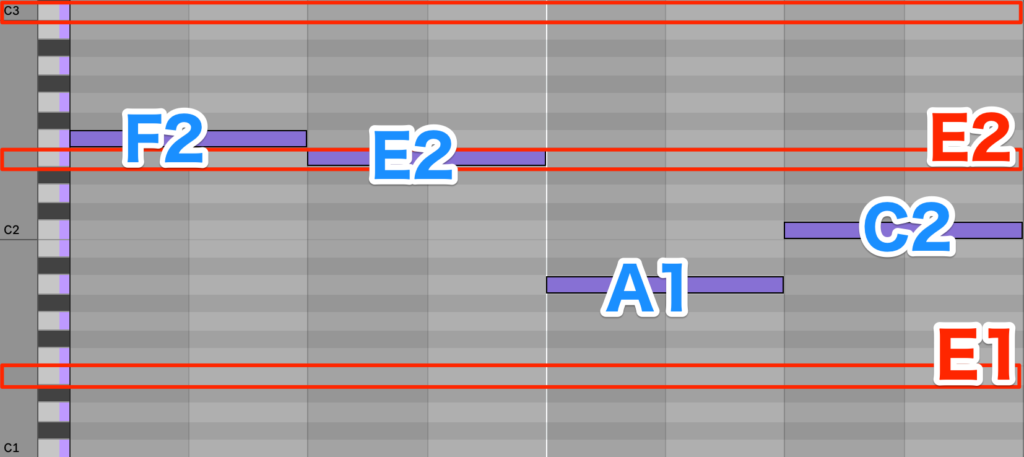
Chords will be explained in the next installment on programming the piano, so for now we use the chord progression [F Em Am C] and enter the root notes, the lowest notes that form the basis of each chord.
The chords change every two beats, so enter [F E A C] as root notes two beats long.
There are two points to keep in mind when entering the bass.
The first is that, to build the foundation of the song, you should use the low register.
As a rough guide, it is good to program from E1 to E2, one octave above, and at most up to around C3.
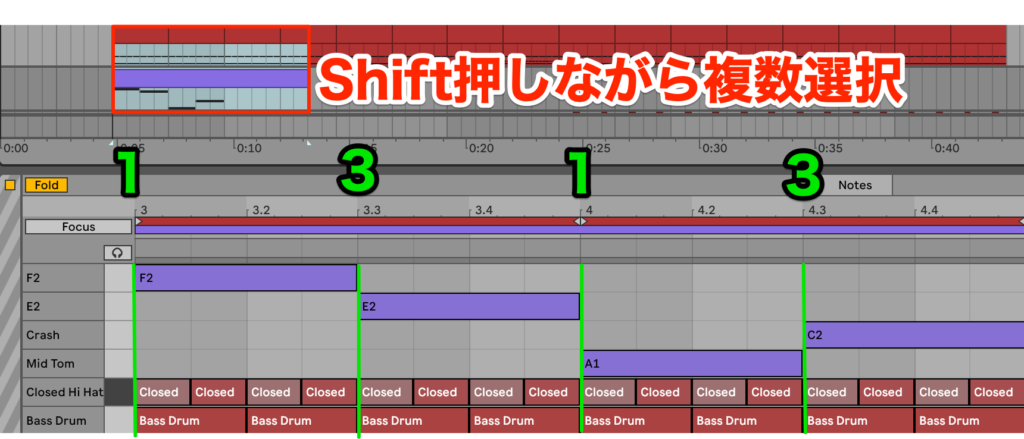
The second is the timing of notes relative to the bass drum, which covers the same low range.
There is no single right answer, but in general, a good groove often comes from having important points sound at the same time and offsetting the others moderately.
At this point, it is very convenient to display clips overlaid.
With the bass clip selected, hold down Shift and select the drum clip, and they are shown at the same time, making them easy to grasp visually.
Checking, the bass falls in the same positions as the bass drum on beats 1 and 3.
Let's listen together with the drums.
All the notes sound at the same time as the bass drum and they are sustained, so you cannot feel the rhythm.
First, we offset the timing of the chord changes.
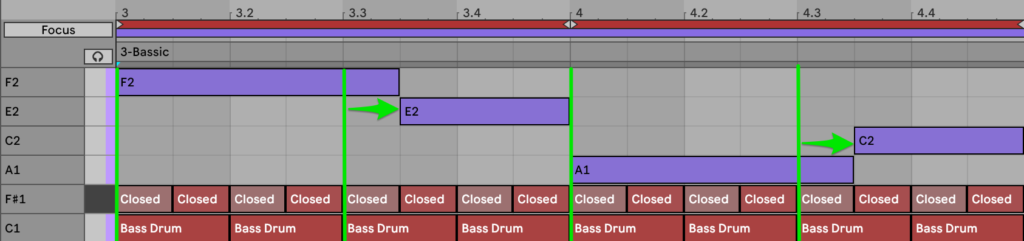
Shift the E on beat 3 of bar 1 by an eighth note, and shift the C in bar 2 the same way.
Also adjust the lengths so they do not overlap the next chord.
Bass shifted by an eighth note
Offsetting from the bass drum positions has added a little complexity to the rhythm.
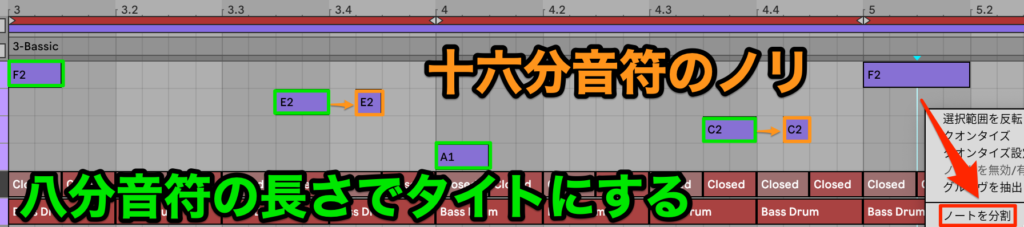
Next, we want a tighter, lighter feel, so we shorten each note.
What is handy here is the note split function.
Place the cursor where you want to cut, right-click and choose "Split Notes."
The shortcut is [Cmd+E] on Mac and [Ctrl+E] on Windows.
After splitting, delete the unneeded parts with Delete, and make every note an eighth note long.
To add an even busier feel, we also add sixteenth notes.
On the sixteenth-note off-beats, add short notes a sixteenth note long.
You can probably hear that combining eighth and sixteenth notes gives the rhythm depth and makes the bass phrase more lively.
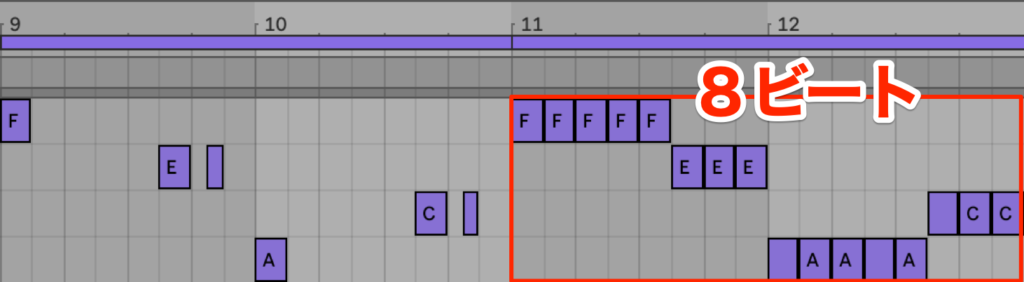
In this song, these two bars repeat throughout, through the verse and chorus.
It is deliberately kept simple for the purposes of creating a looping feel through repetition and maintaining the groove.
Changing the pattern between the verse and chorus is also an option.
Let's try how the impression changes with a different bass phrase.
Pattern switching to an 8-beat in the chorus
What did you think?
You can probably feel the groove change in the chorus, creating ups and downs in the song's development.
Neither is right or wrong; it is best to decide according to the direction of the song.
This time we continue the simple two-bar loop, so paste it across the song as needed.
This completes programming the bass.
Organizing Tracks
As the number of tracks grows, the song becomes harder to manage.
Let's organize the tracks at this point.
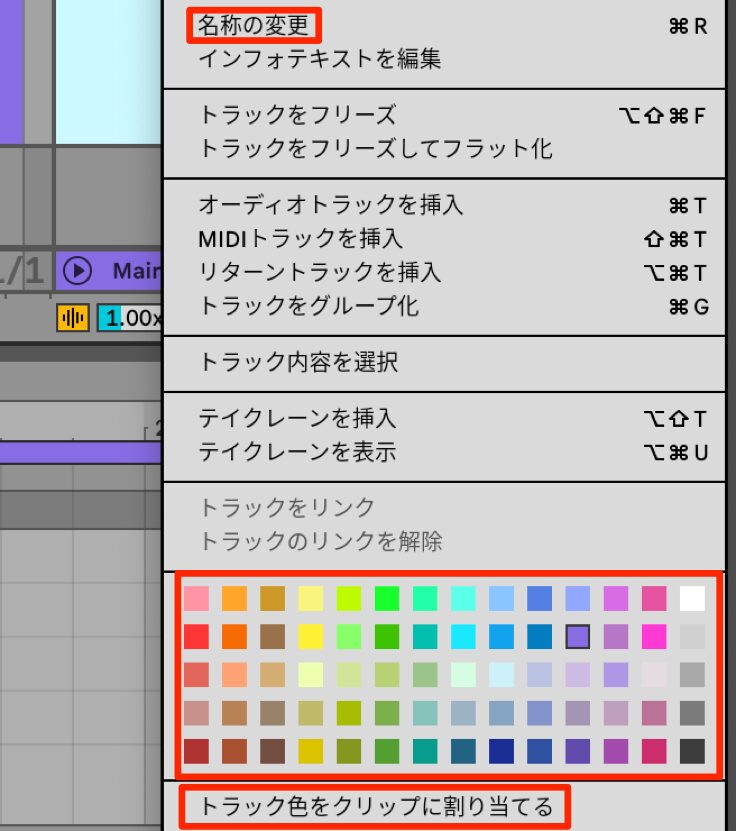
First, name and color the tracks.
To name a track, right-click its name, choose "Rename," and type the name.
To color a track, likewise right-click its name and choose any color from the color palette.
The trick is not to divide things too finely, and to keep the same category fairly uniform.
In this case, all the rhythm instruments are brown.
At this point, if you select multiple tracks while holding [Shift], or [Cmd] on Mac or [Ctrl] on Windows, you can change them all at once.
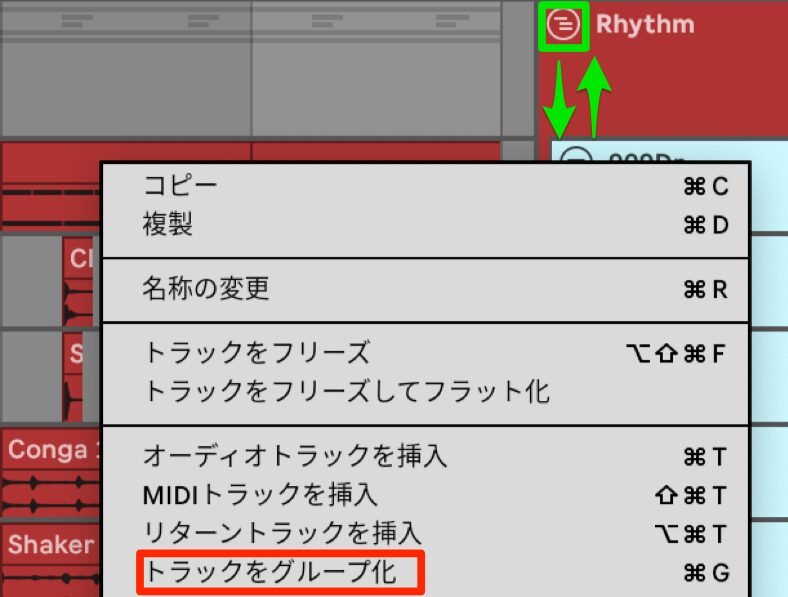
Next, group the rhythm instruments, which are the same category.
Select all the relevant tracks, right-click and choose "Group Tracks."
They are then nested like a folder, and by clicking next to the group track name you can expand and collapse the tracks.
It is useful for making production more efficient in many situations, such as changing levels all at once in the Mixer, so remember it.
You can move tracks easily by dragging and dropping them.
Moving them into and out of group tracks is also intuitive.
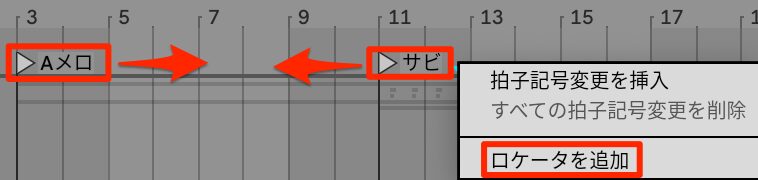
Finally, marking the song's sections, such as the verse and chorus, makes the structure easier to grasp.
Move the cursor to the top where it changes to the "speaker," right-click and choose "Add Locator," and you can enter any section name.
Locators can be moved easily by dragging and dropping.
Clicking the ▶ mark starts playback from there, which is convenient, so make use of it.
That concludes organizing the tracks.
Could you feel how the bass changes the groove of the song?
The bass may seem plain, but you probably now understand its importance.
With the foundation of rhythm instruments and bass in place, next we will program the piano and add chords to the song.
Frequently Asked Questions
Q1. How can I choose bass sounds efficiently in Ableton Live 12?
Narrow down step by step with Filters such as "Bass," "Synth Bass" and "Basic," and save frequently used combinations as labels to save time. Using similar sound search also lets you quickly explore related sounds from a preset you like.
Q2. What range should I keep in mind when programming the bass?
To build the foundation of the groove, programming in the low register, generally around E1 to E2 and at most around C3, is recommended. Keeping within this range maintains the balance of the whole song.
Q3. What effect does offsetting the timing of the drums and bass have?
Rather than only aligning notes with the bass drum, offsetting some moderately creates complexity and adds depth to the rhythm. Combining eighth and sixteenth notes makes the bass phrase more lively and appealing.
Q4. Why does the "Bassic" preset sound one octave higher?
This preset is raised by one octave with the "1oct" setting. To make programming easier to understand, change this value to "0oct" to return it to normal pitch.
Q5. Please tell me about the oscillators in the Meld synth.
Meld has oscillators A and B, equivalent to vocal cords, each generating a different waveform. If an unwanted sound is included, you can clean up the sound by turning off the relevant oscillator.
NEW ARTICLES
Latest English Articles











