
This article explains, for beginners, how to produce a pop track using "Live Lite," the entry-level edition of Ableton Live. Live Lite is music production software included with many DTM products, and many people already own a license. The article explains in detail a nine-step workflow from creating a chord progression to adding a melody, and you can learn practical operations such as setting a scale and using the MIDI Note Editor. Even beginners can produce simple electronic pop within the eight-track limit, and with a downloadable project file you can experience making a song yourself, making it excellent learning material for DTM newcomers.
The Steps for Producing a Pop Track with Live Lite
This time, we explain how to use "Live Lite," the entry-level edition of Ableton Live.
Live Lite is music production software (a DAW) included with DTM products from various manufacturers, such as KORG, Novation, Focusrite, Native Instruments and AKG.
Many of you may already have a Live Lite license.

List of products that include Live Lite

Here, we present a workflow for producing electronic pop using only Live Lite, covering composition steps and features.
It is especially useful for those who want to start DTM or music production, or who have been curious about Ableton Live, so please take a look!
How to Make a Pop Track, Explained for Beginners: Live Lite Edition
Checking the Demo Song
What kind of song can you make with Live Lite?
Please listen to the finished version of the song we are about to produce.
Compared with the higher editions, Live Lite has limitations, such as handling up to eight tracks and the included instruments and effects, but it is fully capable of producing simple songs.
Downloading the Project File
We are also distributing the project for the demo song.
Please use it for learning and production.

Installing the Product
Installing Live Lite is explained in the article below.
If you get stuck, please make use of it.

About the Song Production Process
Music has various elements such as melody, rhythm and chords, and where you start depends on your preference.
This time, we proceed in a way that suits electronic pop music and is also recommended for beginners: first create the accompaniment other than the vocals, then add the melody afterward.
Creating the Chord Progression
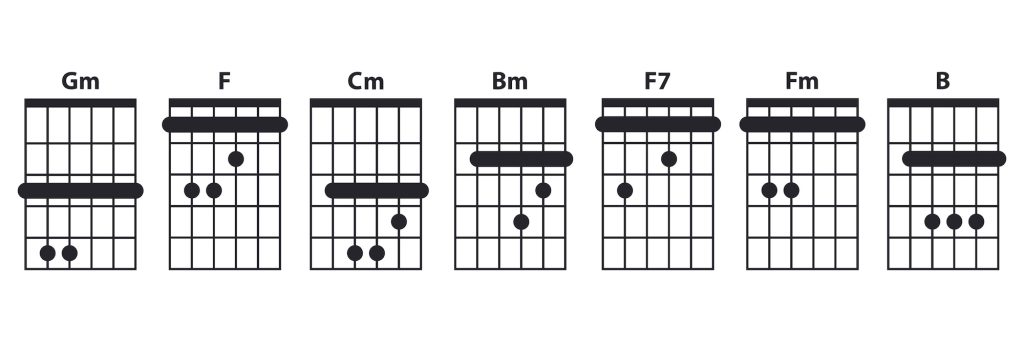
A chord refers to a harmony in which two or more different pitches are stacked.
And the changing of chords over the course of a song is called a "chord progression".
Chords and chord progressions are extremely important elements that create the mood of a song, such as brightness or darkness, and generate drama such as calm and excitement. Pop songs in particular often have easy-to-follow chord progressions, and building this part well instantly creates atmosphere on its own.
We start by entering the chord progression.
Loading a Sound into a MIDI Track
To think about a chord progression pattern, first load some kind of sound.
Live Lite comes with various sounds, and you can search for sounds you like by category under Sounds in the Browser.
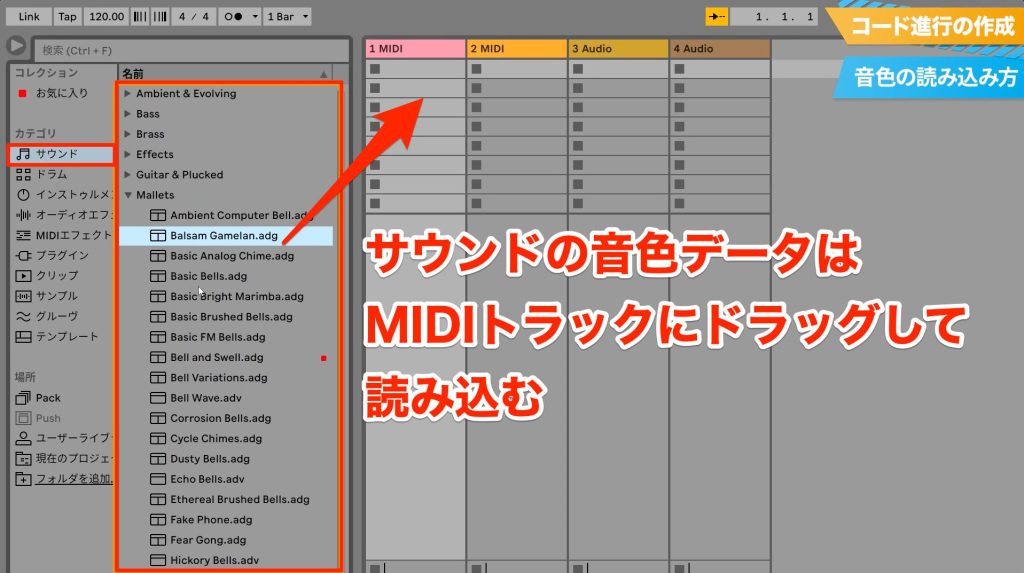
Once you have decided on a sound, drag it onto the track labeled MIDI to load it on that track.
Playing a MIDI Track
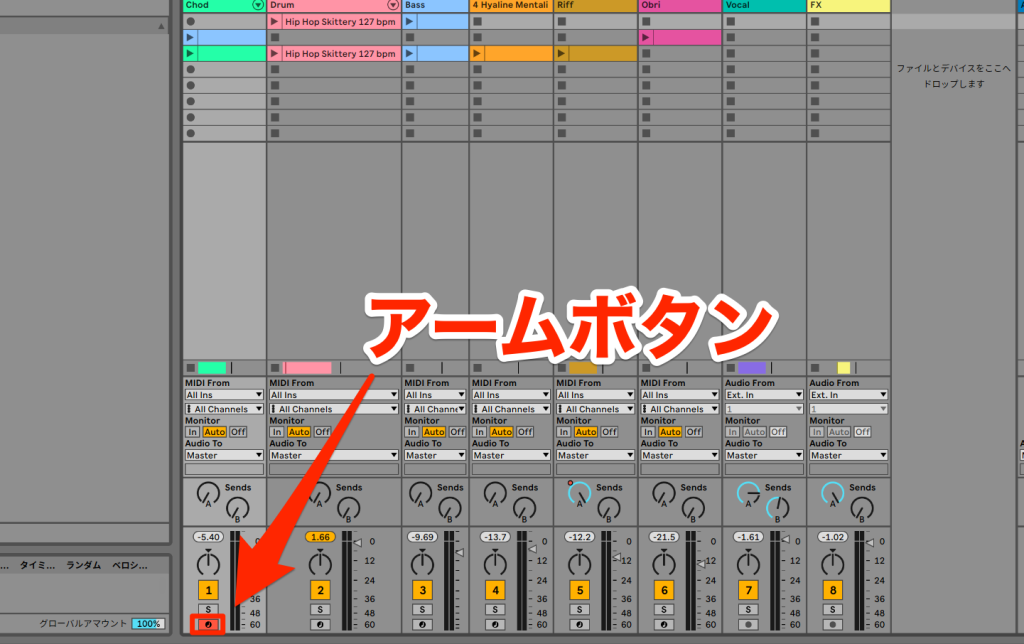
If a MIDI keyboard or similar is connected, lighting the [Arm] button at the bottom of the track red lets you play and record your performance in real time.
Creating and Editing Clips
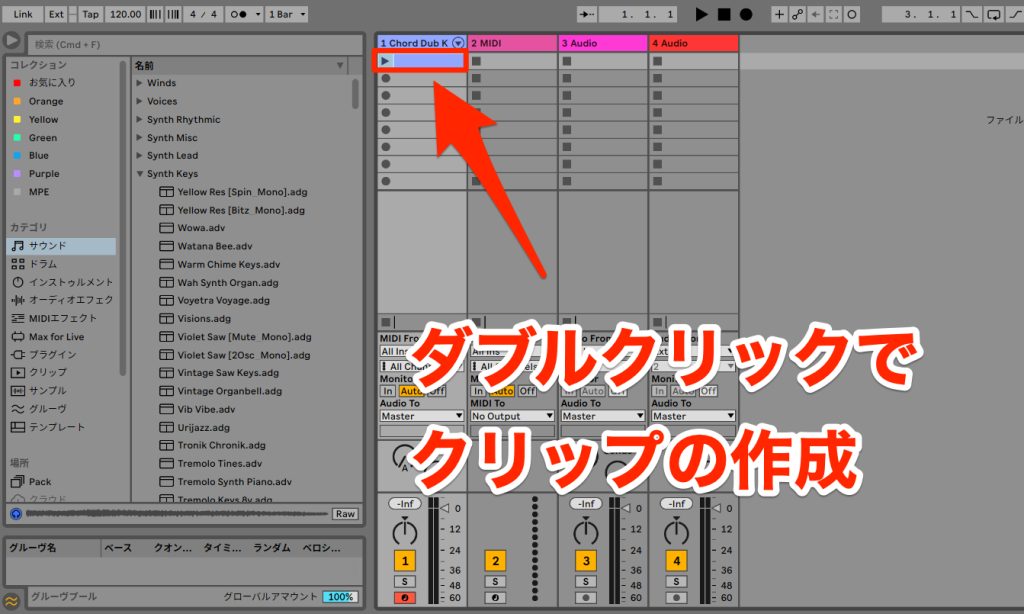
This time we want to enter the chord progression with the mouse, so double-click one of the slots visible on the track where the sound was loaded to create a [clip].
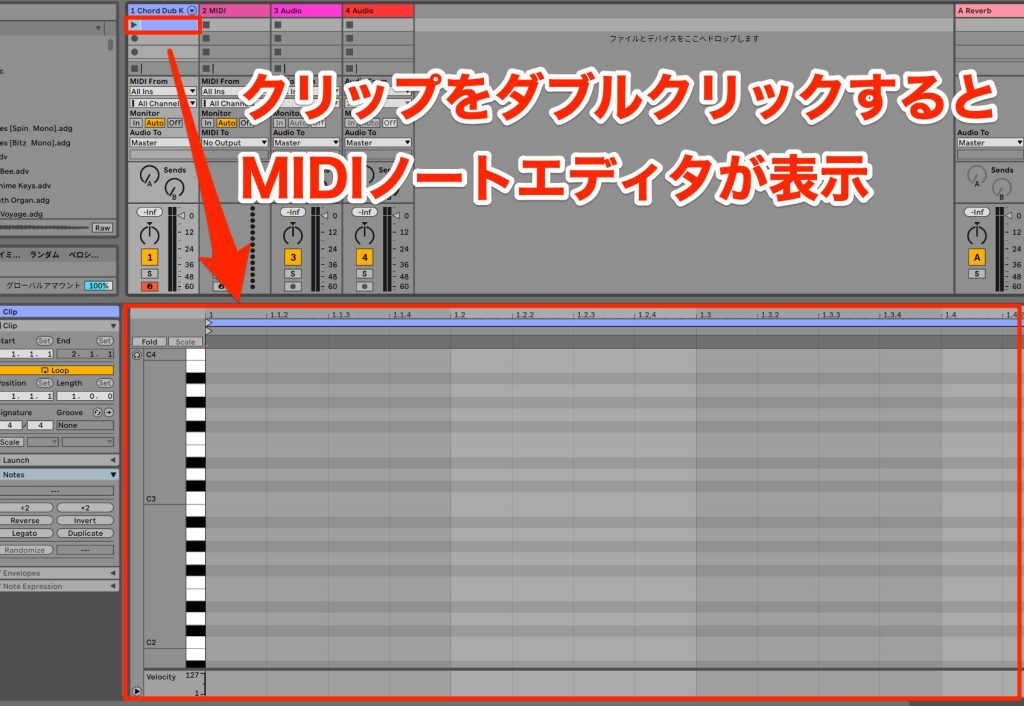
Selecting this clip displays the MIDI Note Editor at the bottom of the screen.
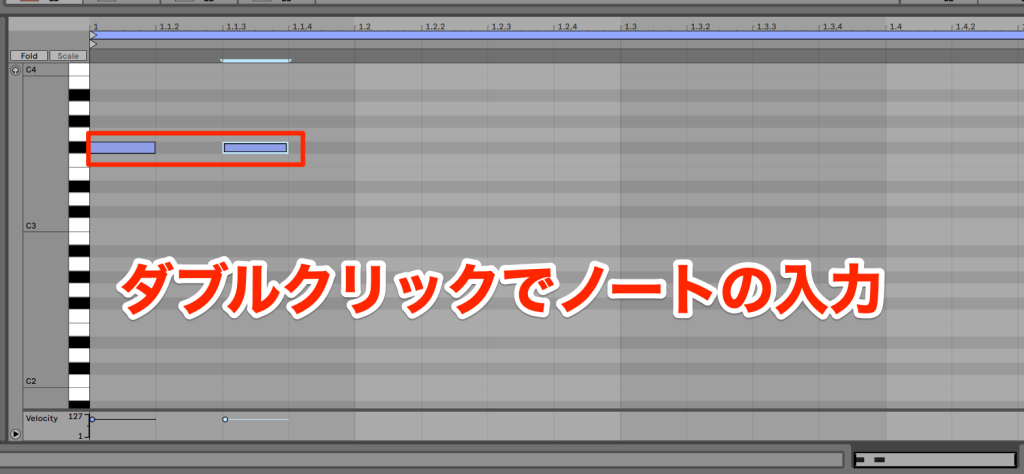
In the editor, you can enter notes by double-clicking at any pitch and timing you like.
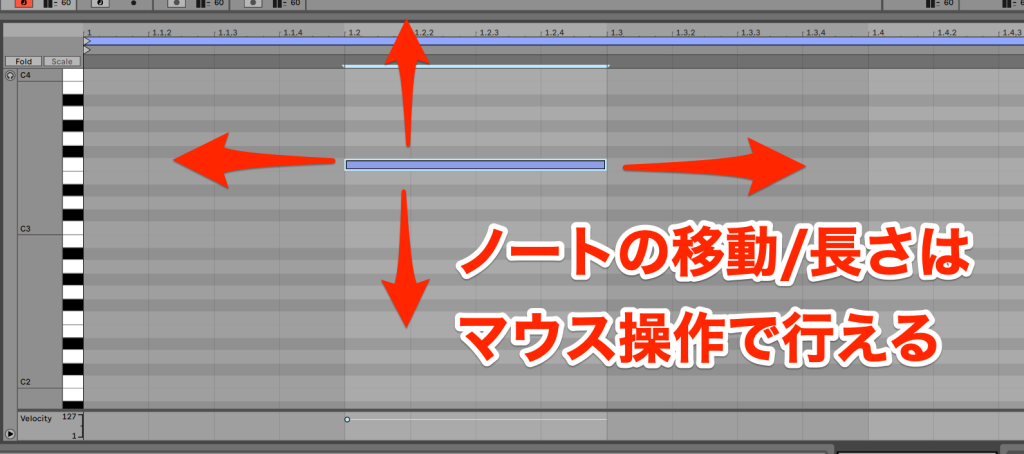
You can change the length of entered notes or move them later using only the mouse, and you can delete notes by selecting them and pressing Backspace or Delete on the keyboard.
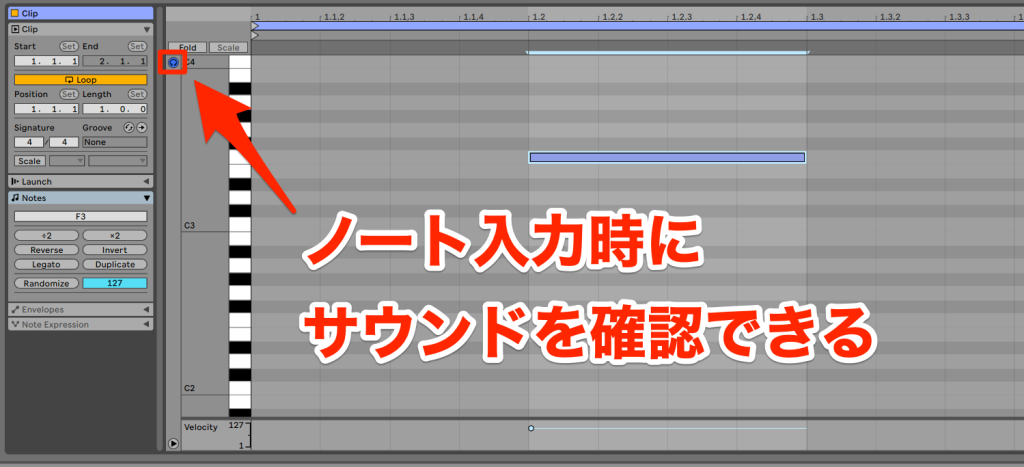
If you want to hear the entered notes, light up the small headphone icon at the top left of the screen.
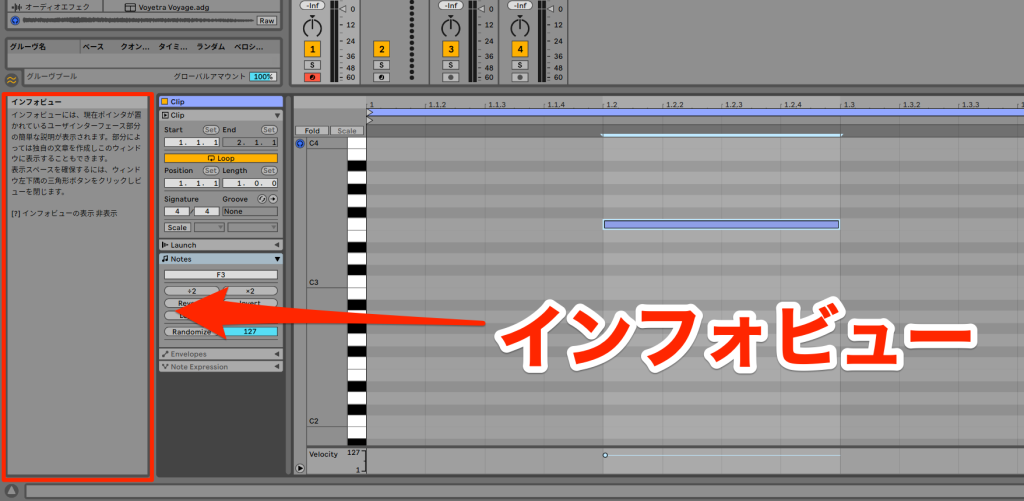
If you want to know the role of buttons and parameters like these, Live shows an explanation of whatever the mouse cursor is pointing at in the [Info View] at the bottom left of the screen, so beginners should make good use of it for learning.
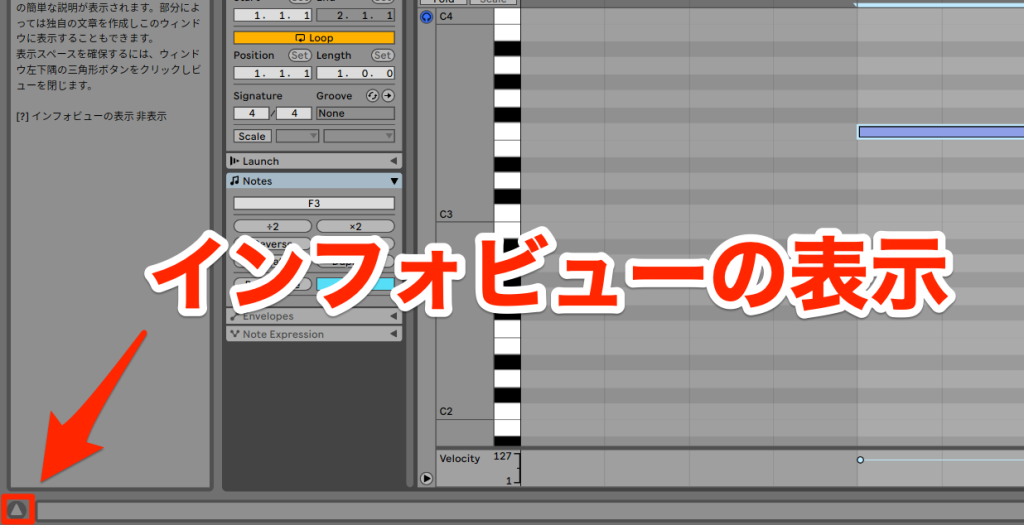
If it is not displayed, you can show it by clicking the arrow at the very bottom left.
Setting a Scale for Easy Entry
Now that you understand the basic operations, let's enter the chords.
In music production, you first need to set the key (tonality), and this time we choose the simplest one, [C major].
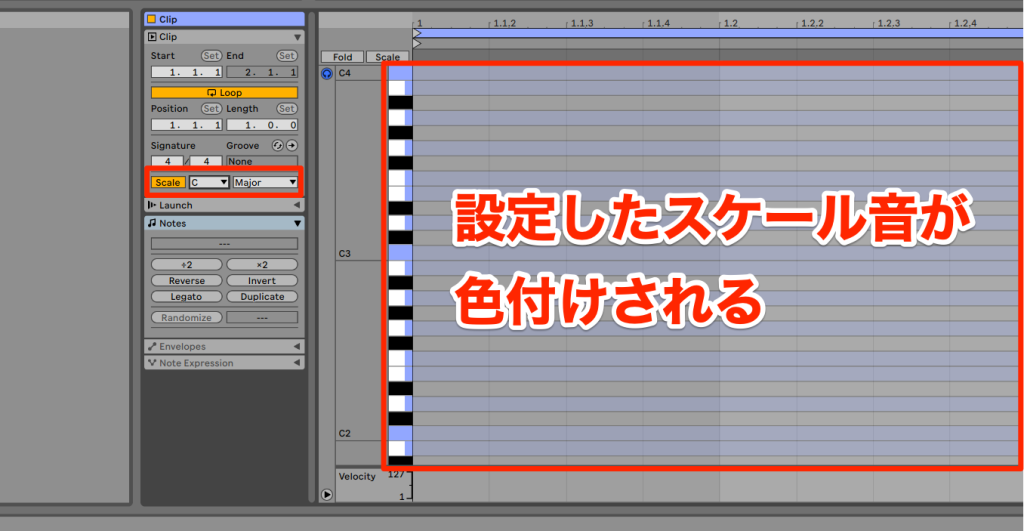
Light up [Scale] in the panel labeled [Clip] at the bottom left and specify the root note and scale, and the notes in the MIDI Note Editor are color-coded.
Only the notes of the set scale are colored, so it is convenient to keep it on.
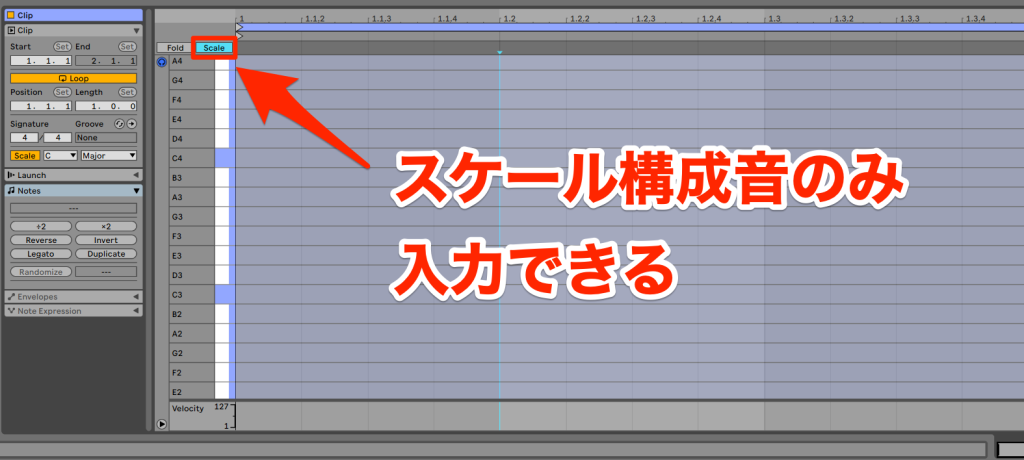
Furthermore, lighting up [Scale] in the MIDI Note Editor lets you enter only the notes in the scale, so it is recommended when you want to enter notes without hitting wrong ones.
Entering Chords
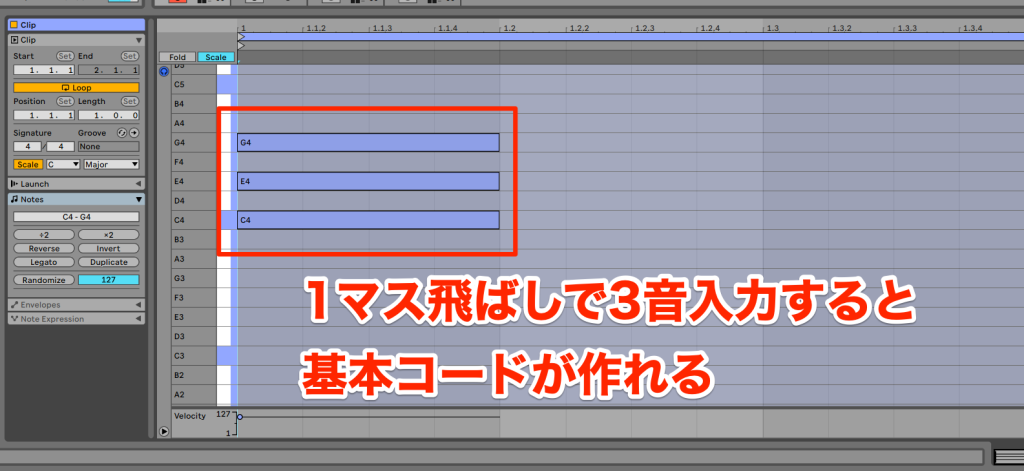
From this state, stacking three notes, skipping one step each time, creates the most basic form of a chord.
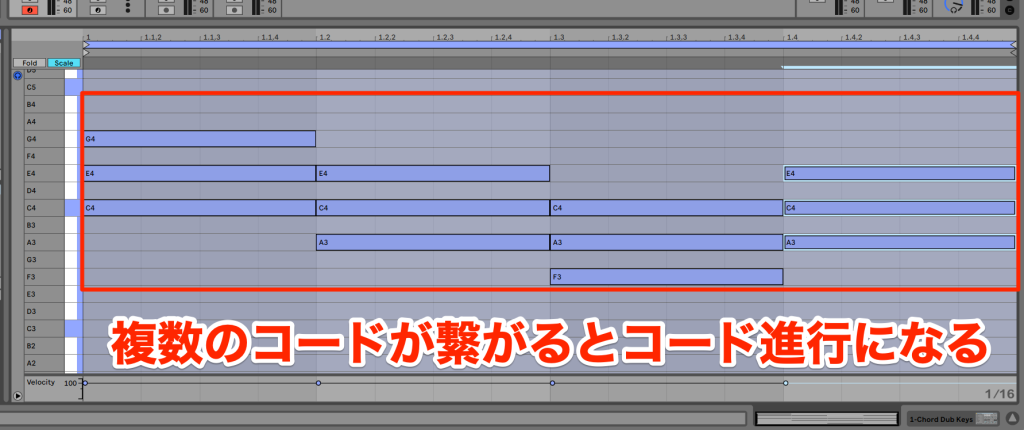
Once you have one chord, you can change the pitch and connect multiple chords to create a chord progression.
However, the clip we first created is only one bar long, so we want to extend it a little to connect multiple chords.
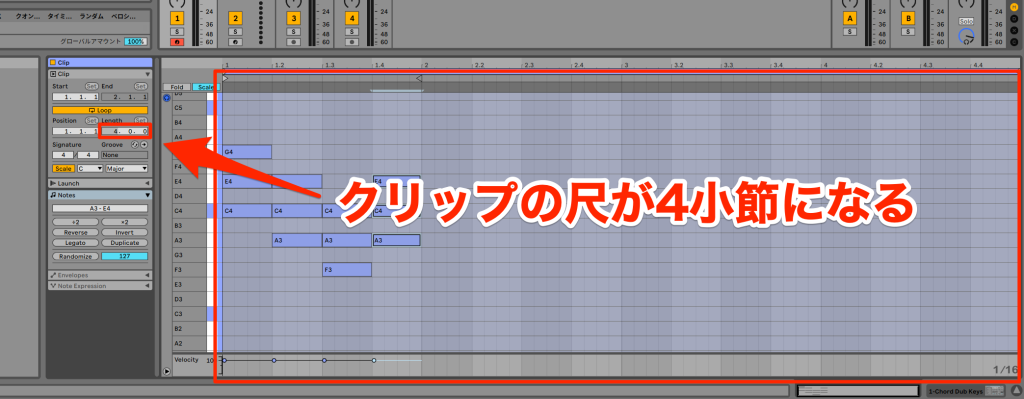
In that case, change the length with [Length] in the Clip panel.
The first number is the number of bars, so this time we set it to 4 to change the clip length to four bars.
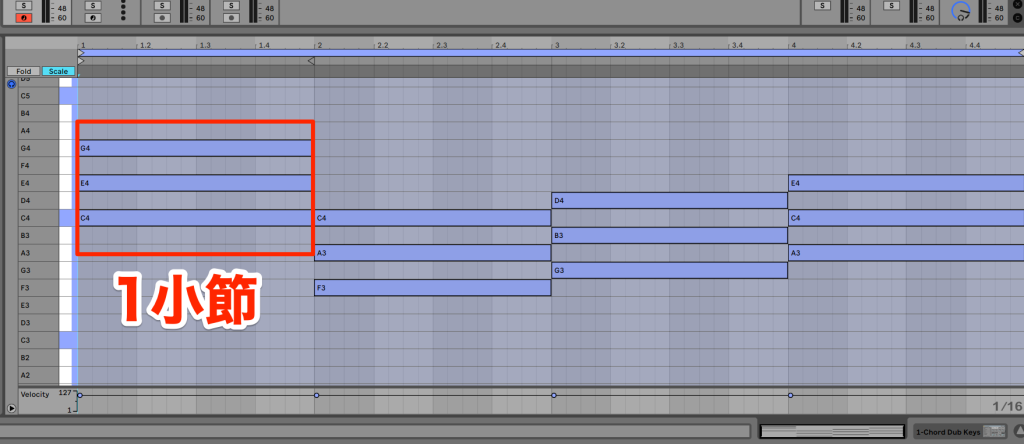
There is no rule for how long each chord is played, but here we use the standard form in which one chord is played per bar and four chords make one cycle.
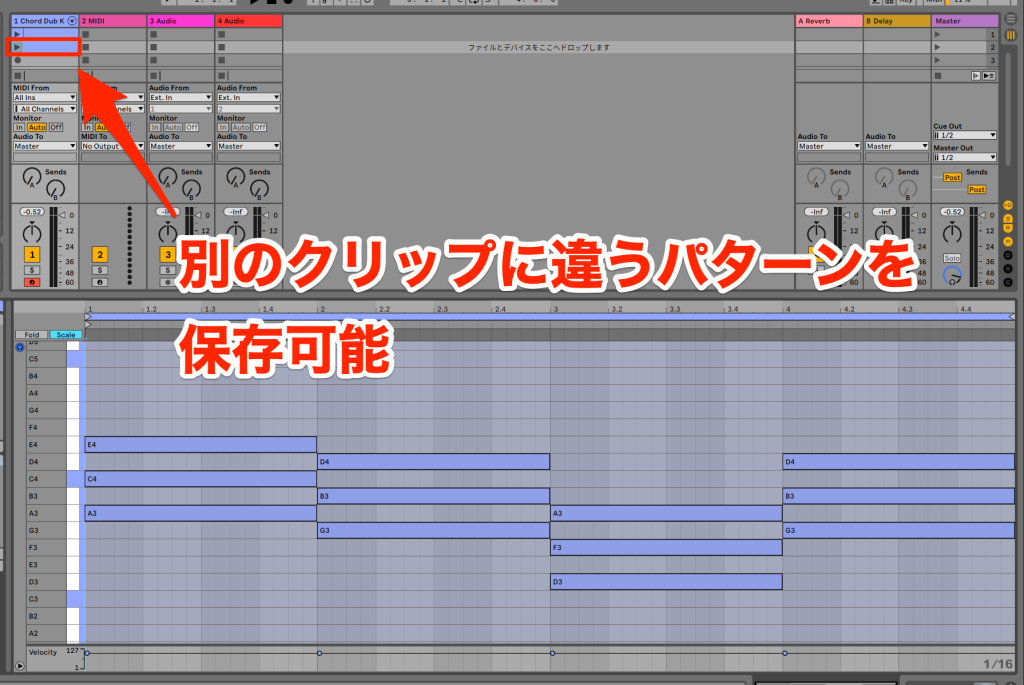
If you come up with more than one you like, it is a good idea to keep them in different clip slots.
Creating the Rhythm Track
Next, we add the rhythm track.
In pop music, rhythm instruments such as drums and percussion are indispensable, so please learn the steps!
There are three ways to enter drums in Live:
- Use loop files
- Choose sounds and enter the rhythm yourself
- Use clips and reuse basic beats
Using Loop Files
Live Lite includes loop samples with drum rhythms already played.
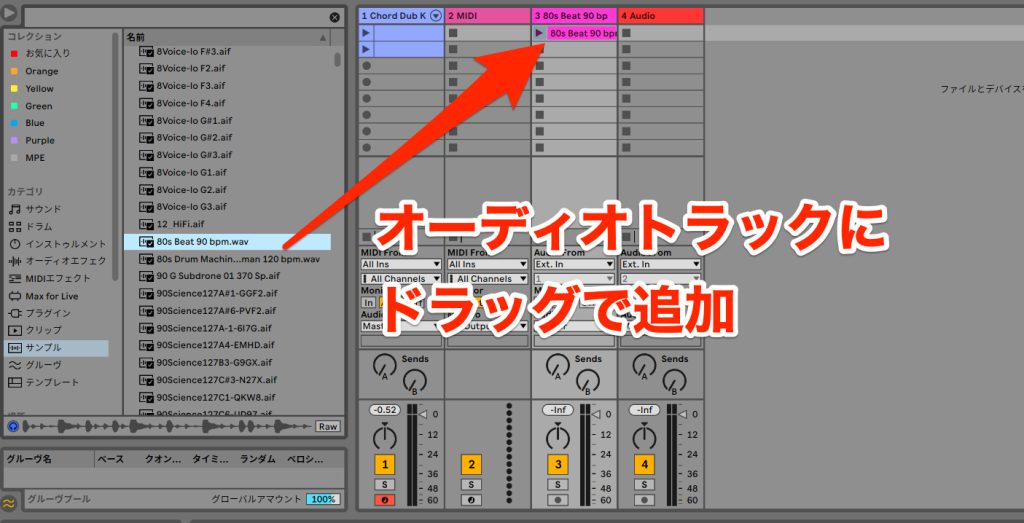
Just by loading a sample with a rhythm pattern from [Samples] in the Browser onto an audio track, you can easily add a rhythm part to the song.
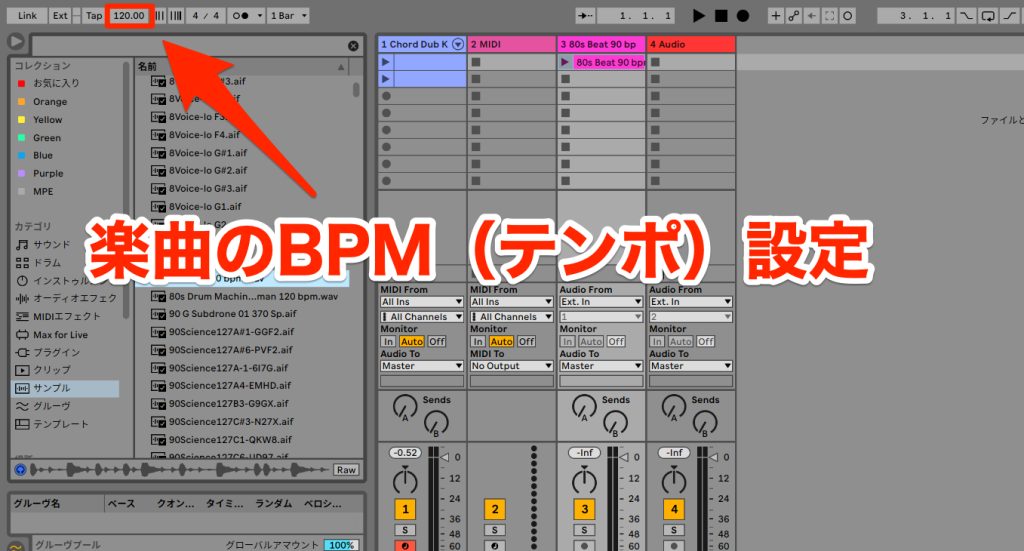
When you change the song's BPM (tempo), the rhythm's tempo can automatically follow.
Choosing Sounds and Entering the Rhythm Yourself
You can also create sounds and patterns to your own taste without using loop samples.
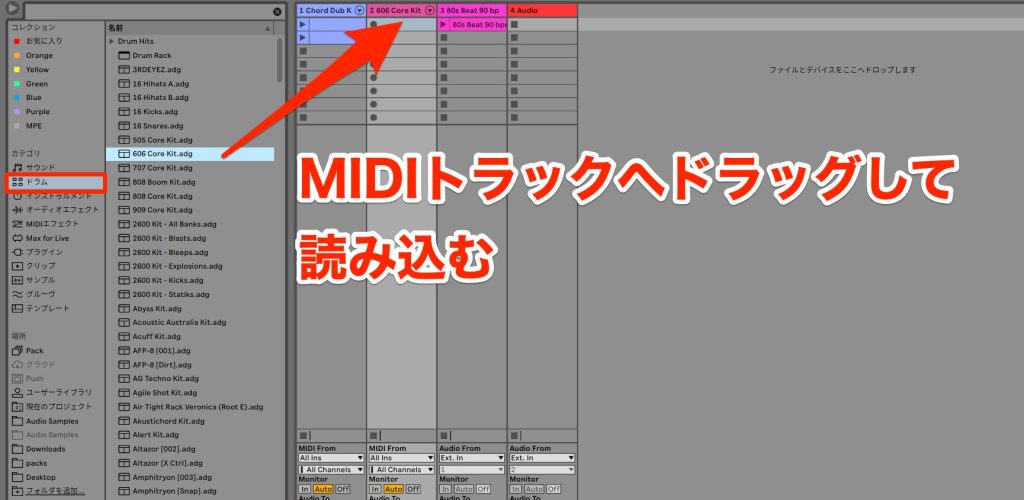
In that case, choose a sound you like from [Drums] in the Browser and load it onto a MIDI track.
As before, create a clip and program a pattern in the MIDI Note Editor.
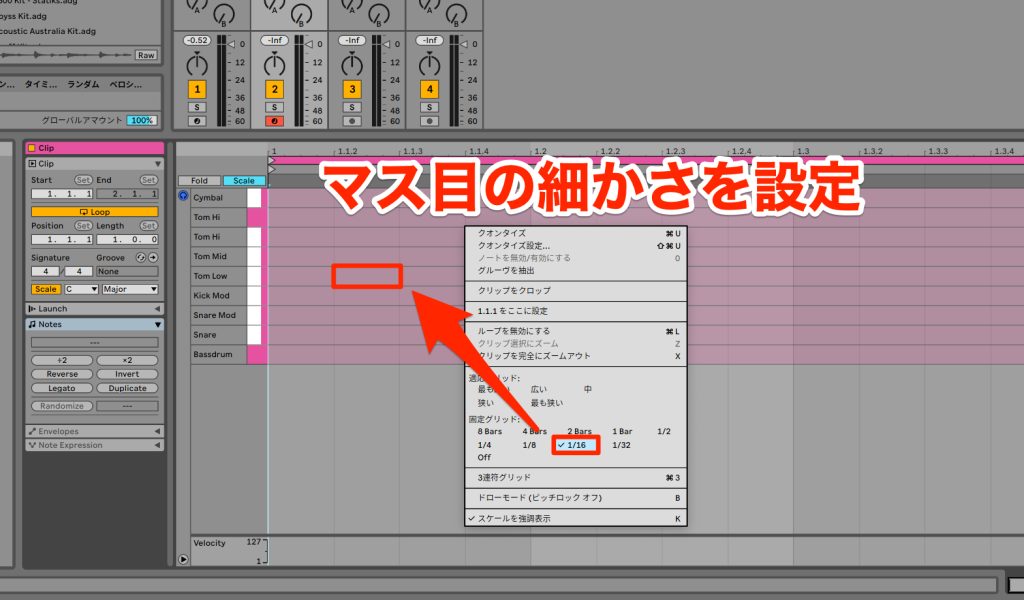
Notes are entered along the grid, and you can change the grid resolution from the right-click menu.
For typical drum beats, we recommend setting it to [1/16].
Using Clips and Reusing Basic Beats
If you find it hard to create a beat from scratch, you can also use patterns that are already provided.
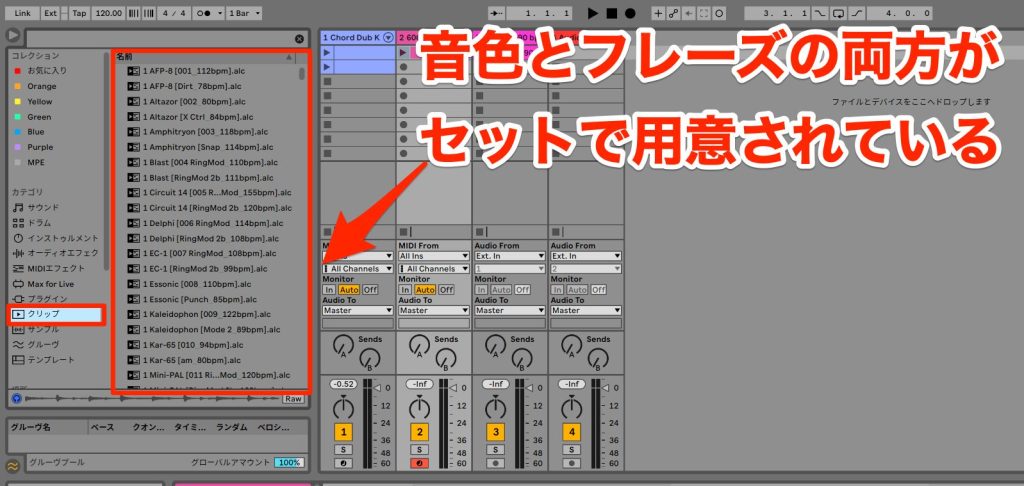
[Clips] in the Browser contains ready-made patterns with various sounds and phrases, including drums.
By dragging one you like onto a MIDI track, you can bring it into your song.
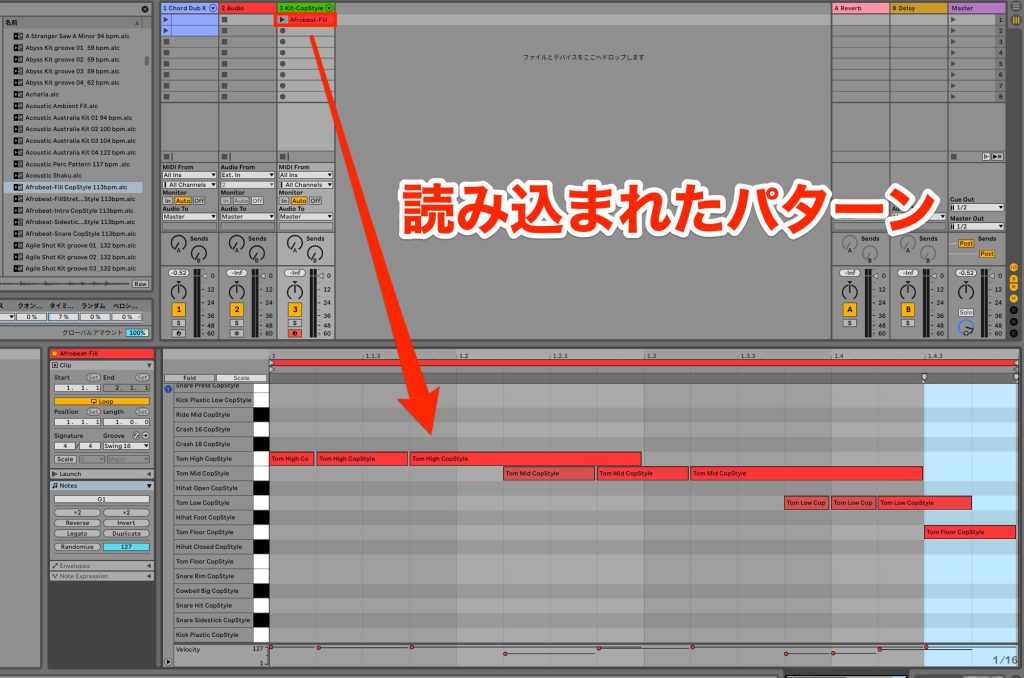
After loading, you can edit the pattern and sounds, so you can also use them to learn drums from existing patterns.
Drums play an important role in expressing the build of a song, so at this stage we recommend preparing rough patterns for the intro, verse, chorus and so on.
Creating the Bass Track
Next, we add the bass track.
The bass, which supports the low end of the song, is another indispensable element of music.
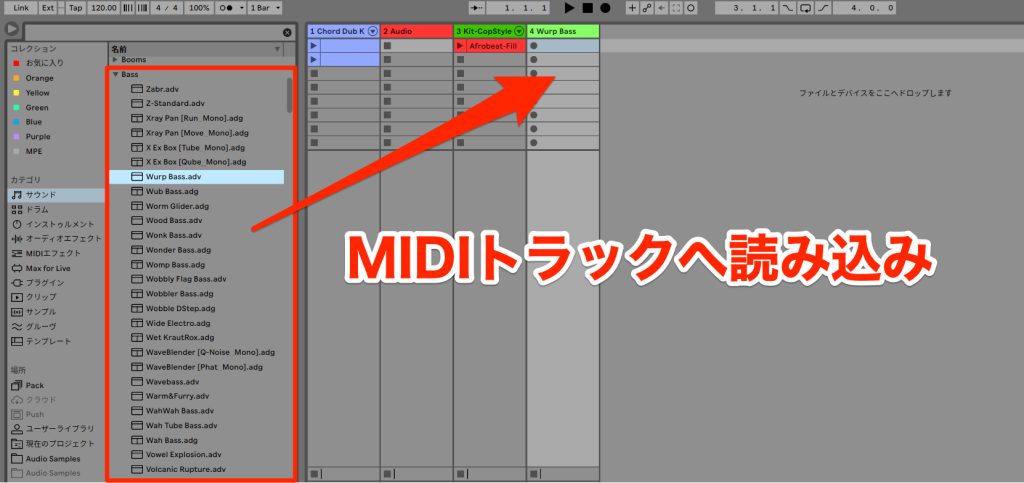
Bass sounds are in the [Bass] category under Sounds, so choose a sound you like and load it onto a MIDI track.
Next, we think about the bassline. This time, we create a pattern that includes the two simplest and most basic features:
- 1. Play the root note of the chord
- 2. Enter notes at the same timing as the kick
We create a pattern with these two features.
Duplicating a Clip
To enter the root notes of the chords, you need to know the chord tones, but if you are not familiar with them, we recommend duplicating the chord clip you created first.
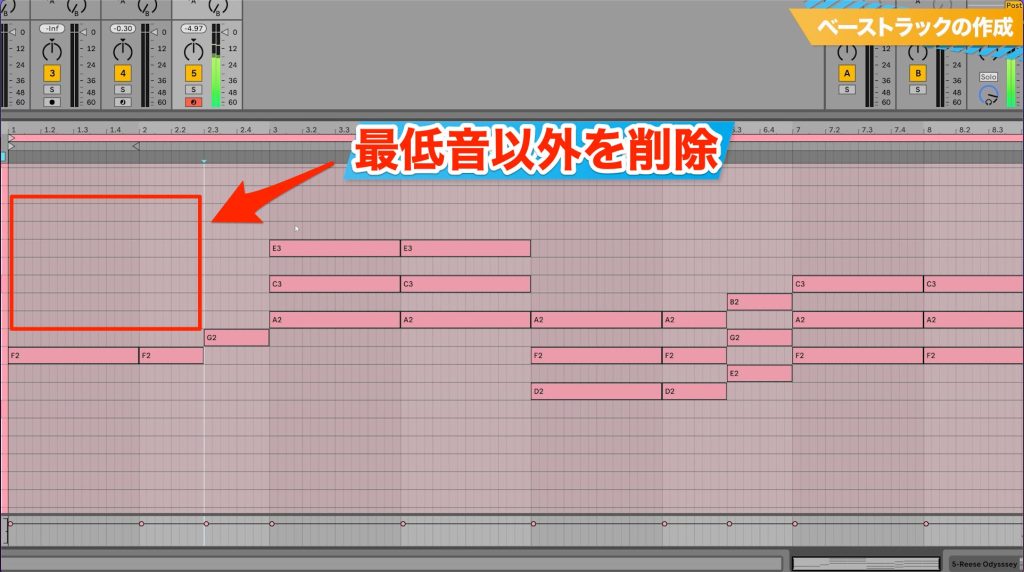
The lowest note in each chord is the root, so delete the other notes.
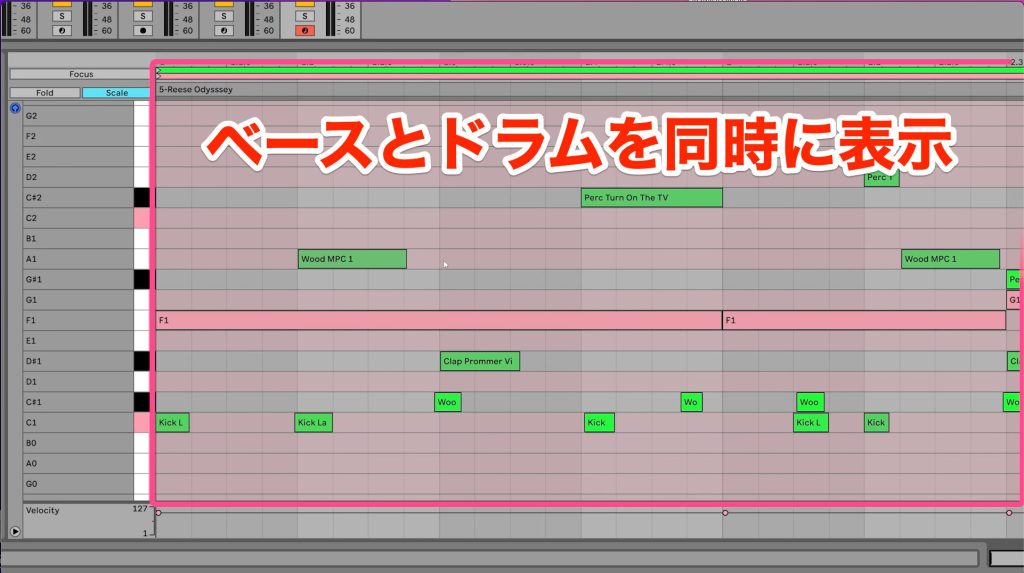
Next, enter notes at the same points where the kick hits. Here, displaying both the drum and bass clips at the same time makes editing more efficient.
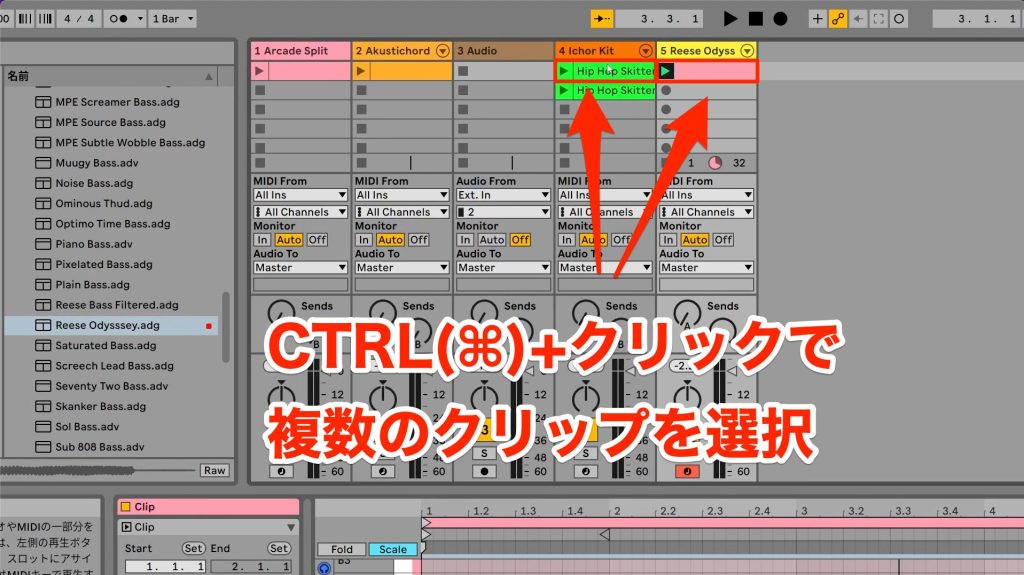
Windows: Control key
Mac: Command key
Hold this down and click multiple clips in turn to display them at the same time.
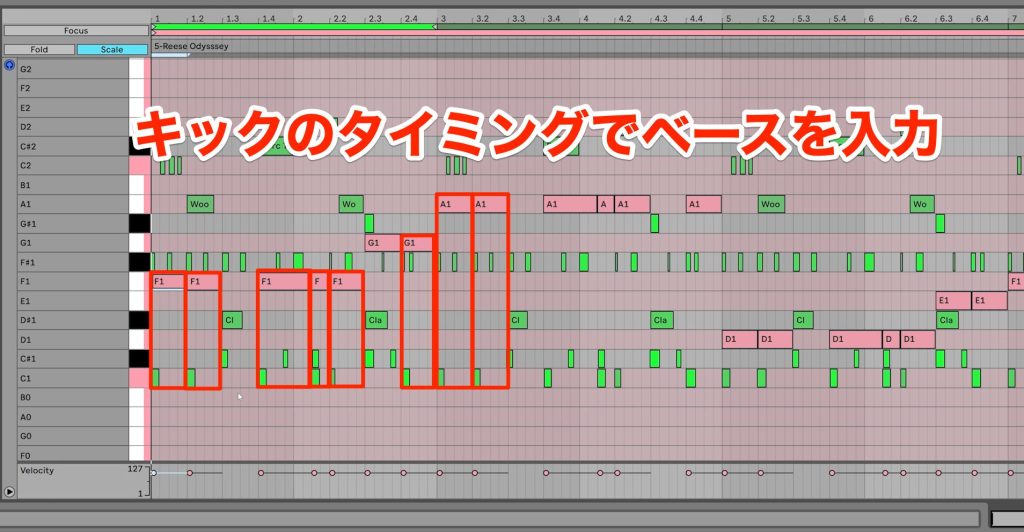
Then split the bass notes at the timings where the kick is entered, as shown in the image.
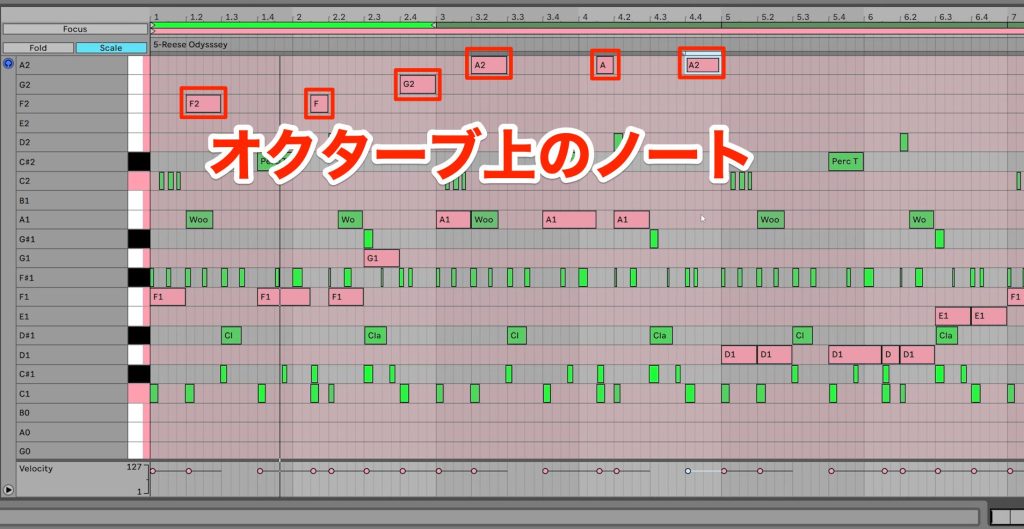
If using only the root note feels flat, you can add more dynamic rhythmic nuance by using notes an octave higher.
Using the same steps, create a bassline for each of the drum patterns you prepared for the different sections.
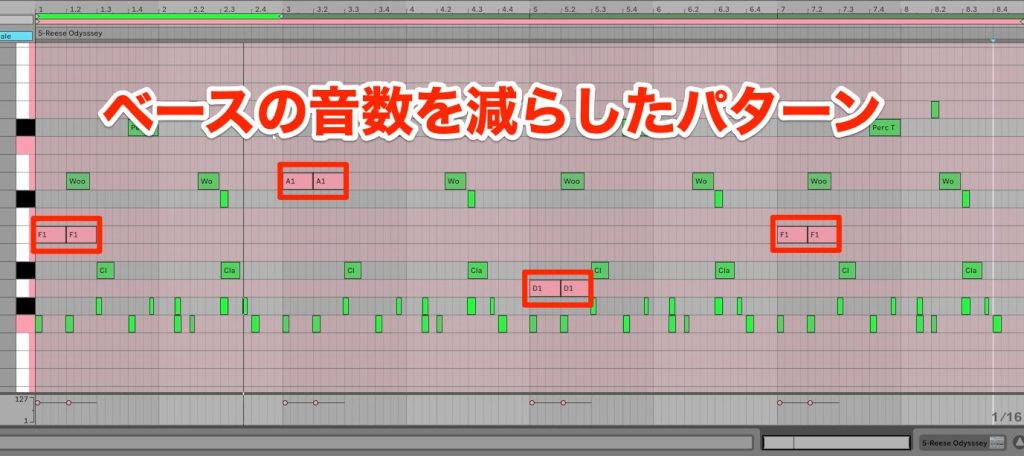
For example, in quiet sections, you can give the song contrast by varying it from the exciting parts, such as resting the bass, playing it higher, or using fewer notes.
Finishing the Chord Backing
Next, we finish the performance of the chords we created to match the drums and bass.
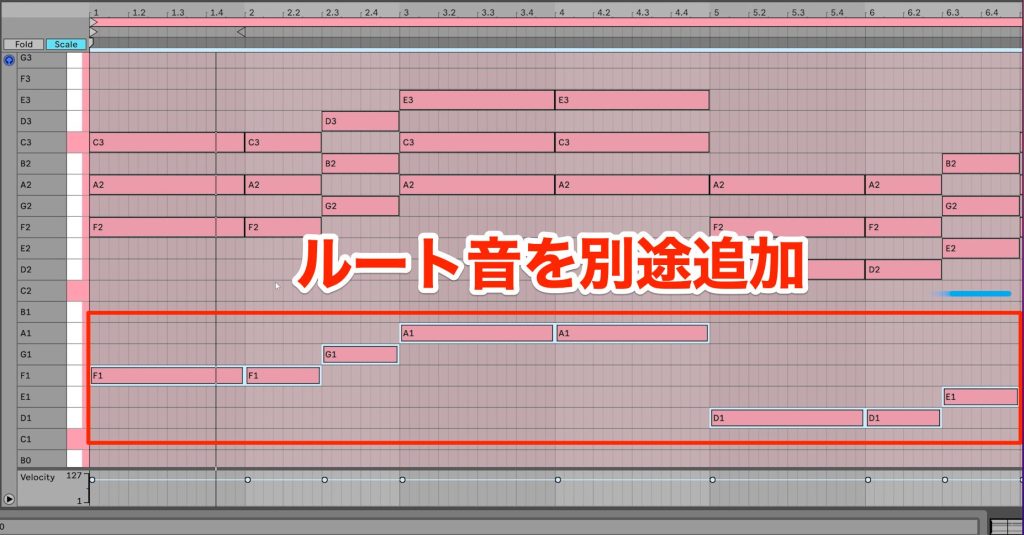
First, add the root note of each chord separately in a low position so that the root can be clearly felt even in sections where the bass rests.
It is not something you must do, but adding mid-low notes has the effect of increasing the song's thickness even with few tracks.
Next, we introduce the most basic pattern for playing chords: keeping the pitch range of each chord aligned.
As long as the chord tones are the same, you can change the pitch of the notes, which gives the accompaniment a sense of stability.
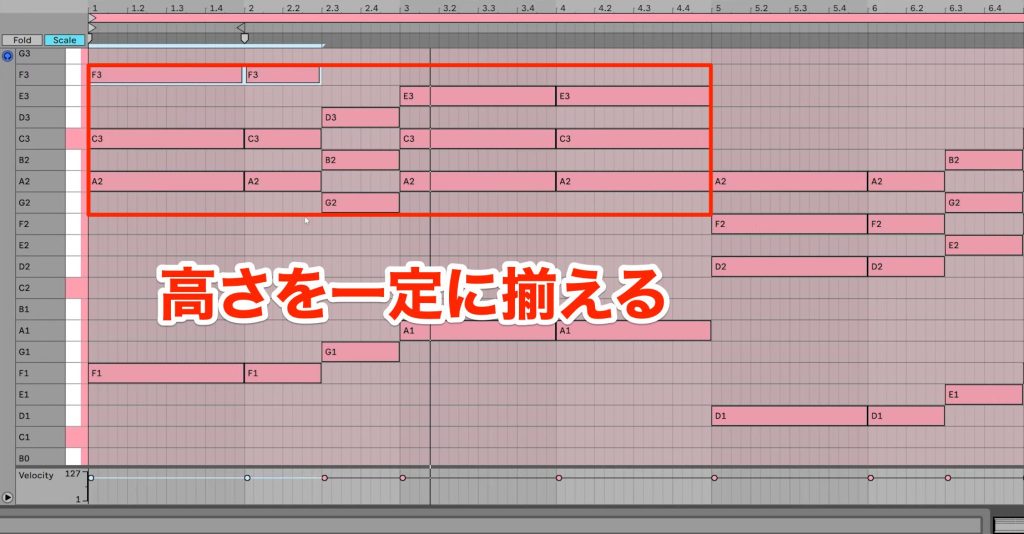
Move notes freely to taste so that they sit at an even average pitch.
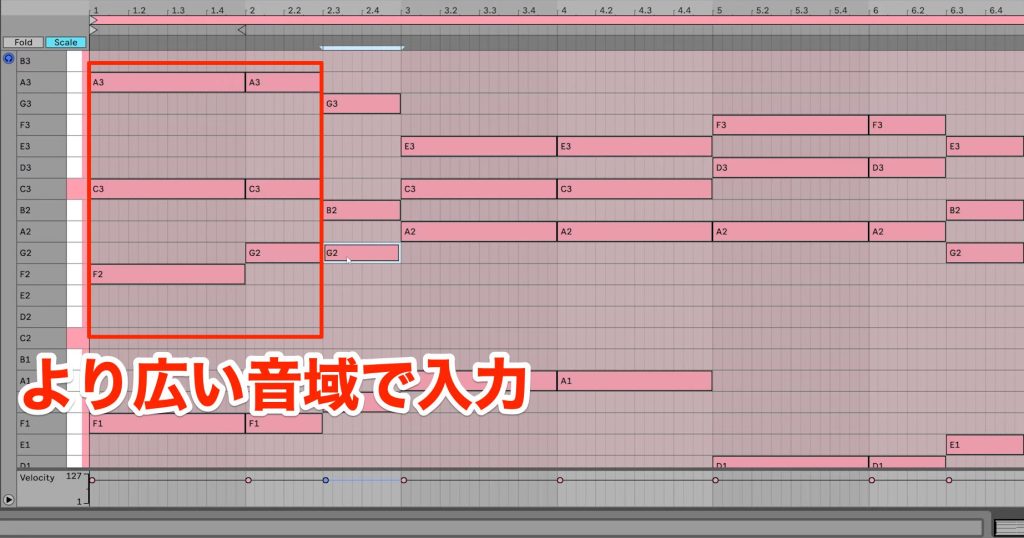
There is also a pattern in which you spread the notes over a wider range to widen the pitch span.
This gives a more brilliant impression and pairs well with sections where you want to create excitement, such as the chorus.
Adding Flow to the Song
At this point the framework of the song is complete, so next let's move on to building the song's structure.
Building the Structure in Arrangement View
In Ableton Live, the Session View we have been working in is suited to making music in units of patterns and has many uses, such as trying combinations of clips, but it is not well suited to creating song development along a timeline.
To actually finish a song, we use the other editing mode, [Arrangement View].
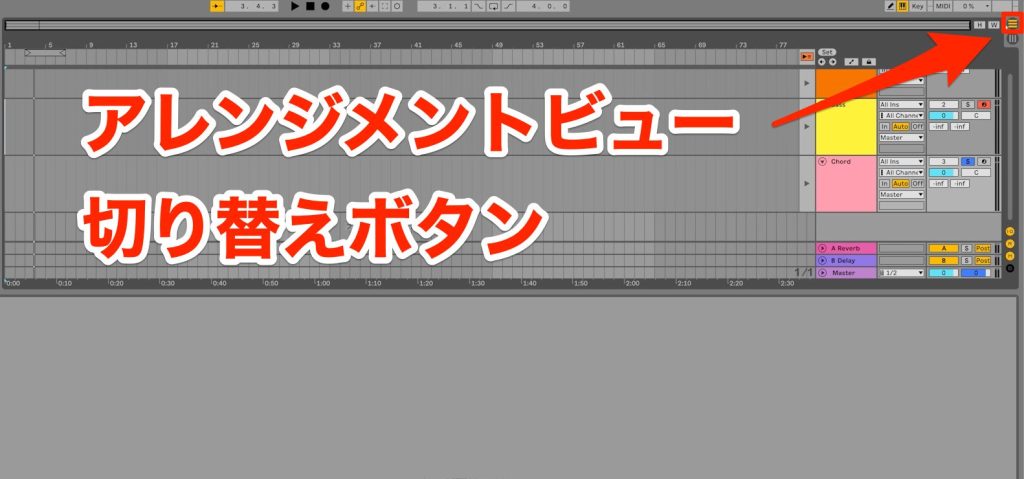
Arrangement View, shown by clicking the button with horizontal lines at the top right of the screen or pressing the [Tab] shortcut, allows timeline-based editing and is designed to make the flow of the song easy to grasp.
We load the phrases created so far onto this screen to give the song its flow, and there are multiple ways to do this.
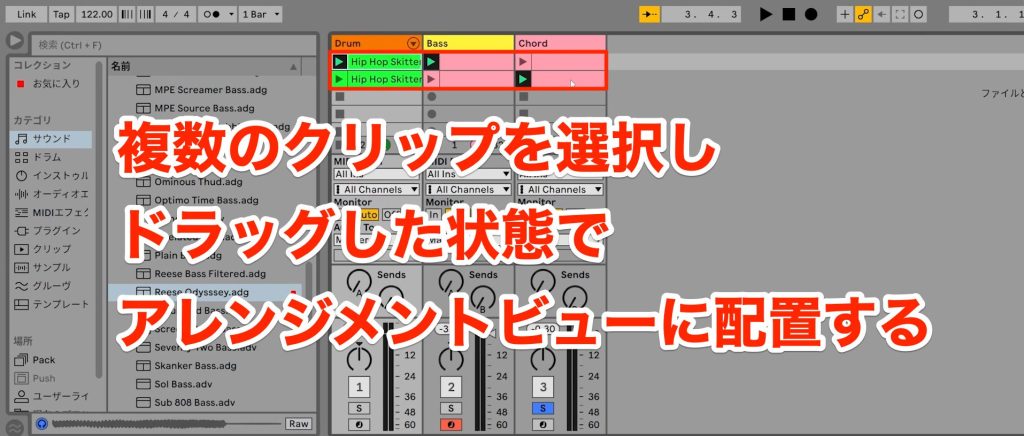
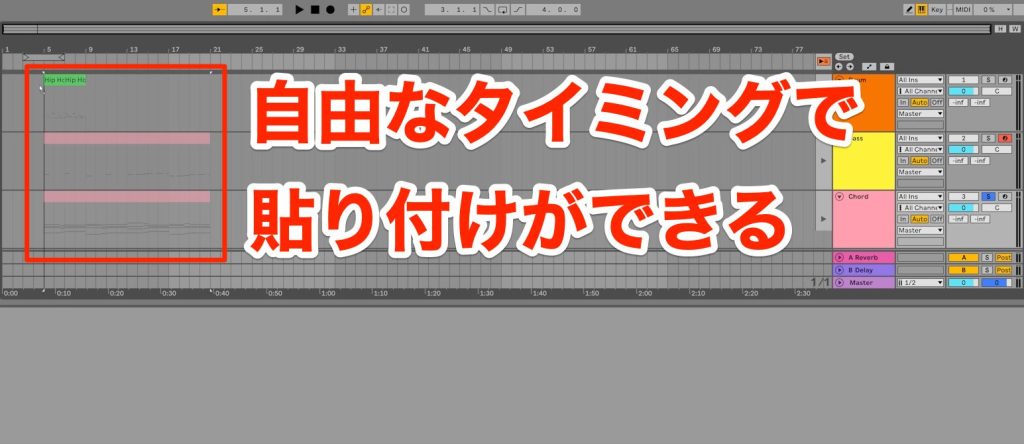
The first is to return to Session View and move clips by drag and drop. You can also select multiple clips while holding Shift and move them all at once.
The other way is to play the Session View clips with the [Arrangement Record button] at the top center of the screen lit.
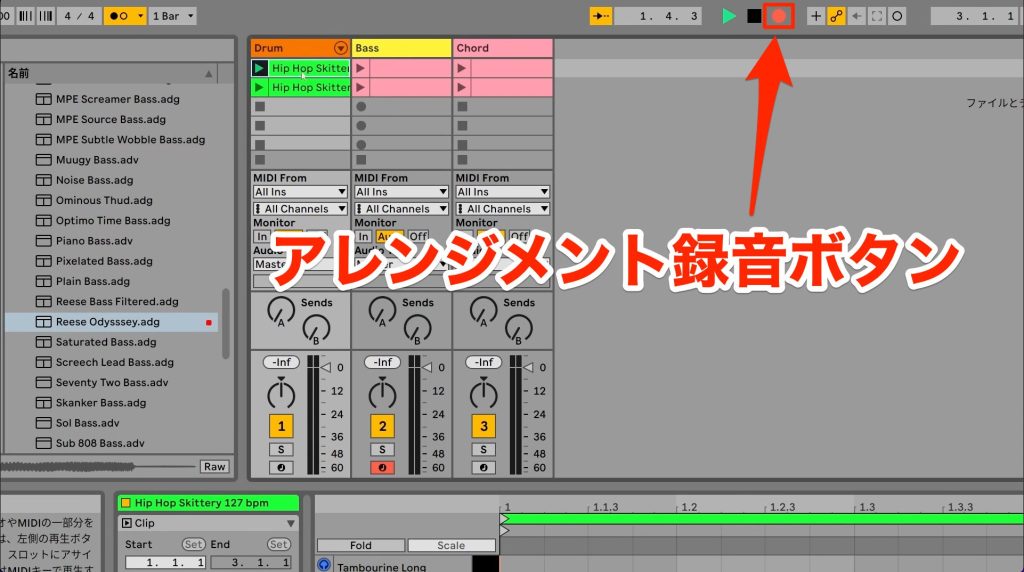
When you play and stop clips while recording, those actions are recorded in Arrangement View, so you can build the flow of the song in real time.
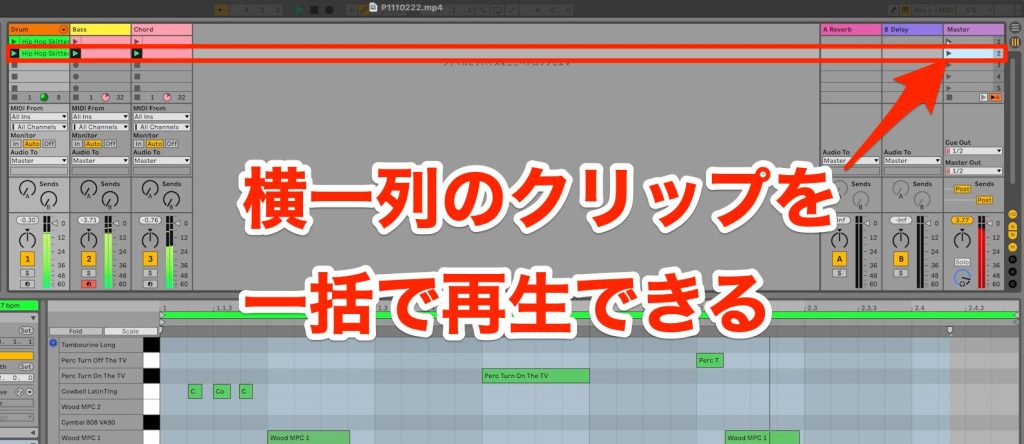
At this point, pressing the play button on the Master track lets you control all the clips in a horizontal row at once, which is convenient.
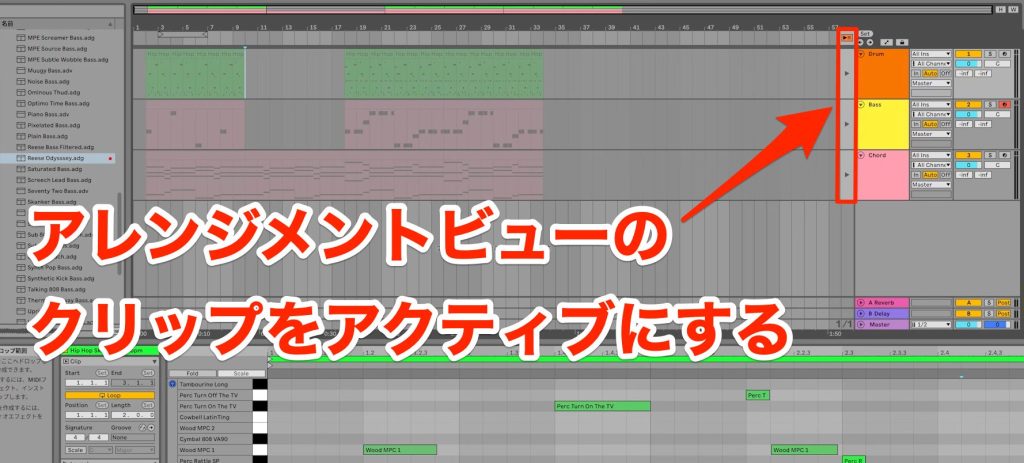
To play the clips recorded in Arrangement View, click the [▶︎ button] shown at the right of each track or the orange play button above them, and the tracks in Arrangement View will play.
If you go back to Session View and play a clip, the clips in Arrangement View stop and are grayed out.
Until you get used to it, it is hard to tell which side's clips are playing, so we recommend learning this switching method well.
Adding the Melody
Melodies are performed with various sounds such as vocals and instruments, and for vocals you can record your voice with a microphone, or you can enter it by programming with an instrument as before.
This time, we explain the steps for recording live vocals with a microphone.
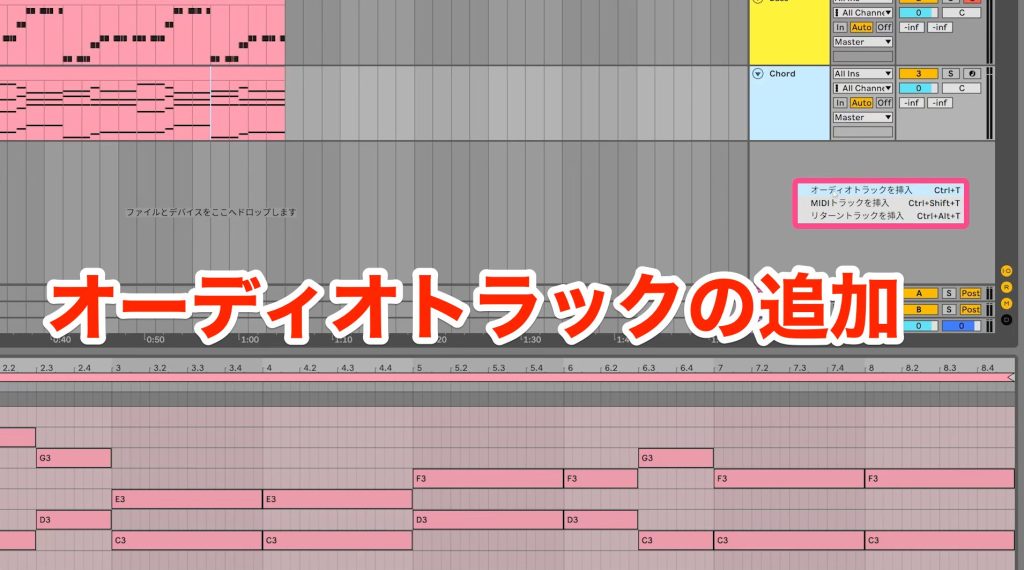
Prepare an Audio track to record audio.
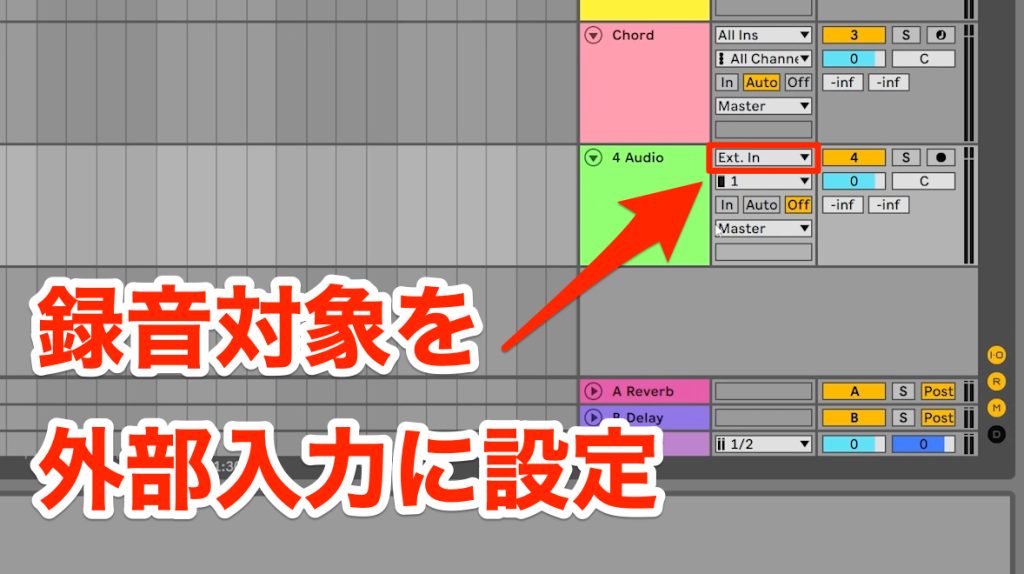
Next, change the track's input type to [Ext. In] so that you can record sound coming in from outside.
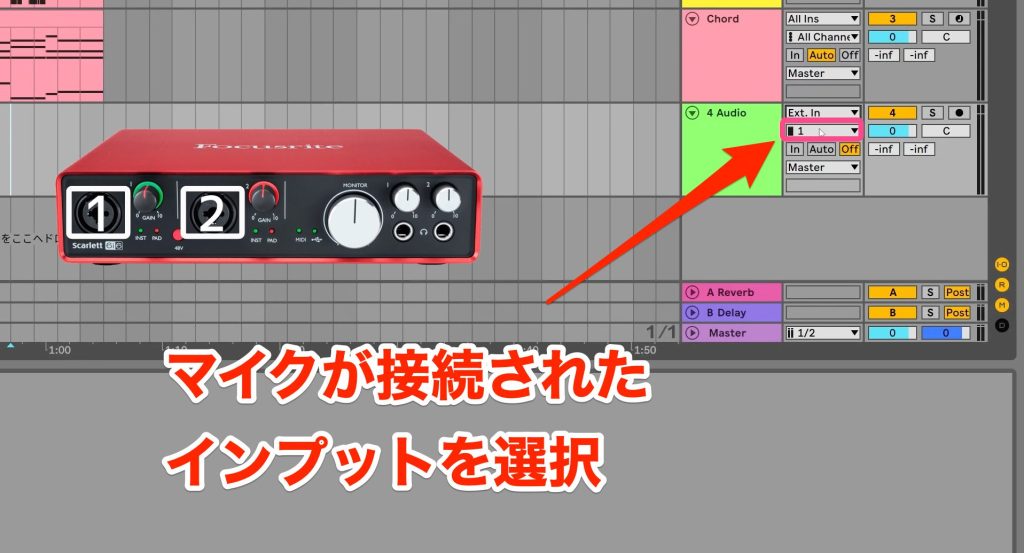
If your audio interface has multiple inputs, you need to choose which external input to record, so in that case choose the input the microphone is connected to.
If your voice is actually being picked up by the microphone, the indicator will respond.
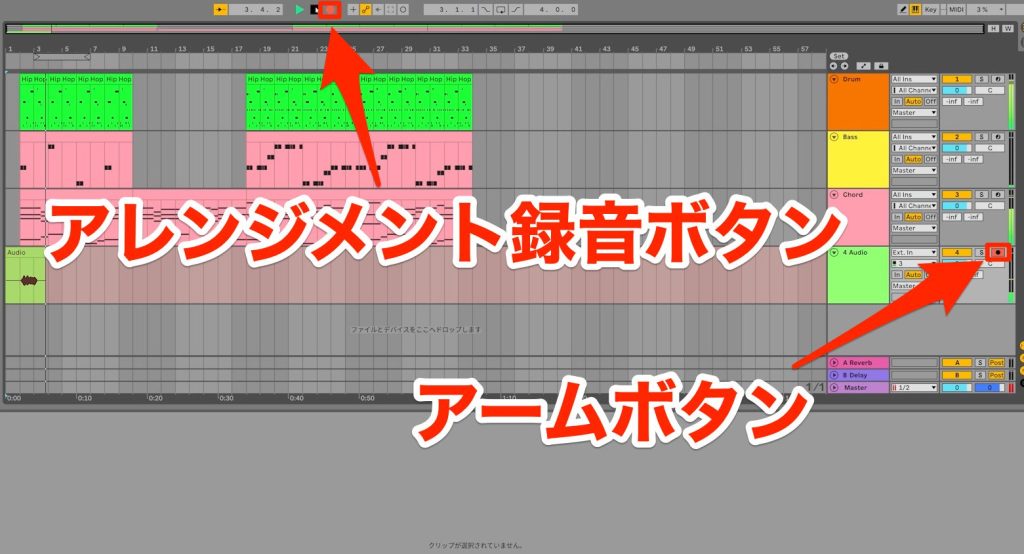
Once everything is set, light the [Arm button] and press the Arrangement Record button, and recording starts from the specified point.
Entering Decorative Phrases
Finally, let's add some decorative phrases.
With rhythm, bass, chords and melody, the music sounds complete enough, but adding decorative phrases can make it even more brilliant.
Here, as representative decorative phrases, we introduce
- 1. Arpeggios
- 2. Riffs
- 3. Sub-melodies
these three patterns.
Adding an Arpeggio
An arpeggio, also called a broken chord, means playing the notes of a chord, in which multiple notes are stacked, one at a time.
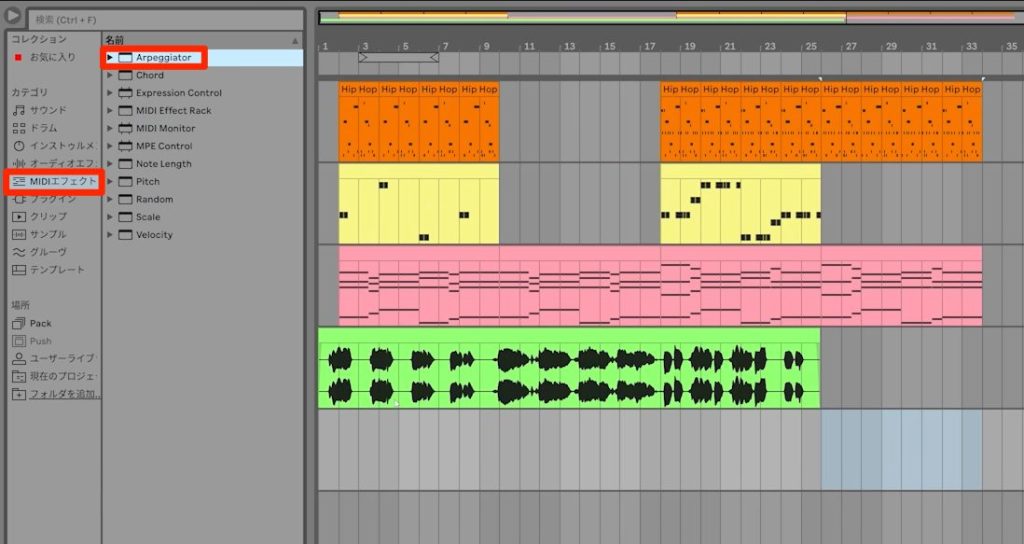
Live has a MIDI effect called [Arpeggiator], and adding it to a MIDI track lets the entered chords be played automatically as arpeggios.
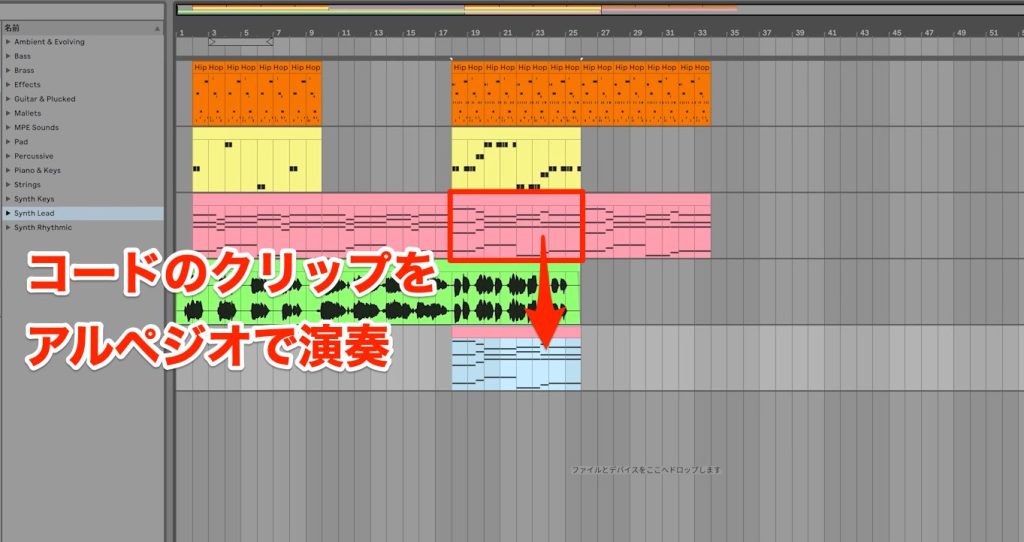
Let's add a new MIDI track right away and have the chord clip played as an arpeggio.
Movement is added to the chord accompaniment.
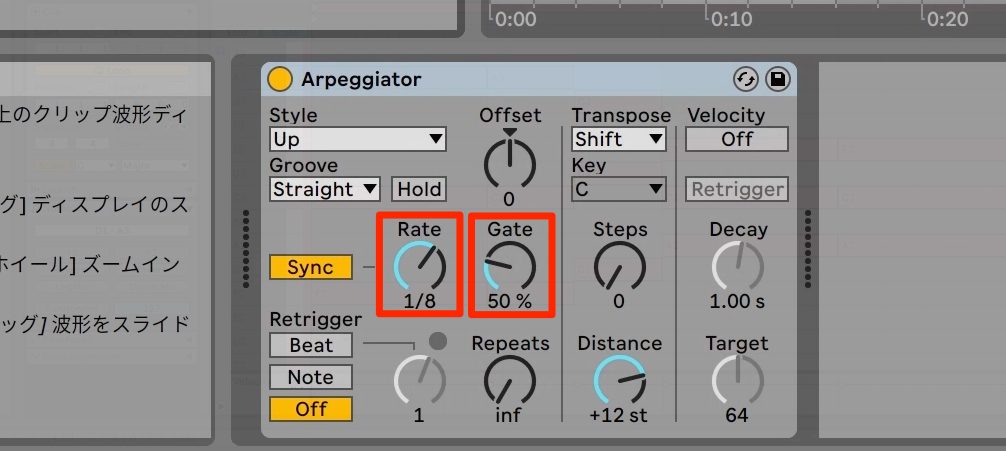
With the Arpeggiator, you can set note resolution with [Rate] and note length with [Gate], so adjust them to taste.
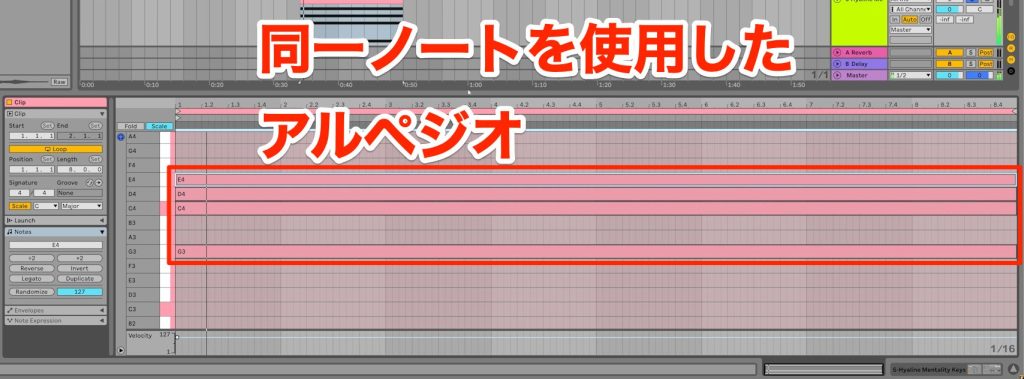
Arpeggios are also often used for things other than the chords, such as patterns that keep playing the same chord.
In this way, you can add breadth to the harmony.
Adding a Riff
A riff refers to a repeated (refrain) phrase, characterized by a simple, memorable melody.
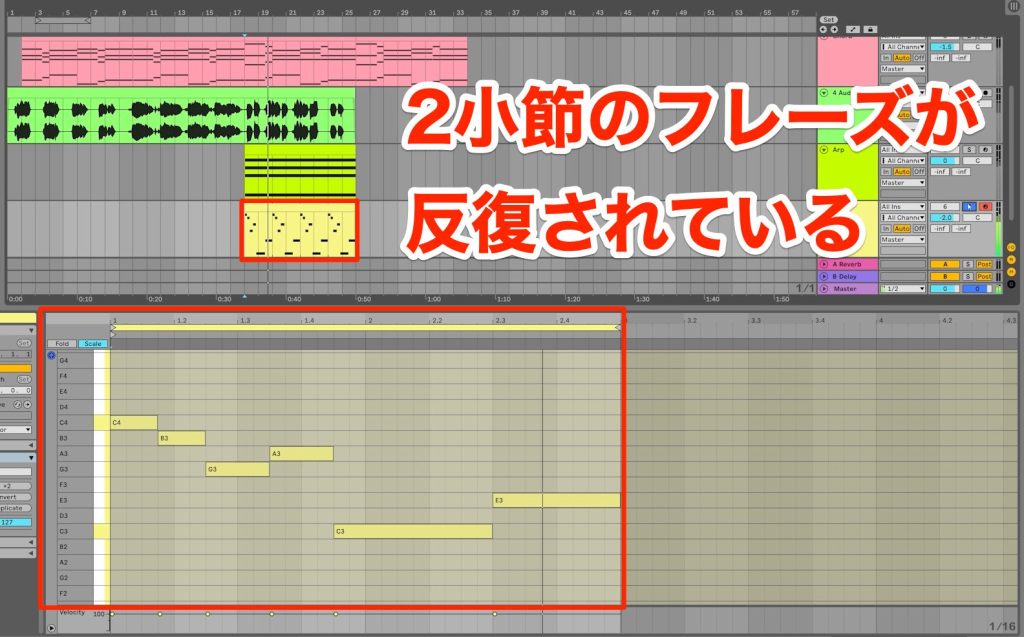
To give the impression of repetition, we recommend making the phrase about two beats or two bars long.
If it gets boring as it keeps repeating, it is also a good idea to change part of the phrase in places.
Adding a riff gives a more brilliant impression!
Adding a Sub-Melody
The last one, a sub-melody, refers to another melody prepared separately from the main melody.
Basically, you can use any melody you come up with freely, but it is important to make sure it does not get in the way of the main melody.
When entering the phrase, relative to the main melody:
- Keep some distance in pitch so they do not clash
- Where the main melody moves a lot, keep the sub-melody's movement restrained
The key is to create it while paying attention to these points.
Here, we add one to the quiet pre-chorus section.
We have made three decorative phrase patterns, and by varying them, such as using several in exciting places like the chorus and holding back in quiet places, you can give the song contrast.
Adding Thickness to the Sound
When producing a song, you often run into situations where the sound lacks thickness.
Adding new phrases is effective in such cases, but if too many tracks with different movements overlap, the track you want people to hear can become hard for listeners to catch.
In such cases, we recommend a technique called [layering], which stacks a different sound on a track you have already made.
Live has a feature called the [Instrument Rack], which lets you stack and play multiple instruments within a single track.
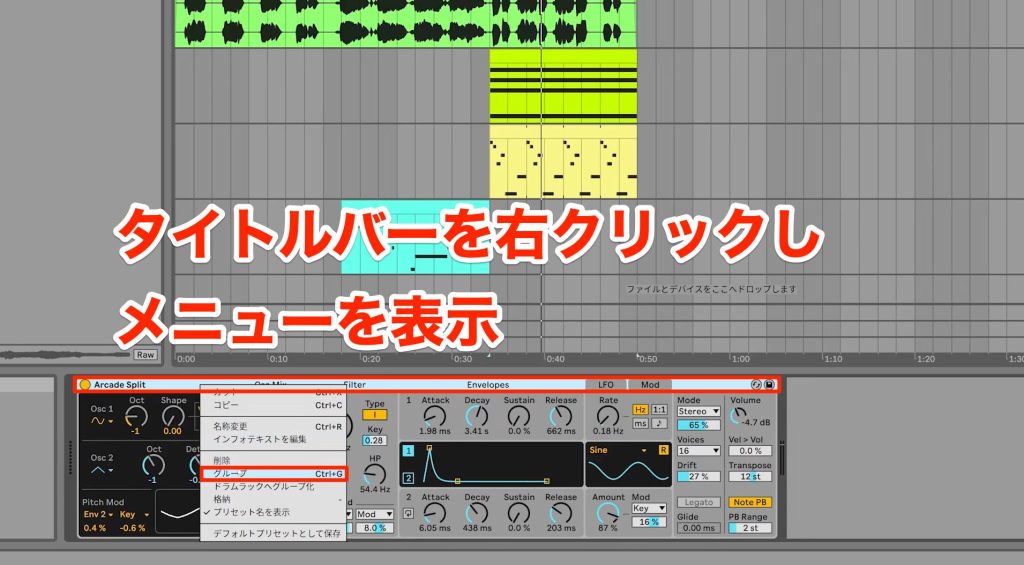
Right-click the title bar of the instrument in use to show the menu and choose [Group].
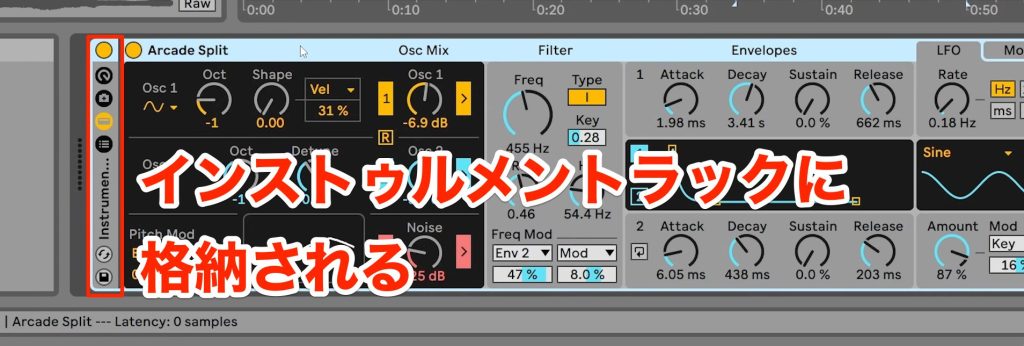
This places the instrument in use inside an Instrument Rack.
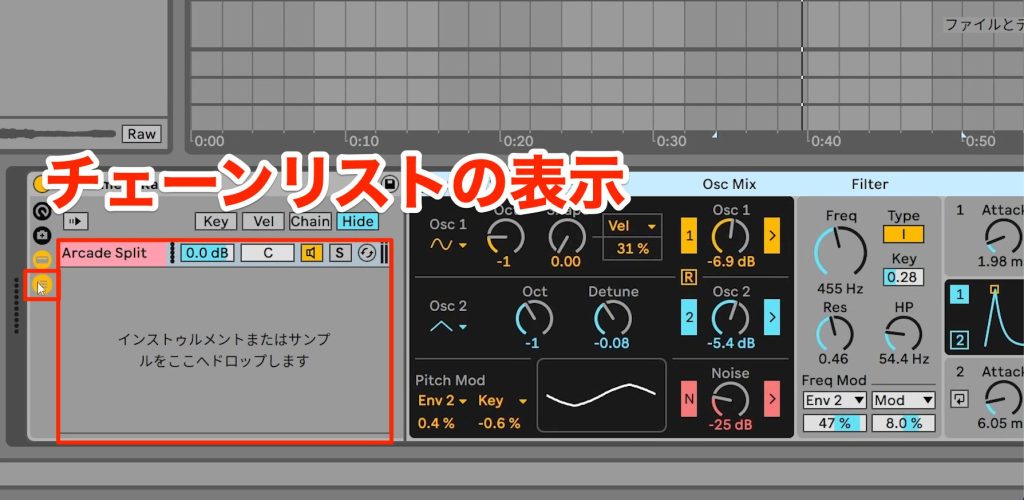
Next, click the [Show Chain List] button to show the space for adding instruments.
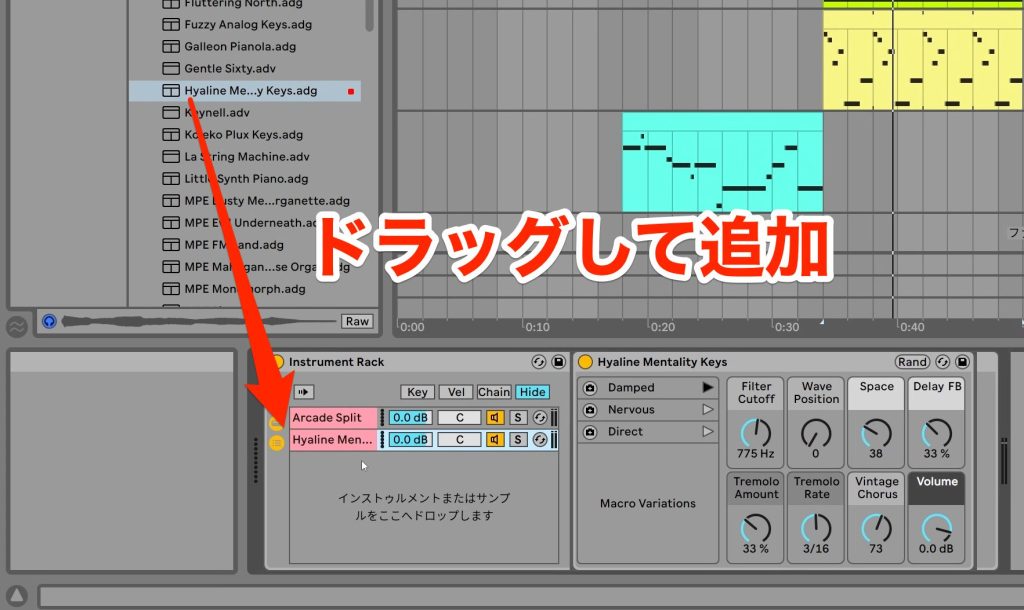
Then just drag in any instrument you like, and the setup to play multiple instruments is complete.
Connecting the Sections
Finally, let's create the flow between sections.
At the moment, the whole song is a simple repeated performance, so each section changes abruptly and the transitions feel unnatural in places.
We fix this with the following three techniques.
- Stop a track's sound
- Add sounds
- Add movement with effects
Stopping a Track's Sound
The technique of stopping a track's sound bridges to the next section by temporarily stopping a specific part.
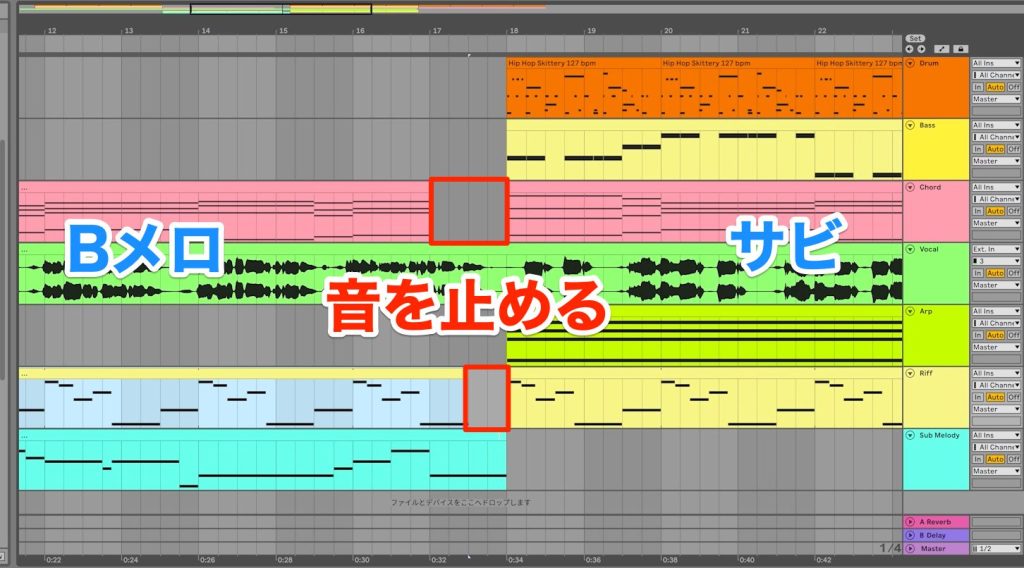
This time, we stop the sound just before the chorus to make the chorus sound more striking.
Here is a comparison with the original state.
It is a simple process, but very effective for creating a smooth flow.
Adding Sounds
The next technique, connecting by adding sounds, lets you create flow in the song by adding sounds that build excitement, called fills and FX.
A fill refers to a performance that adds movement to a repeated performance and gives a sense of a run-up, and doing it on drums is one of the standard patterns.
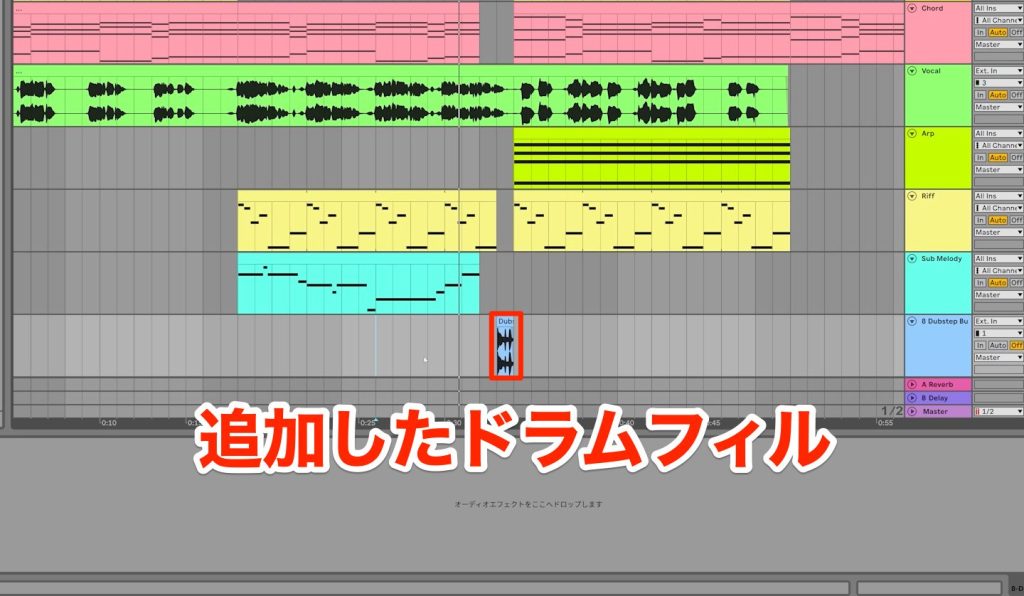
You can use the current drum sounds and play more notes to make it more complex, but using a completely new sound can make the fill more striking.
Combining it with the earlier technique of stopping a track's sound gives an impression of an even bolder change.
The next item, FX, refers to sound effects, such as a [Riser] or [Uplifter] that creates a sense of rising, and an [Impact] that strengthens accents.
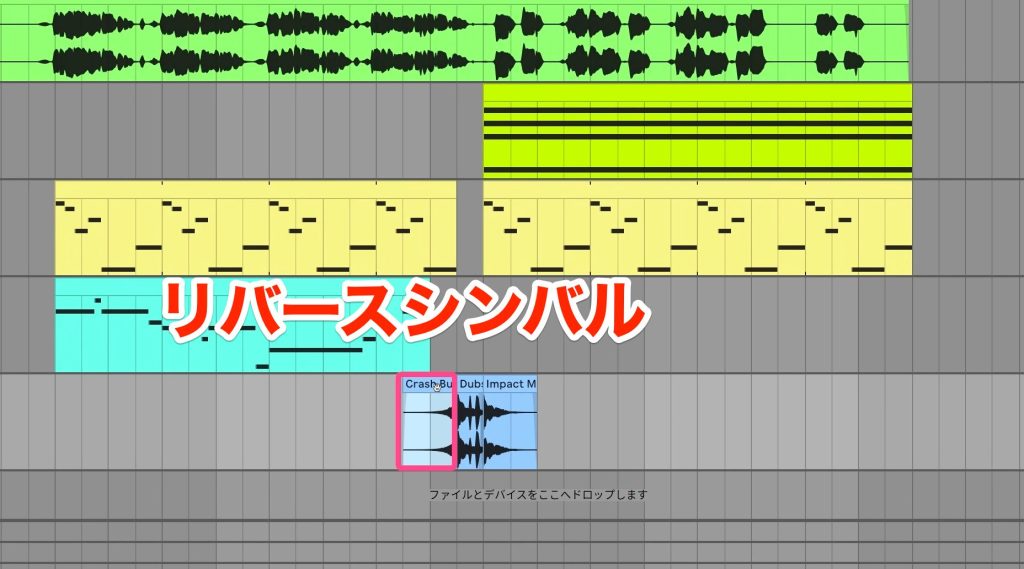
Here, we add a [reverse cymbal], a crash cymbal played backward, just before the point where we stopped the sound earlier, to raise anticipation for the fill.
To reverse an audio sample, select the clip and press the [R] key.
Depending on the situation, you can use several of these FX sounds at the same time, so please use them actively where you want more excitement.
Adding Movement with Effects
The technique of adding movement with effects applies audio effects to chosen tracks, creating excitement through changes in sound.
Various effects can be used, but this time we introduce a pattern using one of the most standard: a [filter].
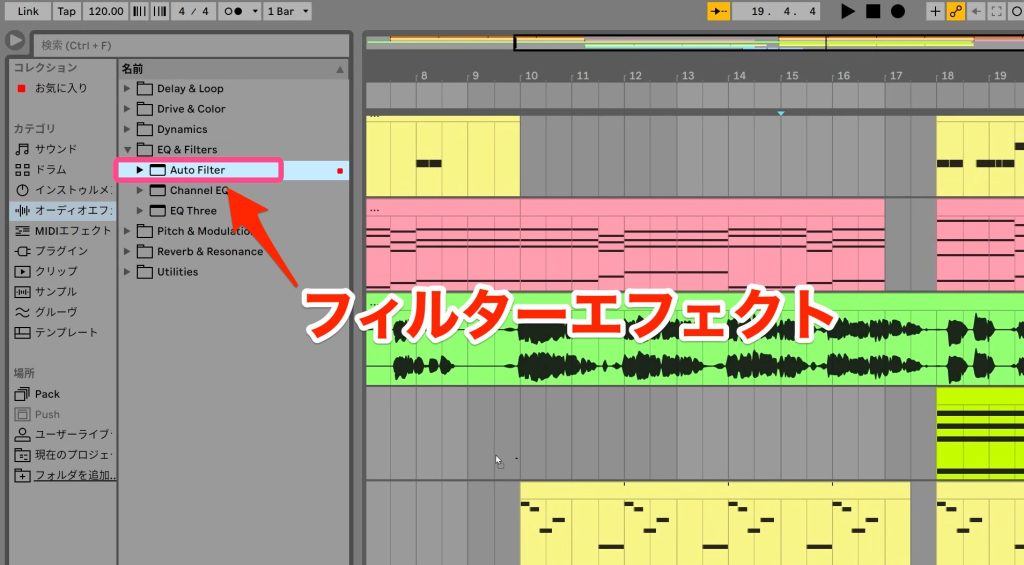
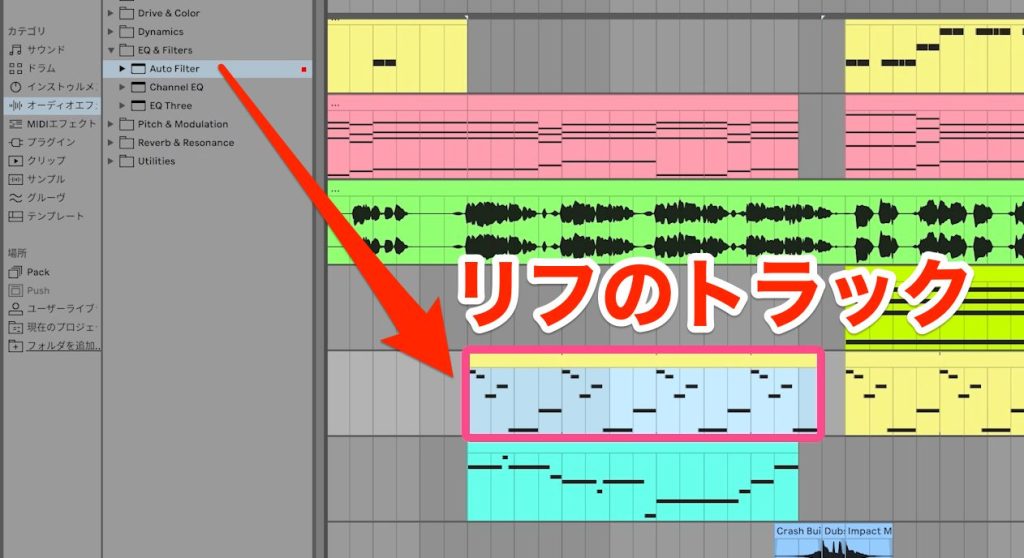
Load the [Auto Filter] effect from Audio Effects onto the riff track.
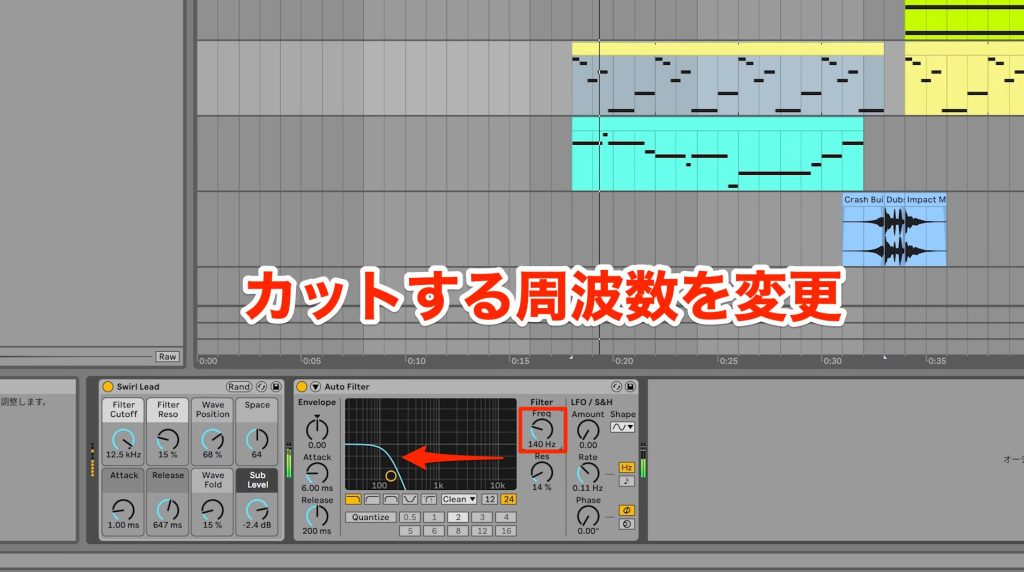
A filter is an effect that can cut various frequency ranges, and moving [Freq] changes the frequencies that sound, adding movement to the song.
We raise this parameter gradually during the song to build excitement, and in such cases we use a feature called [automation].
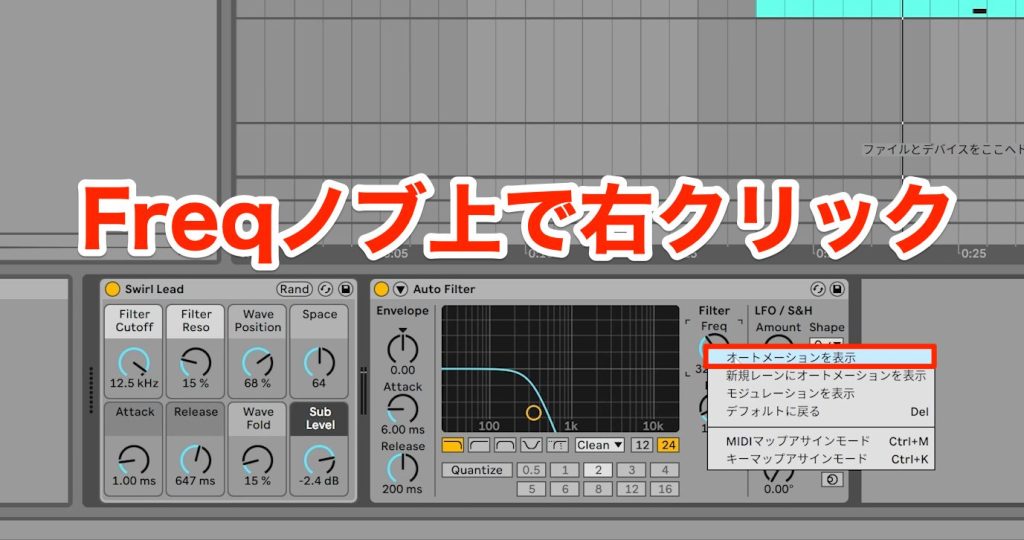
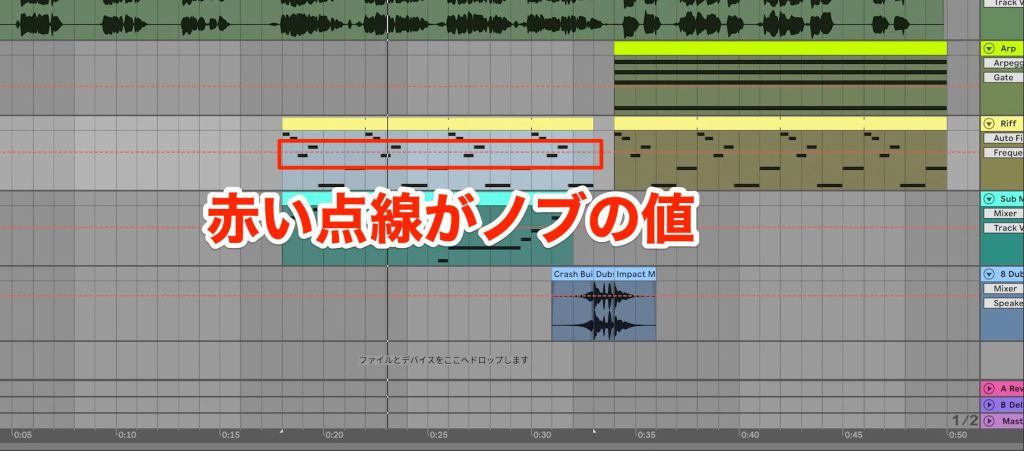
For devices included with Live, right-click the parameter you want to move to show the menu and choose [Show Automation], and a red line appears on the track.
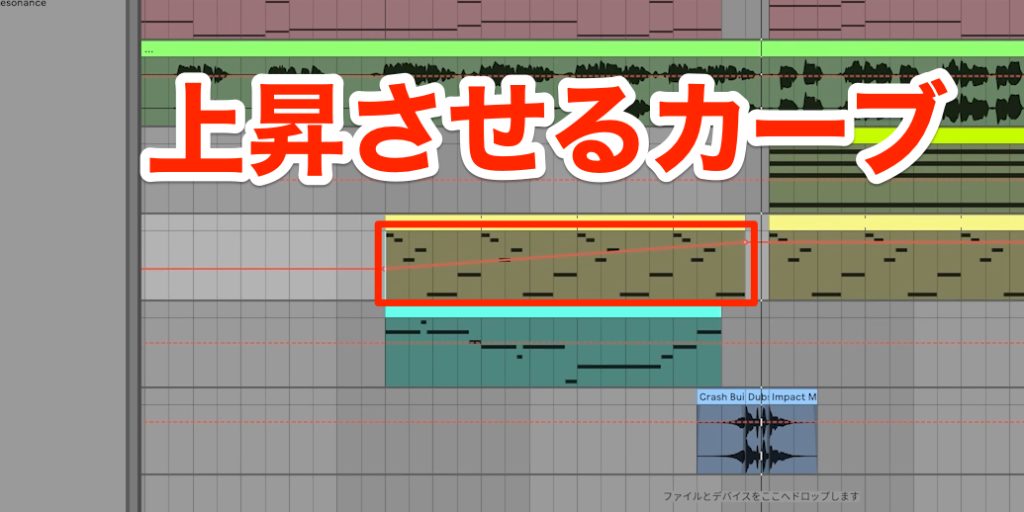
This line shows the value of the parameter it is set for, so if you want to raise it gradually, draw the line rising to the right.
Automation is a feature frequently used to add movement to songs, so try it with various devices and parameters and find what you like.
Load the [Auto Filter] effect from Audio Effects onto the riff track.
A filter is an effect that can cut various frequency ranges, and moving [Freq] changes the frequencies that sound, adding movement to the song.
For devices included with Live, right-click the parameter you want to move to show the menu and choose [Show Automation], and a red line appears on the track.
This line shows the value of the parameter it is set for, so if you want to raise it gradually, draw the line rising to the right.
We have shown the steps for producing one chorus of a song in this way. Did you find it helpful?
As mentioned at the beginning, there are no rules for the production process, and it varies by music genre and by person, so finding the best process for yourself is important for making work smoothly.
If you are struggling with your production process, we hope this article will serve as a reference.
🔰 How to make a pop track, explained for beginners
This time, we present the steps for producing electronic pop using "Live Lite," the entry-level edition of Ableton Live. It is useful content for those who want to start making music!
Article: https://t.co/w1mBCwAWa1Video: https://t.co/3e1cf6591T#DTM pic.twitter.com/NibUJH8PfR
— SLEEP FREAKS (@SLEEPFREAKS_DTM) July 22, 2023
Frequently Asked Questions
Q1. How does Live Lite differ from the full version of Ableton Live?
Live Lite is limited to eight tracks and includes fewer instruments and effects than the higher editions. However, it has enough features for simple songs and is well suited to beginners' learning.
Q2. Which products include Live Lite?
It is included with DTM products from multiple manufacturers, such as KORG, Novation, Focusrite, Native Instruments and AKG, and many users already own a license.
Q3. Why is the chord progression important in producing a pop track?
The chord progression is an extremely important element that creates the mood of a song, such as brightness or darkness, and generates drama such as calm and excitement. Pop songs in particular are built on easy-to-follow chord progressions, so building this part well instantly brings out the song's atmosphere.
NEW ARTICLES
Latest English Articles











